When I’m craving a quick win in the studio, simple clay figures are my favorite because they’re basically just balls, coils, and tiny pinches. Here are beginner-friendly ideas you can make with air-dry clay or polymer clay using easy shapes and sweet little details.
Round Penguin Pal
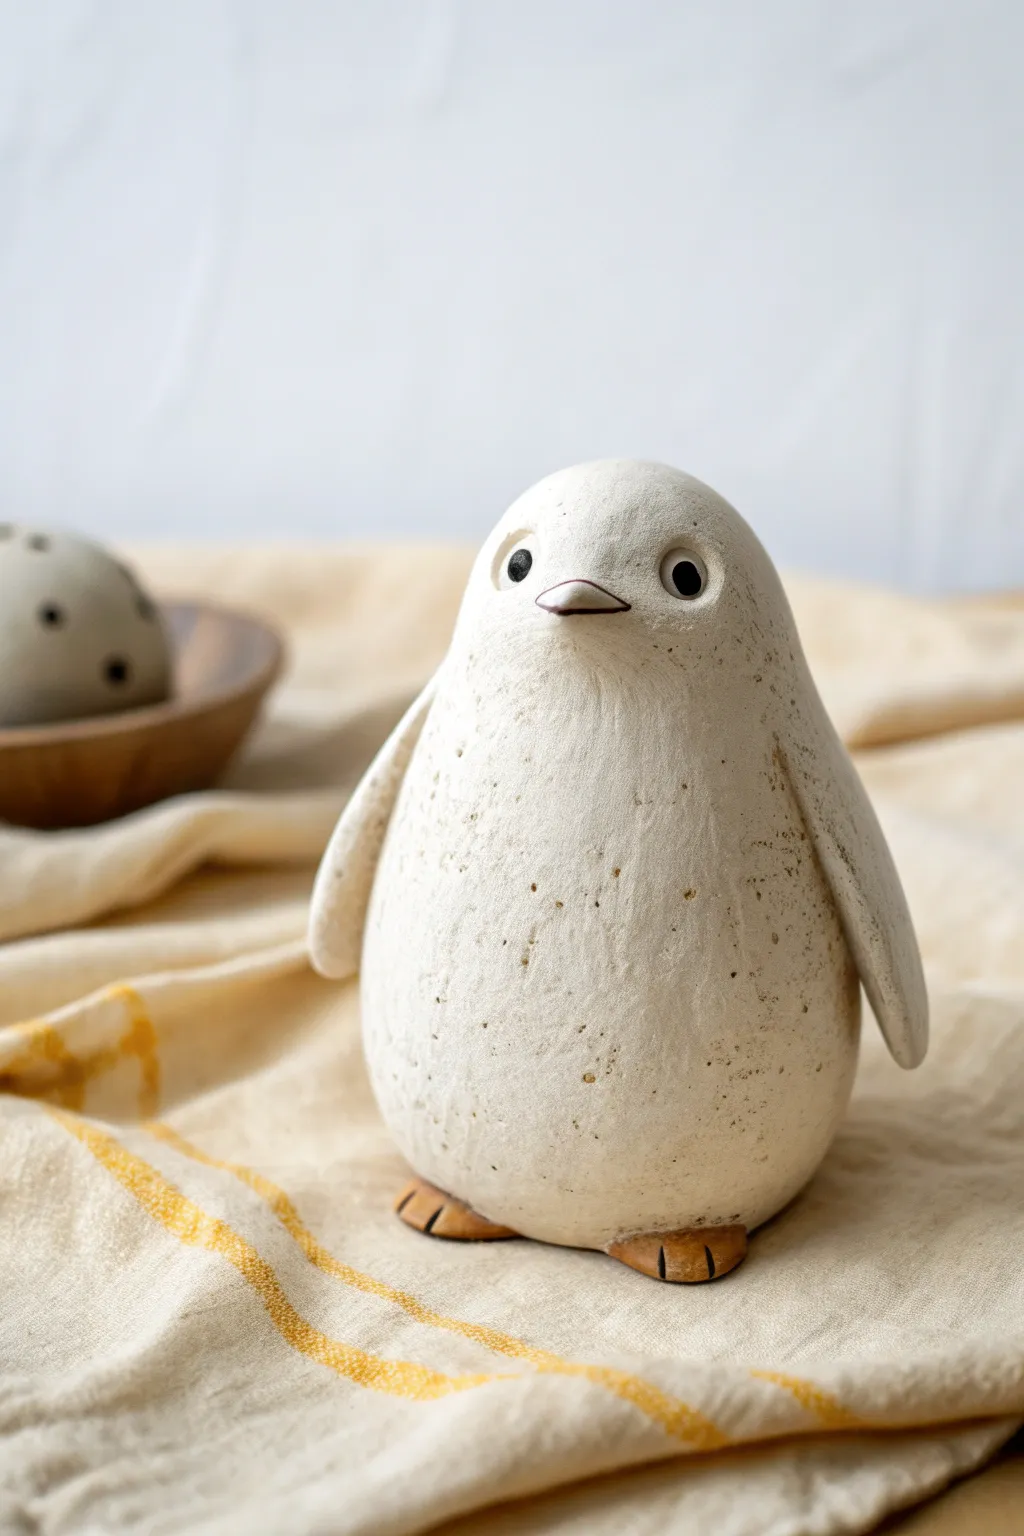
This charmingly round penguin captures the look of textured stoneware with its speckled cream finish and expressive, minimalist face. It’s a deceptively simple sculpt that relies on a gentle egg shape and subtle textures to achieve its professional, handmade feel.
Detailed Instructions
Materials
- Air-dry clay (white or light grey)
- Acrylic paints (Cream/Off-White, Dark Brown, Terracotta)
- Small cup of water
- Aluminum foil
- Old toothbrush or stiff bristle brush
- Needle tool or toothpick
- Fine grit sandpaper
- Matte varnish or sealant
- Small round paintbrush
- Smooth work surface
Step 1: Shaping the Core Body
-
Create the core:
Start by crumpling a piece of aluminum foil into a tight egg shape roughly two-thirds the size you want your finished penguin to be. This saves clay and keeps the figure lightweight. -
Cover the armature:
Roll out a slab of clay about 1/4 inch thick. Wrap this completely around your foil egg, pressing seams together and smoothing them out with a little water until invisible. -
Refine the form:
Roll the clay egg gently on your work surface to ensure it is perfectly round and smooth. Use your palms to taper the top slightly more than the bottom, creating a pear-like silhouette. -
Flatten the base:
Tap the bottom of the egg firmly against your table. You want a flat, stable base so your penguin stands upright without wobbling.
Natural Texture Hack
Mix dried coffee grounds or fine sand directly into your white clay before sculpting. This creates real texture and intricate specks without needing to paint them later.
Step 2: Adding Details & Texture
-
Form the wings:
Roll two small sausage shapes of clay and flatten them into teardrops. These should be long enough to reach from the shoulder area to the mid-belly. -
Attach the wings:
Score the sides of the body and the back of the wings with your needle tool. Apply a dab of water (slip) and press the wings onto the body, blending the top seam smoothly into the shoulder so they hang naturally. -
sculpt the beak:
Take a tiny pinch of clay and roll it into a small cone. Attach this to the center of the face area, pressing it on securely. Use a tool to carve a horizontal line across it to separate the upper and lower beak. -
Indent the eyes:
Using the back of a paintbrush or a small ball tool, press two deep divots into the clay where the eyes will go. Placing them slightly wider apart gives a cuter expression. -
Create the feet:
Roll two small balls of clay and flatten them into discs. Use a knife tool or toothpick to press two lines into the front of each disc to imply toes. -
Attach the feet:
Slip and score these discs onto the very bottom edge of the penguin so they just peek out from under the belly. -
Add surface texture:
To mimic the stone look, take an old toothbrush and gently tap the entire surface of the damp clay. This removes the plastic smoothness and adds a subtle, grainy texture. -
Let it dry:
Allow the figure to dry completely. For air-dry clay of this thickness, I usually wait at least 24-48 hours. Turn it occasionally to ensure the bottom dries too.
Winter Scarf Addition
Before the clay dries, roll a thin snake of clay and wrap it around the penguin’s neck. Use a tool to texture it like knit wool for a cozy winter accessory.
Step 3: Painting and Finishing
-
Base coat application:
Paint the entire penguin (avoiding the feet if you like, though painting over them is fine too) with a creamy off-white acrylic paint. You may need two coats for opaque coverage. -
Create the speckles:
Dilute a small amount of dark brown paint with water. Load a stiff brush or toothbrush, and run your thumb across the bristles to flick tiny specks of paint all over the dried body. Practice on paper first to control the splatter size. -
Paint the eyes:
Using a fine detail brush, paint the insides of the eye divots black or very dark brown. A tiny white dot highlight can make them look alive, but leaving them dark keeps the rustic look. -
Detail the beak:
Paint the beak a soft brown or grey. Keep the line between the upper and lower beak distinct. -
Finish the feet:
Paint the feet usually a warm terracotta or light brown tone to contrast slightly with the body. -
Seal the work:
Once all paint is bone dry, apply a coat of matte varnish. This protects the paint and unifies the sheen, making it look like fired ceramic.
Place your little speckled friend on a shelf where its calm expression can bring a moment of peace to your day


Chubby Bunny Sitting Up
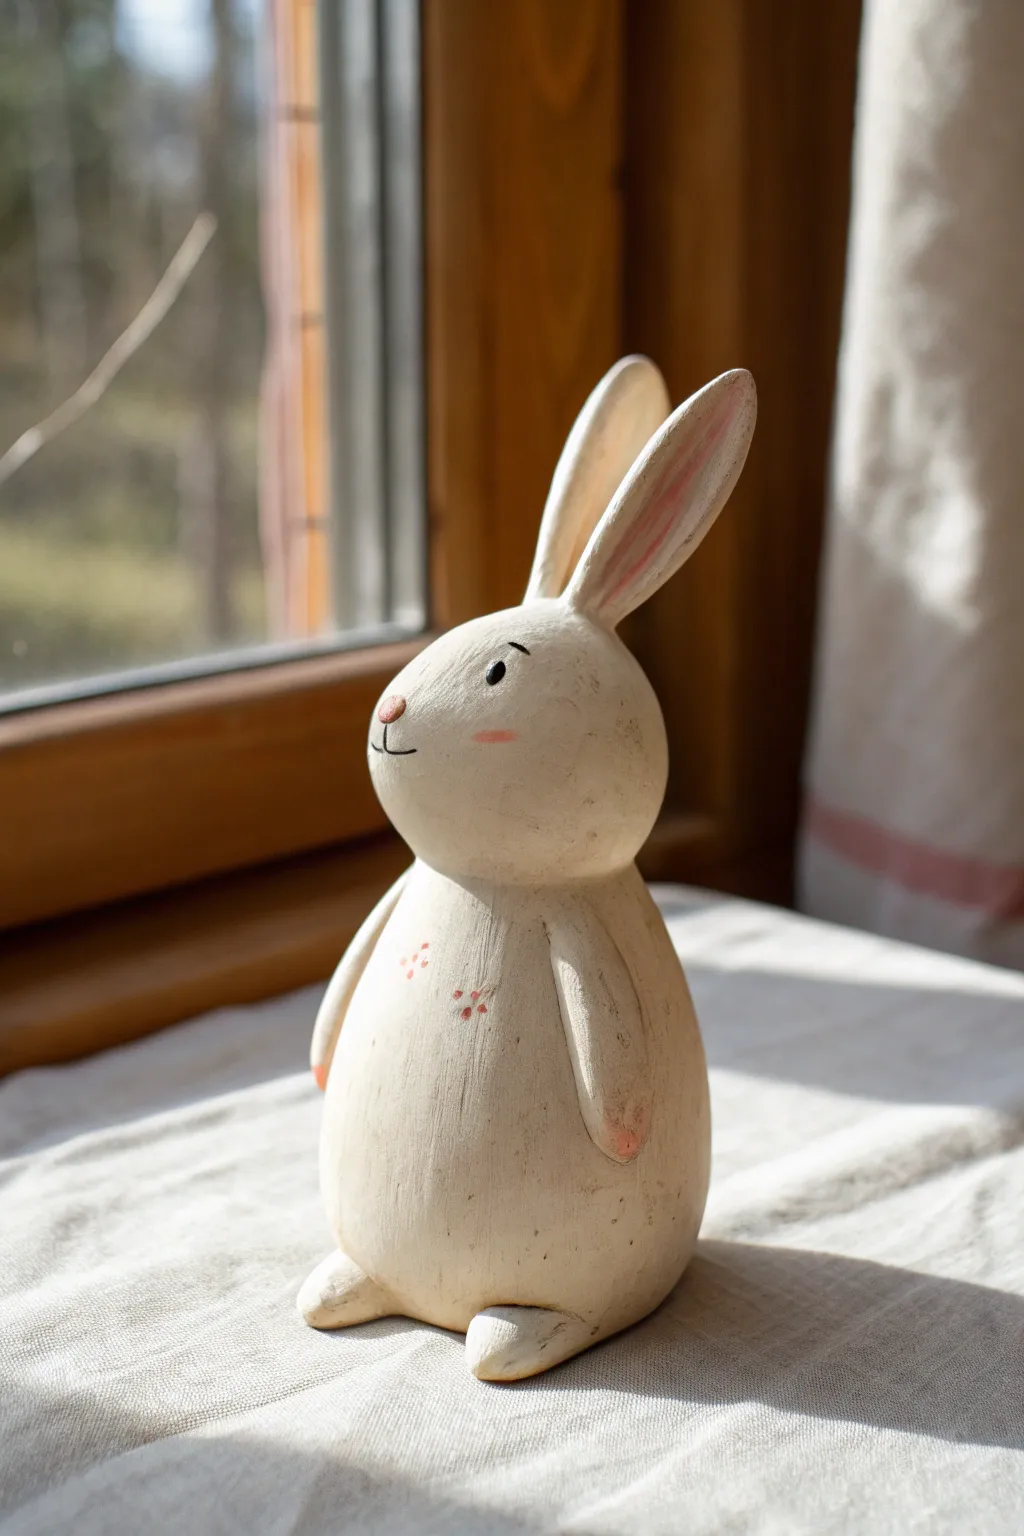
This rustic, standing bunny combines a chubby, rounded base with delightfully tall ears for a charming country-cottage aesthetic. The final piece features a distressed cream finish with soft pink accents, giving it a timeless, hand-carved appearance.
How-To Guide
Materials
- Air-dry clay or polymer clay (white or light grey)
- Clay sculpting tools (specifically a needle tool and smoothing rib)
- Aluminum foil (for armature)
- Acrylic paints (Cream/Off-White, Soft Pink, Black, Antique Brown)
- Paintbrushes (flat shader and fine detail liner)
- Fine-grit sandpaper
- Water cup (for smoothing)
- Matte varnish or sealant
Step 1: Forming the Body and Head
-
Create the core:
Start by scrunching a piece of aluminum foil into a pear shape, roughly 3 inches tall, to serve as the core. This saves clay and keeps the figure lightweight. -
Cover the armature:
Roll out a sheet of clay about 1/4 inch thick and wrap it completely around your foil core, pressing the seams together until smooth. -
Shape the torso:
Roll the clay-covered form back and forth on your work surface to smooth it out. Gently tap the bottom against the table to create a flat, stable base so the bunny stands upright. -
Form the head:
Roll a separate ball of clay, slightly smaller than the top of your body section. It should be roughly spherical but slightly flattened on the sides. -
Attach the head:
Score the top of the body and the bottom of the head with a needle tool. Apply a dab of water (or liquid clay if using polymer) and press the head firmly onto the body. -
The crucial blend:
Use a modeling tool or your thumb to drag clay across the neck seam, blending the head and body into one continuous, sturdy object. Smooth the area with water.
Tip: Seamless Blending
When joining clay parts (like ears to head), use a wet finger or rubber tool to smooth the seam completely until invisible. This prevents cracks as the clay shrinks during drying.
Step 2: Adding Limbs and Features
-
Sculpt the ears:
Roll two long, tapered logs of clay for the ears. Flatten them gently so they are wide but still have some thickness. -
Attach the ears:
Score the connection points on the top of the head and the base of the ears. Press them on securely, blending the clay at the base. I like to tilt one slightly backward for variety. -
Form the arms:
Create two long, thin sausage shapes for the arms. They should be simple and straighter, rather than bent at an elbow. -
Connect the arms:
Attach the arms to the sides of the body, starting just below the neck. Blend the top shoulder area into the body, but leave the rest of the arm distinct so it looks like it’s resting against the belly. -
Make the feet:
Roll two small ovals for feet. Flatten the bottoms and attach them to the front base of the body, pointing outward slightly so they peek out from under the tummy. -
Refine the face:
Add a tiny triangular speck of clay for the nose. Use a needle tool to create a very subtle vertical line downward from the nose for the mouth.
Step 3: Painting and Finishing
-
Dry or bake:
Let your figure dry completely (for air-dry clay, wait 24-48 hours) or bake according to your polymer clay package instructions. -
Sand the surface:
Once hardened, gently sand any rough fingerprints or bumps with fine-grit sandpaper. Wipe away the dust with a damp cloth. -
Apply base coat:
Paint the entire figure with two coats of cream or off-white acrylic paint. Let the first coat dry fully before adding the second for opaque coverage. -
Paint the inner ears:
Mix a watery wash of soft pink paint. Carefully paint inside the ears, letting the color fade out before it reaches the edges. -
Add delicate details:
Using the same soft pink, paint a tiny nose, small circular cheeks, and little pads on the ends of the arms. -
Draw the face:
Use a very fine liner brush and black paint to add two small oval eyes and outline the mouth. Add three tiny pink dots on the belly for a decorative touch. -
Distress (optional):
For that antiqued look shown in the photo, dip a dry brush into a tiny amount of brown paint, wipe most of it off on a paper towel, and lightly scuff it over the raised areas and feet. -
Seal it:
Protect your paint job with a coat of matte varnish to finish the piece without making it too shiny.
Trouble: Heavy Ears?
If the long ears droop while wet, insert a piece of toothpick or wire inside slightly longer than the ear itself to act as an internal spine that anchors into the head.
Now you have a charming, rustic bunny perfect for sitting on a windowsill or shelf.


Tiny Sitting Cat
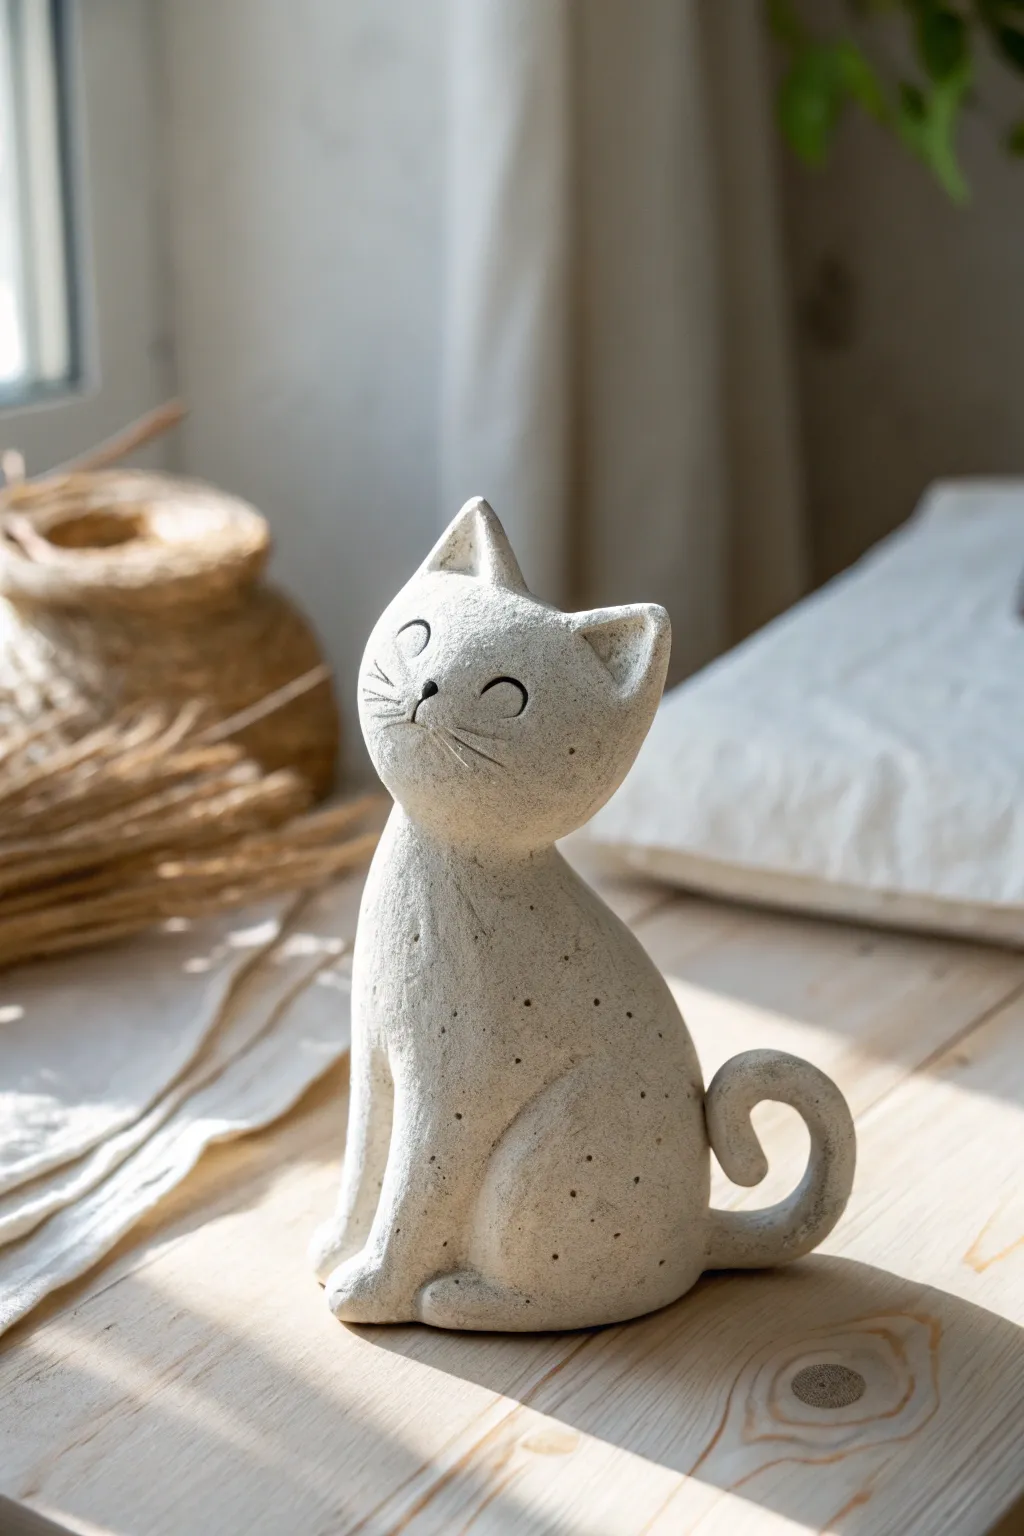
This charming, stylized cat figurine brings a sense of calm to any shelf with its smooth curves and speckled stone-effect finish. It’s a perfect beginner project that relies on simple shapes to capture a sweet, upward-gazing expression.
Step-by-Step Tutorial
Materials
- Air-dry clay (white or light grey)
- Acrylic paints: Stone White, Black, Milky Beige
- Stiff bristle toothbrush or splatter brush
- Fine detail paintbrush (size 0 or 00)
- Mod Podge or matte varnish
- Cup of water
- Smooth work surface/mat
- Sculpting tool or toothpick
Step 1: Shaping the Base Body
-
Form the teardrop:
Start with a golf-ball-sized lump of clay. Roll it into a smooth ball first, then gently roll one end between your palms to taper it into a pear or teardrop shape. This will be the cat’s body. -
Establish the posture:
Press the wider bottom of your teardrop firmly onto your work surface to create a flat, stable base. Rub your finger over the clay to smooth out any fingerprints. -
Arch the back:
Gently push the ‘chest’ of the figurine forward while curving the tapered neck backward slightly. You want a distinct S-curve that suggests a proud, seated posture.
Cracks appeared?
Mix a tiny bit of fresh clay with water to create a paste (slip). Fill any drying cracks with this paste, smooth it down, and let it dry again before painting
Step 2: Sculpting the Head & Ears
-
Create the head:
Roll a smaller ball of clay, roughly one-third the size of the body. Flatten it slightly so it isn’t a perfect sphere, looking more like a rounded bun. -
Attach the head:
Score the top of the neck and the bottom of the head with a toothpick (scratching hatch marks). Apply a tiny dab of water as ‘glue’ and press the head onto the neck, tilting it upward so the cat looks towards the sky. -
Blend the seams:
Using your thumb or a sculpting tool, drag clay from the neck up onto the head and from the head down to the neck until the seam disappears completely. Smooth it over with a little water. -
Form the ears:
Pinch two small triangles of clay. Gently shape them into curved pyramids, like cat ears. Use your thumb to create a small indentation inside each ear for depth. -
Place the ears:
Score and slip the ears onto the top of the head. Position them wide apart and facing slightly outward. Blend the base of the ears seamlessly into the skull.
Step 3: Legs, Tail & Drying
-
Define the front legs:
Roll a thin snake of clay and cut it in half. Attach these vertically to the front of the chest to suggest straight front legs. Blend the top edge into the chest so it looks like one muscle, but keep the paws distinct at the bottom. -
Add the hind leg:
Create a flattened oval of clay and attach it to the side of the body base. I like to score a deep curve here to suggest the haunch of the seated leg, blending the edges smoothly. -
Create the tail:
Roll a tapered snake of clay. Curl the end into a tight, snail-like spiral. Attach the thicker end to the base of the cat’s back, blending well. -
Final smoothing:
Perform a final check. Dip your finger in water and run it over the entire sculpture to remove any remaining imperfections or lint. Let the piece dry completely for 24-48 hours.
Make it a Duo
Create a second, slightly smaller cat with its head turned horizontally. Position them together so they look like they are leaning into each other
Step 4: The Stone Finish
-
Base coat:
Paint the entire dried figure with a milky beige or off-white acrylic paint. You may need two coats for opaque coverage. -
Create the speckles:
Mix a small amount of black paint with water to make it inky. Dip a stiff toothbrush into the mix, pointing the bristles at the cat. Run your thumb over the bristles to flick tiny specks of paint onto the surface. -
Paint the face:
Using your finest detail brush and black paint, draw two small arched semi-circles for closed, smiling eyes. Add a tiny triangle nose and three wispy whiskers on each cheek. -
Seal the work:
Once the paint is fully dry, apply a layer of matte varnish to protect the finish without making it too shiny, preserving that natural stone look.
Place your little stone-effect cat near a window where the light can catch its happy expression


Sausage-Leg Puppy
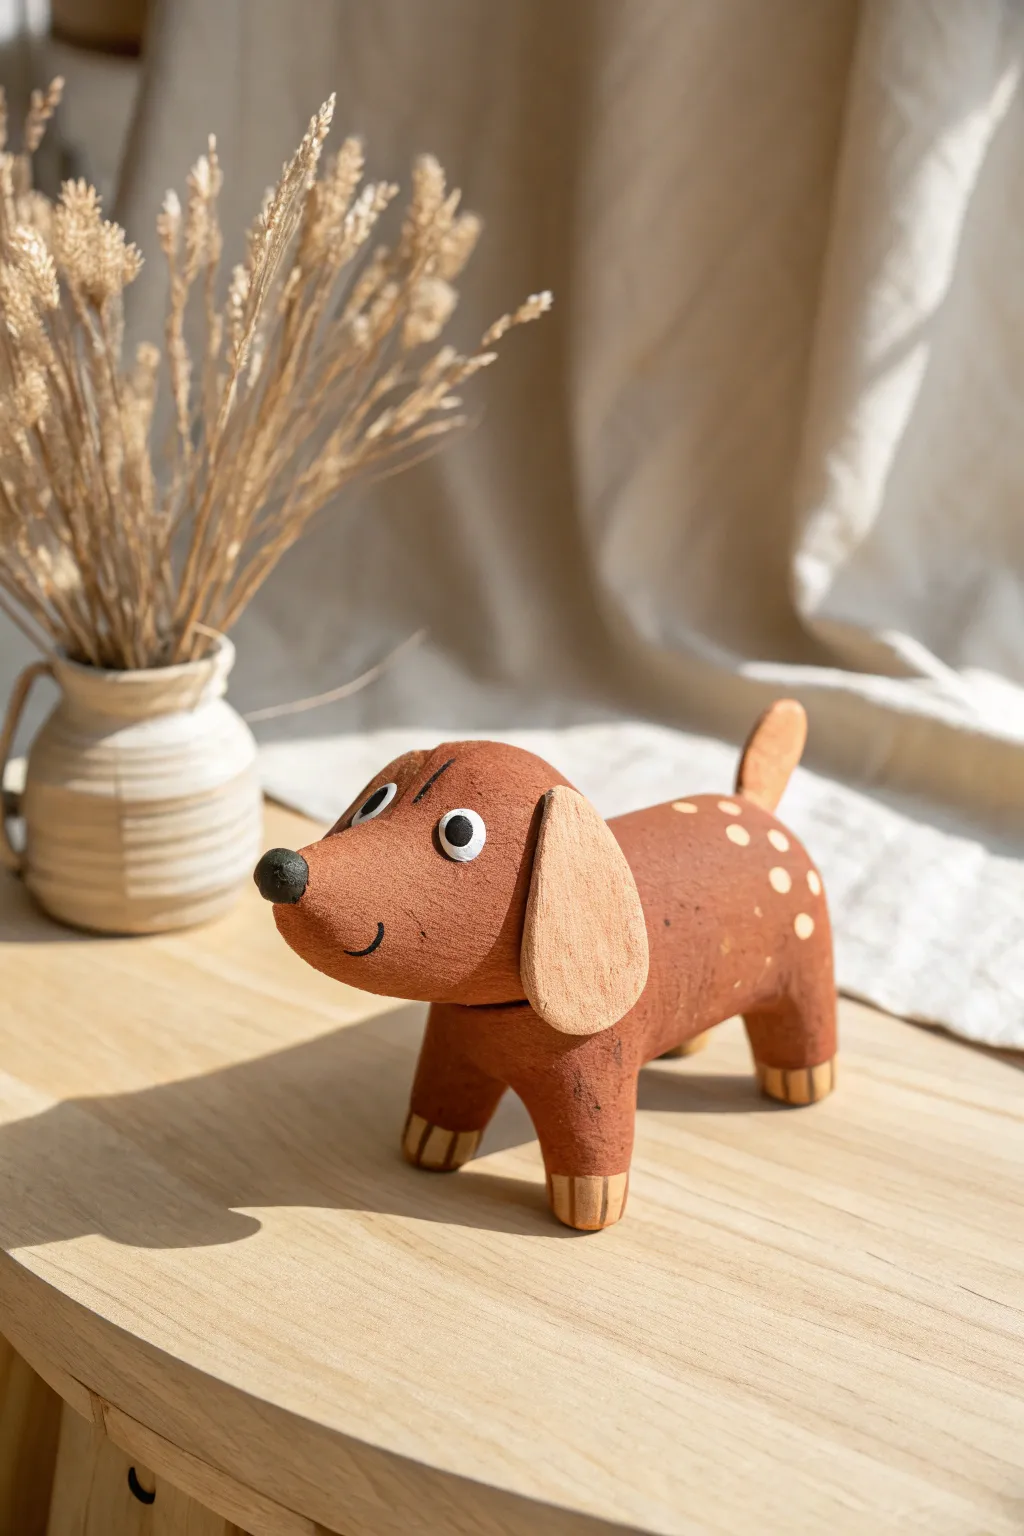
This charming dachshund figurine captures a handcrafted wooden toy aesthetic using accessible clay techniques. With its warm terracotta tones, spotted back, and comically stout legs, it makes for a heartwarming desk companion or a sweet handmade gift.
Step-by-Step Guide
Materials
- Air-dry clay (terra cotta color or white)
- Acrylic paints (burnt sienna, cream/beige, black, white)
- Sculpting tools (needle tool, smoothing tool)
- Water cup and sponge
- Fine grit sandpaper
- Small flat paintbrush
- Fine detail paintbrush
- Matte varnish or sealant
- Toothpicks (optional for support)
Step 1: Sculpting the Body
-
Form the Torso:
Start with a generous handful of clay and roll it into a thick, smooth cylinder. Round off both ends gently so it resembles a smooth sausage shape, about 3-4 inches long. -
Shape the Head:
Create a separate, slightly smaller egg-shaped ball of clay for the head. Flatten the wider end slightly where it will attach to the body. -
Connect Head and Body:
Score the clay (scratch cross-hatch marks) on the front of the body and the back of the head. Apply a dab of water (or slip) and press them firmly together. You might want to insert half a toothpick inside the join for extra stability. -
Refine the Snout:
Gently pull and taper the front of the egg shape to create a distinct, long snout characteristic of this breed, keeping the forehead slightly rounded. -
Make the Stout Legs:
Roll four identical small balls of clay. Flatten the bottoms against your work surface and shape them into short, wide pillars. These sturdy legs are key to the ‘wooden toy’ look. -
Attach the Legs:
Score and slip the top of each leg and press them onto the underside of the body. Position them wide enough apart so the puppy stands stable without tipping. -
Create the Ears:
Flatten two drop-shaped pieces of clay to make the floppy ears. Attach these to the sides of the head using the score-and-slip method, blending the top seam smooth so they look integrated. -
Add the Tail:
Roll a small cone of clay for the tail. Attach it to the upper rear of the body, curving it slightly upward for a perky expression. -
Smooth and Dry:
Use a damp sponge or your finger to smooth out any fingerprints or rough seams. Let the figure dry completely, which usually takes 24-48 hours depending on humidity.
Cracks happen
If you see hairline cracks while drying, mix a tiny bit of fresh clay with water to make a paste (slip). Fill the cracks, smooth over with a finger, and let dry again.
Step 2: Painting and Details
-
Sand for Texture:
Once fully dry, lightly sand the surface. This removes bumps but also gives the clay a slightly matte, wood-grain texture that absorbs paint beautifully. -
Base Coat:
Paint the entire body, head, and tail with a warm burnt sienna or terracotta acrylic paint. I prefer two thin coats rather than one thick one to maintain the texture. -
Paint the Ears:
Mix a light beige or cream color and carefully paint the ears. This contrast mimics the lighter wood or fur often seen on toy designs. -
Add the Spots:
Using the back of a paintbrush handle or a dotting tool, dip into the cream paint and stamp random polka dots across the dog’s back and rear. -
Define the Paws:
Use the same cream color to paint the very bottom of each leg. Once dry, use a fine liner brush with brown paint to add vertical lines, creating the paw toes. -
Paint the Nose:
Paint a simple matte black circle on the very tip of the snout for the nose. -
Draw the Eyes:
Paint two white circles on the face. Once the white is completely dry, add smaller black pupils in the center, looking slightly sideways for a goofy expression. -
Add the Smile and Seal:
Paint a thin, curved black line for the mouth using your finest brush. Finish by coating the entire piece with a matte varnish to protect the paint and unify the sheen.
Make it a planter
Scoop out a hollow section in the dog’s back before the clay dries. Once hardened and sealed, you can place a tiny air plant or succulent cushion inside.
Place your new sturdy friend on a shelf or desk where his cheerful spots can brighten your day

The Complete Guide to Pottery Troubleshooting
Uncover the most common ceramic mistakes—from cracking clay to failed glazes—and learn how to fix them fast.
Easy Teddy Bear
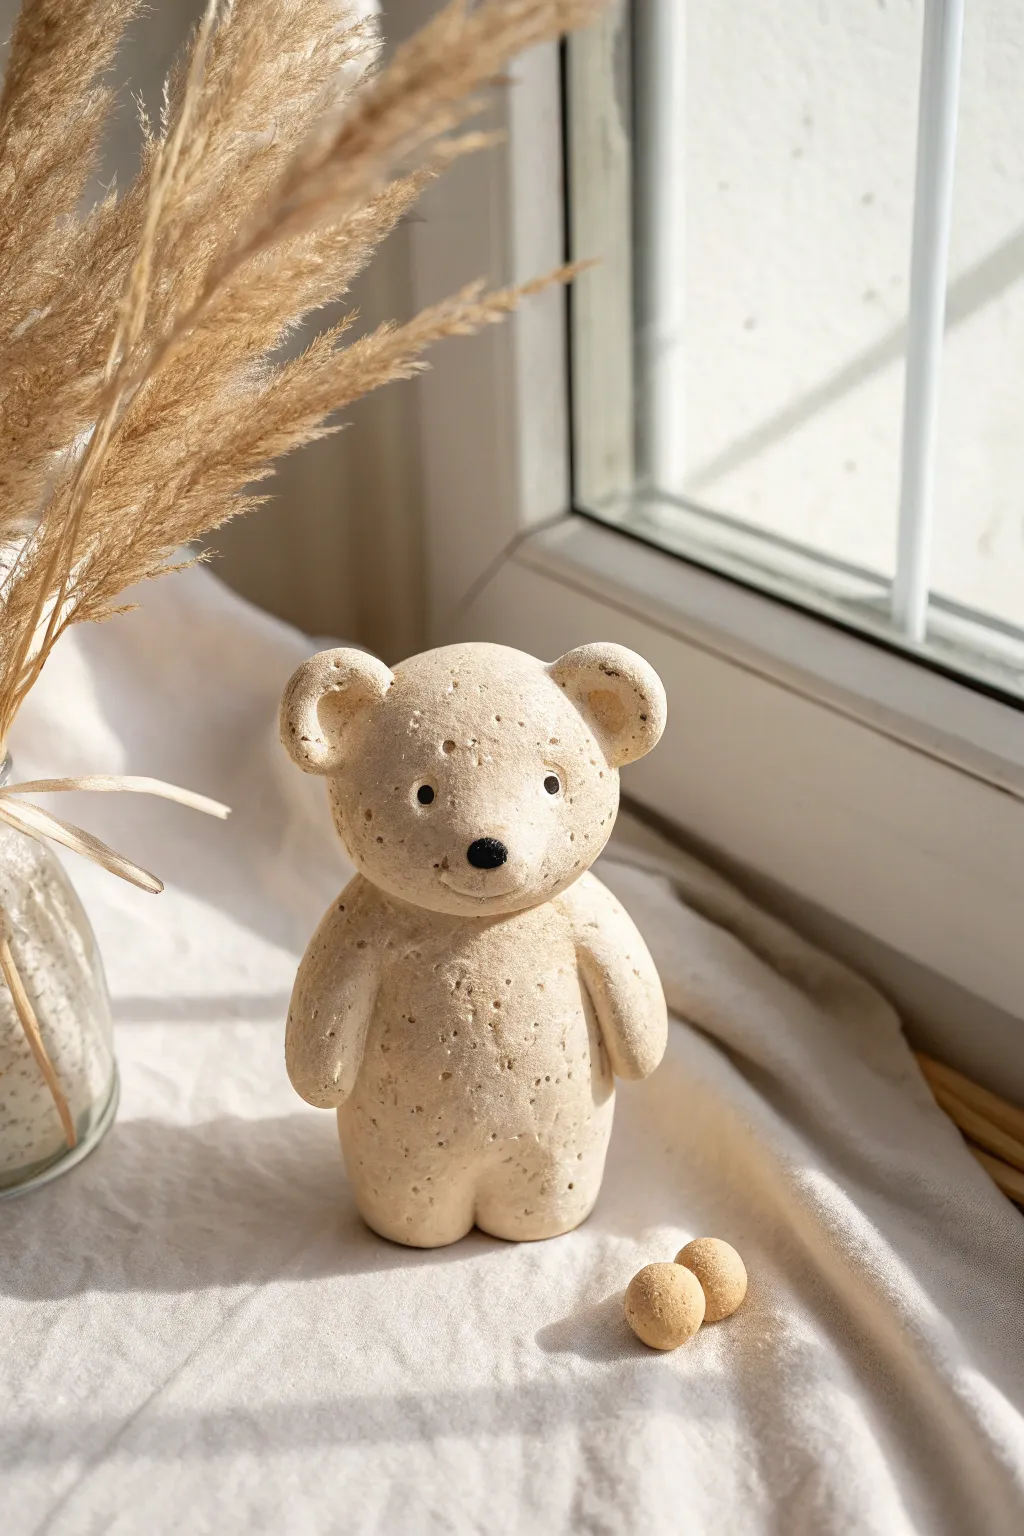
This charming, minimalist teddy bear brings a natural, rustic warmth to any shelf with its speckled stone finish. Using simple shapes and air-dry clay, you can sculpt this sweet character to stand proudly on its own.
How-To Guide
Materials
- White or cream air-dry clay (approx. 200g)
- Dried coffee grounds or fine sand (for texture)
- Black acrylic paint
- Small round paintbrush
- Water in a small cup
- Toothpick or sculpting tool
- Rolling pin (optional)
- Matte sealant spray
Step 1: Preparing the Clay
-
Mix the texture:
Start by kneading a teaspoon of dried coffee grounds or fine sand into your white clay. Fold the clay over itself repeatedly until the speckles are evenly distributed throughout the batch. -
Divide the portions:
Separate your clay into two main pieces: a larger portion for the body (about the size of an egg) and a slightly smaller portion for the head. Save a small marble-sized bit for the ears and arms.
Secrets of the Stone Look
Use used coffee grounds that are BONE DRY. Wet grounds can introduce mold inside the clay as it dries and weaken the structure.
Step 2: Sculpting the Form
-
Shape the body:
Roll the largest piece of clay into a smooth cylinder that is slightly wider at the bottom. Tap the bottom gently on your work surface to flatten it so the bear can stand securely. -
Create the legs:
Using a modeling tool or a dull knife, cut a small vertical slit at the bottom center of the body cylinder. Gently smooth the edges of the cut with your finger to create two distinct, rounded legs. -
Shape the head:
Roll the second-largest piece into a smooth sphere. Gently press the front center to create a very subtle snout area, just enough to give the face dimension without adding extra clay. -
Attach the head:
Score the top of the body and the bottom of the head with a toothpick (scratch hatch marks) and apply a tiny dab of water. Press the head firmly onto the body, smoothing the seam at the neck just slightly so it looks connected but distinct.
Step 3: Adding Details
-
Form the ears:
Take two pea-sized balls of clay and flatten them slightly. Use the back of a paintbrush or your pinky finger to create a small indentation in the center of each. -
Attach the ears:
Score the contact points on the head and the ears, add a touch of water, and press the ears onto the top corners of the head. Smooth the join on the back side for strength. -
Make the arms:
Roll two elongated sausage shapes for the arms. They should be slightly thicker at the shoulder and taper just a bit toward the paw. -
Attach the arms:
Secure the arms to the sides of the body using the slip and score method. Press them close to the body so they hang naturally rather than sticking out, blending the clay at the shoulder joint. -
Refine the surface:
Dip your finger in a little water and run it over the entire sculpture to remove unwanted fingerprints and soften any harsh lines. I find this really helps unify the grainy texture. -
Dry the figure:
Let the bear dry completely in a cool, dry place. Depending on the thickness, this can take 24 to 48 hours. Turn it occasionally so the bottom dries evenly.
Cracks Appearing?
If small fissures appear while drying, mix a tiny amount of fresh clay with water to make a paste and fill the cracks, then smooth over.
Step 4: Finishing Touches
-
Paint the face:
Once fully dry, use a fine paintbrush dipped in black acrylic paint to dot two small eyes wide apart. Add a small oval nose right at the center of the snout bump. -
Add the smile:
With an extremely steady hand or a fine-tip black marker, draw a tiny, faint vertical line down from the nose and a subtle horizontal curve for the mouth. -
Seal the work:
Protect your sandy texture and paint work by spraying the entire figure with a matte sealant. This prevents the coffee grounds or sand from shedding over time.
Your little stone-effect bear is now ready to add a cozy touch to your windowsill or desk
Mini Turtle With Dome Shell
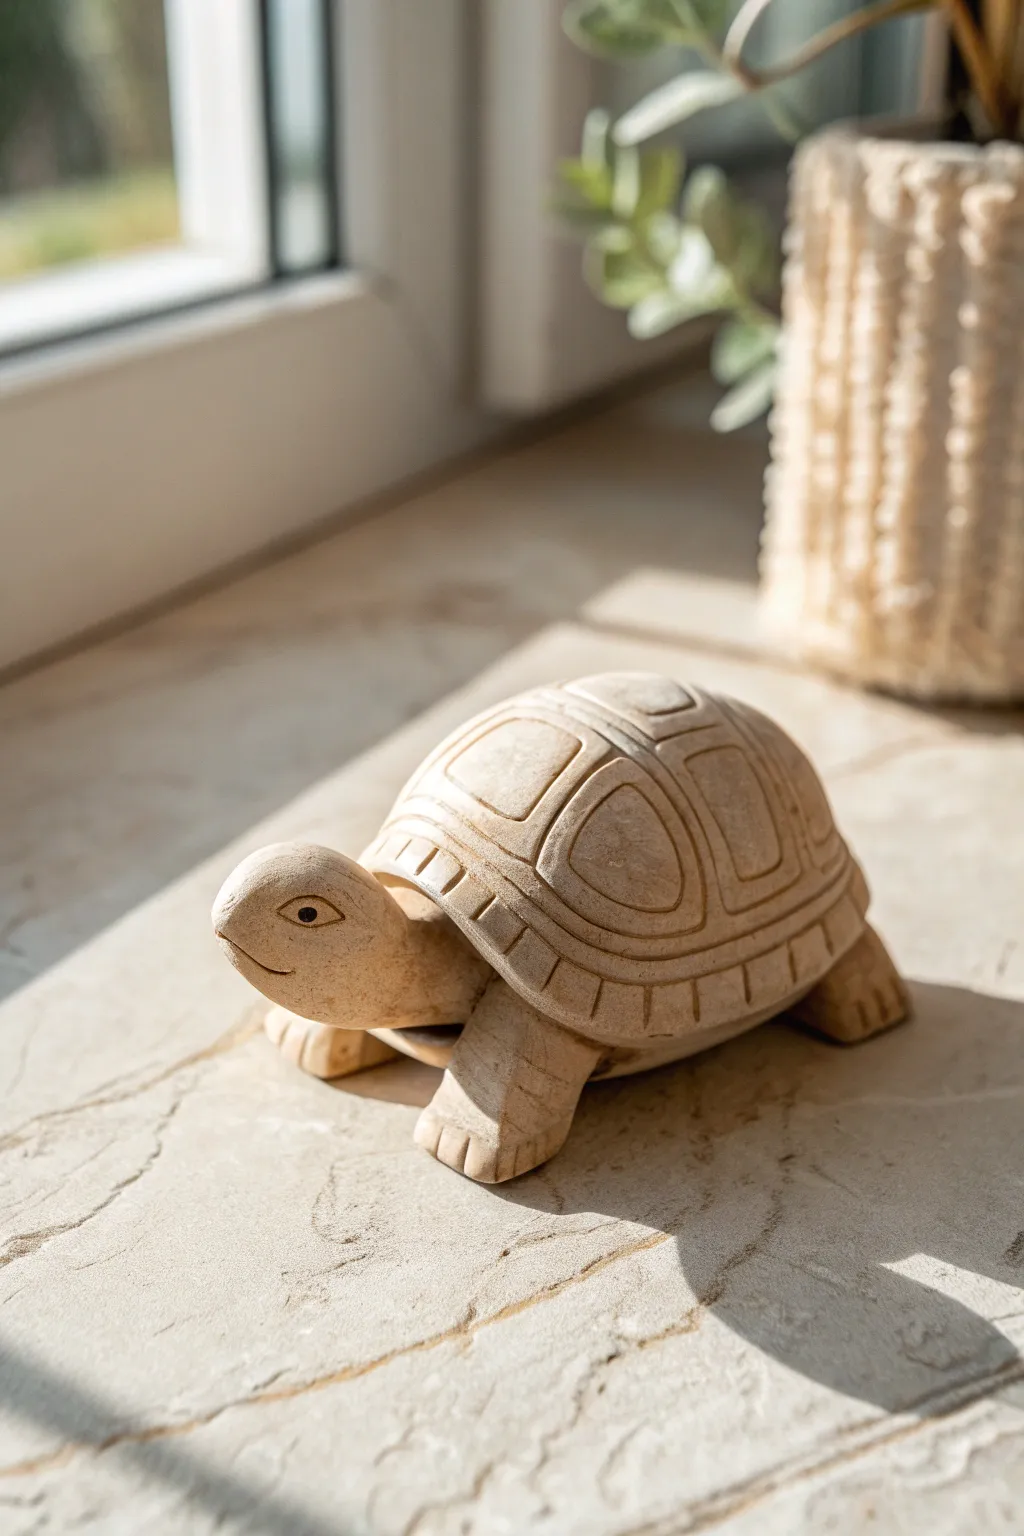
Capture the slow, peaceful charm of nature with this hand-sculpted turtle figurine. Made to mimic the look of carved sandstone, this project features a delightfully smooth dome shell and simple, stylized details.
Detailed Instructions
Materials
- Beige or oatmeal-colored polymer clay (or air-dry clay)
- Modeling tools (specifically a needle tool and a small flat-edged tool)
- Acrylic roller
- Small ball stylus
- Aluminum foil (for the armature)
- Soft brush for smoothing
- Oven for baking (if using polymer clay)
Step 1: Shaping the Core
-
Form the Base:
Start by creating a tight ball of aluminum foil about the size of a golf ball. Flatten the bottom slightly against your work surface so it sits stable without rolling away. -
Shell Covering:
Roll out a sheet of your beige clay to about 1/4 inch thickness. Drape this over your foil dome, smoothing it down the sides to cover the foil completely, trimming away excess from the bottom edge. -
Smooth the Surface:
Take your time smoothing the clay dome with your fingers. You want a very uniform, matte finish that resembles a polished river stone.
Step 2: Head and Limbs
-
Sculpt the Head:
Roll a cylinder of clay roughly the thickness of your thumb. Round off one end for the snout and slightly flatten the other end to attach to the body. -
Define the Mouth:
Use a sharp blade or needle tool to slice a small, shallow smile into the side of the snout. I like to curve it up just a tiny bit to give the turtle a friendly expression. -
Add the Eyes:
Create an almond shape with your needle tool for the eye. Use a small ball stylus to press a pupil into the center, creating a deep shadow that mimics a drilled carving. -
Attach the Head:
Score the clay where the neck meets the shell and press the head firmly onto the underside of the front rim. Blend the clay on the underside so the connection is seamless. -
Create the Legs:
Form four stout, rectangular blocks of clay. These should be thick and sturdy to support the ‘heavy’ look of the shell. Score lines into the bottom front of each block to represent toes. -
Position the Limbs:
Attach the legs underneath the shell’s rim—two in front, two in back. Angle them slightly outward as if the turtle is mid-step.
Cracks in the Shell?
If you see small cracks while smoothing the dome, dip your finger in a tiny bit of water (for air-dry) or baby oil (for polymer) to buff them out immediately.
Step 3: Carving the Details
-
Draft the Shell Pattern:
Lightly sketch your shell design with a needle tool before committing to deep cuts. Draw a central row of rounded squares down the spine. -
Deepen the Lines:
Go back over your sketched lines with a flat-edged modeling tool or a U-shaped gouge. You want wide, groovy channels rather than thin scratches to mimic stone carving. -
Add Side Plates:
Carve larger, curved pentagon shapes on the sides of the shell, following the curve of the dome. -
Carve the Rim:
Create a border around the bottom edge of the shell by carving a continuous line about a half-inch up from the bottom. Divide this rim into small rectangular segments with vertical indentations. -
Refine the Texture:
If your clay looks too plastic or shiny, lightly tap the surface with a toothbrush or stiff brush to add a subtle stone-like texture. -
Final Inspection:
Check your figurine from all angles. Ensure the head is lifted slightly and the legs are even so it sits flat. -
Bake or Dry:
Follow the specific instructions for your clay type to cure the piece. If using polymer clay, tent it with foil to prevent scorching the light color.
Faux Stone Finish
For a true sandstone look, mix a pinch of black pepper or craft sand into your clay before sculpting to create natural speckles.
Now you have a timeless little companion ready to sit peacefully on your windowsill or shelf


What Really Happens Inside the Kiln
Learn how time and temperature work together inside the kiln to transform clay into durable ceramic.
Chunky Frog Buddy

This delightful, rotund amphibian brings a touch of serenity to any desk or shelf with its smooth, jade-green finish and gentle smile. Its simple, rounded forms make it an ideal project for beginners looking to practice shaping cohesive, organic volumes in clay.
Step-by-Step
Materials
- Air-dry clay or polymer clay (white or light grey)
- Acrylic paints (moss green, hunter green, black, white)
- Fine grit sandpaper
- Water cup and sponge
- Sculpting tools (needle tool, rubber shaper)
- Two small black beads (optional, for eyes)
- Matte varnish or sealant
- Old toothbrush or stiff bristle brush
Step 1: Forming the Body
-
Prepare the base:
Start with a large handful of clay, about the size of a grapefruit. Knead it thoroughly to remove air bubbles and warm it up, ensuring it’s pliable and smooth. -
Original shape:
Roll the clay into a smooth ball, then gently flatten the bottom on your work surface so it sits stably. Taper the top slightly to form a very subtle pear shape, keeping the bulk at the bottom for that chunky look. -
Define the head:
Instead of adding a separate head, gently press into the upper third of the pear shape to distinguish the head area without breaking the smooth silhouette. The transition should be seamless. -
Adding eye mounds:
Form two small balls of clay. Score and slip (if using air-dry clay) or blend (if using polymer) these onto the very top of the head to create the raised sockets for the eyes. -
Smoothing the sockets:
Use a rubber shaper or your thumb to blend the bottom edges of the eye mounds into the main body until they look like natural extensions of the head.
Cracks Appearing?
If air-dry clay cracks while drying, mix a tiny bit of fresh clay with water to make a paste (slip). Fill the cracks, smooth over, and let dry again.
Step 2: Limbs and Details
-
Create the front legs:
Roll two thick, short sausages of clay. These will be the front arms. They should be substantial enough to match the chunky body aesthetic. -
Attach the arms:
Press these rolls vertically against the front of the body. I like to position them slightly angled inward. Blend the upper edges into the shoulder area so there are no harsh seams. -
Form the hind legs:
Roll two larger tear-drop shapes for the back legs. Flatten them slightly and attach them to the lower sides of the body, curving them forward to hug the frog’s flanks. -
Define the toes:
Use a needle tool or a small knife to gently press indentations into the bottom of the front arms and back feet to suggest toes without sculpting individual digits. -
The smile:
Using a thin needle tool, carve a wide, shallow curve across the face. Add tiny perpendicular tick marks at the corners of the mouth for a whimsical, stitched look. -
Nostrils and eyes:
Poke two small holes for nostrils. For the eyes, you can either press black beads into the sockets now or shape small clay balls to paint later. -
Final smoothing:
Dip a sponge in water (wipe off excess) and gently run it over the entire sculpture to erase fingerprints and soften any sharp tool marks.
Step 3: Texture and Color
-
Drying or baking:
Let your frog dry completely (24-48 hours for air-dry) or bake according to your polymer clay package instructions. Once hardened, sand lightly if there are any rough spots. -
Base coat:
Paint the entire frog with a muted moss green acrylic. You may need two coats for full opacity. -
Spattering texture:
Mix a small amount of white paint with water. Dip an old toothbrush into it and flick the bristles with your thumb to spray tiny speckles over the green body for a stone-like texture. -
Dark speckles:
Repeat the spattering process with a diluted hunter green or dark grey paint to add depth and realism to the skin pattern. -
Painting the eyes:
If you used clay for eyes, paint them solid black. Use a high-gloss varnish on just the eyes later to make them look wet and alert. -
Detail work:
Use a fine brush to carefully paint the carved mouth line with dark grey or black to make the smile pop. -
Sealing:
Finish the piece with a coat of matte spray varnish to protect the paint and give it that soft, ceramic-like sheen.
Make it a planter
Before drying, use a large sculpting loop tool to hollow out the back. Add a drainage hole, and you have a custom succulent pot.
Place your new chunky friend near a window or plant to oversee your home with quiet patience
Ball-and-Coil Octopus
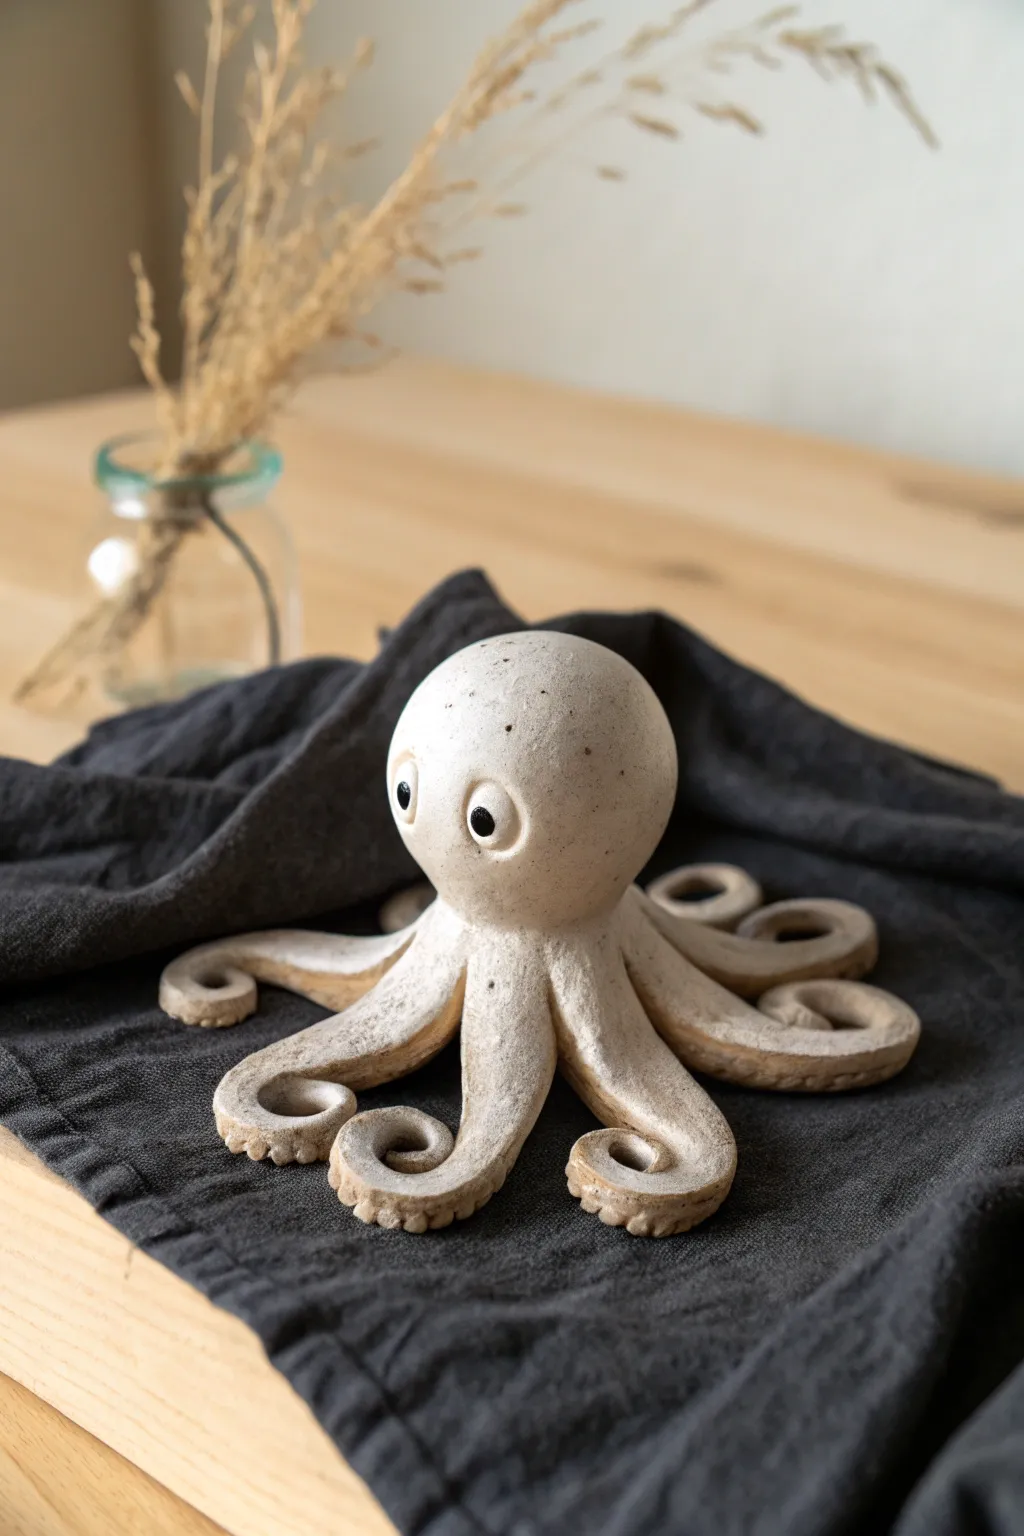
This charming octopus sculpture relies on basic hand-building shapes to create a minimalist yet expressive sea creature. With its smooth, round head and playfully curled tentacles, it captures the fluid movement of marine life in a sturdy, textured clay form.
Detailed Instructions
Materials
- Stoneware or air-dry clay (speckled or beige)
- Small bowl of water
- Score-and-slip tool (needle tool or serrated kidney)
- Modeling tool with a small ball end
- Wooden sculpting tool
- Sponge
- Black underglaze (or acrylic paint if using air-dry clay)
- Small fine-point brush
- Canvas or cloth work surface
Step 1: Forming the Body
-
Create the head:
Start with a fist-sized lump of clay and roll it between your palms to create a smooth sphere. Gently tap the bottom on your work surface to create a slightly flattened base so it doesn’t roll away. -
Shape the eyes:
Roll two smaller balls of clay, roughly the size of large marbles. Slightly flatten them into discs. -
Attach the eyes:
Score the back of the eye discs and the attachment points on the main head sphere. Apply a dab of water or slip, press the eyes firmly onto the head, and use a wooden tool to blend the edges seamlessly into the skull until no seam remains. -
Indent the pupils:
Using the back of a brush or a small dowel, press gently into the center of each eye mound to create a concave pupil. This adds depth and character to the face.
Supporting the Curls
If your tentacle curls are drooping while wet, tuck small balls of crumpled paper towel or foam underneath them for support until the clay stiffens.
Step 2: Tentacles and Details
-
Roll the coils:
Roll out eight thick coils of clay. They should be thicker at one end (where they attach to the body) and taper down to a rounded point at the tip. -
Arrange the base:
Flip the head upside down. Score the bottom flat area thoroughly. Score the thick ends of your eight tentacles as well. -
Attach tentacles:
Press the thick ends of the tentacles onto the base of the head, radiating outward like a star. Smooth the clay from the tentacles onto the underside of the head to secure the bond. -
Curl the tips:
Flip the octopus back upright carefully. Take each tentacle and curl the tapered end into a spiral. Vary the tightness and direction of the curls to give the creature a natural, fluid sense of movement. -
Add suction cups:
Roll many tiny balls of clay, about the size of peppercorns. Slightly flatten them and press them in a single row along the underside of the curled tentacles. -
Texture the cups:
Use your small ball-ended tool to press an indentation into the center of each suction cup. This secures them to the tentacle and gives them their distinctive donut shape. -
Smooth the surface:
I prefer to use a slightly damp sponge to wipe down the head and the tops of the tentacles, removing any fingerprints while leaving the clay’s natural speckled texture visible.
Step 3: Finishing Touches
-
Dry the piece:
Allow the clay to dry slowly under a loose plastic sheet for the first day to prevent the tentacles from cracking where they join the body. -
Initial firing:
If using ceramic clay, bisque fire the piece according to your clay body’s instructions (usually Cone 04). -
Paint the pupils:
Using a fine-point brush, carefully paint the inside of the pupil indentations with black underglaze or acrylic paint. Keep the edges crisp. -
Final aesthetic:
Leave the rest of the body unglazed to highlight the raw, sandy texture of the material. If you used ceramic clay, fire it once more to set the underglaze.
Sea Glass Accents
For a magical touch, have the octopus hold a piece of sea glass or a small seashell in one of its curled tentacles before the clay dries completely.
Place your completed octopus on a shelf or desk where its wide-eyed gaze can add a bit of oceanic whimsy to your day

TRACK YOUR CERAMIC JOURNEY
Capture glaze tests, firing details, and creative progress—all in one simple printable. Make your projects easier to repeat and improve.
Segmented Caterpillar
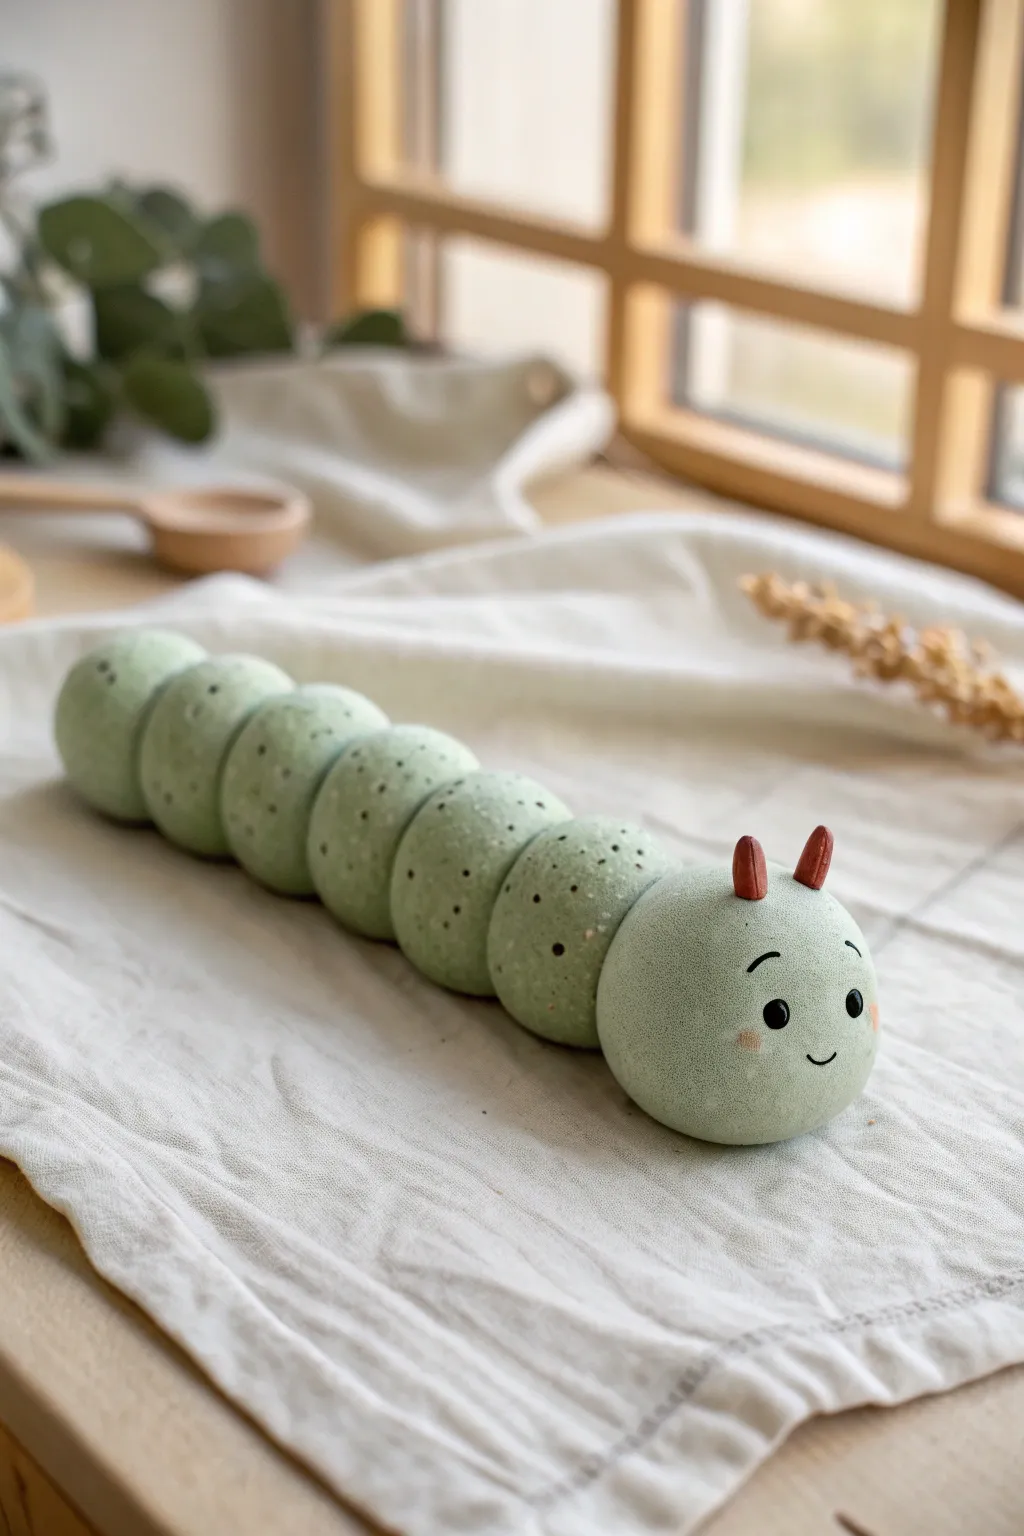
This adorable caterpillar brings a touch of nature indoors with its soothing mint-green hue and speckled earthen texture. The segmented design is incredibly simple to construct, making it a perfect project for beginners looking to practice consistent shaping.
Step-by-Step
Materials
- Air-dry clay (white or light grey base)
- Acrylic paint (sage green, dark brown/black, burnt sienna, pink)
- Old toothbrush or stiff bristle brush
- Water formatting and smoothing
- Two small dried seeds or tiny clay cones (for antennae)
- Needle tool or toothpick
- Fine detail paintbrush
- Matte varnish or sealant
Step 1: Creating the Segments
-
Prepare the Body Clay:
Start by taking a large chunk of air-dry clay. If you want the color integrated, knead a generous amount of sage green acrylic paint directly into the white clay until the color is uniform and pale green. -
Portion Control:
Divide your clay into 7 distinct pieces. You will need one larger piece for the head and six slightly smaller pieces for the body segments. Try to make the body pieces gradually decrease in size just a tiny bit for a natural taper, though keeping them uniform works too. -
Roll Spheres:
Roll each piece of clay into a smooth, tight ball between your palms. Inspect them for cracks; if you see any, dip your finger in water and smooth them out now before assembling. -
Texturizing:
Before connecting them, take an old toothbrush and gently tap the surface of each ball. This gives the clay a subtle, porous texture that mimics organic matter rather than perfectly smooth plastic.
Stone Effect Secret
Mix dried tea leaves or coffee grounds directly into your clay before rolling. This adds internal texture that looks like natural speckled stone without painting.
Step 2: Assembly
-
Connect the Head:
Take the largest sphere (the head) and the first body segment. Score the contact points on both spheres with a needle tool—making little hash marks—and dab a tiny bit of water or slip on the rough area. -
Press Together:
Firmly press the head and the first body segment together. You want them to stick, but don’t squish them so hard they lose their spherical shape. -
Build the Line:
Continue this scoring and pressing method for the remaining five spheres, attaching them in a straight line behind the head. -
Create the Undulation:
While the clay is still wet, gently nudge the line of spheres into a slight ‘S’ curve or a subtle wave. This makes the caterpillar look like it’s crawling rather than lying stiff. -
Check Connections:
Flip the caterpillar over gently. If any connections look weak, smooth a tiny bit of clay across the bottom seams to reinforce the bond without ruining the segmented look on top.
Make it a Memo Holder
Before the clay dries, insert a coiled wire note holder into the center of the third body segment. It turns a cute decoration into a functional desk buddy.
Step 3: Adding Details
-
Insert Antennae:
While the head is still soft, press two small indentations on top for the antennae. Insert your small brown seeds or hand-rolled clay cones into these spots. If using clay cones, paint them burnt sienna beforehand or color the clay red-brown. -
Dry Time:
Let the figure dry completely. Depending on your climate and the thickness of the balls, this might take 24 to 48 hours. Turn it over halfway through to ensure the bottom dries too. -
Speckling Process:
Once dry, mix a watery dark brown or black paint. Dip a toothbrush into it, and running your thumb over the bristles, splatter fine mists of paint spots over the top of the caterpillar to create that stone-like effect. -
Clean the Face Area:
If the speckling got too heavy on the face area, you can gently wipe it back with a damp cloth or paint over it with a thin layer of your original green to clear a space for the eyes.
Step 4: Bringing it to Life
-
Paint the Eyes:
Using your finest detail brush and black paint, create two small oval eyes wide apart on the face. Add tiny eyebrows floating just above them for a surprised, innocent expression. -
Add the Smile:
Paint a very fine, small ‘U’ shape between the eyes for the mouth. Keep the line thin and delicate. -
Rosy Cheeks:
I usually dry rub a tiny amount of pink paint or soft pastel dust onto the cheeks using a cotton swab to give it a gentle blush. -
Highlighting:
Add a microscopic white dot to the top corner of each black eye. This ‘catchlight’ is crucial for making the character look alive. -
Sealing:
Finish with a coat of matte varnish. Avoid glossy finishes, as the matte look preserves the velvety, natural texture we created earlier.
Place your finished caterpillar on a windowsill or near a potted plant to give it a natural home
Little Piglet With Button Nose
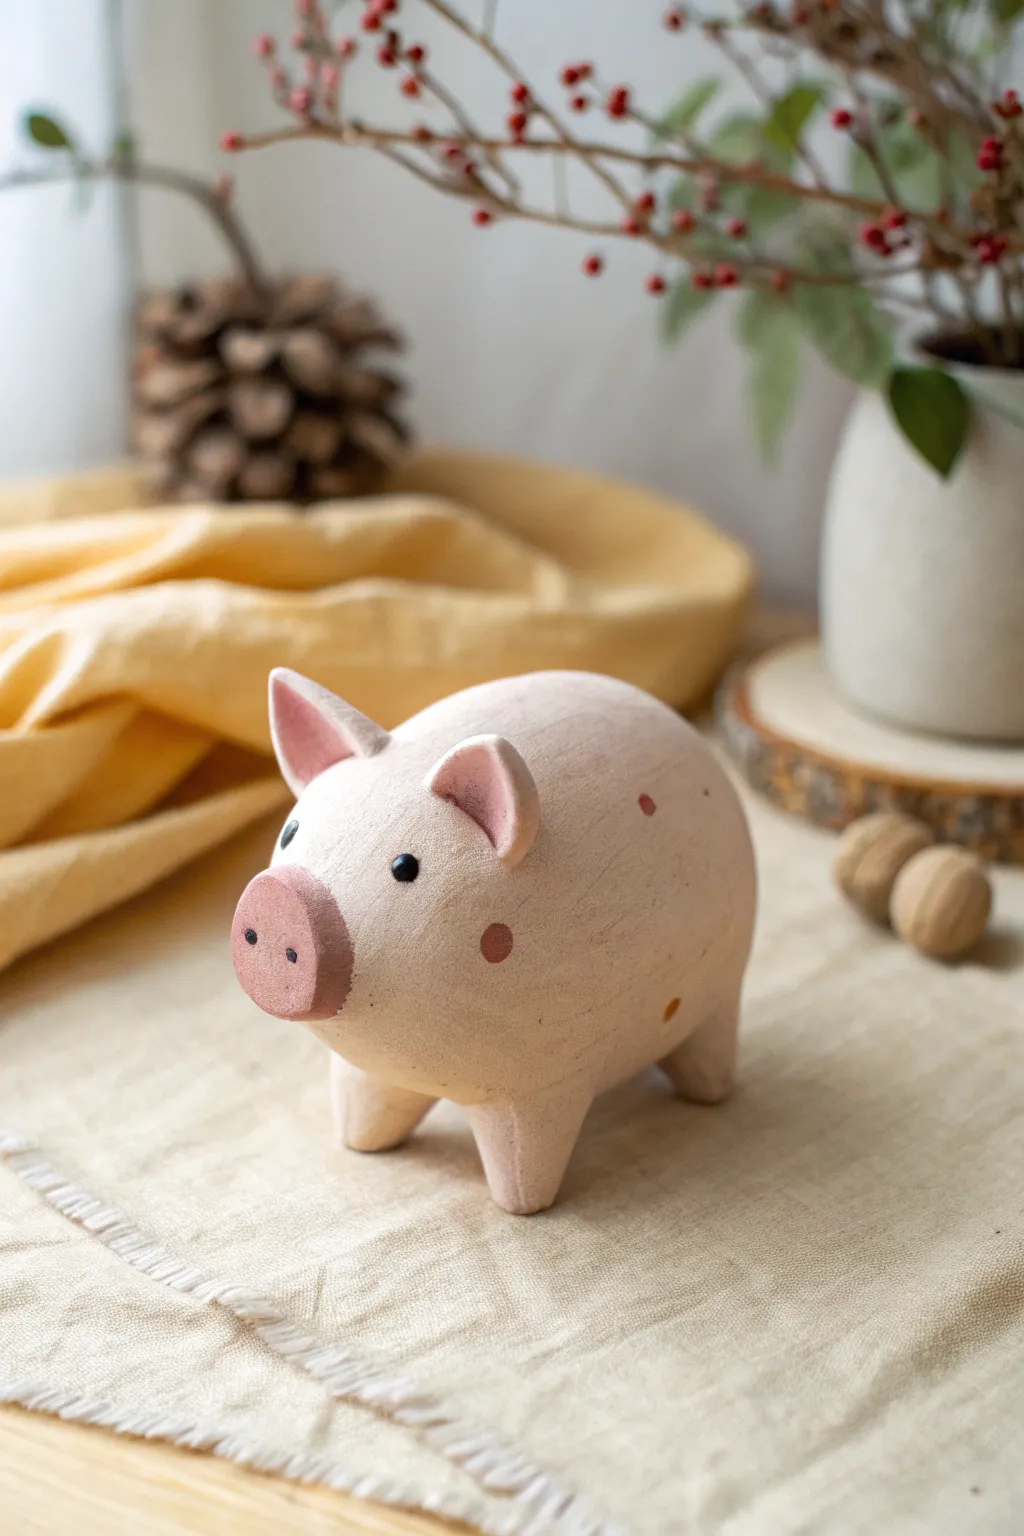
This charming, rustic piglet features a soft pink hue and adorable painted details that bring its personality to life. Easy to shape and delightful to display, this clay figure captures a simple folk-art aesthetic perfect for any shelf.
Step-by-Step Tutorial
Materials
- Air-dry clay (white or terra cotta)
- Modeling tools (or a toothpick and a popsicle stick)
- Acrylic paints (pale pink, deep rose, dark brown/black, cream/white)
- Fine grit sandpaper
- Small paintbrush
- Cup of water
- Clear matte sealant or varnish
Step 1: Shaping the Body
-
Form the base:
Begin with a ball of clay roughly the size of a large orange. Roll it between your palms until smooth, then gently elongate it into a thick oval or egg shape to form the main body. -
Flatten the bottom:
Tap the oval gently on your work surface to create a slight flat spot on the belly area, ensuring the pig will hold its shape while you add legs. -
Create the legs:
Roll four smaller balls of clay, about the size of marbles. Pull and pinch each one slightly into a short, stout cone shape. -
Attach the legs:
Score the attachment points on the body and the tops of the legs with a toothpick or tool. Dab a little water (slip) on these rough areas and press the legs firmly onto the underside of the body. -
Smooth the seams:
Use your thumb or a modeling tool to blend the clay from the legs onto the body until the seams disappear completely. I like to double-check that the pig stands level at this stage before moving on.
Step 2: Adding Character
-
Make the snout:
Roll a small ball of clay and flatten it into a thick disk. Attach this to the front of the face using the score-and-slip method. -
Detail the nose:
Using a small, round tool or the back of a paintbrush, press two deep indentations into the snout to create nostrils. -
Shape the ears:
Form two small triangles of clay. Gently curve them slightly to give them a cupped shape, mimicking real pig ears. -
Attach ears:
Place the ears on top of the head, blending the clay at the base into the skull so they are secure. Position them slightly forward for a curious expression. -
Tail time:
Roll a tiny, thin snake of clay. Coil it into a spiral and attach it to the rear of the piglet, blending the attachment point carefully. -
Final smoothing:
Dip your finger in a tiny bit of water and rub it over the entire sculpture to smooth out fingerprints and harsh tool marks. -
Dry completely:
Let the figure dry for 24-48 hours. If it feels cold to the touch, it still holds moisture and needs more time.
Keep it Steady
While sculpting legs, place a small support (like a crumpled piece of foil) under the belly. This keeps the heavy body from sagging while the legs firm up.
Step 3: Painting and Finishing
-
Sand imperfections:
Once fully dry, use fine-grit sandpaper to gently buff away any rough bumps or unevenness, giving the piece a smooth, professional finish. -
Base coat:
Mix white paint with a tiny drop of red or brown to create a creamy, pale pink. Paint the entire piglet, applying two coats if necessary for opacity. -
Paint the snout and ears:
Mix a slightly darker, rosier pink. Paint the flat surface of the snout and the inner triangles of the ears. -
Add polka dots:
Using the darker pink or a soft brown, paint sporadic, large polka dots on the pig’s back and sides. Keep them random for a natural, playful look. -
Eyes and nostrils:
With a fine-tip brush and black or dark brown paint, add two small dots for eyes just above the snout. Add tiny dots inside the nostril indentations to define them. -
Highlight the eyes:
Once the eye dots are dry, adding a microscopic white speck to each eye brings a spark of life to the face. -
Seal the work:
Finish by applying a clear matte sealant. This protects the paint and gives the clay a lovely finished texture.
Make it a Bank
Before the clay dries, carefully cut a slot in the top. Once dry, you can fit a rubber stopper in the belly hole, turning your sculpture into a functional piggy bank.
Place your finished piglet on a sunny windowsill or rustic shelf to enjoy its handmade charm every day
Egg-Shaped Baby Chick
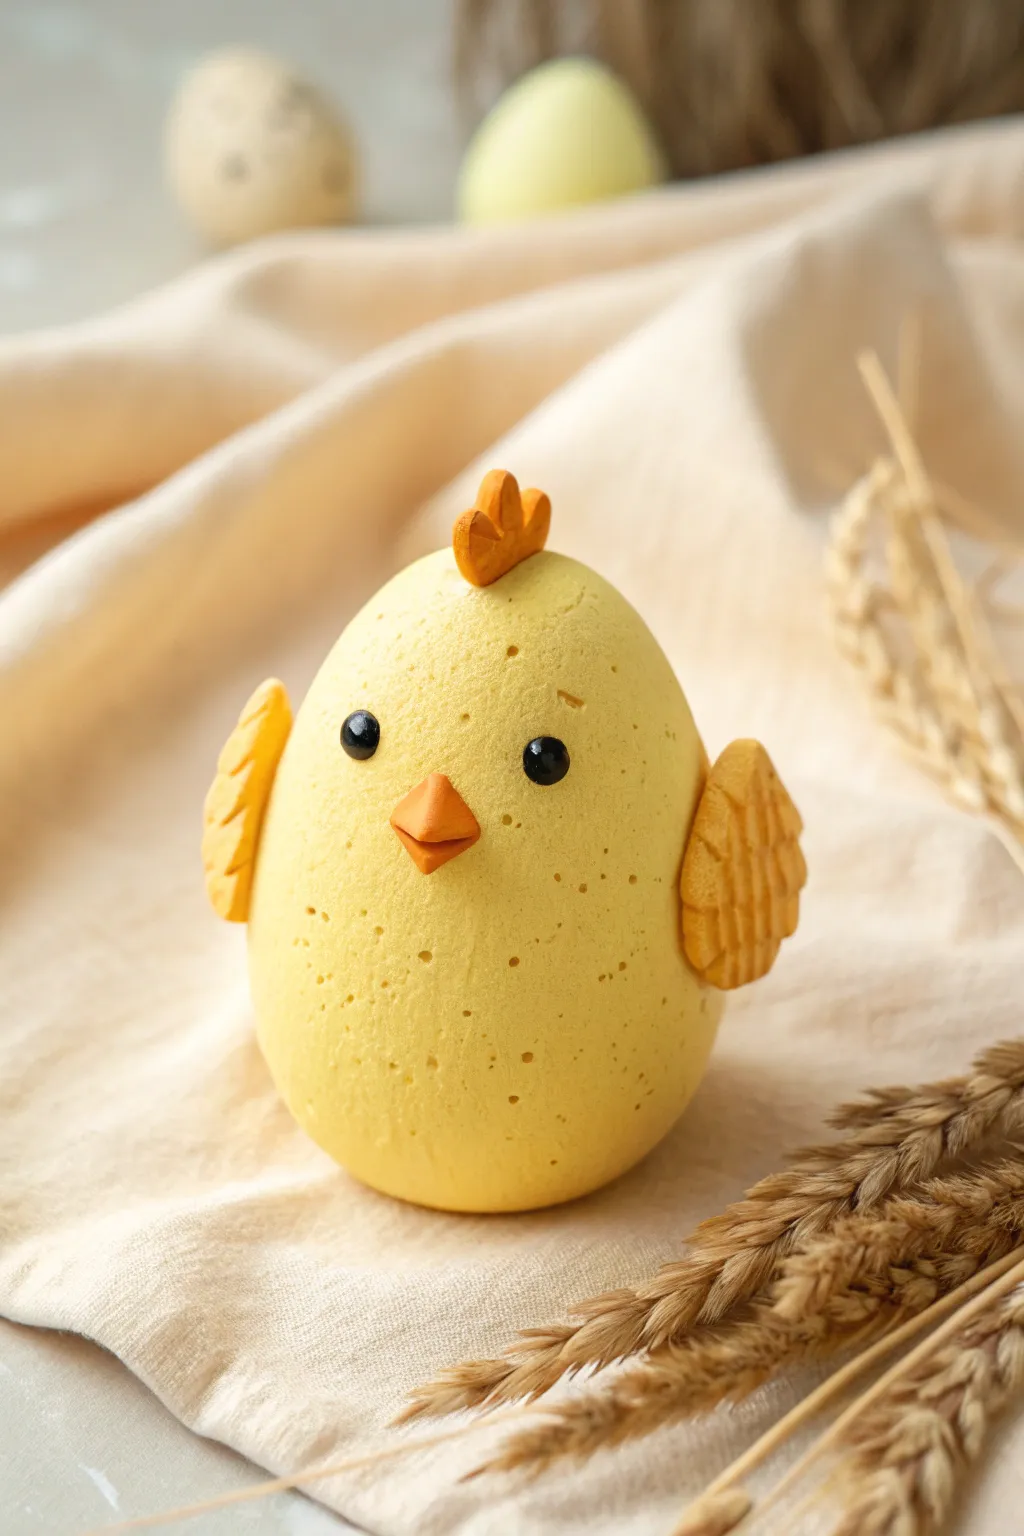
This adorable egg-shaped chick is a perfect beginner project that combines simple shapes with charming details. The textured yellow finish gives it a soft, realistic look, while the tiny wings and comb add a playful personality.
How-To Guide
Materials
- Polymer clay or air-dry clay (primary color: pastel yellow)
- Small amount of orange clay
- Two small black beads or small balls of black clay
- Toothbrush or texturing sponge
- Basic sculpting tools (clay knife, needle tool)
- Clay adhesive or liquid clay (optional)
- Glaze or varnish (optional)
Step 1: Forming the Body
-
Shape the base:
Start by conditioning a large ball of pastel yellow clay until it is soft and pliable. Roll it between your palms to remove any cracks or lines. -
create the egg form:
Gently taper the top of the ball while keeping the bottom broad and rounded. You want a distinct egg shape that can stand upright on its own without rolling over. -
Apply texture:
To give the chick that fluffy, porous look seen in the photo, gently tap the entire surface of the egg with a clean toothbrush or a piece of texturing sponge. Be careful not to press too hard and deform the egg shape. -
Smooth the base:
Check the bottom of the egg to ensure it remains flat enough for the figure to stand securely. You might need to press it gently against your work surface one more time.
Texturing Tip
If using a toothbrush for texture, wrap the clay egg in plastic wrap first. This softens the texture marks, making the chick look fluffy rather than just pitted.
Step 2: Adding the Features
-
Prepare the eye sockets:
Use a small ball tool or the rounded end of a paintbrush handle to create two shallow indentations where the eyes will go. Place them slightly above the vertical center. -
Insert the eyes:
Press two small black beads into the indentations. If using black clay instead, roll two tiny spheres and press them in firmly so they don’t protrude too much. -
Shape the beak:
Take a tiny amount of orange clay and form a small diamond shape. Fold it gently in half or score a line across the middle to create an open beak look. -
Attach the beak:
Place the beak directly between and slightly below the eyes. Press it gently onto the textured surface so it adheres well.
Step 3: Wings and Details
-
Create wing bases:
Roll two equal-sized pieces of yellow clay (slightly darker than the body if you want contrast, or blend a little orange into your yellow) into teardrop shapes. -
Flatten and texture wings:
Flatten the teardrops securely. Use a needle tool or clay knife to press a cross-hatch or grid pattern onto the outer side of each wing to simulate feathers. -
Attach the wings:
Press the wings onto the sides of the body, positioning them so the pointed ends face backward and slightly upward. I find it helps to blend the clay slightly at the shoulder connection point for durability. -
Shape the comb:
Using a small piece of orange clay, form a flattened semi-circle or three tiny connected teardrops to create the rooster comb. -
Detail the comb:
If using a single piece, use your knife tool to cut two notches into the top edge, creating a three-bump silhouette. -
Mount the comb:
Place the orange comb on the very top center of the chick’s head. Press down gently to secure it without squashing the shape.
Make it a Set
Create a whole family by making slightly larger versions for parent chickens or cracking the top off a white clay ‘egg’ to have a chick peeking out from inside.
Step 4: Finishing Touches
-
Final texture check:
Look over the model for any fingerprints you might have left while attaching the wings or beak. Gently re-texture those spots with your toothbrush. -
Add speckles (optional):
For added realism like the reference photo, you can use a needle tool to poke a few deeper, scattered holes around the body to mimic eggshell imperfections. -
Bake or dry:
Follow the manufacturer instructions for your specific type of clay. If baking, tent with foil to prevent the yellow from scorching.
Once dry and cool, your little clay chick is ready to bring a touch of cheer to your desk or shelf
Friendly Mini Dinosaur
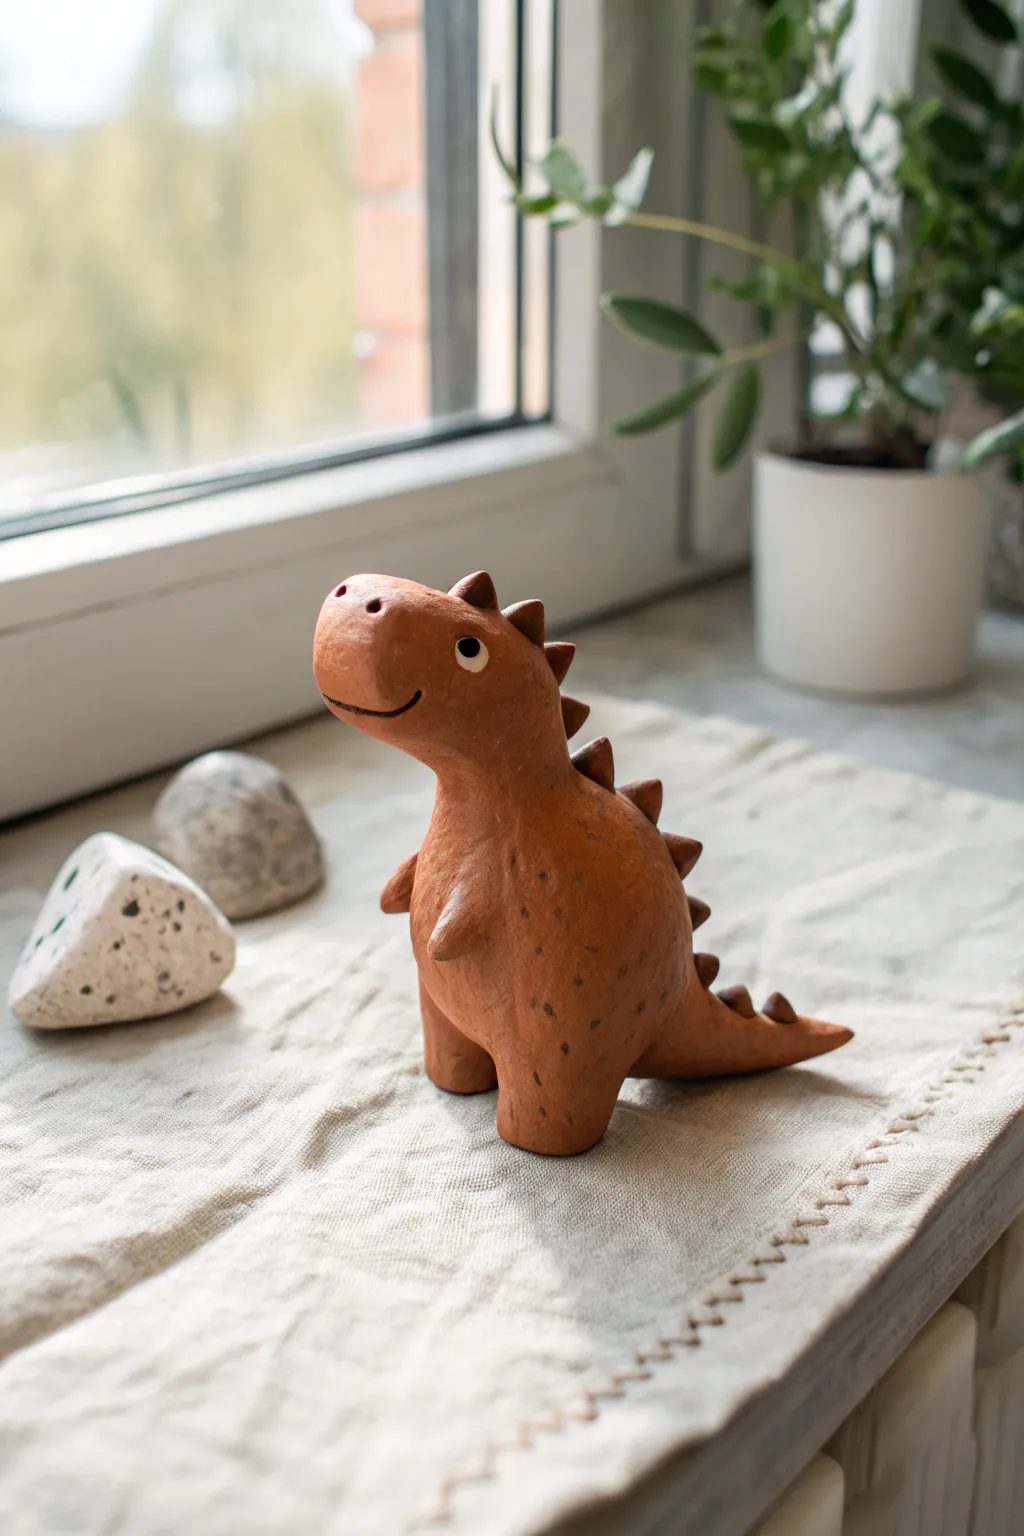
Bring a prehistoric pal to life with this charming little clay project that radiates warmth and whimsy. With its friendly smile, soft terracotta hue, and simple triangular spikes, this mini dinosaur makes for a perfect beginner sculpture that looks great on any windowsill.
Detailed Instructions
Materials
- Terracotta-colored polymer clay (or air-dry clay)
- Small amount of white clay (for eyes)
- Black acrylic paint
- Fine-point paintbrush or toothpick
- Clay sculpting tools (specifically a smoothing tool and a needle tool)
- Aluminum foil (optional, for armature)
- Oven (if using polymer clay) or clear sealant (if using air-dry)
Step 1: Shaping the Base
-
Prepare the body clay:
Start with a ball of terracotta clay roughly the size of a tangerine. Condition it by kneading it in your hands until it is soft, pliable, and free of cracks. -
Form the main shape:
Roll the clay into a smooth pear shape. Gently elongate the narrower top part to form the neck and head, while keeping the bottom rounded and heavy to ensure stability. -
Define the head:
Use your thumb to gently press and smooth the neck area, creating a slight distinction between the head and the body, tilting the snout slightly upward for a curious expression. -
Create the tail:
Pinch the back of the heavy base and pull the clay outward to form a thick, tapered tail. Smooth the transition so it flows naturally from the body. -
Add the legs:
Roll two small balls of clay for the feet. Press them firmly onto the bottom front of the body, blending the seams upward with a smoothing tool so the dinosaur stands sturdily.
Cracks appearing?
If you see small cracks while shaping, dip your finger in a tiny bit of water (for air-dry) or baby oil (for polymer) and smooth them out immediately.
Step 2: Adding Details
-
Make the arms:
Create two tiny tear-drop shapes for the arms. Attach them to the chest area, blending the top of the arm into the body while leaving the little hands poking outward. -
Sculpt the snout:
Refine the face shape by slightly flattening the front of the snout. Use a needle tool or toothpick to poke two small nostrils near the top. -
Carve the smile:
Use a curved tool or the edge of a spoon to press a long, gentle smile into the side of the snout. I like to curve the end of the line upward slightly to give him a really happy look. -
Craft the spikes:
Roll out a small snake of clay and cut it into small triangular sections. You will need about 8-10 pieces, graduating in size. -
Attach the spikes:
Starting from the top of the head down to the tail, press the triangular spikes onto the spine. Use your tool to blend the base of each spike into the back so they don’t fall off. -
Texture the skin:
For that earthy, handmade look, take a toothbrush or a crumpled ball of foil and gently tap it against the clay surface to add subtle skin texture, avoiding the smooth face area. -
Add speckles:
Use a needle tool or toothpick to poke random, shallow little dots all over the body and legs to mimic scales or freckles.
Step 3: Finishing Up
-
Add eyes:
Roll two tiny balls of white clay. Press them flat onto the sides of the head. Add a tiny dot of black clay (or paint later) for the pupil. -
Bake or dry:
If using polymer clay, bake according to package instructions (usually around 275°F/130°C for 15-30 minutes). If using air-dry clay, let it sit undisturbed for 24-48 hours. -
Paint details:
Once cool or dry, use a fine brush with black acrylic paint to darken the eyes if you didn’t use colored clay, and carefully trace the smile line to make it pop. -
Seal (optional):
If desired, brush on a matte varnish to protect your new friend from dust and moisture, keeping that natural clay look intact.
Make it a planter
Hollow out the back of the dinosaur before baking to create a tiny space for an air plant or a small succulent cutting.
Place your prehistoric friend in a sunny spot to keep your plants company
Mushroom Person Figure
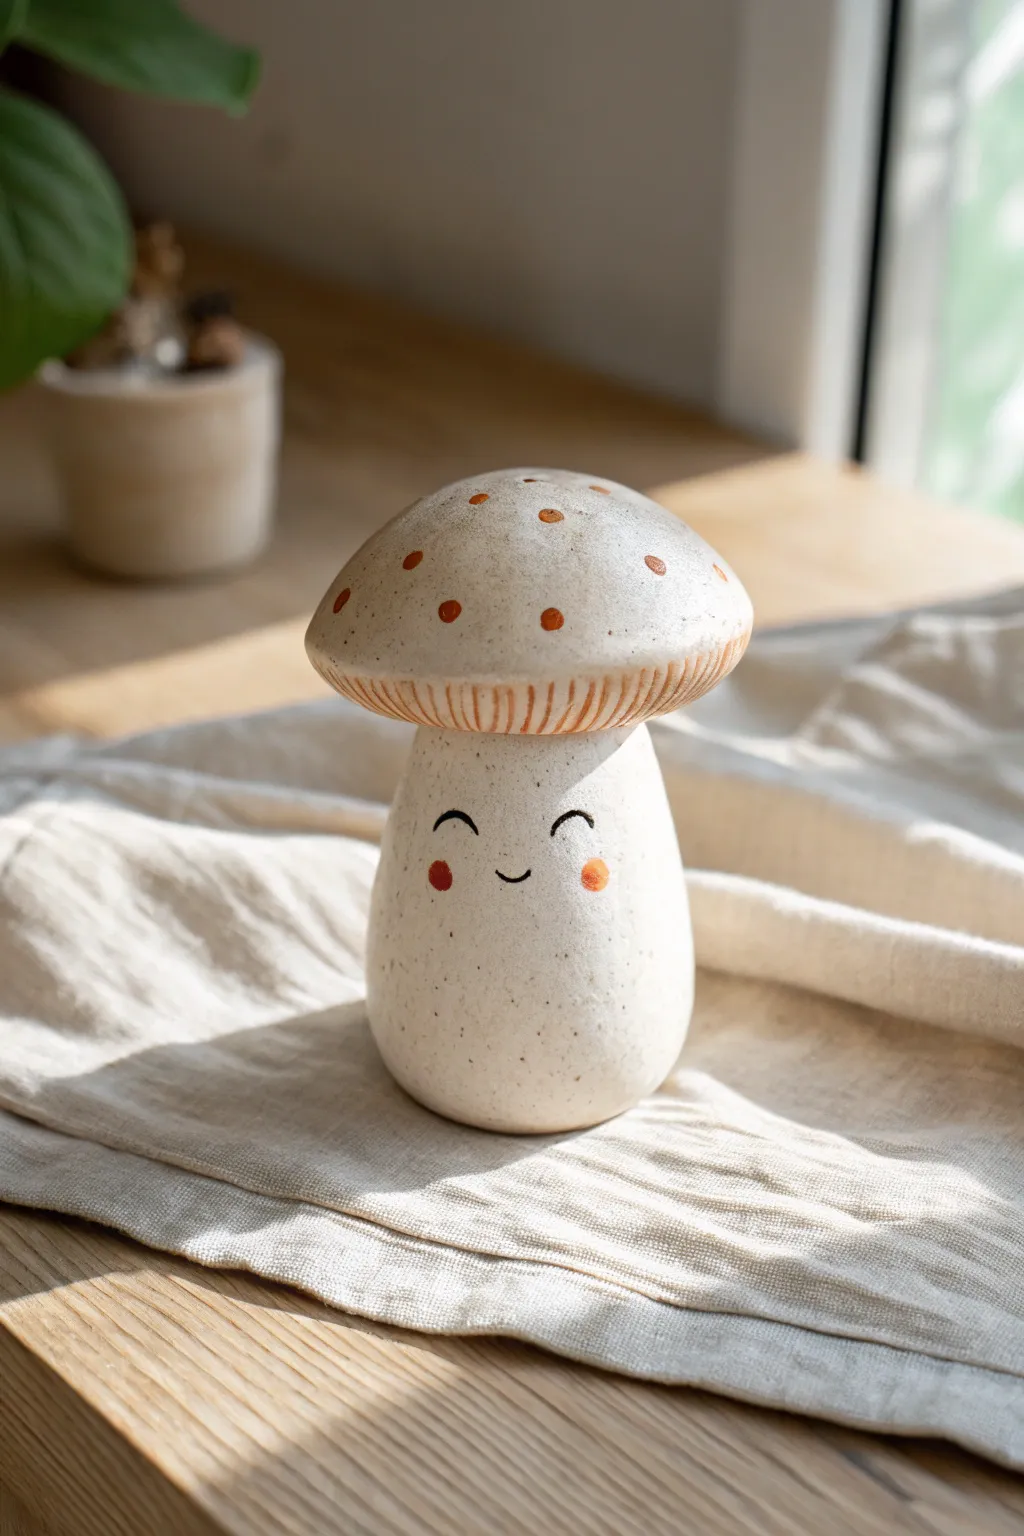
Bring a little woodland magic to your desk with this adorable ceramic-style mushroom figure. Featuring a natural speckled finish, a sweet smiling face, and a charmingly rustic cap, this project is perfect for beginners working with air-dry or polymer clay.
Step-by-Step Guide
Materials
- White polymer clay or air-dry clay (preferably with a speckled effect)
- Speckle additive (if clay isn’t pre-speckled, use dried coffee grounds or black pepper)
- Acrylic paints: Burnt Orange/Terracotta, Black, Blush Pink
- Fine grit sandpaper
- Sculpting tools (needle tool and ball stylus)
- Small paintbrush
- Matte or satin varnish (optional)
- Aluminum foil (for armature)
Step 1: Shaping the Base
-
Prepare the Clay:
Start by conditioning your clay until it’s soft and pliable. If your clay isn’t pre-speckled, this is the moment where I like to mix in a tiny pinch of black pepper or dried coffee grounds to achieve that organic, pottery-like texture. -
Form the Stalk Core:
Roll a ball of aluminum foil into a pear shape, roughly 2 inches tall. This saves clay and keeps the figure lightweight. -
Cover the Stalk:
Flatten a sheet of clay and wrap it smoothly around your foil armature. Roll it gently on your work surface to eliminate seams. -
Refine the Shape:
Mold the clay into a tapered cylinder that is wider at the bottom (like a rounded pear) and slightly narrower at the top where the cap will sit. Tap the bottom against the table to flatten it so it stands securely.
Step 2: Creating the Cap
-
Shape the Dome:
Roll a fresh ball of clay, slightly larger than the top of your stalk. Flatten the bottom and round the top to create a classic mushroom cap shape. -
Hollow the Underside:
Use your thumb or a ball tool to create a gentle indentation underneath the cap where it will connect to the stalk. -
Add Texture:
Using a needle tool or a dull knife, carefully score fine lines around the bottom rim of the cap to mimic the gills of a mushroom. These vertical lines should be close together. -
Connect Cap to Stalk:
Score the top of the stalk and the center underside of the cap. Apply a dab of liquid clay (or water for air-dry clay) and press the cap firmly onto the stalk. -
Smooth Transitions:
Use your finger or a silicone smoothing tool to ensure the neck connection looks clean, though the cap should overhang the stalk slightly.
Wobbly Cap?
If the cap keeps sliding off the stalk while working, insert a toothpick halfway into the stalk and place the cap onto the protruding end for internal support.
Step 3: Painting and Finishing
-
Bake or Dry:
Follow the manufacturer instructions for your specific clay. If baking polymer clay, support the cap with a bit of polyester fiberfill or tissue to keep it from drooping. -
Sand for Smoothness:
Once fully cured and cooled, lightly sand any fingerprints or rough spots with fine-grit sandpaper for that stone-like feel. -
Paint the Spots:
Dip a small brush into your terracotta or burnt orange paint. Dab small, imperfect circles randomly onto the top of the mushroom cap. -
Detail the Gills:
Dilute a tiny bit of the orange paint with water. Gently wash this color over the textured gill area under the cap rim, allowing the color to settle into the grooves. -
Add the Face:
Using a very fine detail brush or a black paint pen, draw two wide, inverted ‘U’ shapes for the smiling eyes. -
Draw the Smile:
Place a tiny, centered ‘u’ shape between and below the eyes for the mouth. -
Rosy Cheeks:
Dip the end of a paintbrush handle or a ball stylus into pink or orange paint. Dot two cheeks onto the face, just outside the smile line. -
Seal the Figure:
Protect your paint job with a coat of matte varnish. This unifies the surface sheen and makes the speckled texture pop.
Make it a Trio
Make two smaller mushrooms with slightly different cap shapes (one pointy, one flat) to display alongside this one for a complete forest family.
Now you have a charming little fungi friend to keep you company and brighten up your shelf
Cactus Buddy With Arms
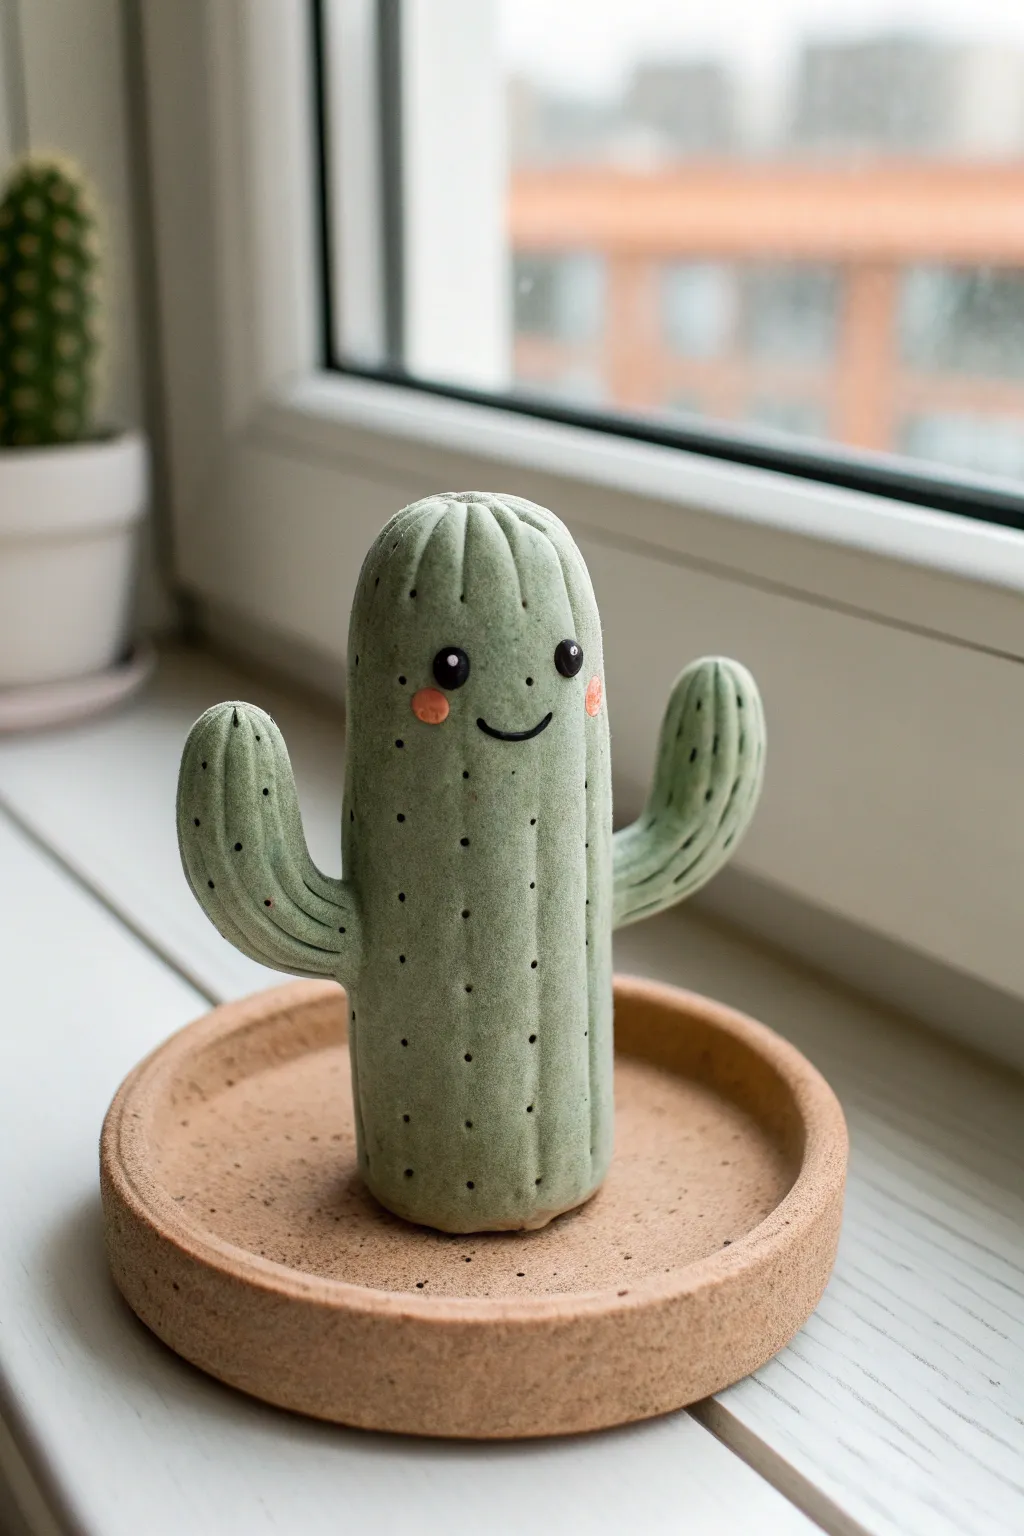
Sculpt a prickly yet friendly desert companion with this adorable clay project. Featuring a textured body, waving arms, and a cheerful face, this cactus buddy sits perfectly in a simple saucer dish.
How-To Guide
Materials
- Polymer clay (Sage Green, Light Terracotta, Black, Pink)
- Clay roller or rolling pin
- Modeling tools (needle tool, ball tool)
- Small craft knife
- Acrylic paints (Black, Pink) – optional if not using colored clay
- Fine-grit sandpaper
- Oven for baking (if using polymer clay)
- Clear matte varnish (optional)
Step 1: Shaping the Cactus Body
-
Prepare the core:
Start by conditioning a substantial amount of sage green clay until it is soft and pliable. Roll it into a smooth ball to remove air bubbles, then elongate it into a thick cylinder shape with a rounded top and a flat bottom. -
Refine the cylinder:
Roll the cylinder gently on your work surface to ensure it has an even thickness. The top should be pleasantly doomed like a thimble. Make sure it stands upright stably on its own. -
Create the signature ridges:
Using a needle tool or the back of a craft knife, press vertical lines into the clay body. Start from the very center of the top dome and drag the lines down to the base to create the ribbed cactus texture. -
Form the arms:
Roll two smaller sausages of the same green clay for the arms. One should be slightly longer than the other. Bend each one into a gentle ‘L’ or curve shape. -
Attach the arms:
Score the side of the body and the base of each arm where they will connect to create a stronger bond. Press the arms onto the body—place one lower and one higher for a dynamic ‘waving’ look. -
Blend the seams:
Use a clay sculpting tool or your fingertip to smooth the clay where the arms meet the body. You want the arms to look like they grew out of the trunk, not just stuck on. Re-draw the ridge lines over the connection points if they get smudged. -
Add arm ridges:
Continue the vertical ridge texture onto the arms, ensuring the lines flow naturally around the curves.
Floppy Arms?
If the arms are drooping before baking, support them with small balls of crumpled aluminum foil or a toothpick inserted internally for structure.
Step 2: Adding Details and the Saucer
-
Poke the prickles:
Take a fine needle tool and gently poke tiny holes all over the ridges of the cactus body and arms. These represent the spines without actually being sharp. Space them somewhat randomly but keep them along the vertical ribs. -
Make the base saucer:
Switch to your terracotta-colored clay. Roll out a thick sheet and cut a circle slightly wider than your cactus. Create a raised rim by rolling a long snake of clay and attaching it to the edge of the circle, blending the seam inside. -
Texture the saucer:
Give the saucer a stone-like texture by gently pressing a piece of sandpaper or a crumpled ball of foil against the clay surface. This adds realism to the ‘pot’ look. -
Create the face indentations:
Decide where the face will go on the main trunk. Use a small ball tool to make two shallow indents for the eyes to sit in.
Step 3: Finishing Touches
-
Add the eyes:
Roll two tiny balls of black clay. Press them into the eye sockets you created. Add extremely tiny specks of white clay (or white paint later) for the highlights to bring the character to life. -
Sculpt the smile:
Roll a very thin thread of black clay and curve it into a ‘U’ shape. Press this gently onto the face between the eyes to create a sweet smile. -
Apply rosy cheeks:
Take two small bits of pink clay, flatten them into discs, and press them onto the cheeks just below the eyes. -
Final check:
Look over your figure for any fingerprints. Gently buff them away with a drop of baby oil on your finger if needed before baking. -
Bake the project:
Bake the cactus and the saucer according to your polymer clay package instructions. I usually tent foil over mine to prevent scorching the light green color. -
Assembly:
Once cool, you can glue the cactus into the center of the saucer if you want a permanent display, or leave it loose to reposition later.
Add Realism
After baking, dilute some brown acrylic paint with water and brush it over the cactus, then immediately wipe it off. Ideally the paint stays in the grooves.
Enjoy your new low-maintenance plant friend on your desk or windowsill
Happy Little Toast Character
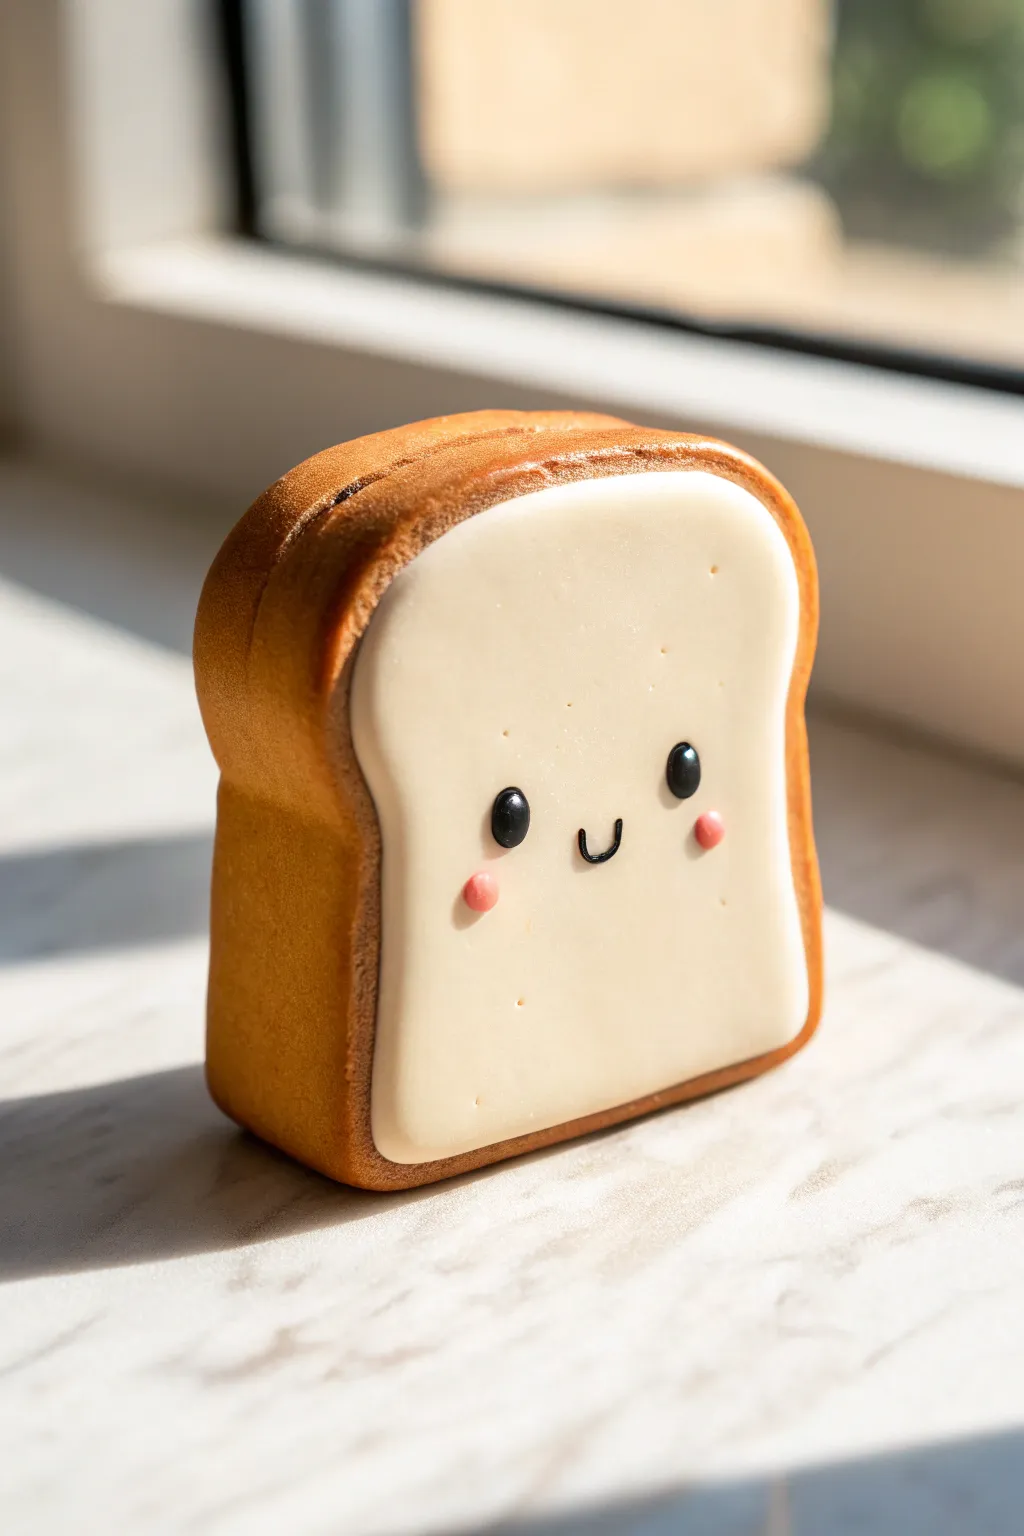
This ridiculously cute toast slice makes for a perfect desk buddy or a charming magnet. With its golden-brown crust and smooth icing-like finish, it features a sweet kawaii face that’s deceptively simple to sculpt.
Detailed Instructions
Materials
- Light tan polymer clay (bread dough)
- Dark brown soft pastels or acrylic paint
- Translucent liquid clay (for smoothing later)
- White or cream polymer clay (bread face)
- Black polymer clay (tiny amount for eyes/mouth)
- Pink polymer clay (tiny amount for cheeks)
- Rolling pin
- Rectangular clay cutter or craft knife
- Soft paintbrush
- Small dotting tool or toothpick
- Oven (for baking)
- Gloss glaze (optional)
Step 1: Shaping the Loaf
-
Mix the bread color:
Start by conditioning your light tan clay. If it’s too pale, mix in a tiny pinhead of brown to get that perfect unbaked dough color. -
Form the main block:
Roll the clay into a thick slab, about 1 inch deep. Based on the image, the toast is quite chunky, almost like a thick slice of Texas toast. -
Cut the basic shape:
Using your blade, cut a rectangle that is taller than it is wide. Round off the top two corners gently with your fingers to create the signature loaf dome. -
Refine the sides:
Press the sides in slightly at the middle to give it that “baked inside a tin” look, creating a very subtle waistline to the slice. -
Texture the crust:
Use a toothbrush or a ball of aluminum foil to gently tap texture onto the sides, top, and bottom edges only. Leave the front and back flat faces smooth.
Step 2: Toasting and Icing
-
Add the baked effect:
Shave some dark brown soft pastel into a powder. Using a dry, soft brush, dust the textured edges of the clay. Focus the darkest color on the very top crust and the corners. -
Create the bread face:
Roll out your white or cream clay very thinly. Cut it into a shape that mirrors your toast slice but is slightly smaller all around. -
Attach the layer:
Gently press this cream layer onto the front of your tan block. I find smoothing from the center outward helps prevent air bubbles from getting trapped underneath. -
Soften the edges:
Use your finger or a silicone tool to gently bevel the edges of the cream layer so it looks like soft, fluffy white bread rather than a hard separate sheet. -
Mimic pores:
Take a needle tool and make two or three extremely tiny, shallow pinpricks on the white face. Do this sparingly to mimic the airy texture of bread without making it look rough.
Crispy Crust Woes
If your pastel shading looks too streaky, dip your brush in a tiny bit of rubbing alcohol to blend the powder into the clay for a seamless gradient.
Step 3: The Kawaii Face
-
Make the eyes:
Roll two tiny balls of black clay. They should be oval-shaped rather than perfectly round. Place them wide apart on the lower half of the face. -
Flatten the eyes:
Gently press the black eyes down until they are flush with the white surface. They shouldn’t bulge out too much. -
Add highlights:
Place an infinitesimally small dot of white clay in the upper right corner of each eye. This ‘catchlight’ is crucial for bringing the character to life. -
Sculpt the smile:
Roll a microscopic snake of black clay. Curve it into a ‘U’ shape and place it perfectly centered between the eyes. -
Add rosy cheeks:
Create two small, flattened discs of pink clay. Position them just under the outer corners of the eyes for that classic blushing look. -
Final inspection:
Check for fingerprints. A light brush of baby oil or clay softener can smooth them away before baking. -
Bake carefully:
Bake according to your clay manufacturer’s instructions. Usually, this is around 275°F (130°C) for 15-30 minutes depending on thickness.
Jam It Up
Before adding the face, create a ‘bite’ mark on the corner and fill the inside texture with translucent red liquid clay for a strawberry jam filling effect.
Once cooled, your happy toast is ready to brighten up your shelf
Tiny House With a Face
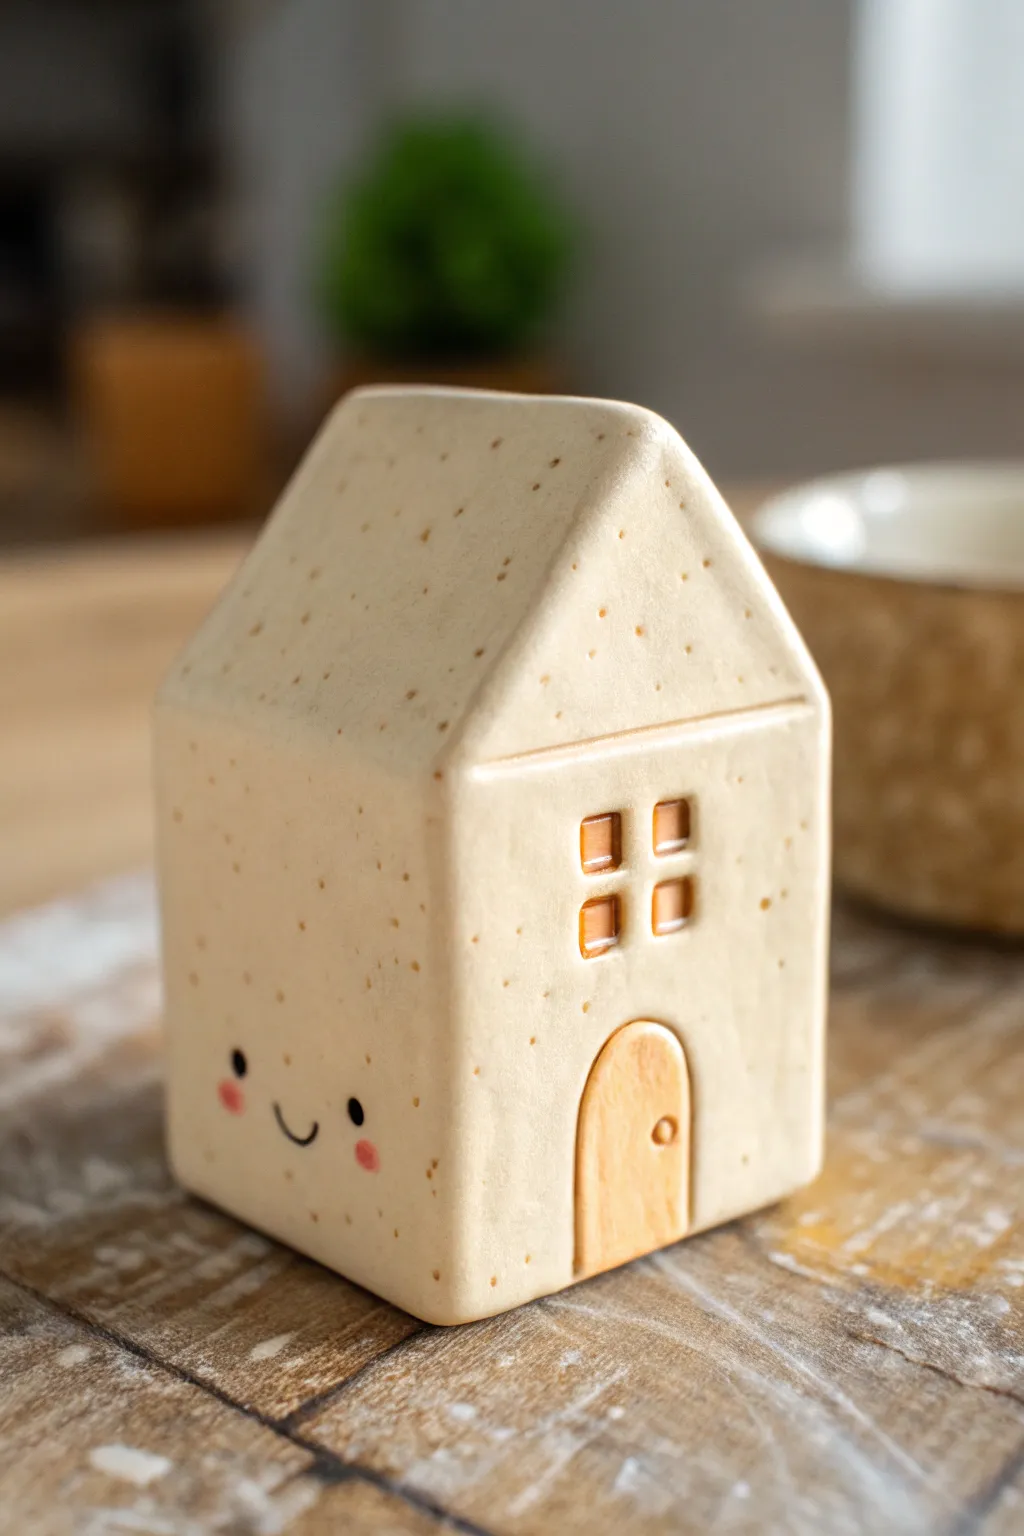
This adorable miniature house combines the clean lines of geometric sculpture with the warmth of a friendly character. With its speckled cream finish and distinct architectural details, it makes a perfect desktop companion or shelf accent.
How-To Guide
Materials
- Polymer clay (beige or speckled tan)
- Black pepper or brown embossing powder (if creating custom speckles)
- Blade or craft knife
- Rolling pin
- Small square cutter (or knife)
- Needle tool or toothpick
- Acrylic paints (black, pink, warm brown)
- Fine detail brush or dotting tool
- Gloss varnish or liquid clay
- Sandpaper (fine grit)
Step 1: Preparing the Base
-
Condition the Clay:
Begin by conditioning your beige polymer clay until it is soft and pliable. If you want that realistic stoneware look and your clay isn’t pre-speckled, mix in a tiny pinch of ground black pepper or brown embossing powder now. -
Form the Main Block:
Roll the clay into a smooth ball to remove air bubbles, then shape it into a rectangular block approximately 2 inches wide and 2 inches deep. -
Shape the Walls:
Press the block against your work surface to flatten the bottom. Use your blade to slice the sides straight up and down, creating a clean prism shape with distinct corners. -
Create the Roof Pitch:
Decide which side will be the front facade. Use your blade to slice two diagonal cuts at the top of the block, meeting in the center to form a triangular roof peak. -
Refine the Edges:
Check the symmetry of the roof. Gently tap any sharp cut edges with your finger to soften them slightly while maintaining the geometric form.
Step 2: Adding Architectural Details
-
Mark the Window Placement:
On the front face (below the roof peak), use a needle tool to faintly mark where your four window panes will go. -
Carve the Windows:
Using a small square cutter or carefully cutting with your knife, press four small squares into the clay to create a window indentation. Don’t cut all the way through; just create relief. -
Outline the Door:
Below the windows, sketch a rounded arch shape for the door using your needle tool. -
Sculpt the Door Dimension:
Gently press the clay surrounding the door line back just a millimeter, making the door itself appear slightly raised. Smooth the transition area. -
Add Door Details:
Press a tiny indentation for the doorknob. If you want a wood texture, lightly drag a needle tool vertically down the door surface.
Smudged features?
If your painted face smudges, don’t panic. Let it dry completely, sand it off gently with fine sandpaper, and try again on the fresh surface.
Step 3: Finishing and Decoration
-
Bake the Piece:
Place your house on a ceramic tile or baking sheet. Bake according to your clay manufacturer’s instructions (usually around 275°F for 15-30 minutes per 1/4 inch thickness). -
Cool and Sand:
Allow the house to cool completely. Once hard, use fine-grit sandpaper to buff away any fingerprints or sharp burrs on the edges. -
Paint the Windows and Door:
Mix a warm honey-brown acrylic paint. Carefully fill in the four window squares and the door arch, keeping the paint inside the recessed areas. -
Draft the Face:
Turn the house to the side wall. Visualize the face placement low on the wall to give it a cute proportion. -
Paint the Eyes:
Using a dotting tool or the back of a paintbrush dipped in black paint, stamp two small, widely spaced eyes. -
Add the Smile:
With your finest brush, paint a tiny ‘U’ shape between the eyes for the mouth. -
Add Cheeks:
Dip a fresh dotting tool into soft pink paint and stamp slight oval cheeks just outside and below the eyes. -
Apply Glaze:
For a ceramic feel, apply a coat of gloss varnish over the entire piece, or spot-varnish just the door and windows for contrast.
Make it speckled
To mimic the stoneware look in the photo without buying special clay, mix fine sand or nutmeg into white clay before sculpting.
Now you have a charming little companion to brighten up your desk
One-Minute Blob Monsters
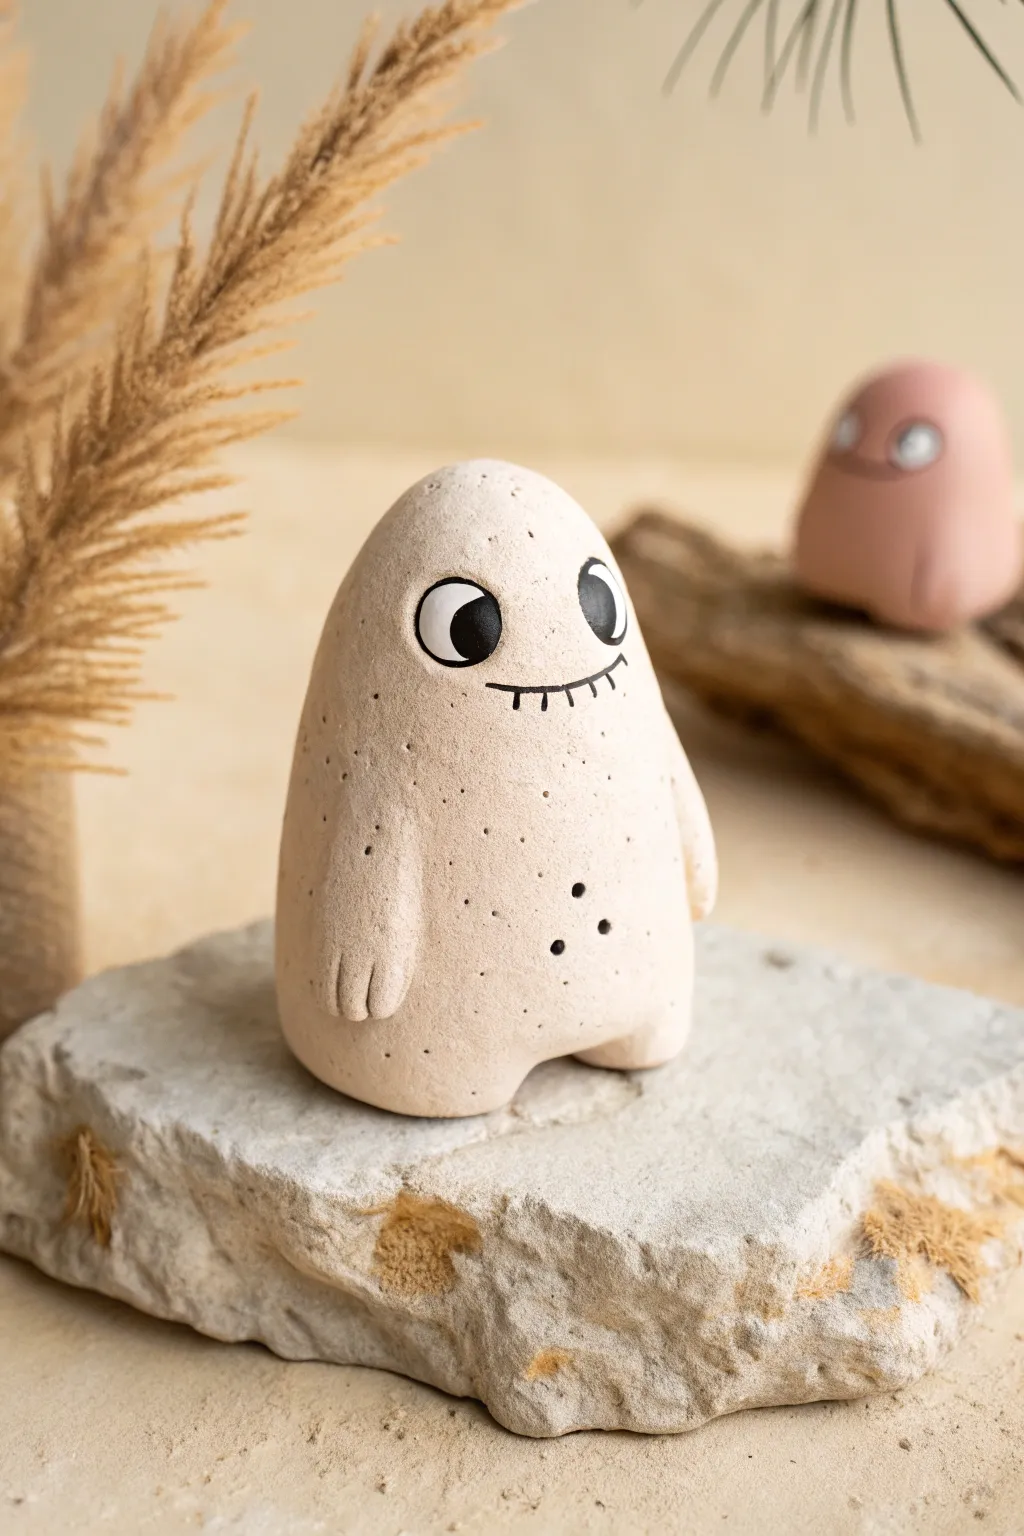
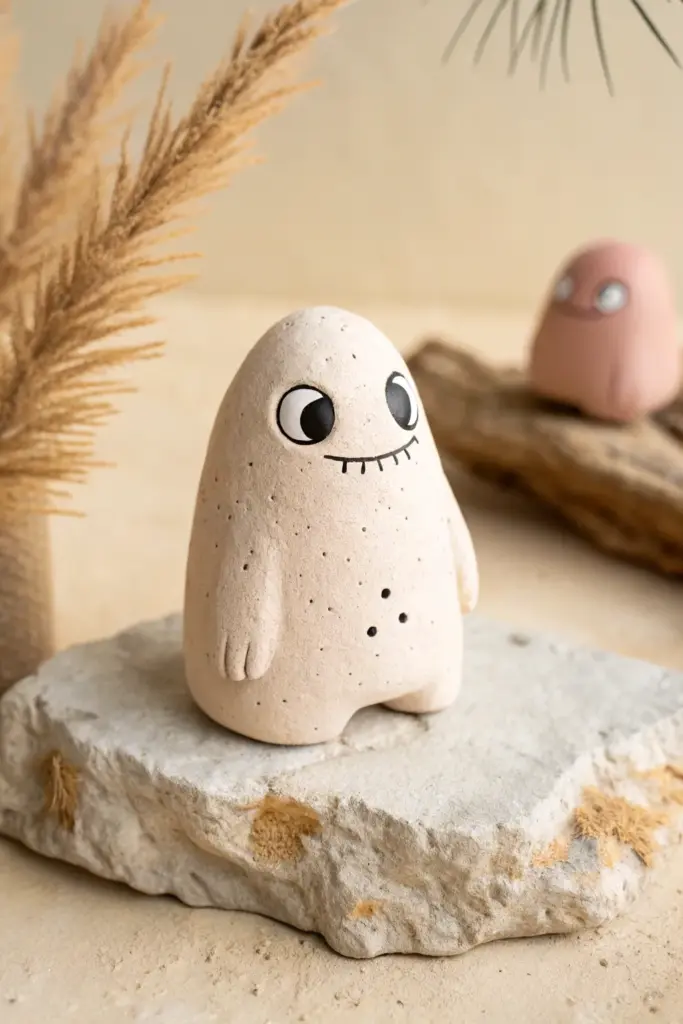
These charming little blob monsters have a wonderful organic feel, mimicking the look of raw, speckled stone. With their expressive painted eyes and simple stitched smiles, they make adorable desk companions that take only minutes to shape.
Step-by-Step Guide
Materials
- Beige or sand-colored air-dry clay (stone effect preferred)
- Black acrylic paint
- Small round paintbrush (size 0 or 1)
- Wooden modeling tool or toothpick
- Water bonding slip (water mixed with a little clay)
- Fine-grit sandpaper (optional)
- Matte varnish (optional)
Step 1: Shaping the Body
-
Form the base blob:
Start by taking a golf-ball-sized amount of your beige clay. Roll it firmly between your palms to creating a smooth, crack-free sphere. -
Create the egg shape:
Gently taper the top of the sphere to create a soft egg or teardrop shape. Keep the bottom wider and heavier for stability. -
Flatten the base:
Tap the bottom of your egg shape repeatedly against your work surface. You want a completely flat bottom so the monster stands securely without wobbling. -
Define the legs:
Using your thumb, press gently into the bottom center of the figure to create an arch. Use your fingers to smooth the two resulting nub-like legs on either side. -
Smooth the surface:
Dip your finger in a tiny bit of water and rub it over the clay to remove any fingerprints or small cracks. The surface should be as smooth as a river stone.
Cracks Appearing?
If small cracks appear while drying, mix a tiny bit of fresh clay with water to make a paste and fill them in, then smooth over with a damp finger.
Step 2: Adding Details
-
Form simple arms:
Take two very small pea-sized pieces of clay and roll them into elongated teardrops for the arms. -
Attached the arms:
Score the sides of the body where you want the arms to sit. Dab a little water or slip on the spot, then press the arms firmly against the body so they lay flush. -
Blend the seams:
I like to use a wooden modeling tool here to smooth the clay from the top of the arm onto the body, making the limb look like it grew naturally from the form. -
Indicate fingers:
Use the edge of your modeling tool or a knife to press two small vertical lines into the end of each arm, creating simple paw-like hands. -
Add texture holes:
Using a toothpick or a small dotting tool, poke a random cluster of three shallow holes on the tummy area for decorative texture. -
Create the speckles:
If your clay isn’t pre-speckled, you can simulate the stone look now. Dilute a tiny drop of black paint and flick it onto the wet clay with an old toothbrush, or poke tiny holes with a needle tool. -
Let it dry:
Set your monster aside in a safe place. Allow it to air dry completely for 24-48 hours until it is hard and lighter in color.
Make a Scene
Create a whole family in different sizes and slightly different shades of beige or terracotta clay to create a diverse group of forest spirits.
Step 3: Painting the Face
-
Outline the eyes:
Once dry, use a fine paintbrush and black acrylic paint to draw two large ovals near the top of the head for eyes. -
Fill in the pupils:
Paint a large black circle inside each oval, leaving the rest of the oval the natural clay color. Position the pupils looking slightly to the side for a quirky expression. -
Paint the smile:
Draw a thin, curved horizontal line between the eyes for the mouth. -
Add stitch details:
Carefully paint small vertical hash marks along the mouth line to give it a stitched or toothy appearance. -
Add highlights:
For a spark of life, dip the blunt end of your paintbrush in white paint (or leave the clay bare if precise enough) to add a tiny dot reflection in the black pupils. -
Seal the piece:
To protect your paint and the clay, brush on a coat of matte varnish. This keeps the natural stone look while adding durability.
Place your new clay friend on a shelf near a plant to enjoy their calm, stony presence