If you’re just starting out with clay, the trick is picking projects that feel satisfying fast—think small, cute, and totally doable with basic shapes. These beginner-friendly ideas will help you practice simple techniques while making pieces you’ll actually want to keep around (or gift).
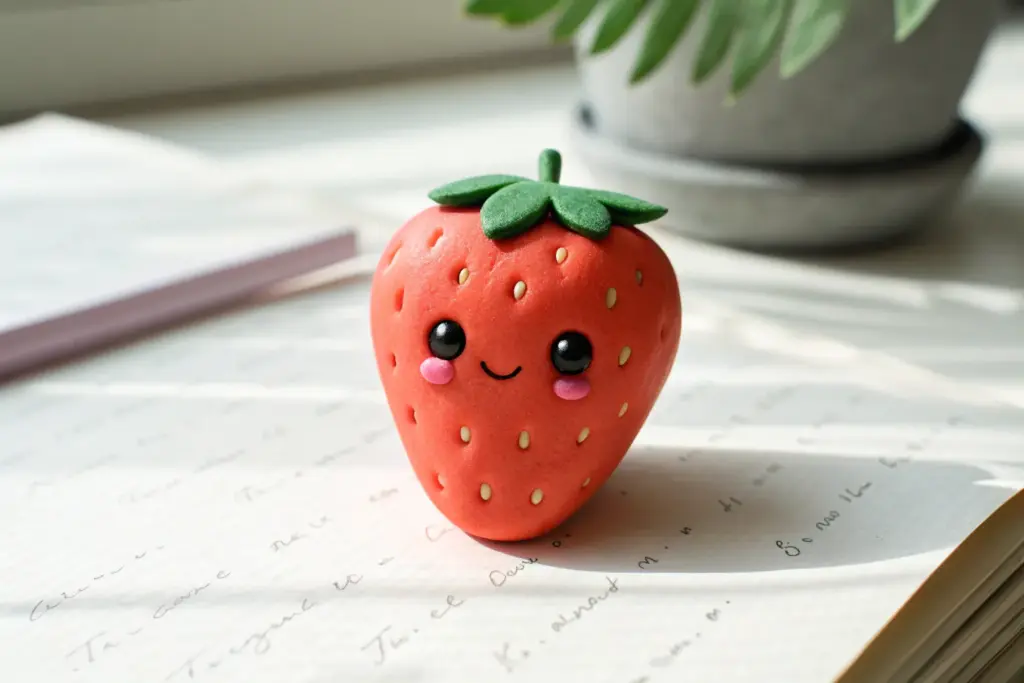
Tiny Food Charms With Cute Faces
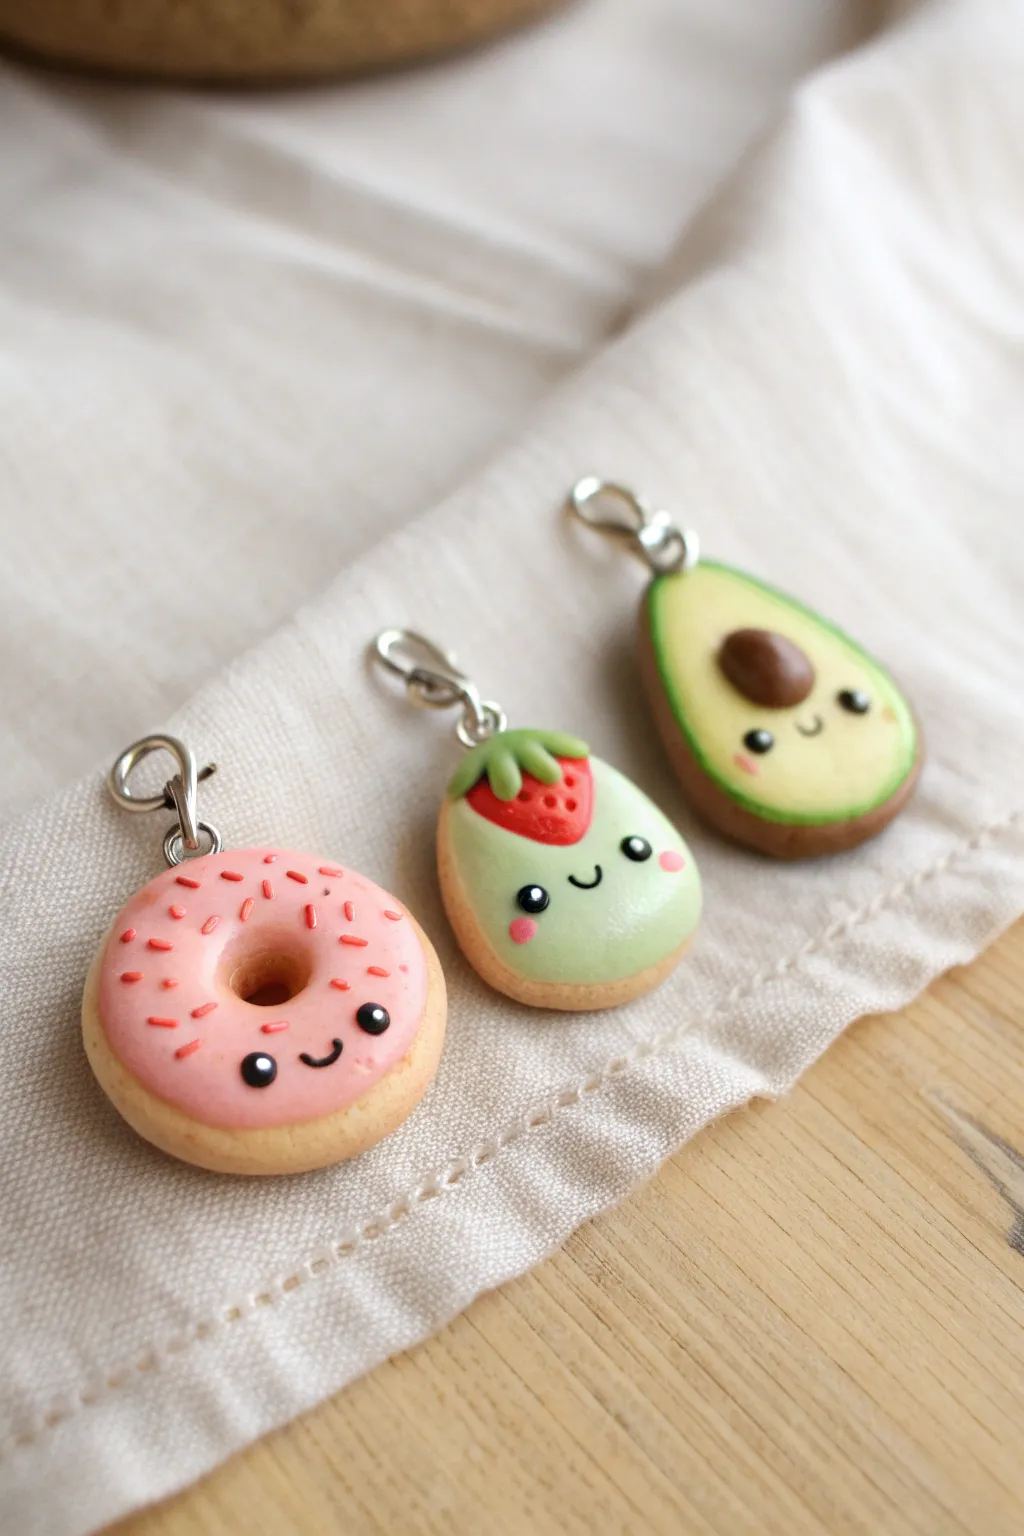
These adorable polymer clay charms transform everyday snacks into tiny companions with personality. Featuring a classic pink donut, a fruity strawberry-topped treat, and a happy avocado, this trio is perfect for practicing simple shapes and delicate facial details.
Step-by-Step Guide
Materials
- Polymer clay (tan/beige, light pink, dark pink, light green, dark green, brown, red, black, white)
- Clay sculpting tools (dotting tool, needle tool)
- Small metal jump rings and lobster clasps
- Liquid polymer clay (optional, for sauce)
- Glaze or varnish (gloss and satin)
- Oven for baking
- Aluminum foil or ceramic tile
Step 1: Sculpting the Happy Donut
-
Base shape:
Start by conditioning a ball of tan dough about the size of a marble. Flatten it slightly into a thick disc and use a large dotting tool or the back of a paintbrush to press a hole through the center, smoothing the edges to create a classic ring shape. -
Pink frosting:
Roll out a thin sheet of light pink clay. Use a small round cutter or your blade to cut a wavy, uneven circle that sits on top of your donut base, mimicking poured icing. -
Adding texture:
Gently press the pink clay down so it hugs the curves of the donut. You can gently texture the tan dough with a toothbrush if you want a more realistic baked look. -
Sprinkles:
Roll extremely thin snakes of dark pink or red clay. Slice tiny bits off with a razor blade and gently press them onto the pink frosting in a random pattern.
Step 2: Crafting the Strawberry Sweet
-
Cookie base:
Create a flattened round base using tan clay, similar to the donut but without the hole. Keep the edges rounded and soft. -
Green icing layer:
Take light green clay and shape it into a dome that covers the top two-thirds of the cookie base. Smooth the seam where the green meets the tan clay. -
Strawberry topper:
Shape a tiny rounded triangle of red clay for the strawberry. Press it onto the top center of the green dome. Add tiny indents with a needle tool for seeds. -
Stem detail:
Add a few tiny leaves using green clay where the strawberry meets the main body. Insert a metal eye pin at the very top for hanging later.
Eye Placement
For the ‘kawaii’ style, place the eyes low on the object and wide apart. Align the mouth exactly centered between them for the cutest proportion.
Step 3: Forming the Avocado Friend
-
Avocado shape:
Mix dark green and brown clay to get a skin color, or just use dark green. Shape a teardrop. Flatten a piece of light green-yellow clay into a slightly smaller teardrop and press it onto the dark base. -
The pit:
Roll a small ball of brown clay and flatten it slightly. Press this into the lower center of the light green section to act as the seed. -
Hardware prep:
Before baking, insert eye pins or small wire loops into the top of all three charms. Secure them with a dab of liquid clay if available.
Clean Fingerprints
If you see fingerprints on your raw clay, lightly brush the surface with a tiny amount of baby oil or cornstarch before baking to smooth them out.
Step 4: Bringing Them to Life
-
Baking:
Place all charms on a tile or foil-lined tray. Bake according to your clay manufacturer’s instructions (usually 275°F/135°C for 15-30 minutes). Let them cool completely. -
Painting faces:
Using a fine detail brush or a needle tool dipped in black acrylic paint, add two tiny dots for eyes on each charm. Place them wide apart for maximum cuteness. -
The smile:
Paint a tiny ‘u’ shape between the eyes. For the avocado and donut, keep the mouth simple; for the strawberry treat, I find a slightly wider smile looks extra cheerful. -
Cheeks and highlights:
Add tiny pink blush marks under the eyes using chalk pastel dust or diluted paint. Finally, add a microscopic white dot inside the black eyes for that sparkling ‘kawaii’ look. -
Finishing touches:
Coat the charms with a gloss glaze to protect the paint and give them a shine. Once dry, attach your jump rings and lobster clasps to finish the set.
Now you have a trio of sweet miniature friends ready to hang on a zipper or bracelet


Beginner Animal Pins With Dot Eyes
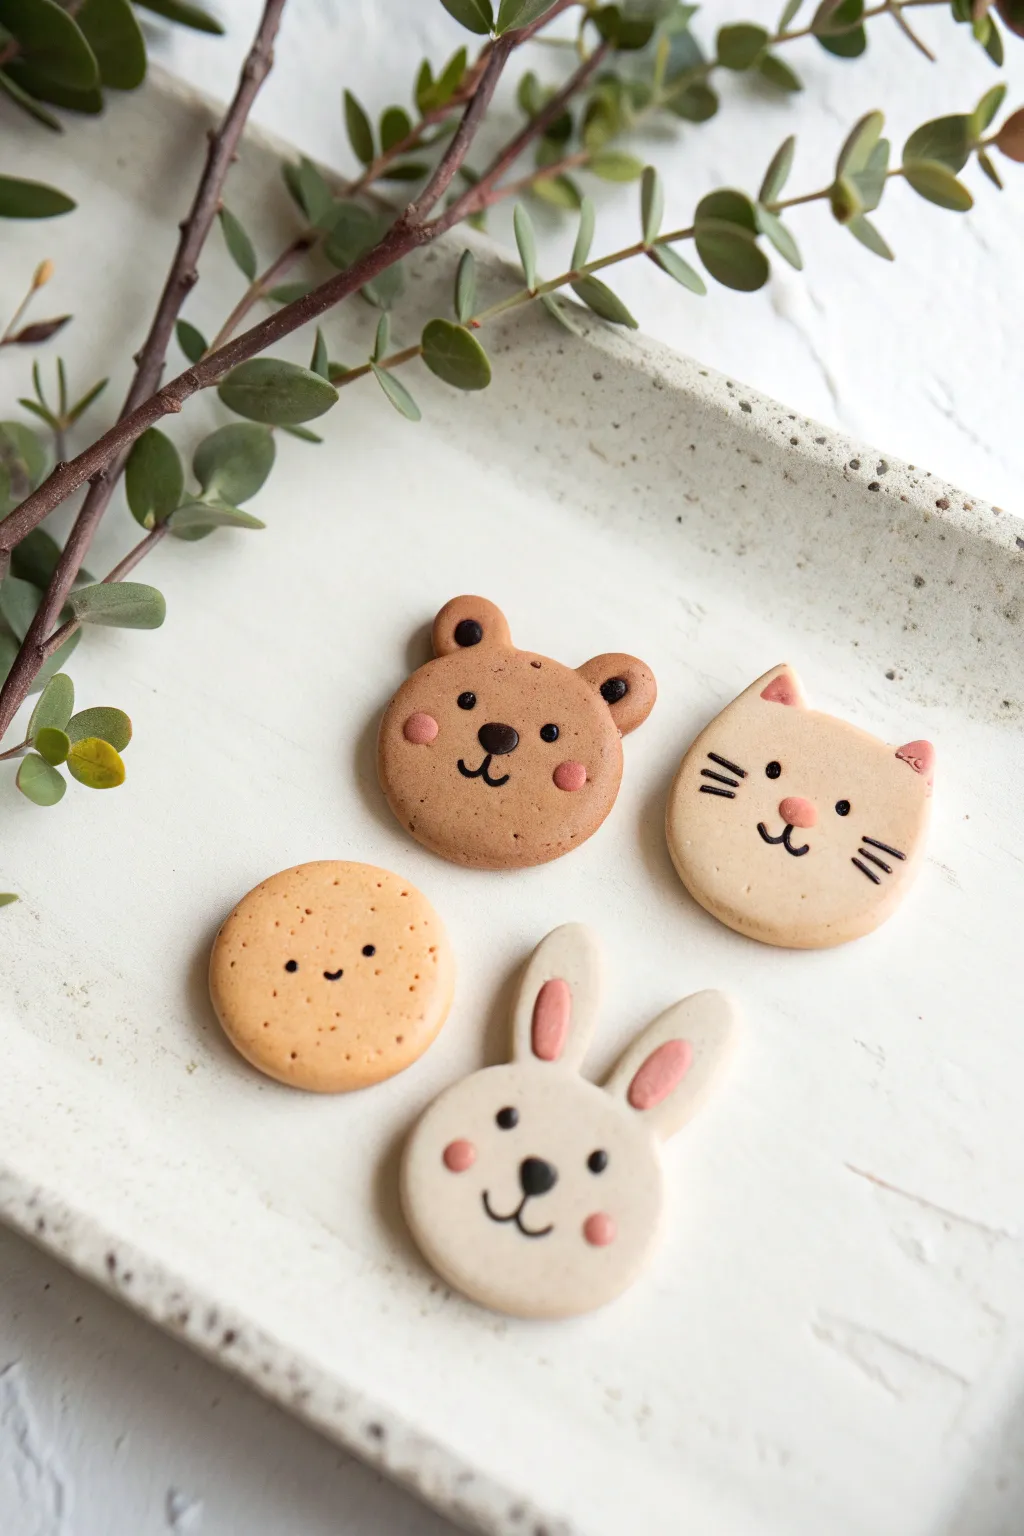
Create a charming set of faux-cookie animal friends using polymer or air-dry clay with this simple tutorial. These adorable bear, rabbit, cat, and cracker shapes feature soft pastel tones and minimalist dot eyes for a sweet, kawaii aesthetic.
Step-by-Step
Materials
- Polymer clay (brown, beige, white, pale orange, pink, black)
- Rolling pin or acrylic roller
- Circle cookie cutters (various sizes)
- Ball stylus tool or toothpick
- Needle tool
- Soft pastel chalks (brown and pink) for shading
- Small soft brush
- Parchment paper or baking mat
- Oven (if using polymer clay)
Step 1: Shaping the Base Forms
-
Prepare the clay:
Begin by conditioning your clay colors. You will need a medium brown for the bear, a creamy beige for the cat, bright white for the rabbit, and a warm orange-brown for the cookie. -
Roll out the slab:
Roll your clay out on parchment paper to an even thickness of about 1/4 inch. It’s important they feel substantial, like real cookies. -
Cut the main shapes:
Use a medium circular cutter for the bear, rabbit, and cookie bases. For the cat, gently flatten the top of a circle into a slight oval shape with your finger. -
Add the bear ears:
Roll two small balls of brown clay. Press them gently onto the top left and right of the bear’s head, blending the seam slightly on the back so they adhere securely. -
Form the bunny ears:
Shape two longer teardrop shapes from white clay. Flatten them slightly and attach them to the top of the rabbit’s head, pressing down firmly to connect them. -
Sculpt the cat ears:
Pinch two small triangles of beige clay. Attach these to the top corners of the cat’s head, ensuring they look perky and alert. -
Refine the edges:
Gently tap the edges of all your shapes with your finger to soften any sharp cutting lines, giving them that baked dough appearance.
Clean Lines Pro Tip
Keep a pack of wet wipes or baby wipes nearby. Clean your hands thoroughly when switching from dark clay (like the brown bear) to white clay to avoid color transfer.
Step 2: Adding Details and Features
-
Create the inner ears:
Use tiny amounts of pink clay to create small flattened ovals for the bunny’s inner ears and small triangles for the cat’s inner ears. Press these into place. -
Texture the cookie:
For the round cracker, use a needle tool to poke small, random dots all over the surface to mimic a baked texture. -
Scrape the brush:
I like to scrape a little bit of brown pastel chalk into a fine powder. Use a soft brush to gently dust the edges of the ‘cookie’ and the bear to make them look golden baked. -
Pre-bake indentation:
Before adding the eyes, use a small ball tool to make very shallow divots where the eyes will go. This helps the black clay sit flush rather than bulging out. -
Add the eyes:
Roll extremely tiny balls of black clay. Place them into the indentations you made. Keep them wide-set for a cuter look. -
Create the noses:
Add a small oval of black clay for the bear/bunny noses and a tiny pink triangle for the cat’s nose. Place them centrally between the eyes. -
Detail the whiskers:
Roll incredibly thin noodles of black clay and cut them into tiny lengths. Carefully press three onto each side of the cat’s cheeks. -
Draw the mouths:
Roll a thin black thread of clay and shape it into a ‘w’ or ‘u’ shape on your work surface first, then transfer it to the face using a needle tool. -
Apply blush:
Press tiny flattened circles of pink clay onto the cheeks of the bear and rabbit. Alternatively, you can use pink pastel powder and a Q-tip for a softer look. -
Final smooth:
Check for any fingerprints. If you find any, lightly brush them away with a drop of baby oil or water depending on your clay type. -
Bake or dry:
Follow the manufacturer’s instructions for your specific clay. If baking, tent with foil to prevent scorching the light colors.
Uneven Surface?
If your clay surface looks bumpy or has fingerprints, dip your finger in a tiny bit of cornstarch (for polymer) or water (for air-dry) and gently buff the surface in circles.
Once cooled and hardened, glue a pin backing to your new little friends and wear them on your favorite jacket


Face Cup Pencil Holder
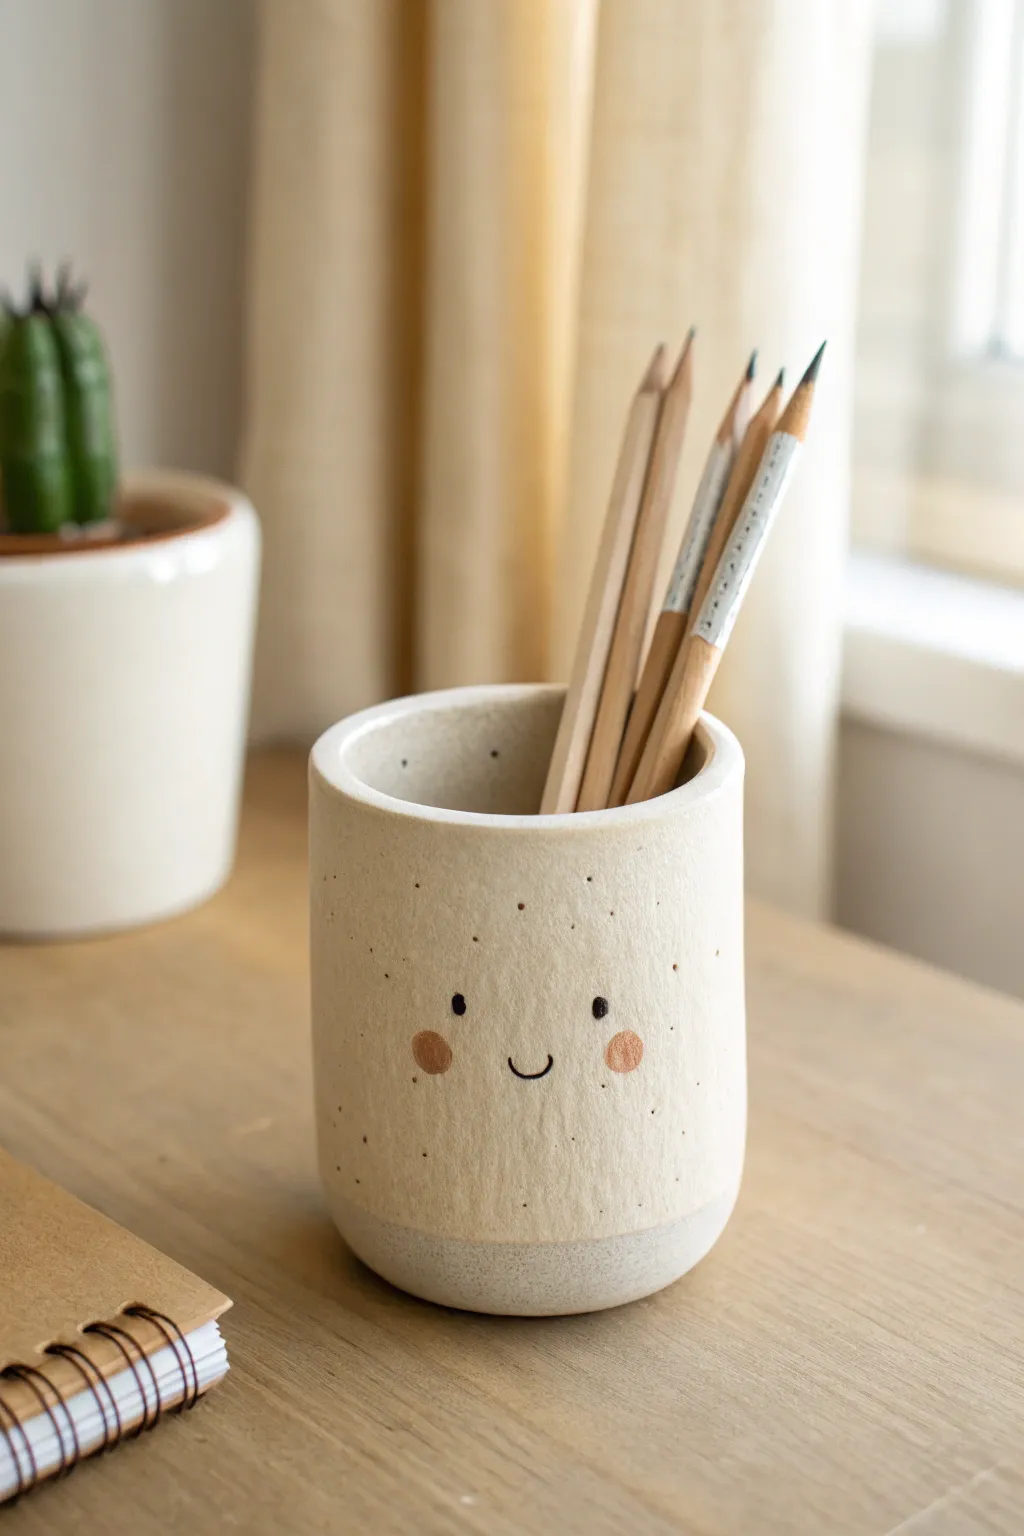
Brighten up your desk space with this charming, minimalist pencil holder that smiles back at you while you work. Its textural, speckled finish and sweet expression make it an approachable project perfect for dipping your toes into pottery techniques.
Step-by-Step
Materials
- Air-dry clay (white or cream)
- Rolling pin
- Empty soup can or cylindrical mold
- Clay knife or craft knife
- Small bowl of water
- Sponge
- Fine-grit sandpaper
- Acrylic paints (black, terracotta/blush)
- Small round paintbrush
- Toothbrush (for speckling)
- Brown acrylic paint or watered-down coffee (optional for speckles)
- Matte spray sealant
Step 1: Shaping the Vessel
-
Prepare your clay:
Cut off a manageable chunk of air-dry clay and knead it in your hands for a minute until it feels pliable and warm. -
Roll the slab:
Using a rolling pin, flatten the clay into a smooth, even slab about ¼ inch thick. Try to keep the thickness consistent so the walls of your cup are sturdy. -
Cut the base:
Place your soup can or cylindrical mold onto the slab and trace around the bottom with your knife to cut out a perfect circle. Set this disc aside; it will be your base. -
Measure the walls:
Cut a long rectangular strip from the remaining slab. The length needs to be enough to wrap around your cylinder mold with a little overlap, and the height should act as the depth of your pencil holder. -
Form the cylinder:
Wrap the rectangular strip around your mold. Where the ends meet, slice through both layers at an angle to create a beveled seam that will join flush. -
Score and slip:
Use your knife to scratch cross-hatch marks (scoring) on the edges you plan to join. Dab a little water (slip) on these rough areas to act as glue. -
Attach the walls:
Press the cylinder seams together firmly. Then, score and slip the bottom edge of the cylinder and the outer edge of your circular base. -
Secure the join:
Place the cylinder onto the base. Use your finger or a modeling tool to smooth the clay from the wall down onto the base, blurring the seam until it disappears completely.
Step 2: Refining and Decorating
-
Smooth the surface:
With a slightly damp sponge, gently wipe the entire surface to remove fingerprints and bumps. Don’t use too much water, or the clay might weaken. -
Create the two-tone effect (optional):
If you want the subtle textured base seen in the photo, gently press a piece of coarse sandpaper or fabric against the bottom inch of the cup while the clay is still soft. -
Let it dry:
Leave the cup to dry completely in a safe spot for 24-48 hours. I usually rotate it halfway through so air reaches all sides evenly. -
Sand for perfection:
Once bone dry, take your fine-grit sandpaper and lightly buff the rim and sides to get that creamy, matte finish. -
Add the speckles:
Dip an old toothbrush into watered-down brown paint or strong coffee. Run your thumb over the bristles to flick tiny speckles across the exterior for a ceramic look. -
Paint the cheeks:
Dip a round paintbrush or even the tip of your finger into terracotta or blush-colored paint. Stamp two soft, round circles for the rosy cheeks. -
Draw the features:
Using a very fine brush and black paint, carefully add two small dots for eyes just above the cheeks and a tiny, thin ‘U’ shape between them for the smile. -
Seal the piece:
Take the holder outside or to a well-ventilated area and apply a coat of matte spray sealant. This protects the clay from moisture and keeps the paint from chipping.
Cracks Appearing?
If small hairline cracks appear during drying, don’t panic. Mix a tiny bit of fresh clay with water to make a paste and fill them in, then sand smooth once dry.
Make it a Planter
To turn this into a succulent pot instead of a pencil holder, poke a drainage hole in the center of the base disc before assembly and seal the inside very thoroughly.
Now populate your new friend with your favorite sketching tools and enjoy the cheerful company on your desk


Magnet Set With Happy Icons
Brighten up your fridge or magnetic board with this adorable set of smiling clay magnets. Featuring sweet pastel hearts, stars, and fluffy clouds, this beginner-friendly project uses simple shapes and minimalist facial expressions to create maximum charm.
Step-by-Step Tutorial
Materials
- Polymer clay in pastel shades (sage green, terracotta, blush pink, light peach, white, beige)
- Granite or speckled effect polymer clay (optional)
- Small round magnet discs
- Rolling pin (acrylic preferred)
- Cookie cutters (small stars, hearts, and cloud shapes)
- Needle tool or toothpick
- Ball stylus tool (small)
- Black acrylic paint
- Fine detail paintbrush (size 000)
- Strong craft glue (like E6000)
- Oven and baking sheet
- Parchment paper
Step 1: Shaping the Clay Base
-
Prepare the clay:
Begin by conditioning each color of polymer clay separately. Knead them warm in your hands until they are soft and pliable to prevent cracking later. -
Roll it out:
Roll the clay out onto a smooth surface to an even thickness of about 1/4 inch (6mm). If you want a uniform look across all magnets, use depth guides or stack playing cards on either side of your roller. -
Cut the shapes:
Press your cookie cutters firmly into the clay. Create a variety of shapes: a sage star, a terracotta star, blush hearts, and a white cloud. For the speckled star, mix a tiny bit of black glitter or pepper into beige clay if you don’t have pre-mixed granite clay. -
Smooth the edges:
After cutting, gently run your finger along the edges of each shape to soften the sharp cuts left by the cutter. This gives the magnets a softer, puffy aesthetic resembling cookies.
Smudged Smile?
If you mess up painting the face, don’t panic. Since the clay is baked, you can gently scrape off wet acrylic paint with a moist Q-tip or a toothpick and try again.
Step 2: Adding Personality
-
Indent the eyes:
Before baking, use a small ball stylus tool to gently press indentations where the eyes will go. Spacing them wide apart creates that cute ‘kawaii’ look. -
Bake the pieces:
Place your clay shapes on a baking sheet lined with parchment paper. Bake according to your specific brand’s package instructions—usually around 275°F (135°C) for 15-20 minutes. -
Cool down completely:
Once baked, remove them from the oven and let them cool completely. The clay hardens as it cools, so don’t handle them while hot or they might warp.
Glazed Finish
For a glossy, ceramic-like finish, coat the front of your magnets with UV resin or a polymer clay gloss varnish after the paint dries.
Step 3: Painting the Faces
-
Draw the eyes:
Dip your fine detail brush or a needle tool into black acrylic paint. Carefully dot paint into the eye indentations you made earlier. Alternatively, draw small U-shapes for ‘sleeping’ eyes on some of the hearts. -
Add the smile:
Using the very tip of your brush, paint a tiny, thin U-shape for the mouth centrally between the eyes. Keep the line weight very delicate. -
Add rosy cheeks:
I like to mix a tiny drop of red paint with white to make a soft pink. Use a dotting tool or the end of a paintbrush handle to stamp two small rosy cheeks just below the eyes. -
Let paint dry:
Allow the painted details to dry fully. This usually takes about 10-15 minutes depending on how thick the paint dots are.
Step 4: Final Assembly
-
Attach magnets:
Flip perfectly cooled and dry pieces over. Place a small dab of strong craft glue on the center of the back. -
Secure the disc:
Press a magnet disc firmly into the glue. If your magnets are very strong, ensure the clay pieces are far apart while drying so they don’t snap together. -
Cure time:
Let the glue cure according to the manufacturer’s suggested time (often 24 hours for maximum strength) before placing them on your fridge.
Now your fridge has a cheerful little family to greet you every time you reach for a snack