When I’m teaching kids in the studio, I always start with projects that feel like play but still turn into something they’re proud to keep. These simple clay ideas for kids stick to easy shapes—balls, coils, and slabs—so you get big smiles with low frustration.
Pinch Pot Treasure Bowls
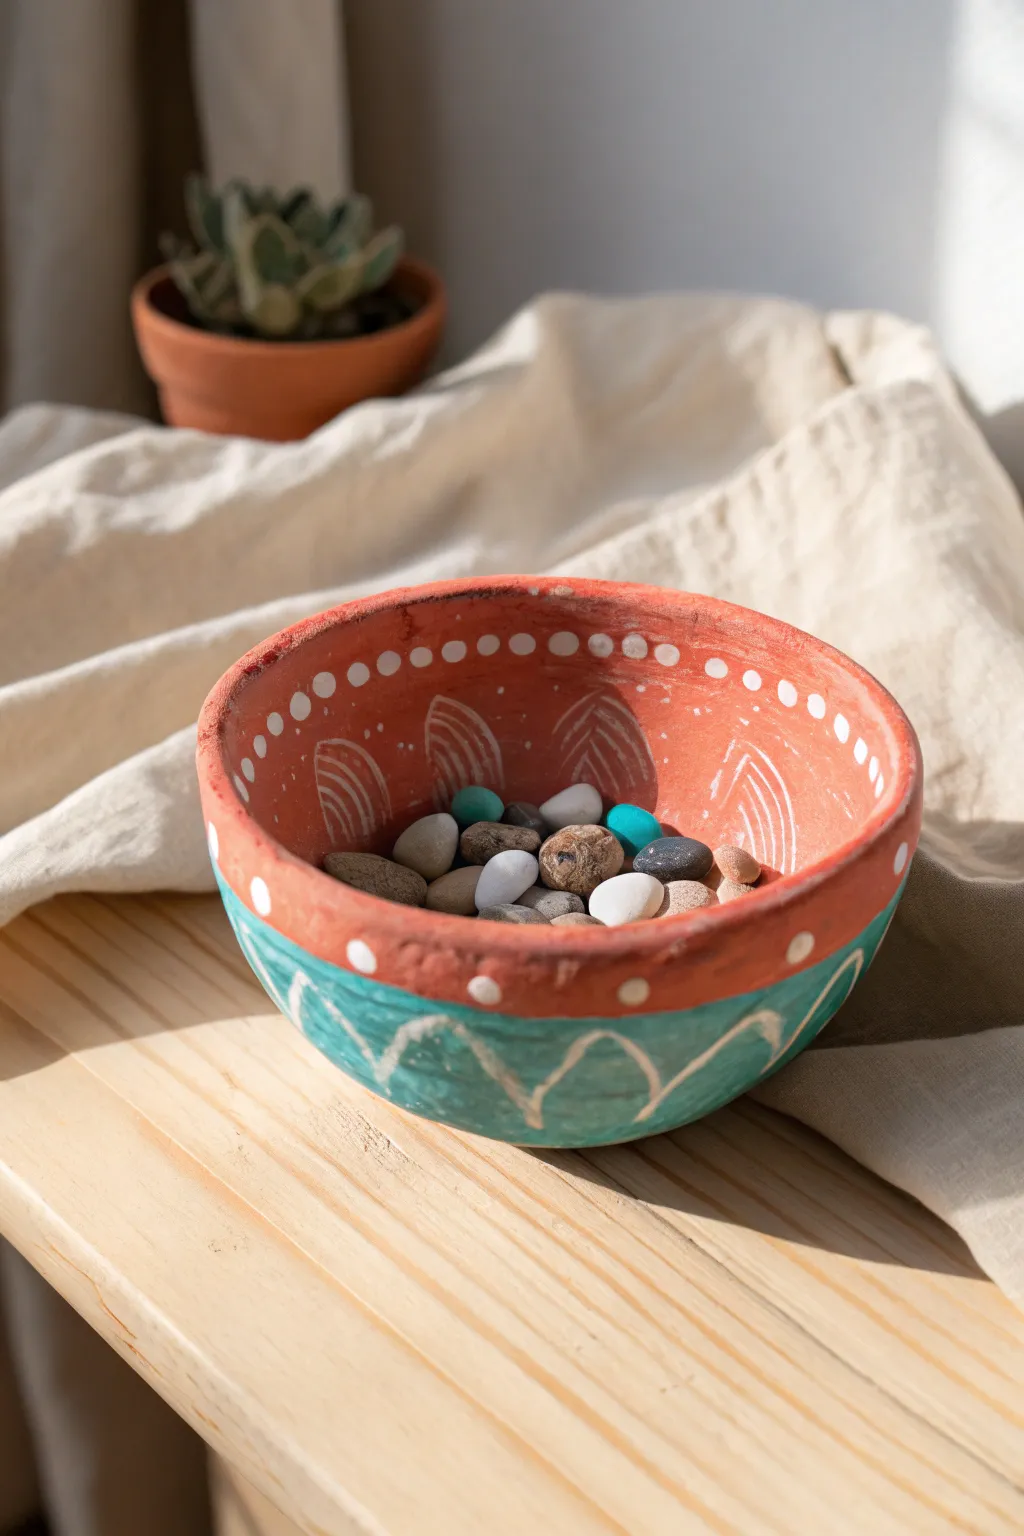
Create a charming home for your tiniest treasures with this painted clay bowl. By combining the rustic warmth of terracotta with a splash of cool teal and simple white patterns, you’ll make a piece that feels both earthy and artistic.
Step-by-Step Guide
Materials
- Air-dry clay (terracotta color)
- Acrylic paint (teal/turquoise)
- Acrylic paint (white)
- Small round paintbrush
- Fine detail paintbrush
- Cup of water
- Paper towel
- Optional: Clear acrylic sealer (matte or satin)
Step 1: Shaping the Clay
-
Start with a sphere:
Begin by taking a handful of terracotta air-dry clay and rolling it briskly between your palms until you have a smooth, round ball about the size of a tennis ball. -
Open the pot:
Hold the clay ball in one hand and gently push your thumb into the center of the sphere, going about halfway down. Don’t push all the way through the bottom. -
Pinch the walls:
Using your thumb on the inside and your fingers on the outside, start pinching the clay wall gently. Rotate the ball slightly after each pinch to keep the thickness even. -
Widen the form:
Continue pinching and turning, working your way from the bottom up towards the rim. Aim for a wide, open bowl shape rather than a tall cup. -
Smooth the surfaces:
Once you have your basic bowl shape, dip your finger in a tiny bit of water and rub it over any small cracks on the rim or outside surface to smooth them out. -
Create a flat base:
Gently tap the bottom of your bowl against your table to create a small flat area so the finished pot will sit steadily without wobbling. -
Let it dry completely:
Set your bowl aside in a safe spot to dry. Depending on the thickness of your clay and humidity, this usually takes 24 to 48 hours. The clay will lighten in color when fully dry.
Smooth Operator
If your clay cracks while pinching, your clay might be too dry. Dip your fingers in water often, or use a slightly damp sponge to smooth the walls as you shape them.
Step 2: Painting the Design
-
Paint the teal band:
Load a small round brush with teal acrylic paint. Paint a wide band around the bottom exterior half of the bowl, leaving the top rim area and the inside unpainted to show off the natural clay. -
Refine the edge:
Go back over the top edge of your teal paint to make sure the line separating the paint and the bare clay is relatively neat, though a little handmade unevenness adds charm. -
Let the first layer dry:
Wait about 10–15 minutes for the teal paint to be dry to the touch so you don’t smudge it while adding details. -
Dot the rim:
Dip the handle end of a paintbrush into white paint. Use this to stamp a row of evenly spaced white dots around the very top flat edge of the rim. -
Add interior dots:
Using the same dotting technique, add a matching row of white dots just inside the bowl’s rim, mirroring the ones on top. -
Paint the bottom zig-zags:
Switch to a fine detail brush with white paint. On the teal section, paint a continuous zig-zag or wavy line that bounces up and down around the bowl. -
Add interior arches:
Inside the bowl, on the bare clay walls, use the fine brush to paint simple arch shapes outlined in white. -
Detail the arches:
Before the white paint dries on your brush, fill the inside of each arch with 3–4 small curved lines that echo the shape of the main arch. -
Final touch-ups:
Look over your design. If any white lines look too thin, gently go over them again to make the white pop against the clay background.
Step 3: Finishing
-
Dry and seal:
Allow all paint to dry completely. For durability, especially if storing rocks or keys, apply a thin coat of matte clear sealer over the entire bowl.
Level Up: Texture
Before the clay dries, gently press a piece of lace or burlap into the wet exterior clay. When you paint over it later, the texture will catch the paint beautifully.
Fill your new bowl with pretty stones, beads, or little collectibles to complete the look


Coil Snake Mini Bowls
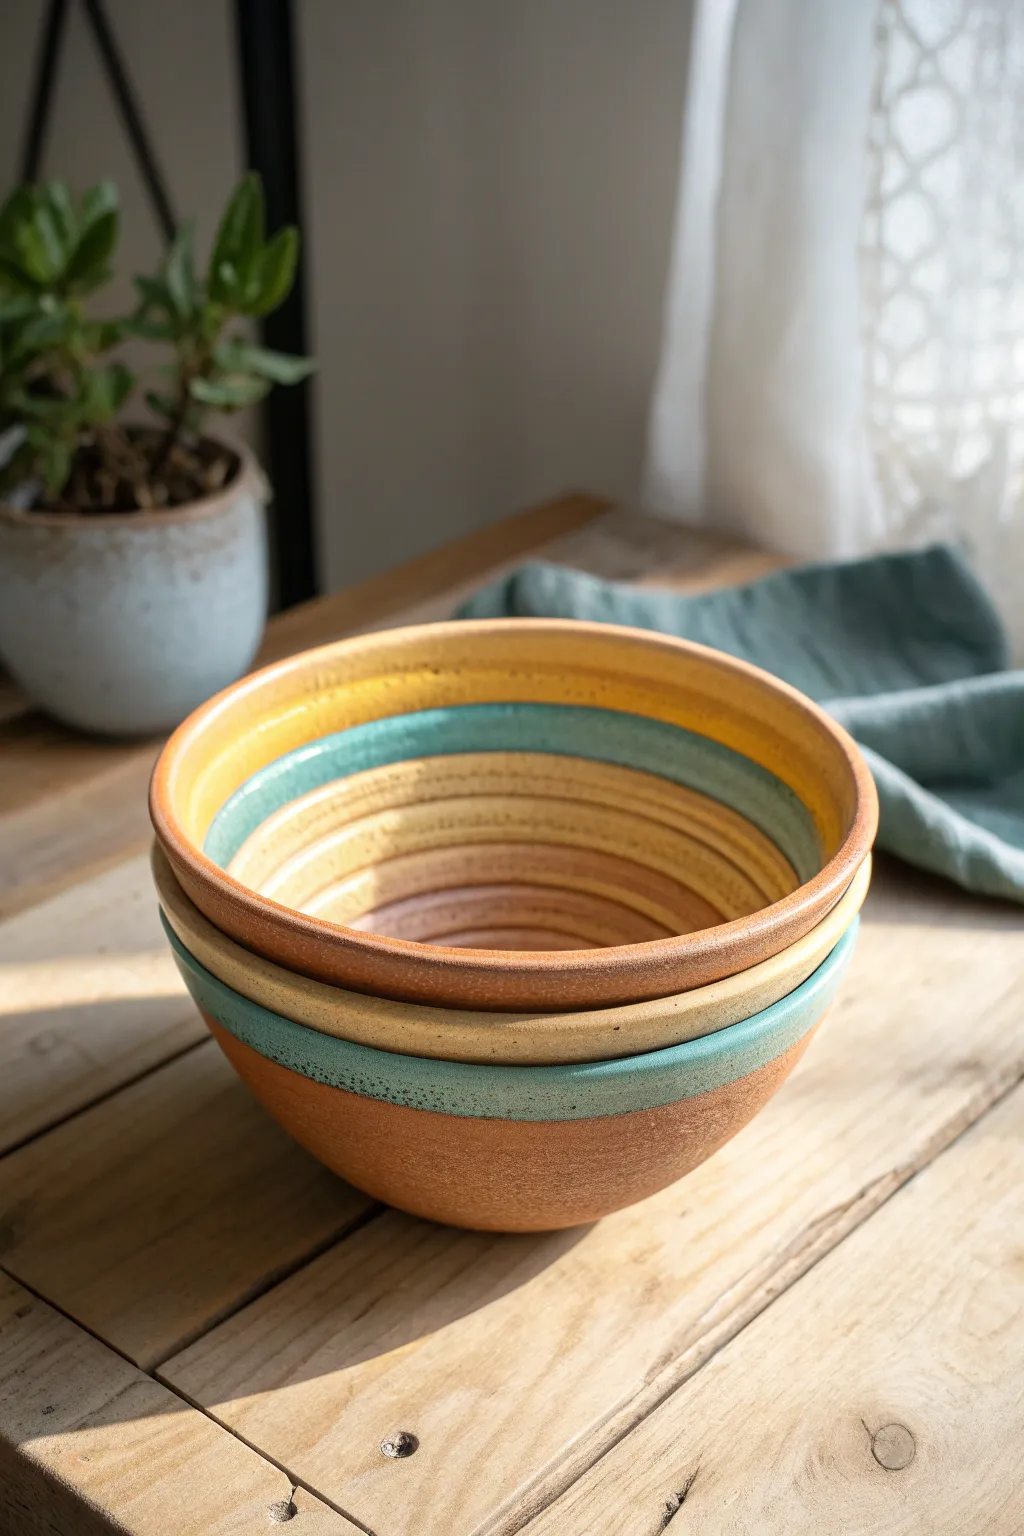
These charming, rustic bowls rely on a simple layering technique to create a beautiful gradient effect on the inside. They look like professional pottery but are surprisingly achievable using basic hand-building methods that are perfect for little hands.
How-To Guide
Materials
- Air-dry clay (terra cotta color works best for the base look)
- Acrylic craft paints (mustard yellow, teal/turquoise, cream)
- Glossy varnish or sealant (Mod Podge or spray acrylic)
- Rolling pin
- Small bowl or cup (to use as a mold)
- Plastic wrap
- Clay sculpting tools or a butter knife
- Sponge and water
- Fine-grit sandpaper
Step 1: Forming the Base Bowls
-
Prepare the workspace:
Lay down canvas or wax paper to protect your surface. Grab a small existing bowl from your kitchen to use as a slump mold and cover the outside of it tightly with plastic wrap. -
Roll out the clay:
Take a generous handful of terra cotta-colored air-dry clay. Roll it out into a slab that is roughly 1/4 inch thick, trying to keep the thickness consistent throughout. -
Cut the circles:
Place your bowl mold upside down on the clay slab and cut a circle about an inch wider than the rim of your bowl. Repeat this to make as many bowls as you want in your stack. -
Shape the clay:
Drape your clay circle over the plastic-wrapped bowl mold. Gently press the clay down to hug the shape of the bowl. -
Create the coil texture:
To mimic the coiled look seen in the inspiration image without the structural weakness of actual coils, use a modeling tool or the back of a knife to gently score horizontal groove lines around the inside of the bowl while it’s still pliable. -
Smooth the exterior:
While the inside has texture, use a slightly damp sponge to smooth the outside surface of the bowl perfectly. This creates that nice contrast between the rough rim and smooth body. -
Refine the rim:
I like to run a wet finger along the top edge of the clay to round it off so it isn’t sharp or jagged. -
Initial dry:
Let the clay sit on the mold for about 2-3 hours until it holds its shape on its own, then carefully pop it off the mold and remove the plastic wrap. -
Full cure:
Set the bowls aside to dry completely for 24-48 hours. They will turn a lighter color when fully dry.
Cracks Appearing?
If small cracks appear while drying, mix a tiny bit of fresh clay with water to make a paste (slip) and fill them in using a paintbrush before painting.
Step 2: Sanding and Painting
-
Smooth the rough spots:
Once bone dry, take fine-grit sandpaper and gently sand the outside bottom and rim to remove any fingerprints or bumps. -
Mix your palette:
Prepare your acrylic paints. You’ll need a mustard yellow, a dusty teal, and a soft cream color to match the image accurately. -
Paint the interior bands:
Start painting the inside of the bowl. Paint the bottom center circle with the cream color. Let it dry slightly. -
Add the middle ring:
Paint a thick band of teal around the cream center. Don’t worry about perfect lines; the rustic look is part of the charm. -
Finish the rim:
Paint the top band (the rim) with the mustard yellow. Bring this color just slightly over the top edge. -
Paint the exterior accents:
For the outside of each bowl, paint a single solid band of color near the rim. Do one bowl with a teal rim, one with yellow, and one with cream to permit mixing and matching. -
Distress the paint:
If the paint looks too opaque, lightly sand it after it dries to let some of the terra cotta clay color peek through. -
Seal the work:
Apply two coats of glossy varnish or Mod Podge. This gives it that fired ceramic shine and protects the paint from chipping.
Pro Tip: Weighted Bottoms
For a sturdier feel, leave the center of your clay slab slightly thicker at the bottom. This adds weight and prevents the finished bowl from tipping over easily.
Stack your finished creation on a shelf to display the beautiful earthy tones of your handmade pottery


Handprint Keepsake Dish

Capture a moment in time with this elegant, heirloom-quality trinket dish featuring your little one’s handprint. The soft terracotta hue and minimalist stamped lettering give it a modern, sophisticated look that fits any decor.
Step-by-Step Guide
Materials
- Air-dry clay (terracotta or white)
- Small rolling pin
- Circle cutter or a bowl (approx. 6-8 inches)
- Knife or needle tool
- Alphabet stamp set
- Small bowl of water
- Sponge
- Acrylic paint (peach or terracotta if not using colored clay)
- Black fine-tip paint pen or acrylic paint
- Matte or satin sealant/varnish
- Sandpaper (fine grit)
Step 1: Shaping the Base
-
Prepare the Clay:
Start with a ball of clay roughly the size of a large orange. Knead it well to remove air bubbles and warm it up, making it pliable and easy to work with. -
Roll it Out:
On a smooth surface or canvas mat, roll the clay out to an even thickness of about 1/4 to 1/2 inch. You want it thick enough to take a deep impression but not so thick that it takes weeks to dry. -
Cut the Circle:
Place your circle cutter or an overturned bowl onto the clay slab. Press down firmly to mark your circle, then carefully cut around the edge with a knife or needle tool to create a clean disc. -
Smoothing:
Dip your finger or a small sponge into a little water and run it around the cut edge of the circle. This smooths out any harsh lines or jagged bits left by the cutting tool. -
Form the Rim:
Gently curve the outer edges of the circle upward to create a shallow bowl shape. You can do this by pinching the edges lightly or placing the clay circle inside a slightly larger shallow bowl to help it hold its form.
Step 2: Impressing and Text
-
Position the Hand:
Center your child’s hand over the clay dish. Ensure their fingers are spread pleasantly but comfortably. -
Press Down:
Gently but firmly press the hand into the clay. Press on the center of the palm and individually on each finger to ensure a clear, deep print. Lift the hand straight up to avoid smudging. -
Plan the Text:
Before stamping, lightly mark where you want the letters to go along the bottom curve to ensure they are centered and evenly spaced. -
Stamp the Sentiment:
Using your alphabet stamps, press the words “HAND PRINT KEEPSTONE” (or your child’s name) into the clay below the palm area. Apply even pressure so the letters are legible but not too deep. -
Final Smoothing:
Check for any nail marks or unintended dents. I like to use a slightly damp finger to gently buff these out before setting the piece aside.
Clean Prints
If the clay is sticky, lightly dust the child’s hand with cornstarch before pressing. This ensures the hand lifts away cleanly without pulling up the clay.
Step 3: Finishing Touches
-
Drying Time:
Let the dish dry completely in a safe, draft-free spot. This usually takes 24 to 48 hours depending on your humidity. Rotate it occasionally so the bottom dries evenly. -
Sanding:
Once bone dry, use fine-grit sandpaper to gently smooth the rim and any rough spots on the surface. Wipe away the dust with a barely damp cloth. -
Painting the Base color:
If you used white clay, mix a soft peach or terracotta acrylic paint. Apply two smooth coats to the entire dish, letting it dry between layers. -
Adding Speckles:
To achieve the stone-like texture seen in the photo, dip a toothbrush in diluted darker brown paint and flick the bristles to spray fine speckles across the dish. -
Highlighting Text:
Carefully trace the stamped letters with a fine-tip black paint pen or a very small brush to make the text pop. -
Sealing:
Protect your keepsake by applying a coat of matte or satin varnish. This will give it a professional finish and keep the paint from chipping.
Gilded Edge
For an upscale twist, paint just the very rim of the dish with liquid gold leaf or metallic gold paint after the main color has dried.
Place this lovely keepsake on a shelf or dresser to cherish those tiny fingers for years to come


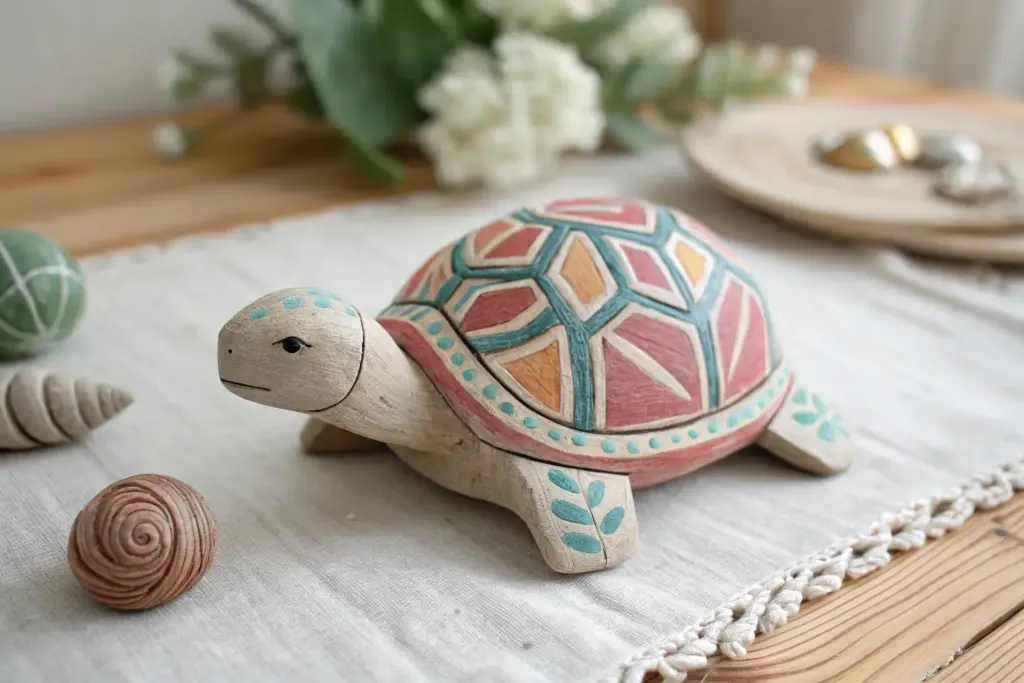
Cute Animal Pinch Pots

This cheerful little bowl features a classic pinch pot shape brought to life with friendly frog faces peeking out from the inside. The two-tone design combines a natural terracotta-style base with a glossy turquoise green interior that makes the painted smiles really pop.
Step-by-Step
Materials
- Terracotta or brown air-dry clay (or kiln-fire stoneware if you have access)
- Glossy turquoise or sea-foam green acrylic paint (or glaze)
- Black fine-tip acrylic paint marker or detail brush
- White acrylic paint
- Clear sealant or varnish (food safe if using for snacks)
- Small sponge
- Water cup
Step 1: Shaping the Clay
-
Form a ball:
Start with a lump of terracotta-colored clay about the size of a tennis ball. Roll it between your palms until it is a smooth, even sphere without any cracks. -
Open the pot:
Hold the ball in one hand and gently push your thumb into the center, going about three-quarters of the way down. Be careful not to push all the way through the bottom. -
Pinch the walls:
Using your thumb on the inside and fingers on the outside, gently pinch and rotate the clay. Work your way around the ball, thinning the walls evenly as you go. -
Smooth the shape:
Aim for a nice, rounded bowl shape. I like to continuously check that the rim is an even thickness all the way around, smoothing out any finger marks with a slightly damp sponge. -
Create a flat base:
Gently tap the bottom of your pot on a table so it sits flat and doesn’t wobble. Let the clay dry completely according to the package instructions before moving on to painting.
Step 2: Painting the Design
-
Masking line (optional):
Decide where you want the color change to happen. The pot in the example has the green glaze extend just over the lip onto the top edge of the exterior. You can lightly sketch this line with a pencil. -
Apply the green base:
Paint the entire interior of the bowl with your turquoise or sea-foam green paint. Bring the color up over the rim and just slightly down the outside edge. -
Add a second coat:
Let the first layer dry, then add a second coat of green to ensure the raw clay color doesn’t show through. The color needs to be solid for the faces to look crisp. -
Clean the exterior:
If you dripped any green paint further down the brown sides, quickly wipe it away with a damp cloth to keep that nice, clean line between color and raw clay. -
Paint the eyes:
Once the green inside is totally dry, dip a the handle end of a paintbrush into white paint to make perfect dots for eyes. Place pairs of dots around the inner walls. -
Add pupils:
Wait for the white dots to dry, then use a black paint marker or very fine brush to add small black dots in the center of the white circles. -
Draw the smiles:
Using your black marker or thin brush, draw wide, U-shaped smiles under the eyes. Add dimples at the ends of the smile lines for extra cuteness. -
Add tiny details:
Draw tiny nostrils (just two small dots) between the eyes provided there is enough space. -
Seal the work:
Finish by applying a coat of clear varnish over the entire piece. This gives it that shiny, ceramic-glaze look and protects the paint from chipping.
Smooth Moves
To get that super smooth rim like the photo, rub a tiny bit of water over the lip of the bowl with your finger right before setting it to dry.
Make it a Set
Don’t stop at frogs! Try painting different animals inside other bowls—orange for a fox, grey for a bear, or pink for a pig to create a full zoo set.
Now you have a charming little dish perfect for holding treasures or purely for decoration

The Complete Guide to Pottery Troubleshooting
Uncover the most common ceramic mistakes—from cracking clay to failed glazes—and learn how to fix them fast.
Caterpillar Made of Clay Balls
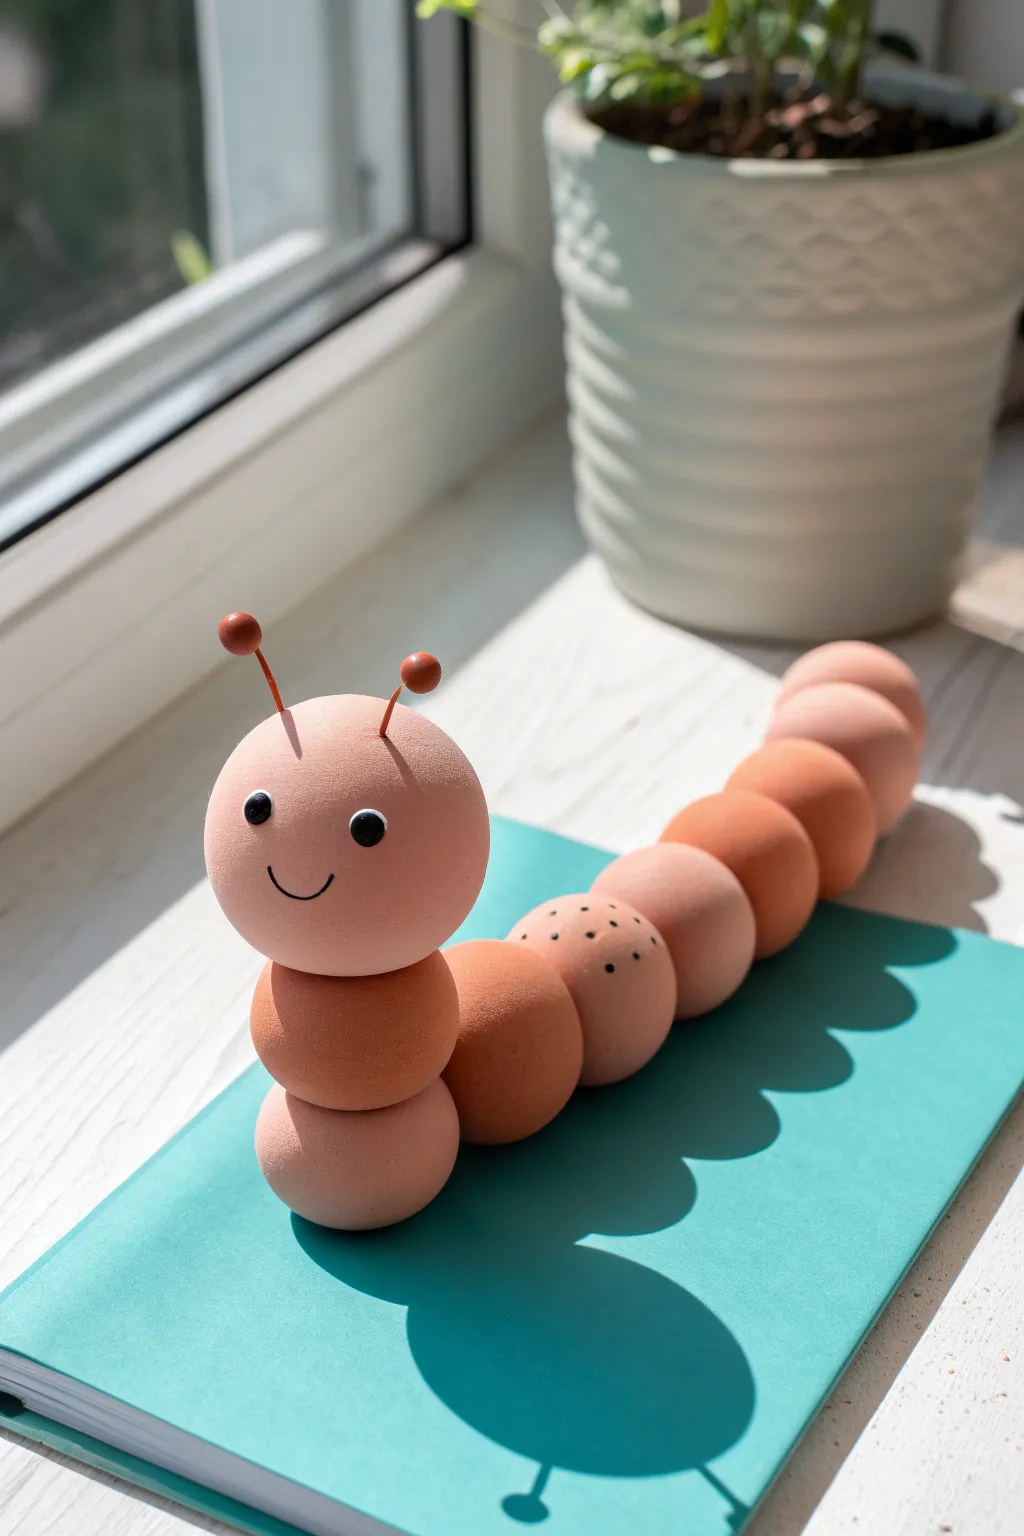
This friendly crawler is composed of perfectly smooth spheres that curve gently to create a sense of movement. With warm, earthy tones ranging from peach to terracotta, it makes for a charming desk companion sitting atop a favorite notebook.
Step-by-Step Tutorial
Materials
- Polymer clay or air-dry clay (shades of peach, light orange, and terracotta)
- Small black beads or black clay (for eyes)
- Thin brown wire or craft wire
- Small brown beads (for antennae tips)
- Black fine-tip marker
- Smoothing tool or spoon back
- Gloss glaze (optional)
Step 1: Preparing the Clay Spheres
-
Color Selection:
Begin by selecting your color palette. You will need three distinct shades: a light soft peach, a medium orange-brown, and a slightly darker terracotta. If using white clay, mix in acrylic paints carefully to achieve these warm, gradient tones. -
Rolling the Head:
Start with the lightest peach color for the head. Roll a piece of clay between your palms to create a perfectly smooth sphere about 1.5 inches in diameter. -
Checking for Imperfections:
Inspect the head sphere closely. If there are any cracks or fingerprints, gently rub them out with your thumb or a smoothing tool until the surface is flawless. -
Creating Body Segments:
Roll seven more spheres for the body. You want a mix of the medium orange-brown and the darker terracotta colors. Try to keep them slightly smaller than the head, roughly 1 to 1.25 inches in diameter. -
Gradating the Size:
For a natural tail look, make the last two or three spheres progressively smaller than the rest of the body segments. -
Adding Texture (Optional):
Select one of the medium-toned body spheres to be the third segment from the tail. Use a needle tool or toothpick to gently stipple tiny dots onto its surface for a speckled effect, mimicking the image.
Smooth Moves
To eliminate fingerprints completely, lightly dust your fingers with cornstarch (or water for air-dry clay) before the final smoothing of each ball.
Step 2: Assembly and Shaping
-
Forming the Base Curve:
Arrange your body spheres on your work surface in a gentle ‘S’ curve or wiggle shape. Do not attach them yet; just plan the layout to ensure the movement looks natural. -
Connecting the Head:
Take the head sphere and place it at the front of your line. Instead of placing it directly on the table, prop it on top of the first body segment so it sits slightly elevated, looking forward. -
Stacking the Neck:
To achieve the lifted head look seen in the photo, you need two spheres stacked vertically at the front. Place a medium-toned sphere on the table, and secure the lighter head sphere directly on top of it. -
Joining the Segments:
Press the clay balls firmly against each other to bond them. If using polymer clay, a drop of liquid clay or ‘bake and bond’ works wonders here. I find gently twisting them together helps create a suction bond. -
Securing the Tail:
Continue attaching the rest of the body spheres in a trailing line behind the stacked ‘neck’ segment. Ensure they touch firmly but maintain their round shapes. -
Final Shaping:
Once assembled, nudge the tail end so it curves slightly. This simple adjustment gives the caterpillar a sense of life and direction.
Head Won’t Stay?
If the elevated head keeps rolling off the neck segment, insert a toothpick or a short piece of wire between the two spheres to act as an internal dowel.
Step 3: Adding Personality
-
Placing the Eyes:
Press two small black beads into the upper half of the head sphere. Push them in deep enough so they stay secure but protrude slightly for a bubbly look. -
Drawing the Smile:
Using a fine-tip black marker (or a very thin roll of black clay if you have a steady hand), draw a simple, small ‘U’ shape between and below the eyes for the smile. -
Preparing Antennae Wire:
Cut two short pieces of thin brown wire, each appearing about 0.5 inches long once inserted. -
Adding Antennae Tips:
Thread a small brown bead onto the end of each wire piece. If the fit is loose, secure it with a tiny dab of superglue. -
Attaching the Antennae:
Insert the bare ends of the wires into the top of the head sphere, spacing them apart slightly. Angle them outwards for a cute, inquisitive expression. -
Finishing Up:
If you used polymer clay, bake according to package instructions. If using air-dry clay, let it sit undisturbed for 24 hours until fully hard.
Now you have a cheerful little friend ready to keep you company while you study or read
Ladybug Pebble Magnets
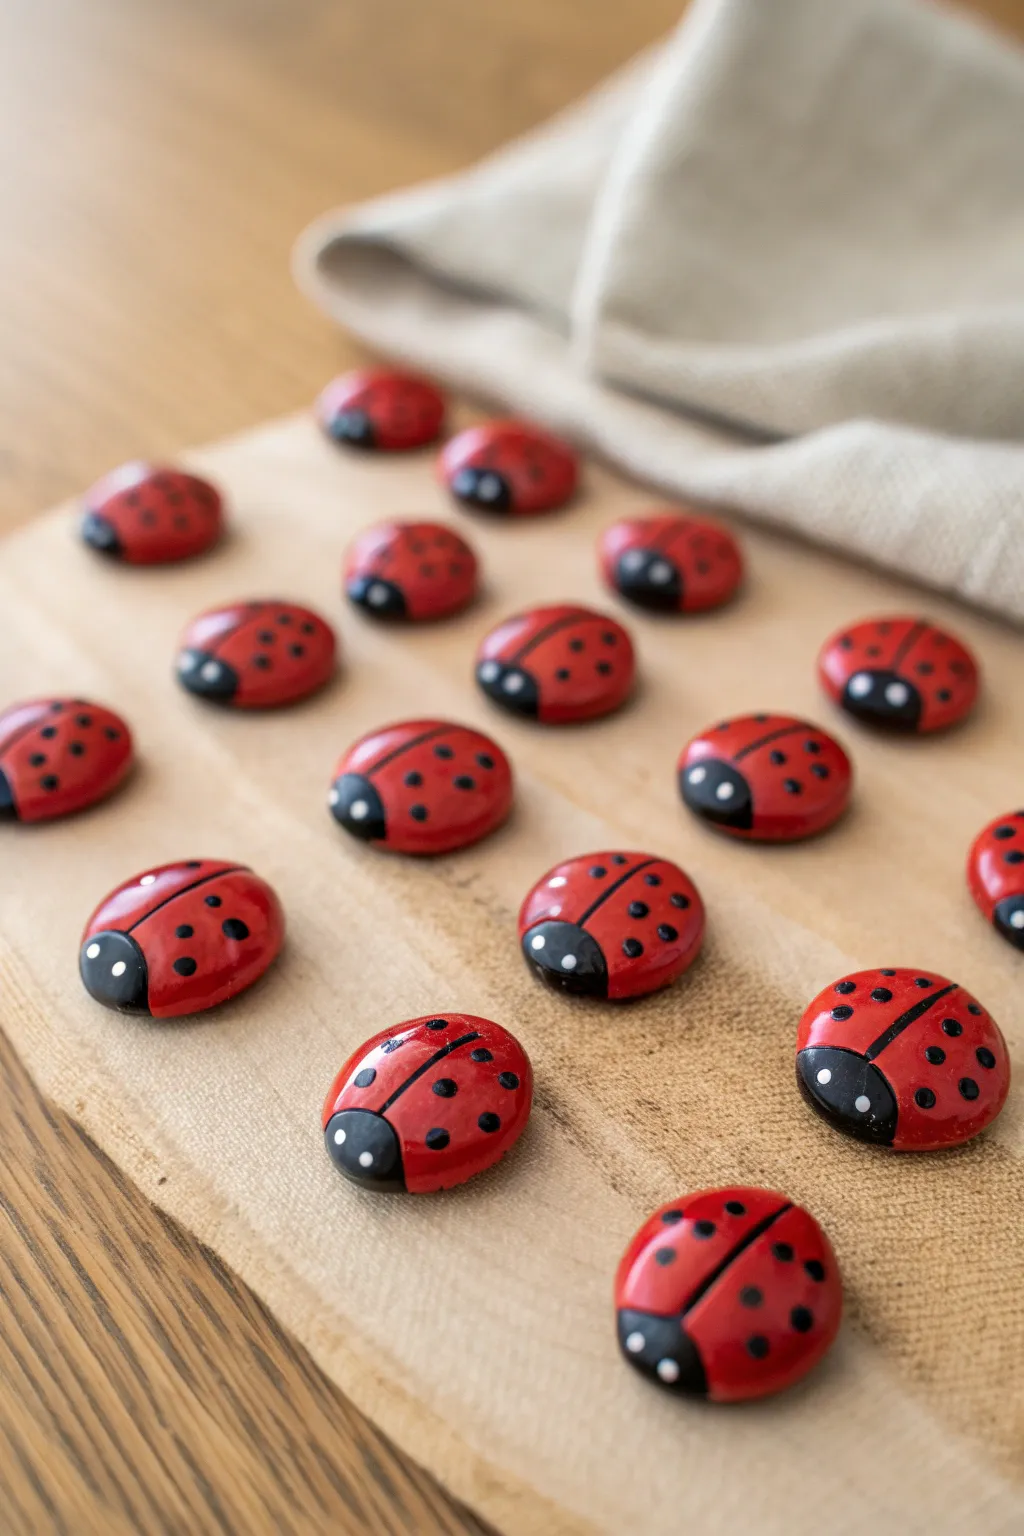
These charming little ladybugs are crafted to look like smooth, shiny river stones brought to life. With their vibrant cherry-red shells and distinct glossy finish, they make adorable magnets that add a pop of cheer to any fridge or magnetic board.
How-To Guide
Materials
- White air-dry clay or smooth oval river rocks
- Glossy acrylic paint (bright red, black, white)
- Small flat paintbrush
- Fine detail paintbrush or dotting tool
- High-gloss varnish or Mod Podge
- Strong round craft magnets
- Strong craft glue (E6000 or hot glue)
- Palette for mixing
- Cup of water and paper towels
Step 1: Shaping the Base
-
Form the pebbles:
If using clay, pinch off small amounts (about the size of a walnut) and roll them into smooth balls. Gently flatten them against your work surface to create a rounded, dome-like shape that resembles a smooth pebble. -
Refine the edges:
Smooth out any fingerprints or cracks with a tiny bit of water on your finger. You want the surface to be as flawless as a polished stone for that professional finish. -
Dry completely:
Let your clay pebbles dry according to the package instructions—usually 24-48 hours. Flipping them halfway through helps the underside dry evenly.
Sticky Situation?
If your magnets slide down the fridge, the magnet might be too weak for the weight of the clay. Use heavy-duty ceramic or neodymium magnets instead of standard craft tape.
Step 2: Painting the Shell
-
Apply the red base:
Using your flat brush, paint the entire top surface of the dried clay (or rock) with bright red acrylic paint. You may need two coats to get a solid, opaque color that hides the material underneath. -
Create the head:
Once the red is dry to the touch, load a smaller brush with black paint. Paint a semi-circle at one end of the oval to form the ladybug’s head. -
Draw the center line:
Carefully draw a thin black line down the center of the red body, starting from the base of the black head and going all the way to the tail. A steady hand is key here, or you can use a fine-tip black paint marker. -
Add the spots:
Dip the handle end of a paintbrush or a dotting tool into black paint. Press gently onto the red wings to create symmetrical dots. Varying the pressure slightly can give you different sized spots for a natural look. -
Paint the eyes:
Clean your dotting tool or use a toothpick. Dip it into white paint and place two tiny dots on the black head area to create the eyes. This instantly brings the ladybug to life.
Color Variations
Don’t stop at red! Real ladybugs come in yellow and orange too. Try painting a few in sunset orange or bright yellow for a colorful garden variety set.
Step 3: Finishing Touches
-
Seal for shine:
This is the most crucial step for the ‘pebble’ look. Once the paint is fully dry, apply a generous coat of high-gloss varnish or Mod Podge over the entire painted surface. This mimics the shine of a wet river stone. -
Attach the magnet:
Flip the ladybug over once the varnish is cured. Apply a dab of strong craft glue to the flat underside. -
Secure the backing:
Press a round magnet firmly into the glue. I like to let this dry overnight to ensure the bond is strong enough to hold up papers on the fridge.
Enjoy arranging your shiny little beetle family on your refrigerator door


What Really Happens Inside the Kiln
Learn how time and temperature work together inside the kiln to transform clay into durable ceramic.
Leaf Print Clay Medallions
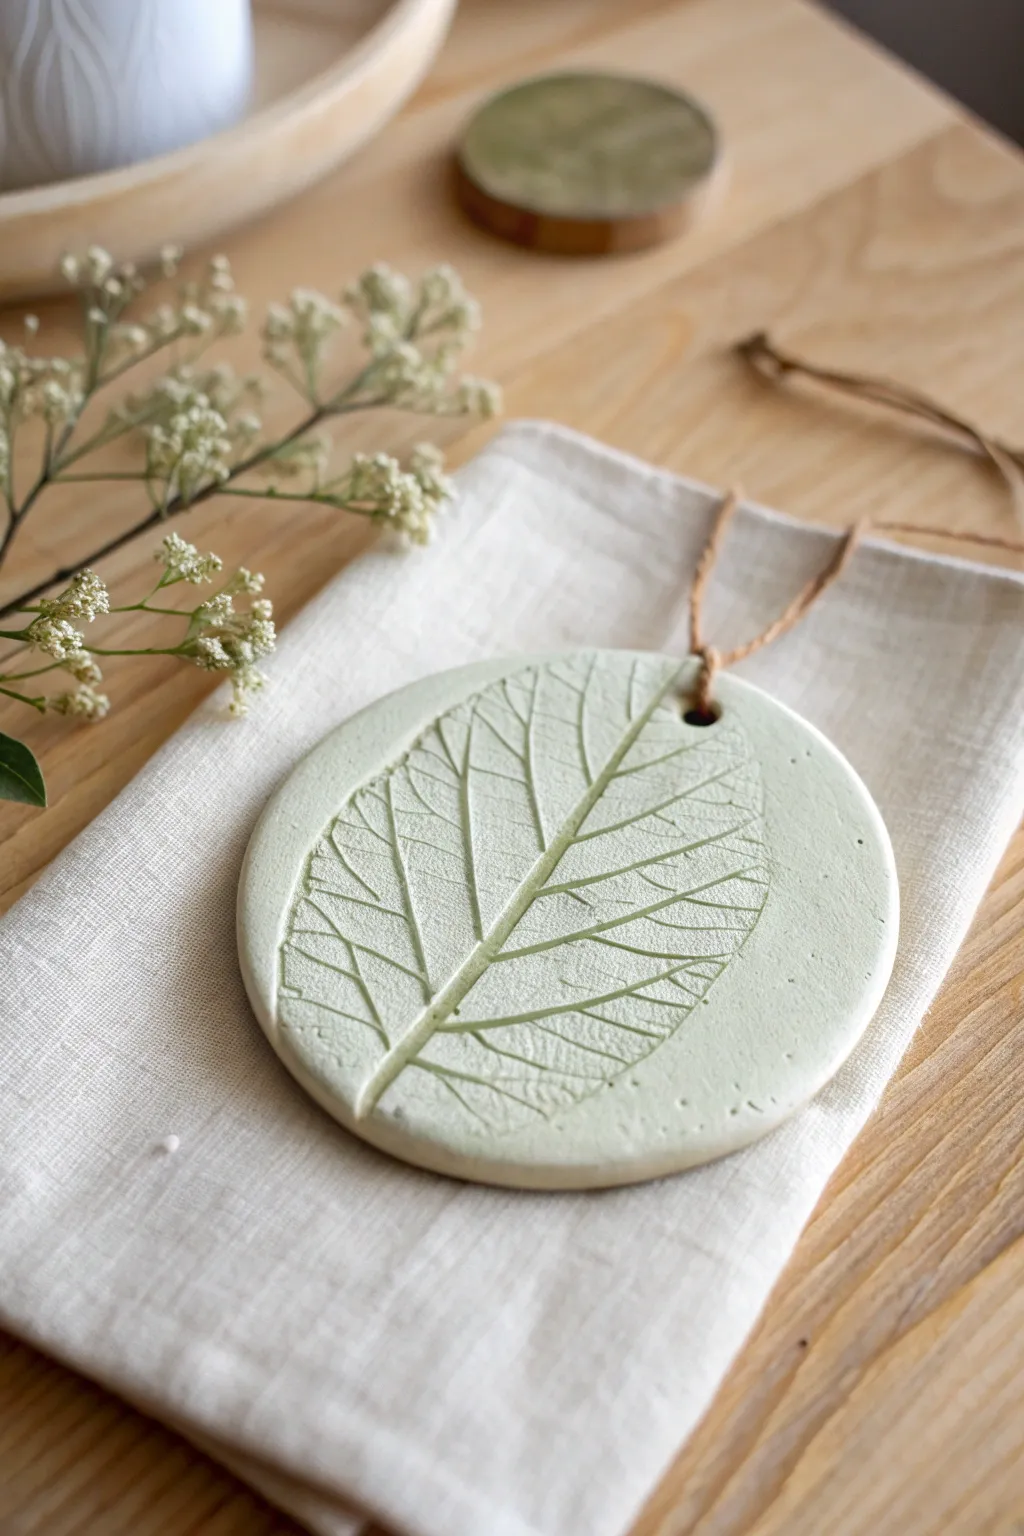
Capture the intricate beauty of nature with this elegant and minimalist clay project. Using simple air-dry clay, you’ll create lasting botanical impressions that highlight the delicate veins and textures of your favorite leaves, finished with a rustic hanging cord.
Step-by-Step
Materials
- White air-dry clay (or polymer clay)
- Fresh leaf with prominent veins (like a hydrangea or beech leaf)
- Rolling pin
- Circular cookie cutter (approx. 3-4 inches diameter)
- Parchment paper or smooth work mat
- Drinking straw or small circular tool
- Jute twine or leather cord
- Fine-grit sandpaper (optional)
- Clear matte varnish (optional)
Step 1: Preparing the Clay Canvas
-
Condition the Clay:
Start by taking a handful of air-dry clay and kneading it in your hands until it becomes soft, pliable, and warm. This helps prevent cracks later on. -
Roll It Out:
Place your clay onto a piece of parchment paper to prevent sticking. Use your rolling pin to flatten the clay into a smooth slab that is roughly 1/4 inch thick. Aim for an even thickness throughout. -
Inspect for Imperfections:
Check the surface for any air bubbles or rough spots. Gently smooth them out with a slightly damp finger if necessary to create a pristine base.
Step 2: Creating the Botanical Impression
-
Select and Position:
Take your chosen leaf and place it vein-side down onto the clay slab. The back of the leaf usually has the most raised texture, which gives the best print. -
Initial Press:
Gently press the leaf down with your fingertips to tack it in place so it doesn’t slide around during the next step. -
Roll the Impression:
Using the rolling pin, roll over the leaf once or twice with firm, even pressure. This embeds the leaf into the clay and captures those tiny details. -
The Reveal:
Carefully lift the stem of the leaf and slowly peel it away from the clay. I love this moment—seeing the intricate skeleton of the leaf transferred perfectly into the surface is so satisfying.
Cracked Edges?
If you see tiny cracks forming while the clay dries, mix a tiny bit of fresh clay with water to make a paste and smooth it into the cracks with your finger.
Step 3: Shaping and Refining
-
Cut the Shape:
Position your circular cookie cutter over the best part of the leaf print. Press down firmly to cut out your medallion shape. -
Remove Excess:
Peel away the excess clay from around the circle, leaving just your imprinted medallion on the parchment paper. -
Smooth the Edges:
Dip your finger in a tiny bit of water and run it gently around the cut brim of the circle to soften any sharp edges left by the cutter. -
Create a Hanging Hole:
Use a drinking straw to punch a neat hole near the top of the medallion. twisted gently as you push through to get a clean removal. Make sure the hole isn’t too close to the edge to avoid breakage.
Make it Pop
After drying, lightly brush a diluted watercolor wash (green or brown) over the leaf imprint, then wipe the surface with a damp cloth to leave color just in the veins.
Step 4: Drying and Finishing
-
Let it Cure:
Allow the clay to dry according to the package instructions. This usually takes 24-48 hours. Turn the medallion over halfway through the process to ensure even drying and prevent warping. -
Sand for Perfection:
Once fully dry, check the edges again. If they feel rough, lightly sand them with fine-grit sandpaper for a professional finish. -
Seal (Optional):
To protect your artwork, you can brush on a thin layer of clear matte varnish. This keeps the look natural while sealing the porous clay against moisture. -
Add the Hanger:
Cut a length of jute twine roughly 8 inches long. Thread one end through the hole you created earlier. -
Secure the Loop:
Bring the ends of the twine together and tie a simple overhand knot. Trim any excess twine if needed. -
Final Display:
Your nature-inspired medallion is now ready to be hung on a wall, a holiday tree, or used as a special gift tag.
Enjoy displaying your beautiful botanical creation or gifting it to a fellow nature lover.
Texture Stamp Tiles
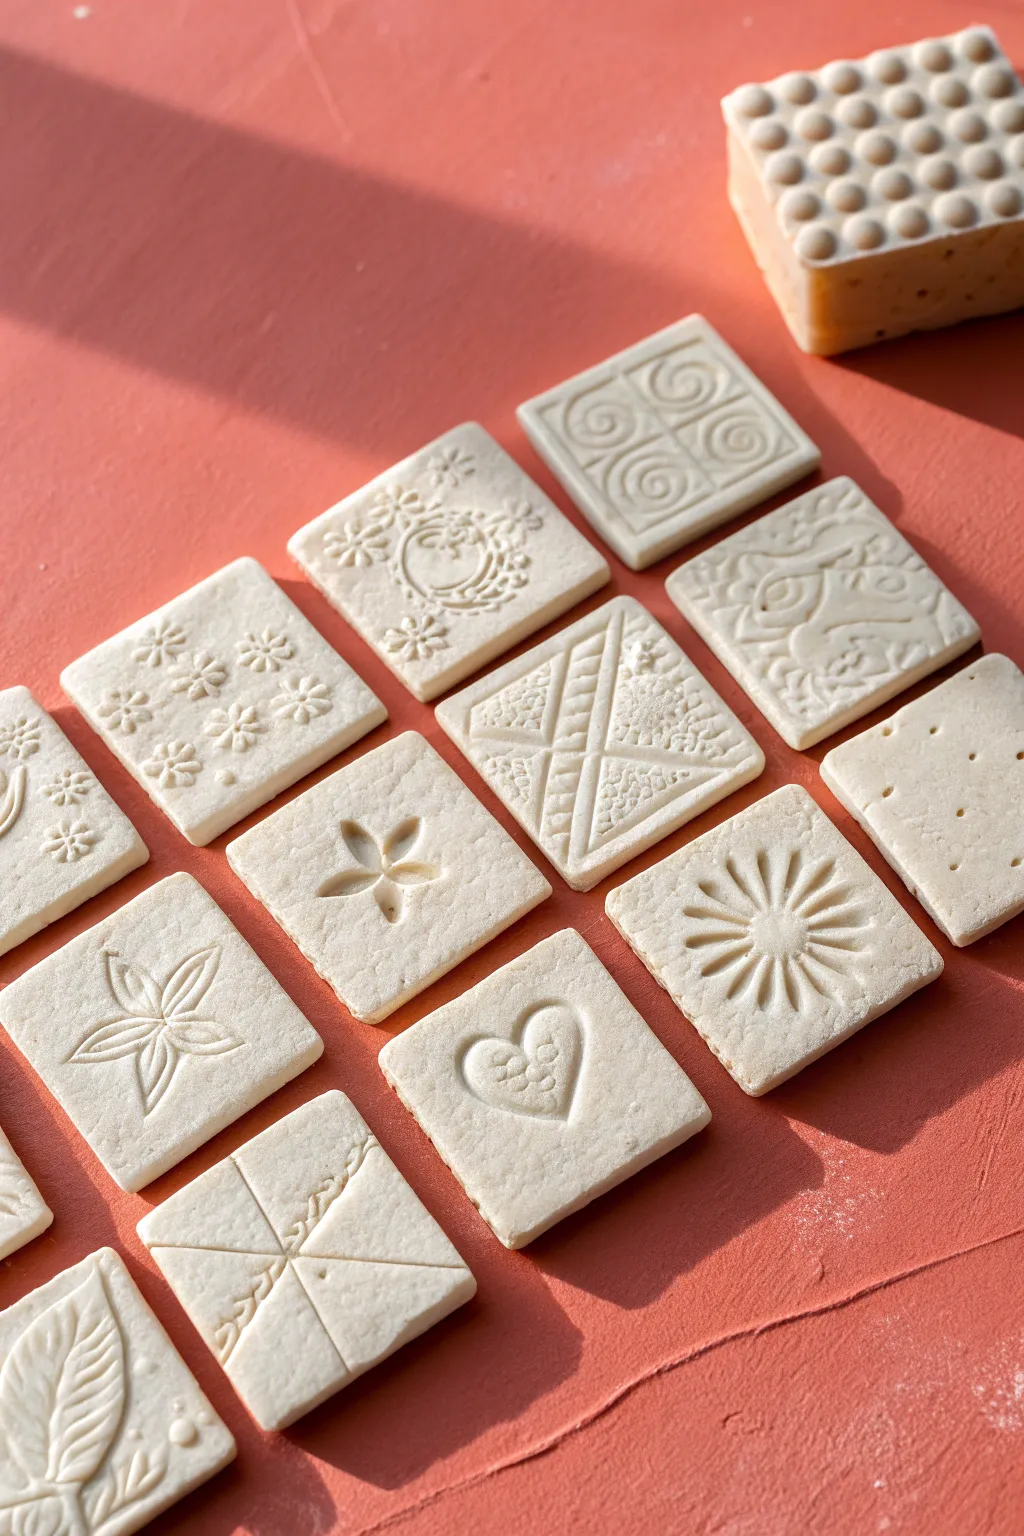
These charming, monochromatic clay tiles are a fantastic way to explore patterns and simple relief techniques. The result is a collection of uniformly sized squares, each boasting a unique, imprinted design created with everyday tools.
How-To Guide
Materials
- Air-dry clay (white or off-white) or polymer clay
- Rolling pin or smooth glass jar
- Square cookie cutter (approx. 2-3 inches)
- Parchment paper or non-stick craft mat
- Texture tools: forks, toothpicks, pen caps, buttons, rubber stamps, lace
- Small bowl of water (for smoothing)
- Fine-grit sandpaper (optional)
Step 1: Preparation & Rolling
-
Surface Prep:
Begin by laying down a sheet of parchment paper or a non-stick craft mat. This prevents the clay from sticking to your table and makes moving the wet tiles much easier. -
Knead the Clay:
Take a generous handful of white air-dry clay. Knead it in your hands for a minute or two until it feels soft, pliable, and free of cracks. -
Roll it Out:
Place the clay on your mat. Using a rolling pin, roll the clay out into a large, even slab. -
Check Thickness:
Aim for a consistent thickness of about 1/4 inch (6mm). If it’s too thin, the tiles might curl; too thick, and they take forever to dry. -
Smooth the Surface:
I like to run a slightly damp finger over the top of the slab to remove any tiny imperfections or rolling lines before cutting.
Step 2: Cutting & Shaping
-
Cut the Squares:
Press your square cookie cutter firmly into the clay slab. Repeat this to create as many tiles as you can fit. -
Remove Excess:
Carefully peel away the excess clay from around the squares. You can ball this up and re-roll it later for more tiles. -
Smooth Edges:
Dip your finger in a little water and gently run it along the cut edges of each square to soften that sharp ‘cookie cutter’ look.
Clean Release
If your stamps are sticking to the clay, lightly dust them with cornstarch or baby powder before pressing down. This ensures a crisp impression.
Step 3: Imprinting Designs
-
Plan Your Patterns:
Look at your tools. Think about simple geometric shapes: intersecting lines, dots, spirals, or floral motifs. -
Create Linear Geometrics:
For the geometric tiles, use the edge of a ruler or a dull knife to press straight lines into the clay. Try crossing them to make X shapes or grids. -
Stipple Texture:
To recreate the textured sections shown in the image, gently press a piece of rough fabric or a stiff sponge into specific triangles within your geometric lines. -
Floral Motifs:
For the flower designs, use a teardrop-shaped tool or the side of a spoon handle. Press it radially from a center point to create petals. -
Spiral Details:
Create spirals by pressing a small coil stamp or simply by carefully dragging a toothpick in a circular motion. Be gentle so you don’t tear the surface. -
Heart Impression:
To make the heart tile, lightly sketch a heart outline with a needle tool, then press the tool deeper to define the shape. Adding tiny dots inside gives it that cute detail seen in the photo. -
Sunburst Pattern:
Press a small circle in the center, then use a flat tool to stamp radiating lines outward, like sun rays. -
Dot Accents:
Use the back end of a paintbrush to stamp creating perfect little circles or dots to border your designs or fill empty space. -
The Grid Tile:
For the thick, waffle-like tile in the corner, create a thicker block of clay and press a grid of large, deep indentations using a rounded tool handle.
Make Them Magnets
Once fully dry, hot glue a strong magnet to the back of each tile. They make a beautiful, cohesive set for the refrigerator.
Step 4: Finishing
-
Final Smoothing:
Give the tiles one last look. If any clay crumbs appeared during stamping, brush them away gently with a soft, dry brush. -
Drying:
Let the tiles dry flat on the parchment paper for 24-48 hours. Turn them over halfway through to ensure even drying and prevent warping. -
Sanding (Optional):
Once fully dry and hard, you can lightly sand any rough edges with fine-grit sandpaper for a professional finish.
Arrange your finished white tiles together to admire the beautiful interplay of light and shadow on your textured collection

TRACK YOUR CERAMIC JOURNEY
Capture glaze tests, firing details, and creative progress—all in one simple printable. Make your projects easier to repeat and improve.
Clay Bead Necklaces
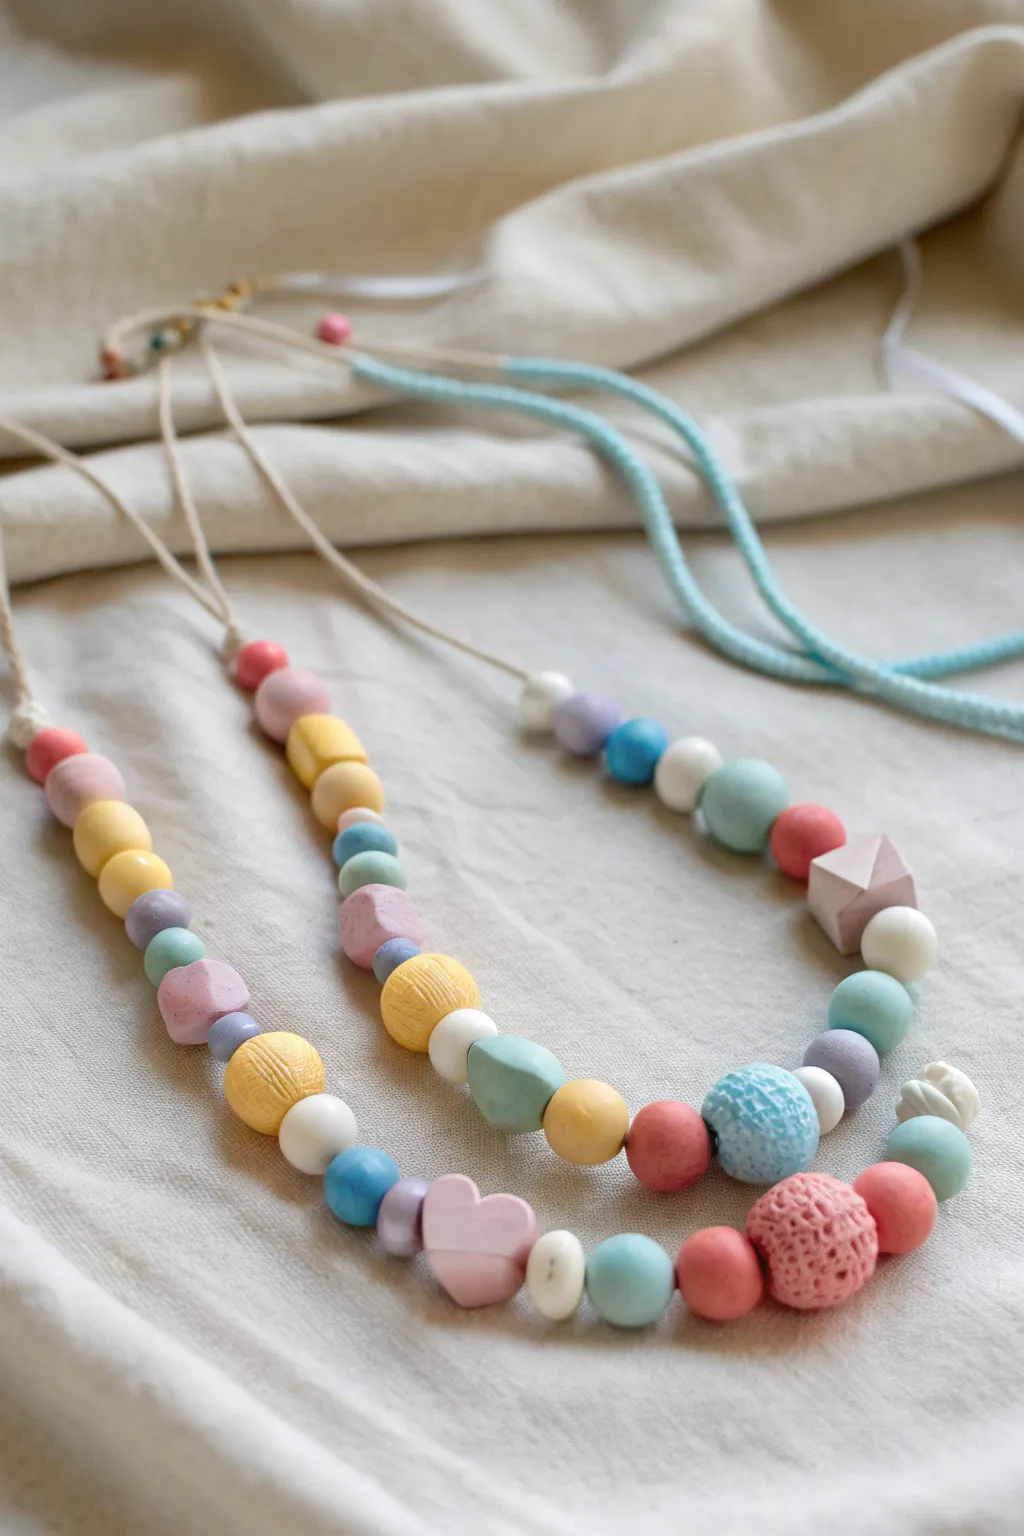
These delightful necklaces combine soft pastel colors with a variety of interesting shapes and textures, making them a perfect wearable art project. The mixed matte finishes and geometric forms create a modern, playful look that kids will love stringing together.
Step-by-Step Tutorial
Materials
- Polymer clay (white, baby pink, soft yellow, light blue, lavender, coral)
- Acrylic roller or smooth jar
- Clay carving tools or toothpicks
- Bopath stick or skewer for piercing
- Waxed cotton cord (beige/cream)
- Jewelry clasps (optional) or sliding knot setup
- Parchment paper
- Baking sheet
- Texture tools (optional: coarse fabric, sandpaper)
Step 1: Shaping the Beads
-
Prepare your clay:
Begin by conditioning your polymer clay blocks until they are soft and pliable. If the colors are too bright, knead in a small amount of white clay to achieve those gentle pastel tones seen in the photo. -
Roll smooth spheres:
Start with the basics by rolling several balls of clay in various sizes. Aim for a mix of tiny spacers (about 5mm) and larger feature beads (up to 1.5cm). Keep your palms flat for the roundest shape. -
Form geometric cubes:
Take a ball of pink or lavender clay and gently press it against your work surface to flatten one side. Rotate and repeat until you have a soft cube shape. Tap the corners gently to round them off slightly. -
Create the geometric gem:
For the striking faceted bead, start with a larger ball. Use a stiff blade or a flat tool to slice off sections at random angles, creating a geometric, gem-like appearance. -
Shape the heart charm:
Flatten a ball of pink clay slightly into a thick disc. Use your finger to press an indentation into the top, then pinch the bottom into a point to form a chunky, organic heart shape. -
Make oblong nuggets:
Roll a few pieces of blue and yellow clay into organic, pebble-like shapes. These don’t need to be perfect circles; irregular shapes add lovely visual interest.
Step 2: Adding Textures & Piercing
-
Add surface texture:
Select a few specific beads, such as a large blue round one or a coral ball, to texturize. Gently roll these beads over a piece of coarse fabric, sandpaper, or an abrasive sponge to create a pitted, stone-like surface. -
Imprint details:
For the intricate coral bead, I like to use a toothpick or a small needle tool to poke tiny, close-set holes all of the way around the surface, mimicking a coral reef texture. -
Pierce the holes:
While the clay is still raw, carefully insert your toothpick or skewer through the center of each bead. Rotate the tool as you push it through to prevent squashing the bead’s shape. -
Double-check openings:
Ensure the holes are wide enough for your cord to pass through easily, especially if you plan to double the cord.
Clean Beading Tip
To prevent fingerprints on your smooth beads, wipe your hands with a baby wipe when switching colors, or lightly dust your fingertips with cornstarch before rolling.
Step 3: Baking & Assembly
-
Bake the beads:
Arrange all your beads on a parchment-lined baking sheet. Bake according to your clay package instructions (usually around 275°F/135°C for 15-30 minutes). Let them cool completely before handling. -
Lay out your design:
Before stringing, lay your cooled beads on a table to plan the pattern. Alternate colors, shapes, and textures. Try placing your largest bead or the heart charm in the center as a focal point. -
Prepare the cord:
Cut a length of beige waxed cotton cord—about 30 inches is usually plenty for a child’s necklace that slips over the head. -
Start stringing:
Thread the cord through your beads, following the pattern you designed. If the cord end frays, wrap a tiny piece of tape around the tip to make a makeshift needle. -
Secure the ends:
Once all beads are strung, verify the length. Tie the ends securely with a strong double knot or attach metal jewelry clasps if you prefer a more polished finish. -
Add knotted details:
For extra security and style, you can tie a simple overhand knot in the cord right next to the first and last bead to keep them centered on the necklace.
Varnish Variation
Mix things up by applying a glossy glaze to just the smooth round beads after baking, leaving the textured and geometric beads matte for awesome contrast.
Now you have a beautiful, custom-designed necklace ready to wear or gift to a friend
Heart Ornaments With Imprints
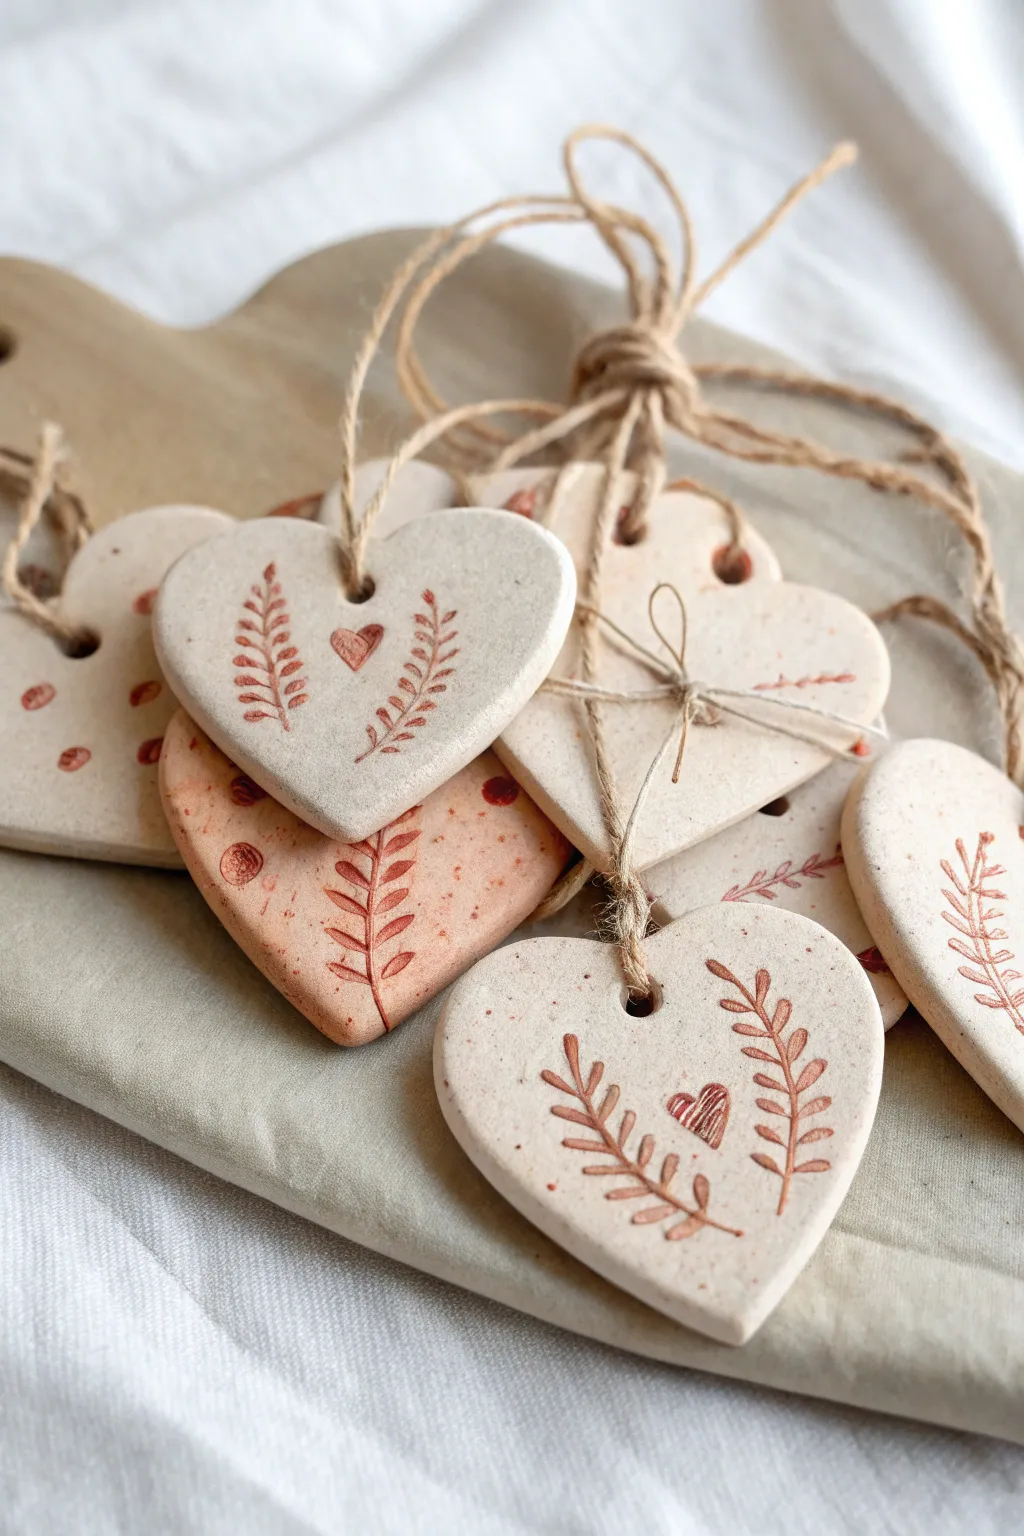
These charming heart-shaped ornaments capture a rustic, natural beauty with delicate botanical imprints and warm, reddish-brown accents. Perfect for beginners and kids alike, these keepsakes offer a lovely tactile experience and a gorgeous finished product to display or gift.
Step-by-Step
Materials
- Air-dry clay (white or light cream)
- Heart-shaped cookie cutter (medium size)
- Rolling pin
- Parchment paper or canvas mat
- Small botanical stamps or natural leaves/ferns
- Straw or skewer (for hole punching)
- Acrylic paint or watercolors (burnt sienna, terracotta, or rust colors)
- Fine-tipped paintbrush
- Jute twine or rustic string
- Sandpaper (fine grit)
- Small sponge (optional)
- Sealant or varnish (matte finish)
Step 1: Shaping the Base
-
Prepare your workspace:
Lay down parchment paper or a canvas mat to prevent sticking. Grab a handful of air-dry clay and knead it briefly until it feels soft and pliable, removing any air bubbles. -
Roll the slab:
Using your rolling pin, flatten the clay to an even thickness of about 1/4 inch (6mm). If you want them a bit chunkier, keep it closer to 1/3 inch, but ensure it’s uniform so they dry evenly. -
Cut the shapes:
Press your heart-shaped cookie cutter firmly into the rolled clay. Wiggle it slightly to ensure a clean cut, then lift the cutter. Gently remove the excess clay around the hearts. -
Smooth the edges:
Dip your finger in a tiny bit of water and run it along the cut edges of each heart to soften any sharp ridges or burrs left by the cutter. -
Punch the hanging hole:
Use a straw or a skewer to poke a hole near the top center of each heart. Make sure the hole is large enough for your jute twine to pass through later, keeping in mind the clay shrinks slightly as it dries.
Step 2: Imprinting and Coloring
-
Create the imprints:
While the clay is still wet, gently press your botanical stamps onto the surface. You can use a repeating fern pattern along the sides or a single sprig in the center. Don’t press too hard; you just want a clear indentation. -
Add detail motifs:
For some variety, create small heart imprints in the center of the botanical designs, or add tiny dots using the blunt end of a skewer as seen on some of the ornaments. -
Initial drying phase:
Let the hearts sit undisturbed for 24-48 hours. I usually flip them over halfway through the drying process to ensure the backs dry just as well as the fronts. -
Sand for smoothness:
Once fully cured and hard, check the edges again. If they feel rough, lightly buff them with fine-grit sandpaper for a professional finish. -
Mix your color:
Prepare a wash using burnt sienna or terracotta acrylic paint. Dilute the paint with a little water so it acts more like a stain than a thick coat. -
Fill the imprints:
Using a fine-tipped brush, carefully paint inside the indented fern leaves and hearts. The diluted paint will naturally pool in the deeper parts of the imprint, creating lovely depth. -
Create a speckled effect:
To mimic the stone-like texture in the photo, dip a stiff brush or a toothbrush into the diluted paint and flick tiny speckles across the surface of the dry hearts. -
Tinting variations:
For the darker, rosier hearts shown in the image, use a sponge to lightly dab a wash of the terracotta color over the entire surface, wiping away the excess so the texture shows through. -
Dry the paint:
Allow the paint to dry completely. Since the layers are thin, this should only take about 30 minutes.
Stamp Clean-Up Trick
If your stamps stick to the raw clay, lightly dust the stamp surface with cornstarch or baby powder before pressing it down. This ensures a crisp, clean release every time.
Step 3: Final Assembly
-
Seal the surface:
Apply a thin coat of matte varnish or sealant to protect the clay and the paint. This prevents moisture from damaging your hard work later. -
Prepare the hanger:
Cut a length of jute twine or rustic string, roughly 8-10 inches long depending on how low you want the ornament to hang. -
Tie the knot:
Thread the twine through the hole. Bring the ends together and tie a simple overhand knot. For a bundled look, you can group several ornaments together and wrap extra twine around the tops.
Spice Scented Clay
Knead cinnamon or nutmeg directly into the wet clay before rolling. The specks look beautiful, and the ornaments will smell amazing while hanging on your tree or gift.
These earthy, handcrafted hearts are ready to be tied onto gifts or hung up to bring a touch of nature indoors.
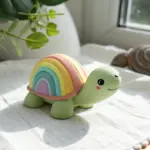
Rainbow Coil Wall Decor
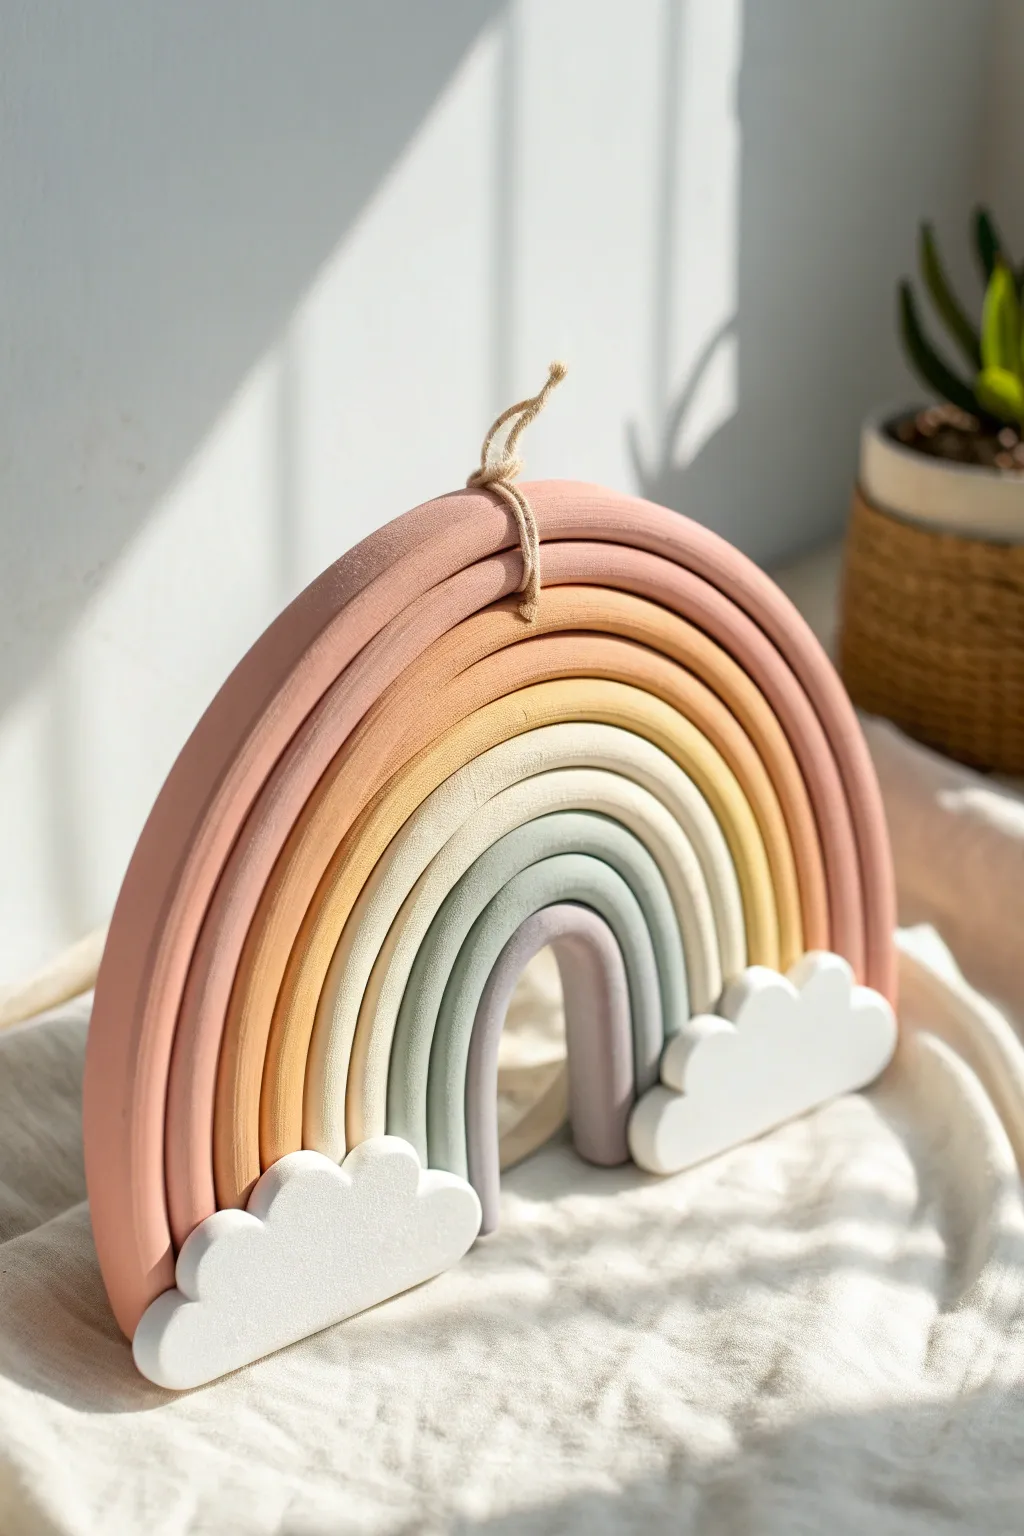
Create a soothing, minimalist piece of decor with this earthy-toned clay rainbow. Featuring smooth, rounded arches and soft cloud bases, this project brings a touch of modern bohemian style to any nursery or shelf.
How-To Guide
Materials
- Polymer clay or air-dry clay (mutiple colors: dusty pink, terracotta, mustard, cream, sage green, grey, purple, white)
- Clay roller or acrylic rolling pin
- Clay extruder (optional but helpful for uniform thickness)
- Craft knife or clay slicer
- Small piece of twine or jute string
- Parchment paper or baking mat
- Liquid clay or strong craft glue
- Sandpaper (fine grit)
- Oven (if using polymer clay)
Step 1: Prepping and Rolling the Clay
-
Color selection:
Begin by selecting your color palette. For the look in the photo, you will need seven distinct shades ranging from a dark dusty rose on the outside to a muted lavender in the center. -
Conditioning:
Knead each color of clay thoroughly until it is soft, pliable, and free of any air bubbles. This prevents cracking later. -
Rolling coils:
Roll each color into a long, snake-like coil. Aim for a thickness of about 1/2 inch (1.2 cm). An acrylic roller works well, but using a clay extruder will give you perfectly uniform ropes. -
Ensuring specific lengths:
Remember that the outer arches need to be significantly longer than the inner ones. Roll the dusty pink coil the longest and decrease the length for each subsequent color.
Step 2: Forming the Rainbow Arch
-
Creating the first arch:
Take your smallest, innermost coil (the lavender one) and bend it into a tight ‘U’ shape on your parchment paper. -
Stacking the layers:
Take the next color (sage green), curve it around the purple arch, and gently press them together so they adhere slightly without losing their round shape. -
Continuing the stack:
Continue adding each color layer, working your way outward through cream, mustard, terracotta, and finally the dusty pink. -
Tightening the shape:
Once all seven arches are stacked, gently press the sides inward with your palms to ensure there are no gaps between the coils. -
Adding the hanger:
Before the clay hardens, cut a small piece of twine. Tie a knot to make a loop and carefully press the knot into the back of the clay between the top two arches or embed a small metal hook. -
Trimming the base:
Use your craft knife or clay slicer to cut straight across the bottom of the rainbow legs, creating a flat, even surface for the clouds to attach to.
Cracks Appearing?
If you see tiny cracks while bending the clay, apply a tiny drop of baby oil (polymer) or water (air-dry) and smooth it out with your finger immediately before baking.
Step 3: Adding the Clouds
-
Rolling white clay:
Take a larger portion of white clay and roll it into a thick slab, about the same thickness as your rainbow coils. -
Cutting cloud shapes:
Use a cloud-shaped cutter or freehand cut two puffy cloud shapes with your craft knife. They should be wide enough to cover the bottom edges of the rainbow. -
Smoothing edges:
Dip your finger in a little water (for air-dry clay) or baby oil (for polymer) and smooth the sharp cut edges of the clouds to make them look soft and puffy. -
Attaching the clouds:
Place the clouds at the base of the rainbow legs. Press firmly to bond them to the coils. I usually add a dab of liquid clay or score the surfaces for a better grip.
Textured Clouds
Before the clay hardens, press a crumpled ball of aluminum foil gently against the white cloud pieces to give them a realistic, fluffy stone texture.
Step 4: Finishing Touches
-
Curing or drying:
If using polymer clay, bake according to the package instructions (usually 275°F/135°C for 15-30 minutes). If using air-dry clay, leave it in a dry spot for 24-48 hours. -
Sanding:
Once fully cured and cooled, inspect for any fingerprints or rough spots. Use fine-grit sandpaper to gently buff the surface smooth. -
Final assembly:
If the clouds didn’t bond perfectly during baking, you can reinforce them now with a strong super glue. -
Adding the tie:
Secure a fresh piece of twine through the top loop if you didn’t bake one in, tying a simple knot at the top for a rustic finish.
Hang your finished rainbow on a sunlit wall to enjoy the soft, calming colors every day
Desk-Friendly Pencil Holder
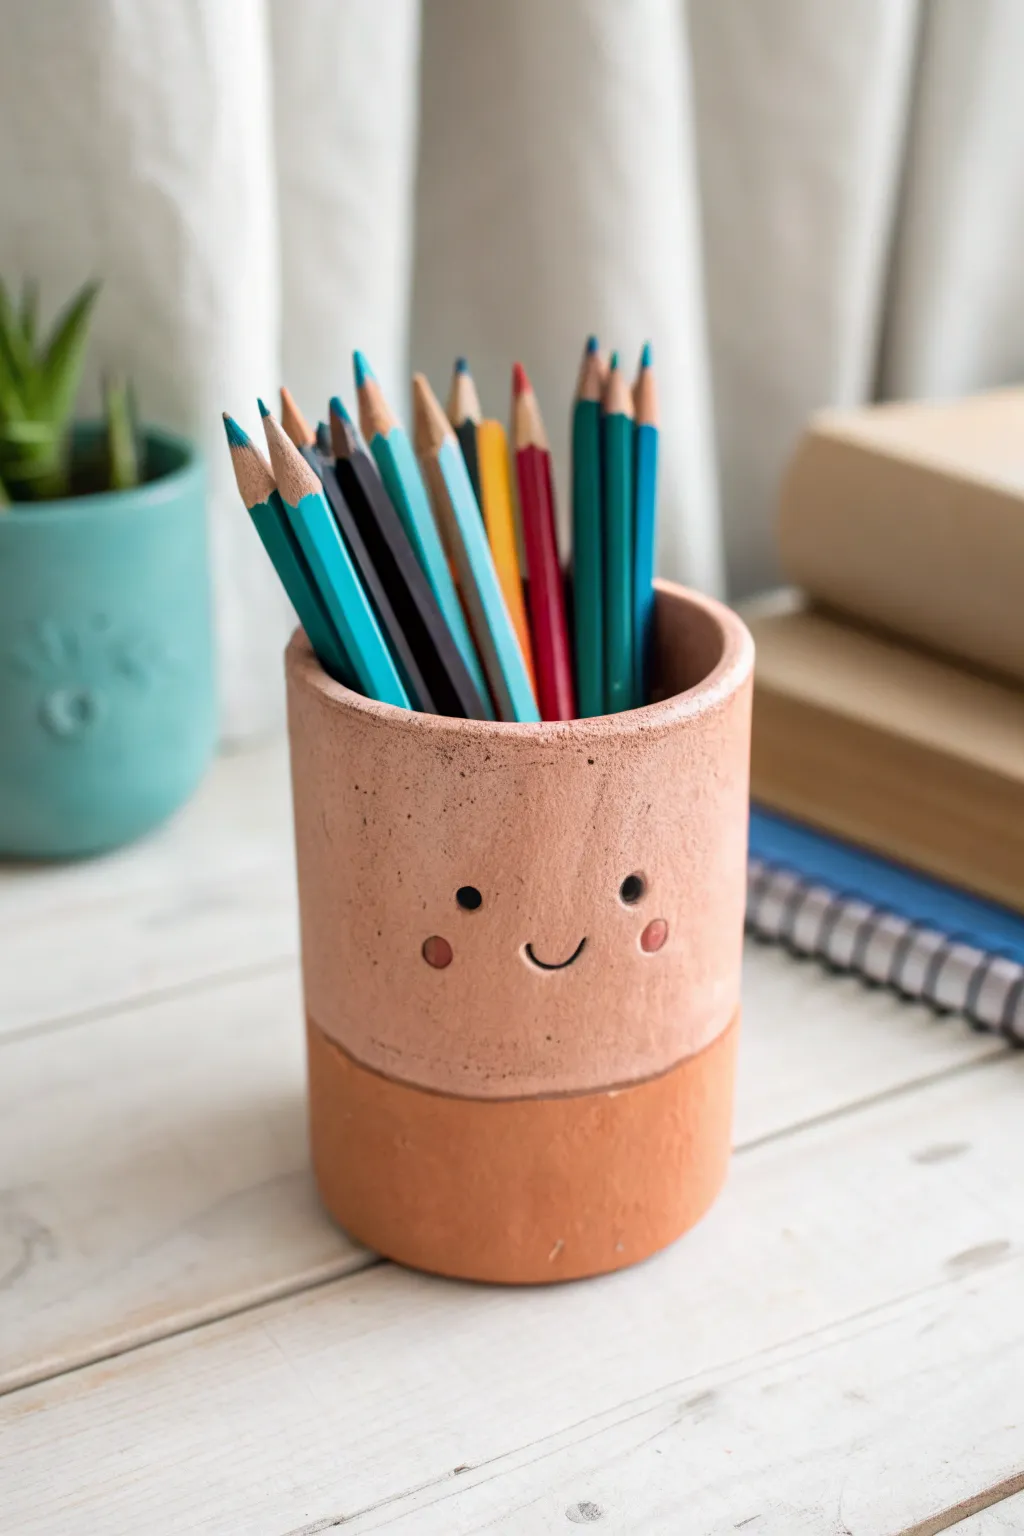
Brighten up homework time with this adorable two-tone pencil holder made from air-dry clay. Its minimalist face and warm, earthy colors give it a charming, modern look that’s perfect for any desk.
Step-by-Step
Materials
- Air-dry clay (white or terra cotta)
- Rolling pin
- Empty soda can or glass jar (as a mold)
- Craft knife or clay cutter
- Small bowl of water
- Acrylic paints (terracotta orange, peach/light skin tone, black, pink)
- Paintbrushes (flat wide brush and fine detail brush)
- Fine-grit sandpaper
- Matte sealant/varnish
Step 1: Shaping the Cylinder
-
Roll the base:
Start by taking a ball of clay roughly the size of a tangerine. Roll it out into a flat, even circle about 1/4 inch thick to form the bottom of your pot. -
Cut the base:
Place your soda can or jar on the clay and trace around it with a craft knife to get a perfect circle. Set this disc aside. -
Roll the walls:
Take a larger chunk of clay and roll it out into a long rectangle. Aim for a consistent thickness of about 1/4 inch so the walls are sturdy. -
Measure and cut:
Wrap the clay strip loosely around your form (the can or jar) to measure the length needed. Cut the rectangle to size, leaving a tiny bit of overlap. -
Join the seam:
Score (scratch) the short edges of the rectangle and dab on a little water. Press the edges together to form a tube. I like to smooth the seam with a wet finger until it disappears. -
Attach the bottom:
Score the bottom edge of your clay tube and the outer edge of your circular base. Add a drop of water and press the tube firmly onto the base. -
Smooth everything out:
Use a little water on your fingertips to blend the clay where the walls meet the floor of the pot. Ensure the outside is smooth and the rim is even. -
Create the face indentations:
While the clay is still soft, use the rounded end of a paintbrush handle to gently press two small divots for the eyes into the upper third of the pot.
Cracks happen?
If small cracks form while drying, mix a tiny bit of clay with water to make a paste (slip) and fill them in before painting.
Step 2: Finishing and Painting
-
Let it dry:
Allow the pot to dry completely. This usually takes 24-48 hours depending on humidity. Don’t rush this part or cracks may appear. -
Sand for smoothness:
Once bone dry, take fine-grit sandpaper and gently sand the outside to remove any bumps or fingerprints, creating a professional finish. -
Block the bottom color:
Using painter’s tape, tape a horizontal line around the bottom third of the pot. Paint this lower section a deep terracotta orange. -
Paint the top section:
Once the bottom is dry, remove the tape. Paint the upper two-thirds with a lighter peach or soft skin-tone color. Use two coats if needed for opacity. -
Add the smile:
With a very fine brush and black paint, carefully paint a small ‘U’ shape for the smile centered between the eye indentations. -
Define the eyes:
Dip the end of a paintbrush handle into black paint and dab it into the eye indentations you made earlier for perfectly round eyes. -
Rosy cheeks:
Use a small dotting tool or the tip of a brush handle to add two small pink circles just outside the smile line for blushing cheeks. -
Seal the deal:
Finish by applying a coat of clear matte varnish over the entire piece to protect the paint and give it a finished sheen.
Make it yours
Try painting patterns on the bottom section, like stripes or polka dots, instead of a solid block color for extra flair.
Now your desk has a cheerful new buddy ready to hold all your favorite pens and pencils
Simple Clay Picture Frame
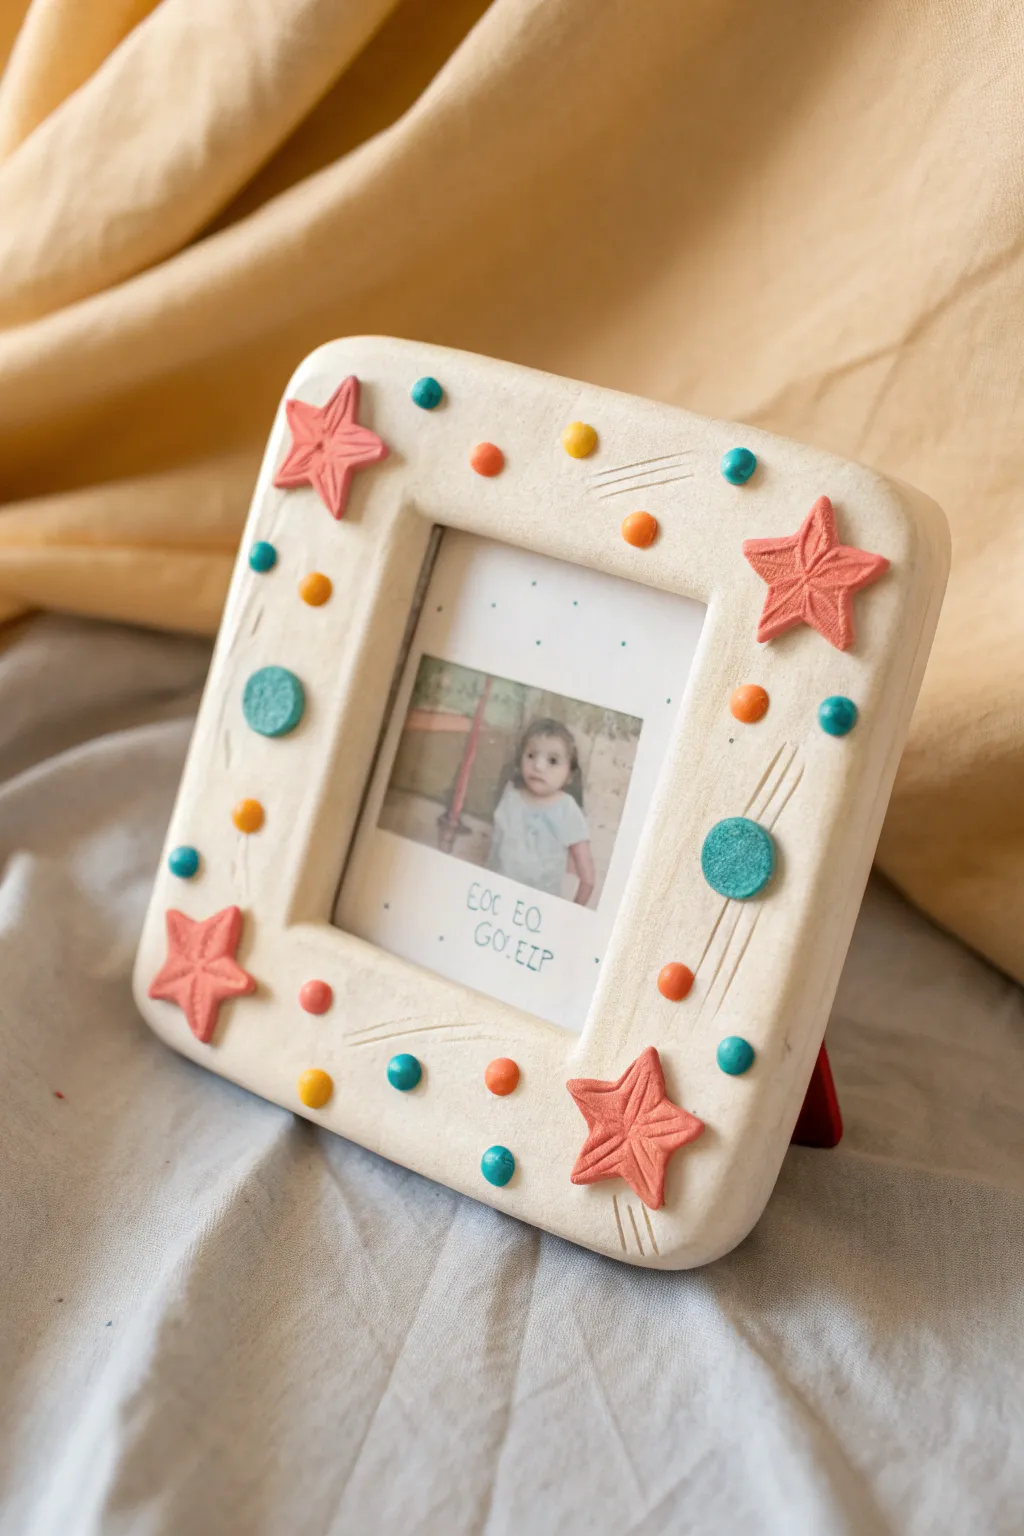
Transform a simple lump of clay into a celestial keepsake with this charming picture frame project. Featuring playful stars and colorful dots on a creamy base, it’s the perfect way to display a favorite Polaroid-style photo.
How-To Guide
Materials
- White air-dry clay or polymer clay (approx. 500g)
- Acrylic paints (pink, orange, teal, yellow, blue)
- Small rolling pin
- Square cookie cutter (approx. 3-4 inches) or craft knife
- Ruler
- Small star-shaped clay cutter (or mold)
- Sculpting tool with a pointed tip (or a toothpick)
- Strong craft glue
- Fine-grit sandpaper
- Clear varnish or sealant (optional)
- Cardboard and cardboard stand backing
Step 1: Shaping the Base
-
Prepare the Clay:
Start by kneading your white clay until it is soft, pliable, and free of cracks. This ensures a smooth surface for your frame. -
Roll it Out:
On a clean, flat surface, roll the clay out to an even thickness of about 1 centimeter. You want it sturdy enough to stand up but not too heavy. -
Cut the Shape:
Using a craft knife and ruler, cut out a square approximately 6×6 inches. Smooth the cut outer edges with a little water on your finger to round them off gently. -
Create the Window:
Place your square cookie cutter in the exact center of the clay square and press down to remove the middle section. If cutting by hand, measure a smaller square window and cut carefully with your knife. -
Refine the Edges:
Take a moment to smooth the inner window edges. I like to use a slightly damp sponge for this step to get a really professional finish. -
Add Texture:
Using your pointed sculpting tool or a toothpick, gently scratch sets of three or four parallel lines near the corners and sides to create the decorative ‘shooting star’ trails shown in the photo.
Step 2: Creating Decorations
-
Form the Stars:
Roll out a small separate piece of clay. Use your star cutter to make four stars. If you want them to look like the image, gently press a crisscross pattern into the center of each star for added texture. -
Make the Dots:
Roll tiny balls of clay between your fingers in various sizes—some small like beads, some slightly larger and flattened into discs. -
Attach the Elements:
Score the back of your stars and dots (scratch them up a bit) and add a dab of clay slip or water. Press them firmly onto the frame base. Place stars near the corners and scatter dots randomly. -
Drying Time:
Let the entire assembly dry completely. For air-dry clay, this usually takes 24-48 hours depending on humidity. Flip it halfway through to ensure the back dries evenly.
Cracks Appearing?
If small cracks appear while the clay dries, mix a tiny bit of fresh clay with water to make a paste and fill them in like spackle before painting.
Step 3: Painting and Finishing
-
Sanding:
Once bone dry, gently sand any rough edges or fingerprints with fine-grit sandpaper. -
Painting the Stars:
Paint the four stars with a soft coral or salmon-pink acrylic paint. Use a small detail brush to get into the textured crevices. -
Painting the Dots:
Paint the scattered dots in alternating colors: bright orange, teal blue, yellow, and navy. Make sure the colors pop against the white background. -
Add the Detail Work:
Paint the larger, flat clay discs teal. Once dry, you can add a subtle texture or highlight to these if you wish. -
Seal the Frame:
Apply a coat of clear varnish (matte or satin works best here) to protect the paint and give the clay a finished look. -
Assemble the Backing:
Cut a piece of sturdy cardboard slightly smaller than the frame. Glue it to the back on three sides (left, bottom, right), leaving the top open to slide a photo in. -
Add a Stand:
Fold a stiff piece of cardboard into a triangle kickstand and glue it to the back panel so your frame can stand upright on a shelf.
Clean Edges
Dip your finger in water and run it along every cut edge before drying. This ‘burnishing’ step removes sharp burrs and minimizes sanding later.
Now slide in your favorite memory and enjoy your handmade display piece
Mini Clay Food Charms
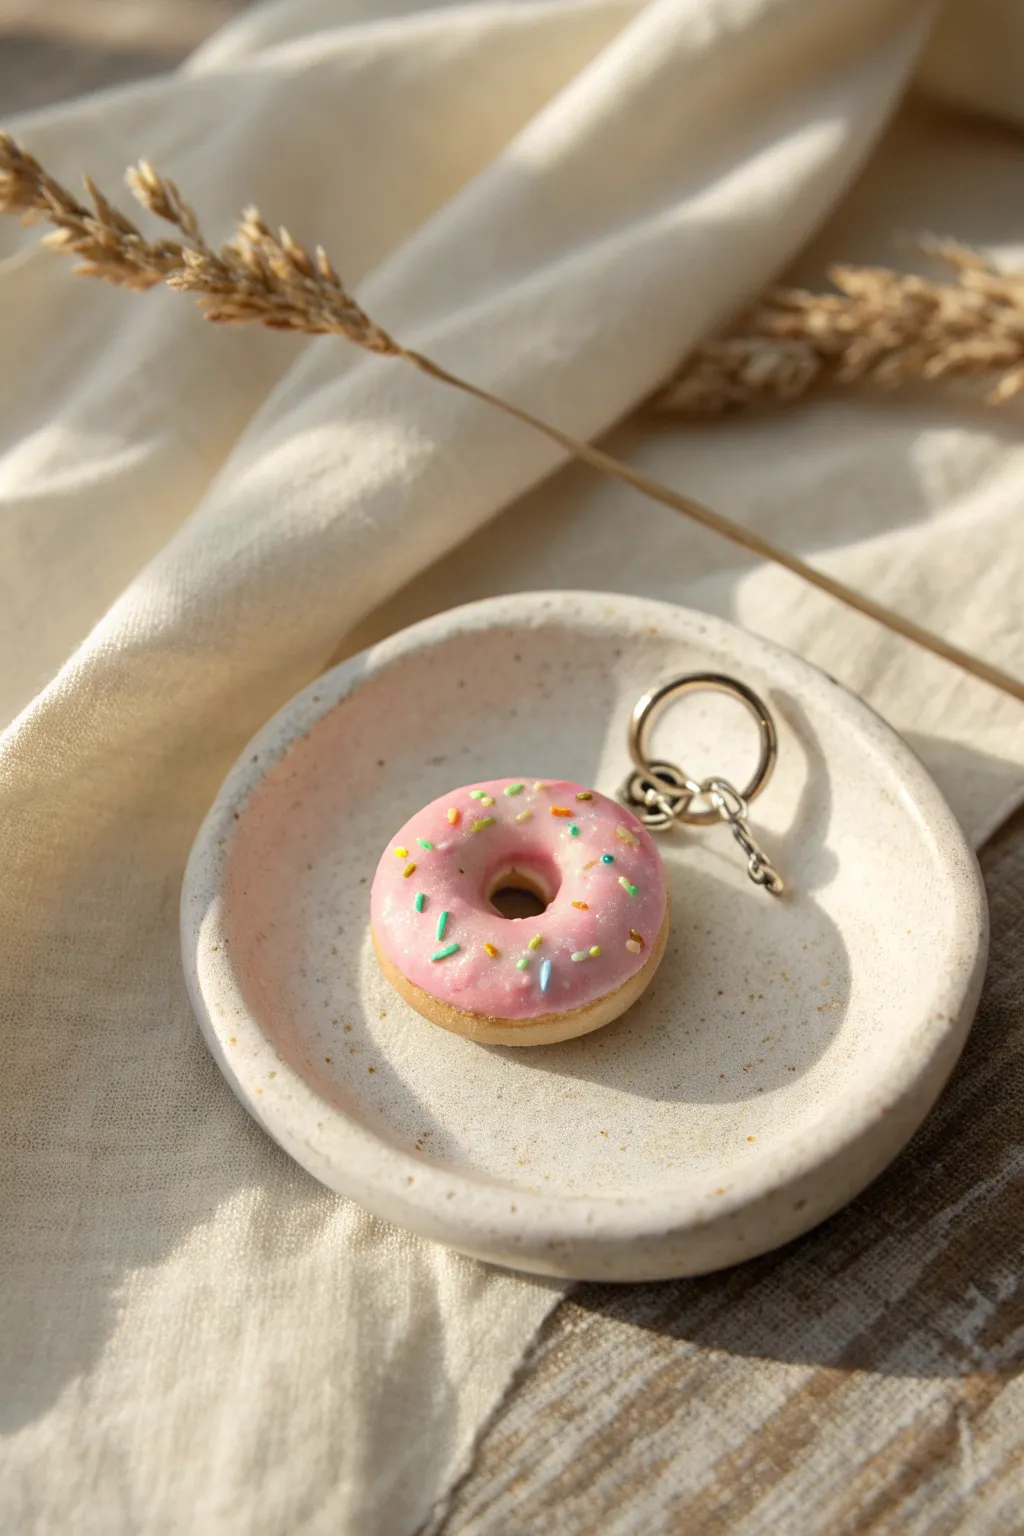
This adorable mini donut charm looks good enough to eat with its realistic golden-brown dough and glossy pink icing. It’s a perfect beginner project that results in a delightful keychain or zipper pull for your bag.
Step-by-Step
Materials
- Beige or tan polymer clay
- Pink polymer clay
- Various colors of polymer clay for sprinkles (blue, yellow, green, white)
- Soft pastel chalk (yellow ochre, brown)
- Small paintbrush
- Toothpick or needle tool
- Rolling pin or smooth round marker
- Small circle cutter (optional)
- Eye pin
- Jump ring and keychain hardware
- Gloss glaze or polyurethane varnish
Step 1: Shaping the Dough Base
-
Condition the clay:
Start by kneading a small amount of beige clay until it’s soft and pliable. This conditioning step prevents cracks later on. -
Form a ball:
Roll the conditioned clay into a smooth, crack-free ball about the size of a large marble. -
Flatten deeply:
Gently press the ball down onto your work surface with your palm to create a thick disc shape. Don’t flatten it too much; you want it to look puffy like a real raised donut. -
Create the center hole:
Use the back of a paintbrush or a small tool to press a hole directly into the center of the disc. Make the hole slightly larger than you think it needs to be, as it tends to close up a bit during baking. -
Refine the shape:
Smooth out the edges of the hole with your finger or a spherical tool to make it look rounded and natural rather than sharp. -
Add texture (optional):
For extra realism, take an old toothbrush and gently tap it all over the surface of the beige clay to mimic the texture of fried dough. -
Shade the dough:
Scrape a little bit of yellow ochre and brown pastel chalk into a fine powder. Use a dry paintbrush to dust this powder gently around the edges and bottom of the donut to give it a ‘baked’ look.
Step 2: Adding the Sweet Toppings
-
Prepare the icing:
Knead a smaller piece of pink clay until soft. -
Flatten the pink clay:
Roll the pink clay out into a thin sheet. It needs to be much thinner than your donut base. -
Cut the icing shape:
Use a small cutter or just tear a rough circle shape that is slightly smaller than the top of your donut. -
Apply the icing:
Place the pink clay securely on top of the beige donut. Gently press from the center outwards. -
Detail the hole:
Poke through the center hole again to clear the pink clay, pressing the edges down inside the hole. -
Create the drip effect:
Use your finger or a smooth tool to gently pull the edges of the pink clay down the sides of the donut in random spots, making it look like dripping glaze. -
Make sprinkles:
Roll very tiny, thin snakes of blue, yellow, green, and white clay. I usually roll them thinner than a toothpick. -
Cut and place sprinkles:
Use a craft knife or blade to cut tiny segments from your clay snakes. -
Decorate:
Press these tiny bits gently onto the pink icing in a random pattern. Ensure they adhere well so they don’t pop off later.
Uneven Sprinkles?
If your sprinkles look clunky, try pre-baking your thin clay snakes for 5 mins first. Then chop them up rigid—they’ll keep their sharp shape perfectly!
Step 3: Finishing Up
-
Insert hardware:
Trim an eye pin to an appropriate length and push it securely into the side or top of the donut. -
Bake:
Bake the charm according to your clay package instructions. This is typically around 275°F (130°C) for 15-20 minutes depending on thickness. -
Cool down:
Let the piece cool completely before handling. Just-baked clay is still fragile. -
Glaze:
Apply a coat of gloss glaze strictly to the pink icing area to make it look wet and sugary. Leave the dough part matte. -
Assemble keychain:
Once the glaze is dry, use pliers to attach a jump ring and your keychain hardware to the eye pin.
Scented Charm Hack
Before baking, mix a tiny drop of vanilla or strawberry essential oil into the clay. Your donut won’t just look sweet, it will smell like a bakery too.
Attach your new donut charm to your backpack and enjoy showing off your mini masterpiece
Tiny Fairy Garden Houses
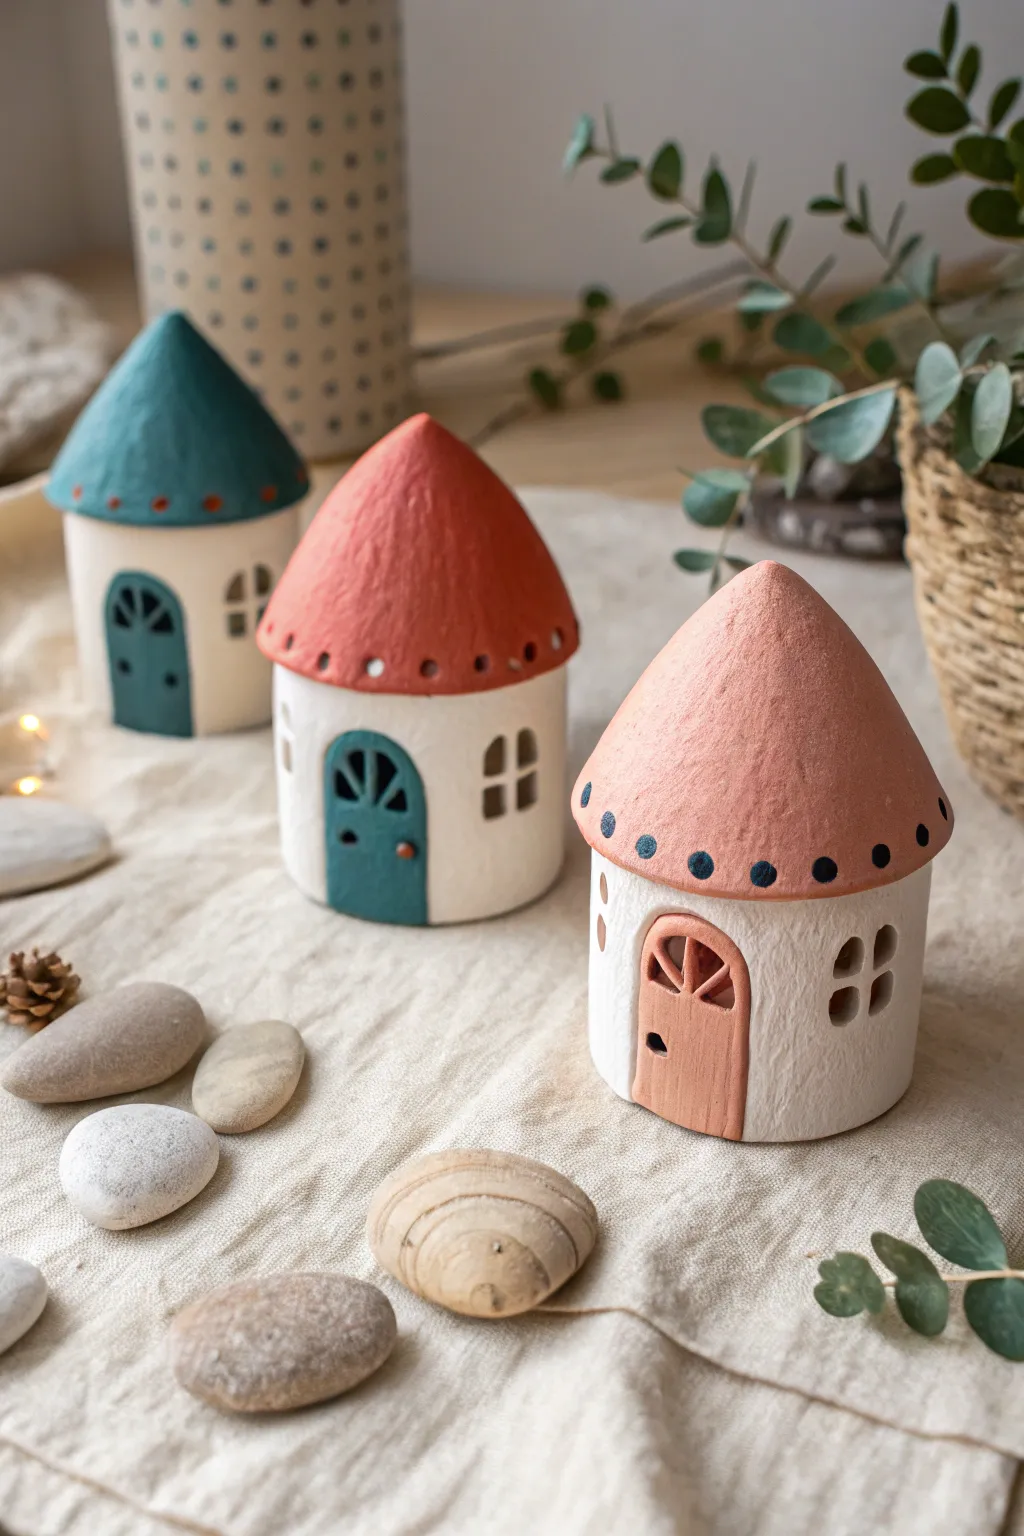
These enchanting miniature dwellings bring a touch of fairytale magic to any shelf or play area. With their textured roofs and charming arched doorways, they look like they were plucked straight from a woodland storybook.
Step-by-Step Guide
Materials
- White air-dry clay (approx. 500g per house)
- Acrylic paints (teal, terracotta, light pink, white, black/dark grey)
- Small paintbrush (flat and detail brushes)
- Clay rolling pin
- Modeling tools or a plastic knife
- Small circular cutter (or a bottle cap)
- Water in a small cup
- Sandpaper (fine grit)
- Toothpick or skewer
- Aluminum foil (optional, for armature)
Step 1: Shaping the Base
-
Prepare the core:
Start by rolling a ball of white air-dry clay roughly the size of a tennis ball. If you want to save clay and keep the house light, you can ball up some aluminum foil first and wrap the clay around it. -
Form the cylinder:
Gently roll the ball on your work surface to create a thick cylinder shape. Tap the top and bottom flat so it stands sturdily on its own. -
Smooth the walls:
Dip your finger in a little water and smooth out any cracks or fingerprints on the cylinder’s surface. You want a nice, rustic texture, but no deep fissures. -
Carve the windows:
Using a small square cutter or a knife, carefully cut out two or three small rectangular windows. Gently press the edges inward to round them off slightly. -
Create window panes:
Roll a very thin snake of clay. Cut tiny pieces to form a cross shape and press them gently inside the window openings to make the panes.
Step 2: Crafting the Roof
-
Shape the cone:
Take a new lump of clay and roll it into a ball, then shape it into a cone. The base of the cone should be slightly wider than your house cylinder. -
Hollow it out:
Press your thumb into the bottom of the cone to hollow it out slightly. This helps it sit securely on top of the base rather than just balancing there. -
Add texture:
Before attaching, I like to gently press a crumpled paper towel or sponge against the roof surface to give it that stony, natural texture seen in the photo. -
Attach the roof:
Score the top of the cylinder and the inside rim of the roof with a needle tool or toothpick. Add a dab of water (slip) and press the roof firmly onto the base. -
Detail the rim:
Use the back of a small paintbrush or a dotting tool to press a row of small indentations all around the bottom edge of the roof.
Cracks while drying?
Mix a tiny bit of fresh clay with water to make a paste (slip). Fill any cracks, smooth with a damp finger, and let it dry again.
Step 3: Adding the Door
-
Cut the arch:
Roll out a small flat slab of clay about 3mm thick. Cut out an arched shape that fits proportionally on the front of your house. -
Design the door:
Using a needle tool, lightly carve lines to mimic wood planks or create a window design within the door arch. Don’t cut all the way through. -
Attach the door:
Score the back of the door and the spot on the house where it will go. Apply a little water and press the door onto the cylinder. -
Add a handle:
Roll a tiny speck of clay into a ball and press it onto the door to serve as the doorknob. -
Dry completely:
Set the house aside to dry. This usually takes 24-48 hours depending on thickness. Rotate it occasionally so the bottom dries evenly.
Light it up!
Make the house hollow from the bottom up. Once dry, place it over a battery-operated tea light candle for a glowing nightlight window effect.
Step 4: Painting and Finishing
-
Sand edges:
Once bone dry, use fine-grit sandpaper to smooth any sharp peaks or rough spots on the base, leaving the roof textured. -
Paint the roofs:
Paint the roof cones in solid, matte colors. Use a deep teal for one, a warm terracotta red for another, and a soft salmon pink for the third. -
Paint the doors:
Carefully paint the doors. For the teal-roofed house, match the door color. For the pink one, use a slightly darker shade of pink or terracotta. -
Add the dots:
Dip the non-brush end of your paintbrush into a contrasting paint color (like dark blue or terracotta) and stamp dots into the indentations along the roof rim. -
Seal (optional):
If these will live near real plants, apply a coat of matte spray varnish to protect them from moisture.
Group your little village together on a windowsill or scatter them among your houseplants for a hidden world feeling