When I need a quick creative reset, I reach for a little lump of clay and make simple clay sculptures that come together from just a few basic shapes. Here are my favorite simple clay sculpture ideas for beginners—cute, sturdy, and totally doable with minimal tools.
Pinch-Pot Owl
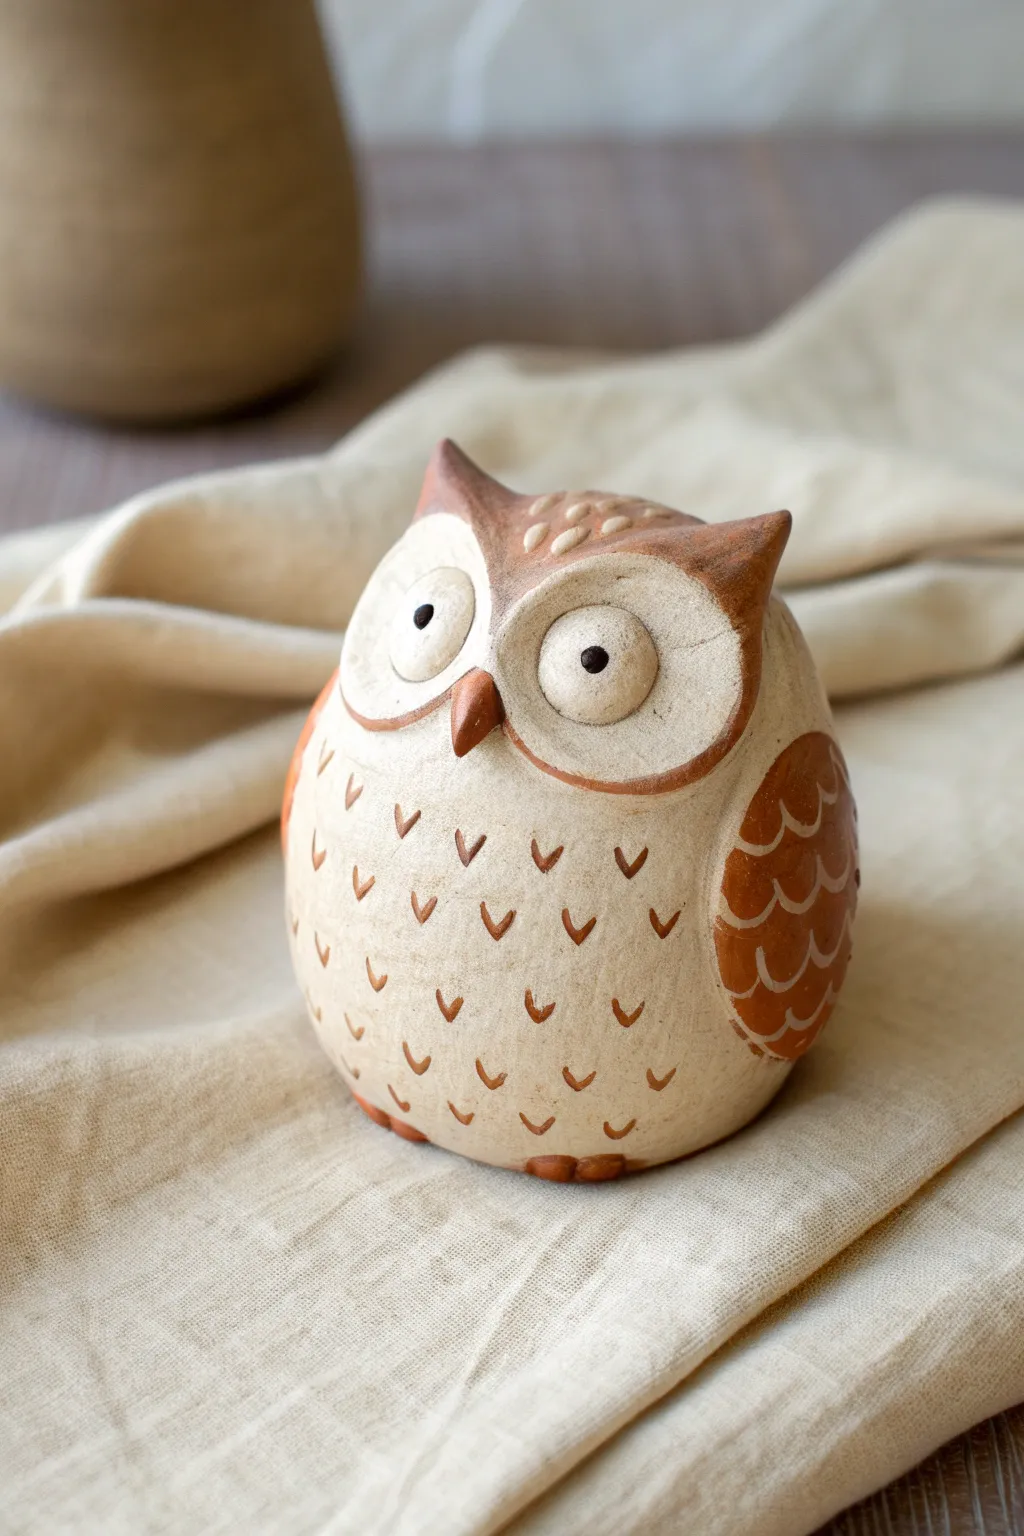
This charming, round-bellied owl starts as a simple pinch pot but evolves into a character-filled sculpture with rustic textures. The warm, unglazed clay finish combined with reddish-brown accents gives it a cozy, organic feel perfect for any shelf.
Detailed Instructions
Materials
- Light-colored stoneware or polymer clay (cream/beige)
- Red-brown underglaze or acrylic paint (terracotta color)
- Black acrylic paint or glaze
- Rolling pin
- Needle tool or toothpick
- Small loop tool or carving knife
- Slip and scoring tool (if using ceramic clay)
- Small round paintbrush
- Sponge
Step 1: Forming the Base Body
-
Create the pinch pot:
Start with a ball of clay about the size of a large orange. Insert your thumb into the center and gently pinch the walls while rotating the ball to create a deep, even cup shape. -
Close the form:
Once the walls are even, gently curve the top edges inward until they touch, effectively closing the sphere. If you are using ceramic clay, score and slip the edges to seal the air inside, creating a hollow enclosed ball. -
Shape the owl:
Gently paddle the clay ball on your work surface to flatten the bottom so it sits stable. Then, subtly manipulate the sphere into a slightly egg-like shape, keeping the wider part at the bottom for that chubby owl look. -
Pinch the ears:
At the top of the head, use your thumb and forefinger to pinch up two distinct points for the ear tufts. Smooth the clay between them so the transition from the forehead is seamless.
Uneven Drying?
If your owl cracks while drying, you likely trapped air or dried it too fast. Poke a tiny pinhole in the hidden base of the sculpture to let expanding air escape safely.
Step 2: Adding Facial Features
-
Make the eye discs:
Roll out a small slab of clay and cut two large circles. Flatten them slightly so they look like discs. -
Attach the discs:
Score the face area and apply a little slip or water. Press the two discs onto the face, positioning them side-by-side so they touch in the middle. Smooth the outer edges down into the main body. -
Carve the eyes:
Within each disc, imprint a concentric circle or carve a shallow line to define the rim of the eye. In the very center, press a small divot where the pupil will eventually be painted. -
Add the beak:
Roll a tiny cone of clay. Score the spot where the eye discs meet and attach the beak pointing downward. Smooth the top seam so it looks like it’s emerging from the face.
Level Up: Texture
Before painting, gently rub the entire unpainted body with a rough scrubbing pad or toothbrush. This creates a realistic, stone-like texture on the ‘feathers’
Step 3: Detailing and Texture
-
Define the wings:
Using a needle tool, lightly sketch the outline regarding the wings on the sides of the body. They should curve from the shoulder area down towards the base. -
Carve wing feathers:
Inside the wing outline, carve rows of ‘U’ shapes or scallops to represent feathers. Press firmly enough to create a texture that will catch the paint later. -
Create belly feathers:
For the chest and stomach, use a small V-shaped tool or just the tip of your needle to press in small ‘V’ marks. Scatter them in an alternating pattern, becoming slightly denser near the bottom. -
Stamp tiny feet:
At the very bottom front edge, press two small balls of clay for feet, marking three toes on each with your knife tool. -
Dry or Bake:
If using ceramic clay, allow the piece to dry slowly to leather hard before firing. If using polymer clay, bake according to the manufacturer’s instructions.
Step 4: Painting and Finishing
-
Paint the accents:
Mix a warm terracotta or reddish-brown paint. Carefully paint the wing areas, the top of the head, and the beak. I personally like to water down the paint slightly so it sinks into the carved lines. -
Detail the head:
While painting the top of the head, leave small unpainted dashes or spots to mimic the spotted pattern seen on the forehead. -
Define the wings:
If the paint filled your carved wing feathers too much, you can gently wipe the surface with a damp sponge (if using underglaze) or paint the feather outlines in a lighter cream color to make them pop. -
Paint the eyes:
Use a fine brush to paint the center pupils pitch black. Add a tiny white dot as a highlight to bring the owl to life. -
Finish body markings:
Take a very fine brush with your reddish-brown paint and carefully fill in the small ‘V’ marks on the belly.
Place your finished owl on a bookshelf or windowsill where he can keep watch over the room


Chunky Frog Buddy
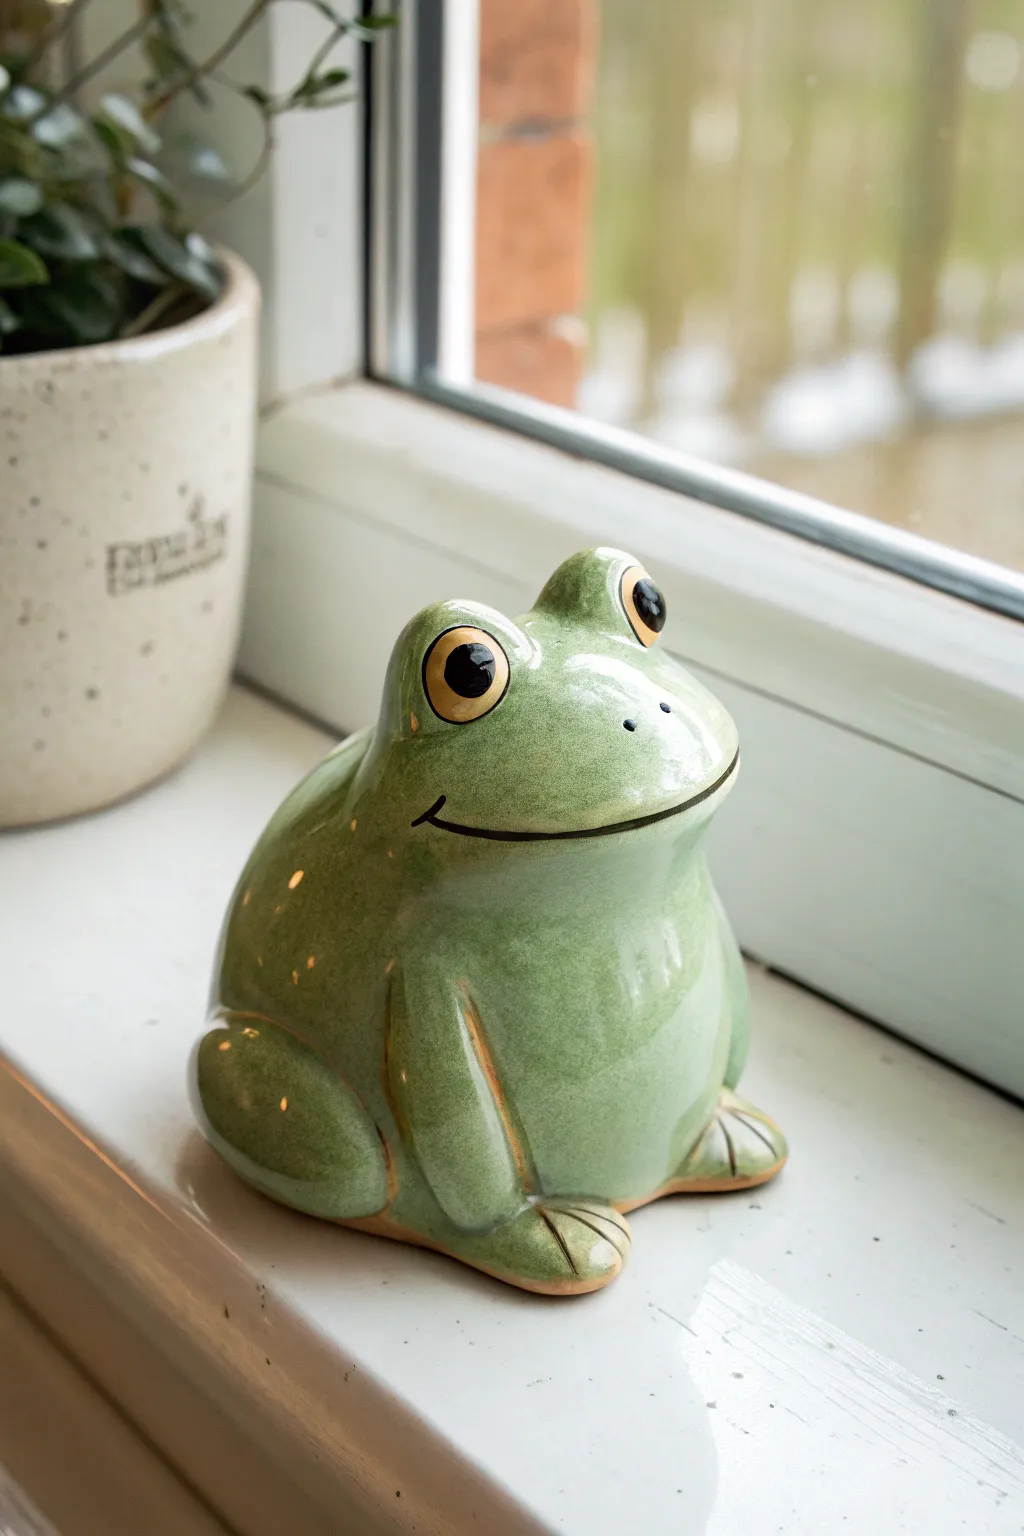
Brighten up any windowsill with this delightfully plump ceramic frog friend, featuring a glossy green glaze and an infectious smile. Its rounded, heavy-bottomed shape makes it a stable and satisfying project for sculptors of all skill levels.
Step-by-Step
Materials
- White or speckled stoneware clay
- Pottery wheel (optional) or rolling pin
- Sponge
- Stylus tool or needle tool
- Loop trimming tool
- Rib tool (rubber)
- Small paintbrush
- Water and slip container
- Celedon or sage green glossy glaze
- Yellow/amber glaze (for eyes)
- Black underglaze (for pupils)
Step 1: Shaping the Body
-
Start the base:
Begin with a ball of well-wedged clay about the size of a grapefruit. You can either throw a closed form on the wheel or build a hollow pinch pot from two hemispheres joined together. -
Refine the shape:
Shape the clay into a relaxed, seated posture. The bottom should be widest, tapering slightly toward the top, like a rounded teardrop that has settled due to gravity. -
Smooth the surface:
Use a damp sponge or a soft rubber rib to completely smooth the exterior. You want to erase any finger marks or joining seams to prepare for that high-gloss finish later. -
Vent the body:
Flip the frog over and create a small hole in the bottom with your needle tool. This allows trapped air to escape during firing so your chunky buddy doesn’t explode.
Step 2: Sculpting Features
-
Create the eye sockets:
Roll two small balls of clay for the eyes. Score and slip the top of the head where they will sit, ensuring they are spaced wide enough for a friendly expression. -
Attach the eyes:
Press the eye balls firmly onto the head. Use a small wooden modeling tool to blend the clay from the back of the eye downward into the head, creating a seamless eyelid transition. -
Form the legs:
Roll two thick coils of clay for the rear legs. I like to flatten them slightly into an elongated oval shape that hugs the curve of the body. -
Attach the legs:
Score and slip the sides of the body and press the leg coils into place. Blend the upper edges smoothly into the body, but leave the front curve distinct to show the thigh muscle. -
Sculpt the feet:
At the bottom of each leg, flatten a small pad of clay. Use a fettling knife or needle tool to gently impress three lines to suggest toes, keeping the edges soft and rounded. -
Carve the smile:
Using a needle tool, lightly sketch a wide, U-shaped mouth. Once you are happy with the curve, deepen the line slightly to ensure the glaze pools nicely there later. -
Refine and dry:
Give the entire piece one final sponge wipe to soften any sharp edges. Let the frog dry slowly under plastic to the leather-hard stage, then fully dry before bisque firing.
Smoother Surfaces
Burnish the clay with the back of a spoon when leather-hard. This compresses surface particles and creates an ultra-smooth base for shiny glazes.
Step 3: Glazing and Finishing
-
Bisque fire:
Fire the piece in the kiln to cone 04 (or your clay’s specific bisque temperature). -
Apply wax resist:
Paint liquid wax resist on the very bottom of the frog so it doesn’t stick to the kiln shelf. -
Paint the pupils:
Use a small detail brush to paint absolute black underglaze in the center of the eyes. -
Glaze the irises:
Carefully dab a drop of amber or yellow glaze around the black pupil. Be precise here so the colors don’t bleed too much. -
Dip the body:
Holding the frog by the unglazed footpads (or using glazing tongs), dip the entire frog into your sage green glaze. Ensure the glaze covers everything except the bottom. -
Clean up details:
If glaze covered the eyes, gently wipe it back with a wet brush tip, or simply let the green glaze remain if it is transclucent enough. For this specific look, paint around the eyes carefully. -
Final fire:
Place the frog in the glaze firing (usually Cone 5 or 6). The heat will melt the green glaze into that beautiful, glassy finish.
Garden Guardian
Before drying, slice a large coin slot in the back and make the body hollower to turn this sculpture into a functional piggy bank for garden savings.
Place your finished frog near natural light to let those bright eyes and glossy coat really shine


Easy Turtle With Disc Shell
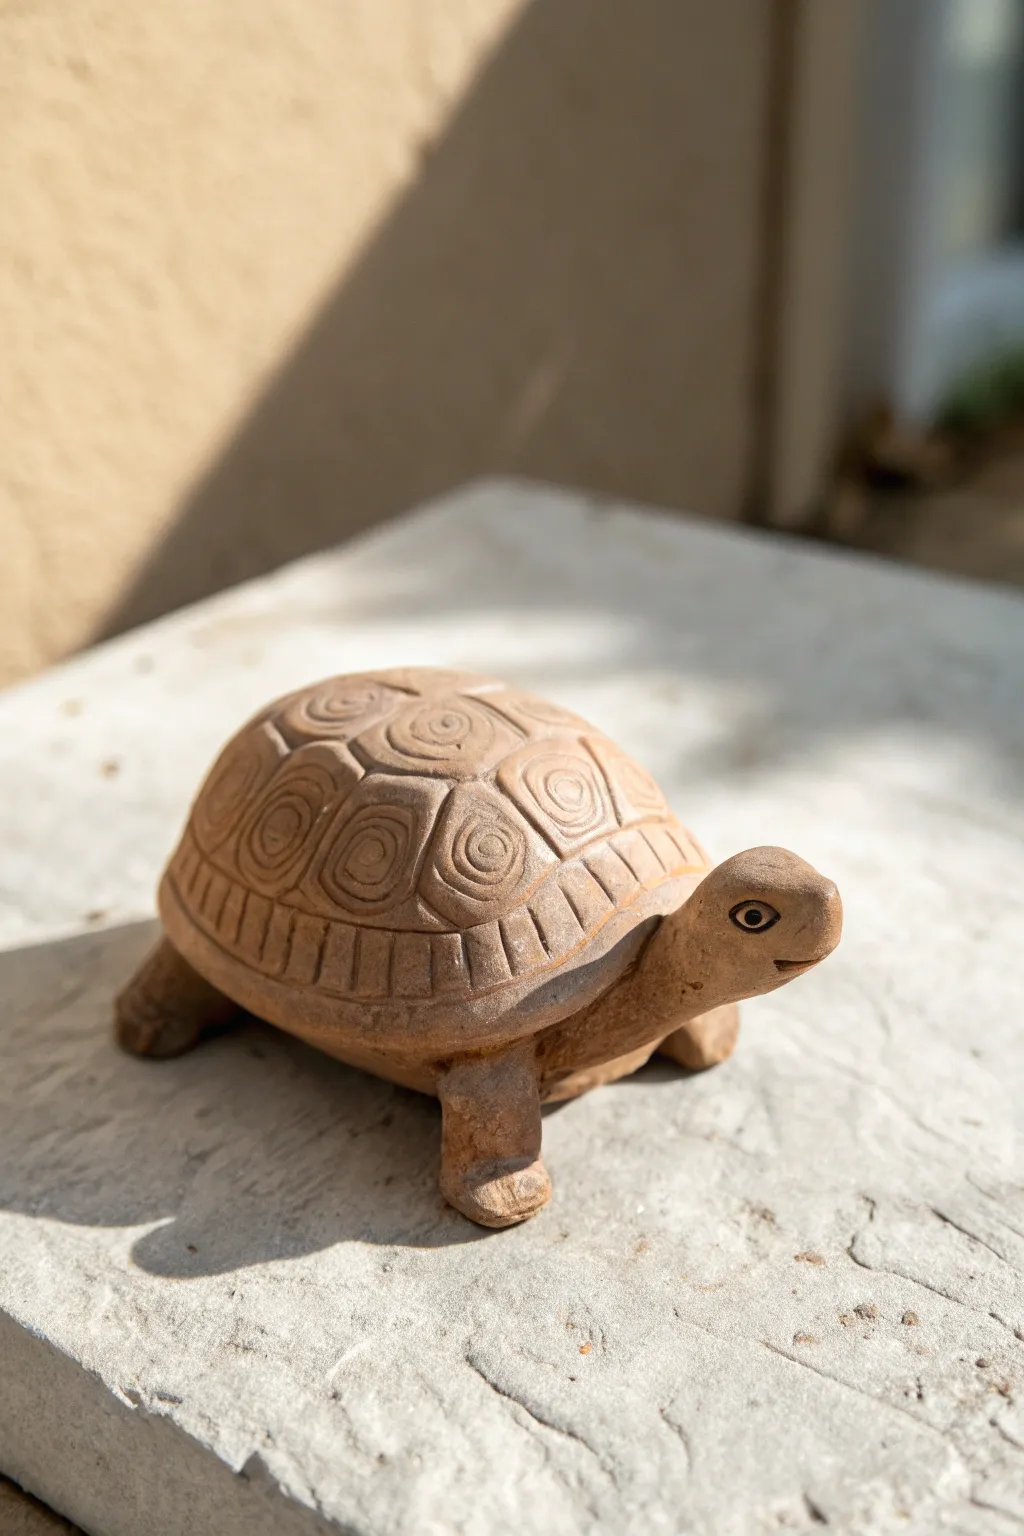
This charming little turtle features a domed shell decorated with classic spiral motifs and a friendly, upturned face. It’s a wonderful introductory project for working with terracotta-colored clay, focusing on simple shaping techniques and incised texturing.
Step-by-Step Tutorial
Materials
- Terracotta air-dry clay or polymer clay
- Rolling pin
- Small circular cookie cutter or bottle cap
- Needle tool or toothpick
- Small loop tool or carving tool
- Slip (clay and water mix) or scoring tool
- Fine grit sandpaper (for finishing)
- Black acrylic paint (optional, for eyes)
Step 1: Forming the Base Body
-
Shape the main body:
Start with a lump of clay about the size of a lemon. Roll it into a smooth ball in your palms, then gently press it into an oval shape to create the bulk of the turtle’s body. -
Flatten the bottom:
Press the oval firmly onto your work surface to create a flat belly. This ensures your turtle sits stably and doesn’t rock back and forth. -
Create the legs:
Roll four smaller balls of clay, roughly the size of large marbles. Slightly flatten them into cylinder shapes to form stout, sturdy legs. -
Attach the legs:
Score the underside of the body and the tops of the legs using your needle tool. Add a dab of slip (or water if using polymer) and press the legs firmly into place at the four corners. -
Blend the seams:
Use your thumb or a modeling tool to smooth the clay where the legs meet the body, ensuring there are no visible gaps or cracks. -
Form the head and neck:
Shape a slightly elongated teardrop for the head and neck. The neck end should be thicker to blend into the body, while the nose should taper slightly. -
Attach the head:
Score and slip the front of the body and the base of the neck. Press them together, blending the clay downward into the chest area so the neck extends upwards at an angle.
Step 2: Sculpting the Shell
-
Create the shell dome:
Take a larger portion of clay and roll it into a ball, then flatten it into a thick disc. Gently mold this over the back of your turtle to create the rounded carapace. -
Define the shell rim:
Use your needle tool or a knife tool to create a shallow groove around the bottom edge of the shell, separating the ‘rim’ from the main dome. -
Mark the scute sections:
Lightly sketch a grid or hexagonal pattern on the dome to map out where the shell plates (scutes) will go. A central row with surrounding plates works best. -
Add spiral details:
Using a small loop tool or a semi-dull pencil, carve a spiral into the center of each marked section. Apply consistent pressure to keep the lines clean. -
Carve the dividing lines:
Deepen the lines between the spirals to create distinct separation between the shell plates, giving it that segmented look. -
Texture the rim:
Use a knife tool or the side of a credit card to press vertical lines all around the bottom rim of the shell for added detail.
Clean Lines Pro-Tip
When carving the spirals, wait until the clay has stiffened slightly (leather hard). Creating details on soft clay can result in mushy lines.
Step 3: Finishing Touches
-
Sculpt the face:
Use a small tool to press a line for the mouth, giving it a slight upward curve for a smile. Poke two small holes for the nostrils. -
Add the eyes:
Press a small indentation for the eye socket, then place a tiny ball of clay inside. Use a needle tool to poke a pupil in the center. -
Detail the feet:
incise two or three small lines on the front of each foot to suggest toes or claws. -
Refine the surface:
I like to take a damp sponge or finger and smooth out any unwanted fingerprints on the skin areas, leaving the shell texture crisp. -
Dry and paint:
Allow the clay to dry completely according to package instructions. Once dry, you can paint the pupil black for contrast, or leave it natural for an earthy look.
Texture Twist
Instead of carving spirals, press different household objects like screws, buttons, or lace into the shell plates for a unique stamped texture.
Now you have a timeless nature-inspired sculpture perfect for a garden shelf or desk display


Sleepy Cat Loaf
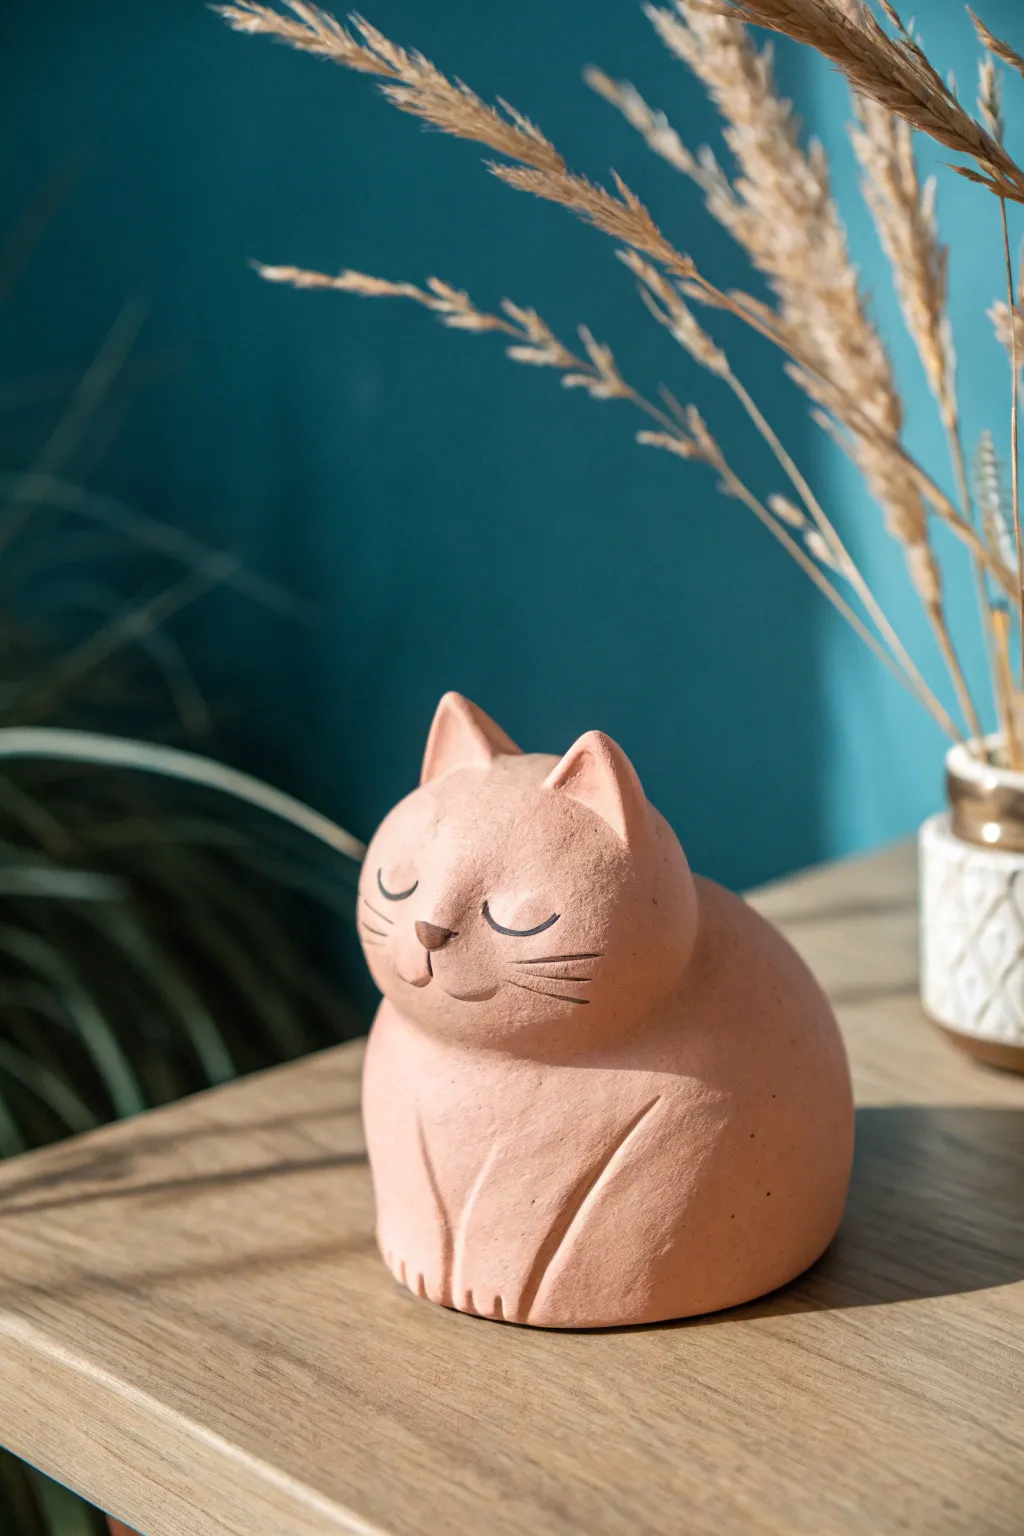
Capture the essence of a serene cat nap with this warm, minimalist sculpture. Its smooth, rounded ‘loaf’ shape and gentle terracotta color make it a soothing addition to any shelf, requiring only simple hand-building techniques to master.
Step-by-Step
Materials
- Air-dry clay (terracotta color) or polymer clay
- Small cup of water (for smoothing)
- Needle tool or toothpick
- Loop tool or clay scraper (optional)
- Fine grit sandpaper
- Black acrylic paint or fine-tip permanent marker
- Matte sealant spray
Step 1: Forming the Base
-
Shape the body loaf:
Start with a large ball of clay roughly the size of a grapefruit. Gently roll it between your palms and then flatten the bottom against your work surface to create a stable, rounded mound. The goal is a smooth, heavy dome shape that feels grounded. -
Define the head:
Visualize where the head should be relative to the body—it’s not a separate ball, but merges seamlessly. Using your thumbs, gently press into the clay to distinguish a slightly smaller, rounded section at the front top. Don’t pinch it off completely; just create a subtle neck indentation. -
Smooth the transition:
Dip your finger in a little water and stroke the clay where the head meets the back. You want a continuous, fluid line from the top of the head down the spine, distinct from the chest area.
Cracking Issues?
If you see small cracks forming while air-dry clay dries, mix a tiny bit of fresh clay with water to make a ‘slip’ paste. Fill the cracks, smooth over, and let dry again away from direct heat or sunlight.
Step 2: Sculpting Features
-
Pinch the ears:
At the top of the head, pinch two small triangles of clay upward to form the ears. Keep them thick at the base so they don’t snap off later. Use your thumb to create the inner ear depression, ensuring the tips point slightly outward. -
Round the cheeks:
Add a tiny amount of extra clay to the cheek area if needed, or simply push the clay from the center face outward to create chubby, rounded cheeks. -
Carve the paws:
Using your needle tool, gently draw the outline of the front paws resting against the chest. Instead of adding separate pieces, carve shallow relief lines into the main body mass to suggest the legs are tucked in close. Make small indentations at the bottom for toes. -
Add the nose:
Roll a very tiny triangle of clay. Score the center of the face lightly, add a drop of water, and press the nose into place. Smooth the edges so it doesn’t look like it’s just stuck on. -
Refine the surface:
I prefer to spend extra time here smoothing everything out. Use a damp sponge or your finger to erase fingerprints. The charm of this piece relies on that ultra-smooth, matte texture.
Step 3: Finishing Touches
-
Dry completely:
Let the sculpture dry. If using air-dry clay, this might take 24-48 hours depending on thickness. If using polymer, bake according to package instructions. -
Sand for perfection:
Once fully cured, use fine-grit sandpaper to gently buff away any remaining bumps or roughness, paying attention to the ears and base. -
Paint the face details:
Using a very fine brush with black acrylic paint (or a permanent marker for easier control), draw two U-shaped curves for the sleeping eyes. Add a small vertical line from the nose to the mouth, and draw three whiskers on each cheek. -
Seal the piece:
Protect your work with a matte spray sealant. Avoid glossy finishes, as the natural, earthy look suits this sleepy subject best.
Make it a Pair
Make a second, slightly smaller cat in a contrasting clay tone (like white or grey) and position them so they are leaning against each other for a cute ‘cuddle puddle’ display.
Now you have a tranquil feline friend that brings a sense of calm to any corner of your home

The Complete Guide to Pottery Troubleshooting
Uncover the most common ceramic mistakes—from cracking clay to failed glazes—and learn how to fix them fast.
Puppy With Sausage Legs
Capture the charm of man’s best friend with this adorable clay sculpture featuring short, sturdy legs and a gentle expression. The smooth, speckled finish gives it a polished, ceramic look that fits perfectly on any windowsill.
Detailed Instructions
Materials
- Air-dry clay or polymer clay (creamy white shade)
- Brown clay (small amount for nose and spots) or acrylic paint
- Modeling tools (or a toothpick and small knife)
- Small rolling pin
- Water (for smoothing)
- Black acrylic paint
- Fine-tipped paintbrush
- Toothbrush (optional for texture)
- Clear matte varnish
Step 1: Shaping the Body
-
Form the torso:
Start with a generous handful of cream-colored clay. Roll it into a thick, smooth sausage shape, roughly 4-5 inches long. Gently round both ends so there are no sharp edges. -
Create the legs:
Roll four smaller, equal-sized balls of clay. Press these into short, stout stumps. These will be the signature ‘sausage legs’ that give the puppy its sturdy stance. -
Attach the legs:
Score the underside of the body and the tops of the leg stumps with a toothpick or needle tool. Add a dab of water (or slip) to the scored areas and press the legs firmly onto the body. -
Blend the seams:
Use a modeling tool or your fingertip to smooth the clay where the legs meet the body. You want a seamless transition so the legs look like they are growing out of the torso, not just stuck on. -
Add paw details:
At the bottom of each leg, use a small knife tool to gently press three vertical indentations. These simple lines suggest toes without needing complex sculpting.
Step 2: Adding the Head and Tail
-
Shape the head:
Roll a ball of clay slightly larger than the width of the body. Gently elongate the front to create a rounded snout area. -
Attach the head:
Score and wet the neck area on the body and the base of the head. Press them together firmly. I like to tilt the head slightly to the side to give the pup a curious expression. -
Make the tail:
Roll a small cone of clay for the tail. Attach it to the upper rear of the body, curving it slightly upward so it looks perky and alert. -
Form the ears:
Flatten two teardrop-shaped pieces of clay. These should be fairly thick but smooth. Attach one to each side of the head, letting them flop down naturally against the cheeks.
Cracks Appearing?
If you see hairline cracks while drying, mix a tiny bit of fresh clay with water to make a paste. Fill the cracks, smooth it over with a finger, and let dry again.
Step 3: Face and Finishing Details
-
Sculpt the nose:
Take a tiny piece of reddish-brown clay (or plain clay you will paint later) and roll it into a small oval. Press this onto the tip of the snout. -
Carve the mouth:
Use a curved tool or the edge of a spoon handle to impress a gentle, upturned smile line right under the snout. Make it asymmetrical for extra cuteness. -
Add texture:
If you want that speckled, stone-like look, you can gently flick a specialized speckle paint or a toothbrush with diluted brown paint over the clay before it fully dries, or wait until after painting. -
Add spots:
Apply small, flat circles of brown clay to the back and rump of the puppy. Press them in until they are flush with the surface. -
Let it dry:
Allow the sculpture to dry completely. For air-dry clay, this usually takes 24-48 hours depending on thickness. Only proceed to painting once it is hard and dry to the touch.
Seamless Join Pro-Tip
When attaching the head or ears, use a small coil of clay around the joint. Smear the coil across the seam to create a much stronger bond than pressing alone.
Step 4: Painting and Sealing
-
Paint the eyes:
Using a fine-tipped brush and black acrylic paint, add two oval eyes. Leave a tiny dot of white in the upper corner of each eye for a reflective highlight, which brings the face to life. -
Add eyebrows:
Paint delicate, thin curved lines floating just above the eyes to create eyebrows. This adds significant personality to the face. -
Enhance the spots:
If you didn’t use colored clay for the spots and nose earlier, paint them now with a warm, earthy brown acrylic. -
Seal the piece:
Once all paint is dry, brush on a coat of clear matte varnish. This will protect your sculpture and unify the finish without making it too shiny.
Place your new clay companion on a shelf or desk where its friendly face can greet you every day
Mini Elephant With Curved Trunk
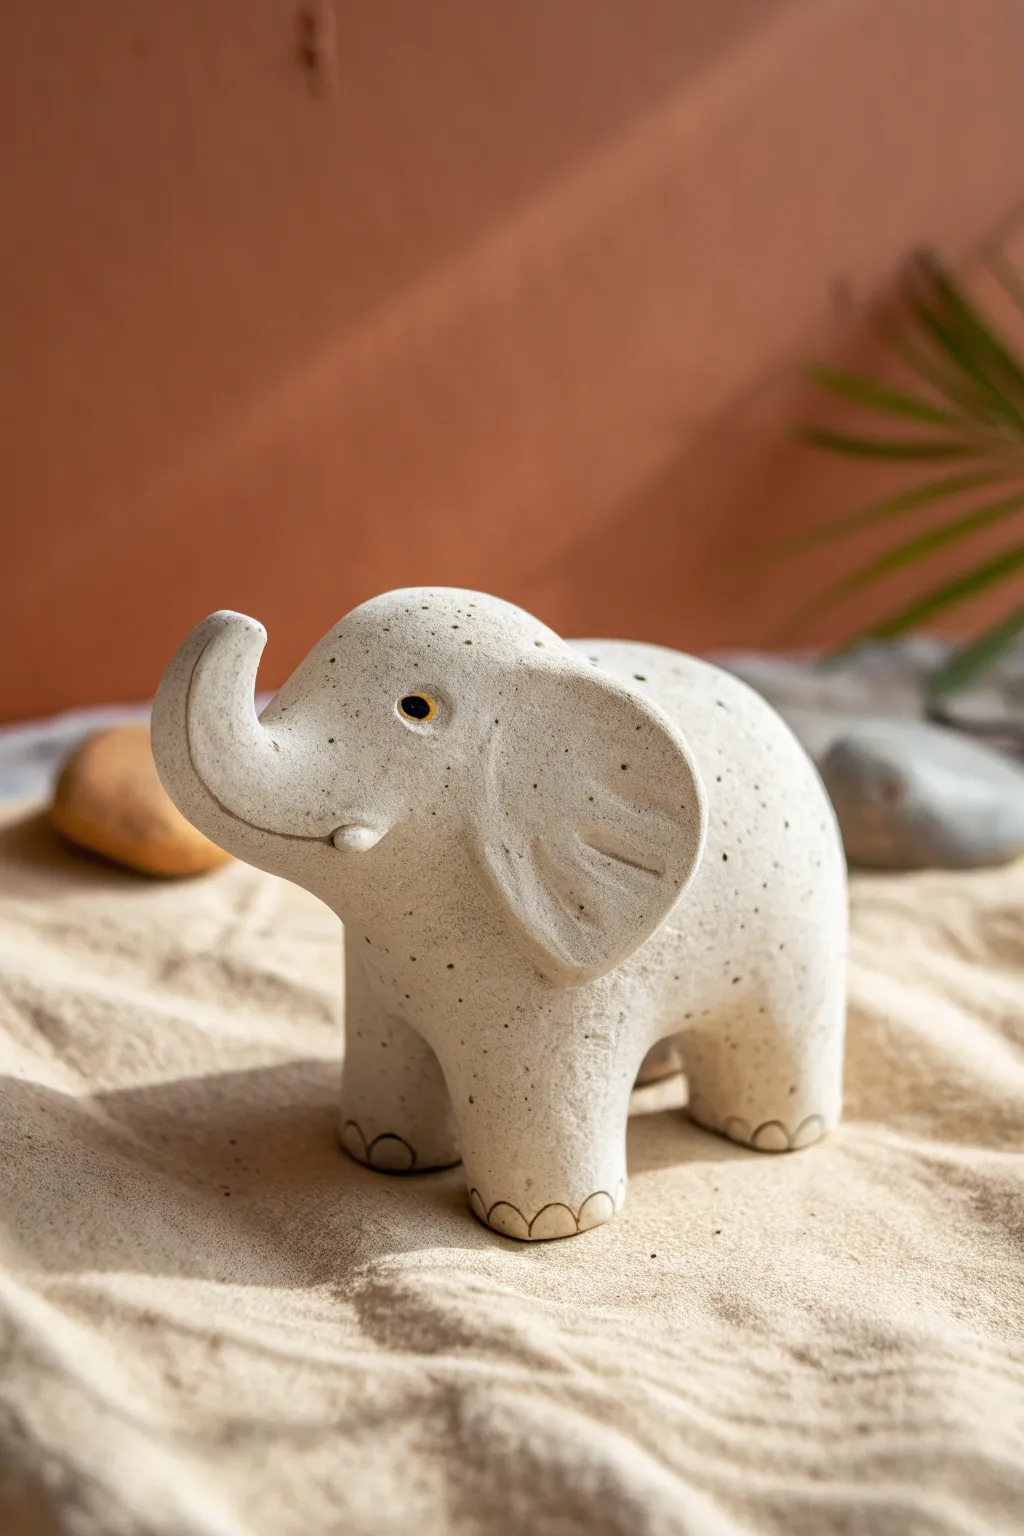
This charming miniature elephant features a unique speckled finish and a friendly, upright posture. Its simplified form and gently upturned trunk make it an approachable sculpting project for beginners looking to add character to their collection.
Step-by-Step Guide
Materials
- White polymer clay or air-dry clay
- Coarse black pepper or black embossing powder (for speckles)
- Sculpting tools (ball stylus, needle tool)
- Small glass bead or yellow acrylic paint (for the eye)
- Black acrylic paint
- Fine-grit sandpaper
- Matte varnish or sealant
Step 1: Preparing the Clay
-
Mix in Texture:
Begin by conditioning your white clay until it is soft and pliable. To achieve the speckled stone look shown in the photo, kneading in a very small pinch of coarse black pepper or black embossing powder. Fold and roll the clay until the speckles are evenly distributed throughout the mass. -
Divide the Portions:
Separate your clay into four distinct parts: a large ball for the body/head unit, four smaller equal-sized balls for the legs, and two medium balls for the ears.
Stone Texture Trick
Use an old toothbrush to gently tap the surface of the damp clay. This creates a subtle micropore texture that makes it look more like carved rock.
Step 2: Sculpting the Body
-
Form the Torso:
Take the largest ball and roll it into a smooth egg shape. Gently pull one end upward and forward to create the neck and head area, ensuring the transition stays smooth without a distinct neck crease. -
Shape the Trunk:
Extend the clay from the ‘head’ portion forward to form the trunk. Roll it between your fingers to taper it, then curl it firmly upward in a ‘J’ shape. Flatten the very tip slightly to create the snout. -
Define the Mouth:
using a clay knife or a needle tool, carve a subtle curved line just under the base of the trunk to form a smiling mouth. I like to press a small dent at the corner of the mouth to give it extra personality. -
Attach the Legs:
Roll your four leg pieces into thick, sturdy cylinders. Press the body onto these legs, blending the clay upwards into the torso with a modeling tool so there are no visible seams. The legs should be thick enough to support the weight.
Make it a Planter
Before drying, hollow out the top of the elephant’s back with a large loop tool. It creates the perfect space for a tiny air plant or succulent.
Step 3: Adding Details
-
Create the Ears:
Flatten your two ear portions into thick, rounded triangles. Press them firmly onto the sides of the head. Position them so they flap slightly forward, giving the elephant an attentive look. -
Detail the ears:
Use a needle tool to gently score two or three lines inside the ear flap, mimicking the natural wrinkles of elephant skin. Keep these lines soft rather than sharp. -
Add Toes:
At the bottom of each leg, use a small loop tool or the tip of a straw cut in half to impress three small semi-circles. These create the stylised toenails visible in the reference. -
Insert the Eye:
Press a small indentation where the eye should go. If you are using a glass bead, press it in now. If painting later, just leave the smooth indentation. -
Smooth the Surface:
Dip your finger in a little water (for air-dry clay) or baby oil (for polymer) and run it over the entire sculpture to remove fingerprints. The finish should look like a smooth, tumbled stone.
Step 4: Finishing Touches
-
Dry or Bake:
Follow the manufacturer’s instructions for your specific clay. If baking polymer clay, support the trunk with a small piece of foil so it doesn’t droop in the oven. -
Paint the Details:
Once hardened, paint the eye indentation yellow with a small black pupil if you didn’t use a bead. You can also run a very diluted wash of brown paint over the toes to define them, then wipe it away quickly. -
Seal the piece:
Apply a coat of matte varnish to protect your work. The matte finish is crucial here to maintain that natural, stony appearance.
Place your new elephant friend on a shelf or in a plant pot to enjoy its cheerful presence


What Really Happens Inside the Kiln
Learn how time and temperature work together inside the kiln to transform clay into durable ceramic.
Simple Whale With Tiny Fins
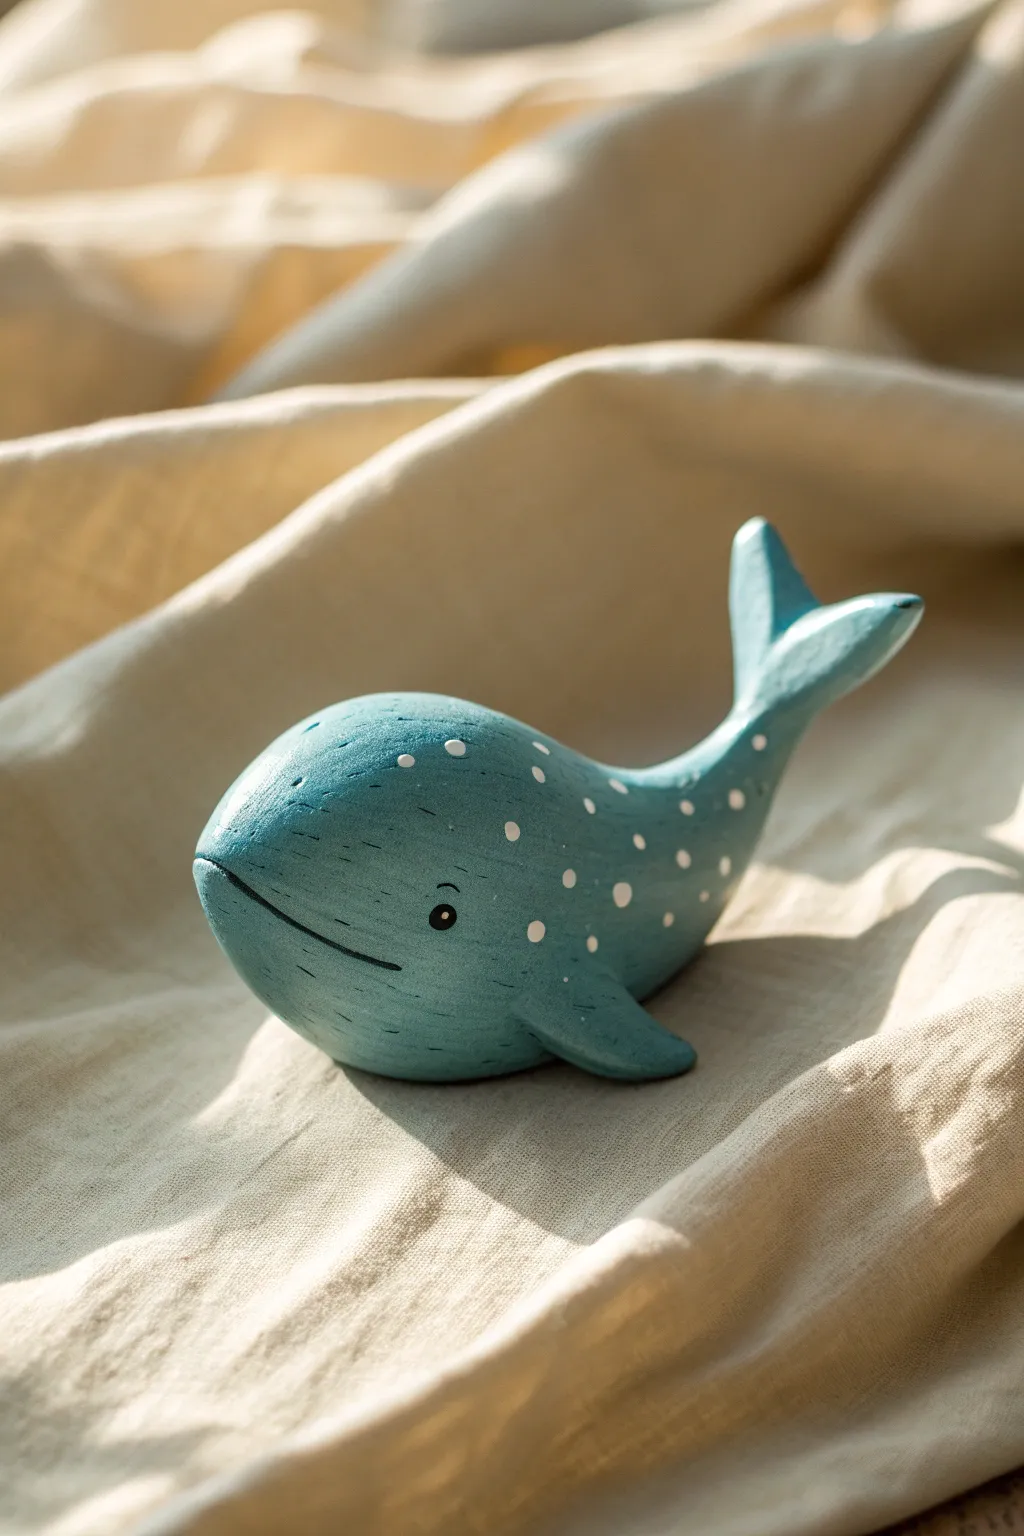
This charming little whale brings a splash of ocean magic to your shelf with its calming teal hue and playful white spots. Its rounded, pebble-like form fits perfectly in the palm of your hand, making it a soothing desk companion or a sweet gift.
Step-by-Step Tutorial
Materials
- Air-dry clay or polymer clay (white or neutral color)
- Acrylic paints (Teal/Turquoise, White, Black)
- Small flat paintbrush
- Fine detail paintbrush or dotting tool
- Modeling tools (or a toothpick)
- Fine-grit sandpaper
- gloss or matte varnish (optional)
Step 1: Sculpting the Form
-
Condition the clay:
Begin by kneading a golf-ball-sized amount of clay until it is warm, pliable, and free of cracks. -
Form the basic body:
Roll the clay into a smooth ball first, then gently roll one side against your work surface to elongate it into a teardrop shape. This tapered end will become the tail. -
Shape the head:
Gently press and round the bulbous end of the teardrop to create a distinct, blunt head. It should feel substantial and rounded, like a smooth river stone. -
Curve the tail:
Lift the tapered tail end and gently curve it upwards. Pinch the very tip to flatten it slightly where the flukes will attach, creating a dynamic swimming pose. -
Create the flukes:
Take a smaller piece of clay and shape it into a triangle. carefully cut a notch in the wide end to create two flukes, and smooth the edges so they aren’t sharp. -
Attach the tail:
Score the end of the body and the base of the flukes with a texturing tool. Apply a tiny dab of water (or liquid clay if using polymer) and press them firmly together. Blend the seam with your finger or a tool until invisible. -
Add the side fins:
Form two small, flattened triangles for the pectoral fins. Attach them low on the body just behind the head area, angling them slightly backward for an aerodynamic look. -
Carve the mouth:
Using a thin blade or the side of a toothpick, press a long, gently curving line into the lower part of the head. I like to make this line quite long to give the whale a serene, gentle expression. -
Smooth the surface:
Dip your finger in a little water (or baby oil for polymer) and gently rub the entire surface to remove fingerprints and bumps. Let the sculpture dry or bake according to your clay package instructions.
Cracked Clay?
If you see cracks forming while air-dry clay dries, dip your finger in a slurry of clay and water (slip) and smooth it into the cracks immediately.
Step 2: Painting and Details
-
Sand for texture:
Once fully cured, use fine-grit sandpaper to briefly buff the surface. This mimics the slightly weathered, wood-carved look seen in the photo. -
Base coat:
Mix a calming teal color using turquoise and a touch of white. Apply an even coat over the entire whale. You may need two thin layers for full opacity. -
Add subtle texture:
While the blue paint is dry, you can lightly dry-brush a slightly lighter blue in horizontal strokes to simulate wood grain, though a solid color works beautifully too. -
Paint the eye:
Dip the back end of a paintbrush into black paint to stamp a perfect circle for the eye. Once dry, add a tiny white reflection dot to bring it to life. -
Darken the mouth:
Run a very fine brush with diluted black paint along the carved mouth line to accentuate the smile. -
Apply the spots:
Using a dotting tool or a toothpick dipped in white paint, create scattered spots along the whale’s back. Vary the pressure to make some dots slightly larger than others for an organic feel. -
Seal the piece:
Protect your artwork with a layer of matte or satin varnish to prevent the paint from chipping and to give it a professional finish.
Pro Tip: Balanced Tail
When attaching the tail, prop it up with a small crumpled piece of paper or foil while it dries or bakes so gravity doesn’t make it droop.
Now you have a serene little ocean friend to keep you company on your desk
Swan With an S-Curve Neck
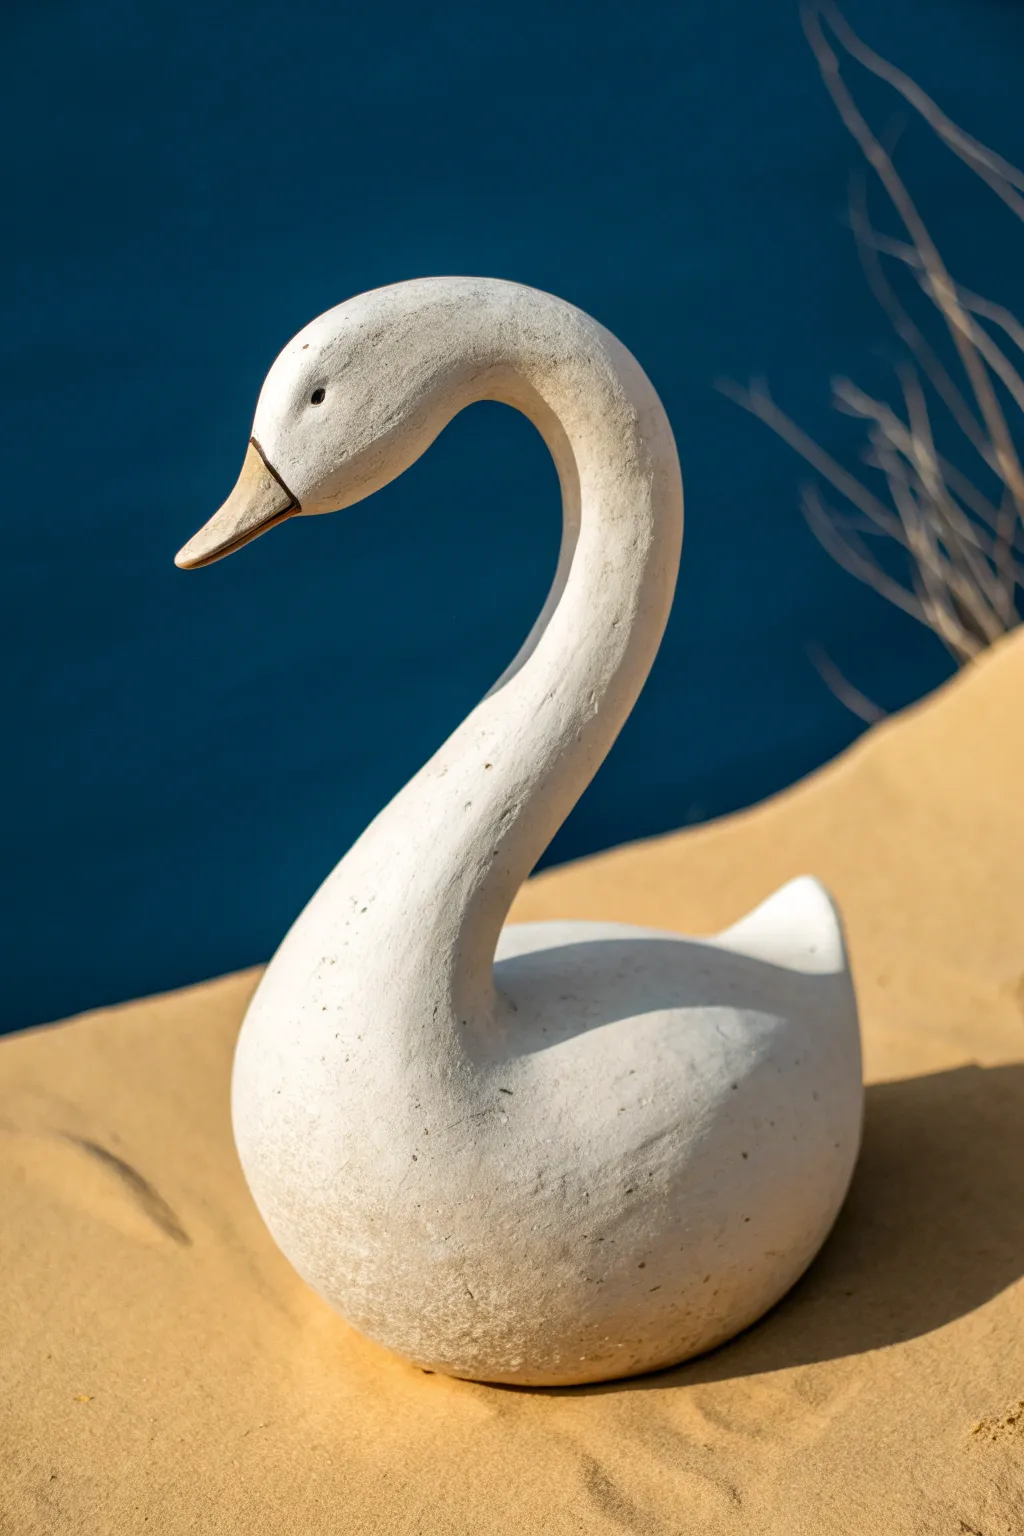
Capture the elegance of waterfowl with this simple yet graceful clay swan sculpture. Its smooth, sweeping S-curve neck and textured white finish mimic the look of aged stone or unglazed natural pottery.
Step-by-Step
Materials
- White polymer clay or air-dry clay (approx. 1 lb)
- Aluminum foil (for armature)
- Strong armature wire (14-16 gauge)
- Clay sculpting tools (rib tool, modeling tool)
- Small cup of water (if using air-dry clay)
- Fine-grit sandpaper
- Acrylic paints (White, Raw Sienna, Black)
- Matte sealant spray
Step 1: Building the Armature
-
Prepare the core:
Begin by crumpling aluminum foil into an oval shape roughly the size of a large mango to form the main body of the swan. Compress it tightly so it sits flat on your work surface without rolling. -
Wire structure:
Cut a length of armature wire about 12 inches long. Bend one end into a loop and insert this loop deep into the foil body to anchor it. -
Shape the neck:
Bend the protruding wire into a graceful ‘S’ shape. The curve should arch backward first, then sweep forward and up, mimicking the swan’s characteristic posture. Leave about an inch at the top straight for the head. -
Foil the neck:
Wrap thinner strips of aluminum foil around the wire neck to bulk it out. Taper the foil so it is thicker at the base where it meets the body and thinner toward the head.
Stone Effect
Mix gritty sand or baking soda into your acrylic paint before applying the final coat. This gives the swan a genuine textured, grainy surface that feels like old stone.
Step 2: Sculpting the Form
-
Condition the clay:
Knead your white clay until it is soft and pliable. If using air-dry clay, keep your hands slightly damp to prevent cracking. -
Cover the body:
Roll out a large sheet of clay about 1/4 inch thick. Drape this over the foil body, pressing it firmly to ensure it adheres to the armature texture underneath. -
Cover the neck:
Roll a snake or coil of clay and gently wrap it around the foil neck. Blend the seams together using your thumb or a modeling tool until the surface is smooth. -
Blend the join:
Pay special attention to the area where the neck meets the body. Use downward strokes to merge the clay, ensuring a seamless transition that supports the vertical weight. -
Form the tail:
At the rear of the body, pinch and pull the clay slightly upward to form a small, pointed tail. Keep this shape subtle and rounded rather than sharp. -
Shape the head:
Add a small ball of clay to the top of the neck wire. Blend it downwards into the neck, smoothing it into a rounded oval shape for the head. -
Beak details:
Pinch the front of the head to pull out the beak shape. It should slope downwards gently. Use a small knife tool to refine the edges of the beak.
Weathered Wings
Before the clay dries, attach thin, overlapping clay ‘feathers’ to the sides of the body using slip, creating detailed folded wings rather than a smooth body.
Step 3: Texturing and Finishing
-
Surface texture:
Take a stiff bristle brush or a crumpled ball of foil and gently tap it all over the clay surface. This creates a natural, stone-like pitted texture rather than a perfectly smooth plastic look. -
Eye placement:
Use a small ball stylus or the end of a paintbrush handle to indent slight sockets where the eyes will go. -
Drying limits:
Allow the sculpture to dry or bake according to your specific clay’s instructions. Air-dry clay often needs 24-48 hours to fully cure given the thickness. -
Sanding:
Once fully cured, use fine-grit sandpaper to knock back any overly sharp ridges, but keep the overall texture rough for that organic feel. -
Base coat:
Paint the entire swan with a matte white acrylic paint. If you want an aged look, mix in a tiny drop of beige or grey to break the brightness. -
Detail painting:
Paint the beak with a wash of Raw Sienna or a muted yellow-brown. Use a fine-tip brush to add a small black dot for the eye. -
Sealing:
Finish by spraying the piece with a matte sealant to protect the paint and preserve the stone-like finish.
Now you have a serene, classic sculpture perfect for a shelf display or garden accent

TRACK YOUR CERAMIC JOURNEY
Capture glaze tests, firing details, and creative progress—all in one simple printable. Make your projects easier to repeat and improve.
Chubby Penguin Figure
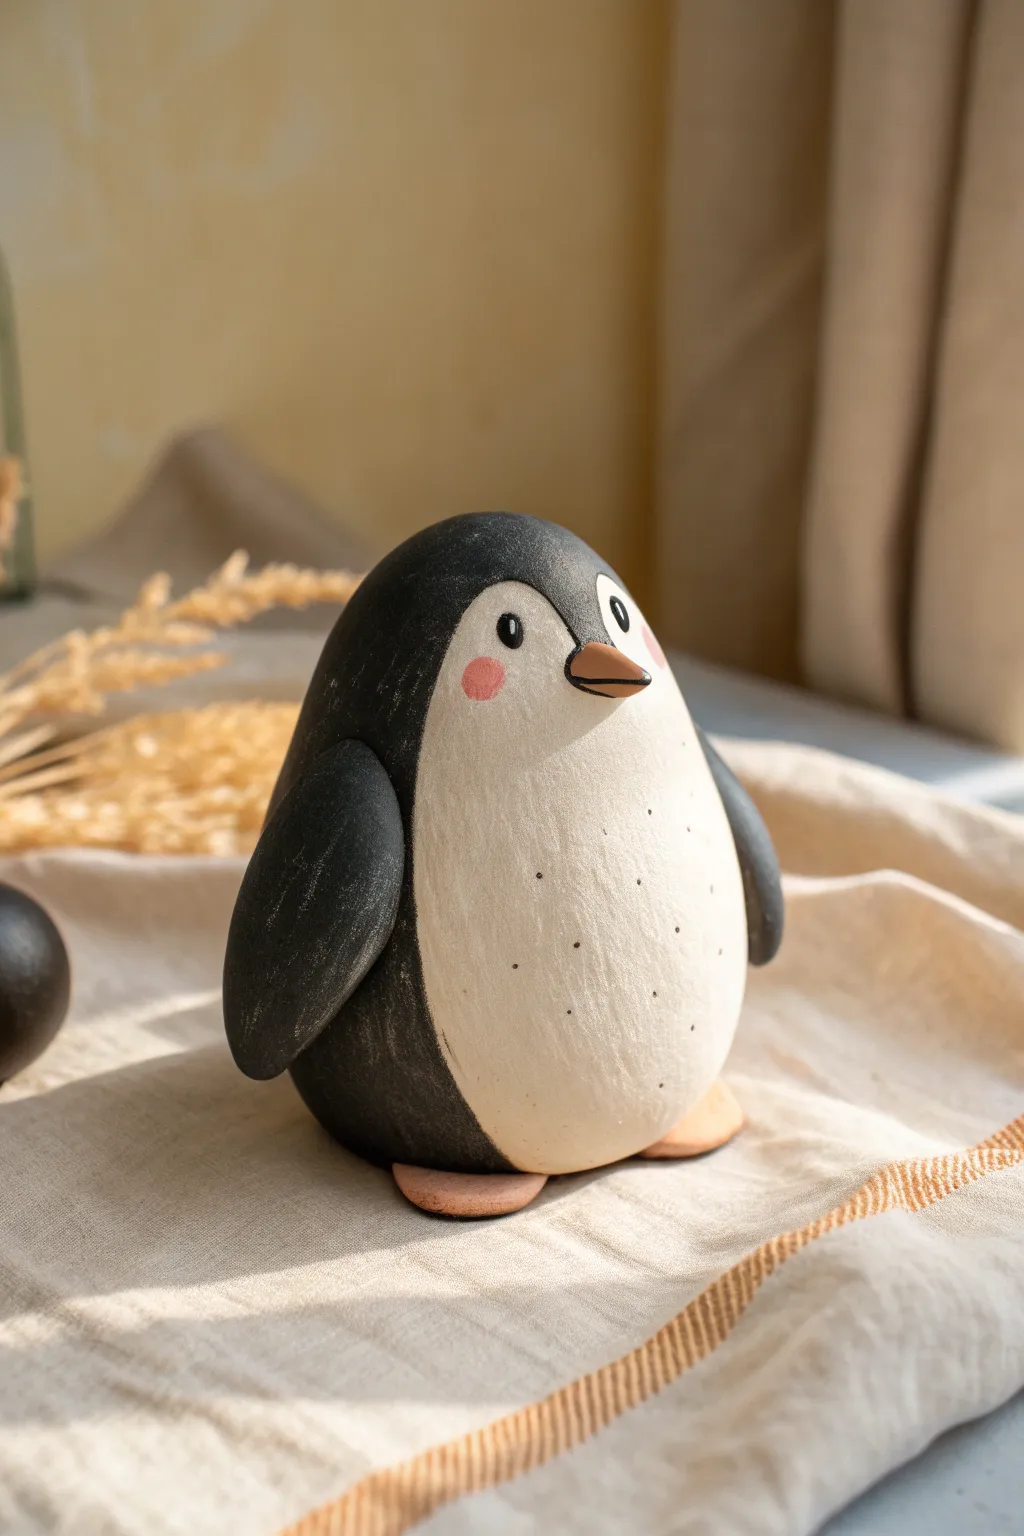
This adorable, stout penguin figurine captures the charm of simplified shapes and gentle textures. With its smooth, egg-like body and sweet painted details, it makes for a perfect desk companion or a beginner-friendly sculpture project.
How-To Guide
Materials
- Air-dry clay (white or grey) or polymer clay
- Rolling pin
- Water based acrylic paints (black, white, burnt orange, pale pink)
- Fine-grit sandpaper
- Small flat brush
- Detail round brush (size 0 or 00)
- Modeling tools (or a plastic knife/toothpick)
- Cup of water for smoothing
- Matte varnish (optional)
Step 1: Shaping the Base
-
Create the core shape:
Start with a large ball of clay roughly the size of a tangerine. Roll it between your palms until it is smooth and free of cracks. -
Form the body:
Gently taper the top of the ball to create a rounded egg shape. The bottom should remain wide and heavy to keep the penguin stable. -
Flatten the base:
Press the bottom of the egg shape firmly onto your work surface. Tap it gently to ensure it stands completely flat without wobbling. -
Smooth the surface:
Dip your finger in a little water and run it over the entire surface of the clay egg to remove any fingerprints or minor imperfections. The smoother the base now, the better the paint will look later.
Cracks Appearing?
If you see hairline cracks while air-drying, mix a smallAmount of clay with water to make a paste (slip) and fill them in immediately. Smooth with a damp finger.
Step 2: Adding Features
-
Make the wings:
Roll two small, equal-sized logs of clay. Flatten them into elongated teardrop shapes, about half the height of the body. -
Attach the wings:
Score the sides of the body where the wings will go by scratching cross-hatch marks. Add a dab of water (or slip) and press the wings flush against the body, smoothing the seams at the top so they blend seamlessly. -
sculpt the feet:
Roll two small balls of clay and flatten them slightly into discs. Tuck these under the front edge of the penguin’s body so only the front halves protrude. -
Add the beak:
Form a tiny cone of clay. Attach it to the center of the ‘face’ area, slightly higher than the middle of the body. Press it on securely and smooth the connection point. -
Dry and refine:
Let the sculpture dry completely (24-48 hours for air-dry clay). Once hard, lightly sand the surface with fine-grit sandpaper to remove any bumps, focusing on the roundness of the belly.
Make It a set
Make a whole colony of penguins in varying sizes! Try sculpting one looking upward or tilting its head for variety, then display them on a wooden slice.
Step 3: Painting and Details
-
Paint the belly:
Using the flat brush, paint a large, creamy white oval on the front of the penguin. I usually do two thin coats here to get solid coverage without brushstrokes. -
Paint the body:
Carefully paint the rest of the body—including the back of the wings and head—with matte black paint. Use a steady hand where the black meets the white belly to keep the line crisp. -
Color the extremities:
Paint the beak and the little feet with a muted burnt orange color. This warm tone contrasts nicely with the stark black and white. -
Add facial expression:
Dip the handle end of a paintbrush into black paint and dot two eyes onto the white face area. Add tiny white highlights inside the black dots once they are dry for extra life. -
Blush the cheeks:
Mix a very watery pale pink. Using a mostly dry brush, gently dab circular pink cheeks just below the eyes. -
Create texture:
Dilute a tiny bit of black paint with water. Flick or gently dot tiny speckles onto the white belly area to give it an organic, stony texture. -
Final scratches:
To mimic the weathered look in the photo, you can lightly distress the dried black paint with sandpaper, revealing just a hint of the raw clay underneath on the wings.
Place your finished penguin on a sunny shelf or wrap it up as a handmade gift
Hedgehog With Pressed Spines
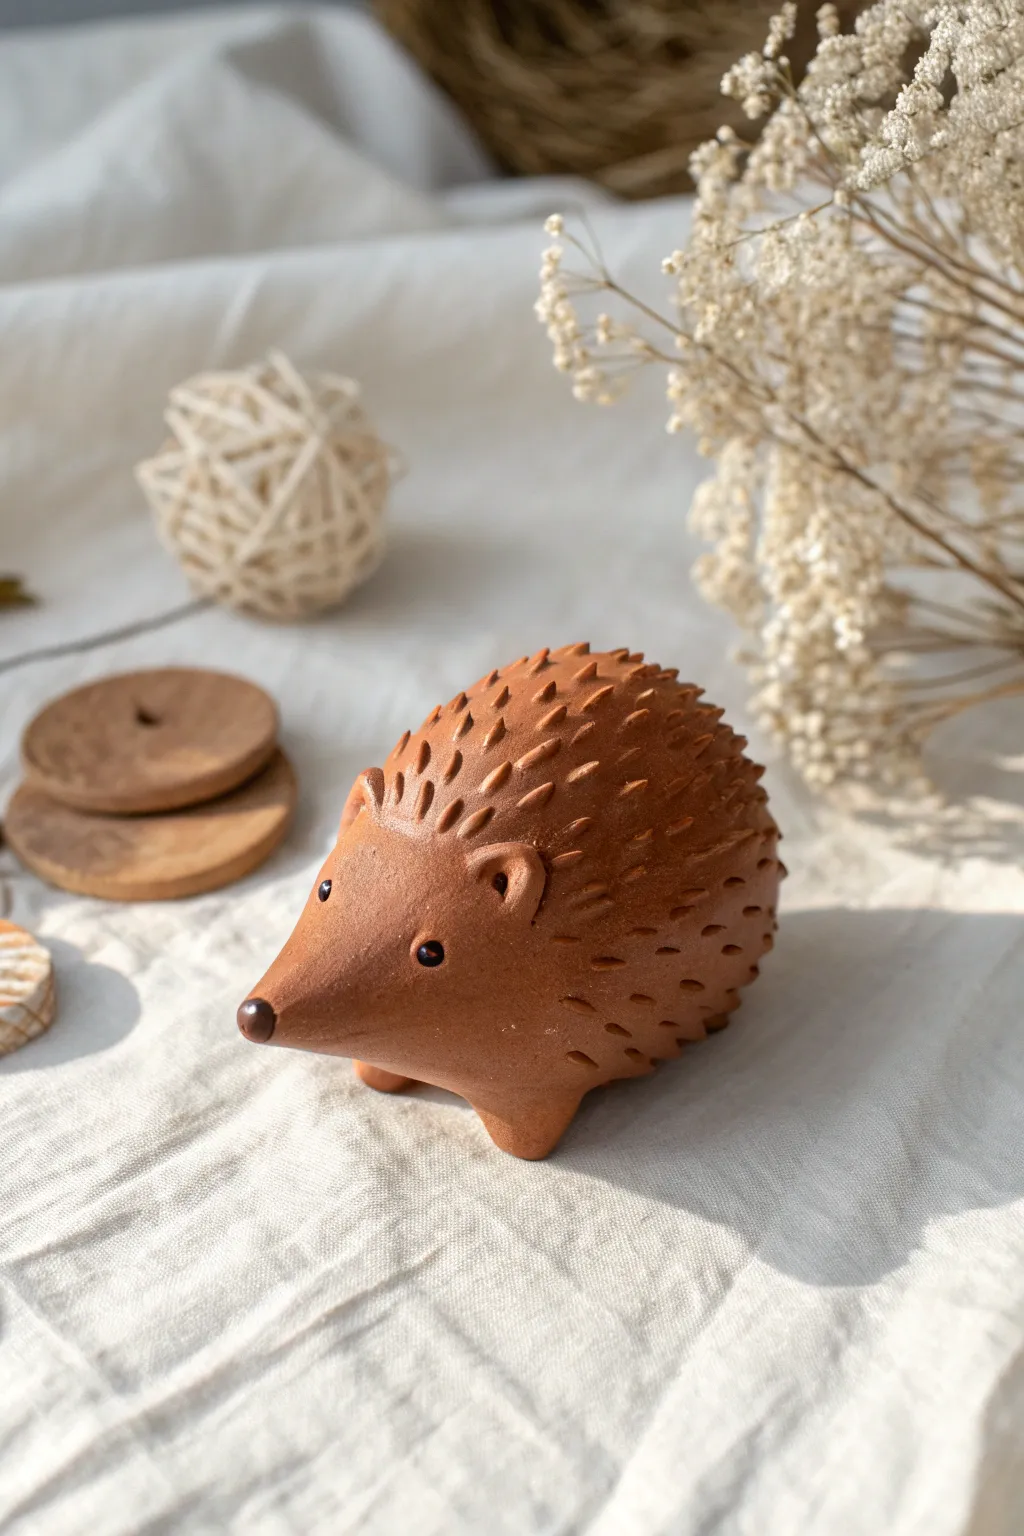
Sculpt a charming woodland friend using rich, earthy clay and a unique texturing technique. This clay hedgehog features a smooth, expressive face and a back covered in tactile spines created by gently pulling at the clay surface.
Step-by-Step Tutorial
Materials
- Reddish-brown air-dry clay or polymer clay (terracotta color)
- Small metal spatula or clay sculpting tool
- Pointed detailing tool or toothpick
- Small black beads (for eyes) or black clay
- Dark brown acrylic paint (optional, for nose)
- Small paintbrush
- Water bonding slip (if using air-dry clay)
- Matte varnish (optional)
Step 1: Shaping the Base
-
Create the main form:
Start with a ball of clay roughly the size of a lemon or tennis ball. Knead it well until it’s smooth and free of cracks. -
Form the teardrop shape:
Gently roll one side of the ball between your palms to taper it, creating a teardrop shape. The rounded end will be the body, and the pointed end will become the snout. -
Refine the snout:
Pinch the tapered end slightly to define the nose area. I like to curve the snout upwards just a tiny bit to give the hedgehog an inquisitive look. -
Flatten the base:
Tap the bottom of the hedgehog gently against your work surface. This creates a flat belly so the sculpture sits stable without rolling over.
Spines Falling Flat?
If spines sag, your clay is too soft. Let the main body dry (air-dry) or cool (polymer) for 15 minutes to firm up before texturing.
Step 2: Adding Features
-
Sculpt the feet:
Roll four small, marble-sized balls of clay. Attach two near the front and two near the back underside of the body. -
Blend the feet:
Use your thumb or a modeling tool to blend the seams of the feet into the underbelly, ensuring they are securely attached. Shape them into little nubbins. -
Make the ears:
Create two small, flattened semi-circles of clay. Press your thumb into the center of each to create a concave ear shape. -
Attach the ears:
Score the clay lightly behind the face area where the ears will go. Use a dab of water or slip to attach the ears, blending the back edge into the head while keeping the front edge distinct. -
Insert the eyes:
Press two small indentations into the face with a round tool. Place a small black bead into each hollow securely. If you don’t have beads, roll tiny balls of black clay. -
Form the nose:
Roll a very tiny ball of clay for the nose tip. Attach it to the very point of the snout with a dot of water.
Pro Tip: Sharp Spines
Wipe your sculpting tool with a damp sponge or baby wipe every few strokes. Clay buildup dulls the tool and makes spines clumpy.
Step 3: Creating the Spines
-
Mark the spine line:
Lightly trace a faint line around the hedgehog’s face and sides to define where the smooth face ends and the spiny back begins. -
Start the texture:
Starting just behind the ears at the top of the head, use a small metal spatula or a pointed tool. Insert the tool tip shallowly into the clay. -
Pull and flick:
Gently scoop and lift the clay upwards and backwards in a quick motion. This pulls up a small triangular point of clay, mimicking a spine. -
Creating rows:
Work in staggered rows moving backward towards the tail. Offset each new row of spines so they sit in the gaps of the row before them. -
Vary the direction:
As you work down the sides, angle your tool slightly so the spines point backwards and downwards, following the natural curve of the body. -
Finish the back:
Continue texturing all the way to the tail end. Make the spines slightly smaller near the very edges and bottom for a natural graduation.
Step 4: Finishing Touches
-
Smoothen the face:
Check the face area for any accidental fingerprints. Dip your finger in a little water and gently buff the snout and cheeks until perfectly smooth. -
Drying or baking:
If using air-dry clay, let the piece dry for 24-48 hours. If using polymer clay, bake according to the package instructions. -
Painting the nose:
Once fully cured, use a small detail brush to paint the nose tip a dark brown or black if you didn’t use colored clay. -
Protect the piece:
Apply a coat of clear matte varnish if desired to protect the surface while maintaining that earthy, natural clay look.
Place your little hedgehog on a shelf or among some dried flowers for a cozy touch of nature
Snail With a Coiled Shell
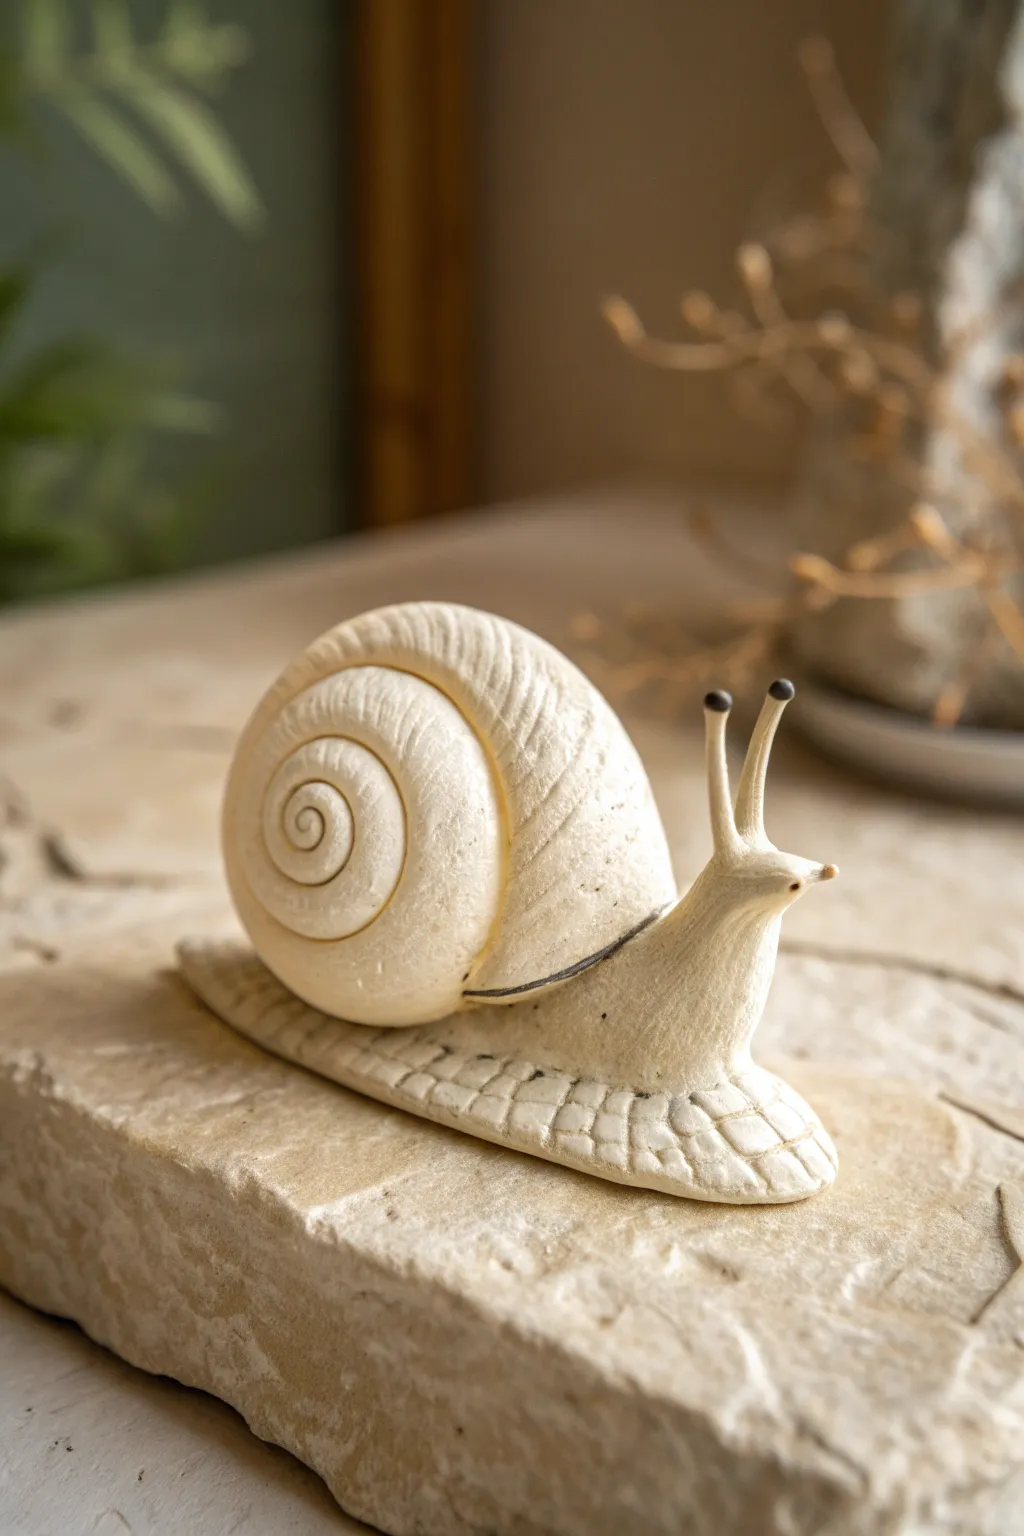
This charming little garden snail features a detailed coiled shell and a textured body that looks beautifully organic. It’s a perfect beginner project that teaches basic coiling and texturing techniques to create a piece with distinct personality.
Step-by-Step
Materials
- White air-dry clay or polymer clay (stone effect preferred)
- Clay blending tool or smooth wooden modeling tool
- Pointed sculpting tool or toothpick
- Small ball stylus
- Black acrylic paint
- Fine detail paintbrush
- Water bonding slip (if using air-dry clay)
- Matte varnish (optional)
Step 1: Sculpting the Body
-
Form the base:
Start by rolling a sausage shape of clay about 3 inches long. Taper one end significantly to form the tail, and keep the other end thicker for the head and chest area. -
Flatten the foot:
Gently press the sausage shape onto your work surface to flatten the bottom. You want a distinct ‘foot’ for the snail to glide on, so slightly pinch the edges of the base outwards to widen it. -
Lift the head:
Bend the thicker end of your clay sausage upwards to create the snail’s neck and head. Smooth the transition so it curves naturally rather than creating a sharp crease. -
Texture the skin:
Using a pointed tool or a knife, gently score a grid pattern along the sides of the snail’s foot. Press lightly to create rectangular ‘scales’ that mimic the texture seen in the photo.
Step 2: Creating the Shell
-
Roll a coil:
Roll out a long, consistent snake of clay. It should be thicker at one end and gradually taper to a thin point at the other. -
Start the spiral:
Starting with the thinnest end, begin rolling the clay coil tightly around itself to create a spiral. I like to keep the center distinct and raised slightly. -
Build the volume:
Continue wrapping the thicker part of the coil around the center. As you wrap, create a slight dome shape rather than a flat disc, giving the shell three-dimensional volume. -
Add shell texture:
Before attaching it, use your modeling tool to impress shallow, vertical lines across the shell’s segments. These ridges give it that organic, grown-in-nature appearance. -
Attach the shell:
Score the back of the snail body and the underside of the shell. Add a dab of water or slip (or liquid clay for polymer), and press the shell firmly onto the back. Smooth the seam where the shell meets the neck.
Crack Control
If you see hairline cracks while air-drying, patch them immediately with a ‘slip’ paste made of wet clay and water. Smooth it over the crack with a wet finger.
Step 3: Face and Details
-
Make the stalks:
Roll two very small, thin logs of clay for the eye stalks. Attach them to the top of the head, blending the clay downwards so they don’t fall off. -
Refine the face:
Pinch the very front of the face to create a tiny, pointed snout. Use a smoothing tool to ensure the neck flows smoothly into the head area. -
Initial drying or baking:
If using air-dry clay, let the piece dry for 24-48 hours away from direct heat. If using polymer clay, bake according to the package instructions. -
Painting eyes:
Once fully cured or dry, dip a fine brush or the tip of a toothpick into black acrylic paint. carefully dab a small black dot onto the very tip of each eye stalk. -
Dry brush finish:
To enhance the texture, you can lightly dry-brush a slightly lighter cream color over the shell ridges and body scales, though the natural clay color works beautifully on its own.
Go Bigger
Turn this into a functional planter! Make the shell hollow and leave the top open to hold a tiny succulent or air plant for a cute desk companion.
Place your finished snail on a sunny windowsill or among your potted plants to enjoy its slow and steady charm
Tiny Mushroom Pal
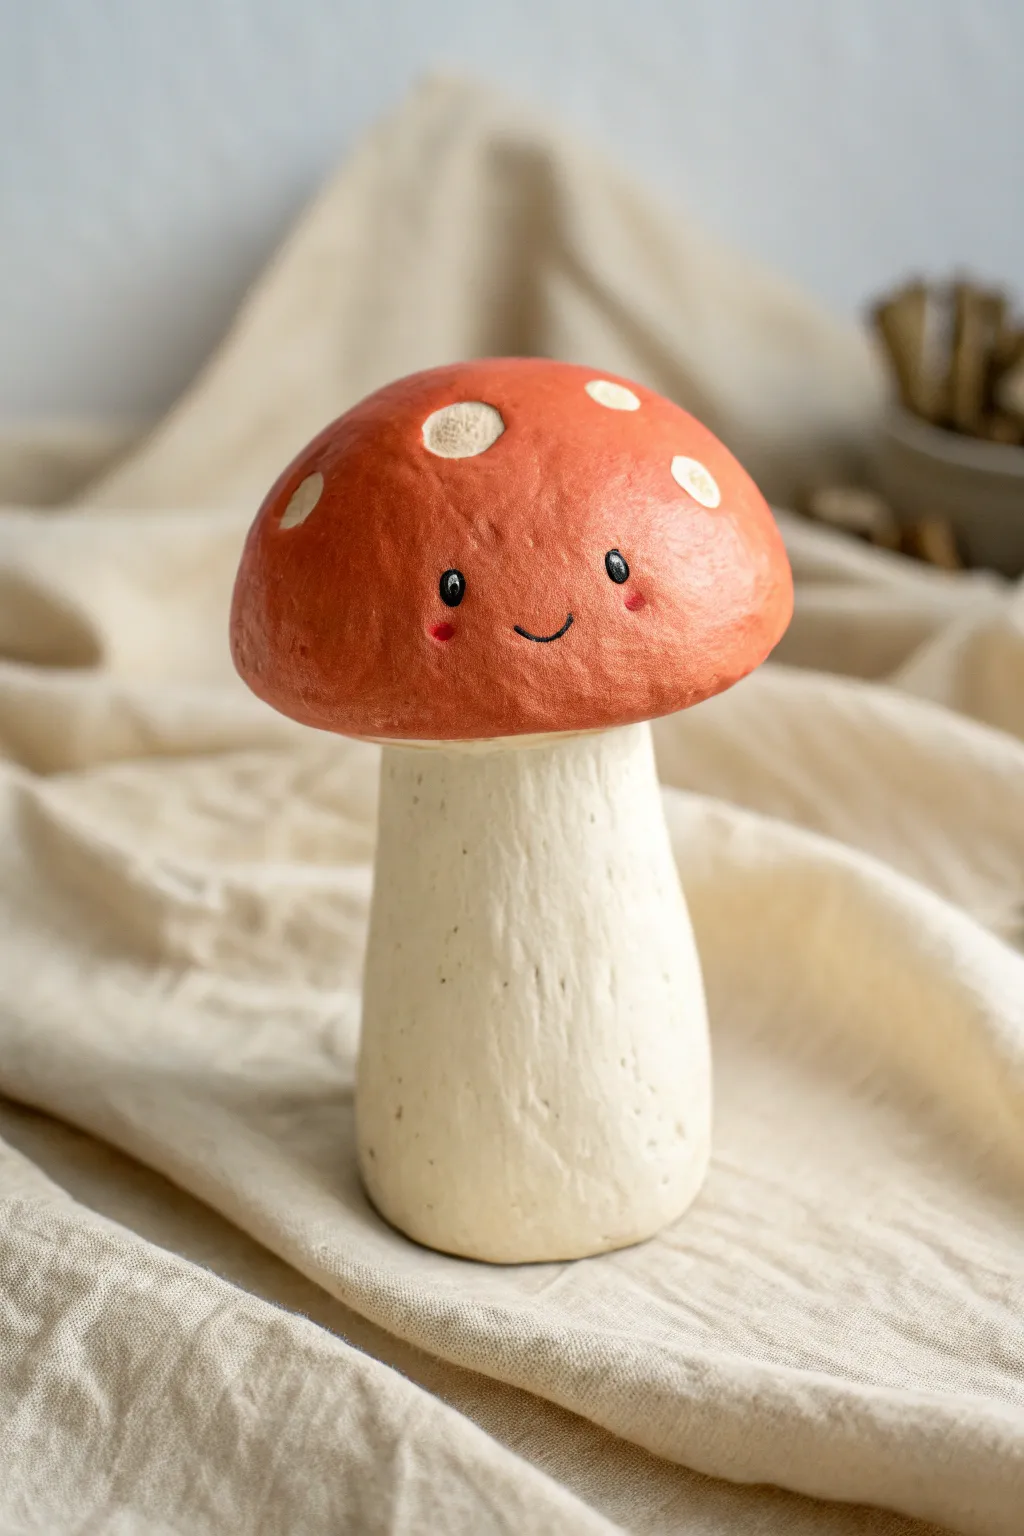
Bring a little woodland charm to your desk or shelf with this adorable clay mushroom character. With its cheery red cap, textured stem, and sweet smiling face, this beginner-friendly sculpture captures the cozy essence of a fairytale forest.
How-To Guide
Materials
- White or cream air-dry clay (or polymer clay)
- Acrylic paints (Red, White, Black, Pink, Cream/Beige)
- Small round sculpting tool or toothpick
- Aluminum foil
- Fine grit sandpaper
- Small round paintbrush
- Fine detail paintbrush
- Matte varnish or sealant
- Water cup (for smoothing)
Step 1: Forming the Base Structure
-
Create the armature:
Crumple a small piece of aluminum foil into a thick, cylindrical shape for the stem and a domed, flattened hemisphere for the cap. This saves clay and keeps the sculpture lightweight while helping it dry evenly. -
Cover the stem:
Roll out a slab of your white clay to about a quarter-inch thickness. Wrap this securely around your foil cylinder, blending the seam with your fingers until it’s completely smooth and invisible. -
Flare the base:
Gently press the bottom of the stem onto your work surface to flatten it so it stands upright. Slightly push the clay outward at the very bottom creating a subtle, organic flare for stability. -
Shape the cap:
Take a larger ball of clay and flatten it into a thick pancake. Drape this over your foil dome armature, smoothing it down the sides to create the classic mushroom cap shape. -
Under-cap detailing:
Before attaching the two pieces, use your thumb to create a slight indentation in the center of the underside of the cap where the stem will connect. -
Connect the pieces:
Score the top of the stem and the underside of the cap with a toothpick (scratching hatch marks). Add a tiny dab of water or liquid clay to the scored areas and press the cap firmly onto the stem.
Natural Texture Hack
Before the clay dries, gently press a clean, old toothbrush against the stem section. This creates realistic micropores and varied texture faster than drawing individual lines.
Step 2: Texturing and Refining
-
Blend the join:
Use a sculpting tool or your finger to smooth the clay where the cap meets the stem, ensuring a strong bond. You want the transition to look seamless underneath. -
Apply stem texture:
Take a toothpick or a needle tool and gently drag vertical, slightly wavy lines down the length of the stem. Vary the pressure to create natural-looking grooves representing the stipe’s fibrous texture. -
Add cap imperfections:
Gently tap the surface of the red cap with the texture of a stiff brush or a textured sponge to give it a slightly organic, non-plastic feel. Keep the area for the face relatively smooth. -
Dry the sculpture:
Let the mushroom dry completely according to your clay’s instructions. For air-dry clay, this usually takes 24-48 hours. I like to rotate it occasionally so the bottom dries well too. -
Sand for smoothness:
Once fully dry, lightly sand any rough fingerprints or sharp edges on the cap, being careful not to sand away the nice texture you created on the stem.
Forest Vignette
Create a trio of mushrooms in varying heights. Glue them to a slice of wood or bark and add dried moss around the base for a complete enchanted forest scene.
Step 3: Painting the Character
-
Base coat the stem:
Paint the stem with a cream or off-white acrylic paint. You might need two thin coats to get solid coverage. Let the paint settle into the texture grooves. -
Paint the cap:
Apply a warm, earthy red paint to the cap. Avoid a neon red; mixing in a tiny dot of brown or orange gives it that natural, forest-floor look shown in the reference. -
Add the spots:
Using a small round brush, dab on circular spots using a creamy white paint. Notice how the spots in the example aren’t perfect circles—make them slightly irregular for realism. -
Draw the eyes:
With your finest detail brush and black paint, add two small oval eyes widely spaced on the cap. Add tiny white reflection dots in the upper corners of the eyes to bring them to life. -
Add the smile:
Paint a very thin, small ‘U’ shape between the eyes for the mouth using black paint. Keep the line weight delicate. -
Rosy cheeks:
Dilute a drop of pink paint with water to make a glaze, or use a fairly dry brush, to dab soft rosy cheeks underneath the eyes. -
Seal the work:
Finish by applying a matte varnish over the entire piece to protect the paint and give it a professional, finished look.
Place your little fungus friend near a houseplant to keep him close to nature
Mini Cactus Trio
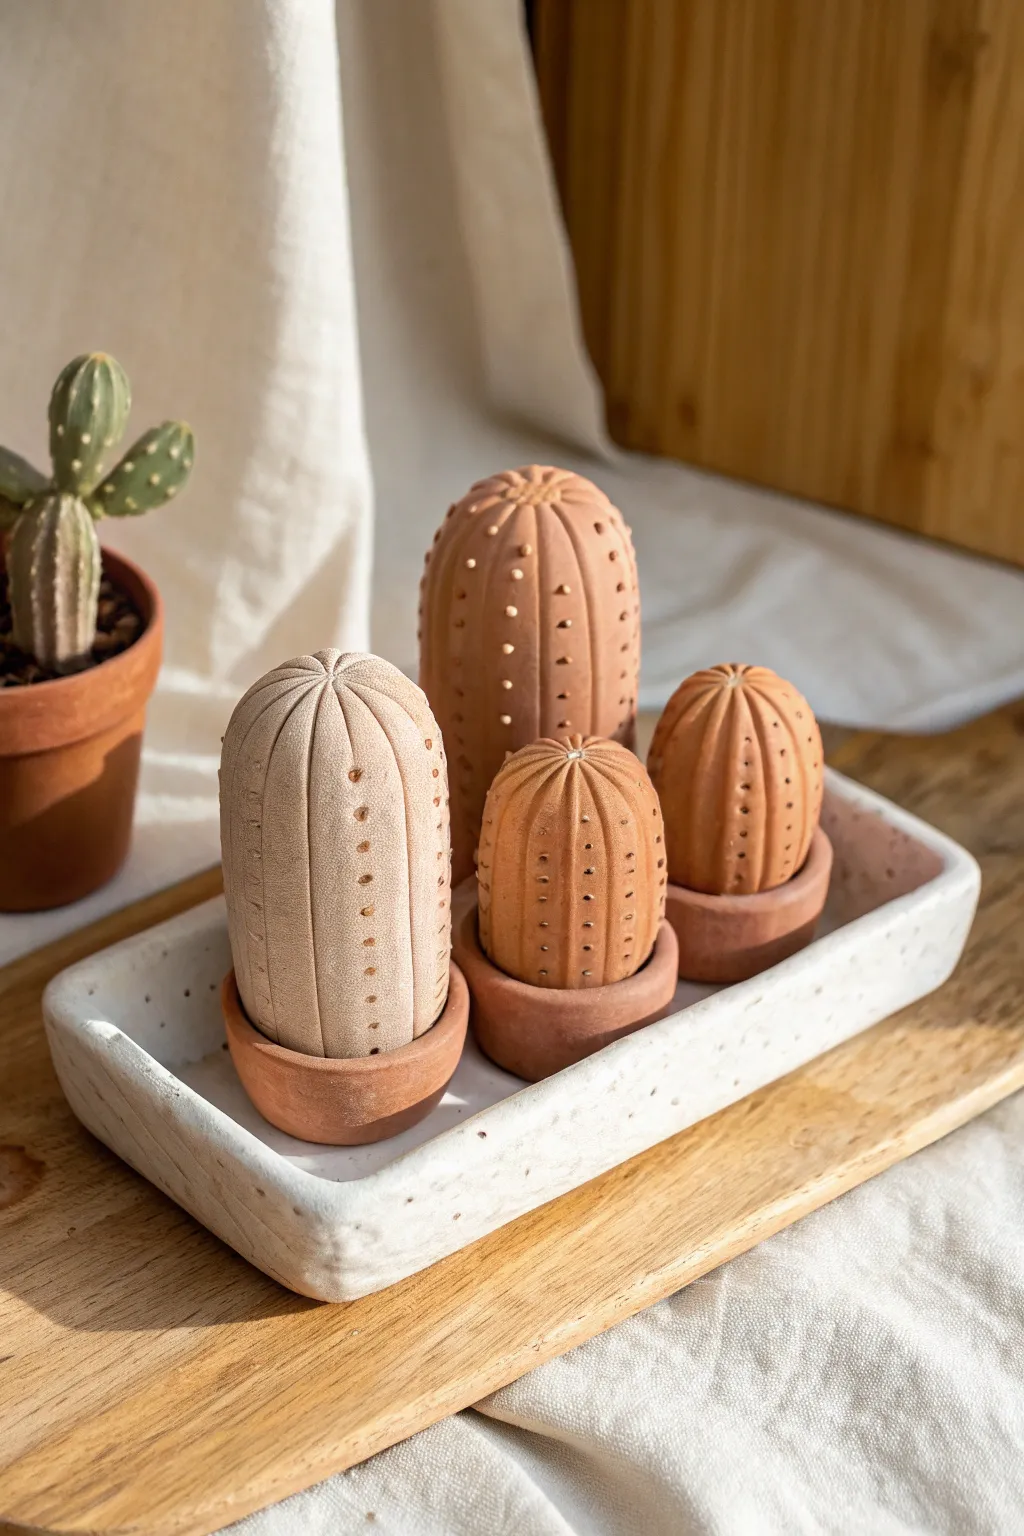
Bring a touch of the arid desert indoors without the prickly spines using these charming terracotta-style clay sculptures. This project creates a set of minimalistic, warm-toned faux cacti nestled in their own tiny pots, perfect for a sunny windowsill display.
Step-by-Step Tutorial
Materials
- Air-dry clay (terra cotta color) or polymer clay in terracotta/burnt orange
- Lighter beige clay (or white clay mixed with a tiny bit of brown)
- Small rolling pin
- Needle tool or toothpick
- Modeling tools (specifically a curved smooth tool)
- Small cup of water (for smoothing)
- Fine grit sandpaper
- Acrylic rolling board or smooth work surface
- Rectangular tray mold or slab building tools (optional for the base)
Step 1: Shaping the Bodies
-
Prepare your palette:
Begin by conditioning your clay. If using polymer, knead it until soft. You want two main shades: a deep, classic terracotta orange and a lighter, sandy beige tone. Mix clays if necessary to achieve these natural hues. -
Roll the cylinders:
Take a portion of the terracotta clay and roll it into a thick cylinder with a rounded top. Make three different sizes: one tall and thick for the back, and two smaller, stubbier ones for the front right. -
Create the beige cactus:
Repeat the rolling process with your lighter beige clay to create the medium-sized cactus that will sit on the front left. Smooth the dome shape with your fingers to remove any fingerprints. -
Define the ribs:
Using the side of a needle tool or a modeling stick, gently press vertical indentations from the very top center of each cactus down to the base. Space these evenly around the circumference to create likely distinct ribs. -
Refine the segments:
Once the lines are pressed, use a dampened finger (for air-dry) or a smooth tool to soften the edges of the ribs, making them look pillowy and organic rather than sharp geometric cuts.
Step 2: Adding Texture & Polishing
-
Mark the spines:
Take your needle tool and gently poke small holes in vertical lines down the center of each rib. These represent the areoles where spines would grow. Keep the pressure consistent for a uniform look. -
Smooth the tops:
Pay special attention to the apex of each cactus where the rib lines meet. Soften this convergence point so it looks like a natural growth pattern using a small ball tool or just your thumb. -
Form the mini pots:
Roll four small balls of the darker terracotta clay. Flatten them slightly into thick discs, then use your thumb to create a shallow indentation in the center of each, forming a very simple, low-profile saucer shape. -
Assemble the individual pieces:
Place each cactus body into its corresponding saucer. Press down firmly enough to adhere them ensuring they sit upright. If using air-dry clay, you might need a dab of slip (clay water) to join them securely.
Cracking Issues?
If using air-dry clay, surface cracks can happen if it dries too fast. Drape a slightly damp paper towel over your drying pieces to slow the process down.
Step 3: Creating the Display Tray
-
Roll the slab:
Roll out a slab of white or very pale grey clay to about a 1/4 inch thickness. I like to use guide sticks here to keep the thickness perfectly even. -
Cut the rectangle:
Cut a rectangle large enough to hold all your cactus pots comfortably. Lift the edges of the slab up to create a shallow rim, smoothing the corners together. -
Add texture to the tray:
Before the tray dries, gently press a coarse sponge or sand onto the surface to give it a speckled, stone-like texture. You can also poke tiny random holes for an aerated concrete look. -
Final drying (or baking):
If using polymer clay, bake all pieces according to package instructions (usually 275°F for 15-30 mins). For air-dry clay, let everything sit in a cool, dry place for at least 24-48 hours. -
Sanding and finishing:
Once completely hardened, lightly sand the surface of the cacti with fine-grit sandpaper to mimic the matte, dry texture of terracotta. Dust off any powder with a large soft brush.
Level Up: Realism
Mix real dried coffee grounds or black pepper into your clay before rolling. This adds instant organic speckling that looks like expensive ceramic stoneware.
Arrange your drought-tolerant garden on a shelf where the light can catch the texture of the ribs
Pocket Dinosaur
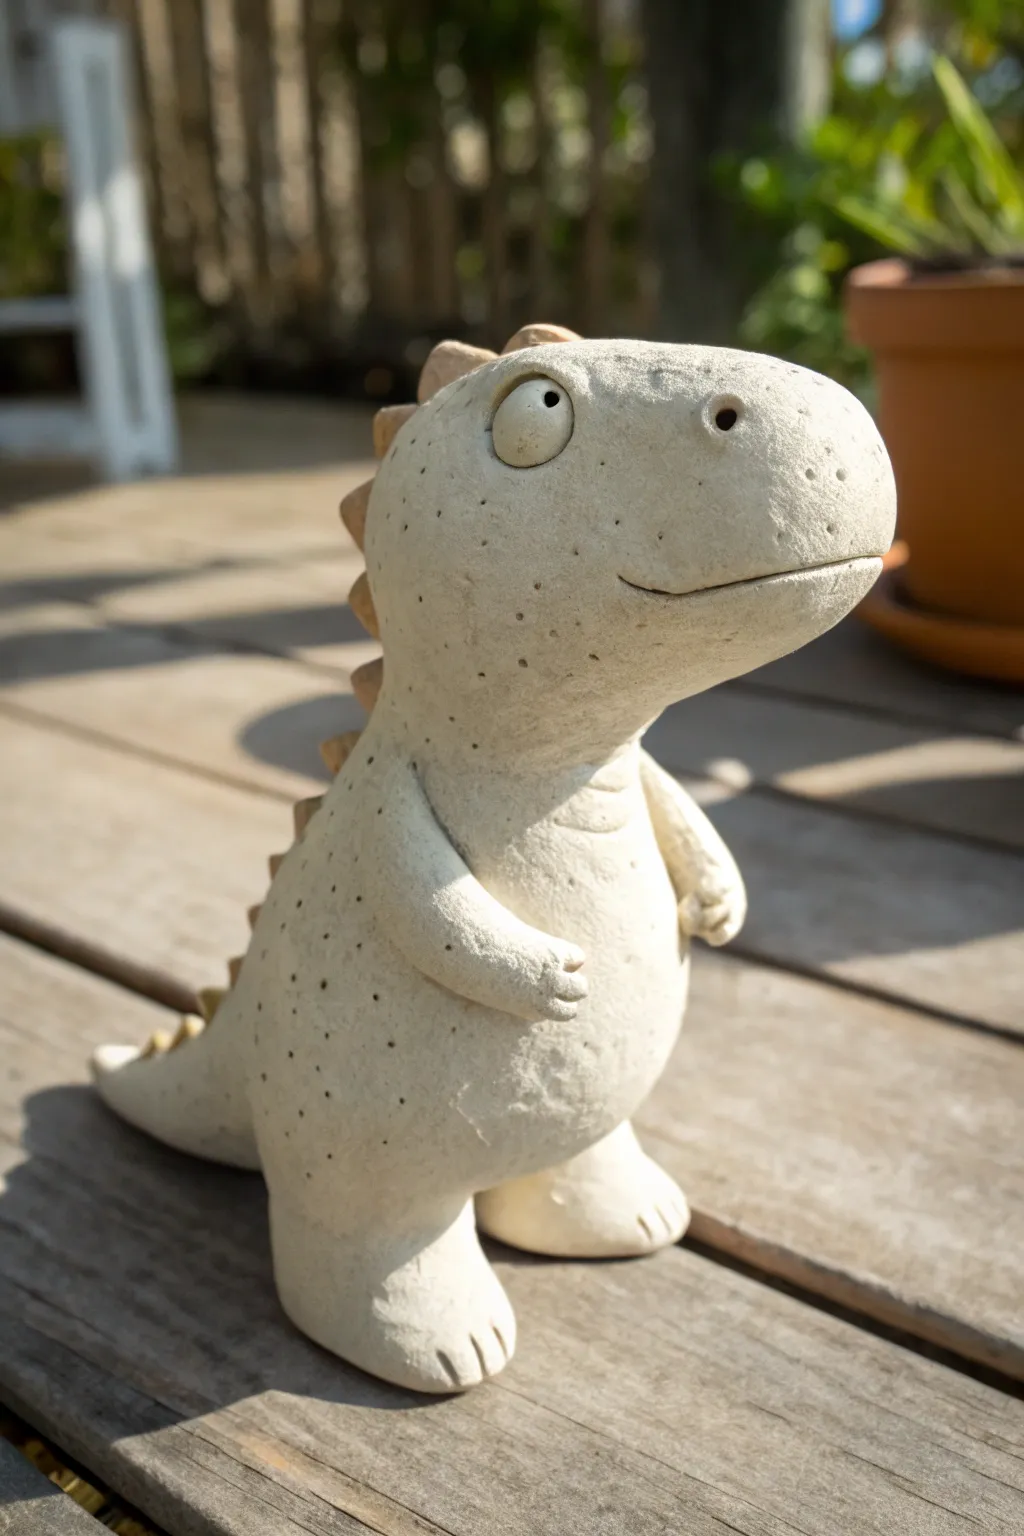
This charming little dinosaur sculpture captures hearts with his innocent, sideways glance and wonderfully tactile stone-like texture. Standing upright on stubby legs with a gentle smile, this pocket-sized friend is the perfect whimsical project to practice your character sculpting skills.
How-To Guide
Materials
- White or light grey air-dry clay (or polymer clay)
- Speckled clay additive or fine black sand (optional for texture)
- Set of small sculpting tools
- Ball stylus tool
- Needle tool or toothpick
- Water and a small sponge
Step 1: Forming the Core
-
Prepare your clay:
Begin by kneading your clay until it’s pliable and warm. If you want that stone-effect look shown in the photo, mix in a tiny pinch of speckled additive or fine black sand now, kneading until it’s evenly distributed. -
Shape the body:
Roll a smooth ball of clay about the size of a golf ball, then gently elongate it into a pear shape. This will be the dinosaur’s belly and chest, so make sure the bottom is wider and flatter for stability. -
Create the head:
Roll a second, slightly smaller ball for the head. Shape it into a soft oval, slightly flattening the front to create a distinct snout area. -
Attach the head:
Score the top of the body and the bottom of the head with a needle tool, dab with a little water (or slip), and press them firmly together. Use a modeling tool to blend the clay at the neck seam until it is completely seamless and smooth.
Step 2: Limbs and Tail
-
Form the feet:
Make two small, equal-sized balls of clay. Flatten the bottoms against your work surface and press them onto the base of the body to form stubby, sturdy legs. -
Sculpt the toes:
Using a knife tool or the edge of a credit card, gently press three indentations into the front of each foot to create simple, rounded toes. -
Shape the heavy tail:
Roll a cone of clay for the tail. It should be thick at the base and taper to a point. Attach this to the lower back of the body, blending the seams thoroughly so it acts as a third point of balance to help him stand. -
Add the arms:
Roll two very small sausage shapes for arms. Attach them high on the belly. I find bending them slightly at the ‘elbow’ adds more personality before blending the shoulders into the main body.
Smooth Seams
Use a slightly damp paintbrush to blend seams in tight spots like under the chin or behind the arms where fingers can’t reach.
Step 3: Detailed Features
-
Sculpt the smile:
Take a sharp curved tool or a knife and cut a long, sweeping smile line across the snout. It should go quite far back on the cheeks to give him that happy, dopey expression. -
Add the nostrils:
Use a small ball stylus or the blunt end of a paintbrush to press two distinct holes at the front of the snout for nostrils. -
Make the eyes:
Roll two tiny white balls of clay for the eyes. Press them onto the head, spacing them wide apart. Use a needle tool to poke a tiny pupil into the center of one, and perhaps off-center on the other for a quirky look. -
Create the eyelids:
Roll extremely thin snakes of clay and place them over the top half of the eyeballs to create heavy, sleepy eyelids. Blend the top edge of these eyelids into the head. -
Spikes on the back:
Pinch off several small pieces of clay and shape them into triangles. Attach them in a row running down the back of the head, spine, and tail. Make the ones on the head largest and taper them smaller as they go down the tail.
Fossil Find
After drying, give him a ‘wash’ of diluted brown acrylic paint. Wipe it off immediately with a rag so the dark color stays only in the textures.
Step 4: Texturing and Finishing
-
Apply skin texture:
To mimic the stone texture, gently poke the skin randomly with a stiff bristle brush or a needle tool. Focus these little pockmarks on the back and top of the head, leaving the belly smoother. -
Refine the pose:
Stand your dino up on a flat surface. Gently tap the head to tilt it slightly if you want him looking up or to the side, and ensure the feet are flat. -
Smoothing check:
Dip your finger in a tiny bit of water and run it over any fingerprints or rough seams, particularly around the belly and the join at the neck. -
Drying:
Allow the sculpture to dry slowly away from direct heat to prevent cracking. This usually takes 24-48 hours depending on the clay thickness.
Once dry, you’ll have a rugged little prehistoric pal ready to guard your desk or bookshelf