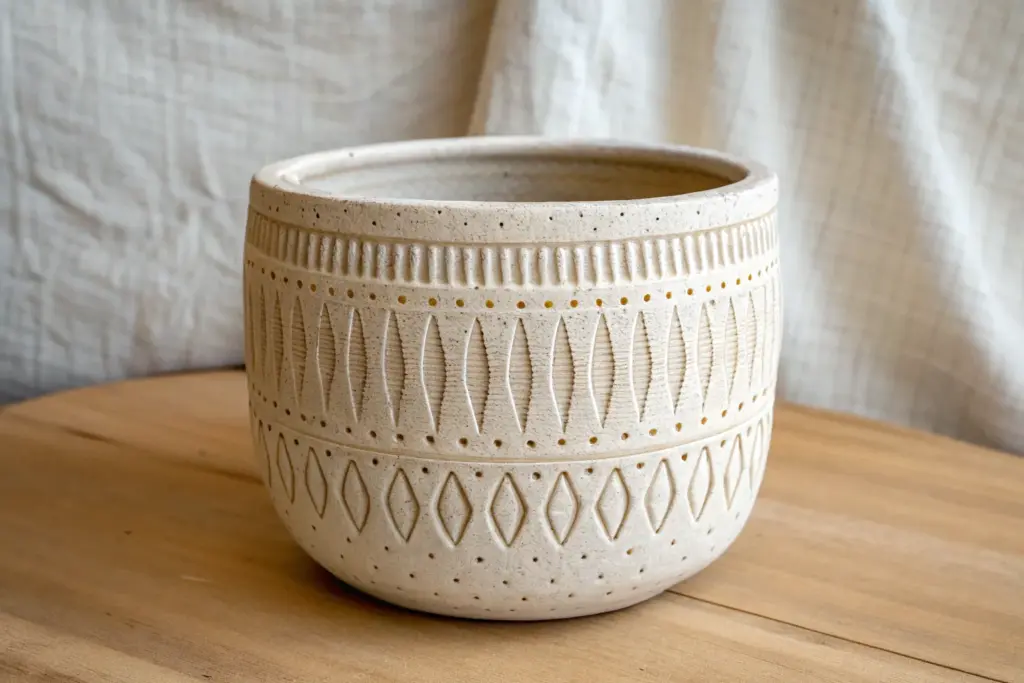
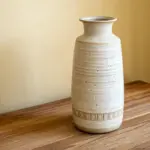
Texture is the fastest way to make even the simplest clay project feel special, and you don’t need fancy tools to do it. These simple clay texture ideas are the kinds of studio tricks I reach for when I want big visual payoff with low stress.
Classic Lace Press
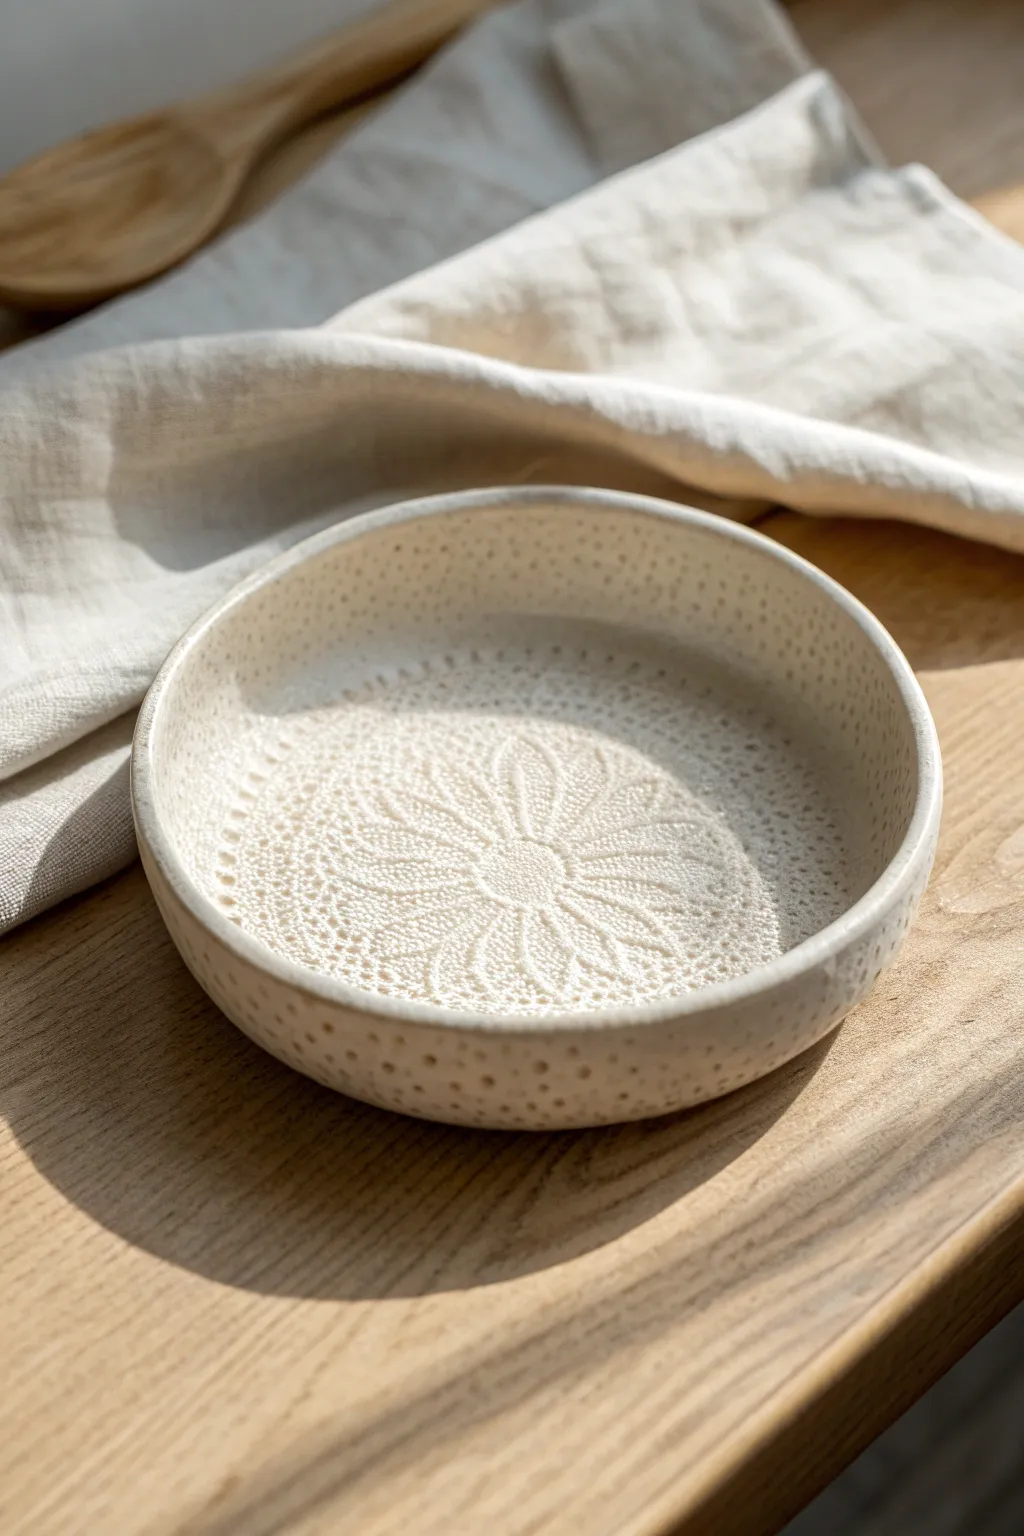
Transform a simple slab of clay into a delicate heirloom-style piece by capturing the intricate patterns of vintage fabric. This low-profile bowl features a stunning central mandala design created by pressing a lace doily directly into the surface, complemented by speckled clay for a rustic finish.
Step-by-Step
Materials
- Stoneware clay (speckled or buff)
- Small vintage lace doily (circular)
- Rolling pin
- Wooden guide strips (approx. 1/4 inch thick)
- Canvas work surface or cloth
- Circle cutter or needle tool
- Shallow bowl mold (biscuit mold or unwanted bowl)
- Sponge
- Rib tool
- Clear matte glaze
Step 1: Preparing the Slab
-
Wedge the clay:
Start by thoroughly wedging a ball of speckled stoneware clay to remove any air bubbles and ensure an even consistency. -
Set up your workspace:
Place your canvas cloth on a flat table. Position your wooden guide strips on either side of your working area to ensure a uniform thickness. -
Roll the slab:
Flatten the clay ball slightly with your palm, then use the rolling pin to roll it out into a smooth slab that extends beyond the guides. -
Smooth the surface:
Use a rib tool to compress the clay fibers and remove any canvas texture from the top surface, creating a pristine canvas for your lace.
Step 2: Creating the Texture
-
Position the lace:
Gently place your vintage doily in the center of the slab. Take care to ensure it is laid completely flat with no wrinkles. -
First light pass:
Roll your rolling pin over the doily once with very light pressure just to tack it down and prevent shifting. -
Deep impression:
Roll over the doily again, this time applying firm, steady pressure to drive the intricate threads deep into the soft clay. -
Remove the fabric:
Find a loose edge of the doily and slowly peel it back to reveal the raised pattern imprinted in the clay. -
Add rim texture:
If the doily didn’t reach the edges, or if you want extra detail like the reference photo, use a small textured roller or a stiff brush to stipple small dots around the perimeter of the lace design.
Clean Release
Worried about the lace sticking? Before pressing, lightly dust the doily with a tiny amount of cornstarch. It acts as a resist and burns off cleanly in the kiln.
Step 3: Shaping and Finishing
-
Cut the shape:
Place your circle template or bowl mold upside down over the pattern. Use a needle tool to cut a clean circle around the design. -
Soften the rim:
Run a damp sponge or your finger along the cut edge to round it off and remove any sharp burrs left by the cutting tool. -
Lift the slab:
Carefully lift your textured clay circle. I find sliding a thin board underneath helps keep it from warping during transfer. -
Form the bowl:
Drape the clay slab inside your shallow bowl mold. Gently press it down into the curve, starting from the center and working outward. -
Refine the shape:
Use a soft sponge to gently press the clay against the mold walls, ensuring the curve is smooth and no air is trapped between the clay and the mold. -
Initial drying:
Let the clay sit in the mold until it is leather hard. This usually takes a few hours depending on humidity. -
Remove and clean:
Once stiff enough to hold its shape, remove the bowl from the mold. Use a sponge to smooth the bottom and outer rim if needed. -
Bisque fire:
Allow the piece to dry completely (bone dry) before loading it into the kiln for the bisque firing. -
Glaze and final fire:
Dip or brush a clear matte glaze over the piece. The clear glaze will protect the surface while letting the natural speckles and lace texture shine through after the final firing.
Oxide Accent
For more drama, wipe a dark iron oxide wash over the bisque-fired texture, then wipe it back with a damp sponge. This leaves dark color in the deep lace recesses.
Now you have a permanently captured piece of textile history perfect for holding jewelry or keys


Toothbrush Speckle Texture
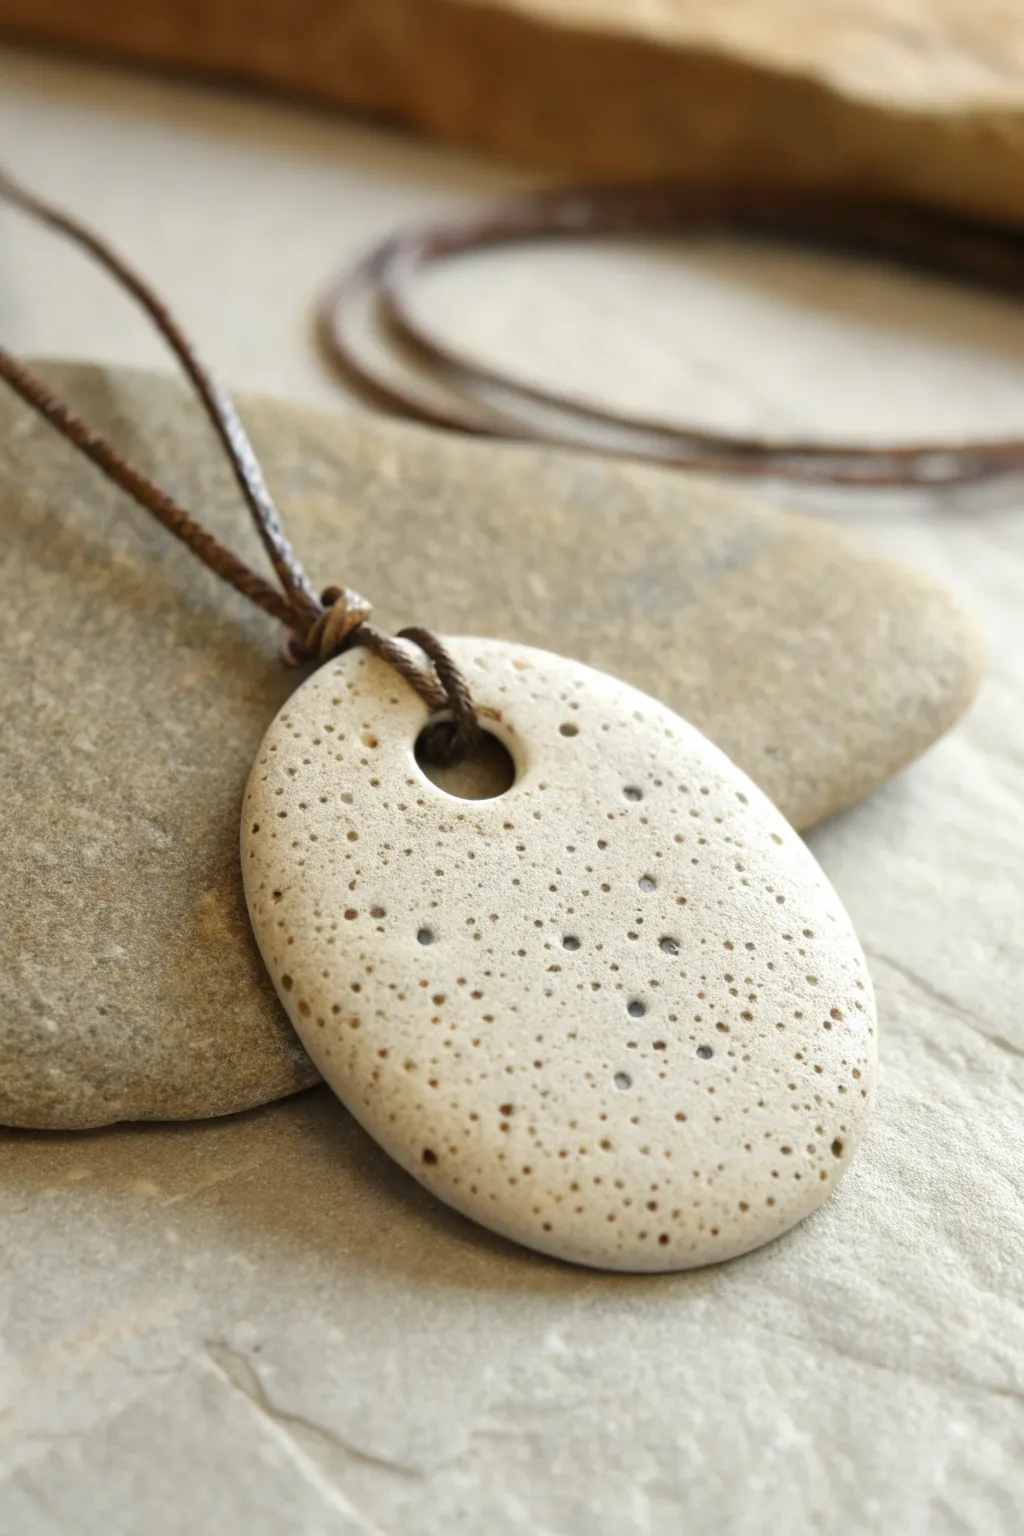
Mimic the natural beauty of porous river stones with this simple yet effective toothbrush sputtering technique. The result is a wonderfully organic, minimalist pendant that looks like it was plucked straight from a streambed.
Step-by-Step Tutorial
Materials
- White or cream-colored polymer clay (or air-dry clay)
- Brown acrylic paint (burnt umber or similar)
- Grey acrylic paint (optional for depth)
- Old toothbrush
- Small round cutter or drinking straw (for the hole)
- Oval shape cutter (or craft knife)
- Rolling pin or pasta machine
- Sandpaper (fine grit)
- Brown waxed cotton cord
- Matte varnish (optional)
Step 1: Shaping the Base
-
Condition the Clay:
Begin by thoroughly kneading your white or cream clay until it is soft, pliable, and free of cracks. This ensures a smooth canvas for our texture. -
Roll the Sheet:
Roll out the clay to a uniform thickness of about 1/4 inch (6mm). You want it substantial enough to look like a stone, but light enough to wear. -
Cut the Shape:
Use an oval cutter to stamp out your pendant shape. If you don’t have a cutter, you can freehand an organic oval shape with a craft knife for a more natural look. -
Soften the Edges:
Gently tap the edges of the oval with your finger to round them off. Real river stones rarely have sharp, 90-degree angles, so softening the perimeter adds realism. -
Create the Bail Hole:
Use a small circular cutter or a sturdy drinking straw to punch a hole near the top of the oval. Make sure it’s centered and not too close to the edge to prevent breakage.
Step 2: Creating the Texture
-
Prepare the Paint:
Squeeze a small amount of brown acrylic paint onto a palette. Add a drop of water to thin it slightly; it needs to be fluid enough to fly off the bristles easily. -
Load the Brush:
Dip the tips of an old toothbrush into the thinned paint. Blot it once on a paper towel to remove excess drips—you want a spray, not a puddle. -
The Sputter Technique:
Hold the toothbrush about 4-6 inches above the clay. Run your thumb firmly across the bristles, flicking them towards the pendant to create a fine mist of speckles. -
Vary the Intensity:
Apply a second, lighter pass of speckles. If you want more dimension, repeat the process with a tiny bit of grey paint to mimic mineral variations. -
Add Larger Spots:
For the few larger dark spots seen in the reference, dip a toothpick into the paint and gently touch it to the clay surface in random areas. -
Embed the Texture:
Wait just a moment for the paint to surface-dry, then verify the texture looks organic. I usually let this sit for about 10 minutes before moving the piece to the baking sheet.
Paint Blob Rescue
Accidentally flicked a giant blob of paint? Don’t wipe it! Dab it gently with the corner of a paper towel to lift the excess, then blend the edges with a clean brush.
Step 3: Finishing and Assembly
-
Bake or Dry:
If using polymer clay, bake according to the manufacturer’s instructions (usually 275°F/130°C for 15-30 minutes). If using air-dry clay, let it cure for 24-48 hours. -
Cool Down:
Allow the pendant to cool completely before handling. It creates a stronger final bond. -
Smooth the Surface:
Lightly sand the back and edges with fine-grit sandpaper to remove any fingerprints or sharp ridges left from the cutter. -
Seal (Optional):
For protection, apply a very thin coat of matte varnish. Avoid glossy finishes as they will ruin the natural stone effect. -
Prepare the Cord:
Cut a length of brown waxed cotton cord (about 24 inches or your preferred length). -
Attach the Pendant:
Fold the cord in half to create a loop. Push this loop through the hole in the pendant from front to back. -
Secure the Knot:
Pull the loose ends of the cord through the loop (creating a Larks Head knot) and tighten it gently against the top of the stone.
Eroded Stone Look
Before baking, gently press coarse sandpaper or a real rock onto the clay surface. This adds physical pitting alongside the painted visual texture.
Enjoy wearing your new earthy accessory that captures the effortless calm of nature


Burlap or Canvas Imprint
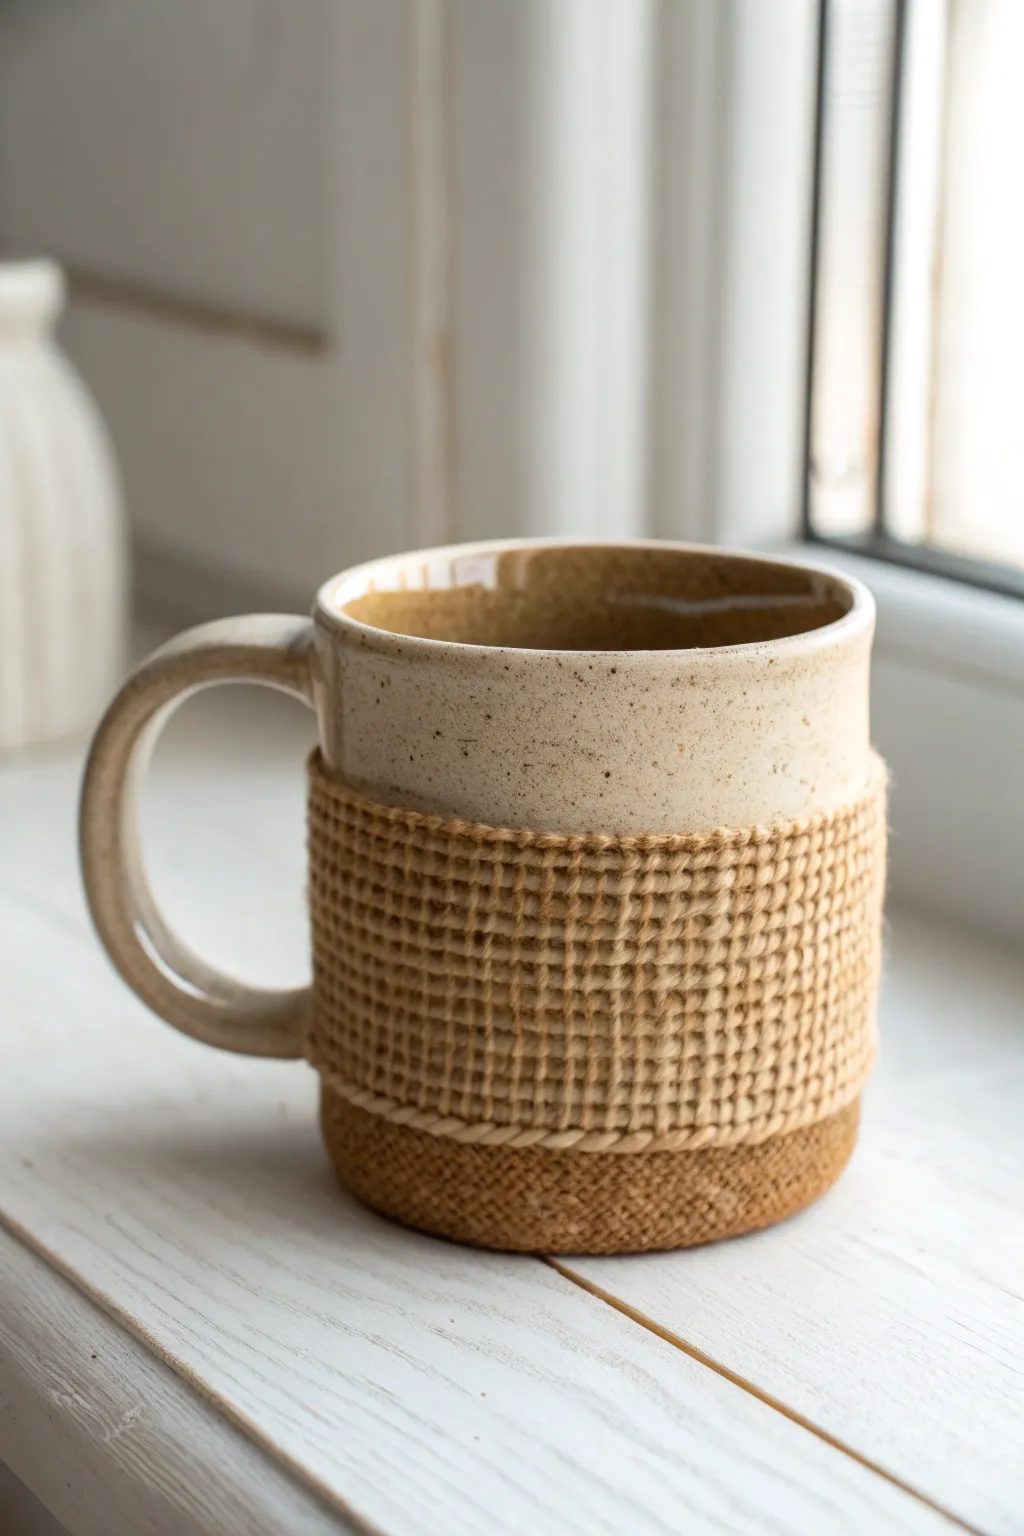
Bring a cozy, tactile feel to your morning coffee with this earthy stoneware mug featuring a deep burlap texture. This project combines smooth, speckled clay with a central band of woven imprint, highlighting the beautiful contrast between raw material and textile patterns.
Step-by-Step
Materials
- Stoneware clay (speckled or tan body)
- Burlap fabric strip or coarse canvas
- Rolling pin
- Clay slab roller (optional)
- Can shape cutter or paper template
- Scoring tool or needle tool
- Slip (clay and water slurry)
- Circular clay cutter or mug base template
- Pottery sponge
- Rib tool (wood or rubber)
- Clear or transparent matte glaze
- Sponge for wiping back glaze
- Kiln
Step 1: Preparing the Slab
-
Roll out the clay:
Begin by rolling out a consistent slab of speckled stoneware clay to about 1/4 inch thickness. Ensure the surface is smooth and free of air bubbles by compressing it lightly with a rib tool. -
Prepare the texture:
Cut a strip of coarse burlap fabric that is slightly wider than the height you want for the textured band on your mug. Ironing the fabric first helps get a clean, crisp impression. -
Apply the texture:
Place the burlap strip across the center of your clay slab. Using your rolling pin, roll firmly over the fabric just once to press the weave pattern deep into the clay surface. Avoid rolling back and forth, as this can create a double image. -
Reveal the pattern:
Carefully peel back the burlap fabric to reveal the woven texture imprinted on the clay. Check to ensure the impression is deep enough to catch glaze later.
Step 2: Constructing the Cylinder
-
Cut the body Template:
Using a rectangular template sized for your mug body, cut the slab. Position the template so the textured band runs horizontally across the middle, leaving smooth clay at the very top and bottom margins. -
Bevel the edges:
Cut the short ends of your rectangle at a 45-degree angle. This beveling creates a stronger, more seamless join when you roll the cylinder. -
Form the cylinder:
Carefully curve the clay slab into a cylinder shape. Score the beveled edges aggressively with your needle tool and apply a generous amount of slip. -
Seam the join:
Press the edges together firmly. I like to use a wooden tool on the inside and a smooth rib on the outside to blend the seam, being very careful not to smear the burlap texture you just created. -
Cut the base:
Roll a small piece of excess clay into a slab for the base. Use a circular cutter that matches the diameter of your cylinder to cut the floor of the mug. -
Attach the base:
Score and slip the bottom edge of your cylinder and the perimeter of the base. Press the cylinder onto the base. -
Seal the bottom:
Use a modeling tool to blend the clay from the base up into the wall of the mug to ensure a watertight seal. Smooth the join with a damp sponge.
Clean Edges
Before rolling the texture, lightly dust the burlap with cornstarch. This prevents sticky clay from getting trapped in the fabric weave and ensures a sharp release.
Step 3: Adding the Handle and Finishing
-
Pull a handle:
Pull a strap of clay for the handle. Keep the handle profile simple and smooth to contrast with the busy texture of the mug body. -
Attach the handle:
Once the handle has stiffened slightly to a ‘leather hard’ stage, score and slip the attachment points. Attach it to the smooth upper section and the lower textured section of the mug. -
Smooth the rim:
Use a damp sponge or a piece of chamois leather to compress and round the rim of the mug. A smooth rim is essential for comfortable drinking. -
Define the borders:
Using a modeling tool, you can gently press a line or create a small indentation above and below the textured area to create a ‘frame’ effect, simulating a rope border. -
Bisque fire:
Allow the mug to dry slowly to avoid cracking, then load it into the kiln for a bisque firing.
Make it Cozy
Try using an old chunky knit sweater instead of burlap for the imprint. This creates a cozy ‘cable knit’ texture that looks amazing when glazed white or cream.
Step 4: Glazing
-
Apply the glaze:
Dip or brush a transparent or semi-transparent glaze over the entire mug. A glaze that breaks over edges works best here. -
Wipe back technique:
While the glaze is still slightly powdery on the surface, use a damp sponge to gently wipe the glaze off the high points of the burlap texture. This leaves glaze deep in the crevices but reveals the raw, specked clay on top. -
Final fire:
Fire the mug to the temperature appropriate for your clay and glaze combination.
Your finished mug will have a delightful surface variety that feels comforting in the hands


Rope Twist Lines
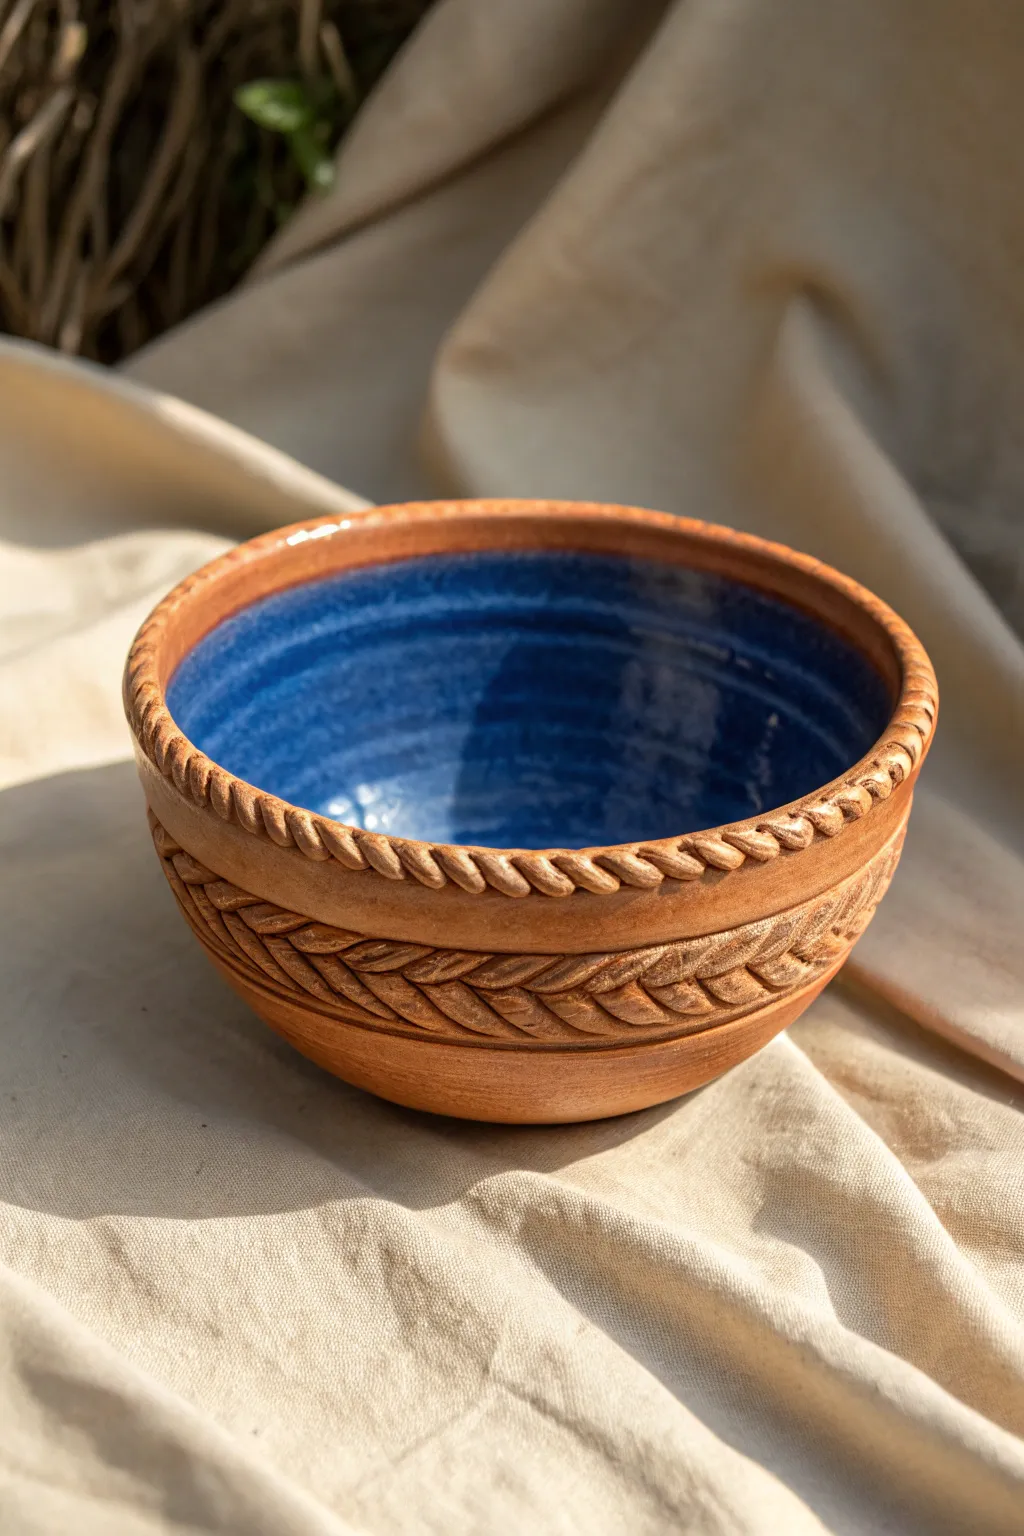
This rustic handmade bowl contrasts the raw warmth of terracotta clay with a stunning, deep blue interior glaze. Featuring two distinct textured bands—a classic rope twist at the rim and a sophisticated wheat braid around the belly—it offers a tactile experience that looks as good as it feels.
Step-by-Step Guide
Materials
- Red earthenware or terracotta clay body
- Pottery wheel (or coil/pinch supplies for hand-building)
- Wooden modeling tool with a flat edge
- Pointed needle tool
- Water and slip in a small container
- Sponge
- Deep cobalt blue glossy glaze (cone 04 or suitable for your clay)
- Clear or matte wax resist (optional)
- Kiln access
Step 1: Forming the Bowl Base
-
Center and throw:
Begin with a ball of clay equivalent to a large grapefruit. Center it on your pottery wheel, and throw a basic bowl shape with relatively thick walls (about 1/4 inch) to support the later texture work. -
Refine the curve:
Shape a gentle, consistent curve from the foot to the rim. Avoid flaring the rim out too far; keep it slightly upright to accommodate the rope twist later. -
Smooth the exterior:
Use a metal rib to compress and smooth the outside wall while the wheel is spinning slowly, removing any finger ridges to create a blank canvas for your braiding. -
Trim the foot:
Once the clay is leather hard, trim a neat foot ring on the bottom. This elevates the form and gives the bowl a professional finish.
Crack Prevention
Added coils dry faster than the main body. Once assembled, wrap the bowl loosely in plastic for 24 hours to equalize moisture before letting it air dry.
Step 2: Creating the Rope Twist Rim
-
Prepare a small coil:
Roll out a very thin, consistent coil of fresh clay, roughly the thickness of a pencil lead or slightly larger. -
Twist the rope:
Fold the coil in half and gently twist the two strands together to create a tight rope effect. Alternatively, you can use a single coil and press diagonal impressions, but twisting two strands looks more authentic. -
Score and slip:
Score the very top edge of the bowl rim and apply a small amount of slip. Carefully attach your twisted rope coil along the rim, pressing gently to bond it without flattening the texture. -
Clean the join:
Use a damp sponge or your finger to smooth the underside of the rope where it meets the bowl wall, ensuring it looks integrated rather than just stuck on.
Step 3: Sculpting the Wheat Braid Band
-
Mark your guidelines:
About halfway down the bowl’s exterior, lightly scribe two parallel horizontal lines around the circumference. These will define the top and bottom of your braided band. -
Add the central bulk:
Roll a slightly flattened coil of clay and attach it firmly between your guidelines using score and slip. This adds the necessary volume for the carving stage. -
Initial diagonal cuts:
Using a wooden modeling tool, press into the added coil at an angle to create a series of diagonal overlapping strokes, moving from left to right. -
Refining the weave:
Go back over the band, pressing in the opposite diagonal direction to create the ‘V’ shape characteristic of a wheat braid. I find that rocking the tool slightly as you press gives a nicer depth. -
Define the edges:
Use a needle tool or the edge of your wooden tool to deeply incise the top and bottom borders of the braid, making the pattern pop away from the smooth clay walls.
Antique Finish
After bisque firing, rub a black or dark brown iron oxide wash into the exterior braid texture and wipe away the high points to highlight the carving.
Step 4: Glazing and Finishing
-
Bisque fire:
Let the bowl dry slowly to prevent cracking, especially around the added coils. Fire to bisque temperature (usually cone 04 or 06). -
Wax the exterior:
Apply wax resist to the entire exterior of the bowl, including the textured rim. This ensures the raw terracotta color remains visible and prevents glaze from ruining the texture details. -
Pour the interior:
Pour a liberal amount of deep blue glaze into the bowl. Swirl it around quickly to coat the entire interior surface, then pour the excess back into your bucket. -
Clean up:
Even with wax, checks the rim carefully. Use a damp sponge to wipe away any droplets of blue glaze that may have beaded up on the rope texture or the exterior walls. -
Glaze fire:
Fire the piece a second time to the maturation temperature of your glaze and clay body.
Enjoy using your new bowl for everything from morning cereal to serving salads

The Complete Guide to Pottery Troubleshooting
Uncover the most common ceramic mistakes—from cracking clay to failed glazes—and learn how to fix them fast.
Leaf Vein Impressions
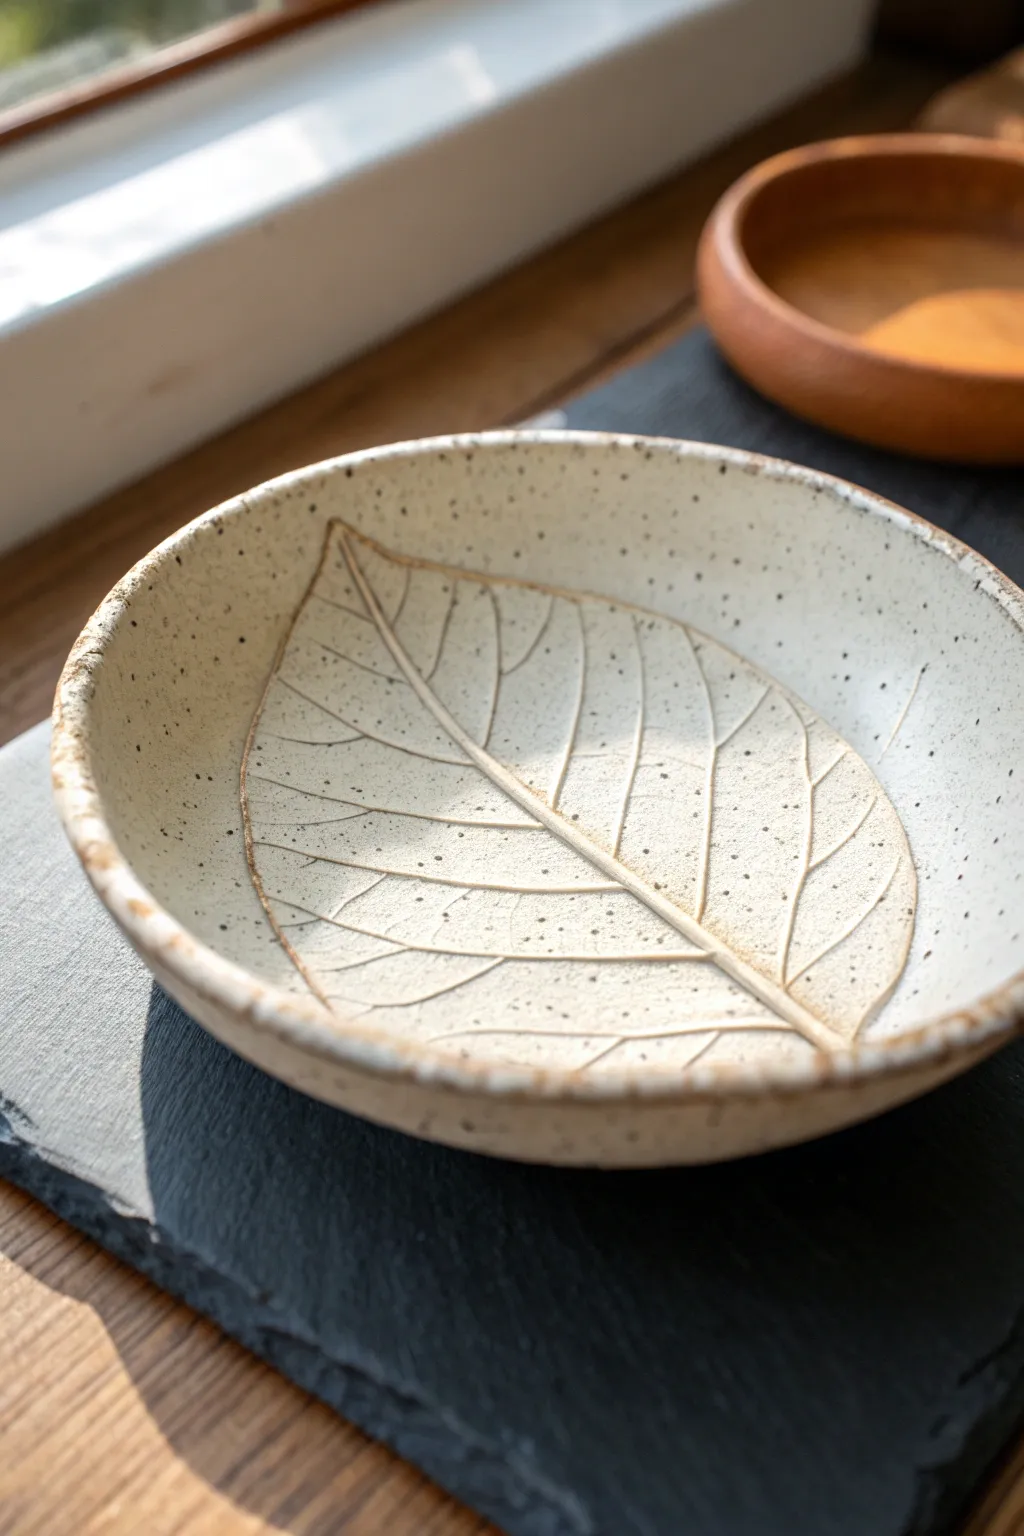
Capture the delicate beauty of nature with this organic-style shallow dish, featuring a prominent leaf skeletal impression. The textured, speckled clay body enhances the rustic feel, making the subtle veins pop without needing complex glazing techniques.
Step-by-Step Guide
Materials
- Speckled stoneware clay (mid-fire)
- Large, fresh leaf with prominent veins (e.g., hydrangea or hosta)
- Rolling pin
- Canvas mat or slab roller
- Potter’s needle tool or fettling knife
- Shallow slumped mold or a large bowl for forming
- Rib tool (wooden or silicone)
- Sponge
- Clear matte glaze
- Kiln access
Step 1: Preparing the Slab
-
Wedge the clay:
Begin by thoroughly wedging your speckled stoneware clay. This removes air bubbles and ensures the particles are aligned, which is crucial for preventing warping later. -
Roll out the slab:
Place the clay on your canvas mat. Using a rolling pin, roll out a slab to an even thickness of approximately 1/4 inch. Turn the clay occasionally to ensure it doesn’t stick to the surface. -
Smooth the surface:
Take your rib tool and gently compress the clay surface on both sides. This removes the canvas texture and aligns the clay platelets, giving you a smooth canvas for the leaf.
Step 2: Creating the Texture
-
Position the leaf:
Select your leaf—finding one with thick, raised veins on the back is key. Place the leaf vein-side down onto the center of your prepared clay slab. -
Roll the impression:
With the rolling pin, roll firmly over the leaf one single time. Do not roll back and forth, as this creates a double image or ‘ghosting.’ Apply enough pressure to embed the veins deep into the clay. -
Verify adherence:
I like to gently press down on the edges of the leaf with my fingers just to make sure the finer details at the perimeter are caught before peeling it away. -
Remove the leaf:
Carefully lift the stem and peel the leaf off the clay. You should see a crisp, deep impression of the skeletal structure left behind.
Sticky Leaf?
If the leaf pulls up clay or sticks, dust the leaf underside very lightly with cornstarch before rolling. This acts as a release agent and burns off in the kiln without a trace.
Step 3: Shaping and Refining
-
Cut the shape:
Using a needle tool, cut a circular shape around the leaf impression. You can use a paper template or a bowl as a guide, or cut freehand for a more organic look. -
Smooth the rim:
Run a damp sponge or your finger along the cut edge to round it off. Sharp edges can become very brittle and dangerous after firing, so take your time here. -
Form the curve:
Gently lift the clay slab and drape it into a shallow slump mold or inside a large bowl lined with plastic wrap. Press gently to help it take the curve. -
Refine the form:
While it’s in the mold, check that the rim is even. You can lightly tamper the rim with a damp sponge to enhance the rustic, slightly uneven texture seen in the photo. -
Dry slowly:
Cover the bowl loosely with plastic. Allow it to dry slowly to the leather-hard stage before removing it from the mold to avoid warping.
Enhance the Contrast
To make veins pop like the photo, rub a red iron oxide wash into the veins and wipe it back with a sponge before applying the clear glaze. This deepens the shadows.
Step 4: Firing and Glazing
-
Bisque fire:
Once the piece is bone dry, fire it to cone 04 (or your clay body’s bisque temperature) in the kiln. -
Clean the bisque:
Wipe the bisque-fired bowl with a damp sponge to remove any dust, which could prevent the glaze from adhering properly. -
Highlight the veins:
To get the look in the image, the veins are left largely unglazed or thinly glazed to show the clay body. You can wipe away glaze from the high points of the veins after dipping. -
Apply clear glaze:
Dip or brush a thin layer of clear matte glaze over the entire interior. The speckles in the clay will show through, creating that sandy texture. -
Wipe the rim:
For the rustic brown edge shown, wipe the glaze back slightly from the rim, allowing the natural toasting of the clay body to act as a frame. -
Glaze fire:
Fire the bowl to cone 5/6 (mid-fire). This higher temperature vitrifies the stoneware and brings out the dark speckles in the clay body.
Enjoy using your beautiful botanical dish as a jewelry holder or simply as a piece of natural decor on your shelf
Seashell Ripple Press
Capture the organic beauty of the coastline with this deceptively simple textured bowl project. By using the natural ridges of a seashell, you can create a sophisticated, spiraling ripple effect that mimics sand dunes or ocean currents on raw clay.
Step-by-Step Tutorial
Materials
- Speckled buff stoneware clay or air-dry clay (sand-colored)
- Small to medium ribbed scallop shell (clean and dry)
- Rolling pin
- Canvas mat or cloth
- Bowl mold (plaster, plastic, or a simple kitchen bowl)
- Fettling knife or needle tool
- Finishing sponge
- Water slip (if using kiln clay) or water (if using air-dry)
- Potter’s rib (optional)
Step 1: Preparing the Slab
-
Wedge the clay:
Start by wedging a baseball-sized amount of speckled clay to remove air bubbles and ensure consistency. If you are using air-dry clay, simply knead it briefly to make it pliable. -
Roll out the slab:
Place your clay on a canvas mat to prevent sticking. Using your rolling pin, roll the clay out into a slab that is roughly 1/4 inch thick. Try to keep the thickness even across the entire surface. -
Smooth the surface:
Take a damp sponge or a soft rib tool and gently compress the surface of the slab. This removes the canvas texture and prepares a smooth canvas for your seashell impressions.
Shell Selection
Use a scallop shell with deep, sharp ridges. Older, worn shells create a blurry texture. Clean the shell thoroughly and apply a tiny dab of vegetable oil to prevent sticky clay buildup.
Step 2: Creating the Texture
-
Position the shell:
I prefer to hold the scallop shell by its hinge, with the wide, ribbed fan edge facing down towards the clay. -
Press the initial ridge:
Starting near the center of your slab (but not the exact middle), press the edge of the shell firmly into the clay. Rock it slightly to ensure the ridges leave a deep impression. -
Create the drag pattern:
Instead of lifting the shell straight up, drag it slightly downwards and to the side to elongate the textural lines. This creates that sweeping, dynamic movement seen in the photo. -
Repeat in a spiral:
Move the shell slightly over and repeat the press-and-drag motion. Continue this process, working your way outward in a loose spiral or concentric circles until the entire slab is covered in these beautiful rippled lines. -
Checking depth:
Examine your texture. The ridges should be distinct and deep enough to catch glaze later, but not so deep that they compromise the structural integrity of the wall.
Step 3: Forming the Bowl
-
Cut the circle:
Place your chosen mold or a circular template lightly over the textured slab. Using a needle tool or fettling knife, cut a clean circle. This will determine the size of your finished bowl. -
Lift the slab:
Carefully peel away the excess clay. Gently lift your textured circle. If the clay is very soft, let it firm up for 10-15 minutes so you don’t smudge the texture while handling. -
Drape over the mold:
Place your slab *inside* a bowl mold (slump method) if you want the texture on the inside, or drape it *over* a bowl mold (hump method) to feature the texture on the outside like the example image. The image shows external texture, so draping over a convex form works best here. -
Shape carefully:
Gently press the clay against the mold to shape it. Be extremely careful not to flatten your seashell ridges. Use a soft sponge to press from the inside (or the back of the slab) to conform it to the curve. -
Refine the rim:
While the clay is on the mold, check the rim. You can use your finger or a damp chamois cloth to round off the sharp cut edge, ensuring it feels smooth to the touch. -
Set the base:
If the bowl is round-bottomed, gently flatten the very center while it’s on the mold to create a small, stable foot so it will sit flat on a table.
Make it Functional
If you want this bowl to be food-safe, ensure you use stoneware clay and fire it to high temperatures (Cone 5/6) with a food-safe glaze. Air-dry clay is for decorative use only.
Step 4: Drying and Finishing
-
Stiffen the form:
Allow the clay to dry on the mold until it is leather-hard. This usually takes a few hours depending on humidity. Don’t leave it too long, or the clay might shrink and crack against the rigid mold. -
Remove from mold:
Once the bowl holds its own shape, gently pop it off the mold. Turn it right-side up. -
Smooth the interior:
Inspect the interior surface. Use a slightly damp sponge to smooth out any imperfections or canvas marks, giving the inside a clean, professional finish that contrasts with the rough exterior. -
Final drying:
Let the bowl dry completely. If using kiln clay, it’s now ready for bisque firing. If using air-dry clay, wait 24-48 hours until bone dry. -
Seal or glaze:
For kiln firing, a clear or translucent matte glaze works best to highlight the speckles and shadows. For air-dry clay, seal with a matte acrylic varnish.
Place your finished bowl near a window where the sunlight can dance across those beautiful coastal ridges


What Really Happens Inside the Kiln
Learn how time and temperature work together inside the kiln to transform clay into durable ceramic.
Pebble Dimple Texture
Transform a simple cylinder vessel into a tactile masterpiece with this satisfying raised texture technique. The uniform rows of tiny clay pebbles create a mesmerizing rhythm that catches the light beautifully, giving your planter a sophisticated yet handcrafted feel.
Detailed Instructions
Materials
- White or speckled stoneware clay
- Potter’s wheel (or slab roller for hand-building)
- Needle tool
- Flexible metal kidney rib
- Wooden modeling tool
- Slip (liquid clay)
- Small scoring tool or serrated rib
- Sponge
- Matte pale pink glaze (or bisque stain)
Step 1: Forming the Base
-
Prepare your clay:
Begin by wedging your clay thoroughly to remove air bubbles. For a pot of this size (roughly 5-6 inches wide), start with about 2-3 pounds of clay. -
Throw the cylinder:
Center your clay on the wheel and open it up. Pull the walls up to form a straight-sided cylinder. Aim for walls that are uniform in thickness, perhaps slightly thicker than usual to support the added weight of the texture. -
Smooth the surface:
Use a flexible metal kidney rib to compress the outside wall. This removes throwing lines and creates a perfectly smooth canvas for your pebble texture. This step is crucial for that clean, modern look. -
Trim the rim:
Finish the lip of the pot with a chamois or your sponge to ensure it is rounded and comfortable to the touch. Cut the pot from the wheel but leave it on the bat to firm up slightly to leather-hard.
Extruder Shortcut
Use a clay extruder with a small round die to make a long ‘noodle’ of clay. Slice the noodle into equal segments to create perfectly uniform balls instantly.
Step 2: Creating the Pebbles
-
Roll clay balls:
While the pot firms up, take a chunk of fresh clay and start rolling dozens of tiny spheres. Aim for pea-sized balls, approximately 5-6mm in diameter. I find it meditative to roll a whole batch at once so I don’t break my flow later. -
Check consistency:
Ensure the clay balls are roughly the same moisture content as your pot. If the pot is too dry, the balls will pop off; if too wet, the pot might slump. -
Mark your grid:
Lightly trace horizontal guidelines around the pot using a needle tool while slowly spinning the banding wheel. This helps keep your rows straight, though you can eyeball it for a more organic feel. -
Score the surface:
Take a serrated rib or small scoring tool and gently scratch the surface where your first row of dots will go. You don’t need deep gouges, just enough to rough up the skin.
Step 3: Attaching the Texture
-
Apply slip:
Dab a very small amount of slip onto the scored area. Too much slip will make a mess and slide around. -
Place the first row:
Press the clay balls onto the pot one by one. Use your thumb to gently flatten them just slightly so they adhere well but maintain their domed shape. -
Establish the pattern:
Continue adding rows. For the specific look in the photo, align the dots in a grid pattern (stacked directly on top of each other) rather than offsetting them like bricks. This creates those distinct vertical columns. -
Clean as you go:
Use a small, slightly damp paintbrush to clean up any excess slip that squeezes out from under the dots. It is much harder to clean this up once it dries. -
Inspect the adhesion:
Give each dot a gentle wiggle test. If one feels loose, remove it, re-score, add fresh slip, and reattach. -
Dry slowly:
Once the entire surface is covered, cover the pot loosely with plastic. Uneven drying forces between the thick dots and thin wall can cause cracking, so slow drying is essential.
Play with Spacing
Try creating a gradient effect by placing the dots close together at the bottom and spacing them further apart as you move up the vessel wall.
Step 4: Finishing
-
Bisque fire:
Once bone dry, fire the piece to bisque temperature (usually Cone 04 or 06). -
Glaze selection:
Choose a matte or satin glaze. A high-gloss glaze tends to obscure the subtlety of the texture with harsh reflections. The pale peach/pink tone here works best with a matte finish. -
Apply glaze:
Dip or spray your glaze. If dipping, be careful not to let the glaze pool too thickly between the bumps, which can hide the definition. -
Final fire:
Fire to the maturity temperature of your clay and glaze (likely Cone 5 or 6 for stoneware).
Place your finished pot on a sunny ledge and watch how the shifting shadows dance across the bumpy surface throughout the day
Honeycomb Dot Grid
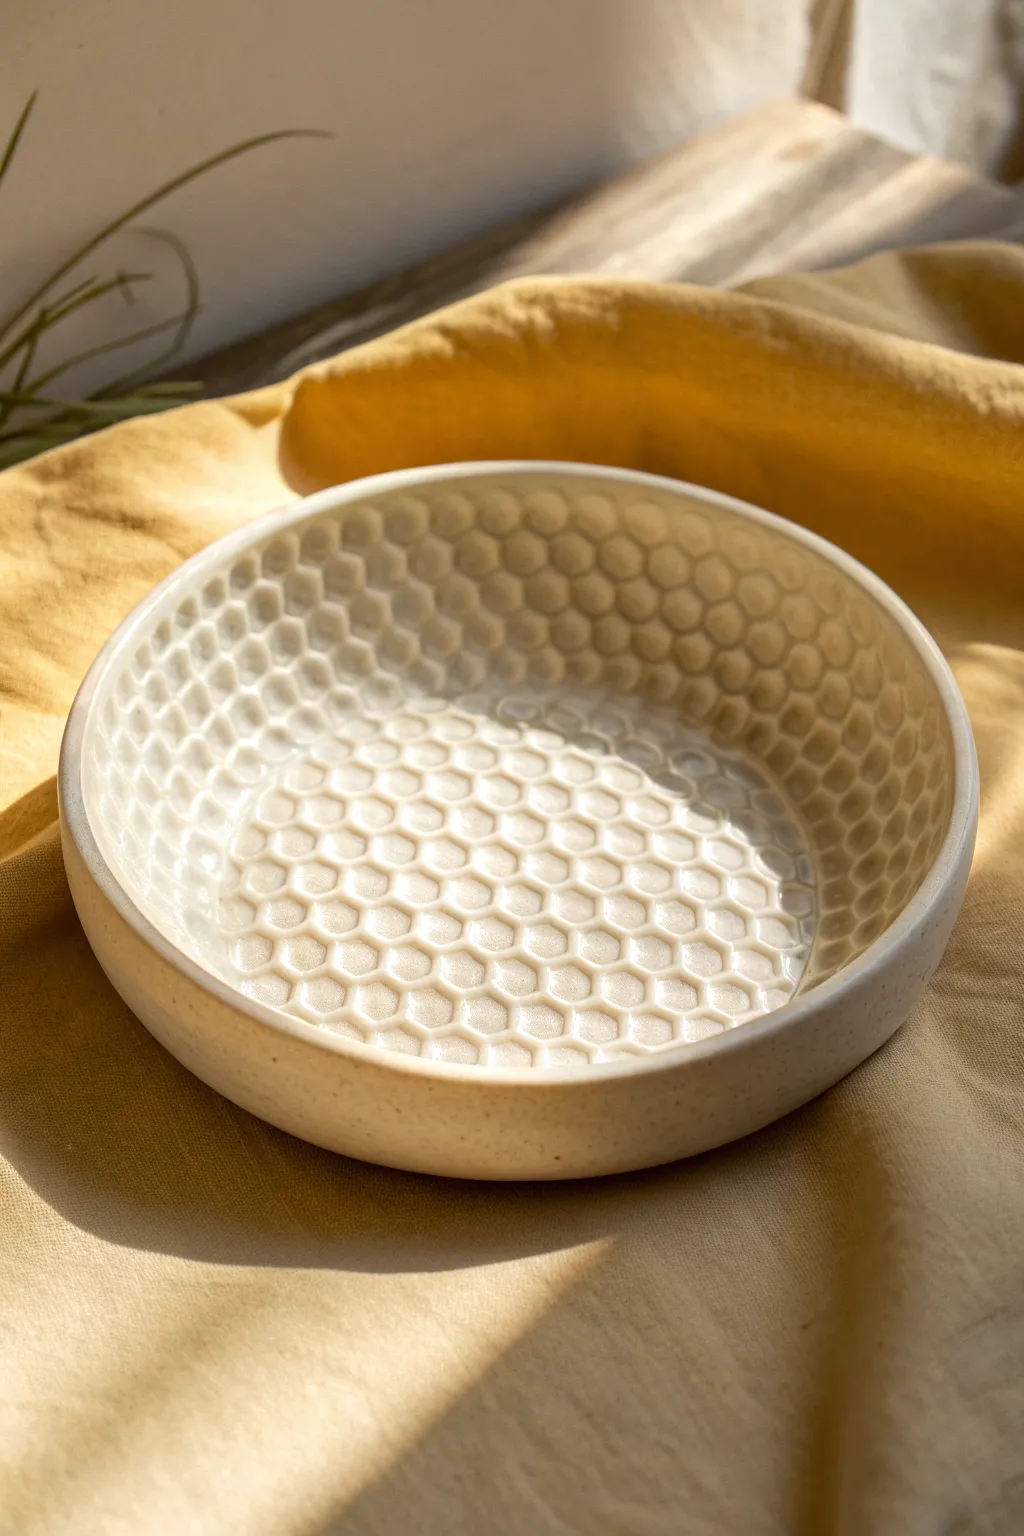
This project transforms a simple slab of clay into a tactile delight, featuring a mesmerizing honeycomb pattern that catches the light beautifully. The finished bowl combines a smooth, speckled exterior with a deeply textured interior grid that feels wonderful to the touch.
Step-by-Step Guide
Materials
- Stoneware clay (smooth or lightly grogged)
- Circular texture roller or template (honeycomb pattern)
- Rubber kidney rib
- Rolling pin
- Guide sticks (about 1/4 inch thick)
- Slump mold or a bowl to use as a mold
- Canvas or heavy fabric
- Fettling knife or needle tool
- Sponge
- Glossy transparent glaze (food safe)
Step 1: Preparing the Slab
-
Wedge the clay:
Begin by thoroughly wedging your clay to remove any air bubbles and ensure an even consistency. This is crucial for structural integrity later. -
Set up your workspace:
Lay down your canvas or heavy fabric on a flat surface. Place your guide sticks on either side of the working area to ensure your slab rolls out to an even thickness. -
Roll out the slab:
Roll the clay out between the guide sticks until the rolling pin rests on the wood, creating a perfectly uniform slab about 1/4 inch thick. -
Compress the surface:
Run a rubber kidney rib firmly over both sides of the slab. This aligns the clay particles and creates a smooth canvas for your texture work.
Stamp Clarity Tip
Dust your texture roller or mat lightly with cornstarch before pressing it into the clay. This acts as a release agent and prevents the tool from sticking and pulling up the clay.
Step 2: Texturing and Forming
-
Apply the texture:
Using a honeycomb texture roller or a flexible mat, press firmly into the clay slab. I like to stand up for this step to use my body weight for an even, deep impression. -
Check the depth:
Lift the tool carefully to ensure the hexagonal ridges are crisp and the ‘cells’ are concave. If the impression is too light, carefully realign and press again. -
Cut the circle:
Place a circular template or plate over the textured area. Use a needle tool or fettling knife to cut a clean circle, holding the tool perpendicular to the table. -
Smooth the rim:
Run a damp finger or a small piece of chamois gently around the fresh cut edge to round it off, removing any sharp burrs before the clay dries. -
Prepare the mold:
Cover your slump mold or bowl with a thin layer of plastic wrap or cheesecloth to prevent sticking. -
Slump the clay:
Carefully lift the textured circle and center it over the mold, texture side facing up (away from the mold surface). -
Shape the curve:
Gently press the clay down into the mold, starting from the center and working spirally outward. Be careful not to smudge your beautiful honeycomb pattern.
Step 3: Finishing and firing
-
Dry slowly:
Let the bowl stiffen in the mold until leather hard. This usually takes a few hours depending on humidity. -
Refine the rim:
Once removed from the mold, do a final pass on the rim with a slightly damp sponge to ensure it is perfectly comfortable for handling. -
Bisque fire:
Allow the piece to bone dry completely before loading it into the kiln for a bisque firing (typically cone 04). -
Apply glaze:
Dip the piece in a transparent glossy glaze. This type of glaze will pool slightly in the honeycomb recesses while breaking over the ridges, highlighting the geometry. -
Wipe the foot:
Clean the bottom of the bowl with a sponge to remove any glaze so it doesn’t stick to the kiln shelf. -
Final firing:
Fire the piece to the temperature appropriate for your clay body and glaze (e.g., cone 5 or 6). Let the kiln cool completely before opening.
Dual-Tone Effect
After bisque firing, wipe a dark underglaze into the honeycomb texture and sponge it off the surface. Then apply a clear glaze. Ideally, the dark color remains only deep in the cells.
Now you have a stunning, texturally rich bowl ready to hold trinkets or serve snacks

TRACK YOUR CERAMIC JOURNEY
Capture glaze tests, firing details, and creative progress—all in one simple printable. Make your projects easier to repeat and improve.
Comb-Dragged Lines
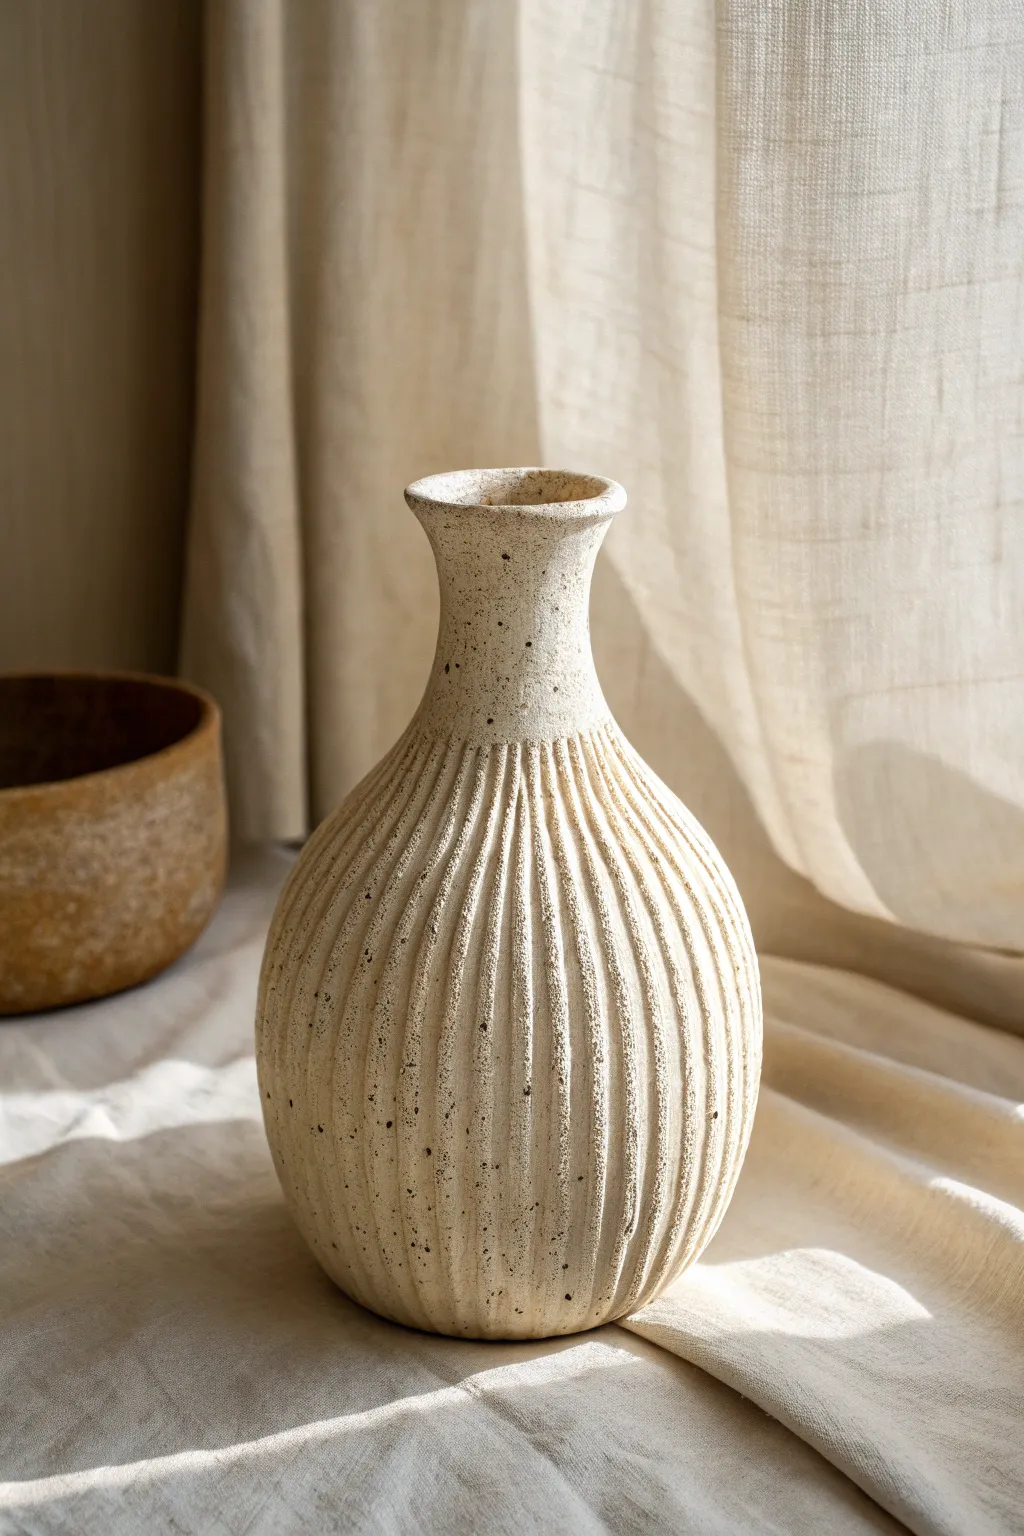
This elegant vessel combines a classic bottle shape with a satisfyingly tactile surface. The organic, speckled clay body contrasts beautifully with the precise, vertical furrows created using a simple combing technique, giving the piece a timeless, handcrafted appeal.
Step-by-Step Tutorial
Materials
- Speckled buff stoneware clay (or white clay with added grog/sand)
- Pottery wheel (or coil building tools)
- Serrated metal rib or texture comb
- Wooden throwing ribs
- Pin tool
- Sponge
- Wire cutter
- Clear matte glaze
Step 1: Throwing and Shaping
-
Center the clay:
Start with a well-wedged ball of speckled stoneware clay. Secure it firmly to the center of your wheel head and use water to center it into a smooth, even mound. -
Open the form:
Press your thumbs into the center to open the clay, pulling outwards to establish a base width of about 4-5 inches, depending on your desired final size. -
Pull the cylinder:
Begin pulling the walls upward. Aim for a consistent thickness, but leave a little extra weight near the bottom to support the belly of the vase later. -
Shape the belly:
Using a rib tool inside the vessel and gentle pressure from the outside, push the clay outward to form a rounded, bulbous shape for the main body. -
Collar the neck:
As you move upward, gently collar (squeeze) the clay inward to create the transition from the wide belly to the narrower neck. Keep your hands wet to prevent drag. -
Refine the rim:
Extend the neck upwards, flaring the rim slightly at the very top. Use a chamois or sponge to compress the lip, ensuring it is smooth and pleasant to touch. -
Smooth the surface:
Run a smooth metal or wooden rib over the entire exterior to remove throwing lines and excess slurry. This clean surface is crucial for the texture to look crisp.
Step 2: Adding Texture
-
Firm up slightly:
Let the vase sit for a short while until it is barely leather hard; if the clay is too wet, the texture will look mushy, but too dry and it will scratch. -
Establish the texture zone:
Decide where the texture stops. On this piece, the ribbing ends right at the shoulder where the neck begins. I find marking a faint guide line helps me stop consistently. -
Begin dragging:
Take your serrated rib or texture comb. Starting from the bottom of the belly, press the teeth into the clay and drag upward in a straight(ish) vertical line. -
Follow the curve:
As you drag up, follow the contour of the belly. The lines will naturally converge as the form narrows toward the neck. -
Disengage at the shoulder:
Lift the tool smoothly away from the surface as you reach your guide line at the neck, leaving the top section smooth. -
Repeat around the form:
Continue this process around the entire circumference. Try to keep the spacing consistent, but embrace slight irregularities as part of the handmade charm. -
Clean up burrs:
Let the piece dry to a firm leather hard stage. Once dry, gently brush away any sharp clay crumbs or ‘burrs’ created by the combing tool.
Uneven Lines?
If you wobble while dragging the comb, don’t try to pave over it. Use a smooth rib to erase that section completely, then redraw the lines fresh.
Step 3: Finishing
-
Trimming the foot:
Turn the piece over (once the rim can support weight) and trim a neat foot ring, ensuring the bottom is smooth and won’t scratch surfaces. -
Bisque fire:
Fire the completely dry piece in a bisque kiln to prepare it for glazing. -
Glaze application:
Dip or spray the vase with a clear matte glaze. A clear glaze is essential here to let the natural speckles of the clay body shine through without obscuring the ridge texture. -
Final firing:
Fire again to the cone temperature recommended for your specific clay and glaze combination.
Go Horizontal
For a totally different energy, hold the comb steady against the spinning wheel to create perfect horizontal rings instead of vertical ones.
Now you have a stunning, textural vase that looks beautiful empty or filled with dried stems
Crosshatch Carved Texture
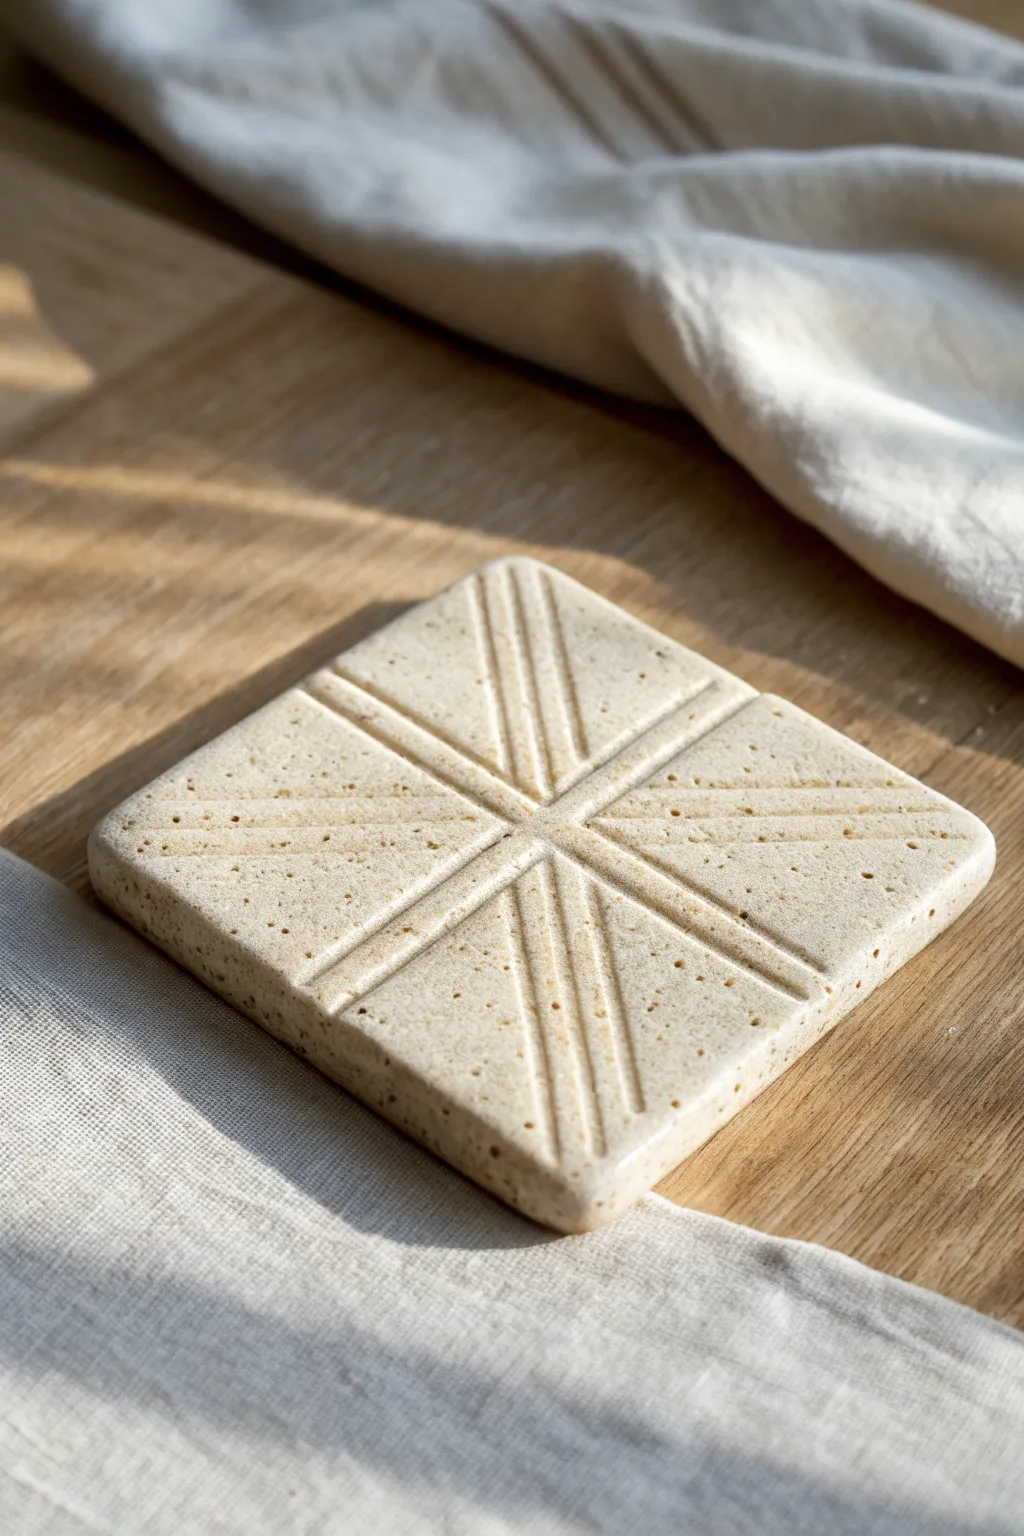
This elegant square tile showcases the natural beauty of speckled clay enhanced by precise, radiating line work. The minimalist geometric pattern, reminiscent of a starburst or compass, creates a striking textural contrast that feels both modern and timeless.
Step-by-Step
Materials
- Speckled stoneware clay (buff or cream color)
- Rolling pin
- Two 1/4-inch wooden guide strips (slats)
- Square template or ruler (approx. 4-5 inches)
- Fettling knife or needle tool
- Carving tool (small U-gouge or V-gouge)
- Smoothing sponge
- Small bowl of water
- Canvas or ware board for working
Step 1: Preparation & Shaping
-
Wedge the clay:
Begin with a ball of speckled clay slightly larger than a grapefruit. Wedge it thoroughly to remove air bubbles and ensure the speckles are evenly distributed throughout the body. -
Set up guides:
Place your canvas on a flat work surface. Position your two 1/4-inch wooden guide strips on either side of the clay ball to ensure an even thickness when rolling. -
Roll the slab:
Using the rolling pin, roll the clay out into a smooth, even slab. Check that the rolling pin rests on the guide strips during the final passes for perfect uniformity. -
Compress the slab:
Take a rib tool or a slightly damp sponge and compress the surface of the clay slab. This strengthens the clay and helps prevent future warping. -
Cut the square:
Place your square template onto the clay. Holding your fettling knife vertically, cut around the template to create a clean square shape. Lift away the excess clay. -
Soften the edges:
Gently run a damp finger or a sponge along the sharp cut edges to round them off slightly. This makes the finished coaster friendlier to hold.
Step 2: Mapping the Design
-
Locate center:
Using a ruler, lightly mark the exact center point of the square. Simply press a tiny dot with your needle tool; don’t dig deep. -
Mark diagonals:
Lay your ruler from corner to corner. Very lightly re-score a faint guideline intersecting the center point. Repeat for the opposite corners. -
Mark orthogonal lines:
Measure the halfway point of each side. Connect opposing midpoints with a faint guideline, crossing through the center. You should now have a faint “Union Jack” type grid sketched on the surface. -
Leather hard stage:
Allow the tile to dry to a leather-hard state. It should be firm enough to hold its shape but soft enough to carve without chipping. This usually takes a few hours depending on humidity.
Clean Lines
When carving long straight lines, act confidently. Moving the tool too slowly often results in wobbly lines; a faster, decisive stroke creates a smoother channel.
Step 3: Carving the Texture
-
Start the center vertical:
Using your U-gouge or V-gouge tool, carve a groove along your vertical center guideline. Start near the center point and pull outward to the edge. I prefer to stop just millimetres short of the Center point so the lines don’t get muddy. -
Add parallel verticals:
Carve a parallel line on the left and right of your central vertical groove. Try to keep the spacing consistent between the three lines. -
Carve horizontal lines:
Repeat the process for the horizontal axis. Carve the center line first, then the two parallel flanking lines. -
Carve diagonal sets:
Move to the diagonal guidelines. Carefully carve three parallel lines along each diagonal offering, radiating from the center toward the corners. -
Clean up center:
With all lines carved, inspect the center junction. Use a needle tool to gently clear away any clay crumbs where the lines converge.
Inlaid Color
Before firing, fill the carved lines with a dark underglaze, let it dry, and sponge off the surface. The dark lines will pop dramatically against the cream clay.
Step 4: Finishing
-
Smooth the burrs:
Once the clay is bone dry, gently rub the surface with a dry scouring pad or your finger to knock off any sharp little clay ‘crumbs’ created by the carving tool. -
First firing:
Bisque fire the piece according to your clay body’s instructions (usually Cone 04 or 06). -
Glaze application:
Apply a clear or transparent glaze to highlight the speckles. Alternatively, leave the raw clay unglazed for a matte, stone-like texture, just ensure it is high-fired to full vitrification so it doesn’t absorb water. -
Final firing:
Glaze fire to the temperature appropriate for your clay (likely Cone 5/6 or Cone 10).
Place your finished tile on a wooden table to admire how the light catches the carved grooves
Fork Tine Stripes
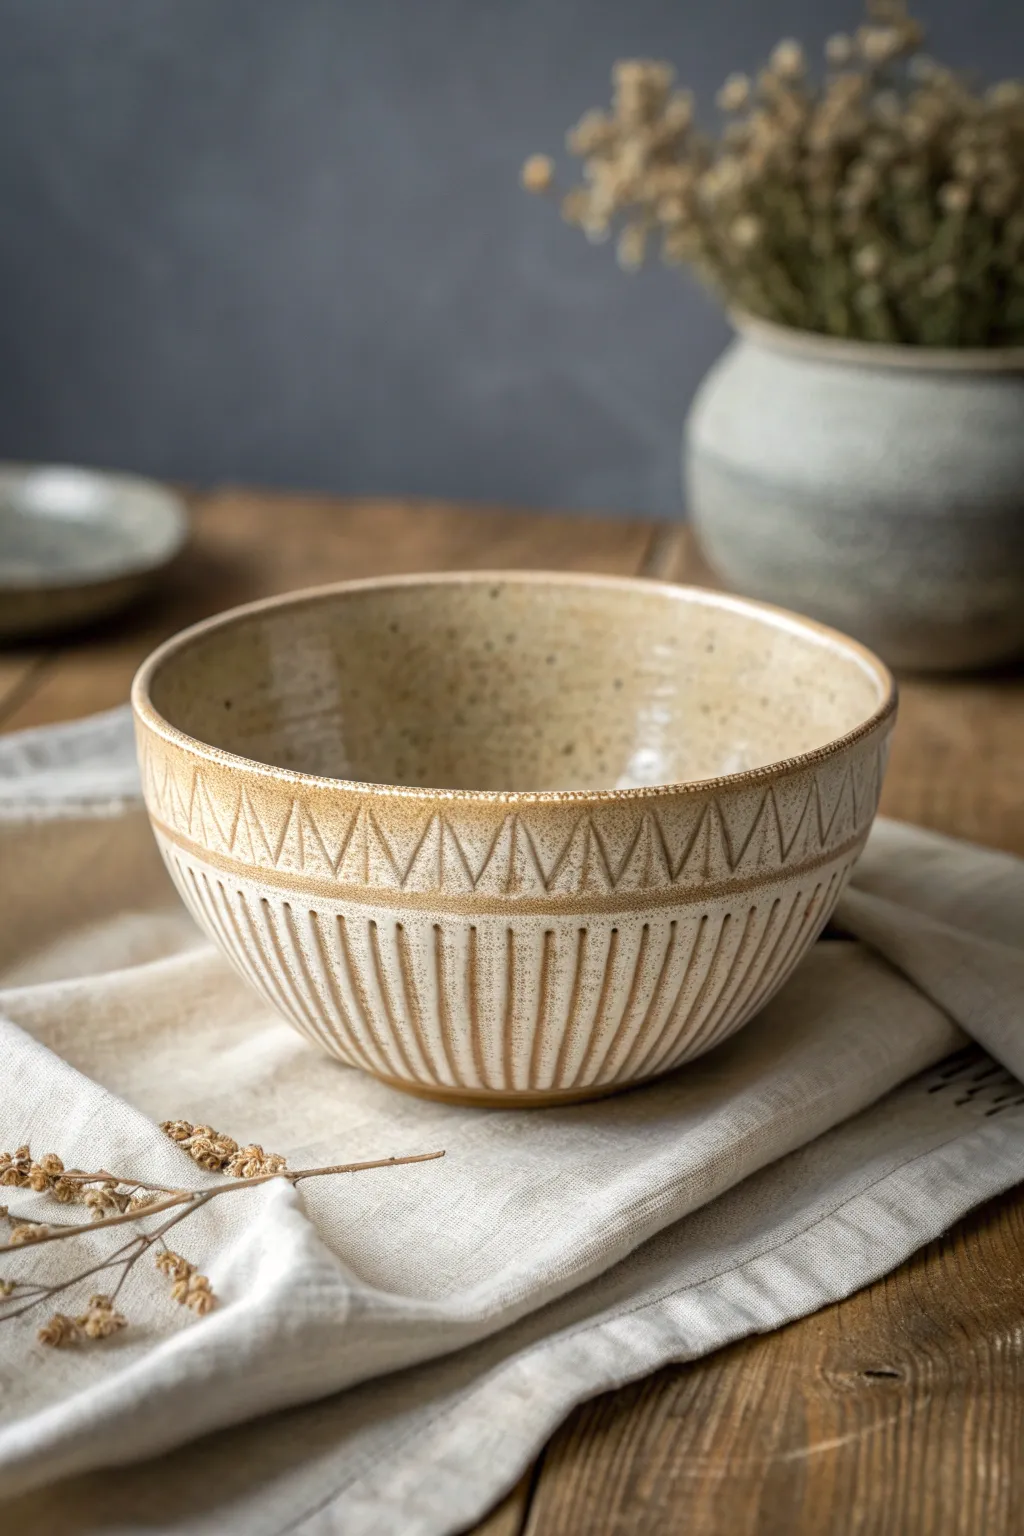
This rustic bowl combines the warmth of toasted stoneware with simple, geometric surface decorations created using everyday tools. The interplay between the etched zig-zags and the vertical striations gives this piece a cozy, handcrafted feel perfect for any kitchen table.
Step-by-Step
Materials
- Speckled stoneware clay (mid-fire)
- Pottery wheel
- Throwing tools (sponge, rib, wire cutter)
- Trimming tools
- Needle tool or sgraffito tool
- Standard dining fork (or clay texture comb)
- Clear or semi-transparent matte glaze
- Kiln
Step 1: Throwing and Shaping
-
Center the clay:
Start with a ball of well-wedged speckled stoneware clay. Center it firmly on the wheel head, ensuring it runs smooth and true before opening. -
Open and pull:
Open the clay and pull up the walls to create a medium-sized bowl shape. Aim for a generous curve at the bottom that straightens slightly as it reaches the rim. -
Define the rim:
Compress the rim with a sponge or chamois to make it rounded and durable. This prevents chipping later on. -
Refine the curve:
Use a metal or wooden rib to smooth the interior curve, removing any throwing lines. Repeat on the exterior to create a smooth canvas for your texture work later. -
Dry to leather hard:
Cut the bowl from the bat and let it dry slowly to a leather-hard stage. The clay should be firm enough to handle without deforming but soft enough to carve.
Uneven Drag Lines?
If the fork sticks or drags unevenly, the clay might be too wet. Let it dry for another 30 minutes, or wrap the fork tines in thin plastic wrap to glide smoother.
Step 2: Trimming and Texturing
-
Trim the foot:
Place the bowl upside down on the wheel. Center it and trim away excess weight from the bottom, carving a distinct foot ring that elevates the bowl slightly. -
Mark the design bands:
While the bowl is spinning slowly, use a needle tool to lightly score a horizontal line about one-third of the way down from the rim. This separates your texture zones. -
Carve the zig-zags:
In the top band (between the rim and your scored line), use a needle tool or sgraffito tool to hand-carve a continuous zig-zag or triangle pattern. Keep the lines deep enough to catch the glaze later. -
Refining the triangles:
Go back over your zig-zag lines to clean up any burrs. I sometimes scratch vertical hash marks inside the triangles for extra visual interest, though leaving them plain works beautifully too. -
Apply the fork texture:
For the bottom section, take a standard dining fork. Press the tines into the clay just below your horizontal line and drag downward towards the foot. -
Continue the pattern:
Repeat this vertical dragging motion all around the bowl. Try to space the fork strokes evenly so the ridges look consistent, mimicking a fluted effect. -
Clean the surface:
Once the texturing is done, use a soft brightness or a slightly damp sponge to gently wipe away sharp clay crumbs without erasing the texture definition.
Step 3: Glazing and Firing
-
Bisque fire:
Let the bowl dry completely to bone dry state, then complete a bisque firing in the kiln according to your clay body’s specifications. -
Wax the foot:
Apply wax resist to the foot ring you trimmed earlier to prevent glaze from adhering to the bottom and fusing to the kiln shelf. -
Apply interior glaze:
Pour a clear or light-colored liner glaze inside the bowl, swirl to coat, and pour out the excess. Wipe any drips off the rim immediately. -
Glaze the exterior:
Dip the exterior into a semi-transparent matte glaze. A glaze that ‘breaks’ over edges is ideal here, as it will pool in the fork lines and highlight the toasted color of the clay on the high points. -
Glaze firing:
Load the kiln and fire to the maturity temperature of your clay and glaze (likely Cone 5 or 6 for stoneware). This final firing reveals the beautiful speckling in the clay.
Add Color Depth
Before glazing, rub an iron oxide wash into the textures and wipe it back with a damp sponge. This darkens the grooves while keeping the surface bright.
Once cooled, your bowl is ready to bring a touch of earthy elegance to your dining collection
Bottlecap Ring Prints
This project transforms simple household items into texture tools, creating a stunning concentric circle design on a slab of clay. The finished piece has a clean, modern aesthetic with a fluted edge that looks much more complicated than it actually is.
Step-by-Step Tutorial
Materials
- Air-dry clay or ceramic clay (white or light beige)
- Rolling pin
- Two guide sticks (approx. 1/4 inch thick) or slats
- Round cookie cutter or bowl (approx. 6-8 inches)
- Small bottle caps or lids (various sizes)
- Textured fabric or mesh (like burlap or tulle)
- Clay knife or fettling knife
- Ribbed fluting tool or a thick comb
- Sponge and water
- Fine-grit sandpaper (optional)
Step 1: Preparation and Rolling
-
Prepare your workspace:
Finding a clean, flat surface is key. I like to lay down a canvas cloth or a piece of heavy-duty paper to prevent the clay from sticking to the table. -
Wedge the clay:
Take a generous handful of clay and wedge it thoroughly to remove air bubbles. This ensures a smooth surface for your texture work later. -
Set up guides:
Place your two guide sticks parallel to each other on your work surface. These will ensure your clay slab is perfectly even in thickness. -
Roll out the slab:
Place your clay ball between the sticks and roll it out with the rolling pin. Keep rolling until the pin rides on top of the guide sticks. -
Cut the circle:
Using your large round cookie cutter or placing a bowl upside down as a template, cut out a perfect circle. Remove the excess clay from around the edges.
Step 2: Adding Texture
-
Prepare the impression tools:
Gather your bottle caps. For the interior texture, cut small squares of your textured fabric or mesh. -
Create the center feature:
Choose a medium-sized cap. Place a piece of mesh over the clay in the center, then press the cap firmly over the mesh. Lift the cap and peel back the mesh to reveal a textured circle. -
Build the pattern:
Work outward from the center, pressing different sizes of caps into the clay. You can alternate between using the mesh for texture and leaving some circles smooth if you prefer, though the example uses texture for all. -
Vary the sizes:
To keep the design dynamic, try not to place two identical sized caps right next to each other. Nest smaller circles near larger ones to fill the gaps. -
Monitor pressure:
Apply consistent pressure so all impressions are roughly the same depth, but be careful not to push all the way through the slab. -
Clean up the surface:
If the clay displaced slightly around the rings, you can gently smooth it down with a finger, but be careful not to smudge your new textures.
Mesh Magic
Don’t limit yourself to one fabric! Try onion bags, lace, or sandpaper inside the bottle caps to create different variations of ‘stippled’ textures effectively.
Step 3: Finishing the Edges
-
Create the fluted edge:
Using a ribbed fluting tool, a thick comb, or even the side of a popsicle stick, gently press indentations vertically all around the outer rim of the circle. -
Space the fluting:
Try to keep the spacing consistent. I find it helpful to mark four cardinal points (North, South, East, West) first and then fill in the sections between them. -
Smooth the bottom edge:
Run a slightly damp finger along the very bottom edge where the clay meets the table to remove any sharpness created by the fluting process.
Color Wash
After drying, apply a diluted dark paint wash over the textured circles and wipe away the excess. The paint stays in the dots, making the texture pop.
Step 4: Drying and Final Touches
-
Slow drying:
The key to a flat trivet is slow drying. Cover the piece loosely with plastic wrap for the first 24 hours to prevent the edges from curling up. -
Flip occasionally:
Once the clay is leather hard, you can uncover it. Flip the piece gently every few hours to let air reach the bottom surface. -
Final sand:
After the piece is bone dry (usually 2-3 days), use fine-grit sandpaper to gently smooth any sharp burrs on the rim or surface. -
Seal (optional):
If you plan to use this as a coaster, apply a clear acrylic sealer or verify if your specific clay requires kiln firing to be water-resistant.
Now you have a beautifully textured trivet that brings an organic, handcrafted touch to your coffee table
Straw or Tube Dot Clusters
Create a stunning, textured vessel that marries rustic charm with modern geometric design using simple impressing tools. This project transforms plain clay into a boutique-worthy vase featuring spiral medallions, precise stripes, and a charming field of impressed dots.
Step-by-Step
Materials
- Stoneware clay (buff or speckled)
- Pottery wheel (or coil-building supplies)
- Needle tool or trimming tool
- Drinking straw (standard size)
- Small round piping tip or stylus tool
- Underglazes (Teal/Turquoise and Red-Iron/Brown)
- Small round paintbrush
- Clear matte glaze
- Sponge
- Wire cutter
- Rib tool
Step 1: Forming the Base
-
Throw the Body:
Begin specific wheel-throwing or extensive coil-building to create a bulbous, rounded base that tapers significantly into a narrow neck. Aim for a smooth curve that feels organic rather than rigid. -
Shape the Neck:
Collar the clay inward to form a tight, short neck, flaring the rim slightly at the very top for a classic bottle shape. Keep the walls even to prevent cracking later. -
Smooth the Surface:
While the wheel is spinning slowly (or by hand), use a rib tool to compress the exterior, removing finger marks and creating a blank canvas for your texture. -
Leather Hard Stage:
Allow the vase to dry to a leather-hard state. It needs to be firm enough to handle incising tools without warping, but soft enough to take an impression.
Clean Straw Cuts
When using a drinking straw to cut dots, twist the straw slightly as you pull it away from the clay. This creates a cleaner release and prevents the clay plug from getting stuck inside the tube.
Step 2: Creating the Linear Texture
-
Marking the Top Bands:
Place the pot back on the wheel or a banding wheel. Hold a needle tool or a dull trimming tool steady against the top shoulder while spinning to carve three distinct, parallel horizontal grooves. -
Carving the Base Lines:
Repeat this process near the bottom of the vase. Create a set of 5-6 parallel horizontal lines, spacing them evenly to anchor the design visually.
Wax Resist Method
Apply wax resist over your painted teal circles before dipping the clear glaze. This will leave the colored clay raw and matte for an extra tactile finish.
Step 3: Stamping and Patterning
-
Planning the Medallions:
Lightly sketch large circles around the upper swell of the vase using a pencil or a light touch with a needle tool to establish where your teal spots will go. -
Impressing Spirals:
Press a small circular stamp or a coiled piece of wire into the center of each sketched circle to create the inner spiral texture. -
Creating the Dot Field:
Using the end of a drinking straw or a small round tool, press rows of dots between the spiral medallions and the bottom stripes. I find graduating the spacing—making them denser at the bottom—adds nice visual weight. -
Cleaning Burrs:
Once the clay is bone dry, gently rub a finger or a dry sponge over the impressed areas to knock off any sharp little clay crumbs created by the straw.
Step 4: Glazing and Finishing
-
Bisque Fire:
Fire the piece to cone 04 (or your clay’s bisque temperature) to prepare it for glazing. -
Painting the Spirals:
Using a small brush, carefully fill the inner textured spirals of your medallions with a teal or turquoise underglaze. It’s okay if it looks a bit wash-like; that adds to the rustic feel. -
Inlaying the Lines:
Dilute a reddish-brown or iron oxide wash. Brush it into the top and bottom horizontal grooves you carved earlier. -
Wiping Back:
With a damp sponge, gently wipe the surface of the grooves. This leaves the dark color trapped inside the cut lines while cleaning the high points. -
Dotting the Texture:
Dab a small amount of the brown underglaze onto each impressed straw dot to make the texture pop. -
Clear Coat:
Dip or brush the entire vase in a clear matte glaze to seal the clay while preserving the natural stone texture. -
Final Fire:
Fire the vase to its final maturity temperature (likely Cone 5/6 for stoneware) to finish the piece.
Place a few dried stems or wildflowers in your vase to complete the organic aesthetic
Twigs and Bark Imprints
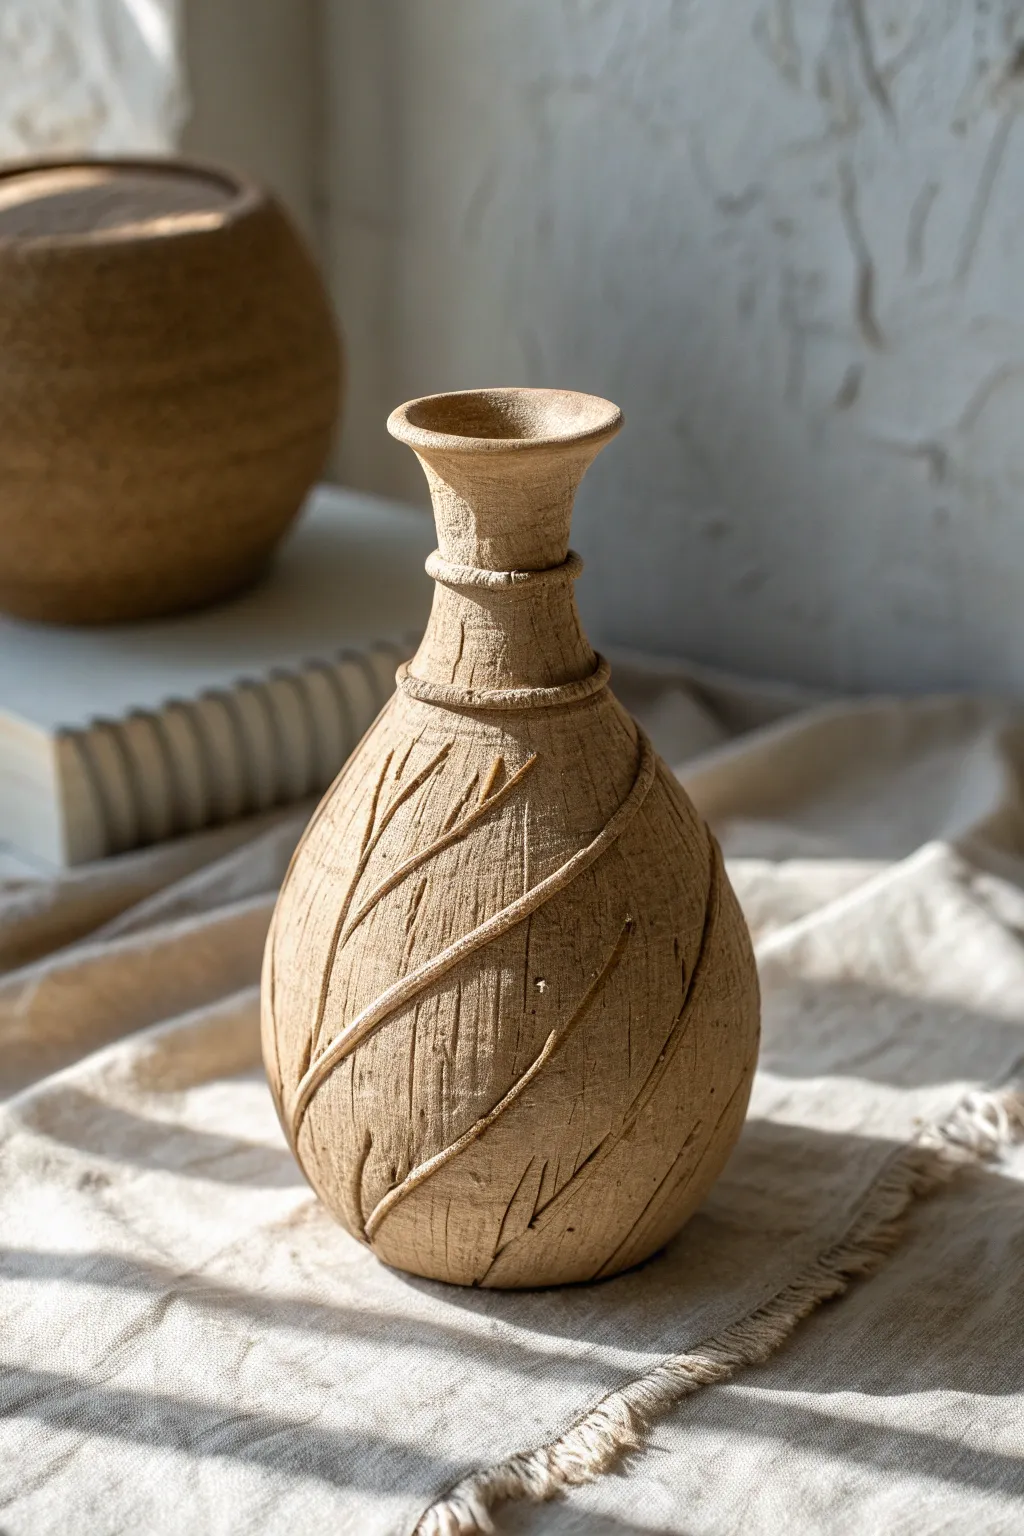
Embrace the imperfect beauty of nature with this hand-built clay vessel that captures the essence of weathered wood and creeping vines. The textured surface mimics natural bark, while raised coils add a dynamic, organic spiral that guides the eye up the form.
Detailed Instructions
Materials
- Stoneware clay (groggy or smooth depending on preference)
- Potter’s wheel (optional, can be hand-built)
- Wooden modeling tool or old credit card
- Wire texturing brush or stiff wire tool
- Small rolling pin
- Slip and scoring tool
- Sponge
- Cutting wire
- Needle tool
Step 1: Forming the Base Vessel
-
Prepare the clay:
Begin by wedging about 2-3 lbs of stoneware clay to remove air bubbles. This ensures the structure is sound whether you throw it or build it by hand. -
Shape the body:
If using a wheel, center the clay and pull a cylinder. Shape the walls outward to create a rounded, bulbous belly, tapering it back in as you move toward the neck. -
Form the neck:
Pull the neck tall and narrow, leaving enough clay at the top to flare out the rim slightly for that trumpet-like opening. -
Refine the profile:
If hand-building, use coil construction to build the same rounded bottom and narrow neck shape, smoothing the coils together thoroughly on the inside and outside. -
Dry to leather hard:
Allow the vase to dry until it is leather hard—firm enough to hold its shape when handled, but soft enough to carve and attach additions.
Natural Touch
Instead of carving all the lines, press actual rough bark or a heavily textured rock against the leather-hard clay to create varied, realistic surface patterns.
Step 2: Creating the Bark Texture
-
Initial scratching:
Take a stiff wire brush or a serrated metal rib and drag it vertically up and down the main body of the vase. Don’t worry about being neat; these scratches form the base of the bark illusion. -
Deepen the grain:
Use a wooden modeling tool or a needle tool to carve deeper, irregular vertical lines into the surface. Vary the pressure to create thick and thin fissures like aged wood. -
Horizontal detailing:
Add small, horizontal chatter marks or short strokes occasionally across the vertical grain to break up the pattern and make it look organic. -
Smooth rough burrs:
Lightly brush your hand or a soft sponge over the texture to knock off any sharp little crumbs of clay, but don’t smooth away the texture itself.
Oxide Magic
After bisque firing, apply a wash of red iron oxide and wipe it back with a sponge. The dark color stays in the deep crevices, making the bark texture pop instantly.
Step 3: Adding the Vines
-
Roll thin coils:
Roll out several thin snakes of clay, about the thickness of a small twig or a shoelace. Keep them slightly uneven for a natural look. -
Plan the spiral:
Lay a coil against the vase to test the placement. I like to start from the bottom right and spiral diagonally upward toward the left to create dynamic movement. -
Score and slip:
Mark the path of the vine on the vase with a scoring tool. Apply a small amount of slip to the path and the back of the clay coil. -
Attach the main vines:
Press the coil firmly onto the scored path. Use your thumb to smudge the edges of the coil slightly into the vase body so it looks like it’s growing out of the pot, not just stuck on top. -
Add floating branches:
Attach shorter, thinner coils branching off the main vines. Let these fade into the texture of the pot at their ends. -
Texture the vines:
Gently press varying textures into the vines themselves, or flatten them slightly in spots, so they don’t look like perfect rolled tubes.
Step 4: Finishing Touches
-
Refine the neck ring:
Roll a slightly thicker coil and attach it horizontally around the base of the neck, where the bulbous body ends. Texture this ring vertically to match the rest of the piece. -
Checking the rim:
Smooth the rim with a damp chamois or sponge to ensure it is comfortable to the touch and perfectly round. -
Final drying:
Allow the finished piece to dry slowly, covered loosely with plastic, to prevent the added vines from cracking away from the body as the clay shrinks. -
Firing:
Once bone dry, bisque fire the vessel. Since the texture is the star, glaze is optional; an iron oxide wash or a matte finish works best to highlight the relief.
Once fired, the interplay of light and shadow on the carved surface will bring a quiet, earthy elegance to any shelf
Homemade Clay Stamp Set
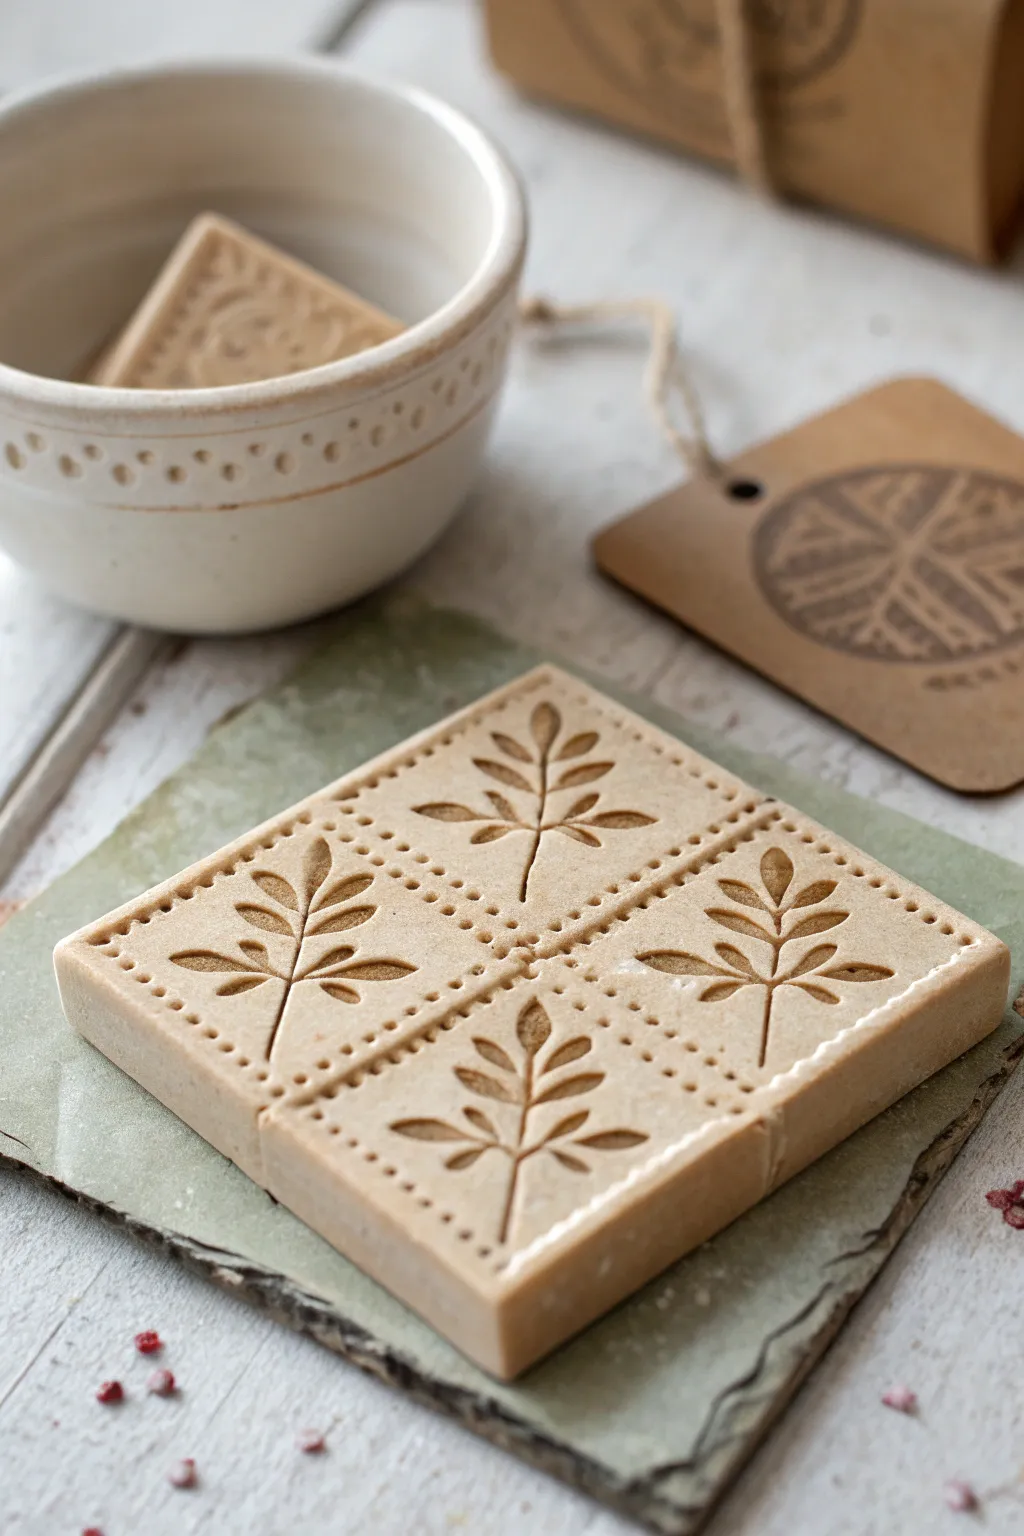
Transform a simple slab of clay into an elegant textured tool with this botanical relief design. This project focuses on precise carving and creating a modular pattern that can stamp repeating leaf motifs into future pottery or be displayed as a finished tile itself.
Step-by-Step Tutorial
Materials
- Polymer clay or air-dry clay (in a neutral beige or biscuit color)
- Square cookie cutter (approx. 3-4 inches) or ruler and craft knife
- Rolling pin
- Clay carving tools (specifically a small V-gouge and a needle tool)
- Small dotting tool or blunt toothpick
- Fine-grit sandpaper (optional)
- Smooth work surface (ceramic tile or acrylic sheet)
Step 1: Preparation & Base Formation
-
Condition the Clay:
Begin by thoroughly kneading your clay to remove any air bubbles and ensure a consistent texture. If using polymer clay, the warmth from your hands will make it more pliable. -
Roll the Slab:
Roll out the clay on your smooth work surface until you achieve a uniform thickness of about 1/4 inch to 3/8 inch. Using depth guides on either side of your roller can help maintain perfect evenness. -
Cut the Square:
Press your square cutter firmly into the clay slab. If you are using a ruler and knife, measure a perfect square and slice cleanly straight down to avoid dragging the clay. -
Smooth the Edges:
Gently run your finger along the cut edges to soften any sharp corners or clay burrs left by the cutting tool. -
Divide the Canvas:
Using the back of a knife or a ruler, very lightly press a cross shape into the clay to divide your square into four equal quadrants. Don’t cut through; just make a guideline.
Uneven Carving Depths?
If your carving depths look inconsistent, flood the recesses with a darker slip or acrylic wash, then wipe the surface clean. This highlights the lows and hides depth variances.
Step 2: Carving the Design
-
Outline the Leaves:
With a needle tool, lightly sketch a central stem in the middle of each quadrant. Then sketch simple, oval-shaped leaves branching off symmetrically from the stem. -
Carve the Stems:
Using your V-gouge tool, carefully carve out the central stem line first. Apply consistent pressure to keep the depth uniform. -
Carve the Leaves:
Carve the leaf shapes using the V-gouge or a small ribbon tool. Start from the stem and pull outward to the leaf tip, scooping out the clay to create a recessed negative space. -
Refine the Foliage:
Go back into each carved leaf depression and ensure the bottom is relatively smooth. I usually use a small sculpting tool to flatten any ridges at the bottom of the carving. -
Create the Bead Borders:
Using your small dotting tool or a blunt toothpick, press a row of evenly spaced dots along the horizontal and vertical dividing lines you made earlier. -
Add Exterior Dots:
Continue this dot pattern around the entire outer perimeter of the square, creating a ‘stitched’ look that frames the four quadrants. -
Check Consistency:
Rotate your work to look at the depth of the dots and leaves from different angles. Deepen any shallow impressions to ensure a crisp print later. -
Clean Up Crumbs:
Use a soft, dry paintbrush to gently sweep away any little crumbs of clay produced during the carving process.
Step 3: Finishing
-
Final Surface Smooth:
Inspect the flat, uncarved surfaces. If you see fingerprints, lightly buff them away with a drop of baby oil (for polymer) or water (for air-dry). -
Cure or Dry:
If using polymer clay, bake according to the manufacturer’s instructions on the package. If using air-dry clay, allow it to dry slowly over 24-48 hours away from direct heat to prevent warping. -
Sand for Perfection:
Once fully cured or dry, place a sheet of fine-grit sandpaper flat on the table and gently rub the face of your stamp against it in a circular motion. This sharpens the contrast between the flat top and the carved recesses.
Make It a Handle
Before baking, attach a small knob or a thick coil of clay to the back of the square. This creates a grip, turning your texture tile into an ergonomic hand stamp.
Your new stamp is now ready to impress beautiful botanical patterns into soap, dough, or fresh clay
Stencil-Pressed Geometric Texture
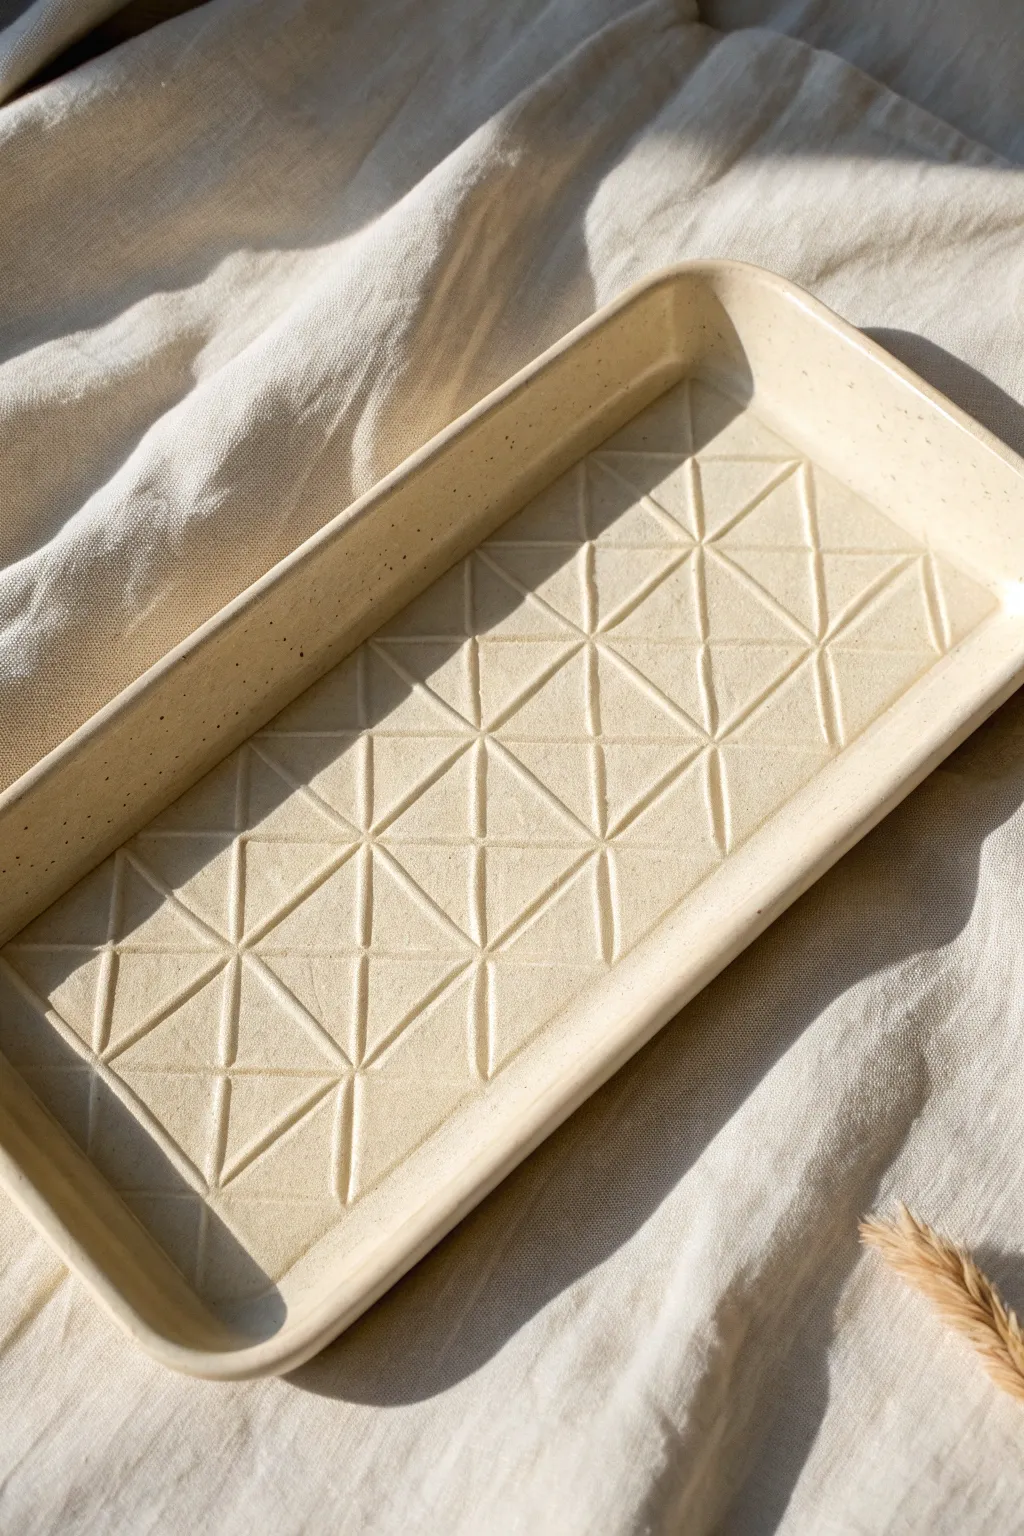
Transform a simple slab of clay into a sophisticated catch-all dish featuring a crisp, repeated triangle pattern. The subtle speckled finish combined with the deep relief texture creates a tactile surface that catches the light beautifully.
Detailed Instructions
Materials
- Speckled buff stoneware clay
- Rolling pin
- Canvas work surface or slab mat
- Needle tool
- Sharp Fettling knife or clay slicer
- Wooden guide strips (optional, for even thickness)
- Geometric stencil or 3D printed texture roller
- Rectangular drape mold or a simple wooden block
- Sponge
- Rubber rib
- Clear or transparent cream glaze
Step 1: Preparing the Slab
-
Wedge the clay:
Begin by thoroughly wedging your speckled buff clay to remove air bubbles and ensure particle alignment. This foundational step is crucial for preventing warping later. -
Roll the slab:
Roll out the clay onto your canvas or slab mat. Aim for a consistent thickness of about 1/4 inch. If you have guide strips, use them on either side of your rolling pin to keep the slab perfectly even. -
Compress the surface:
Take a rubber rib and firmly drag it across the surface of the clay in multiple directions. This compresses the clay particles, smooths out canvas texture, and strengthens the slab.
Warping Woes?
If the tray curls up while drying, flip it upside down on a flat board and place a small, weighted bag of sand or rice in the center to gently weigh it down.
Step 2: Adding Texture
-
Position the stencil:
Lay your geometric stencil gently over the center of the slab. Alternatively, if you are using a patterned rolling pin or texture mat, position it at the edge of the slab. -
Press the design:
Roll your rolling pin firmly over the stencil or mat. You want to press hard enough to leave a deep, clean impression (about half the depth of the slab), but not so hard that you cut all the way through. -
Remove the tool:
Carefully peel back the stencil or mat. Do this slowly to ensure the clay releases cleanly without distorting the sharp lines of the geometric diamonds.
Dual-Tone Effect
Brush a darker underglaze into the grooves, then wipe the surface clean with a damp sponge before applying clear glaze. This makes the geometry pop!
Step 3: Forming the Tray
-
Cut the rectangle:
Using a ruler and a fettling knife, cut a clean rectangle around your impressed pattern. Leave enough border around the pattern to form the vertical walls of the tray later. -
Define the walls:
For a folded slab method, you can cut small square notches out of each corner. Alternatively, for a soft curve like the example, simply prepare to lift the edges. -
Shape the rim:
Gently lift the edges of the slab upwards to create a rim roughly 0.75 inches high. I find it helpful to support the outside of the wall with one hand while smoothing the interior curve with a damp sponge. -
Refine the corners:
Smooth the corners where the clay rises. Ensure the walls are perpendicular to the base or slightly flared, creating that clean, modern tray profile.
Step 4: Finishing Touches
-
Smooth the rim:
Run a damp sponge or a chamois cloth along the top edge of the rim to round it off slightly. Sharp edges can be chipping hazards after firing, so a soft curve is practical and aesthetic. -
Clean the texture:
Inspect the geometric grooves. If there are any clay crumbs or rough bits inside the lines, pick them out carefully with a needle tool or a soft brush. -
Slow drying:
Loosely cover the tray with plastic to let it dry slowly. Uneven drying is the enemy of flat trays, so giving it a few days under plastic helps keep it perfectly flat. -
Bisque fire:
Once bone dry, fire the piece to bisque temperature (usually Cone 04) to prepare it for glazing.
Step 5: Glazing
-
Apply glaze:
Select a transparent or semi-transparent cream glaze. This type of glaze will break over the sharp edges of the texture, highlighting the geometric pattern while showing off the clay’s speckles. -
Wipe the foot:
Clean off any glaze from the bottom of the tray to prevent it from sticking to the kiln shelf. -
Final fire:
Fire to the maturity temperature of your clay body (likely Cone 5 or 6 for stoneware). Allow the kiln to cool completely before removing your finished tray.
Place your finished tray on a nightstand or vanity to hold your daily essentials with style
Texture Sampler Test Tiles
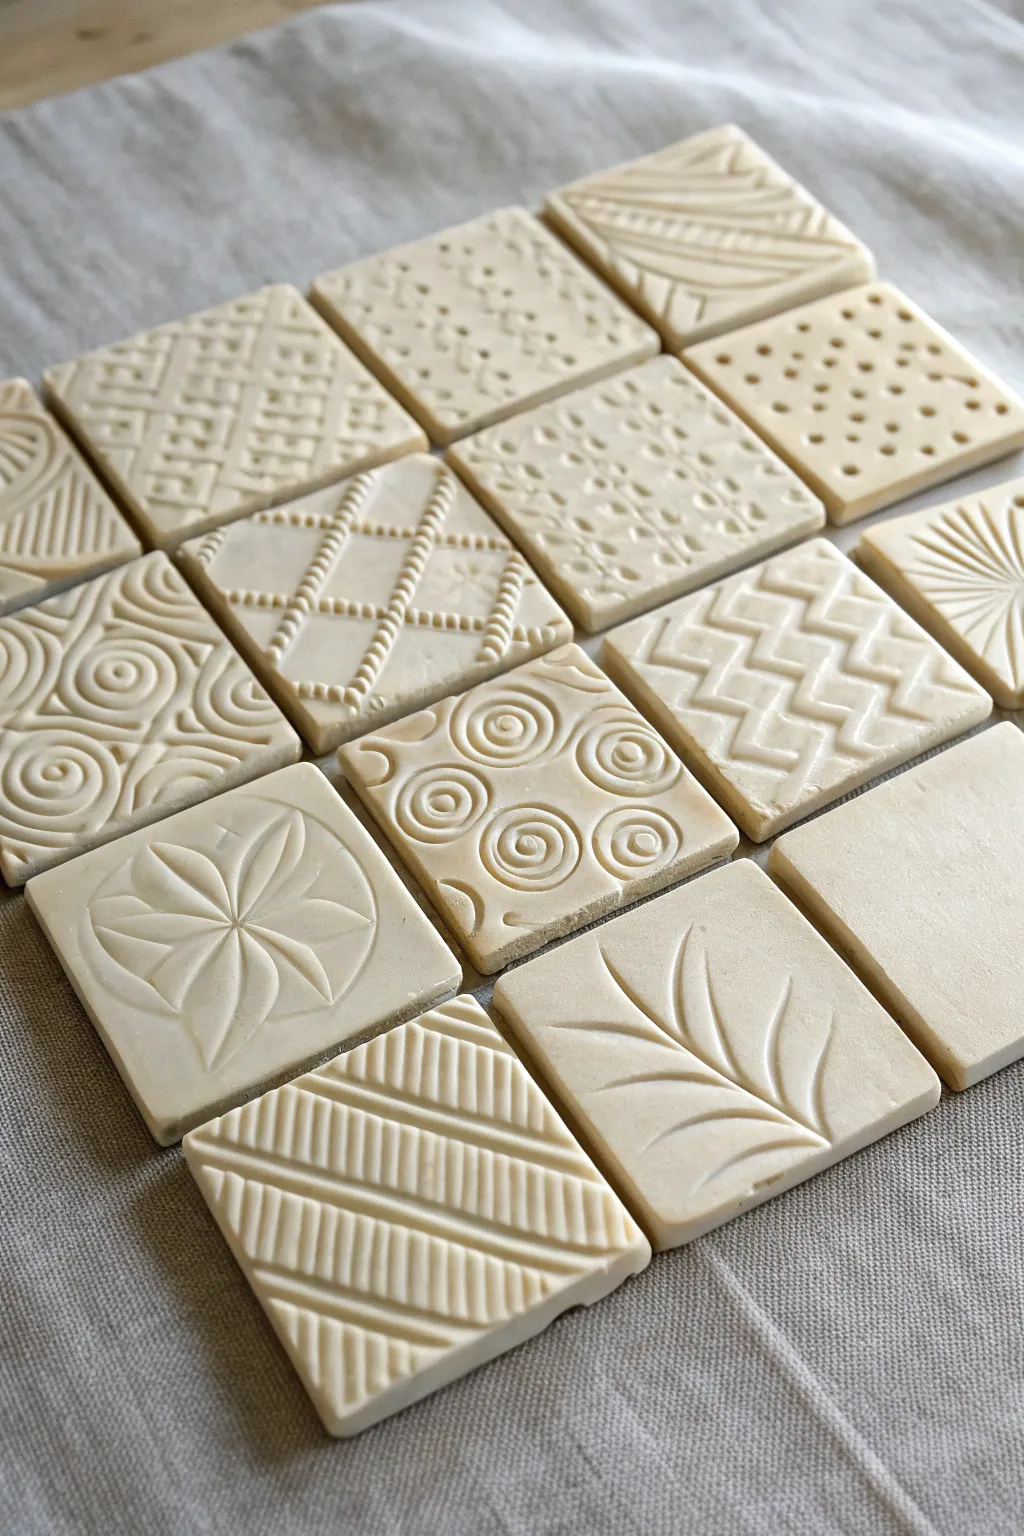
Create a library of tactile inspiration with these beautifully simple clay test tiles. This project involves rolling out uniform squares of clay and experimenting with everyday tools to press, carve, and stamp unique geometric patterns, resulting in a cohesive yet varied collection.
Step-by-Step
Materials
- White air-dry clay or ceramic clay body
- Rolling pin
- Two wooden guide strips (approx. 1/4 inch thick)
- Square cookie cutter (approx. 2-3 inches)
- Needle tool or fettling knife
- Loop tool for carving
- Canvas or heavy fabric mat for rolling
- Assorted texture tools: wooden skewers, plastic forks, buttons, pen caps, stamps
- Sponge and water
- Sandpaper (fine grit)
Step 1: Preparing the Canvas
-
Wedging the clay:
Begin by thoroughly wedging your clay to remove any air bubbles. If using air-dry clay, simply knead it briefly to ensure it’s pliable and uniform in consistency. -
Rolling the slab:
Place your clay between two wooden guide strips on your canvas work surface. Roll the clay out until the rolling pin rests on the guides, ensuring a perfectly even thickness across the entire slab. -
Smoothening the surface:
Before cutting, take a damp sponge or a flexible rib tool and gently glide it over the surface of the clay slab. This removes canvas texture and creates a pristine ‘blank slate’ for your designs. -
Cutting the squares:
Using a square cookie cutter, press firmly into the slab to cut out your tiles. Wiggle slightly to separate, then lift them away. Aim for at least 16 squares to match the variety seen in the example. -
Refining edges:
Gently tap the edges of each square on your work surface to square them up. Smooth any sharp burrs left by the cutter with your fingertip dipped in a tiny bit of water.
Warping Woes?
If tile corners curl up while drying, flip them over halfway through the drying process. Weighting them gently with a board also helps keep them flat.
Step 2: Texturing Techniques
-
Carved leafy fronds:
For the botanical tile, use a needle tool or small loop tool. Start at the bottom corner and carve a central curved stem, then carve almond-shaped leaves branching outward. Vary the pressure to give the leaves depth. -
Impressing concentric circles:
Find circle cutters, pen caps, or hollow tubes of different sizes. Press them gently into the clay to create rings. Try bunching them together or overlapping them slightly for a bubbly effect. -
Zig-zag stamping:
Use the edge of a ruler or a flat modeling tool. Press it into the clay at alternating angles to create a continuous chevron or zig-zag path across the tile surface. -
Stippled dots:
Take a blunt tool, like the back of a drill bit or a round chopstick. Press rows of dots into the clay. I find that offsetting the rows creating a honeycomb pattern looks particularly pleasing. -
Cross-hatching grid:
Use a needle tool or knife to score diagonal lines in one direction, then cross them in the opposite direction to create a diamond grid. You can accentuate the intersections by pressing a small dot at each crossing point. -
Radiating lines:
Starting from a corner or the center, use a straight edge to impress lines fanning outward, mimicking a sunburst or fan shape. Keep the pressure consistent for clean lines. -
Subtractive carving:
For bold lines, use a small ribbon loop tool to actually scoop out ribbons of clay rather than just pressing them in. This creates the deep, shadowed channels seen in the striped tiles. -
Creating movement:
Combine straight impressions with curved ones. For example, press a diagonal grid, but disrupt it with small stamped spirals or organic wavy lines to break up the geometry.
Step 3: Finishing and Drying
-
Final clean-up:
Look over your tiles. If pressing the textures caused the square shapes to distort or bulge out, gently tap the sides on the table again to regain the square form. -
Slow drying:
Place the tiles on a piece of drywall or clean wood board. Cover them loosely with a sheet of plastic to ensure they dry slowly and evenly, which prevents warping at the corners. -
Sanding:
Once bone dry (or fully cured if using air-dry clay), take your fine-grit sandpaper and lightly sand the edges and surface. This removes any sharp ‘crumbs’ of clay left from the carving process. -
Sealing or firing:
If using ceramic clay, these are now ready for the kiln. If using air-dry clay, apply a matte acrylic varnish or sealant to protect the intricate textures from dust and moisture.
Texture Hunt
Don’t buy expensive tools! Press lace, screw heads, burlap, or bark into the clay. Create a ‘found object’ library by making a test tile for every interesting texture.
You now have a reference library of textures that makes a lovely wall hanging or coaster set.