If you’ve been craving that handmade look for your shelves, simple clay vases are such an easy place to start. I love them because you can keep the shapes beginner-friendly and still get a seriously modern, artsy vibe.
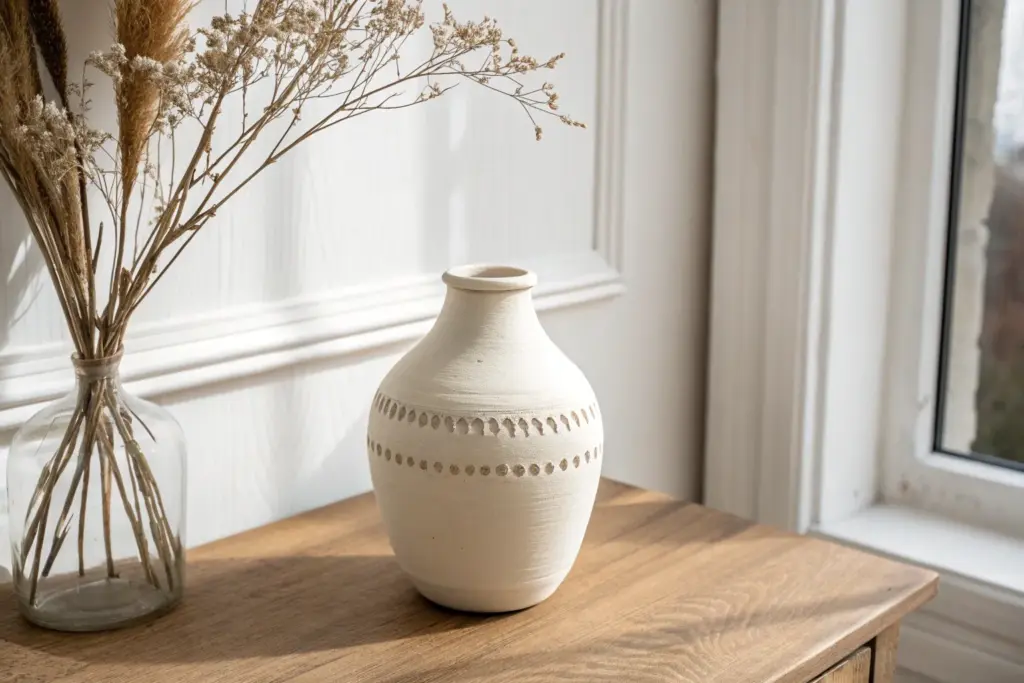
Pinch-Pot Bud Vase That Actually Looks Chic
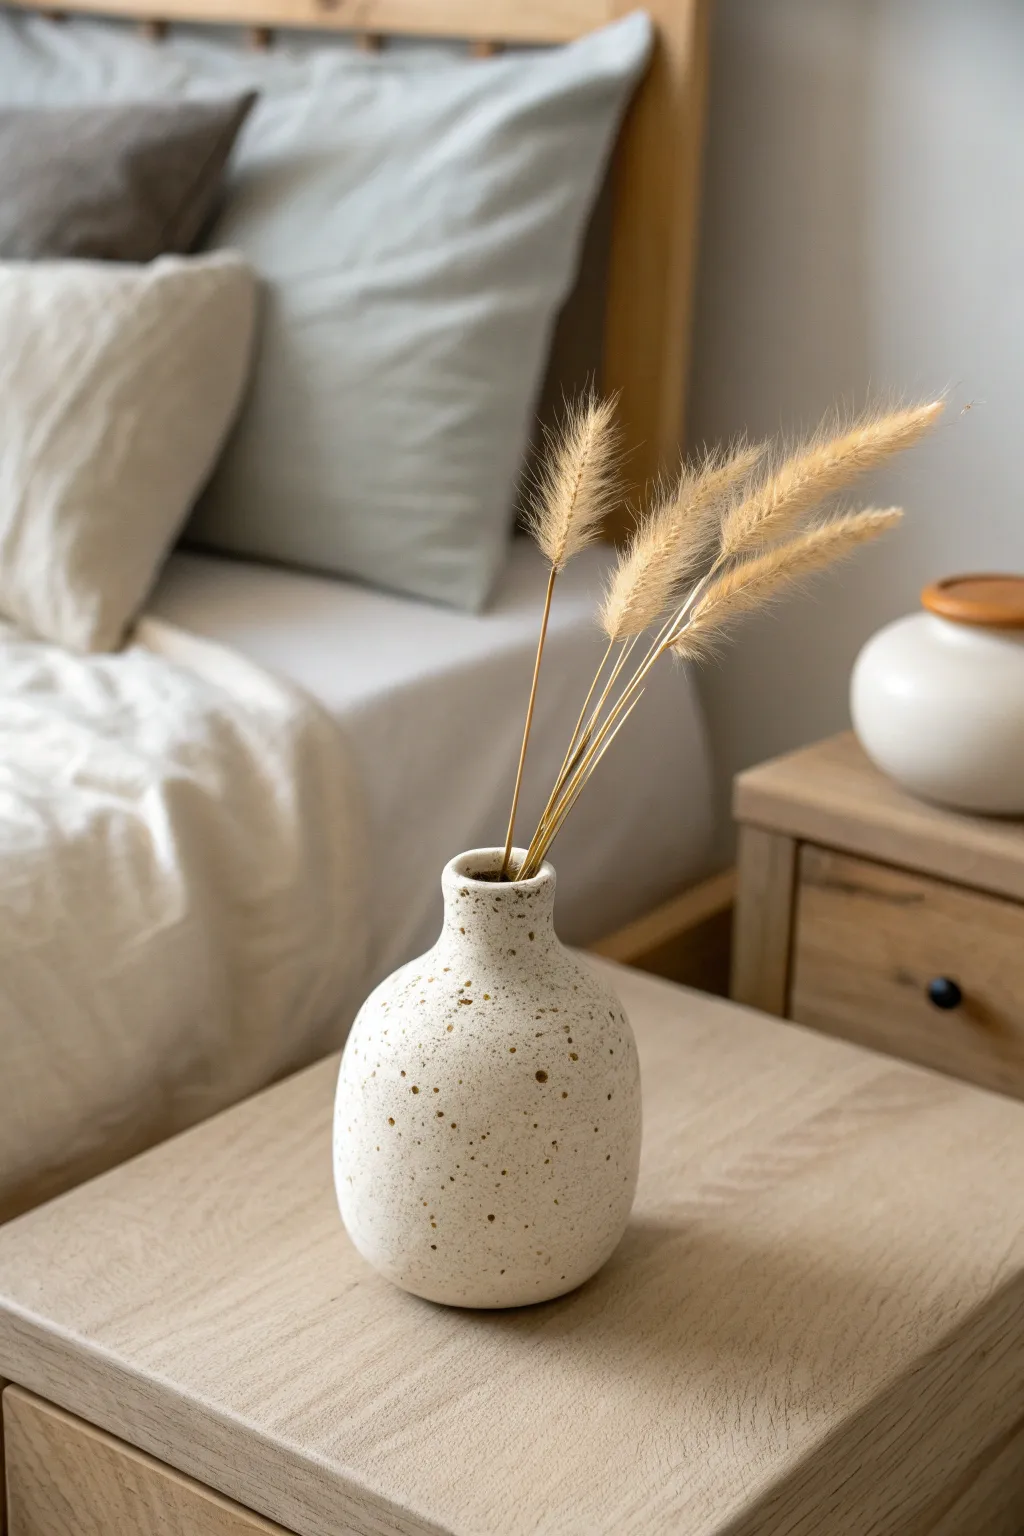
This charming little vase proves that simple hand-building techniques can yield sophisticated results. With its organic bottleneck shape and warm, speckled finish, it makes the perfect minimalist vessel for dried grasses or single stems.
How-To Guide
Materials
- Air-dry clay (white or cream)
- Acrylic paint (cream/warm white)
- Acrylic paint (brown or burnt umber for speckles)
- Small sponge
- Water cup
- Old toothbrush or stiff bristle brush
- Sandpaper (fine grit)
- Matte spray sealant or varnish
- Dried ornamental grass (e.g., bunny tails) for display
Step 1: Shaping the Base
-
Prepare your clay ball:
Start with a lump of air-dry clay about the size of a tennis ball. Knead it in your hands to warm it up and remove any air bubbles, then roll it into a smooth, seamless sphere. -
Start the pinch pot:
Hold the sphere in one hand and dedicate your thumb to the center. Gently press your thumb down into the clay, stopping about a half-inch from the bottom to leave a solid base. -
Open the walls:
Begin pinching the clay between your thumb and fingers, rotating the ball as you go. Work from the bottom upward, aiming for an even wall thickness of about a quarter-inch. -
Refine the sphere shape:
Unlike a bowl, you want this to remain somewhat closed. Cup your hands around the outside and gently squeeze inward as you rotate to encourage a rounded, bulbous belly shape rather than a wide opening.
Cracks Appearing?
Make a thick ‘slip’ paste using dry clay scraps and water. Fill any drying cracks with this paste, smooth it over, and let it dry again before sanding.
Step 2: Creating the Neck
-
Gather the top:
As you reach the top rim, gently pinch and collar the clay inward to narrow the opening significantly. This is the transition point from the body to the neck. -
Build the neck height:
If you have enough clay surplus at the rim, gently pull it upward to form a short neck. If not, roll a small coil of fresh clay, score the rim, and attach the coil, smoothing it seamlessly into the body. -
Smooth the transition:
Use a slightly damp finger or a sponge to smooth the connection between the shoulder and the neck. This area should curve gracefully, not look like two separate shapes stuck together. -
Form the lip:
flatten the very top rim slightly with your finger. It doesn’t need to be perfectly level—the organic, handmade look is part of the charm. -
Final smoothing:
Dip a sponge in water and wring it out almost completely. Run it over the entire exterior to erase fingerprints and harsh bumps. I like to spend extra time here to get that professional finish.
Step 3: Drying and Refining
-
Let it dry completely:
Place your vase in a safe, dry spot away from direct heat sources. Allow it to dry for 24-48 hours. The clay will turn from grey to white and feel room temperature (not cold) when fully dry. -
Sand for smoothness:
Once fully cured, use fine-grit sandpaper to buff out any remaining ridges or rough spots. Pay special attention to the rim and the neck area. -
Wipe it down:
Use a dry cloth or a tack cloth to remove all sanding dust before you start painting. Dust can ruin the smooth finish you just worked for.
Natural Texture
For a grittier, sand-like texture, mix about a teaspoon of baking soda into your base coat of acrylic paint.
Step 4: Decoration
-
Apply base color:
Paint the entire exterior with a warm white or cream acrylic paint. Depending on your clay color and paint opacity, this may take two coats for solid coverage. -
Prepare the speckle mix:
Dilute a small amount of brown or burnt umber acrylic paint with water until it has an inky consistency. -
Splatter the speckles:
Dip an old toothbrush into the watered-down paint. Hold it near the vase and run your thumb across the bristles to flick tiny droplets onto the surface. Rotate the vase to cover all sides evenly. -
Vary the intense spots:
Aim for a random distribution. Some areas might have clusters of speckles, while others are sparser, which creates a more natural, stone-like appearance. -
Seal the piece:
Once the paint is totally dry, apply a matte spray sealant or varnish. This protects the finish and gives it a finished ceramic feel, though remember it won’t be water-tight. -
Style it:
Insert a few stalks of dried bunny tails or wheat grass to complete the look.
Place your new vase on a bedside table to bring a touch of earthy warmth to your room


Classic Coil-Built Vase With a Soft Rounded Belly
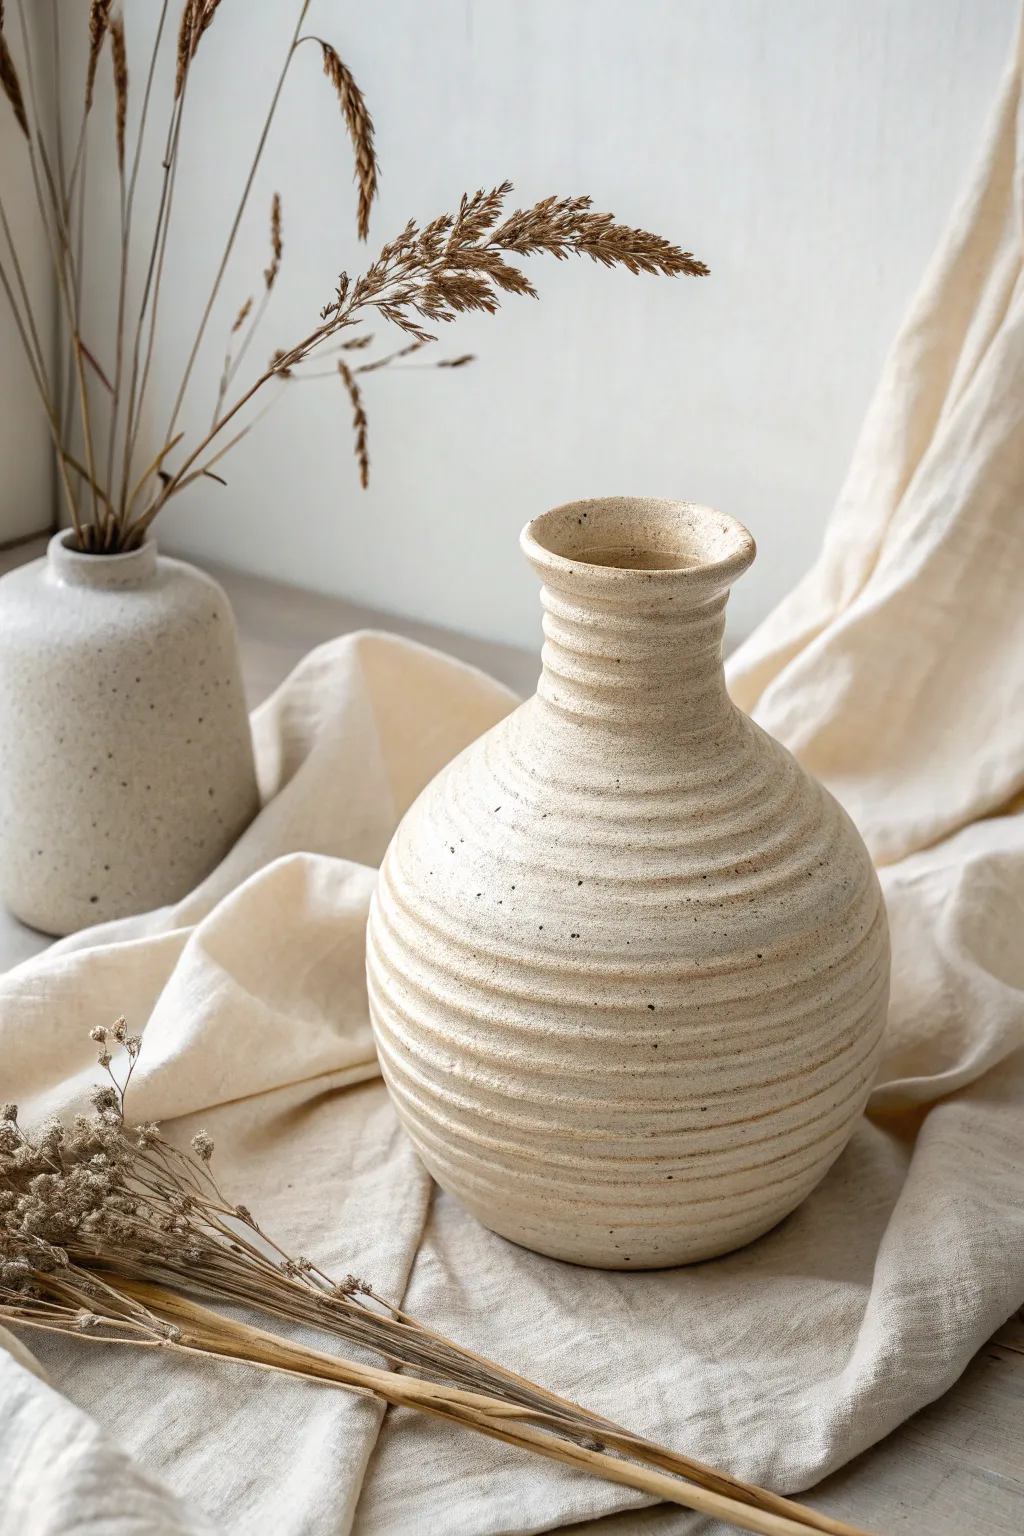
Embrace the meditative rhythm of coil building with this charmingly textured vase featuring a generous, swelling belly and a gentle, narrow neck. The visible coil ridges create a delightful tactile surface that catches the light and emphasizes the organic, handmade nature of the piece.
Step-by-Step
Materials
- Stoneware clay (smooth or with fine grog)
- Scoring tool or serrated kidney
- Slip (clay mixed with water)
- Wooden modeling tool
- Sponge
- Turn-table (banding wheel)
- Wire cutter
- Rolling pin (optional, for the base)
Step 1: Building the Foundation
-
Create the base:
Start by rolling out a small slab of clay, roughly a quarter-inch thick. Cut a circle about 3 to 4 inches in diameter to serve as the foot of your vase. -
Prepare your first coils:
Roll out several long, even coils of clay on a table. Aim for the thickness of your pinky finger or a thick marker. Try to keep the pressure even so the coils don’t get lumpy. -
Score and slip:
Score the outer edge of your base circle and apply a generous amount of slip. This first connection is crucial for stability. -
Lay the first ring:
Place your first coil onto the slipped edge. Cut the ends at an angle where they meet, score and slip the join, and press them firmly together. -
Smooth the interior:
Using your thumb or a wooden modeling tool, drag clay from the coil down onto the base on the *inside* only. Smoothing the inside creates a solid wall, while leaving the outside coils visible preserves the ribbed aesthetic.
Uneven Walls?
If one side looks higher than the other, simply pinch the clay slightly to thin and raise the shorter side, or gently press down on the taller side before adding final neck coils.
Step 2: Swelling the Belly
-
Stacking outward:
To create that lovely round belly, place your next coil slightly toward the *outer* edge of the coil below it. This will naturally flare the wall outward. -
Continue expanding:
The next 4-5 coils should continue this outward stacking pattern. Remember to score and slip between every single layer to stick them securely. -
Check the curve:
Pause and spin your banding wheel. Ensure the pot is expanding evenly on all sides. I find it helpful to stand up and look at the silhouette from eye level. -
Reach the widest point:
Once you have built up about a third of the height, place one or two coils directly on top of the previous ones (without moving outward) to establish the widest part of the belly. -
Internal smoothing check:
Don’t forget to smooth the interior seams as you go. It becomes much harder to reach the bottom once the neck starts closing in.
Step 3: Narrowing and Refining
-
Stacking inward:
Now, begin placing your coils slightly toward the *inner* edge of the coil below. This will start to close the form and create the shoulder of the vase. -
Control the slope:
Continue stacking inwardly for several layers. The slope should be gentle, mirroring the curve of the bottom half. -
Form the neck:
When the opening is about 2-3 inches wide, stop stacking inwardly. Build 3-4 coils straight up vertically to create the distinct neck section shown in the photo. -
Flare the rim:
For the final coil, attach it slightly outward again to create a subtle lip or flare at the very top. Smooth this top rim with a damp sponge or chamois leather for a professional finish. -
Refine the exterior texture:
The charm of this piece lies in the visible coils, but they shouldn’t look messy. Gently run a damp finger or soft rib over the outside ridges to soften sharp edges while keeping the horizontal lines defined. -
Drying:
Let the vase dry slowly under loose plastic. Because the belly is wide and unsupported, drying too fast can cause it to slump or crack.
Speckled Finish
To get the look in the photo, use a clay body with Manganese speckles or adding a speckled buff glaze. The tiny dots give it that natural, stone-like character.
Once fired, fill your new creation with dried grasses to complete the rustic, earthy aesthetic


Easy Slab-Box Vase With Clean Modern Corners
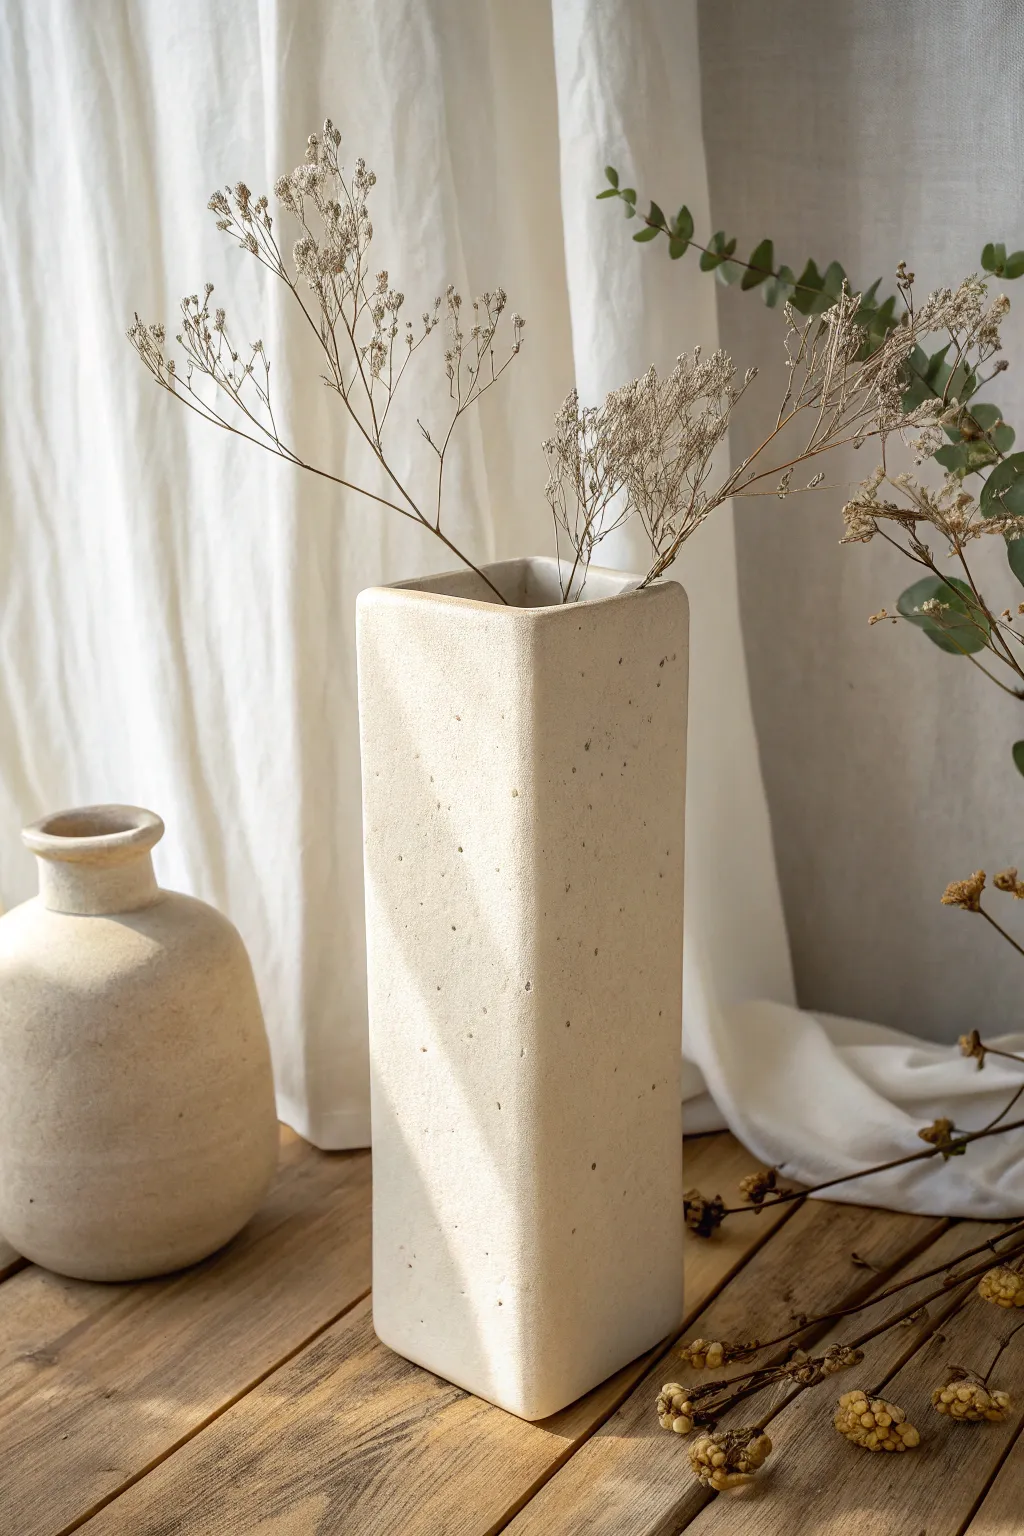
This project transforms simple clay slabs into a sophisticated, minimalist vase with a striking geometric profile. The speckles in the clay body and the raw, unglazed exterior give it a warm, organic modern feel that contrasts beautifully with sharp corners.
How-To Guide
Materials
- Speckled Stoneware Clay (mid-fire)
- Rolling pin
- Two 1/4 inch wooden guide strips (slab rulers)
- Fettling knife or X-Acto tool
- Ruler or square tool
- Scoring tool (serrated rib or needle tool)
- Slip (clay slurry)
- Wooden paddle
- Sponge
- Plastic wrap or plastic bag
Step 1: Slab Preparation
-
Roll the clay:
Begin by wedging your speckled clay to remove air bubbles, then flatten it slightly with your palms on a canvas surface. Place your wooden guide strips on either side of the clay and roll it out with a rolling pin until the slab is a uniform 1/4 inch thickness. -
Smooth the surface:
Before cutting, take a soft rubber rib or a slightly damp sponge to compress and smooth both sides of the slab. This removes canvas texture and aligns the clay platelets, reducing the chance of warping later. -
Let it firm up:
Leave the slab uncovered for a short period—usually 30 to 60 minutes—until it reaches a ‘soft leather-hard’ stage. It should be firm enough to hold its shape when lifted but not so dry that it cracks when bent.
Step 2: Cutting and Assembly
-
Measure your panels:
Using a ruler and a square, carefully mark out your four side walls. For this tall profile, aim for rectangles approximately 3 inches wide by 10 inches tall. You will also need one square base piece slightly smaller than the assembled width (about 2.5 x 2.5 inches). -
Miter the edges:
For the cleanest corners, I like to cut the vertical edges of all four wall panels at a 45-degree angle. Use a bevel cutter or hold your knife at a consistent angle. Keep the top and bottom edges straight. -
Score the clay:
Take your serrated rib or needle tool and aggressively score (scratch) all the mitered edges that will be joined. Do the same for the edges of the base piece. -
Apply slip:
Dab a generous amount of slip onto the scored areas. It should be goopy but not dripping wet. -
Assemble the walls:
Stand two walls up and press their mitered edges together to form a corner. It helps to have a prop or a friend hold them while you add the third and fourth walls. -
Secure the base:
Once the four walls create a rectangular tube, check that it’s square. Then, slip and score the bottom edges of the tube and press slightly inwards to attach the base piece from the inside, or simply set the tube onto a slightly larger base slab and trim the excess flush. -
Reinforce the seams:
Reach inside (use a long wooden tool if your hand doesn’t fit) and run a thin coil of soft clay along all inner seams. Smear this coil smooth to reinforce the joints and ensure the vase is water-tight.
Seam Splitting?
If seams crack during drying, your clay was likely too dry when joining. Patch immediately with ‘paper clay’ slip (vinegar + clay + TP) and wrap tightly to re-hydrate.
Step 3: Refining and Finishing
-
Paddle the shape:
From the outside, gently tap the walls with a wooden paddle. This helps seal the mitered joints further and sharpens the 90-degree corners for that crisp, modern look. -
Clean the exterior:
Run a barely damp sponge along the corner seams to clean up any oozing slip, but be careful not to round over your sharp edges. You want to maintain that boxy silhouette. -
Detail the rim:
Smooth the top rim with a chamois or a strip of plastic wrap to make it soft to the touch, while keeping the square profile intact. -
Dry slowly:
Place plastic wrap loosely over the finished vase. Let it dry very slowly over several days to prevent the long vertical seams from splitting due to uneven shrinkage. -
Bisque fire:
Once bone dry, fire the piece to bisque temperature (usually cone 04). -
Final smooth and fire:
If you want the raw look shown in the image, you can leave the exterior unglazed to show off the speckles. Simply apply a clear liner glaze to the inside for functionality, then fire to the final temperature (e.g., cone 5 or 6).
Texture Pro Tip
For extra ‘stone’ texture, gently press a coarse sanding sponge against the leather-hard surface before drying. This exposes more grog and speckles.
Fill your new architectural vessel with dried botanicals for a serene, natural display


Upcycled Jar Vase Wrapped in Air-Dry Clay
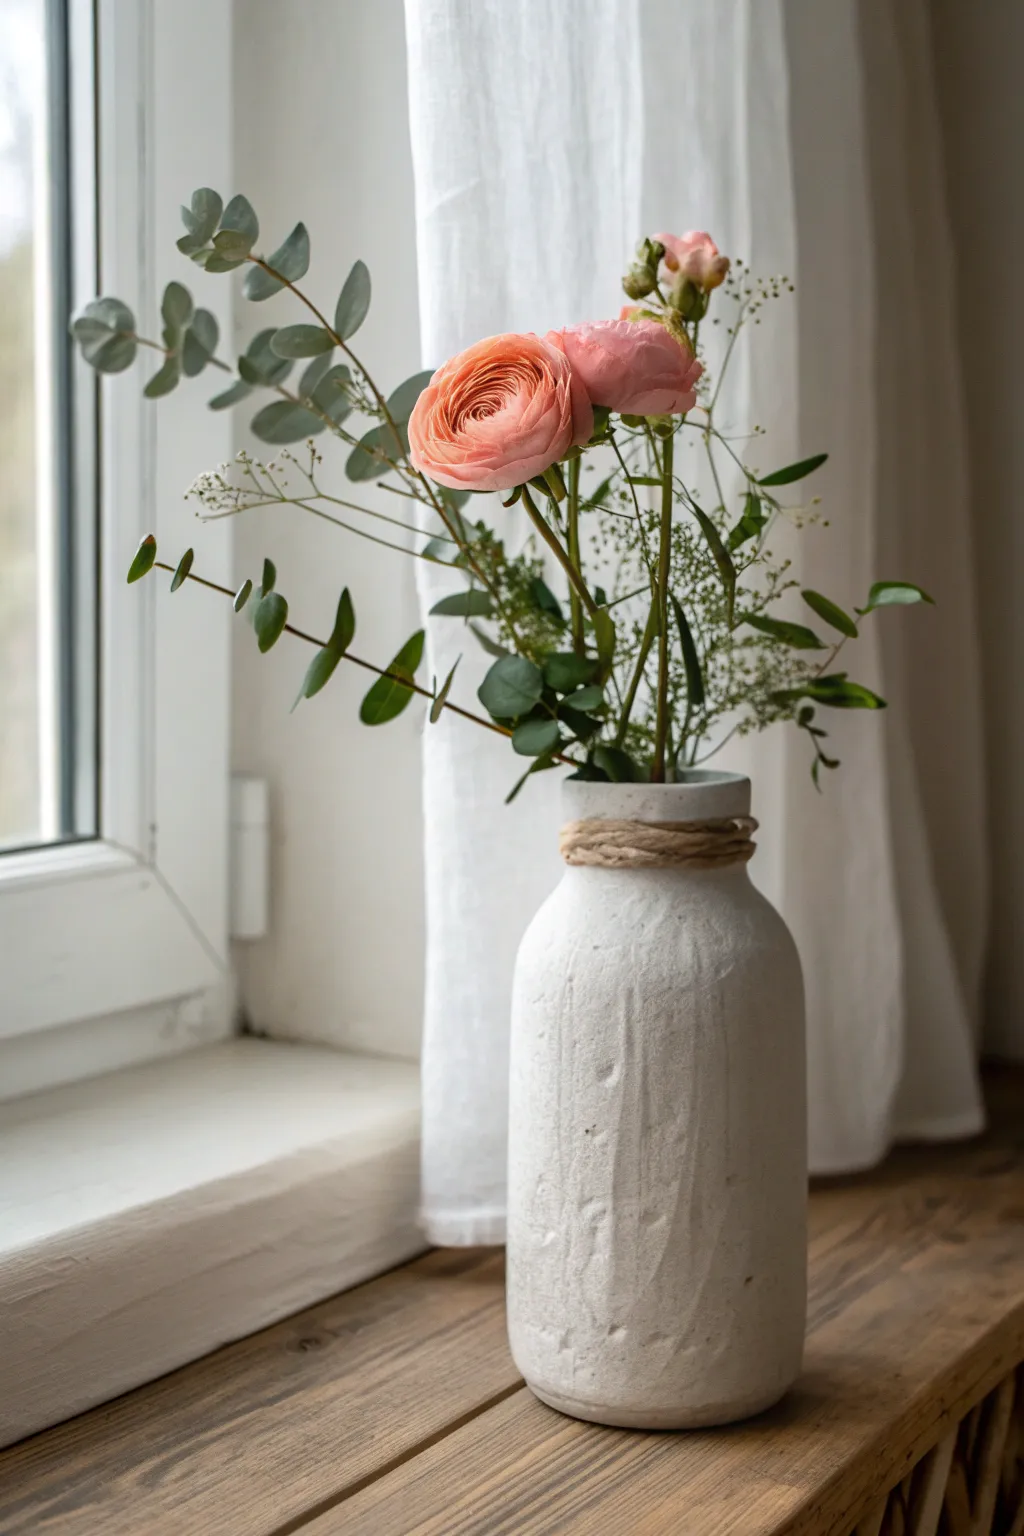
Transform a simple glass jar into a stunning, textured vase that mimics the look of artisanal pottery. By wrapping a standard container in air-dry clay and adding subtle, hand-sculpted details, you’ll create a perfectly imperfect vessel for your favorite blooms.
Step-by-Step
Materials
- Clean glass jar or bottle (smooth sides work best)
- White or stone-colored air-dry clay
- Rolling pin
- Parchment paper or non-stick mat
- Small bowl of water
- Pottery sponge or damp cloth
- Clay knife or butter knife
- Jute twine or rope
- Matte sealant (optional)
Step 1: Preparation and Base Layer
-
Prep the jar:
Begin by thoroughly cleaning and drying your glass jar to ensure no dust or oils remain. This helps the clay adhere properly to the glass surface. -
Condition the clay:
Take a large chunk of air-dry clay and knead it in your hands for a minute or two until it is warm and pliable. This prevents cracks from forming later. -
Roll out a slab:
Place the clay on parchment paper and roll it into a large, rectangular slab about 1/4 inch thick. Aim for a size that will wrap entirely around your chosen jar with a little overlap. -
Apply to jar:
Carefully lift the clay slab and wrap it around the glass jar. Press firmly against the glass as you go to eliminate any trapped air bubbles.
Step 2: Shaping and Refining
-
Seal the seam:
Where the two ends of the clay meet, overlap them slightly. Dip your finger in water and smooth the seam down until it blends invisibly with the rest of the surface. -
Trim the excess:
Use your knife to trim any excess clay hanging off the bottom, ensuring the vase sits flat. Trim the top rim flush with the jar’s opening, or leave it slightly organic if you prefer. -
Secure the rim:
Fold the top edge of the clay slightly over the lip of the jar and smooth it down inside the rim. This hides the glass completely and gives a finished, ceramic look. -
Initial smoothing:
Run a damp sponge or your wet hands over the entire surface to smooth out fingerprints and major bumps, creating a unified canvas for texturing.
Fixing Cracks
If cracks appear during drying, mix a tiny amount of fresh clay with water to make a paste (slip). Fill the cracks, smooth over, and let dry again.
Step 3: Texturing and Finishing
-
Create vertical texture:
Using your fingers or the back of a spoon, drag vertical lines down the length of the vase. Don’t aim for perfection; I find that slightly irregular pressure creates those lovely, rustic ridges seen in the photo. -
Add subtle imperfections:
Press gently in random spots to create small divots and an aged stone appearance. This organic texture catches the light beautifully. -
Create the neck groove:
About an inch or two down from the top rim, press your thumb around the circumference to create a slight indentation or ‘neck.’ This is where the twine will sit later. -
Smooth the ridges:
Lightly brush over your texture marks with a barely damp sponge. You want to soften the sharp edges of the clay without erasing the texture you just created. -
Dry partially:
Let the vase sit for about an hour until the surface is leathery but not fully hard. This reduced stickiness makes the final touches easier. -
Refine the bottom:
Check the base of the vase again. If the clay has slumped, use your fingers to reshape the bottom edge so it maintains a clean, straight profile. -
Full drying time:
Allow the vase to dry completely for 24-48 hours. Keep it away from direct heat sources to prevent cracking as the clay shrinks against the glass. -
Wrap the twine:
Once fully dry, take a length of jute twine. Wrap it tightly around the indentation you created at the neck, looping it 3-4 times. -
Secure the knot:
Tie the twine securely at the back or side, tucking the loose ends underneath the wrapping for a clean finish. -
Optional sealing:
If you plan to use this in a humid area, brush on a coat of matte spray sealant to protect the clay from moisture absorption.
Faux Stone Look
Mix spent coffee grounds or black pepper into your clay before rolling it out. This adds speckles that mimic real stoneware pottery.
Fill your new handmade vessel with eucalyptus or roses and enjoy the calm, earthy vibe it brings to your space

The Complete Guide to Pottery Troubleshooting
Uncover the most common ceramic mistakes—from cracking clay to failed glazes—and learn how to fix them fast.
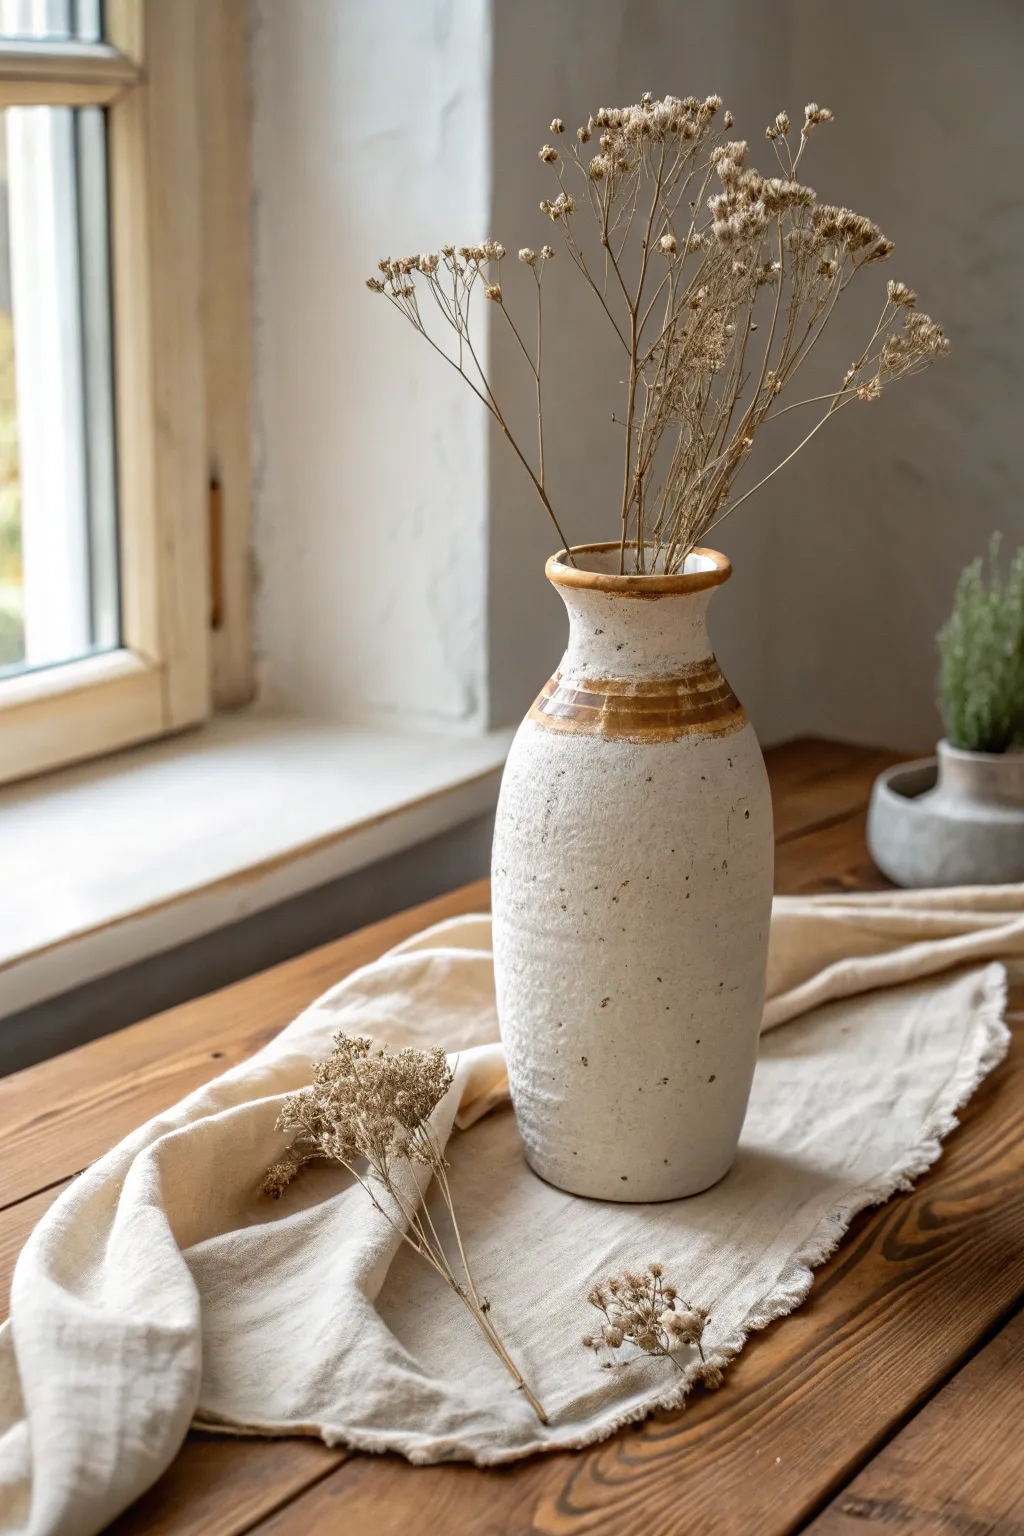
Simple Narrow-Neck Bottle Vase for a Single Stem
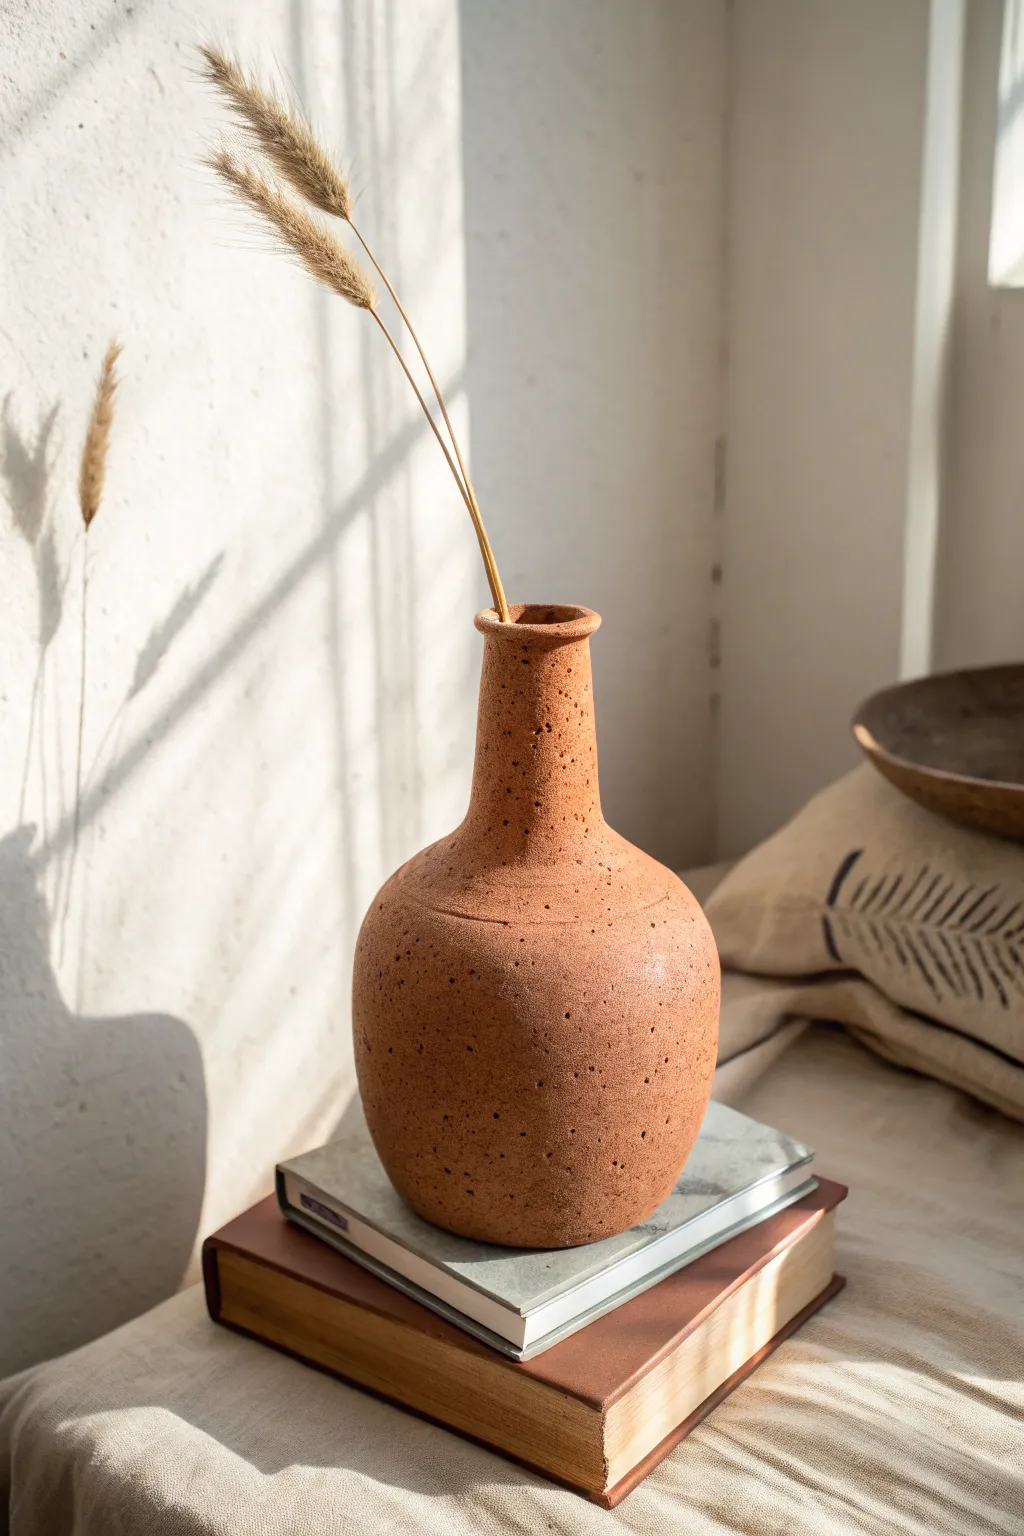
Embrace the organic beauty of raw textures with this minimalist narrow-neck bottle vase. The speckled, matte finish and warm terracotta tones create a grounded, ancient feel that perfectly showcases a simple dried stem.
Step-by-Step Tutorial
Materials
- Red stoneware clay (with grog or sand for texture)
- Pottery wheel
- Sponge
- Rib tool (wood or kidney)
- Wire cutter
- Needle tool
- Loop turning tool
- Black iron oxide or dark mason stain (optional for extra speckling)
- Matte clear glaze or low-sheen sealer
Step 1: Prepping and Centering
-
Wedge the Clay:
Begin by thoroughly wedging about 2-3 pounds of red stoneware clay. If your clay is very smooth, wedge in a small amount of sand or grog to achieve that delightful rough texture seen in the photo. -
Add Speckles (Optional):
For a more pronounced spotted effect, now is the time to knead in a tiny pinch of granular manganese or iron oxide, or simply use a clay body pre-mixed with speckles. -
Center on the Wheel:
Slam your clay ball onto the center of the wheel head. Use water and firm hand pressure to center the clay until it spins smoothly without wobbling.
Pro Tip: Collaring Success
When narrowing the neck, increase your wheel speed slightly and keep the clay well-lubricated. This prevents twist or collapse.
Step 2: Forming the Base
-
Open the Clay:
Press your thumbs into the center to open the clay, leaving about a half-inch thick floor for stability. -
Pull the Walls:
Slowly pull the clay upward into a cylinder. Don’t worry about the final shape yet; focus on getting even wall thickness from bottom to top. -
Belly Out the Form:
Using a rib tool or your fingers inside the vessel, gently push the clay outward near the bottom to create a rounded, bulbous belly. Support the outside with your other hand to maintain control.
Step 3: Collaring the Neck
-
Begin Collaring:
Place your hands around the upper part of the cylinder. Gently squeeze inwards while moving your hands upward to narrow the opening. Do this in several passes to avoid buckling the clay. -
Elongate the Neck:
As you collar in, the clay will thicken. Use your fingertips to pull this excess clay upward, creating a tall, slender neck. -
Refine the Transition:
Smooth the curve where the bulbous body meets the narrow neck. It should be a continuous, fluid line rather than a sharp angle. -
Flare the Rim:
At the very top, use your index finger to gently flare the rim outward slightly, creating a soft lip.
Level Up: Smoked finish
Skip the kiln glaze and try pit firing or a sawdust firing for dramatic, smoky surface clouds.
Step 4: Finishing and Firing
-
Dry to Leather Hard:
Cut the vase from the wheel and let it dry until it is leather hard—firm enough to handle but softer than fired ceramic. -
Trim the Foot:
Place the vase back on the wheel (upside down in a chuck if needed) and use a loop tool to trim a clean foot ring on the bottom, refining the curve of the belly. -
Add Surface Texture:
If the surface looks too smooth, lightly tap it with a stiff brush or a scouring pad to enhance that pitted, organic look before it dries completely. -
Clean Up:
Sponge away any sharp bits or crumbs, but be careful not to erase your beautiful texture. -
Bisque Fire:
Allow the vase to dry completely (bone dry) before loading it into the kiln for a bisque firing. -
Glazing:
To maintain the raw clay look, you might choose to leave the exterior unglazed or apply a very thin wash of iron oxide. If you want it functional for water, pour a clear liner glaze inside the bottle. -
Final Firing:
Fire the piece to the maturity temperature of your specific clay body.
Once fired, pop in a dried grass stem and enjoy the serene simplicity of your handcrafted vessel
Minimal Cylinder Vase With a Matte Stone Look
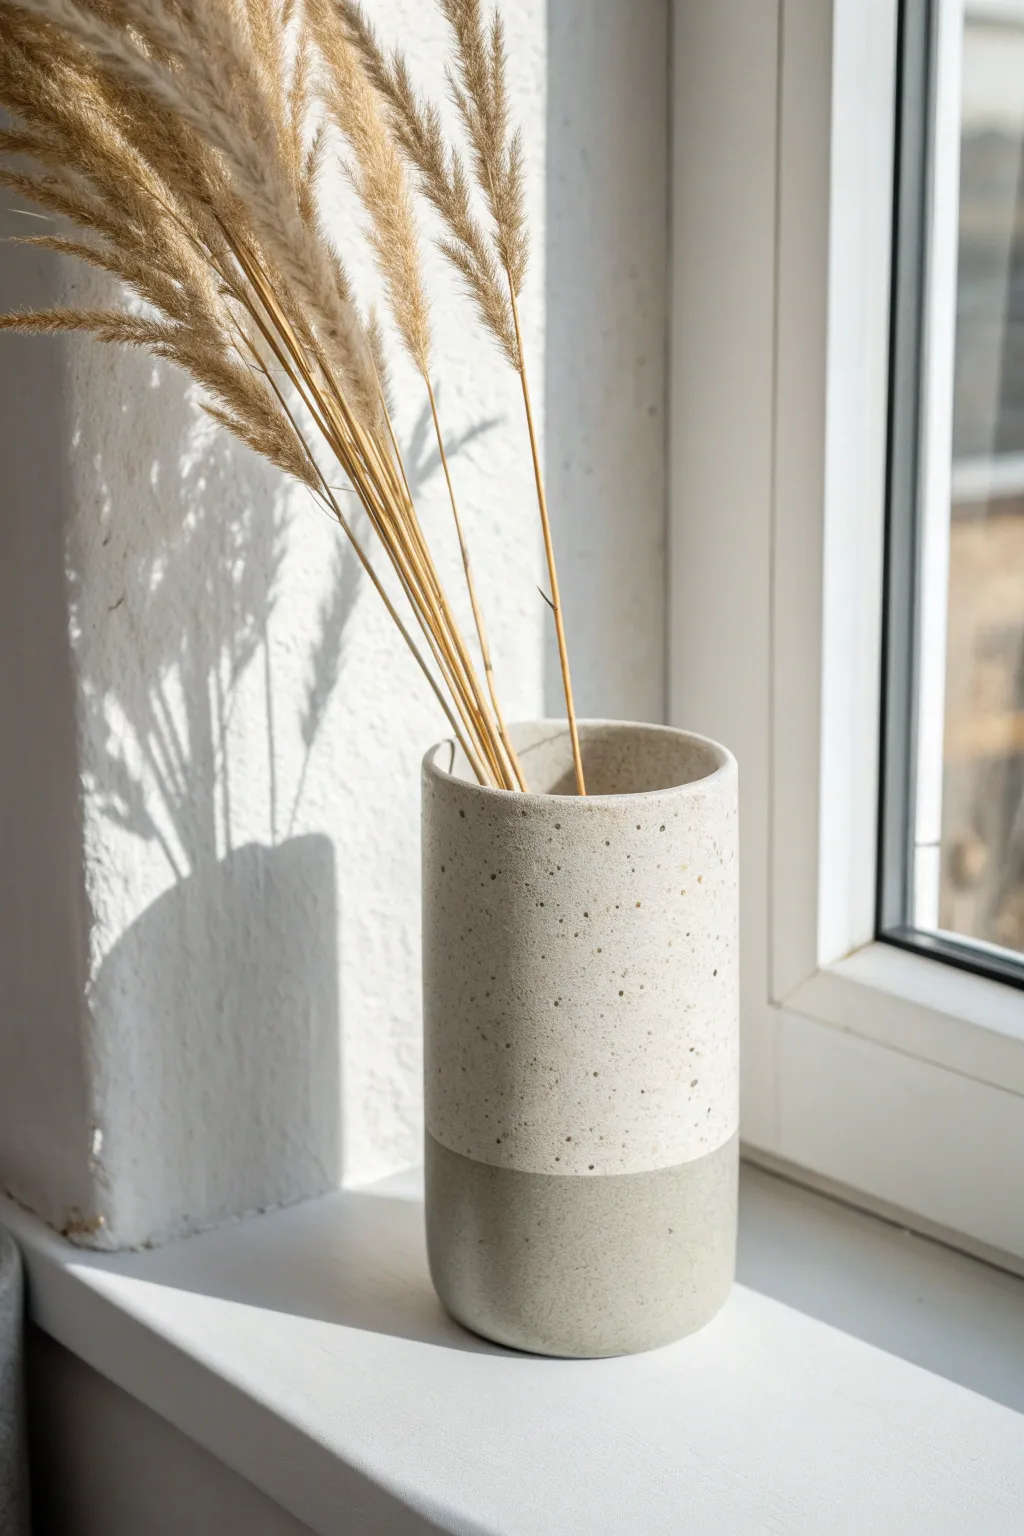
Achieve a high-end, modern aesthetic with this straightforward slab-building project that mimics the look of natural stone. The subtle speckling and clean two-tone dip create a sophisticated finish that perfectly complements dried botanicals.
Step-by-Step
Materials
- White stoneware clay (preferably with grog or speckles)
- Grey underglaze or slip
- Matte transparent glaze
- Rolling pin
- Guide sticks (approx. 5-7mm thickness)
- Sharp knife or needle tool
- Straight edge or ruler
- Scoring tool (or fork)
- Slip (clay and water mixture)
- Sponge
- Plastic wrap
- Old toothbrush (for spattering)
Step 1: Forming the Cylinder
-
Roll the slab:
Begin by wedging your white stoneware clay to remove air bubbles. Place it on a canvas surface and use guide sticks on either side to roll out an even slab, approximately 5-7mm thick. -
Cut the rectangle:
Decide on the height and circumference of your vase. Use your ruler and knife to cut a precise rectangle from the slab. Remember that clay shrinks during firing, so cut it slightly larger than your desired final size. -
Bevel the edges:
To create a seamless join, cut the two shorter vertical edges of your rectangle at a 45-degree angle. They should slant in opposite directions so they overlap perfectly when the clay is curled. -
Score and slip:
Rough up the beveled edges using a scoring tool or a simple fork. Apply a generous amount of potter’s slip to the roughened areas. -
Join the seam:
Carefully stand the slab up and curve it into a cylinder. Press the beveled ends together firmly. Provide support from the inside with one hand while smoothing the outside seam with the other. -
Smooth the connection:
Use a rib tool or a slightly damp sponge to compress the seam until it is invisible. It’s important to blend the clay well here so the join doesn’t crack during drying.
Seamless Seams
For a truly invisible vertical seam, use a wooden paddle to gently tap the outside of the join while supporting the inside with a firm hand or a rolling pin.
Step 2: Adding the Base
-
Cut the base:
Roll out a small piece of leftover clay to the same thickness as the walls. Place your cylinder on top of this slab and trace lightly around the bottom edge with a needle tool. -
Prepare the join:
Remove the cylinder, score the traced circle area and the bottom rim of the cylinder, and apply slip to both surfaces. -
Attach the bottom:
Place the cylinder back onto the prepared base. Press down gently to secure the bond. Use a modeling tool to smudge the clay from the base up onto the wall of the vase to lock it in place. -
Clean and perfect:
Trim away any excess clay from the base with a knife. Use a damp sponge to smooth the bottom edge and rim, ensuring the top lip is rounded and soft rather than sharp.
Wobbly Rim?
If the top opening isn’t perfectly round after forming, wait until the clay is leather hard. Gently lay a circular object (like a lids) on top to reshape it.
Step 3: Surface Design & Glazing
-
Dry partially:
Loosely cover the vase with plastic and let it dry slowly to the ‘leather hard’ stage. This prevents warping. -
Create the speckles:
If your clay isn’t naturally speckled, mix a small amount of watered-down brown or black underglaze. Dip a toothbrush into it and flick the bristles to spatter tiny dots unevenly across the surface. -
Bisque fire:
Once the vase is bone dry, fire it in the kiln to bisque temperature (usually cone 04 or 06). -
Prepare the dip:
Pour your grey underglaze or slip into a shallow container. The depth of the liquid should match the height of the bottom grey band you see in the photo. -
Dip the base:
Hold the bisque-fired vase securely and dip the bottom third straight down into the grey liquid. Hold for 3-5 seconds, then lift straight up to ensure a crisp, level horizon line. -
Apply clear glaze:
Once the grey accent is dry, apply a matte transparent glaze over the entire interior and exterior of the vase. This seals the clay while preserving exactly that stone-like texture we want. -
Final wipe:
Wipe the very bottom foot of the vase with a sponge to remove any glaze so it won’t stick to the kiln shelf. -
Glaze fire:
Fire the vase a final time to the temperature required by your clay and glaze (typically cone 5 or 6 for stoneware).
Now, fill your vessel with dried grasses to complete the serene, minimalist look.


What Really Happens Inside the Kiln
Learn how time and temperature work together inside the kiln to transform clay into durable ceramic.
Organic Wavy-Rim Vase That Feels Effortless
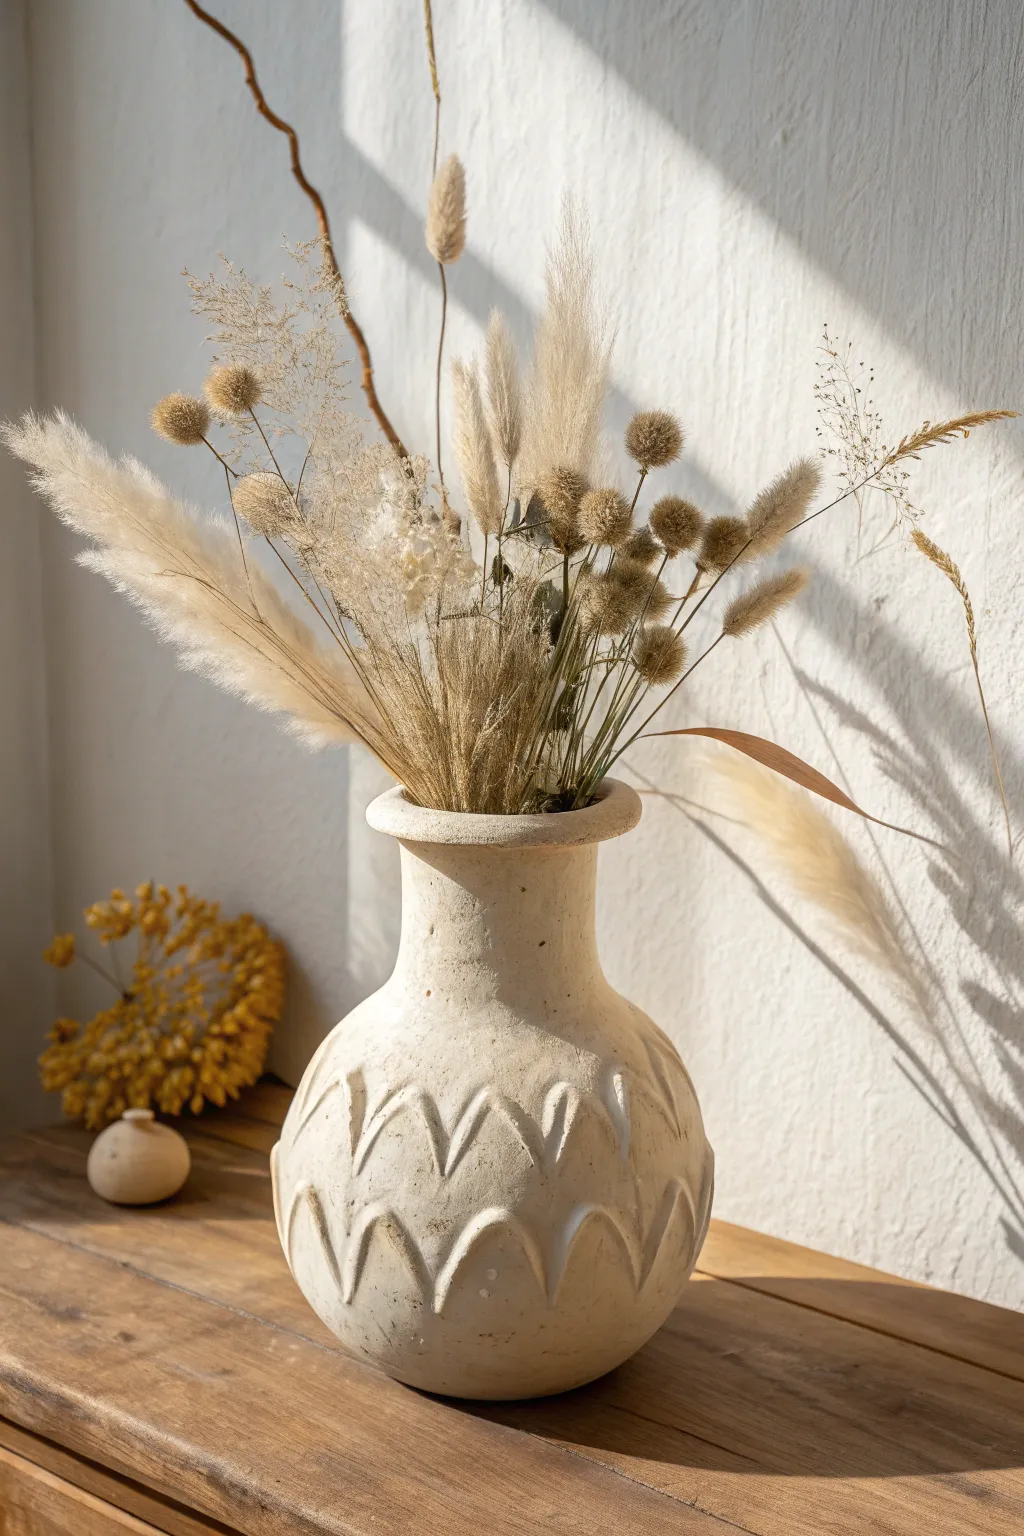
Recreate the charm of artisanal pottery with this hand-built clay vase featuring a repeating carved scallop pattern. The finished piece has a wonderfully tactile, matte texture that perfectly complements dried florals and grasses.
Step-by-Step Guide
Materials
- Air-dry clay (stone or white color) or stoneware clay
- Rolling pin
- Canvas mat or non-stick work surface
- Pottery needle tool or craft knife
- Loop carving tools (small and medium)
- Small bowl relative to vase body size (for soaking sponge)
- Potter’s sponge
- Wooden modeling tool
- Slip (clay mixed with water)
- Wide mouth jar or cylinder (to use as a mold/armature, optional)
- Matte sealant or matte acrylic paint (creme/beige)
Step 1: Building the Form
-
Prepare your clay:
Begin by wedging your clay thoroughly to remove air bubbles. This ensures a smooth working consistency and prevents cracks later on. -
Create the base:
Roll out a slab of clay about 1/4 inch thick. Cut a circle approximately 4-5 inches in diameter for the base of your vase. -
Form the body slab:
Roll out a larger rectangular slab for the walls of the vase. The length should be the circumference of your base, and the height depends on your desired vase scale, generally 8-10 inches. -
Assemble the cylinder:
Score and slip the edges of the base and the bottom of the rectangular slab. Wrap the slab around to form a cylinder, pressing the seam together firmly inside and out. -
Shape the belly:
Using your hands inside the cylinder, gently push outward to create a rounded, bulbous belly at the bottom half of the vase. Keep the neck slightly narrower to mimic the reference image. -
Attach the rim:
Roll a thick coil of clay. Score the top edge of your vase neck and attach the coil. Flatten it slightly outwards to create a flared, substantial rim. -
Smooth the surface:
Use a damp sponge or a flexible rib tool to smooth the entire exterior surface. I find it helpful to let the clay firm up to a leather-hard state before moving to the carving phase.
Cracks Appearing?
If you see hairline cracks while drying, mix a small amount of clay with vinegar to create a paste (slip) and fill the crack immediately. Smooth it over with a damp finger.
Step 2: Carving the Texture
-
Mark the grid:
Lightly trace horizontal guidelines around the belly of the vase where you want your rows of scallops to sit. This helps keep the pattern symmetrical. -
Carve the bottom row:
Using a U-shaped loop tool, carve upward strokes to create the bottom row of arches. Remove the clay to create negative space around the ‘scallop’ shapes depending on whether you want the pattern raised or indented. The reference shows raised arches, so carve the space *between* the V-shapes. -
Carve the upper row:
Create a second row of scallop shapes above the first, offsetting them so the points of the top row align with the dips of the bottom row. -
Refine the ridges:
Use a smaller loop tool or wooden tool to sharpen the ridges of the V-shapes. The pattern should look like repeating chevrons or arches. -
Deepen the relief:
Go back over the negative spaces to ensure they are deep enough to create shadows. This depth gives the vase its distinct visual texture. -
Clean up burrs:
Once the carving is complete, gently brush away any clay crumbs with a soft brush. Don’t use water here, or you’ll lose the crispy edges.
Step 3: Finishing Touches
-
Rough texturing:
To achieve the aged, stone-like look, tap a stiff-bristled brush or a crumpled ball of foil lightly over the smooth areas of the clay to add micro-texture. -
Slow drying:
Cover the vase loosely with plastic and let it dry slowly over several days. This prevents the rim or thin carved areas from cracking. -
Sanding:
Once completely bone dry, use fine-grit sandpaper to soften any overly sharp edges on the rim or the carved pattern. -
Applying the finish:
If you used air-dry clay, paint the vase with a mixture of baking soda and off-white acrylic paint for a textured, matte finish. If firing in a kiln, use a matte white or stone-colored glaze.
Pro Texture Tip
For that aged, excavated look shown in the photo, rub a little dark brown wax or diluted brown paint into the carved crevices and wipe the surface clean, leaving shadow in the grooves.
Now you have a stunning, sculptural vessel ready to display your favorite dried botanicals
Carved Line Texture Vase With Simple Vertical Grooves
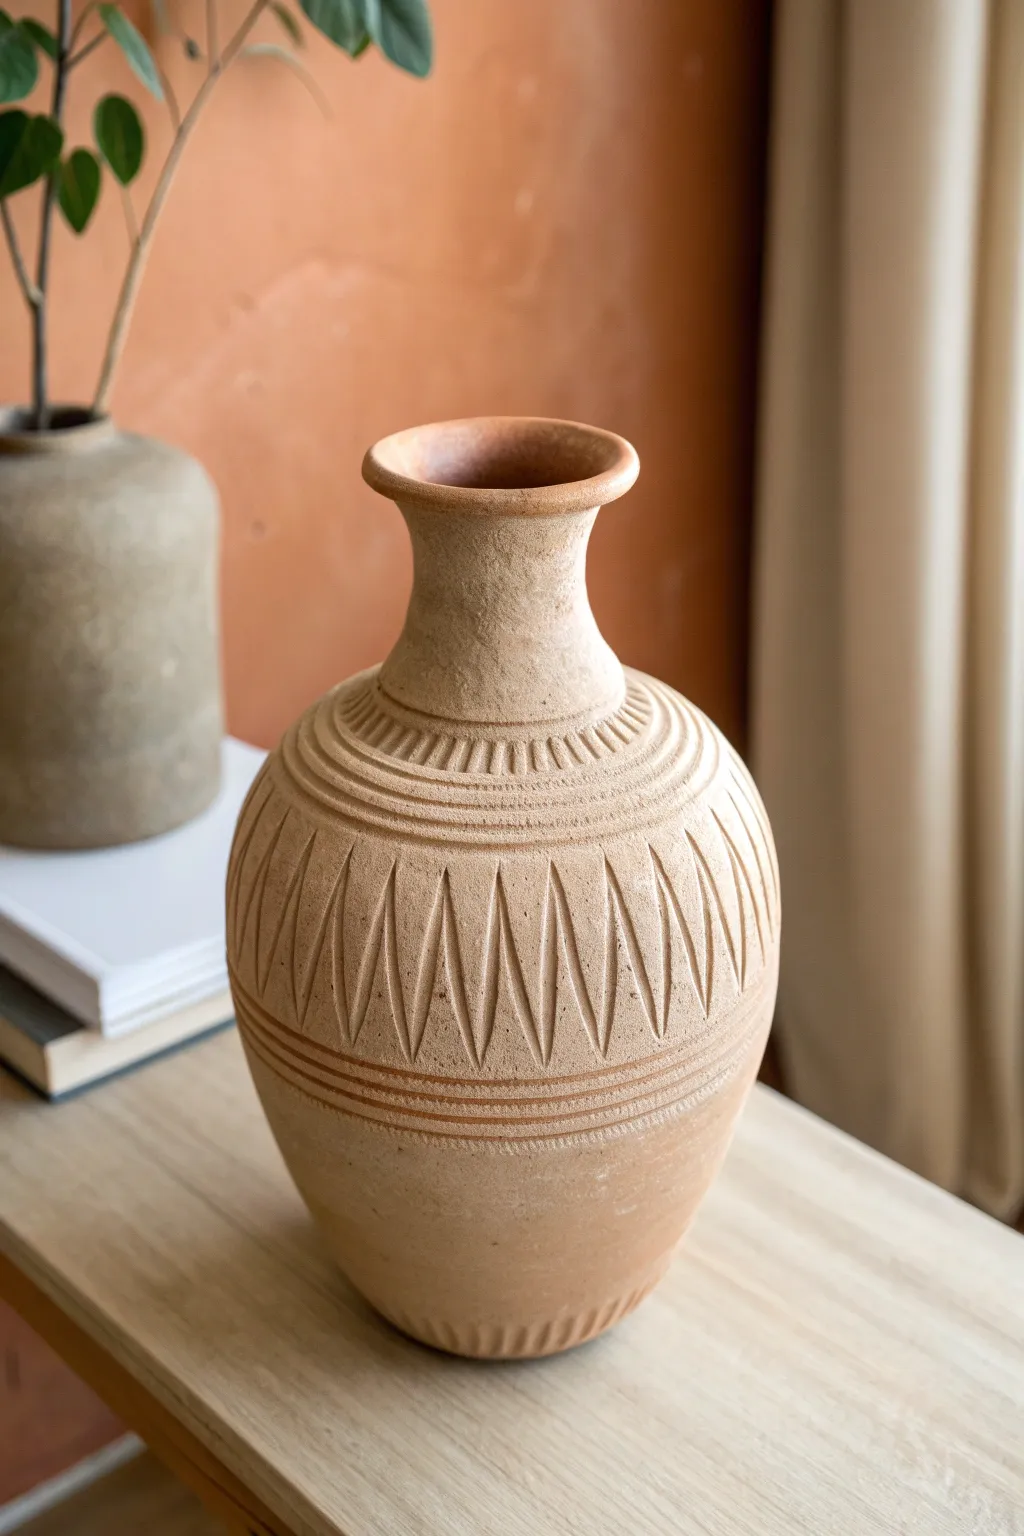
This project transforms simple stoneware clay into a stunning, earthy vessel featuring a rustic finish and sophisticated carved details. By combining wheel-throwing or coil-building techniques with precise carving, you can create a timeless piece that mimics the raw beauty of ancient pottery.
Step-by-Step
Materials
- Stoneware clay (grogged for texture)
- Pottery wheel (or banding wheel for coil method)
- Rib tools (wooden and metal)
- Needle tool
- Loop carving tools (small and medium)
- Sponge
- Wire cutter
- Carving knife or clay scalpel
- Transparent matte glaze (optional)
- Kiln
Step 1: Forming the Vessel
-
Establish the base:
Begin by centering roughly 3-4 pounds of clay on your wheel. Open the center and pull up a cylinder, aiming for a consistent wall thickness of about a quarter inch. -
Shape the belly:
Gently push the clay outward from the inside to create a rounded, bulbous belly. This shape provides the perfect canvas for the vertical carving later. -
Collar the neck:
As you move upward, collar the clay inward significantly to create a graceful, narrow neck. Take your time here to avoid buckling the walls. -
Flare the rim:
Once the neck is established, gently flare the rim outward. Use a chamois or a wet sponge to compress and smooth the lip for a finished professional look. -
Initial smoothing:
Use a metal rib on the exterior while the wheel is spinning slowly to remove throwing lines and create a smooth, unified surface ready for texture. -
Dry to leather-hard:
Allow the vase to dry until it is leather-hard. This is critical—the clay must be firm enough to carve without warping, but soft enough to cut cleanly.
Crumbly Carving?
If clay crumbles while carving, it’s too dry. Mist it lightly with water, wrap it in plastic, and let it sit for 2-3 hours to rehydrate the surface before trying again.
Step 2: Creating the Decorative Bands
-
Mark horizontal guides:
Place the vase on a banding wheel. Using a needle tool, lightly incise horizontal lines around the shoulder and lower belly to define the zones where your main carving will go. -
Carve the relief rings:
Using a small loop tool, carve two shallow, parallel channels around the top of the belly (the shoulder area) and two more near the bottom. This creates raised relief bands that frame the central design. -
Add shoulder details:
Above the top set of rings, use a small, sharp tool to carve short, vertical hatch marks all around the neck base. Spacing them evenly creates a nice rhythm.
Make It Pop
After bisque firing, rub a dark focused stain (like black iron oxide or mason stain) into the carved grooves, then sponge off the high points to accentuate the texture.
Step 3: Carving the Central Motif
-
Plan the verticals:
Lightly mark vertical reference points around the widest part of the belly to ensure your carved triangles remain evenly spaced. -
Carve the primary grooves:
Using a V-tipped carving tool or a sharp knife, carve long, tapering vertical lines. Start deep at the top of the stroke and lift out as you reach the bottom, creating a teardrop or long triangle effect. -
Create the alternating pattern:
I find it helpful to crave every downward-pointing triangle first. Then, go back and carve upward-pointing triangles in the negative spaces between them. The tips should overlap slightly at the center. -
Refine the edges:
Once the main pattern is cut, use a slightly damp sponge to carefully soften any sharp burrs or crumbs of clay without washing away the crisp definition of the carving. -
Add the footer texture:
At the very bottom of the vase, near the foot, carve a series of small, short tick marks similar to the ones on the shoulder to balance the design.
Step 4: Finishing and Firing
-
Bone dry:
Let the vase dry completely to the bone-dry stage. Cover it loosely with plastic for the first day to ensure the thick and thin parts dry at the same rate. -
Bisque fire:
Load the kiln and fire to cone 04 (or your clay body’s bisque temperature). -
Glazing strategy:
To maintain the raw, earthy look in the photo, apply a very thin wash of iron oxide or a matte transparent glaze. Avoid thick glazes that would fill in your beautiful carving. -
Final fire:
Fire the piece to maturity (Cone 5/6 or Cone 10 depending on your stoneware). This final firing will vitrify the clay and seal the surface.
Place your finished vase near a window where natural light can play across the carved ridges and deepen the shadows

TRACK YOUR CERAMIC JOURNEY
Capture glaze tests, firing details, and creative progress—all in one simple printable. Make your projects easier to repeat and improve.
Dot-Impressed Vase for a Sweet Handmade Pattern
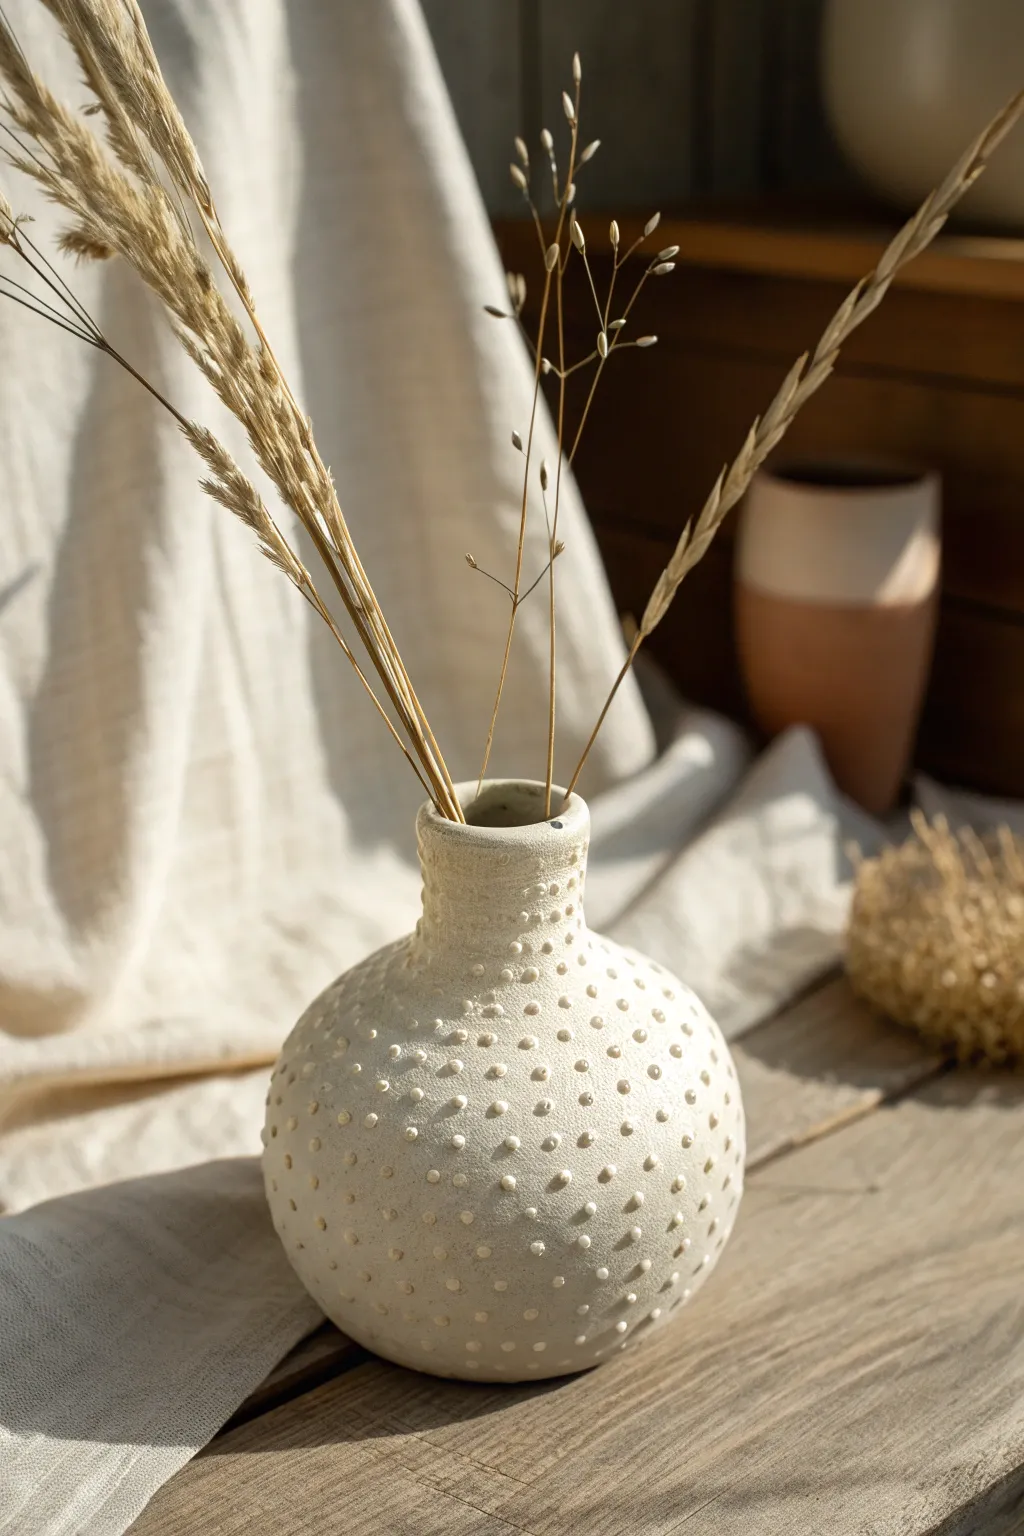
This charming, petite vase features a delightful tactile surface created by hundreds of tiny, raised dots. Its organic, rotund shape and matte white finish give it a modern yet rustic feel that is perfect for displaying dried stems.
Detailed Instructions
Materials
- White stoneware clay or air-dry clay (approx. 1-2 lbs)
- Small sponge
- Water bowl
- Wooden modeling tool or butter knife
- Small circular piping tip or a smooth rod tool (for dots)
- Slip (clay mixed with water to a yogurt consistency)
- Scoring tool or fork
- Matte white acrylic paint (if using air-dry clay)
- Clear matte sealant
Step 1: Forming the Base
-
Prepare the Clay:
Begin by wedging your clay thoroughly to remove any air bubbles, ensuring a smooth, consistent texture throughout. -
Create the Pinch Pot:
Roll the clay into a ball slightly larger than a tennis ball. Push your thumb into the center, stopping about a half-inch from the bottom. -
Shape the Belly:
Gently pinch and rotate the clay, extending the walls outward to create a rounded, bulbous belly shape. Keep the walls roughly 1/4 inch thick. -
Narrow the Neck:
As you move upward, begin to gently collar the clay inward, narrowing the opening significantly to form the neck of the vase. -
Refine the Rim:
Smooth the lip of the vase with a wet finger or a damp sponge to create an even, soft edge. -
Smooth the Surface:
Use a damp sponge or a flexible rib tool to smooth out the exterior of the vase, removing any fingerprints or unwanted bumps before adding texture.
Dots falling off?
If slip dots detach during drying, your base clay was likely too dry. Score the spot lightly, add a drop of water, and re-apply a fresh dollop of thick slip.
Step 2: Creating the Dot Texture
-
Prepare Slip Dots:
This method uses applied slip for raised texture. Mix a small amount of your clay with water until it reaches the consistency of thick frosting or heavy cream. -
Load Your Tool:
You can use a slip-trailing bottle for speed, but for this organic look, I prefer to dip the end of a small dowel or the back of a paintbrush into the thick slip. -
Apply the First Row:
Starting near the bottom, dab a row of slip dots onto the vase surface. If the dots aren’t sticking well, you may need to score the surface lightly with a needle tool first, though usually, tacky clay grabs the slip well. -
Build the Pattern:
Work your way up the vase in rows or a spiral pattern. Keep the spacing somewhat consistent, but allow for slight organic variations to maintain the handmade charm. -
Cover the Neck:
Continue the dot pattern all the way up the neck to the rim. Ensure the dots near the top are slightly smaller if space becomes tight. -
Let it Set:
Allow the vase to dry slowly. Cover it loosely with plastic for the first day to ensure the dots don’t dry faster than the body and pop off.
Step 3: Finishing
-
Drying or Firing:
If using ceramic clay, bisque fire and then glaze (a matte white glaze works best) before the final firing. If using air-dry clay, allow it to dry completely for 48-72 hours until hard and room temperature. -
Sanding (Optional):
For air-dry clay, if any dots became too sharp or pointy upon drying, gently run a fine-grit sanding sponge over them to soften the tips. -
Painting:
If your clay isn’t naturally bright white, apply two coats of matte white acrylic paint. Dabbing the brush works better than stroking to get paint into the crevices between dots. -
Sealing:
protect your work with a coat of matte spray sealant. Note that air-dry clay is not waterproof, so only use dried botanicals in this vase.
Color Wash Effect
Make the texture pop by painting the vase a dark color first, then dry-brushing white over the top. This leaves shadows around the dots for high contrast.
Fill your new textured vessel with some wild grasses for an effortless slice of nature.
Stamped Texture Vase Using Simple Repeating Shapes
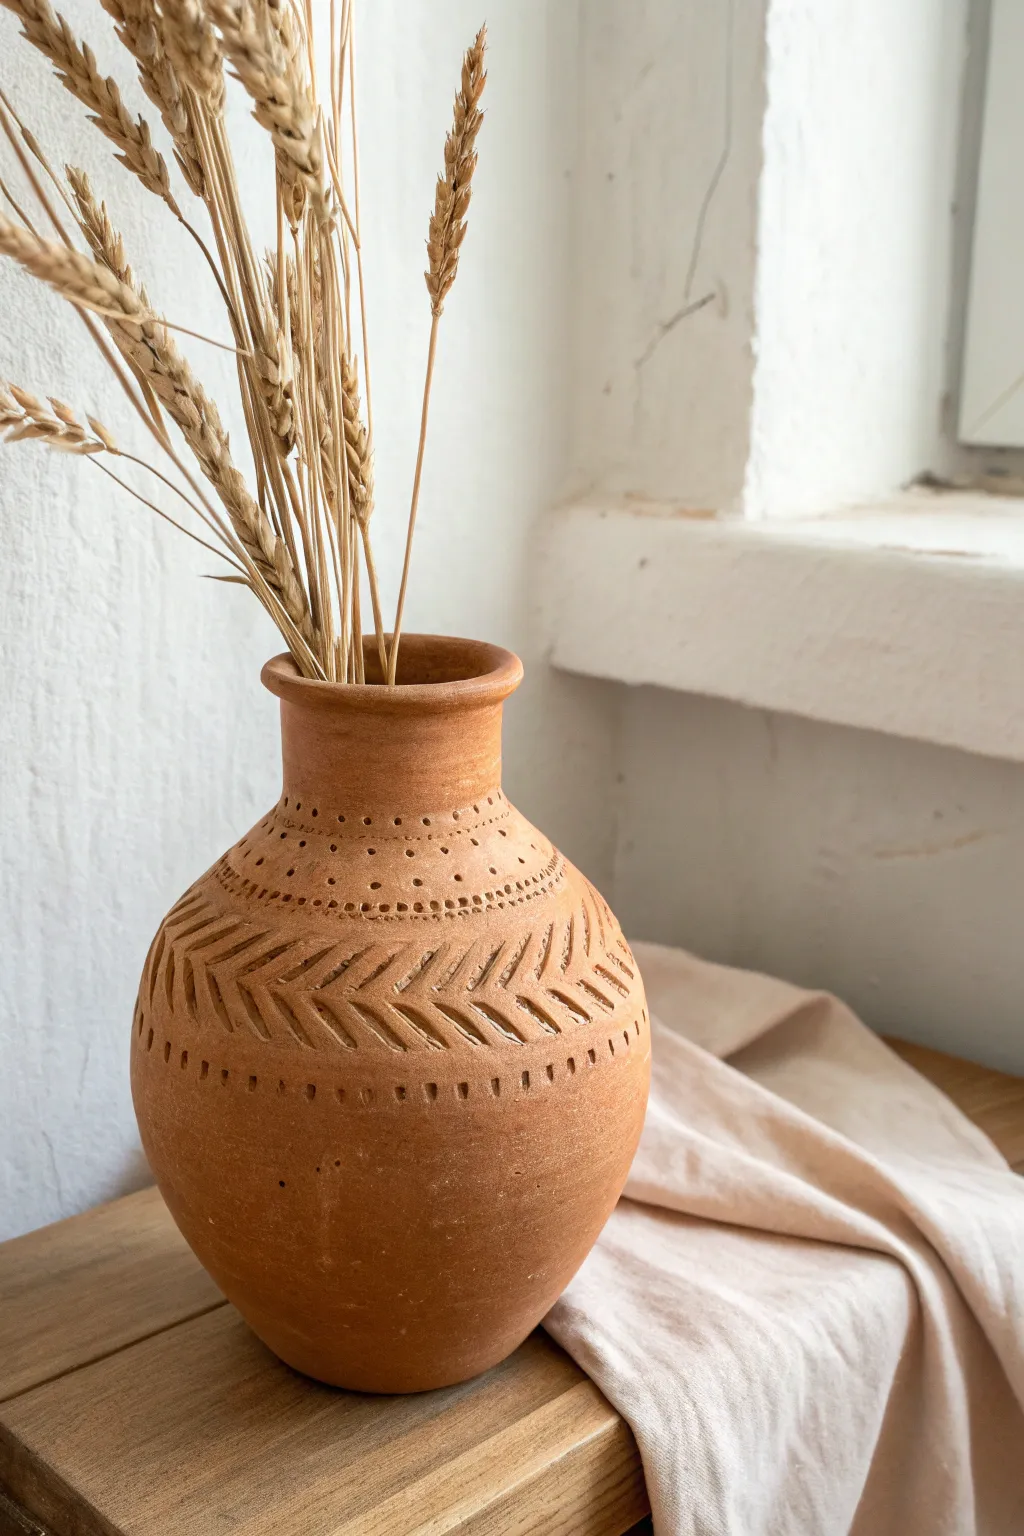
Bring the warmth of autumn into your home with this beautifully textured terra cotta vase featuring a classic wheat-patterned band. The natural red clay body combined with simple stamped geometric details creates an earthy vessel perfect for dried botanical displays.
Step-by-Step Guide
Materials
- Red earthenware or terra cotta clay (approx. 2-3 lbs)
- Pottery wheel (optional) or turntable and banding wheel
- Sponge
- Wire cutter
- Wooden modeling tool with a chiseled end
- Needle tool or small round stylus
- Rib tool (kidney shaped for smoothing)
- Water slip or slurry
- Kiln for firing
Step 1: Forming the Base Vessel
-
Prepare the clay:
Begin by wedging your red earthenware clay thoroughly to remove any air pockets. Form it into a smooth, round ball about the size of a grapefruit. -
Center and open:
If using a wheel, center the clay and open it up. If hand-building, create a sturdy base by forming a pinch pot or coiling clay to create a cylinder about 4 inches wide at the bottom. -
Shape the belly:
Pull the walls upward, gently pushing outward from the inside to create a bulbous, rounded belly shape. Aim for the widest point to be slightly below the vertical center of the vase. -
Narrow the neck:
Collar the clay in gradually as you move toward the top to form a narrower neck. This creates that classic bottleneck silhouette. -
Flare the rim:
At the very top, use your thumb or a finger to gently flare the clay outward, creating a small, rolled lip that defines the opening. -
Smooth the surface:
While the clay is still plastic but firm, use a rib tool to smooth the exterior walls, removing any finger marks or uneven ridges to create a clean canvas for your texture.
Step 2: Adding the Textured Details
-
Mark your guidelines:
Wait until the clay is leather-hard. Lightly trace two horizontal parallel lines around the upper belly of the vase using a needle tool to define where your main chevron pattern will go. -
Create the top border:
Just above your top guideline, use a small round stylus or the blunt end of a small tool to press a row of tiny dots evenly around the circumference. -
Add a second dot row:
Create a second row of dots slightly below the first one for a double-dotted boarder effect. -
Carve the chevron spine:
Inside your main band area, use a carving tool to create a central horizontal line, or visual ‘spine’, that runs around the vase. -
Stamp the diagonal texture:
Using a wooden modeling tool with a chiseled or rectangular end, press diagonal impressions slanting downward from the top guideline to the center spine. Repeat this all the way around. -
Complete the chevron:
Mirror the previous step by pressing diagonal impressions slanting upward from the bottom guideline to the center spine, creating a ‘V’ or wheat-like pattern. -
Define the lower border:
Below your patterned band, use the edge of your wooden tool to press vertical dash marks around the vase, creating a simple fence-like border. -
Refine the surface:
Gently rub your finger over any sharp burrs created by the carving to soften the edges without erasing the texture.
Uneven Spacing?
If your pattern doesn’t meet up perfectly at the end, don’t panic. Gently smudge the last inch of texture with your thumb and re-stamp the intervals slightly closer together to fit.
Step 3: Drying and Firing
-
Slow drying:
Cover the vase loosely with plastic for the first day to ensure even drying, especially where walls might vary in thickness. Then uncover and let it dry completely to the bone-dry stage. -
Bisque fire:
Load the vase into the kiln and bisque fire it according to your clay body’s specifications (usually cone 04 or 06). -
Clean up:
Once fired and cooled, wipe the vase with a damp sponge to remove any kiln dust. -
Leave unglazed:
To maintain the raw, rustic look shown in the image, do not apply a glaze. The natural terra cotta color is the finish itself. You can fire it a second time if needed to reach maturity, or leave as simple bisque for decorative use.
Moisture Matters
Carving works best when the clay is ‘cheese hard’—firm enough to hold shape but soft enough to cut easily. If it’s crumbling, it’s too dry; sponge it slightly.
Place your finished vase near a window where natural light can highlight the deep relief of your hand-carved textures
Two-Tone Color Block Vase That Looks Super Modern
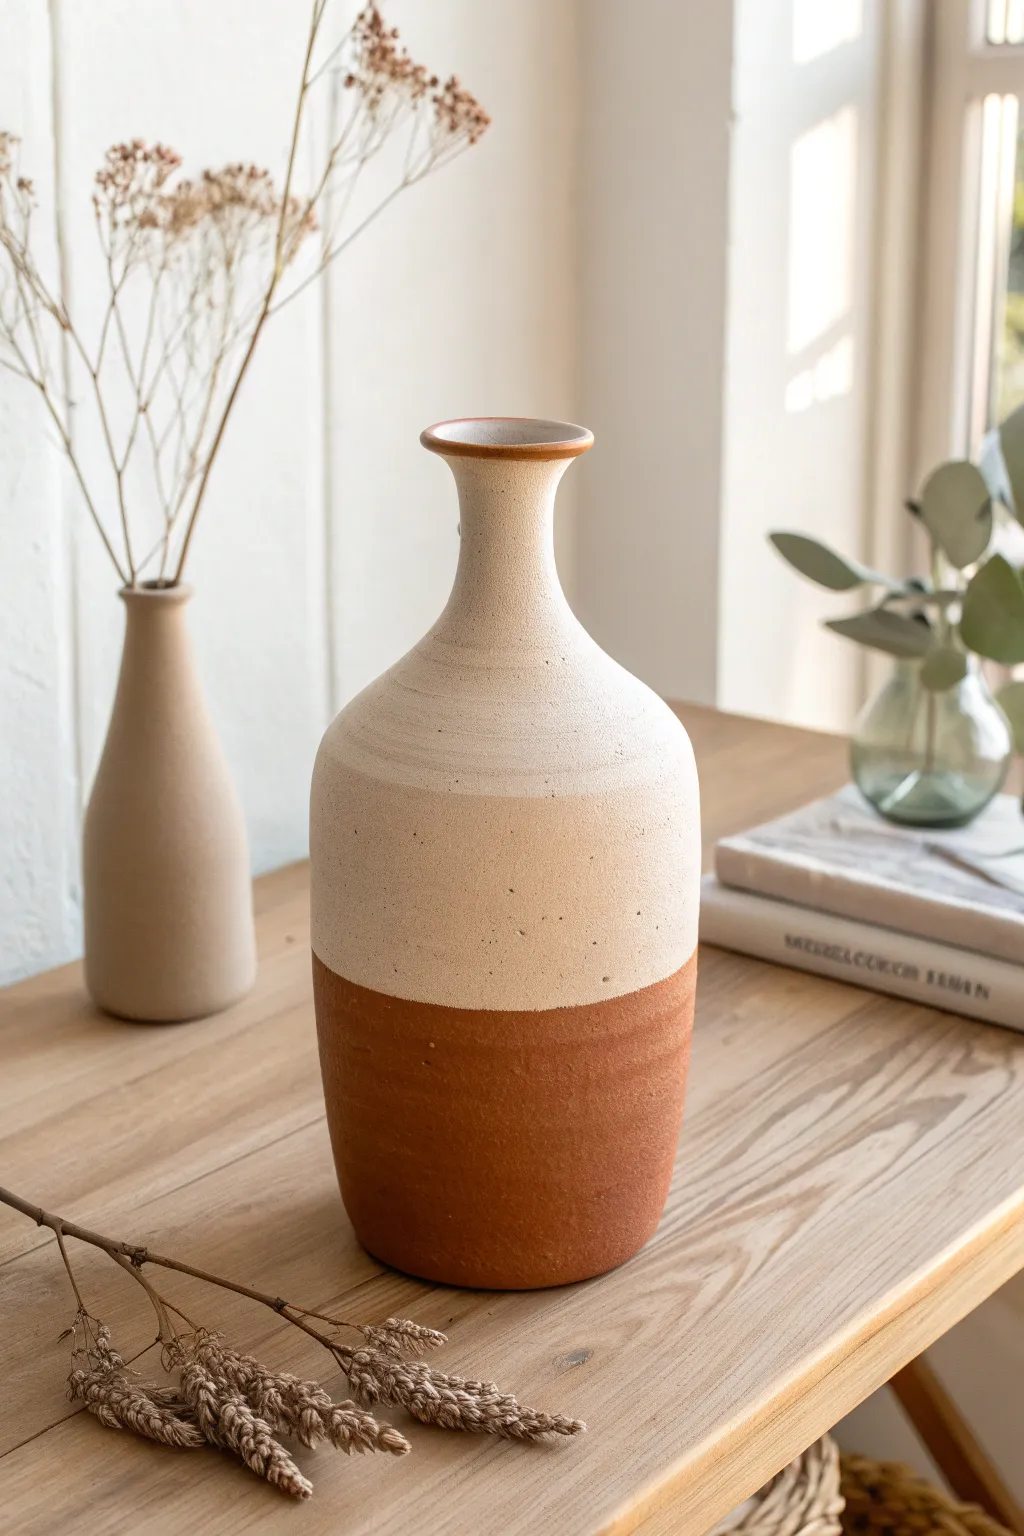
Achieve a high-end designer look with a simple color-blocking technique that highlights texture and contrast. This project transforms a basic vessel into a stunning centerpiece by pairing raw, earthy terracotta tones with a creamy, speckled finish.
Step-by-Step
Materials
- Tall vase (ceramic, glass, or thrifted find)
- Terracotta-colored texture paint (or baking soda mixed with terracotta acrylic paint)
- Cream or off-white acrylic paint
- Matte clear sealant spray
- Painter’s tape (low tack)
- Medium-grit sandpaper
- Wide foam brush or soft bristle brush
- Old toothbrush (for speckling)
- Baking soda (optional for added texture)
- Paper plate or palette
- Drop cloth or newspaper
Step 1: Preparation & Base Texture
-
Clean the Surface:
Begin by thoroughly washing your chosen vase with warm soapy water to remove any dust, grease, or price tag residue. Let it dry completely. -
Prepare the Texture Mix:
If you aren’t using pre-made texture paint, mix your terracotta-colored acrylic paint with baking soda. Aim for a ratio of about 1 part baking soda to 2 parts paint to create a thick, fluffy consistency. -
First Coat Application:
Using a foam brush, dab the terracotta mixture all over the vase. Don’t brush it on smoothly; stick to an up-and-down dabbing motion to build up that earthy, stonelike texture. -
Let it Set:
Allow this first textured layer to dry for at least 30 minutes. It should feel dry to the touch but doesn’t need to be fully cured yet. -
Build the Texture:
Apply a second coat of the terracotta mix, focusing on areas that look thin. This ensures full coverage and deepens the rich rust color. -
Full Dry:
Let the vase dry completely, preferably overnight. The thick texture paint needs time to harden so it won’t peel up during the taping phase.
Bleeding Lines?
If paint bleeds under the tape due to heavy texture, re-apply a thin line of the base color over the tape edge first before applying the top color.
Step 2: Color Blocking
-
Measure the Line:
Determine where you want your color break. For this look, the line sits about one-third of the way up from the bottom. Mark this height lightly with a pencil. -
Tape the Boundary:
Apply painter’s tape horizontally around the vase at your pencil mark. Press the bottom edge of the tape down firmly to seal it against the texture, preventing bleed-through. -
Protect the Bottom:
Cover the exposed terracotta section below the tape with paper or a plastic bag to catch any accidental drips from the top color. -
Mix the Top Color:
Prepare your cream or off-white acrylic paint. I like to add just a pinch of baking soda here too, but less than the base, to keep the top slightly smoother than the bottom. -
Apply Cream Coat:
Paint the top section of the vase with your cream color. Use horizontal brush strokes near the neck for a thrown-pottery look, or dab for texture. -
Second Top Coat:
Once the first cream layer is dry, apply a second coat to ensure the terracotta color underneath is completely hidden.
Step 3: Finishing Details
-
Splatter Effect:
Dilute a tiny drop of brown or black paint with water. Dip an old toothbrush into it and run your thumb across the bristles to flick tiny speckles onto the cream section for a natural ceramic look. -
Remove Tape:
Carefully peel off the painter’s tape while the top paint is still slightly tacky. Pull at a 45-degree angle away from the painted edge to keep the line crisp. -
Touch Ups:
If any paint bled under the tape, use a small detail brush and your original terracotta color to carefully correct the line. -
Rim Detail:
Using a small brush, carefully paint the very top rim of the vase with the terracotta color to tie the design together. -
Seal the Work:
Once the entire vase is bone dry, take it outside and spray it with a clear matte sealant. This protects the textured paint from chipping and makes it easier to dust later.
Make it Waterproof
Acrylic texture paint isn’t waterproof. To use fresh flowers, simply slip a smaller glass jar or plastic cup inside the vase to hold the water safely.
Place your new vase on a wooden table or shelf to let those warm earth tones really shine
Terrazzo-Speckled Vase for an Easy Trendy Finish
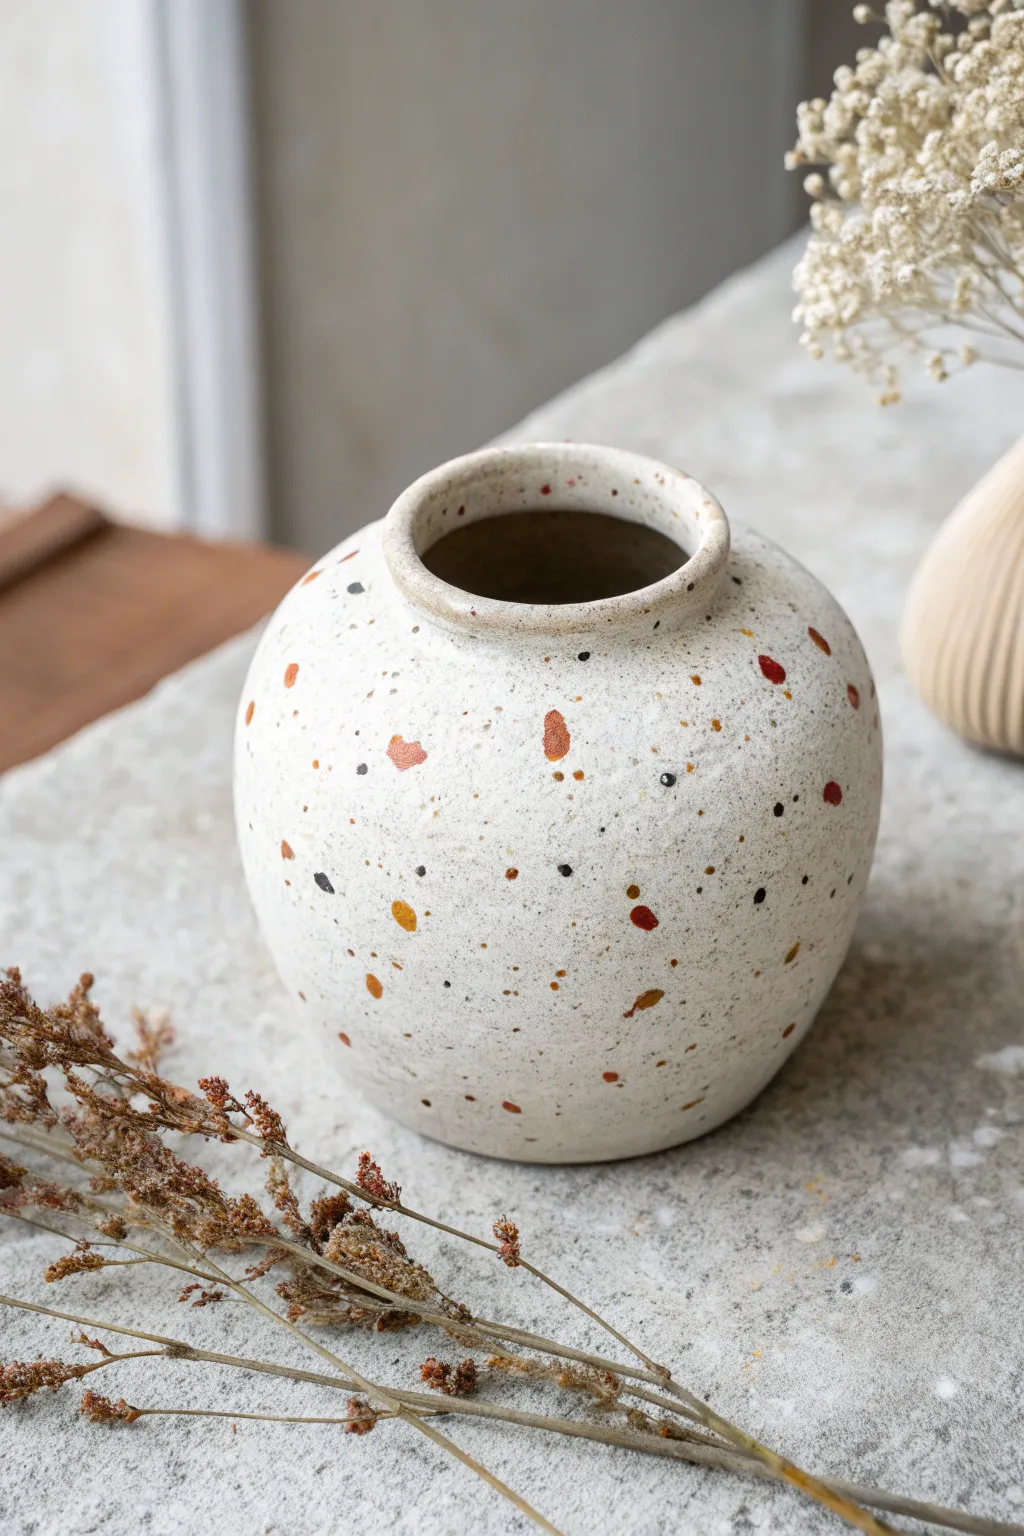
Transform a plain vase into a trendy geometric masterpiece with this faux terrazzo technique that requires zero kiln firing. The creamy stone-effect base, punctuated by warm rust and black speckles, creates an organic, high-end look perfect for dried botanicals.
Step-by-Step Guide
Materials
- Round ceramic or bisque vase
- Baking soda
- Acrylic paint (creamy white/beige)
- Acrylic paint (burnt orange/terracotta)
- Acrylic paint (black)
- Paintbrush (medium flat)
- Small round detail brush (size 0 or 1)
- Old toothbrush (optional for micro-speckles)
- Palette or paper plate
- Matte clear sealant spray
Step 1: Creating the Stone Texture
-
Prepare the texture mix:
Mix your creamy white acrylic paint with baking soda in a roughly 1:1 ratio. You want a consistency that feels like fluffy frosting—thick enough to hold texture but spreadable. -
Apply the first coat:
Using a flat brush, apply the paint mixture all over the vase. Use horizontal, somewhat messy strokes to build up that organic, stone-like texture. -
Let it dry completely:
Allow this first layer to dry for at least an hour. The baking soda mixture can be quite thick, so patience is key here to avoid dragging the paint. -
Add a second textured layer:
Apply a second coat of the baking soda paint. This time, use a stippling or dabbing motion with your brush to create pitted, uneven areas that mimic real stone. -
Smooth the rim:
Pay special attention to the rim of the vase. While the body should be textured, I like to gently smooth the very top edge with a slightly damp finger for a cleaner finish. -
Final texture check:
Inspect the vase for any bald spots. If you see the original vase showing through, dab a little more mixture on those areas and let it dry fully.
Natural Variation
Don’t aim for perfect circles. The charm of terrazzo is the jagged, random chips of stone. Keeping your hand loose creates a more authentic finish.
Step 2: Painting the Terrazzo Pattern
-
Mix your spot colors:
Prepare a small amount of burnt orange or terracotta, and jet black acrylic paint on your palette. You want these slightly thinned with a tiny drop of water for better flow. -
Paint large shapes:
Using your small detail brush, paint irregular, organic shapes with the terracotta color. Think of clumsy triangles or lopsided ovals rather than perfect dots. -
Vary the spacing:
Space these larger orange shapes randomly around the belly of the vase. Leave pleanty of negative space; less is often more with this style. -
Add medium spots:
Clean your brush and switch to black paint. Add slightly smaller, irregular blobs near the orange ones, but try not to let them touch. -
Create micro-speckles:
For the tiniest black dots, load just the tip of your detail brush and gently tap it against the surface. Alternatively, flick the bristles of an old toothbrush for a fine mist of specks. -
Layering colors:
Go back with your terracotta color and add a few tiny pin-prick dots amongst the larger shapes to tie the design together visually. -
Check balance:
Step back and look at the vase from a distance. If one side looks too empty, add a small cluster of spots to balance the composition.
Paint Peeling off?
If the baking soda paint flakes off as you apply the second coat, the first layer wasn’t dry enough. Let it sit longer or use a hair dryer on low heat.
Step 3: Finishing Touches
-
Allow to cure:
Let all your painted details dry completely. Since the speckles are just acrylic without baking soda, they should dry within 20-30 minutes. -
Seal the surface:
Take the vase to a well-ventilated area and spray it with a clear matte sealant. This protects the textured paint from chipping and moisture. -
Second coat of sealant:
Apply a second light coat of sealant for extra durability, ensuring you get coverage on the textured nooks and crannies.
Now you have a stunning, artisanal-looking vase ready to display your favorite dried flowers or simply stand alone as a piece of decor
Jagged Torn-Edge Rim Vase for Instant Character
Capture the essence of weathered stoneware with this handcrafted clay vase project. Featuring a purposely imperfect, jagged rim and a coarse, speckled texture, this piece brings instant history and warmth to any windowsill.
Step-by-Step
Materials
- White or speckled stoneware clay (approx. 2-3 lbs)
- Pottery wheel (or coil building supplies)
- Needle tool
- Metal kidney rib
- Sponge
- Brown iron oxide wash or brown underglaze
- Clear matte glaze
- Paintbrush (medium round)
- Wooden modeling tool
- Sandpaper or scouring pad
Step 1: Forming the Base
-
Center the clay:
Begin by wedging your clay to remove air bubbles, then slam it onto your wheel head. Center the mound using steady pressure and water to ensure symmetrical walls. -
Open and pull:
Open the clay to create the floor of your vase. Begin pulling the walls upward into a cylinder, aiming for a consistent thickness of about a quarter-inch. -
Collar the neck:
As you get taller, gently collar the clay inward at the top third to create the narrow neck. Use both hands to compress the clay so the walls don’t buckle. -
Shape the belly:
Using a rib on the inside, gently push the clay outward in the lower two-thirds to form a soft, rounded belly shape. -
Refine the rim:
Flare the very top lip slightly outward. Don’t worry about making it perfectly smooth; we will distress it later.
Step 2: Adding Texture & Distress
-
Apply rough texture:
While the clay is still somewhat wet but holding its shape, take a scouring pad or rough sponge and dab it aggressively all over the exterior. -
Create the jagged rim:
Using a needle tool or your fingers, intentionally tear small uneven sections off the rim. You want an organic, worn look, not a clean cut. -
Smooth the tears:
Gently gently run a damp sponge over the sharpest torn edges so they are safe to touch but visually retain their broken appearance. -
Dry to leather hard:
Allow the vase to dry slowly until it reaches the leather-hard stage, where it’s firm enough to trim but still cool to the touch. -
Trim the foot:
Place the vase back on the wheel (upside down) and use a trim tool to define the foot ring and remove excess weight from the bottom.
Glazing Pro-Tip
For the neck band, use wax resist over the brown oxide before dipping the whole pot in white glaze. The white glaze will bead off, revealing the brown stripe.
Step 3: Glazing and Finishing
-
Bisque fire:
Fire your piece in the kiln to cone 04 (or your clay’s specific bisque temperature) to prepare it for glazing. -
Paint the accent band:
Using a brown iron oxide wash or underglaze, paint a thick band around the neck where it transitions to the shoulder. I like to let the brush skip slightly for a distressed effect. -
Highlight the rim:
Apply that same brown wash specifically to the jagged rim edge, letting it seep into the torn crevices to highlight the uneven shape. -
Apply the main glaze:
Dip the entire vase into a matte white or clear glaze (if using speckled clay). If brushing, apply three even coats to the main body, avoiding the brown accents if you want them raw, or glazing over them for a sealed look. -
Create speckles (optional):
If your clay isn’t naturally speckled, flick a stiff toothbrush dipped in iron oxide wash over the white glaze to create tiny artificial speckles. -
Final wipe:
Wipe the bottom foot ring completely clean with a wet sponge to prevent the pot from sticking to the kiln shelf. -
Glaze fire:
Fire the vase a final time to the maturity temperature of your clay and glaze (typically cone 5 or 6 for stoneware).
Level Up: Dried florals
Style your finished vase with dried baby’s breath or bleached ruscus. Their delicate, brittle textures perfectly complement the torn clay rim.
This heavy, textured vessel will look lovely holding dry stems near a window
Bubble Stack Vase Made from Simple Rounded Forms
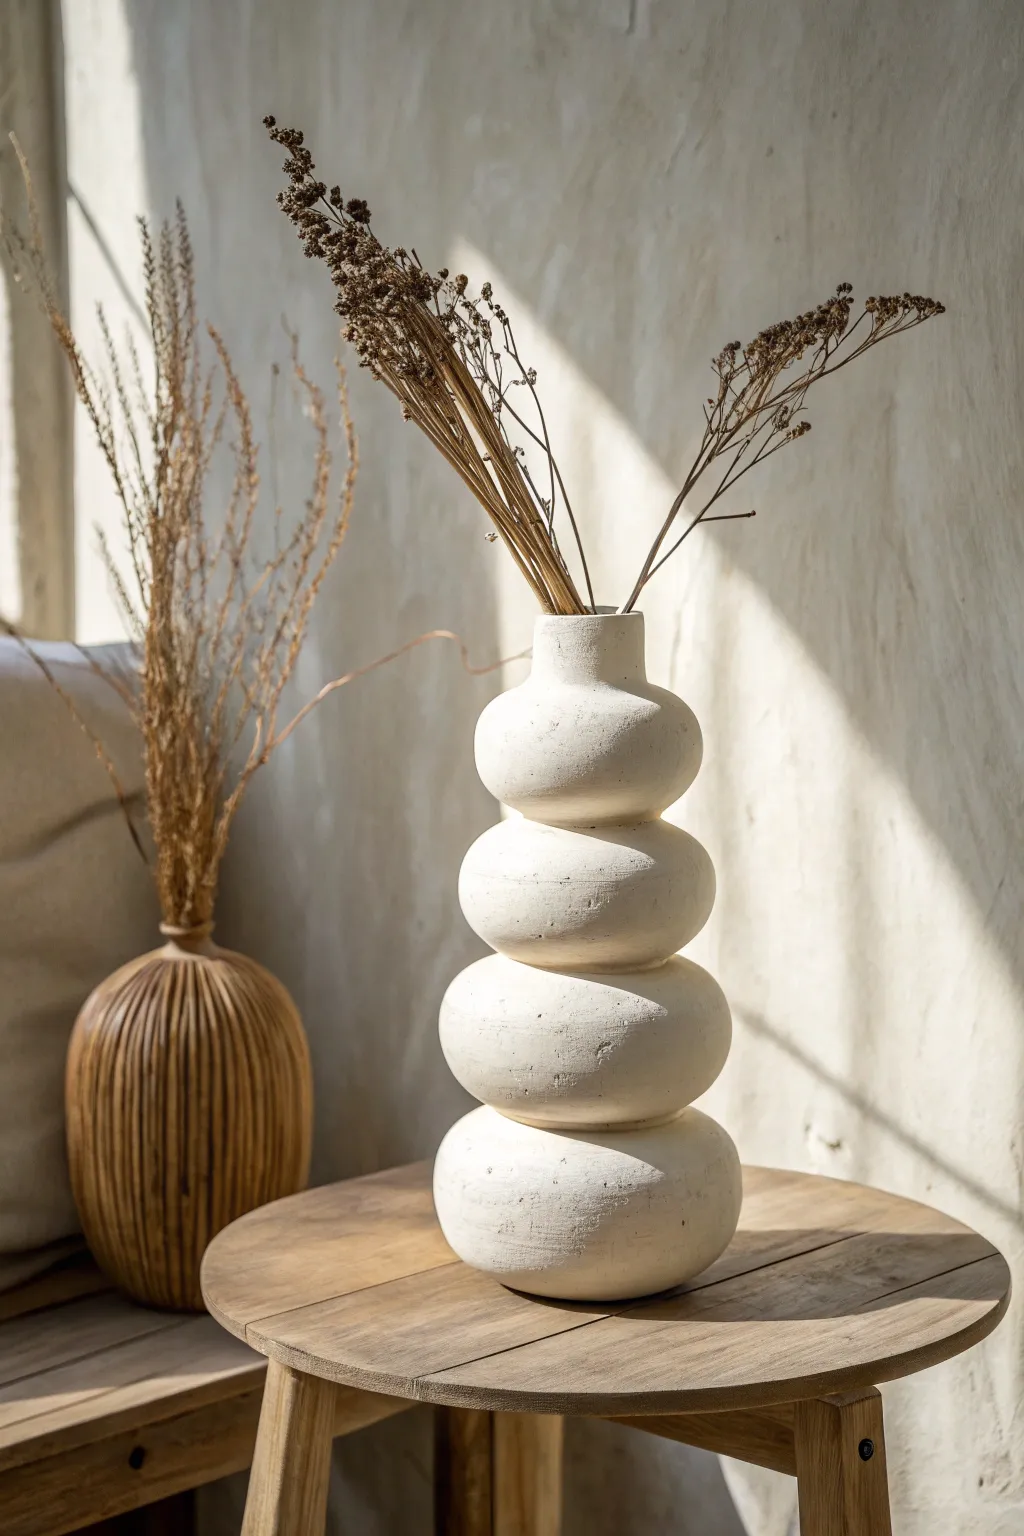
Bring minimal, sculptural elegance to your space with this stacked bubble vase. By repeating simple rounded forms, this project creates a striking silhouette that looks like high-end ceramic, yet retains a lovely, handcrafted charm.
Step-by-Step Guide
Materials
- Air-dry clay (approximately 2-3 lbs) or polymer clay
- Rolling pin
- Clay cutting tool or knife
- Small bowl of water (for smoothing)
- Slip (clay mixed with water to make a paste)
- Small sponge
- Acrylic paint (warm white/bone)
- Baking soda (for texture)
- Paintbrush
- Clear matte sealer spray
Step 1: Forming the Base Segments
-
Prepare your clay:
Begin by kneading your clay thoroughly to remove air bubbles and make it pliable. Separate the clay is into four equal-sized portions, reserving a small amount for the neck. -
Shape the first sphere:
Take one portion and roll it between your palms or on your work surface until you have a smooth, firm sphere. This will be the bottom segment. -
Flatten slightly:
Gently press the sphere onto the table to create a flat bottom so the vase stands stable. Then, press the top slightly to create a landing pad for the next segment. Think of making a thick, rounded donut shape, but without the hole. -
Create the stack:
Repeat this process for the next two spheres. Aim to make each one slightly smaller than the one below it for a tapered look, or keep them uniform like the example for a columnar effect. Flatten the top and bottom of each sphere where they will connect. -
Hollow the centers:
Since this is a vase, you need a channel for the stems. Carefully push your thumb or a cylindrical tool through the center of each flattened sphere. You don’t need thin walls; just a central hole about an inch wide.
Reinforce the Core
For a taller vase, insert a cardboard tube or dowel through the center while stacking. This keeps the stack straight while drying and can be removed or left inside.
Step 2: Assembly and Refining
-
Score the surfaces:
Use your needle tool or knife to scratch cross-hatching marks (scoring) onto the flat connecting surfaces of your clay segments. -
Apply slip:
Dab a generous amount of slip onto the scored areas. This acts as the glue that bonds the clay permanently. -
Stack the segments:
Press the second segment firmly onto the base segment. Wiggle it slightly to lock the scored clays together. Repeat this for the third and fourth segments. -
Blend the seams:
Using a modeling tool or your thumb, drag a little clay from the top segment down to the bottom one across the seam to bridge the gap. Do this on the inside hole as well if possible. -
Smooth the exterior:
Once the pieces are joined, use a wet finger or damp sponge to smooth over the seams. I find that blurring the line slightly helps, but leaving a distinct indentation between bubbles preserves the stacked look. -
Form the neck:
With your reserved clay, fashion a smaller, slightly taller cylinder for the neck. Attach this to the top bubble using the score and slip method, blending the clay downward securely.
Step 3: Finishing and Texturing
-
Refine the surface:
Before the clay dries completely, go over the entire piece with a barely damp sponge. Remove any harsh fingerprints, but don’t worry about perfection; organic bumps add character. -
Allow to dry:
Let the vase air dry for 24-48 hours. Keep it away from direct heat sources to prevent cracking. It should turn a lighter color when fully dry. -
Prepare the textured paint:
Mix your warm white acrylic paint with a teaspoon of baking soda. This mixture creates that trendy, stone-like faux ceramic finish seen in the photo. -
Apply the first coat:
Brush the baking soda paint onto the vase in horizontal strokes. The baking soda will give it a gritty, matte texture. Let this layer dry fully. -
Add depth:
If you want more dimension, dab a second coat of paint into the crevices between the bubbles to accentuate the stacked shape. -
Seal the piece:
Once the paint is cured, spray the vase with a matte clear sealer. This protects the finish and makes it easier to dust later.
Cracks Appearing?
Small cracks often appear as air-dry clay shrinks. No panic—fill them with a little fresh wet clay or spackle paste, smooth it over, and let it dry before painting.
Place your favorite dried stems inside and enjoy the organic warmth this piece adds to your corner
Donut Ring Vase With a Clean Sculptural Shape

This elegant, donut-shaped vase brings a modern, minimalist aesthetic to any space with its clean lines and textured, stone-like finish. While it looks like high-end ceramic, you can achieve this striking sculptural form right at home using basic clay techniques.
Step-by-Step Tutorial
Materials
- White air-dry clay (approximately 1kg)
- Rolling pin
- Rolling guides or wooden slats (approx. 0.5 cm thick)
- A round cookie cutter or small jar lid (about 5-7cm diameter)
- Needle tool or craft knife
- Slip (clay mixed with water)
- Modeling tools or a blunt knife
- Sponge
- Water bowl
- Fine grit sandpaper
- Optional: White acrylic paint and baking soda for texture
Step 1: Creating the Donut Form
-
Prepare the slab:
Begin by conditioning your clay, kneading it until it is soft and pliable but not sticky. Roll it out into a large, even slab using your rolling pin and thickness guides to ensure a consistent thickness of about 0.5 cm. -
Cut the circles:
You will need two identical large circles for the front and back of the vase. Use a large bowl (approx. 15-20cm diameter) as a template to cut these shapes out with your needle tool. -
Create the center hole:
Place your smaller round cutter or jar lid exactly in the center of one of your large clay circles and cut out the inner hole. Repeat this step for the second large circle, ensuring the holes align perfectly when stacked. -
Make the walls:
Roll out a long strip of clay, also 0.5 cm thick. This strip needs to be wide enough to create the depth of your vase (about 4-5 cm) and long enough to go around the circumference of the large circle. Cut a second, shorter strip of the same width for the inner circle’s circumference. -
Attach the inner wall:
Score (scratch) the area around the inner hole of your first clay ring and apply a little slip. Take the shorter strip of clay and attach it upright around this inner circle to form the inner wall of the donut. Blend the seams smoothly on the inside. -
Attach the outer wall:
Similarly, score and slip the outer edge of the base ring. Attach the longer clay strip upright along this outer edge. Seam the two ends of the strip together firmly so you have a complete walled ring. -
Close the form:
Score the top edges of both the inner and outer walls you’ve just built. Apply slip, then carefully place the second clay ring on top, aligning the center hole. Press gently to seal.
Internal Support
If the vase walls start sagging before you put the top piece on, gently stuff the inside cavity with crumpled newspaper or paper towels. This supports the shape while it dries.
Step 2: Refining and Adding the Neck
-
Seal the seams:
Use a modeling tool to drag clay across the seams where the top ring meets the walls, both on the outer edge and inside the donut hole. Smooth these areas with your finger or a damp sponge until the joins disappear. -
Cut the opening:
Decide where the top of your vase will be. Use your needle tool to cut a small circular hole in the outer wall of the donut shape where the neck will attach. -
Form the neck:
Roll a small rectangular slab of clay and form it into a cylinder that matches the size of the hole you just cut. I find it helpful to roll this around a thick marker or handle to keep the shape perfect. -
Attach the neck:
Score and slip the base of your clay cylinder and the area around the hole on the vase body. Press the neck firmly into place. -
Blend the join:
Use a small tool to smooth the clay from the neck down onto the body of the vase, creating a seamless transition. A damp brush helps to get into the tight curve here.
Step 3: Finishing Touches
-
Smooth the surface:
Wipe the entire piece down with a slightly damp sponge to remove fingerprints and bumps. Let the clay dry slowly over 24-48 hours away from direct sunlight. -
Sand for perfection:
Once fully dry, use fine-grit sandpaper to sand down any remaining uneven spots or sharp edges, particularly around the rim of the neck. -
Create texture:
To mimic the stone finish in the photo, mix white acrylic paint with a teaspoon of baking soda. Paint this mixture onto the vase in a dabbing motion. -
Final coat:
Allow the first layer of texture to dry, then apply a second coat if you want a rougher, more organic stone appearance.
Cracks Appearing?
Small cracks during drying are normal. Mix a tiny amount of fresh clay with water to make a thick paste (spackle consistency) and fill the cracks, then sand smooth once dry.
Now you have a stunning piece of sculptural decor ready to display your favorite dried grasses
Abstract Face Vase With Simple Raised Features
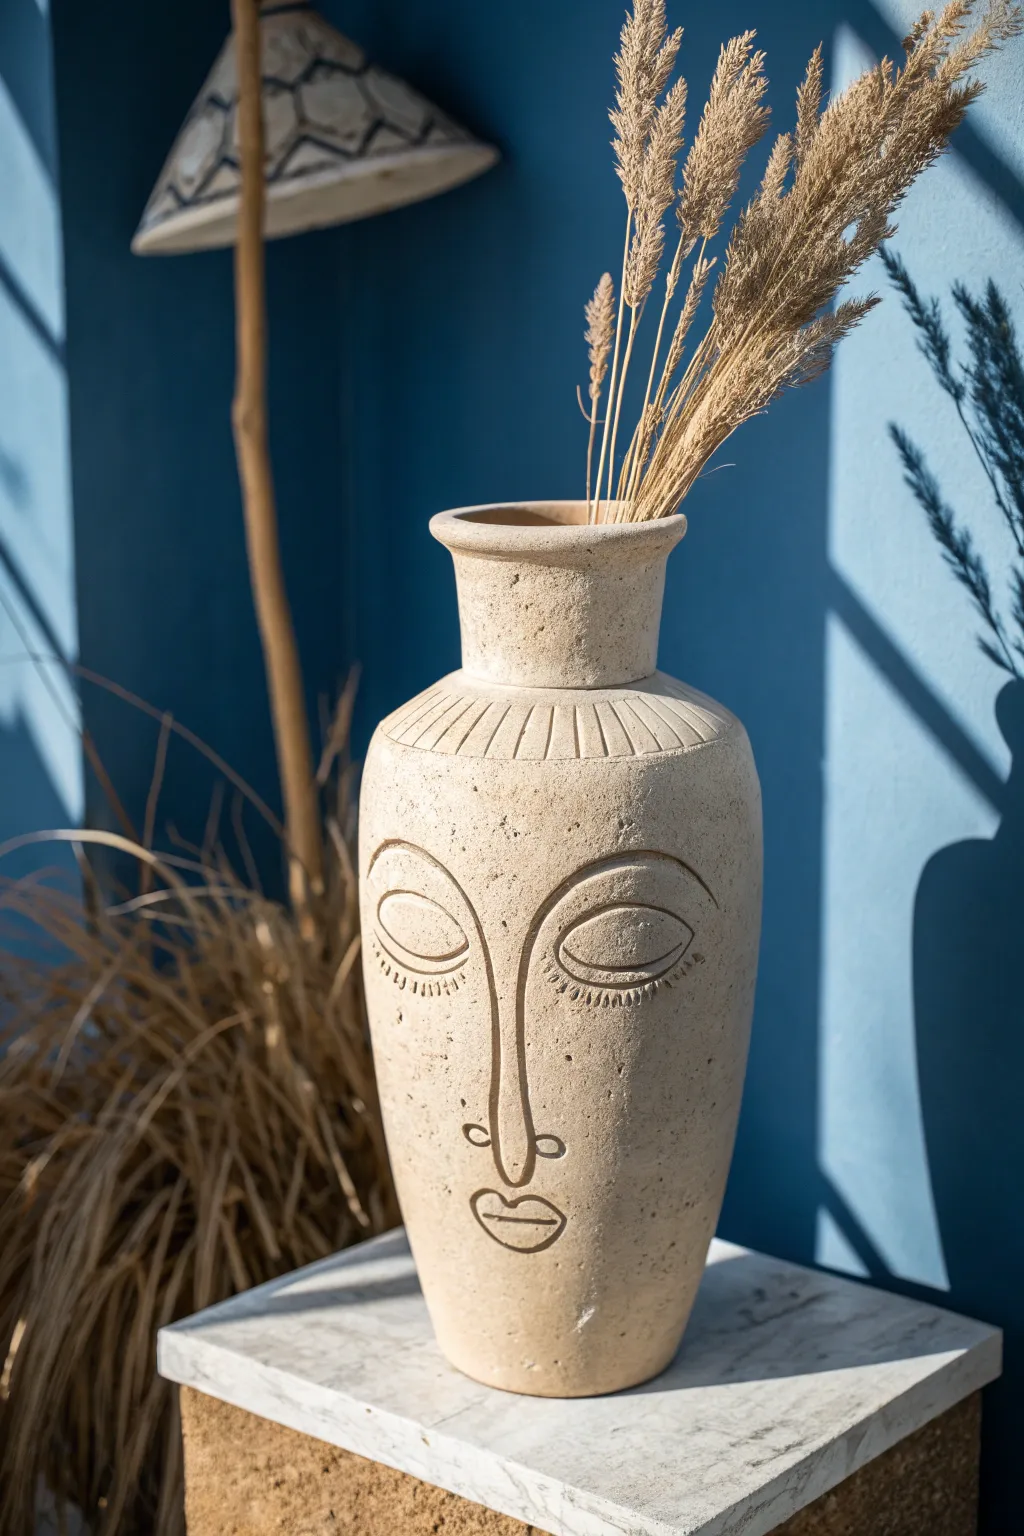
This serene vase project combines the rustic charm of textured stoneware with simple, modernist line art. The result is a striking vessel featuring a stylized face with incised details and a sandy, stone-like finish that feels both ancient and contemporary.
Step-by-Step
Materials
- High-grog stoneware clay (sand or buff color)
- Pottery wheel (optional, can be coil-built)
- Needle tool
- Loop carving tools (small and medium)
- Ribs (wooden and metal)
- Sponge
- Wire cutter
- Scoring tool or fork
- Slip
- Matte clear glaze or raw finish protectant
Step 1: Forming the Base Vessel
-
Establish the cylinder:
Begin by centering a generous mount of clay—around 3 to 4 pounds—on your wheel. Open the center and pull the walls up into a tall, consistent cylinder, aiming for a height of about 10-12 inches. -
Shape the belly:
From the inside, gently push the clay outward starting just above the base to create a subtle swell. This ‘shoulder’ area will be the canvas for the face, so ensure the curve is smooth and gradual. -
Collar the neck:
As you reach the top third, begin collaring the clay inward significantly to form a distinct neck. This should be narrower than the body but wide enough to hold a bouquet of dried grasses. -
Flare the rim:
At the very top, use your fingers or a shammy to flare the rim outward slightly, creating a confident lip that balances the visual weight of the base. -
Refine the surface:
Before taking it off the wheel, run a metal rib up the exterior. Don’t smooth it perfectly; leave some of the grog exposed to achieve that sandy, stone-like texture evident in the photo.
Clean Lines Tip
When carving the long nose line, pull the tool toward your body rather than pushing away. This gives you steadier control for straight, confident lines.
Step 2: Carving the Features
-
Leather hard stage:
Allow the vase to dry slowly until it reaches a sturdy leather-hard state. The clay needs to be firm enough to carve without deforming, but soft enough to cut cleanly. -
Map the face:
Lightly scratch the outline of the face using a needle tool. Start with a long, continuous line that forms the nose bridge, extending up to curve into the eyebrows. -
Outline the eyes:
Sketch two large almond shapes below the eyebrow curves. Keep them symmetrical and heavy-lidded to capture the sleepy, meditative expression. -
Carve the main lines:
Using a small loop tool or V-tip carving tool, deepen the lines you just sketched. Create a consistent groove for the nose, eyebrows, and the outline of the eyes. -
Detail the lashes:
Beneath each eye, press a series of short, vertical hash marks using a flat-edged tool or the side of your needle tool to simulate stylized lower lashes. -
Form the lips:
Carve a small, simple mouth shape below the nose. Use an almond shape for the lips with a single horizontal line through the center to separate top from bottom. -
Add decorative shoulder marks:
around the shoulder of the vase—where the neck meets the body—carve vertical hash marks or incised lines. These act like a decorative collar or necklace for your figure.
Make it Pop
After bisque firing, rub a dark oxide wash (like iron oxide or manganese) into the carved grooves and wipe away the excess to accentuate the drawing.
Step 3: Finishing and Firing
-
Clean up burrs:
Once the carving is complete, wait for the clay to dry slightly more, then gently brush away any crumbs or sharp burrs with a soft dry brush. -
Bisque fire:
Fire the piece to cone 04 (or your clay’s specific bisque temperature). This sets the form permanently. -
Glaze application:
To maintain the raw, sandy look, I prefer to glaze only the interior with a liner glaze for water-tightness. Leave the exterior unglazed to highlight the clay’s natural texture. -
Alternative finish:
If you want a fully sealed exterior, dip the entire piece in a very matte, transparent glaze that won’t obscure the carving or the groggy texture. -
Final firing:
Fire the vase to maturity (likely cone 5/6 or cone 10 depending on your stoneware). Let it cool completely in the kiln.
Fill your new vase with dried pampas grass or wheat to complement its earthy tones and enjoy the calm presence it adds to your room
Hanging Wall Pocket Vase for Dried Florals
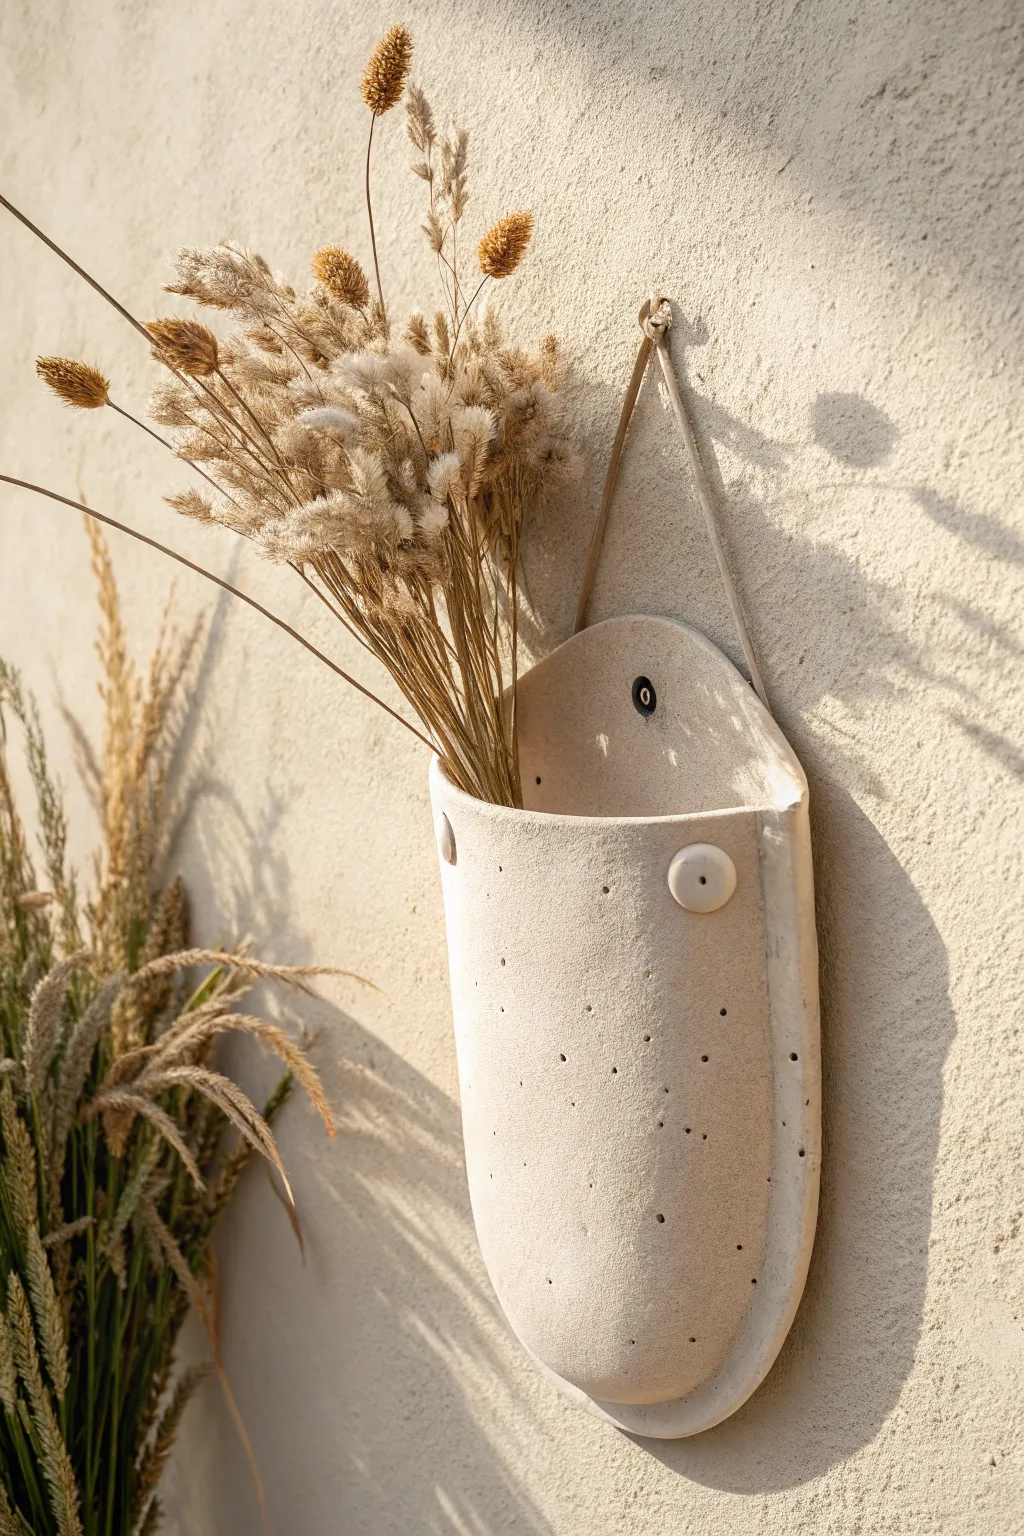
Embrace organic textures with this hanging wall pocket, crafted to showcase the natural beauty of raw, speckled clay. Its elongated pouch shape and textured surface create a rustic yet modern home for your favorite dried floral arrangements.
Step-by-Step Tutorial
Materials
- Speckled cream stoneware clay (a groggy clay body works best)
- Rolling pin
- Slab roller or canvas mat
- Cardstock or paper for templates
- Needle tool or fettling knife
- Scoring tool or serrated rib
- Slip (clay and water mixture)
- Small circle cutter (approx. 1/2 inch)
- Wooden modeling tool
- Damp sponge
- Natural twine, leather cord, or rope for hanging
Step 1: Preparing the Slabs
-
Create your template:
Cut a U-shaped template from cardstock for the back panel, roughly 10 inches tall and 5 inches wide. Create a slightly shorter, wider version for the front pocket piece. -
Roll out the clay:
Roll your speckled clay onto a canvas mat until it is an even slab, approximately 1/4 inch thick. I like to flip the slab over halfway through rolling to prevent warping. -
Cut the shapes:
Place your templates onto the slab and trace around them with a needle tool. Cut out the back panel and the front pocket piece cleanly. -
Smooth the edges:
Run a damp finger or sponge along the cut edges of both clay pieces to compress the clay particles and remove any sharp burrs.
Step 2: Constructing the Pocket
-
Create the volume:
Gently curve the front pocket piece over your thigh or a rolling pin to give it a convex shape without cracking it. -
Score the contact points:
Take a serrated rib or scoring tool and rough up the outer edges of the back panel’s lower half and the corresponding inner edges of the front pocket piece. -
Apply slip:
Generously dab slip onto the scored areas to act as your glue. -
Attach the pieces:
Press the front pocket onto the back panel, aligning the bottom curves. Work your way up the sides, applying firm, even pressure to seal the seam. -
Reinforce the seam:
Use a wooden modeling tool to blend the clay across the seam on the outside, ensuring a strong bond. Smooth over the join with a damp sponge so it looks seamless.
Pro Tip: Texture Trick
To get that weathered limestone look without special tools, gently press coarse sandpaper or a real rock against the clay surface while it’s still leather-hard.
Step 3: Adding Details and Finishing
-
Add decorative buttons:
Roll two small balls of clay and flatten them into decorative ‘buttons.’ Score and slip them onto the upper corners of the front pocket piece. -
Punctuate the buttons:
Using a small, dull tool end, press a dimple into the center of each button for a tailored look. -
Make the hanger hole:
Use your small circle cutter or a straw to punch a hole near the top center of the back panel. This will be for the nail or hook. -
Add side loops (optional):
If you prefer to hang it via a cord as shown, punch holes on the upper sides of the back panel instead of the center. -
Texture the surface:
Take a needle tool or stiff brush and gently stipple the surface of the pocket to enhance the ‘pitted’ stone texture, playing up the natural grog of the clay. -
Refine the rim:
Check the top opening of the pocket. If it looks too sharp, gently compress it with a chamois or wet fingertips to round it off. -
Dry slowly:
Loosely cover the piece with plastic to let it dry slowly over several days. This prevents the pocket from pulling away from the back panel. -
Fire the piece:
Bisque fire the piece in a kiln. For the look in the photo, you can leave the exterior unglazed to show off the raw clay texture, glazing only the inside if you plan to hold fresh flowers. -
Attach the hanging cord:
Once fired, thread a natural rope or leather strip through the side holes and secure with knots to finish the rustic aesthetic.
Level Up: Glaze Inlay
Before firing, carve distinct vertical lines into the pocket. After bisque firing, wipe a dark oxide into the lines and sponge off the excess to highlight the pattern.
Fill your new stoneware pocket with dried bunny tails or grasses for an earthy display