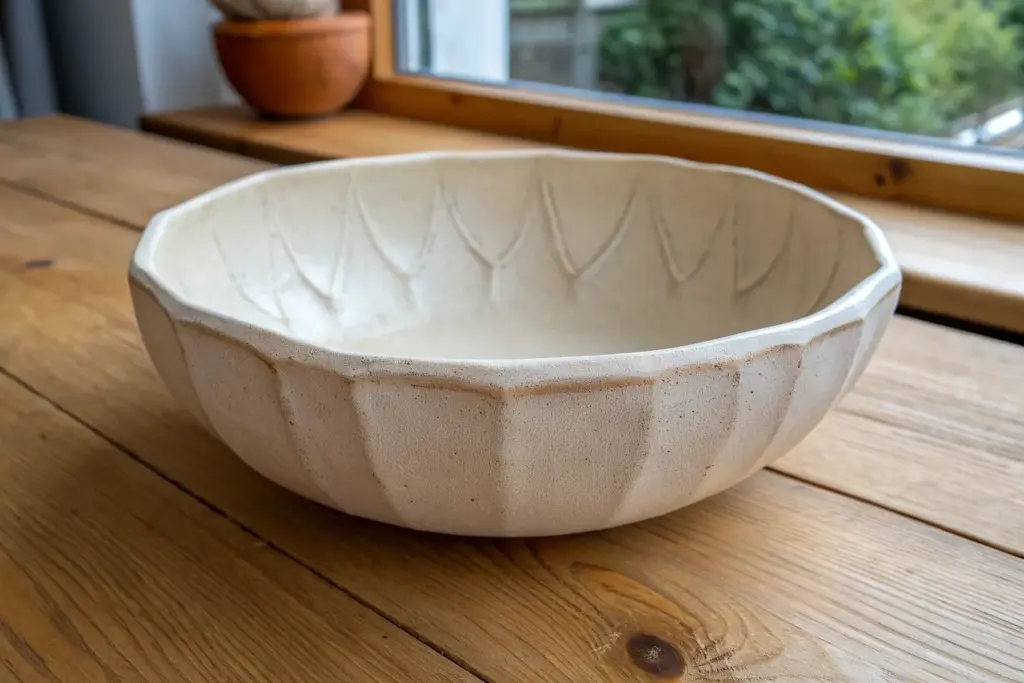
Slab bowls are my favorite kind of magic trick in clay: you start with a flat sheet, and suddenly you’ve got a real, three-dimensional bowl. Here are a bunch of slab bowl ideas that play with shape, seams, texture, and rims—without ever needing a wheel.
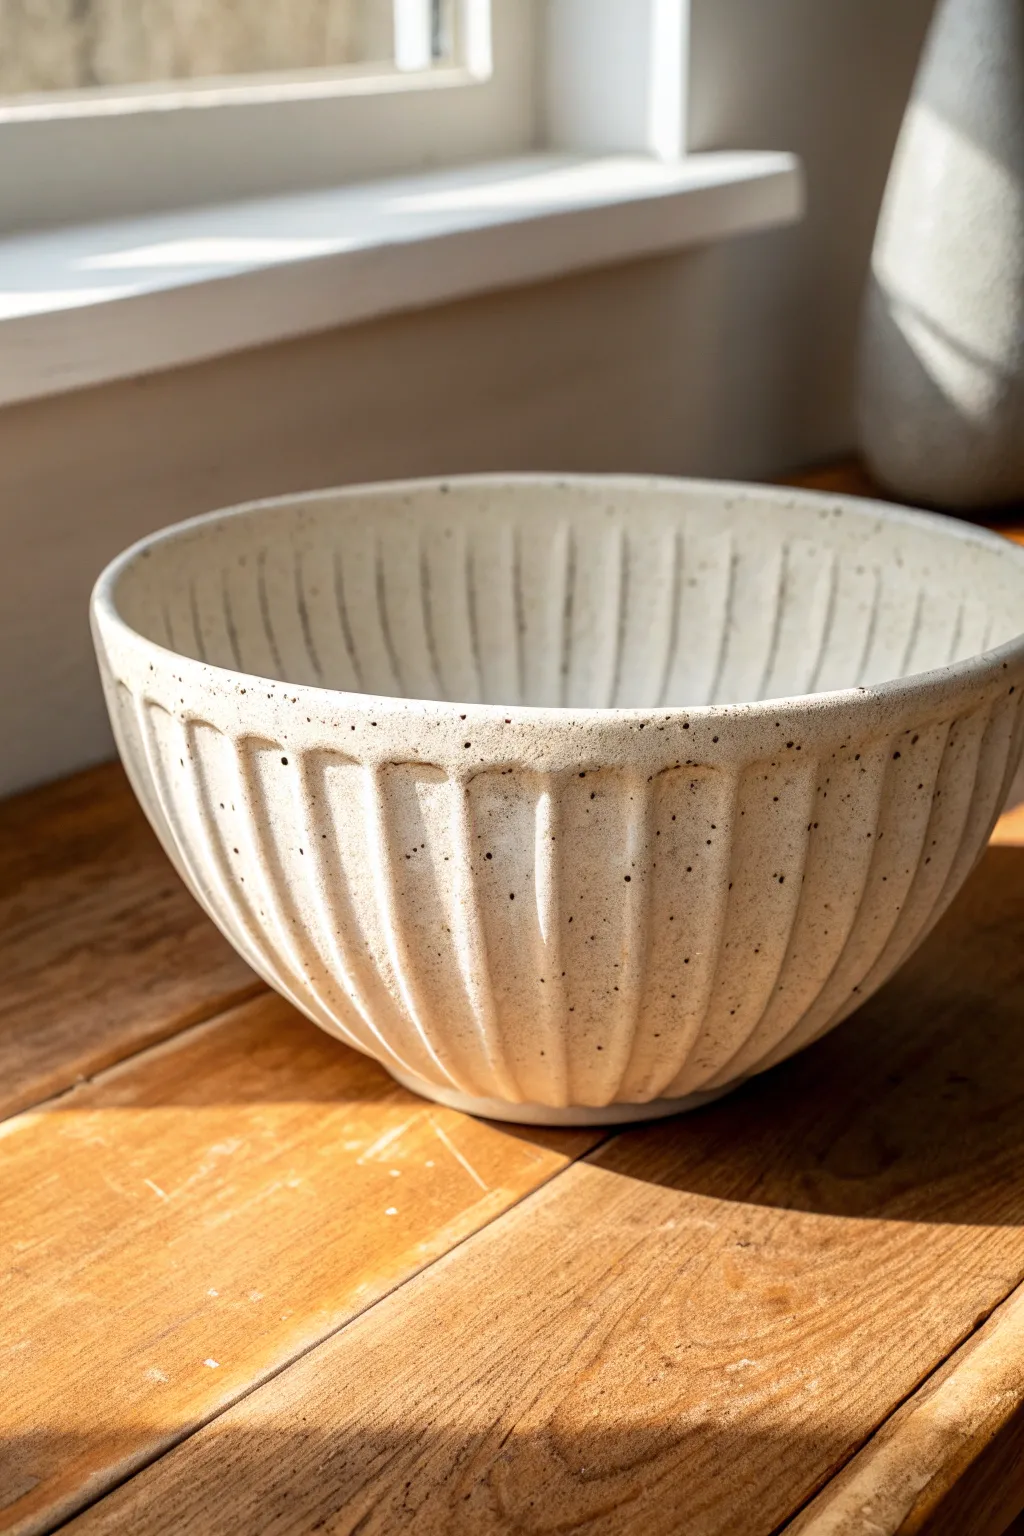
Classic Draped Slab Bowl Over a Simple Mold
This project explores the beauty of imperfection with a soft, organic form that highlights the natural texture of clay. By draping a simple slab over a mold, you create gently undulating curves and a charming, irregular rim perfect for displaying fruits or simply standing alone as a centerpiece.
Step-by-Step Tutorial
Materials
- Light stoneware or white earthenware clay body
- Rolling pin
- Canvas or heavy fabric (for rolling)
- Two wooden guide strips (approx. 1/4 inch thick)
- Large plaster or bisque mold (a large mixing bowl works too)
- Thin plastic sheet or cheesecloth (if using a non-porous mold)
- Needle tool or fettling knife
- Rib tool (rubber or silicone)
- Sponge
- Finishing glaze (matte white or cream recommended)
Step 1: Preparing the Slab
-
Wedge the clay:
Begin by thoroughly wedging your clay to remove any air bubbles. This ensures a uniform consistency which is crucial for preventing cracks during drying and firing. -
Set up your workspace:
Lay down your canvas or heavy fabric on a flat table. Place your two wooden guide strips on either side of where you intend to roll the clay. These strips act as rails for the rolling pin to ensure an even thickness. -
Roll out the clay:
Place your clay ball in the center and begin rolling it out. Rotate the clay periodically so it stretches evenly in all directions, aiming for a consistent slab that matches the height of your guide strips, usually about 1/4 inch thick. -
Smooth the surface:
Take a rubber rib tool and gently compress the surface of the slab. I like to do this on both sides to align the clay particles, which strengthens the piece and creates a cleaner canvas for any textures.
Master the Slump
Don’t force the clay down immediately. Let gravity do the initial work when placing the slab, then gently guide it. This prevents thinning the clay at the curve of the rim.
Step 2: Shaping the Form
-
Prepare the mold:
Select your mold form. If you are using a non-absorbent bowl (like glass or finished ceramic), cover it tightly with a thin plastic sheet or cheesecloth to prevent sticking. -
Cut the slab:
Using a needle tool, cut a large, rough circle from your slab. It doesn’t need to be perfect; an irregular edge actually enhances the organic look of this specific project. -
Transfer the clay:
Carefully lift your slab and center it over your mold. For this project, we are draping *into* the mold (slump molding) or *over* the mold (hump molding). I prefer draping over a hump mold to easily control the exterior curve. -
Ease the shape:
Gently press the slab onto the mold form. Work from the center outward, smoothing with your hands to ensure the clay takes the shape of the mold without trapping air pockets underneath. -
Create the wave:
Allow the excess clay at the rim to naturally drape. You can gently push sections of the rim up or down with your fingers to exaggerate the undulating, wavy aesthetic seen in the photo.
Warping Woes?
If your rim warps excessively during drying, try weighing the rim down gently with small sandbags or drying the bowl upside-down once it’s stiff enough to support itself.
Step 3: Refining and Drying
-
Add superficial texture:
While the clay is still soft on the mold, use your rib tool or a thumb to gently impress subtle sweeping lines near the base or sides, mimicking the faint ripples visible in the reference image. -
Trim the edge:
If the rim feels too thick or sharp, use a damp sponge to soften and round it off. You want the edge to feel comfortable to the touch. -
Initial drying:
Let the bowl rest on the mold until it reaches a leather-hard state. It should be stiff enough to hold its shape but not bone dry. -
Remove from mold:
Carefully remove the bowl from the mold. If you used plastic, peel it away gently. -
Refine the interior:
Check the inside of the bowl for any marks or roughness. Smooth these out with a slightly damp sponge or a flexible rib tool. -
Dry slowly:
Place the bowl rim-down on a flat surface or ware board. Cover loosely with plastic to ensure it dries slowly and evenly, preventing warping.
Step 4: Finishing
-
Bisque fire:
Once the piece is bone dry, fire it in the kiln to bisque temperature (usually Cone 04 or 06, depending on your clay body). -
Glaze application:
Dip or brush your bowl with a matte, creamy white glaze. The matte finish helps absorb light softly, emphasizing the subtle textures you created. -
Wipe the foot:
Ensure the bottom foot of the bowl is free of glaze so it doesn’t fuse to the kiln shelf. -
Final firing:
Fire the piece again to the maturation temperature of your glaze and clay body.
Now you have a serene, handcrafted bowl ready to bring a touch of artisan charm to your table


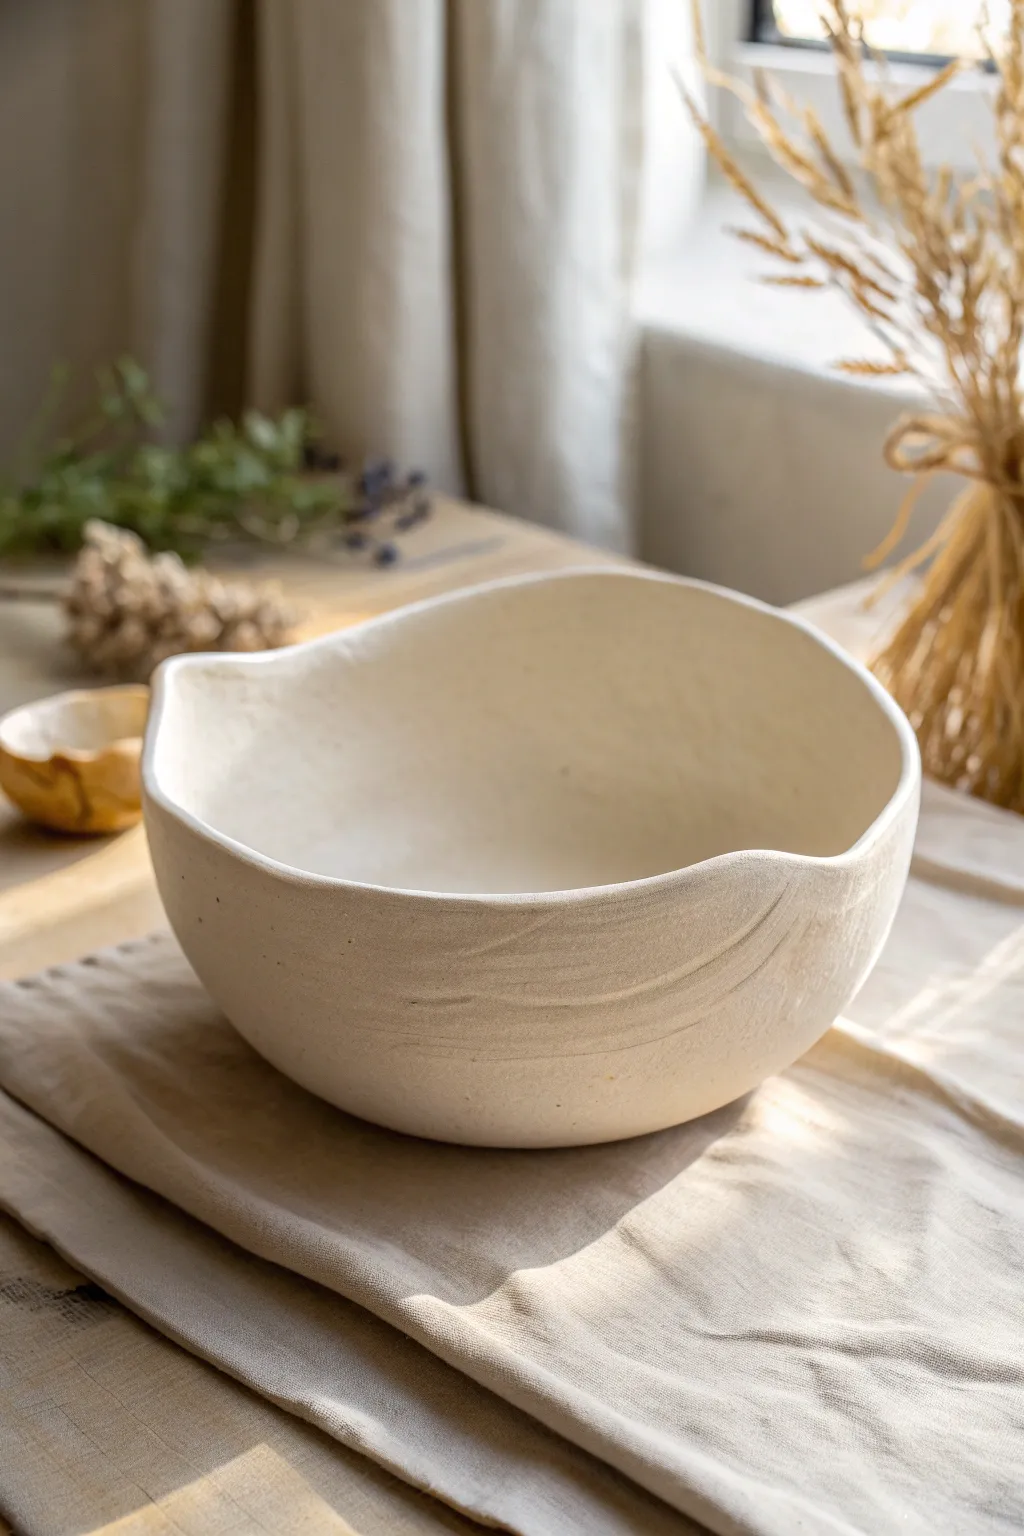
Soft-Slab Pinch-Up Bowl With a Clean Foot Ring
This project creates a beautifully organic, wide shallow bowl with a polished finish that belies its simple beginnings. By combining soft-slab construction with pinch techniques, you will achieve that coveted blend of handmade charm and professional clean lines, complete with a distinct foot ring.
Detailed Instructions
Materials
- Stoneware clay (speckled clay body recommended)
- Rolling pin
- Guide strips or slab roller (approx. 1/4 inch thickness)
- Round bisqueware mold or plaster hump mold (optional, but helpful)
- Fettling knife or needle tool
- Flexible metal rib
- Serrated rib or scoring tool
- Slip
- Sponge
- Small trimming loop tool
- Chamois leather or soft plastic
- White or cream glossy glaze
Step 1: Preparing the Soft Slab
-
Wedge the clay:
Start by thoroughly wedging your speckled stoneware clay. Since this is a slab project, removing air bubbles is critical to prevent surface imperfections later. -
Roll the slab:
Using a rolling pin and guide strips (or a slab roller), roll out a smooth, even slab. Aim for a thickness of about 1/4 inch to ensure the bowl feels substantial but not heavy. -
Compress the surface:
Run a flexible metal rib over the slab in multiple directions. This aligns the clay particles, preventing warping during firing and creating a silky smooth canvas for your glaze. -
Cut the circle:
Use a needle tool to cut a large circle from your slab. You can trace around a dinner plate or use a template. For the bowl shown, a 10-12 inch circle is a good starting size.
Step 2: Forming the Bowl Shape
-
Initial shaping:
Gently drape your slab over a hump mold or inside a concave mold if you have one. If working freely, place the slab on a banding wheel and lift the edges. -
Pinching up the walls:
Begin to gently pinch the edges of the slab upward to create height. Do this slowly, working your way around the circumference several times to keep the walls strictly even. -
Refine the curve:
I like to use a soft rubber rib on the interior while supporting the exterior with my hand to push out a consistent, gentle curve from the center to the rim. -
Smooth the transition:
Ensure there is no sharp angle where the floor meets the wall. The transition should be fluid and continuous, mimicking the soft slump of the clay.
Uneven Drying?
If the rim warps or dries too fast, mist it lightly and cover just the rim with damp plastic strips, leaving the foot exposed to catch up.
Step 3: Adding the Foot Ring
-
Create a coil:
Roll a coil of clay slightly thinner than a pencil. This will become the foot ring that elevates the bowl. -
Score and slip:
Flip your leather-hard bowl upside down. Mark a circle on the bottom for placement, then thoroughly score both the attachment site and one side of your coil. Apply slip generously. -
Attach the coil:
Press the coil firmly onto the scored ring. Overlap the ends slightly, cut through both at an angle for a clean join, and smooth the seam. -
Integrate the foot:
Use a modeling tool or your thumb to drag a small amount of clay from the coil down onto the bowl body to lock it in place.
Texture Twist
Press a linen cloth into the wet slab before cutting your circle. The glaze will break beautifully over the subtle fabric weave texture.
Step 4: Refining and Glazing
-
Sharpen the foot profile:
Once the foot ring is attached, use a damp sponge or a trimming tool to sharpen the edges, giving it that crisp definition seen in the example image. -
Rim treatment:
Run a piece of soft chamois leather over the rim of the bowl. This softens the edge visually and makes it pleasant to touch without losing the handmade irregularity. -
Slow drying:
Dry the bowl slowly under loose plastic to prevent the rim from drying faster than the thicker foot, which can cause warping. -
Bisque fire:
Fire the piece to cone 04 (or your clay body’s bisque temperature). -
Wax resist:
Apply wax resist carefully to the bottom of the foot ring and a few millimeters up the side of the foot to keep that raw clay line crisp. -
Glaze application:
Dip or pour a white or cream glaze over the piece. Let the speckles from the clay body engage with the glaze—a slightly translucent white works best here. -
Final wipe:
Check the foot ring one last time to ensure no glaze droplets are clinging to the wax before loading it into the kiln for the final glaze firing.
Enjoy using your elegant new bowl for serving salads or simply displaying as a standalone piece of art


Square Slab Bowl With Lifted Corners
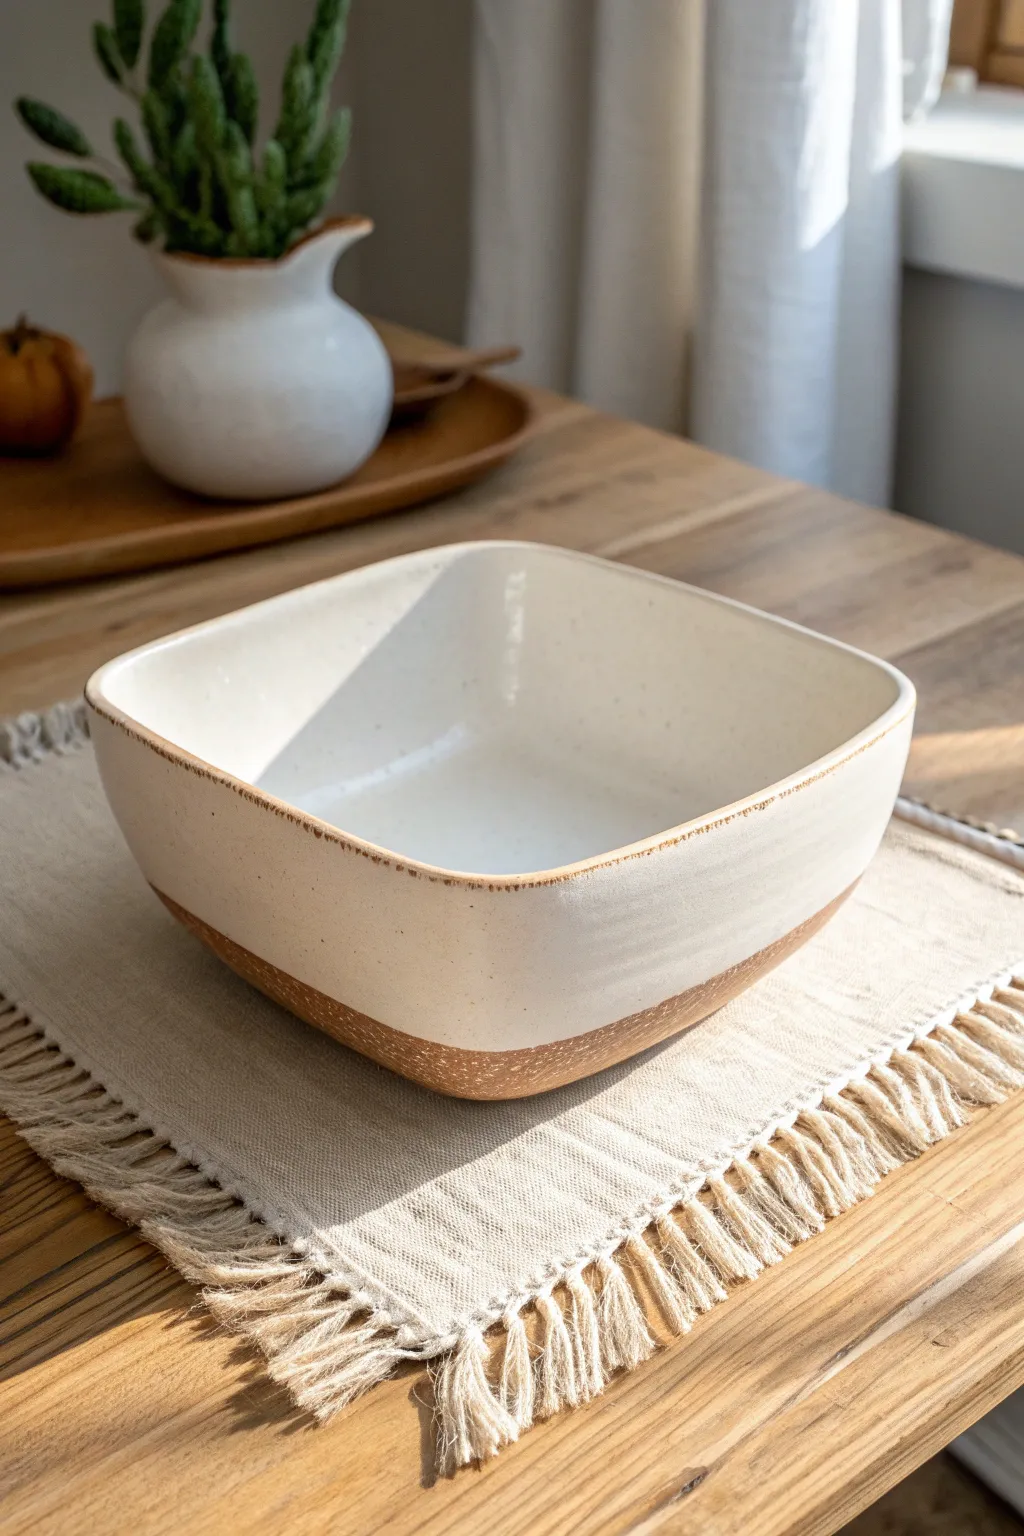
This project combines the clean lines of a square silhouette with soft, organic curves for a functional and beautiful centerpiece. The finished piece features a lovely contrast between the smooth, creamy glaze on the upper section and the raw, exposed clay texture at the base.
How-To Guide
Materials
- Mid-fire stoneware clay (speckled or tan)
- Rolling pin
- Canvas work surface or slab mat
- Square slump mold (plaster or bisque)
- Fettling knife or needle tool
- Ruler or square template
- Rib tool (rubber or silicone)
- Sponge
- Pottery wire
- Cream or white semi-matte glaze
- Wax resist
- Kiln
Step 1: Preparing the Slab
-
Wedge the Clay:
Begin by thoroughly wedging about 3-4 pounds of clay to remove any air bubbles. This ensures your slab will be uniform and significantly reduces the risk of cracking during firing. -
Roll Out the Clay:
Using a rolling pin and canvas, roll the clay into a large, even slab. Aim for a thickness of about 1/4 to 3/8 of an inch, keeping the pressure consistent to avoid thin spots. -
Compress the Slab:
Take a rubber rib and run it firmly over the surface of the clay in multiple directions. This compression aligns the clay particles, strengthens the slab, and creates a smooth starting surface for your glaze later. -
Cut the Square:
Place your square template or use a ruler to measure a perfect square on the slab. Using your fettling knife held vertically, cut cleanly around the shape. I usually cut slightly larger than the mold to account for the depth of the curve.
Step 2: Forming the Bowl
-
Soften the Edges:
Before moving the clay, gently run a damp sponge or your finger along the freshly cut edges to round them off. Sharp corners can be fragile and prone to chipping after firing. -
Transfer to Mold:
Carefully lift your slab and drape it over your square slump mold. If you don’t have a specific mold, you can slump it inside a plastic bowl lined with a thin plastic bag to create the curve. -
Shape the Deep Curve:
Gently press the clay down into the mold, starting from the center and working outward. Encourage the corners to lift slightly, creating that distinctive swoop seen in the reference image. -
Refine the Form:
Once settled, use a damp sponge to smooth the interior. Ensure the transition from the base to the walls is seamless and gradual, rather than a sharp angle. -
Let it Set:
Allow the clay to dry to a leather-hard state while still in (or on) the mold. This helps the bowl memorize its shape so it won’t collapse when you remove it.
Slumping Issues?
If the corners slump too much while drying, prop them up with small wedges of foam or crumpled newspaper until the clay stiffens.
Step 3: Finishing and firing
-
Refine the Rim:
Once leather hard, remove the bowl from the mold. Use a finishing sponge or a chamois cloth to excessively smooth the rim, giving it that professional, manufactured look. -
Bisque Fire:
Allow the bowl to dry completely (bone dry) before placing it in the kiln for a bisque fire (typically Cone 04 or 06, depending on your clay body). -
Apply Wax Resist:
After the bisque fire, wipe the piece down to remove dust. Apply a band of wax resist to the bottom portion of the exterior, creating a straight line where you want the raw clay to remain exposed. -
Glazing:
Pour a creamy white semi-matte glaze inside the bowl and swish it to coat the interior evenly, pouring out the excess. Then, dip the exterior top section into the glaze, stopping right where your wax line begins. -
Clean Up:
Use a damp sponge to wipe away any tiny beads of glaze that might currently be sitting on top of the waxed area to ensure a crisp, clean line. -
Final Fire:
Load the glazed bowl into the kiln for the final glaze firing (often Cone 5 or 6). Make sure the unglazed foot is clean so it doesn’t stick to the kiln shelf.
Add Texture
Before slumping the slab, roll a texture mat or lace over the exterior side of the clay to add a hidden pattern to the raw bottom section.
Enjoy using your new handcrafted bowl for fruit, salads, or simply as a stunning decorative object


Folded “Origami” Slab Bowl With Crisp Creases
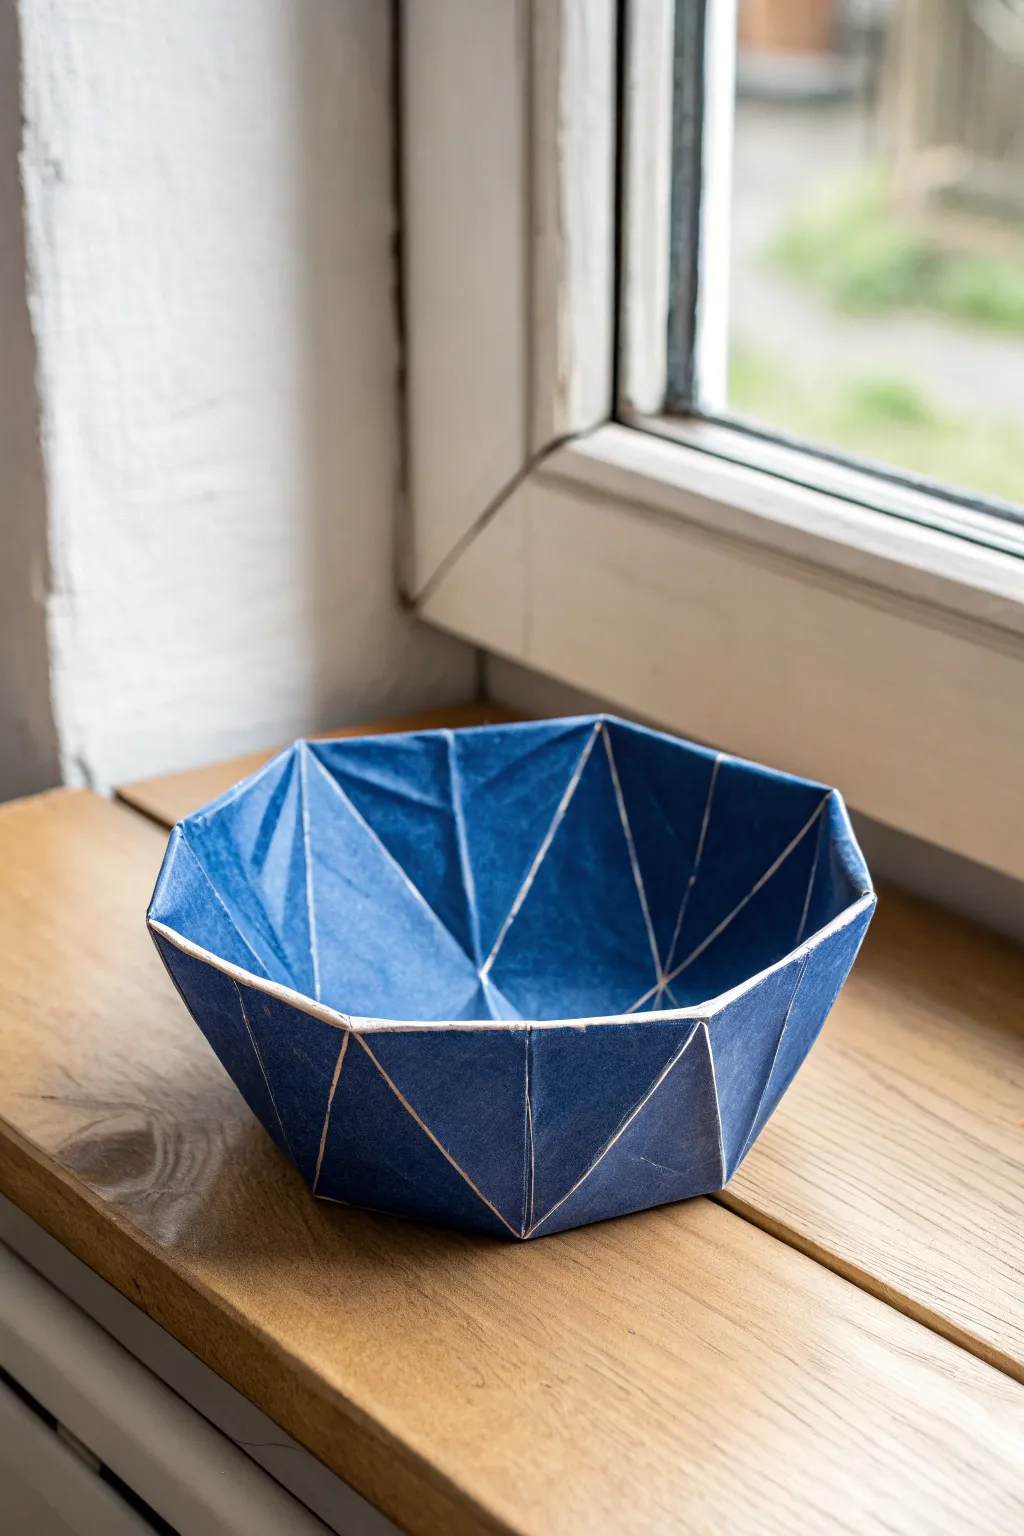
This striking ceramic bowl borrows its aesthetic from papercraft, featuring sharp, geometric creases and a deep indigo glaze that highlights every fold. The white edges create a beautiful contrast, emphasizing the structural lines of this faceted form.
Step-by-Step Tutorial
Materials
- White earthenware or stoneware clay slab
- Rolling pin and guide strips (approx. 1/4 inch thickness)
- Paper template (octagon or hexagon shape)
- Fettling knife or X-Acto blade
- Ruler or straight edge
- Sponge
- Deep blue underglaze or glaze
- Clear glaze (if using underglaze)
- Small flat brush
Step 1: Preparing the Slab and Template
-
Create your template:
Draft a geometric shape on cardstock for your base. A hexagon or octagon works best for this origami style. Draw lines from the center to each point to mark where the folds will be. -
Roll the slab:
Roll out a smooth, even slab of white clay. Aim for about 1/4 inch thickness; if it’s too thick, the folds won’t look crisp, but too thin and it might collapse. -
Smooth the surface:
Use a rib or a slightly damp sponge to compress the clay surface on both sides. This removes canvas texture and prevents future cracking. -
Cut the shape:
Place your paper template onto the clay. Using your fettling knife held vertically, cut cleanly around the perimeter of the shape.
Cracking at the folds?
If the clay cracks on the exterior while folding, compress the bend with a rib immediately. For the next one, try cutting the V-groove slightly deeper to reduce tension.
Step 2: Scoring and Folding
-
Mark the fold lines:
While the template is still on the clay, lightly mark the corners. Remove the template and use a ruler to lightly draw connecting lines where the geometric facets will be. -
Create V-grooves:
This is crucial for the origami look. Carefully cut shallow V-shaped channels along your marked lines on the side of the clay that will be the *inside* of the bowl. Do not cut all the way through. -
Pre-fold the clay:
Gently lift the edges to test the fold. The V-grooves allow the clay to bend sharply without tearing the exterior surface. -
Cut structural darts:
To make the slab stand up as a bowl rather than a flat plate, you need to remove narrow triangles of clay (darts) at the corners where the sides will meet. -
Score and slip:
Score the raw edges where the darts were removed. Apply a generous amount of slip to these edges. -
Form the bowl:
Bring the sides up and press the scored edges together. The bowl should naturally take on a cupped, geometric form.
High Contrast Edges
Wax resist can be applied to the sharp ridges before glazing. This is faster than wiping back the glaze later and keeps the white lines perfectly crisp.
Step 3: Refining and Finishing
-
Reinforce the seams:
On the interior, use a thin coil of clay to reinforce the seams where you joined the darts. Smooth it down so it is invisible. -
Sharpen the exterior:
Use a wood tool or a flat paddle to gently tap the exterior planes, making sure those fold lines remain crisp and sharp. -
Clean the rim:
Wait until the clay is leather hard, then use a sponge or sanding block (if dry) to level the rim. I prefer to keep the edges slightly squared off to match the geometric theme. -
Bisque fire:
Slowly dry the piece to prevent warping, then bisque fire it according to your clay body’s specifications.
Step 4: Glazing
-
Apply the blue:
Use a rich, deep blue underglaze or glaze. Apply 2-3 coats to get that solid, opaque color seen in the example. -
Reveal the edges:
Once the glaze is dry, take a damp sponge and carefully wipe the glaze *off* the very sharpest edges of the facets and the rim. This exposes the white clay body underneath. -
Refine the lines:
Use a clean, damp detailed brush to tidy up the white lines, ensuring they are consistent in width. -
Final firing:
Fire the piece for the final time. The result will be a stunning blue vessel with highlighted white ‘creases’ that mimic folded paper.
Place your finished geometric bowl near a window to let the light play across its faceted surfaces

The Complete Guide to Pottery Troubleshooting
Uncover the most common ceramic mistakes—from cracking clay to failed glazes—and learn how to fix them fast.
Overlapped Seam Slab Bowl That Shows the Join
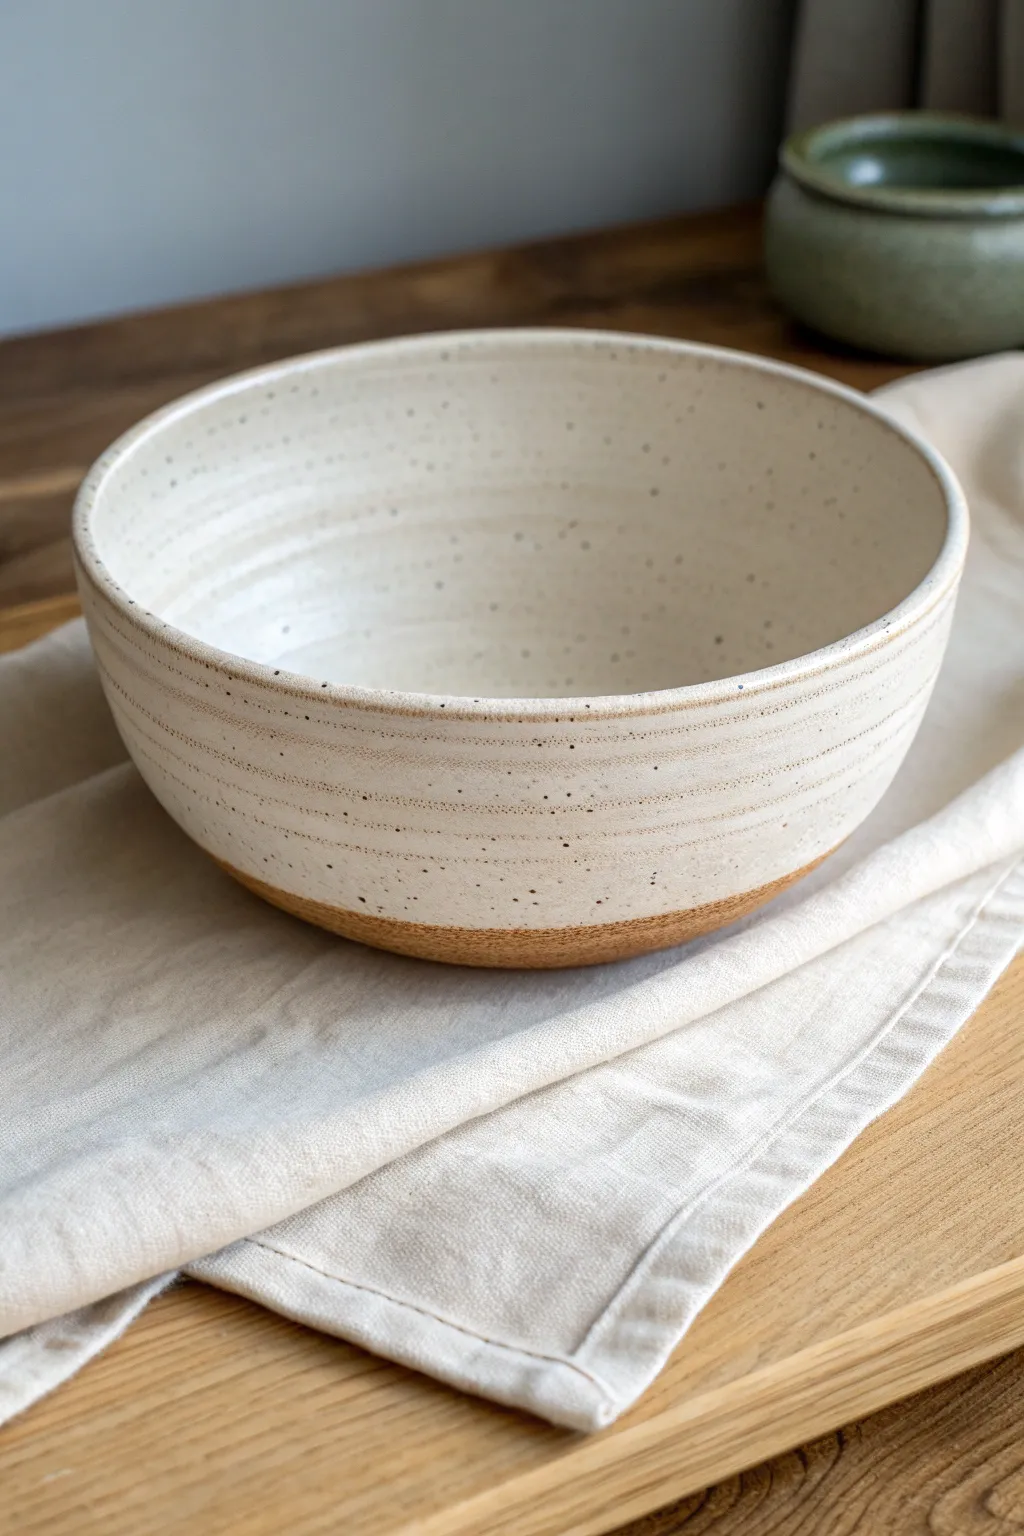
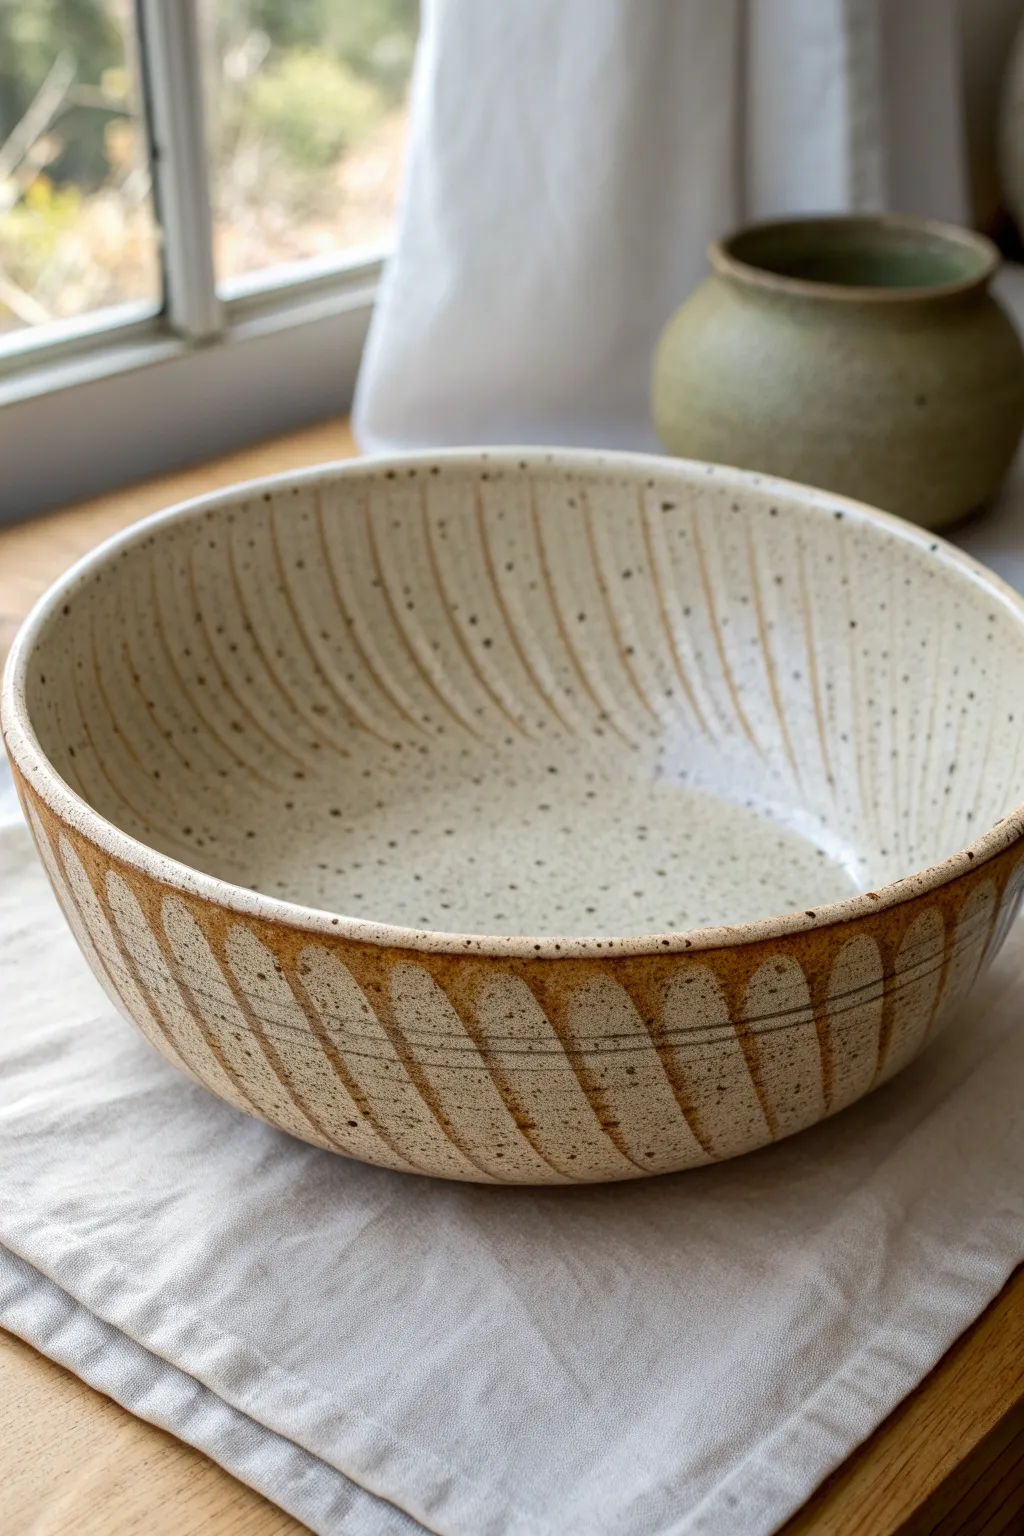
Learn to construct a beautifully rustic bowl using slab techniques that mimic the look of wheel-thrown pottery with distinct throwing lines. This project features a warm, toasted stoneware body peeking through a glossy, speckled cream glaze for a timeless kitchen aesthetic.
Detailed Instructions
Materials
- Toasted stoneware or speckled buff clay body
- Rolling pin
- Guide strips or slab roller (approx. 1/4 inch thick)
- Bowl mold (plaster, plastic, or bisque)
- Rib tool (serrated and smooth rubber)
- Potter’s needle tool
- Fettling knife
- Scoring tool or fork
- Slip
- Sponge
- Glossy cream or white glaze (cone 5/6 compatible)
- Canvas or slab mat
Step 1: Preparing the Slab
-
Roll out the clay:
Begin by wedging your toasted stoneware clay to remove air bubbles. Using guide strips or a slab roller, flatten the clay into a large, even sheet approximately 1/4 inch thick. A consistent thickness prevents warping during the drying process. -
Add texture:
While the slab is flat, you can optionally create the faint horizontal grooves seen in the image. Gently drag a serrated rib across the surface in parallel lines to mimic wheel-thrown ridges, or leave it smooth for a cleaner look. I find doing this now adds nice character later. -
Cut the circle:
Place your bowl mold upside down on the slab or use a circular template. Cut a large circle using your needle tool, ensuring it’s large enough to drape over or into your chosen mold with some overhang.
Uneven Rim?
If your rim looks wobbly after draping, place the bowl upside down on a flat board and gently rotate it while applying light pressure to level it out before it fully dries.
Step 2: Forming the Bowl
-
Position the slab:
Carefully lift your clay circle and drape it over your hump mold (or press it into a slump mold). If using a hump mold, let gravity help the clay settle naturally over the curve. -
Compress the clay:
Using a soft rubber rib, gently compress the clay against the mold. Start from the center (what will be the bottom of the bowl) and work your way spiraling outward toward the rim. This strengthens the clay and removes surface imperfections. -
Define the rim:
Use your needle tool or fettling knife to trim the excess clay at the bottom edge of the mold to create an even rim. Smooth this cut edge with a damp sponge or piece of chamois so the drinking lip is rounded and pleasant to touch. -
Create the foot ring (optional):
If you want the raised foot seen in the photo, roll a small coil of clay. Score and slip the bottom center of the bowl, attach the coil in a circle, and smooth it onto the body. Use a flat board to press down gently on the coil, ensuring the bowl will sit level. -
Drying:
Allow the clay to stiffen to a leather-hard state while still on the mold. This prevents it from collapsing when you flip it over.
Step 3: Finishing and Glazing
-
Refine the surface:
Once leather hard, remove the bowl from the mold. Sponge away any sharp edges or burrs. If you want to accentuate the ‘throwing lines’ look, place the bowl on a banding wheel and hold a tool against the side while spinning it slowly to etch shallow horizontal grooves. -
Bisque fire:
Let the bowl dry completely until it is bone dry. Fire the piece in the kiln to bisque temperature (usually Cone 04 or 06). -
Wax the foot:
Apply wax resist to the bottom inch of the bowl’s exterior, as well as the underside. This creates the beautiful contrast seen in the image where the raw, toasted clay meets the glaze. -
Glaze application:
Dip the bowl into a glossy cream or white glaze. If your glaze doesn’t naturally have speckles like the photo, you can use a clay body with iron pyrite spots that burn through, or choose a ‘speckled’ glaze specifically. -
Clean up:
Use a damp sponge to wipe away any glaze droplets that may have beaded up on the waxed area to ensure a crisp termination line. -
Glaze fire:
Load the kiln and fire to the top temperature required for your clay and glaze combination (typically Cone 5 or 6 for stoneware).
Iron Speckle Hack
If using plain white clay, mix a very small amount of granular ilmenite or iron oxide into your white glaze. It will melt into those lovely dark specks during firing.
Now you have a stunning, functional piece of pottery ready for your next meal or display
Template-Cut Slab Bowl With Even, Repeatable Shape
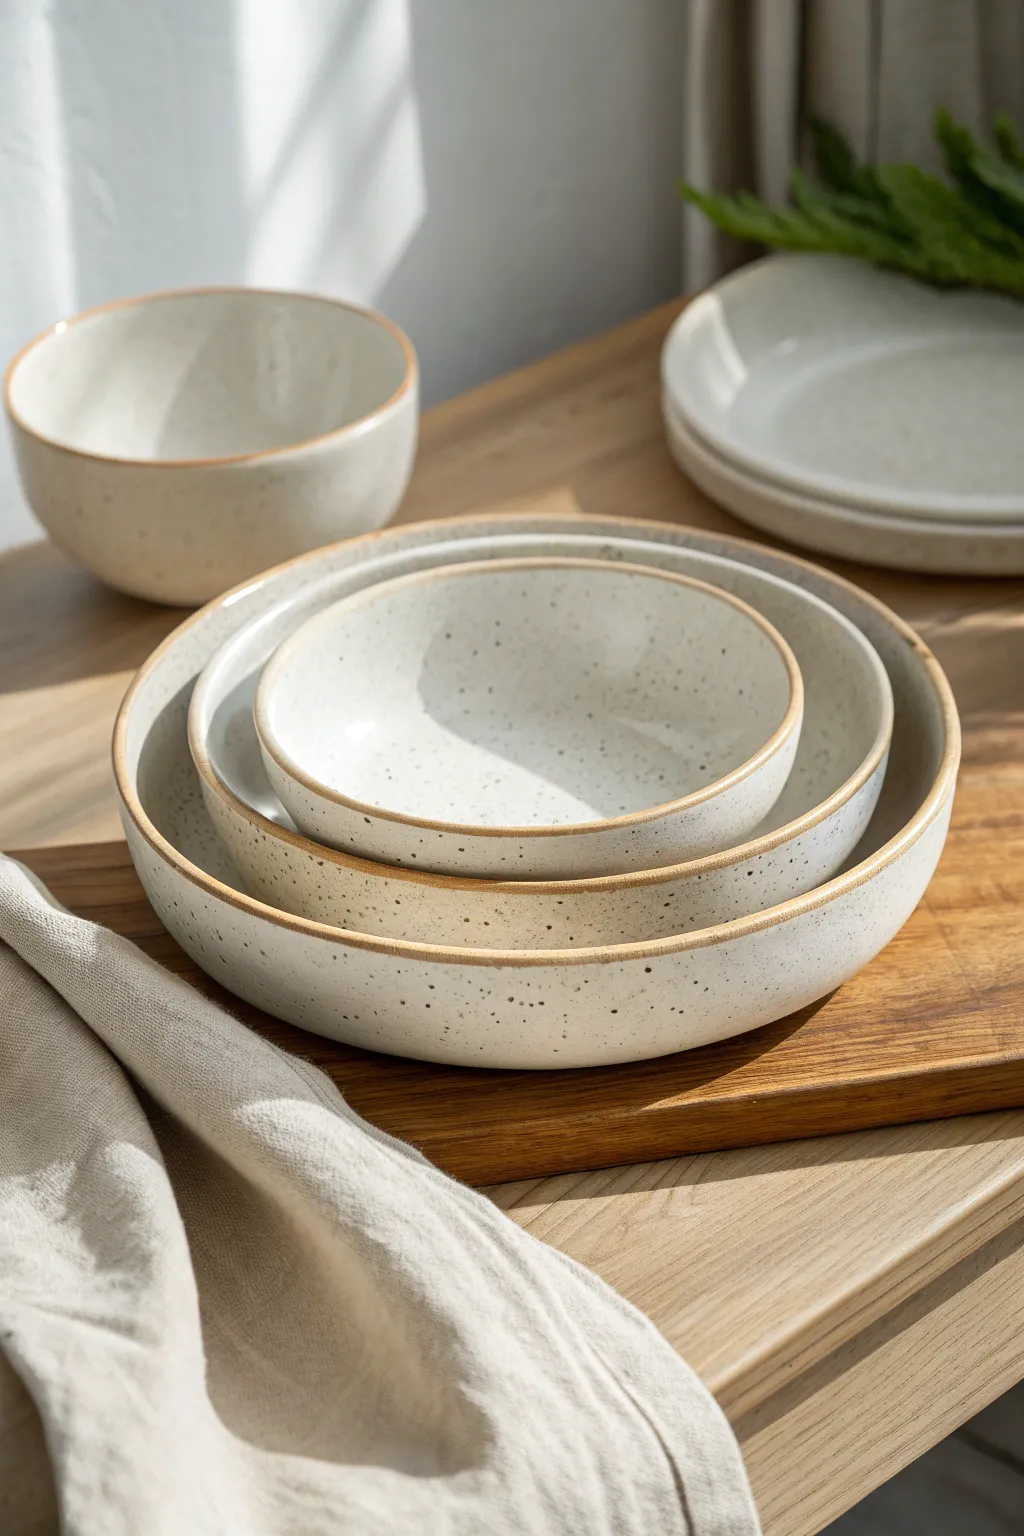
Achieve the clean, modern look of wheel-thrown pottery using accessible slab-building techniques. These nesting bowls feature a classic speckled cream glaze finish with a distinctive exposed clay rim, highlighting the beautiful raw stoneware underneath.
Step-by-Step Guide
Materials
- Speckled stoneware clay (mid-fire)
- Circular templates (heavy paper or tar paper, graduating sizes)
- Rolling pin with thickness guides/slats (approx. 1/4 inch)
- Canvas mat or slab roller
- Fettling knife or needle tool
- Bowl molds or plaster slump molds (matching template sizes)
- Soft rubber rib
- Serrated rib or scoring tool
- Slip (clay and water slurry)
- Sponges
- Speckled cream or matte white glaze
- Wax resist (optional)
Step 1: Preparing the Slabs
-
Design your templates:
Begin by cutting three circular templates from tar paper or heavy cardstock. Ensure each circle is roughly 2-3 inches larger in diameter than the next to account for the depth of the bowl when slumped. -
Roll out the clay:
Wedge your speckled stoneware clay thoroughly to remove air bubbles. Roll it out onto your canvas using thickness guides or a slab roller to achieve a consistent 1/4-inch thickness. -
Smooth the surface:
Before cutting, take a soft rubber rib and compress the clay slab on both sides. This aligns the clay particles, preventing future warping, and removes any canvas texture. -
Cut the shapes:
Place your templates onto the slab. Using a needle tool or fettling knife, cut vertically around the perimeter of each circle for a clean, sharp edge. -
Refine the rims:
While the clay is flat, smooth the cut edges with a damp sponge or your finger to slightly round them off, ensuring the final rim won’t be sharp.
Step 2: Forming the Bowls
-
Transfer to molds:
Gently lift your clay circles and drape them inside your chosen slump molds. If you don’t have plaster molds, plastic bowls lined with thin fabric or cornstarch work well to prevent sticking. -
Secure the shape:
Working from the center outward, gently press the slab into the curve of the mold. I prefer to use a small, damp sponge for this to avoid leaving fingerprints. -
Remove excess flapping:
If the clay buckles or folds at the rim, you can cut a small ‘dart’ (a V-shape), slip and score the edges, and overlap them to smooth it out, though a proper slump should generally fit smoothly. -
Let them stiffen:
Allow the bowls to dry in the molds until they reach leather-hard. This usually takes a few hours depending on humidity; the clay should hold its shape without support but still be carveable. -
Clean the foot:
Once removed from the molds, flip the bowls over. You can leave the bottom flat or use a trimming tool to carve a shallow foot ring for a more elevated look.
Rim Perfector
When smoothing the rim with a sponge, run a small piece of chamois leather over the heavy grit clay edge. This essentially burnishes the rim, making it incredibly smooth to the touch after firing.
Step 3: Glazing and Finishing
-
Bisque fire:
Let the bowls dry completely to the bone-dry stage. Load them into the kiln for a bisque firing according to your clay body’s specifications (usually Cone 04). -
Prepare for glazing:
Wipe the bisque-fired bowls with a damp sponge to remove any dust. For the exposed rim look, carefully apply a band of wax resist to the very top edge of the rim. -
Apply the glaze:
Pour your speckled cream glaze inside the bowl, roll it around to coat, and pour out the excess. Then, dip the exterior or brush the glaze onto the outside, stopping right where the wax resist begins. -
Clean the lines:
Use a damp sponge to wipe away any glaze beads that are sitting on top of the wax resist, ensuring a crisp transition between the glaze and the raw clay rim. -
Glaze the foot:
Wipe the very bottom of the foot completely clean of glaze to prevent it from fusing to the kiln shelf. -
Final wipe down:
Check the interior for any pinholes in the glaze and smooth them over with a fingertip. -
Glaze fire:
Fire the bowls to the maturity temperature of your clay and glaze (likely Cone 5 or 6 for mid-fire stoneware).
Rustic Speckle Hack
If you don’t have speckled clay body, simply wedge granular manganese or commercial ‘speckles’ (ilmenite) into plain white clay. Just handle carefully, as manganese is toxic in powder form.
Stack your finished set on a shelf or fill them with snacks to enjoy the tactile beauty of your handmade ceramics


What Really Happens Inside the Kiln
Learn how time and temperature work together inside the kiln to transform clay into durable ceramic.
Faceted Slab Bowl Made From Geometric Panels

Bring modern architecture to your table with this sharp-edged geometric bowl featuring a raw, speckled finish. By assembling precise clay triangles, you will create a stunning vessel that plays with light and shadow across its many facets.
Detailed Instructions
Materials
- Speckled cream stoneware clay (mid-fire)
- Paper or cardstock templates
- Rolling pin
- Guide sticks (1/4 inch)
- Needle tool or fettling knife
- Serrated rib tool
- Vinegar or slip
- Soft ribs (silicone)
- Sponge
- Plastic wrap
- Matte clear glaze
Step 1: Creating the Template & Slabs
-
Draft your geometry:
Design a master triangle and a pentagon base on cardstock. For the specific shape in the photo, you will need a base polygon (heptagon or similar) and two sets of isosceles triangles: one taller set for the upward slope and one inverted set to fill the gaps. -
Roll the clay:
Wedge your speckled stoneware thoroughly to distribute the speckles evenly. Place the clay between 1/4 inch guide sticks and roll out a large, smooth slab. -
Compress the surface:
Run a soft silicone rib over both sides of your slab. This aligns the clay particles, preventing warping later, and creates that smooth canvas for the speckles to shine. -
Cut the shapes:
Place your cardstock templates onto the leather-hard slab. Use a needle tool to trace and cut out your base and the required number of triangular panels. Keep your knife perpendicular to the table for clean 90-degree edges.
Cracking Seams?
If seams split during drying, your clay may have been too dry when joining. Score deeper next time, use more slip, and dry much slower under plastic.
Step 2: Assembling the Form
-
Bevel the edges:
Carefully angle-cut (mitre) the edges of your triangles and the base where they will join. A 45-degree angle usually works best to create clean, sharp corners on the exterior. -
Score the base:
Take your polygon base and deeply score the beveled edges with a serrated rib. Brush on a small amount of vinegar or slip as adhesive. -
Attach the first ring:
Score the bottom edge of your first set of triangles. Firmly press them onto the base, ensuring the seams between the triangles also have scored-and-slipped connections. -
Connect the sides:
As you stand the triangles up, score and slip the sides where they meet neighbors. I find it helpful to use small coils of clay on the *interior* seams to reinforce the joints without ruining the sharp exterior lines. -
Fill the gaps:
Place the inverted triangles into the V-shaped gaps created by the first set. Score, slip, and smooth them into place to complete the wall height. -
Refine the interior:
Use a damp sponge or a rounded tool to smooth the interior seams. You want the inside to feel continuous while maintaining the distinct geometric planes.
Level Up: Marble Effect
Mix two different stoneware clays (like white and tan) but stop wedging early. When you slice the slab, you’ll get a natural marble swirl across the facets.
Step 3: Finishing and Firing
-
Refine the rim:
Once assembled, the rim might be uneven. Use a cheese cutter or sharp knife to slice the rim level, then soften the sharp edge slightly with a damp sponge. -
Clean the facets:
Allow the bowl to stiffen to a solid leather-hard state. Use a metal rib to scrape the exterior facets flat, sharpening the lines between panels and removing any finger marks. -
Slow drying:
Loosely cover the bowl with plastic wrap. This shape creates tension at the seams, so drying it very slowly over several days will prevent cracking. -
Bisque fire:
Once bone dry, fire the piece to a bisque temperature (usually roughly cone 04) to prepare it for glazing. -
Glaze application:
Since the clay body provides the visual texture, use a thin, matte clear glaze. Dip or brush it on evenly to seal the piece without obscuring the speckled clay character. -
Final firing:
Glaze fire to the maturation point of your clay (typically Cone 5 or 6 for stoneware). Ensure no glaze touches the very bottom of the foot.
Place your finished geometric bowl in a sunlit spot to enjoy how the light catches the sharp angles
Triangular Segment Slab Bowl With a Star-Like Base
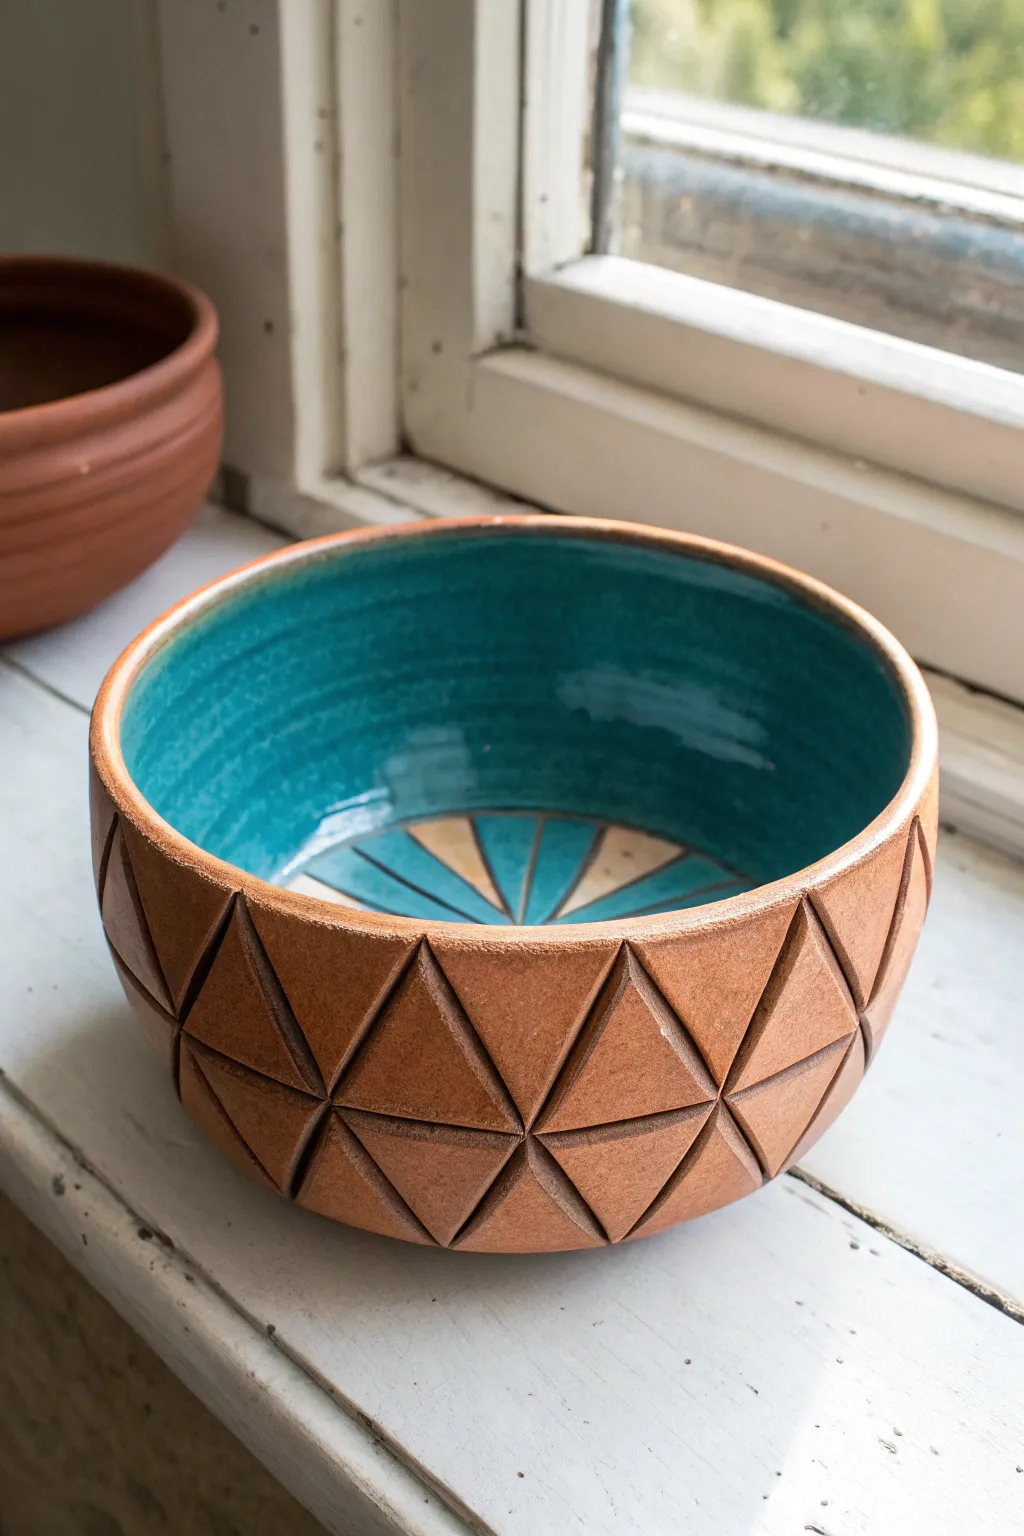
This striking bowl features a deeply carved, geometric exterior that contrasts beautifully with a vibrant teal interior glaze. The starburst pattern at the base adds a hidden surprise, tying the sharp exterior angles to the smooth inner curve.
Step-by-Step Tutorial
Materials
- Red stoneware or terracotta clay
- Rolling pin
- Guide strips (1/4 inch thickness)
- Bowl mold (plaster or bisque)
- Fettling knife
- Flexible metal rib
- Serrated rib
- Carving tools (loop tool or specific triangle carving tool)
- Teal gloss glaze
- Wax resist
- Sponge
Step 1: Forming the Bowl
-
Roll the slab:
Begin by rolling out a smooth slab of red stoneware clay. Use your guide strips to ensure an even thickness of about 1/4 inch, which provides enough depth for carving later without cutting through. -
Compress the clay:
Using a flexible metal rib, compress the clay slab on both sides. This aligns the clay particles to prevent warping and creates a smooth canvas for your future texture. -
Drape over mold:
Gently lift your slab and drape it over your chosen slump or hump mold. Carefully press the clay against the mold, working from the center outward to avoid trapping air bubbles. -
Trim the rim:
Once the clay has taken the shape of the mold, use a needle tool or fettling knife to trim the excess clay at the rim. Aim for a level, clean edge. -
Leather hard drying:
Allow the bowl to dry slowly until it reaches a sturdy leather-hard stage. It needs to be firm enough to handle carving pressure without deforming.
Uneven Carving Depths?
If you accidentally carve too deep, reinforce the area from the inside with a small coil of soft clay. Smooth it thoroughly so the patch is invisible.
Step 2: Designing the Exterior
-
Map the grid:
Lightly sketch a grid on the exterior using a soft pencil or a dull tool. You want to create horizontal bands, and then mark diagonal lines to form a tessellating triangle pattern. -
Carve the outlines:
Using a V-tip carving tool or a sharp knife, firmly score the outlines of your triangles. Deep cuts define the geometry better than shallow scratches. -
Bevel the edges:
To create the 3D relief effect, carve inward from the lines you just made toward the center of each triangle, but stop short of the middle. You are essentially beveling the edges of each triangle to make the center point create a pyramid shape. -
Refine the surface:
Go over your carved lines with a damp sponge or a soft brush to smooth out any sharp clay burrs or crumbs. I like to keep the texture slightly crisp to emphasize the geometric look. -
Bisque fire:
Let the bowl dry completely (bone dry) and then bisque fire it according to your clay’s specific temperature requirements.
Make It Pop
After bisque firing, apply a black mason stain wash to the exterior grooves and wipe it back. This will deepen the shadows and make the triangles stand out.
Step 3: Glazing and Finishing
-
Wax the exterior:
Apply wax resist carefully to the entire exterior of the bowl, including the rim. This ensures the raw clay texture remains visible and unglazed. -
Pour the interior:
Pour a generous amount of teal gloss glaze into the bowl. Roll the glaze around to coat the entire interior surface evenly, then pour out the excess. -
Create the sunburst:
While the glaze is powdery but not fully set, use a sgraffito technique to carve through the glaze at the very bottom center. Carve radiating triangle shapes to reveal the raw clay underneath, mirroring the exterior theme. -
Clean the rim:
Wipe the rim with a damp sponge to visual perfection, ensuring a sharp transition between the interior glaze and the exterior raw clay. -
Final Fire:
Glaze fire the piece to the maturation temperature of your clay and glaze combination.
Now you have a stunning vessel where tactile geometry meets vibrant color

TRACK YOUR CERAMIC JOURNEY
Capture glaze tests, firing details, and creative progress—all in one simple printable. Make your projects easier to repeat and improve.
Fluted Slab Bowl With Finger-Pressed Pleats
This rustic, elegant bowl combines soft, vertical fluting with a speckled stoneware body that catches the light beautifully. The deep finger-pressed ridges create a visual rhythm that feels both modern and historically grounded, perfect for a fruit bowl or centerpiece.
Detailed Instructions
Materials
- Speckled stoneware clay (mid-fire)
- Rolling pin
- Canvas mat or slab roller
- Bowl mold or large existing bowl (for draping)
- Fettling knife
- Needle tool
- Rib tool (flexible rubber)
- Serrated rib or scoring tool
- Slip
- Damp sponge
- Wide paddle (optional)
- Matte white glaze
Step 1: Preparing the Slab
-
Roll out the clay:
Begin by wedging your speckled stoneware clay thoroughly to remove air bubbles. Roll it out into a large, even slab approximately 1/4 inch thick. I like to flip the slab and roll on both sides to compress the clay particles, which helps prevent warping later. -
Smooth the surface:
Use a flexible rubber rib to compress both sides of the slab. Run the rib firmly across the surface to remove any canvas texture and creating a silky-smooth finish before you start texturing. -
Cut the circle:
Place your intended bowl mold upside down on the slab to gauge the size, or use a large paper template. Cut a large circle using your needle tool, leaving about 2 extra inches of diameter beyond the mold’s rim to account for the depth of the fluting.
Cracking at the rim?
If the pleats start cracking as you drape the clay, the slab is likely too dry. Mist it lightly with water, cover with plastic for 20 minutes to rehydrate, and try bending it again more slowly.
Step 2: Creating the Flutes
-
Mark the spacing:
Lightly marks the rim of your clay circle at regular intervals (about 1 inch apart) to guide your fluting. You don’t need to be mathematically perfect; a little variation adds character. -
Press the initial grooves:
While the slab is still flat on the table, use your thumb or a thick wooden dowel to gently press indentations starting from the center and radiating out to the marks on the rim. Do not press too hard yet; just establish the lines. -
Deepen the flutes:
Go back over your lines and press deeper. For that distinct ‘finger-pressed’ look shown in the photo, run your finger firmly down the groove, creating a concave channel. Support the clay underneath so you don’t tear it. -
Refine the ridges:
Between each finger-pressed channel, a ridge will naturally rise up. Gently pinch or smooth these ridges to make sure they are crisp but not sharp.
Step 3: Forming the Bowl
-
Prepare the mold:
Dust your slump mold (or a large kitchen bowl) with cornstarch or cover it with a thin piece of plastic wrap to prevent sticking. -
Slump the slab:
Carefully lift your textured slab and place it inside the mold. Let gravity do the initial work, allowing the clay to sink into the curve. -
conform the shape:
Gently press the slab against the mold walls. Be very careful not to flatten out the beautiful fluting you just created. Press from the ‘valley’ of the flutes rather than the high ridges. -
Define the rim:
If the clay bunched up at the rim due to the curve, use that excess to emphasize the pleats. Pinch the rim slightly to create the scalloped edge visible in the final piece. -
Base compression:
Press firmly on the bottom center of the bowl to ensure it sits flat. You can use a slightly damp sponge to smooth out the transition from the walls to the floor. -
Stiffening:
Allow the bowl to dry in the mold until it is leather hard. This usually takes a few hours or overnight depending on humidity. Don’t rush this, or the bowl continuously slump.
Highlight the texture
Use a clear glaze over a dark slip wiped back on the high points. This ‘inlay’ technique makes the vertical lines pop dramatically while keeping the surface smooth.
Step 4: Finishing and Glazing
-
Remove and trim:
Once leather hard, remove the bowl from the mold. If the rim is uneven, use a surfacing tool or a knife to level it, then smooth the edge with a damp sponge. -
Add a foot ring (optional):
If you want a lifted look, score and slip a small coil of clay onto the bottom to create a foot ring. Otherwise, just smooth the bottom and stamp your maker’s mark. -
Bisque fire:
Let the bowl dry completely (bone dry) before loading it into the kiln for a bisque fire (usually Cone 06 or 04). -
Glaze application:
Dip or brush on a matte white or cream glaze. The key here is a glaze that isn’t too opaque; you want the iron specks from the clay body to bleed through. -
Wipe the rim:
For added dimension, gently wipe a little glaze off the high points of the fluting and rim with a damp sponge. This exposes the raw clay texture slightly. -
Final firing:
Fire the piece to the maturity temperature of your clay (likely Cone 5 or 6). Let the kiln cool completely before unloading.
Place your finished bowl in a sunny spot to let the shadows play across the rhythmic fluting you created
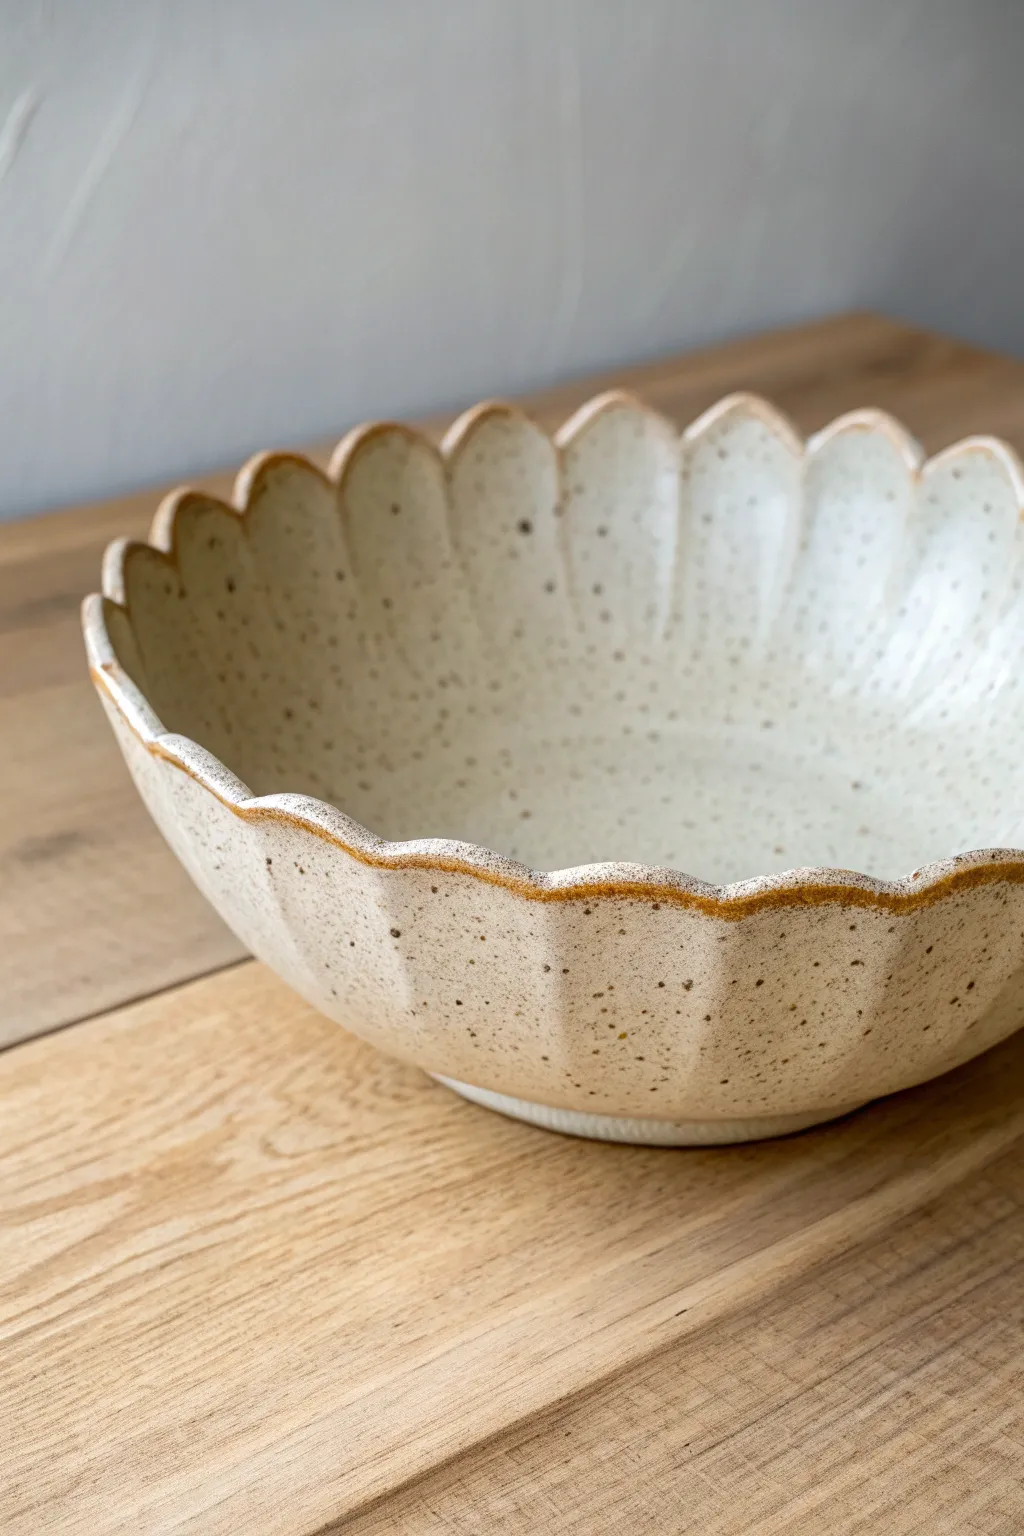
Scalloped Rim Slab Bowl With a Soft Wave Edge
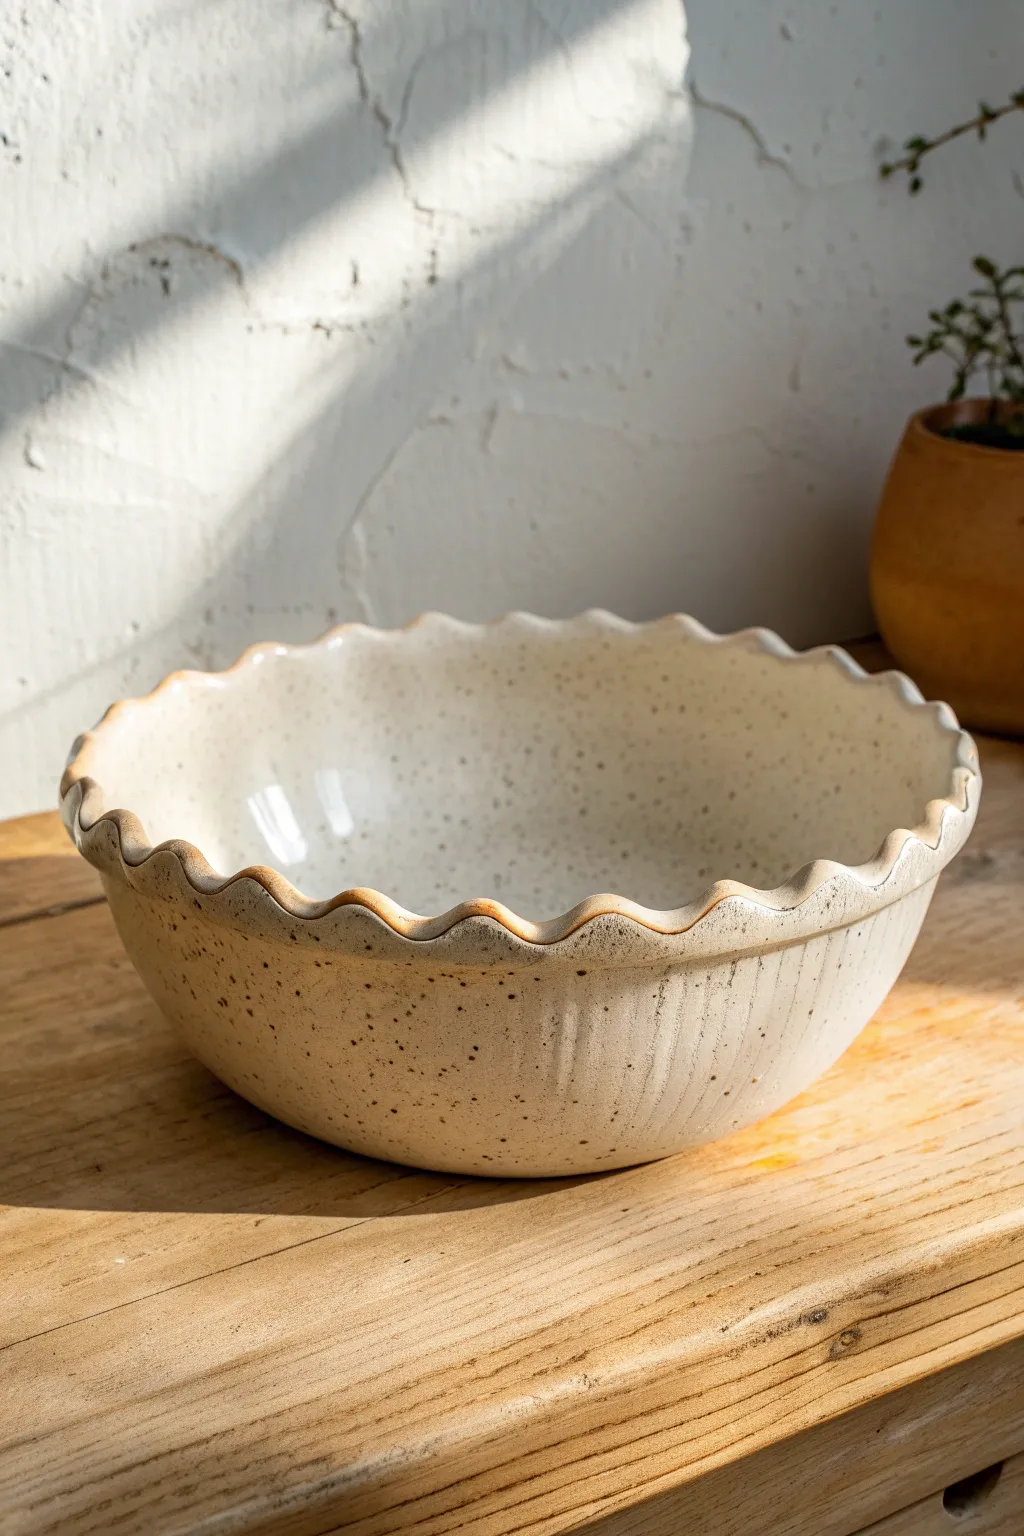
This rustic, elegant bowl features a gentle scalloped edge that mimics the organic motion of waves. The speckled clay body and soft vertical texture give it a timeless, handmade charm that works perfectly as a fruit bowl or a standalone centerpiece.
Step-by-Step Tutorial
Materials
- Speckled Stoneware Clay (mid-fire)
- Rolling Pin
- Canvas or Ware Board
- Circle Template (paper or rigid)
- Needle Tool
- Smooth Wooden Rib
- Small Loop Tool or Modeling Tool
- Sponge
- Slump Mold (plaster or bisqueware bowl)
- Newspaper (optional)
- Clear or White Glaze
Step 1: Preparing the Slab
-
Roll the clay:
Begin by wedging your speckled stoneware clay to remove air bubbles. Roll it out into a smooth, even slab that is approximately 1/4 inch thick. Turn the slab frequently while rolling to prevent it from sticking to your canvas. -
Smooth the surface:
Take a soft rib tool and compress both sides of the slab. This aligns the clay particles, which helps prevent warping later, and creates a nice, professional finish on the surface. -
Cut the circle:
Place your large circle template onto the slab. Using a needle tool held vertically, trace around the template to cut out your main bowl shape. Remove the excess clay and set it aside for recycling. -
Add texture:
Before forming the bowl, gently press a subtle texture into the clay if desired. For the look in the photo, you can lightly drag a serrated rib or a textured rolling pin vertically across the slab, or simply leave the natural canvas texture.
Step 2: Forming the Bowl
-
Prepare the mold:
If using a non-porous bowl as a slump mold, place a sheet of newspaper or thin plastic over it to prevent sticking. If using a plaster mold, you can place the clay directly onto it. -
Slump the clay:
Carefully lift your clay circle and center it over your mold. Gently drape it down, allowing gravity to do most of the work. Use a soft sponge to press the clay against the mold, starting from the center and working spirally outward to avoid trapping air pockets. -
Refine the shape:
Once the clay is snug against the mold, use a wooden rib to smooth the interior curve. This ensures the inside of your bowl is seamless and easy to clean later. -
Create the scalloped rim:
With the clay still in the mold, start forming the wavy edge. Use your thumb from the inside and your index and middle fingers from the outside to gently push the rim into an undulating wave pattern. -
Refine the waves:
Go around the rim a second time to sharpen the waves. I find that using the handle of a paintbrush or a rounded modeling tool helps press uniform indents if you want a more structured scallop. -
Smooth the edge:
Take a slightly damp sponge or a piece of chamois leather and run it along the rim. This softens any sharp angles and compresses the clay at the edge to prevent future chipping.
Even Waves Pro-Tip
Mark the rim at 12, 3, 6, and 9 o’clock before scalloping. Divide those sections in half. This ensures your waves are spaced evenly around the bowl.
Step 3: Finishing Touches & Glazing
-
Let it stiffen:
Allow the bowl to dry to a leather-hard state while still on the mold. This is crucial so the bowl holds its shape when you remove it. -
Add exterior texture:
Once removed from the mold, turn the bowl upside down. Using a small loop tool or a modeling tool, carve faint vertical lines running from the base up toward the rim to mimic the texture seen in the reference image. -
Final smoothing:
Check the foot and rim one last time. Sponge away any burrs or rough crumbs of clay created during the texturing process. -
Bisque fire:
Let the bowl dry completely (bone dry) before loading it into the kiln for a bisque firing according to your clay body’s specifications. -
Apply glaze:
Wipe the bisqued bowl with a damp sponge to remove dust. A semi-opaque white or clear glaze works best here, as it allows the natural speckles of the clay to show through. -
Wipe the rim:
For a highlighted effect, you can gently wipe a bit of the glaze off the very high points of the scalloped rim with a sponge, allowing the toasted clay color to define the edge. -
Final fire:
Fire the bowl a second time to the maturation temperature of your glaze and clay body.
Rim Cracking?
If the rim cracks while bending the waves, your clay is too dry. Mist it lightly with water, cover it with plastic for 30 minutes, and try again.
Now you have a stunning, functional piece of pottery inspired by the gentle movement of the ocean
Textured Slab Bowl Using Pressed Pattern Before Forming
This project transforms a simple clay slab into an elegant vessel featuring a mesmerizing, rhythmic spear pattern. Using a ‘slip and carve’ sgraffito-inspired technique before forming allows you to achieve crisp, high-contrast lines that highlight the warmth of the raw clay body against a creamy glaze.
Step-by-Step
Materials
- Stoneware clay (speckled or buff works best for contrast)
- Wooden rolling pin
- Canvas mat or slab roller
- Large circular slump mold or plaster hump mold
- Potter’s knife or fettling knife
- Serrated rib tool
- Soft rubber kidney rib
- Dark iron-oxide wash or dark slip (e.g., Tenmoku or Red Iron Oxide)
- Wide hake brush or soft fan brush
- Loop tool (small, rounded tip)
- Sponge
- Cream or oatmeal matte glaze
Step 1: Preparing the Slab
-
Roll the clay:
Begin by wedging your clay thoroughly to remove air pockets. Roll out a large, even slab approximately 1/4 to 3/8 inch thick. Make sure the slab is large enough to cover your chosen mold with some overhang. -
Compress the surface:
Use a soft rubber rib to compress the slab on both sides. This aligns the clay particles, preventing future warping, and creates a smooth canvas for your texture work. -
Apply the oxide wash:
While the slab is flat, use a wide brush to apply a coat of dark iron oxide wash or a dark slip to the entire surface that will become the *outside* of the bowl. You want good coverage, but not so thick that it flakes off. -
Wait for leather-hard:
Let the slab set up slightly until it is stiff enough to hold a carved line cleanly but soft enough to bend without cracking. This ‘soft leather-hard’ stage is crucial for crisp carving.
Cracking at the Rim?
If the rim cracks while draping, your slab was too dry. Mist the edges with water and wrap in plastic for 30 mins to rehydrate slightly before bending.
Step 2: Texturing the Surface
-
Mark the center:
Lightly mark the center point of your slab. This will serve as the origin for your radial pattern. -
Carve the vertical spears:
Using a small loop tool, carve long, curved lines radiating from the center outward to the edge. These are the borders of your ‘spear’ shapes. Vary the pressure slightly to create a tapered end near the rim. -
Reveal the clay body:
The goal is to carve *through* the dark wash to reveal the lighter clay body underneath. Keep your carving strokes confident and fluid. -
Add horizontal definitions:
Once the vertical curves are done, carve two or three horizontal rings around the circumference of the slab. These lines intersect the spears and add structural visual interest near where the foot will be. -
Clean up burrs:
Gently brush away any clay crumbs or ‘burrs’ created by the loop tool using a soft, dry brush. Do not use a wet sponge yet, or you’ll muddy the crisp lines.
Step 3: Forming the Bowl
-
Drape the slab:
Carefully lift your slab and drape it over your hump mold (or into a slump mold), ensuring the textured side is facing the direction you want (outward for a hump mold). Center the pattern on the mold peak. -
Shape the vessel:
Gently press the clay onto the mold form. Start from the center (the bottom of the bowl) and work your way down the sides, using your hands to smooth it against the curve. -
Trim the rim:
Use a needle tool or potter’s knife to trim the excess clay at the bottom edge of the mold to establish an even rim height. I find using a banding wheel here helps create a level cut. -
Refine the edge:
Smooth the cut rim with a damp sponge or a piece of chamois leather to round it off comfortably. -
Dry slowly:
Cover the bowl loosely with plastic and allow it to dry slowly on the mold until it is firm leather-hard. Remove it from the mold before it shrinks too much to prevent cracking.
Level Up: Rim Drips
Deliberately overlap the interior glaze onto the exterior rim by 1/4 inch. It creates a ‘drippy’ effect that frames the carved texture beautifully.
Step 4: Finishing and Glazing
-
Bisque fire:
Once bone dry, bisque fire the bowl to Cone 04 (or your clay’s specific bisque temperature). -
Wax the exterior:
Apply wax resist to the entire textured exterior. This ensures the glaze only adheres to the smooth interior, leaving the raw, textured clay exposed on the outside. -
Glaze the interior:
Pour a creamy, speckled matte glaze into the bowl, swirl it to coat the entire interior, and pour out the excess. Clean up any drips on the rim immediately. -
Glaze fire:
Fire the piece to maturity (Cone 5, 6, or 10 depending on your clay). The heat will interact with the iron oxide wash, creating that toasted, rusty contrast against the bare clay.
Now you have a stunning centerpiece bowl ready to hold fruit or stand alone as a sculptural work of art
Sgraffito Slab Bowl With Carved Line Art
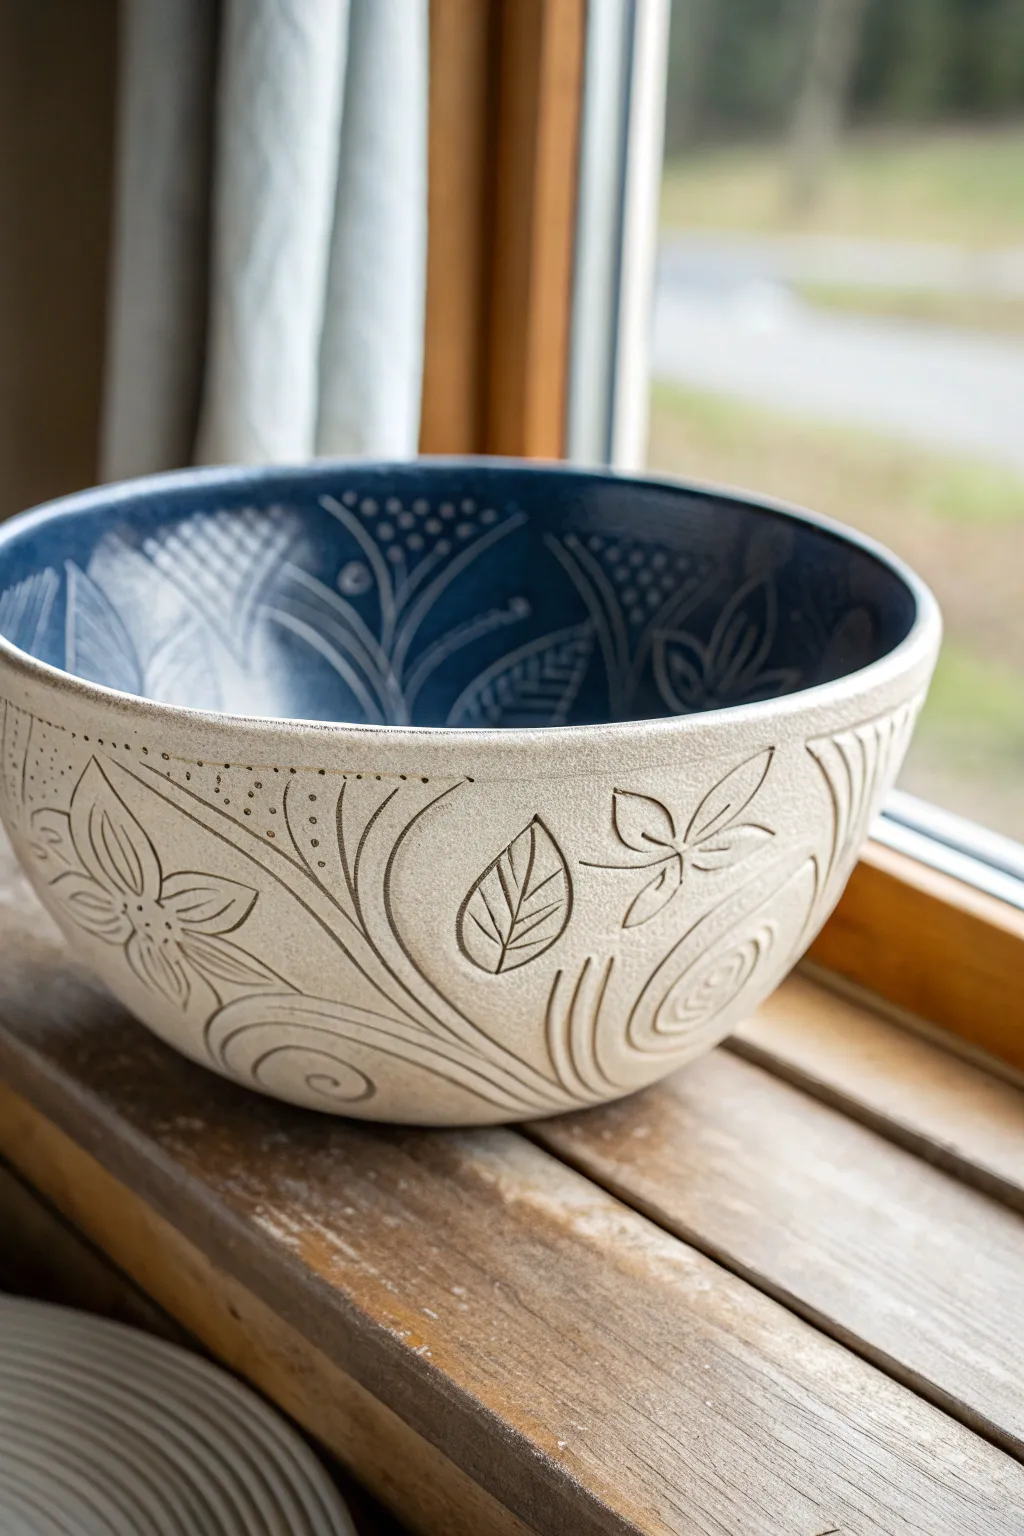
This stunning slab-built bowl features a high-contrast design with a deep cobalt blue interior and a natural, creamy white exterior. The intricate sgraffito and carving techniques bring the botanical motifs to life, creating a tactile piece that is as beautiful to hold as it is to look at.
Step-by-Step Tutorial
Materials
- Stoneware clay (smooth, light-colored body)
- Cobalt blue underglaze
- Clear transparent glaze (food safe)
- Large plaster or bisque slump mold (bowl shape)
- Rolling pin and canvas or slab roller
- Flexible metal rib
- Needle tool
- Loop carving tools (varying sizes)
- Sgraffito tool or fine stylus
- Sponge and water
- Cleanup tool
- Paintbrush (fan or hake brush for underglaze)
Step 1: Slab Construction
-
Roll the clay:
Begin by rolling out a smooth, even slab of stoneware clay, aiming for approximately 3/8 inch thickness. Compress the slab on both sides with a rib to align the clay particles and prevent future cracking. -
Drape the mold:
Carefully lift your slab and drape it into your chosen slump mold. Gently press the clay into the curve of the mold, starting from the center and working your way out to avoid trapping air bubbles. -
Refine the rim:
Trim the excess clay from the rim using a needle tool held perpendicular to the mold edge. Smooth the rim with a damp sponge or a piece of chamois leather to create a rounded, finished lip. -
Leather hard stage:
Allow the bowl to dry slowly in the mold until it reaches a sturdy leather-hard stage. It should be firm enough to hold its shape perfectly when removed but still soft enough to carve into easily.
Clean Lines
For the crispest sgraffito lines inside, wait until the underglaze is fully dry but the clay underneath is still leather hard. Too wet and it smudges; too dry and it chips.
Step 2: Interior Surface Design
-
Apply underglaze:
Once removed from the mold, apply 2-3 even coats of deep cobalt blue underglaze to the entire interior surface. Let each coat dry until it loses its sheen before applying the next to ensure solid coverage. -
Sketch the interior:
Lightly sketch your botanical design directly onto the dry underglaze using a pencil. The pencil lines will burn off in the kiln, so don’t worry about mistakes. -
Sgraffito carving:
Using a sharp sgraffito tool or fine loop tool, carve through the layer of blue underglaze to reveal the white clay body beneath. Follow your sketched lines to create the white floral outlines, leaves, and decorative dots shown in the image. -
Clean up crumbs:
Use a soft, dry brush to gently sweep away the clay crumbs created by carving. Avoid using water at this stage, as it can smear the blue pigment into your crisp white lines.
Step 3: Exterior Carving
-
Plan the exterior:
Turn your attention to the exterior. I like to lightly map out the main flow of the stems and large flowers with a needle tool to ensure the design wraps seamlessly around the curve. -
Carve deep lines:
Use a U-shaped loop tool to carve the main structural lines of the design—the sweeping stems and flower outlines. Cut deep enough to create a distinct shadow but be careful not to puncture the wall. -
Add details:
Switch to a finer tool to carve the leaf veins, flower petals, and stippling textures. Vary your line depth and width to give the botanical illustration a dynamic, organic feel. -
Smooth the burrs:
Once the carving is complete and the clay is bone dry, gently rub the surface with a green scrubbing pad or a dry finger to knock off any sharp burrs or rough clay crumbs.
Dual Texture Effect
Skip the clear glaze on the exterior! Glaze only the interior for food safety, leaving the outside raw vitrified clay. This enhances the tactile carving.
Step 4: Firing and Glazing
-
Bisque fire:
Slowly fire the piece to bisque temperature (usually massive cone 04 or 06). This sets the shape and makes the pot porous for glazing. -
Apply clear glaze:
Dip the entire bowl into a clear, gloss glaze, or brush it on carefully. Ensure the glaze is not too thick, especially over the textured exterior, to avoid obscuring the carved details. -
Wipe the foot:
Thoroughly wipe any glaze off the bottom foot of the bowl with a wet sponge to prevent it from sticking to the kiln shelf. -
Final firing:
Fire the bowl to the maturity temperature of your clay body (typically cone 5 or 6 for stoneware). The clear glaze will seal the surface and make the cobalt blue pop vividly.
Once cooled, your bowl is ready to display or serve as a stunning functional centerpiece on your table
Slip-Trailed Slab Bowl With Raised Doodles
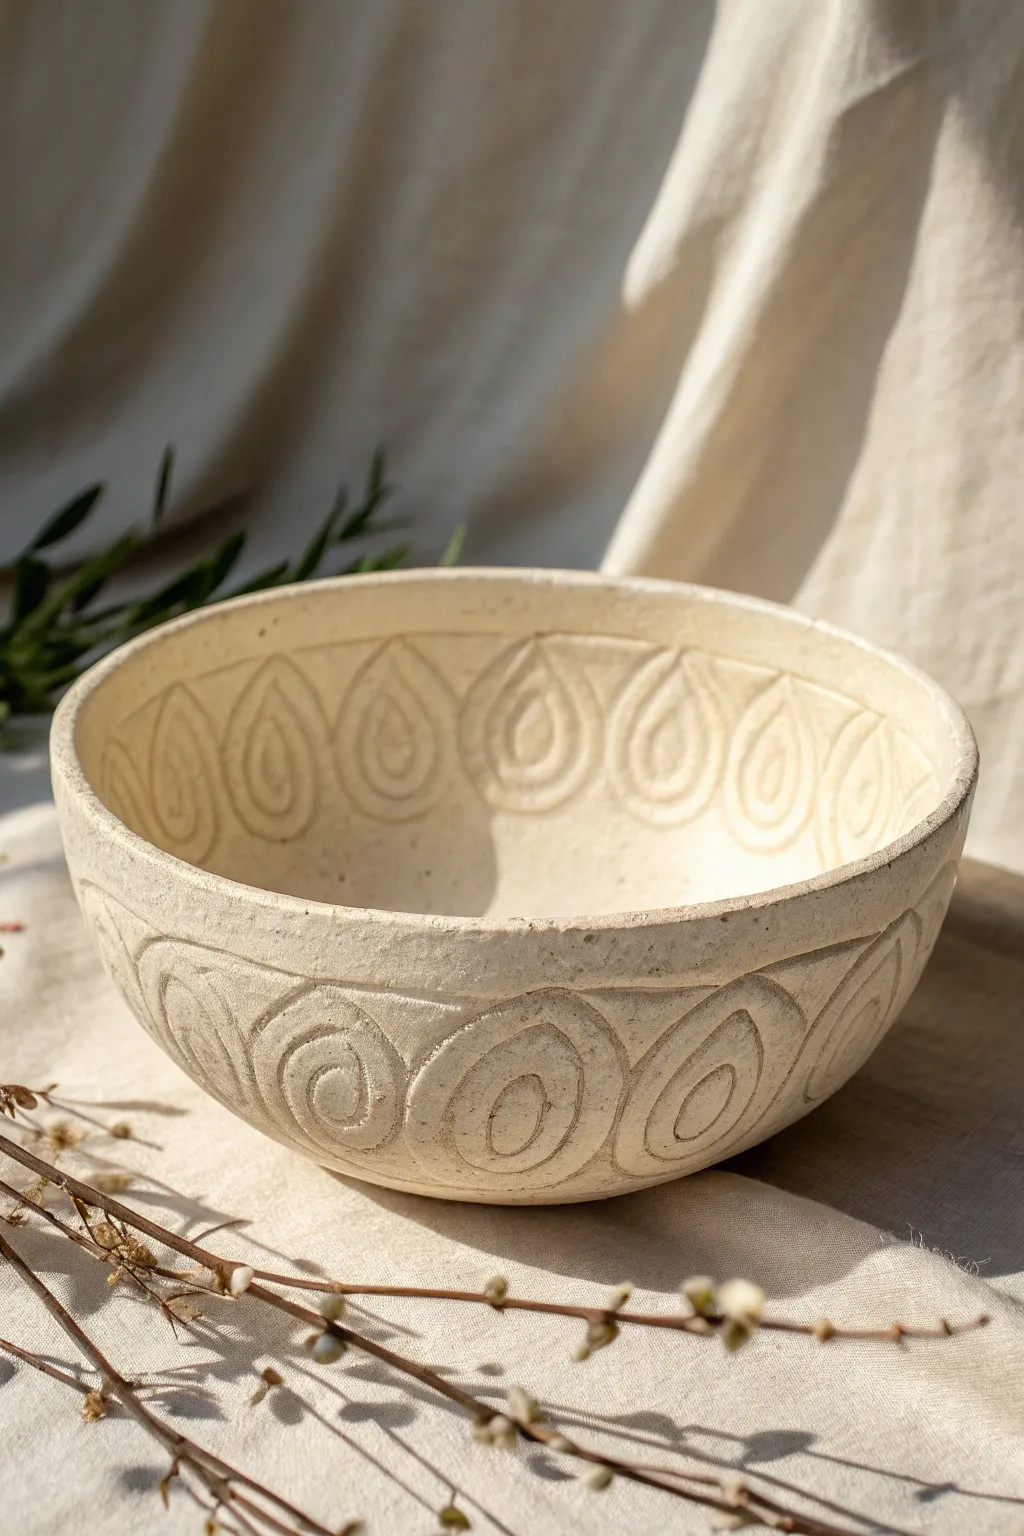
Embrace the rustic charm of hand-building with this beautifully textured slab bowl, featuring repetitive geometric motifs that echo ancient pottery. By combining simple slab construction with mindful carving techniques, you’ll create a vessel that feels both primitive and undeniably modern.
Step-by-Step Guide
Materials
- Stoneware clay (smooth or with fine grog)
- Rolling pin
- Canvas work surface or slab mat
- Deep bowl for use as a slump mold
- Thin plastic sheet or cheesecloth
- Needle tool
- Carving tools (loop tool or small u-gouge)
- Rib tool (flexible metal or rubber)
- Sponge
- Scoring tool or serrated rib
- Slip (clay slurry)
- Matte white or transparent glaze
Step 1: Forming the Bowl
-
Roll the Slab:
Begin by wedging your clay to remove air bubbles, then toss it onto your canvas. Using a rolling pin, roll out a consistent slab that is approximately 1/4 to 3/8 inch thick. Rotate the clay frequently to ensure an even thickness throughout. -
Smooth the Surface:
Before cutting, take a flexible rib tool and compress the clay surface on both sides. This aligns the clay particles, preventing future cracking, and creates a pristine canvas for your future carving work. -
Prepare the Mold:
Select a bowl from your kitchen to use as a slump mold. Line the interior with a thin plastic sheet or a layer of cheesecloth; this barrier prevents the clay from sticking to the mold and makes removal much easier. -
Slump the Clay:
Gently lift your clay slab and drape it into the lined mold. Let gravity do most of the work, then use a damp sponge to softly press the slab against the mold’s walls, ensuring it takes the shape without stretching the clay too thin. -
Trim the Rim:
Once settled, use your needle tool to trim the excess clay around the rim of the mold. For a more organic look like the example, you don’t need a perfectly level cut; a slight undulation adds character. Smooth the cut edge with a damp finger or chamois.
Uneven Depth?
If your carving tool is digging too deep or getting stuck, the clay is likely too soft. Wait another hour. If it’s crumbling or chipping, it’s too dry—mist it lightly and cover with plastic.
Step 2: Designing and Carving
-
Leather Hard Stage:
Allow the bowl to dry in the mold until it reaches a ‘leather hard’ state. This is crucial—the clay should be firm enough to hold its shape without slumping, but soft enough to carve into easily. -
Map the Design:
Remove the bowl from the mold. Using a needle tool with very light pressure, sketch out your repeating teardrop or ovate shapes. Draw a row of these shapes around the upper interior rim, and a corresponding row on the exterior. -
Carving the Outline (Sgraffito-style):
Using a small U-gouge or a sharp carving tool, gently carve out the lines you just sketched. You want to create a distinct channel for the outline of each teardrop shape. Keep your depth consistent. -
Creating the Inner details:
Inside each large teardrop outline, carve a smaller, concentric teardrop. Repeat this process until you have a nesting doll effect (usually two or three rings total). The ridges left between your carving lines create that beautiful raised relief effect. -
Refining the Ridges:
I find it helpful to go back over the carved channels with a damp brush to smooth out any sharp burrs or clay crumbs, slightly rounding the edges of the raised sections for a softer tactile feel. -
Rim Definition:
Carve a horizontal line just below the rim on the exterior (and interior if desired) to frame your pattern area. This creates a dedicated ‘band’ for your decoration.
Step 3: Finishing and Glazing
-
Slow Drying:
Loosely cover the bowl with plastic to let it dry very slowly. Uneven drying can cause warping, especially with a wide open form like this. Once bone dry, bisque fire the piece according to your clay body’s specifications. -
Glaze Application:
After the bisque fire, wipe the bowl down with a damp sponge to remove dust. Apply a matte white, cream, or transparent glaze. A dipping method works best to get into all the carved crevices without pooling too heavily. -
Wipe Back (Optional):
To highlight the texture further, you can gently wipe the raised surfaces with a sponge immediately after dipping. This leaves more glaze in the recesses and less on the high points, accentuating the carving. -
Final Fire:
Fire the bowl a second time to the glaze’s recommended temperature (cone 5/6 or cone 10, depending on your clay).
Oxide Wash Accent
Before glazing, brush iron oxide wash into the carving lines and wipe away the excess with a sponge. The dark oxide will stay in the deep lines, making the pattern pop against a light glaze.
Place your finished bowl on a central table to catch the light, letting the shadows play across your hand-carved textures
Two-Tone Inlaid Slab Bowl With Simple Color Blocking
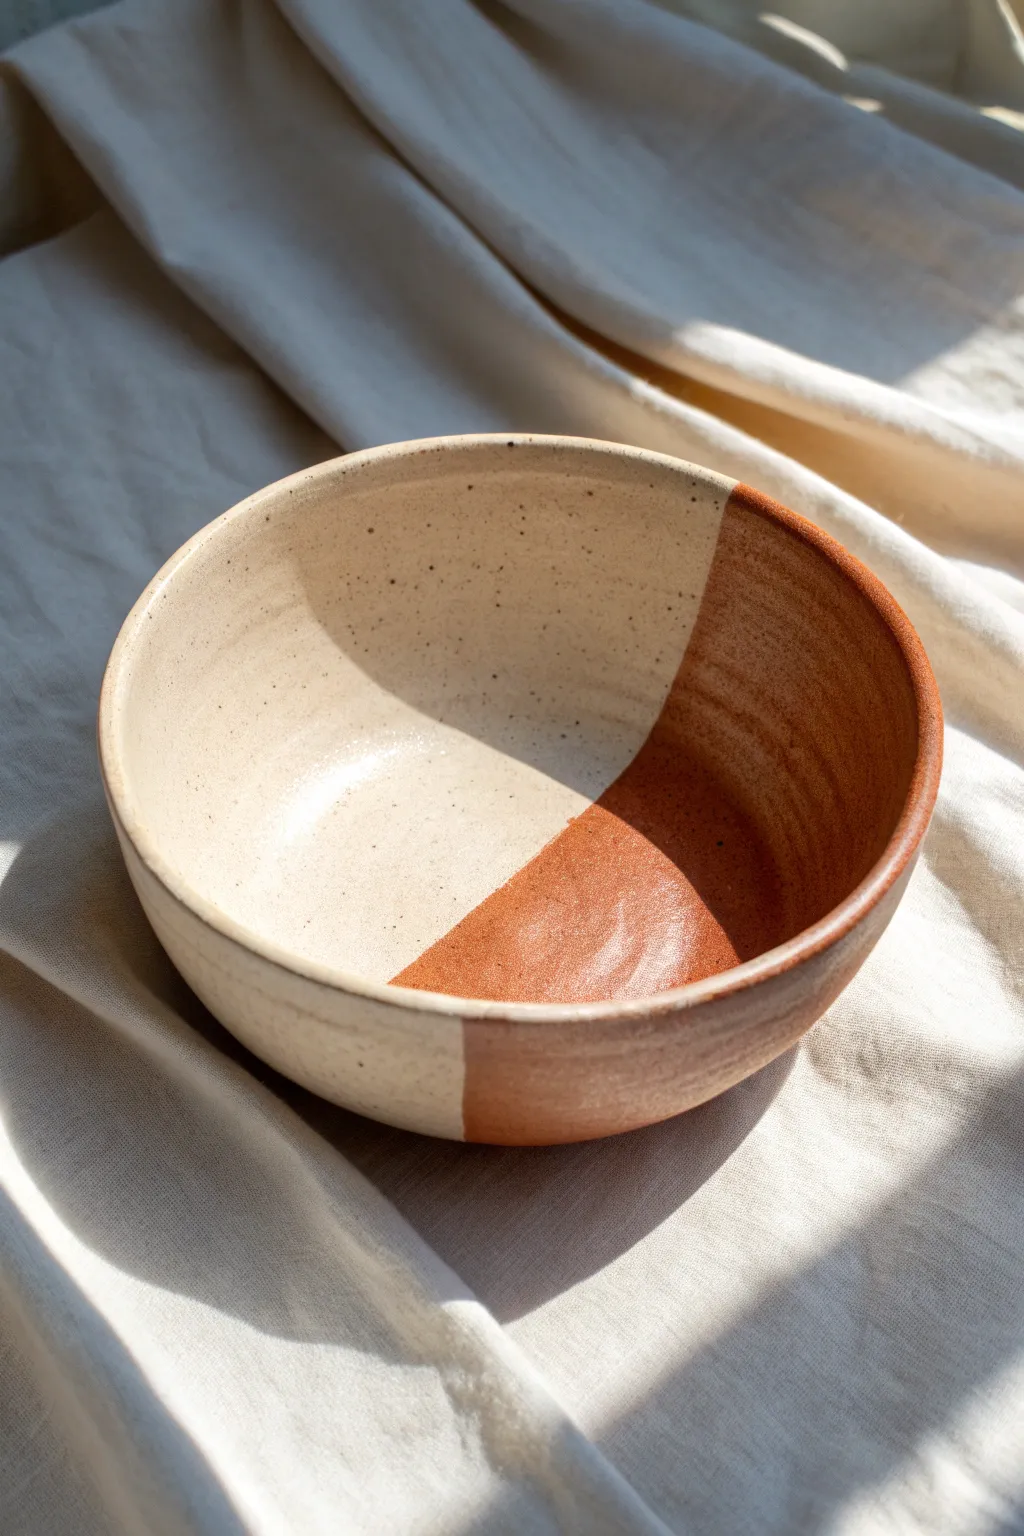
Achieve a striking contemporary look by joining two distinct clay bodies into a single, seamless form. This project uses a simple slump mold technique to create a perfectly rounded bowl that highlights the natural beauty of contrasting white and terracotta clays.
How-To Guide
Materials
- White speckled stoneware clay
- Terracotta or red stoneware clay
- Rolling pin
- Canvas working surface
- Cutting wire
- Fettling knife or needle tool
- Bowl mold (plaster or bisque)
- Serrated rib tool
- Soft rubber rib
- Vinegar or slip
- Clear glossy glaze
- Sponge
Step 1: Preparing the Slab
-
Wedge the clay:
Begin by thoroughly wedging about one pound of the white speckled clay and one pound of the red clay separately to remove air bubbles and ensure consistency. -
Initial flattening:
Using the palm of your hand, flatten both balls of clay into thick, rough patties on your canvas surface. -
Cut the join lines:
Take your fettling knife and cut a straight edge on one side of each clay patty. This fresh cut is crucial for a strong seam. -
Join the clays:
Score the straight cut edges deeply with a serrated tool and apply a small amount of vinegar or slip. Press the two patties together firmly on the canvas to create one two-tone piece. -
Roll the slab:
Roll out the joined clay into a unified slab, about 1/4 inch thick. Roll diagonally across the seam in both directions to help knit the clay particles together without distorting the straight line too much. -
Compress the seam:
Run a soft rubber rib over the seam on both sides of the slab to ensure it is completely flush and smooth.
Step 2: Forming the Bowl
-
Draping the mold:
Carefully lift your two-tone slab and drape it into your chosen slump mold. I like to position the color line off-center for a more dynamic composition. -
Setting the curve:
Starting from the center and working outward, gently press the clay into the curve of the mold using a soft sponge or the heel of your hand. -
Define the rim:
Once the clay is snug against the mold, use a needle tool to trim the excess clay at the rim. Hold the tool steady against the top edge of the mold and rotate if using a banding wheel. -
Smooth the interior:
Use a damp sponge on the inside of the bowl to refine the surface and smooth out the rim edge so it’s rounded and pleasant to touch. -
Leather hard drying:
Allow the bowl to stiffen in the mold until it reaches leather hard. This usually takes a few hours or overnight if covered loosely.
Crack Control
If the seam cracks during drying, the clays may have different shrinkage rates. Only use clays from the same manufacturer designed to be fired to the same cone.
Step 3: Finishing and Glazing
-
Release and clean:
Remove the bowl from the mold. Flip it over and use the rubber rib to smooth the exterior, paying special attention to the seam connection on the outside. -
Bisque firing:
Once the bowl is bone dry, fire it to cone 04 (or your clay’s specific bisque temperature). -
Wax the foot:
Apply wax resist to the bottom foot of the bowl to prevent glaze from sticking to the kiln shelf. -
Glaze application:
Pour a clear glossy glaze inside the bowl, swirl it to coat the entire interior, and pour out the excess. Dip the exterior or brush the clear glaze on, ensuring an even coat. -
Final firing:
Fire the bowl to the maturation temperature of your clay bodies (likely cone 5 or 6) to reveal the rich contrast between the earthy red and speckled white.
Carved Texture
At the leather-hard stage, try carving shallow vertical flutes into just the red section of the bowl to add tactile contrast to the color blocking.
Enjoy using your sleek new bowl for serving salads or simply displaying as a piece of modern art
Marbled Slab Bowl Made From Layered Clay Sheets
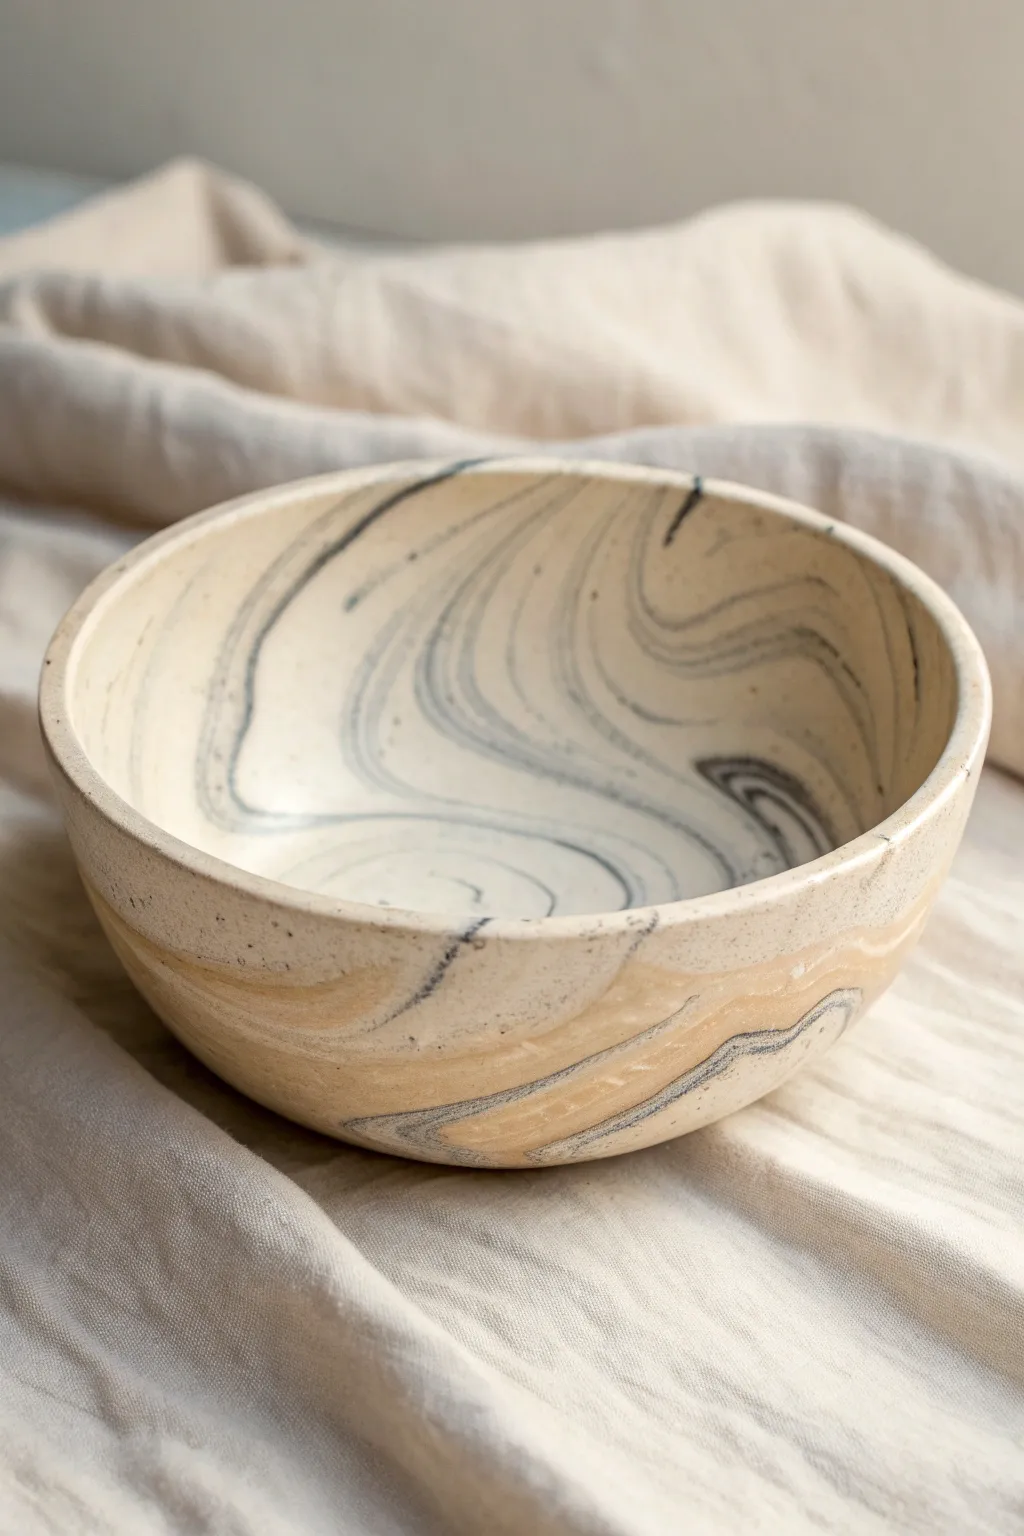
This project captures the organic beauty of sedimentary rock formations right in your hands using a simple yet stunning layering technique. By stacking and rolling alternating colors of clay, you’ll create a unique, wavy marbled pattern that runs seamlessly through the entire body of the bowl.
Detailed Instructions
Materials
- Stoneware clay (beige or cream body)
- Mason stain (black or dark blue) or pre-colored dark clay
- Rolling pin
- Canvas work surface or slab mat
- Fettling knife or needle tool
- Rib tool (smooth silicone or wood)
- Slump mold (plaster or a simple kitchen bowl covered in plastic)
- Serrated rib or scoring tool
- Slip
- Sponge
Step 1: Preparing the Clay Body
-
Color the Clay:
Begin with your base clay body. If you aren’t using pre-colored clay, wedge a small amount of dark mason stain (black or cobalt blue) into about one-third of your white or beige clay until fully incorporated. Wear gloves for this part to avoid staining your hands. -
Create Thin Sheets:
Roll out a portion of the plain beige clay and a portion of the colored dark clay into separate, somewhat thick slabs, roughly 1/2 inch thick each. -
Stack the Layers:
Place the dark slab on top of the light slab. Cut this stack in half, and stack one half on top of the other again. Repeat this stacking process 3-4 times to create a multi-layered block that resembles a striped cake.
Step 2: Creating the Marbled Slab
-
Slice the Stack:
Turn your striped clay block onto its side so the stripes are vertical. Using a wire cutter, slice thin cross-sections off the block. Each slice should reveal the alternating striped pattern. -
Arrange the Slices:
Lay these slices flat on your canvas, overlapping their edges slightly. You can arrange them in curves or waves to disturb the straight lines, which is crucial for that organic, swirling effect. -
Roll to Join:
With your rolling pin, roll over the arranged slices. Roll in multiple directions to stretch the clay and distort the lines. This pressure will merge the pieces into a single, cohesive slab while creating the characteristic agate swirl. -
Compress the Slab:
I always take a moment here to use a soft rib tool to compress the surface. This smoothes out any texture from the canvas and ensures the joins between the slices are completely seamless.
Distort the Pattern
Before the final roll, try throwing the slab onto the table at an angle. This stretches the clay diagonally, turning straight stripes into dynamic, windswept curves.
Step 3: Forming the Bowl
-
Cut the Circle:
Place a template or round object gently on your marbled slab. Using a needle tool or fettling knife, cut out a large circle. This will determine the final size of your bowl. -
Prepare the Mold:
Select your slump mold. If using a kitchen bowl, cover it tightly with plastic wrap or a piece of fabric to prevent the clay from sticking as it dries. -
Slump the Clay:
Gently lift your clay circle and lower it into the mold. Let gravity do most of the work, allowing the slab to sink naturally into the curve. -
Secure the Shape:
Press the clay gently against the mold’s interior walls to ensure it takes the shape. Be careful not to smudge your beautiful marble pattern; use a soft sponge if needed. -
Refine the Rim:
While the clay is still soft, use a sponge or chamois leather to smooth the top rim of the bowl. A rounded, smooth lip feels much better to use and looks more professional.
Add a Foot Ring
Once the bowl is leather hard, flip it over and score a circle on the bottom. Add a coil of marbled clay to create a raised foot, giving the bowl elegance and height.
Step 4: Finishing and Firing
-
Check for Cracks:
As the clay begins to stiffen to leather-hard, check the areas where the different clay colors meet. If tiny separation cracks appear, compress them immediately with a smooth ribbed tool. -
Slow Drying:
Marbled clay consists of different moisture levels or clay particles, which can lead to warping. Dry your bowl very slowly by covering it loosely with plastic for the first 2-3 days. -
Bisque Fire:
Once bone dry, bisque fire the bowl according to your clay body’s specifications (usually Cone 04 or 06). -
Glazing:
To preserve the visual texture of the marble, use a clear glaze. You can apply a matte or glossy clear coat, dipping or brushing it on evenly. -
Final Firing:
Fire the glazed piece to maturity. The heat will vitrify the clay and the clear glaze will make those dark swirls pop against the creamy background.
Enjoy the surprise of seeing exactly how your unique geology reveals itself after the final firing
Nested Slab Bowl Set With Graduated Sizes
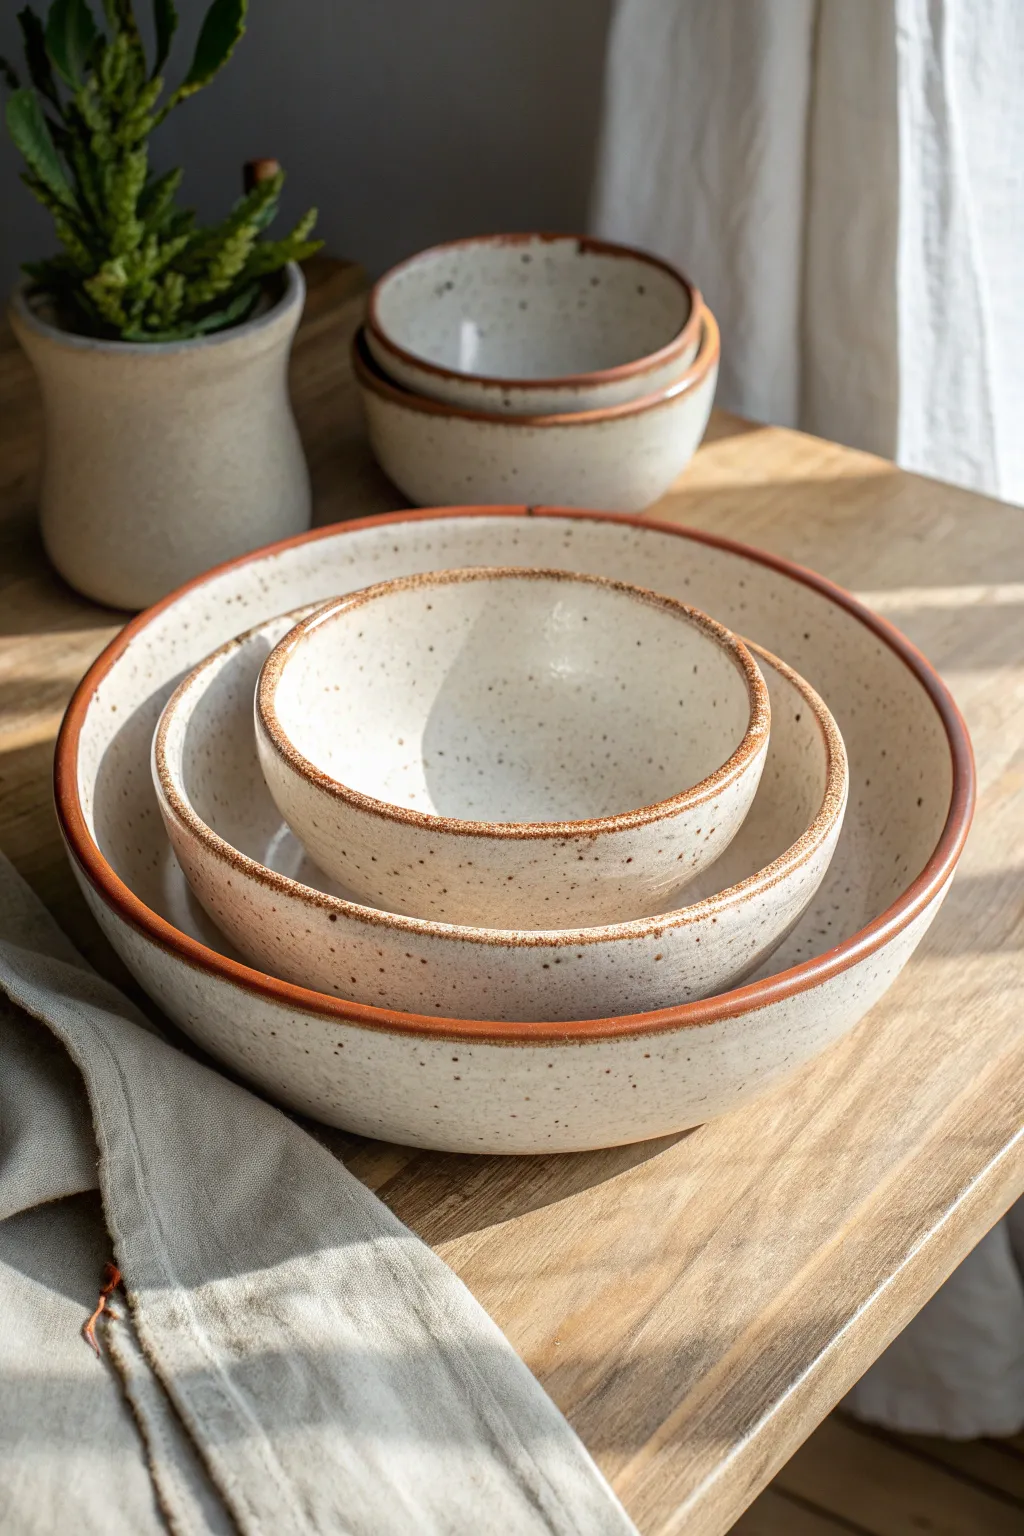
Create a warm, functional centerpiece with this set of three nested slab bowls featuring a speckled clay body and a distinct terracotta-colored rim. The organic shapes and consistent nesting make this trio perfect for both serving and display.
Step-by-Step
Materials
- Speckled stoneware clay (mid-fire)
- Terracotta or red stoneware slip (or underglaze)
- Canvas mat or slab roller
- Rolling pin
- Guide sticks (approx. 1/4 inch thickness)
- Three graduated slump molds (or bowls allowed to be used as molds)
- Cornstarch (for release)
- Needle tool
- Rubber kidney rib
- Sponge
- Soft fan brush
- Fettling knife
- White or clear matte glaze
Step 1: Preparing the Slabs
-
Wedge the clay:
Begin by thoroughly wedging your speckled stoneware clay to remove air bubbles and ensure particle alignment. Divide the clay into three portions relative to the size of your intended bowls. -
Roll out the slab:
Place your first portion of clay on a canvas mat. Using guide sticks on either side to ensure even thickness, roll the clay out into a smooth slab approximately 1/4 inch thick. Repeat this for all three portions. -
Compress the clay:
Take a rubber kidney rib and firmly drag it across the surface of your slabs in multiple directions. This compression step is crucial for preventing warping later during the firing process.
Warped Rims?
If your bowls warp during drying, keep them on the mold longer next time, or place a weighted bag of sand inside the bowl while it dries to hold the shape.
Step 2: Forming the Bowls
-
Prepare the molds:
Select three bowls or slump molds in graduated sizes. Dust the interiors of the molds lightly with cornstarch or place a thin sheet of plastic wrap over them to prevent the clay from sticking. -
Drape the clay:
Gently lift your rolled slab and drape it into the largest mold. I find that lifting the edges of the slab slightly while pressing the center down helps ease the clay into the curve without trapping air. -
Trim the excess:
Once the clay is seated firmly against the mold wall, use a needle tool to trim the excess clay at the rim. Hold the tool perpendicular to the mold edge for a clean, sharp cut. -
Repeat for all sizes:
Repeat the draping and trimming process for the medium and small bowl molds. Ensure the clay is pressed smoothly against the mold walls with no wrinkles. -
Smooth the rims:
While the clay is still in the mold, use a slightly damp sponge or a chamois cloth to compress and round over the sharp cut edge of the rim. This prevents chipping later. -
Let them firm up:
Allow the bowls to dry inside the molds until they reach a soft leather-hard stage. They should be firm enough to hold their shape but still dark in color.
Step 3: Finishing and Decoration
-
Refine the surface:
Remove the bowls from the molds. If there are any marks on the exterior from the mold texture, smooth them out now with your rubber rib. -
Apply the rim detail:
Using a small brush, apply a band of terracotta slip or red underglaze directly to the rim. Let the natural movement of the brush create a slightly organic, uneven line rather than taping it off perfectly. -
Dry slowly:
Stack the bowls loosely or place them rim-down on a board to dry. Cover them loosely with plastic for the first day to ensure even drying and prevent warping. -
Bisque fire:
Once bone dry, bisque fire the bowls to Cone 04 (or according to your clay’s specific instructions). -
Glazing:
Dip or brush a clear or white matte glaze over the entire bowl. If you want the raw clay texture to shine through, wipe back the glaze slightly with a sponge, or use a semi-transparent glaze. -
Expose the rim:
Before the glaze dries completely, carefully wipe the glaze off the very edge of the rim with a damp sponge to reveal that beautiful terracotta line you painted earlier. -
Final fire:
Glaze fire the pieces to the temperature appropriate for your clay and glaze combination, typically Cone 5 or 6 for stoneware.
Level Up: Texture
Before placing the slab into the mold, roll a textured fabric or lace into the soft clay. Ideally, do this on the exterior side for a subtle tactile surprise.
Now you have a stunning set of custom nesting bowls ready to grace your table with handmade charm
Leaf-Edge Slab Bowl With Cut Rim Points
This charming project features a lovely repetitive scalloped edge that mimics the organic shape of flower petals or leaves. Using a speckled clay body adds beautiful, rustic character that shines through the glaze, while the iron-oxide washed rim emphasizes the unique silhouette.
How-To Guide
Materials
- Speckled stoneware clay (mid-fire recommended)
- Circular slumped mold or plaster hump mold (approx. 10-12 inches diameter)
- Canvas mat or slab roller
- Rolling pin
- Fettling knife or needle tool
- Soft rubber rib
- Serrated metal rib
- Sponge
- Clear or glossy white glaze
- Red iron oxide wash (or a breaking brown glaze for the rim)
- Small artist brush
Step 1: Creating the Slab Base
-
Roll the slab:
Start by wedging your speckled clay to remove air bubbles. Roll it out into a large, even slab approximately 1/4 to 3/8 inch thick. I like to rotate the slab a quarter turn after every pass with the rolling pin to ensure the clay particles are compressed in all directions. -
Check thickness:
Verify the thickness is uniform throughout. A consistent thickness helps prevent warping later in the kiln. If you notice any canvas texture on the surface, gently smooth it away now using a soft rubber rib. -
Cut the circle:
Place a circular template or a large plate over your slab that matches the size of your mold. Using your needle tool, cut a clean circle around the template.
Slumping Issues?
If your clay slumps too much and loses the scallop definition, let the slab stiffen slightly on a porous board before putting it on the mold.
Step 2: Shaping the Bowl
-
Form the curve:
If using a hump mold (convex), drape the clay circle gently over it. If using a slump mold (concave), carefully lower the clay inside. Press the clay firmly but gently against the mold surface to establish the bowl’s basic curve. -
Define the rim size:
Decide how deep you want the bowl. You can trim excess clay from the rim now if the slab is extending too far beyond the mold’s edge, leaving a clean, even lip to work with. -
Center the form:
Ensure the clay is centered on the mold. If possible, place the mold on a banding wheel and give it a spin to check for symmetry before you start dividing the rim.
Pro Tip: Texture Depth
Enhance the fluting by gently running a damp sponge down the vertical grooves after the clay is leather hard to soften and widen the shadows.
Step 3: Creating the Leaf Edge
-
Mark the divisions:
Lightly mark the rim into even segments to guide your sculpting. If you want a specific number of ‘petals,’ use a ruler or division tool to make faint tick marks along the edge. -
Scallop the rim:
With your fettling knife, cut curved, semi-circle shapes out of the rim between your marked points creating rising peaks. Alternatively, leave the rim high and cut notches downwards. The visual effect should be a series of connected arches. -
Refine the peaks:
Use a damp sponge or your fingers to round off the sharp cut edges of each scallop. You want them to look soft and organic, not mechanically sliced. -
Add vertical definition:
Using a modeling tool or the pad of your thumb, press a vertical indentation starting from the lowest point between each scallop, running down towards the bottom of the bowl. This creates the ‘fluted’ or petal look on the body. -
Smooth the interior:
Run a soft rib along the inside of the bowl to smooth out any heavy finger marks from creating the exterior fluting, integrating the texture so it looks cohesive inside and out.
Step 4: Dry and Bisque
-
Slow drying:
Cover the bowl loosely with plastic and let it dry slowly to the leather-hard stage. Once leather hard, remove it from the mold so it can shrink without cracking. -
Foot ring (optional):
If you want a foot ring, flip the leather-hard bowl over and attach a coil ring or trim a foot into the bottom. Alternatively, simply flatten the bottom slightly so it sits stable on a table. -
Bisque fire:
Allow the piece to become bone dry, then bisque fire it according to your clay body’s specifications (usually Cone 06 or 04).
Step 5: Glazing
-
Apply base glaze:
Dip or brush your clear or glossy white glaze over the entire piece. If dipping, use tongs to ensure an even coat inside and out. Wipe the foot clean with a sponge. -
Highlight the rim:
Dip a small brush into red iron oxide wash or a breaking brown glaze. Carefully run the brush along the very edge of the scalloped rim. Let the color naturally pool slightly in the dips of the scallops. -
Final fire:
Load the kiln and fire to the maturity temperature of your clay and glaze (likely Cone 5 or 6 for stoneware). The heat will fuse the oxide into that beautiful toasty brown line.
Once cooled, the speckles will pop through the glaze, giving you a stunning bowl perfect for salads or fruit
Draped Slab Bowl Over a Textured Form for Natural Ripples
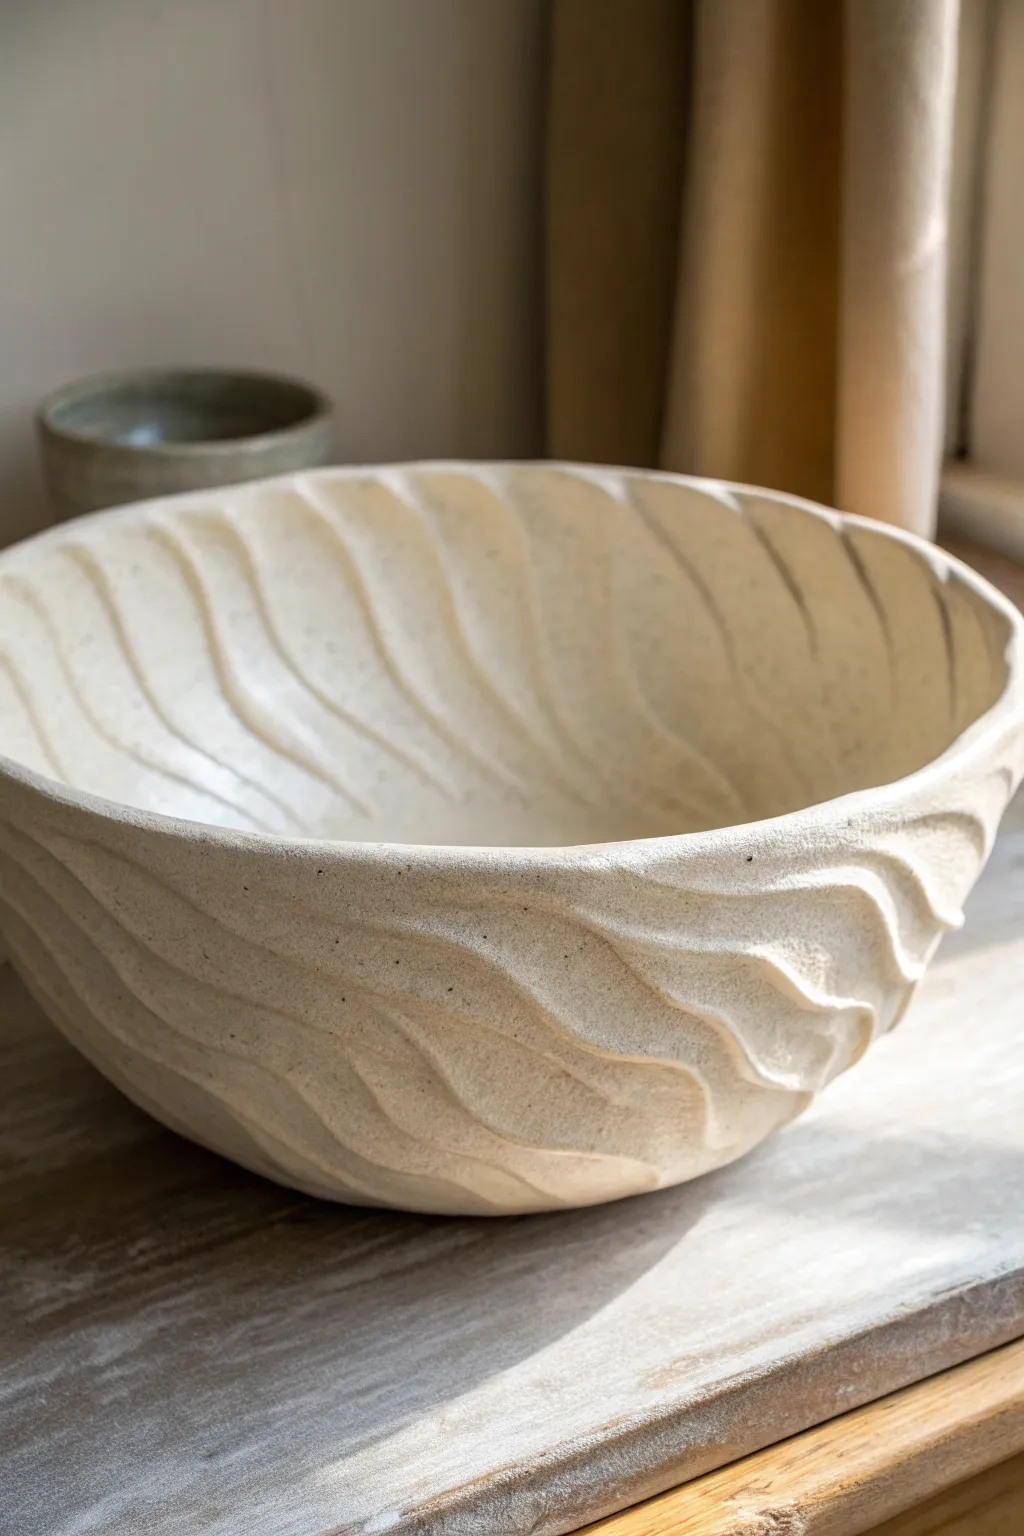
This project explores the beauty of repeating lines and organic forms, resulting in a stunning stoneware bowl that looks like it was sculpted by ocean waves. By draping a slab over a custom-made or found convex mold, you can achieve deep, undulating ridges that catch the light beautifully.
Detailed Instructions
Materials
- Stoneware clay body (smooth, speckled, or sand-colored)
- Circular hump mold (plaster, bisque, or a simple repurposed bowl)
- Plastic wrap or newsprint (if using a non-porous mold)
- Canvas or slab mat
- Rolling pin
- Fettling knife or needle tool
- Wooden sculpting tool with a rounded edge
- Carving loop tool (large)
- Rubber kidney rib
- Sponge
- Scoring tool and slip
Step 1: Preparing the Slab
-
Wedge the Clay:
Begin by thoroughly wedging your clay to remove air bubbles and ensure a consistent texture. For a bowl of this size, start with a generous ball of stoneware, roughly 3-4 pounds. -
Roll the Slab:
Roll out your clay on a piece of canvas or a slab mat. Aim for a slightly thicker slab than usual—about 3/8 to 1/2 inch thick—because you will be carving into it later, and you need enough wall thickness to support those deep grooves. -
Compress the Clay:
Use a rubber kidney rib to compress the slab on both sides. This aligns the clay particles, preventing warping during the firing process and creating a smooth canvas for your texture. -
Cut the Circle:
Place your intended mold upside down on the slab to gauge the size, or use a template. Cut a large circle around it, leaving about 2-3 inches of excess clay beyond the rim of the mold to manipulate later.
Too Deep?
If you accidentally carve too deep and breakthrough, don’t panic. Score the hole, patch it with soft clay, smooth firmly, and re-carve gently once it stiffens up again.
Step 2: Forming the Bowl
-
Prepare the Mold:
If using a repurposed kitchen bowl as a hump mold, cover it tightly with plastic wrap to prevent the clay from sticking. If using plaster or bisque, you can skip this step. -
Drape the Slab:
Carefully lift your slab and drape it continually over the hump mold. Gently press the clay down against the mold, starting from the center and working your way out to avoid trapping air bubbles. -
Trim the Excess:
Once the clay is snug against the mold, use your fettling knife or needle tool to trim the bottom edge evenly. You can spin the mold on a banding wheel if you have one to get a consistent cut. -
Allow to Stiffen:
Let the bowl sit on the mold until it becomes leather hard. This is crucial; if the clay is too soft, the carving tools will drag, and if it’s too dry, it will chip. Check it periodically.
Make it Matte
To mimic the stone-like look in the image, leave the exterior unglazed if using a nice speckle clay, or use a ‘dry’ matte glaze to enhance the tactile stone feel.
Step 3: Carving the Ripples
-
Map the Flow:
Using a needle tool, very lightly sketch the direction of your wave lines on the exterior. Curved, spiral-like lines that flow from the base to the rim create the best movement. -
Carve the Exterior:
With the bowl still on the mold for support, use a large wire loop tool to carve out channels following your sketched lines. Vary the depth slightly to create that natural, organic feel. -
Smooth the ridges:
After carving, use a damp sponge or your finger to soften the sharp edges of the carved ridges. You want the clay to look eroded by water, not sharply machined. -
Release the Bowl:
Once the exterior is carved and the clay is firm enough to hold its shape without slumping, gently remove the bowl from the mold and flip it over. -
Texture the Interior:
Repeat the carving process on the inside of the bowl. I prefer to try and match the placement of the interior grooves with the exterior ridges to create a uniform wall thickness, though exact precision isn’t necessary. -
Refine the Rim:
The carving will leave an uneven rim. Use a sponge or a chamois strip to smooth the lip, ensuring it feels pleasant to the touch.
Step 4: Finishing Touches
-
Slow Drying:
Cover the bowl loosely with plastic to ensure slow, even drying. This prevents the rim from drying faster than the thicker base, which can cause cracking. -
Bisque Fire:
Once bone dry, bisque fire the piece to the appropriate cone for your clay body. -
Glazing:
Choose a glaze that breaks over texture. A matte white or light celadon works perfectly here, as it will pool in the recesses and thin out on the ridges, highlighting the carving work.
Now you have a sculptural vessel that brings a sense of organic calm to any room