When you start with a simple slab box, you’re basically holding a blank little canvas that can turn into anything. These ideas are the kind I love sharing in the studio—easy to build, fun to personalize, and super satisfying when that lid fits just right.
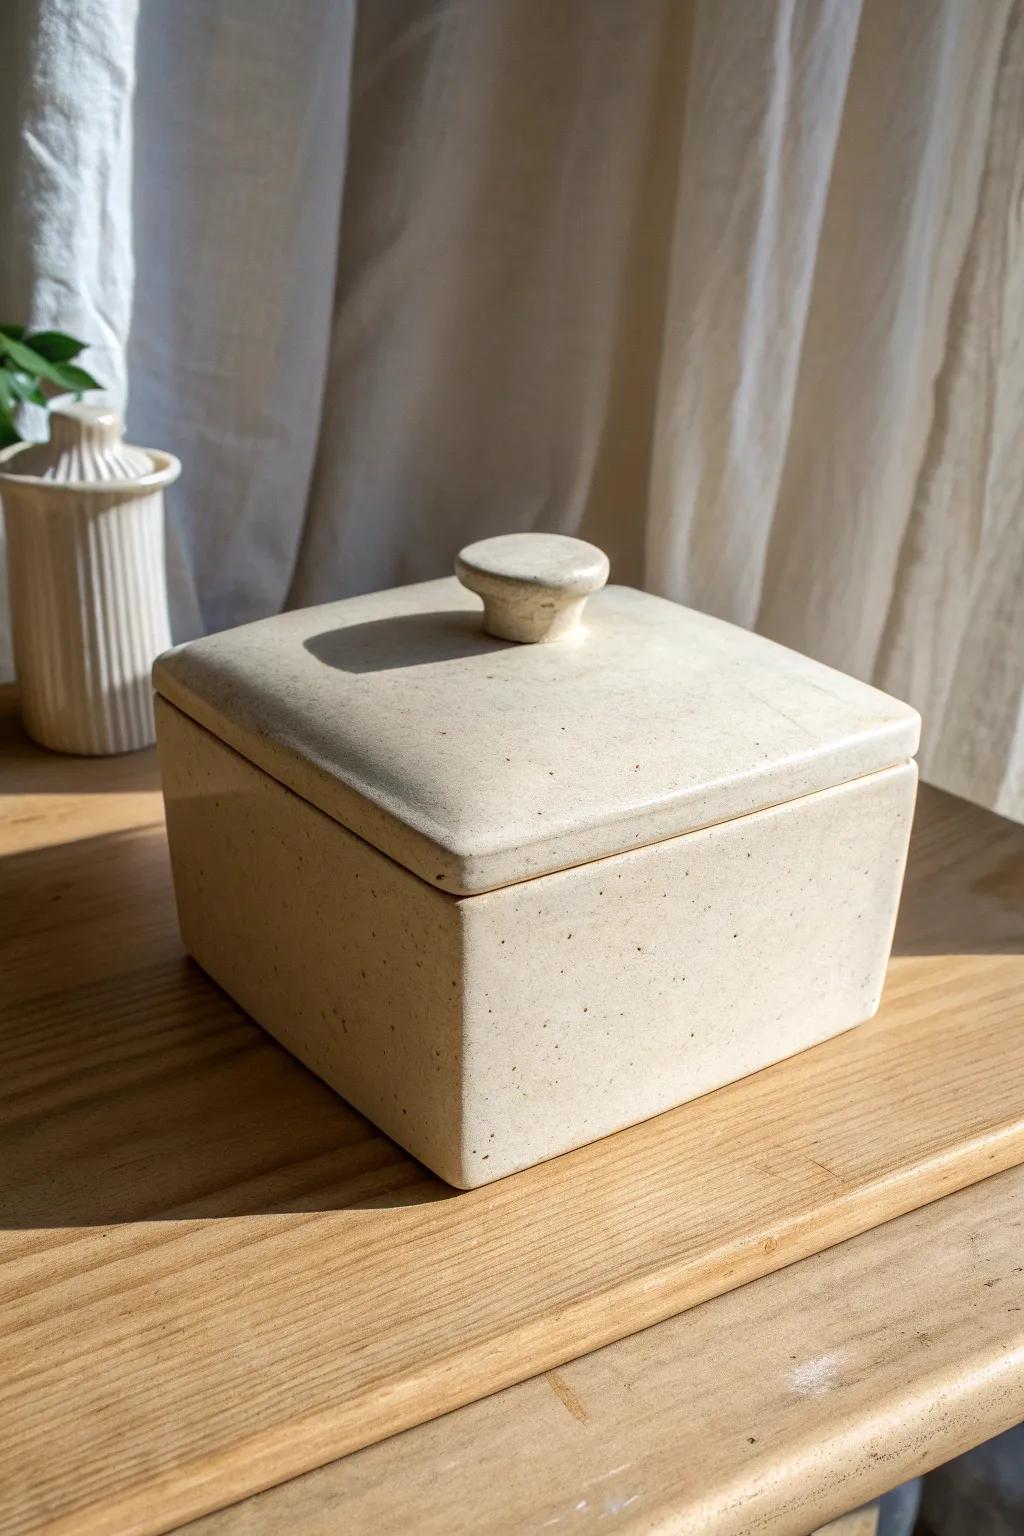
Classic Slab Box With a Clean Gallery Lid
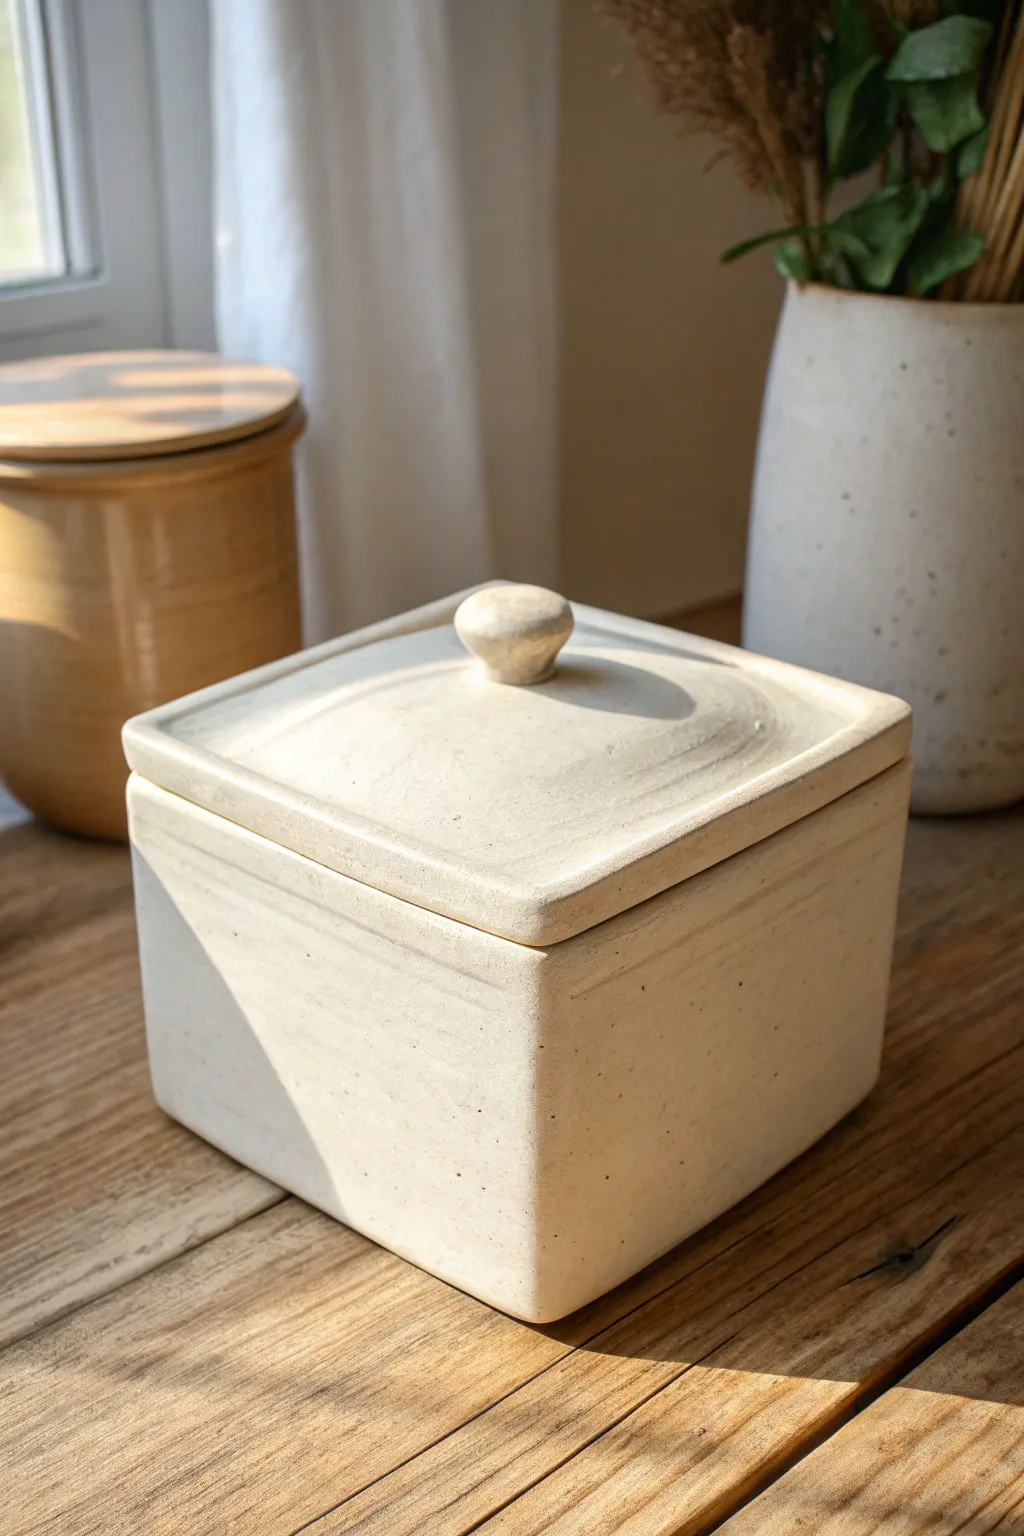
This elegant, cream-colored ceramic box relies on simple geometry and clean lines for a timeless look. Featuring a perfectly fitted gallery lid and a classic knob handle, it’s a foundational slab-building project that results in a functional piece of art.
Step-by-Step Tutorial
Materials
- Light-colored stoneware clay (speckled or plain white)
- Slab roller or rolling pin with thickness guides
- Fettling knife or X-Acto blade
- Ruler and square tool
- Scoring tool (serrated rib or needle tool)
- Slip or vinegar
- Wooden paddle
- Loop tool for trimming
- Sponge
- Plastic wrap for slow drying
- Kiln and clear matte glaze
Step 1: Preparing the Slabs
-
Roll out the clay:
Begin by wedging your clay to remove air bubbles, then roll out a consistent slab about 1/4 inch thick. Compress the clay on both sides with a rib to align particles and prevent warping later. -
Create templates:
Using paper or cardstock, cut out your templates. You will need one large square for the base (e.g., 5×5 inches) and four rectangular side walls. Ensure the width of the walls matches the side of the base plus the thickness of the clay if you aren’t doing miter joints. -
Cut the clay shapes:
Lay your templates onto the leather-hard slab—wait until the clay is stiff enough to hold its shape but soft enough to bend slightly without cracking. Cut out your base and four walls using a sharp fettling knife held perpendicular to the table. -
Miter the edges (optional):
For the cleanest corner seams shown in the image, bevel the vertical edges of your wall pieces at a 45-degree angle. This allows the corners to meet perfectly.
Warped Walls?
If walls bow inward while drying, place a supportive block of rigid foam inside the box until it reaches leather-hard stage. Dry slowly under plastic.
Step 2: Assembling the Box Body
-
Score and slip the base:
Rough up the edges of your base square and the bottom edges of your wall pieces. Apply a generous amount of slip or vinegar to these areas. -
Attach the first wall:
Press the first wall firmly onto the base. Use a square tool to ensure it is standing at a perfect 90-degree angle. -
Complete the perimeter:
Attach the remaining three walls, scoring and slipping the vertical seams where the walls meet. Press the joints firmly together. -
Reinforce the interior:
Roll thin coils of soft clay and press them into the interior seams at the bottom and corners. Smooth these coils down completely with a modeling tool or your finger to strengthen the joints. -
Paddle the shape:
Using a wooden paddle, gently tap the exterior walls to straighten them and sharpen the corners. This compresses the joints further and refines the square shape.
Step 3: Creating the Lid and Knob
-
Measure the opening:
Measure the exact outer dimensions of your assembled box. Cut a square slab that matches this size exactly to form the top of the lid. -
Create the gallery flange:
Cut four strips of clay about 1/2 inch wide. Attach these to the *underside* of the lid slab, inset slightly from the edge so they fit snugly inside the box walls. This hidden flange keeps the lid from sliding off. -
Form the knob:
Roll a small ball of clay and shape it into a mushroom-cap knob. Keep the stem slightly thicker for durability. -
Attach the knob:
Score the center of the lid top and the bottom of the knob stem. Apply slip and press the knob firmly into place, smoothing the clay where it connects to create a seamless transition. -
Dry fit the lid:
Place the lid on the box. If the fit is tight, I check the specific high spots and shave them down slightly with a sureform tool while the clay is leather hard.
Level Up: Texture
Before assembling, roll a textured fabric or lace over your fresh slabs. The pattern will highlight beautifully under a translucent celadon glaze.
Step 4: Refining and Finishing
-
Clean surface texture:
Once the piece is bone dry, use a slightly damp sponge to wipe away any hard edges or burrs. The goal is a smooth, matte finish like the image. -
Bisque fire:
Load the drying completely box and lid into the kiln and fire to cone 04 (or your clay body’s bisque temperature). -
Glazing:
Dip or brush a clear matte or satin white glaze over the piece. If you want the speckled clay body to show through, ensure the glaze application isn’t too thick. -
Wipe the footing:
Clean the glaze off the bottom of the box and the contact points where the lid meets the box rim to prevent them from fusing together during firing. -
Final firing:
Fire the piece to maturity (Cone 5, 6, or 10 depending on your clay). Allow the kiln to cool completely before opening.
Enjoy using your beautifully understated box for storing treasures or tea bags


All-Over Textured Slab Box Using Repeating Impressions
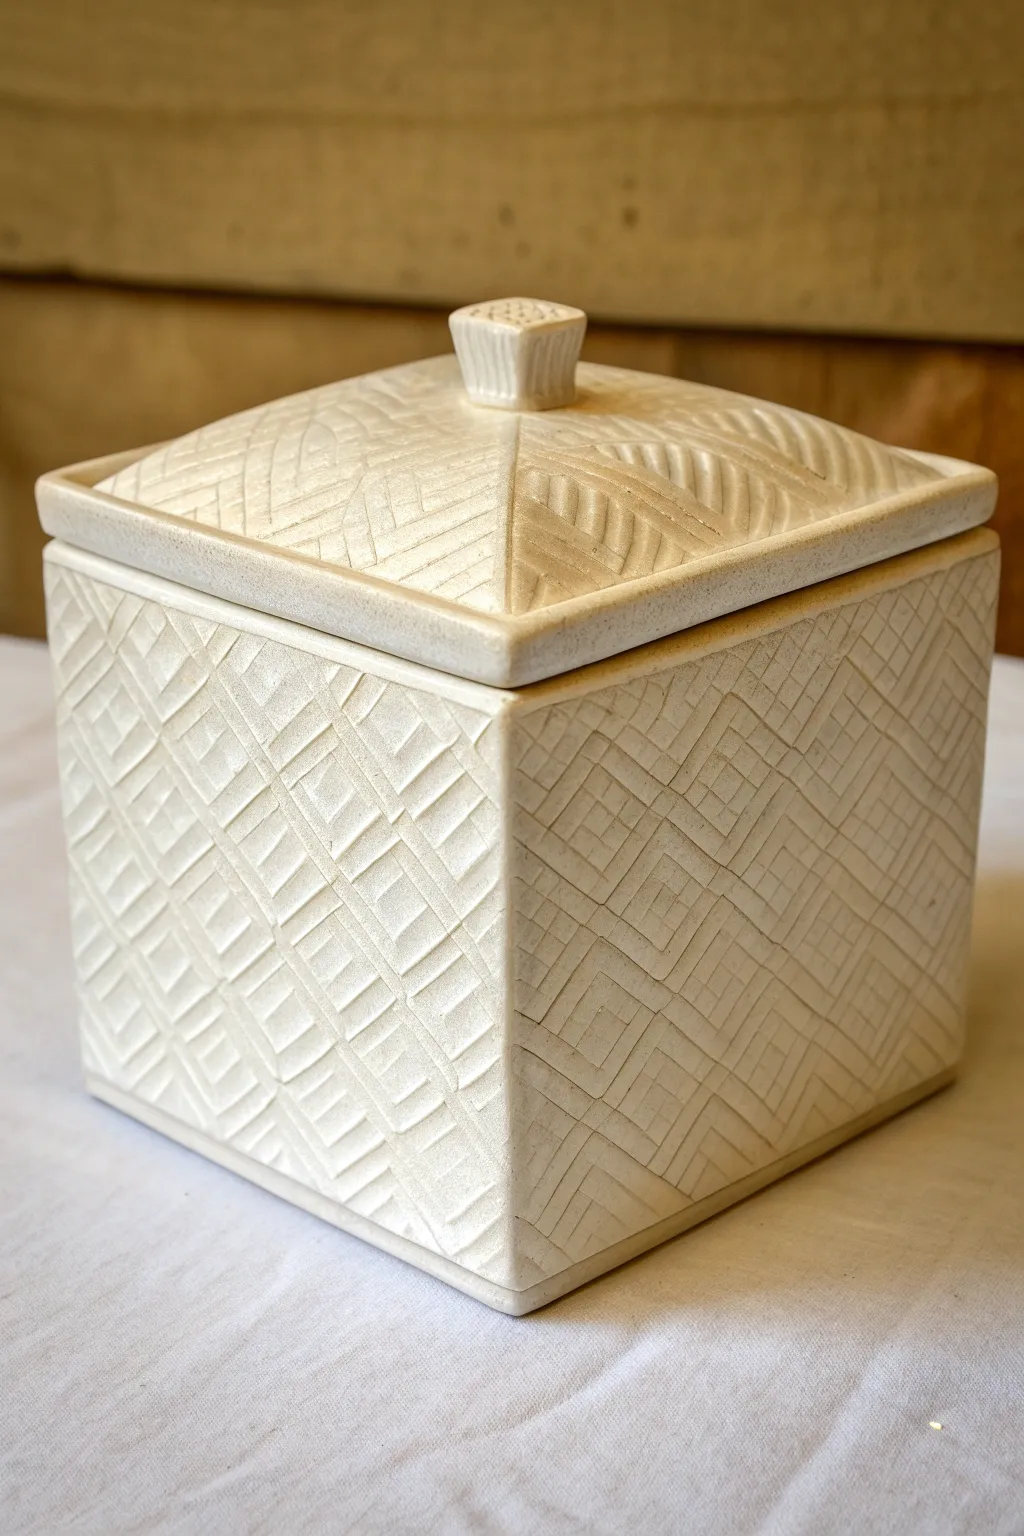
This elegant ceramic box relies on precise slab construction and a meditative, all-over impressed texture that mimics woven fabric. The clean lines and repeating geometric patterns create a sophisticated container perfect for holding small treasures or simply serving as a standalone sculptural piece.
Step-by-Step
Materials
- White stoneware or porcelain clay body
- Rolling pin
- Canvas mat or slab roller
- Thickness strips (1/4 inch)
- Small carving tool or dull pencil for texture
- Fettling knife
- Ruler
- Scoring tool (serrated rib or needle tool)
- Slip or vinegar
- Soft rib (red rubber or silicone)
- Sponge
- Plastic sheet
Step 1: Slab Preparation and Texturing
-
Roll out the clay:
Begin by rolling out a generous slab of clay to an even ¼-inch thickness. Using thickness strips or wooden guides on either side of your rolling pin ensures the walls will be perfectly uniform, which is crucial for a box of this style. -
Compress the slab:
Smooth the clay on both sides with a soft rib. This compresses the clay particles, preventing warping later, and creates a pristine canvas for your texture. -
Create the texture guidelines:
Using a ruler and a dull tool, very lightly mark a grid of squares across your entire slab surface. These squares will serve as boundaries for your geometric pattern. -
Impress the pattern:
Within each marked square, use a small, flat-edged tool or the side of a wooden modeling stick to press in parallel lines. Alternate the direction of lines in adjacent squares (horizontal, then vertical) to create the woven, parquet-like effect shown in the image. -
Let the slab firm up:
Allow the textured slab to dry to a ‘soft leather-hard’ state. This is critical; if the clay is too soft, your box walls will slump during assembly.
Slumping Walls?
If walls bow inward, your slab was likely too soft. Keep a square block of foam or wood inside the box as a temporary support while the clay stiffens to leather-hard.
Step 2: Cutting and Assembly
-
Measure your templates:
Design your dimensions. You will need four identical rectangular walls and two squares (one for the floor, one for the lid base). -
Cut the components:
Using a ruler and a sharp fettling knife, precisely cut your four walls and the floor piece from the textured slab. I like to bevel the vertical edges of the walls at a 45-degree angle for a cleaner corner, but straight butt-joints work too. -
Score and slip:
Aggressively score the edges that will join together and apply a generous amount of slip or vinegar. -
Construct the walls:
Attach one wall to the floor slab first, pressing firmly. Add the adjacent wall, securing the vertical seam. Continue until the box shape is formed. -
Reinforce the seams:
On the interior of the box, run a thin coil of soft clay along all seams and smooth it down completely to strengthen the joints. -
Refine the corners:
Gently paddle the outside corners with a flat board to sharpen the angles and ensure the box is perfectly square.
Step 3: Lid Construction and Finishing
-
Form the lid slab:
Cut your final square slab slightly larger than the opening of the box to create an overhang lip. -
Create the pyramid effect:
To mimic the gentle rise seen in the photo, you can gently press the center of the lid slab upward from underneath while supporting the edges, or cut four triangular pieces and bevel-join them for a sharper peak. -
Add the gallery:
Flip the lid over and attach a smaller square of clay or small coils to the underside. This ‘gallery’ helps the lid sit securely inside the box rim without sliding off. -
Attach the knob:
Form a small cube or faceted chunk of clay for the knob. Texture it to match the rest of the box, score the connection point in the center of the lid, and attach it firmly. -
Final drying check:
Place the lid on the box with a thin piece of paper or plastic between them to prevent sticking. Wrap the entire piece loosely in plastic to dry slowly. This helps the lid and box shrink at the same rate. -
Bisque and polish:
Once bone dry, bisque fire the piece. Because the texture is the star here, a simple clear glaze or a light oxide wash wiped back is often the best finish to highlight the relief.
Sharper Textures
Impress your texture deeper than you think you need to. Glaze tends to pool in depressions and soften details, so a bold, deep impression ensures the pattern remains crisp.
Once fired, the interplay of light and shadow across the surface will turn this simple box into a tactile masterpiece.


Crisp Beveled-Corner Slab Box for Sharp, Pro Edges
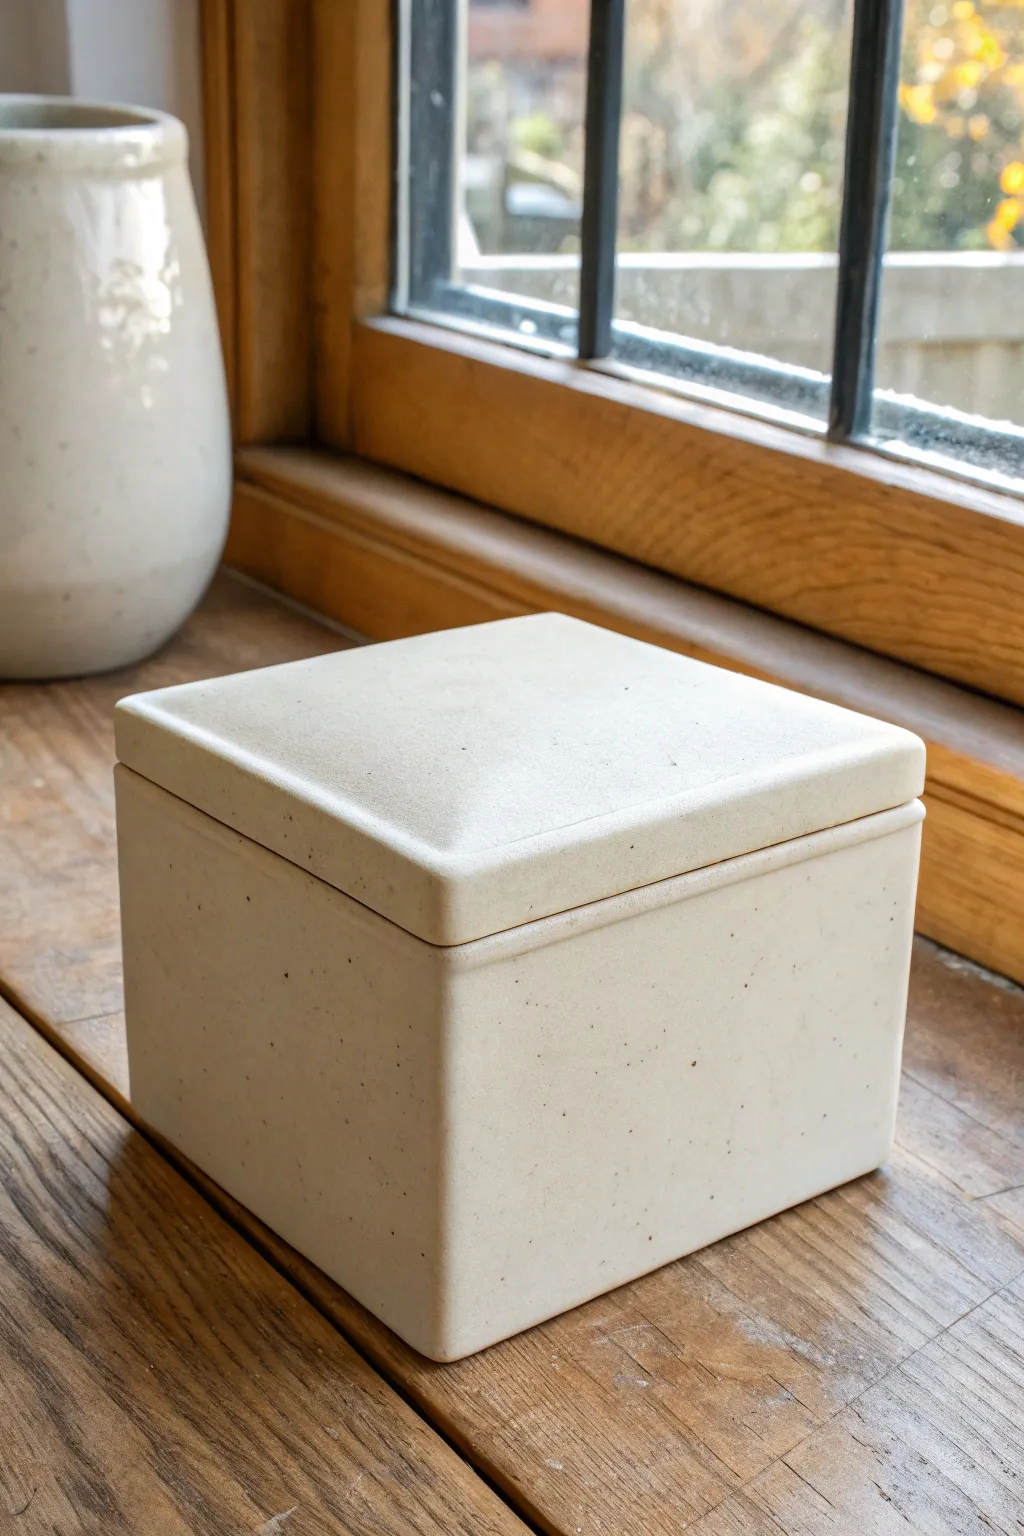
This elegant ceramic box features crisp, understated lines and a lid with a subtle, beveled profile that elevates a simple cube into a sophisticated object. Its speckled matte finish gives it a timeless, architectural feel perfect for storing small treasures.
Step-by-Step Guide
Materials
- Stoneware clay body (speckled)
- Rolling pin
- Two thickness strips (canvas or wood, approx. 1/4 inch)
- Fettling knife
- Needle tool
- Serrated rib or scoring tool
- Slip or vinegar
- 45-degree bevel cutter (optional but helpful)
- paddle
- Straight edge/ruler
- Soft sponge
- Cardboard or paper templates (body walls and lid pieces)
Step 1: Preparation & Slab Rolling
-
Wedge the clay:
Begin by thoroughly wedging about 3-4 lbs of speckled stoneware clay to remove air bubbles and ensure particle alignment, which is crucial for slab work. -
Create templates:
Cut four equal square templates for the walls (e.g., 4×4 inches), one for the base (slightly smaller due to wall thickness), and one larger square for the lid that overhangs the walls slightly. -
Roll the slab:
Using your thickness strips as guides, roll out a large, even slab of clay approximately 1/4 inch thick. Compress the slab on both sides with a rib to prevent warping later. -
Cut the components:
Lay your templates over the slab and carefully cut out your four walls, the floor, and the lid piece. Store them under plastic for about an hour until they are leather-hard and can hold their shape without bending.
Warping Woes?
If your lid rocks or doesn’t sit flat after drying, place it on a dedicated drywall board with a small weight on top during the bone-dry stage to gently coax it back to flat.
Step 2: Assembling the Box Body
-
Bevel the edges:
For the crispest corners, use a bevel cutter or hold your knife at a 45-degree angle to cut mitered edges on the vertical sides of your wall pieces. This creates a stronger, invisible seam. -
Score and slip:
Take two wall pieces, deeply score the mitered edges, and apply a generous amount of slip or vinegar. Press them together firmly on a flat surface to form a right angle. -
Complete the square:
Repeat the process with the remaining two walls until you have a complete square frame. Check the squareness with a ruler or set square. -
Reinforce the seams:
Roll a very thin coil of clay and press it into the interior corners of the box. Smooth this coil down with a modeling tool or your finger to reinforce the join. -
Attach the base:
Score and slip the bottom edge of your square frame and the edges of your base piece. Press the base into place. I find flipping the box over and gently paddling the base ensures it sits perfectly flat.
Step 3: Crafting the Beveled Lid
-
Shape the lid profile:
Take your thick lid slab. Instead of just cutting it square, use a sureform tool or a knife to shave down the top edges, creating a gentle slope or chamfer towards the center, mimicking a low pyramid shape. -
Refine the lid angles:
Once the initial slope is cut, use a metal rib to smooth and compress these angled planes, making them sharp and distinct. -
Add a flange:
To keep the lid from sliding off, roll a small square coil or cut a smaller slab square that fits exactly *inside* the box rim. Score and slip this onto the underside of your lid. -
Check the fit:
Gently place the lid on the box body. If the flange is too tight, shave it down slightly; if it’s too loose, you may need to add a small coil to the flange.
Pro Tip: The Paper Resist
To keep the lid and box fitting perfectly during the glaze firing, wax the contact points heavily and consider firing the lid *on* the box.
Step 4: Finishing Touches
-
Smooth the exterior:
Once the box is fully built and leather hard, use a slightly damp sponge to clean up all edges. Don’t over-wet the clay, as this brings out the grog. -
Crisp the corners:
Run a metal rib or a flat wooden tool along the outside corners one last time to sharpen them up, removing any softness from the sponging. -
Dry slowly:
Place the lid on the box with a thin piece of paper or plastic in between to prevent sticking. Dry the completed piece slowly under loose plastic to prevent the walls from warping. -
Bisque and glaze:
Bisque fire firmly. Then, apply a matte white or cream glaze that allows the speckles of the clay body to bleed through, enhancing the natural stone look. -
Final firing:
Fire to cone 5 or 6 (depending on your clay body). Use stilts or wipe the bottom clean to ensure the lid doesn’t fuse to the shelf or the box itself.
Enjoy the satisfaction of seeing your perfectly fitted lid click into place on this modern piece


Softened-Edge Slab Box With Rounded Corners
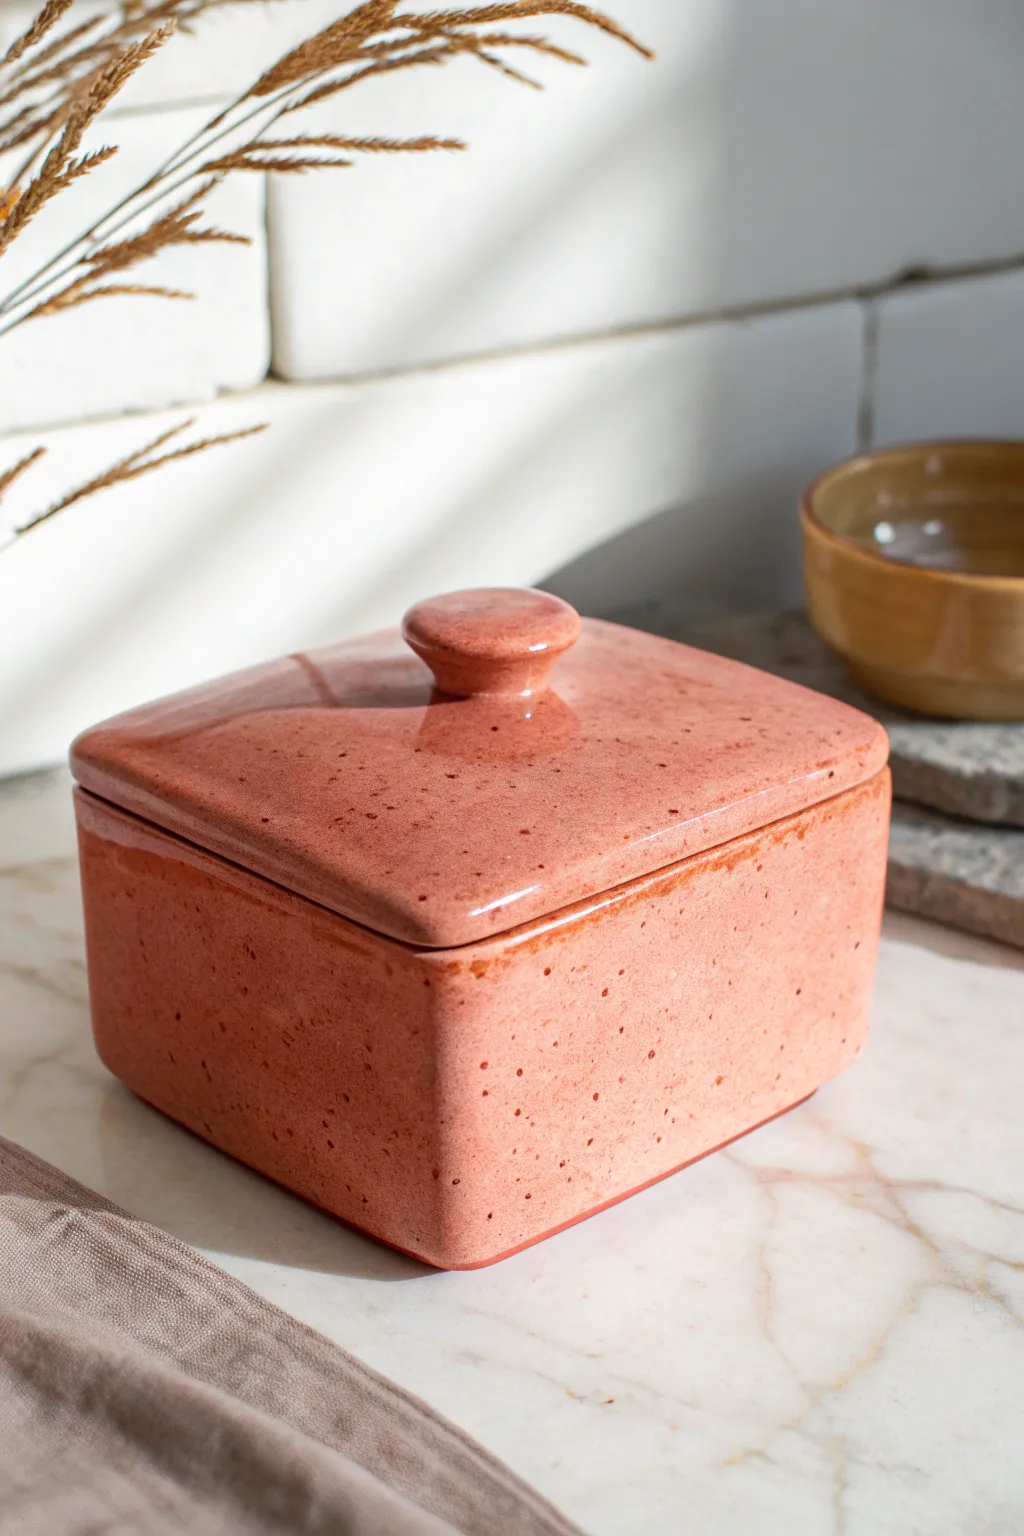
This charming ceramic box features gently rounded corners and a soft, speckled pink glaze that feels both modern and handmade. The lid sits snugly atop the form, crowned with a simple, rounded knob, making it perfect for holding butter, jewelry, or small treasures.
Step-by-Step
Materials
- Stoneware clay (preferably with speckles or grog)
- Rolling pin
- Canvas or slab mat
- Sharp clay knife or fettling knife
- Paper template (squares for sides and base)
- Scoring tool (serrated rib or needle tool)
- Slip or vinegar
- Soft rib (rubber or silicone)
- Sponge
- Wooden paddle
- Pink speckled glaze
- Kiln
Step 1: Preparing the Slabs
-
Roll the clay:
Begin by wedging your clay thoroughly to remove air bubbles. Roll it out into an even slab, approximately 1/4 inch thick. Consistency is key here, so use guide sticks if you have them. -
Smooth the surface:
Compress the slab on both sides using a soft rubber rib. This aligns the clay particles to prevent warping later and creates a pristine surface for that glossy glaze. -
Cut the components:
Using your paper templates, cut out four equal rectangles for the walls and two slightly larger squares (one for the base, one for the lid). Let these pieces firm up to a ‘leather hard’ state so they can hold their weight.
Step 2: Assembling the Box
-
Bevel the edges:
For a clean join, cut the vertical edges of your wall pieces at a 45-degree angle. This miter joint creates a stronger bond and hides the seam better than a butt joint. -
Score and slip:
Aggressively score the beveled edges and apply slip or vinegar. Assemble the four walls onto the base slab (which should also be scored where the walls will sit). -
Reinforce the seams:
Once the walls are up, press a tiny coil of soft clay into the interior corners to reinforce the joints. Smooth this coil down until it disappears. -
Draft the form:
Use a wooden paddle to gently tap the outside of the box walls. This not only strengthens the joins but also helps square up the shape if it went slightly askew during assembly. -
Round the corners:
With a damp sponge or your fingers, gently rub the sharp outer corners of the box. You want to erode that sharp 90-degree angle into a soft, organic curve.
Air Pocket Trick
Make the lid while the box is assembled. Place a sheet of paper over the box rim, set the lid slab on top, and paddle them together gently for a perfect fit.
Step 3: Creating the Lid
-
Construct the lid flange:
Measure the *inner* dimensions of your finished box opening. Cut a slab square slightly smaller than this measurement and score-and-slip it onto the center of the underside of your lid slab. This flange keeps the lid from sliding off. -
Shape the knob:
Roll a small ball of clay and flatten it slightly into a mushroom cap shape. I like to taper the connection point underneath slightly so it looks elegant. -
Attach the knob:
Score the center of the lid top and the bottom of your knob. Join them firmly, cleaning up any excess slip with a small brush. -
Soften the lid edges:
Just like the box body, sponge the edges of the lid slab to remove sharpness and impart that ‘softened’ look.
Uneven Lid?
If the lid rocks after firing, use a little grinding paste or wet sandpaper on the rim. Rotate the lid back and forth against the box until they sit flush.
Step 4: Glazing and Finishing
-
Bisque fire:
Allow the piece to dry slowly under plastic to prevent warping, then bisque fire it according to your clay body’s specifications. -
Apply glaze:
Dip or brush on your pink speckled glaze. If brushing, apply 2-3 even coats, letting each layer dry to the touch before adding the next. -
Clean the distinct lines:
Wipe the glaze off the bottom of the box and the contact points (the rim of the box and the underside flange of the lid) to prevent the lid from fusing shut. -
Final firing:
Glaze fire the piece. The heat will melt the glaze and bring out those lovely iron speckles in the clay body.
Now you have a beautifully functional box with a soft, inviting finish

What Really Happens Inside the Kiln
Learn how time and temperature work together inside the kiln to transform clay into durable ceramic.
Footed Slab Box With Four Matching Corner Feet
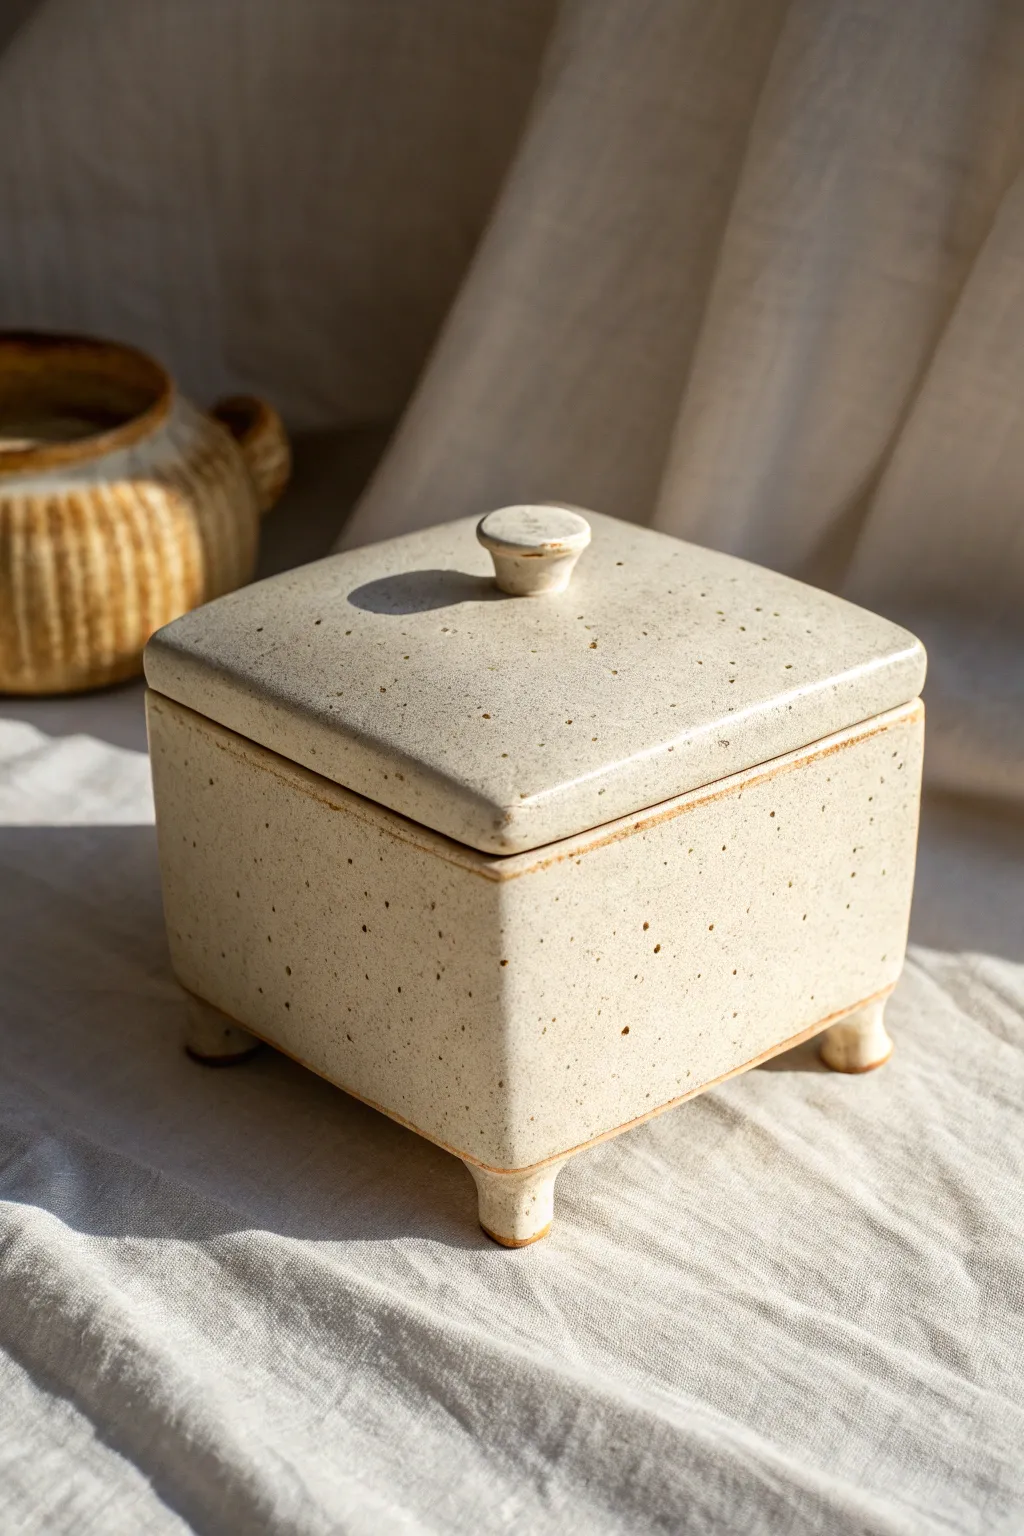
This elegant square box showcases the natural beauty of speckled stoneware clay with its minimalist form and gentle, earthy glaze. Featuring charming corner feet and a fitted lid with a simple knob, it makes for a perfect jewelry container or decorative accent.
Step-by-Step Guide
Materials
- Speckled stoneware clay
- Rolling pin
- Two wooden thickness strips (3/8 inch)
- Fettling knife
- Square paper template (approx 4×4 inches)
- Rectangular paper template (approx 4×3 inches)
- Serrated rib or scoring tool
- Slip (clay slurry)
- Wooden modeling tool
- Sponge
- Clean canvas or ware board
- Transparent or white satin glaze
Step 1: Preparing the Slabs
-
Roll out the clay:
Wedge your speckled stoneware clay thoroughly to remove air bubbles. Place it between two wooden thickness strips on a canvas surface and roll it out into a large, even sheet. Aim for a consistent thickness, as this is crucial for the box’s structural integrity. -
Compress the slab:
Using a rubber rib, firmly compress the clay on both sides. This aligns the clay particles, preventing warping during the drying and firing stages, and creates a smooth canvas for those beautiful speckles to show through. -
Cut the components:
Place your paper templates onto the leather-hard slab. You’ll need one 4×4″ square for the base, one slightly larger square (wait to cut this until the box is built to ensure a perfect fit) for the lid, and four 4×3″ rectangles for the walls. Cut these out cleanly with your fettling knife. -
Bevel the edges:
For clean, sharp corners, bevel the vertical edges of your wall pieces at a 45-degree angle. This miter joint creates a stronger bond and a more professional finish than a simple butt joint.
Seamless Lid Trick
Cut the lid from the same slab as the box *after* tracing the box’s outline. Dry them together on the box to prevent warping and ensure a perfect, airtight fit.
Step 2: Assembling the Box
-
Score and slip the base:
Take your square base and score the top perimeter roughly. Apply a generous amount of slip to the scored areas. Do the same to the bottom edge of your first wall piece. -
Attach the first wall:
Firmly press the first wall onto the base. Use a small wooden coil on the inside seam to reinforce the joint, blending it smoothly into both the wall and floor so it disappears. -
Add remaining walls:
Continue adding the walls, scoring and slipping all connecting edges. Pay special attention to the corner joints where your beveled edges meet. Press them together firmly but gently to avoid distorting the square shape. -
Refine the form:
Once all four walls are up, use a paddle or a flat board to gently tap the sides, ensuring they are straight and the corners remain at sharp 90-degree angles. I like to let this stiffen up for an hour under plastic before moving on.
Step 3: Creating the Lid and Feet
-
Measure and cut the lid:
Measure the outer dimensions of your assembled box. Cut a square slab that matches these dimensions exactly for a flush lid, or slightly larger for an overhang. Create a smaller square slab or flange on the underside that fits *inside* the box walls to keep the lid from sliding off. -
Sculpt the feet:
Roll four small balls of clay for the feet. Shape them into tapered cylinders or rounded knobs. Flip your box upside down (support the walls if needed) and score/slip the four corners of the base. -
Attach the feet:
Press the feet onto the corners. Blend the clay from the foot onto the base of the box for a seamless transition. Turn the box upright and gently press down to ensure it sits level on the table. -
Add the lid knob:
Create a small, flat mushroom shape or a simple cylinder for the handle. attached it to the center of the lid using the score and slip method. Refine the shape with a damp sponge.
Texture Twist
Before assembling, press a piece of coarse linen or lace into the soft slabs. The glaze will break beautifully over the texture, adding depth to the vintage look.
Step 4: Finishing and Glazing
-
Clean and refine:
Once the piece is bone dry, gently sponge away any sharp edges or rough texture. Be careful not to introduce too much water, which can weaken the clay. -
Bisque fire:
Fire the piece to cone 04 (or your clay body’s bisque temperature). This prepares the ceramic for glazing. -
Glaze application:
Dip or brush your transparent or satin white glaze. To achieve the look in the photo, wipe back the glaze slightly on the edges and corners with a damp sponge. This reveals the darker, toasted clay body underneath and highlights the form. -
Final wipe:
Ensure the bottom of the feet and the area where the lid serves contact are completely free of glaze. You can use wax resist on these areas before dipping to make cleanup easier. -
Glaze fire:
Fire the piece to cone 5/6 (or your clay’s maturity temperature) in an oxidation atmosphere to let those iron speckles pop through the creamy glaze.
Enjoy the satisfaction of organizing your small treasures in a vessel you built from scratch
Ribbon-Wrapped Gift Slab Box With a Bow Handle
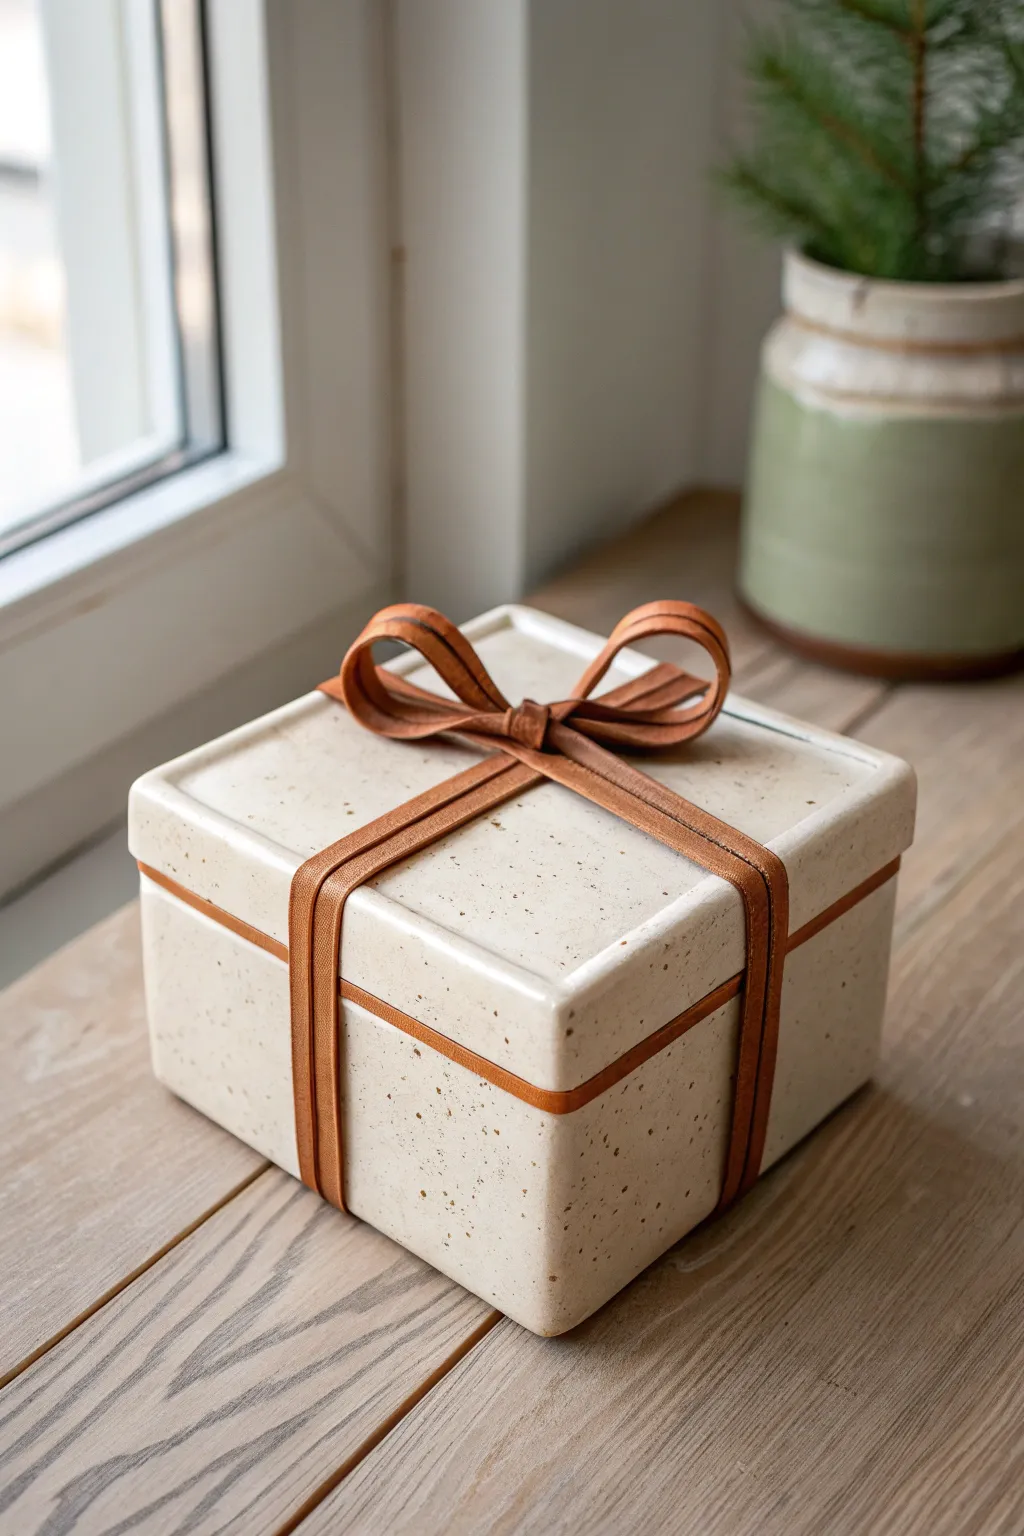
Transform simple clay slabs into a charming trompe l’oeil present perfect for hiding tiny treasures. This project combines precise slab construction with faux-leather detailing to create a speckled ceramic box that looks permanently ready to be opened.
Step-by-Step Tutorial
Materials
- Speckled Stoneware Clay (cream or white body)
- Rolling pin and guide sticks (approx. 1/4 inch)
- Fettling knife or X-Acto blade
- Ruler/Straight edge
- Scoring tool or serrated rib
- Slip (clay and water slurry)
- Red iron oxide wash or terra cotta underglaze (for the ‘leather’ look)
- Small paintbrush
- Clear matte or satin glaze
- Sponge
- Ware board
Step 1: Constructing the Box Base
-
Roll the Slabs:
Start by rolling out your speckled clay to an even ¼-inch thickness. Compress the clay on both sides with a rubber rib to align the particles and prevent warping later. -
Cut the Base and Walls:
Measure and cut a square for the floor (e.g., 4×4 inches). Next, cut four wall rectangles. Two should be the exact width of your floor (4 inches), and two should be slightly shorter to account for the wall thickness if you are doing butt joints, or cut them all equal and bevel the edges for miter joints. -
Dry to Leather Hard:
Let these pieces sit until they are leather hard—stiff enough to hold their shape without slumping but still soft enough to join. This is crucial for sharp corners. -
Score and Slip:
Rough up the edges of the floor and the bottom edges of your walls with a scoring tool. Apply a generous amount of slip to the scored areas. -
Assemble the Walls:
Attach the walls to the base one by one. Press them firmly together, reinforcing the interior seams with specific attention. I like to roll a tiny coil of clay and press it into the inside corners to ensure they are watertight and sturdy. -
Refine the Form:
Once assembled, use a wooden paddle to gently tap the outside walls flat and square. Smooth the rim with a damp sponge so it is level.
Clean Lines Pro-Tip
Use painter’s tape or masking tape on the raw clay alongside where the ‘ribbon’ will go before applying slip. Peel it off after attaching for crisp, clean edges without smear marks.
Step 2: Creating the Lid
-
Cut the Lid Slab:
Cut another square of clay slightly larger than your box opening (e.g., 4.25 x 4.25 inches) to create a slight overhang, or exact size for a flush fit. The example image shows a flush fit with a beveled top edge. -
Add a Flange:
To keep the lid from sliding off, attach small strips of clay or a square ring to the *underside* of the lid, inset just enough to fit loosely inside the box walls. -
Bevel the Top Edge:
For that soft, pillowy look seen in the photo, gently gently round off or bevel the top outer edges of the lid using a sponge or a pony roller.
Step 3: The Faux Leather Ribbon
-
Create the Straps:
Roll out a very thin sheet of clay (1/8 inch or less). Cut long, narrow strips to serve as your ribbon. Use a ruler to ensure they are perfectly straight. -
Attach the Vertical Ribbons:
Score and slip the sides of the box and the top of the lid where the ribbon will sit. Lay the strips over the box, running vertically up the sides. Do the same for the lid, ensuring the lines will match up when the box is closed. -
Create the Bow Loops:
Cut shorter strips of the thin clay for the bow. Fold them into loop shapes, gently pressing the center point together without creasing the loop itself. You need two main loops. -
Form the Center Knot:
Make a small ring or ‘knot’ piece of clay. Attach the two loops to the center of the lid, then wrap the small knot piece over the center junction to conceal the connection point. -
Detail the Ribbon:
Use a needle tool or a dull pencil to draw a faint line down the center or edges of your clay ribbons to mimic the stitching or texture of leather.
Level Up: Texture
Before cutting your ribbon strips, press a real piece of leather or coarse fabric into the wet clay slab to transfer a realistic grain texture onto the ceramic ‘straps’.
Step 4: Finishing
-
Bisque Fire:
Allow the entire piece to dry very slowly under plastic to prevent the delicate bow from cracking. Once bone dry, bisque fire the piece to the appropriate cone (usually Cone 04). -
Apply Oxide Wash:
Mix red iron oxide with water (or use a terra cotta underglaze). Carefully paint this only onto the ribbon and bow areas. Wipe away any excess with a clean, damp sponge so the color stains the clay but doesn’t look like solid paint. -
Glaze:
Dip or brush the entire box (avoiding the bottom touching the shelf) in a clear matte or clear satin glaze. This will seal the clay and heighten the speckled effect. -
Final Fire:
Fire the piece to maturity (steps will vary based on your clay body, likely Cone 5 or 6). Once cool, your ceramic gift box is ready.
This delightful ceramic package makes a perfect permanent wrapping for jewelry or handwritten notes.


The Complete Guide to Pottery Troubleshooting
Uncover the most common ceramic mistakes—from cracking clay to failed glazes—and learn how to fix them fast.
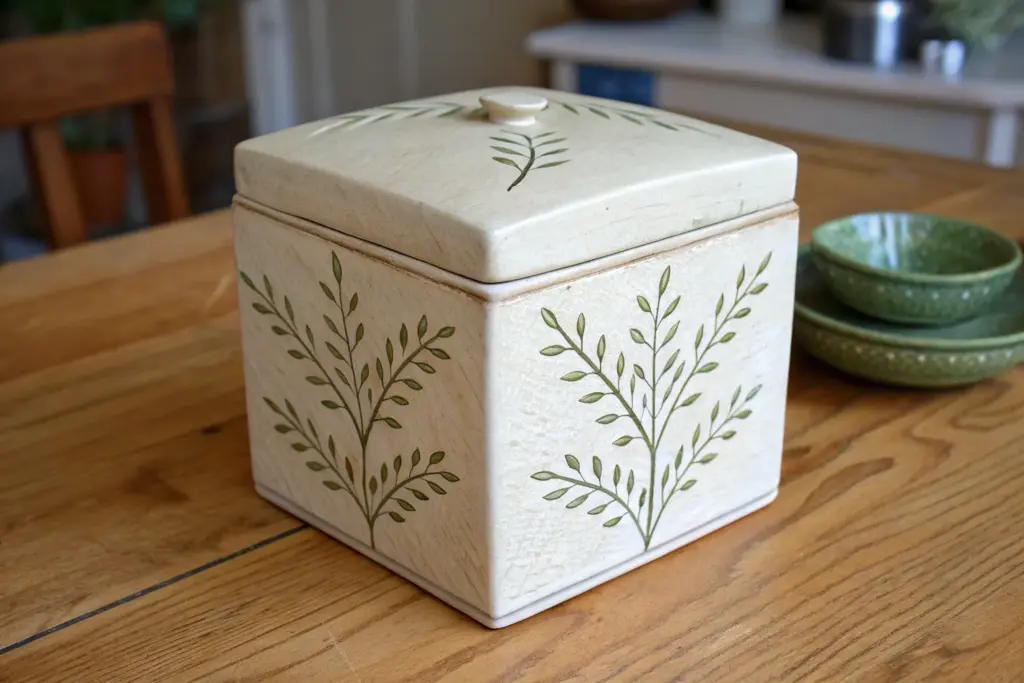
Carved Floral Sgraffito Slab Box on Flat Panel Sides
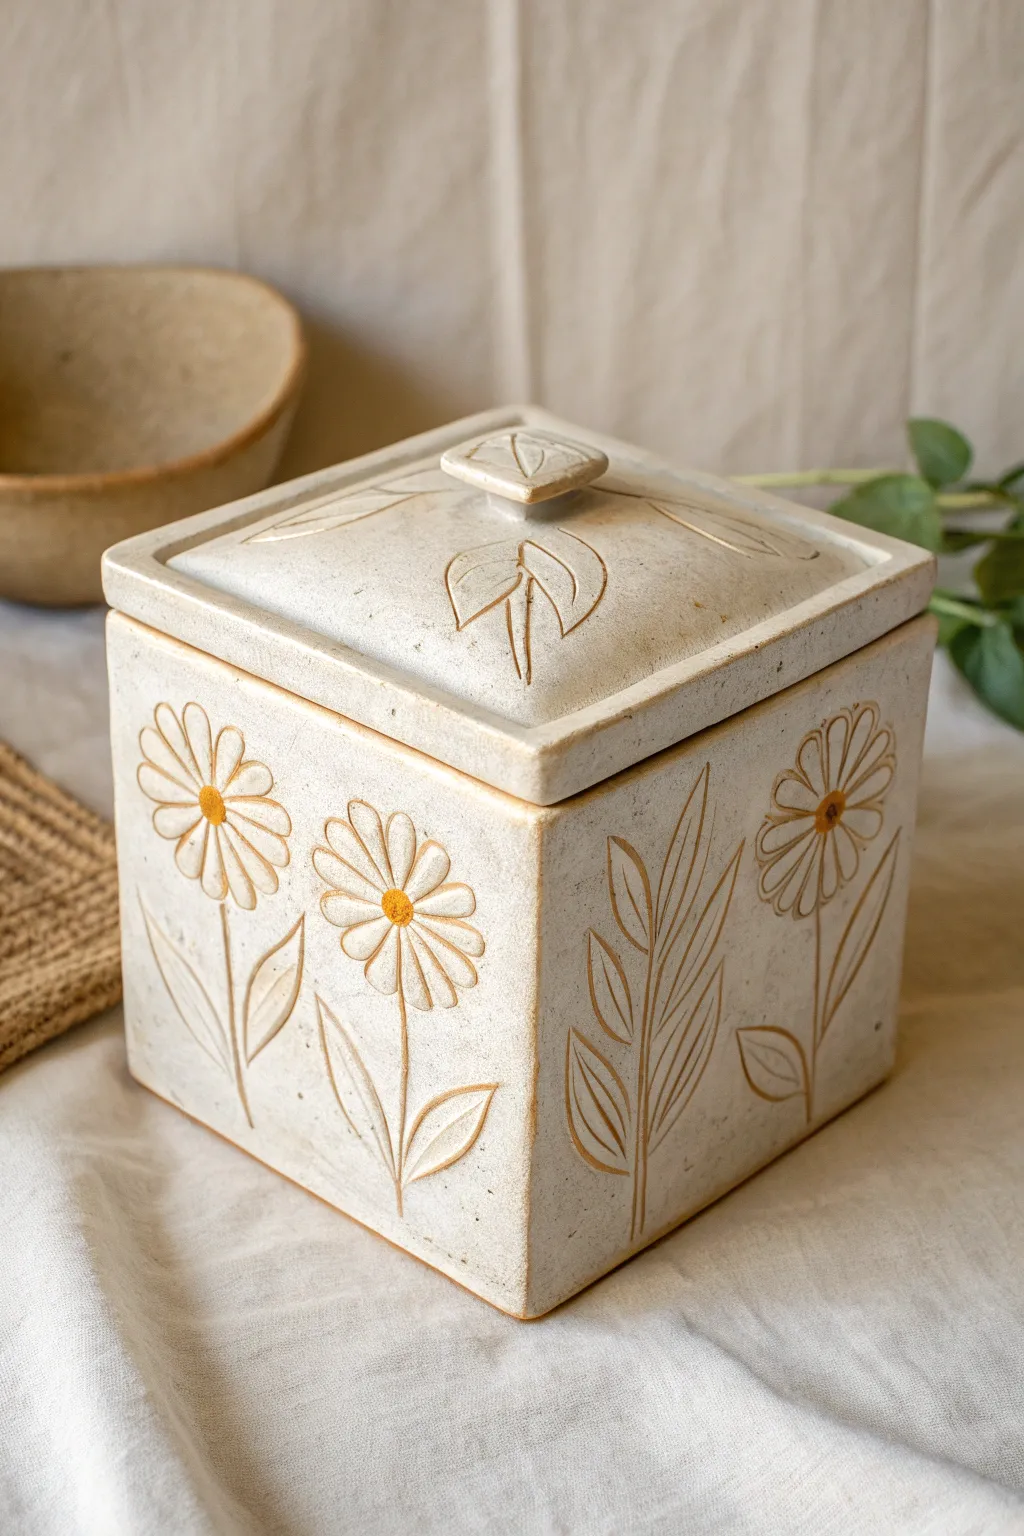
This charming ceramic box blends sturdy slab construction with delicate, hand-carved floral motifs. Its earthy, speckled clay body and warm yellow accents create a vintage farmhouse aesthetic perfect for storing tea or trinkets.
Step-by-Step
Materials
- Speckled stoneware clay
- Rolling pin and guide sticks (about 3/8 inch thick)
- Ruler and needle tool
- Fettling knife
- Serrated rib or scoring tool
- Slip (clay mixed with water)
- Small loop carving tool or sgraffito tool
- Sponge
- Yellow underglaze
- Clear matte glaze
- Small paintbrush
- Plastic sheet
Step 1: Slab Preparation & Cutting
-
Roll the Slabs:
Begin by rolling out your speckled stoneware clay into a large, even slab. Use guide sticks to ensure a consistent thickness of roughly 3/8 inch, which provides good structural integrity for a box this size. -
Recompress the Clay:
Run a rubber rib firmly over both sides of the slab. This compresses the clay particles, helping prevent warping during firing and creating a smooth canvas for your future carving. -
Measure and Cut:
Using a ruler and fettling knife, cut four equal square walls (e.g., 5×5 inches) and one square base slightly smaller to fit inside the walls. Don’t forget to cut a separate square for the lid, making it slightly larger than the box opening. -
Leather Hard Stage:
Let the cut pieces sit on a ware board covered lightly with plastic until they reach a stiff leather-hard state. They need to be firm enough to stand up without slumping but soft enough to score and join.
Warping Woes?
If your lid doesn’t fit after firing, dry the box and lid together next time! Keeping them paired while drying ensures they shrink at the same rate and maintain their fit.
Step 2: Box Assembly
-
Bevel the Edges:
For a seamless look, cut 45-degree angles on the vertical edges of your four wall pieces. This miter joint creates cleaner corners than a simple butt joint. -
Score and Slip:
Rough up the beveled edges and the perimeter of the base with a serrated rib. Apply a generous amount of slip to all scored areas. -
Join the Walls:
Assemble the four walls onto the base, pressing the mitered corners firmly together. Use a small coil of soft clay on the interior seams to reinforce the joints, smoothing it out with your thumb. -
Refine the Exterior:
Paddle the outside of the box gently with a wooden paddle to sharpen the corners and ensure the walls are perfectly straight. Smooth away any visible seams with a rib.
Step 3: Lid Construction
-
Create the Flange:
Flip your box over onto the underside of your lid slab and trace the perimeter lightly. Score and slip a small coil or square strip of clay just inside this traced line to create a flange that keeps the lid from sliding off. -
Add a Handle:
Fashion a small, geometric handle or knob from scrap clay. Score and slip it onto the center of the lid, making sure it’s easy to grip.
Level Up: Oxide Wash
After bisque firing, wipe a dark iron oxide wash over the carvings and sponge it back. This will darken the recessed lines, making the floral design pop dramatically.
Step 4: Carving & Decoration
-
Sketch the Design:
Once assembled and stable, lightly sketch your floral design onto the clay surface using a pencil. I find the pencil lines burn out in the kiln, so don’t worry about erasing mistakes. -
Carve the Outlines:
Using a small loop tool or V-tip carving tool, gently carve along your pencil lines. Remove long ribbons of clay to create the stems, leaves, and petal outlines. -
Detail Work:
Add interior lines to the leaves and petals for texture. Vary the depth of your carving slightly to give the design a more organic, hand-drawn feel. -
Clean Up Burrs:
After carving, let the box dry a bit more, then gently rub the surface with a barely damp sponge or your finger to remove any sharp clay crumbs or ‘burrs’ created by the tool. -
Apply Underglaze:
Using a small detail brush, paint yellow underglaze specifically into the centers of the carved daisies. You can be loose with this, or precise depending on your style. -
Final Drying:
Allow the entire piece to dry slowly under loose plastic to prevent uneven shrinkage between the thick and thin areas.
Step 5: Finishing
-
Bisque Fire:
Fire the bone-dry piece to bisque temperature (usually cone 04) to prepare it for glazing. -
Glaze Application:
Dip or brush a clear matte glaze over the entire piece. The matte finish enhances the rustic stone texture while protecting the yellow underglaze and carving. -
Glaze Firing:
Fire the piece to the final maturity temperature of your clay body (likely cone 5 or 6). Once cool, sand the bottom if necessary.
Enjoy using your beautiful new box to hold your favorite teas or small treasures
Mishima Linework Slab Box With Bold Geometric Patterns
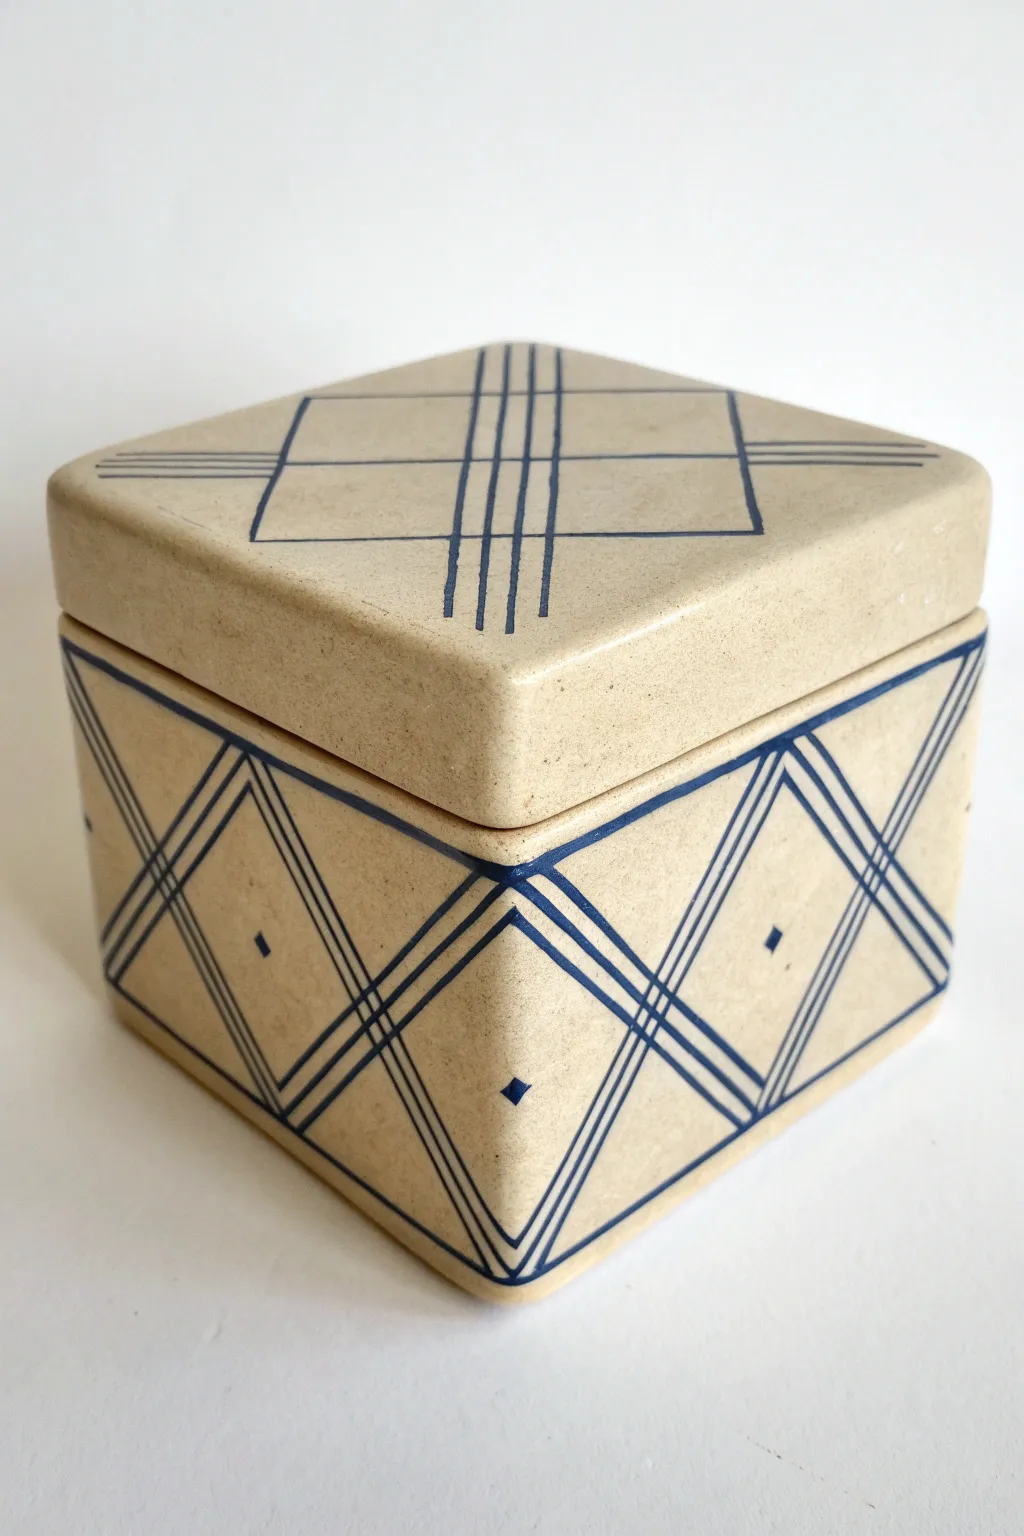
This elegant ceramic box features crisp, inlaid blue lines using the traditional Mishima technique to create a bold geometric design on natural clay. The clean slab construction and precise pattern work result in a modern, sophisticated container perfect for storing small treasures.
Detailed Instructions
Materials
- Beige stoneware clay slab (approx. 1/4 inch thick)
- Ruler
- Fettling knife or craft knife
- Slip (clay slurry)
- Scoring tool or serrated kidney
- Carving tool (needle tool or small loop tool)
- Blue underglaze or slip
- Wax resist
- Clean sponge and water
- Metal scraper or rib
- Clear glaze (optional)
Step 1: Constructing the Box Base
-
Cut the slabs:
Roll out your beige stoneware clay to an even 1/4 inch thickness. Using a ruler and knife, cut out five squares for the box base. For a 4-inch box, you will need one 4×4 inch base and four 4×4 inch side walls. -
Leather hard preparation:
Allow your cut slabs to dry slowly until they reach a firm leather-hard state. This stiffness is crucial for maintaining sharp corners and geometric precision during assembly. -
Bevel the edges:
For the cleanest seams, cut the vertical edges of your side walls and the edges of your base at a 45-degree angle. This miter joint creates a stronger bond and a invisible seam. -
Score and slip:
Rough up all beveled edges with your scoring tool and apply a generous amount of slip. Score thoroughly; you want to create a messy, sticky surface. -
Assemble the walls:
Press the walls onto the base and against each other. Apply firm, even pressure to ensure a tight bond. Clean up excess slip from the inside corners with a soft brush or fingertip. -
Reinforce seams:
Roll a very thin coil of soft clay and press it into the interior seams. Smooth it out completely so it disappears, adding structural integrity to your corners.
Smudgy Lines?
Work cleaner instantly: Wipe perpendicular to your carved lines, not parallel. This prevents the sponge from scooping out the inlaid underglaze.
Step 2: Creating the Lid
-
Measure the opening:
Measure the outside dimensions of your assembled box. Cut a slab square slightly larger than this (about 1/8 to 1/4 inch overhang) for the lid top. -
Add a flange:
To keep the lid secure, add a flange on the underside. Cut four strips of clay and attach them to the bottom of the lid slab, positioned so they fit snugly inside the box opening.
Level Up: Texture Contrast
After the wax resist step, lightly sponge away some clay grain from non-carved areas to create a subtle texture difference against the smooth inlaid lines.
Step 3: Mishima Patterning
-
Plan the design:
Lightly sketch your geometric grid pattern onto the leather-hard box and lid using a soft pencil. The graphite will burn off in the kiln, leaving only your carving guide. -
Coat with wax:
I find it helpful to brush a coat of wax resist over the entire exterior surface before carving. This protects the pristine clay surface from staining when you wipe back the underglaze later. -
Carve the lines:
Using a needle tool or specialized Mishima carving tool, firmly incise your lines through the wax and into the clay. Keep your pressure consistent to create channels of uniform depth. -
Apply the color:
Generously paint blue underglaze over all the carved lines. Don’t worry about being neat; you want the underglaze to fill the carved channels completely. -
Let it set:
Allow the underglaze to dry until it is no longer shiny. This prevents you from pulling wet color out of the grooves during the next step. -
Wipe back:
Using a clean, damp sponge or a metal scraper, remove the excess underglaze from the surface. The wax resist will help it slide off the high points, leaving color only trapped in the incised lines. -
Final clean up:
If using a scraper, gently scrape the surface to reveal crisp, sharp lines. If using a sponge, wipe carefully to avoid ‘dishing’ out the clay or removing too much color. The pattern should look inlaid and flush with the surface.
Step 4: Finishing
-
Bisque fire:
Once the box is bone dry, bisque fire it to the appropriate temperature for your clay body (usually Cone 04 or 06). -
Glaze application:
Apply a clear, transparent glaze to seal the box and make the blue lines pop. Alternatively, leave the exterior unglazed for a matte, stone-like texture, glazing only the interior for functionality. -
Final firing:
Glaze fire the piece to maturity. Ensure the lid is fired separately or with kiln wash on the contact points to prevent it from fusing shut.
Once fired, you will have a stunning, architecturally inspired box that showcases the beauty of hand-carved geometry.

TRACK YOUR CERAMIC JOURNEY
Capture glaze tests, firing details, and creative progress—all in one simple printable. Make your projects easier to repeat and improve.
Marbled Surface Slab Box With Swirly Color Blocking
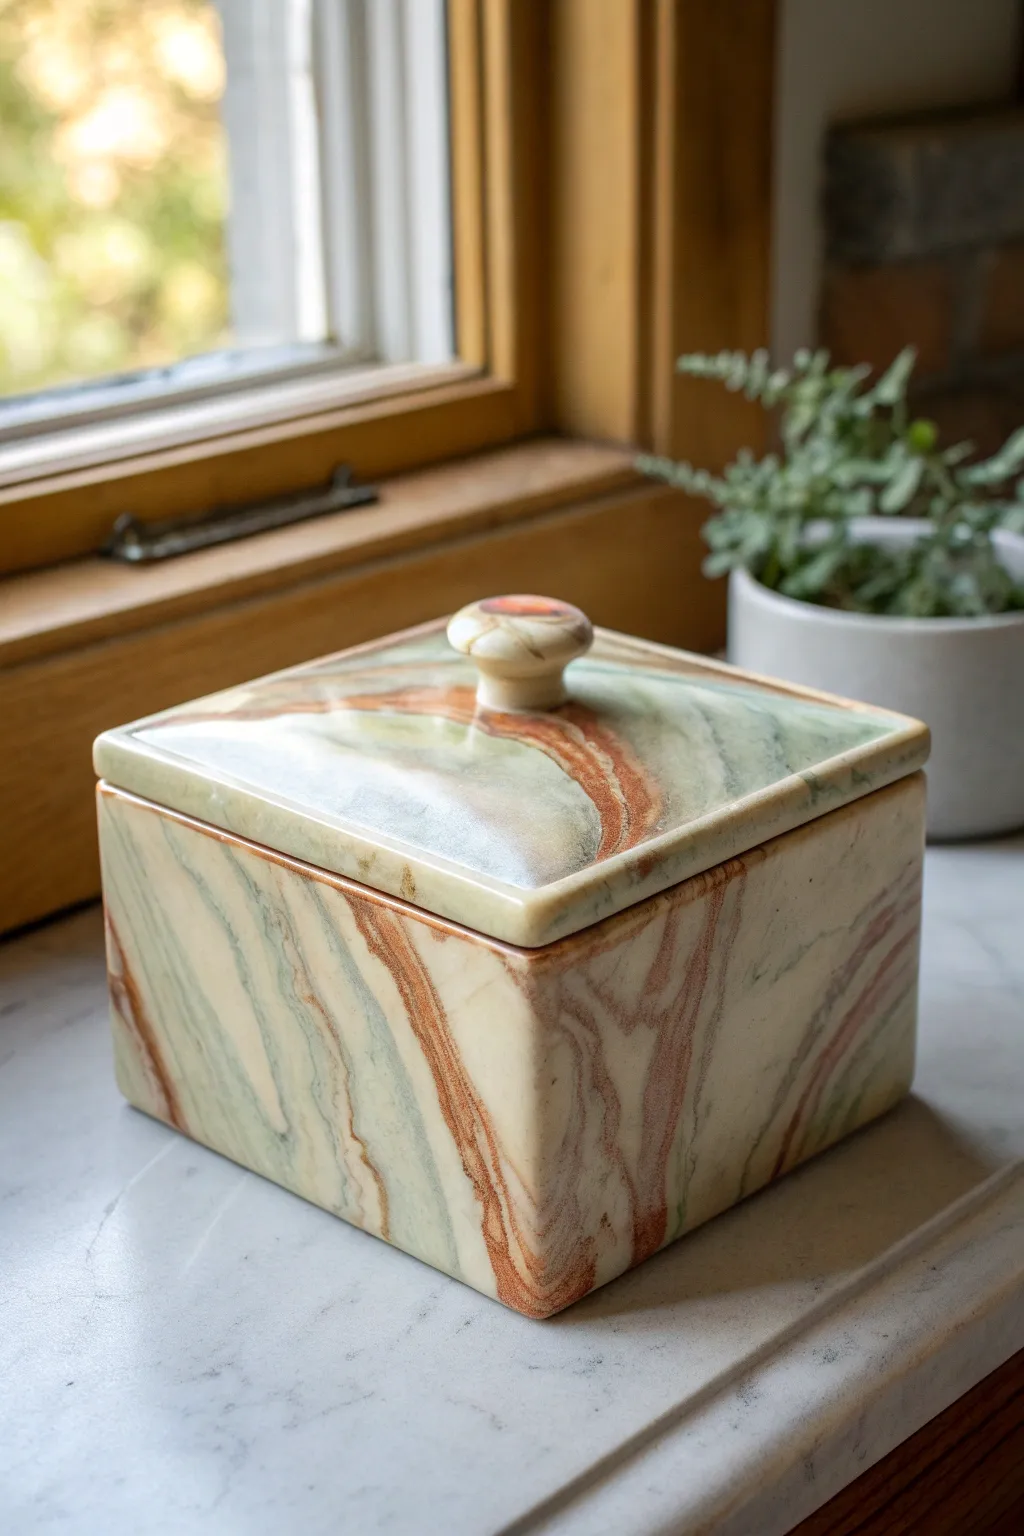
Recreate the sophisticated look of polished green onyx using swirled polymer or ceramic clays. This slab-built box features organic veins of rust, cream, and sage green that mimic natural stone, finished with a matching knob for a seamless, high-end appearance.
How-To Guide
Materials
- White clay body (earthenware or polymer)
- Mason stains or clay pigments (Sage Green, Rust/Burnt Orange, Warm Brown)
- Pottery knife or fettling knife
- Rolling pin
- Canvas board or slab mat
- Guide sticks or smooth slats (approx. 1/4 inch thick)
- Scoring tool or serrated rib
- Slip (liquid clay slurry)
- Ruler
- Clay shaper or wooden blending tool
- Glossy clear glaze or high-gloss varnish (for polymer)
- Sponge
Step 1: Preparing the Marbled Clay
-
Coloring the Clay:
Divide your white clay into four unequal portions. Keep the largest portion white. Tint the others using your pigments: a medium amount of sage green, a smaller amount of rust/orange, and a tiny accent amount of warm brown. Knead until the color is consistent. -
Stacking the Loaf:
Form each color into thick, rough logs. Twist the logs together like a candy cane, then fold the twisted log in half. Repeat this twisting and folding process 2-3 times—don’t overmix, or the distinct colors will turn muddy. -
Creating the Slab:
Slam the marbled log onto your canvas to flatten it slightly. Using guide sticks on either side for even thickness, roll the clay out into a large, consistent slab. I prefer to roll in different directions to stretch the marbling pattern organically. -
Smoothing the Pattern:
Run a rubber rib tool firmly over the surface of the slab. This compresses the clay particles and smears the colors slightly, creating that fluid, stone-like aesthetic.
Step 2: Constructing the Box
-
Cutting the Walls:
Using a ruler and fettling knife, cut four equal rectangles for the walls and two squares (one for the base, one for the lid). Ensure your measurements are precise for a square fit. -
beveling the Edges:
For the crispest corners, cut the vertical edges of your wall pieces at a 45-degree angle. This allows them to fit together seamlessly without exposing end-grain. -
Scoring and Slipping:
Score (scratch) and slip (add liquid clay) the edges of the base and the bottom of your first wall. Press them firmly together. -
Assembling the Walls:
Attach the remaining walls, scoring and slipping the beveled corners. Reinforce the interior seams by running a thin coil of clay into the joint and smoothing it down with a wooden tool. -
Refining the Form:
Check that the box is perfectly square. Paddle the outside gently with a flat wooden spatula to sharpen the corners and ensure the walls are straight.
Muddy Colors?
If your colors are blending into a single grey-brown, stop kneading sooner. You want distinct chunks of color in your initial clay log before rolling it out.
Step 3: Creating the Lid & Finishes
-
Fitting the Lid:
Flip your lid slab over. Use spare clay offcuts to build a small interior flange or “gallery” (a square ring of clay) on the underside of the lid. This ring should fit just inside the box opening to keep the lid from sliding off. -
Shaping the Knob:
Roll a small ball of your marbled clay. Pinch the bottom to create a pedestal shape and flatten the top slightly to mimic a mushroom cap. It should feel ergonomic to grip. -
Attaching the Handle:
Score the center of the lid top and the base of your knob. Join them with slip, pressing down firmly to ensure a solid bond. Clean up any excess slip with a brush. -
Drying:
Place the lid on the box with a piece of paper towel in between to prevent sticking. Let them dry slowly under loose plastic to avoid warping. -
Bisque Firing:
Once bone dry, fire the piece to the appropriate bisque temperature for your specific clay body. -
Glazing:
Apply a clear, high-gloss glaze. This is crucial for mimicking the look of polished stone, as it deepens the colors and adds that reflective ‘wet’ look seen in onyx.
Make it Shine
For an ultra-realistic stone effect, sand the piece with fine-grit wet sandpaper after firing but before glazing, or use a diamond polishing pad on the bare clay.
Display your faux-stone box on a sunny shelf often to catch that beautiful light reflection
Story Panel Slab Box With Carved “Scenes” on Each Side
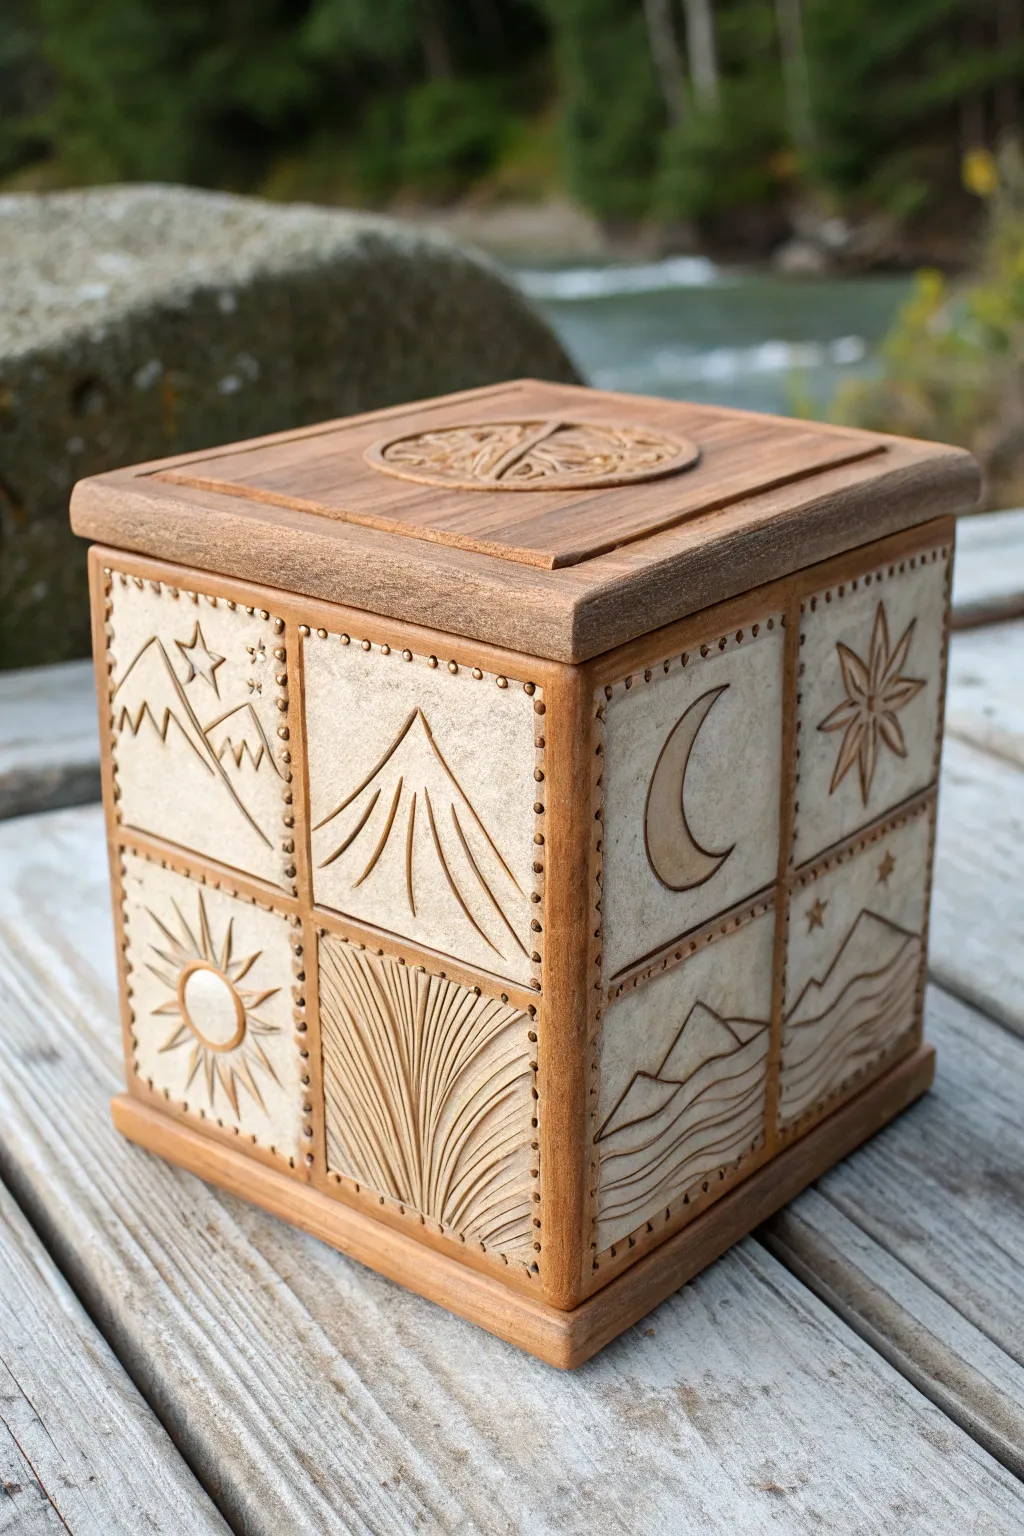
This rustic, nature-inspired box features carved panels telling a story on every side, from moonlit nights to sun-drenched mountains. The construction mimics the warmth of wood while utilizing the versatility of slab-rolled clay to create deep, relief-style imagery.
Step-by-Step Tutorial
Materials
- Stoneware clay (buff or brown speckle)
- Slab roller or rolling pin with thickness strips
- Fettling knife or craft knife
- Needle tool
- Carving loop tools (small and medium)
- Measuring tape or ruler
- Slip and scoring tool
- Wooden paddle
- Iron oxide wash or wood-tone underglaze
- Matte transparent glaze (optional)
- Sponge
Step 1: Preparing the Slabs
-
Roll the clay:
Begin by rolling out a consistent slab of clay, approximately 3/8 inch thick. Ensure the slab is large enough to cut four wall panels, a base, and a lid. -
Texture the surface (optional):
If you want a wood-grain effect for the frame borders, execute this now by dragging a serrated rib or stiff brush gently across the clay surface before cutting. -
Let it stiffen:
Allow the clay slab to dry to a ‘leather-hard’ state. This is crucial for slab construction; if the clay is too soft, the box walls will warp or slump during assembly. -
Measure and cut:
Using a template or ruler, cut four identical square wall pieces (e.g., 5×5 inches), one base piece, and one lid piece. Miter heavy edges at a 45-degree angle if you want seamless corners, or use butt joints for a simpler rustic look. -
Define the panels:
On each of the four wall pieces, lightly scribe a border about 1/2 inch from the edge. Draw a cross in the center to divide the face into four smaller quadrants. This creates the ‘windowpane’ layout for your scenes.
Depth Trick
Carve at two different depths. Deep cuts for the main outline and shallow scratches for texture create a stunning 3D shadow effect.
Step 2: Carving the Imagery
-
Sketch the scenes:
Lightly draw your nature designs into the quadrants using a needle tool. Alternate themes like mountains, a crescent moon, a radiating sun, and flowing water lines to create visual variety. -
Carve the relief:
Use a small loop tool to carve away the negative space around your designs. For the mountains and moon, lower the background clay so the main shapes appear raised. -
Add line details:
Switch to a sharp needle tool or fine sgraffito tool to incise distinct lines, such as the rays of the sun or the ripples in the water panels. -
Detail the frame:
To give the border a riveted or stitched look, use a small, blunt tool (like the end of a paintbrush) to press uniform dots along the inner edge of your frame borders. -
Lid decoration:
Carve a circular medallion feature in the center of the lid piece, perhaps mirroring the mountain or tree motif, to tie the design together.
Level Up: Hidden Compartment
Create a false bottom inside the box by adding a second slab floor 1 inch above the real base for hiding tiny treasures.
Step 3: Assembly and Finishing
-
Score and slip:
Thoroughly score (scratch) and apply slip to all connecting edges of the base and wall pieces. -
Construct the box:
Assemble the walls onto the base. Reinforce the inner seams by firmly pressing a thin coil of soft clay into the corners and smoothing it out with your finger or a modeling tool. -
Paddle into shape:
Gently tap the exterior walls with a wooden paddle to ensure they are perfectly square and the joints are tight. I typically do this twice—once immediately after joining, and again after thirty minutes. -
Add lid flange:
Flip the lid over and attach a smaller square of clay (or four small strips) to the underside. This inner flange will keep the lid from sliding off the finished box. -
Clean up edges:
Smooth any sharp edges with a damp sponge, being careful not to blur your crisp carvings. -
Bisque fire:
Allow the piece to dry slowly under plastic to prevent warping, then bisque fire according to your clay body’s instructions. -
Apply oxide wash:
Mix iron oxide with water and brush it liberally over the entire piece, ensuring it gets into the carved crevices. -
Wipe back:
Using a damp sponge, wipe away the oxide from the raised surfaces. The dark color will remain in the carved recesses, highlighting the design and simulating wood grain. -
Final fire:
Fire the piece to maturity. A clear matte glaze can be applied beforehand if you want the box to be sealed, or leave it bare for a raw, tactile finish.
Once fired, this durable box becomes a timeless vessel for your most precious small items
Divider Slab Box With Two Interior Compartments
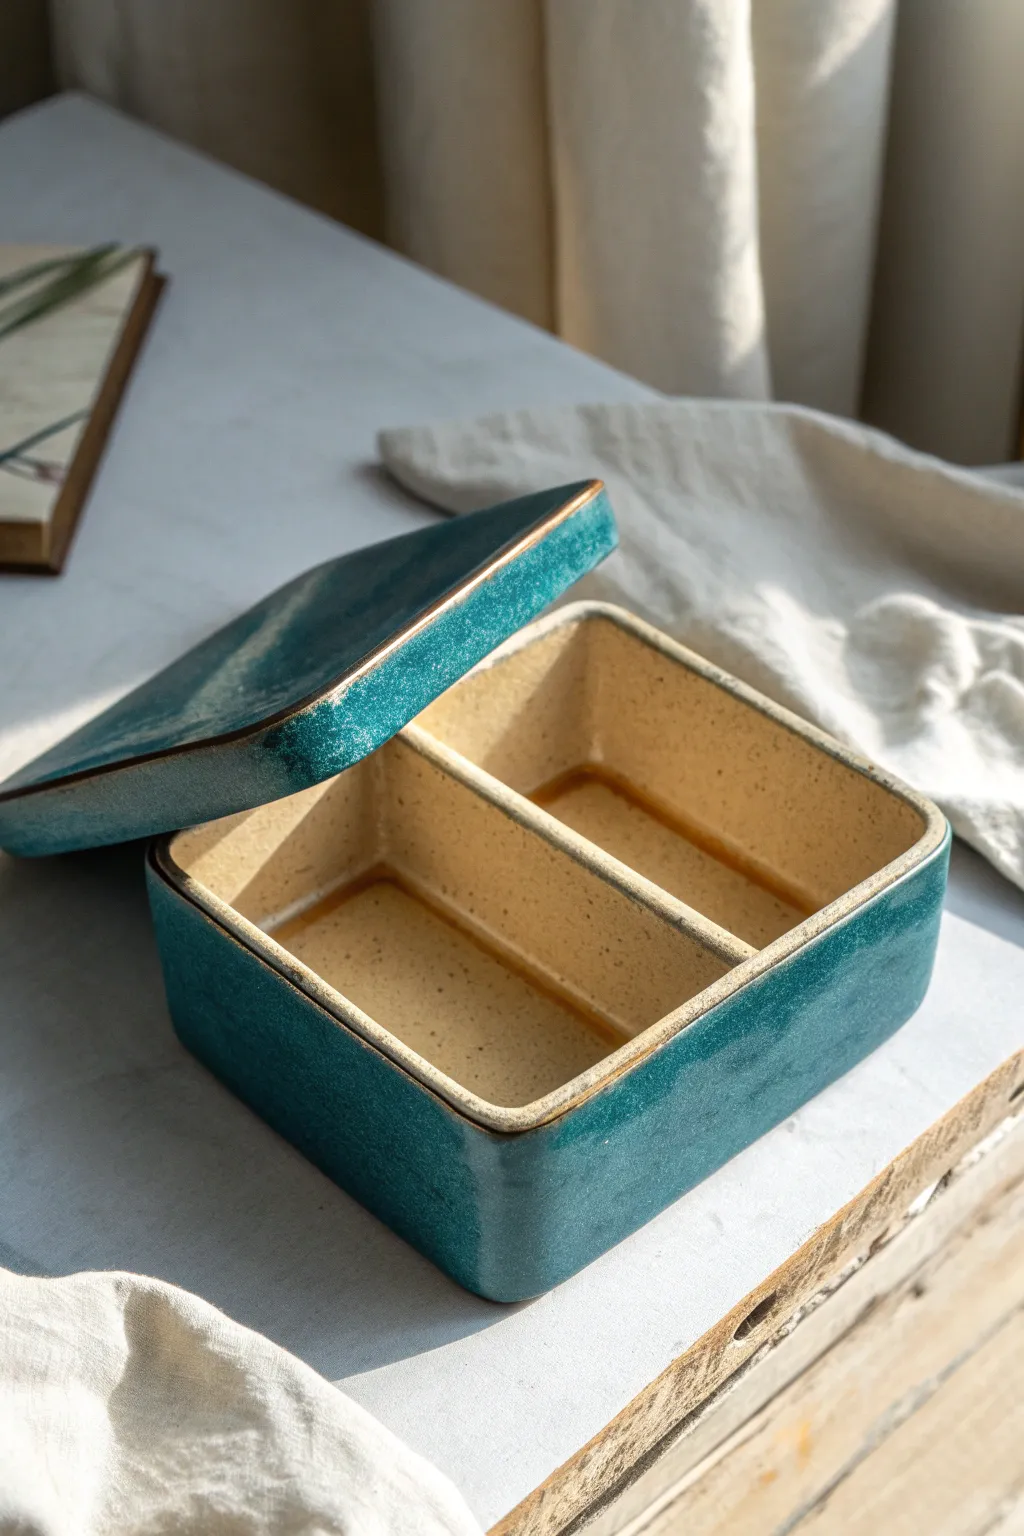
This elegant ceramic box features a glossy teal exterior contrasted with a warm, speckled cream interior, perfect for keeping small treasures organized. Its clean lines and functional two-compartment design make it a satisfying project that builds essential slab-building skills.
Step-by-Step Guide
Materials
- Stoneware clay body suitable for slab work
- Rolling pin
- Two smooth wooden guiding strips (approx. 1/4 inch thick)
- Fettling knife or sharp clay tool
- Ruler or set square
- Scoring tool or serrated rib
- Slip (clay slurry)
- Wooden paddle
- Sponge
- Plastic sheet or ware board
- Brushes for glazing
- Teal/Turquoise glossy glaze
- Speckled cream/oatmeal matte glaze
Step 1: Preparing the Slabs
-
Roll out the clay:
Begin by wedging your clay thoroughly to remove air bubbles. Place the clay between your two wooden guiding strips and use the rolling pin to create a large, even slab. The strips ensure a consistent 1/4 inch thickness throughout. -
Smooth the surface:
Before cutting, compress the slab on both sides using a rib tool. This aligns the clay particles, preventing warping later, and creates a nice canvas for that smooth teal glaze. -
Measure and cut components:
Using your ruler and fettling knife, cut out the required pieces: one base rectangle, four side walls, one central divider wall that matches the interior width, and one lid piece that is slightly larger than the base to account for the overhang. -
Let them firm up:
Allow your cut slabs to dry to a ‘leather-hard’ state. They need to be stiff enough to hold their shape upright without bending, but soft enough to join. I usually leave them uncovered for an hour or so, checking frequently.
Step 2: Constructing the Box
-
Score and slip the base:
Take your base piece and score the perimeter edges where the walls will attach. Apply a generous amount of slip to these rough areas. -
Attach the first wall:
Score the bottom edge of a long side wall. Press it firmly onto the base. Use a small coil of clay on the interior seam to reinforce the joint, blending it smooth with your finger or a modelling tool. -
Add adjacent walls:
Repeat the process with the short walls. Score and slip the vertical edges where the walls meet. Ensure your corners are perfectly square, as this precision is key for the lid fitting later. -
Install the divider:
Mark the exact center of the box on the interior of the long walls. Score vertical lines at these marks and on the edges of your divider piece. Slide the divider in, press firmly, and reinforce the seams with tiny clay coils. -
Paddle into shape:
Once all walls are attached, gently tap the exterior with a wooden paddle. This helps compress the joints further and sharpens the box’s rectangular form.
Warped Walls?
If your walls start bowing inward while working, the clay is too soft. Stuff the compartments with crumpled newspaper or foam to support the walls while they stiffen up to leather-hard.
Step 3: Creating the Lid
-
Add a flange or gallery:
To keep the lid secure, you need a mechanism to stop it sliding off. You can either add a small strip of clay to the underside of the lid (inset from the edge) that fits inside the box, or cut a gallery into the box rim. For this look, a flange on the lid underside works best. -
Refine the lid edges:
Smooth the edges of your lid slab with a damp sponge. The image shows a slightly softened edge rather than a sharp razor cut, which adds to the tactile quality. -
Dry slowly:
Place the lid on top of the box with a piece of newspaper in between to prevent sticking. Wrap the whole piece in plastic and let it dry slowly to prevent warping.
Exposed Rim Detail
To get that crisp brown line on the rim shown in the photo, wipe away all glaze from the very top edge with a distinct, firm stroke of a damp sponge right before firing.
Step 4: Glazing and Finishing
-
Bisque fire:
Once bone dry, fire the piece to bisque temperature (usually Cone 04 or 06). Wipe the fired piece with a damp sponge to remove dust. -
Wax the contact points:
Apply wax resist to the underside of the lid and the rim of the box where they will touch. This prevents the lid from fusing to the box during the glaze firing. -
Glaze the interior:
Pour the speckled cream glaze into the compartments, swirl it around to coat every corner, and pour out the excess. Clean any drips off the rim immediately. -
Glaze the exterior:
Brush or dip the exterior in your glossy teal glaze. Be careful not to get this glaze inside. For the rim detailing seen in the image, you can gently wipe the very edge of the clay with a sponge to reveal the raw clay body, creating a nice border. -
Glaze fire:
Fire the piece to the maturity temperature of your clay and glazes (e.g., Cone 5/6). Make sure to fire the lid on the box (if compatible) or on a separate stilt to maintain its shape.
Now you have a beautifully organized ceramic container ready for jewelry or desk supplies
Wavy Seam Slab Box With an Irregular Lid Cut Line
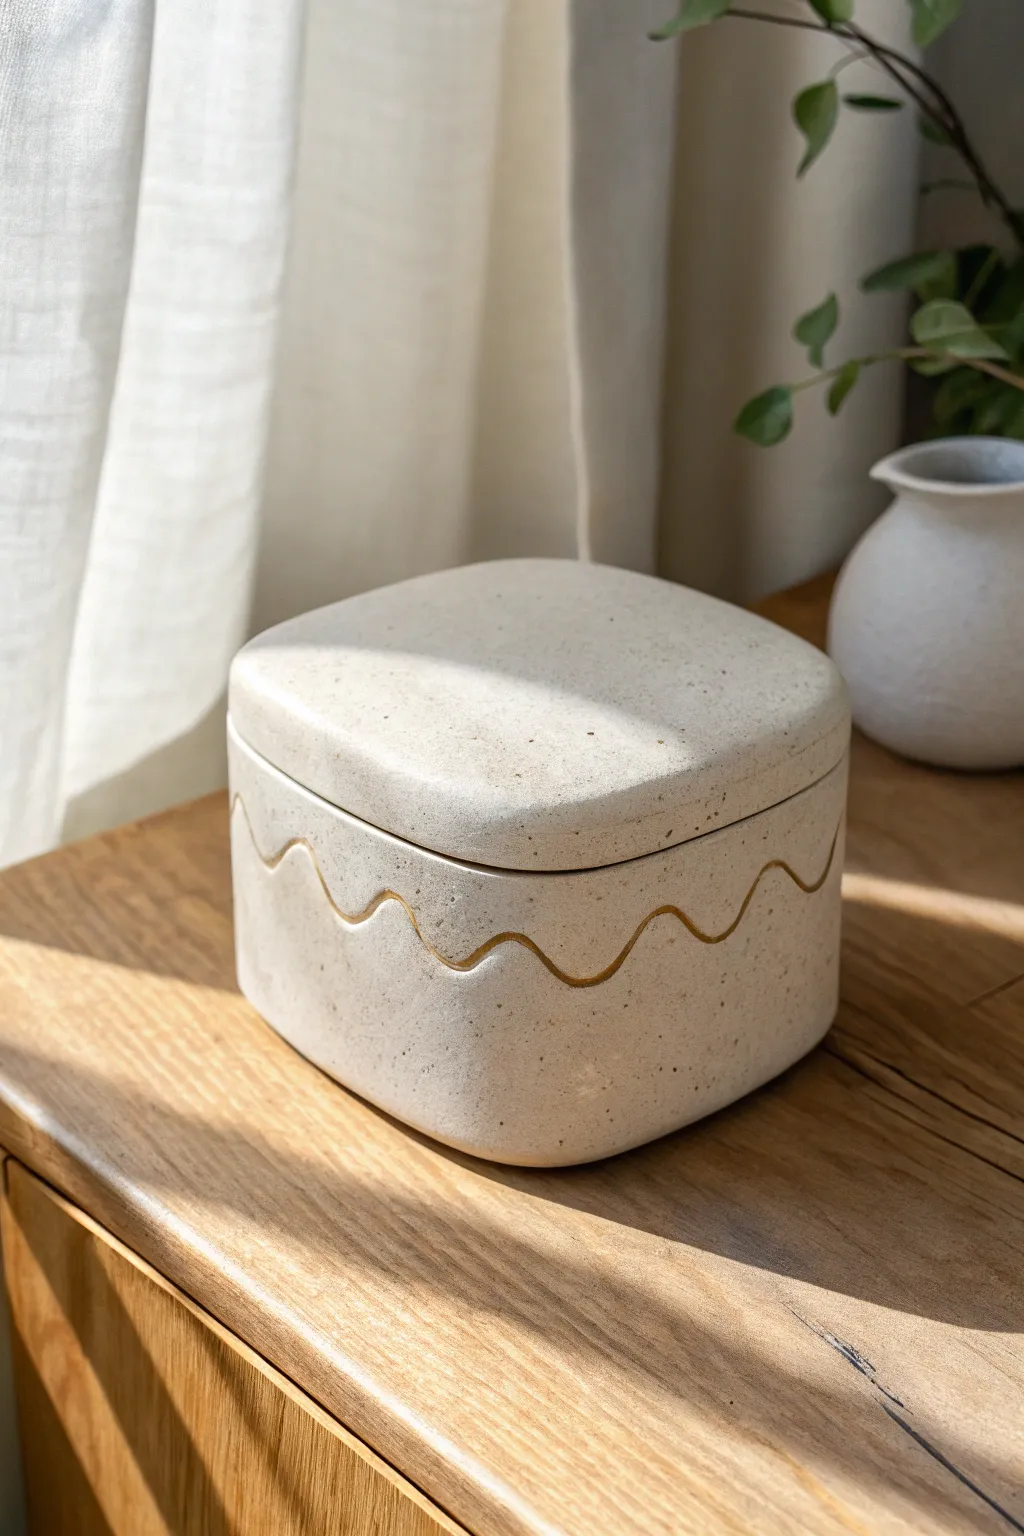
This elegant ceramic box features a soft, square form with rounded corners and a distinctive wavy seam that acts as a hidden locking mechanism for the lid. The speckled clay body and minimalist design create a modern, organic aesthetic perfect for storing small treasures.
Step-by-Step
Materials
- Stoneware clay with speckles (or grog)
- Rolling pin
- Two wooden guide strips (approx. 1/4 inch thick)
- Fettling knife or X-Acto knife
- Paper template (rounded square)
- Scoring tool (serrated rib or needle tool)
- Slip (clay mixed with water)
- Paddle tool
- Plastic wrap
- Sponge
- Matte white or clear matte glaze
Step 1: Creating the Basic Form
-
Roll the Slabs:
Begin by wedging your speckled clay to remove air bubbles. Using wooden guide strips on either side for even thickness, roll out a large slab of clay to approximately 1/4 inch thick. -
Cut the Walls:
Cut a long rectangular strip for the walls. The length needs to be the perimeter of your desired box plus a little overlap for the seam. The height should be taller than the final box to accommodate the lid cut. -
Form the Tube:
Stand the rectangular strip on its edge. Curve it around to form a hollow square shape. Bevel the two joining ends at 45-degree angles to create a stronger overlapping joint. -
Join the Walls:
Score the beveled edges thoroughly and apply slip. Press the ends together firmly to close the shape. Smooth the seam inside and out with a rib so it disappears completely. -
Shape the Box:
While the clay is still plastic but holding its shape, gently push from the inside to round out the four corners. Use a paddle on the outside to keep the walls vertical and flat where needed, ensuring the square shape is symmetrical. -
Attach the Floor and Roof:
Place your hollow tube onto the remaining slab. Trace around the shape twice to cut out a top and bottom piece. Score and slip the top and bottom edges of the wall, then attach the flat slabs to seal the box completely shut like a balloon.
Step 2: Sculpting the Lid
-
Consolidate the Form:
Paddle the now-sealed box gently to ensure the top and bottom seals are tight and the curve is continuous. The air trapped inside acts as support, letting you refine the shape without it collapsing. -
Let it Stiffen:
This is crucial: wrap the box loosely in plastic and let it set to a leather-hard state. I find that if you cut too early, the walls will slump and the wavy line won’t fit back together. -
Draw the Wavy Line:
Once leather-hard, lightly sketch a continuous wavy line around the middle of the box using a needle tool. Ensure the start and end points of your wave meet perfectly. -
Cut the Lid:
Using a sharp, thin fettling knife or X-Acto blade, carefully cut along your traced wavy line. Keep the knife blade perpendicular to the wall at all times to ensure the lid lifts off straight. -
Release the Lid:
Gently lift the lid off. Depending on the clay’s moisture, you might need to wiggle it slightly. Don’t force it; if it sticks, run the knife through the cut one more time.
Clean Cuts Pro Tip
Wrap your box in plastic wrap before cutting the lid. Cut directly through the plastic; it lubricates the blade and prevents clay burrs from forming on the cut edge.
Step 3: Refining and Finishing
-
Add a Flange (Optional but Recommended):
To keep the lid secure, you can add a small coil of clay on the inside of the bottom piece, extending slightly upward past the wavy rim. Alternatively, since the wave itself locks the lid in position, a flange might not be strictly necessary if the fit is precise. -
Clean the Edges:
Smooth the cut edges of both the lid and the base with a damp sponge or a chamois cloth. You want to soften the sharp corners created by the knife without altering the shape of the wave. -
Drying:
Dry the box with the lid placed on top of it. This ensures they warp together (if they warp at all) and remain a perfect fit. Dry slowly under plastic for the first few days. -
Bisque Fire:
Fire the piece to cone 04 (or your clay’s specific bisque temperature). Keep the lid on the box during firing to maintain the fit. -
Glazing:
Apply a wax resist to the wavy rim of both the lid and the base where they touch. Dip or brush your chosen matte glaze on the interior and exterior. -
Final Fire:
Fire to the final temperature (e.g., cone 6). If you are worried about the lid sticking, you can fire them side-by-side, but firing them together is best for shape retention, provided you cleaned the wax resist perfectly.
Level Up: Gallery Ledge
Instead of an added coil flange, carve a ‘gallery’ into the thicker walls of the base. This creates a recessed shelf for the lid to sit flush, offering a super professional finish.
Now you have a stunning, sculptural container that invites curiosity every time someone lifts the lid
Puffed Slab Box With Slightly Bulged, Organic Sides
This project explores the technique of creating a ‘puffed’ or ‘pillowed’ slab box, where the straight lines of a typical hard-edged form are softened into gentle, convex curves. The result is a tactile, organic vessel that feels wonderful in the hand, finished with a subtle matte glaze to let the speckled clay body shine through.
How-To Guide
Materials
- Speckled stoneware clay
- Rolling pin
- Two long wooden guide strips (thickness slats, approx. 1/4 inch)
- Fettling knife or needle tool
- Paper template (square, approx. 5×5 inches)
- Serrated rib or scoring tool
- Slip or magic water
- Soft rubber rib
- Paddle (wooden)
- Sponge
- Caliper (optional)
- Matte cream or white glaze
Step 1: Preparing the Slabs
-
Roll the Clay:
Begin by wedging your speckled stoneware clay thoroughly to remove air bubbles. Using your wooden guide strips, roll out a large slab that is an even 1/4 inch thick. Smooth the surface with a soft rib to compress the clay particles. -
Cut the Shapes:
Using your square paper template, cut out six identical squares. You will need one for the base, four for the walls, and one for the lid. Keep the leftover scraps for the knob and flange. -
Leather Hard Stage:
Lay the squares on a ware board. This is the crucial part: let them dry until they are steep leather hard. They need to be stiff enough to hold their shape without slumping, but soft enough to be manipulated.
Step 2: Assembling the Box
-
Bevel the Edges:
Take four of the squares (the walls) and the base square. Use your fettling knife to cut a 45-degree angle (miter) on the vertical edges where the walls will meet. Do the same for the bottom edge of the walls and the four edges of the base. -
Score and Slip:
Score all the mitered edges aggressively with a serrated tool. Apply a generous amount of slip or magic water to the scored areas. -
Construct the Walls:
Attach two walls to the base first, pressing them firmly together at the corner. Add the remaining two walls. It’s helpful to work on a banding wheel so you can turn the piece easily. -
Reinforce Seams:
Roll a very thin coil of soft clay. Press this into the interior corners of the box to reinforce the seams, then smooth it flat with a modeling tool so it becomes invisible.
Air Trap Trick
To get the best ‘puff,’ seal the box completely shut with a temporary slab on top before paddling. Trapped air pushes walls out evenly. Cut the top off later!
Step 3: Creating the Puffed Effect
-
Paddle the Form:
With the box sealed (you can temporarily place the lid slab on top without attaching it to trap air), take your wooden paddle and gently tap the corners and edges. The trapped air provides resistance, forcing the walls to bow outward slightly. -
Enhance the Curve:
I like to use a soft rubber rib on the outside to further smooth and round over the hard corners. You want the box to look like it’s taking a deep breath, eliminating sharp geometric angles. -
Refine the Lid:
Take the final square slab for the lid. Place it on a piece of foam or a folded towel and gently press from the center outwards with a rib to create a subtle dome shape that matches the puffiness of the box.
Warped Lid Woes?
If your lid rocks after firing, use a circular motion on a flat piece of sandpaper or a concrete floor to grind the high spots down until it sits flush.
Step 4: Adding the Flange and Knob
-
Make the Flange:
Roll a coil or cut strips of slab to create a flange. Score and slip this onto the underside of the domed lid, inset slightly from the edge so that it fits snugly inside the box opening. -
Check the Fit:
Test the lid on the box. If it’s too tight, shave down the flange; if it’s too loose, you may need to add a little clay. Aim for a fit that accounts for shrinkage. -
Create the Knob:
Form a small, thick disk of clay for the knob’s top and a smaller cylinder for the stem. Join them together to create a pedestal shape. -
Attach Knob to Lid:
Score the center of the lid top and the bottom of the knob stem. Attach firmly with slip. Clean up any excess slip with a damp brush.
Step 5: Finishing Touches
-
Smooth and Dry:
Go over the entire piece with a barely damp sponge to remove fingerprints and harsh tooling marks. Let the box dry slowly under plastic to prevent warping, especially the lid. -
Bisque Fire:
Once bone dry, fire the piece to bisque temperature (usually Cone 04). -
Glazing:
Dip or spray the box with a matte cream or off-white glaze. Avoid thick application near the flange and the box rim to prevent the lid from sticking during the firing. -
Final Fire:
Glaze fire to maturity (e.g., Cone 5 or 6 depending on your clay). The heat will meld the glaze with the speckles for that warm, natural finish.
Place this charming box on your dresser or shelf and enjoy the blend of geometric structure and organic softness
Cheese Block Slab Box With Holes and Tiny Character Details
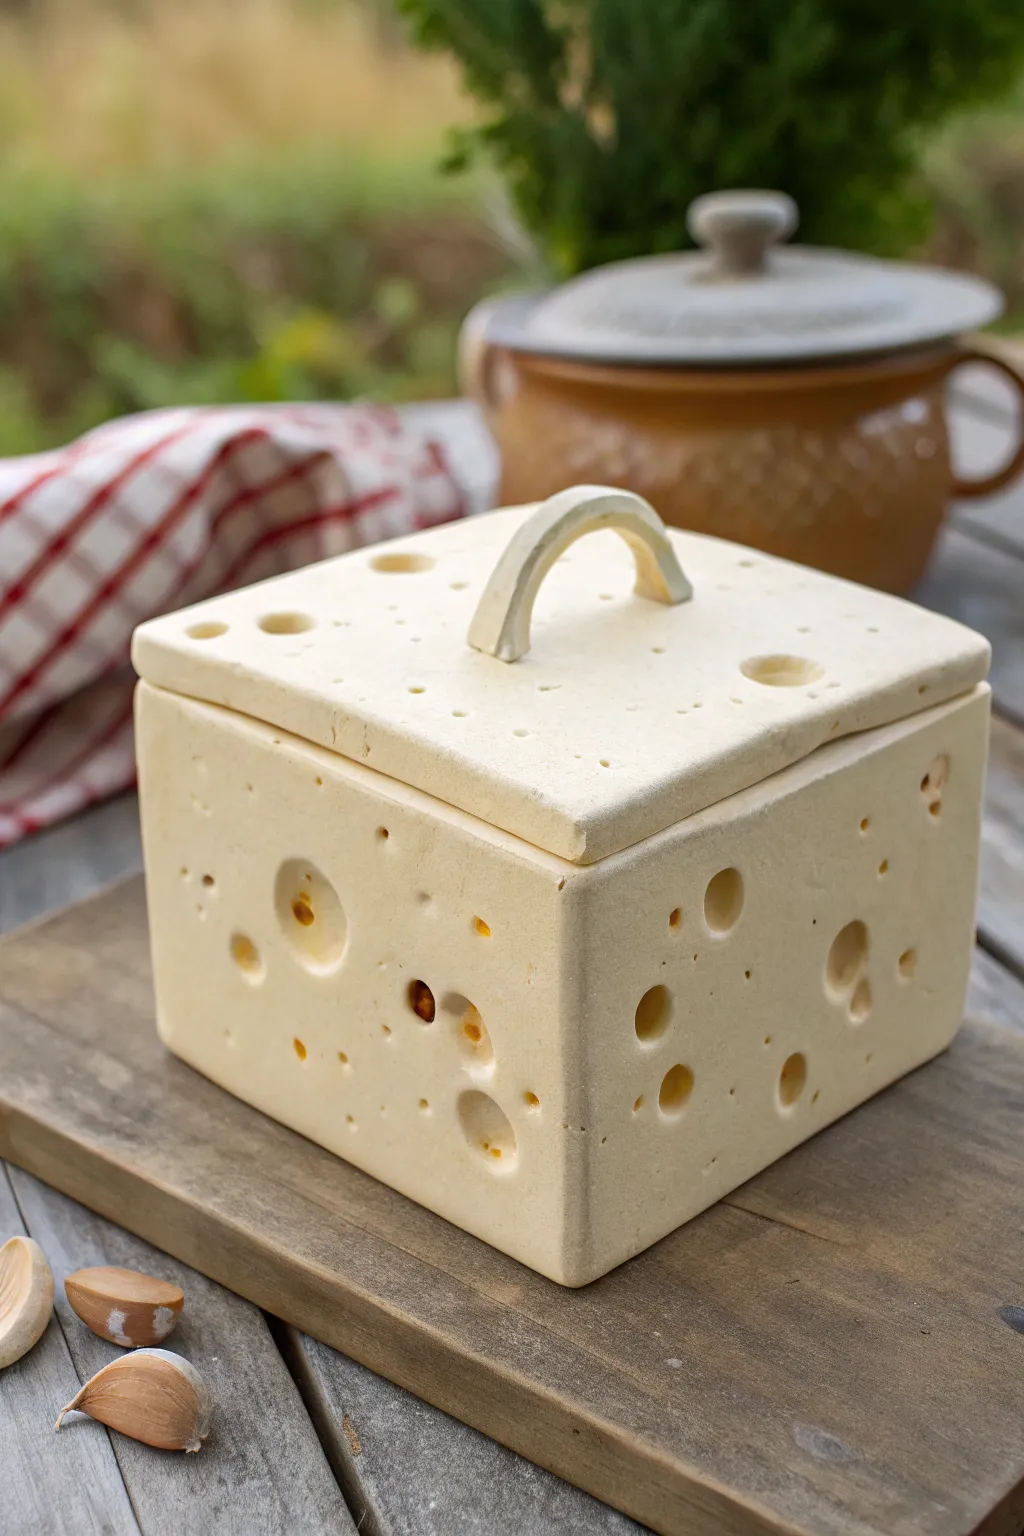
This whimsical lidded box is constructed from slabs to mimic a block of Swiss cheese, complete with realistic-looking holes and a creamy matte finish. It makes a delightful kitchen container or a conversation-starting piece for your pottery collection.
Detailed Instructions
Materials
- Light-colored stoneware or porcelain clay
- Rolling pin and guide sticks (about 1/4 inch thick)
- Fettling knife or needle tool
- Scoring tool (serrated rib)
- Slip (clay mixed with water)
- Various circle cutters or hole punches (different sizes)
- Ball stylus tool
- Sponge
- Ruler or square edge
- Matte cream or pale yellow glaze
Step 1: Slab Preparation and Cutting
-
Roll the Slabs:
Start by rolling out a consistent slab of clay using your guide sticks for an even 1/4 inch thickness. Compress the clay with a rib on both sides to align the particles and prevent warping later. -
Measure Your Templates:
Decide on the size of your square box; a 5-inch cube works well. You will need to cut four side walls, one base, and one lid piece. Remember to account for the thickness of the clay when measuring the base piece. -
Cut the shapes:
Using a ruler and a fettling knife, cut out your four walls, the base square, and the lid square. Allow these pieces to stiffen to a soft leather-hard stage so they can stand up without slumping. -
Bevel the edges:
For a really crisp corner, bevel the vertical edges of your wall pieces at a 45-degree angle. This increases the surface area for the join, though a simple butt joint also works if you score thoroughly.
Hole Placement Tip
Don’t evenly space the holes. Natural cheese has random clustering. Group a large hole with two tiny ones for an organic, unplanned look.
Step 2: Assembling the Box
-
Score and Slip:
Aggressively score the edges that will touch—the sides of the base and the vertical edges of the walls. Apply a generous amount of slip to these scored areas. -
Construct the Walls:
Attach the walls to the base first, pressing firmly. Then, join the walls to each other at the corners. I find it helpful to use a small coil of soft clay on the interior seams to reinforce the connection. -
Smooth the seams:
On the outside, use a rib or a wooden tool to smooth the vertical seams so the clay looks like one solid block. The corners should be somewhat rounded, not sharp, to mimic organic cheese. -
Fit the lid:
Place your lid slab on top. To keep it from sliding off later, add a small flange (a smaller square of clay) or small tabs to the underside of the lid that will fit just inside the box walls.
Step 3: Creating the Cheese Texture
-
Add the Handle:
Roll a small coil or cut a strip of clay and arch it into a simple handle shape. Attach this to the center of the lid using scoring and slip. -
Punch the Holes:
Now for the fun part: using various sizes of circle cutters, punch holes randomly into the box walls and the lid. Don’t go all the way through on every hole; vary the depth to create visual interest. -
Create indentations:
For smaller ‘divots’ that do not pierce the wall, use a ball stylus or your thumb to gently press rounded depressions into the surface. This variety makes the cheese texture believable. -
Soften the edges:
Freshly cut holes can look sharp and mechanical. Use a damp sponge or your fingertip to softly round over the edges of every hole and indentation. The goal is a soft, melted aesthetic. -
Refine the surface:
Go over the entire exterior with a soft sponge to remove any fingerprints or canvas marks, ensuring the ‘cheese’ surface is smooth.
Mouse Surprise
Sculpt a tiny clay mouse and attach it peeking out of one of the larger holes or sitting on the lid handle for a cute narrative touch.
Step 4: Firing and Glazing
-
Bisque Fire:
Allow the box to dry slowly under plastic to prevent warping, then bisque fire it according to your clay body’s specifications. -
Glaze Application:
Choose a matte satin glaze in a pale cream or very light yellow. A high-gloss glaze makes it look like plastic, so a matte finish is crucial for the cheese look. Dip or brush the glaze evenly. -
Add hints of color (Optional):
If you want extra depth, you can dab a slightly darker ochre underglaze or wash into the deepest recesses of the holes before applying the main glaze, mimicking shading.
Once fired, fill your ceramic cheese block with kitchen trinkets or wrapped candies