A simple slab cylinder is one of those magical forms that can turn into almost anything with a few smart tweaks. Here are my favorite slab cylinder ideas—from classic, useful studio staples to the kind of playful experiments that make you fall in love with handbuilding all over again.
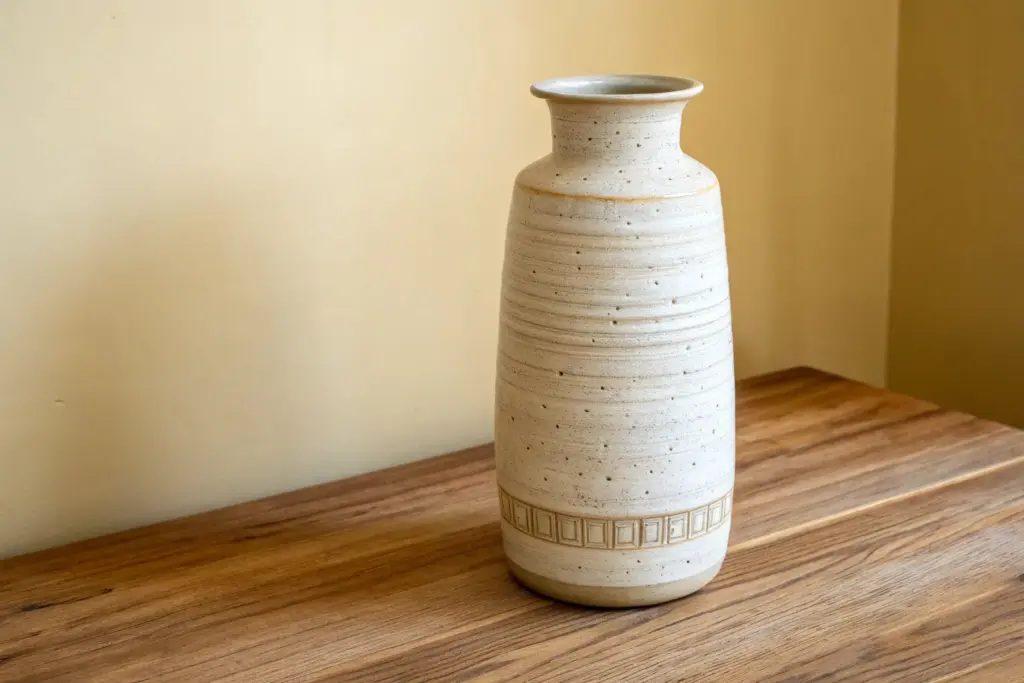
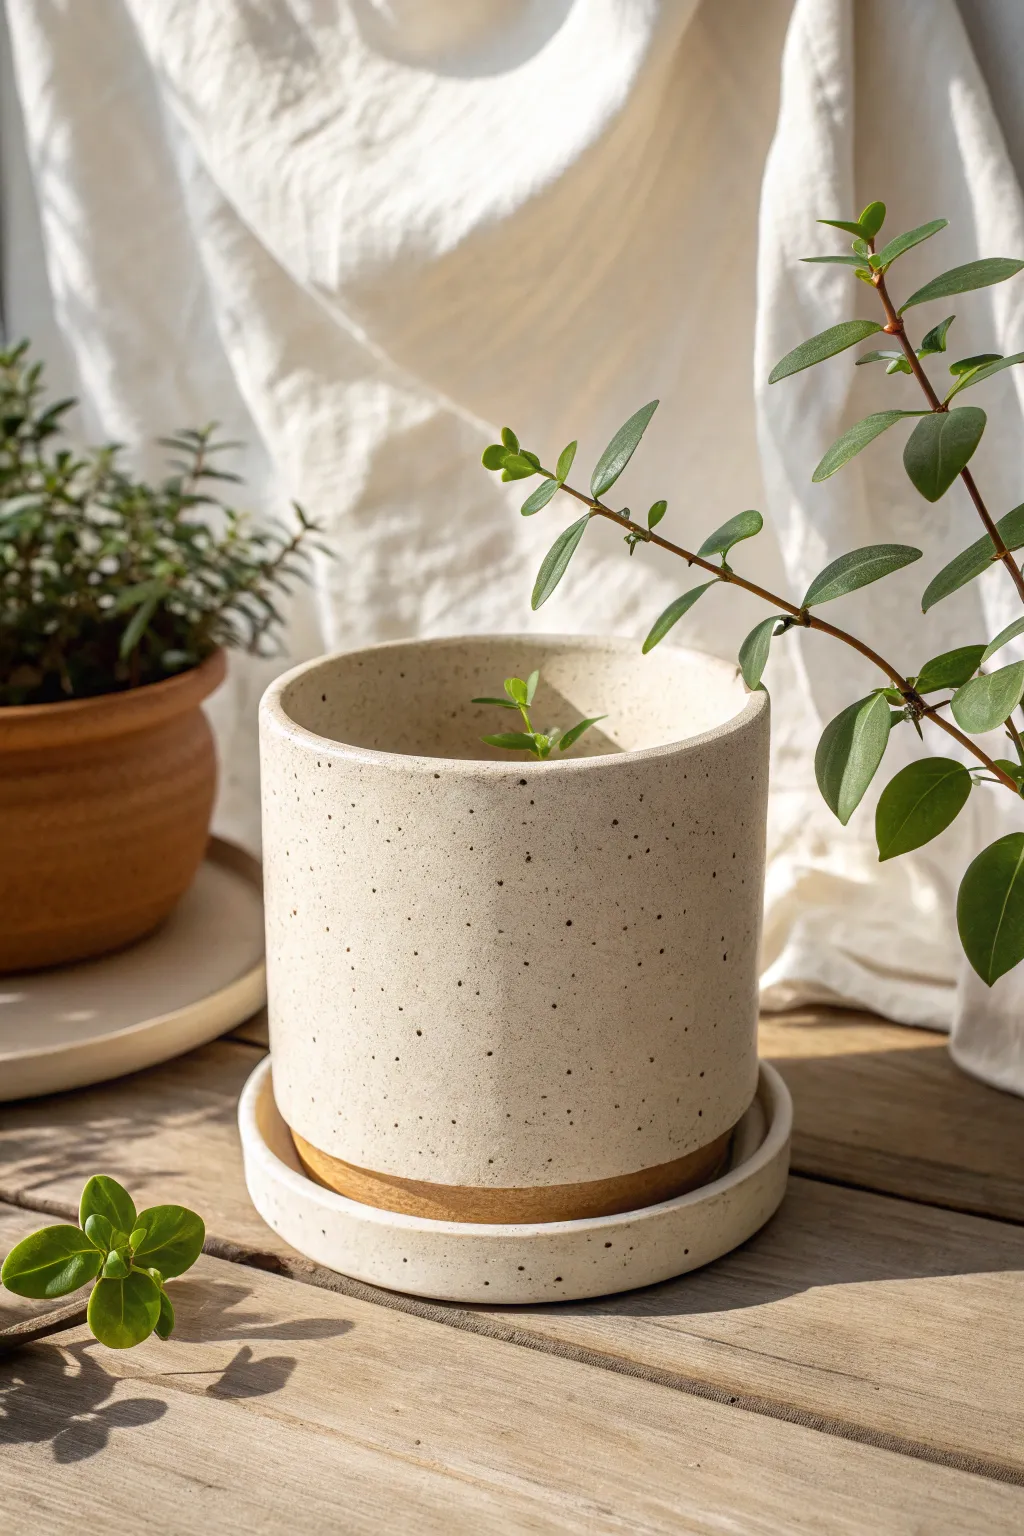
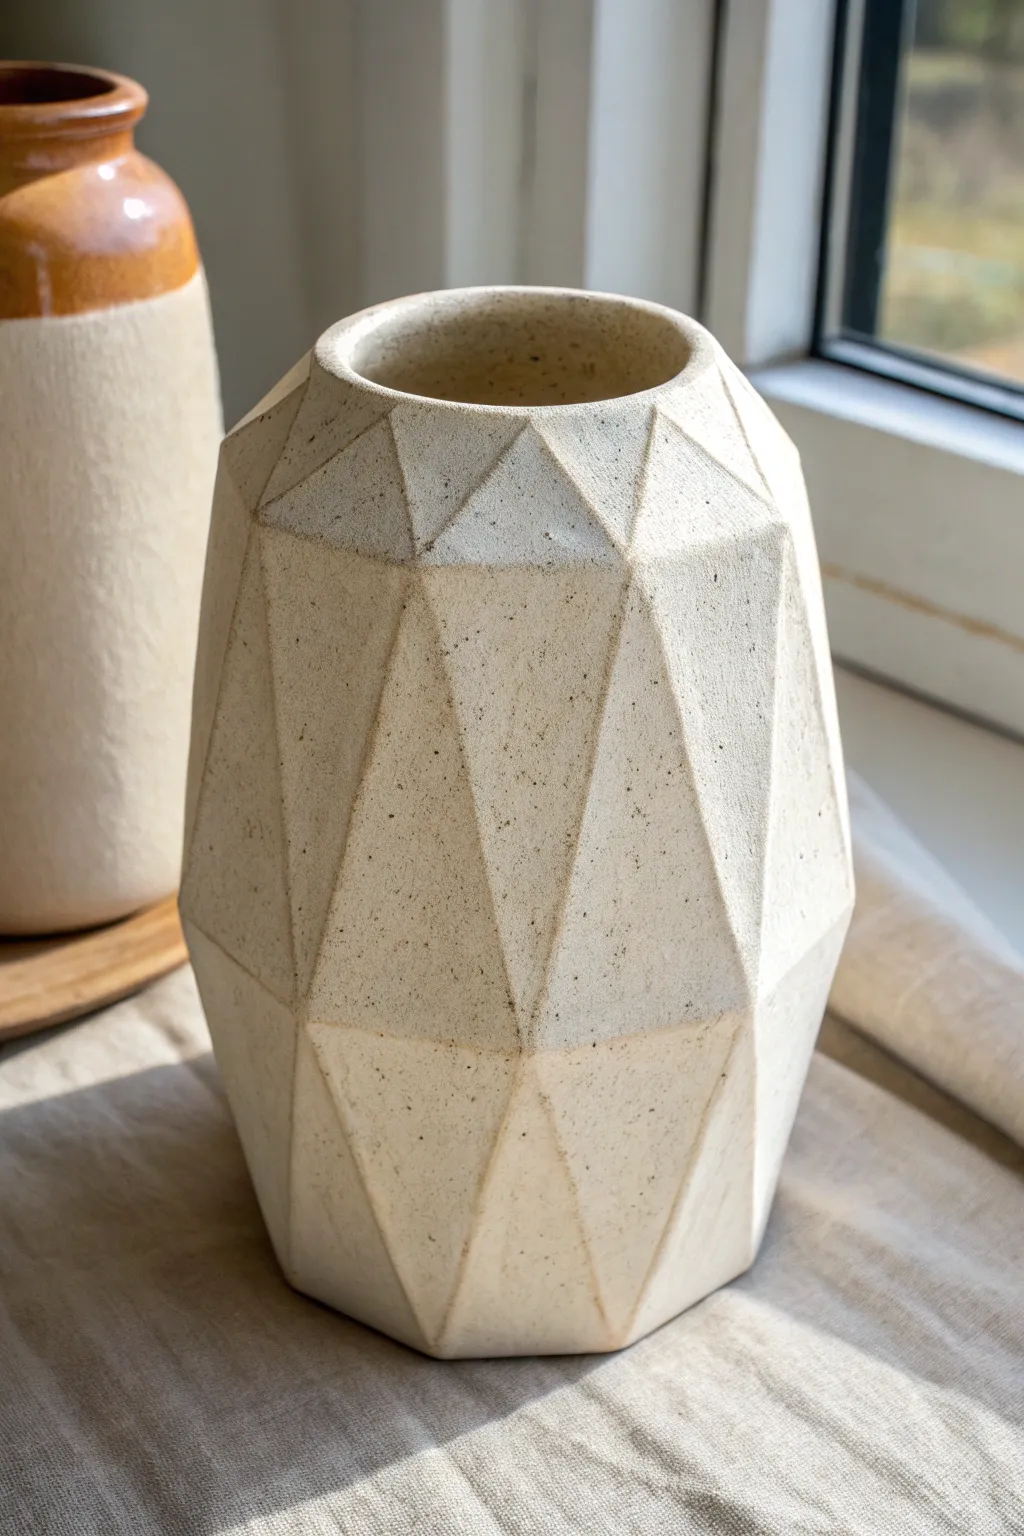
Straight-Sided Vase Cylinder
Embrace clean lines and architectural simplicity with this tall, slab-built cylindrical vase. The design features a matte, textured cream body beautifully framed by raw stoneware accents at the rim and base, creating a modern vessel perfect for dried botanical arrangements.
How-To Guide
Materials
- Stoneware clay (buff or speckled)
- White matte glaze or white underglaze/slip
- Rolling pin or slab roller
- Canvas work surface
- Wooden dowel or PVC pipe (3-4 inch diameter) for form
- Potter’s needle tool
- Rib tool (metal or flexible rubber)
- Serrated rib or scoring tool
- Slip (clay mixed with water)
- Fettling knife
- Sponge
- Newsprint or paper
Step 1: Preparing the Slab
-
Roll the clay:
Begin by wedging your stoneware clay thoroughly to remove air bubbles. Roll it out into a long rectangular slab, aiming for an even thickness of about 1/4 inch. If you are using a rolling pin, use guide strips to ensure consistency. -
Check surface texture:
Before cutting, smoothing the surface with a soft rib is essential. This compresses the clay particles and creates the perfect canvas for that smooth, stone-like finish visible in the final piece. -
Measure and cut:
Determine the height of your vase. Based on the image, a narrow and tall 10-12 inch height works well. Cut a precise rectangle. You’ll also need to cut a circle for the base using a cookie cutter or needle tool that matches the diameter of your forming tube.
Warping Walls?
If your tall cylinder starts to slump or warp while wet, let the slab stiffen slightly on the canvas before wrapping it around the form. The clay needs to be strong enough to stand.
Step 2: Forming the Cylinder
-
Wrap the form:
Wrap your PVC pipe or wooden dowel in a sheet of newsprint. This acts as a barrier so the clay doesn’t stick to the form, allowing you to slide it out easily later. -
bevel the edges:
On the shorter sides of your clay rectangle (the height), cut the edges at a 45-degree angle. Bevenling these sides creates a stronger seam where the cylinder joins. -
Score and slip:
Rough up the beveled edges with your serrated rib or needle tool and apply a generous amount of slip. This ‘glue’ is vital for a joint that won’t crack during firing. -
Join the seam:
Wrap the clay slab around your paper-covered form, bringing the beveled edges together. Press them firmly to join. I usually roll the seam gently against the table to compress it further. -
Smooth the connection:
Use a wooden tool or your thumb to blend the clay across the seam line until it disappears completely. The goal is a seamless, continuous cylinder.
Add Texture
Before rolling the slab into a cylinder, gently press a piece of coarse linen or canvas into the main body section to give the glazed area a subtle woven ghost texture.
Step 3: Adding the Base and Rim
-
Attach the base:
Score and slip the bottom edge of your cylinder and the outer edge of your circular base slab. Press the cylinder onto the base. Use a modeling tool to blend the clay from the base up onto the wall slightly to seal it. -
Refine the rim:
Create the distinct thick rim seen in the photo. You can do this by adding a small coil of clay to the top edge, blending it downwards on the inside, but leaving a defined ‘step’ on the outside. -
Create the bottom detail:
Similar to the rim, refine the bottom ½ inch of the vase. You can use a tool to slightly indent a line around the base, separating the ‘foot’ area from the main body visually. -
Initial drying:
Let the cylinder firm up to leather-hard before removing the inner support tube. Twist the tube gently and pull it out, peeling away the newsprint from the inside.
Step 4: Finishing and Glazing
-
Bisque fire:
Allow the piece to bone dry completely (this can take a week for taller forms) before bisque firing it in the kiln. -
Wax resist application:
To achieve the two-tone look, apply wax resist carefully to the top rim (about 1/2 inch) and the bottom foot (about 1/2 inch). This prevents glaze from adhering to these areas, exposing the raw clay. -
Glaze application:
Pour a matte white or cream glaze inside the vessel first, swirl to coat, and pour out. Then, either dip the exterior or spray the glaze onto the body. The wax will repel the glaze at the top and bottom. -
Clean up:
Even with wax, small beads of glaze might remain on the rim or base. Wipe these away with a damp sponge to ensure sharp, clean lines between the glazed body and the raw accents. -
Final firing:
Fire the vase to the maturity temperature of your clay and glaze (likely Cone 5 or 6 for stoneware). This final firing will vitrify the clay and melt the matte glaze into that stony texture.
Place your dried branches inside and enjoy the striking vertical elegance this handmade piece adds to your space


Utensil Crock Slab Cylinder
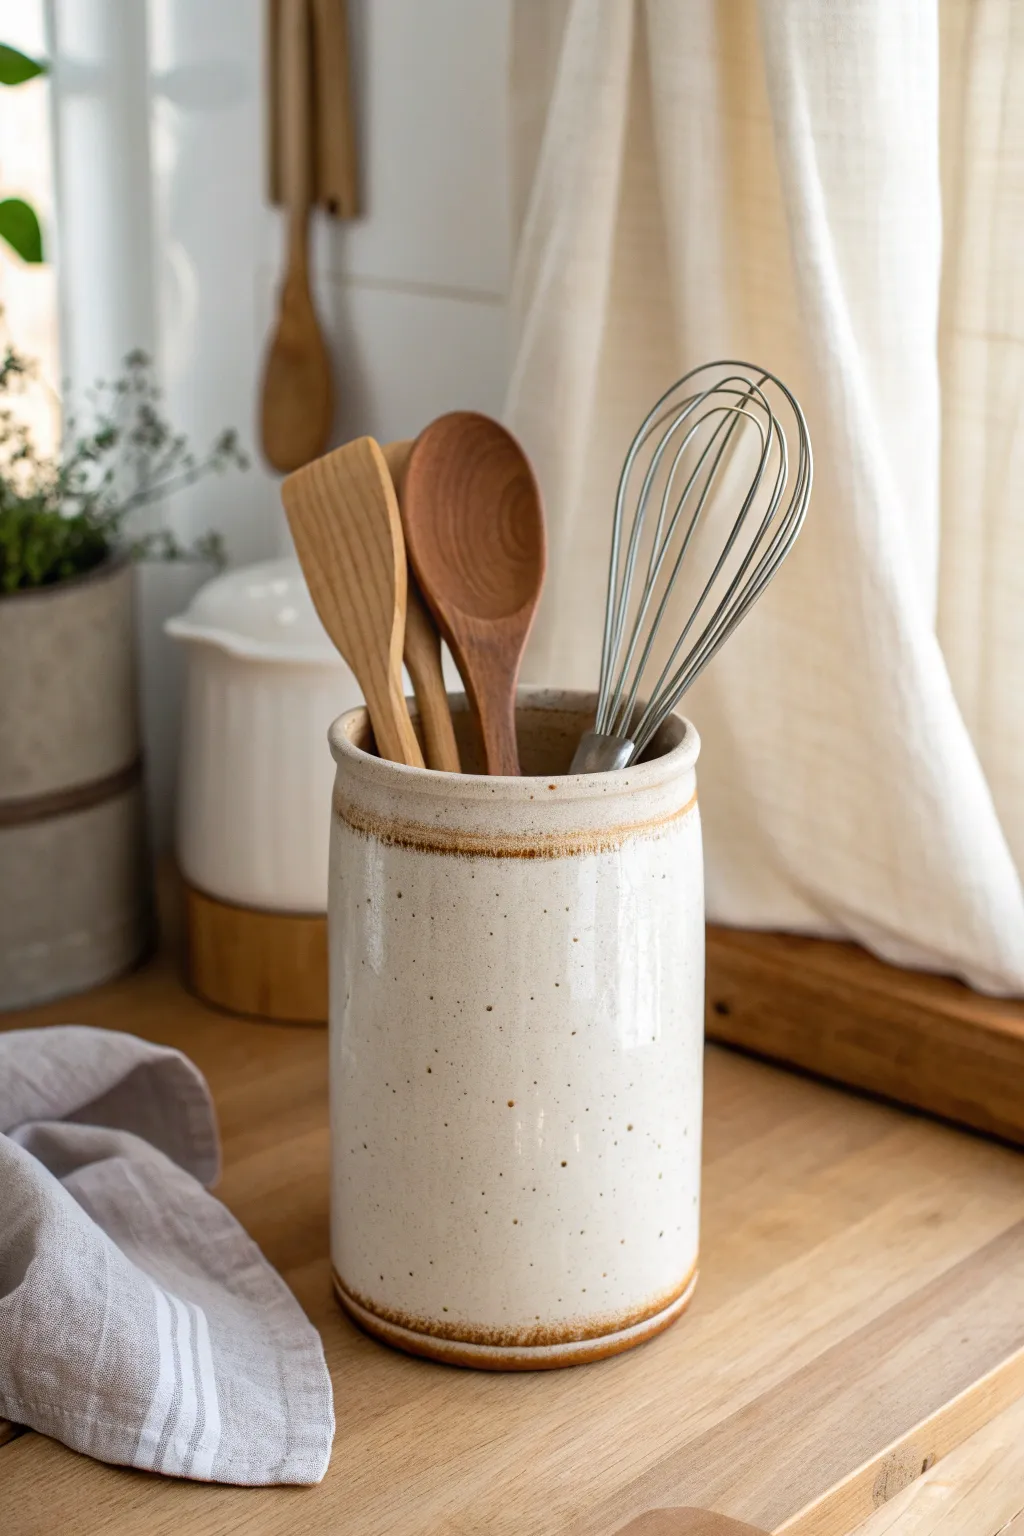
This rustic, speckled utensil crock offers a timeless home for your wooden spoons and whisks, combining a simple cylinder form with warm, earthy details. The subtle brown rim and base accents frame the creamy glazed surface, creating a piece that feels both modern and handmade.
Detailed Instructions
Materials
- Speckled stoneware clay (mid-fire)
- Canvas-covered work board
- Rolling pin and thickness strips (approx. 1/4 inch)
- Needle tool or fettling knife
- Ruler for measuring
- Serrated rib (metal or plastic)
- Rubber kidney rib (soft)
- Slip (clay and water mixture)
- Cylindrical form for template (PVC pipe or large can)
- Creamy white dipping glaze
- Iron oxide wash or dark brown underglaze
- Sponge and water
- Pottery trimming tool
Step 1: Preparing the Slab
-
Roll the Clay:
Begin by wedging your speckled stoneware clay to remove air bubbles. Flatten it slightly with your palm, then use a rolling pin over thickness strips to roll out a consistent slab about 1/4 inch thick. -
Compress the Slab:
Take a soft rubber kidney rib and firmly run it over both sides of the slab. This compression step aligns the clay particles, which helps prevent warping later and provides a nice smooth surface for glazing. -
Measure and Cut Dimensions:
Determine the desired height and circumference of your crock. A standard utensil holder is often 6-7 inches tall. Measure carefully using a ruler and cut a clean rectangle using your needle tool or fettling knife. -
Bevel the Edges:
For a seamless join, cut the short ends of your rectangle at a 45-degree angle. This increases the surface area for the join and helps hide the seam.
Seam Splitting?
If your vertical seam cracks during drying, you likely didn’t score deeply enough. Use a distinct cross-hatching motion when scratching the clay and use plenty of slip to act as glue.
Step 2: Assembling the Cylinder
-
Score the Edges:
Use your serrated rib or needle tool to scratch up the beveled edges thoroughly. Apply a generous amount of slip to these scored areas. -
Join the Seams:
Carefully lift the slab and curl it into a cylinder. Press the two beveled ends together firmly. I like to stand the cylinder up at this point to ensure it’s sitting level. -
Reinforce the Seam:
Support the wall from the inside with one hand while using a smooth tool or your thumb on the outside to blend the seam until it disappears. Repeat this on the inside of the pot. -
Create the Base:
Roll out a slightly smaller piece of clay for the floor. Place your cylinder on top of this fresh slab and trace around the bottom edge with a needle tool. -
Attach the Base:
Remove the cylinder, score the traced circle and the bottom rim of your cylinder, add slip, and press the cylinder firmly onto the base. -
Trim and Smooth:
Cut away any excess clay extending beyond the cylinder walls. Use a wooden tool to blend the exterior seam where the wall meets the floor.
Textural Twist
Before rolling your cylinder, press a piece of coarse linen or lace into the slab. The glaze will break beautifully over the texture, adding depth while keeping the minimalist vibe.
Step 3: Finishing and Decoration
-
Refine the Rim:
Use a damp sponge or a piece of chamois leather to compress and round off the top rim. A smooth rim is crucial since you’ll be reaching in and out of the crock frequently. -
Create the Foot Detail:
Use a trimming tool to carve a small indentation or visual separation near the bottom of the pot, mimicking the foot ring seen in the photo. -
Dry to Bisque:
Loosely cover the piece with plastic to let it dry showly. Once bone dry, fire the piece to bisque temperature (usually cone 04). -
Apply Oxide Accent:
Mix a small amount of iron oxide wash. Using a small brush, carefully apply a thin band of oxide to the very top rim and the bottom foot ring. Use a damp sponge to wipe it back slightly if it looks too heavy. -
Glaze Application:
Dip the entire bisque cylinder into a creamy white glaze. The glaze should be fluid enough to allow the natural speckles of the clay body to show through. -
Final Firing:
Clean off any glaze from the very bottom of the pot to prevent sticking to the kiln shelf. Fire to maturity (usually cone 5 or 6, depending on your clay).
Once fired, fill your new crock with your favorite kitchen tools and enjoy the warmth it adds to your countertop


Pencil Cup Desk Cylinder
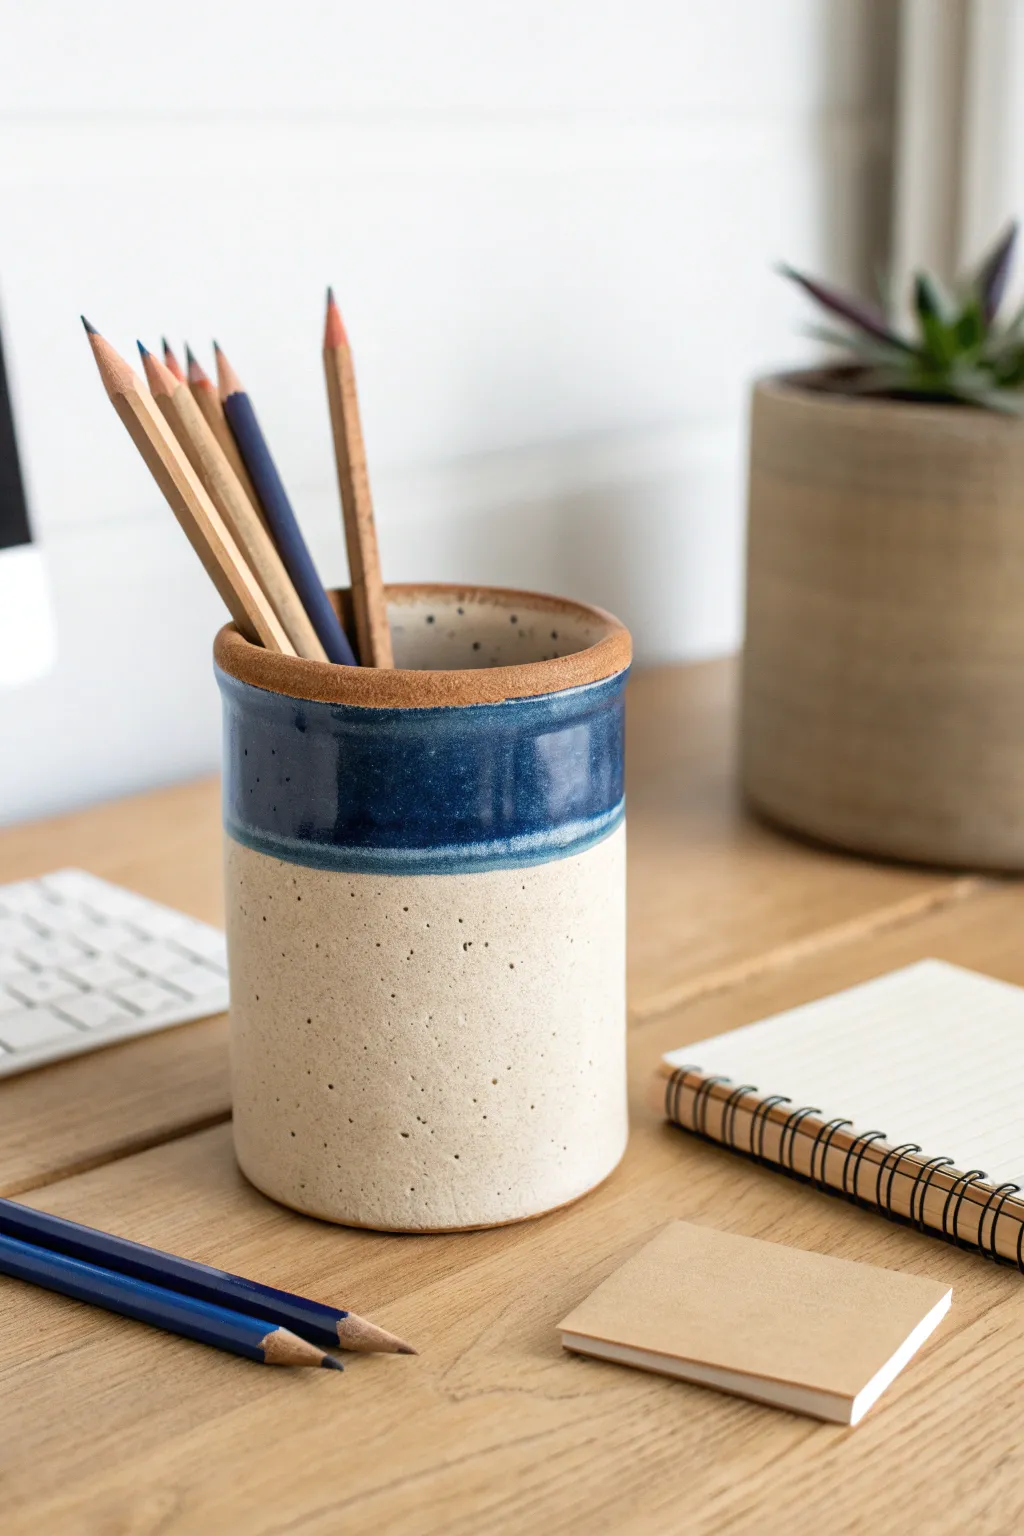
This charming ceramic pencil cup combines a speckled creamy base with a rich, glossy blue rim for a modern, earthy aesthetic. Perfect for organizing your desk, this beginner-friendly slab cylinder project showcases the beauty of raw clay against vibrant glaze.
Step-by-Step
Materials
- Speckled mid-range stoneware clay
- Rolling pin
- Canvas mat or slab roller
- Fettling knife
- Needle tool
- Serrated rib or flexible rib
- Scoring tool or fork
- Slip (clay and water mixture)
- Ruler
- Can or PVC pipe (optional form)
- Sponge
- Glossy navy blue dipping glaze
- Matte cream glaze (optional, or use raw clay texture)
- Wax resist
Step 1: Creating the Slab
-
Wedge the clay:
Begin by thoroughly wedging about 1-2 pounds of speckled stoneware clay to remove any air bubbles and ensure an even consistency. -
Roll the slab:
Flatten the clay slightly with your palms, then use a rolling pin to roll out a slab. Aim for a thickness of about 1/4 inch across the entire piece. -
Compress the clay:
Run a flexible rib over both sides of the slab in multiple directions. This compression aligns the clay particles, preventing warping during firing, and smooths the surface texture. -
Measure and cut:
Using a ruler and fettling knife, cut a rectangular strip. For a standard pencil cup, a rectangle approximately 10 inches long by 4.5 inches high works well.
Smooth Seams
When joining the vertical seam, place a wooden rolling pin inside the cylinder. This gives you a firm surface to press against while smoothing the outside joint.
Step 2: Assembling the Cylinder
-
Score the edges:
Bevel the two short ends of your rectangle at opposite 45-degree angles to create a stronger overlap joint. Score these beveled edges generously with your serrated tool. -
Apply slip and join:
Apply a liberal amount of slip to the scored areas. Curl the slab carefully into a cylinder shape, overlapping the scored ends. -
Reinforce the seam:
Press the seam firmly together from both the inside and outside. I like to use a wooden tool to blend the clay across the seam line so it becomes invisible. -
Cut the base:
Place your cylinder upright on a remaining piece of slab. Trace around the bottom edge with a needle tool, then cut out the circle. -
Attach the base:
Score the bottom edge of the cylinder and the outer rim of the circular base. Apply slip, press them together firmly, and smooth the clay from the side of the cup down onto the base to seal it. -
Refine the rim:
Use a damp sponge or piece of chamois leather to smooth the top rim. The image shows a slightly rounded, exposed clay rim, so ensure it looks neat and intentional.
Make it Functional
Before drying, use a small hole cutter to make a drainage hole in the bottom. This transforms your pencil cup into a functional succulent planter if you change your mind later.
Step 3: Drying and Bisque Firing
-
Slow drying:
Cover the cylinder loosely with plastic and let it dry slowly for a day or two to equalize moisture, then uncover to let it dry completely to the bone-dry stage. -
Smooth imperfections:
Once bone dry, gently rub away any sharp burrs or rough spots with a dry green kitchen scouring pad or a soft sponge. -
Bisque fire:
Load your kiln and bisque fire the piece to Cone 04 (or your clay body’s recommended bisque temperature) to prepare it for glazing.
Step 4: Glazing
-
Apply wax resist:
Paint a band of wax resist along the very top rim of the cup if you want that raw clay accent shown in the example photo. Also wax the bottom foot to prevent sticking to the kiln shelf. -
Base glaze (optional):
If you want the bottom section to be glazed rather than raw clay, dip the bottom 2/3 of the cup into a matte white or clear glaze first. -
The blue dip:
Prepare your glossy navy blue glaze. Hold the cup by the base and dip the top 1/3 straight down into the glaze bucket. Hold for 3 seconds and pull straight up. -
Clean up:
While the glaze is still slightly damp, wipe any drips off the waxed areas with a sponge to ensure a crisp line where the clay meets the glaze. -
Glaze fire:
Fire the piece to maturity (usually Cone 5 or 6 for stoneware). Ensure the blue glaze doesn’t run too much by leaving a small safety margin above the white section.
Once cooled, fill your new handmade vessel with your favorite art supplies and enjoy the upgrade to your workspace


Toothbrush Holder Cylinder With Holes
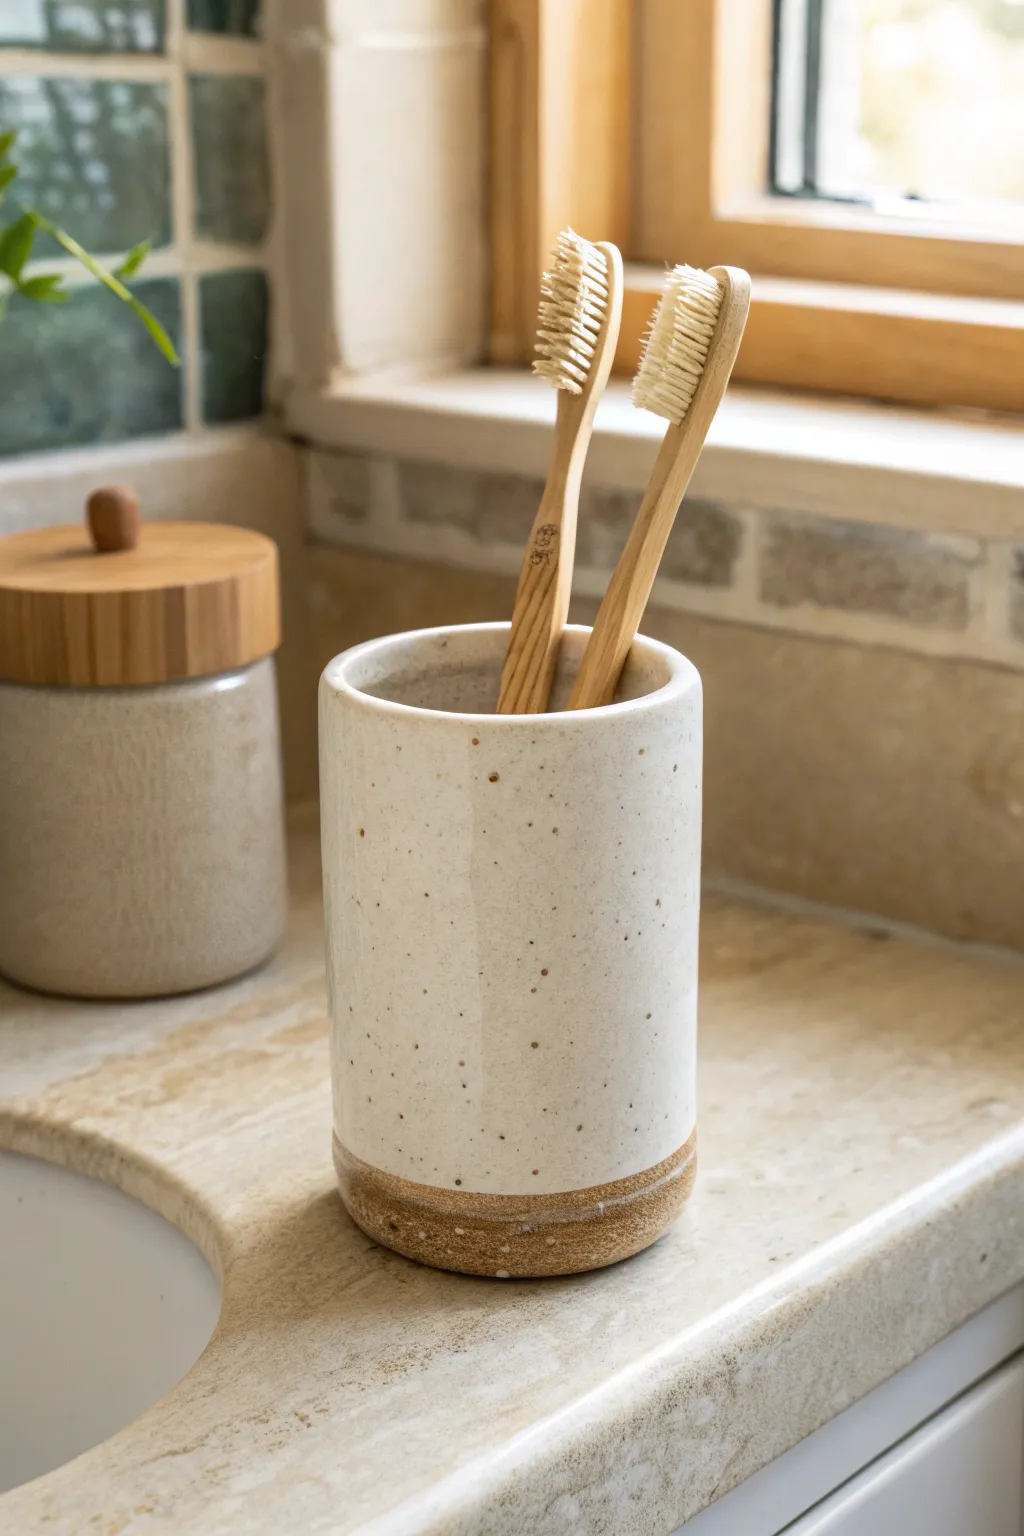
Elevate your bathroom counter with this serene, speckled ceramic toothbrush holder. Its simple cylindrical form features a creamy matte glaze above a raw, textured base, creating a modern yet earthy aesthetic.
Step-by-Step Guide
Materials
- Stoneware clay (speckled or buff)
- Rolling pin
- Canvas board or cloth
- Cylinder mold (like a PVC pipe or tall can)
- Newspaper or paper towel
- Fettling knife
- Needle tool
- Serrated rib or scoring tool
- Slip (clay mixed with water)
- Sponge
- Creamy white dipping glaze (matte finish)
- Wax resist (optional)
Step 1: Forming the Cylinder
-
Roll the slab:
Begin by rolling out your clay on a canvas surface to a uniform thickness, about 1/4 inch. If you are using plain clay and want speckles, wedge in some manganese granular specks before rolling. -
Measure the circumference:
Take your chosen cylinder form (a PVC pipe works perfectly) and wrap a strip of paper around it to measure the circumference. Add about half an inch to this measurement for the overlap or joining seam. -
Cut the rectangle:
Using a ruler and your fettling knife, cut a clean rectangle from the slab. The height should be roughly 4-5 inches depending on your toothbrush handle lengths, and the width should match your circumference measurement. -
Prepare the mold:
Wrap your PVC pipe or can in a sheet of newspaper or paper towel. This prevents the clay from sticking to the mold and makes removal much easier later. -
bevel the edges:
On the short sides of your rectangle (the vertical seam), angle your knife to cut 45-degree bevels. Bevel one side facing up and the opposite side facing down so they will overlap flush. -
Score and slip:
Aggressively hash marks into the beveled edges with your serrated rib tool and apply a generous amount of slip. -
Construct the wall:
Wrap the clay slab around your paper-covered mold. Press the beveled, slipped edges together firmly to create the cylinder walls. Use a wooden rib to smooth the seam until it disappears.
Step 2: Adding the Base & Refining
-
Cut the base:
Roll a small piece of leftover clay to the same thickness. Place your cylinder on top of it and trace a circle around the base with a needle tool, cutting slightly wider than the cylinder itself. -
Attach the bottom:
Score and slip the bottom edge of your cylinder and the outer edge of the circular base. Press them together firmly. I like to use a small wooden tool to drag clay from the base up onto the wall to ensure a strong seal. -
Clean the exterior:
With the mold still inside for support, use a sponge to wipe away excess slip and smooth out the connection point at the bottom. -
Texture the bottom:
To achieve the raw look seen in the photo, wipe away the smoothness at the bottom inch of the holder with a slightly coarser sponge or a stiff brush to expose the clay’s natural grain. -
Clean the rim:
Remove the inner mold carefully. Use a chamois cloth or a damp sponge to round off the top rim so it is soft to the touch and won’t chip easily. -
Dry slowly:
Loosely cover the piece with plastic and let it dry slowly to the bone-dry stage. This prevents warping. -
Bisque fire:
Fire the piece in a kiln to cone 04 (or your clay body’s specified bisque temperature).
Warping Woes?
If your cylinder turns into an oval while drying, place a lightweight object (like a round cookie cutter) gently on top of the rim to hold the circular shape as it firms up.
Step 3: Glazing
-
Wax the base:
Apply wax resist to the bottom inch of the exterior and the entire underside. This reserves that beautiful raw clay band shown in the image. -
Dip the glaze:
Using dipping tongs, submerge the holder into a creamy, matte white glaze. The glaze should cover the inside and the outside down to the wax line. -
Clean edges:
Immediately wipe off any glaze beads that may have formed on the wax resist with a damp sponge to ensure a crisp line. -
Final fire:
Glaze fire the piece to the temperature required by your clay and glaze combination (typically Cone 5 or 6 for stoneware).
Make it a Set
Create a matching soap pump or a wider container for cotton rounds by adjusting the diameter of your mold object for a cohesive vanity set.
Place your finished holder near natural light to let those subtle speckles shine.

The Complete Guide to Pottery Troubleshooting
Uncover the most common ceramic mistakes—from cracking clay to failed glazes—and learn how to fix them fast.
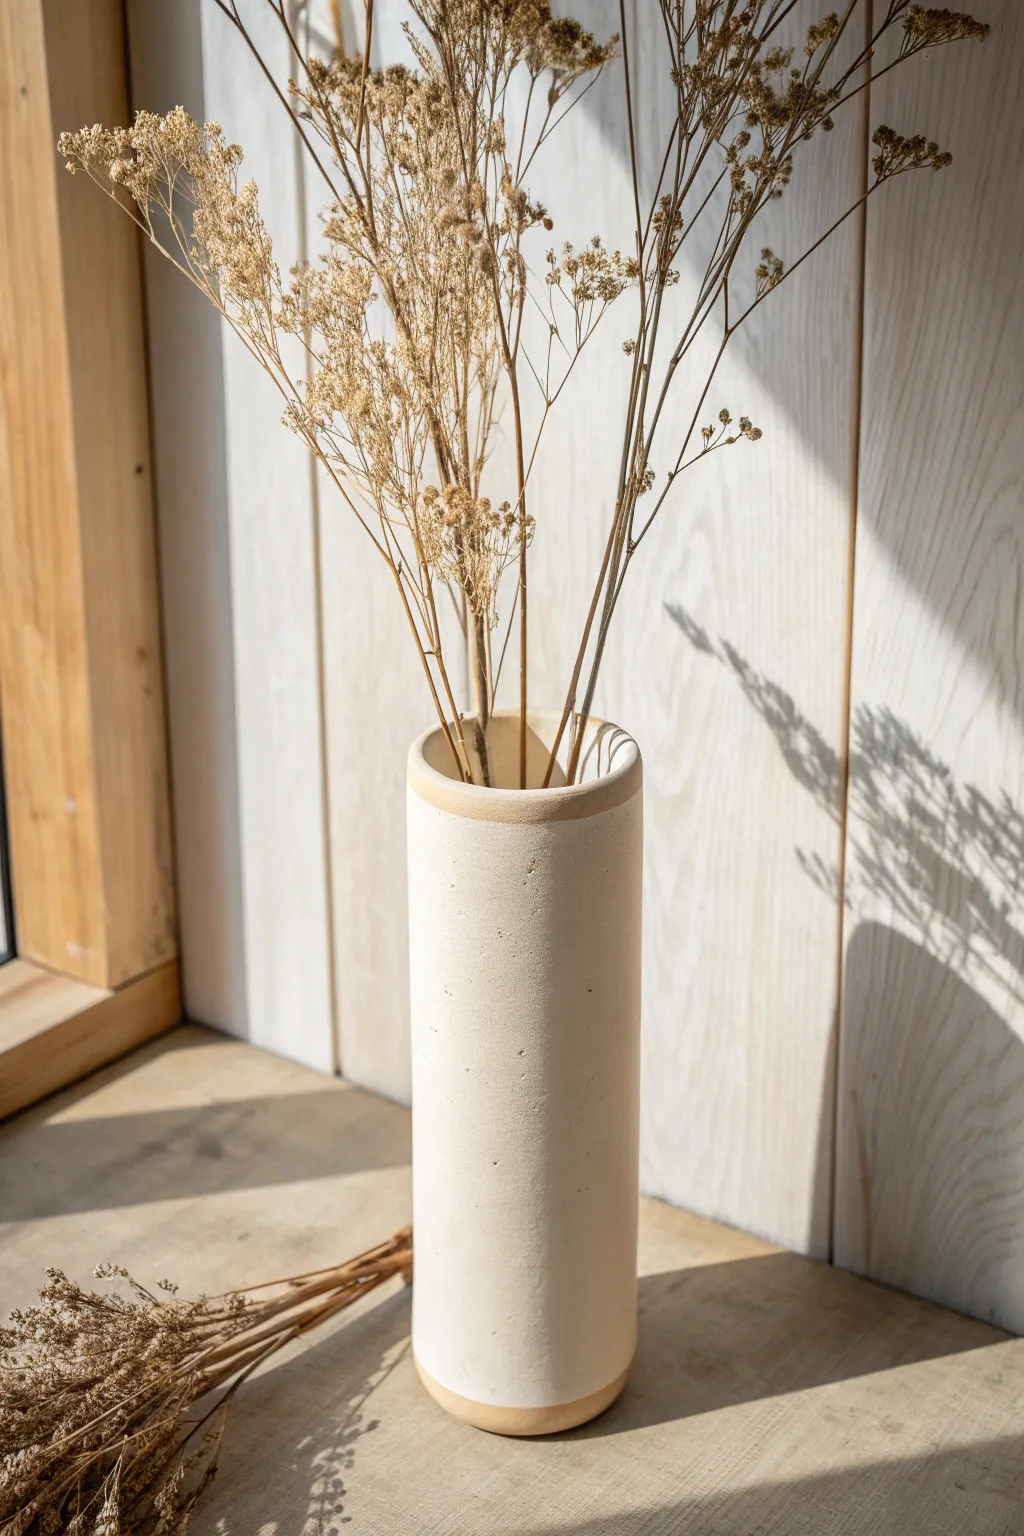
Mini Bud Vase Slab Cylinder
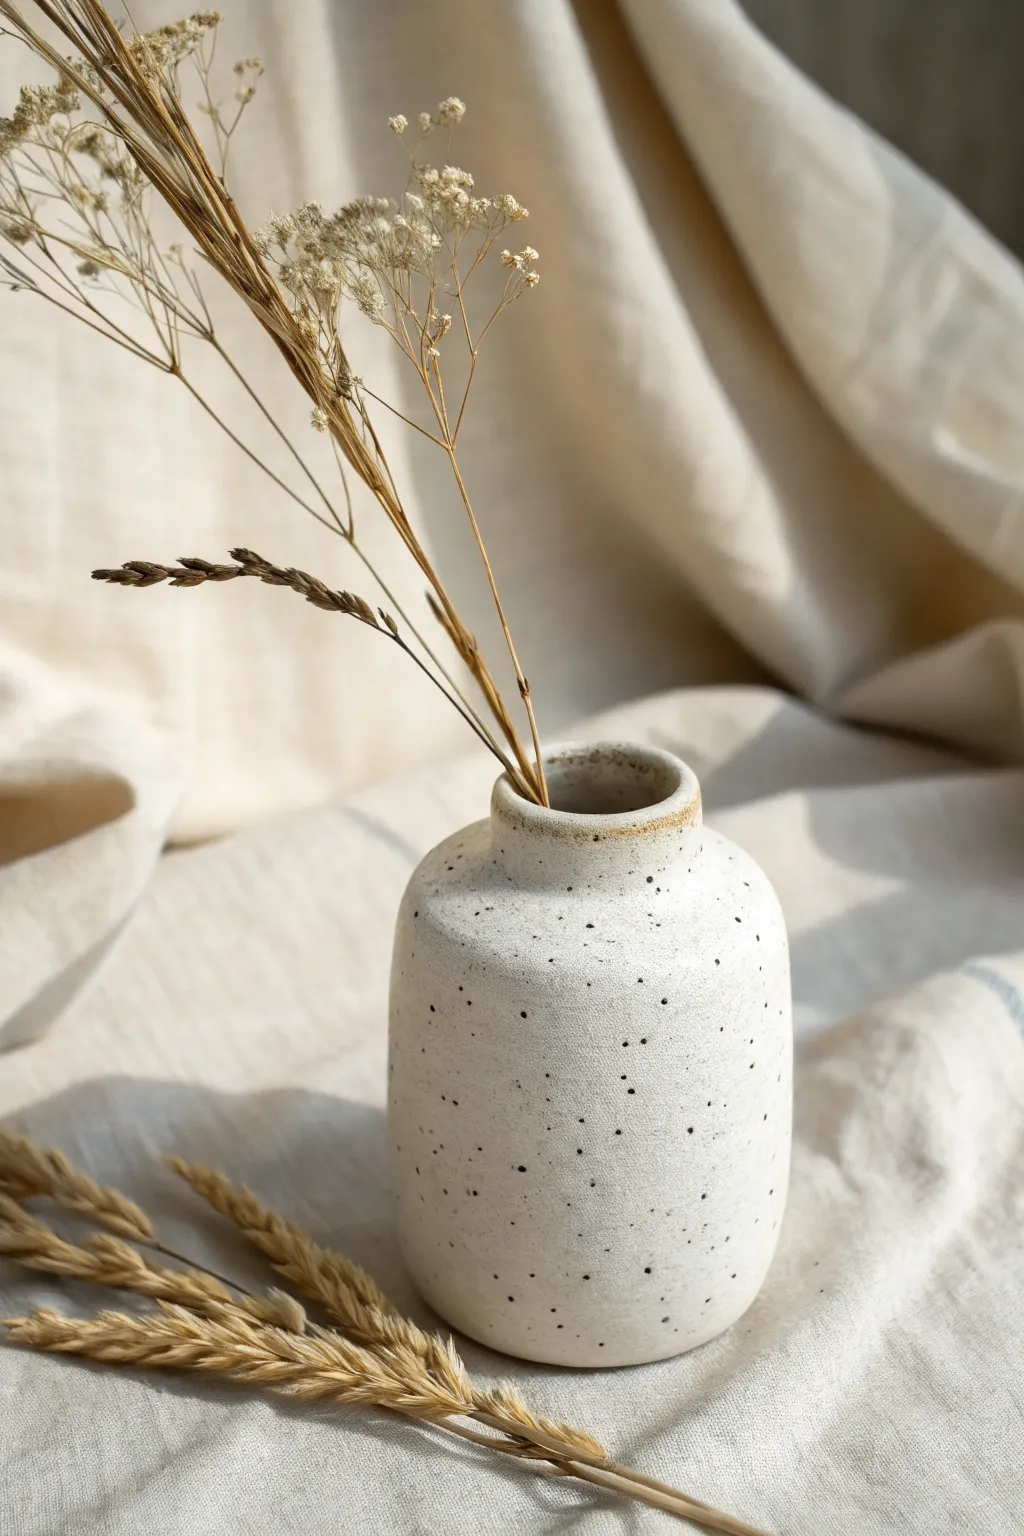
This charming mini bud vase features a creamy white surface dotted with natural speckles and a soft, rounded shoulder leading to a narrow neck. Its handcrafted, matte texture and simple cylindrical form make it perfect for displaying slender dried grasses or wildflowers.
Step-by-Step
Materials
- Speckled Stoneware Clay (white base with grog/speckles)
- Rolling Pin or Slab Roller
- Canvas or Ware Board
- Fettling Knife or Needle Tool
- Serrated Rib or Scoring Tool
- Slip (clay and water mixture)
- Wooden Modeling Tool
- Soft Sponge
- Clear Matte Glaze (or raw firing if clay body is vitreous)
- Cardboard Cylinder or Dowel (about 2-2.5 inches diameter for mold)
- Paper template (optional)
Step 1: Preparing the Slab
-
Roll out the clay:
Begin by wedging your speckled stoneware clay to remove air bubbles. Roll it out into an even slab, approximately 1/4 inch thick. Aim for a consistent thickness to ensure the vase stands straight. -
Compress the surface:
Take a soft rib tool and gently drag it across the surface of the slab on both sides. This aligns the clay particles, preventing warping during drying, and also creates a smoother canvas for those beautiful speckles to shine through. -
Cut the body rectangle:
Measure and cut a rectangle from your slab. For a vase similar to the photo, try a rectangle about 8 inches long and 4 inches high. This will form the main body of the cylinder. -
Cut the base and top components:
Cut two circles using a cookie cutter or by tracing a template. You’ll need one for the base (roughly 2.5 inches diameter) and one slightly larger one for the shoulder/neck assembly.
Uneven Cylinder?
If your cylinder keeps warping or slumping, let the slab stiffen to a ‘soft leather hard’ stage before assembling. It should be flexible but firm enough to hold its own weight.
Step 2: Forming the Cylinder
-
Create the cylinder:
Wrap your rectangular slab around a cardboard tube or dowel to help maintain its shape. Bevel the vertical edges at a 45-degree angle to create a seamless overlap. -
Score and slip the seam:
Roughen the beveled edges with your serrated tool and apply a generous amount of slip. Press the edges firmly together. -
Blend the seam:
Use a wooden modeling tool to stitch the clay across the seam line, blending it until it disappears. I prefer to smooth the inside seam first for structural integrity, then refine the outside. -
Attach the base:
Score and slip the bottom edge of your cylinder and the outer rim of your base circle. Press the cylinder onto the base. -
Refine the connection:
Blend the clay from the cylinder wall down onto the base to seal it completely. Use your sponge to tidy up excess slip.
Level Up: Texture Pop
After the final sponging, gently gently rub the exterior with fine steel wool once bone dry. This removes fine clay particles and makes the grog and speckles stand out even more after firing.
Step 3: Shaping the Shoulder and Neck
-
Form the shoulder:
Take your second circle and gently curve it over your thumb or a small rounded object to create a slight dome shape. Cut a small hole in the absolute center for the neck opening. -
Attach the shoulder:
Score the top rim of your cylinder and the underside of your domed shoulder piece. Place the shoulder on top, slipping and scoring to attach. Gently paddle the shoulder with a wooden spatula to round out the transition where it meets the straight walls. -
Create the neck collar:
Roll a small strip of clay, about 1/2 inch high. Form this into a tiny loop that matches the size of the hole in your shoulder piece. -
Secure the neck:
Attach this small ring to the hole in the shoulder using the score and slip method. Use your pinky finger or a small tool to smooth the inside connection so it looks seamless. -
Refine the lip:
dampen a small piece of chamois or your sponge and run it over the top rim of the neck to round it off softly, ensuring there are no sharp edges.
Step 4: Finishing and Firing
-
Final smoothing:
Once the piece is leather hard, give the entire surface a final wipe with a damp sponge. This exposes the grit and speckles slightly, enhancing the texture. -
Slow drying:
Cover the vase loosely with plastic to let it dry slowly and evenly. This prevents the seams from cracking as the clay shrinks. -
Bisque fire:
Fire the completely dry piece in a kiln to bisque temperature (usually cone 04 or 06). -
Glazing:
Dip the vase into a clear matte glaze, or a satin white glaze that allows the iron speckles from the clay body to bleed through. Check the photo—the rim has a lovely toasty color, likely from the raw clay or a thinner glaze application. -
Final wipe:
Wipe the bottom of the vase clean of any glaze to prevent it from sticking to the kiln shelf. -
Glaze fire:
Fire again to the maturity temperature of your clay body (typically cone 5/6 or cone 10) to vitrify the clay and melt the glaze.
Now you have a beautifully understated vessel ready to hold your favorite dried stems.
Cutout Luminary Slab Cylinder
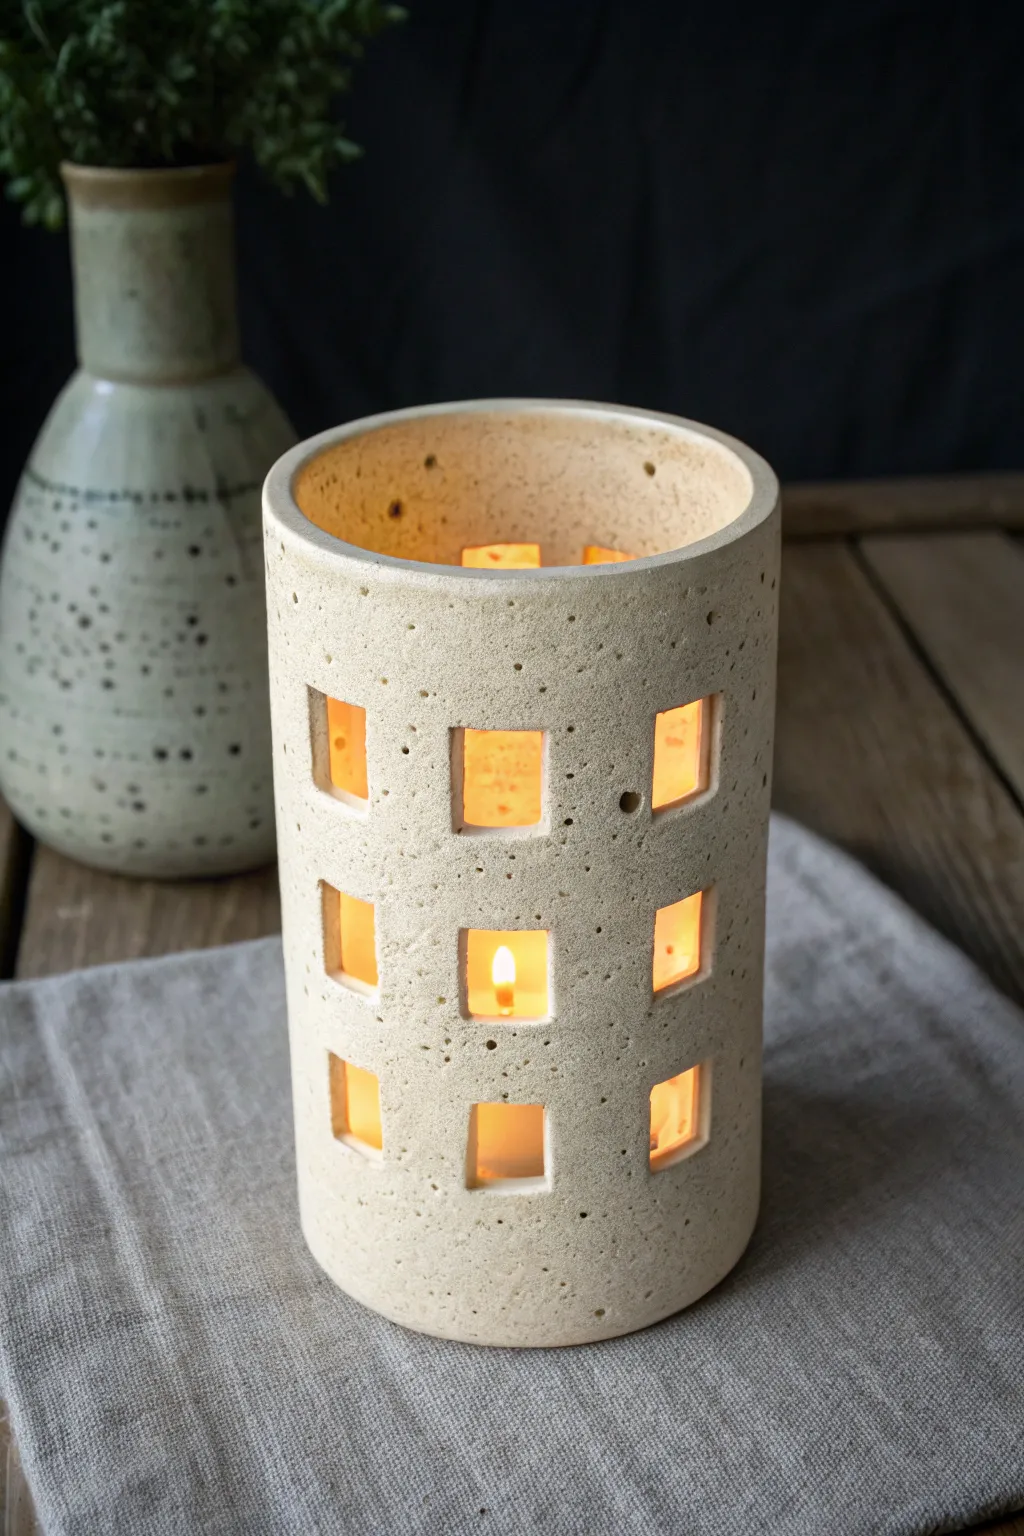
Illuminate your space with the soft, inviting amber light of this handcrafted ceramic cylinder. Featuring a textured, speckled clay body and a rhythmic grid of window-like cutouts, this luminary transforms simple candlelight into a modern architectural statement.
Step-by-Step
Materials
- Speckled Stoneware Clay (mid-fire)
- Wide Rolling Pin
- Canvas or Ware Board
- Fettling Knife or Needle Tool
- Ruler
- Square Cookie Cutter (approx. 1 inch)
- Small Sponge
- Slip (clay and water mixture)
- Scoring Tool or serrated rib
- Wooden Modeling Tool
- Sandpaper (for greenware stage)
Step 1: Preparing the Slab
-
Roll the clay:
Begin by wedging your speckled stoneware clay to remove air bubbles. Roll it out into a long, rectangular slab on your canvas. Aim for a thickness of about 1/4 inch to ensure stability while keeping the piece light. -
Smooth the surface:
Compress the clay on both sides using a rib tool. This aligns the clay particles to prevent warping and creates that smooth, stone-like texture needed for the final look. -
Measure and cut:
Using a ruler, measure a rectangle approx. 12 inches long and 6 inches tall, or customize the size based on your desired candle width. Cut the rectangle cleanly with a fettling knife. -
Bevel the edges:
On the two short ends of your rectangle, cut 45-degree angles in opposite directions. These beveled edges will create a seamless overlap when you form the cylinder.
Slumping Walls?
If the clay walls sag while standing, the clay is too wet. Let the slab stiffen to soft leather-hard before rolling it upright.
Step 2: Designing the Grid
-
Mark the grid:
Before rolling the cylinder, lay the slab flat. With a ruler, lightly mark a grid pattern where your windows will go, ensuring equal spacing between the rows and columns so the design looks intentional. -
Punch the windows:
Use a small square cookie cutter to punch out the windows along your marked grid. If the clay is sticky, I find it helpful to let it firm up slightly before this step for cleaner cuts. -
Clean the cuts:
Remove the square clay plugs. Use a damp brush or your finger to gently smooth the sharp inner edges of each square cutout, but be careful not to distort the geometric shape.
Step 3: Forming the Cylinder
-
Lift and curve:
Carefully lift the slab and begin curving it into a cylindrical shape. Move slowly to prevent cracking the clay, especially around the cutout areas which are more fragile. -
Score and slip:
Score the beveled edges aggressively and apply a generous amount of slip. This ‘glue’ is crucial for a join that won’t split during firing. -
Join the seam:
Press the beveled ends together firmly. Reach inside the cylinder with one hand to support the wall while pressing from the outside to seal the seam. -
Reinforce the join:
Run a wooden modeling tool up and down the seam on the interior to blend the clay together. Do the same on the exterior, smoothing it until the line disappears entirely.
Level Up: Colored Light
Apply a coat of bright yellow or gold underglaze to the *interior* walls before firing to tint the candlelight and add a hidden pop of color.
Step 4: Finishing Touches
-
Shape correction:
Check the cylinder for roundness. If it has become oval-shaped during handling, gently gently manipulate it back into a perfect circle. -
Refine the rim:
Smooth the top rim with a damp sponge or a piece of chamois leather. A rounded, smooth lip makes the piece look much more professional. -
Add texture:
If surface details were lost during construction, lightly press the exterior with a sponge or fabric to revive that natural, stony texture visible in the photo. -
Dry slowly:
Cover the luminary loosely with plastic for the first day to let the moisture equalize, then uncover to dry completely. This slow drying helps prevent warping. -
Fire:
Bisque fire the piece. Since the beauty relies on the raw clay body, you can choose to leave the outside unglazed and just clear glaze the inside, or fire it to maturity without glaze for a totally matte finish.
Place a tea light inside and enjoy the geometric shadows dancing on your walls


What Really Happens Inside the Kiln
Learn how time and temperature work together inside the kiln to transform clay into durable ceramic.
Planter With a Slab Cylinder Body
This minimalist planter highlights the beauty of simple geometry and contrasting textures. Using a speckled stoneware clay body and a creamy white glaze, you can create a modern vessel with a charming raw clay accent at the base.
Step-by-Step Guide
Materials
- Speckled stoneware clay (mid-fire)
- Creamy satin white glaze
- Rolling pin and guide sticks (approx. 1/4 inch thick)
- Canvas or slab mat
- Fettling knife or needle tool
- Ruler or straight edge
- Template (paper or tar paper)
- Scoring tool (serrated rib)
- Slip (made from your clay body)
- Wooden modeling tool
- Metal rib
- Sponge
- Kiln
Step 1: Preparing the Slabs
-
Wedge and roll:
Begin by thoroughly wedging your speckled clay to remove air bubbles. Roll it out on a canvas surface using 1/4 inch guide sticks to ensure an even thickness throughout. -
smooth the slab:
Take a soft rib and compress the slab on both sides. I always do this in multiple directions—it aligns the clay particles and minimizes warping later in the kiln. -
Cut the cylinder wall:
Using a straight edge and a fettling knife, cut a long rectangle for the container’s body. The length should be the circumference of your desired pot plus a small overlap allowance. -
Cut the bases:
Cut two rough circles from the remaining slab. One will be the floor of the pot, and the other will become the saucer. Use a round template or a jar lid as a guide.
Step 2: Assembling the Cylinder
-
Bevel the edges:
On the short ends of your rectangular slab, cut 45-degree bevels in opposite directions. This increases surface area for a stronger join without adding bulk. -
Score and slip:
Use a serrated rib to roughly score the beveled edges. Apply a generous amount of slipping using a brush or your finger. -
Form the tube:
Stand the slab up and curl it into a cylinder, matching the beveled ends. pressing them firmly together to create a seamless tube. -
Refine the seam:
Support the wall from the inside with one hand while using a wooden tool to blend the seam on the outside. Repeat on the interior to ensure the connection is invisible. -
Attach the base:
Score and slip the bottom edge of your cylinder and the outer rim of your circular base. Press the cylinder onto the base firmly. -
Trim the excess:
Using a needle tool, trim away the excess clay from the base slab so it is flush with the vertical walls.
Warped Walls?
If your cylinder looks oval after firing, you likely handled it while it was too soft. Let the slab stiffen to soft leather-hard before standing it up.
Step 3: Creating the Saucer & Finishing
-
Form the saucer rim:
For the saucer, roll a thin coil of clay. Score and slip the edge of your second circular slab and attach the coil to create a low rim. -
Smooth the saucer:
Blend the coil into the base using your thumb or a modeling tool, then run a damp sponge over the rim to round it off smoothly. -
Refine the surface:
Once the pot is leather hard, use a metal rib to scrape away any canvas texture or imperfections on the exterior walls. -
Create the reveal line:
Using a ruler, lightly mark a line about 3/4 inch up from the bottom of the pot. This will be your glazing guide. -
Add drainage:
Don’t forget to puncture a drainage hole in the center of the pot’s bottom using a hole cutter or drill bit. -
Bisque fire:
Allow the pieces to dry slowly under plastic to prevent cracking, then load them into the kiln for a bisque firing.
Level Up: Texture
Before rolling the slab into a cylinder, gently press dried leaves or lace into the surface for a subtle, organic relief texture under the glaze.
Step 4: Glazing
-
Wax resist:
Apply wax resist to the bottom of the saucer and the bottom 3/4 inch section of the planter (below the line you marked earlier). -
Apply glaze:
Dip the planter into the creamy satin white glaze, or pour it over depending on your vessel size. With the wax resist, the glaze will bead off the bottom strip. -
Clean up:
Use a damp sponge to wipe any stray droplets of glaze off the waxed raw clay section to ensure a crisp line. -
Final fire:
Fire the piece to full maturity (likely Cone 5 or 6 depending on your clay body) to vitrify the clay and melt the glaze.
Now you have a sleek, modern planter ready to house your favorite greenery
Lidded Canister Slab Cylinder
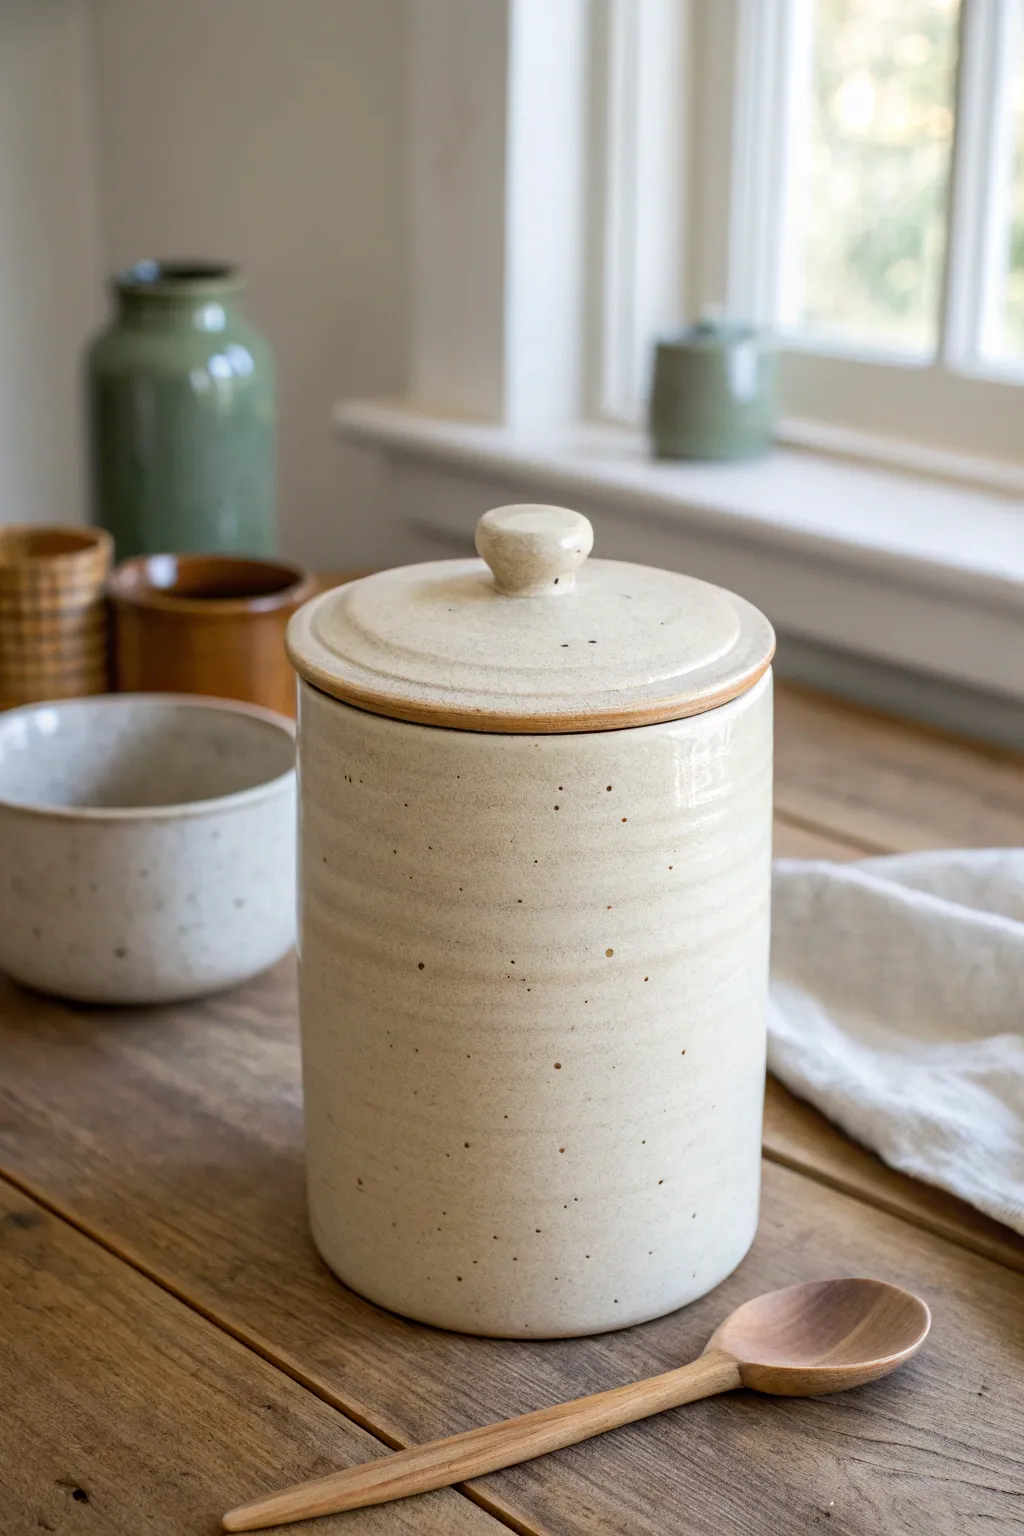
This classic kitchen canister features a soft, speckled cream glaze and gentle throwing rings created through slab texture rather than on a wheel. Its fitted lid with a simple knob makes it perfect for storing everything from sugar to coffee beans.
How-To Guide
Materials
- Speckled buff stoneware clay (mid-fire)
- Canvas-covered work surface
- Rolling pin
- Two wooden thickness strips (1/4 inch)
- Needle tool or fettling knife
- Flexible metal rib
- Serrated rib
- Slip (clay slurry)
- Large sponge
- Wooden modeling tool
- Ruler
- Paper template (rectangle for body, circle for base)
- Potter’s wheel or banding wheel (optional but helpful)
- Cream or glossy white mid-fire glaze
Step 1: Creating the Slab Body
-
Roll the main slab:
Begin by wedging your speckled buff clay to remove air bubbles. Flatten it onto your canvas board and roll it out into a long rectangle using your 1/4 inch wooden strips as guides to ensure an even thickness. -
Add surface texture:
Before cutting, gently drag a serrated rib or a notched tool horizontally across the wet slab to create subtle horizontal striations. This mimics the look of wheel-thrown rings, which adds a lovely tactile quality to the finished piece. -
Cut the forms:
Using your ruler and paper templates, cut a large rectangle for the cylinder walls and a circle for the base. Be sure your rectangle length matches the circumference of your base circle plus a little overlap. -
Bevel the edges:
On the short ends of your rectangular slab, cut 45-degree angles in opposite directions. This beveling allows the ends to overlap seamlessly without creating a thick lump at the seam. -
Form the cylinder:
Score the beveled edges with your needle tool and apply slip. Stand the slab up and curve it into a cylinder, pressing the beveled ends together firmly. -
Secure the seam:
Use a wooden tool to blend the clay across the seam on both the inside and outside. Smooth over the area with a rib so the join becomes invisible. -
Attach the base:
Score and slip the bottom edge of your cylinder and the outer edge of your circular base. Press the cylinder onto the base. Use a modeling tool to blend the clay from the outside wall down onto the base to seal it.
Warping Woes?
If your lid no longer fits after firing, the clay likely warped. Dry the lid ON the canister (with paper between them) to keep them matched.
Step 2: Fabricating the Lid
-
Cut the lid slab:
Roll out a smaller slab of clay, slightly thicker than the body. Cut a circle that is about half an inch wider than the diameter of your canister. -
Make the flange:
Roll a coil of clay and attach it to the underside of the lid slab in a circle. Detailed measurement is key here: the outer edge of this coil ring needs to fit snugly inside the canister opening to keep the lid from sliding off. -
Create the tapered rim:
On the top side of the lid, use a damp sponge or your fingers to smooth and taper the outer edge downwards. We want a slight dome shape rather than a flat pancake. -
Form the knob:
Roll a small ball of clay. Pinch the bottom to create a short stem and flatten the top slightly into a mushroom cap shape. This simple knob design is easy to grip. -
Attach the knob:
Score the center of the lid and the bottom of the knob stem. Apply slip and press the knob firmly into place. I like to twist it slightly back and forth to ensure a tight bond.
Step 3: Finishing and Glazing
-
Refine the surface:
Once the clay is leather-hard, use a damp sponge to smooth any sharp edges, especially around the rim of the canister and the lid. Re-emphasize the horizontal texture lines if they were smudged during handling. -
Bisque fire:
Allow the piece to dry completely slowly to prevent warping. Fire it in the kiln to cone 04 (or your clay’s specific bisque temperature). -
Wax the contact points:
Apply wax resist to the bottom of the canister, the underside of the lid where it touches the rim, and the rim of the canister itself. This prevents the lid from fusing to the jar during the glaze firing. -
Glaze application:
Dip the body and lid into a creamy, semi-translucent glaze. A glaze that breaks over texture is ideal, as it will highlight the iron speckles in the clay and the horizontal striations you created. -
Final firing:
Fire the piece to cone 5 or 6 (mid-fire). The heat will draw out the iron speckles from the buff clay, creating that charming rustic spotting through the cream glaze.
Spoon Notch
Before the clay dries, cut a small U-shaped notch in the rim and lid flange to allow a wooden spoon handle to rest while the lid is closed.
Now you have a functional, earthy storage vessel ready to sit on your counter

TRACK YOUR CERAMIC JOURNEY
Capture glaze tests, firing details, and creative progress—all in one simple printable. Make your projects easier to repeat and improve.
Tapered Slab Cylinder Cup
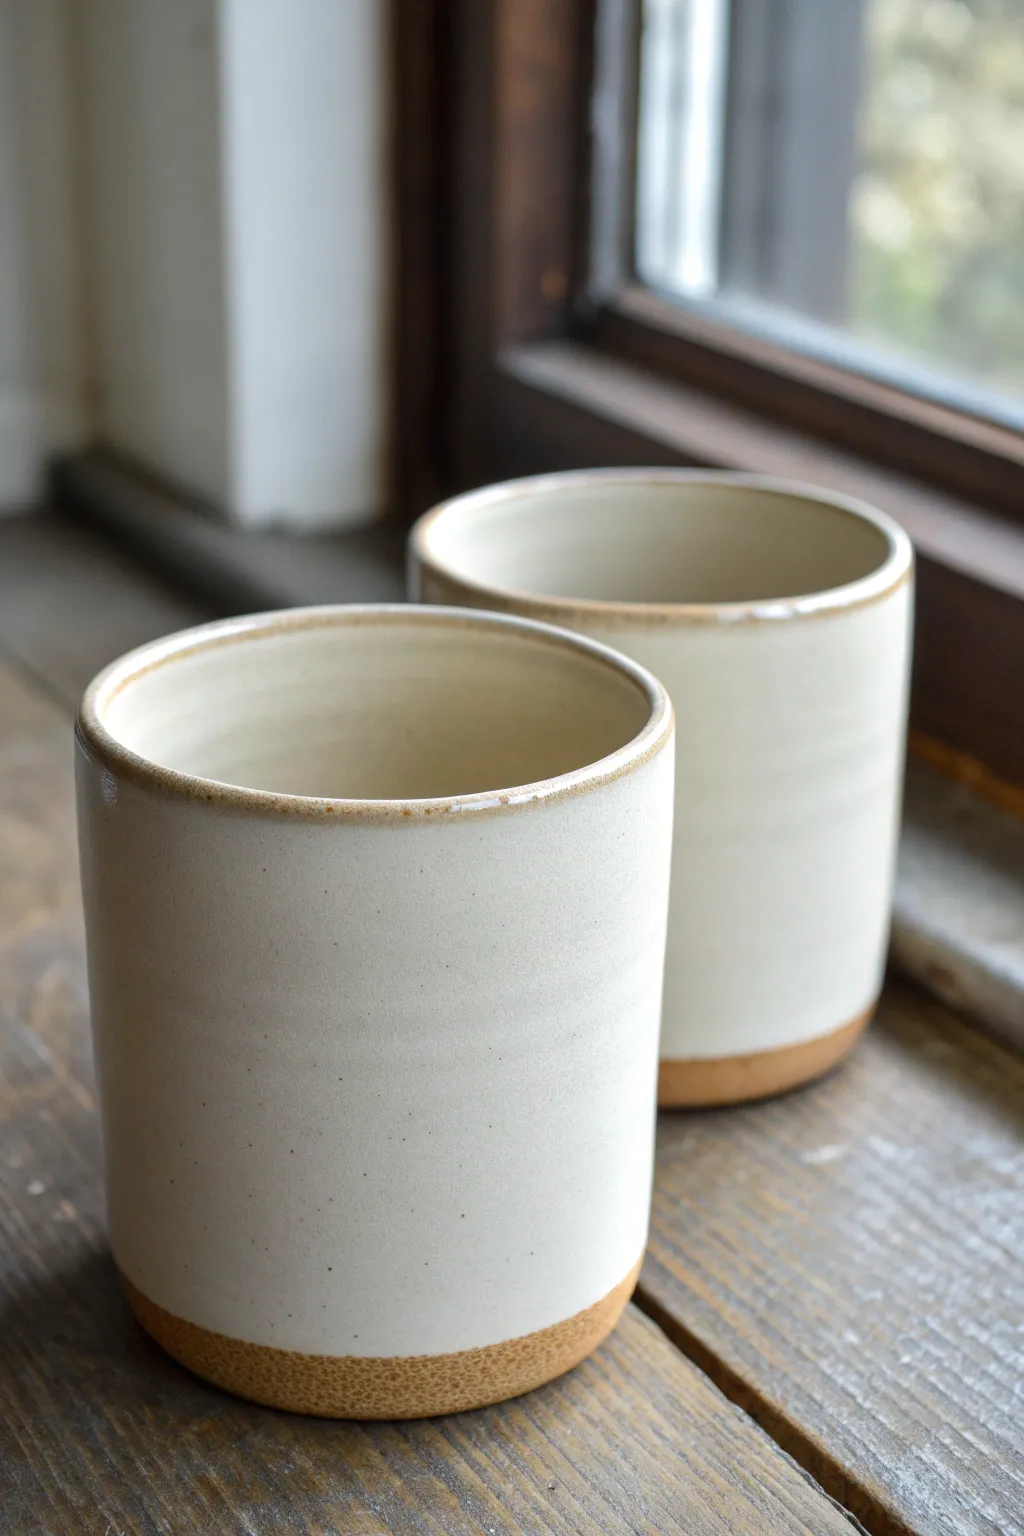
These understated, handmade ceramic cups bring a touch of minimalist beauty to your morning routine with their clean lines and exposed clay bases. The design highlights the contrast between the smooth, milky white glaze and the warm, textured stoneware for a perfectly cozy aesthetic.
Step-by-Step Tutorial
Materials
- Speckled stoneware clay (mid-fire)
- Rolling pin
- Canvas working mat or slab roller
- Wooden guide strips (1/4 inch thickness)
- Fettling knife or needle tool
- Paper template (rectangle approx 10” x 5”)
- Scoring rib or serrated kidney tool
- Slip (clay mixed with water)
- Wooden modeling tool
- Smooth slightly damp sponge
- Cream or antique white dipping glaze
- Wax resist (optional)
Step 1: Preparing the Slab
-
Roll the clay:
Begin by wedging your speckled stoneware clay to remove any air bubbles. Place it on your canvas mat between two 1/4 inch wooden guide strips. Roll the clay out firmly until it is a uniform thickness, checking for any uneven spots. -
Compress the slab:
Use a soft rib tool to compress the clay surface on both sides. This aligns the clay particles, preventing warping during firing, and creates that smooth canvas for your future glaze. -
Cut the rectangle:
Lay your paper template onto the slab. Using your fettling knife, cut precisely around the template. You want perpendicular cuts, so keep your knife straight up and down, not angled. -
Bevel the edges:
To create a seamless join, bevel the two short ends of your rectangle. Cut one end at a 45-degree angle facing up, and the opposite end at a 45-degree angle facing down. This allows them to overlap perfectly without adding bulk.
Seam Success
Work the vertical seam in slightly different directions (up, down, diagonal) when smoothing. This ‘knits’ the clay particles together better than just dragging the tool in one direction.
Step 2: Forming the Cylinder
-
Score and slip:
Take your serrated rib or needle tool and aggressively score the beveled edges you just created. Apply a generous amount of slip to these roughed-up areas. -
Join the walls:
Stand the slab up and curve it into a cylinder shape. Overlap the beveled edges and press them firmly together. Support the inside of the wall with one hand while pressing from the outside to ensure a tight bond. -
Smooth the seam:
With a wooden modeling tool, blend the clay across the seam line both inside and out. I like to run a rib over the exterior seam afterward to make it virtually invisible. -
Measure the base:
Place your cylinder on top of a leftover piece of the rolled slab. Use your needle tool to trace a circle directly around the base of the cylinder. -
Attach the bottom:
Score and slip both the bottom rim of the cylinder and the outer edge of the circular base you just cut. Press the cylinder onto the base firmly. -
Seal the connection:
Use a small coil of soft clay to reinforce the interior seam where the floor meets the wall. Blend this coil smoothly into both surfaces so there are no crevices for liquids to hide.
Level Up: Texture
Before rolling the slab into a cylinder, gently press a textured fabric or canvas onto the exterior side. The glaze will break beautifully over the subtle pattern during firing.
Step 3: Refining and Glazing
-
Refine the rim:
Once the cup is leather hard, use a damp sponge or a chamois cloth to round over the top drinking rim. It should feel soft to the touch, not sharp. -
Clean the footing:
Turn the cup over and clean up the connection point at the bottom ensuring a sharp, clean 90-degree angle where the wall meets the floor, matching the reference photo’s clean break. -
Bisque fire:
Load the bone-dry cups into a kiln and bisque fire them (usually to cone 04) to prepare them for glazing. -
Wax the base:
Using a brush or sponge, apply wax resist to the bottom 1/2 inch of the exterior and the entire underside of the cup. This creates the ‘resist’ line that keeps the raw speckled clay exposed. -
Dip into glaze:
Hold the cup by the base (or use glazing tongs) and dip it straight down into a bucket of cream or white semi-opaque glaze. Hold for 3 seconds and lift straight out. -
Clean up drips:
Once the glaze is dry on the surface, wipe away any beads of glaze that might have settled on the waxed bottom edge with a damp sponge. -
Final firing:
Place the cups in the kiln for the glaze firing (usually cone 5 or 6 depending on your clay body). Ensure they don’t touch each other.
Enjoy that first sip of coffee from a vessel you built with your own hands
Oval Slab Cylinder Vase
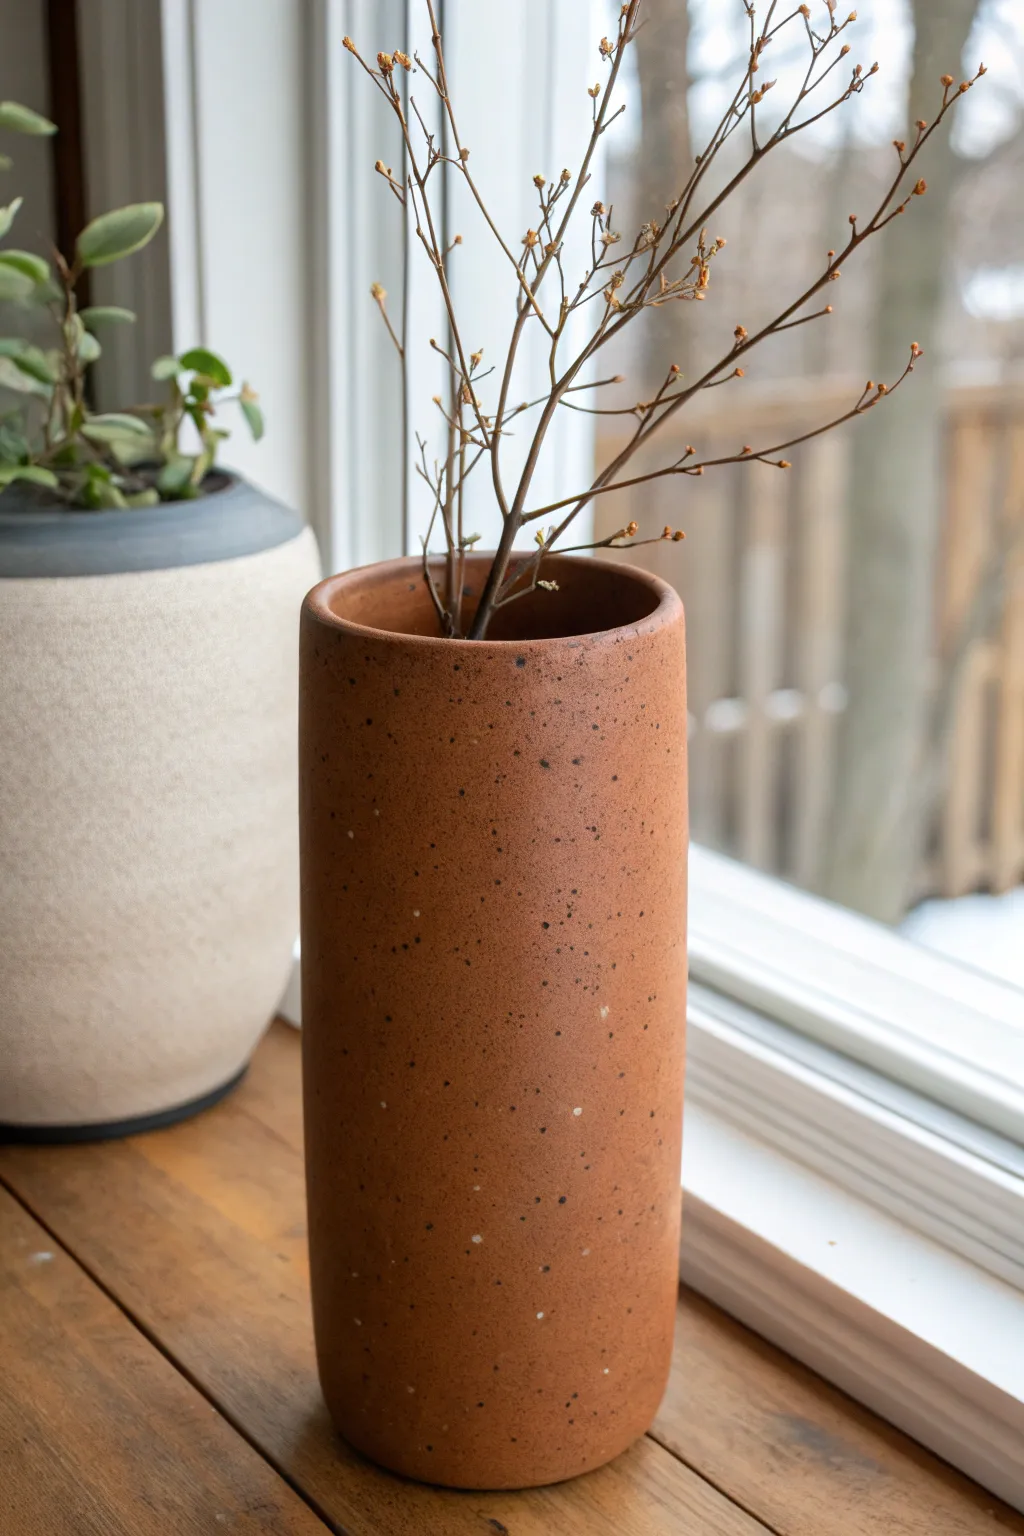
Embrace the warmth of natural clay with this tall, elegant cylinder vase built using slab construction techniques. The finished piece features a subtly textured, speckled reddish-brown surface that feels both rustic and modern, perfect for displaying dried botanicals.
Detailed Instructions
Materials
- Red stoneware clay with speckles (or grog)
- Rolling pin or slab roller
- Canvas or slab mat
- Fettling knife
- Needle tool
- Serrated rib or scoring tool
- Slip (clay and water mixture)
- Wooden rib
- Rubber rib (soft)
- Sponge
- Ruler or straight edge
- Plastic sheet
Step 1: Preparing the Slab
-
Roll the clay:
Begin by wedging your red stoneware clay to remove air bubbles. Roll it out into a large, consistent slab approximately 1/4 to 3/8 inch thick. If you want that sturdy look from the photo, don’t go too thin. -
Compress the surface:
Using a rubber rib, firmly compress the clay on both sides. This aligns the clay particles, reducing warping later, and creates a smooth canvas for the speckled texture to shine through. -
Measure and cut:
Determine the desired height and circumference of your vase. For a tall vase like this, cut a rectangle roughly 12 inches high by 10 inches wide. Use a ruler and fettling knife for clean, straight edges. -
Bevel the sides:
On the two vertical edges that will join together, cut a 45-degree angle (bevel). One side should be beveled facing up, and the opposite vertical edge beveled facing down, creating an overlapping joint.
Step 2: Forming the Cylinder
-
Stand and shape:
Carefully lift the slab and curve it into a cylinder shape. If the clay is very fresh, let it stiffen slightly for 15-20 minutes so it can support its own weight without slumping. -
Score and slip:
Rough up the beveled edges using a serrated rib or scoring tool. Apply a generous amount of slip to both scored areas. -
Join the seam:
Overlap the beveled edges and press them firmly together. Support the inside wall with one hand while pressing from the outside to ensure a tight bond. -
Smooth the seam:
Use a wooden rib to smooth the seam on the outside until it is invisible. I like to run the rib vertically up the pot to maintain the straight lines. Repeat on the inside with your fingers or a long-handled tool. -
Shape the oval:
Gently press on opposite sides of the damp cylinder to distort the perfect circle into a soft oval shape. This gives the piece the distinctive profile seen in the image.
Seamless Success
When joining your seam, use a ‘pony roller’ or a small brayer on the inside and outside of the joint. This compresses the clay layers much tighter than finger pressure alone.
Step 3: Adding the Base & Finishing
-
Cut the base:
Place your oval cylinder onto a fresh piece of rolled slab. Trace around the bottom edge with a needle tool, then remove the cylinder and cut out the base shape slightly inside your trace line. -
Attach the bottom:
Score and slip both the bottom edge of the cylinder and the edge of the base slab. Press the base into place. If you cut it slightly small, you can gently paddle the walls in to meet it. -
Compress the rim:
Use a damp sponge or a piece of plastic wrap folded over the rim to smooth and compress the top edge. A rounded, well-compressed rim prevents future chipping. -
Refine the surface:
Once the pot is leather hard, use a metal rib to scrape away any grog imperfections or unevenness. This is also the time to sponge away any final blemishes. -
Clean the speckles:
Wipe the surface with a slightly damp sponge to expose the natural grog or speckles in the clay body, enhancing the texture shown in the reference photo. -
Bisque fire:
Allow the vase to dry slowly under plastic to prevent warping. Once bone dry, bisque fire the piece in the kiln to cone 04 (or your clay’s specific bisque temperature). -
Glazing and final fire:
For this raw clay look, you might choose to only glaze the interior with a liner glaze for waterproofing, leaving the exterior unglazed to show off the clay body color. Fire to maturity (likely cone 5/6 or 10).
Wobbly Walls?
If your tall cylinder won’t stay oval and tries to round out, let it stiffen to leather hard, then gently squeeze it back into an oval. It will hold the shape much better when drier.
Fill your new handmade vessel with minimalist branches to complete the organic aesthetic
Faceted Slab Cylinder Form
This project transforms a simple slab-built cylinder into a sophisticated piece of modern decor using a reductive carving technique. The result is a sharp, architectural vessel that highlights the natural beauty of speckled stoneware clay through crisp, light-catching planes.
How-To Guide
Materials
- Speckled stoneware clay (mid-fire)
- Canvas-covered work board
- Rolling pin and guide strips (approx. 1/4 inch)
- Needle tool
- Metal rib
- Carving wire or cheese cutter
- Scoring tool or serrated rib
- Slip
- Sponge
- Paddle
- Matte white glaze (optional, or clear)
Step 1: Forming the Cylinder
-
Roll the slab:
Start by rolling out a generous slab of speckled stoneware clay. Use your guide strips to ensure an even thickness of about 1/4 inch or slightly thicker to allow for the faceting process later. -
Compress the clay:
Using a metal rib, compress the clay firmly on both sides. This is crucial for structural integrity and helps remove canvas texture, creating a smooth starting canvas for your facets. -
Cut the rectangle:
Measure and cut a clean rectangle from your slab. The height of the rectangle will be the height of your vase, and the length will determine the diameter. -
Join the seam:
Bevel the short ends of your rectangle at a 45-degree angle. Score these edges thoroughly and apply slip, then bring them together to form a cylinder. I find compressing this seam with a wood tool helps it disappear completely. -
Add the base:
Roll a small separate slab for the base. Score and slip the bottom edge of your cylinder and attach it to this base slab. Trim away the excess clay with a needle tool. -
Shape the shoulder:
Gently collar the top inch of the cylinder inward to create a slightly tapered shoulder. You can do this by gently squeezing with your hands while rotating the piece, or using a paddle.
Collapsing Cylinder?
If the cylinder buckles while cutting, the clay is too soft. Stuff the inside with newspaper or foam to support the walls against the pressure of the wire cutter.
Step 2: Designing the Facets
-
Mark the guide lines:
Let the cylinder stiffen to a firm leather-hard state. This is the most critical timing step; too soft and it will warp, too hard and it won’t cut. Lightly scratch vertical lines around the cylinder to divide it into equal sections (e.g., 6 or 8 sections). -
Plan the geometry:
At each vertical mark, decide where your facets will peak. For this diamond pattern, you’ll want alternating high and low points. Mark a horizontal line around the widest part of the belly. -
Begin slicing:
Using a sharp wire tool or a cheese cutter, make your first slice. Start from the top rim and slice diagonally down toward the belly line. The cut should be swift and confident to leave a smooth plane. -
Complete the top row:
Continue cutting the top facets around the circumference. You are essentially shaving off triangles of clay to create the upper slope of the geometric form. -
Carve the bottom row:
Now, cut from the bottom up toward that same belly line. These cuts should meet the upper cuts, creating a sharp ridge where the planes intersect at the widest part of the vase. -
Refine the surface:
Once all facets are cut, you might have some rough clay crumbs. Wait until the piece is bone dry, then lightly brush them away with a stiff brush rather than a sponge, which can dull your crisp edges.
Step 3: Finishing
-
Bisque fire:
Fire the vessel to bisque temperature (usually Cone 04). This sets the shape permanently and prepares it for glazing. -
Glaze application:
For this look, choose a glaze that breaks over edges, or a matte white that allows the speckles to show through. Pour the glaze inside the vase, swirl, and pour out. -
Exterior glazing:
Dip the exterior or spray the glaze. If you want the raw clay texture shown in the image, wipe the glaze back with a sponge so it remains only in the texture, or skip glazing the exterior entirely if your clay body is vitrified. -
Final firing:
Fire to the maturation temperature of your clay (likely Cone 5 or 6). Ensure the base is wiped clean of glaze before loading it into the kiln.
Sharpest Edges
Don’t sponge the facets after cutting! Sponging erases the crisp separation lines. Use a barely damp chamois strip only on the rim for comfort.
Place your finished vase near a window where the shifting daylight can play across the geometric planes.
Fluted Slab Cylinder With Pinches

This project transforms a simple slab of clay into a sophisticated, textured cylinder with a creamy matte finish. The vertical fluting adds tactile interest and a modern architectural feel, while the iron-speckled clay body gives it warmth and character.
Step-by-Step
Materials
- Speckled Stoneware Clay
- Rolling Pin or Slab Roller
- Clay Knife or Fettling Knife
- Needle Tool
- Smoothing Rib (Metal or Rubber)
- Wooden Fluting Tool or Modeling Tool
- Slip and Scoring Tool
- Ruler
- Guide Sticks (approx 1/4 inch)
- Sponge
- Matte cream/white glaze
Step 1: Preparing the Slab
-
Roll the Slab:
Begin by wedging your speckled stoneware clay to remove air bubbles. Using guide sticks or a slab roller, roll a consistent slab about 1/4 inch thick. This thickness is ideal because it provides enough depth for the fluted texture without making the final piece too heavy. -
Cut to Size:
Measure and cut a rectangle from your slab. For a tumbler similar to the image, try dimensions around 10 inches long by 6 inches high. Remember, the clay will shrink during firing, so cut slightly larger than your desired finished size. -
Smooth the Surface:
Before adding texture, compress the clay on both sides using a soft rib. This removes canvas marks and strengthens the bonds in the clay particles, which helps prevent warping later. -
Create the Flutes:
While the slab is flat on your work surface, mark even intervals along the top and bottom edge as guides. Using a wooden fluting tool or the rounded edge of a modeling tool, press vertical indentations from top to bottom. Apply steady, even pressure to create consistent grooves. -
Refine the Ridges:
After pressing the grooves, run a damp sponge or finger gently over the raised ridges to soften any sharp edges. The texture should look distinct but feel pleasant to the touch.
Fixing a Visible Seam
If the seam interrupts the flute pattern, use a small coil to fill gaps, then re-carve that specfic flute with your tool while the clay is leather hard.
Step 2: Forming the Cylinder
-
Bevel the Edges:
Cut a 45-degree bevel on the two short ends of your rectangle. One bevel should face up, and the other should face down. This allows the seam to overlap cleanly without adding extra bulk. -
Score and Slip:
Score the beveled edges thoroughly and apply clay slip. This creates the ‘glue’ needed for a strong bond. -
Join the Seam:
Carefully lift the slab and curl it into a cylinder. Press the beveled ends together firmly. Because the texture is already applied, support the wall from the inside with one hand while gently pressing the seam with the other to avoid crushing the flutes. -
Hide the Seam:
Use a wooden tool to blend the seam line into one of the vertical grooves. Usually, I try to align the seam creates a ‘valley’ in the fluting pattern so it becomes invisible.
Pro Tip: Consistent Depth
Place a ruler alongside your fluting tool as a guide rail. This keeps your vertical lines perfectly straight and prevents your hand from wavering.
Step 3: Adding the Base and Refining
-
Cut the Base:
Roll a small piece of slab for the floor. Place your cylinder on top of it and trace around the base with a needle tool. -
Attach the Base:
Score and slip both the bottom edge of the cylinder and the outer edge of the base circle. Press them together firmly. -
Round the Bottom:
Use your thumb or a rounded tool to compress the connection point where the wall meets the floor. Gently pinch or tap the bottom edge upwards slightly to create the tapered, rounded look seen at the base of the vase. -
Finish the Rim:
Inspect the rim of your cylinder. Use a damp sponge or a chamois cloth to compress and smooth it. A slightly rounded rim is more durable and comfortable to drink from. -
Dry Slowly:
Cover the piece loosely with plastic to let it dry slowly. This ensures the seam doesn’t crack as the clay shrinks.
Step 4: Glazing and Firing
-
Bisque Fire:
Once bone dry, fire the piece in a bisque kiln according to your clay body’s specifications (usually Cone 04 or 06). -
Apply Glaze:
Dip or brush a matte cream or soft white glaze onto the piece. The glaze should break slightly over the sharp edges of the fluting, allowing the speckled clay underneath to peek through. -
Final Fire:
Glaze fire to maturity (often Cone 5 or 6 for stoneware). The heat will interact with the iron specks, creating that lovely spotted effect through the creamy surface.
Now you have a stunning, functional piece of art ready for your favorite beverage or a small bouquet.
Carved Sgraffito Slab Cylinder Wrap
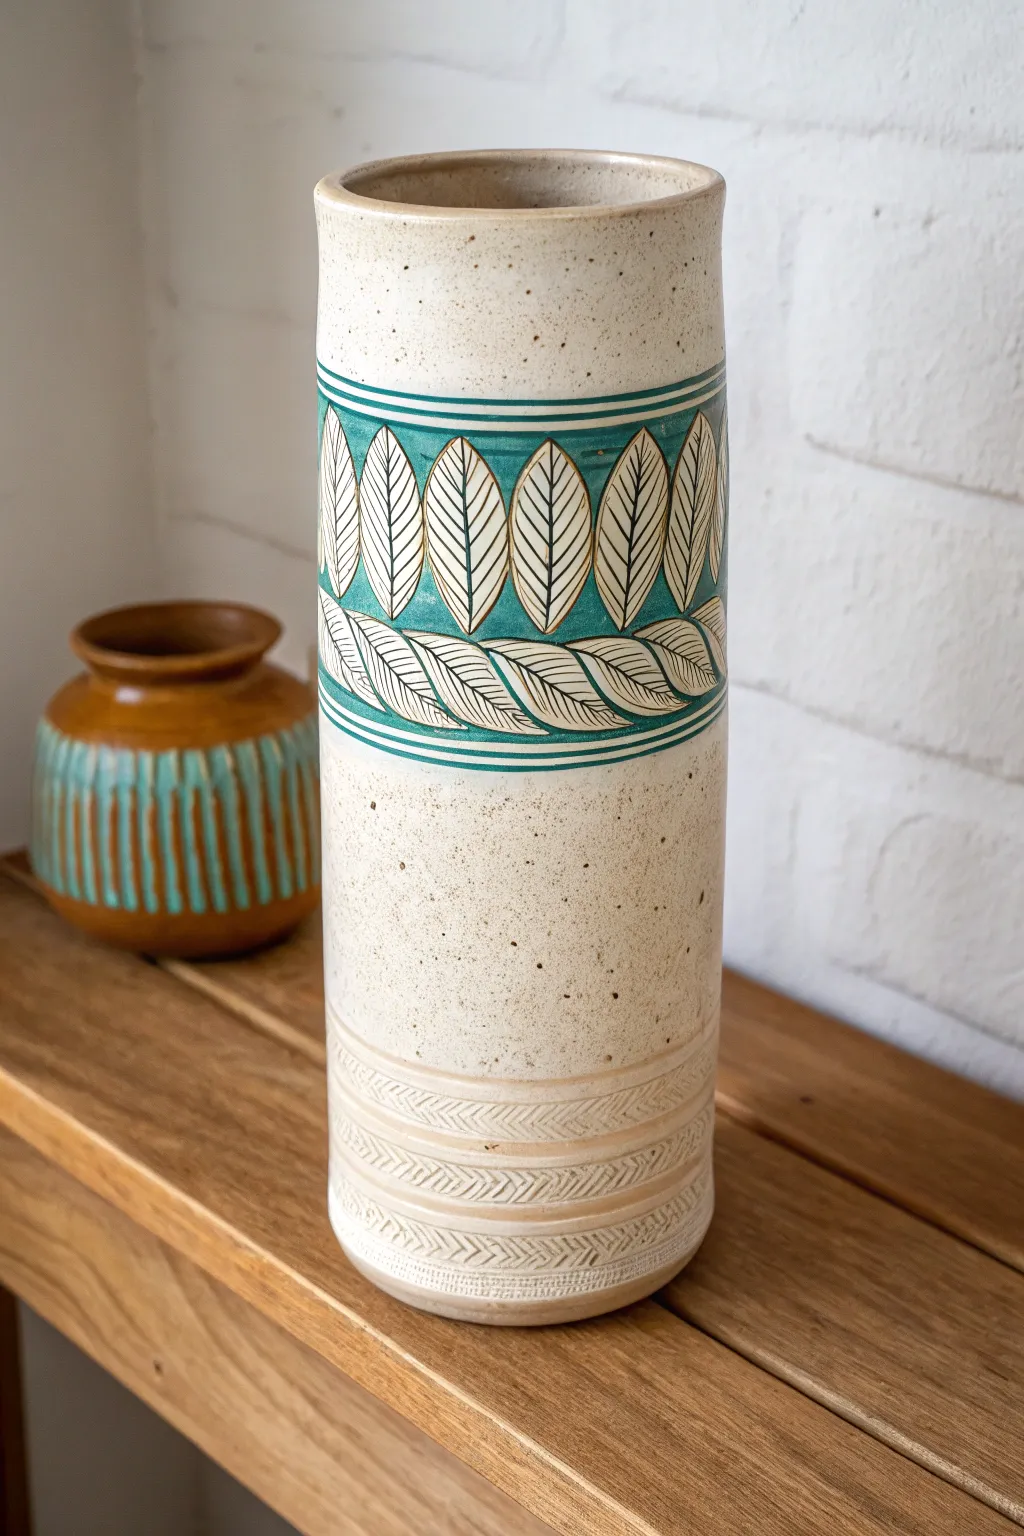
This elegant slab-built vase combines the raw beauty of speckled clay with intricate sgraffito detailing. The striking contrast of creamy white leaves against a deep teal band creates a sophisticated focal point, grounded by subtle textured carving at the base.
Step-by-Step
Materials
- Speckled Stoneware Clay (mid-fire)
- Teal Underglaze (or colored slip)
- White Underglaze (or white slip)
- Slab Roller or Rolling Pin with Guide Strips
- Canvas or Ware Board
- Cylindrical Form/Mold (PVC pipe or similar)
- Needle Tool
- Sgraffito/Carving Tools (loop tool and fine point)
- Serrated Rib or Scoring Tool
- Slip (made from your clay body)
- Soft Paintbrushes
- Clear Glaze
Step 1: Forming the Cylinder
-
Roll the Slab:
Begin by wedging your speckled clay to remove air bubbles. Roll out a consistent slab approximately 1/4 to 3/8 inch thick. Using guide strips is helpful here to ensure the wall thickness is uniform throughout. -
Cut to Size:
Measure your cylindrical mold (like a PVC pipe wrapped in newspaper) to determine the circumference. Cut a rectangular slab that matches this length plus a slight overlap for the seam, and your desired height. -
Texture the Base (Optional):
Before assembling, you can lightly texture the bottom third of the slab. Use a carving tool to impress horizontal herringbone or chevron patterns into the clay while it’s flat, as shown in the bottom section of the reference image. -
Bevel the Edges:
Cut 45-degree bevels on the two short ends of your rectangle. This angled cut increases the surface area for the join and helps hide the seam. -
Construct the Cylinder:
Wrap the slab around your form. Score and slip the beveled edges thoroughly, then press them together firmly to create a seamless cylinder. -
Add the Base:
Roll a small separate slab for the floor. Place your cylinder on top, trace around it, and cut out the circle. Score and slip both contact points, then attach the floor to the cylinder walls, compressing the seam well.
Clean Lines Pro-Tip
When carving through the teal underglaze, brush away the crumbs frequently with a soft, dry brush. Don’t use your finger, or you might smear the colored dust into the raw clay.
Step 2: Applying Design
-
Define the Band:
Once the cylinder has stiffened to a leather-hard state, place it on a banding wheel. Use a needle tool to lightly scribe two parallel lines around the upper middle section to define the area for your leaf design. -
Apply Teal Underglaze:
Paint two to three even coats of teal underglaze inside the band you just defined. I like to let each coat dry until it loses its sheen before applying the next to ensure solid coverage. -
Outline the Leaves:
Using a fine pencil or a very light touch with a needle tool, sketch large, vertical ovular leaf shapes around the band. Below them, sketch a horizontal vine of leaves flowing around the cylinder. -
Carving the Leaves (Sgraffito):
With a fine carving tool, carefully scratch away the teal underglaze to reveal the raw clay body underneath. Outline the leaf shapes first, then carve a central vein down the middle of each. -
Add Leaf Veins:
Carve delicate diagonal lines branching from the central vein to the leaf edges. Keep your strokes confident and fluid to mimic natural leaf structures. -
Refine the Borders:
Carve thin horizontal lines above and below the teal band to create a crisp border. This separates the painted section from the raw clay above and below. -
White Accent (Mishima-style):
If you want the leaves to appear white rather than raw clay color (as seen in some variations), you can paint white underglaze into the carved lines, let it dry, and then carefully scrape the surface flush. Alternatively, simply carve through the teal to reveal the speckled clay if your clay is light enough.
Level Up: Wax Resist
Apply wax resist over your finished teal and leaf carving before dipping the pot in a matte white glaze. This creates a stunning contrast between the glossy design and a soft matte body.
Step 3: Finishing Touches
-
Refine the Base Texture:
Go back to the textured area at the bottom. If the handling blurred your herringbone pattern, use a sharp tool to re-define those lines now. -
Smooth the Rim:
Use a damp chamois or sponge to smooth the top rim of the vase. Ensure it is rounded and comfortable to the touch. -
Bisque Fire:
Allow the piece to dry slowly and completely. Bisque fire it according to your clay body’s specifications (usually Cone 04 or 06). -
Glaze Application:
Apply a clear glossy glaze over the entire interior to make it waterproof. For the exterior, brush a clear glaze over the design area to make the colors pop, or dip the whole piece if preferred. -
Final Fire:
Glaze fire the piece to the maturity temperature of your clay and glaze (likely Cone 5 or 6). This will reveal the lovely speckles in the clay body.
Once fired, fill your new vase with tall stems or dried grasses to compliment the organic leaf motifs.
Raised Relief Slab Cylinder Scene
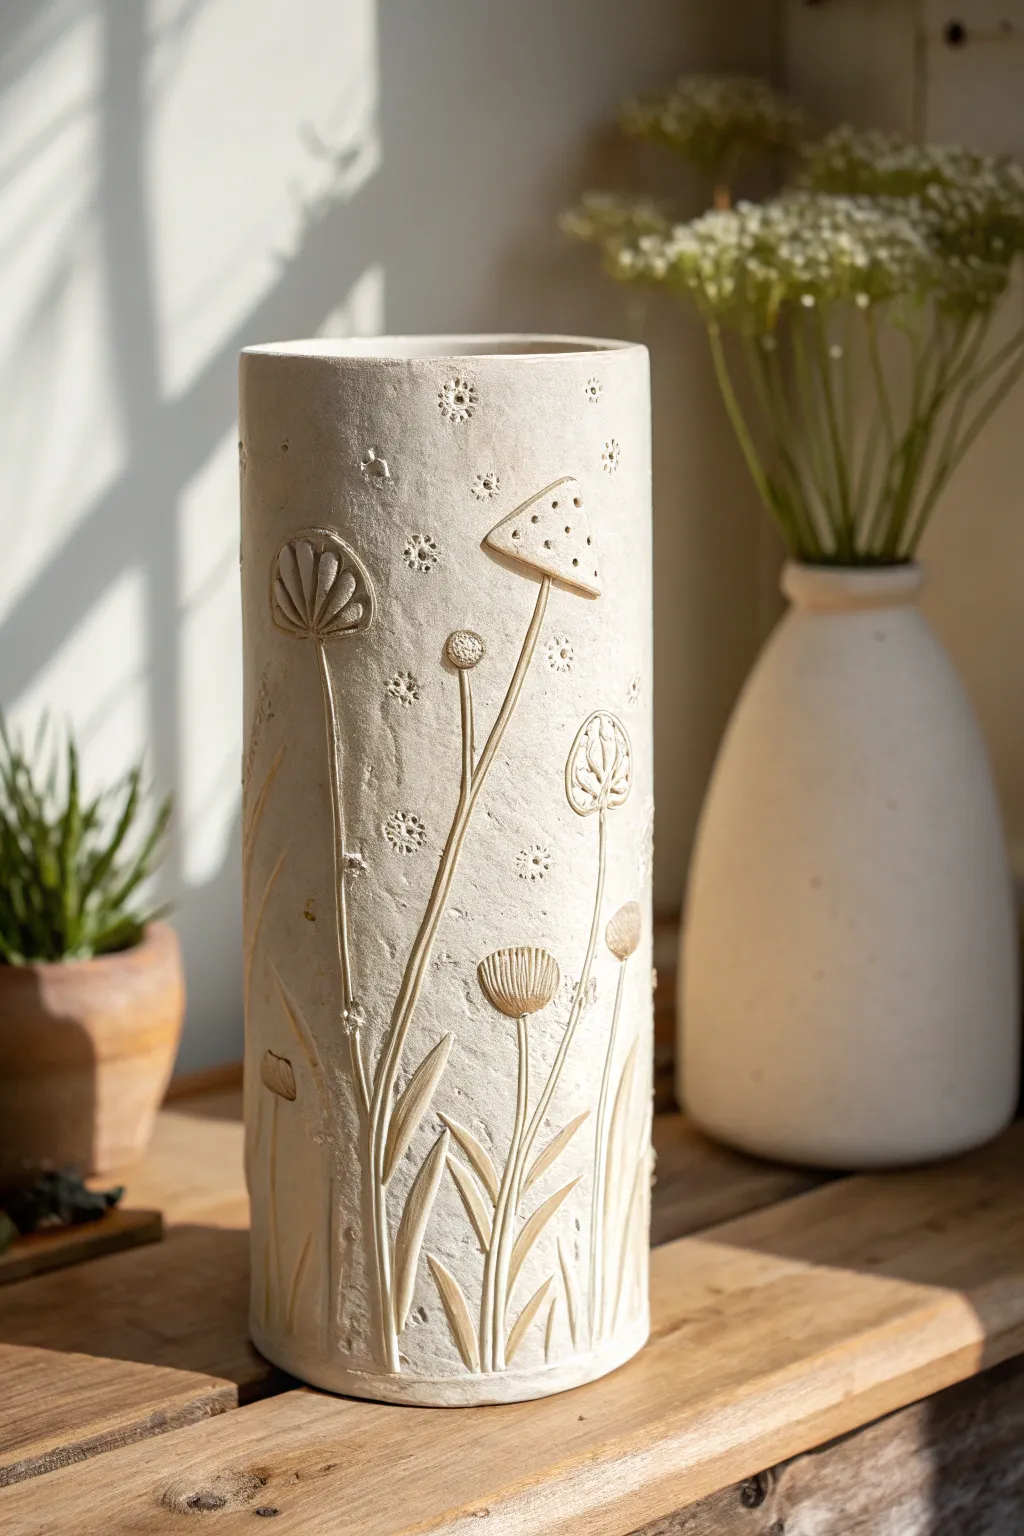
Capture the charm of a forest floor with this elegant slab-built cylinder featuring raised relief botanical and mushroom designs. The natural texture and subtle carving create a sophisticated yet organic showcase for your favorite blooms.
Step-by-Step Guide
Materials
- Stoneware clay (smooth or fine grog)
- Rolling pin
- Two guide sticks (approx. 1/4 inch thick)
- Canvas or slab mat
- Fettling knife
- Pin tool
- Scoring tool (serrated rib or needle tool)
- Slip (clay mixed with water)
- Wooden modeling tools
- Various small stamps (star/flower patterns)
- Cylindrical form for support (PVC pipe or bisque mold, covered in newspaper)
- Chamois or soft sponge
- Clear matte or satin transparent glaze
Step 1: Preparing the Slab
-
Roll out the clay:
Begin by wedging your clay to remove air bubbles, then place it on your canvas. Use your guide sticks on either side to roll out an even slab that is roughly 1/4 inch thick. -
Smooth the surface:
Take a rubber rib and compress the clay on both sides. This aligns the clay particles, preventing cracking later, and creates that smooth, stone-like canvas for your design. -
Cut the rectangle:
Measure the circumference of your support cylinder plus an inch for overlap. Cut a precise rectangle from your slab using a ruler and fettling knife.
Clean Seams
To erase the vertical seam completely, use a serrated rib to cross-hatch over the join line, dragging clay across the gap. Follow with a smooth rib for a seamless finish.
Step 2: Creating the Floral Relief
-
Outline the design:
Before rolling the cylinder, lightly sketch your tall flower and mushroom stems directly onto the flat slab using a needle tool. Keep the pressure very light so you don’t cut through. -
Build the stems:
Roll very thin coils of clay for the long stems. Score the sketched lines on the slab with a serrated tool, apply a tiny bit of slip, and press the coils onto the surface. -
Add flower heads and caps:
Form small balls or triangles of clay for the flower buds and mushroom caps. Flatten them slightly and attach them to the tops of your stems using the score-and-slip method. -
Sculpt the details:
Use a wooden modeling tool to press definition into the added clay. Carve vertical lines into the mushroom caps for gills and radiating lines into the flower heads to suggest petals. -
Create the leaves:
Shape small, teardrop-shaped pieces of clay for the lower leaves. Attach them near the base of the stems, pressing the edges down to blend them seamlessly into the background slab. -
Add background texture:
Using your small star or flower stamps, press random patterns into the negative space around the upper part of the design. I like to vary the pressure here to create depth, making some impressions deeper than others.
Add Depth
Before the final glaze, brush a diluted black underglaze over the relief details and wipe it back with a wet sponge. The dark color will stay in the recesses, making the design pop.
Step 3: Forming the Cylinder
-
Prepare the connection:
Let the slab stiffen slightly to a ‘soft leather hard’ stage so it can hold the weight of the relief. Bevel the short edges of your clay rectangle at 45-degree angles to create a stronger seam. -
Wrap the form:
Wrap your newspaper-covered support cylinder with the slab. Carefully bring the beveled edges together, ensuring you don’t squash your raised relief work in the process. -
Seal the seam:
Score and slip the beveled edges thoroughly. Press them together firmly and smooth the seam on the inside and outside with a wooden tool. If the seam disrupts the design, you can add a clay leaf over it to hide the join. -
Attach the base:
Roll a small separate slab for the floor of the vase. Place your cylinder on top, trace around it, and cut out the circle. Score, slip, and attach the base firmly to the cylinder walls.
Step 4: Finishing Touches
-
Refine the rim:
Use a damp chamois or sponge to smooth the top rim of the vase. It should be perfectly round and pleasant to the touch. -
Clean up the relief:
Check your added sculpted elements. Use a small, damp brush to smooth away any rough crumbs of clay or sharp edges on the petals and mushroom caps. -
Drying:
Cover the piece loosely with plastic for the first 24 hours to ensure the added relief drying rate matches the main body. Then, uncover and let it dry completely to the bone-dry stage. -
Bisque fire:
Fire the piece to cone 04 (or your clay body’s bisque temperature) in the kiln. -
Glaze application:
Apply a clear matte or very light satin glaze over the entire piece. Alternatively, you can wipe an iron oxide wash onto the relief areas first and sponge it back to highlight the textures before glazing. -
Final firing:
Glaze fire the piece to the maturity temperature of your clay (typically cone 5 or 6 for stoneware).
Once fired, fill your new vase with dried grasses or fresh wildflowers to complete the woodland look
Overlapped Seam Slab Cylinder Look
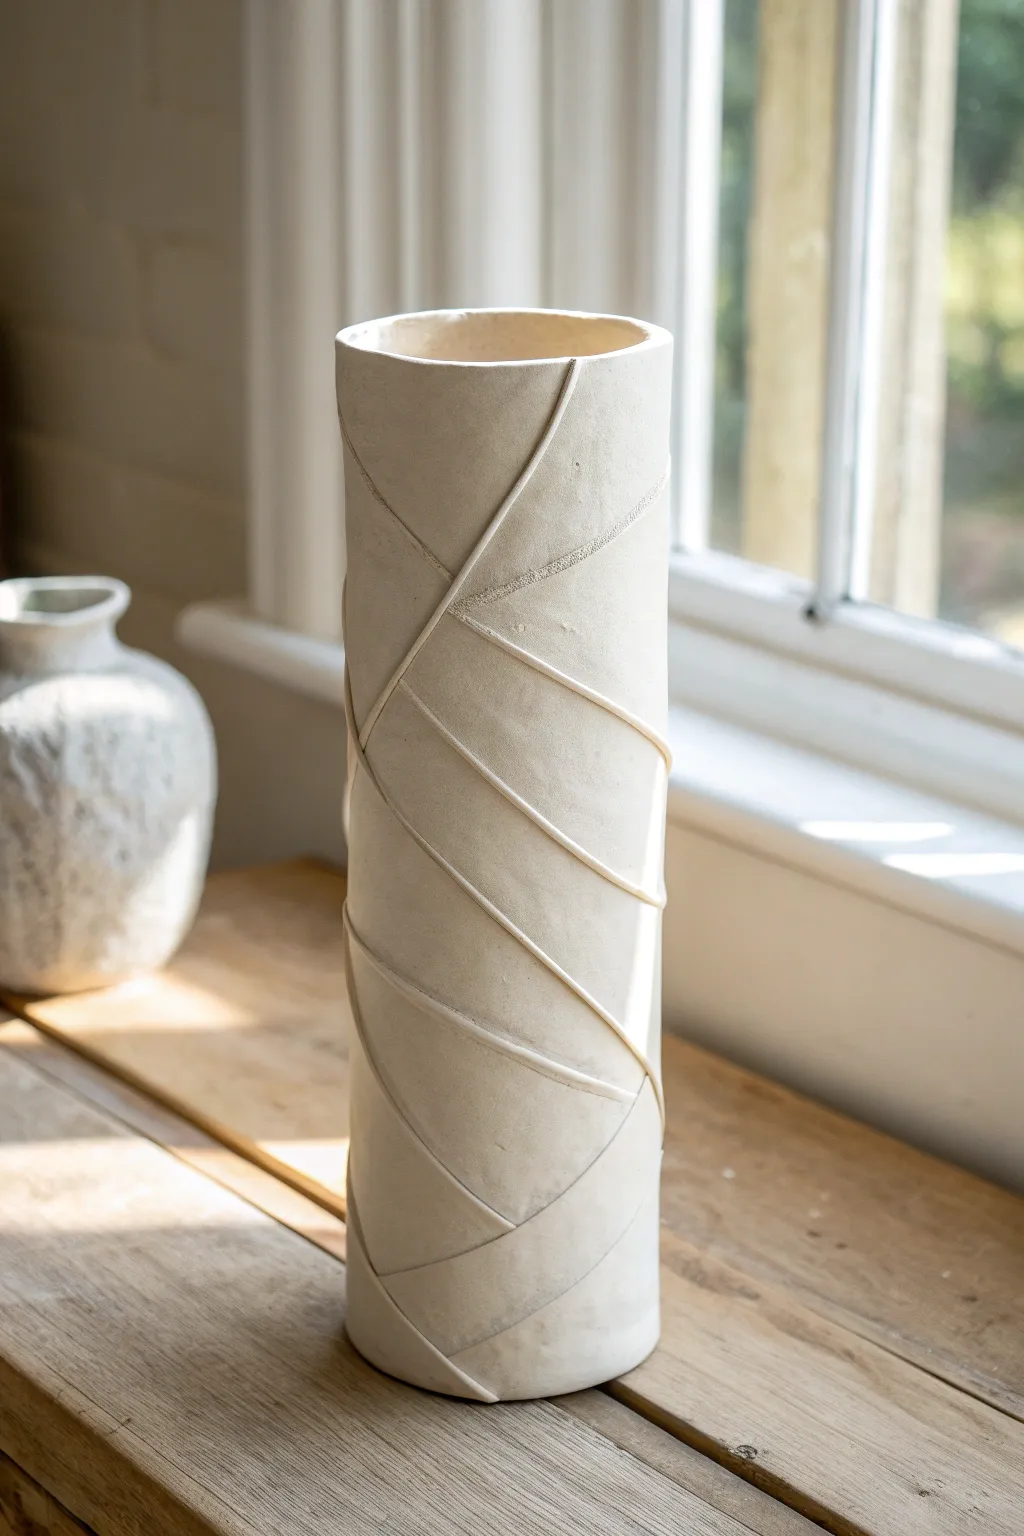
This elegant cylindrical vase showcases the beauty of construction lines, turning structural seams into a spiraling decorative feature. By layering thin strips of clay over a simple slab cylinder, create a rhythmic, bandaged aesthetic that feels both modern and organic.
Step-by-Step
Materials
- Stoneware clay (smooth or light grog)
- Rolling pin
- Canvas/slab mat
- Cylindrical form or rolling tube (PVC or cardboard)
- Newsprint or paper
- Needle tool
- Fettling knife
- Scoring tool (serrated rib)
- Slip or vinegar
- Soft rib (rubber or silicone)
- Sponge
Step 1: Creating the Base Cylinder
-
Roll the main slab:
Begin by wedging your clay to remove air bubbles, then roll out a large, even slab approximately 1/4 inch thick. Compress the slab on both sides with a rib to align the clay particles and prevent warping later. -
Prepare your template:
Measure the circumference and height of your desired cylinder form (like a PVC pipe or heavy cardboard tube). Cut a rectangle from your slab that matches these dimensions, adding a small amount to the width for a beveled overlap. -
Shield the form:
Before assembling, wrap your cylindrical form in a sheet of newsprint. This crucial step prevents the clay from sticking to the tube and allows you to easily slide the form out later. -
Form the cylinder:
Stand the clay slab up and wrap it around the paper-covered form. Bevel the vertical edges at complementary 45-degree angles to create a strong, invisible join. -
Seal the seam:
Score the beveled edges thoroughly and apply slip. Press the seam together firmly, then smooth over it with a rib until the join is seamless and the cylinder surface is uniform. -
Add a base:
Roll a small slab for the floor of the vase. Place your cylinder on top of it, trace the circle, score and slip the contact points, and attach the base. Trim away any excess clay flush with the wall.
Uneven Seams?
If strips won’t lay flat or keep popping up, your clay might be too dry. Score deeper and use vinegar instead of water for a stronger bite on leather-hard clay.
Step 2: Applying the Wrapped Texture
-
Prepare the strips:
Roll out a fresh, thinner slab of clay (about 1/8 inch thick). Use a ruler and fettling knife to cut multiple long, consistent strips resulting in ribbons approximately 1 to 1.5 inches wide. -
Plan the spiral:
Lightly visualize or mark a diagonal path around your cylinder. You want the strips to look like they are wrapping around the form, overlapping each other in a continuous or broken spiral pattern. -
Attach the first strip:
Score and slip a diagonal path on the cylinder. Lay your first strip down, starting near the top or bottom. I find it helpful to gently wipe the strip with a damp sponge first to prevent cracking as it curves. -
Layering the wrap:
Continue adding strips. This is the defining aesthetic step: allow the edges of the new strips to physically overlap the previous ones, creating raised ridges. -
Refining the overlaps:
Don’t smooth the overlaps completely flat. Use your finger or a soft tool to gently press the uppers strip down, ensuring adhesion while maintaining that distinct ‘stepped’ line that mimics a wrapped bandage. -
Clean the lines:
Use a damp sponge to smooth any jagged edges on the strips, but maintain the architectural sharpness of the overlap lines. The beauty lies in the shadow created by the ridge. -
Checking the rim:
If your strips extend past the top rim, trim them flush using a needle tool or wire cutter while the support tube is still inside for resistance. Smooth the rim with a chamois.
Level Up: Oxide Wash
After bisque firing, brush a dark oxide wash (like iron or manganese) over the piece and wipe it back with a sponge. The dark color will remain in the seam steps.
Step 3: Drying and Finishing
-
Remove the form:
Once the clay has stiffened slightly to leather-hard (usually after an hour or two), carefully slide the inner support tube out. Peel away the newsprint from the inside. -
Refine the interior:
Check the interior seams and base connection visually. If you can reach, run a long-handled tool or sponge on a stick down the inside to smooth any rough spots. -
Slow drying:
Because you have varying thicknesses due to the overlaps, dry this piece slowly under loose plastic for the first few days to prevent uneven shrinkage or cracking seams. -
Firing suggestions:
Bisque fire once bone dry. To replicate the look in the reference image, leave the exterior unglazed or use a very thin matte wash to highlight the relief texture without obscuring the clay body.
Place your finished cylinder near a window to let the natural light catch those beautiful diagonal ridges.