
If you love the look of handmade ceramics but don’t want to deal with a wheel, slab pottery is your best friend. I’m sharing my go-to slab-built pottery ideas that start simple and get delightfully creative as you go.
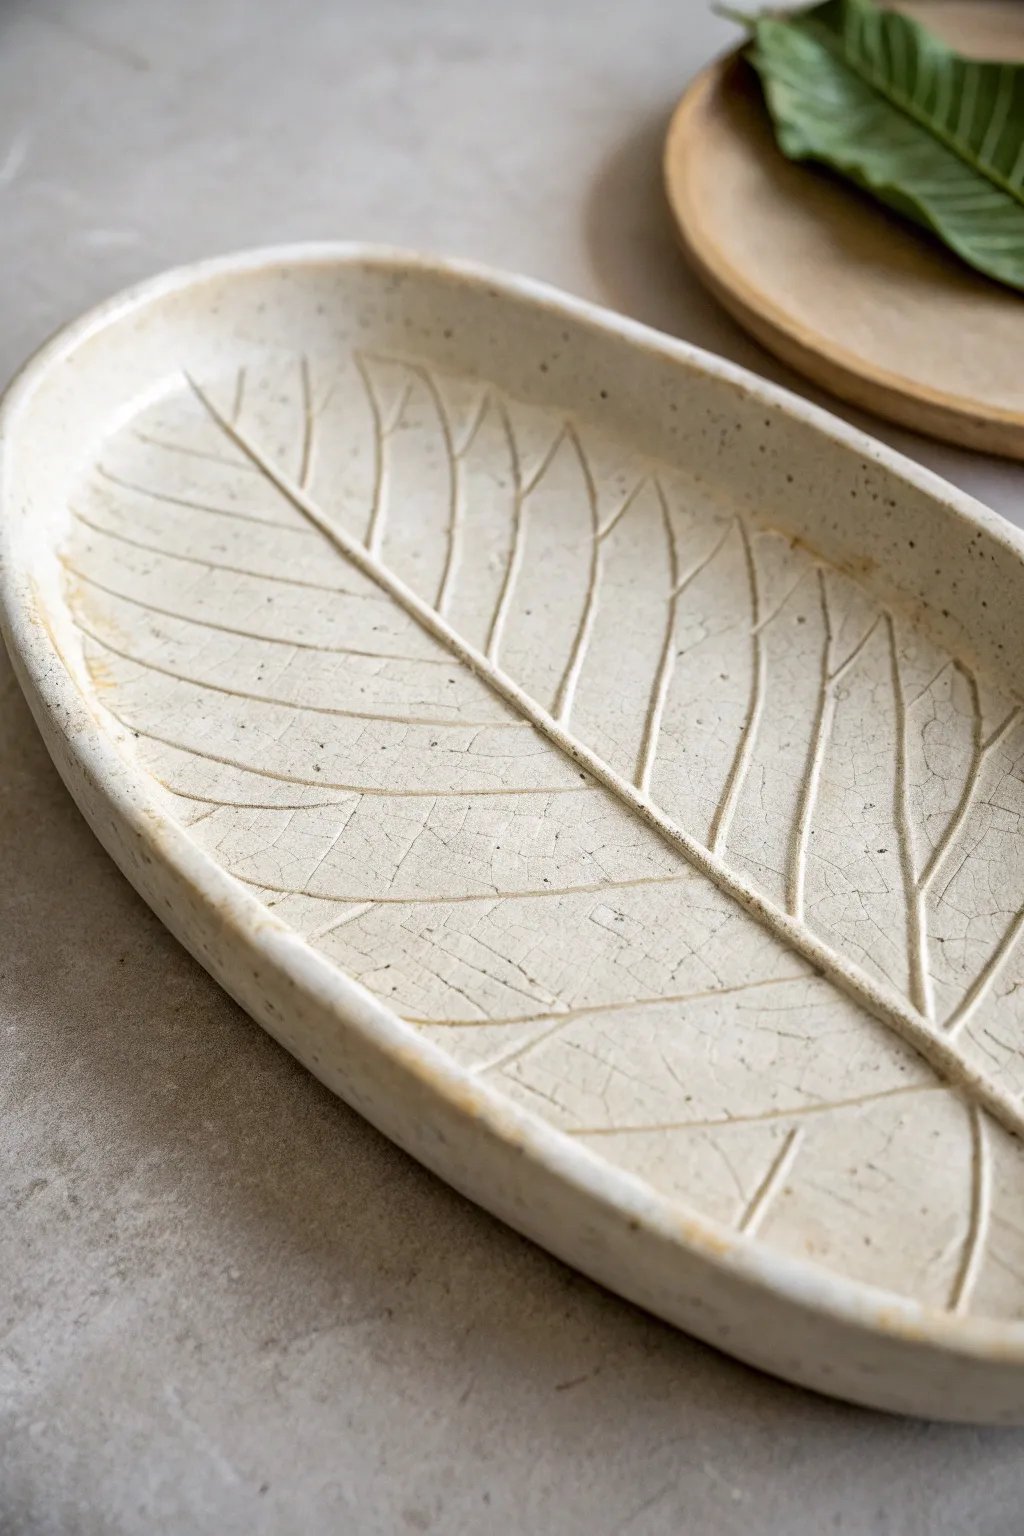
Organic-Edge Slab Plates
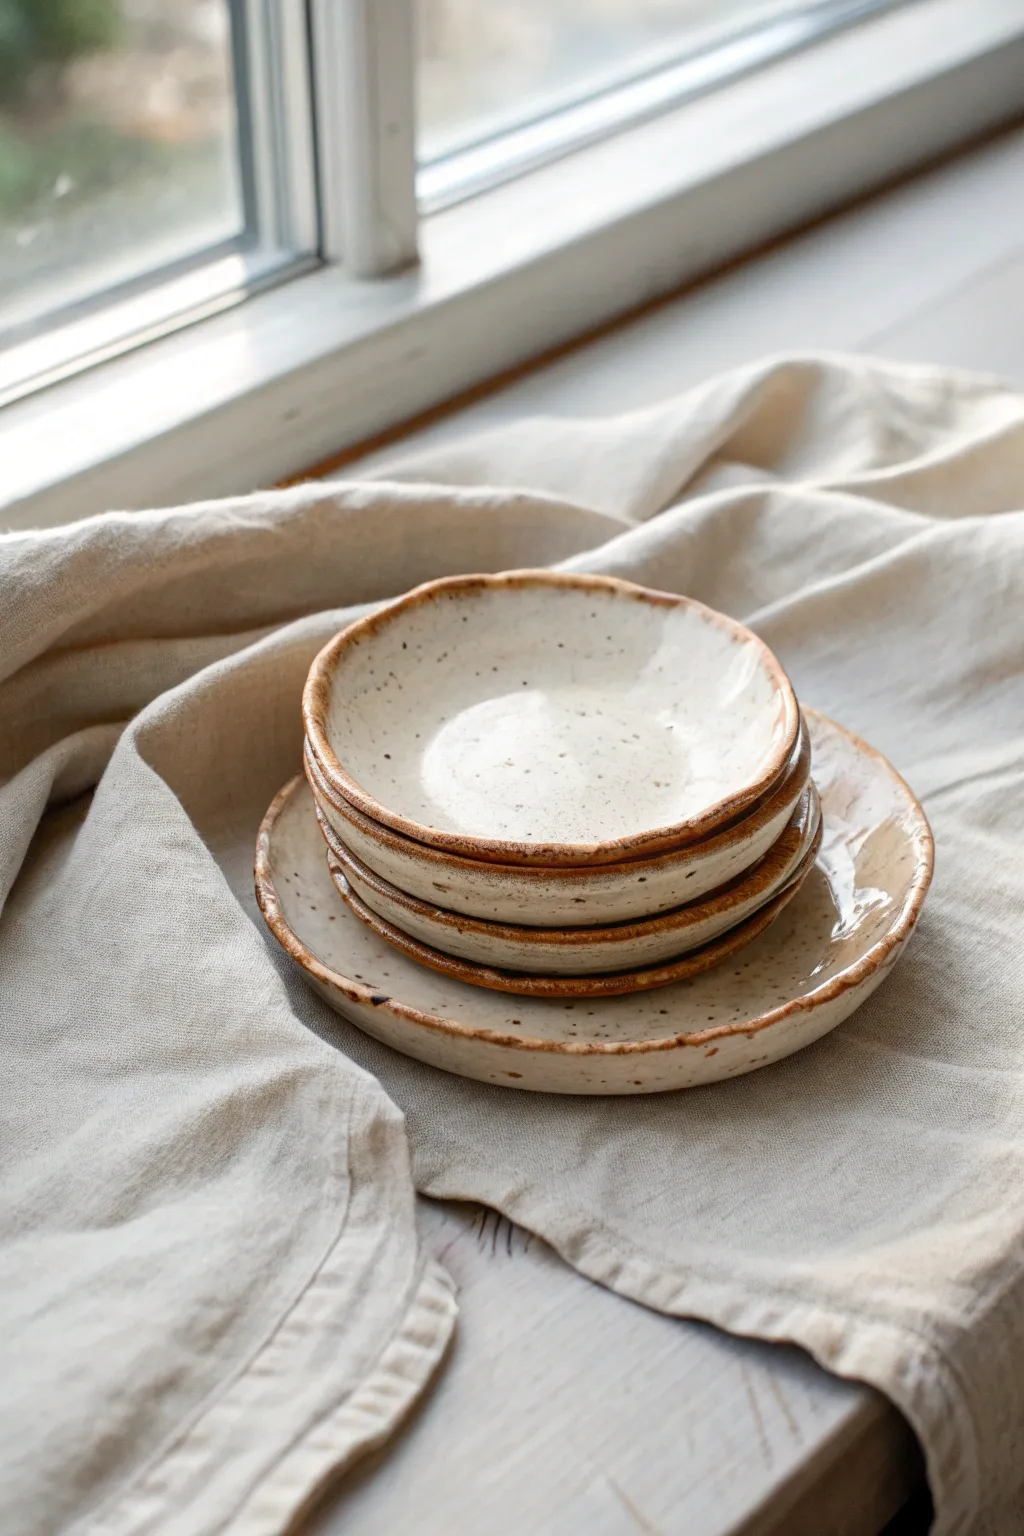
Capture the beauty of imperfection with these charmingly uneven, organic-edge slab bowls. The speckled clay body combined with a toasted rim gives them a cozy, handmade warmth that feels right at home in any kitchen.
Detailed Instructions
Materials
- Speckled stoneware clay (mid-fire)
- Rolling pin
- Canvas working mat or slab roller
- Wooden guide strips (1/4 inch thick)
- Soft rubber rib
- Needle tool
- Sponge
- GR Pottery Forms or simple slump molds (bowls and plate size)
- Weighted bag or large sponge for pressing
- Glossy white glaze
- Iron oxide wash (optional, for rim enhancement)
- Kiln
Step 1: Preparing the Slabs
-
Wedge the clay:
Start with a good amount of speckled stoneware clay. Wedge it thoroughly to remove air bubbles and ensure the particles are aligned, which prevents warping later on. -
Set up guides:
Place your wooden guide strips on either side of your canvas mat. These ensure your slab is a consistent thickness, which is crucial for drying and firing. -
Roll the slab:
Roll your clay out between the guides. For these organic plates, a thickness of about 1/4 inch is perfect—sturdy enough for daily use but delicate enough to look refined. -
Compress the clay:
Take your soft rubber rib and run it firmly across the surface of the slab in multiple directions. This compression aligns the clay particles again and removes the texture of the canvas.
Warping Woes?
Slab plates love to warp. Dry them very slowly under plastic, weighted down with a small sandbag in the center if necessary, to keep rims flat.
Step 2: Forming the Shape
-
Cut the basic circle:
Place your chosen mold or a circular template onto the slab. Using a needle tool, cut a loose circle around it. Don’t worry about being perfectly geometric; a slightly wavering hand adds character here. -
Secure the form:
If using GR Pottery Forms or similar wooden molds, place the slab centrally over the form. If using a plaster or bisque hump mold, drape the clay gently over it. -
Press into shape:
Gently press the clay onto the form. I like to start from the center and spiral my way out to avoid trapping air pockets. -
Define the rim:
Using a damp sponge or your fingers, run along the cut edge of the clay. Compress and round it off. This is where you can intentionally push the rim slightly up or down to create that ‘wobbly’ organic aesthetic visible in the photo. -
Dry to leather hard:
Let the plates sit on the forms until they are leather hard. They should be firm enough to hold their shape but still cool to the touch.
Step 3: Refining and Finishing
-
Release the form:
Carefully remove the plate from the mold. If it sticks, gently tap the edge of the mold or wait a bit longer for the clay to shrink slightly. -
Smooth the bottom:
Flip the plate over and use a rib to smooth out any marks from the mold. You can add a foot ring here if desired, but these simple slab plates often look best with a flat bottom. -
Final rim touch-up:
Go over the rim one last time with a moist sponge to ensure it’s completely smooth and pleasant to touch for the future diner. -
Bisque fire:
Allow the greenware to dry completely (bone dry) before loading it into the kiln for a bisque firing.
Make it a Set
Vary the size of your templates to create a nesting set. Use the same clay and glaze combo to unify the different shapes into a cohesive collection.
Step 4: Glazing
-
Wipe down:
Once bisqued, wipe the pottery with a damp sponge to remove any kiln dust. This helps the glaze adhere properly. -
Apply the glaze:
Dip or pour a glossy white glaze over the entire piece. The white glaze will allow the natural speckles of the clay body to bleed through during firing. -
Accentuate the rim:
For that distinct brownish-orange edge seen in the image, carefully wipe the glaze off the very edge of the rim with a sponge. Alternatively, brush a very light wash of iron oxide over the rim. -
Clean the foot:
Thoroughly wipe all glaze off the bottom of the plate to prevent it sticking to the kiln shelf. -
Glaze fire:
Fire the kiln to the maturation temperature of your clay and glaze (likely Cone 5 or 6). Let the kiln cool completely before opening to avoid thermal shock.
Enjoy using your beautiful new stack of plates for your next casual dinner gathering


Square or Rectangle Serving Platters
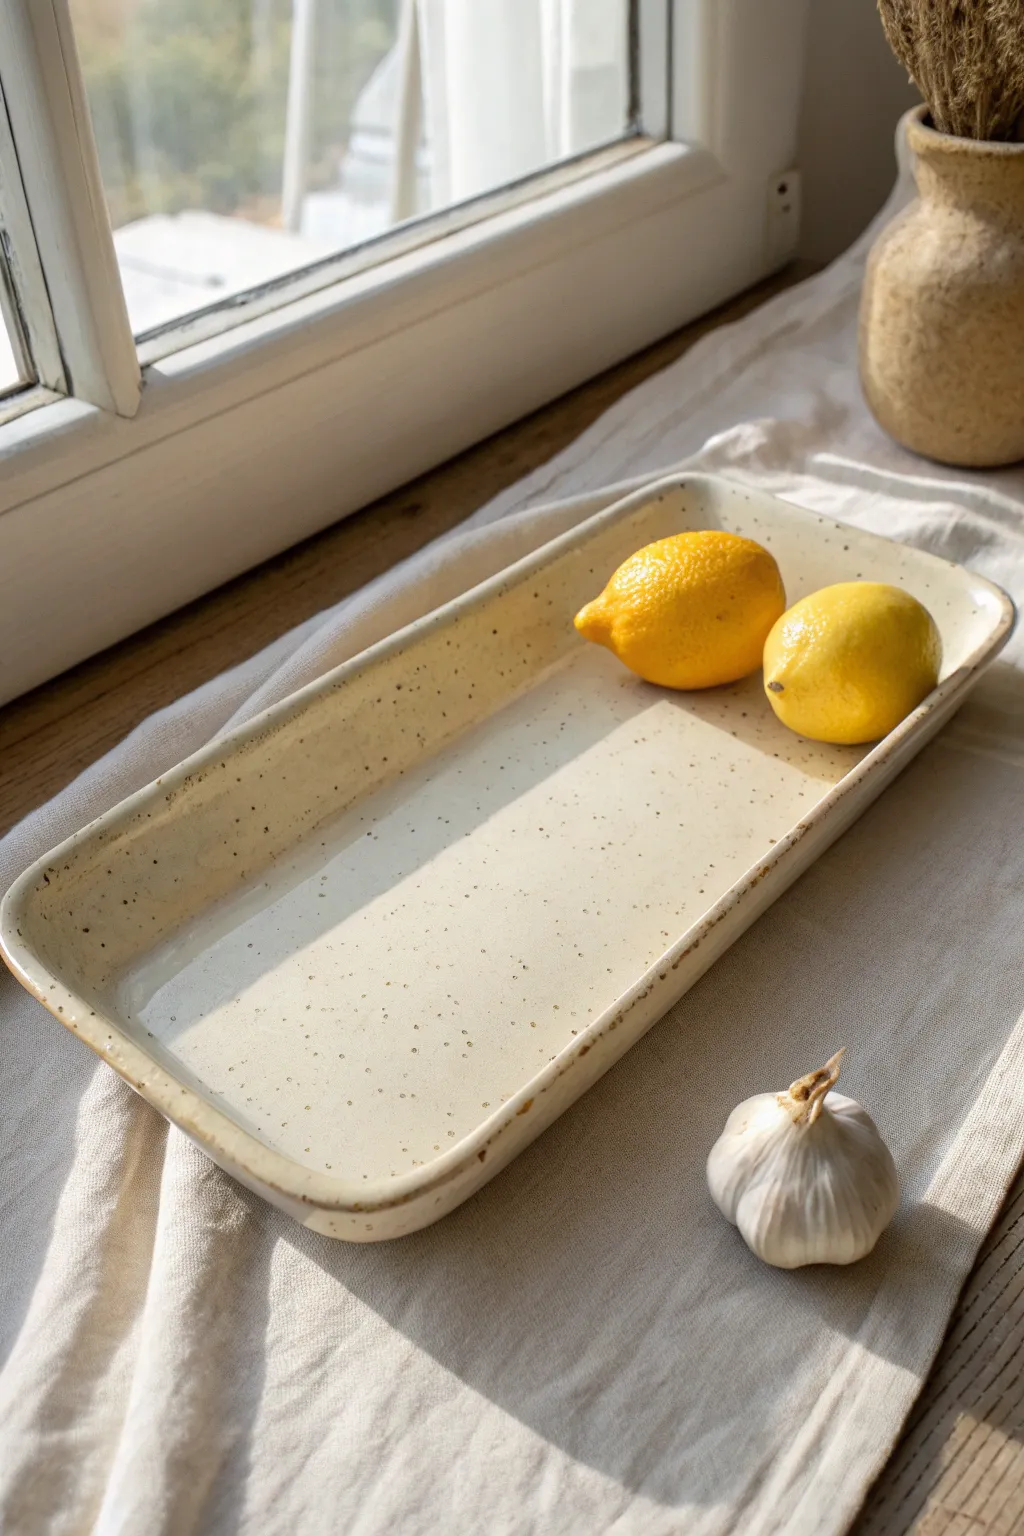
This elegant rectangular tray combines simple slab construction with a warm, speckled finish that feels both modern and timeless. Its shallow profile makes it perfect for serving appetizers or as a catch-all for kitchen countertop essentials like lemons and garlic.
Step-by-Step Tutorial
Materials
- Speckled Stoneware Clay (e.g., Laguna Speckled Buff or similar)
- Rolling pin
- Guide sticks or slats (approx. 1/4 inch thick)
- Canvas ware board or slab mat
- Rectangular paper template (approx. 6×12 inches)
- Needle tool or fettling knife
- Rib tool (rubber or silicone)
- Sponge
- Creamy matte white glaze (translucent enough to show speckles)
- Kiln
Step 1: Creating the Slab Base
-
Preparation:
Begin by wedging your speckled stoneware clay thoroughly to remove any air bubbles. Good wedging prevents cracking later in the firing process. -
Rolling out:
Place your clay on a canvas board or slab mat. Set up your guide sticks on either side of the clay to ensure an even thickness. -
Flattening the slab:
Roll the clay out firmly until the rolling pin rests on the guide sticks. I personally like to flip the slab over halfway through rolling to compress the clay fibers on both sides. -
Smoothing texture:
Take a soft rubber rib and compress the surface of the slab. Run the rib across the clay in multiple directions to remove the canvas texture and align the clay particles. -
Cutting the shape:
Place your rectangular paper template gently on top of the smooth clay. Use a fettling knife or needle tool to cut vertically around the template. Keep the knife straight so the edges don’t bevel. -
Rounding corners:
Instead of leaving sharp 90-degree corners, use your finger or a small round object (like a jar lid) as a guide to gently trim the corners into soft curves.
Warp Watch
Rectangular slabs love to warp. Dry very slowly on a slatted rack or drywall board so air hits both sides evenly, keeping it flat.
Step 2: Building the Rim
-
Making the coil:
Roll out a separate long coil of clay, approximately the thickness of a pencil. This will become the raised rim of your platter. -
Scoring the edge:
Using a serrated rib or needle tool, rough up (score) the very outer edge of your rectangular slab base around the entire perimeter. -
Applying slip:
Dab a small amount of slip or water onto the scored area. Place the coil directly on top of the scored edge, trimming the ends so they meet flush. -
Blending the coil:
Use your thumb or a modeling tool to smudge the inside of the coil down into the slab base. The goal is to make the seam invisible on the inside. -
Smoothing the outside:
Repeat the blending process on the outside edge, smudging the coil down towards the table surface to integrate it with the slab’s edge. -
Refining the rim:
Take a damp sponge and run it over the rim to even it out. Pinch the rim gently between your thumb and forefinger to create a uniform height of about half an inch.
Step 3: Finishing and Glazing
-
Drying:
Let the tray dry slowly. Cover it loosely with plastic for the first day to prevent the rim from drying faster than the base, which causes warping. -
Bisque firing:
Once bone dry, fire the piece to a bisque temperature (usually cone 04 or 06, depending on your clay body). -
Glaze application:
Wipe the bisque ware with a damp sponge to remove dust. Pour a creamy matte white glaze into the tray, swirl it to coat the bottom, and pour out the excess. -
Coating the rim:
Brush or dip the rim carefully. Ensure the glaze isn’t too thick, as you want the natural iron speckles from the clay to burn through during the final firing. -
Rim wipedown:
For that rustic look seen in the photo, take a damp sponge and gently wipe the very top edge of the rim to expose a thin line of raw clay. -
Check the foot:
Make sure the bottom of the tray is completely free of glaze before loading it into the kiln. -
Final firing:
Fire the piece to maturity (Cone 5 or 6 for most stoneware). This higher temperature brings out the toasty color of the clay spots.
Texture Play
Before cutting the shape, press a piece of lace or linen into the wet slab. The glaze will break beautifully over the subtle fabric texture.
Now you have a durable, custom serving piece ready for your next gathering


Easy Slab Bowls Draped Over a Mold
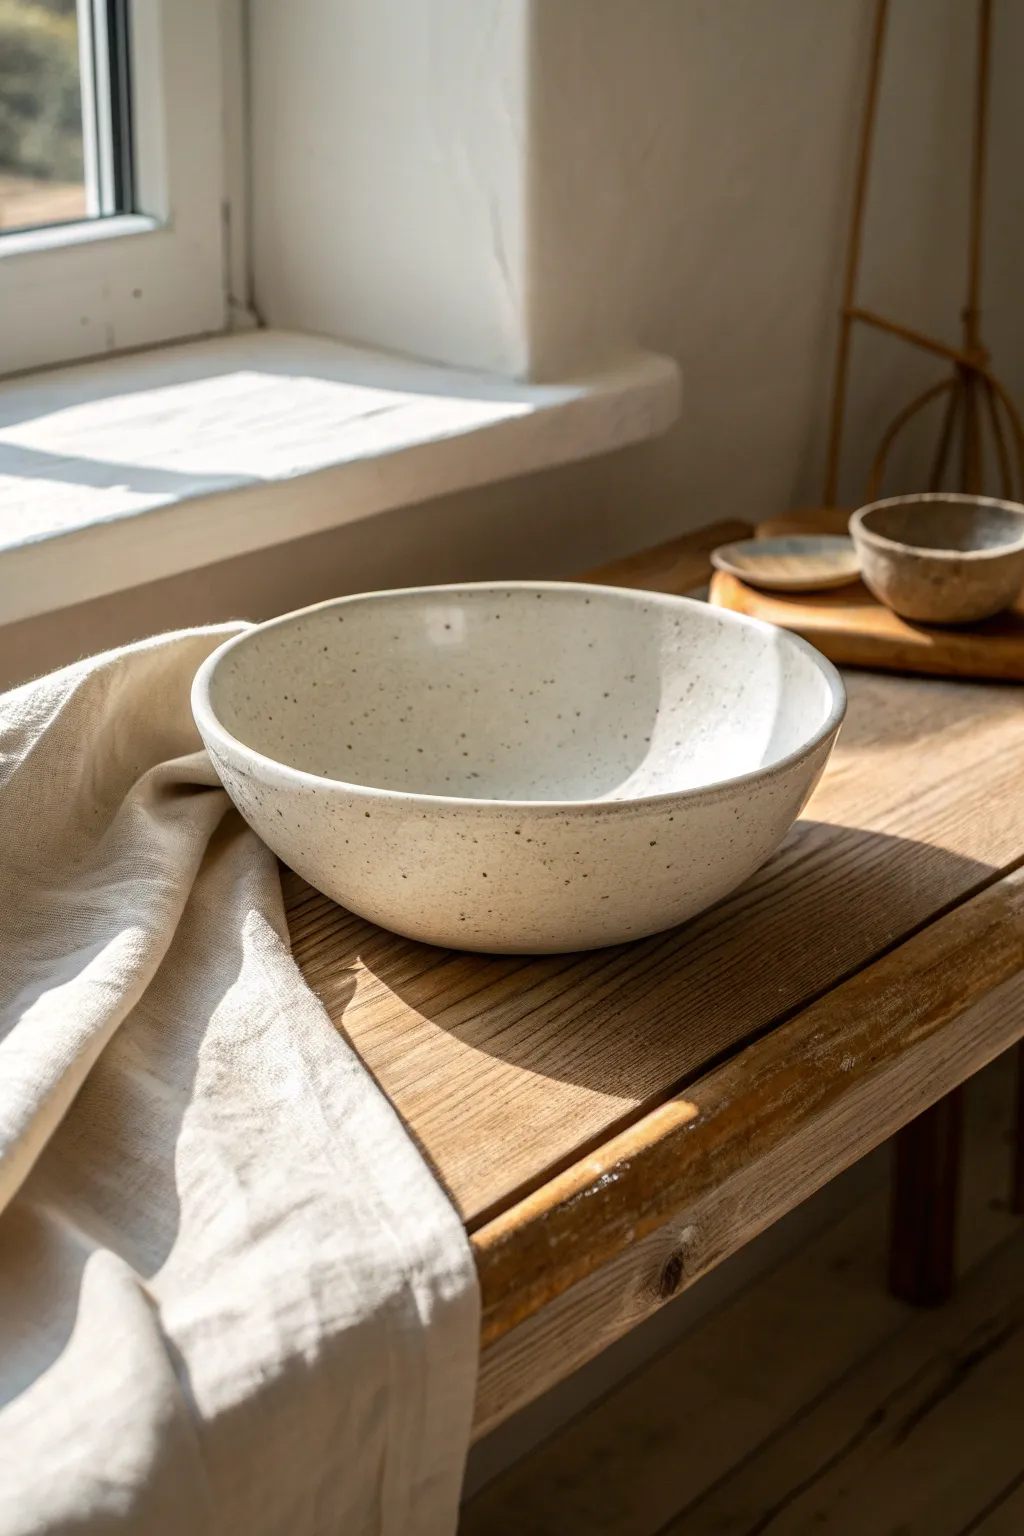
Embrace the beauty of imperfection with this lovely, speckled ceramic bowl, created using a simple slab-building technique. Its gentle curve and organic rim evoke a sense of quiet rustic charm, perfect for showcasing your favorite fruits or serving a warm side dish.
Step-by-Step Guide
Materials
- Speckled Stoneware Clay (e.g., Laguna Speckled Buff)
- Rolling Pin
- Canvas Mat or Slab Roller
- Wooden Guide Strips (approx. 1/4 inch thick)
- Large Bowl (to use as a slump or hump mold)
- Newspaper or Thin Plastic Sheet
- Needle Tool or Potter’s Knife
- Soft Rubber Rib
- Sponge
- Clear or White Satin Glaze
Step 1: Preparing the Slab
-
Wedge the Clay:
Begin by thoroughly wedging your speckled stoneware clay to remove any air bubbles and ensure an even consistency throughout the tough. -
Set Up Your Workspace:
Lay down your canvas mat on a sturdy table. Place your wooden guide strips on either side of the mat, spacing them wide enough to accommodate the size of the bowl you want to make. -
Flatten the Clay:
Take your wedged clay ball and flatten it slightly with the palm of your hand onto the canvas. -
Roll Out the Slab:
Using your rolling pin, roll the clay out into a large, even sheet. Rest the rolling pin on the guide strips as you work to guarantee a uniform thickness of about 1/4 inch. -
Smooth the Surface:
Once rolled, take a soft rubber rib and gently compress the surface of the clay slab. This aligns the clay particles, reducing the chance of warping later, and creates a silky smooth finish.
Uneven Drying?
If the rim dries faster than the base, causing cracks, wrap the rim loosely in plastic while the center catches up. Slow drying is key for flat bowls
Step 2: Shaping the Bowl
-
Prepare the Mold:
Choose a bowl from your kitchen to act as a mold. If you are draping *inside* (slump mold), line the interior with a single layer of newspaper or thin plastic so the clay doesn’t stick. -
Cut the Circle:
Place a measuring guide or a light plate upside down on your slab to check the size, then use a needle tool to cut a freehand circle. Don’t worry about being perfectly round; a slightly wavy edge adds character. -
Position the Slab:
Carefully lift your clay circle and gently lower it into your prepared mold. Let gravity do most of the work as it settles against the sides. -
Secure the Shape:
Using a soft sponge or your fingertips, gently press the slab into the curve of the mold, starting from the center and working outward to avoid trapping air pockets. -
Refine the Rim:
While the clay is supported by the mold, run a damp sponge or a piece of chamois leather over the rim of the bowl to smooth out any sharp edges or cutting burrs.
Step 3: Finishing and Firing
-
Let it Dry to Leather Hard:
Allow the bowl to dry slowly inside the mold until it reaches a leather-hard state. I prefer to cover it loosely with plastic for the first few hours to even out the drying process. -
Remove from Mold:
Once the clay is firm enough to hold its shape but still workable, gently lift the bowl out of the mold and peel away the newspaper or plastic. -
Clean Up the Bottom:
Turn the bowl over and smooth the bottom surface with a rib. If desired, you can impress a maker’s mark or sign your name at this stage. -
Bisque Fire:
Let the bowl dry completely until it is bone dry, then load it into the kiln for a bisque firing (usually around Cone 04). -
Glaze Application:
Dip or brush your bisque-fired bowl with a clear or white satin glaze. This transparency allows the natural speckles of the clay body to shine through, creating the signature look. -
Final Firing:
Fire the glazed piece to the temperature recommended for your specific clay and glaze combination (often Cone 5 or 6 for stoneware).
Level Up: Texture
Before placing the slab in the mold, press a piece of lace or linen into the wet clay to add a subtle, fabric-like texture to the bowl’s exterior
Enjoy the simple pleasure of using your handmade speckled bowl for your next meal


Soap Dish With Drain Holes or Channels
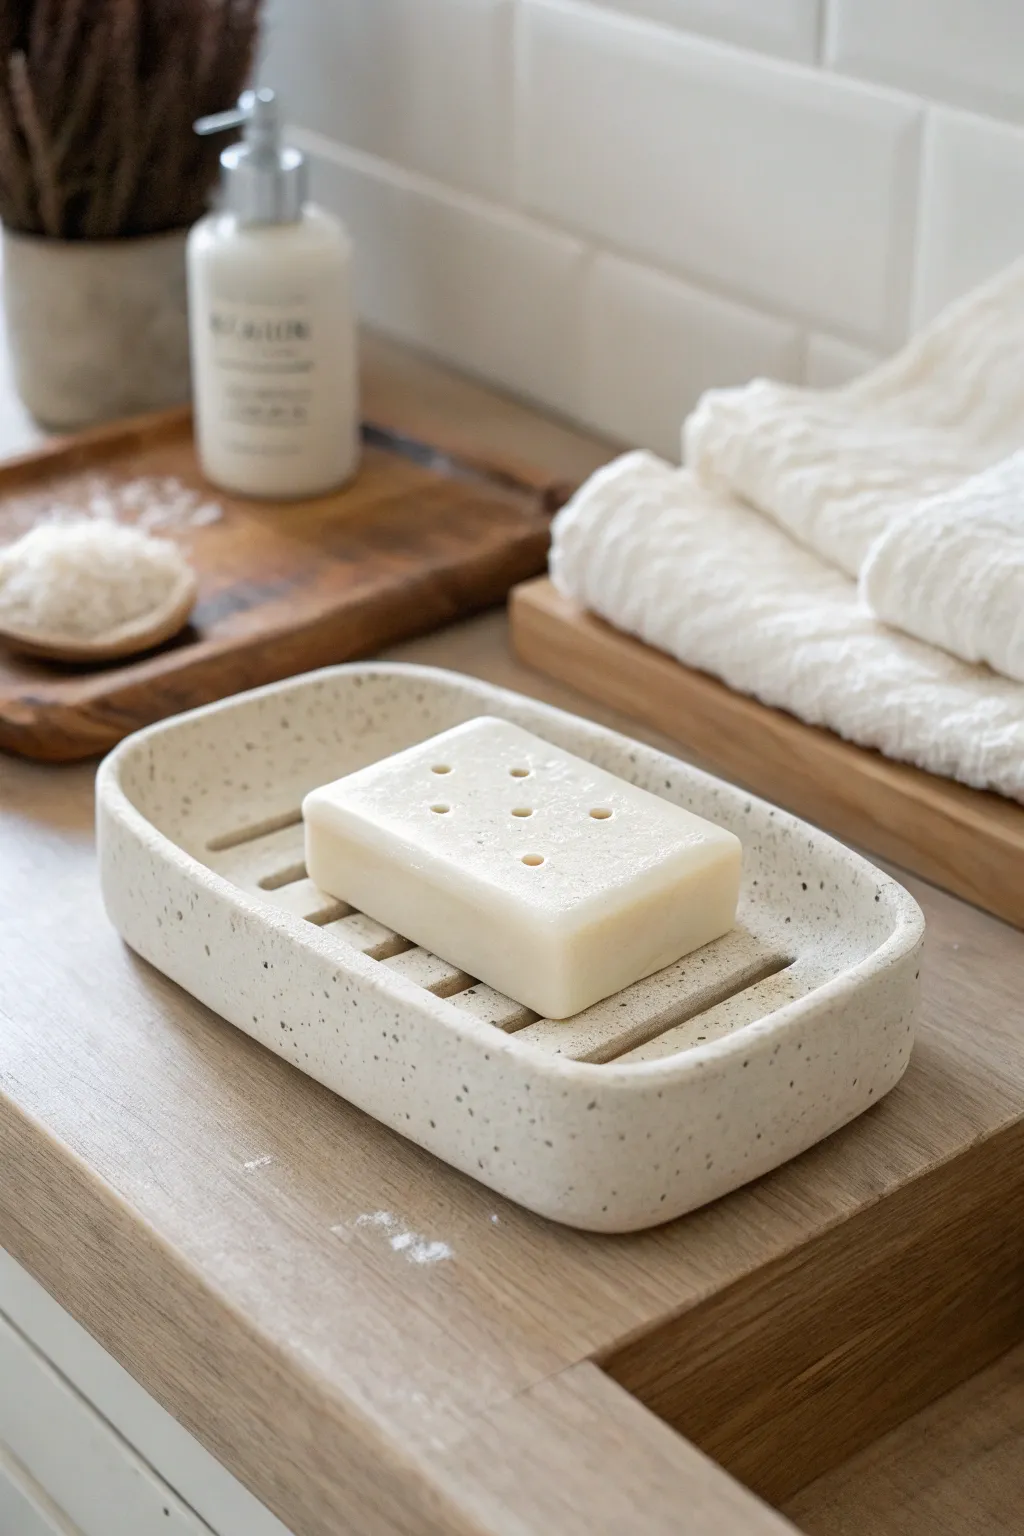
This minimalist soap dish brings a spa-like tranquility to any bathroom with its soft, rounded edges and practical drainage channels. The speckled clay body mimics the look of natural river stone while ensuring your soap stays dry and long-lasting.
Step-by-Step Tutorial
Materials
- Speckled stoneware clay (approx. 1 lb)
- Canvas work surface or slab mat
- Rolling pin
- Two wood thickness strips (1/4 inch thick)
- Damp sponge
- Rib tool (kidney)
- Fettling knife or needle tool
- Loop tool or carving tool (for channels)
- Small bowl of water
- Paper template (rectangular with rounded corners)
- Optional: Cornstarch (release agent)
Step 1: Preparing the Slab
-
Wedge the clay:
Begin by wedging your speckled clay thoroughly to remove any air bubbles and ensure an even consistency, which is crucial for preventing warping later. -
Roll out the slab:
Place your clay on the canvas between the two thickness strips. Roll the clay out until it is perfectly flat and the rolling pin rides along the wood strips, ensuring a uniform 1/4-inch thickness. -
Compress the slab:
Run a rib tool firmly over the surface of the slab in multiple directions. This compression aligns the clay particles, reducing the chance of cracks during drying. -
Cut the base shape:
Place your paper template onto the slab. Using a fettling knife held vertically, trace around the template to cut out the main rectangular shape with rounded corners for the dish base. -
Cut the wall strip:
From the remaining clay slab, cut a long strip approximately 3/4 inch to 1 inch wide. This will become the raised wall of the dish.
Clean Channels
When carving the slats, do it when the clay is leather hard. If it’s too wet, the clay will drag and create burrs; too dry, and it will chip.
Step 2: Constructing the Dish
-
Score the edges:
Using a needle tool or serrated rib, rough up (score) the outer edge of the base slab and one long edge of your wall strip. -
Apply slip:
Dab a small amount of water or slip onto the scored areas to create a sticky glue-like surface. -
Attach the walls:
Gently place the strip onto the edge of the base. I find it easiest to start at the center of a long side and work my way around. -
Overlap and trim:
Where the strip ends meet, overlap them slightly, cut through both layers at a 45-degree angle, and join the seam for a clean, invisible finish. -
Blend the coil:
Use your thumb or a modeling tool to blend the clay from the wall down onto the base on the inside, and from the base up onto the wall on the outside, ensuring a strong bond.
Elevate It
Add four small clay balls or feet to the underside corners. This raises the dish off the counter, preventing water rings and aiding drainage.
Step 3: Refining and Carving
-
Smooth the seams:
Run your damp sponge or rib tool over the joined areas to smooth out any finger marks and refine the curve of the walls. -
Soft leather hard:
Set the piece aside until it reaches a soft leather-hard state. It should be firm enough to handle without deforming but soft enough to carve easily. -
Mark the channels:
Lightly sketch parallel lines across the interior bottom of the dish where you want your drainage slats to go. -
Carve the drainage:
Using a loop tool, carefully carve out the clay between your marked lines, creating deep grooves that go about halfway through the base thickness. -
Cut the drain holes:
For true drainage, you can cut entirely through the clay in the center of these channels, or simply leave them as deep reservoirs to catch water. -
Soften edges:
Take a slightly damp sponge and gently wipe specifically over the carved channels to soften the sharp -
Final drying:
Cover the piece loosely with plastic for the first day to let humidity equalize, then uncover to dry completely before the bisque firing. -
Glazing:
After bisque firing, dip or brush on a matte white or clear matte glaze that allows the natural speckles of the clay body to show through, then fire to temperature.
Once fired, this durable piece will add a lovely handcrafted touch to your daily routine

The Complete Guide to Pottery Troubleshooting
Uncover the most common ceramic mistakes—from cracking clay to failed glazes—and learn how to fix them fast.
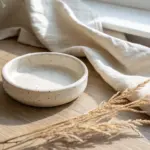
Jewelry Tray With Softly Pinched Corners
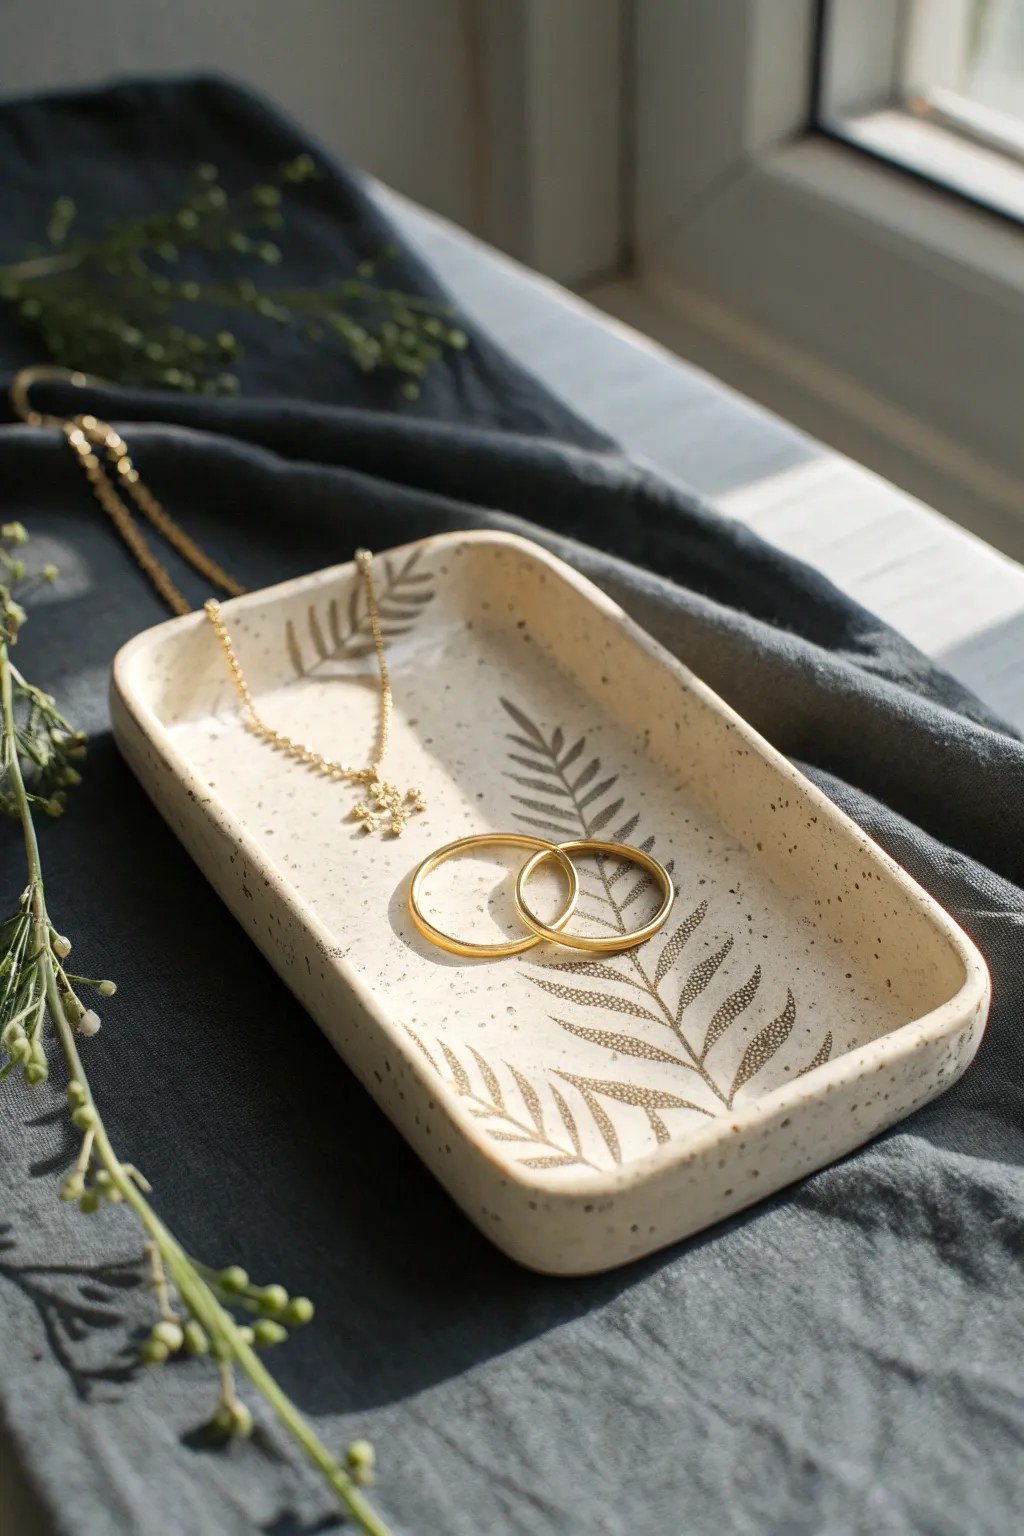
This elegant trinket dish combines the organic beauty of real botanicals with a modern, speckled clay body. The gentle curve of the rim and the subtle imprint of a fern frond create a perfect resting place for your daily jewelry.
How-To Guide
Materials
- Speckled stoneware clay (e.g., intense speckled buff)
- Small rolling pin
- Canvas mat or slab roller
- Fettling knife or needle tool
- Rectangular paper template (approx. 4×6 inches)
- Fresh or dried fern frond (stiff is better than soft)
- Small sponge
- Clear glaze (cone 5 or 6)
- Sepia or iron oxide wash (optional, for enhancing texture)
- Paintbrush
Step 1: Slab Preparation
-
Wedging the Clay:
Begin with a ball of speckled stoneware clay slightly larger than a grapefruit. Wedge it thoroughly to remove air bubbles and align the particles, ensuring a smooth working surface. -
Rolling the Slab:
On your canvas mat, roll out the clay. Aim for a consistent thickness of about 1/4 inch. If you want a more refined look, you can go slightly thinner, but be careful not to make it fragile. -
Compressing the Surface:
Take a rib tool (metal or rubber) and gently run it over the slab in multiple directions. This compression is crucial to prevent warping during firing and creates a silky smooth canvas for your impression.
Fresh vs. Dry
Use a plant that is slightly dried rather than freshly picked. Fresh leaves contain moisture that can cause them to stick to the clay, while drier leaves make cleaner impressions.
Step 2: Creating the Design
-
Cutting the Shape:
Place your rectangular paper template onto the slab. Using your fettling knife, cut straight down around the perimeter. I find that holding the knife vertical ensures the cleanest edge. -
Smoothing Edges:
Run a slightly damp finger along the freshly cut edges to round them off gently. This prevents sharp burrs later and gives the piece a more finished, professional feel. -
Positioning the Botanicals:
Lay your fern frond diagonally across the clay rectangle. Arrange it so the tips of the leaves point toward the corners, creating visual movement. -
Making the Impression:
With the rolling pin, roll firmly over the fern once. Commit to the motion—don’t roll back and forth, or you might create a ghost image. The goal is to press the veins deep enough to catch glaze later. -
Removing the Leaf:
Carefully lift the fern stem using a needle tool or tweezers to peel it away from the clay. If bits of leaf get stuck, wait until the clay is bone dry; they’ll often flick right off.
Warping Woes?
To prevent warping, dry your tray on a drywall board (sheetrock). The gypsum absorbs moisture evenly from the bottom while the air dries the top, keeping the slab perfectly flat.
Step 3: Forming and Finishing
-
Lifting the Rim:
Place the slab on a piece of foam or a folded towel. Gently lift the edges of the rectangle upward with your fingertips to create a shallow wall. -
Pinching Corners:
At each of the four corners, gently pinch the clay to round it out. Instead of a sharp 90-degree fold, mold the clay into a soft curve that rises slightly higher than the straight sides. -
Refining the Shape:
Look at the tray from eye level. Tap the tray gently on the table to flatten the bottom, ensuring it will sit level without wobbling. Smooth out any finger marks from the lifting process. -
Drying:
Because slabs can warp, let this dry slowly. Cover loosely with plastic for the first day, then uncover to let it reach bone dry status before bisque firing.
Step 4: Glazing
-
Apply Oxide Wash:
After bisque firing, mix a small amount of iron oxide or sepia wash. Paint this directly into the fern impression. -
Wipe Back:
Using a clean, damp sponge, wipe away the excess wash from the surface. The dark color should remain only in the deep recesses of the leaf veins, highlighting the texture. -
Clear Coat:
Dip the entire piece in a clear gloss glaze. This will amplify the speckles in the clay body and seal the oxide decoration. -
Final Firing:
Fire the piece to cone 5 or 6 (depending on your clay’s specifications). Ensure the bottom is wiped clean of glaze so it doesn’t fuse to the kiln shelf.
Now you have a beautifully functional piece of art ready to hold your favorite rings and chains
Spoon Rest With a Notched Handle Groove
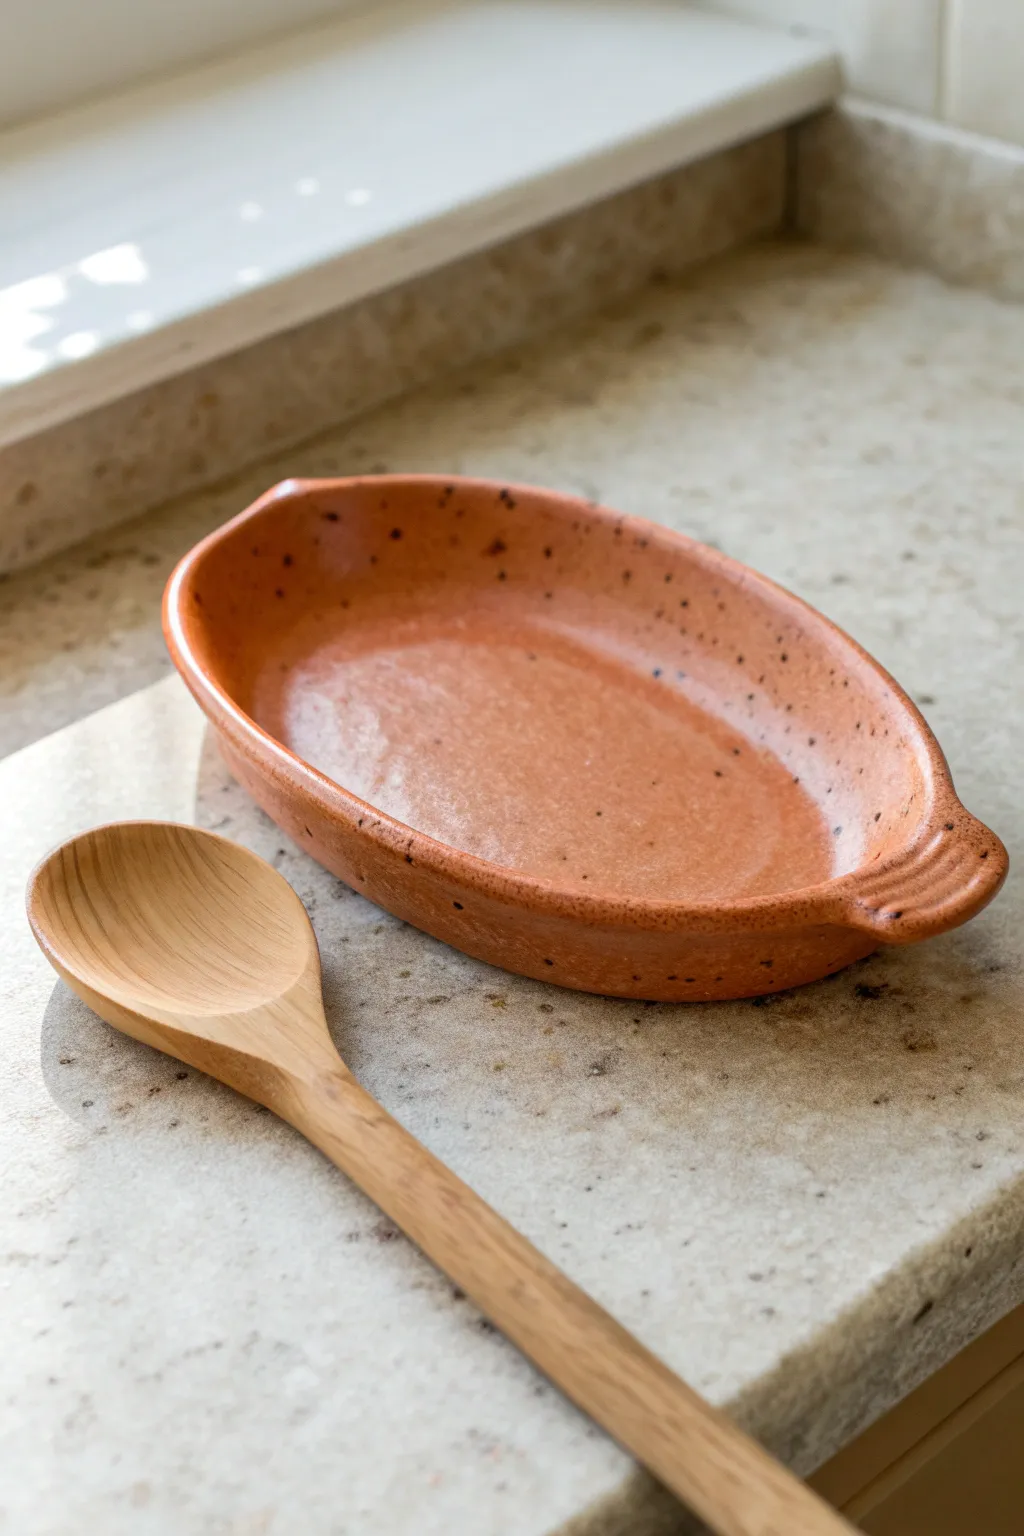
This rustic, speckled spoon rest combines functional simplicity with the warmth of red clay. The generous oval shape catches drips easily, while the notched handle groove keeps your utensil securely in place.
Step-by-Step Guide
Materials
- Red stoneware or terracotta clay (speckled)
- Rolling pin
- Slab guide strips (approx. 1/4 inch)
- Oval template (paper or cardstock)
- Fettling knife or needle tool
- Soft rib (silicone or rubber)
- Small sponge
- Modeling tool or wooden spoon handle (for the notch)
- Clear or transparent amber glaze
Step 1: Forming the Slab
-
Roll the clay:
Begin by wedging your red clay to remove any air pockets. Place it between two guide strips on your canvas working surface and roll it out into a smooth, even slab about 1/4 inch thick. -
Compress the slab:
Use a soft rib to compress the clay surface on both sides. This aligns the clay particles to prevent warping and creates that smooth, professional finish we want for the spoon rest. -
Trace the shape:
Place your oval paper template onto the slab. Lightly trace around it with a needle tool without cutting all the way through initially to ensure you like the placement. -
Cut the oval:
Commit to the shape by cutting cleanly through the clay with a fettling knife held vertically. Remove the excess clay and set it aside for recycling.
Warping Walls?
If your oval walls flop down while working, the clay is too wet. Let the slab stiffen slightly to a soft leather-hard state before lifting the edges.
Step 2: Shaping the Walls
-
Soften the rim:
Run a damp sponge or your finger along the sharp cut edge of the oval to round it over slightly. I find doing this now is easier than waiting until the walls are lifted. -
Lift the edges:
Gently lift the edges of the oval slab with your fingers, curling them upward to create a shallow wall. Work your way around the oval several times, lifting incrementally rather than all at once. -
Smooth the interior:
Once the walls are lifted, use your thumb or the soft rib to smooth the interior curve where the floor meets the wall, ensuring a seamless transition suitable for easy cleaning later. -
Refine the exterior:
Check the outside curve of the wall. If any small cracks appeared during lifting, smooth them over immediately with a barely damp sponge or ribbed tool.
Pro Tip: Texture
For that earthy, speckled look without buying special clay, knead granular manganese or iron oxide into plain clay (wear a mask!) before rolling.
Step 3: Creating the Notch
-
Identify the spot:
Choose one of the narrower ends of the oval for the handle rest. This natural placement balances the spoon’s weight best. -
Press the groove:
Take a round wooden tool handle or simply use your finger to gently press down on the rim at your chosen spot. Create a U-shaped indentation deep enough to hold a spoon handle but not so deep it compromises the wall structure. -
Detail the notch:
Refine the edges of your indentation. You can add small decorative distinct grooves on either side of the dip using a modeling tool, mimicking the texture seen in the reference image. -
Clean the area:
Smooth out any clay burrs created by the detailing process using a damp fingertip.
Step 4: Finishing and Glazing
-
Dry slowly:
Cover the piece loosely with plastic to let it dry slowly to the leather-hard stage, then uncover to bone dry. This prevents the oval shape from warping as moisture leaves the clay. -
Bisque fire:
Once fully bone dry, bisque fire the spoon rest to the appropriate cone temperature for your specific clay body (usually Cone 04 or 06). -
Wipe down:
Use a damp sponge to wipe any dust off the bisque-fired piece. This step is crucial for preventing pinholes in the final glaze. -
Apply glaze:
Pour a clear or transparent amber glaze into the interior of the spoon rest, swill it around to coat, and pour out the excess. You want to highlight the natural speckles of the clay. -
Clean the foot:
Ensure the bottom of the spoon rest is completely free of glaze. Wipe it with a sponge or use a wax resist before glazing to keep the kiln shelf safe. -
Glaze fire:
Fire the piece a final time to the maturity temperature of your clay and glaze combination.
Your finished spoon rest will be a durable and charming addition to your kitchen counter


What Really Happens Inside the Kiln
Learn how time and temperature work together inside the kiln to transform clay into durable ceramic.
Wavy Rim Drape Bowl for a Centerpiece
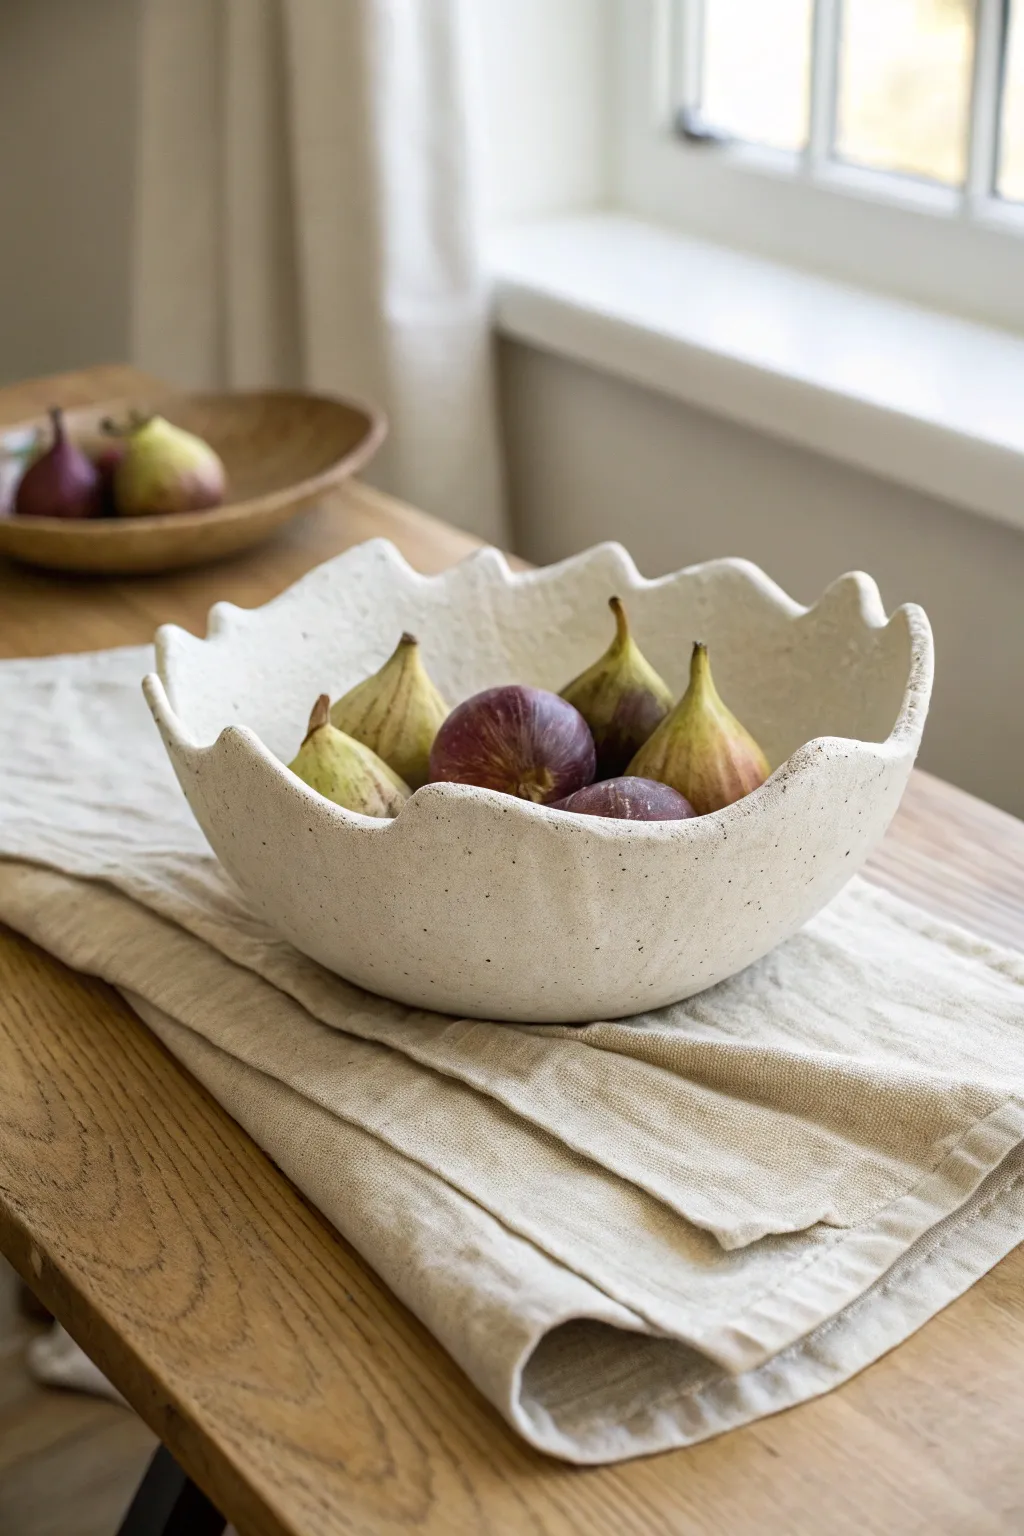
This project captures the essence of organic modern pottery with its raw, wavy edge and speckled matte finish. By draping a simple slab over a hump mold, you create a functional centerpiece that feels both handcrafted and contemporary.
How-To Guide
Materials
- Speckled stoneware clay (mid-fire)
- Hump mold (plaster, bisque, or a large overturned bowl covered in plastic)
- Rolling pin
- Slab roller or wooden thickness strips (approx. 1/4 inch thick)
- Needle tool
- Rib tool (soft kidney)
- Sponge
- Canvas or slab mat
- Matte white or clear glaze (food safe)
Step 1: Creating the Slab
-
Wedge the Clay:
Begin with a ball of clay around the size of a grapefruit. Wedge it thoroughly to remove air pockets and ensure an even particle distribution. -
Roll the Slab:
Flatten the clay slightly with your palm. Using your rolling pin and thickness strips (or slab roller), roll the clay out into a large, even sheet about 1/4 inch thick. Make sure it’s wide enough to cover your intended mold. -
Compress the Surface:
Take a rubber rib tool and gently drag it across the surface of the slab in several directions. This compression aligns the clay particles, reducing the chance of warping later.
Slumping Issues?
If the clay is tearing or slumping too fast over a tall mold, let the slab firm up slightly on a flat board for 20 minutes before draping it.
Step 2: Forming the Bowl
-
Prepare the Mold:
If using a plaster or bisque hump mold, you are good to go. If using a household bowl as a mold, wrap it tightly in plastic wrap or a thin piece of fabric to prevent the clay from sticking. -
Drape the Clay:
Carefully lift your clay slab and gently lower it over the hump mold. Let gravity do most of the work initially, allowing the clay to slump naturally. -
Shape the Curve:
Using your hands or a soft sponge, gently press the clay against the mold, starting from the center (bottom of the bowl) and working your way out. Smooth out any wrinkles or air pockets caught underneath. -
Define the Foot (Optional):
At this point, the top of the mold is the bottom of your bowl. You can flatten the center slightly to create a stable base, or attach a small coil ring to act as a foot.
Level Up: Texture
Before draping, roll a piece of coarse linen or burlap into the slab’s surface. This adds a tactile fabric texture that enhances the organic aesthetic.
Step 3: Defining the Organic Rim
-
Initial Cut:
Use a needle tool to trim away the excess clay at the bottom of your draped form. Don’t aim for a perfect circle; leave extra material to work with. -
Create the Waves:
This is the signature step. Using your needle tool or a fettling knife, cut a deeply undulating, jagged line around the edge of the bowl. Vary the height of the peaks significantly to mimic eggshell cracks or natural valleys. -
Soften the Edges:
Once the cut is made, wrap a damp sponge over the rim and run it along the edge. You want to round off the sharp cut marks without destroying the organic, jagged silhouette. -
Leather Hard Drying:
Allow the bowl to stiffen on the mold until it reaches a leather-hard state. I find this usually takes few hours depending on humidity, but don’t rush it or the shape might collapse.
Step 4: Finishing and Firing
-
Release from Mold:
Gently lift the bowl off the mold. It should hold its shape firmly. Turn it right-side up and check the inside curve, smoothing any marks with a rib tool. -
Rim Refinement:
Now that it’s upright, check your wavy rim again. Ensure the edges are smooth to the touch, as sharp clay becomes razor-sharp ceramic after firing. -
Bisque Fire:
Let the piece dry completely (bone dry) before loading it into the kiln for a bisque fire (usually Cone 04). -
Glazing:
Clean the bisque piece with a damp sponge. Dip or brush on a matte white or clear glaze. The goal is to let the clay’s natural speckles show through, so avoid opaque, thick glazes. -
Glaze Fire:
Fire the bowl to the maturity temperature of your clay (likely Cone 5 or 6 for stoneware). Ensure the foot is wiped clean of glaze to prevent sticking to the kiln shelf.
Fill your new bowl with seasonal fruit or simply let it stand alone as a sculptural statement on your table
Leaf-Imprint Slab Tray or Dish
Embrace the beauty of nature with this sophisticated slab-built tray, featuring a subtle yet striking carved leaf vein pattern. The creamy, speckled clay and understated glaze work together to highlight the texture, creating a minimalist piece perfect for trinkets or serving.
Detailed Instructions
Materials
- Speckled cream stoneware clay (e.g., standard speckled buff)
- Rolling pin
- Canvas or slab mat
- Wooden guide strips (approx. 1/4 inch thick)
- Oval paper template or large oval cookie cutter (approx. 8-10 inches)
- Needle tool or fettling knife
- Carving tool (small loop tool or specific sgraffito tool)
- Ribs (metal and soft rubber)
- Large foam slump mold or a shallow platter to use as a slump mold
- Sponge
- Clear or matte white glaze
- Iron oxide wash (optional, for aging effect)
Step 1: Preparing the Slab
-
Wedge the clay:
Start by thoroughly wedging about 2-3 pounds of speckled stoneware clay to ensure it is even and free of air bubbles. -
Roll out the slab:
Place your clay on a piece of canvas. Using wooden guide strips on either side to maintain even thickness, roll the clay out until it is approximately 1/4 inch thick. -
Smooth the surface:
Before cutting, take a soft rubber rib and compress the clay surface. Run the rib gently over the slab in multiple directions to align the clay particles and erase the canvas texture. -
Cut the oval shape:
Lay your oval paper template onto the smooth slab. Trace around it with a needle tool or fettling knife held vertically to get a clean cut, then peel away the excess clay. -
Refine the edges:
Take a slightly damp sponge and run it along the cut edge of the oval to round it off and remove any sharp burrs created by the cutting tool.
Clean Lines Tip
Don’t pick at the little clay crumbs immediately after carving! Let the clay stiffen to leather-hard, then simply brush them away with a stiff paintbrush for crisp lines.
Step 2: Carving the Design
-
Sketch the spine:
Using a very light touch with your needle tool, softly sketch a curved central line running lengthwise across the oval. This will be the main vein of your leaf. -
Map the veins:
Sketch the secondary veins branching out from the spine towards the edges. Keep them slightly asymmetrical to mimic a real leaf. -
Carve the main channel:
Once happy with the placement, use a carving tool (like a small U-tip or V-tip loop tool) to carve out the central spine. You want a clean, confident gouge about halfway through the slab’s thickness. -
Carve the branches:
Proceed to carve the side veins. I find it works best to start from the spine and pull the tool outward toward the rim for a fluid line. -
Add fine details:
If you want extra texture like the reference photo, use a needle tool to lightly scratch very faint, tiny tertiary veins between the carved channels, creating a crackled, organic look. -
Clean the crumbs:
Wait until the clay is leather hard before brushing away those little clay crumbs (burrs) created by carving, otherwise you might smear them back into the lines.
Level It Up
Try using a real large leaf (like Hosta or Canna Lily) to impress actual texture into the clay before carving deep lines over the natural veins for hyper-realism.
Step 3: Forming and Finishing
-
Lift the rim:
Carefully transfer your slab onto a large piece of foam. Gently press the center of the oval down into the foam while using your fingers to pull the rim upwards, creating a shallow curve. -
Use a slump mold (Alternative):
Alternatively, you can lay the slab inside a shallow platter lined with thin plastic or cornstarch. Press it gently to adopt the curve of the dish. -
Refine the shape:
Once centered and curved, run a damp sponge along the rim again to ensure it is perfectly smooth and rounded. -
Dry slowly:
Cover the piece loosely with plastic to let it dry very slowly. This helps prevent warping, which is common with flat slab pieces. -
Bisque fire:
Once bone dry, fire the piece to a bisque temperature (usually cone 04 or 06). -
Apply oxide wash (Optional):
To get that ‘antiqued’ look in the crevices, brush an iron oxide wash over the texture and wipe it back with a damp sponge, leaving color only deep in the carved lines. -
Glaze application:
Pour or dip the tray in a matte cream or clear glaze. If you used the oxide wash, a semi-transparent matte white works beautifully to reveal the speckles and carving underneath. -
Final firing:
Fire the piece to your clay body’s maturation temperature (often cone 5 or 6 for stoneware).
Once fired, you will have a durable, nature-inspired vessel that brings a calm, organic presence to any table.

TRACK YOUR CERAMIC JOURNEY
Capture glaze tests, firing details, and creative progress—all in one simple printable. Make your projects easier to repeat and improve.
Monstera-Style Leaf Catchall
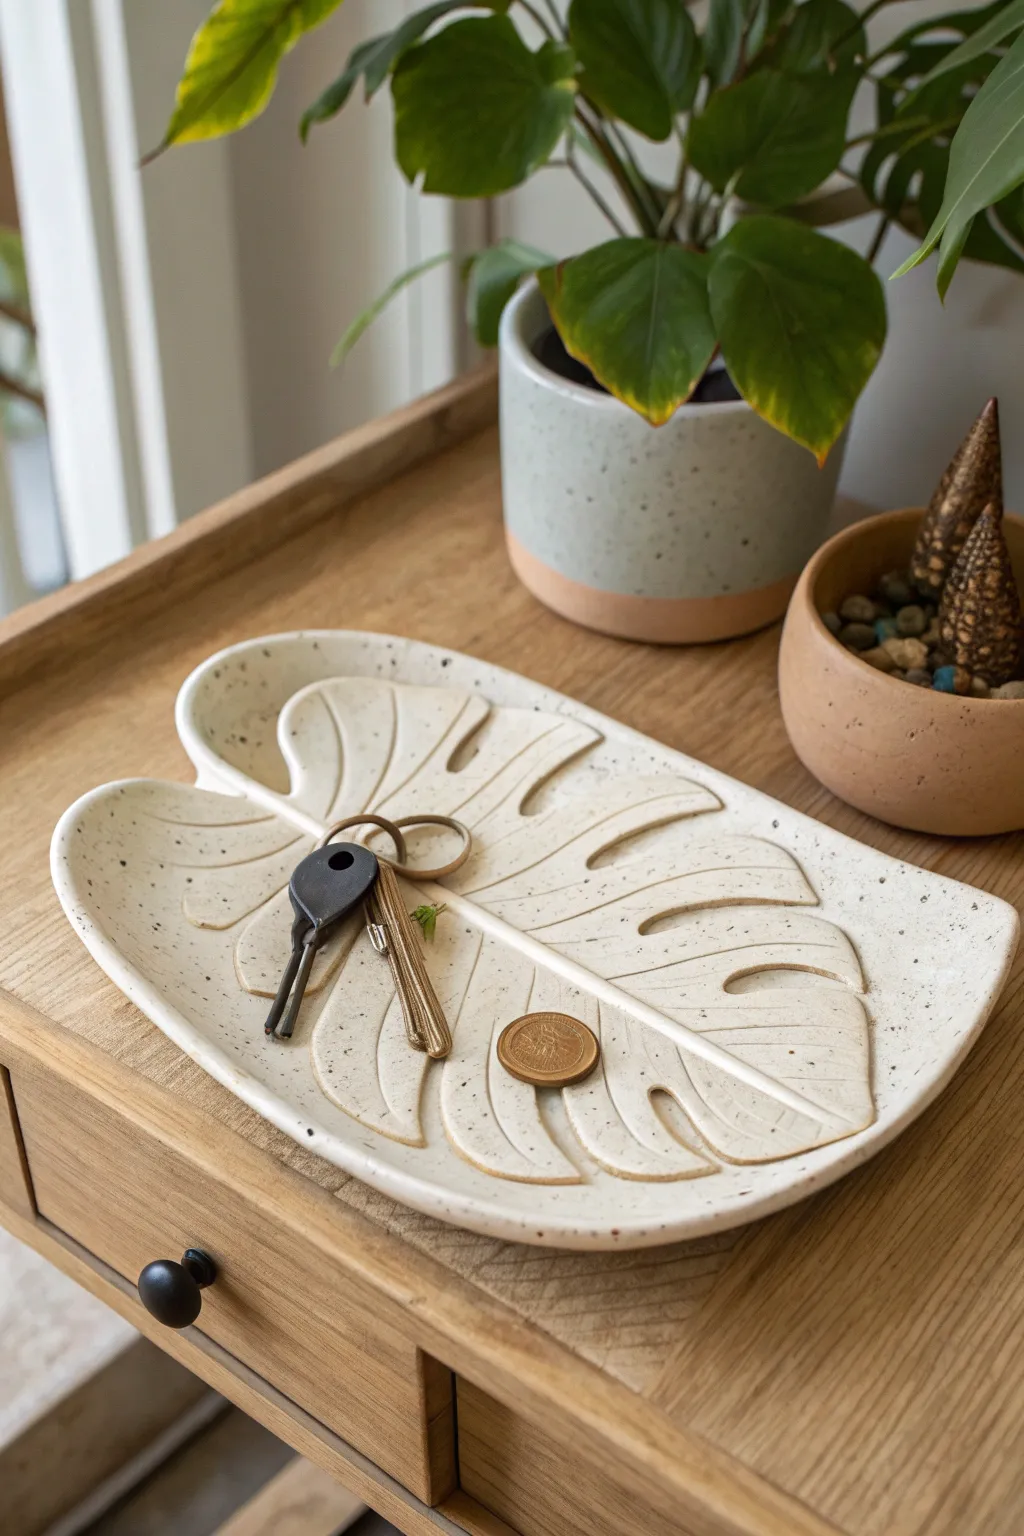
Bring the botanical trend to your tabletop with this elegant stoneware catchall, shaped like a stylized Monstera leaf. Featuring raised relief details and a lovely speckled clay body, this slab-built project balances organic warmth with functional sculpture.
Step-by-Step
Materials
- Speckled stoneware clay (mid-fire)
- Rolling pin
- Canvas working mat or slab roller
- Wooden guide sticks (1/4 inch thickness)
- Monstera leaf template (paper or cardstock)
- Needle tool
- Fettling knife
- Rubber kidney rib
- Modeling tool or small loop tool (for carving)
- Sponge
- Coil of extra clay (for support during drying)
- Clear or matte white glaze
Step 1: Preparing the Slab
-
Wedge the Clay:
Begin by wedging your speckled stoneware clay thoroughly to remove any air bubbles and ensure an even consistency. -
Set the Thickness:
Place your wooden guide sticks on either side of your canvas mat. These will ensure your slab is a uniform 1/4 inch thickness. -
Roll the Slab:
Roll the clay out smoothly between the guides. As I work, I like to flip the slab over once or twice to prevent it from sticking to the canvas texture too much. -
Compress the Surface:
Use a damp sponge or a rubber kidney rib to compress the surface of the clay. This aligns the clay particles and creates a smooth, professional finish before you start cutting.
Keep it Clean
Work on a clean piece of canvas to avoid picking up lint. If the clay is too sticky, dust the canvas very lightly with cornstarch, which will burn off in the kiln completely.
Step 2: Shaping the Leaf
-
Trace the Shape:
Lay your paper Monstera template gently onto the clay slab. Lightly trace the outline with a needle tool without cutting all the way through yet. -
Cut the Perimeter:
using your fettling knife held vertically, carefully cut around the outside perimeter of the leaf shape. Remove the excess clay. -
Smooth the Edges:
Dip your finger or a small sponge in water and run it along the cut edges to soften the sharp angles created by the knife. -
Define the Inner Leaves:
This design relies on relief. Instead of cutting holes, use a modeling tool to press down and define the deep notches that characterize a Monstera leaf, creating distinct sections. -
Add Vein Details:
Use a dull pencil or a stylus tool to gently scribe the central vein down the middle and the branching veins into each leaf segment. -
Enhance the Relief:
To make the veins pop, use a modeling tool to compassionate the clay slightly on either side of your drawn lines, creating a subtle 3D pillowing effect.
Sgraffito Twist
Paint the leaf with black underglaze at the leather-hard stage, then carve your vein lines through it to reveal the white clay underneath before your final clear glaze application.
Step 3: Forming the Dish
-
Lift and Curve:
Gently lift the edges of the leaf slab. Place small balls of scrap clay or a coiled towel underneath the outer rim to prop it up. -
Shape the Curve:
Press the center of the leaf gently downwards to encourage a shallow bowl shape. Ensure the curve is gradual so keys and coins won’t slide off. -
Refine the Rim:
Check the rim again to ensure no sharp edges have formed during the bending process. Smooth again with a damp chamois or sponge. -
Dry Slowly:
Cover the piece loosely with plastic. Because the edges are lifted, you want this to dry very slowly to prevent warping. Let it stiffen to leather-hard over 24-48 hours. -
Bisque Fire:
Once bone dry, fire the piece in the kiln to bisque temperature (usually cone 04).
Step 4: Glazing and Finishing
-
Wipe Down:
Wipe the bisque-fired piece with a damp sponge to remove any kiln dust, which helps the glaze adhere properly. -
Apply Glaze:
Brush or dip the piece in a milky white or clear glaze. A semi-transparent white works best here as it allows the natural speckles of the clay body to show through. -
Wipe the Foot:
Ensure the bottom of the tray is completely free of glaze so it doesn’t fuse to your kiln shelf. -
Final Fire:
Fire again to the maturity temperature of your clay (likely cone 5 or 6). Once cool, sand the bottom if necessary slightly to protect your furniture.
Place your finished dish on an entryway table to stylishly corrall your daily essentials
Incense Holder With a Curved Ash-Catching Lip
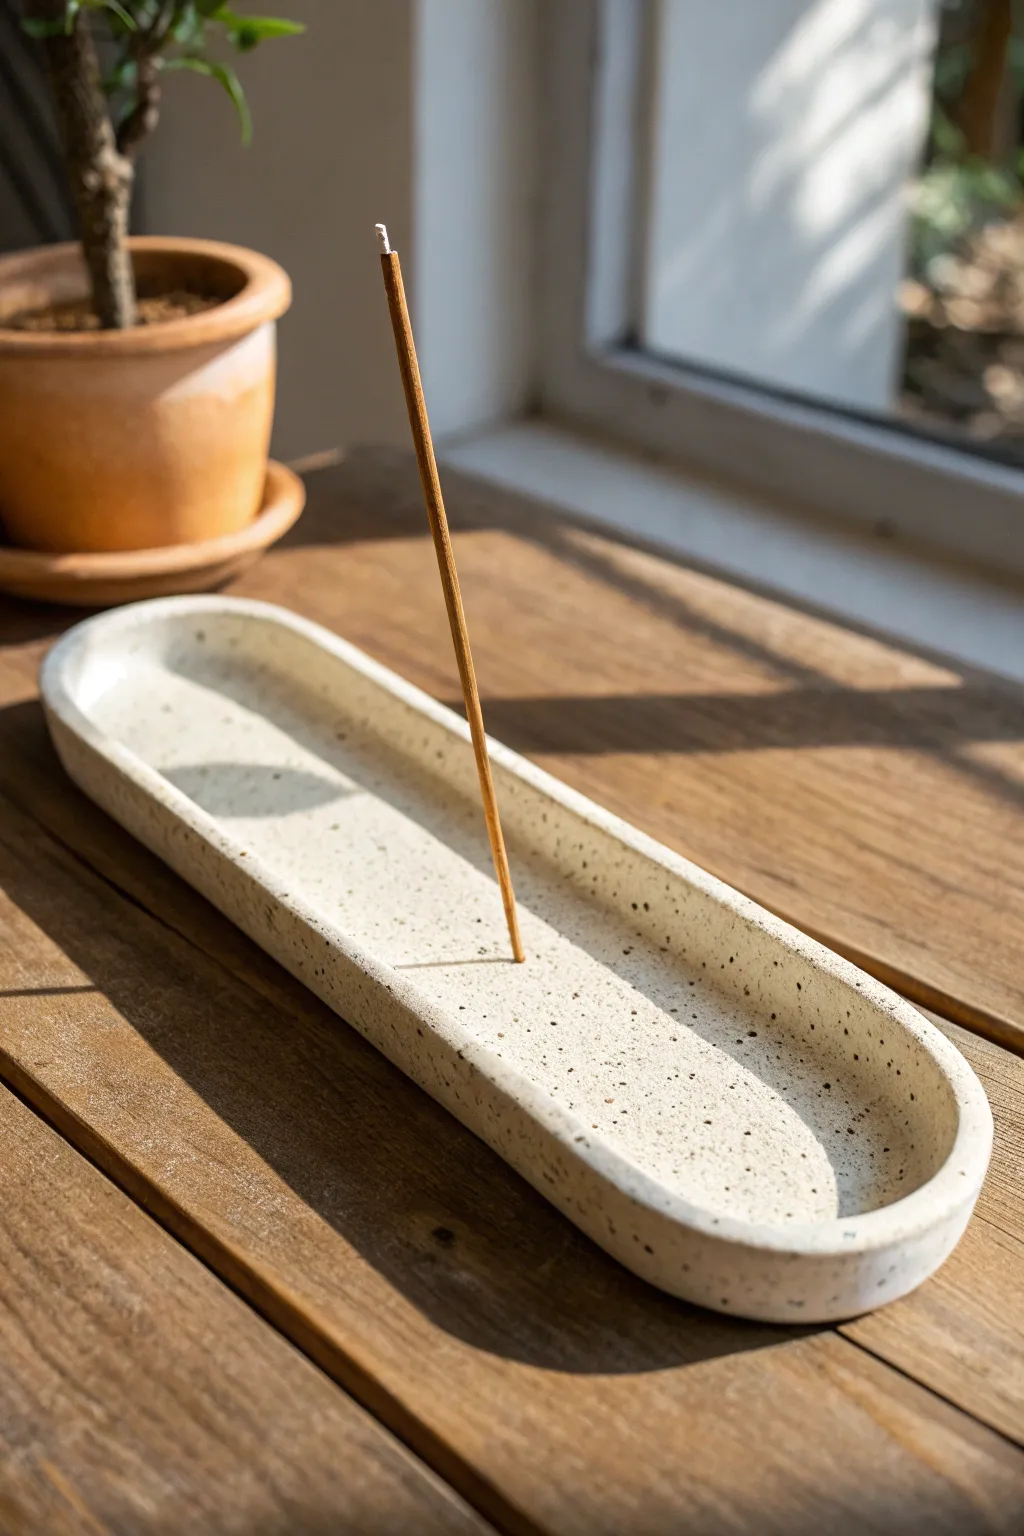
This elegant slab-built incense holder features a clean, elongated oval shape with gently upturned edges specifically designed to catch every speck of falling ash. The speckled clay body adds a natural, organic texture that complements the calm ritual of burning incense.
How-To Guide
Materials
- Speckled stoneware clay
- Rolling pin
- Canvas or slab mat
- Two wooden guide strips (approx. 1/4 inch thick)
- Paper template (long oval shape)
- Needle tool or fettling knife
- Small sponge
- Wooden rib or kidney tool
- Incense stick (for sizing the hole)
- Pottery reamer or small drill bit tool
- Clear matte glaze
Step 1: Preparation and Slab Rolling
-
Prepare the Clay:
Begin by wedging a small ball of speckled stoneware clay to ensure it is consistent and free of air bubbles. -
Set Up Guides:
Place your canvas on a flat work surface and position your two wooden guide strips parallel to each other, slightly wider than your intended finished piece. -
Roll the Slab:
Flatten the clay ball slightly with your palm, then roll it out between the guides using a rolling pin until the rolling pin rests on the wood strips. -
Compress the Surface:
Take a rib tool and gently drag it across the surface of the clay in one direction to compress the particles and align them, which helps prevent warping later.
Preventing Warping
For long, thin pieces like this, sandwich the clay between two pieces of drywall while it dries to leather-hard. This forces it to stay perfectly flat.
Step 2: Shaping the Form
-
Cut the Shape:
Place your oval paper template onto the slab and carefully trace around it with a needle tool or fettling knife to cut out the base shape. -
Smooth the Edges:
Before manipulating the clay, pick up the slab and gently run a damp finger along the sharp cut edges to round them off slightly. -
Create the Lip:
With the slab resting on your work surface, gently use your thumbs to press and lift the outer rim upwards. -
Refine the Curve:
Work your way around the oval several times, pinching and smoothing the wall to create a consistent, curved lip that rises about half an inch from the base. -
Level the Bottom:
Check that the bottom remains flat; if the lifting process distorted it, gently press the center down with a damp sponge.
Step 3: Adding the Functionality
-
Mark the Center:
Find the approximate balance point in the visual center of the oval and mark it lightly. -
Create the Hole:
Using a needle tool, poke a hole straight down through the clay at your mark. -
Adjust Hole Angle:
Insert an actual incense stick or a similarly sized tool into the hole and wiggle it very slightly to ensure it’s wide enough to accommodate the stick after the clay shrinks. -
Clean Up:
Flip the piece over and smooth away any rough clay burrs that were pushed out when creating the hole.
Add a Texture Pop
Before cutting the oval, press a piece of lace or a textured leaf into the slab to leave a subtle impression that glaze will pool into later.
Step 4: Finishing and Glazing
-
Slow Drying:
Place the piece on a ware board and cover it loosely with plastic to dry slowly, which prevents the long shape from curling up at the ends. -
Bisque Fire:
Once bone dry, fire the piece to bisque temperature (usually cone 04 or 06) in your kiln. -
Glaze Application:
Apply a clear matte glaze to the top surface to highlight the natural speckles while keeping the surface non-porous and easy to wipe clean. -
Wipe the Foot:
Thoroughly wipe any glaze off the very bottom of the piece with a damp sponge so it doesn’t fuse to the kiln shelf. -
Final Fire:
Fire the piece again to your clay body’s maturity temperature, typically cone 5 or 6 for stoneware.
With the final firing complete, you simply need to find your favorite incense scent and enjoy the calm atmosphere
Keepsake Slab Box With a Fitted Lid
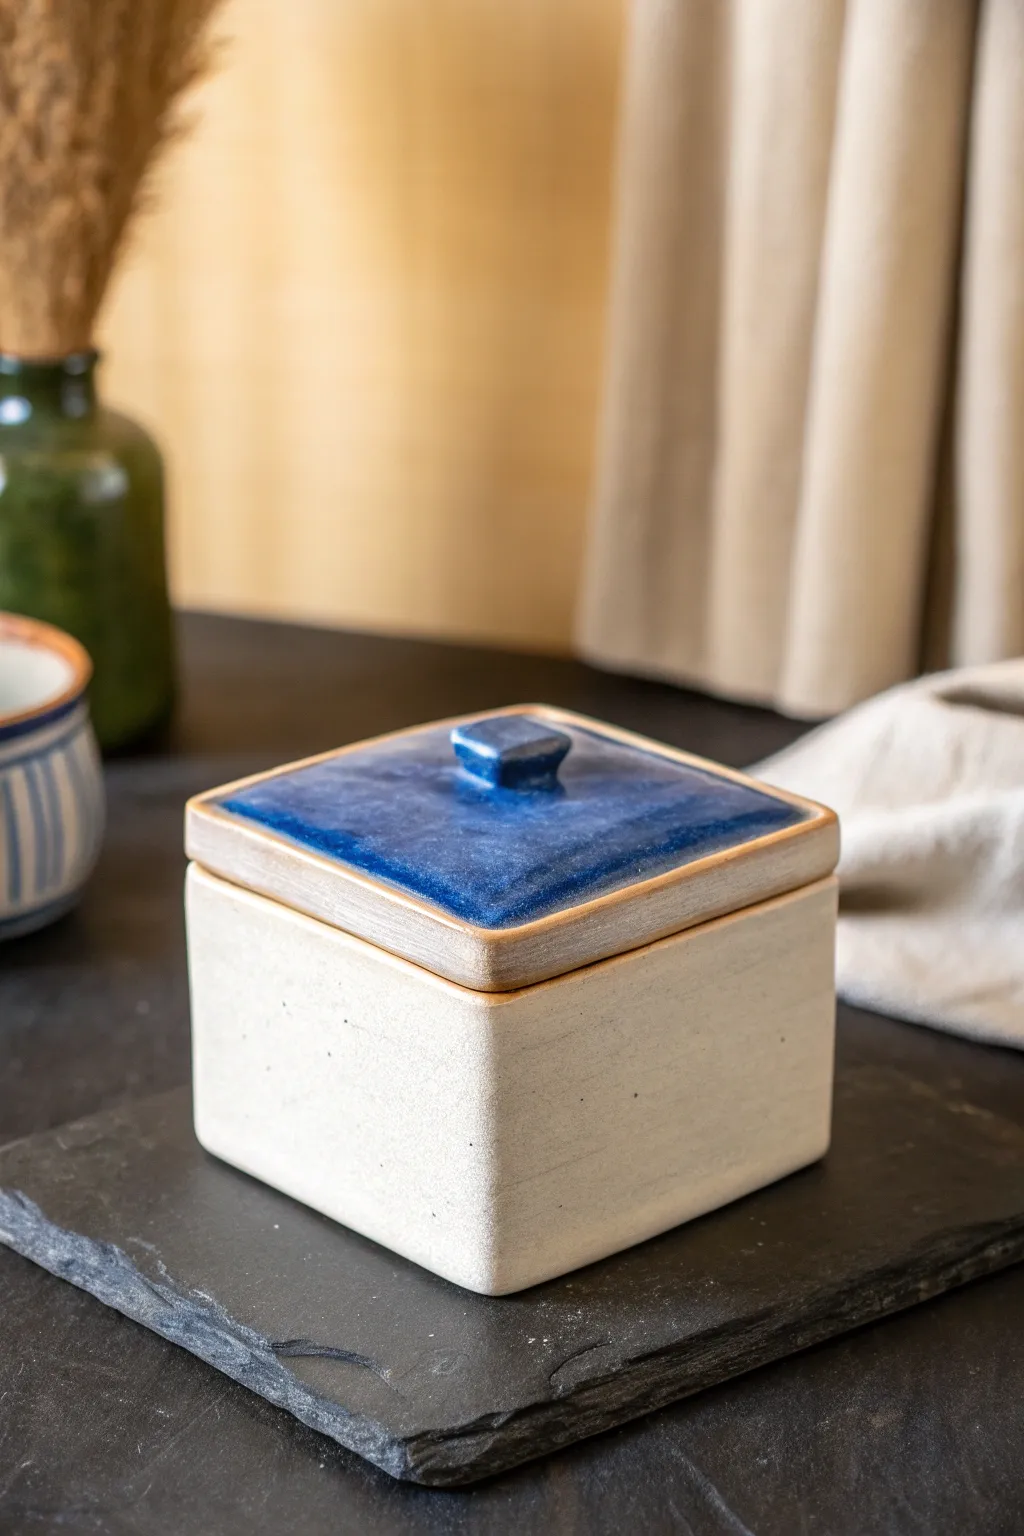
This elegant square box combines the raw, speckled beauty of unglazed stoneware with a stunning pop of deep cobalt blue. Its precise slab construction and perfectly fitted lid make it an ideal project for refining your measuring and joining skills.
Step-by-Step
Materials
- Speckled stoneware clay (approx. 2-3 lbs)
- Rolling pin
- Two wooden guide strips (thickness slats, approx. 1/4 inch)
- Fettling knife or sharp craft knife
- Needle tool
- Serrated rib or scoring tool
- Slip (clay mixed with water)
- Ruler or template
- Bevel cutter (optional but recommended)
- Flat wooden paddle
- Cobalt blue glaze suitable for your firing range
- Wax resist
- Soft sponge
Step 1: Preparing the Slabs
-
Roll the clay:
Begin by wedging your clay to remove air bubbles. Place the clay between your two wooden guide strips on a canvas surface and roll it out into a large, even sheet. Aim for a consistent thickness of about 1/4 inch. -
Smooth surfaces:
Before cutting, use a soft rib to compress the clay on both sides. This aligns the clay particles, reducing warping later, and creates that smooth, speckled surface texture seen in the final piece. -
Cut the components:
Using a ruler and needle tool, cut your pieces. You will need four identical rectangular walls (e.g., 4×3 inches), one square for the base, and a slightly larger square for the lid that will overhang slightly. -
Leather hard stage:
Let the slabs dry until they are ‘leather hard’—firm enough to hold their shape without bending, but still soft enough to score and join. This is crucial for crisp, straight walls.
Step 2: Assembling the Box Body
-
Bevel the edges:
For the neatest corners, cut the vertical edges of your four wall pieces at a 45-degree angle. This allows them to fit together seamlessly like a picture frame. -
Score and slip:
Aggressively score the beveled edges and the perimeter of your base slab. Apply a generous amount of slip to these roughened areas. -
Join the walls:
Press the walls onto the base and against each other. Give them a firm wiggle to lock the clay particles together. Run a thin coil of soft clay into the interior corners for reinforcement. -
Paddle into shape:
Take your wooden paddle and gently tap the outside walls. This sharpens the right angles and ensures the box is perfectly square.
Dry Slow and Low
Slab boxes love to warp. Wrap your finished greenware box loosely in plastic for at least 2 days to let the moisture equalize slowly before uncovering it completely.
Step 3: Creating the Fitted Lid
-
Measure the flange:
To make the lid stay put, you need a flange. Measure accurate dimensions of the *inside* opening of your box. Roll a small coil or cut a thick strip that matches this inner square dimension. -
Attach the flange:
Score and slip the underside of your lid slab. Attach the flange strip in a square shape, ensuring it sits just inside the walls of the box body. Test the fit gently; it should be snug but not tight. -
Add the handle:
Cut a small rectangle or square of clay for the knob. Score the center of the lid top and attach it securely. Smooth the edges with a damp sponge to soften the look. -
Final drying:
Place the lid on the box to dry. Drying them together helps prevent the components from warping differently, ensuring a perfect fit after firing.
Lid Doesn’t Fit?
If the lid is too tight after the bisque firing, use wet-dry sandpaper or a grinding stone under running water to gently sand down the flange until it slots in perfectly.
Step 4: Glazing and Finishing
-
Bisque fire:
Once bone dry, fire the piece to bisque temperature (usually Cone 04) to prepare it for glazing. -
Apply wax resist:
Using a brush, apply wax resist carefully to the bottom of the box and the rim where the lid touches the body. Also apply wax to the raw rim of the lid itself, as we want that exposed clay detail. -
Glaze the lid top:
Pour or brush your cobalt blue glaze onto the top surface of the lid and the knob. Clean up any drips on the vertical rim immediately with a sponge. -
Glaze the interior (optional):
If you want the inside functional for food, pour a clear liner glaze inside the box body, swirl it to coat, and pour out the excess. Leave the exterior raw. -
Final fire:
Fire the piece to the maturity temperature of your clay body (likely Cone 5 or 6 for stoneware). The unglazed exterior will vitrify into a beautiful stone-like texture.
Once cooled, the contrast between the rough stone texture and the smooth, glassy blue lid creates a truly timeless piece for your home
Butter Dish Built Like a Tiny Slab Architecture Project
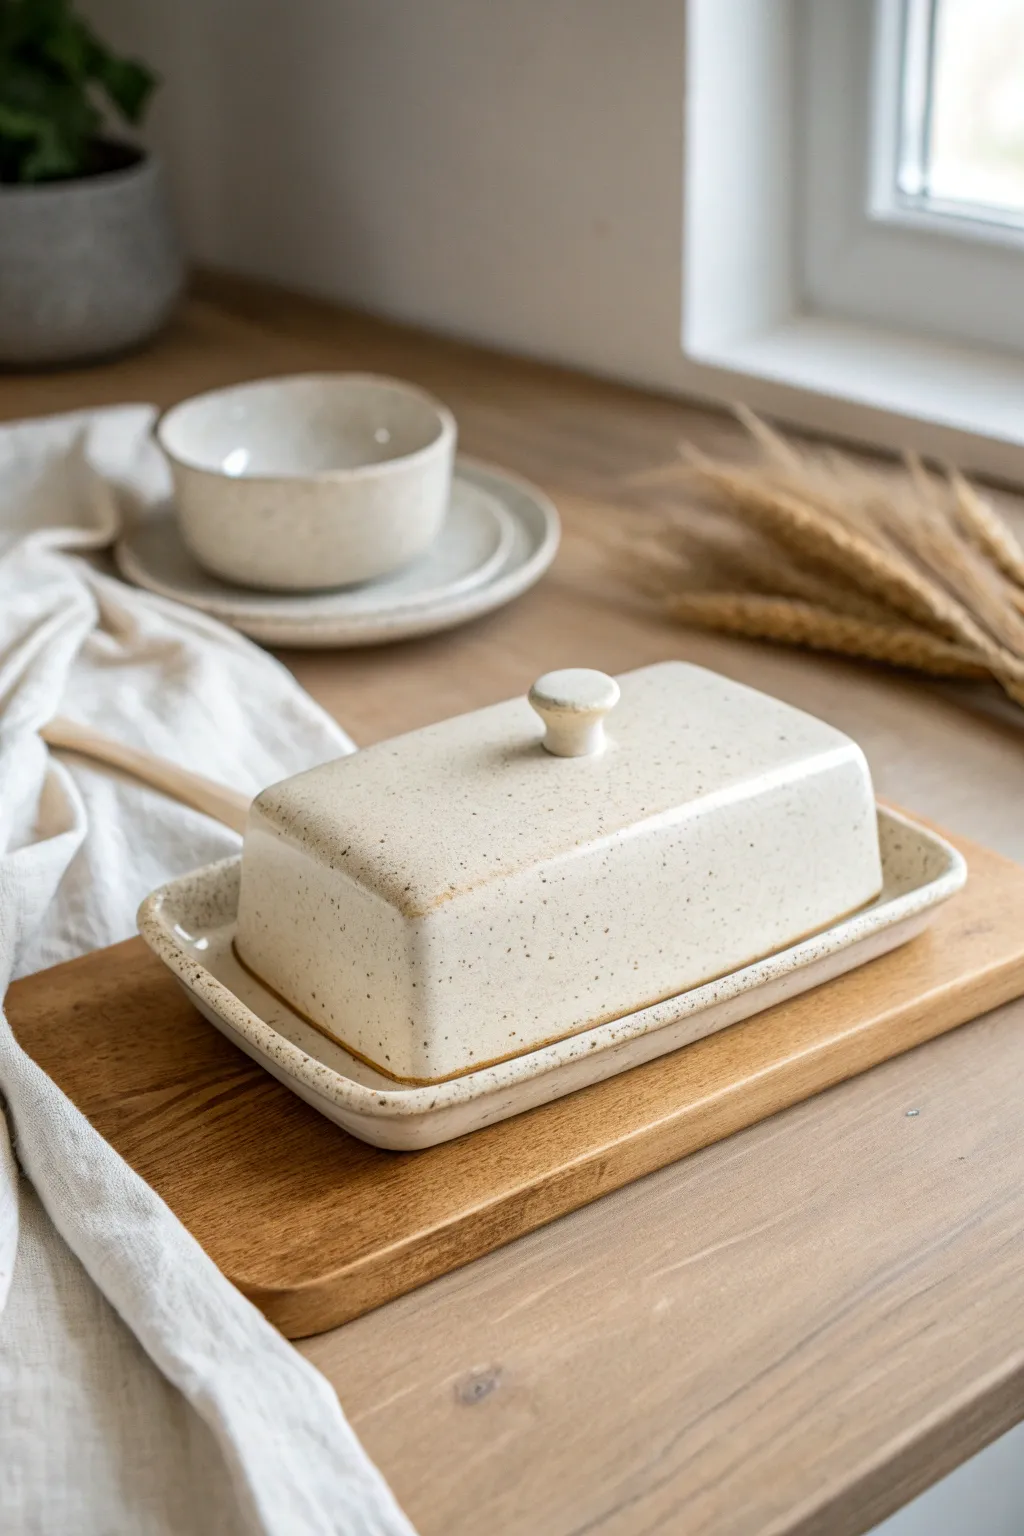
This charming, speckled butter dish combines architectural lines with the soft, organic feel of hand-built pottery. Its simple rectangular cover and lipped base keep things functional while showcasing beautiful clay flecks and a creamy glaze.
Detailed Instructions
Materials
- Speckled cream stoneware clay
- Rolling pin
- Two long wooden guide strips (approx. 1/4 inch thick)
- Fettling knife or needle tool
- Ruler
- Serrated rib and smoothing kidney (soft rubber)
- Slip (clay mixed with water)
- Small sponge
- Canvas or slab mat for rolling
- Paper templates (cardstock recommended)
- Clear or satin matte white glaze
Step 1: Creating the Base Slab
-
Roll the main slab:
Begin by wedging your speckled clay to remove air bubbles. Place it on your canvas between the two wooden guide strips. Roll the clay out until the rolling pin rests flat on the guides, ensuring an even thickness of about 1/4 inch. -
Cut the base shape:
Using a ruler or a pre-cut paper template, cut a rectangle approximately 5 x 8 inches for the bottom saucer. This provides ample room for a standard stick of butter. -
Form the rim:
Roll a small coil of clay, roughly the thickness of a pencil. Score the outer edge of your rectangular base and the underside of the coil with your needle tool. -
Attach the rim:
Apply slip to the scored areas and press the coil firmly onto the base’s edge. Use your thumb to blend the inside seam completely smooth so it looks like one continuous piece, then pinch the coil gently upwards to create a slight lip.
Pro Tip: Warping Prevention
Dry the cover slowly under loose plastic for the first 24 hours. If the edges dry faster than the center, the rectangular shape may pull up and warp.
Step 2: Constructing the Cover
-
Cut the walls and roof:
Roll another slab of the same thickness. You will need five pieces: two long side walls, two shorter end walls, and one top roof piece. Measure your base to ensure the cover will fit inside the rim comfortably. -
Dry to leather hard:
This is crucial: let these flat pieces stiffen up on a ware board until they are ‘leather hard’—firm enough to hold their shape but soft enough to join. If you try to build while the clay is soft, the walls will slump. -
Bevel the edges:
For cleaner corners, cut the joining edges of your walls at a 45-degree angle. This miter joint creates a stronger bond and a sharper, more architectural look. -
Assemble the walls:
Score and slip the vertical edges of your four wall pieces. Stand them up and press the corners together firmly. I like to reinforce the inside seams with a very thin coil of clay blended out with my finger. -
Attach the roof:
Score the top edges of the standing walls and the underside of the roof slab. Place the roof on top, gently pressing down to seal the box.
Level Up: Texture Contrast
Leave the lower 1/4 inch of the cover unglazed (raw clay) for a beautiful textual contrast between the smooth glaze and the gritty, toasted stoneware.
Step 3: Details & Refining
-
Round the corners:
Once assembled, use a damp sponge or your soft rib to gently round over the sharp corners and edges. The goal is to soften the boxy shape just slightly so it feels pleasant to handle. -
Make the knob:
Roll a small ball of clay and pinch it into a mushroom or knob shape. Flatten the bottom stem slightly. -
Secure the handle:
Score the center of the roof and the bottom of the knob. Slip and attach firmly, giving it a little twist to lock it in place. Clean up any excess slip with a brush. -
Smooth the surfaces:
Go over the entire piece with a soft rubber rib to compress the clay particles and bring the speckles to the surface. Wait for it to dry completely before bisque firing. -
Glazing:
After the first firing, dip or brush the piece with a satin matte white or clear glaze to let the natural clay speckles show through. Leave the bottom of the foot ring unglazed.
Once fired, you will have a sturdy, minimalist piece that elevates your morning toast routine
Ceramic Wall Clock Face From a Clean Slab
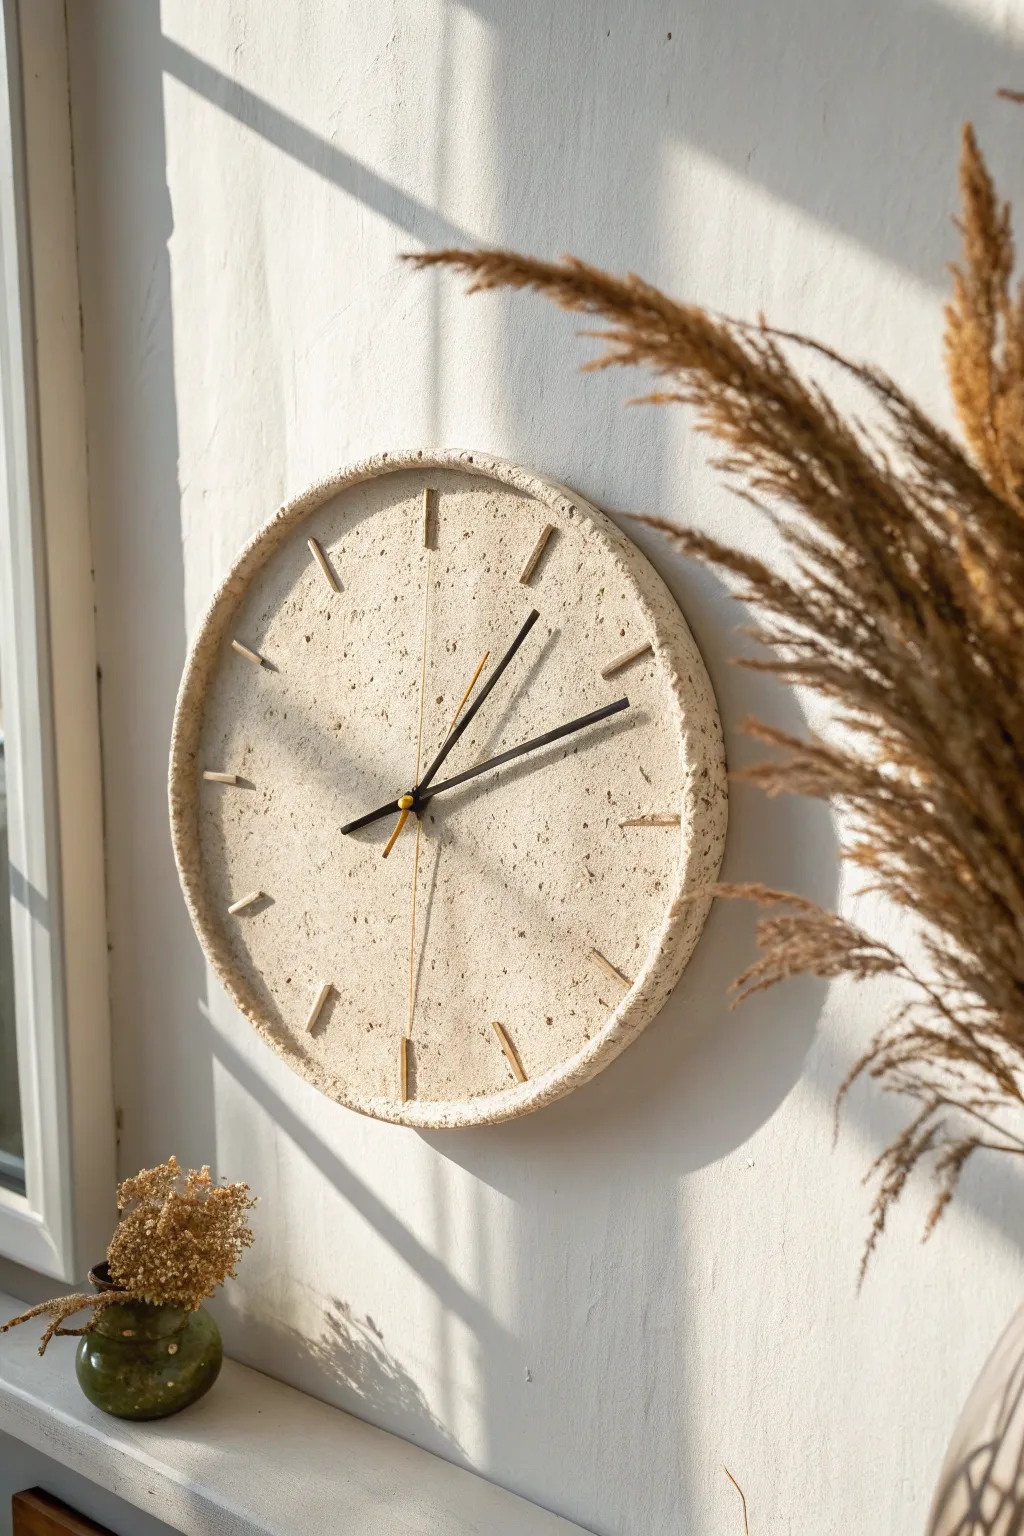
Bring earthy elegance to your walls with this textured ceramic clock, crafted from a single slab of clay. Its natural speckled finish and raised hour markers create a minimalist yet warm focal point that celebrates the raw beauty of the material.
How-To Guide
Materials
- Stoneware clay with grog/speckles (such as toasted stoneware)
- Rolling pin
- Canvas working surface or slab roller
- Round template (paper or bowl, approx. 10-12 inches)
- Fettling knife or needle tool
- Ruler
- Slip (liquid clay)
- Scoring tool (serrated rib)
- Wooden modeling tool
- Sponge
- Clock movement kit (shaft length compatible with slab thickness)
- Straw or hole cutter
- Clear matte glaze
Step 1: Forming the Base
-
Preparing the Slab:
Begin by wedging your clay to remove air bubbles, then roll it out on your canvas to an even thickness of about 1/4 inch. If you want that distinct texture shown in the photo, refrain from smoothing the surface too much with a rib. -
Cutting the Circle:
Place your round template onto the slab. Using a needle tool or fettling knife, cut a clean circle. Don’t discard the scraps; you will need them for the rim and markers. -
Creating the Rim Strip:
Roll out a long strip from your leftover clay, keeping it slightly thinner than the base slab. Cut it into a consistent width, roughly 1/2 inch to 3/4 inch wide, long enough to go around the circumference of your circle. -
Attaching the Rim:
Score the outer edge of your circular base and one side of your clay strip. Apply a generous amount of slip to the scored areas. -
Securing the Wall:
Gently wrap the strip around the edge of the base, placing it *on top* of the slab edge to create a raised lip. Press firmly to adhere. I find using a small wooden tool helps blend the seam on the inside edge for a cleaner look. -
Refining the Edges:
Once the rim is attached, run a slightly damp sponge around the top edge to soften any sharp corners. You want it to look organic but finished.
Step 2: Adding Details & Fire
-
Drilling the Center:
Find the exact center of your circle using a ruler. Use a straw or a hole cutter to create the hole for the clock mechanism. Make sure the hole is slightly larger than your mechanism’s shaft to account for clay shrinkage during drying. -
Making the Markers:
Roll out a thin coil or small strip of clay. Cut twelve small, identical rectangular batons, about 1 inch long. These will serve as your raised hour markers. -
Marking Positions:
Lightly mark the twelve hour positions on the clock face using a clock template or a protractor to ensure perfect symmetry. -
Attaching the Hours:
Score the back of each small clay baton and the corresponding spot on the clock face. Dab on some slip and press each marker into place. -
Texture Check:
Before setting it aside, inspect the surface. If you lost some of the natural groggy texture during handling, gently pat the surface with a coarse sponge or a stiff brush to bring that roughness back. -
Slow Drying:
Sandwich the clock between two pieces of drywall ware board or wrap it loosely in plastic. This shape is prone to warping, so slow, even drying is critical. -
Bisque Firing:
Once bone dry, fire the piece to bisque temperature (usually Cone 04) to prepare it for glazing. -
Glazing:
Apply a thin layer of clear matte glaze. The goal is to highlight the natural speckles of the clay body rather than cover them up with color. Wipe the bottom clean. -
Final Firing:
Fire the piece to maturity (Cone 5, 6, or 10 depending on your clay). Once cooled, install the clock mechanism kit through the center hole and attach the hands.
Warp Watch
Flat slabs love to curl. Dry the clock face slowly, weighted down with a small sandbag in the center if necessary, to keep it perfectly flat.
Gold Standard
After the final firing, use gold leaf or gold sizing on the raised hour markers to add a touch of luxury that contrasts with the rough clay.
Hang your new timepiece in a well-lit spot to let the shadows dance across the textured surface