
If you can roll a few simple shapes in polymer clay or air dry clay, you can absolutely make an adorable little sloth with tons of personality. These sloth clay ideas are my go-to mix of cute classics and a few creative twists that still feel totally doable at your own table.
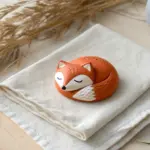
Kawaii Sloth Charm
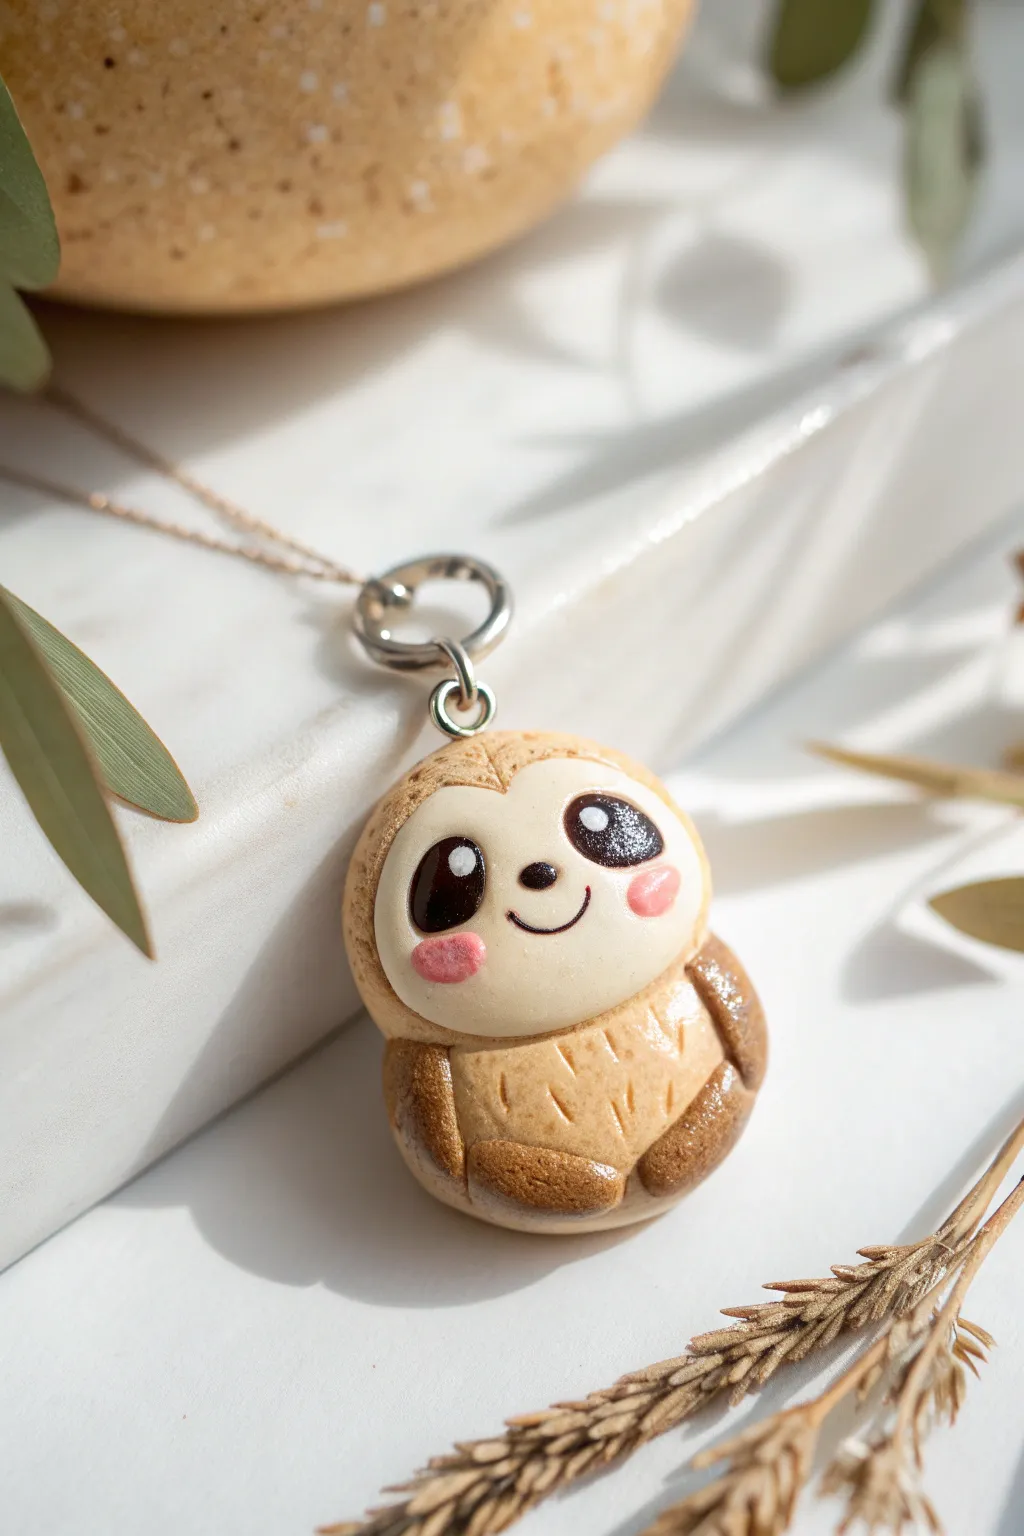
Capture the famously slow-moving energy of a sloth in the most adorable form possible with this miniature Kawaii charm. This project features soft toasted colors, a delightfully simple body shape, and big, sparkling eyes that are impossible to resist.
Step-by-Step Guide
Materials
- Polymer clay (light tan/beige, dark brown, cream/off-white, black, pink)
- Clean ceramic tile or work mat
- Ball stylus tools (large and small)
- Needle tool or toothpick
- Eyepin (silver or gold tone)
- Wire cutters (optional, for trimming eyepin)
- Gloss glaze or UV resin (for the eyes)
- Small paintbrush
- Soft pastel chalks/brown paint (optional for shading)
- Oven for baking
Step 1: Shaping the Base
-
Mix the perfect tan:
Start by conditioning your light tan or beige polymer clay until it is soft and pliable. If the color feels too flat, mixing in a tiny speck of translucent clay can give it a more realistic, warm depth. -
Form the body shape:
Roll a medium-sized ball of the tan clay into a smooth sphere. Gently press the top and bottom to flatten it slightly into a rounded marshmallow or pebble shape. This will be the main body and head combined. -
Create the face plate:
Take a smaller amount of cream or off-white clay and flatten it into a thin, oval disk. It should be wide enough to cover the upper front of the body but leave a border of tan visible. -
Attach the face:
Press the cream oval onto the upper half of the tan body shape. Gently smooth the edges with your fingertip so it adheres fully but retains a slightly raised, distinct look. -
Mark the fur texture:
Using a needle tool or a very sharp toothpick, gently make tiny, shallow scratch marks all over the tan parts of the body. Keep the scratches short and angled downwards to mimic fluffy fur, avoiding the smooth cream face area.
Fingerprint Troubles
Is the cream face showing fingerprints? Lightly brush the raw clay with a drop of baby oil or cornstarch before baking to smooth out any unwanted ridges.
Step 2: Adding the Face Details
-
Indent the eye sockets:
Use a large ball stylus to press two deep, round indentations into the cream face plate where the eyes will go. Space them apart slightly to keep that cute, wide-set kawaii look. -
Add the eye patches:
Roll two small balls of dark brown clay and flatten them into teardrop shapes. Place these into the eye indentations so the tapered ends point slightly downward and outward, mimicking the sloth’s markings. -
Place the eyes:
Roll two slightly smaller balls of black clay. Press these firmly onto the dark brown patches. Flatten them just enough so they look like buttons but still have some dimension. -
Sculpt the nose and mouth:
Take a tiny speck of dark brown or black clay, roll a micro-ball, and place it between the eyes for the nose. Use your needle tool to gently impress a wide, shallow ‘U’ shape underneath for a happy smile. -
Add blush:
To make him extra sweet, press two tiny, flattened circles of pink clay onto the cheeks just below the outer corners of the eyes.
Pro Tip: Eye Shine
For the most professional kawaii look, cure a drop of UV resin on the eyes. It creates a domed, glassy effect that varnish alone can’t quite replicate.
Step 3: Limbs & Finishing
-
Create arms and legs:
Mix a slightly darker brown shade (or use the same tan mixed with a little brown). Roll four small logs. I find that tapering one end of each log helps them blend better into the body. -
Attach the limbs:
Press two logs onto the bottom sides of the body for legs, curving them inward as if the sloth is sitting. Attach the other two logs higher up, curving them down to rest near the belly. -
Texture the limbs:
Just like the body, add tiny scratch marks to the limbs with your needle tool to continue that furry texture. -
Insert the hardware:
Trim an eyepin to a suitable length (about 1cm). Push it straight down into the center top of the head. If the clay distorts, gently reshape it around the pin. -
Bake the charm:
Place your sloth on a ceramic tile or baking sheet. Bake according to your clay manufacturer’s instructions (usually around 275°F/130°C for 15-30 minutes). Let it cool completely. -
Add the sparkle:
Once cool, use a toothpick to apply two tiny dots of white paint to the black eyes for reflections. Finally, brush a coat of gloss glaze or UV resin over just the eyes and nose to make them shine.
String your new little friend onto a necklace chain and enjoy his relaxed vibe all day long


Hanging Sloth Branch Ornament
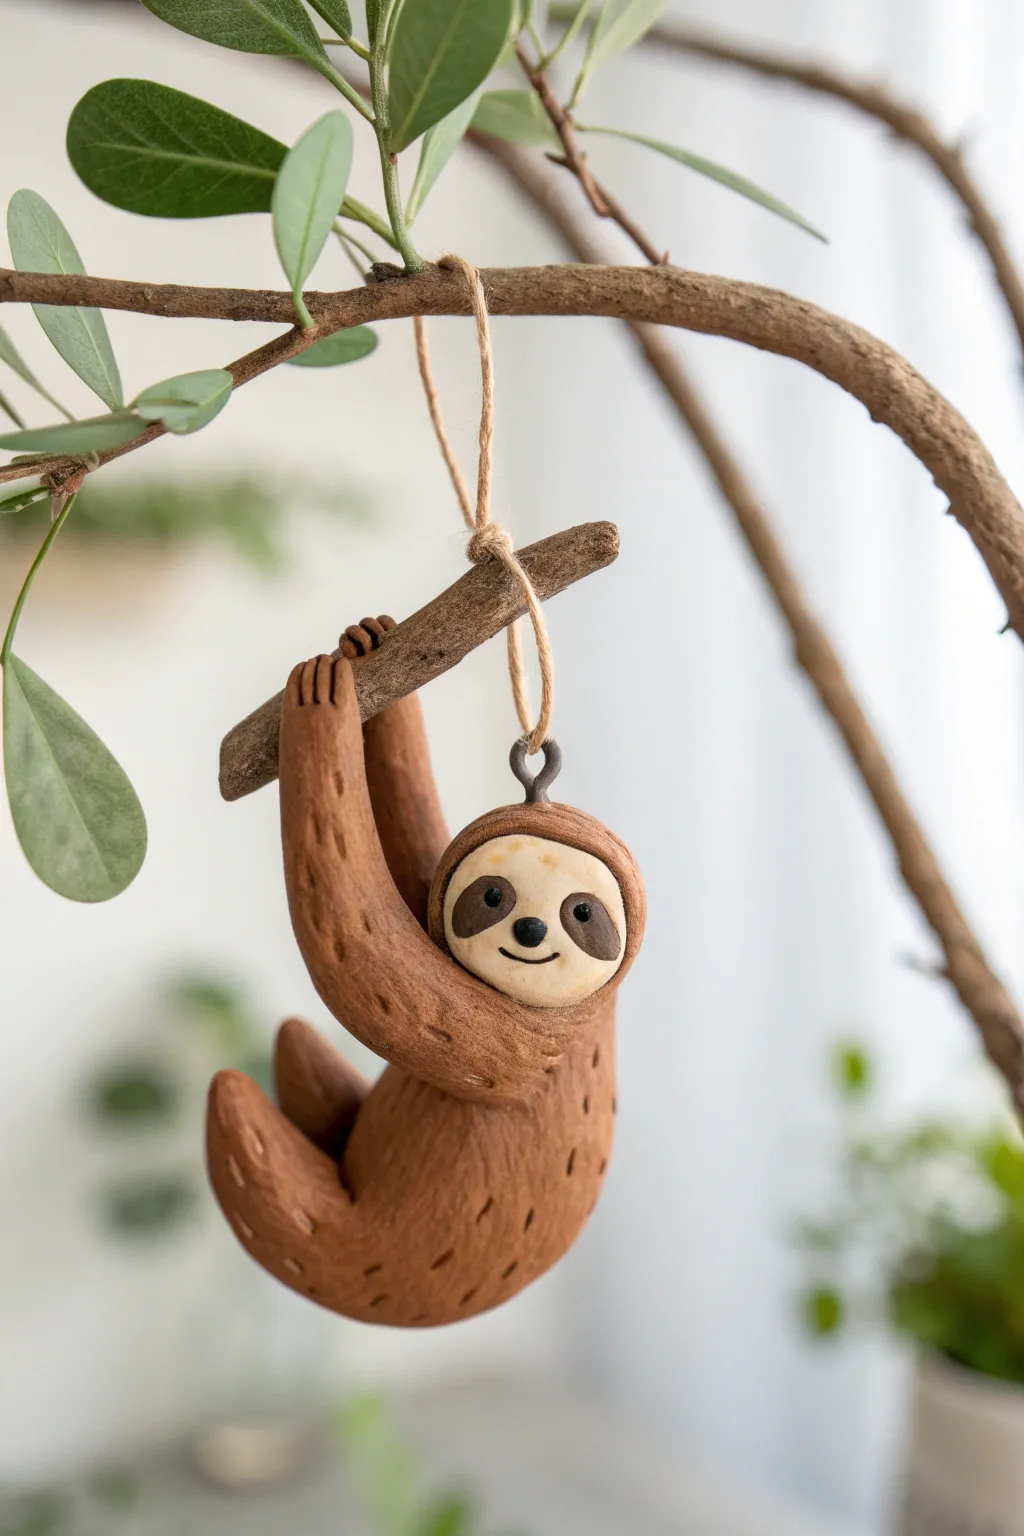
Capture the laid-back charm of a sloth with this adorable hanging ornament, perfect for adding a touch of whimsy to your indoor plants. You’ll sculpt a sweet sloth clinging to a real twig, complete with textured fur and a friendly smile.
Step-by-Step Tutorial
Materials
- Polymer clay (brown, beige/cream, dark brown/black)
- Small natural twig or branch (dry and clean)
- Eye screw or wire loop
- Jute twine or string
- Needle tool or toothpick
- Ball stylus tool
- Sculpting tool with a flat edge
- Liquid clay (or bake and bond)
- Craft knife
- Oven for baking (if using polymer clay)
Step 1: Prepping the Base
-
Prepare the branch:
Start by selecting a small, dry twig roughly 3-4 inches long. Ensure it’s clean and sturdy enough to hold the weight of the clay. -
Mix your colors:
Condition your brown clay until it is soft and pliable. Use a medium warm brown for the body. If your brown is too dark, mix in a little orange or white to warm it up.
Step 2: Sculpting the Body
-
Form the torso:
Roll a smooth, kidney-bean-shaped piece of brown clay for the sloth’s body. It should be slightly curved to mimic the hanging posture. -
Attach the head:
Roll a smaller ball of brown clay for the head. Flatten the back slightly and attach it securely to the top of the body, blending the seam with a smoothing tool so the neck looks natural. -
Create the face plate:
Take a small amount of beige or cream clay and flatten it into a wide heart or oval shape. Gently press this onto the front of the head to create the face area. -
Add facial features:
Use a small ball tool to make two indentations for the eyes. Gently press dark brown patches around these sockets for the classic bandit-mask look, then place tiny black beads of clay inside for the eyes. -
Sculpt the smile:
Add a tiny black nose between the eyes. Use a needle tool to carefully etch a small, curved smile just below the nose to give him a happy expression.
Natural Texture Hack
Instead of cutting every hair individually, gently roll a stiff-bristled toothbrush over the clay surface before baking for instant fuzzy texture.
Step 3: Limbs and Assembly
-
Shape the arms:
Roll two long logs of brown clay for the arms. They should be thicker at the shoulder and taper slightly towards the paws. Attach them near the neck, reaching upwards. -
Shape the legs:
Create two shorter logs for the legs. Attach these to the bottom of the body, curving them upwards as if the sloth is tucking its legs in or gripping air. -
Position on the branch:
This is the crucial step. Place your clay sloth under the twig. Carefully wrap the ends of the arms over the top of the twig. Press the clay paw-pads firmly onto the wood so it grips tightly. -
Detail the claws:
Using a knife tool, gently score three little lines into the end of each paw that is gripping the branch to represent toes or claws. -
Add hanging hardware:
Before baking, screw a tiny eye pin or insert a wire loop directly into the top of the sloth’s head or back. Securing it with a drop of liquid clay helps it stay put.
Sloth Slipping?
If the clay paws won’t stick to a smooth twig, lightly sand the contact area on the wood or add a dab of superglue after baking for a permanent hold.
Step 4: Texturing and Finishing
-
Texture the fur:
With a needle tool, create short, dashed strokes all over the brown parts of the body. Follow the direction of how fur would naturally lay (downwards) to add realism. -
Final check:
Check for any fingerprints and smooth them out. Ensure the connection between the paws and the twig is solid; I like to add a tiny dab of liquid clay here for extra strength. -
Bake the project:
Bake the entire piece—wood included—according to your clay manufacturer’s instructions (usually 275°F for 15-30 minutes). Wood is safe in the oven at these low temperatures. -
Cool down:
Let the ornament cool completely before handling. The clay is fragile while warm. -
String it up:
Cut a length of jute twine. Tie it securely to the eye screw or loop, creating a loop for hanging.
Now your little sloth friend is ready to hang out on your favorite houseplant


Sleepy Sloth Mini Figurine
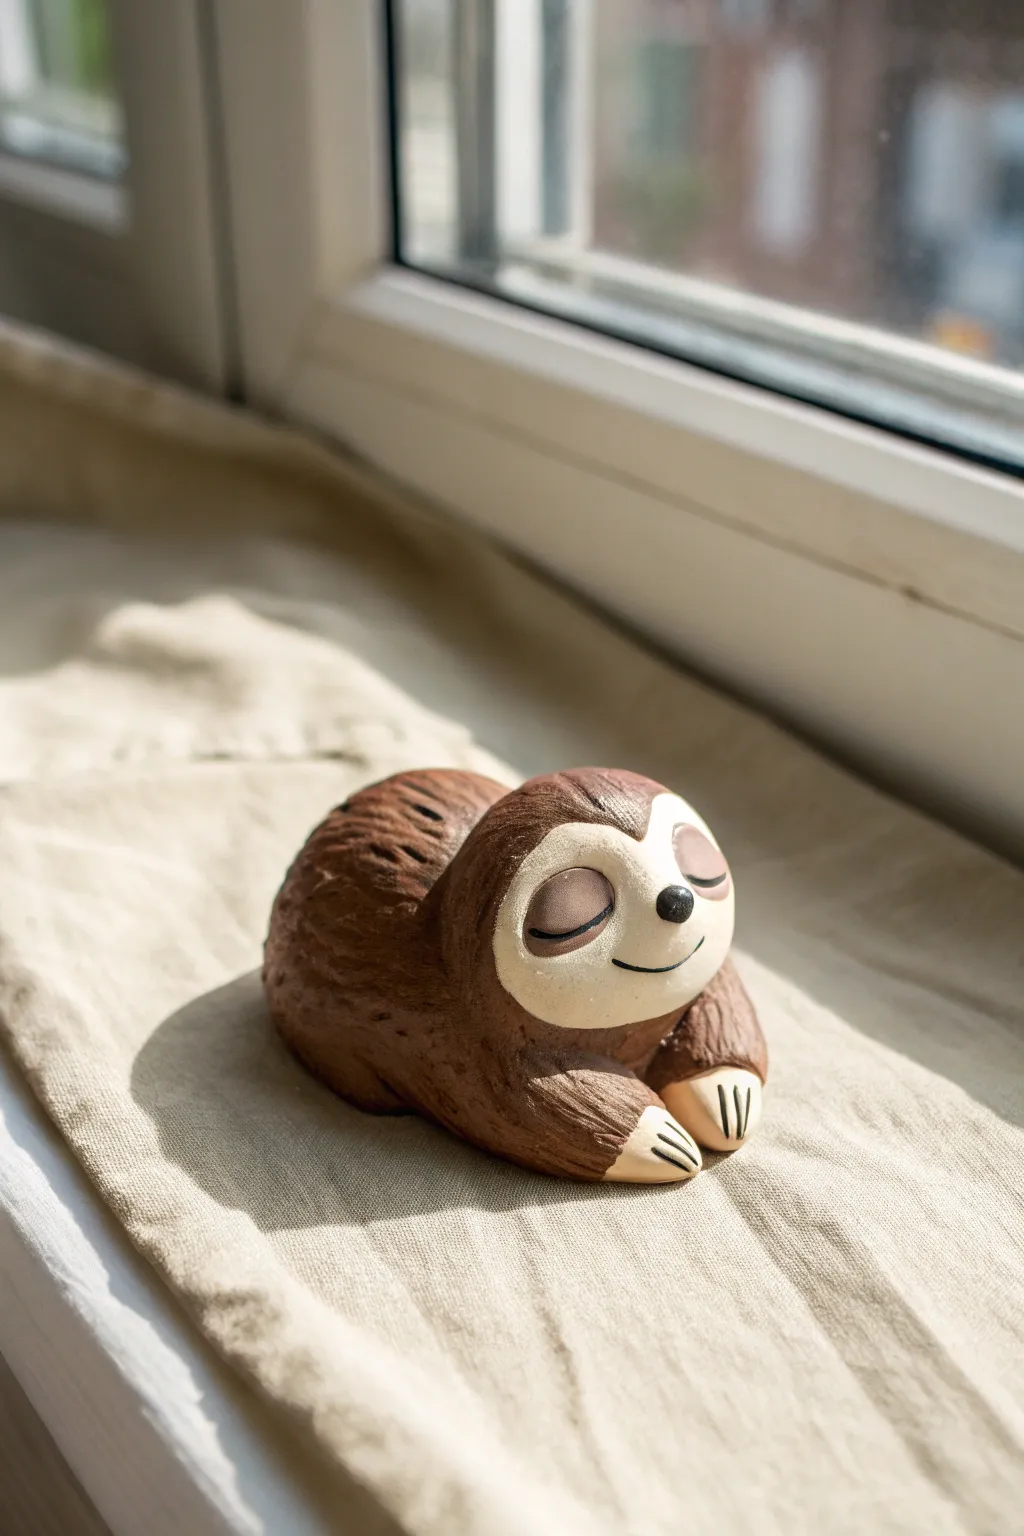
Capture the ultimate master of relaxation with this adorable polymer clay sloth figurine. With its peaceful closed eyes and textured fur, this little sleeper brings a sense of calm to any windowsill or desk.
Detailed Instructions
Materials
- Polymer clay (Dark Brown, Cream/Beige, Black)
- Needle tool or toothpick
- Ball stylus tool (small)
- Small craft knife
- Smooth work surface (ceramic tile or glass)
- Oven for baking
- Matte varnish (optional)
Step 1: Shaping the Base
-
Prepare the Body:
Start by conditioning a walnut-sized ball of dark brown clay. Roll it into a smooth oval shape, slightly tapering one end to form the neck area where the head will attach. -
Form the Head:
Create a slightly smaller sphere of brown clay for the head. Press it gently onto the tapered end of the body, smoothing the seam with your finger or a blending tool until the transition is seamless. -
Create the Arms:
Roll two sausage shapes from brown clay for the front arms. These should be thick near the shoulder and taper slightly towards the paws. Attach them to the sides of the body, curving them forward so they rest under the chin. -
Add the Legs:
Form two shorter, thicker logs for the back legs. tuck them against the rear of the body, blending the upper thigh area into the main torso so the sloth looks curled up.
Fixing Smudges
Get brown clay on the cream face? Use a q-tip dipped in a tiny bit of rubbing alcohol or baby oil to gently wipe the light clay clean before baking.
Step 2: Face Details
-
Make the Face Mask:
Roll a small ball of cream or beige clay and flatten it into a heart-shape or rounded disk. This needs to be thin. Gently press this onto the front of the head to create the sloth’s signature face mask. -
Blend the Edges:
With a soft touch, smooth the edges of the cream clay so it sits flush against the brown head without a harsh ridge. -
Eye Markings:
Take two very tiny pieces of brown clay (lighter than the body if possible, or mix a little white in). Flatten them into tear-drop shapes and place them on the cream face for the eye patches. -
Sculpt the Nose:
Roll a miniscule ball of black clay. Press it firmly into the center of the face, slightly lower than the eye patches, to form the nose button. -
Draw the Mouth:
Using your needle tool or a craft knife, carefully impress a gentle, curved smile line under the nose. Keep it subtle for that contented sleeping look. -
Sleeping Eyes:
Roll two microscopic threads of black clay. Curve them into ‘U’ shapes and place them gently onto the brown eye patches to represent closed eyelids.
Mossy Friends
Before baking, gently press tiny bits of green clay into the fur texture on the back. This creates a mossy, ‘wild sloth’ look for a forest vibe.
Step 3: Texture and Paws
-
Define the Claws:
Flatten small pieces of cream clay and attach them to the tips of the arms and legs. Use your knife to cut two or three notches into each, creating the three-toed claw look. -
Initial Fur Texture:
Using a needle tool, begin scratching short, directional lines into the brown clay. Start at the top of the head and work your way down the back. -
Refining the Flow:
Ensure your texture marks flow in the direction real fur would grow—down the back and wrapping around the limbs. I find varying the pressure adds realistic depth. -
Avoiding the Face:
Be careful to keep the cream face mask smooth. The contrast between the textured body and smooth face is key to the style. -
Final Check:
Inspect the figurine from all angles. Smooth out any accidental fingerprints on the claws or nose before baking.
Step 4: Baking and Finishing
-
Bake:
Bake the figurine according to your clay manufacturer’s instructions (usually around 275°F or 130°C for 15-30 minutes depending on thickness). -
Cool Down:
Let the sloth cool completely inside the oven with the door slightly ajar to prevent cracking from thermal shock. -
Optional Varnish:
If you want to protect the finish, brush on a very light coat of matte varnish. Avoid glossy finishes as they can make the fur texture look plastic.
Place your little friend on a sunny chill spot and enjoy the peaceful vibes


Sloth Planter With Succulent Spot
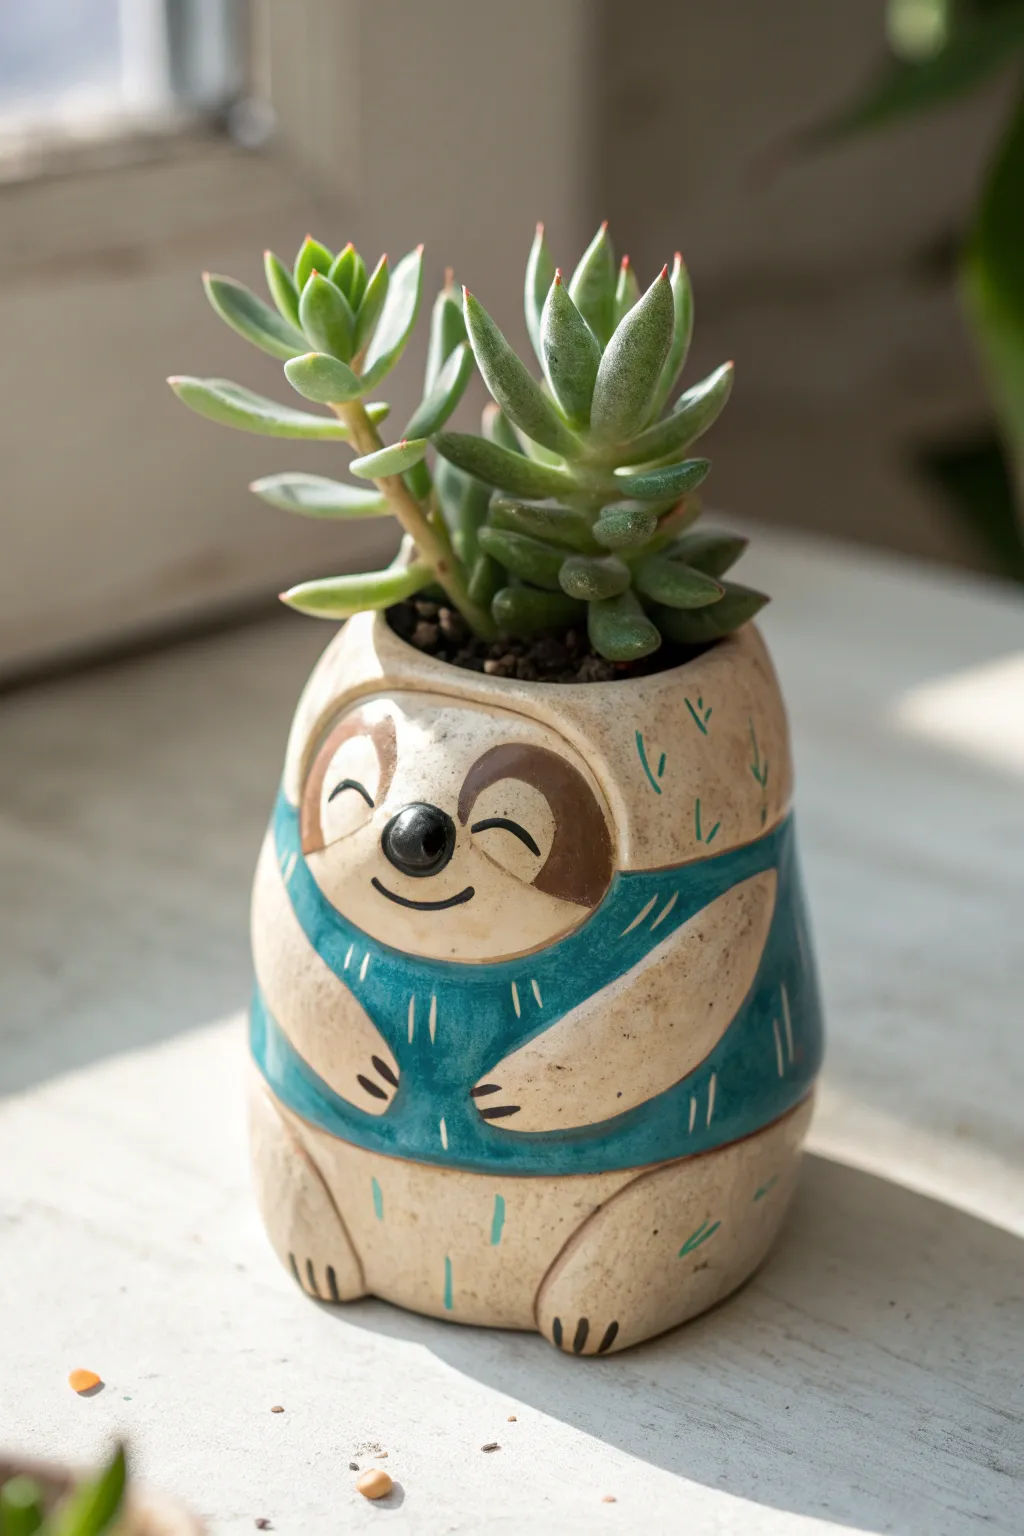
This adorable sloth planter brings a touch of whimsy and warmth to any windowsill with his contented smile and cozy teal sweater. Sculpted from clay and painted with charming details, he makes the perfect cheerful guardian for your favorite succulents.
How-To Guide
Materials
- Air-dry clay or polymer clay (white or beige)
- Clay sculpting tools (needle tool, modeling tool)
- Small rolling pin
- Aluminum foil (for armature)
- Water and slip (if using air-dry clay) or liquid polymer clay
- Acrylic paints: beige/cream, teal/turquoise, dark brown, black
- Fine detail paintbrushes
- Varnish or sealant (matte or satin)
- Sandpaper (fine grit)
Step 1: Forming the Base Body
-
Create the core:
Since the planter needs to be hollow, ball up a large piece of aluminum foil into a slightly flattened egg shape. This acts as a placeholder for the dirt cavity later. -
Roll your slab:
Roll out a thick slab of clay, roughly 1/4 inch thick. It needs to be sturdy enough to hold soil and a plant. -
Wrap the core:
Drape the clay slab over your foil ball, molding it around the sides and bottom. Leave the top open. Smooth the seams together at the back or bottom until invisible. -
Shape the silhouette:
Gently shape the clay-covered form. You want a rounded bottom that tapers slightly toward the top, like a classic sloth sitting upright. Flatten the bottom so it sits stable on a table.
Step 2: Sculpting the Sloth Features
-
Define the head:
At the top of your form (the rim of the pot), sculpt a slight protrusion for the head area. Smooth it seamlessly into the body. -
Add the faceplate:
Roll a small, thin oval of clay and attach it to the front upper section to create the sloth’s lighter face mask area. Blend the edges completely. -
Arms and legs:
Roll four sausages of clay. Attach two near the bottom extending forward for feet, and two curving around the middle of the body for arms. The arms should look like they are hugging his belly. -
Refine the limbs:
Use a modeling tool to press three small indentations into the ends of the hands and feet to suggest claws. -
Add the nose:
Roll a tiny ball of clay and attach it to the center of the face area for his nose. Press it on firmly. -
Refine the interior:
Carefully trim the clay at the uneven top rim. If the clay is firm enough, you can remove the foil core now; otherwise, wait until it begins to harden.
Cracking Clay?
If you see hairline cracks while air-drying, mix a small amount of clay with water to make a paste and fill them in immediately before sanding.
Step 3: Painting and Finishing
-
Dry and sand:
Allow the clay to dry completely according to package instructions. Once bone dry, lightly sand any rough bumps, especially around the rim and bottom. -
Base coat:
Paint the entire sloth body (face, hands, feet, and exposed fur areas) with a creamy beige color. You may need two coats for opaque coverage. -
Paint the sweater:
Using your teal color, carefully paint the torso area, mimicking the look of a sweater. Paint around the arms and under the chin, leaving the beige base visible on the limbs and head. -
Facial details:
Paint the eye patches with dark brown. Add two curved, happy lines for closed eyes and a small curved mouth. Paint the nose solid black with a tiny white highlight dot. -
Sweater texture:
Using a very fine brush and cream paint (or a lighter teal), paint small vertical dash marks on the sweater to simulate a knit texture. -
Fur texture:
Add small, random accent strokes in teal or dark brown on the beige parts of the body to suggest fur and tie the color palette together. -
Protect your work:
Seal the entire planter, inside and out, with a waterproof varnish. This step is crucial to prevent water from damaging your paint job or degrading the clay.
Make It Hang
Before drying, poke horizontal holes through the sides of the rim. Thread jute twine through after painting to turn this into a hanging planter.
Pop your succulent inside and enjoy your new slow-moving friend

The Complete Guide to Pottery Troubleshooting
Uncover the most common ceramic mistakes—from cracking clay to failed glazes—and learn how to fix them fast.
Sloth Holding a Tiny Heart
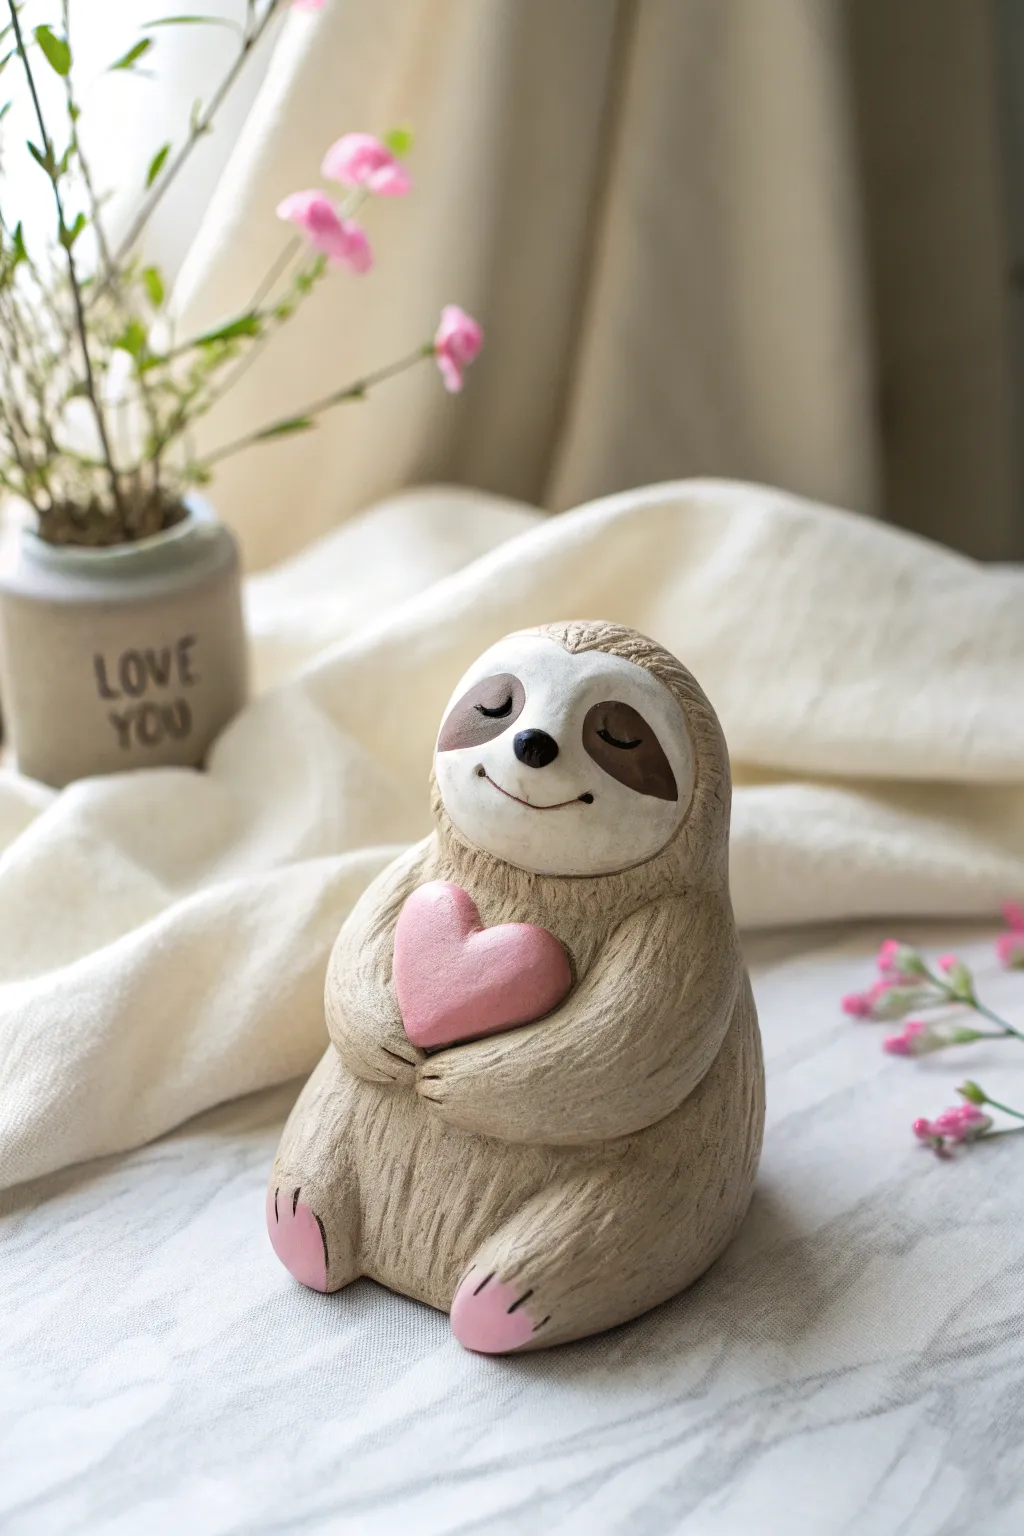
Capture the sweetest moment of slow-motion affection with this adorable clay project. You’ll sculpt a contented sloth hugging a tiny heart, featuring textured fur and peaceful, sleepy eyes.
Step-by-Step Tutorial
Materials
- Polymer clay (beige/light brown, white, pink, black)
- Aluminum foil (for the core)
- Clay sculpting tools (needle tool, ball stylus)
- Baking sheet and parchment paper
- Texture tool or stiff bristle brush
- Acrylic paint (optional shading)
- Matte varnish
Step 1: Forming the Body
-
Create the Core:
Start by crumpling a piece of aluminum foil into a pear shape. This saves clay and keeps the figurine lightweight. The base should be wide enough to support the sitting posture. -
Cover with Clay:
Condition your beige or light brown clay until soft. Roll out a sheet thick enough to cover the foil core without tearing. Smooth the clay over the foil, blending seams until the surface is uniform. -
Shape the Base:
Gently press the seated figure onto your work surface to flatten the bottom. Make sure it sits stable and leans slightly backward for a relaxed look. -
Define the Head:
While the body is essentially one continuous shape, gently pinch and smooth the upper portion to define a rounded head area that flows seamlessly into the shoulders.
Step 2: Adding Features and Limbs
-
Add the Face Patch:
Flatten a small ball of white clay into an oval. Press this firmly onto the face area. Use your fingers to smooth the edges so the white transitions gently into the brown body. -
Form the Eye Patches:
Roll two small teardrop shapes from a darker shade of brown clay (or mix a little black into your beige). Flatten them and place them on the white face patch, slanting downwards for that signature sleepy sloth expression. -
Sculpt the Nose and Mouth:
Add a tiny oval of black clay between the eye patches for the nose. Use a needle tool to carve a gentle, wide smile underneath. -
Draw Closed Eyes:
Using a very fine needle tool or a fine-tip marker (post-baking), create two curved lines on the dark eye patches to represent closed, happy eyelids. -
Create the Back Legs:
Roll two thick logs of beige clay. Attach them to the bottom sides of the body, blending the upper thigh area into the torso so only the feet protrude forward. -
Make the Arms:
Roll two slightly longer logs for the arms. Attach them at the shoulders, bending them forward so the hands meet in the center of the chest.
Fingerprint Fighter
Is the white face showing fingerprints? Dip your finger in a tiny bit of rubbing alcohol or baby oil and gently glide it over the clay to smooth them away instantly.
Step 3: Detailing and Accessories
-
Create the Heart:
Condition a piece of pink clay. Form a ball, pinch the bottom into a point, and indent the top to create a puffy heart shape. Smooth it until it looks soft and pillowy. -
Position the Heart:
Place the heart against the sloth’s chest. Adjust the arms you created earlier so they wrap snugly around the heart, looking like a tight hug. -
Sculpt Claws and Paws:
Use a knife tool to mark three little toes on each foot and three fingers on the hands holding the heart. Add small pink pads to the bottom of the feet for extra cuteness. -
Add Fur Texture:
Here I prefer to use a specialized texture tool or a stiff toothbrush. Gently create short, vertical strokes all over the beige parts of the body to mimic coarse fur, avoiding the face and heart. -
Refine the Head:
Don’t forget to texture the top and back of the head. Leave the white face mask smooth to create contrast.
Pink Tone Tip
For a softer, pastel pink heart like the picture, mix a tiny dot of white clay into your standard pink. It creates a creamy, candy-like color that looks sweeter.
Step 4: Finishing Touches
-
Check Stability:
Give the figure one last look from all angles. Ensure the heart is secure and the sloth isn’t tipping over. -
Bake:
Bake the figurine according to your clay manufacturer’s instructions (usually 275°F/135°C for 15-30 minutes per 1/4 inch thickness). Let it cool completely in the oven to prevent cracking. -
Optional Shading:
Once cool, you can brush a tiny amount of diluted brown acrylic paint into the fur grooves and wipe off the excess to highlight the texture. -
Seal:
Apply a coat of matte varnish to protect your work, or use a satin glaze specifically on the heart and nose to make them stand out.
Place your finished sloth on a shelf or desk as a daily reminder to take life at your own pace
Mini Sloth Keychain Tag
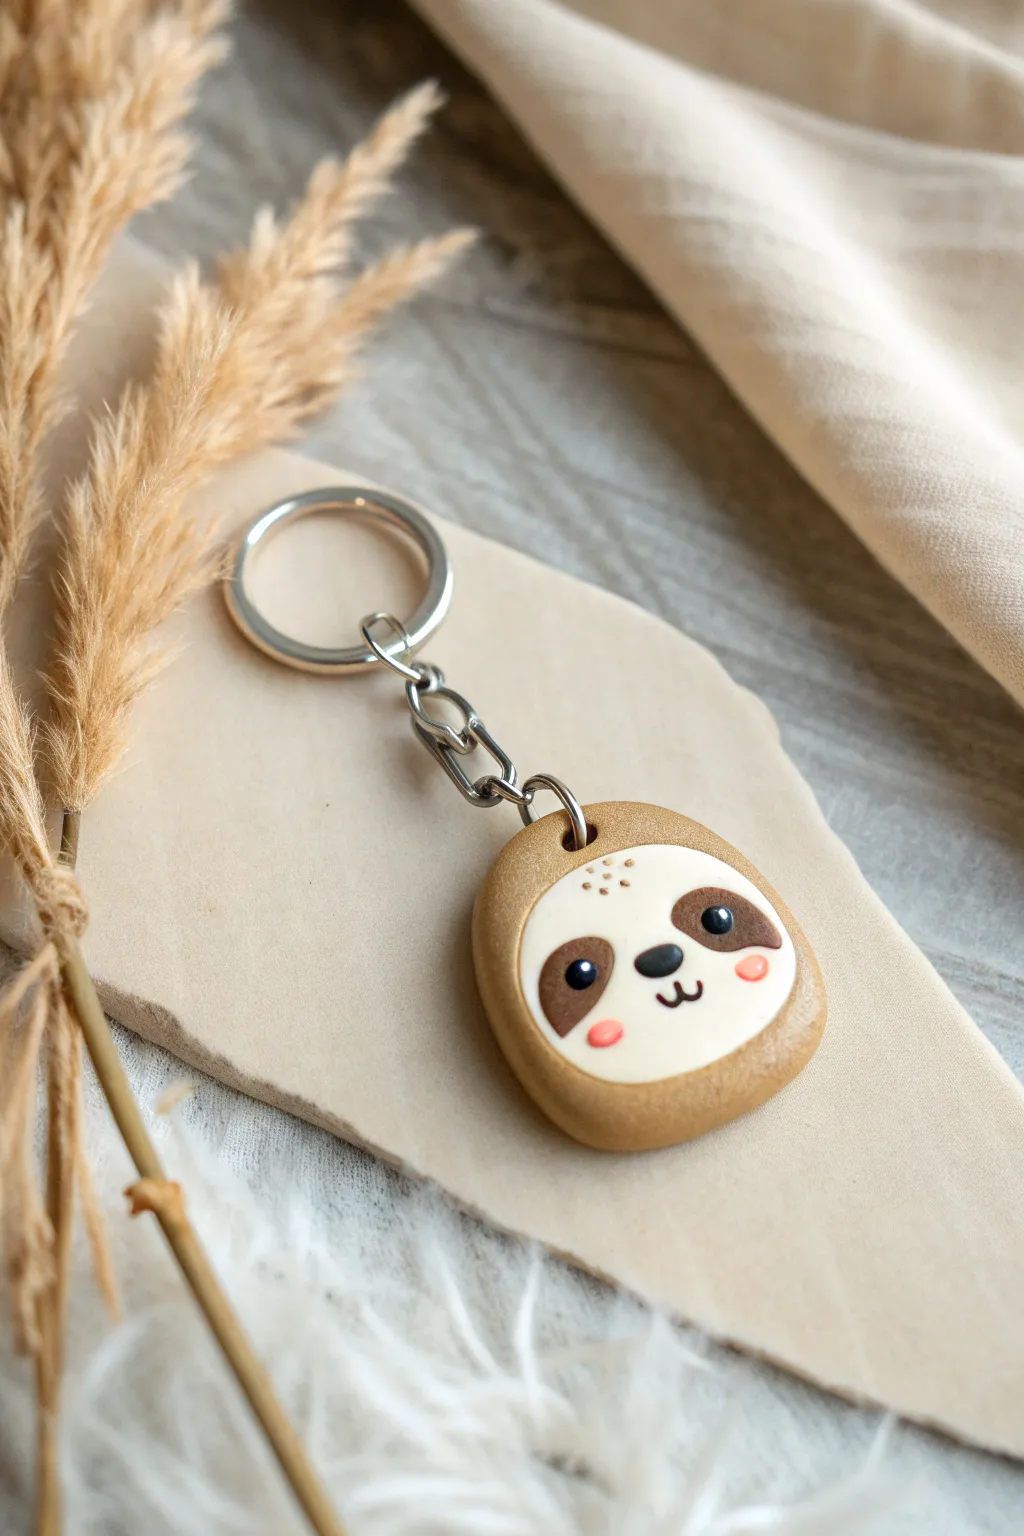
Carry a little bit of calm wherever you go with this adorable sloth keychain, featuring a smooth, rounded finish and the sweetest little face. This project uses simple polymer clay techniques to create a durable, tag-style charm that’s perfect for beginners.
Step-by-Step
Materials
- Polymer clay (light golden brown, cream/white, dark chocolate brown, black, light pink)
- Acrylic roller or pasta machine
- Oval or rounded-rectangle clay cutter (approx. 1.5 inches)
- Circle clay cutter (slightly smaller than the oval)
- Detailing needle tool or toothpick
- Small ball tool
- Keychain hardware (jump ring and split ring chain)
- Hand drill or pin vibe (if baking before drilling)
- Wet wipe or baby oil (for smoothing)
- Oven and baking tray/tile
Step 1: Shaping the Base
-
Condition the Clay:
Start by thoroughly conditioning your light golden brown clay until it is soft and pliable. This prevents cracks later on. -
Roll the Base Sheet:
Roll out the brown clay to a thick, sturdy slab, roughly 1/4 inch thick. You want it substantial enough to holding the hardware securely. -
Cut the Shape:
Use your rounded-rectangle or oval cutter to punch out the main body of the sloth. -
Soften the Edges:
Gently tap and smooth the cut edges with your finger to round them off slightly, removing that sharp ‘cookie cutter’ look. -
Pierce the Hole:
Using a needle tool or straw, poke a hole at the very top center of the shape for your keychain hardware. Make sure it’s not too close to the edge.
Step 2: Creating the Face
-
Prepare the Face Color:
Roll out a sheet of cream or white clay. This layer should be much thinner than your base, about 1/16 of an inch. -
Cut the Face Shape:
Use a circle cutter (or cut a slightly smaller oval by hand) from the cream clay. It should fit inside the brown base with a nice border visible around it. -
Shape the Face:
Gently stretch the top of the cream circle slightly to give it a forehead, making it look a bit like a rounded guitar pick shape. -
Attach the Face:
Place the cream clay onto the lower portion of the brown base. Press it down gently so no air bubbles are trapped underneath. -
Smooth the Seams:
Use your finger or a silicone tool to gently smooth the edges of the cream clay into the brown base so they look like one cohesive piece.
Sticky Situation?
If fingerprints are stubborn, brush a tiny amount of baby oil or clay softener over the surface before baking. It melts away prints like magic.
Step 3: Adding Details
-
Make Eye Patches:
Take two tiny balls of dark chocolate brown clay and flatten them into teardrop or comma shapes. -
Position Eye Patches:
Place these patches on the cream face, slanting them slightly downwards towards the outer edges for that sleepy sloth look. -
Add the Eyes:
Roll two minuscule balls of black clay. Press them onto the upper-inner part of the brown eye patches. -
Add the Highlight:
For that spark of life, add the tiniest white speck of clay to the top right of each black eye pupil. -
Create the Nose:
Form a small, wide oval from black clay and place it centrally between the eyes. -
Draw the Mouth:
Using a needle tool, carefully etch a small ‘w’ shape connects to the bottom of the nose for a smile. I sometimes fill this etched line with tiny snakes of fluid black clay if I want it to pop. -
Rosy Cheeks:
Flatten two tiny circles of light pink clay and press them onto the cheeks just outside the brown eye patches. -
Freckles:
Use your needle tool to gently texture tiny dots on the forehead area for extra cuteness.
Glaze It Up
Add a coat of UV resin or glossy polyurethane varnish after baking. It protects the details and makes those eyes look wet and shiny.
Step 4: Finishing Up
-
Final Smoothing:
Before baking, give the piece a final check. Use a baby wipe to gently remove any lint or fingerprints. -
Bake:
Bake the piece according to your polymer clay manufacturer’s instructions (usually 275°F for 15-30 minutes). -
Assemble:
Once cool, use pliers to open a jump ring, thread it through the hole you made at the top, and attach the keychain loop.
Now you have a charming companion to hang on your keys or backpack


What Really Happens Inside the Kiln
Learn how time and temperature work together inside the kiln to transform clay into durable ceramic.
Sloth Pendant Necklace Piece
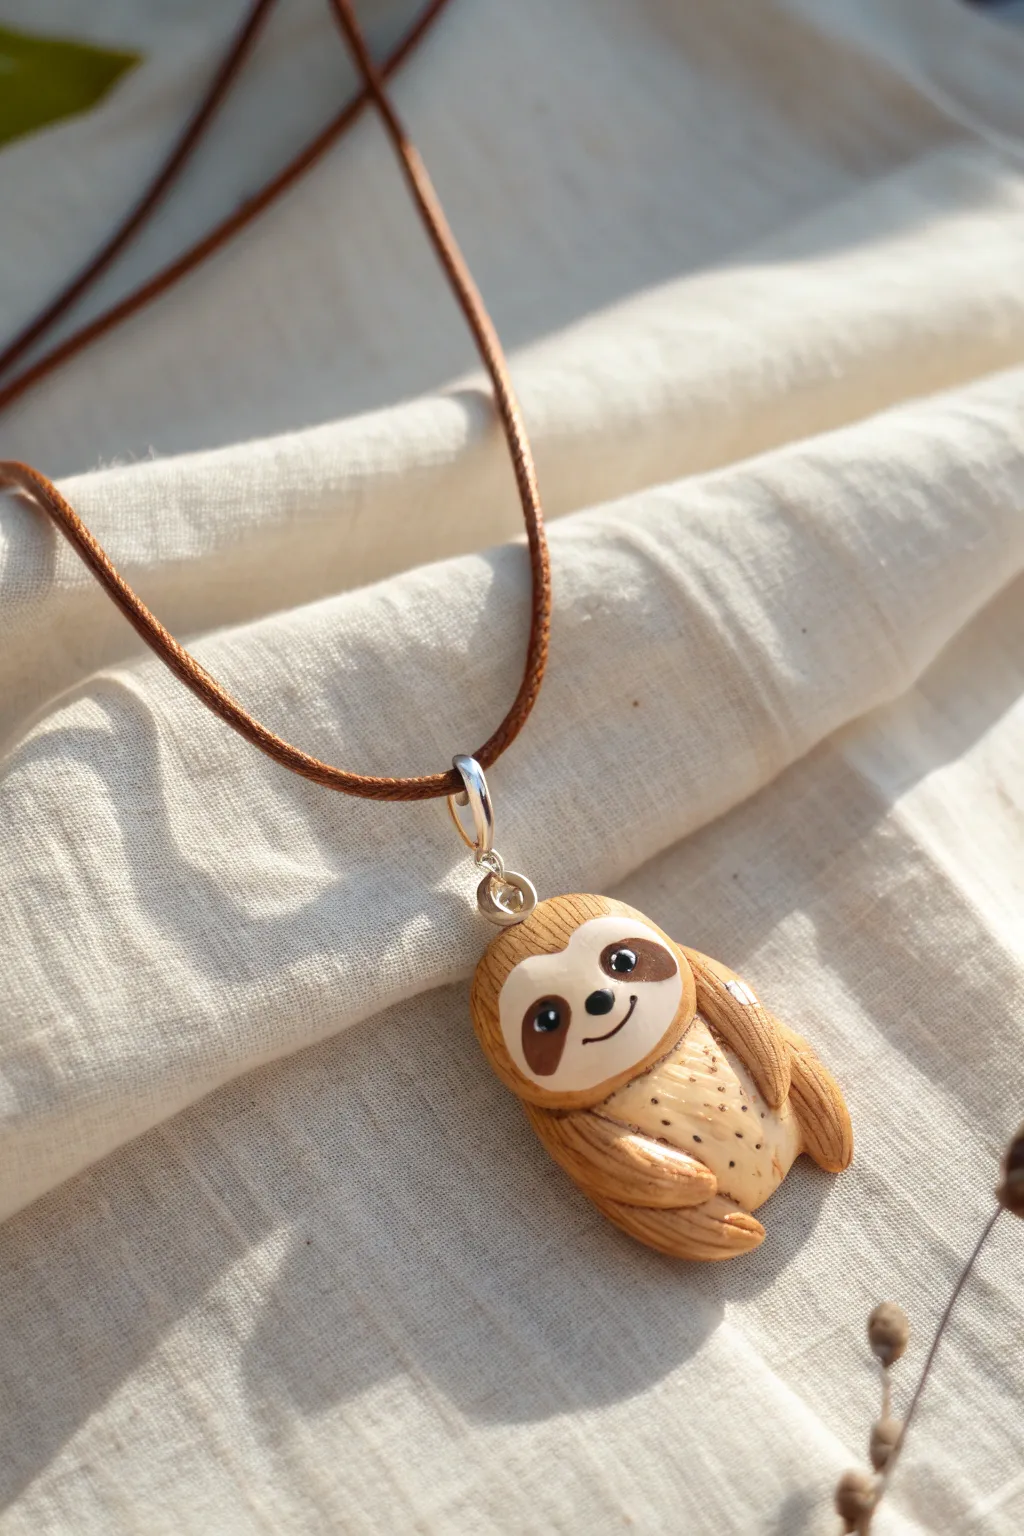
This charming little sloth pendant captures a relaxed vibe perfectly with its sweet smile and textured fur details. Suspended on a simple cord, it makes for an adorable accessory that brings a bit of calm to your day.
Detailed Instructions
Materials
- Polymer clay (light tan/beige, dark brown, white, black)
- Clay sculpting tools (needle tool, small ball tool)
- Texture tool or toothbrush
- Silver eye pin
- Silver jump ring
- Brown waxed cord necklace
- Gloss glaze or varnish
- Oven for baking
Step 1: Shaping the Sloth Body
-
Condition the clay:
Start by warming up your light tan or beige polymer clay in your hands until it becomes soft and pliable. -
Form the base:
Roll a medium-sized ball of tan clay, then gently flatten it into a thick oval shape. This will serve as both the head and torso. -
Curve the body:
Slightly curve the oval so the bottom rounded part curls inward, creating that distinct, curled-up sloth posture. -
Add texture:
Using a needle tool, gently scratch fine, vertical lines all over the tan body to mimic fur, leaving the belly area smoother.
Step 2: Creating the Face
-
Make the face mask:
Flatten a small piece of white clay into a rounded heart shape or broad oval and press it onto the upper part of the body. -
Add eye patches:
Take two tiny pieces of dark brown clay and shape them into tear-drop patches that slope downwards. -
Position the patches:
Place these brown patches on the white face area, angling them slightly outward to follow the curve of the face. -
Create the eyes:
Roll two minuscule balls of black clay and press them into the center of the brown patches. Add a tiny white speck to each for a highlight. -
Add the nose:
Place a small oval of black clay between the eye patches for the nose. -
Sculpt the smile:
Use a needle tool or small blade to gently impress a curved smile line under the nose.
Fixing Fingerprints
If you smudge the tiny face details while working, use a cotton swab dipped in a tiny bit of rubbing alcohol or baby oil to gently smooth them out before baking.
Step 3: Sculpting the Limbs
-
Form the arms:
Roll two logs of tan clay, tapering one end of each slightly. -
Attach the arms:
Attach the thicker ends to the shoulders and curve the arms down so the hands meet near the bottom of the belly. -
Form the legs:
Create two shorter, thicker tear-drop shapes for the legs. -
Attach the legs:
Press these onto the bottom sides of the body, curving the feet upward to rest just below the hands. -
Refine the texture:
Use your needle tool to extend the fur texture onto the limbs, blending the seams where they attach to the body. -
Add claws:
Use a knife tool to mark three small indentations at the end of each limb to suggest claws.
Branch Buddy
Make a textured brown log shape and curve the sloth’s limbs around it before baking to make it look like it’s hanging from a tree branch.
Step 4: Assembly and Finish
-
Add belly details:
Using a needle tool, poke tiny, gentle dots across the lighter belly area for a speckled effect. -
Insert hardware:
Trim a silver eye pin to size and carefully insert it into the top center of the sloth’s head. -
Bake the piece:
Bake the clay according to your package instructions (usually around 275°F/135°C for 15-30 minutes). -
Final assembly:
Once cool, attach a jump ring to the eye pin and thread the brown cord through to complete the necklace.
Wear your new relaxed friend as a reminder to take things slow and enjoy the moment
Tiny Sloth Stud Earrings
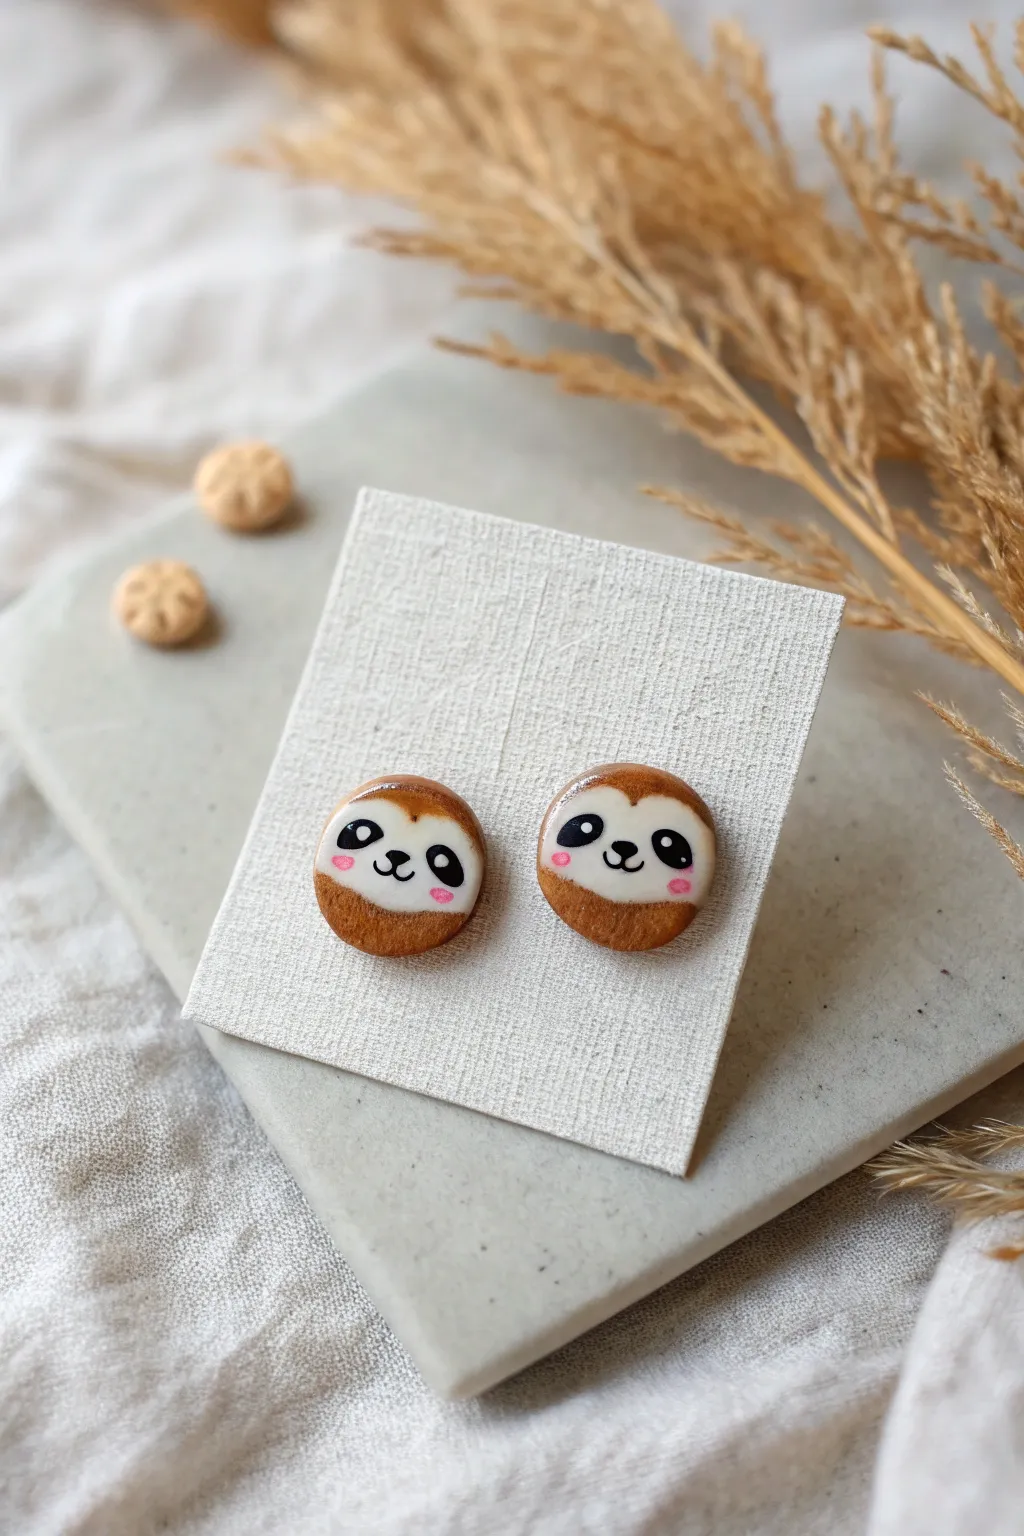
These adorable stud earrings feature a sweet sloth face painted onto a tiny clay circle, finished with a high-shine glaze for a professional look. Their simple round shape makes them a perfect beginner project that packs a ton of personality into a small package.
Step-by-Step Tutorial
Materials
- Polymer clay in ‘Caramel’ or light brown
- Polymer clay in ‘Translucent’ or ‘White’ (optional for mixing)
- Small circular clay cutter (approx. 10mm)
- Acrylic rolling pin
- Acrylic paints: White, Black, Light Pink
- Fine detail paintbrush (size 000 or a dotting tool)
- UV resin or glossy polyurethane varnish
- UV lamp (if using resin)
- Earring posts and backs
- Superglue or strong jewelry adhesive
- Ceramic tile or baking sheet
- Oven
Step 1: Creating the Base
-
Condition the clay:
Start by warming up your light brown polymer clay in your hands until it becomes soft and pliable. If the color is too dark, mix in a tiny amount of white or translucent clay to achieve that soft, honey-brown hue seen in the photo. -
Roll it out:
Using your acrylic rolling pin, roll the clay into a slab that is roughly 2mm to 3mm thick. You want it sturdy enough to hold the post but light enough to wear comfortably. -
Cut the circles:
Press your small circular cutter firmly into the clay slab to punch out two identical circles. Wiggle the cutter slightly before lifting to ensure a clean cut. -
Smooth the edges:
Gently rub your finger around the perimeter of each circle to soften any sharp ridges left by the cutter. This gives the finished earring a more polished, pebble-like feel. -
Bake the bases:
Place your clay circles on a ceramic tile or a baking sheet lined with parchment paper. Bake according to your brand of clay’s instructions (usually around 275°F/130°C for 15-30 minutes). Let them cool completely before moving to the painting stage.
Clean Lines Tip
If your hand shakes while painting detail, rest your pinky finger on the table surface to stabilize your hand. It acts like a tripod for steadier lines.
Step 2: Painting the Details
-
Paint the face shape:
Dip your fine brush into white acrylic paint. Paint a wide, heart-shaped or kidney-bean-shaped mask on the upper two-thirds of the brown circle. This is the sloth’s face. You may need two thin coats for full opacity. -
Add the eye patches:
Once the white paint is fully dry, take your black paint. Carefully paint two drooping, teardrop shapes inside the white area for the distinctive sloth eye patches. They should angle slightly downwards towards the outer edges. -
Dot the eyes:
Inside the black patches, add a tiny white reflection dot near the top of the eye to bring the character to life. -
Draw the nose and mouth:
Using the very tip of your brush or a needle tool dipped in black paint, place a small oval nose between the eyes. draw a tiny ‘w’ shape directly underneath for the smiling mouth. -
Apply rosy cheeks:
Dip a dotting tool or the back of a toothpick into light pink paint. Gently tap a small dot on the white face area, just below the outer corner of each eye, for blushing cheeks. -
Dry thoroughly:
I always let the paint dry for at least 30 minutes to ensure no moisture is trapped under the glaze later.
Texture Play
Before baking, gently press a piece of coarse sandpaper onto the brown rim area to give the ‘fur’ parts a realistic, fuzzy texture contrast.
Step 3: Finishing Touches
-
Apply the glaze:
Squeeze a small drop of UV resin onto the center of the earring. Use a toothpick to drag the resin to the very edges, letting surface tension create a nice dome. If using varnish, apply a thick, wet coat. -
Cure or dry:
If using resin, place the pieces under a UV lamp for 2-3 minutes until hard and non-tacky. If using varnish, let them air dry in a dust-free box for 24 hours. -
Attach the posts:
Flip the finished studs over. Apply a dab of superglue or jewelry adhesive to the flat pad of an earring post and press it firmly onto the back of the clay circle. -
Final cure:
Allow the glue to set completely according to the manufacturer’s directions before wearing or packaging your new sloth friends.
Wear your tiny sloths with pride and enjoy the smiles they bring to everyone who notices them

TRACK YOUR CERAMIC JOURNEY
Capture glaze tests, firing details, and creative progress—all in one simple printable. Make your projects easier to repeat and improve.
Sloth Fridge Magnet Buddy
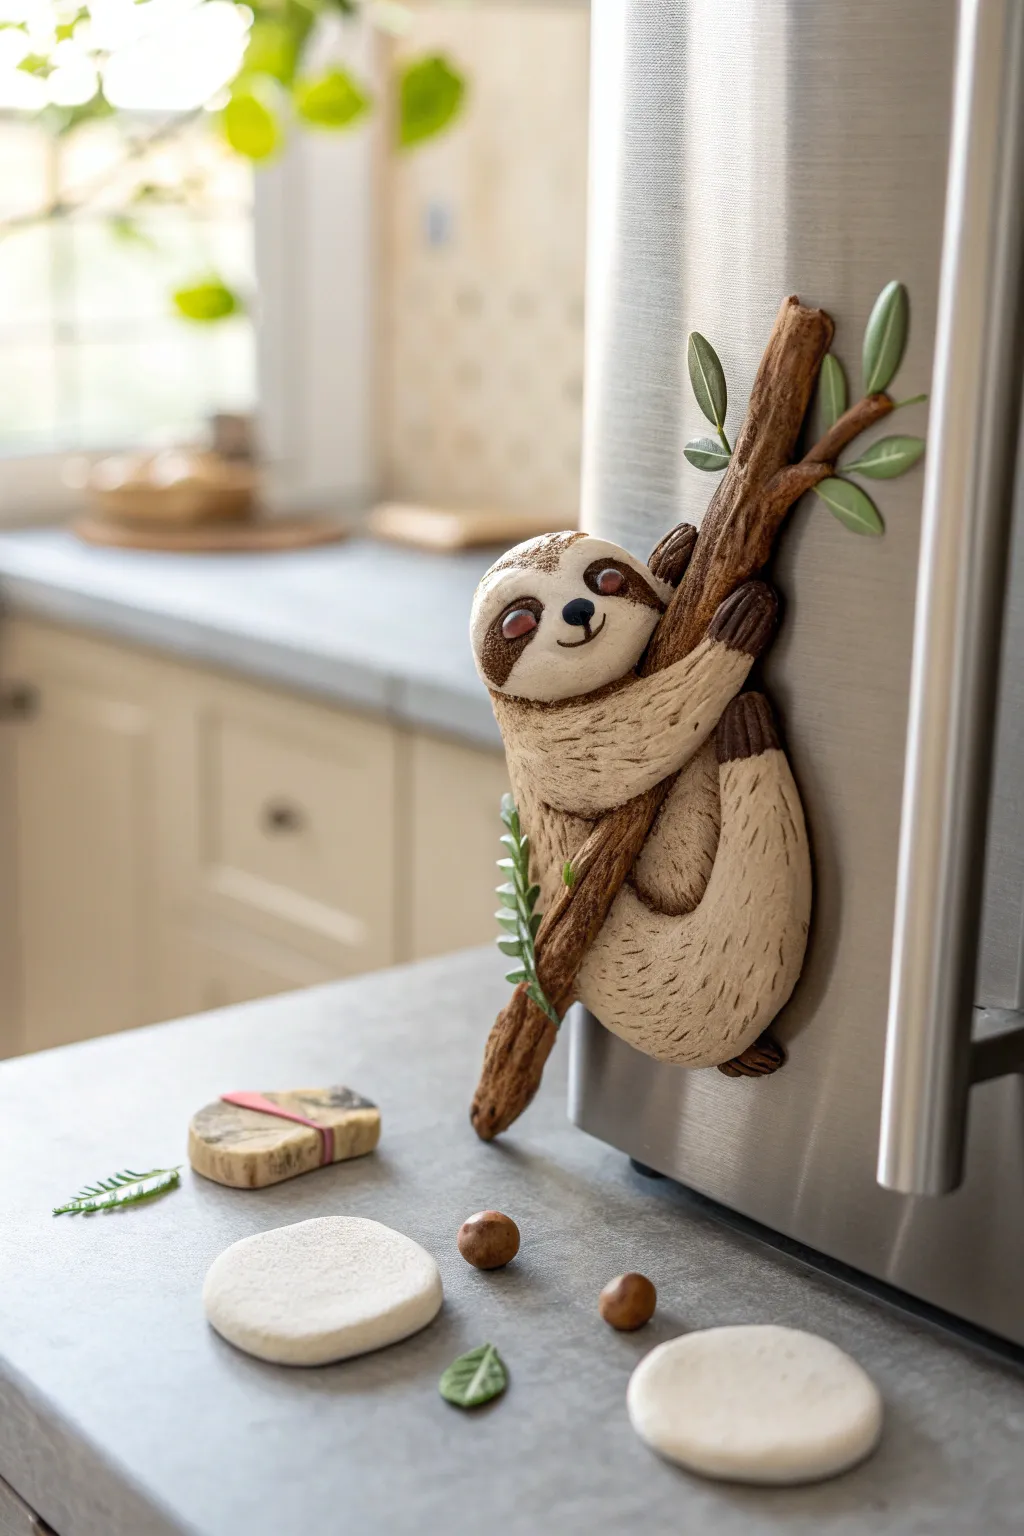
Transform your refrigerator into a mini rainforest with this adorable polymer clay sloth magnet. The textured fur and detailed branch create a charming 3D effect that looks like this little guy is just stopping by for a snack.
Step-by-Step Guide
Materials
- Polymer clay (light beige, dark brown, medium brown, green)
- Strong neodymium magnets
- Sculpting tools (needle tool, ball stylus)
- Texture sponge or toothbrush
- Baking sheet and parchment paper
- Oven
- Gloss varnish (optional for eyes and nose)
- Liquid clay or bake-and-bond adhesive
Step 1: Sculpting the Branch
-
Base shape:
Start by rolling a log of medium brown clay about 4-5 inches long. Create a slight curve or diagonal slant, as if the branch is growing upwards. -
Adding texture:
Use a needle tool to drag long, irregular lines down the length of the branch to mimic tree bark. Twist the clay slightly to enhance the organic look. -
Branch offshoots:
Attach two smaller twig pieces near top, blending the seams with your tool so they look like natural extensions. -
Magnet placement:
Press your magnets firmly into the back of the branch while the clay is still soft. I like to embed them about halfway deep, then smooth a thin layer of clay over the back to secure them completely.
Clean Clay Tip
Keep baby wipes nearby! Use them to clean your hands when switching between dark brown and light beige clay to avoid muddying the sloth’s fur color.
Step 2: Forming the Sloth
-
Body basics:
Roll a large egg shape from the light beige clay for the body. Gently flatten the back side so it will sit flush against the fridge surface. -
Head shape:
Create a slightly smaller, flattened sphere for the head and attach it to the top of the body. Tilt it slightly so the sloth looks like it’s peeking around the branch. -
Positioning:
Press the body and head gently onto your prepared branch. The body should curve around the wood, ensuring good contact points for stability. -
creating limbs:
Roll four sausages of beige clay for the arms and legs. Attach the back legs first, wrapping them securely around the lower part of the branch. -
Upper limbs:
Attach the arms near the neck area, stretching them up to grasp the branch above the head. Getting the grip right is key to making him look like he’s effortlessly hanging on.
Jungle Vibes
Make tiny accessories for your sloth to hold, like a small hibiscus flower or a little clay coffee mug, to give your fridge magnet extra personality.
Step 3: Detailing & Finishing
-
Fur texture:
Using a needle tool or a stiff texture brush, scratch short, directional lines all over the beige clay body to resemble coarse fur. -
Face mask:
Flatten two tiny teardrops of dark brown clay. Press these onto the face for the eye patches, angling them slightly downwards. -
Features:
Add tiny black clay balls for eyes inside the patches. Place a small black oval for the nose and use a needle tool to carve a simple, happy smile. -
Claws:
Form small, dark brown cones for claws (three for each limb) and attach them to the ends of the hands and feet where they grip the wood. -
Leafy green accents:
Press small teardrops of green clay into flat leaves. Use a knife to score a central vein on each one. -
Attaching foliage:
Apply a dot of liquid clay to the branch tips and press the leaves on. Add a few leaves near the bottom leg for balance. -
Baking:
Bake the piece according to your clay package instructions (usually 275°F for 15-30 minutes). Let it cool completely before moving. -
Varnish touches:
Once cool, paint a tiny dot of gloss varnish on the nose and eyes to make them look wet and lively.
Now your kitchen has a relaxed new resident to keep your grocery list safe
Sloth Incense Holder Lounge Pose
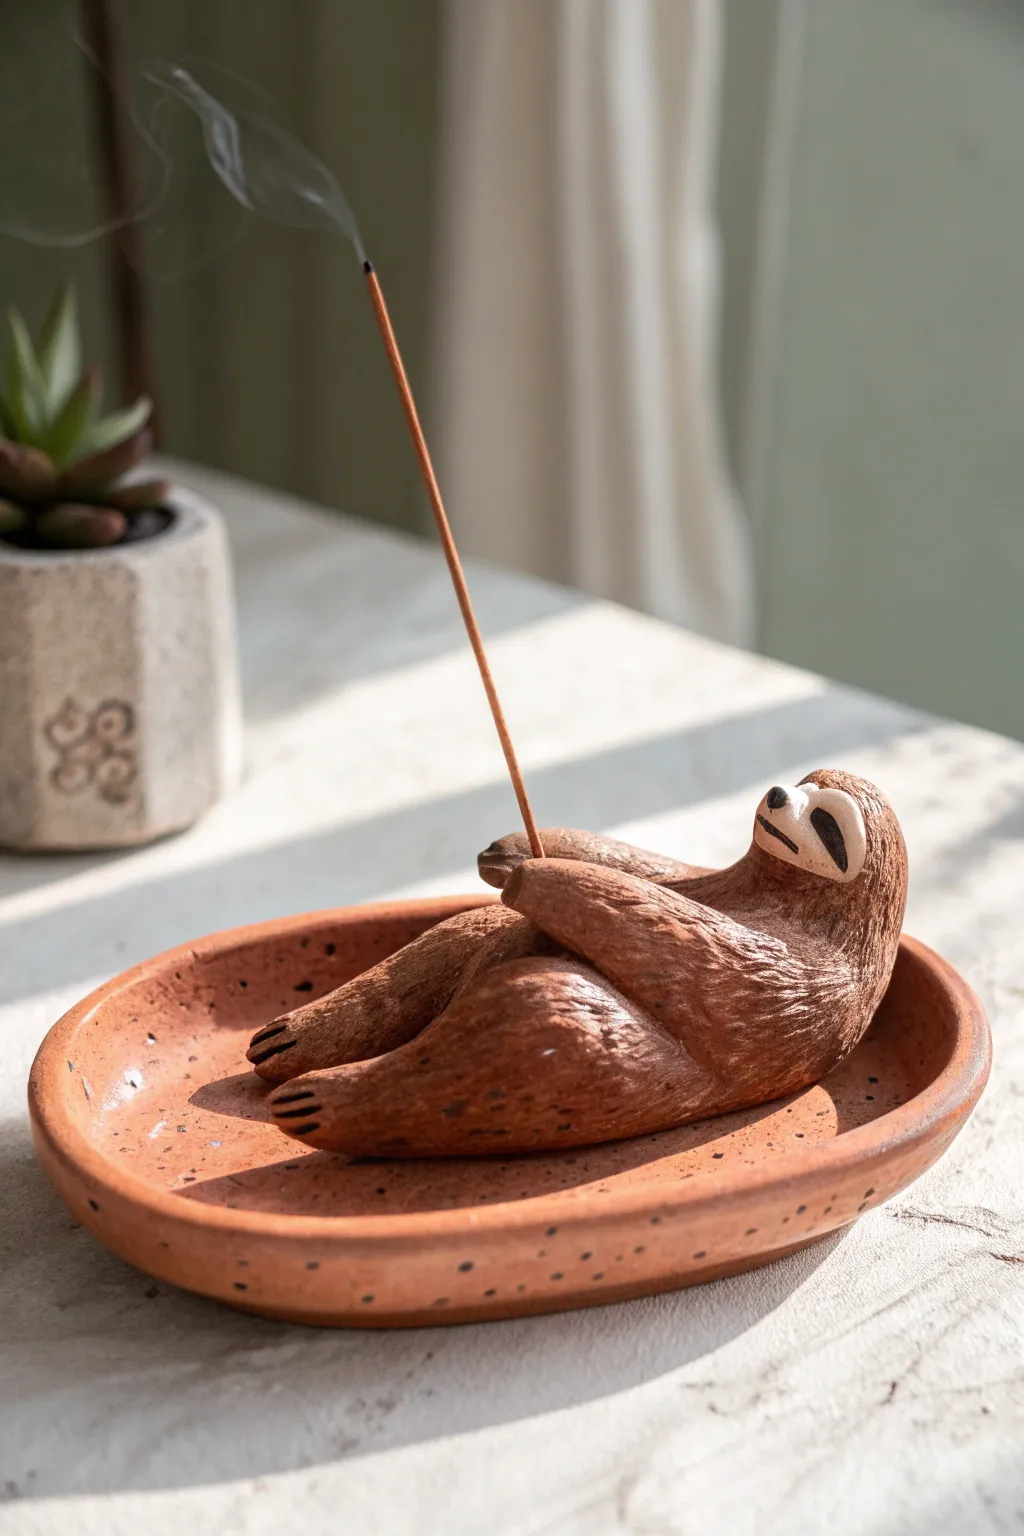
This charming clay project features a relaxed sloth reclining in a shallow dish, holding an incense stick between its paws as it gazes peacefully upward. The textured fur and natural earth tones make it a cozy, functional piece of decor perfect for slow afternoons.
Step-by-Step Tutorial
Materials
- Air-dry clay or polymer clay (terracotta or brown colored)
- Clay sculpting tools (needle tool, small loop tool)
- Texture tool (toothbrush or stiff bristle brush)
- Needle or toothpick (for piercing)
- Rolling pin
- Small bowl of water (for smoothing)
- Acrylic paints (dark brown, cream, black)
- Fine detail paintbrush
- Matte varnish or sealant
Step 1: Shaping the Base Dish
-
Roll the slab:
Begin by rolling out a portion of your brown clay into a thick slab, about 1/4 inch thick. This will form the sturdy base for your incense holder. -
Cut the oval shape:
Use a needle tool or a craft knife to cut out a long, organic oval shape. It needs to be large enough to catch the ash from the incense stick, so aim for about 6-7 inches in length. -
Form the rim:
Gently pinch and lift the edges of the oval slab upwards to create a shallow rim. Smooth the edges with a bit of water on your finger to ensure there are no sharp angles or cracks. -
Add speckling (optional):
Looking at the reference, the dish has a lovely speckled texture. You can achieve this now by pressing coarse sand or coffee grounds into the clay, or save it for the painting stage.
Step 2: Sculpting the Sloth
-
Form the body:
Roll a thick sausage shape of clay that is slightly tapered at one end for the legs. Lay this inside your dish to check the fit—it should look comfortably nestled. -
Define the legs:
Using a modeling tool, create a deep indentation to separate the two back legs. Round off the ends to form the feet, using a knife tool to mark three small claws on each foot. -
Attach the head:
Roll a ball of clay for the head and attach it to the upper part of the body. Blend the clay at the neck seam thoroughly so it becomes one solid piece. Tilt the head slightly upward as if the sloth is daydreaming. -
Shape the face:
Flatten the front of the face slightly. Pinch the clay gently to form a faint snout area. -
Add the arms:
Roll two smaller coils for the arms. Attach them to the shoulders and bring them together over the chest/stomach area. The paws need to meet or overlap slightly to hold the incense. -
Create the incense hole:
This is crucial: take an actual incense stick (or a tool of the same diameter) and press it between the joined paws to create the holding angle. Ensure the angle points the stick away from the face and over the dish to catch ash.
Drooping Arms?
If the arms sag while the clay is wet, place a small ball of crumpled aluminum foil or paper towel underneath them for support. Remove it gently once the clay firms up.
Step 3: Detailing and Finishing
-
Texture the fur:
Use a stiff brush, a needle tool, or a crumpled ball of foil to scratch fine lines all over the sloth’s body (avoiding face, claws, and inner dish). Follow the natural direction that fur would grow. -
Dry or bake:
If using polymer clay, bake according to package instructions. If using air-dry clay, let it sit in a cool, dry place for 24-48 hours until completely hard. -
Paint the face mask:
Mix a cream or light beige acrylic paint. Carefully paint the ‘mask’ area on the face, covering the eyes and snout zone. Let this layer dry. -
Add facial features:
Using a very fine brush and black paint, draw the sleepy eye slits (curved downwards) and a small triangular nose. Add the distinct brown ‘mask’ markings around the eyes if desired. -
Highlight the fur:
To enhance the texture, try a technique called dry brushing. I dip a dry brush into a lighter brown paint, wipe most of it off, and lightly whisk it over the raised fur texture to make it pop. -
Paint the claws:
Use a dark brown or black paint to darken the three claws on each foot and hand. -
Seal the piece:
Finish by applying a matte varnish or sealant over the entire piece. This protects the paint and makes it easier to wipe away ash later.
Make it Speckled
To mimic the ceramic glaze look in the photo, create a ‘splatter’ effect. Dip an old toothbrush in watered-down dark paint and flick the bristles to spray tiny dots over the dish.
Now light a stick of incense and enjoy your slow, calming creation
Sloth Tea Bag Holder Clip-On
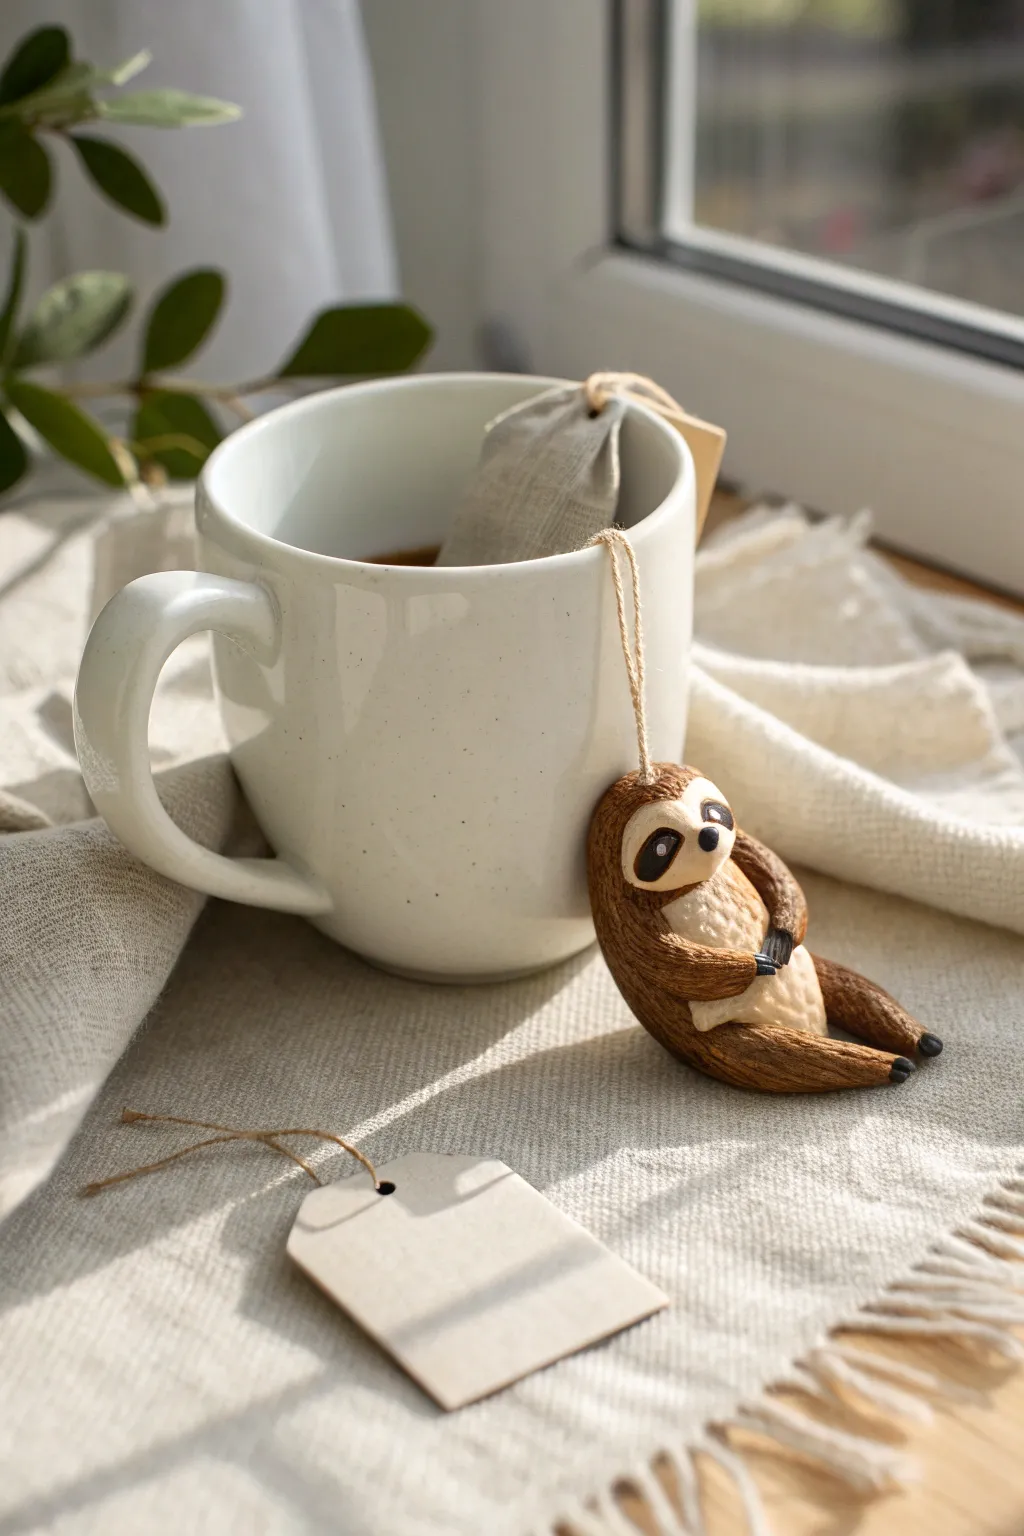
This adorable little sloth clings effortlessly to your tea bag string, making teatime instantly more relaxing. Sculpted from polymer clay with a warm, textured finish, he’s the perfect companion for a slow, steamy brew.
Detailed Instructions
Materials
- Polymer clay (medium brown, beige/cream, dark brown/black)
- Small sculpting tools (needle tool, ball stylus)
- Texturing tool (old toothbrush or stiff bristle brush)
- Thin wire or a strong paperclip (for structural support)
- Small piece of aluminum foil
- Baking sheet and parchment paper
- Oven (for baking clay)
- Acrylic paint (optional, for details)
- Matte varnish (optional)
Step 1: Forming the Body
-
Create the core:
Start by crumpling a very small piece of aluminum foil into a bean shape, about an inch long. This keeps the sloth lightweight and helps it bake evenly. -
Cover with clay:
Condition your medium brown clay until pliable, then flatten it into a sheet. Wrap this sheet around your foil core, smoothing the seams until you have a seamless, kidney-bean-shaped body. -
Add texture:
Using an old toothbrush or a stiff bristle brush, gently tap the entire surface of the brown body to create a furry, hair-like texture. Do this before adding limbs so you don’t squash them later.
String Theory
Insert a piece of wire into the arms while baking, then remove it after. This ensures the channel for the string stays perfectly open and rigid.
Step 2: Adding Limbs and Features
-
Shape the legs:
Roll four small logs of medium brown clay for the arms and legs. The arms should be slightly longer than the legs. Taper one end of each log slightly where it will join the body. -
Attach the limbs:
Press the limbs onto the body. The back legs should curve forward as if sitting, and the front arms should reach upward and inward, creating a ‘clamping’ pose. -
Check the grip:
This is crucial: While the clay is soft, test the fit. I usually take a piece of thick string or yarn similar to a tea bag string and gently press the arms around it to ensure there’s a small vertical channel for the string to slide through without falling out. -
Blend the seams:
Use a silicone tool or your finger to smooth the clay where the limbs attach to the body so they don’t look stuck on, then re-apply texture to those areas. -
Create the face framing:
Roll a small ball of the beige or cream clay and flatten it into a teardrop shape. Press this onto the upper front of the body for the face. -
Add the belly:
Flatten a larger piece of beige clay into an oval and press it onto the tummy area. Gently texture the edges to blend it slightly with the brown fur.
Sloth Slipping?
If the sloth is too heavy and slides down the string, glue a tiny piece of grippy rubber or silicone inside the arm channel for friction.
Step 3: The Tiny Details
-
Make the eye patches:
Take two tiny pieces of dark brown clay and shape them into teardrops. Press these onto the beige face area, slanting them downwards for that sleepy sloth look. -
Add the nose:
Roll a minuscule ball of black clay and place it right between the eye patches at the bottom. -
Sculpt the claws:
For the claws, use dark brown or black clay to make three tiny tapered points for each hand and foot. Attach them carefully to the ends of the limbs. -
Refine the eyes:
Using a tiny ball stylus, make indents in the dark eye patches. Fill these with white clay (or paint them white after baking) and add a tiny black pupil. -
Check the posture:
Before baking, double-check that the sloth sits upright on a flat surface and that the arm gap hasn’t closed up during detailing.
Step 4: Baking and Finishing
-
Bake carefully:
Place your sloth on a parchment-lined baking sheet. Bake according to your polymer clay manufacturer’s instructions (usually around 275°F or 130°C for 15-20 minutes depending on thickness). -
Cool down:
Let the piece cool completely in the oven with the door slightly ajar. Sudden temperature changes can sometimes cause cracks. -
Paint details (optional):
If you used a single color of clay, now is the time to paint the face, belly, and claws with acrylics. Use a fine liner brush for the heavy lifting. -
Seal the piece:
Apply a thin coat of matte varnish to protect the clay, especially if you added paint. Avoid glossy finishes to keep the natural, furry look.
Now your little tea buddy is ready to hang out while you wait for the perfect steep.
Sloth Wall Hook Hanger

Transform a lump of clay into this utterly charming sloth, happily suspended from its own little branch. With its speckled finish and contented smile, this piece makes for a delightful wall hanger or a sturdy, oversized keychain.
How-To Guide
Materials
- Polymer clay or air-dry earth clay (off-white/cream)
- Small wooden dowel or sturdy twig (for the sloth to hang on in the oven)
- Sculpting tools (needle tool, small ball stylus)
- Black acrylic paint
- Brown acrylic paint (diluted)
- Fine detail paintbrush
- Gloss varnish or resin (optional)
- Keyring and jump rings
- Eye screw pin (small)
- Baking sheet or drying rack
Step 1: Sculpting the Sloth Body
-
Form the core shape:
Start with a ball of cream-colored clay roughly the size of a golf ball. Roll it into a thick sausage shape, tapering it slightly at one end to designate the head area. -
Curve the body:
Gently bend the sausage shape into a smooth ‘U’ or hammock curve. The head should lift slightly upwards, looking forward. -
Shape the limbs:
Pull clay from the main body to form four thick, short limbs. Two should extend from the shoulder area and two from the hips. Keep them integrated with the body rather than attaching separate coils for a stronger hold. -
Position the hanging pose:
Take your small wooden dowel or a dedicated twig. Curve the sloth’s arms and legs up and over the wood so they meet at the top. The limbs need to hook securely over this rod, as this is how the finished piece will hang. -
Refine the paws:
Press the ends of the limbs onto the dowel to ensure a good fit. Use a needle tool to press three small indentations into each paw to simulate sloth claws.
Loose Limbs?
If the clay limbs crack away from the dowel while drying, use a dab of liquid superglue or bake-and-bond (for polymer) to re-secure the paws to the wood after curing.
Step 2: Adding Details and Texture
-
Create the face:
Flatten the head slightly. Use a small ball tool to indent two eye sockets. Add a very tiny pinch of clay for a nose if you want dimension, or keep it smooth for painting later. -
Smooth the surface:
Dip your finger in a little water (or baby oil for polymer clay) and smooth out any fingerprints. The curve of the back should be continuous and fluid. -
Insert hardware:
Insert a small metal screw eye pin directly into the top center of the wooden dowel used for hanging. This creates the attachment point for the keyring. -
Bake or dry:
If using polymer clay, bake the sloth *while it is still hanging on the wooden dowel* according to package directions. If using air-dry clay, let it cure in this position for at least 24-48 hours.
Step 3: Painting and Finishing
-
Paint facial features:
Once fully cured and cool, use a fine detail brush and black acrylic paint to draw the iconic sloth face. Paint two curved patches for the eyes, add small pupils, a button nose, and a wide, sleepy smile. -
Create the fur texture:
To mimic the speckled stoneware look in the photo, dilute some brown paint with water. Use a stiff brush or an old toothbrush to gently flick or stipple tiny speckles across the sloth’s body. -
Add stripe details:
Paint very faint, short, scratchy lines along the back and limbs using the diluted brown paint to suggest fur direction and texture without overwhelming the cream base. -
Seal the piece:
Apply a coat of gloss varnish to the sloth to protect the paint and give it a ceramic-like shine. I prefer to leave the wooden dowel unvarnished for a rustic contrast. -
Attach the hardware:
Open a jump ring with pliers and loop it through the eye screw on the dowel. Connect this to your large split-ring keychain. -
Hang it up:
Find a decorative branch or hook on your wall and slide the keychain ring over it to display your new slow-moving friend.
Add Some Foliage
Make tiny clay leaves and attach them to the wooden dowel near the sloth’s paws before baking to make it look like he’s snacking on a mid-day treat.
Now you have a happy ceramic companion that brings a relaxed vibe to any corner of your room
Sloth Plant Marker Stakes
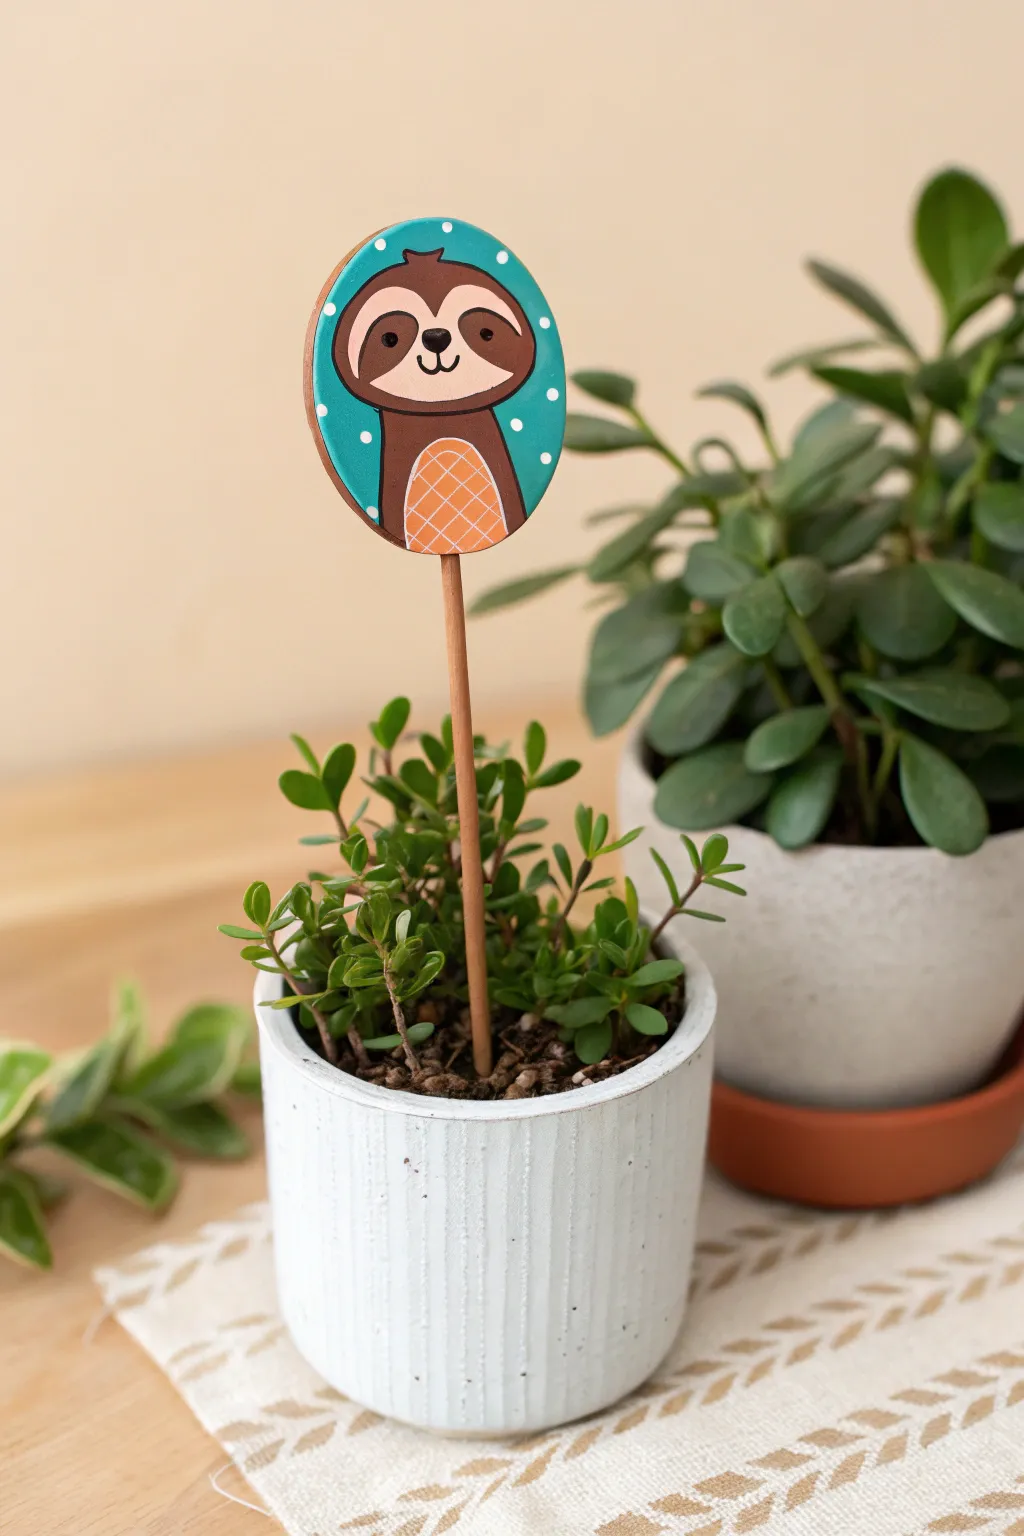
Add a touch of playful charm to your indoor garden with this adorable, hand-painted sloth plant marker. This simple clay project combines flat modeling with acrylic painting to create a durable and sweet decoration for your favorite succulents.
Step-by-Step
Materials
- White air-dry clay or polymer clay
- Rolling pin
- Circle cookie cutter (approx. 2-3 inches)
- Wooden skewer or dowel rod
- Fine-grit sandpaper
- Acrylic paints (teal, dark brown, medium brown, cream, orange, white)
- Fine detail paintbrushes (sizes 0 and 00)
- Posca paint pens (optional, for details)
- Matte or satin varnish/sealant
- Strong craft glue or super glue
Step 1: Shaping the Base
-
Roll the clay:
Begin by conditioning your clay until it is soft and pliable. Roll it out on a non-stick surface to a uniform thickness of about 1/4 inch. If you want a perfectly smooth surface, I like to place parchment paper over the clay before that final roll. -
Cut the circle:
Press your circle cookie cutter firmly into the clay to create a clean, round disc. Remove the excess clay from around the cutter before lifting it to keep the shape perfectly round. -
Smooth the edges:
Dip your finger in a little water specifically for air-dry clay (or baby oil for polymer) and gently run it around the cut edge to soften any sharp ridges left by the cutter. -
Insert the stake channel:
While the clay is still wet, carefully press the wooden skewer into the bottom edge of the circle to create a hole about 1/2 inch deep. Remove the skewer before drying; we will glue it in later to prevent cracking as the clay shrinks. -
Dry or bake:
Follow the manufacturer instructions for your specific clay. For air-dry clay, let it sit for 24-48 hours, flipping halfway through. For polymer, bake at the recommended temperature. -
Sand for smoothness:
Once fully cured and cool, lightly sand the surface and edges with fine-grit sandpaper to ensure a professional, flat canvas for your painting.
Uneven Drying?
If using air-dry clay, discs can curl up at the edges as they dry. To prevent this, place a heavy book on top of the disc (sandwiched between parchment paper) once it’s semi-dry to keep it flat.
Step 2: Painting the Design
-
Apply base coat:
Paint the entire front surface of the disc with a bright teal or turquoise acrylic paint. You may need two coats to get a solid, opaque coverage without brushstrokes showing. -
Outline the sloth shape:
Using a very light pencil sketch on top of the dry teal paint, draw a simple mushroom-cap shape for the head and a rounded rectangle for the body below it. -
Block in brown tones:
Fill in the main body and the outer rim of the head with a rich, dark brown paint. Leave the center of the face unpainted for now. -
Paint the face mask:
Mix a lighter, medium-brown shade and paint the heart-shaped ‘mask’ area on the face. It should slightly dip in the center where the eyes will go. -
Add the face cream:
Paint the very center of the face with a cream or off-white color. This shape is essentially a wide oval that sits inside the medium-brown mask. -
Add the belly detail:
Paint a small, arched semi-circle at the bottom of the body using an orange or terracotta color to represent the sloth’s tummy. -
Detail the belly grid:
Once the orange paint is bone dry, use a white paint pen or a liner brush with thinned white paint to draw a cross-hatch grid pattern over the orange belly. -
Paint facial features:
Using your smallest brush or a black paint pen, add two small dots for eyes, a rounded upside-down triangle for the nose, and a small ‘w’ shape for the mouth. -
Add polka dots:
Dip the non-brush end of a paintbrush handle into white paint and dot it around the teal background to create a playful pattern.
Step 3: Finishing Up
-
Seal the artwork:
Once all paint is completely dry, apply a coat of matte or satin varnish. This is crucial for protecting the clay from moisture, especially since it will live near plants. -
Attach the stake:
Place a drop of strong craft glue or super glue into the hole you created earlier. Insert the wooden skewer and hold it steady for a moment until it bonds secure.
Clean Lines Hack
If you struggle painting perfect circles or curves, lightly sketch your design with a watercolor pencil first. The lines will dissolve into the acrylic paint as you work, leaving no graphite marks.
Pop your finished marker into a pot and enjoy your smiling new plant friend
Mini Sloth Diorama in a Small Scene
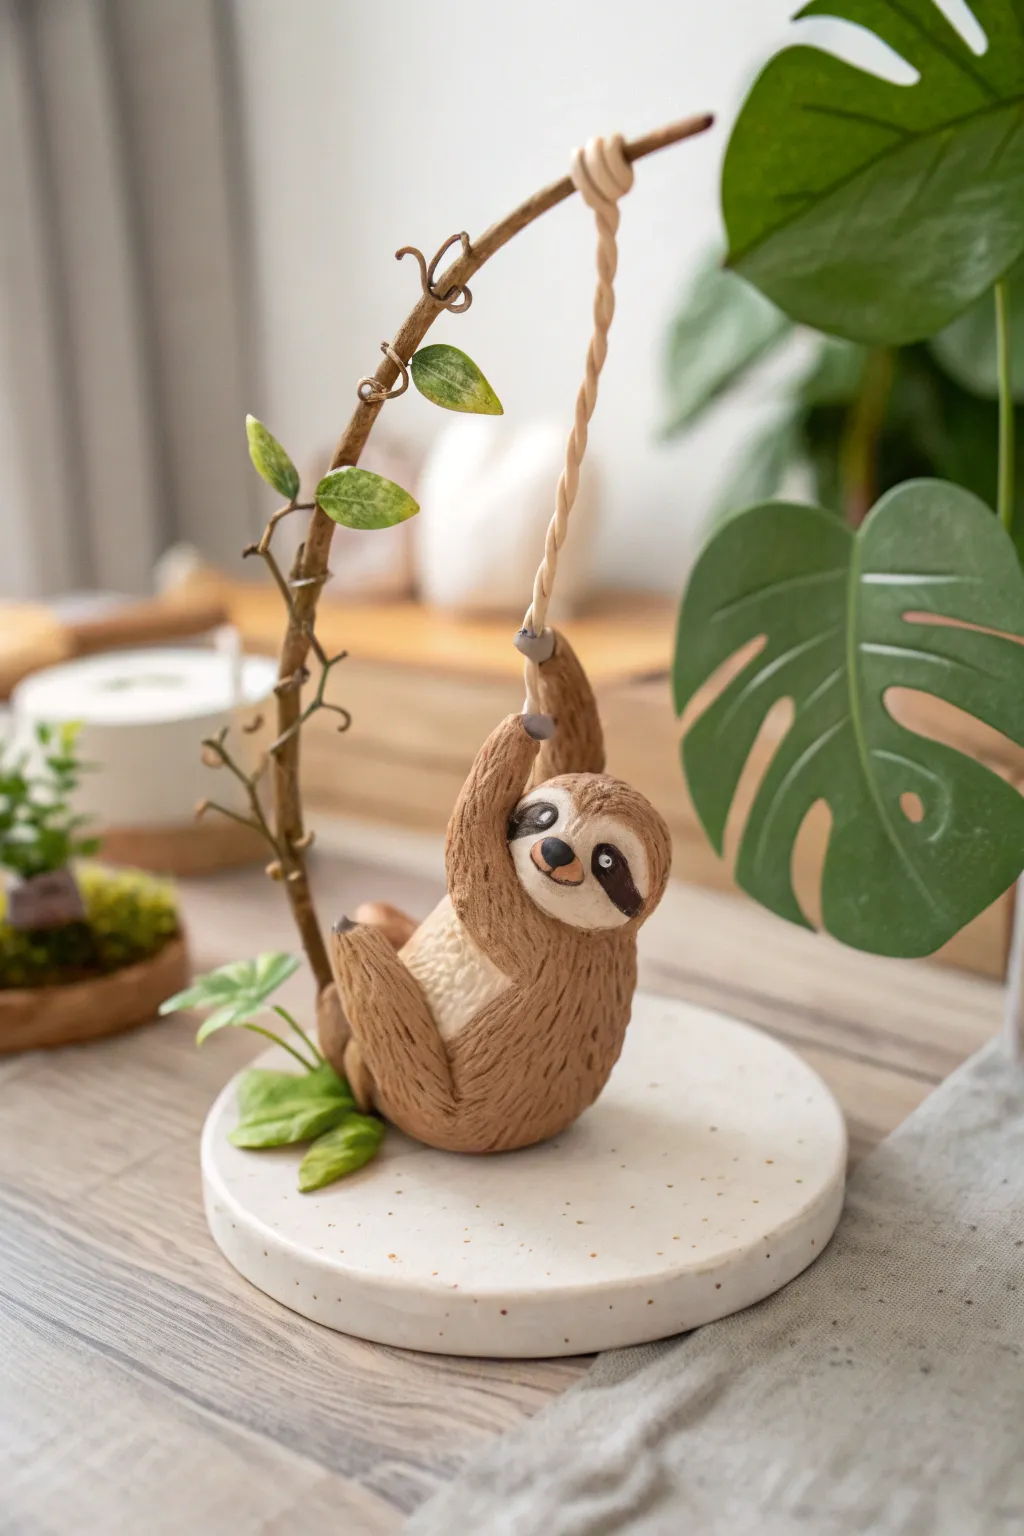
Capture the laid-back life with this charming display of a sloth swinging from a vine. This project combines sculpting a textured animal figure with assembling a sturdy, decorative base for a complete mini-scene.
Step-by-Step Tutorial
Materials
- Polymer clay (brown, beige, white, black, green)
- Thick floral wire or armature wire (approx. 16-18 gauge)
- White circular clay base or coaster
- Sculpting tools (needle tool, ball stylus, blending silicone tool)
- Texture tool (wire brush or stiff toothbrush)
- Twisted armature wire or floral tape
- Liquid polymer clay (adhesive)
- Oven for baking
Step 1: Building the Tree and Vine
-
Base Preparation:
Start with a pre-made white clay disc or coaster as your base. If making it from scratch, roll out white clay to about 1/4 inch thickness and cut a perfect circle, speckling it with tiny brown clay bits for a terrazzo look. -
Wire Armature structure:
Cut a length of thick floral wire, bending it into an arch shape that reaches about 6 inches high. Create a loop at the bottom to press firmly into the base for stability. -
Covering the Main Steam:
Take brown clay and wrap it around the bottom half of the wire to create the tree trunk. Texture this vertically with a needle tool to simulate bark. -
Creating the Rope Vine:
For the swinging rope, you can twist two thin snakes of lighter tan clay together. Attach one end to the top of your wire arch and let the other end hang freely for now. -
Adding Leaves:
Using green clay, shape small teardrops and flatten them slightly. Press a vein line into the center of each. Attach these sporadically along the main trunk wire.
Step 2: Sculpting the Sloth
-
Body Form:
Roll a medium-sized ball of brown clay into an oval shape for the sloth’s torso. Curve it slightly to mimic the hanging posture. -
Tummy Patch:
Flatten a thin piece of beige clay and press it onto the bell area of the brown oval. Smooth the edges so it transitions seamlessly. -
Adding Fur Texture:
I prefer using a needle tool or stiff brush for this part—gently scratch short, downward lines all over the brown fur areas to create a realistic, fuzzy texture. -
Head and Face Details:
Attach a smaller brown sphere for the head. Add a heart-shaped beige piece for the face mask. -
Facial Features:
Press two tiny indentations for eye sockets. Add darker brown teardrop shapes around the eyes, then tiny black beads for the eyes themselves. A small black oval makes the nose. -
Front Arms:
Roll two cylinders of brown clay. Attach them near the neck, reaching upward. Bend the ends to form hooks that will grip the rope. -
Back Legs:
Create two shorter cylinders for legs. Attach them to the bottom of the body, curving them forward as if the sloth is tucking its legs in. -
Claws:
Use grey or black clay to make three tiny tapered claws for each limb. Attach these carefully to the ends of the hands and feet.
Wire Stability Tip
Before baking, prop the hanging sloth up with a crumpled ball of aluminum foil. This supports the weight so the wire doesn’t droop in the heat.
Step 3: Assembly and Baking
-
Mounting the Sloth:
Carefully position the sloth so its claws grip the twisted rope vine you made earlier. Use a dab of liquid clay on the paws to ensure a strong bond. -
Reinforcing the pose:
Adjust the angle of the sloth so it looks like it is swinging naturally. Ensure the connection point between the rope and the tree branch is secure. -
Base Foliage:
Add a few larger green leaves at the base of the trunk to cover the wire insertion point and add visual weight to the bottom. -
Final Texture Check:
Look over the piece and re-texture any areas that got smoothed down while you were handling the sloth. -
Baking:
Bake the entire sculpture according to your clay manufacturer’s instructions (usually 275°F for 15-30 minutes). Use a foil tent to prevent scorching the thin leaves. -
Finishing Touches:
Once cool, you can lightly brush a dark brown acrylic wash over the detailed fur to emphasize the depth, wiping away the excess on the surface.
Make it a Photo Holder
Extend the main wire branch upwards into a spiral loop instead of a leaf. Now your cute diorama doubles as a functional memo or photo holder.
Now you have an adorable desk companion ready to hang out with you all day
Furry Texture vs Smooth Sloth Finish
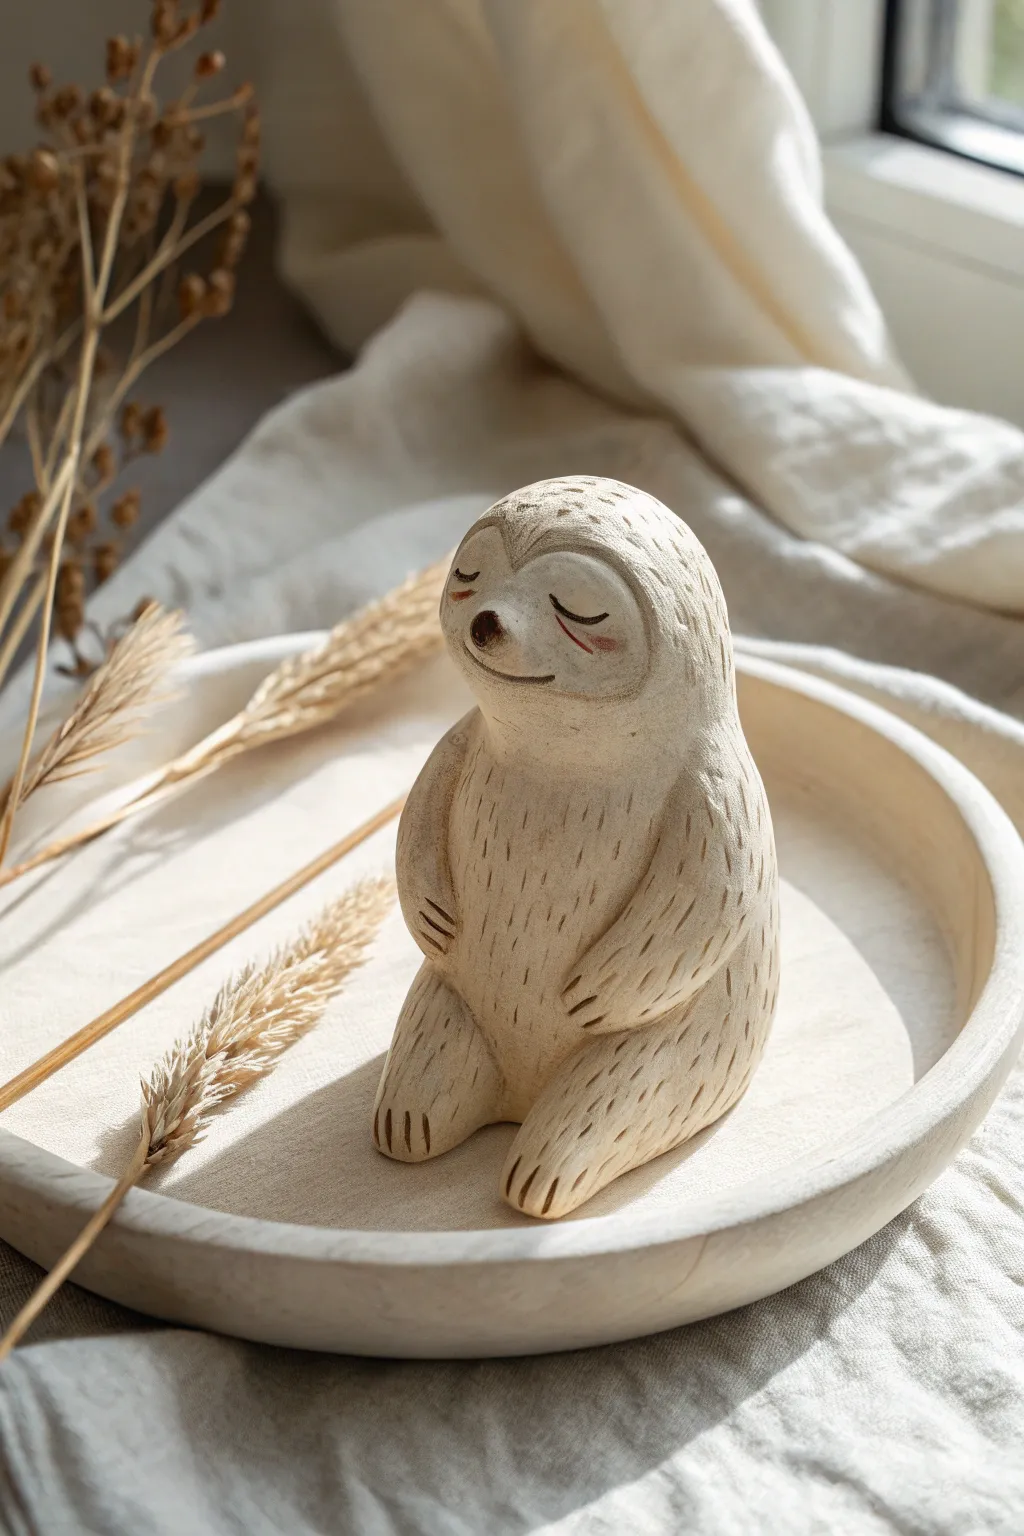
Capture a moment of pure tranquility with this textured clay sloth figurine, sitting peacefully with a gentle smile. The charm of this piece lies in the contrast between the smooth face and the rhythmic, dashed fur texture that invites touch.
How-To Guide
Materials
- Air-dry clay or polymer clay (beige or off-white)
- Needle tool or toothpick
- Small loop tool or clay sculpting spatula
- Water (for smoothing)
- Sponge
- Acrylic paints (brown, dark grey, soft pink)
- Fine detail paintbrush
- Matte sealant or varnish
Step 1: Sculpting the Base Form
-
Shape the body:
Begin with a fist-sized ball of clay. Roll it into a smooth, slightly elongated pear shape. Allow the bottom to be wider and flatter so the figurine sits stably on your work surface. -
Define the head:
Gently pinch and smooth the upper portion of the pear shape to define a distinct head area. It shouldn’t be a separate ball attached, but rather a seamless transition from the neck. -
Create the face mask:
Use your thumb or a small spoon tool to create a shallow, heart-shaped or oval depression on the front of the head. This will be the sloth’s smooth face area. -
Form the arms:
Roll two small sausages of clay for the arms. Attach them to the sides of the body, blending the upper seams completely. Curve them forward so the hands rest gently on the belly. -
Add the legs:
Create two slightly thicker, shorter rolls for the legs. Attach them at the base of the body, extending forward, and blend the connection points thoroughly. I like to smooth the seams with a damp finger to ensure they don’t crack later. -
Refine the shape:
Look at the silhouette from all angles. Soften any sharp edges and ensure the sloth looks relaxed and seated comfortably. The back should have a gentle, rounded curve.
Fixing Fur Mistakes
If your fur dashes look too messy or deep, lightly brush over the wet clay with a damp sponge or finger. This softens the edges without erasing the texture completely.
Step 2: Texturing and Details
-
Mark the claws:
Using a needle tool or a knife, press three distinct indentations into the end of each hand and foot to suggest simple, stylized claws. -
Create the fur texture:
This is the signature step. Take your needle tool and press short, repetitive dashes into the clay. Start at the neck and work your way down the back and sides. -
Follow the form:
Ensure the direction of your dashes follows the curve of the body. On the arms, the fur should flow downwards towards the hands; on the belly, it should curve gently around the center. -
Keep the face smooth:
Be careful to leave the depressed face area completely smooth. This contrast is essential for the final look. -
Sculpt facial features:
Roll a tiny speck of clay into a ball and press it into the center of the face for the nose. Use a sculpting tool to carve a soft, wide U-shape for the smiling mouth. -
Dry or bake:
Follow the instructions for your specific clay type. If using air-dry clay, let it sit for at least 24-48 hours until fully hardened.
Step 3: Finishing Touches
-
Paint the nose:
Using a dark brown or dark grey acrylic paint, carefully color the nose bump. A very small brush is crucial here. -
Paint the eyes:
Paint two simple, curved arches for the sleeping eyes. Make them slightly thicker in the middle and tapered at the ends. -
Add gentle blush:
Dilute a tiny drop of pink paint with water to create a glaze. Lightly dab this under the eyes to give the sloth a rosy, wholesome glow. -
Highlight the fur (optional):
If you want the texture to pop, dry brush a slightly lighter shade of beige over the textured body, catching only the raised areas. -
Seal the piece:
Finish with a coat of matte varnish. Avoid glossy finishes, as the matte look suits the natural, earthy vibe of the sloth.
Cozy Accessories
Before the clay dries, sculpt a tiny clay leaf or a miniature coffee mug and place it in the sloth’s hands to add a personalized storytelling element.
Now you have a serene little companion to bring a sense of calm to your shelf or desk
Pastel Gradient Sloth With Cute Accessories
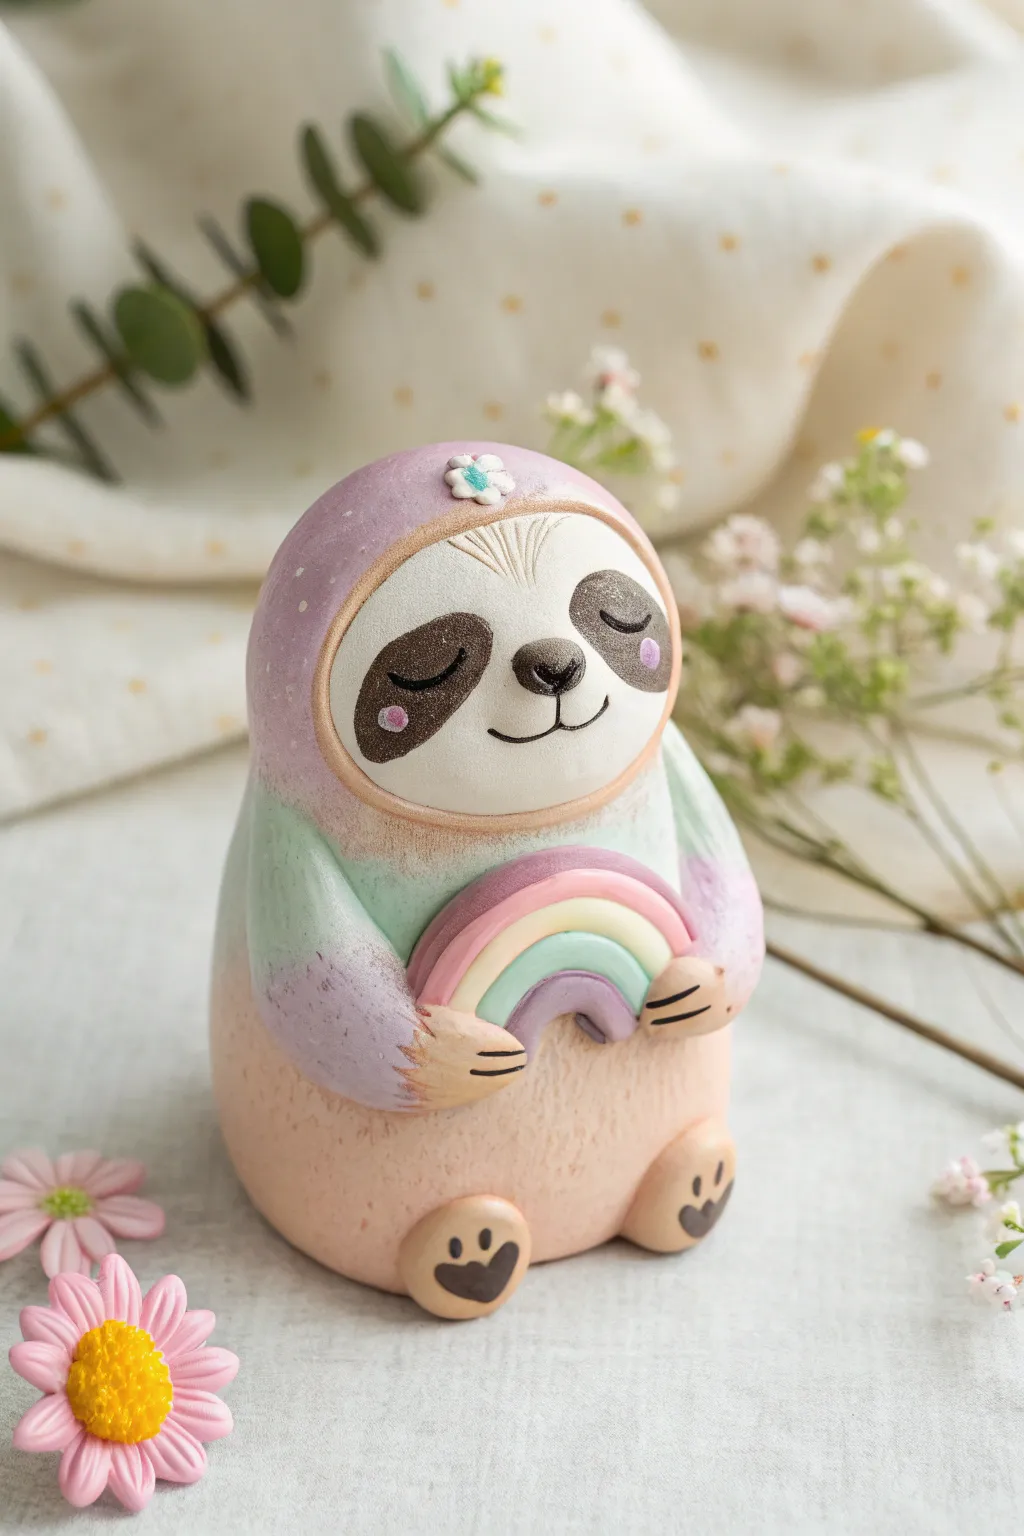
Embrace the slow life with this adorable pastel gradient sloth figurine clutching a tiny rainbow. With its soothing lavender hood and minty accents, this project combines smooth sculpting techniques with gentle color transitions for a heartwarming desk companion.
Step-by-Step Guide
Materials
- Polymer clay (White, Lavender, Mint Green, Peach/Beige, Brown, Black)
- Acrylic paints (optional, if using only white clay)
- Sculpting tools (needle tool, dotting tool)
- Rolling pin
- Soft pastel chalks (pink, teal) for shading
- Small paintbrush
- Matte varnish
- Aluminum foil (for the core)
Step 1: Forming the Body Base
-
Create the core:
Crumple a small amount of aluminum foil into a dense, rounded egg shape. This saves clay and keeps the figurine lightweight. -
Cover with peach clay:
Condition your peach or beige clay until soft. Roll it into a sheet about 1/4 inch thick and wrap it completely around your foil core, smoothing out any seams to create a chubby, seamless egg shape for the sloth’s bottom half. -
Establish the texture:
Using a needle tool or an old toothbrush, gently tap the lower peach section of the body to create a subtle, furry texture. Avoid texturing the top half where the hood will go.
Step 2: Hood and Head Details
-
Mix the gradient clay:
Take lavender and mint green clay. Mix a tiny bit of them together where they meet to create a marbled or gradient effect, then roll this out into a thin sheet for the sloth’s ‘hood’ or outfit. -
Apply the hood:
Drape the pastel clay sheet over the top half of the body. Smooth the edges down so it looks like a cozy, one-piece suit, blending the bottom edge slightly into the textured peach body if desired, or leaving a clean cut line. -
Shape the face:
Roll a disk of white clay and press it onto the front of the hood area. Flatten it gently so it contours to the round shape; this is the faceplate. -
Add the eye patches:
Take two small balls of brown clay and flatten them into teardrop shapes. Press these onto the white faceplate, angled slightly downwards for that sleepy sloth look. -
Sculpt facial features:
Use a needle tool or knife to verify the eye patches are symmetrical. Add a tiny black triangle nose between them and carve a small curved mouth connected to the nose with a thin line. -
Draw the sleeping eyes:
Roll two impossibly thin snakes of black clay (or use black paint later) and place them on the brown patches as closed, U-shaped eyelids.
Clean Clay Pro-Tip
Keep baby wipes or hand sanitizer nearby. Clean your hands thoroughly before handling the white clay for the face to avoid transferring lint or dark pigments.
Step 3: Arms and Accessories
-
Form the arms:
Roll two sausage shapes using the same pastel gradient clay used for the hood. I like to make the shoulder end slightly rounded and the paw end tapered. -
Attach the limbs:
Press the arms onto the sides of the body, curving them forward so they meet at the belly. Blend the clay at the shoulders so they connect seamlessly to the body. -
Sculpt the paws:
Flatten the ends of the arms slightly and use a knife tool to mark three small cuts for claws or fingers. -
Create the rainbow:
Roll three tiny snakes of clay: one pink, one mint, and one yellow. Arch them together to form a small rainbow stack. -
Place the rainbow:
Tuck the clay rainbow into the sloth’s arms. Gently press the paws over the ends of the rainbow to make it look like it’s being hugged.
Troubleshooting Fingerprints
If you see fingerprints on the smooth hood or face before baking, lightly brush the clay with a tiny amount of baby oil or cornstarch to smooth them away instantly.
Step 4: Finishing Touches
-
Add the flower:
Make a tiny five-petal flower using white clay and place a mint green dot in the center. Press this onto the forehead area of the hood. -
Sculpt the feet:
Create two small ovals from peach clay. Attach them to the bottom front of the body. Add tiny brown heart shapes to the soles for paw pads and mark toes with a tool. -
Apply blush:
Shave a little pink soft pastel chalk into dust. Use a dry brush to gently dab pink cheeks onto the face and pink accents on the rainbow or hood. -
Bake carefully:
Bake according to your polymer clay package instructions. Usually, this is around 275°F (135°C) for 30 minutes, but check your specific brand. -
Final details:
Once cool, paint tiny white dots on the cheeks for highlights. Seal the piece with a matte varnish to protect the surface.
Now you have a peaceful little friend to bring a moment of calm to your day