If you’ve got a little lump of clay and a spare afternoon, you’re already halfway to something adorable. These small clay ideas are the projects I reach for when you want quick wins, cute details, and tiny pieces that fit right into real life.
Tiny Trinket Dishes You’ll Actually Use
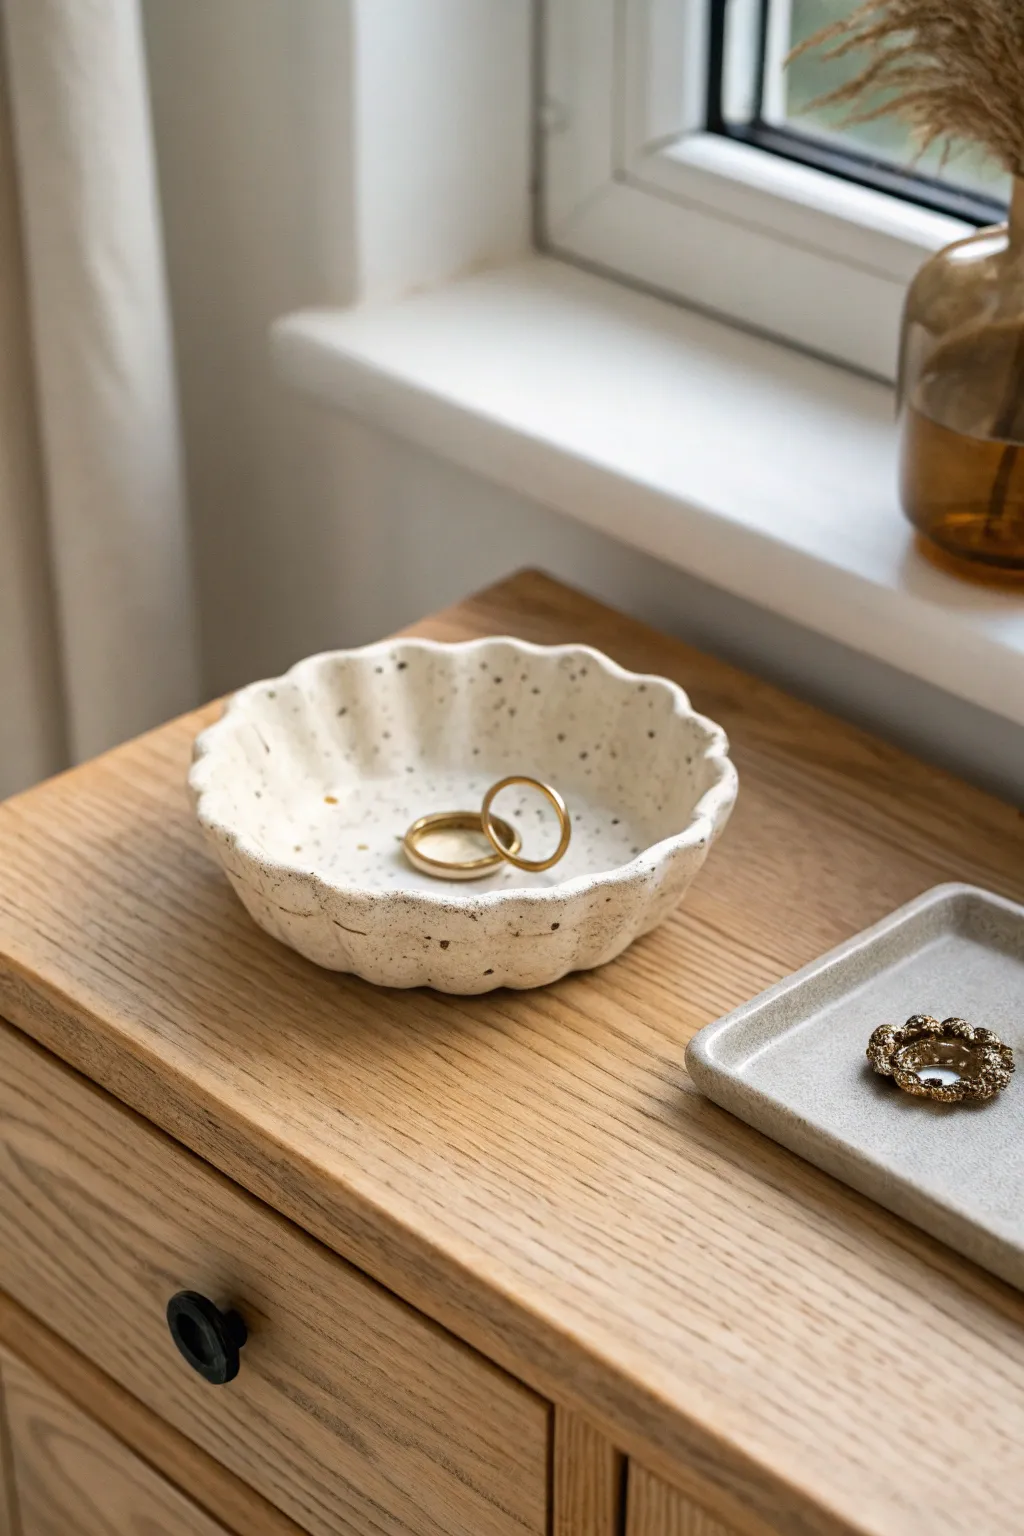
This charming little jewelry holder combines rustic handmade texture with a polished, fluted edge design that looks effortlessly chic. Its creamy speckled finish mimics high-end stoneware, making it the perfect catch-all for your favorite gold bands.
Step-by-Step Tutorial
Materials
- White air-dry clay or polymer clay (approx. 100g)
- Dried coffee grounds or black pepper (for speckles)
- Small rolling pin
- Circle cookie cutter (approx. 4-5 inches diameter)
- Modeling tool or unused pencil
- Fine-grit sandpaper
- Gloss or satin varnish/sealer
- Paintbrush
- Small bowl or sponge (to support shape)
Step 1: Preparing the Clay
-
Condition the clay:
Start by kneading your white clay in your hands until it becomes warm, soft, and pliable. This prevents cracks later on. -
Add the speckles:
Flatten the clay slightly and sprinkle a small pinch of dried coffee grounds or coarse black pepper onto the surface. I like to fold the clay over itself and knead again to distribute the ‘speckles’ evenly throughout the mass. -
Roll it out:
Place the clay on a smooth work surface or parchment paper. Roll it out to an even thickness of about 1/4 inch (6mm). Try to keep the thickness consistent so it dries evenly.
Cracking Up?
If small cracks appear while drying, don’t panic. Mix a tiny bit of fresh clay with water to make a paste and fill the cracks, then smooth over.
Step 2: Shaping the Bowl
-
Cut the base shape:
Use your large circle cookie cutter to punch out a perfect round shape. If you don’t have a cutter, trace around a bowl and cut with a craft knife. -
Smooth the edges:
Dip your finger in a tiny bit of water and run it along the cut edge of the circle. This softens the sharp cut line and gives it a more finished pottery look. -
Create the curve:
Gently lift the clay circle and cup it in the palm of your hand, pressing the center down slightly to start forming a shallow bowl shape. -
Begin the fluting:
Place the clay back down. Using your index finger and thumb, gently pinch the rim at regular intervals. Push inward with your finger to create a depression while the thumb supports the outside. -
Refine the scallops:
Work your way around the entire rim until you have a wavy, scalloped edge. Ensure the spacing is somewhat uniform, though small variations add to the handmade charm. -
Deepen the bowl:
Once the rim is scalloped, gently press the center of the bowl down again to deepen the cavity. Be careful not to flatten your scalloped edges.
Pro Tip: Faux Stone
For a more granite-like look, mix in a pinch of dried herbs (like dill or oregano) alongside the pepper for varied green and black speckles.
Step 3: Finishing Touches
-
Dry cleaning:
Inspect the clay for any stray fingerprints or lint. Smooth them out gently with a slightly damp finger or the back of a spoon. -
Support and dry:
Place the bowl into a slightly larger curved object (like a small shallow bowl lined with paper towel) to help it hold its cupped shape while drying. Let it air dry for 24-48 hours. -
Check dryness:
The clay should look chalky and feel room temperature (not cold) when it is fully dry. -
Sand imperfections:
Once bone dry, take fine-grit sandpaper and lightly buff the rim and any rough spots. Wipe away the dust with a dry cloth. -
Seal the piece:
Apply a thin layer of gloss or satin varnish to the inside and outside of the bowl. This protects the clay and seals in the coffee/pepper speckles so they don’t flake off. -
Apply second coat:
Let the first coat dry completely, then add a second layer of varnish for extra durability and a shine resembling fired ceramic glaze.
Now you have a bespoke, pottery-style dish ready to keep your rings safe and sound


Mini Ring Cones for Sink-Side Storage
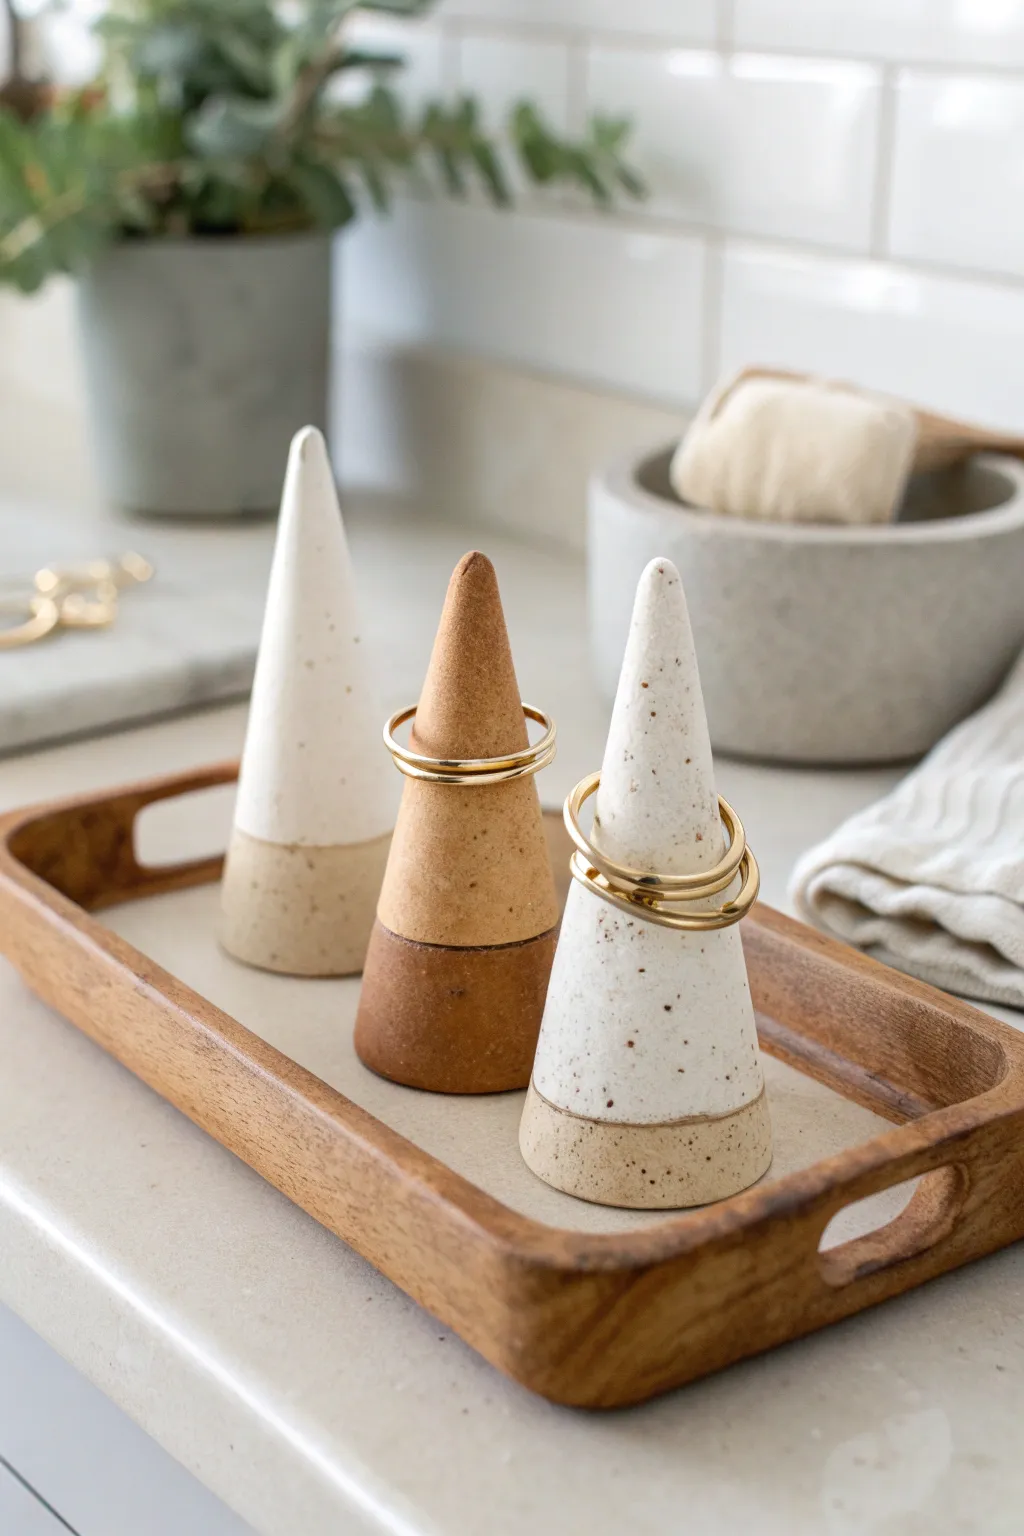
These modern, minimalist ring cones combine functional storage with an artisanal aesthetic, perfect for keeping your jewelry safe near the sink. The project features natural clay tones, subtle speckling, and clean two-tone blocking for a sophisticated ceramic look without needing a kiln.
Step-by-Step
Materials
- Polymer clay (white, beige/granite, and terracotta colors)
- Black pepper or dried coffee grounds (for speckling)
- Acrylic rolling pin
- Essential cone shape tools (or cardstock to make a template)
- Craft knife or tissue blade
- Baking sheet and parchment paper
- Fine-grit sandpaper (400-600 grit)
- Matte polymer clay varnish (optional)
- Oven (for curing)
Step 1: Preparing the Clay Mixes
-
Conditioning the base:
Start by warming up your white, beige, and terracotta polymer clay blocks in your hands separately. Knead each one until soft and pliable to prevent cracking later. -
Creating the speckled effect:
Take your white clay and flatten it slightly. Sprinkle a small pinch of ground black pepper or dried coffee grounds onto the surface. Fold the clay over and knead repeatedly until the specks are evenly distributed throughout the white block. -
Mixing custom tones:
To achieve that natural sandy beige seen at the base of the white cones, try mixing a small amount of translucent clay into your beige block. This gives it a more realistic stone appearance.
Seamless Transitions
To get a straight line between the two colors, slice the clay logs with a tissue blade before joining, rather than molding two lumps together by hand.
Step 2: Shaping the Cones
-
Rolling the clay:
Roll each color of clay into a smooth, thick log about 1 inch in diameter. Ensure the surface is free of fingerprints. -
Cutting the segments:
Decide on your color blocking. For the two-tone cones, use your craft knife to cut a segment of speckled white clay (about 2 inches long) and a separate segment of beige clay (about 0.75 inches long). -
Joining the pieces:
Place the longer white segment on top of the shorter beige segment. Press them firmly together so they bond, but be careful not to distort the cylindrical shape too much. -
Initial shaping:
Begin rolling the joined cylinder on your work surface, applying more pressure to the top end to start tapering it into a cone shape. I find using an acrylic block to roll helps keep the sides straight. -
Refining the tip:
Continue rolling and tapering until you have a smooth cone shape. The tip should be rounded enough to not chip, but narrow enough to hold small rings. -
Flattening the base:
Stand the cone upright on your work surface. Press down gently to ensure the bottom is perfectly flat and the cone stands straight without wobbling. -
Smoothing the seam:
Examine the line where the two colors meet. Gently run your finger or a clay tool over the seam to smooth it out, creating a flush transition between the top and bottom colors. -
Creating variations:
Repeat the process for the other cones. For an all-terracotta cone, simply shape a single log of terracotta clay. Try varying the height slightly for visual interest when they are grouped.
Removing Fingerprints
Before baking, lightly brush the unbaked clay with a tiny amount of baby oil or cornstarch. This smoothes out fingerprints without changing the shape.
Step 3: Finishing Touches
-
Baking preparation:
Place your finished cones on a baking sheet lined with parchment paper. Ensure they aren’t touching each other. -
Curing the clay:
Bake the cones according to the specific temperature and time instructions on your package of polymer clay. While waiting, clear your workspace for the finishing steps. -
Cooling down:
Once the baking time is up, turn off the oven and let the cones cool down completely inside. This helps prevent thermal shock and cracking. -
Sanding for texture:
After cooling, use fine-grit sandpaper to gently buff the surface. This removes any fingerprints and gives the clay a matte, stone-like texture. -
Cleaning up:
Wipe the cones down with a slightly damp cloth to remove any sanding dust. -
Sealing (optional):
If these will sit right next to a wet sink, apply a thin coat of matte varnish to protect the clay from water spots, though baked polymer clay is naturally water-resistant.
Place these charming cones on a wooden tray or by your vanity for an instantly organized space


Easy Slab Earrings in Polymer Clay
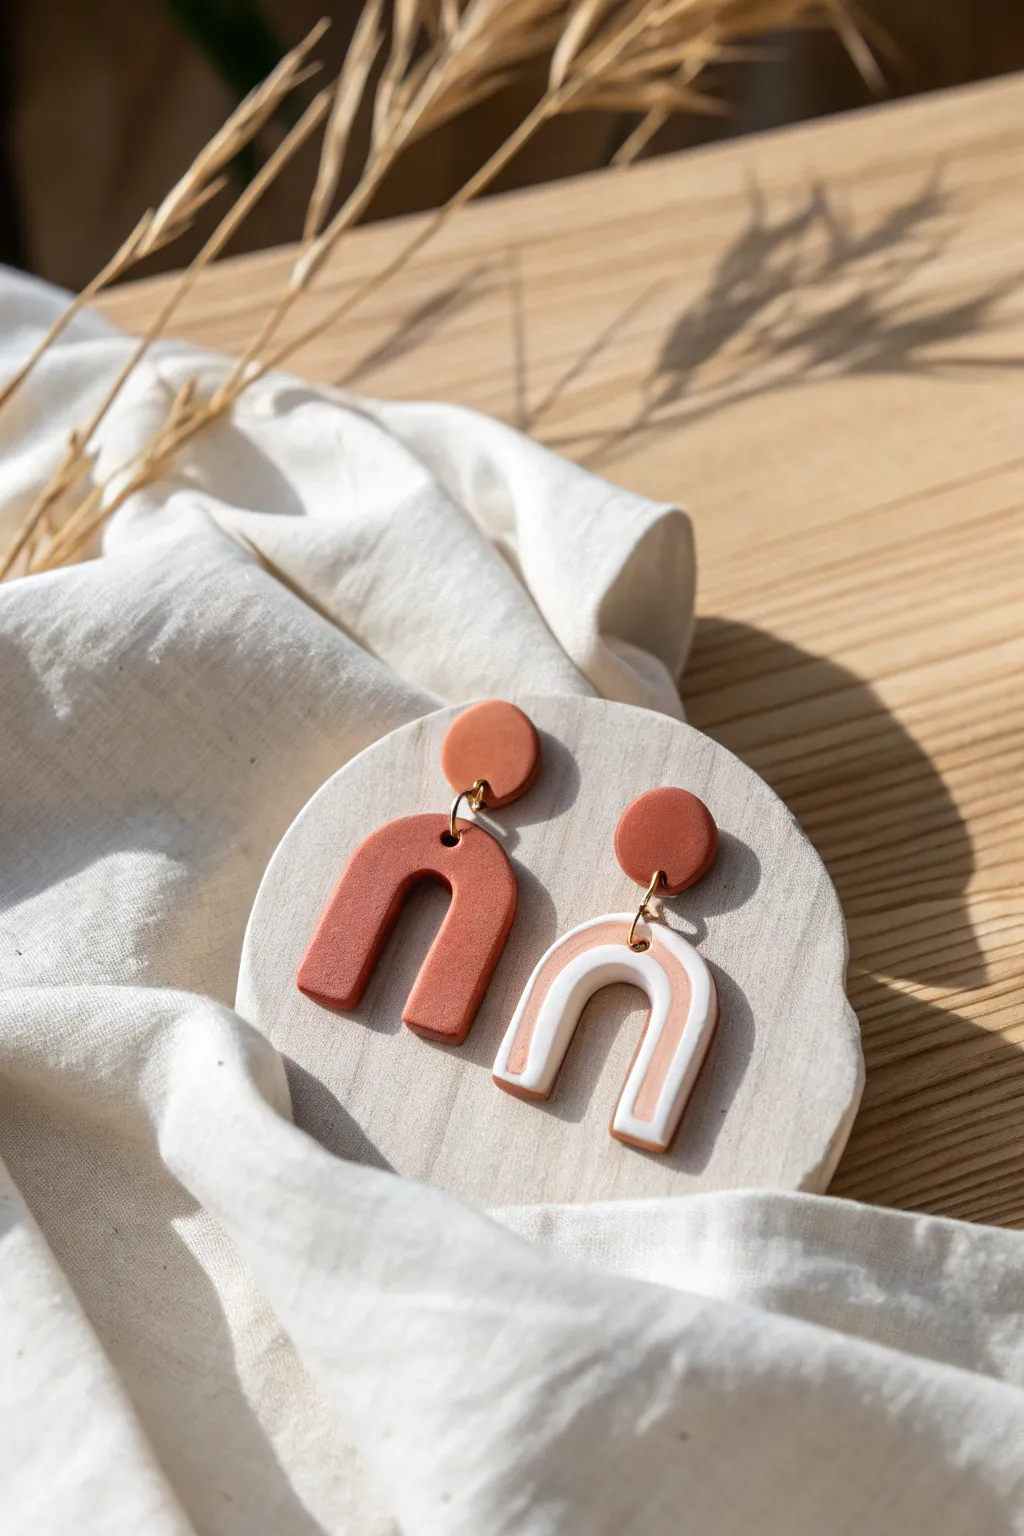
Embrace warm, earthy tones with these simple yet striking arch earrings crafted from polymer clay. The design features a mix of solid terracotta and a delicate striped pattern, offering a modern bohemian aesthetic perfect for everyday wear.
Step-by-Step Tutorial
Materials
- Polymer clay in terracotta/burnt orange
- Polymer clay in white
- Acrylic rolling pin or pasta machine
- U-shape or arch clay cutters (small or medium size)
- Small circular clay cutter (approx. 10mm)
- Craft knife or tissue blade
- Needle tool or small drill bit
- 4 Gold jump rings
- 2 Earring posts or hooks
- Jewelry pliers
- Super glue (optional showing for post attachment)
- Piece of parchment paper or ceramic tile
Step 1: Preparing the Clay Slabs
-
Condition the terracotta clay:
Start by warming up a portion of the terracotta clay in your hands, kneading it until it is soft and pliable. This prevents cracking later. -
Roll the base slab:
Using your acrylic roller or pasta machine on a medium setting (approx. 3mm thick), roll the conditioned terracotta clay into a smooth, even sheet. -
Condition the white clay:
Repeat the conditioning process with a smaller amount of white clay until it is equally soft. -
Create the striped slab base:
Roll out a small sheet of white clay and a small sheet of terracotta clay, both to the same thickness as your first slab.
Smooth Moves
Before baking, lightly dip your finger in cornstarch or baby oil and rub it over the clay surface. This removes fingerprints and leaves a silky, professional finish.
Step 2: Creating the Striped Pattern
-
Cut thin strips:
Using your tissue blade or craft knife, cut a long, thin strip of the terracotta clay sheet. It should be narrow and delicate. -
Lay the strip:
Place the thin terracotta strip gently onto the surface of the white clay sheet. I like to curve it slightly to mimic the arch shape, but straight works too. -
Embed the strip:
Gently roll over the white sheet with the terracotta strip on top using the acrylic roller. Apply just enough pressure to make the strip flush with the white clay without distorting the shape too much.
Step 3: Cutting and Baking
-
Cut the solid arch:
Place your U-shaped cutter onto the plain terracotta slab and press down firmly to cut your first earring shape. -
Cut the striped arch:
Position the cutter on the white slab so the terracotta strip runs through the center of the arch shape, then press down to cut. -
Cut the stud circles:
Use the small circular cutter on the plain terracotta slab to create two identical circles. These will be the top studs. -
Smooth the edges:
Gently rub the edges of all cut pieces with your finger to remove any stray bits of clay or sharp cutter marks. -
Create holes:
Use a needle tool to pierce a small hole at the top center of each arch and the bottom edge of each circle stud. Ensure the hole is big enough for your jump rings. -
Bake the pieces:
Transfer the clay pieces to a ceramic tile or baking sheet lined with parchment paper. Bake according to your clay manufacturer’s instructions (usually 275°F/135°C for 15-30 minutes). -
Cool down:
Allow the pieces to cool completely before handling them to ensure they reach their full hardness.
Make it Shine
After baking and cooling, coat the clay pieces with a thin layer of UV resin or glassy gloss glaze. This adds durability and gives the earrings a high-end ceramic look.
Step 4: Assembly
-
Attach earring posts:
Flip the circular studs over and use a dab of super glue to attach the earring posts to the back. Let them dry securely. -
Open jump rings:
Using two pairs of pliers, twist your jump rings open sideways (never pull them apart). -
Connect the pieces:
Thread an open jump ring through the hole in the arch and the corresponding hole in the stud. -
Close the rings:
Use the pliers to twist the jump ring back into a closed position, ensuring the gap is tight so the pieces don’t slip out. -
Final check:
Give the earrings a gentle shake to make sure all connections are secure and the movement is fluid.
Now you have a stunning set of custom earrings ready to complement your favorite outfit


Kawaii Food Charms Made from Basic Shapes
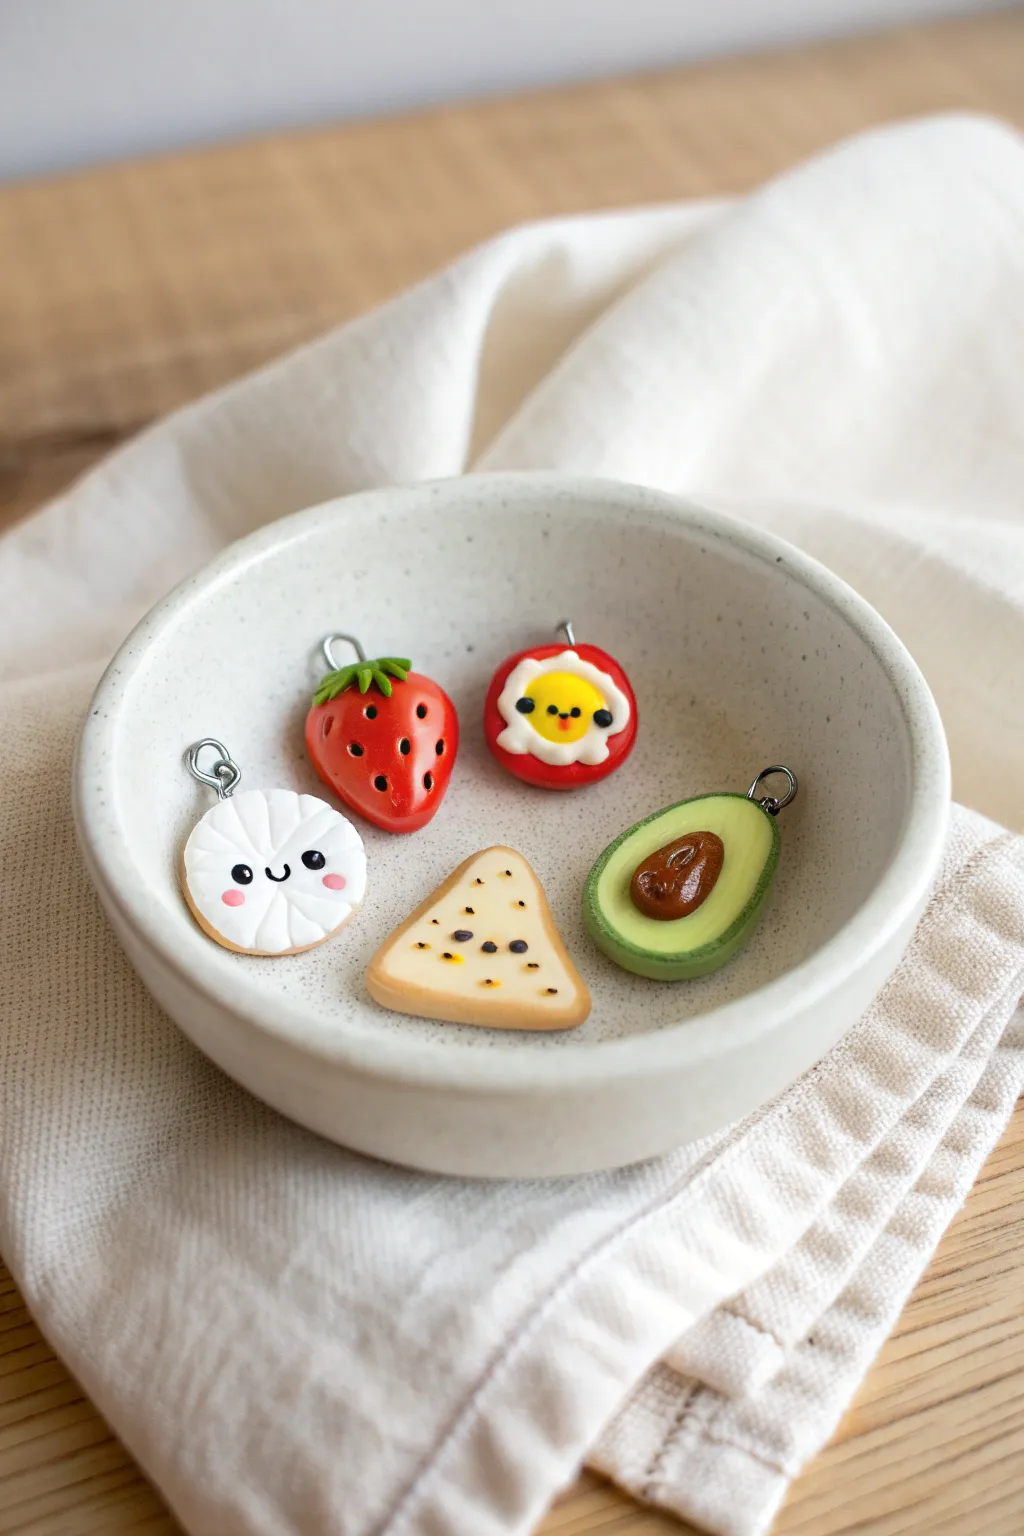
These adorable miniature food charms are perfect for turning into jewelry, stitch markers, or phone accessories. Using simple geometric bases, you’ll sculpt five distinct characters including a happy dumpling, a sweet strawberry, and a fresh avocado.
Step-by-Step Guide
Materials
- Polymer clay (white, red, green, yellow, translucent, tan/beige, dark brown)
- Eye pins (silver tone)
- Dotting tools or ball stylus
- Needle tool or toothpick
- Liquid polymer clay (optional)
- Gloss glaze (optional)
- Black acrylic paint or fine tip marker
- Small pink pastel chalk (for cheeks)
- Oven and baking sheet
Step 1: Prepping Basic Shapes
-
Condition the clay:
Start by kneading each color of polymer clay until it is soft and pliable. This prevents cracking and makes shaping much easier. -
Form the base spheres:
Roll small balls of clay roughly the size of a marble for each charm. You will need a white ball for the dumpling, a red one for the strawberry and tomato/egg, a tan one for the chip, and a green one for the avocado. -
Insert eye pins:
Before sculpting further, gently press a metal eye pin into the top of each base shape. Add a tiny dot of liquid clay or translucent liquid sculpey to the pin shaft for a stronger hold after baking.
Sticky Fingerprints?
If your clay picks up fingerprints or dust, wipe the unbaked surface gently with a Q-tip dipped in a tiny bit of rubbing alcohol or baby oil to smooth it.
Step 2: Sculpting the Fruit & Veggies
-
Shape the Strawberry:
Take a red sphere and gently pinch the bottom to create a tapered heart shape. Use a needle tool to press small indentations all over the surface for seeds. -
Add strawberry leaves:
Flatten a tiny piece of green clay and cut a small star or flower shape. Press this onto the top of the strawberry around the eye pin loop to create the calyx. -
Create the Avocado:
Shape a light green ball into a pear shape, then flatten it slightly. Keep the edges rounded. This will be the skin and flesh. -
Add the avocado pit:
Press a thumb or large ball tool into the lower center of the avocado to make a crater. Roll a small oval of brown clay and press it into this indentation. I like to texture the pit slightly with a toothbrush for realism. -
Assemble the Tomato Egg:
Flatten a red ball into a thick disk. Create a smaller, uneven white shape for egg white and press it onto the red base. Add a tiny yellow dome in the center for the yolk.
Make It a Charm Bracelet
Attach jump rings to your eye pins once baked, then clip them onto a chain bracelet. Add small colorful beads between the food charms for extra pop.
Step 3: Creating the Snacks
-
Form the Dumpling Face:
Flatten a white sphere into a thick, soft disk. Using a needle tool, press radial lines from the center toward the edges to mimic the pleats of a dumpling wrapper. -
Shape the Tortilla Chip:
Flatten a ball of tan or beige clay into a triangle with rounded corners. Texture the surface lightly with a toothbrush or sandpaper to give it a baked appearance. -
Season the chip:
Use a needle tool to add tiny dots of dark brown or black clay to represent seasoning or charred spots on the chip surface.
Step 4: Adding Kawaii Details
-
Add facial features:
For the dumpling and egg, roll infinitesimally small ropes of black clay to form U-shaped mouths. Use a dotting tool to add tiny black eyes. -
Apply rosy cheeks:
Scrape a little pink pastel chalk into a powder. Use a small, soft brush or a cotton swab to dab pink circles onto the ‘cheeks’ of the dumpling and the egg yolk. -
Paint secondary details:
If you find clay too fiddly for the tiny eyes, you can bake the pieces first and draw the faces on later with a fine-tip black marker or acrylic paint.
Step 5: Finishing Up
-
Bake the charms:
Place all your pieces on a baking sheet or ceramic tile. Bake according to your brand of clay’s instructions—usually around 275°F (130°C) for 15-20 minutes. -
Cool down:
Let the pieces cool completely in the oven before moving them; hot clay is fragile. -
Glaze optional:
For extra shine and protection, apply a coat of gloss glaze to the fruit parts or the ‘yolk’ of the egg, leaving the bread/chip parts matte for texture contrast.
Once cooled, these tiny treats are ready to add a sweetly savory touch to your accessories collection

The Complete Guide to Pottery Troubleshooting
Uncover the most common ceramic mistakes—from cracking clay to failed glazes—and learn how to fix them fast.
Mini Animal Keychains with Chunky Features
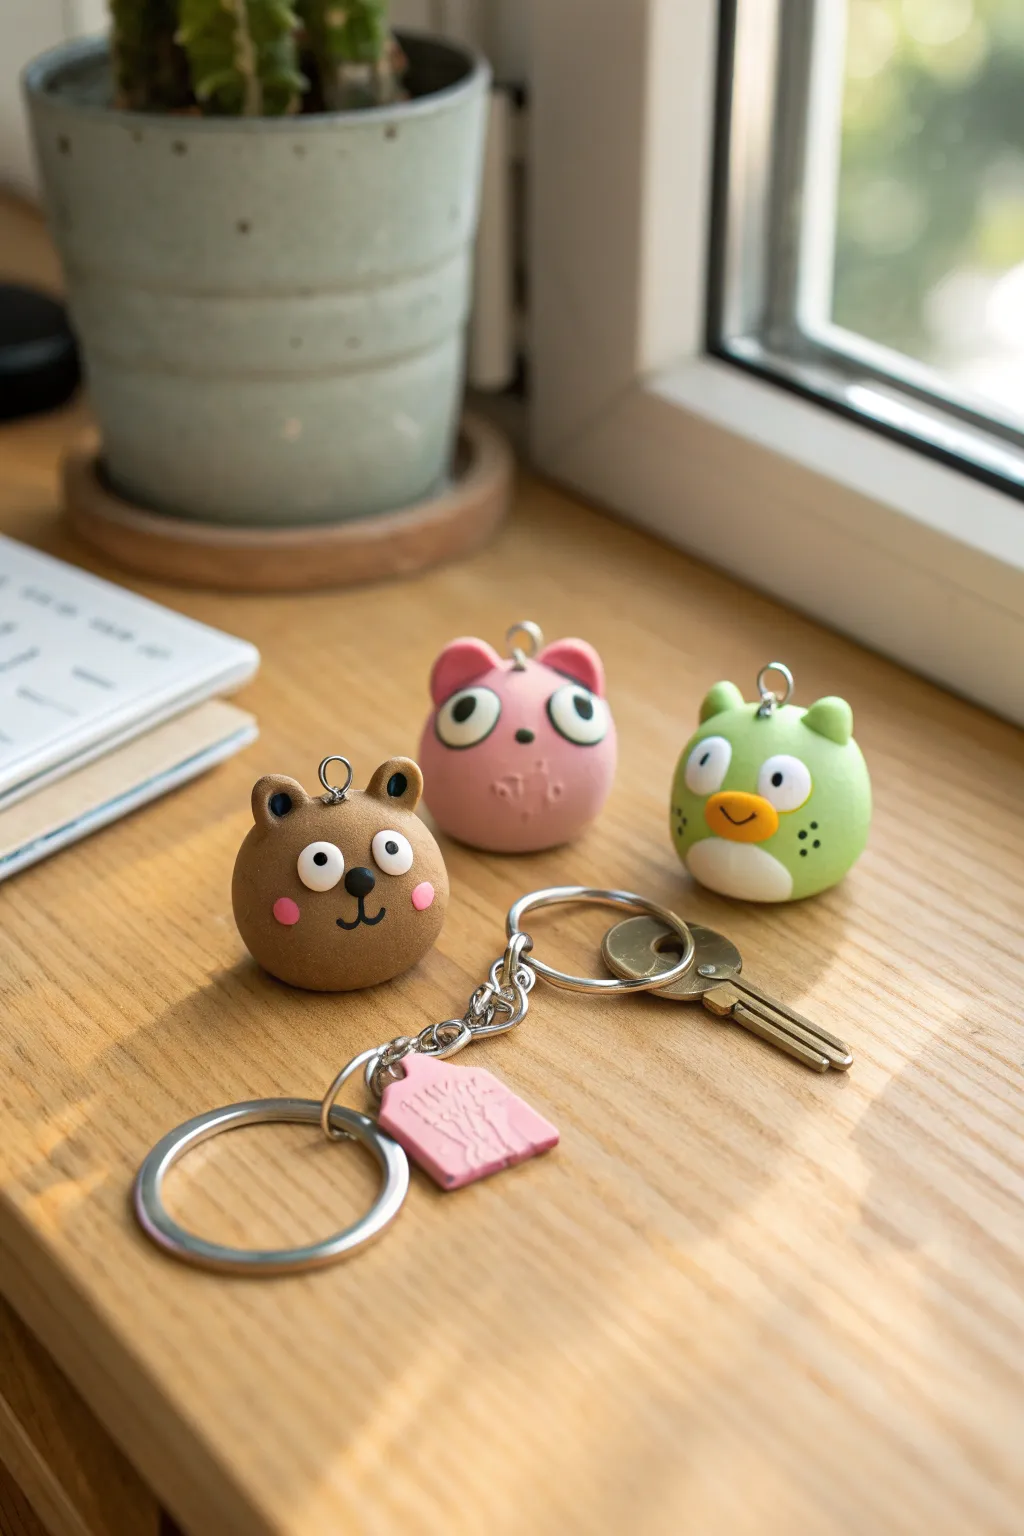
These adorable, chubby animal keychains bring a whimsical charm to your keyring with their perfectly spherical bodies and oversized eyes. Crafted from polymer clay, each character—be it the friendly bear, the rosy cat, or the green bird—features a uniquely textured matte finish that feels great to hold.
Step-by-Step
Materials
- Polymer clay (brown, pink, lime green, white, black, orange/yellow)
- Small metal eye pins or screw eyes
- Ball stylus tools (various sizes)
- Needle tool or toothpick
- Soft pastel chalks (pink for cheeks)
- Small paintbrush
- Flexible blade or craft knife
- Wet wipes
- Oven for baking
- Keychain hardware (jump rings, chains, split rings)
- Pliers (round nose and flat nose)
- Gloss varnish (optional for eyes)
Step 1: Shaping the Base Bodies
-
Prepare the portions:
Start by conditioning your clay thoroughly until it’s soft and pliable. Divide your main colors (brown, pink, and lime green) into equal portions, roughly the size of a large walnut. Roll each piece between your palms until you have a smooth, crack-free sphere. -
Create stability:
Gently tap the bottom of each sphere onto your work surface to create a slightly flattened base so the figures can stand upright while you work on them. -
Insert hardware:
Take a metal eye pin, trim the stem if it’s too long, and insert it directly into the top center of each sphere. If you prefer extra security, you can bend the very tip of the wire into a small hook before pushing it into the clay.
Eye Pin Loose?
If the metal eye pin spins or feels loose after baking, pull it out gently, add a drop of superglue to the stem, and reinsert it into the hole.
Step 2: Adding Ears and Facial Bases
-
Bear ears:
For the brown bear, roll two tiny balls of brown clay. Press them gently onto the top sides of the head using a ball tool to blend the seam at the back, creating small, rounded ears. Use a smaller ball tool to create an indentation in the center of each ear and fill it with a speck of black clay. -
Cat ears:
For the pink figure, shape two small triangles of pink clay. Attach them to the top of the sphere, smoothing the connection points downward so they look integrated rather than just stuck on. -
Bird features:
For the green bird, make two small nubs for ears or crests on top. Mix a tiny bit of orange or yellow clay to form a wide, flat oval for the beak area, placing it centrally on the lower half of the face.
Clean White Clay
To keep white eyes pure, clean your hands and work surface thoroughly with a baby wipe before handling white clay to avoid transferring lint or color.
Step 3: Creating the Expressive Faces
-
Make the eye sockets:
Use a medium-sized ball tool to press two indentations into the face of each figure where the eyes will go. I like to space them slightly wide apart to enhance the ‘chunky’ cute look. -
Form the whites:
Roll small balls of white clay—make sure your hands are clean first—and press them into the sockets. Flatten them slightly so they look like large, eager discs. -
Add pupils:
Roll tiny distinct balls of black clay. Place these onto the white discs. Position is key here: placing them slightly cross-eyed or looking in different directions adds a goofy charm. -
Nose details:
For the bear, add a small black oval nose between the eyes and use a needle tool to drag a tiny line straight down for the mouth. For the pink cat, a tiny pink triangle nose works best. For the bird, use a tool to press a smile into the yellow beak area.
Step 4: Finishing Details
-
Apply blush:
Scrape a little pink soft pastel chalk into a powder. Use a small, dry brush to gently dab rosy cheeks onto the bear and cat figures, just below the eyes. -
Add freckles and texture:
For the green bird, use a fine-point tool or a black clay suspend pointer to add three tiny freckles on each cheek. If you want a textured look like the bear, lightly tap the surface with an old toothbrush or stiff brush before baking. -
Bake:
Place your figures on a baking sheet or ceramic tile. Bake according to your clay manufacturer’s instructions (usually around 275°F or 130°C for 15-30 minutes). Let them cool completely in the oven to prevent cracking. -
Assemble keychain:
Once cool, use pliers to open a jump ring. Loop it through the eye pin on top of the figure and attach your keychain clasp or split ring. Close the jump ring securely. -
Make the tag (optional):
Roll out a small slab of scrap pink clay, cut a rectangle shape, and press a texture or initial into it. Poke a hole, bake it, and attach it to the keychain chain for an extra custom touch.
Clip these cheerful, chunky friends onto your keys or backpack for a daily dose of handmade joy
Cute Fridge Magnets in Small Clay Sets
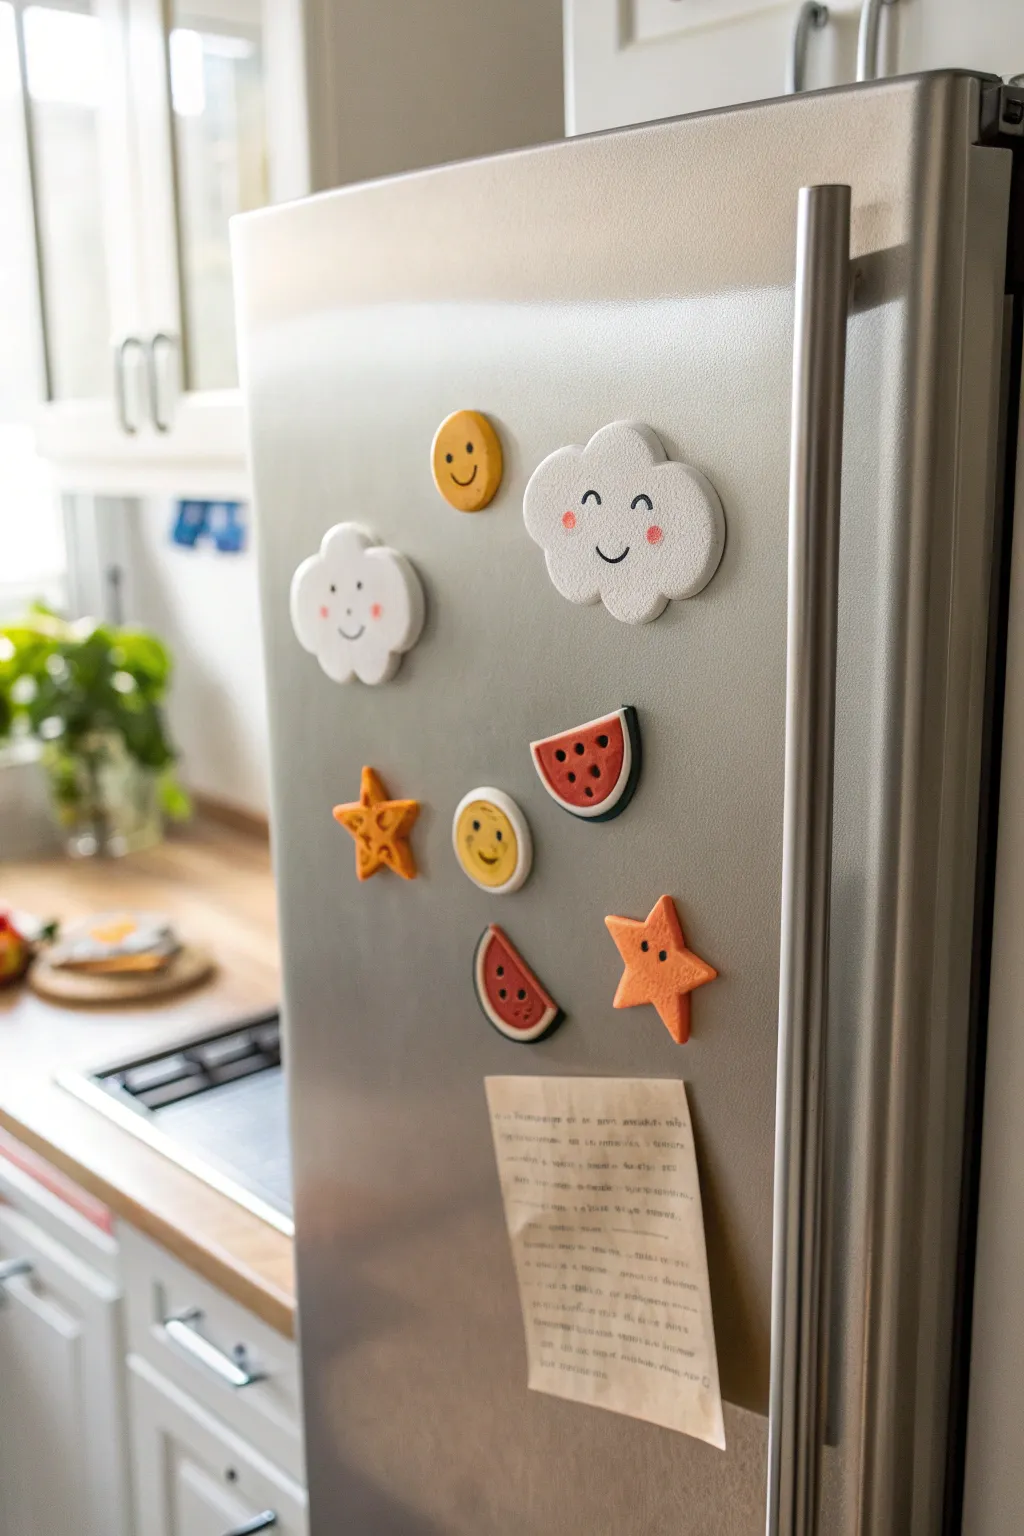
Brighten up your kitchen with this collection of kawaii-inspired clay magnets featuring cheerful clouds, juicy watermelons, and smiling stars. These chunky, matte-finish pieces add a playful touch to any metal surface and are perfect for holding up sweet notes or grocery lists.
Step-by-Step Tutorial
Materials
- White polymer clay or air-dry clay
- Yellow, orange, red, and green polymer clay packages
- Rolling pin or smooth glass jar
- Small round cookie cutters (varied sizes)
- Cloud-shaped cookie cutter (or a craft knife)
- Star-shaped cookie cutter
- Black fine-point permanent marker or acrylic paint pen
- Pink acrylic paint or chalk pastel (for cheeks)
- Dotting tool or toothpick
- Strong craft glue (E6000 recommended)
- Round ferrite or neodymium magnets
- Parchment paper
Step 1: Shaping the Happy Clouds
-
Prepare the base:
Condition a generous amount of white clay until it is soft and pliable. Roll it out on parchment paper to a thickness of about 1/4 inch (6mm) so the magnets will have a nice, chunky feel. -
Cut the shapes:
Use a cloud cutter to punch out two shapes: one larger and one slightly smaller. If you don’t have a cutter, you can freehand the scalloped edges with a craft knife and smooth them with your finger. -
Smooth the edges:
Gently tap the edges of the clay clouds with your fingertip to round them off, removing any sharp angles from the cutting process.
Smooth Surface Trick
Before baking, lightly brush your clay pieces with a tiny amount of baby oil or cornstarch. This smoothes out fingerprints and gives a professional matte finish.
Step 2: Creating the Fruit & Stars
-
Make the watermelon rind:
Roll a small snake of dark green clay and flatten it slightly. Wrap a thin strip of white clay on top of the green to create the rind layers. -
Form the red center:
Shape a piece of red clay into a semi-circle that fits inside your rind strip. Press them gently together so the layers adhere without distorting the shape. -
Slice the watermelon:
If you made a thick log, slice it into 1/4 inch thick semi-circles. You’ll need two slices for this set. -
Cut the star shapes:
Roll out orange clay to the same 1/4 inch thickness. Use a star cutter to create two stars. For variety, you can create a cutout in the center of one star using a tiny star cutter, or leave it solid. -
Create the suns:
Roll out yellow clay. Cut a simple circle for the main sun. For the second sun face, cut a slightly smaller yellow circle and press it into the center of a slightly larger flattened white circle to create a rimmed effect.
Texture Twist
Press a piece of clean sandpaper or a textured sponge gently onto the cloud shapes before baking to give them a fluffy, stone-like texture.
Step 3: Baking and Face Details
-
Bake the clay:
Arrange all your clay pieces on a parchment-lined baking sheet. Bake according to your customized clay package instructions (usually 275°F/135°C for 15-30 minutes depending tot he brand). -
Cool down:
Let the pieces cool completely before handling. This ensures they harden properly and won’t fingerprint. -
Draw the eyes:
Using a black fine-point marker or paint pen, draw small, wide-set eyes. For the happy winking expressions, draw small downward arches. -
Add smiles:
Draw simple ‘U’ shapes for the mouths. Place them centered between the eyes but slightly lower. -
Add rosy cheeks:
Dip a dotting tool or the end of a toothpick into a tiny bit of pink paint. Dab small dots just under the eyes for cheeks. I find lighter tapping creates a sweeter, more delicate look. -
Detail the watermelon:
Use the black marker to add three or four small dots on the red section of the watermelon slices to represent seeds.
Step 4: Assembly
-
Prep the backs:
Turn all your finished clay pieces face down on a soft surface like a towel to prevent scratching the faces. -
Attach magnets:
Apply a pea-sized drop of strong craft glue to the back center of each piece. Press a magnet firmly into the glue. -
Final dry:
Allow the glue to cure for at least 24 hours before sticking them to your fridge to ensure the bond is secure.
Arranging these happy little characters on your fridge adds an instant dose of cheer to your daily routine


What Really Happens Inside the Kiln
Learn how time and temperature work together inside the kiln to transform clay into durable ceramic.
Little Desk Buddy Figurines for Instant Joy
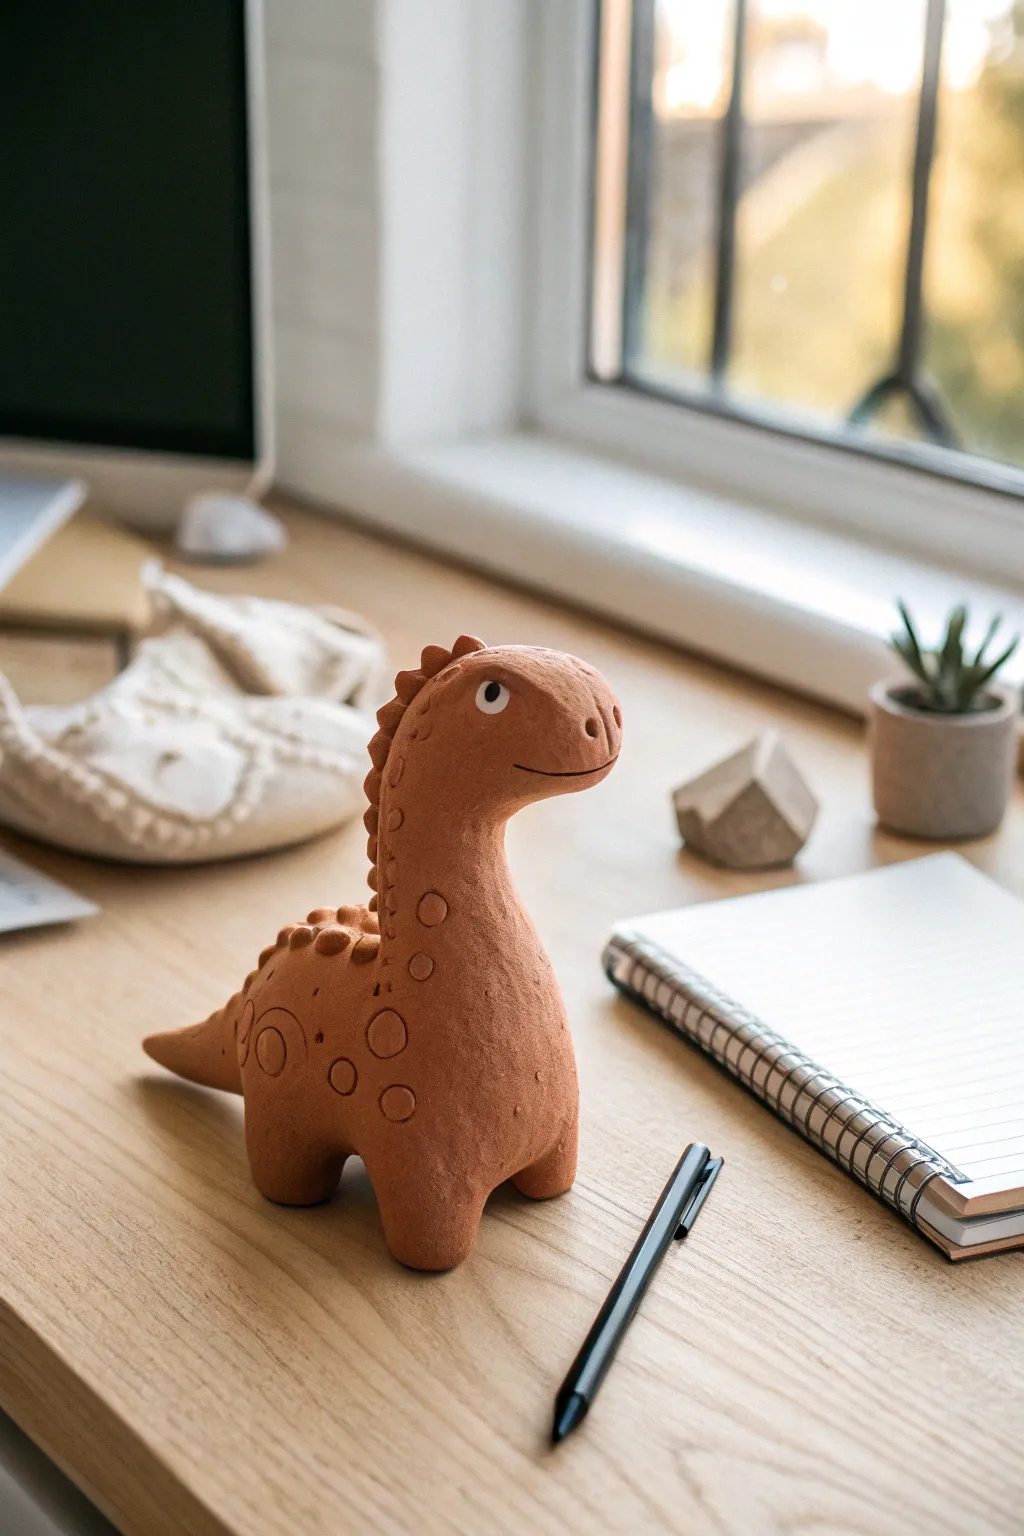
Bring a touch of prehistoric charm to your workspace with this adorable long-necked dinosaur figurine. Created from warm terracotta polymer clay, its smooth curves and minimalist textures make it a calming companion for busy days.
How-To Guide
Materials
- Terracotta-colored polymer clay (approx. 2 oz)
- Small amount of white polymer clay
- Tiny amount of black polymer clay
- Ball stylus tool (medium and small)
- Needle tool or toothpick
- Clay roller
- Baking sheet
- Parchment paper
- Oven
Step 1: Forming the Body Construction
-
Conditioning the Clay:
Begin by warming the terracotta clay in your hands, kneading it until it is soft, pliable, without cracks. This is crucial for a smooth finish later on. -
Shaping the Main Torso:
Roll about two-thirds of your clay into a smooth ball, then gently elongate it into a pear shape. This will serve as the heavy base and body of the dinosaur. -
Creating the Legs:
Pull four small knobs from the bottom of your pear shape to form the legs. Instead of attaching separate pieces, drawing them out from the main mass ensures a stronger structure. -
Refining the Stance:
Set the figure onto your work surface and press down gently to flatten the feet. Adjust the legs until the body stands stable and upright on its own. -
Drafting the Neck:
Take the remaining main portion of clay and roll it into a thick cylinder. Gently bend it into an organic ‘S’ curve to mimic the dinosaur’s neck and head. -
Attaching the Neck:
Using a blending tool or your thumb, firmly press the neck piece onto the smaller end of your pear-shaped body. Smooth the seams thoroughly downward until the join is completely invisible. -
Adding the Tail:
Form a small cone of clay for the tail. Attach it to the lower back of the body, blending the clay smoothly so it looks like a natural extension of the spine.
Sagging Neck?
If the long neck droops while you shape the body, insert a trimmed toothpick or a crumpled core of aluminum foil inside the neck and body for invisible internal support.
Step 2: Detailing and Expressions
-
Sculpting the Face:
On the head portion, use your thumb to slightly round out the snout. Use a needle tool to create a simple, long curved line for a gentle smile. -
Adding Nostrils:
Use a small ball tool to press two small indentations at the very front of the snout for nostrils. -
Creating the Eye Socket:
Press a small indentation on the side of the head where the eye will go. This helps the eye sit flush rather than protruding too much. -
Inserting the Eye:
Roll a tiny ball of white clay and press it into the socket. Add a pinhead-sized dot of black clay to the center for the pupil. -
Making the Spines:
Roll several tiny balls of terracotta clay, graduating them in size. Placing the largest ones on the upper back and smaller ones toward the neck and tail. -
Attaching the Spines:
Press these balls gently along the spine line, flattening the bottoms slightly so they stick well. You can blend the bottom edges slightly if you want them very secure. -
Adding Circle Textures:
Using two different sizes of ball tools or empty pen caps, press circular indentations randomly across the body to create a fun, spotted texture. -
Final Smoothing:
Check over your sculpture for any fingerprints. I like to lightly buff the surface with a tiny drop of baby oil on my finger to remove prints before baking. -
Baking:
Place your dino on parchment paper and bake according to your clay package instructions (usually 275°F/135°C for 15-30 minutes per 1/4 inch of thickness). -
Cooling:
Let the figurine cool completely in the oven with the door cracked open. This gradual cooling helps prevent cracks in the terracotta clay.
Prehistoric Patina
After baking, dilute brown acrylic paint with water and wash it over the figure. Wipe it off immediately with a cloth—paint will stay in the circle textures for an aged look.
Now you have a stoic little friend ready to guard your pens and keep you company.
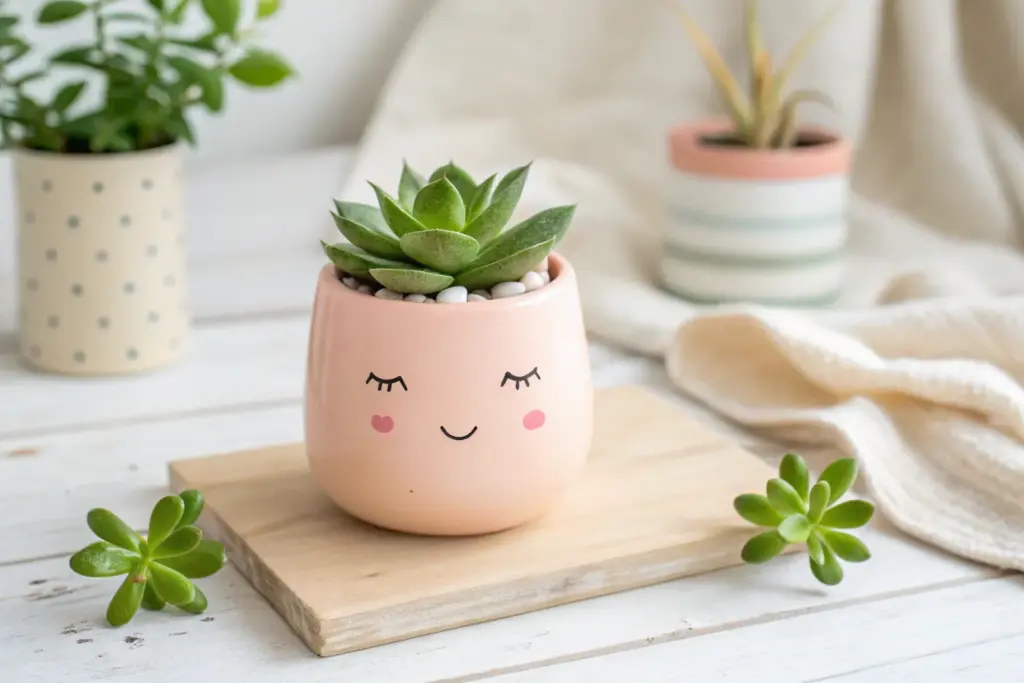
Mini Plant Pots with Sweet Faces
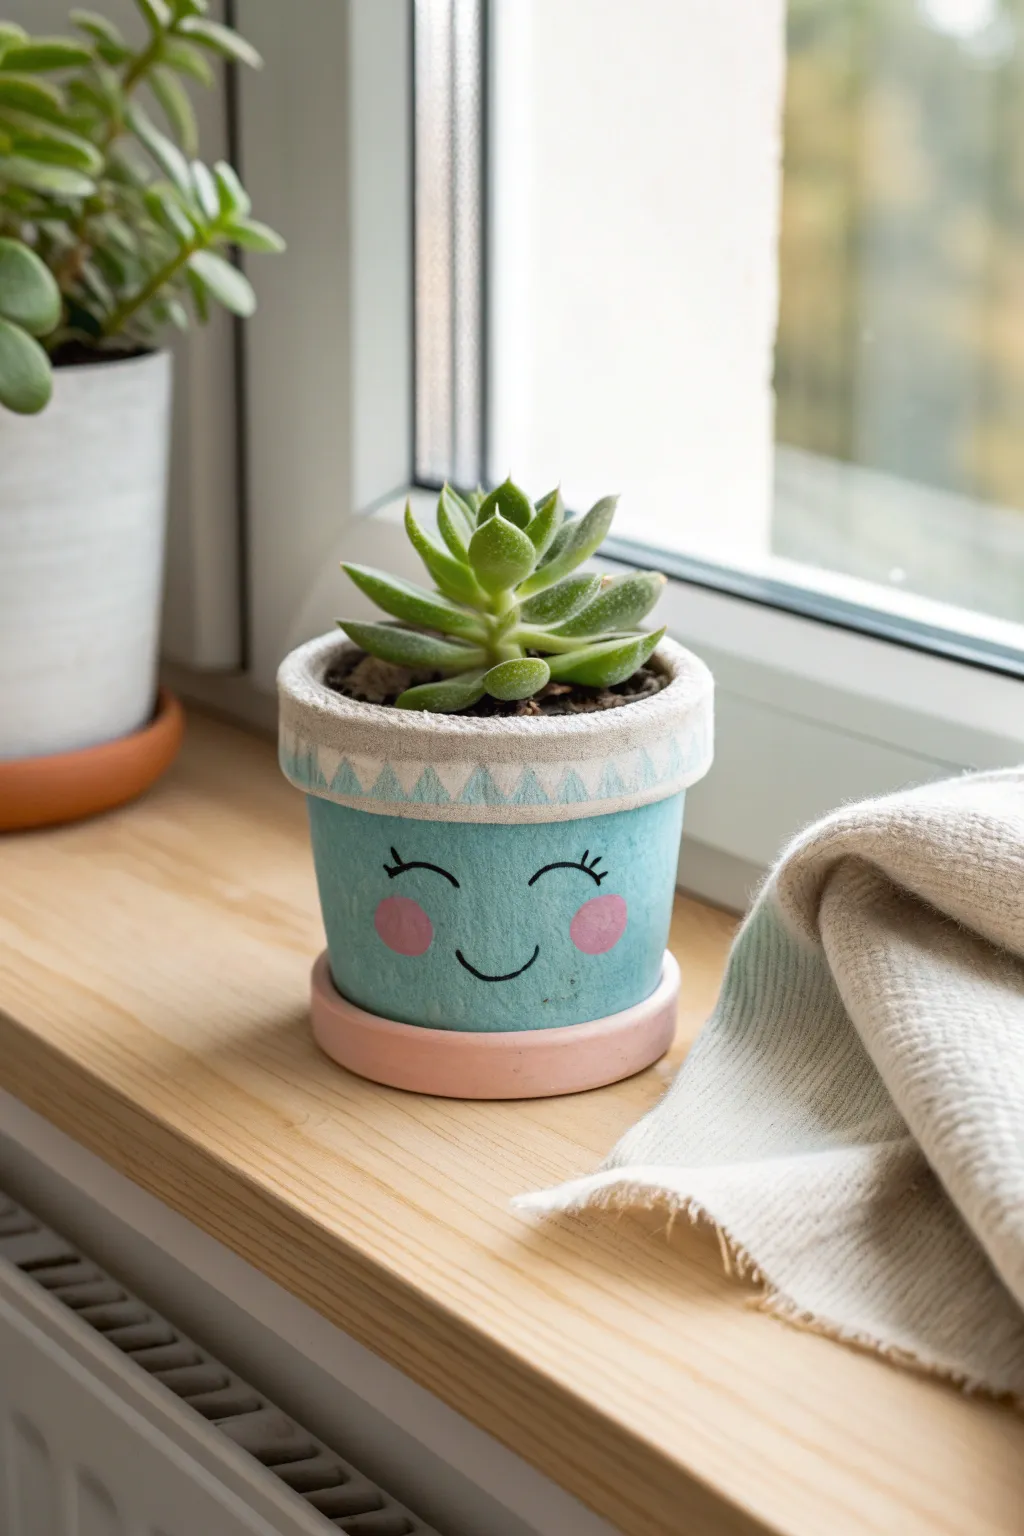
Transform a plain terracotta pot into a charming character with just a bit of paint and a lot of personality. This project features a serene, smiling face with soft rosy cheeks and a delicate patterned rim, perfect for brightening up any windowsill.
Step-by-Step
Materials
- Small terracotta pot (approx. 3-4 inch diameter)
- Matching terracotta saucer
- Acrylic paints: Teal/Mint Blue, White, Baby Pink, Black
- Flat paintbrush (medium)
- Small round detail brush (size 0 or 1)
- Pencil
- Matte spray sealer or mod podge
- Succulent plant and potting soil
Step 1: Base Painting
-
Clean the surface:
Before starting, wipe down your terracotta pot and saucer with a damp cloth to remove any dust or loose clay particles. Let them dry completely. -
Mix the teal shade:
Mix your teal paint with a tiny drop of white to soften it. You want a pastel, calming blue-green hue that feels fresh and bright. -
Paint the pot body:
Apply the teal paint to the exterior of the pot, stopping just underneath the rim. You don’t need to paint the bottom or the very top edge just yet. -
Apply a second coat:
Once the first layer is dry to the touch, add a second coat of teal. This ensures solid coverage so the orange clay doesn’t peek through. -
Paint the rim:
Using white acrylic paint, cover the raised rim of the pot entirely. I like to use a slightly thicker layer here for texture. Let this dry fully before moving on. -
Paint the saucer:
Paint the outer edge of your saucer with the baby pink paint. This creates a sweet color-blocking effect when the teal pot sits inside it.
Step 2: Adding the Face
-
Sketch the features:
Lightly sketch the facial features onto the dried teal surface using a pencil. Draw two curved arches for closed happy eyes and a simple U-shape for the smile. -
Paint the cheeks:
Dip a round sponge pouncer or the tip of your finger into the pink paint. Dab two soft circles onto the pot for the rosy cheeks. -
Outline the eyes:
Using your finest detail brush and black paint, carefully trace over your pencil lines for the eyes. Add three tiny lashes to the outer corner of each eye. -
Define the mouth:
Paint the smiling mouth with a steady hand. Keep the line thin and consistent for that delicate, illustrative look. -
Refine the cheeks:
If the pink cheeks look too translucent, add a second dab of pink paint once the first layer is dry to make them pop.
Clean Lines Hack
Use a piece of waif-thin washi tape just under the rim while painting the body. This ensures a razor-sharp division between the white rim and the teal body.
Step 3: Detailing the Rim
-
Create the triangle pattern:
Mix a diluted version of your teal paint. On the white rim, paint a row of small, contiguous triangles pointing upward. -
Add texture lines:
Using the same diluted teal or a very light gray, add tiny vertical hatching lines inside the triangles to mimic a woven or fabric texture. -
Clean up edges:
If any teal paint from the rim strayed onto the main body, use a small brush with your main teal color to touch up the line where the rim meets the pot.
Add Dimension
Use a tiny dotting tool to add faux “stitching” marks in white around the pink saucer edge, making it look like hemmed fabric to match the rim.
Step 4: Finishing Up
-
Seal the artwork:
Once all paint is completely dry (wait at least an hour), spray the entire pot and saucer with a matte sealer to protect your work from water damage. -
Plant your green friend:
Fill the pot with succulent-specific soil and nestle your small plant inside. Place the pot into the pink saucer.
Place your adorable new friend in a sunny spot and enjoy the cheerful vibe it adds to the room

TRACK YOUR CERAMIC JOURNEY
Capture glaze tests, firing details, and creative progress—all in one simple printable. Make your projects easier to repeat and improve.
Small Toothbrush Holders Shaped Like Little Creatures
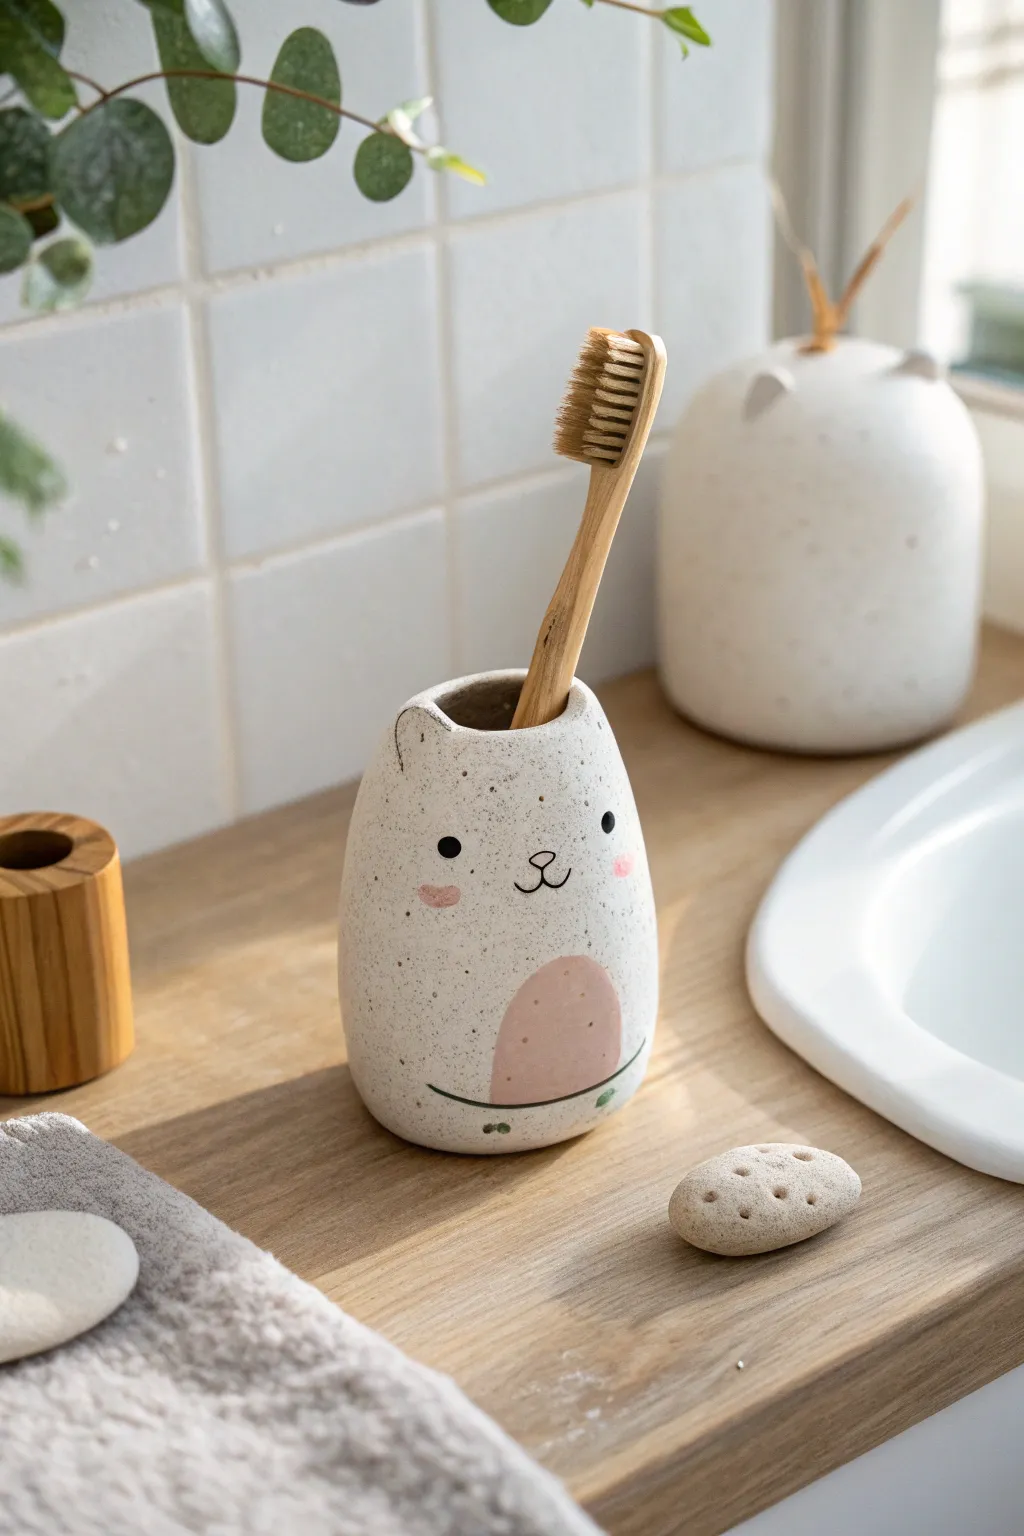
This adorable toothbrush holder brings a touch of whimsy to your bathroom sink with its gentle curves and sweet, painted face. Made from speckled clay, its minimal design features tiny perked ears and soft pastel details that make morning routines just a little brighter.
Step-by-Step Guide
Materials
- Speckled stoneware clay (white or cream base)
- Pottery wheel (optional, can be hand-built)
- Needle tool
- Small loop tool
- Sponge
- Underglaze (black, pink, soft green)
- Fine detail paintbrush
- Clear transparent glaze
- Kiln
Step 1: Forming the Base
-
Prepare the clay:
Start by wedging a baseball-sized amount of speckled clay. Ensure it is free of air bubbles, as these can cause cracks during firing. A white stoneware with manganese speckles works best to replicate this organic look. -
Center and open:
If throwing on the wheel, center your clay and open it up. Aim for a narrow opening, keeping the floor about a quarter-inch thick to provide stability for the toothbrush. -
Pull the walls:
Pull the walls up gently. Instead of a straight cylinder, you want a slightly bulbous, egg-like shape. Apply pressure from the inside to belly out the form in the middle while keeping the rim slightly narrower. -
Refine the rim:
Smooth the rim with a chamois or your sponge. It should be rounded and comfortable to touch. Make sure the opening is wide enough for a standard toothbrush handle. -
Hand-building alternative:
If you don’t have a wheel, you can pinch a ball of clay into a deep cup shape. Smooth the walls upward with your thumb and fingers, aiming for that same tapered, egg-like silhouette.
Step 2: Sculpting Details
-
Leather hard stage:
Let the piece dry to a leather-hard state. It should be firm enough to handle without deforming but soft enough to carve and attach clay. -
Create the ears:
Take two tiny pinch-sized balls of fresh clay. Shape them into small triangles. Score the top rim of your pot and the bottom of the ears, add a dab of slip, and press them firmly into place. -
Blend the seams:
Using a wooden modeling tool or your finger, blend the clay of the ears seamlessly into the main body so they look like they grew out of the form rather than just being stuck on. -
Trim the base:
Turn the pot over and trim the bottom if necessary to create a slight foot or just a clean, flat surface so it sits wobbles-free. -
Smooth the surface:
Wipe the entire piece down with a slightly damp sponge. This removes any finger marks and brings the natural speckles of the clay to the surface.
Clean Lines Tip
Use a needle tool to faintly scratch the face outline before painting. This creates a guide for your brush so you don’t paint crooked eyes.
Step 3: Decorating & Glazing
-
Initial bisque fire:
Once the piece is bone dry, fire it in the kiln to bisque temperature (usually cone 04 or 06). This prepares it for glazing. -
Clean the bisque:
Wipe the bisque-fired piece with a damp sponge to remove any kiln dust. I find this step crucial for ensuring the underglaze adheres properly without crawling. -
Paint the belly:
Mix a soft, pastel pink underglaze. Paint a semi-circle or tombstone shape on the lower front of the pot to create the creature’s belly. -
Face details:
Using a very fine liner brush and black underglaze, paint two small dots for eyes and a simplistic ‘w’ shape for the mouth. Add a tiny nose just above the mouth. -
Cheeks and accents:
Dab two small pink ovals for cheeks using the same pink as the belly. Add faint green lines at the very bottom if you want to ground the character, like it’s standing on grass. -
Apply clear glaze:
Once the underglaze is dry, dip the entire piece into a clear, glossy glaze. Shake off excess drips gently. -
Wipe the foot:
Clean the glaze off the very bottom of the pot with a sponge so it doesn’t fuse to the kiln shelf during firing. -
Final firing:
Fire the piece again to the maturation temperature of your clay and glaze (often cone 5 or 6 for stoneware). Let it cool completely before removing.
Make a Set
Create a shorter, wider version for a bar of soap, or a larger version to hold toothpaste, giving each family member a different animal face.
Now your bathroom sink has a friendly little guardian for your toothbrush.
Mini Photo and Note Holders for Your Workspace
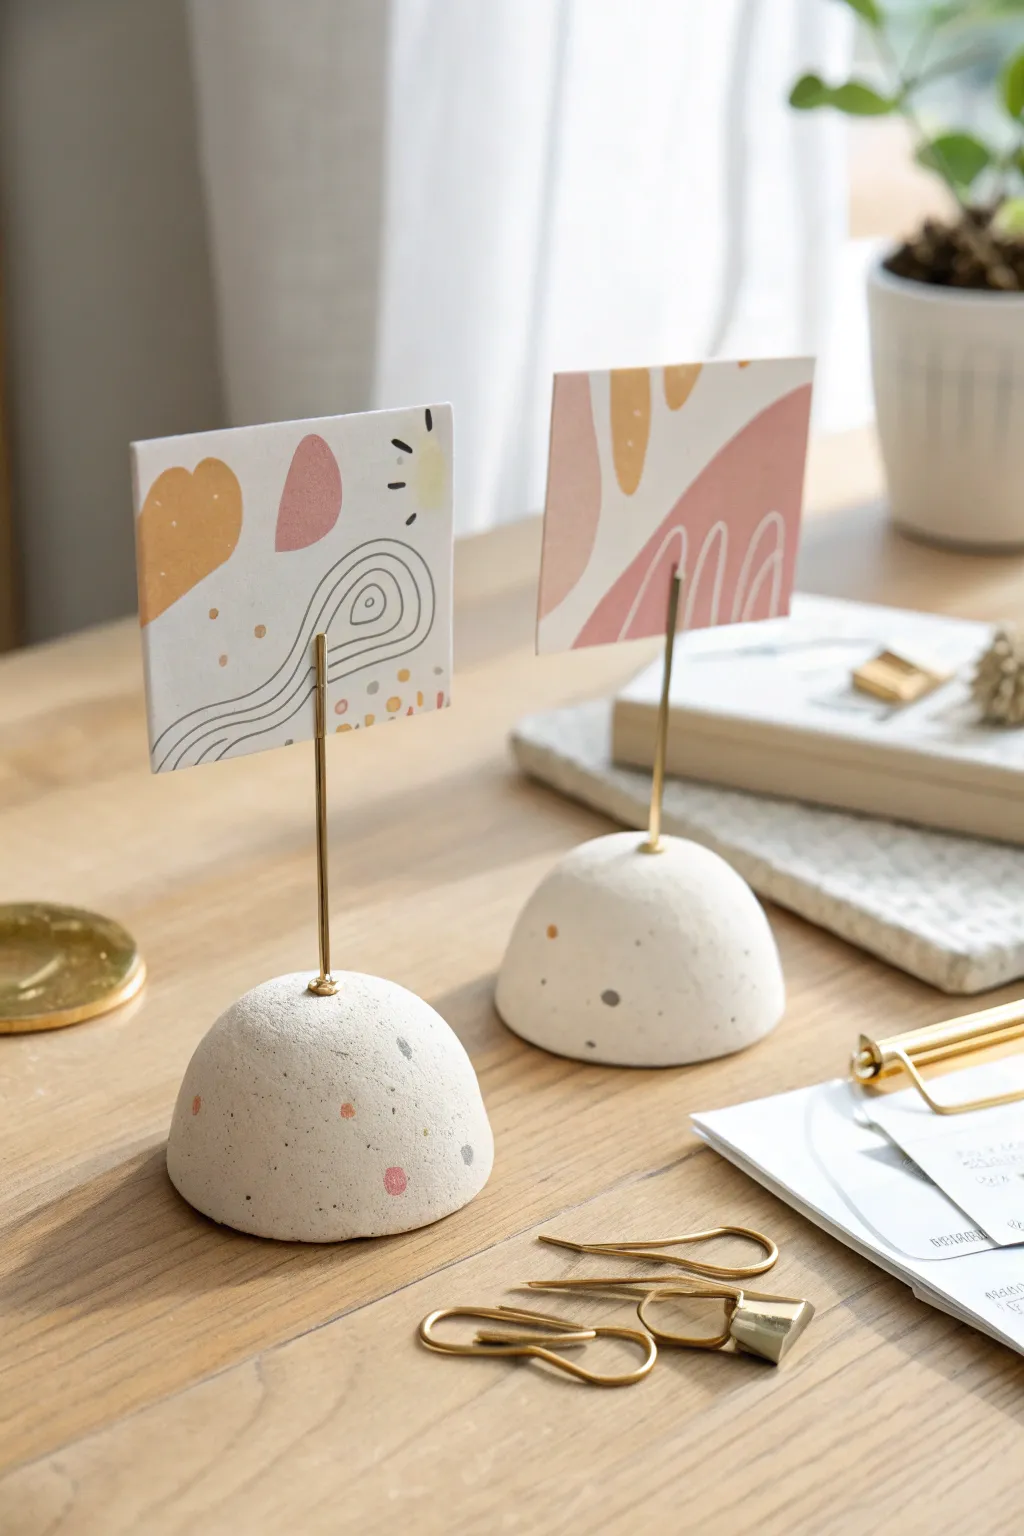
Elevate your desk organization with these minimalist, domed memo holders featuring a subtle terrazzo effect. These weighty little stands combine a clean, modern silhouette with playful pops of color, perfect for displaying your favorite photos or important reminders.
Step-by-Step Tutorial
Materials
- Air-dry clay (white or off-white)
- Acrylic paints (pastel pink, mustard yellow, grey, terracotta)
- Gold craft wire (16 or 18 gauge)
- Wire cutters
- Needle-nose pliers
- Rolling pin or smooth round object
- Sandpaper (fine grit)
- Matte varnish or sealant (optional)
- Small hobby knife
- Bowl of water
Step 1: Creating the Speckle Mixture
-
Flatten Clay Scraps:
Start by taking very small pinches of fresh clay, about the size of a dime. Flatten these pieces into thin, uneven sheets on your work surface. -
Paint the Components:
Paint each of these small flattened scraps a different color to match the terrazzo look: mustard yellow, terracotta, light grey, and a soft pink. Let the paint dry fully on the surface. -
Cut the Chips:
Once the paint is dry, use your hobby knife to chop these colored clay sheets into tiny, jagged fragments. These will become your ‘stone’ chips, so vary their sizes slightly for a natural look. -
Prepare the Base Clay:
Take a larger lump of white clay, roughly the size of a tangerine for two holders. Knead it until it is soft and pliable. -
Incorporate the Chips:
Sprinkle your colored clay chips onto the white clay slab. Fold the clay over and gently knead just enough to distribute the color chips throughout the mass without muddying the main white color.
Clean Cuts Pro Tip
To get cleaner ‘chips’ for your terrazzo effect, let the painted clay scraps dry until they are leathery hard before chopping them. Wet clay tends to smear rather than crumble into distinct shapes.
Step 2: Shaping the Domes
-
Divide and Roll:
Split your speckled clay mixture into two equal portions. Roll each portion into a smooth, tight sphere between your palms to eliminate any major cracks. -
Form the Dome:
Place the sphere onto your work surface and gently press down with the palm of your hand. You want to flatten the bottom while keeping the top nice and rounded, creating a classic dome shape. -
Refine the Surface:
Dip your finger in a little water and smooth out the surface of the dome. If any colored chips are hiding just beneath the surface, you can gently scrape away a thin layer of white clay to reveal them. -
Flatten the Base:
Pick up the dome and tap the flat bottom against the table a few times to ensure it sits perfectly level. I find this creates a much more stable base than just pressing it down.
Step 3: Wire Mechanism and Finishing
-
Cut the Wire:
Cut two lengths of your gold craft wire, approximately 4 to 5 inches long each. -
Create the Clip:
On one end of the wire, use your round-nose pliers to create a double loop or a tight spiral. This is where the paper will slide in, so make sure the loops are tight against each other. -
Straighten the Stem:
Ensure the rest of the wire stem is perfectly straight, adjusting with your fingers or pliers if necessary. -
Insert the Wire:
Carefully push the straight end of the wire into the absolute center of your clay dome. Push it down until it feels secure, but don’t go all the way through the bottom. -
Secure the Connection:
Gently pinch the clay around the base of the wire entry point to ensure a tight seal as the clay shrinks slightly during drying. -
Drying Phase:
Let your memo holders dry completely for 24-48 hours. Keep them away from direct heat sources to prevent cracking. -
Sanding for Texture:
Once fully dry, take fine-grit sandpaper and lightly sand the surface. This is the magic step—it will expose more of those colored chips and give the piece a true stone-like finish. -
Final Seal:
Apply a thin coat of matte varnish to protect the clay and keep the colors vibrant without adding too artificial of a shine.
Level Up: Art Cards
Create your own abstract mini-art to match the clay base! Use the same acrylic paint colors on thick cardstock to paint loose, organic shapes that mirror the terrazzo speckles.
Once dry and sealed, slip your favorite snapshot or a motivational card into the wire loop to complete your stylish desk accessory
Tiny Incense Holders with Minimal Shapes
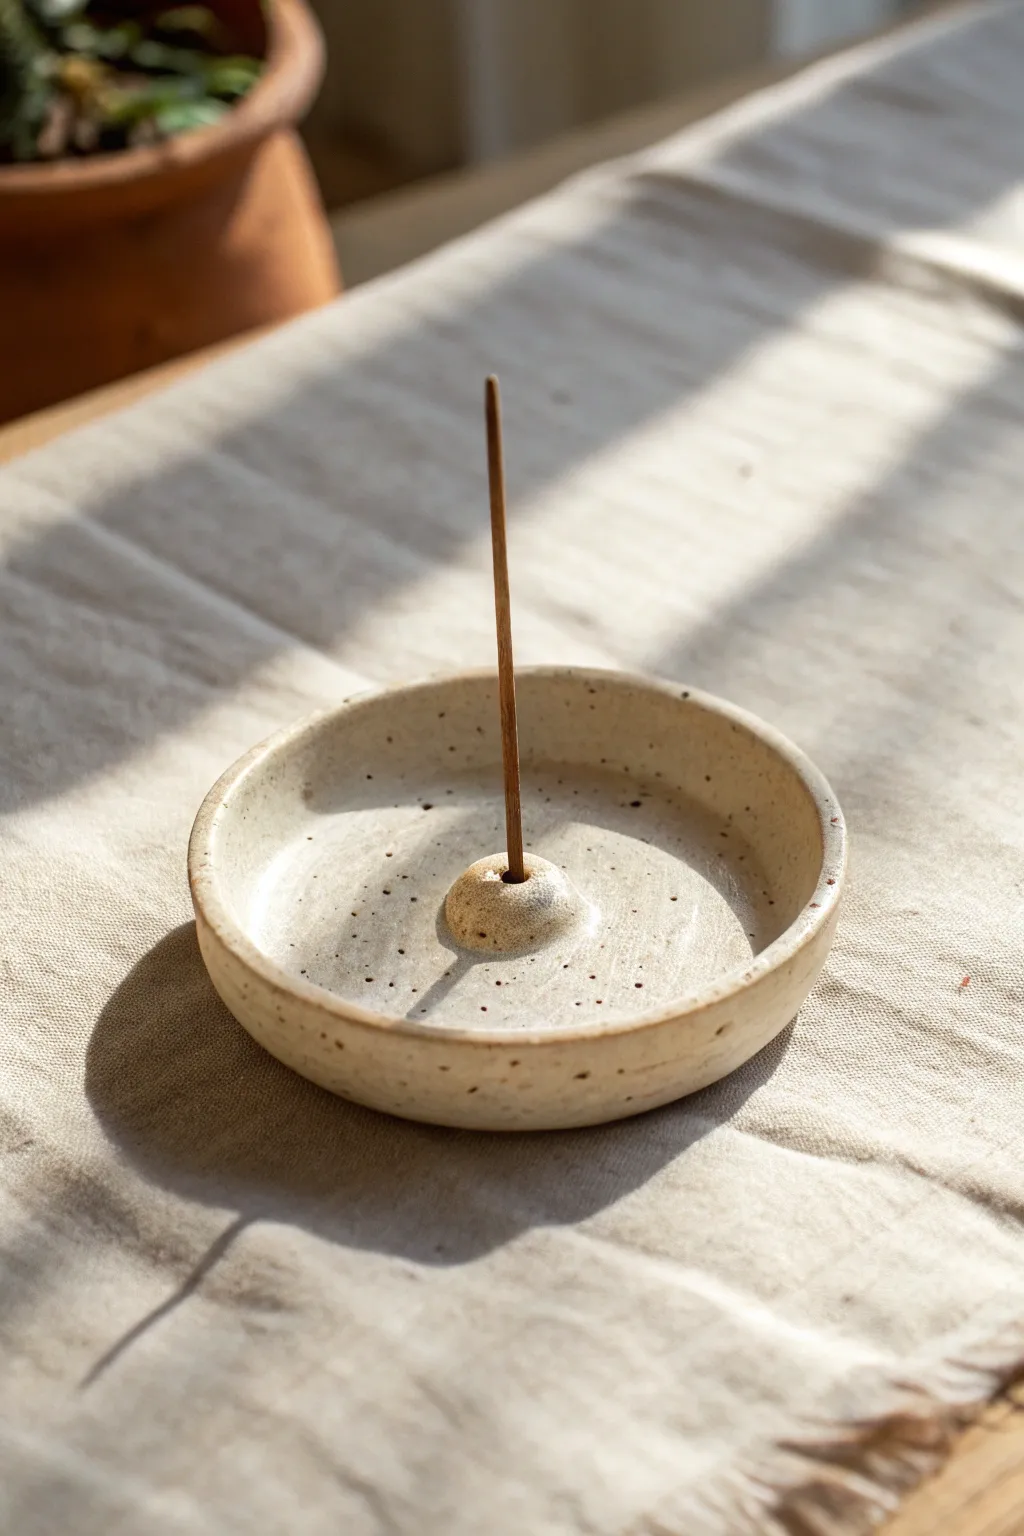
Embrace the beauty of simplicity with this handmade ceramic incense holder, featuring a gentle rim and natural speckling. This project balances functional design with organic charm, perfect for adding a moment of calm to your daily routine.
Step-by-Step Guide
Materials
- Speckled stoneware clay (or white clay with added grog/sand)
- Sponge
- Rolling pin
- Canvas or cloth board for rolling
- Circular template (cookie cutter or jar lid, approx. 3-4 inches)
- Potter’s needle tool or wooden skewer
- Rib tool (wood or rubber)
- Small bowl of water
- Incense stick (for sizing)
- Clear matte or satin glaze
- Kiln access
Step 1: Forming the Base
-
Prep the clay:
Begin with a ball of speckled stoneware clay about the size of a tangerine. Wedging it thoroughly is crucial to remove air bubbles and ensure an even consistency. -
Roll the slab:
Place the clay on your canvas mat to prevent sticking. Using the rolling pin, roll the clay out evenly until it is approximately 1/4 inch thick. Turn the slab occasionally to keep the thickness uniform. -
Cut the circle:
Place your circular template onto the slab. Using the needle tool, cut straight down around the edge to create your perfect circle base. -
Smooth the edges:
Dip your finger slightly in water and run it gently along the cut edge of the circle. This removes sharp burrs and refines the rim before we start shaping.
Step 2: Shaping and Detailing
-
Create the rim:
With the clay circle resting on the table, gently pinch the outer edge upward to create a shallow wall. Rotate the piece as you go, aiming for a wall height of about half an inch. -
Refine the curve:
Use a damp sponge to smooth the transition between the floor of the dish and the new wall. I like to gently compress the rim here to ensure it creates a pleasing, continuous curve rather than a sharp angle. -
Level the rim:
Turn the piece upside down gently onto a flat surface for just a moment to ensure the top rim is level, then flip it back over. -
Make the holder nub:
Roll a small, separate ball of clay, roughly the size of a large marble or a hazelnut. This will become the central anchor for the incense. -
Score the connection points:
Using your needle tool, scratch cross-hatch marks into the very center of the dish and on the bottom of the small clay ball. This scoring is vital for a strong bond. -
Apply slip and attach:
Dab a tiny drop of water or clay slip onto the scored areas. Press the ball firmly into the center of the dish. -
Blend the seam:
Use a small modeling tool or your finger to smooth the clay from the base of the ball onto the floor of the dish, ensuring there is no visible seam. -
Shape the nub:
Gently pinch and round the attached ball so it looks like a soft, organic mound rising from the center. -
Pierce the hole:
Take your actual incense stick (or a skewer of similar thickness) and press it vertically into the center of the mound. Don’t go all the way through to the table; stop about 3/4 of the way down. -
Wiggle for clearance:
ever so slightly wiggle the stick in a circular motion to widen the hole just a hair. Clay shrinks when drying, so the hole needs to be slightly larger than the stick.
Hole Size Warning
Clay shrinks 10-15% in the kiln! Always make the incense hole slightly larger than you think necessary, or the stick won’t fit later.
Step 3: Finishing and Firing
-
Slow drying:
Cover the piece loosely with plastic for the first 24 hours to let moisture even out. Then, uncover and let it dry completely to the bone-dry stage, which usually takes a few days. -
Bisque fire:
Load the bone-dry piece into the kiln for a bisque firing (usually Cone 04 or 06). This hardens the clay and prepares it for glazing. -
Glaze application:
Once cooled, wipe the piece with a damp sponge to remove dust. A simple clear matte glaze works best here to highlight the natural speckles of the clay body. Dip or brush the glaze evenly. -
Clean the distinct foot:
Before the final firing, meticulously wipe away any glaze from the bottom of the dish so it doesn’t fuse to the kiln shelf. -
Final glaze fire:
Fire the piece to the maturity temperature of your specific clay and glaze combo (often Cone 5 or 6 for stoneware).
Air-Dry Alternative
No kiln? Use air-dry clay mixed with coffee grounds to mimic the speckles, and seal with a matte acrylic varnish for a similar look.
Once cool, your minimalist dish is ready to catch ash and bring a serene element to your home decor
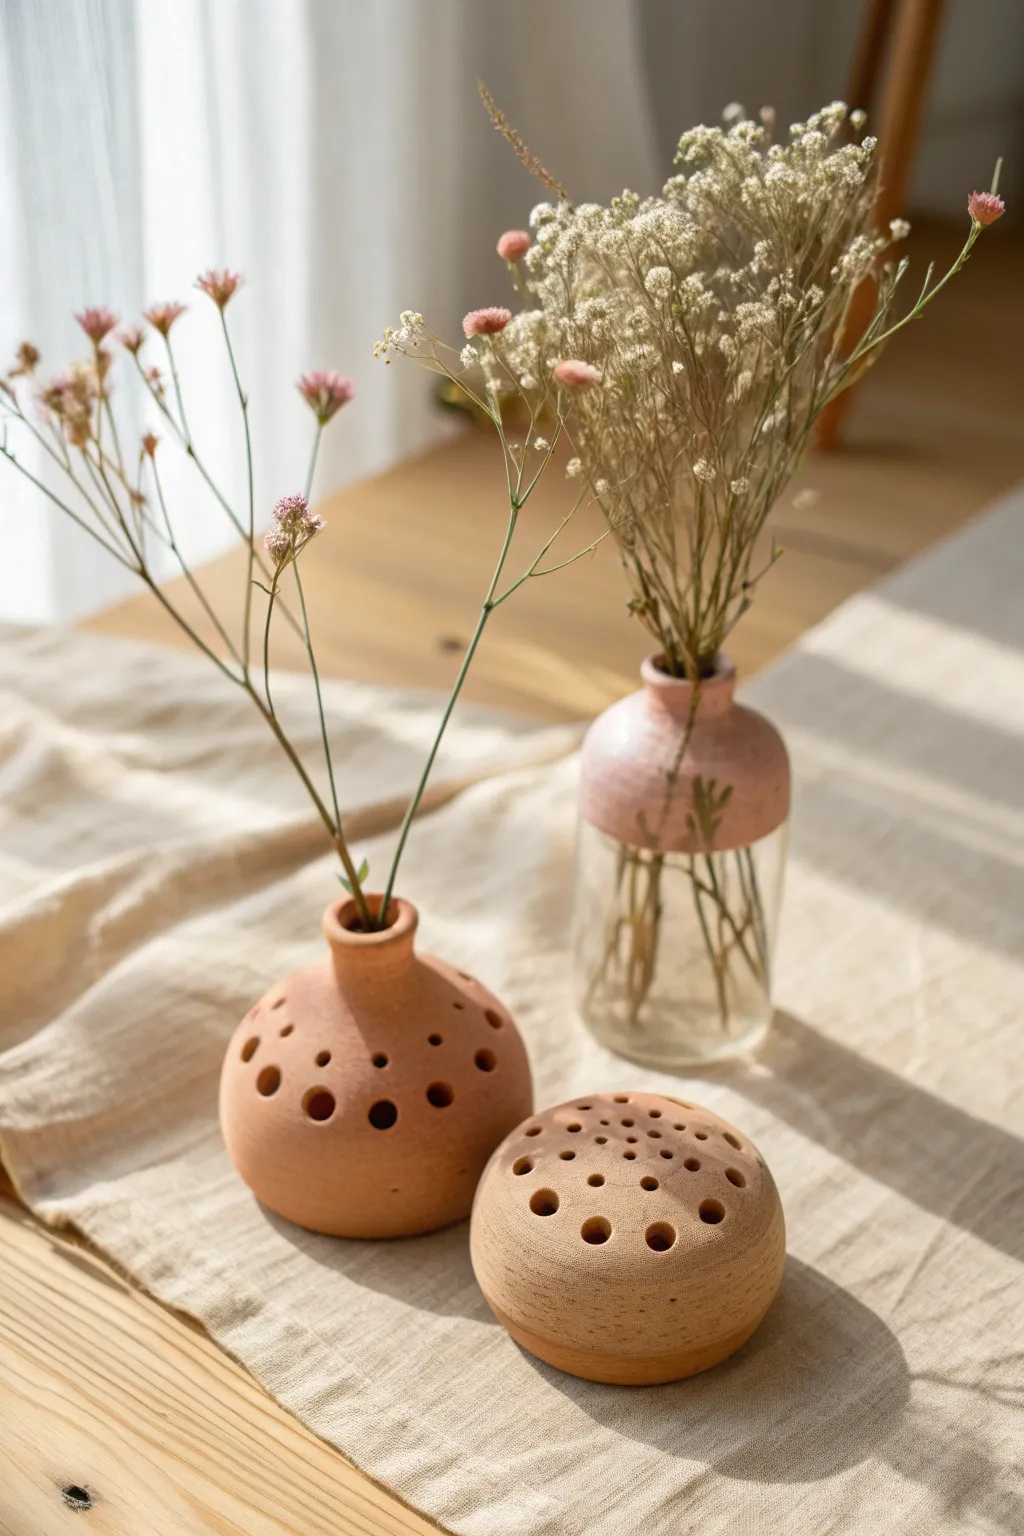
Mini Bud Vases That Look Great in Groups
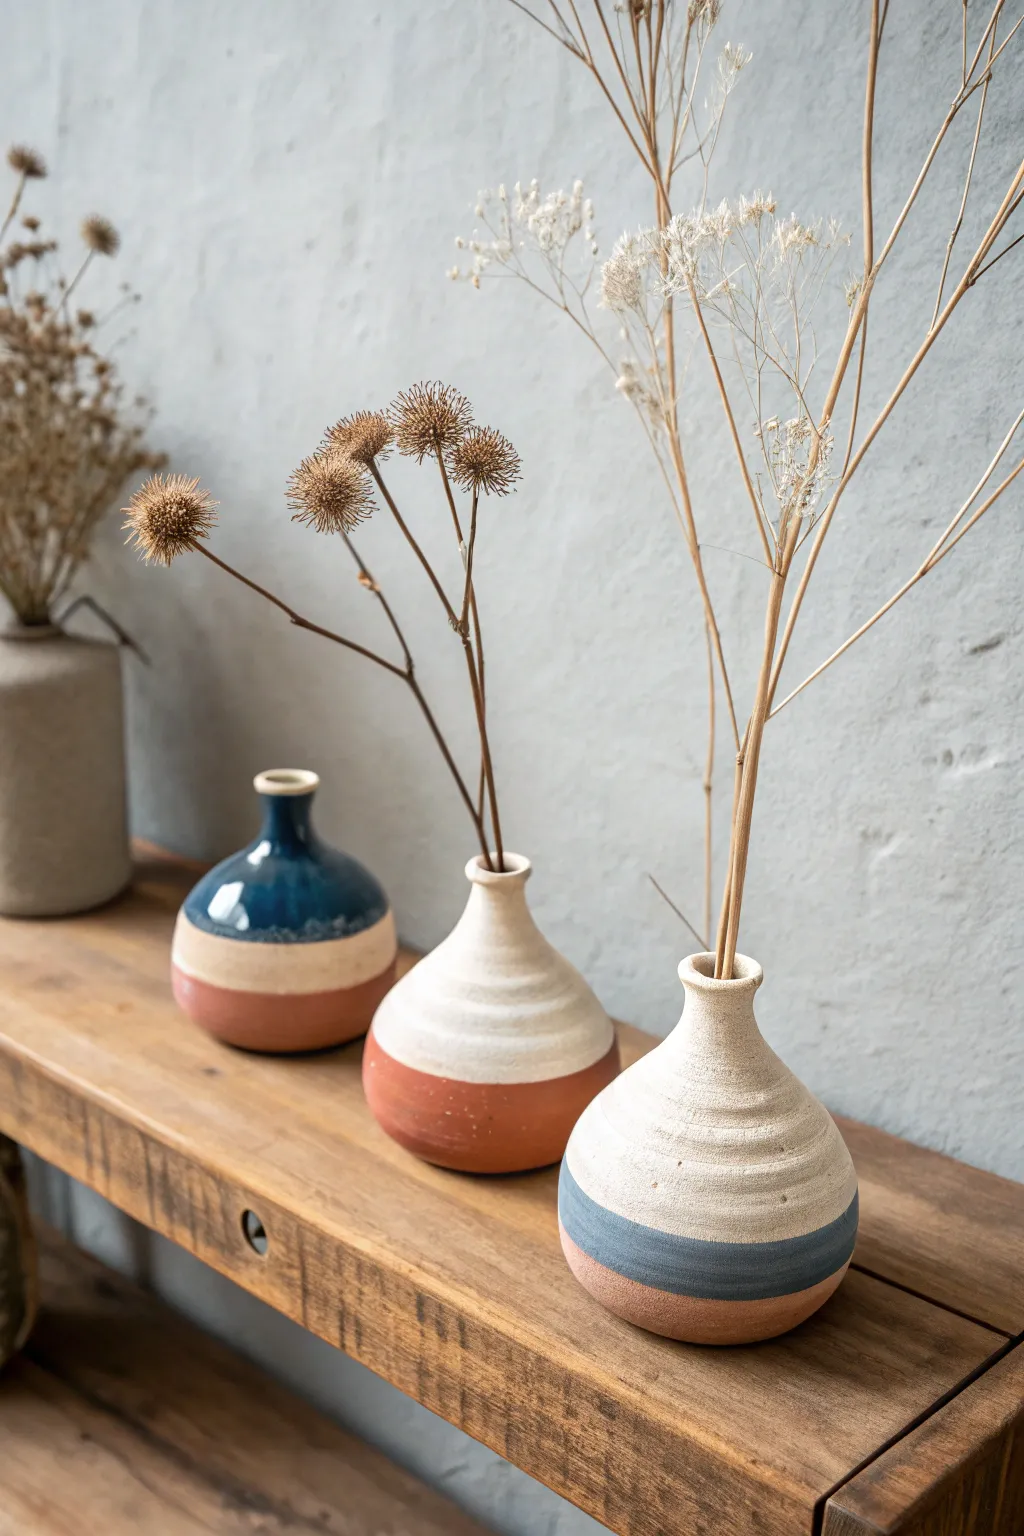
These charming mini bud vases combine raw terracotta textures with smooth, milky glazes and pops of blue, creating a modern yet rustic aesthetic perfect for dried botanicals. The staggered heights and cohesive color palette make them look especially striking when displayed as a trio.
Step-by-Step
Materials
- Air-dry clay (terracotta color) or firing clay if you have kiln access
- Pottery wheel (optional) or rolling pin and coil-building tools
- Sponge
- Wire clay cutter
- Needle tool
- Water bowl
- Rib tool (kidney scraper)
- White matte acrylic paint (or glaze if firing)
- Deep indigo blue acrylic paint (or glaze)
- Painters tape
- Fine grit sandpaper
- Clear matte sealant spray
Step 1: Shaping the Clay Body
-
Prepare the clay:
Begin by wedging your terracotta clay thoroughly to remove any air bubbles. Divide the clay into three slightly different sized balls to create the graduated sizes for your trio. -
Form the base:
If hand-building, create a pinch pot for the base of the first vase. Smooth the walls to ensure an even thickness of about a quarter inch. -
Build the height:
Roll out clay coils and score and slip them onto your pinch pot base. Build upward, gradually tapering the form inward as you reach the shoulder of the vase. -
Shape the neck:
Continue adding smaller coils to form a narrow, vertical neck. Use your fingers or a modeling tool to smooth the transition between the bulbous body and the slender neck. -
Refine the surface:
While the clay is leather hard, use a damp sponge or a rib tool to smooth the exterior. You can gently press horizontal ridges into the clay with your finger or a tool if you want to mimic the wheel-thrown texture seen in the reference. -
Create the rim:
Use your fingers to gently flair or flatten the very top of the neck to create a finished rim. Repeat this entire process for the other two vases, varying their body shapes slightly.
Uneven stripes?
If your hand-painted lines are wobbly, place the vase on a lazy susan. Hold your brush steady in one spot and slowly rotate the turntable for perfect bands.
Step 2: Refining and Drying
-
Let it dry:
Allow your vases to dry completely. For air-dry clay, this usually takes 24-48 hours depending on humidity; turn them occasionally so the bottoms dry evenly. -
Sanding:
Once fully dry, take your fine-grit sandpaper and gently smooth out any rough patches, particularly around the rim and the base. Wipe away all dust with a slightly damp cloth.
Waterproofing Tip
Air-dry clay isn’t water-tight! Use a small pill bottle or test tube hidden inside the vase to hold live flowers, or stick exclusively to dried florals.
Step 3: Painting and Finishing
-
Tape the first line:
Decide on your color blocking. For a sharp line, wrap painter’s tape horizontally around the vase. Press the edge down firmly to stop paint bleeding. -
Apply the base color:
Paint the upper section (or the specific band you are working on) with the white matte paint. I find that dabbing with a sponge brush often leaves a nicer texture than stroking with a bristle brush. -
Add the blue accent:
For the vase with the blue top or blue stripe, apply your indigo paint. You may need two coats to get that rich, glazed look. -
Create the raw look:
Leave the bottom third of the vase unpainted to expose the beautiful terracotta color. This anchors the design and gives it that dipped appearance. -
Freehand (optional):
If you prefer the organic, slightly imperfect line seen in the reference image, skip the tape. Use a steady hand to paint the lines, allowing small natural variations. -
Soften the transitions:
If the paint lines feel too harsh, lightly sand the painted edge after it dries to embrace a more weathered, rustic vibe. -
Seal the project:
Spray the entire vase (inside and out) with a clear matte sealant. This protects the clay and makes the paint durable.
Arrange your finished trio on a windowsill with some dried meadow flowers to enjoy your handiwork
Small Bead-Edge Dishes for Coins and Clips
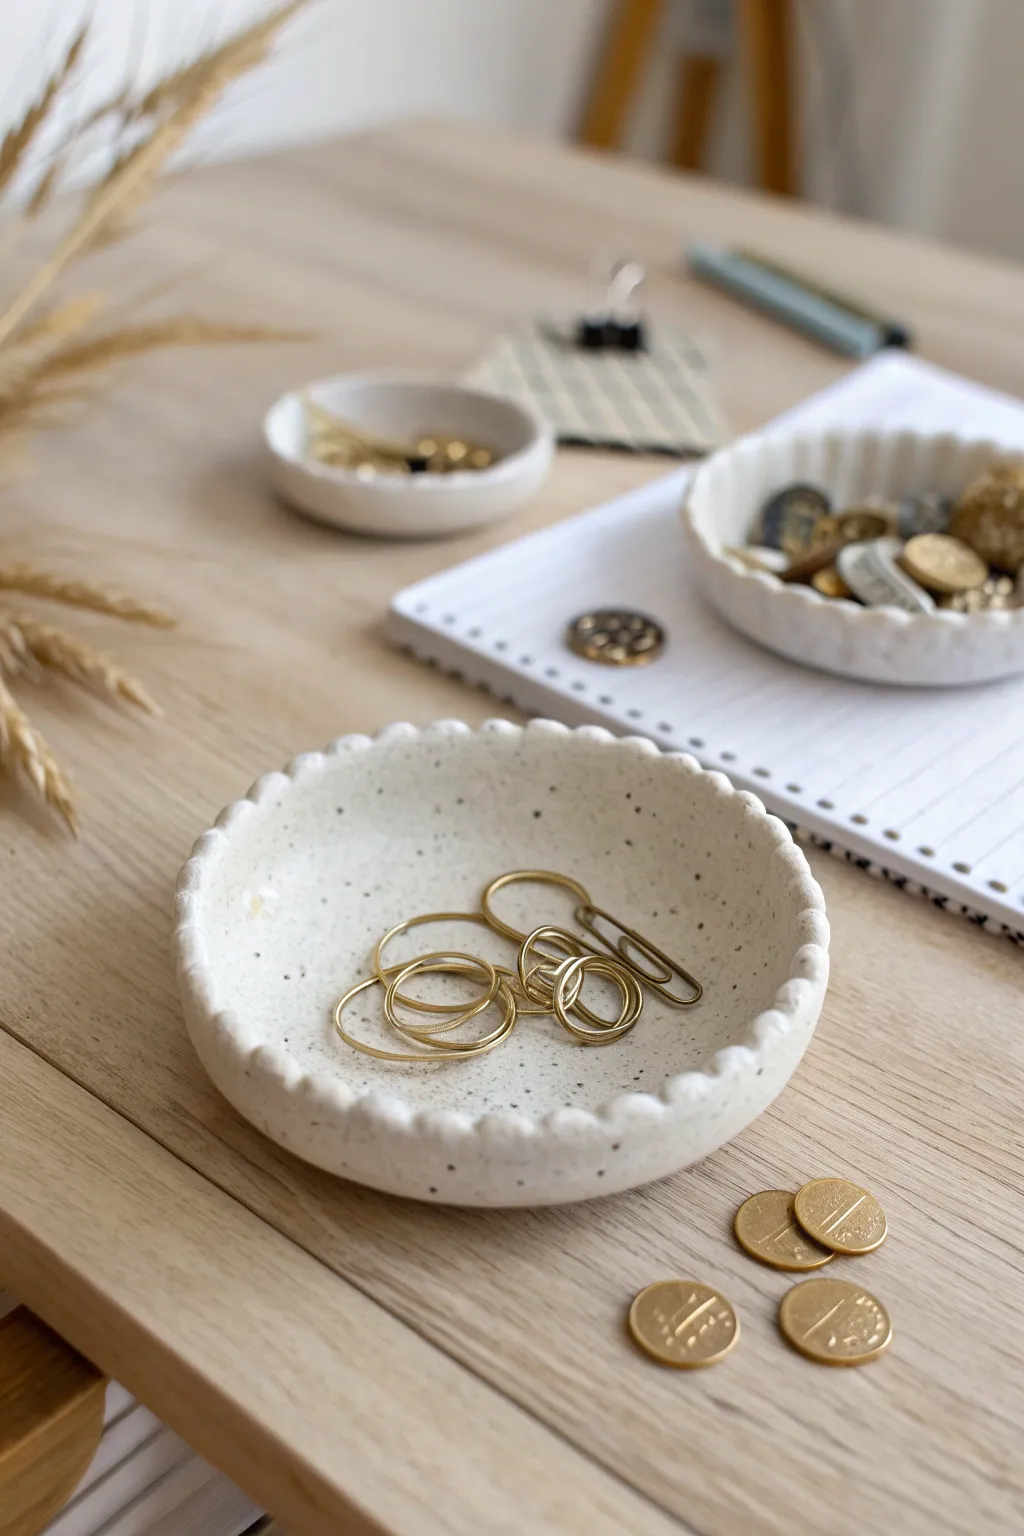
Create a charming home for your loose change, jewelry, and office odds and ends with this simple yet elegant clay project. The distinctive beaded rim and speckled finish give these handmade dishes a professional, pottery-studio look without needing a kiln.
Step-by-Step Guide
Materials
- Air-dry clay (white or light grey)
- Acrylic rolling pin
- Circle cutter or small bowl (approx. 4-5 inches diameter)
- Small bowl for molding (slump mold)
- Plastic wrap or cling film
- Pottery sponge
- Small cup of water
- Modeling tool or butter knife
- Acrylic paints (cream/off-white and black/dark brown)
- Paintbrush (flat shader)
- Old toothbrush
- Matte or satin varnish
Step 1: Shaping the Base
-
Prepare the Clay:
Begin by taking a handful of air-dry clay and kneading it in your hands to warm it up. If the clay feels a bit stiff, adding a drop or two of water can help make it pliable. -
Roll the Slab:
Place the clay on a smooth surface or canvas mat. Use your acrylic rolling pin to roll it out into an even slab, aiming for a consistent thickness of about 1/4 inch. -
Cut the Circle:
Press your circle cutter or an inverted bowl onto the clay slab to cut out a perfect circle. Remove the excess clay from around the edges and set it aside for the detail work. -
Smooth the Edges:
Dip your finger lightly in water and run it along the cut edge of your clay circle to smooth out any roughness or sharp debris.
Cracks Appearing?
Make a ‘slip’ paste by mixing dry clay crumbs with water. Fill any cracks with this paste, smooth it over with a damp finger, and let it dry again before painting.
Step 2: Creating the Beaded Rim
-
Roll Small Spheres:
Take the excess clay you set aside earlier and roll many small balls. Try to keep them consistent in size, roughly the size of a pea or a small blueberry. -
Attach the Beads:
Score the outer rim of your clay circle slightly with a modeling tool or needle. Dab a tiny bit of water or slip (clay mixed with water) onto the scored area. -
Positioning:
Press the small clay balls onto the rim one by one, ensuring they touch each other and adhere firmly to the base circle. Work your way around the entire circumference. -
Initial Smoothing:
Once the rim is full, gently press down on the tops of the balls just slightly to secure them, but be careful not to flatten their round shape completely. -
Seamless Integration:
On the inside of the dish where the ball meets the base, use your modeling tool to gently drag a tiny bit of clay from the ball onto the base to bond them together so they don’t pop off later. -
Sponge Finish:
Take a slightly damp sponge and gently wipe over the beaded rim to smooth out fingerprints and soften the look.
Make it Luxe
Paint the beaded rim with liquid gold leaf or metallic gold paint after the speckling step to add a sophisticated, jewelry-store border to your dish.
Step 3: Forming and Drying
-
Prepare the Mold:
Take a small bowl that has a nice curved bottom. Line the inside of this bowl with plastic wrap to prevent the clay from sticking. -
Slump the Clay:
Carefully lift your clay circle with the beaded rim and place it inside the lined bowl. Let gravity pull the center down so it takes on the curved shape of the bowl. -
Adjust the Rim:
I like to check the rim at this stage to make sure the beads haven’t shifted. Gently nudging them back into a perfect circle ensures the final piece looks uniform. -
Dry Time:
Let the dish dry in the mold for at least 24 hours. Once the surface feels hard, remove it from the bowl and let the bottom dry for another 12-24 hours.
Step 4: Finishing Touches
-
Base Coat:
Once bone dry, paint the entire dish with a creamy off-white acrylic paint. You may need two thin coats for opaque coverage. -
Create the Speckles:
Dilute a small mount of black or dark brown paint with water so it is runny. Dip an old toothbrush into this mixture. -
Splatter Technique:
Hold the toothbrush over the dish and run your thumb across the bristles to flick tiny speckles of paint onto the surface. Test on a paper towel first to control the spray size. -
Seal Protection:
Allow the paint to dry completely. Finish by applying a coat of matte or satin varnish to seal the clay and protect it from moisture and scratches.
Now you have a stylish set of organizers ready to tidy up your desk or vanity
Mini Candy-Color Candle Holders You Can Batch Make

These charming pastel candle holders feature a stacked, tapered design that mimics the look of colorful ring toys. Their ribbed texture adds a lovely tactile element, making them a perfect, modern centerpiece for any table setting.
Detailed Instructions
Materials
- Air-dry clay or polymer clay (white)
- Acrylic paints (pastel pink, blue, yellow, lavender)
- Small rolling pin
- Clay knife or craft blade
- Circle cutters (graduated sizes) or templates
- Texture tool (comb, fork, or ribbed rolling pin)
- Regular taper candle (for sizing)
- Strong craft glue or liquid clay (optional for reinforcement)
- Fine-grit sandpaper
- Matte varnish
Step 1: Creating the Clay Rings
-
Condition the Clay:
Begin by kneading your white clay until it is soft, pliable, and free of air bubbles. If you are using polymer clay, the warmth of your hands will help make it workable. -
Roll Out the Slab:
Use your rolling pin to flatten the clay into a thick, even slab. Aim for a thickness of about 3/4 inch (2 cm) to give each ring enough substantial height. -
Cut the Circles:
Using graduated circle cutters, punch out five or six circles for each candle holder. Each circle should be slightly smaller than the one before it to create the tapered effect. -
Add Texture:
Take a texture tool, such as a fine-toothed clay comb or even a fork, and gently roll or press vertical lines around the outer edge of each clay circle. This creates the ribbed, sweater-like pattern. -
Create the Center Hole (Top Piece):
Take the smallest circle (the top piece) and press the base of your taper candle into the center to create an indentation. Use a cutter or knife to hollow this out so the candle fits snugly. -
Create Center Holes (Body Pieces):
For the remaining larger circles, cut a hole through the center of each one. This reduces weight and helps them dry faster, though you don’t need these holes to be perfectly neat since they will be hidden.
Texturing Trick
Short on tools? Roll the edge of the clay circles over the thread of a large bolt or screw. This instantly creates perfect, uniform ridges.
Step 2: Assembly and Refining
-
Stack the Rings:
Stack the rings from largest at the bottom to smallest at the top to check the silhouette. I like to do a dry fit first to ensure the proportions look pleasing before committing. -
Join the Layers:
Score the top of the bottom ring and the bottom of the next ring with a needle tool. Apply a small amount of water (for air-dry clay) or liquid clay (for polymer) to the scored areas. -
Press and Secure:
Press the rings firmly together, ensuring they are centered. Repeat this process until all layers are stacked, concluding with the solid top piece that holds the candle. -
Smooth the Connections:
Use a modeling tool to gently blend the clay slightly between the layers if needed for stability, but create a deep groove to maintain the defined ‘stacked ring’ appearance. -
Final Shaping:
While the clay is still workable, check that the holder stands perfectly flat on the table and that the candle slot is vertical. Adjust gently if it leans.
Step 3: Finishing Touches
-
Drying or Baking:
If using air-dry clay, let the piece dry for 24-48 hours away from direct heat. If using polymer clay, bake according to the manufacturer’s instructions on the package. -
Sanding:
Once fully cured and cooled, use fine-grit sandpaper to smooth out any rough edges or fingerprints, being careful not to sand away the ribbed texture you created. -
Base Coat:
Wipe away any sanding dust with a damp cloth. Apply a thin coat of white acrylic paint as a primer to help the final pastel colors pop. -
Painting Pastels:
Paint each candle holder a different soft pastel shade—pink, blue, yellow, and lavender. Use a small brush to get the paint into the textured grooves. -
Second Coat:
Allow the first coat to dry, then apply a second coat for opaque, even coverage. Ensure no white clay is showing through the texture. -
Sealing:
Finish by applying a matte varnish over the entire piece. This protects the paint from chipping and gives the holder a professional, finished look.
Level Up: Ombré Effect
Instead of a solid color, mix different shades of clay or paint each ring a slightly lighter shade as you go up for a stunning gradient effect.
Now you have a set of adorable table accessories ready to brighten up your next dinner party
Tiny Stampable Tags for Gifts and Storage Jars
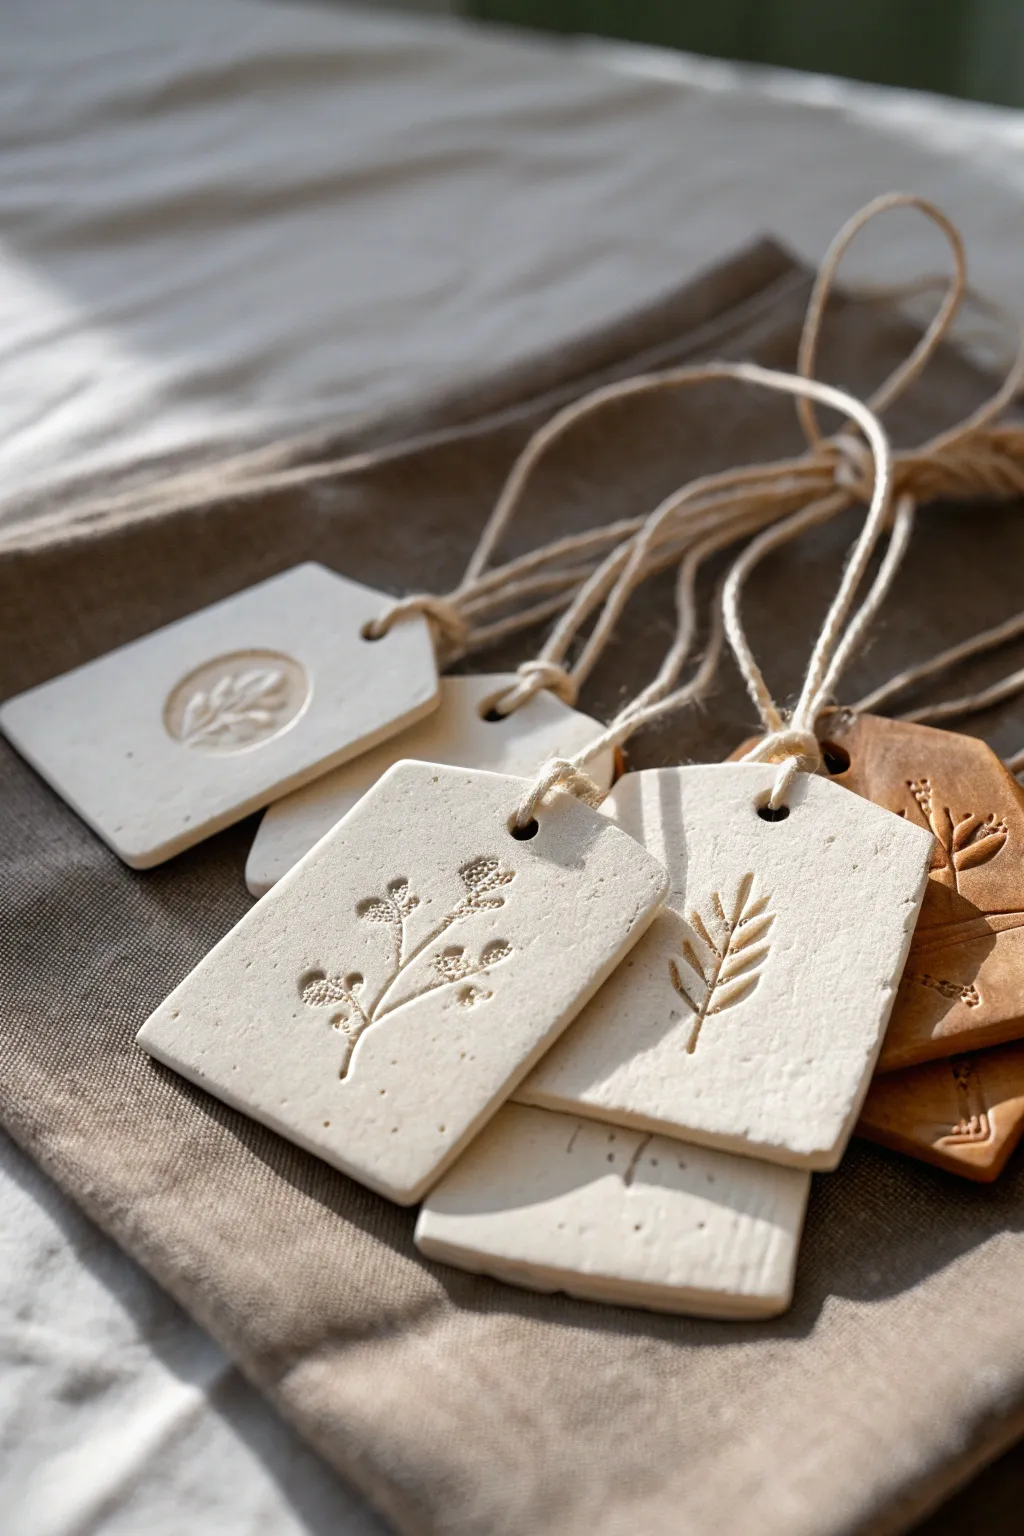
Create a rustic, elegant touch for gifts or pantry organization with these delicate stamped tags. Using simple botanical impressions and natural twine, you can capture the subtle beauty of nature in a durable, handmade keepsake.
Step-by-Step Guide
Materials
- White air-dry clay or polymer clay
- Terra cotta colored air-dry clay (optional for variation)
- Fresh or dried botanical sprigs (small leaves, fern tips, small flowers)
- Rolling pin or smooth glass jar
- Rectangle clay cutter or a sharp craft knife and ruler
- Straw or small circular cutter (for the hole)
- Fine-grit sandpaper (optional)
- Natural jute twine
- Parchment paper or non-stick work mat
- Clear matte acrylic sealer (optional)
Step 1: Preparation and Rolling
-
Prepare your workspace:
Lay down a sheet of parchment paper or a non-stick silicone mat. This prevents the clay from sticking and ensures a smooth removal later. -
Condition the clay:
Take a handful of your white clay and knead it in your hands until it becomes soft, pliable, and free of cracks. If you are using terra cotta clay as well, repeat the process with a separate piece, washing your hands between colors to avoid staining the white clay. -
Roll out the slab:
Use your rolling pin to flatten the clay into an even slab. Aim for a thickness of about 1/4 inch (approx. 5-6mm). You want it thick enough to be sturdy but thin enough to look delicate. -
Smooth the surface:
Run your finger or a slightly damp sponge lightly over the surface of the clay to remove any fingerprints or rolling marks.
Clean Impressions
If your plant sprigs stick to the clay too much, lightly dust the greenery with cornstarch before pressing. It acts as a release agent and brushes off easily once dry.
Step 2: Creating the Impressions
-
Arrange the botanicals:
Select your small botanical sprigs. Fern tips, lavender buds, or tiny wildflowers work beautifully. Place them gently onto the rolled clay slab where you intend to cut your tags, leaving enough space between them for cutting lines. -
Press the designs:
With the botanicals in position, gently roll your rolling pin over them once firmly. You want to press the plant material into the clay to create a deep, clear impression without distorting the slab’s thickness too much. -
Remove the plants:
Carefully use a pair of tweezers or a pin to lift the plant material out of the clay. Peel it slowly to reveal the detailed fossil-like imprint left behind.
Step 3: Cutting and Shaping
-
Cut the rectangles:
Using a rectangular cutter or a ruler and craft knife, cut around your imprinted designs to create uniform tag shapes. Center the botanical print on the lower two-thirds of the rectangle to leave room for the string hole at the top. -
Create the hole:
While the clay is still wet, take a plastic straw or a small circular messy punch and press a hole near the top center of each tag. Twist slightly as you pull it out to get a clean circle. -
Smooth the edges:
Dip your finger in a tiny bit of water and run it along the cut edges of the rectangles to soften any sharp corners or ragged bits left by the knife. -
Variation texture:
For a more rustic, weathered look like the ones in the image, you can lightly tap the non-imprinted areas with a textured sponge or extra piece of dried clay before cutting.
Antique Finish
Mix a tiny amount of brown acrylic paint with water to make a wash. Brush over typical imprints and wipe off the surface to darken the recessed grooves.
Step 4: Drying and Finishing
-
Let them dry:
Transfer the tags (still on the parchment paper if possible) to a flat, safe area to dry. Allow them to air dry for 24-48 hours. I find flipping them over halfway through the drying process helps keep them perfectly flat. -
Sand imperfections:
Once fully cured and hard, check the edges. If there are any rough spots, gently buff them away with fine-grit sandpaper. -
Seal (Optional):
For extra durability, especially if these will handle moisture in a kitchen, brush on a thin coat of clear matte acrylic sealer. -
Add the twine:
Cut lengths of natural jute twine, approximately 8-10 inches long. Fold a piece in half to create a loop at one end. -
Thread the loop:
Push the folded loop end through the hole in the tag from front to back. -
Secure the knot:
Pass the loose ends of the twine through the loop you just pushed through and pull tight to create a lark’s head knot, securing the string to the tag.
Tie these onto your homemade preserves or holiday gifts for a timeless, natural presentation
Mini Date Blocks for a Tiny Desk Calendar
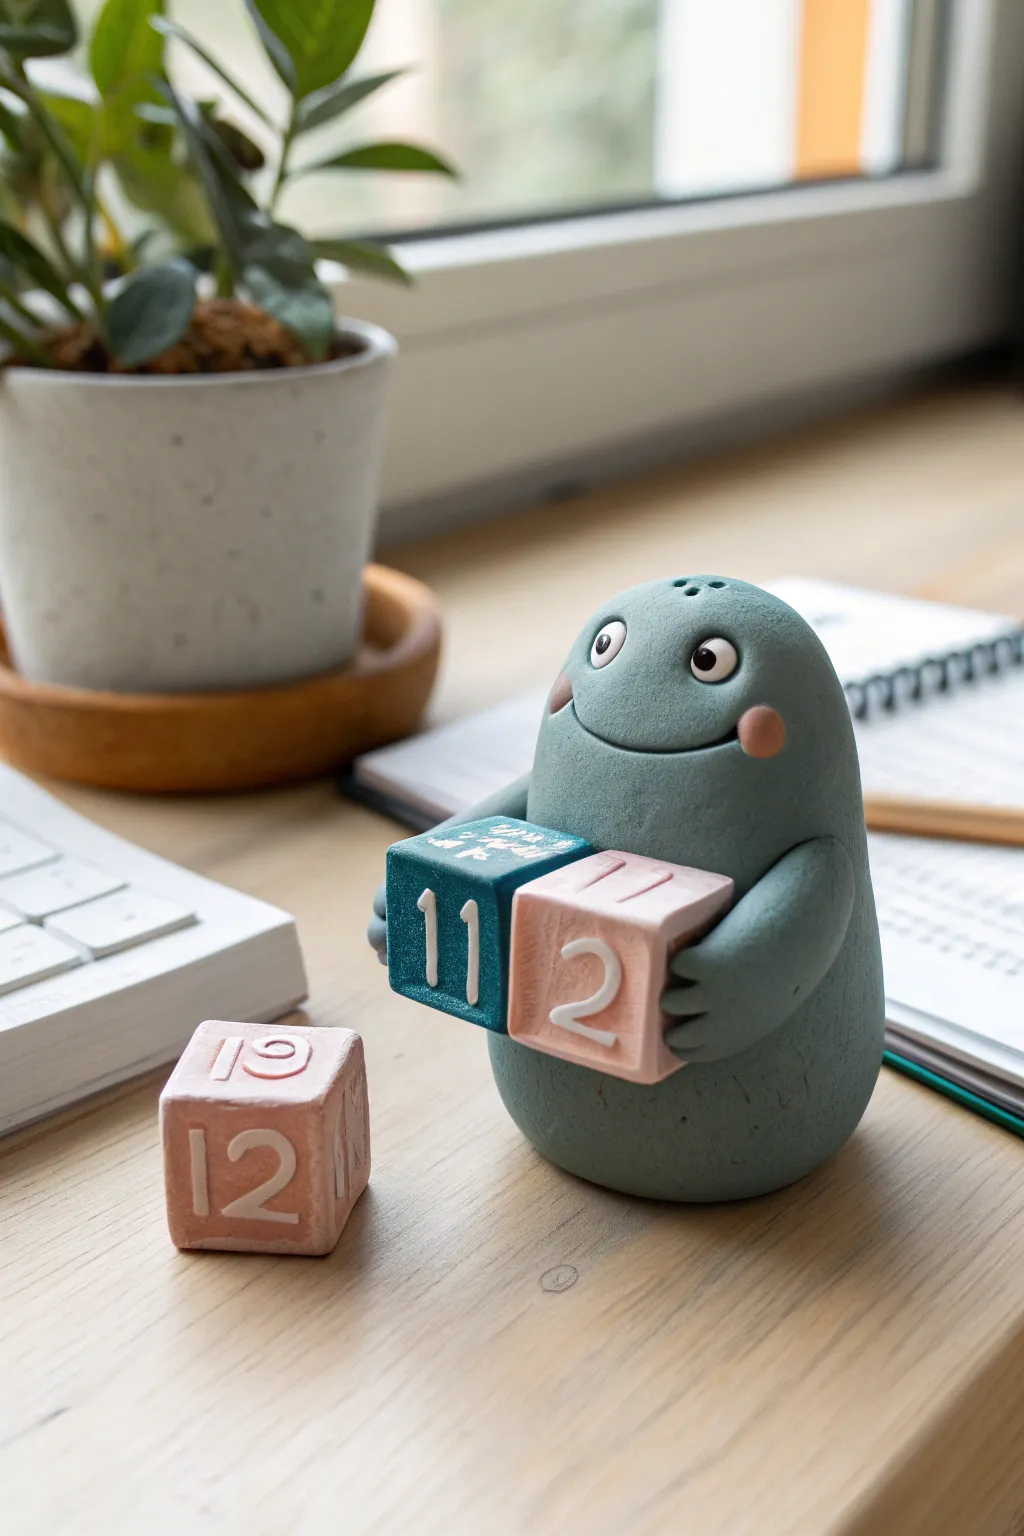
Brighten your workspace with this adorable teal clay creature that serves a practical purpose. This friendly little desk buddy holds customizable date blocks, making each day a hands-on interaction.
Step-by-Step
Materials
- Teal polymer clay (approx. 2oz)
- White or cream polymer clay
- Light pink polymer clay
- Black polymer clay
- Liquid clay or Bake & Bond
- Square cutter (small, approx. 1 inch)
- X-acto knife or clay blade
- Ball stylus tools (various sizes)
- Small number stamps (optional) or white acrylic paint
- Fine detail paintbrush
- Fine grit sandpaper
- Matte varnish
Step 1: Sculpting the Creature Base
-
Form the body:
Start by conditioning the teal clay until it’s soft and pliable. Roll it into a smooth ball, then gently elongate it into a rounded teardrop or egg shape, flattening the bottom so it stands securely on its own. -
Create the arms:
Roll two small sausages of teal clay for the arms. They should be thick enough to look chubby but long enough to wrap around the front. -
Position the arms:
Attach the arms to the sides of the body, curving them forward as if the creature is holding something. Use a blending tool to seamless merge the shoulders into the main body. -
Check the fit:
I like to use a dummy block or a scrap piece of clay to test the spacing between the arms; ensure there is enough room to hold two cubes comfortably. -
Add fingers:
Using a knife tool or needle tool, gently impress three lines into the ends of the arms to create simple finger details.
Step 2: Adding Facial Features
-
Make the eyes:
Roll two tiny balls of white clay and flatten them slightly. Press these onto the upper part of the face. Add even smaller black pupils in the center, and a microscopic dot of white for the highlight. -
Sculpt the mouth:
Use a large ball tool or a curved clay tool to impress a wide, shallow smile into the clay below the eyes. -
Rosy cheeks:
Take two tiny pinch amounts of pink clay, roll them into balls, and flatten them onto the ends of the smile to give the character a sweet expression. -
Top details:
Poke three tiny holes or add small textured divots at the very top of the head for a bit of extra character design.
Sticky Situation?
If the clay gets too soft and sticky while sculpting, pop it in the fridge for 10 minutes. This firms it up, making it much easier to carve details without squishing the shape.
Step 3: Creating the Date Blocks
-
Shape the cubes:
Condition your teal and pink clay. Roll the clay into thick sheets (or form by hand) and use a square cutter or blade to create perfect cubes. You will need enough cubes to cover all dates (usually requires 2 cubes for days, plus extras for months if desired). -
Refine the edges:
Gently tap the sides of the cubes on your work surface to sharpen the corners and ensure they are uniform in size. -
Add the numbers:
If using clay for numbers, roll tiny thin snakes of white clay and shape them into digits, pressing them gently onto the cube faces. Alternatively, impress the numbers with stamps. -
Smooth the surfaces:
Go over the cubes with a fingertip dipped in a tiny bit of baby oil or clay softener to remove any fingerprints before baking.
Number Logic
To display all dates 01-31, Cube 1 needs: 0, 1, 2, 3, 4, 5. Cube 2 needs: 0, 1, 2, 6, 7, 8 (the 6 doubles as a 9 when flipped). Plan carefully.
Step 4: Baking and Finishing
-
Bake everything:
Place the creature and the blocks on a ceramic tile or baking sheet. Bake according to your polymer clay package instructions (typically 275°F/135°C for 15-30 minutes depending on thickness). -
Cool down:
Turn off the oven and open the door slightly, letting the pieces cool down slowly inside to prevent cracking. -
Paint (if needed):
If you stamped your numbers instead of using clay appliques, now is the time to carefully fill the indentations with white acrylic paint. -
Clean up paint:
Wipe away excess surface paint with a damp paper towel, leaving the white pigment only inside the stamped numbers. -
Seal the project:
Apply a thin layer of matte varnish to the entire project to protect it from dust and handling without making it overly shiny.
Place your little friend on your desk and enjoy flipping the blocks to start every new day
Little Flower Frogs for Small Vases
Create beautiful and functional miniature flower frogs that turn simple jars and tiny vessels into elegant displays. These terracotta-style pieces feature charming perforation patterns that help delicate dried stems stand tall and graceful.
Step-by-Step Tutorial
Materials
- Terracotta air-dry clay or polymer clay
- Light beige or wood-effect air-dry clay
- Small glass jar (recycled spice or jam jar)
- Wooden skewer or toothpick
- Straw (for larger holes)
- Small rolling pin
- Fine-grit sandpaper
- Bowl of water (for smoothing)
- Sponge
- Matte varnish (optional)
Step 1: Sculpting the Bulb Vase Frog
-
Form the base:
Start with a ball of terracotta-colored clay slightly larger than a golf ball. Gently pinch and rotate it in your palms to create a hollow pot shape, keeping the walls relatively thick for stability. -
Close the form:
Gradually bring the clay inwards at the top to create a closed, rounded dome shape. Smooth out any seams with a damp finger so it looks like a continuous sphere. -
Add the neck:
Roll a small coil of clay and attach it to the very top center of your sphere. Blend the clay downwards onto the sphere to create a seamless, narrow neck opening. -
Smooth the surface:
Use a slightly damp sponge to wipe the entire exterior. This removes fingerprints and gives that soft, matte texture seen in the photo. -
Create the perforation pattern:
Using a wooden skewer or the end of a paintbrush, poke holes around the upper shoulder of the vase. I like to arrange them in two circular rows for a balanced look. -
Refine the holes:
Gently wiggle the skewer in each hole to ensure they are wide enough for dried flower stems and clean up any displaced clay bits.
Clean Cuts
When poking holes, twist the tool as you pull it out. This prevents the clay from lifting and creates a cleaner edge that requires less sanding later.
Step 2: Crafting the Dome Frog
-
Shape the dome:
Take your lighter beige clay and roll it into a ball. Press it down onto a flat surface to create a solid hemisphere or dome shape. -
Refine the curve:
Cup your hands around the clay to round off the top edges, creating a gentle slope rather than a sharp corner. -
Pattern the center:
Mark the center point with a small hole. Then, create a ring of holes around that center point using your skewer. -
Add secondary holes:
Create a second, wider ring of holes. For visual interest, try making these slightly larger by using a drinking straw instead of a skewer. -
Texture the surface:
Lightly brush the surface with a stiff-bristled brush or a textured sponge to give it a stone-like or wood-grain appearance.
Step 3: Making the Jar topper
-
Prepare the jar:
Clean and dry your small glass jar thoroughly. Roll out a sheet of pink-toned or terracotta clay to about 1/4 inch thickness. -
Cut the cap:
Cut a circle of clay slightly larger than the jar’s opening. Drape this over the jar mouth. -
Seal the edges:
Press the clay down around the rim of the jar, smoothing it against the glass to create a seal and a short ‘skirt’ of clay. -
Shape the spout:
Build up the center of the clay cap into a small neck, similar to the first vase, blending the clay smoothly. -
Final drying:
Allow all pieces to dry completely according to your clay package instructions (usually 24-48 hours). -
Sand and finish:
Once bone dry, use fine-grit sandpaper to smooth any rough edges around the holes or base. Wipe away dust with a dry cloth.
Dual Tone
Mix two colors of air-dry clay together but don’t blend them fully to create a beautiful marbled stone effect for your flower frogs.
Arrange your favorite dried blooms in the holes for a lovely rustic display
Micro “Tiny World” Accessories for Mini Displays
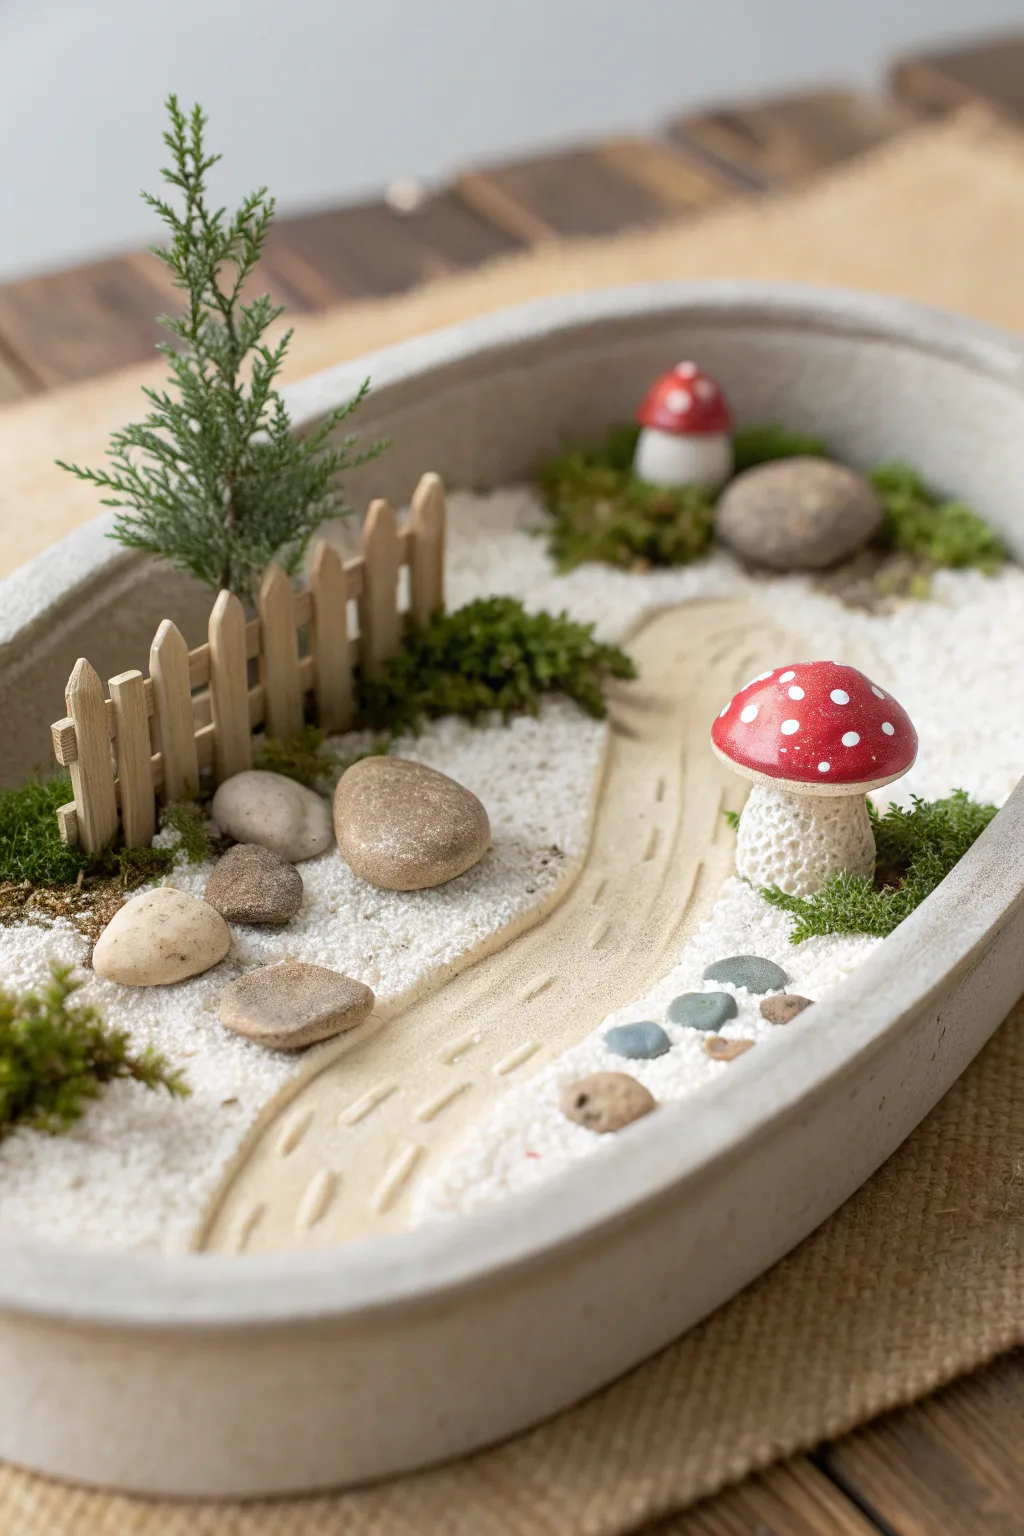
Create a serene, miniature landscape that fits right on your desk, featuring charming clay mushrooms and a winding path. This tiny world combines natural textures like moss and stones with simple sculpting techniques for a delightful, low-maintenance display.
How-To Guide
Materials
- Shallow oval planter (ceramic or concrete)
- Polymer clay (terracotta/beige, red, white, brown)
- White craft sand
- Dried moss (various textures)
- Small smooth river stones and pebbles
- Miniature wooden picket fence
- Small faux cedar or cypress sprig
- Sculpting tools (needle tool, small blade)
- Acrylic sealer (matte and gloss)
- Super glue or tacky glue
- Piece of floral foam or styrofoam bases
Step 1: Sculpting the Accessories
-
Form the mushroom stems:
Start by conditioning white polymer clay and rolling it into two thick, short logs. Pinch the bases slightly to make them wider for stability, and use a needle tool to poke tiny, irregular holes all over the stem for a textured, realistic look. -
Create the mushroom caps:
Roll two balls of red clay, one slightly larger than the other. Press your thumb into the center to create a dome shape, then gently press these onto your white stems. -
Add the polka dots:
Take tiny pinches of white clay, roll them into minuscule balls, and flatten them onto the red caps. Don’t worry about making them perfectly round; a little irregularity adds character. -
Shape the winding path:
Roll out beige or light brown clay into a long, flat strip about 1.5 inches wide. Curve it into an gentle ‘S’ shape that mimics the winding road in the photo. -
Texture the path:
Use a sculpting tool to gently press dashed lines along the edges of the path to simulate road markings or wood grain indentations. -
Bake the clay:
Place your mushrooms and the path on a baking sheet. Bake according to your clay package’s instructions (usually 275°F for 15-20 minutes). Allow them to cool completely.
Wobbly Mushrooms?
If your mushrooms won’t stand up in the sand, glue a toothpick into the base of the stem before baking. This gives you a spike to anchor it into the foam.
Step 2: Preparing the Base
-
Fill the container:
Fill your oval planter mostly full with floral foam or a styrofoam block cut to fit. This acts as a riser so you don’t need to use pounds of sand. -
Position the main elements:
Place your cooled clay path onto the foam base to see where it fits best. It should run diagonally through the center. -
Plant the tree:
Stick the faux cedar sprig firmly into the foam near the back left curve of your path. I usually add a dab of glue to the stem before inserting it to ensure it stays upright. -
Install the fence:
Place the miniature picket fence just behind the path, curving it slightly around the tree. If the fence is too long, trim the wire connecting the pickets.
Step 3: Assembling the Landscape
-
Add the ground cover:
Carefully pour white craft sand over the exposed foam areas, smoothing it out so it sits flush with the edges of your clay path. -
Place the mushrooms:
Nestle the larger mushroom on the right side of the path and the smaller one towards the back, pressing them slightly into the sand so they stand firm. -
Arrange the boulders:
Select two medium-sized smooth stones. Place one near the base of the fence on the left and another larger one behind the path on the right for balance. -
Create stepping stones:
Take tiny, flat grey pebbles and arrange three or four of them in a small cluster near the front edge of the planter. -
Add greenery tufts:
Tuck small pieces of dried moss around the base of the fence, the tree, and the mushrooms. This softens the transition between the objects and the sand. -
Final adjustments:
Use a soft brush to sweep away any stray sand grains that landed on your path or mushrooms during assembly.
Make it Magical
Paint the white dots on the mushroom caps with glow-in-the-dark acrylic paint. When the lights go out, your garden becomes an enchanted night forest.
Place your finished miniature garden in a bright spot to enjoy your peaceful handiwork