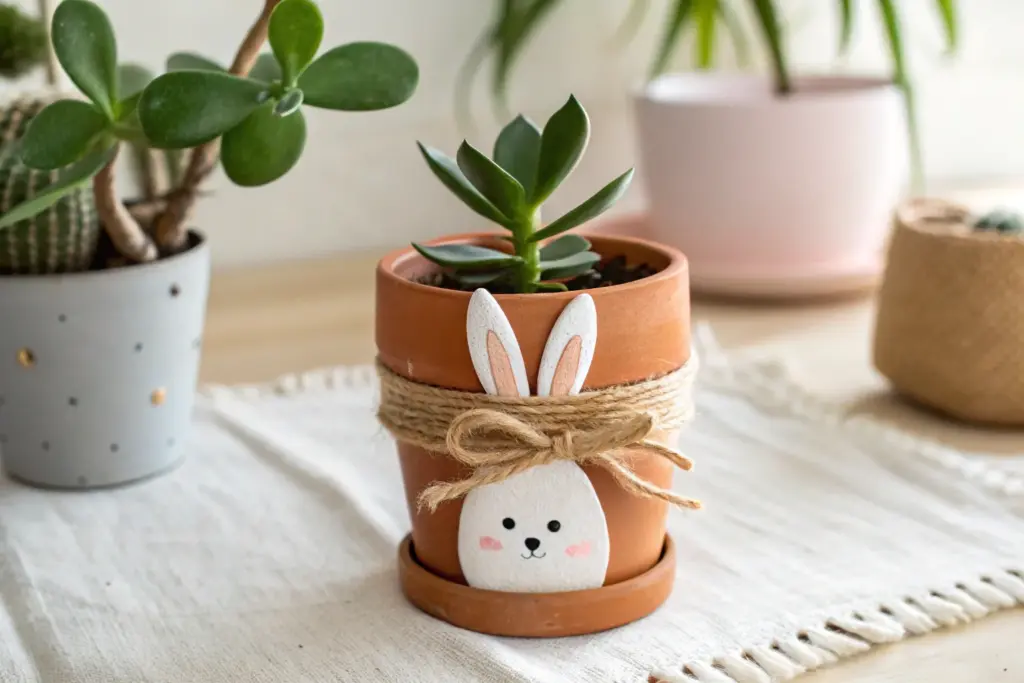
I love how small terracotta pots can go from plain and practical to seriously cute with just a little paint and a few simple add-ons. Grab a handful of mini pots and saucers, and let me walk you through my favorite small clay pot craft ideas for shelves, gifts, and garden corners.
Classic Painted Mini Planters
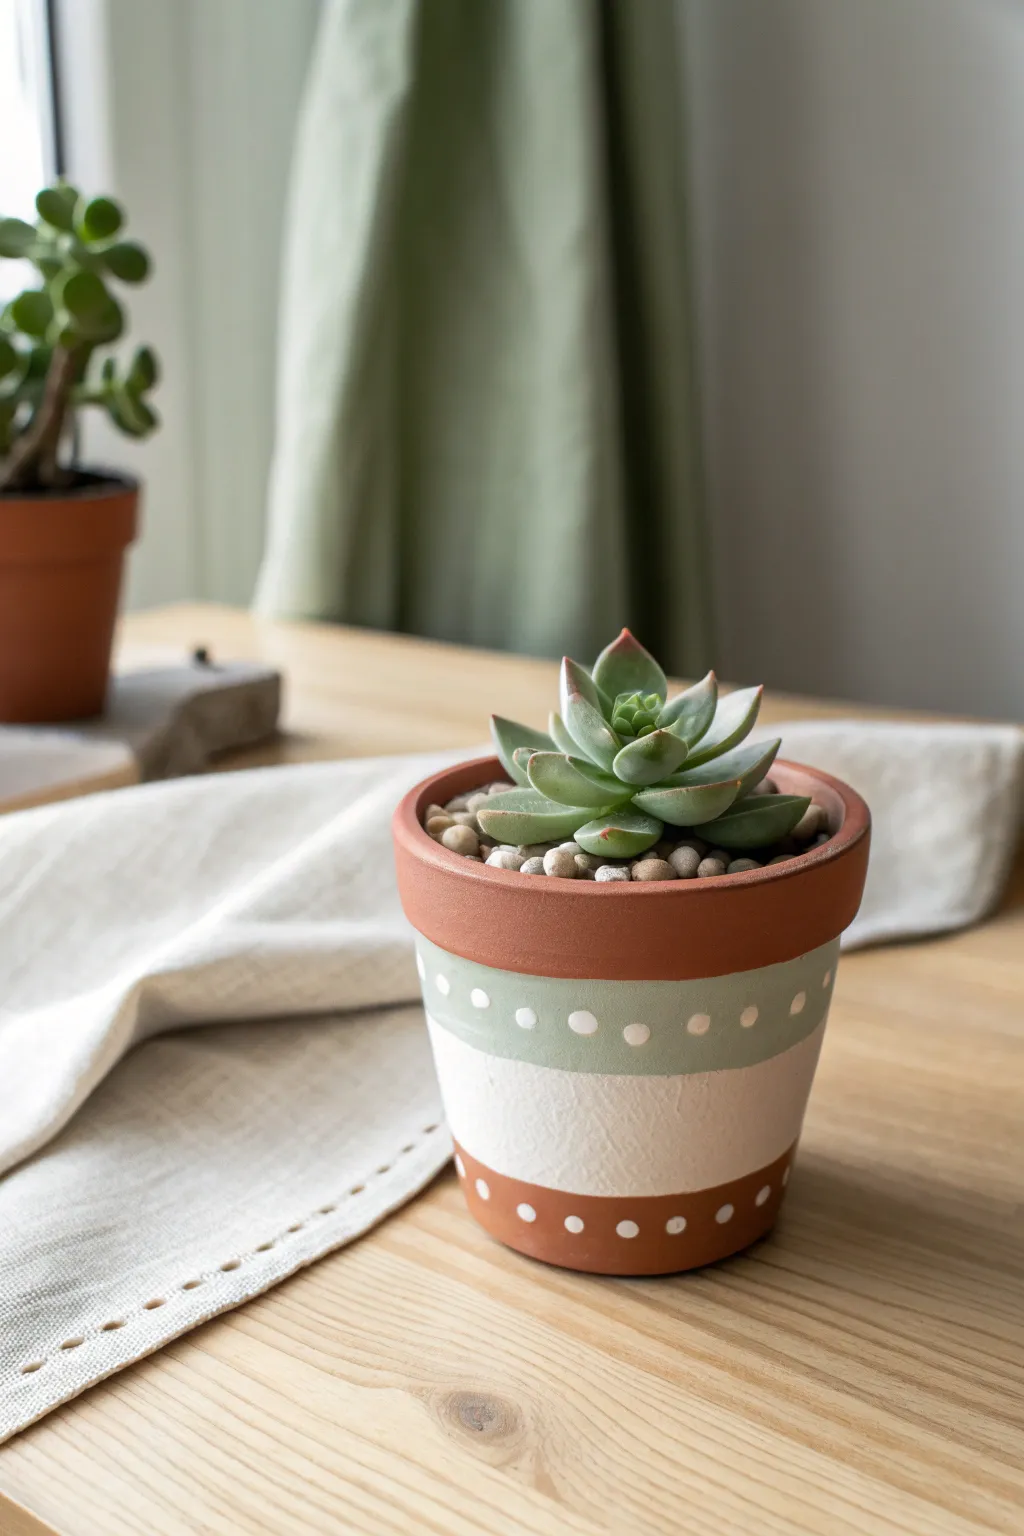
Embrace a soft, earthy palette with this striped planter design that highlights the natural beauty of standard terracotta. This easy-to-master pattern combines crisp lines with playful dots for a look that is both modern and charmingly rustic.
Step-by-Step
Materials
- Small terracotta pot (3-4 inch diameter)
- Painter’s tape or masking tape (1 inch width)
- White acrylic paint (matte finish)
- Soft sage or mint green acrylic paint (matte finish)
- Flat paintbrush (medium width)
- Small round paintbrush or dotting tool
- Paper plate or palette
- Small succulent and potting soil (for finishing)
Step 1: Preparing the Base
-
Clean the Surface:
Begin by wiping down your terracotta pot with a damp cloth to remove any dust or manufacturing residue. Let it dry completely so your tape adheres properly. -
Apply First Tape Line:
Place a strip of painter’s tape horizontally around the pot, just under the protruding top rim. Press the edges down firmly with your fingernail to prevent paint bleed. -
Define the Bottom Band:
Apply a second strip of tape around the bottom section of the pot. leave about an inch of exposed terracotta at the very bottom. -
Check Spacing:
Ensure the gap between your two tape lines is even all the way around; this middle area will become your main white stripe.
Step 2: Painting Stripes
-
Paint the White Band:
Using your flat brush, fill in the space between the tape lines with white acrylic paint. Apply thin, even strokes horizontally. -
Layer for Opacity:
Let the first coat dry for about 10-15 minutes. Apply a second coat of white to ensure the terracotta color doesn’t show through. -
Remove Tape Carefully:
While the second coat is still slightly tacky but mostly dry, gently peel off the painter’s tape at a 45-degree angle to reveal crisp lines. -
Paint the Upper Band:
Once the white paint is fully dry, use freehand strokes or new tape guidelines to paint a band of mint green directly below the rim, overlapping slightly with the top edge of your white stripe if desired, or just meeting it. -
Smooth the Green Layer:
Apply a second coat of the mint green paint if the color looks streaky. I prefer to feather the edges slightly if blending, but for this look, keep the line distinct.
Seal for Safety
Terracotta is porous! If painting the inside, seal it first. Otherwise, water will seep through and bubble your exterior paint job over time.
Step 3: Adding Details
-
Prepare for Dots:
Pour a small amount of white paint onto your palette. It should be thick enough to hold a shape but fluid enough to drop off a tool. -
Dot the Green Band:
Dip the handle end of a small paintbrush or a dotting tool into the white paint. Gently press dots onto the mint green band, spacing them evenly apart. -
Create Bottom Dots:
Repeat the dotting process along the exposed terracotta band at the very bottom of the pot. Try to align these dots vertically with the ones on the upper band for symmetry. -
Wait for Full Cure:
Allow the paint to cure completely for at least an hour before handling heavily. -
Pot Your Plant:
Fill the pot with suitable soil and gently nestle your succulent into its new home. Add small decorative pebbles on top of the soil for a polished finish that matches the image.
Fixing Wonky Dots
Smudged a dot? Wait for it to dry completely, then gently scrape it off with a craft knife or paint over it with the background color.
Place your newly painted pot on a sunny windowsill where the fresh colors can brighten your morning view


Mini Owl Pot Planters
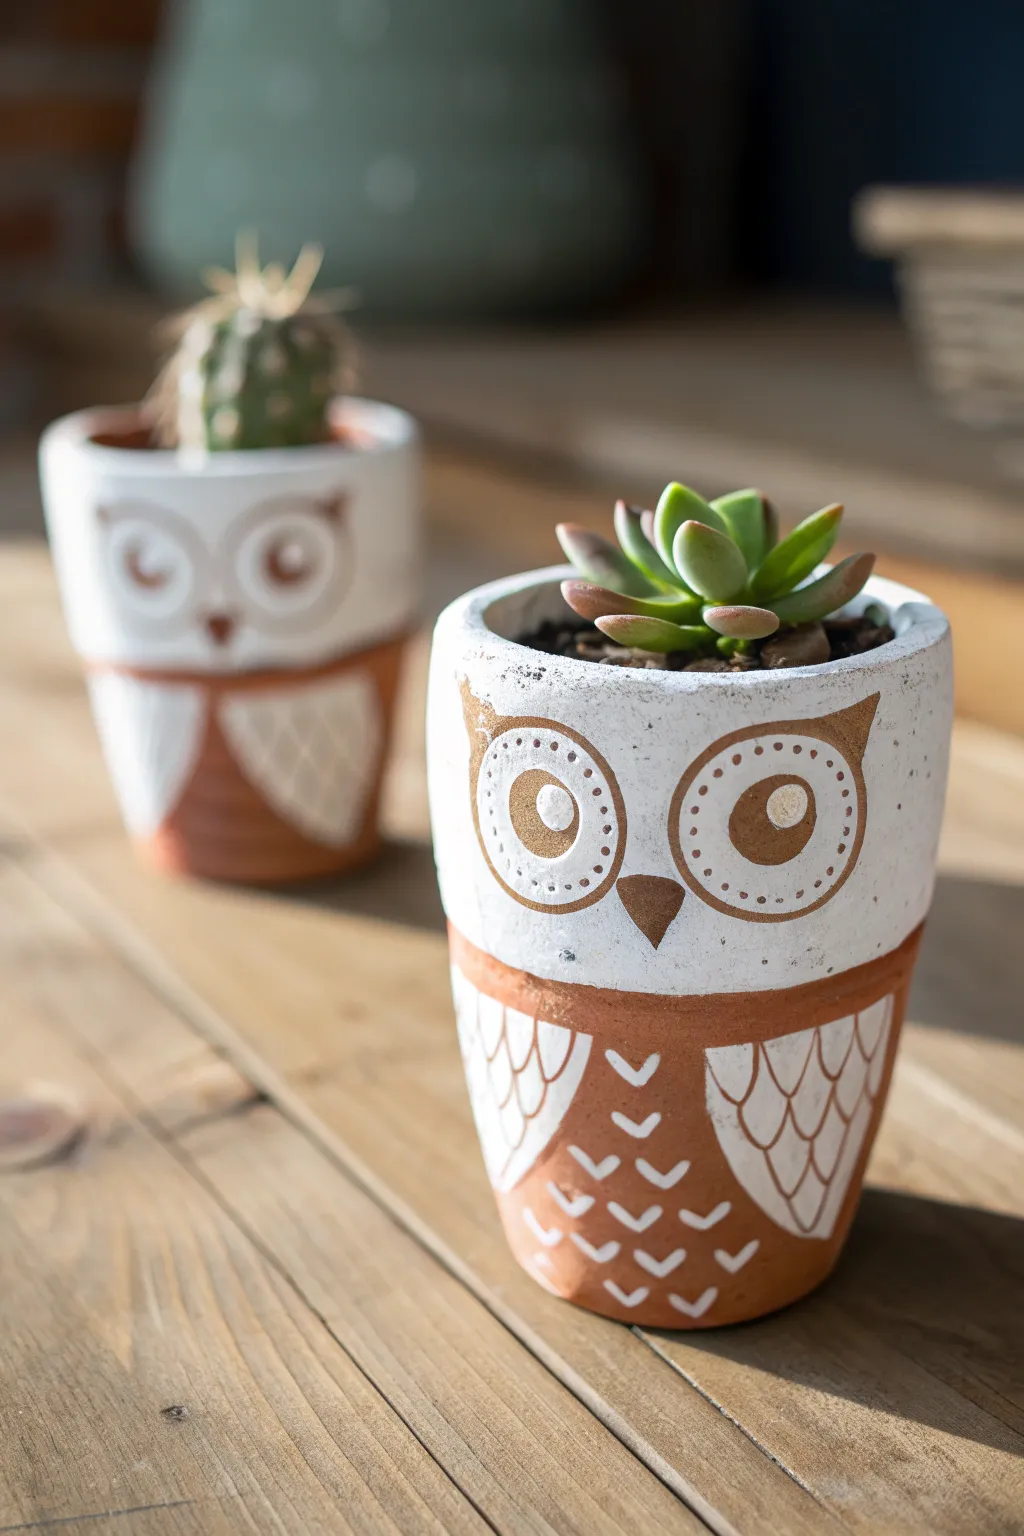
These adorable mini owl planters turn simple terracotta into charming characters perfect for housing small succulents. With their wide-eyed expressions and hand-painted feather details, they add a touch of woodland whimsy to any windowsill or desk.
How-To Guide
Materials
- Small terracotta pot (approx. 2-3 inches)
- White acrylic paint (matte finish)
- Terracotta or rust-orange acrylic paint
- Dark brown acrylic paint
- Flat paintbrush (medium size)
- Small round detail brush (size 0 or 1)
- Pencil
- Small succulent or cactus
- Potting soil
Step 1: Creating the Base
-
Clean the surface:
Before you begin, wipe down your terracotta pot with a damp cloth to remove any dust or loose clay particles. Let it dry completely so the paint adheres properly. -
Map out the design:
Using a pencil, lightly sketch a horizontal line around the pot, roughly 1/3 of the way up from the bottom. This will separate the white head from the colored body. -
Paint the top section:
Use your flat brush to paint the top two-thirds of the pot with white acrylic paint. You will likely need two coats to get solid, opaque coverage over current porous clay. -
Define the wings:
While you have the white paint out, paint two oval shapes extending down into the bottom third of the pot on the sides. These will become the folded wings.
Step 2: Adding the Owl Details
-
Fill the lower body:
Once the white paint is dry, use the rust-orange or terracotta-colored paint to fill in the bottom third of the pot, carefully painting around the white wing areas you established. -
Outline the eyes:
With the terracotta paint and a smaller brush, paint two large circles on the upper white section for the eyes. These should be quite large to give the owl a cute, surprised look. -
Add eye details:
I like to switch to my smallest detail brush here. Paint a second, smaller circle inside the terracotta ring, leaving a gap of white. Then, paint a solid circle in the center for the pupil. -
Highlight the eyes:
Dip the very tip of your brush (or a toothpick) into white paint and add a tiny dot to each pupil to create a ‘catchlight’, bringing the owl to life. -
Paint the beak:
Using dark brown paint, create a small, inverted triangle right between the eyes for the beak. -
Add ear tufts:
Using the terracotta paint, draw two small triangular wisps or curved lines just above the outer corners of the eyes to simulate ear tufts or eyebrows.
Steady Hands
For the tiny white dots in the eyes, use the non-brush end of your paintbrush or a toothpick. Dip it in paint and stamp it for perfect circles.
Step 3: Featherwork & Finishing
-
Decorate the eye rings:
Go back to the large terracotta eye rings. With a steady hand and white paint, add tiny dots all around the inside of the ring for texture. -
Detail the wings:
On the white wing sections at the bottom, use the rust paint and a detail brush to draw a scalloped pattern, creating the look of layered feathers. -
Create breast feathers:
On the front rust-colored belly section, paint small white ‘V’ shapes in alternating rows. This creates a fluffy chest texture. -
Let it cure:
Allow the pot to dry fully for at least an hour. If you plan to put this outside, apply a clear matte sealant spray. -
Planting:
Fill the pot with cactus soil and gently nestle your succulent inside. Finish with a layer of small pebbles on top to complete the look.
Mistakes Happen
If you smudge a line, don’t wipe it while wet! Let the mistake dry completely, then paint over it with the background color to erase it cleanly.
Now you have a wise little companion ready to brighten up your favorite corner


Frog Pot Candy Jar
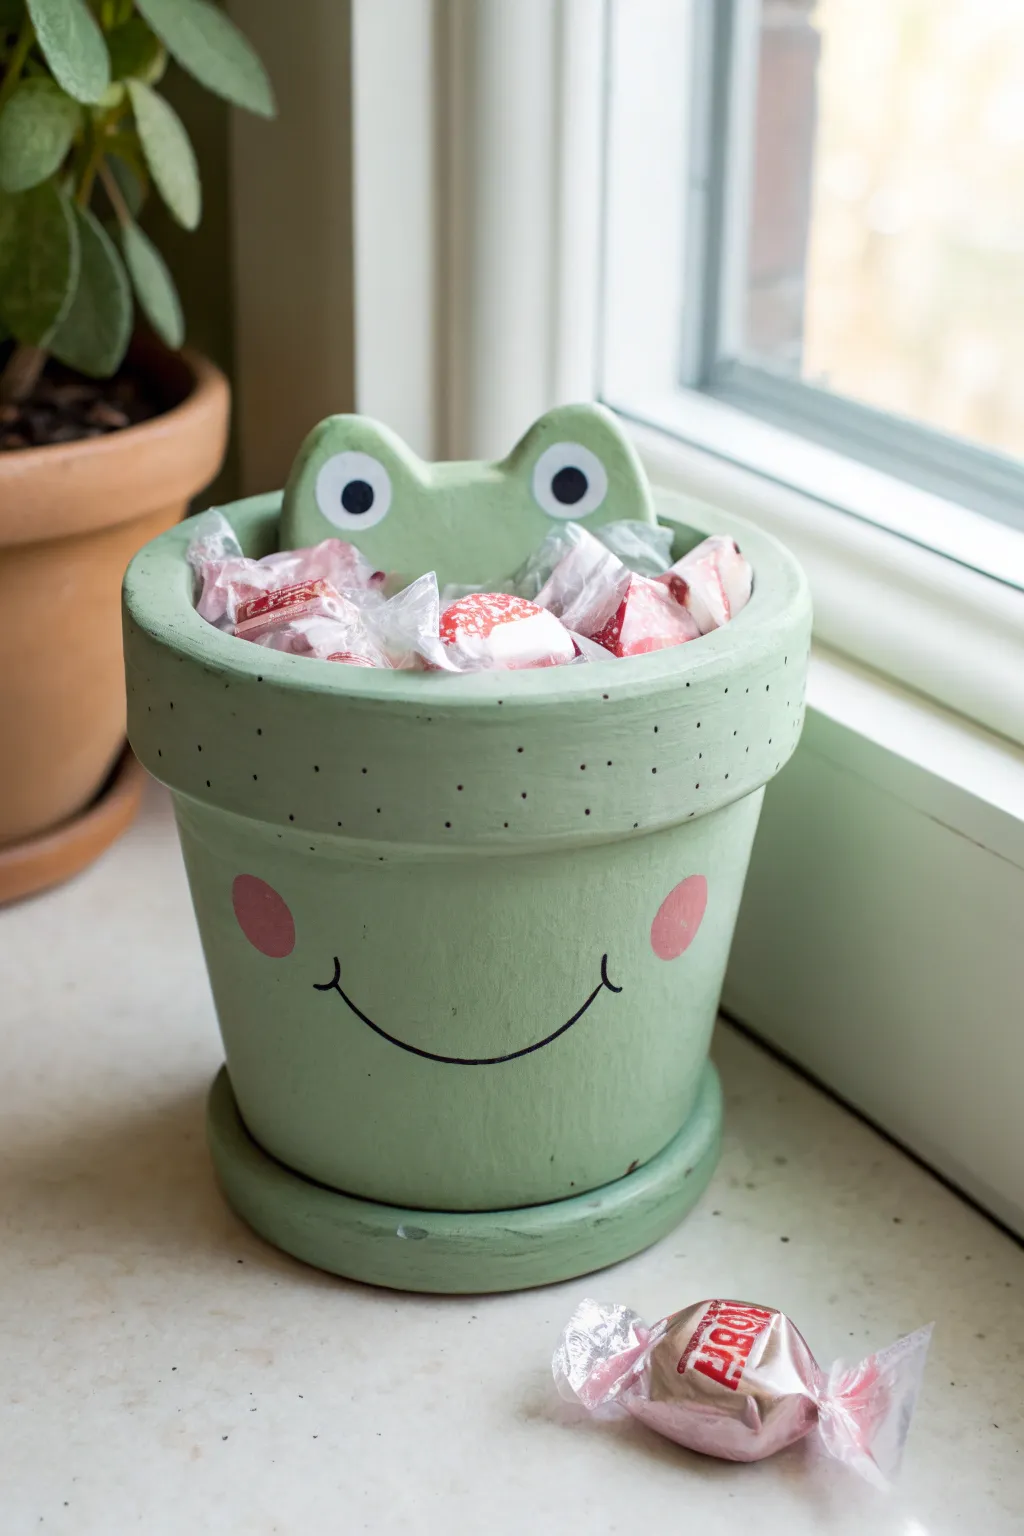
Transform a simple terracotta pot into an adorable, wide-smiling frog candy jar that brightens up any windowsill. This friendly amphibian features a soft sage green finish, rosy pink cheeks, and googly eyes peeking out from the rim.
Detailed Instructions
Materials
- Small terracotta pot (4-inch recommended)
- Matching terracotta saucer
- Small wooden circle or second smaller saucer (to fit inside the rim for the eyes)
- Sage green acrylic paint
- Black acrylic paint or paint pen
- Pink acrylic paint
- White acrylic paint
- Mod Podge or clear sealant (matte finish)
- Paintbrushes (flat shader and fine liner)
- Pencil
- Strong craft glue or hot glue gun
Step 1: Base Painting
-
Clean the surface:
Start by wiping down your terracotta pot and saucer with a damp cloth to remove any pottery dust or finger oils, which helps the paint adhere better. -
Apply the base coat:
Squeeze out a generous amount of sage green acrylic paint. Using a flat shader brush, paint the entire exterior of the pot, including the bottom rim. -
Paint the saucer:
Paint the terracotta saucer in the same sage green shade. This will serve as the frog’s feet/base. -
Paint the interior rim:
Extend the green paint about one inch down the inside of the pot so the raw clay doesn’t show when it’s filled with candy. -
Add a second coat:
Terracotta is very porous and soaks up paint quickly. Once the first layer is dry to the touch, apply a second coat for a smooth, opaque finish. -
Prepare the eye piece:
Take your wooden circle or the smaller insert piece. Draw a shape that resembles the top of a frog’s head with two bumps for eyes, then cut it out if necessary, or simply paint the two bumps onto your insert piece. -
Paint the eye piece:
Coat this entire eye insert piece with the same sage green paint and let it dry completely.
Uneven Cheeks?
If painting perfect circles is tricky, dip the eraser end of a pencil into the pink paint and stamp it onto the pot for uniform cheeks.
Step 2: Face Details
-
Sketch the face:
Lightly sketch the frog’s features onto the pot using a pencil. You’ll want a wide, U-shaped smile and two circular areas for the cheeks. -
Paint the cheeks:
Dip a round sponge dabber or a medium brush into pink paint. Gently create two rosy circles on either side of the smile line. -
Draw the smile:
Using a fine liner brush with black paint, or a black paint marker for easier control, trace over your pencil line to create the wide smile. -
Add smile dimples:
Add tiny little curved hooks at the ends of the smile to give the frog a cheerful expression. -
Add the freckles:
Dip the very tip of a stiff brush or a toothpick into black paint and gently dot small freckles across the upper rim of the pot for added texture. -
Create the eyes:
On your separate green eye piece, paint two large white circles on the bumps. -
Add pupils:
Once the white circles are dry, add smaller black dots in the center of the white circles.
Step 3: Assembly & Finishing
-
Glue the base:
Apply strong craft glue to the bottom of the painted pot and center it onto the painted saucer. -
Insert the eyes:
Place the eye piece vertically inside the pot. I usually secure this with a dab of hot glue near the back rim so it stays peeking up perfectly. -
Seal the project:
Apply a coat of matte Mod Podge or clear acrylic sealer over the entire outside of the frog to protect the paint from chipping. -
Fill with treats:
Once all sealants are fully cured and odorless, line the pot with a small baggie or wax paper and fill it with your favorite wrapped candies.
Add a Crown
Make your frog royalty by cutting a small crown shape from yellow craft foam and gluing it between the eyes.
Now your desk has a charming little guardian ready to dispense sweet treats whenever you need them


Piglet Pots With Snouts
Transform ordinary terracotta pots into these charming little piglets complete with 3D snouts and perky ears. The soft pink finish and playful polka dots make them sweet additions to any windowsill garden or kid’s room.
How-To Guide
Materials
- Small terracotta pots (3-4 inch diameter)
- Air-dry clay or polymer clay
- Acrylic paint (light pastel pink, white, black, dark grey)
- Strong craft glue or E6000
- Fine-grit sandpaper
- Paintbrushes (flat shader and fine detail round)
- Dotting tool or toothpick
- Matte spray sealer
Step 1: Sculpting the Features
-
Prepare the surface:
Begin by wiping down your terracotta pots with a damp cloth to remove any dust or debris. Let them dry completely, as moisture will prevent the clay from adhering properly. -
Shape the snouts:
Take a small ball of air-dry clay, about the size of a large marble, and flatten it slightly into an oval disk. This will be the pig’s snout. -
Attach the snout:
Apply a dab of strong glue to the back of your clay oval and press it firmly onto the lower front center of the pot. -
Add nostril details:
While the clay is still soft, use the end of a paintbrush handle or a large dotting tool to press two distinct indentations into the snout for nostrils. I like to wiggle the tool slightly to make them wide enough. -
Form the ears:
Roll two smaller balls of clay into tapered cones, then flatten them into triangular ear shapes. Pinch the tips slightly to give them character. -
Attach the ears:
Glue the ears to the rim of the pot, spaced equally apart. Smooth the bottom edge of the clay downward onto the pot surface to create a seamless transition. -
Dry completely:
Allow the clay features to harden fully according to the package instructions—usually overnight for air-dry clay.
Clay Cracking?
If the clay pulls away from the pot as it dries, fill the gap with a little extra glue or filler spackle before painting to hide the seam.
Step 2: Painting and Detailing
-
Base coat:
Sand any rough edges on the clay gently, then paint the entire pot (including the clay additions) with a coat of white acrylic paint. This primer layer helps the pink color pop. -
Apply the pink:
Once the white is dry, apply 2-3 coats of pastel pink acrylic paint, covering the pot, snout, and ears evenly. Let each coat dry before adding the next to avoid streakiness. -
Paint the nostrils:
Using a fine detail brush, carefully paint the inside of the nostril indentations with black or dark grey paint. -
Detail the ears:
Paint a small, soft triangular shape inside each clay ear using dark grey paint to create depth. -
Add the eyes:
Dip the handle end of a paintbrush into black paint and dot two eyes just above the snout. Keep them wide-set for a cuter expression. -
Create the polka dots:
Using a dotting tool or the head of a pin, dip into white paint and create a random pattern of small polka dots all over the pink surface of the pot. -
Seal the work:
Once all paint is thoroughly dry, spray the entire pot with a clear matte sealer to protect your paint job from moisture and scratches.
Smoother Dots
Load your dotting tool fresh for every single dot. This ensures they all stay perfectly round and have the same opacity.
Fill your new piglet pots with succulents or air plants to complete the adorable look

The Complete Guide to Pottery Troubleshooting
Uncover the most common ceramic mistakes—from cracking clay to failed glazes—and learn how to fix them fast.
Ladybug And Bee Pot Set
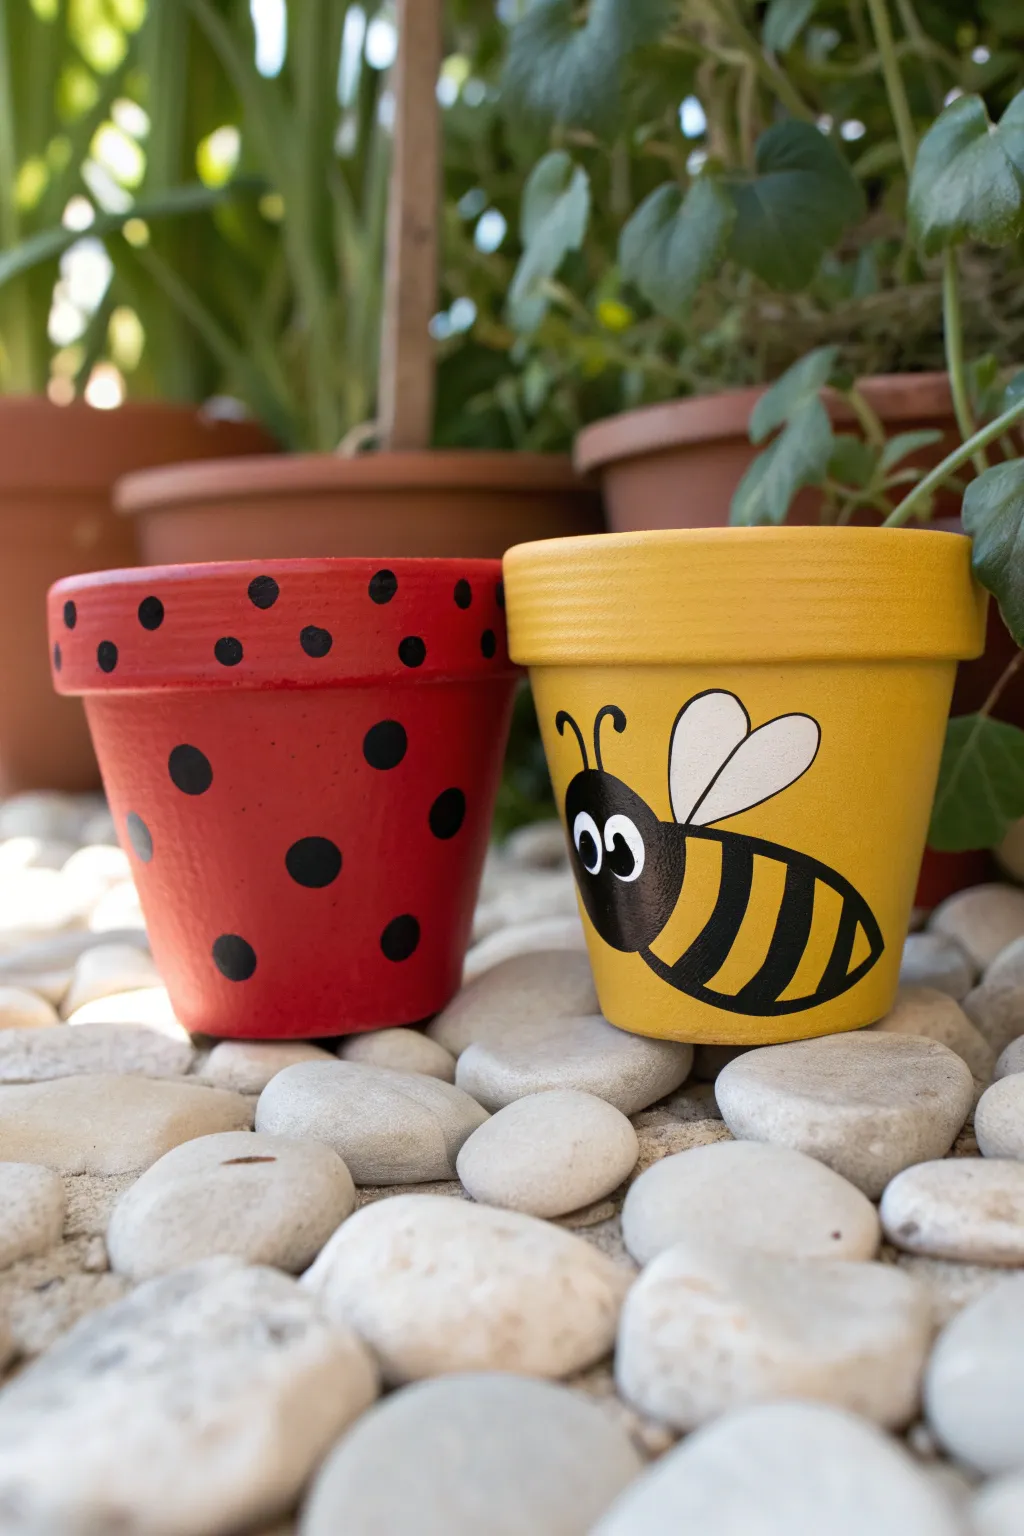
Bring a buzz of excitement to your windowsill with this adorable pair of insect-inspired planters. The bright, classic red of the ladybug perfectly complements the cheerful yellow bee, creating a charming set that looks great nestled among white garden stones.
Detailed Instructions
Materials
- Two small terracotta pots (3-4 inch diameter)
- Red acrylic craft paint
- Yellow acrylic craft paint
- Black acrylic craft paint
- White acrylic craft paint
- Medium flat paintbrush
- Small round detail paintbrush
- Round foam pouncer or cotton swab (optional)
- Pencil
- Clear acrylic sealer spray (matte or gloss)
- Newspaper or drop cloth
Step 1: Base Prep & Coating
-
Clean the surface:
Before starting, wipe down your terracotta pots with a damp cloth to remove any dust or pottery residue. Let them dry completely, as paint won’t stick well to damp clay. -
Base coat application:
Squeeze out your red and yellow paints onto a palette. Using the medium flat brush, paint the entire exterior of one pot red (for the ladybug) and the other pot yellow (for the bee). -
Paint the rim:
Don’t forget to extend the color over the top rim and just an inch or so down the inside of the pot so the raw clay doesn’t show when filled with soil. -
Apply second coat:
Terracotta is porous and drinks up paint quickly. Once the first layer is dry to the touch, apply a second coat to ensure vibrant, opaque coverage for both pots.
Step 2: Creating the Ladybug
-
Plan the dots:
While the pots dry completely, plan your dot placement. You want them scattered randomly but evenly. I find it helpful to visualize a triangle pattern to keep spacing consistent. -
Paint the rim dots:
Dip a small round brush (or a round foam pouncer for perfect circles) into black paint. Create a ring of small, evenly spaced dots all around the rim of the red pot. -
Add body spots:
Switching to slightly larger circles, paint the polka dots on the main body of the pot. Ensure some wrap around the sides so the pattern looks continuous from every angle.
Perfect Polka Circles
Does painting round dots stress you out? Dip the eraser end of a pencil into the paint and stamp it onto the pot for uniform, perfect circles every time.
Step 3: Painting the Bee
-
Sketch the bee:
On the yellow pot, lightly use a pencil to sketch the oval shape of the bee’s body, the wings, and the antennae. This guide helps prevent mistakes with the black paint. -
Fill the body:
Use the small round brush and black paint to fill in the head and the main oval body shape of the bee. Don’t worry about the stripes yet; just get the silhouette painted solid black first. -
Add the stripes:
Wait for the black silhouette to dry slightly, then carefully paint yellow stripes over the black body. Alternatively, if you are unsteady, paint the black stripes directly onto the yellow background, leaving yellow gaps for the body segments. -
Paint the wings:
Using white paint, fill in the two teardrop shapes for the wings. You may need two coats of white to make sure the yellow background doesn’t show through. -
Outline details:
Once the white wings are dry, use a very fine liner brush and black paint to outline the wings and draw the curly antennae sprouting from the head. -
Paint the eyes:
Dip the handle end of a paintbrush into white paint and dot two eyes onto the black head. Let this dry, then add tiny black pupils in the center of the white dots to give the bee character.
Add Dimension
Hot glue small wooden beads to the ladybug pot and paint them black for 3D spots, or glue wiggle eyes onto the bee for extra personality.
Step 4: Finishing Touches
-
Final curing:
Allow both pots to sit undisturbed for at least 24 hours to let the acrylic paint cure fully. -
Seal the work:
Take the pots to a well-ventilated area and spray them with a clear acrylic sealer. This step is crucial if you plan to keep the pots outdoors or water real plants in them.
Now your garden has some friendly little helpers ready for planting
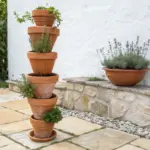
Mini Lighthouse Pot Stack
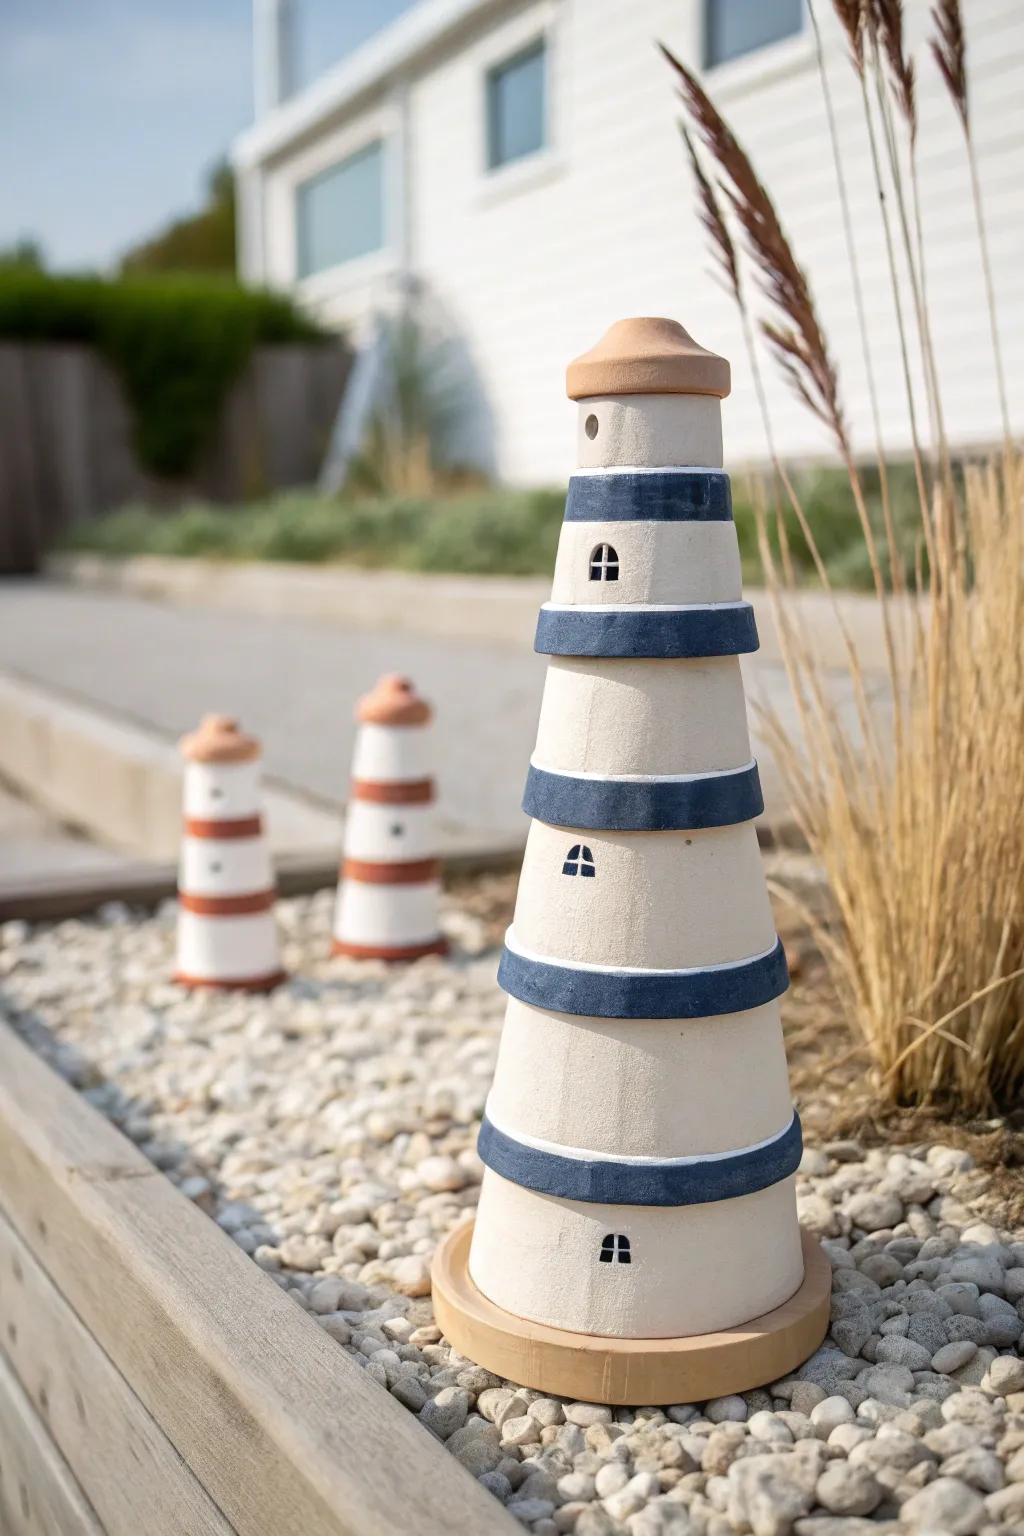
Transform ordinary terracotta pots into a charming seaside beacon for your garden or porch. This tiered lighthouse project uses graduating sizes of clay pots painted in crisp nautical hues to create a timeless coastal accent.
Step-by-Step Tutorial
Materials
- 4 terracotta pots in graduating sizes (e.g., 6″, 5″, 4″, 3″)
- 1 small terracotta saucer (sized to fit the smallest pot rim)
- 1 larger terracotta saucer (for the base)
- Outdoor acrylic craft paint (White, Navy Blue)
- Heavy-duty outdoor adhesive (e.g., E6000 or construction adhesive)
- Foam brushes and small detail brushes
- Painter’s tape (optional)
- Clear outdoor sealant spray (matte finish)
Step 1: Painting the Base Coats
-
Clean the pots:
Before starting, wipe down all your terracotta pots and saucers with a damp cloth to remove any dust or warehouse grime. Let them dry completely to ensure the paint adheres properly. -
Prime the surface:
Apply a base coat of white outdoor acrylic paint to the entire exterior of all four pots. You don’t need to paint the inside, but extending the paint just inside the rim looks nicer. -
Apply second coat:
Terracotta is porous and tends to soak up the first layer. Apply a second or even third coat of white paint until you have a solid, opaque finish. Allow this to dry fully before moving on. -
Paint the rims:
Using your navy blue paint, carefully paint the thick rim of the three largest pots. You can do this freehand for a rustic look or use painter’s tape for a crisp edge. -
Detail the smallest pot:
For the smallest top pot, paint a blue stripe around the middle or rim as well, depending on your preferred design.
Wobbly Tower?
If pots don’t sit flat, the manufacturing might be uneven. Rotate the pot until you find the ‘sweet spot’ where it sits level, or add a dab of extra glue to fill the gap.
Step 2: Assembly and Details
-
Prepare the stacking order:
Arrange your pots from largest to smallest to verify they stack neatly. The largest pot will be on the bottom, inverted upside down. -
Glue the base:
Apply a generous ring of strong outdoor adhesive to the bottom rim of the largest inverted pot. -
Stack the second tier:
Place the second-largest pot upside down onto the adhesive on the first pot. Center it carefully and press down firmly to set the bond. -
Continue stacking:
Repeat the gluing process with the remaining smaller pots, stacking them upwards in decreasing size. Make sure each layer is centered before the glue sets. -
Add windows:
Once the paint is dry and pots are stacked, use a small detail brush and navy blue or black paint to add simple arched windows. -
Refine the windows:
Paint a small semi-circle or square, then add cross-bars to look like window panes. I find outlining the window first helps keep the shape consistent. -
Prepare the top lantern:
Take the small terracotta saucer meant for the top. You can leave this natural terracotta for contrast or paint it; the reference image keeps a natural look. -
Attach the top:
Invert the small saucer and glue it to the flat bottom of the topmost pot to create the lighthouse ‘lantern’ roof. -
Prepare the bottom base:
Take the largest saucer (the base). You can paint this or leave it natural wood/terracotta color as shown in the image. -
Final assembly:
Apply glue to the rim of the bottom-most pot and center the entire tower onto the large base saucer. -
Seal for protection:
Once all paint and glue are completely cured (check your glue’s instructions), spray the entire structure with a clear matte outdoor sealant to protect it from the elements.
Pro Tip: Solar Light
Instead of gluing a saucer on top, glue a cheap outdoor solar path light into the hole of the top pot. It creates a real working beacon at night.
Place your new lighthouse among some white decorative stones or tall grasses to complete the nautical scene


What Really Happens Inside the Kiln
Learn how time and temperature work together inside the kiln to transform clay into durable ceramic.
Mini Pot Candle Luminaries
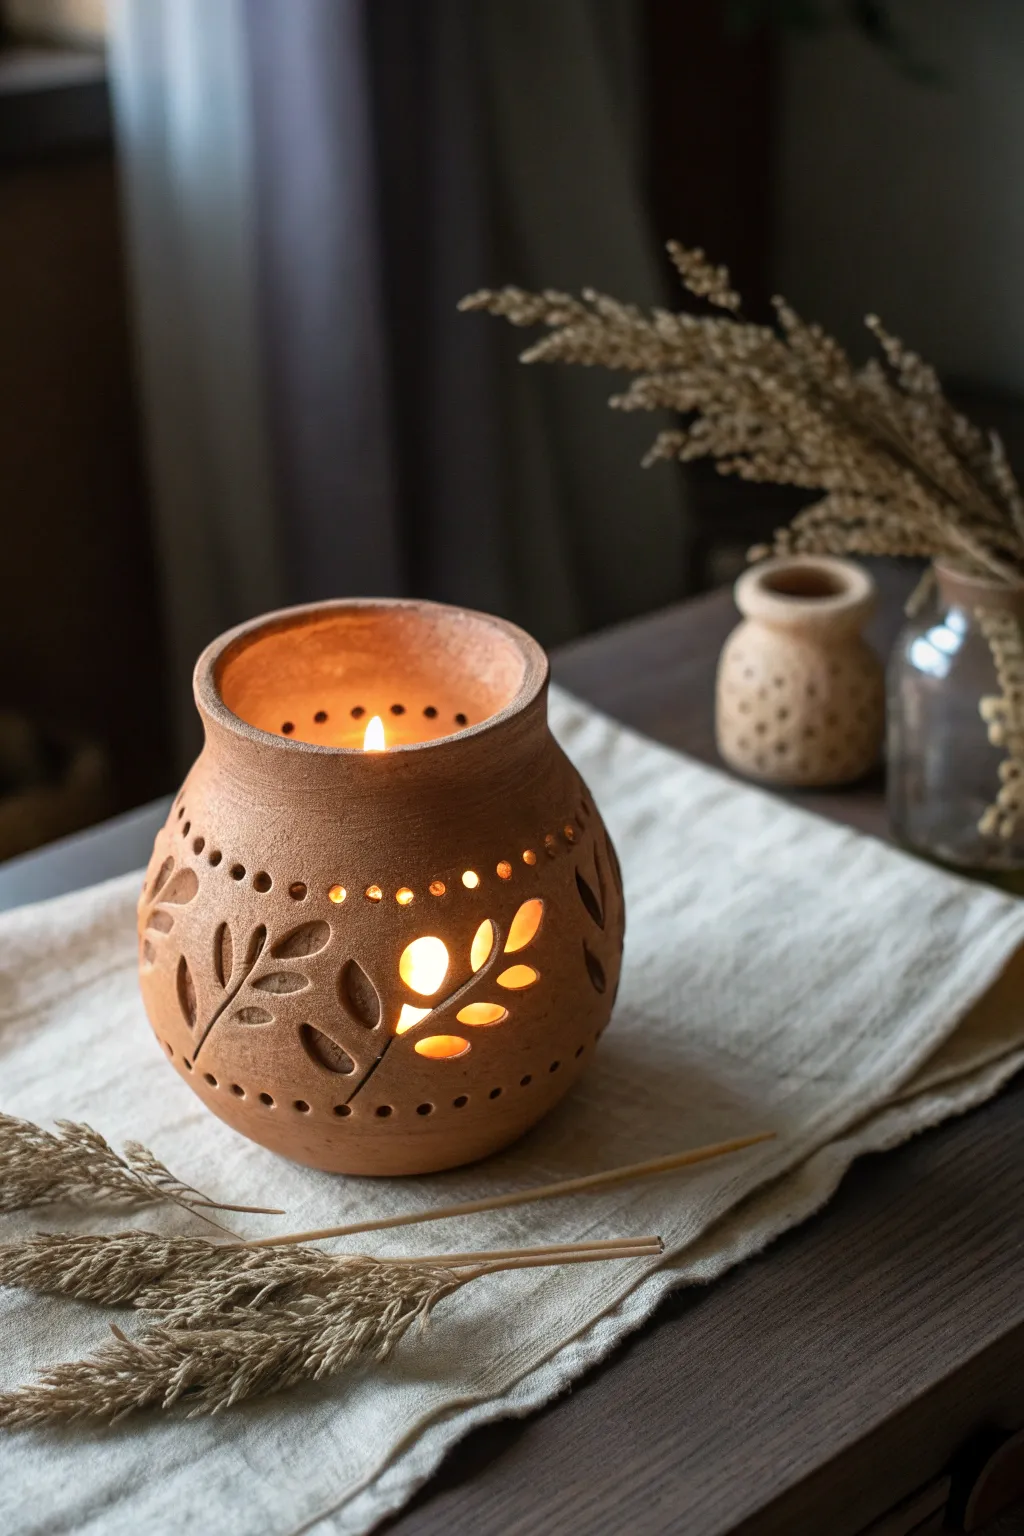
Transform a simple lump of air-dry clay or a terracotta pot into a cozy source of light. This rustic luminary features delicate cut-out leaf patterns that cast warm, dancing shadows when a candle flickers inside.
Step-by-Step Tutorial
Materials
- Air-dry clay (terracotta color) or a semi-dry wheel-thrown pot
- Pottery needle tool or awl
- Small circular hole cutter (straw or metal tube)
- Small carving loop tool
- Sponge
- Water
- Fine-grit sandpaper
- Tea light or LED candle
Step 1: Shaping the Vessel
-
Form the base shape:
Begin with a ball of terracotta-colored air-dry clay. Using the pinch pot method, press your thumb into the center and gently pinch the walls upward and outward to create a rounded belly. -
Define the neck and rim:
As you build height, slightly narrow the opening to create a neck, then gently flare the very top edge outward to form a distinct rim. Keep the walls about 1/4 inch thick for stability. -
Smooth the surface:
Dip a sponge in a little water and wipe it across the exterior and interior to remove fingerprints and smooth out any major bumps. The finish should look matte and natural. -
Let it firm up:
Allow the clay to dry until it reaches a ‘leather-hard’ state—firm to the touch but still cool and carveable without collapsing. This usually takes 2-4 hours depending on humidity.
Clean Cuts
When punching holes, keep a small ball of spare clay handy. Push the clogged clay out of your straw or cutter into the spare ball after every few punches to keep the tool clear.
Step 2: Carving the Design
-
Sketch the leaves:
Lightly trace a vine and leaf pattern around the belly of the pot using a needle tool. I like to draw a mix of small and large leaves flowing horizontally around the vessel. -
Punch the upper border:
Using a small circular cutter or a sturdy straw, punch a row of small holes just below the neck of the pot. Space them evenly to create a decorative dotted border. -
Punch the lower border:
Repeat the dotting process near the base of the pot. These holes help frame the central leaf design and also aid airflow for the candle. -
Cut out the main accents:
Select a few feature leaves to be completely cut out. Use a sharp craft knife or needle tool to slice through the clay, creating open spaces for the light to shine through brightly. -
Carve surface details:
For the remaining leaves, use a loop tool or needle to crave into the surface without cutting all the way through. This creates texture and depth (bas-relief) that catches the light differently. -
Refine the edges:
Go back over your cut-outs with a damp detail brush or your finger to smooth down any jagged clay crumbs or sharp edges left by the cutting tools.
Scented Clay
Mix a few drops of essential oil like cinnamon or clove into the air-dry clay while kneading it before shaping. As the candle warms the pot, it will release a subtle, spicy fragrance.
Step 3: Finishing Touches
-
Dry completely:
Set the pot in a cool, dry place away from direct sunlight. Let it dry for at least 24-48 hours until the clay lightens in color and is completely hard. -
Sand for perfection:
Once fully dry, take a piece of fine-grit sandpaper and gently sand the rim and base to ensure they are level and smooth. -
Clean dust:
Wipe the pot down with a dry cloth or soft brush to remove any sanding dust from the crevices of your carving. -
Light it up:
Place a tea light or small LED candle inside. Center it carefully so the flame is safely away from the curved walls.
Enjoy the cozy atmosphere your handcrafted luminary brings to the room
Hanging Wall Pocket Trio
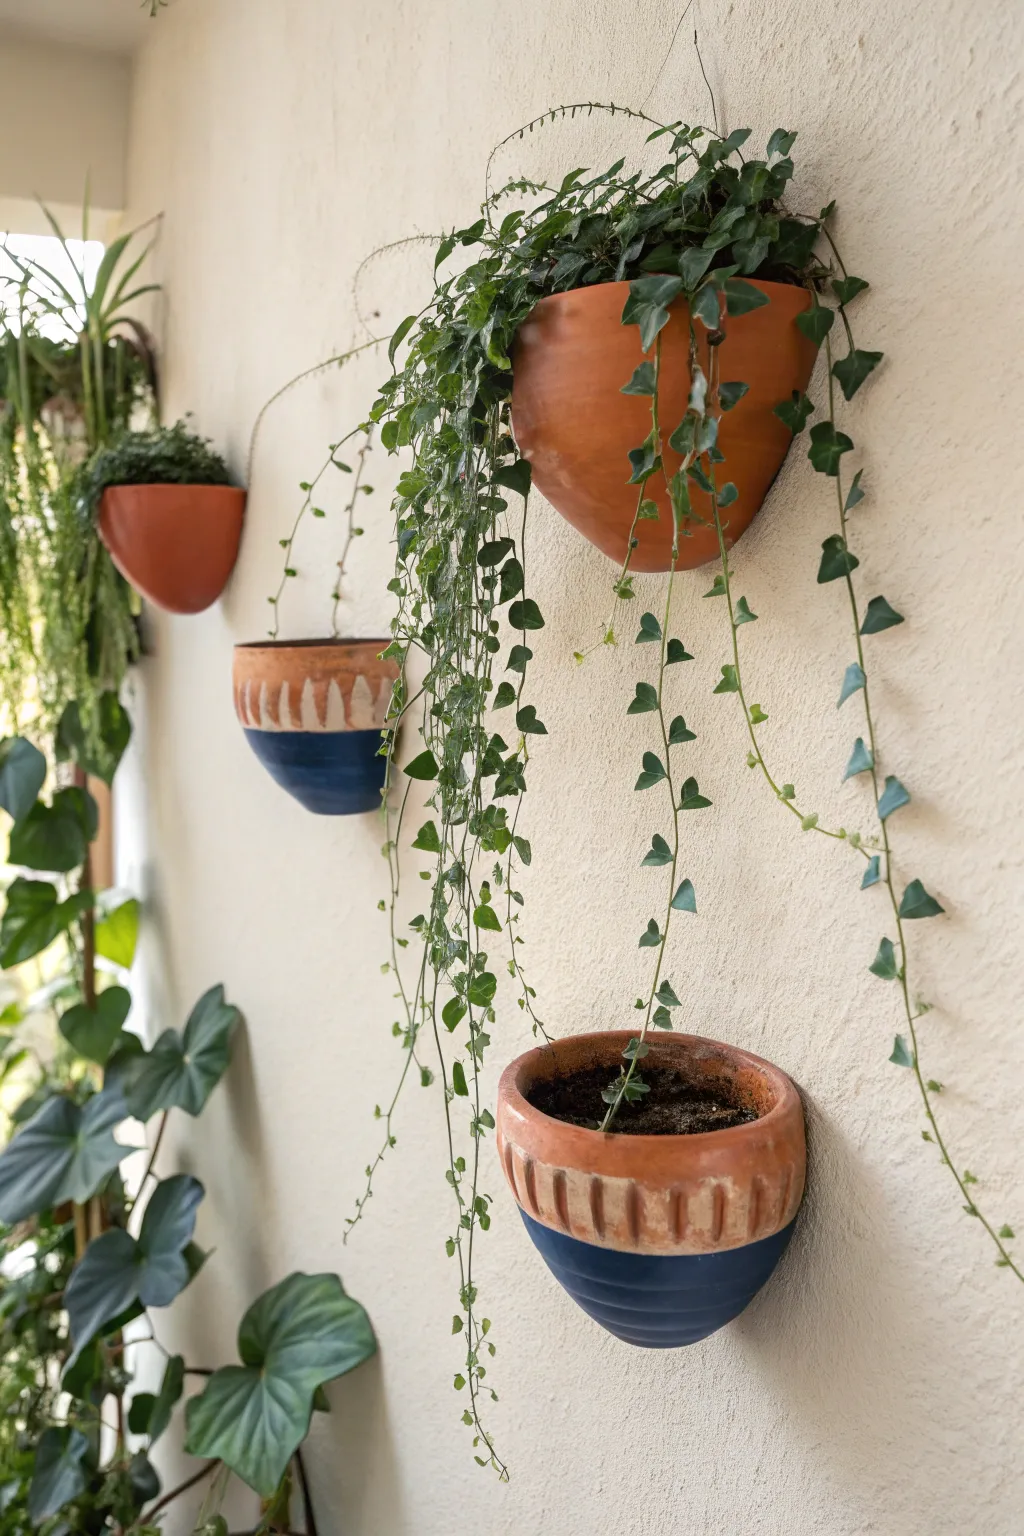
Transform standard wall-mounted terracotta planters into a stylish vertical garden display with a touch of Mediterranean flair. By adding texture and a bold color-blocked design, you can turn plain clay pots into eye-catching homes for your favorite trailing ivy.
How-To Guide
Materials
- 3 half-round terracotta wall planters (approx. 6-8 inches wide)
- Navy blue acrylic craft paint
- White or cream acrylic craft paint (chalk finish works best)
- Air-dry clay or terracotta-colored polymer clay
- Strong craft glue (E6000 or similar)
- Painter’s tape
- Medium flat paintbrush
- Small detail paintbrush
- Clay sculpting tool or a dull knife
- Clear matte sealer spray
- Wall hooks or screws for mounting
- Potting soil and trailing plants (like English Ivy or String of Pearls)
Step 1: Adding Texture
-
Clean surface:
Begin by wiping down two of the terracotta pots with a damp cloth to remove any dust or manufacturing residue. Let them dry completely. -
Roll clay coil:
Take a chunk of your air-dry clay and roll it into a long, even snake that is roughly the same circumference as the rim of your pot. -
Apply the rim:
Apply a thin line of strong craft glue just under the existing rim of the pot. Press the clay coil onto this glue line, smoothing it so it adheres well to the terracotta. -
Flatten the band:
Gently press the clay coil flat with your thumb so it forms a band about 1 inch wide around the top of the pot. -
Carve grooves:
Using a sculpting tool or the back of a dull knife, press vertical indentations into the fresh clay band. Space them evenly apart to create a ribbed or fluted effect. -
Create the top edge:
Use your finger to smooth the top edge where the clay meets the original pot rim, blending the seam slightly for a cohesive look. -
Dry time:
Allow the clay to dry according to the package instructions. This usually takes 24 hours for air-dry clay. I prefer to leave it overnight to be safe.
Pro Tip: Seamless Clay
To make the added clay band grip the terracotta better, score (scratch) the surface of the pot with sandpaper before applying the glue and clay.
Step 2: Painting the Design
-
Tape the line:
Once the clay is rock hard, place a strip of painter’s tape horizontally around the body of the pot. Position it about halfway down to mark the color-block section. -
Seal the tape:
Press the edge of the tape down firmly with your fingernail to prevent paint from bleeding underneath. -
Paint the base:
Using the medium flat brush, paint the bottom section of the pot with the navy blue acrylic paint. You will likely need two coats for full opacity. -
Apply texture wash:
While the clay rim is drying, mix a small amount of white paint with water to create a very thin wash. -
Highlight the rim:
Lightly brush this whitewash over the textured clay rim. Wipe it back immediately with a paper towel so the white only remains in the grooves, highlighting the texture. -
Remove tape:
Carefully peel off the painter’s tape while the blue paint is still slightly tacky to ensure a crisp clean line. -
Seal the work:
Take the pots outside or to a well-ventilated area and spray the exterior with a clear matte sealer. This protects the paint and clay from moisture when watering.
Step 3: Assembly & Planting
-
Prepare the third pot:
Leave the third terracotta pot completely plain to provide a nice visual contrast to the two decorated ones. -
Mount the hooks:
Install secure wall hooks or screws into your wall. Arrange them in a staggered vertical line for a cascading effect. -
Add drainage:
Place a small piece of mesh or a coffee filter over the drainage hole inside each pot to keep soil from washing out. -
Planting:
Fill the pots with potting soil and gently transfer your trailing plants. English ivy works beautifully for the top and bottom, while a delicate vine suits the middle. -
Hang and enjoy:
Carefully hang each pot on its designated hook and water lightly to settle the soil.
Level Up: Aged Patina
Before painting the blue, rub a little garden soil or dark wax over the plain terracotta areas and wipe off. This gives an instant weathered, antique look.
Step back and admire how this simple trio brings life and greenery to your wall

TRACK YOUR CERAMIC JOURNEY
Capture glaze tests, firing details, and creative progress—all in one simple printable. Make your projects easier to repeat and improve.
Gumball-Style Candy Dispenser
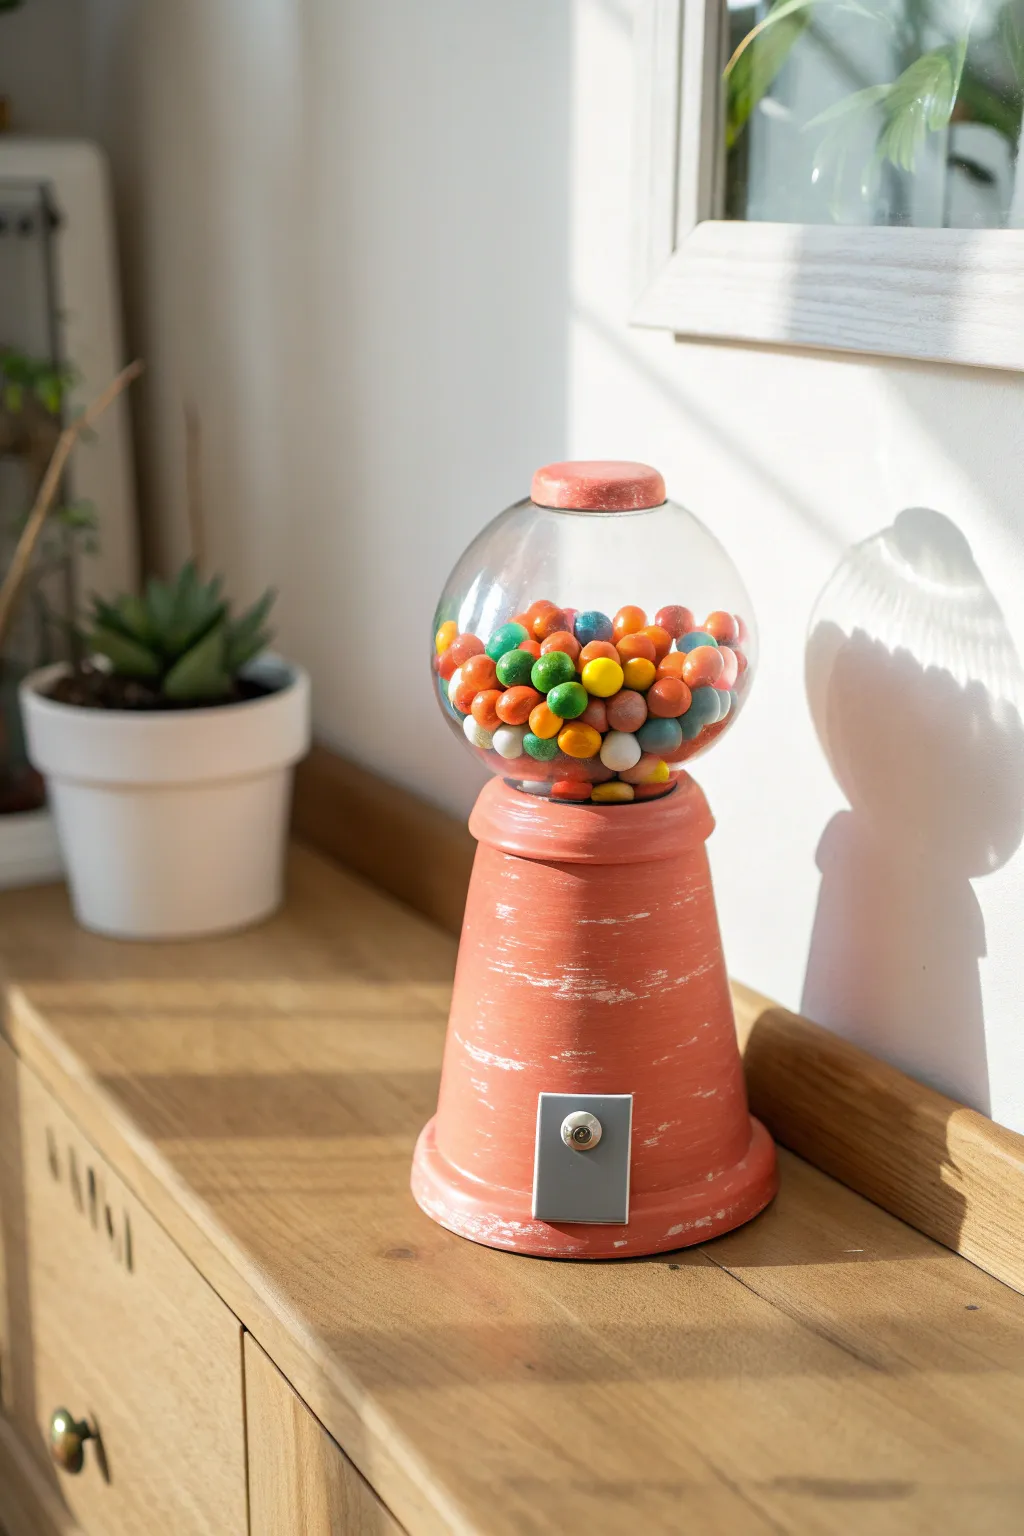
Transform a simple terracotta pot into a charming, vintage-inspired candy dispenser that adds a touch of nostalgia to any room. This project uses clever stacking and distressing techniques to create a functional piece of decor that looks like a well-loved antique find.
Step-by-Step Guide
Materials
- One medium terracotta flower pot (approx. 4-5 inches)
- One terracotta saucer (sized to fit the pot base when inverted)
- Small wooden knob or finial
- Bubble-shaped glass bowl or ivy bowl (sized to sit on the pot’s bottom)
- Coral or salmon pink acrylic paint
- White acrylic paint (for distressing)
- E6000 or strong clear craft glue
- Small rectangular piece of wood or metal
- Small metal washer and screw (decorative)
- Sandpaper (medium to fine grit)
- Paintbrushes (flat brush and dry brush)
- Colorful candy or gum
Step 1: Preparation and Base Coat
-
Clean the surfaces:
Begin by wiping down your terracotta pot and saucer with a damp cloth to remove any dust or debris. Let them dry completely, as moisture will prevent the paint from adhering properly. -
Invert the pot:
Flip the terracotta pot upside down. The wider rim will be the base of your machine, and the smaller bottom (now top) will hold the glass bowl. -
Paint the base color:
Apply a coat of coral or salmon pink acrylic paint to the entire exterior of the inverted pot. Don’t forget to paint the saucer (which will be the lid) and the wooden knob in the same shade. -
Apply a second coat:
Once the first layer is dry to the touch, apply a second coat to ensure opaque, solid coverage. Terracotta is porous and tends to soak up the first layer. -
Let it cure:
Allow all the painted clay pieces to dry fully, ideally for at least an hour.
Step 2: Distressing and Assembly
-
Dry brush technique:
Dip a dry, stiff-bristled brush lightly into white acrylic paint, then wipe most of it off onto a paper towel. You want barely any paint left on the bristles. -
Apply the distressed look:
Lightly sweep the dry brush horizontally across the painted pot and saucer. Focus on the raised ridges and edges where natural wear would occur. -
Sand for texture:
I like to take a bit of sandpaper and gently scuff some of the white paint and even the underlying coral paint to reveal hints of the natural clay beneath. This creates that authentic vintage feel seen in the photo. -
Create the dispensing mechanism:
Paint your small wooden rectangle silver or grey to mimic metal. Alternatively, use a real piece of scrap metal if you have one. -
Add the hardware detail:
Glue a small metal washer and a screw head (or a faux screw) into the center of the grey rectangle to simulate the turning mechanism. -
Attach the mechanism:
Glue the finished grey rectangle near the bottom of your inverted pot base. -
Assemble the lid:
Glue the wooden knob directly onto the center of the inverted terracotta saucer. This creates the removable lid for the machine.
Glue Grip Tip
Before gluing the glass to the clay, rough up the glass bottom slightly with sandpaper. This texture gives the adhesive something to grab onto for a stronger bond.
Step 3: Final Construction
-
Prepare the glass bowl:
Clean your glass bowl thoroughly with glass cleaner to ensure it’s sparkling and food-safe. -
Secure the bowl:
Apply a strong ring of E6000 glue to the bottom (now top) of the inverted clay pot. Center the glass bowl on top of the glue and press firmly. -
Allow to set:
Let the adhesive cure undisturbed for 24 hours. This is crucial for stability. -
Fill with treats:
Once the glue is fully set, fill the glass bowl with colorful gumballs or hard candies. -
Top it off:
Place your painted saucer lid on top of the glass bowl to complete the look.
Wobbly Bowl?
If the glass bowl rocks on the pot base, the clay might be uneven. Add a thick bead of silicone sealant or hot glue to the gaps to level it out before final gluing.
Place your new vintage-style candy dispenser on a sunny shelf and enjoy the pop of color it brings to your space
Modern Mini Pot Totem Sculpture
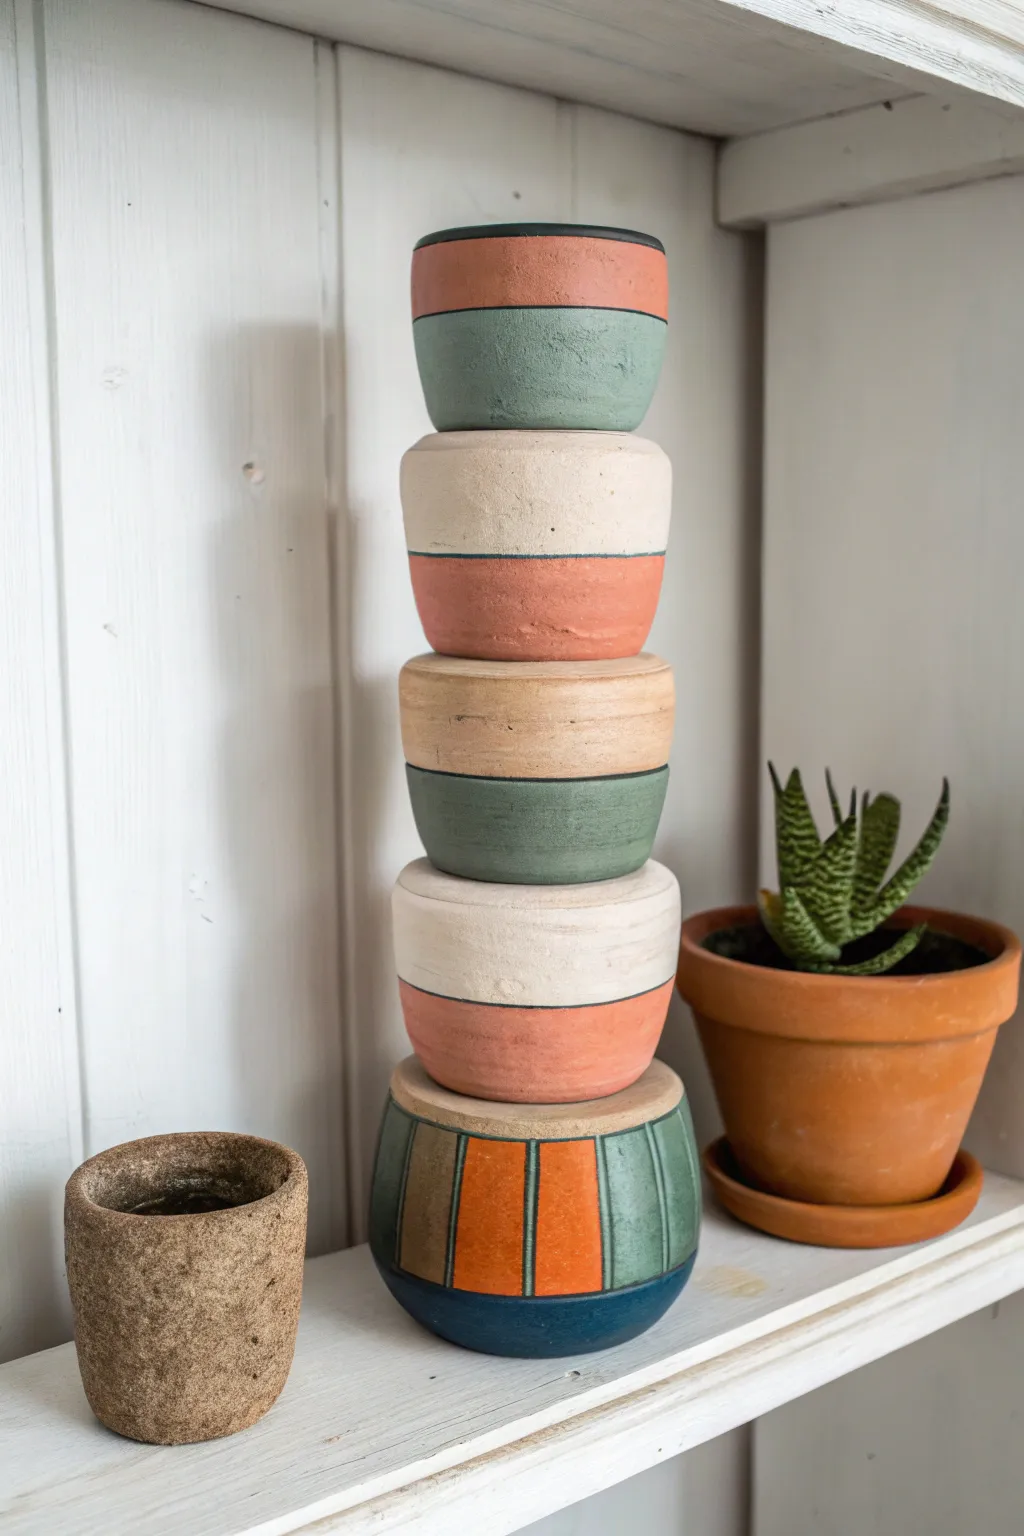
Transform simple miniature clay pots into a striking vertical sculpture with a modern, earthy color palette. This stacked totem project brings height and texture to your shelf decor using muted tones of sage, cream, and terracotta.
Step-by-Step
Materials
- 5 miniature terra cotta pots (approx. 2-3 inches in diameter)
- Acrylic craft paints (terracotta orange, sage green, cream/off-white, dark teal)
- Flat paintbrushes (medium size)
- Painter’s tape or washit tape
- Strong craft adhesive or hot glue gun
- Matte clear sealant spray (optional)
- Sandpaper (fine grit)
Step 1: Color Blocking the Top Pots
-
Prep the surface:
Begin by wiping down all your terra cotta pots with a damp cloth to remove dust. If there are any rough stickers or jagged edges, give them a quick pass with fine-grit sandpaper. -
Base coat the top pot:
Select the smallest pot for the very top. Paint the upper rim section a warm terracotta orange and the bottom body a sage green. You can freehand the line following the natural groove of the rim. -
Paint the second pot:
For the second pot down, flip the color scheme. Paint the rim section a creamy off-white and the bottom half the terracotta orange. Apply two coats for solid coverage. -
Create the middle pot:
For the middle tier, paint the rim a natural beige or light tan (or leave it raw if clean) and paint the bottom section the sage green to tie it back to the top piece. -
Paint the fourth pot:
Repeat the pattern from the second pot: cream rim with a terracotta orange base. This repetition creates a pleasing rhythm in the stack.
Paint Texture Tip
Mix a teaspoon of baking soda into your acrylic paint before applying. This creates a grainy, stone-like texture that mimics aged pottery perfectly.
Step 2: Designing the Base
-
Select the base pot:
Choose your largest or most uniquely shaped pot for the bottom. The example uses a deeper, bowl-shaped vessel for stability. -
Tape vertical stripes:
I find using thin washi tape works best here. Mask off vertical sections on the main body of the pot to create crisp lines between your colors. -
Paint the base stripes:
Paint the exposed vertical sections in alternating colors: sage green, terracotta orange, and a darker olive or grey-brown. -
Add the bottom accent:
Paint the very bottom ‘foot’ or lower curve of this base pot a deep teal blue to ground the entire sculpture visually. -
Remove tape and touch up:
Carefully peel back the tape while the paint is slightly tacky to avoid chipping. Use a small detail brush to neaten any bleed-through.
Level Up: Functionality
Don’t glue the top pot! Leave it loose so you can lift it off and use the hollow space inside the totem as a secret hiding spot for keys or cash.
Step 3: Assembly and Finishing
-
Dry check:
Ensure every single pot is completely dry to the touch before starting assembly. Wet paint will cause the pots to stick together unevenly. -
Apply adhesive to the base:
Apply a ring of strong craft glue or hot glue around the top rim of your striped base pot. -
Stack the fourth pot:
Place the fourth pot (cream/orange) upside down onto the base pot. Center it carefully and press down firmly. -
Continue stacking:
Glue the bottom of the middle pot (sage/tan) to the bottom of the previous pot. For the next layer, glue rim-to-rim. You want to alternate orientations (bottom-to-bottom, rim-to-rim) to create that totem shape. -
Secure the top piece:
Finally, glue the topmost pot (orange/green) onto the stack. Check from all angles to ensure the tower is standing straight before the glue sets. -
Seal the work:
Once the glue is cured, take the sculpture outside and spray it with a matte clear coat. This protects the acrylic paint from chipping and gives it a finished, ceramic look.
Now you have a custom piece of geometric art ready to brighten up your bookshelf