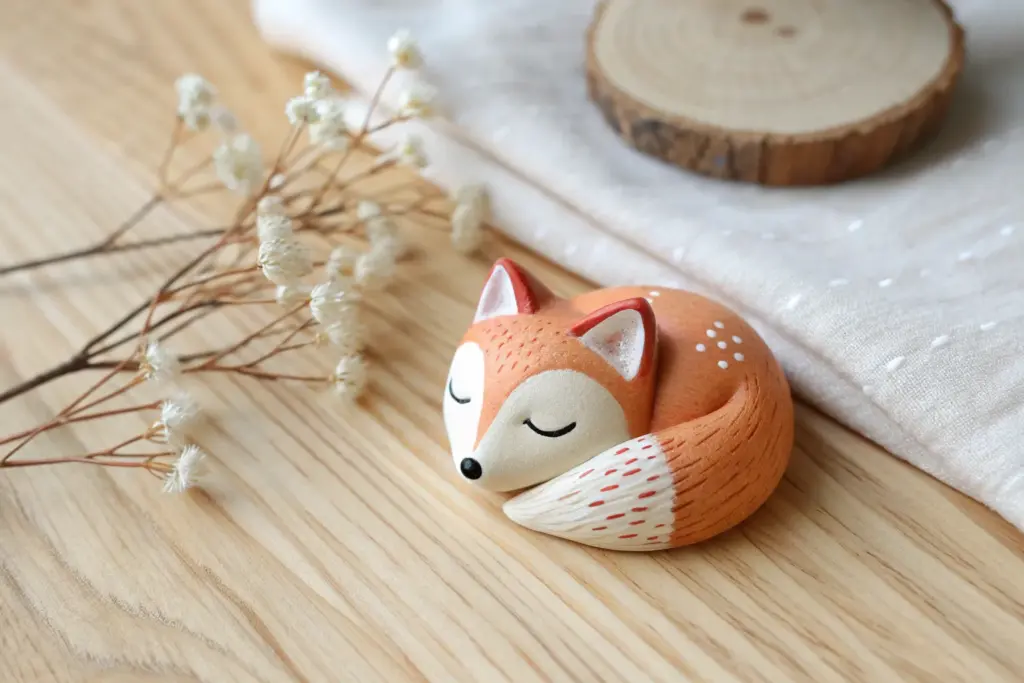
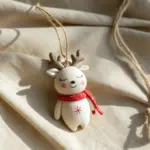
Whenever I’m short on time but still craving that hands-on clay joy, I reach for small clay sculptures—they’re quick, cute, and ridiculously satisfying. If you’ve got a little polymer clay or air-dry clay and a few minutes, you can make a tiny character that feels like a whole world in your palm.
Tiny Round Animal Figurines From Simple Shapes
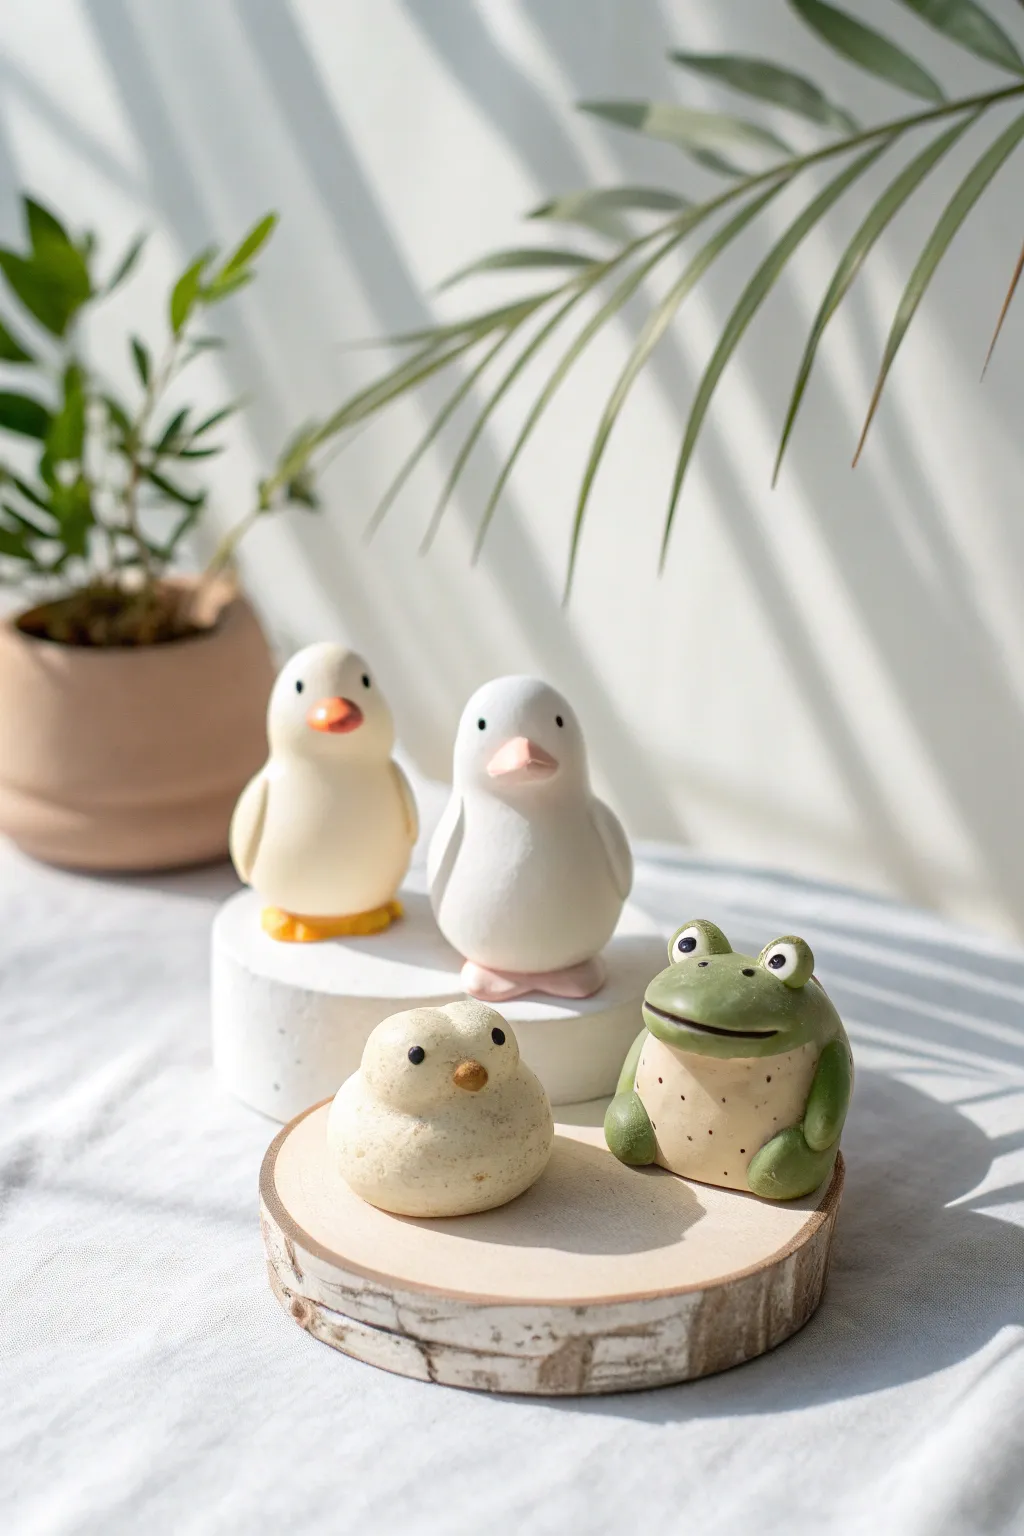
These adorable minimalistic animal figurines are crafted from simple spherical and teardrop shapes, making them perfect for beginners. The set includes two standing ducks, a round little chick, and a contented frog, all boasting a smooth, matte finish that adds a modern touch to any shelf.
Step-by-Step Guide
Materials
- Polymer clay or air-dry clay (white, yellow, green, orange/pink)
- Acrylic paints (black, orange, pink, brown) if using white clay
- Small ball stylus or toothpick
- Fine-grit sandpaper (optional)
- Matte varnish
- Detail paintbrush
- Clean work surface
Step 1: Shaping the Ducks
-
Form the base body:
Start with a golf-ball-sized amount of white or pale yellow clay. Roll it into a smooth sphere, then gently taper the top third to create a pear shape. This forms the head and body in one cohesive piece. -
Define the wings:
Roll two small, flat ovals of clay. Press them gently onto the sides of the body, smoothing the edges seamlessly into the main form so they look like subtle, folded wings. -
Add the beak:
Take a tiny pinch of orange or pink clay and roll it into a small cone. Press the wider end onto the center of the face area, slightly flattening it to create a duck-bill shape. -
Create the feet:
Make two small flat heart shapes or triangles from orange/pink clay. Place the duck body on top of these, positioning them so the toes peek out the front for stability. -
Eye indentations:
Use a small ball stylus to make two tiny indents where the eyes will go. Repeat this entire process to make a second duck, varying the size slightly for interest.
Smooth Operator
Before baking or drying, use a soft paintbrush dipped in baby oil (polymer) or water (air-dry) to brush over the clay. It melts away fingerprints instantly.
Step 2: Crafting the Round Chick
-
Roll a perfect sphere:
For the smallest bird, roll a ping-pong-sized ball of cream or textured clay. Keep it almost perfectly round, flattening the bottom just enough so it doesn’t roll away. -
Pinch a tail:
Gently pinch one side of the sphere to pull out a very subtle, tiny tail point. -
Attach the tiny beak:
Roll a minuscule cone of brown or dark orange clay. Press it onto the front center of the sphere. -
Mark the eyes:
Rather than surface painting, use your stylus to press two deep, widely spaced eye sockets. This gives it that quirky, focused look.
Cracks Appearing?
If air-dry clay cracks while drying, mix a tiny bit of fresh clay with water to make a paste (slip) and fill in the cracks, then smooth over.
Step 3: Sculpting the Frog
-
Shape the frog body:
Roll a ball of light green or beige clay for the belly. Flatten it slightly into a squat, rounded mound. -
Add the back and head:
Add a layer of darker green clay over the back if you want a two-tone look, or simply sculpt the head as a wide oval on top of the body base. -
Form the legs:
Roll two sausage shapes of green clay. Bend them into a ‘V’ shape and attach them to the sides of the body, smoothing the top thigh into the body while leaving the feet distinct at the bottom. -
Create the eyes:
Roll two small balls of white clay and place them on top of the head. Press them down firmly so they integrate with the head shape but remain protruding. -
Carve the mouth:
Use a thin clay tool or the side of a toothpick to press a wide, horizontal line across the face for the mouth.
Step 4: Finishing Touches
-
Smooth imperfections:
Dip your finger in a little water (for air-dry) or baby oil (for polymer) and gently rub away any fingerprints on all figurines. -
Bake or dry:
If using polymer clay, bake according to package instructions (usually 275°F/130°C). For air-dry clay, leave them in a dry spot for 24-48 hours. -
Paint the details:
Once fully dry or cool, use a fine detail brush to paint small black dots in the eye indentations. Add tiny dots or freckles to the frog’s belly for texture. -
Apply varnish:
Finish with a coat of matte varnish to protect your work and unify the surface sheen without making them glossy.
Arrange your little clay family on a wooden slice or windowsill to bring a bit of nature indoors


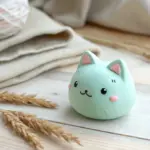
Mini Cat Sitters With Sweet Face Details
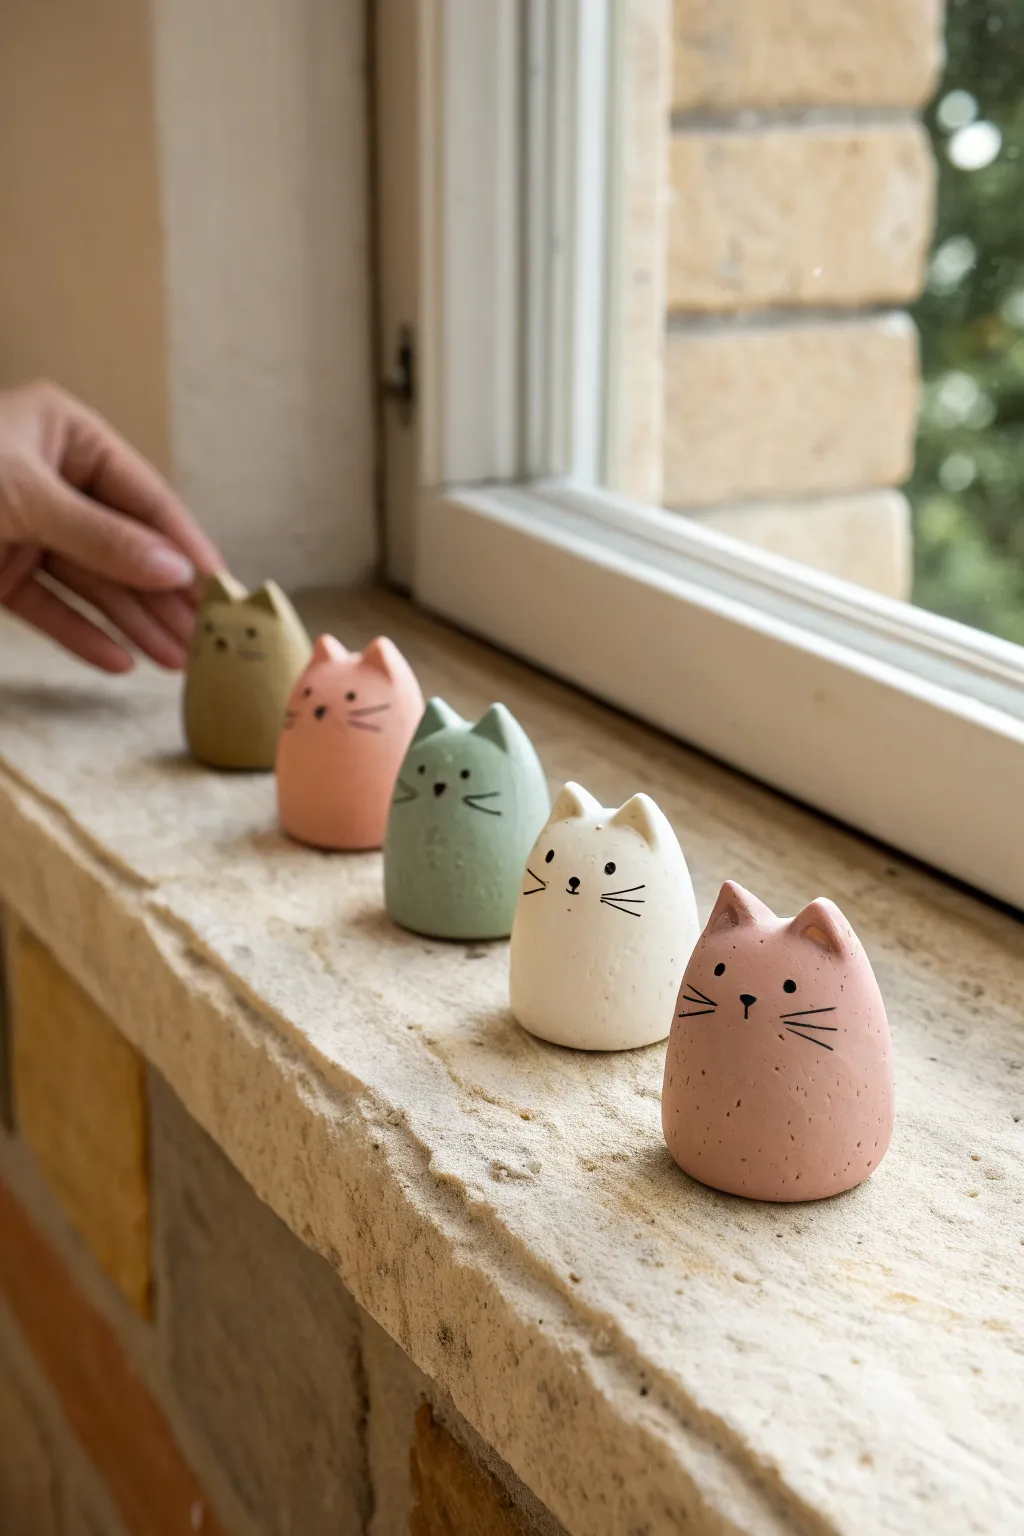
These charming, minimalist cat figures add a subtle touch of whimsy to any windowsill or shelf. Modeled with a smooth, egg-like base and simple pointed ears, their personalities shine through with delicately painted facial details.
Step-by-Step
Materials
- Air-dry clay (white or terracotta)
- Acrylic paints (pastel pink, sage green, beige, white, mustard)
- Fine-point black permanent marker or fine lined paintbrush
- Matte acrylic sealant or varnish
- Small bowl of water
- Sandpaper (fine grit)
- Modeling tool or butter knife
Step 1: Shaping the Base
-
Portion the clay:
Start by grabbing a chunk of air-dry clay about the size of a golf ball or a large walnut. Roll it firmly between your palms to warm it up and check for any air bubbles. -
Roll a smooth sphere:
Continue rolling until you have a perfectly round, seamless sphere. If cracks appear, dip your finger in water and smooth them out immediately. -
Form the egg shape:
Gently gently roll the top half of the sphere to taper it slightly, creating a soft egg shape that is wider at the bottom. -
Flatten the base:
Tap the bottom wide end of your egg onto your work surface. You want a flat, stable bottom so the kitty sits upright without wobbling.
Smooth Operator
To get that super-smooth ceramic look without a kiln, burnish the nearly-dry clay with the back of a spoon before sanding.
Step 2: Adding Details
-
Pinch the ears:
At the top of the tapered end, use your thumb and forefinger to pinch two small triangles. Keep them relatively short and spaced slightly apart. -
Refine the ear shape:
Use a modeling tool or your fingertip to smooth the transition between the head and the ears. The ears should look like they are pulled from the main shape, not stuck on separately. -
Smooth the surface:
Dip your finger in a tiny bit of water and run it over the entire surface of the cat. Eliminate any fingerprints or tool marks for a polished, modern look. -
Dry completely:
Set your cats aside in a dry area. Depending on the brand of clay and humidity, this usually takes 24 to 48 hours. Turn them occasionally to ensure the bottom dries too. -
Sand for perfection:
Once fully cured, inspect the surface. I like to use fine-grit sandpaper here to gently buff away any remaining uneven spots or rough textures.
Step 3: Painting and Finishing
-
Apply base coats:
Select your pastel palette. Paint each cat a solid color—try a muted pink, sage green, or creamy white. You may need two thin coats for full coverage. -
Let paint dry:
Allow the base coat to dry completely. If the paint is tacky, your marker lines might bleed in the next step. -
Mark the center:
Visualize a ‘T’ shape on the face to find the center placement for the nose. A tiny dot with a pencil can help guide you. -
Draw the nose:
Using your fine-point black marker or a very thin brush with black paint, draw a small, inverted triangle for the nose about halfway down the face. -
Add the eyes:
Place two small dots for eyes, widely spaced on either side of the nose. Keeping them small and wide-set gives the face a sweet, innocent expression. -
Draw whiskers:
Add three straight lines radiating outward on each cheek. Keep your hand steady and use a quick, light flicking motion for the sharpest lines. -
Draw the mouth:
Draw a tiny vertical line dropping straight down from the bottom point of the nose triangle. -
Seal the sculpture:
Finish by applying a coat of matte acrylic sealant. This protects the paint and gives the clay a lovely finished texture.
Wobbly Kitty?
If the bottom bowed out while drying, simply glue a small circle of felt to the base to stabilize the figure and protect your shelf.
Group your colorful litter together on a windowsill to watch over your home


Pocket-Size Dogs With Floppy Ears and Big Noses
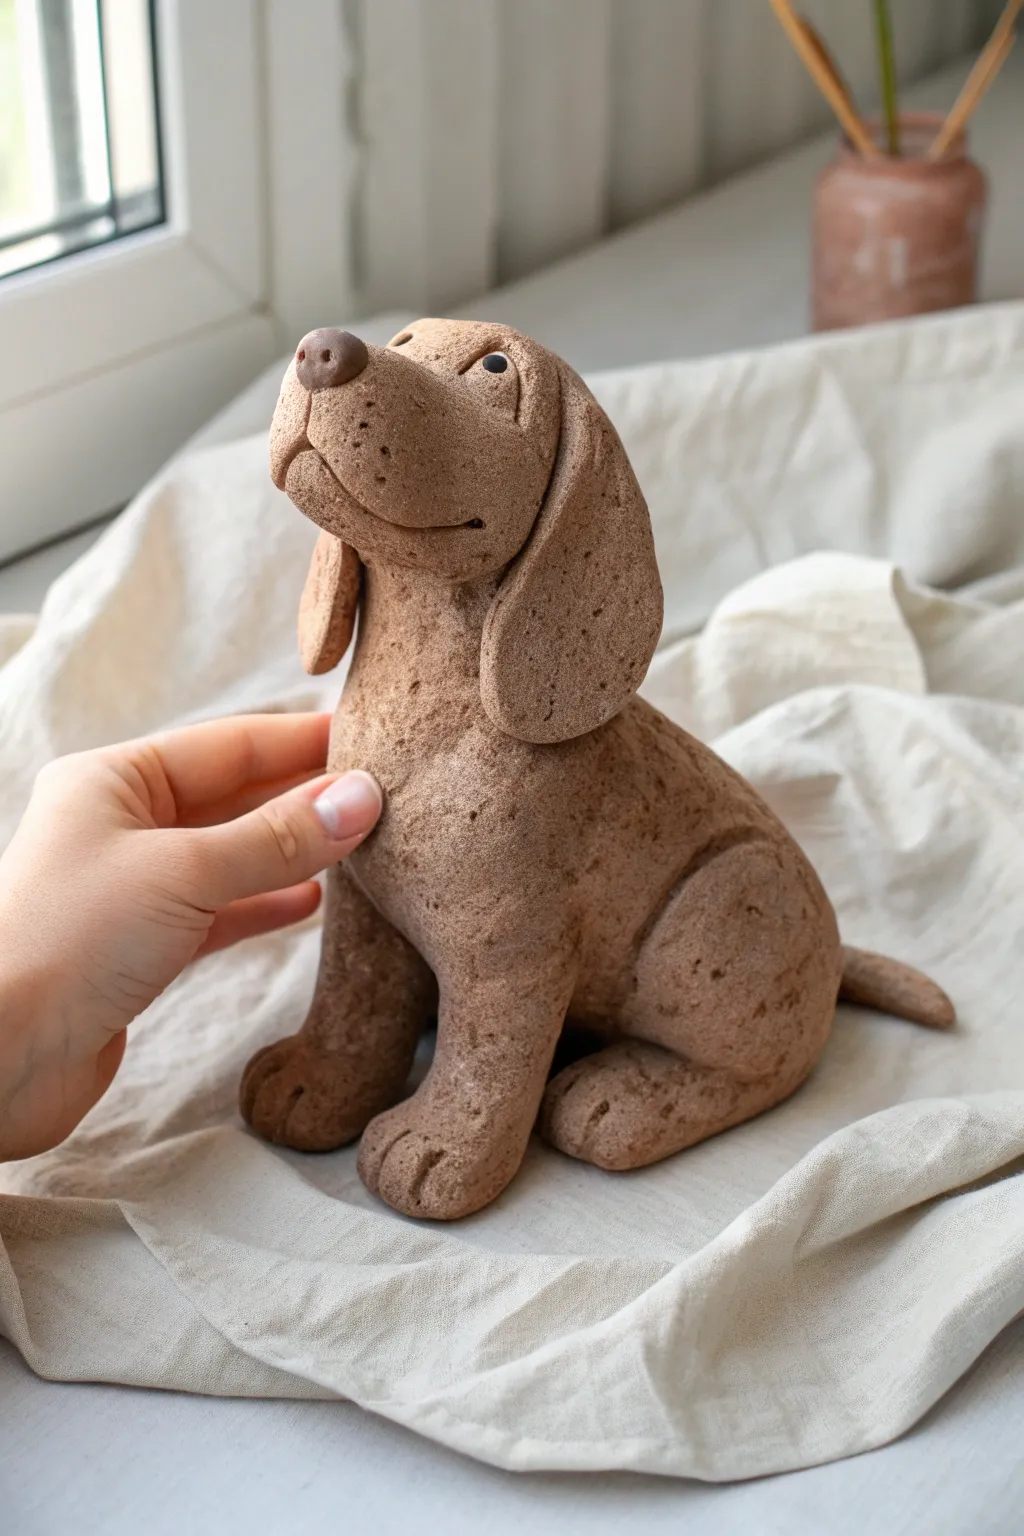
Capture the charm of man’s best friend with this delightful clay sculpture, defined by its exaggerated floppy ears and speckled, stone-like texture. The finished piece has a rustic, warm feel that looks wonderful on a windowsill or bookshelf.
Step-by-Step Guide
Materials
- Stoneware or speckled polymer clay (brown/terracotta tone)
- Small sculpting tools (needle tool, blending tool)
- Water or slip (for joining)
- Rough sponge or stiff bristled brush (for texturing)
- Small rolling pin
- Wire cutter
- Dark clay or acrylic paint (for eyes/nose detail)
Step 1: Forming the Body and Head
-
Create the heavy base:
Start with a solid ball of clay about the size of a lemon. Gently roll it into a pear shape, flattening the bottom so it sits securely without tipping. This will be the seated body. -
Shape the head:
Form a second, smaller sphere for the head. Press one side slightly to create a flatter surface where the nose will attach later. -
Connect head to body:
Score the top of the body and the bottom of the head with a needle tool. Apply a dab of slip or water, then press the head firmly onto the neck area. Smooth the seam completely with your thumb or a modeling tool until the clear line disappears. -
Sculpt the snout:
Take a smaller lump of clay and shape it into a rounded muzzle. Attach this to the front of the face, blending the edges backward into the cheeks to ensure a seamless transition.
Step 2: Adding Character Features
-
Shape the floppy ears:
Roll out a slab of clay to about 1/4 inch thickness. Cut two large, elongated teardrop shapes. Soften the cut edges with your fingers so they look organic, not sharp. -
Attach the ears:
Score and slip the contact points on the side of the head. Press the ears on, letting them hang heavily down the sides of the neck. I like to slightly curve the bottom of the ear outward to give it a bit of movement. -
Add the nose:
Roll a small, darker piece of clay (or the same clay) into a triangle with rounded corners. Press it onto the tip of the muzzle. -
Refine the mouth:
Use a needle tool or a thin blade to slice a smiling mouth line under the snout. Use a tool to gently lift the corners of the mouth for a happy expression. -
Create the eyes:
Make small indentations where the eyes should go. Insert tiny balls of dark clay (or paint them later) into these sockets. Add small eyelids by rolling tiny coils and placing them over the top of the eyes.
Pro Tip: Hollow Out
If your sculpture is thicker than 1 inch, hollow out the body from the bottom before attaching the head. This prevents cracking during firing or baking by ensuring even drying.
Step 3: Limbs and Texture
-
Form the front legs:
Roll two sausage shapes for the front legs. Attach them vertically to the front of the chest, blending the clay at the shoulders so they look muscular and integrated. -
Sculpt the paws:
flatten the bottom of the leg coils slightly to form paws. Use a knife tool to press two or three indentations into each paw to suggest toes. -
Add the hind legs:
Make two large, flattened ovals for the haunches. Attach these to the sides of the lower body. Add smaller ovals tucked underneath for the back feet, adding toe details here as well. -
Attach the tail:
Roll a short, tapered cone for the tail. Score and slip it onto the lower back, curving it slightly to the side so it’s visible from the front. -
Apply texture:
This is crucial for the stone look. Take a stiff brush or a rough sponge and dab it all over the sculpture’s surface. Avoid smoothing it back out; you want that pitted, organic feel. -
Add freckles (optional):
If your clay isn’t pre-speckled, you can use a toothbrush to gently flick a spray of watered-down dark underglaze or paint over the surface for that speckled egg appearance. -
Final smooth:
Check for any sharp burrs or unintentional fingerprints and gently pat them down with the texture sponge.
Troubleshooting: Ears Falling Off
Heavy ears might droop too much while wet. Prop them up with crumpled paper towels or small sponges to support them until the clay stiffens or dries enough to hold its own weight.
Once fired or baked, your loyal clay companion is ready to sit faithfully on your desk


Small Sea Creature Minis: Turtles, Whales, and Octopuses
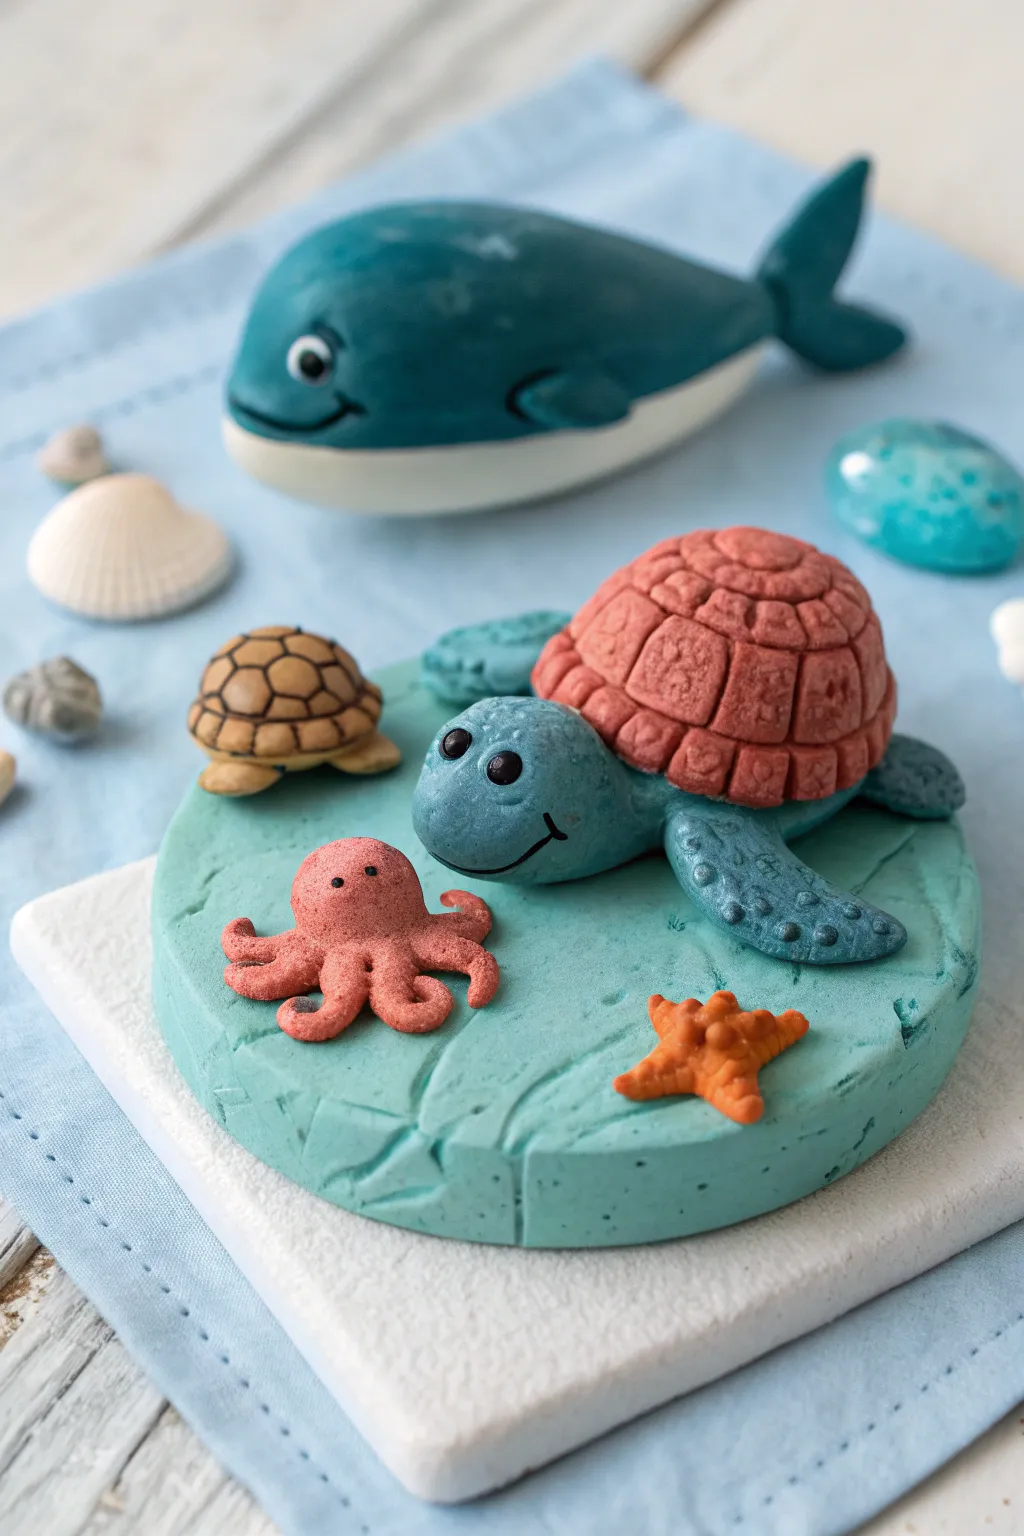
Create a charming underwater scene featuring a friendly sea turtle, a tiny octopus, and their ocean companions resting on a textured base. This project combines simple shapes with detailed texturing techniques to bring a miniature seascape to life.
Detailed Instructions
Materials
- Polymer clay (teal, dusty pink/coral, tan, orange, dark blue, black, white)
- Clay sculpting tools (needle tool, ball tool, silicone shapers)
- Rolling pin or pasta machine
- Round cookie cutter (approx. 3-4 inches)
- Texture sheet or crumpled foil
- Baking sheet and parchment paper
- Liquid clay adhesive (optional)
- Gloss glaze (optional for wet look)
Step 1: The Ocean Base
-
Prepare the Teal Clay:
Start by conditioning a large ball of teal clay until it is soft and pliable. Use a rolling pin to flatten it into a thick slab, about 1/4 inch thick. -
Cut the Base Shape:
Use your round cookie cutter to punch out a perfect circle from the teal slab. Create a subtle texture on the surface by gently pressing crumpled aluminum foil or a texture sheet into the clay to mimic sandy ocean floor ripples. -
Smooth the Edges:
Use your finger or a soft silicone tool to gently round off the sharp cut edges of the circle for a more finished look.
Step 2: Sculpting the Large Sea Turtle
-
Form the Body Segments:
Roll a medium-sized ball of dusty pink clay for the shell and a slightly smaller teal ball for the head and body. Flatten the pink ball slightly into a dome shape. -
Texture the Shell:
Using a needle tool or a small knife tool, score a pattern onto the pink dome. Create concentric circles or a grid-like scute pattern to mimic a turtle shell. -
Shape the Head and Neck:
Mold the teal clay into an elongated teardrop shape. Bend the narrower end slightly upward to form the neck and head. -
Add Facial Features:
Press two small indentations for eye sockets using a ball tool. Insert tiny balls of black clay for eyes and add a minuscule white highlight dot to each. Use a curved tool to press in a happy smile. -
Attach Limbs:
Create four flattened teardrop shapes from teal clay for the flippers. Texture them with small dots using a needle tool, then press them onto the underside of the shell before placing the whole assembly onto the base.
Clean Clay Tip
Keep baby wipes handy to clean your hands between colors. Dark clay pigments can easily stain lighter colors like the pink octopus or white whale belly.
Step 3: Creating the Companions
-
Shape the Octopus:
Roll a small ball of coral-pink clay. Flatten the bottom slightly and pull out eight tiny sections for tentacles, curling the ends upward. -
Detail the Octopus:
Smooth the head into a rounded dome shape. Add two tiny black dots for eyes to give it personality. -
Sculpt the Baby Turtle:
Make a miniature version of the large turtle using tan clay for the shell and beige for the limbs. Keep the details simple due to the small size, drawing the shell pattern with a needle tool. -
Form the Starfish:
Take a tiny amount of orange clay and shape it into a five-pointed star. Gently pinch the arms to taper them and use a needle tool to poke a texture onto the surface.
Fixing Cracks
If you see cracks while smoothing the turtle shell, rub a tiny drop of baby oil or liquid clay into the fissure and smooth it with your finger before baking.
Step 4: Assembly and Finishing
-
Arrange the Scene:
Place the large turtle off-center on the teal base. Position the octopus, baby turtle, and starfish around it in a pleasing arrangement. Press them down gently to ensure they adhere. -
Add Extra Details:
If desired, sculpt a simple whale from dark blue and white clay to sit alongside the display, ensuring its underbelly is smooth and rounded. -
Final Inspection:
Check for any fingerprints and smooth them out with a drop of baby oil or a light touch. Verify all tiny eyes and limbs are secure. -
Bake the Project:
Place the sculpture on parchment paper and bake according to your clay manufacturer’s specific instructions for time and temperature.
Once cooled, your adorable sea creature collection is ready to bring a touch of the ocean to your desk

The Complete Guide to Pottery Troubleshooting
Uncover the most common ceramic mistakes—from cracking clay to failed glazes—and learn how to fix them fast.
Mini Frogs on Lily Pads for Instant Cozy Pond Energy
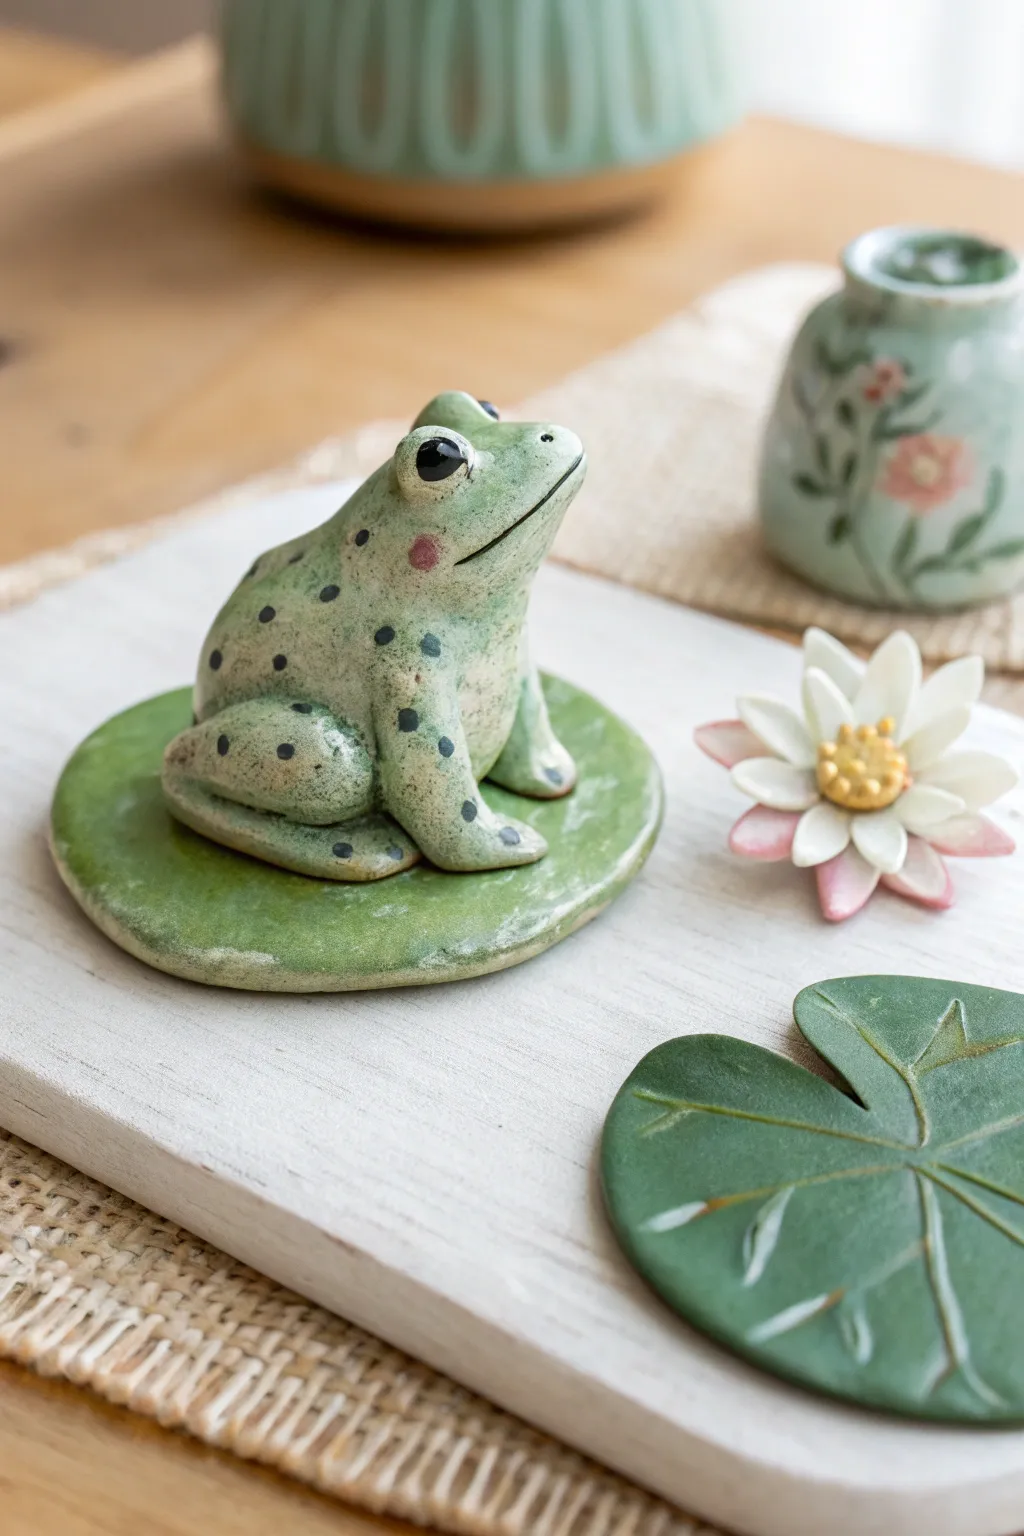
Bring a dash of whimsical wetland charm to your desk or shelf with this adorable ceramic frog sculpture. Featuring soft green glazes, speckled details, and a simple lily pad base, this project captures the peaceful essence of a cozy pond scene in miniature form.
Step-by-Step Tutorial
Materials
- Light-colored stoneware clay or polymer clay (if not firing)
- Pottery tools (needle tool, rib, sponge)
- Rolling pin
- Slip and scoring tool (for ceramic clay)
- Underglazes: Light green, dark green, black, pink
- Clear glaze (glossy)
- Modeling tools or wooden skewer
- Small paintbrush
- Canvas or working mat
Step 1: Forming the Lily Pad Base
-
Roll the Slab:
Begin by rolling out a small amount of clay into a slab approximately 1/4 inch thick. It doesn’t need to be perfectly uniform; a little organic variation adds character. -
Cut the Shape:
Use a needle tool or knife to cut out a rough circle or oval shape, about 3-4 inches in diameter. Soften the cut edges with a damp sponge or your finger to remove any sharp burrs. -
Create Texture:
gently press around the edges of the disk to flatten them slightly, making the center appear subtly raised. This mimics the natural buoyancy of a lily pad.
Step 2: Sculpting the Frog Body
-
Shape the Main Core:
Take a lump of clay about the size of a plum and roll it into a smooth ball. Gently taper one end to create a teardrop shape—the wider end will be the frog’s bottom, and the tapered end connects to the head. -
Form the Legs:
Roll two thick coils for the rear legs. Attach them to the sides of the body using the score and slip method (scratching the surface and adding water/clay slurry). Bend the coils so the ‘knees’ point upward effectively. -
Refine the Thighs:
Smoothen the clay where the legs join the body using a modeling tool so they look like one continuous muscle rather than stuck-on pieces. Press a small indentation into the side of the thigh for definition. -
Add Front Arms:
Roll two smaller, shorter coils for the front arms. Attach them under the chest area, pressing them down so they rest flat on the surface, supporting the frog’s upright posture. -
Sculpt the Head:
If the head needs more volume, add a small pad of clay to the top of the teardrop shape. Use your thumbs to gently push up eye sockets on either side of the head. -
Create the Eyes:
Roll two small spheres of clay and place them into the raised sockets. Flatten them just slightly so they don’t look like they are popping out too aggressively. -
Carve the Mouth:
Using a needle tool or thin blade, slice a long, curving line for the mouth. I like to curve the corners up slightly to give him a permanently pleasant expression.
Cracking Legs?
If the legs detach while drying, your clay may have been too dry when joining. Always score deeply and use plenty of slip. Wrap the connection point in plastic overnight to equalize moisture.
Step 3: Assembly and Decoration
-
Attach to Base:
Score the bottom of the frog and the center of your lily pad base. Apply slip and press the frog firmly onto the pad. Clean up any oozing slip with a brush. -
Initial Drying (Bisque):
Allow the piece to dry slowly under plastic to prevent cracking. Once bone dry, fire the piece to bisque temperature (if using ceramic clay) or bake according to package directions (if using polymer). -
Base Glazing:
Apply a medium green underglaze to the lily pad base. For the frog’s body, sponge on a lighter, speckled green or a soft celadon color to give it that amphibian texture. -
Adding Details:
Use a fine liner brush and black underglaze to paint the pupils and small speckles across the frog’s back. Tap a tiny bit of pink on the cheeks for a blush effect. -
Final Glaze and Fire:
Once the underglaze is dry, coat the entire frog and the top of the lily pad with a glossy clear glaze. Avoid glazing the very bottom of the pad so it doesn’t stick to the kiln shelf. Fire one last time to finish the piece.
Pro Tip: Lively Eyes
Make the eyes shine! When painting the black pupil, leave a tiny white dot (or scratch through the black paint back to white clay) to create a ‘catchlight’ reflection that brings the frog to life.
Place your finished frog near a sunny window or potted plant to enjoy its peaceful presence every day
Small Bird Buddies on Pebble Bases
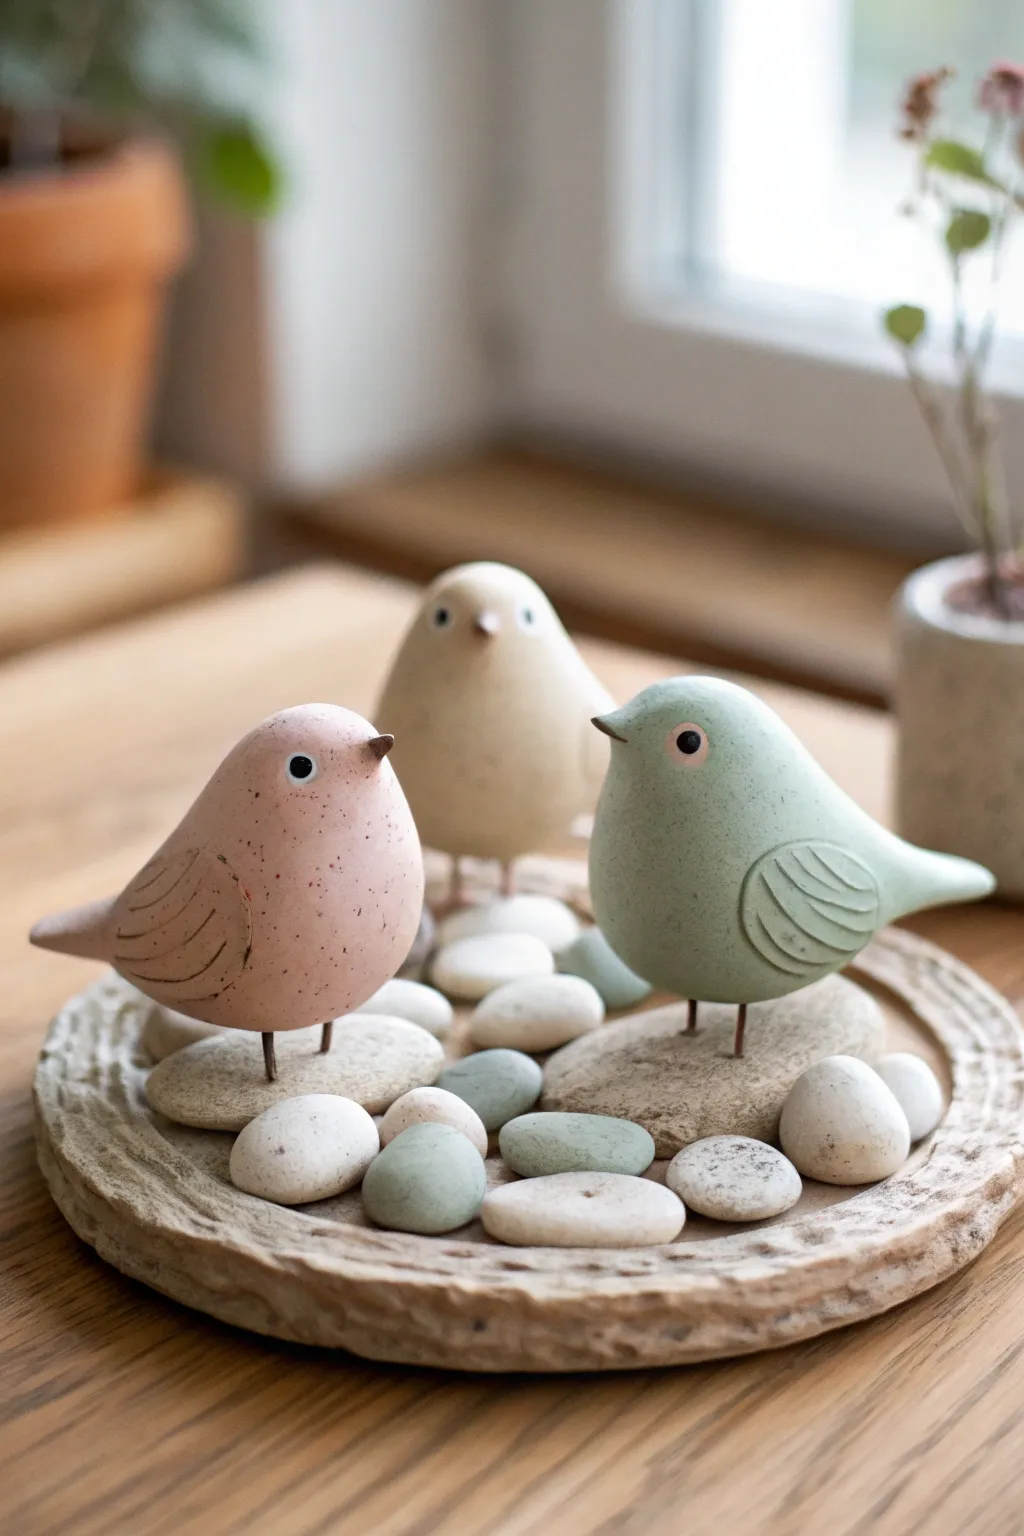
These charming minimal birds rest elegantly on natural stone pedestals, creating a serene tabletop display. The soft matte finish and speckled clay effect give them a high-end, gallery-worthy appearance that is surprisingly achievable at home.
Detailed Instructions
Materials
- Polymer clay or air-dry clay (Speckled beige or white)
- Acrylic paints (Pastel pink, sage green, cream)
- Matte varnish or sealant
- Aluminum wire (1.5mm or 16 gauge)
- Assorted smooth river stones (large flat ones for bases, small ones for fill)
- Shallow decorative bowl or clay saucers (for the tray base)
- Sculpting tools (needle tool, smooth rib)
- Super glue (cyanoacrylate) or strong epoxy
- Aluminum foil (for armature)
- Sandpaper (fine grit)
- Needle-nose pliers
Step 1: Shaping the Birds
-
Create the Core:
Start by crumpling a small ball of aluminum foil into a tight egg shape. This serves as a lightweight core and saves clay. -
Cover the Core:
Roll a sheet of conditioned clay to about 1/4 inch thickness. Wrap this smoothly around your foil egg, blending the seams until invisible. -
Define the Tail:
Gently pinch one end of the egg shape and pull it outward to form a short, jaunty tail. Smooth the transition so it curves naturally from the body. -
Sculpt the Head:
Use your thumb to lightly press upwards on the chest area to distinguish a round head shape, and pull a tiny bit of clay forward to form a small, pointed beak. -
Carve Wing Details:
With a needle tool or clay knife, gently score a teardrop shape on each side for wings. Add three curved lines inside the teardrop to suggest feathers without being too literal. -
Insert Leg Wires:
Cut two 2-inch pieces of wire for legs. Insert them deeply into the bottom of the bird while the clay is soft to create holes, then remove them for baking or drying.
Sticky Situation?
If the birds won’t stand on the smooth stones, create a tiny ‘pad’ of epoxy putty around the feet. Once dry, paint the putty to match the stone color.
Step 2: Finishing and Painting
-
Refine the Surface:
Once the clay is fully hardened (baked or dried according to package instructions), lightly sand the surface with fine-grit sandpaper to remove any fingerprints. -
Base Color Application:
Paint each bird in a solid pastel shade—I personally love a muted sage green and dusty pink. Apply two to three thin coats for opaque coverage. -
Adding the Speckle:
To mimic the speckled stoneware look, dip an old toothbrush in watered-down brown or grey paint. Run your thumb over the bristles to flick tiny specks onto the birds. -
Eye and Beak Detail:
Using a tiny detail brush or the end of a toothpick, paint a small black circle for the eye with a tiny white highlight dot. Paint the beak a warm brown. -
Seal the Work:
Apply a coat of matte varnish. This is crucial as it protects the paint while maintaining that soft, unglazed ceramic aesthetic.
Step 3: Assembly and Display
-
Prepare the Bases:
Select flat, stable river stones for the individual pedestals. Using a strong adhesive, glue the wire legs into the holes you made in the birds earlier. -
Mounting the Birds:
Glue the bottom tips of the wire legs onto your chosen flat stones. You may need to prop the birds up with extra clay or blocks while the glue cures completely. -
Create the Tray:
Though you can buy a tray, you can also sculpt a shallow rimmed dish from leftover clay. Use a stone to imprint texture into the rim before hardening. -
Final Arrangement:
Place your mounted birds onto the tray. Surround their stone bases with smaller, smooth white pebbles to hide the glue points and complete the scene.
Level It Up
Instead of painted eyes, press small black glass beads into the clay head before baking for a glossy, three-dimensional eye that catches the light.
Enjoy the peaceful vibe these little sculpted companions bring to your space


What Really Happens Inside the Kiln
Learn how time and temperature work together inside the kiln to transform clay into durable ceramic.
Small Clay Food Minis With Faces (Because Why Not)
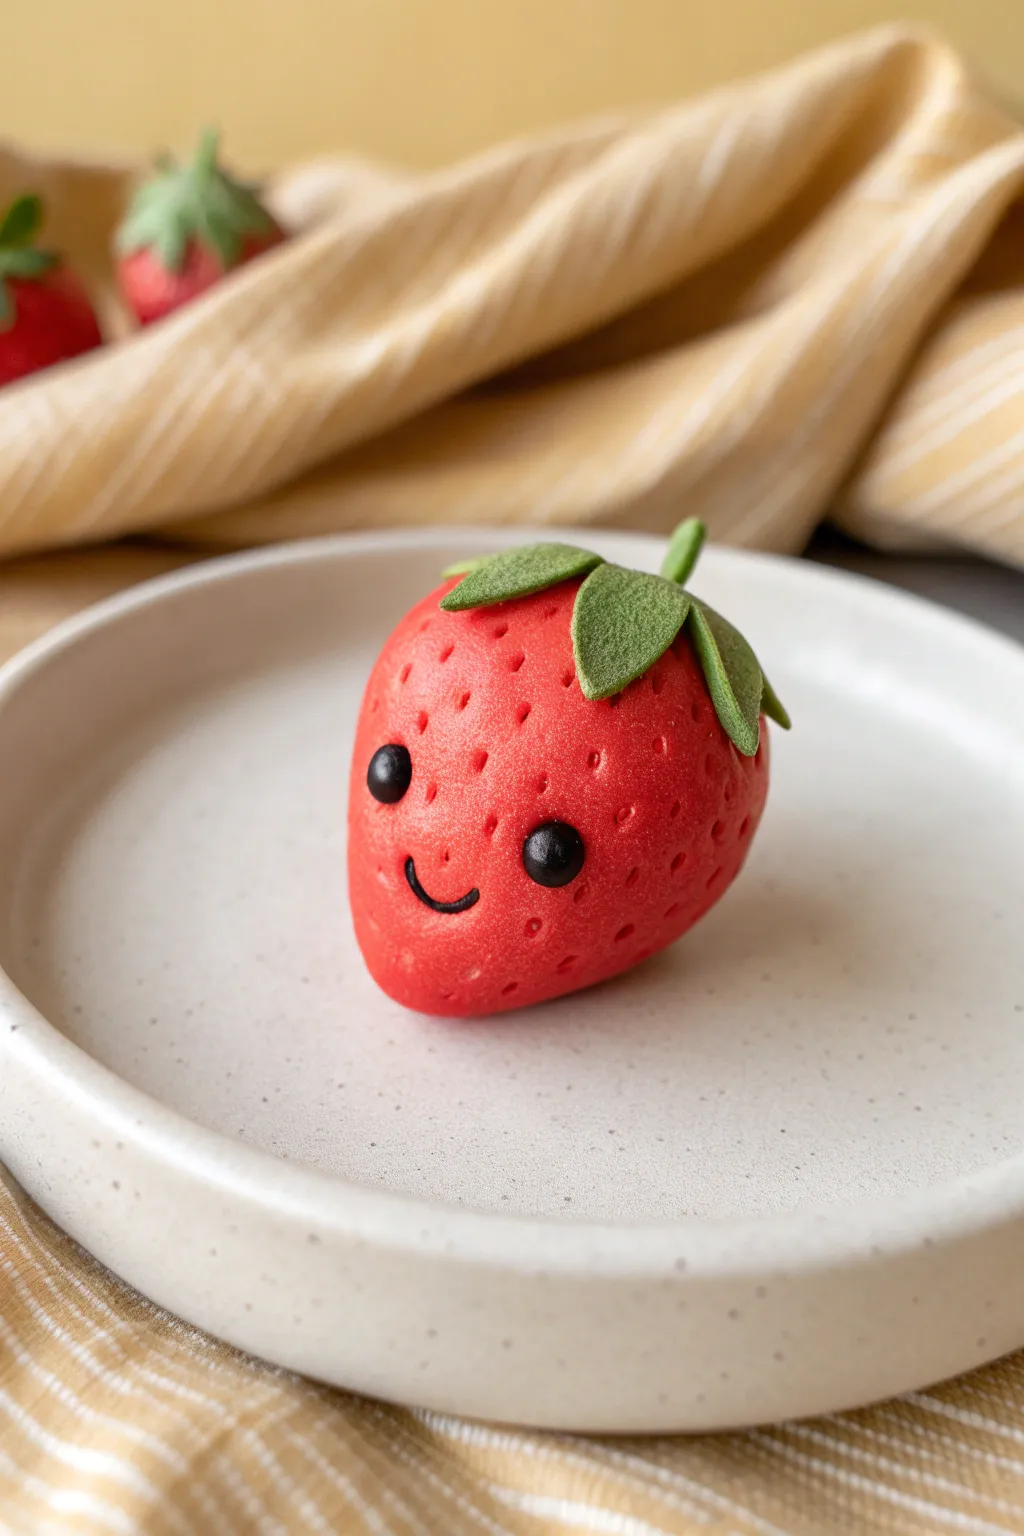
This adorable little strawberry sculpture brings a burst of cheer with its bright red color and tiny, happy face. With a smooth, matte finish and perfectly spaced seeds, it captures that classic clay charm that looks good enough to eat—but please don’t.
How-To Guide
Materials
- Red polymer clay (bright scarlet)
- Green polymer clay (leaf green)
- Black polymer clay
- Ball stylus tool (small)
- Needle tool or toothpick
- Smooth work surface or ceramic tile
- Small rolling pin (acrylic)
- Precision craft knife
- Optional: translucent liquid clay or bake and bond
Step 1: Sculpting the Raspberry Base
-
Condition the Red Clay:
Begin by taking a chunk of your bright red polymer clay and kneading it thoroughly in your hands. You want it warm and pliable to ensure there are no cracks when you shape it. -
Form the Initial Ball:
Roll the red clay into a perfect sphere between your palms. Aim for a size roughly slightly larger than a ping-pong ball, or adjust to your preference. -
Shape the Berry:
Gently gently roll the ball on your work surface, applying slightly more pressure on one side to create a taper. You are looking for a rounded cone shape—fat at the top and narrower at the bottom, just like a real strawberry. -
Flatten the Bottom:
Tap the very tip of the bottom gently against your work surface. Why do this? It creates a tiny flat spot so your strawberry will stand up on its own without rolling away.
Seed Spacing Trick
Don’t poke holes randomly! Work in diagonal lines wrapping around the berry. This creates that natural, spiral-like seed pattern seen on real fruit.
Step 2: Adding Texture and Details
-
Create Seed Indentations:
Using a small ball stylus or a blunt needle tool, press shallow, tiny dots all over the red surface. Stagger them in rough rows rather than a perfect grid for a more organic look. -
Prepare the Eye Sockets:
Choose a spot just below the midline of the berry for the face. Press two slightly larger indentations with your ball tool to create sockets where the eyes will sit. -
Make the Eyes:
Take a tiny pinch of black clay and roll two extremely small balls. I find it helpful to make them both first to ensure they are the exact same size before attaching. -
Attach the Eyes:
Place the black balls into the sockets you prepared. Press them in gently so they are secure but slightly protruding, giving that cute, wide-eyed look. -
Form the Smile:
Roll a microscopic snake of black clay—thinner than a thread. Cut a tiny U-shaped segment and press it gently onto the clay between and slightly below the eyes.
Dirty Clay?
If red lint gets on your light green clay, use a piece of clear scotch tape to dab the clay surface. It lifts dust instantly without ruining the shape.
Step 3: Creating the Leafy Cap
-
Roll Out Green Clay:
Clean your hands or tools to avoid red transfer, then condition the green clay. Roll it out into a flat, thin sheet, roughly 2mm thick. -
Cut the Leaf Shape:
Use a craft knife or a star-shaped cutter to create a five-pointed star shape. If cutting by hand, make the points slightly curved rather than sharp triangles. -
Add Leaf Texture:
Before attaching, use your needle tool to gently scratch a faint line down the center of each leaf point to simulate veins, or lightly stipple the surface for a fuzzy texture. -
Attach the Cap:
Place the green star on top of the wide end of your strawberry. Gently curve the tips of the leaves down so they hug the red fruit shape. -
Make the Stem:
Roll a small, short cylinder of green clay. Attach it to the very center of the leaf cap, smoothing the seam where it connects so it ooks like one piece. -
Check Surfaces:
Do a final inspection for fingerprints. You can gently buff them out with a tiny amount of baby oil on your finger, or lightly brush with cornstarch before baking. -
Bake:
Bake the strawberry according to your polymer clay package instructions (usually 275°F/135°C for about 15-20 minutes depending on thickness). Let it cool completely before handling.
Once cooled, your charming strawberry friend is ready to brighten up a desk or shelf
Tiny Character Heads as Mini Sculptures You Can Make Fast
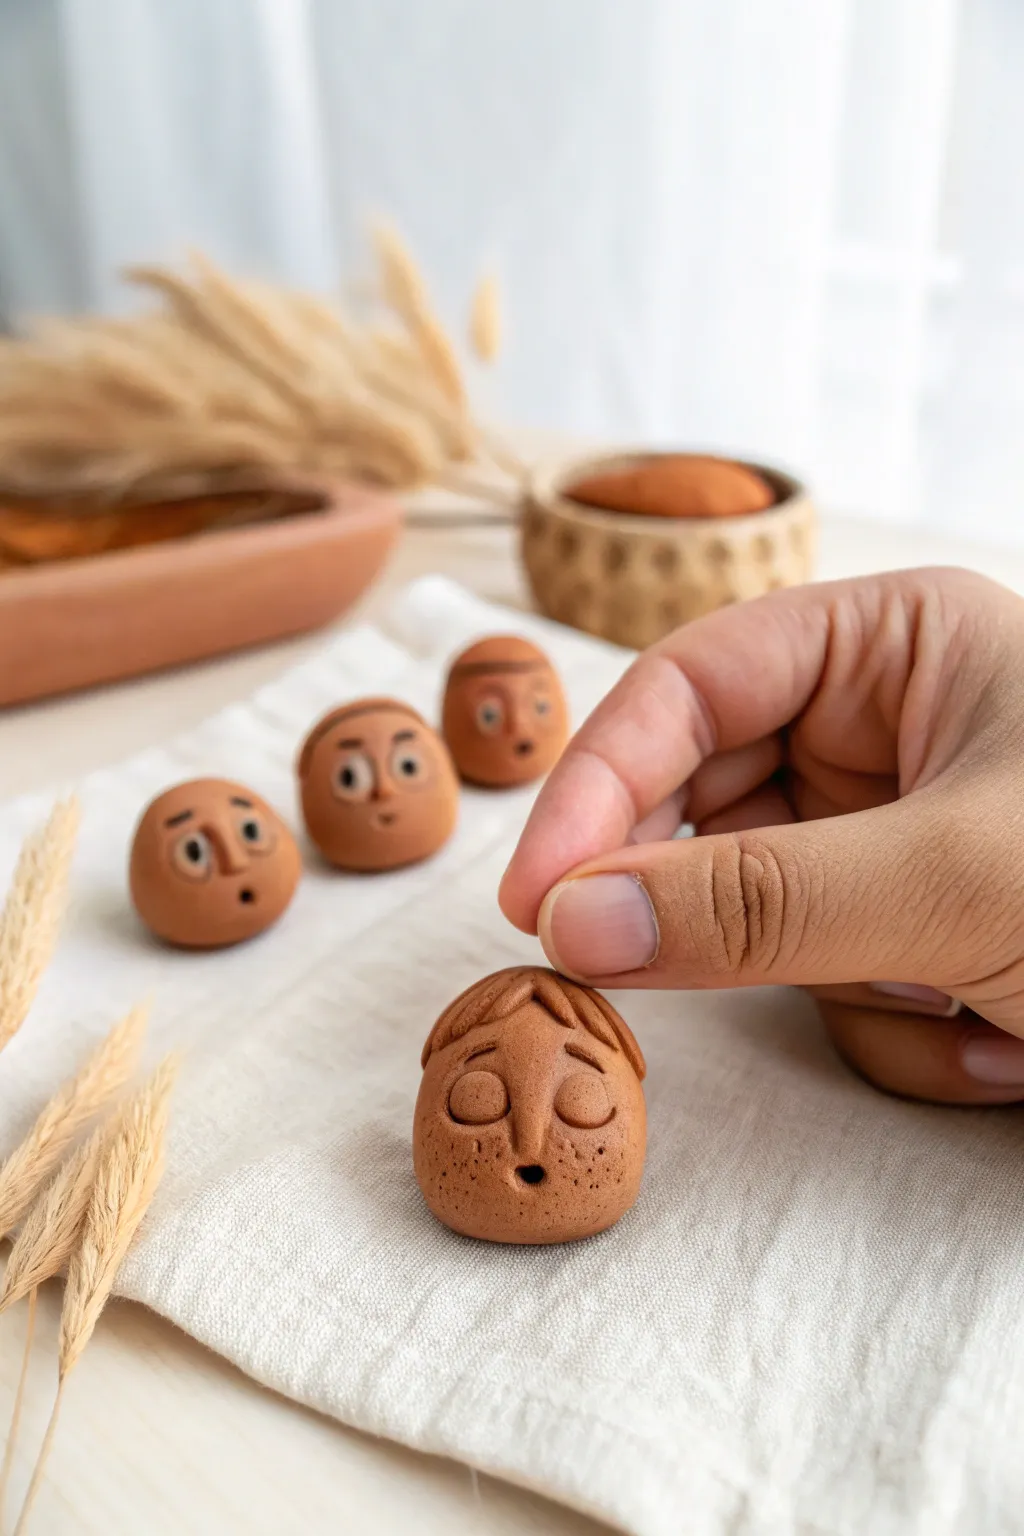
These adorable, coin-sized clay heads capture charming expressions with minimal effort, making them perfect for beginners. Using warm, earth-toned clay, they evoke the cozy feeling of woodland spirits or animated acorns.
Step-by-Step Guide
Materials
- Terracotta-colored polymer clay (or air-dry clay)
- Small ball stylus tool
- Pin tool or needle tool
- Modeling tool (soft silicone tip)
- Soft detail brush
- Black acrylic paint (optional, for eye centers)
Step 1: Shaping the Base
-
Portion the clay:
Start by conditioning your terracotta clay until it differs from the sticky block, becoming soft and pliable in your hands. -
Form the head shape:
Roll a small amount of clay, roughly the size of a large grape or small walnut, into a smooth ball. -
Refine the form:
Gently press the ball onto your work surface to flatten the bottom slightly so it stands upright on its own. -
Taper the top:
Using your thumb and forefinger, very subtly taper the upper half of the ball to create an egg-like or acorn-like silhouette, slightly narrower at the crown.
Keeping It Dull
Avoid glossy sealers. The charm of these figures relies on the matte, earthenware look. If using polymer clay, cornstarch can remove surface shine before baking.
Step 2: Sculpting the Hair
-
Create a hair cap:
Flatten a separate, smaller piece of the same clay into a thin pancake about the size of a dime. -
Attach the hair:
Drape this flattened piece over the top of the head shape, smoothing the edges down so it blends seamlessly at the back but creates a raised ‘hairline’ at the front. -
Add texture:
Use a modeling tool or the side of a toothpick to press indentations into the hair cap, creating a parted look or simple strands that flow outward from the center.
Create a Scene
Make several heads with different emotions—singing, sleeping, surprised. Glue them onto small wooden blocks or driftwood to create a choir of forest sprites.
Step 3: Building Facial Features
-
Position the nose:
Roll a tiny, rice-sized snake of clay and press it vertically into the center of the face. Shape it into a simple, long nose bridge using your silicone tool or finger. -
Blend the nose seams:
Carefully smooth the edges of the nose into the face so it looks like it protrudes naturally rather than just sitting on top. -
Add eyebrows:
Roll two miniscule coils of clay. Curve them slightly and press them above the nose area to create the brow ridge. Their angle will determine the expression—slanted for sad, arched for surprised. -
Create the mouth:
Use a small ball stylus or the end of a paintbrush to press a small, deep hole for an ‘o’ shaped mouth.
Step 4: Creating the Eyes & Details
-
Indent eye sockets:
I prefer to use a larger ball tool to gently press indentations on either side of the nose bridge where the eyes will sit. -
Form the eyelids:
For the sleepy look shown in the main character, roll two small balls of clay, flatten them into half-moons, and place them into the eye sockets. -
Refine the eyelids:
Smooth the top edge of the eyelids into the forehead area, leaving the bottom edge distinct to look like closed eyes. -
Add freckles:
Using a needle tool, gently stipple tiny dots across the cheeks and nose area to mimic the texture of freckles or porous stone. -
Alternative: Open eyes:
For the background characters, instead of eyelids, place small white clay balls into the sockets and add tiny black clay pupils (or paint them later).
Step 5: Finishing Touches
-
Final smoothing:
Dip your finger in a tiny bit of baby oil (for polymer) or water (for air dry) and run it over the surface to remove any fingerprints. -
Baking or drying:
Follow the manufacturer instructions for your specific clay type to cure the piece. If baking, ensure the temperature is low to keep the color purely matte. -
Matte finish:
Once cool or dry, leave the clay raw for that natural textural look, or apply a very matte varnish to protect it without adding shine.
Arranging your little clay family together creates a wonderful storytelling element on any shelf

TRACK YOUR CERAMIC JOURNEY
Capture glaze tests, firing details, and creative progress—all in one simple printable. Make your projects easier to repeat and improve.
Mini Mythical Creatures: Little Dragons With Simple Spikes
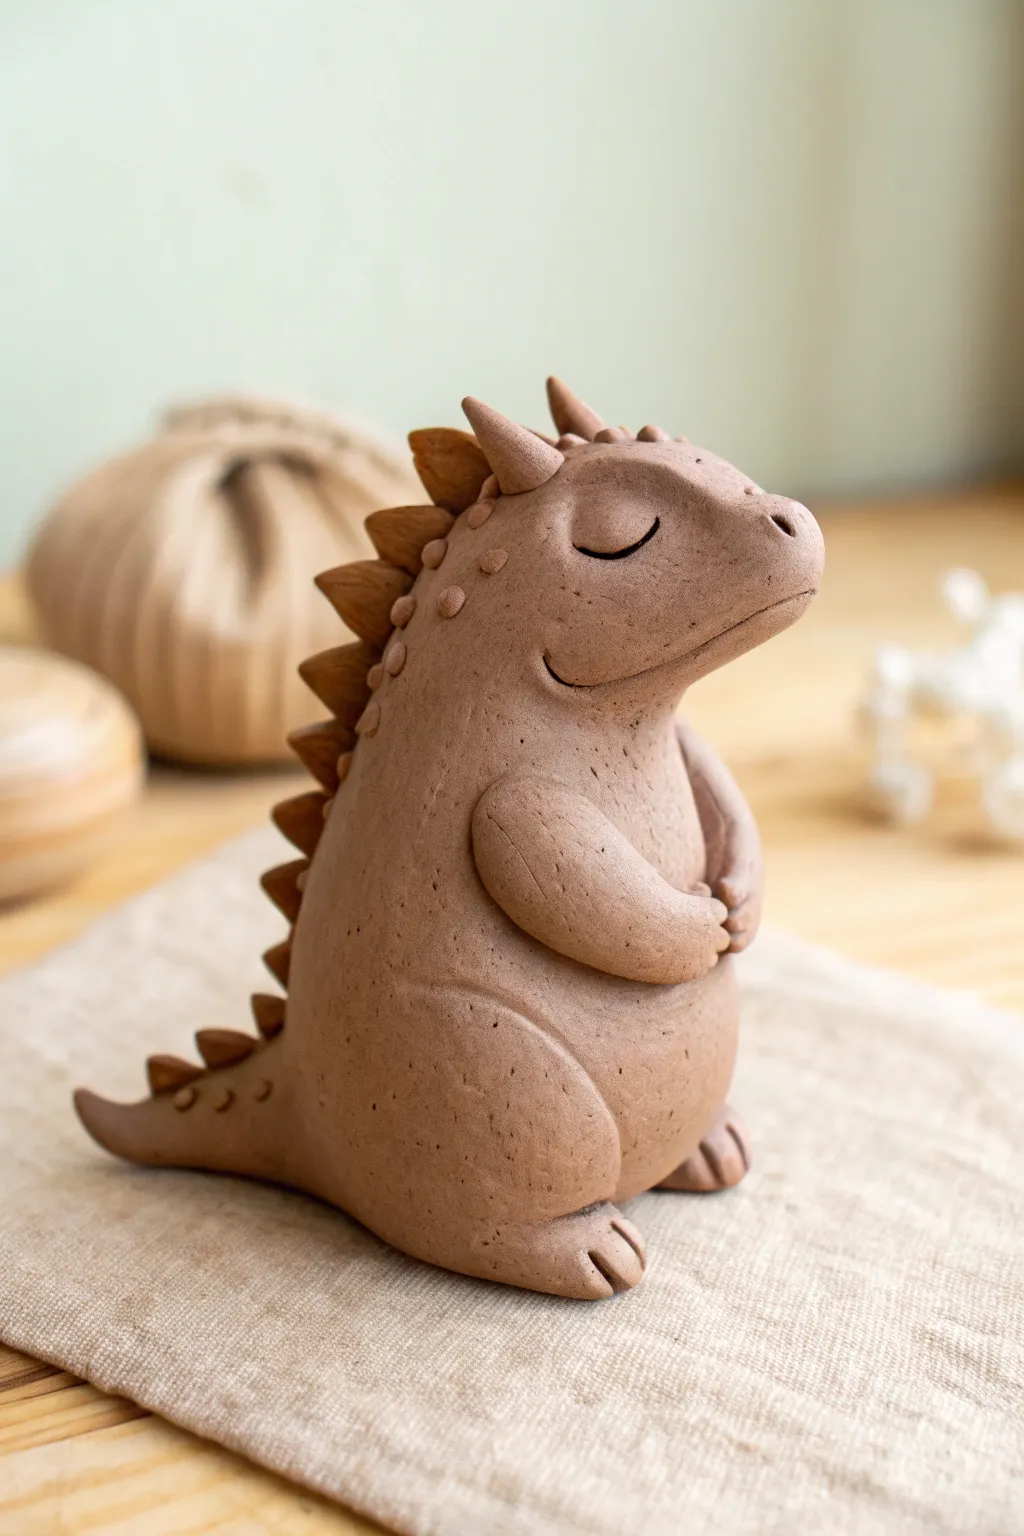
Create a peaceful little guardian with this charming project featuring a chubby, sleepy dragon made from speckled clay. Its simple, rounded forms and distinctive spiked spine make it a perfect introduction to sculpting mythical creatures without needing complex armatures.
Detailed Instructions
Materials
- Speckled stoneware clay (brown or buff)
- Small rolling pin
- Pin tool or needle tool
- Scoring tool (or an old toothbrush)
- Slip (clay mixed with water)
- Small wooden modeling tool
- Rubber kidney rib (for smoothing)
- Sponge
Step 1: Forming the Body and Base
-
Shape the main body:
Start with a fist-sized ball of clay. Gently roll it into a pear shape, keeping the bottom wide and stable so the dragon sits upright comfortably. The top should taper slightly for the neck area. -
Define the head:
Gently pull and pinch the narrower top section to form the head, extending it forward to create a snout. Try to keep the transition from neck to head distinct but smooth. -
Refine the posture:
Press the base onto your work surface firmly so it stands on its own. Tilt the head slightly upward to give the dragon a proud but sleepy look. -
Add the tail:
Roll a thick coil of clay that tapers to a point. Score and slip the back of the body near the base, then attach the wider end of the tail there. Curve the tail slightly to the side for movement. -
Smooth the seams:
Use your wooden tool or thumb to blend the clay where the tail meets the body until the seam disappears completely. A damp sponge helps create that flawless finish.
Spikes Falling Off?
If your triangular spikes won’t stick, create a deeper groove in the back first. Set the spikes into the groove with plenty of slip, then pinch the body clay around the base of each spike to lock it in.
Step 2: Limbs and Belly
-
Create the legs:
Roll two small, equal-sized balls of clay for feet. Flatten the bottoms and attach them to the lower front of the body using the score-and-slip method. -
Detail the toes:
Use a modeling tool or knife to press two indentations into the front of each foot, creating three simple rounded toes. -
Define the thigh area:
Use a rounded wooden tool to press a curved line into the side of the body just above the foot, suggesting a rounded thigh muscle folded against the belly. -
Shape the arms:
Roll two slightly elongated tear-drop shapes for the arms. They should be just long enough to reach across the belly. -
Attach the arms:
Score and slip the shoulders, then press the arms onto the body. Curve them inward so the hands rest gently on the stomach, clasping together. I find blending the shoulder joint thoroughly ensures they don’t pop off later.
Step 3: The Spikes and Face
-
Prepare the spikes:
Roll out a small slab of clay and cut a series of triangles. Make some large for the back, and smaller ones for the neck and tail. -
Attach the spine:
Score a line down the center of the dragon’s back, from head to tail tip. Apply a little slip along this line. -
Place the spikes:
Press the triangles onto the scored line, starting with smaller ones at the head, getting larger in the middle, and tapering small again at the tail. -
Detail the skin texture:
Using a small, round tool, press tiny circles or dots randomly around the neck and shoulders to create a knobby, scale-like texture. -
Sculpt the horns:
Roll two tiny cones for horns. Attach them to the top of the head using slip, positioning them just behind where the eyes will go. -
Carve the mouth:
Use a thin blade or needle tool to slice a long, curved smile deeply into the snout. Curve the ends slightly upward for a content expression. -
Create sleepy eyes:
Carve two simple focused arcs (u-shapes) for closed eyes. This gives the dragon its signature meditating or napping appearance. -
Final smoothing:
Check the whole piece for rough fingerprints. Use a soft brush or slightly damp sponge to smooth everything out before setting it aside to dry slowly.
Pro Tip: Hollow Out
If your dragon is larger than a tennis ball, hollow out the body from the bottom before attaching the base or let it dry slower. Thick solid clay can crack or explode in the firing kiln.
Once fired, this little stoneware creature will be a sturdy companion for your desk or garden shelf
Small Clay Unicorn Minis With Minimal Features
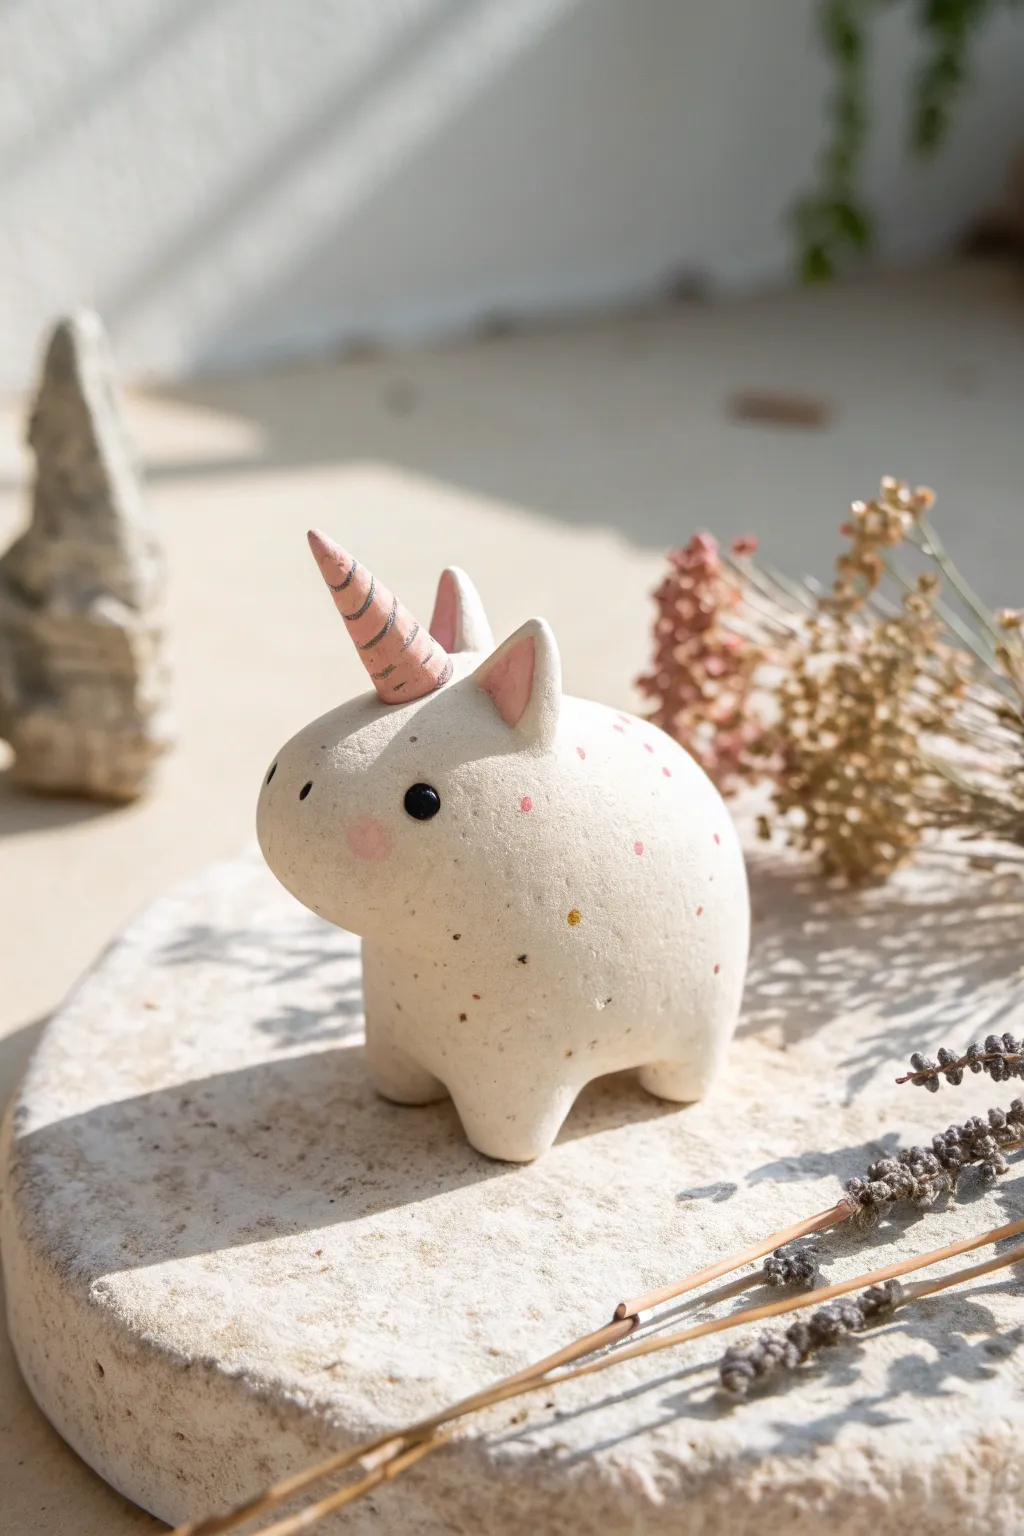
This adorable clay unicorn captures simplicity at its finest with a chubby, marshmallow-like body and minimal features. The speckled pottery finish adds a rustic, handmade charm that makes it look like it was fired in a professional kiln.
Step-by-Step Guide
Materials
- White air-dry clay or polymer clay
- Flecked/speckled clay (optional, or mix in pepper/sand)
- Acrylic paints (pink, pastel pink, black)
- Fine detail paintbrush
- Clay sculpting tools (needle tool, smoothing tool)
- Water (for smoothing)
- Matte varnish or sealant
Step 1: Sculpting the Base
-
Mix the clay:
If you aren’t using pre-speckled clay, knead a tiny pinch of black sand, ground pepper, or dried coffee grounds into your white clay to achieve that speckled ceramic look. -
Form the body:
Roll a ping-pong ball sized amount of clay into a smooth sphere, then gently elongate it into a thick, rounded oval shape. -
Shape the legs:
Instead of attaching separate legs, gently pinch and pull four short, stout nubs directly from the bottom of the belly to keep that cohesive, minimal silhouette. -
Flatten the base:
Press the figure gently onto your work surface so the four legs flatten at the bottom, ensuring the unicorn stands stably on its own. -
Smooth the surface:
Dip your finger in a little water and run it over the clay to erase any fingerprints or cracks, creating a porcelain-smooth finish.
Step 2: Adding Features
-
Create the ears:
Roll two tiny heavy-duty rice-grain shapes. Make a small indentation in the center of each with a rounded tool to form the inner ear. -
Attach the ears:
Score the top of the head slightly, add a dab of water or liquid clay, and press the ears firmly in place, blending the seams at the base. -
Form the horn:
Roll a thin snake of clay that tapers to a point. Twist it gently to create a spiral texture, or simply score spiral lines into a cone shape with a needle tool. -
Mount the horn:
Position the horn in the center of the forehead, just in front of the ears. Blend the clay at the attachment point so it looks like it grew there naturally. -
Refine the spiral:
Once attached, go back over the spiral grooves on the horn with your needle tool to ensure they are deep enough to catch the paint later. -
Dry the figure:
Let the sculpture dry completely according to your clay package instructions. I find waiting an extra few hours ensures the core is solid before painting.
Cracks Appearing?
If you see hairline cracks while drying, mix a tiny bit of fresh clay with water to make a paste (slip) and fill them in immediately with a brush.
Step 3: Painting and Finishing
-
Paint the horn:
Using a small brush, carefully paint the spiraled horn with a muted, dusty pink acrylic paint. -
Add the inner ears:
Fill the small indentations of the ears with the same dusty pink shade. -
Dot the eyes:
Using the handle end of a paintbrush or a dotting tool, place two small, solid black circles on the side of the head for eyes. -
Apply blush:
Dilute pink paint with a lot of water to create a wash, then dab a soft circle of ‘blush’ onto the cheeks just below the eyes. -
Create the confetti spots:
Using a toothpick or very fine brush, add tiny, random dots in pink and perhaps a touch of gold or ochre across the unicorn’s back and flanks. -
Seal the piece:
Finish with a coat of matte varnish to protect the paint and enhance that stone-like, pottery texture.
Make It a Planter
Before drying, press a large hole into the back to create space for a tiny air plant or succulent to sit snugly inside.
Place your little mystical friend on a shelf or desk for a daily dose of magic
Mini Clay Magnet Sculptures That Live on Your Fridge
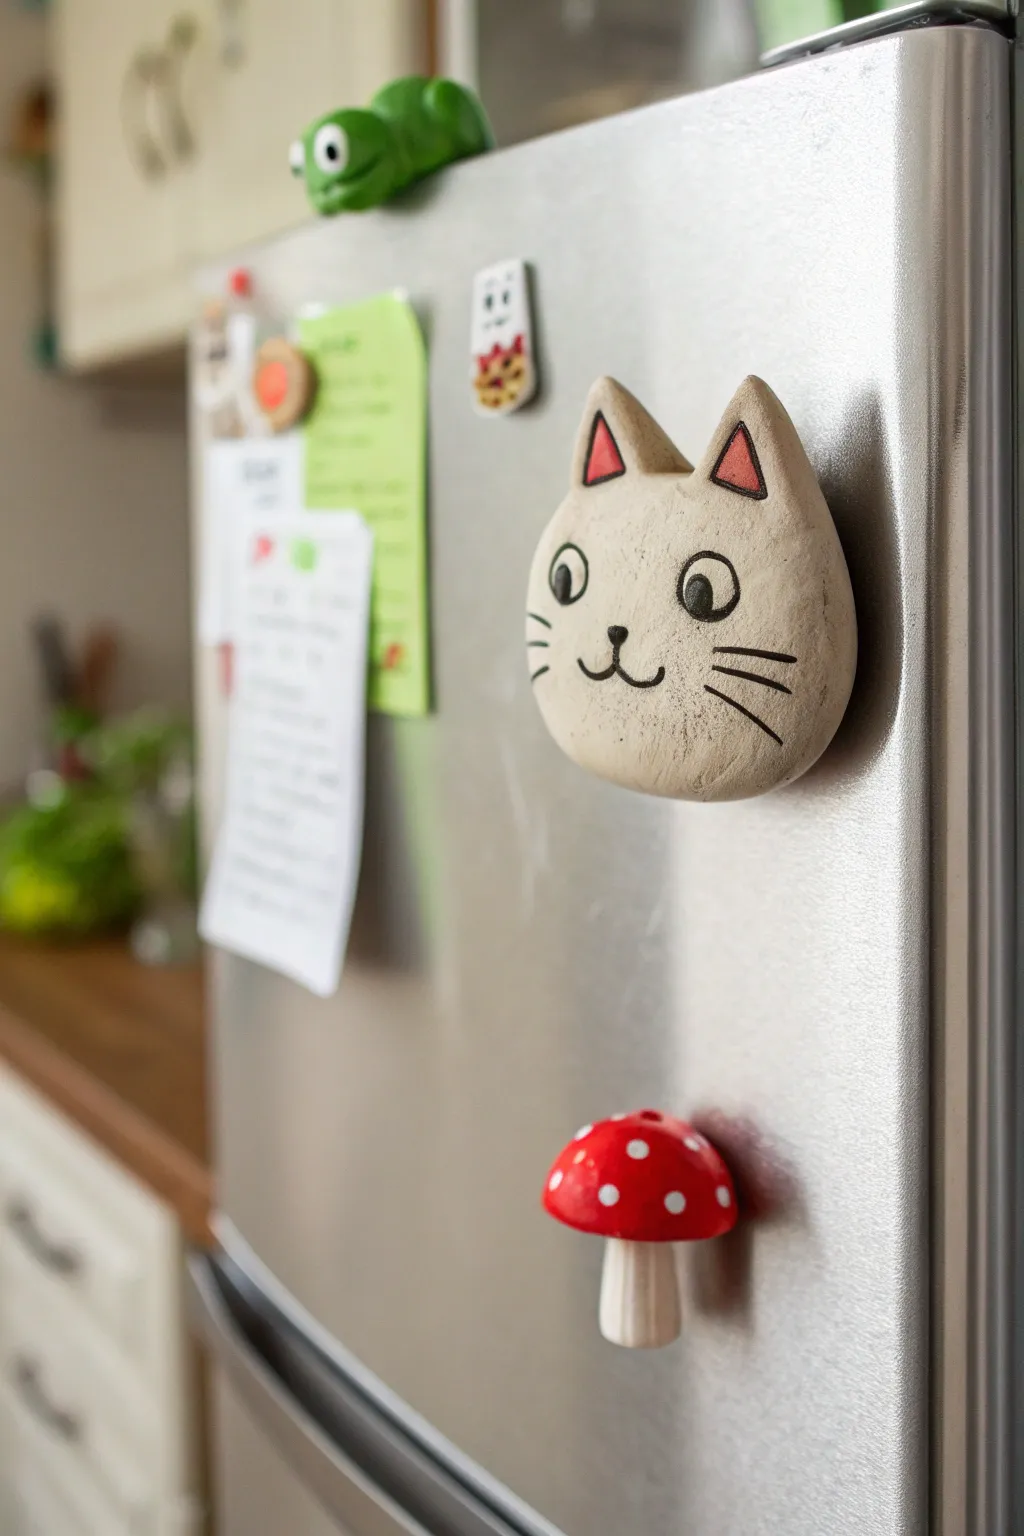
Add a touch of handmade charm to your kitchen with these adorable, rustic clay magnets. This project features a textured, milky-white cat head with simple line work and a classic red-and-white spotted mushroom to keep it company.
Step-by-Step
Materials
- White or light grey air-dry clay (or polymer clay)
- Acrylic paints (White, Black, Red, Pink)
- Strong round magnets (neodymium recommended)
- Super glue or E6000 adhesive
- Rolling pin
- Small fine-point paintbrush
- Fine-grit sandpaper
- Sculpting tools (needle tool, small ball tool)
- Clear matte varnish or sealant
- Cup of water
- Aluminum foil
Step 1: Sculpting the Cat Base
-
Prepare the Clay:
Start by taking a golf-ball-sized amount of clay and kneading it until it is soft and pliable. If you’re using air-dry clay and it feels dry, dip your fingers in water to rehydrate it slightly. -
Shape the Head:
Roll the clay into a smooth ball, then gently flatten it into a thick disc shape about 2-3 inches wide. It should be slightly domed, not perfectly flat like a cookie. -
Form the Ears:
Pinch the top two corners of your disc to pull out triangular shapes for the ears. Use your fingers to smooth the transition where the ears meet the head so they look integrated, not stuck on. -
Refine the Surface:
Dip your finger in water and smooth out any fingerprints or cracks. The charm of this piece is a slightly organic, hand-molded look, so don’t worry about perfect symmetry.
Smoother Surfaces
Before drying, gently brush your clay with a little water using a soft paintbrush. This melts the top layer slightly, removing fingerprints better than sanding later.
Step 2: Sculpting the Mushroom
-
Create the Cap and Stem:
While the cat dries, roll a smaller ball for the mushroom cap and flatten the bottom to create a dome. Roll a separate cylinder for the stem, making sure it’s thick enough to support the cap. -
Join the Pieces:
Score the bottom of the cap and the top of the stem with a needle tool. Add a dab of water (or liquid clay if using polymer) and press them firmly together to join.
3D Whiskers
Instead of painting whiskers, insert small lengths of thin black wire into the cheeks while the clay is wet. Secure with a drop of glue once dry.
Step 3: Drying and Prepping
-
Let it Dry:
Place your pieces on a flat surface to dry completely. For air-dry clay, this usually takes 24-48 hours. Turn them over halfway through so the back dries evenly. -
Sand the Edges:
Once fully cured, use fine-grit sandpaper to gently smooth any rough edges on the cat’s ears or chin. Wipe away the dust with a slightly damp cloth.
Step 4: Painting the Cat
-
Base Coat:
Apply a thin layer of milky-white or cream acrylic paint over the entire cat to give it a uniform, ceramic-like finish. Let this dry completely. -
Painting the Ears:
Using a small brush, paint triangular pink shapes inside the ears. I prefer to mix a tiny bit of red with white to get a soft, pastel pink rather than using straight neon pink. -
Adding the Eyes:
With a fine-point brush and black paint, draw two large circles for eyes. Fill in the pupils, leaving a tiny white dot in the upper corner of each for a ‘catchlight,’ or paint the dot in white afterwards. -
Drawing the Details:
paint a tiny upside-down triangle for the nose. Draw a simple curved ‘w’ shape for the mouth extending from the nose. Add three straight whiskers on each cheek. -
Varnish:
Seal the paint with a layer of matte varnish. This protects the design and gives the clay a lovely finished texture.
Step 5: Painting the Mushroom
-
Coloring the Cap:
Paint the mushroom cap a bright, vibrant red. You may need two coats for solid opacity. -
Painting the Stem:
Paint the stem a soft cream or white color. -
Adding Dots:
Once the red paint is dry, use the back of a paintbrush handle dipped in white paint to stamp clean, round polka dots onto the cap.
Step 6: Assembly
-
Attach the Magnets:
Apply a strong adhesive like E6000 to the back of your clay pieces. Press a magnet firmly into the glue. -
Final Cure:
Let the glue cure for the time recommended on the package (usually overnight) before sticking them to your fridge.
Now your fridge has a little extra personality with these handmade clay companions
Tiny Charm Sculptures for Keychains and Jewelry
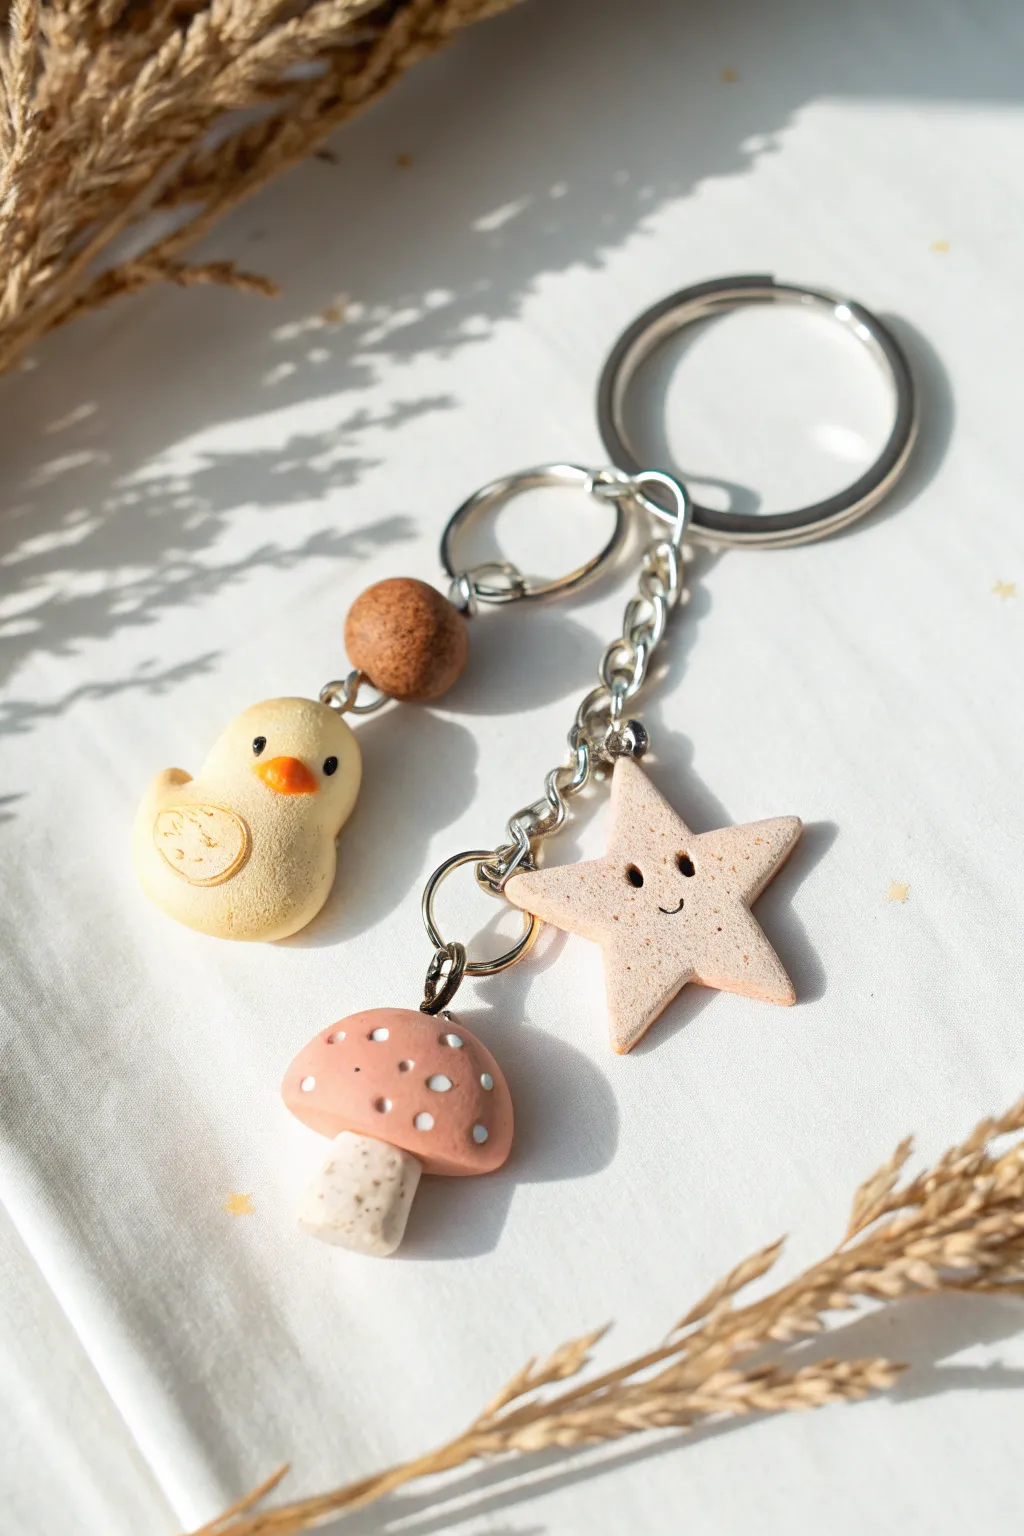
Brighten up your keys or backpack with this adorable set of tiny clay charms. Featuring a chubby chick, a smiling star, and a speckled mushroom, this project combines simple shapes with sweet details for a truly heartwarming accessory.
How-To Guide
Materials
- Polymer clay (pale yellow, light pink, white, rust-brown, orange, black)
- Eye pins (silver)
- Keychain hardware (split ring, small chain links, jump rings)
- Needle tool or toothpick
- Ball stylus tool
- Small blade or craft knife
- Pliers (round nose and flat nose)
- Glaze or varnish (optional)
Step 1: Sculpting the Chick
-
Shape the body:
Start with a ball of pale yellow clay about the size of a marble. Gently pinch and pull one side to form a small, rounded head, keeping the bottom part wider for that classic chubby chick look. -
Add wings:
Take two tiny pieces of yellow clay and flatten them into teardrop shapes. Press these onto the sides of the body, smoothing the seams so they embrace the chick naturally. -
Create the wing detail:
Use a needle tool or toothpick to lightly etch circular scrawls or feather patterns onto the surface of the wings for texture. -
Form the face:
Roll a tiny cone of orange clay for the beak and press it onto the face. Use your needle tool to make two small indentations for eye sockets, then insert tiny balls of black clay. -
Insert the hardware:
Carefully push a silver eye pin down through the top of the head until the loop sits flush with the clay.
Step 2: Crafting the Smiling Star
-
Cut the star:
Roll out light pink clay (or a speckled beige mixture like the photo) to about 1/4 inch thickness. Use a small star cutter or cut a 5-point star shape freehand with a craft knife. -
Soften the edges:
Gently tap the star points with your finger to round them off slightly; this makes the finished charm more durable and friendly-looking. -
Add the smile:
Use a needle tool to carve a tiny, curved smile into the center of the star. A little wiggle of the tool helps widen the line. -
Place the eyes:
Press two tiny black clay balls above the smile. Embedding them slightly ensures they won’t pop off later. -
Secure the pin:
Insert an eye pin into the top point of the star. If the point is too thin, you can insert it into the ‘valley’ between two points instead.
Texturizing Trick
To get the speckled, stone-like texture seen in the photo, mix ground black pepper or dried used coffee grounds into your clay before sculpting.
Step 3: Making the Mushroom & Bead
-
Form the cap:
Roll a ball of pink clay and flatten the bottom to create a dome shape. I like to gently push the center up from underneath to make space for the stem. -
Add the spots:
Take tiny bits of white clay, roll them into balls, and flatten them onto the pink cap. Press them flat so they are flush with the surface. -
Make the stem:
Roll a cylinder of white or beige clay. For realism, you can mix in tiny specks of black or brown clay to mimic a textured, earthy look. -
Attach and pierce:
Press the stem firmly into the underside of the cap. Insert your eye pin through the top center of the mushroom cap. -
Create the spacer bead:
Roll a ball of rust-brown clay. Use a needle tool to poke a hole straight through the center, creating a simple round bead to add visual contrast.
Loose Eye Pins?
If an eye pin feels loose after baking, pull it out, add a tiny drop of super glue or E6000 to the shaft, and slide it back into the hole.
Step 4: Baking and Assembly
-
Bake carefully:
Arrange all your pieces on a baking tile or parchment paper. Bake according to your customized clay package instructions—usually 275°F (135°C) for 15-30 minutes. -
Cool down:
Let the charms cool completely before handling. This hardening phase is crucial for their structural integrity. -
Assemble the chain:
Attached the brown bead to the chick charm using a jump ring or by threading wire through it. Attach separate chains to the star and mushroom. -
Final connection:
Using your pliers, open the jump rings and attach each chain segment to the main large split ring, staggering the lengths so the charms hang at different heights.
Now you have a charming, personalized accessory ready to accompany you on your daily adventures
Tiny Creature Whistles and Bells That Are Also Small Sculptures
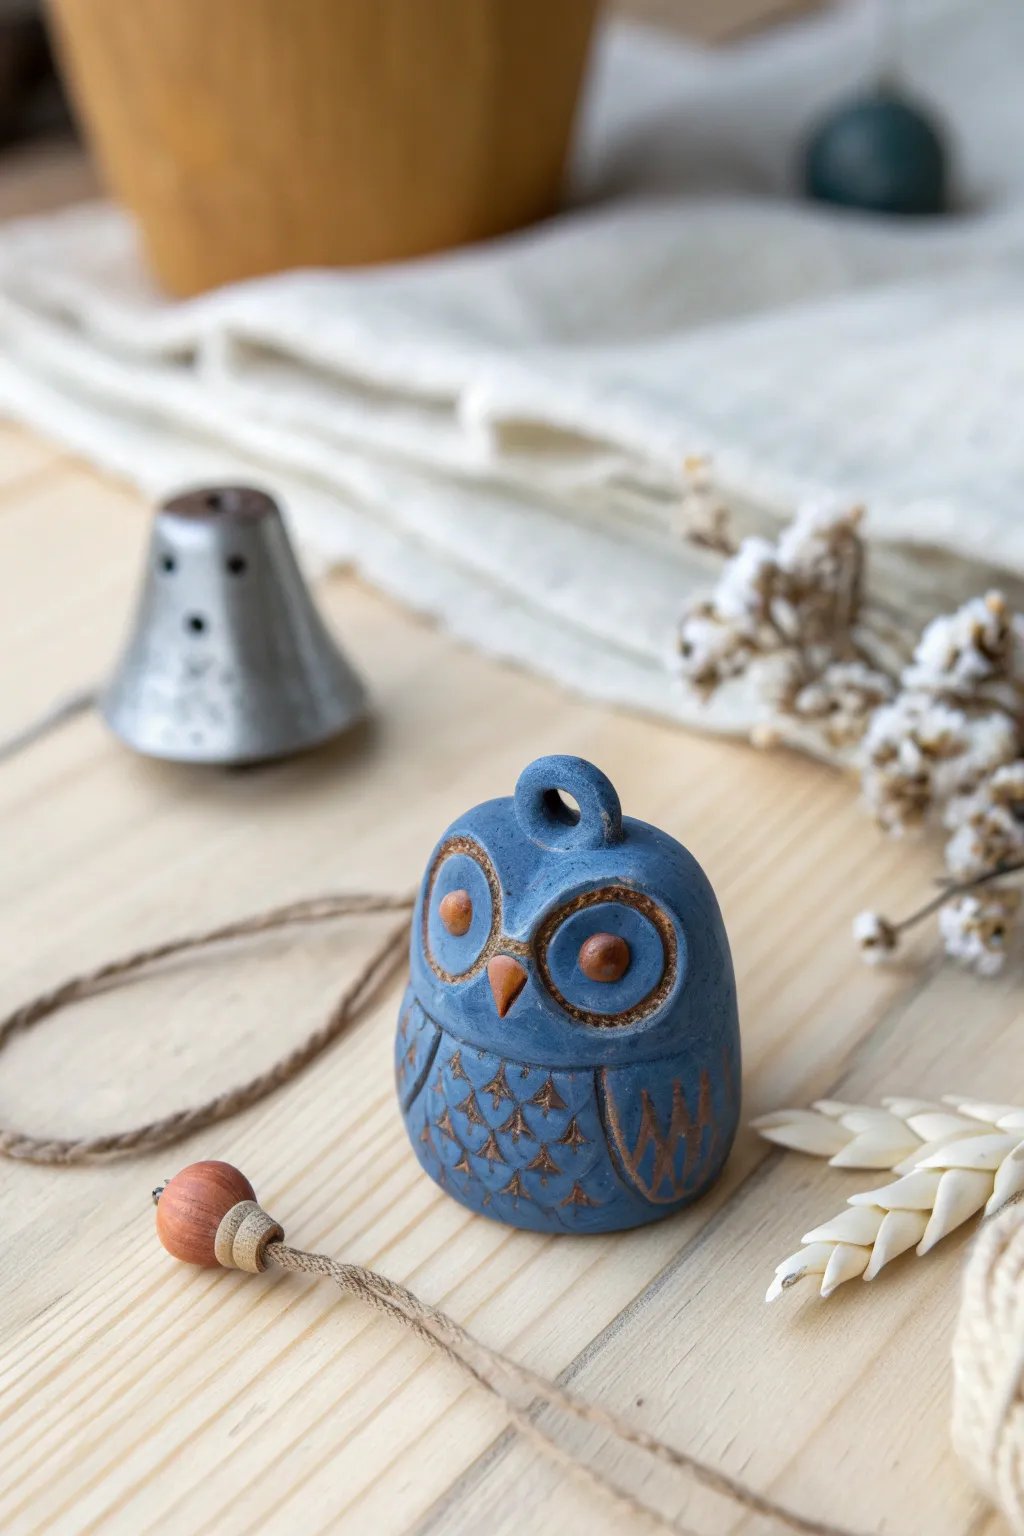
This charming little owl doubles as a functional bell, crafted from clay and finished with a distinct matte blue glaze and raw clay accents. Its rounded shape and textural feather details make it a delightful addition to any wind chime or ornament collection.
Step-by-Step Guide
Materials
- White earthenware or stoneware clay
- Rolling pin and canvas mat
- Needle tool
- Small loop tool or carving tool
- Slip and scoring tool
- Underglaze (Matte Blue)
- Clear matte glaze (optional)
- Small wooden sphere or clay bead for the clapper
- Twine or waxed cord
- Sponge
- Kiln (or air-dry clay alternatives for a decorative-only version)
Step 1: Forming the Body
-
Shape the base:
Start with a ball of clay roughly the size of a tangerine. Working rhythmically, pinch the clay into a hollow, rounded bell shape (like a pinch pot), keeping the walls even—about 1/4 inch thick. -
Refine the form:
Gently tap the open bottom on your work surface to create a flat rim. Smooth the exterior with a damp sponge or rib tool to remove fingerprints, ensuring the dome shape is pleasingly round. -
Create the hanger:
Roll a small coil of clay. Create a loop and securely attach it to the very top of the owl’s head using the slip-and-score method. Smooth the connection points so it looks seamless. -
Punch the cord hole:
Once the loop is secure, use the back of a paintbrush or a specialized hole punch tool to ensure the opening is large enough for your twine to pass through after shrinkage.
Clean Lines
For sharper feather details, carve the clay when it’s ‘leather hard’ rather than wet. This prevents clay crumbs.
Step 2: Sculpting Details
-
Define the eyes:
Roll two thin coils of clay and form them into circles. Attach these to the upper half of the bell body to create the large spectacle-like eye sockets. -
Add pupils:
Roll two small spheres of clay, flatten them slightly, and attach them inside the eye circles. Position them towards the center for that attentive owl gaze. -
Attach the beak:
Form a tiny triangular cone of clay. Score and slip this right between the bottom of the eye circles, pointing downwards. -
Texture the feathers:
Using a needle tool or a small V-gouge, carve upside-down ‘V’ shapes into the belly area to mimic chest feathers. Press deeply enough to create texture but be careful not to puncture the wall. -
Carve the wings:
On the sides of the body, lightly outline a wing shape. Inside this outline, carve swift, vertical zigzag lines to represent the longer flight feathers. -
Final smoothing:
Check all your attachments. Run a damp artist’s brush around the eyes, beak, and loop to clean up any rough slip residue before drying.
Make a Family
Vary the sizes and glaze colors to create a whole flock. Try greens or browns for a woodland theme.
Step 3: Glazing and Finishing
-
Bisque fire:
Allow the owl to dry completely (bone dry) before firing it in the kiln to the appropriate cone for your specific clay body. -
Apply wax resist:
I find it helpful to apply wax resist to the beak, the pupils, and the eye outlines if you want those to remain as exposed, raw clay like the original image. -
Apply blue underglaze:
Brush 2-3 coats of a matte blue underglaze over the entire body. If you waxed the details, the glaze will bead up and can be wiped away easily. -
Wipe back for texture:
Once the glaze is dry but before firing, gently wipe the carved belly feathers with a damp sponge. This removes some blue from the high points, revealing the clay color and accentuating the texture. -
Glaze fire:
Fire the piece again to the temperature recommended for your underglaze. Avoid a glossy clear coat if you want that stony, matte look shown in the photo.
Step 4: Assembly
-
Prepare the clapper:
Take a small wooden bead or a pre-made clay bead. Thread a length of sturdy twine through it and tie a large knot at the bottom to hold it in place. -
Determine length:
Measure the twine against the bell. The bead should hang just inside the rim of the owl so it strikes the clay wall when shaken. -
Thread the owl:
Pass the top of the twine up through the inside of the bell and out through the loop on the owl’s head. -
Secure the cord:
Tie a secure knot or add a second decorative bead at the top to keep the clapper suspended at the correct height.
Hang your handcrafted owl near a window or in the garden to enjoy its gentle chimes