Small polymer clay projects are my favorite kind of satisfying—quick to make, easy to bake, and adorable the moment they cool down. If you’re craving tiny wins you can finish in one sitting, these small polymer clay ideas will keep your hands busy in the best way.
Mini Polymer Clay Charms for Keychains and Zipper Pulls
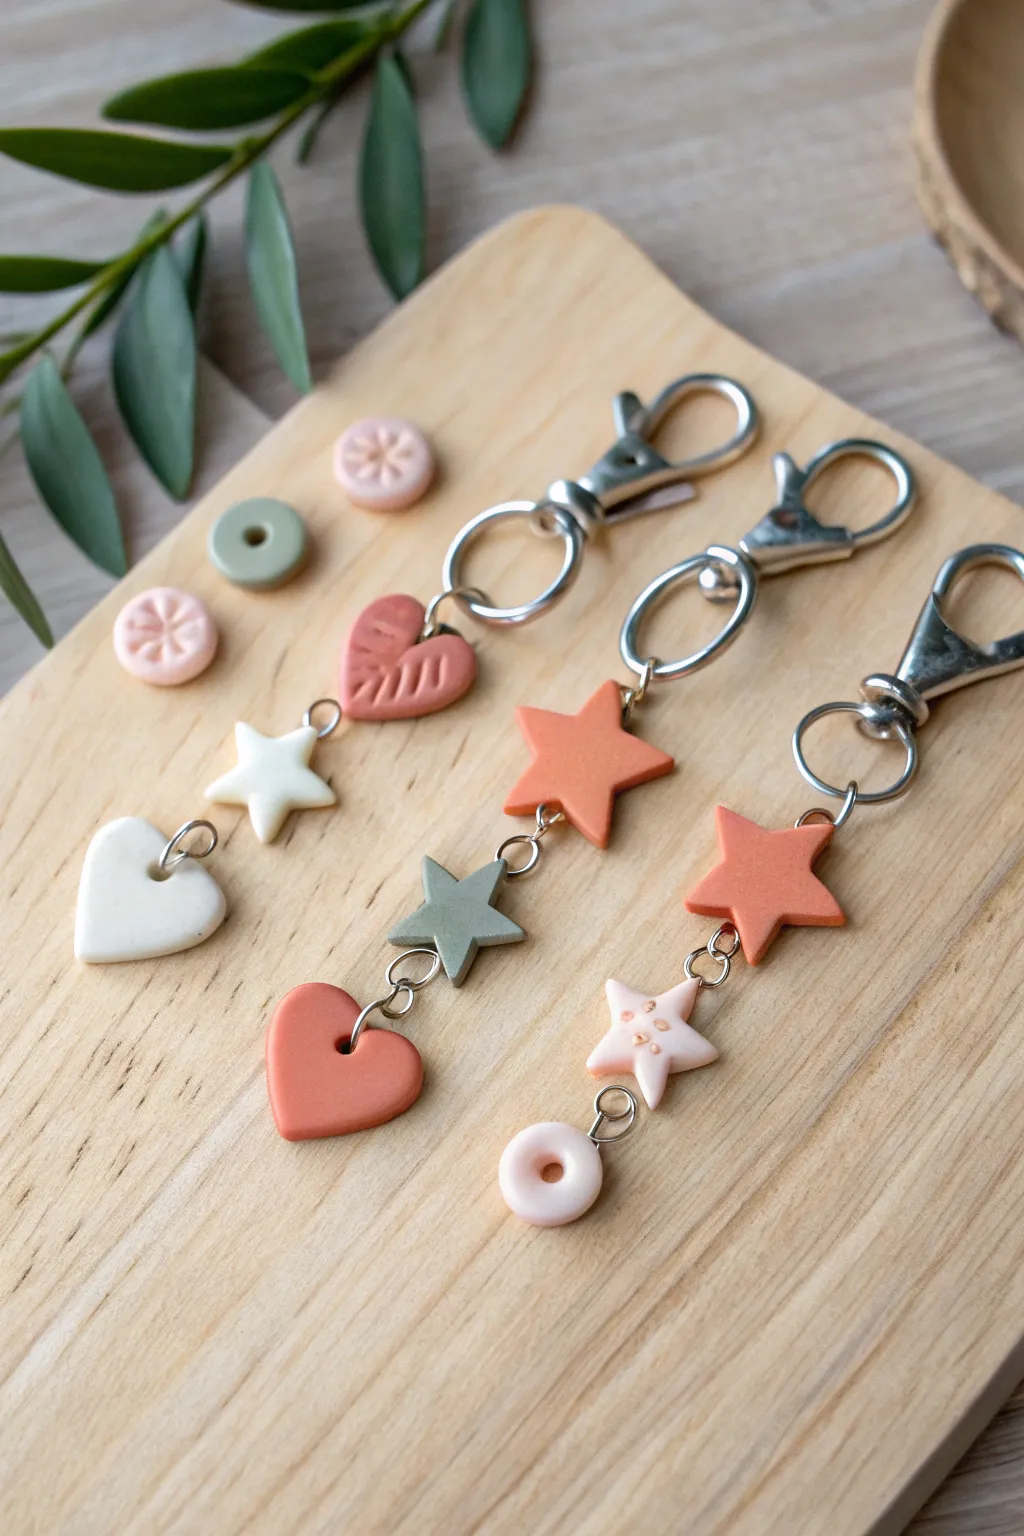
These delightful cascading keychains combine earthy, muted tones with simple geometric shapes like stars and hearts for a lovely bohemian aesthetic. Perfect for using up scrap clay, these mini charms are linked together to create movement and personalized style for your keys or bag.
Step-by-Step Tutorial
Materials
- Polymer clay in terracotta, sage green, cream, and pale pink
- Rolling pin or pasta machine
- Small shape cutters (star, heart, circle)
- Small circle cutter (for donut holes and tops)
- Needle tool or toothpick
- Jump rings (6mm-8mm, silver tone)
- Lobster clasp keychains with swivel
- Jewelry pliers (round nose and flat nose)
- Baking sheet with parchment paper
- Wet wipes (for cleaning hands between colors)
Step 1: Shaping the Clay Elements
-
Condition and Roll:
Start by conditioning your clay colors until they are soft and pliable. Roll each color out to a uniform thickness, about 3mm to 4mm—you want them sturdy enough to withstand jangling on a keychain. -
Cut Main Shapes:
Use your larger star and heart cutters to punch out the main focal beads from the terracotta and cream clay. Press firmly and give a little wiggle before lifting to get clean edges. -
Create Accent Charms:
Cut out smaller stars from the sage green and pale pink clay. Use a small circle cutter to make the round donut shapes, then use a tiny straw or cutter to remove the center hole. -
Add Texture Details:
For the leaf-patterned heart, use your needle tool to gently impress a vertical line down the center, then press small V-shapes branching off it. For the flower rounds, gently press a stamp or tool tip into the surface. -
Make the Top Loop Hole:
Carefully pierce a hole at the top of each charm using a needle tool or toothpick. Ensure the hole is large enough for your jump rings but not so close to the edge that the clay tears. -
Create Double-Hole Connectors:
For the middle pieces in the chain (like the sage star or the cream star), you will need a hole at the top *and* the bottom so other charms can hang from them. -
Smooth the Edges:
Dip your finger in a little baby oil or water and gently run it along the cut edges of your shapes to smooth out any ragged bits before baking.
Step 2: Baking and Assembly
-
Bake the Charms:
Arrange your clay pieces on a parchment-lined baking sheet. Bake according to your brand’s specific instructions (usually 275°F/130°C for 15-30 minutes). Let them cool completely before handling. -
Prepare Jump Rings:
Using your two pairs of pliers, twist open your jump rings. Remember to twist the ends away from each other (front to back), rather than pulling them apart horizontally, to maintain their circle shape. -
Attach the First Charm:
Thread an open jump ring through the top hole of your top-most charm (e.g., the textured heart or terracotta star). Loop this onto the bottom ring of the lobster clasp keychain and close the jump ring securely. -
Add the Middle Link:
Take another jump ring and thread it through the bottom hole of the first charm (if applicable) or simply attach the next charm in the sequence to the previous jump ring to create a chain effect. -
Finish the Cascade:
Continue linking your charms. For the bottom-most piece (like the heart or donut), simply attach it to the hanging loop of the charm above it using a single jump ring. -
Tighten Connections:
Go back through and check every jump ring. Use your pliers to ensure the gaps are perfectly closed so your charms won’t slip off during daily use.
Uneven Surfaces?
If fingerprints appear on your raw clay, lightly cornstarch your finger and buff them out in a circular motion before baking for a flawless finish.
Add Some Shine
Coat finished, cooled pieces with a thin layer of UV resin or glossy polymer clay glaze to make the colors pop and protect surface textures.
Clip your new handmade accessory onto your bag and enjoy the gentle clinking sound of your custom creation


Tiny Polymer Clay Stud Earrings in Simple Shapes
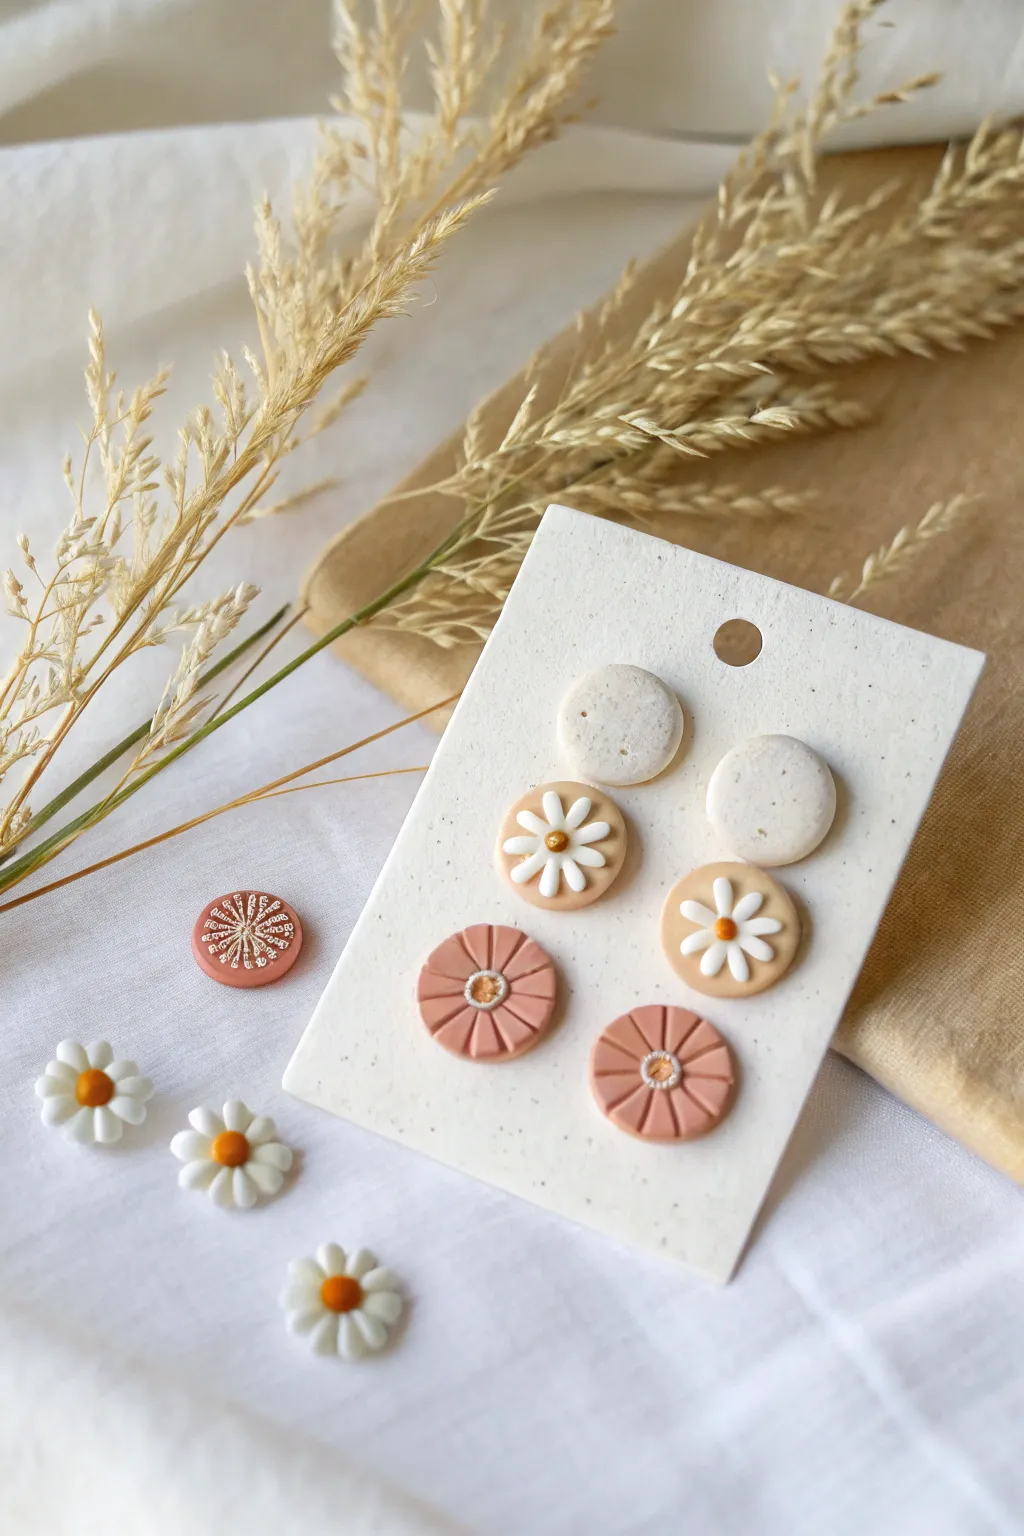
These charming polymer clay studs bring a touch of nature to your jewelry collection with their gentle earth tones and intricate floral details. The set features three distinct designs—minimalist speckled rounds, raised daisies on beige, and petal-cut pink flowers—perfect for mixing and matching.
How-To Guide
Materials
- Polymer clay in speckled white/granite, light beige/tan, muted dusty pink, white, and mustard yellow
- Small round clay cutter (approx. 10-12mm)
- Tiny teardrop cutter or sharp craft knife/needle tool
- Needle tool or toothpick
- Liquid polymer clay (Translucent or Bake & Bond)
- Acrylic rolling pin or pasta machine
- Ceramic tile or glass work surface
- Earring posts and backs (stainless steel or gold-plated)
- Super glue or UV resin
- Cornstarch or baby powder (optional, for release)
Step 1: Preparing the Bases
-
Condition and Roll:
Start by conditioning your speckled white, light beige, and dusty pink clays separately until they are soft and pliable. Roll each color out into a slab that is approximately 2-3mm thick. I find a pasta machine on a medium setting ensures consistency across all pairs. -
Cut the Base Circles:
Using your small round cutter, punch out two circles from each color slab: two speckled white, two beige, and two pink. You should have six circles total. -
Smooth the Edges:
Gently run your finger around the edge of each cut circle to smooth out any harsh lines or clay burrs left by the cutter. Place them on your baking tile.
Sticky Petals?
If tiny petals stick to your fingers while arranging, use a needle tool or toothpick to pick them up and place them. A light dusting of cornstarch on your fingertips also helps handling without sticking.
Step 2: Design 1: The Speckled Minimalist
-
Texture and Finish:
The speckled white pair is the simplest. Since the clay itself provides the visual interest, simply ensure the surface is perfectly smooth. If you want a slight stone texture, you can gently tap the surface with a toothbrush, but leaving them smooth highlights the granite effect best.
Step 3: Design 2: The Raised Daisy
-
Create Petals:
Take a tiny amount of white clay and roll it into very small teardrop shapes. You will need about 7-8 petals for each earring. Flatten them slightly with your fingertip. -
Arrange the Flower:
On the beige clay circles, arrange the white teardrops in a radial pattern, points facing inward toward the center. Use a tiny dot of liquid clay underneath if the clay isn’t sticking on its own. -
Add the Center:
Roll a tiny ball of mustard yellow clay. Press it gently into the center where the petal points meet. This secures the petals and completes the daisy look.
Clean Edges
Before baking, dip your fingertip in a tiny bit of baby oil or clay softener and gently rub the surface. This removes fingerprints and smoothes out any tiny lint specs for a professional finish.
Step 4: Design 3: The Pink Petal Cut
-
Mark the Center:
On the dusty pink circles, use your needle tool to gently mark a small dot in the absolute center as a guide. -
Impress the Petals:
Using a dull knife or the side of a needle tool, press indentation lines radiating from the center to the edge, creating wedge shapes like pizza slices. Don’t cut all the way through; just create deep impressions. -
Shape the Edges:
Where your lines meet the outer edge of the circle, use a small tool or your finger to gently curve the edge inward slightly, giving each section a rounded ‘petal’ silhouette rather than a perfect circle. -
Detail the Center:
Using a very small dotting tool or the head of a pin, press a small indentation into the center of the flower. You can add a speck of white or gold mica powder here for extra detail, or leave it indented.
Step 5: Baking and Assembly
-
Bake:
Bake the clay pieces on your tile according to your specific brand’s package instructions (usually 275°F/130°C for 15-30 minutes). Let them cool completely before moving them. -
Attach Posts:
Flip the cooled clay pieces over. Apply a small dab of super glue or UV resin to the flat pad of an earring post and press it firmly onto the back of the clay. -
Secure the Backs:
For extra durability, you can cover the earring post pad with a small smear of liquid clay or UV resin and cure it again. This embeds the post into the earring and prevents it from popping off later.
Once assembled, display these sweet studs on a card or wear them immediately to add a floral touch to your day


Kawaii Mini Food Charms With Sweet Little Faces
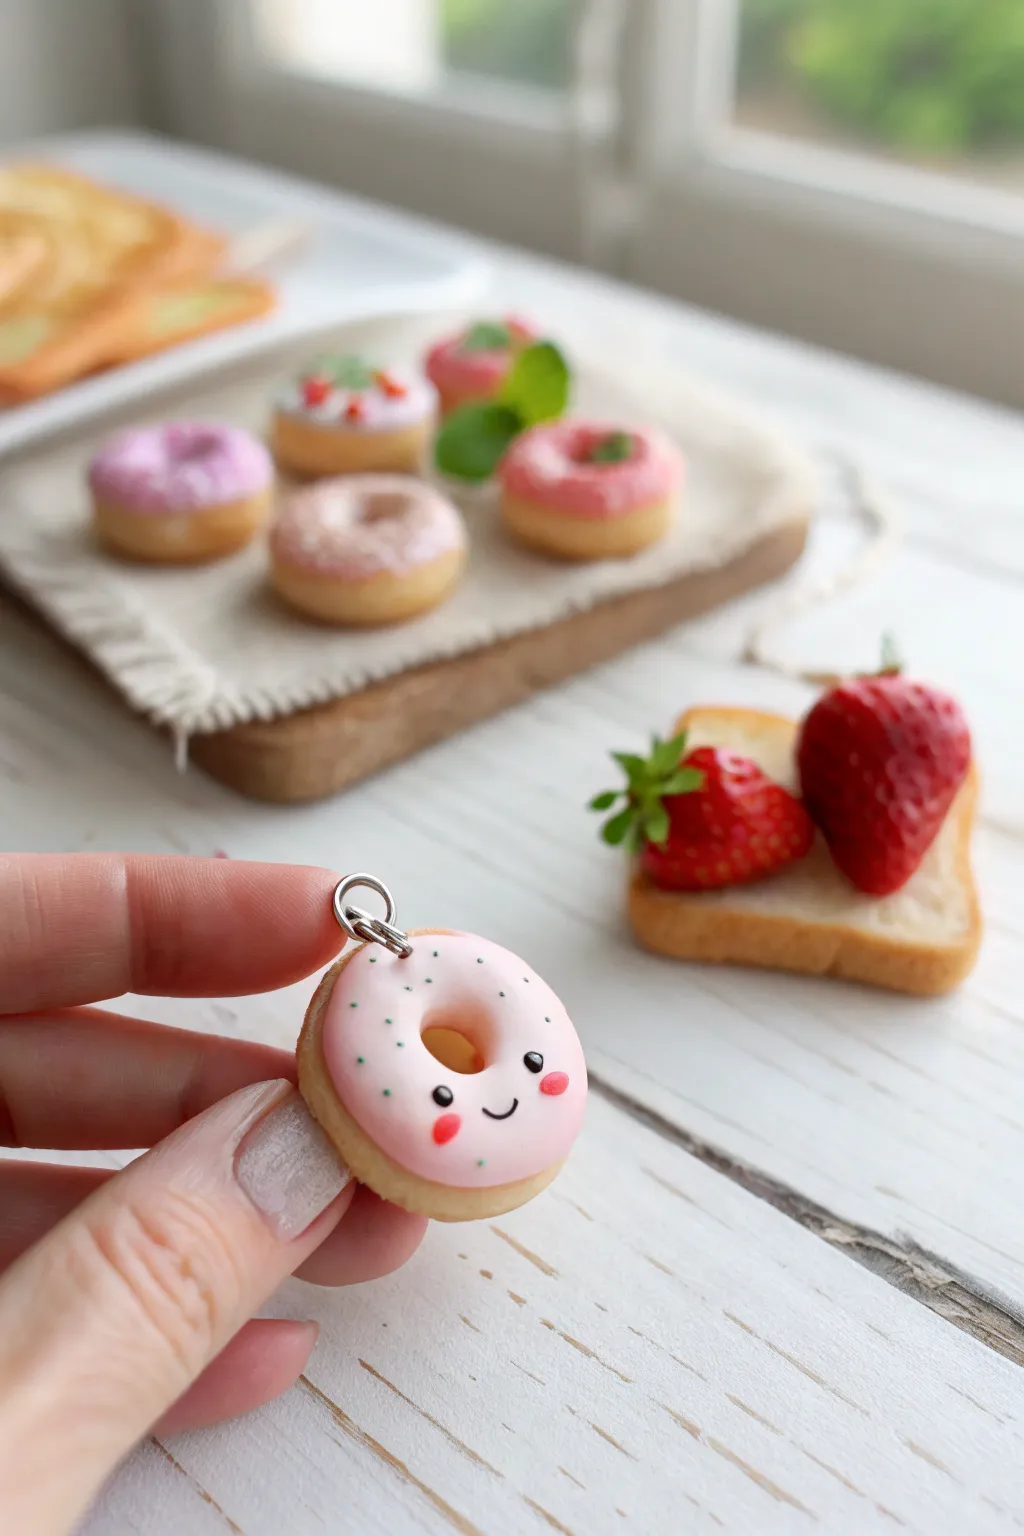
Bring a little sweetness to your day with this adorable polymer clay donut charm, complete with a perpetually happy expression. The soft pink icing and tiny face details give it an irresistible charm that’s perfect for keychains or stitch markers.
Step-by-Step Guide
Materials
- Polymer clay in beige/light tan (dough color)
- Polymer clay in pastel pink (icing color)
- Acrylic paint (black and pink/red)
- Glaze or liquid varnish (glossy and matte)
- Eye pin or screw eye
- Jump ring
- Dotting tool or toothpick
- Detail paintbrush
- Soft pastel chalks in orange/brown (for shading)
- Pliers
- Toaster oven or clay oven
Step 1: Shaping the Dough Base
-
Condition the beige clay:
Begin by kneading your beige polymer clay until it is soft and pliable. This conditioning step prevents cracks later on. -
Form the ball:
Roll a small piece of the beige clay, about the size of a large marble (approximately 1.5 cm diameter), into a smooth, perfect sphere. -
Flatten deeply:
Gently press the sphere down onto your work surface with your thumb to create a thick disc shape. Be careful not to make it too thin; you want a fluffy-looking donut. -
Round the edges:
Smooth out the circumference with your fingertip to ensure the sides are rounded and soft, rather than having sharp, cylinder-like edges. -
Create the center hole:
Use a dotting tool or the back of a paintbrush to pierce the center of the disc. Gently wiggle the tool in circular motions to widen the hole slightly. -
Pre-shading texture:
For added realism, take an old toothbrush and lightly tap it over the surface of the beige clay to create a baked texture. -
Add baked color:
I like to scrape some orange and brown pastel chalk into a dust. Brush this dust lightly around the edges and bottom of the donut to mimic a golden-brown baked finish.
Sticky Situation?
Polymer clay attracts dust like a magnet. Keep baby wipes nearby to clean your hands and tools before switching to the light pink clay to keep it pristine.
Step 2: Adding the Icing
-
Prepare the pink clay:
Roll out a small ball of soft pink clay, slightly smaller than your beige base, and flatten it into a thin sheet. -
Create the drip shape:
Use a small cutter or a needle tool to cut a wavy, irregular flower-like shape. This wavy edge will simulate icing dripping down the sides. -
Attach the icing:
Place the pink shape on top of your beige donut base. Gently press the edges down so they curve over the top. -
Finish the hole:
Using your dotting tool again, poke through the hole you made earlier, piercing the pink layer to match the dough beneath. -
Insert the hardware:
If you are using an eye pin, trim it to size and insert it firmly into the top of the donut. You can add a speck of liquid clay for extra grip.
Step 3: Details & Baking
-
Add sprinkles:
You can either use tiny specks of colored clay or wait to paint them on later. For clay sprinkles, roll microscopic bits of green or white clay and press them gently into the pink icing. -
Bake the charm:
Bake your piece according to your polymer clay package instructions (usually around 275°F/130°C for 15-20 minutes). Let it cool completely before touching. -
Paint the eyes:
Dip a very fine dotting tool into black acrylic paint. Carefully place two small dots for the eyes, spaced widely apart for maximum cuteness. -
Draw the mouth:
Use your finest detail brush to paint a tiny, thin ‘U’ shape between the eyes for a smile. -
Add rosy cheeks:
Mix a little pink or red paint and dab two small ovals directly under the unexpected sides of the eyes. -
Sealing the charm:
Once the paint is fully dry, coat the pink icing area with a gloss glaze to make it look wet and sugary. Leave the beige dough matte for contrast. -
Final assembly:
Attach a larger jump ring to your eye pin using two pairs of pliers to twist it open and shut securely.
Sweet Variations
Make a whole bakery set by swapping the pink clay for chocolate brown or vanilla white, and changing the sprinkle colors to match different themes.
Now you have a tiny, smiling companion ready to sweeten up your keychain or necklace


Mini Fruit Slices You Can Turn Into Charms
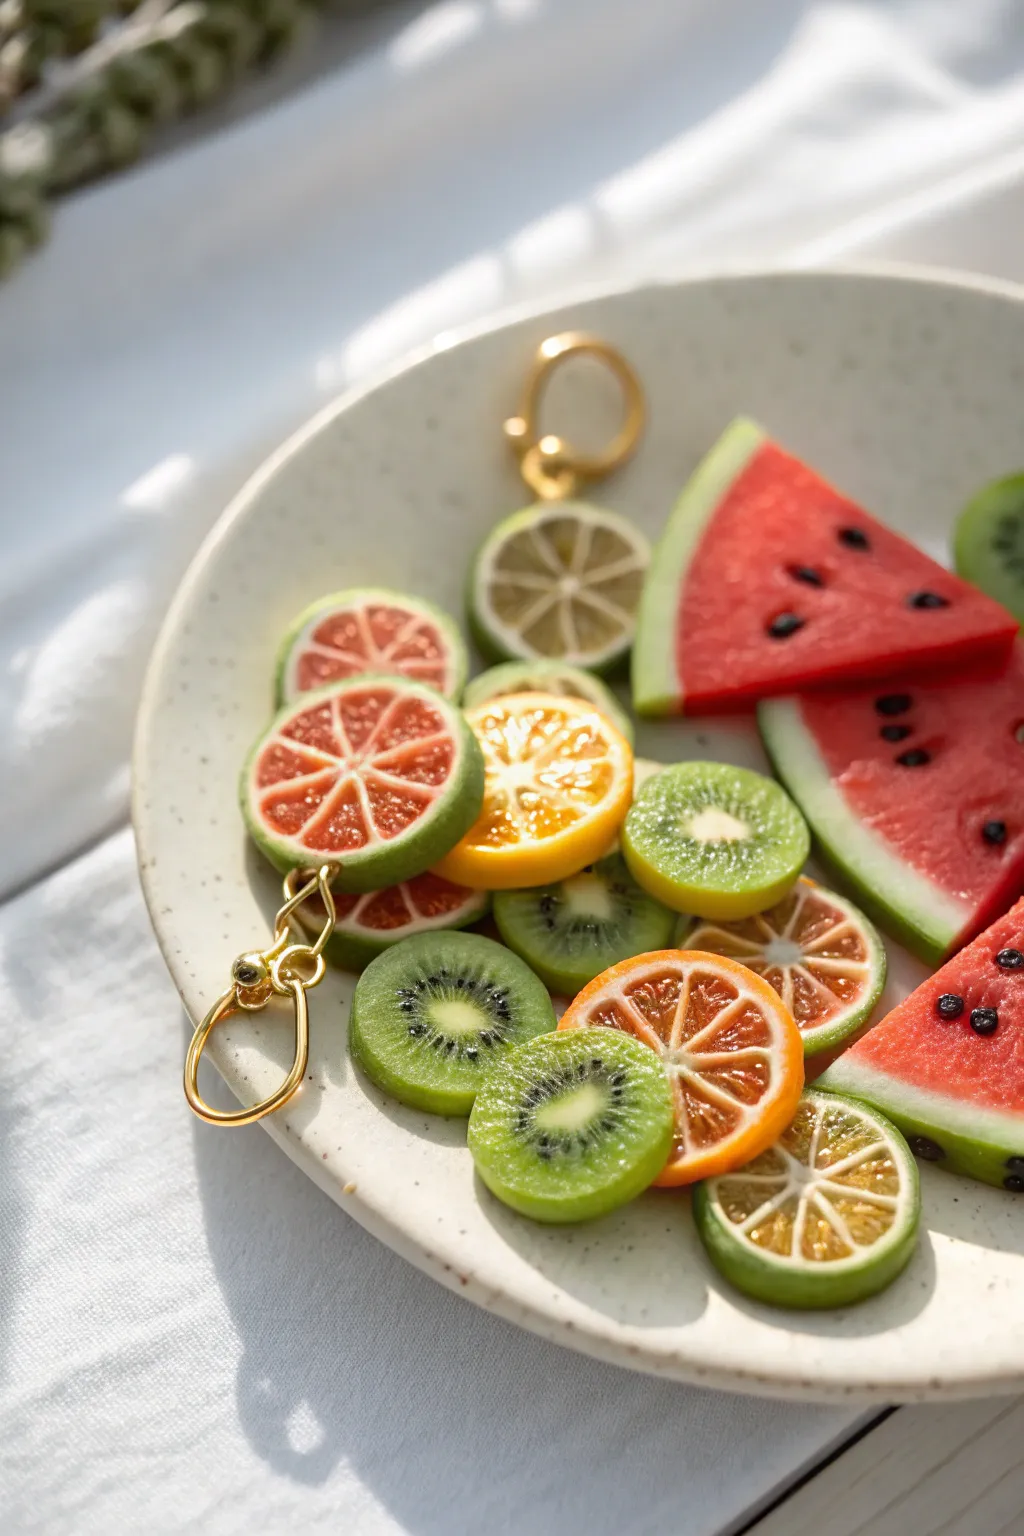
These incredibly realistic mini fruit slices capture the juicy translucence of fresh summer produce in durable polymer clay form. You’ll learn to make detailed watermelon, kiwi, and citrus canes that can be sliced and transformed into delightful jewelry charms.
Step-by-Step Tutorial
Materials
- Polymer clay (translucent, opaque white, red, green, yellow, orange, black)
- Liquid polymer clay (translucent)
- Acrylic rolling pin
- Tissue blade or sharp clay slicer
- Needle tool or dotting tool
- Sandpaper (various grits)
- UV resin or gloss varnish
- Fine paintbrush
- Gold jewelry jump rings
- Small pliers
- Oven for baking
Step 1: Crafting the Citrus Canes
-
Mix the pith color:
Start by mixing opaque white clay with a tiny amount of translucent clay. This creates the ‘pith’ (the white part of the rind) that looks more natural than stark white. -
Create the segments:
For orange slices, mix translucent clay with a drop of orange alcohol ink or a pinch of orange clay. Form this into a log, then wrap a thin sheet of your white ‘pith’ mix around it. Repeat this process for yellow (lemon) or green (lime) segments. -
Shape the wedges:
Pinch the wrapped log into a teardrop or triangular wedge shape. Stretch and pull this log until it’s about 3 inches long, then use your blade to cut it into 8 equal lengths. -
Assemble the wheel:
Arrange the 8 wedges in a circle with the pointy ends meeting in the center. Place a very thin snake of white clay in the absolute center to fill the gap. -
Wrap the rind:
Roll a thin sheet of the white pith mix and wrap the entire assembled circle. Then, roll a slightly thicker sheet of the colored rind clay (green, orange, or yellow) and wrap it over the white layer. This forms the skin. -
Reduce the cane:
Gently squeeze and roll the cane to reduce its diameter. Start from the middle and work outward to prevent distortion. Roll it until it is the diameter of the finished charm slices shown in the photo.
Step 2: Making Kiwi & Watermelon
-
Prepare the kiwi center:
Roll a small log of pale cream or white clay. Wrap this with a thick layer of translucent green clay mixed with tiny black specs (or pre-baked black clay snakes chopped up) to mimic seeds. -
Establish the kiwi rays:
For the realistic hairy texture inside, I like to alternate thin wedges of the seed mix with very thin sheets of white clay, compressing them into a round log. Wrap the final log in a thin brown or green-brown skin layer. -
Build the watermelon block:
Form a large triangular wedge of translucent red clay. Add tiny teardrops of black clay onto the face of the triangle for seeds, pushing them in slightly. -
Add the watermelon rind:
Layer a sheet of white clay on the curved bottom edge of the red triangle, followed by a sheet of green clay for the outer skin. Elongate the cane carefully to maintain the triangular profile.
Smudged Slices?
If your colors are dragging or smearing when you slice the cane, the clay is too warm. Let the cane rest in the freezer for 10 minutes before trying to slice again.
Step 3: Slicing and Finishing
-
Chill and slice:
Place your canes in the fridge for about 20 minutes to firm up. Using a very sharp tissue blade, slice thin, even wafers from your canes. Aim for about 3mm thickness. -
Texture the surface:
Use a needle tool to gently gently scratch texture into the fruit flesh areas (especially the citrus) to simulate juice sacs. Do not texture the rinds. -
Insert hardware holes:
Before baking, use a needle tool to pierce a hole through the rind of each slice where you want the jump ring to go. Make sure the hole is large enough for your rings. -
Bake the clay:
Bake the slices according to your clay manufacturer’s instructions (usually 275°F/130°C for 15-30 minutes). Let them cool completely. -
Sand and buff:
Lightly sand the cut surfaces with high-grit sandpaper to remove any fingerprints and enhance the translucency. -
Apply gloss finish:
Brush a thin layer of UV resin or gloss varnish over the fruit flesh areas only. This makes them look wet and juicy while keeping the rinds realistic and matte. -
Attach the hardware:
Using two pairs of small pliers, twist open your gold jump rings. Thread one through the hole in a fruit slice and twist it closed securely.
Make Them Sparkle
Before baking, brush a tiny amount of pearl ex powder or fine glitter over the ‘sugared’ rind edges for a candy-coated look, or create matching earrings.
Enjoy styling these fresh, fruity accents on your favorite bag or keychain

What Really Happens Inside the Kiln
Learn how time and temperature work together inside the kiln to transform clay into durable ceramic.
Cute Blob Animals Made From Two or Three Shapes
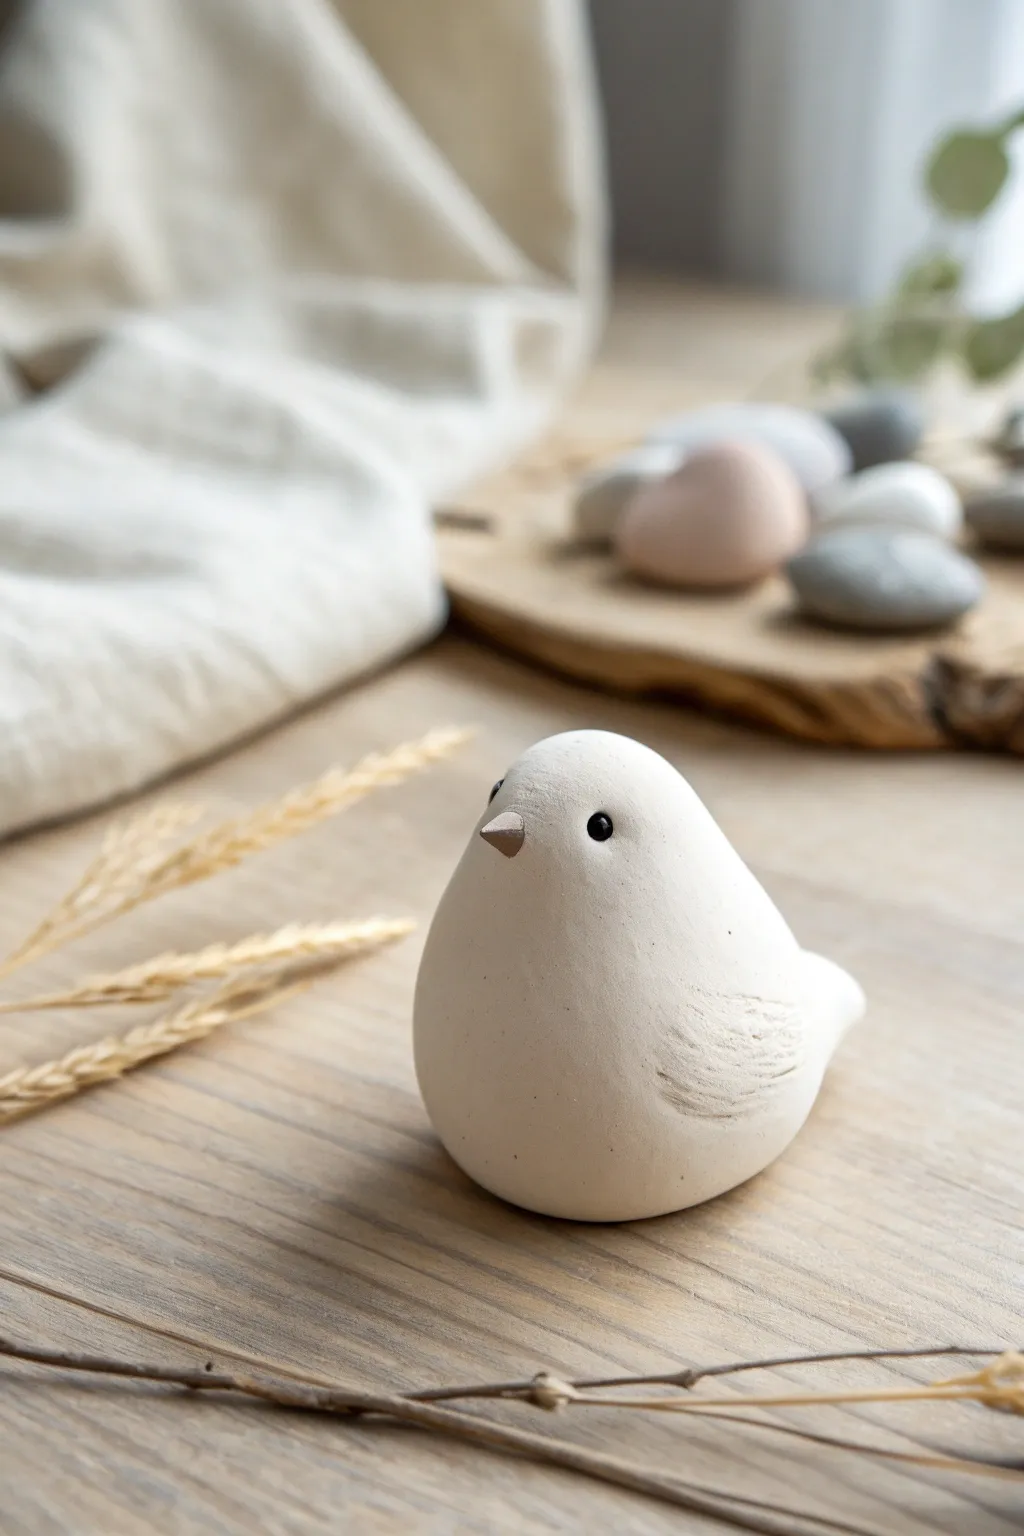
This serene little songbird proves that you don’t need complex anatomy to create something adorable. Using a simple teardrop shape as a base, you’ll sculpt a smooth, matte-finish bird that looks lovely as part of a minimalist nature display.
Step-by-Step Guide
Materials
- White polymer clay (approx. 2 oz)
- Beige or light brown polymer clay (tiny amount for beak)
- Black glass micro-beads or black acrylic paint
- Small needle tool or toothpick
- Soft detail paintbrush
- Baking sheet and parchment paper
- Clay roller or smooth round object
- Finger cots or baby wipes (to keep white clay clean)
Step 1: Shaping the Base
-
Prepare the clay:
Start by conditioning the white polymer clay thoroughly. Knead it in your hands until it is warm, pliable, and free of any cracks. Since white clay picks up dust easily, I always make sure my hands and work surface are spotless before starting. -
Form the main sphere:
Roll the conditioned clay into a smooth ball about the size of a golf ball or slightly smaller. Roll it firmly between your palms to eliminate any seam lines. -
Create the teardrop shape:
Place the ball on your work surface. Using the side of your hand and palm, gently roll one side of the ball to taper it. You are aiming for a fat teardrop shape—the round part will be the head and body, and the tapered point will become the tail. -
Define the tail:
Gently pinch and flatten the tapered end upwards slightly to give the tail a perky, elevated look. Smooth the transition area where the tail meets the body so there are no sharp angles, just gentle curves. -
Establish the posture:
Pick up the bird and gently tap the bottom against your work surface. This creates a small flat spot so the figurine sits stably without rolling over.
Clean Clay Habit
White clay shows every speck of dust. Wipe your hands and tools with a baby wipe constantly, and avoid wearing fuzzy sweaters while sculpting.
Step 2: Adding Details
-
Mark the eye placement:
Determine where the face should be. Use your needle tool to make two small, symmetrical indentations on either side of the wider, front part of the shape. -
Insert the eyes:
If using black micro-beads, press one firmly into each indentation. Use the back of your tool to push them in flush with the surface. If you plan to paint them later, leave the indentations as they are for now. -
Form the beak:
Take a tiny pinch of the beige clay, no bigger than a grain of rice. Roll it into a tiny cone shape. -
Attach the beak:
Place the beige cone precisely in the center of the face, slightly lower than the eyes. Press it gently to adhere it to the white clay without squashing the triangle shape. -
Smooth the seams:
If needed, use a soft silicone tool or your finger to very gently smooth the back of the beak into the face for a seamless join.
Drooping Tail?
If the tail begins to sag while shaping the face, prop it up with a small wedge of scrap clay or folded foil during the baking process to hold the angle.
Step 3: Texturing and Finishing
-
Outline the wings:
Visualize where the wings would rest on the sides of the body. Using your needle tool, lightly scratch a curved line on each side to define the top edge of the wing. -
Add feather texture:
Inside the wing area you just outlined, make several very shallow, sweeping curved lines. These scratches should look sketchy and organic to mimic soft feathers. -
Refine the surface:
Check the whole bird for fingerprints. I like to lightly brush the surface with a tiny bit of baby oil or cornstarch to smooth away any prints before baking. -
Final inspection:
Double-check that the beak is straight and the dust hasn’t settled on the white clay. Clean up any imperfections now, as they are permanent after baking. -
Bake the project:
Place the bird on parchment paper on a baking sheet. Bake according to your specific clay manufacturer’s instructions (usually 275°F/135°C for about 30 minutes per 1/4 inch of thickness). -
Cool and paint:
Let the bird cool completely in the oven. If you didn’t use beads for eyes, dip the tip of a toothpick into black acrylic paint and carefully dot the eyes into the indentations.
Place your finished bird near a window or on a wooden coaster for a peaceful decorative accent
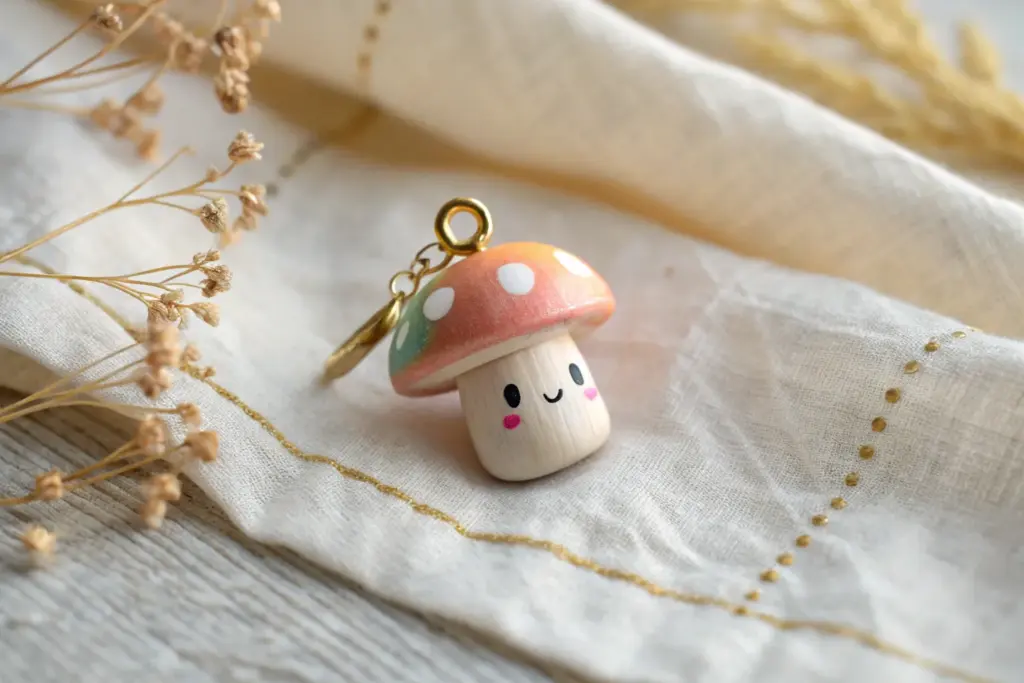
Tiny Polymer Clay Mushrooms for Mini Scenes
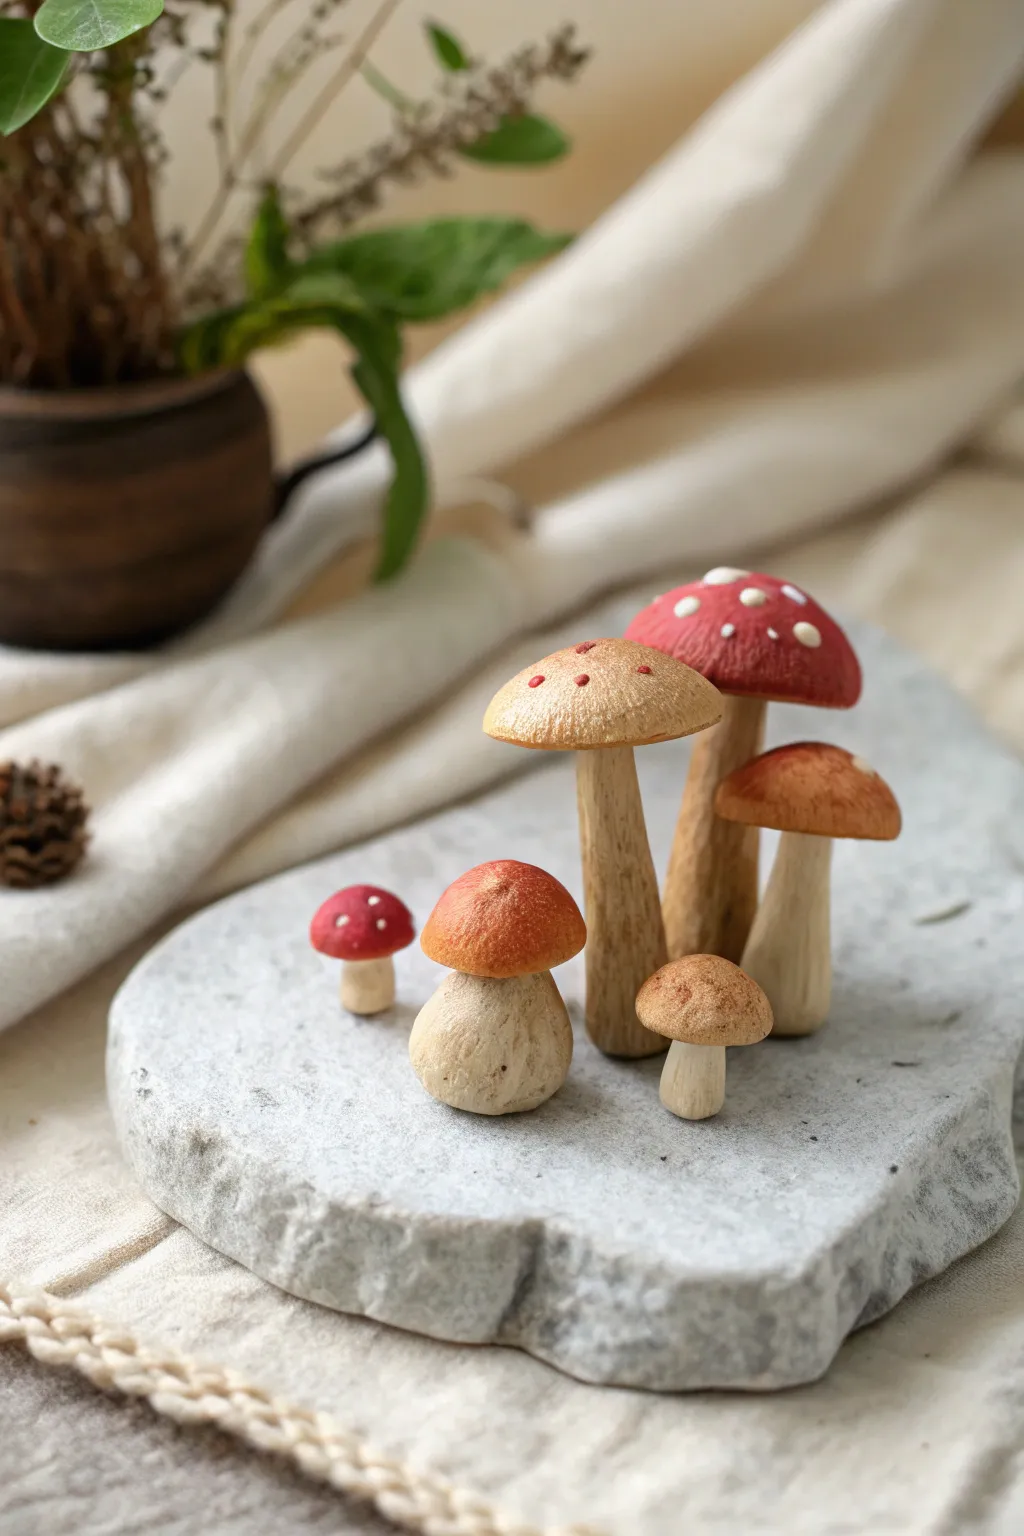
Bring a touch of enchanted woodland to your desk with this collection of hyper-realistic polymer clay mushrooms. Ranging from tiny red-capped toadstools to textured boletes, this project focuses on organic shapes and delicate painting techniques.
Step-by-Step Tutorial
Materials
- Polymer clay (white, beige, translucent)
- Acrylic paints (red, burnt umber, yellow ochre, white)
- Fine detail paintbrush
- Stiff bristle toothbrush or texturing sponge
- Ball stylus tool
- Needle tool
- Pastel chalks (browns and oranges), optional
- Liquid polymer clay or bake-and-bond
- Matte varnish
Step 1: Shaping the Stems
-
Condition the Clay:
Begin by conditioning a mix of white, beige, and a small amount of translucent clay to achieve a natural, earthy off-white tone. -
Form the Base Shapes:
Roll the clay into cylinders of varying thicknesses. For the bolete-style mushrooms, create thicker, bulbous bases; for the taller mushrooms, roll longer, thinner stalks. -
Elongate the Stems:
Gently taper the neck of the stalks where the cap will attach. I like to leave the bottoms slightly uneven to mimic how they would look pulled from soil. -
Add Texture:
Using a needle tool, lightly drag vertical lines down the length of the stems to create a fibrous texture. Don’t make these lines perfectly straight; organic wiggles look more realistic.
Uneven Paint Job?
If your acrylics look streaky, try thinning the paint slightly with water and applying multiple thin layers instead of one thick glob. Let dry fully between coats.
Step 2: Crafting the Caps
-
Create Cap Variities:
Roll balls of clay for the caps. Flatten them slightly into domes. For the younger mushrooms, keep the domes round and tight; for mature ones, flatten them out further. -
Texture the Tops:
Gently press a stiff toothbrush or a texturing sponge onto the top surface of the unbaked caps to give them a porous, non-plastic finish. -
Hollow the Underside:
Flip the caps over and use a ball stylus to create an indentation in the center where the stem will join. -
Detail the Gills (Optional):
If viewing from below matters, use your needle tool to score fine lines radiating from the center hole to the edge of the cap to simulate gills or pores. -
Assemble the Pieces:
Apply a tiny drop of liquid clay or bake-and-bond to the top of a stem and gently press the cap onto it. Ensure the connection is secure but don’t squish the textures.
Step 3: Painting and Finishing
-
Pre-Bake Shading:
Before baking, you can brush shaved brown pastel chalk dust onto the stems and the edges of the caps to create a soft, gradient ‘baked-in’ dirt look. -
Bake the Clay:
Bake the mushrooms according to your specific clay manufacturer’s instructions. Usually, this is around 275°F (130°C) for 15-30 minutes. -
Base Color for Caps:
Once cool, paint the caps. For the red toadstool, use a bright crimson acrylic. For the boletes, mix burnt umber and yellow ochre for a warm tan. -
Layering Colors:
Sponge on the paint lightly rather than brushing it flat. This creates depth on the textured surface. -
Adding the Gradient:
For the tan caps, darken the very center with a wash of burnt umber to make the cap look rounded and aged. -
The White Dots:
For the red toadstool and the tan speckled mushroom, use a fine dotting tool or toothpick to apply tiny dots of white paint. Vary the size of the dots for realism. -
Antiquing the Stems:
Create a very watery wash of brown acrylic paint. Brush it over the stems and immediately wipe it off with a paper towel, leaving pigment only in the needle-tool crevices. -
Seal the Work:
Finish everything with a coat of matte varnish to protect the paint and remove any remaining unnatural shine.
Glossy Finishes
Make your mushrooms look freshly rained on by spotting a little UV resin or high-gloss varnish on just the very top center of the caps.
Set your new fungal friends on a piece of slate or moss to complete your miniature display


The Complete Guide to Pottery Troubleshooting
Uncover the most common ceramic mistakes—from cracking clay to failed glazes—and learn how to fix them fast.
Mini Succulents in Thimble-Size Pots
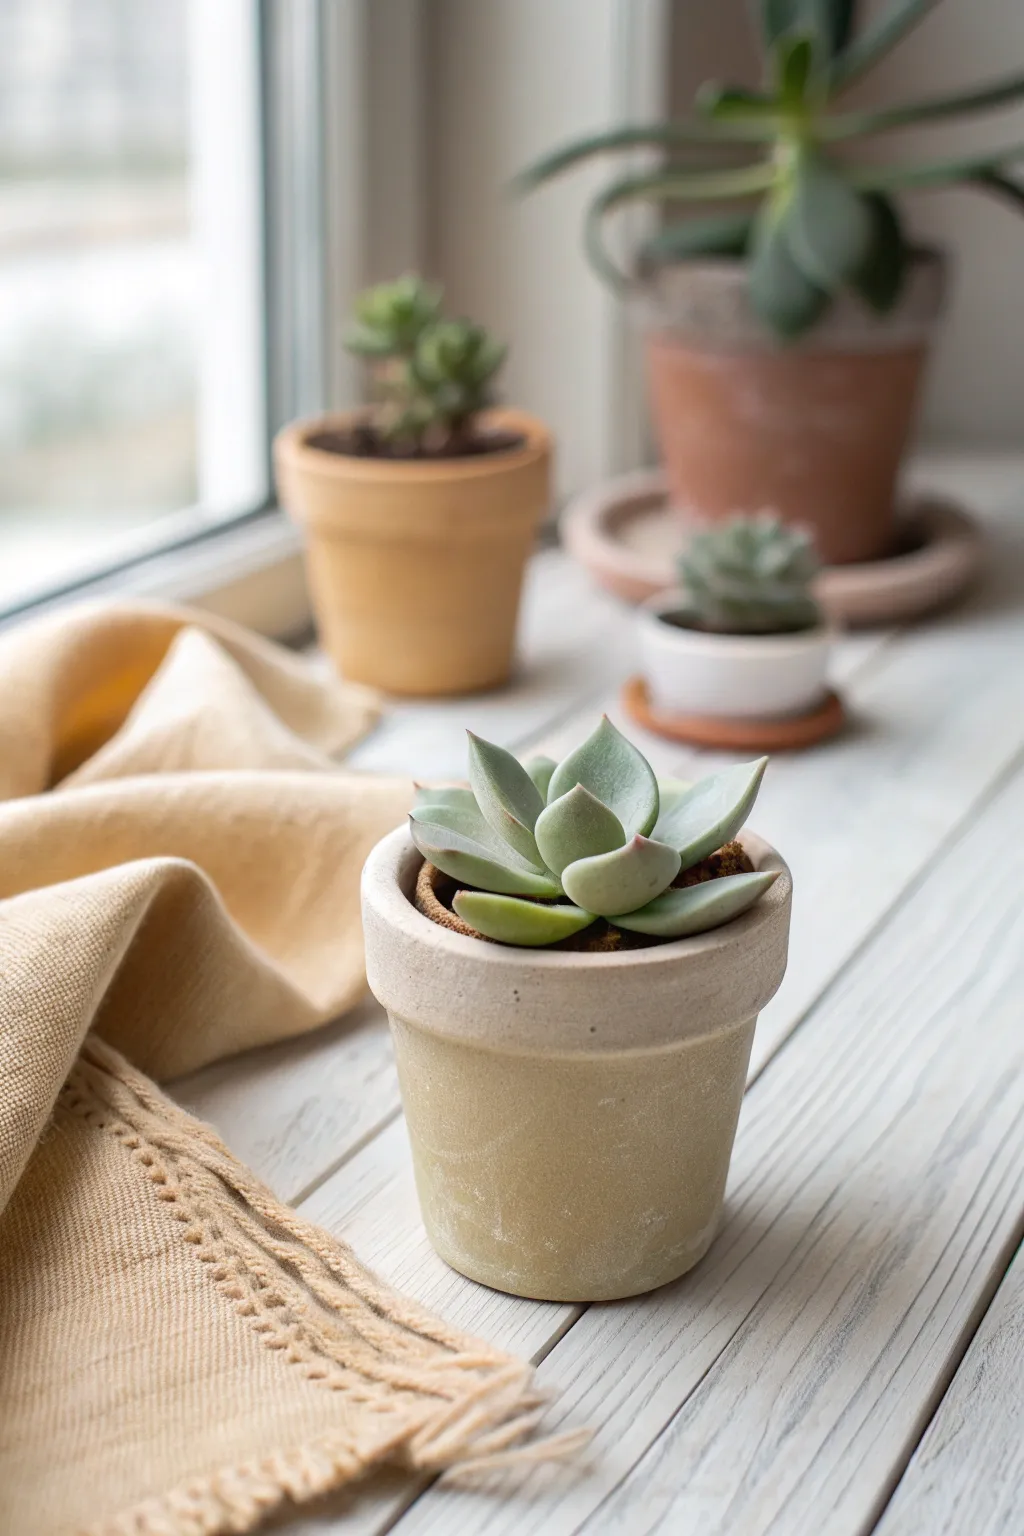
Create a calming, minimalist display with these remarkably realistic polymer clay succulents housed in faux-stone pots. The muted sage greens and dusty earthy tones give these tiny sculptures a sophisticated, organic look that mimics expensive ceramic pottery.
Step-by-Step Guide
Materials
- Polymer clay (colors: translucent, white, olive green, beige, granite/stone effect)
- Acrylic paints (burnt umber, dark green, soft pink)
- Clay roller or pasta machine
- Ball stylus tools (various sizes)
- Needle tool or toothpick
- Small round cutter (approx. 1 inch)
- Dry pastels or chalk (soft pink/red)
- Soft paintbrush for dusting
- Texture sponge or sandpaper
- Liquid polymer clay or bake-and-bond
- Oven for baking
Step 1: Crafting the Faux Stone Pot
-
Mix the Pot Color:
Begin by conditioning beige polymer clay. To achieve the convincing stony look shown in the image, mix in a small amount of granite-effect clay or white clay speckled with black pepper. The goal is a sandy, natural limestone shade. -
Form the Base:
Roll a ball of the conditioned clay about the size of a walnut. Flatten the bottom slightly on your work surface to ensure it stands stable. -
Hollow the Pot:
Use a large ball tool or your thumb to press into the center of the ball, creating the inner cavity. Rotate the pot as you press to keep the walls even, aiming for a thickness of about 3-4mm. -
Shape the Rim:
Roll a separate snake of clay, flatten it into a long strip, and wrap it around the top edge of your pot to create the distinct cuff seen in the reference. Smooth the seam carefully with your finger. -
Texturize the Surface:
To mimic fired clay or stone, gently tap a coarse texture sponge or a crumpled ball of aluminum foil all over the exterior. I find that lightly brushing the surface with cornstarch first prevents the sponge from sticking. -
Pre-Bake the Pot:
Bake the pot alone according to your clay package variations (usually 275°F/135°C) for about 15 minutes. This creates a solid base for planting your succulent later.
Drooping Leaves?
If the outer leaves sag while you work, prop them up with tiny bits of tissue paper or cotton wool. These can be left in during baking and removed afterward.
Step 2: Creating the Echeveria Succulent
-
Mix the Leaf Color:
Combine translucent clay with a small amount of olive green and white. You want a pale, muted sage color that looks slightly waxy, not opaque plastic. -
Form Teardrops:
Roll tiny balls of clay, graduating in size from very small (central leaves) to medium (outer leaves). Shape each ball into a flattened teardrop. -
Shape the Leaves:
Place a teardrop on your palm and press a medium ball tool into the center to cup it. Pinch the pointed tip gently to create that characteristic succulent spine. -
Prepare the Soil Base:
Fill the cooled, pre-baked pot with brown clay. Use a needle tool or stiff brush to stipple the surface heavily, making it look like loose potting soil. -
Plant the Center:
Start from the very middle. Take three of your smallest leaves and arrange them in a tight triangle cluster in the center of the soil, pressing them gently into the raw brown clay. -
Add Leaf Layers:
Work outward in concentric circles. Place the medium leaves in the gaps between the previous row’s leaves. Ensure they angle slightly upward, embracing the center. -
Adjust the Form:
Once all layers are placed, inspect the rosette from all angles. Use your needle tool to gently nudge leaves into a symmetrical, organic arrangement. -
Apply Blush:
Before the final bake, shave some soft pink or red chalk pastel into a powder. With a dry, soft brush, dust the very tips of the leaves to replicate sun-stress coloration.
Step 3: Final Assembly and Finishing
-
Final Bake:
Bake the entire piece again for the full duration recommended by the manufacturer (usually 30-45 minutes) to ensure the leaves cure completely. -
Pot Weathering:
Once cool, create a watery wash of burnt umber acrylic paint. Brush it over the pot’s exterior and immediately wipe it off with a paper towel. The paint will remain in the texture crevices, aging the pot beautifully. -
Dusting:
For a final touch of realism, brush a tiny amount of cornstarch or baby powder over the leaves to simulate the natural farina (powdery coating) found on real succulents.
Level Up: Roots
Mix dried tea leaves or used coffee grounds into your brown ‘soil’ clay before baking. This adds incredible texture that looks like real organic potting mix.
Now you have a botanically inspired miniature that brings a touch of greenery to your desk without ever needing water
Tiny Cactus Minis With Simple Spines and Flowers
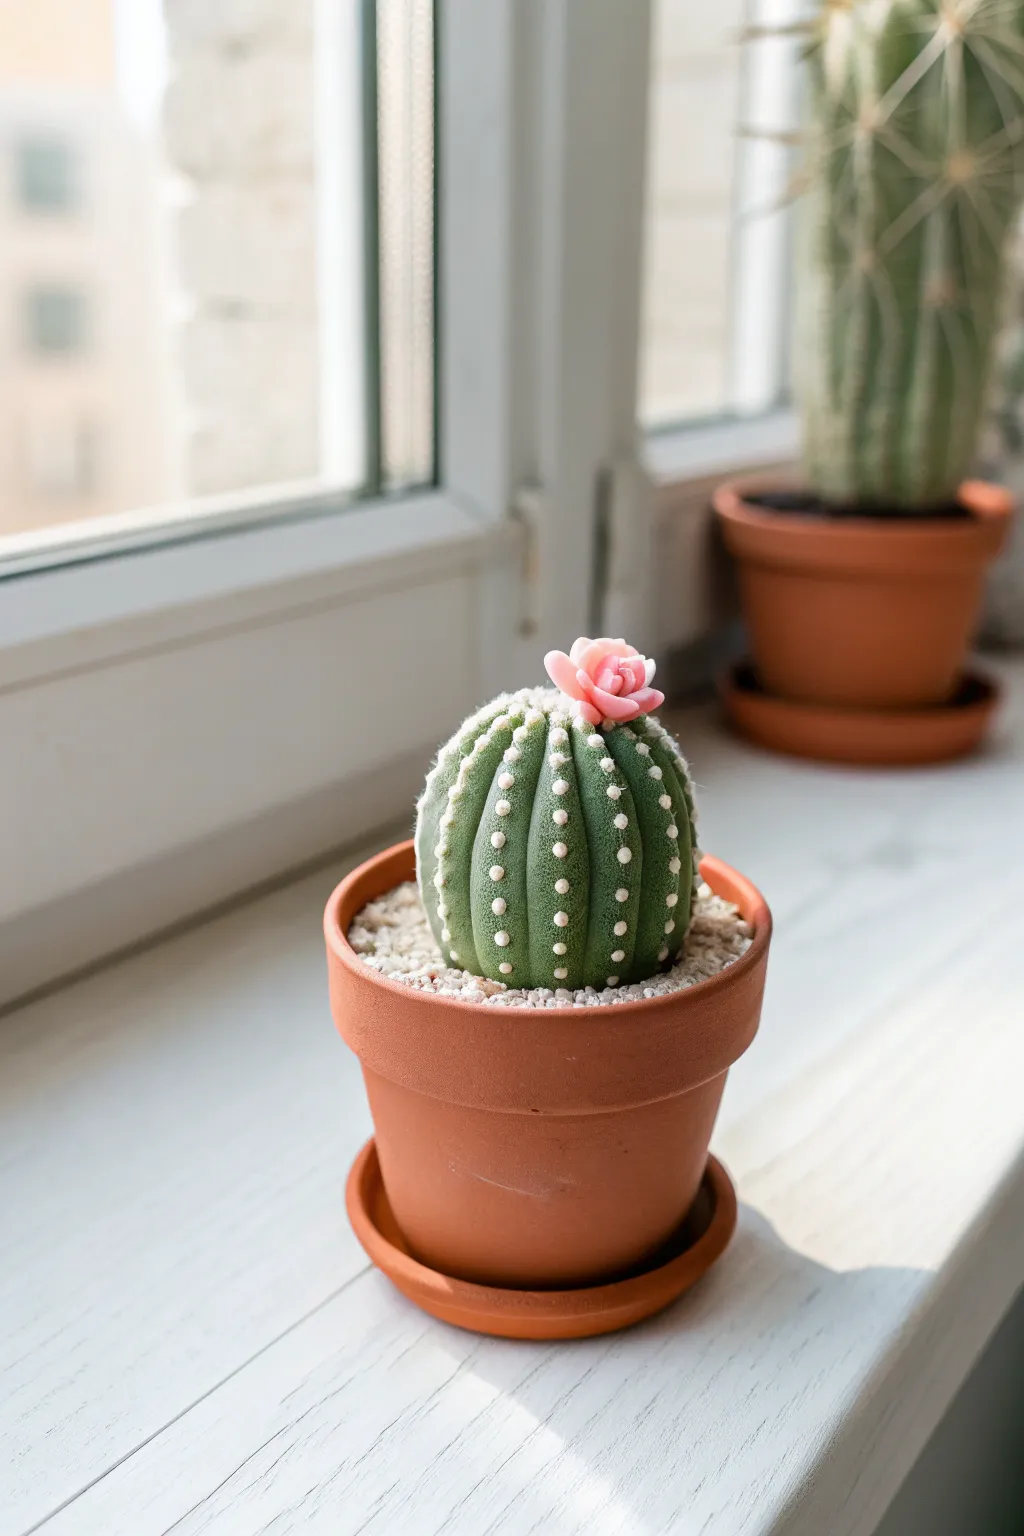
Create a charming, maintenance-free desert oasis with this detailed polymer clay cactus project. This tutorial guides you through sculpting a realistic ribbed body with dotted spine details and topping it with a delicate pink bloom.
How-To Guide
Materials
- Green polymer clay (a mix of emerald and a touch of white/translucent)
- Pink polymer clay for the flower
- White or pale yellow polymer clay (or acrylic paint) for spines
- Ball stylus tool
- Needle tool or toothpick
- Small terracotta pot (1.5 – 2 inch size)
- Small white gravel or decorative sand
- Wire cutters
- Thin crafting wire or toothpicks (for internal armature)
- Clay roller or pasta machine
- Translucent liquid clay (optional)
- Gloss glaze (optional)
Step 1: Shaping the Cactus Body
-
Prepare the core:
Start by conditioning your green clay well until it is soft and pliable. Roll it into a smooth ball that is roughly the size you want your finished cactus to be, ensuring it fits nicely inside your terracotta pot. -
Form the shape:
Gently press the ball onto your work surface to flatten the bottom slightly. Use your palms to shape it into a slightly rounded dome or a squat cylinder, mirroring the look of a barrel cactus. -
Create the ribs:
Take a needle tool or the side of a toothpick and press vertical indentations around the circumference of the cactus. Space these evenly to create the distinct ‘ribs’ of the plant. -
Refine the ridges:
After marking the lines, use your fingers to gently smooth the areas between the indentations, making them slightly convex or puffy. This gives the cactus a plump, healthy appearance rather than a flat, geometric look.
Natural Texture
Before baking, gently dab the green clay with a toothbrush or stiff paintbrush. This adds a subtle pitted texture that mimics real plant skin.
Step 2: Adding the Spines
-
Mark the spine locations:
Using a small ball stylus, gently press small dimples along the peak of each vertical rib. Space them evenly from top to bottom. -
Create the spines:
Roll extremely tiny snakes or balls of white clay. I find it easiest to roll a very thin snake and slice off tiny segments using a craft knife. -
Attach the spines:
Place a tiny white clay bit into each dimple you created. Depending on the size, you can leave them as small raised bumps or gently tease them with a needle tool to look slightly fuzzy. -
Secure the dots:
Once placed, gently tap each white dot with your finger or a flat tool to ensure they adhere well to the green body without flattening them completely.
Gradient Magic
Mix a tiny bit of yellow into your green clay for the top of the cactus to create a sun-bleached ombré effect for extra realism.
Step 3: Sculpting the Flower
-
Roll the petals:
Take your pink clay and roll a small thin snake. Cut roughly 5-7 small pieces for the outer petals and 3-4 smaller pieces for the inner bud. -
Flatten and shape:
Flatten each piece between your fingers to create thin ovals. Gently crowd the edges to make them irregular and organic, like real petals. -
Assemble the center:
Take the smallest petal and curl it tight onto itself to form the center bud. Overlap the next small petal around it. -
Open the bloom:
Continue adding petals, working outward. Angle the outer petals slightly open to simulate a bloom greeting the sun. Pinch the bottom of the flower cluster to fuse the clay together. -
Trim the base:
Use a sharp blade to cut off any excess clay at the bottom of the flower so it sits flat. -
Attach to cactus:
Place the flower on the top center of your green cactus body. You can use a tiny drop of liquid clay or secure it by blending clay gently with an embossing tool if needed.
Step 4: Baking and Assembly
-
Bake the piece:
Place your sculpted cactus on a baking sheet or tile. Bake according to your specific polymer clay manufacturer’s instructions (usually around 275°F/130°C for 15-30 minutes). -
Cool down:
Turn off the oven and let the clay cool completely inside to prevent cracking from thermal shock. -
Prepare the pot:
While the clay cools, fill your mini terracotta pot nearly to the rim with scrap clay or a filler material like aluminum foil, leaving just enough space at the top. -
Final placement:
Apply a strong adhesive to the bottom of your cooled cactus and press it firmly into the center of the pot’s filler material. -
Add gravel:
Brush white glue over the exposed filler material around the cactus base. Carefully pour your small white gravel or decorative sand over the glue to finish the realistic potted look.
Place your miniature succulent on a sunny windowsill and enjoy a plant that never needs watering

TRACK YOUR CERAMIC JOURNEY
Capture glaze tests, firing details, and creative progress—all in one simple printable. Make your projects easier to repeat and improve.
Micro Trinket Dish for Rings and Stud Earrings
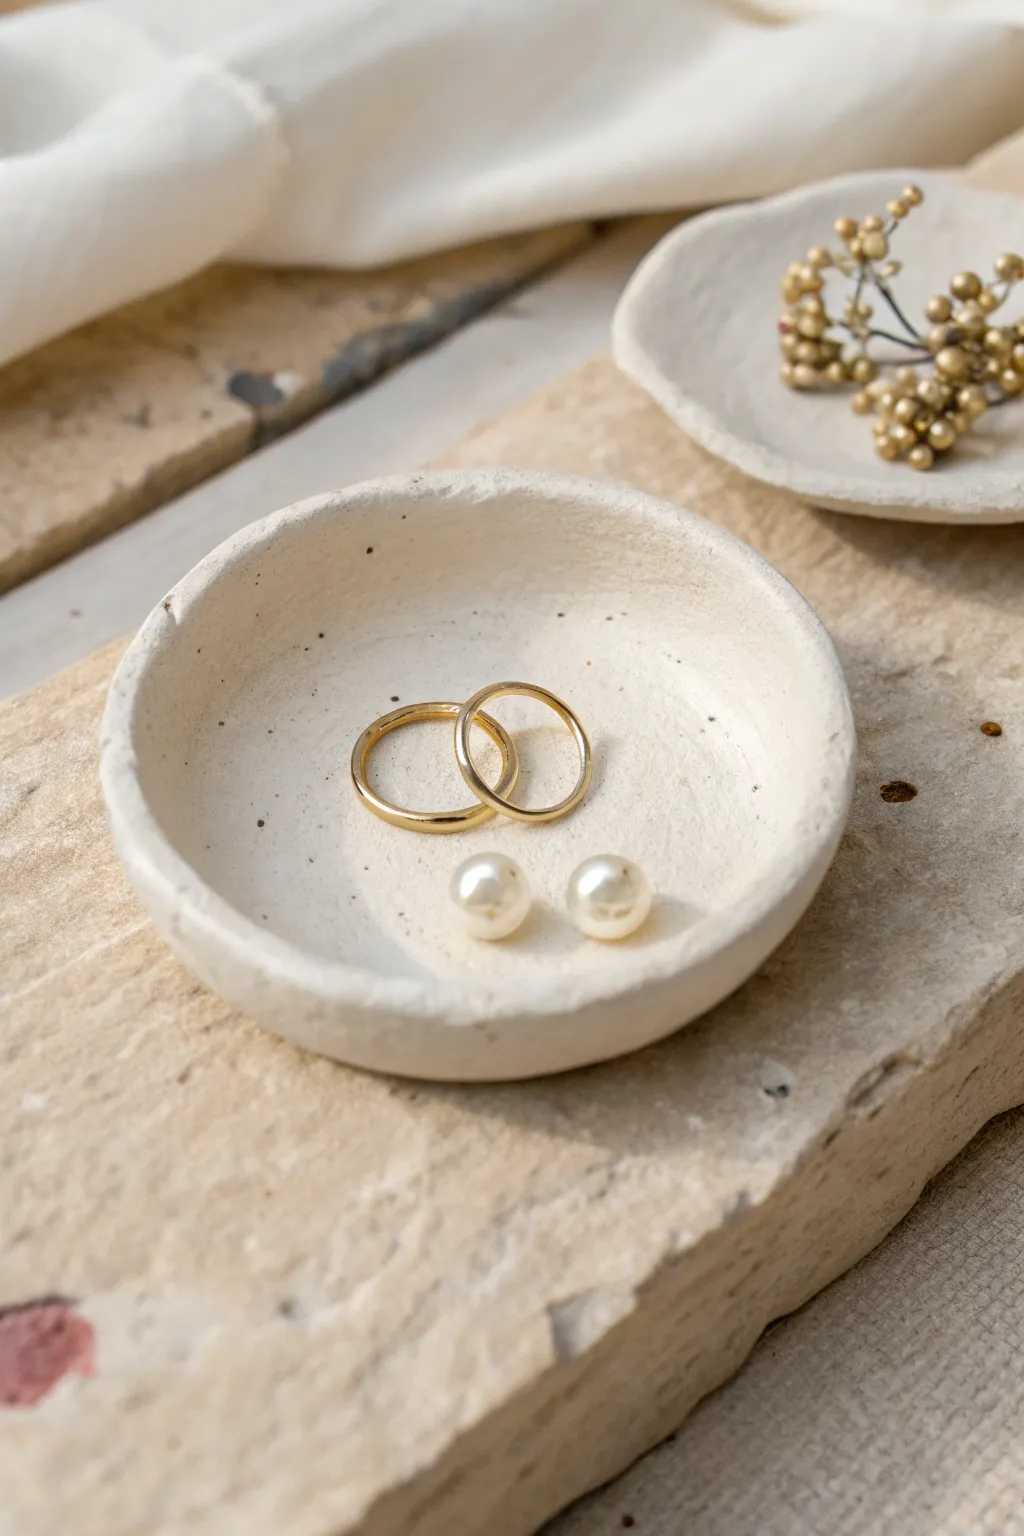
Embrace the beauty of imperfection with these charmingly rustic, hand-formed clay dishes. Their organic shape and subtle speckling mimic the look of high-end stoneware pottery without the need for a kiln.
Step-by-Step
Materials
- White or cream polymer clay (approx. 2 oz)
- Black polymer clay (tiny amount) or black pepper
- Rolling pin or acrylic roller
- Circular cutter or a drinking glass (approx. 3-4 inches)
- Small bowl or lightbulb (for shaping)
- Foil or parchment paper
- Fine grit sandpaper (400-600 grit)
- Matte varnish (optional)
Step 1: Preparing the Clay
-
Condition the base:
Begin by thoroughly kneading your white or cream clay until it is soft, pliable, and free of any air bubbles. Warm hands make this process much easier. -
Create the speckles:
To achieve that stoneware look, you have two options. You can either mix in a heavy dusting of ground black pepper, or take a crumb-sized bit of black clay and chop it into microscopic pieces. -
Incorporate the texture:
Fold the pepper or black clay crumbles into your white base. Knead and fold repeatedly until the specks are distributed randomly throughout the entire ball. -
Roll it out:
Place your clay on a smooth surface or baking mat. Roll it out to an even thickness of about 1/4 inch creating a nice, substantial slab.
Pepper Protocol
If using black pepper for speckles, bake at a slightly lower temp for a longer time to prevent the pepper from burning and turning brown.
Step 2: Shaping the Form
-
Cut the circle:
Use your circle cutter or the rim of a glass to press down into the clay slab and cut out a clean, round shape. -
Soften the edges:
Run your finger gently around the cut circumference to smooth out any sharp angles or cutting debris. I like to tap the edge lightly to make it look less manufactured. -
Create the lip:
Gently pinch the edges of the circle upward. Work your way around the perimeter, creating a shallow, raised rim that feels organic and hand-built. -
Add imperfections:
Don’t aim for perfect symmetry. Gently press slightly uneven indentations into the rim or the base to mimic the wabi-sabi style shown in the photo. -
Support the shape:
Place your clay disc onto a curved surface to bake. You can drape it over the bottom of a small oven-safe bowl, or nestle it into a piece of crumpled aluminum foil shaped like a nest.
Gilded Edge
For a luxe upgrade, paint just the irregular rim of the hardened dish with liquid gold leaf or metallic acrylic paint.
Step 3: Finishing Touches
-
Bake carefully:
Bake the clay according to the manufacturer’s instructions for the specific brand you are using, typically at 275°F (135°C) for 15-30 minutes. -
Cool down:
Allow the dish to cool completely inside the oven or on a wire rack before handling it, as warm clay is fragile. -
Sand the surface:
Dip your fine-grit sandpaper in water and gently wet-sand the edges and surface. This removes fingerprints and gives the piece that ultra-smooth, matte stone texture. -
Dry and seal:
Wipe away any sanding dust. If you want a protected finish, apply a very thin layer of matte varnish, though leaving it raw preserves the stony feel best.
Now you have a serene little home for your favorite rings that looks like it came from an artisan boutique
Mini Polymer Clay Magnets With Simple Icons
Brighten up your kitchen with these charming, minimalist magnets that look almost good enough to eat. With simple shapes and delightful details like speckles and seeds, this set includes fruity favorites and cheerful icons perfect for holding up your grocery lists.
Detailed Instructions
Materials
- Polymer clay (pale yellow, light orange, dusty pink, terracotta, red, white, green, translucent yellow)
- Circle, star, and heart clay cutters (small)
- Acrylic rolling pin
- Texture tool (toothpick or needle tool)
- X-Acto knife or clay blade
- Round ferrite or neodymium magnets
- Strong craft glue (E6000 or superglue)
- Black acrylic paint and fine-tip brush (for the smiley face)
- Oven for baking
Step 1: Shaping the Bases
-
Condition the clay:
Begin by thoroughly kneading each color of clay until it is soft and pliable. This prevents cracking and makes the shapes smoother. -
Roll out slabs:
Roll each color into a slab approximately 1/4 inch thick. You want them sturdy enough to hold the magnet but not too heavy. -
Cut basic shapes:
Use your cutters to create the foundations: a pale yellow star, a pink heart, a terracotta circle, and an orange circle for the citrus slice.
Clean Edges Trick
Before baking, smooth the edges of your cutouts with a little baby oil on your finger. This removes fingerprints and softens sharp cutter lines for a professional finish.
Step 2: Detailing the Icons
-
Speckle the heart:
Take your pink heart cutout and gently poke small indentations across the surface using a needle tool to mimic a cookie texture. -
Create the Star face:
For the smiling star, use a needle tool to gently impress two small dots for eyes and a curved line for the smile. We will paint these later. -
Sculpt the geometric star:
For the terracotta circle, roll a thin sheet of green clay. Cut a 6-point star shape. Gently score lines from the center to each tip to create a faceted, 3D look, then press it onto the center of the terracotta circle. -
Construct the citrus wheel:
Take your light orange circle base. Roll very thin strands of white clay. Place them on the circle like wagon wheel spokes—one long vertical line, and two crossing diagonal lines. -
Rim the citrus:
Roll a slightly thicker snake of white clay and wrap it around the edge of the orange circle to create the pith, smoothing the seam where it meets.
Make It Matte
To get the soft, matte look shown in the photo, lightly sand the baked pieces with high-grit sandpaper (1000+) or apply a layer of matte varnish instead of gloss.
Step 3: Fruity Realism
-
Shape the strawberry:
Form a small ball of red clay and flatten it slightly into a rounded triangle shape. -
Add strawberry seeds:
Use your needle tool to poke teardrop-shaped indentations all over the red surface. -
Add the leafy top:
Create three small teardrops of green clay. Flatten them and press them onto the top of the strawberry to look like leaves, using a tool to create a center vein in each leaf. -
Lemon slice technique:
For the translucent lemon, create a cane. Make six triangular logs of translucent yellow clay and wrap each in a thin sheet of white clay. -
Assemble the lemon cane:
Press the wrapped triangles together into a circle. Wrap the entire bundle in a layer of yellow clay for the rind. -
Slice the lemon:
Carefully slice a disk from your cane to reveal the lemon pattern inside. If it warped during cutting, gently reshape it into a perfect circle.
Step 4: Finishing Touches
-
Bake carefully:
Arrange all your pieces on a baking sheet lined with parchment paper. Bake according to your clay package instructions (usually 275°F for 15-30 minutes). -
Cool down:
I always let the pieces cool completely inside the oven with the door cracked open to prevent thermal shock cracking. -
Paint the smile:
Once cool, use a very fine brush and a tiny amount of black acrylic paint to fill in the impressed eyes and mouth of the yellow star. -
Attach magnets:
Flip the shapes over. Apply a dab of strong glue to the back of each shape and press a magnet firmly into place. -
Final cure:
Allow the glue to cure fully (usually 24 hours) before sticking your new creations to the fridge.
Enjoy arranging your colorful new collection on the fridge door
Tiny Bow and Flower Hair Pin Accents
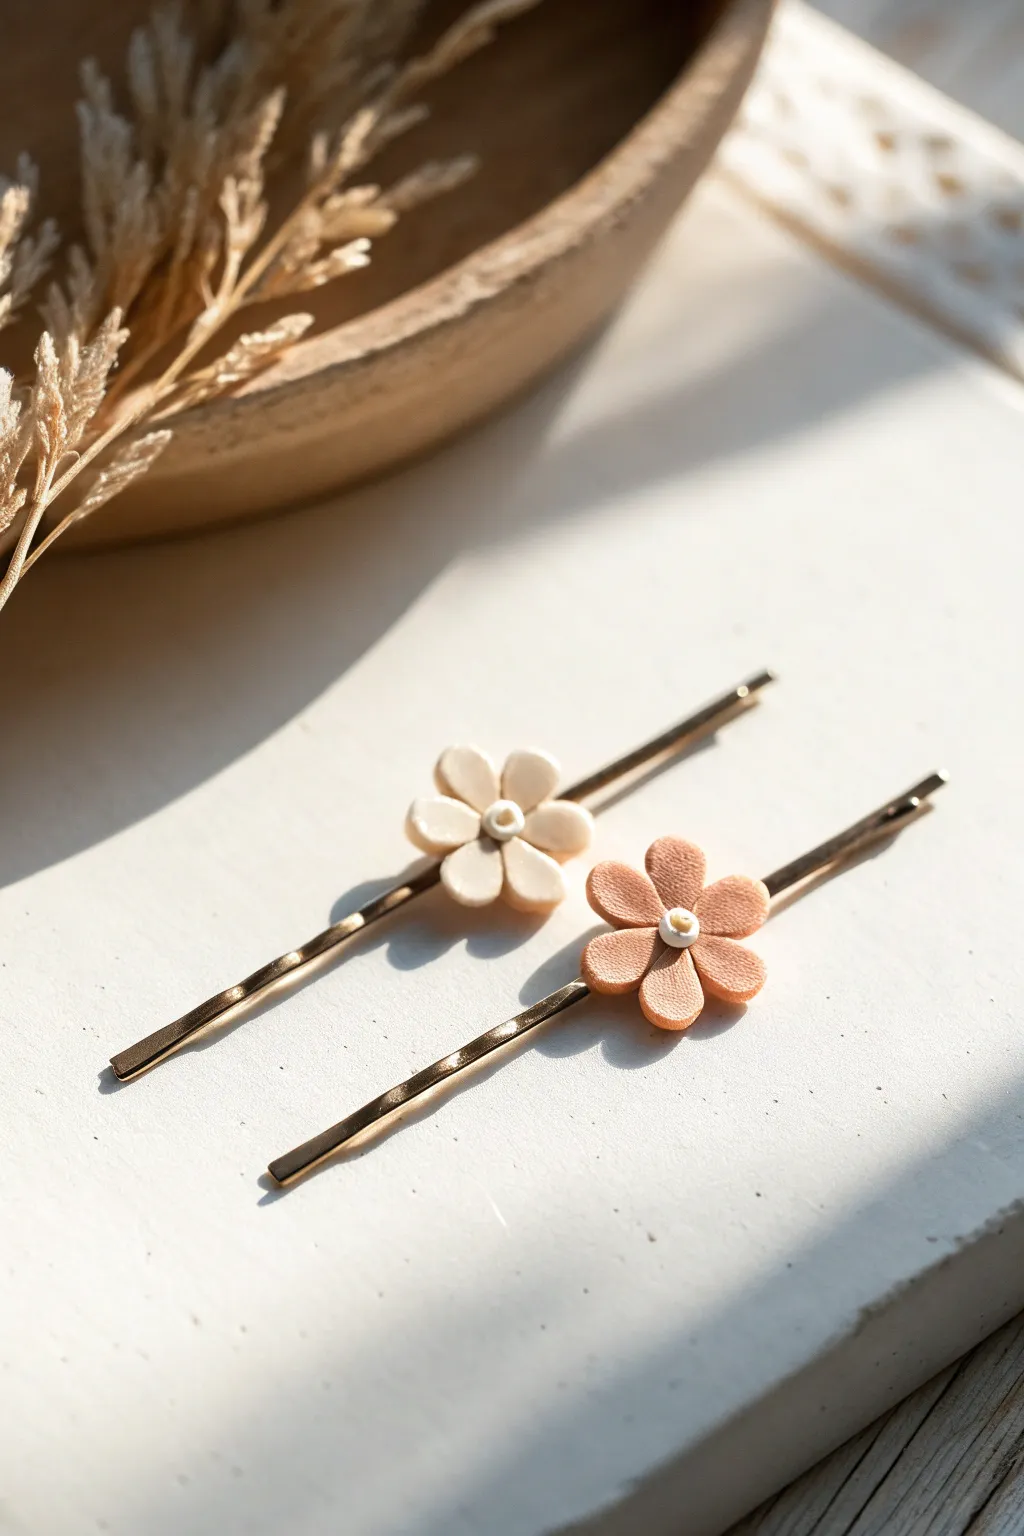
These charming floral hair pins bring a touch of nature to any hairstyle with their soft, matte finish and delicate petals. The design features simple six-petal blooms in cream and peach tones, securely mounted on classic gold bobby pins for everyday elegance.
Step-by-Step Tutorial
Materials
- Polymer clay (cream/beige and peach/terracotta colors)
- Polymer clay (white for centers)
- Small dotting tool or toothpick
- Gold bobby pins with flat pad (optional, but standard pins work too)
- Strong craft adhesive (like E6000 or super glue gel)
- Precision knife or clay blade
- Clean ceramic tile or glass work surface
- Oven for baking
Step 1: Shaping the Petals
-
Condition the clay:
Start by warming the cream and peach clay in your hands, kneading thoroughly until it is pliable and smooth. -
Roll petal logs:
Roll a small amount of the peach clay into a thin, even log, approximately 3-4mm in diameter. -
Cut equal segments:
Using your clay blade, slice the log into six tiny, equal-sized segments. Uniformity here ensures your flower looks balanced. -
Form spheres:
Roll each tiny segment between your fingers into a perfect ball. -
Shape teardrops:
Gently pinch one side of each ball to form a slight teardrop shape, flattening them slightly as you press down on your work surface.
Uneven Petals?
If your petals look different sizes, try using a small circle cutter (or a straw) to punch out equal circles from a flat sheet of clay first, then roll them into balls.
Step 2: Assembling the Blooms
-
Arranging the circle:
Arrange the six teardrop shapes in a circle on your ceramic tile, with the pointy ends meeting in the center. -
Pressing together:
Gently nudge the petals so they touch, pressing lightly to bond them at the center point without squishing the outer edges. -
Add texture:
Take a needle tool or toothpick and orchestrate a shallow line down the center of each petal for a realistic vein effect, if desired, or leave them smooth as seen in the cream flower. -
Create the center:
Roll a very tiny ball of white clay for the flower’s pistil. -
Place the center:
Position the white ball directly in the middle where the petal points meet. -
Indent the center:
Using a small dotting tool, press firmly into the white ball to secure it and create a small cup shape. -
Repeat for cream flower:
Repeat the entire process using the cream/beige clay to make the second flower.
Go Botanical
Before baking, use a needle tool to drag tiny lines from the center outward on each petal for extra texture, or dust the centers with soft pastel chalk for a gradient effect.
Step 3: Baking and Mounting
-
Bake the clay:
Bake the flowers right on the tile according to your clay package instructions (usually around 275°F/130°C for 15-30 minutes). -
Cool down:
Allow the clay flowers to cool completely before attempting to remove them from the tile to prevent warping. -
Prepare the pins:
If using standard rounded bobby pins, I find it helpful to lightly sand the curved top surface to give the glue better grip. -
Apply adhesive:
Place a small dab of strong adhesive onto the flat pad or the end of the bobby pin. -
Attach the flower:
Press the baked flower firmly onto the glue, ensuring it is centered. -
Final drying:
Prop the pins up so the flowers stay horizontal while the glue cures completely, usually for 24 hours.
Once the glue is fully set, your delicate floral accessories are ready to wear or gift
Mini Alphabet Letter Beads for Bracelets
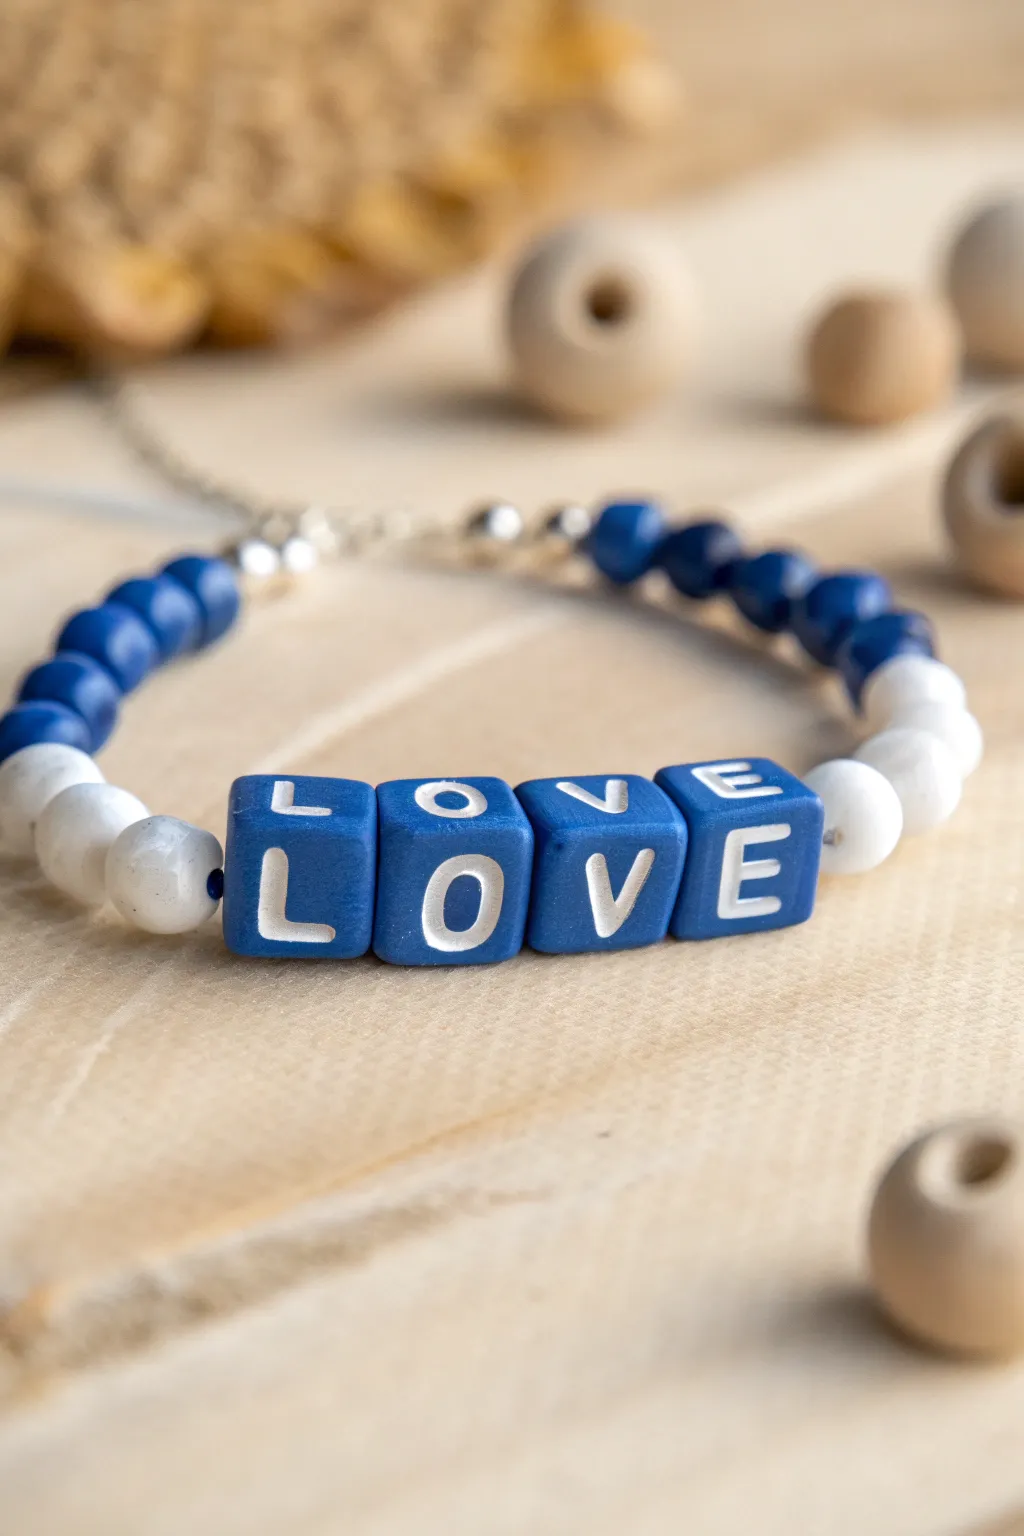
These custom letter beads act as the centerpiece for a charming bracelet, combining crisp white lettering on a deep matte blue background. It is a fantastic way to practice precision skills with polymer clay while creating a personalized accessory.
How-To Guide
Materials
- Navy blue polymer clay
- White liquid polymer clay (or white clay softened to a paste)
- White round accent beads (6mm)
- Blue round accent beads (4mm or 5mm)
- Stretch cord or beading wire
- Needle tool or thin awl
- Alphabet rubber stamps (small serif font)
- Razor blade or tissue blade
- Jewelry findings (lobster clasp, jump rings, crimp beads) if using wire
- Small roller
Step 1: Creating the Clay Letter Beads
-
Condition the clay:
Begin by thoroughly conditioning your navy blue polymer clay until it is soft and pliable. Roll it into a smooth, even log shape on your work surface. -
Form the square log:
Gently press the round log against your work surface to flatten one side. Rotate it 90 degrees and press again. Continue this process, refining the shape until you have a long, perfect square cane about 8-10mm thick. -
Slice the beads:
Using a sharp tissue blade, slice four equal cubes from your square cane. Make sure your cuts are perfectly straight so the beads sit flush against each other. -
Create the hole:
Before baking, pierce each cube. Carefully insert a needle tool through the side of the cube, keeping it perfectly centered. Twist gently as you push through to avoid distorting the square shape. -
Stamp the letters:
Select the ‘L’, ‘O’, ‘V’, and ‘E’ stamps from your alphabet set. Gently press the first letter into the top face of a cube. I prefer to press just deep enough to create a clear impression without deforming the bead walls. -
Repeat stamping:
Repeat this process for all four letters. If a bead gets slightly squashed, gently reshape the sides with your fingers or a flat tool before moving on. -
First bake:
Place the blue cubes on a baking tile or parchment-lined tray. Bake according to your clay package instructions (usually 275°F/130°C for 15-30 minutes). Let them cool completely.
Step 2: Infilling and Finishing
-
Fill the impressions:
Once the beads are cool, take your white liquid clay. Carefully fill the stamped letter indentations. Don’t worry if it overflows slightly onto the flat surface. -
Wipe away excess:
Before baking the liquid clay, use a damp cloth or a scraping tool to gently wipe across the surface of the bead. This leaves the white clay only inside the depressed letter, creating a crisp contrast. -
Second bake:
Bake the beads again for a short duration (typically 10-15 minutes) to set the liquid clay. Allow them to cool down fully before handling. -
Optional sanding:
If there is any white haze left on the blue surface, lightly sand the face of the bead with high-grit sandpaper to reveal the clean blue clay underneath.
Stamp Stuck?
If stamps stick to the raw clay, lightly dust the stamp face with cornstarch or dip it in water before pressing it into the bead.
Step 3: Assembling the Bracelet
-
Prepare the cord:
Cut a length of beading wire or stretch cord about 3 inches longer than your wrist measurement. This gives you enough room to tie knots or attach clasps comfortably. -
Plan the pattern:
Lay out your design on a bead board or towel. Place the ‘LOVE’ beads in the center. Flank them with two or three white round beads on either side. -
Add side beads:
Continue the pattern outward using the smaller blue round beads until the strand reaches the desired length for your wrist size. -
String the beads:
Thread all the beads onto your cord, double-checking that your letters are facing the correct way and are in the right order. -
Secure the ends:
If using elastic, tie a secure surgeon’s knot and hide it inside a bead. If using wire, thread a crimp bead onto each end, followed by a jump ring or clasp loop. -
Crimp and trim:
Thread the wire back through the crimp bead and use crimping pliers to flatten it securely. Trim any excess wire close to the crimp bead.
Make it Shine
For a glossy finish instead of matte, coat the cured clay beads with a thin layer of UV resin or water-based polyurethane varnish.
Wear your handcrafted message proudly or gift it to someone special to brighten their day
Tiny Marble Swirl Beads Using Scrap Clay
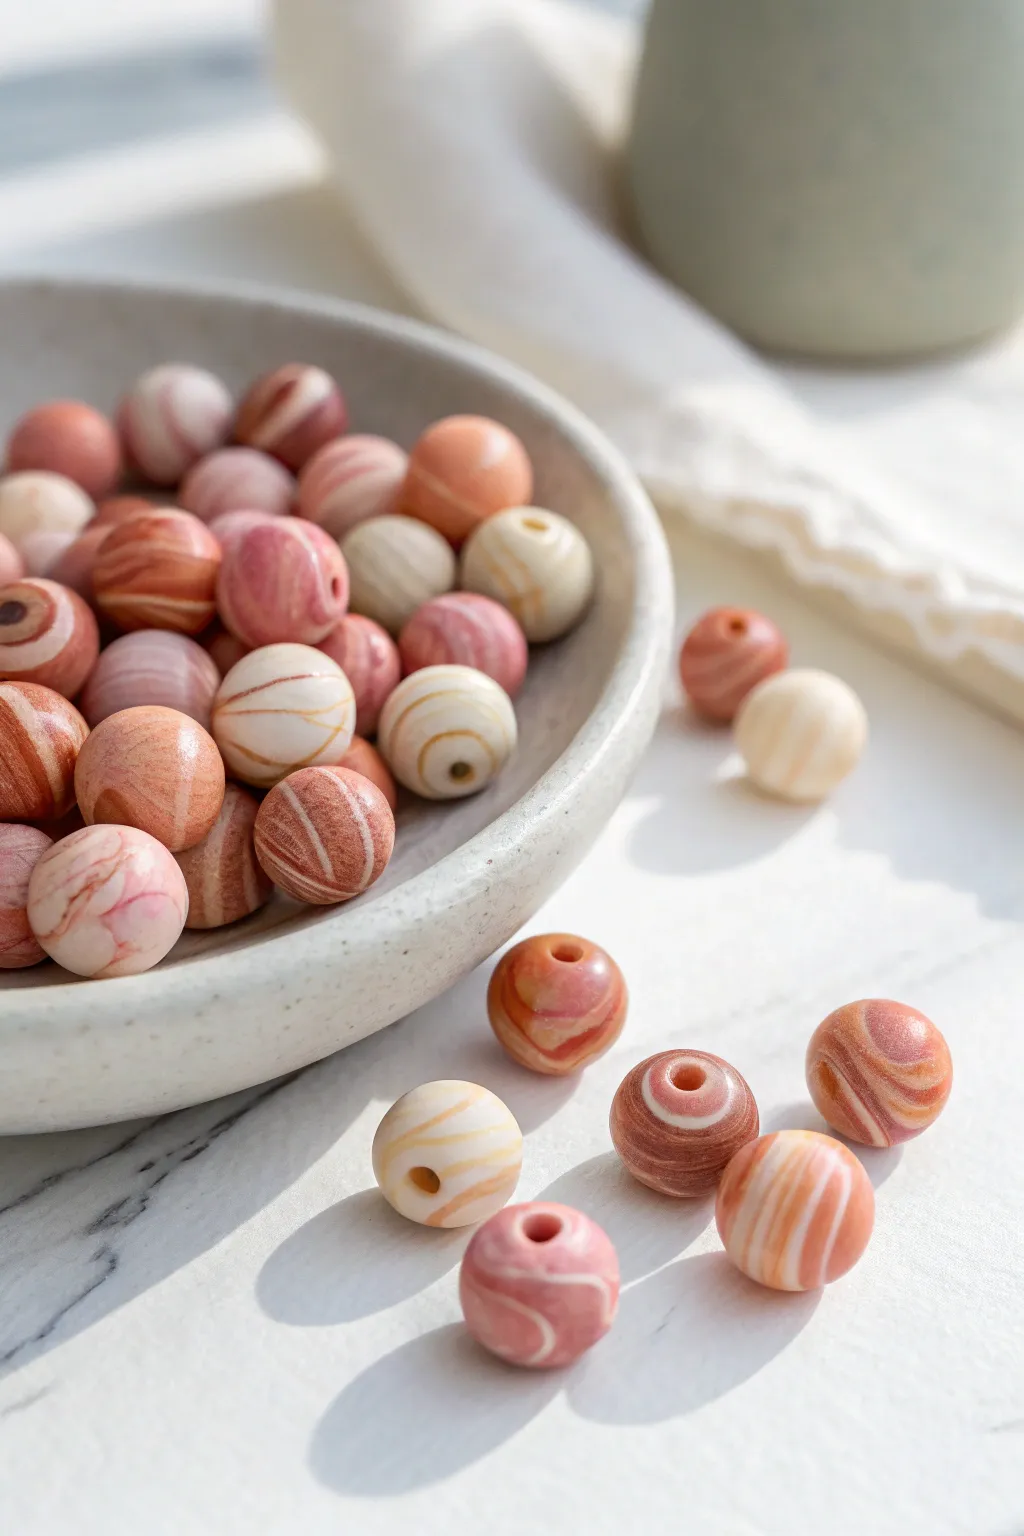
Transform leftover bits of polymer clay into elegant, earthy beads featuring delicate swirls of terracotta, pale pink, and cream. This zero-waste project creates a sophisticated stone-like finish perfect for minimalist jewelry or accents.
Step-by-Step Tutorial
Materials
- Polymer clay scraps (terracotta, beige, white, pale pink)
- Acrylic roller or pasta machine
- Tissue blade or craft knife
- Bead piercing pins or toothpicks
- Cornstarch or baby powder (optional)
- Baking sheet with parchment paper
- Wet/dry sandpaper (400 to 1000 grit)
- Buffing wheel or denim scrap
Step 1: Preparing the Clay Palette
-
Gather your scraps:
Select colors that complement each other to match the photo’s aesthetic. You’ll need warm tones like terracotta, soft pinks, translucent whites, and beige. If your colors are too bright, mix in a tiny bit of brown or white to mute them down. -
Condition the clay:
Knead each color individually until it is soft and pliable. This is crucial for smooth blending later. Roll each color into a distinct snake or “rope” about 6mm thick. -
Create the main bundle:
Hold the ropes of different colors together in your hand to form a bundle. Twist them together slightly like a candy cane to begin the mixing process. -
Roll and fold:
Roll the twisted bundle on your work surface until it doubles in length. Fold it in half, then twist again. I find doing this 3-4 times creates the best marbling without muddying the colors.
Muddy Colors?
If your swirl looks brown instead of defined, you over-mixed. Stop twisting sooner next time. The distinct lines should still be visible in the raw log.
Step 2: Shaping the Beads
-
Cut equal portions:
Once you have a marbled log you are happy with, use your tissue blade to slice it into equal-sized segments. The size of the slice will dictate the size of your bead, so aim for cubes about 1cm in size. -
Initial rolling:
Take one segment and roll it roughly between your palms. The heat from your hands will help fuse any seams. -
Refine the sphere:
Place the rough ball on your work surface. Cup your hand over it and roll in quick circular motions. Maintain light pressure to ensure the bead becomes perfectly round. -
Avoid fingerprints:
If you struggle with fingerprints, lightly dust your palms with cornstarch or wear latex finger cots during the final smoothing. -
Check the swirl:
Inspect each bead. If the pattern looks too striped and not ‘marble’ enough, give the clay an extra tiny twist before rolling it back into a ball.
Seamless Holes
Twist the bead onto the pin while piercing, rather than just pushing the pin. This drilling motion prevents the exit hole from blowing out or distorting.
Step 3: Piercing and Baking
-
Chill the beads:
Place your rolled beads in the fridge for about 15 minutes. Firming up the clay prevents them from squishing into ovals when you pierce them. -
Pierce the holes:
Using a bead pin, gently twist—don’t push—through the center of the bead. I prefer to go halfway through, then pull the pin out and come in from the opposite side to meet in the middle for a clean exit hole. -
Arrange for baking:
Place the beads on a parchment-lined baking sheet. You can bake them directly on the paper, or thread them onto a rack to prevent flat spots. -
Bake:
Bake according to your clay manufacturer’s instructions (usually 275°F/135°C for 30-45 minutes). Longer baking makes the beads stronger. -
Cool down:
Let the beads cool completely in the oven with the door slightly ajar to prevent thermal shock cracks.
Step 4: Finishing Touches
-
Sanding:
Once cool, wet sand the beads in a bowl of water. Start with 400 grit to remove fingerprints, then move to 600 and 1000 for a smooth feel. -
Buffing:
Rub the dry beads vigorously with a piece of denim or a buffing wheel. This creates the soft, natural sheen seen in the photo without looking artificially glossy.
String these beauties onto elastic cord or headpins to enjoy your custom jewelry creation
Mini Checkerboard or Terrazzo Tiles for Dollhouse Decor
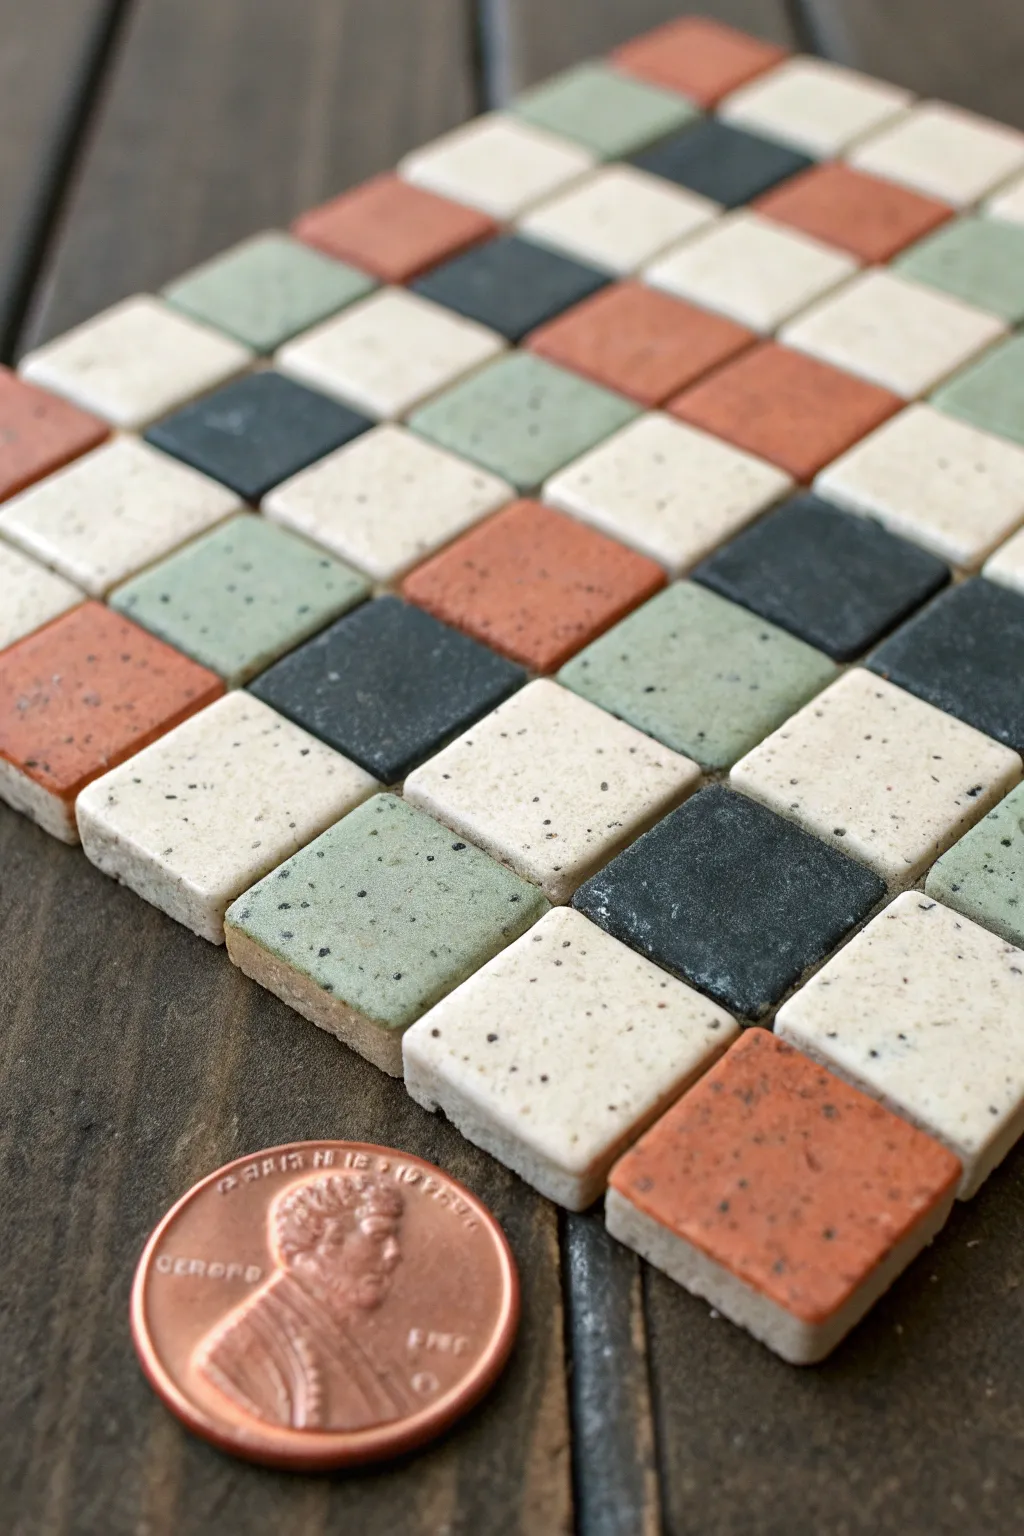
Create a stunningly realistic miniature tiled floor or backsplash using polymer clay, perfect for adding texture and rustic charm to a dollhouse. These tiny, speckled squares mimic real ceramic or stone, bringing an authentic architectural detail to your miniature world.
How-To Guide
Materials
- Polymer clay in four colors: rust, sage green, charcoal grey, and cream
- Coarse black pepper or fine sand (for speckling)
- Black acrylic paint (optional, alternative for speckling)
- Rolling pin or clay pasta machine
- Sharp craft blade or tissue blade
- Ruler
- Ceramic tile or glass sheet for baking
- Fine-grit sandpaper (optional)
- Liquid polymer clay or tacky glue (for assembly afterwards)
Step 1: Preparing the Clay
-
Condition the clay:
Start by thoroughly kneading each color of polymer clay separately until they are soft and pliable. This prevents cracks during baking. -
Add texture:
To achieve the realistic stone effect seen in the photo, mix a pinch of coarse black pepper or very fine sand into each color. Knead it in well so the speckles are distributed evenly. -
Roll out sheets:
Roll each color of clay into a flat sheet. Aim for a thickness of about 2-3mm. To ensure uniform thickness across all colors, I prefer using a clay pasta machine on a medium setting. -
Chill the clay:
Place your rolled sheets of clay on a piece of paper and pop them in the refrigerator for about 10-15 minutes. Firm clay cuts much cleaner and distorts less under the blade.
Step 2: Cutting and Shaping
-
Cut into strips:
Remove one sheet from the fridge. Using your ruler as a guide, cut the sheet into long, even strips. The width of the strip will determine the size of your tile, so aim for approx 5-6mm wide for 1:12 scale. -
Cut into squares:
Turn your strips horizontally and cut vertically across them at the same 5-6mm interval to create individual squares. -
Refine the edges:
Gently tap the sides of the squares with your finger or the flat side of your blade if they became slightly squished during cutting. You want sharp, clean corners. -
Repeat for all colors:
Process the remaining three colors in the same way, creating a pile of squares in rust, sage, charcoal, and cream. -
Texture the surface (optional):
If you want a more weathered look, lightly press a piece of sandpaper or an old toothbrush onto the surface of the unbaked tiles to add subtle pits.
Sticky Squares?
If clay sticks to your blade, dust the blade lightly with cornstarch or dip it in water before cutting. This helps the metal glide through without dragging the clay.
Step 3: Assembly and Baking
-
Arrange the pattern:
Arrange your raw tiles on a ceramic tile or glass baking surface. You can lay them out in a random ‘terrazzo’ style mix or a classic checkerboard pattern. Ensure they are touching side-by-side if you want a pre-assembled sheet. -
Check for flatness:
Once arranged, lay a sheet of parchment paper over the top and gently roll over them once with your roller to ensure they are all leveled to the same height. -
Bake carefully:
Bake the tiles according to your clay manufacturer’s instructions (usually 275°F/130°C for 15-30 minutes). Use an oven thermometer to ensure the temperature is accurate. -
Cool down:
Allow the tiles to cool completely on the baking surface before moving them. They are fragile while warm. -
Sand edges:
Once cool, if any tiles have sharp, raised edges or ‘horns’ from cutting, gently sand them smooth with fine-grit sandpaper. -
Mounting:
Your tiles are now ready to be glued individually onto a dollhouse floor or glued onto a piece of cardstock to create a removable flooring sheet.
Grout Lines
After baking and gluing tiles down, rub actual powdered grout or polymer clay ‘grout’ (liquid clay mixed with white paint) into the gaps. Wipe clean with a damp sponge.
Enjoy laying out your miniature flooring and seeing your tiny room transform with realistic detail
Tiny Book Charms With Painted Spines
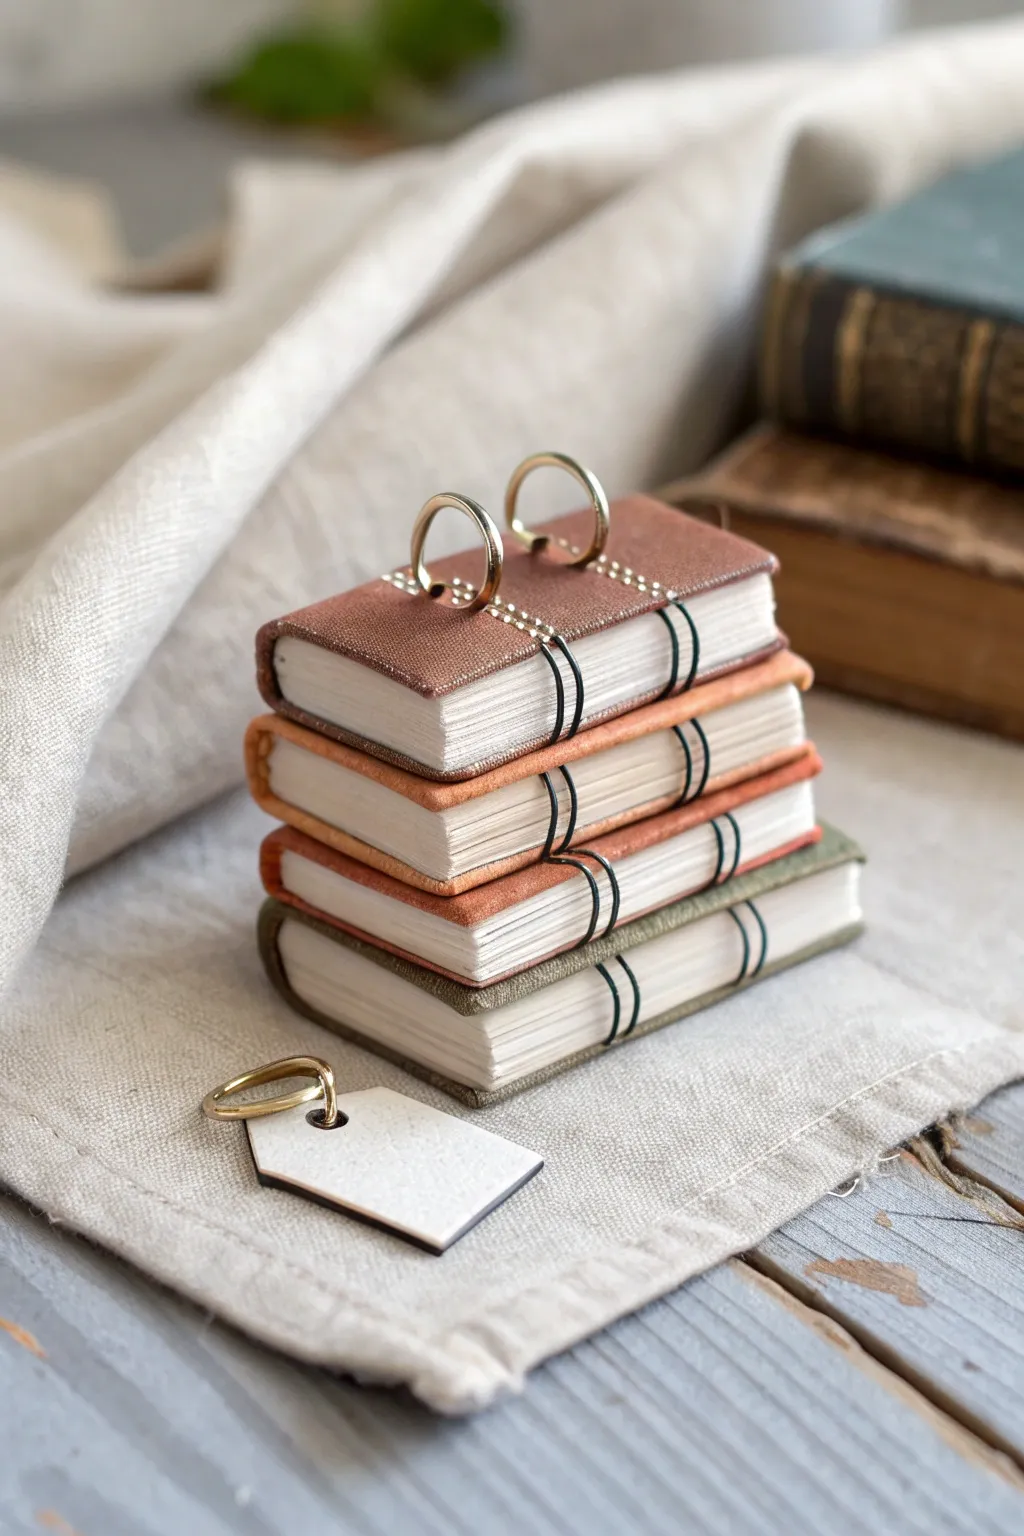
Create a charming library of wearable art with these realistic mini book charms. Featuring textured covers and faux paper blocks, these tiny volumes make perfect pendants, earrings, or unique zipper pulls for book lovers.
Detailed Instructions
Materials
- Polymer clay (shades of brown, tan, olive green, and white/ecru)
- Liquid polymer clay (translucent or white)
- Tissue blade or craft knife
- Needle tool or toothpick
- Texture sponge or sandpaper (for cover texture)
- Black wire or thin waxed thread
- Large jump rings (gold or brass)
- Small eye pins (optional for internal structure)
- Acrylic roller
- Oven baking sheet
Step 1: Preparing the Pages
-
Mix the page color:
Begin by conditioning your white or ecru polymer clay. If the white is too stark, mix in a tiny pinhead amount of tan to give it an aged, realistic paper look. -
Shape the block:
Roll the clay into a thick slab, about 5-6mm thick. Cut out small rectangles using your tissue blade. These should be slightly smaller than your desired final book size, perhaps 1.5 cm x 2 cm. -
Texture the pages:
Use a needle tool or the dull side of a craft knife to score fine, parallel lines along the three visible edges of your white rectangle. This mimics the look of stacked paper pages.
Pro Tip: Realistic Pages
Mix a tiny bit of translucent clay into your white page block. This adds visual depth, making the ‘paper’ look less like plastic and closer to real parchment.
Step 2: Crafting the Covers
-
Create the cover sheet:
Roll out your colored clays (brown, tan, green) into thin sheets, approximately 1-2mm thick. These will serve as the leather-bound covers. -
Add texture:
Before cutting, press a texture sponge, a piece of sandpaper, or balled-up aluminum foil gently onto the surface of the clay sheet to create a faux-leather or fabric grain. -
Cut to size:
Measure your white page block against the colored sheet. Cut a rectangle that is long enough to wrap around the bottom, spine, and top of the page block, with a slight overhang on the edges. -
Assembly:
Apply a very thin layer of liquid polymer clay to the spine and top/bottom faces of the white page block to act as an adhesive. -
Wrap the book:
Carefully wrap the textured cover strip around the page block. Gently press the spine to ensure it adheres, but be careful not to squish the page texture you created earlier. -
Adding the spine details:
If you want the look of bound spines, use a blunt tool to gently indent two horizontal lines across the spine where the binding cords would traditionally be.
Step 3: Hardware and Finishing
-
Insert the binding rings:
For the specific look in the image, take two large jump rings. Carefully press them into the top of the book spine, sinking them deep enough into the clay so they stand upright and parallel. -
Secure the jump rings:
Use a dab of liquid clay around the insertion points of the rings to ensure they bake securely into the structure. -
Simulate the binding wrap:
Take thin black wire or waxed thread (if heat resistant). Gently press it into the cover clay, starting near the spine, wrapping down the front, and ending near the edge. This mimics the elastic bands or decorative binding seen on journals. -
Additional indented details:
For the dotted line detail seen on the top book, use a needle tool to poke a row of shallow holes parallel to the spine on both the front and back covers.
Troubleshooting: Rings Falling Out?
If jump rings feel loose after baking, carefully pull them out, add a drop of superglue (cyanoacrylate) to the hole, and reinsert them for a permanent hold.
Step 4: Baking and Polishing
-
First bake:
Arrange your books on a baking sheet. I advise tenting them with foil to prevent the light-colored pages from scorching. Bake according to your clay manufacturer’s instructions (usually 275°F/135°C for 30 minutes). -
Cooling down:
Let the books cool completely before handling. The metal rings will be hot and the clay is fragile while warm. -
Optional aesthetic touches:
Once cool, you can dry-brush a tiny amount of darker brown acrylic paint into the texture of the spine to highlight the ‘leather’ grain.
String your new library onto a necklace or keychain and enjoy your miniature literary collection
Mini Lucky Charms Like Stars, Moons, and Tiny Eyes
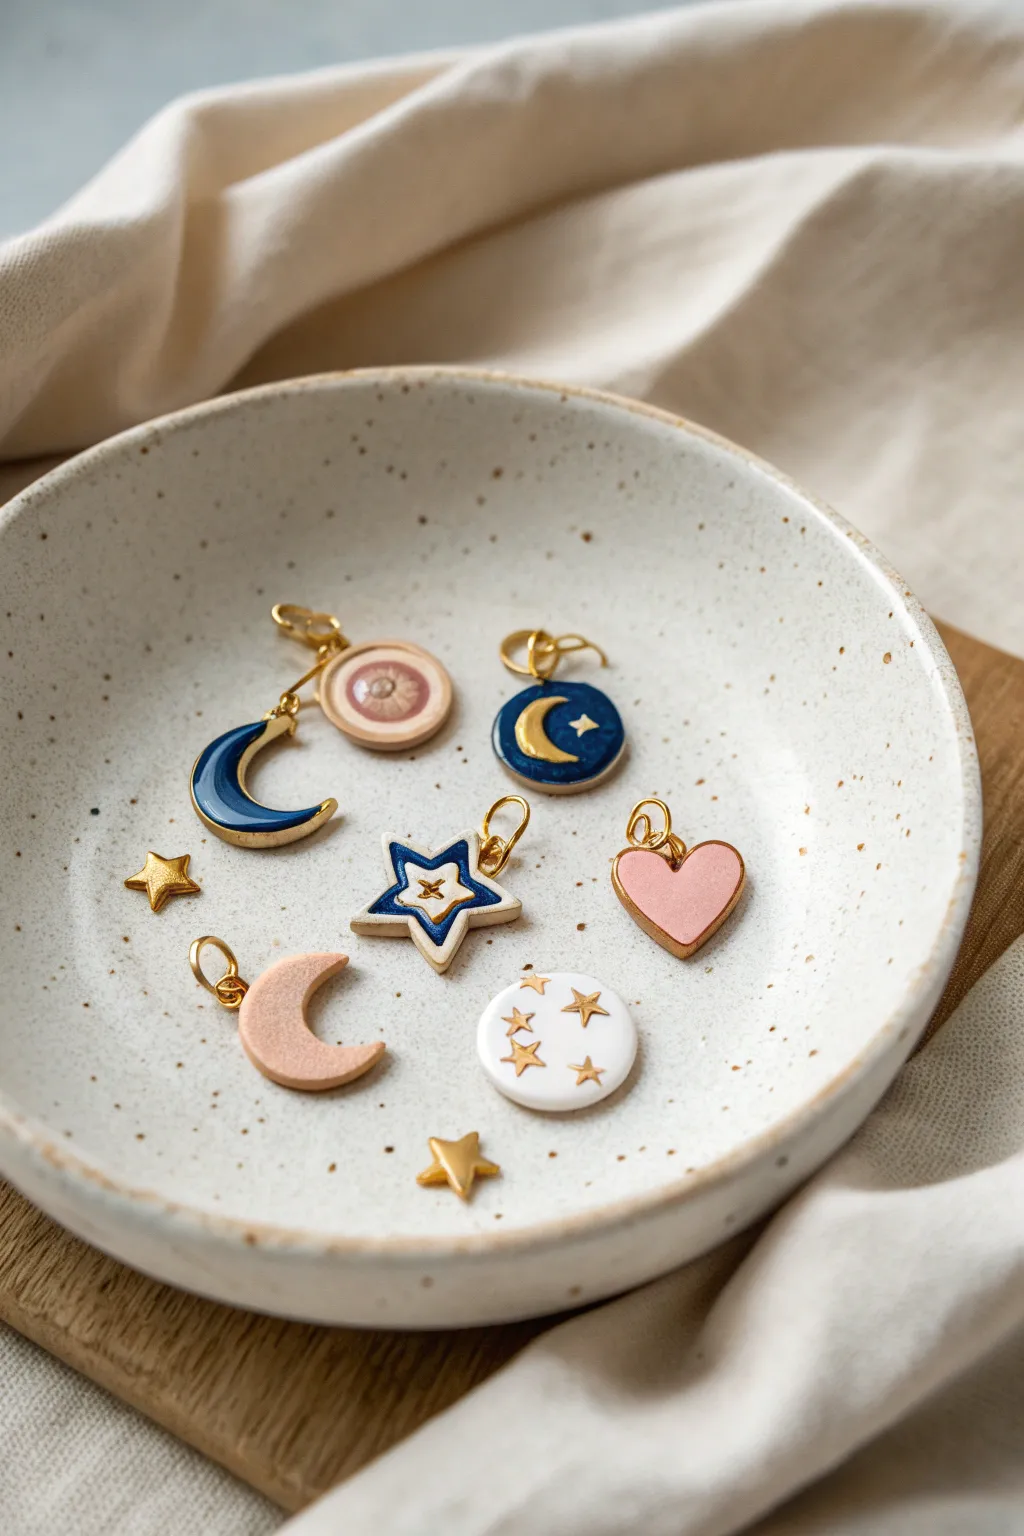
These miniature charms combine celestial motifs with soft pastels and deep blues for a dreamy, mystical aesthetic. The tiny moons, stars, and hearts gain a touch of elegance from metallic gold accents and a glossy resin finish.
Step-by-Step Tutorial
Materials
- Polymer clay (white, navy blue, dusty pink, beige)
- Small geometric clay cutters (crescent moon, star, heart, circle)
- Acrylic rolling pin and depth guides (optional)
- Small ball stylus or needle tool
- Gold liquid gilding or gold acrylic paint
- Fine-tipped paintbrush (00 or 000 size)
- UV resin or gloss glaze
- UV lamp (if using resin)
- Jump rings and eye pins (gold finish)
- Jewelry pliers
- Needle nose pliers
- Baking sheet and parchment paper
- Oven
Step 1: Shaping the Base Charms
-
Condition the Clay:
Begin by conditioning each color of polymer clay separately. Knead the navy blue, dusty pink, beige, and white clays until they are soft, pliable, and free of air bubbles or cracks. -
Roll Flat Sheets:
Roll each color out into a sheet approximately 3mm thick. Using depth guides will help ensure all your charms have a uniform thickness which looks much more professional. -
Cut the Basic Shapes:
Use your cutters to punch out the base shapes. Aim for a mix: navy blue crescent moons, pink hearts, pink crescents, and white circles. For the star, cut a larger white star shape. -
Create Layered Designs:
For the layered star charm, cut a slightly smaller star from the navy blue clay and center it on top of the white star base. Gently press them together. Do the same for the eye charm using circles of decreasing size (beige base, pink iris, small center). -
Add Attachment Points:
Carefully insert gold eye pins into the top edge of each charm. Alternatively, use a needle tool to pierce a small hole near the top edge where a jump ring can go later. Ensure the hole is large enough for your hardware. -
Bake the Pieces:
Arrange the charms on a parchment-lined baking sheet. Bake according to your polymer clay manufacturer’s instructions (usually 275°F/130°C for 15-30 minutes). Let them cool completely before handling.
Clean Edges Trick
Before baking, smooth the rough cut edges of your clay with a finger dipped in a tiny bit of baby oil or cornstarch. This removes fingerprints and cutting burrs.
Step 2: Embellishing with Gold
-
Paint the Edges:
Using a very fine brush and gold liquid gilding, carefully paint the outer edges of the moon and heart charms. This creates a framed, high-end look. -
Detail the Starry Circle:
On the plain white circle charm, hand-paint tiny five-point stars scattered across the surface. I find it easiest to paint five small dots first, then drag the paint outward to form the points. -
Add Celestial Accents:
Paint a small gold crescent moon onto the navy blue circle charm. For the layered star, paint a small gold star right in the center and line the edges of the blue layer with gold. -
Create Loose Stars:
If you have tiny leftover scraps of clay shaped like stars (or small molded ones), paint them entirely gold to act as filler charms or stud earring pieces. -
Dry the Paint:
Allow the gold paint or gilding to dry completely. Liquid gilding usually dries very fast, but acrylics may need 20 minutes.
Make it a Stitch Marker
These make perfect knitting stitch markers. Instead of regular jump rings, attach large, closed-loop rings or lobster clasps that fit over knitting needles.
Step 3: Finishing Touches
-
Apply Resin Coating:
Place the charms on a non-stick surface or silicone mat. Apply a thin, even layer of UV resin over the top surface of each charm. Use a toothpick to guide the resin to the edges without overflowing. -
Cure the Resin:
Place the resin-coated charms under a UV lamp for 2-4 minutes until the surface is rock-hard and glossy. If using a regular gloss glaze instead, apply it now and let it air dry for several hours. -
Attach Hardware:
Open your gold jump rings using two pairs of pliers (twist sideways, don’t pull apart). Thread them through the eye pins or punched holes. -
Final Assembly:
These charms are now ready to be attached to bracelet chains, necklace cords, or earring hooks. You can even link multiple charms together for a cluster effect.
Now you have a shimmering collection of lucky tokens ready to bring a bit of magic to your jewelry box
Mini Seasonal Polymer Clay Icons for Quick Swaps
These delightful mini icons—a pumpkin, a ghost, a flower, and a snowflake—allow your keychain to shift seasons instantly. Using simple shapes and clever clasp hardware, you can keep your accessories festive all year round without cluttering your pockets.
How-To Guide
Materials
- Polymer clay (Orange, White, Light Blue)
- Brass or gold-tone keychain hardware (split ring, chains, lobster clasps)
- Small brass screw eye pins
- Jump rings (brass/gold tone)
- Needle sculpting tool or toothpick
- Small dotting tool
- Black acrylic paint
- Fine detail paintbrush
- Craft knife or clay blade
- Baby wipes or cotton swabs
- Oven (for baking clay)
- Pliers (round nose and chain nose)
Step 1: Sculpting the Halloween Duo
-
Form the Pumpkin Base:
Pinch off a small ball of orange clay, about the size of a marble. Roll it until smooth, then gently press down slightly to flatten the bottom so it can sit upright. -
Add Pumpkin Ribs:
Using a needle tool or the blunt side of a craft knife, press vertical indentations around the side of the sphere to create the classic pumpkin segments. Start at the top center and curve down to the bottom. -
Create the Stem:
Take a tiny speck of brown or dark metallic clay (or paint some orange clay later) and roll a tiny tapered coil. Attach this to the center top of your pumpkin, curling the tip slightly. -
Shape the Ghost:
Roll a small ball of white clay. Pinch and pull one side to create a teardrop shape for the ghost’s head, flattening the bottom. Using your fingers, gently flare out the bottom edge to create the flowing ‘sheet’ look. -
Detail the Hem:
Use a modeling tool to indent the bottom edge of the ghost, creating wavy folds that make it look like fabric draping. -
Add Hardware:
Carefully screw a small brass eye pin into the top center of both the pumpkin and the ghost. If the clay distorts, smooth it back into shape gently with your fingertips.
Sticky Situation?
If the eye pins slip out after baking, pull them out, add a dab of superglue to the shaft, and reinsert them into the existing hole for a permanent bond.
Step 2: Creating the Winter Icons
-
Make the Snowflake:
Roll light blue clay flat to about 3mm thickness. Carefully cut out a small snowflake shape with a tiny cutter or a sharp craft knife. If cutting by hand, I find it easier to cut a star first and then cut notches. -
Refine Snowflake Edges:
Smooth any rough cut edges with your finger or a soft tool. Use a needle tool to add a small hole at the top of one spoke for the jump ring. -
Form the Flower:
Using the same light blue clay, form five or six tiny balls of equal size. Press them together in a circle to form petals, flattening them slightly. -
Detail the Petals:
Use a small dotting tool to press distinct spiral or dot patterns into each petal for texture. Poke a hole near the edge of one petal for hanging. -
Bake the Charms:
Place all four pieces on a tile or parchment-lined baking sheet. Bake according to your brand of polymer clay instructions (usually 275°F/135°C for 15-30 minutes). Let them cool completely.
Level Up
Make a charm for every month! Try a red heart for Feb, a shamrock for March, or a tiny sun for July to keep your collection growing all year.
Step 3: Painting and Assembly
-
Add Faces:
Once the pumpkin and ghost are cool, use a fine detail brush and black acrylic paint to add facial features. Two dots for eyes on the pumpkin, and three oval shapes (eyes and mouth) for the ghost. -
Set the Faces:
Allow the paint to dry fully. If you want extra durability, you can add a tiny dab of glaze over just the painted areas. -
Prepare the Keychain:
Take your main split ring and attach a short length of chain that ends in a lobster clasp. This clasp will act as your ‘quick swap’ station. -
Attach Jump Rings:
Open brass jump rings with your pliers. Thread one through the hole of the snowflake, one through the flower, and one through the eye pins of the pumpkin and ghost. -
Final Assembly:
Close the jump rings securely. Now clip your chosen seasonal charms onto the main keychain or lobster clasp.
Enjoy swapping out your tiny sculptures as the weather changes
Tiny Desk Buddy Figurines That Sit on Your Monitor Base
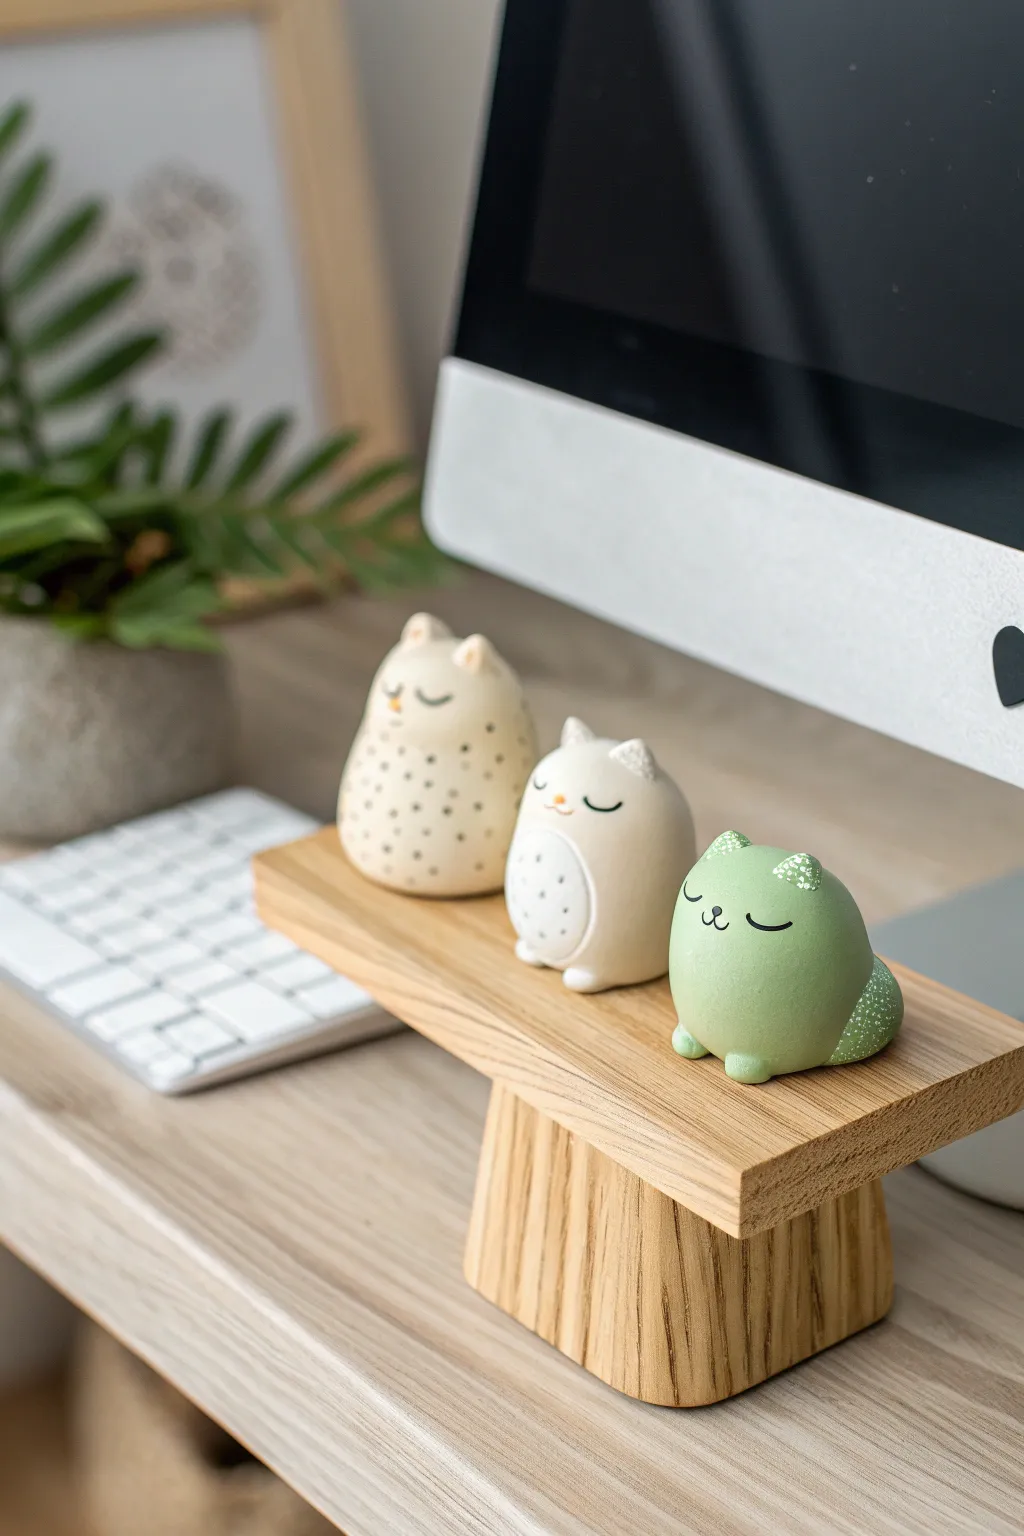
These soothing, pebble-shaped creatures are the perfect desk companions, bringing a touch of calm to your workspace with their muted tones and peaceful expressions. Their simple, rounded forms make them an excellent project for beginners looking to practice smooth shaping and delicate detailing.
Detailed Instructions
Materials
- Polymer clay (beige, white, and sage green)
- Acrylic paint (black, dark grey, burnt orange)
- Fine-grit sandpaper (400 and 800 grit)
- Small ball stylus tool
- Detail paintbrush (size 000 or 10/0)
- Clean ceramic tile or glass work surface
- Aluminum foil
- Polymer clay glaze (matte finish)
Step 1: Core Shaping
-
Prepare the base clay:
Begin by conditioning your beige, white, and green clay separately until each is soft and pliable. For the speckled beige cat, mix in a tiny amount of ground black pepper or dried coffee grounds into the clay before shaping for a natural, stone-like texture. -
Form the foil cores:
To save clay and reduce baking time, tightly scrunch aluminum foil into three egg-shaped balls, each about the size of a walnut. Compress them firmly so they are dense. -
Wrap the cores:
Flatten a sheet of conditioned clay and wrap it fully around a foil core. Roll the form between your palms repeatedly to smooth out any seams and create a perfect, organic egg shape. Repeat for all three colors. -
Refine the posture:
Gently tap the bottom of each egg shape against your work surface. This creates a flat base so your figurines will sit stable on your monitor stand without rolling away. -
Add the ears:
Pinch off two very small triangles of matching clay for each figurine. Attach these to the top of the head, blending the seams downward with a silicone tool or your finger so they look integrated rather than just stuck on. -
Create the tail details:
For the green cat, roll a small teardrop shape and attach it to the lower back side, curling it slightly around the body. For the sitting posture, you can add tiny balls of clay at the front base to represent paws. -
Texture the accents:
Using a needle tool or an old toothbrush, gently stipple the surface of the green cat’s tail and ear tips to create a contrasting mossy texture.
Step 2: Refining and Baking
-
Smoothing the surface:
Before baking, dip your finger in a little rubbing alcohol or baby oil and gently glide it over the clay. This removes fingerprints and creates a professional, smooth finish. -
First bake:
Bake your pieces according to the clay manufacturer’s instructions (usually 275°F/135°C for 15-30 minutes). Let them cool completely inside the oven to prevent cracking. -
Sanding:
Once cool, use wet sandpaper to buff away any remaining lint or bumps. Start with 400 grit and finish with 800 grit for a silky touch. I prefer to do this under running water to keep dust down.
Paint Blob Rescue
Mess up the painted face? Don’t panic! Since the clay is baked, you can carefully scratch off the dry acrylic paint with a toothpick or wipe it away with a Q-tip dipped in rubbing alcohol.
Step 3: Painting and Finishing
-
Pencil sketch:
Lightly sketch the facial features with a mechanical pencil. Keep the eyes wide-set and low on the face for that cute ‘kawaii’ aesthetic. -
Paint the eyes:
Using your finest brush and black paint, carefully trace the sleeping eye curves. A steady hand is key here—try resting your pinky on the table for stability. -
Add noses and mouths:
Paint a tiny ‘x’ or inverted ‘v’ for the mouth. For the noses, use a toothpick dipped in orange paint to place a microscopic dot. -
Add speckling:
Dilute some dark grey paint with water. Dip a stiff brush (like a toothbrush) into it and run your thumb across the bristles to flick tiny speckles onto the beige figurine’s belly area. -
White belly details:
For the middle white figurine, paint small grey dots in a circular pattern on its tummy to mimic soft fur or a patterned sweater. -
Seal the work:
Finish by applying two thin coats of matte varnish to protect the paint without making the figurines look plastic or shiny.
Make Them Functional
Embed a strong neodymium magnet into the bottom of the clay before baking. Now they won’t just sit there—they can hold paperclips or stick securely to a metal monitor stand!
Set your trio on your desk and enjoy the serene vibe they bring to your workday
Mini “Tiny World” Shadowbox With Small Polymer Clay Minis
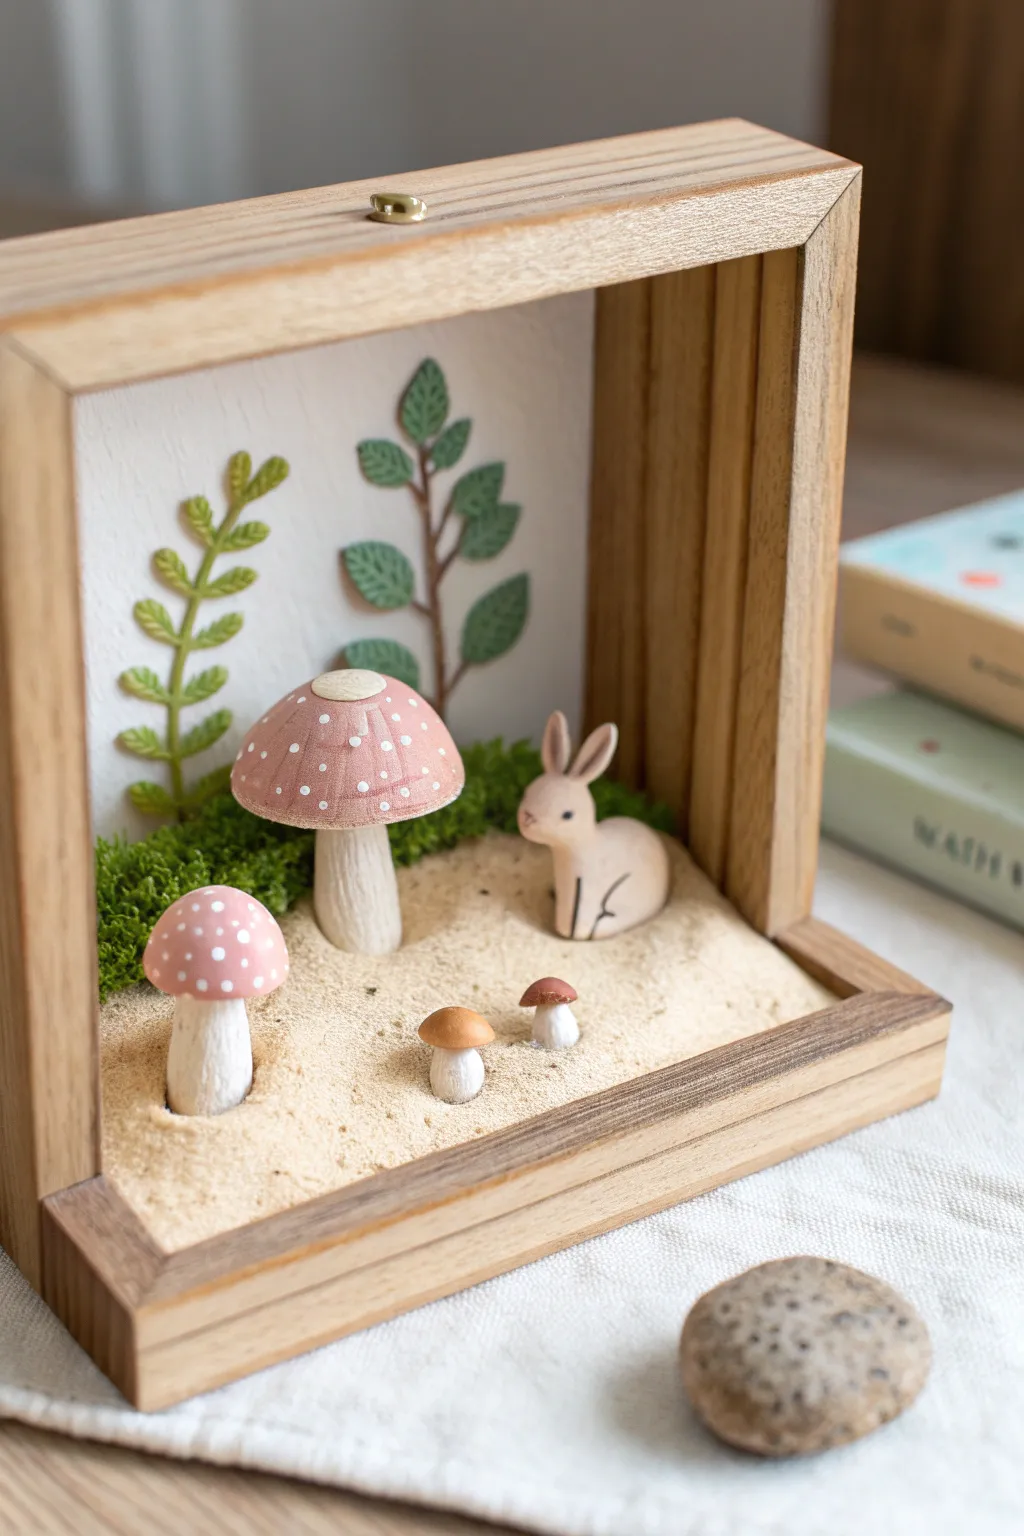
This charming diorama captures a quiet moment in a miniature forest, featuring a sweet bunny and spotted toadstools nestled in a sandy clearing. The clean wooden frame and delicate details creating a peaceful, tiny world perfect for displaying on a bookshelf or desk.
Step-by-Step Guide
Materials
- Small wooden shadowbox frame (deep set)
- Polymer clay (white, beige, pink, brown)
- Fine craft sand
- Dried moss
- Patterned cardstock in green
- Acrylic paint (black, white)
- Fine detail paintbrush
- Sculpting tools
- Strong craft glue or hot glue
- Liquid clay or Bake & Bond
Step 1: Sculpting the Mushrooms
-
Form the large stems:
Start by conditioning white polymer clay and rolling two thick cylinders for the large mushroom stems. Taper them slightly at the top and texture the sides vertically with a needle tool to mimic fibrous stalks. -
Create the caps:
Roll balls of pink clay and flatten them into domes for the caps. Attach these to the stems using a drop of liquid clay to ensure a strong bond before baking. -
Add the spots:
Take tiny pinches of white clay, roll them into diverse sizes, and press them gently onto the pink caps. Flatten them until they are flush with the surface for a smooth finish. -
Sculpt the tiny mushrooms:
Create two very small stems from white clay and top them with tiny brown clay domes. These should be significantly smaller than the main toadstools to add scale variation.
Step 2: Crafting the Bunny
-
Shape the body:
Using beige clay, form a smooth, rounded teardrop shape for the rabbit’s body, ensuring the base is flat so it sits stable. -
Form the head:
Roll a smaller sphere for the head and attach it to the narrower top of the body. Smooth the seam gently with a sculpting tool or your finger. -
Attach ears:
Shape two long, thin tear-drops for ears. Press an indentation into the center of each, then attach them to the top of the head. -
Bake everything:
Arrangement your clay pieces on a baking tile or parchment paper. Bake according to your brand’s specific temperature and time instructions, then let cool completely. -
Paint details:
Once cool, use a very fine brush to paint a simple black eye, nose, and leg definition lines on the bunny.
Texturing Tip
Before baking the bunny, I like to gently brush the clay with a soft toothbrush. This removes fingerprints and adds a subtle matte texture.
Step 3: Preparing the Backdrop
-
Cut the foliage:
Sketch simple fern and leafy branch shapes onto green patterned cardstock or stiff paper. If you prefer texture, you can use thin sheets of green clay instead. -
Secure the background:
Apply glue to the back of your paper leaves and adhere them to the inside back panel of the wooden shadowbox. Arrange them so they will peek out from behind the mushrooms.
Glue Not Holding?
If the minis won’t stick to the sand, clear a tiny spot of sand away to glue the clay directly to the wood, then sprinkle sand over the glue seam.
Step 4: Assembling the Scene
-
Create the ground layer:
Brush a generous layer of craft glue across the entire bottom floor of the shadowbox. -
Add the sand:
Pour fine craft sand over the wet glue, pressing it down lightly to ensure coverage. Shake out any excess sand once the glue begins to tack. -
Position the moss:
Glue clumps of dried green moss along the back edge of the sand, partially covering the base of your paper leaves to create depth. -
Plant the mushrooms:
Using a dab of strong glue on the base of each stem, nestle the large pink mushrooms into the sand on the left side, burying the base slightly for realism. -
Place the bunny:
Glue the bunny onto the sand on the right side of the box, positioning it so it looks toward the mushrooms. -
Add final details:
Glue the two tiny brown mushrooms into the foreground sand to complete the triangular composition.
Set your finished shadowbox on a shelf where it can catch the light and spark a little joy