I’m obsessed with small pottery projects because you can finish something cute in a short session and still get that “real ceramics” satisfaction. If you’ve got leftover clay calling your name, these small pottery ideas turn little scraps into pieces you’ll actually use and show off.
Pinch Pot Condiment Dishes
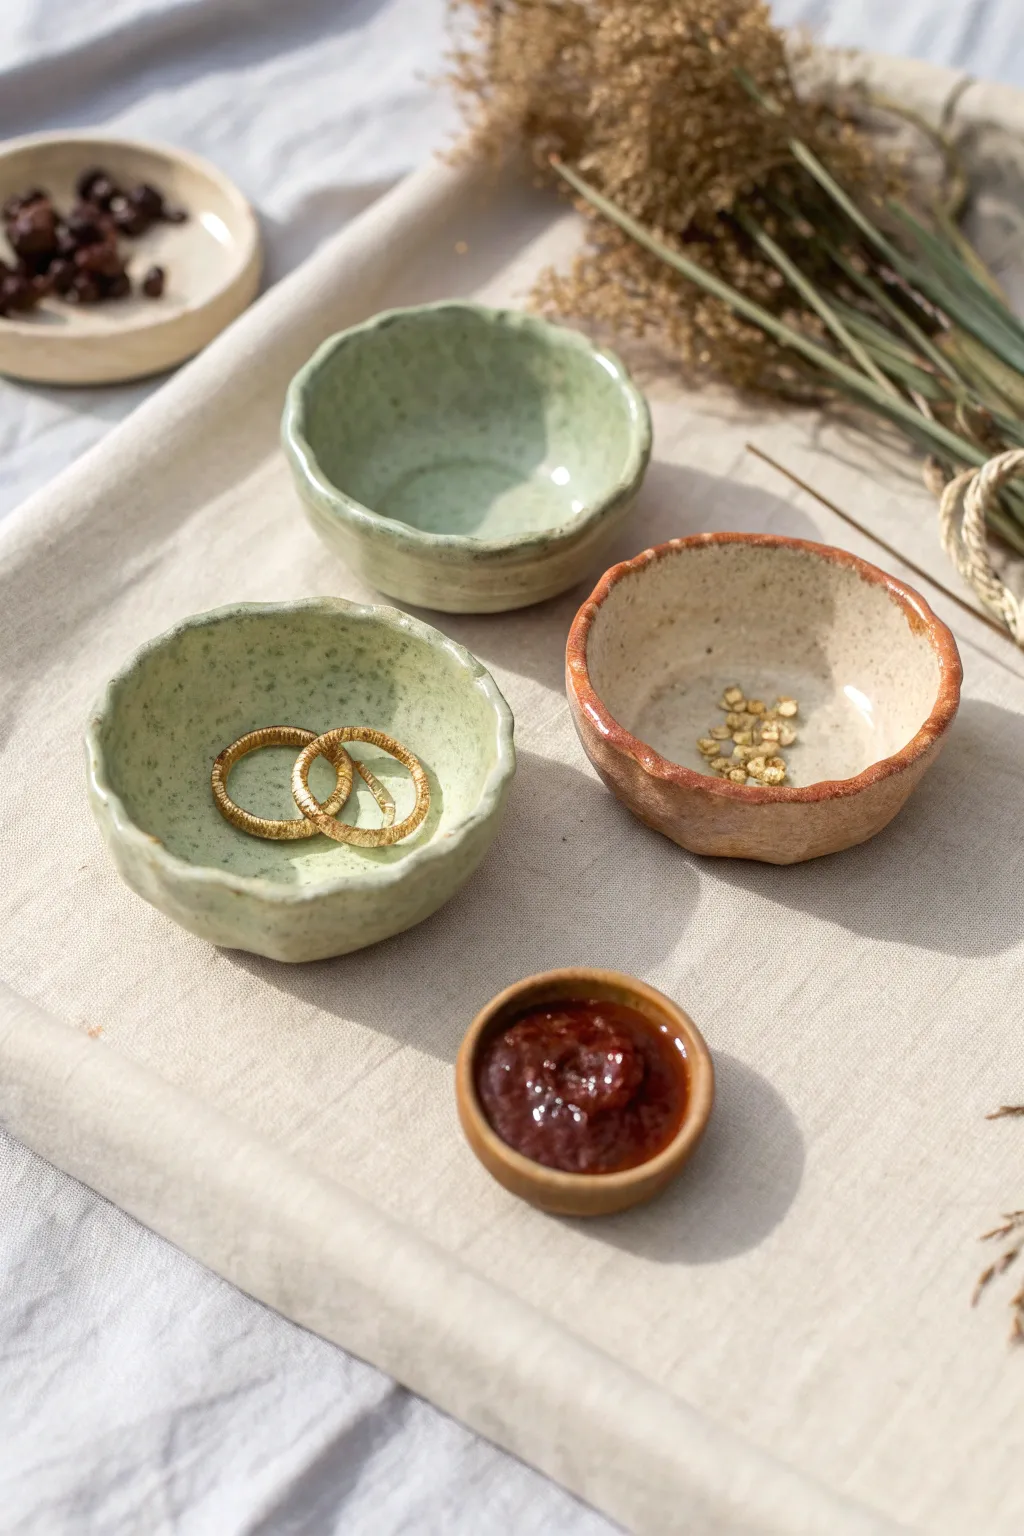
These charming, organic condiment dishes showcase the beauty of handmade ceramics with their gently undulating rims and speckled glazes. Perfect for holding jewelry, spices, or sauces, this project teaches you to embrace imperfection for a beautifully rustic finish.
Step-by-Step Guide
Materials
- White stoneware clay (speckled clay body recommended)
- Pottery sponge
- Pin tool or needle tool
- Rib tool (flexible metal or rubber)
- Loop tool (optional for trimming)
- Celadon glaze (Soft Sage or similar)
- Cream or oatmeal glaze
- Iron oxide wash or rust-colored underglaze
- Small kiln (or access to a firing service)
- Small paintbrush
Step 1: Forming the Basic Shape
-
Prepare clay balls:
Start by wedging your clay to remove air bubbles, then divide it into small lumps. Roll these into smooth balls roughly the size of a golf ball or slightly larger, depending on your desired final size. -
Open the pot:
Hold a clay ball in your non-dominant palm. Press your thumb into the center, pushing down until you are about a quarter-inch from the bottom. Be careful not to push all the way through. -
Pinch the walls:
Using your thumb on the inside and fingers on the outside, gently pinch and rotate the clay. Work your way from the bottom curve up to the rim in a spiral motion. -
Even out thickness:
Continue pinching until the walls have a consistent thickness of about 1/4 inch. I find it helpful to close my eyes for a moment to feel thick spots rather than just looking for them. -
Shape the bottom:
Gently tap the pot’s base against your table to flatten it slightly so it sits stable. If you want a more rounded bottom, you’ll need to add a small coil foot later, but a flat bottom works best for these simple condiment dishes.
Rim Cracks?
Small cracks often appear on the rim while pinching. Compress the rim immediately by running a damp finger or piece of chamois leather over it to heal fractures before drying.
Step 2: Refining and Rim Work
-
Create the organic rim:
Instead of smoothing the rim perfectly flat, gently press down on the rim at random intervals with your thumb to create a soft, wavy ‘flower petal’ effect. -
Smooth the surfaces:
Use a slightly damp sponge to wipe away any sharp fingerprints or cracking on the rim. Don’t use too much water, as this exposes the grog (rough particles) in the clay. -
Dry to leather hard:
Set your pots aside loosely covered with plastic for a day until they reach the leather-hard stage. They should be firm enough to handle without warping but still cool to the touch. -
Refine the shape:
Once leather hard, use a flexible rib tool to scrape away any unwanted surface texture on the outside, or keep the finger marks for a more primitive look.
Level Up: Texture
Before the clay dries, gently press a piece of coarse linen or burlap into the exterior. The glaze will break over the fabric texture, adding amazing visual depth.
Step 3: Firing and Glazing
-
Bisque fire:
Load your bone-dry pots into the kiln and fire to Cone 04 (or your clay’s specific bisque temperature). This hardens the clay and prepares it for glazing. -
Wax the bottom:
Apply wax resist to the bottom of each pot and about 1/8 inch up the side to prevent glaze from running onto your kiln shelf. -
Apply base glaze:
Dip two of your pots into a semi-translucent sage green celadon glaze. For the third pot, use a cream or oatmeal glaze that allows clay specks to show through. -
Detail the rim:
For the cream-colored pot, dip a small brush into iron oxide wash or a rust-colored underglaze. Gently run the bristles along the very edge of the uneven rim to highlight the shape. -
Clean up:
Wipe away any glaze droplets from the waxed bottom with a clean sponge. -
Glaze fire:
Fire the pots again to the maturity temperature of your clay and glaze combination (typically Cone 5 or 6 for stoneware).
Once cooled, your trio of bowls is ready to serve sauces or display your favorite rings


Mini Ring Dishes With Patterned Centers
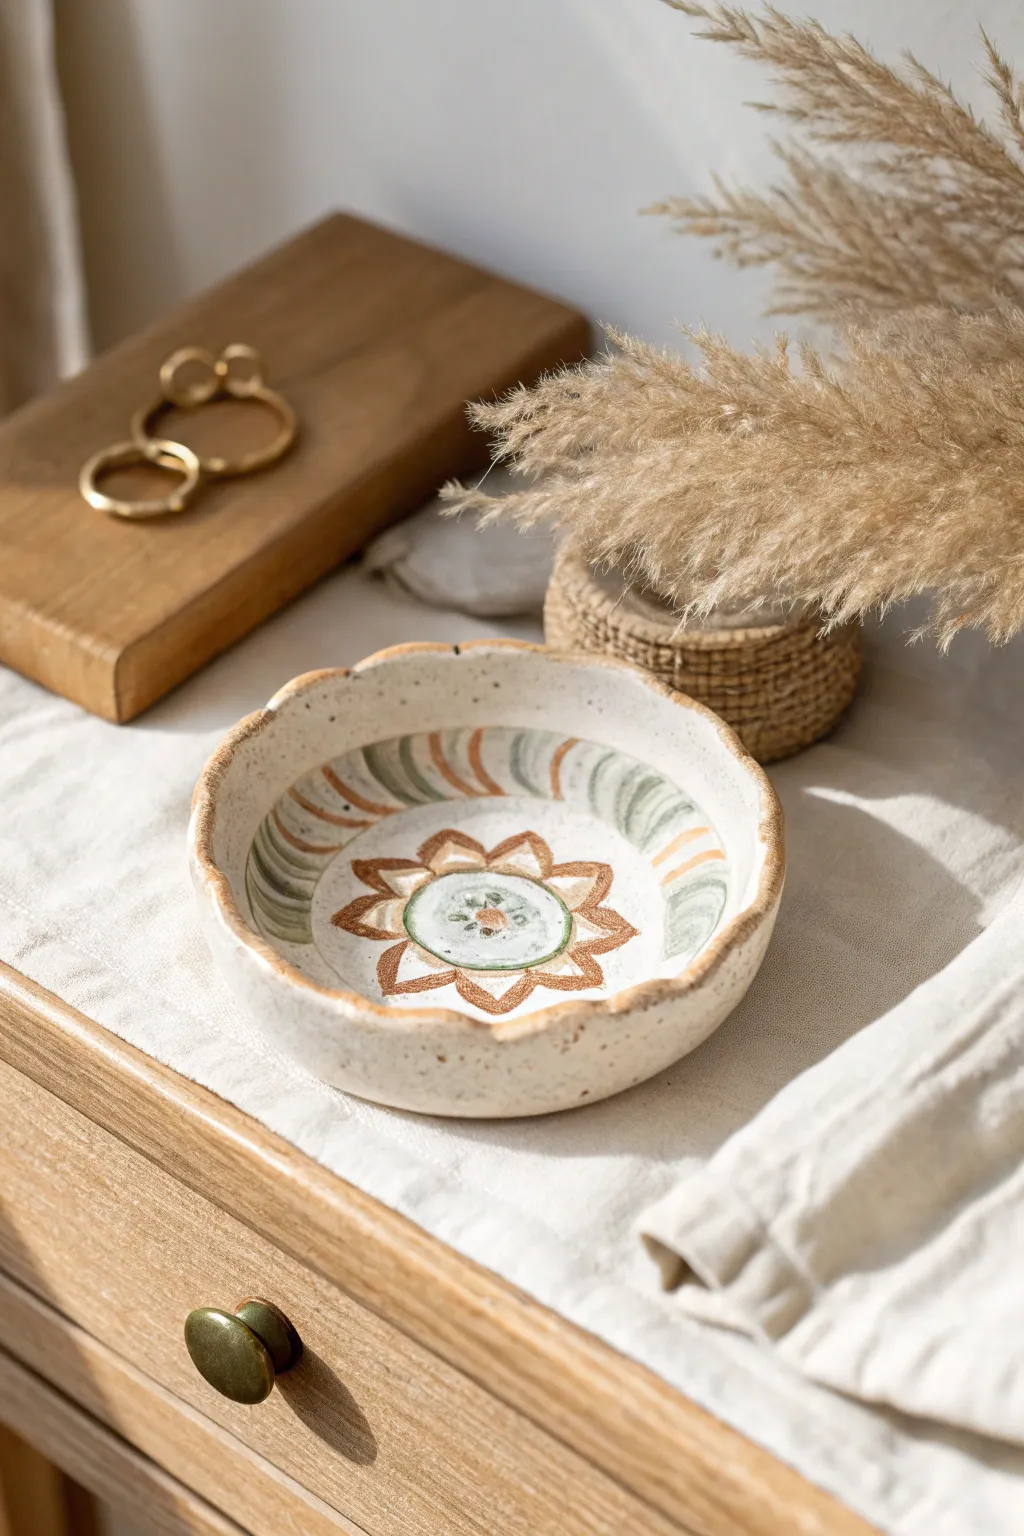
This charming little catch-all combines the rustic warmth of speckled clay with a hand-painted sunburst motif in earthy tones. Its gentle scalloped edges and matte finish make it the perfect cozy home for your favorite everyday jewelry.
Step-by-Step Tutorial
Materials
- Speckled stoneware clay (mid-fire)
- Pottery wheel or slab roller (or rolling pin with guide sticks)
- circular template or cookie cutter (approx. 4-5 inches)
- Sponge
- Loop trimming tool
- Needle tool
- Underglazes (terracotta/rust orange, sage green, and white for mixing)
- Fine detail brushes (sizes 0 and 2)
- Clear matte or satin glaze
- Rib tool (wood or rubber)
Step 1: Forming the Dish
-
Prepare the slab:
Begin by rolling out a slab of speckled stoneware clay to a uniform thickness of about 1/4 inch. If you want a more organic feel, you can pound it out by hand, but rolling ensures evenness. -
Cut the circle:
Use your needle tool and a circular template or cookie cutter to cut a perfect circle from the slab. A 4 to 5-inch diameter works well for a ring dish. -
Shape the curvature:
Gently lift the clay circle and place it onto a foam mold or inside a shallow bowl lined with plastic wrap. Press gently from the center outwards to establish a shallow curve. -
Create the scalloped rim:
With the dish still supported by the mold, use your thumb and forefinger to gently pinch the rim at regular intervals. Create a soft, wavy pattern rather than sharp points for that relaxed, wavy look. -
Smooth the edges:
Take a slightly damp sponge and run it along the rim to soften any sharp edges created during cutting or pinching. This compression also helps prevent future cracks. -
Dry to leather hard:
Allow the dish to dry slowly until it reaches a leather-hard state. It should be firm enough to handle without warping but still cool to the touch.
Sponge Savvy
For the softest rim, use a cosmetic sponge wedge instead of a regular pottery sponge. The tighter pores create a smoother finish on the delicate scalloped edges.
Step 2: Decorating the Center
-
Sketch the design:
Lightly trace your design directly onto the clay using a pencil. Sketch a central flower/star shape and a border area. Don’t worry about the graphite; it will burn off in the kiln. -
Paint the central motif:
Using a size 0 brush and rust-colored underglaze, outline the central eight-pointed star shape. Fill in the petal outlines carefully. I like to keep the lines slightly imperfect to match the rustic clay. -
Add the center detail:
Mix a tiny bit of sage green with white underglaze for a softer tone. Paint a small circle in the very center of your star, then add a tiny rust dot and radiating lines inside it once the green is dry to the touch. -
Create the striped border:
Moving to the curved sides of the bowl, paint alternating curved dashes. Use your rust color for thin strokes and the sage green for slightly wider, leaf-like strokes that follow the curve of the bowl. -
Refine the pattern:
Go back in with your finest brush to sharpen any edges or add tiny dots between pattern elements if the design feels too sparse. -
Bisque fire:
Once the underglaze is fully dry, fire the piece to cone 04 (or your clay body’s bisque temperature). This sets the shape and makes the underglaze permanent.
Make it a Set
Create different sizes of dishes using this same technique—a tiny one for stud earrings and a larger, flatter one for necklaces—to make a nesting vanity set.
Step 3: Glazing and Finishing
-
Prepare for glazing:
Wipe the bisque-fired dish with a damp sponge to remove any dust. This ensures the clear glaze will adhere properly without crawling. -
Apply clear glaze:
Dip the entire dish into a clear matte or satin glaze. A glossy glaze can work, but a matte finish emphasizes the earthy texture of the speckled clay better. -
Clean the foot:
Thoroughly wipe away any glaze from the bottom of the dish (the foot ring or base) so it doesn’t fuse to your kiln shelf. -
Glaze fire:
Fire the piece again to the maturity temperature of your clay and glaze, typically cone 5 or 6 for stoneware. -
Sand the bottom:
After the kiln has cooled and you’ve removed your piece, use wet sandpaper or a grinding stone to smooth the unglazed bottom surface to protect your furniture.
Place your finished dish on a nightstand or dresser to add a touch of handmade warmth to your daily routine


Tiny Bud Vases for One or Two Stems
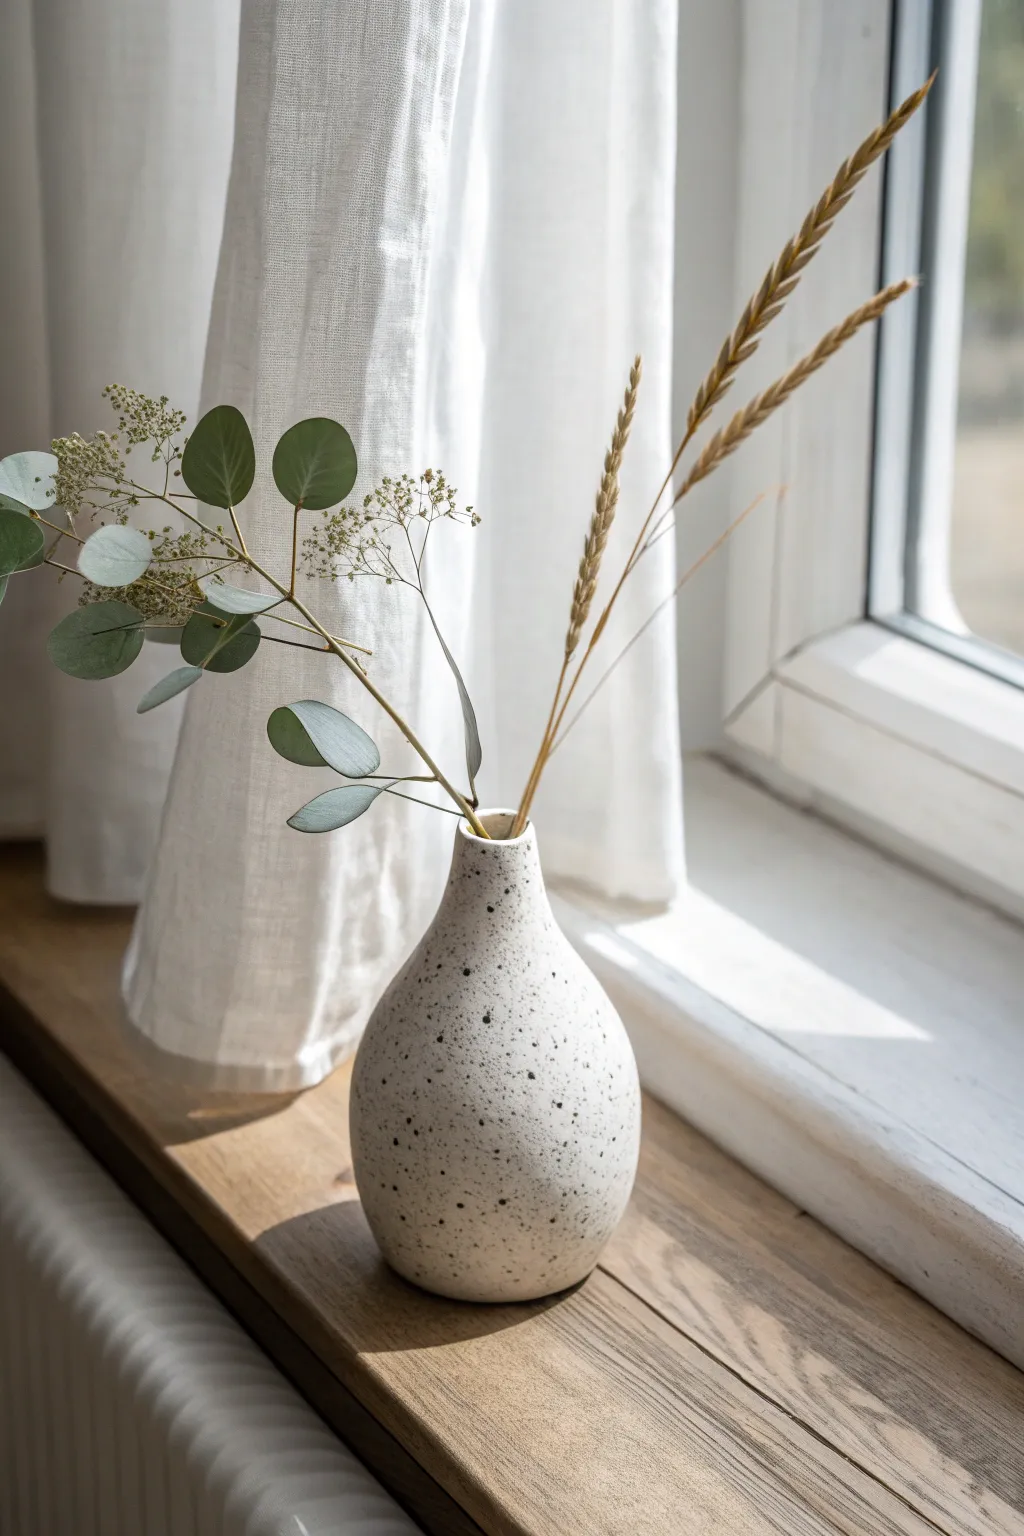
This minimalist bud vase features a graceful, organic shape with a narrow neck perfect for holding just a few dried stems. Its matte white glaze, accented by subtle black speckling, creates a modern rustic look that sits beautifully on any windowsill.
Detailed Instructions
Materials
- White stoneware clay (cone 6)
- Pottery wheel
- Throwing sponge
- Needle tool
- Wire cutter
- Rib tool (wooden or metal)
- Trimming tools
- Matte white glaze
- Black underglaze or oxide powder
- Stiff bristle brush (e.g., toothbrush)
- Kiln
Step 1: Throwing the Form
-
Prepare the clay:
Start by wedging about 1 to 1.5 pounds of white stoneware clay. It’s crucial to remove all air bubbles to ensure the narrow neck doesn’t warp later. Form it into a tight, smooth ball. -
Center specifically for height:
Slam the ball onto the wheel head and center it. For a bottle shape like this, you want a slightly taller, narrower mound than you would use for a bowl. -
Open the clay:
Open the hole, leaving about a quarter-inch of thickness for the floor. Compress the bottom well to prevent S-cracks during the firing process. -
Pull the cylinder:
Begin pulling the walls upward. Focus on maintaining an even thickness. Since we are making a bulbous bottom, keep the lower third slightly thicker to support the curve, then pull the rest straight up into a tall, narrow cylinder. -
Belly it out:
Use a sponge or a curved rib inside the pot to gently push the bottom half of the cylinder outward. Support the outside with your other hand to create a smooth, rounded teardrop shape at the base. -
Collar the neck:
Now for the tricky part. Using both hands, gently encircle the upper half of the cylinder and apply inward pressure while the wheel spins slowly. This is called ‘collaring.’ Do this in small increments. -
Refine the neck shape:
After each collaring pass, run your finger or a throwing stick up the inside of the neck to smooth out ripples. Continue collaring until the opening is roughly the size of a quarter. -
Finish the lip:
Use a chamois or a damp sponge to compress and round off the rim. A smooth, well-defined lip gives the piece a professional finish. -
Cut underneath:
Use a wooden knife tool to trim away excess clay at the very base of the pot, creating a slight undercut. Then, run your wire tool underneath to separate it from the wheel head.
Collaring Woes
If the clay ripples or twists while narrowing the neck, the wheel is likely spinning too fast or the clay is too dry. Slow the wheel down and lubricate slightly with slip.
Step 2: Trimming and Glazing
-
Dry to leather hard:
Let the vase dry slowly until it is leather hard. Because the neck handles differently than the body, ensure the whole piece is evenly firm before trimming. -
Trim the foot:
Invert the vase on the wheel (you may need a chuck or a tall jar to support the neck). Trim the base to refine the curve and create a defined foot ring. -
Bisque fire:
Once fully bone dry, load the vase into the kiln for a bisque firing (typically Cone 04). This prepares the clay to accept glaze. -
Apply base glaze:
Dip the bud vase into a bucket of matte white glaze. Hold it upside down for a few seconds to let excess glaze drip off, ensuring an even coating without runs. -
Prepare the speckles:
Mix a small amount of black underglaze with water, or use an oxide wash. I find that a slightly watery consistency works best for splattering. -
Splatter technique:
Dip a stiff bristle brush or an old toothbrush into the black mixture. Hold the brush near the vase and flick the bristles with your thumb to spray fine droplets onto the wet white glaze. -
Clean the foot:
Use a damp sponge to wipe any glaze off the bottom of the foot ring. This prevents the vase from fusing to the kiln shelf. -
Glaze fire:
Fire the piece again to the maturation temperature of your clay and glaze (likely Cone 6). The heat will fuse the speckles into the white glaze permanently.
Speckle Control
Test your splatter technique on a piece of paper first. Flicking closer to the pot creates dense clusters; flicking from further away creates a uniform, airy mist.
Once cooled, fill your new vase with dried botanicals for an instant touch of serenity


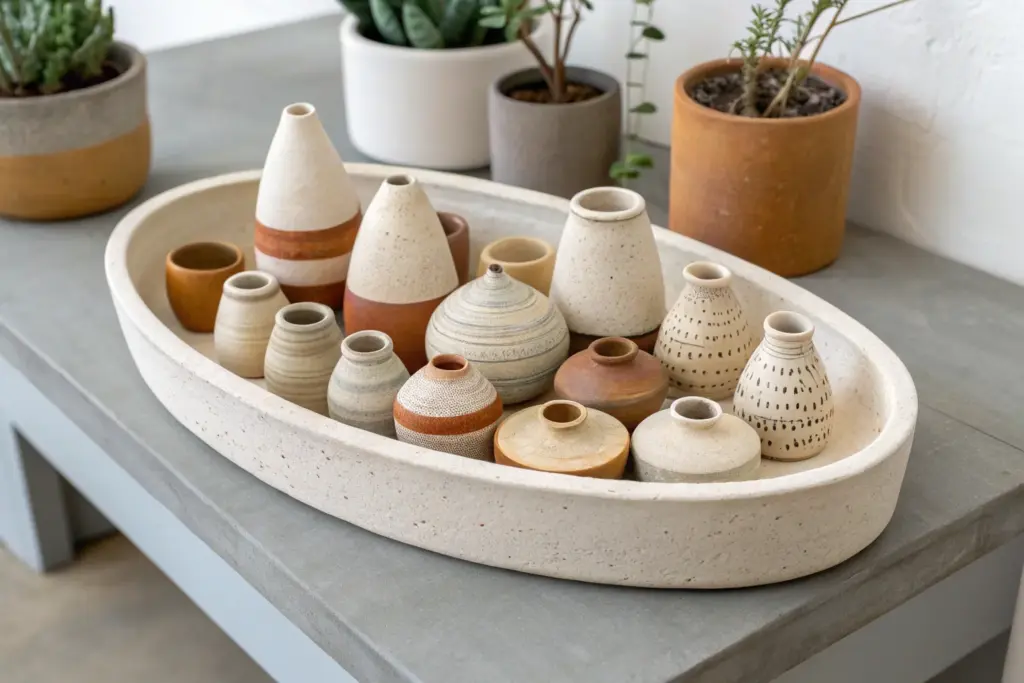
Small Succulent Planters With Simple Texture
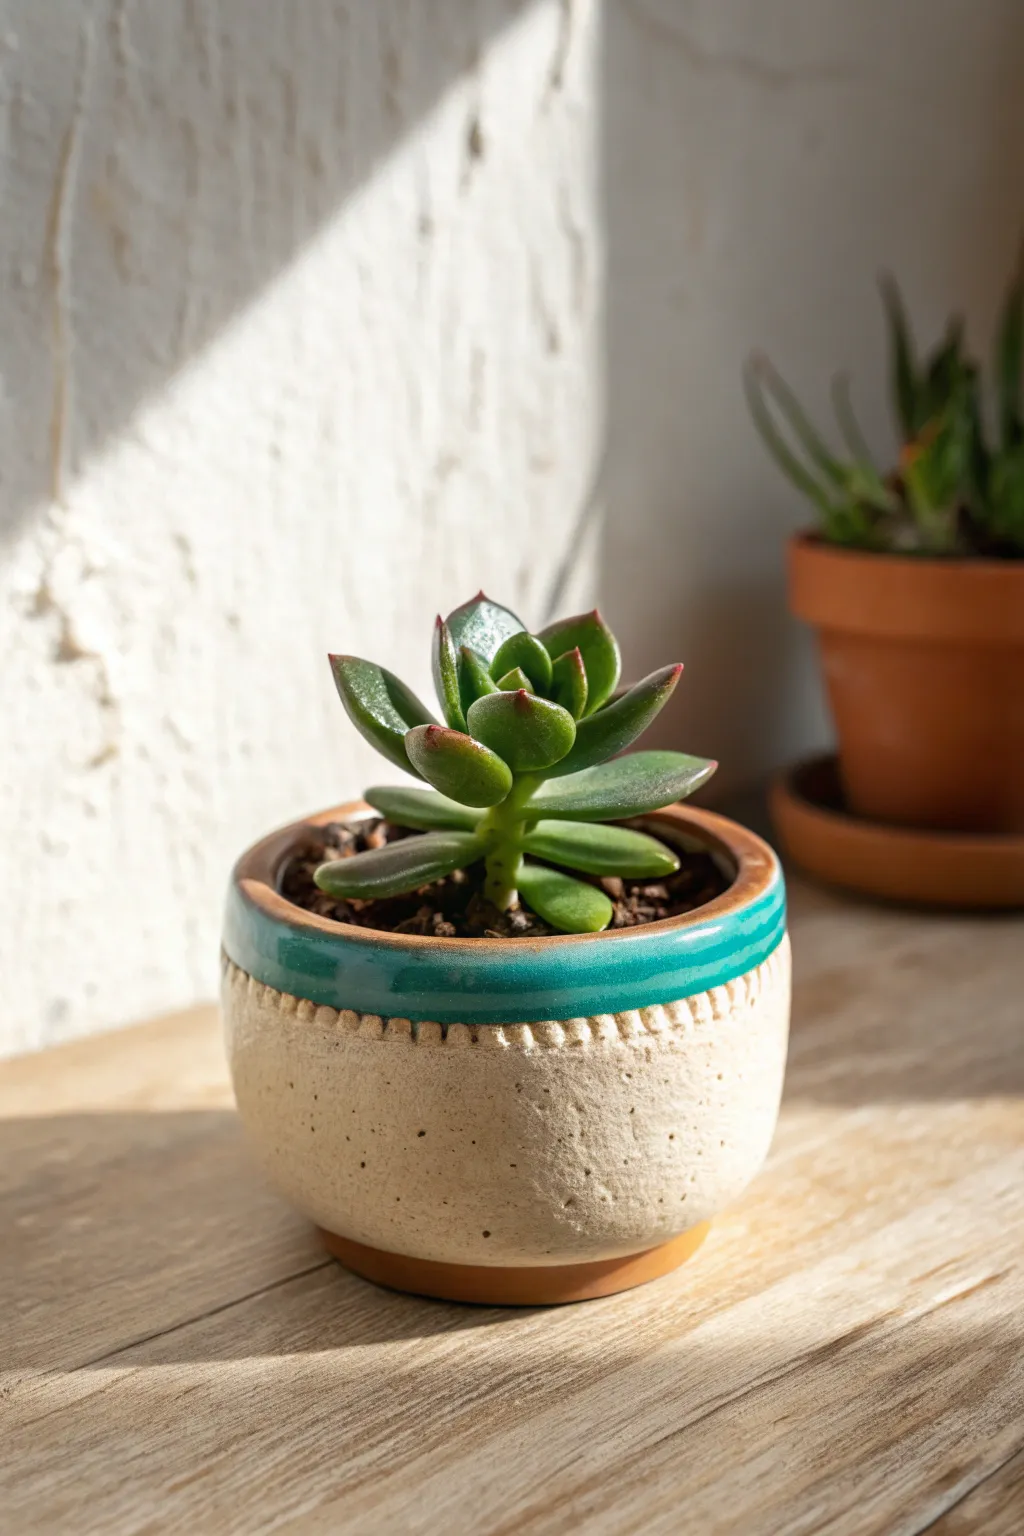
These charming little pots combine a rustic, textured body with a striking band of glossy colour to create the perfect home for your succulents. The simple notched rim detail adds character without requiring complex tools, making it an ideal weekend project for beginners.
Step-by-Step Guide
Materials
- Speckled buff stoneware clay (or white clay with speckles added)
- Potter’s wheel (or hand-building tools if pinching)
- Wooden modeling tool or popsicle stick
- Pin tool
- Sponge
- Wire cutter
- Turquoise glossy glaze
- Clear matte glaze (optional, for the body)
- Wax resist
- Small paintbrush
Step 1: Forming the Pot
-
Prepare the Clay:
Start with a ball of speckled clay about the size of a tennis ball. Wedge it thoroughly to remove air pockets and ensure an even consistency. -
Center and Open:
Throw the clay onto your wheel head and center it. Open the clay up, leaving a floor thickness of about 1/4 inch. -
Pull the Walls:
Gently pull the clay upwards to form a small cylinder. Aim for a slightly rounded, bowl-like shape rather than perfectly straight walls. The height should be around 2.5 to 3 inches. -
Define the Rim:
Compress the rim with your sponge or chamois to smooth it. Create a slight inward curve at the very top to give it a finished look. -
Shape the Belly:
Use a rib tool or your fingers to gently push the belly of the pot out from the inside, giving it that soft, rounded curve seen in the photo. -
Trim the Base:
Use a wooden tool to undercut the base slightly while it’s still on the wheel to define where the foot will be. Wire the pot off the wheel and set it aside to stiffen to leather-hard.
Step 2: Adding Texture and Detail
-
Trim the Foot:
Once leather-hard, center the pot upside down on the wheel. Trim a clean foot ring. This lifts the pot and gives it a professional shadow line. -
Mark the Texture Band:
Flip the pot right side up. Use a pin tool to lightly score a horizontal line about 1/2 inch below the rim. This marks the area for your texture. -
Create Vertical Notches:
Using a small wooden modeling tool or the edge of a credit card, press vertical indentations into the clay between the rim and your scored line. Space them evenly around the circumference. -
Smooth the Transitions:
Lightly run a damp finger over the notched area to soften any sharp burrs created during the pressing process. You want the texture to feel organic, not jagged. -
Bisque Fire:
Allow the pot to dry completely (bone dry). Fire it in the kiln to bisque temperature (usually Cone 04 or 06, depending on your clay).
Stamp Master
Instead of a wooden tool, use the threading of a screw or bolt to press into the rim area. It creates perfect, repeating industrial ridges instantly.
Step 3: Glazing and Finishing
-
Clean the Surface:
Wipe the bisque-fired pot with a damp sponge to remove any kiln dust. This ensures the glaze adheres properly. -
Wax the Bottom:
Apply wax resist to the foot ring and the bottom of the pot to prevent glaze from sticking to the kiln shelf. -
Wax the Body:
I find it easiest to also apply wax resist to the main body of the pot, right up to the bottom of the textured band. This preserves the raw, speckled clay look. -
Glaze the Band:
Carefully dip just the rim section into your turquoise glaze, or paint it on by hand. The glaze should cover the notched texture and slightly overlap the rim. -
Clean Drips:
If any glaze dripped onto the waxed body, wipe it away cleanly with a sponge. The wax helps, but a quick wipe ensures crisp lines. -
Glaze Fire:
Fire the pot again to the maturity temperature of your clay and glaze (likely Cone 5 or 6 for stoneware). Let the kiln cool completely before unloading.
Uneven Glaze Line?
If your hand is shaky while waxing, use painter’s tape to mask off the body before glazing. Peel it off immediately after applying glaze for a sharp edge.
Pop in your favorite succulent and enjoy the beautiful contrast between raw clay and glossy color

The Complete Guide to Pottery Troubleshooting
Uncover the most common ceramic mistakes—from cracking clay to failed glazes—and learn how to fix them fast.
Mini Soap Dishes With Drainage Ridges
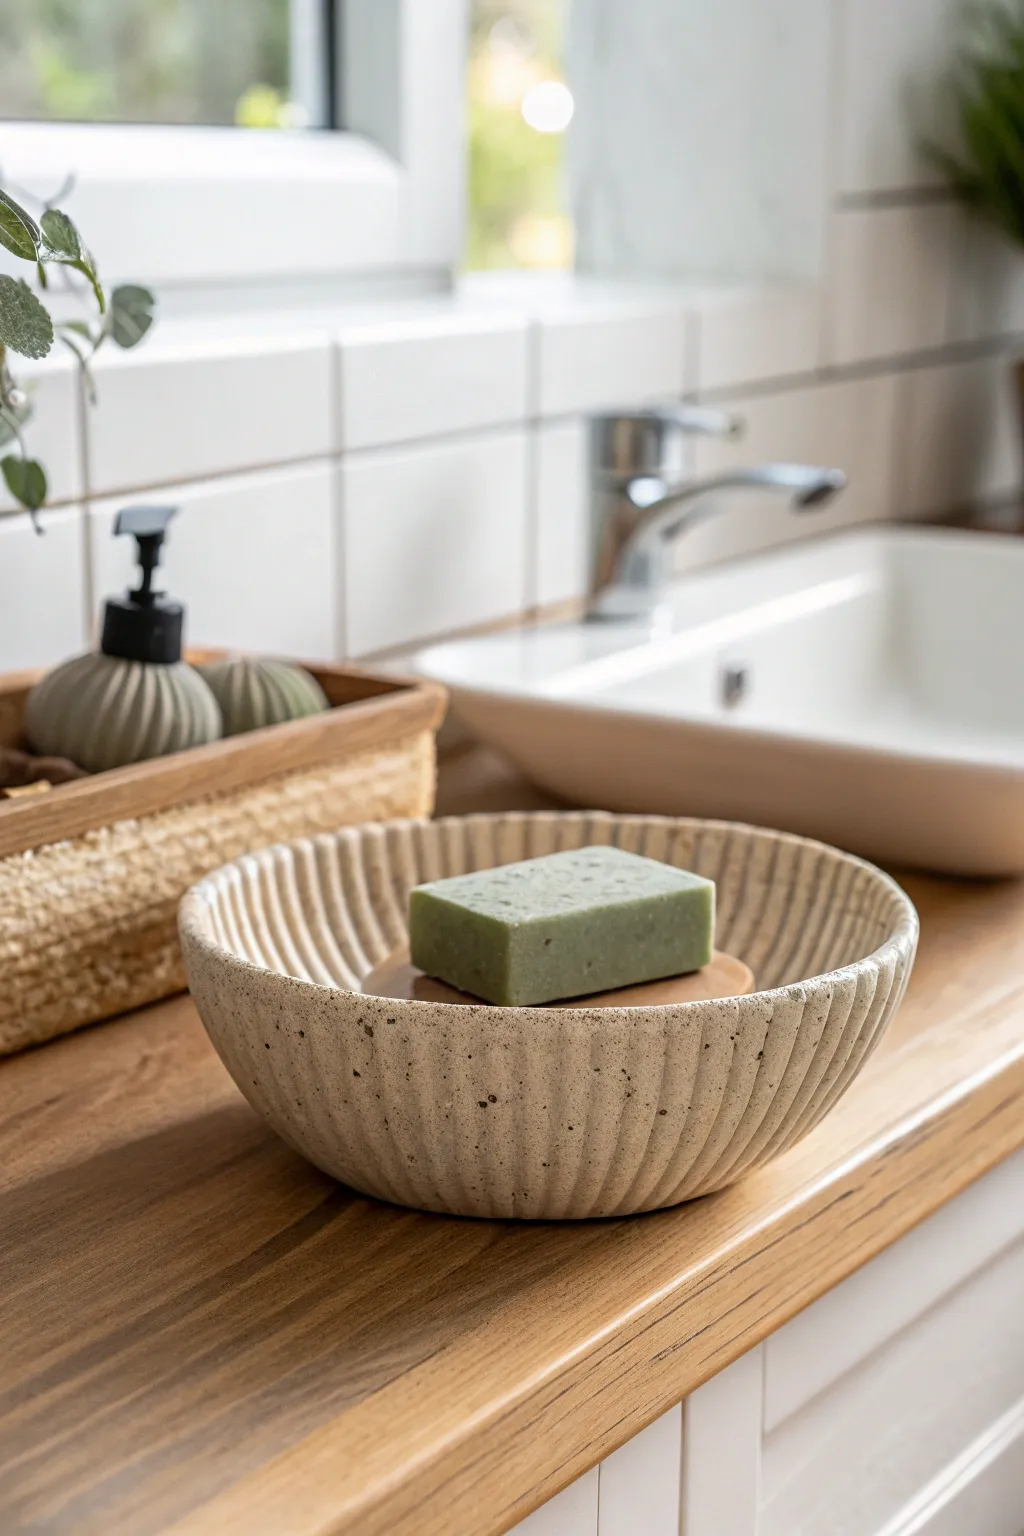
Embrace organic textures with this beautifully simple fluted soap dish. Modeled after river stones and natural limestone, its gentle ridges and speckled finish turn a bathroom essential into a miniature piece of art.
Step-by-Step Tutorial
Materials
- Speckled stoneware clay (approx. 1 lb)
- Rib tool (metal or wood)
- Carving tool (loop tool or fluting tool)
- Sponge
- Rolling pin
- Small bowl mold or plaster hump mold
- Canvas board or mat
- Wire cutter
- Water
Step 1: Forming the Base
-
Prepare the Clay:
Begin by wedging your speckled stoneware clay thoroughly to remove any air bubbles. This ensures the clay is uniform and workable. -
Roll out a Slab:
Roll your clay out onto a canvas surface until it is approximately 1/4 inch thick. Try to keep the thickness consistent across the entire slab. -
Cut the Circle:
Use a needle tool or knife to cut a circle from your slab. A 6-inch diameter circle usually works well for a standard bar of soap, allowing for shrinkage during firing. -
Shape over Mold:
Gently drape your clay circle over a hump mold or the bottom of a small bowl. I like to press lightly from the center outwards to encourage the curve without stretching the clay too thin. -
Smooth the Rim:
While on the mold, use a damp sponge or your finger to round off the rim. A sharp rim can be chipping hazard later, so take your time to compress and smooth it. -
Initial Drying:
Let the piece sit on the mold until it becomes leather-hard. This means it is firm enough to hold its shape but soft enough to carve into.
Warped Rim?
If your rim goes oval during drying, gently coax it back to round every few hours. Weighing it down lightly with a small sandbag can help maintain shape.
Step 2: Adding Texture & Detail
-
Plan the Fluting:
Remove the dish from the mold. Flip it so the convex side is facing you. You can lightly mark vertical guidelines with a needle tool if you want perfect symmetry, or trust your eye for a more organic look. -
Carve the Ridges:
Using a U-shaped loop tool or fluting tool, carve vertical grooves from the rim down towards the base. Apply steady pressure to create consistent, shallow valleys. -
Refine the Grooves:
Go back over your carved lines with a slightly damp sponge to soften any sharp clay burs or jagged edges left by the carving tool. -
Create the Inner Step:
Flip the bowl over to work on the inside. You’ll need a raised platform for the soap to sit on to prevent sogginess. Roll a small coil of clay or cut a smaller flat disc. -
Attach the Platform:
Score and slip the center of the bowl’s interior and attach your clay disc or coil. If using a flat disc (as seen in some styles), ensure it’s centered. -
Drill Drainage Holes:
Using a small hole cutter or drill bit tool, create 2-3 small holes in the bottom of the dish (through the platform if applicable) to allow water to drain away completely.
Step 3: Finishing Touches
-
Final Smoothing:
Once all carving and attachments are done, give the entire piece a final wipe with a sponge. Check the rim again to ensure the fluting hasn’t created sharp points. -
Dry Slowly:
Cover the dish loosely with plastic to let it dry slowly. This prevents the rim from drying faster than the thicker base, which can cause warping. -
Bisque Fire:
Fire the piece to bisque temperature (usually cone 04 or 06) according to your clay body’s specifications. -
Glazing:
For the look in the image, you want a very matte finish. Apply a clear matte glaze or a ‘naked clay’ sealant if firing high enough to vitrify the stoneware. -
Wipe Back (Optional):
If you use a colored glaze, consider wiping it back with a sponge so the glaze only remains in the carved crevices, highlighting the texture while leaving the ridges bare. -
Final Fire:
Fire for a final time to the maturity temperature of your clay (likely Cone 5/6 or 10).
Clean Lines
For ultra-crisp fluting lines, let the clay get stiff leather-hard before carving. Softer clay drags and creates messy burs that are hard to smooth.
Place your favorite scented soap on your new dish and enjoy the natural elegance it brings to your sink area
Small Spoon Rests That Fit One Spoon Perfectly
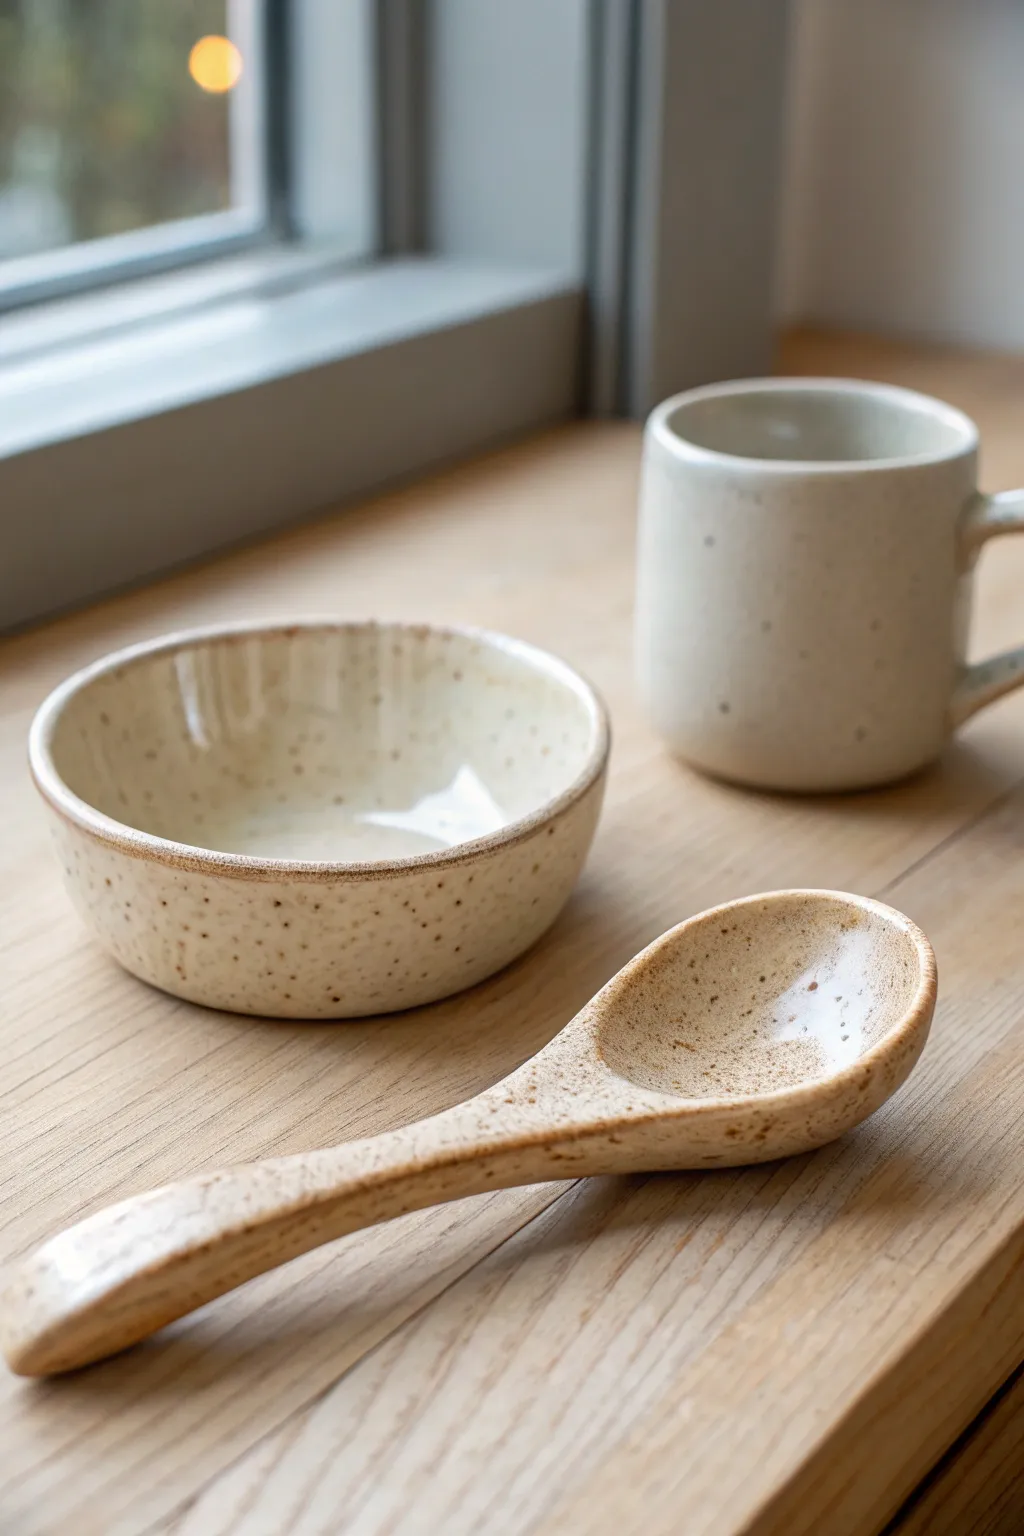
This charming, minimalist spoon rest doubles as a functional serving piece, featuring a gentle curve and a lovely speckled stoneware finish. Its organic, hand-modeled shape perfectly cradles a single spoon, keeping your countertops clean with effortless style.
Detailed Instructions
Materials
- Speckled buff stoneware clay
- Rolling pin
- Canvas working mat or slab mat
- Needle tool
- Wooden modeling tool (rounded end)
- Rib tool (flexible rubber or metal)
- Large sponge for smoothing
- Clear or translucent white glaze (cone 5/6)
- Small bowl for water
- Kiln (or access to a firing service)
Step 1: Shaping the Base Form
-
Prepare the Clay:
Begin with a ball of speckled buff stoneware clay roughly the size of a small tangerine. Wedge the clay thoroughly to remove air bubbles and ensure the particles are aligned. -
Roll the Coil:
Roll the ball of clay on your canvas mat to create a thick, tapered coil. One end should be bulbous for the bowl of the spoon, gently tapering down into a thinner handle. -
Flatten the Form:
Gently press the bulbous end with your thumb to begin flattening it. Then, carefully flatten the handle section, maintaining a thickness of about 1/4 inch throughout to prevent cracking during drying. -
Refine the Outline:
Use your needle tool to trim the edges if the flattening process created an uneven shape. You want a smooth, elongated oval for the spoon bowl and a consistent width for the handle. -
Smooth the Edges:
Dip your finger in a little water and run it along the cut edges. I like to focus on rounding them over completely so the finished piece feels soft in the hand.
Step 2: Sculpting the Curve
-
Hollow the Bowl:
Cradle the bulbous end in your palm. Using your thumb or a rounded wooden modeling tool, press into the center to create a shallow depression. Rotate the piece as you work to keep the wall thickness even. -
Create the Handle Curve:
Lay the spoon on your table. Gently lift the tip of the handle and place a small rolled coil of spare clay underneath it. This creates a slight arch, giving the spoon rest an elegant profile while it dries. -
Compress the Surface:
Use a flexible rubber rib to compress the inside of the spoon bowl and the length of the handle. This step is crucial for aligning clay particles and creating that ultra-smooth final texture. -
Final Smoothing:
Take a slightly damp sponge and wipe the entire piece one last time to remove any tool marks or fingerprints. Pay special attention to the transition where the handle meets the bowl.
Pro Tip: Thickness Check
Use a needle tool to poke through the center of the bowl to check thickness, then smooth the hole over. The bottom should be just as thick as the walls.
Step 3: Firing and Glazing
-
Slow Drying:
Allow the spoon to dry slowly under a loose sheet of plastic for the first day. This prevents the handle from warping or curling up as it shrinks. -
Bisque Fire:
Once bone dry, fire the piece to bisque temperature (usually cone 04). This hardens the clay and prepares it for glazing. -
Wax the Foot:
Apply a small patch of wax resist to the very bottom of the spoon bowl where it will touch the kiln shelf. Alternatively, you can just wipe this area clean after dipping. -
Glaze Application:
Dip the entire spoon into a clear or semi-translucent white glaze. Based on the image, you want a glaze that allows the natural iron speckles in the clay body to show through clearly. -
Clean Up:
Double-check the bottom contact point is free of glaze. If glaze remains here, the spoon will fuse to your kiln shelf permanently. -
Glaze Fire:
Fire the piece to maturity (likely cone 5 or 6 depending on your clay body). Allow the kiln to cool completely before opening to prevent thermal shock. -
Sand the Bottom:
After firing, hold the spoon and rub the unglazed bottom patch against a piece of sanding paper or a sanding block to ensure it won’t scratch your table.
Troubleshooting: Warped Handle
If the handle curls up while drying, gently weigh down the very end with a small bean bag or clean rock during the leather-hard stage.
Enjoy using this lovely handmade piece to keep your cooking surfaces tidy


What Really Happens Inside the Kiln
Learn how time and temperature work together inside the kiln to transform clay into durable ceramic.
Whimsical Egg Cups With Little Feet
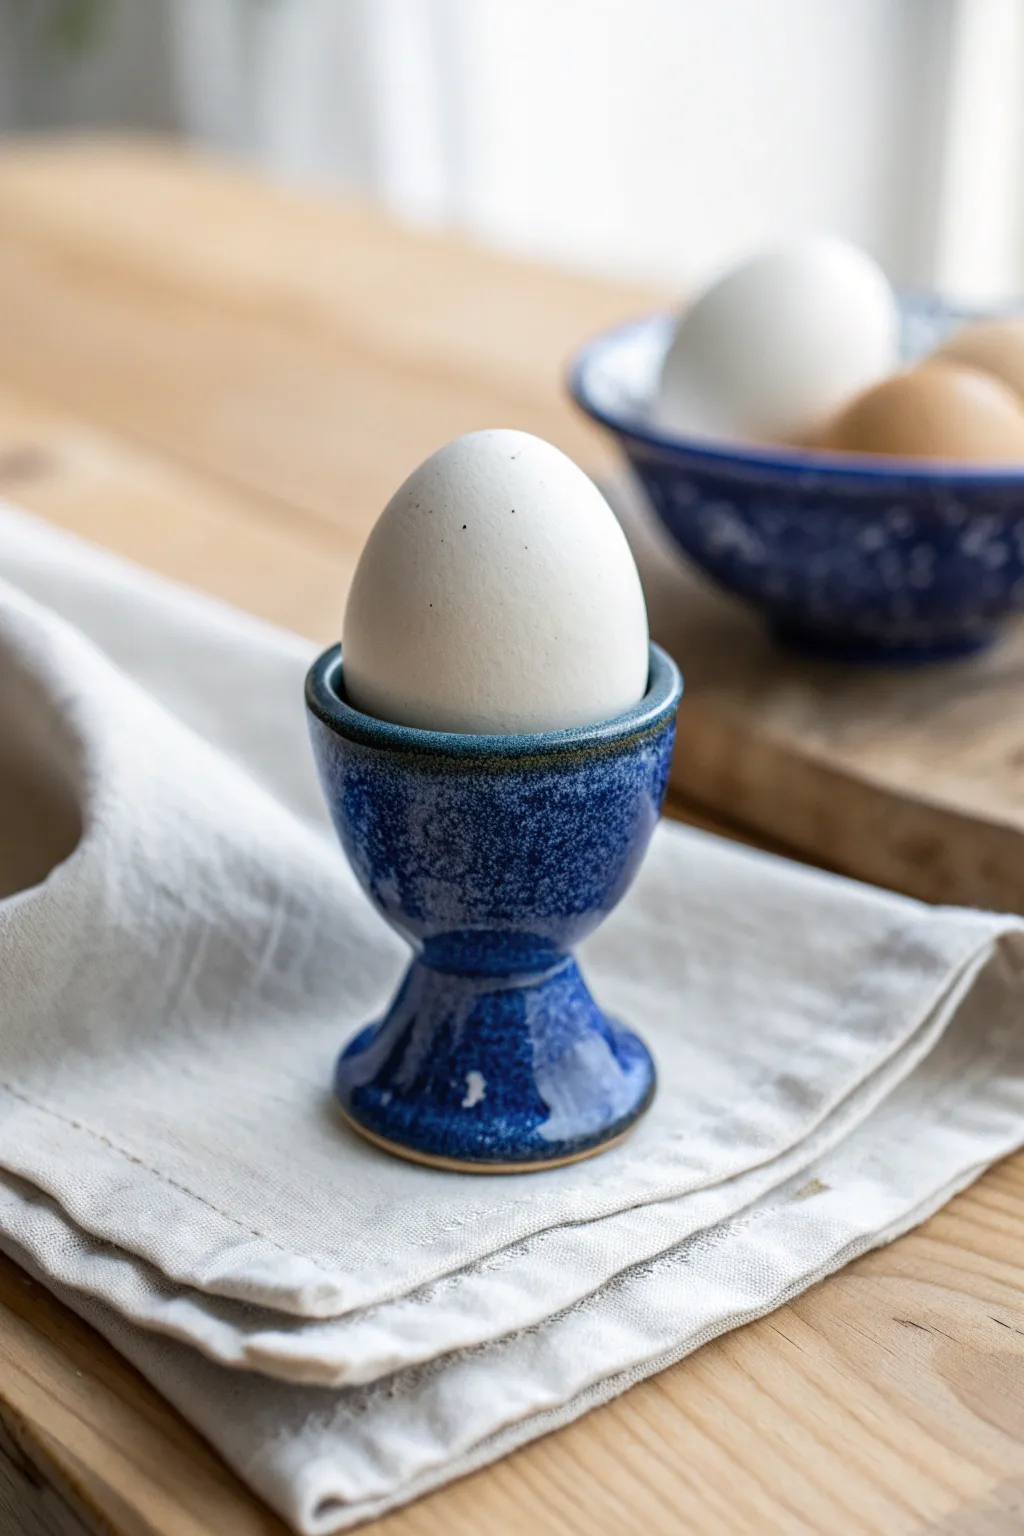
Bring a touch of galaxy-inspired charm to your breakfast table with this wheel-thrown egg cup. Its deep, speckled blue glaze and classic hourglass silhouette offer both functionality and a stunning visual pop for your morning routine.
Step-by-Step
Materials
- Stoneware clay (smooth body recommended)
- Pottery wheel
- Small sponges
- Needle tool
- Wire cutter
- Trimming tools (pear-shaped and loop)
- Glaze: Deep cobalt blue (reactive or speckled)
- Glaze: Glossy clear (optional for mixing)
- Kiln for bisque and glaze firing
Step 1: Throwing the Form
-
Prepare the Clay:
Start with a small ball of clay, roughly the size of a golf ball or slightly larger (about 0.5 to 0.75 lbs). Wedge it thoroughly to remove air bubbles, ensuring a smooth, consistent texture. -
Center and Open:
Secure the clay firmly to the wheel head. Center it into a low mound. Open the clay gently with your thumbs, creating a small well. You don’t need to go all the way down to the wheel head; leave a thick base for the foot. -
Define the Cup:
Pull up the walls to form a small cylinder, roughly 1.5 to 2 inches wide. This upper section needs to be sized to cradle a standard egg, so keep the rim diameter around 1.75 inches. -
Shape the Hourglass:
Using your fingertips or a small rib tool, gently press in just below the cup section to create a waist. This narrowing defines the transition between the egg holder and the base, forming that classic pedestal look. -
Flare the Foot:
Shape the remaining clay at the bottom into a flared skirt. This will be the foot of the egg cup. Ensure it is wide enough to provide stability so the cup won’t tip over easily. -
Refine the Rim:
Compress the rim of the cup section gently with a sponge or chamois leather. A rounded, smooth rim is crucial for durability and feels better to handle. -
Cut and Remove:
Run a wire cutter under the base to separate it from the wheel head. Carefully lift the egg cup off and set it aside on a ware board to dry to a leather-hard state.
Step 2: Trimming and Bisque
-
Center for Trimming:
Once leather hard, place the egg cup upside down on the wheel. You may need to use a chuck (a clay cylinder support) if the rim is delicate, or simply secure it directly to the wheel head with clay lugs. -
Trim the Foot:
Use a small loop tool to carve out the underside of the foot, creating a recessed ring. This removes excess weight and gives the piece a professional finish. -
Refine the Profile:
Clean up the exterior curve of the pedestal waist with a sharp trimming tool. I find that refining this curve really emphasizes the elegance of the hourglass shape. -
Smooth the Surface:
Wipe the trimmed areas with a slightly damp sponge to remove any grog or trimming lines, ensuring the surface is perfectly smooth for glazing. -
Dry and Bisque:
Allow the egg cup to dry completely until it is bone dry. Fire it in the kiln to a bisque temperature (usually cone 04 or 06) to prepare it for glazing.
Double Check Size
Keep a hard-boiled egg handy while throwing! You can gently test the cup size (if the clay isn’t too soft) or measure against it to ensure a perfect fit.
Step 3: Glazing and Finishing
-
Wax the Foot:
Apply wax resist to the very bottom of the foot ring. This prevents glaze from sticking to the kiln shelf during firing. -
Prepare the Glaze:
Stir your deep cobalt blue glaze thoroughly. If you want the speckled effect shown in the image, ensure any suspended particles are well-distributed. -
Dip the Cup:
Holding the piece by the waxed foot, submerge it into the glaze bucket for about 3 seconds. Pull it out and give it a quick shake to remove excess drips. -
Check the Rim:
If the glaze looks too thick around the rim, gently sponge a tiny bit away. This encourages the glaze to ‘break’ or thin out at the edge during firing, revealing the clay body color underneath. -
Clean Up:
Use a sponge to wipe away any glaze droplets that may have splashed onto the waxed foot ring. -
Glaze Fire:
Load the egg cup into the kiln and fire to the maturity temperature of your clay and glaze (typically cone 5 or 6 for stoneware). Allow the kiln to cool naturally before unloading.
Mix & Match Sets
Make a set of four using different glaze colors for the interior and exterior to create a playful, mismatched breakfast collection.
Now you have a charming, handmade vessel ready for your next soft-boiled egg breakfast
Mini Tea Light Holders With Cutouts
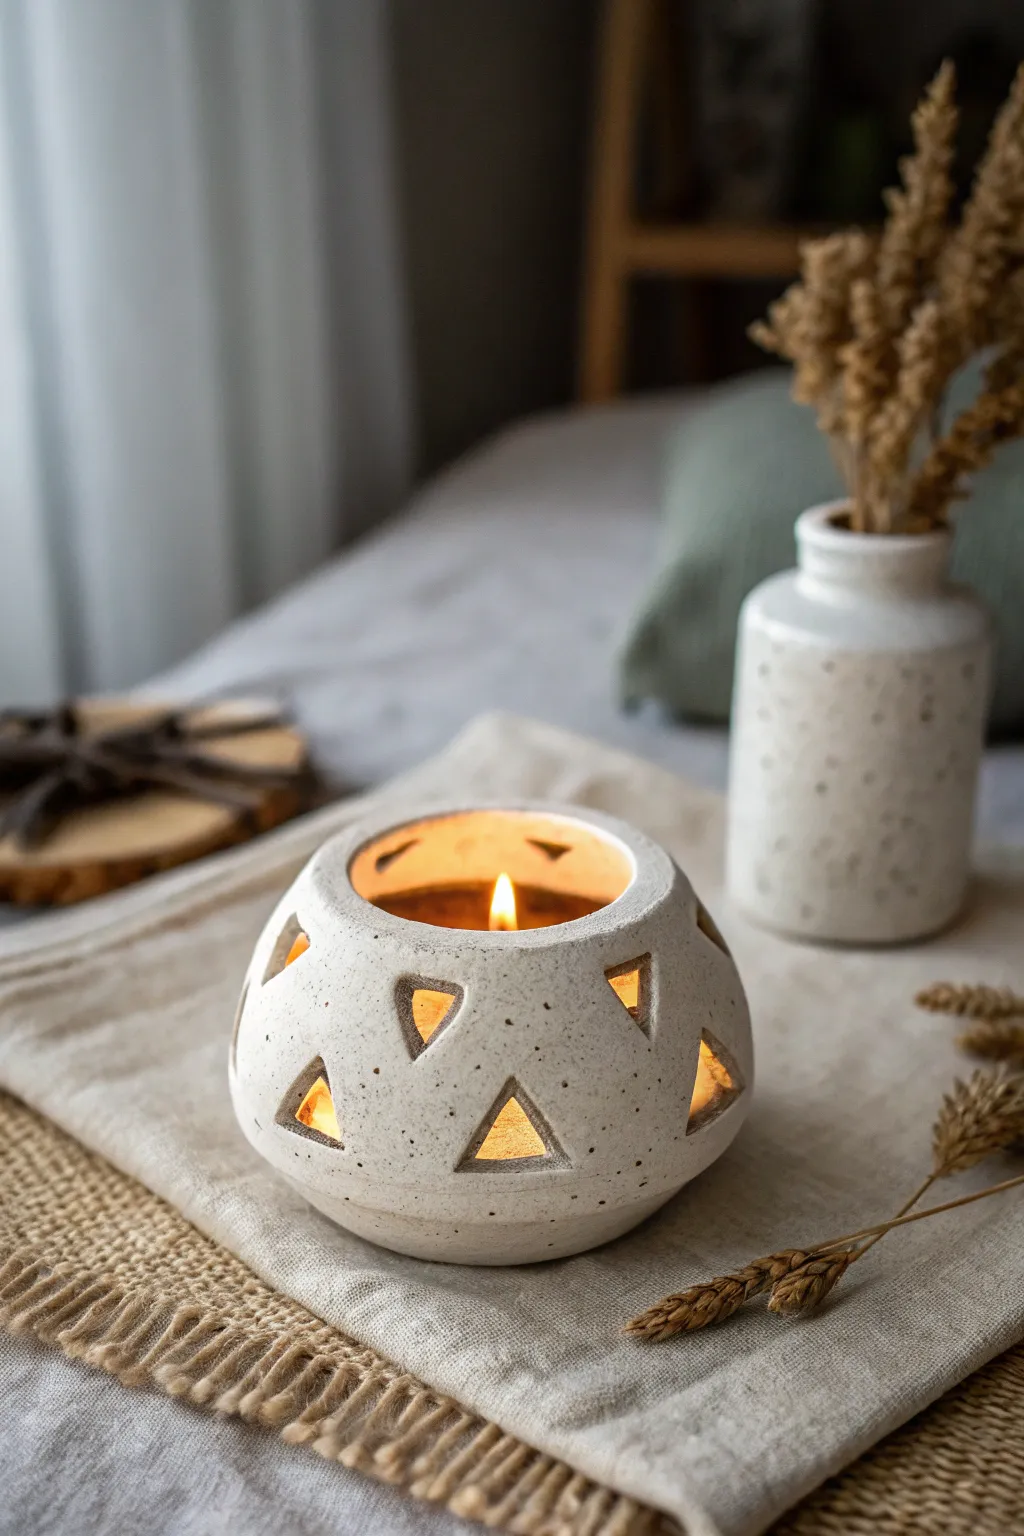
This charming, squat tea light holder features a naturally speckled clay body and warm triangular cutouts that cast playful shadows when lit. Its organic, rounded form contrasts beautifully with the sharp geometric openings, creating a cozy modern accent piece.
Step-by-Step Guide
Materials
- Speckled cone 6 stoneware clay
- Sphere mold (styrofoam ball or plaster mold)
- Fettling knife
- Needle tool
- Small triangle cutter (or X-Acto knife)
- Soft rubber rib
- Sponge
- Scoring tool or serrated rib
- Slip
- Rolling pin
- Wooden paddle (optional)
- Small sanding sponge
Step 1: Forming the Base Sphere
-
Wedging and Rolling:
Begin by wedging a small ball of speckled stoneware clay to remove air bubbles. Roll it out into a slab that is roughly 1/4 inch thick, ensuring an even thickness throughout. -
Draping the Clay:
Take your slab and gently drape it over your sphere mold. I prefer using a styrofoam ball covered in plastic wrap or a pantyhose layer to prevent sticking. -
Securing the Form:
Smooth the clay down over the curve of the mold with a soft rubber rib, compressing the clay particles and erasing any canvas texture from the rolling process. -
Creating the Rim:
Cut the clay at what will be the ‘equator’ of your sphere (or slightly below) to create a half-sphere bowl shape. This will be the main body of your candle holder. -
Closing the Top:
Roll a second, smaller slab. Cut a circle that fits the top diameter of your half-sphere. Cut a large circular hole in the center of this new piece to allow the candle to be inserted later. -
Attaching the Collar:
Score the top rim of your bowl and the underside of your new ring piece. Apply slip generously to both surfaces. -
Blending Seams:
Press the ring onto the bowl firmly. Use your thumb or a wooden tool to blend the clay across the seam on the outside, creating a continuous, rounded curve that tapers inward at the top.
Clean Cuts Every Time
When cutting geometrics, let the clay get stiffer than usual—almost ‘chocolate hard.’ This prevents the knife from dragging and warping the delicate triangle points.
Step 2: Refining and Carving
-
Refining the Shape:
Once the basic enclosed form is constructed, use a wooden paddle to gently tap the sides if you want to adjust the roundness or flatten the bottom slightly for stability. -
Smoothing the Surface:
Run a damp sponge over the entire exterior to smooth out the blended seam. It should look like one continuous piece of clay now. -
Leather Hard Stage:
Set the piece aside to dry until it reaches a sturdy leather-hard state. This is crucial; if it’s too soft, the walls will collapse when you cut. -
Mapping the Cutouts:
Lightly sketch your triangle pattern onto the surface with a needle tool. You can arrange them randomly or in structured rows like the example. -
Cutting the Triangles:
Using a small, sharp X-Acto knife or a dedicated triangle clay cutter, carefully slice through the wall. Support the wall from the inside with a finger if your hand fits, or be extremely gentle. -
Removing Debris:
Pop the clay triangles out. Don’t worry about rough edges just yet; let the clay firm up slightly more before cleaning them. -
Cleaning Edges:
Use a slightly damp brush or your finger to smooth the sharp edges of the cutouts. This creates that professional, soft-focus look seen in the photo. -
Final Sanding:
Once completely bone dry, you can very gently rub the surface with a fine sanding sponge to remove any remaining burrs or sharp spots. -
Firing:
Bisque fire the piece. For the finish shown, apply a clear matte glaze or leave the exterior raw to show off the speckles, then glaze fire to the clay’s appropriate temperature (Cone 6 for stoneware).
Cracking at Seams?
If the seam where you attached the top ring is cracking, you likely didn’t score deep enough. Reinforce with a thin coil of clay on the inside seam for extra strength.
Place a tea light inside and enjoy the warm, patterned atmosphere you have created in your space

TRACK YOUR CERAMIC JOURNEY
Capture glaze tests, firing details, and creative progress—all in one simple printable. Make your projects easier to repeat and improve.
Tiny Incense Holders in Clean Geometric Shapes
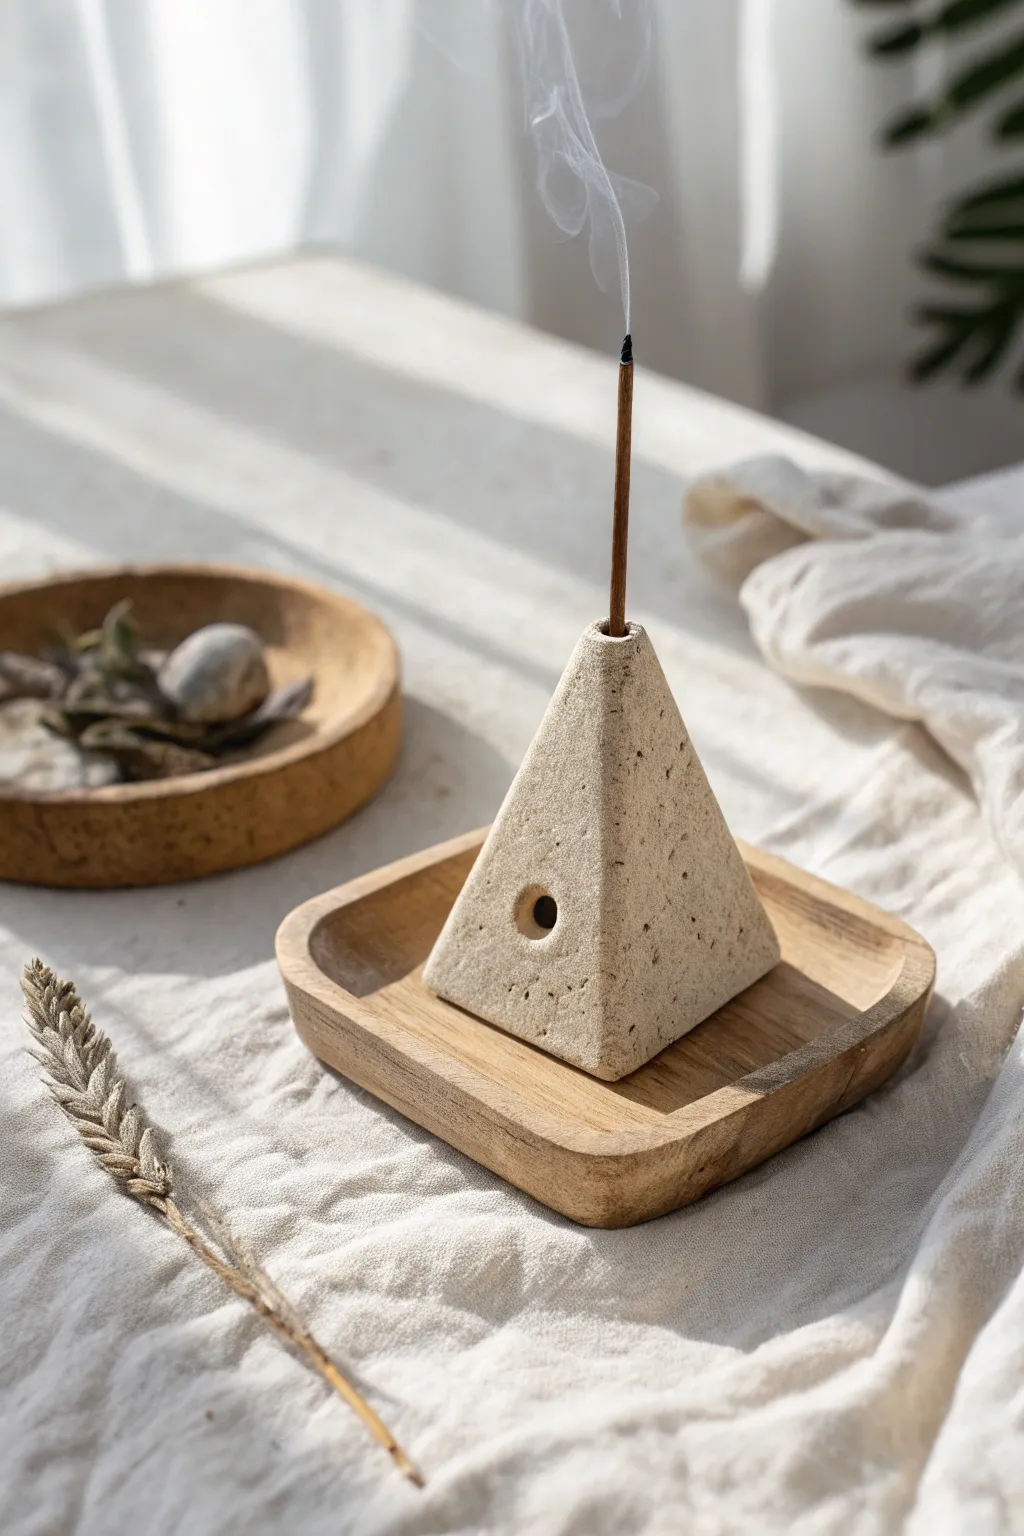
This project celebrates the beauty of simplicity with a clean, geometric pyramid incense holder made from speckled clay. Its sharply distinct form brings a modern, architectural feel to any small space while serving a functional purpose.
Step-by-Step
Materials
- Speckled Stoneware Clay (e.g., Laguna Speckled Buff)
- Rolling pin
- Guide sticks or slats (approx. 1/4 inch thick)
- Needle tool or X-Acto knife
- Ruler
- Paper template (equilateral triangle)
- Slip and scoring tool (or serrated rib)
- Small drill bit or circular hole cutter (approx. 1cm diameter)
- Standard incense stick (for sizing)
- Smoothing sponge
- Sandpaper (fine grit)
Step 1: Planning and Preparation
-
Create your template:
Sketch an equilateral triangle on cardstock. For a holder of this size, aim for sides that are about 3 to 3.5 inches long. Cut this shape out carefully, as it will determine the symmetry of your pyramid. -
Roll the slab:
Take a manageable chunk of speckled clay and wedge it briefly to remove air bubbles. Place it between your guide sticks and roll it out into an even slab. You want a consistent thickness of about 1/4 inch so the walls are sturdy but not chunky. -
Compress the clay:
Use a rubber rib to compress the surface of the slab on both sides. This aligns the clay particles, reducing the chance of warping later, and creates that smooth, stone-like canvas we’ll need for the final look.
Step 2: Cutting and Assembling
-
Cut the faces:
Place your paper template onto the clay slab. Using your needle tool or knife, cut out three identical triangles. Be sure to hold the blade perpendicular to the table for straight edges. -
Bevel the edges:
For a truly sharp geometric look, bevel the long edges of your triangles at a 45-degree angle. This allows the pieces to join flush against each other without leaving large gaps. -
Score the connection points:
Take your scoring tool or serrated rib and rough up the beveled edges where the three triangles will meet. Apply a generous amount of slip to these roughened areas. -
Form the pyramid:
Stand the three triangles up, leaning them inward until they touch. Gently press the seams together from the outside, ensuring the peak meets neatly at the top point. -
Reinforce the interior:
I like to roll a very thin coil of clay and gently press it into the inside seams if my fingers can reach, or use a tool to smooth the inside corners. This adds structural hidden strength.
Keep it Clean
Wipe the raw clay with a vinegar-dampened sponge before drying. Vinegar breaks down surface tension differently than water, helping to smooth out tiny micro-cracks.
Step 3: Refining and Detailing
-
Smooth the exterior seams:
On the outside, use a rib or your thumb to blend the clay across the seams until they disappear. You want the surface to look like a single, solid block of stone. -
Create the incense channel:
At the very peak of the pyramid, cut or gently drill a vertical hole. Use a standard incense stick to check the size, making sure it’s slightly larger than the stick to account for clay shrinkage during firing. -
Add the decorative vent:
On one face of the pyramid, about a third of the way up from the bottom, use your small circular cutter or drill bit to create the round ‘window’ seen in the image. Clean up any burrs around the edges with a damp sponge. -
Level the base:
Gently tap the base of the pyramid on your work surface to ensure it sits perfectly flat. If it wobbles, adhere a sheet of coarse sandpaper to a board and gently rub the base in a circular motion to level it. -
Final smooth:
Wipe the entire piece down with a slightly damp sponge to remove fingerprints and harsh tooling marks, revealing the natural grit and speckle of the clay body.
Fixing a Wobbly Base
If the pyramid rocks after drying but before firing, lay sandpaper flat on a table and gently rub the base of the bone-dry piece in figure-8 motions until perfectly level.
Step 4: Drying and Firing
-
Slow drying:
Cover the pyramid loosely with plastic for the first day to let the moisture equalize. This geometric shape creates tension at the seams, so slow drying prevents those corners from pulling apart. -
Bisque fire:
Once completely bone dry, fire the piece to bisque temperature (usually Cone 04). This prepares it for glazing or stains, though for this natural look, we will keep it largely bare. -
Surface treatment:
Since the charm of this piece is the raw clay, leave the exterior unglazed to show off the speckles. If you wish, you can apply a clear matte glaze to the inside for easier cleaning. -
The final fire:
Fire the piece to maturity (Cone 5 or 6 for most stoneware). This vitrifies the clay, making the stone-like texture permanent and durable.
Place your finished pyramid on a small wooden coaster to complete the natural, Zen aesthetic of your new creation
Small Match Strikers With Textured Sides
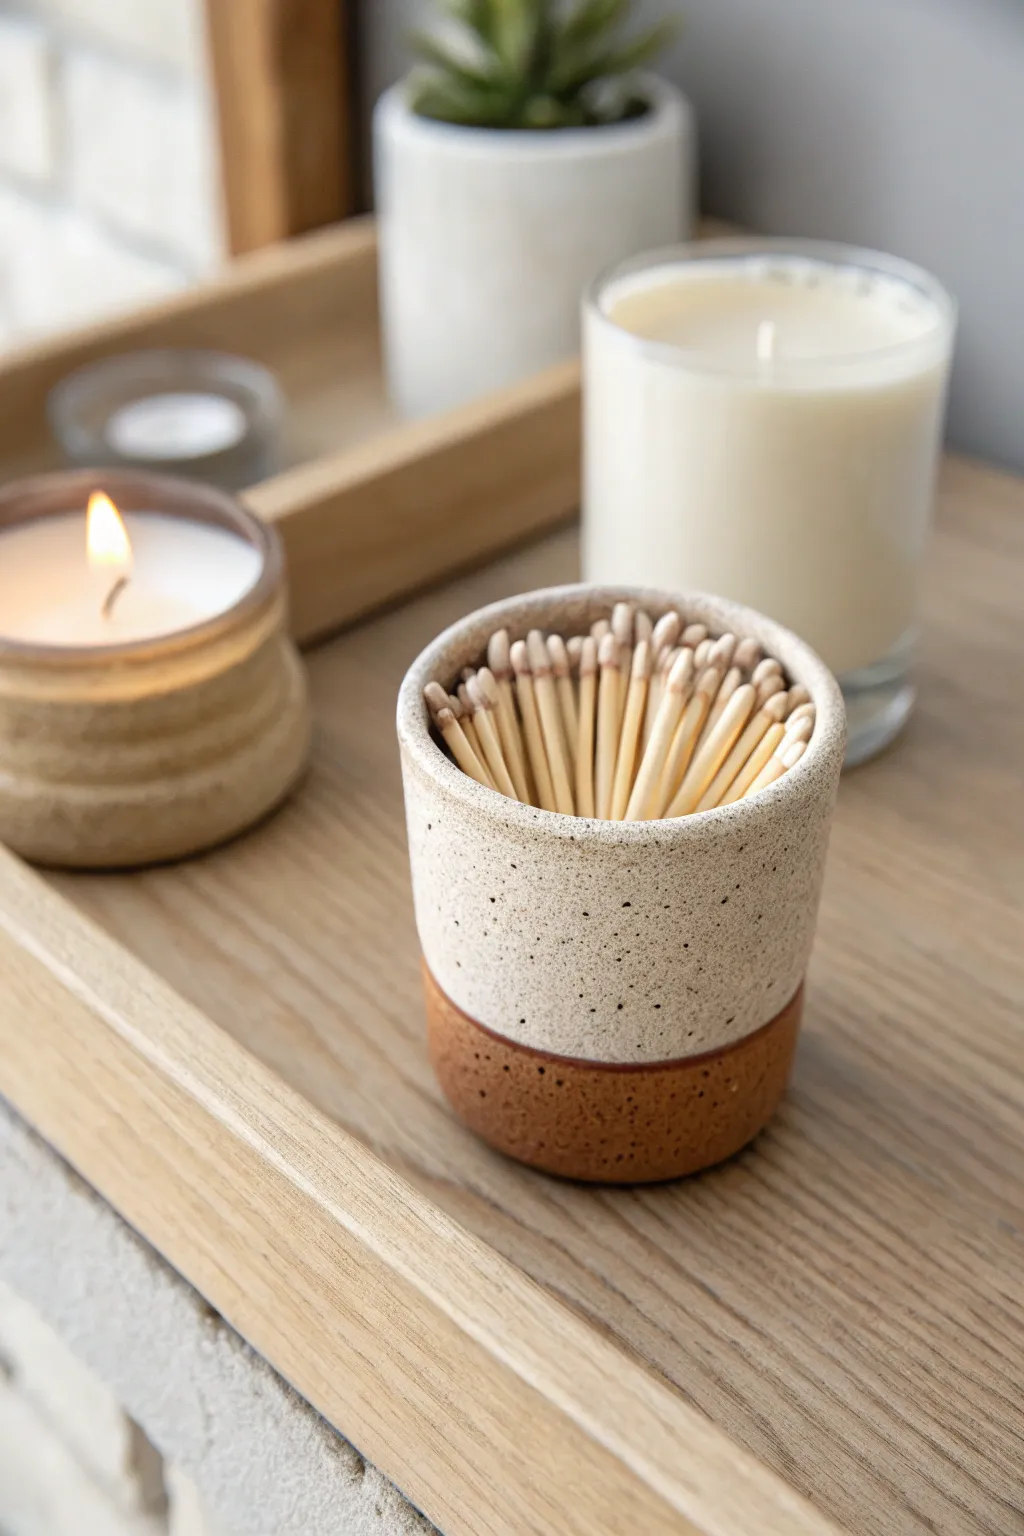
This charming little vessel combines form and function, featuring a gritty clay base that doubles as a striking surface for strike-anywhere matches. The dual-texture design pairs a smooth, speckled cream glaze with raw earthenware for a modern, rustic aesthetic.
Detailed Instructions
Materials
- Stoneware clay or red earthenware clay (groggy texture preferred)
- Pottery wheel (or slab roller for hand-building)
- Wire cutter
- Loop trimming tools
- Rib tool (wooden or silicone)
- Speckled cream or matte white glaze
- Wax resist
- Kiln
- Sponge and bucket of water
- Strike-anywhere matches (for testing later)
Step 1: Throwing the Form
-
Prepare the clay:
Start by wedging a small ball of clay, roughly the size of a large orange (about 1 lb or 500g). Ensure it is free of air bubbles to prevent explosions in the kiln. -
Center on the wheel:
Secure the balls to the wheel head and center it using firm, steady pressure. Since this is a small piece, precise centering is crucial for thin, even walls. -
Open the clay:
Press your thumbs into the center to open the clay, leaving about a half-inch of thickness at the floor to give the cup some weight and stability. -
Pull the walls:
Gently pull the clay upwards to create a cylinder. Aim for a height of about 2.5 to 3 inches. Keep the walls vertical rather than bowing out. -
Refine the shape:
Use a rib tool on the exterior while supporting the interior with your fingers to smooth the sides and create a perfectly straight, vertical profile. -
Finish the rim:
Compress the rim slightly with a damp sponge or a piece of chamois leather to ensure it is smooth and pleasant to touch. -
Remove from wheel:
Wire cut the vessel from the wheel head and set it aside on a ware board. Let it dry until it reaches a leather-hard state.
Grit is Good
For the best match-striking functionality, choose a clay body with grog (sand) in it. Smooth porcelain won’t create enough friction to light the match.
Step 2: Trimming and Texturing
-
Secure for trimming:
Once leather-hard, center the pot upside down on the wheel. Secure it with clay lugs or use a Giffin Grip. -
Trim the base:
Use a loop tool to trim away excess weight from the bottom third. This isn’t just about weight; you are exposing the fresh, gritty grain of the clay. -
Create the striking zone:
Leave the bottom third unburnished. If your clay isn’t naturally gritty, you can gently lightly score this area with a serrated rib to ensure enough friction for the matches. -
Bisque fire:
Allow the piece to dry completely to the bone-dry stage. Load it into the kiln for a bisque firing (typically Cone 04 or 06).
Add a Striking Patch
If you forget to leave raw clay, or if your clay is too smooth, paint a small patch of ‘match striker paint’ (potassium chlorate mix) on the bottom after firing.
Step 3: Glazing and Finishing
-
Clean the bisqueware:
Wipe the fired piece down with a damp sponge to remove any kiln dust, which can prevent glaze from adhering properly. -
Mark the glaze line:
Visually divide the cup. You want the glaze to stop about one-third of the way up from the bottom. You can use a pencil to lightly mark this line if helpful. -
Apply wax resist:
Paint a band of liquid wax resist over the bottom third of the pot (the area you want to remain raw clay) and the entire bottom foot. Let it dry completely. -
Dip the glaze:
Stir your speckled cream glaze thoroughly. Hold the pot by the foot and dip it upside down into the bucket, submerging it just past the wax line. -
Clean the line:
Although wax helps, glaze beads can still stick. Use a damp sponge to wipe any stray droplets off the waxed bottom section for a crisp, clean line. -
Glaze fire:
Fire the piece again to the maturation temperature of your specific clay and glaze (often Cone 5 or 6 for stoneware). The raw clay section will vitrify but remain rough.
Now flip your matches over, give them a strike against the textured base, and enjoy the glow of your handmade creation
Pocket-Sized Paint Palettes With Tiny Wells
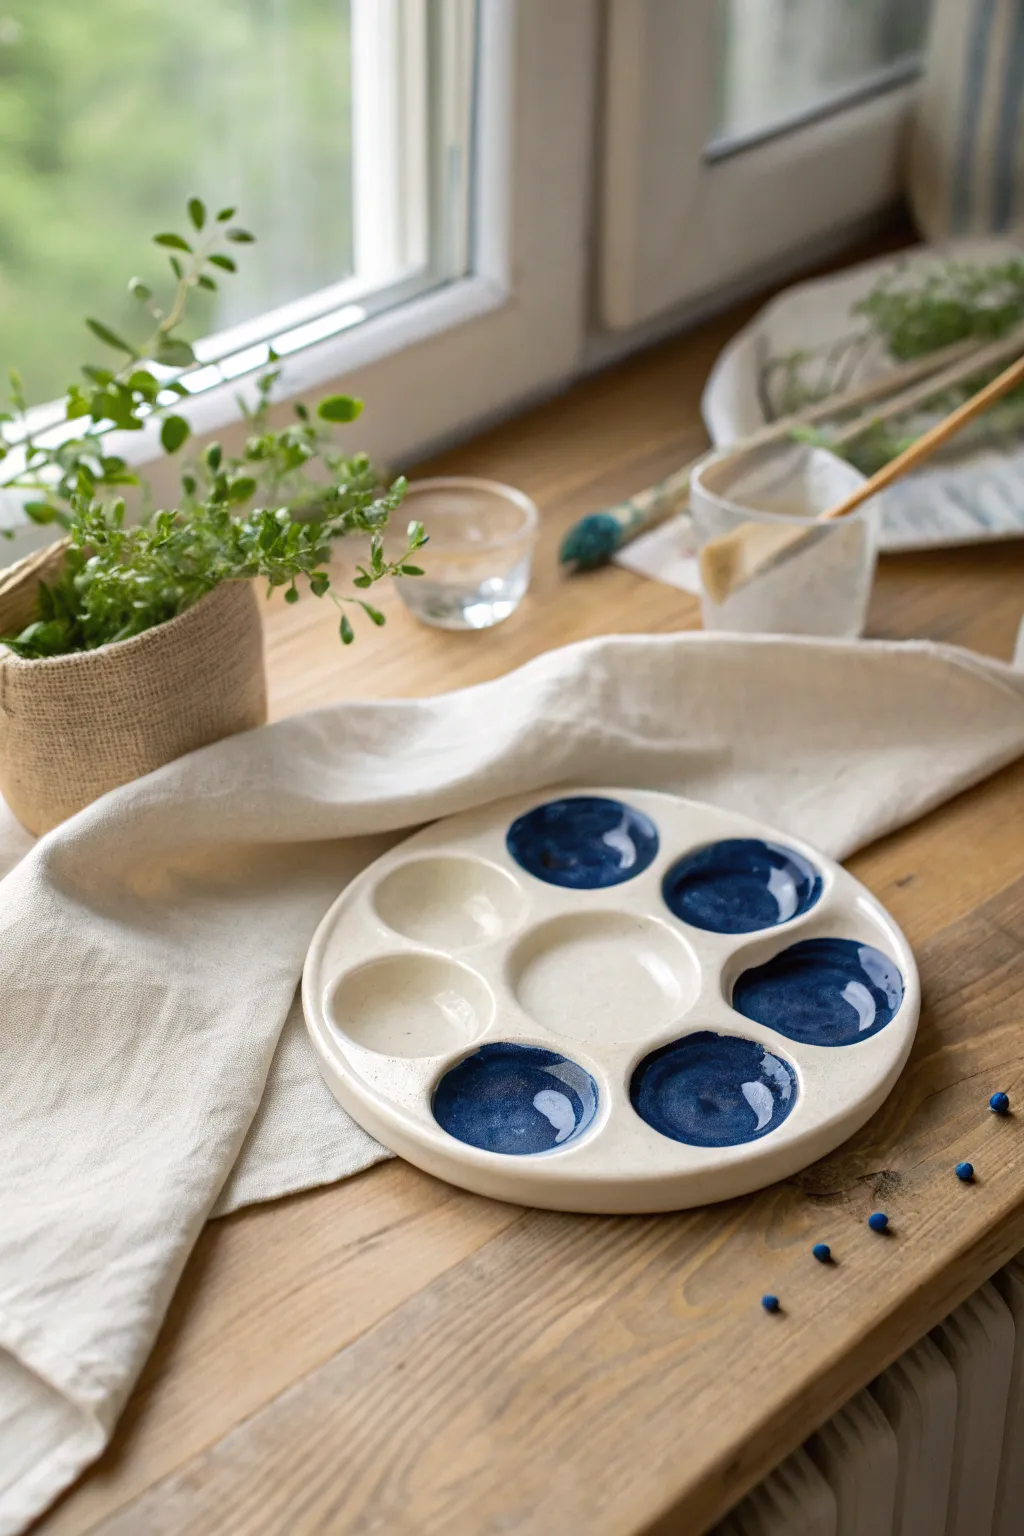
Create a charming, portable ceramic palette that is perfect for watercolor sketching on the go. This project features a classic round design with deep, glossy blue wells contrasting against smooth, creamy white clay for a timeless pottery studio look.
Step-by-Step Guide
Materials
- White stoneware or porcelain clay body
- Rolling pin
- Canvas work surface
- Needle tool
- Round cookie cutter (approx. 4-5 inches diameter)
- Small round measuring spoon or melon baller (for shaping wells)
- Sponge
- Rib tool (flexible metal or rubber)
- Deep glossy blue ceramic glaze (cone 5/6 or suitable for your clay)
- Clear transparent glaze
- Small soft glaze brushes
- Kiln access
Step 1: Forming the Base
-
Prepare the Clay:
Begin by wedging a small ball of white stoneware clay thoroughly to remove any air bubbles. Pat it into a thick pancake shape with your palms. -
Roll the Slab:
Place the clay on your canvas and roll it out into an even slab. You want it relatively thick, about 3/8 to 1/2 of an inch, to accommodate the depth of the paint wells without punching through. -
Smooth the Surface:
Use a flexible rib tool to compress the clay surface on both sides. This aligns the clay particles and creates that super-smooth, professional finish we’re aiming for. -
Cut the Circle:
Press your round cookie cutter firmly into the slab to cut the outer shape. Alternatively, trace a circle template with a needle tool for a slightly more organic edge. -
Refine the Edge:
Run a damp sponge or your finger along the cut rim to soften the sharp angle. A rounded edge feels much nicer in the hand and resists chipping better than a sharp one.
Uneven Glaze Edges?
If you struggle to paint neat circles with the blue glaze, apply liquid wax resist to the flat top surface first. Any glaze that lands outside the well will bead up and wipe away easily.
Step 2: Creating the Wells
-
Mark the Layout:
Lightly visualize where your seven wells will go: one in the center and six surrounding it in a hexagon pattern. You can lightly mark the centers with a needle tool if helpful. -
Form the Center Well:
Press a small object, like the back of a rounded measuring spoon or a melon baller, gently into the exact center. Rotate it slightly to open up the well, but be careful not to push all the way through the bottom. -
Add Surrounding Wells:
Repeat this pressing motion for the six surrounding circles. Try to keep the spacing even between them so the structural walls remain distinct. -
Smooth the Transitions:
I usually dampen my pinky finger slightly to run it around the inside rim of each indentation. This smooths out any tool marks and creates a seamless transition from the well to the flat surface. -
Final Cleanup:
Check the underside of the palette. If pressing the wells deformed the bottom, gently flip the piece onto a clean board and tap it flat, or verify it sits level. -
Bisque Fire:
Allow the clay to dry slowly under plastic for a day, then uncovered until bone dry. Fire the piece to bisque temperature (usually cone 04) based on your clay specifications.
Add a Thumb Hole
Before firing, punch a small hole near the edge and sand it smooth. Tie a leather cord through it after glazing to hang the palette on your studio wall or secure it to a travel bag.
Step 3: Glazing and Finishing
-
Wipe Down:
Once bisqued, wipe the entire piece with a damp sponge to remove any kiln dust. This ensures the glaze adheres properly to the ceramic surface. -
Apply Clear Glaze:
Brush or dip the entire piece in a clear glossy glaze first. This will seal the white clay areas (the two uncolored wells and the main body) so they can be wiped clean easily during painting sessions. -
Add the Blue Accents:
Select five of the outer wells to be colored. Carefully fill these wells with the deep blue glaze using a small brush. Be precise—you want the blue to pool at the bottom but stay neatly inside the indentation. -
Second Coat:
Apply a second or third coat of the blue glaze to those five specific wells, depending on the opacity of your specific glaze product. Wait for each layer to dry until it’s chalky before adding the next. -
Clean the Foot:
Use a sponge to wipe any stray glaze off the very bottom of the palette so it doesn’t fuse to the kiln shelf. -
Final Firing:
Fire the piece again to the glaze temperature (usually Cone 5 or 6). Let the kiln cool completely before retrieving your finished palette.
Once cooled, fill the deep blue wells with your favorite watercolors and capture the world outside your window
Tiny Lidded Trinket Jars for Little Treasures
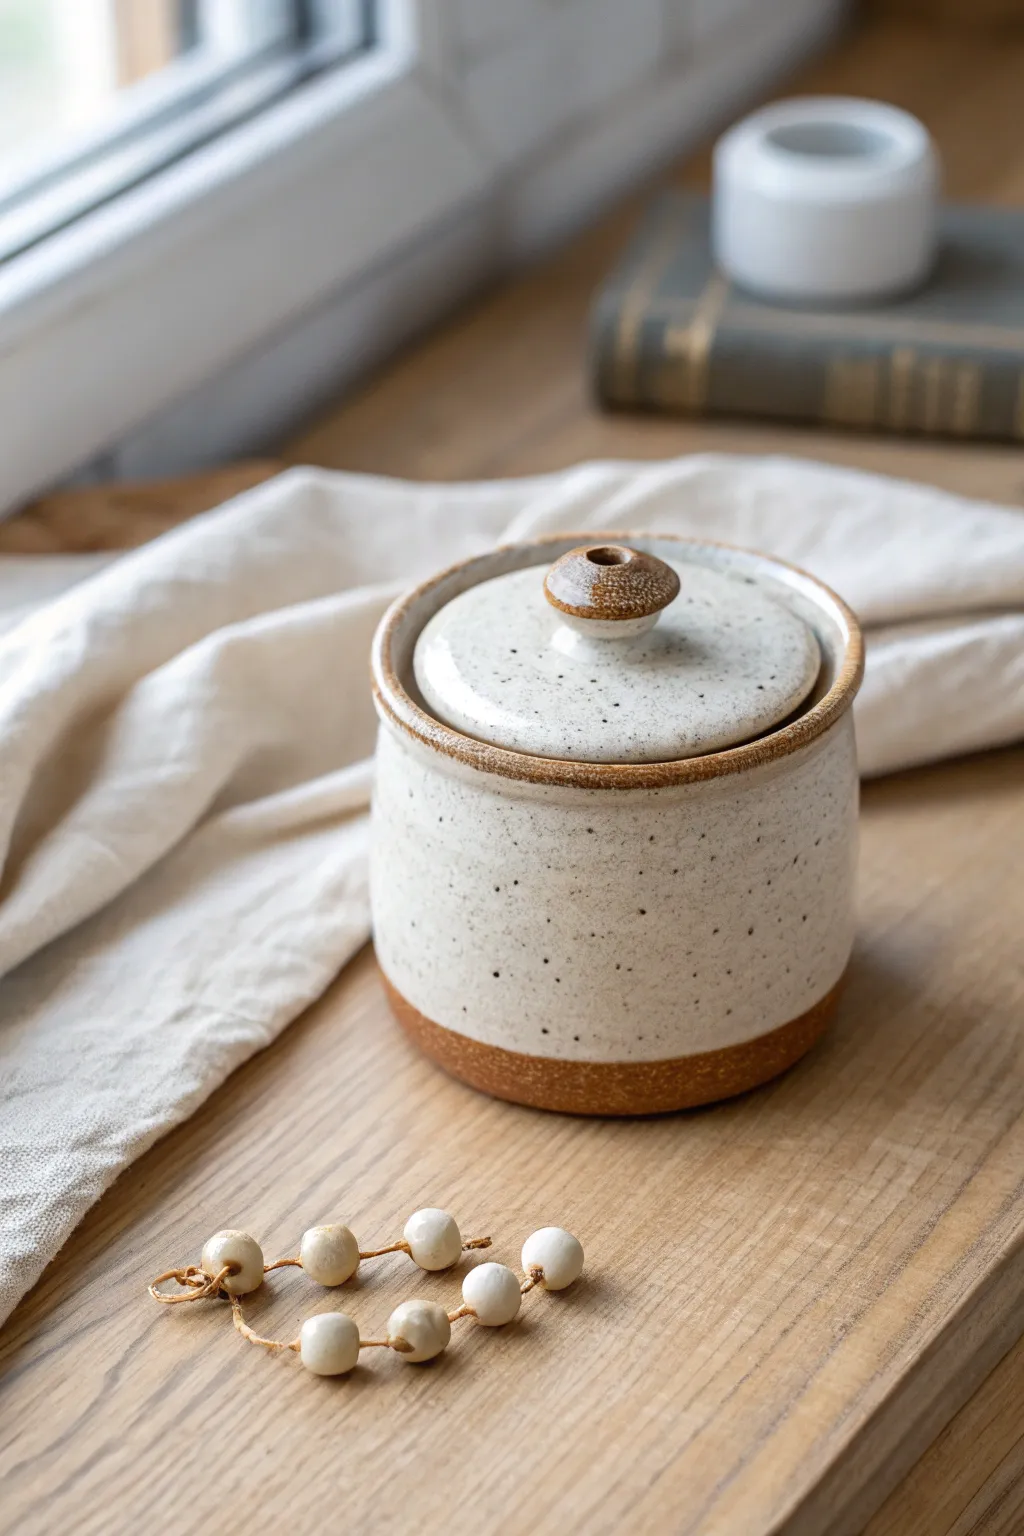
This charming, rustic jar combines a raw, earthy base with a smooth, speckled glaze, perfect for holding small treasures like beads or jewelry. Its simple cylindrical form and fitted lid make it a delightful project for refining your wheel-throwing or hand-building skills.
How-To Guide
Materials
- Speckled Stoneware Clay (or white clay with added grog/sand)
- Pottery Wheel (or rolling pin for hand-building)
- Throwing Ribs (wooden and metal)
- Wire Clay Cutter
- Trimming Tools
- Needle Tool
- Calipers
- Sponge
- Clear or White Semi-Opaque Glaze (compatible with your clay)
Step 1: Throwing the Base
-
Center the Clay:
Start with a small ball of speckled stoneware clay, about 1 pound. Center it firmly on the wheel head, ensuring there is no wobble before you proceed. -
Open the Form:
Press down into the center to open the clay, leaving the floor about 1/4 to 1/2 inch thick to allow for trimming later. -
Pull the Walls:
Create a flat floor and compress it well. Begin pulling the walls straight up. Aim for a cylindrical shape with a very subtle outward curve in the middle for a softer look. -
Shape the Rim:
Once you reach the desired height (around 3-4 inches), make sure the rim is slightly thickened and flat. This flat surface is crucial for the lid to sit securely. -
Measure with Calipers:
Use calipers to measure the exact inside diameter of the rim. Lock the calipers in place; you’ll need this measurement for the lid.
Lid Too Loose?
If your lid rattles, the flange is too small. Don’t toss it! Use a thick bead of glaze on the flange (checking it won’t drip) to tighten the fit after firing.
Step 2: Creating the Lid
-
Throw the Lid off the Hump:
Using a larger mound of clay, center just the top portion. Open it shallowly to create a plate-like shape. -
Create the Flange:
Using your caliper measurement, create a vertical flange on the underside of the lid (currently facing up) that will fit inside the jar’s opening. Check the fit frequently. -
Cut the Lid:
Carefully wire under the lid to separate it from the hump and set it aside to stiffen to a leather-hard state.
Step 3: Trimming and Finishing
-
Trim the Jar Base:
Once the jar is leather hard, center it upside down on the wheel. Trim the bottom to create a clean foot ring and reveal the raw clay texture at the base. -
Refine the Lid:
Place the lid upside down (knob side up) on the wheel—you may need a chuck or to re-center it on the jar itself. Trim away excess weight. -
Add the Knob:
Score and slip the center of the lid. Attach a small ball of clay and shape it into a rounded button knob. I like to press a small dimple into the center for a tactile detail. -
Bisque Fire:
Allow both pieces to dry slowly and completely before firing them in the kiln to a bisque temperature (usually Cone 04 or 06).
Texture Twist
Before the clay dries, gently press a piece of coarse linen fabric against the exterior walls. The glaze will break beautifully over the subtle fabric weave texture.
Step 4: Glazing
-
Wax Resist:
Apply wax resist to the bottom inch of the jar’s exterior and the foot ring. This will create the exposed raw clay band shown in the reference. -
Glaze Application:
Dip the jar into a speckled white or cream glaze. Ensure the inside is fully coated. -
Glaze the Lid:
Dip the top of the lid. Be very careful to wipe any glaze off the flange and the rim where the lid meets the jar to prevent fusing during firing. -
Partial Glaze on Knob:
For the two-tone knob look, wipe the glaze off the very top surface of the button knob, exposing the raw clay underneath. -
Final Firing:
Fire the pieces to the maturation temperature of your clay and glaze (often Cone 5 or 6 for stoneware). Let the kiln cool completely before opening.
Enjoy using your new handmade vessel to organize your smallest, most precious keepsakes
Mini Sgraffito Practice Vases With Bold Carving
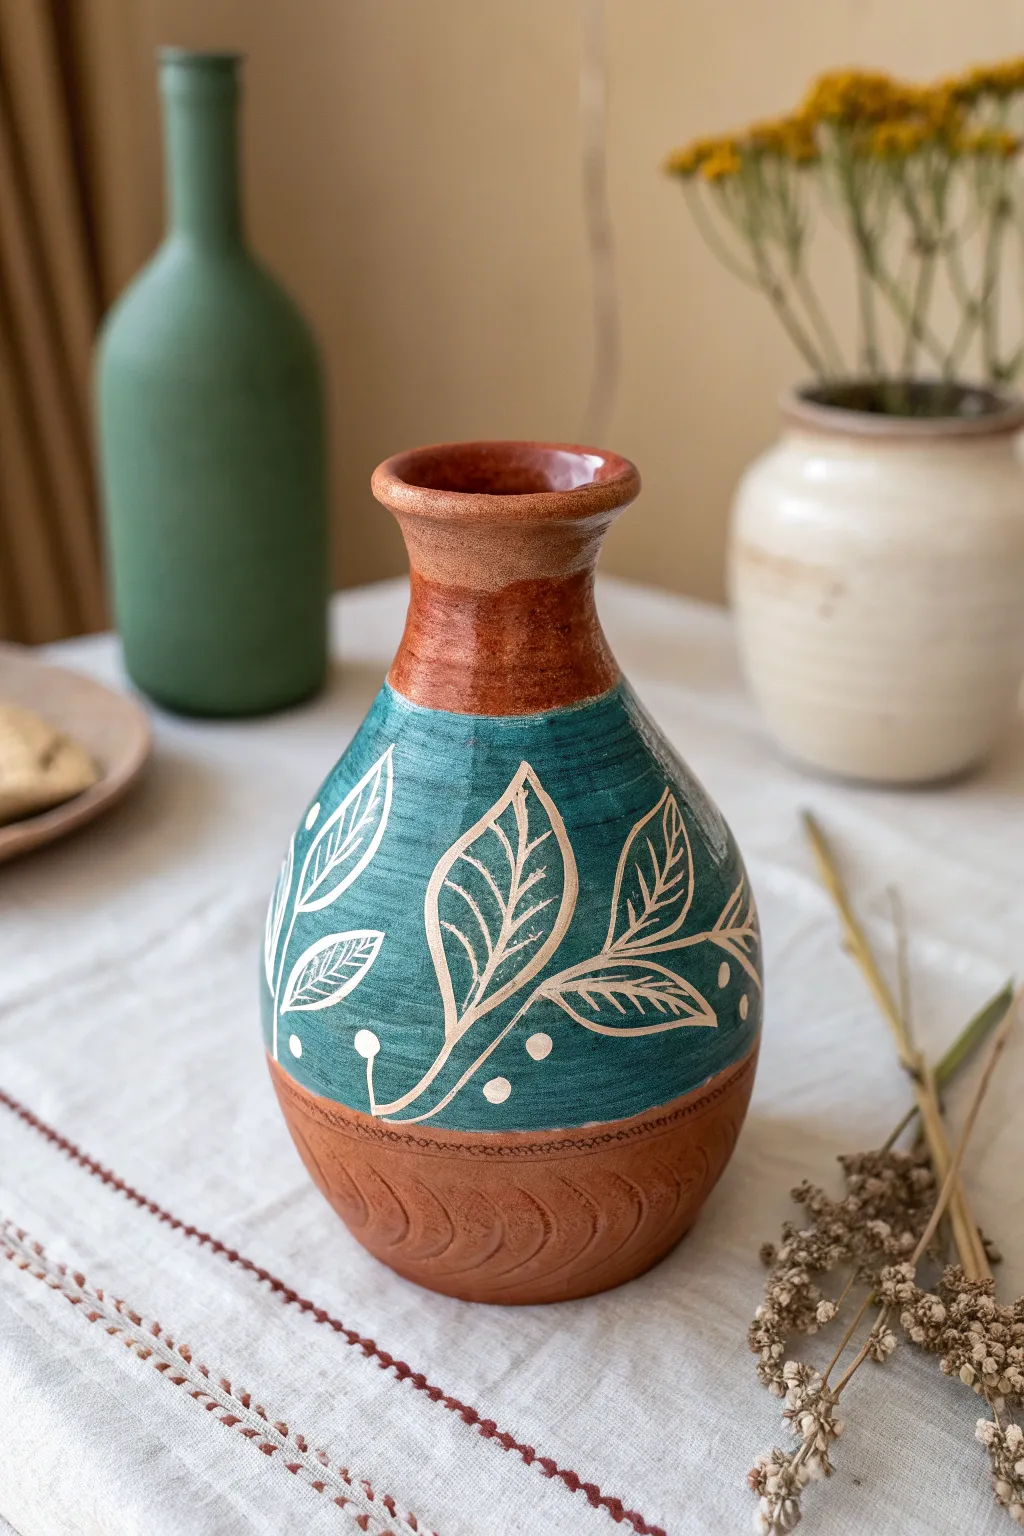
This charming project combines exposed raw clay with vibrant turquoise slip for a striking contrast. Using simple sgraffito carving techniques, you will reveal delicate leaf patterns beneath the color, creating a piece that feels both rustic and refined.
Step-by-Step Tutorial
Materials
- Red earthenware or terracotta clay
- Pottery wheel (or coil/pinch tools for hand-building)
- Turquoise underglaze or colored slip
- Soft fan brush
- Sgraffito loop tool (small)
- Needle tool
- Rib tool (wood or rubber)
- Sponge
- Clear glaze (optional)
Step 1: Forming the Vessel
-
Prepare the clay:
Start with a ball of well-wedged terracotta clay, roughly the size of a large orange. Ensure there are no air bubbles. -
Center and open:
Center the clay on the wheel and open it up, creating a floor about 3 inches wide. This will be a small bud vase, so keep the base proportional. -
Pull the walls:
Pull the walls upward into a cylinder first. Aim for a height of about 5-6 inches, keeping the walls relatively even in thickness. -
Shape the belly:
Using a rib tool on the outside and your hand on the inside, gently push the clay outward from the inside to create a rounded, bulbous belly at the bottom. -
Collar the neck:
Slowly collar the top section inward to form a narrow neck. Be gentle to avoid buckling the clay; use water sparingly here. -
Flare the rim:
Once the neck is narrow, gently flare the very top rim outward to create a small lip, smoothing it with a chamois or sponge. -
Trim lightly:
Use a wood tool to undercut the base slightly, giving the vase a little lift off the bat. Let the piece dry to leather-hard. -
Detail the base:
Once leather-hard, you can carve shallow, curved slanted lines into the bottom unglazed section of the belly for added texture, mimicking the swirling motion of the wheel.
Moisture Control Tip
Sgraffito works best on ‘leather hard’ clay. If your pot gets too dry while working, drape a damp paper towel over the unworked areas to keep moisture in.
Step 2: Applying Color & Carving
-
Define the color zone:
Decide where your teal band will start and stop. I like to leave the neck and the very bottom base raw. -
Apply underglaze:
Using a soft fan brush, apply 2-3 even coats of turquoise underglaze or slip to the middle section of the vase. Let each coat dry until the sheen disappears before adding the next. -
Verify dryness:
Touch the underglazed area gently; it should be firm and not tacky, but the clay underneath should still be leather-hard, not bone dry. -
Plan the motif:
Lightly scratch a faint outline of your leaves with a needle tool if you aren’t confident freehanding, or just visualize the placement of three large leaves wrapping around the form. -
Carve the stems:
Using a small sgraffito tool, carve the main curved stems first. Apply enough pressure to cut through the teal layer and reveal the red clay, but don’t dig deep into the wall. -
Outline the leaves:
Carve the outer shape of the leaves attached to the stems. Make the lines crisp and confident. -
Add leaf veins:
Inside each leaf outline, carve the central vein and angled side veins. Keep these lines slightly thinner than the outline if possible for variety. -
Embellish with dots:
Using the customized rounded tip of a loop tool or the back of a drill bit, gently scrape away small circles of underglaze around the leaves to create the polka-dot accents. -
Clean up crumbs:
Use a large, dry soft brush to sweep away the clay ‘crumbs’ created by carving. Do not use water or a wet sponge, or you will smear the teal into the raw clay lines.
Uneven Carving Lines?
If your lines look jagged, your clay is likely too dry or your tool is dull. Slightly dampen the surface with a mist bottle or sharpen your loop tool.
Step 3: Finishing
-
Bisque fire:
Allow the vase to dry completely to bone dry state, then bisque fire it to cone 04 (or according to your clay body’s specifications). -
Glaze application:
Apply a clear glossy glaze over the entire piece (or just the interior if you prefer a matte exterior). If dipping, hold it by the foot and dip quickly. -
Final fire:
Fire the piece again to the maturation temperature of your clay and glaze (likely cone 05/06 or cone 5/6 depending on materials used).
Once fired, fill your beautiful new vessel with dried grass or wildflowers to complement the earth tones.