If you’re craving a project that feels satisfying but won’t take over your whole table, small sculptures are the sweetest spot. I love them because you can finish one in a weekend, try a new style, and still have time left to make a second (because you will).
Mini Animal Figurines With Simple Shapes
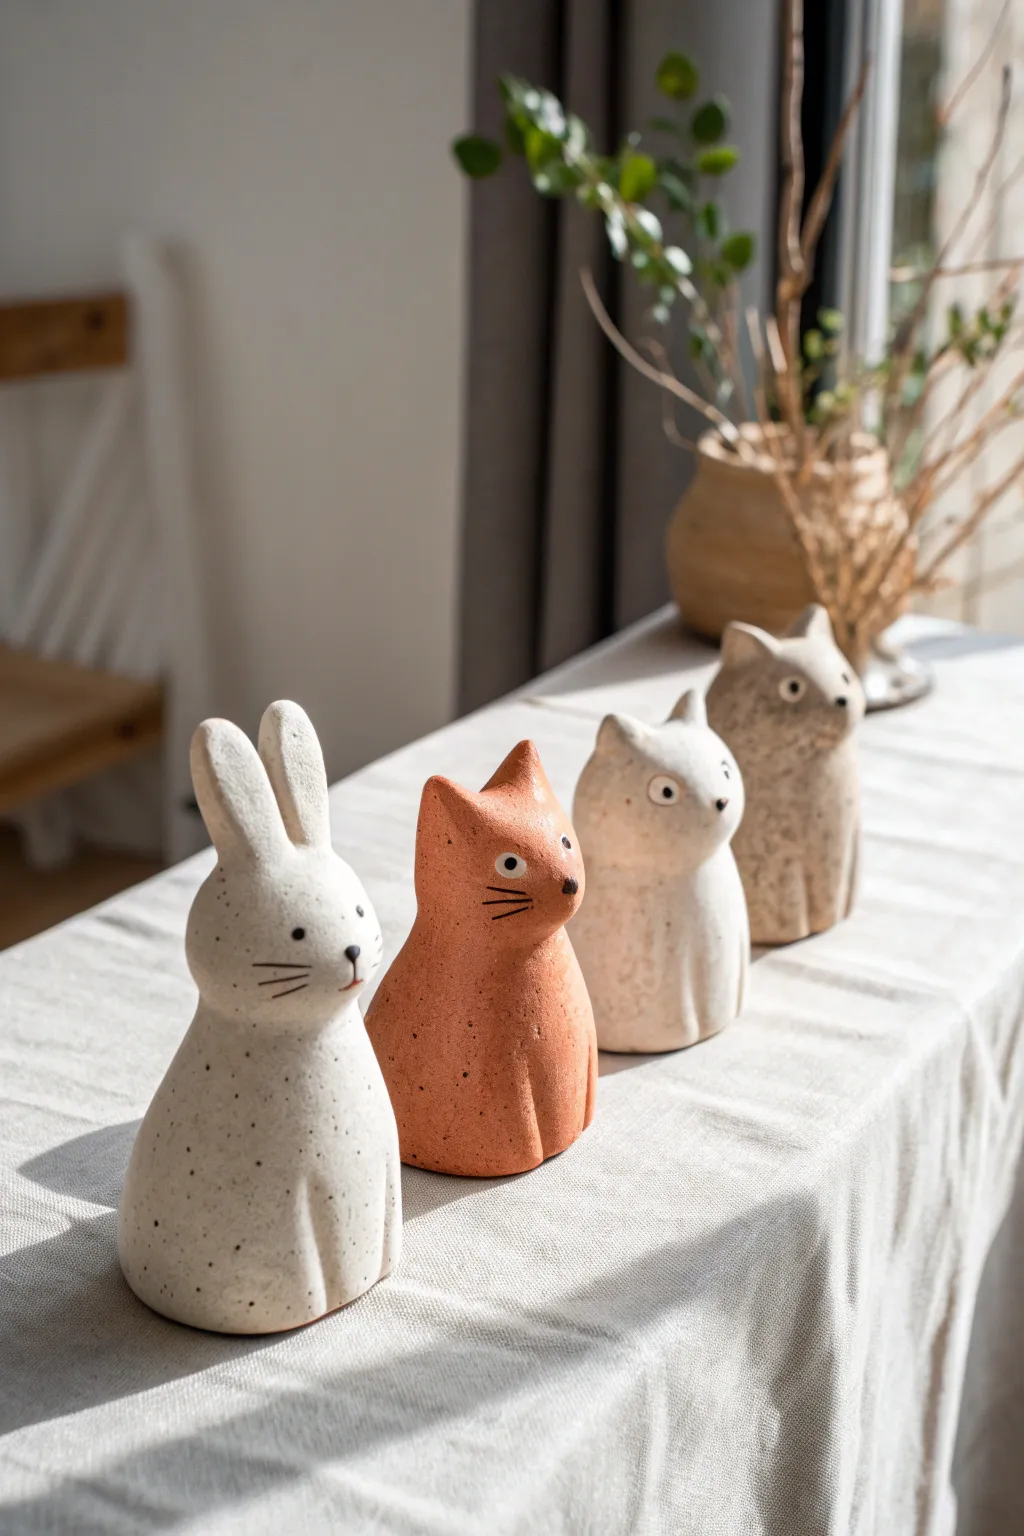
These charming, stylized animal figurines capture the essence of woodland creatures using simple, rounded forms and earthy textures. With their speckled matte finish and minimalist faces, they make a delightful, modern addition to any windowsill or shelf display.
Step-by-Step Guide
Materials
- White stoneware clay or air-dry clay (if not firing)
- Terracotta colored clay (or acrylic paint)
- Speckled buff clay (or speckled glaze)
- Pottery tools: needle tool, smoothing rib, sponge
- Slip (liquid clay) for joining
- Clear matte glaze or satin varnish
- Underglaze pencil or fine black acrylic marker
- Water container
Step 1: Forming the Base Body
-
Prepare the clay:
Begin by wedging your chosen clay thoroughly to remove any air bubbles. Divide the clay into fist-sized or smaller balls depending on how large you want your final figurines to be. The example pieces are roughly 4-5 inches tall. -
Shape the cone:
Roll a ball of clay between your palms to smooth it, then gently roll it on your work surface into a thick cone shape. The base should be wide and stable, tapering up slightly towards where the head will be. -
Define the head:
Instead of attaching a separate head, gently pinch and mold the top third of the cone to distinguish the head area. Use your thumbs to create a slight indentation for the neck, keeping the transition very subtle and smooth. -
Smooth the surface:
Use a damp sponge or a soft rib tool to smooth out the entire form. The charm of these figures lies in their seamless, pebble-like surface, so take your time erasing any fingerprints.
Clean Lines
Keep a bowl of water and a very smooth, damp sponge nearby. Wiping the clay frequently creates that soft, manufactured-smooth look essential to the minimalist style.
Step 2: Sculpting the Features
-
Form the rabbit ears:
For the bunny, roll two small coils of clay. Flatten them slightly and taper the ends. Score and slip the attachment points on top of the head, then press the ears firmly in place. -
Blend the ears:
Use a modeling tool to drag clay from the base of the ears down onto the head, smoothing the seam completely so they look like they grew naturally from the form. I find a wooden tool works best here for blending. -
Sculpt fox or cat ears:
For the other animals, pinch small triangles directly from the clay on top of the head. Keep them short and perky. Gently round the tips so they aren’t sharp. -
Create the nose:
For the bunny and foxes, add a tiny, almost microscopic ball of clay to the center of the face for a nose, or simply press a small indentation where the nose will be painted later. The dimensionality adds character. -
Define the legs:
These figures don’t have distinct paws. Instead, use a modeling tool to press a vertical line into the bottom front of the cone. This suggests the front legs sitting together without needing complex sculpting. -
Refine the posture:
Give the body a slight curve or tilt to create personality. Maybe the bunny looks slightly up, while the fox looks straight ahead. Check stability again to ensure they stand solid.
Weighted Bases
Hollow out the bottom slightly with a loop tool, but leave the base thick toward the bottom. This lowers the center of gravity so your tall figurines won’t tip over.
Step 3: Finishing and Details
-
Dry the pieces:
Allow the clay to dry slowly under loose plastic if using ceramic clay, or according to package directions for air-dry clay. Slow drying prevents cracking. -
Apply finish or fire:
If using ceramic clay, bisque fire your pieces. For the speckled look shown, apply a sheer speckled glaze (like a matte speckled cream) or use a clay body that already has speckles and apply a clear matte glaze. -
Air-dry alternative:
If using air-dry clay, paint the dried figures with matte acrylics. Use an old toothbrush to flick tiny specks of brown or black paint onto the white and terracotta figures to mimic the stoneware texture. -
Draw the face:
Once the base surface is dry (or fired), use a fine black marker or underglaze pencil to draw the minimalist features. Place two small dots for eyes wide apart. -
Add whiskers and mouth:
Draw three simple, straight lines on each cheek for whiskers. Add a tiny vertical line connecting the nose to a subtle mouth line. -
Final eyes:
To make the eyes pop like the photo, you can add a tiny ring of white paint around the black pupil, or simply use a slightly larger white dot with a black center for a surprised look. -
Seal the work:
Finish with a final coat of matte varnish relative to your medium to protect the painted details and give that soft, ceramic sheen.
Group your new friends together on a sunny ledge to enjoy their quiet companionship


Tiny Elephant Sculptures With Big Ears
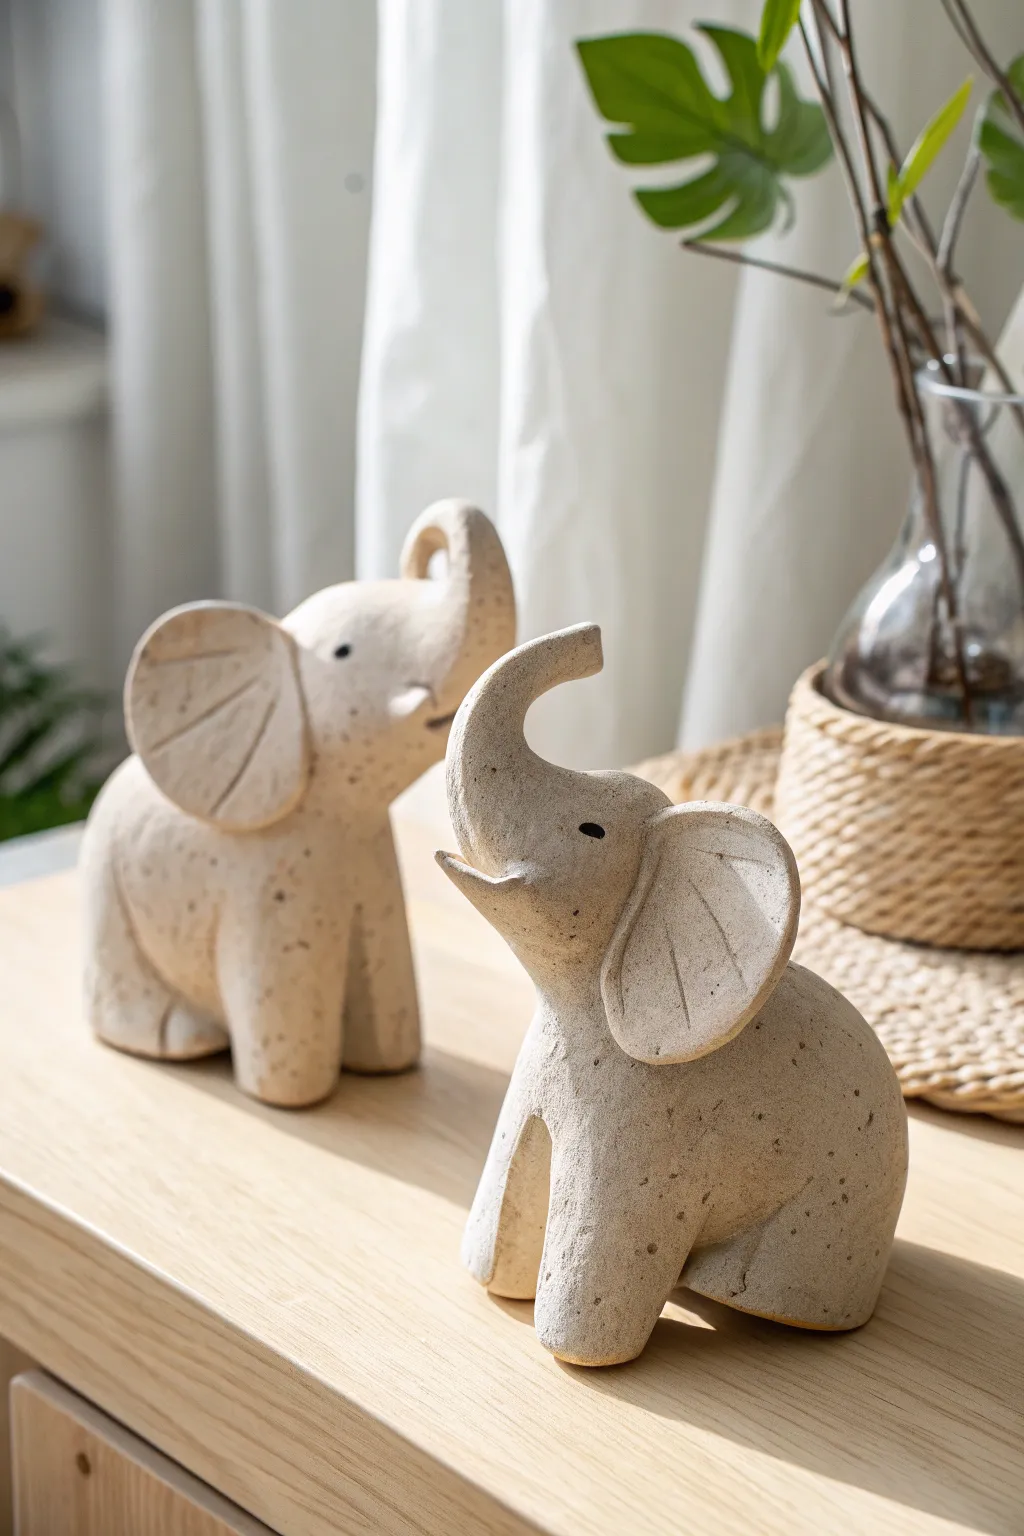
These charming, minimalist elephant sculptures feature a delightful textured finish that mimics natural sandstone. With their joyful upturned trunks and oversized ears, they add a touch of handcrafted warmth to any shelf or tabletop display.
Step-by-Step Tutorial
Materials
- Air-dry clay (stone or natural color prefered)
- Small rolling pin
- Sculpting tools (needle tool, smoothing tool)
- Aluminum foil
- Water in a small cup
- Sponge
- Acrylic paint (beige/cream, dark brown, black)
- Old toothbrush
- Matte sealant spray
- Fine-grit sandpaper
Step 1: Sculpting the Base Form
-
Create the armature:
Crumple a small piece of aluminum foil into a rounded, slightly elongated egg shape. This will be the core of the elephant’s body, helping to save clay and reduce drying time. -
Wrap and shape the body:
Roll out a thick slab of clay and wrap it fully around your foil core. Smooth the seams together with a little water until you have a seamless, solid oval shape. -
Form the legs:
Roll four thick, short cylinders of clay for the legs. They should be stout to support the body. Attach them to the bottom of the body by scoring both surfaces (scratching hatch marks) and adding a dab of water or slip. -
Blend the joints:
Using a smoothing tool or your finger, blend the clay from the legs upward into the body so there are no visible seams. The transition should be smooth and organic. -
Shape the head:
Roll a slightly smaller ball of clay for the head. Attach it firmly to the front top of the body, again scoring and blending the clay to ensure a strong bond.
Clay Consistency
If your clay starts cracking while you sculpture, dip your fingers in water and smooth it immediately. Keep unused clay wrapped in plastic to prevent drying.
Step 2: Adding Details
-
Form the trunk:
Roll a cone of clay and attach the wider end to the face. Gently curb the trunk upwards in a ‘J’ shape. I like to slightly flatten the tip to give it a trumpet-like appearance. -
Create the oversized ears:
Flatten two balls of clay into large, thick pancake shapes. These should be quite large relative to the head. Attach them to the sides of the head, blending the back edge seamlessly into the neck area. -
Detail the ears:
Use a needle tool or a dull knife to gently press curved lines into the ears, mimicking the texture of wrinkles or veins. Don’t cut all the way through; just make an impression. -
Add the eyes:
Use the rounded end of a small paintbrush or a dotting tool to press small indentations where the eyes will go. You can also define the mouth by pressing a small tool under the trunk base. -
Refine the surface:
Before the clay dries, use a slightly damp sponge to wipe over the entire sculpture. This removes fingerprints and softens any harsh tool marks. -
Allow to dry:
Let your elephants dry completely. Depending on the thickness and climate, this usually takes 24 to 48 hours. Turn them occasionally to ensure the bottom dries too.
Step 3: Finishing the Texture
-
Sand imperfections:
Once bone dry, use fine-grit sandpaper to gently smooth any rough spots, particularly around the bottom of the feet or ear edges. -
Base coat:
Paint the entire sculpture with a creamy beige or warm sand-colored acrylic paint. You may need two coats for full coverage. -
Create the splatter effect:
Mix a small amount of dark brown paint with a little water to thin it. Dip an old toothbrush into this mixture. -
Apply the speckles:
Hold the toothbrush near the sculpture and run your thumb across the bristles to flick tiny specks of paint onto the surface. Rotate the elephant to get even coverage. -
Paint the eyes:
Using a very fine brush or a black marker, carefully fill in the small eye indentations with black paint. -
Seal the work:
Finish by spraying the sculpture with a matte clear coat. This protects the paint and creates that realistic, unglazed ceramic look.
Earthy Tones
Instead of painting, try kneading instant coffee granules or black pepper directly into the wet clay before sculpting for a natural, embedded texture.
Set your finished pair on a sunny windowsill where their textured finish can catch the light


Pocket-Size Cat Sculptures in Stretch Poses
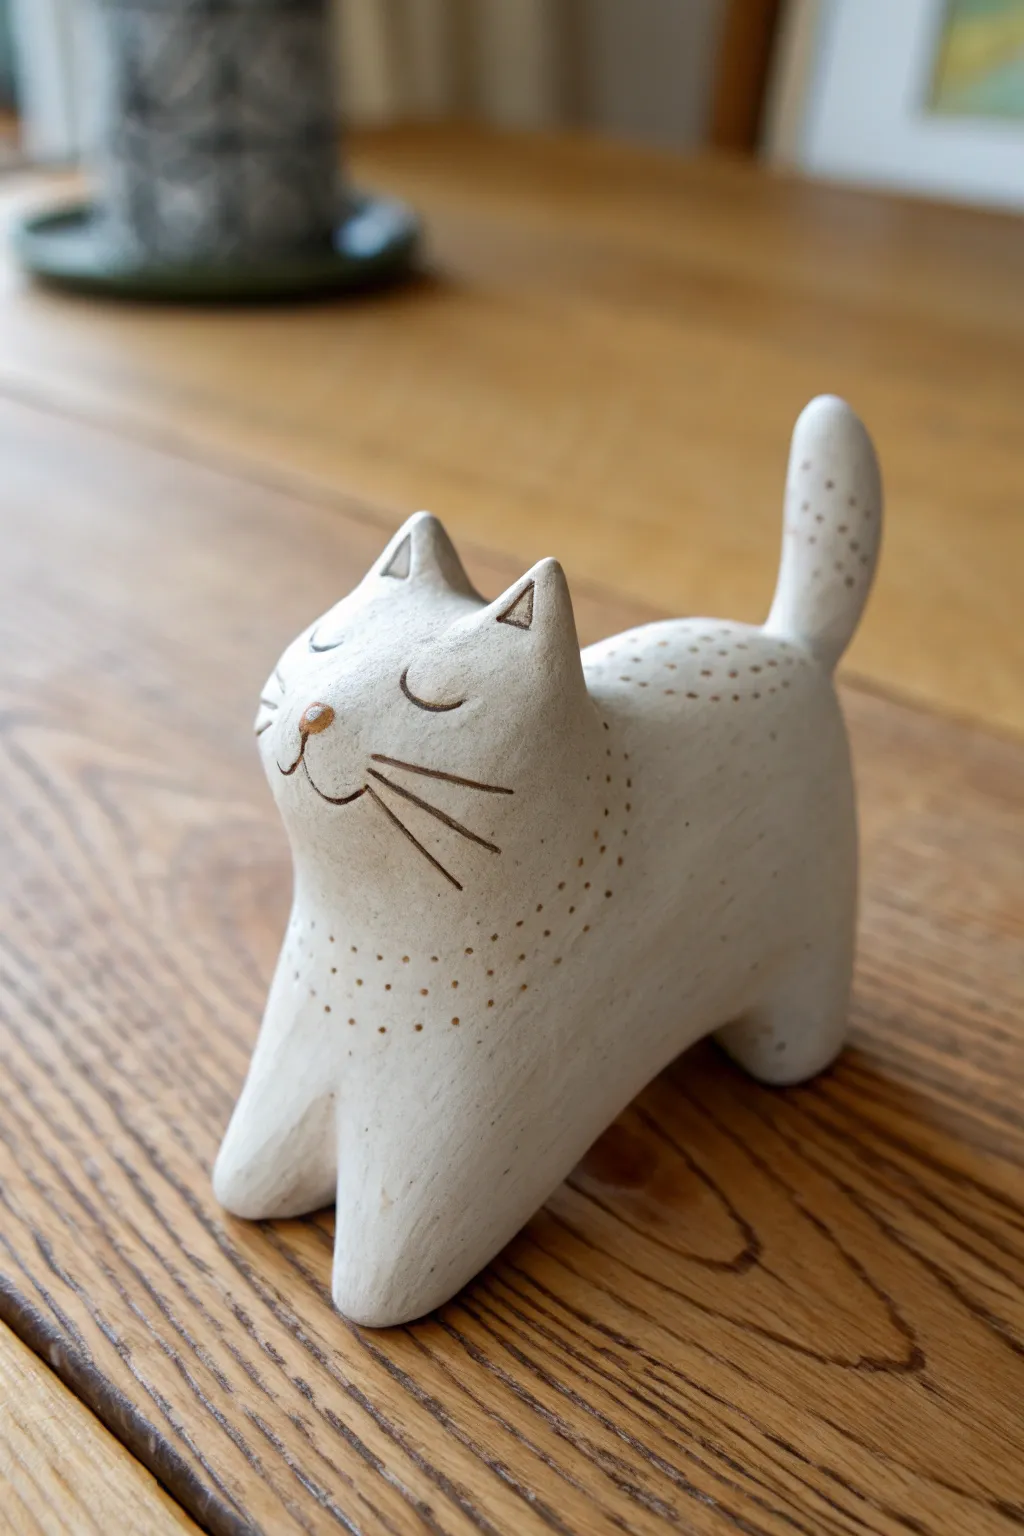
Capture the essence of a happy feline morning stretch with this charming little sculpture. Using air-dry clay or polymer clay, you’ll create a smooth, stylized form with subtle incised details that give it a warm, folksy character.
Detailed Instructions
Materials
- White air-dry clay (e.g., DAS) or white polymer clay
- Small bowl of water (for smoothing)
- Needle tool or toothpick
- Small rolling pin
- Fine-grit sandpaper (200-400 grit)
- Brown acrylic paint (burnt umber or sienna)
- Small detail paintbrush
- Paper towel or soft cloth
- Matte spray varnish (optional)
Step 1: Forming the Body
-
Prepare the Clay:
Start with a ball of clay roughly the size of a golf ball. Knead it well until it’s pliable and warm, ensuring there are no air bubbles trapped inside. -
Shape the Cylinder:
Roll the ball into a thick sausage shape between your palms. This cylinder will form the main torso of the cat. -
Establish the Stretch:
Gently bend the cylinder into an ‘L’ shape, but keep the angle soft and curved rather than sharp. The upright part will become the chest and head, while the horizontal part is the back and rear legs. -
Define the Front Legs:
At the base of the upright section, use your thumb and forefinger to pinch and pull the clay slightly forward to create two distinct front paws. Press them definitively against your work surface so the cat stands stable. -
Create the Head:
Smooth out the top of the upright section into a rounded dome. If you need more volume for the head, you can add a small pinch of clay and smooth the seam completely with a bit of water. -
Sculpt the Ears:
Pinch two small triangles of clay from the top of the head. Shape them to be perky and upright, blending the base of the ears seamlessly into the skull. -
Form the Hindquarters:
Move to the back end of the sculpture. Gently separate the end of the clay cylinder to suggest two rear legs, similar to the front, creating a stable four-point stance. -
Add the Tail:
Roll a small, tapered coil of clay for the tail. Attach it firmly to the rear, blending the clay upwards so the tail points toward the sky. I like to give it a slight curve for personality.
Cracks Appearing?
If air-dry clay cracks while drying, mix a tiny bit of fresh clay with water to make a paste (slip). Fill the crack, smooth it over, and let it dry again.
Step 2: Refining and Detailing
-
Smooth the Surface:
Dip your finger in a little water and run it over the entire sculpture. Your goal is to erase fingerprints and create that smooth, ceramic-like finish seen in the photo. -
Carve Facial Features:
Using a needle tool, carefully carve two curved arches for the sleeping eyes. Below them, carve a small ‘Y’ shape for the nose and mouth. -
Add Whiskers:
Incise three long, sweeping lines on each cheek for whiskers. Make these deeper than the other marks so they hold paint well later. -
Dot Texture:
Use the point of your needle tool to poke a pattern of small dots like a collar around the neck and along the spine. Keep the spacing consistent for a neat look. -
Drying:
Let the sculpture dry completely. For air-dry clay, this takes 24-48 hours. If using polymer clay, bake according to the manufacturer’s instructions. -
Sanding:
Once fully cured, gently sand any rough spots or sharp edges with fine-grit sandpaper to achieve a velvety texture.
Step 3: Finishing Touches
-
Apply the Wash:
Dilute a small drop of brown acrylic paint with water. Brush this wash into the carved eyes, whiskers, and dot patterns. -
Wipe Back:
Immediately wipe the surface with a damp paper towel. The paint will stay trapped in the recessed lines but wipe off the smooth surface, emphasizing the details. -
Spot Color:
If needed, dab a tiny dot of undiluted brown paint onto the nose tip for definition. -
Seal:
Finish with a light coat of matte spray varnish to protect the clay and give it a finished, professional sheen.
Make it a Set
Create two more cats in different yoga poses—one curled in a sleeping ball and one arching its back (Halloween style)—to display as a ‘morning routine’ trio.
Now you have a serene little companion to keep you company on your desk or shelf


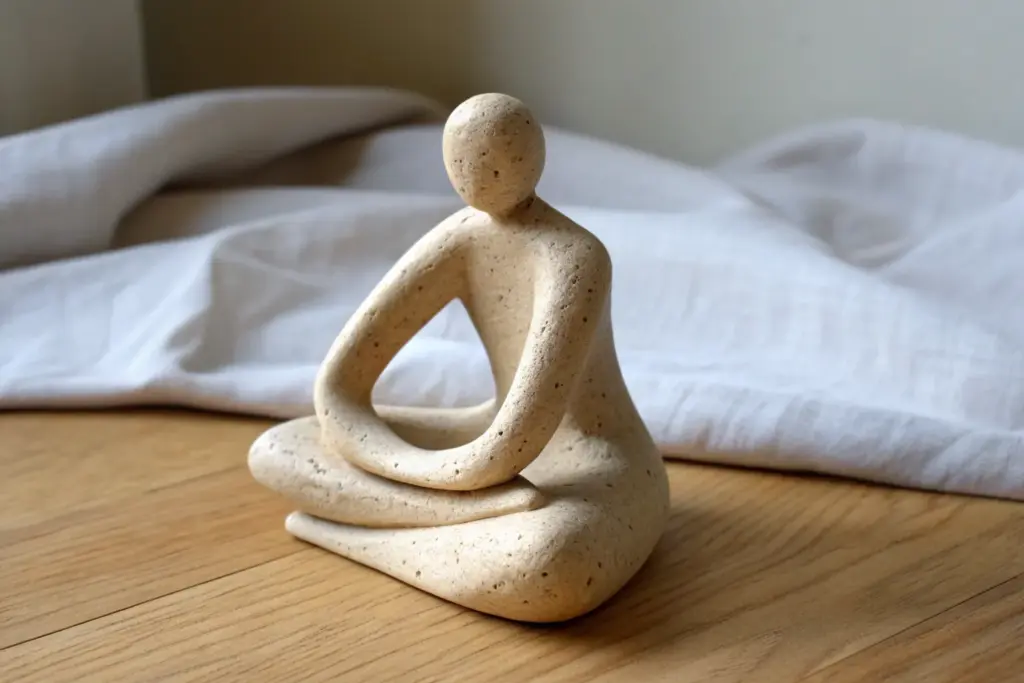
Simple Human Figure “Thinker” Pose

This project captures the essence of human introspection through a simplified, unglazed clay figure. The texture is purposefully rough and stony, giving the sculpture a timeless, ancient artifact feel that looks beautiful on a shelf or desk.
Detailed Instructions
Materials
- Stoneware clay (groggy/sandy texture preferred) or air-dry stone clay
- Wooden modeling tools (rib, paddle)
- Needle tool
- Sponge and water
- Canvas or wooden board to work on
- Wire clay cutter
- Loop tool (for hollowing, if firing)
- Slip (clay slurry)
Step 1: Building the Core Form
-
Preparing the clay:
Begin by wedging a grapefruit-sized ball of clay to remove air bubbles. This ensures a consistent texture, which is crucial for this raw finish. -
Shaping the torso:
Take about half of your clay and roll it into a thick cylinder. Gently taper one end to form the waist and flatten the other slightly for the shoulders. This will be the main anchor for the limbs. -
Forming the legs:
Roll two thick coils for the legs. Bend them at the ‘knee’ to create a sharp 45-degree angle. The feet should be flat extensions rather than detailed appendages, maintaining the minimalist aesthetic. -
Attaching the legs:
Score the bottom of the torso and the top of the thighs with your needle tool. Apply a dab of slip and press the legs firmly onto the torso base so the figure sits balanced on its bottom. -
Check stability:
Before moving on, ensure the figure sits upright without tipping. I usually tap the base gently on the table to flatten the seat and improve stability.
Step 2: Arms and Posture
-
Creating the arms:
Roll two slightly thinner coils for the arms. Bend them to create the elbows. The pose requires the elbows to rest on or near the knees, so measure the length against your torso-leg assembly. -
Positioning the shoulders:
Score and slip the shoulders. Attach the arms so they reach forward. The key to this pose is the ‘hunch,’ so angle the arms slightly downward to pull the future head forward. -
Crossing the arms:
Rest the forearms across the knees. You can merge the two hands into a single abstract mass or cross them over each other. Press them firmly onto the knee area to create a closed structural loop.
Pro Tip: Hidden Strength
Ensure the points where the head touches the arms and the arms touch the knees are thoroughly scored and slipped. This triangulation makes the sculpture incredibly sturdy.
Step 3: The Head and Details
-
Sculpting the head:
Roll a smooth egg shape for the head. Keep the features minimal—no eyes or mouth. Just a suggestion of a nose ridge or ear bump is enough. -
Placement:
Attach the head to the shoulders and lean it forward until the forehead or chin rests against the crossed arms. This contact point adds physical strength to the sculpture and emotional weight to the pose. -
Refining the connection:
Use a small wooden tool to blend the clay at the neck and where the head touches the arms. The transition should look organic, not like stuck-on parts. -
Suggesting features:
Using a small loop tool or your thumb, subtly press in the eye socket area and pin back small pieces of clay for simple ears. Keep it abstract.
Troubleshooting: Sagging Limbs
If the clay is too soft and the figure slumps, prop up the knees or head with crumpled paper towels or foam blocks until the clay stiffens to leather-hard.
Step 4: Texturing and Finishing
-
Initial smoothing:
Go over the entire figure with a damp sponge to remove fingerprints, but don’t over-smooth. You want to keep the clay’s natural grain. -
Adding the ‘stone’ texture:
Take a stiff bristle brush or a rough stone and gently tap the surface of the clay. This stippling creates that weathered, sandstone look seen in the photo. -
Sharpening changes of plane:
Use a wooden paddle or flat tool to slightly flatten the sides of the arms and legs. This creates planar shifts that catch the light better than round tubes. -
Drying:
Cover the figure loosely with plastic for the first 24 hours to let moisture even out. Then, uncover and let it dry slowly away from direct heat to prevent cracking. -
Optional Hollowing:
If you plan to kiln fire this and the torso is thicker than an inch, hollow out the underside carefully with a loop tool once the clay is leather hard.
Enjoy the quiet presence this thoughtful little figure brings to your space

The Complete Guide to Pottery Troubleshooting
Uncover the most common ceramic mistakes—from cracking clay to failed glazes—and learn how to fix them fast.
Two-Figure Hug Sculpture for Connection
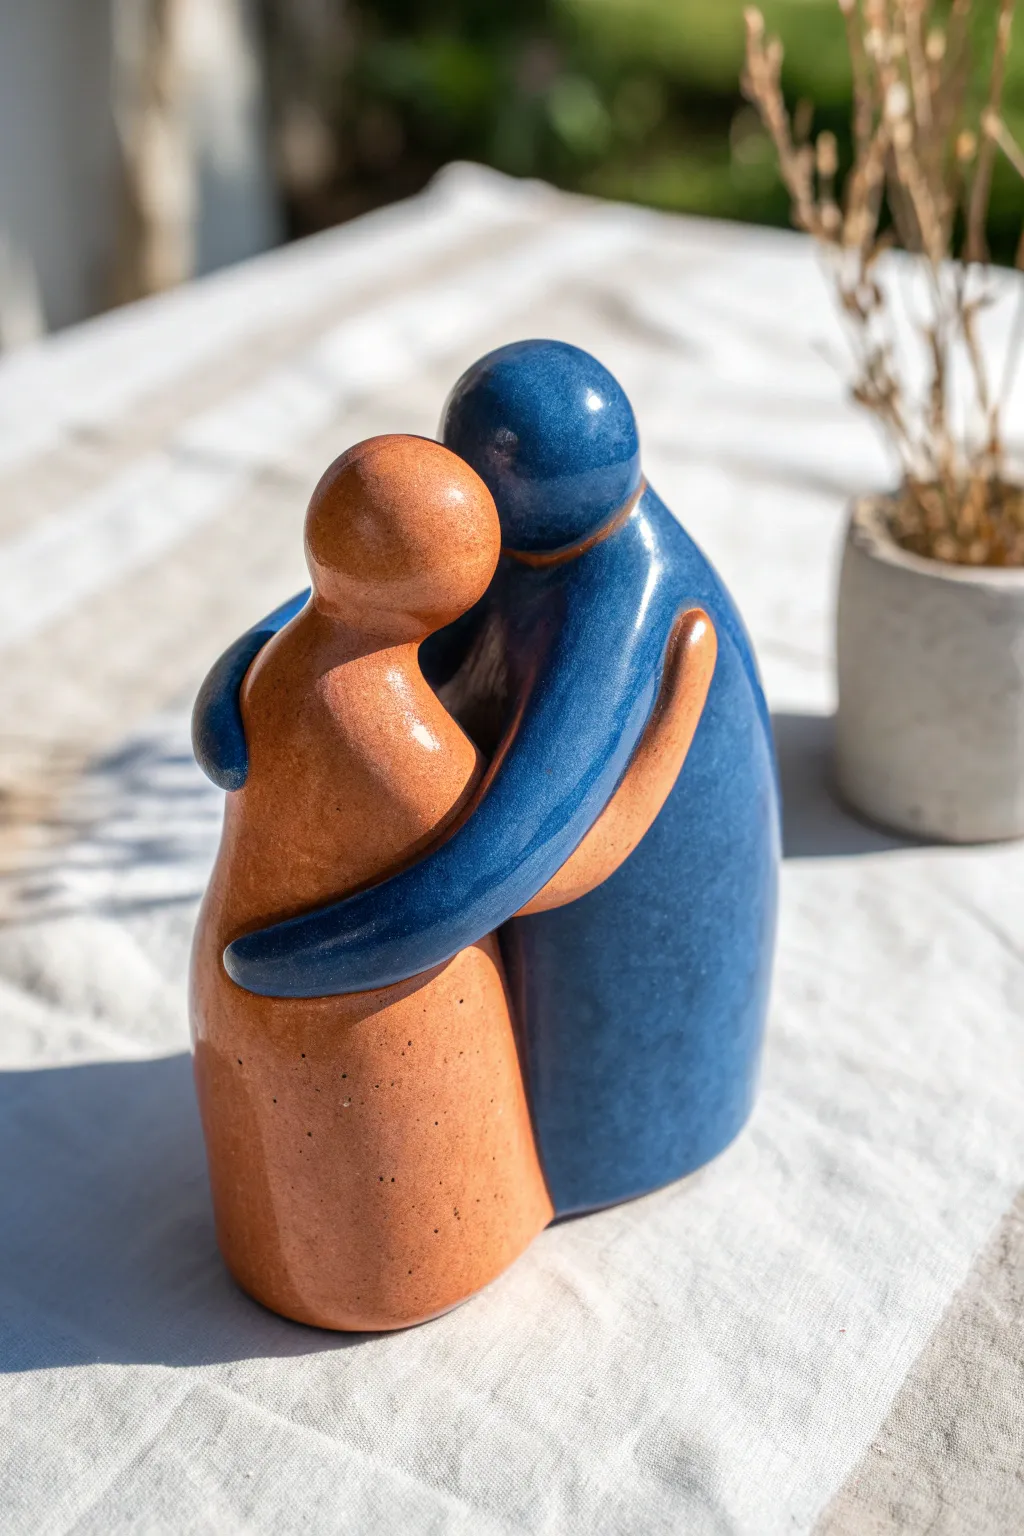
Capture the warmth of a loving embrace with this smooth, stylized ceramic sculpture featuring two interlocking figures. The contrasting warm terracotta and deep blue glazes create a striking visual balance while emphasizing the bond between forms.
How-To Guide
Materials
- High-quality stoneware clay (brown or buff)
- Pottery wheel (optional, for base forms) or rolling pin
- Loop tools and modeling ribs (wood and rubber)
- Needle tool
- Score and slip tool (or serrated rib)
- Sponge and bucket of water
- Deep glossy blue ceramic glaze
- Glossy terracotta/orange ceramic glaze (or transparent glaze if using terracotta clay)
- Kiln access
- Small paintbrush for precision glazing
Step 1: Forming the Body Bases
-
Prepare the clay:
Begin by thoroughly wedging your stoneware clay to remove any air bubbles, ensuring a smooth, uniform consistency that won’t crack during firing. -
Create two cones:
Form two solid, elongated cone shapes of roughly equal height. These will serve as the core bodies for the figures. You can do this by hand-building or by throwing a thick cylinder on the wheel and altering it. -
Shape the torsos:
Gently taper the top of each cone to create a suggestion of a neck and shoulders. The forms should remain abstract and rounded rather than anatomically precise. -
Add the heads:
Roll two smooth spheres of clay for the heads. Attach one to the top of each body using the score and slip technique—scratching both surfaces and applying clay slurry/slip to bond them securely.
Clean Color Lines
To prevent the blue glaze from running onto the orange during firing, leave a hairline gap between the glazes or use a wax resist line between the two distinct colors.
Step 2: Sculpting the Embrace
-
Position the figures:
Press the two figures together side-by-side, slightly angled inward so their ‘cheeks’ or heads touch. The clay should still be plastic enough to deform slightly where they meet, creating a natural seamless unit. -
Form the arms:
Roll out two long, thick coils of clay. These will become the sweeping arms that wrap around the figures. -
Attach the blue figure’s arm:
Take one coil and attach it to the ‘blue’ figure’s shoulder area. Drape it across the front of the ‘orange’ figure, wrapping it around their waist. Smooth the attachment point at the shoulder so it flows seamlessly from the body. -
Attach the orange figure’s arm:
Repeat the process for the other figure, but position this arm slightly underneath the first one if you want a layered look, or have it wrap around the back depending on your preferred composition. -
Refine the embrace:
Ensure the ends of the arms (the hand areas) taper gently and blend into the back or side of the partner figure. I find using a wooden modeling tool helps blend these seams invisibly.
Step 3: Smoothing and Firing
-
Smooth the surface:
Use a damp sponge and a soft rubber rib to go over the entire sculpture. The goal is a flawless, pebble-like finish with no fingerprints or sharp angles. -
Check the base:
Flip the sculpture gently and hollow out the bottom if the figures are thick (more than an inch) to prevent explosions in the kiln. Use a loop tool to remove excess interior clay. -
Slow dry:
Loosely cover the piece with plastic and let it dry very slowly over several days to bone dry status. This prevents the joined areas from cracking apart. -
Bisque fire:
Fire the piece in the kiln to cone 04 (or your clay’s bisque temperature) to prepare it for glazing.
Cracks at the Seams?
If the figures separate while drying, wrap the piece in wet paper towels and plastic to rehydrate it, then score deeper and add more slip to reinforce the bond.
Step 4: Glazing
-
Apply wax resist:
Apply wax resist to the bottom of the piece to prevent it from sticking to the kiln shelf. -
Glaze the first figure:
Carefully brush the deep blue glaze onto the first figure. Use a steady hand where the two bodies meet, or use wax resist on the orange figure’s side to create a clean line. -
Glaze the second figure:
Apply the warm terracotta or orange glaze to the second figure. Be extra careful around the ‘arm’ of the blue figure that crosses the orange body—this boundary needs to be crisp. -
Clean up:
Wipe away any stray drips with a damp sponge, especially near the base or where the colors meet. -
Final firing:
Fire the piece again to the maturation temperature of your glaze (e.g., Cone 5 or 6) to achieve that deep, glossy finish.
Place your finished sculpture in a well-lit spot where the glossy curves can catch the light
Mini Hand Gesture Sculptures (Peace, Wave, Heart)
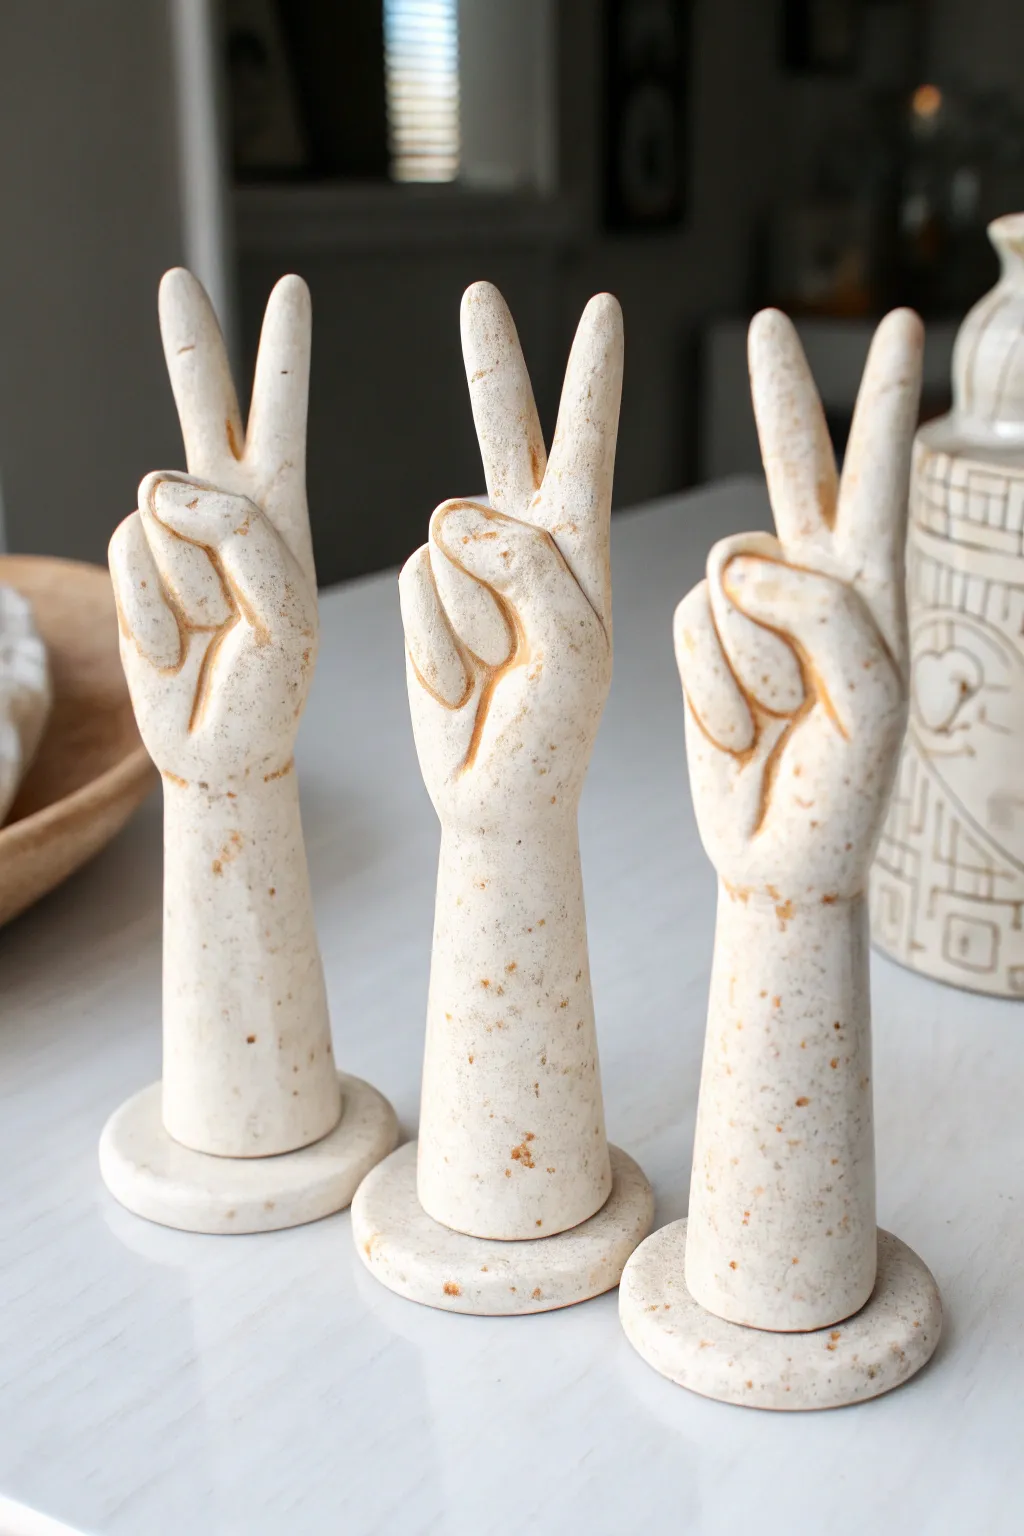
Create your own groovy, minimalist decor with these charming hand sculptures capturing the classic peace sign gesture. Their warm, speckled stoneware finish gives them an organic, modern pottery look without needing a kiln.
Step-by-Step Guide
Materials
- White polymer clay (approx. 3-4 blocks per hand)
- Speckled clay add-in (e.g., ground pepper, embossing powder, or pre-speckled clay)
- Armature wire (12 or 14 gauge)
- Pliers
- Aluminum foil
- Rolling pin
- Clay sculpting tools (silicone shapers, needle tool)
- Round cookie cutter (approx. 3 inches)
- X-Acto knife or clay blade
- Oven for baking
- Smooth work surface (glass or ceramic tile)
Step 1: Preparation and Armature
-
Mix the Speckles:
If you aren’t using pre-speckled clay, start by thoroughly kneading your white polymer clay to condition it. Add a small pinch of your speckling agent (like ground black pepper or coarse sand) and knead until it is evenly distributed for that faux-stoneware effect. -
Construct the Base Wire:
Cut a piece of thick armature wire about 10 inches long. Bend one end into a flat spiral or loop; this will anchor the sculpture into the base so it doesn’t wobble. -
Form the Fingers:
Extend the wire straight up from the loop. At the top, fashion the wire into the general ‘V’ shape of the peace sign fingers. This internal skeleton prevents the long fingers from drooping during baking. -
Create the Foil Core:
Tightly wrap aluminum foil around the wire to bulk up the wrist and palm area. This saves clay and ensures the piece bakes evenly. Keep the foil slightly thinner than you want the final wrist to be.
Drooping Fingers?
If the upright fingers sag while sculpting, your clay is too warm. Pop the sculpture in the freezer for 5 minutes to firm it up before continuing detail work.
Step 2: Basic Shaping
-
Sheet the Clay:
Roll out a sheet of your speckled clay to about 1/4 inch thickness. I usually ensure I have enough to wrap the entire form in one go to minimize seams. -
Cover the Armature:
Wrap the clay sheet around your foil and wire armature. close the seams by pinching the clay together and smoothing it down with your thumb. -
Define the Wrist:
Roll the bottom section of the sculpture on your work surface to create a smooth, cylindrical wrist. It should taper slightly as it moves up towards the hand. -
Form the Palm:
Flatten the top section slightly to create the palm. The area should look like a mitten at this stage before we define individual fingers.
Step 3: Detailing the Gesture
-
Separate the Fingers:
Use your clay blade to carefully cut the clay at the top to separate the index and middle fingers, following the wire ‘V’ inside. Smooth the clay around the wire tips. -
Fold the Other Fingers:
For the ring and pinky fingers, shape two small logs of clay. Attach them to the palm so they look curled downward. Blend the attachment points so they look seamless. -
Add the Thumb:
Shape a shorter, thicker log for the thumb. Attach it so it crosses over the curled ring and pinky fingers, pressing gently to secure the ‘fist’ portion of the gesture. -
Refine the Anatomy:
Use a silicone tool to smooth the ‘webbing’ between the two upright fingers. Add subtle indentations for knuckles and fingernails if you want extra realism, or keep it smooth for a modern abstract look.
Pro Tip: Texture
For a true ceramic feel, use an old toothbrush to gently tap the surface before baking. This removes the ‘plastic’ shine and adds a stone-like texture.
Step 4: The Base and Finish
-
Create the Stand:
Roll out a thick slab of clay (about 1/2 inch). Use your round cookie cutter to punch out a clean circle base. -
Attach the Hand:
Place the hand sculpture onto the center of the round base. The wire loop at the bottom should be pushed into this base. Blend the clay from the wrist down into the base using a dragging motion with a sculpting tool. -
Final Smoothing:
Brush a tiny amount of baby oil or clay softener over the entire piece with your finger to remove fingerprints and crate a flawless, satin finish. -
Bake:
Bake adhering strictly to your clay manufacturer’s temperature instructions. Since this is a thicker piece, bake for at least 45–60 minutes to ensure full curing. -
Cool Down:
Turn off the oven and let the sculpture cool completely inside. This gradual cooling helps prevent cracks in thicker sculptures.
Place your trio of peace signs on a console table or shelf to spread good vibes through your home.


What Really Happens Inside the Kiln
Learn how time and temperature work together inside the kiln to transform clay into durable ceramic.
Tiny Face Busts With Stylized Features
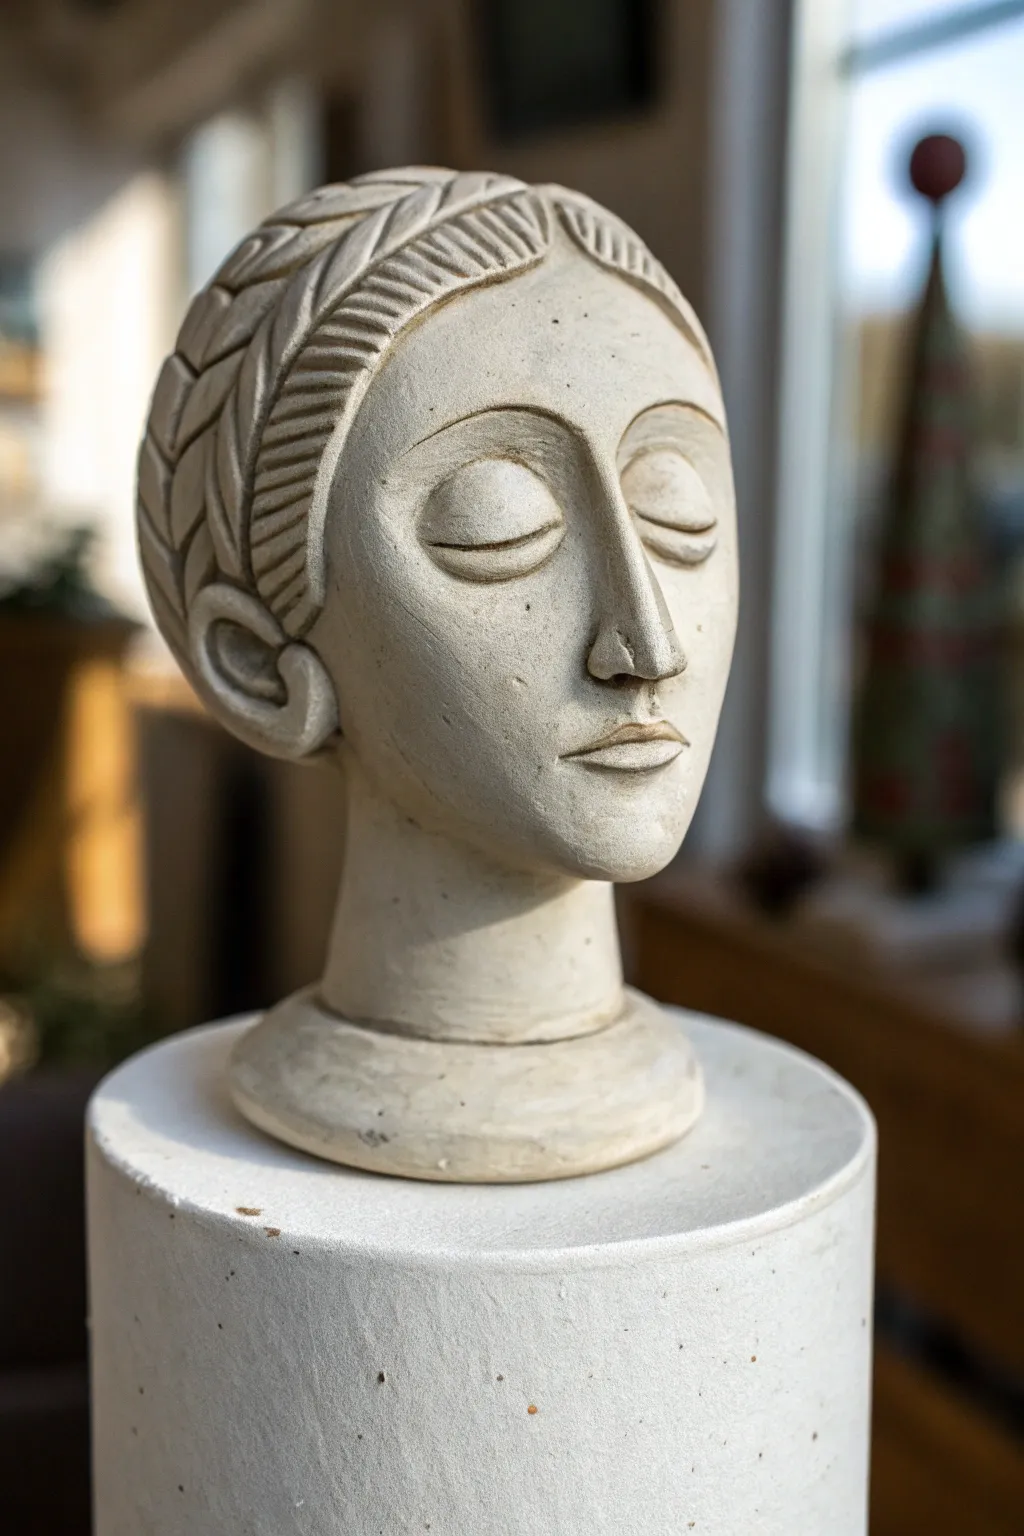
Capture a sense of ancient calm with this small, stylized bust sculpture. Featuring elongated, graceful features and textured hair detailing, this project uses air-dry or polymer clay to mimic the look of carved limestone.
Step-by-Step
Materials
- White air-dry clay or stone-colored polymer clay
- Wire armature kit (or sturdy floral wire & aluminum foil)
- Wooden sculpting tools (needle tool, loop tool)
- Small rolling pin
- Sponge and water
- Fine-grit sandpaper
- Acrylic paint (cream, beige, antique white)
- Matte sealant
Step 1: Building the Core
-
Prepare the armature:
Begin by creating a simple T-shaped armature using twisted wire to support the neck and head. Secure this into a small wooden base or a heavy lump of clay that will serve as the temporary stand during sculpting. -
Form the foil bulk:
Crumple aluminum foil tightly around the top of the wire to form an egg shape. This saves clay and keeps the sculpture lightweight. Ensure the tapered end of the ‘egg’ points downward for the chin. -
Apply the base layer:
Roll out a sheet of clay to about 1/4 inch thickness. Wrap this over the foil core, smoothing the seams together with a bit of water or slip until the foil is completely hidden. -
Establish the neck and base:
Add a thick cylinder of clay below the head for the neck, blending it seamlessly into the jawline. At the bottom, form a rounded, tiered plinth base as seen in the image to give the bust a classical finish.
Cracks appeared?
If air-dry clay develops hairline cracks while drying, mix a small amount of fresh clay with water to make a paste (slip) and fill the cracks, then sand smooth once dry.
Step 2: Sculpting the Features
-
Map out proportions:
Lightly sketch a vertical centerline and a horizontal eye line with a needle tool. For this stylized look, place the eye line slightly higher than usual to elongate the face elegance. -
Build the nose:
Roll a small snake of clay and adhere it along the centerline. Blend the sides down onto the face, creating a long, straight bridge that connects directly into the brow bone area without a deep indentation. -
Form the eyes:
Add two almond-shaped flattened balls of clay for the eyes. Instead of carving pupils, smooth them into convex domes that represent closed eyelids, reinforcing the sculpture’s serene expression. -
Define the eyelids:
Roll tiny, thread-thin coils of clay. Place one above and one below each eye mound to create the eyelid rims, blending the outer edges into the surrounding skin. -
Sculpt the brows:
Carve high, arched eyebrows directly into the clay using a curved sculpting tool, ensuring they frame the nose bridge symmetrically. -
Shape the mouth:
Add a small mound for the mouth area. Use a thin blade to cut a horizontal line, then gently push the clay up and down to form the lips. Keep the mouth small and slightly pouty for that stylized aesthetic.
Step 3: Detailing & Finishing
-
Construct the hair cap:
Roll a sheet of clay and drape it over the top and back of the head. Trim the excess around the forehead and ears to create a clean hairline. -
Create the braided texture:
Using a needle tool or small spatula, press diagonal chevron patterns into the hair clay. Start from the center part and work outwards to mimic the look of tightly braided or woven hair. -
Add the ears:
Form two C-shaped spirals of clay and attach them low on the sides of the head. I find placing them slightly lower than realistic looks adds to the archaic charm. -
Smooth the surface:
Use a slightly damp sponge to gently wipe the face and neck. This removes fingerprints and softens any harsh tool marks, giving the piece a stone-like texture. -
Final drying or baking:
Allow the sculpture to dry thoroughly (24-48 hours for air-dry clay) or bake according to your polymer clay package instructions. -
Sanding:
Once hardened, use fine-grit sandpaper to smooth the cheeks and forehead further, but leave the hair texture rough for contrast. -
Painting the finish:
Apply a wash of diluted beige or antique white acrylic paint. Wipe most of it off immediately with a rag, leaving paint in the crevices of the hair and eyes to accentuate the depth.
Pro Tip: Symmetry Check
Hold your sculpture in front of a mirror occasionally while working. Methods usually hidden to the naked eye become obvious in the reflection, helping you balance the features.
Place your finished bust on a shelf where the light can catch the textured braids and peaceful expression
Small Animal Totem Stacks for Easy “Wow”
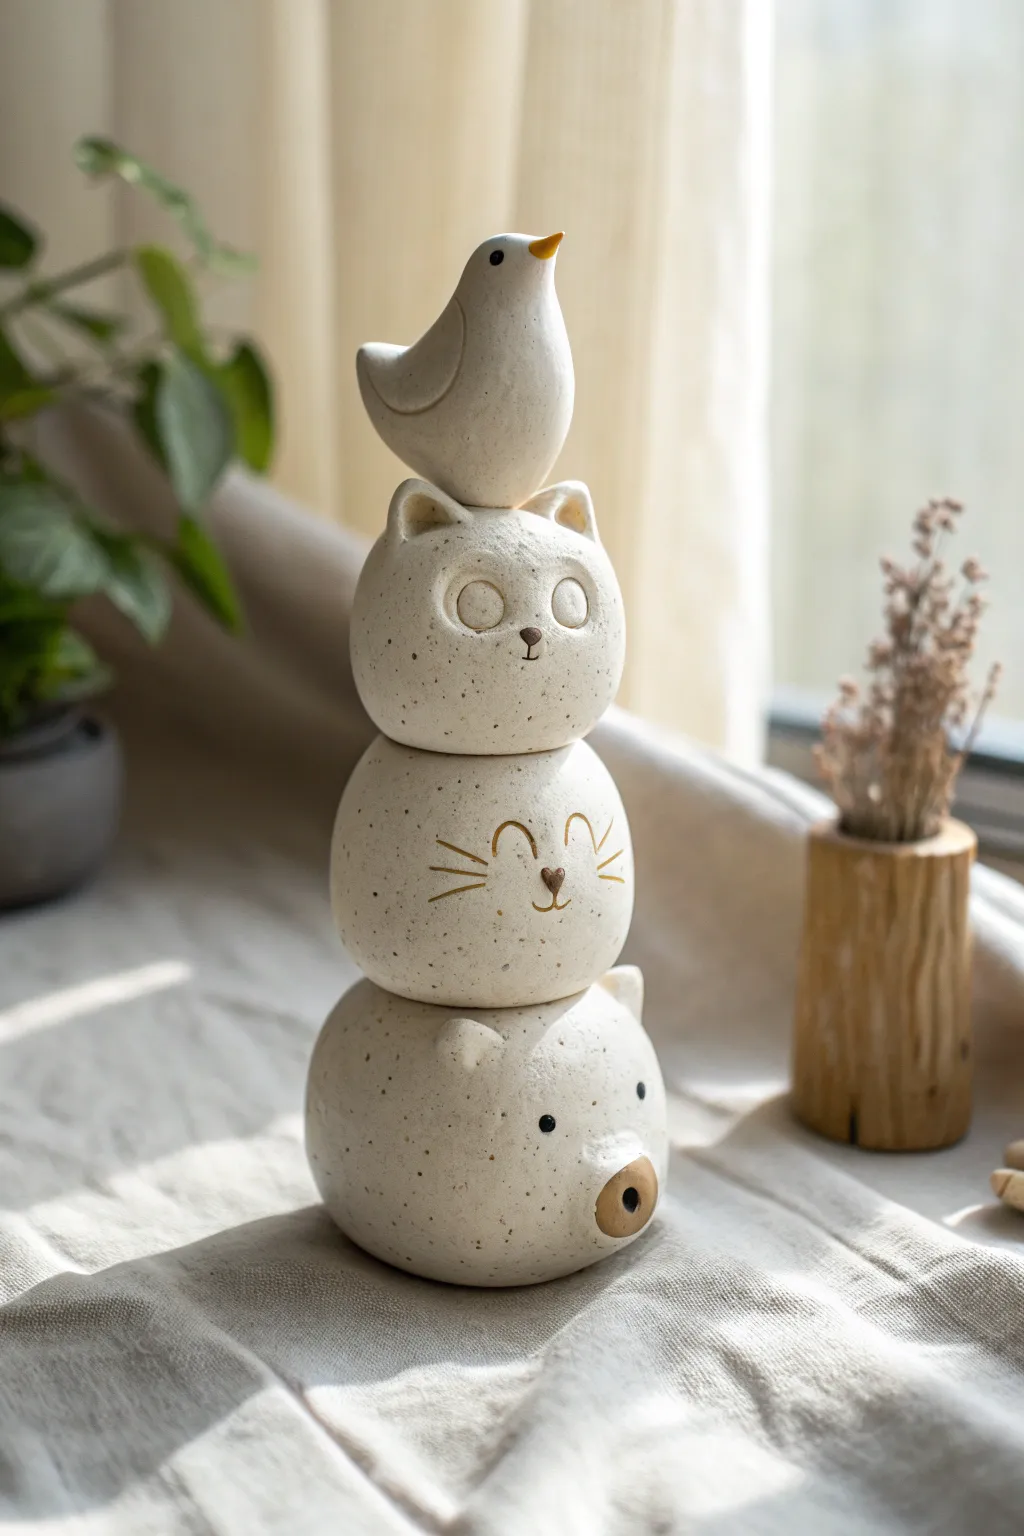
Create a charming vertical sculpture featuring four delightful characters balanced in perfect harmony. This speckle-finished totem combines simple geometric spheres with sweet, minimalist expressions for a serene and playful decorative accent.
Step-by-Step Guide
Materials
- White polymer clay (approx. 1 lb) or air-dry stoneware clay
- Faux speckled clay additive (like ground black pepper or specialty clay inclusions)
- Modeling tools (needle tool, small ball stylus)
- Acrylic paints (pale pink, gold/ochre, black)
- Fine detail paintbrush
- Aluminum foil (for armature)
- Strong craft glue or liquid clay (if baking)
- Satin or matte varnish spray
Step 1: Preparation & Base Forms
-
Prepare the clay body:
If using plain white clay, knead in your speckle additive first. I like to use a tiny pinch of coarse ground black pepper or dried coffee grounds to mimic that organic stoneware look without needing a kiln. -
Create the armatures:
Ideally, you want lightweight cores. Crumple aluminum foil into three distinct balls: a large one for the base (bear), a slightly smaller one for the middle (lower cat), and a medium one for the top cat. -
Cover the base sphere:
Roll out a sheet of clay about 1/4 inch thick. Wrap it smoothly around your largest foil ball. Roll it gently on your work surface to ensure it is perfectly round, then flatten the bottom slightly so it stands stability. -
Form the middle spheres:
Repeat the covering process for the next two foil balls. These should look like slightly flattened spheres, similar to river stones. -
Shape the bird:
For the top piece, form a solid piece of clay (no foil needed) into a teardrop shape. Gently curve the tapered end up to form the tail and pull a tiny beak shape from the rounded front.
Step 2: Sculpting the Characters
-
Detail the base bear:
On the largest sphere, attach a small, flattened disk of clay near the bottom for the snout. Use a ball stylus to press a deep indentation for the mouth/nose area. Add two tiny triangular ears to the top sides of the sphere. -
Sculpt the smiling cat:
Take the second-largest sphere. This one relies mostly on painted details later, but you can lightly score where the whiskers will go. Smooth the surface perfectly, as this creates that ‘soothing stone’ aesthetic. -
Sculpt the wide-eyed cat:
On the third sphere (second from top), attach two distinctive triangular ears. Instead of painting eyes, scratch two large circles into the clay. Inside these circles, sculpt slightly raised eyelids using small crescents of added clay. -
Refine the stack:
Before curing or drying, gently test-stack your animals. Press them lightly together to create natural contact points where they will sit securely. This prevents wobbling later. -
Curing stage:
Bake your polymer clay according to package instructions or let your air-dry clay harden completely (usually 24-48 hours). Ensure they are fully rigid before painting.
Wobbly Stack?
If the dried pieces don’t sit flat, rub the contact points against a sheet of fine-grit sandpaper on a flat surface to create a flush, level connection before gluing.
Step 3: Painting & Assembly
-
Paint the bird’s details:
Using a gold or ochre acrylic paint, carefully color the bird’s beak. Add a tiny black dot for the eye using the tip of a toothpick or a fine detail brush. -
Detail the top cat:
Fill the scratched eye circles with the natural clay color but outline them faintly if needed. Paint a tiny brown upside-down triangle for the nose and a small vertical line for the mouth. -
Paint the middle cat:
With a steady hand and gold or light brown paint, draw the closed ‘smiling’ eyes (two arches), the whiskers, and a heart-shaped nose. The lines should be thin and delicate. -
Finish the bear:
Paint the snout area with a wash of brown or gold. Add two small black dots for wide-set eyes and fill in the mouth indentation with dark brown or black to create depth. -
Final assembly:
Once the paint is dry, apply a strong craft glue (like E6000) or 2-part epoxy to the contact points you created earlier. Stack them carefully: Bear, Smiling Cat, Wide-Eyed Cat, Bird. -
Seal the piece:
Spray the entire stack with a matte or satin varnish. This protects the painted details and gives the clay a cohesive, finished ceramic look.
Add Height & Texture
Insert a wooden skewer or wire through the center of all wet clay spheres before drying. This acts as an internal spine for extra stability on taller stacks.
Place your adorable totem near a sunny window to enjoy the friendly shadows it casts

TRACK YOUR CERAMIC JOURNEY
Capture glaze tests, firing details, and creative progress—all in one simple printable. Make your projects easier to repeat and improve.
Negative Space Ring Sculpture With a Floating Figure
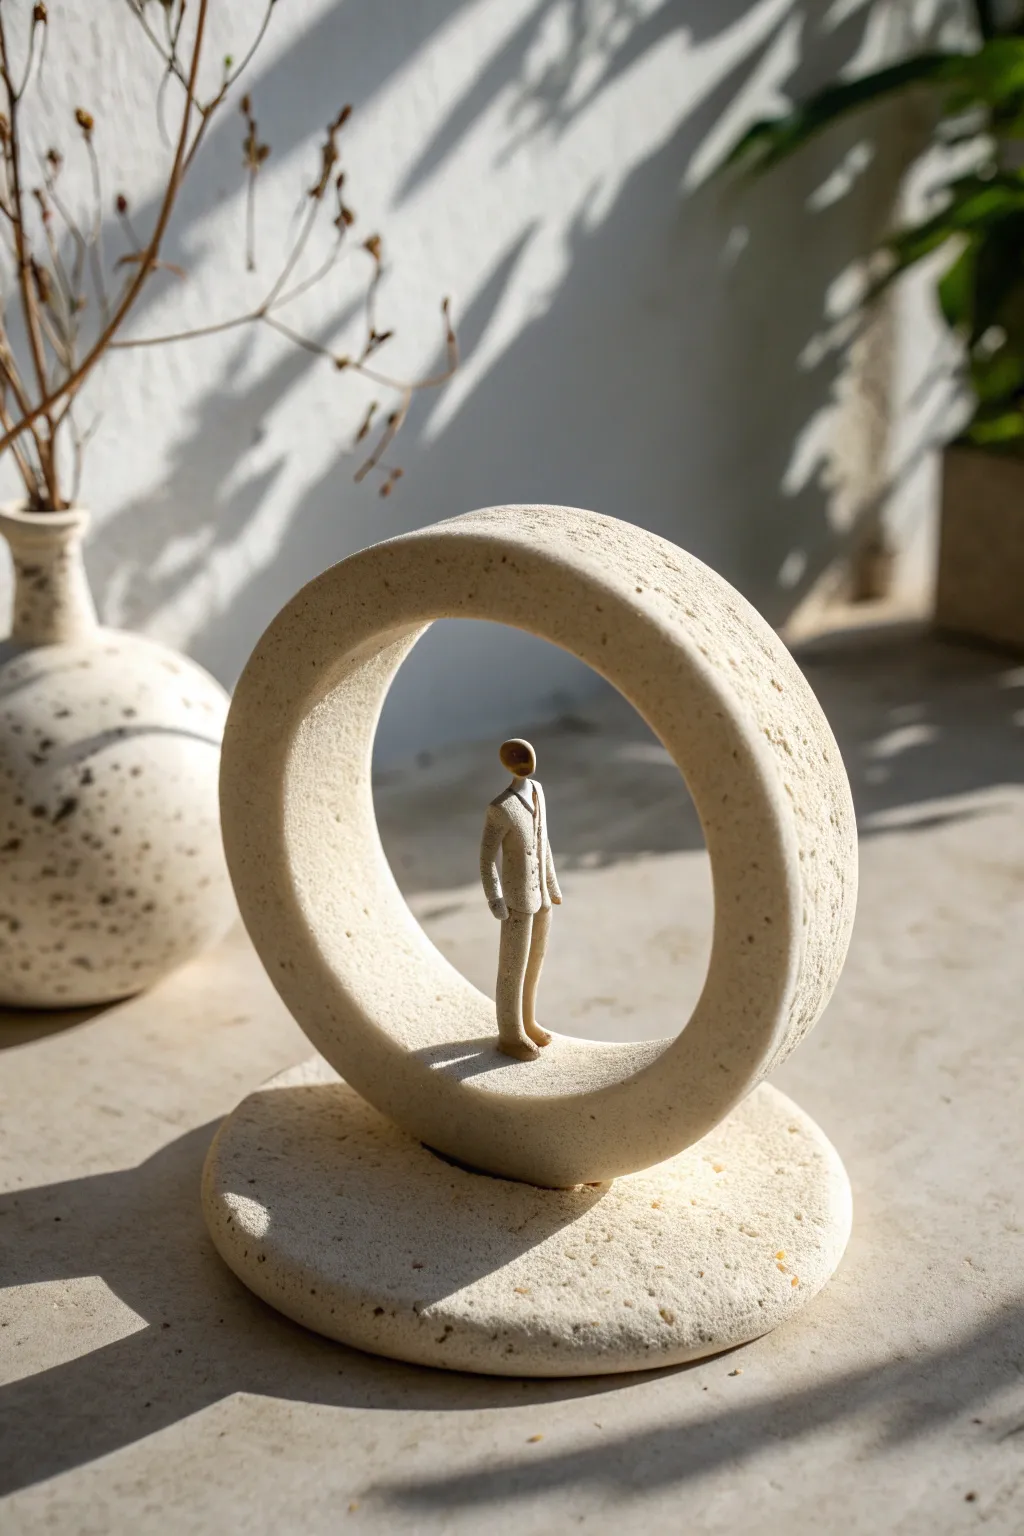
This elegant limestone-effect sculpture captures a tiny, solitary figure contemplating a great void, framed by a minimalist ring. By combining simplistic geometric forms with a detailed miniature, you create a piece that feels both modern and deeply introspective.
Step-by-Step Tutorial
Materials
- White or beige air-dry clay (stone effect preferred)
- Fine-grit sandpaper (220 and 400 grit)
- Rolling pin
- Circle cutters (two sizes) or round objects to trace
- Sculpting tools (needle tool, small spatula)
- Small cup or bowl (to use as a mold)
- PVA glue or clay slip
- Acrylic paint (warm beige/stone wash)
- Matte sealant spray
Step 1: Forming the Geometrics
-
Prepare the clay:
Begin by conditioning your air-dry clay until it is pliable and smooth. If you are using a stone-effect clay, ensure the speckles are distributed evenly. -
Cut the base:
Roll out a slab of clay to approximately 1/2 inch thickness. Use your larger circle cutter (or trace a bowl) to cut a perfect disc for the base. Smooth the edges with a wet finger to remove any cutting texture. -
Form the ring:
Roll a thick snake of clay, ensuring it remains even in diameter. Flatten it slightly into a strap-like shape, creating a rectangular cross-section rather than a round tube. -
Shape the ring:
Wrap this clay strap around a cylindrical object like a jar or sturdy cup that is slightly smaller than your base diameter. Join the ends by scoring the clay, adding a dab of water or slip, and blending the seam until invisible. -
Dry the structural parts:
Allow the base and the ring (still on its support if needed) to dry for at least 24 hours. They need to be rigid before assembly.
Slumping Ring?
If your clay ring sags while drying, keep the jar inside it until it’s leather-hard. Remove the jar carefully only when the clay holds its own shape but isn’t fully dry yet.
Step 2: Sculpting the Miniature Figure
-
Create the armature wire (optional):
For extra stability, you can twist a very thin piece of wire into a stick-figure shape, but for a figure this small, solid clay usually suffices. -
Form the legs:
Roll two tiny cylinders of clay for the legs. Join them at the hip and smooth them together. Keep the stance narrow and straight to match the contemplative pose. -
Build the torso:
Add a small rectangular block for the torso. Use your needle tool to gently carve a line down the center to suggest a blazer or jacket. -
Add the arms:
Attach thin rolls of clay for arms, blending them at the shoulders. Let them hang naturally at the sides. -
Shape the head:
Roll a tiny oval for the head and attach it to the neck area. The figure in the example is faceless and stylized, so you don’t need to carve eyes or a mouth—just a smooth, oval form. -
Refine the details:
Use your smallest sculpting tool to clean up the ‘suit’ lines and smooth out any fingerprints. The figure should look crisp and modern.
Stone Texture Trick
Mix coffee grounds or coarse sand directly into your clay before sculpting. When you sand the dried piece later, these specks will reveal themselves as realistic rock textures.
Step 3: Assembly and Finishing
-
Sand the components:
Once the ring and base are bone dry, sand them thoroughly. Focus on the outer curve of the ring to get that textured, stone-like finish seen in the photo. I find 220 grit works best for shaping, followed by 400 for smoothing. -
Attach the ring to the base:
Score the bottom of the ring and the center of the base. Apply a generous amount of clay slip or strong glue. Press the ring firmly onto the base and wipe away excess adhesive. -
Position the figure:
Place the figure inside the ring, centered at the bottom curve. Glue the feet securely to the inner surface of the ring. -
Create the texture:
To mimic the porous rock look, take an old toothbrush or a stiff bristle brush and gently stipple wet clay slip over the surface of the ring and base. -
Paint the wash:
Dilute warm beige acrylic paint with water until it’s very thin. Brush this wash over the entire sculpture. The paint will settle into the texturing pits, highlighting the ‘stone’ effect. -
Highlight the figure:
Paint the figure’s head with a slightly darker brown or metallic bronze specifically to draw the eye, leaving the body the same color as the ring for a cohesive look. -
Seal the work:
Finish with a light coat of matte spray sealant to protect the surface without making it shiny.
Now you have a serene, gallery-worthy sculpture that captures a quiet moment of reflection in stone
Windblown Figure Sculptures With Striped Texture
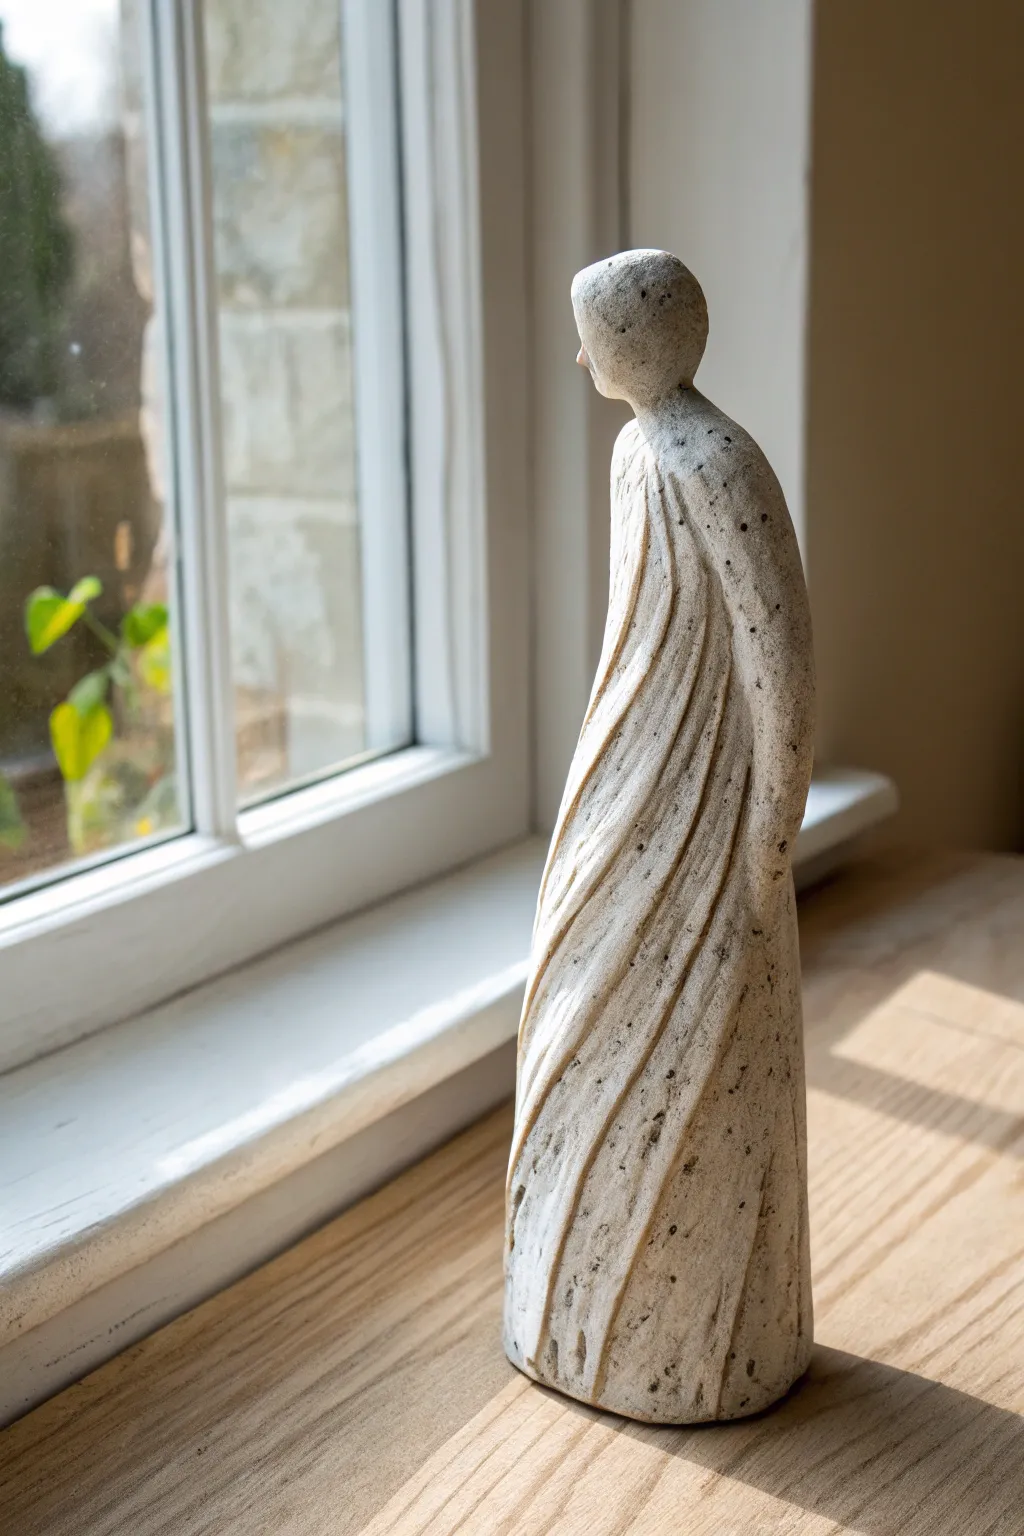
Capture the ethereal movement of wind in solid form with this elegantly simple stone-like sculpture. Its sweeping draped lines and speckled finish give it the appearance of an ancient artifact gazing out a window.
Step-by-Step
Materials
- Air-dry clay (stone color or white)
- Aluminum foil
- Medium gauge armature wire
- Sculpting tools (specifically a curved loop tool and a needle tool)
- Water spray bottle
- Fine-grit sandpaper
- Acrylic paints (cream, beige, dark grey)
- Old toothbrush (for speckling)
- Matte sealant spray
Step 1: Building the Core
-
Bend the armature:
Cut a length of wire about 10-12 inches long. Fold it in half and twist the top loop to form a small head shape. Twist the two ends together to create a central spine, leaving the bottom ends slightly flared to anchor into the base later. -
Establish the pose:
Give the wire spine a gentle ‘S’ curve. The neck should crane slightly forward and upward, while the ‘body’ curves back, mimicking a figure leaning into a breeze. -
Create the foil bulk:
Crumple aluminum foil tightly around the wire armature. Build up a long, tapered cone shape for the body, keeping it thinner at the neck and wider at the base where the ‘dress’ or robe will flare out. -
Check the stability:
Ensure the foil base is flat and wide enough for the figure to stand on its own. Press firmly against a table to level it. If it tips, add a bit more foil to the base perimeter.
Step 2: Applying Clay & Shaping
-
Cover with clay:
Roll out a sheet of air-dry clay about 1/4 inch thick. Wrap this sheet around the foil armature, smoothing the seams together with a bit of water. -
Form the head:
Add a small ball of clay to the top loop. Smooth it down into the neck with no visible seam. The head should be a simple oval, tilted slightly upward; keep the facial area blank and smooth for that minimalist look. -
Elongate the silhouette:
Use your hands to stroke the clay downward, lengthening the form. The figure should look tall and slender, not bulky. -
Carve the main folds:
Using a curved loop tool, begin carving deep, sweeping grooves that start from the shoulder/neck area and spiral gently down toward the right side of the base. -
Refine the ridges:
Between your carved grooves, pinch the clay slightly to create sharp peaks. These ridges represent the heavy fabric folds. They should be continuous and fluid, wrapping around the form. -
Add movement details:
With a needle tool or smaller loop, add shallower secondary lines within the larger folds. These smaller lines enhance the sense of motion and fabric texture. -
Define the arm:
Suggest an arm by leaving a smooth, un-grooved section on the right side that blends into the folds near the hip, or carve a subtle separation line to indicate a sleeve hanging down.
Natural Stone Look
Mix a pinch of sand or dried coffee grounds into your clay before sculpting. This adds real grit and texture that painting alone can’t achieve.
Step 3: Finishing the Texture
-
Let it dry completely:
Allow the sculpture to dry for at least 24-48 hours. It must be bone dry before sanding or painting. -
Sand for stone effect:
Gently sand the surface with fine-grit sandpaper. Don’t make it perfectly smooth; leaving some surface irregularity helps mimic the look of carved sandstone. -
Base coat application:
Paint the entire figure with a mixture of cream and beige acrylics. This provides a warm, natural stone base tone. -
Apply a wash:
Mix a tiny amount of dark grey or brown paint with lots of water. Brush this wash over the sculpture, letting it settle into the carved grooves to create shadow and depth, then wipe the high points clean with a rag. -
Create the speckles:
Dip an old toothbrush into thinned dark grey paint. Run your thumb over the bristles to flick tiny specks of paint onto the sculpture. I find doing this from a distance of about 10 inches gives the most natural distribution. -
Seal the work:
Once the paint is fully dry, finish with a coat of matte sealant spray to protect the surface without adding an unnatural shine.
Cracking Clay?
If you see cracks forming as it dries, mix a slurry of clay and water (slip) and paint it into the cracks, then smooth over with a finger.
Place your finished figure near a window to let the natural light emphasize the beautiful shadows in your carving