Whenever I’m craving a quick, feel-good make, I reach for small simple clay ideas—tiny projects you can finish fast and actually use or gift. These are all about beginner-friendly clay crafts with cute results, minimal tools, and lots of room to play.
Tiny Pinch-Pot Trinket Dish
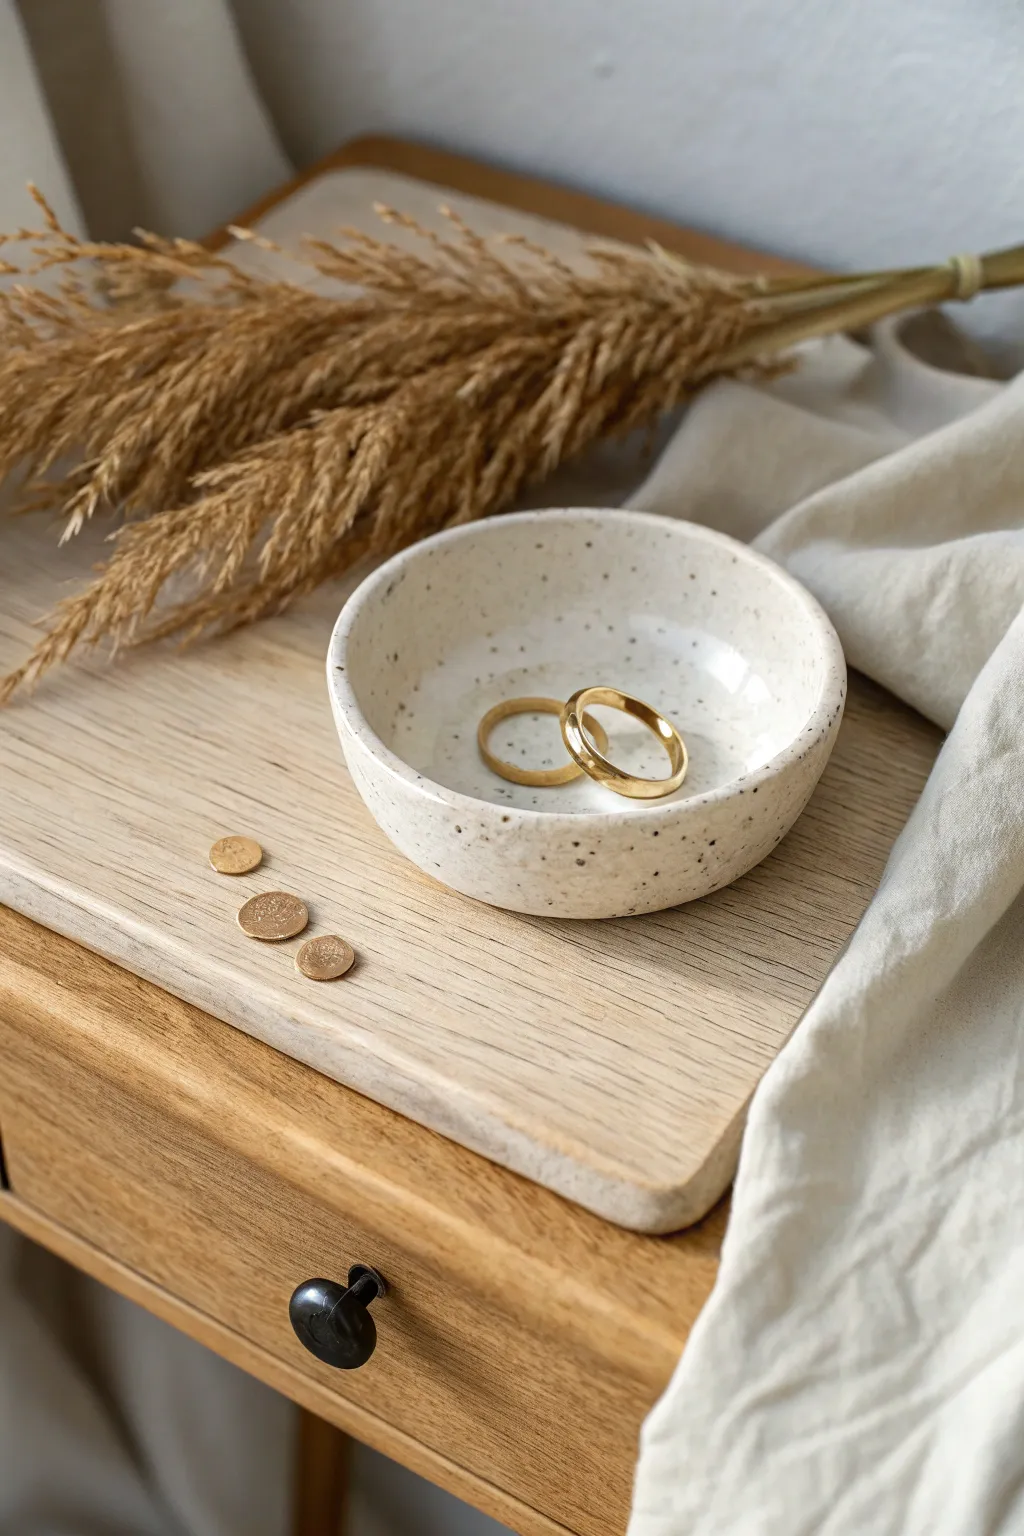
This minimalist trinket dish features a beautiful speckled finish and a smooth, rounded form perfect for holding rings and delicate jewelry. Using the classic pinch pot method, you can shape this organic piece by hand without needing a potter’s wheel.
How-To Guide
Materials
- White polymer clay or air-dry clay (approx. 2-3 oz)
- Dried coffee grounds or coarse black pepper (for creating speckles)
- Acrylic rolling pin
- Small bowl or sponge
- Water (if using air-dry clay)
- Very fine sandpaper (400-600 grit)
- Gloss varnish or glaze
- Soft paintbrush
Step 1: Preparing the Clay
-
Condition the clay:
Start by warming your white clay in your hands, kneading it thoroughly until it is soft, pliable, and free of any cracks. -
Add texture:
To achieve that signature speckled look without buying special clay, flatten your clay slightly and sprinkle a pinch of dried coffee grounds or coarse black pepper onto the surface. -
Mix the speckles:
Fold the clay over the grounds and knead repeatedly. I like to keep folding until the specks are evenly distributed throughout the entire ball for a uniform stone-like finish. -
Form a sphere:
Roll the clay between your palms to create a smooth, tight sphere about the size of a golf ball or slightly larger.
Cracks Appearing?
If small cracks form while shaping air-dry clay, dip your finger in water and smooth them out immediately. For polymer clay, use a drop of baby oil to blend edges together.
Step 2: Shaping the Dish
-
Open the pot:
Hold the sphere in your non-dominant hand. Gently press your thumb into the center of the ball, stopping about a quarter-inch from the bottom to leave enough thickness for the base. -
Pinch the walls:
Using your thumb on the inside and fingers on the outside, gently pinch the clay while rotating the ball. Work your way from the bottom up to the rim. -
Even out thickness:
Check that the walls are a consistent thickness, roughly 1/4 inch all around. Aim for a shallow, open bowl shape rather than a tall cup. -
Flatten the base:
Gently tap the bottom of the pot against your work surface. This creates a small, flat foot so the dish sits stably without rocking. -
Smooth the interior:
Use a slightly damp sponge or your finger to smooth out any fingerprints inside the bowl. The curve should be seamless and gentle. -
Refine the rim:
Run your finger along the top rim to round it off. You want a soft, organic edge rather than a sharp or jagged one.
Gold Rim Upgrade
For an elegant touch, paint only the very top edge of the rim with liquid gold leaf or metallic acrylic paint after the clear glaze has fully dried.
Step 3: Finishing Touches
-
Cure or dry:
If using polymer clay, bake according to the package instructions (usually 275°F for 15-30 minutes). If using air-dry clay, let it sit in a dry spot for 24-48 hours until fully hardened and white. -
Sand for smoothness:
Once fully cured and cooled, take your fine-grit sandpaper and gently buff the entire surface. Focus on the rim and the outside curve to make it feel like polished stone. -
Wipe clean:
Use a barely damp cloth or paper towel to remove all the sanding dust from the dish before proceeding to the glazing step. -
Apply varnish:
Dip your soft brush into the gloss varnish. Apply a thin, even coat to the interior of the bowl first to create that shiny, ceramic-like finish visible in the photo. -
Glaze the exterior:
Continue painting the varnish on the exterior. Ensure you don’t let the glaze pool at the bottom; nice thin layers work best. -
Final dry:
Set the dish on a piece of wax paper or a drying rack to let the varnish cure completely, following the manufacturer’s drying times.
Now you have a chic, handmade vessel ready to organize your favorite rings or bedside treasures


Mini Ring Cone Holders
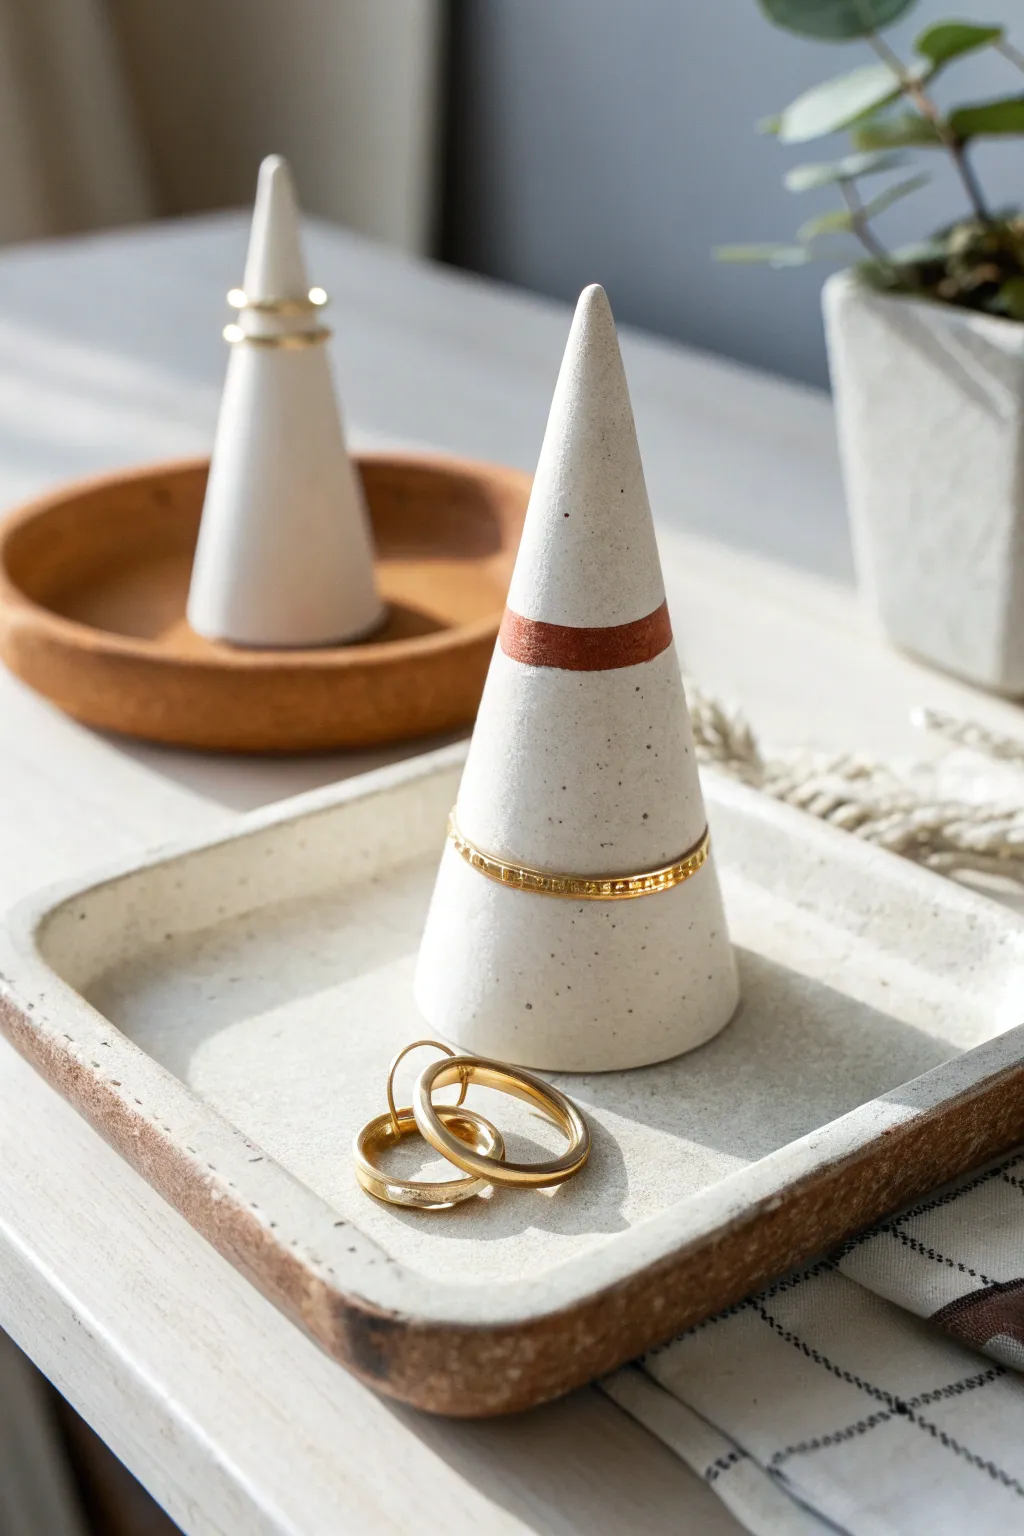
These elegant, minimalist ring cones are the perfect functional decor for your vanity or bedside table. Featuring a beautiful speckled white finish with a contrasting raw clay stripe, they offer a modern home for your favorite jewelry pieces.
Detailed Instructions
Materials
- White speckled polymer clay (or granite effect)
- Terracotta color polymer clay
- Rolling pin or acrylic roller
- Flexible tissue blade or craft knife
- Smooth work surface (glass or ceramic tile)
- Oven for baking
- Fine grit sandpaper (400-600 grit)
- Small square ceramic dish (optional, for display base)
Step 1: Preparing the Clay
-
Condition the white clay:
Start by taking a chunk of your speckled white clay and kneading it in your hands until it becomes soft and pliable. This conditioning step is crucial to prevent cracks later. -
Condition the terracotta clay:
Repeat the process with a smaller amount of the terracotta-colored clay. You’ll need significantly less of this color, as it’s only used for the accent stripe. -
Roll out the base clay:
Roll the white speckled clay into a smooth ball, ensuring there are no visible seams or air bubbles trapped inside.
Leaning Tower?
If your cone leans after baking, simply sand the bottom against a flat piece of sandpaper until the base is perfectly level and the tip points straight up.
Step 2: Forming the Cone
-
Shape the initial cone:
Place the ball on your work surface and begin rolling it back and forth with the palm of your hand, applying more pressure to one side to create a tapered, carrot-like shape. -
Refine the point:
Continue rolling until you achieve a sharp point at the top. The base should be wide enough to stand stable. -
Flatten the bottom:
Stand the cone upright and press it gently onto your work surface to flatten the bottom. Check that it stands perfectly straight without leaning. -
Create the stripe insertion point:
Decide where you want your terracotta stripe to be—about two-thirds of the way up looks nice. Use your blade to make a clean, straight cut horizontally through the cone at this height.
Clean Lines
Chill the clay in the fridge for 10 minutes before slicing it for the stripe insert. Firm clay cuts much cleaner and won’t squish out of shape.
Step 3: Adding the Stripe
-
Create the colored disk:
Roll a small ball of the terracotta clay and flatten it into a disk. It should be slightly wider than the cut surface of your cone pieces and about 3-4mm thick. -
Assemble the stack:
Place the terracotta disk between the two cut sections of the white cone. Sandwich them together, pressing firmly enough to adhere the layers but gently enough to not distort the shape. -
Smooth the seams:
Using your thumb or a smooth tool, gently drag the clay across the seams to blend the layers together slightly, then roll the entire cone on your work surface again to make the exterior seamless and smooth. -
Reshape the cone:
The cutting and joining process might have warped the shape. Re-roll the cone back and forth to restore that perfect conical geometry and ensure the terracotta band is flush with the white clay.
Step 4: Finishing Touches
-
Final inspection:
Check the cone from all angles. Tap the base on the table one last time to ensure stability. Smooth out any fingerprints with a light touch. -
Bake the clay:
Place your cones on a baking sheet or tile. Bake according to your specific clay brand’s instructions (usually around 275°F/130°C for 15-30 minutes). -
Cool down:
Allow the cones to cool completely inside the oven or on a wire rack before handling them. They are fragile while warm. -
Sand for texture:
Once cool, use fine-grit sandpaper to buff the surface. I like to do this under running water to keep dust down. This removes any final imperfections and gives the clay a stone-like matte finish. -
Optional dish creation:
If you want to create the matching tray shown in the photo, roll out a slab of the speckled clay, cut a square, and gently curve up the edges. Bake this alongside your cones.
Enjoy styling your new jewelry holder with your favorite gold bands and delicate rings


Simple Textured Clay Coasters
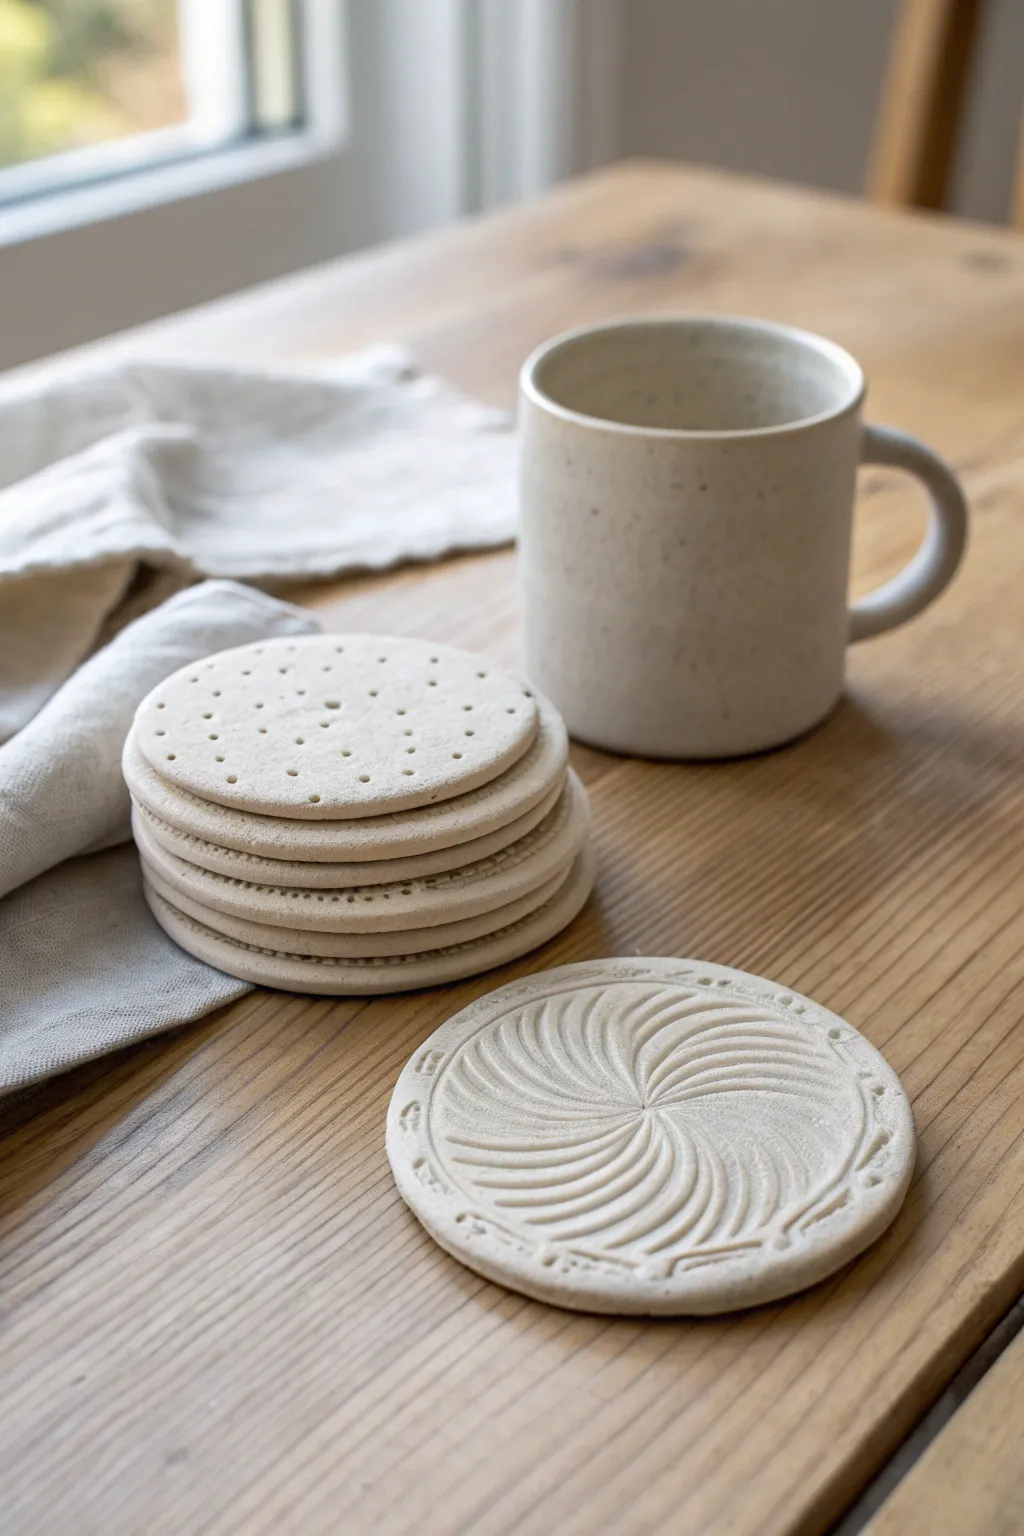
Embrace the beauty of raw simplicity with these handcrafted clay coasters. Featuring tactile patterns like delicate swirls and simple dimples, these natural-finish discs are perfect for adding an organic touch to your coffee table.
Step-by-Step Guide
Materials
- Air-dry clay (white or cream)
- Rolling pin
- Circle cookie cutter (approx. 4 inches)
- Rolling guides or two pencils
- Sculpting tools or toothpick
- Carving tool (loop tool)
- Parchment paper
- Fine-grit sandpaper
- Cup or bowl with clear water
- Sponge
Step 1: Preparation & Shaping
-
Prep the workspace:
Lay down a sheet of parchment paper on a flat, stable surface. This prevents the clay from sticking and makes it easier to move the coasters later without warping them. -
Condition the clay:
Take a generous handful of air-dry clay and knead it in your hands for a minute or two. You want it to be warm and pliable, eliminating any potential air bubbles. -
Roll the slab:
Place your clay ball on the parchment. Position rolling guides or two pencils on either side of the clay to ensure an even thickness. Roll the clay out until it is smooth and uniform, roughly 1/4 inch thick. -
Cut the forms:
Using your 4-inch circle cutter, press firmly into the clay slab. Create as many circles as your slab allows. Peel away the excess clay around the circles rather than lifting the circles themselves to keep their shape perfect. -
Smooth the edges:
Dip your finger lightly in water and run it along the cut edge of each circle. This softens the sharp cut line and gives the coaster a more finished, handmade ceramic look.
Unwanted Curling?
If your coasters curl up at the edges while drying, you can place a heavy book on top of them (sandwich them between parchment paper first) during the final stages of drying to flatten them out.
Step 2: Texturing: The Swirl Design
-
Mark the center:
For the swirl coaster, lightly press a tiny dot in the exact center of one clay circle. This will be your reference point for all the carving. -
Carve the first curve:
Using a small carving tool or a toothpick, start at the center dot and draw a curved line extending outward to the edge, like a sun ray that is twisting. -
Repeat the pattern:
Continue drawing these curved lines from the center to the edge, spacing them evenly. Imagine the spokes of a wheel that is spinning rapidly. -
Deepen the grooves:
Go back over your lines with a slightly wider sculpting tool to define the grooves. The texture needs to be deep enough to see, but not so deep it cuts through the coaster. -
Add rim details:
Use a small stamp or the end of a paintbrush to gently press a border pattern around the outer rim of the swirl coaster, framing the design.
Use Texture Tools
Look around your house for texture tools! Lace, fabric, leaves, or even the bottom of a glass can be pressed into the damp clay to create unique surface designs effortlessly.
Step 3: Texturing: The Dimple Design
-
Plan the grid:
For the simpler dimpled coasters, visualize a grid or random organic scattering on the surface. I like to keep mine somewhat uniform but not mechanically perfect. -
Create indentations:
Use a tool with a small, blunt round tip (like the back of a paintbrush or a dotting tool). Press straight down into the clay to make small, neat holes. -
Vary the depth:
Don’t poke all the way through. Press firmly enough to create a distinct shadow, but stop about halfway through the slab’s thickness. -
Detail the rim:
Create a textural variation for the side view. Use a needle tool to gently poke holes horizontally into the side edge of the coaster, creating a perforated look along the rim.
Step 4: Finishing Touches
-
Final smooth:
Check the surface for any little crumbs of clay created during carving. Gently brush them away with a soft, dry brush. -
Drying setup:
Carefully transfer the parchment paper with the coasters to a drying rack. If you dry them flat on a table, the bottoms won’t get air. -
Flipping routine:
To prevent warping—a common issue with flat clay projects—flip the coasters over every few hours during the drying process so both sides dry evenly. -
Sanding:
Once fully dry (usually 24-48 hours depending on humidity), take a piece of fine-grit sandpaper and gently sand the edges and surface to removing any roughness. -
Sealing (Optional):
If you plan to use these for wet drinks, apply a matte waterproof varnish to protect the clay from moisture rings.
Enjoy your customized set of coasters for your next coffee break


Easy Leaf-Imprint Mini Dish
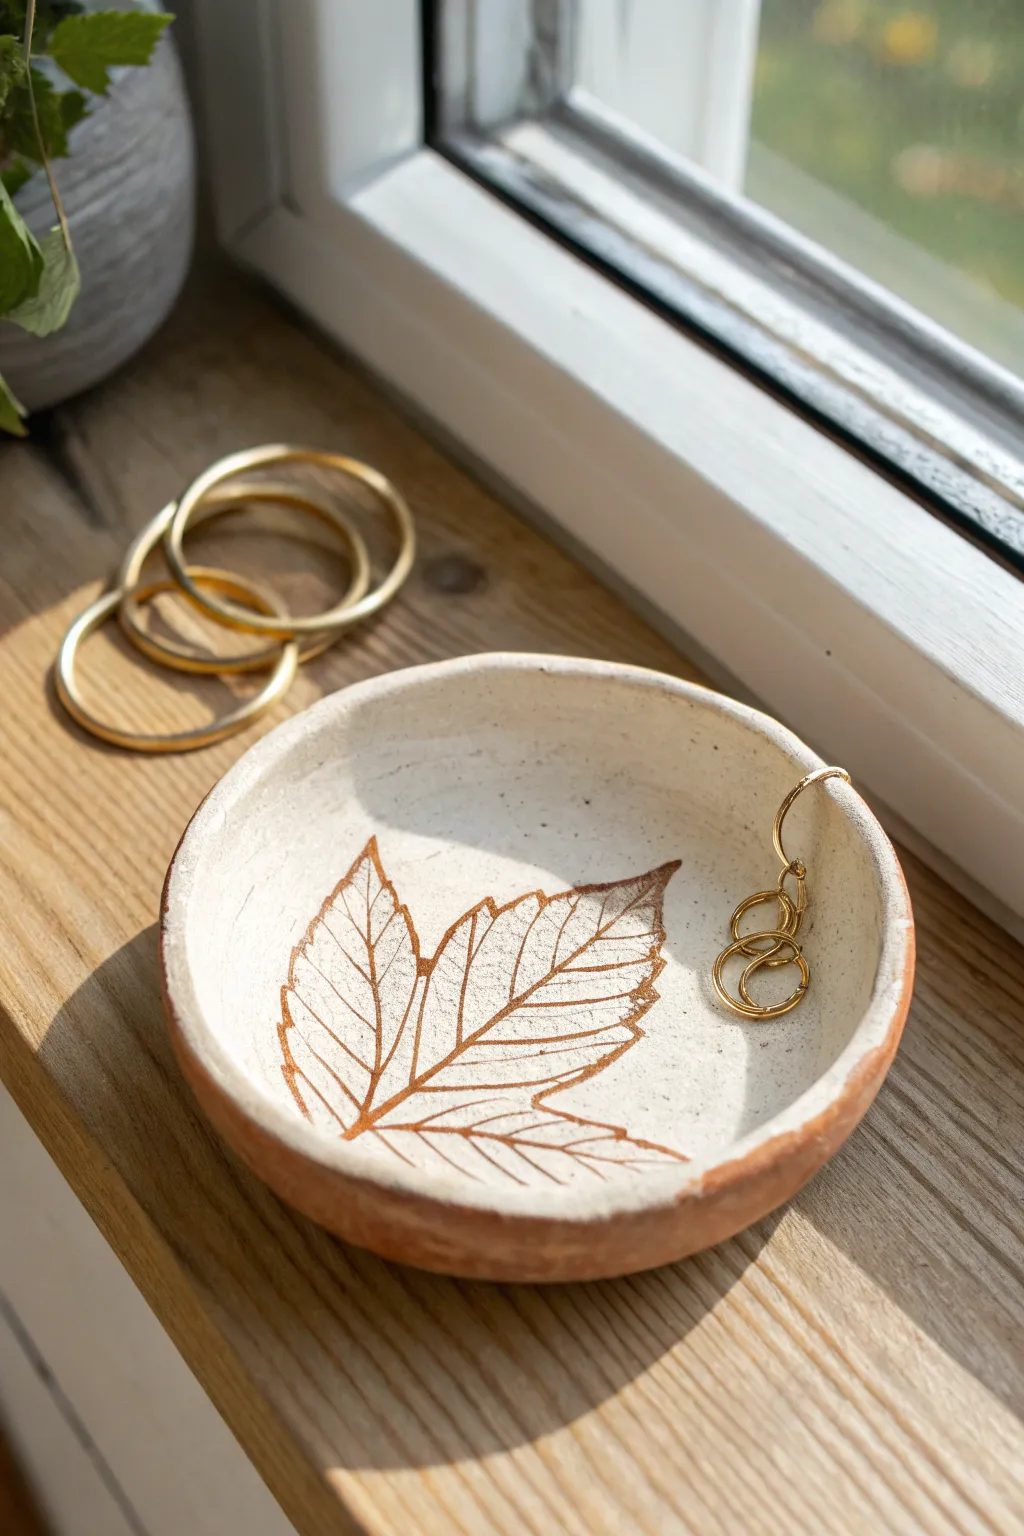
Capture the delicate veins of nature with this charming terracotta trinket dish. The classic combination of warm red clay and creamy white details creates a rustic yet refined piece perfect for holding your favorite gold rings.
How-To Guide
Materials
- Terracotta air-dry clay or kiln-fire clay
- White acrylic paint or white ceramic slip
- Warm brown acrylic paint (burnt sienna)
- Small rolling pin
- Fresh leaf with prominent veins (e.g., raspberry or maple)
- Small craft knife or needle tool
- Fine-grit sandpaper
- Medium round paintbrush
- Fine detail brush
- Water and sponge
- Matte or sealant varnish
Step 1: Shaping the Clay Body
-
Prepare the Clay:
Start by taking a handful of terracotta clay, roughly the size of a tennis ball. Knead it in your hands to warm it up and ensure it’s pliable and free of large air bubbles. -
Roll the Slab:
On a clean, flat surface, roll the clay out into a circle about 1/4 inch thick. Aim for an organic, slightly imperfect circle rather than a geometrically perfect one to match the rustic aesthetic. -
Create the Rim:
Gently curve the edges of the circle upwards to create a shallow bowl shape. Use your thumbs to pinch the walls slightly, smoothing any large cracks with a damp finger, but leaving the rim slightly uneven for a handmade feel. -
Smooth the Form:
Once the walls are raised, use a slightly damp sponge to smooth the interior surface. This creates a clean canvas for your leaf design later. -
Initial Drying:
Let the dish sit for about 24-48 hours until it is bone dry. If using kiln clay, this is where you would bisque fire it; if using air-dry, proceed to the sanding step once fully hardened.
Vein Definition Tip
Choose a ‘dryer’ leaf like a fallen maple rather than a fleshy succulent. Stiff leaves with prominent, hard veins create significantly sharper stamps than soft, watery leaves.
Step 2: Creating the Surface Design
-
Sand for Smoothness:
Once dry, take your fine-grit sandpaper and gently sand the interior of the bowl. You want a relatively smooth surface so the paint adheres evenly. -
Clean the Dust:
Wipe away all sanding dust thoroughly with a dry cloth or a slightly damp sponge. Any leftover dust will make likely make the paint peel later. -
Apply the White Base:
Paint the entire interior of the bowl with the white acrylic paint (or slip). Leave the exterior raw terracotta. I like to apply two thin coats rather than one thick one for better coverage. -
Dry the Base Coat:
Allow the white layer to dry completely. It must be dry to the touch before you attempt the leaf transfer. -
Prepare the Leaf:
Select your fresh leaf. Place it vein-side up on a scrap piece of paper. This is crucial as the vein side holds the most texture. -
Apply Brown Paint:
Using your medium brush, coat the vein side of the leaf with the warm brown (burnt sienna) paint. Don’t let the paint pool; you want an even, thin layer that highlights the structure. -
Press the Imprint:
Carefully pick up the leaf and place it paint-side down into the center of the white bowl. Place a paper towel over it and press firmly but gently over the entire surface to transfer the paint. -
Reveal the Design:
Lift the leaf carefully by the stem to reveal the stamped image. If some areas are faint, don’t worry—it adds to the aged look. -
Refine Details:
If the stem or main veins didn’t transfer clearly, use your fine detail brush and a tiny amount of brown paint to lightly connect the lines. Keep your hand shaking slightly to mimic natural lines.
Gold Rim Upgrade
For an extra touch of elegance, paint the very top edge of the rim with a gold leafing pen. This creates a beautiful bridge between the rustic clay and your gold jewelry.
Step 3: Finishing Touches
-
Outer Clean Up:
Check the exterior raw terracotta rim. If any white paint spilled over, gently sand it off or wipe it away to keep that crisp contrast between the inside and outside. -
Seal the Dish:
Apply a coat of matte varnish over the interior painted area to protect the design from scratches. You can seal the outside if you wish, but leaving it raw maintains the tactile clay texture. -
Final Cure:
Let the varnish cure per the manufacturer’s instructions before placing any jewelry inside.
Place your new dish on a sunny windowsill where the light can catch the subtle textures of your imprint

The Complete Guide to Pottery Troubleshooting
Uncover the most common ceramic mistakes—from cracking clay to failed glazes—and learn how to fix them fast.
Cute Fridge Magnets in Simple Shapes
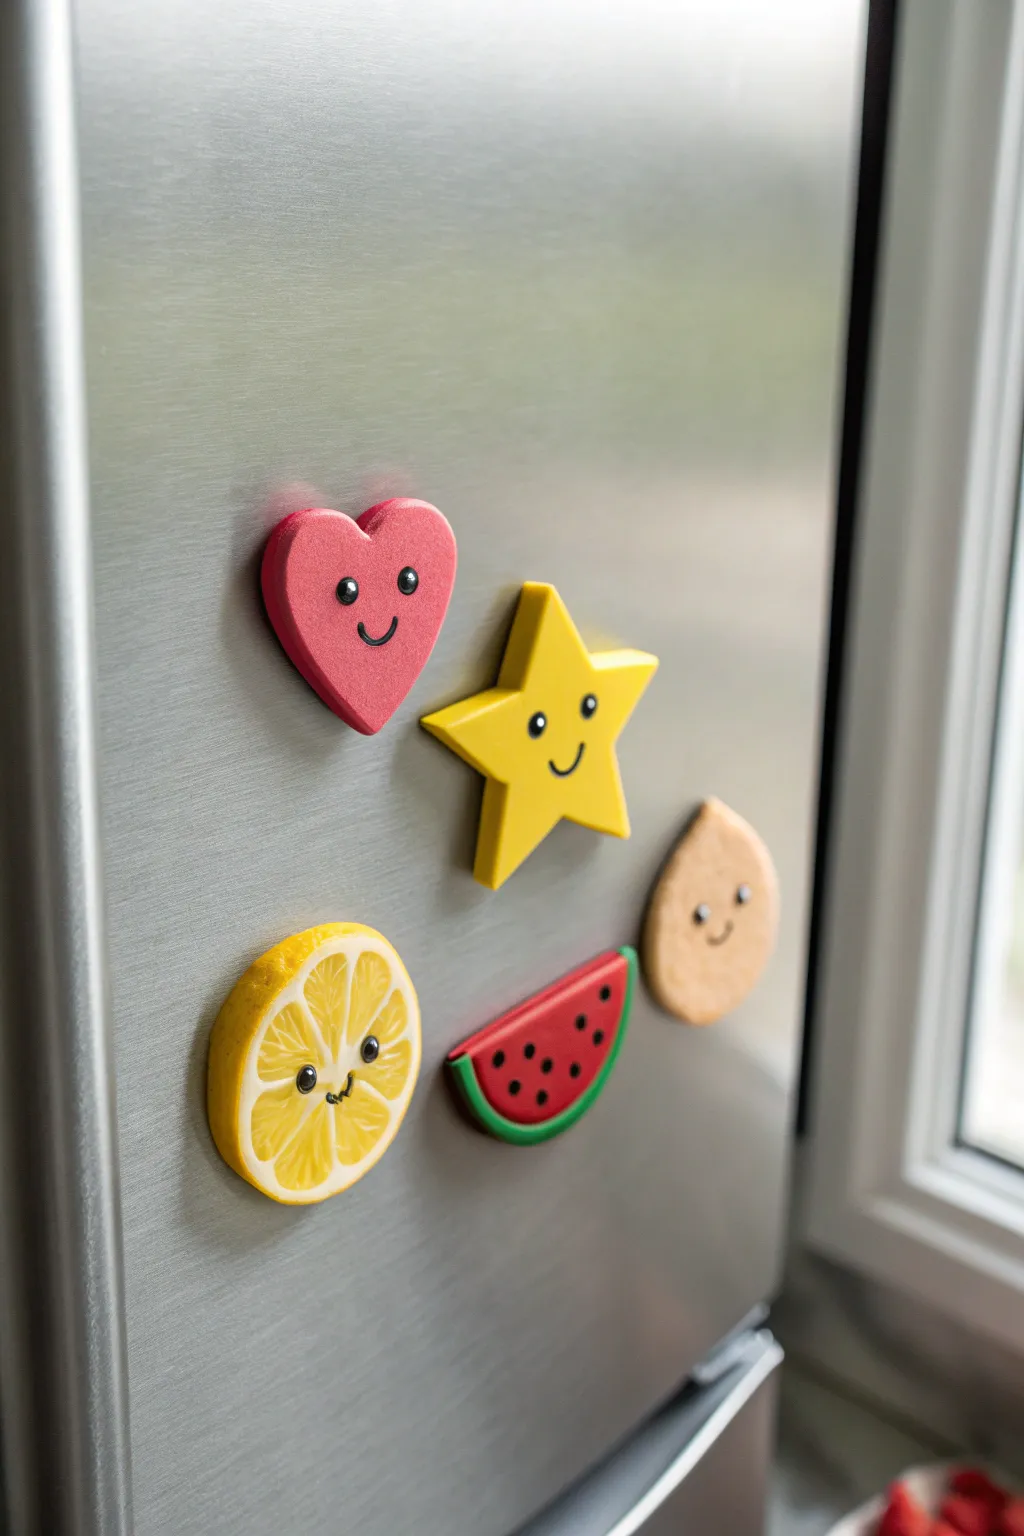
Brighten up your kitchen with this cheerful collection of kawaii-inspired fridge magnets. These simple shapes—a heart, star, lemon, watermelon, and drop—are brought to life with tiny, smiling faces and vibrant summer colors.
Step-by-Step Guide
Materials
- Polymer clay (yellow, pink, red, green, tan/beige, white, black)
- Clay roller or acrylic rolling pin
- Cookie cutters (small heart, star, circle)
- X-Acto knife or clay blade
- Dotting tool or ball stylus
- Thin black permanent marker or black acrylic paint
- Adhesive magnets (round or peel-and-stick)
- Gloss glaze (optional)
- Oven and baking tray
Step 1: Shaping the Base Forms
-
Condition the clay:
Begin by kneading your colored clays until they are soft and pliable. This prevents cracking later. -
Roll out the pink clay:
Roll your dark pink clay into a slab approximately 1/4 inch thick. I like to keep these a bit chunky so they look soft and dimensional. -
Cut the shapes:
Use a small heart cutter to punch out your heart shape. For the star, repeat the process with bright yellow clay and a star cutter. Smooth the sharp edges gently with your fingertip. -
Create the watermelon:
Roll out a semi-circle of red clay. Roll a thin snake of green clay and flatten it against the curved edge to create the rind, smoothing the seam so they bond. -
Form the lemon slice:
Start with a thick disk of yellow clay. Using a blade, gently impress lines radiating from the center to mimic citrus segments, but don’t cut all the way through. -
Sculpt the drop shape:
Take a ball of tan or beige clay and pinch one side to form a teardrop shape, flattening it slightly against your work surface.
Clean Clay Tip
Keep baby wipes nearby to clean your hands and tools between colors. Light colors like yellow pick up dust easily, so always roll them first.
Step 2: Adding Details & Faces
-
Detail the lemon:
Take very tiny slivers of white clay and press them into your impressed lines on the lemon slice to create the pith effect. Roll a thin white snake to outline the outer edge before adding a final yellow ‘rind’ layer. -
Prepare the eye sockets:
Before adding the black clay, use a medium-sized ball stylus to make shallow indentations where you want the eyes to go on each shape. -
Insert the eyes:
Roll tiny balls of black clay and press them firmly into the indentations you just made. This keeps the eyes secure and flush with the surface. -
Add highlights:
Using a needle tool or the smallest dotting tool, add a microscopic speck of white clay or white paint to the upper corner of each black eye for that sparkling look. -
Create smiles:
Roll extremely thin threads of black clay for the mouths. Gently curve them into ‘U’ shapes and press them onto the faces. Alternatively, you can paint these after baking. -
Watermelon seeds:
Roll small, teardrop-shaped bits of black clay and press them randomly onto the red section of your watermelon slice.
Texture Twist
Before baking, gently dab the surface of the beige drop or the lemon rind with a clean toothbrush to give it a realistic, textured surface.
Step 3: Finishing Up
-
Bake the pieces:
Place all your shapes on a baking sheet lined with parchment paper. Bake according to your clay manufacturer’s instructions (usually 275°F for 15-30 minutes). -
Cool down:
Let the shapes cool completely in the oven or on the tray before handling them to ensure they harden fully. -
Glaze (optional):
If you want a shiny, ceramic-like finish, brush a coat of polymer clay gloss glaze over the front of the magnets and let it dry. -
Attach magnets:
Flip the shapes over and glue strong round magnets to the back using superglue or E6000. Press firmly and let the adhesive cure.
Pop these onto your fridge door and enjoy the instant burst of color every time you reach for a snack
Mini Slab Photo or Card Stand
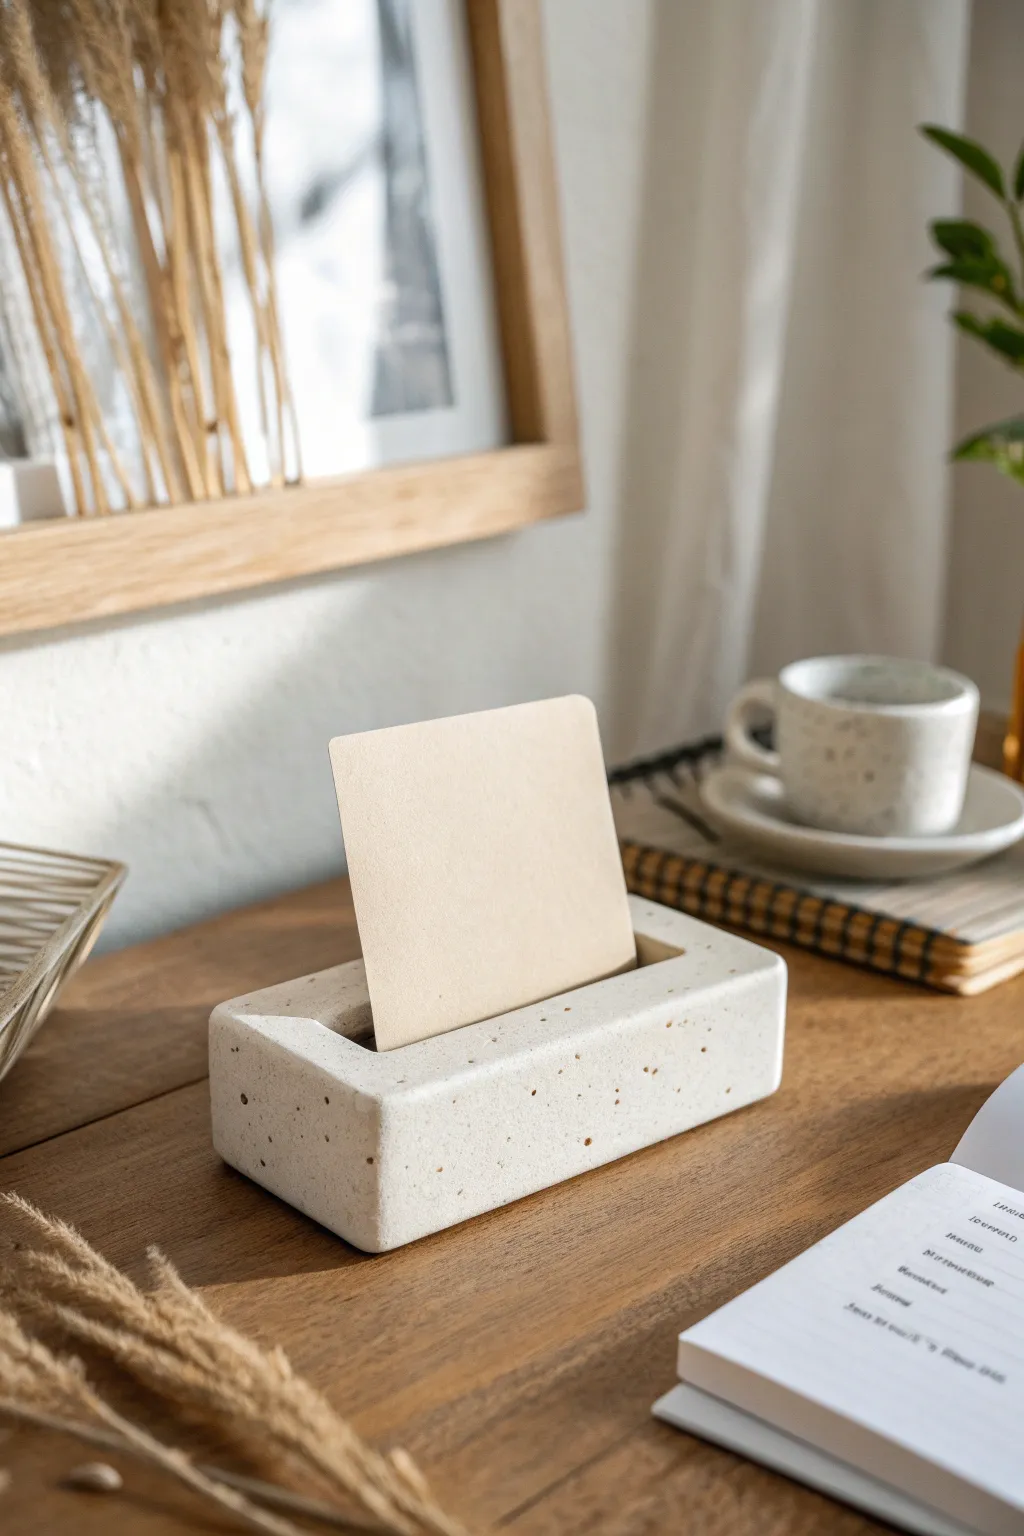
This minimalist card stand combines the weightiness of a concrete aesthetic with the ease of polymer clay sculpting. Its subtle speckled texture adds a touch of natural elegance to any desk, making it the perfect home for a favorite photo or daily affirmation.
Detailed Instructions
Materials
- White polymer clay (approx. 2oz)
- Granite effect polymer clay or black/brown pepper
- Rolling pin or acrylic roller
- Rectangular clay cutter (approx. 3×1.5 inches)
- Flexible tissue blade
- Sandpaper (various grits from 400 to 1000)
- Index card or thick cardstock (for measuring)
- Ruler
- Baking sheet with parchment paper
- Ceramic tile (optional work surface)
Step 1: Prepping the Clay Body
-
Condition the clay:
Start by warming the white polymer clay in your hands. Knead it thoroughly until it is soft and malleable, ensuring there are no air bubbles trapped inside. -
Create the speckle:
Mix in a small amount of granite-effect clay to the white base. Alternatively, if you want a DIY approach, I like to sprinkle in a tiny pinch of cracked black pepper or dried coffee grounds for an organic look. -
Marble the mixture:
Knead the mixture until the speckles are evenly distributed throughout the white clay. You want a uniform granite look rather than swirls. -
Initial shaping:
Form the clay into a rough rectangular log shape with your hands. This pre-shapes the material, making it easier to roll out evenly.
Weight It Down
To make the stand heavier like real stone, form the clay around a small, clean rectangular rock or a heavy metal nut hidden in the center.
Step 2: Forming the Block
-
Roll the slab:
Using your acrylic roller, flatten the log into a thick slab. Aim for a thickness of about 0.75 inches (2 cm). Since this piece needs weight to hold cards, thicker is better. -
Cut the rectangle:
Use your rectangular clutter or a ruler and tissue blade to cut a clean, sharp rectangle. The dimensions should be roughly 3 inches long by 1.5 inches wide. -
Refine the edges:
Gently tap the cut sides against your work surface to square them up. Proper alignment now saves sanding time later. -
Round the corners:
With the tip of your finger, very gently smooth down the sharp corners and the top edges. You want to transform the sharp geometric cut into a softer, rounded stone look. -
Smooth the surface:
Check for fingerprints. Lightly brush the surface with a tiny bit of cornstarch or baby oil to buff away any imperfections before creating the slot.
Step 3: Creating the Slot
-
Mark the center:
Use a ruler to find the exact center of the block lengthwise. Make a tiny, faint guide mark. -
Press the groove:
Take a doubled-up piece of thick cardstock or an old credit card. Press it firmly into the center of the clay block to create the holding slot. -
Deepen and widen:
Wiggle the card slightly front-to-back to widen the slot just enough so a photo can slide in easily. Aim for a depth of about half the height of the block. -
Clean up distortion:
Pressing the slot might have bulged the sides of the block out slightly. Gently push the sides back in to regain the straight rectangular shape. -
Final smooth:
Run a finger along the top edge of the slot to ensure the clay hasn’t raised up into a sharp ridge.
Slot Closing Up?
If the slot closes during baking, insert a folded piece of parchment paper into the groove while baking to keep it open perfectly.
Step 4: Baking and Finishing
-
Bake the piece:
Place the block on a parchment-lined baking sheet. Bake according to your clay manufacturer’s instructions (usually 275°F/135°C for 30-45 minutes). -
Cool completely:
Let the piece cool down fully in the oven with the door slightly ajar. This prevents thermal shock and cracking. -
Sand the surface:
Once cool, wet-sand the piece under running water. Start with 400 grit to remove big bumps and move up to 1000 grit for a silky smooth, stone-like finish. -
Buff to matte:
Dry the piece thoroughly and rub it vigorously with a piece of denim or heavy canvas. This gives it a soft sheen without making it look glossy or plastic.
Place your favorite memory in the slot and admire your modern, handmade display piece


What Really Happens Inside the Kiln
Learn how time and temperature work together inside the kiln to transform clay into durable ceramic.
Pocket-Size Bud Vase
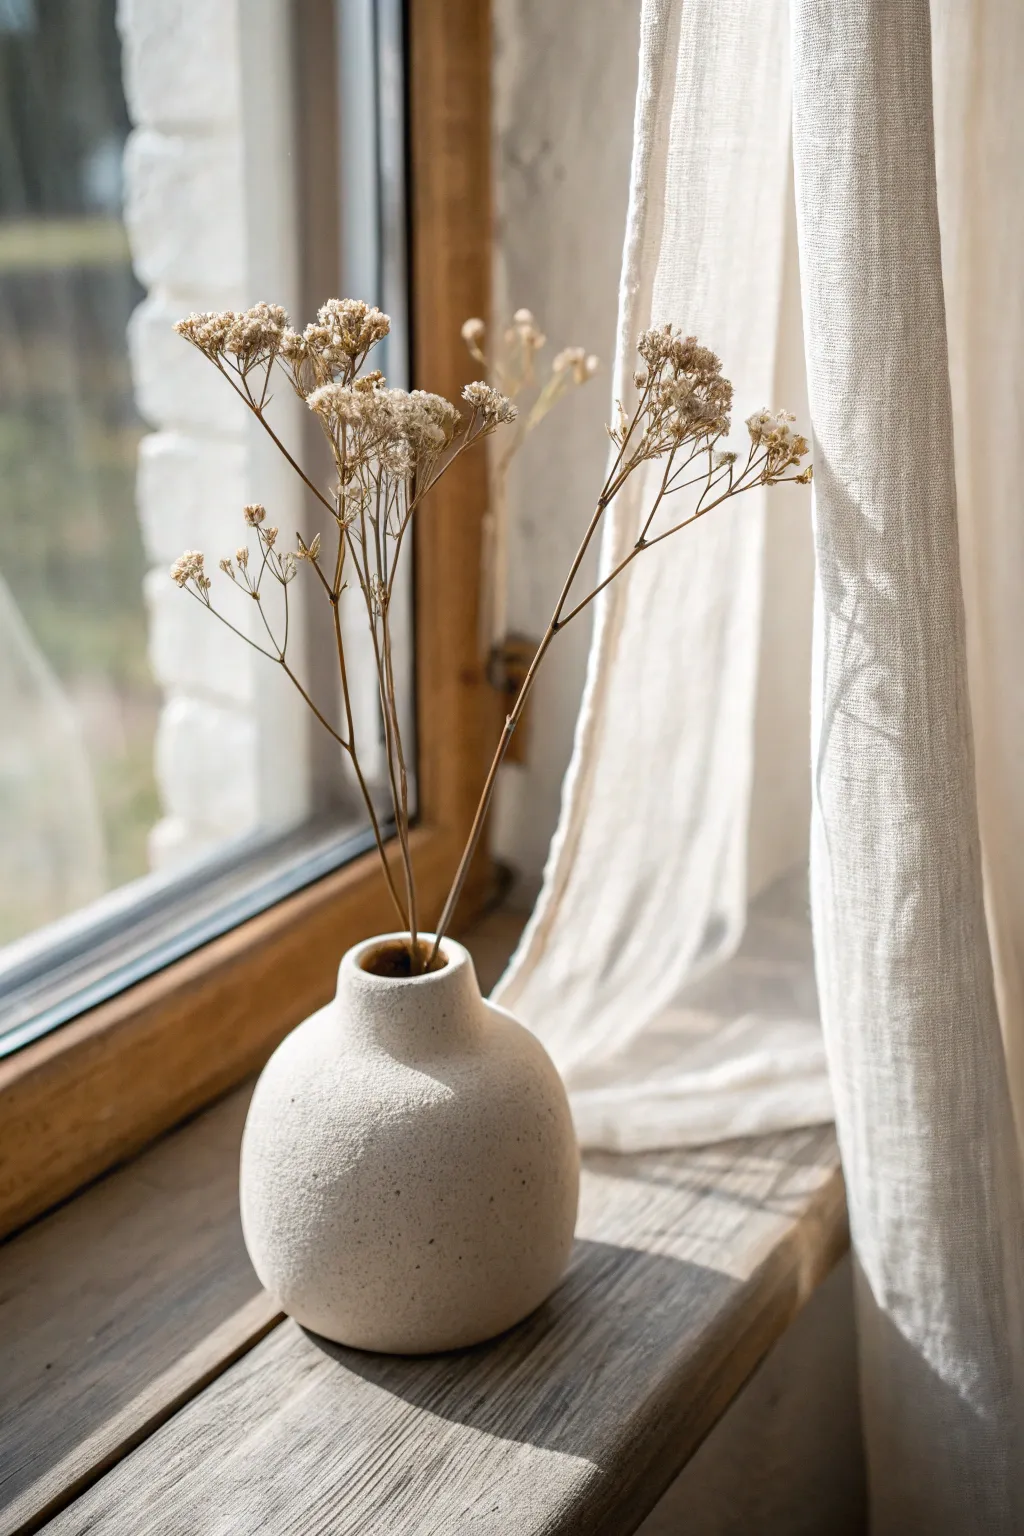
Capture the calm beauty of organic minimalism with this textured bud vase, perfectly sized for a few dried stems. Its rounded, heavy bottom and rough, speckled finish give it the look of hand-carved stone, making it a timeless addition to any windowsill.
How-To Guide
Materials
- Air-dry clay (white or cream)
- Small bowl relative to desired vase size (for pinch pot technique)
- Sponge
- Water
- Pottery needle tool or toothpick
- Fine-grit sandpaper
- Acrylic paint (cream, white, taupe)
- Clean toothbrush (for speckling)
- Black or dark brown acrylic paint (diluted)
- Matte varnish or sealant
Step 1: Forming the Base
-
Condition the clay:
Start by taking a handful of air-dry clay, about the size of a tennis ball. Knead it thoroughly in your hands to warm it up and remove any air bubbles, ensuring it’s pliable and smooth. -
Create the initial sphere:
Roll the clay between your palms or on a flat surface until you have a smooth, round ball. I find rolling it on a canvas mat helps keep sticking to a minimum. -
Open the form:
Hold the ball in one hand and gently press your thumb into the center, creating a depression. Don’t push all the way through; leave about half an inch at the bottom for stability. -
Pinch the walls:
Using your thumb on the inside and fingers on the outside, gently pinch and rotate the clay to thin the walls and expand the opening. Aim for an even thickness, roughly 1/4 inch throughout. -
Shape the belly:
Continue pinching, focusing on widening the bottom half to create a bulbous, round shape. Gently tap the bottom against your work surface just enough to create a small flat spot so the vase stands securely.
Step 2: Refining the Neck
-
Collar the top:
Place your hands around the upper rim of your open bowl shape. Gently squeeze inward while rotating the piece to narrow the opening, encouraging the clay to move upward. -
Add a coil:
Roll a small, thick snake of clay. Score the top rim of your vase base and the underside of the coil with a needle tool, add a dab of water, and attach the coil to build up the neck height. -
Blend the seams:
Use your thumb or a modeling tool to blend the clay coil downward into the body on the outside, and upward on the inside, until the seam is completely invisible. -
Smooth the lip:
Dip your finger in water and run it around the top rim to smooth it out. For this specific look, you don’t want it razor-sharp; a slightly rounded, organic lip works best. -
Add surface texture:
Take a damp sponge and dab it firmly all over the exterior of the wet clay. This removes fingerprints and creates a subtle, porous texture resembling natural stone. -
Let it dry:
Set the vase aside in a dry area away from direct sunlight. Rotate it every few hours to ensure even drying. Wait 24-48 hours until the clay is bone dry and chalky white.
Weight It Down
Before the clay dries, drop a few small, clean pebbles into the bottom of the vase interior. This adds physical weight, making the tiny vase feel expensive and substantial.
Step 3: Faux Stone Finish
-
Sand imperfections:
Once fully dry, lightly sand any sharp ridges or bumps. Don’t over-sand; you want to keep that organic, handmade character intact. -
Base coat:
Mix white and a tiny drop of taupe acrylic paint to create a warm limestone color. Paint the entire exterior and the inner rim of the vase. Let it dry completely. -
Prepare the speckle mix:
Dilute a very small amount of black or dark brown paint with water until it’s the consistency of ink or watercolor. -
Apply the speckles:
Dip the bristles of an old toothbrush into the diluted dark paint. Hold the brush near the vase and run your thumb across the bristles to flick tiny droplets onto the surface. -
Vary the density:
Test the spray on a piece of paper first. Apply the speckles sparingly in some areas and slightly denser in others to mimic natural rock formations. -
Seal the piece:
Protect your paint job with a coat of matte varnish. Note that air-dry clay is not waterproof, so this vase is strictly for dried arrangements.
Cracking While Drying?
If you see hairline cracks appearing as it dries, mix a tiny bit of fresh clay with water to make a paste (slip) and fill the cracks immediately, then smooth over.
Place it near a window to catch the afternoon light and enjoy the simple tranquility it brings to your space
Mini Incense Holder With a Single Groove
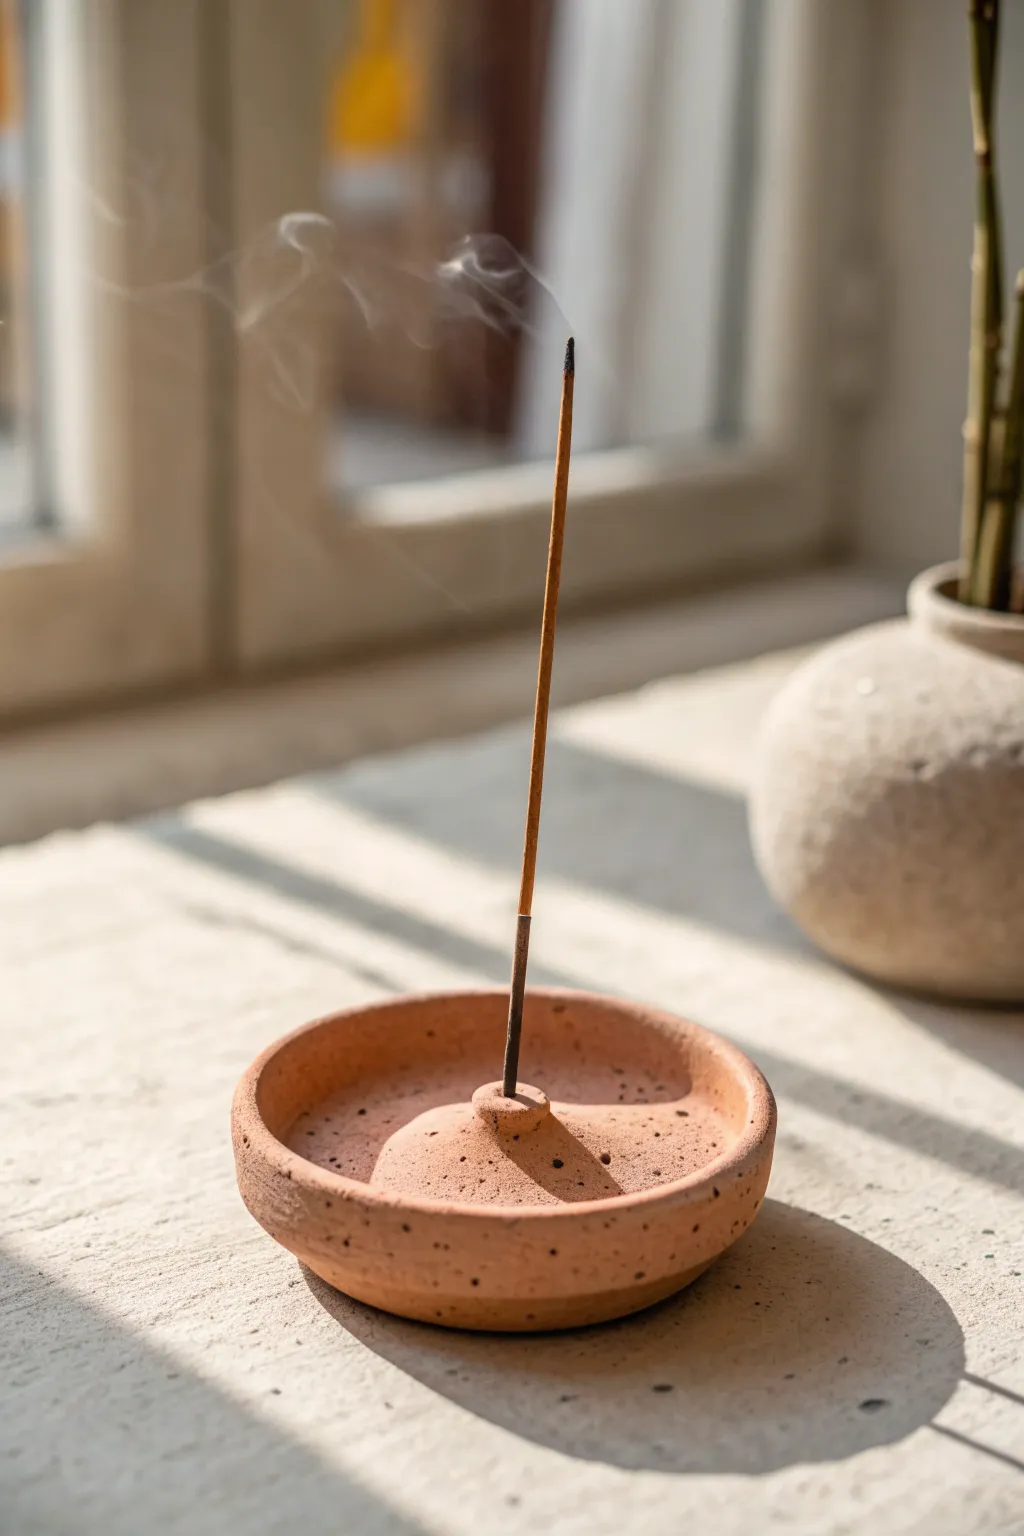
Embrace the warmth of natural earth tones with this minimalist incense holder featuring a gentle central dome. Its textured, speckled finish and organic shape make it a grounding addition to any meditation corner or windowsill.
Detailed Instructions
Materials
- Terracotta-colored polymer clay or air-dry clay
- Dried coffee grounds or coarse black pepper (for speckling)
- Clean flat work surface
- Rolling pin or acrylic roller
- Circle cutter (approx. 3-4 inches diameter)
- Small wooden skewer or toothpick
- Sponge or soft paintbrush (for smoothing)
- Water (if using air-dry clay)
- Manicure sanding block or fine-grit sandpaper
Step 1: Preparation and Base Formation
-
Prepare the clay:
Begin by conditioning your terracotta clay until it is soft and pliable. If you are using standard uniform clay, this is the moment to knead in a small pinch of dried coffee grounds or coarse black pepper to achieve that scattered, speckled aesthetic seen in the photo. -
Roll the slab:
Roll out the prepared clay on your work surface to an even thickness of about 1/4 inch. Ensure the thickness is consistent to prevent warping during drying. -
Cut the base:
Using your circle cutter or a bowl template with a knife, cut out a clean circle. This will form the main saucer of your holder. -
Soften the edges:
Gently run your finger around the cut edge of the circle to round it off slightly, removing the sharp angle from the cutter for a softer, handmade look. -
Create the rim:
Depending on your preference, you can gently pinch and lift the outer edge of the circle upward to create a shallow rim, or leave it flat. The example shows a subtle raised collection area for ash.
Hole Sizing Tip
Make the hole slightly larger than your incense stick. Clay shrinks when drying (air-dry) or baking (polymer), and you don’t want the fit to be too tight.
Step 2: Sculpting the Dome
-
Form the center ball:
Take a separate piece of clay, roughly the size of a large marble or a walnut. Roll it between your palms until it is a perfect sphere. -
Shape the dome:
Place the sphere in the exact center of your clay base. Gently press it down so the bottom flattens against the base, but keep the top round to create a mound shape. -
Blend the seams:
Use a modeling tool or your finger to smooth the clay where the dome meets the base work around the entire circumference. I find using a tiny bit of water here helps blend air-dry clay seamlessly so it looks like one solid piece. -
Create the heavy texture:
If your clay looks too smooth, lightly tap the surface of the entire piece with a stiff-bristled brush or a balled-up piece of aluminum foil to add that earthy, stone-like texture.
Step 3: Finishing Touches
-
Make the incense hole:
Take your incense stick (or a skewer of similar thickness) and press it vertically into the center of the dome. Go about halfway through the dome—do not push all the way through to the table. -
Adjust the angle:
Give the stick a very slight wiggle to ensure the hole is wide enough to hold incense loosely once the clay shrinks during drying. -
Check for imperfections:
Look over the piece for any unwanted fingerprints. Lightly buff them away with a damp sponge or your finger. -
Initial drying:
Set the piece aside in a spot away from direct sunlight. Let it dry slowly to prevent cracking. -
Sanding:
Once fully cured or dried, take a fine-grit sanding block and gently sand the rim and bottom to ensure they are perfectly smooth. -
Final cleaning:
Wipe away any clay dust with a slightly damp cloth to reveal the speckles clearly.
Ash Catcher Upgrade
Before drying, curve the outer rim upwards more dramatically. This ensures all falling ash stays contained within the dish rather than spilling onto your table.
Now you have a serene, functional piece of art ready to hold your favorite scents

TRACK YOUR CERAMIC JOURNEY
Capture glaze tests, firing details, and creative progress—all in one simple printable. Make your projects easier to repeat and improve.
Little Toothbrush Holder Buddy
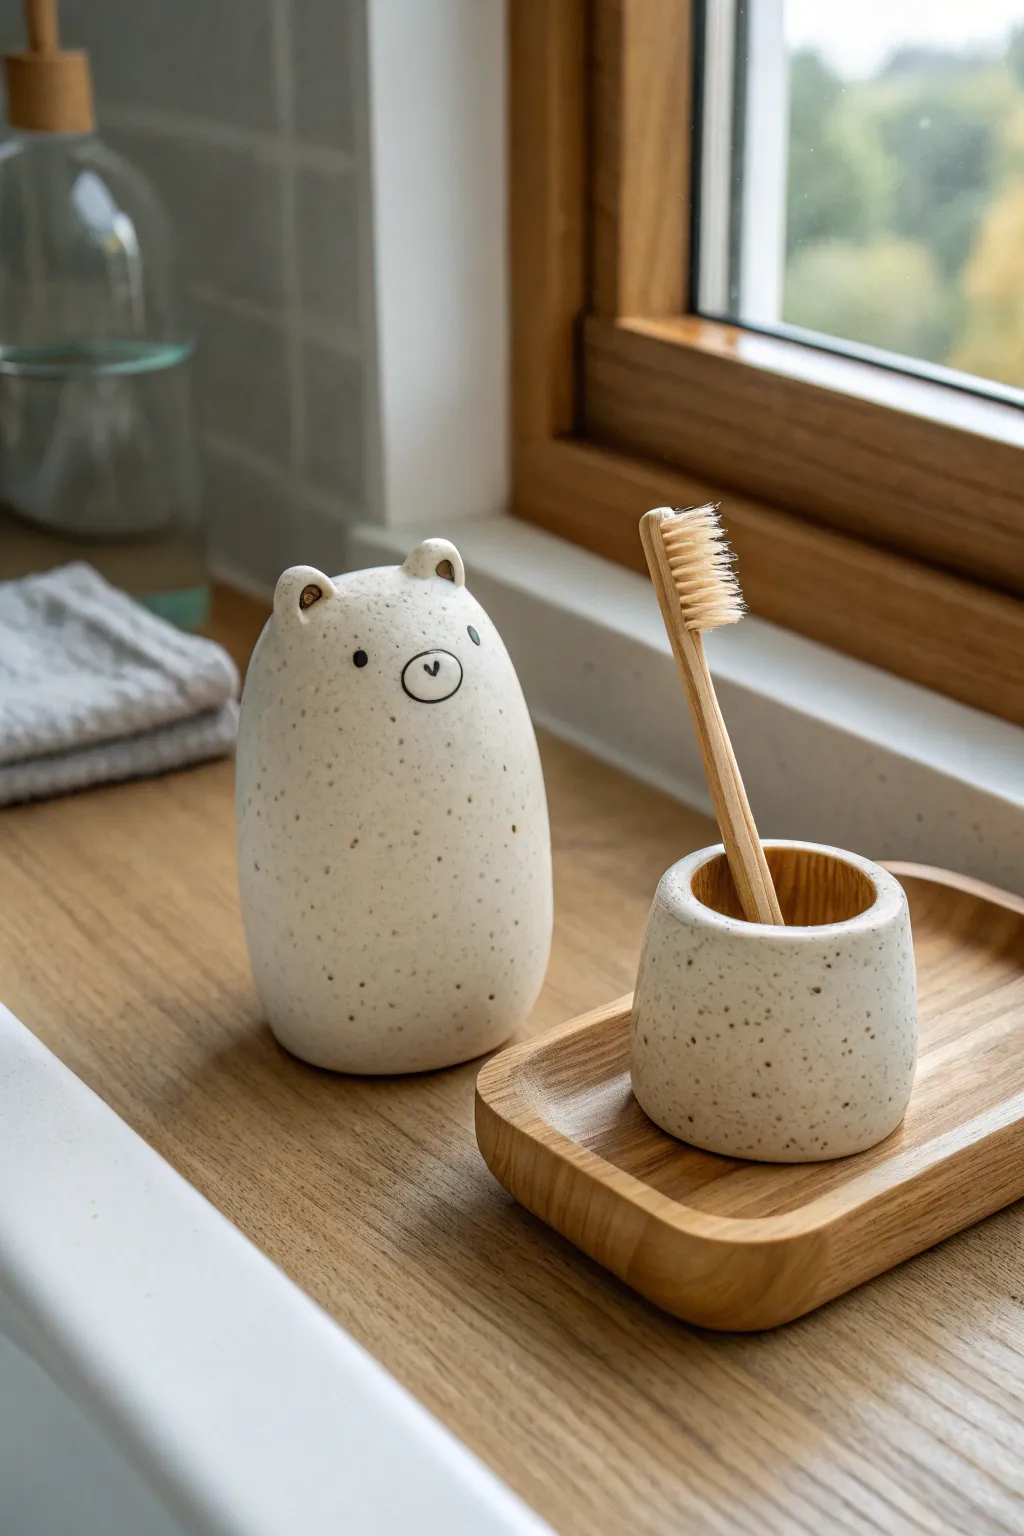
Bring a touch of whimsical charm to your morning routine with this adorable bear figurine and matching toothbrush cup. This beginner-friendly clay project uses simple pinching and coiling techniques to create smooth, organic shapes finished with a lovely speckled glaze.
Step-by-Step
Materials
- White stoneware clay with speckles (or plain white clay + speckled glaze)
- Pottery tools (needle tool, sponge, rib tool)
- Slip (clay mixed with water)
- Clear or white glossy glaze (food-safe)
- Rolling pin
- Small paintbrush for details
- Underglaze pencil or black underglaze for the face
- Wooden tray (optional, for display)
Step 1: Shaping the Bear Body
-
Prepare the clay:
Start with a ball of clay roughly the size of a large orange. Wedge it well to remove air bubbles, ensuring a smooth consistency before you begin forming. -
Establish the base:
Gently tap the ball on your work surface to create a flat, stable bottom. This ensures your bear won’t wobble when it’s finished. -
Form the tapered shape:
Using your palms, gently roll and smooth the clay upwards to create an elongated egg shape. The base should remain wider while the top tapers slightly for the head area. -
Smooth the surface:
Take a damp sponge or a soft rib tool and run it over the entire surface. You want to remove any fingerprints and create that sleek, rounded finish seen in the photo. -
Create the ears:
Pinch two small, pea-sized balls of clay. Flatten them slightly and use your thumb to create a tiny indentation in the center of each. -
Attach the ears:
Score the top of the bear’s head and the bottom of the ears with a needle tool. Apply a dab of slip, press the ears firmly in place, and smooth the seams down so they look seamless.
Smooth Moves
Use a damp chamois leather strip over the rim of your cup while spinning it slowly. This compresses the clay and creates a perfectly rounded, professional lip.
Step 2: Crafting the Toothbrush Cup
-
Start a pinch pot:
Take a second ball of clay, slightly smaller than a tennis ball. Press your thumb into the center, stopping about a half-inch from the bottom. -
Open the walls:
Gently pinch the clay between your thumb and fingers, rotating while you work. Aim for an even wall thickness of about a quarter-inch all the way around. -
Shape the cylinder:
Instead of flaring the walls out like a bowl, gently guide them upwards to form a short, open cylinder. The top opening needs to be wide enough to hold a toothbrush comfortably. -
Refine the rim:
Use a damp sponge to round off the top rim of the cup. It should be smooth to the touch and level all the way around. -
Match the textures:
Just like with the bear, use a rib tool to smooth the exterior walls, removing any lumps or bumps so both pieces look like a cohesive set.
Wobbly Bear?
If the bear feels unstable before firing, gently tap the base on a table again. If the bottom is concave, it might rock; aim for perfectly flat.
Step 3: Details & Glazing
-
Dry to leather hard:
Let both pieces dry slowly under plastic until they are leather hard. This makes them firm enough to paint on without warping. -
Draw the face:
Using a black underglaze pencil or a fine brush with black underglaze, draw a small circle for the muzzle. Add a heart-shaped nose inside the circle. -
Add the eyes:
Dot two small eyes just above the muzzle area. Keep them wide-set for a cuter, more innocent expression. -
Initial firing:
Bisque fire your pieces according to your clay’s specific temperature instructions (usually cone 04). -
Apply the glaze:
Dip or brush a clear or milky white glaze over the entire piece. If you didn’t use speckled clay, I recommend using a ‘speckled white’ glaze here to get that texture. -
Wipe the bottoms:
Carefully sponge off any glaze from the bottom of both the bear and the cup to prevent them from sticking to the kiln shelf. -
Final firing:
Fire the pieces a second time to the glaze temperature (often cone 5 or 6) to vitrify the clay and melt the glaze into a glossy finish.
Once cool, arrange your new ceramic friends on a wooden tray for a spa-like bathroom vibe
Chubby Mini Animal Figurines
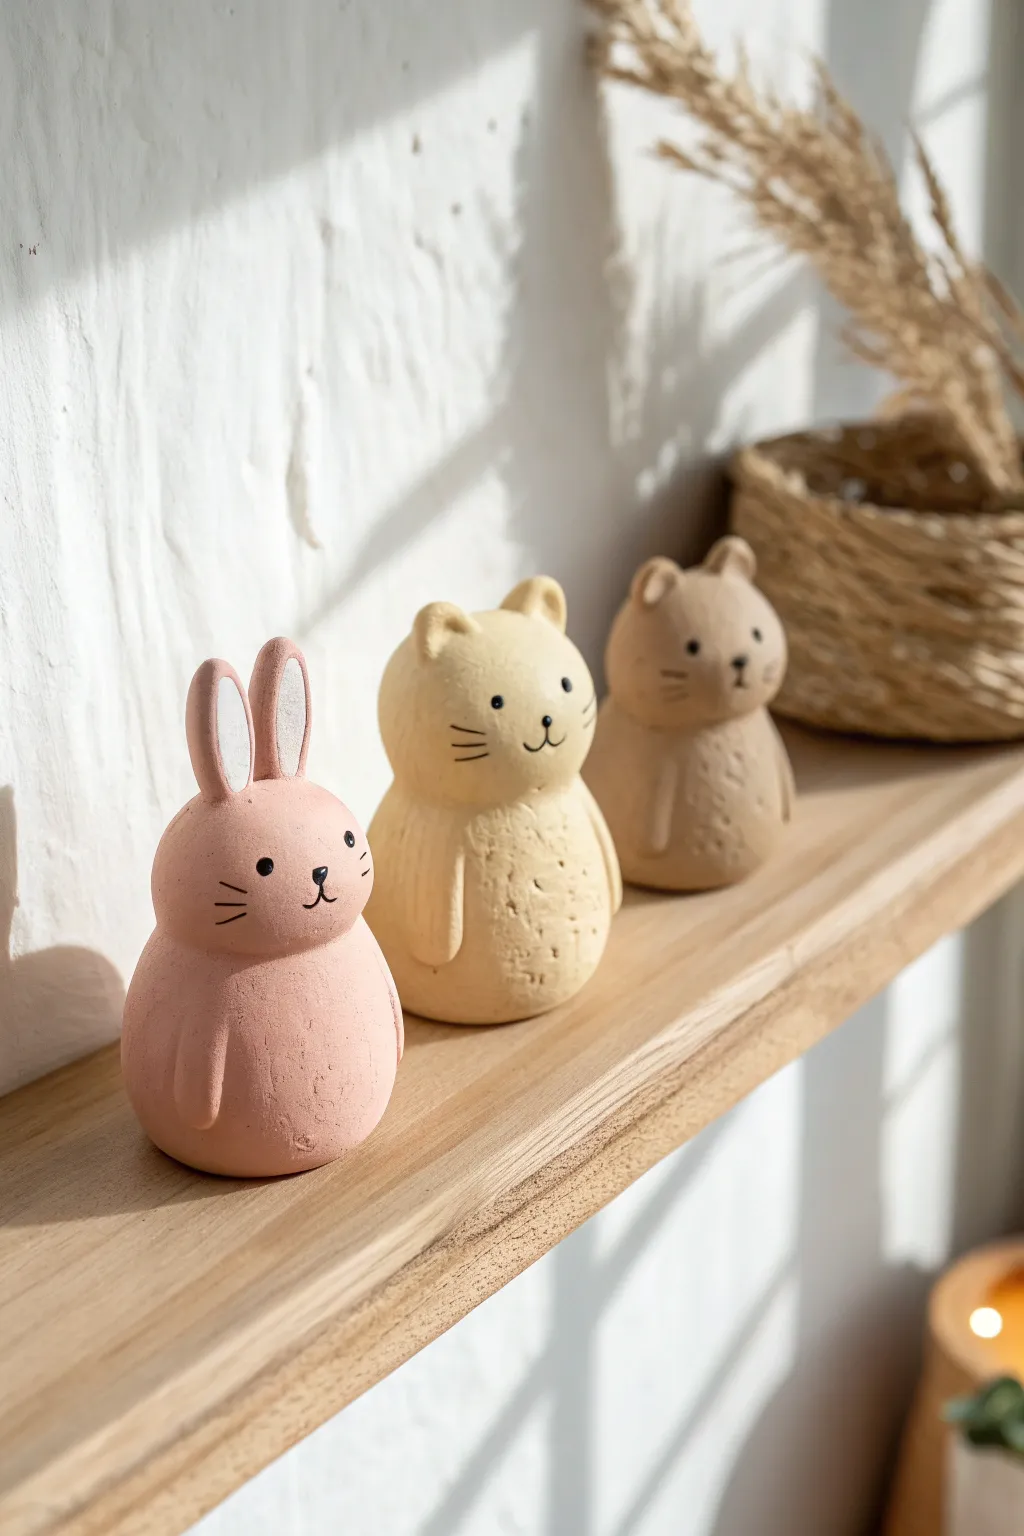
These adorable, minimalist figurines rely on simple shapes and soft, matte colors to create a cozy shelf display. With their rounded bodies and tiny painted faces, they are the perfect beginner-friendly project for exploring air-dry or polymer clay.
Detailed Instructions
Materials
- Air-dry clay or polymer clay (white or neutral)
- Acrylic paints (pastel pink, cream yellow, light caramel, black, white)
- Fine-grit sandpaper (optional)
- Small paintbrush (for base coats)
- Ultra-fine detail brush or black ultra-fine marker
- Water cup and paper towels
- Matte varnish or sealant (spray or brush-on)
- Toothpick or needle tool
Step 1: Shaping the Bodies
-
Prepare the clay:
Start by conditioning your clay. If using air-dry clay, knead it briefly to remove cracks; for polymer, warm it in your hands until it is pliable and smooth. -
Form the base:
Roll three balls of clay, each about the size of a large tangerine or a small lemon. Adjust the size based on how large you want your final figurines to be. -
Create the pear shape:
Gently gently roll the top third of each ball between your fingers to narrow it slightly. You want a subtle pear shape—wide and chubby at the bottom, slightly narrower at the head, but keep it all one continuous piece without a distinct neck. -
Flatten the bottom:
Tap the bottom of each figure firmly on your work surface. This ensures they will stand flat and stable on a shelf later. -
Add little arms:
Roll two tiny, thin sausages of clay for each animal. Press them vertically onto the sides of the body, blending the top edge onto the shoulder area so they look like little resting arms.
Step 2: Refining the Characters
-
Sculpt rabbit ears:
For the bunny, roll two medium-sized oblong shapes. Flatten them slightly and press them firmly onto the top of one head. Use a specialized tool or your finger to smooth the seam so the ears don’t fall off. -
Sculpt cat ears:
For the cat, make two small triangles. Attach them to the second body, keeping them relatively wide apart. Gently pinch the tips to keep them slightly rounded rather than sharp. -
Sculpt bear ears:
For the bear (or hamster), make two small semi-circles. Attach them low on the curve of the head for a sweet, round look. -
Smooth the surface:
Dip your finger in a tiny bit of water (for air-dry) or baby oil (for polymer) and run it over the figurines to smooth out any fingerprints or bumps. -
Dry or bake:
If using polymer clay, bake according to the package instructions. If using air-dry clay, set them aside in a cool, dry place for at least 24-48 hours until completely hardened.
Seamless Attachment
When adding ears or arms in air-dry clay, scratch both joining surfaces with a needle tool and add a dab of water (scoring and slipping) to ensure they fuse permanently.
Step 3: Painting and Finishing
-
Sand for texture:
Once fully cured, briefly scuff the surface with fine-grit sandpaper if you want that rustic, stone-like texture visible in the photo. Wipe away the dust with a damp cloth. -
Mix base colors:
Mix your acrylics to get soft, muted shades. I typically add a drop of white to my pink, yellow, and brown paints to achieve that chalky, pastel finish. -
Apply base coats:
Paint each animal in its respective color: dusty pink for the rabbit, cream yellow for the cat, and light caramel for the bear. You may need two thin coats for full coverage. -
Add ear details:
For the rabbit, mix white with a tiny dot of pink. Paint an oval shape inside the ears to define the inner ear area. -
Paint the faces:
Using an ultra-fine brush or a marker, carefully dot two small black eyes wide apart on the face. Add a tiny inverted triangle or ‘Y’ shape for the nose and mouth. -
Add whiskers:
With the lightest touch possible, paint three short, horizontal whiskers on each cheek. -
Texture the body:
For the cat and bear, create a subtle fur effect by diluting a darker shade of paint (watery brown) and flicking tiny speckles onto the lower belly with an old toothbrush or stiff brush. -
Seal the work:
Finish with a spray matte varnish. Avoid glossy sealants, as the charm of these figures lies in their soft, matte aesthetic.
Leggy Paint Lines?
If your painted whiskers look shaky or too thick, wait for the paint to dry completely, then use the base body color to ‘erase’ the mistake and try again.
Arrange your new trio on a sunny shelf near a plant for a heartwarming decorative touch
Smiley Food Charms From Basic Shapes
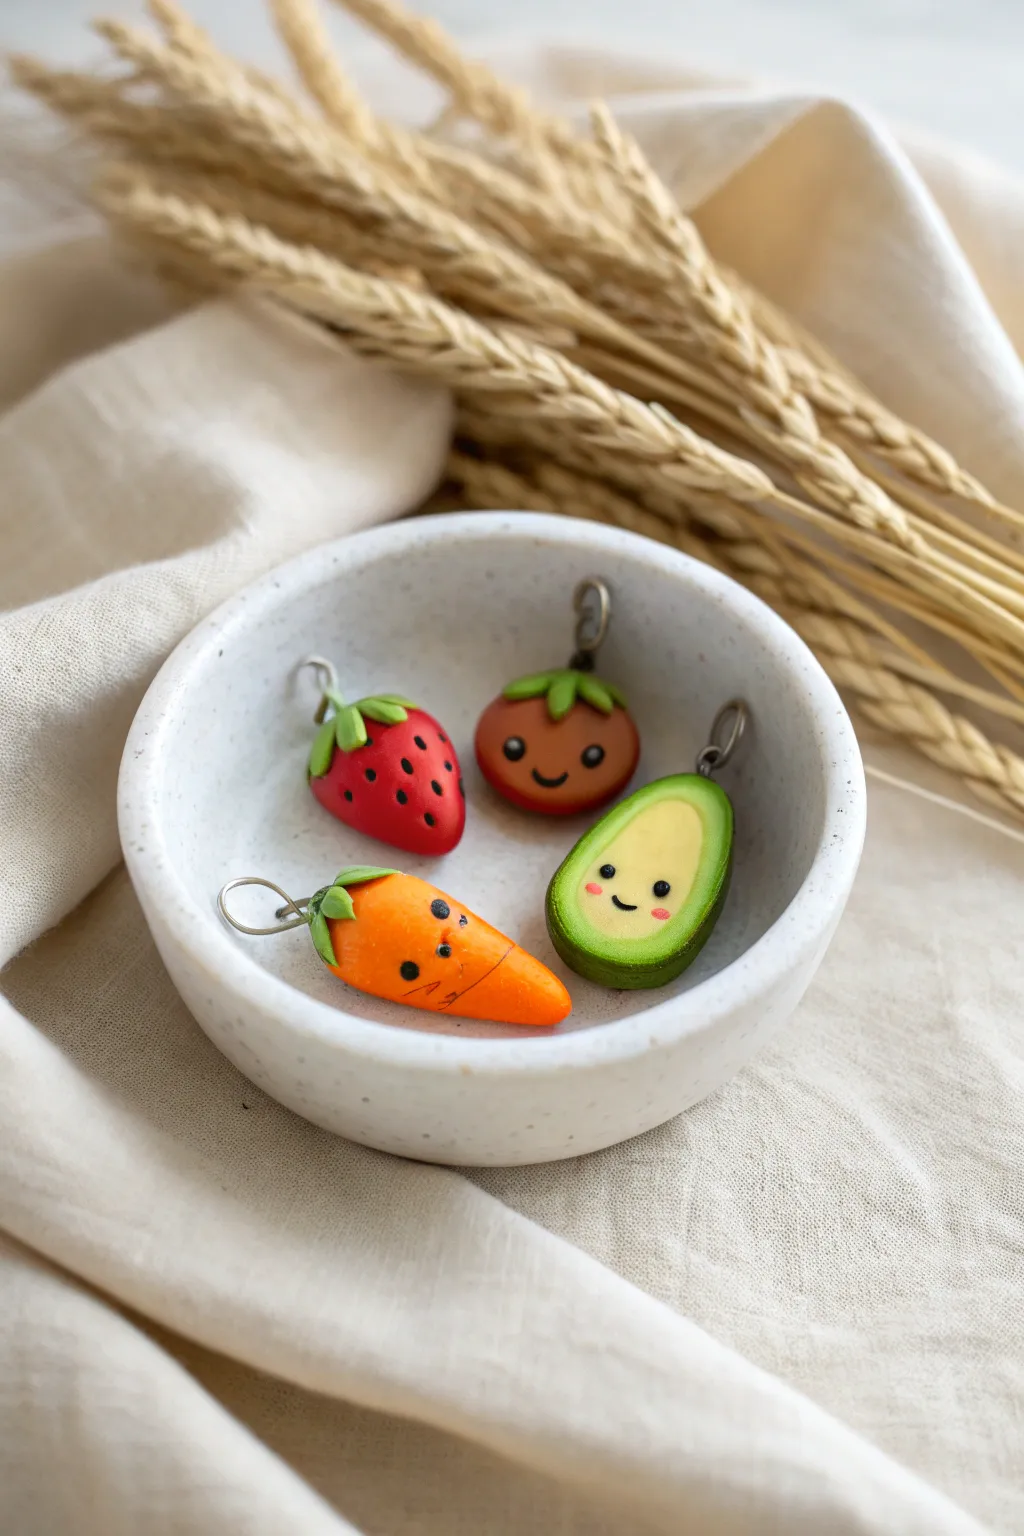
These adorable mini food charms bring a pop of cheer to any keychain or jewelry collection with their vibrant colors and cute expressions. Made from basic geometric shapes, this project is perfect for beginners looking to practice simple modeling and detailing techniques.
How-To Guide
Materials
- Polymer clay (red, orange, green, light yellow, dark green, black)
- Eye pins or small metal screw eyes
- Pointed sculpting tool or toothpick
- Ball stylus tool
- Baking sheet and parchment paper
- Oven (for baking polymer clay)
- Gloss glaze (optional)
Step 1: Shaping the Bases
-
Mix colors:
Begin by conditioning your polymer clay until it is soft and pliable. For the tomato, mix a bit of orange into red clay to get a warm, reddish-orange hue. -
Form the tomato:
Roll a small ball of the reddish-orange clay, about the size of a marble, and flatten it slightly at the top and bottom to create a squat, round shape. -
Create the avocado:
Blend green and a tiny bit of yellow for the avocado skin. Shape a teardrop, flatten the front face, and press a smaller teardrop of light yellow clay onto the flat surface for the flesh. Smooth the edges so they merge seamlessly. -
Shape the strawberry:
Take a piece of bright red clay and roll it into a ball, then gently taper one end to form a soft triangular or strawberry shape. -
Mold the carrot:
Roll bright orange clay into a cone shape, keeping the top relatively wide and tapering it down to a rounded point. Slightly flatten the wider end where the greens will go.
Step 2: Adding Greenery
-
Tomato stem:
Using dark green clay, form a tiny star shape or several small teardrops joined at the center. Press this onto the top of the tomato. -
Refine the calyx:
Use a toothpick or sculpting tool to create a small indentation in the center of the tomato stem where the vine would attach. -
Strawberry leaves:
Make small, varied teardrops from green clay. Attach 3-4 of these to the top of the strawberry, curling the tips slightly upward for a natural look. -
Carrot tops:
Form two or three tiny, flattened ovals of green clay. Press them firmly into the center of the wide end of the carrot.
Fixing Fingerprints
Before baking, lightly brush your uncooked clay with a little baby oil or cornstarch to smooth out any accidental fingerprints.
Step 3: Face and Details
-
Make eye sockets:
Using a small ball stylus, gently press two small indentations onto each fruit where you want the eyes to sit. This helps the tiny black clay balls stay in place. -
Add eyes:
Roll minuscule balls of black clay—smaller than a poppy seed. Place them into the sockets you just made and press gently to secure. -
Create smiles:
Roll a very thin snake of black clay. Cut tiny segments and curve them into a ‘U’ shape. Gently press these onto the faces using your needle tool. -
Rosy cheeks:
For the avocado, add two tiny flattened circles of pink clay just below the eyes for blush. -
Strawberry seeds:
Use a needle tool or toothpick to poke small, scattered holes all over the red surface of the strawberry to mimic seeds. -
Carrot texture:
Use a blade or needle tool to press horizontal lines across the carrot body for texture, being careful not to distort the shape.
Keep It Clean
Baby wipes are essential! Wipe your hands and tools when switching between colors, especially before touching the light yellow avocado flesh.
Step 4: Finishing Up
-
Insert hardware:
Screw the eye pins into the top center of each charm. I find it helps to add a tiny dab of liquid clay or translucent bake-and-bond on the threads for extra security. -
Bake:
Arrange the charms on a parchment-lined baking sheet. Bake according to your clay package instructions (usually around 275°F or 130°C for 15-30 minutes). -
Cool and glaze:
Let the charms cool completely before handling. If you want a shiny finish, apply a thin coat of polymer clay gloss glaze.
Once cooled, these cheerful little charms are ready to be strung onto a necklace or keychain to brighten your day
Tiny Mushroom Minis
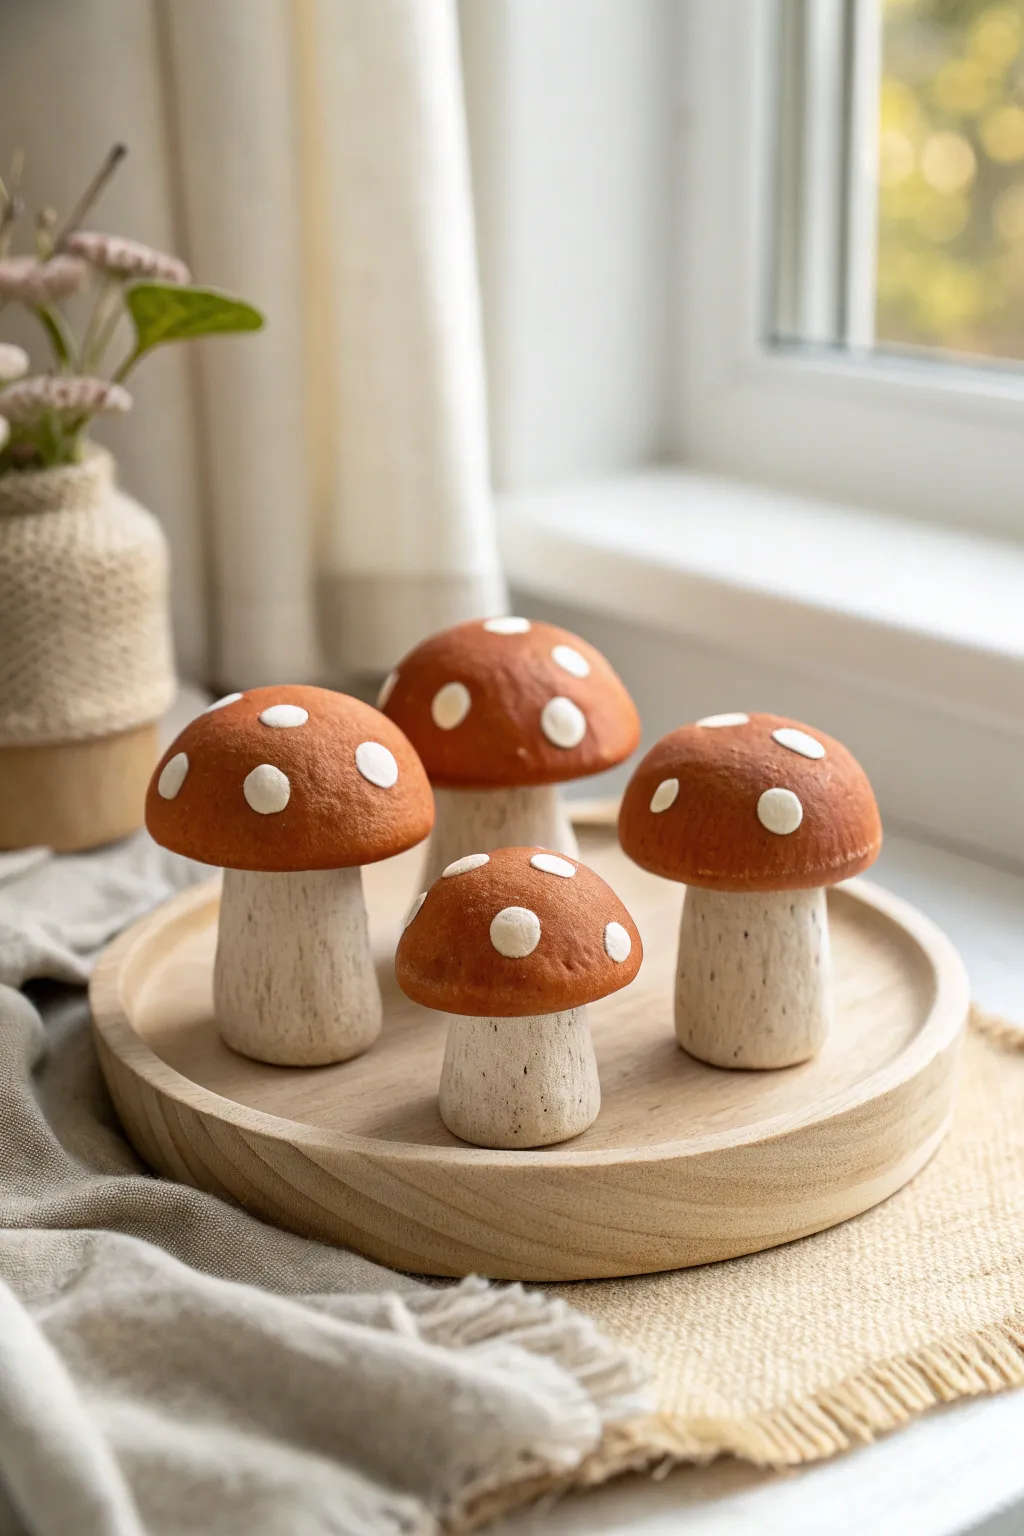
Bring a touch of woodland whimsy into your home with these charming, rustic clay mushrooms. These handcrafted pieces feature beautifully textured stems and smooth, spotted caps in warm autumnal tones, perfect for a cozy seasonal display.
Detailed Instructions
Materials
- Air-dry clay (white or light grey)
- Aluminum foil
- Acrylic paints (Burnt Sienna/Rust Orange, Warm White, Dark Brown)
- Sculpting tools (needle tool and small wire loop)
- Old toothbrush or stiff bristle brush
- Soft synthetic brushes for painting
- Matte varnish or sealant
- Sandpaper (fine grit)
- Water cup
Step 1: Sculpting the Base Forms
-
Prepare the foil cores:
To save clay and reduce weight, start by tightly crunching aluminum foil into four stem shapes—make them slightly wider at the bottom like a tree trunk. Create four separate foil domes for the caps. -
Wrap the stems:
Roll out a slab of clay about 1/4 inch thick. Wrap it around your foil stem cores, smoothing the seams together with a little water until the foil is completely hidden. -
Shape the stems:
Roll the clay-covered stems gently on your work surface to shape them. Flare the base slightly so they stand stably on their own. -
Form the caps:
Cover the foil domes with a similar layer of clay. Smooth the surface with a bit of water on your finger until it is perfectly round and free of cracks. -
Connect the pieces:
Score the top of the stem and the underside of the cap with a needle tool. Apply a dab of water or clay slip, then press the cap firmly onto the stem. Smooth the join underneath so it looks seamless.
Cracked Clay?
If hairline cracks appear while drying, mix a small paste of clay and water (slip) and fill the crack. Smooth it over with a damp finger and let dry again.
Step 2: Adding Texture and Detail
-
Texture the stems:
This is crucial for the rustic look. Use a needle tool to drag vertical lines up and down the stem. Vary the pressure to create deep and shallow grooves resembling bark. -
Add pore holes:
Take your needle tool and randomly poke tiny holes all over the stem texture for an organic, porous appearance. -
Soften the texture:
I like to gently tap the textured stem with an old toothbrush or a stiff brush. This knocks down any sharp clay burrs and makes the wood texture look weathered rather than carved. -
Create the spots:
Roll tiny, flat discs of fresh clay in various sizes. Press them randomly onto the smooth caps. Make sure to press the edges down so they don’t curl up while drying. -
Let it dry:
Set your mushrooms aside in a draft-free area. Let them dry completely for 24-48 hours until they are hard and room temperature to the touch.
Fairy Ring Display
Make a tiny door on one stem before baking to turn it into a fairy house, or use real moss glued to the base for a realistic forest floor effect.
Step 3: Painting and Finishing
-
Base coat the stems:
Mix a wash of water and warm white paint. Apply this to the stems, ensuring it gets into all the textured grooves. -
Apply an antiquing wash:
Once the white is dry, water down some dark brown paint heavily. Brush it over the stems and immediately wipe the raised areas with a paper towel, leaving dark paint trapped in the crevices. -
Paint the caps:
Paint the cap surface (avoiding the white spots) with your Burnt Sienna or Rust Orange. You may need two coats for opaque coverage. -
Highlight the spots:
Carefully paint the raised clay spots with crisp Warm White paint. If you get orange on them, don’t worry—just wait for it to dry and paint the white over it. -
Reference the look:
Look at the stem bottoms; if you want them to look like they were just picked, dab a tiny amount of grey-brown paint near the very base. -
Seal the work:
Finish with a coat of matte varnish over the entire piece to protect the paint and give it a cohesive, non-shiny finish consistent with natural fungi.
Group your finished mushrooms on a wooden tray or windowsill for a delightful autumnal accent
Mini Ghosts and Tiny Pumpkins
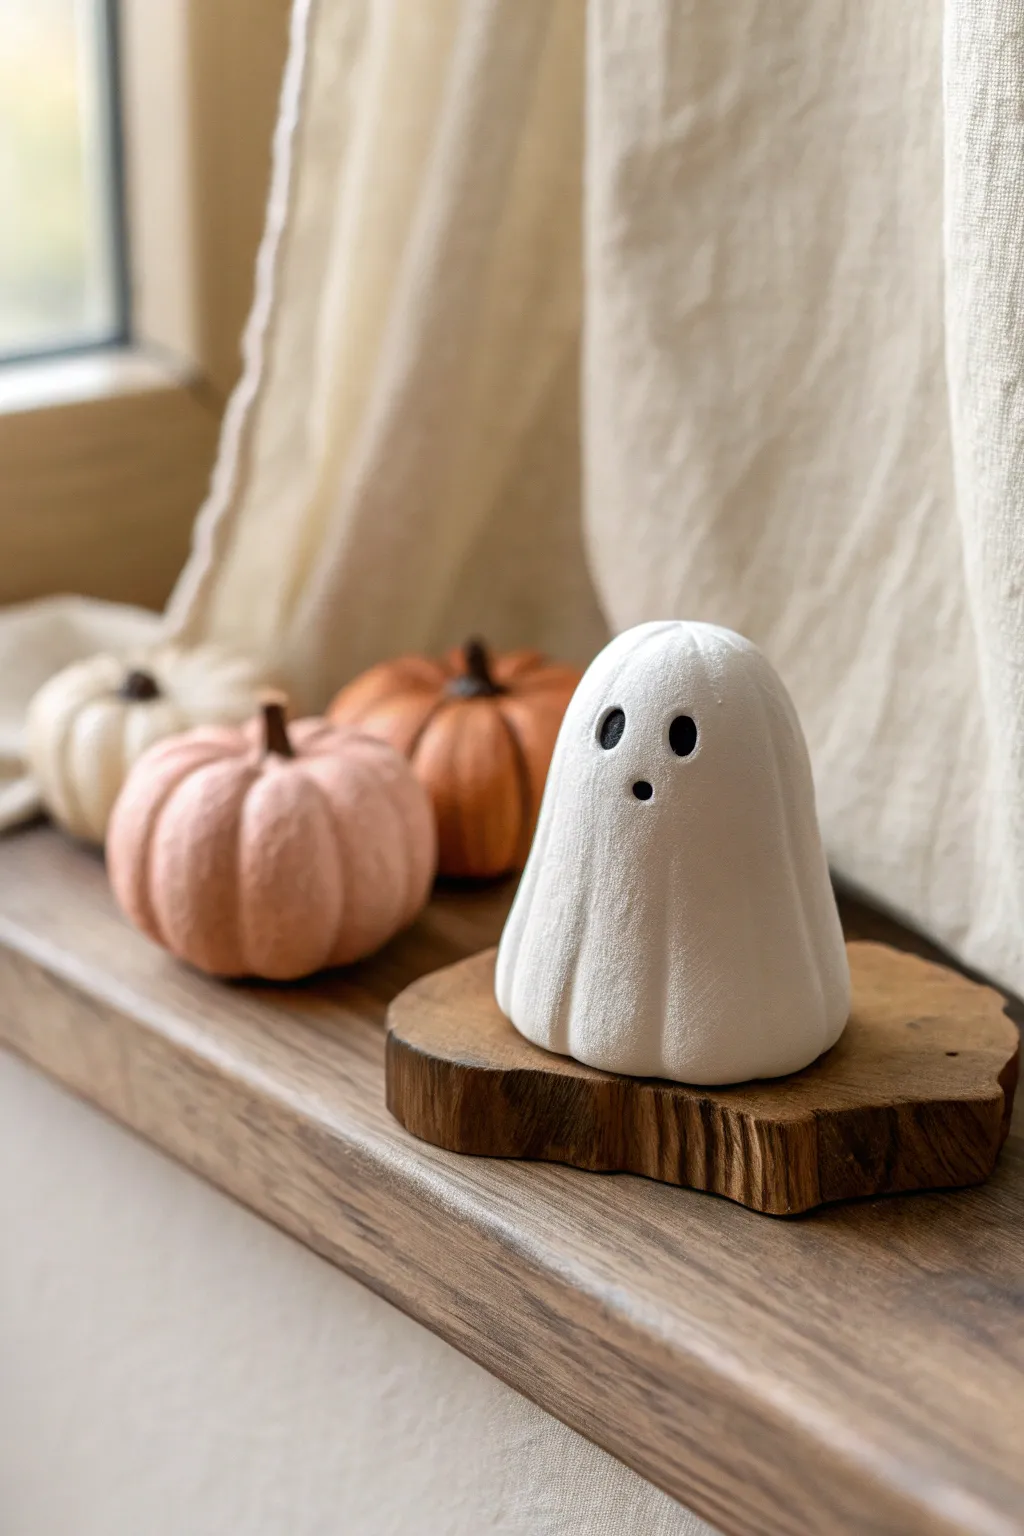
These adorable little clay figures bring a touch of minimalist Halloween magic to any nook. You’ll sculpt a classic draped ghost and a trio of muted pumpkins, perfecting that smooth, matte pottery look without needing a kiln.
Step-by-Step Tutorial
Materials
- White airy-dry clay (or polymer clay)
- Acrylic paints (White, pastel pink, burnt orange, black, beige)
- Basic sculpting tools (or a butter knife and toothpick)
- Fine grit sandpaper
- Ball stylus tool
- Matte varnish or sealant
- Small wood slice (optional base)
Step 1: Shaping the Ghost
-
Create the base form:
Start with a ball of white clay about the size of a golf ball. Roll it into a smooth sphere to remove any cracks, then gently elongate it into a thick cylinder shape. -
Define the head:
Round off the top of your cylinder to form a smooth dome for the ghost’s head. The bottom should remain flat so it stands securely on your shelf. -
Add the draping folds:
Using a modeling tool or the handle of a paintbrush, gently press vertical indentations from the base up toward the ‘neck’ area. -
Refine the fabric look:
Smooth the ridges between your indentations with a wet finger. You want these to look like soft folds of a sheet, not sharp cuts, so take time to round them out. -
Create facial features:
Use a ball stylus tool to press into the clay for the eyes. Gently rotate the tool to make two small, oval cavities. Add a smaller, circular indentation below them for the mouth. -
Smooth perfection:
Dip your finger in a little water and run it over the entire surface of the ghost to blur any fingerprints and ensure a satiny finish before drying.
Smoother Surfaces
Keep a small bowl of water nearby while sculpting. Regularly wetting your fingertips acts like a mini-polishing wheel, smoothing out tiny cracks instantly.
Step 2: Sculpting the Pumpkin Trio
-
Form pumpkin spheres:
Roll three smaller balls of clay. Make them slightly different sizes—one larger (golf ball size) and two smaller (ping pong ball size) for variety. -
Flatten slightly:
Press each ball gently against your work surface to flatten the bottom. Press the top down slightly with your palm to create that squat pumpkin silhouette. -
Mark the segments:
Use the side of a toothpick or sculpting tool to press vertical lines from the center top to the bottom edge. Imagine slicing a pie; space these lines evenly around the sphere. -
Soften the segments:
Use your thumb to gently press the clay between the vertical lines, making the segments puff out. This gives the pumpkins their characteristic bumpy shape. -
Add stem indents:
Press a small indentation into the very top center of each pumpkin where the stem will go. -
Create tiny stems:
Roll three tiny snakes of clay. Pinch one end to be slightly thinner. Insert the thicker end into the top indentation of each pumpkin, blending the clay slightly if needed.
Step 3: Refining and Painting
-
Drying time:
Allow all your pieces to dry completely. For air-dry clay, this usually takes 24-48 hours depending on thickness. I like to flip them over halfway through so the bottoms dry evenly. -
Sand for smoothness:
Once bone dry, take fine-grit sandpaper and gently buff out any remaining roughness or fingerprints. This is key to achieving that high-end ceramic look. -
Paint the Ghost:
Paint the ghost entirely white. You might need two coats for a solid, opaque finish. Let it dry between coats. -
Detail the face:
Use a fine liner brush and black acrylic paint to carefully fill in the eye and mouth indentations. Keep the edges crisp. -
Paint the pumpkins:
Mix a muted palette: a soft beige for the white pumpkin, a dusty pink, and a burnt orange. Paint the bodies of the pumpkins, getting into all the crevices. -
Detail the stems:
Paint the stems a dark brown or black. A slightly messy application near the base of the stem adds realism. -
Final coat:
Finish all pieces with a matte varnish. This protects the paint and unifies the sheen, making the clay look like fired bisque ceramic.
Glow Up
Before drying, use a straw to poke a hole in the bottom of the ghost. Once dry, you can place it over a battery-operated tea light for a spooky glow.
Arrange your little clay family on a windowsill or mantle for instant autumn charm
Matchbox-Size Lidded Keepsake Box
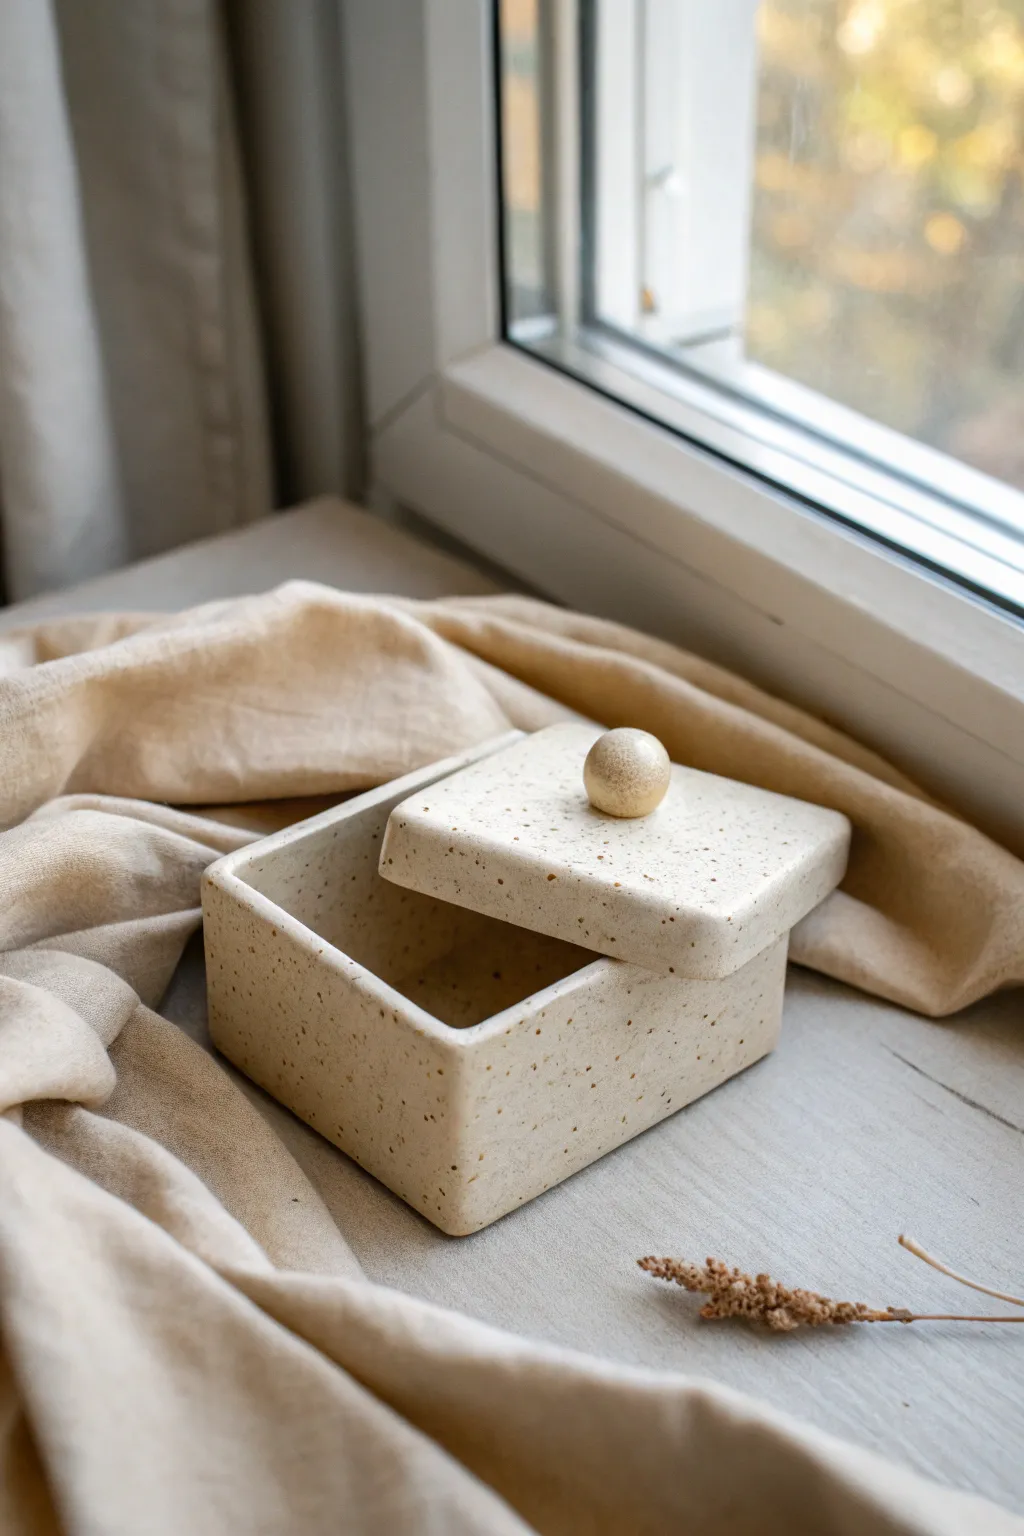
This minimalist lidded box radiates understated elegance with its warm, sandy tones and delicate speckling. Perfect for holding tiny treasures, it mimics the look of high-end ceramic stoneware but can be crafted right at home.
Detailed Instructions
Materials
- Polymer clay (beige or sand color)
- Faux granite or speckle inclusions (or black pepper)
- Clay roller or pasta machine
- Square cookie cutter (approx. 2-3 inches)
- Craft blade or scalpel
- Liquid polymer clay (Bake & Bond)
- Small wooden bead or ball tool for knob
- Smooth work surface (ceramic tile or glass)
- Sandpaper (fine grit)
- Matte varnish
Step 1: Preparing the Clay
-
Condition the clay:
Begin by thoroughly kneading your beige polymer clay until it is soft and pliable. Warm clay helps prevent cracking during the shaping process. -
Add the speckles:
If you aren’t using pre-speckled granite clay, gently knead in a small pinch of faux granite inclusions or even freshly ground black pepper to achieve that natural, earthy texture. -
Roll out the slab:
Roll the clay out to a uniform thickness of about 1/4 inch (6mm). Using depth guides or playing cards stacked on either side of your roller ensures the thickness is perfectly even.
Step 2: Constructing the Base
-
Cut the base square:
Using your square cookie cutter or a ruler and blade, cut out a perfect square for the bottom of the box. -
Measure the walls:
Measure the side length of your base square. Cut a long strip of clay that matches this length for the four walls, keeping the height around 1.5 inches. -
Cut wall sections:
Slice the long strip into four equal rectangular sections. I find it helpful to double-check these against the base to ensure a tight fit. -
Assemble the perimeter:
Place the walls on top of the base slab edges. Use a drop of liquid clay at the seams to act as glue, pressing the corners together firmly. -
Blend the seams:
On the outside and inside, use a modeling tool or your finger to gently drag clay across the vertical seams and the bottom connection point to fuse the pieces together. -
Smooth the surfaces:
Once fused, smooth out the drag marks until the walls look seamless. Check that the box is still perfectly square and hasn’t warped during handling.
Seamless Corners
Cut wall edges at 45-degree angles (mitered corners) before assembling. This hides the seams right at the corner edge rather than on the face of the box.
Step 3: Creating the Lid
-
Cut the lid slab:
Roll out a fresh slab, slightly thicker than the walls. Cut a square that is just a fraction larger than your box base to create a nice overhang. -
Soften the edges:
Gently tap the sharp corners and edges of the lid with your fingertip to give them a slightly rounded, organic finish similar to the reference photo. -
Form the knob:
Roll a small ball of clay about the size of a marble. Ensure it is perfectly round and smooth. -
Attach the knob:
Apply a dot of liquid clay to the direct center of the lid. Press the ball firmly onto the spot, ensuring a strong bond without flattening the sphere too much. -
Add the inner flange:
To keep the lid from sliding off, cut a smaller square of clay that fits loosely *inside* the box opening. Attach this centered on the underside of the lid using liquid clay.
Make it Match
Create a matching vanity set by making a shallow, long rectangular tray to sit underneath your new box, perfect for holding jewelry or brushes.
Step 4: Finishing Touches
-
Final inspection:
Look over the entire piece for fingerprints or lint. Lightly brush over the surface with a little baby oil or cornstarch if you need to smooth out stubborn prints. -
Baking:
Bake the box and lid (separate them first) according to your clay package instructions. Using an oven thermometer is crucial to prevent scorching that beautiful beige tone. -
Cooling:
Allow the clay to cool completely inside the oven. Sudden temperature changes can sometimes cause cracks in box corners. -
Sanding:
Once cool, wet-sand the edges lightly with fine-grit sandpaper to mimic the texture of honed stone. -
Sealing:
Apply a very thin coat of matte varnish to protect the surface while maintaining that raw, natural ceramic appearance.
Place your finished box on a windowsill or nightstand to add a touch of handcrafted serenity to your space
Micro Wall Tiles for a Mini Mosaic Set
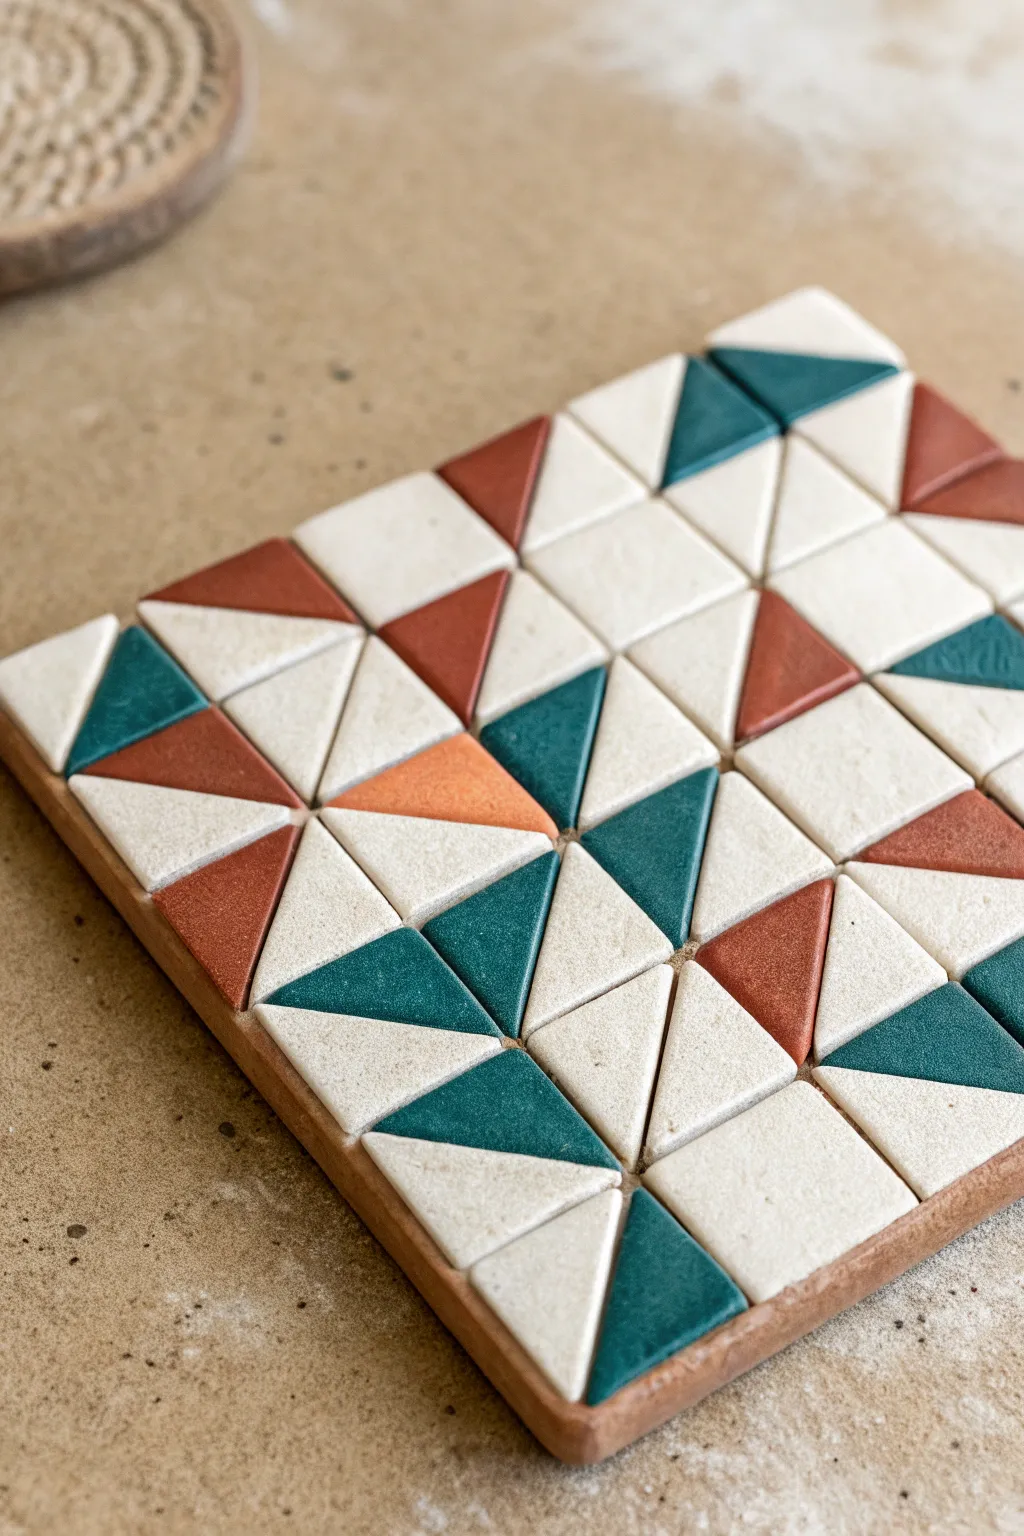
This elegant little project transforms humble polymer or air-dry clay into a sophisticated geometric coaster or wall accent. Using a classic quilt-block style pattern, the mix of cream, terracotta, and teal triangles creates a warm, modern aesthetic perfect for any home.
How-To Guide
Materials
- Polymer clay or air-dry clay (Cream, Terracotta/Rust, Deep Teal, and a small amount of Orange)
- Clay roller or pasta machine
- Sharp clay blade or X-Acto knife
- Ruler
- Small square wooden base (approx 4×4 inches) or a slab of clay for the base
- Strong craft glue (e.g., E6000 or tacky glue)
- Fine-grit sandpaper
- Matte varnish (optional)
- Grout (optional, depending on desired finish)
Step 1: Creating the Tile Sheet
-
Condition the material:
Begin by conditioning each color of clay separately until it is soft and pliable. You will need mostly cream clay, followed by equal parts terracotta and teal, and just a pinch of bright orange. -
Roll out slabs:
Roll each color into a flat slab of even thickness, approximately 3mm to 4mm thick. Using a pasta machine here ensures perfect uniformity, which is crucial for the final pattern to align. -
Cut strips:
Use your clay blade and a ruler to slice the slabs into long strips. The width of the strip will determine the size of your squares, so aim for about 1.5 cm wide. -
Cross-cut into squares:
Cut across the strips at 1.5 cm intervals to create perfect squares. Don’t worry if they aren’t mathematically perfect, but try to keep them consistent. -
Create triangles:
Slice each small square diagonally from corner to corner to create two triangles. For this pattern, you will need a large pile of cream triangles and smaller piles of the colored ones.
Gaps happen!
If your triangles leave unwanted gaps, don’t panic. Mix a bit of liquid clay or white glue with clay dust to create a paste and fill the cracks like grout.
Step 2: Assembling the Pattern
-
Dry run layout:
Before gluing, arrange your triangles on a flat surface to plan your design. Use the reference image to replicate the ‘flying geese’ style pattern, alternating straight rows and diagonal clusters. -
Prepare the base:
If you are using a wooden base, ensure it is clean and dry. If making a clay base, roll out a thick square slab larger than your pattern area and create a raised lip around the edge to frame the tiles. -
Apply adhesive:
Spread a thin layer of strong craft glue into one corner of your base. Working in small sections prevents the glue from drying out before you place the tiles. -
Place corners first:
Start placing your triangles from one corner, pressing them gently but firmly into the base. I find that starting with the outer perimeter helps keep the interior grid straight. -
Follow the grid:
Continue placing tiles, paying close attention to the spacing. You want them touching or barely separated if you plan to grout later. Replicate the specific color placements, ensuring the single orange triangle is placed centrally for that pop of interest. -
Adjust and trim:
If you reach the edge and the triangles hang over slightly, gently trim the excess flush with the base using your clay blade while the clay is still uncured/wet.
Go Retro 70s
Swap the teal and cream for mustard yellow, avocado green, and brown to create a deeply vintage 1970s color palette for your mosaic.
Step 3: Finishing Touches
-
Bake or dry:
If using polymer clay, bake the entire assembled piece according to the manufacturer’s instructions (usually 275°F/135°C for 15-30 minutes). If using air-dry clay, let it sit undisturbed for 24-48 hours. -
Sand for smoothness:
Once fully cured or dry, lightly sand the surface with fine-grit sandpaper to remove any fingerprints or sharp edges on the triangles. -
Dust off debris:
Wipe the surface with a barely damp cloth to remove any sanding dust. This ensures your finish will be clear. -
Seal the surface:
Apply a coat of matte varnish to protect the clay and give it a finished look. This mimics the stone-like texture seen in the photo. -
Add protective backing:
Glue a piece of felt or cork to the bottom of the trivet to prevent it from scratching your furniture.
Now you have a stunning, geometric piece of art that looks professionally crafted and adds a warm, handmade touch to your space