Soft clay is my go-to when I want something cute, quick, and actually doable in one sitting. If you’re craving that smooth, squishy satisfaction and a finished piece you’ll want to keep on your desk, these soft clay ideas are right up your alley.
Cute Blob Animal Figurines
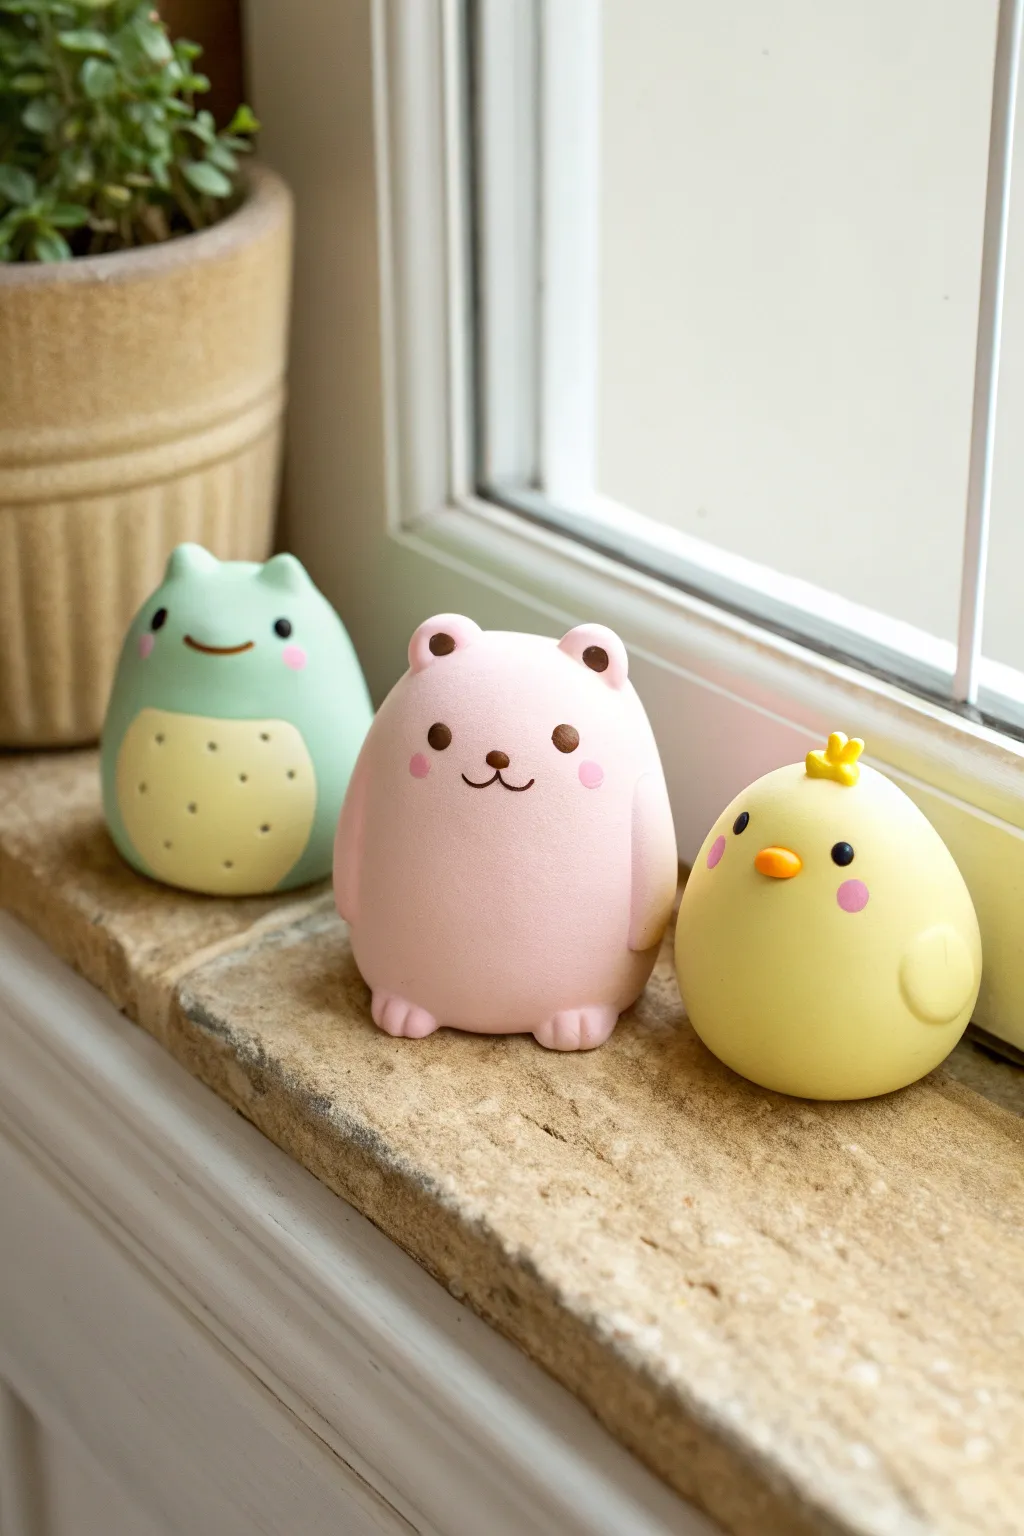
These delightfully chubby figurines—a minty frog, a rosy bear, and a sunny chick—are the perfect desk companions to mold from soft clay. Their simple, egg-like shapes make them an ideal beginner project with a clean, kawaii aesthetic.
Step-by-Step Tutorial
Materials
- Polymer clay or air-dry soft clay (colors: pastel green, pastel pink, pastel yellow, pale yellow, white, orange, black)
- Small dotting tool or toothpick
- Soft-bristle brush (for smoothing)
- Rolling pin or round marker casing
- Pink chalk pastel or blush (for cheeks)
- Gloss varnish (optional, for eyes)
- Clean work surface or silicone mat
Step 1: The Minty Frog Blob
-
Base Shape:
Start with a golf-ball-sized amount of pastel green clay. Roll it into a smooth sphere, then gently continuously tap the bottom against your work surface to create a flat base while narrowing the top slightly into an egg shape. -
Belly Patch:
Take a smaller amount of pale yellow clay and flatten it into a thin oval. Press this gently onto the lower front of your green ‘egg’ to create the belly. Smooth the edges with your finger so it integrates seamlessly. -
Tiny Ears:
Create two small balls of green clay. Attach them to the very top of the head, spacing them slightly apart for that classic froggy silhouette. Blend the seams downward into the head using a tool or your finger. -
Facial Features:
Using a needle tool or toothpick, gently imprint a wide, shallow ‘U’ shape for the smile. For eyes, create two tiny balls of black clay and press them onto the face. -
Adding Details:
Use a dotting tool to add small indentations or tiny balls of darker green or brown clay onto the pale yellow belly for texture. Apply a tiny dab of pink pastel dust to the cheeks for a blush effect.
Step 2: The Rosy Bear Blob
-
Forming the Body:
For the bear, knead your pastel pink clay until soft and roll it into a similar egg-like blob shape, ensuring it stands stably on its own. -
Creating Ears:
Roll two small balls of pink clay. Indent the center of each with a round tool, then fill that indentation with a tiny speck of dark brown clay. Attach these ears to the top corners of the head. -
Little Paws and Feet:
Roll two tiny sausages of pink clay and attach them vertically to the sides of the body as arms. For feet, attach two flattened mini-balls to the bottom front and use a knife tool to mark little toe indentations. -
Bear Face:
Place two small black clay balls for eyes, wide apart. Between them, add a tiny brown nose and use a thin snake of brown clay (or paint later) to form the mouth anchors. -
Finishing Touches:
Smooth out any fingerprints by lightly brushing the clay with a tiny bit of baby oil or water (depending on clay type). Don’t forget the rosy cheeks using chalk pastel.
Sticky Situation?
If your clay is too soft or sticky and deforming as you work, pop it in the fridge for 10 minutes to firm it up before handling again.
Step 3: The Sunny Chick Blob
-
Yellow Base:
Roll your pastel yellow clay into a round, slightly shorter blob compared to the others. This one should look particularly plump and spherical. -
Wings:
Flatten two small balls of yellow clay into teardrop shapes. Press these onto the sides of the body, curving slightly to hug the round form. -
The Beak:
Take a tiny amount of orange clay and roll it into a small cone or oval. Press it into the center of the face, flattening it just enough so it doesn’t protrude too sharply. -
Head Feathers:
I like to create a tiny ‘sprout’ on top. Roll three extremely small sausages of yellow clay or just pinch a small piece of clay into a three-pronged tuft and attach it to the very center of the head. -
Final Face Details:
Add the black bead eyes on either side of the beak. Use a dry brush to dust pink pastel circles right under the eyes for that sweet, flushed look. -
Baking or Drying:
If using polymer clay, bake according to package instructions (usually 275°F/135°C for 15-30 mins). If using air-dry clay, leave them in a dry spot for 24-48 hours.
Dust-Free Zone
To keep light clay clean, wipe your hands with a baby wipe before switching colors. Lint shows up easily on pastel shades!
Once dry and set, arrange your trio on a windowsill to bring a little handmade joy to your day


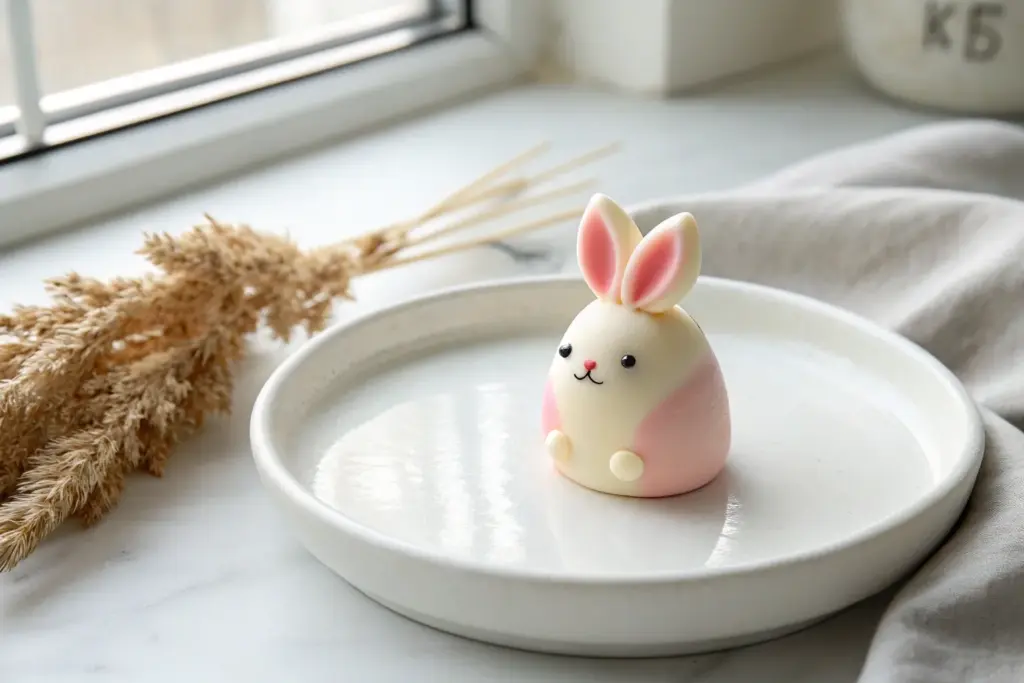
Simple Soft Clay Charms for Keychains
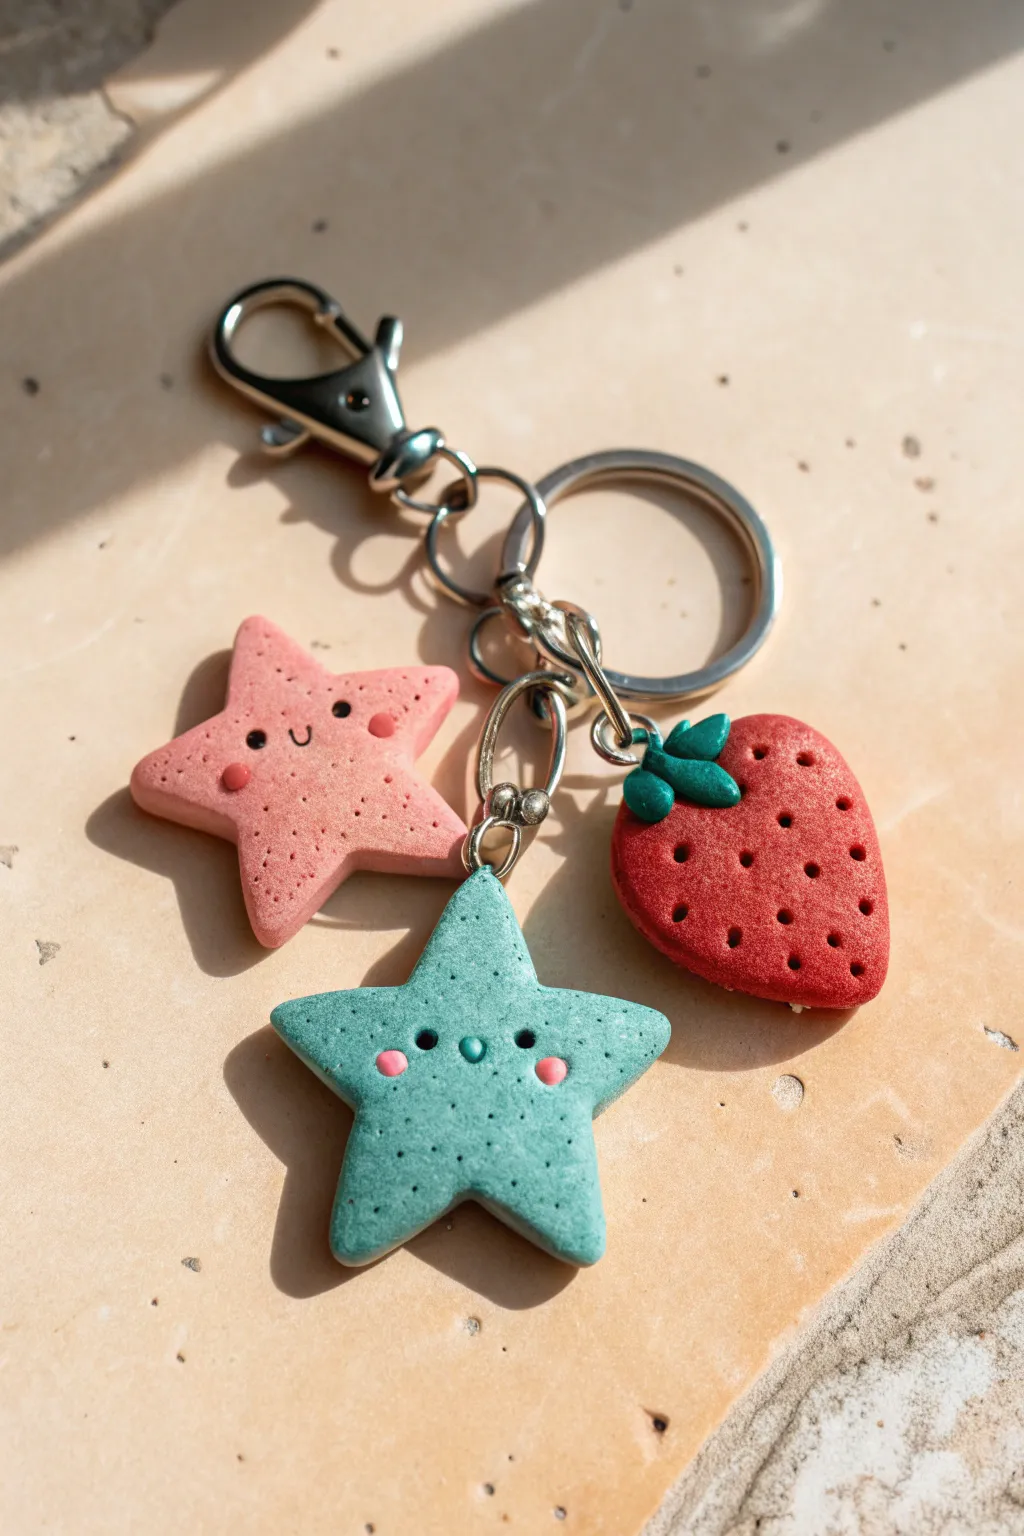
Brighten up your keyring with this adorable trio of polymer clay charms. This project features two smiling, textured stars—one pink and one teal—alongside a vibrant red strawberry, all hung on a secure silver clasp.
Step-by-Step Guide
Materials
- Polymer clay (pink, teal/mint green, red, dark green)
- Black and pink acrylic paint (for faces)
- Fine-tipped dotting tool or needle tool
- Small star-shaped cookie cutter (optional)
- Eye pins (silver)
- Jump rings (silver)
- Keychain clasp with chain
- Gloss glaze or polyurethane varnish
- Toothbrush or texturing sponge
- Baking sheet and parchment paper
- Oven
Step 1: Shaping the Stars
-
Prepare the clay:
Begin by conditioning the pink and teal clay until it is soft and malleable. Roll each color out into a slab that is approximately 1/4 inch thick to ensure the charms are sturdy. -
Cut the shapes:
Use a small star cutter to punch out one pink star and one teal star. If you don’t have a cutter, you can hand-cut the shape using a craft knife or mold it with your fingers. -
Soften the edges:
Gently tap the sharp edges of the stars with your finger to round them off slightly. This gives the charms a softer, ‘puffy’ look rather than a sharp, cookie-cutter finish. -
Add texture:
Take a clean toothbrush or a texture sponge and gently pat the surface of both stars. This creates the subtle, stone-like texture visible in the reference image. -
Create the faces:
Using a small ball tool, press two indentations for the eyes into the center of each star. For the pink star, use a needle tool to carve a tiny ‘U’ shape for the smile. For the teal star, create a tiny round indentation for an open mouth. -
Insert eye pins:
Carefully insert a silver eye pin into the top point of each star. I find it helpful to put a tiny drop of liquid clay or bake-and-bond on the pin shaft to secure it permanently.
Clean Texture Trick
To keep texture clean, place a piece of plastic wrap over the clay before pressing your texture tool. This softens the imprint and prevents clay from sticking to your brush.
Step 2: Sculpting the Strawberry
-
Form the berry:
Roll a piece of red clay into a ball, then pinch one end slightly to create a rounded cone or strawberry shape. Flatten the back slightly if you want it to lay flat against your keys. -
Add the seeds:
Focusing on the front surface, use a needle tool to poke small, evenly spaced holes across the strawberry to mimic heavy texturing and seed pockets. -
Texture the surface:
Like the stars, lightly tap the red surface with your toothbrush to remove any fingerprints and blend the seed holes naturally into the clay. -
Make the leaves:
Take small bits of dark green clay and shape them into tiny teardrops. Flatten them and press three or four of them onto the top wide part of the strawberry. -
Secure the hardware:
Insert an eye pin through the center of the green leaves and down into the red fruit body.
Loose Eye Pins?
If an eye pin feels loose after baking, pull it out gently, apply a dab of superglue to the metal shaft, and slide it quickly back into the existing hole.
Step 3: Finishing Touches
-
Bake the charms:
Place all three pieces on a parchment-lined baking sheet. Bake according to your clay package instructions (usually 275°F/135°C for 15-30 minutes). -
Cool and paint:
Once fully cooled, dip a fine tool into black acrylic paint to fill in the eye indentations on the stars. Add tiny pink dots for cheeks using pink paint. -
Seal the charms:
Apply a thin coat of matte or gloss glaze to protect the paint and the clay surface. This adds durability for daily use. -
Assemble the keychain:
Open your jump rings using pliers. Attach each charm’s eye pin loop to the main keychain ring or chain links. Staggering their lengths slightly helps them bunch together nicely.
Now you have a charming, handmade accessory ready to organize your keys or gift to a friend


Toothbrush Holder With a Blob Critter
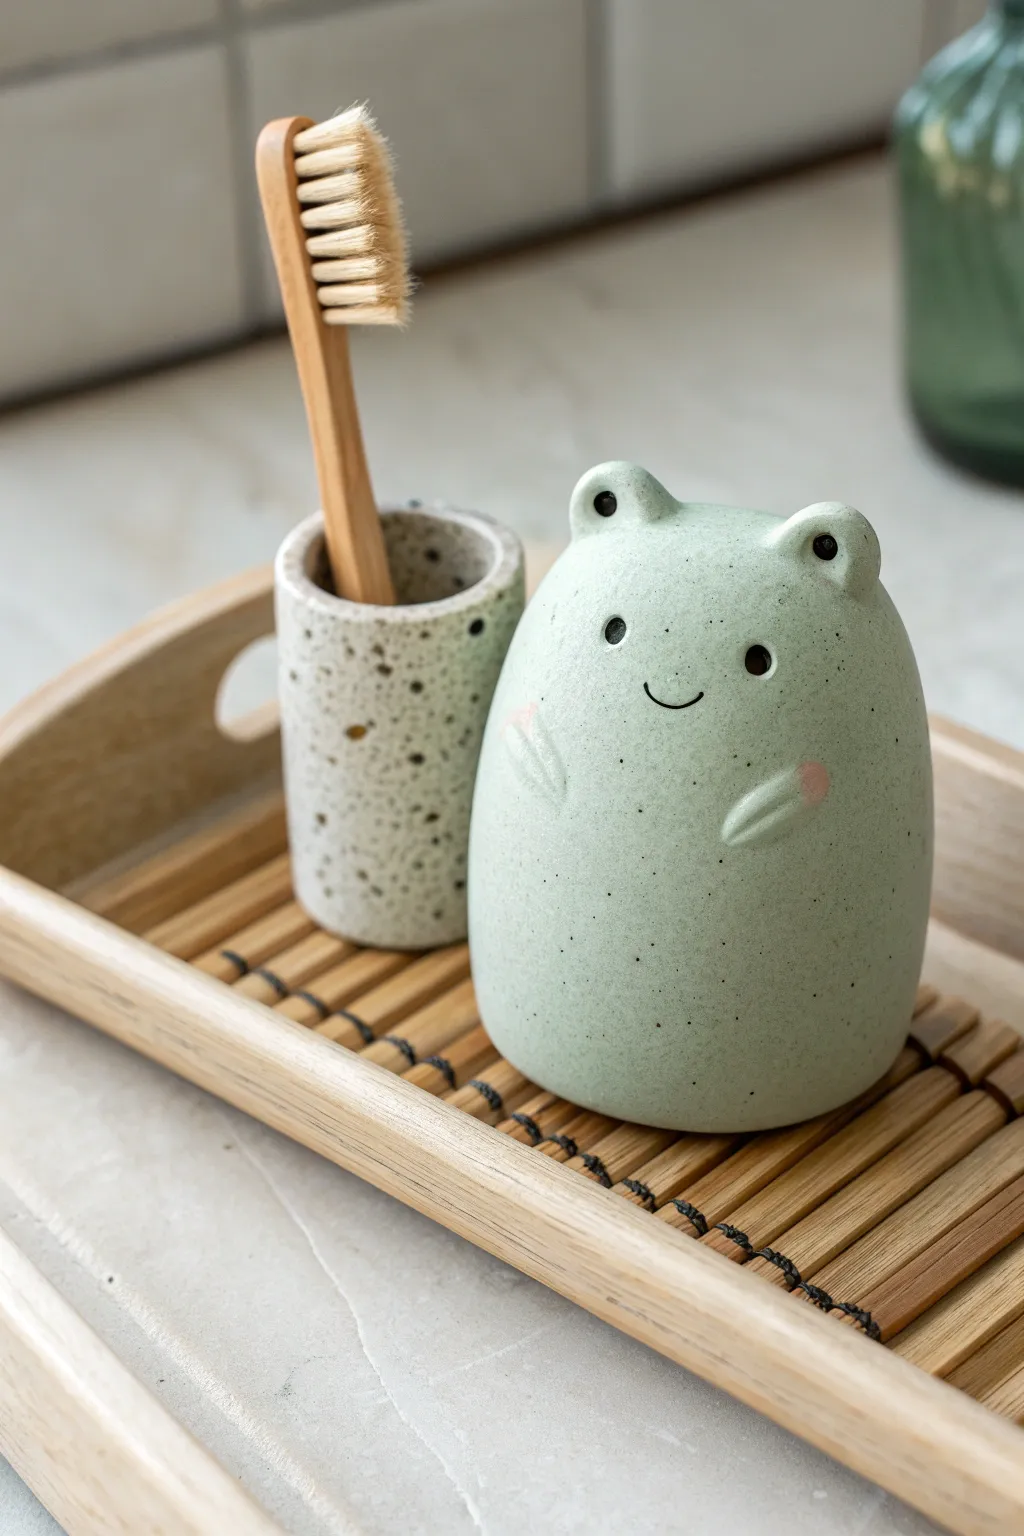
This adorable blob-shaped frog brings a touch of whimsy to your bathroom counter while keeping things organized. Its speckled, mint-green finish mimics expensive ceramic ware, but it’s easily achievable with soft clay at home.
Step-by-Step Guide
Materials
- Polymer clay (white)
- Acrylic paint (mint green, black, pink)
- Glossy varnish or glaze
- Old toothbrush (for speckling)
- Clay sculpting tools (needle tool, small ball tool)
- Black clay (very small amount)
- Liquid clay or Bake & Bond
Step 1: Shaping the Base
-
Form the Body:
Start with a large ball of white polymer clay, roughly the size of a tennis ball. Gently roll it into a soft egg shape, ensuring the bottom is flattened so it stands sturdily on its own. -
Smooth the Surface:
Take your time smoothing out any fingerprints or unwanted bumps. The goal is a super-smooth, river-stone texture. I sometimes use a tiny bit of baby oil on my finger to glide over imperfections. -
Create Eye Mounds:
Pinch off two small, equal-sized pieces of clay for the eyes. Roll them into balls and attach them to the top of the head using a dot of liquid clay to secure them. -
Blend the Seams:
Using a silicone blending tool or your finger, carefully smooth the seams where the eye mounds meet the body so they look like one continuous piece rather than tacked-on balls. -
Shape the Arms:
Roll two small, tapered teardrop shapes for the little arms. Press these gently onto the belly area, angling them slightly inward as if the frog is holding its tummy.
Clean Start
Keep baby wipes nearby to clean your hands between colors. White clay picks up dust instantly, so work on a clean glass or ceramic tile.
Step 2: Adding Details
-
Sculpt the Eye Sockets:
Use a medium-sized ball tool to press indentations into the front of the eye mounds. This creates the socket where the black eye detail will sit later. -
Add Cheek Indents:
Press lightly into the cheeks with a larger ball tool if you want a slight dimension, though keeping it round is perfectly fine too. -
Insert the Pupils:
Roll tiny spheres of black clay. Press these firmly into the indentations you made on the eye mounds. Ensure they are flush with the surface for that smooth, cartoonish look. -
Create the Smile:
Use a needle tool or a small curved blade to gently press a smile into the clay between the eyes. Keep the line thin and delicate. -
Refine the Blushing Cheeks:
For the pink cheeks, you can either indent slightly now to paint later, or adhere tiny, flattened discs of pink clay if you prefer not to paint that detail. -
Bake the Clay:
Bake the piece according to the instructions on your specific package of clay. Typically, this is around 275°F (135°C) for 30 minutes per 1/4 inch of thickness.
Dual Purpose
Before baking, press a large hole into the back or top of the frog’s head. Now your cute sculpture doubles as a functional pencil or toothbrush holder.
Step 3: Painting & Finishing
-
Base Coat:
Once cool, paint the entire frog (avoiding the black eyes if possible) with a soft mint green acrylic paint. You may need two thin coats for opaque coverage. -
Paint Details:
Use a fine liner brush to paint the smile black and add soft pink ovals to the tips of the hands or cheeks if you didn’t use colored clay earlier. -
Create the Speckled Effect:
Dilute a small amount of black or dark grey acrylic paint with water. Dip an old toothbrush into this mixture. -
Flicking the Paint:
Hold the toothbrush near the frog and run your thumb across the bristles to flick tiny specks of paint onto the surface. Practice on paper first to control the spray. -
Apply Glaze:
Wait for all paint to be completely dry. Apply two coats of high-gloss varnish to seal the paint and give it that shiny, wet-ceramic look. -
Final Dry:
Let the glaze cure fully according to the bottle instructions before placing it in a humid environment like a bathroom.
Now you have a charming little amphibious friend to brighten up your morning routine


Photo Holders With Chunky Soft Clay Bases
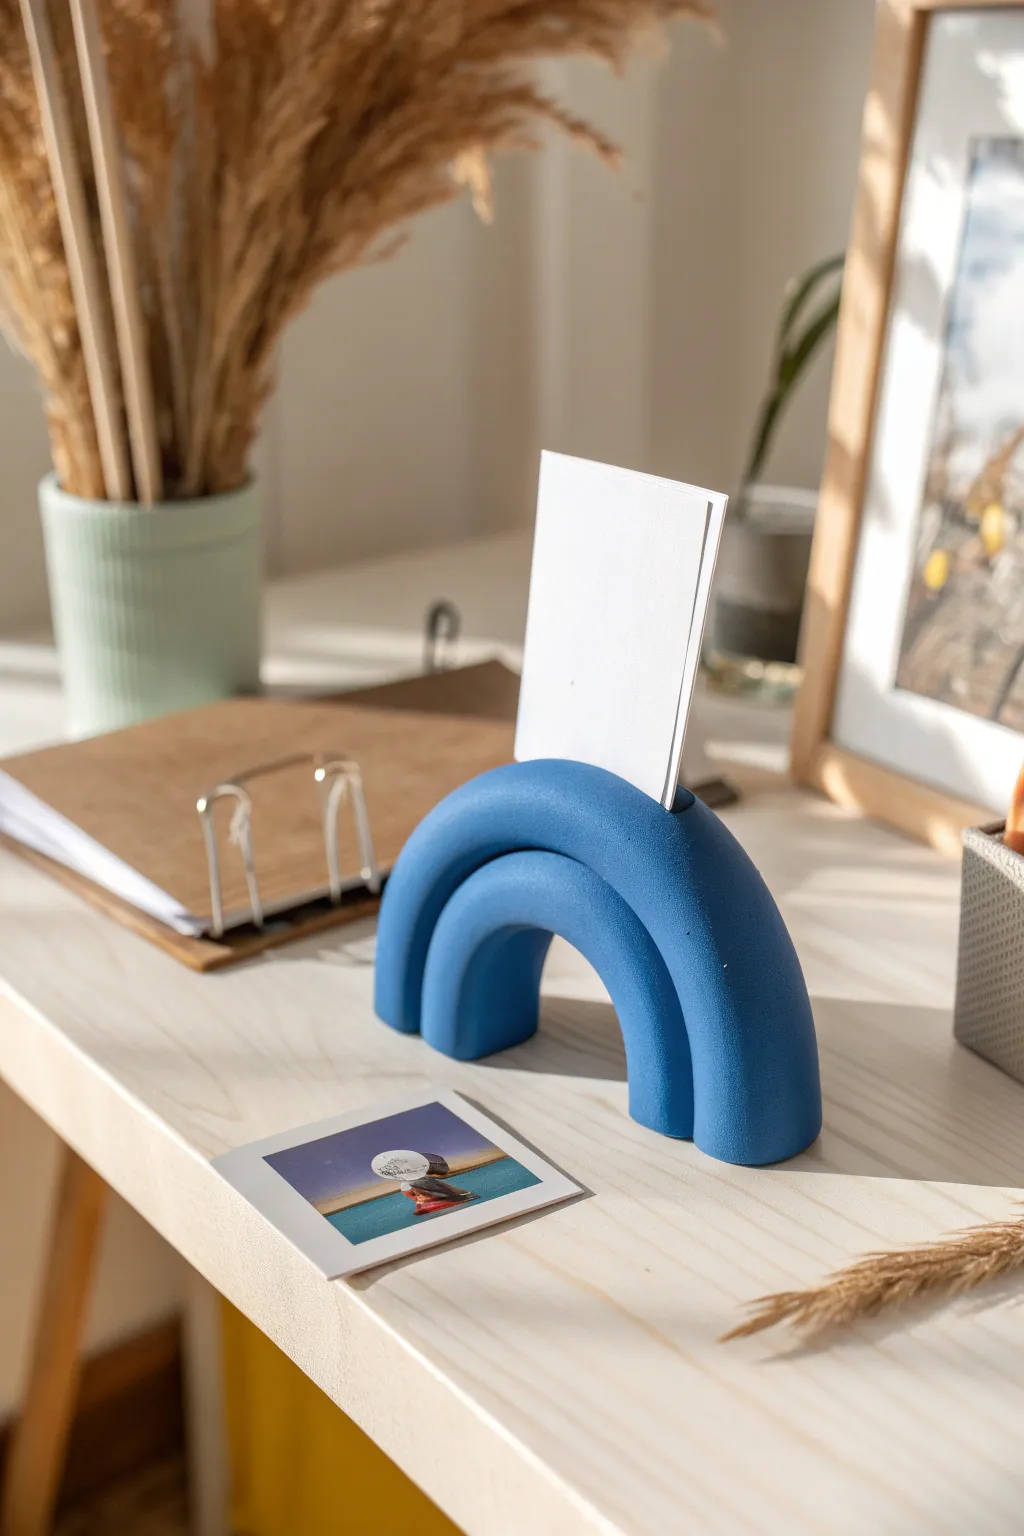
This chunky, matte blue photo holder serves as both a functional display piece and a sculptural element for your desk. The doubled arch design creates a satisfying weight that keeps your photos secure while adding a pop of cobalt to neutral spaces.
Detailed Instructions
Materials
- Polymer clay (blue) or air-dry clay
- Rolling pin or acrylic roller
- sharp crafting blade or tissue blade
- Smooth work surface (ceramic tile or glass)
- Ruler
- Sandpaper (fine grit)
- Matte acrylic paint (Cobalt blue, if using air-dry clay)
- Paintbrush (soft bristle)
- Matte spray sealant (optional)
Step 1: Planning and Mixing
-
Prepare your clay:
Start by conditioning your clay thoroughly. Whether using polymer or air-dry clay, knead it until it is pliable and free of cracks. If you are mixing colors to achieve this specific deep blue, blend your pigments now until fully uniform. -
Divide the clay:
Separate your clay ball into two uneven portions. You will need about 60% of the clay for the larger outer arch and 40% for the smaller inner arch. -
Roll the first snake:
Take the larger portion and roll it into a thick, even log or ‘snake’. Aim for a diameter of roughly 1 inch (2.5 cm) to get that chunky look seen in the photo. -
Roll the second snake:
Repeat the process with the smaller portion of clay. Roll it until it matches the diameter of your first log perfectly. Keeping the thickness consistent is key to the finished aesthetic.
Step 2: Forming the Arches
-
Form the inner arch:
Curve the shorter log into a tight U-shape. Stand it up on your work surface to ensure the legs are even. You want a semi-circle shape rather than a tall horseshoe. -
Shape the outer arch:
Take the longer log and drape it over the inner arch. Gently press it down so it conforms to the curve of the smaller piece beneath it. I like to lightly press them together to ensure they bond without flattening the round profile. -
Trim the base:
Using your sharp blade, slice straight down through all four ‘legs’ of your rainbow simultaneously. This ensures the bottom is perfectly flat and the piece will stand upright without wobbling. -
Creates the slot:
This is the most critical step for functionality. Use the edge of a ruler or a thick piece of cardstock to press a slit into the very top center of the outer arch. Press deep enough to hold a photo (about 1 cm) but be careful not to slice all the way through. -
Refine the surface:
Dip your finger in a little water (for air-dry clay) or baby oil (for polymer) and gently smooth out any fingerprints or join lines between the two arches. The goal is a seamless, modern finish.
Slit Closing Up?
If the photo slot closes during baking or drying, fold a small piece of parchment paper and insert it into the slot while it cures. Remove it easily once hard.
Step 3: Finishing Touches
-
Cure or dry:
If using polymer clay, bake according to the package instructions (usually 275°F/135°C for 15-30 minutes). If using air-dry clay, let it sit in a cool, dry place for 24-48 hours until fully hardened. -
Sand for smoothness:
Once fully cured or dry, use fine-grit sandpaper to buff away any minor imperfections or sharp edges on the bottom. -
Painting (Air-dry only):
If you used white air-dry clay, now is the time to apply that stunning cobalt blue. Apply 2-3 thin coats of matte acrylic paint, allowing each layer to dry completely. -
Seal the piece:
To protect against dust and handling, lightly mist the holder with a matte spray sealant. This preserves that soft, velvety texture seen in the reference image while protecting the color. -
Test the hold:
Once everything is dry, slide a postcard or photo into the top slot. If the fit is too tight, you can gently widen it with a folded piece of sandpaper.
Speckled Stone Effect
Mix black pepper or dried tea leaves into your clay before rolling. When sanded, this creates a trendy faux-granite or terrazzo look.
Place your new sculptural photo holder on your desk and enjoy the pop of creative color every day

The Complete Guide to Pottery Troubleshooting
Uncover the most common ceramic mistakes—from cracking clay to failed glazes—and learn how to fix them fast.
Chunky Bookends With Rounded Cartoon Forms
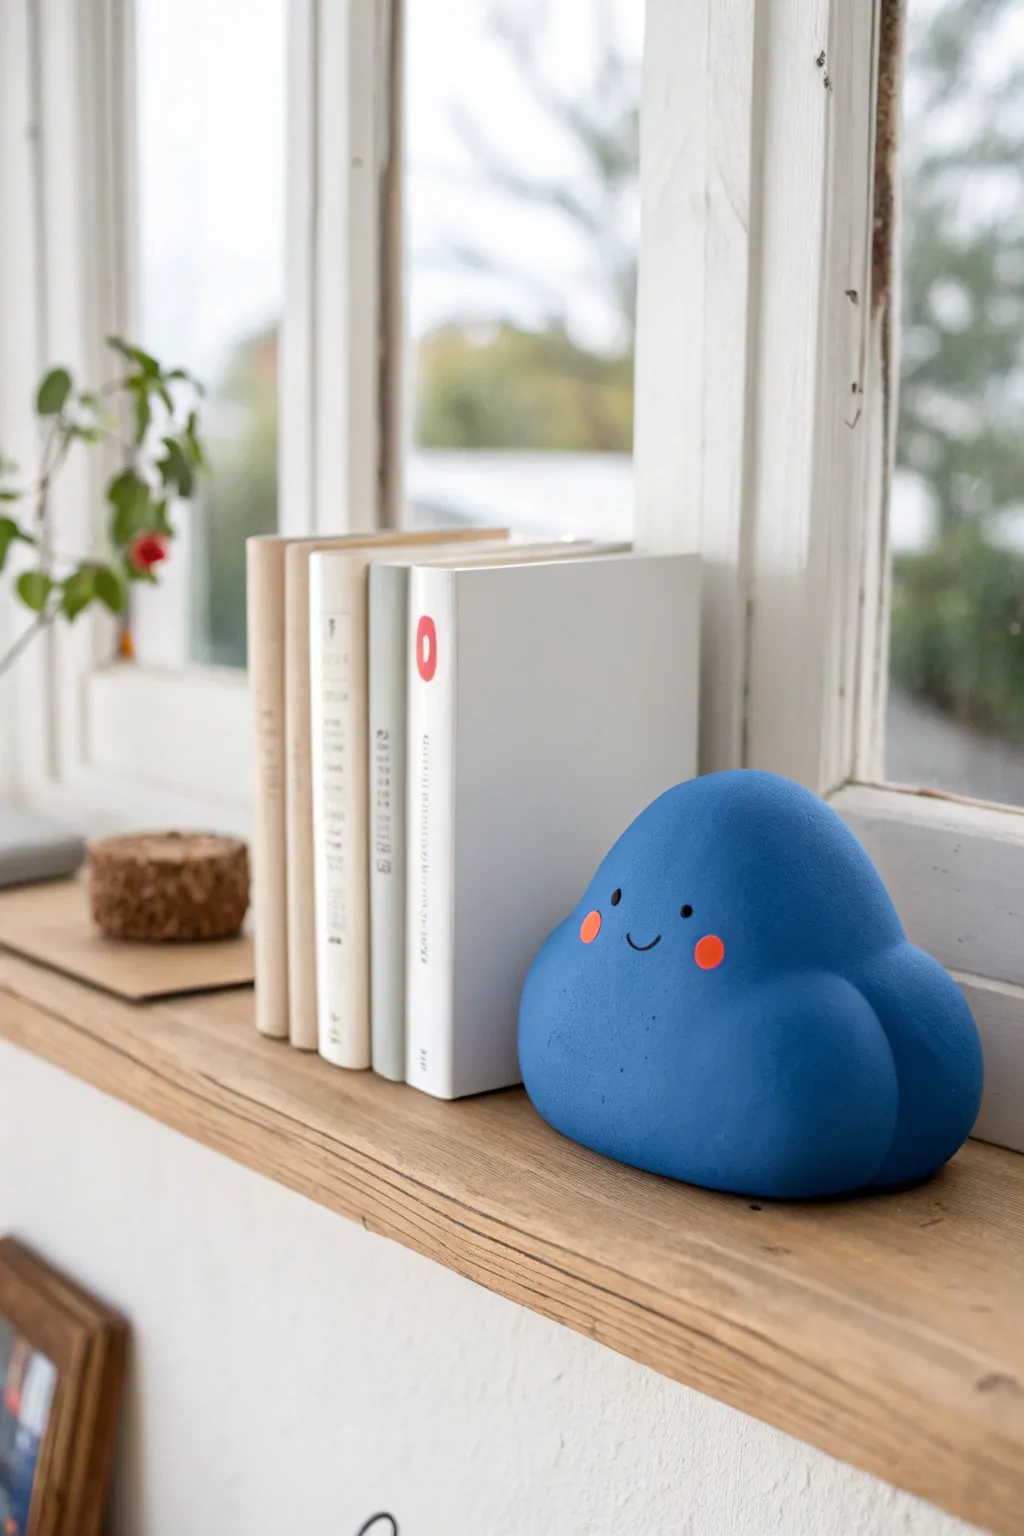
Add a touch of playful charm to your bookshelf with this smooth, blob-shaped bookend that looks almost soft to the touch. With its calming blue hue and sweet cartoon expression, this weighty clay creation is sturdy enough to hold your favorite novels in place while bringing a smile to your face.
Step-by-Step Tutorial
Materials
- Air-dry clay or polymer clay (approx. 1-2 lbs per bookend)
- Acrylic paint (Deep Blue, White, Black, Coral/Orange)
- Fine-grit sandpaper (220 and 400 grit)
- Wide, soft-bristle paintbrush
- Small detail paintbrush
- Ball stylus tool or toothpick
- Matte spray varnish or sealant
- Aluminum foil (for armature/core)
- Water and sponge (for smoothing)
- Heavy filler (optional: clean stones or marbles for extra weight)
Step 1: Forming the Core and Base
-
Create a foil armature:
Crumple a large amount of aluminum foil into a tight ball, shaping it roughly into a rounded, bottom-heavy triangle. This saves clay and keeps the bookend lighter, though we will add weight next. -
Establish the weight:
Since this needs to hold books, press some heavy stones or marbles into the bottom center of your foil armature before finalizing the shape. Wrap these securely with more foil so nothing rattles. -
Flatten the base:
Press the foil shape firmly onto your work surface to create a flat, stable bottom. The structure should sit perfectly upright without wobbling. -
Define the side wall:
Identify which side will press against the books. Flatten this side slightly so it sits flush against a book cover, though keep the edges rounded for that ‘soft’ look.
Step 2: Sculpting the Cloud Shape
-
Review clay conditioning:
Before starting, condition your clay by kneading it until it is warm and pliable. This prevents cracks later on. -
Apply the first layer:
Roll out a sheet of clay about 1/4 inch thick. Drape this over your foil armature, pressing it down firmly to adhere it to the core. -
Build the chunky silhouette:
Add extra bulk to the bottom corners to create that distinct ‘blob’ shape seen in the image. You want a wide base that tapers gently to a rounded peak. -
Refine the bulbous curves:
Add a slightly protruding round section on the lower right side (the ‘arm’ or puff of the cloud). Smooth the seam using a bit of water on your finger so it integrates seamlessly into the main body. -
Smooth the surface:
Wet a sponge slightly and rub it over the entire surface. Eliminate any fingerprints or lumps; the goal is a texture that looks incredibly smooth, akin to sea glass or soft plastic.
Smooth Seams
If using air-dry clay, keep a small dish of clay ‘slip’ (clay dissolved in water until it’s like paste) nearby. Use this as glue to fill any tiny cracks that appear while drying.
Step 3: Finishing and Painting
-
Dry completely:
Allow the clay to dry fully. For a piece this thick, it may take 24-48 hours. Turn it occasionally so the bottom dries too. -
Sand for perfection:
Once bone dry, use 220-grit sandpaper to remove any remaining bumps. Follow up with 400-grit for a satin-smooth finish. Wipe away all dust with a damp cloth. -
Apply the base coat:
Mix a deep, rich blue acrylic paint. I find that mixing a touch of white into a primary blue softens it just enough. Apply 2-3 coats, letting each dry fully, until the color is opaque and solid. -
Map the face:
Lightly sketch the face position with a pencil. The eyes should be wide-set, and the mouth a tiny upturned curve right between them. -
Paint the cheeks:
Using a coral or soft orange paint, dab two small, imperfect circles for cheeks. Position them slightly lower and wider than the eyes. -
Add the features:
Use your smallest detail brush or a ball stylus dipped in black paint. Dot the two eyes and carefully drag the paint to form the small smile. Keep the lines crisp. -
Seal the piece:
Finish with a matte spray varnish. A glossy finish would reflect too much light and ruin the soft, matte aesthetic shown in the photo.
Make it a Set
Create a partner bookend in a contrasting shape, like a rounded sun or a soft teardrop, and paint it a warm yellow or pastel pink for a complete day-and-night theme.
Place your new cheerful friend on the shelf and enjoy the pop of color it brings to your reading nook