
When kids get their hands on soft clay, the magic is how quickly a simple blob turns into a tiny character with a whole personality. These kid-friendly clay projects are all about easy shapes, bright colors, and that instant “I made this!” pride.
Easy Pinch-Pot Critters
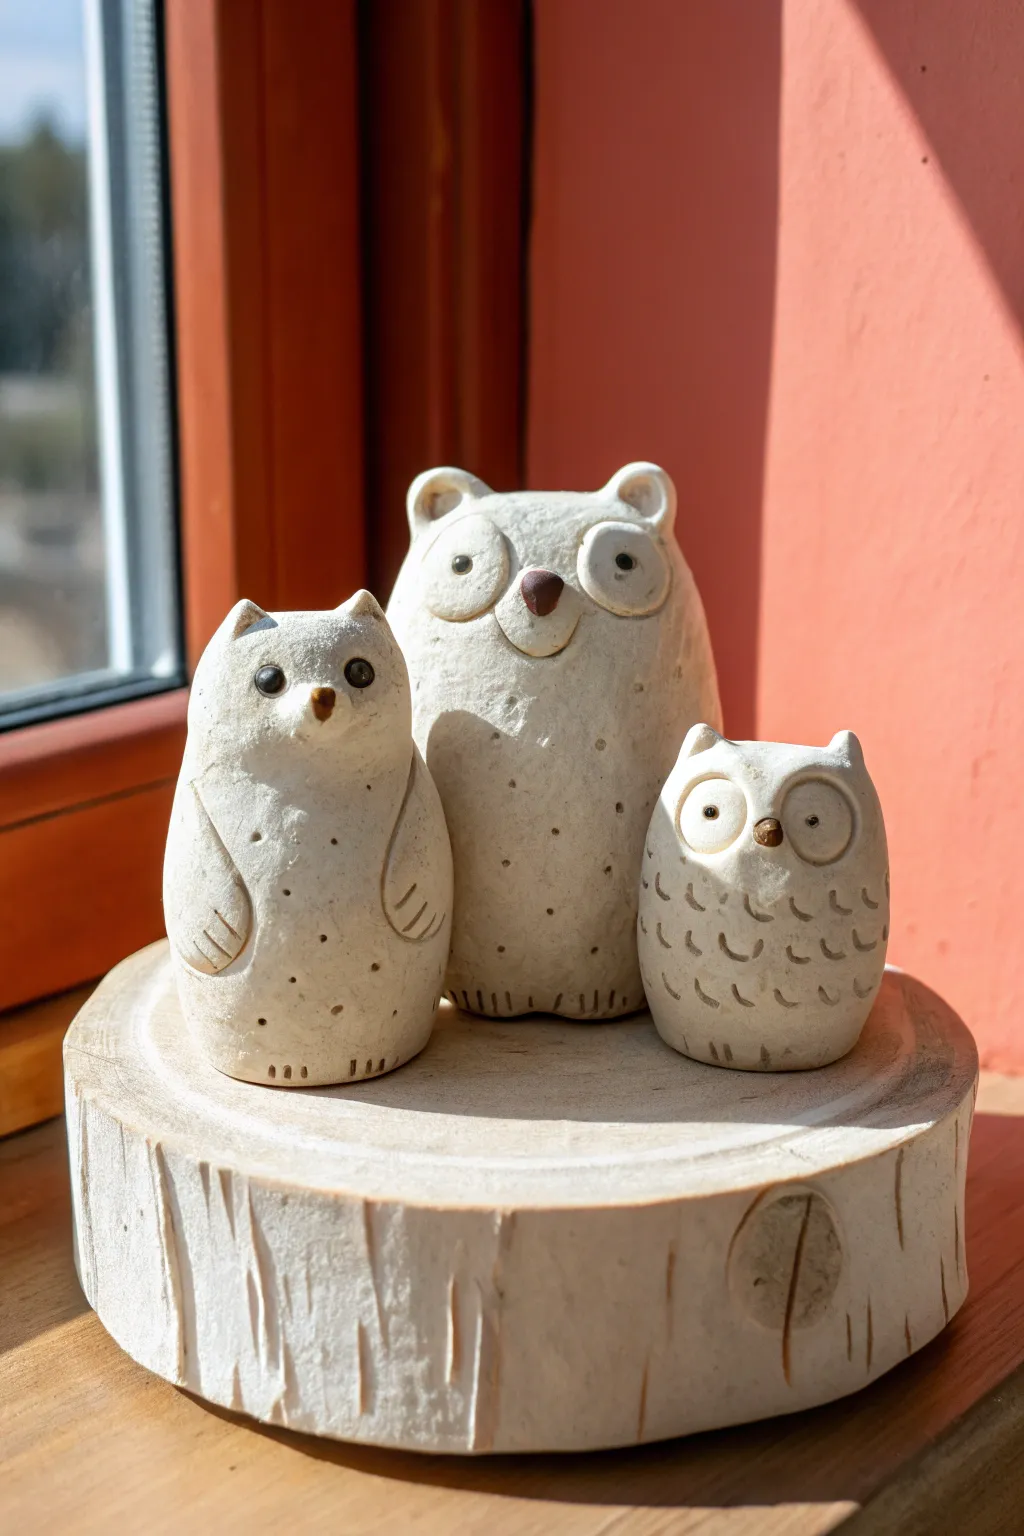
Learn to sculpt a charming family of woodland creatures using simple pinch-pot techniques suitable for little hands. These bear and owl figurines feature a lovely matte finish and rustic textures that give them a timeless, handcrafted appeal.
Step-by-Step Tutorial
Materials
- White air-dry clay or polymer clay
- Small rolling pin
- Modeling tools (needle tool, ball stylus)
- Small cup of water (for smoothing)
- Brown acrylic paint
- Fine-grit sandpaper
- Clear matte varnish (optional)
Step 1: Forming the Bodies
-
Prepare the Clay:
Begin by conditioning your clay until it is soft and pliable. Divide the clay into three portions: a large ball for the bear, a medium ball for the tall owl, and a small ball for the squat owlet. -
Shape the Bear Base:
Take the largest ball and roll it into a smooth egg shape. Gently tap the wider bottom on your work surface to intricate a flat base so the figure stands securely. -
Form the Bear Ears:
Instead of attaching separate ears, gently pinch the top corners of the head upwards. Use your thumb to smooth the curve between the ears, creating a soft depression on top of the head. -
Sculpt the Owl Bodies:
Repeat the egg-shaping process for the two owl figures, making the medium one taller and slightly narrower, while keeping the smallest one round and stout. Tap both bases to flatten them. -
Add Owl Ears:
Pinch the top corners of the owl heads just like you did for the bear, but make these slightly sharper and more pointed to resemble tufted feathers.
Step 2: Adding Facial Features
-
Create Eye Sockets:
Using your thumbs or a large ball tool, press two shallow indentations into the face area of the bear to define where the eyes will go. For the owls, press similarly but make the indentations larger and rounder. -
Form the Eyes:
Roll tiny spheres of clay for the eyes. Gently press these into the sockets you created. For the bear, use varying sizes if you want a quirky look, or keep them uniform. -
Add Noses and Beaks:
Roll a small oval for the bear’s nose and attach it just below the eyes. For the owls, shape tiny triangles for beaks and press them securely between the eye areas. -
Refine the Owl Eyes:
For the owls specifically, roll thin coils of clay to create rims around the eyes, or simply press a circular tool around the eyeballs to create that wide-eyed look. -
Define the Bear’s Muzzle:
I like to use a curved tool or a fingernail to press a soft smile line under the bear’s nose, giving it a gentle expression.
Rustic Stone Effect
Mix a tiny pinch of used coffee grounds or cracked pepper into your white clay before sculpting. This creates natural speckles without needing to paint them later.
Step 3: Texturing and Details
-
Create Wings:
Use a modeling tool to incise wing curves on the sides of the tall owl. Press gently to outline the wing shape without cutting all the way through. -
Add Belly Feathers:
On the smallest owl, use a U-shaped tool (or the end of a straw cut in half) to stamp scallop patterns across the belly area to mimic feathers. -
Dot Texture:
Using a needle tool or toothpick, poke small, random holes across the bear’s body and the tall owl’s belly. This adds visual interest and mimics a rustic ceramic glaze effect. -
Refine the Feet:
At the very bottom of each figure, use a dull knife or tool to press small vertical lines, suggesting paws or claws tucked underneath. -
Smoothing:
Dip your finger in a little water and gently run it over any rough seams or fingerprints to ensure a smooth, professional finish before drying.
Cracks Appearing?
If you see cracks forming while air-dry clay cures, smooth a tiny bit of fresh, wet clay paste (slip) into the crack with your finger and let it dry again.
Step 4: Finishing Touches
-
Dry or Bake:
Allow the figures to dry completely (for air-dry clay) or bake them according to the polymer clay package instructions. -
Sand for Texture:
Once fully cured and hard, lightly sand the surface with fine-grit sandpaper. This gives the clay that stone-like, speckled texture seen in the photo. -
Paint Details:
Use a fine brush and brown acrylic paint to carefully color the noses, beaks, and pupils of the eyes. Keep the paint minimal to maintain the earthy aesthetic. -
Paint Wash (Optional):
To highlight the textures, you can apply a very watered-down brown aesthetic wash and wipe it away immediately, leaving pigment only in the recessed dots and lines.
Set out your finished trio on a windowsill or shelf to bring a bit of nature’s charm indoors


Roll-And-Stack Caterpillars
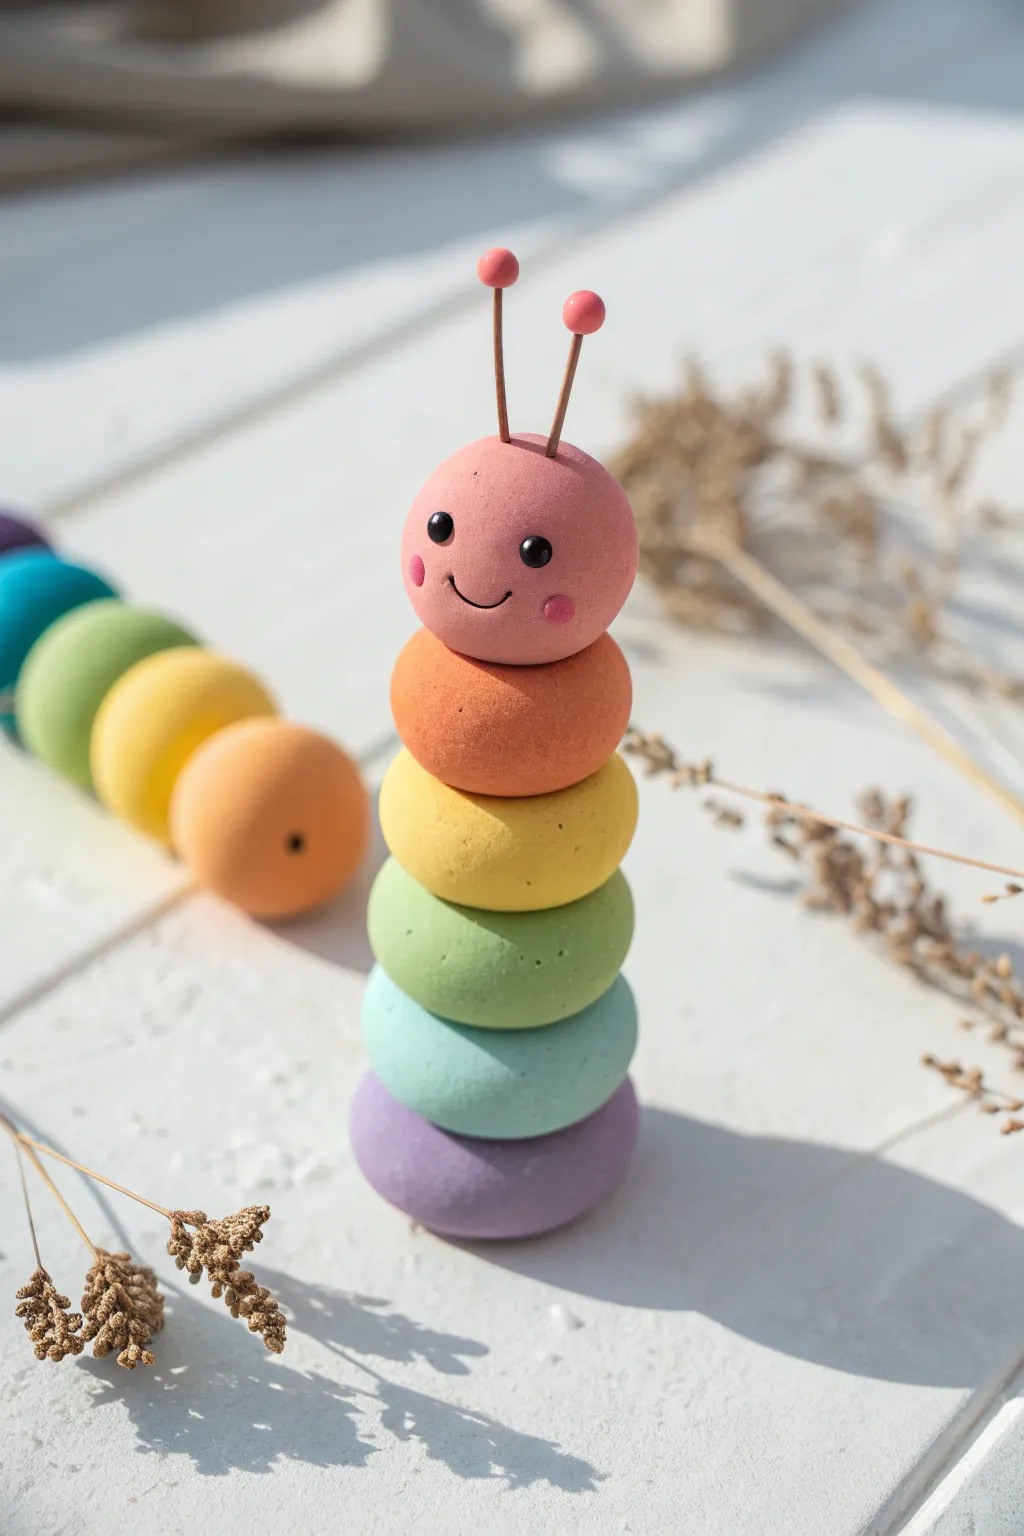
Brighten up your play area or desk with this charming pastel caterpillar, created by stacking soft, colorful spheres. With its gentle matte finish and sweet smiling face, this vertical sculpture is as fun to assemble as it is to admire.
Step-by-Step
Materials
- Soft air-dry clay or polymer clay (pink, orange, yellow, light green, mint blue, purple)
- Black clay (tiny amount for eyes)
- Pink clay (slightly darker shade for cheeks)
- Two small lengths of brown floral wire or stiff cord (for antennae)
- Two small pink beads (optional, for antenna tips)
- Toothpick or sculpting needle tool
- Wooden skewer or dowel (fundamental for structure)
- Strong craft glue
Step 1: Preparing the Body segments
-
Condition the clay:
Start by warming up your clay in your hands. Knead each color separately until it is soft, pliable, and free of cracks. This ensures smooth rolling later. -
Portion the body:
Pinch off equal-sized amounts of clay for the body segments. You will need one portion each of purple, mint blue, light green, yellow, and orange. Aim for pieces about the size of a large walnut. -
Roll the spheres:
Take the purple clay and roll it between your palms to create a perfect sphere. Repeat this for the blue, green, yellow, and orange pieces. -
Flatten slightly:
Gently press each sphere down onto your work surface just enough to create a small flat spot on the top and bottom. This doughnut-like shape helps them stack securely without rolling away. -
Create the head:
Roll a ball of pink clay for the head. It should be roughly the same size as the body segments, perhaps just a tiny bit smaller to look proportional. Keep this one perfectly round.
Keeping the Round Shape
When pressing the spheres onto the skewer, twist the stick through the clay gently like a drill rather than just pushing, preventing the balls from squashing.
Step 2: Adding the Face Details
-
Make the eyes:
Roll two extremely tiny balls of black clay. Position them on the pink head sphere, spacing them wide apart for a cute look, and press them gently so they adhere flat against the surface. -
Add the cheeks:
Take two small pinches of the darker pink clay and flatten them into tiny discs. Press these just below and to the side of each eye to create rosy cheeks. -
Sculpt the smile:
Using a needle tool or the tip of a toothpick, carefully press a curved line into the clay between the cheeks to create a happy smile. -
Refine the smile:
I find it helpful to wiggle the tool slightly at the corners of the mouth to deepen the expression and make it more readable. -
Prepare the antennae:
Cut two short pieces of brown floral wire or stiff cord (about 1 inch long). If you have small pink beads, glue them to the very tips, or roll tiny balls of pink clay and press them onto the wire ends. -
Insert antennae:
Push the bottom ends of your antennae into the top of the pink head. If using air-dry clay, you might want to dip the wire in a little glue first for extra hold.
Step 3: Assembly and Stacking
-
Prepare the core:
Take your wooden skewer. This will act as the spine to keep your caterpillar standing upright. Cut it to a length slightly shorter than your estimated total stack height. -
Start the stack:
Push the skewer through the center of the purple (bottom) piece. Slide the clay down until the skewer is flush with the bottom surface so it can stand flat. -
Add the colors:
Slide the mint blue sphere onto the skewer, followed by the green, yellow, and orange spheres. Apply a tiny dot of glue between each layer if you want the sculpture to be permanent. -
Top with the head:
Finally, push the pink head onto the top of the skewer. Press down gently to ensure the neck connects firmly with the orange body segment. -
Surface smoothing:
While the clay is still workable, use your finger to gently smooth out any fingerprints that might have occurred during stacking. -
Final drying:
Let the sculpture sit undisturbed to cure. If using air-dry clay, leave it for 24 hours; if using polymer clay, bake according to the manufacturer’s instructions on the packet.
Sticky Clay Fix
If your clay gets too warm and sticky, pop it in the fridge for 10 minutes. This firms it up, making it easier to roll perfectly smooth spheres.
Once dry, place your cheerful new friend on a shelf to bring a pop of color to the room


Spiral Snails With Shell Swirls
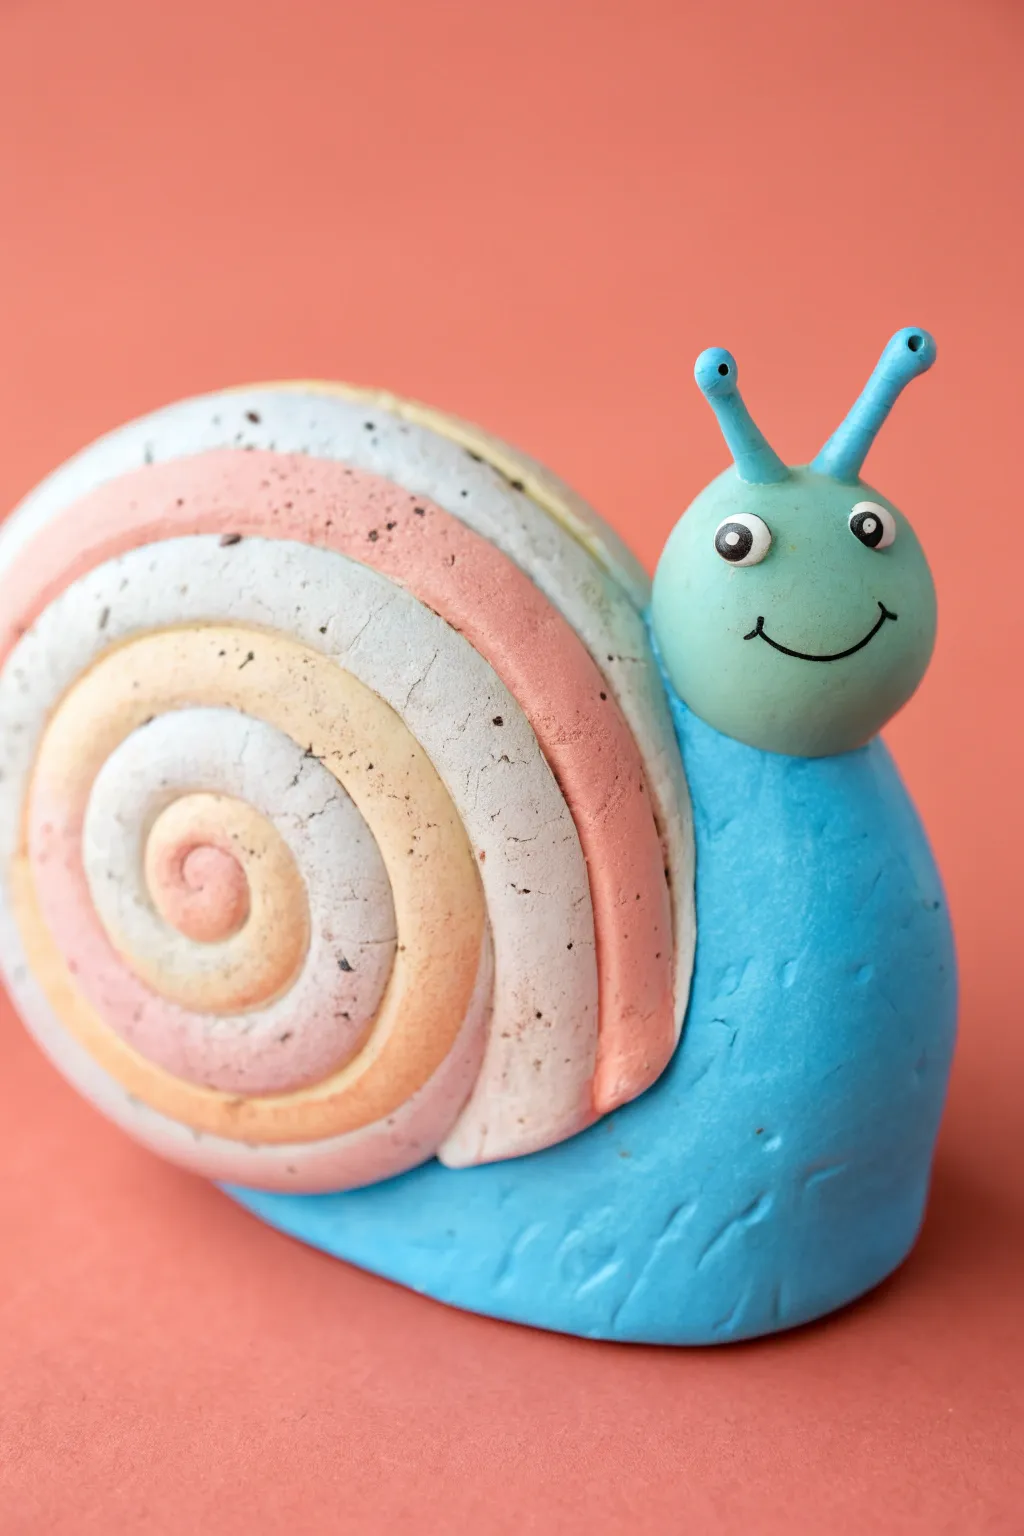
Create a cheerful garden friend with a beautifully swirled shell and a bright smile. This soft clay project combines simple rolling techniques with pastel colors to make a sturdy and adorable snail sculpture.
Step-by-Step Tutorial
Materials
- Soft air-dry or polymer clay (Blue, Peach, White, Pink, Mint Green)
- Black clay or marker (for eyes and mouth)
- Clay rolling tool or rolling pin
- Plastic knife or clay sculpting tool (optional)
- Toothpick (for structural support)
- Damp sponge (to smooth seams)
Step 1: Forming the Body
-
Create the base:
Start with a generous amount of bright blue clay. Roll it into a thick log shape, tapering one end slightly to form the tail. -
Shape the head support:
Gently curve the thicker end of the blue log upwards. This vertical section will support the head later, so ensure it is thick enough to hold weight. -
Flatten the bottom:
Press the entire blue shape gently onto your work surface to create a flat bottom. This ensures your snail will stand up straight without wobbling. -
Add texture:
Using a sculpting tool or just your fingernail, add tiny indentations and marks along the sides of the blue body to mimic a natural, organic texture.
Clean Seams
Before attaching the head, smooth the blue neck area with a barely damp finger to remove any fingerprints or cracks for a professional finish.
Step 2: Creating the Swirled Shell
-
Prepare pastel colors:
Take your white, peach, pink, and mint green clays. You want distinct ropes of each color, so don’t mix them yet. -
Roll long snakes:
Roll each color into a long, thin snake. Try to keep them roughly the same thickness for a neat final spiral. -
Combine the strands:
Lay the colored snakes next to each other. Gently twist them together or press them side-by-side to form one thick, multi-colored rope. -
Flatten the rope:
I like to gently roll over the combined rope with a rolling pin just once to flatten it slightly into a ribbon shape. -
Coil the shell:
Starting from one end, tightly roll the multi-colored ribbon into a flat spiral. Keep rolling until you have a large, round disc that resembles a lollipop. -
Secure the end:
Tuck the loose end of the coil underneath the shell shape and blend it slightly so it doesn’t unravel. -
Attach to body:
Place the shell vertically onto the back of the blue body. Press down firmly to adhere the clays together.
Glossy Finish
Once the clay is fully cured or dried, brush a layer of clear gloss varnish or Mod Podge over just the shell to make the colors pop.
Step 3: Sculpting the Head and Face
-
Roll the head:
Roll a ball of mint green clay. It should be proportional to the body but slightly smaller than the shell. -
Connect the head:
Place the head onto the upright blue neck section. If the clay is dry, use a small piece of toothpick inside to act as a hidden connector. -
Make the antennae:
Roll two small, thin logs of blue clay. Round off the tops and press them onto the top of the mint green head. -
Add the eye stems:
Note how the eyes are separate here? Make two tiny indentations on the mint face first. -
Create the eyes:
Make two small white balls and flatten them slightly. Add tiny black dots for pupils and press these onto the face. -
Add the smile:
Roll a microscopically thin snake of black clay for the mouth. Curve it into a U-shape and press it gently onto the face for a happy expression. -
Add speckles:
For a rustic finish, you can lightly flick a stiff toothbrush with brown paint over the shell to create tiny speckles.
Now you have a charming colorful companion to decorate your desk or shelf


Octopus Pals With Curly Arms
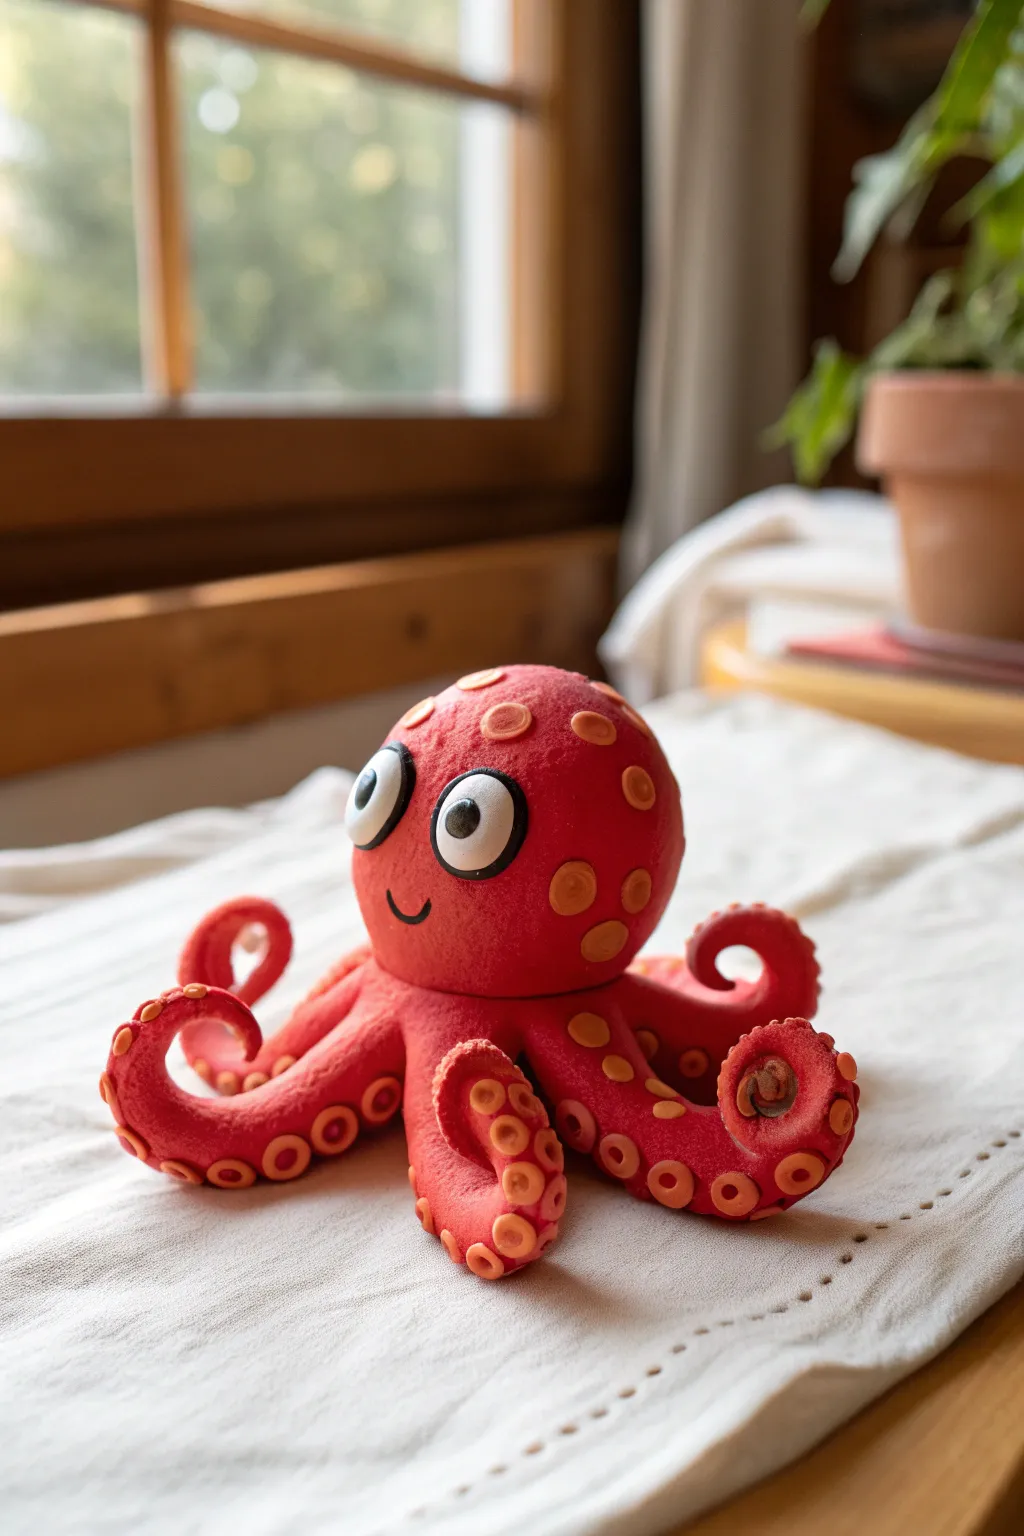
Dive into creativity with this adorable red octopus featuring playful, curling tentacles and cheerful cartoon eyes. This soft clay project combines simple shapes with fun textures like suction cups and spots for a sea creature that’s full of personality.
Step-by-Step
Materials
- Red soft modeling clay (air-dry or polymer)
- Light orange or coral soft modeling clay
- White soft modeling clay
- Black soft modeling clay
- Small ball tool or rounded modeling stick
- Plastic knife or clay sculpting tool
- Toothpick (optional, for structural support)
Step 1: Sculpting the Head and Body
-
Form the head base:
Start by rolling a large ball of red clay for the octopus’s head. Aim for a smooth sphere slightly larger than a golf ball. -
Shape the head:
Gently press the spherical ball down onto your work surface to flatten the bottom. Using your palms, slightly taper the top to give it a rounded dome shape rather than a perfect circle. -
Create the tentacle base:
Take a second, slightly smaller chunk of red clay and flatten it into a thick disc. This will serve as the hub where all the legs attach underneath the head.
Keep it Clean
Red clay can stain light colors easily. Always wipe your hands or wash them thoroughly before switching to the white clay for the eyes to keep them bright and clean.
Step 2: Creating the Tentacles
-
Roll out the legs:
Divide your remaining red clay into eight equal portions. Roll each portion into a tapered snake or cone shape, thicker at one end and pointy at the other. -
Curl the tips:
Take the pointy end of each tentacle and carefully curl it upward or inward. Vary the curls—some can be tight spirals, while others can be gentle waves for a natural, flowing look. -
Attach the legs:
Press the thick end of each tentacle onto the underside of the head or your base disc. Arrange them in a star pattern so they fan out evenly around the creature. -
Add suction cups:
Roll many tiny balls of light orange clay. Press these flat onto the undersides and curled tips of the tentacles. -
Detail the suction cups:
Using a small ball tool or the end of a paintbrush, press an indentation into the center of each orange disc to make them look like real suction rings.
Step 3: Face and Details
-
Make the eyes:
Roll two medium-sized balls of white clay and flatten them into thick discs. Position them side-by-side on the front of the head. -
Add pupils:
Roll two smaller balls of black clay. Press these onto the white discs, positioning them slightly off-center or looking in different directions for a goofy expression. -
Create the eye shine:
Take two minuscule specks of white clay and press them onto the upper corner of the black pupils to bring the eyes to life. -
Form the smile:
Roll a very thin, short thread of black clay. Gently curve it into a ‘U’ shape and press it onto the face below the eyes to make a gentle smile. -
Create the spots:
Roll various sizes of light orange clay balls—some small, some medium. Flatten them slightly with your finger. -
Apply the spots:
Decorate the top and sides of the red head with these orange spots. I like to cluster a few different sizes together for an organic look. -
Texture the spots:
Just like the suction cups, use your ball tool to press a small dimple into the center of the larger head spots for extra texture. -
Final smoothing:
Check all your clay connections. If using air-dry clay, smooth out any cracks with a tiny bit of water on your finger before setting it aside to dry.
Texture Time
Before adding spots, gently roll a textured fabric or a toothbrush over the red skin to give the octopus a bumpy, realistic skin texture instead of a smooth finish.
Place your new ocean friend on a shelf to dry and enjoy the splash of color it adds to the room

The Complete Guide to Pottery Troubleshooting
Uncover the most common ceramic mistakes—from cracking clay to failed glazes—and learn how to fix them fast.
Hedgehog Half-Domes With Toothpick Spikes
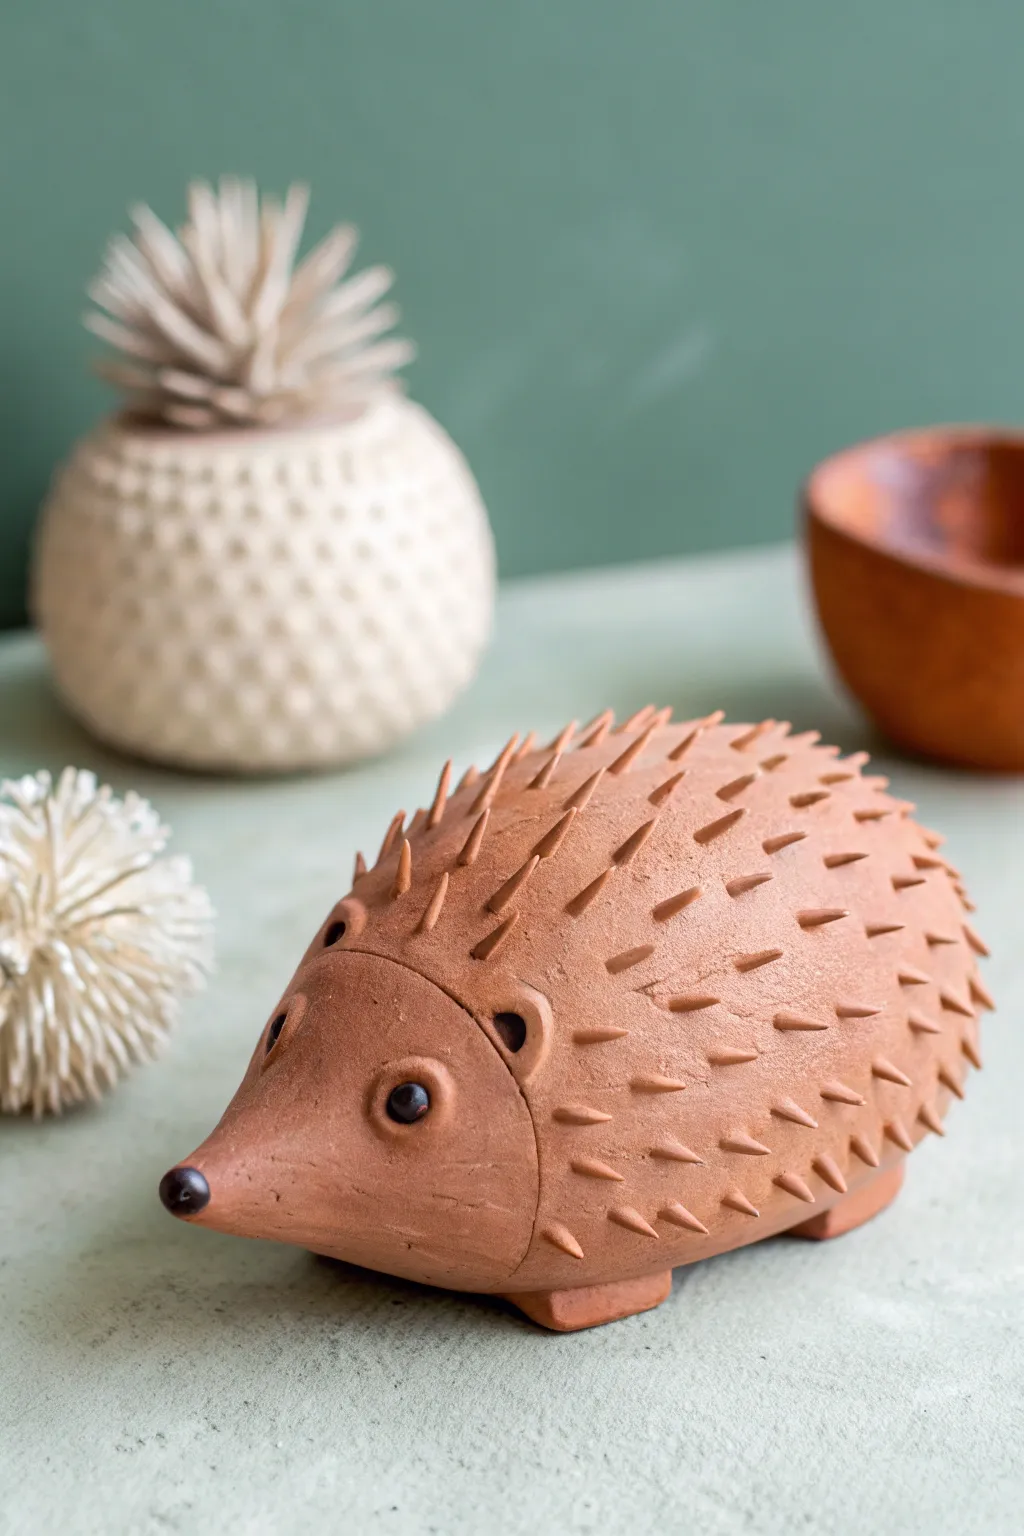
This charming project transforms simple terracotta-colored clay into a spiky little friend with a wonderfully textured back. The smooth, rounded face contrasts perfectly with the sharp clay spines, making for a delightful tactile experience.
Step-by-Step Tutorial
Materials
- Terracotta-colored air-dry clay or polymer clay
- Small rolling pin
- Clay knife or plastic modeling tool
- Slip (water and clay mixture) or liquid clay adhesive
- Two small black beads (for eyes)
- Small amount of black clay or paint (for nose)
- Toothpick or needle tool
- Water for smoothing
Step 1: Shaping the Body
-
Form the base:
Start with a softball-sized lump of terracotta clay. Roll it in your hands to warm it up and remove cracks, then shape it into a smooth, slightly elongated oval. -
Create the half-dome:
Press the oval gently onto your work surface to flatten the bottom. You want a sturdy base so your hedgehog doesn’t wobble. Smooth the dome shape with your fingers. -
Define the face area:
Using your thumb, gently press into the front one-third of the shape to slightly indent it, distinguishing the head area from the body area. Draw a faint curved line with your tool to mark where the spines will stop. -
Refine the snout:
Gently pull and pinch the clay at the very front to create a slightly upturned, pointed snout. Smooth the clay back towards the body with a little water on your finger to keep it seamless. -
Add feet:
Flatten four small balls of clay into rectangular tabs. Score the bottom of the body and attach these feet so they peek out just slightly from underneath.
Step 2: Adding Details
-
Create ear sockets:
Use the rounded end of a paintbrush or a ball tool to press two small indentations on the head, just above where the body curve begins. -
Form the ears:
Roll two small, pea-sized balls of clay. Flatten each slightly and press the center to make a cup shape. Attach these into the sockets you made. -
Insert the eyes:
Take your two small black beads and press them firmly into the face area. I like to bury them slightly so they look natural and secure. -
Add the nose:
Place a tiny ball of black clay on the very tip of the snout. If you don’t have black clay, you can simply sculpt a nose bump and paint it black later. -
Carve the mouth:
Using a thin needle tool or knife, carefully slice a horizontal lines under the snout to separate the jaw, giving the hedgehog a little smile.
Spike Slump?
If your clay spikes droop, the clay is too soft. Let your little cones sit on a piece of paper for 10-15 minutes to stiffen up before attaching them to the body.
Step 3: Creating the Spines
-
Prepare the spikes:
This step requires patience. Roll out dozens of small, thin cones or teardrop shapes from your remaining clay. They should be about half an inch long. -
Start at the back:
Begin attaching your spikes at the very rear of the hedgehog. Score the spot, add a dab of water or slip, and press the wide end of the cone onto the body. -
Work in rows:
Continue adding spikes in alternating rows, working your way upward and forward. Keep the points angled slightly backward for a streamlined look. -
Approach the face:
As you get close to the curved line you marked earlier, angle the spikes more vertically. Ensure the row directly behind the head is neat and follows the curve. -
Final smooth:
Check the face and feet one last time for fingerprints. Use a damp brush to smooth any imperfections on the non-spiky areas. -
Dry thoroughly:
Let the figure dry completely according to your clay’s instructions. If using air-dry clay, turn it over occasionally to let the bottom dry too.
Forest Floor Finish
Once dry, try dry-brushing the tips of the spikes with a lighter cream acrylic paint. It highlights the texture and makes the spines look much more realistic.
Place your finished hedgehog near a plant pot for a cute, natural woodland vibe
Frog Friends With Big Eyes
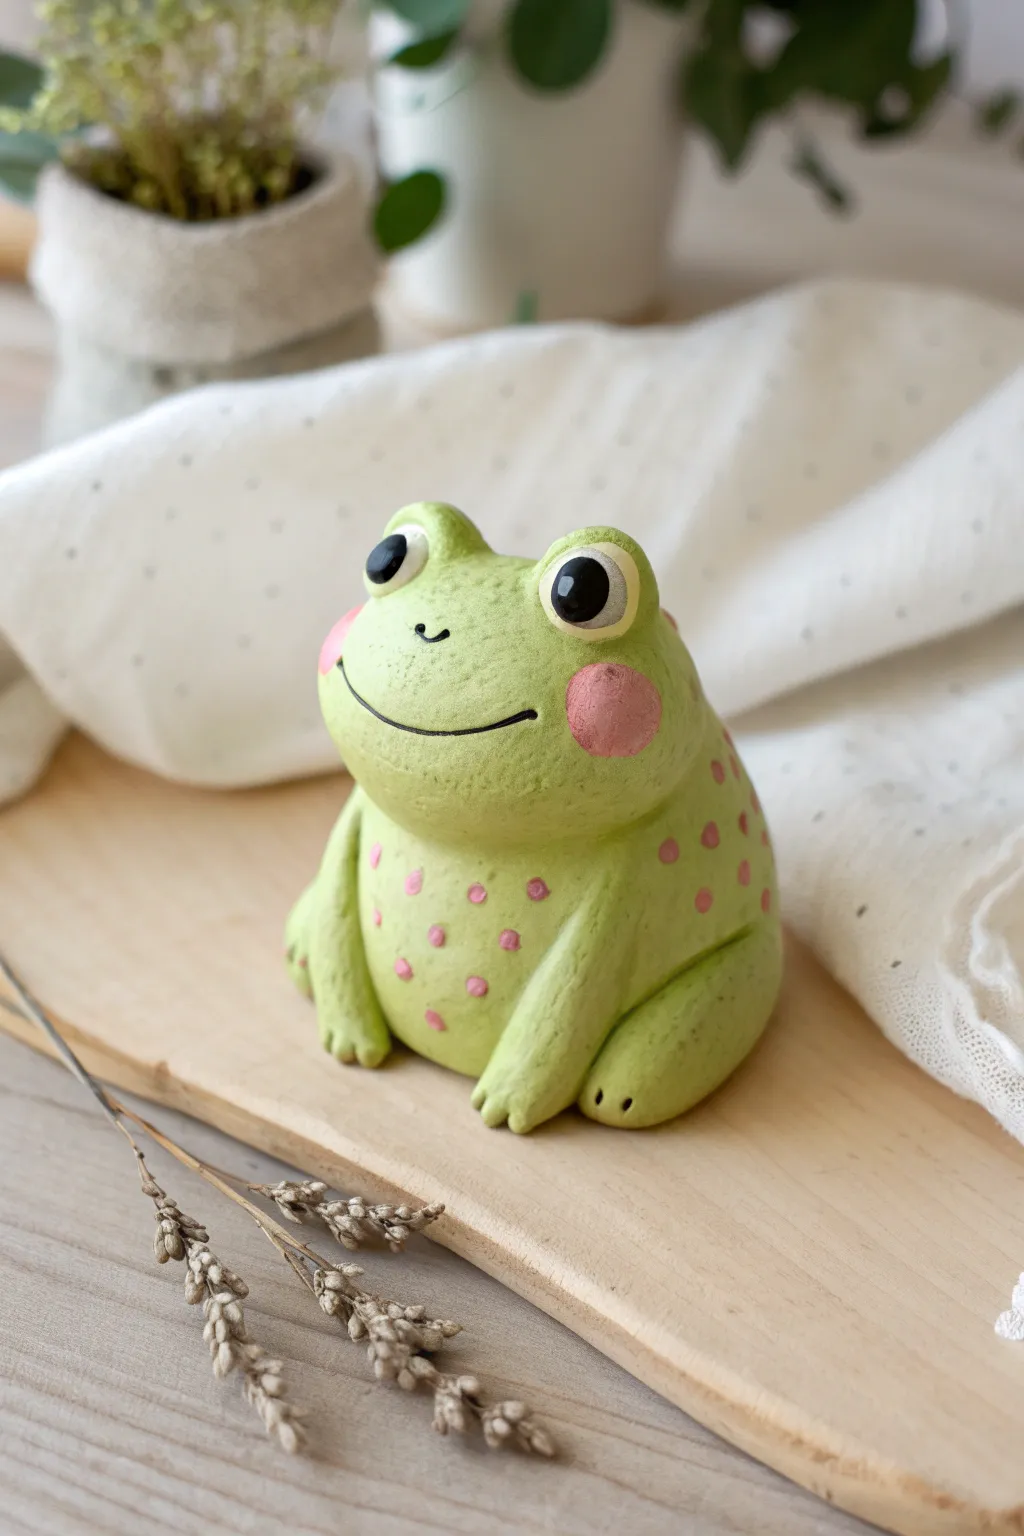
Create this cheerful frog friend with adorable oversized eyes and a friendly smile. Using simple shapes and soft green tones, you’ll sculpt a charming desk companion that looks like it hopped right out of a storybook.
Detailed Instructions
Materials
- Soft air-dry clay (light green, white, black, pink)
- Modeling tools (ball tool, needle tool or toothpick)
- Acrylic rolling pin
- Water (for smoothing)
- Clear sealant (optional)
- Soft paintbrush
Step 1: Shaping the Frog Body
-
Form the Base:
Start with a large ball of light green clay, about the size of a tangerine. Roll it until it’s perfectly smooth and free of cracks. -
Create the Pear Shape:
Gently gently press the ball down onto your work surface to flatten the bottom. Narrow the top slightly so it resembles a stout, rounded pear shape—this combines the head and body into one solid piece. -
Smooth the Surface:
Use a tiny bit of water on your finger to smooth out any fingerprints or uneven areas, ensuring the frog looks soft and rounded.
Step 2: Adding the Face
-
Sculpt Eye Sockets:
Roll two smaller balls of light green clay and press them onto the top of the head to form the elevated eye mounds. -
Make the Eye Whites:
Take two small pieces of white clay, roll them into balls, and flatten them into discs. Press these into the center of the green eye mounds. -
Add Pupils:
Roll two tiny balls of black clay. Press these firmly onto the white discs. I like to place them slightly off-center to give him a quirky, curious expression. -
Add Shine:
For that spark of life, add the tiniest speck of white clay to the upper corner of each black pupil. -
Carve the Smile:
Using a needle tool or a dull knife, gently carve a wide, U-shaped smile across the face. Make small vertical indentations at the corners for cheeks. -
Define the Nose:
Press a tiny u-shape or two small dots between the eyes to create nostrils. -
Make Rosy Cheeks:
Flatten two small circles of pink clay and press them onto the sides of the face, just below the eyes.
Cracks Appearing?
If you see small cracks while the clay dries, dip your finger in water and smooth a little fresh clay paste over the crack to seal it instantly.
Step 3: Limbs and Details
-
Add Front Legs:
Roll two thick logs of green clay. Attach them vertically to the front of the body, blending the clay at the shoulder area so it looks seamless. -
Shape the Feet:
Flatten the bottom of the front legs slightly. Use a knife tool to press indentations for the toes. -
Add Hind Legs:
Create two large teardrop shapes for the powerful back legs. Press these onto the sides of the body, curving them forward toward the front feet. -
Blend Seams:
Use a modeling tool to gently blend edges of the hind legs into the body for a solid look. -
Create Texture:
Take a clean toothbrush or stiff brush and gently tap it all over the green skin to create a subtle, mossy texture. -
Pink Spots:
Roll very tiny balls of pink clay and scatter them across the frog’s belly and back. Press them flat so they look like natural spots. -
Final Paint Details:
If you want extra definition, use a very thin brush with black acrylic paint to deepen the smile line and nostrils after the clay hardens.
Pro Tip: Weighted Base
To prevent your frog from tipping over easily, you can hide a small, flat stone or a crumpled ball of aluminum foil inside the bottom of the main body.
Let your frog sit undisturbed for at least 24 hours to cure.


What Really Happens Inside the Kiln
Learn how time and temperature work together inside the kiln to transform clay into durable ceramic.
Unicorn Charms With Simple Horns
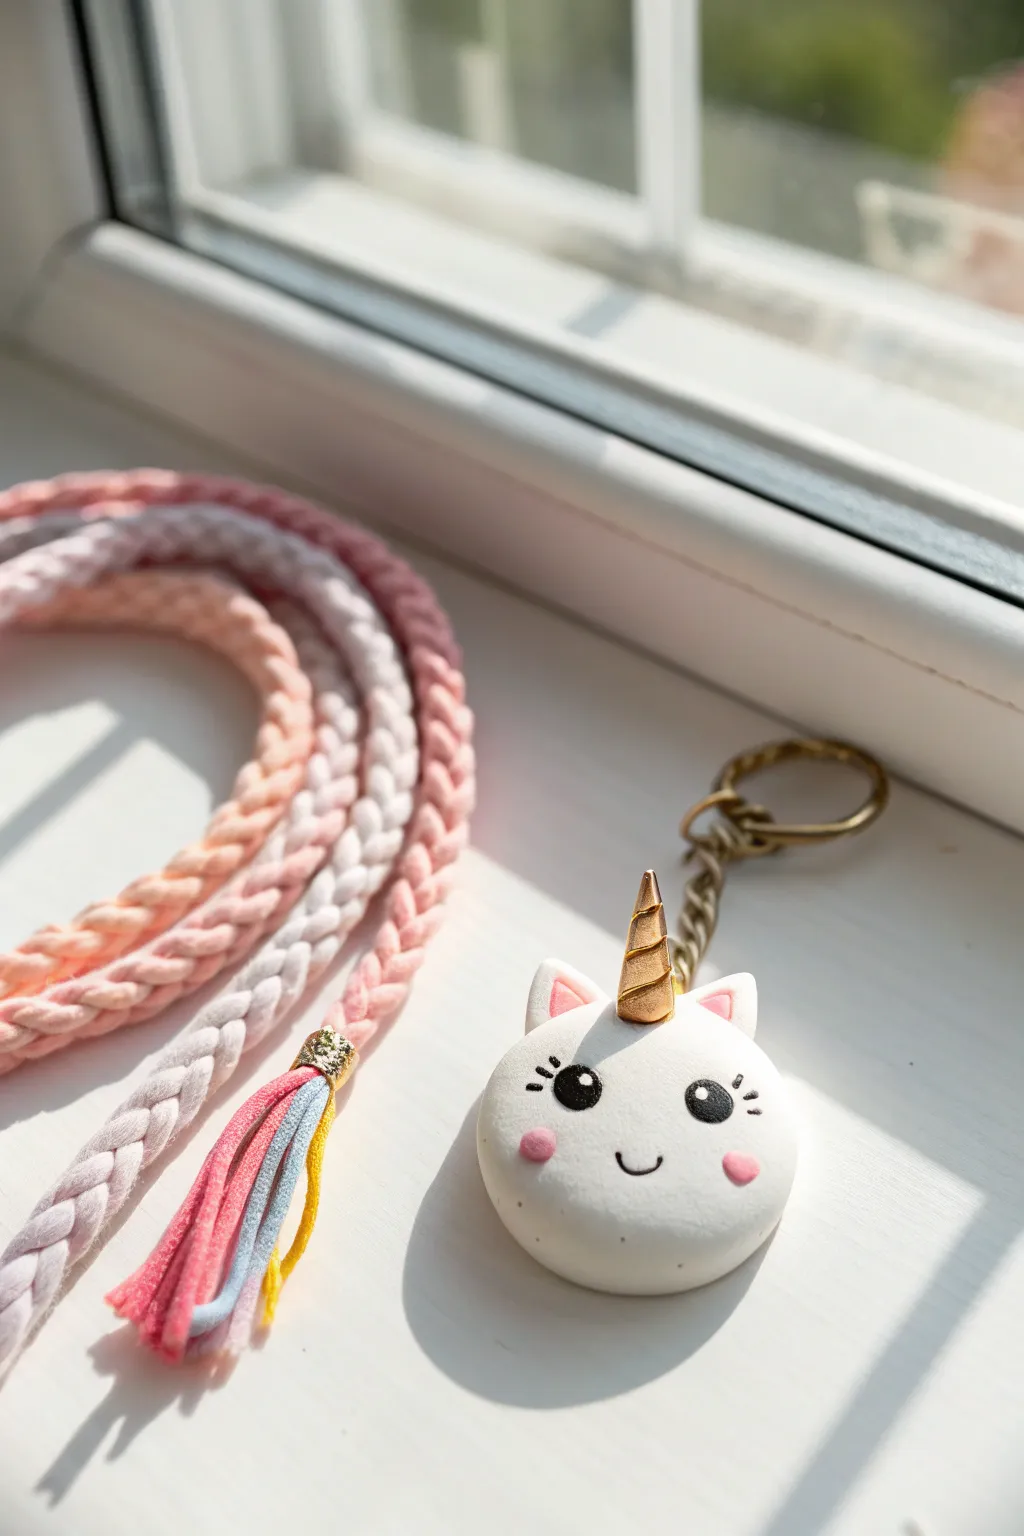
Create a magical little companion with this easy-to-make unicorn charm that captures the sweetness of a macaron. With its simple round shape, golden horn, and rosy cheeks, this adorable accessory is perfect for clipping onto backpacks or keyrings.
Step-by-Step
Materials
- White polymer clay or air-dry clay
- Gold polymer clay (or gold acrylic paint)
- Pink polymer clay (pale shade)
- Black acrylic paint
- Fine detail paintbrush or dotting tool
- Clear gloss glaze or varnish
- Eye pin (gold tone)
- Jump ring and keychain attachment
- Clay sculpting tools (needle tool, small ball tool)
- Rolling pin/acrylic roller
- Round cutter (approximately 1.5 inches)
Step 1: Base Shaping
-
Condition the Clay:
Begin by taking a chunk of white clay and kneading it in your hands until it becomes soft, pliable, and warm to the touch. -
Form the Head:
Roll the white clay into a smooth ball, ensuring there are no cracks on the surface. Gently press it down onto your work surface to flatten it slightly into a thick disc, similar to the shape of a macaron. -
Smooth the Edges:
Use your finger or a smoothing tool to round off the edges of the disc so it looks soft and puffy rather than sharp-edged.
Clean Clay Pro-Tip
To keep your white clay pristine, always wash your hands thoroughly before starting and keep a pack of baby wipes nearby to clean fingers between handling colored and white clay.
Step 2: Adding Essentials
-
Ear Placement:
Take two tiny pieces of white clay and shape them into small triangles. Press the bottom of each triangle lightly against the top curve of the head to attach them. -
Pink Inner Ears:
Take extremely small amounts of pink clay and roll them into tiny balls. Press these into the center of the white ears using a small ball tool or just your pinky finger to create the inner ear detail. -
Create the Horn:
Take a small piece of gold clay (or white clay if you plan to paint it later). Roll it into a thin cone shape, tapering it to a point at one end. -
Texture the Horn:
Use a needle tool or the edge of a credit card to gently press spiral indentations around the cone to give it that twisted unicorn horn texture. -
Attach the Horn:
Place the horn exactly in the center of the forehead, between the two ears. Press down firmly enough to adhere, or use a dab of liquid clay for a stronger bond.
Eye Pin Security
If your eye pin feels loose after baking, pull it out gently, add a drop of super glue to the stem, and slide it back into the existing hole for a permanent hold.
Step 3: Hardware & Baking
-
Insert Eye Pin:
Take your metal eye pin and carefully push the straight end vertically into the top of the unicorn’s head, right behind the horn. Make sure the loop sits flush against the clay. -
Final Smoothing:
Check the charm one last time for any fingerprints. Gently rub them away with a drop of baby oil on your finger if needed. -
Initial Hardening:
If using oven-bake polymer clay, bake according to the package instructions (usually around 275°F/135°C for 15-30 minutes). If using air-dry clay, allow it to dry completely for 24-48 hours.
Step 4: Painting & Finishing
-
Paint the Horn:
If you didn’t use gold clay, carefully paint the horn with metallic gold acrylic paint now. Wait for it to dry completely. -
Draw the Eyes:
Using a fine detail brush or a black paint pen, draw two solid black circles for the eyes. Add three tiny lashes springing from the outer corner of each eye. -
Add Sparkle:
I prefer to use a dotting tool here to add a tiny white reflection dot inside each black eye pupil. This really brings the character to life. -
Draw the Smile:
Paint a very small, simple ‘u’ shape between the eyes for a sweet smile. -
Rosy Cheeks:
Mix a tiny bit of pink paint or use pink chalk pastel dust. Dab two soft pink circles onto the cheeks, just below the eyes. -
Seal the Charm:
Once all paint is dry, coat the entire charm (except the metal hardware) with a clear gloss glaze to protect the paint and give it a polished porcelain look. -
Assembly:
Use pliers to open a jump ring, thread it through the eye pin loop on your charm and your keychain attachment, then close the ring securely.
Now you have a charming magical friend ready to guard your keys or brighten up your bag
Dino Fossil Impressions

Create a charming botanical fossil that combines the prehistoric fun of dinosaur tracks with modern leaf prints. This circular clay relief features earthy terracotta and sage tones on a textured stone-like base, making it a perfect decorative coaster or display piece.
Detailed Instructions
Materials
- Air-dry clay (white or cream)
- Acrylic paints (terracotta/burnt sienna, sage green/teal)
- Clear matte varnish or sealant
- Rolling pin
- Circle cutter or a small bowl (approx. 4-5 inches)
- Parchment paper or craft mat
- Fine-grit sandpaper
- Small fine-point paint brushes
- Real or plastic leaves (fern, monstera, simple leaf)
- Plastic dinosaur toy with distinct feet (or a stamp)
- Sponge (optional for texture)
Step 1: Shaping the Base
-
Prepare the workspace:
Lay down parchment paper or a craft mat to prevent the clay from sticking to your table. Take a handful of air-dry clay and knead it until it’s soft and pliable. -
Roll the slab:
Use your rolling pin to flatten the clay into an even slab. You want a sturdy thickness, about 1/4 inch to 1/2 inch thick, to ensure it doesn’t crack easily when handling. -
Texture the surface:
For that authentic ‘stone’ look seen in the photo, lightly dab the surface with a coarse sponge or gently crumble a ball of foil over the clay before cutting. This removes the perfect smoothness. -
Cut the circle:
Place your circle cutter or inverted bowl onto the clay slab. Press down firmly to cut a clean circle. Peel away the excess clay from the outside and smooth the edges of your disc with a little water on your finger.
Uneven Impressions?
If a leaf isn’t pressing deep enough, place a piece of paper over it and use a rolling pin. This distributes pressure evenly without your fingers leaving unwanted dents.
Step 2: Creating Impressions
-
Arrangement planning:
Before pressing anything down, gently lay your leaves and dinosaur foot (or paw stamp) onto the clay to check the spacing. Aim for a balanced composition like the example, with leaves fanning out and the print at the bottom. -
Press the fern:
Place your fern-like leaf on the left side. Use the rolling pin gently over the leaf to press it evenly into the clay without distorting the circle shape. Slowly peel it back to reveal the veins. -
Add the centerpiece leaves:
Press the smaller central leaf and the larger oval leaf near the top. Ensure you exert even pressure so the stem and veins make a clear indentation. -
The monstera accent:
Place the monstera leaf on the right side. Since these leaves are often thicker, you might need to press firmly with your thumb to capture the distinct holes and edges. -
Stomp the track:
Firmly press the dinosaur toy foot or paw stamp into the open space at the bottom. Rock it slightly back and forth to ensure the ‘toes’ make a deep, clear impression. -
Initial drying:
Allow the clay disc to dry for at least 24-48 hours. Flip it over halfway through the drying process to prevent curling.
Step 3: Adding Color
-
Smooth the edges:
Once fully dry, take your fine-grit sandpaper and very gently sand the outer rim of the circle to soften any sharp ridges left by the cutter. -
Mix your colors:
Prepare a palette with burnt sienna (terracotta) and a muted sage or teal green. I find watering the paint down slightly helps it flow into the intricate crevices of the leaf veins. -
Painting the fern:
Using a fine-point brush, carefully fill in the impression of the large fern leaf on the left with the terracotta paint. Try to keep the paint strictly inside the indented area. -
Painting the simple leaves:
Paint the central sprig with the sage green, and the upper oval leaf with the terracotta color to balance the warm tones on the disc. -
Monstera details:
Fill the monstera leaf impression with the sage green/teal paint. This larger shape requires a steady hand to keep the edges crisp against the white clay. -
Fossilizing the track:
Paint the paw print impression with the terracotta color. If you want it to look older, dab a little extra paint in the deepest parts of the print. -
Sealing the work:
Let the paint dry completely. Finally, brush a thin layer of matte varnish over the entire top surface to protect the paint and give the clay a finished, durable seal.
Rustic Speckle Effect
To mimic real stone, dilute some brown paint with water and flick it off an old toothbrush onto the dry clay before sealing. It adds instant texture.
Now you have a beautiful, durable piece of faux-fossil art to display on a shelf or use as a unique coaster.

TRACK YOUR CERAMIC JOURNEY
Capture glaze tests, firing details, and creative progress—all in one simple printable. Make your projects easier to repeat and improve.
Leaf And Flower Texture Prints
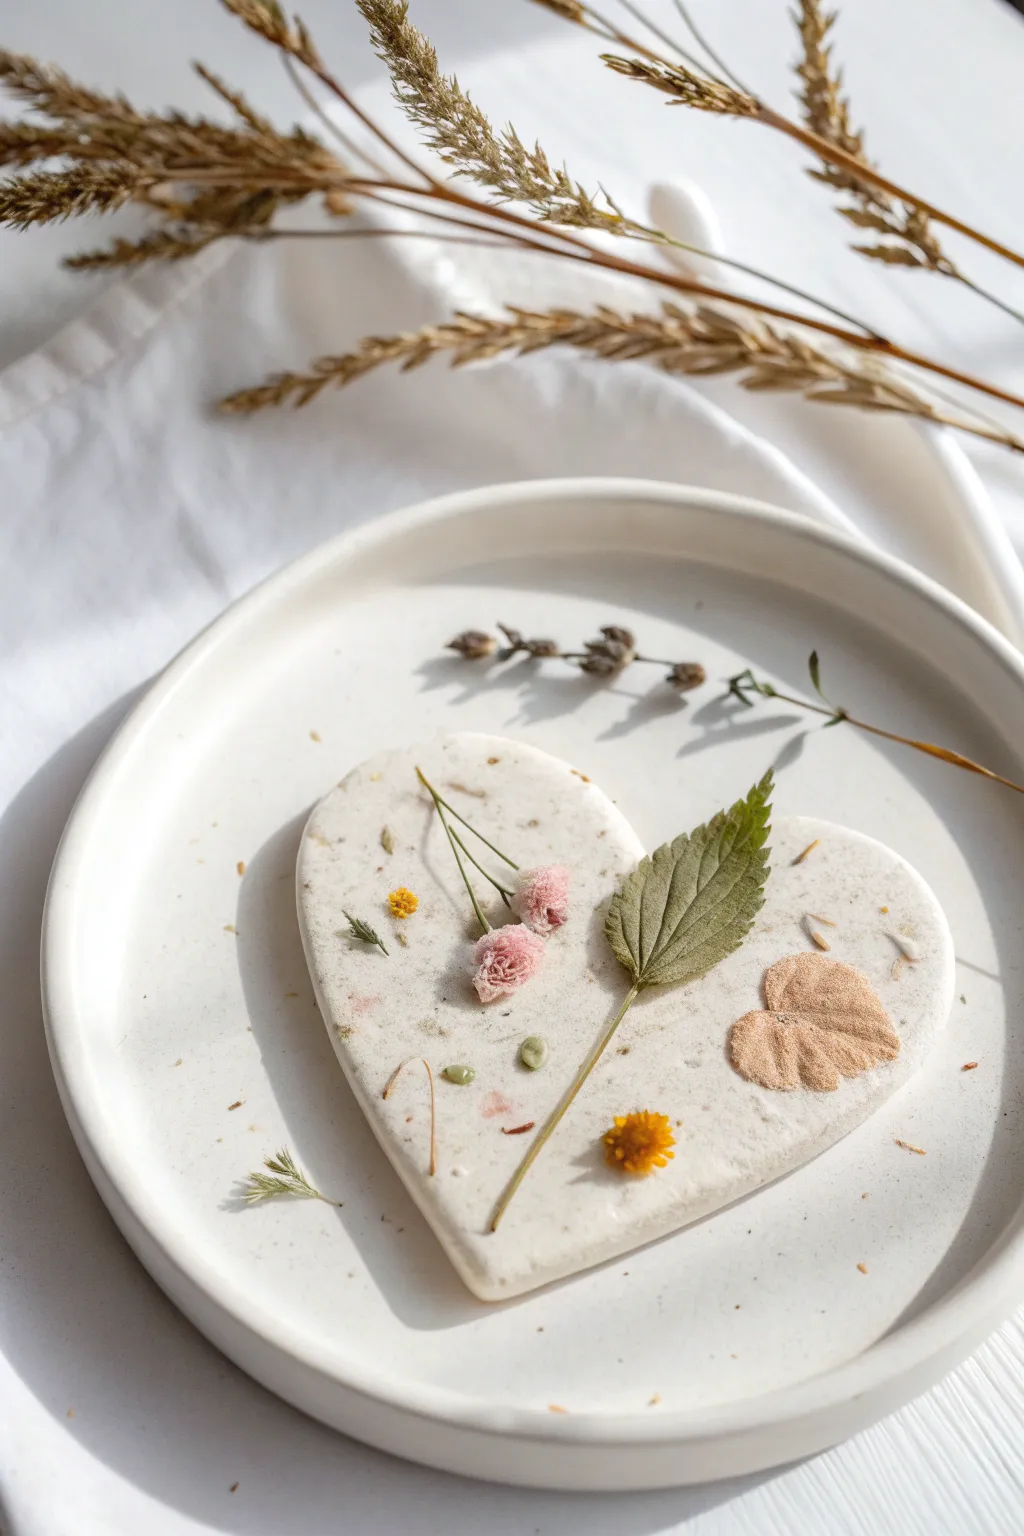
Capture the delicate beauty of a garden walk with these lovely heart-shaped keepsakes. Using simple air-dry clay and a collection of dried botanicals, you can create a nature-inspired decoration that preserves the textures of leaves and tiny blooms forever.
Step-by-Step
Materials
- White cosmetic-grade air-dry clay (or homemade salt dough)
- Small heart-shaped cookie cutter (approx. 3-4 inches wide)
- Rolling pin
- Parchment paper or non-stick craft mat
- Selection of small dried flowers (e.g., tiny pink buds, yellow blooms)
- Small dried leaves (serrated edges work best for texture)
- Dried seed pods or grass tips
- Tweezers (optional, for placing small items)
- Fine-grit sandpaper (optional)
- Matte sealant spray or matte Mod Podge (optional)
Step 1: Preparing the Base
-
Condition the clay:
Start by taking a handful of white air-dry clay and kneading it in your hands until it becomes soft, pliable, and warm. This helps prevent cracking later on. -
Roll it out:
Place the clay on a sheet of parchment paper. Roll it out evenly until it is about 1/4 inch (6mm) thick. You want it sturdy enough to hold the impressions but not too chunky. -
Cut the shape:
Firmly press your heart-shaped cookie cutter into the center of the rolled clay. Wiggle it slightly to ensure a clean cut. -
Clean the edges:
Remove the excess clay from around the outside of the cutter first, then gently lift the cutter away. Smooth any rough edges on the heart with a slightly damp fingertip to give it a polished look.
Placement Pro Tip
Use tweezers to handle very fragile dried flowers. The natural oils in your fingers can sometimes damage petals or cause them to stick to you instead of the clay.
Step 2: Designing the Botanical Print
-
Select your specimens:
Arrange your dried flowers and leaves on a table first to plan your design. For this look, aim for a balanced composition with a central focal leaf and smaller flowers flanking it. -
Begin placement:
Starting with the largest elements, like the serrated green leaf, gently place it onto the clay surface. I like to position this one diagonally across the heart for a dynamic look. -
Add floral accents:
Place tiny pink flower buds (like clover or dried buds) near the center. Add a small yellow accent flower near the bottom point of the heart. -
Layering textures:
Tuck smaller elements, like single dried petals or tiny grass heads, into the empty spaces. Don’t overcrowd the heart; leave some white space to let the clay show through. -
The vital press:
Once you are happy with the arrangement, place a piece of parchment paper gently over the top. Use the rolling pin to roll *very* lightly over the paper once. This embeds the botanicals into the clay so they sit flush with the surface. -
Check the bond:
Peel back the parchment carefully. If any stems or petals are sticking up, use your finger to gently press them down into the clay.
Scented Variation
Mix a few drops of essential oil (like lavender or rose) into the clay during the kneading phase. As the clay dries, it will release a subtle, garden-fresh scent.
Step 3: Finishing Touches
-
Allow to dry:
Leave the heart on the parchment paper in a cool, dry place. Air-dry clay typically takes 24-48 hours to cure completely. Flip the heart over halfway through the drying time to prevent warping. -
Clean up:
Once fully hard, check the edges again. If they feel sharp or rough, very lightly sand them with fine-grit sandpaper for a smooth, stone-like finish. -
Seal (Optional):
To protect delicate plant parts from crumbling over time, you can brush on a very thin layer of matte Mod Podge or use a matte spray sealant. This step is optional if you prefer the raw, natural texture. -
Display:
Use it as a decorative object on a tray or shelf, or careful drill a hole at the top (before drying) to hang it as an ornament.
Enjoy displaying your little piece of nature on a shelf or tray for a touch of rustic charm
Handprint Trinket Bowls
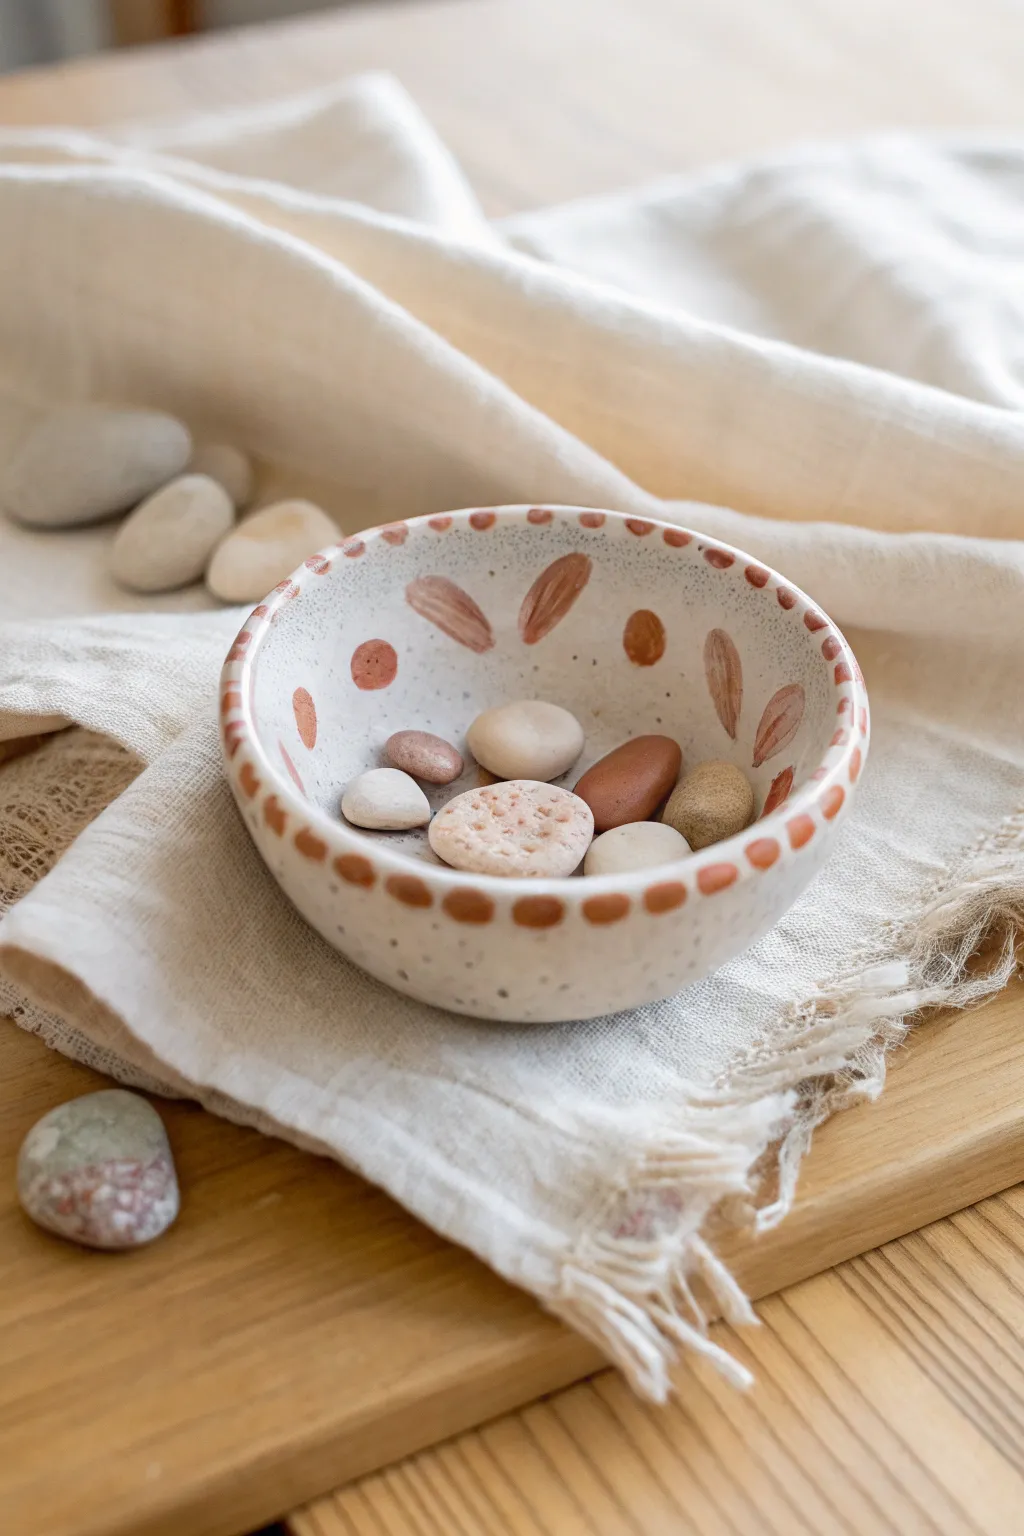
Create a charming, earthy trinket dish that perfectly mimics the look of high-end speckled pottery without needing a kiln. This simple pinch pot features warm terracotta accents and a delightful spotted texture that brings a cozy, natural feel to any space.
Step-by-Step Tutorial
Materials
- White air-dry clay (or polymer clay)
- Black pepper or dried coffee grounds (for speckling)
- Terracotta or rust-colored acrylic paint
- Small round paintbrush (size 2 or 4)
- Bowl of water
- Rolling pin (optional)
- Fine grit sandpaper
- Matte or satin varnish
Step 1: Preparing the Speckled Clay
-
Condition the clay:
Start by taking a fist-sized ball of white air-dry clay. Knead it thoroughly in your hands to warm it up and make it pliable, ensuring there are no air bubbles trapped inside. -
Add the texture:
Flatten the clay slightly and sprinkle a generous pinch of coarse black pepper or dried coffee grounds onto the surface. Fold the clay over itself to trap the speckles inside. -
Mix uniformly:
Continue kneading the clay, folding and pressing repeatedly, until the speckles are evenly distributed throughout the entire ball. Add more texture if the clay still looks too plain.
Step 2: Shaping the Bowl
-
Form a ball:
Roll your prepared speckled clay into a smooth, tight sphere between your palms. -
Start the pinch:
Hold the ball in one hand and gently press your thumb into the center, stopping about a half-inch from the bottom. This creates the base of your pinch pot. -
Pinch the walls:
Using your thumb on the inside and fingers on the outside, gently pinch and rotate the clay. Work your way from the bottom up, thinning the walls significantly as you go. -
Smooth the shape:
Continue pinching until the walls are an even thickness—aim for about 1/4 inch. Gently tap the bottom on your table to create a flat base so the bowl sits stably. -
Refine the surface:
Dip your finger in a little water and smooth out any major cracks or fingerprints on the rim and interior. I find it helpful to run a slightly damp finger along the rim to round it off nicely.
Uneven drying?
If your bowl cracks while drying, it likely dried too fast. Repair cracks with a ‘slip’ made of clay and water, then let it dry slowly under a loose plastic bag.
Step 3: Drying and Refining
-
Let it dry:
Place your bowl in a safe spot to air dry. Depending on humidity, this usually takes 24 to 48 hours. The clay will turn a lighter white color when fully dry. -
Sand for smoothness:
Once fully cured, use fine-grit sandpaper to gently buff the surface. Focus on the rim to make it perfectly smooth, but be careful not to sand away the nice uneven, handmade character. -
Wipe clean:
Use a dry cloth or a slightly damp paper towel to wipe away all the clay dust from sanding. This ensures your paint will adhere properly.
Golden Touch
Once the varnish is dry, paint the very edge of the rim with liquid gold leaf or metallic gold paint for a chic, sophisticated upgrade.
Step 4: Painting the Design
-
Mix your color:
Prepare your terracotta or rust-colored acrylic paint. You want a warm, earthy tone. If your paint is too thick, thin it with a tiny drop of water for smoother application. -
Paint the rim dots:
Load your small round brush with paint. Dab small oval-shaped dots directly onto the top edge of the rim, spacing them evenly all the way around. -
Create interior leaves:
Inside the bowl, paint simple leaf shapes. Press the belly of the brush down and pull up to create a tapered teardrop shape. Paint these sporadically around the inner walls. -
Add floating dots:
Between the leaf shapes, add a few random circular dots of the same color to balance the negative space. -
Dry the paint:
Allow the acrylic paint to dry completely. This usually happens quickly, often within 20-30 minutes. -
Seal the piece:
Apply a coat of matte or satin varnish over the entire bowl, inside and out. This creates that ceramic-like finish and protects the clay from moisture.
Fill your new bowl with smooth garden stones or jewelry to show off your handiwork
Alphabet And Shape Magnets
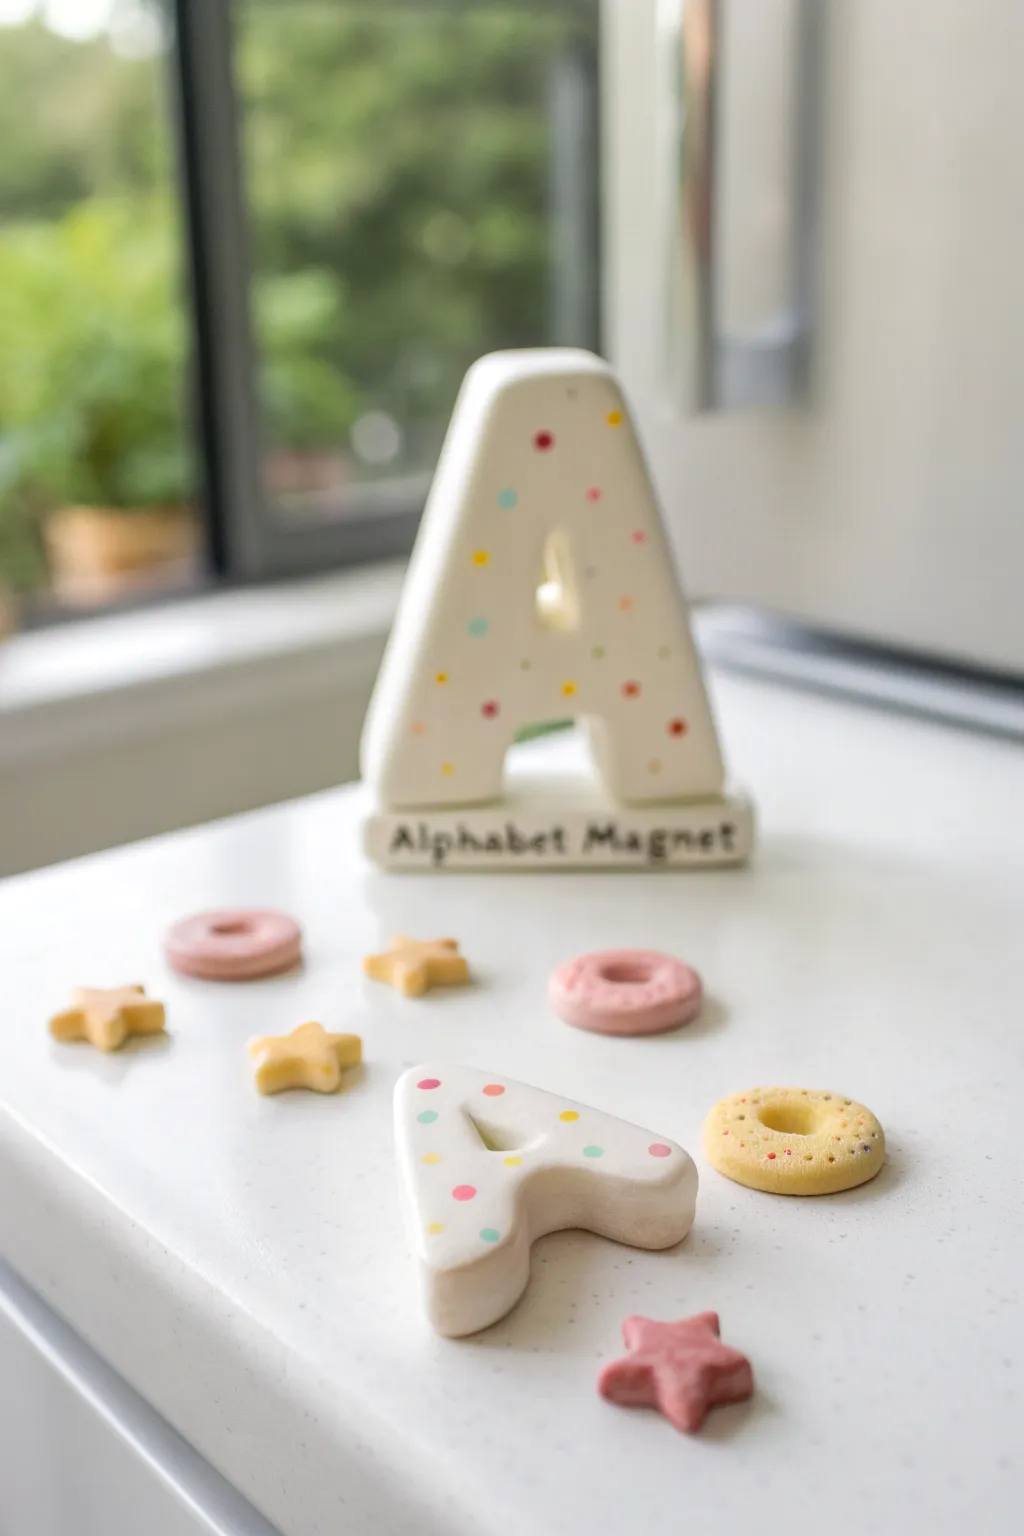
Transform soft clay into charming, chunky alphabet letters and miniature sweet treats that double as functional decor. These smooth, matte-finish magnets feature whimsical polka dots and pastel colors, perfect for brightening up any fridge or magnetic board.
Step-by-Step Guide
Materials
- White soft air-dry clay (or polymer clay)
- Pastel colored soft clay (pink, yellow, light orange)
- Acrylic paints (pastel pink, blue, yellow, red, green)
- Fine-point paintbrush or dotting tool
- Rolling pin
- Clay sculpting tools or a craft knife
- Strong round magnets
- Super glue or strong craft adhesive
- Alphabet cookie cutters (optional but helpful)
- Fine-tip black permanent marker or black paint
- Sandpaper (fine grit)
- Sealant (matte or satin varnish)
Step 1: Shaping the Alphabet
-
Prepare the base clay:
Start by conditioning a large chunk of white clay. Knead it in your hands until it is warm, pliable, and free of cracks. -
Roll out the slab:
Roll the white clay out on a smooth surface to a generous thickness of about 1/2 inch to 3/4 inch. You want these letters to look chunky and substantial. -
Cut the letter shape:
Use a large ‘A’ cookie cutter or a paper template with a craft knife to cut out your letter shape. If freehanding, make the legs of the ‘A’ wide for stability. -
Smooth the edges:
Dip your finger in a little bit of water (if using air-dry clay) and gently run it along all the cut edges to round them off. You want a soft, marshmallow-like appearance, not sharp corners. -
Create the display base:
Form a rectangular bar of white clay that is slightly wider than the base of your standing letter. Flatten the bottom so it sits flush on a table. -
Attach the letter:
Score the bottom of the letter ‘A’ and the top of the rectangular base. Apply a tiny bit of water or slip (clay mixed with water) and press the letter firmly onto the base to join them.
Smooth Surface Secret
To get that perfectly smooth finish, lightly wet your fingertip and buff the raw clay in circular motions before it starts to dry. It saves sanding time later.
Step 2: Crafting the Mini Charms
-
Form star shapes:
Take small amounts of yellow and pink clay. Flatten them slightly and use a small star cutter, or pinch five points gently with your fingers to create chubby little stars. -
Make the doughnuts:
Roll small balls of pink and yellow clay. Flatten them into thick discs, then use a tool handle or straw to punch a clean hole through the center. -
Texturize the doughnuts:
For a realistic baked look, gently tap the surface of the yellow doughnut with a toothbrush or stiff brush to create a porous texture. -
Dry the pieces:
Set all your clay pieces aside on a flat surface. Follow the manufacturer’s drying time—usually 24 to 48 hours for air-dry clay—turning them occasionally for even drying.
Step 3: Decorating and Finishing
-
Sand imperfections:
Once fully dry, inspect your white letter. Use fine-grit sandpaper to buff away any fingerprints or rough spots until the surface is ultra-smooth. -
Paint the polka dots:
Dip a fine-point brush or a dotting tool into your pastel acrylic paints. Dab small, random dots all over the front and sides of the white ‘A’. Space them out comfortably for a clean look. -
Label the base:
Using a very steady hand and a fine-tip black marker (or black paint), print ‘Alphabet Magnet’ across the front face of the rectangular base. -
Decorate the charms:
Use tiny dabs of paint to add ‘sprinkles’ to your yellow doughnut. For the pink doughnut, you can leave it solid or add a slightly darker pink swirl for icing. -
Seal the work:
Apply a coat of matte or satin varnish to all pieces. This protects the paint and gives the clay a finished, professional porcelain feel. -
Attach the magnets:
Flip the small shapes and the loose letter ‘A’ over. Apply a drop of super glue to the back and press a round magnet firmly into place.
Make It Interactive
Embed small neodymium magnets inside the clay while it’s wet instead of gluing them on the back. This makes the magnet invisible and flush on the fridge.
Now you have a cheerful set of custom magnets ready to organize your notes or display artwork
Smile-Face Tokens And Game Pieces
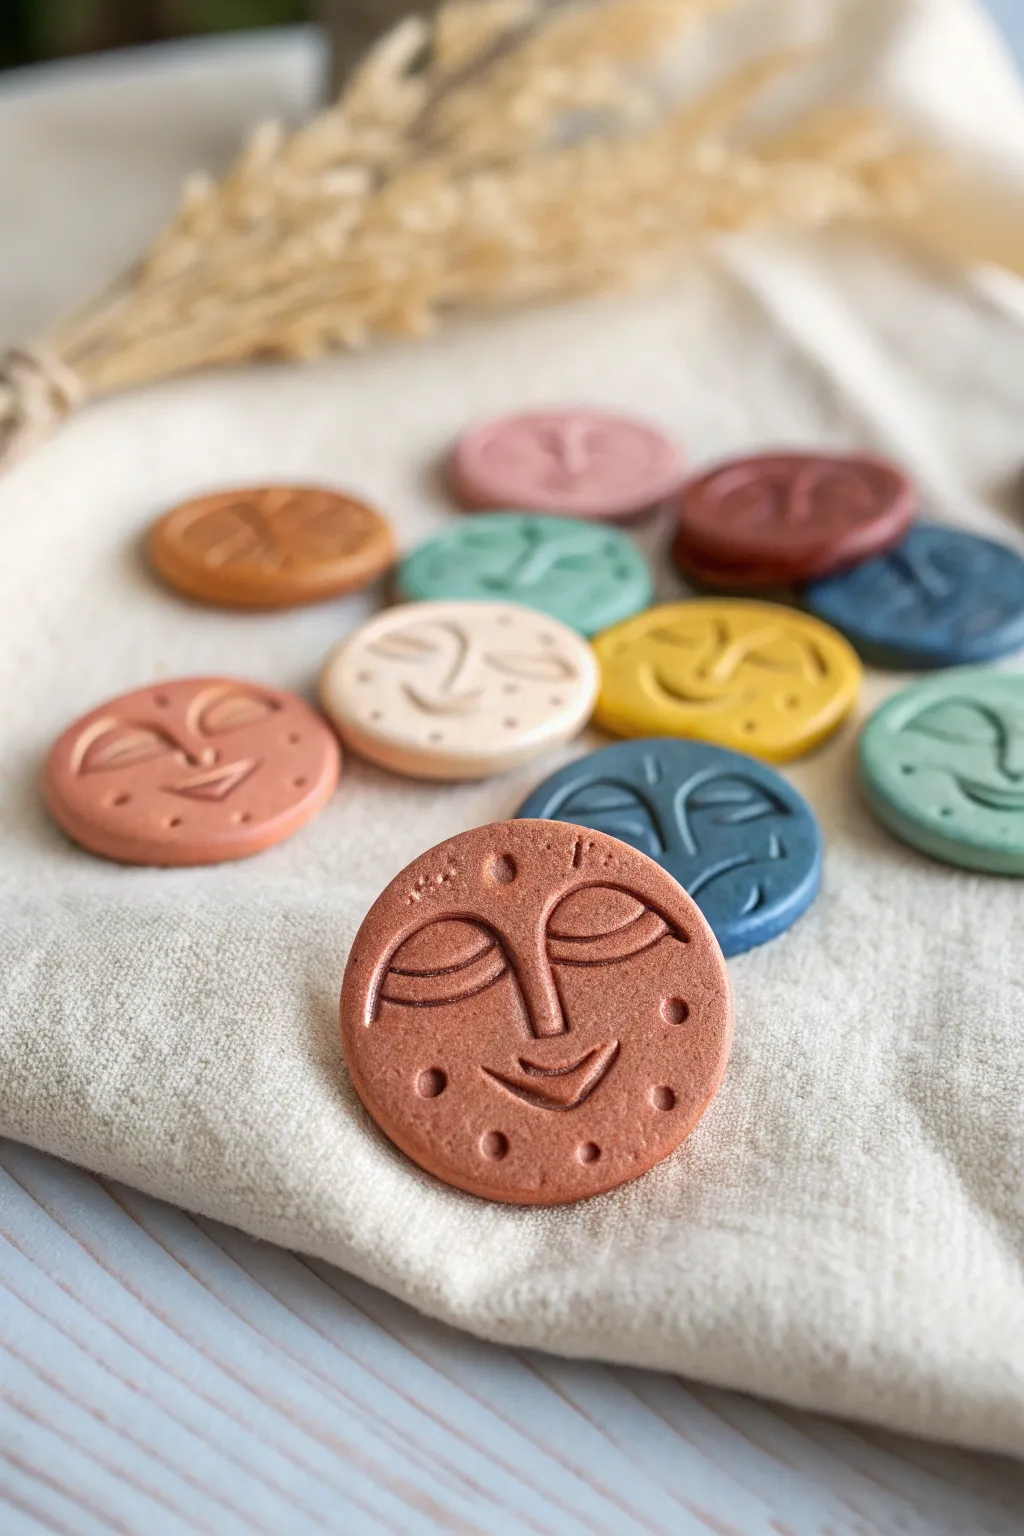
Create a charming set of multicolored, tactile tokens that feature simple, soothing moon-face smiles. These smooth, coin-sized discs are perfect for board games, reward systems, or just sensory play, finished in a beautiful palette of muted earth tones.
Detailed Instructions
Materials
- Polymer clay (terracotta, burnt orange, sage green, cream, mustard yellow, dusty blue, brick red)
- Circle clay cutter (approx. 1.5 inches)
- Acrylic roller or rolling pin
- Parchment paper or ceramic tile (work surface)
- Small ball stylus tool
- Needle tool or toothpick
- Clay carving tool or small U-shaped gouge
- Oven (for baking)
- Baking sheet
Step 1: Preparation & Base Creation
-
Prepare your workspace:
Lay down parchment paper or use a clean ceramic tile as your work surface to prevent the clay from picking up dust or sticking. -
Condition the clay:
Start with the terracotta color. Break off a chunk and knead it thoroughly in your hands until it becomes soft, warm, and pliable. This conditioning step is crucial to prevent cracks later. -
Roll out the slab:
Using your acrylic roller, roll the conditioned clay out into an even sheet. Aim for a thickness of about 1/4 inch (6mm)—thick enough to feel substantial but thin enough to bake evenly. -
Cut the circles:
Press your circle cutter firmly into the clay sheet to punch out your base tokens. Gently wiggle the cutter before lifting to ensure clean edges. -
Smooth the edges:
Pick up each circle carefully. If there are any sharp ridges or rough spots on the rim, gently smooth them down with your fingertip.
Step 2: Sculpting the Faces
-
Mark the center:
Visualize a vertical line down the center of the token. Using your needle tool, lightly scratch a tiny guideline for the nose bridge to keep the face symmetrical. -
Carve the nose:
Use a small carving tool or the side of a toothpick to press a long, narrow ‘L’ or soft vertical line for the nose. Don’t dig too deep; just displace the clay slightly. -
Outline the eyelids:
For the sleepy eyes, use your needle tool to draw two wide, downward-curving arcs on either side of the nose bridge. -
Create the heavy lid look:
Draw straight horizontal lines connecting the ends of each arc, creating a half-moon shape for the heavy, peaceful eyelid. -
Form the smile:
Switch to your U-shaped gouge or press the side of a small rounded tool into the clay below the nose to create a gentle, upturned mouth. -
Add cheek details:
Using a small ball stylus, press several small indentations into the cheek areas and around the perimeter of the face to create decorative freckles or texture dots. -
Refine the lines:
Go back over your main lines with the needle tool to deepen them slightly, ensuring the features will remain visible after baking. -
Repeat with other colors:
Repeat the rolling, cutting, and sculpting process with your other clay colors—sage, cream, mustard, and blue—until you have a full set.
Clean Lines Pro-Tip
cover the unfinished clay circle with a piece of plastic wrap before pressing your tools into it. This softens the edges of your lines for a smooth, pillowy look.
Step 3: Baking & Finishing
-
Arrange for baking:
Place all your finished tokens on a baking sheet lined with parchment paper. Leave a little space between each one. -
Bake the clay:
Bake according to your specific brand of polymer clay instructions (usually around 275°F or 135°C) for 15-20 minutes. -
Cool down:
Allow the tokens to cool completely on the baking sheet before handling them. They will harden as they cool. -
Optional sanding:
If you find any fingerprints on the back or rough edges after cooling, you can lightly sand them with fine-grit sandpaper for a professional finish.
Fixing Drafts
If you mess up a face while sculpting, don’t try to patch it. Just ball up that specific token, re-roll it, and start fresh. The clay is forgiving!
Gather your finished tokens in a small drawstring bag for a handmade game set ready for play
Mini Fruit Coasters Kids Can Make

These cheerful coasters add a splash of summer to any table, showcasing vibrant fruit designs like strawberries, oranges, and grapefruits. They are the perfect functional craft for kids, combining simple circle shaping with colorful, painted details.
Step-by-Step
Materials
- White air-dry clay or polymer clay
- Rolling pin
- Round cookie cutter (approx. 3.5 inches)
- Sandpaper (fine grit)
- Acrylic paints (Red, Orange, Yellow, Green, White, Black)
- Fine detail paintbrushes
- Flat shader paintbrush
- Ruler
- Pencil
- Clear sealant (Mod Podge or spray varnish)
Step 1: Shaping the Base
-
Prepare the workspace:
Lay down a non-stick baking mat or parchment paper to prevent the clay from sticking to your table. If using polymer clay, knead a chunk until it is soft and conditioned. -
Roll the clay slab:
Using a rolling pin, flatten the clay into a smooth, even sheet. Aim for a thickness of about 1/4 inch so the coasters feel sturdy but not too heavy. -
Cut the circles:
Press your round cookie cutter firmly into the rolled clay. Create as many circles as you’d like to make sets of; lifting the excess clay away before moving the circles helps keep them perfectly round. -
Smooth the edges:
Dip your finger in a tiny bit of water and run it gently around the rim of each circle to smooth out any rough cutting marks or jagged edges. -
Create a raised rim (Optional):
To mimic the look in the photo, you can gently press a slightly smaller flat object or the bottom of a glass into the center of the wet clay, leaving a very subtle raised border around the edge. -
Allow to dry:
Let the clay discs dry completely according to your package instructions. For air-dry clay, turning them over halfway through the drying process helps prevent warping. -
Sand for smoothness:
Once fully cured and hard, lightly sand the surface and edges with fine-grit sandpaper to ensure a perfect canvas for your painting.
Smooth Surface Secret
Use a slightly damp sponge to wipe the raw clay before it dries. It works better than fingers for erasing tool marks and creates a porcelain-like finish.
Step 2: Fruit Slice Designs
-
Draft the segments:
For citrus designs (orange, lemon, grapefruit), use a ruler and pencil to lightly draw a center point, then sketch radiating lines to create the refreshing fruit segments. -
Base coat the segments:
Using a flat shader brush, paint the fruit segments. For the grapefruit look, mix a little yellow into your orange paint for one half and use a darker reddish-orange for the other half to create a gradient effect. -
Base coat the strawberry:
For the strawberry coaster, paint a soft red, rounded triangle shape in the center of the white circle, leaving plenty of white space around the edges. -
Add definition lines:
Once the base colors are dry to the touch, use a very thin brush and white paint to clean up the lines between the citrus segments, giving them that distinct ‘slice’ appearance. -
Paint the leaves:
On the strawberry coaster, use green paint to add a small leafy top. Paint three or four distinct little leaves stemming from the top of the red berry shape.
Step 3: Final Details
-
Dot the seeds:
This is the part I find most satisfying: using the very tip of a fine brush or a toothpick, add tiny black or dark brown dots. Place them randomly on the strawberry and in the corners of the citrus segments. -
Clean the rims:
Check the white raised rim of your coasters. If any fruit paint smudged onto the border, use a small amount of white paint to touch it up and keep that crisp, clean look. -
Dry the paint:
Allow all paint layers to dry completely. Acrylics dry fast, but giving them an extra hour ensures nothing smears during the final step. -
Seal the deal:
Apply a coat of waterproof clear sealant. This is crucial because coasters will get wet from condensation; a good sealer protects your hard work from water rings.
Make it a Set
Don’t stop at fruit! Try painting a kiwi slice with green and black seeds, or a watermelon slice using pink and green for a complete summer collection.
Now you have a durable, custom set of coasters ready to brighten up your snack time
Clay Bead Necklaces With Big Holes
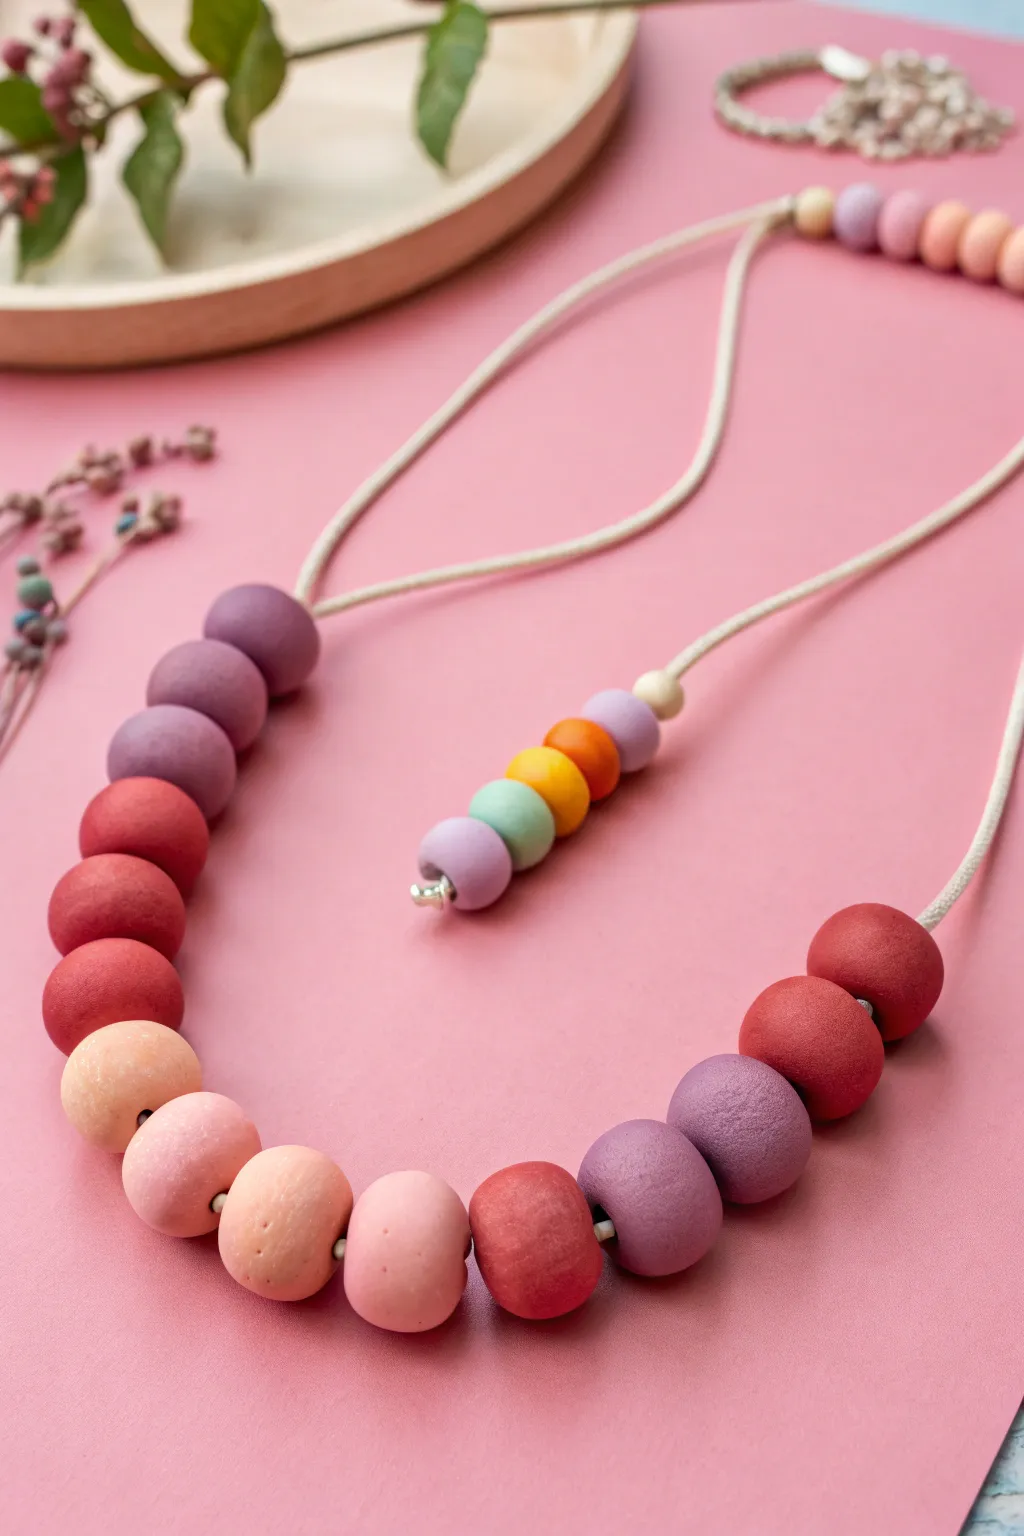
Create a stunning statement piece with these chunky, colorful beads that have a beautiful matte finish and an organic feel. Perfect for little hands to shape and string, this necklace combines vibrant berry and sunset tones with a sturdy cord for durable style.
Detailed Instructions
Materials
- Soft polymer clay or air-dry clay (shades: dark purple, lavender, magenta, red, peach, cream, yellow, teal)
- Thick cotton or nylon cord (cream or beige, approx. 2mm thickness)
- Wooden skewer or knitting needle (for making holes)
- Smooth work surface (ceramic tile or silicone mat)
- Baking sheet and parchment paper (if using polymer clay)
- Scissors
Step 1: Preparing the Clay
-
Condition the clay:
Start by warming up your clay in your hands. Knead each color separately until it is soft, pliable, and free of cracks. -
Mix custom shades:
To achieve the gradual ombre effect seen in the photo, try mixing a little white or cream clay into your darker purples and reds to create custom intermediate shades. -
Portion the clay:
Pinch off chunks of clay for your main beads. You will need about 15-18 pieces roughly the size of a large grape or small walnut. -
Create the mini beads:
Prepare smaller portions, about size of a pea, for the decorative accent tail. You’ll need about 6-7 of these in a rainbow of colors (purple, blue, yellow, orange).
Step 2: Shaping and Piercing
-
Roll spheres:
Roll the large portions between your palms to create smooth, round spheres. They don’t need to be perfectly machine-round; a little organic irregularity adds charm. -
Flatten slightly:
Gently tap the top and bottom of each sphere against your work surface to create a slightly flattened ‘rondelle’ shape, rather than a perfect ball. -
Pierce the large beads:
Hold a bead steady and gently twist your skewer or knitting needle through the center. Since we are using thick cord, wiggle the tool in a circular motion to widen the hole significantly. -
Check the hole size:
Ensure the hole is at least 3-4mm wide. I always make the hole slightly larger than I think I need, as clay can shrink slightly or distort during curing. -
Shape the accent beads:
Repeat the rolling and piercing process for the tiny accent beads, ensuring their holes are large enough for the cord as well. -
Smooth the edges:
Check the openings of the holes for any jagged bits of clay and smooth them down with your finger so the bead sits nicely on the cord.
Tip: Texture Trick
To get that matte, stone-like texture shown in the photo, gently roll your raw clay beads over a piece of sandpaper or an old clean washcloth before baking.
Step 3: Curing and Assembly
-
Bake or dry:
Place your beads on a baking sheet lined with parchment paper. If using polymer clay, bake according to package directions (usually 275°F/130°C for 15-30 mins). If using air-dry clay, let them sit for 24-48 hours. -
Cool down:
Allow the beads to cool completely before handling. They will be hard and durable once fully set. -
Cut the cord:
Cut a generous length of cord, about 30-36 inches, depending on how low you want the necklace to hang. -
String the main necklace:
Thread your large beads onto the cord. Arrange them in a color gradient: dark purples on the outside, fading into reds, then lighter pinks and peaches in the center. -
Secure the ends:
Bring the two ends of the cord together. You can simply tie a strong overhand knot to close the loop. -
Add the accent tail:
For the decorative dangler shown in the image, thread one end of the cord through your stack of mini rainbow beads *before* tying the final knot, or tie a separate short piece of cord with the mini beads to the main knot. -
Final knot:
Tie a secure knot below the mini beads to keep them in place and trim any excess cord.
Trouble: Frayed Cord?
If your cord ends are fraying and won’t go through the bead holes, wrap a tiny piece of tape around the tip to make a stiff ‘needle’ structure.
Wear your colorful new chunky necklace with pride or gift it to a friend who loves bold accessories
Mushroom Ornaments With Polka Dots
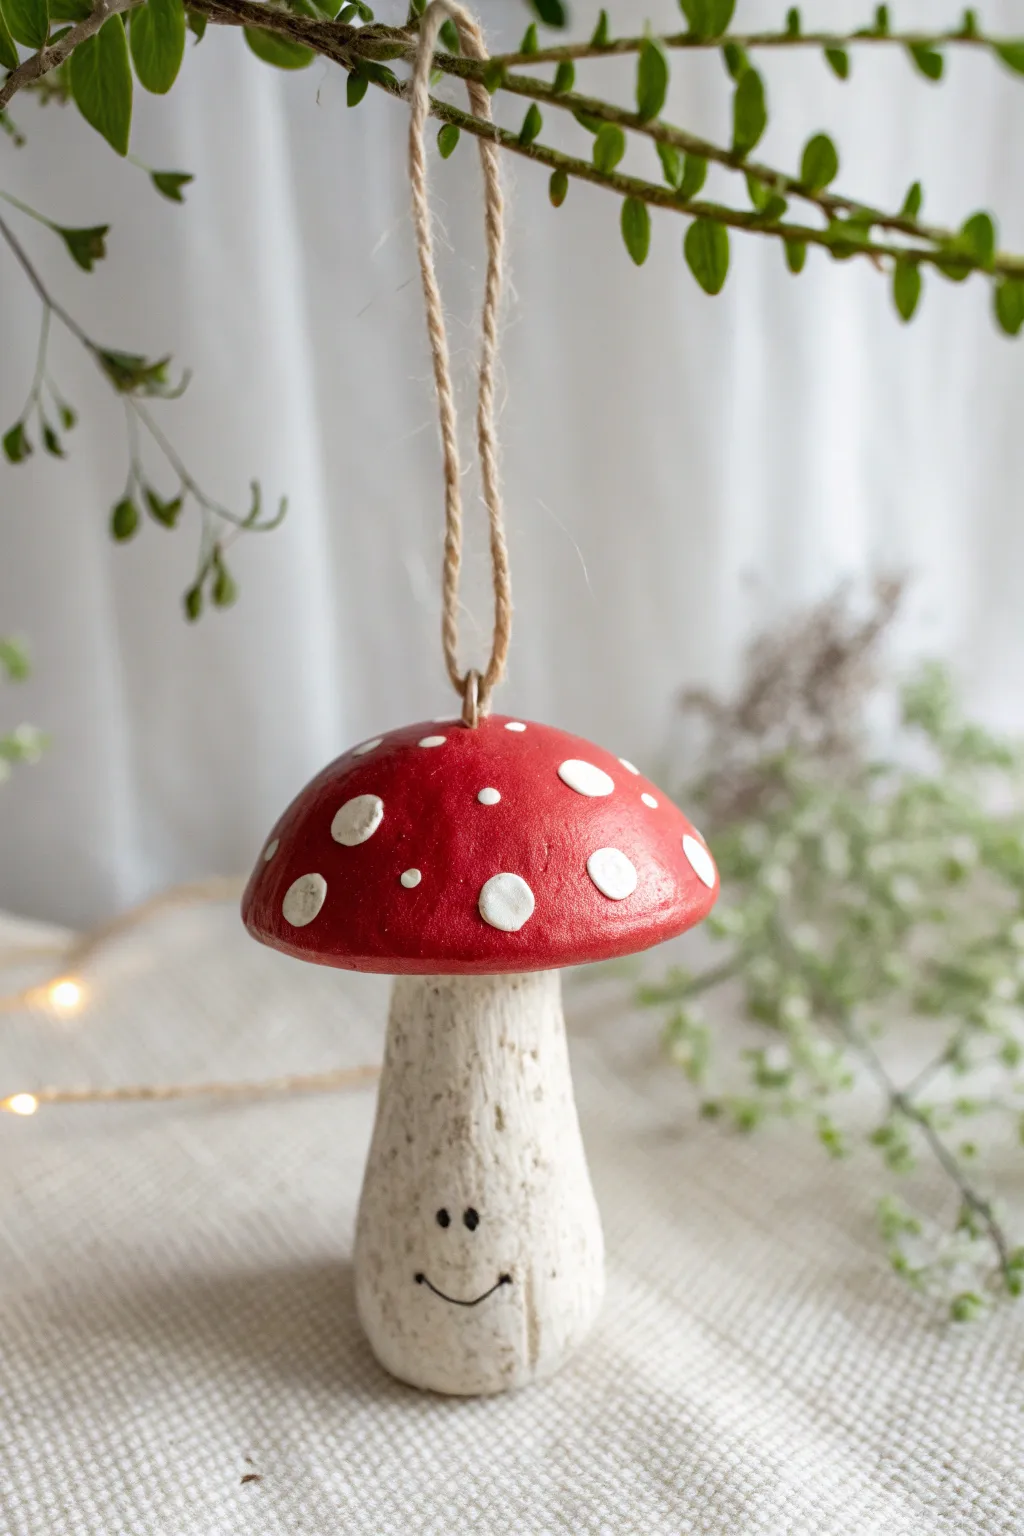
These adorable mushroom ornaments bring a touch of woodland magic to any room, featuring charming smiley faces and classic red-and-white caps. Crafted from soft clay, they are a simple yet delightful project perfect for hanging on a holiday tree or a decorative branch.
How-To Guide
Materials
- White soft air-dry clay (or polymer clay)
- Red acrylic paint
- White acrylic paint
- Black fine-point permanent marker or acrylic paint pen
- Jute twine or rustic string
- Craft wire or a small metal eye hook
- Paintbrushes (flat and fine round)
- Old toothbrush or stiff bristle brush
- Sculpting tools (or a toothpick)
- Matte sealant or varnish (optional)
Step 1: Sculpting the Base
-
Form the Stem:
Start by taking a chunk of white clay roughly the size of a large strawberry. Roll it into a thick log shape that is slightly wider at the bottom to give the mushroom a stable, cute look. -
Shape the Cap:
Take a second piece of clay, slightly larger than the first, and roll it into a ball. Gently flatten the bottom and round out the top to create a dome shape for the mushroom cap. -
Join the Parts:
Place the cap onto the top of the stem. If the clay is dry, wet the connection points slightly or use a dab of slip (clay mixed with water) to ensure they bond securely. Press them together gently but firmly. -
Add Texture:
Before the clay dries, take an old toothbrush or a stiff bristle brush and gently tap it all over the stem. This creates a natural, stone-like texture that contrasts beautifully with the smooth cap. -
Insert the Hanger:
Cut a short piece of wire, bend it into a loop, and push the ends deep into the center of the cap’s top. Alternatively, screw in a small metal eye hook. Ensure the loop is open enough to thread twine through later. -
Create Polka Dots:
Roll tiny balls of clay between your fingers to make the spots. Flatten them slightly and press them randomly all over the mushroom cap. Varying the sizes makes it look more organic. -
Dry Completely:
Set your mushroom aside in a safe, dry spot. Depending on the thickness of your clay, this usually takes 24 to 48 hours. Turn it occasionally so the bottom dries evenly.
Texturing Trick
If you don’t have a toothbrush, gently rolling a ball of crumpled aluminum foil over the wet clay stem creates a fantastic, earthy texture in seconds.
Step 2: Painting and Finishing
-
Base Coat the Cap:
Once fully dry, paint the main area of the cap with bright red acrylic paint. Use a smaller brush to carefully paint around the raised white polka dots to keep them crisp. -
Refine the Dots:
If any red paint accidentally got onto the white dots, wait for it to dry, then touch them up with a dab of white acrylic paint. This makes them pop against the red background. -
Enhance the Stem:
While the stem is already white clay, I like to give it a quick dry-brush of off-white or light beige paint to highlight the toothbrush texture we created earlier. -
Paint the Face:
Using a very fine paintbrush dipped in black paint (or a paint pen for better control), draw two small vertical ovals for eyes low on the stem. Add a simple U-shaped smile underneath. -
Seal the Work:
To protect your ornament, apply a coat of matte varnish or sealant over the entire piece. This is especially helpful if you used air-dry clay, which can be sensitive to moisture. -
Attach the String:
Cut a length of jute twine, about 8 inches long. Thread it through the wire loop or eye hook at the top of the cap. -
Knot the Loop:
Bring the two ends of the twine together and tie a secure overhand knot near the ends to create a hanging loop.
Cracking Clay?
Surface cracks can happen as clay shrinks. Fix them by mixing a tiny bit of fresh clay with water into a paste and smoothing it into the cracks with your finger.
Hang your cheerful mushroom creation in a window or on a branch to spread a little forest joy
Tiny Fairy Houses Made From Soft Clay
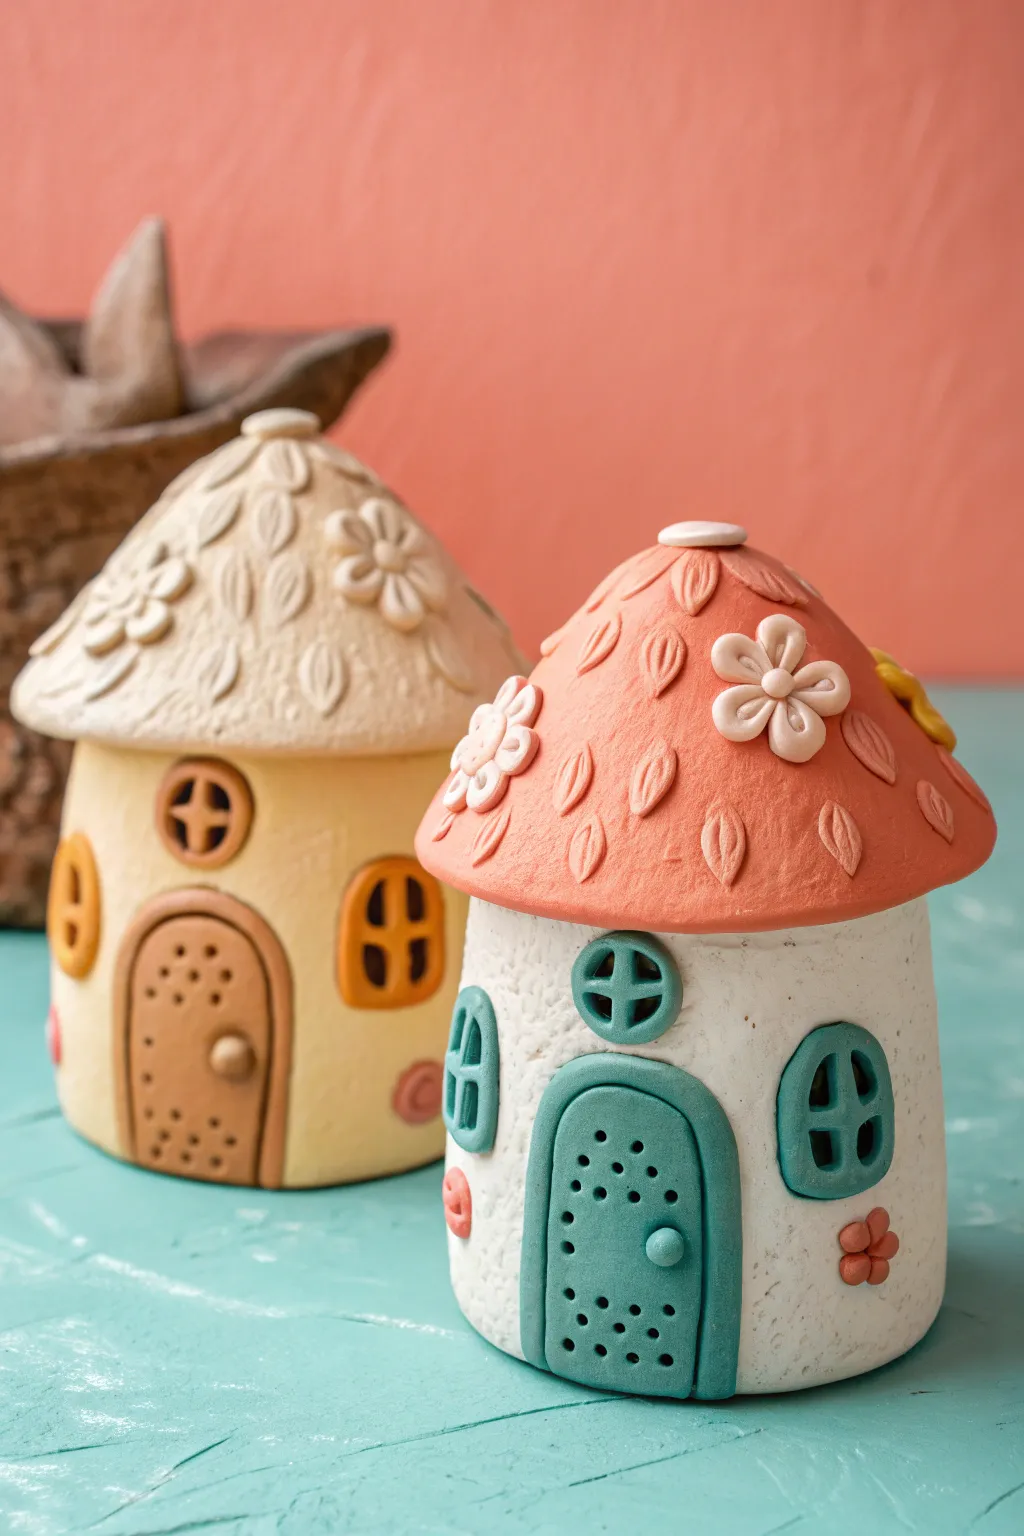
These enchanting little abodes are bursting with charm, featuring textured roofs, tiny floral accents, and inviting arched doors. They are the perfect size to nestle on a bookshelf or create a magical village in a corner of your room.
Step-by-Step Tutorial
Materials
- Air-dry clay or polymer clay (White, pastel yellow, terracotta/coral, teal, brown)
- Small rolling pin
- Clay sculpting tools (needle tool, ball stylus)
- Small circle cutter or bottle cap
- Textured sponge or foil ball (for walls)
- Plastic knife or clay blade
- Small leafy shaped plunger cutter (optional)
- Acrylic paints (if using white clay for everything)
- Gloss varnish (optional)
Step 1: Building the Base Structure
-
Shape the main body:
Start by rolling a ball of white or pastel yellow clay, depending on which cottage you are making. Gently flatten the bottom and roll the sides against your work surface to form a sturdy, thick cylinder shape. It should be slightly wider at the bottom than the top. -
Create the roof cone:
Take a contrasting color clay (like terracotta or beige) and roll it into a ball. Flatten it slightly and pinch the top while pressing down the edges to form a cone shape that is wide enough to sit on top of your cylinder like a hat. -
Hollow the inside (optional):
If you want the houses to be lighter or act as luminaries, gently push your thumb into the bottom of the cylinder and pinch the walls to hollow it out, keeping the walls thick and sturdy. -
Assemble the pieces:
Place the roof onto the cylinder body. If using air-dry clay, score both touching surfaces with a needle tool and add a dab of water to help them adhere securely.
Roof Slumping?
If the roof cone starts to sag or lose shape, scrunch up a small ball of paper or foil and place it inside the cone as a support structure until the clay hardens enough to stand alone.
Step 2: Adding Texture and Details
-
Texture the walls:
To give the house a rustic, stucco look, lightly press a textured sponge or a ball of crumbled aluminum foil all over the surface of the cylinder walls. -
Make the roof shingles:
Roll tiny tear-drop shapes from the roof-colored clay. Flatten them gently to look like leaves. Press these onto the roof in a random pattern, using a needle tool to draw a vein down the center of each one. -
Create the door slab:
Roll out a small slab of clay (teal for the white house, brown for the yellow house). Cut out a tall arch shape. -
Make the door frame:
Roll a thin snake of clay in the same color as the door. Wrap this snake around the arched edge of the door slab to create a raised frame. -
Add door details:
Press the door onto the front of the house. Use a needle tool to poke small indentations all over the door surface for texture, and roll a tiny ball of clay to attach as a doorknob.
Step 3: Windows and Finishing Touches
-
Form the windows:
Create small arched shapes similar to the door but much smaller. Attach two or three around the house. Use a thin clay snake to outline them and add a cross shape in the center for window panes. -
Create a circular window:
For the attic window, shape a small circle of clay. Use a tool to hollow out four pie-wedge shapes, leaving a cross in the middle, and attach this centered above the door. -
Sculpt tiny flowers:
Roll five tiny balls of white or pink clay and press them together in a circle to form petals. Add a small yellow center. Make a few of these flowers. -
Decorate the roof:
Gently press your clay flowers onto the roof, nestling them among the leaf textures you created earlier. -
Add base flowers:
Create simpler, smaller flowers by pressing tiny clay balls flat against the base of the house walls for extra charm. -
Final smooth and check:
Look over the entire piece. Smooth out any unintentional fingerprints with a slightly damp finger or soft brush. -
Let it dry:
Place the finished house in a safe, dry spot away from direct sunlight. Allow it to cure fully according to your clay’s package instructions (usually 24-48 hours for air-dry clay).
Pro Tip: Clean Cuts
When cutting out your doors and windows, dip your clay knife or cutter into a little bit of cornstarch or baby powder first to prevent stickiness and get super sharp, clean edges.
Once dry, your tiny fairy neighborhood is ready to welcome its magical new residents
Cutout Lantern Jars With Clay Sleeves
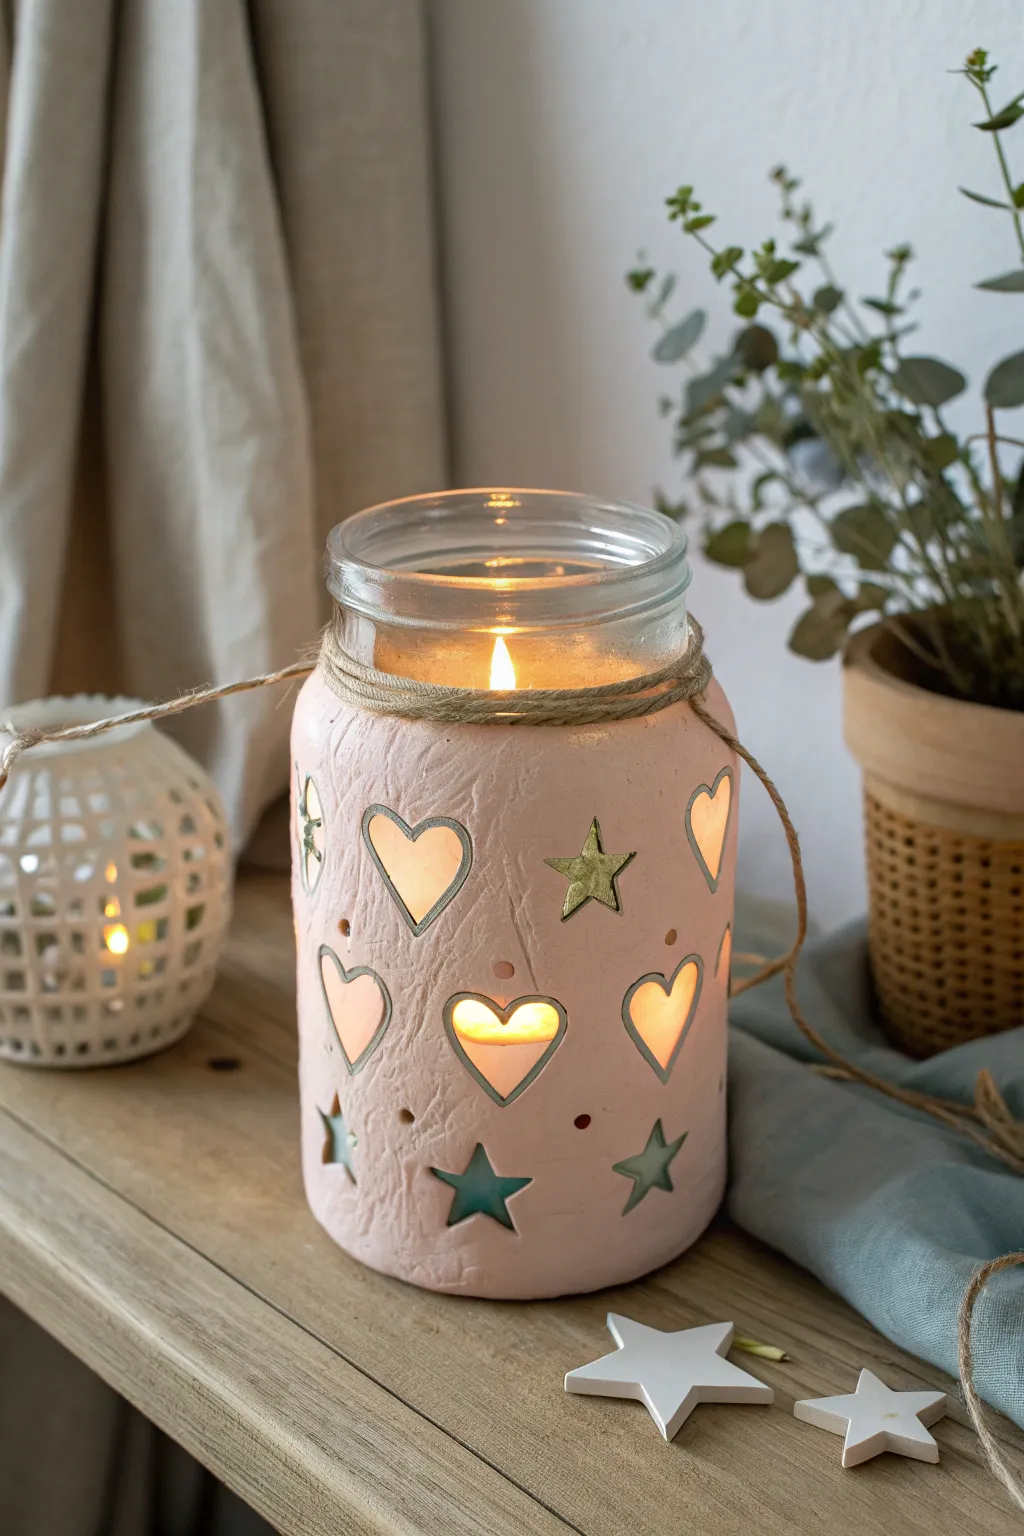
Transform a simple glass jar into a cozy luminary with this textured soft clay sleeve project. The warm pink tone and charming heart and star cutouts create a magical glow when a candle flickers inside, perfect for a bedside table or holiday mantle.
Step-by-Step Guide
Materials
- Clean glass jar (mason jar or recycled jam jar)
- Air-dry clay or polymer clay (soft pink or terra cotta color)
- Small heart and star cookie cutters (approx. 1 inch)
- Rolling pin
- Parchment paper or non-stick mat
- Craft knife or plastic clay tool
- Jute twine or hemp cord
- Texturing tool (crumpled foil or sponge)
- Small bowl of water (for smoothing)
- Clear matte varnish (optional)
- Tea light or LED candle
Step 1: Preparing the Sleeve
-
Clean surface:
Begin by thoroughly washing your glass jar with soapy water to remove any grease or labels. Dry it completely so moisture doesn’t interfere with the clay application later. -
Roll the clay:
Take a large ball of your soft pink air-dry clay. Working on a piece of parchment paper, use a rolling pin to flatten it into a long rectangular slab. You want it roughly 1/4 inch thick—thick enough to hold its shape but thin enough to let light filter through eventually. -
Measure the wrap:
Lift the clay slab (keeping it on the parchment helps) and wrap it loosely around your jar to check the size. Trim the excess clay so that the edges just barely overlap, and trim the top and bottom so it sits below the jar’s rim threads. -
Add texture:
Before attaching it to the jar, I like to add that lovely rustic texture. Gently press a ball of crumpled aluminum foil or a coarse sponge across the entire surface of the clay slab to give it a stone-like, pitted finish.
Step 2: Cutting and Mounting
-
Cut the shapes:
While the clay is still flat on your work surface, plan your design. Use your small heart and star cutters to punch out shapes in a random, pleasing pattern. Leave about an inch of space between each cutout to maintain structural integrity. -
Remove cutouts:
Carefully lift away the clay hearts and stars you just punched out. You can save these for another project or make tiny ornaments with them. -
Apply to jar:
Carefully lift your textured, cutout clay slab. Wrap it around the glass jar. Press it gently against the glass so it adheres, being careful not to squish your cutout shapes. -
Seal the seam:
Where the two ends of the clay meet at the back of the jar, wet your finger slightly and smoosh the clay together to form a seamless join. Smooth it out until the line disappears. -
Refine edges:
Check the top and bottom rims. If the clay looks jagged, use a damp finger or a plastic tool to smooth the edges for a cleaner look. -
Fix distortions:
During the wrapping process, some hearts or stars might have warped. Use the tip of a craft knife or a toothpick to gently reshape them while the clay is still soft.
Clay Sliding Down?
If the heavy clay sags while drying on the smooth glass, dab a tiny amount of white craft glue on the glass surface before wrapping the clay slab to help it grip immediately.
Step 3: Finishing Touches
-
Dry time:
Let the jar sit undisturbed in a dry, cool place. Air-dry clay typically takes 24-48 hours to cure completely. It will lighten in color slightly as it dries. -
Optional paint:
If you used white clay and want the pink look from the photo, mix a very watery acrylic pink paint (a ‘wash’) and brush it over the dry clay. Wipe off the excess with a rag to let the texture catch the pigment. -
Highlight the stars:
For the metallic stars seen in the image, use a small brush to paint the inside edges or the backing of specific star cutouts with gold or silver paint, or simply paint a few solid stars directly onto the clay surface. -
Select twine:
Cut a long piece of jute twine, roughly three feet long, so you have plenty to work with for wrapping. -
Wrap the neck:
Wind the twine around the threaded neck of the jar multiple times. You want a thick, rustic band of cord. -
Secure the twine:
Tie the ends of the twine securely, either in a simple knot tucked underneath the wraps or a small bow if you prefer a cuter look. Let the loose ends trail down slightly. -
Insert light:
Place a tea light or a small battery-operated LED candle inside the jar. The light will beam through the cutouts, creating a warm atmosphere.
Frosted Glass Effect
Before adding the clay sleeve, spray the glass jar with ‘frosted glass’ spray paint. This diffuses the candlelight softly through the cutouts instead of showing the bulb directly.
Now watch your beautiful lantern glow warmly as evening sets in
Story-Stone Tiles For Make-Believe Play
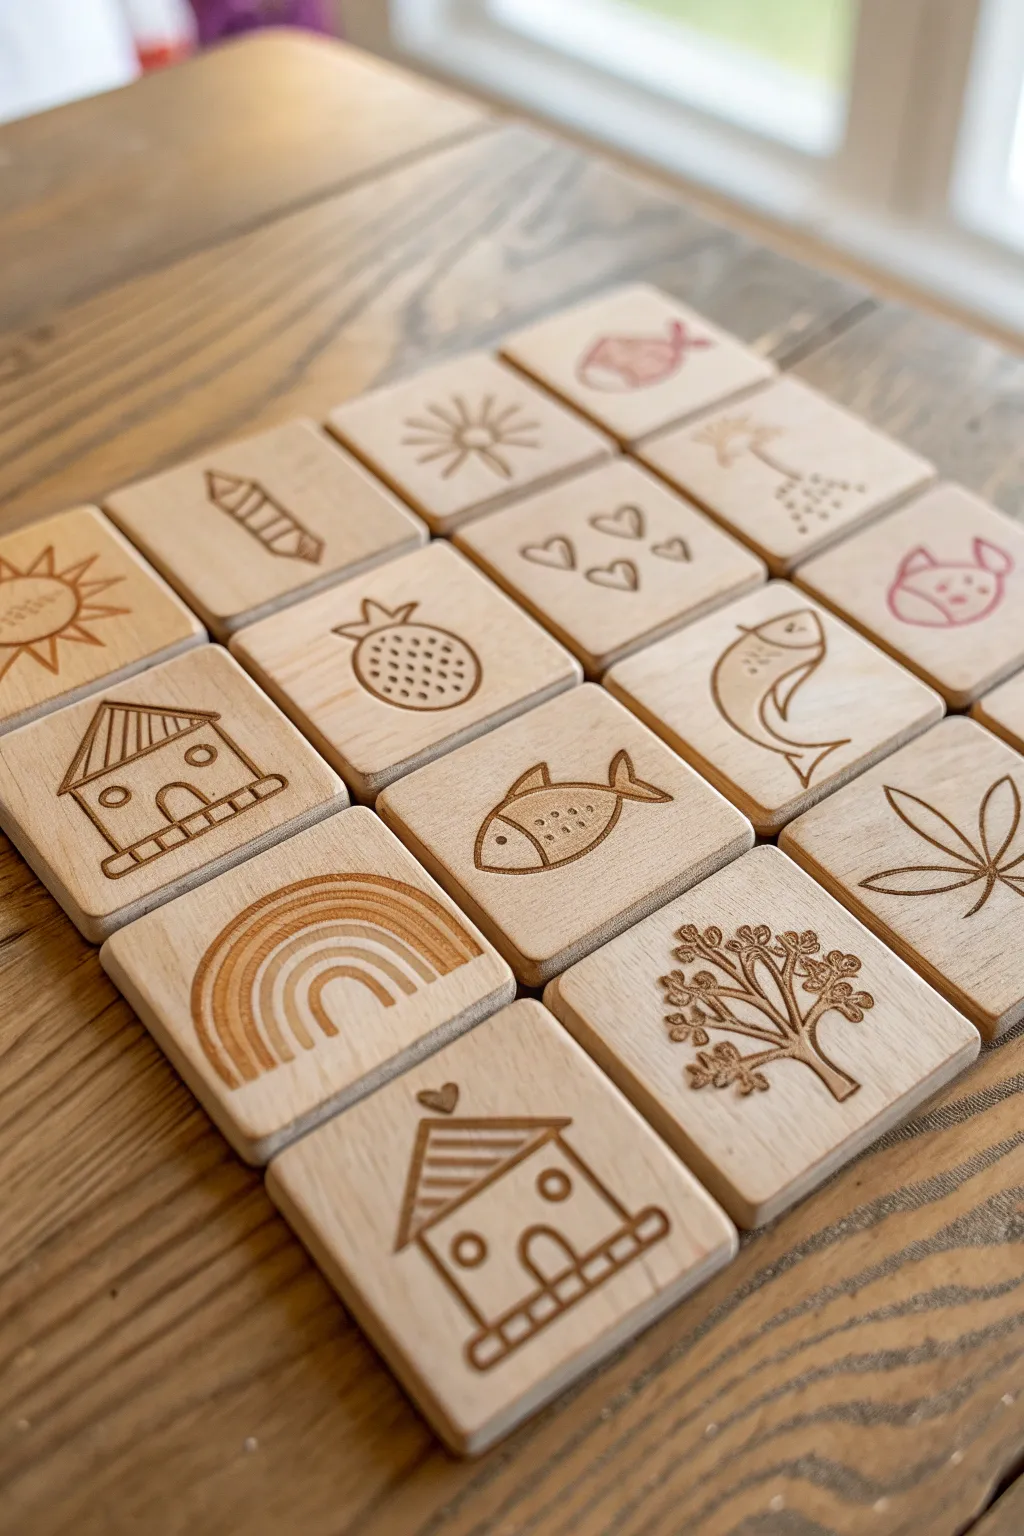
These charming, faux-wood tiles transform simple lumps of clay into a library of symbols perfect for imaginative storytelling. With their clean lines and soft, natural finish, they offer a tactile and durable alternative to traditional paper flashcards.
How-To Guide
Materials
- Light-colored air dry clay (or polymer clay in varied beige tones)
- Rolling pin with depth guides (about 1/4 inch)
- Square cookie cutter (approx. 2 inches)
- Fine-point sculpting tools or needle tool
- Sandpaper (fine grit)
- Brown acrylic paint or wood stain (water-based)
- Paper towels or soft cloth
- Matte varnish or sealant
- Ruler
Step 1: Shaping the Base
-
Condition the clay:
Start by kneading your light-colored clay until it is warm, pliable, and free of air bubbles. If using polymer clay, mixing a tiny bit of translucent clay can mimic a natural stone or wood grain effect. -
Roll out the slab:
Using depth guides or two wooden rulers on either side of your clay, roll it out into a smooth, even slab about 1/4 inch thick to ensure all tiles are uniform. -
Cut the squares:
Press your square cookie cutter firmly into the slab to create your tiles. Try to cut them as close together as possible to minimize waste. -
Smooth the edges:
Gently lift the squares and smooth the sharp cut edges with a water-dampened finger (for air dry clay) or a touch of baby oil (for polymer clay). This gives them that soft, tumbled look seen in the photo.
Step 2: Etching the Designs
-
Choose your icons:
Plan out simple, linear symbols like the ones shown: a rainbow, a fish, a house, a sun, or a tree. Sketching them on paper first helps visual sizing. -
Outline lightly:
Take a needle tool and very lightly scratch your design onto the wet clay surface. This is just a guide, so keep a light hand. -
Deepen the lines:
Go back over your guide lines with a slightly thicker sculpting tool or a dull pencil point. Press down firmly to create a deep, U-shaped groove rather than a sharp V-shape. -
Add texture details:
For the pineapple or fish scales, use dots or small C-shapes. For the sun rays, press linear indentations radiating outward. I find adding tiny circles for details like the house windows really brings the character to life. -
Clean up crumbs:
Carving often leaves little ‘crumbs’ of clay. Brushing them away gently with a soft makeup brush keeps your lines crisp without smudging the design.
Clean Lines Hack
If you struggle with freehand carving, lay a piece of cling wrap over the raw clay before pressing your tool into it. This softens the edges and prevents jagged clay crumbs.
Step 3: Finishing and Coloring
-
Dry or bake:
If using air-dry clay, let the tiles dry on a wire rack for 24-48 hours, flipping them occasionally to prevent warping. If using polymer, bake according to the package directions. -
Sand for perfection:
Once fully cured, gently sand the edges and the top surface with fine-grit sandpaper. This ensures they feel smooth in small hands. -
Apply the wash:
Dilute brown acrylic paint with water creates a ‘wash.’ Brush this liberally over the entire tile, ensuring it gets deep into the carved grooves. -
Wipe back:
Immediately wipe the surface with a damp paper towel or cloth. The dark paint will stay trapped in the etched lines, while the surface returns to a lighter shade, imitating the look of laser-engraved wood. -
Seal the tiles:
Finish with a coat of matte varnish to protect the clay from dirt and oils during play, keeping that natural, non-glossy aesthetic.
Make It Magnetic
Before the clay dries, embed a small neodymium magnet into the back of each tile. Now your story stones can turn the refrigerator door into a vertical adventures board.
Once dry, toss these durable little story-starters into a drawstring bag for entertainment on the go