When I’m craving that flowy, fabric-like look in clay, I reach for a soft slab—the kind that drapes, folds, and moves without fighting you. These ideas are all about letting pliable slabs do their thing, so your pieces feel organic, relaxed, and beautifully handmade.
Drape-Molded Wavy Rim Bowl
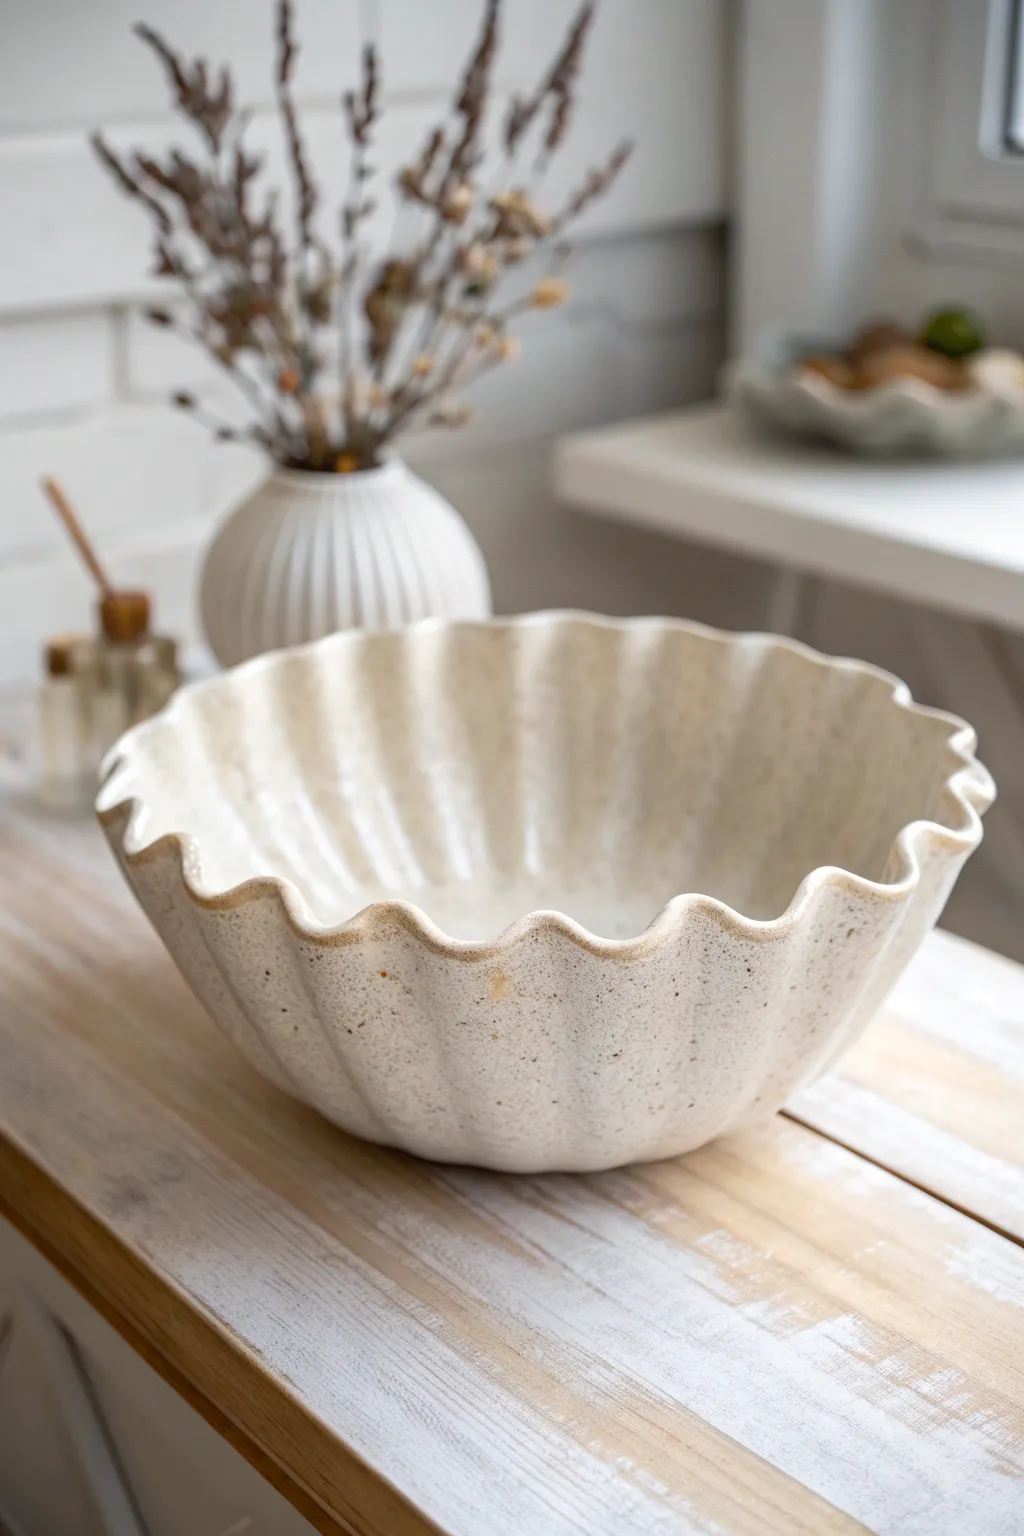
Embrace the natural fluidity of soft slab pottery with this wide, undulating bowl. Its gentle speckling and rhythmic wavy rim create a piece that feels both handcrafted and elegantly structured, perfect for a rustic farmhouse centerpiece.
Detailed Instructions
Materials
- Speckled stoneware clay (mid-fire)
- Wide, shallow slump mold (or a large serving bowl covered in plastic)
- Rolling pin and guide sticks (1/4 inch thickness)
- Canvas mat or slab roller
- Large circular template (paper or cardboard)
- Pounce wheel or potter’s needle
- Soft red rib
- Sponge
- Fettling knife
- Wooden dowel or thick brush handle
- Clear or semi-transparent glossy glaze
Step 1: Preparing the Slab
-
Roll out the clay:
Begin by wedging your speckled stoneware clay thoroughly to remove air bubbles. Roll it out into a large, consistent slab on your canvas mat, using guide sticks to ensure an even 1/4 inch thickness. -
Compress the slab:
Take your soft red rib and gently compress the clay surface in multiple directions. This strengthens the slab and removes the canvas texture, giving you a smooth canvas for the glaze later. -
Cut the circle:
Place your oversized circular template onto the slab. Using a needle tool or fettling knife, cut cleanly around the edge to create your base disc. -
Smooth the edges:
Wait until the clay has stiffened just slightly, then run a damp sponge or your finger around the cut edge to round it off, preventing sharpness after firing.
Rim Stability Pro-Tip
Compress the rim excessively with a chamois strip. This tightens clay particles, significantly reducing the chance of S-cracks forming at the delicate peaks.
Step 2: Shaping the Form
-
Prepare the mold:
If you are using a household bowl as a mold, cover it tightly with plastic wrap or a piece of fabric to prevent sticking. -
Drape the slab:
Carefully lift your clay circle and center it over your slump mold. Allow gravity to pull the clay down into the form. -
Establish the curve:
Starting from the center and working outward in a spiral motion, use a soft sponge to gently press the clay against the mold wall, ensuring there are no air pockets trapped beneath. -
Introduce the fluting:
To create the distinct vertical flutes seen in the image, use your fingers to gently create valleys running from the rim down toward the center. -
Refining the flutes:
I like to use the side of a wooden dowel here to press into the valleys while supporting the ridges from underneath, giving the fluting more definition and regularity.
Step 3: Forming the Rim
-
Mark the scallop points:
Visually divide your rim into equal sections. You want a consistent rhythm, so marking light guide points with a needle tool can be helpful. -
Push and pull:
Using your thumb and forefinger, gently push the clay rim downward between your guide points, and pull the clay upward at the points. -
Exaggerate the wave:
Deepen these curves slightly more than you think is necessary, as the clay tends to relax and flatten slightly during drying. -
Smooth the transitions:
Run a damp chamois or very soft geometric sponge along the rim to soften the peaks and valleys, ensuring the wave feels organic rather than mechanical. -
Check symmetry:
Stand back and look at the bowl from eye level, rotating it slowly to ensure the rim undulates evenly all the way around.
Slumping Issues?
If the bowl walls collapse during forming, the slab was too wet. Let the clay stiffen to ‘leather hard’ before removing it from the mold.
Step 4: Finishing and Glazing
-
Slow drying:
Cover the rim loosely with plastic to let the thinner edges dry at the same rate as the thicker base. Uneven drying is the enemy of large bowls. -
Bisque fire:
Once bone dry, fire the piece to bisque temperature (usually cone 04 or 06) to prepare it for glazing. -
Glaze application:
Dip or pour a white or clear glossy glaze over the piece. The glaze should be thin enough to break over the high points and pool slightly in the flutes. -
Expose the rim:
If you want that warm, unglazed edge look from the photo, carefully wipe the glaze off the very top edge of the rim with a damp sponge. -
Final firing:
Load the kiln for your final glaze firing, ensuring ample space around the wide rim so it doesn’t touch other pots.
Allow the kiln to cool completely before opening to reveal your beautiful, ripple-edged centerpiece


Soft Slab Plates With Lifted Edges
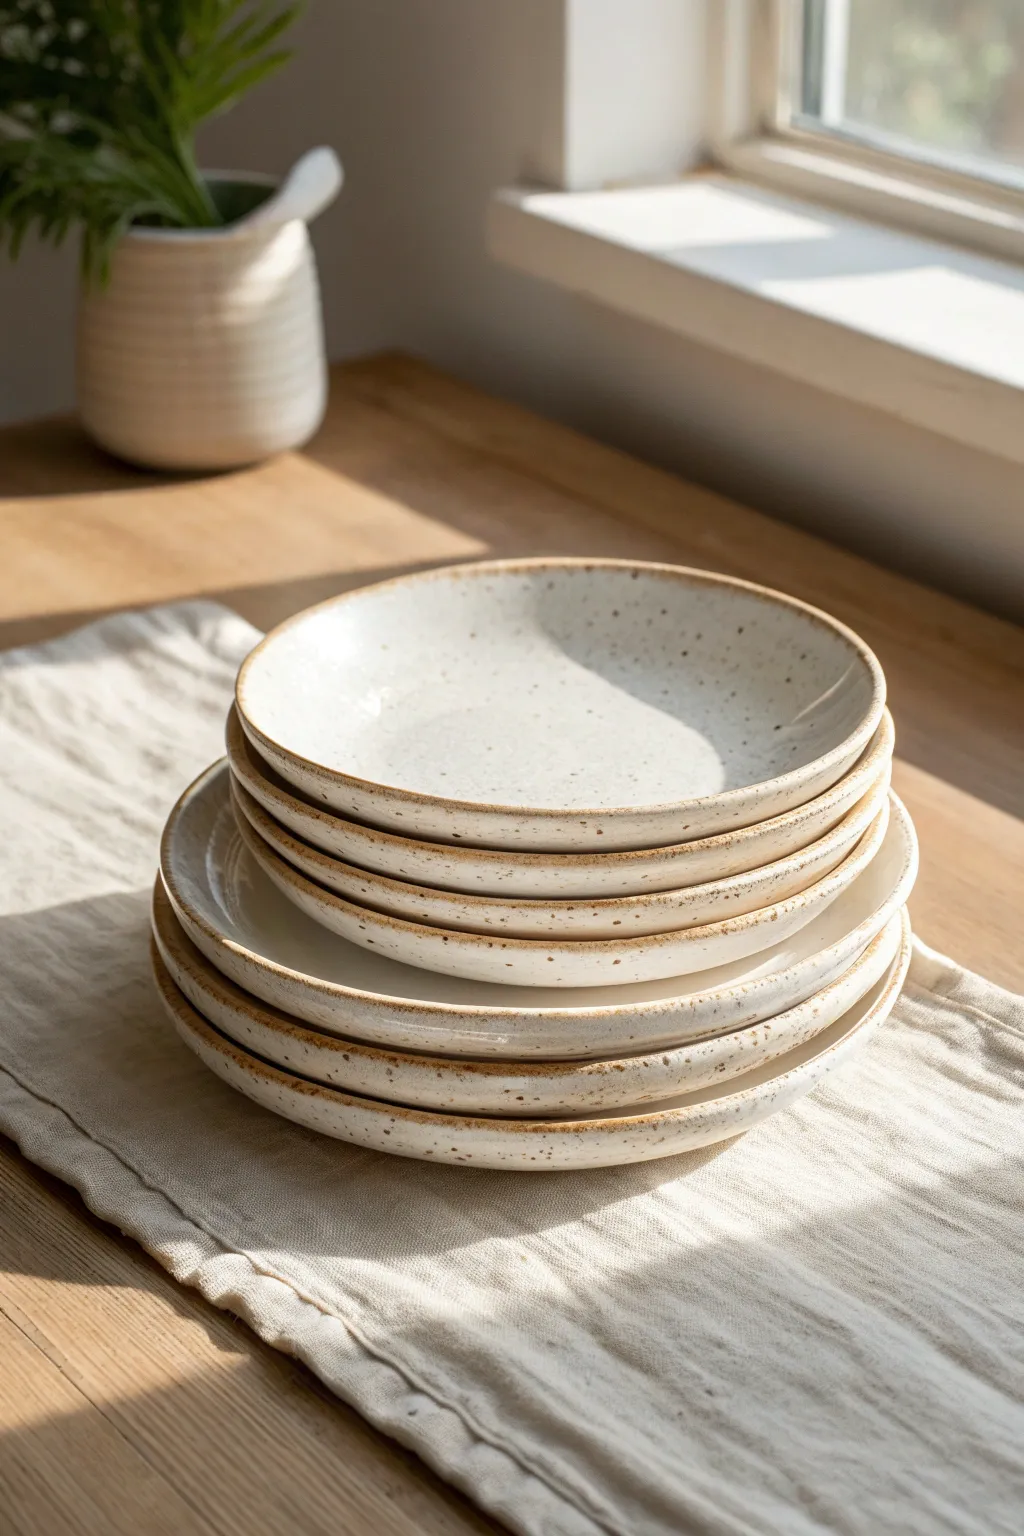
These elegant, shallow plates showcase the beauty of soft slab construction with their organic lifted edges and raw clay rims. The finish features a creamy, speckled glaze that pools beautifully in the center while leaving the lips pleasantly earthy and unglazed.
Step-by-Step Tutorial
Materials
- Speckled buff stoneware clay (or white stoneware with iron flecks)
- Wide rolling pin
- Canvas or slab mat
- Needle tool
- Round template (paper, wood, or a plastic lid)
- Ribs (soft rubber and smooth metal)
- Smooth foam piece (upholstery foam)
- Small sponge
- Carving tool or trimming loop
- Glossy white or cream glaze
Step 1: Slab Preparation and Cutout
-
Roll the clay:
Begin by rolling out your clay on a slab mat or canvas. You want an even thickness of about 1/4 inch; consistent thickness is crucial so your plates dry evenly without warping. -
Compress the slab:
Use a soft rubber rib to compress the clay surface on both sides. This aligns the clay particles, which significantly reduces the chance of cracking later, and also erases the canvas texture. -
Place the template:
Gently lay your round template onto the slab. For the dinner-plate size shown, a 10-12 inch circle works well, knowing it will shrink about 10-12% in the kiln. -
Cut the shape:
Hold your needle tool straight up and down to cut around the template. Remove the excess clay, but don’t lift your circle just yet.
Weighted Drying
To prevent warping, place a small bag of sand or rice in the center of the plate while it dries to the leather-hard stage. This keeps the floor perfectly flat.
Step 2: Forming the Lifted edge
-
Transfer to foam:
Carefully slide your clay circle onto a piece of soft upholstery foam. This is where the magic happens for soft slab work. -
Define the interior:
Place a smaller circular form or just use your hand to apply gentle pressure in the center of the slab. I like to use a soft rib here to swirl downwards, pressing the center into the foam. -
Smooth the transition:
As the center depresses, the edges will naturally lift up because of the foam underneath. Use a damp sponge to smooth the curve where the flat bottom meets the rising wall. -
Lift the rim:
Go around the circumference and gently nudge the very edge upward with your fingertips to create that distinct, slightly vertical lip seen in the photo. -
Refine the lip:
Compress the rim with a chamois or a strip of plastic bag. This ensures the edge is smooth for dining and prevents future chipping.
Step 3: Drying and Finishing
-
Stiffen the form:
Let the plate sit on the foam until it reaches a soft leather-hard stage. It needs to hold its shape when lifted but still be workable. -
Refine the foot:
Flip the plate over gently. You can either smooth the bottom perfectly flat with a metal rib or attach a very low coil ring if you prefer a trimmed foot. -
Slow drying:
Cover the plates loosely with plastic to let them dry slowly. Rimmed plates are notorious for warping if the rim dries faster than the center, so patience is key here. -
Bisque fire:
Once bone dry, fire the pieces to cone 04 (or your clay body’s bisque temperature).
Warped Rims?
If your rims curl up during drying, flip the plate upside down onto a flat board once the rim is stiff enough to support the weight. This forces it back into alignment.
Step 4: Glazing
-
Wax the rim:
To achieve the look in the image, apply wax resist carefully to the very outer edge of the rim. This will keep the glaze off the lip, revealing the warm, toasted clay body beneath. -
Wax the bottom:
Don’t forget to wax the foot or the entire bottom surface to prevent it from sticking to the kiln shelf. -
Pour the glaze:
Pour your creamy white glaze into the center of the plate, swirl it to coat the interior walls, and pour the excess out. -
Dip the exterior (optional):
If you want the outside glazed, hold the plate by the unglazed foot and dip it into the glaze bucket, stopping just before the waxed rim. -
Clean up:
Use a sponge to wipe away any rogue glaze droplets on the waxed areas to ensure a crisp line. -
Glaze fire:
Fire to cone 6 (or your clay’s maturity temperature). The heat will interact with the iron speckles in the clay, causing them to bleed through the white glaze.
Stack your finished plates to admire the subtle variations in their handmade forms


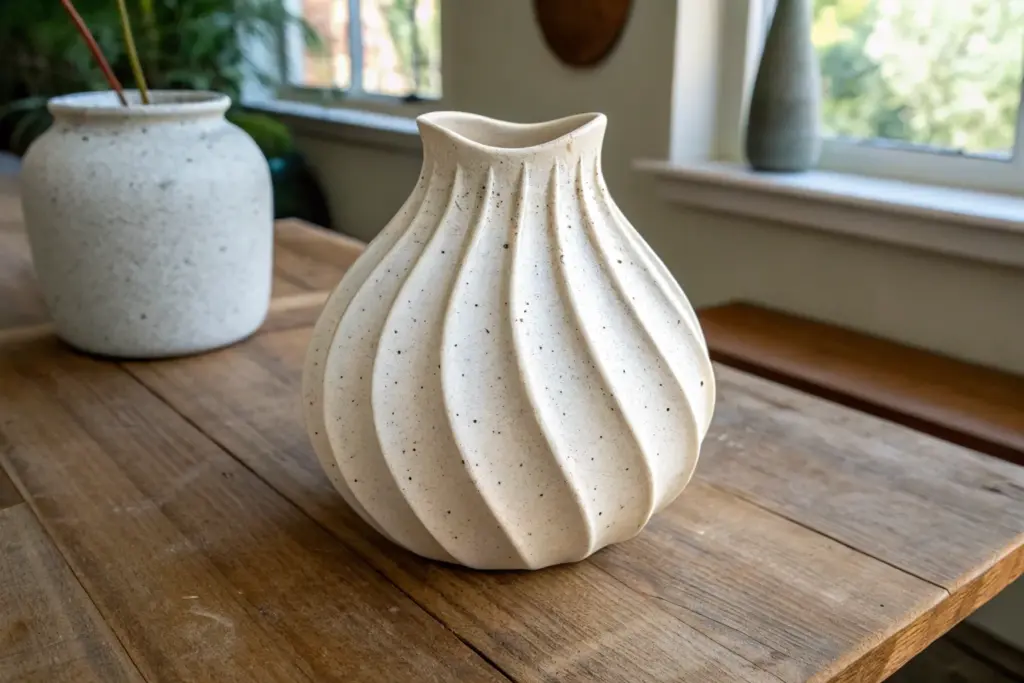
Overlapped-Seam Cylinder Vase
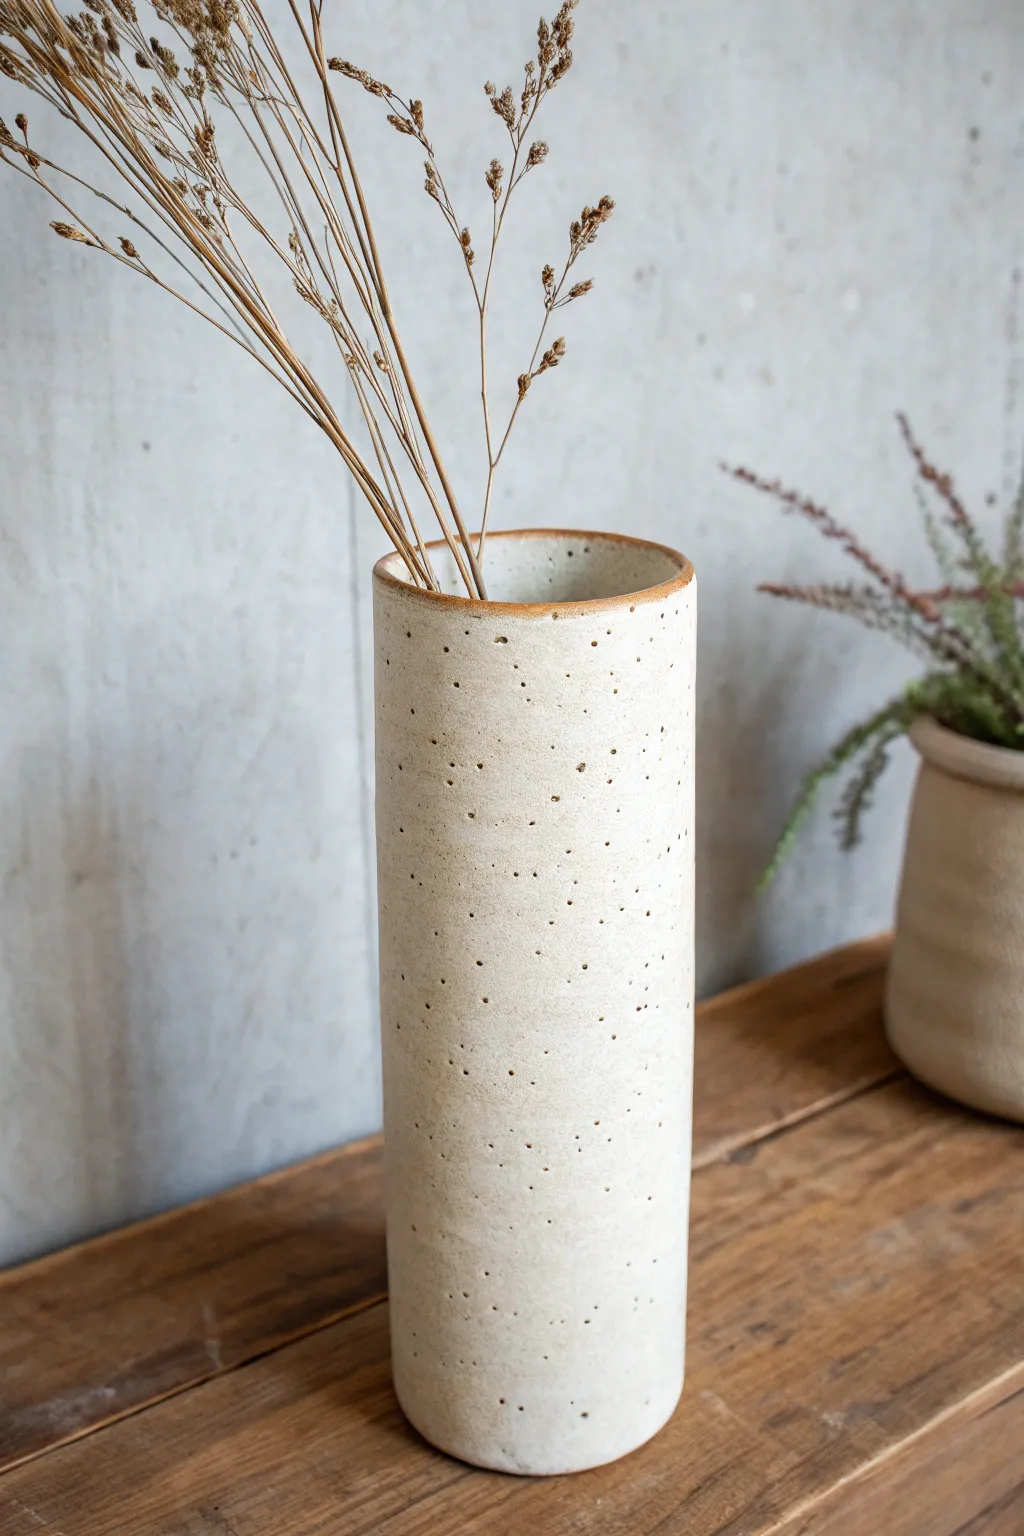
Capture the essence of minimal, rustic elegance with this tall slab-built cylinder vase. The piece features a beautiful speckled clay body and a warm, unglazed rim that adds a touch of earthy contrast to the creamy white glaze.
Detailed Instructions
Materials
- Speckled stoneware clay (mid-fire)
- Rolling pin
- Canvas or slab mat
- Two long wooden guide strips (approx. 1/4 inch thick)
- Wooden or plastic rib tool
- Needle tool
- Fettling knife
- Serrated rib or scoring tool
- Slip (clay mixed with water)
- Cylindrical form for template (optional)
- Ruler
- Sponge
- Matte white glaze
Step 1: Preparing the Slab
-
Wedge and prep:
Begin by thoroughly wedging your speckled stoneware clay to remove air bubbles. Shape it into a rectangular block to make rolling easier. -
Roll the slab:
Place your clay between two 1/4 inch wooden guide strips on your canvas. Roll the clay out until the rolling pin rests flat on the guides, ensuring an even thickness throughout. -
Compress the surface:
Use a rib tool to firmly compress the clay on both sides. This aligns the clay particles to prevent warping and creates a smooth canvas for the speckled texture to shine through. -
Measure and cut:
Using a ruler and fettling knife, cut a precise rectangle. For a vase similar to the photo, aim for approximately 12 inches wide by 10 inches tall. -
Bevel the vertical edges:
To create a seamless join, cut a 45-degree angle on the two shorter vertical edges of your rectangle. Bevel one side facing up and the opposite side facing down so they will overlap perfectly.
Step 2: Forming the Cylinder
-
Stand and shape:
Carefully lift your slab and curve it into a cylinder. Bring the beveled edges together to check the fit. -
Score and slip:
Rough up both beveled surfaces with your serrated tool and apply a generous amount of slip. -
Join the seam:
Press the beveled edges together firmly. Support the inside of the wall with one hand while pressing from the outside to ensure a tight bond without flattening the cylinder. -
Smooth the connection:
Use your rib tool to smooth over the seam on the outside until it is invisible. I like to spend extra time here to make sure the cylinder looks continuous. -
Create the base:
Roll out a small piece of spare clay to the same thickness. Place your cylinder on top and trace around the bottom with a needle tool. -
Attach the bottom:
Score and slip the bottom edge of the cylinder and the outer edge of the circular base. Press them together firmly and blend the clay upwards from the base onto the wall using a modeling tool or your finger.
Uneven Cylinder?
If your cylinder keeps bowing or ovaling, stuff the inside lightly with crumpled newspaper while it dries to leather-hard. This internal support helps maintain the perfect round shape.
Step 3: Refining and Finishing
-
Clean the rim:
Use a damp sponge to smooth the top rim. For the look in the photo, slightly round the edges but keep a flat profile. -
Surface texture:
Wipe the exterior with a damp sponge to expose the grog or speckles slightly, which adds that lovely tactile quality. -
Slow drying:
Cover the vase loosely with plastic to let it dry slowly. This is crucial for tall cylinders to prevent warping or cracking at the seam. -
Bisque fire:
Once bone dry, bisque fire the vase to cone 04 (or your clay’s specific bisque temperature). -
Wax the rim:
Apply wax resist to the top rim of the vase. This will prevent glaze from adhering there, creating the exposed raw clay ring seen in the image. -
Glaze application:
Pour a matte white glaze inside the vase, swirl to coat, and pour out. Then, dip the exterior or pour glaze over it. The wax will reveal the toasted clay color at the top. -
Final firing:
Fire to the maturation temperature of your clay and glaze (likely cone 5 or 6 for speckled stoneware).
Level Up: Texture
Before rolling the slab into a cylinder, gently roll a textured fabric (like coarse linen) over the soft clay slab. The glaze will break beautifully over the subtle woven impressions.
Fill your new vase with dried wildflowers or grasses to complete the rustic, natural aesthetic.


Squarish Soft Slab Mug
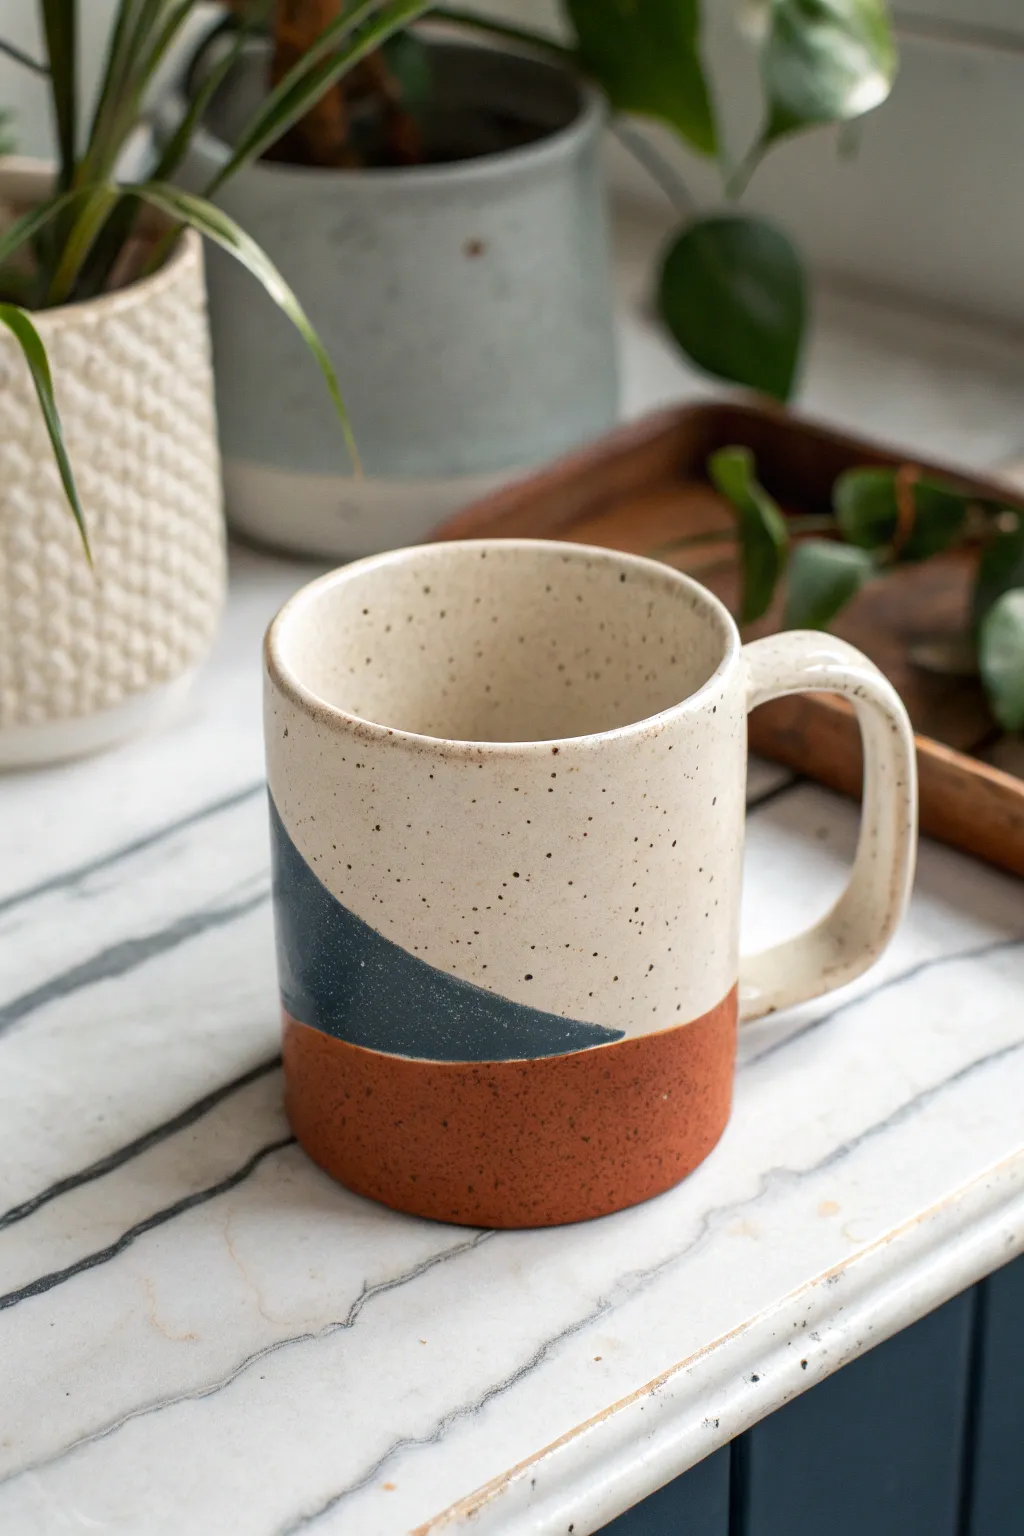
This project combines the rustic warmth of exposed clay with modern geometric glazing. The squared-off handle and subtle cylinder shape give it a contemporary silhouette perfect for your morning coffee.
Step-by-Step
Materials
- Speckled buff stoneware clay or terracotta clay
- Rolling pin and guide sticks (1/4 inch thickness)
- Fettling knife
- Scoring tool (serrated rib or needle tool)
- Slip (clay mixed with water)
- Cylindrical form for template (optional)
- Ruler
- Sponge
- Creamy white speckled glaze
- Deep teal or denim blue underglaze/glaze
- Wax resist
- Paintbrushes
Step 1: Forming the Body
-
Roll the slab:
Begin by rolling out your clay slab to an even 1/4 inch thickness using guide sticks to ensure consistency. -
Cut the rectangle:
Measure and cut a long rectangle for the body of the mug. A standard size is roughly 11-12 inches long and 4-5 inches high, depending on your desired volume. -
Texture and smooth:
Use a soft rib to compress the clay on both sides. This aligns the clay particles and removes canvas texture, which is crucial for a clean finish. -
Bevel the edges:
Cut 45-degree bevels on the short ends of your rectangle—one bevel facing up, the other facing down—so they will overlap seamlessly when rolled. -
Form the cylinder:
Gently curve the slab into a cylinder. Score the beveled edges aggressively and apply slip. -
Join the seam:
Press the scored edges together firmly. Use your fingers or a wooden tool to blend the seam inside and out until it is invisible. -
Attach the base:
Roll a smaller slab for the floor. Place your cylinder on it, trace around the base, score and slip both contact points, and press the cylinder onto the floor. Trim the excess clay flush with the wall.
Warped Rim?
If your cylinder goes oval during drying, gently squeeze it back to round when it’s soft leather-hard. Place a round cookie cutter inside the rim loosely while it dries.
Step 2: The Handle & Finishing
-
Make the handle strap:
Cut a strip of clay about 3/4 inch wide. Smooth the edges with a damp sponge so they are rounded and comfortable to hold. -
Shape the handle:
Curve the strip into a ‘C’ shape, but give it a bit of a squared-off profile at the top bend to match the modern aesthetic, rather than a perfect circle. -
Attach handle:
Score and slip the attachment points on both the mug body and the handle. Press firmly to join, blending the clay with a modeling tool. -
Refine the rim:
Use a damp chamois or sponge to compress the drinking rim. I like to do this now while the clay is leather hard to ensure it’s perfectly smooth for lips.
Level Up: Texture
Before rolling your cylinder, press a subtle texture (like burlap or lace) gently into just the section that will remain unglazed for extra tactile contrast.
Step 3: Decorating & Glazing
-
Bisque fire:
Allow the mug to dry slowly to prevent warping, then bisque fire it according to your clay body’s specifications (usually Cone 04). -
Tape or wax the geometry:
To create the sharp diagonal line, apply painter’s tape or a straight line of wax resist diagonally across the lower third of the mug. -
Glaze the interior:
Pour your creamy white speckled glaze inside the mug, roll it around to coat, and pour out the excess. -
Dip the top section:
Dip the exterior of the mug into the cream glaze, stopping exactly where your diagonal line begins. If you waxed, the glaze will bead off the lower section. -
Apply the triangle accent:
Brush the deep teal glaze onto the triangular section formed between the white glaze and the raw clay bottom. You want this to overlap the white slightly or meet it perfectly. -
Leave the bottom raw:
Ensure the bottom third (the rust-colored section) remains unglazed exposed clay. Wipe away any stray drips with a sponge. -
Final fire:
Glaze fire the piece to maturity (Cone 5 or 6 typically). The heat will reveal the iron speckles in the cream glaze and rich tone of the bare clay.
Enjoy using your new handmade mug, where the raw clay texture warms your hands as you drink

The Complete Guide to Pottery Troubleshooting
Uncover the most common ceramic mistakes—from cracking clay to failed glazes—and learn how to fix them fast.
Curved Incense Catcher Tray
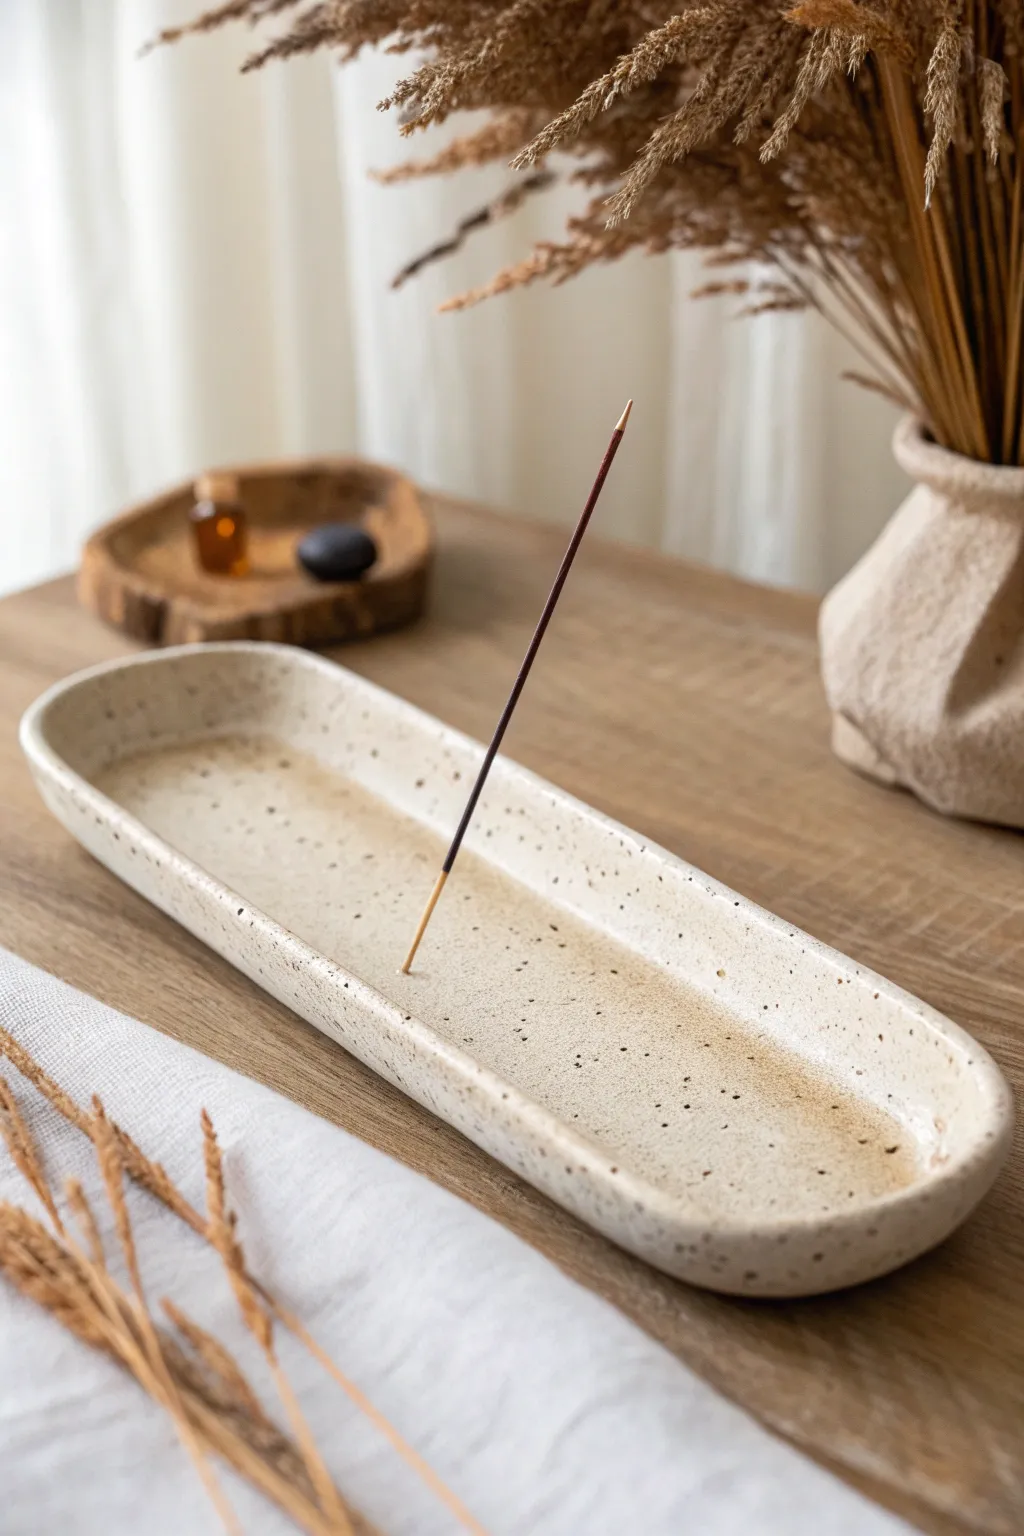
This elegant, elongated incense catcher combines minimalist design with the rustic charm of speckled stoneware. Its gently curved boat shape is perfect for catching falling ash, offering both function and a tranquil aesthetic for your home.
Step-by-Step Guide
Materials
- Speckled stoneware clay (mid-fire)
- Rolling pin
- Canvas working mat or slab mat
- Fettling knife or needle tool
- Wooden rib tool
- Flexible metal rib or rubber kidney
- Small sponge
- Soft elongated form for draping (like a section of PVC pipe or a rolled towel covered in fabric)
- Slip and scoring tool
- Clear or transparent gloss glaze
Step 1: Creating the Slab
-
Wedge the clay:
Begin by thoroughly wedging a manageable chunk of speckled stoneware clay to remove any air pockets and ensure a consistent texture. -
Roll somewhat thin:
Roll out your slab on the canvas. Aim for a thickness of about 1/4 inch (6mm). You don’t want it too chunky, but it needs enough heft to hold its curve. -
Smooth the surface:
Before cutting, take this opportunity to compress the clay. Run your flexible metal or runner rib lightly over the surface in multiple directions to align the clay particles and remove canvas texture. -
Cut the shape:
Using a fettling knife or needle tool, cut out a long oval shape with rounded ends. For this project, a length of about 10-12 inches and a width of 3-4 inches works beautifully. -
Refine the rim:
Once the shape is cut, run a damp finger or a small piece of chamois leather around the cut edge to soften the sharp corner left by the knife.
Warping Woes
If the long tray twists while drying, weight the ends gently with sandbags during the leather-hard stage to keep it flush against the table.
Step 2: Forming the Curve
-
Lift the walls:
Gently lift the long edges of the oval to create a shallow boat shape. The ends should remain slightly lower than the sides, creating a natural flow. -
Support the shape:
If the clay is very soft, you might need to rest the curved slab inside a DIY mold. I like to use a rolled-up towel covered in newspaper or plastic to cradle the outside curve until it firms up leather-hard. -
Establish the base:
Gently tap the very center bottom of the tray onto your work surface to create a tiny flat spot, ensuring the tray won’t roll or wobble later. -
Smooth the transition:
Use a damp sponge to smooth the interior curve where the walls rise up. You want a seamless, continuous slope so the ash slides easily.
Dual-Tone Design
Try leaving the outside rim unglazed raw clay. This creates a beautiful textural contrast between the smooth interior and matte exterior.
Step 3: Adding the Incense Holder
-
Create a clay bead:
Roll a small ball of clay, roughly the size of a large pea or marble. -
Attach to the tray:
Score the center of your tray and the bottom of the clay ball. Add a dab of slip and press the ball firmly into place. -
Pierce the hole:
Using a needle tool or an incense stick (be careful as the stick is brittle), create a hole in the clay bead. Angle the hole slightly so the incense will lean rather than stand perfectly straight. -
Check the fit:
Wiggle the tool slightly to ensure the hole isn’t too tight, keeping in mind that the clay shrinks during firing.
Step 4: Finishing and Glazing
-
Slow drying:
Loosely cover the piece with plastic to let it dry slowly to the leather-hard stage, then uncover to bone dry. This prevents warping. -
Bisque fire:
Fire the piece in a kiln to cone 04 (or your clay’s specific bisque temperature). -
Apply clear glaze:
Pour or dip a transparent clear glaze over the entire piece. The clear glaze is crucial as it allows the natural speckles of the clay body to shine through. -
Wipe the foot:
Use a wet sponge to wipe glaze off the very bottom contact point so it doesn’t fuse to the kiln shelf. -
Glaze fire:
Fire to the final temperature required by your clay (likely Cone 5 or 6). Once cooled, the speckles will pop through the glossy surface.
Light your favorite scent and watch the ash collect neatly in your new handmade vessel
Leaf-Impressed Slump Dish
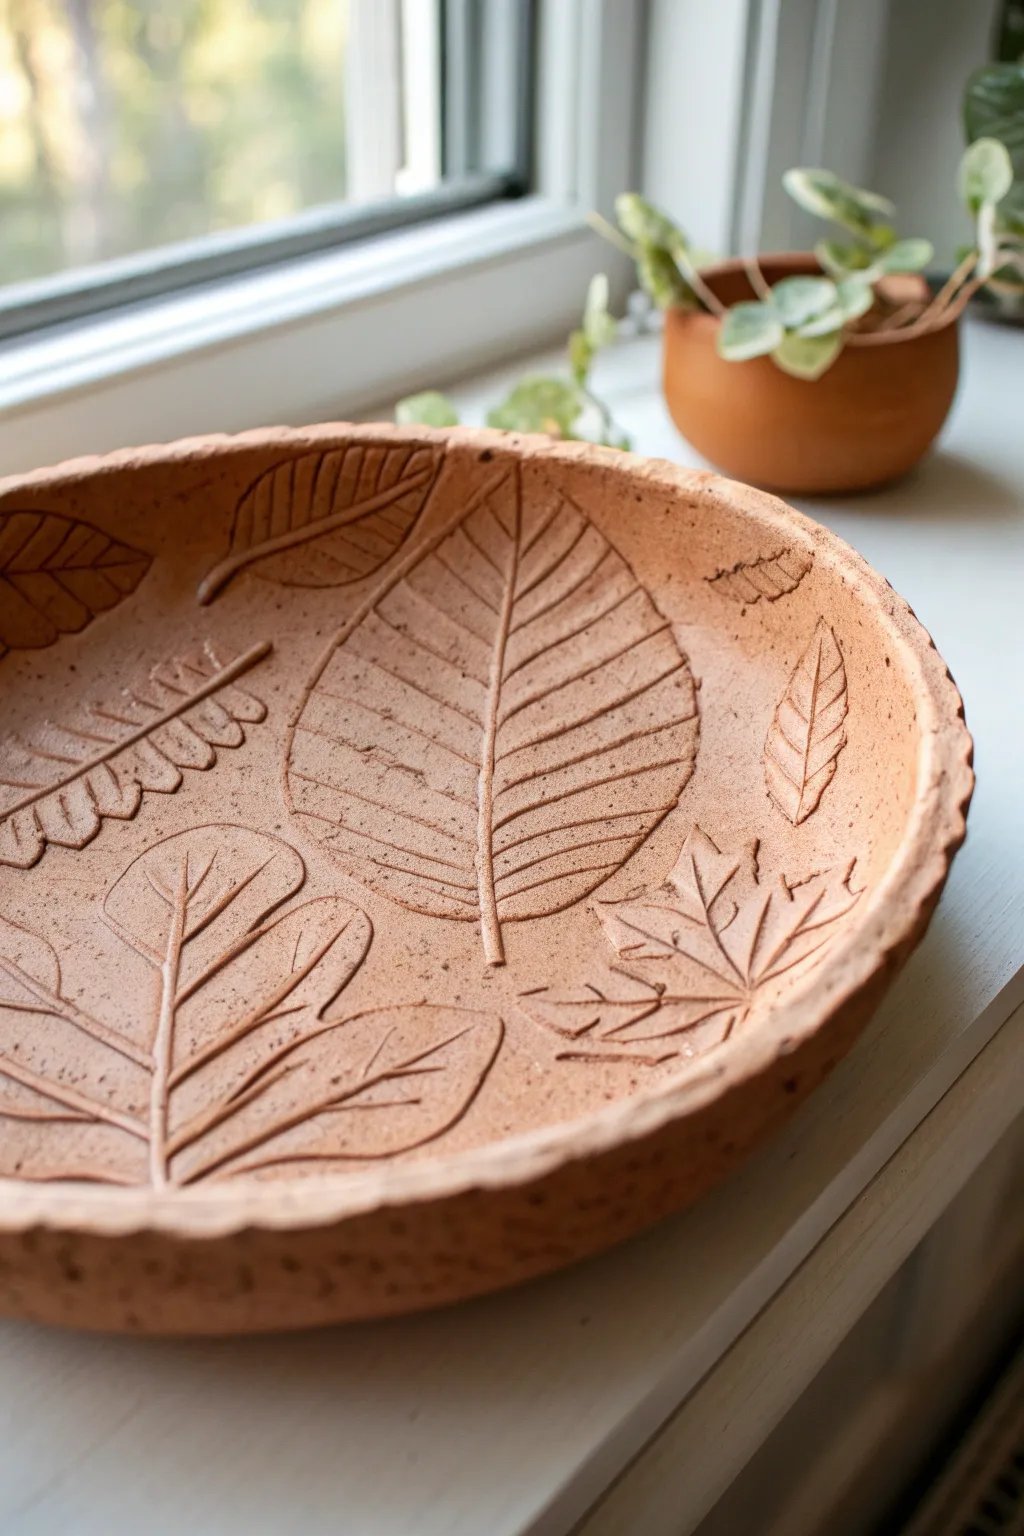
Capture the delicate veins and organic shapes of nature permanently in clay with this beautiful slump-molded dish. Using real leaves or carving tools, you can create a warm, earthy centerpiece perfect for holding keys or displaying dried arrangement.
Step-by-Step Tutorial
Materials
- Terracotta or warm stoneware clay (mid-fire or earthenware)
- Rolling pin
- Canvas mat or cloth-covered board
- Assorted texture tools (needle tool, loop tool, or wooden modeling tools)
- Small sponge
- Bisque mold or plaster slump mold (a shallow bowl works too)
- Newspaper or plastic sheet
- Serrated metal rib or kidney tool
- Wire cutter
- Optional: Real leaves for pressing
Step 1: Preparation & slab rolling
-
Wedge the clay:
Begin by thoroughly wedging a ball of terracotta clay to remove trapped air bubbles and ensure the moisture is evenly distributed. You’ll need about 2-3 pounds depending on the size of your mold. -
Shape the initial puck:
Pat the wedged clay into a thick, circular puck shape with your hands. This pre-shaping helps ensure your final rolled slab stays relatively round. -
Roll out the slab:
Place the clay on your canvas mat. Using a rolling pin, roll the clay out from the center in multiple directions. Aim for an even thickness of about 1/4 to 3/8 of an inch. -
Smooth the surface:
Take a rubber rib or a damp sponge and gently compress the surface of the slab. This removes the canvas texture and prepares a pristine ‘canvas’ for your leaf designs.
Use Real Nature
Instead of carving freehand, press actual fresh leaves into the soft clay and roll over them gently. Peel them away to reveal perfect, realistic vein textures.
Step 2: Creating the botanical design
-
Plan your composition:
Visualize where you want your leaves to sit. A mix of large central leaves and smaller peripheral ones creates a nice balance. -
Outline the leaf shapes:
Using a needle tool, lightly scratch the outline of your chosen leaf shapes directly onto the clay. Don’t dig too deep yet; these are just guide lines. -
Carve the main veins:
Switch to a small styling tool or a dull pencil. Press firmly to create the central stem and primary veins of each leaf. The pressure should displace the clay slightly to create depth. -
Add secondary veins:
With a finer point tool, branch off from the main veins to create the delicate network of secondary lines. I find creating slight variations in pressure makes the leaves look more natural. -
Texturing the negative space:
For the areas between the leaves, you can either leave them smooth or gently stipple them with a sponge to create a subtle contrast against the smooth leaf interiors. -
Refine the edges:
Go back over the outer edges of your leaf drawings to ensure they are crisp. You can press deeper here to make the leaves appear slightly raised or embossed.
Step 3: Forming & Finishing
-
Prepare the mold:
Cover your slump mold with a layer of newspaper or a thin sheet of plastic. This prevents the clay from sticking to the mold as it dries. -
Transfer the slab:
Carefully lift your decorated slab. Support it gently with both hands and place it centering over the mold. -
Slump into shape:
Let gravity do the initial work, then gently press the slab into the curve of the mold. use a soft sponge to press it down without smushing your beautiful carving. -
Trim the rim:
Once settled, use a needle tool or fettling knife to cut the excess clay around the rim. You can cut a perfect circle or follow the organic edge of the design. -
Texture the rim:
To match the rustic look in the photo, take a serrated metal rib or a rough tool and gently scrape along the cut rim to give it a raw, earthy texture. -
Slow drying:
Cover the piece loosely with plastic. Allow it to dry slowly to the leather-hard stage before removing it from the mold to prevent warping. -
Final smooth:
Once leather hard, remove from the mold and use a slightly damp sponge to soften any sharp burrs on the rim or the carving lines. -
Fire the piece:
Bisque fire the piece according to your clay body’s specifications. The natural terracotta color is beautiful on its own, so glazing is optional.
Highlight with Oxide
After bisque firing, rub a dark iron oxide wash into the carved lines and wipe back the surface. This deepens the veins and makes the design pop.
Your finished dish will bring a touch of the forest floor into your home decor


What Really Happens Inside the Kiln
Learn how time and temperature work together inside the kiln to transform clay into durable ceramic.
Ruffled Flower-Petal Catchall
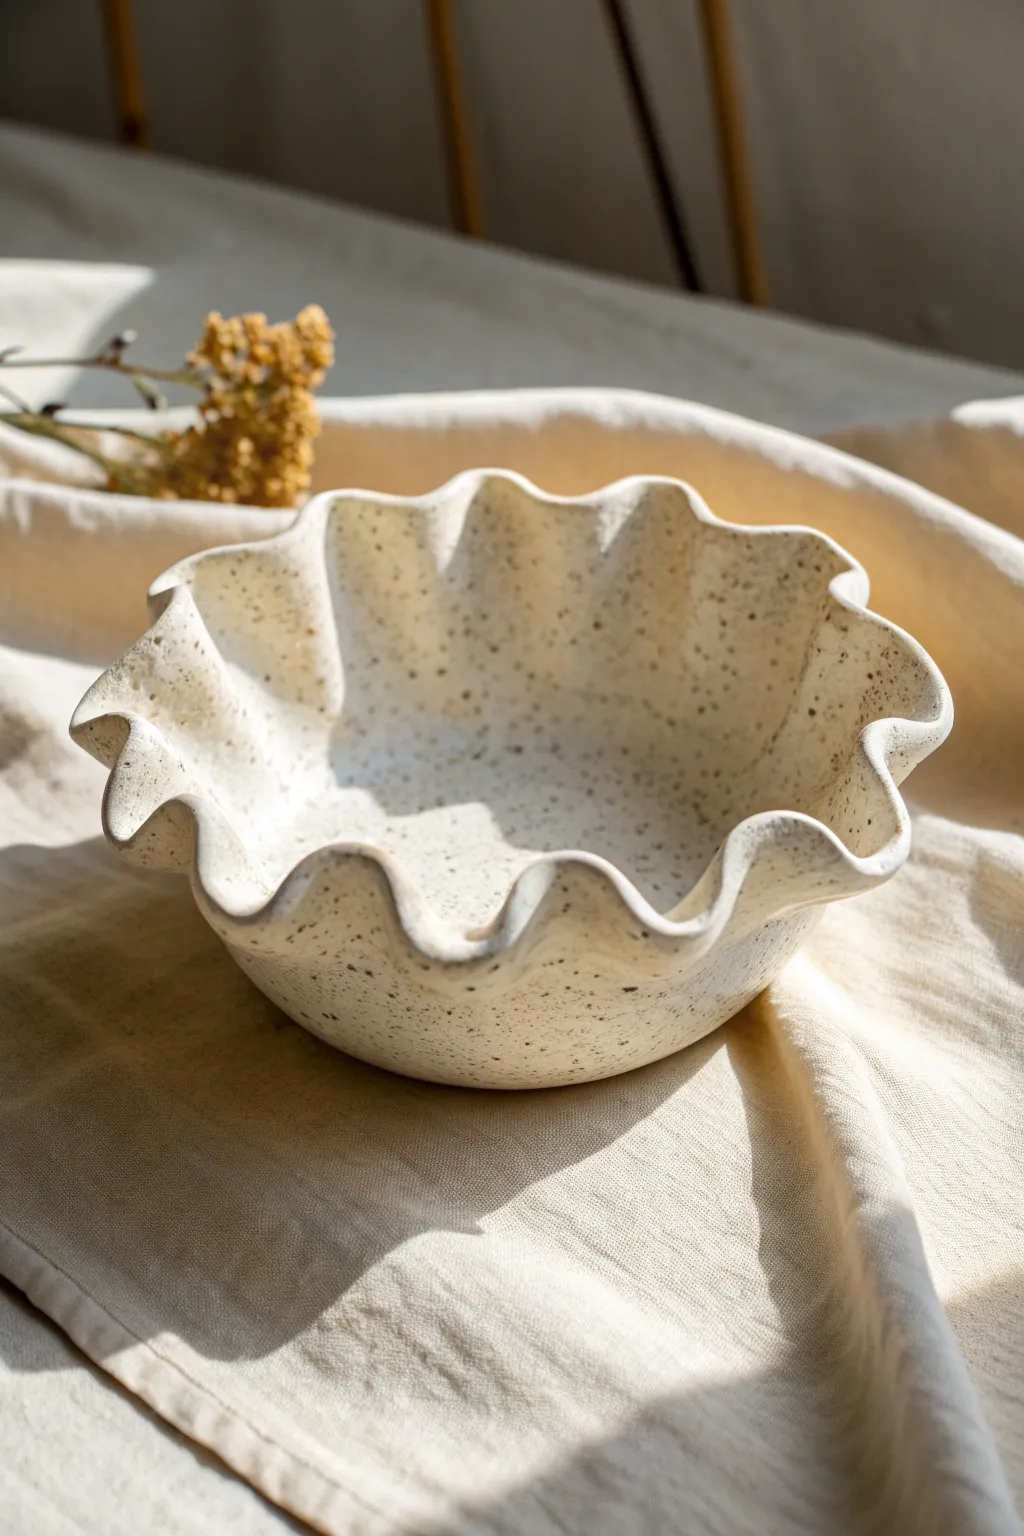
Embrace the fluid beauty of soft slab building with this charming, flower-like catchall. Featuring a creamy, speckled clay body and a dramatically waved rim, this piece captures organic movement frozen in time.
Step-by-Step
Materials
- Speckled stoneware clay (mid-fire)
- Rolling pin
- Canvas work surface or slab mat
- Round bowl (for use as a mold/template)
- Needle tool or fettling knife
- Soft rubber rib
- Sponge
- Clear or matte white glaze
- Plastic wrap or thin plastic bag
- Wooden modeling tool
- Weight bag (filled with sand or rice)
Step 1: Preparing the Slab
-
Wedge and prep:
Begin by wedging your speckled stoneware clay thoroughly to remove air bubbles and ensure an even consistency. Pat roughly 1.5 lbs of clay into a flat pancake shape with your palms. -
Roll the slab:
Using a rolling pin on a canvas surface, roll out the clay. Flip and rotate the slab frequently to keep the thickness even and prevent sticking. Aim for a thickness of about 1/4 inch. -
Compress the clay:
Take a soft rubber rib and gently drag it across the surface of the slab in multiple directions. This aligns the clay particles, preventing future warping, and removes any canvas texture. -
Measure the circle:
Select a bowl from your kitchen to use as a sizing template. Place it upside down on your slab. It needs to be significantly larger than your desired finished footprint because the ruffled walls will consume much of the diameter. -
Cut the shape:
Holding your needle tool or fettling knife perpendicular to the table, cut around the bowl template to create a perfect clay circle. Remove the excess clay. -
Smooth the edges:
Run a damp sponge or your finger along the cut edge of the clay circle to round it off. A sharp, square edge is less pleasant to touch and more prone to chipping later.
Gravity is Your Friend
For deeper ruffles, place supports (like rolled-up paper towels or foam chunks) under the high points of the rim while drying to prevent them from drooping.
Step 2: Forming the Ruffles
-
Prepare the mold:
Cover your bowl mold (the same one used for cutting or a slightly deeper one) with a layer of thin plastic wrap or a dry cleaner bag. This prevents sticking and allows for easier release. -
Drape the clay:
Carefully lift your clay circle and center it over the bowl mold. Gently slump the clay down into the bowl or over the hump, depending on if you are using a slump (inside) or hump (outside) mold. For this deep ruffled look, slumping inside a bowl usually works best. -
Establish the base:
Press a small sandbag or a bundled pair of socks into the very bottom center of the clay to weigh it down and define the flat base of your catchall. -
First fold:
To create the deep ruffles, act quickly while the clay is soft. Use your fingers to gently push a section of the rim inward while supporting the adjacent sections outward. -
Create the rhythm:
Work your way around the rim, creating relatively even undulating waves. I like to target 5 or 7 waves for an odd-numbered, natural look similar to a flower bloom. -
Refine the curves:
Once the general wave pattern is established, go back and pinch the ‘valleys’ and ‘peaks’ slightly to sharpen or soften them according to your taste. Ensure the walls stand up but lean slightly outward.
Cracking at the Rim?
Rim cracks often happen from drying too fast. Run a damp chamois strip over the rim right after forming to compress the clay tightly before drying.
Step 3: Finishing and Firing
-
Stiffen the form:
Let the bowl sit in the mold until it reaches a soft leather-hard state. It needs to be firm enough to hold its ruffled shape without slumping when removed. -
Clean and refine:
Remove the bowl from the mold. Use a barely damp sponge to smooth out any handling marks or fingerprints, paying special attention to the rim. -
Slow drying:
Place the piece on a shelf to dry slowly, loosely covered with plastic for the first day to equalize moisture, then uncovered until bone dry. -
Bisque fire:
Fire the piece to cone 04 (or your clay’s specific bisque temperature) in the kiln. -
Glaze application:
Dip or brush your fired piece with a transparent or semi-opaque white glaze. A simple glaze choice allows the natural speckles of the clay body to shine through. -
Final firing:
Fire the glazed piece to maturity (typically cone 5 or 6 for stoneware). Check your clay and glaze packaging to match the temperatures perfectly.
Once cooled, your speckled catchall allows those delightful ruffles to serve as a stunning home for trinkets or dry snacks
Soft Slab Pinch-and-Slab Snack Bowl
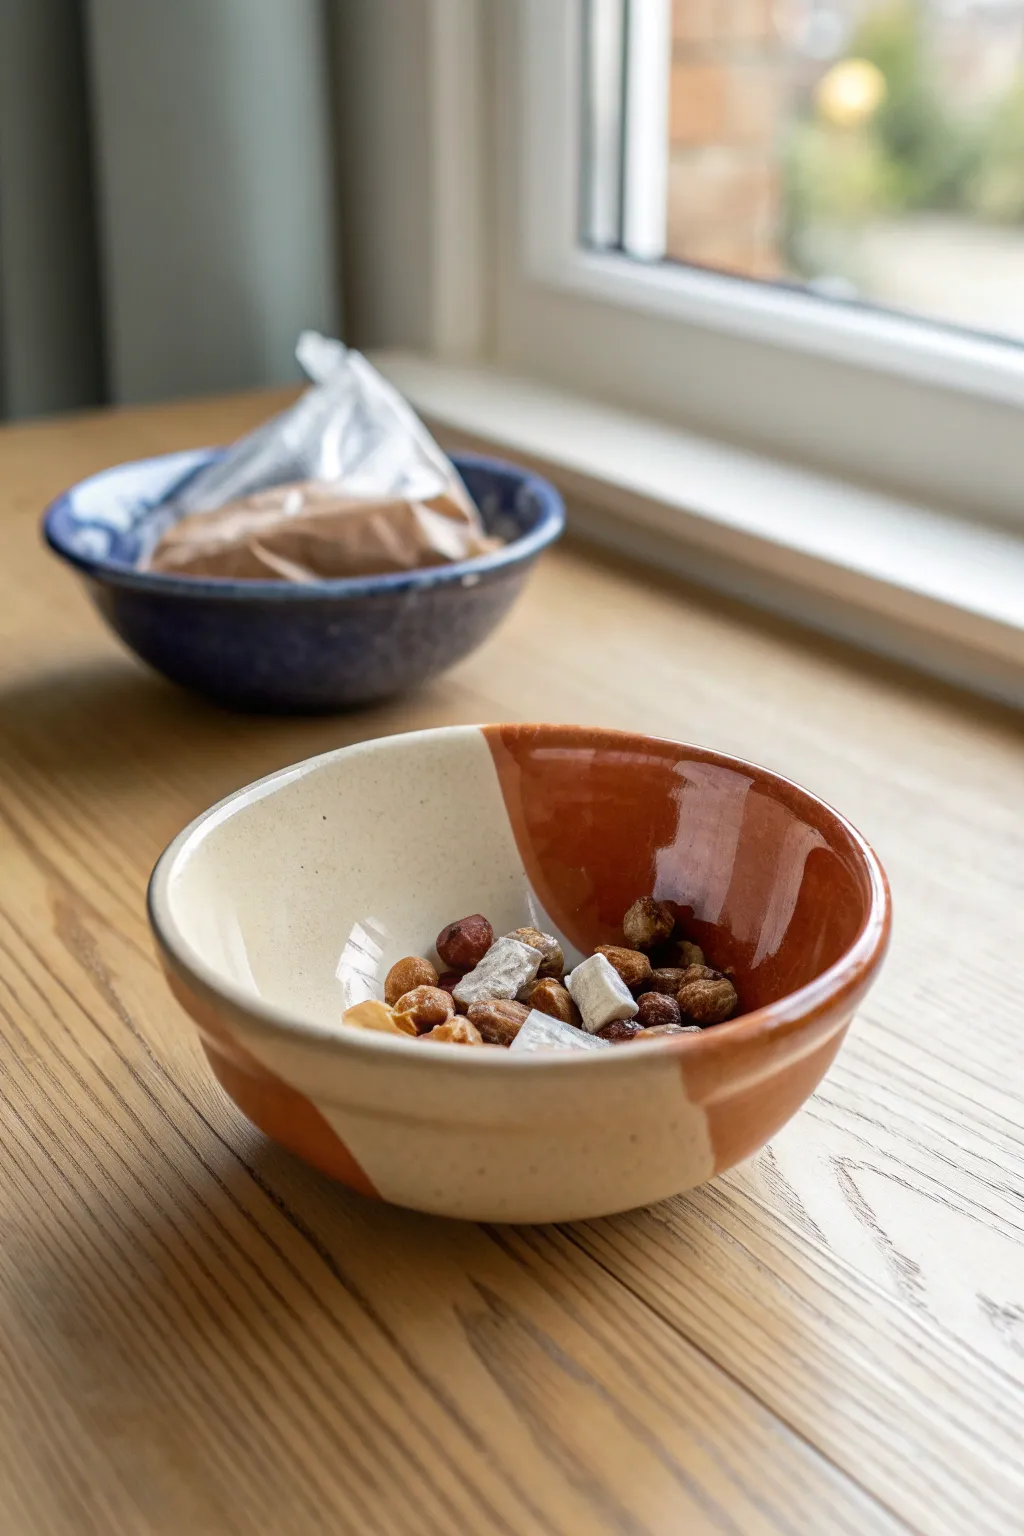
This charming, handmade bowl combines the ease of soft slab construction with a classic two-tone aesthetic. Its gentle curves and dipped glaze effect create a warm, modern piece perfect for holding nuts or small treats.
Step-by-Step Tutorial
Materials
- Cone 6 stoneware clay (white or buff)
- Rolling pin
- Wooden guide strips (1/4 inch thick)
- Small slump mold (plaster or a padded bowl)
- Fettling knife
- Serrated rib tool
- Soft rubber kidney rib
- Creamy matte speckled glaze
- Glossy terracotta or rust-colored glaze
- Wax resist
- Sponge
Step 1: Forming the Slab
-
Prepare the Clay:
Begin by wedging about 1-2 pounds of stoneware clay to ensure it is homogeneous and free of air bubbles, forming it into a rough ball. -
Flatten the Slab:
Press the clay ball onto your canvas workspace with your palm to start flattening it. -
Roll to Thickness:
Using a rolling pin and 1/4 inch wooden guide strips on either side of the clay, roll out a consistent slab. Roll in multiple directions to compress the clay platelets. -
Smooth the Surface:
Take a soft rubber kidney rib and gently compress the surface of the slab on both sides. This removes canvas texture and strengthens the clay.
Warped Rim?
If your rim warps while drying, place a small weighted bag (like rice or beans) inside the bowl while it’s in the leather-hard stage to gently weigh it down.
Step 2: Shaping the Bowl
-
Cut the Circle:
Use a needle tool or fettling knife to cut a circle from your slab. A 6-7 inch circle will result in a good-sized snack bowl after shrinkage. -
Slump the Clay:
Gently lift the clay circle and place it over your slump mold. If using a kitchen bowl as a mold, ensure it is covered in plastic wrap or fabric so the clay doesn’t stick. -
Define the Shape:
Press the clay gently into the mold. I like to start from the center and work outward in a spiral motion to avoid trapping air pockets. -
Refine the Rim:
While the clay is supported by the mold, use a damp sponge or your fingers to round off the sharp edge of the rim. This prevents chipping later. -
Dry to Leather Hard:
Allow the bowl to stiffen up to a leather-hard state. It should hold its shape without slumping when removed from the mold.
Crisp Dipping Tip
For a super sharp line between the two glaze colors, apply wax resist over the first dry layer of cream glaze before dipping the second color.
Step 3: Finishing and Bisque
-
Smooth the Foot:
Once leather hard, flip the bowl over. You can gently sponge the bottom to create a smooth sitting surface, or lightly tap the center with a wooden paddle to flatten the base slightly. -
Final Smoothing:
Run a damp sponge over the entire piece one last time to remove any finger marks or rough spots. -
Bisque Fire:
Let the bowl dry completely (bone dry) before loading it into the kiln for a bisque firing to roughly Cone 04.
Step 4: Glazing
-
Clean the Bisque:
Wipe the bisque-fired bowl with a damp sponge to remove any kiln dust before glazing. -
Apply First Glaze:
Dip the entire bowl into your creamy matte speckled glaze. Hold it for about 3 seconds for an even coat. -
Clean First Layer:
Allow the cream glaze to dry completely. If any glaze dripped where you don’t want it, scrape it off now. -
Dip the Accent Color:
Hold the bowl at a steep angle and dip exactly one-half of the bowl into the glossy terracotta glaze. This creates the split-tone look. -
Wipe the Foot:
Use a sponge to wipe all glaze off the very bottom of the bowl where it will touch the kiln shelf perfectly clean. -
Final Fire:
Fire the bowl to Cone 6 (or whatever temperature your clay and glaze require) to finish the piece.
Now you have a stylish, modern vessel ready to serve your favorite snacks

TRACK YOUR CERAMIC JOURNEY
Capture glaze tests, firing details, and creative progress—all in one simple printable. Make your projects easier to repeat and improve.
Folded Corner Trinket Tray
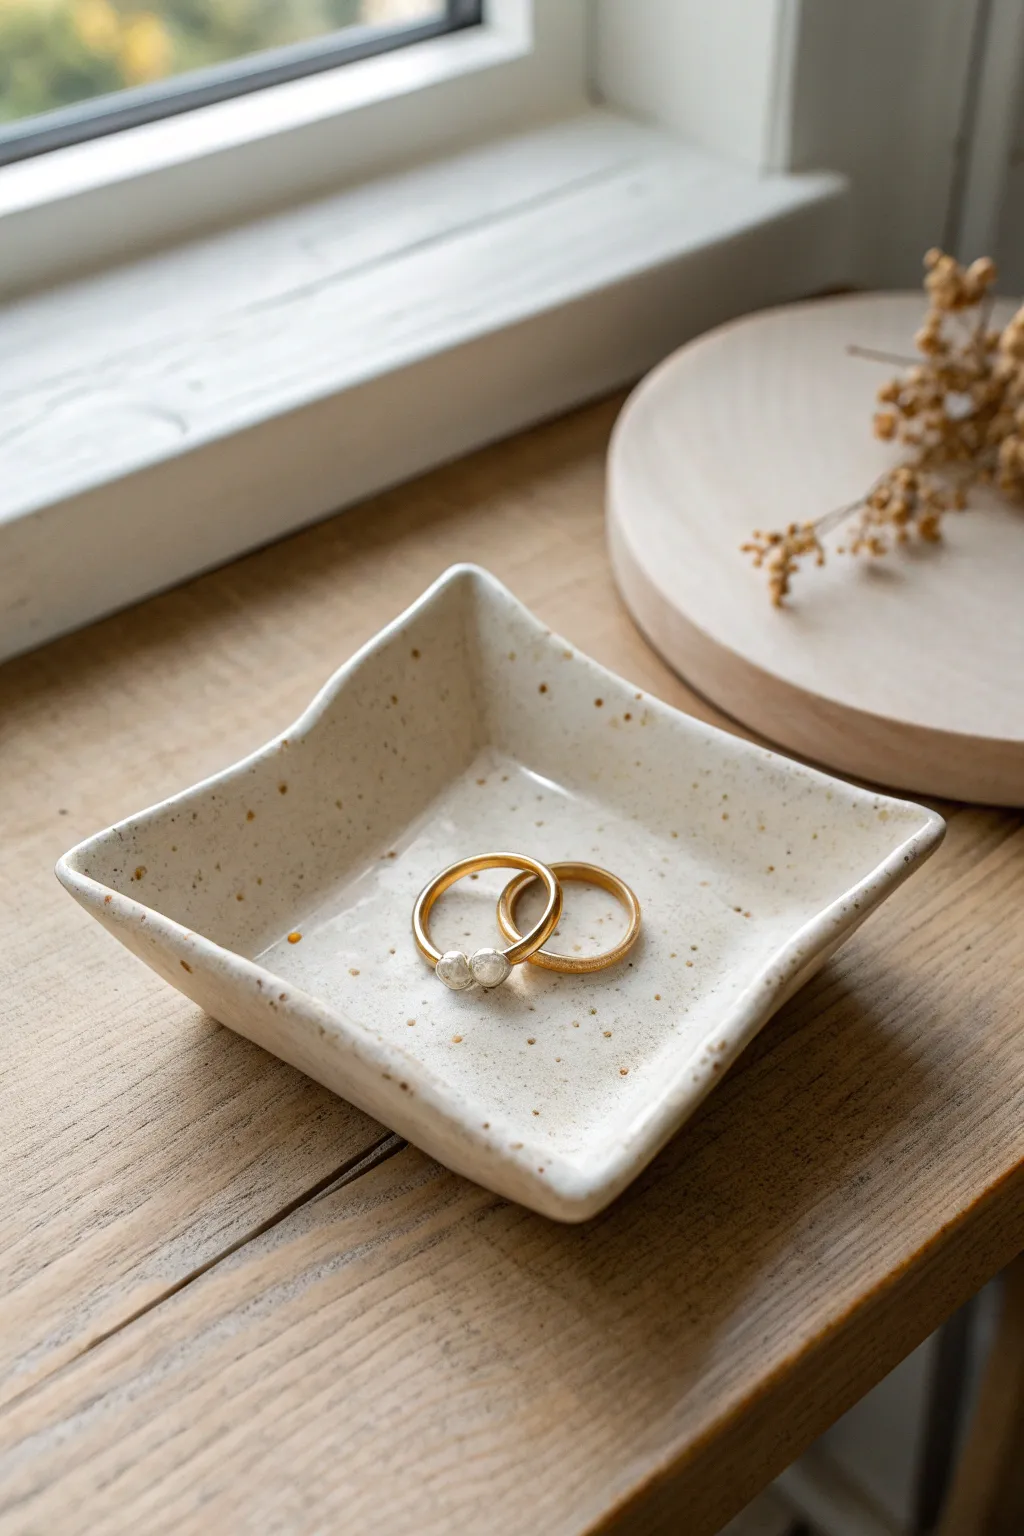
This charming, organically shaped trinket dish captures the essence of soft slab building with its gentle curves and distinctive speckled finish. Perfect for holding rings or small treasures, the lifted corners create an elegant yet relaxed silhouette that feels wonderfully handmade.
Step-by-Step Guide
Materials
- Speckled stoneware clay (white or buff)
- Rolling pin
- Canvas board or slab mat
- Fetling knife or needle tool
- Paper template (approx 4-5 inch square)
- Small bowl or slump mold (optional)
- Soft rib (rubber or silicone)
- Sponge
- Clear or transparent white glaze
- Kiln
Step 1: Prepping and Rolling
-
Wedge the clay:
Begin by wedging a softball-sized amount of speckled stoneware clay to ensure it is homogeneous and free of air bubbles. -
Roll the slab:
Using your rolling pin on a canvas surface, roll the clay out into an even slab. Aim for a thickness of about 1/4 inch (approx 6mm). -
Compassion the clay:
Take a soft rib and gently compress the surface of the slab on both sides. This aligns the clay particles, reducing warping later, and smooths out the canvas texture. -
Cut the shape:
Place your square paper template onto the slab. Using a fetling knife held vertically, cut around the template to create your base square.
Step 2: Forming the Tray
-
Soften the edges:
Before lifting, use a damp sponge or your finger to gently round over the sharp cut edges of the square. This gives the finished piece a softer, more professional look. -
Lift the sides:
While the clay is still plastic but not sticky, gently lift all four sides of the square with your fingers, cupping the clay. -
Pinch the corners:
At each corner, gently pinch the clay inward to encourage the rim to rise. You aren’t folding it sharply like origami, but rather coaxing the corner upward to potential energy. -
Create the curve:
Press the center of each side wall slightly outward with your thumb while supporting the outside with your fingers. This creates the gentle ‘dip’ seen in the rim profile. -
Refine the shape:
I like to place the formed dish onto a piece of foam or a small towel to rest. This allows the curved bottom to maintain its shape without flattening out completely on a hard table.
Natural Texture Hack
If you don’t have speckled clay, wedge some granular manganese or heavy grog into plain white clay. Just wear a mask when handling dry oxides.
Step 3: Finishing and Glazing
-
Dry slowly:
Loosely cover the tray with plastic to let it dry slowly to a leather-hard state. This prevents the lifted corners from warping or cracking. -
Bisque fire:
Once fully bone dry, fire the piece in your kiln to a bisque temperature (usually Cone 04). -
Wipe down:
After the bisque firing, wipe the piece with a damp sponge to remove any dust that might interfere with glazing. -
Glaze application:
Dip or brush on a clear or semi-transparent milky white glaze. The transparency is crucial here—you want those beautiful natural speckles in the clay body to show through clearly. -
Clean the foot:
Wipe the bottom of the tray completely clean of glaze to prevent it from sticking to the kiln shelf. -
Glaze fire:
Fire again to the maturity temperature of your clay and glaze (typically Cone 5 or 6 for stoneware).
Prevent Flatness
If your corners keep drooping while drying, prop them up with small wedges of foam or crumpled newspaper until the clay becomes leather hard.
Place your favorite rings in your new dish and admire the simple beauty of handmade ceramics
Soft Slab Spoon Rest With Notch
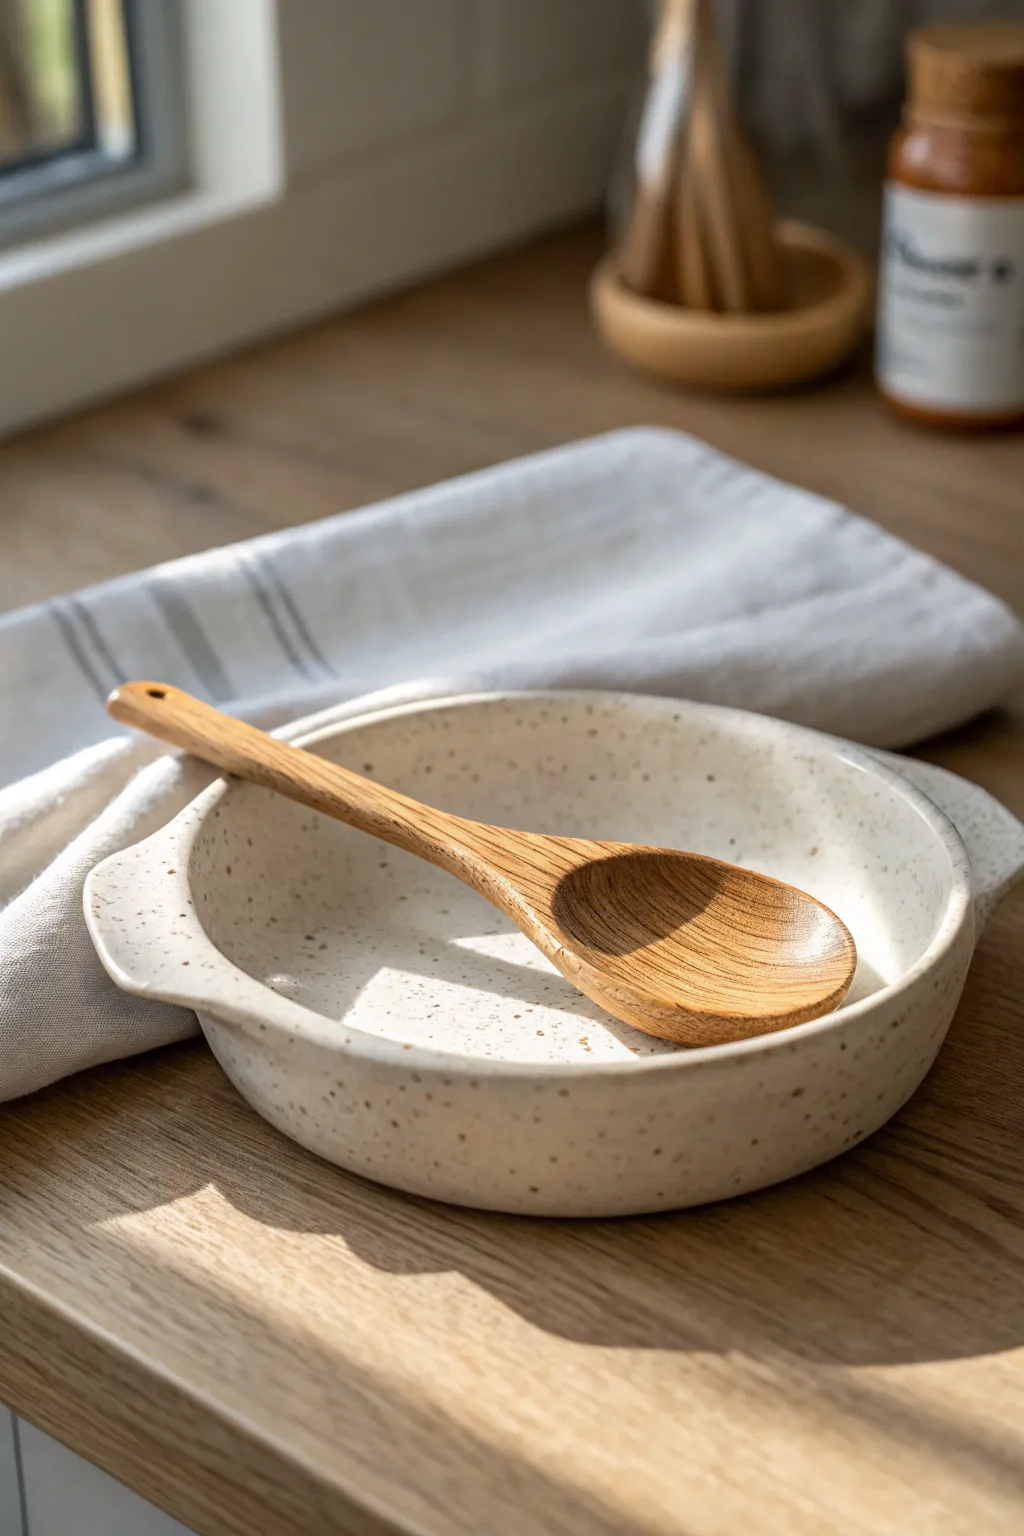
Create a modern, functional spoon rest that embraces natural textures and simple forms. This low-profile dish features a beautiful speckled clay body and a gently contoured rim perfect for keeping your kitchen counters clean.
Detailed Instructions
Materials
- Speckled stoneware clay (mid-fire)
- Canvas work surface or slab mat
- Rolling pin
- Two wooden thickness strips (quarter-inch)
- Needle tool or fettling knife
- Round plate or template (approx. 5-6 inches)
- Soft rib (rubber or silicone)
- Sponge
- Small bowl or hump mold for shaping
- Matte white or clear glaze
Step 1: Preparing the Slab
-
Wedge the clay:
Start by thoroughly wedging a grapefruit-sized ball of speckled stoneware clay to remove any air bubbles and ensure an even consistency. -
Flatten the base:
Pat the ball of clay into a thick pancake shape with your palms before you start rolling. -
Set up guides:
Place your quarter-inch wooden thickness strips on either side of the clay on your canvas workspace. -
Roll the slab:
Roll the clay out using the rolling pin. Ensure the pin rides on top of the wooden strips to create a perfectly even thickness across the entire slab. -
Compress the clay:
Take your flexible rubber rib and firmly drag it across the surface of the slab in multiple directions. This aligns the clay particles and creates a smooth, finished surface that is less prone to warping.
Warping Woes?
If your rim warps during drying, weigh it down gently with a small bag of sand or rice placed in the center while it sits on a flat board.
Step 2: Forming the Shape
-
Cut the circle:
Place your circular template or plate (approx. 5-6 inches diameter) onto the slab. Trace around it cleanly with a needle tool and remove the excess clay. -
Initial lift:
Gently lift the edges of the clay circle. I find it helpful to place the slab onto a slightly curved saucer or a shallow hump mold to give it a natural concave shape. -
Refine the rim:
Use a damp sponge to smooth the cut edge of the rim. Round it over so there are no sharp angles left from the cutting tool. -
Create the notch handles:
Identify two opposite points on the rim. With wet fingers, gently flare these sections slightly outward and downward to create the subtle ‘ears’ or handles seen in the design. -
Deepen the bowl:
Press a soft sponge into the center of the form while supporting the outside with your other hand to deepen the resting area slightly.
Texture Trick
Before cutting your circle, lightly dab the slab with a coarse sponge. This enhances the rustic look under the glaze later on.
Step 3: Finishing and Firing
-
Slow drying:
Cover the piece loosely with plastic for the first 24 hours to let humidity equalize. This prevents the rim from drying too fast and cracking. -
Bisque fire:
Once bone dry, fire the piece to a bisque temperature suitable for your specific clay body (usually Cone 04). -
Wax the foot:
Apply wax resist to the bottom contact ring of the spoon rest to prevent glaze from sticking to the kiln shelf. -
Glaze application:
Dip the piece into a matte white or semi-transparent glaze. A thinner application allows the natural speckles of the clay body to burn through beautifully. -
Final wipe:
Use a sponge to clean up any glaze drips on the foot or rim. -
Glaze fire:
Fire the final piece to maturity (Cone 5 or 6, depending on your clay).
Enjoy using your handmade spoon rest to add a touch of artisan charm to your daily cooking routine
Mini Bud Vases From Wrapped Strips
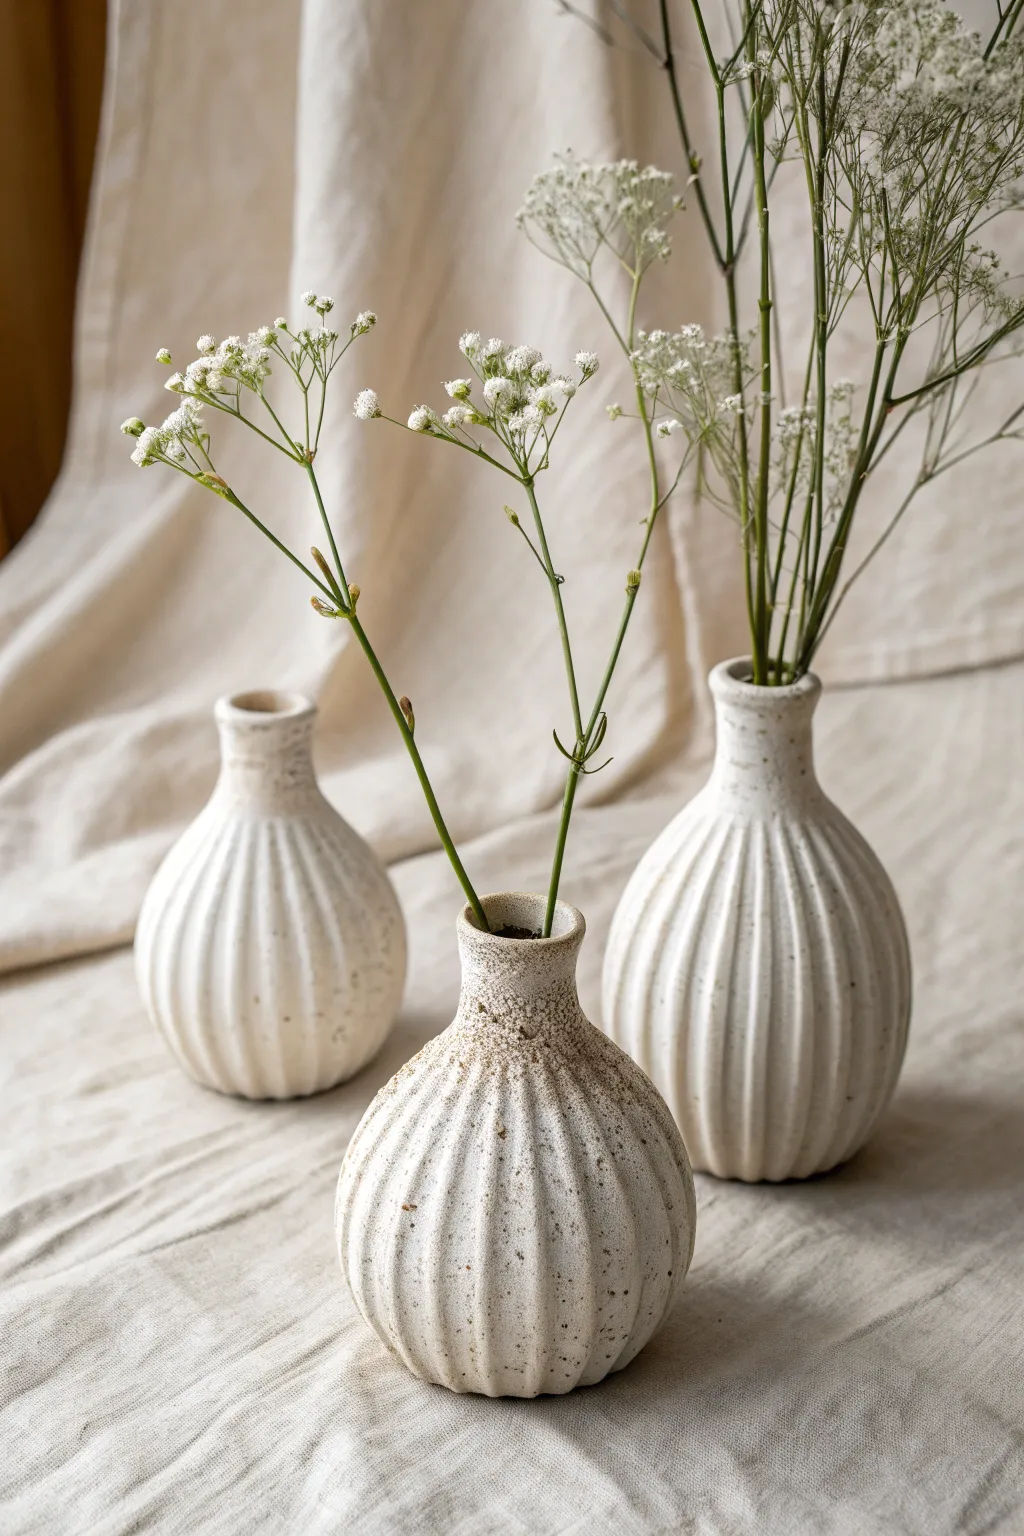
Create a trio of delightful mini bud vases using simple soft slab techniques and everyday textures. These ribbed vessels feature a bulbous shape and a rustic, speckled finish that perfectly complements delicate dried florals.
Step-by-Step
Materials
- Speckled stoneware clay (mid-fire)
- Corrugated cardboard or specialized rib tool
- Rolling pin
- Canvas work surface
- Small balloon or foam ball (about 3-4 inches diameter)
- Cling film
- Needle tool
- Slip and scoring tool (serrated rib)
- Wooden modeling tool
- Sponge
- Matte white glaze
Step 1: Prepping the Texture
-
Roll the Slab:
Begin by wedging your speckled stoneware clay thoroughly. Roll out a soft slab to a consistent thickness of about 1/4 inch. It’s crucial for the slab to be relatively thin to achieve that delicate bud vase feel. -
Create the Ribbed Pattern:
While the slab is flat on your canvas, gently press vertical lines using a specialized rib tool or even a piece of corrugated cardboard. Press firmly enough to leave a deep impression but not so hard that you cut through the clay. -
Cut the Strips:
Using your needle tool, cut long rectangular strips from the textured slab. For these mini vases, strips roughly 4 to 5 inches tall and sufficiently wide to wrap around your mold form work best.
Collaring Cracks?
If the clay cracks while narrowing the neck, it’s too dry. Sponge on water and work slower. If deep cracks form, score and slip them immediately to heal the wall.
Step 2: Forming the Body
-
Prepare the Mold:
Take a small balloon (inflated just slightly to a pear shape) or a round foam ball. Wrap it tightly in cling film to prevent the clay from sticking. -
Wrap the Cylinder:
Pick up a textured clay strip and wrap it loosely around the widest part of your mold to gauge the size. Cut the excess length, leaving enough for a small overlap. -
Seam the Join:
Score and slip the overlapping edges. Press them together gently from the inside to avoid crushing your beautiful ribbed texture on the outside. Blend the vertical seam carefully so it disappears into the fluting. -
Close the Bottom:
Gently ease the bottom edge of the clay cylinder inward toward the center of the mold base. You may need to cut small darts (triangular notches) to help the clay curve smoothly without bunching too much. -
Finish the Base:
Place a small disk of slab over the bottom hole, score and slip it into place, and smooth it with a wooden rib. Tap the base lightly on the table to flatten it so the vase sits stable.
Level Up: Iron Oxide
Before glazing, wipe a wash of red iron oxide into the texture grooves and sponge it off the high points. This adds ancient-looking depth beneath a translucent glaze.
Step 3: Shaping the Neck
-
Remove the Mold:
Once the clay has stiffened slightly—I usually wait about 20 minutes—carefully deflate and remove the balloon or slide out the foam ball through the top opening. -
Collar the Top:
With damp hands, gently squeeze the top rim inward to narrow the opening. This technique, called collaring, creates the bottleneck shape. Do this slowly, rotating the vase as you go to keep it symmetrical. -
Refine the Rim:
As the neck narrows, the wall thickness will increase. Pinch the very top rim to thin it out slightly and smooth it with a damp chamois or sponge for a professional finish. -
Add Variation:
Repeat the process for the other two vases, varying the height of your strips or the width of your molds slightly to create a dynamic grouping like the one in the photo.
Step 4: Firing and Glazing
-
Bisque Fire:
Allow the vases to dry completely slowly. Fire them to bisque temperature (usually cone 04) according to your clay manufacturer’s instructions. -
Apply Glaze:
Dip the vases into a matte white glaze. A quick dip is best; you want the glaze to be thin enough to ‘break’ over the sharp edges of the ribs, revealing the speckled clay underneath. -
Wipe the Base:
Use a damp sponge to meticulously clean any glaze off the bottom of the vases to prevent them from adhering to the kiln shelf. -
Final Fire:
Glaze fire to maturity (likely cone 5 or 6). Once cool, these little vessels are ready to hold your favorite dried stems.
Group these charming vases on a windowsill or centerpiece to bring a touch of handcrafted serenity to your space
Soft-Edged Coasters With Pressed Texture
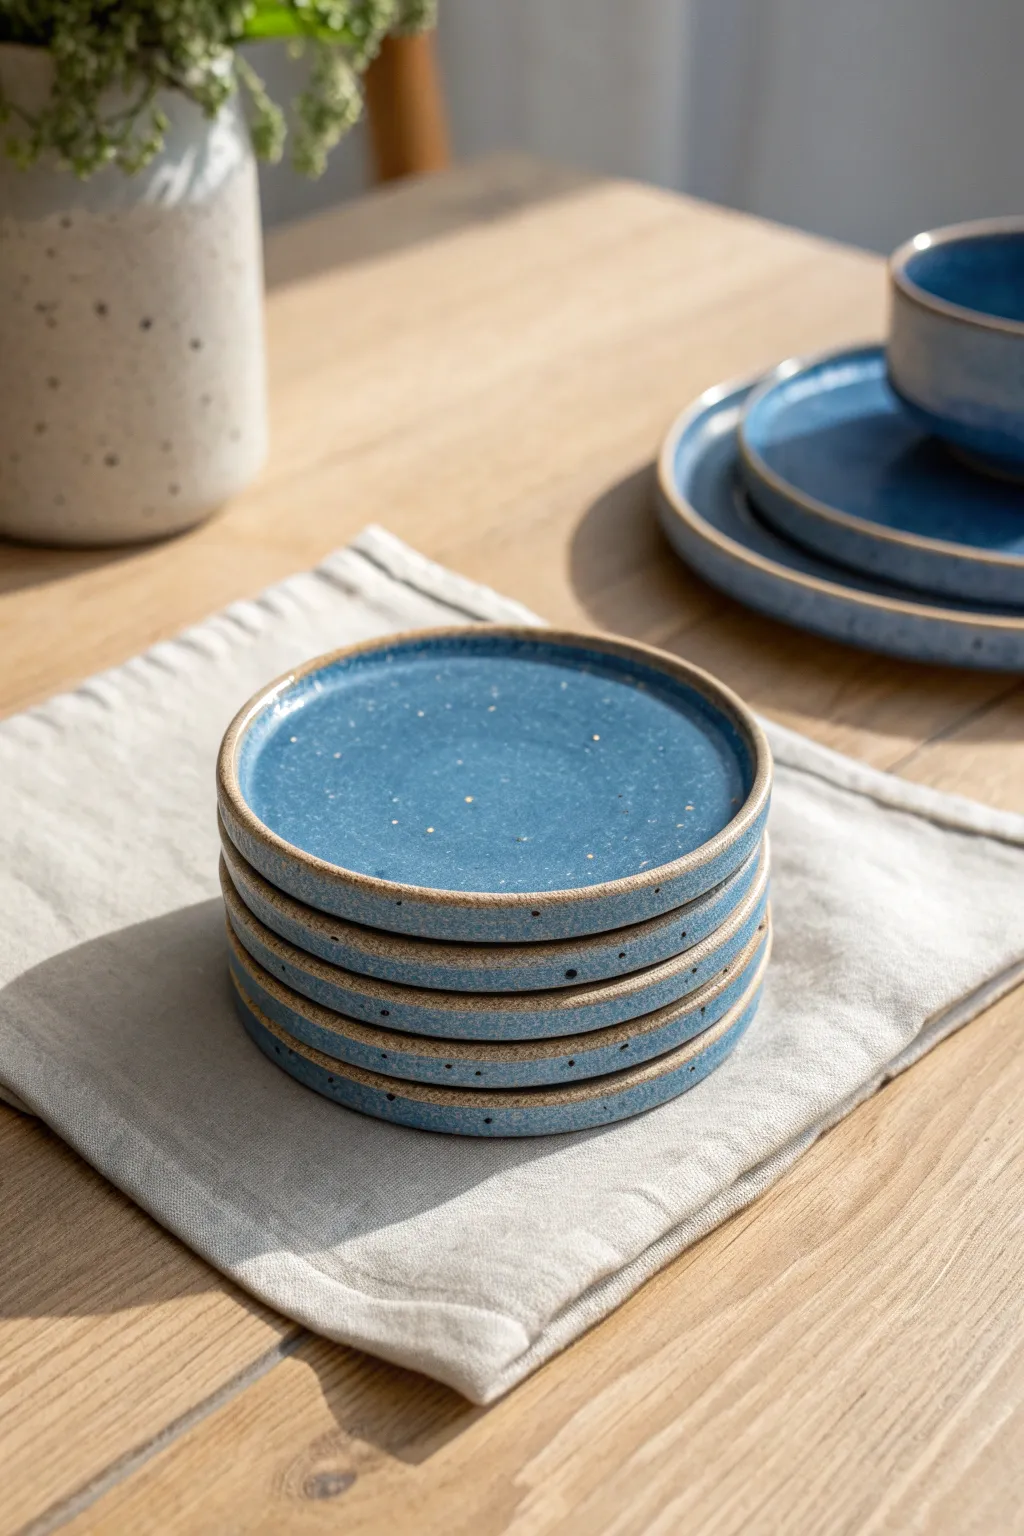
These charming coasters combine a warm, sandy stoneware body with a vibrant sky-blue glaze, featuring a subtle raised rim that keeps condensation contained. The exposed unglazed edge adds a rustic, tactile finish that perfectly frames the glossy interior.
Step-by-Step Tutorial
Materials
- Speckled stoneware clay (buff or sand color)
- Rolling pin
- Canvas or slab mat
- Two 1/4 inch wooden guide strips
- Round cookie cutter (approx. 4 inches) or circle template
- Soft rib tool (rubber or silicone)
- Fettling knife or needle tool
- Small sponge
- Contrasting blue glaze (glossy)
- Wax resist (optional)
- Kiln
Step 1: Planning and Rolling
-
Prepare your clay:
Begin by wedging a softball-sized amount of speckled stoneware clay to remove air bubbles and ensure a consistent texture. This particular look relies heavily on the clay body’s natural speckles, so choose your clay type carefully. -
Set up the guides:
Place your canvas or slab mat on a sturdy table. Position your 1/4 inch wooden guide strips on either side of the clay ball to ensure an even thickness. -
Roll the slab:
Using a rolling pin, roll the clay out firmly until the rolling pin rests on the wooden guides. Roll in multiple directions to compress the clay platelets, which helps prevent warping later. -
Smooth the surface:
Take your soft rubber rib and gently compress the surface of the slab. I like to do this several times to create a buttery smooth finish that will accept the glaze beautifully.
Step 2: Shaping and Refining
-
Cut the circles:
Using your circle cutter or a template with a needle tool, cut out your coaster shapes. Create a few extras, as flat slabs can be finicky during the drying process. -
Soften the edges:
Once cut, run a damp fingertip or a very slightly moist sponge around the sharp cut edge to round it over. This creates that ‘soft slab’ aesthetic rather than a sharp, industrial look. -
Create the rim:
Gently press your thumb or a smooth modeling tool just inside the perimeter of the circle while supporting the outside edge with your other hand. This creates the slight lift or lip seen in the image. -
Dry slowly:
Place the coasters on a flat board covered with paper or canvas. Cover them loosely with plastic to ensure they dry very slowly and evenly, flipping them once a day to prevent curling. -
Bisque fire:
Once bone dry, fire the coasters to cone 04 (or your clay’s specific bisque temperature).
Weighted Drying
To prevent warping, dry your coasters sandwiched between two pieces of drywall or sheetrock. The weight keeps them perfectly flat while the material absorbs moisture evenly.
Step 3: Glazing and Finishing
-
Clean the bisque:
Wipe the fired coasters with a damp sponge to remove any kiln dust that might resist the glaze. -
Prepare the rim:
To achieve the specific look in the photo, apply a ring of wax resist along the very top edge of the rim and the exterior side. Alternatively, you can carefully wipe this area clean after dipping. -
Wax the bottom:
Apply wax resist to the entire bottom of the coaster and slightly up the side wall to create a clean stopping point for the glaze. -
Dip or pour:
Pour a glossy, speckled blue glaze into the center of the coaster, swirling it to coat the interior, or dip the piece face-down if you have a large enough bucket. -
Clean the edges:
If you didn’t use wax on the rim, take a damp sponge and carefully wipe the glaze off the lip, exposing a thin line of raw clay. This frames the blue color effectively. -
Check for pinholes:
Inspect the glazed surface. If bubbles appear, gently rub them with a clean finger to smooth them over before firing. -
Glaze fire:
Load into the kiln and fire to the maturity temperature of your clay and glaze (typically cone 5 or 6 for stoneware). -
Final polish:
After firing, use fine-grit sandpaper (wet/dry paper used wet is best) to sand the unglazed bottom and rim so they feel smooth against a table surface.
Go Geometric
Instead of circles, cut hexagons or organic pebble shapes. You can also press dried flowers into the wet clay before the bisque fire for a fossilized texture effect.
Enjoy using your custom handmade stack for your morning coffee or evening tea
Drainage-Cut Soft Slab Soap Dish
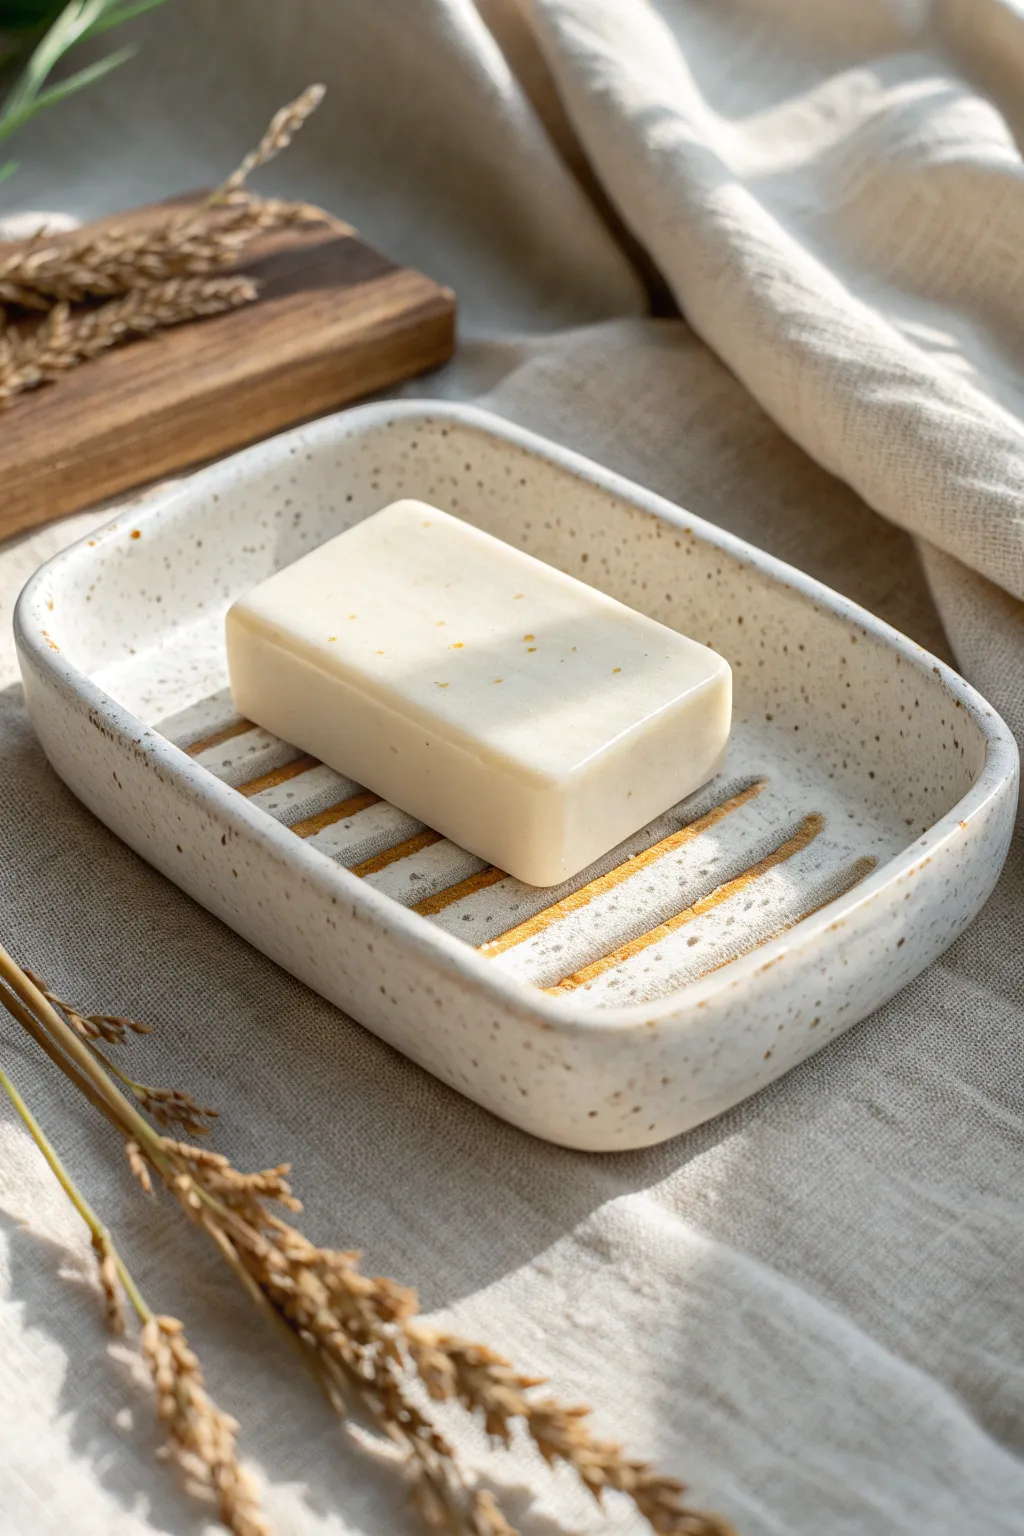
This project showcases the simple elegance of soft slab construction using a lovely speckled clay body. The design features a gently organic rectangular shape with raised drainage ridges that are both functional and visually textural.
Step-by-Step
Materials
- Speckled cone 5/6 clay (scraps/grog included)
- Cotton canvas or slab mat
- Rolling pin
- Two wooden thickness strips (approx. 1/4 inch)
- Flexible metal or rubber kidney rib
- Needle tool
- Soft sponge
- Wooden modeling tool or popsicle stick
- A small rectangular bowl or mold (for draping)
- Clear or translucent white glossy glaze
Step 1: Preparing the Slab
-
Wedge the clay:
Begin by thoroughly wedging a ball of speckled clay to ensure it is even and free of air bubbles. A ball about the size of a large orange should be sufficient for a single dish. -
Initial flattening:
Using the palm of your hand, press the ball down onto your canvas to create a thick pancake shape. Turn it over once to ensure it doesn’t stick. -
Set up guides:
Place your wooden thickness strips on either side of the clay. These guides ensure your slab is a uniform thickness throughout, which is crucial for even drying. -
Roll the slab:
Roll the clay out until the rolling pin rests on the wooden strips. Make sure to roll in multiple directions to compress the clay particles, preventing warping later. -
Smooth surface:
Take your flexible rib and compress the surface of the slab. I like to do this fairly firmly to align the clay particles and create that silky-smooth finish seen in the final piece.
Step 2: Shaping and Adding Texture
-
Cut the rectangle:
Using a needle tool, cut a rectangle from your slab approximately 4 inches wide by 6 inches long. You can use a paper template if you want precise measurements. -
Round the corners:
Use your needle tool or knife to gently round off the four sharp corners of the rectangle. Softening these edges gives the piece its organic, pebble-like feeling. -
Smooth the edges:
With a slightly damp sponge or your finger, run along the cut edges to round them over and remove any sharp burrs left by the cutting tool. -
Plan the ridges:
Lightly visualize where the drainage ridges will go. These are the raised lines inside the dish that keep the soap dry. They should run parallel to the longer side. -
Pressing the texture:
Using the side of a wooden modeling tool or a popsicle stick, press down into the slab to create depressions, leaving raised areas between them. Alternatively, you can attach small coils of clay as raised ridges. -
Refine the ridges:
Smooth the transitions of your ridges with a damp finger. The goal is to maximize the contrast between the high points (ridges) and low points (drainage channels) without creating sharp crevices.
Clean Texture Trick
Place cling film over the slab before pressing your ridges. This softens the tooling marks instantly, eliminating the need for tedious smoothing later
Step 3: Forming and Finishing
-
Prepare the mold:
Take your rectangular slump mold (a plastic container or bowl works well) and cover it with a piece of thin plastic or newspaper to prevent sticking. -
Slump the form:
Gently lift your textured slab and place it inside the mold. Gravity will naturally curve the sides upward, creating the dish shape. -
Adjust the rim:
While it sits in the mold, gently press the rim outward if it curls in too much. You want the walls to rise vertically or slightly outward rather than curling back in. -
Leather hard drying:
Allow the clay to dry to a leather-hard state inside the mold. This usually takes a few hours to overnight, depending on humidity. -
Final sponging:
Once removed from the mold, use a damp sponge to do a final pass over the rim and ridges, ensuring everything feels soft to the touch. -
Bisque fire:
Fire the completely dry piece in a bisque kiln according to your clay body’s specifications (usually Cone 04). -
Glazing:
Dip or brush a clear or semi-transparent glossy white glaze over the entire piece. The transparency is key to letting the natural speckles of the clay shine through. -
Glaze fire:
Fire the piece again to the final temperature (typically Cone 5 or 6). Ensure the foot is wiped clean so it doesn’t stick to the kiln shelf.
Level Up: Oxide Wash
Apply an iron oxide wash into the ridges before glazing. Wipe away the excess on top so the darkness remains only in the crevices for dramatic contrast
Once fired, you’ll have a durable, spa-quality accessory ready to hold your favorite bar of soap
Slip-Trailed Lines Before You Drape
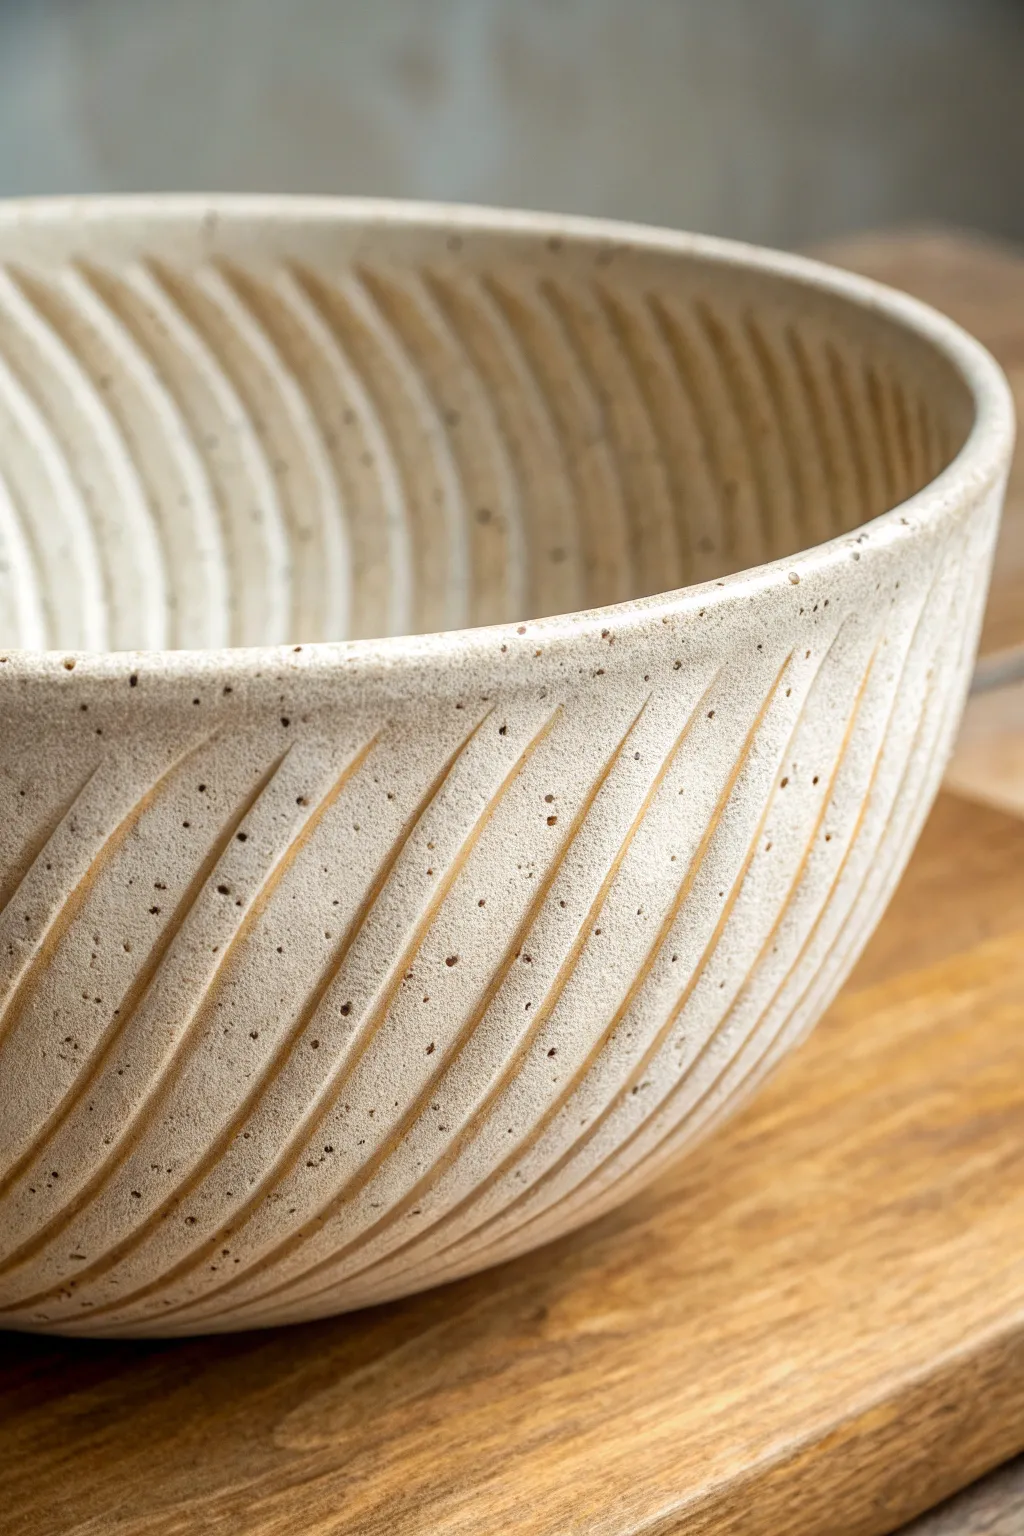
This project transforms a simple soft slab into a textural masterpiece by adding dimension before the form even takes shape. The result is a stunning bowl featuring continuous, rhythmic ridges that wrap around the vessel, highlighted by the natural speckle of the clay body.
Detailed Instructions
Materials
- Speckled clay body (stoneware recommended)
- Slip trailer bottle with a medium nozzle
- Thick slip (made from the same clay body)
- Rolling pin
- Canvas or slab mat
- GR Pottery Form or a simple plaster hump mold
- Soft rubber rib
- Sponge
- Ware board
- Serrated rib (optional for scoring)
Step 1: Preparing the Canvas
-
Mix your trailing slip:
Before rolling any clay, prepare your slip. Take some dry scraps of your speckled clay body and slake them down in water. You want a consistency similar to Greek yogurt or thick frosting—stiff enough to hold a line without spreading, but fluid enough to squeeze out of the bottle. -
Roll out the slab:
Roll out a slab of your speckled clay to an even thickness of about 1/4 inch. Ensure the slab is large enough to cover your intended mold with some overhang. Compress the slab on both sides with a rubber rib to align the clay particles and prevent warping. -
Smooth the surface:
Give the surface one final smoothing pass with a damp sponge or soft rib. This ensures a clean canvas for your slip lines and helps them adhere better.
Slumping Lines?
If slip lines look messy or slump after trailing, your slip is too thin. Let it dry in the open air for 30 minutes to thicken up, or add a pinch of epsom salts to flocculate it.
Step 2: Texturing the Slab
-
Plan your pattern:
Visualize the diagonal flow of the lines. You don’t need to draw them first, but establishing a general angle in your mind helps keep the pattern consistent. -
Begin trailing slip:
Starting at one edge of the slab, squeeze the slip trailer with steady pressure to create a raised line. Move your arm, not just your wrist, to keep the lines straight and fluid. -
Create the rhythm:
Continue trailing parallel lines across the entire slab, spacing them about 1/4 to 1/2 inch apart. Don’t worry if they aren’t perfectly uniform; minor variations add organic character to the finished piece. -
Clean up the starts and stops:
If you have blobs at the beginning or end of your lines, gently smooth them down with a fingertip or a small paintbrush so they don’t catch later. -
The crucial waiting period:
Let the slab sit until the slip lines have stiffened up. They should no longer be tacky to the touch. If you try to drape the slab while the slip is wet, the lines will smear and flatten.
Step 3: Forming the Bowl
-
Prepare the mold:
Place your hump mold or form on a banding wheel. If using a plaster mold, you might want to dust it slightly with cornstarch to prevent sticking. -
Lift the slab:
Carefully slide your hand under the slab or use a board to flip it. You want the textured side facing *down* towards the mold surface if you want the texture on the inside, or facing *up* if you want it on the outside. For the look in the photo, the texture is on both sides? No, wait—this is a soft slab drape. If you drape over a hump mold, the texture shown in the photo is clearly on the *outside* and *inside*. To achieve the look in the photo where the lines seem continuous, we are actually seeing the result of the texture being on the *face* of the slab. Place the slab texture-side UP onto a shallow slump mold (concave) or texture-side OUT over a hump mold (convex). The photo shows texture on the interior and exterior, implying the texture might have been impressed or the slip is on one side and showing through? Actually, looking closer, the texture is distinct additive slip on the exterior. Let’s assume we are draping over a hump mold so the texture is on the exterior. -
Draping the slab:
Gently lift your textured slab. I find it easiest to support it on a piece of thin fabric or plastic. Carefully center it over your hump mold with the slip-trailed lines facing outward (away from the mold). -
Shaping the vessel:
As you lower the slab onto the mold, gravity will do most of the work. Gently guide the clay down the sides of the form. Because of the slip lines, avoid using a rib to smooth the clay against the mold, as this would crush your texture. -
Securing the shape:
Instead of rubbing, use a soft pouncing motion with a sponge or a sandbag to conform the slab to the mold shape without flattening the ridges. -
Trimming the rim:
Once the clay has settled, use a needle tool or fettling knife to trim the excess clay at the base of the mold (which will become the rim of your bowl). Hold the tool steady and rotate the banding wheel for a clean cut. -
Defining the rim:
After trimming, run a damp chamois or your wet finger along the cut edge to round it off and compress it. This prevents sharp edges and future chipping.
Dual-Sided Texture
For texture inside AND out, roll the slab on a textured mat first, then flip and slip-trail the other side. You get double the tactile interest without double the work.
Step 4: Finishing Touches
-
Drying on the mold:
Allow the bowl to dry on the mold until it reaches a soft leather-hard stage. This ensures it holds its shape when you remove it. -
Releasing the form:
Gently lift the bowl off the mold. If it resists, let it dry a bit longer—forcing it can warp the shape. -
Smoothing the interior:
Now that the bowl is off the mold, inspect the interior. Use a soft rubber rib to smooth out any canvas marks or imperfections, ensuring the inside is functional and easy to clean. -
Final drying:
Place the bowl rim-down on a ware board to dry slowly. Cover loosely with plastic if your studio is dry to prevent uneven shrinkage.
Once fired, the glaze will break beautifully over those ridges, highlighting the rhythm of your hand-built form
Mishima-Style Inlay on Soft Slabs
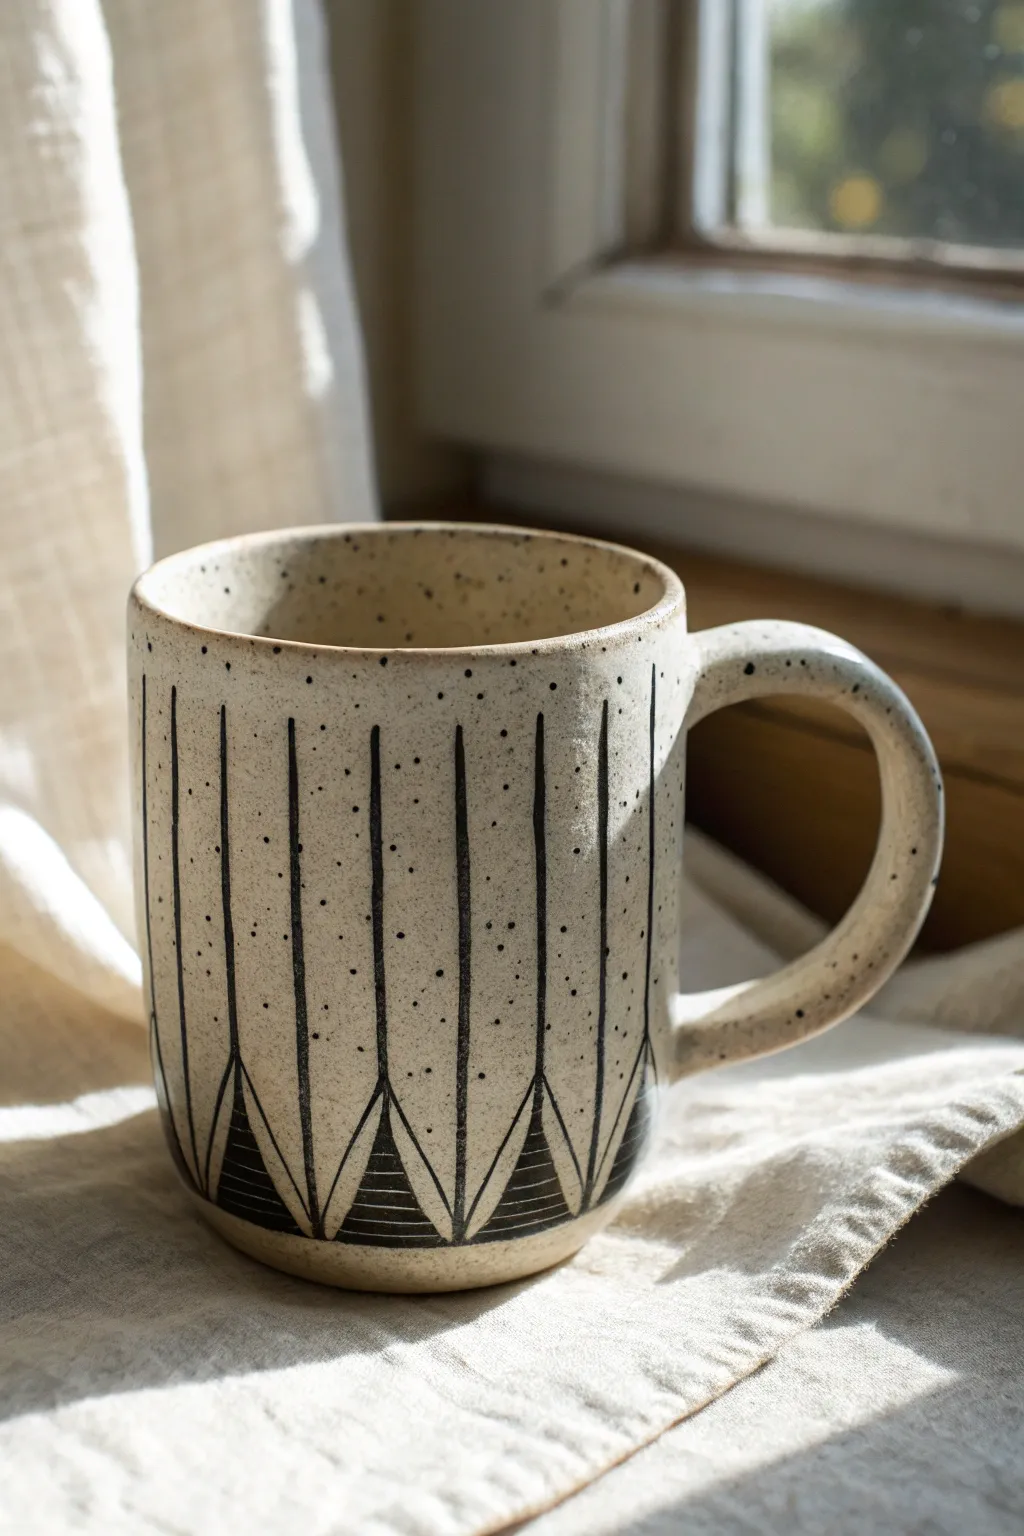
This project combines the clean lines of soft slab construction with the striking contrast of Mishima inlay. The finished piece features a charming speckled cream surface interrupted by crisp, black vertical lines and stylized triangular motifs that create a modern, graphic aesthetic.
Step-by-Step
Materials
- Stoneware clay (preferably a speckled clay body)
- Black underglaze or slip
- Rolling pin and guide strips (approx. 1/4 inch or 6mm)
- Carving tool or needle tool
- X-Acto knife or sharp blade
- Scoring tool (serrated rib)
- Slip or vinegar for joining
- Metal rib or scraper
- Sponge
- Clear or transparent matte glaze
- Cylindrical form (like a PVC pipe or rolling pin) for shaping
- Paper template for the mug body
Step 1: Forming the Slab Mug
-
Roll the slab:
Begin by rolling out your speckled clay into a smooth, even slab using guide strips to maintain a consistent thickness of about 1/4 inch. -
Rib the surface:
Compress the clay on both sides using a rib tool. This aligns the clay particles to prevent warping and creates a smooth canvas for your inlay work. -
Cut the body:
Place your paper template onto the slab and cut out the rectangular shape that will form the cylinder of the mug. -
Join the seam:
After scoring and slipping the short edges, wrap the slab around your cylindrical form. Join the edges carefully, blending the clay to create a seamless cylinder. -
Add the base:
Cut a circular base from your remaining slab. Score and slip the bottom of the cylinder and the edge of the base, then attaching them firmly. Clean up the exterior seam. -
Attach the handle:
Pull or roll a coil for the handle. Shape it into a ‘C’ curve and attach it when the clay is leather hard, smoothing the connections for a strong bond.
Smudged Lines?
If underglaze smears during scraping, your clay might be too wet. Let the piece dry longer so the slip flakes off cleanly rather than smearing.
Step 2: The Mishima Process
-
Apply wax resist (optional):
Some potters coat the piece in wax resist before carving to make cleanup easier, though you can skip this if you are careful with scraping later. -
Carve vertical lines:
Using a sharp carving tool or needle tool, draw vertical lines spaced evenly around the mug, stopping about an inch from the bottom. -
Carve the triangles:
At the base of each vertical line, carve an inverted ‘V’ shape to create triangles. The lines should meet perfectly at the points. -
Add detail lines:
Inside every other triangle (or following your preferred pattern), carve small horizontal lines to fill the triangular space with texture. -
Fill with underglaze:
Generously brush black underglaze or slip over all your carved lines. Don’t worry about being neat; you want the ink to get deep into the customized grooves. -
Let it firm up:
Allow the underglaze to dry until it is no longer shiny and the clay itself is leather hard.
Step 3: The Reveal & Finish
-
Scrape the excess:
Using a sharp metal rib or a specialized loop tool, gently scrape away the excess underglaze from the surface. I like to hold the tool almost flat against the pot relative to the curve. -
Clean with a sponge:
Follow up with a barely damp sponge to wipe away any lingering smudges, ensuring the black remains only inside the carved lines. -
Bisque fire:
Once the mug is bone dry, fire it to bisque temperature according to your clay body’s specifications. -
Apply clear glaze:
Dip or brush a coat of transparent matte or glossy glaze over the entire piece. This will seal the clay and make the black inlay pop without obscuring the speckles. -
Final firing:
Glaze fire the piece to the final temperature required for your stoneware clay.
Add Color
Before the final clear glaze, try dabbing translucent colored glazes into just the triangles for a subtle pop of geometric color.
Enjoy your morning coffee knowing the pattern will never fade or scratch off since it is inlaid deep within the clay
Torn-Edge Look Soft Slab Platter

Embrace the imperfect beauty of hand-building with this striking platter, featuring a deliberately uneven rim and a stunning two-tone glaze. The contrast between the warm, speckled clay body and the cool blue shoreline effect creates a piece that feels both organic and modern.
How-To Guide
Materials
- Speckled stoneware clay (mid-fire)
- Canvas work surface
- Rolling pin
- Two wood slat guides (approx. 1/4 inch thick)
- Needle tool
- Large foam slump mold or a shallow bowl/wok
- Rib tool (rubber or wood)
- Sponge
- Two glazes: a transparent clear or amber, and a reactive blue
- Wax resist (optional)
- Glaze brushes
Step 1: Creating the Soft Slab
-
Wedge the clay:
Start by thoroughly wedging a generous ball of speckled stoneware clay to remove air bubbles and ensure even consistency. -
Set up the guides:
Place your wooden slat guides on either side of the clay ball on your canvas surface to ensure a uniform thickness. -
Roll the slab:
Using the rolling pin, roll the clay out until the pin rests on the wooden guides. I like to flip the clay over once or twice during this process to prevent it from sticking to the canvas. -
Compress the slab:
Take your rib tool and gently drag it across the surface of the clay in multiple directions. This compression aligns the clay particles and helps prevent warping during firing.
Step 2: Shaping the Torn Edge
-
Create the rough outline:
Instead of cutting a perfect circle, use your needle tool to loosely trace a large, organic round shape, but don’t cut all the way through yet. -
Tear the edges:
This is the signature step: pinch the excess clay outside your line and gently tear it away from the main slab. Aim for a jagged, uneven texture that mimics a torn piece of paper or bread crust. -
Soften the sharpness:
Run a damp sponge or your finger lightly over the torn edge to remove any extremely sharp burrs, but be careful not to smooth away the lovely jagged texture you just created. -
Transfer to mold:
Carefully lift the slab and drape it into your large foam slump mold or inside a shallow bowl lined with plastic wrap. -
Define the form:
Gently press the slab into the curve of the mold. Use a soft sponge to smooth the interior bottom, ensuring it creates a nice, gradual basin. -
Dry slowly:
Cover the piece loosely with plastic and let it dry slowly to the leather-hard stage before removing it from the mold to bone-dry.
Fixing Flatness
If the rim starts to slump too flat while drying, prop up the edges with small pieces of foam or balled-up newspaper under the plastic until it stiffens to leather-hard.
Step 3: Glazing the Two-Tone Design
-
Bisque fire:
Fire the bone-dry platter to cone 04 (or your clay body’s bisque temperature). -
Clean the bisque:
Wipe the fired piece down with a damp sponge to remove any kiln dust that could interfere with glaze adhesion. -
Apply the base color:
Pour or brush a transparent amber or clear glaze over the left side of the platter. This allows the natural speckled brown clay body to show through as the dominant warm tone. -
Apply the accent color:
Dip or brush a reactive blue glaze onto the right side of the platter, letting it overlap the first glaze slightly in the middle. -
Create the shoreline:
Where the glazes meet, use a dry brush to feather the blue edge slightly, creating that organic, wave-like transition seen in the reference. -
Glaze the rim:
Ensure the glaze settles into the crevices of the torn rim to highlight the texture, but wipe back the very high points with a sponge if you want the raw clay texture to pop. -
Clean the foot:
Wipe the bottom of the platter completely clean of glaze or apply wax resist to the foot ring. -
Glaze fire:
Fire to cone 6 (or your specific clay/glaze temperature) to finish the piece.
Glaze Overlap Tip
Test your two glazes on a test tile first. Some blue glazes can turn muddy brown when overlapped with amber; you want a combination that creates a nice reaction line.
Now you have a stunning, food-safe platter that brings an earthy elegance to your table setting
Glaze-Pooling Dimples in a Tray
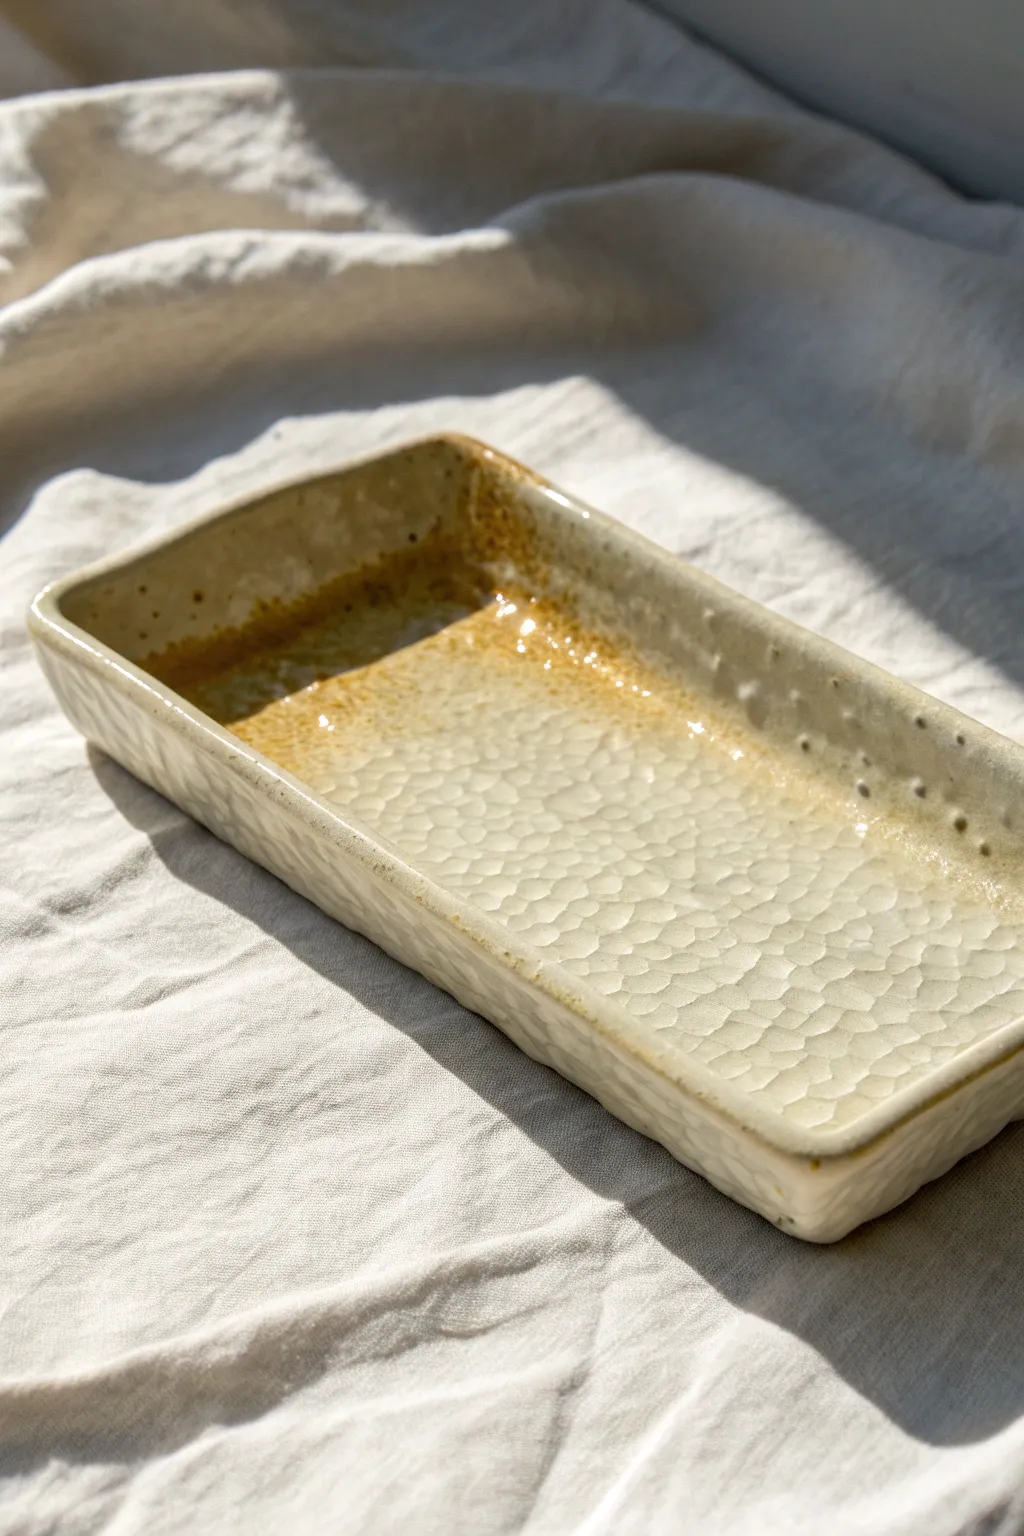
Capture the beauty of liquid glass with this textured rectangular tray, designed specifically to encourage magnificent glaze pooling. The dimpled surface acts like a honeycomb, catching the glaze to create rich, caramelized depths against creamy high points.
Step-by-Step
Materials
- Stoneware clay (smooth or speckled)
- Rolling pin
- Two wooden slats (approx. 1/4 inch thick)
- Ball-peen hammer or rounded texturing tool
- Fettling knife
- Rectangular template (cardboard or paper)
- Scoring tool or serrated rib
- Slip
- Sponge
- High-gloss translucent glaze (amber or celadon works best)
Step 1: Preparing the Slab
-
Roll out the clay:
Begin by wedging your stoneware clay thoroughly to remove air pockets. Place the clay between two wooden slats on a canvas surface and roll it out until the rolling pin rests on the slats, ensuring an even thickness throughout. -
Compress the slab:
Use a soft rubber rib to compress the clay surface on both sides. This aligns the clay particles, preventing future warping, and smooths out the canvas texture. -
Define the shape:
Lay your rectangular template onto the slab. Using a fettling knife, cut carefully around the template. Don’t discard the excess clay just yet; you’ll need it for the walls.
Dimple Depth
Don’t hammer too hard! You only need shallow depressions for the effect. If you go too deep, you weaken the slab and risk cracking during drying.
Step 2: Creating the Texture
-
Texture the base:
Before assembling, create the dimpled surface on your rectangular base. Take a ball-peen hammer or a rounded tool and gently tap rows of indentations across the entire surface. -
Vary the depth:
Aim for a consistent rhythm, but allow slight variations in depth. Deeper pockets will hold more glaze later, creating those darker amber pools. -
Smooth the texture:
If the hammering created any sharp ridges or burrs, lightly smooth them with a damp finger or a very soft sponge so the glaze flows easily over the peaks.
Step 3: Forming the Walls
-
Cut the strips:
From your remaining slab, cut long strips of clay approximately 1 to 1.5 inches wide, depending on how deep you want your tray to be. -
Bevel the edges:
For a cleaner join, cut a 45-degree angle (bevel) on the bottom edge of your wall strips and the outer edge of your textured base. -
Score and slip:
Rough up the beveled areas with a scoring tool and apply a generous amount of slip to act as glue. -
Attach the walls:
Press the wall strips firmly onto the base. I like to wiggle them slightly back and forth to ensure a tight bond and to squeeze out air bubbles. -
Reinforce the seam:
Roll a very thin coil of clay and press it into the interior corner where the wall meets the floor. Smooth this coil out completely to seamlessly blend the two pieces.
Warped Corners?
If corners lift while drying, place small weighted bags (filled with sand or rice) on the inside corners to gently hold them down until leather hard.
Step 4: Refining and Drying
-
Detail the exterior:
Add texture to the outside walls if desired. In the example, the exterior has a subtle faceted or carved look, which can be achieved by shaving bits of clay off with a resolute tool once the clay is leather hard. -
Clean the rim:
Use a damp chamois or sponge to round off the top rim of the tray perfectly smooth. A sharp edge here tends to chip easily after firing. -
Slow drying:
Loosely cover the tray with plastic to let it dry slowly. Uneven drying in rectangular pieces can cause corners to lift or curl. -
Bisque fire:
Once bone dry, fire the piece to bisque temperature (usually cone 04 or 06) to prepare it for glazing.
Step 5: Glazing
-
Select the glaze:
Choose a glaze known for ‘breaking’. These fluid glazes thin out on edges and pool in recesses, highlighting the texture you created. -
Apply the glaze:
Pour the glaze into the interior of the tray, tilt it to coat the bottom evenly, and pour the excess out. This often ensures a nice thick coat in the dimples. -
Check the corners:
Wipe away any glaze that has pooled too thickly in the sharp corners, as this can sometimes cause crawling or running during the firing. -
Final fire:
Fire the tray to the maturity temperature of your clay and glaze (typically cone 5/6 or cone 10), ensuring the kiln shelf is level so the glaze settles evenly.
Once cooled, your tray is ready to catch the light and serve as a stunning centerpiece on any table
Pleated Vase Wrapped Around a Cord
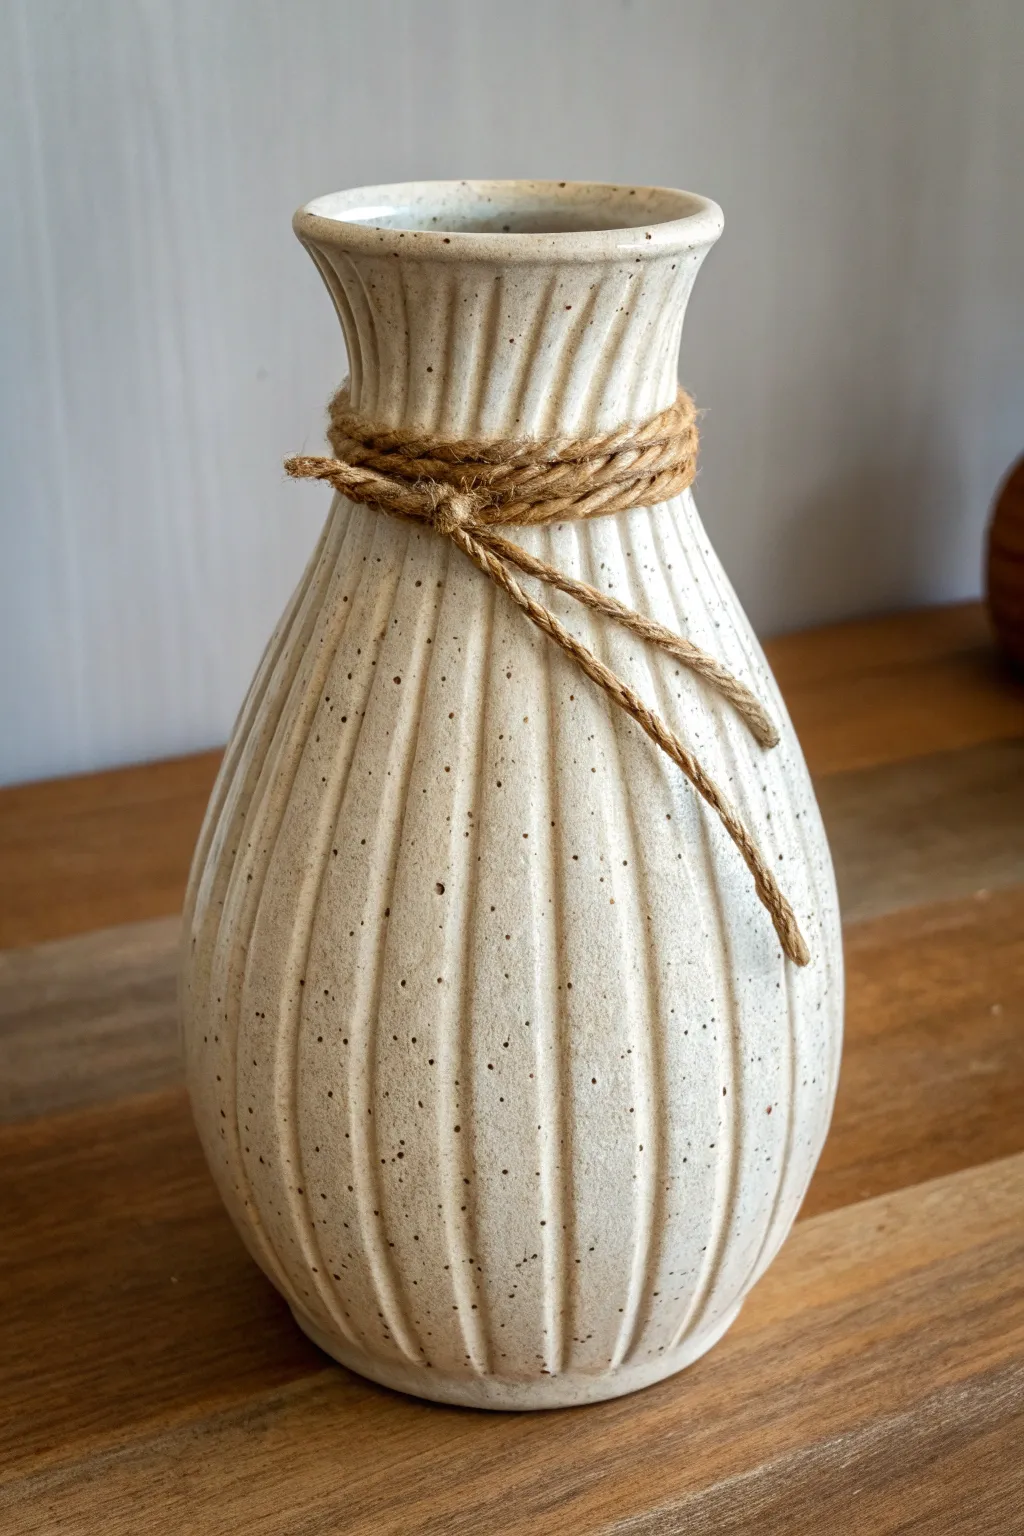
This project combines the delicate texture of vertical pleating with a rustic, speckled clay body to create a timeless vessel. The soft slab construction allows for a naturally organic shape, beautifully accented by a simple twine wrapping at the neck.
Detailed Instructions
Materials
- Speckled stoneware clay (soft slab consistency)
- Rolling pin with guide strips (approx. 1/4 inch thick)
- Ribbed wooden texture tool or dowel
- Cardstock or craft foam for template
- Needle tool
- Scoring tool (serrated rib)
- Slip or vinegar
- Sponge
- Soft flexible rib (rubber or silicone)
- Clay knife or fettling knife
- Jute twine or hemp cord
- Clear or white satin glaze
Step 1: Preparing the Slab and Texture
-
Roll the slab:
Begin by wedging your speckled clay to remove air bubbles. Roll it out into a large rectangular slab, using guide strips to ensure an even thickness of about 1/4 inch. -
Smooth the surface:
Take a soft flexible rib and run it gently over the slab in multiple directions. This compresses the clay particles and removes any canvas texture from your work surface. -
Create the pleating:
Using a ribbed texture tool or a simple wooden dowel, press vertical lines into the slab. I like to press firmly enough to create deep grooves, as these will soften during the forming process. -
Cut the template:
Cut your cardstock template into a gentle fan shape—narrower at the top for the neck and wider at the bottom for the belly of the vase. -
Cut the clay body:
Place your template over the textured slab. Use a needle tool to cut out the shape, being careful not to smudge your beautiful vertical lines.
Keep it Vertical
When expanding the belly from the inside, push straight out rather than dragging your hand. This keeps the vertical fluting straight rather than twisting it into a spiral.
Step 2: Forming the Vessel
-
Bevel the edges:
Angle your knife at 45 degrees and cut a bevel on the two vertical edges where the cylinder will join. This creates a stronger, more seamless connection. -
Stand and shape:
Carefully lift the slab and stand it upright. Curving it gently, bring the beveled edges together to form a cylinder that tapers toward the top. -
Score and slip:
Rough up the beveled edges with your scoring tool and apply a generous amount of slip. Press the seam together firmly from the inside. -
Reinforce the seam:
Roll a very thin coil of clay and press it into the interior seam.这是crucial smooth it out with your thumb or a tool to ensure the join is undetectable and leak-proof. -
Shape the belly:
With one hand inside the vase, gently push outward to expand the belly of the form, enhancing the curve. The vertical texture lines will expand slightly, adding character. -
Refine the neck:
Collar the neck in slightly by gently squeezing with damp hands while rotating the piece (if on a banding wheel) to create that distinct narrowing before the rim flares.
Step 3: Finishing Touches and Firing
-
Construct the base:
Roll a small separate slab for the bottom. Place your cylinder on top, trace around it, and cut out the circle. Score and slip to attach it to the cylinder’s base. -
Refine the rim:
Smooth the top rim with a damp chamois or sponge. I prefer a slightly rounded, uneven organic rim to match the rustic aesthetic. -
Dry slowly:
Cover the vase loosely with plastic to let it dry slowly over several days. This prevents warping and cracking, especially at the seam. -
Bisque fire:
Once bone dry, fire the piece in the kiln to bisque temperature (usually cone 04 or 06, depending on your clay). -
Glaze application:
Dip or brush on a clear or translucent white satin glaze. This allows the speckles in the clay body to show through. -
Final firing:
Glaze fire the piece to the maturity temperature of your clay body (likely cone 5 or 6). -
Add the cord:
Cut a length of jute twine roughly 24 inches long. Wrap it around the narrowest part of the neck three times. -
Tie the knot:
Secure the twine with a simple overhand knot, letting the ends drape down casually over the front of the vase.
Slumping Walls?
If the soft slab walls start to collapse while shaping, stuff the interior loosely with crumpled newspaper or plastic bags to support the form until it stiffens up.
Now you have a charming vessel perfect for holding dried wildflowers or standing beautifully on its own
Expressive Face Cup From a Soft Slab
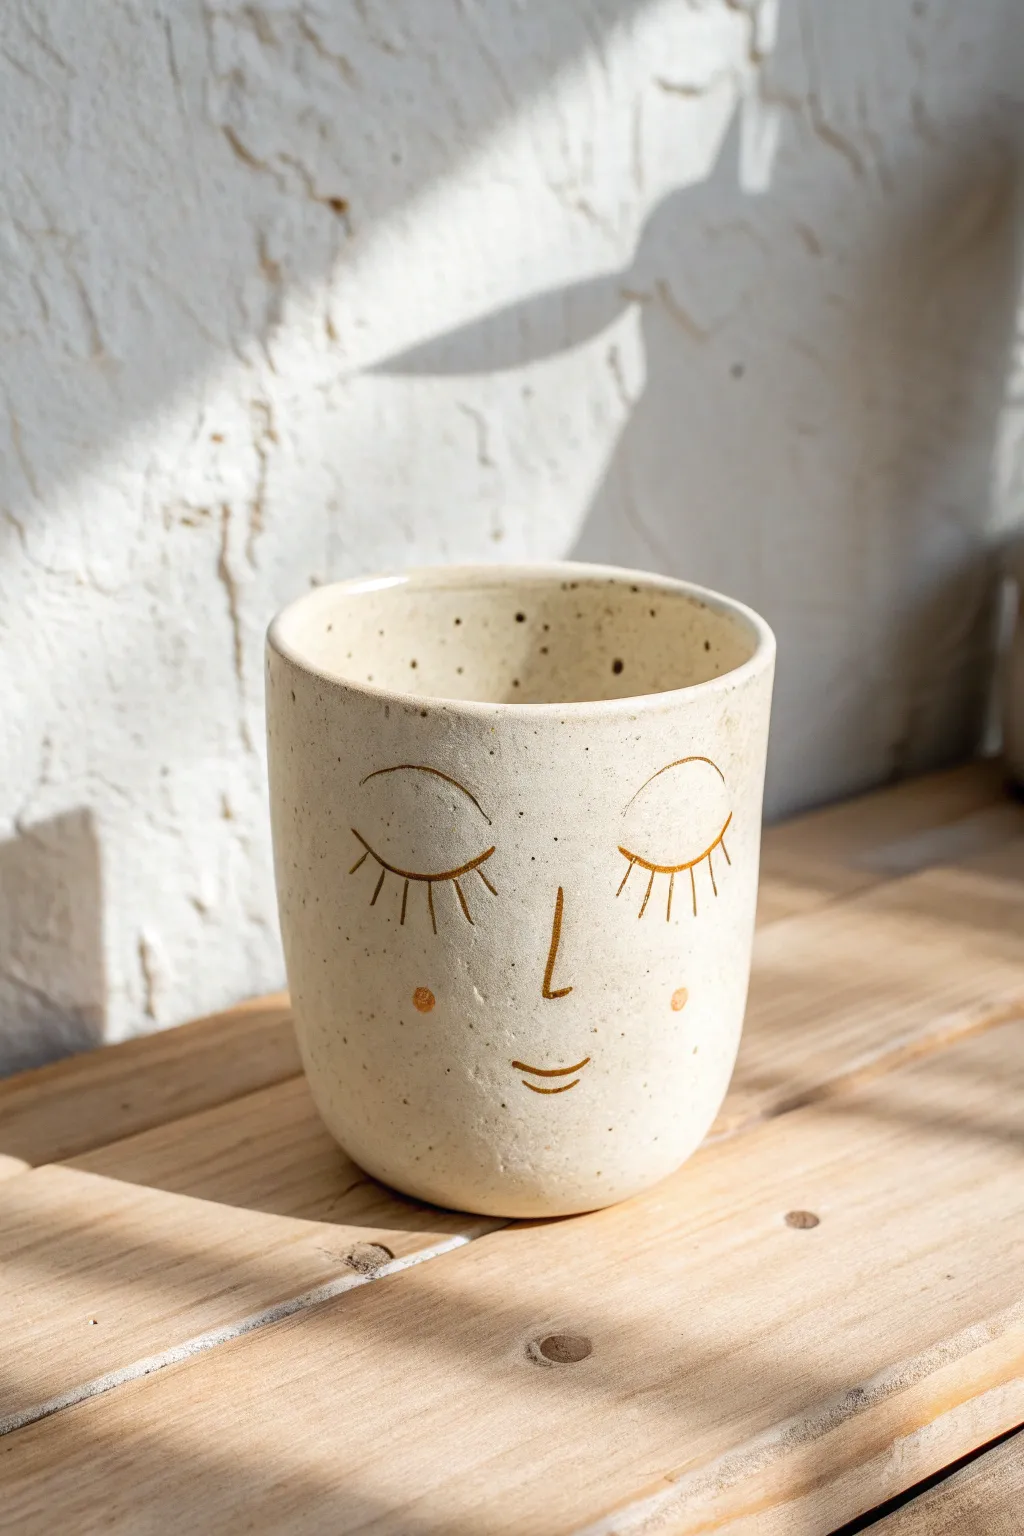
Capture the serenity of a lazy Sunday morning with this charming soft slab cup. Featuring speckled clay and delicate hand-carved facial features, it brings a peaceful, minimalist aesthetic to your daily coffee ritual.
How-To Guide
Materials
- Speckled cone 6 stoneware clay
- Rolling pin
- Canvas or slab mat
- Fettling knife or needle tool
- Rib tool (flexible metal or rubber)
- Scoring tool (or serrated kidney)
- Slip (clay and water mixture)
- Fine-point sgraffito tool or needle tool
- Underglaze (dark brown or black for lines, soft pink/orange for cheeks)
- Fine detail paintbrush
- Clear matte or satin glaze
- Sponge
- Round template (optional for base)
- Banding wheel (optional)
Step 1: Preparing the Slab
-
Roll the clay:
Begin by wedging your speckled stoneware to remove air bubbles. Flatten it slightly with your palm, then use a rolling pin to create a slab about 1/4 inch thick. I like to flip the clay and roll from multiple directions to ensure an even thickness throughout. -
Smooth the surface:
Take a flexible rib tool and compress the surface of your slab on both sides. This aligns the clay particles, preventing warping later, and creates that silky smooth canvas needed for drawing the face. -
Cut the walls:
Measure out a rectangle for the body of your cup. A standard size is roughly 10-11 inches wide by 4 inches tall, but adjust based on your desired cup volume. Use a fettling knife and a ruler to cut a clean rectangle. -
Bevel the edges:
On the two short ends of your rectangle, cut 45-degree bevels in opposite directions. This allows the clay to overlap seamlessly when you form the cylinder.
Clean Lines
When wiping back the underglaze inlay, move your sponge diagonally across the carved lines rather than parallel to them. This prevents the sponge from scooping the color back out of the grooves.
Step 2: Building the Form
-
Score and slip:
Rough up the beveled edges with your scoring tool and apply a generous amount of slip. -
Form the cylinder:
Gently lift the slab and curl it into a cylinder, pressing the scored beveled edges together firmly. Verify the seam is fully connected from top to bottom. -
Smooth the seam:
Support the wall from the inside with one hand and smooth the exterior seam with a rib so it disappears completely. Repeat on the interior for a clean finish. -
Cut the base:
Roll a small piece of leftover clay for the base. Place your cylinder on top of it and trace around the bottom with a needle tool, then cut out the circle. -
Attach the base:
Score and slip the bottom edge of the cylinder and the outer edge of the base circle. Press them together firmly. -
Refine the connection:
Use a wooden modeling tool to meld the clay of the base up into the wall of the cup. Follow up with a sponge to round off the bottom edge slightly for a soft, seamless look. -
Shape the rim:
Gently pinch and smooth the rim with a damp sponge or a piece of chamois leather to make it comfortable for drinking. Ensure the cup is roughly round, though a slightly organic oval shape adds character.
Make It a Planter
Make a slightly larger version and poke a drainage hole in the bottom center before firing. This sleepy face design makes an adorable home for a
Step 3: Adding the Expression
-
Let it stiffen:
Allow the cup to dry to a ‘leather hard’ state. The clay should be firm enough to handle without deforming but soft enough to carve into easily. -
Sketch the face:
Use a dull pencil to lightly sketch the facial features. Mark two large arches for closed eyes, a long ‘L’ shape for the nose, and a small upward curve for the smile. -
Carve the lines:
Using a fine-point sgraffito tool or a sharp needle tool, carefully incise over your pencil lines. Carve downward-facing lashes on the closed eyes for that sleepy vibe. -
Inlay the color:
Paint dark brown or black underglaze into the carved lines. Don’t worry if it’s messy; let it dry completely, then wipe the surface with a barely-damp sponge to remove excess, leaving color only deep in the grooves. -
Add rosy cheeks:
Dip a small round brush into thinned pink or orange underglaze. Dab two small circles on the cheeks. Keep the edges soft and organic rather than perfectly geometric.
Step 4: Finishing
-
Bisque fire:
Once the cup is bone dry, load it into the kiln for a bisque firing (usually cone 04). -
Glaze application:
Dip the bisqued cup into a clear matte or satin glaze. This will seal the clay and make it food-safe while allowing the natural speckles of the clay body to shine through. -
Final firing:
Fire the cup to the maturity temperature of your clay (likely cone 6) to vitrify the stoneware.
Now you have a serene, handcrafted vessel ready for your favorite warm beverage