
If you’ve ever cracked a pot and couldn’t bear to toss it, you’re in my favorite kind of creative territory. These spilled flower and broken pots garden ideas turn that “oops” moment into a blooming little illusion that looks like color is pouring right onto the ground.
Mulch Bed Spill for Bold Contrast
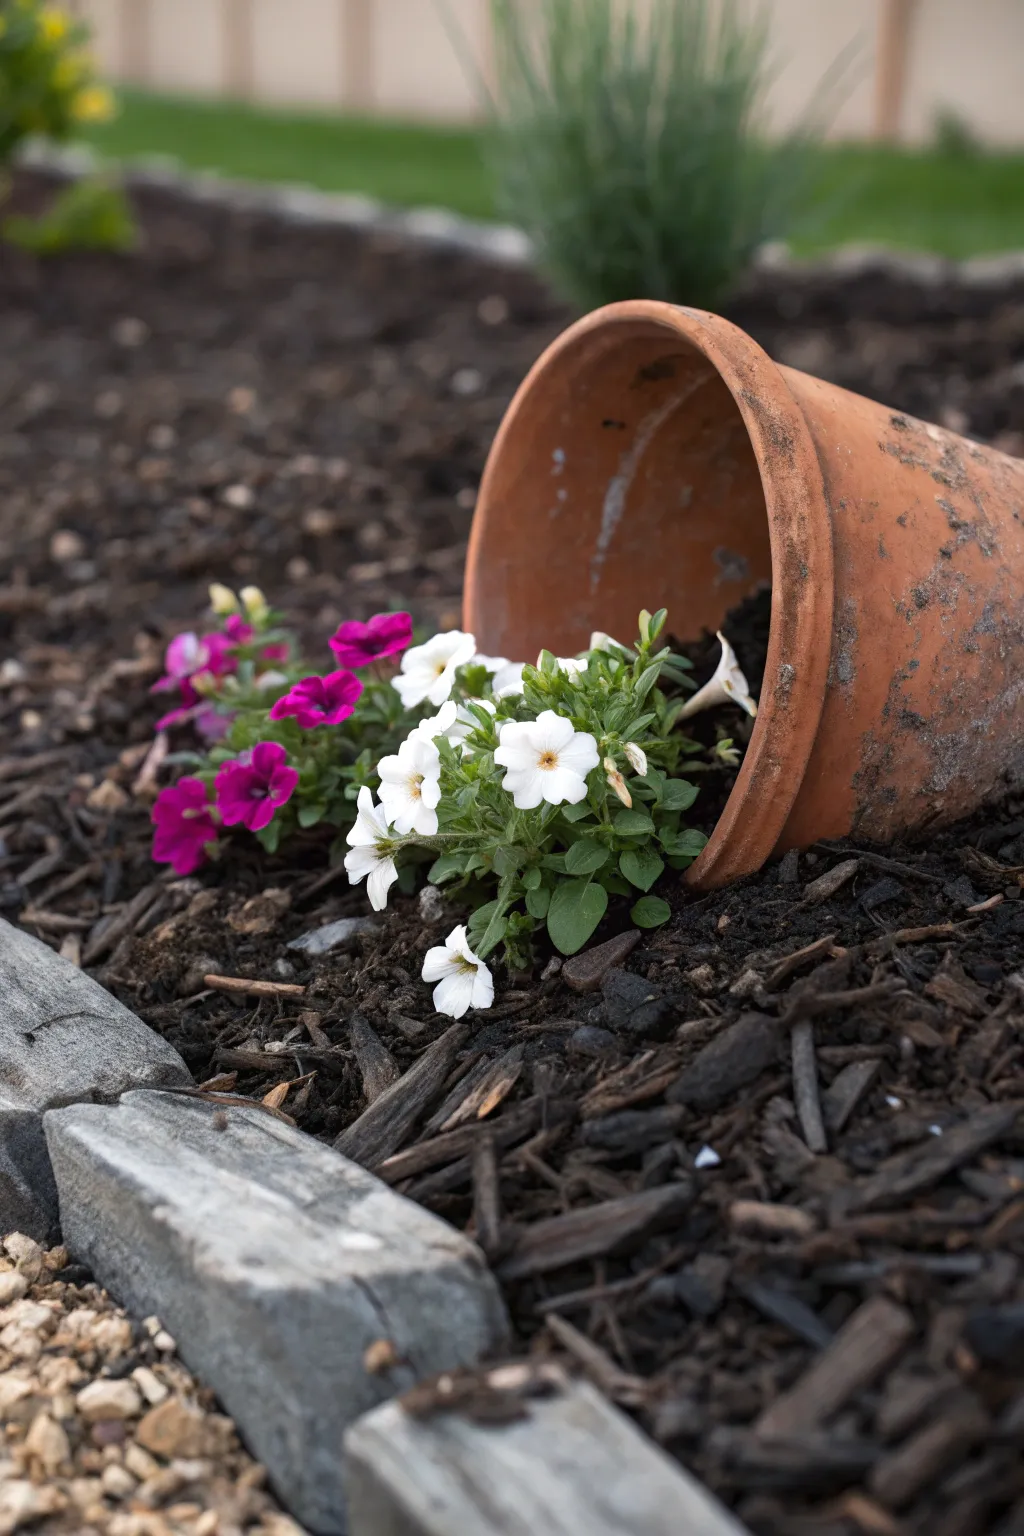
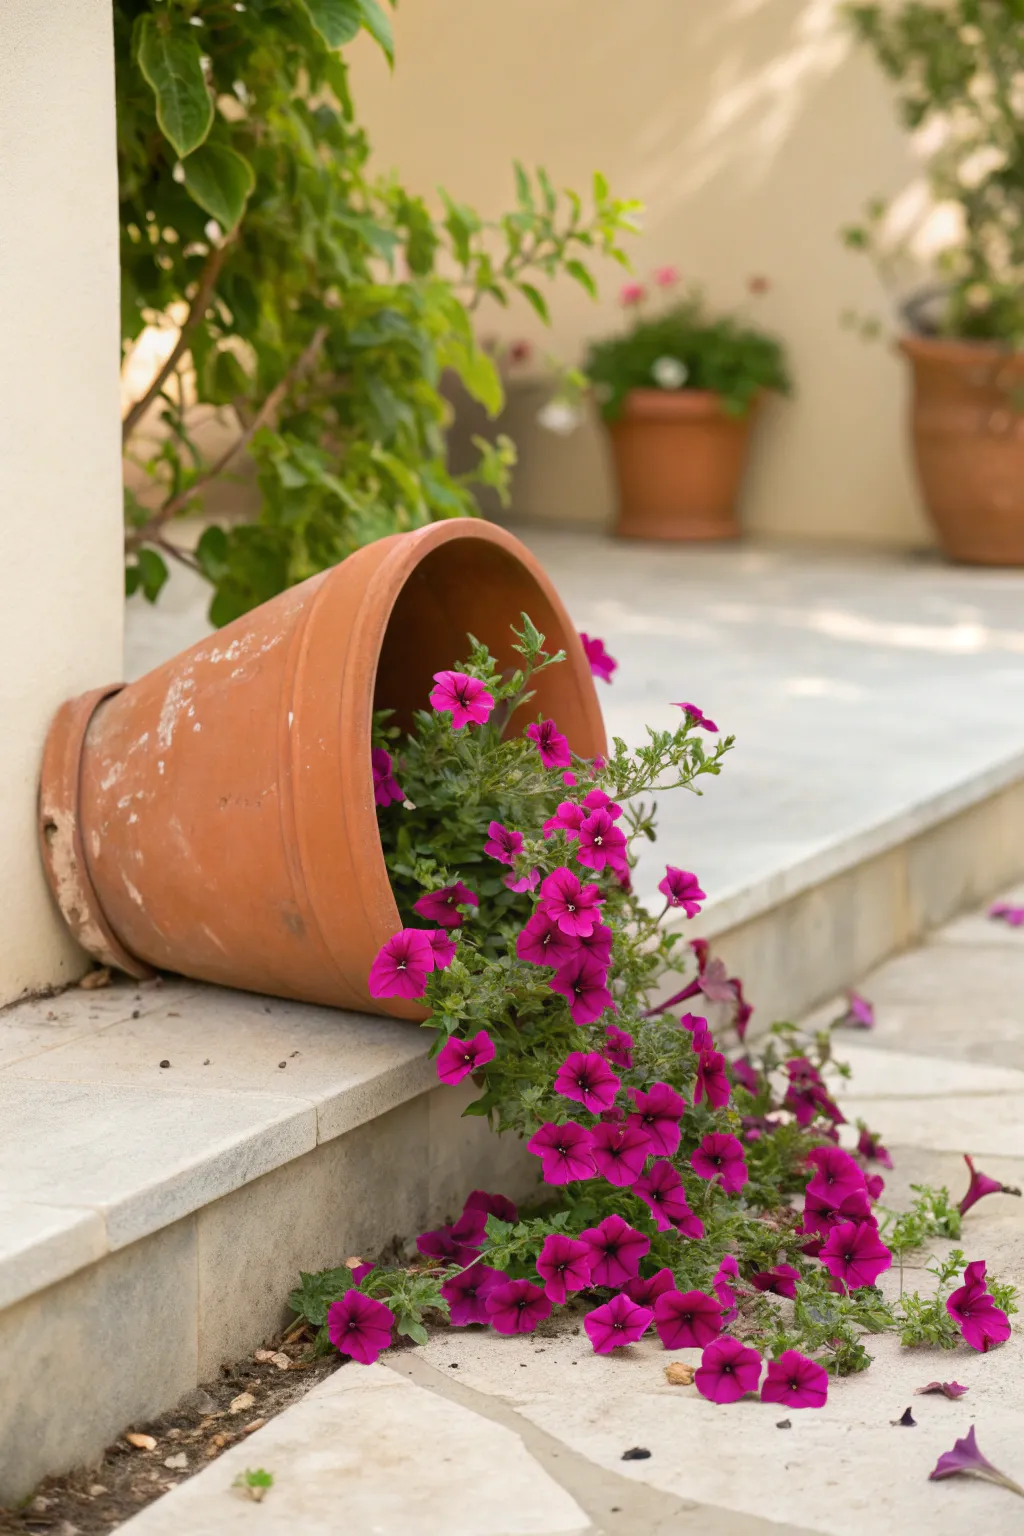
Create a charming, whimsical garden feature that looks like a happy accident with this spilled pot arrangement. By partially burying a terracotta vessel, you create the illusion that vibrant flowers have tumbled out and taken root in a flowing stream of color.
Step-by-Step Tutorial
Materials
- Medium to large terracotta pot (weathered look is ideal)
- Bag of potting soil
- Dark wood mulch
- Small shovel or garden trowel
- White Petunias or Calibrachoa (4-inch pots)
- Magenta/Purple Petunias or Calibrachoa (4-inch pots)
- Grey landscape edging stones or bricks
- Garden gloves
- Watering can
Step 1: Preparing the Ground
-
Select the spot:
Choose a clear area in your garden bed that receives enough sunlight for the flowers you selected. A spot near a walkway or border adds visual interest where it’s easily seen. -
Clear surface debris:
Rake away any existing large debris, leaves, or old mulch from a roughly 3-foot by 2-foot area where the pot and flowers will go. This gives you a clean slate to work with. -
Dig the pot groove:
Using your trowel, dig a shallow depression for the pot. You don’t want a deep hole, just a groove large enough to cradle the bottom third of the pot so it rests securely on its side without rolling.
Soil Washout Fix
If soil washes out of the pot during rain, pack the inside rear of the pot with a wad of newspaper before adding soil to help hold moisture and structure.
Step 2: Positioning the Pot
-
Place the vessel:
Lay the terracotta pot into the groove you dug. Angle the mouth of the pot slightly downward so it looks like it has naturally tipped over. -
Partially bury the pot:
Scoop some of the displaced soil back around the bottom and sides of the pot. I like to pack this soil firmly to ensure the pot doesn’t shift during high winds or heavy rain. -
Fill the interior:
Add a generous amount of fresh potting soil inside the pot, filling the bottom half (which is now resting on the ground). This soil should spill out slightly from the mouth of the pot onto the ground in front of it.
Step 3: Planting the ‘Spill’
-
Arrange the white flowers:
Take the white petunias out of their nursery pots. Plant one directly inside the mouth of the terracotta pot, and another immediately outside it. -
Create the flow:
Plant the remaining white flowers extending outward from the pot mouth, gently curving the line to mimic a liquid spill. -
Add the contrast color:
Nestle the magenta or purple petunias next to the white ones, further down the ‘stream’ away from the pot. This creates a beautiful gradient effect as the flowers spread out. -
Tease the roots:
Before finalized planting, gently tease the roots of your flowers. This encourages them to expand into the new soil quickly. -
Backfill with soil:
Pack extra potting soil around the base of all the plants, ensuring the root balls are fully covered and level with the ground.
Broken Pot Charm
Don’t discard a cracked pot! Carefully adhere the shards back together loosely or leave a gap for a ‘ruined’ look, planting sedum or succulents in the cracks.
Step 4: Finishing Touches
-
Apply the mulch:
Spread the dark wood mulch heavily around the pot and the flowers. The dark color provides the high contrast needed to make the white and purple blooms pop. -
Cover the pot rim:
Carefully push some mulch over the bottom edge of the pot’s rim where it touches the ground. This helps integrate the pot into the landscape so it looks like it has been there for years. -
Clean the pot exterior:
Brush off any loose dry soil from the exposed top half of the terracotta pot. Leaving a few smudges adds character, but you want the orange clay to be visible. -
Install the edging:
Place your grey landscape stones in a row along the edge of the mulch bed, a foot or two away from the flowers. This frames the scene and keeps the mulch contained. -
Water deeply:
Give the new plants a thorough watering right at the base. Avoid spraying the soil forcefully, which might splash mud onto your clean terracotta pot.
Now watch your spilled garden grow lusher and more vibrant with each passing week

Tree Base Spill That Circles the Trunk
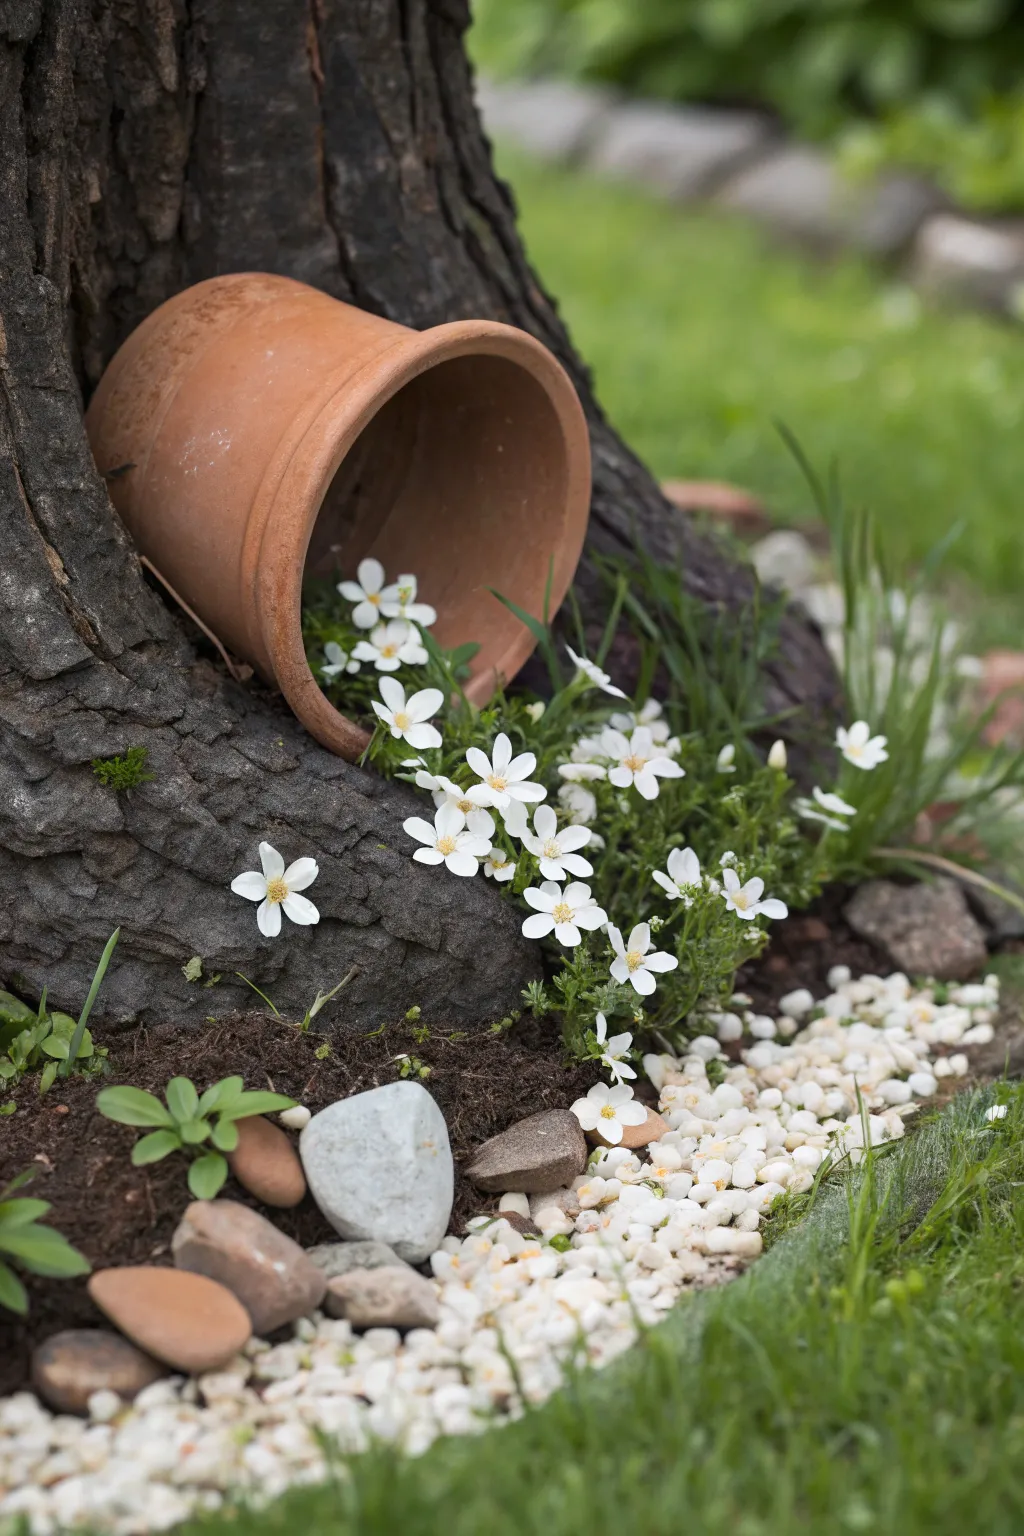
Transform the base of an old tree into a living art installation with this charming “spilled pot” design. Tiny white blooms appear to tumble effortlessly from a tilted terracotta vessel, creating a whimsical cascade that softens the rugged texture of the tree bark.
Step-by-Step
Materials
- Medium-sized terracotta pot (8-10 inch diameter)
- Garden spade or hand trowel
- Potting soil mix
- White groundcover annuals (e.g., Cerastium, white lobelia, or creeping phlox)
- Small white decorative gravel or pea pebbles
- River rocks (medium size, grey/brown tones)
- Garden edging (optional, for defining the bed)
- Watering can
Step 1: Site Preparation
-
Clear vegetation:
Begin by gently clearing away existing grass or weeds right at the base of your chosen tree. Focus on the nook between large protruding roots where the pot will nestle naturally. -
Define the flow:
Visualize the path the ‘spilled’ flowers will take. It should curve gently around the trunk base rather than spilling straight out, mimicking liquid flow. -
Loosen soil:
Use your trowel to carefully loosen the top 2-3 inches of soil in the spill area. Be careful not to damage the tree’s surface roots.
Step 2: Setting the Pot
-
Dig the recess:
Dig a shallow depression right against the tree bark where the bottom of the pot will rest. You want the pot to look like it’s been there for years, partially sunken into the earth. -
Position the pot:
Lay the terracotta pot on its side in the depression. Tilt the opening slightly downward and angle the pot so it leans securely against the tree trunk. -
Backfill to secure:
Pack soil underneath the bottom curve of the pot and around the back. This stabilization is crucial so it doesn’t shift during watering or heavy rain. -
Fill the interior:
Scoop fresh potting soil into the pot until it is about half to two-thirds full. Slope the soil so it spills out of the mouth and connects seamlessly with the ground soil.
Pot Stability Hack
Bury the bottom third of the pot into the soil for maximum stability. If your site is windy, place a heavy rock inside the back of the pot before adding soil.
Step 3: Planting the Cascade
-
Start inside:
Take your first flowering plant and tuck it deep inside the pot mouth. This creates the source of the ‘spill’ effect. -
Plant the transition:
Place the next few plants right at the rim of the pot. Tease the foliage so it hangs over the terracotta edge, blurring the line between pot and soil. -
Create the stream:
Continue planting the remaining flowers in a widening, curved shape extending out from the pot. Plant them slightly closer together than recommended to achieve an immediate lush look. -
Press and firm:
Gently press down around the base of each plant to eliminate air pockets. I always ensure the roots are fully covered with soil before moving on.
Seasonal Swap
Use a plastic nursery pot inside the terracotta one. This lets you lift out fading spring blooms and drop in summer annuals without re-digging the whole setup.
Step 4: Adding Texture & Detail
-
Place anchor rocks:
Nestle a few medium-sized river rocks along the outer edge of your flower stream. These act as a visual barrier and help contain the soil. -
Add accent plants:
If you have small green shoots or non-flowering ground cover, tuck one or two near the rocks for textural contrast against the dark soil. -
Lay the gravel border:
Pour the small white decorative gravel in a curve outside the planted area. This white line echoes the white flowers and defines the garden bed edge distinctly. -
Clean up stones:
Use your hand to sweep any stray soil off the white pebbles or river rocks to keep the presentation crisp and high-contrast. -
Final water:
Water the plants gently using a watering can with a rose attachment to avoid washing away the fresh soil or disturbing your carefully placed gravel.
Step back and enjoy how this simple arrangement adds a storybook quality to your garden corner


Pathway Edge Spill Border
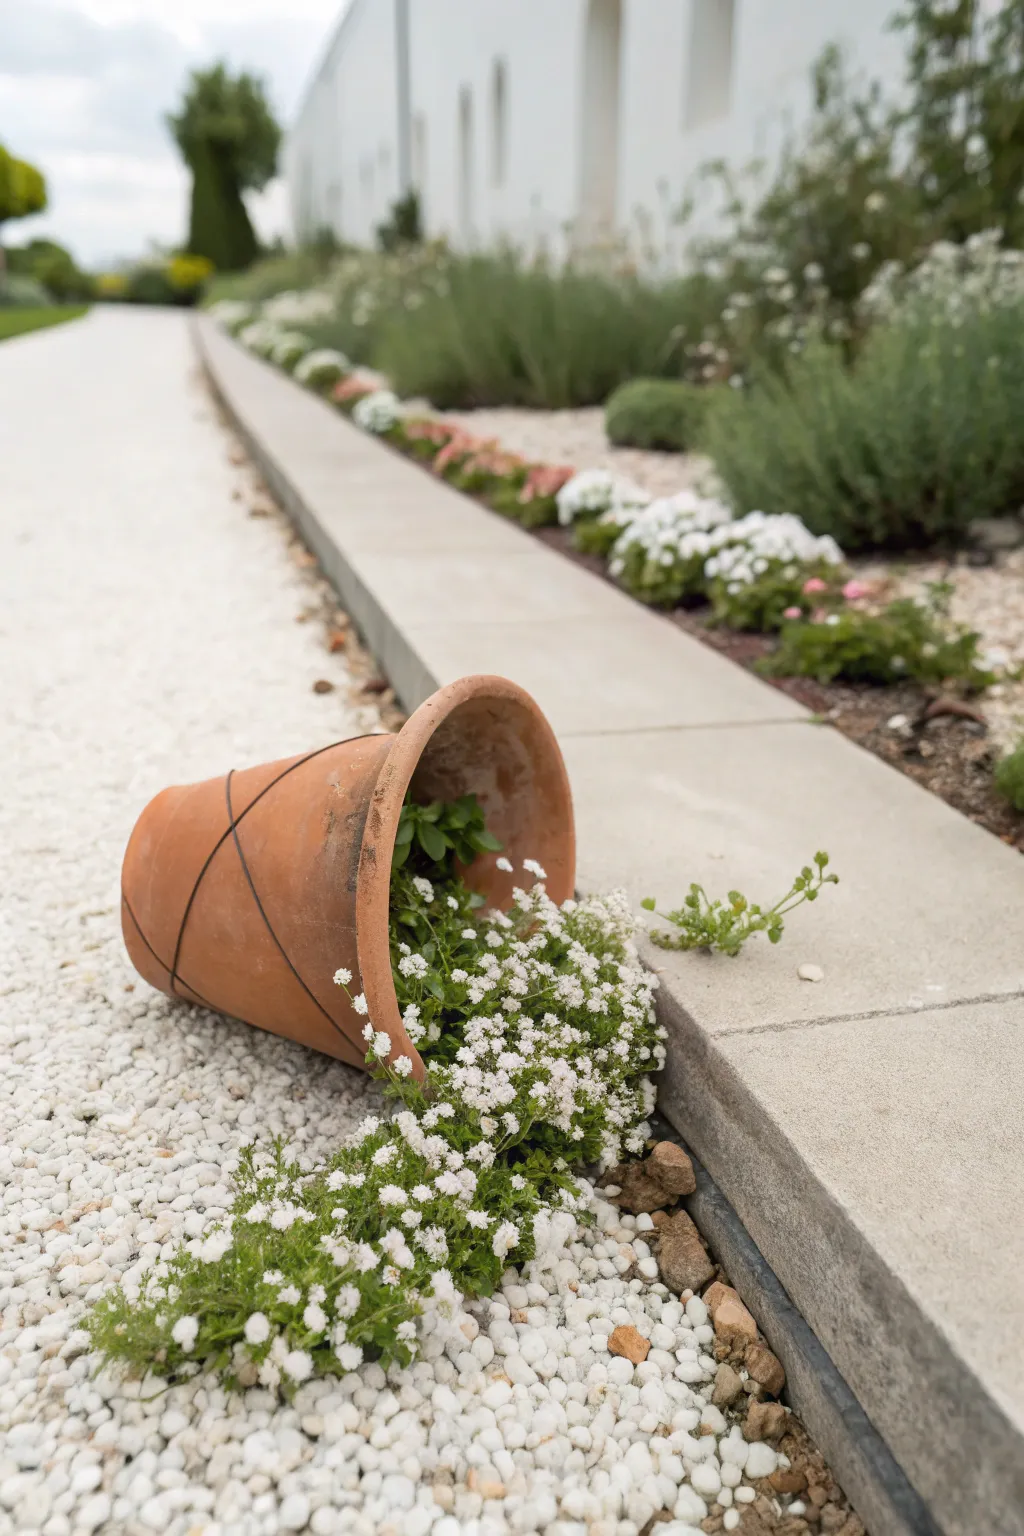
Create a whimsical garden moment with this spilled flower pot feature, where blooms appear to tumble naturally onto a pathway. This charming landscaping trick adds movement and a touch of orchestrated chaos to manicured borders.
Step-by-Step Tutorial
Materials
- Medium-sized terracotta pot (aged finish preferred)
- White perennial creeping plants (e.g., Sweet Alyssum, Bacopa, or Creeping Phlox)
- potting soil
- Small trowel
- White gravel or decorative pebbles
- Existing garden border or pathway edge
- Metal wire or landscape pins (optional)
Step 1: Preparing the Site
-
Select the location:
Choose a spot along a pathway or border edge where the spilled effect will be clearly visible but not a tripping hazard. Look for an area with enough flat space to accommodate the pot lying on its side. -
Clear and level:
Clear away existing mulch or debris from the chosen spot. Ensure the ground is relatively level near the concrete curbing so the pot can rest securely without rolling. -
Dig a depression:
Dig a shallow, depression in the soil—just an inch or two deep—where the main body of the pot will rest. This helps nestle the pot into the earth so it looks settled rather than precariously perched. -
Clean the gravel:
If you are working on an existing gravel path, rake the white pebbles smooth to create a clean canvas for your spill.
Pro Tip: Half-Pot Trick
If you can’t stop the pot from rolling, you can actually bury the bottom half completely or break a pot in half lengthwise to lay flat.
Step 2: Positioning the Vessel
-
Place the pot:
Lay the terracotta pot on its side in the depression you created. Angle the opening slightly downward and towards the path or border edge where you want the flowers to flow. -
Secure the pot:
Pack soil firmly around the lower side of the pot to keep it from rolling. For extra stability in windy areas, I sometimes bury the bottom third of the pot into the soil itself. -
Add potting mix:
Fill the inside of the pot about halfway with good quality potting soil. Slope the soil so it spills out of the mouth of the pot and onto the ground in a fan shape. -
Extend the soil bed:
Continue adding a layer of soil directly onto the ground outside the pot, mimicking the shape of spilled liquid. Taper it off as it gets further from the rim.
Troubleshooting: Drainage
If water pools inside the sideways pot, drill a small hole in the side that is facing down against the earth to prevent root rot.
Step 3: Planting the Spill
-
Prepare the plants:
Gently remove your creeping plants (like Alyssum) from their nursery containers. Loosen the root balls slightly to encourage them to spread. -
Plant inside the rim:
Place the first plant deeply inside the pot, tucking it well into the back so foliage looks like it’s tumbling out from the very bottom. -
Plant the rim:
Position the next plant right at the lip of the pot. Arrange the stems so they drape over the terracotta edge, concealing the soil line. -
Create the flow:
Plant the remaining flowers in the soil bed you prepared on the ground. Place them close together to create a dense, continuous carpet of blooms. -
Shape the spill:
As you plant further away from the pot, narrow the arrangement slightly or curve it naturally to simulate the organic movement of spilled water.
Step 4: Finishing Touches
-
Backfill with gravel:
Carefully push the white gravel back around the edges of your new flower ‘puddle’ to define the shape and hide the edges of the potting soil. -
Water gently:
Water the plants immediately using a watering can with a rose attachment. Water gently to settle the soil without washing it away or disturbing the gravel. -
Clean the area:
Brush off any soil that may have gotten onto the outside of the terracotta pot or the surrounding concrete border to keep the look crisp. -
Add stray blooms:
For a hyper-realistic touch, plant one or tiny seedling slightly separated from the main mass, as seen in the photo, to look like a splash or droplet. -
Monitor growth:
In the first few weeks, train the stems as they grow to ensure they flow in the right direction, using small landscape pins if necessary to guide them.
Enjoy the surprising burst of life this creative planting technique brings to your garden path


Ombre Spill from Dark to Light
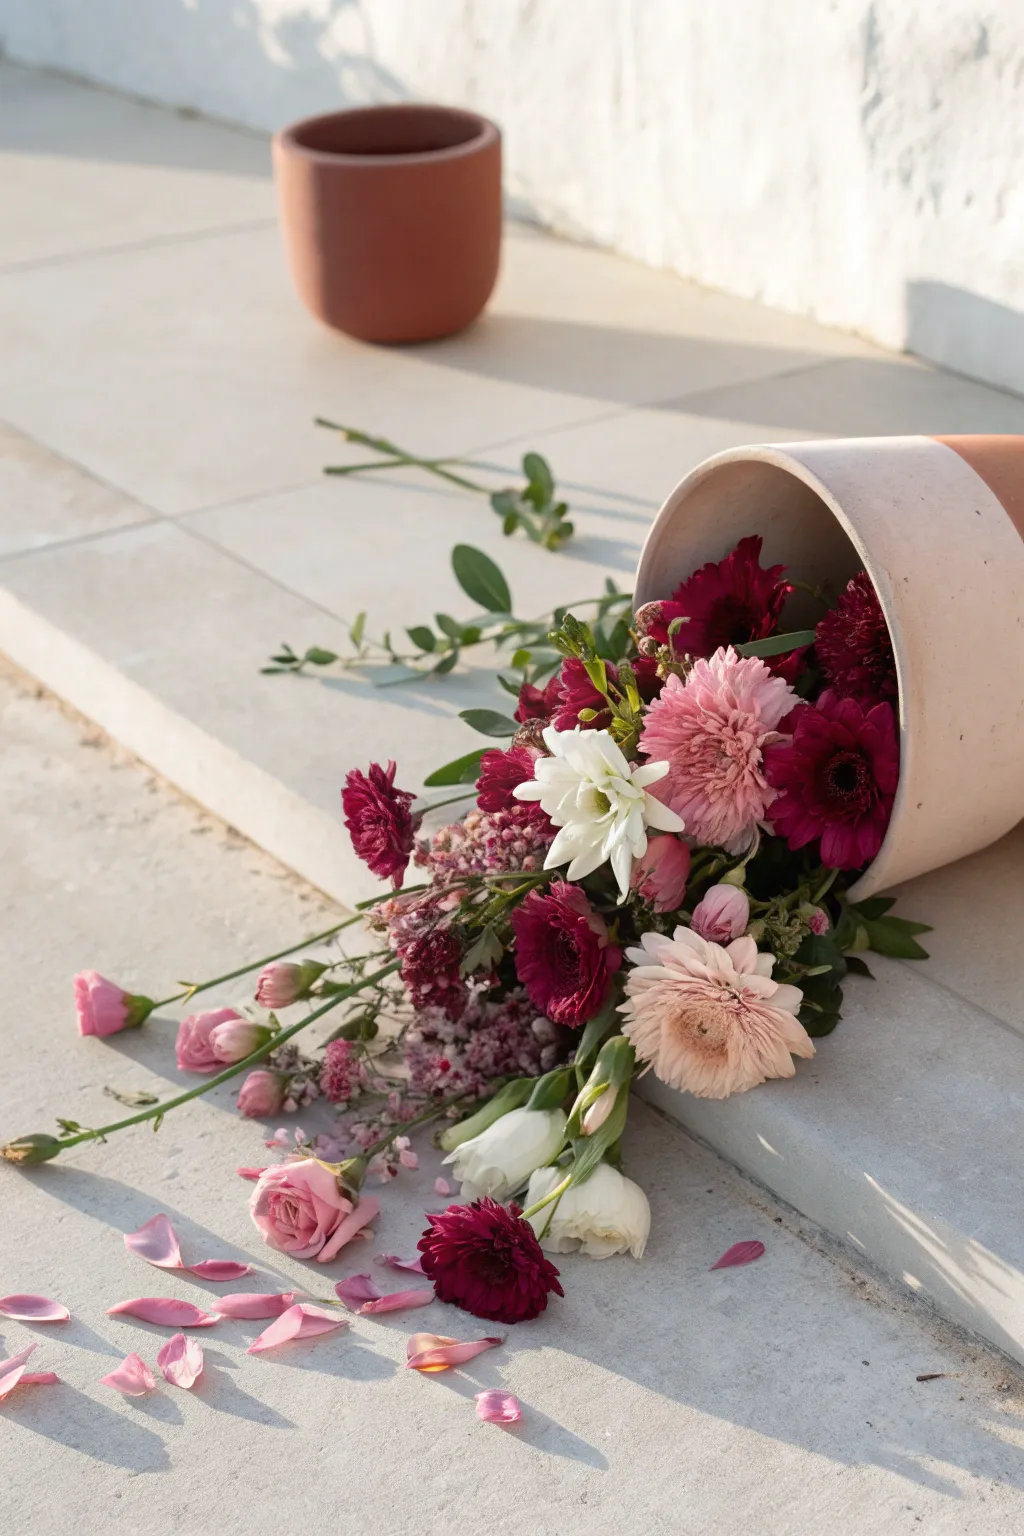
Capture the romantic illusion of a garden accident turned into art with this spilled flower pot arrangement. This project uses a gradient of blooms, flowing from deep crimson to soft blush and creamy white, to create a stunning visual pathway across your patio steps.
Step-by-Step Tutorial
Materials
- Large terracotta pot (10-12 inch diameter)
- Matte paint (cream or pale pink) for pot rim
- Painter’s tape
- Floral foam block or chicken wire
- Sharp floral shears
- Burgundy chrysanthemums or dahlias
- Deep red gerbera daisies
- Pink carnations or lisianthus
- Creamy white mums or daisies
- Eucalyptus or soft greenery sprigs
- Loose rose petals (assorted pink shades)
Step 1: Preparing the Vessel
-
Tape the rim:
Begin by masking off the main body of your terracotta pot with painter’s tape, leaving just the thick upper rim exposed. -
Paint the accent:
Apply a coat of matte cream or pale pink paint to the rim. I like to use a sponge brush here to avoid streak marks. Let it dry completely before peeling off the tape. -
Position the pot:
Lay the pot on its side on your chosen step or patio area. Use a small stone or wedge discreetly placed underneath to stop it from rolling. -
Insert mechanics:
Tuck a soaked block of floral foam or a crumpled ball of chicken wire deep into the mouth of the pot. This will anchor your stems.
Keep It Fresh
If using floral foam, pour a small cup of water into the foam daily. For chicken wire, use water tubes on individual stems to extend their life.
Step 2: Building the Ombre Flow
-
Start with darkness:
Select your deepest burgundy and red flowers. Cut the stems relatively short. -
Anchor the base:
Insert these dark blooms deep into the pot’s opening, clustering them tightly to create a shadowed, intense focal point right at the source of the ‘spill’. -
Extend the spill:
Move to your medium pink tones—carnations work beautifully here. Cut these stems slightly longer. -
Bridge the colors:
Place the pink flowers so they extend outward from the pot mouth, intertwining slightly with the darker red blooms to blur the line between colors. -
Add the highlights:
Introduce the lightest flowers—the white mums and pale pink lisianthus. These should have the longest stems. -
Create the flow:
Arrange these lighter blooms so they reach furthest away from the pot, trailing down the step or across the pavement to complete the gradient.
Go Permanent
Recreate this using high-quality silk flowers and glue the stems into a styrofoam block for a permanent decor piece that lasts all season.
Step 3: Refining the Illusion
-
Insert greenery:
Take your eucalyptus or greenery sprigs and tuck them sporadically along the sides of the flow. -
Soften edges:
Ensure the greenery looks haphazard, like it grew there naturally, rather than perfectly placed. -
Check for gaps:
Stand back and look for any empty spots where the mechanics (foam or wire) might show. Fill these with mid-sized blooms. -
Scatter the finish:
Take a handful of loose rose petals in mixed pink shades. -
Create movement:
Gently toss the petals at the very end of the flower trail and slightly to the sides, simulating the momentum of a spill. -
Final adjustment:
Nudge a few stray petals further away to make the scene look spontaneous and organic.
Step back and enjoy the poetic beauty of your tumbled garden masterpiece

The Complete Guide to Pottery Troubleshooting
Uncover the most common ceramic mistakes—from cracking clay to failed glazes—and learn how to fix them fast.
Single-Color “Paint Pour” Planting
Create a stunning visual trick in your garden with this spilled pot arrangement, where vibrant magenta petunias seem to tumble effortlessly from an overturned terracotta vessel. This living ‘paint pour’ adds a whimsical, dynamic touch to any patio corner or garden step.
How-To Guide
Materials
- Large terracotta pot (12-14 inch diameter)
- Potting soil mix
- Slow-release fertilizer granules
- 6-8 Magenta Petunia starter plants (trailing variety like Wave or Supertunia)
- Trowel
- Garden shovel
- Small rocks or broken pottery shards (optional, for stabilizing)
- Watering can
Step 1: Setting the Scene
-
Choose your location:
Select a spot where the ‘spill’ can flow naturally, such as the edge of a patio, a wide walkway step, or a corner of a flower bed. Ensure the area gets at least 6 hours of full sun for petunias to thrive. -
Prepare the ground:
Clear the area where the flowers will land. If you are planting directly into the ground, loosen the soil in a fan shape extending away from where the pot mouth will be. If planting on a hard surface like the image, distinct planting pockets aren’t needed yet. -
Position the pot:
Lay your terracotta pot on its side. Experiment with the angle; it looks most natural if the mouth is slightly lower than the base, or perfectly horizontal. -
Secure the pot:
Once you like the angle, dig a shallow depression in the soil to nestle the pot into so it doesn’t roll away. If placing on concrete, secure it by placing small wedges or rocks inconspicuously on either side of the pot’s belly.
Soil Erosion Fix
If rain washes your soil slope away, try mixing in a bit of peat moss or coconut coir to improve adherence, or tuck small invisible landscape pins over the root balls to hold them firm.
Step 2: Creating the Spill
-
Fill the interior:
Pack the bottom half of the tipped pot with potting soil. Press it down firmly so it stays inside despite the angle. I like to dampen the soil slightly here to help it hold its shape. -
Create the flow path:
Add a mound of soil spilling out from the mouth of the pot. Shape this soil into a tapered, cascading form that simulates liquid pouring out. It should be widest near the pot and narrow slightly as it travels down the step or ground. -
Enrich the soil:
Mix a handful of slow-release fertilizer into your soil mound. Petunias are heavy feeders, and this ensures continuous blooming without constant liquid feeding. -
Plant the anchor:
Take your first two petunia plants and tuck them deep inside the mouth of the pot. Angle them outward so their blooms will face the viewer, obscuring the rim of the pot. -
Build the cascade:
Plant the remaining petunias along the soil path you created. Place them close together—closer than you normally would—to create an instant, dense carpet of color that hides the soil beneath. -
Connect the levels:
If your display goes over a step edge like the photo, place a plant right at the drop-off point. Allow its trailing stems to hang down toward the lower level naturally.
Multi-Color Pour
For a ‘mixed paint’ look, alternate two trailing plant colors, like white and purple alyssum or contrasting creeping phlox, blending them where they meet in the middle of the spill.
Step 3: Finishing Touches
-
Plant the landing zone:
Place the final 1-2 plants at the bottom of the ‘spill’ area. Fan the stems out broadly to create a pooling effect where the ‘paint’ has settled. -
Tuck and hide:
Gently manipulate the stems of all the plants. Interweave them slightly to cover any bare soil patches or visible plastic tags. The goal is a seamless ribbon of magenta. -
Hide stabilizers:
If you used rocks or wedges to hold the pot in place, pull some foliage over them now to conceal the mechanics of the structure. -
Water carefully:
Water the plants immediately using a watering can with a rosette attachment. Pour gently to avoid washing away the sloped soil. Focus on the root zones. -
Clean up:
Brush away any loose soil crumbs from the terracotta rim or the surrounding patio stones to keep the look crisp and intentional.
Step back and enjoy the playful illusion of your perpetual garden accident that blooms brighter every day
Mixed Texture Spill with Trailers and Mounds
Embrace the beauty of imperfection with this charming ‘spilled’ flower pot arrangement. By artfully tipping a classic terracotta vessel, you can create a dynamic, flowing garden feature that combines mounded white blooms with cascading pink trailers for a striking visual effect.
Detailed Instructions
Materials
- Medium-sized terracotta pot (standard rim style)
- Potting soil (high quality, well-draining)
- One white flowering plant (e.g., Bacopa or Alyssum)
- Two to three pink trailing plants (e.g., Verbena or Calibrachoa)
- Small trowel
- Watering can
- Optional: Landscape fabric or burlap
- Optional: Small stone or wedge for stability
Step 1: Setting the Stage
-
Select the location:
Choose a flat, paved area or a sturdy garden bed where the pot won’t be easily kicked. A corner on a patio or walkway works beautifully to frame the spill. -
Prepare the soil base:
Before placing the pot, check if your surface is slippery. If placing on stone, you might want to put down a small patch of landscape fabric to give the soil some grip. -
Dig a slight depression:
If you are working on dirt, dig a very shallow groove where the side of the pot will rest. This prevents it from rolling. -
Position the pot:
Lay the terracotta pot on its side. For extra security, especially if you have pets or wind, wedge a small, flat stone or a piece of wood underneath the curved side to stop it from rolling left or right. -
Create the spill zone:
Take several scoops of potting soil and create a mound that starts inside the pot and spills outward onto the ground in a fan shape. -
Compacting the soil:
Gently press down on the soil mound. You want it firm enough to hold the roots but loose enough for drainage. The soil should look like it naturally tumbled out.
Bury the Pot
For a truly sunken look in a garden bed, bury the bottom third of the pot in the ground. This looks more natural and anchors it permanently against wind.
Step 2: Planting the Flow
-
Prepare the anchor plant:
Take your white flowering plant (the mounding variety) out of its nursery container. Gently loosen the root ball with your fingers. -
Plant the interior:
Tuck the white plant deep into the mouth of the pot. Angling it slightly upward helps the foliage look full and hides the empty space at the back of the pot. -
Add more soil:
Pack a bit more soil around the base of the white plant to secure it inside the rim. -
Prepare the trailers:
Remove the pink trailing plants from their pots. I find it helpful to tease the vines apart slightly so they aren’t in a tight clump. -
Position the cascade:
Plant the pink flowers in the spilled soil just outside the pot’s rim. Arrange them so the stems extend away from the pot, following the direction of the soil spill. -
Mix the textures:
Ensure there is no visible gap between the white plant inside and the pink plants outside. The foliage should mingle at the rim for a seamless look. -
Cover the roots:
Top off the exposed roots with a final layer of fresh potting soil. Smooth the edges of the soil pile on the ground so it tapers off naturally rather than ending in a sharp ridge. -
Clean the pot:
Brush off any loose dirt clumps from the terracotta rim or the outside of the pot to keep the focus on the flowers.
Step 3: Maintenance and Care
-
Initial watering:
Water gently using a shower setting or a watering can with a rose attachment. A heavy stream will wash away your carefully arranged soil spill. -
Check stability:
Once wet, the soil will be heavier. Double-check that the pot hasn’t shifted and adjust your stabilizing wedge if necessary.
Extended Spill
Make the ‘spill’ longer by digging a shallow trench extending from the pot mouth. Fill with soil and plant trailers further out for a dramatic river of color.
Enjoy the whimsical touch this effortless-looking arrangement brings to your outdoor space


What Really Happens Inside the Kiln
Learn how time and temperature work together inside the kiln to transform clay into durable ceramic.
Succulent Stream from a Broken Clay Pot
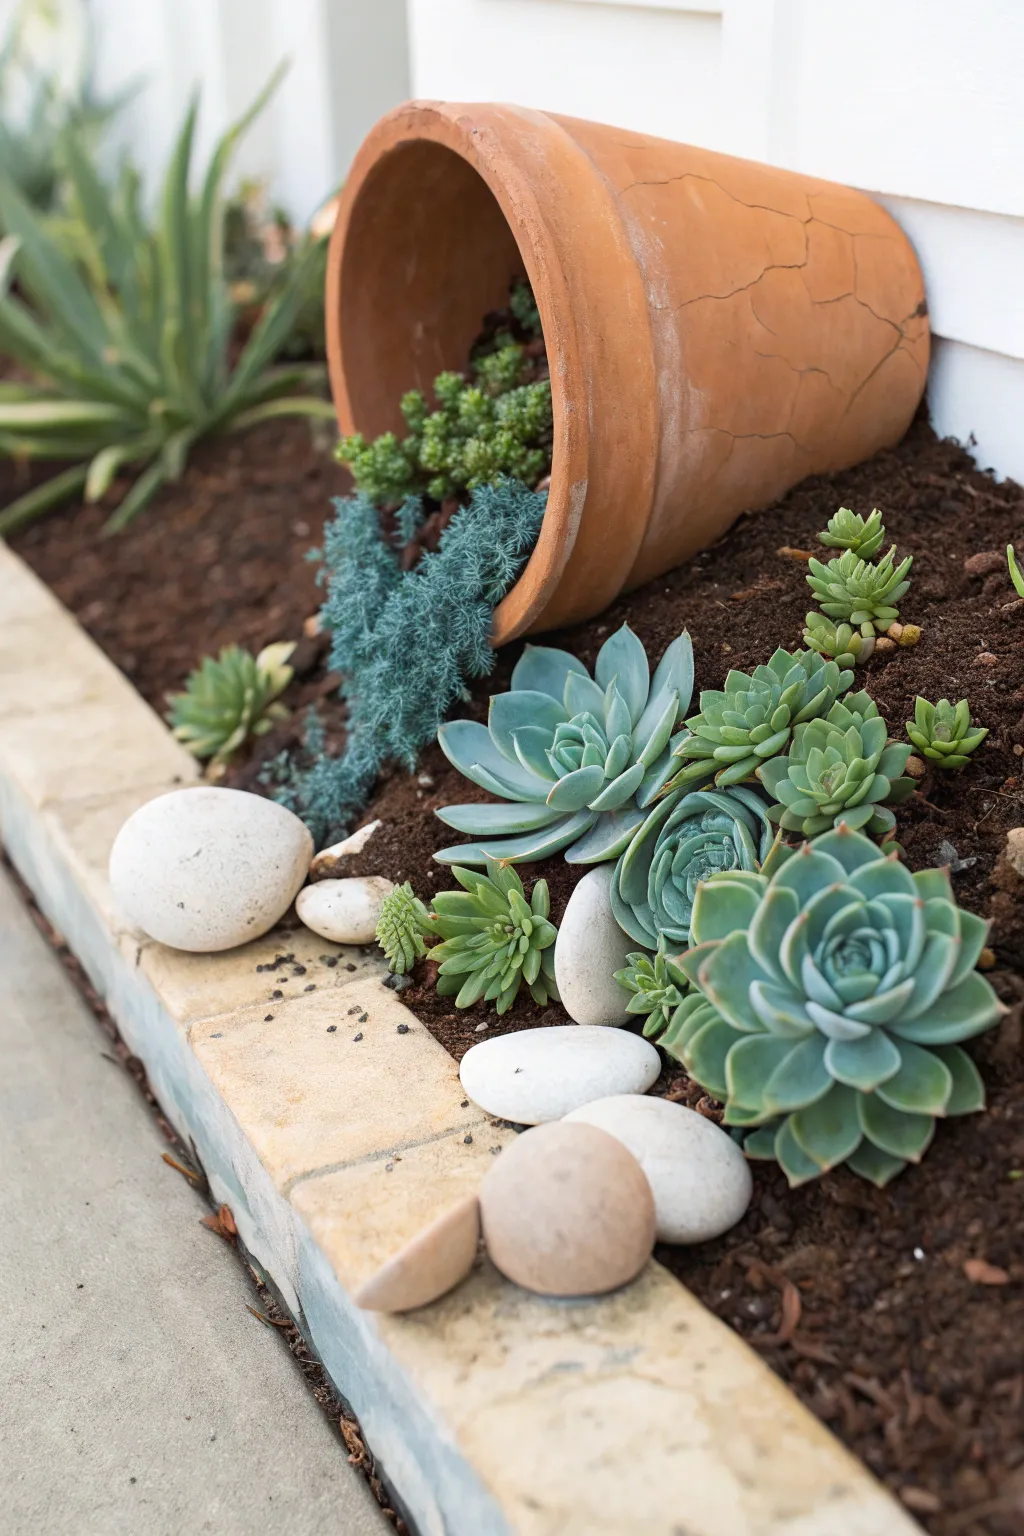
Transform a broken or cracked terra cotta pot into a whimsical garden feature where greenery seems to pour onto the ground like liquid. This ‘spill pot’ arrangement uses a variety of rosette-shaped and trailing succulents to create a stunning, low-maintenance focal point.
Step-by-Step Guide
Materials
- Large terra cotta pot (cracked or intact)
- Succulent potting soil mix
- Assorted rosette succulents (Echeveria, Sempervivum)
- Trailing succulents (Sedum, Burro’s Tail)
- Small white river stones or pebbles
- Garden shovel or trowel
- Gravel for drainage
- Protective gardening gloves
Step 1: Preparing the Foundation
-
Select the location:
Choose a spot in your garden that receives bright, indirect sunlight, which most succulents prefer. A slightly sloped area works best to enhance the spilling effect, but a flat bed like the one pictured works perfectly too. -
Dig the hollow:
Using your trowel, dig a shallow depression in the soil where the pot will rest. You want to bury about one-third to one-half of the pot’s side so it looks naturally embedded in the landscape rather than just sitting on top. -
Position the pot:
Place your terra cotta pot on its side in the hollow. If you are using a pot that is actually broken, position the broken side downwards or bury it so the damage looks intentional or is hidden. Ensure the mouth of the pot is facing the direction you want your ‘stream’ to flow. -
Backfill and secure:
Pack soil tightly around the submerged part of the pot to stabilize it. It shouldn’t wiggle or roll. Inside the pot itself, add soil until it is about half full, creating a continuous level surface that flows out of the pot’s mouth onto the garden bed.
Loose Soil Fix
If soil washes out of the tilted pot when watering, pack damp moss deep inside the back of the pot before adding dirt. It holds moisture and keeps the soil structure intact.
Step 2: Creating the Flow
-
Map the stream:
Lightly scratch a winding path into the dirt extending from the pot’s mouth. The shape should start wider at the opening and perhaps taper or fan out naturally as it flows downhill or across the bed. -
Plant the anchor succulents:
Start planting right inside the lip of the pot. Use trailing or dense, small succulents like Sedum or ‘Blue Spruce’ reflexum here. They act as the source of the spill, creating a lush carpet that looks like it’s tumbling out. -
Add larger rosettes:
Place your larger Echeveria or Sempervivum specimens further down the ‘stream’. Plant these randomly but close together to mimic a natural cluster. I like to angle them slightly so their faces look up towards the viewer. -
Fill the gaps:
In between the larger rosettes, tuck in smaller chicks or cuttings. The goal is to hide the soil completely within the ‘stream’ area to give the impression of a solid flow of vegetation.
Color Burst Idea
Incorporate purple varieties like ‘Perle von Nurnberg’ or red-tipped sedums into the stream. The contrast against the classic terracotta orange creates a vibrant, sunset-like palette.
Step 3: Styling the Edges
-
Border with stones:
Gather your smooth white river stones. Place them strategically along the edge of your succulent flow and near the border of the garden bed. These act as visual punctuation marks and help define the space. -
Create stone clusters:
Instead of lining them up perfectly, group two or three stones of varying sizes together. Place a large stone near the bottom of the arrangement and a few smaller ones drifting away, echoing the organic placement of the plants. -
Expose the soil texture:
Leave the dark brown garden soil exposed around the succulent stream. The high contrast between the dark earth, the green-blue plants, and the white stones is key to the visual impact shown in the photo. -
Water gently:
Give the new plants a drink, but be careful not to wash away the soil. A gentle mist setting or a watering can with a rose attachment is best to help settle the roots without disturbing your design. -
Clean the foliage:
Use a soft brush or a puff of air to remove any loose soil crumbs from the succulent leaves. Pristine, clean rosettes make the finished project look professional and well-cared for.
Step back and enjoy your beautiful, tumbling garden illusion that stays green all year round
Herb Spill for a Kitchen-Garden Corner
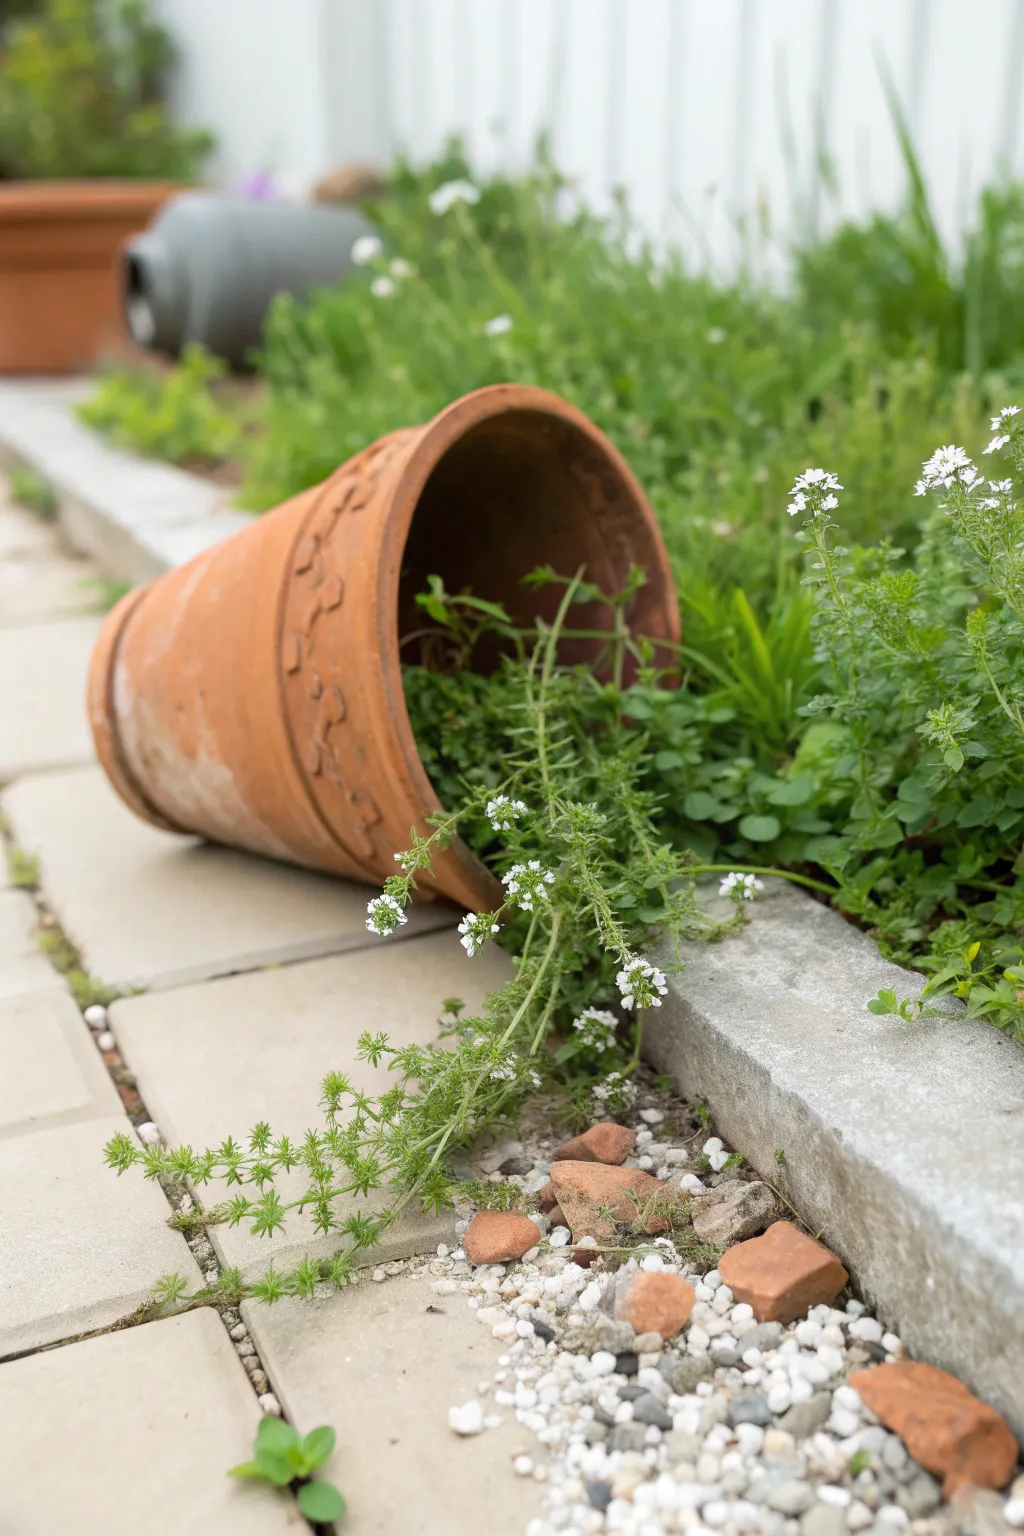
Transform a standard clay pot into a charming garden accident-on-purpose with this spilled pot technique. By burying the rim slightly and allowing plants to flow outward, you create a whimsical bridge between your patio pavers and the garden bed.
How-To Guide
Materials
- Standard terracotta pot (8-10 inch diameter)
- Potting soil mix
- Small gravel or pea stone
- Broken terracotta shards or flat stones
- Creeping thyme or Sweet Alyssum plants
- Hand trowel
- Garden spade
Step 1: Site Preparation
-
Choose your location:
Select a spot where a hardscape edge, like a paver patio or stone connector, meets a garden bed. This contrast is key to the illusion. -
Dig the cradle:
Using your garden spade, dig a shallow depression in the soil right next to the paved edge. It needs to be shaped like a semi-circle to hold the round side of the pot. -
Check the angle:
Test the fit by placing the pot on its side in the depression. I prefer to aim the opening diagonally across the paver edge rather than straight on for a more natural look. -
Adjust the depth:
Dig slightly deeper at the lip end of the pot. About one-third of the pot’s opening should be below the ground level to make it look embedded.
Step 2: Pot Installation
-
Secure the pot:
Once satisfied with the angle, mound soil around the bottom and sides of the pot to wedge it firmly in place so it won’t roll during storms. -
Create a drainage slope:
Pack a small amount of soil inside the very back of the pot. Ensure the soil level inside slopes downward toward the opening so water doesn’t pool in the back. -
Fill the spill zone:
Add potting soil inside the pot, filling it about halfway. Then, continue adding soil spilling out of the mouth of the pot and onto the edge of the pavers or stone border. -
Feather the edges:
Fan the soil out into a triangular or teardrop shape on the ground to mimic a natural spill pattern.
Pot Rolling?
If the pot refuses to stay sideways, dig the hole deeper or bury a heavy rock inside the back of the pot (beneath the soil) to act as a counterweight.
Step 3: Planting and detailing
-
Placement of main plants:
Take your creeping thyme or alyssum out of their nursery containers. Gently tease the roots apart. -
Plant inside the rim:
Tuck the largest root ball just inside the rim of the terracotta pot. This anchors the look. -
Create the flow:
Plant smaller sections of the herbs in the soil you spilled onto the ground, arranging them so they trail away from the pot mouth. -
Connect the greenery:
Ensure there is no gap between the plant inside the pot and the plants outside; they should look like one continuous fluid mass. -
Water gently:
Give the new plants a soft, thorough watering to settle the soil without keeping the pot too wet. -
Add texture with gravel:
Sprinkle small white gravel or pea stones around the ‘spilled’ soil area on the patio side. This hides bare dirt and adds a decorative contrast. -
Incorporate shards:
Place a few broken terracotta shards or rough reddish stones near typical spill areas. I like to scatter these near the gravel for an aged, ruins-like aesthetic.
Plant Choice Matters
Use drought-tolerant herbs like oregano or thyme. Since the pot is sideways, it holds less water, and thirsty plants will struggle in this setup.
Step back and admire how this simple arrangement adds a storybook quality to your garden path

TRACK YOUR CERAMIC JOURNEY
Capture glaze tests, firing details, and creative progress—all in one simple printable. Make your projects easier to repeat and improve.
Stacked Broken Pots as a Cascading Spill
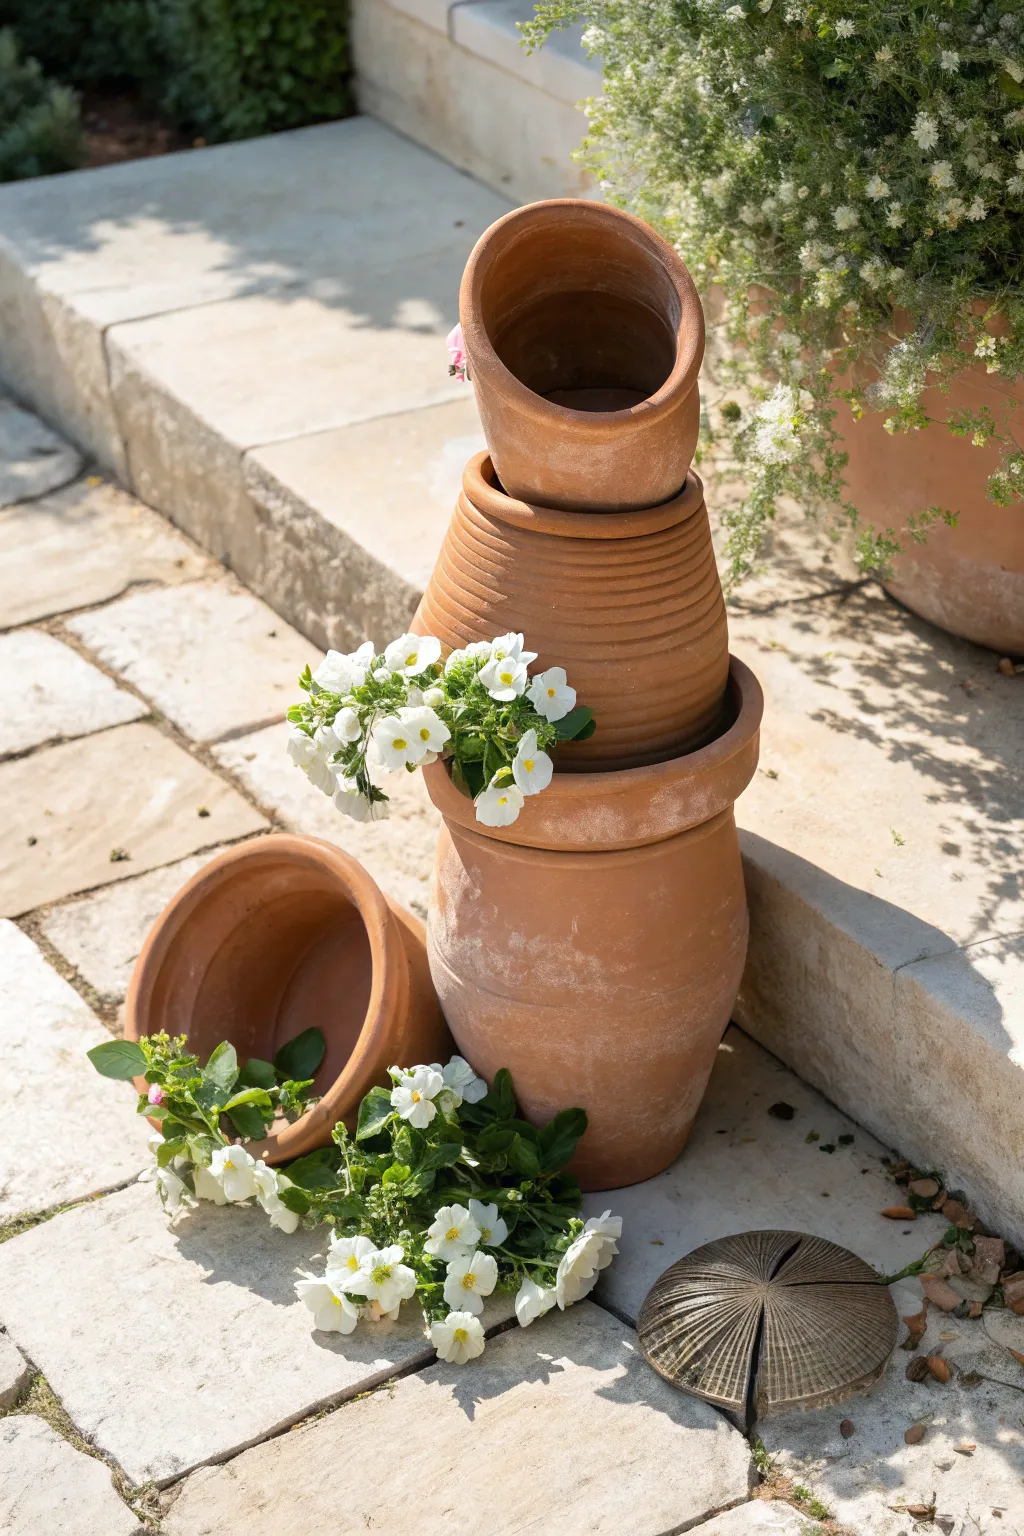
Bring a touch of whimsical charm to your garden path or patio with this gravity-defying terracotta tower. By stacking pots of descending size and planting cascading white blooms, you can create the illusion of flowers spilling effortlessly from a broken collection.
Step-by-Step
Materials
- 1 large terracotta pot (base)
- 1 medium terracotta pot with ribbed texture
- 1 small terracotta pot (top)
- 1 small terracotta pot (for the side accent)
- Strong construction adhesive or landscape glue (optional for permanence)
- Potting soil or garden soil mix
- Cascading white annuals (like petunias, calibrachoa, or bacopa)
- Drainage rocks or gravel
- Trowel
- Garden gloves
Step 1: Setting the Foundation
-
Choose your location:
Select a flat, stable surface for your tower, such as a large stone step, patio pavers, or a level patch of garden soil. Since the finished piece is heavy, assemble it exactly where you want it to stay. -
Prepare the base pot:
Take your largest terracotta pot and place it in position. If it’s going on soil, dig it in just slightly to ensure it doesn’t wobble. If it’s on stone, check for any rocking motion. -
Add drainage:
Fill the bottom third of this large base pot with drainage rocks or gravel. This adds crucial weight for stability and prevents root rot for your plants. -
Fill with soil:
Top up the base pot with potting soil, stopping about three inches from the rim. Pack it down firmly; this soil will act as the support structure for the next pot.
Wobbly Stack?
If the pots feel unstable, drive a rebar stake through the drainage holes of all three pots deep into the ground. Thread the pots onto the stake as you build.
Step 2: Building the Tower
-
Position the second tier:
Take the medium-sized ribbed pot. Nestle its base directly into the soil of the large bottom pot. You want it to sit deep enough that it feels secure and doesn’t tip easily. -
Adjust the angle:
Before securing it, tilt this second pot slightly if you desire a jaunty, imperfect look, or keep it perfectly upright for a classic column style. The soil below will hold it in place. -
Secure the layer (optional):
If you live in a windy area or have pets, I sometimes apply a rim of landscape adhesive where the pots touch for extra peace of mind, though gravity usually does the job well. -
Fill the second pot:
Just as before, add a small layer of gravel for drainage inside this second pot, then fill it nearly to the top with potting soil, packing it down firmly. -
Add the crown:
Place the smallest pot into the opening of the medium pot. Push it down into the soil firmly. Tilt this top pot at a more dramatic angle facing forward—this open mouth creates a dynamic focal point.
Level Up: Aged Patina
Brush plain yogurt onto the new terracotta pots and leave them in a shady spot for a week to encourage rapid moss growth for an ancient, weathered look.
Step 3: Creating the Spill
-
Plant the gaps:
Now for the greenery. Tuck your white flowering plants into the exposed soil around the rim of the bottom pot where the second pot sits. -
Fill the crevices:
Plant more white flowers in the gap between the middle and top pot. Gently tease the roots so they fit into the narrow space. -
Plant the top:
Add a lush cluster of flowers inside the very top, tilted pot. Let the blooms drape over the lower edge to emphasize that cascading effect. -
Arrange the fallen pot:
Take your final small pot and lay it on its side at the base of the tower. Position it so the opening faces outward, looking as if it has tumbled from the stack. -
Create the puddle:
Dig a small depression in the ground right at the mouth of the fallen pot. Plant a dense group of white flowers here, fanning them out to look like a spilled puddle of milk or blooms. -
Connect the visual line:
Ensure the flowers from the ‘spilled’ pot visually connect with the greenery tucked into the base of the main tower, creating a continuous flow from top to bottom. -
Water carefully:
Give the entire arrangement a gentle water. Use a watering can with a rose attachment to avoid washing away the soil in the tilted pots. Let everything settle. -
Clean the terracotta:
Wipe away any mud splashes on the outside of the pots with a damp cloth so the vibrant orange clay contrasts sharply with the white petals. -
Add decorative accents:
For a final touch, place a decorative garden object, like a stone sphere or an antique drain cover, near the spilled flowers to ground the scene.
Step back and enjoy the charming, tumbled elegance of your new garden feature
Raised Ledge Spill Like a Flower Waterfall
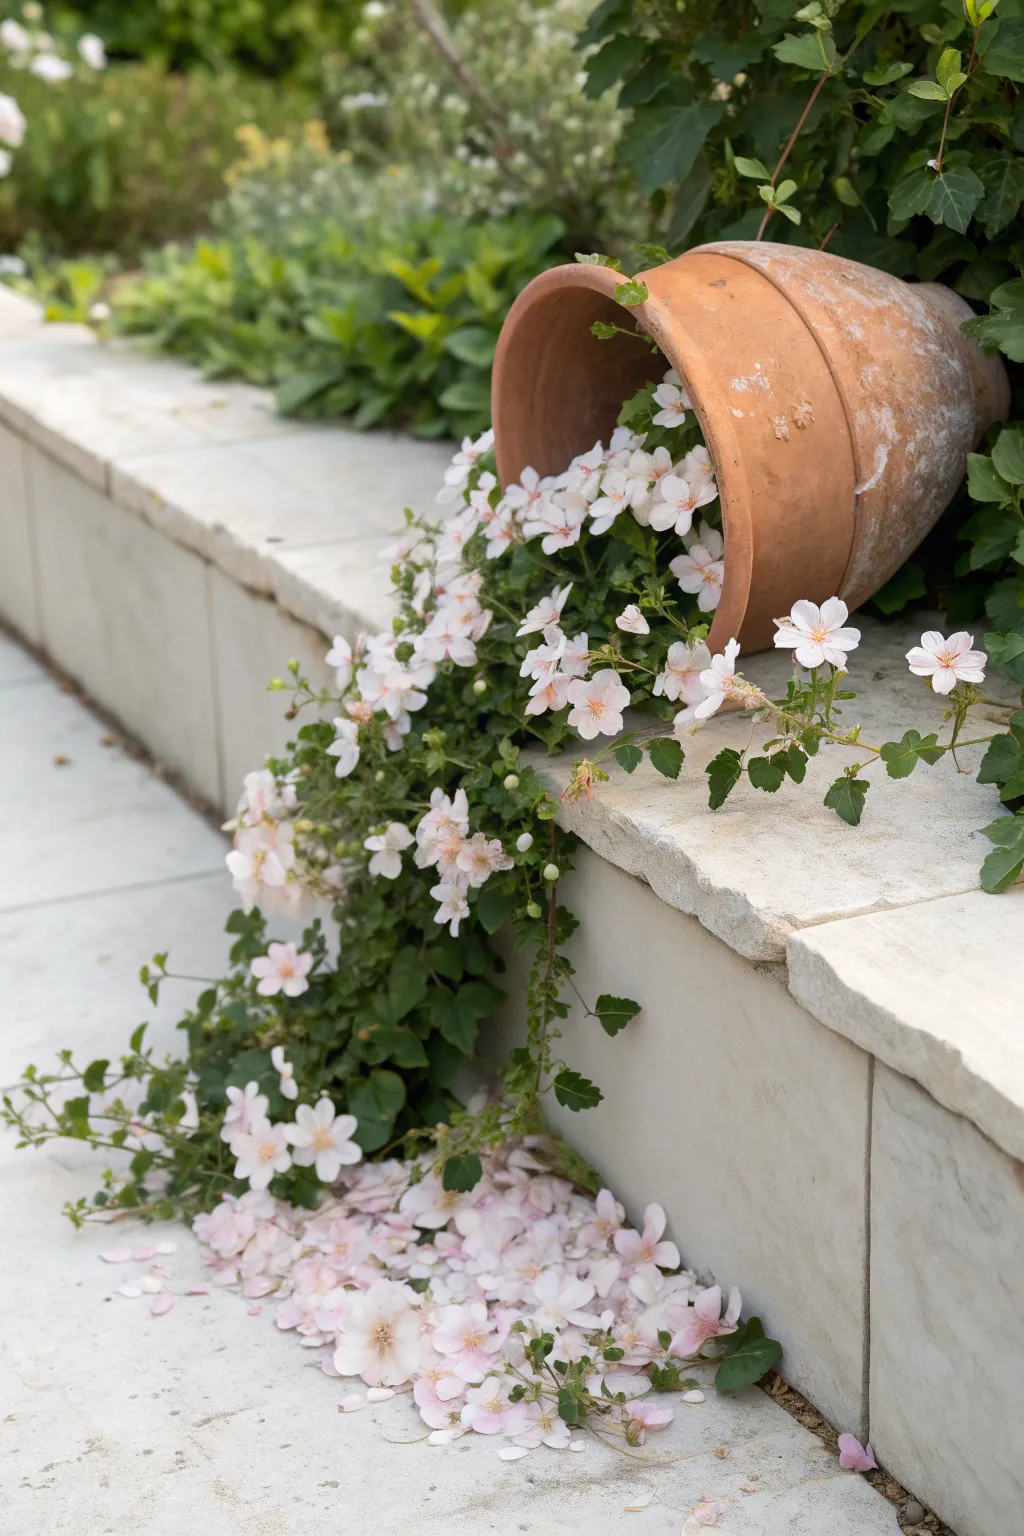
Transform a simple terracotta pot into a breathtaking living waterfall that spills gracefully over a garden ledge. This ‘spilled pot’ technique creates a whimsical illusion of flowers pouring out like liquid, softening hard edges and adding a burst of romantic charm to stone patios.
Detailed Instructions
Materials
- Large terracotta pot (10-12 inch diameter)
- Trailing plants (e.g., white or pale pink Bacopa, trailing Lobelia, or Calibrachoa)
- Potting soil mix
- Small landscape rocks or sturdy wedge
- Hand trowel
- Garden shears
- Watering can
- Soft brush or broom
Step 1: Setting the Stage
-
Select the perfect spot:
Choose a raised ledge or retaining wall about knee-height where the plants have room to drape down vertically. Ensure the surface below is flat enough to accommodate the ‘pool’ of flowers. -
Prepare the pot’s position:
Lay the terracotta pot on its side on the top tier of your ledge. Angle the opening slightly downward so it looks like it has just tipped over naturally. -
Secure the pot:
This is crucial: dig a shallow depression in the soil behind the pot to nestle it in, or use small landscape rocks on either side of the pot to wedge it firmly in place so it won’t roll. -
Fill the interior:
Fill the lower half of the tipped pot with potting soil. Pack it in gently but firmly so it creates a sloping bed leading out of the pot’s mouth. -
Prepare the spillway:
Add a layer of soil directly onto the stone ledge emerging from the pot mouth, creating a continuous path of dirt that flows over the edge of the wall. -
Extend the soil downwards:
For the vertical drop, you might need to tuck soil into crevices if your wall allows, but often the cascading plants themselves will hide the bare pot/stone gap. Focus on ensuring the soil at the top is secure.
Step 2: Planting the Flow
-
Plant inside the pot:
Start by planting your trailing flowers deep inside the pot. Tease the roots gently and press them into the soil bed you created inside. -
Create the spillover:
Plant the next batch right at the lip of the pot. Angle these plants outward and downward so they hang over the edge immediately. -
Establish the vertical drape:
If your ledge has soil pockets, plant trailing stems directly into them. If it’s a solid stone wall like in the photo, rely on long, pre-grown trailing stems from the top plants to hang down. -
Arrange the stems:
Manually guide the long stems over the edge. I like to gently weave them together slightly so they form a thick curtain rather than straggly individual vines. -
Create the bottom pool:
At the base of the wall, pile a small mound of soil and plant a cluster of the same flowers to catch the ‘waterfall’. -
Connect top to bottom:
Ensure the trailing stems from the top reach or overlap with the plants at the bottom. If they don’t yet, be patient—they will grow to bridge the gap.
Pot Keeping Secrets
If the pot keeps rolling, bury it 1/3 of the way into the soil behind it. Applying a dab of outdoor construction adhesive to the pot’s contact point with the stone also works wonders for stability.
Step 3: Styling the ‘Spill’
-
Simulate fallen petals:
To enhance the effect shown in the picture, take fallen blooms or carefully snip a few fully open flowers. -
Scatter at the base:
Sprinkle these loose petals heavily on the flat stone surface at the very bottom, extending outward from the planted pool. This mimics a splash or puddle effect. -
Clean up the edges:
Use a soft brush to sweep away stray soil particles from the stone ledge, keeping the focus purely on the flowers and the pot. -
Water carefully:
Water gently inside the pot and at the base. Avoid a heavy stream that might wash the soil out of the tipped pot. -
Maintenance trimming:
Regularly deadhead spent blooms, but leave some fallen petals on the ground if you want to maintain that effortless, overflowing look. -
Check stability:
Give the pot a final wiggle test to ensure it hasn’t shifted during planting. Add an extra hidden stone wedge if needed for peace of mind.
Fuller Waterfall Look
To get that lush, seamless drape faster, buy larger hanging baskets, remove the hangers, and plant the mature, long vines directly into your spillway rather than starting with small nursery plugs.
Now step back and admire how seamlessly your new floral arrangement softens the hard landscaping of your garden