Whenever I’m craving that spooky-cute vibe, I reach for clay and start making tiny classics like ghosts, pumpkins, and bats. Here are my favorite spooky clay ideas—from super beginner-friendly minis to a few creative “wow” projects once you’re warmed up.
Jack-o-Lantern Minis With Faces
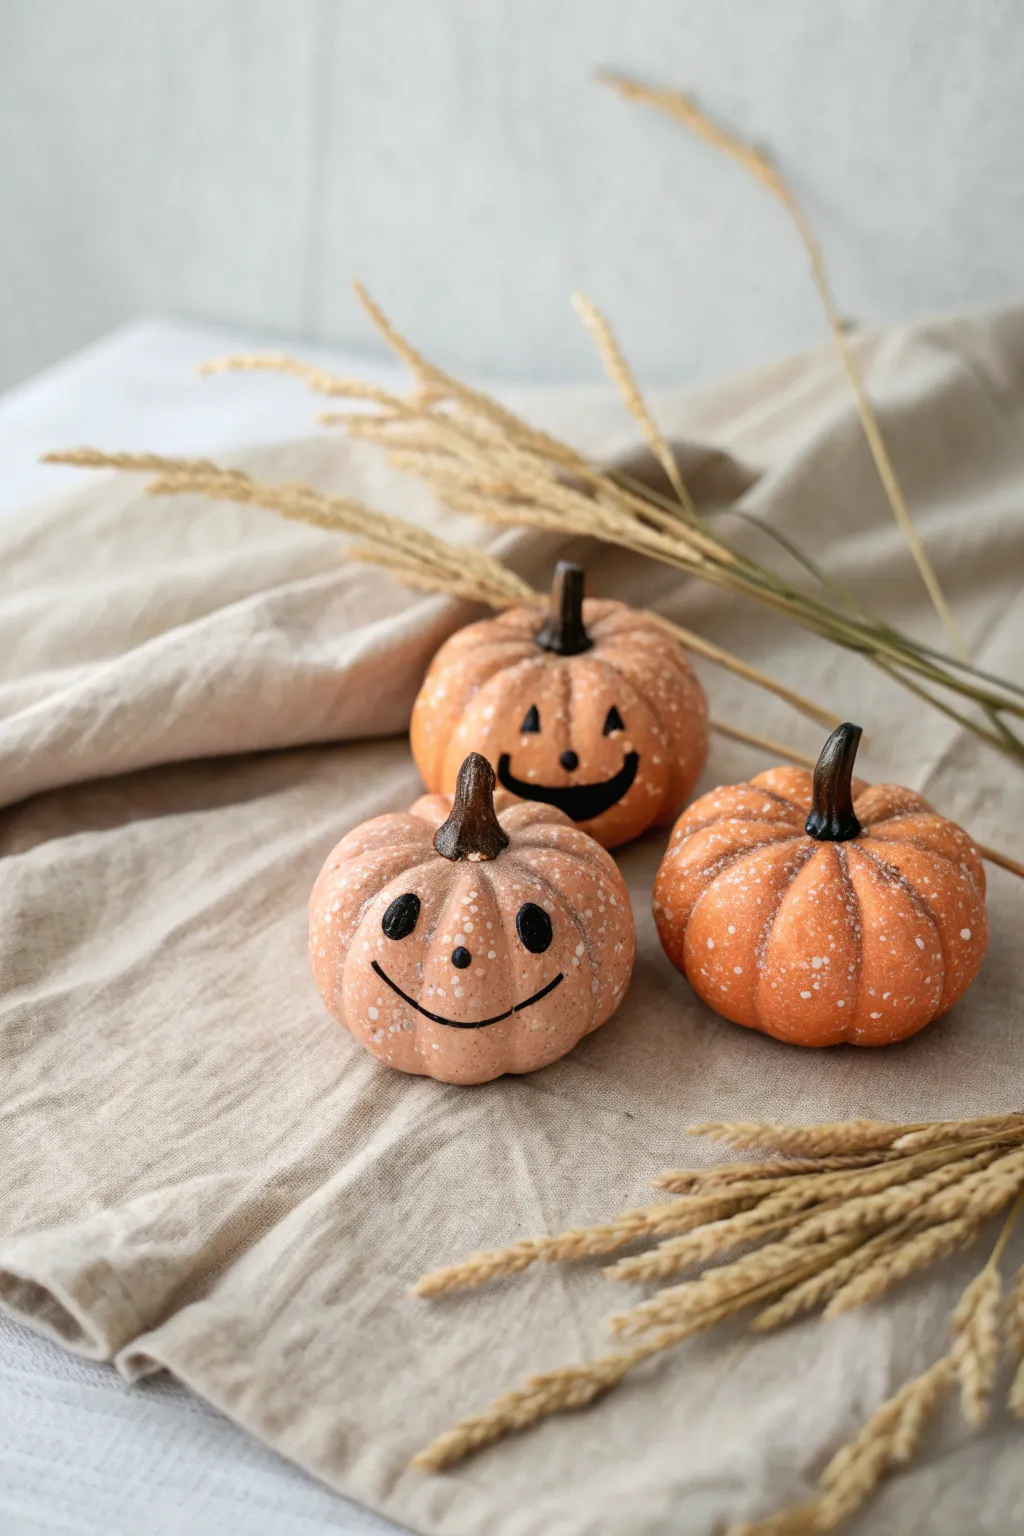
These miniature clay jack-o’-lanterns bring a rustic, handmade charm to your Halloween decor with their unique speckled finish and cheerful expressions. The combination of warm orange tones and imperfect white stippling gives them a delightful vintage farmhouse feel.
Step-by-Step Guide
Materials
- Polymer clay (Orange and Dark Brown)
- Acrylic paint (Black and White)
- Stylus tool or knitting needle
- Old toothbrush or stiff bristle brush
- Fine liner paintbrush
- Matte varnish (optional)
- Baking sheet and parchment paper
- Clay sculpting tools (needle tool/blade)
Step 1: Sculpting the Base
-
Condition the orange clay:
Begin by warming up your orange polymer clay in your hands until it becomes soft and pliable. Roll it into three smooth balls roughly the size of a tangerine or large walnut. -
Form the pumpkin shape:
Gently press down on the top and bottom of each ball to flatten them slightly into a squat, pumpkin-like shape. Don’t worry about perfect symmetry; irregularities add character. -
Depress the center:
Use your thumb or a large ball stylus to create a small indentation in the very center of the top where the stem will eventually sit. -
Create the segments:
Using a knitting needle or a clay sculpting tool, press vertical lines into the sides of the pumpkin, starting from the top center and curving down to the bottom center. Go all the way around to create the distinctive ribbed segments. -
Soften the lines:
Run your finger gently over the vertical grooves you just made to soften sharp edges, making the segments look puffy and organic rather than carved.
Step 2: Adding Details & Texture
-
Form the stems:
Condition a small amount of dark brown clay. Roll it into thick little logs, slightly tapered at the top. Twist them gently to give them a natural, vining look. -
Attach the stems:
Press the brown stems firmly into the depressions you made earlier on top of the pumpkins. You can use a tiny dab of liquid clay if you have it to ensure a strong bond, though pressure usually works for these small sizes. -
Create surface texture:
Before baking, take an old toothbrush or a stiff brush and tap it gently all over the orange surface. This subtle stippling breaks up the smooth plastic look of the clay. -
Bake the batch:
Place your pumpkins on a parchment-lined baking sheet. Bake according to your clay package’s specific instructions (usually around 275°F/130°C for 15-30 minutes per 1/4 inch of thickness). -
Cool completely:
Let the pumpkins cool down fully before moving on to painting. Painting on hot clay can make the acrylics gummy and hard to work with.
Uneven Speckles?
If your paint flicking creates blobs too large, dab them immediately with a paper towel. Practice the flicking motion on a piece of scrap paper first to get the density right.
Step 3: Painting the Faces
-
Apply the speckles:
Dip a stiff brush or toothbrush into slightly watered-down white acrylic paint. Run your thumb over the bristles to flick tiny speckles of paint all over the orange surfaces. Let this dry completely. -
Draft the faces:
For the jack-o’-lanterns, visualize where you want the eyes and mouth. You can lightly mark these spots with a pencil first if you’re nervous about free-handing. -
Paint the eyes:
Using a fine liner brush and black acrylic paint, create two oval or triangular shapes for the eyes. On the smiling pumpkin, add small dots for a nose. -
Draw the mouths:
Paint a simple curved line for the smile. For the wider grin, thicken the line in the center and taper it at the ends. I like to add tiny perpendicular tick marks at the corners of the mouth for a stitched or carved look. -
Seal the work:
Once the black paint is bone dry, you can apply a thin coat of matte varnish to protect the paint and remove any shine, keeping that rustic matte finish intact.
Level Up: Realism
Before baking, lightly brush dry dark orange pastel chalk into the vertical creases of the pumpkin segments. This creates shadowy depth and makes the shape pop.
Arrange your trio on a linen cloth or shelf to enjoy their permanent, spooky smiles


Classic Sheet Ghost Figurines
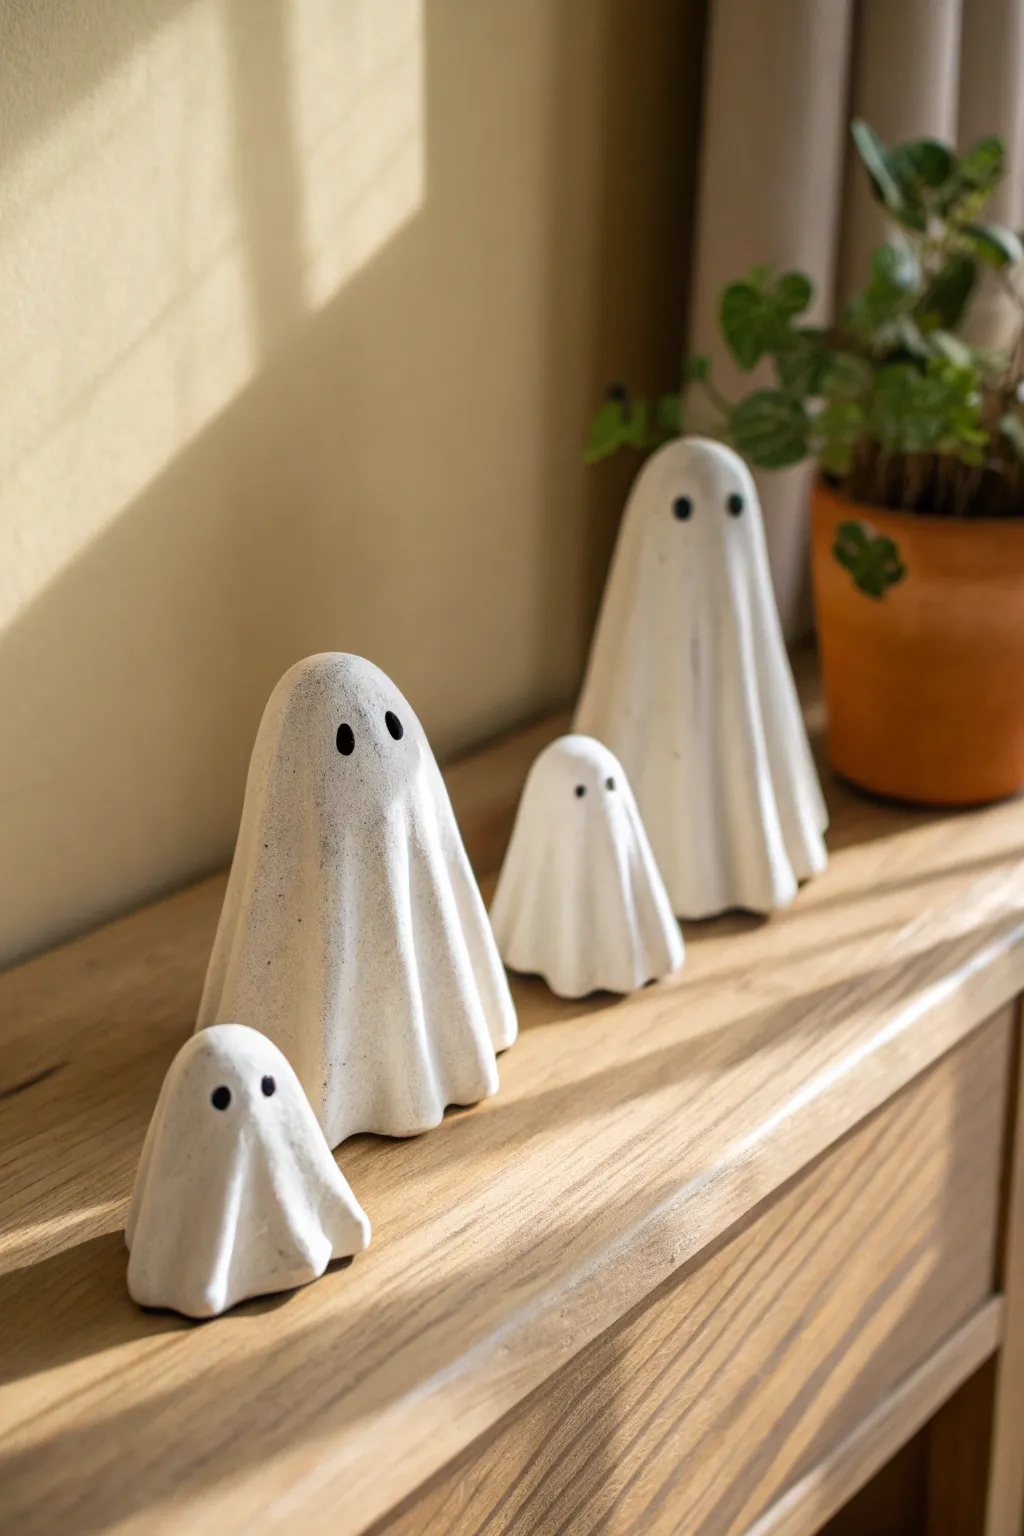
Create a charming family of spooky specters using simple modeling techniques and basic clay. These figurines feature a matte, textured finish that mimics the look of vintage ceramic or carved stone, making them perfect for understated Halloween decor.
How-To Guide
Materials
- White creative paperclay or air-dry clay
- Rolling pin
- Aluminum foil (for armature)
- Small cup of water
- Sponge or textured cloth
- Clay sculpting tools (needle tool, modeling tool)
- Black acrylic paint
- Fine-point paintbrush or dotting tool
- Fine-grit sandpaper (optional)
- Matte sealant spray
Step 1: Forming the Base
-
Prepare the Armature:
Since these ghosts have a distinct height and bell shape, start by scrunching aluminum foil into cone shapes. Create four cones of varying sizes—two tall and two small—to support the clay from the inside. -
Condition the Clay:
Take a generous amount of air-dry clay and knead it in your hands until it becomes warm, pliable, and free of cracks. If it feels too dry, dip your fingers in water and work the moisture in. -
Roll the Sheets:
Roll out the clay on a flat surface to a thickness of about 1/4 inch. You want a somewhat uniform slab, but imperfect edges are fine since they will become the bottom hem of the sheet. -
Create the Draping Layers:
Cut vague circle or oval shapes from your rolled clay. These need to be significantly larger than your foil cones so they can drape down and pool slightly at the bottom.
Cracking Clay?
If you see small cracks forming while the clay dries, mix a tiny bit of fresh clay with water to make a paste (slip) and smooth it over the crack with your finger.
Step 2: Sculpting the Shapes
-
Drape the First Ghost:
Gently lift a clay circle and center it over one of the foil cones. Let gravity do the initial work, allowing the clay to fall naturally around the form. -
Refine the Folds:
Use your fingers to gently guide the clay into vertical folds. Pinch the ‘fabric’ slightly to create deep shadows and distinct pleats, just like a real sheet would hang. -
Blend the Top:
Smooth the very top of the ghost’s head so it is rounded and seamless. Avoid making it too pointy; a softer curve looks friendlier and more classic. -
Shape the Hem:
At the bottom, allow the clay to flare out slightly. You can trim excess clay with a knife if it’s too long, or gently mold the edges to look like fabric dragging on the floor. -
Add Surface Texture:
To achieve the stone-like look seen in the photo, take a damp sponge or a piece of textured cloth and lightly press it all over the surface of the clay. This removes fingerprints and adds a matte grain. -
Repeat for the Family:
Repeat the draping and shaping process for the remaining three foil cones, varying the fold patterns slightly so each ghost has a unique personality. -
Dry Completely:
Allow the figurines to dry fully for 24 to 48 hours. I find that placing them on a wire rack helps air circulate underneath, ensuring the inner clay dries properly. -
Remove Armature:
Once the outside is rock hard, carefully dig out the aluminum foil from the bottom if possible. If the foil is stuck, it’s perfectly fine to leave it inside for weight.
Make Them Glow
Before the clay dries, poke a hole in the back and hollow out the foil completely. Once dry, place a battery-operated tea light underneath for a spooky glow.
Step 3: Finishing Details
-
Sand Imperfections:
If there are any sharp jagged bits on the bottom edge or unwanted bumps, gently buff them away with fine-grit sandpaper. Wipe away the dust with a barely damp cloth. -
Paint the Eyes:
Dip a fine-point brush or a dotting tool into black acrylic paint. Carefully place two small, vertical oval dots near the top quarter of the ghost for the eyes. -
Vary the Gaze:
For the smaller ghosts, try placing the eyes slightly lower or closer together to give them a ‘cuter’ appearance compared to the taller ones. -
Add a Wash:
To enhance the texture, mix a tiny drop of black paint into a cup of water. Lightly brush this grey wash over the ghosts and immediately wipe it off with a paper towel, leaving shadow in the recesses. -
Seal the Project:
Finish by spraying the ghosts with a matte sealant. This protects the clay from moisture and prevents the painted eyes from chipping over time.
Set your new spectral family on a mantle or shelf to watch over your Halloween festivities


Bat Charms and Cutout Ornaments
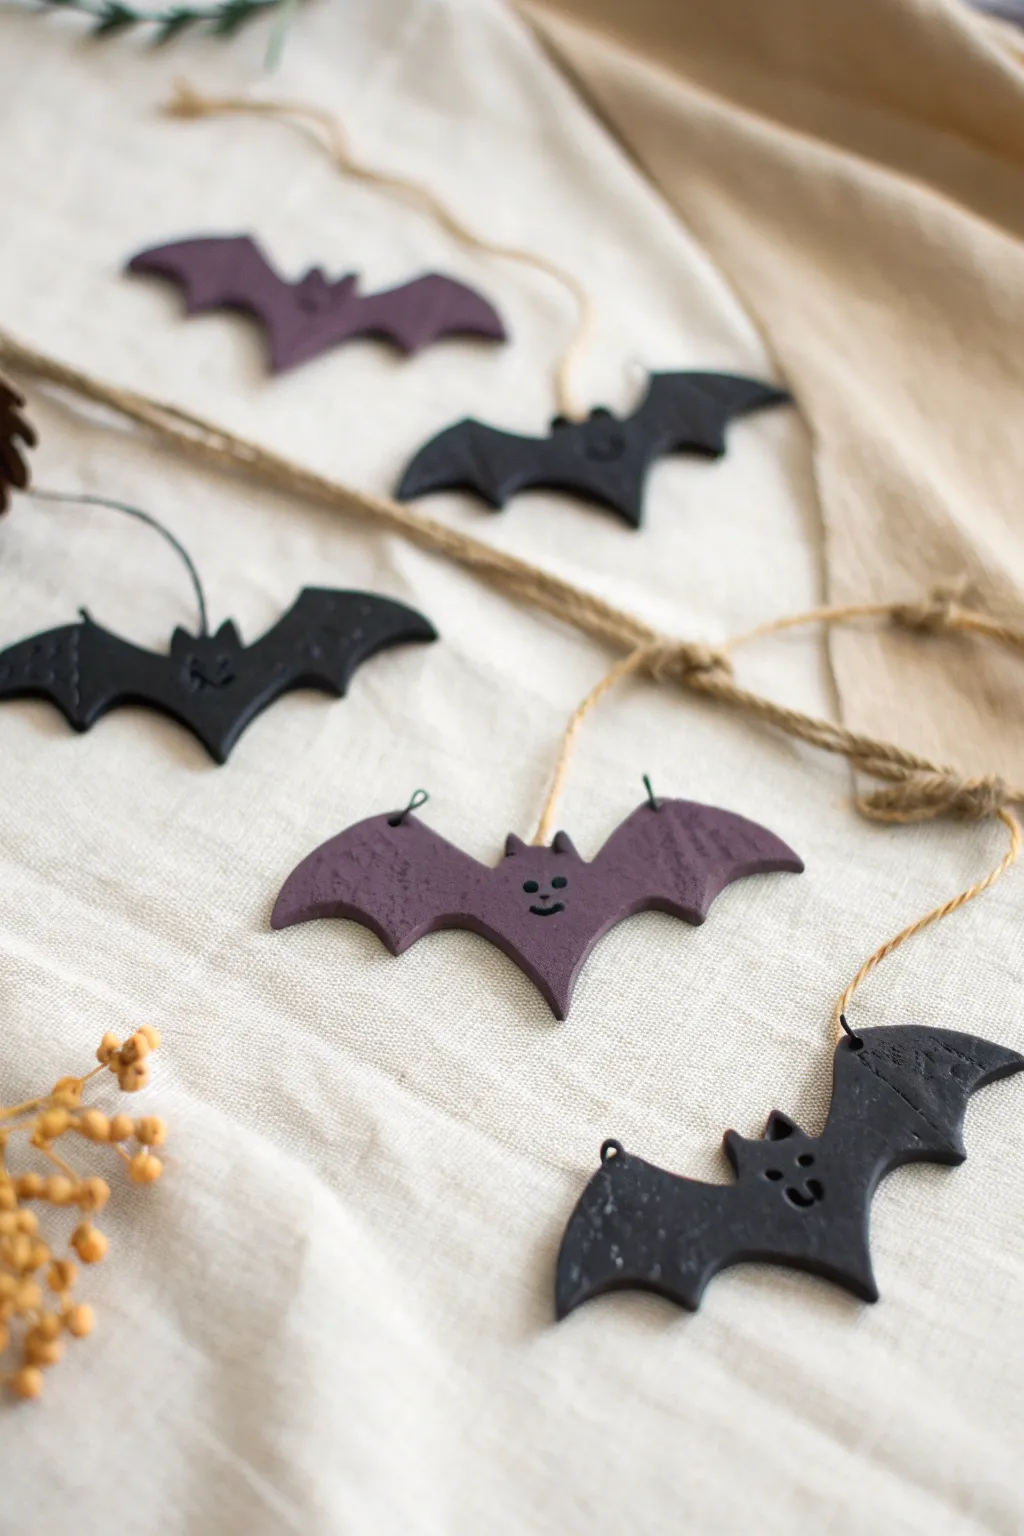
These simplistic, textured bat ornaments make perfect spooky garlands or individual gift tags for Halloween. With a charmingly uneven finish and sweet little faces, they balance eerie and adorable perfectly.
Step-by-Step Tutorial
Materials
- Polymer clay (black and deep purple)
- Small rolling pin
- Bat-shaped cookie cutter
- Parchment paper or clay mat
- Needle tool or toothpick
- Small hole punch or drinking straw (cocktail size)
- Baking sheet
- Twine or jute string
- Black acrylic paint (optional, for faces)
- Fine-grit sandpaper (optional)
Step 1: Shaping the Colony
-
Prepare the Clay:
Start by conditioning your polymer clay. Knead the black and purple clay separately until both are soft, pliable, and warm to the touch. -
Roll it Out:
Place the kneaded clay onto parchment paper. Using your rolling pin, flatten the clay to a uniform thickness, aiming for about 1/4 inch thick so they are sturdy enough to hang. -
Texture the Surface:
For that slightly weathered, flying-creature look seen in the photo, lightly press a piece of rough sandpaper or a crumpled ball of aluminum foil onto the surface of the clay before cutting. -
Cut the Shapes:
Press your bat-shaped cookie cutter firmly into the clay. Give it a tiny wiggle to ensure it cuts all the way through, then lift it away. Repeat until you have your desired number of bats. -
Smooth the Edges:
Gently run your finger around the perimeter of each cut-out bat to soften the sharp edges left by the cutter. This gives them a more finished, handmade ceramic feel.
Clean Cuts Pro Tip
To prevent the clay from sticking inside the cutter, dip the cutting edge into a little cornstarch or flour before pressing it into the clay slab.
Step 2: Details & Baking
-
Create Wing Holes:
Using a small tool or a cocktail straw, punch two small holes near the top of the wings on either side. These will be the anchor points for the string later. -
Add Facial Features:
Take your needle tool or a toothpick. Gently impress two small dots for eyes and a small curved line for a smile into the center of the bat’s head. You don’t need to go deep; just enough to make an indentation. -
Prepare for Baking:
Transfer your parchment paper with the bats onto a baking sheet. Ensure they are laying completely flat so the wings don’t warp during the baking process. -
Bake:
Bake the bats according to the specific temperature and time directions on your package of polymer clay. I always recommend using an oven thermometer to be precise. -
Cool Down:
Once the baking time is up, remove the tray from the oven and let the bats cool completely before handling them. They are fragile while still warm.
Step 3: Finishing Touches
-
Enhance the Faces:
If the indented faces aren’t visible enough, take a tiny detail brush with black acrylic paint and carefully fill in the eyes and mouth indentations. Wipe away excess immediately. -
Cut the String:
Cut lengths of jute twine or string, approximately 8-10 inches long for each bat, depending on how low you want them to hang. -
Thread the Wings:
Feed one end of the twine through the left wing hole from front to back, and the other end through the right wing hole from front to back. -
Tie the Loop:
Bring the two ends of the string together at the top, creating a triangle shape above the bat, and tie them securely in a knot. -
String the Garland:
Pass a long main textural rope through the loops of all your bats to create a garland, or simply hang them individually.
Level Up: Glitter Wings
Before baking, lightly brush a small amount of mica powder or fine glitter onto just the wingtips for a subtle, magical shimmer that catches the light.
Now you have a colony of friendly bats ready to haunt your home


Black Cat on a Pumpkin
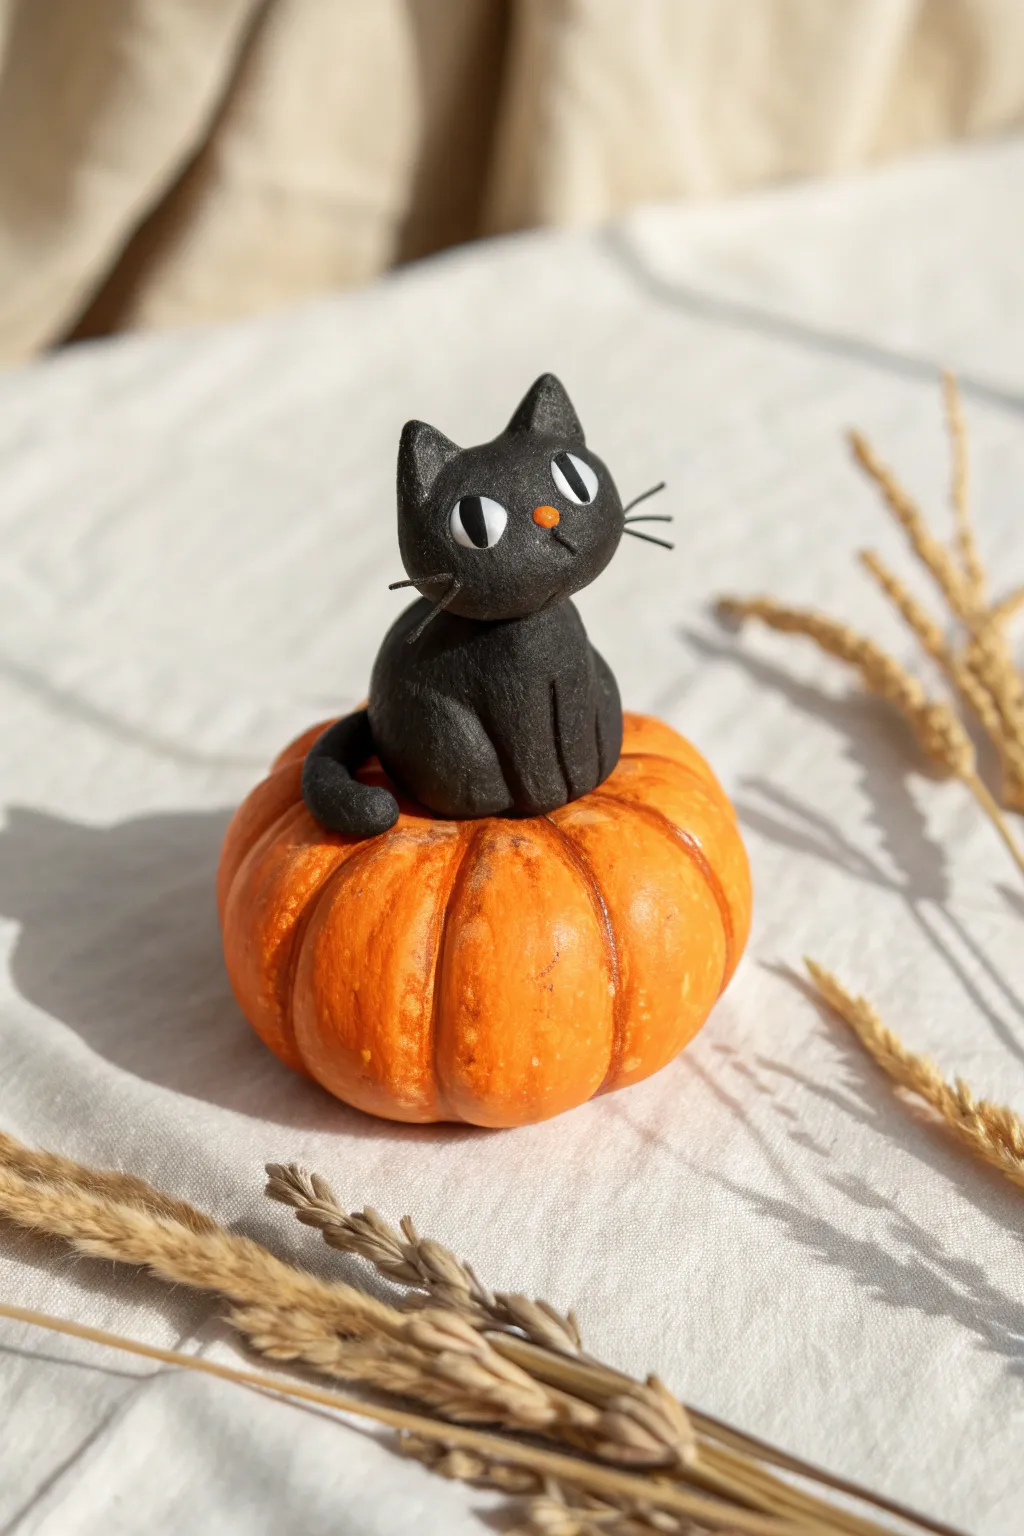
This adorable duo features a wide-eyed black cat perched atop a classic orange pumpkin, capturing the playful side of Halloween. The smooth matte finish and expressive face make this polymer clay figurine a charming addition to any spooky shelf display.
Step-by-Step Guide
Materials
- Polymer clay (Black, Orange, White)
- Acrylic paint (Burnt Umber/Brown)
- Soft pastel chalks (Orange, Red-Orange)
- Dotting tools or ball stylus
- Needle tool or toothpick
- Flexible blade or craft knife
- Thin wire or black nylon bristles (for whiskers)
- Clear matte varnish (optional)
- Sculpting tools (rubber shapers)
- Paintbrush
Step 1: Sculpting the Pumpkin Base
-
Form the base:
Start by conditioning your orange polymer clay until it is soft and pliable. Roll it into a smooth, slightly flattened sphere, which will serve as the pumpkin’s body. -
Add texture:
Use a needle tool or the back of a craft knife to press vertical indentations all around the sphere. These lines create the classic pumpkin ridges. -
Soften the shape:
Gently press your finger or a rubber tool along the ridges to round them out, making the pumpkin look plump and organic rather than sharply cut. -
Shading basics:
Before baking, I like to enhance the realism by dusting dry soft pastel chalks (shave a little orange and red-orange into a powder) into the deep crevices of the ridges with a soft brush.
Dust Magnet Trouble
Black clay picks up every speck of dust. Before rolling the cat, clean your hands and work surface with a baby wipe, and keep a piece of scrap white clay handy to roll over your palms to grab lint.
Step 2: Creating the Cat
-
Shape the body:
Take a piece of conditioned black clay and roll it into a teardrop shape. Flatten the bottom slightly so it sits securely on the center of your pumpkin. -
Form the head:
Roll a slightly smaller ball of black clay for the head. It should be roughly oval-shaped but slightly flattened on the face side to accommodate the features. -
Make the ears:
Create two small triangles from black clay. Press them gently onto the top of the head, blending the seams at the back with a rubber tool so they are seamlessly attached. -
Attach the head:
Place the head onto the top of the teardrop body. Ensure strictly good adhesion by gently wiggling it into place or using a small piece of wire as an internal armature. -
Add the tail:
Roll a small snake of black clay. Attach one end to the back of the body and curl it around the side, resting the tip on the pumpkin for a relaxed pose. -
Define the limbs:
Use a needle tool or a small sculpting blade to impress lines on the front of the body, suggesting the front legs without needing to attach separate pieces.
Step 3: Facial Features & Details
-
Create eye sockets:
Use a medium ball tool to press two indentations into the face where the eyes will go. This helps the eyeballs sit flush rather than bulging out too far. -
Add specific eyes:
Roll two tiny balls of white clay and press them into the sockets. Flatten them gently to fill the space. -
Pupils:
Roll extremely thin slivers of black clay for the pupils. Place them vertically in the center of the white eyes for that signature cat-eye look. -
Nose details:
Add a microscopic triangle of orange clay between the eyes for the nose. -
Whiskers:
Poke three tiny holes on each cheek with a needle. Insert short lengths of thin black wire or stiff nylon bristles into these holes. You can secure these with a dab of liquid clay.
Seamless Blending
To make the cat look like one solid piece rather than glued-together balls, use a silicone tipped tool or your finger to smooth the clay across the neck seam before baking.
Step 4: Finishing Touches
-
Baking:
Bake the piece according to your specific clay manufacturer’s instructions (usually around 275°F/130°C for 15-30 minutes). -
Antiquing the pumpkin:
Once cool, create a wash using burnt umber paint diluted with water. Brush it over the pumpkin and quickly wipe away the excess with a paper towel, leaving dark paint only in the deepest cracks. -
Seal:
If desired, coat the eyes with a gloss varnish for shine, but keep the cat’s fur and the pumpkin matte.
Place your finished kitty on a windowsill or desk to bring a little handmade charm to the season

The Complete Guide to Pottery Troubleshooting
Uncover the most common ceramic mistakes—from cracking clay to failed glazes—and learn how to fix them fast.
Tiny Witch Hat Charms
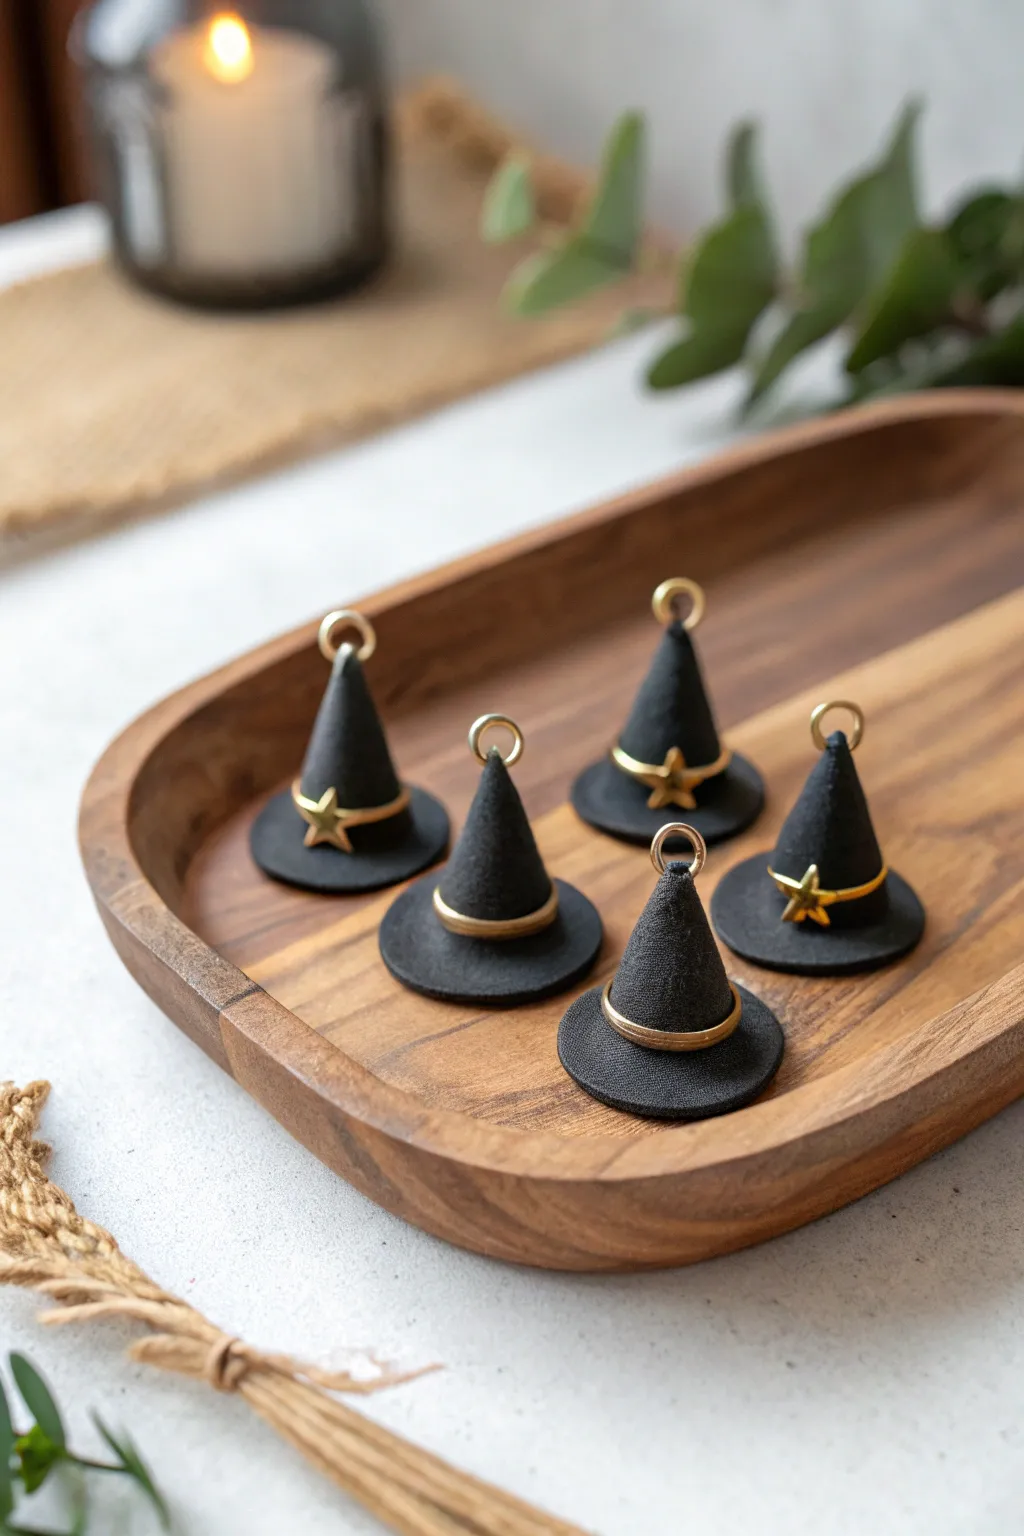
These miniature witch hat charms are minimal, chic, and perfect for Halloween jewelry or decor. Crafted from black clay with elegant gold ring accents, they strike a balance between spooky and sophisticated.
How-To Guide
Materials
- Black polymer clay
- Gold craft wire (20 or 22 gauge)
- Small gold star charms (optional)
- Eye pins or gold jump rings
- Wire cutters
- Needle nose pliers
- Rolling pin or pasta machine
- Small circle cutter (approx. 1 inch)
- Clay sculpting tool or toothpick
- Piece of textured fabric or sandpaper (for texture)
- Super glue (gel type recommended)
Step 1: Shaping the Base
-
Condition the clay:
Start by kneading your black polymer clay until it is soft and pliable. This prevents cracking later on. -
Roll the brim:
Roll out a portion of the clay to a consistent thickness of about 3mm. You want it sturdy but not chunky. -
Cut the circles:
Using your small circle cutter, punch out five discs. These will serve as the brims of your witch hats. -
Add texture:
To mimic the fabric-like look in the photo, gently press a piece of coarse fabric or fine sandpaper onto the surface of each clay disc.
Texturing Trick
Use an old toothbrush or a piece of denim to texture the raw clay. It removes fingerprints and mimics a felt hat instantly.
Step 2: Creating the Cones
-
Form the cones:
Take small balls of the remaining black clay and roll them into tapered cone shapes. Ensure the base of the cone is slightly smaller than your brim diameter. -
Refine the shape:
Gently manipulate the tip of the cone. You can leave it straight or give it a slight, whimsical bend for character. -
Texture the cones:
Roll the cones lightly over your texturing surface (fabric or sandpaper) so they match the matte, felt-like finish of the brims. -
Attach to brim:
Place each cone onto the center of a brim. Press down firmly but gently to bond the raw clay pieces together without distorting the shape. -
Smooth the seam:
Use a clay tool to gently blend the clay on the underside of the brim where it meets the cone, ensuring a secure connection.
Make it Wearable
Attach French hooks to turn these into festive earrings, or string them onto a velvet choker for a gothic necklace look.
Step 3: Adding Hardware & Baking
-
Insert eye pins:
Trim your eye pins to a short length (about 1cm). Push one vertically into the very tip of each hat cone until only the loop is visible. -
Secure the pin:
Gently pinch the clay around the wire insertion point to close up any gaps and secure the pin inside the clay. -
Bake:
Place the hats on a baking sheet lined with parchment paper. Bake according to your polymer clay package instructions, usually around 275°F (135°C) for 15-20 minutes. -
Cool down:
Allow the pieces to cool completely before handling. This is crucial as the clay hardens fully only as it cools.
Step 4: Gold Accents
-
Create gold rings:
Take your gold craft wire and wrap it around a pen or dowel that roughly matches the diameter of the cone’s base to create a perfect circle. -
Cut the rings:
Snip the coiled wire to create individual rings. You might need to adjust the size slightly by trimming so they slide snugly over the cone. -
Fit the rings:
Slide a gold ring down over the top of the hat until it rests at the base where the cone meets the brim. If it’s loose, a tiny dab of super glue will hold it in place. -
Add stars:
I like to add a little extra sparkle here. If using star charms, thread them onto the gold ring before sliding it onto the hat, or glue a tiny flat-back star to the front of the band. -
Final Glue:
For extra security, carefully remove the eye pin, add a drop of super glue to the stem, and re-insert it into the hole created earlier.
Now you have a set of adorable, bewitching charms ready to add a touch of magic to your crafty collection
Mini Cauldron With Bubbles
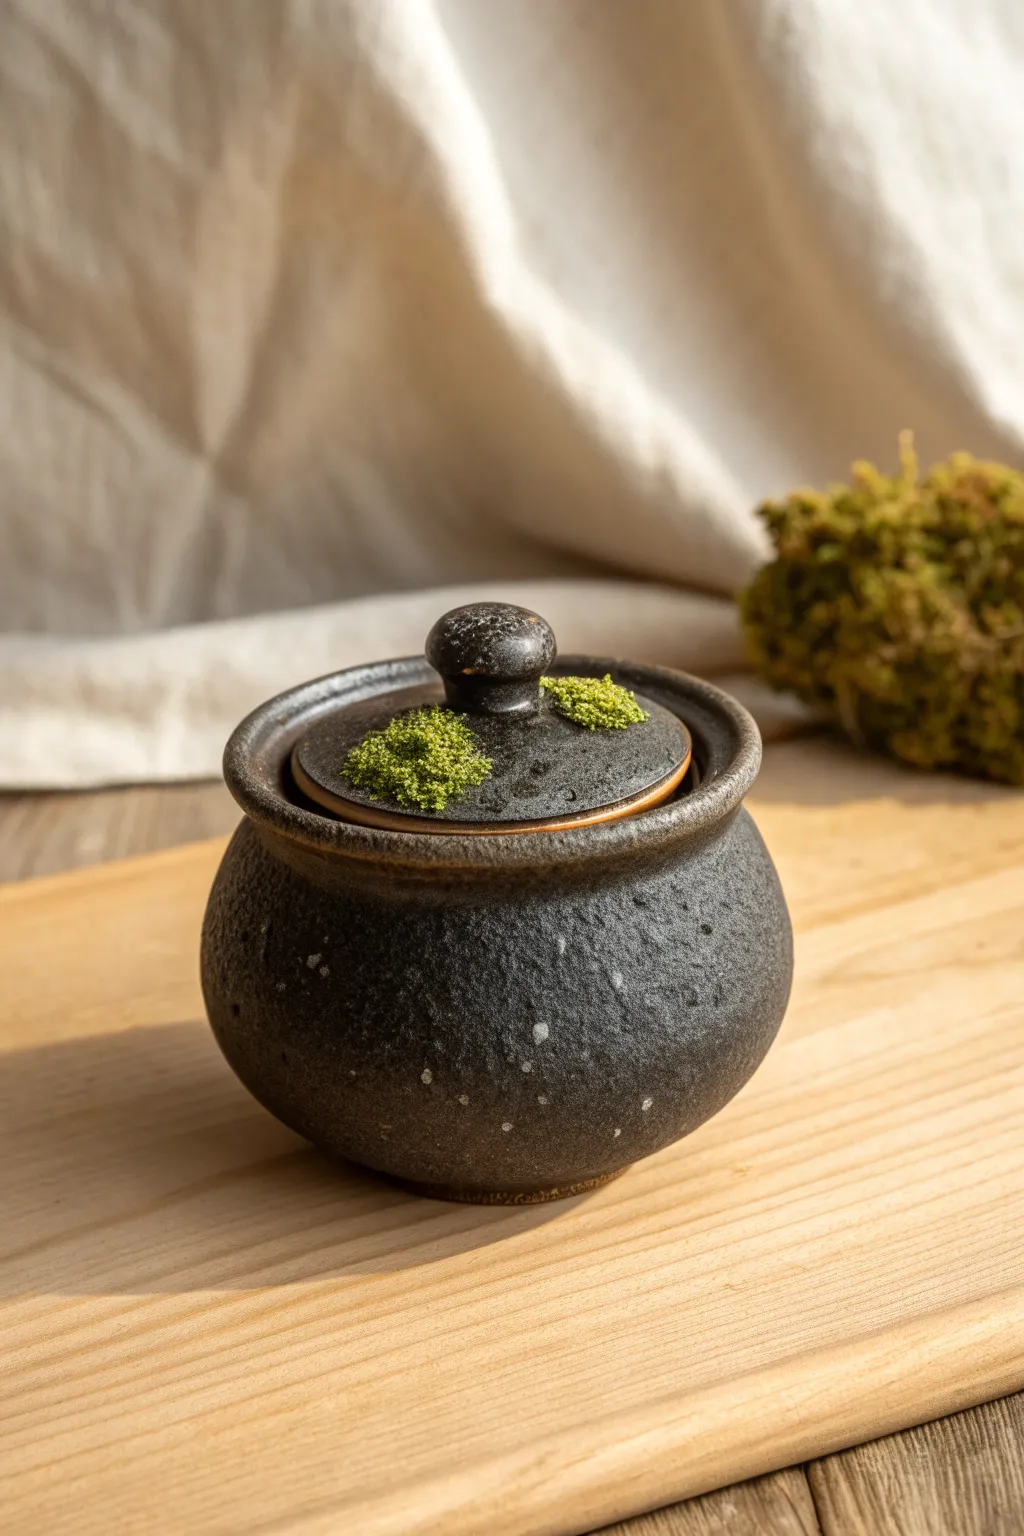
This charmingly spooky miniature cauldron brings a touch of witchcraft to your decor without actual sorcery. With its textured, stone-like finish and mossy “bubbling” lid, it looks like an ancient artifact just waiting for a potion recipe.
How-To Guide
Materials
- Air-dry clay or polymer clay (black or dark grey)
- Black acrylic paint
- Grey and white acrylic paint for speckling
- Textured sponge or ball of aluminum foil
- Sculpting tools (ball styluses, smoothing tool)
- Fine grit sandpaper
- Dried moss bits or green flocking powder
- Craft glue or tacky glue
- Matte varnish or sealant
Step 1: Sculpting the Cauldron Base
-
Form the main body:
Start with a golf-ball-sized amount of clay and roll it into a smooth sphere. Gently press your thumb into the center to create a hollow opening, pinching the walls evenly as you rotate it to widen the pot while keeping a round, bulbous shape. -
Flatten the bottom:
Tap the bottom of your sphere gently on your work surface to create a small, flat base so the cauldron stands stable without rolling. -
Refine the rim:
Fold the upper edge slightly outward to create a distinct, thick rim. Smooth this lip with your fingers or a sculpting tool to ensure it looks heavy and iron-like, rather than thin and fragile. -
Create the lid:
Roll a smaller ball of clay and flatten it into a disc that fits just inside the cauldron’s rim. Test the fit frequently; you want it to sit snugly but not fall all the way in. -
Add a handle:
Roll a very small ball of clay and attach it to the center of the lid to serve as a knob. Smooth the seam where the knob meets the lid so it looks like one solid piece of cast iron.
Step 2: Adding Texture and Detail
-
Texture the surface:
Before the clay hardens, take a ball of crumpled aluminum foil or a coarse texture sponge and press it gently all over the outer surface of the cauldron and lid. This creates that pitted, cast-iron look. -
Enhance the rim:
Go back over the rim with a smoother tool to contrast slightly with the rough body, or keep it textured depending on how rustic you want your pot to appear. -
Dry the clay:
Allow your clay to dry completely according to package instructions. If using polymer clay, bake it now; if using air-dry clay, let it sit for at least 24-48 hours. -
Sand for stability:
Once fully cured or dry, lightly sand the bottom if it became uneven during drying to ensure it sits perfectly flat.
Clay Cracking?
If using air-dry clay, cracks can appear as it shrinks. Fill small cracks with a slurry of fresh clay and water, smooth it over, and let it dry again before painting.
Step 3: Painting and Finishing
-
Base coat:
Paint the entire cauldron and lid (top and bottom) with a solid coat of matte black acrylic paint. Let this layer dry completely. -
Create the stone effect:
Mix a tiny drop of white paint into your black to make a dark charcoal grey. Using a nearly dry sponge, dab this randomly over the textured surface to highlight the raised areas. -
Add speckles:
Dilute a small amount of white or light grey paint with water on an old toothbrush. Run your thumb over the bristles to flick tiny speckles onto the cauldron for a realistic stony or aged iron finish. -
Seal the piece:
Protect your paint job with a coat of matte varnish. This dulls the acrylic shine and makes the object look more like heavy metal or stone.
Realistic Moss Tip
Mix two shades of green flocking powder or cut up different colored dried mosses. The variety in color adds depth and makes the ‘bubbling potion’ look more organic and magical.
Step 4: The Mossy Bubbles
-
Apply glue patches:
Dab small, irregular spots of tacky glue onto the lid, focusing on one side or near the handle where ‘bubbles’ might be overflowing. -
Add the moss:
Press small pinches of green flocking powder or finely chopped dried moss into the glue. I usually gently blow away excess powder over a trash bin to reveal the fuzzy texture. -
Refine the bubbles:
If the moss looks too flat, dab a tiny bit more glue on top of the first layer and add a second pinch to build height and dimension. -
Final touches:
Ensure the lid still fits nicely on the pot with the moss attached. You can glue the lid permanently in place or leave it removable to store tiny trinkets inside.
Now you have a perfectly petite vessel ready for your spooky shelf display


What Really Happens Inside the Kiln
Learn how time and temperature work together inside the kiln to transform clay into durable ceramic.
Spooky Eyeball Beads and Rings
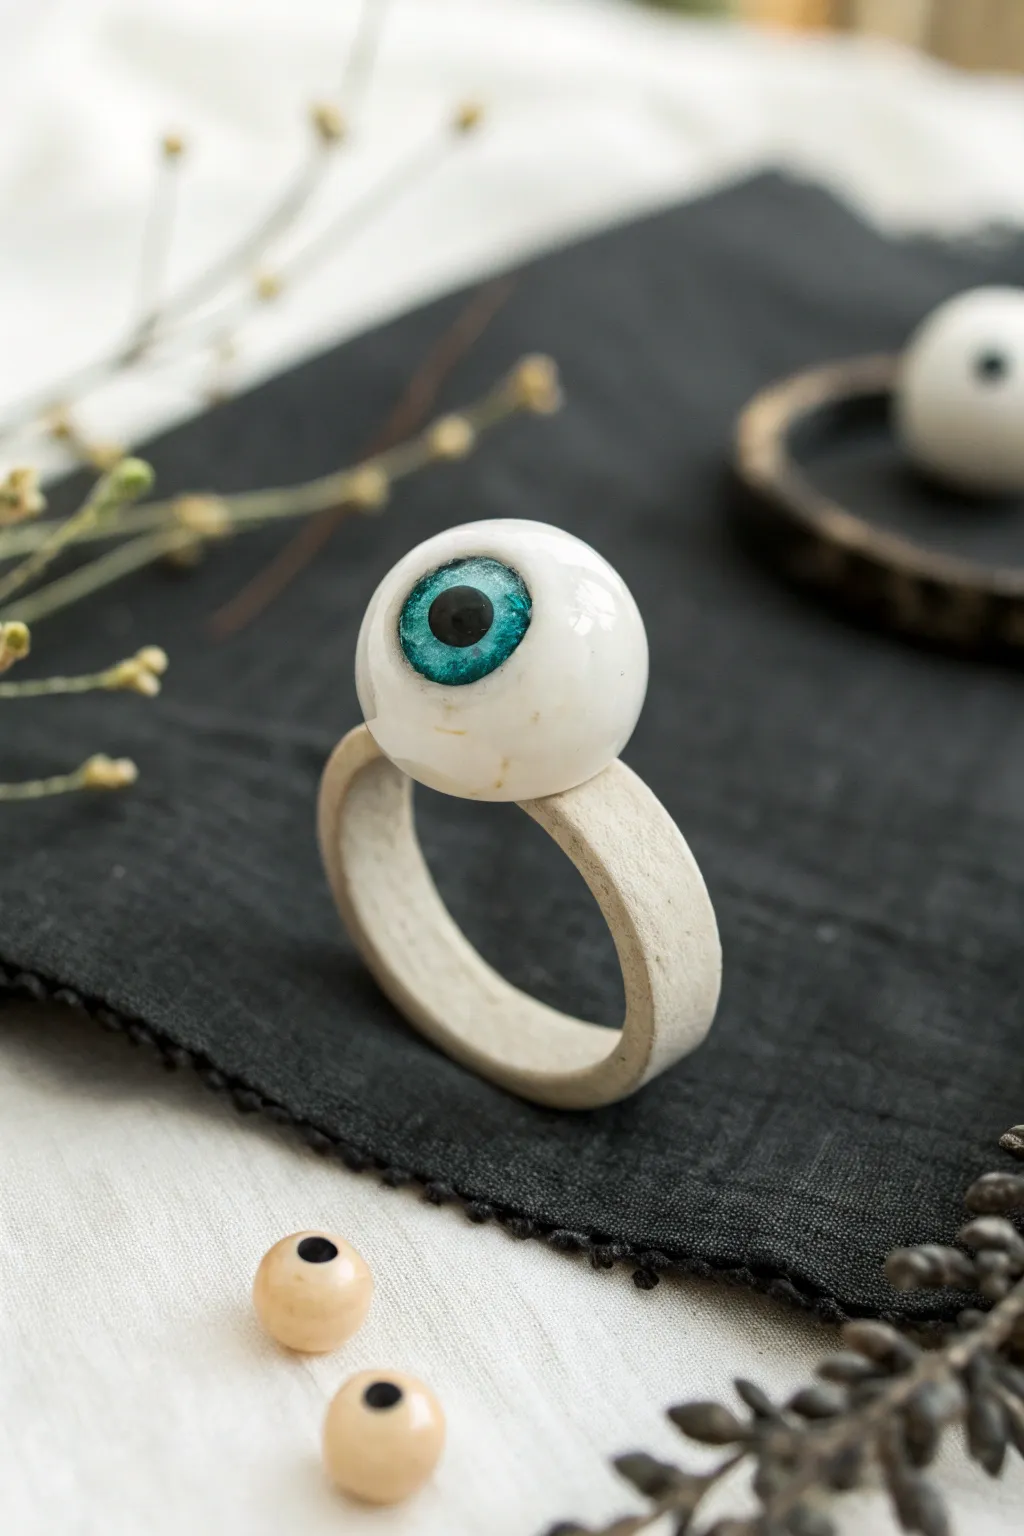
Keep an eye on everyone with this delightfully eerie eyeball ring. Combining a rustic, bone-like band with a glossy, hyper-realistic eye, this accessory strikes the perfect balance between creepy and chic.
Step-by-Step Tutorial
Materials
- White or translucent polymer clay
- Grey or beige polymer clay (for the band)
- Small glass cabochon (10mm – 12mm)
- Acrylic paints (black, metallic turquoise, dark blue)
- Fine detail paintbrush
- Super glue or E6000
- Gloss glaze or UV resin
- Ring mandrel or thick dowel
- Sandpaper or texture sponge
- Needle tool
Step 1: Painting the Eye
-
Prep the cabochon:
Clean the flat back of your glass cabochon thoroughly with rubbing alcohol to ensure the paint adheres perfectly. -
Paint the pupil:
Using a fine detail brush and black acrylic paint, create a solid black circle right in the center of the flat side of the glass. Let this dry completely. -
Add iris details:
Mix a metallic turquoise with a tiny touch of dark blue. Paint fine, radiating lines outward from the pupil toward the edge of the glass to mimic the iris texture. -
Layer the color:
Once the first layer of turquoise is dry, dab a slightly lighter shade near the center or a darker shade near the edges to create depth. I find that stippling the paint here adds a nice organic look. -
Seal the back:
Paint the entire back of the cabochon (over your dried iris work) with opaque white paint. This makes the colors pop and creates the “sclera” or white of the eye.
Step 2: Sculpting the Eyeball
-
Condition the white clay:
Warm up a ball of white polymer clay. You can mix in a tiny crumb of translucent clay to give it a more realistic, fleshy depth. -
Form the sphere:
Roll the clay into a smooth sphere that is slightly larger than your glass cabochon. -
Embed the cabochon:
Press the painted glass cabochon (paint side down) firmly into the clay sphere. Push it in until the clay rises up around the edges of the glass. -
Smooth the transition:
Use your finger or a smoothing tool to blend the clay edge flush against the glass so it looks like a continuous eyeball.
Red Vein Detail
Before baking, adhere tiny snippets of red embroidery thread or painted red clay wisps into the white sclera for a bloodshot effect.
Step 3: Creating the Rustic Band
-
Mix the band color:
Take your grey or beige clay and knead it until soft. You want a color that resembles old bone or stone. -
Shape the band:
Roll the clay into a thick snake, then flatten it slightly into a rectangular strip. It should be thick enough to support the heavy eyeball topper. -
Texture the surface:
Press a piece of coarse sandpaper or a texture sponge against the outside of the band to give it a rough, matte finish. -
Size the ring:
Wrap the clay strip around a ring mandrel or dowel at your desired size. Cut the excess and blend the seam together smoothly. -
Create a mounting point:
Slightly flatten the top of the ring band where the eye will sit to create a stable platform.
Glow in the Dark
Mix glow-in-the-dark powder into your white clay for the eyeball base. The eye will charge in the light and glow eerily green in the dark.
Step 4: Assembly and Finishing
-
Attach the pieces:
If using liquid clay, apply a drop between the band and the back of the eyeball and press them together gently. Alternatively, you can bake them separately and glue later. -
Bake the project:
Bake the ring according to your clay manufacturer’s instructions (usually 275°F/135°C for 15-30 minutes). Support the ring on the mandrel or with foil so the band doesn’t slump. -
Cool down:
Allow the piece to cool completely before handling to ensure the clay hardens fully. -
Secure the bond:
If you baked the pieces separately, use a strong adhesive like E6000 or super glue to attach the eye to the band now. -
Add final gloss:
Brush a coat of gloss glaze or apply a thin layer of UV resin over the white part of the eyeball (avoiding the stone textured band) to make it look wet and alive.
Now you have a wonderfully unsettling piece of jewelry ready to grab attention.
Haunted House Silhouette Tiles
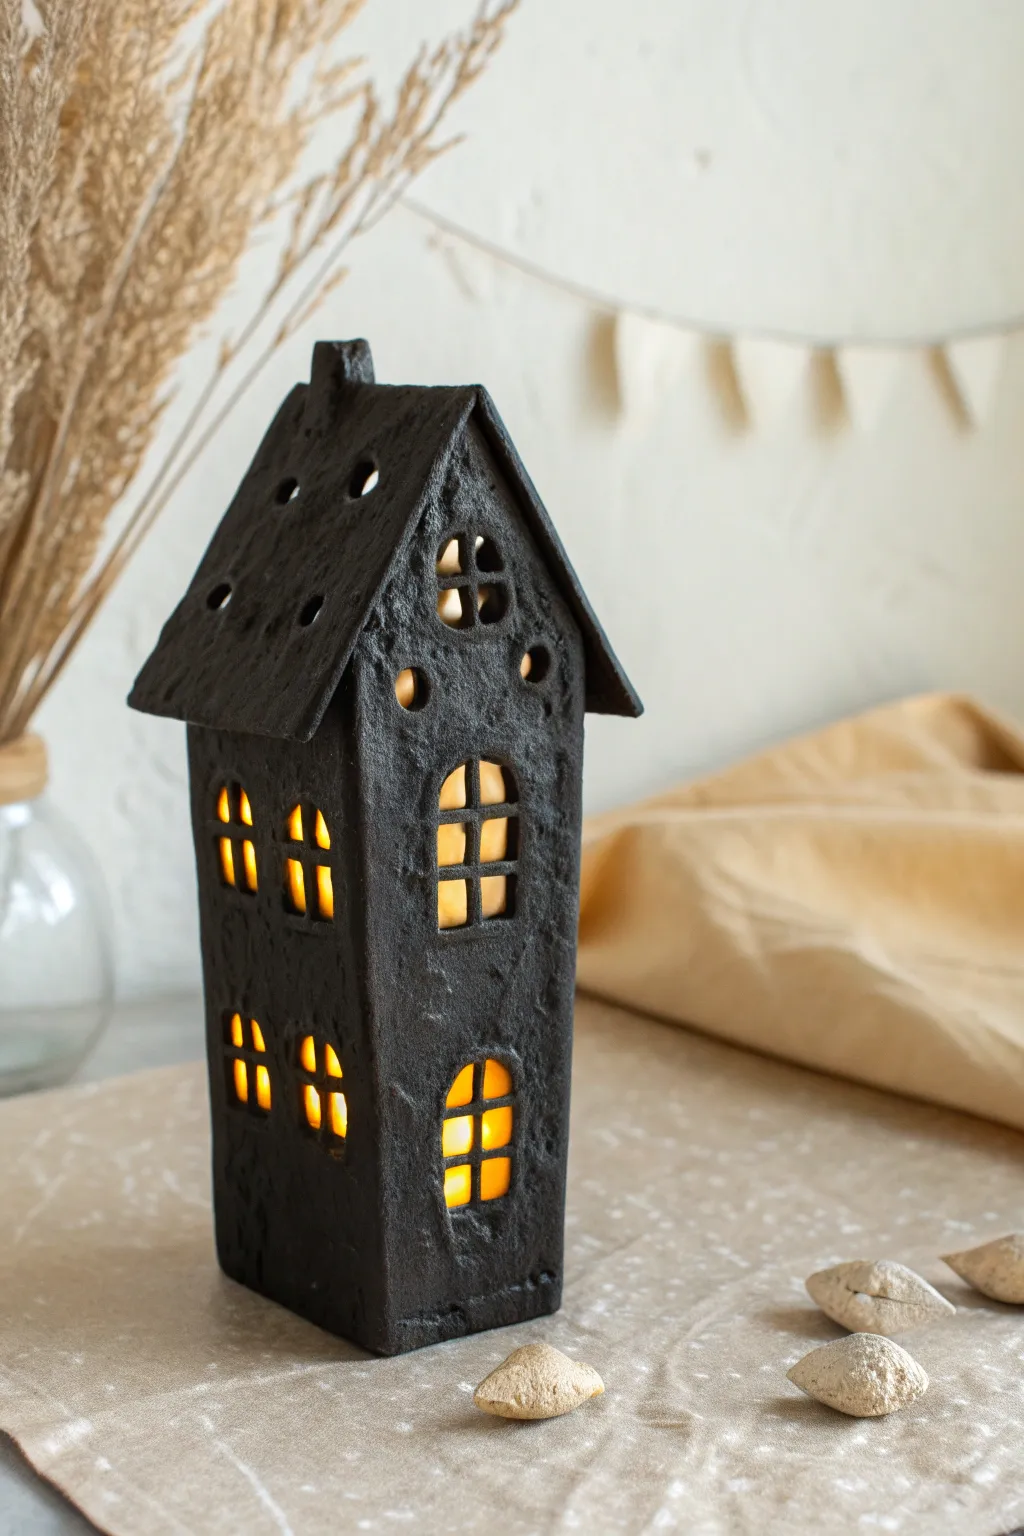
Transform simple air-dry clay into an eerie, architectural beacon for your mantelpiece. This tall, narrow house features a deeply textured, matte black finish that looks like ancient stone, glowing warmly from within when lit by tea lights.
Detailed Instructions
Materials
- Air-dry clay (stone or terracota color works, but white is fine)
- Rolling pin with guide rings (approx. 5mm thickness)
- Craft knife or scalpel
- Ruler
- Cardstock or graph paper (for templates)
- Rough texture tool (stiff bristle brush, crumpled foil, or grit sandpaper)
- Small round cutter or straw (for roof holes)
- Slip (clay mixed with water)
- Acrylic paint: Matte jet black
- Sponge dabber or wide flat brush
- Battery-operated LED tea light
Step 1: Planning and Cutting
-
Draft your templates:
Begin by drawing your house panels on graph paper. You will need two identical narrow rectangles for the sides (e.g., 2” x 6”) and two pentagonal shapes for the front and back facade (e.g., 2” wide x 8” tall at the peak). Don’t forget two rectangles for the roof panels that are slightly wider than the house body. -
Roll the clay slab:
Condition your air-dry clay by kneading it briefly, then roll it out into a large, even slab. Aim for a thickness of about 5mm—too thin and it will warp; too thick and the light won’t shine through the windows effectively. -
Add deep texture:
Before cutting, give the clay a weathered, stone-like appearance. Press a ball of crumpled foil or a stiff-bristled brush firmly into the entire surface of the wet clay slab. Don’t be afraid to be aggressive here; the texture needs to show through the paint later. -
Cut the primary shapes:
Lay your cardstock templates onto the textured clay. Using a sharp craft knife and a ruler for stability, trace around the templates to cut out your four walls and two roof pieces. -
Design the windows:
Freehand the arched windows for a wonky, haunted look, or trace them lightly. Use your scalpel to carefully cut out the negative space. Leave thin vertical and horizontal bars to create panes, as seen in the finished project.
Step 2: Assembly and Refining
-
Dry fit the structure:
Let the pieces firm up for about 30-60 minutes until they are leather-hard. This makes them sturdy enough to stand up without collapsing during assembly. -
Score and slip:
Deeply score the edges where the walls will connect using a needle tool or knife. Apply a generous amount of clay slip to these scored areas to act as glue. -
Construct the walls:
Press the side walls against the back of the front facade. Use a small clay tool or your finger to smooth the interior seams. I usually reinforce the inside corners with a tiny snake of clay for extra durability. -
Attach the back wall:
Complete the box structure by attaching the rear pentagon piece. Ensure the structure stands square and level on your work surface; gently tap it down to flatten the bottom edges. -
Prepare the roof:
Take your two roof panels. Use a small circular cutter or a straw to punch random holes near the top edge—these will cast spooky light patterns on your ceiling. -
Mount the roof:
Score and slip the top angled edges of your house body. Carefully place the roof panels on top, ensuring they overhang slightly at the eaves. Press the peak where the two roof panels meet to seal it shut. -
Add a chimney:
Fashion a small leftover block of textured clay into a rectangle. Score the roof and the bottom of the block, then attach it securely near the peak.
Clean Cuts Hack
If your window bars look messy, wait until the clay is bone dry. Use a fine-grit nail file or sandpaper to gently sharpen the window edges before painting.
Step 3: Finishing Touches
-
Refine the texture:
Check your seams. If the assembly process smoothed out your texture too much, tap your foil or brush over the corners to blend them back into the ‘stone’ surface. -
Slow drying:
Let the house dry slowly away from direct heat or sunlight for 24-48 hours. Turn it occasionally if possible to ensure even airflow. -
Base coat painting:
Once bone dry, apply a coat of matte black acrylic paint. Use a stiff brush to really work the pigment into all the little divots and texture marks you created. -
Second coat:
Allow the first layer to dry, then inspect for any missed light-colored clay spots. Dab on a second coat of black to ensure full, opaque coverage. -
Matte finish:
If your paint has any sheen to it, dab the surface with a slightly damp sponge while the paint is tacky to dull it down, creating that cast-iron or soot-covered appearance.
Sagging Roof?
If the roof starts to bow inward during assembly, lightly crumble a piece of paper towel and stuff it inside the attic space for support until the clay hardens.
Place an LED tea light inside your new haunted manor and watch the warm glow flicker through the uneven windows

TRACK YOUR CERAMIC JOURNEY
Capture glaze tests, firing details, and creative progress—all in one simple printable. Make your projects easier to repeat and improve.
Spiderweb Trinket Dish
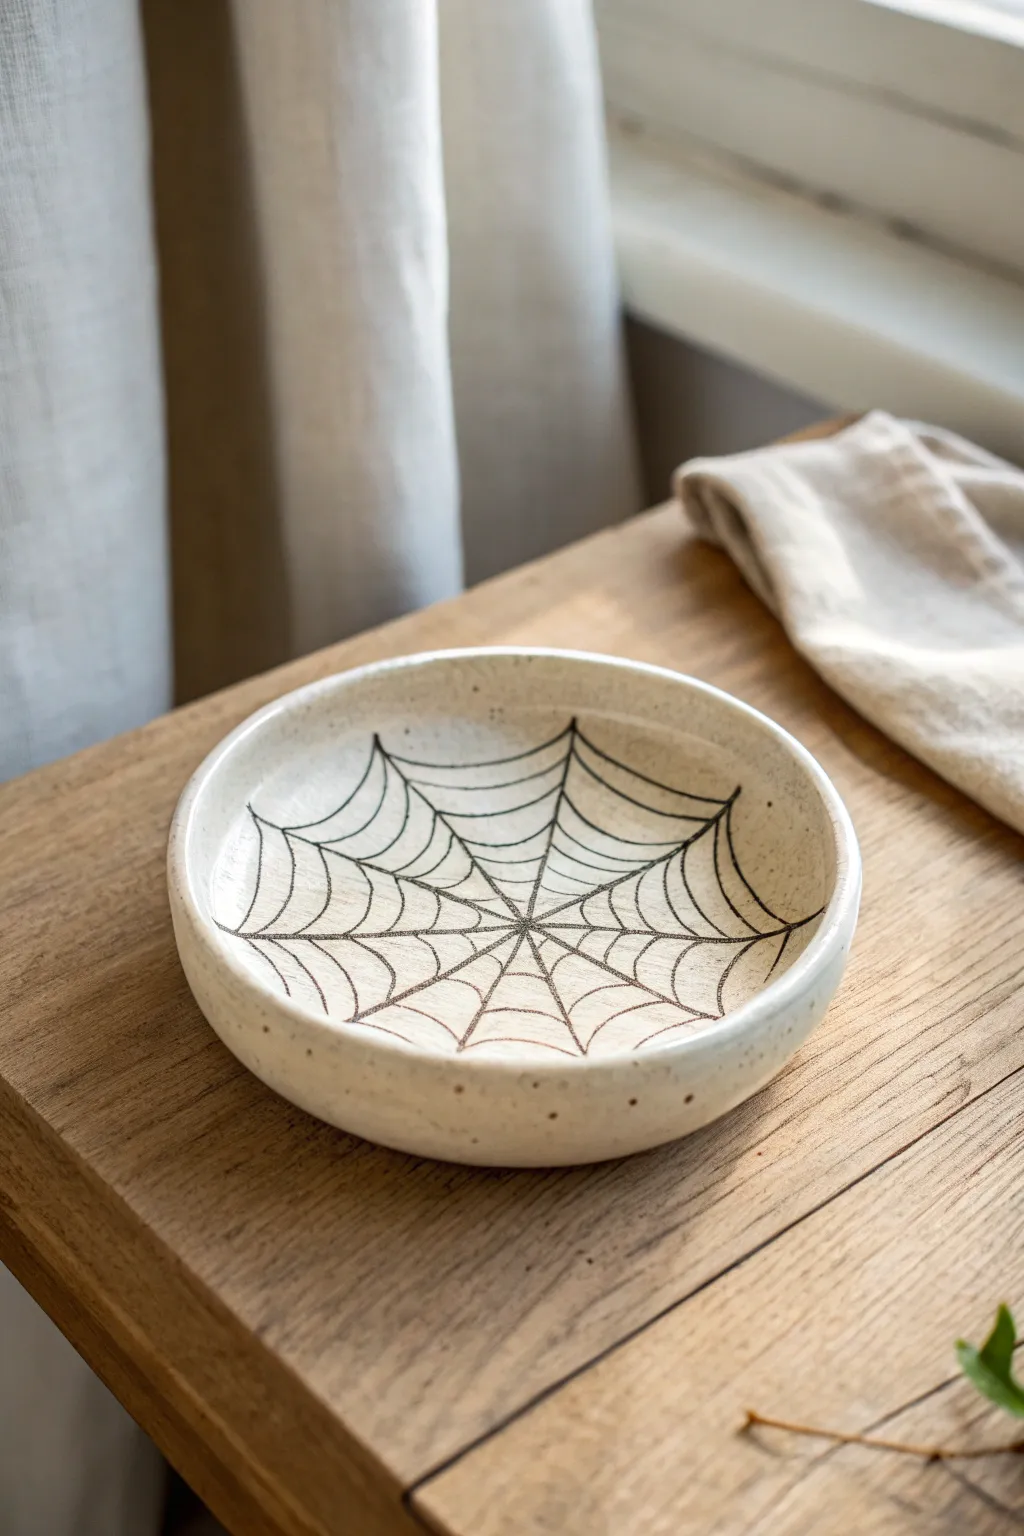
Capture the delicate beauty of a spider’s creation in durable clay with this elegant trinket dish. The speckled cream finish provides a classic pottery look that contrasts perfectly with the stark, hand-drawn web design.
How-To Guide
Materials
- Air-dry clay (white or cream)
- Rolling pin
- Circle template (bowl or plate approx. 5-6 inches)
- Craft knife or clay needle tool
- Small bowl for molding (to shape the curve)
- Sandpaper (fine grit)
- Acrylic paint (black)
- Fine liner brush (size 00 or 0)
- Cream or off-white acrylic paint (optional, for base)
- Brown acrylic paint (for speckling)
- Old toothbrush
- Glossy varnish or sealant (water-based)
- Water and sponge for smoothing
Step 1: Shaping the Clay Base
-
Prepare the Clay:
Start by kneading a generous handful of air-dry clay until it is warm, pliable, and free of air bubbles. If it feels too dry, wet your hands slightly while working it. -
Roll out the Slab:
On a clean, flat surface, roll the clay out to an even thickness of about 1/4 inch. Lift and rotate the clay frequently to prevent it from sticking to your work surface. -
Cut the Circle:
Place your bowl or circular template onto the rolled clay. Using your craft knife or needle tool, cut straight down around the edge to create a clean, perfect circle. -
Smooth the Edges:
Dip your finger in a little water and run it along the cut rim of the circle to round off the sharp edge. You want a soft, pottery-like lip rather than a harsh cut. -
Form the Curve:
Gently lift your clay circle and drape it into your molding bowl. Press it down lightly so it takes the shape of the bowl’s interior, creating that shallow dish form. -
Initial Drying:
Let the clay dry inside the mold for about 24 hours until it holds its shape on its own, then remove it and let it dry completely on a wire rack for another 24-48 hours.
Step 2: Creating the Finish
-
Sanding and Refining:
Once fully cured, use fine-grit sandpaper to smooth out any bumps or uneven textures on the surface and rim. Wipe away the dust with a slightly damp cloth. -
Base Coat Application:
If your clay isn’t naturally the right shade, paint the entire dish with a creamy off-white acrylic paint. I usually apply two thin coats for opaque coverage. -
Adding the Speckles:
Mix a small amount of brown paint with water to make it ink-like. Load an old toothbrush with this mixture and flick the bristles with your thumb to spray fine speckles over the dish, mimicking stoneware clay. -
Drafting the Web:
Lightly sketch your spiderweb design with a pencil directly onto the painted surface. Start with a central point and draw 8-10 lines radiating outward to the rim.
Wobbly Lines?
For steadier lines, brace your pinky finger against the table or the edge of the dish while painting. Thinning the paint with a drop of water also helps it flow smoother.
Step 3: Painting the Design
-
Painting Radial Lines:
Using a size 00 or 0 liner brush and slightly thinned black acrylic paint, carefully trace over your pencil lines radiating from the center. Keep your hand steady and pressure light. -
Connecting the Web:
Beginning near the center, paint scalloped lines connecting the radial spokes. Work in concentric circles moving outward, letting the swoops get slightly larger as you reach the rim. -
Cleaning Up:
If any lines look too shaky, you can tidy them up by carefully painting over the error with your cream base color once the black is dry. -
Sealing the Piece:
Allow the paint to cure for at least few hours. Finally, apply a coat of glossy varnish to the entire dish to give it that glazed ceramic shine and protect the artwork.
Pro Tip: Faux Glaze
Use a high-gloss Mod Podge or a dimensional magic glaze specifically for the final coat. This mimics the thick, glass-like finish of fired pottery better than standard varnish.
Place your finished dish on an entryway table to catch keys or use it to display your favorite spooky-season jewelry
Cute Skull Tea Light Buddy
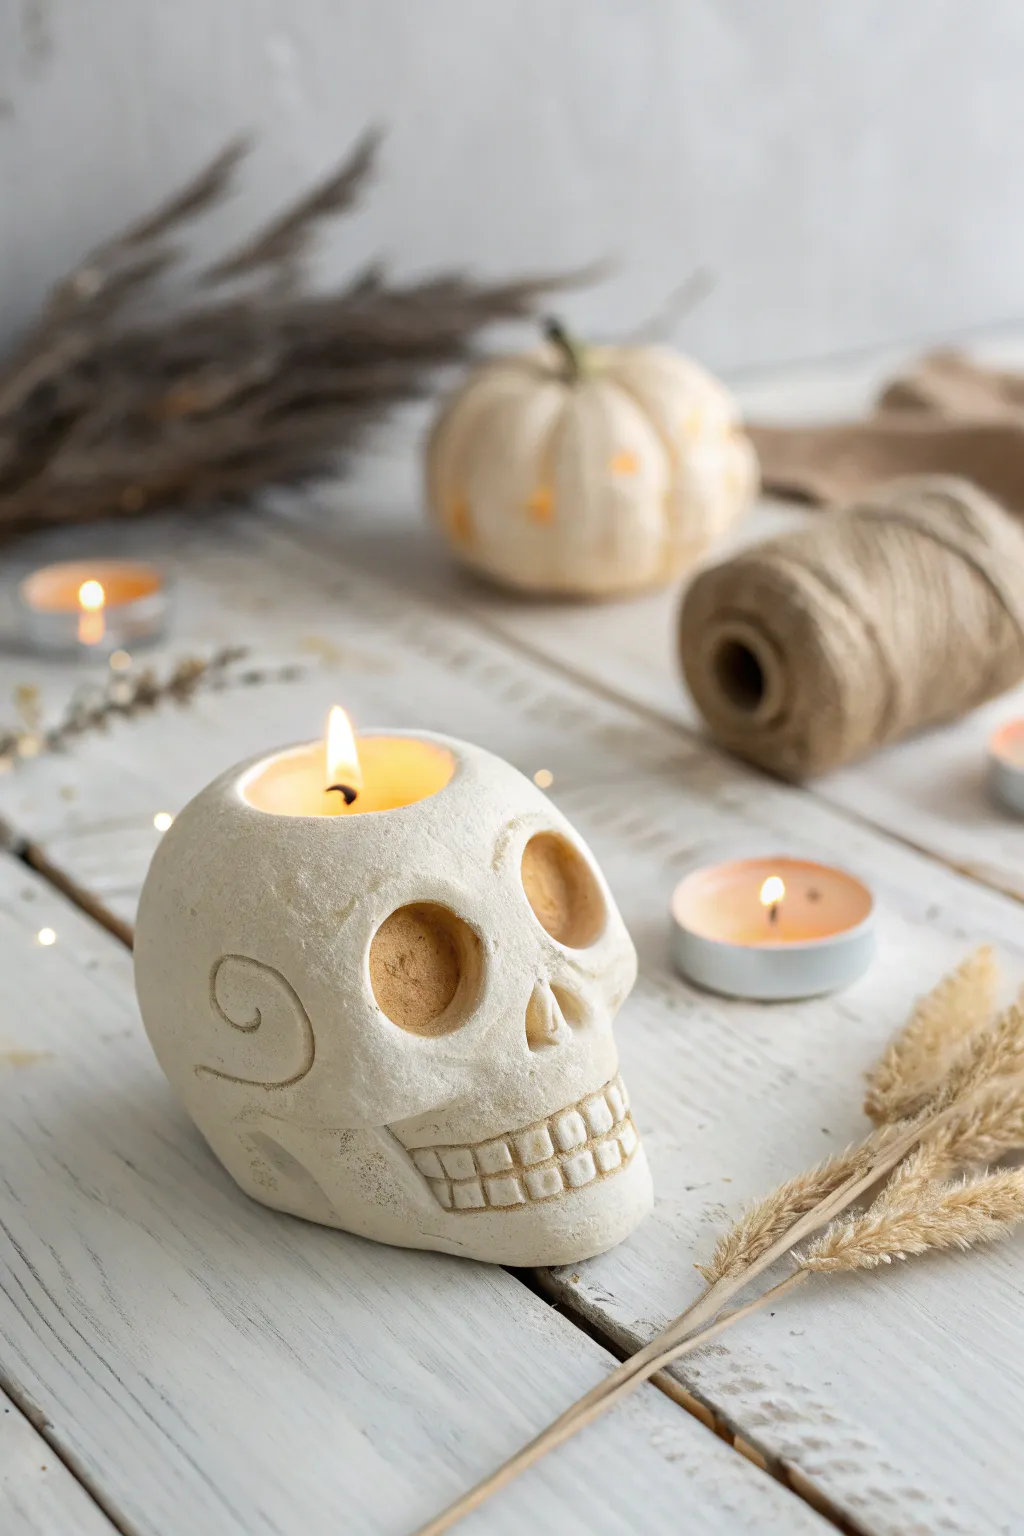
This charmingly rustic skull candle holder adds just the right amount of spookiness to a cozy evening. Crafted from air-dry clay with a stone-like finish, its hollow top perfectly nestles a tea light to give your space a warm, haunting glow.
Step-by-Step Tutorial
Materials
- White or light grey air-dry clay (about 500g)
- Small rolling pin
- Aluminum foil
- Modeling tools (or a butter knife and toothpick)
- Tea light candle (for sizing)
- Small sponge
- Water in a small cup
- Acrylic paints (ivory, pale grey, light brown)
- Sandpaper (fine grit)
Step 1: Shaping the Base
-
Prepare the core:
Crumple a ball of aluminum foil into a shape slightly smaller than your desired skull size. This saves clay and keeps the project lightweight. -
Roll the clay:
Roll out a thick slab of clay, roughly 1/4 inch thick. It needs to be large enough to completely wrap around your foil core. -
Wrap the form:
Drape the clay slab over the foil ball, smoothing the seams together at the bottom. Use a little water on your fingers to blend the clay until the surface is uniform. -
Create the tea light indentation:
While the clay is soft, press a real tea light (metal cup only) firmly into the very top of the skull to create a perfect well. Wiggle it slightly so the hole is just a hair larger than the candle to account for shrinkage.
Shrinkage Check
Air-dry clay shrinks as it dries! Rotate your loose tea light in the hole every few hours during the drying process to ensure it doesn’t get trapped or squeezed out.
Step 2: Sculpting the Features
-
Form the eye sockets:
Using your thumbs or a large ball tool, press deeply into the front of the skull to create two large, round eye sockets. Smooth the edges so they look worn rather than sharp. -
Shape the nose:
Pinch a small amount of clay between the eyes to raise a bridge, then use a tool to press in an inverted heart or triangle shape for the nasal cavity. -
Add the cheek swirl:
On the side of the skull, use a carving tool or toothpick to gently etch a spiral design. Go over the line a few times to make it deep enough to act as a relief detail. -
Define the jaw:
If the skull looks too round, gently squeeze the sides below the cheekbones to narrow the jawline slightly, giving it more anatomical character. -
Carve the mouth and teeth:
Draw a horizontal line for the mouth. Then, carefully carve vertical lines to differentiate the teeth. Use a flat tool to press the clay slightly above the teeth to create a gum line ridge.
Glow Up
Instead of painting the eye sockets dark, carefully punch the holes all the way through to the hollow center. The light from the candle will shine through the eyes.
Step 3: Texture and Finishing
-
Surface texturing:
Take a damp sponge and dab it all over the skull. This removes fingerprints and gives the clay a porous, bone-like texture similar to the reference photo. -
Drying time:
Let the sculpture dry completely. This usually takes 24-48 hours depending on humidity. Flip it occasionally to ensure the bottom dries too. -
Sanding:
Once bone-dry, use fine-grit sandpaper to smooth out any unwanted jagged bits, particularly around the tea light rim. -
Base coat painting:
Paint the entire skull with an ivory or off-white acrylic paint. I usually apply two thin coats for opaque coverage. -
Antiquing the details:
Mix a very watery wash of light brown paint. Brush it into the eye sockets, nose, swirl, and teeth lines. -
Wiping back:
Before the wash dries, wipe the surface with a damp paper towel. The dark paint will stay in the recesses (like the eyes and carving lines) while the high points return to ivory, creating depth. -
Final dry brushing:
Lightly dip a dry brush into pale grey paint and whisk it over the top surfaces to highlight the texture.
Pop in your tea light and enjoy the eerie ambiance of your new little friend
Mummy Wrap Mini Figurines
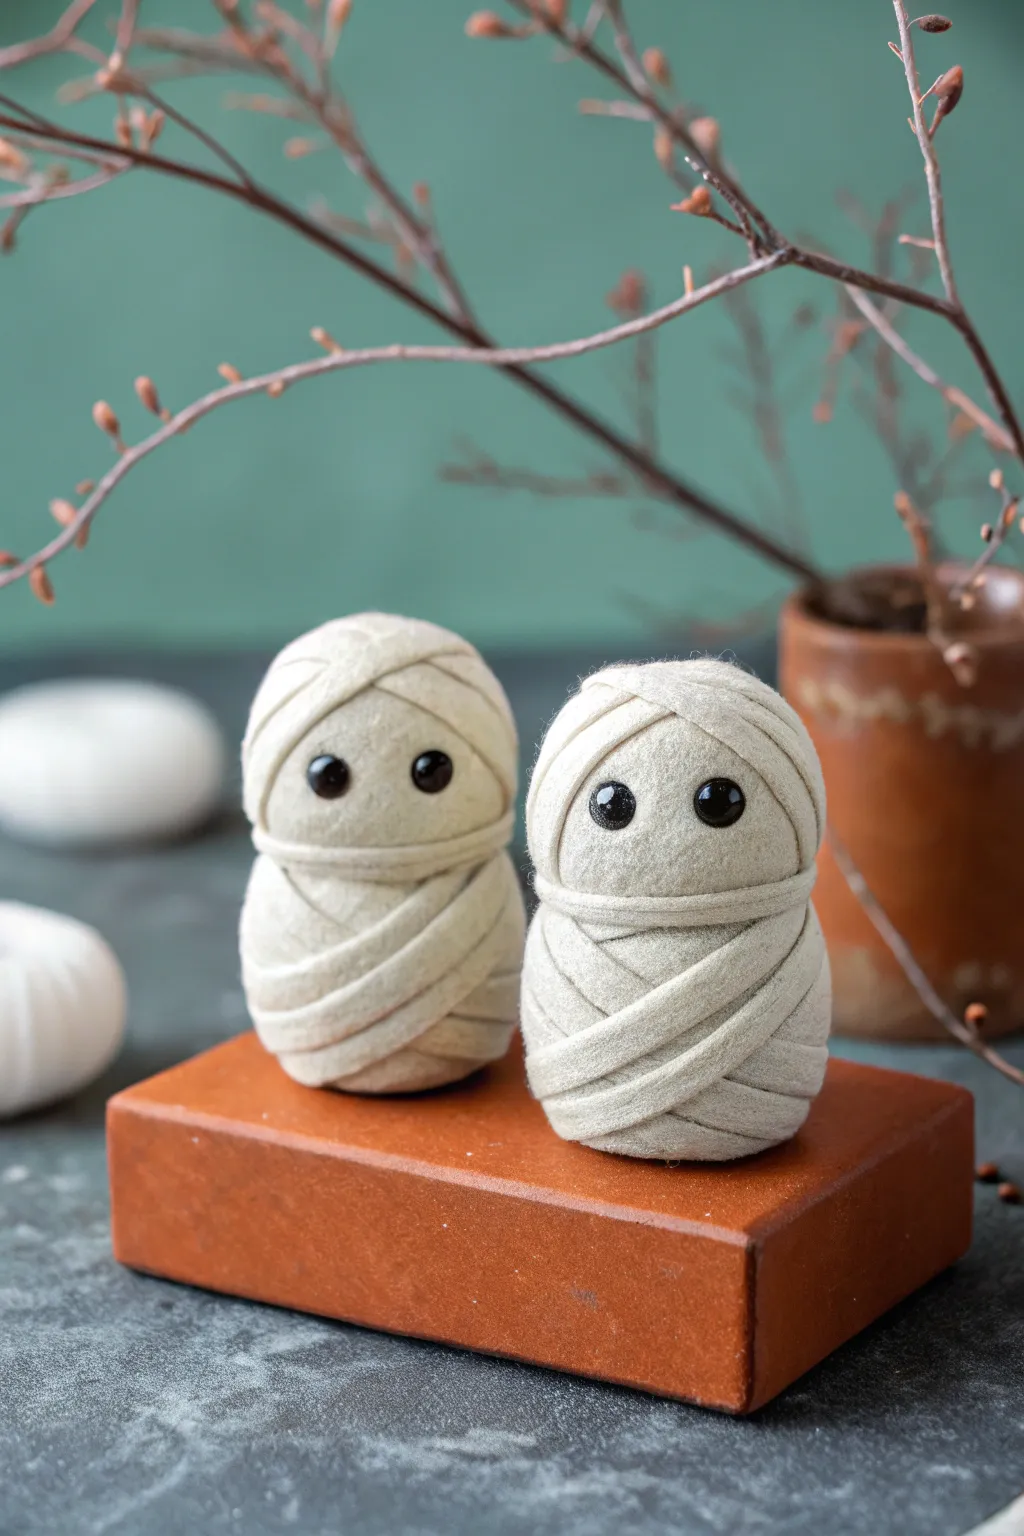
These delightfully small mummy figurines bring a whimsical touch to your Halloween decor without being scary. Crafted with wrapped clay strips and glossy black eyes, they have a soft, almost felted appearance that makes them irresistible to hold.
Detailed Instructions
Materials
- Light beige or off-white polymer clay
- Glossy black beads (4mm or 6mm)
- Clay roller or pasta machine
- Sharp craft knife or scalpel blade
- Needle tool or toothpick
- Texture sponge or toothbrush (optional)
- Liquid polymer clay (Bake & Bond)
- Oven for baking
- Baking sheet with parchment paper
Step 1: Forming the Base
-
Condition the Clay:
Begin by thoroughly conditioning your beige polymer clay until it is soft, pliable, and free of cracks. This ensures the wraps adhere properly later. -
Shape the Body:
Roll a ball of clay roughly the size of a large walnut. Gently elongate it into a rounded cylinder shape, slightly tapering the bottom so it stands upright securely. Aim for a shape that resembles a very plump peanut. -
Create the Head Indent:
Using your thumb and forefinger, gently pinch around the upper third of the cylinder to create a subtle neck indentation. This separates the head area from the body without creating a weak point. -
Insert the Eyes:
Press two black beads into the upper ‘head’ section. Push them deep enough so they look embedded rather than just stuck on the surface. I like to secure these with a tiny dot of liquid clay to ensure they don’t pop out after baking. -
Add Texture (Optional):
If you want that soft, fabric-like look seen in the photo, gently tap a texture sponge or an old toothbrush over the entire surface of the base form before adding strips.
Clay Too Soft?
If your strips are stretching and breaking while wrapping, the clay is too warm. Place it in the fridge for 10 minutes to firm it up before cutting more strips.
Step 2: Wrapping the Mummies
-
Roll Flat Sheets:
Roll out the remaining beige clay into a thin, even sheet. If using a pasta machine, a medium-thin setting (usually #3 or #4) works perfectly. -
Cut Strips:
Use your sharp craft knife to cut long, varied strips from the sheet. They shouldn’t be too perfect; widths between 3mm and 5mm add natural variety. -
Soften the Edges:
Gently run your finger along the cut edges of each strip to smooth them down. Sharp, square edges look less like fabric, so this little step makes a big difference. -
Begin Wrapping:
Start applying the clay strips to the body. Place the first strip diagonally across the lower body, pressing gently to adhere it to the base form. -
Cross the Strips:
Continue adding strips, crossing them over each other in an X pattern. Leave small gaps occasionally to let the underlying layer peek through, creating depth. -
Texture the Strips:
As you apply each strip, lightly tap it with your texture tool. This mimics the weave of ancient cloth and removes fingerprints simultaneously. -
Frame the Face:
Carefully wrap a strip horizontally across the forehead, just above the eyes. Add another strip just below the eyes to define the ‘face’ opening. -
Create the Hood:
Layer a few shorter strips over the top of the head in a dome shape, tucking the ends under the forehead strip for a seamless look. -
Final Adjustments:
Check the silhouette of your mummy. If any strip ends are sticking out awkwardly, blend them into the layer below using your needle tool.
Step 3: Baking and Finishing
-
Clean Up:
Before baking, use a cotton swab dipped in a tiny bit of rubbing alcohol to gently wipe the black bead eyes, removing any clay dust or fingerprints. -
Bake the Figures:
Place your mummies on a parchment-lined baking sheet. Bake according to your clay manufacturer’s instructions (typically 275°F/130°C for 15-30 minutes depending on thickness). -
Cool Down:
Allow the figurines to cool completely in the oven before moving them. This annealing process makes the clay stronger. -
Matte Varnish (Optional):
For extra protection, you can brush a matte varnish over the clay parts, carefully avoiding the glossy eyes to maintain contrast.
Make it Ancient
After baking, dilute brown acrylic paint with water to make a thin wash. Brush over the mummy and wipe off quickly with a paper towel to age the crevices.
These little guardians are now ready to sit on your shelf and quietly observe the spooky season festivities
Potion Bottle Pendants
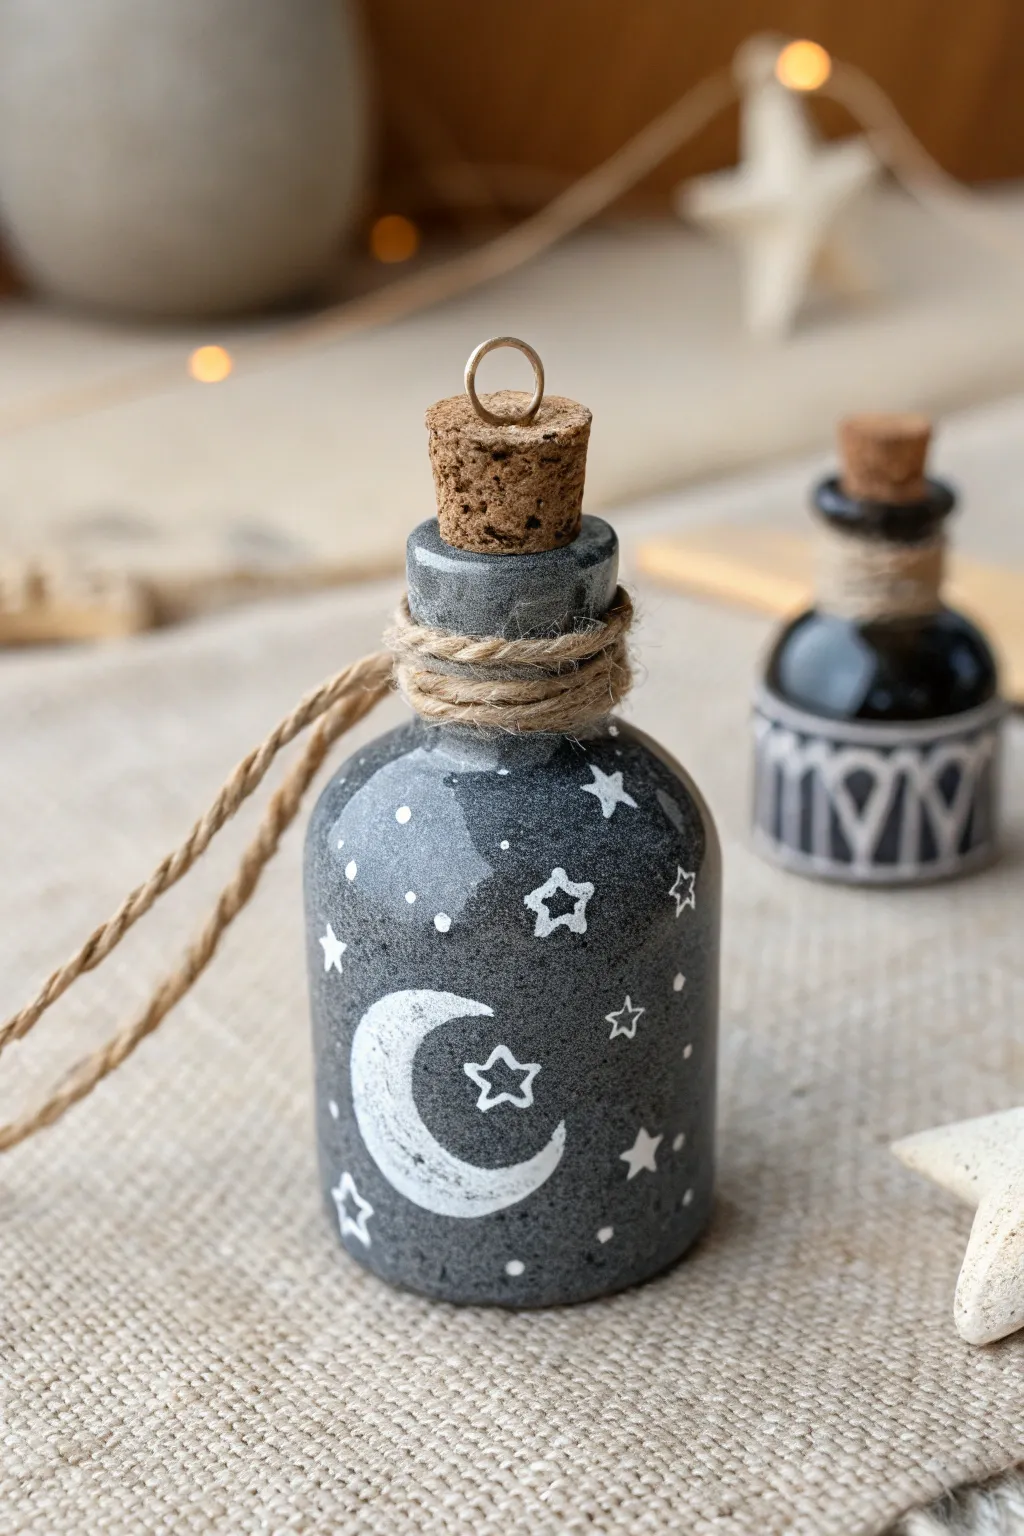
Capture the magic of a starry midnight sky with this charming faux-stone potion bottle pendant. Using polymer clay and careful painting, you’ll craft a miniature vessel perfect for spooky season or everyday enchantment.
How-To Guide
Materials
- Dark grey polymer clay (or black and white to mix)
- Small glass bottle or vial with cork stopper
- Liquid polymer clay (optional, for adhesion)
- Acrylic paint white
- Fine detail paintbrush (size 0 or 00)
- Small metal eye pin
- Jute twine or hemp cord
- Super glue or jewelry glue
- Toothbrush or crumpled aluminum foil (for texturing)
- Matte spray varnish (optional)
Step 1: Shaping the Vessel
-
Prepare the clay:
Begin by conditioning your dark grey polymer clay until it is soft and pliable. If you don’t have the right shade, mix black clay with a tiny amount of white until you achieve a deep charcoal tone. -
Cover the bottle base:
Flatten a pancake of clay roughly the size of the bottom of your glass vial. Press the vial onto it and smooth the clay up the sides slightly to create an anchor point. -
Wrap the body:
Roll out a sheet of clay approximately 3mm thick. Cut a strip wide enough to cover the main body of the bottle up to the neck. -
Smooth the seams:
Wrap the strip around the glass, joining the edges carefully. Use your thumb or a clay tool to blend the seam until it disappears completely, ensuring the clay adheres tightly to the glass. -
Form the shoulder:
Gently gently push the clay inward towards the neck of the bottle to create a rounded shoulder. It should curve naturally rather than having a sharp angle. -
Detail the neck:
Add a thinner strip of clay around the neck of the bottle, blending it down into the shoulder area but leaving a distinct rim at the very top. -
Texturize the surface:
To get that stone-like finish seen in the photo, lightly tap the entire clay surface with an old toothbrush or a ball of crumpled foil. This removes fingerprints and adds realistic grit. -
Bake the clay:
Place your covered bottle upright on a baking sheet. Bake according to your clay manufacturer’s instructions (usually around 275°F/130°C for 15-30 minutes). Let it cool completely.
Step 2: Painting the Cosmos
-
Prime the surface:
Ensure the clay is cool and clean. If there are any oily residues, give it a quick wipe with rubbing alcohol. -
Paint the crescent moon:
Using your fine detail brush and white acrylic paint, draw a ‘C’ shape on the lower front of the bottle. I tend to make the center thick and taper the ends to sharp points. -
Fill the moon:
Fill in the crescent shape. Don’t worry about it being perfectly opaque; a slightly textured, dry-brush look enhances the stone aesthetic. -
Add larger stars:
Paint a few five-pointed outlines of stars scattered around the bottle. Keep the lines thin and delicate. -
Create distant stars:
Using the very tip of your brush or a toothpick, dot tiny specks of white paint across the empty spaces to represent distant stars. -
Seal the paint:
Once the paint is fully dry, you can apply a light coat of matte varnish to protect the design, though leaving it raw preserves the stone texture better.
Uneven Paint Lines?
If your stars look wobble, wait for the white paint to dry, then use a grey paint matching your clay to ‘erase’ and reshape the edges.
Step 3: Assembly and Finish
-
Prepare the cork:
Take the cork stopper and insert a metal eye pin into the center of the top. Remove it, add a dab of super glue to the pin stem, and screw it back in securely. -
Insert the cork:
Place the cork firmly into the bottle neck. You can glue this in permanently if you don’t plan to fill the bottle. -
Add the binding:
Cut a length of jute twine. Apply a small dot of glue to the back of the bottle neck and press the end the twine into it. -
Wrap the neck:
Wrap the twine around the neck 3-4 times, stacking the loops neatly. Secure the end with another dot of glue and trim any excess. -
Attach the hanger:
Thread a longer piece of twine through the eye pin on the cork to create your pendant loop or hanger.
Stone Texture Pro-Tip
Mix a pinch of real black pepper or dried used coffee grounds into your grey clay before rolling it out for an authentic speckled granite look.
Now you have a mysterious, stardust-filled vessel ready to wear or hang on your spooky tree
Spell Book Charms With Symbols
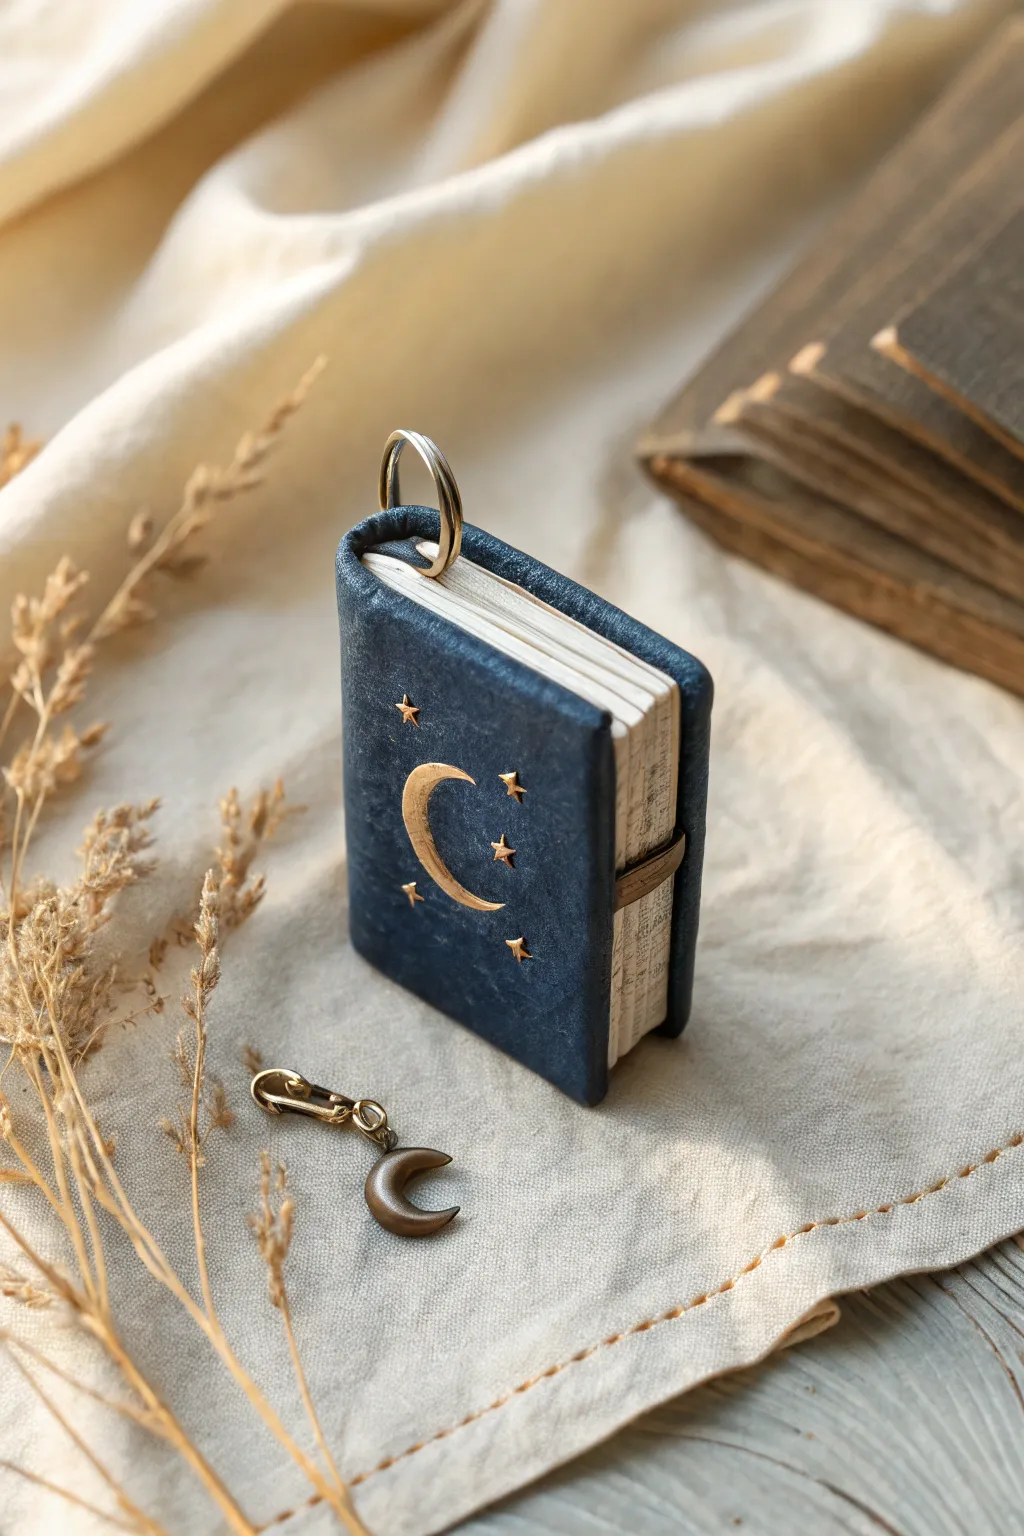
Summon a touch of magic with this enchanting miniature spell book charm, featuring a deep midnight blue cover adorned with celestial gold symbols. Crafted from polymer clay, it mimics the texture of worn leather and aged parchment, making it the perfect accessory for a witchy keychain or necklace.
Detailed Instructions
Materials
- Polymer clay (midnight blue or navy)
- Polymer clay (ecru, beige, or white)
- Acrylic paint (antique gold)
- Acrylic paint (brown or burnt umber)
- Fine detail paintbrush
- Rolling pin or pasta machine
- Blade or X-Acto knife
- Needle tool or toothpick
- Small jump ring (6-8mm)
- Small eye pin or U-shaped wire
- Sandpaper or a toothbrush (for texturing)
- Gloss or matte varnish (optional)
Step 1: Forging the Pages
-
Condition the clay:
Start by conditioning the beige or ecru polymer clay until it is soft and pliable. If you only have white, mix in a tiny speck of brown or yellow to achieve an aged paper look. -
Shape the book block:
Form a rectangular block of the beige clay, approximately 1 inch tall, 0.75 inches wide, and about 0.25 inches thick. Keep the corners relatively sharp. -
Texture the pages:
Use your needle tool or the dull side of a blade to score lines along the three visible edges of the block. I like to make these lines slightly uneven to mimic stacked, hand-bound paper. -
Age the paper:
Lightly brush a very diluted wash of brown acrylic paint over the textured page edges. Wipe away the excess immediately with a paper towel, leaving the dark pigment settled in the grooves for an antique effect.
Sticky pages?
If your pages stick to your work surface or lose their shape while texturing, try popping the clay block in the fridge for 10 minutes to firm it up before scoring the lines.
Step 2: Binding the Tome
-
Prepare the cover:
Roll out a sheet of midnight blue clay to about 2mm thickness. Cut a long rectangle that is slightly taller than your page block and wide enough to wrap around the front, spine, and back. -
Add leather texture:
Before attaching it to the pages, gently press a piece of coarse sandpaper or a clean toothbrush onto the surface of the blue clay to create a subtle, faux-leather grain. -
Wrap the book:
Place the page block in the center of the blue strip. Fold the clay over the front and back of the pages, pressing gently to adhere. Trim any excess length, leaving just a slight overhang. -
Refine the spine:
Use a smooth tool to gently round the spine of the book. You can press two shallow indentations near the top and bottom of the spine to suggest binding cords. -
Insert the hardware:
Insert a U-shaped wire or a small eye pin into the top center of the spine. Ensure it goes deep enough into the clay for a secure hold once baked.
Level Up: Secrets Inside
Instead of a solid block for pages, use real paper, tear the edges, and tea-stain them. Glue them into the baked clay cover for a tiny, writable book.
Step 3: Celestial Details
-
Sculpt the moon:
Roll a tiny snake of leftover beige or blue clay (it will be painted later) into a crescent shape. Carefully press this onto the center of the front cover. Flatten it slightly so it looks embossed. -
Add stars:
Create tiny stars by either cutting triangular points from flattened clay or simply pressing small cross-shaped indentations directly into the cover using a needle tool. -
Create the strap:
Roll a very thin strip of blue clay. Wrap it horizontally around the loose side of the book (opposite the spine) to act as a closure strap. Press it down securely. -
Bake the charm:
Bake the piece according to your clay manufacturer’s instructions (usually around 275°F or 130°C for 15-30 minutes). Let it cool completely.
Step 4: Gilded Finishes
-
Paint the symbols:
Using a fine detail brush, carefully paint the raised crescent moon and the indented stars with antique gold acrylic paint. -
Highlight the spine:
Dry brush a tiny amount of gold onto the raised areas of the spine binding and the closure strap to give them a metallic, magical sheen. -
Attach the ring:
Open a sturdy jump ring using pliers. Feed it through the eye pin or wire loop at the top of the book. -
Final assembly:
Close the jump ring securely. If you have a separate metal moon charm (as seen in the inspiration), you can attach it to the same ring for extra celestial flair.
Now your tiny book of shadows is ready to hold all your miniature secrets or hang charmingly from your bag
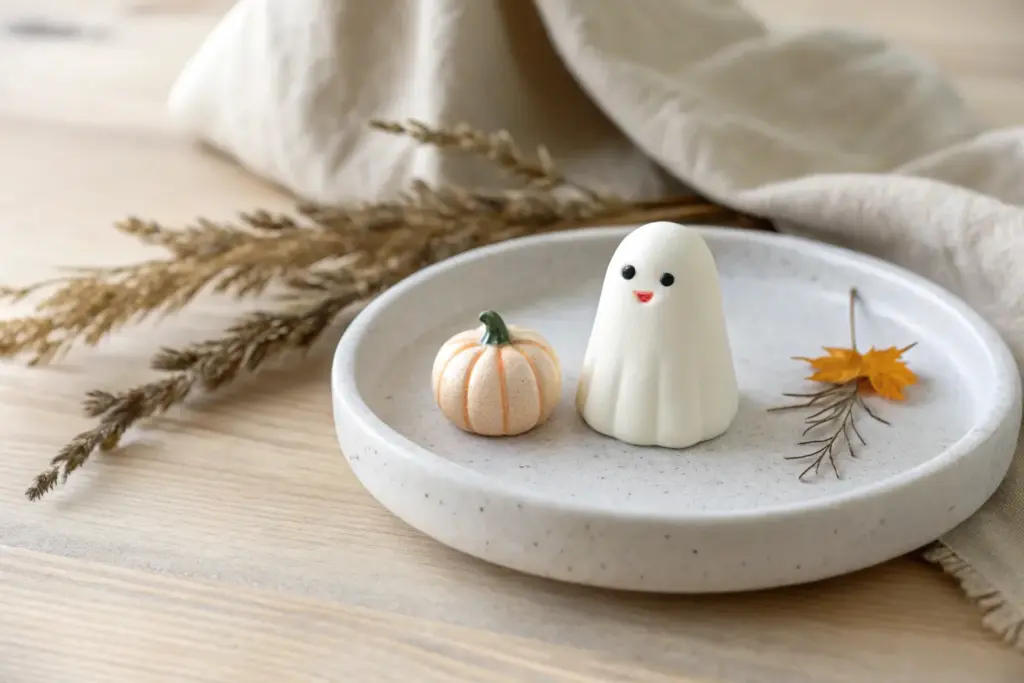
Ghost in a Pumpkin Diorama
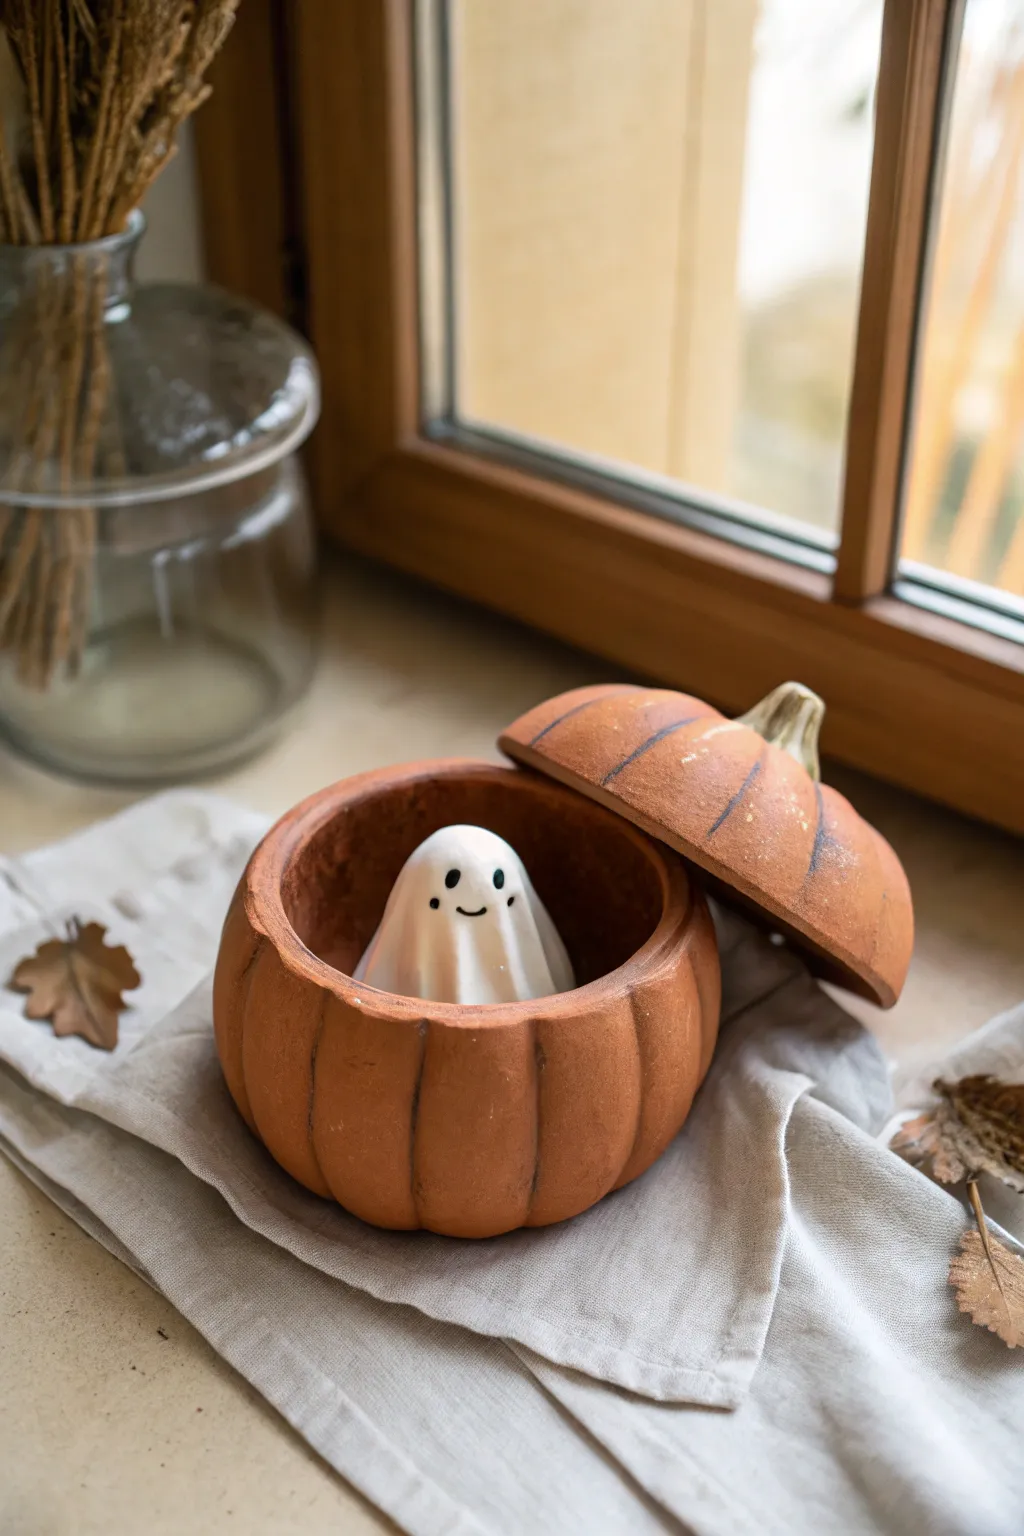
This charming seasonal project combines a rustic terracotta-style pumpkin vessel with an adorable surprise inside. Perfect for a desk companion or fall decor, this two-part sculpture features a removable lid and a permanently perched ghost waiting to greet you.
How-To Guide
Materials
- Terracotta-colored air-dry clay or polymer clay
- White air-dry clay or polymer clay
- Acrylic paints (black, dark brown, antique gold/bronze)
- Clay sculpting tools (knife tool, ball stylus)
- Fine grit sandpaper
- A small round object forms (like a ping pong ball or foil ball)
- Small paintbrush
- Water cup (for smoothing)
- Matte sealant spray
Step 1: Sculpting the Pumpkin Base
-
Form the pinch pot:
Start with a ball of terracotta clay roughly the size of a tangerine. Push your thumb into the center and gently pinch around the sides to open it up into a hollow bowl shape, keeping the walls about 1/4 inch thick. -
Refine the rim:
Tap the open rim gently against your work surface to flatten it slightly. This flat edge is crucial so the lid will sit securely later. -
Create the segments:
Using the back of a knife tool or a needle tool, press vertical indentations from the bottom center up to the rim all around the bowl. These lines create the classic pumpkin ridges. -
Bulge the sections:
Gently push from the inside of the bowl outward in between your indented lines. The goal is to make each pumpkin segment look plump and round rather than flat. -
Smooth the exterior:
Dip your finger in a little water (or clay softener if using polymer) and smooth out any harsh fingerprints while preserving the ridged texture.
Pro Tip: Rustic Texture
Before the clay dries, gently dab the surface with a stiff toothbrush or a ball of crinkled foil. This instills a natural, stone-like texture that catches the antiquing paint beautifully.
Step 2: Crafting the Lid
-
Shape the lid slab:
Flatten a smaller ball of terracotta clay into a thick disk. It needs to be slightly wider than your pumpkin’s opening. -
Dome the top:
Cup the disk in your palm to give it a slight dome shape. Check the fit against your base often makes sure it covers the opening completely. -
Match the ridges:
Carve lines into the lid that align with the vertical lines on your base. Visual continuity is key here, so line them up casually. -
Add a flange (optional):
If you want a secure fit, add a small ring of clay on the underside of the lid that fits just *inside* the pumpkin rim. This stops it from sliding off. -
Sculpt the stem:
Take a tiny pinch of white or beige clay (or paint it later) and twist it into a gnarled stem shape. Attach this firmly to the top center of the lid.
Level Up: Hidden Glow
Make the ghost hollow or sculpt it around a small LED tea light (flameless only!). The light will shine through the white clay, making your ghost glow eerily from within the pumpkin.
Step 3: The Ghostly Resident
-
Form the ghost body:
Roll a piece of white clay into a smooth cone with a rounded top. It needs to be short enough to fit inside the pumpkin with the lid closed. -
Create drapery folds:
Use a modeling tool to press soft, vertical grooves up the sides of the ghost. These mimic the look of fabric draping over a spooky form. -
Place the ghost:
Press the ghost firmly into the bottom center of your pumpkin bowl. I like to score the bottom of the ghost and the inside of the pumpkin first to ensure a strong bond. -
Initial drying:
If using air-dry clay, let the pieces dry separately for 24-48 hours. If using polymer, bake according to package directions now.
Step 4: Painting & Finishing
-
Sand for texture:
Once fully cured, lightly sand the outside of the pumpkin to give it a worn, matte stone texture. -
Antiquing wash:
Mix a tiny drop of brown paint with water. Brush it over the terracotta pumpkin and lid, letting it settle into the grooves, then wipe the high points clean with a paper towel. -
Character details:
Using a fine-point brush and black paint, carefully dot two eyes and a tiny smile onto the ghost’s face. Keep the features simple for that cute look. -
Adding the stripes:
For the specific look in the photo, paint thin, dark blue or charcoal lines inside the deep grooves of the pumpkin and lid. -
Final dry brushing:
Lightly dry brush a bit of white or light beige on the ‘bulges’ of the pumpkin to simulate dusty clay blooming. -
Seal the work:
Finish everything with a matte spray sealant to protect the paint without making it look glossy or plastic.
Place your finished piece near a window to let the natural light highlight those charming rustic textures
Coffin-Shaped Jewelry Tray
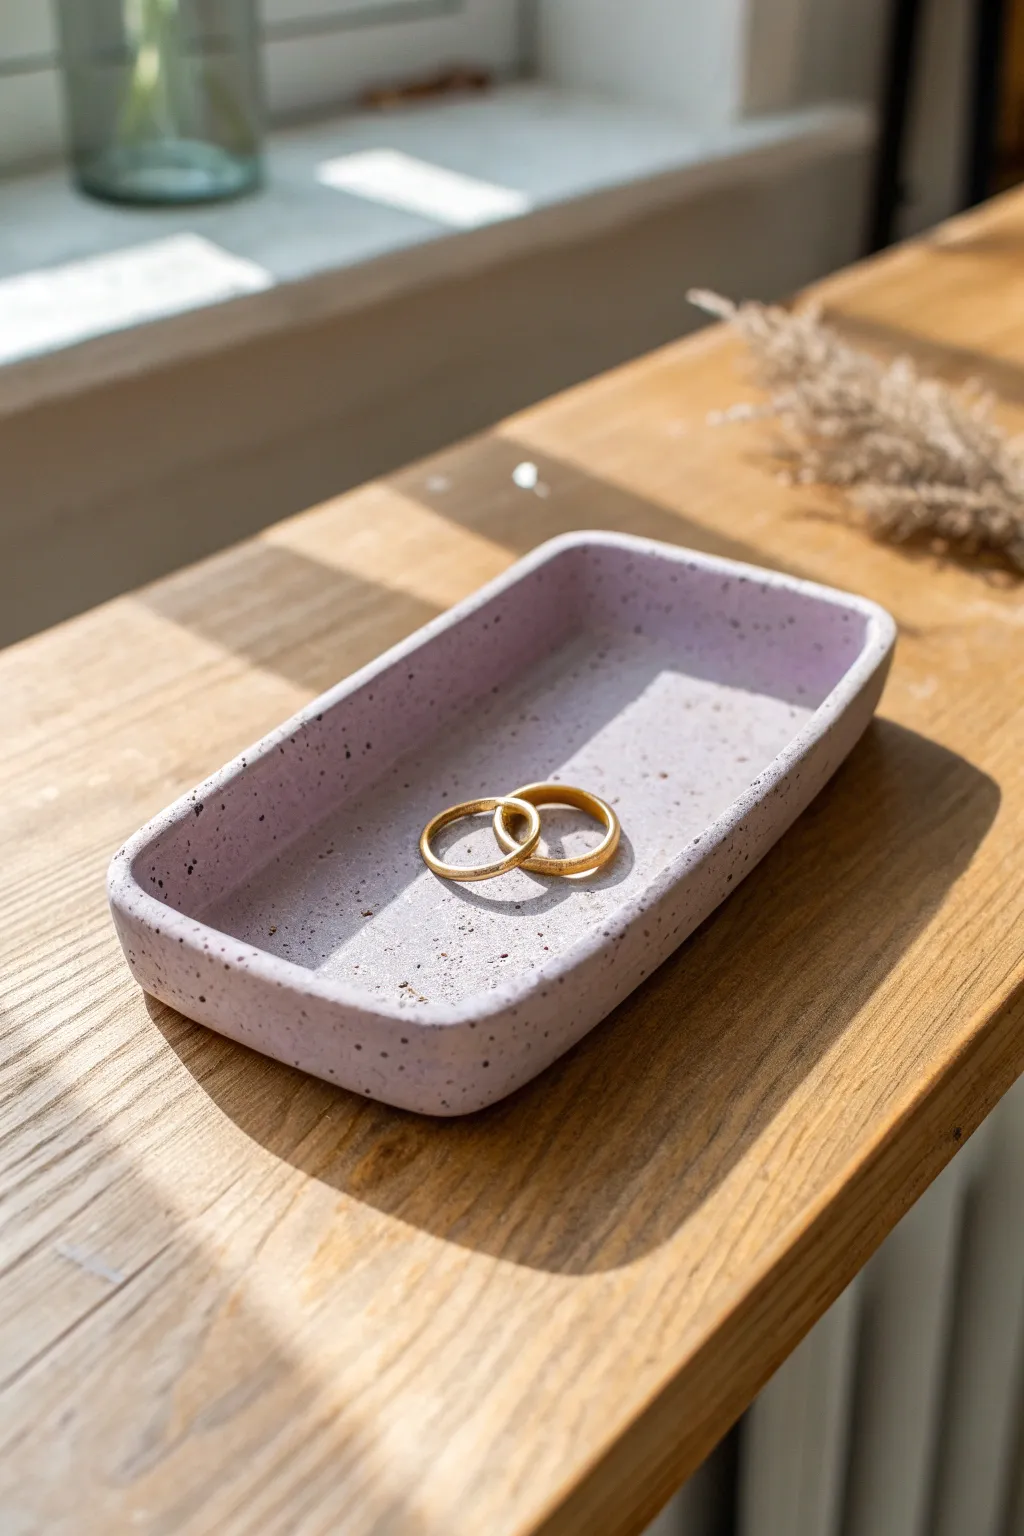
This minimalist yet stylish jewelry tray combines soft lavender tones with a rugged speckled texture, perfect for holding your favorite rings or earrings. The rounded rectangular shape offers a modern look while the terrazzo-style finish adds depth and character to your vanity.
Step-by-Step Guide
Materials
- Polymer clay (white and purple)
- Black acrylic paint or black pepper/dried coffee grounds (for speckling)
- Acrylic roller
- Rolling guides (approx. 5mm thickness)
- Rectangular clay cutter (rounded corners) or template and craft knife
- Sandpaper (various grits from 400 to 1200)
- Liquid polymer clay or Bake & Bond
- Gloss or matte varnish (optional)
- Oven and baking sheet
Step 1: Preparation & Mixing
-
Condition the clay:
Start by warming up your white clay in your hands until it becomes soft and pliable. -
Create the lavender shade:
Mix a very small amount of purple clay into the white clay. Knead thoroughly until you achieve a uniform, pale lavender pastel tone. I find it’s better to add color slowly than to start with too much. -
Add the speckled effect:
To get that granite-like look, sprinkle in either coarse black pepper, dried coffee grounds, or flecks of black clay. Alternatively, you can mix in black acrylic paint later, but for this natural look, solid inclusions work best. -
Incorporate the speckles:
Fold the clay over the speckles and knead until they are evenly distributed throughout the block.
Step 2: Shaping the Base
-
Roll out the slab:
Place your clay between rolling guides or parchment paper. Use your acrylic roller to flatten the clay into a smooth, even sheet about 5mm thick. -
Cut the base shape:
Using a rounded rectangular cutter, press firmly into the slab to cut your base. If you don’t have a cutter, place a paper template on the clay and trace around it carefully with a craft knife. -
Prepare the walls:
Gather the remaining clay scraps and re-roll them into a long snake. Flatten this snake into a long strip, ensuring it has the same thickness as your base. -
Trim the wall strip:
Use a straight blade to trim the long strip so it has a consistent height (about 1.5 cm) and perfectly straight edges.
Seamless Blending Tip
Use the back of a spoon to blend the inside seams. The curvature of the spoon matches the rounded corners perfectly.
Step 3: Assembly
-
Attached the walls:
Apply a thin line of liquid polymer clay or Bake & Bond around the top perimeter of your base slab. -
Position the strip:
Carefully stand the wall strip on top of the base perimeter. Work your way around the curves, gently bending the clay without stretching it. -
Seal the seam:
Where the two ends of the wall meet, cut straight through both layers with a blade for a clean join. Smush the ends together gently. -
Blend the clay:
Use a clay sculpting tool or your finger to smooth the seam between the wall and the base on the inside and outside. The transition should be seamless so it looks like one solid piece. -
Smooth the texture:
Check for any fingerprints or dents. Lightly brush the surface with a little baby oil or cornstarch to smooth it out before baking.
Fixing Air Bubbles
If you see a bump or air bubble before baking, pierce it gently with a needle and smooth the air out with your finger.
Step 4: Baking & Finishing
-
Bake the tray:
Place the tray on a ceramic tile or baking sheet covered with cardstock. Bake according to your clay manufacturer’s instructions, typically around 275°F (130°C) for 30-45 minutes. -
Cool down:
Let the piece cool completely in the oven before removing it to prevent cracking. -
Sand the edges:
Once cool, use wet sandpaper to smooth the top rim and any sharp edges. Start with a lower grit (400) and work up to a higher grit (1200) for a silky finish. -
Seal the piece:
If desired, apply a thin coat of matte varnish to protect the surface, or leave it raw for a stony, matte texture.
Now you have a chic, modern place to rest your most treasured jewelry pieces
Crescent Moon With Bats
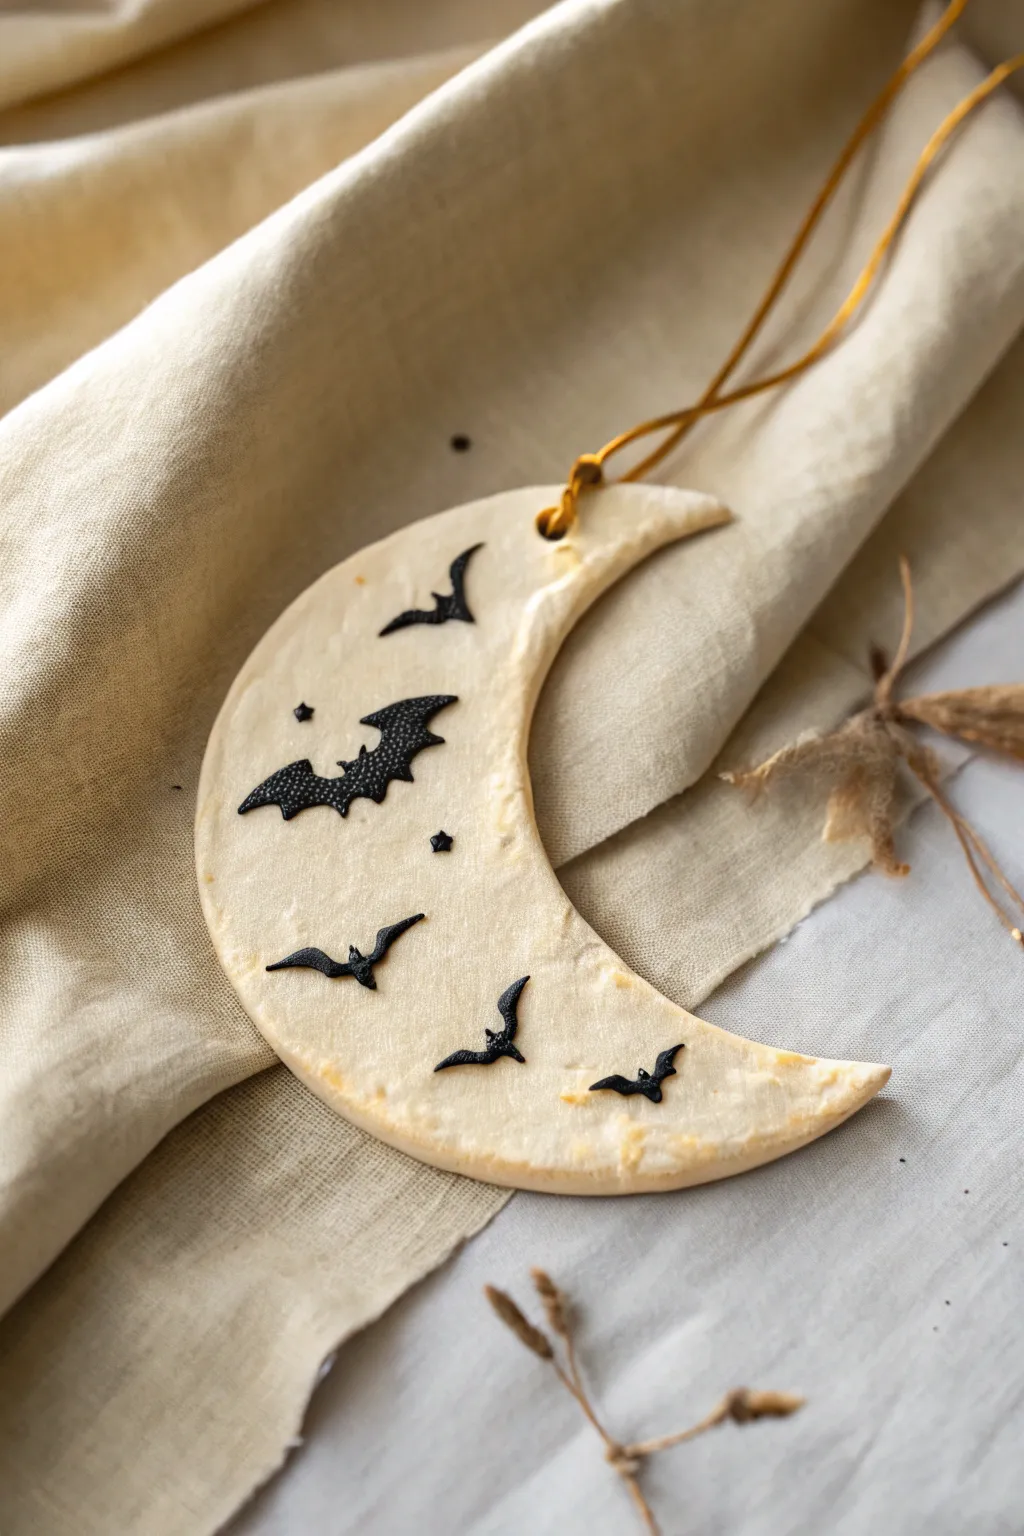
This rustic crescent moon pendant combines a simple cream-colored base with strikingly detailed black bat silhouettes for a classic spooky vibe. The textured surface gives it an ancient, handcrafted feel perfect for Halloween decor.
Step-by-Step Tutorial
Materials
- White or cream-colored air-dry clay (or salt dough)
- Dough roller or rolling pin
- Crescent moon cookie cutter (or a knife and paper template)
- Black acrylic paint
- Fine-point detail paintbrush
- Small black glitter or embossing powder
- String or twine for hanging
- Straw or toothpick for the hole
- Sandpaper (optional)
- Clear matte varnish
Step 1: Shaping the Base
-
Prepare the Clay:
Take a handful of your air-dry clay or salt dough and knead it until it’s soft and pliable. If the clay feels too dry or cracks, dampen your fingers slightly with water. -
Roll It Out:
Roll the clay out on a smooth surface to a thickness of about 1/4 inch. You want it sturdy enough not to break, but light enough to hang. -
Cut the Moon:
Use a large crescent moon cookie cutter to punch out your shape. Alternatively, trace a moon shape onto paper, cut it out, lay it on the clay, and carefully trace around it with a craft knife. -
Soften the Edges:
Dip your finger in a little water and gently run it along the cut edges of the fresh clay to smooth out any sharpness or crumbs. -
Add Texture:
To achieve the rustic look seen in the photo, gently tap the surface of the clay with a crumpled piece of aluminum foil or a textured sponge. Don’t press too hard; you just want subtle surface interest. -
Create the Hanging Hole:
Use a straw or a chopstick to poke a hole near the top point of the crescent. Wiggle it slightly to ensure the opening is clean and large enough for your twine. -
Dry Completely:
Allow the moon to dry according to your clay package’s instructions. This usually takes 24-48 hours. I like to flip it over halfway through drying so the back dries evenly.
Step 2: Painting the Bats
-
Sand Irregularities:
Once bone dry, you can lightly sand any rough spots on the edges if needed, though keeping it a bit rough adds to the charm. -
Sketch the Design:
Lightly sketch the positions of your bats and small stars using a pencil. Plan for one larger, focal bat in the center and 3-4 smaller silhouettes flying around it. -
Paint the Silhouettes:
Using your fine-point brush and black acrylic paint, fill in the smaller bat shapes. Keep the paint opaque and solid. Add tiny stars or dots around them. -
Create the Texture Bat:
For the largest central bat, paint the base shape generously with black paint. While the paint is still wet, you have two options for texture. -
Adding Dimension:
Sprinkle fine black glitter or embossing powder over the wet paint of the large bat. Tap off the excess immediately. Alternatively, use a tool to stipple the wet paint for a rougher finish. -
Let Paint Cure:
Allow all paint work to dry completely. If you used glitter, ensure it is firmly adhered. -
Seal the Piece:
Coat the entire front surface with a clear matte varnish. This seals the clay and protects the paint work, ensuring your spooky decoration lasts for years. -
String It Up:
Cut a length of gold or brown twine. Thread it through the hole at the top and tie a secure knot.
Fixing Clay Cracks
If small cracks appear during drying, mix a tiny bit of fresh clay with water to make a paste and fill them in before painting.
Glow in the Dark
Mix glow-in-the-dark powder into your varnish or use glow paint for the stars to make the moon illuminate when the lights go out.
Hang your handcrafted moon in a window or on a Halloween tree to enjoy its eerie shadow play
Haunted Mirror Frame Charm
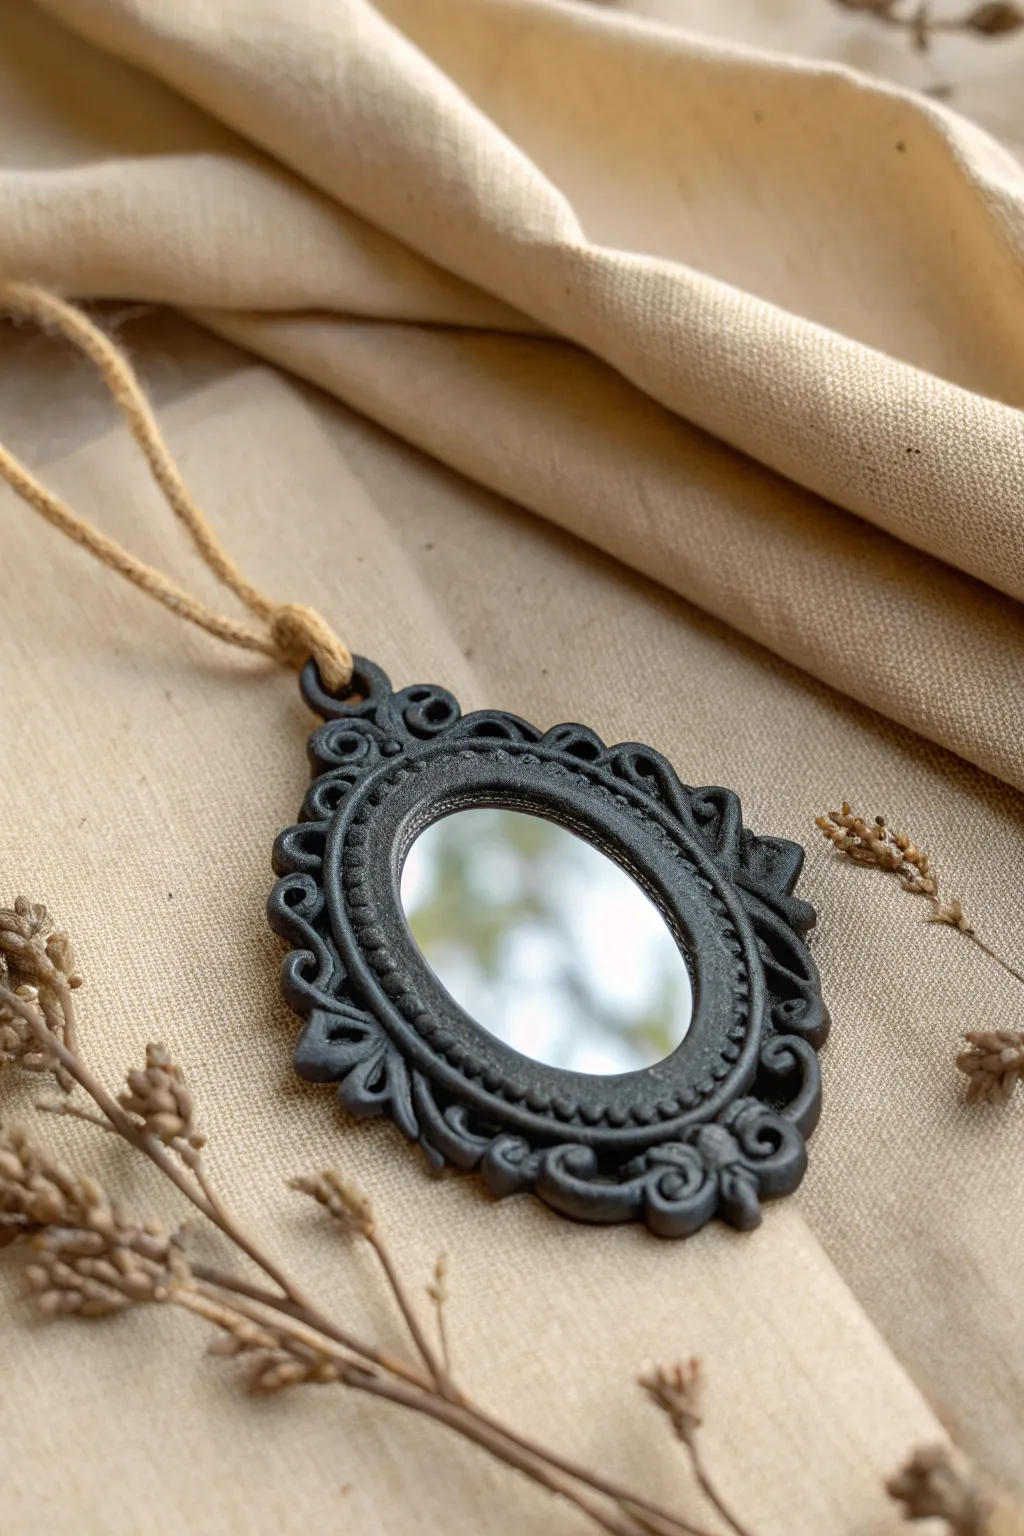
Summon a touch of Victorian gothic elegance with this ornate haunted mirror charm. The matte black finish and intricate filigree details frame a tiny reflection, perfect for a witchy necklace or a spooky decorative hanging.
Detailed Instructions
Materials
- Black polymer clay (or white clay + black acrylic paint)
- Small oval craft mirror (approx. 1-1.5 inches)
- Liquid clay or bake-and-bond adhesive
- Sculpting tools (needle tool, small ball stylus)
- Texture sheet or silicone mold (optional, for filigree)
- Matte varnish or sealant
- Jute twine or cord
- Cornstarch or baby powder (release agent)
- Oven for baking
Step 1: Preparing the Base
-
Condition the clay:
Start by thoroughly kneading your black polymer clay until it is soft and pliable. Warm clay prevents cracking and makes detail work much easier. -
Create the backing:
Roll out a sheet of clay to about 3mm thickness. Place your small oval mirror on top and use a needle tool to trace a shape slightly larger than the mirror—leave about a 5mm border all around. -
Secure the mirror:
Apply a very thin layer of liquid clay to the center of your clay backing. Press the mirror firmly into place. The liquid clay acts as a glue during baking. -
Add the immediate rim:
Roll a thin snake of clay and wrap it directly around the edge of the mirror glass to cover the seam. Flatten it slightly with your finger or a tool so it sits flush against the glass.
Clean Mirror Trick
Worried about baking the mirror? Most craft mirrors are glass and handle polymer clay baking temps fine. Just avoid rapid cooling to prevent thermal shock cracks.
Step 2: Sculpting the Details
-
Texture the inner rim:
Using a needle tool, press tiny indentations all along that inner snake of clay you just added. This creates a beaded or rope-like texture that frames the glass beautifully. -
Form the filigree foundation:
Begin adding small teardrop shapes and curled snakes of clay to the outer border of the backing. I find it helpful to work symmetrically, adding a piece to the left side and then immediately mirroring it on the right. -
Create the ornate swirls:
Roll very thin tapered snakes of clay. Coil them into tight spirals and S-curves. Place these onto the border, pressing gently to adhere them to the base. -
Integrate the design:
Use a small ball stylus to blend the seams where your swirls meet the backing. This ensures they don’t pop off later and gives it that cast-iron look. -
Add a hanging loop:
At the very top center, fashion a sturdy loop of clay. Ensure the hole is large enough for your jute twine to pass through easily. Blend the base of the loop seamlessly into the top filigree. -
Refine the edges:
Go around the outer perimeter with a smoothing tool to neaten up any rough edges. The silhouette should look purposeful and clean.
Smudged Glass?
If you get varnish on the mirror during the final step, don’t panic. Wait for it to dry fully, then gently scrape it off with a craft knife or fingernail.
Step 3: Finishing Touches
-
Clean the mirror:
Before baking, take a cotton swab dipped in a tiny bit of rubbing alcohol and carefully wipe any fingerprints or clay smudges off the mirror glass. -
Bake the piece:
Place your charm on a ceramic tile or baking sheet. Bake according to your polymer clay package instructions (usually around 275°F/130°C for 15-30 minutes). -
Cool down:
Let the piece cool completely in the oven with the door slightly ajar. Sudden temperature changes can sometimes crack the clay or the mirror. -
Painting (If needed):
If you didn’t use black clay, now is the time to paint the entire sculpted area with black acrylic paint. You might need two coats for full opacity. -
Matte finish:
For that spooky, ancient iron look, apply a matte varnish over the clay parts. Avoid getting varnish on the mirror glass. -
String it up:
Once the varnish is dry, cut a length of jute twine. Thread it through the top loop and tie a knot to finish your haunted artifact.
Enjoy your eerie new accessory along with the mysterious vibes it brings to your collection
Witches-Only Fairy Door
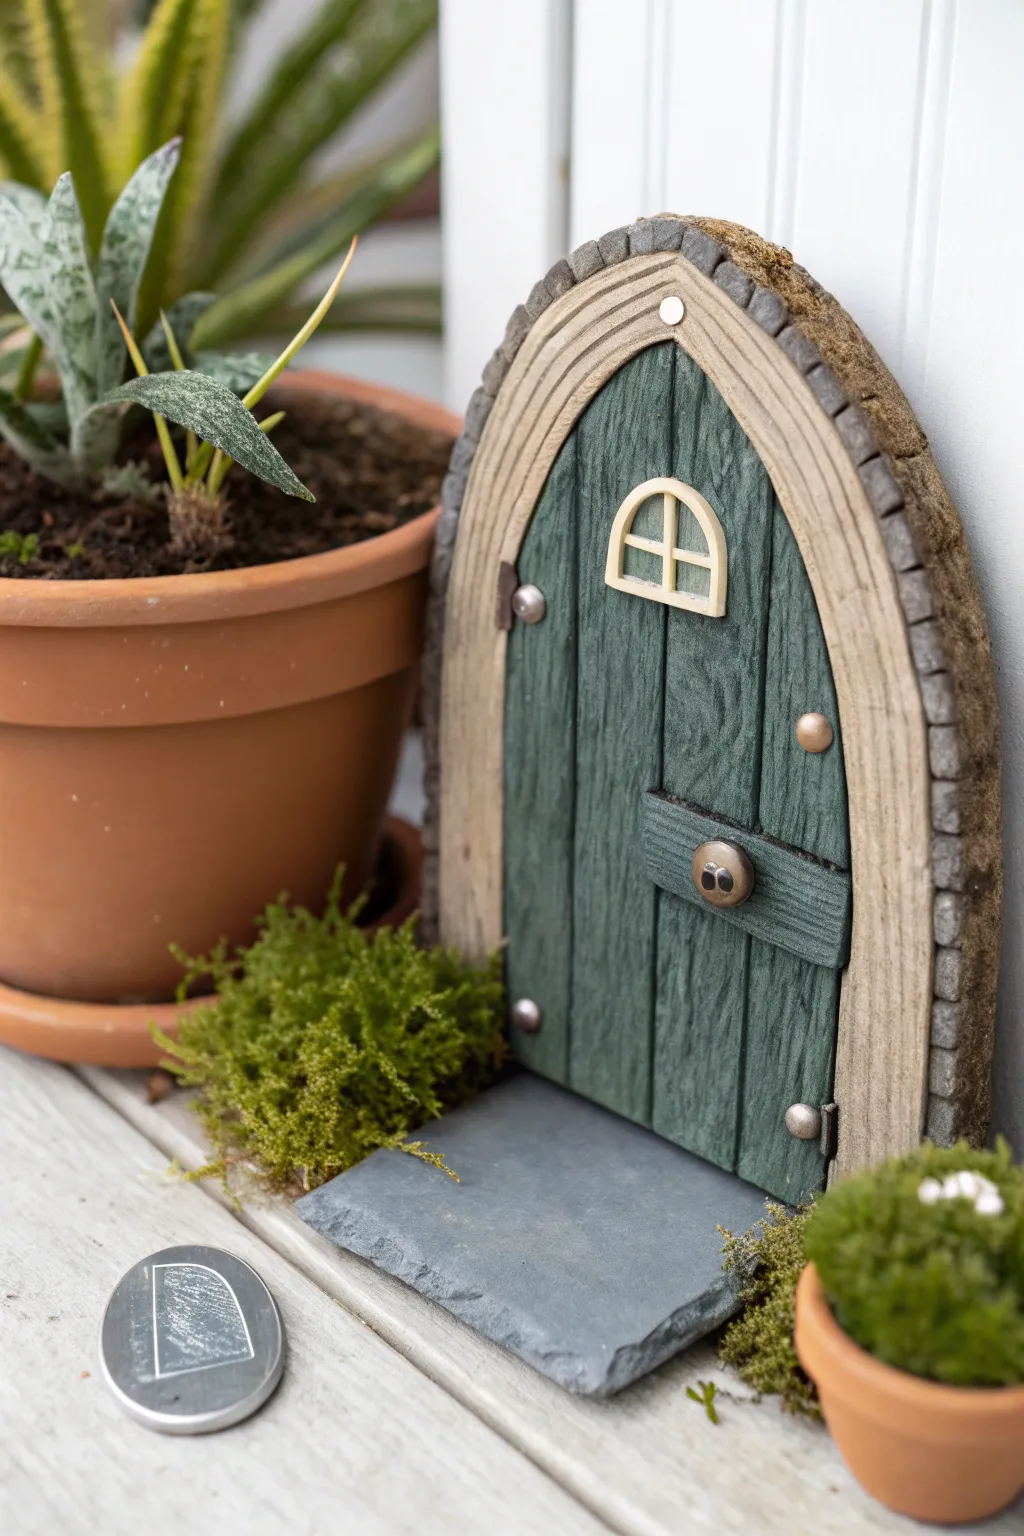
Create a portal to a hidden world with this enchanting clay fairy door, featuring realistic wood grain textures and a weathered stone archway. This deep green door, complete with tiny hardware details, makes a perfect mystical addition to any indoor plant arrangement or bookshelf.
Step-by-Step Tutorial
Materials
- Polymer clay (dark green, beige/tan, grey, brown)
- Rolling pin or pasta machine
- Texture tools (needle tool, toothbrush, wire brush)
- clay knife or scalpel
- Liquid polymer clay (clear or translucent)
- Small piece of slate or flat stone
- Acrylic paints (black, brown, white)
- Small paintbrushes
- Gloss varnish (optional)
- Oven for baking
Step 1: Shaping the Base and Door
-
Prepare the back plate:
Roll out a sheet of scrap clay or neutral-colored clay to about 1/4 inch thickness. Cut this into a tombstone arch shape; this will serve as the backing for your entire door assembly. -
Create the door planks:
Roll out dark green clay into a flat sheet. Using your knife, cut vertical strips to represent wooden planks. Varies the widths slightly for a natural look. -
Assemble the door:
Lay the green strips onto the center of your backing clay, fitting them side-by-side. Leave a border around the edge where the stone arch will go. -
Add wood texture:
Use a needle tool or a stiff wire brush to drag vertical grain lines into the green clay. Add occasional knots by pressing the end of a tool into the clay and swirling gently.
Step 2: Constructing the Archway
-
Form the inner frame:
Roll a snake of beige or light tan clay. Flatten it slightly into a strip and press it around the curved edge of your green door to create the wooden jamb. -
Texture the jamb:
Use your needle tool to scratch deep, parallel lines into the beige strip to mimic raw lumber grain. -
Create the stone surround:
Roll out grey clay and cut small, uniform rectangles for bricks, or a long strip that you score to look like bricks. Press these around the outer edge of the beige frame. -
Weather the stones:
Tap a toothbrush or ball of foil against the grey clay to give the stones a pitted, rough texture.
Clay Conditioning
If your clay is crumbling, mix in a tiny drop of baby oil or clay softener. Warm clay holds texture much better than cold, stiff clay.
Step 3: Details & Hardware
-
Add the cross-brace:
Cut a short horizontal strip of textured green clay and press it across the door, roughly one-third of the way up from the bottom. -
Make the hinges:
Roll tiny balls of metallic or grey clay. Flatten them slightly and press them onto the left side of the door frame to look like primitive hinges. -
Install the handle and window:
Place a small flattened circle of metallic clay on the cross-brace for a handle. For the window, cut a small arch from cream clay and add thin strips for mullions, positioning it in the upper center. -
Bake the project:
Place your clay door onto a baking sheet. Follow the specific temperature and time instructions on your package of polymer clay. Let it cool completely after baking.
Spooky Vibes
Add tiny clay pumpkins, a broomstick leaning against the frame, or glow-in-the-dark clay for the window panes to make it extra witchy.
Step 4: Finishing Touches
-
Apply a wash:
Dilute black or dark brown acrylic paint with water. Brush it over the entire door, letting it seep into the wood grain and stone crevices. -
Wipe back:
Before the paint dries, gently wipe the raised surfaces with a damp paper towel or cloth. This leaves the dark color in the cracks, highlighting the texture. -
Dry brush highlights:
I like to take a dry brush with a tiny amount of white or light grey paint and lightly dust the tops of the stones to make them pop. -
Mount on slate:
Use strong glue or a bit of liquid clay to attach the finished door to a piece of slate or flat stone, creating a realistic doorstep.
Now you have a charming entryway ready to welcome any magical creature passing through your home
Mini Graveyard Tin Diorama
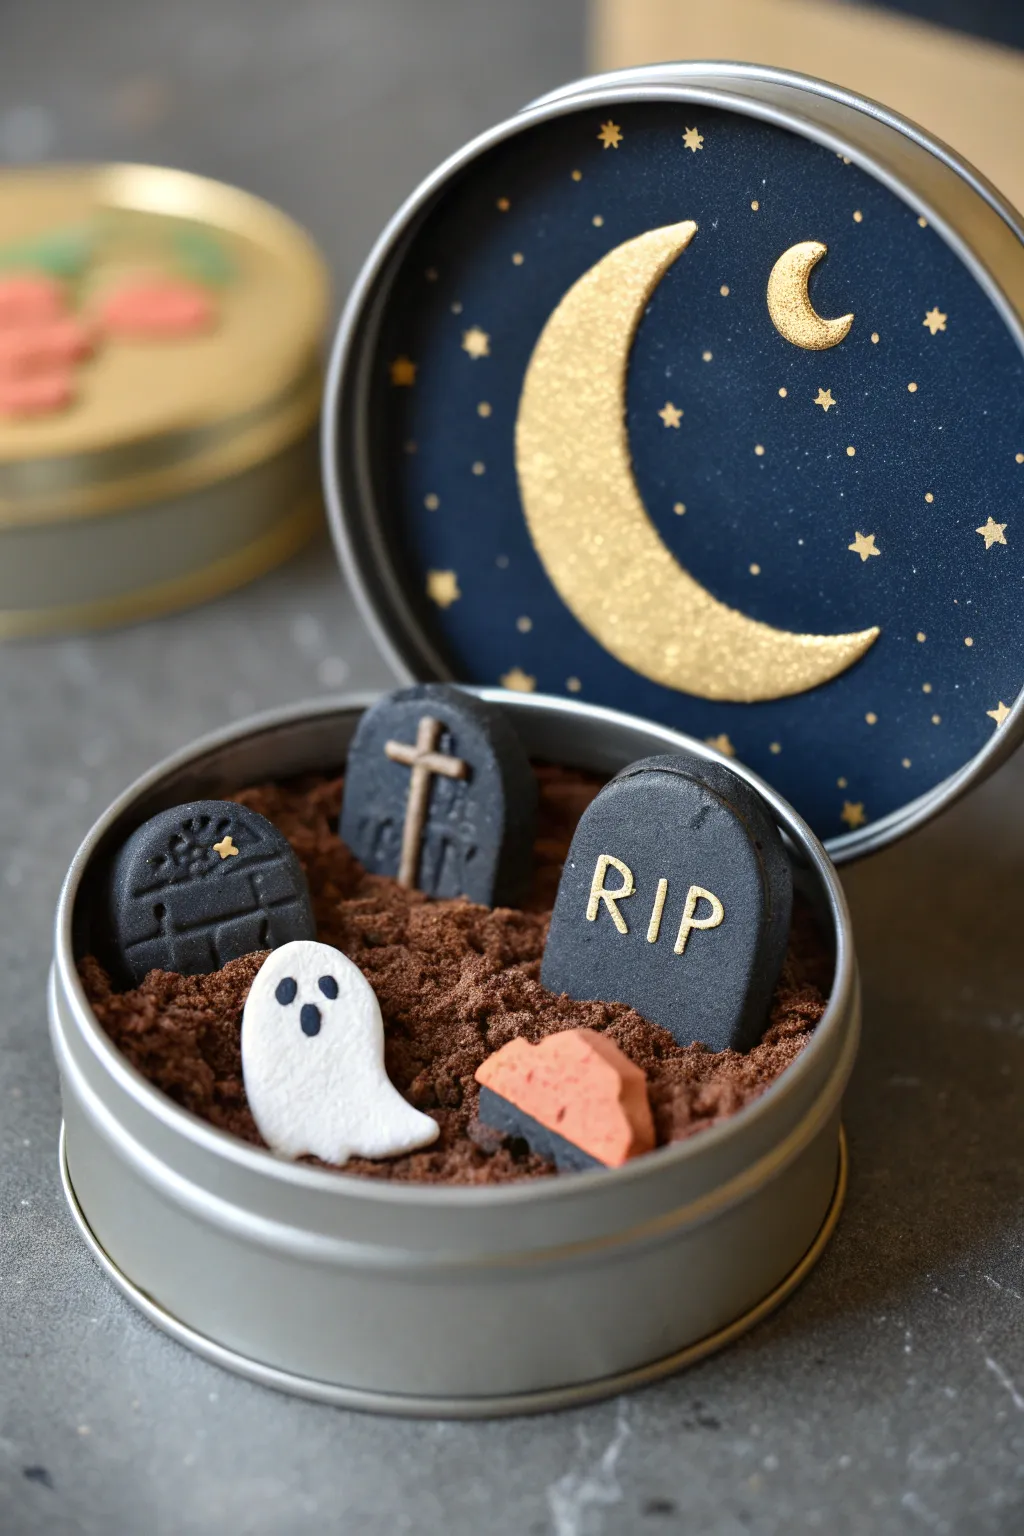
Create a hauntingly adorable scene hidden inside a simple mint tin featuring tiny tombstones and a shimmering night sky. This miniature diorama combines polymer clay sculpting with mixed media elements for a secret spooky world you can carry anywhere.
Detailed Instructions
Materials
- Round metal tin (cleaned and dried)
- Polymer clay: Black, White, Orange, Dark Brown
- Gold acrylic paint or gold leaf pen
- Dark blue cardstock or construction paper
- Star-shaped glitter or gold confetti
- PVA glue or strong craft adhesive
- Sculpting tools (needle tool, small blade)
- Texture tool (toothbrush or stiff brush)
- Rolling pin
- Scissors
Step 1: Setting the Scene
-
Prepare the dirt base:
Begin by conditioning a chunk of dark brown polymer clay. Press it firmly into the bottom half of your metal tin until it’s about half to three-quarters full. The surface doesn’t need to be perfectly flat yet. -
Texture the ground:
To achieve that loose, freshly dug earth look, take an old stiff toothbrush or a texturing tool and vigorously tap the surface of the brown clay. You want to rough it up significantly so it resembles clumps of soil. -
Create the night sky:
Trace the lid of your tin onto dark blue cardstock and cut out the circle. Test the fit inside the lid; it should be snug. Trim slightly if needed, but don’t glue it in just yet.
Clay Won’t Stick?
If figures tip over before baking, use a tiny drop of liquid polymer clay (Bake & Bond) on the bottom of the tombstone before pressing it into the dirt base.
Step 2: Sculpting the Spooks
-
Shape the tombstones:
Roll out a thick slab of black clay (about 1/4 inch thick). Use your blade to cut three arch shapes or rounded rectangles. Smooth the cut edges with your finger so they look like weathered stone. -
Detail the first stones:
For the ‘RIP’ stone, roll very thin snakes of beige or light gold clay (or use white and paint later). Carefully press the letters onto one of the black shapes. Alternatively, you can use a needle tool to scratch the letters in. -
Add symbolic details:
For the second stone, create a small raised cross using two thin strips of clay. Press them gently onto the face of the tombstone to secure. -
Create the decorative stone:
On the third stone, use a needle tool to etch a decorative brick pattern or cracks near the bottom. You can press a tiny gold confetti star into the clay for a magical touch. -
Form the ghost:
Roll a small ball of white clay and flatten the bottom to create a teardrop shape. Gently pull the bottom edge to the side to create a swooping ‘tail.’ Like a little comma shape. -
Give the ghost a face:
Use a tiny dotting tool or the head of a pin to press two eye sockets and a mouth into the ghost. Fill these indents with minuscule balls of black clay and smooth them flat. -
Make the buried pumpkin:
Take a small pinch of orange clay and shape it into a rough, uneven mound. Press it slightly so it looks like a pumpkin or rock that is partially buried in the ground.
Make It Glow
Swap the standard white clay for glow-in-the-dark polymer clay for the ghost and the moon. This adds a fantastic surprise when the lights go out.
Step 3: Assembly and Baking
-
Position the elements:
Press your three tombstones firmly into the textured brown ‘dirt’ inside the tin. Nestle them deep enough so they stand upright securely. Add the ghost and the orange piece in front. -
Re-texture if needed:
If you smoothed out any of the dirt while placing the figures, go back in with your texture tool and roughen the clay around the base of the objects to integrate them. -
Bake the project:
Bake the entire bottom half of the tin (with clay inside) according to your polymer clay manufacturer’s instructions. Metal tins are oven safe at clay curing temperatures. Let it cool completely. -
Decorate the sky:
While the clay bakes, return to your blue paper circle. Cut a crescent moon shape from gold paper or paint one using gold acrylic. Glue it to the center of the blue sky. -
Add the stars:
Using a fine-tip paintbrush or a toothpick, dot tiny specks of white or gold paint onto the blue background to create distant stars. Glue on a few larger gold star confetti pieces for dimension. -
Final assembly:
Once the paint is dry and the tin is cool, apply a thin layer of craft glue to the inside of the tin lid and press your night sky paper into place. -
Highlight the text:
I like to finish by taking a tiny brush with gold paint and carefully going over the ‘RIP’ letters and the cross on the tombstones to make them pop against the black clay.
Now you have a spooky little secret world you can snap shut and reveal to impress your friends