
As soon as the light gets softer and everything starts blooming again, I always reach for air-dry clay or polymer clay and make something cheerful. These spring clay ideas are meant to feel easy, happy, and totally doable at your kitchen table.
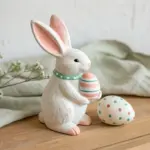
Bunny-Shaped Ring Dish
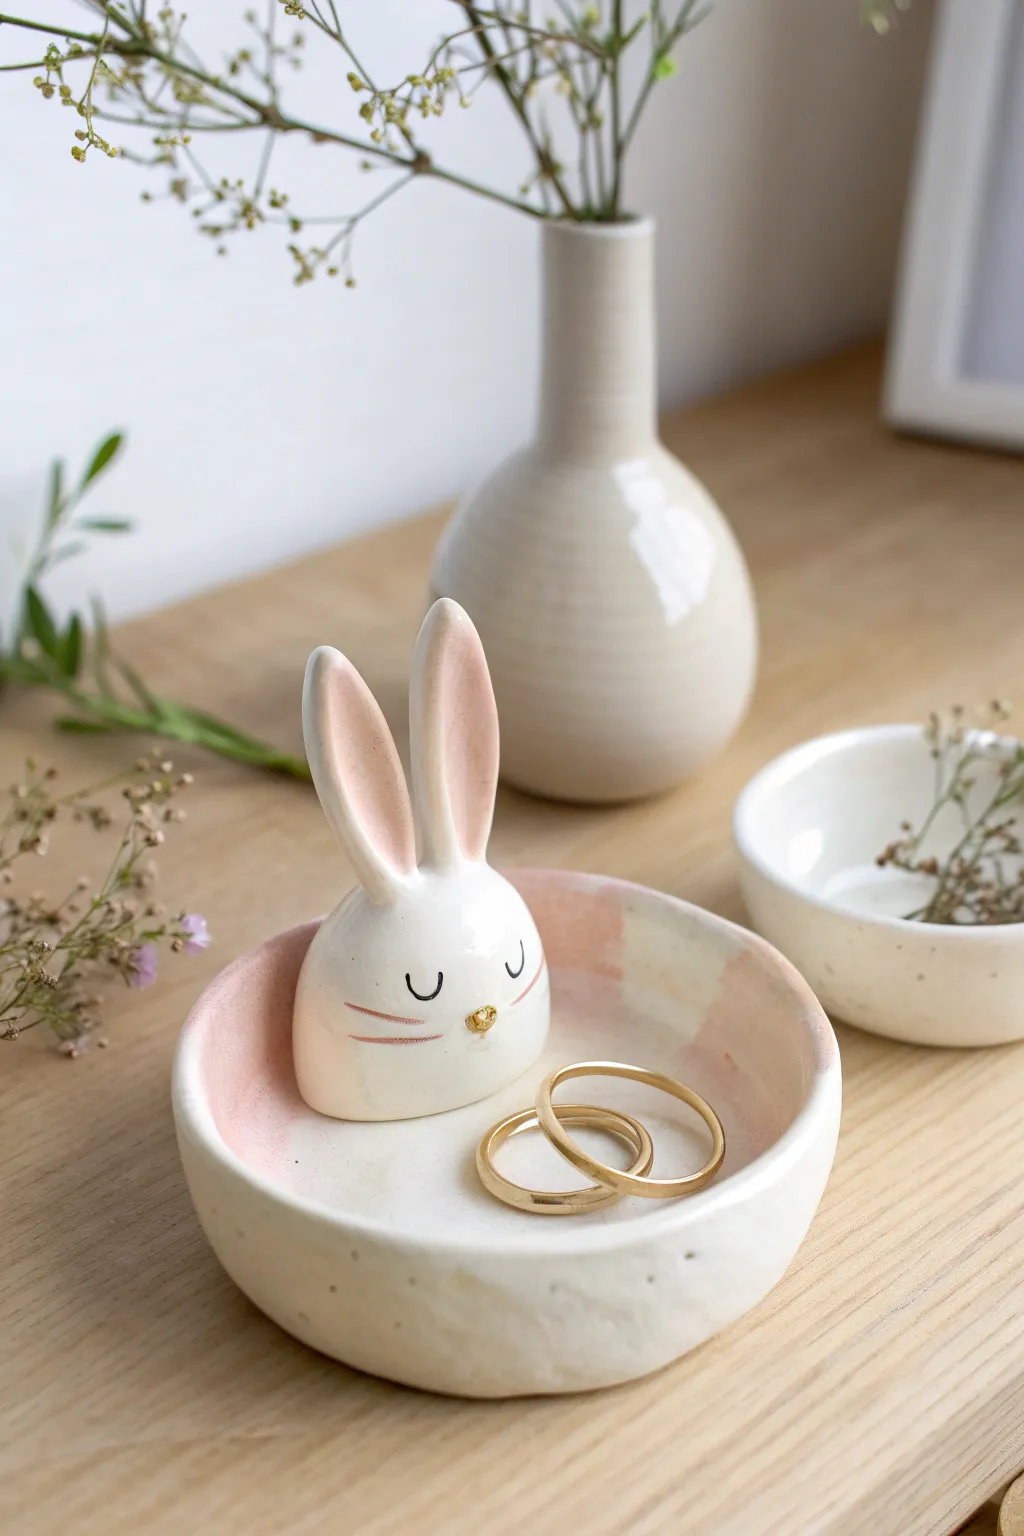
This adorable ring holder features a gentle bunny sculpture nestled in a shallow dish, perfect as a bedside catch-all or a sweet Spring gift. The soft pink accents and delicate facial features give it a timeless, handmade ceramic feel using accessible air-dry or polymer clay.
Step-by-Step
Materials
- White polymer clay or air-dry clay
- Rolling pin
- Circle cookie cutter (approx. 3-4 inches)
- Clay sculpting tools or smooth knife
- Water (for smoothing air-dry clay) or baby oil (for polymer)
- Sandpaper (fine grit)
- Acrylic paints: soft pink, black, gold
- Small round paintbrush
- Detail brush or fine-tip marker
- Gloss varnish or clear sealant
- Sponge or small dish for water
Step 1: Forming the Base Dish
-
Condition the Clay:
Start by kneading a tennis-ball-sized amount of white clay until it is warm, soft, and pliable. This prevents cracks later on. -
Roll the Slab:
Roll the clay out on a smooth surface to an even thickness of about 1/4 inch. If you are using polymer clay, wax paper can help prevent sticking. -
Cut the Circle:
Press your circle cookie cutter firmly into the rolled slab to create a clean, round disc. Remove the excess clay from around the edges. -
Shape the Bowl:
Gently lift the edges of the circle with your fingers, curling them upward to create a shallow bowl shape. Smooth the rim with water (or oil) to soften any sharp cut marks. -
Refine the Form:
Work around the circumference, pinching gently to ensure the walls are even and slightly organic-looking, rather than perfectly machine-made.
Smooth Seams
To erase seams between attached clay (like ears to head), roll a tiny ‘snake’ of clay, place it over the joint, and blend it out with a rubber tool.
Step 2: Sculpting the Bunny
-
Make the Head:
Roll a smaller ball of clay, roughly the size of a walnut, into a smooth, slightly flattened teardrop shape for the bunny’s head. -
Attach the Head:
Place the head in the center of the dish (or slightly off-center if you prefer). Score the bottom of the head and the spot on the dish, adding a dab of water or liquid clay to bond them securely. -
Form the Ears:
Roll two small logs of clay and taper the ends. Flatten them gently to create long, spoon-like bunny ears. -
Attach the Ears:
Press the ears onto the top of the head. Use a blending tool to smooth the seam where the ears meet the skull so they look like one continuous piece. -
Smooth the Surface:
Run a damp finger or soft brush over the entire sculpture to remove fingerprints and ensure strong connections before drying. -
Cure or Dry:
If using polymer clay, bake according to package instructions. If using air-dry clay, allow it to dry completely for 24-48 hours until hard and white.
Speckled Pottery Look
Mix black pepper or dried used coffee grounds into your white clay before rolling. This mimics expensive speckled stoneware clay effortlessly.
Step 3: Painting and Finishing
-
Sand Imperfections:
Once fully cured or dry, gently sand any rough edges on the rim or the bunny’s ears with fine-grit sandpaper for a professional finish. -
Pink Watercolor Wash:
Dilute a small drop of pink acrylic paint with plenty of water. Paint the insides of the ears and swipe a rough, artistic wash across one side of the bowl’s interior. -
Paint the Face:
Using a very fine detail brush and black paint, carefully paint two U-shapes for sleeping eyes and small lines for whiskers. I find resting my hand on a stable surface helps keep the lines steady. -
Add the Nose:
Dip the tip of a toothpick or smallest brush into gold paint and dab a tiny heart or triangle shape for the nose. -
Seal the piece:
Finish by applying a coat of gloss varnish over the entire dish to protect the paint and give it a shiny, ceramic-like glaze.
Place your favorite rings on the bunny’s ears and enjoy your charming new creation


Bunny Egg Cups for Brunch
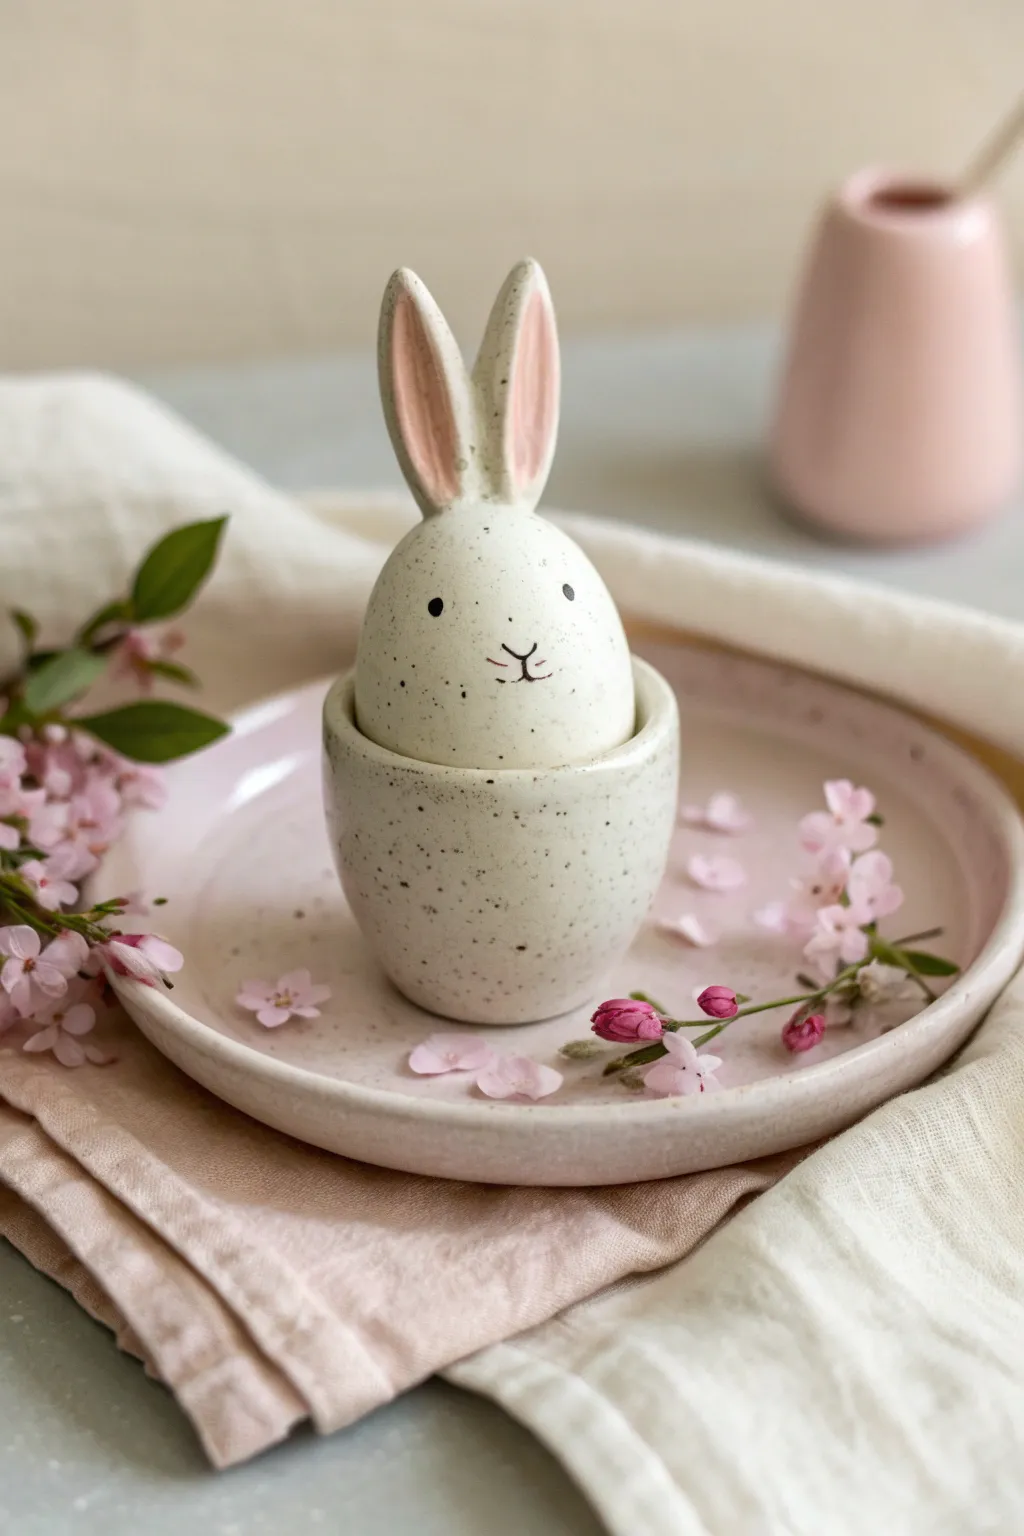
Transform your Easter table setting with these charming ceramic bunny egg cups, featuring sweet, hand-painted faces and delightful speckled finishes. This project combines simple pinch pot techniques with sculptural details to create a whimsical holder perfect for soft-boiled eggs or hiding treats.
Step-by-Step Guide
Materials
- White polymer clay or low-fire earthenware clay
- Rolling pin
- Egg (real hard-boiled or wooden egg for sizing)
- Needle tool or clay knife
- Slip (clay slurry) and scoring tool
- Small paintbrush
- Black acrylic paint or black underglaze
- Pink acrylic paint or pink underglaze
- Old toothbrush (for speckling)
- Water mixed with brown/black acrylic paint (for speckles)
- Clear satin glaze or varnish
- Sandpaper (fine grit)
Step 1: Forming the Base
-
Create the Cup:
Begin with a ball of white clay roughly the size of a golf ball. Use your thumb to press into the center, pinching the walls gently as you rotate the ball to form a small, deep cup shape. -
Check the Fit:
Test the size of your pinch pot using your sizing egg. You want the egg to sit comfortably inside with about half of it peeking out, so adjust the depth and width if necessary. -
Refine the Walls:
Smooth the walls of the cup between your thumb and forefinger to ensure an even thickness all around, which helps prevent cracking during drying or baking. -
Flatten the Bottom:
Gently tap the bottom of the cup onto your work surface to create a flat, stable base so the egg cup won’t wobble on the table.
Pro Tip: Seamless Join
When attaching clay ears, use a small coil of clay wrapped around the base of the ear to reinforce the join, then blend it completely smooth.
Step 2: Sculpting the Bunny Lid
-
Form the Dome:
Create a second pinch pot, slightly shallower than the first, intended to sit upside down over the top half of the egg. Test the fit carefully; it should look like a dome resting on the egg. -
Shape the Ears:
Roll two small logs of clay into elongated teardrop shapes. Flatten them slightly with your thumb to create the classic bunny ear silhouette. -
Attach the Ears:
Score the bottom of the ears and the top of the dome where they will attach. Apply a little slip or liquid clay, press the ears firmly in place, and smooth the seams with a modeling tool so they look seamless. -
Refine the Shape:
Use a damp sponge or finger to smooth out any fingerprints on both the base cup and the lid, ensuring the curves are gentle and organic.
Troubleshooting: Wobble
If your finished cup wobbles, place a sheet of fine-grit sandpaper on a flat surface and rub the bottom of the cup in a circular motion until level.
Step 3: Finishing and Decoration
-
Initial Bake/Dry:
If using polymer clay, bake according to package directions. If using ceramic clay, allow it to dry completely to the greenware stage before the first bisque fire. -
Painting the Ears:
Mix a soft pastel pink paint. Carefully paint the inner section of the bunny ears, leaving a clean white border around the edges. -
Drawing the Face:
Using a very fine detail brush and black paint, add two small dots for eyes. Place them fairly wide apart for a cute expression. -
Adding the Nose:
Paint a tiny ‘Y’ shape just below the eyes to form the nose and mouth. I find that keeping this minimal gives the bunny the sweetest look. -
Adding Whiskers:
Add two or three extremely short, fine horizontal dashes on either side of the nose for subtle whiskers. -
Creating the Speckles:
Dilute a small amount of dark brown or black paint with water until it’s very runny. Dip an old toothbrush into this mixture. -
Applying the Speckles:
Hold the toothbrush a few inches away from the clay pieces and run your thumb across the bristles to flick tiny droplets of paint onto the surface. Rotate the pieces to cover all sides evenly. -
Final Seal:
Once the paint is thoroughly dry, apply a coat of clear satin glaze or varnish. This seals the paint and gives the piece that polished, ceramic look shown in the photo.
Place these sweet speckled bunnies at each setting for a brunch that feels instantly festive and handcrafted


Butterfly Wall Charms

Celebrate the arrival of spring with this charming vertical mobile featuring a flutter of pastel butterflies. Suspended on rustic jute twine, these textured clay charms add a touch of whimsy and movement to any blank wall space.
Step-by-Step Guide
Materials
- White air-dry clay (or polymer clay)
- Small butterfly cookie cutter or template
- Rolling pin
- Wax paper or craft mat
- Modeling tools (or kitchen skewer/toothpick)
- Jute twine
- Acrylic paints (pastel pink, dusty mint green, lavender, white, soft grey)
- Fine-grit sandpaper
- Detail paintbrushes
- Drill with tiny bit or a large nail (for making holes)
- Small branch or wooden slat for hanging
- Clear matte sealer (optional)
Step 1: Sculpting the Charms
-
Prepare the Clay:
Begin by conditioning your air-dry clay. Knead a handful until it is pliable and smooth, then place it on wax paper or a craft mat to prevent sticking. -
Roll Out the Slab:
Use a rolling pin to flatten the clay to an even thickness of about 1/4 inch (6mm). If you want them sturdier, go slightly thicker. -
Cut the Shapes:
Press your butterfly cutter into the clay to create your shapes. For this specific look, aim for about 5-6 butterflies of varying sizes if you have multiple cutters. -
Separate the Wings:
To mimic the look in the photo where the body is distinct, gently press a thin modeling tool down the center of each butterfly to create a long, vertical indentation for the abdomen. -
Add Wing Texture:
Use a dull knife or sculpting tool to press radiating lines into the bottom wings. Don’t drag the tool; press it down to create clean grooves. -
Create Patterns:
Use the blunt end of a small paintbrush or a toothpick to poke small dots along the upper wing edges. You can also press a small heart stamp or shape a tiny heart indent into the wing centers. -
Pierce Hanging Holes:
This step is crucial. Using a toothpick or skewer, poke a hole horizontally through the top of the butterfly’s head/body area. Ensure the hole is wide enough for your jute twine to pass through. -
Dry Completely:
Allow the clay pieces to dry fully according to the package directions. I usually flip them over halfway through the drying process to ensure both sides dry evenly and stay flat.
Smoother Surfaces
Before drying, dip your finger in a tiny bit of water and rub it over the clay edges. This smooths out burrs instantly and saves you sanding time later.
Step 2: Painting and Assembly
-
Sand Imperfections:
Once bone dry, gently run fine-grit sandpaper over the edges to smooth out any roughness from the cutting process. -
Apply Base Colors:
Paint each butterfly in a solid pastel shade. Use coral pink, mint green, off-white, and lavender paints, applying two thin coats for opaque coverage. -
Highlight the Details:
Using a fine-tip brush and white or contrasting paint, carefully fill in the stamped dots and heart indentations to make the texture pop. -
Paint the Bodies:
Paint the central body cylinder a dark grey or soft brown to give the butterfly definition and create visual separation from the wings. -
Seal (Optional):
For longevity, brush on a coat of matte varnish. This protects the paint and gives the clay a lovely finished ceramic look. -
Prepare the Hanger:
Cut a length of jute twine roughly 3 feet long. Tie a loop at the very top for hanging, or attach it to the center of a painted wooden slat or driftwood branch. -
Thread the First Butterfly:
Thread the twine through the hole in your top butterfly. Slide it into position near the top of the rope. -
Secure with Knots:
To keep the butterfly in place, tie a loose, decorative knot directly underneath it. The knot acts as a stopper so the charm rests upon it. -
Continue Assembly:
Repeat the threading and knotting process for the remaining butterflies, spacing them about 4-5 inches apart down the length of the twine. -
Final Adjustments:
Once all butterflies are secured, adjust their angles slightly so they look like they are fluttering in different directions, and trim equal tails of twine at the bottom.
Twine won’t fit?
If the clay shrunk and the holes are too small for the jute, don’t force it. Use a small manual drill bit to gently widen the hole without cracking the dry clay.
Hang your new mobile near a window to catch the light and enjoy the handmade spring vibes


Birds With Pinch-Pot Nests
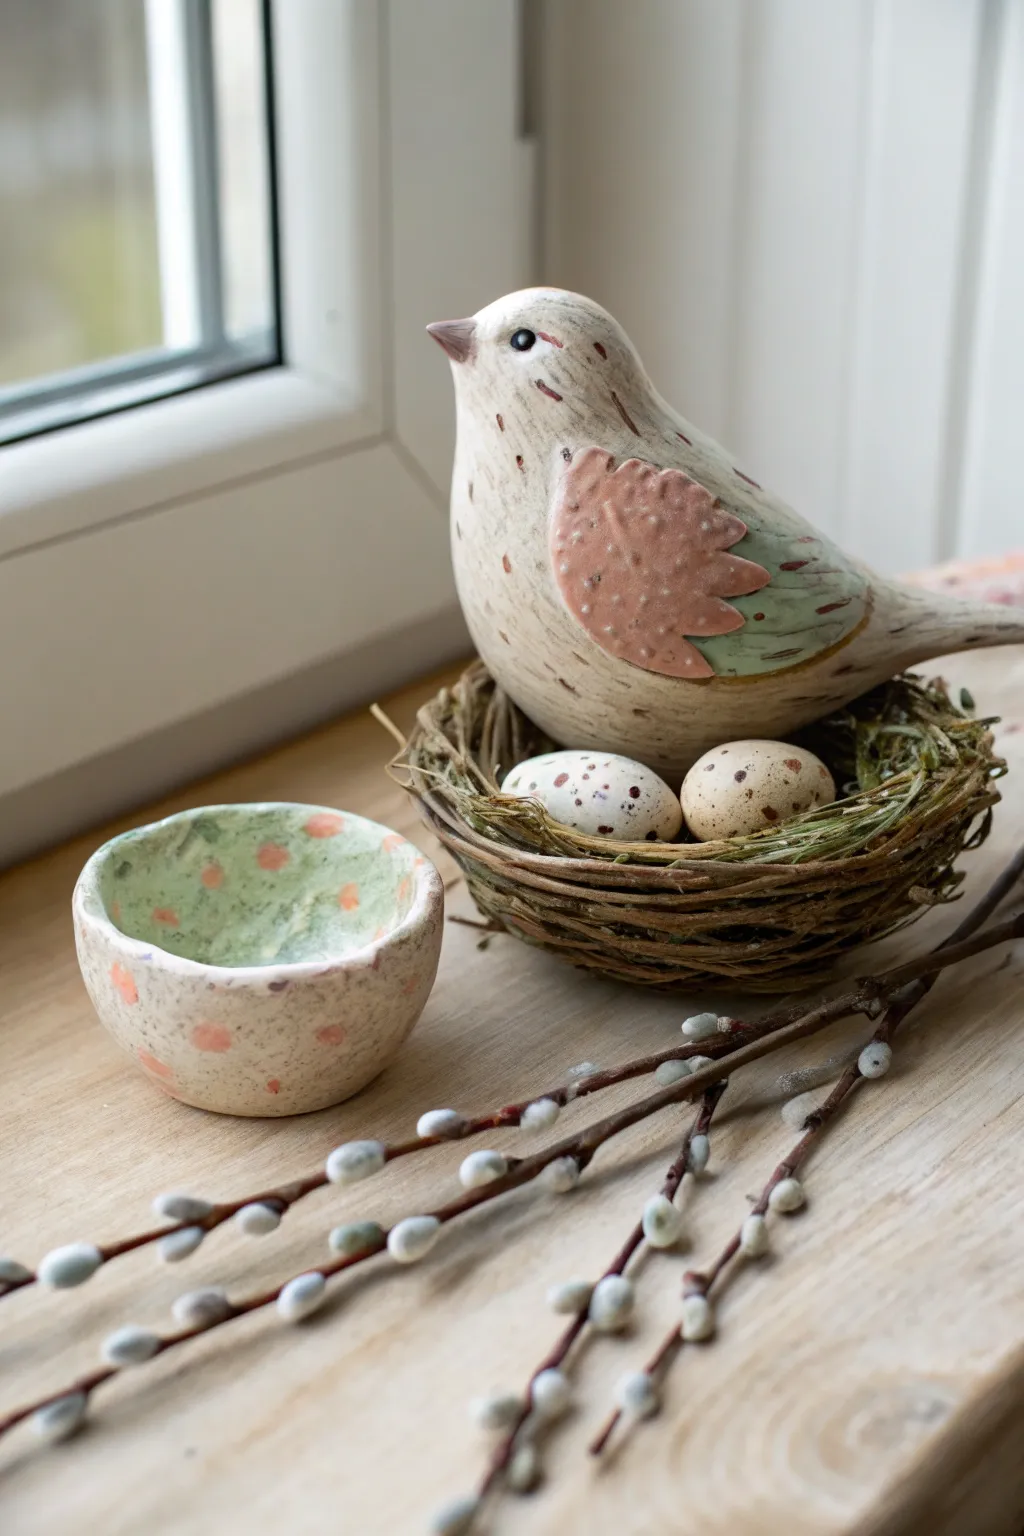
Celebrate the awakening of spring with this charming ceramic vignette featuring a hand-sculpted songbird and a matching pinch pot. The gentle speckled glaze and rustic nest create a cozy, nature-inspired display perfect for a windowsill or seasonal table setting.
Step-by-Step Guide
Materials
- White earthenware or stoneware clay
- Pottery tools (needle tool, rib tool, sponge)
- Slip (clay mixed with water)
- Underglazes (Soft pink/coral, sage green, brown, black)
- Clear transparent glaze
- Dried grapevine or thin twigs
- Hot glue gun or floral wire
- Small paintbrush & fan brush
- Old toothbrush (for speckling)
- Kiln (or air-dry clay alternatives if not firing)
Step 1: Sculpting the Songbird
-
Form the body:
Start with a fist-sized ball of clay. Gently shape it into a tear-drop form, keeping the bottom rounded and pulling one end slightly upward to suggest the head area. -
Pinch the beak:
At the narrower end of your form, carefully pinch out a small, triangular beak. Use your thumb to smooth the transition from the beak to the head so it looks organic, not stuck on. -
Extend the tail:
On the opposite end, pull and flatten the clay slightly to create a tapered tail. Angle it downwards or straight back depending on the bird’s pose you prefer. -
Create the wings:
Roll out a small slab of clay (about 1/4 inch thick). Cut out two leaf-shaped wings using your needle tool. I like to scallop the bottom edges to mimic ruffled feathers. -
Texture the feathers:
Using a modeling tool or the end of a paintbrush, press indentations into the wing clay to create texture. You can also press a texture mat or lace into the clay slab before cutting the wings for intricate patterns. -
Attach the wings:
Score the sides of the bird’s body and the back of the wings. Apply slip to both areas and press firmly to attach. Smooth the top edge of the wing into the body so it looks integrated. -
Refine the surface:
Use a damp sponge to wipe away any rough fingerprints or crumbs of clay. Poke two small holes for the eyes using a needle tool.
Cracking Up?
If clay cracks while shaping wings, it’s too dry. Spritz lightly with water, wrap in plastic for 10 mins, then try again. Keep edges smooth with a damp sponge.
Step 2: Crafting the Pinch Bowl & Eggs
-
Pinch the bowl:
Start with a ball of clay slightly smaller than a tennis ball. Insert your thumb into the center and pinch rotating the clay to open up a simple, organic bowl shape. -
Shape the eggs:
Roll two small pieces of clay into oval shapes. These should be sized to fit comfortably inside the twig nest you will spacing later. -
Dry and Bisque Fire:
Allow all clay pieces (bird, bowl, eggs) to dry completely. Fire them to bisque temperature according to your clay body’s specifications.
Golden Touch
Add 22k gold luster to the beak or wing tips for a luxe finish. This requires a third, lower-temperature firing but adds incredible elegance.
Step 3: Glazing & Finishing
-
Apply base color:
Leave the main body of the bird raw or apply a very thinned white wash if your clay isn’t naturally white. Paint the wings with sage green on the tips and a soft coral pink on the main section. -
Detail the face:
Use a fine liner brush and black underglaze to paint the eye inside the indented hole. Add a tiny dot of white for a highlight. -
Decorate the bowl:
Paint the interior of the pinch pot with a wash of sage green. Add coral pink polka dots to the interior and exterior for a playful matching pattern. -
Speckle the eggs:
Paint the eggs a solid cream or white. Dip an old toothbrush into brown underglaze, hold it near the eggs, and run your thumb across the bristles to flick tiny speckles onto the surface. -
Clear glaze and fire:
Apply a clear transparent glaze over the painted areas (or the whole piece if you prefer a glossy finish). Fire the pieces again to glaze temperature.
Step 4: Assembly
-
Weave the nest:
Take dried grapevine or thin flexible twigs and wind them into a tight circle roughly the diameter of your bird’s base. Secure loose ends with floral wire or a dab of hot glue. -
Arrange the scene:
Place the nest on your surface. Set the ceramic eggs inside, and perch the finished bird on top of the nest rim to complete the look.
Group your sweet ceramic creations with fresh pussy willow branches to bring the outdoors in

The Complete Guide to Pottery Troubleshooting
Uncover the most common ceramic mistakes—from cracking clay to failed glazes—and learn how to fix them fast.
Four-Leaf Clover Charms
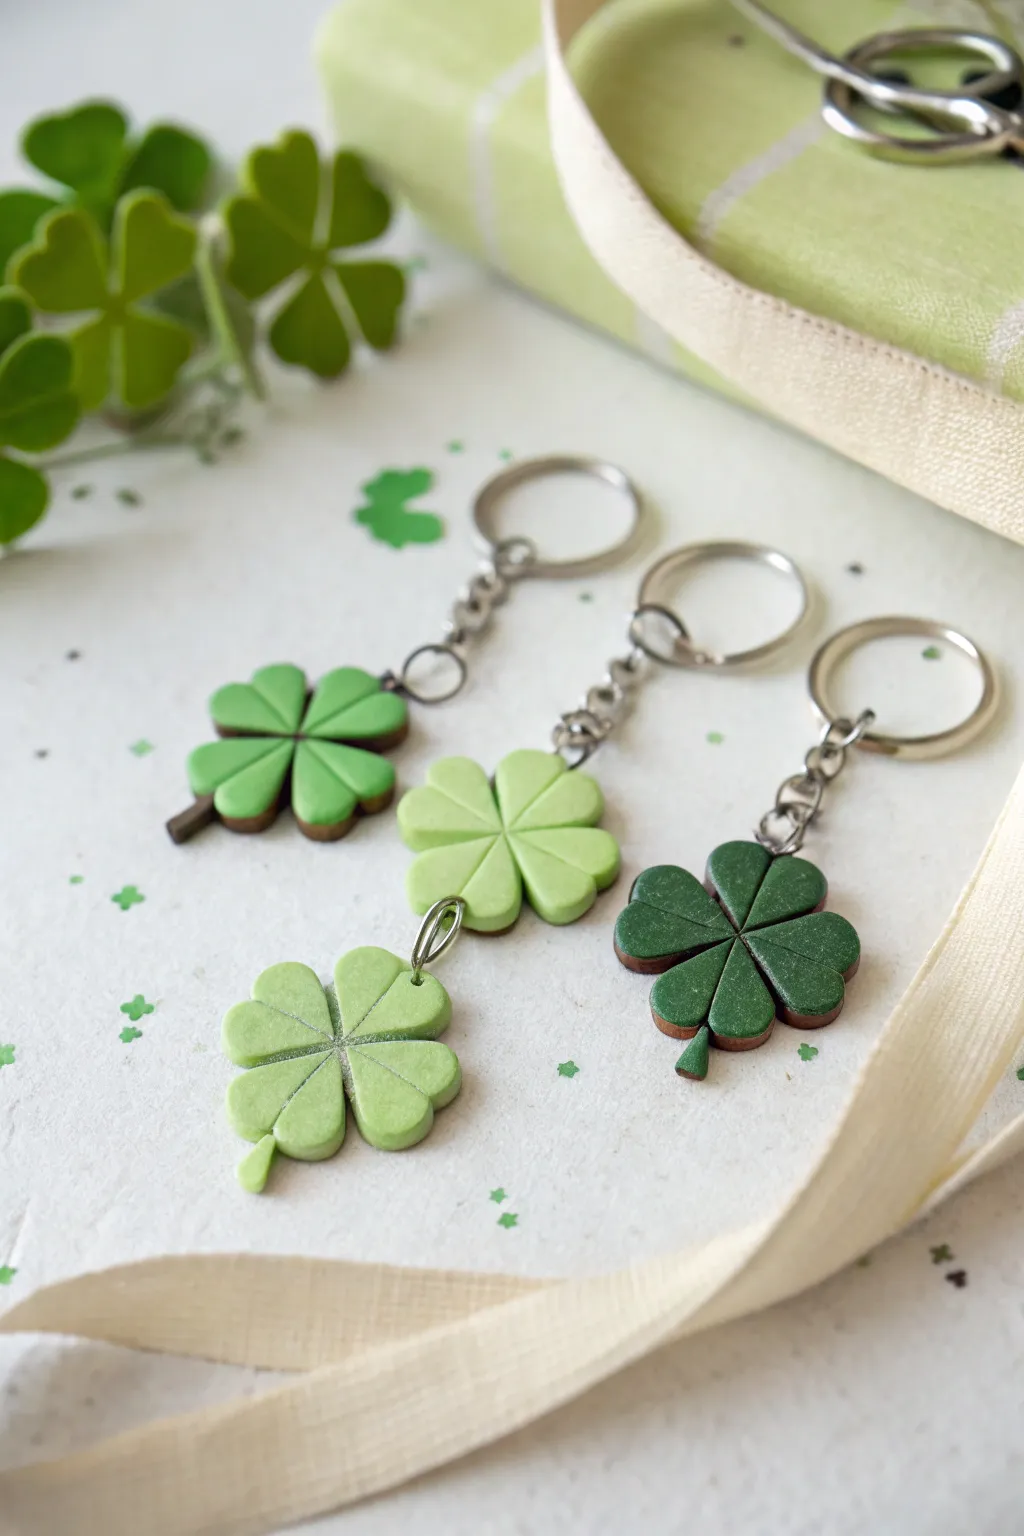
Celebrate the luck of the Irish or simply welcome spring with these delightful lucky clover keychains. Crafted from polymer clay in various shades of green, they feature sleek lines and sturdy hardware, making them perfect little gifts or personal talismans.
Detailed Instructions
Materials
- Polymer clay (emerald green, light green, and lime green)
- Brown polymer clay (for the backing/stems)
- Clay roller or pasta machine
- Heart-shaped micro cutter (approx. 1 cm)
- Needle tool or toothpick
- Liquid polymer clay or Bake & Bond
- Rolling pin
- Metal jump rings and keychain hardware
- Pliers (flat nose and round nose)
- Oven for baking
- Eyepins (optional, if baking directly into clay)
Step 1: Preparing the Clay Base
-
Condition the clay:
Start by thoroughly conditioning your green clays and the brown clay until they are soft and pliable. This prevents cracking later on. -
Roll the backing layer:
Roll out a sheet of brown clay to a thickness of about 2mm. This will serve as the sturdy base and shadow for your clover. -
Roll the green layer:
Roll out your chosen shades of green clay—emerald, lime, and grass green—into sheets slightly thicker than the brown base, perhaps 3mm, to give the leaves nice volume.
Loose Connection?
If the eyepin feels loose after baking, remove it, add a drop of superglue or E6000 to the shaft, and slide it back into the hole for a permanent hold.
Step 2: Shaping the Clovers
-
Cut the hearts:
Using your small heart-shaped cutter, punch out four hearts for each clover from the green clay sheets. Keep sides crisp by pressing straight down. -
Arrange the leaves:
Place four matching green hearts onto your brown backing sheet, arranging their points to meet in the center to form a classic clover shape. -
Press and secure:
Gently press the green hearts down so they adhere to the brown base. If your clay is dry, a tiny dab of liquid clay helps them stick. -
Trim the outline:
Using a craft knife or needle tool, carefully cut the brown backing clay around the shape of the green leaves, leaving a very slight border or cutting flush depending on your preference. Don’t forget to cut a small stem at the bottom. -
Smooth the edges:
Run your finger or a smoothing tool along the cut edges to soften any sharp angles on the brown clay backing.
Step 3: Adding Detail and Hardware
-
Create the central vein:
Take a needle tool or the back of a knife and gently press a straight line down the center of each heart leaf to create a realistic vein. -
Soften the indentation:
I like to gently tap the indentation with a finger to ensure the groove isn’t too sharp or artificial looking. -
Insert the attachment point:
Trim an eyepint to about 1cm long. Insert the metal pin into the top of the clover between two leaves, pushing it into the clay body securely. -
Alternative attachment:
If you don’t use eyepins, carefully use a drinking straw or large needle to punch a clean hole through one of the top leaves before baking. -
Final inspection:
Check for fingerprints. Use a little baby oil or cornstarch on your finger to buff them away lightly before the clay goes into the oven.
Sparkle & Shine
Before baking, lightly brush the green leaves with mica powder or pearl ex pigments in gold or silver to give your lucky charm a subtle, magical shimmer.
Step 4: Baking and Assembly
-
Bake firmly:
Place your clovers on a ceramic tile or baking sheet covered with parchment. Bake according to your clay manufacturer’s instructions (usually around 275°F/130°C for 15-30 minutes per 1/4 inch thickness). -
Cool down:
Allow the charms to cool completely in the oven or on a wire rack. They are fragile while hot. -
Varnish (optional):
For extra durability, apply a matte or satin varnish to seal the clay, though the raw matte look works beautifully here too. -
Open the jump ring:
Using two pairs of pliers, twist a jump ring open sideways (never pull it apart). -
Attach the keychain:
Loop the jump ring through the eyepin or the hole you created, add the keychain chain, and twist the ring closed securely.
Now you have a set of durable, lucky accessories ready to organize your keys or gift to a friend who needs a little boost
Cherry Blossom Jewelry Pieces
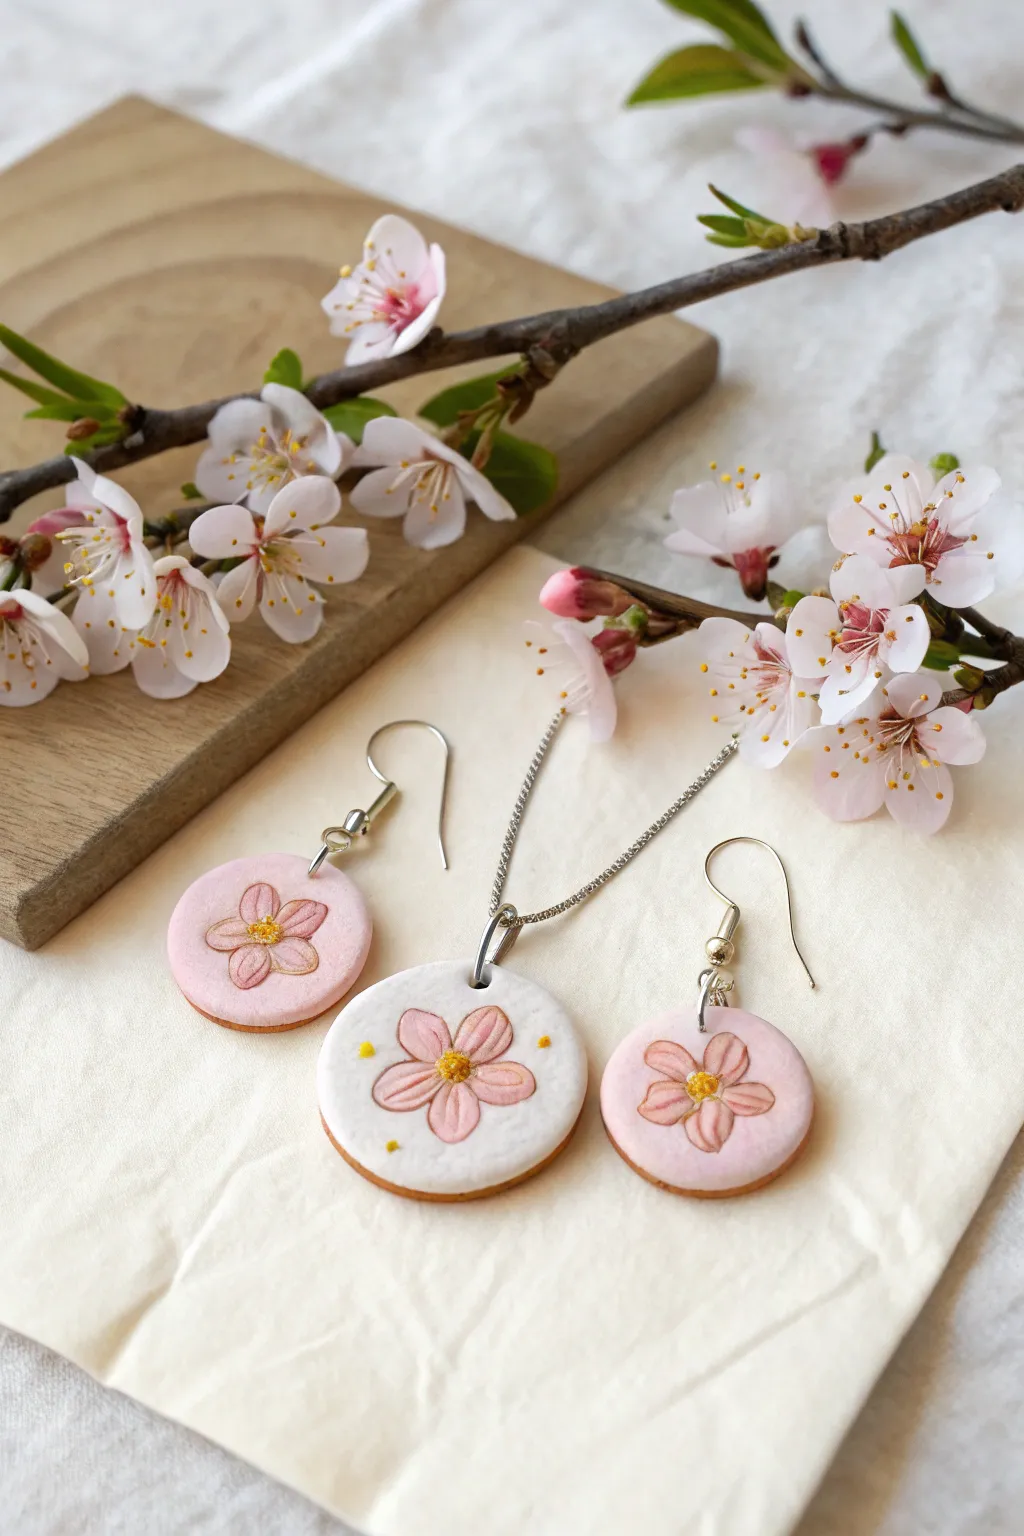
Capture the ephemeral beauty of spring with this delicate jewelry set featuring hand-painted cherry blossoms on soft pastel clay disks. The combination of gentle pink hues and fine floral details creates a romantic, wearable art piece that celebrates the season.
How-To Guide
Materials
- White polymer clay
- Light pink polymer clay (soft pastel shade)
- Round clay cutters (approx. 2cm and 3cm diameter)
- Acrylic rolling pin
- Silver necklace chain and jump ring
- Silver earring hooks and jump rings
- Needle tool or small drill bit
- Fine detail paintbrushes (size 000 and 00)
- Acrylic paints (pink, dark pink, yellow, white)
- Gloss or matte varnish (optional for sealing)
- Smooth work surface (ceramic tile or glass mat)
- Oven for baking clay
Step 1: Shaping the Base
-
Condition the white clay:
Start by warming a chunk of white polymer clay in your hands, kneading it until it is soft and pliable. I find that spending an extra minute here prevents cracks later. -
Condition the pink clay:
Repeat the process with your light pink clay. Aim for a very soft, pale blush tone; if your pink is too vibrant, mix in some white clay to soften the hue. -
Roll out the sheets:
Using your acrylic roller, roll the white clay out to a thickness of about 3-4mm. Do the same for the pink clay, ensuring an even thickness across both slabs. -
Cut the shapes:
Press your larger round cutter into the white clay to create the pendant base. Use the slightly smaller cutter on the pink clay to cut two circles for the earrings. -
Smooth the edges:
Gently run your finger around the rim of each clay circle to soften the sharp cut edge, giving the pieces a more finished look. -
Create holes for hardware:
Using a needle tool, carefully pierce a small hole near the top edge of each circle. Ideally, twist the tool gently to widen the hole enough for your jump rings. -
Bake the clay:
Place your disks on a baking sheet or ceramic tile and bake according to your clay package instructions (typically 275°F/130°C for 15-30 minutes). Let them cool completely before painting.
Clean Lines Tip
If your hand trembles while outlining, rest your painting hand’s wrist on the table and anchor your pinky finger on the work surface for stability.
Step 2: Painting the Blossoms
-
Draft the outline:
Lightly sketch a five-petal flower shape onto the center of each disk using avery sharp pencil, or just freehand it if you feel confident. -
Base coat the petals:
Mix a soft, medium pink acrylic paint. Using your size 00 brush, fill in the five petals. For the white pendant, keep the pink soft; for the pink earrings, you might need a slightly deeper shade to stand out. -
Outline the petals:
Using a very fine liner brush (000) and a darker, brownish-pink color, carefully outline each individual petal to define the shape. -
Add petal definition:
With the same dark pink, paint a tiny line down the center of each petal, starting from the flower center and fading outward. -
Paint the stamens:
Dip the very tip of your finest brush into yellow paint. Stipple a dense cluster of tiny dots in the very center of the flower. -
Add pollen accents:
Add a few scattered yellow dots drifting away from the center or near the petal edges on the white pendant for an artistic touch. -
Let the paint dry:
Allow the paint to dry fully. If you want to protect your work, apply a thin layer of matte or gloss varnish over the artwork at this stage.
Step 3: Final Assembly
-
Open the jump rings:
Use two pairs of pliers to twist your silver jump rings open sideways (never pull them apart). -
Attach earring hooks:
Slide a jump ring through the hole of a pink disk, thread on an earring hook, and twist the ring closed. Repeat for the second earring. -
Assemble the necklace:
Attach a slightly larger jump ring (or a pinch bail) to the white pendant and thread your silver chain through it.
Fixing Mistakes
Acrylic paint dries fast, but if you slip, quickly wipe it away with a damp Q-tip or a wet wipe before it sets on the baked clay.
Wear your new floral set with pride or gift it to someone who needs a little touch of eternal spring