Strawberry clay bead bracelets are my go-to when I want something playful, bright, and still totally wearable. Here are some of my favorite ways to build that sweet strawberry vibe into your next bracelet, from classic color combos to more unexpected twists.
Classic Red-and-Green Strawberry Bracelet
This charming bracelet features textured red clay beads that mimic the look of wild strawberries, centered around a larger, detailed focal bead. The result is a vibrant, nature-inspired accessory that captures the essence of a summer garden.
Step-by-Step Tutorial
Materials
- Polymer clay (Bright Red, Leaf Green)
- Beading elastic cord (0.7mm or 0.8mm)
- Needle, toothpick, or awl (for texturing)
- Clay sculpting tools
- Super glue or jewelry adhesive
- Baking sheet and parchment paper
- Oven (for baking clay)
- Beading needle (optional)
Step 1: Sculpting the Beads
-
Condition the clay:
Start by thoroughly kneading your red polymer clay until it is soft and pliable. This prevents cracking later on. -
Form the base beads:
Roll approximately 20-24 small spheres of red clay. These should be roughly 6-8mm in diameter to form the bulk of the bracelet. -
Form the focal strawberry:
Create one slightly larger, teardrop-shaped piece of red clay for the main strawberry charm. Flatten the wider end slightly. -
Create the texture:
Using a needle, toothpick, or fine-tipped awl, gently press tiny dots all over the surface of every red bead and the strawberry focal piece. Don’t puncture too deep; create shallow indentations to mimic seeds. -
Make the leaves:
Take a small amount of green clay and flatten it. Cut out a small star or flower shape using a mini cutter or a craft knife to serve as the calyx (leaf top). -
Attach the leaves:
Gently press the green clay shape onto the wider top of your strawberry focal bead. Use a tool to curve the leaf tips slightly downward. -
Add spacer beads:
Roll two very small spheres of green clay (about 3-4mm). Poke a hole through the center of each. These will flank the main strawberry. -
Pierce the beads:
Carefully poke a hole through the center of every red bead and the main strawberry charm. Ensure the hole is wide enough for your elastic cord to pass through comfortably.
Sticky Situation?
If your needle sticks when piercing the raw clay beads, dip the tip in a little cornstarch or water before piercing to make it glide through smoothly without distorting the shape.
Step 2: Baking and Assembly
-
Prepare for baking:
Arrange all your beads on a baking sheet lined with parchment paper. Ensure they aren’t touching each other. -
Bake the clay:
Bake the beads according to the manufacturer’s instructions on your package of polymer clay. I usually bake at a slightly lower temperature for a bit longer to prevent scorching the red color. -
Cool down:
Allow the beads to cool completely before handling. They harden fully as they cool. -
Measure the cord:
Cut a length of elastic cord about 10-12 inches long. This gives you plenty of extra room for tying the knot. -
Pre-stretch the elastic:
Give the elastic cord a few firm tugs. This pre-stretching step helps prevent the bracelet from sagging after you wear it a few times. -
Begin stringing:
Thread your beads onto the elastic. Start with half of the textured red beads. -
Add the focal section:
Slide on one small green spacer bead, followed by the large strawberry focal bead (bottom to top alignment), and then the second green spacer. -
Finish the strand:
Thread the remaining red textured beads onto the cord to complete the circle. -
Tie the knot:
Bring the two ends of the elastic together and tie a secure surgeon’s knot (right over left, left over right twice). -
Secure and hide:
Apply a tiny dot of super glue to the knot. Once dry, trim the excess cord and gently pull the knot inside one of the adjacent red beads to hide it.
Make it Shine
Apply a coat of gloss water-based glaze to the strawberry beads after baking. This makes them look juicy and freshly picked while protecting the texture.
Wear your new fruit-themed accessory with pride or gift it to a friend who loves nature-inspired jewelry


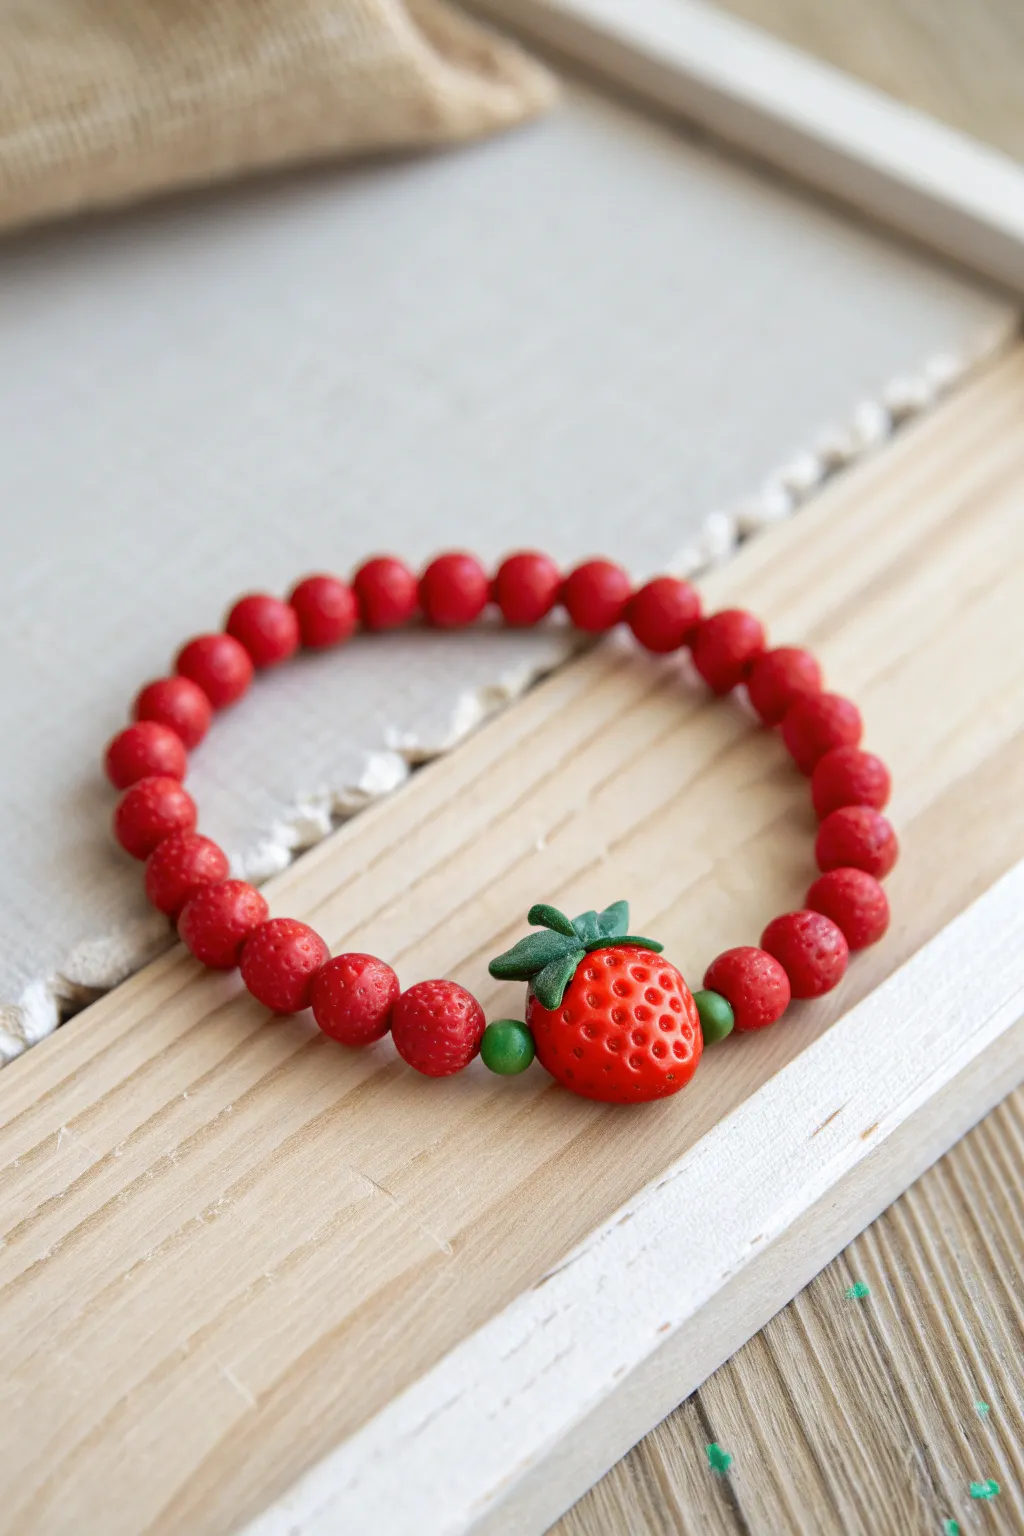
Strawberry Charm Centerpiece Bracelet
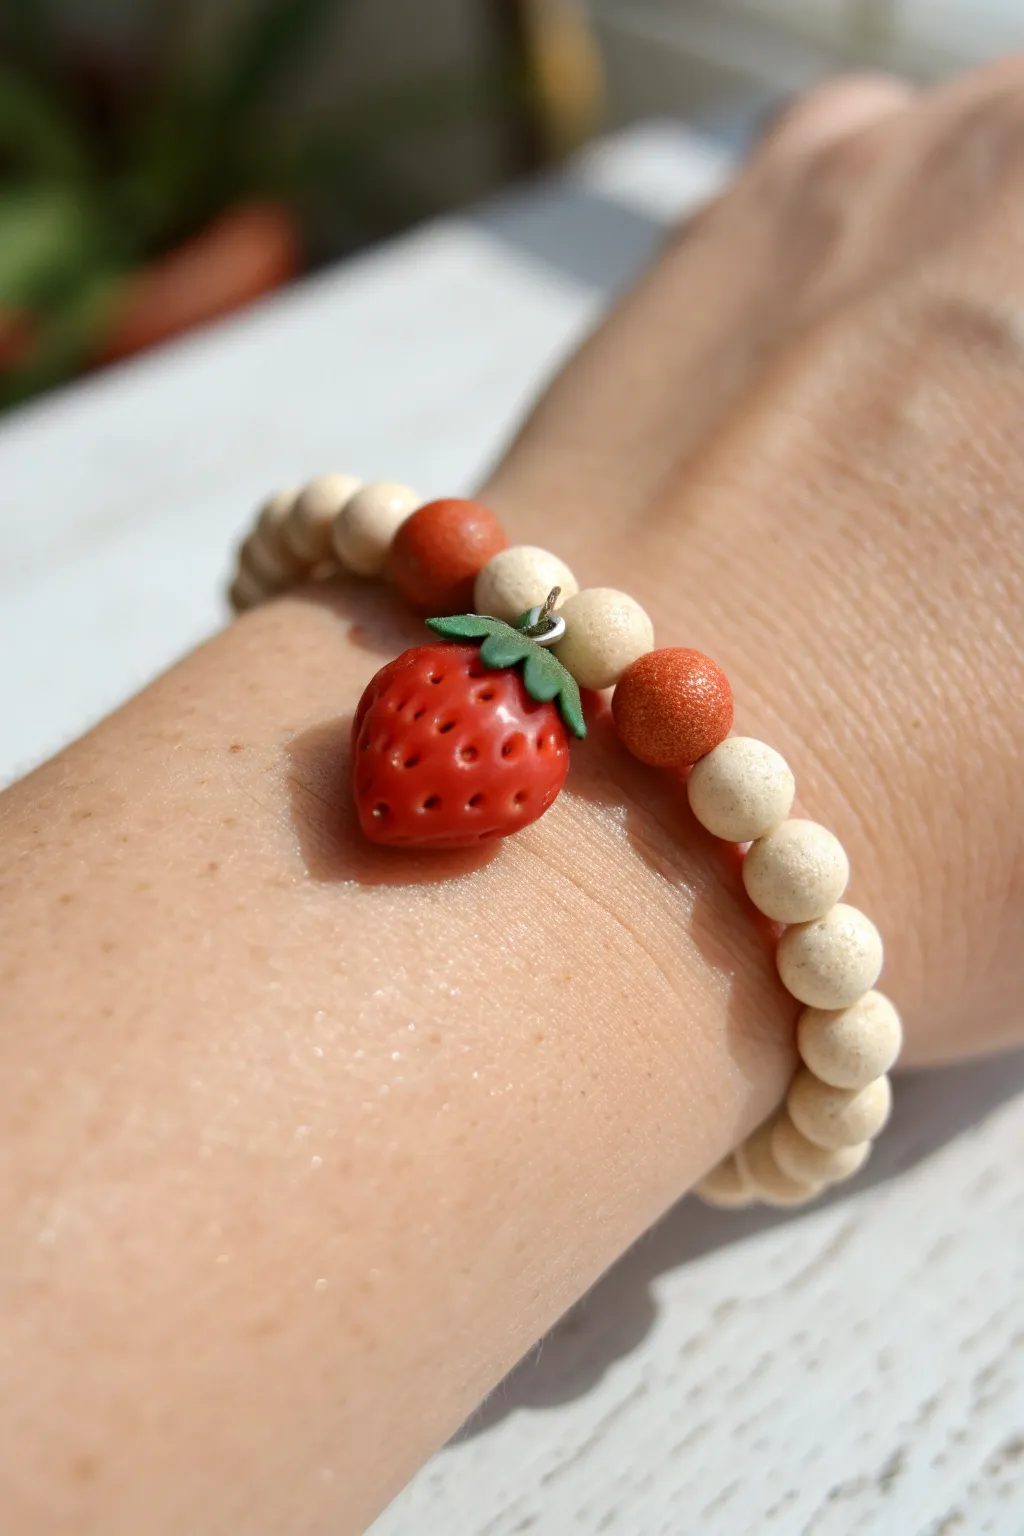
This rustic and sweet bracelet combines the earthy texture of wooden beads with a vibrant, handmade polymer clay strawberry charm. It’s a perfect accessory for adding a touch of cottagecore whimsy to your everyday style.
Step-by-Step
Materials
- Red polymer clay (for the berry body)
- Green polymer clay (for the leaves)
- Eye pin (silver tone)
- Beading elastic cord (0.8mm or 1mm)
- Natural wood beads (approximately 8mm, round)
- Terracotta or reddish-brown wood beads (same size as natural beads)
- Needle tool or toothpick
- Superglue or jewelry adhesive
- Oven (for baking clay)
- Scissors
Step 1: Sculpting the Strawberry Charm
-
Shape the berry base:
Start by conditioning a small ball of red polymer clay, about half an inch in diameter. Roll it between your palms until smooth, then gently pinch one end to form a teardrop or strawberry shape. -
Add texture:
Using a needle tool or a toothpick, gently press small indentations all over the surface of the red clay to mimic seeds. Don’t press too deep; just enough to catch the light. -
Form the leaves:
Take a very small amount of green clay and flatten it into a thin disc. Use an X-acto knife or a clay tool to cut a small star shape or simply pinch off five tiny teardrops. -
Attach the greenery:
Press the green star or teardrops onto the wider top of your red strawberry shape. Gently curve the tips of the leaves downward so they hug the fruit. -
Insert the hardware:
Take your eye pin and trim it if the stem is too long for your berry. Push the straight end down through the center of the green leaves into the red body until the loop rests just on top. -
Secure the pin:
Gently pinch the green clay around the base of the eye pin loop to ensure it’s snug. This helps prevent the pin from pulling out later. -
Bake the charm:
Follow the baking instructions on your specific package of polymer clay (usually around 275°F for 15-30 minutes). Let the charm cool completely before handling.
Step 2: Assembling the Bracelet
-
Measure the elastic:
Cut a piece of elastic cord about 10 inches long. This gives you plenty of extra room for tying knots without struggling to hold the ends. -
Pre-stretch the cord:
I always give the elastic a few firm tugs before stringing. This simple step prevents the bracelet from stretching out and becoming loose after the first few wears. -
Start the pattern:
Thread on two natural wooden beads. These will act as the spacer between your charm and the accent beads. -
Add the charm:
Slide your cooled strawberry charm onto the elastic via the eye pin loop. -
Mirror the start:
Thread two more natural wooden beads onto the other side of the charm so it sits centered between them. -
Add color accents:
Now, thread one terracotta/reddish bead on either side of those natural beads. This frames the strawberry with a subtle pop of color. -
Finish the strand:
Continue threading the remaining natural wood beads until the bracelet reaches your desired length (usually about 6.5 to 7 inches for an average wrist). -
Tie the knot:
Bring the two ends of the elastic together. Tie a standard square knot (right over left, left over right) and pull it tight. Repeat with a surgeon’s knot for extra security. -
Secure and trim:
Place a tiny dot of superglue on the knot and let it dry for a minute. Trim the excess elastic tails close to the knot, but be careful not to snip the knot itself. -
Hide the knot:
Gently tug the elastic so the knot slides inside one of the wooden beads adjacent to it, hiding the join completely.
Loose Eye Pin?
If the eye pin wiggles after baking, carefully pull it out, add a dab of superglue to the shaft, and reinsert it into the hole.
Make It Glossy
After baking, paint the strawberry with a coat of polyurethane gloss or glaze to make it look like juicy, fresh fruit.
Now you have a charming, handmade accessory that celebrates the sweetness of summer.


Mini Strawberry Beads Repeating Pattern
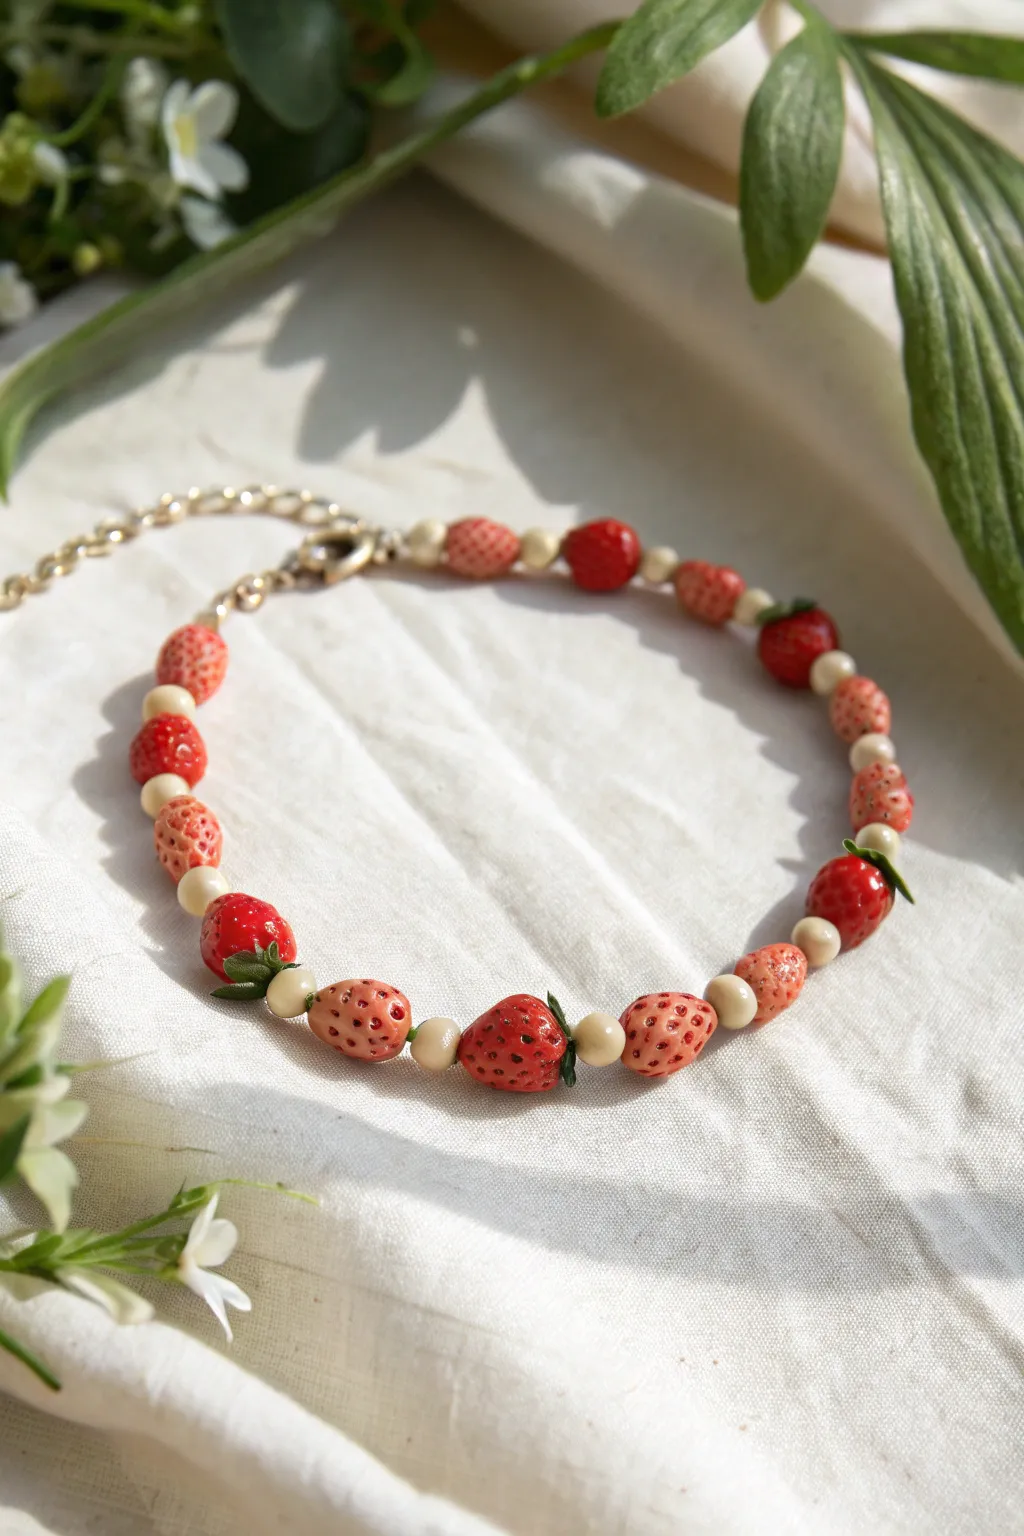
Capture the essence of a summer picnic with this charming beaded bracelet, featuring hand-sculpted strawberries in various stages of ripeness. The alternating pattern of juicy reds, soft corals, and cream spacer beads creates a delightful, rhythmic accessory perfect for cottagecore aesthetics.
Detailed Instructions
Materials
- Polymer clay (translucent red, opaque red, coral pink, white/cream, moss green)
- Glossy glaze or UV resin
- Gold beading wire or tigertail wire
- Gold crimp beads (2)
- Gold lobster clasp
- Gold extension chain
- Needle tool or toothpick
- Small round cutter or dotting tool
- Jewelry pliers (flat nose and cutting)
- Baking tile or parchment paper
Step 1: Sculpting the Strawberries
-
Mix your colors:
Begin by conditioning your polymer clay. You’ll want a few shades of red and pink to mimic natural variation. Mix a little translucent red with opaque red for a ‘juicy’ look, and create a soft coral pink for the under-ripe berries. -
Shape the berry bases:
Roll tiny balls of the red and coral clay, roughly 6-8mm in diameter. Gently pinch the bottom of each ball to form a subtle tapered cone shape, resembling a real strawberry. -
Add texture:
Using a needle tool, carefully poke small, shallow indentations all over the surface of each berry to create the seed texture. Be careful not to squash the cone shape as you work. -
Form the leaves:
For the ripest red berries, create tiny leaves. Roll microscopic snakes of green clay, flatten them slightly, and press 3-4 of them onto the top (wider end) of selected red berries. -
Create the bead holes:
Before baking, pierce a hole horizontally through the top section of each strawberry. Rotate your needle tool gently as you push through to prevent distortion. -
Make the spacer beads:
Roll small, uniform spheres from the cream or white clay. These should be roughly 4mm in size. Pierce a hole through the center of each one. -
Bake the beads:
Arrange all your clay pieces on a tile or parchment-lined tray. Bake according to your brand’s specific temperature instructions (usually around 275°F/135°C) for about 15-20 minutes. -
Glaze specifically:
Once cool, I like to apply a coat of gloss glaze or UV resin only to the red and pink parts of the strawberries, leaving the green leaves and cream spacer beads matte for a nice textural contrast.
Step 2: Assembling the Bracelet
-
Cut the wire:
Measure your wrist and cut a length of beading wire about 4 inches longer than your measurement to allow room for crimping. -
Start the clasp:
Thread a crimp bead onto one end of the wire, followed by the lobster clasp. Loop the wire back through the crimp bead. -
Secure the start:
Use your flat nose pliers to squash the crimp bead firmly, locking the clasp in place. Trim the excess short tail of wire. -
Establishing the pattern:
Begin threading your beads. Start with a cream spacer bead, followed by a coral pink strawberry, then another spacer. This ensures the strawberries don’t crowd each other. -
Vary the berries:
Continue the pattern: spacer, berry, spacer. Alternate between your coral/pink berries (no leaves) and your bright red berries (with leaves) to creating a natural, organic rhythm. -
Check the length:
Pause occasionally to wrap the strand around your wrist. Stop adding beads when the beaded portion covers just slightly less than your wrist circumference. -
Finish the strand:
Add a final cream spacer bead. Thread a crimp bead and the extension chain onto the wire. -
Secure the end:
Loop the wire back through the crimp bead and pull tight, leaving a tiny bit of slack so the bracelet moves fluidly. -
Final crimp:
Flatten the final crimp bead with your pliers and trim the remaining wire tail close to the bead.
Sticky Finger Fix
If fingerprints are marring your tiny strawberries, dip your fingers in a little cornstarch or baby powder before rolling. It smooths the surface instantly
Seed Detail Hack
For hyper-realism, after baking but before glazing, rub a tiny wash of acrylic brown paint over the berries and wipe it off. The paint stays in the holes
Enjoy wearing your handcrafted harvest of tiny, sweet strawberries all year round


Strawberry Slice Bead Bracelet

Capture the sweetness of summer with this charming bracelet made from handmade strawberry slice cane beads. The vibrant red beads feature delicate cross-section details that mimic real fruit, making it a perfect accessory for picnics and sunny days.
Step-by-Step Guide
Materials
- Red polymer clay
- Translucent white or pale pink polymer clay
- Opaque white polymer clay
- Tissue blade or clay slicer
- Acrylic rolling pin
- Pasta machine (optional but helpful for even sheets)
- Bead piercing tool or needle
- Durable beading wire or elastic cord
- Silver crimp beads
- Silver lobster clasp and jump rings
- Chain extender
- Jewelry pliers (flat nose and round nose)
- Oven for baking clay
Step 1: Creating the Strawberry Cane
-
Prepare the core:
Start by conditioning a small amount of pale pink or a mix of red and translucent clay to form a cylinder about 1/4 inch in diameter. This will be the very center of your strawberry. -
Build the ‘pith’ layer:
Roll out a sheet of opaque white clay. It shouldn’t be too thick. Wrap this sheet once around your central core cylinder and trim the excess so the seams meet perfectly. -
Form the strawberry rays:
To create the intricate white rays seen in the slice, take your remaining white clay and form a thick log. Use your tissue blade to slice thin wedges from this log. -
Construct the main flesh:
Roll a log of red clay the same length as your core. Slice it lengthwise into multiple wedges. Insert the thin white wedges you made in the previous step between these red wedges to create a starburst pattern when viewed from the end. -
Assemble the cane:
Reassemble the red and white wedges into a cylinder around your prepared core. Gently squeeze and roll the cane on your work surface to adhere the layers together without distorting the pattern. -
Add the outer skin:
Roll a thin sheet of pure red clay. Wrap this around the entire cylinder to form the smooth outer redness of the strawberry skin. -
Reduce the cane:
Gently squeeze the cane from the center outwards, rolling it on the table to elongate it. Continue reducing until the cane is roughly the diameter of a large pea or small marble.
Smudged Slices?
If your red clay is bleeding into the white sections while slicing, your cane is too warm. Pop it back in the fridge for 20 minutes to firm up properly before trying again.
Step 2: Making and Baking the Beads
-
Chill the cane:
Place your finished cane in the refrigerator for about 5 minutes. This firms up the clay, making it much easier to slice without squishing the round shape. -
Slice the beads:
Using a sharp tissue blade, slice the cane into even discs. Aim for a thickness of about 4-5mm for a sturdy bead. -
Pierce the holes:
Take your piercing pin and gently create a hole through the center of each slice. I find that twisting the pin as you push helps prevent the bead from deforming. -
Refine the shape:
If your slices became slightly oval during cutting, gently roll the edges between your fingers to round them out again. -
Bake the beads:
Arrange the beads on a dedicated baking sheet or tile. Bake according to your polymer clay manufacturer’s instructions (usually 275°F/135°C for 15-30 minutes). Let them cool completely before handling.
Pro Tip: Glossy Finish
For that juicy, fresh-fruit look, coat your baked beads with a thin layer of gloss polymer clay glaze or UV resin. It makes the colors pop and protects the surface.
Step 3: Assembly
-
Prepare the wire:
Cut a length of jewelry wire approximately 9 inches long. This gives you plenty of room to work with the clasp. -
Attach the first clasp component:
Thread a crimp bead onto one end of the wire, followed by a jump ring or the loop of your chain extender. Feed the wire back through the crimp bead. -
Secure the crimp:
Use flat nose pliers to squash the crimp bead firmly, securing the wire loop. Trim the excess short tail of wire. -
String the beads:
Thread your cooled strawberry beads onto the wire. You can string them snugly against each other to create a continuous fruit pattern. -
Check the length:
Wrap the bracelet around your wrist to check the fit. Add or remove beads until it sits comfortably. -
Finish the second end:
Add a final crimp bead and your lobster clasp to the remaining end. Feed the wire back through the crimp bead and the last bead or two for extra security. -
Final secure:
Crimp the bead tightly and trim the excess wire flush with the bead hole so it doesn’t scratch your skin.
Now you have a delightful, berry-themed accessory ready to brighten up any outfit you wear

The Complete Guide to Pottery Troubleshooting
Uncover the most common ceramic mistakes—from cracking clay to failed glazes—and learn how to fix them fast.
Seed-Detail Red Beads With Green Leaf Beads
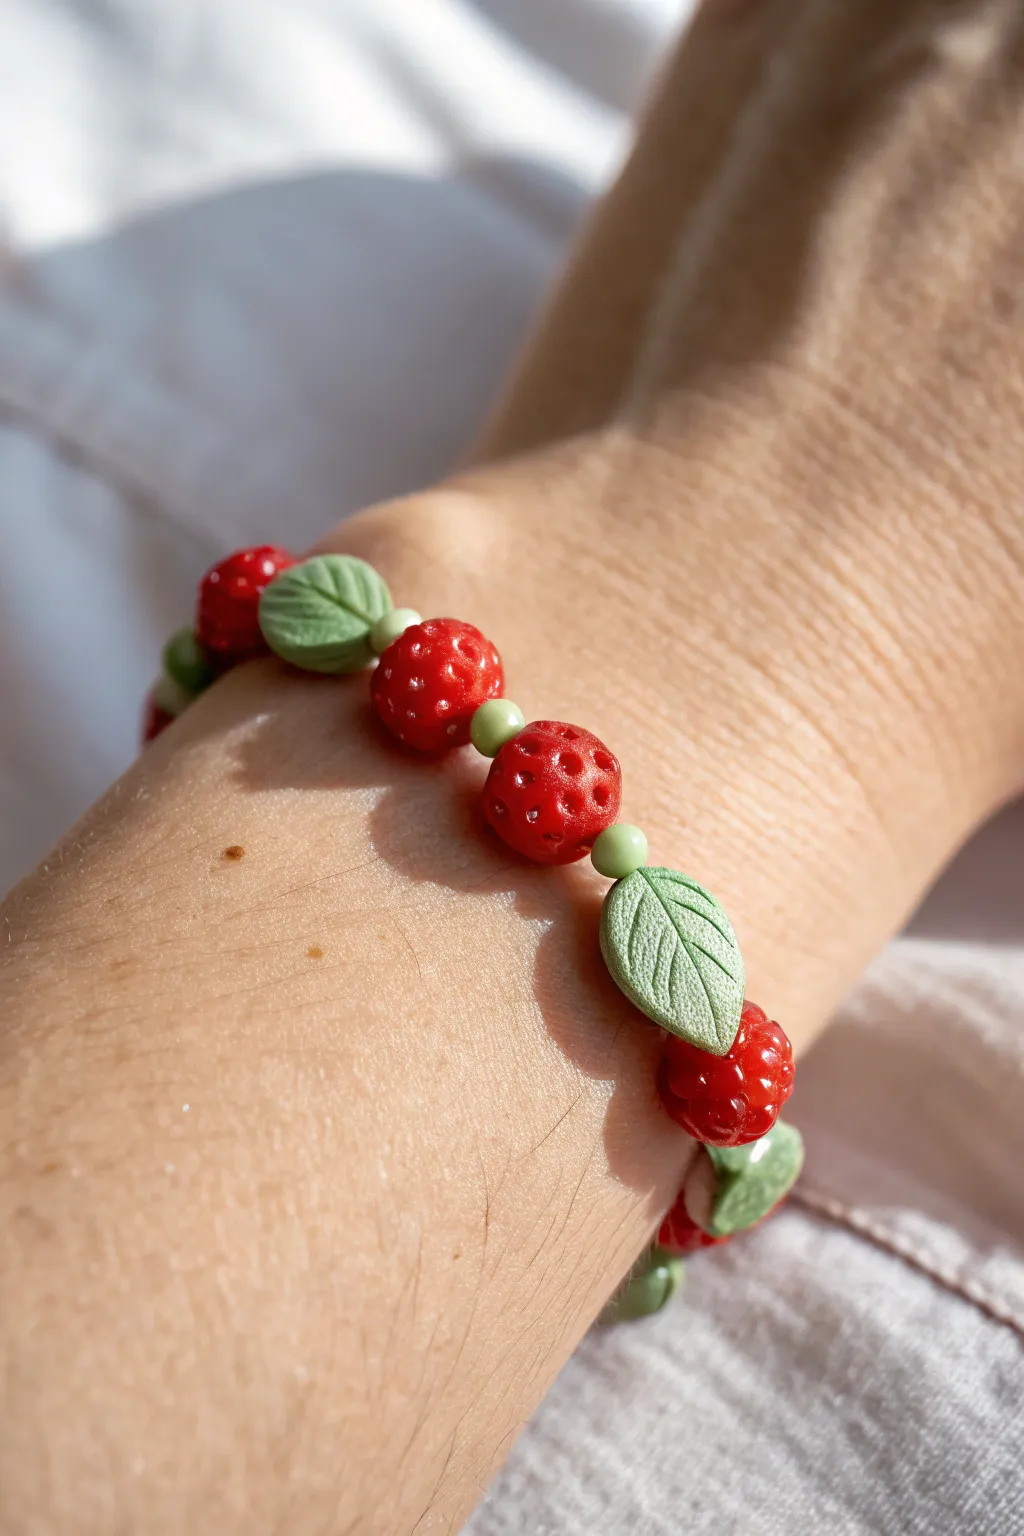
This charming bracelet mimics the look of fresh summer strawberries on a vine, featuring textured red berry beads and detailed green leaves. The polymer clay design captures a beautifully organic feel with its pitted berry surfaces and veined foliage.
Step-by-Step
Materials
- Red polymer clay (translucent or regular)
- Green polymer clay (sage or muted green)
- Light green polymer clay (for spacer beads)
- Elastic beading cord (0.7mm or 0.8mm)
- Needle tool or toothpick
- Small ball tool
- Clay roller or pasta machine
- Blade or craft knife
- Oven for baking
- Super glue (gel type recommended)
- Gloss glaze (optional)
Step 1: Sculpting the Strawberry Beads
-
Condition the clay:
Begin by thoroughly kneading your red polymer clay until it is soft and pliable, ensuring no air bubbles remain inside. -
Form the spheres:
Roll small pieces of the red clay into uniform spheres, aiming for beads that are roughly 8-10mm in diameter. -
Add texture:
Using a small ball tool or a blunt toothpick, gently press little dimples all over the surface of each red sphere to mimic strawberry seeds. -
Create the holes:
While the clay is still soft, use a needle tool to carefully pierce a hole through the center of each berry, twisting gently to avoid distorting the shape.
Hole Distortion?
If piercing the bead squishes it, try letting the clay rest in the fridge for 10 minutes first, or drill the holes after baking using a tiny hand drill.
Step 2: Creating the Leaf Beads
-
Prepare the green clay:
Condition your sage green clay and roll it out into a flat sheet, approximately 3mm thick. -
Cut the shapes:
Use a small leaf cutter or your craft knife to cut out oval shapes with pointed ends, sized similarly to your berry beads. -
Detail the veins:
With your needle tool or knife, gently score a central line down the leaf and add small diagonal veins branching off to the sides for a realistic look. -
Pierce the leaves:
Carefully poke a hole lengthwise through the center of the leaf; I find it helps to do this slowly so the needle doesn’t poke out the side of the thin clay.
Step 3: Creating Spacer Beads
-
Make tiny spheres:
Take the light green clay and roll absolute tiny spheres, about 3-4mm in size. -
Pierce the spacers:
Poke a hole through the center of these small spacer beads, ensuring the hole is large enough for your elastic cord.
Make It Sparkle
Before baking, lightly brush gold mica powder over the textured leaves or into the berry dimples for a magical, sun-kissed finish.
Step 4: Baking & Assembly
-
Bake the beads:
Arrange all your beads on a baking sheet or tile and bake according to the manufacturer’s instructions for your specific brand of clay. -
Cool down:
Allow the beads to cool completely before handling them, as warm clay is fragile. -
Optional glazing:
If you want a juicy look, lightly brush the red berry beads with a gloss glaze. -
Stringing pattern:
Cut a length of elastic cord and begin stringing your pattern: one red berry, one small spacer, one leaf, one small spacer, and repeat. -
Check length:
Wrap the strand around your wrist to check the fit, adding or removing beads until it sits comfortably. -
Tie the knot:
Tie a secure surgeon’s knot (right over left, left over right) to close the bracelet loop. -
Secure and trim:
Add a tiny drop of super glue to the knot, let it dry, and then trim the excess cord ends before sliding the knot inside a bead hole to hide it.
Now you have a sweet, handmade accessory perfect for sunny days
Letter Beads Spelling a Strawberry Phrase
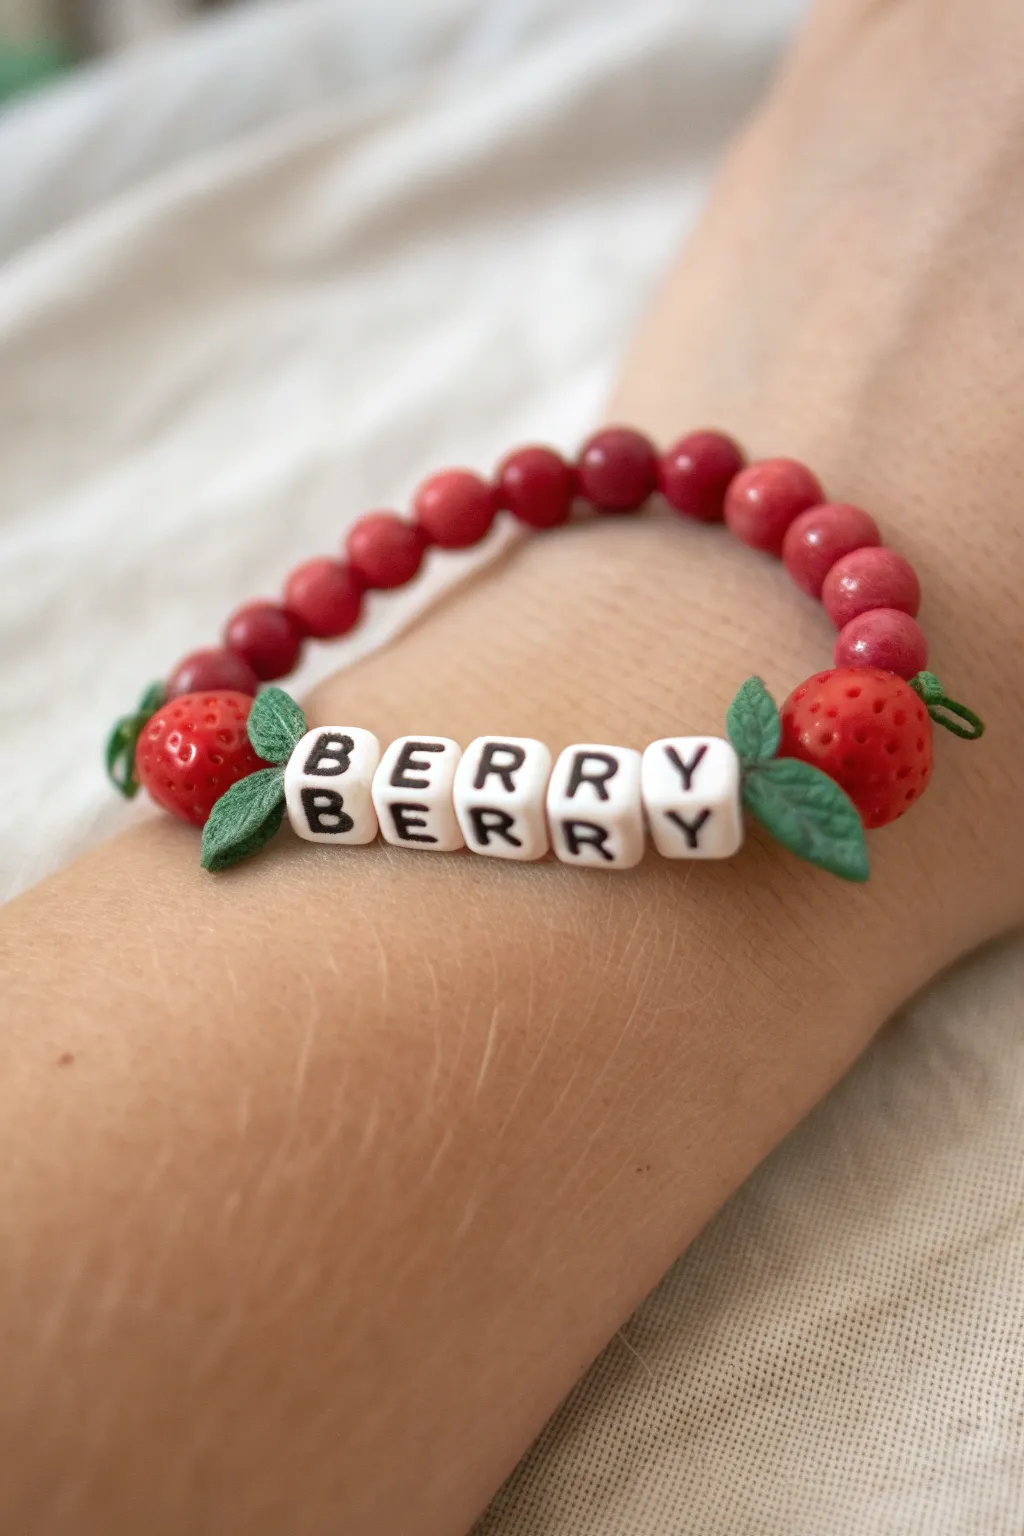
This charming bracelet combines rustic red wooden beads with playful letter blocks to spell out a sweet message. Flanked by incredibly realistic polymer clay strawberries, it creates a whimsical accessory that feels like a freshly picked summer treat.
Step-by-Step
Materials
- Flexible elastic bead cord (0.8mm or 1mm thickness)
- Round wooden beads (approx. 8mm or 10mm) in a dark pink/red stain
- 5 White square letter beads spelling “B-E-R-R-Y”
- 2 Polymer clay strawberry beads (approx. 10-12mm) with horizontal holes
- 4 Polymer clay leaf charms or beads (dark green)
- Scissors
- Super glue or clear jewelry adhesive
- Bead stopper or a piece of tape
Step 1: Preparation & Centerpiece
-
Measure and cut:
Begin by cutting a length of your elastic cord to about 10-12 inches. This gives you plenty of extra room for tying knots later without struggling. -
Secure the end:
Attach a bead stopper or a simple piece of masking tape to one end of the cord to prevent your beads from sliding off while you work. -
String the letters:
Thread your five letter beads onto the cord in the correct order to spell “BERRY”. Double-check the orientation so they are all facing the same way. -
Center the word:
Slide these beads to the approximate center of your cord length so you have room to build outwards symmetrically.
Step 2: Adding the Strawberry Accents
-
Add first leaves:
On the left side of the ‘B’, thread one green leaf bead. Make sure the leaf tip points away from the letters to frame the word nicely. -
Add second leaf:
Repeat this on the right side of the ‘Y’ with a second leaf bead, again pointing the tip outwards. -
Position the strawberries:
Thread one polymer clay strawberry bead onto the left side next to the leaf. Push it snug against the foliage. -
Complete the fruit framing:
Add the second strawberry bead to the right side next to that leaf. The word ‘BERRY’ should now be perfectly bookended by fruit. -
Final foliage:
To finish the focal point, add one more green leaf bead on the far side of each strawberry (one left, one right). This creates a lush, garden-like look.
Loose Leaves?
If your leaf beads flip upside down too often, put a tiny drop of glue where the leaf touches the letter bead to hold its orientation perfectly.
Step 3: Completing the Band
-
Start the red beads:
Begin threading your round red wooden beads onto one side of the cord. Add about 6-8 beads, depending on wrist size. -
Balance the other side:
Repeat the process on the other side of the bracelet, adding the same number of red beads to keep the centerpiece symmetrical. -
Check fit:
Carefully bring the ends together and wrap the bracelet around your wrist. If there are gaps, add more red beads one by one until it fits comfortably without being too tight. -
Prepare to tie:
Remove the bead stopper or tape. Cross the two ends of the elastic cord over each other.
Level Up: Texture Mix
Swap the sleek wooden rounds for faceted glass beads in the same red hue. This adds sparkle that contrasts beautifully with the matte clay fruit.
Step 4: Finishing Touches
-
Tie the knot:
Tie a standard square knot (right over left, left over right). Pull the elastic tight—I usually stretch the cord gently while tightening to ensure the knot sits deep between the beads. -
Secure with glue:
Place a tiny dot of super glue or jewelry adhesive directly onto the knot. Let this dry for a minute to ensure it won’t slip. -
Hide the knot:
Once the glue is tacky or dry, trim the excess cord ends close to the knot. Then, gently tug the bracelet so the knot slides inside the hole of one of the adjacent wooden beads.
Enjoy wearing your new berry-themed accessory that brings a pop of color to any outfit


What Really Happens Inside the Kiln
Learn how time and temperature work together inside the kiln to transform clay into durable ceramic.
Daisy-and-Strawberry Bead Mix
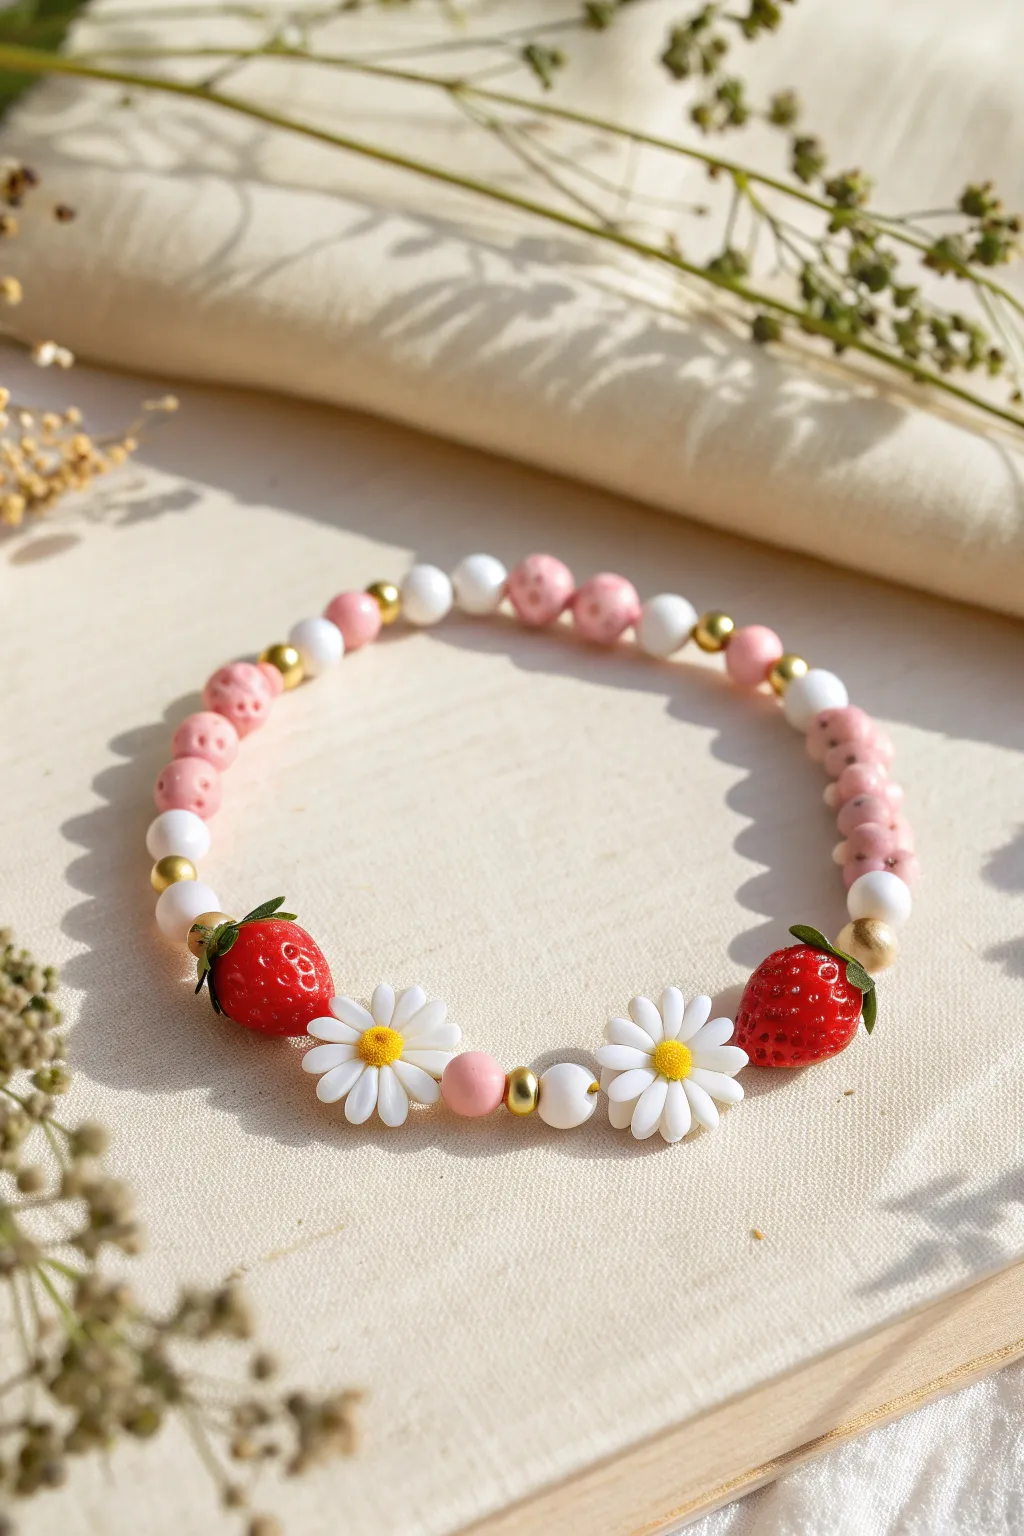
This charming bracelet combines the sweetness of summer strawberries with the classic innocence of white daisies. It features a playful mix of textures, alternating between smooth pearls, rustic lava-style beads, and shiny gold accents for a balanced, whimsical look.
How-To Guide
Materials
- Elastic stretch cord (0.7mm or 0.8mm)
- 2 Polymer clay strawberry beads
- 2 Polymer clay daisy beads (white petals, yellow center)
- Small pink round beads (about 4-5mm, matte or clay)
- White faux pearl beads (4mm)
- Pink ‘lava’ style porous beads (6mm)
- Gold spacer beads (ball style, approx 3-4mm)
- Beading needle (optional but helpful)
- Scissors
- Jewelry glue (e.g., E6000 or similar)
Step 1: Setting the Scene
-
Prepare your workspace:
Lay out a bead mat or a soft towel to prevent your beads from rolling away. Having good lighting is essential when working with these smaller spacer beads. -
Cut the cord:
Cut a piece of elastic cord about 10-12 inches long. This gives you plenty of extra room for tying knots without struggling, something I always appreciate. -
Pre-stretch:
Gently pull on the elastic cord a few times to pre-stretch it. This helps prevent the bracelet from sagging or loosening up after you wear it a few times.
Knot Slipping?
If your elastic knot feels insecure, try pre-stretching the cord vigorously before tying. You can also dab clear nail polish on the knot if you don’t have jewelry glue handy.
Step 2: Creating the Centerpiece
-
Start the center sequence:
Thread on a small Gold Spacer bead, followed by a small Pink Round bead. -
Add the white daisy:
Next, slide on one of the white Daisy beads. Ensure it sits facing forward if the hole runs vertically, though most flat beads like this have a horizontal hole. -
Add a pearl spacer:
Place a single White Faux Pearl next to the daisy to act as a buffer. -
Add the first strawberry:
Thread on your first Strawberry bead. Orient it so the green leafy top is facing outwards, away from the daisy center. -
Secure the strawberry:
Follow the strawberry immediately with a Gold Spacer bead and then a White Faux Pearl. -
Mirror the design:
Now, repeat that sequence on the other side of your starting point. Thread a Gold Spacer and a small White Pearl (or similar small bead) onto the *other* end of the string, then add your second Daisy. -
Finish the focal point:
After the second daisy, add a White Faux Pearl, then the second Strawberry (again, leaves pointing outward), followed by a Gold Spacer bead and a White Faux Pearl.
Add Some Sparkle
Replace the plain gold spacer beads with tiny crystal rondelles or rhinestones. This adds a glittery morning-dew effect to your garden-themed bracelet.
Step 3: Beading the Strap
-
Begin the side pattern:
On the right side of your centerpiece, add a Pink Lava bead. -
Add a gold accent:
Follow the lava bead with a Gold Spacer. -
Continue the sequence:
Add a White Faux Pearl, then another Gold Spacer. This creates a little metallic section that breaks up the pinks. -
Repeat lightly:
Repeat this pattern (Pink Lava, Gold Spacer, White Pearl, Gold Spacer) for about an inch or two, depending on your wrist size. -
Switch to solid pinks:
As you move toward the back of the bracelet (the part opposite the daisies), switch to just alternating the Pink Lava beads with the Pink Round beads or Pearls to create a textured back section. -
Mirror on the left:
Repeat step 1 and 2 on the left side of the string so the bracelet is symmetrical. -
Check the fit:
Wrap the unfinished strand around your wrist. The ends should touch comfortably without stretching the elastic too much. Add or remove the side ‘lava’ beads as needed.
Step 4: Final Assembly
-
Tie the knot:
Bring both ends together and tie a surgeon’s knot (loop the string twice through the first crossover, then pull tight). -
Secure with glue:
Dab a tiny amount of jewelry glue on the knot. Be careful not to get glue on the beads themselves. -
Hide the knot:
While the glue is still slightly tacky but not wet, pull the knot gently inside the hole of a neighboring bead (ideally one of the larger Lava or Strawberry beads if possible). -
Trim excess:
Once dry, trim the excess cord carefully with small scissors.
Now you have a sweet, garden-inspired accessory perfect for styling with picnic outfits
Strawberry Milkshake Swirl Beads
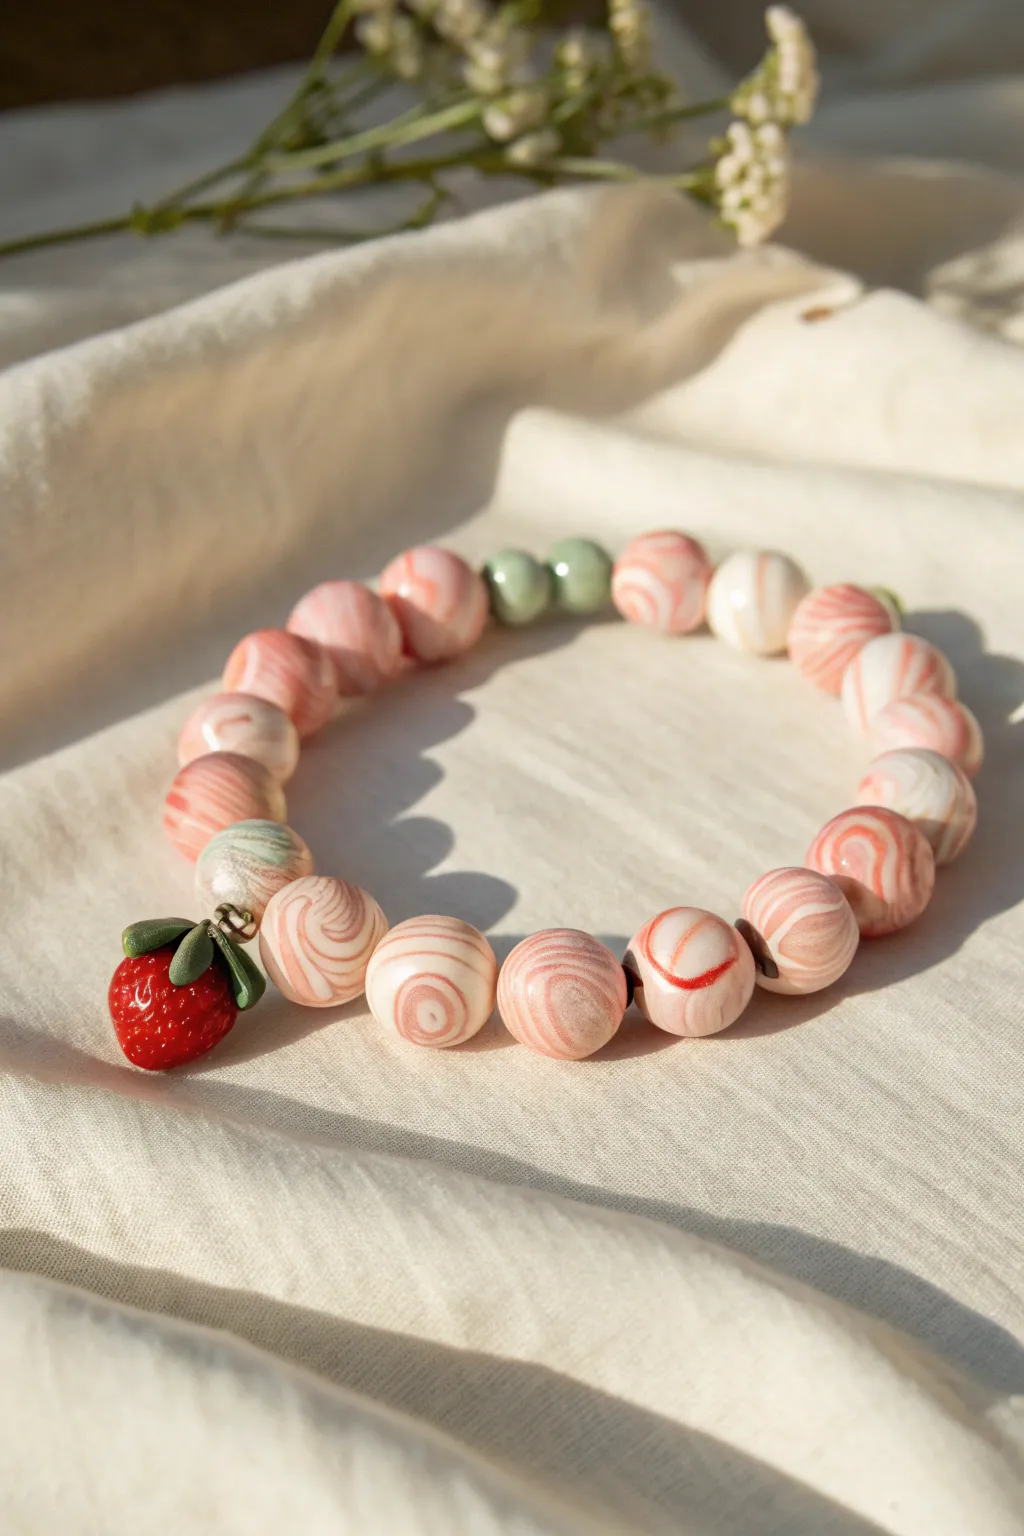
This charming bracelet captures the frothy, sweet essence of a strawberry milkshake with its marbled pink and white polymer clay beads. Finished with a darling little strawberry charm, it’s a delightful accessory perfect for summer crafting sessions.
Step-by-Step
Materials
- Polymer clay (white, translucent white, pale pink, coral pink, and leaf green)
- Acrylic roller or pasta machine
- Tissue blade or clay knife
- Bead rolling tool or clear acrylic block
- Needle tool or bead pins
- Headpin (gold tone)
- Jump rings and bracelet clasp (optional)
- Jewelry pliers (round nose and chain nose)
- Stretch cord (0.8mm)
- Gloss glaze (optional for finish)
- Oven for baking
Step 1: Creating the Swirl Effect
-
Condition the Clay:
Begin by conditioning your white, translucent, pale pink, and coral pink clays separately. Knead them until they are soft and pliable, ensuring there are no air bubbles trapped inside. -
Form Logs:
Roll each color into a long snake or log, roughly 1/4 inch thick. You’ll want slightly more white and pale pink than the darker coral to keep that milky look predominant. -
Twist and Combine:
Gather your clay logs and twist them together into one large rope. Fold this rope in half and twist it again. I like to repeat this folding and twisting process about 3-4 times to get fine, intricate marbling without turning the color into a solid mush. -
Roll Smooth:
Once you are happy with the mix of colors, roll the twisted clay into a smooth, uniform log about 1/2 inch in diameter.
Swirl Control
Don’t over-mix! Stop twisting your clay log when the striations look like peppermint candy; mixing too much will result in a muddy, solid pink color instead of swirls.
Step 2: Shaping the Beads
-
Cut Segments:
Using your tissue blade, slice the log into equal segments. For the size shown in the photo, aim for slices about 1/2 inch thick. Keep two small segments of pale green clay separate for accent beads if desired. -
Roll Spheres:
Take each segment and roll it between your palms to form a rough ball. To get them perfectly round, use a bead roller or gently swirl the ball on your work surface under a flat acrylic block using a circular motion. -
Pierce the Holes:
Before baking, carefully pierce a hole through the center of each bead using a needle tool or bead pin. Gently twist the tool as you push through to avoid deforming the sphere. -
Bake the Beads:
Place your pierced beads on a baking tile or in a bed of cornstarch (to prevent flat spots). Bake according to your clay manufacturer’s instructions, usually around 275°F (135°C) for 30 minutes.
Step 3: Making the Strawberry Charm
-
Form the Base:
While the beads bake, take a small ball of translucent red or coral clay and shape it into a rounded cone for the strawberry body. -
Add Texture:
Using the tip of a needle tool, poke tiny indentations all over the surface to mimic seeds. -
Create the Leaves:
Flatten a tiny piece of green clay and cut a small star or flower shape. Place this on top of the strawberry cone and gently curve the leaf tips downward. -
Insert the Headpin:
Push a headpin up through the bottom of the strawberry until it pokes out through the green leaves. Trim the pin to leave a small loop allowance. -
Bake the Charm:
Bake the strawberry charm following the same temperature guidelines as the beads. Let everything cool completely before handling.
Squished Beads?
If your beads flatten while piercing holes, let the clay rest in the fridge for 10 minutes to firm up before drilling. This keeps the spheres perfectly round.
Step 4: Assembly
-
Create the Loop:
Use your round nose pliers to turn the wire sticking out of the strawberry into a neat loop. -
Glaze (Optional):
If you want that glossy, wet-fruit look, apply a coat of gloss glaze to the strawberry charm and let it dry. -
String the Beads:
Cut a length of stretch cord. Thread your swirled milkshake beads onto the cord. If you made the green accent beads, place them opposite where the charm will hang for balance. -
Attach the Charm:
Thread a small gold jump ring through the loop on your strawberry charm, then slide the jump ring onto the stretch cord between two beads. -
Tie the Knot:
Tie a secure surgeon’s knot with the stretch cord. Pull it tight, dab a tiny drop of super glue on the knot for security, and trim the excess cord once dry. Hide the knot inside a bead hole.
You now have a sweet, distinctive accessory that looks good enough to eat

TRACK YOUR CERAMIC JOURNEY
Capture glaze tests, firing details, and creative progress—all in one simple printable. Make your projects easier to repeat and improve.
Mismatch Pair: Strawberry Bracelet Set
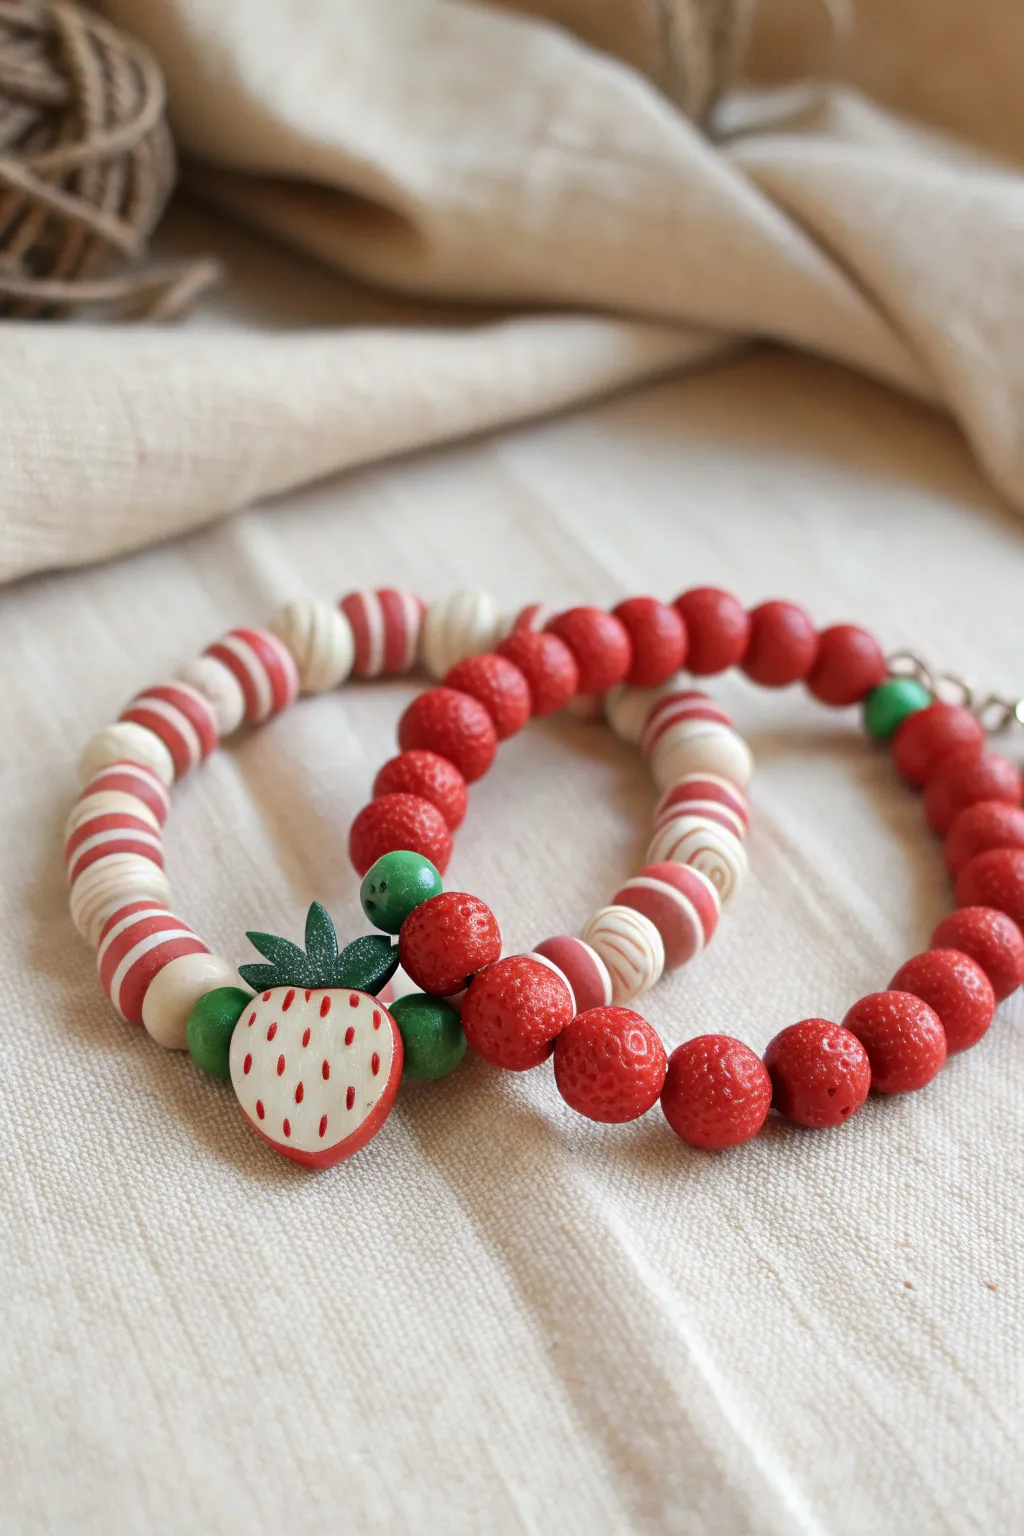
Embrace the charm of mismatched accessories with this adorable duo of strawberry-inspired clay bracelets. One features a playful, seed-flecked strawberry charm amidst candy-striped beads, while the other mimics the texture of the fruit itself with rich red, pitted beads.
Step-by-Step Tutorial
Materials
- Polymer clay (colors: White, Red, Green)
- Elastic beading cord (0.7mm – 1mm)
- Beading needle
- Dotting tool or toothpick
- Ball stylus tool
- Clay roller
- Sharp clay blade
- Super glue (gel type recommended)
- Sandpaper or nail buffer
- Oven for baking
Step 1: Crafting the Focal Strawberry Bead
-
Shape the base:
Condition a chunk of white polymer clay until soft. Roll it into a ball, then flatten it slightly and pinch the bottom to create a rounded heart or strawberry silhouette. -
Mix the stem color:
Take a small amount of green clay. If it’s too bright, mix in a tiny speck of red to deepen it into a more natural leaf green. -
Add the leafy top:
Flatten a small piece of green clay and cut a simple star or flower shape. Press this onto the top (wider end) of your white strawberry base. -
Texture the leaves:
Use a needle tool to gently scratch veins into the green leaves for realistic texture. -
Pierce the bead:
Carefully insert your needle tool or a bead pin horizontally through the top section of the strawberry, just under the leaves, ensuring the hole is wide enough for your cord. -
Add the seeds:
Roll incredibly tiny, elongated teardrops of red clay. Press these gently onto the surface of the white strawberry base in a scattered pattern.
Step 2: Making the Patterned Beads
-
Create the striped cane:
Roll a thick log of white clay. Roll a thin sheet of red clay. Wrap the red sheet around the white log. Squeeze and roll to consolidate. -
Slice and form striped beads:
Cut the cane into equal segments. Roll each segment into a smooth ball; the red outer layer will swirl with the white, creating a striped or swirled peppermint effect. -
Create textured berry beads:
Roll multiple balls of solid red clay for the second bracelet. These should be roughly uniform in size. -
Texturing the berries:
Using a small ball stylus or a blunt toothpick, gently press dimples all over the surface of the red beads to mimic the pitted texture of a real strawberry. -
Prepare spacer beads:
Roll two small balls of green clay to serve as spacers next to the large strawberry charm. Pierce holes through their centers. -
Bake the clay:
Arrange all your beads on a baking sheet. Bake according to your brand of polymer clay instructions (usually around 275°F/135°C for 15-30 minutes). Let them cool completely.
Sticky Situation
If clay sticks to your tools while texturing, dip the tool tip in cornstarch or water before pressing into the clay. This keeps the dimples clean and sharp without tearing.
Step 3: Assembly
-
Measure the cord:
Cut two lengths of elastic cord, adding about 3-4 inches excess to what fits around your wrist for easier knotting. -
String the striped bracelet:
Thread your striped beads onto the first cord. In the center, place a green spacer bead, then your large strawberry charm, and then the second green spacer bead. -
String the berry bracelet:
Thread the textured red beads onto the second cord. I like to break up the pattern by adding two or three striped beads near the knot area for continuity between the two pieces. -
Pre-stretch the elastic:
Before tying, give the ends of the elastic a firm pull. This prevents the bracelet from stretching out permanently the first time you wear it. -
Tie the knots:
Tie a surgical knot (left over right, right over left) as tightly as possible without snapping the cord. Secure the knot with a tiny drop of super glue. -
Hide the knot:
If possible, pull the knot inside the hole of the nearest large bead to hide it. Trim the excess cord ends.
Glossy Finish
For a ‘juicy’ look, coat only the red parts of your beads with a high-gloss water-based varnish after baking, leaving the white parts matte for contrast.
Wear your fresh fruit stack together for a fun summer statement or gift one to a friend for a matching moment
Strawberry Picnic Gingham Color Scheme
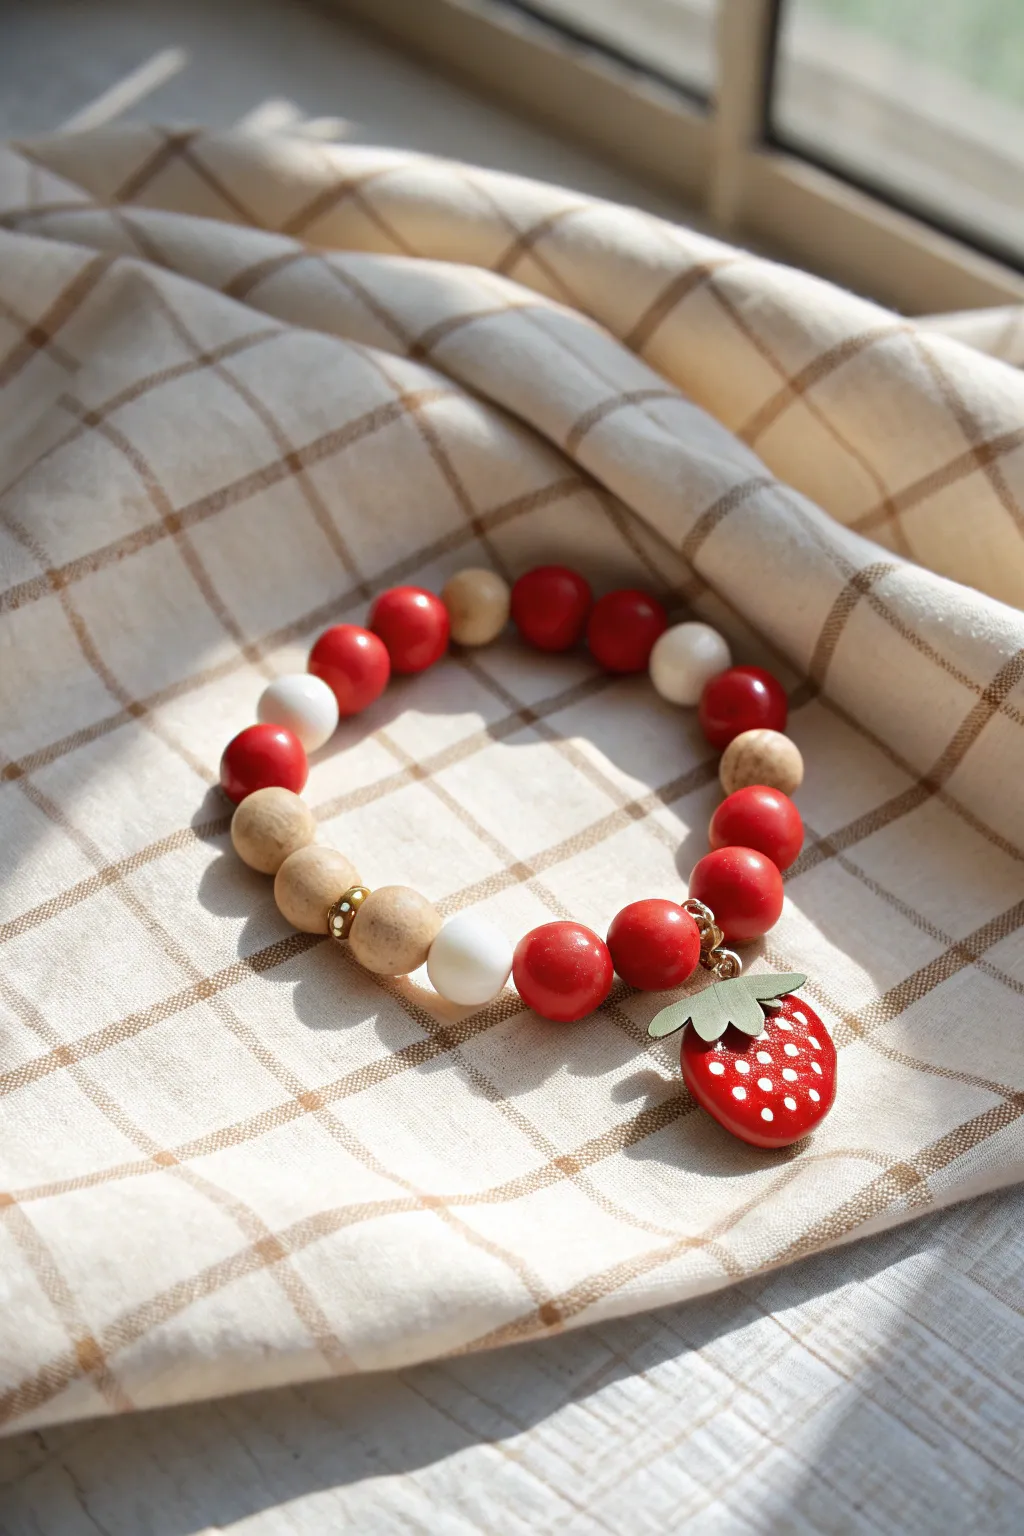
Capture the essence of a sunny afternoon picnic with this charming wooden bead bracelet featuring a classic strawberry motif. The mix of vibrant red, creamy white, and natural wood tones evokes a nostalgic gingham aesthetic that is perfect for summer accessorizing.
Detailed Instructions
Materials
- 10mm Red round wooden beads (approx. 8-10)
- 10mm White round wooden beads (approx. 2-3)
- 10mm Natural wood round beads (approx. 4-5)
- Gold tone spacer bead (rhinestone or textured metal)
- Large strawberry pendant (wood or resin with metal loop)
- Gold tone jump ring (6-8mm)
- Elastic beading cord (0.8mm or 1mm transparent)
- Jewelry adhesive or clear nail polish
- Scissors
- Jewelry pliers (flat nose and bent nose)
- Beading needle (optional, for easier threading)
- Tape or bead stopper
Step 1: Preparation & Pendant Setup
-
Prepare the workspace:
Begin by laying out your soft beading mat or a piece of fabric to keep your round beads from rolling away. Gather all your materials so they are within easy reach. -
Measure the cord:
Cut a length of elastic cord about 10-12 inches long. This extra length makes tying the knot significantly easier later on. -
Secure the end:
Place a piece of tape or a bead stopper on one end of the cut cord to prevent your beads from sliding off while you design your pattern. -
Prep the charm:
Using your jewelry pliers, gently twist open the gold jump ring. Slide the loop of your strawberry pendant onto the open ring. -
Close the jump ring:
Close the jump ring securely using the pliers. Ensure the ends meet perfectly flush so the cord doesn’t accidentally slip out later.
Step 2: Designing the Pattern
-
Plan the color block:
This design relies on color blocking rather than a strict ABC repeat. Start by selecting your main focal beads: the red ones. -
The Strawberry Side:
Thread on two red beads, then slide on your prepared strawberry charm via its jump ring, followed by another red bead. This centers the charm in a block of red. -
Add contrast:
Next, add a single white bead to break up the color. Follow this with a natural wood bead. -
Build the pattern:
Continue adding beads, aiming for an asymmetry that looks organic. Try a sequence like: Red, White, Red, Red, Natural, Natural. -
Insert the accent:
Place the gold spacer bead between two natural wood beads or between a wood and a white bead to add a touch of sparkle. -
Check the fit:
Wrap the strand around your wrist to check the size. Add or remove red or natural beads as needed to ensure a comfortable fit that isn’t too tight.
Sticky Situation
If the knot won’t hide inside a bead, don’t force it. The bead might crack. Instead, try hiding it inside the larger hole of a natural wood bead specifically.
Step 3: Finishing Touches
-
Pre-stretch the cord:
I always give the elastic a few gentle tugs before tying. This pre-stretching prevents the bracelet from loosening up immediately after you wear it. -
Tie the knot:
Remove the tape or bead stopper. Tie a standard surgeon’s knot (right over left, left over right, looping through twice on the second pass) to secure the bracelet. -
Tighten securely:
Pull all four ends of the cord firmly to cinch the knot tight. You want the beads to sit snugly against each other without buckling. -
Apply adhesive:
Dab a tiny drop of jewelry glue or clear nail polish directly onto the knot. This is crucial for longevity. -
Hide the knot:
While the glue is still tacky but not wet, gently pull the knot inside the hole of the nearest large wooden bead to hide it. -
Trim excess:
Once the glue is fully dry, use sharp scissors to trim the excess cord tail carefully, ensuring you don’t nick the main knot.
Picnic Upgrade
Mix in a few small gingham ribbon bows tied directly onto the elastic between the wooden beads for extra texture and cottagecore flair.
Now you have a sweet, berry-themed accessory ready for your next outdoor adventure
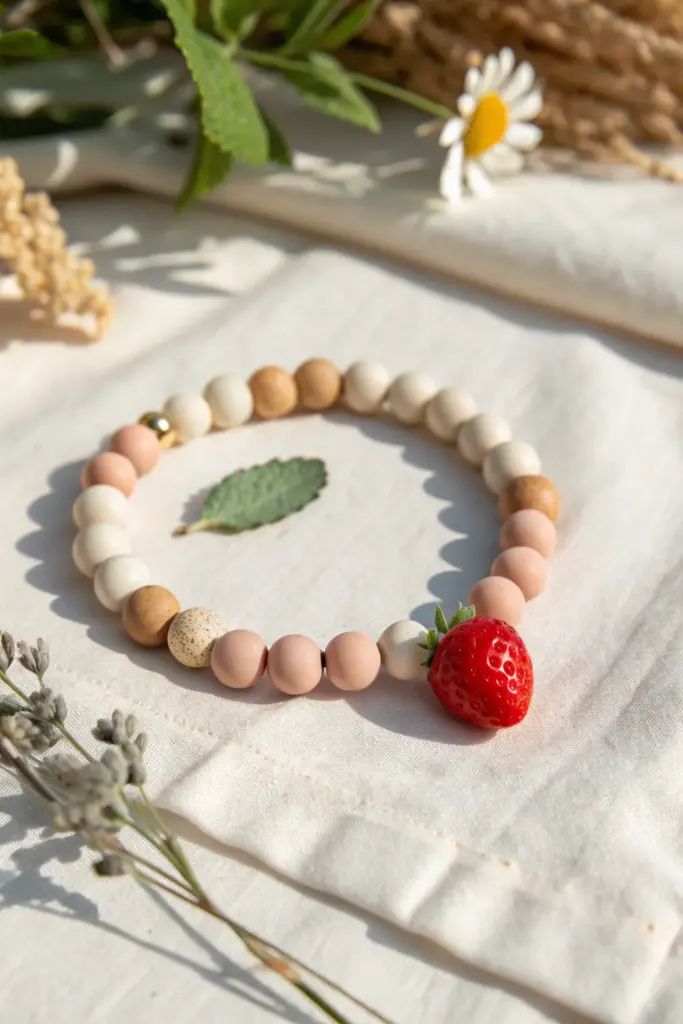
Unexpected Strawberry Neutrals With One Bright Pop

Move beyond the typical bright pinks and greens with this sophisticated take on the fruit jewelry trend. By pairing a singular, hyper-realistic strawberry charm with a palette of soft clays, tans, and matte creams, you create a wearable piece that feels grown-up yet playful.
How-To Guide
Materials
- Polymer clay (white, beige, tan, peach/blush, translucent, red, green)
- Elastic cord (0.7mm or 0.8mm)
- Bead rolling tool or acrylic block
- Course black pepper or brown clay specks (for texture)
- Needle tool or toothpick
- Gloss glaze or UV resin (for the strawberry)
- One small gold metal spacer bead
- Superglue or jewelry cement
- Scissors
Step 1: Crafting the Clay Beads
-
Prepare the neutral palette:
Begin by conditioning your polymer clay. You’ll need distinct portions of white, light beige, a deeper tan, and a soft blush peach color. Knead each until soft and pliable. -
Mix the textured clay:
To create the single speckled bead, take a small ball of beige clay and mix in either coarse black pepper or tiny flecks of baked brown clay. This natural texture adds remarkable depth to the pattern. -
Measure equal portions:
Roll each color into a long snake of even thickness. Slice equal segments from each snake to ensure your finished beads are relatively uniform in size. -
Roll the beads:
Using the palms of your hands or a bead roller, roll each segment into a smooth sphere. You’ll need about 20-22 beads total, depending on your wrist size. -
Create holes:
Carefully pierce the center of each bead with a needle tool or toothpick. I like to twist the tool gently as I push through to prevent the bead from squashing. -
Baking part one:
Arrange the neutral beads on a baking sheet lined with parchment paper. Bake according to your clay manufacturer’s instructions, usually around 275°F (130°C) for 15-30 minutes.
Natural Texture
For a more organic matte look on neutral beads, roll them lightly in cornstarch before baking. Use a soft brush to dust it off after they cool.
Step 2: Sculpting the Strawberry
-
Form the strawberry base:
Roll a ball of bright red clay, then gently taper one end to create a strawberry shape—rounded at the top and slightly pointed at the bottom. -
Add the seeds:
Using your needle tool, gently press tiny indentations all over the surface of the strawberry. Do not pierce all the way through; these are just for surface texture. -
Attach the leaves:
Flatten a tiny bit of green clay and use an X-Acto knife to cut a small star or calyx shape. Press this onto the top (wide end) of your strawberry. -
Pierce the charm:
Create a hole running horizontally through the top part of the strawberry, just under the green leaves, wide enough for your elastic cord. -
Bake the charm:
Bake the strawberry separately or with the other beads if they aren’t finished yet. Once baked and cooled, coat just the red part with a high-gloss glaze or UV resin for that juicy, realistic shine.
Step 3: Assembly
-
Layout your pattern:
On a bead board or cloth, arrange your beads. The pattern in the image relies on color blocking: group 2-3 of the same color together, transitioning from white to tan to peach. -
Insert the accents:
Place the speckled bead near the strawberry as a visual break. Position the small gold metal spacer bead between a peach and cream section for a hint of luxury. -
Thread the elastic:
Cut a piece of elastic cord about 10 inches long. Pre-stretch it by pulling firmly on both ends a few times; this prevents the bracelet from loosening later. -
String the beads:
Thread your beads onto the elastic, following your laid-out pattern. Add the strawberry charm last so it acts as the focal point. -
Tie the knot:
Bring the ends together and tie a surgeon’s knot (loop the right end over the left twice, then pull tight). Secure the knot with a tiny drop of superglue. -
Hide the knot:
Once dry, trim the excess elastic close to the knot. Gently tug the bracelet so the knot slides inside the hole of the nearest large bead.
Seed Detail
Before baking the strawberry, roll a tiny snake of yellow clay and press microscopic dots into each needle indentation for realistic seeds.
Slip this charming piece on your wrist and enjoy the subtle sweetness it adds to your day