Whenever I need a quick, feel-good project at my worktable, I reach for strawberry clay—it’s the perfect mix of simple shapes and satisfying detail. Whether you’re using polymer clay or air-dry clay, these ideas will help you nail that iconic berry look (especially the seeds and the leafy calyx).
Classic Strawberry Charms
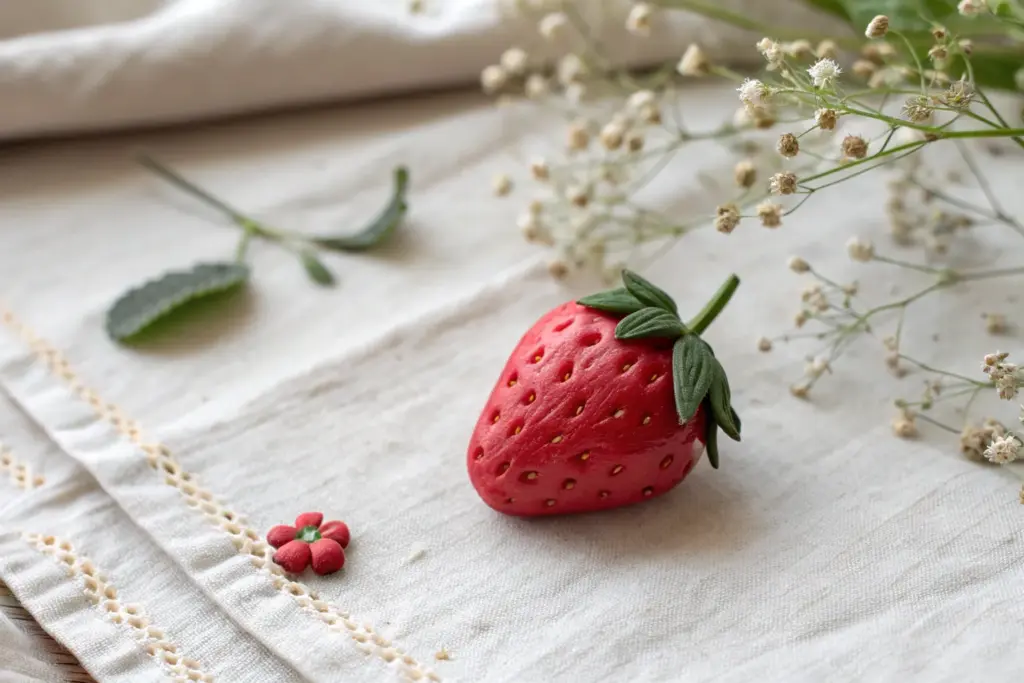
These delightful polymer clay strawberry charms capture the essence of summer with their vibrant red hue and textured seeds. Perfect for earrings, necklaces, or keychains, they balance a realistic look with a cute, stylized charm aesthetic.
Step-by-Step
Materials
- Red polymer clay (e.g., Fimo Soft Cherry Red)
- Green polymer clay (e.g., Fimo Soft Apple Green)
- Needle tool or toothpick
- Ball tool (small)
- Eye pins (silver or gold tone)
- Blade or craft knife
- Oven for baking
- Gloss glaze or varnish (optional)
Step 1: Shaping the berry
-
Condition the clay:
Start by taking a chunk of your red polymer clay. Knead it thoroughly in your hands until it becomes soft, pliable, and warm to the touch. This prevents cracks later on. -
Roll a sphere:
Roll the conditioned red clay into a smooth ball about the size of a large marble, or smaller depending on your desired charm size. -
Form the strawberry shape:
Gently roll one side of the ball between your palms to taper it, creating a soft cone shape with a rounded top and a slightly blunt point. -
Refine the curve:
Set the cone on your work surface and check the profile. Use your fingers to smooth out any fingerprints, ensuring the strawberry looks plump rather than flat.
Step 2: Adding texture
-
Create the seed spacing:
Using a needle tool, gently mark where your seeds will go. Start near the bottom tip and work your way up in alternating rows to keep the pattern uniform. -
Indent the seeds:
For that realistic depth seen in the photo, press the needle tool deeper into each mark you just made. Don’t drag the tool; just press straight in and slightly down to create a teardrop-shaped pit. -
Smooth the surface:
If the needle tool created any raised ridges around the holes, very gently roll the strawberry on your work surface to flatten them back down without closing the holes.
Fixing Loose Pins
If your eye pin feels loose after baking, pull it out, add a dab of superglue to the metal stem, and slide it back into the hole for a permanent hold.
Step 3: Creating the calyx
-
Prepare the green clay:
Condition a small amount of green clay. Roll it into a very thin sheet, roughly 1-2mm thick. -
Cut the leaves:
Using your craft knife, cut out a star shape with 5 or 6 points. Alternatively, you can use a small star-shaped cutter if you have one handy. -
Separate leaves:
I find it easier to cut individual small teardrop shapes for the leaves rather than a single star piece, as it allows for better layering. -
Texture the leaves:
Take your needle tool and gently score a central vein down the middle of each green leaf. Add tiny side veins if you want extra realism. -
Attach the leaves:
Place the leaves onto the top (rounded end) of your red strawberry. Arrange them so they radiate from the center. -
Curve the tips:
Gently lift the very tips of a few leaves so they flare upward slightly, rather than laying completely flat against the berry.
Add a Blossom
Make a tiny white 5-petal flower with a yellow center and attach it near the leaves before baking to add a cute floral accent to your charm.
Step 4: Assembly and Baking
-
Insert the hardware:
Take a metal eye pin. If the stem is too long, trim it down to about half the height of your strawberry. -
Secure the pin:
Push the straight end of the eye pin directly into the center top of the strawberry, right in the middle of the green leaves, until the loop sits flush with the clay. -
Final check:
Give the charm a once-over to ensure the pressure of inserting the pin didn’t squash your shape. Reshape gently if needed. -
Bake:
Place your charms on a baking tile or parchment-lined tray. Bake according to your clay manufacturer’s specific instructions (usually 230°F-275°F for 15-30 minutes). -
Cool down:
Allow the strawberries to cool completely in the oven or on a rack before handling them, as the clay is fragile while hot. -
Optional glaze:
If you want a juicy look, lightly brush a satin or gloss glaze over the red part of the fruit, avoiding the leaves to keep them matte.
String these onto a chain or ear wires and enjoy your fresh-picked accessories


Mini Strawberry Earrings
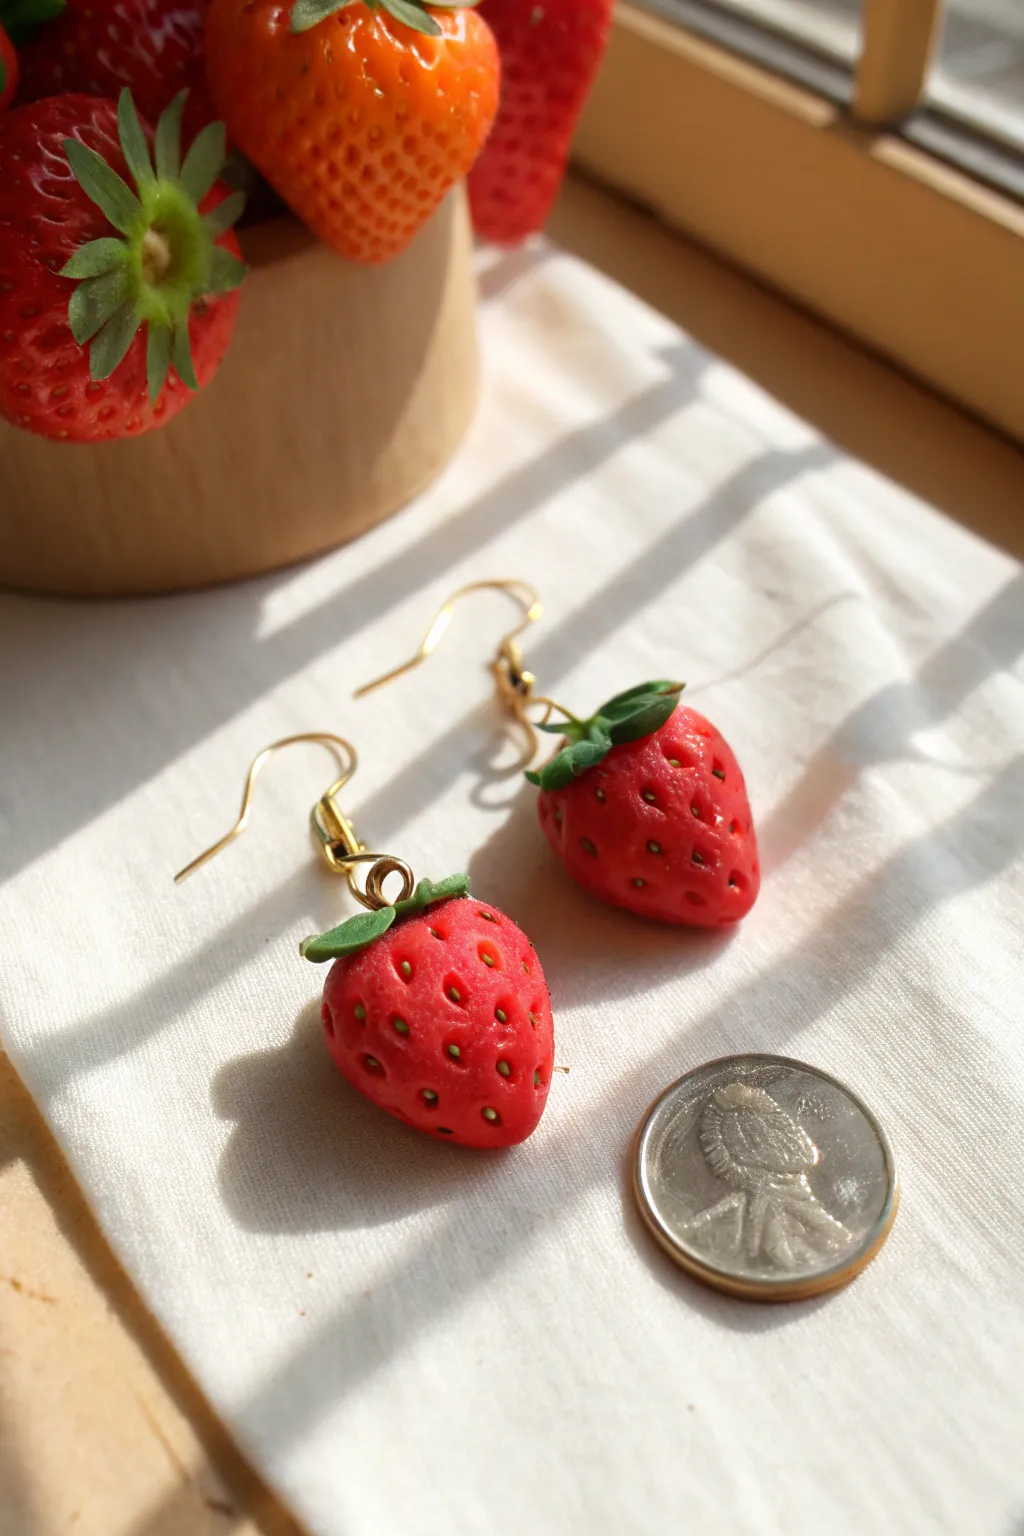
Capture the sweetness of summer with these incredibly lifelike strawberry earrings, perfectly sized to dangle delicately. We’ll use polymer clay to sculpt the perfect berry shape and simple texturing techniques to create that signature seedy surface.
Step-by-Step Tutorial
Materials
- Red polymer clay (translucent red and solid red mix works best)
- Green polymer clay
- Liquid polymer clay (Translucent)
- Small eye pins (gold tone)
- Earring fishhooks (gold tone)
- Needle tool or toothpick
- Dotting tool (small)
- X-acto knife or craft blade
- Gloss glaze or UV resin
- Small paintbrush
- Oven (for baking clay)
- Jewelry pliers
Step 1: Shaping the Base
-
Mix the perfect red:
Start by conditioning your red clay. I like to mix a little translucent clay into my solid red; this gives the berry a juicy, realistic depth rather than looking like flat plastic. -
Form the berry spheres:
Roll two equal-sized balls of red clay, each about the size of a large pea or small marble. Use the provided coin in the reference image as a guide for scale. -
Taper the shape:
Gently roll one side of each ball between your fingers to create a slight teardrop shape. You want a rounded top and a slightly pointed bottom, just like a real strawberry. -
Flatten the top:
Press the rounded top of the teardrop very gently against your work surface. This creates a small flat area where the leaves will eventually sit.
Seed Realism Trick
For ultra-realism, roll microscopic snakes of yellow clay, slice tiny bits, and place one ‘seed’ into each indentation you made.
Step 2: Detailed Texture
-
Create the seed indentations:
Using a needle tool or a very small dotting tool, press tiny holes all over the surface of the red clay. Start from the tip and work your way up in offset rows. -
Refine the texture:
Don’t just poke straight in; angle the tool slightly upwards as you press to create a teardrop-shaped pit, mimicking how seeds sit in the fruit flesh. -
Optional shading:
If you want extra realism, brush a tiny amount of brownish-yellow pastel dust over the textured surface before adding the leaves. This highlights the seeds.
Step 3: Adding Greenery
-
Prepare the calyx:
Roll a very small ball of green clay and flatten it into a thin disk. Use your X-acto knife to cut a small star shape or 5-6 tiny triangles out of the disk. -
Attach the leaves:
Place a tiny drop of liquid polymer clay on the flat top of your strawberry. Gently press the green star shape onto this spot. -
Sculpt the leaves:
Use your needle tool to drag the green clay slightly down the sides of the berry. Curl the tips of the leaves upward just a tiny bit to give them life and movement. -
Insert hardware:
Trim an eye pin so the stem is short (about 1/4 inch). Dip the end in liquid clay for better adhesion. -
Secure the pin:
Push the eye pin straight down through the center of the green leaves into the red berry body. Ensure the loop sits flush against the green clay.
Fingerprint Fix
If you see fingerprints on the red fruit, brush it very lightly with baby oil before baking. It smooths the surface instantly.
Step 4: Baking and Assembly
-
Bake the clay:
Place your strawberries on a baking tile or parchment paper. Bake according to your brand of clay’s instructions (usually 275°F/135°C for 15-20 minutes). -
Cool down:
Let the pieces cool completely before handling. Polymer clay is soft when hot and hardens fully as it returns to room temperature. -
Apply finish:
Brush a thin coat of gloss glaze or UV resin over just the red part of the strawberry to make it look juicy. Leave the green leaves matte for contrast. -
Open the ear wires:
Using your jewelry pliers, gently twist open the loop at the bottom of the fishhook earring finding. Never pull the loop apart; always twist sideways. -
Attach the berry:
Slide the eye pin loop of your strawberry onto the open fishhook loop. -
Close the loop:
Twist the fishhook loop back into a closed position using the pliers, ensuring there are no gaps where the charm could slip out.
Now you have a delightful pair of handmade accessories perfect for a sunny day or a picnic


Strawberry Pendants With Leafy Calyx
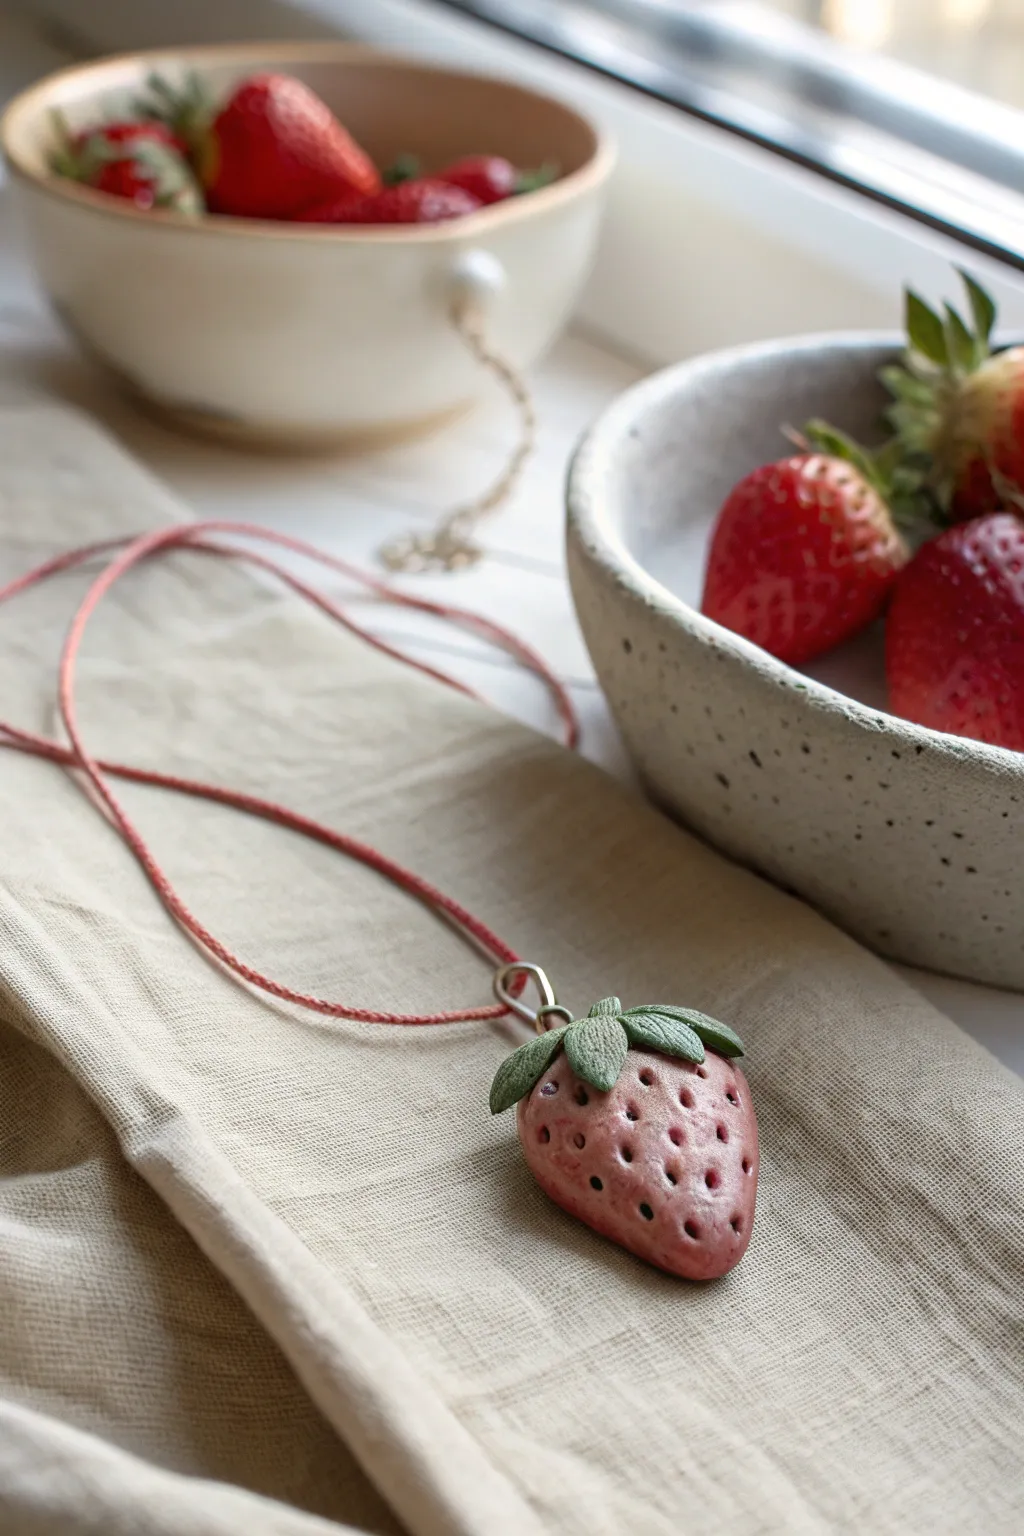
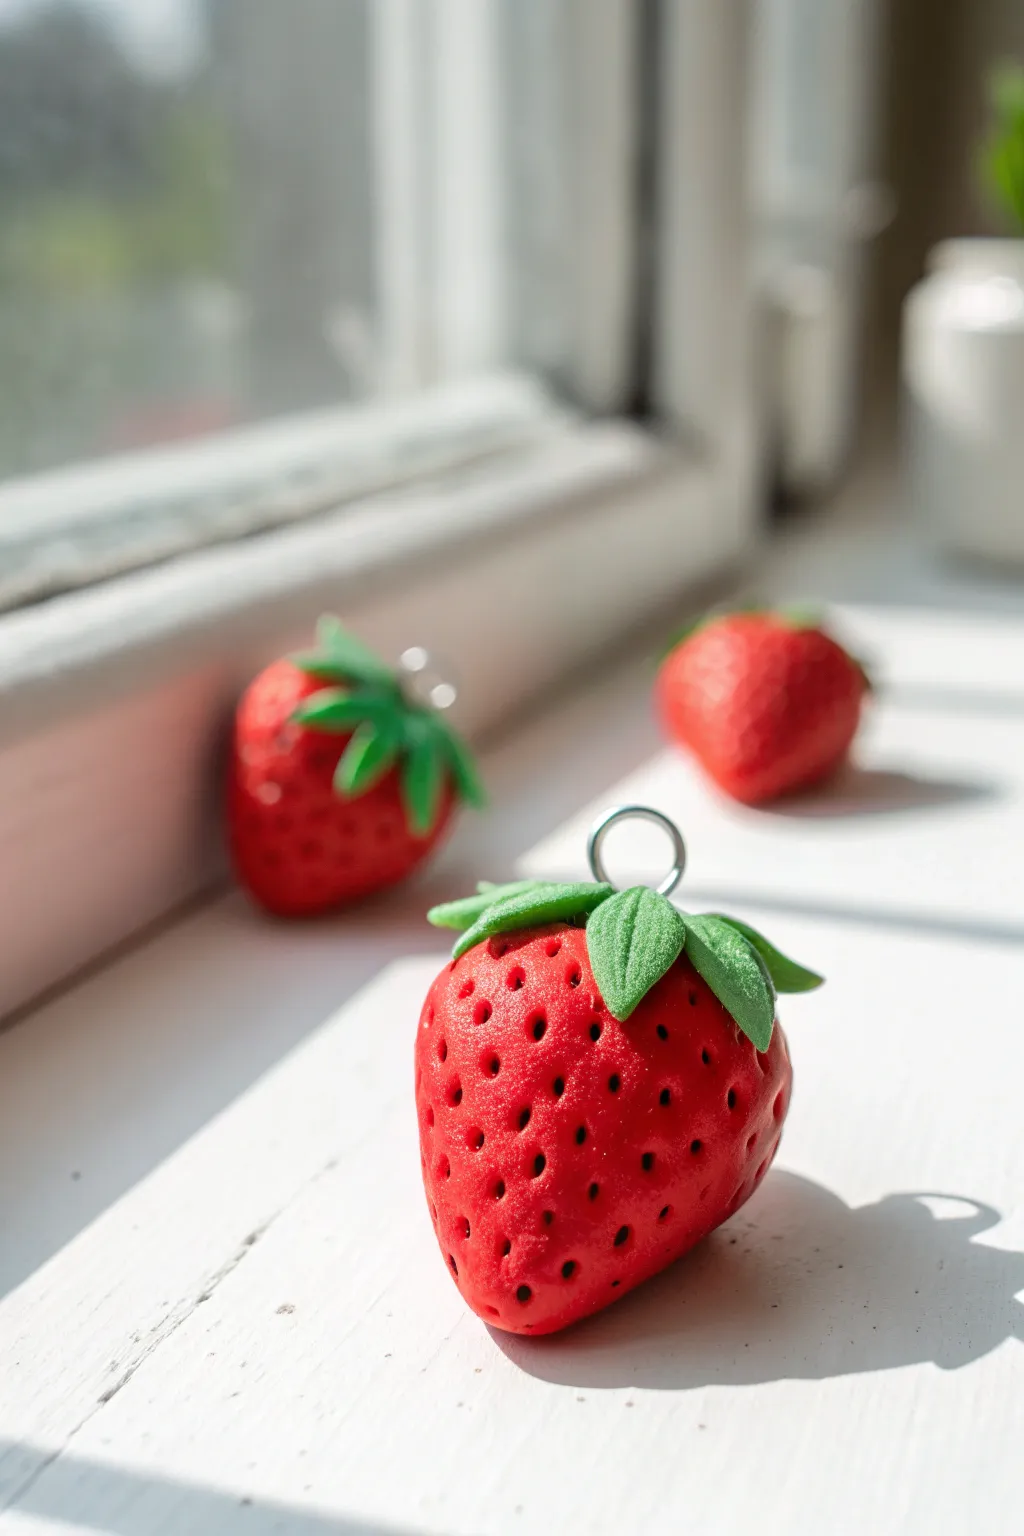
Capture the essence of summer sweetness with this handcrafted clay pendant that features realistic texture and a charming leafy cap. The soft, muted red tones and deep-set seeds give it an organic, artisanal look perfect for everyday wear.
Step-by-Step Guide
Materials
- Polymer clay (translucent white, red, green)
- Needle tool or toothpick
- Ball stylus tool (small)
- Chalk pastels (dark brown, red)
- Soft paintbrush
- Eye pin or wire loop
- Liquid polymer clay (optional)
- Cord or chain for hanging
- Oven for baking
Step 1: Forming the Berry Base
-
Mix your base color:
Start by mixing a small amount of red polymer clay into a larger chunk of translucent clay. You want a soft, fleshy pink-red rather than a bright primary red to mimic the natural ripeness seen in the photo. -
Shape the strawberry:
Roll the clay into a smooth ball, then gently taper one end to create a rounded cone or teardrop shape. Flatten the top slightly where the leaves will sit. -
Create the seed indentations:
Using a small ball stylus or a blunt needle tool, press small, fairly deep holes all over the surface of the berry. Stagger them irregularly so they don’t look like a perfect grid. -
Add depth with shading:
Scrape some dark brown and red chalk pastel into a fine dust. Use a soft, dry brush to dust this powder into the indentations you just made. This creates the look of deep-set seeds and adds dimension. -
Tone the surface:
Lightly brush the surface of the clay with a little red pastel powder to enhance the blushing color, wiping away excess so the deepest red stays in the pits.
Seed Realism Pro-Tip
For extra realism, push tiny pre-baked balls of dark brown clay or real strawberry seeds into the indentations instead of just using pastel dust.
Step 2: Sculpting the Leafy Calyx
-
Prepare the green clay:
Condition your green clay until soft. You may want to mix in a tiny bit of brown or yellow to achieve an olive or forest green tone, avoiding an unnatural neon look. -
Form individual sepals:
Roll 5 or 6 very small teardrops of green clay. Flatten them gently with your finger to create leaf shapes. -
Texture the leaves:
Use a needle tool or a craft knife to gently press a central vein down the middle of each leaf. Then, add tiny, angled scratches radiating from the center to mimic leaf texture. -
Attach the first leaves:
Place the leaves onto the flat top of your strawberry shape, arranging them so they radiate outward. Curve the tips slightly downward to hug the berry. -
Add the stem base:
Place a very small flattened circle of green clay in the center where the leaves meet to cover the join and form the base for the hardware. -
Insert hardware:
Insert an eye pin or a small wire loop deeper into the center of the greens. If you have liquid polymer clay, dab a tiny bit on the pin before inserting it to act as glue.
Fixing Loose Pins
If your eye pin feels loose after baking, pull it out gently, apply a drop of superglue to the shaft, and slide it back into the hole.
Step 3: Baking and Finishing
-
Final inspection:
Check your pendant for any fingerprints. If you find any, smooth them gently with a drop of baby oil or a light brush of cornstarch. -
Bake the piece:
Bake the pendant according to your clay manufacturer’s instructions. A lower, slower bake is often safer for translucent blends to prevent scorching. -
Cool down:
Allow the piece to cool completely in the oven or on the counter before handling it, as hot clay is fragile. -
String it up:
Thread a simple cord, like the waxed cotton or hemp shown in the image, through the metal loop. -
Tie the knot:
Finish by tying a secure knot or adding cord ends and a clasp, adjusting the length to sit comfortably on the chest.
Now you have a charming, nature-inspired accessory ready to wear or gift.


Strawberry Keychains and Bag Charms
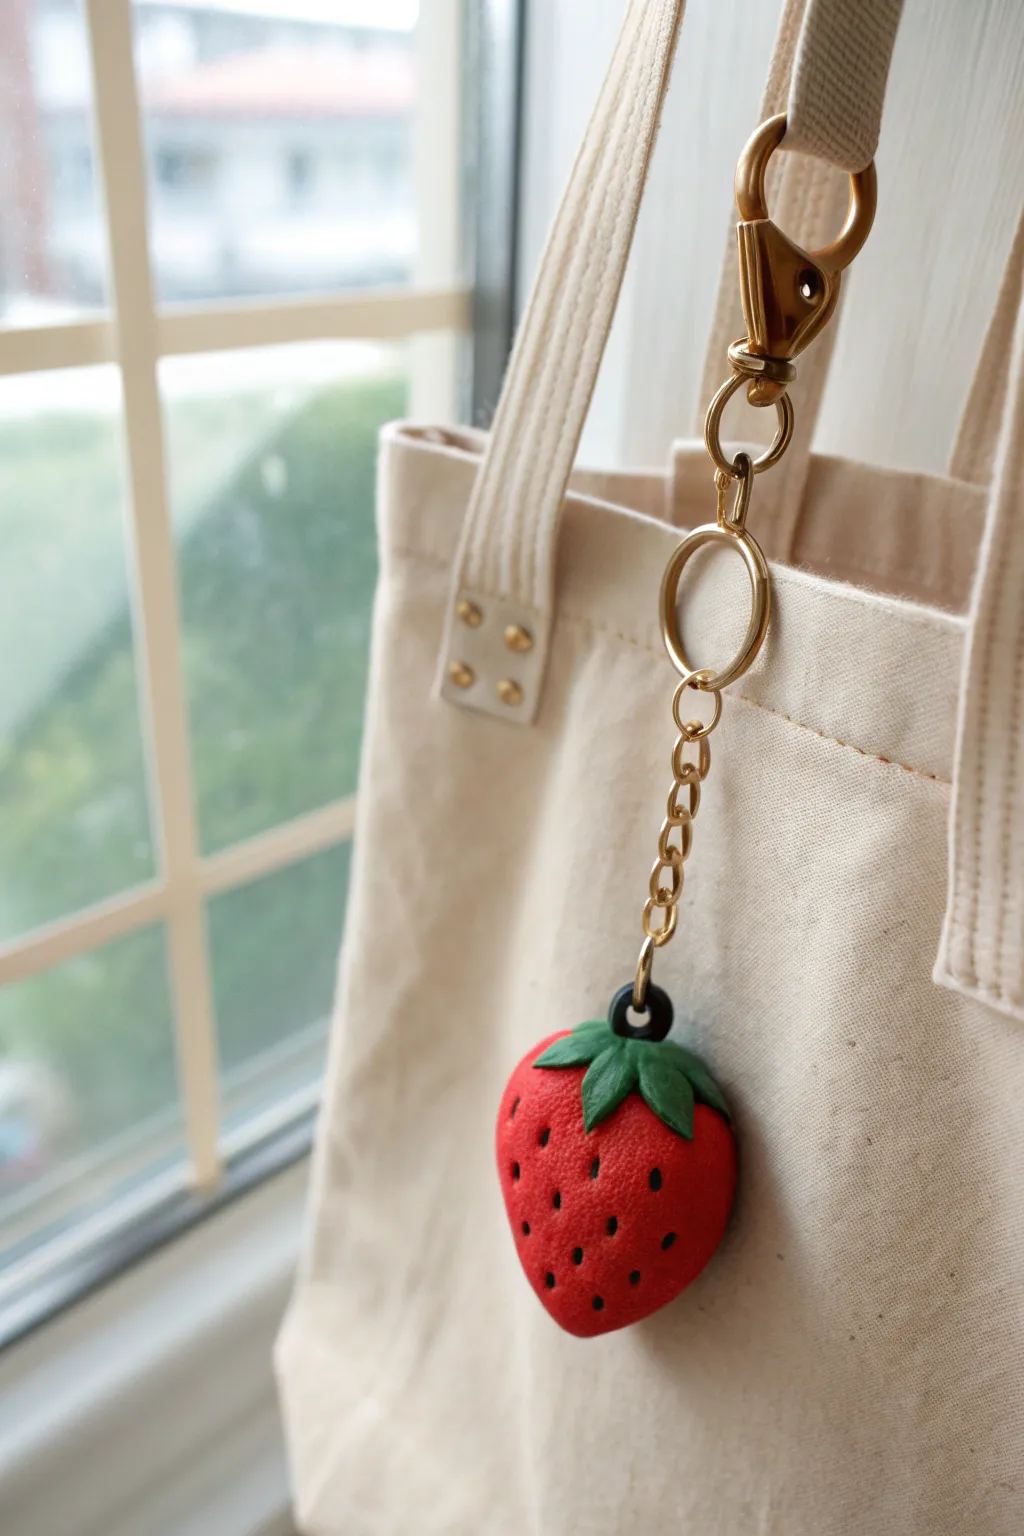
Create a charmingly realistic strawberry accessory that adds a pop of sweetness to any bag. This tutorial guides you through sculpting a textured clay fruit complete with leafy greens and secure hardware attachment.
Step-by-Step
Materials
- Red polymer clay
- Green polymer clay
- Black polymer clay
- Gold keychain hardware (lobster clasp, chain, jump rings)
- Small eye screw or wire loop
- Needle tool or toothpick
- Ball stylus tool
- Round cutter (optional)
- Gloss glaze (optional)
Step 1: Sculpting the Strawberry Base
-
Prepare the Red Clay:
Begin by conditioning a chunk of red polymer clay until it is soft and pliable. Roll it into a smooth ball about the size of a walnut, or adjust based on how large you want your final charm to be. -
Shape the Berry:
Gently roll the ball between your palms, applying slightly more pressure on one side to taper it. You want to create a soft, rounded cone shape resembling a natural strawberry. -
Add Texture:
Instead of leaving the surface perfectly smooth, take an old toothbrush or a piece of sandpaper and gently press it all over the red clay. This subtle texturing gives it a more realistic, organic skin rather than a shiny plastic look. -
Create Seed Indentations:
Using a needle tool or small ball stylus, poke shallow holes all over the strawberry’s surface. Space them somewhat evenly but keep it random enough to look natural. These will house the seeds.
Loose Eye Screw?
If your metal eye screw feels loose after baking, unscrew it, add a drop of superglue or E6000 to the threads, and screw it back in for a permanent hold.
Step 2: Adding Details and Greens
-
Make the Seeds:
Roll out a very thin snake of black clay. Cut tiny specks from this snake and roll them into microscopic balls. -
Place the Seeds:
Carefully place a tiny black ball into each indentation you created earlier. You can gently press them in with your finger or a tool to ensure they adhere well without flattening the berry’s shape. -
Form the Leaves:
Condition a small amount of green clay. Flatten it and cut out a small star shape or individual teardrop shapes for the sepals (calyx). -
Attach the Calyx:
Place the green star shape on top of the wider end of your strawberry. Gently press the leaves down so they curve slightly over the top of the fruit. -
Texture the Leaves:
Use your needle tool to score a central vein down the middle of each leaf for added detail. I like to lift the tips of one or two leaves just slightly to give it movement. -
Add the Stem Loop:
Roll a small ring or semi-circle of black clay to act as the attachment point, or insert a metal eye screw directly into the center of the green top. If using a clay loop, ensure it is thick enough to be durable.
Blended Effect
Mix a tiny bit of translucent clay into your red clay before sculpting. It creates a fleshy, realistic semi-transparency that mimics real fruit skin.
Step 3: Baking and Assembly
-
Bake the Clay:
Preheat your oven according to the manufacturer’s instructions on your clay package. Place the strawberry on a baking sheet or ceramic tile and bake for the recommended time. -
Cool Down:
Once baked, let the strawberry cool completely. The clay is fragile when hot, so patience here ensures you don’t accidentally dent it. -
Optional Glaze:
For a juicy finish, apply a thin coat of gloss glaze to the red part of the strawberry, avoiding the leaves if you prefer a matte contrast. -
Prepare the Hardware:
Identify the end link of your gold chain. If needed, open a jump ring using two pairs of pliers—twist the ring open sideways rather than pulling it apart to maintain its shape. -
Attach to Berry:
Thread the open jump ring or chain link through the black clay loop or metal eye screw on your strawberry. -
Secure the Clasp:
Connect the other end of the chain to your larger keyring or lobster clasp mechanism. Close the jump ring securely by twisting it back into place until the ends meet perfectly.
Clip your new handmade charm onto your favorite tote bag and carry a little piece of summer with you everywhere

The Complete Guide to Pottery Troubleshooting
Uncover the most common ceramic mistakes—from cracking clay to failed glazes—and learn how to fix them fast.
Hanging Strawberry Ornaments

These charming hanging strawberries bring a touch of farmhouse sweetness to any corner of your home. With their textured surfaces and earthy twine loops, they mimic the look of vintage garden finds preserved in clay.
Detailed Instructions
Materials
- Air-dry clay or polymer clay (white or terracotta)
- Acrylic paints (deep red, salmon pink, leaf green, olive green)
- Small paintbrush
- Jute twine
- Toothpick or sculpting tool
- Green felt or extra clay
- Strong craft glue or hot glue gun
- Clear matte varnish (optional)
Step 1: Shaping the Fruit
-
Prepare the Clay:
Condition your clay until it is soft and pliable. Divide it into four equal portions, each roughly the size of a golf ball or a large walnut. -
Form the Base Shape:
Roll one portion into a smooth ball between your palms to remove any cracks or seams. -
Create the Strawberry Cone:
Gently taper one end of the ball to create a rounded cone shape. Keep the top relatively flat and broad, just like a real strawberry. -
Refine the Form:
Repeat this process for all four strawberries. They don’t need to be identical; slight variations in size and plumpness add to the organic, realistic charm. -
Add Texture:
Using a toothpick or a small, round-tipped sculpting tool, press tiny indentations all over the surface of the clay. Start from the bottom tip and work your way up to mimic the seed pockets.
Loose Twine?
If the twine feels loose after the clay dries, squeeze a drop of super glue or strong craft glue directly into the hole at the base of the stem to lock the knot in place.
Step 2: Stem and Twine
-
Create the Loop:
Cut four lengths of jute twine, each about 8-10 inches long. Fold each piece in half and tie a knot at the open ends to create a loop. -
Insert the Twine:
While the clay is still soft, press the knotted end of the twine loop deep into the center of the flat top of each strawberry. You may need to use your tool to push it securely inside. -
Secure the Opening:
Gently pinch the clay around the twine entry point to close the gap slightly, ensuring the knot is trapped inside. I find smoothing this area with a bit of water helps seal it tight. -
Sculpt the Stem:
If you are using clay for the leaves, roll a tiny coil of clay and wrap it around the base of the twine where it exits the fruit to form a small stem. -
Drying Time:
If using air-dry clay, let the strawberries dry for 24-48 hours until completely hard. If using polymer clay, bake according to the manufacturer’s package instructions.
Seed Detail
For extra realism, paint tiny yellow or white dots inside each pitted indentation using a fine-point toothpick after the red base coat is fully dry.
Step 3: Leaves and Color
-
Base Coat Painting:
Once hardened, paint the body of the strawberry. Mix a deep red with a touch of salmon pink for a natural, slightly faded look. Apply an even coat and let it dry. -
Highlight the Seeds:
To make the texture pop, you can lightly dry-brush a darker red or brown over the indentations, or simply let the shadows in the holes do the work. -
Create the Calyx:
Cut small, star-shaped leafy tops (the calyx) from green felt or craft paper if you didn’t sculpt them from clay earlier. Cut a small slit in the center to slide them over the twine. -
Attach the Leaves:
Thread the twine through the leaf cutout and glue the leaves onto the top of the painted strawberry. Use a dab of glue to secure the leaf tips down against the fruit’s shoulders. -
Painting Clay Leaves:
If you sculpted clay leaves, paint them a muted olive green. Adding a touch of brown to the very edges gives them a realistic, ripened appearance. -
Final Assembly:
Tie the loose ends of your twine loops together or hang them individually at varying heights to create a casual, clustered arrangement.
Your strawberries are now ready to be hung on a peg rail or a seasonal tree for a sweet splash of color
Strawberry Bead Bracelet Accents
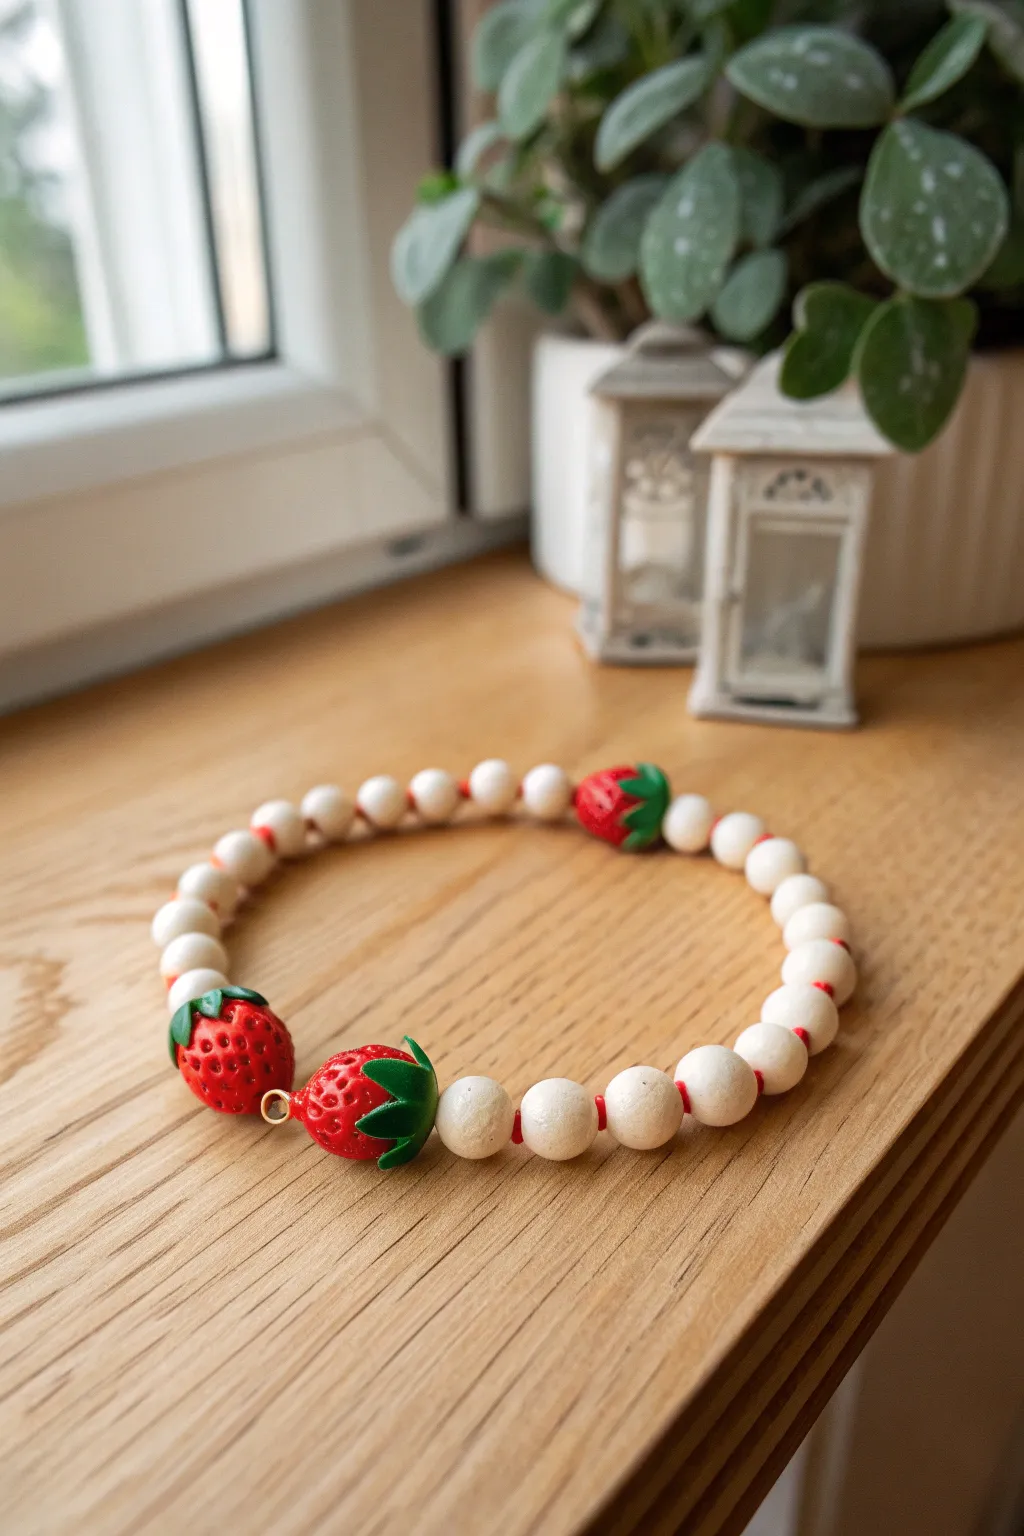
This charming bracelet combines natural textures with vibrant pops of color for a sweet summer accessory. By crafting your own strawberry focal beads from clay, you create a custom piece that perfectly balances rustic wood with playful fruit motifs.
Step-by-Step
Materials
- Red polymer clay
- Green polymer clay
- White acrylic paint
- Round wooden beads (approx. 10mm-12mm)
- Elastic beading cord (0.8mm or 1mm)
- Gloss glaze (water-based polyurethane or clay-specific varnish)
- Needle tool or toothpick
- Small paintbrush
- Clay roller or pasta machine
- Blade or craft knife
- Beading needle (optional but helpful)
- Scissors or jewelry snips
- Super glue or jewelry cement
Step 1: Creating the Strawberry Beads
-
Condition the Clay:
Begin by kneading your red polymer clay until it is soft and pliable. This conditioning step is crucial to prevent cracks during baking. I like to work it in my hands until it feels warm. -
Form the Base Shape:
Roll small balls of red clay, approximately the same size as your wooden beads. Gently pinch one end of each ball to create a tapered, strawberry-like cone shape, flattening -
Create the Texture:
Using a needle tool or toothpick, gently press small indentations all over the surface of the red cone to mimic seeds. Don’t press too deep; just enough to catch the light. -
Add the Leaves:
Condition a small amount of green clay and flatten it into a thin sheet. Using a craft knife, cut out tiny stars or multi-pointed shapes for the calyx (leaves). -
Attach the Greenery:
Carefully press a green clay star onto the wider, top end of each strawberry. Use your finger or a smoothing tool to blend the clay slightly so it adheres well. -
Pierce the Holes:
This is the most critical step. Using your needle tool, slowly bore a hole horizontally through the top part of the strawberry (through the red part just below the green leaves). Twist the tool gently as you push to avoid squishing the shape. -
Bake the Beads:
Arrange your strawberry beads on a baking sheet lined with parchment paper. Bake according to your polymer clay manufacturer’s instructions (usually around 275°F/135°C for 15-30 minutes). -
Glaze and Seal:
Once creating fully cooled, apply a coat of gloss glaze to the strawberries. This makes the colors pop and gives them a juicy, realistic finish.
Clean Holes
Make your bead holes slightly larger than you think you need. Clay shrinks minutely when baked, and glaze can clog opening.
Step 2: Preparing the Wooden Beads
-
Paint Selection:
Choose a matte or satin white acrylic paint. You aren’t looking for a high-gloss finish here, as the contrast with the shiny strawberries is visually appealing. -
Painting Technique:
Thread the wooden beads onto a spare piece of wire or a toothpick to hold them steady. Apply thin, even coats of white paint, allowing them to dry fully between layers. -
Distressing (Optional):
If you prefer the slightly rustic look shown in the image, you can lightly sand the beads after painting to reveal hints of the natural wood grain underneath, or simply apply one semi-opaque coat rather than full coverage.
Step 3: Assembly
-
Measure the Cord:
Cut a length of elastic cord about 10-12 inches long. This gives you plenty of extra room for tying knots without struggling. -
Pre-stretch the Elastic:
Hold the ends of the elastic and pull firmly a few times. This pre-stretching prevents the bracelet from sagging or loosening immediately after you assemble it. -
Plan Your Pattern:
Lay out your beads on a flat surface. For the design shown, group two strawberries together as a focal point, and place the third strawberry on the opposite side, separated by the white wooden beads. -
String the Beads:
Thread your beads onto the elastic cord according to your pattern. If the holes in your clay strawberries are tight, a flexible beading needle can help guide the cord through. -
Check the Fit:
Wrap the strung beads around your wrist to check the size. Add or remove wooden beads as necessary to ensure a comfortable fit. -
Tie the Knot:
Tie a secure surgeon’s knot (right over left, left over right, looping through twice). Pull the elastic tight so there are no gaps between beads. -
Secure and Trim:
Place a tiny drop of super glue or jewelry cement on the knot. Allow it to dry completely before trimming the excess cord close to the knot. Hide the knot by sliding it inside one of the wooden beads.
Seed Details
Before baking, rub a tiny bit of yellow or white acrylic paint into the seed indentations, then wipe the surface clean.
Wear your fresh fruit bracelet alone or stacked with other textures for a beautiful handcrafted look


What Really Happens Inside the Kiln
Learn how time and temperature work together inside the kiln to transform clay into durable ceramic.
Strawberry Trinket Boxes
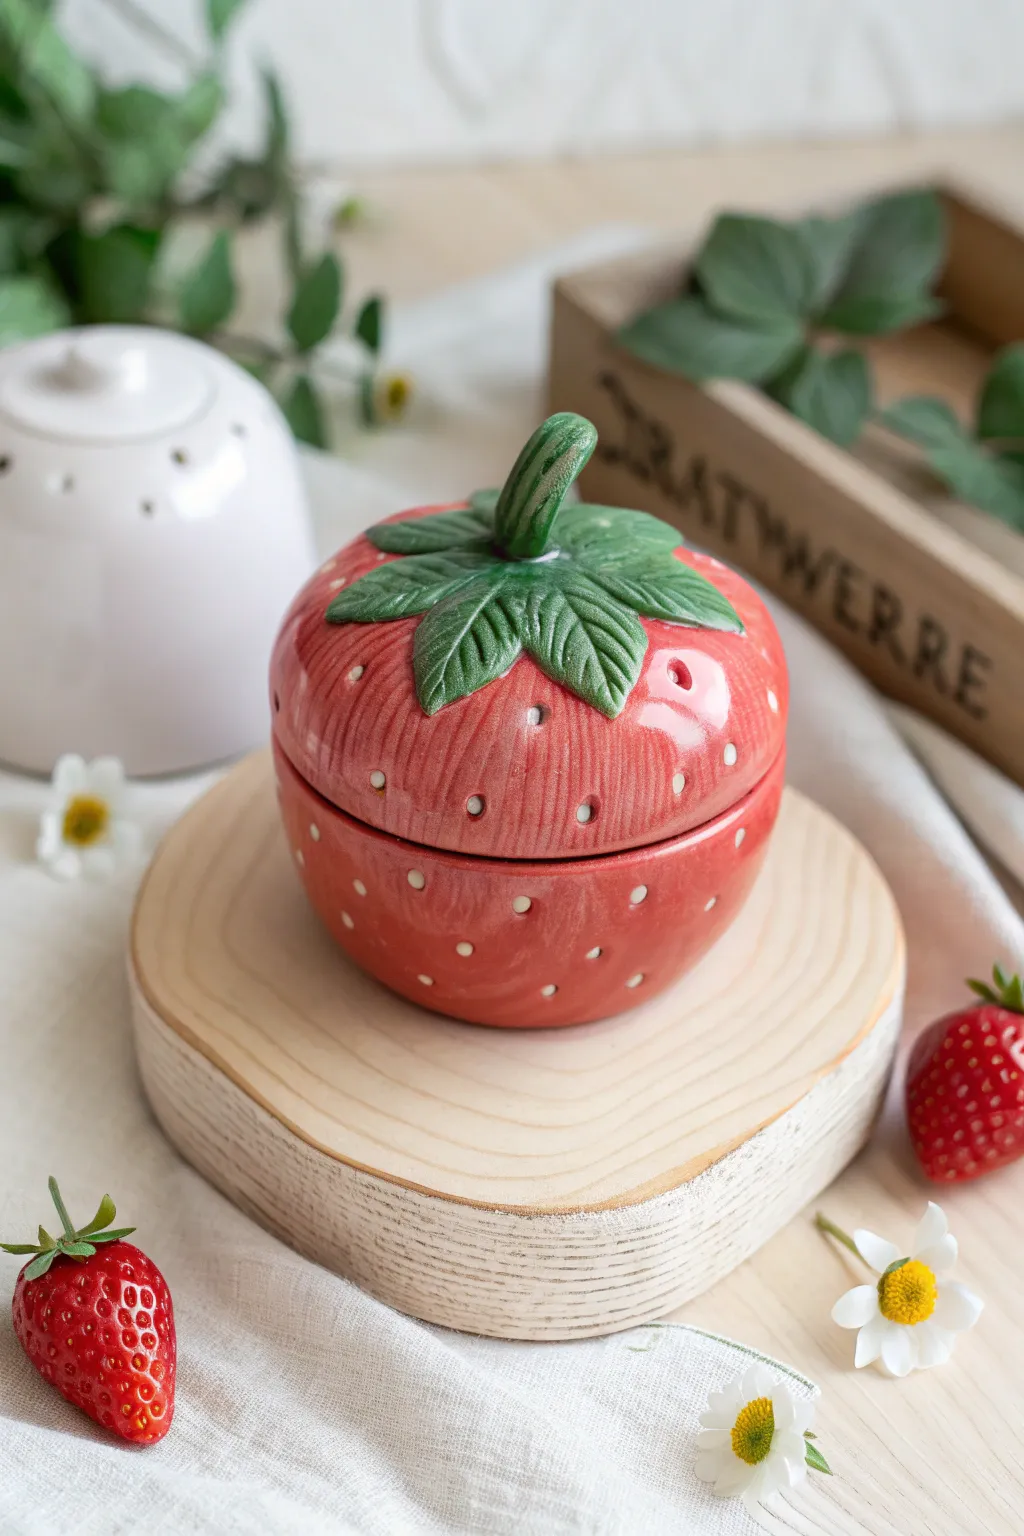
This charming, lidded trinket box mimics the juicy allure of a ripe strawberry with a polished, high-gloss finish. Its sturdy form and delicate leafy handle make it perfect for hiding small treasures or jewelry.
Step-by-Step Tutorial
Materials
- Air-dry clay or polymer clay (white or terracotta)
- Acrylic paints (bright red, deep green, white)
- Small rolling pin
- Pottery tools (needle tool, smooth rib, small ball stylus)
- Bowl of water and slip (if using air-dry clay)
- High-gloss varnish or resin
- Sandpaper (fine grit)
- Small sphere or aluminum foil ball (for armature)
- X-acto knife or clay blade
Step 1: Forming the Base
-
Create the core shape:
Start by forming a smooth ball of clay. For a hollow box, I find it easiest to work around an armature, like a styrofoam ball wrapped in foil, or use the pinch pot method to create a hollow sphere manually. -
Refine the strawberry form:
Gently gently taper the bottom of your sphere so it resembles the slightly pointed shape of a strawberry, keeping the top broad and rounded. -
Separate lid from base:
Using a clay blade or wire tool, slice the top third of your strawberry shape off cleanly. This smaller top piece will become your lid. -
Hollow out the interior:
If you used a solid ball of clay, carefully scoop out the insides of both the base and lid using a loop tool, leaving a wall thickness of about 1/4 inch for stability. -
Create a lip mechanism:
Roll a small snake of clay and attach it to the inside rim of the base piece. Smooth the seam completely so the coil extends upward slightly—this inner lip will keep the lid from sliding off.
Step 2: Adding Texture and Details
-
Smooth the surface:
Use a little water or a damp sponge to smooth out any fingerprints or rough spots on both exterior pieces. -
Create vertical texture:
I like to take a soft-bristled brush or a very fine rib tool and drag it vertically from bottom to top to create subtle, organic striations in the ‘skin’ of the fruit. -
Indent the seeds:
Using a small ball stylus or the rounded end of a paintbrush, press small, shallow indentations all over the surface of both the lid and base. Space them somewhat regularly but keep it organic. -
Form the leaves:
Roll out a thin slab of clay and cut out 5-6 teardrop-shaped leaves. Use a needle tool to etch veins into each leaf for realistic detail. -
Attach the calyx:
Arrange the leaves in a star pattern on top of the lid piece. Use slip (liquid clay) to adhere them securely, draping the tips slightly over the curve. -
Sculpt the stem handle:
Roll a thicker coil of clay for the stem. Attach it vertically to the center of the leaves, bending it slightly for a natural look. Ensure the attachment is strong as this acts as the handle.
Seed Spacing Trick
Work in diagonal rows rather than horizontal lines when pressing in your seed indentations. This creates a more natural, fruit-like pattern that wraps around the form beautifully.
Step 3: Finishing and Painting
-
Dry and sand:
Let the clay dry completely according to package instructions. Once hard, lightly sand any sharp edges or rough patches with fine-grit sandpaper. -
Base coat painting:
Paint the entire exterior of the strawberry body and lid (excluding the leaves) with a vibrant red acrylic paint. You may need two coats for full opacity. -
Painting the greens:
Carefully paint the leaves and stem with a deep forest green. While the paint is wet, you can highlight the veins with a lighter green for dimension. -
Filling the seeds:
Using a very fine detail brush or a toothpick, dab a tiny dot of white or cream paint into the center of each indentation you created earlier. -
Apply the glaze:
To achieve the ceramic look seen in the photo, apply a thick coat of high-gloss varnish or UV resin over the entire exterior. This mimics the shine of fired glaze.
Add a Surprise Interior
Paint the inside of the box a contrasting color, like a pale pink or a soft cream, to make opening the box feel like slicing into a real strawberry.
Once the varnish cures, your glossy strawberry box is ready to hold your favorite rings or serve as adorable decor.
Strawberry Planter Pots
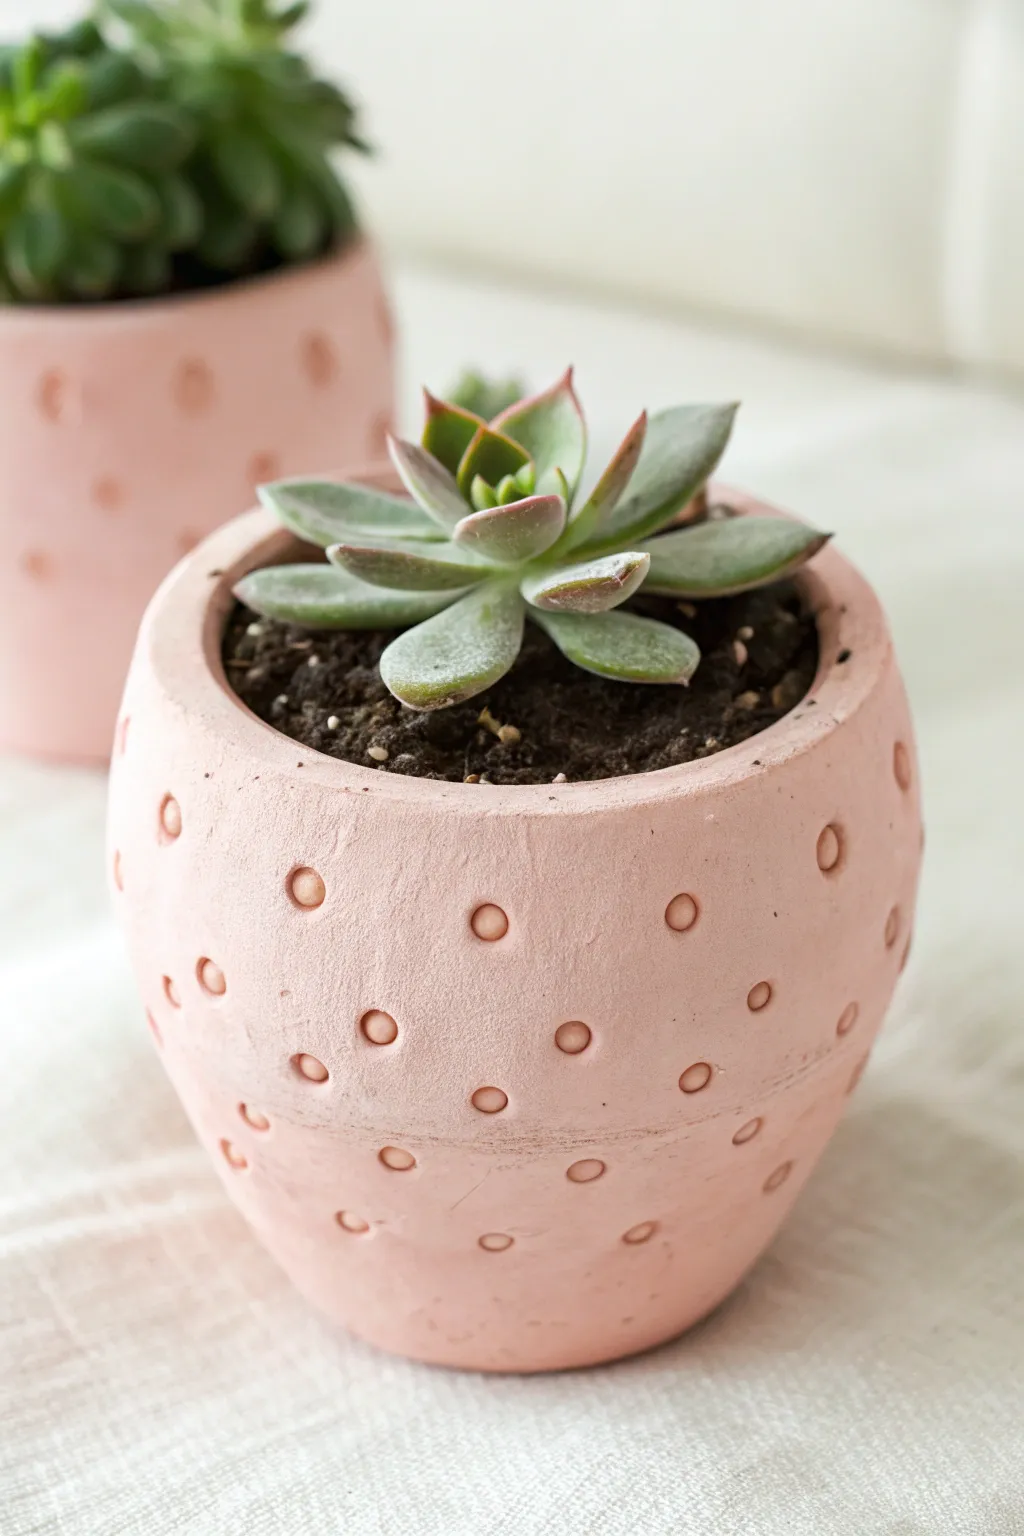
These adorable succulent planters mimic the texture of a sweet strawberry with their soft pink hue and indented seed pattern. Perfect for small succulents, this project transforms simple air-dry or polymer clay into charming, fruit-inspired home decor.
Detailed Instructions
Materials
- Air-dry clay (terra cotta or white)
- Pink acrylic paint (matte finish)
- Small round sculpting tool or chopstick end
- Rolling pin
- Plastic wrap or parchment paper
- Small bowl or cup (to use as a mold)
- Sandpaper (fine grit)
- Clear matte sealant spray
- Succulent potting soil
- Small succulent plant
Step 1: Shaping the Base
-
Prepare your workspace:
Lay down parchment paper or a silicone mat to protect your table from the clay. If you are using white clay, make sure your hands are clean to avoid transferring dust. -
Roll out the clay:
Take a generous ball of air-dry clay and knead it until soft and pliable. Use a rolling pin to flatten it into a thick pancake, roughly 1/4 inch thick. You want it substantial enough to hold the weight of soil. -
Mold the shape:
Place a sheet of plastic wrap over the outside of your small bowl or cup mold. This prevents sticking. Drape your rolled clay over the inverted bowl, gently pressing it down to conform to the round shape. -
Trim the edges:
Using a craft knife or a clay tool, trim around the bottom of your mold (which is currently the top open edge of your pot) to create a clean, straight rim. Smooth this cut edge with a bit of water on your fingertip. -
Create a flat bottom:
While the clay is still on the mold, gently press the very top (which will be the bottom of your pot) against the table surface to flatten it slightly. This ensures your planter will stand up straight.
Seed Spacing
Don’t stress about perfect measurements for the dots. Slight irregularities in spacing actually make the strawberry texture look more organic and natural.
Step 2: Adding the Strawberry Texture
-
Mark the dot pattern:
While the clay is still soft but slightly firm, it’s time to add the seeds. I prefer to start a row about half an inch below the rim. -
Create the indentations:
Using the rounded end of a small paintbrush, a chopstick, or a ball stylus, press gently into the clay to create small, circular divots. Don’t push all the way through; just make a clear impression. -
Offset the rows:
Move down slightly to create the next row. For a natural strawberry look, position these new dots in the spaces between the dots of the row above, creating a brick-lay or staggered pattern. -
Continue patterning:
Repeat this process all the way down the pot until you reach the flat bottom. Try to keep the pressure consistent so all your ‘seeds’ are the same depth. -
Initial drying phase:
Carefully remove the clay from your mold. If it feels too floppy, let it dry on the mold for an hour first. Once removed, set it aside in a cool, dry place. -
Full cure time:
Allow the pot to dry completely. Depending on humidity and clay thickness, this usually takes 24 to 48 hours. The clay will turn a lighter color when fully dry.
Drainage Hole Hack
Before drying, use a straw to punch a hole in the bottom center. Essential for succulents to prevent root rot if you plant directly in the pot!
Step 3: Finishing Touches
-
Sand for smoothness:
Once fully cured, inspect your pot for any rough ridges or sharp edges on the rim. Gently lightly sand these areas with fine-grit sandpaper until smooth to the touch. -
Wipe clean:
Use a slightly damp cloth or a dry brush to remove all the clay dust created by sanding. A clean surface is crucial for the paint to adhere properly. -
Apply the base color:
Squeeze out some matte pink acrylic paint. Mix in a tiny dot of white if you want a softer pastel look. Paint the entire exterior and the inner rim of the pot. -
Layer the paint:
Let the first coat dry completely, then apply a second coat for opaque, even coverage. Ensure the paint gets into the little seed indentations. -
Highlight the seeds (Optional):
If you want the seeds to pop, you can use a fine brush to paint the inside of the indentations a slightly darker pink or a soft yellow, though a monochromatic look is very modern and chic. -
Seal the pot:
Spray the entire pot, inside and out, with a clear matte sealant. This protects the clay from moisture when you water your plant. I like to do two thin coats for extra durability. -
Plant:
Once the sealer is dry, fill your new strawberry pot with succulent soil and nestle your plant inside.
Place your sweet new planter on a sunny windowsill and enjoy the summery vibe year-round

TRACK YOUR CERAMIC JOURNEY
Capture glaze tests, firing details, and creative progress—all in one simple printable. Make your projects easier to repeat and improve.
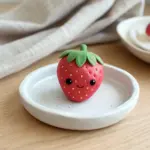
Kawaii Strawberry Face Figurines
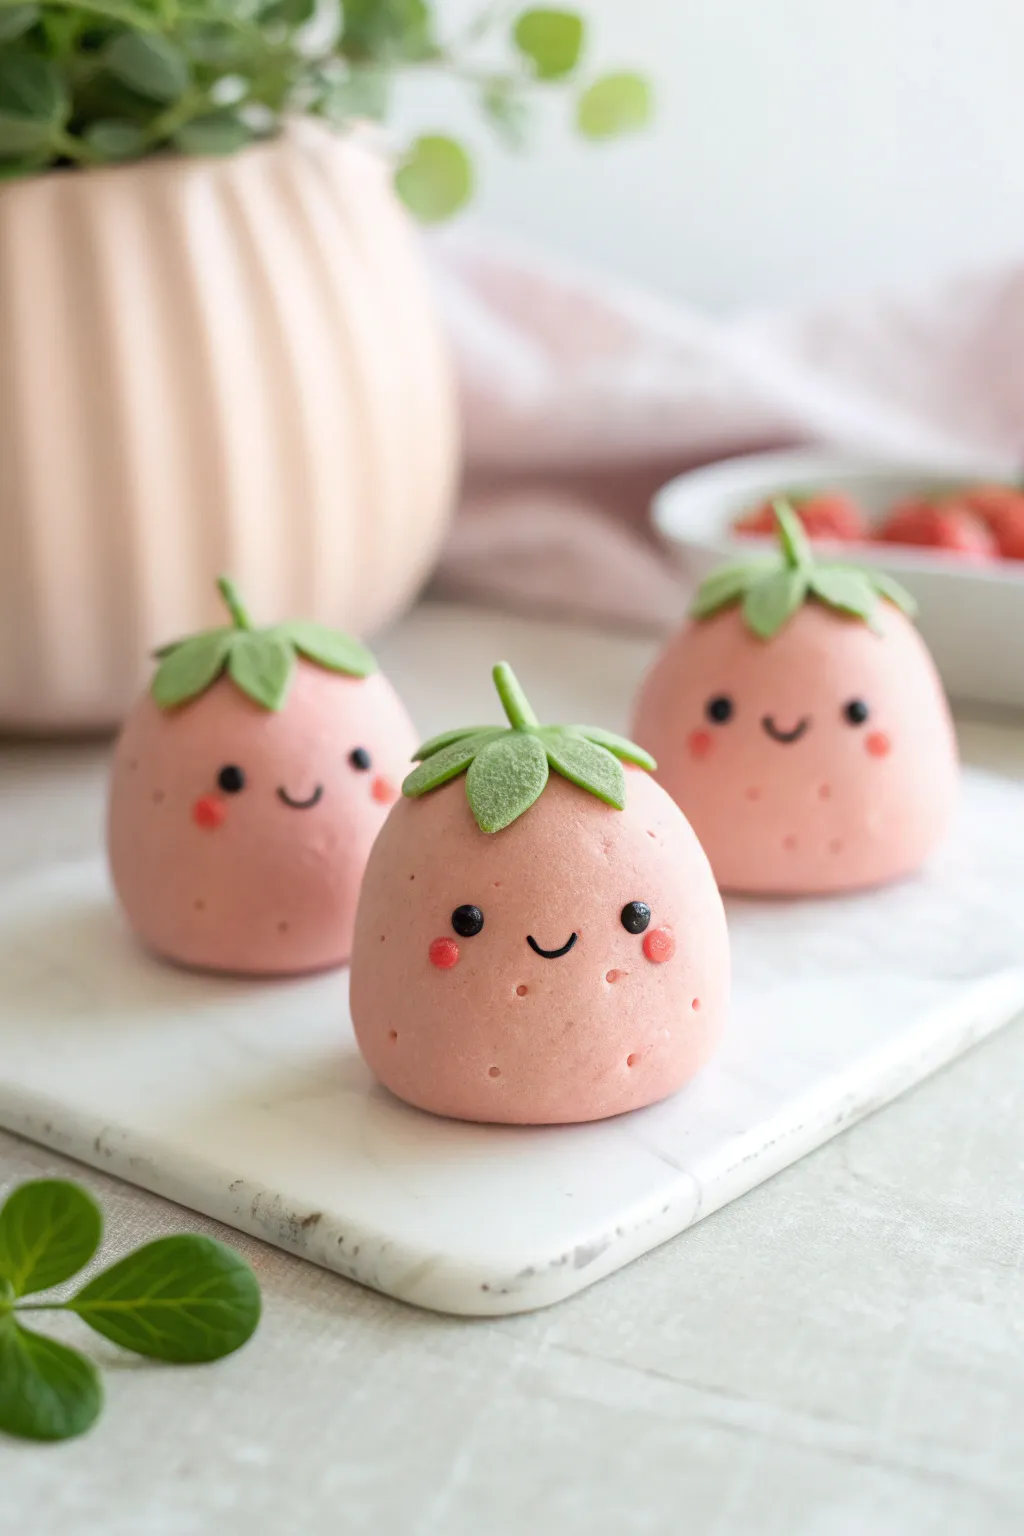
These adorable little strawberry figurines feature soft pink hues and blushing cheeks for a perfectly cheerful addition to your desk or shelf. Their simple, round shapes make them an ideal project for beginners looking to practice creating smooth forms and tiny facial details.
Step-by-Step
Materials
- Polymer clay (light pink, leaf green, black, and coral/red)
- Clay sculpting tools (needle tool, small ball tool)
- Rolling pin or acrylic roller
- Parchment paper or ceramic tile (work surface)
- Wet wipes
- Oven (for baking)
- Glaze or varnish (optional)
Step 1: Shaping the Berry Bodies
-
Condition the pink clay:
Start by warming up your light pink polymer clay in your hands. Knead and fold it repeatedly until it becomes soft, pliable, and free of any cracks. -
Form the base sphere:
Roll the pink clay into a smooth ball. Ensure there are no seam lines visible. -
Create the taper:
Gently gently roll the top half of the ball between your palms to create a slight teardrop shape, flattening the bottom so the strawberry sits stability on your work surface. The shape should be plump and rounded, not sharp. -
Add texture:
Using a needle tool or the tip of a toothpick, gently poke small indents scattered randomly across the surface to mimic strawberry seeds. Leave the front center area smooth where the face will go.
Sticky Fingerprints?
If your clay is getting too soft and holding fingerprints, pop it in the fridge for 10 minutes. Use a bit of cornstarch on your fingertips to smooth usage marks.
Step 2: Creating the Leafy Top
-
Roll out green clay:
Condition a small amount of leaf green clay and flatten it into a thin sheet using your acrylic roller. -
Cut the calyx:
Use a small star cutter or cut freehand with a craft knife to create a five- or six-pointed star shape for the leaves. -
Attach the leaves:
Place the green star on top of your pink strawberry body. Gently press the points of the star down so they curve naturally onto the pink sides. -
Make the stem:
Roll a tiny log of green clay for the stem. Attach it vertically to the center of the leaf cluster, smoothing the seam where they join with a small blending tool.
Make it a Charm
Before baking, insert a metal screw eye pin into the center of the stem. Once baked, you can attach a jump ring and turn your berry buddy into a necklace or keychain.
Step 3: Adding the Kawaii Face
-
Mark eye positions:
Before adding clay, use your needle tool to mark two tiny guide holes where you want the eyes to sit. Spacing them slightly far apart adds to the cute factor. -
Place the eyes:
Roll two minuscule balls of black clay. Pick them up with the tip of your needle tool and press them gently into the guide holes you marked. -
Form the smile:
Roll a microscopically thin snake of black clay. Cut a tiny segment and shape it into a ‘U’ curve on your finger before transferring it to the face between the eyes. -
Add blushing cheeks:
Take a tiny amount of coral or red clay and roll two small, flat circles. Press these gently onto the cheeks, just below and outside the eyes. -
Add highlights (optional):
If you want extra sparkle, you can add tiny specks of white clay to the black eyes, but the matte look shown here is just as charming without them.
Step 4: Finishing Up
-
Final inspection:
Check your figurine for any fingerprints or lint. I like to lightly brush the surface with a tiny bit of baby oil or use a soft brush to smooth impercetions away. -
Bake:
Place your strawberries on a parchment-lined baking sheet. Bake according to your clay manufacturer’s instructions (typically 275°F/135°C for 15-30 minutes depending on size). -
Cool down:
Allow the figurines to cool completely inside the oven or on a wire rack before handling, as the clay is fragile while hot.
Now you have a sweet little trio of berries ready to brighten up your day