If you’ve got a plain terra cotta pot and a cute little plant, you’re already 90% of the way to a seriously charming succulent pot. Here are my go-to succulent pot painting ideas—from classic, clean designs to a few playful ones that feel like instant personality on your shelf.
Classic Color-Blocked Bands
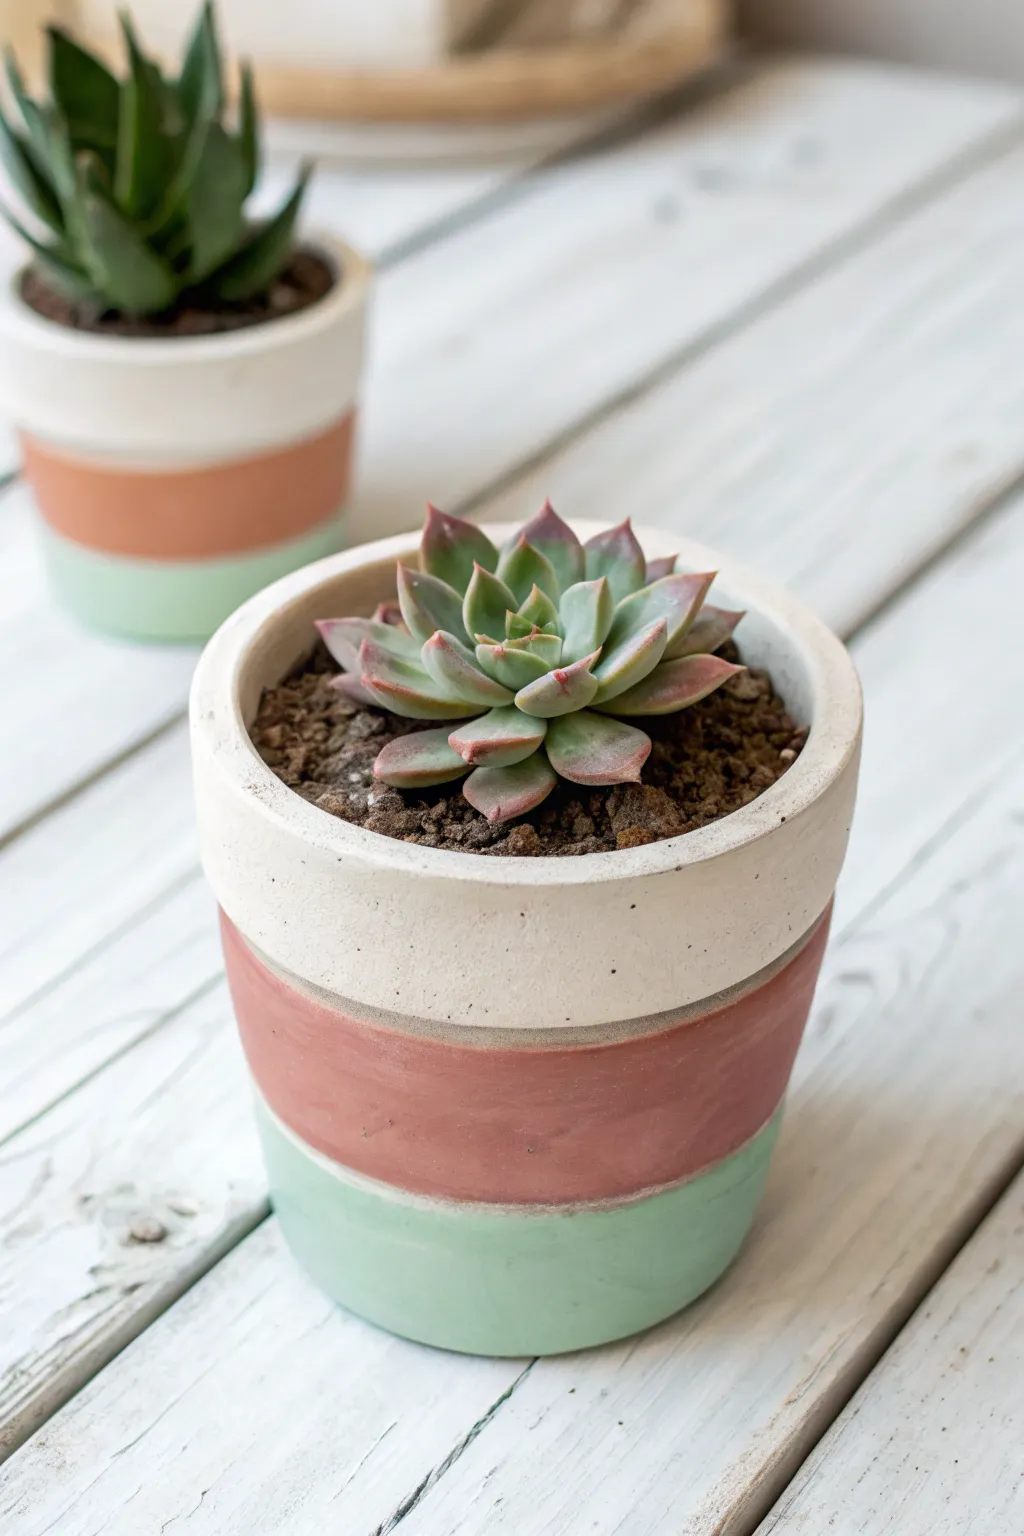
Achieve a clean, modern aesthetic with these charming color-blocked succulent planners featuring distinct horizontal bands. This project combines creamy white, warm terracotta, and soft mint green to create a refreshing look that perfectly complements the natural geometry of succulents.
Step-by-Step Tutorial
Materials
- Small concrete or terracotta planter pot (cylinder shape preferred)
- Painter’s tape (washi tape or low-tack masking tape work well)
- Matte acrylic craft paints: Creamy White, Terracotta/Dusty Rose, Mint Green
- Flat shader brush (size 6 or 8)
- Small palette or ceramic dish
- Ruler (optional)
- Pencil (optional)
- Matte spray sealer or varnish
Step 1: Preparation & Base
-
Surface Prep:
Begin by wiping down your pot with a damp cloth to remove any dust or debris. If you are using a standard terracotta pot, ensure it is completely dry before starting to prevent paint bubbling. -
White Base Coat:
Load your flat shader brush with the creamy white acrylic paint. Apply a coat around the upper third rim of the pot. -
Extend the Base:
Since the top band is white, you don’t need to be perfectly neat at the bottom edge yet. Bring the white paint down just slightly lower than where you want the first line to be to ensure full coverage. -
Drying Time:
Allow this top section to dry completely. This is crucial because we will be applying tape over it, and we don’t want to peel up any wet paint.
Fixing Bleeds
If paint seeps under the tape, wait for it to dry completely. Then, scratch the excess paint away gently with a craft knife or toothpick for a sharp line.
Step 2: Creating the Bands
-
Marking the Lines:
For precision, you can lightly mark the pot into three equal horizontal sections using a pencil and ruler. Alternatively, eyeballing the thirds works fine for a more organic feel. -
Taping the Top:
Apply a strip of painter’s tape horizontally around the pot. Position the bottom edge of the tape exactly where you want the white section to end. -
Sealing the Tape Edge:
Press the tape down firmly with your thumbnail or a credit card edge to prevent paint bleed. I like to brush a tiny amount of the white paint over the tape edge first to create a perfect seal. -
The Terracotta Band:
Dip your brush into the terracotta or dusty rose paint. Paint the middle section of the pot, starting from the tape line and working downwards. -
Middle Coverage:
Ensure the middle color extends slightly lower than your intended bottom line, just like we did with the white, to avoid gaps later. -
Second Drying Phase:
Let this middle band dry thoroughly to the touch. Patience here prevents smudging between your crisp lines. -
Taping the Middle:
Once dry, place a new strip of painter’s tape over the bottom edge of your terracotta band. This will define the line between the middle and bottom colors.
Distressed Look
After painting, lightly sand the pot with fine-grit sandpaper. This scuffs the bands and reveals the pot’s texture for a rustic, vintage vibe.
Step 3: Finishing Touches
-
Painting the Base:
Apply the mint green paint to the remaining bottom third of the pot. Work carefully around the very bottom edge for a clean finish. -
Layering Up:
Depending on the opacity of your paint, the mint section might need a second coat. Apply it lightly if needed to avoid ridges. -
The Reveal:
While the paint is still slightly tacky (but not wet), slowly and carefully peel off both strips of painter’s tape at a 45-degree angle. -
Touch Ups:
Inspect your lines. If any paint bled through, use a very small detail brush with the appropriate color to clean up the edges. -
Sealing:
Once the entire pot is bone dry, take it outside and spray it with a clear matte sealer. This protects the paint from water damage when you water your plants.
Pop in your favorite Echeveria and enjoy the calm, structured beauty of your new planter


Modern Geometric Tape Triangles
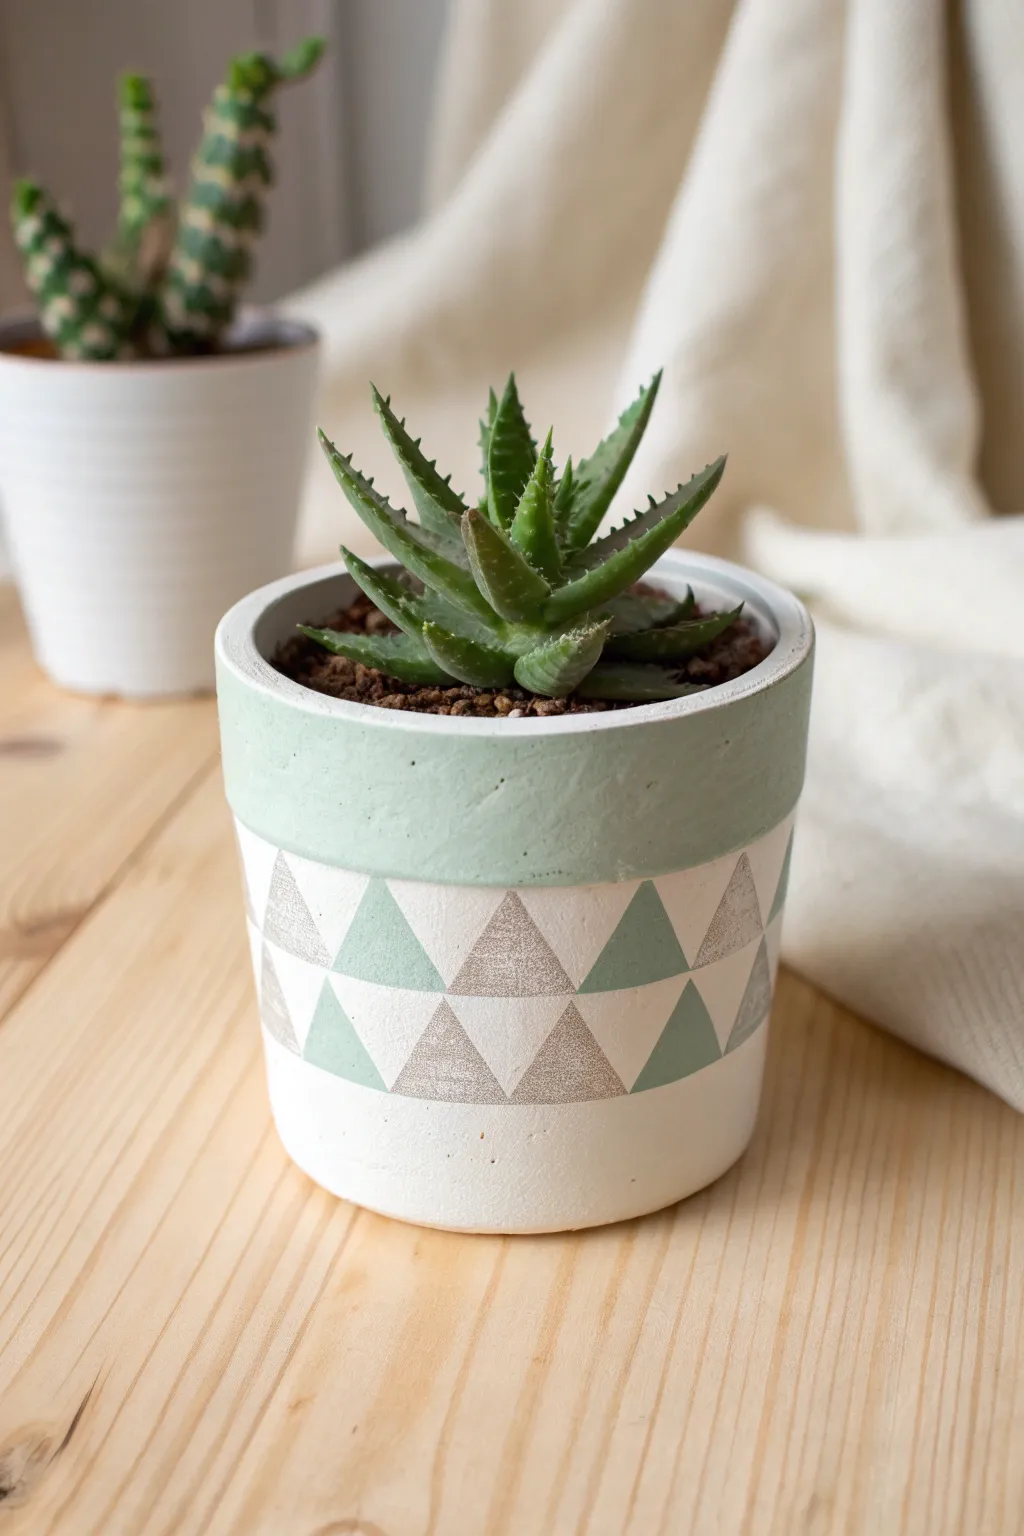
Achieve a high-end, modern look with crisp geometric lines using nothing more than tape and paint. This design features a soothing mint green band paired with shimmering silver and pastel triangles for a chic finish.
How-To Guide
Materials
- Small terracotta or concrete pot
- White acrylic paint (base coat)
- Mint green acrylic paint
- Silver or metallic champagne acrylic paint
- Painter’s tape or washi tape (1/4 inch width is ideal)
- Flat paintbrush (medium size)
- Detail paintbrush (small)
- Matte or satin sealant spray
Step 1: Base Preparation
-
Clean the surface:
Ensure your pot is completely clean and dry. If using a standard clay pot, wipe away any dust with a damp cloth and let it dry fully so the paint adheres properly. -
Apply the base coat:
Paint the entire exterior of the pot with a solid coat of white acrylic paint. This creates a bright background for the triangles. -
Check coverage:
Let the first coat dry for about 20 minutes. If the terracotta color is still peeking through, apply a second coat of white for an opaque, consistent finish. -
Dry completely:
Before moving on to taping, it is crucial that the base white layer is 100% dry to the touch to prevent peeling later.
Crisp Line Secret
Paint a thin layer of your WHITE base coat over the tape edges first. This seals the tape, so any bleed is just white on white.
Step 2: Taping the Design
-
Tape the rim:
Apply a strip of painter’s tape horizontally around the pot, about one inch down from the rim. This defines the separation between the top band and the triangle pattern. -
Create the first diagonal:
Starting just below your horizontal tape line, place a long strip of tape diagonally across the body of the pot towards the bottom. -
Mirror the diagonals:
Place a second strip of tape angled in the opposite direction to cross the first one, creating ‘V’ shapes or ‘X’ shapes depending on placement. -
Form the triangles:
Continue adding diagonal tape strips until you have a network of triangles around the pot. Don’t worry about perfect symmetry; random geometric shapes often look best. -
Seal the edges:
Run your fingernail or a credit card firmly over the edges of all the tape strips. This creates a tight seal and prevents paint from bleeding underneath.
Step 3: Applying Color
-
Paint the rim:
Using the medium flat brush, paint the entire top section above the horizontal tape line with your mint green paint. -
Select mint triangles:
In the geometric section below, choose random triangles to paint with the same mint green. Aim to scatter them so no two mint triangles touch directly. -
Apply metallic accents:
Fill in the remaining empty triangles with the silver or metallic champagne paint. The shimmer adds a lovely contrast to the matte pastel. -
Second coat:
Metallic paints can be a bit sheer, so I usually apply a second coat to those specific triangles once the first layer is tacky. -
Touch ups:
Check for any uneven spots in the mint or silver sections and smooth them out with your small detail brush.
Metallic Mix-Up
Try gold or rose gold foil flakes instead of metallic paint for the silver triangles to add actual texture and high shine.
Step 4: The Reveal
-
Remove tape while wet:
Carefully peel off the painter’s tape while the paint is still slightly wet. This helps ensure a crisp, clean line without chipping dry paint. -
Correct imperfections:
If a little paint bled through, don’t panic. Use a very fine brush and a dab of white paint to tidy up the dividing lines. -
Seal the work:
Once the entire pot is bone dry (give it a few hours), spray it with a clear matte sealant to protect your design from water damage when watering your plant. -
Plant:
Add your potting soil and succulent to your beautiful new vessel.
Place your finished geometric pot on a wooden shelf or windowsill to let the natural light catch those metallic details


Dipped Base With Metallic Pop
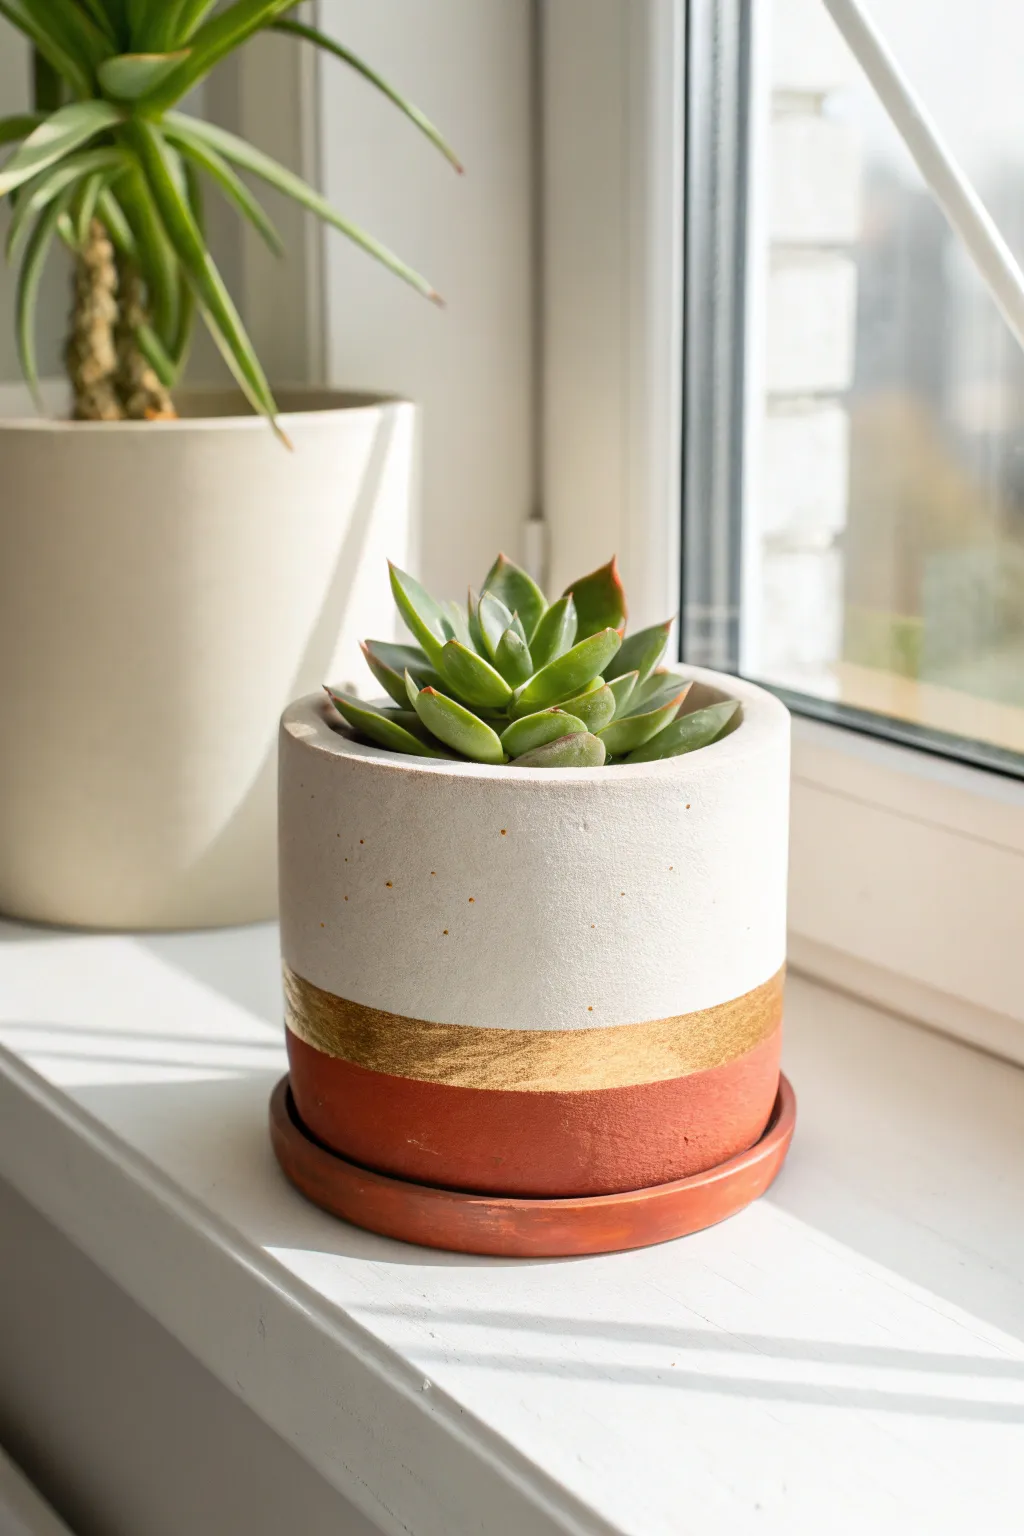
Elevate a simple concrete planter with this chic, modern design featuring a dipped rust-colored base topped with a flash of metallic gold. The clean lines and warm tones create a sophisticated look that pairs beautifully with green succulents.
Detailed Instructions
Materials
- Small concrete planter with matching saucer
- Rust or terracotta colored acrylic craft paint
- Metallic gold paint (high pigment)
- White or cream acrylic paint (optional, for the top)
- Painter’s tape (automotive or multi-surface preferred)
- Flat paintbrush (medium width)
- Small detail brush
- Pencil
- Ruler
Step 1: Preparation & Base Coat
-
Clean the surface:
Wipe down your concrete pot and saucer with a damp cloth to remove any dust or manufacturing residue. Let them dry completely before starting. -
Paint the saucer:
Since the saucer matches the bottom of the pot, paint the entire saucer with your rust-colored acrylic paint. It usually takes two coats for an opaque finish. -
Determine the sections:
Visualize the pot in thirds. The bottom third will be rust, the middle stripe will be gold, and the top section will remain the natural concrete color (or painted white if you prefer).
Bleeding Lines?
If paint seeped under the tape, wait for it to dry fully. Then, use a small flat brush and the base color (or white) to carefully touch up the line for a sharp edge.
Step 2: Creating the Dipped Base
-
Mark the first line:
Use a ruler to measure about 1.5 to 2 inches up from the bottom of the pot. Make small pencil marks around the circumference at this height. -
Tape the first section:
Apply a strip of painter’s tape just *above* your pencil marks. Run your fingernail or a credit card firmly along the bottom edge of the tape to seal it tightly against the concrete. -
Paint the base:
Paint the exposed bottom section with the rust color. Brush vertically from the tape downwards to prevent paint from bleeding under the edge. -
Paint the bottom:
Don’t forget to flip the pot and paint the underside so no grey concrete shows when it’s sitting on the saucer. -
Add a second coat:
Allow the first layer to dry until it feels chalky to the touch, then apply a second coat for rich, solid color coverage. -
Remove tape promptly:
Peel off the tape while the second coat is still slightly tacky to ensure a crisp, clean line.
Step 3: Adding the Gold Band
-
Let the base cure:
Wait for the rust-colored base to dry completely. I prefer to give it at least an hour so the next tape application doesn’t peel up the fresh paint. -
Mark the gold stripe:
Measure about half an inch above your new paint line. Mark this height with a pencil to define the top edge of your gold band. -
Tape the top edge:
Apply painter’s tape *above* these new marks to protect the top section of the pot. -
Apply the gold:
Using a smaller flat brush, fill in the gap between the rust paint and the tape with your metallic gold paint. -
Watch the texture:
If your pot has a rough concrete texture, dab the gold paint into the pores rather than just brushing across, to ensure full coverage. -
Overlap slightly:
Allow the gold paint to slightly overlap the very top edge of the rust paint. This bridges the gap and creates a seamless transition. -
Repeat if necessary:
Metallic paints can be semi-transparent. Apply 2-3 thin coats as needed, letting them dry briefly in between. -
Final reveal:
Remove the top tape strip gently. If you notice any jagged edges against the white top, you can carefully scrape them away with a toothpick while fresh.
Level Up: Texture
Mix a teaspoon of baking soda into the rust-colored paint before applying. This creates a gritty, ceramic-like texture that mimics real terracotta pottery.
Place your favorite succulent inside and enjoy the modern warmth it brings to your windowsill


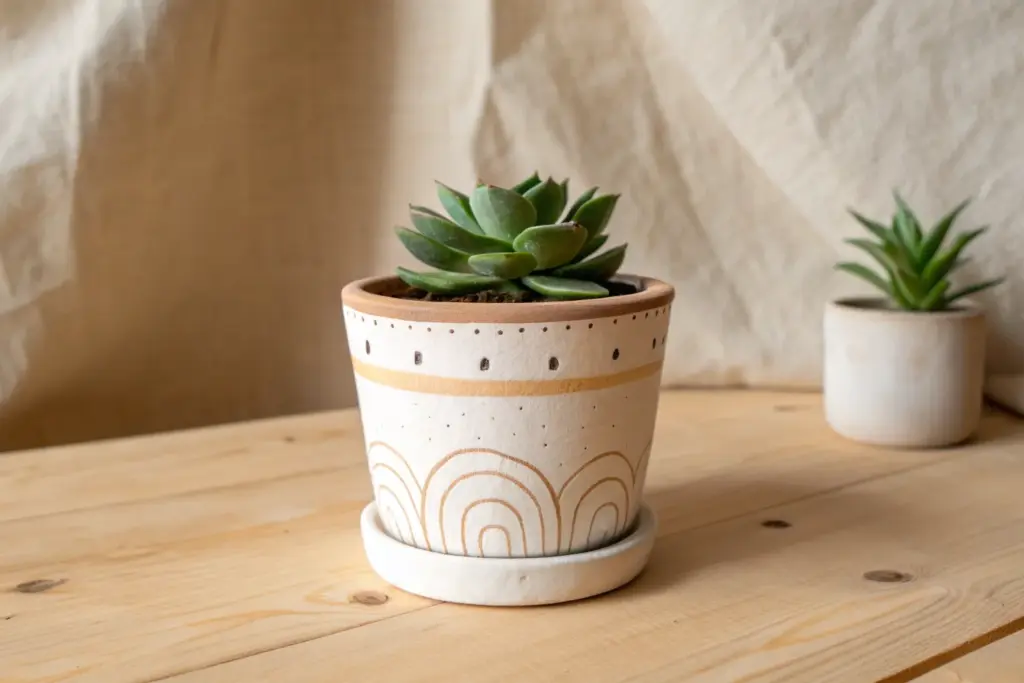
Polka Dots and Confetti Specks
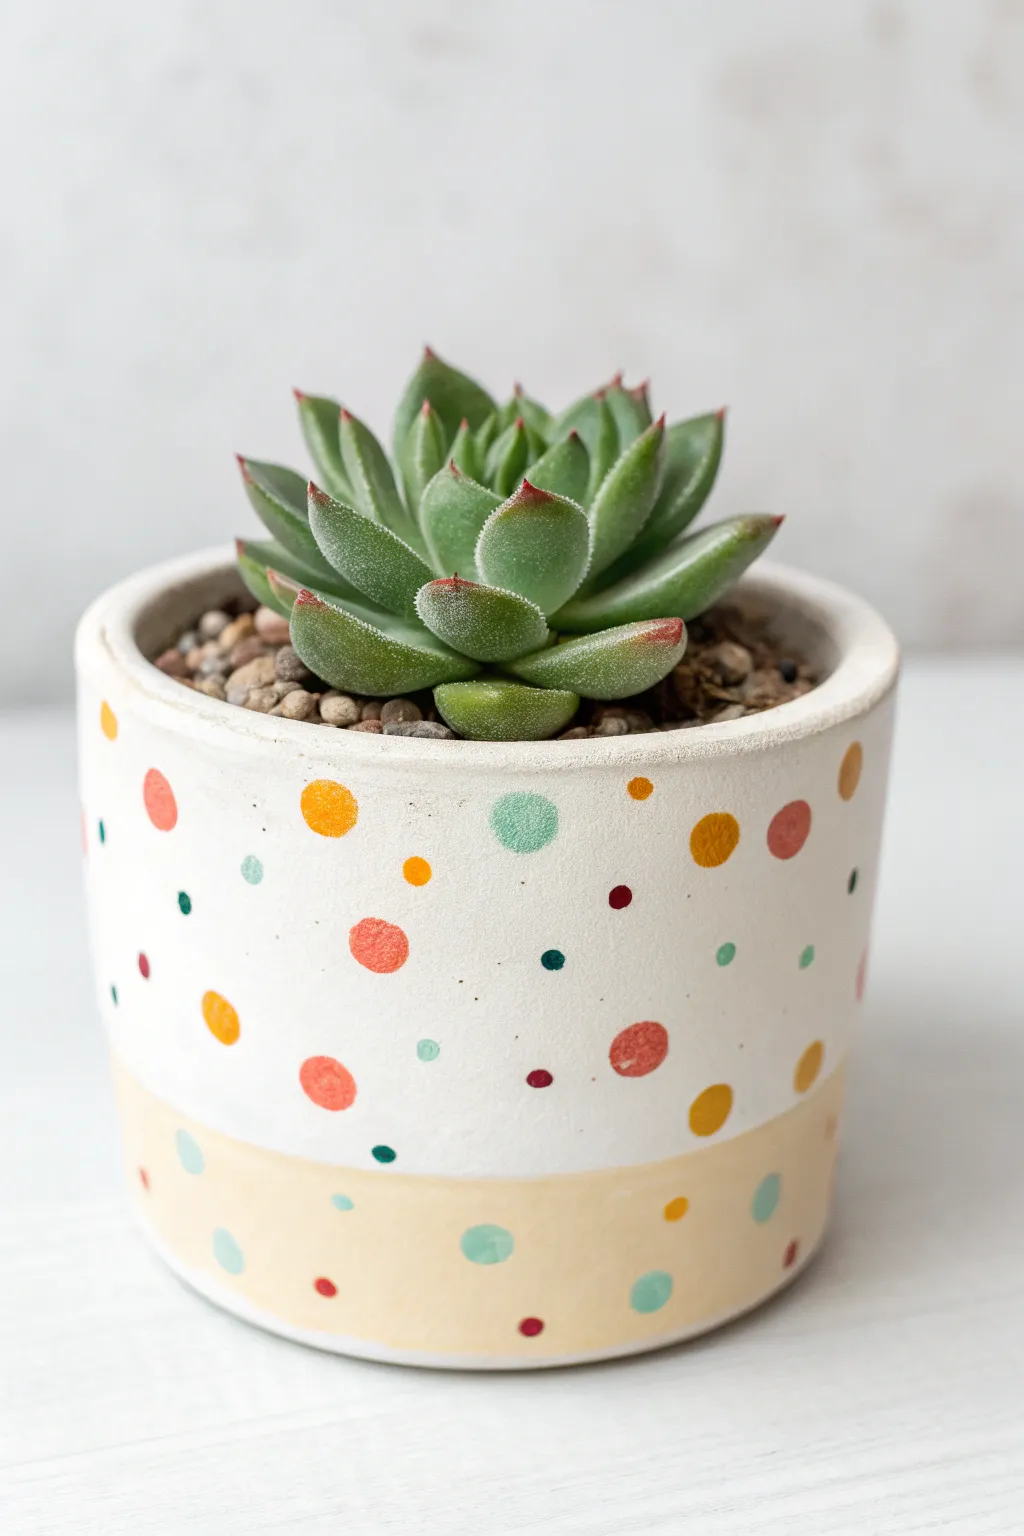
Transform a plain pot into a joyful home for your succulents with this confetti-style design. The combination of a creamy base, a sunny dipped bottom, and sporadic multicolored dots creates a playful yet modern look.
How-To Guide
Materials
- Small terracotta or ceramic pot (cylindrical shape works best)
- White acrylic paint
- Cream or off-white acrylic paint
- Pale yellow acrylic paint
- Assorted acrylic paints for dots (orange, teal, mint, burgundy, mustard)
- Medium flat brush
- Small round brush (size 1 or 2)
- Painter’s tape or masking tape
- Clear matte sealer spray
- Palette or paper plate
- Cup of water and paper towels
Step 1: Base Prep & Blocking
-
Clean the surface:
Wipe down your pot with a damp cloth to remove any dust or oils. Let it dry completely before starting to ensure the paint adheres properly. -
Whiten the canvas:
Apply a base coat of pure white paint to the entire exterior of the pot. This neutralizes the terracotta color and makes your final colors pop. Let this dry for about 15-20 minutes. -
Mix the cream tone:
While the white dries, mix a little bit of yellow or brown into your white paint to create a warm cream color, or use a pre-mixed bottle like ‘antique white’. -
Tape the horizon line:
Measure about one-third of the way up from the bottom of the pot. Wrap a piece of painter’s tape around the circumference, pressing down firmly on the edge to prevent bleeding. -
Paint the top section:
Using your flat brush, paint the area above the tape with your cream color. Paint right over the tape edge slightly to ensure a crisp line. I like to do two thin coats here for an even finish. -
Paint the rim:
Don’t forget the top rim of the pot. Extend the cream color over the lip and just inside the top edge for a polished look. -
Dry and reveal:
Wait until the cream paint is dry to the touch, then gently peel off the tape. You should have a clean line separating the painted top from the white-primed bottom.
Step 2: Color Blocking the Base
-
Apply the bottom color:
Switch to a clean flat brush. Carefully paint the bottom third of the pot (the area previously covered by tape) with your pale yellow paint. -
Refine the line:
Use a steady hand to paint up to the cream edge. Since you have a visual guide now, you don’t necessarily need tape again, but take your time to keep the line straight. -
Double check coverage:
Yellow paint can sometimes be translucent. Apply a second coat if the white primer is still showing through too much. Let the entire pot dry completely for at least an hour.
Wonky Circles?
If your brush-handle dots aren’t perfectly round, rotate the handle slightly as you press down on the pot. This twisting motion helps spread the paint into a cleaner circle.
Step 3: Adding the Confetti Design
-
Prepare your confetti palette:
Squeeze small blobs of your accent colors onto your palette: bright orange, teal, soft mint, deep burgundy, and mustard yellow. -
Start with large dots:
Using the back end of your paintbrush handle or a large dotting tool, dip into the orange paint. Stamp larger circles randomly around the upper cream section. -
Vary the sizes:
Wipe the handle clean and switch to the mustard yellow. Add a few medium-sized dots, spacing them out so no two colors are clustered too tightly. -
Add cool tones:
Dip a smaller brush handle into the teal paint. Place these dots in the empty spaces, keeping the distribution random and airy. -
Create tiny specks:
use your smallest round brush tip to add tiny ‘confetti’ specks in burgundy and mint. These should be much smaller than the main polka dots—just little dabs of color. -
Cross the border:
Don’t be afraid to let the pattern continue onto the yellow bottom section. Add a few teal and burgundy specks down there to tie the two sections together visully. -
Check for balance:
Spin the pot slowly and look for any large empty gaps. Fill them with a tiny speck of a contrasting color. -
Seal the deal:
Once the dots are fully cured (give them a few hours as thick dots dry slowly), take the pot outside and spray it with a clear matte sealer to protect your work from water and soil.
Make It 3D
Use puffy fabric paint for the dots instead of standard acrylics. This will give the confetti texture you can actually feel, adding a tactile element to your planter.
Now you have a cheerful vessel ready to showcase your favorite succulent

The Complete Guide to Pottery Troubleshooting
Uncover the most common ceramic mistakes—from cracking clay to failed glazes—and learn how to fix them fast.
Soft Ombre Fade
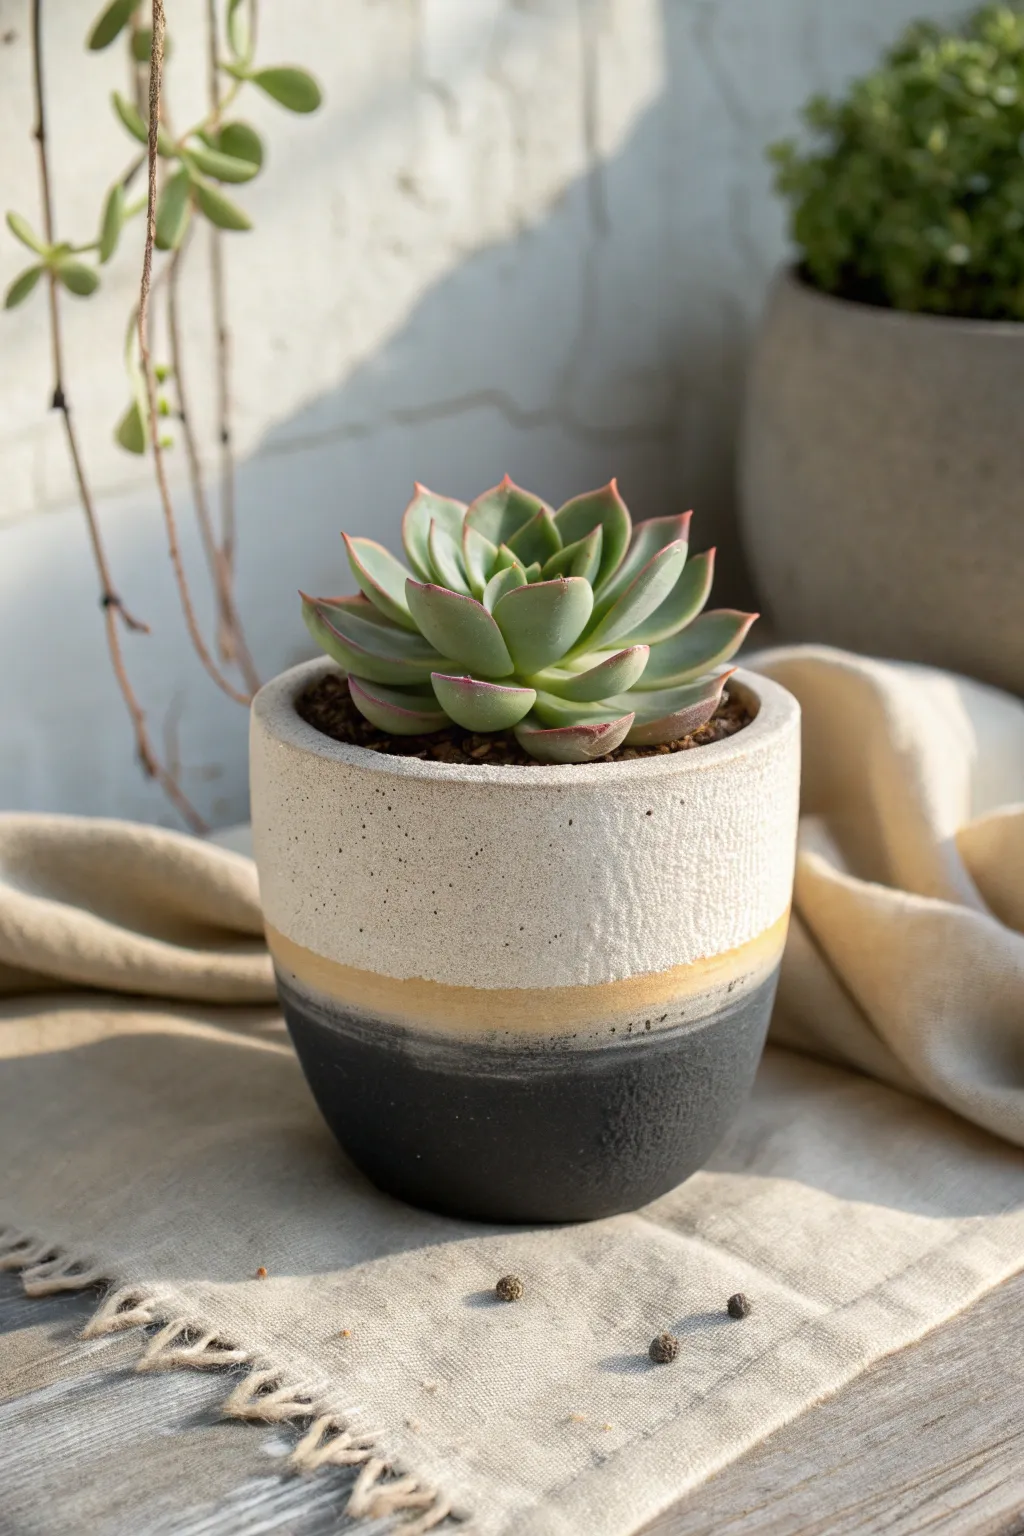
Achieve a sophisticated, earthy look with this three-tone ombre design that blends raw textures with smooth transitions. The combination of speckled cream, soft gold, and deep charcoal creates a grounded yet elegant home for your favorite succulent.
Step-by-Step Tutorial
Materials
- Cylindrical ceramic or terracotta pot (around 4-6 inches)
- Acrylic craft paints: Cream/Off-White, Yellow Ochre/Gold, Charcoal Grey/Black
- Textured medium (sand or texture paste)
- Clean kitchen sponge or sea sponge
- Soft synthetic flat brushes (medium and large)
- Palette for mixing paint
- Paper towels
- Matte spray sealer
Step 1: Preparation and Base Layout
-
Clean surface:
Begin by wiping down your pot with a damp cloth to remove any dust or oils. Let it dry completely to ensure the paint adheres well. -
Mix textured base:
For the top section, mix your cream acrylic paint with a small amount of texture medium or fine sand. Aim for a ratio that feels gritty but is still spreadable. -
Paint top section:
Apply this textured cream mixture to the top half of the pot. Use dabbing motions with a brush to enhance the stippled, stone-like effect seen in the photo. -
Dry top layer:
Allow this initial textured layer to dry fully. It might take a bit longer than standard paint due to the added texture medium.
Step 2: Creating the Ombre Gradient
-
Apply base charcoal:
Using the charcoal grey paint, coat the bottom third of the pot. Ensure a solid, opaque coverage, bringing the paint up to meet the empty middle band area. -
Feather the charcoal edge:
While the charcoal paint is still slightly wet, use a clean, dry brush to lightly feather the top edge upward. This softens the line where the gold will eventually sit. -
Prepare the gold transition:
Pour out your yellow ochre or gold paint. You want a consistency that is slightly fluid to help with blending, so add a drop of water if your paint is heavy body. -
Paint the middle band:
Apply the gold paint in the gap between the cream top and charcoal bottom. Start by overlapping slightly onto the textured cream section. -
Start the blend downward:
With a slightly damp sponge, gently tap the gold paint downwards into the charcoal area. You want to create a hazy, soft horizon line rather than a hard stripe. -
Refining the top blend:
Rinse your sponge and squeeze it out well. Gently dab the upper edge of the gold band so it naturally fades into the textured cream area without losing the grit you created earlier. -
Softening strokes:
I like to take a soft, dry brush and run it horizontally around the pot while the paints are tacky. This smooths out any harsh sponge marks and unifies the gradient.
Natural Texture Hack
No texture paste? Mix baking soda into your acrylic paint. It creates a fluffy, gritty texture perfect for that stone-like top section.
Step 3: Finishing Touches
-
Add speckling:
Dilute a tiny amount of brown or dark grey paint with water until it’s very runny. Load a toothbrush or stiff brush, and flick tiny droplets over the cream section to mimic ceramic speckles. -
Assess the balance:
Step back and look at your bands. If the gold feels too thin, gently glaze another thin layer over the transition area to boost the warmth. -
Full dry time:
Let the pot sit undisturbed for several hours. The layers, especially the texture paste, need to be bone dry before sealing. -
Seal the work:
Ideally outdoors or in a ventilated area, spray the entire pot with a clear matte sealer. This protects the finish from water damage when you water your plant. -
Pot your plant:
Once the sealer is dry and no longer smells, fill the pot with succulent soil and gently nestle your echeveria or chosen plant inside.
Muddy Blend Fix
If your gold and grey mix into a muddy green, let the layers dry completely between coats. Apply the gold as a dry-brush glaze over the dry grey instead.
Your finished pot now has a stunning, modern artisan look that brings warmth to any windowsill
Crisp Black-and-White Stripes
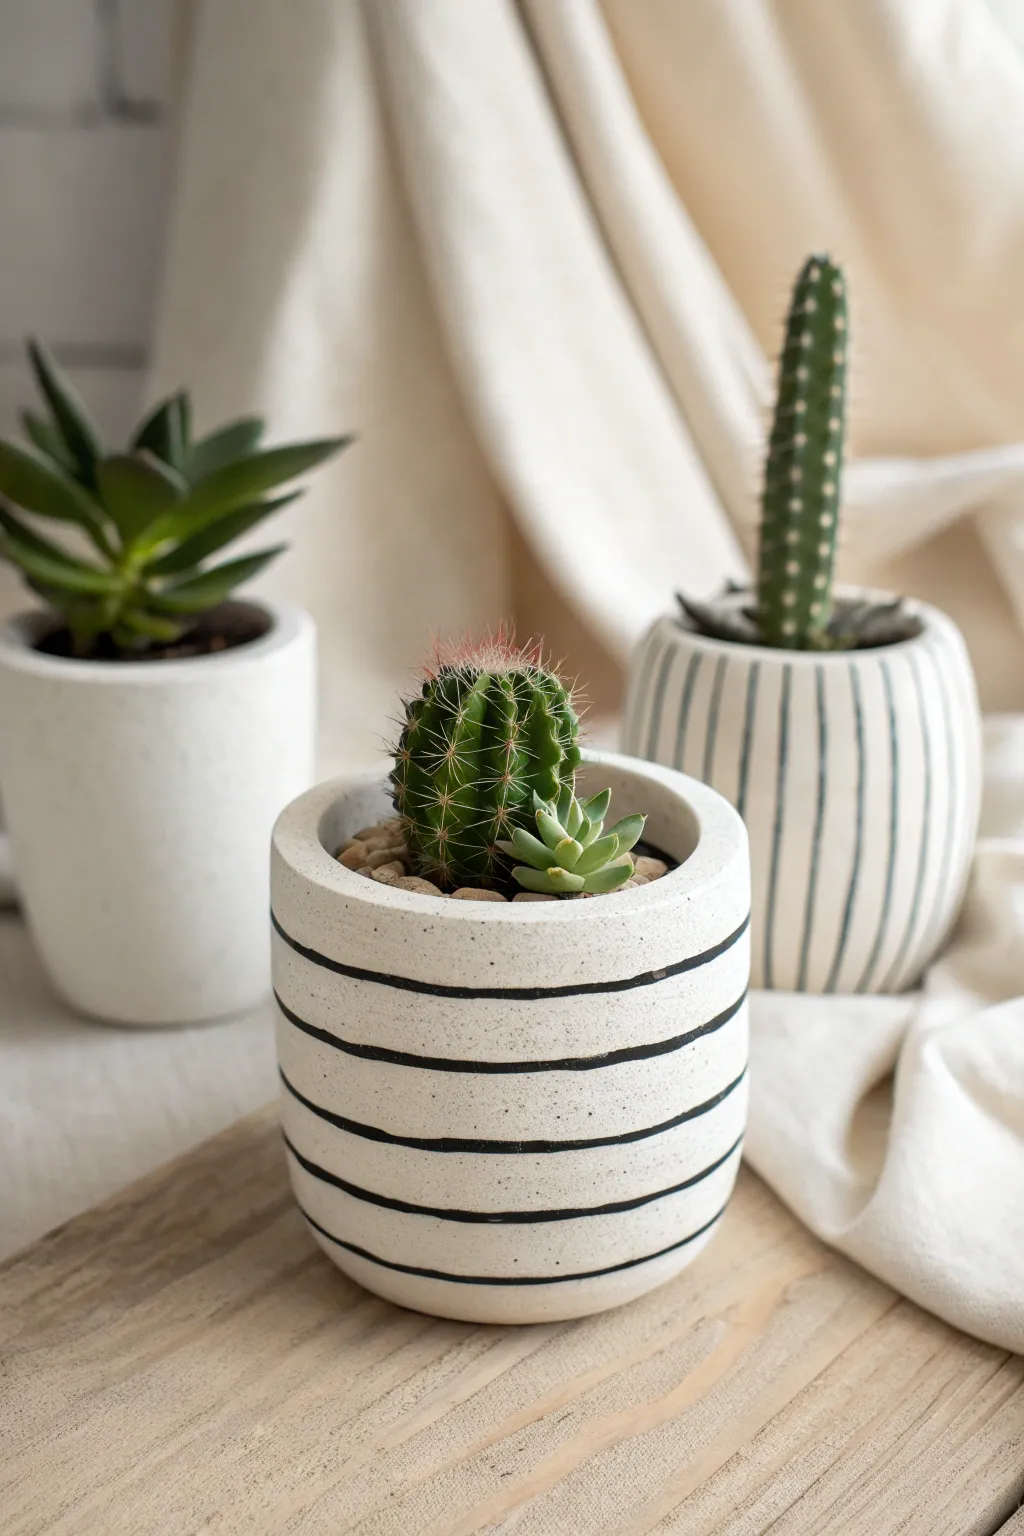
Achieve a timeless, minimalistic aesthetic with this clean black-and-white stripe design. The slight irregularity of the hand-painted lines adds organic warmth to the modern contrast, making it perfect for housing contrasting green cacti.
Detailed Instructions
Materials
- Small white ceramic or terracotta pot
- Matte white acrylic paint (if pot isn’t already white)
- Black acrylic paint or multi-surface paint
- Flat shader brush (medium width)
- Small round detail brush
- Pencil
- Painters tape or masking tape (optional for straighter lines)
- Matte spray sealer or varnish
- Palette or small dish
- Paper towels
Step 1: Base Preparation
-
Clean surface:
Begin by wiping down your ceramic pot with a damp cloth to remove any dust or oils. Let it dry completely. -
Apply base coat:
If your pot is raw terracotta or a glossy color you don’t want, apply two even coats of matte white acrylic paint using the flat shader brush. -
Let it cure:
Allow the white base coat to dry thoroughly between layers. I prefer to let the final coat sit for an hour to ensure the surface is hard enough for the detail work.
Step 2: Drafting the Design
-
Plan your spacing:
Look at the height of your pot and decide on the stripe frequency. For the look in the photo, aim for about 5-6 horizontal stripes evenly focused on the lower two-thirds. -
Mark guides:
Using a pencil very lightly, make small tick marks around the circumference of the pot where each line should sit to keep them relatively level. -
Connect the dots (optional):
For extra precision, you can lightly sketch the full line around the pot, or apply thin strips of painter’s tape if you want perfectly rigid edges.
Wobbly Lines?
If your hand is shaking, try placing the pot on a lazy susan or turntable. Hold your brush steady in one spot and spin the table for smoother circles.
Step 3: Painting Stripes
-
Load the brush:
Dip your small round detail brush into the black acrylic paint. You want the paint to be fluid but not watery, so mix in a tiny drop of water if it feels too thick. -
Anchor your hand:
Place your pinky finger against the pot to stabilize your hand while painting. This helps control the brush pressure. -
Start the first stripe:
Begin painting the top stripe first. Use a slow, sweeping motion, rotating the pot with your other hand as you drag the brush. -
Embrace imperfection:
Don’t stress if the line thickness varies slightly. The charm of this specific design lies in that hand-painted feel rather than machine perfection. -
Continue downwards:
Work your way down the pot, painting the subsequent horizontal lines using your pencil guides. -
Check consistency:
Step back occasionally to look at the pot from a distance. If a line looks too thin in one section, carefully thicken it with a second pass. -
Refine edges:
If you slipped and made a smudge, wait for the black paint to dry completely, then touch it up with a dab of white paint.
Mix It Up
Try vertical stripes on a companion pot (like the background image) using the same technique for a cohesive but varied display set.
Step 4: Finishing Touches
-
Dry time:
Allow the black stripes to dry fully. Acrylics usually dry to the touch quickly, but give it about 30 minutes to be safe. -
Erase guides:
If any pencil marks are still visible between the painted lines, gently erase them now. -
Apply sealer:
To protect your artwork from moisture when watering your succulent, spray the entire exterior with a matte clear sealer. -
Final cure:
Let the sealer cure according to the can’s instructions, usually 24 hours, before potting your plant.
Once dry, plant your favorite cactus or succulent to complete this effortlessly chic look


What Really Happens Inside the Kiln
Learn how time and temperature work together inside the kiln to transform clay into durable ceramic.
Sleepy Eyes With Blush Cheeks
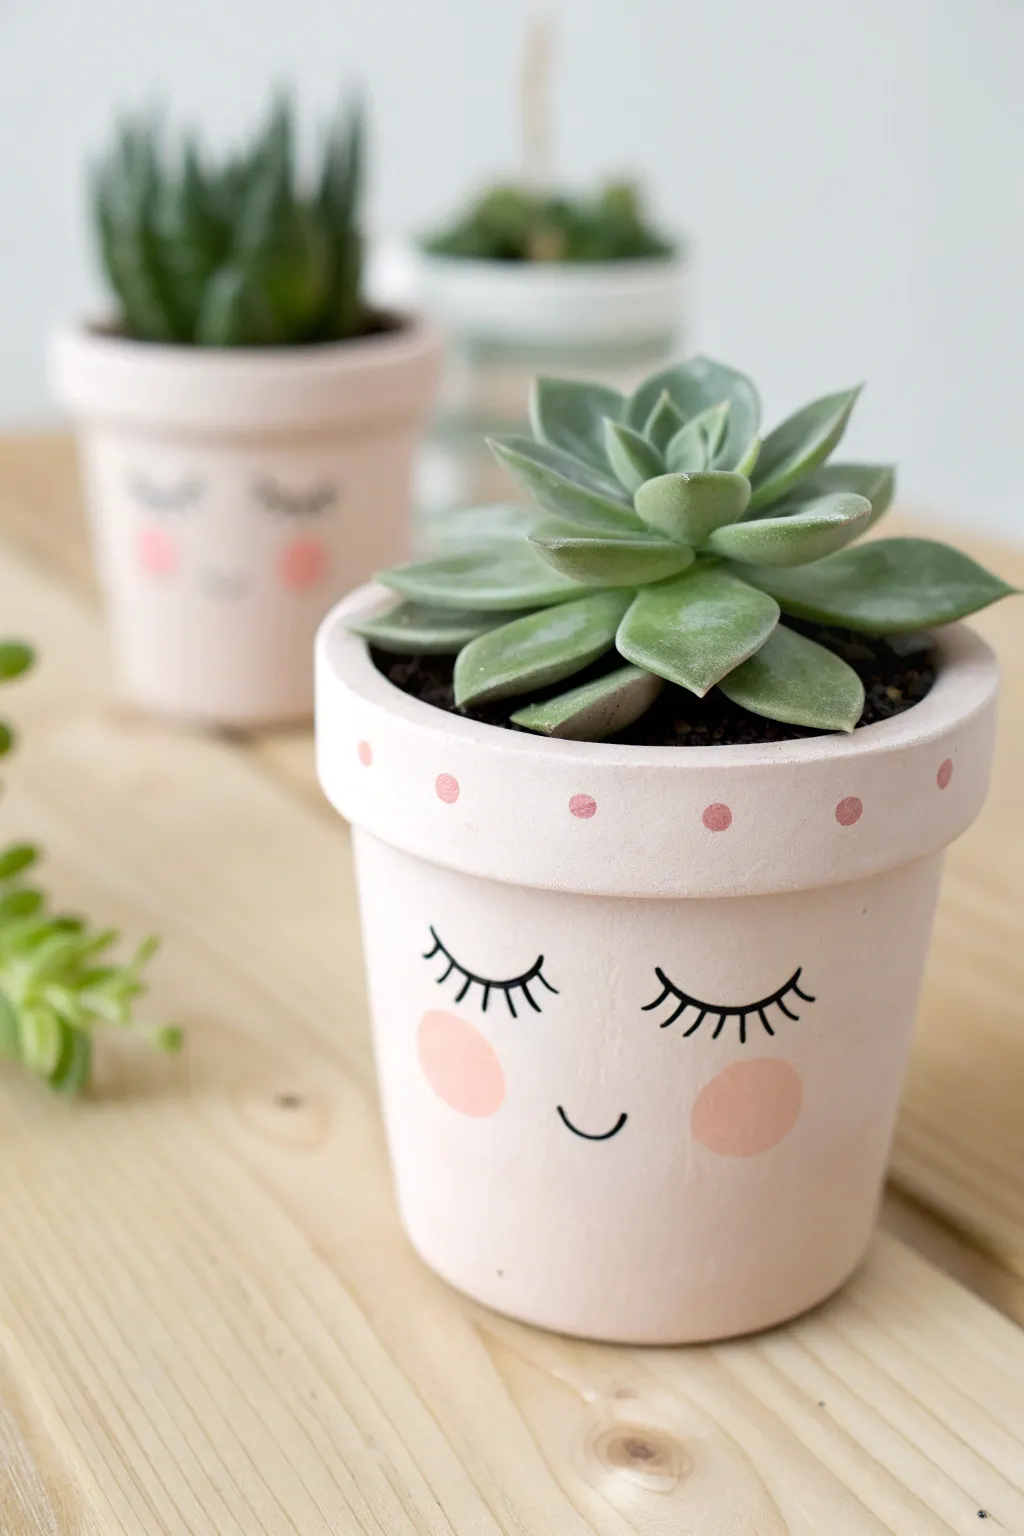
Turn a plain terracotta pot into a charming character with just a few simple strokes. This adorable sleepy face design features delicate eyelashes, rosy cheeks, and a polka-dot rim, making it the perfect cozy home for your favorite succulent.
Step-by-Step
Materials
- Small terracotta pot (approx. 3-4 inches)
- White acrylic paint
- Light peach or pale pink acrylic paint (for the base)
- Rosy pink acrylic paint (for cheeks and dots)
- Black paint pen (fine tip) or black acrylic paint with a liner brush
- Small flat brush (for base coat)
- Small round brush or dotting tool
- Pencil
- Matte spray sealer or varnish
- Succulent and potting soil
Step 1: Preparing the Canvas
-
Clean the pot:
Before you start painting, make sure your terracotta pot is clean and dry. Wipe away any dust or loose clay particles with a damp cloth to ensure the paint adheres smoothly. -
Mix the base color:
Create a smooth, milky pale pink for the skin tone. I like to mix a large amount of white acrylic paint with just a tiny drop of light peach or pink until you get a very soft, pastel shade. -
Apply the first coat:
Using a small flat brush, apply an even layer of your pale pink mixture all over the exterior of the pot, including the rim. Don’t worry if it looks streaky at first; terracotta is thirsty. -
Let it dry:
Allow the first coat to dry completely. This usually takes about 15-20 minutes depending on humidity. -
Apply the second coat:
Paint a second layer of the pale pink base to get solid, opaque coverage. If you see any brush strokes, lightly sand between coats for an ultra-smooth finish. -
Paint the inner rim:
Extend the base color just inside the top rim of the pot (about 1 inch down). This ensures the terracotta won’t show through once the soil is added.
Use a Pencil Eraser
For perfectly round cheeks, dip the eraser end of a standard pencil into the paint and stamp it onto the pot. It makes a perfect circle every time.
Step 2: Drawing the Face
-
Sketch the features:
Using a pencil, very lightly sketch where you want the face to go. Draw two curved lines for the closed eyes, a tiny U-shape for the mouth, and mark lightly where the cheeks will sit. -
Draw the eyelashes:
With your black paint pen or a very fine liner brush, trace over your pencil lines for the eyes. Add 4-5 small, vertical dashes coming off the main curve to create the eyelashes. -
Add the smile:
Trace the small smile in the center, keeping the line thin and delicate. A paint pen gives you much more control here than a brush usually implies. -
Create the cheeks:
Dip a small round brush (or use your pinky finger for a softer look) into the rosy pink paint. Dab two circles onto the cheek area. You want these to be solid circles, not blended blush.
Step 3: Adding Details & Finishing
-
Dot the rim:
Using the back end of a paintbrush or a dotting tool, dip into the same rosy pink paint used for the cheeks. -
Apply the pattern:
Press dots evenly spaced around the thickened rim of the pot. Try to keep them aligned in the center of the rim band. -
Let everything cure:
Allow all the detailed paint work to dry completely for at least an hour to prevent smudging during the sealing process. -
Seal the pot:
Spray the entire pot with a matte sealer. This protects your artwork from water damage when you water your plant. -
Plant your succulent:
Once dry, fill the pot with succulent soil and carefully plant a rosette-shaped succulent, like an Echeveria, to look like a floral ‘hairdo’ for your pot.
Add Freckles
After the cheeks dry, use a brown fine-tip marker to add three tiny freckles across the nose area or on the cheeks for extra cuteness.
Now you have a sweet little companion to brighten up your desk or windowsill
Botanical Leaf Silhouettes
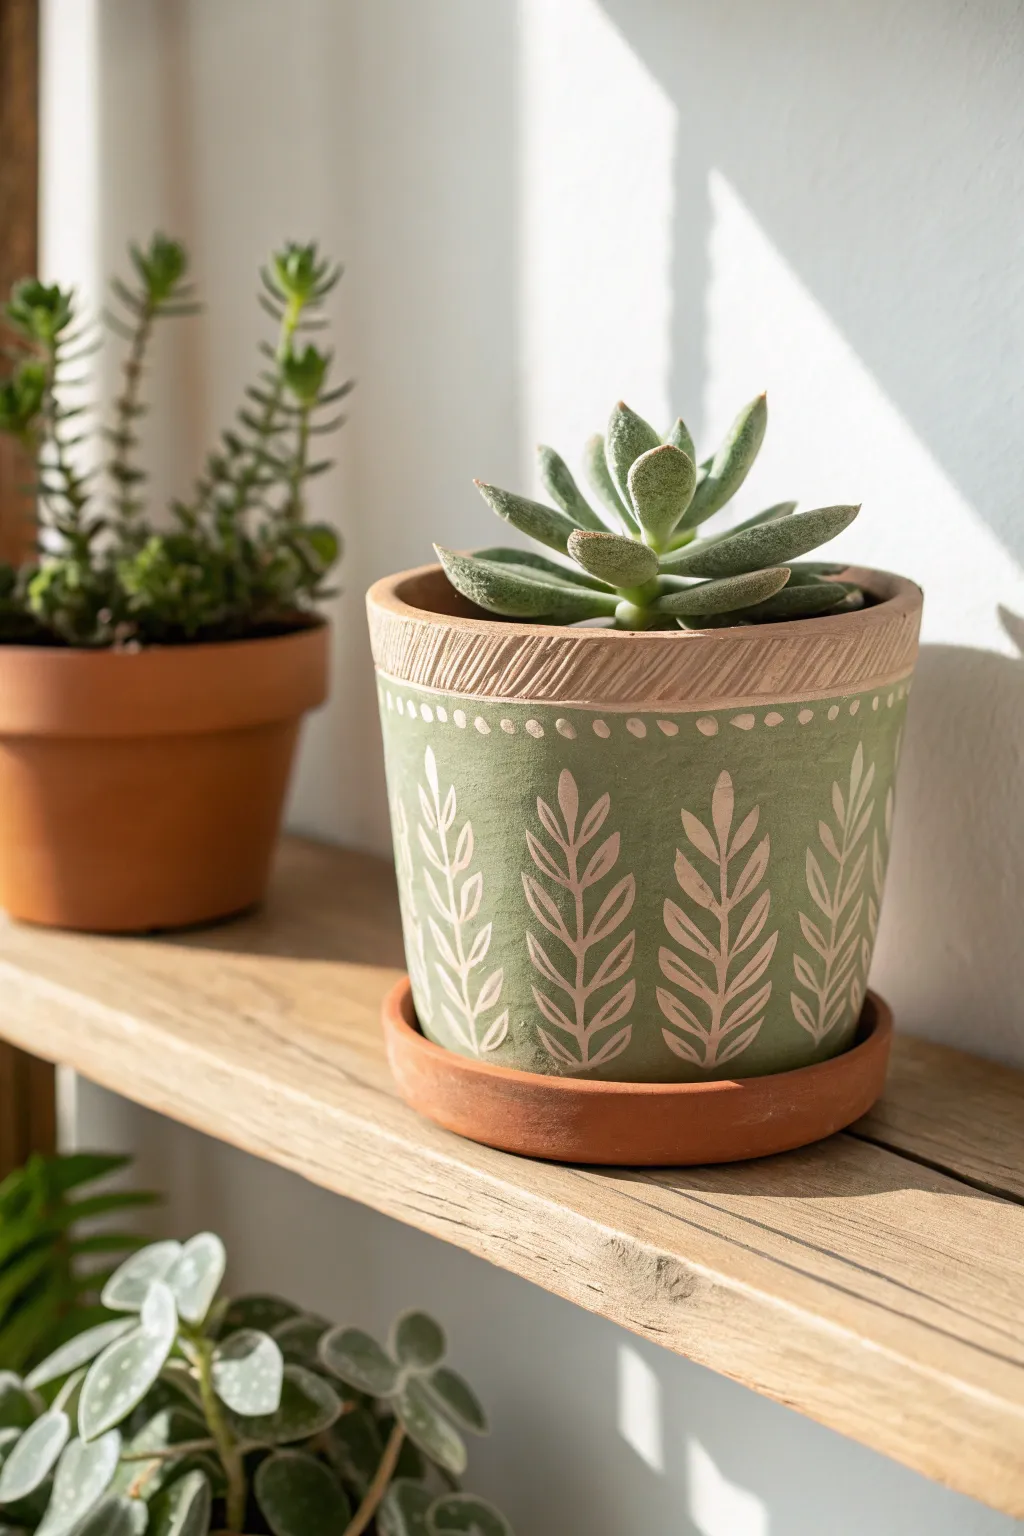
Transform a plain terracotta pot into a botanical beauty with this elegant leaf silhouette design. Using a soothing sage green backdrop against the natural clay creates a stunning, organic contrast perfect for your favorite succulents.
Step-by-Step Guide
Materials
- Standard terracotta pot with saucer (clean and dry)
- Sage green acrylic outdoor craft paint
- Pencil
- Flat paintbrush (medium size)
- Detail round paintbrush (size 1 or 2)
- Clean cloth or rag
- Carving tool or small nail (optional for rim texture)
- Clear matte sealer spray
Step 1: Preparation & Base Coat
-
Clean surface:
Ensure your terracotta pot is completely free of dust and dirt. Wipe it down with a damp cloth and let it dry fully, as moisture can prevent the paint from adhering properly. -
Tape the rim:
If you want a perfectly straight line under the rim, apply painter’s tape just below the protruding lip of the pot. Press it down firmly to seal the edge. -
Apply green base:
Load your flat brush with sage green acrylic paint. Paint the main body of the pot below the rim. -
Smooth coverage:
Apply the paint in even, vertical strokes. Terracotta is very porous and soaks up paint quickly, so you might find the first coat looks streaky. -
Second coat:
Let the first layer dry for about 15-20 minutes. Apply a second coat of sage green to get that opaque, matte finish seen in the photo. -
Remove tape:
Carefully peel off the tape while the paint is still slightly tacky to avoid chipping the dry edge. Let this base coat cure completely for an hour.
Step 2: Painting the Botanical Design
-
Sketch the stems:
Using a pencil, lightly draw vertical curved lines evenly spaced around the pot. These will be the central stems for your leaves. -
Sketch the leaves:
Add small leaf shapes branching off each stem. Aim for a simple almond shape, paired symmetrically or alternating up the stem. -
Mix paint shade:
You want the leaves to look like exposed clay. You can either paint negative space (difficult) or mix a paint color that matches the terracotta rim. I prefer mixing a warm beige-pink acrylic to mimic the clay tone. -
Paint the stems:
Using your fine detail brush and the clay-colored paint, carefully trace over your pencil stem lines. Keep the hand steady and pressure light. -
Fill the leaves:
Paint the leaf shapes. Start at the stem and pull the brush outward to the tip of the leaf to get a sharp point. -
Add rim details:
Below the rim, use the tip of your detail brush to dab small dots of the clay-colored paint in a horizontal row, creating a delicate border.
Paint Peeling?
Terracotta is porous. If paint peels, seal the pot inside and out with a clay sealer before painting to stop moisture from pushing the paint off from behind.
Step 3: Texture & Finishing touches
-
Carve the rim (Optional):
The pot in the image features diagonal texture on the rim. Use a carving tool or a sturdy nail to gently scratch diagonal lines into the raw terracotta rim. If the pot is hard, you can paint these lines on instead using a darker brown. -
Clean up lines:
If any green paint smudged onto your leaf designs, use a tiny bit of the green paint to touch up the edges and sharpen the silhouettes. -
Seal the work:
Once all paint is bonedry (give it at least 2-3 hours), take the pot outside and spray it with a clear matte sealer. This protects the design from water damage when you water your plant. -
Pot your plant:
Place your succulent into the finished pot, adding fresh cactus soil, and set it on its matching saucer.
Go Geometric
Swap the organic leaves for rigid geometric triangles or diamonds in the same clay-tone color for a modern, desert-boho look.
Enjoy the calming presence of your new botanical pot on a sunny windowsill

TRACK YOUR CERAMIC JOURNEY
Capture glaze tests, firing details, and creative progress—all in one simple printable. Make your projects easier to repeat and improve.
Desert Sunset Wraparound Scene
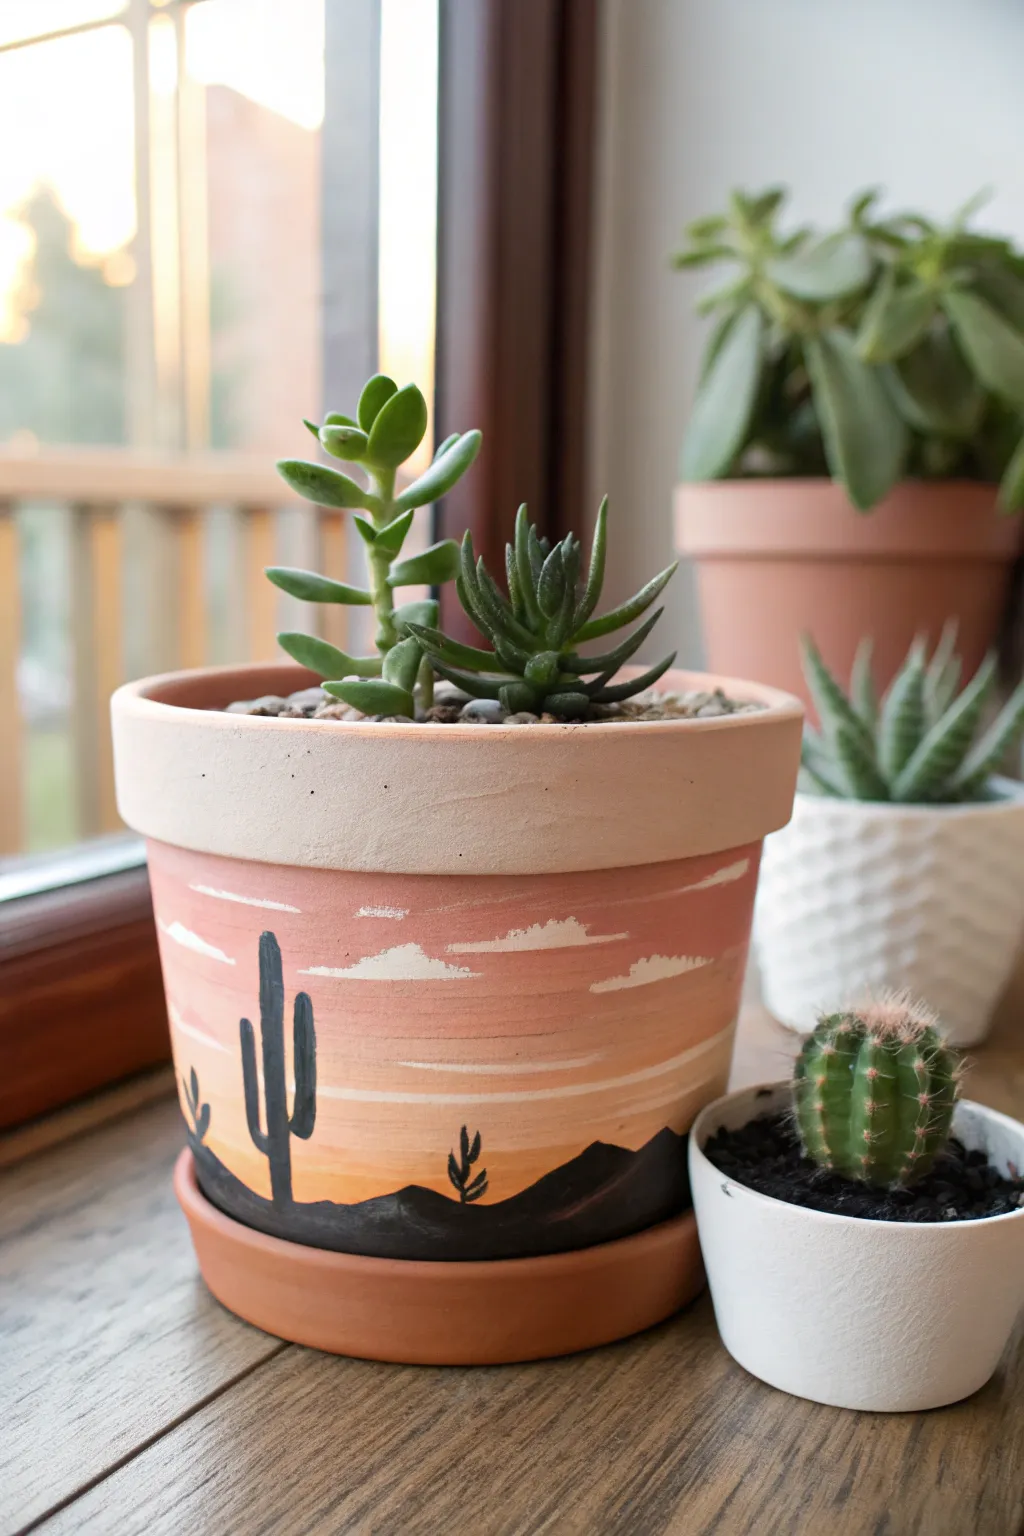
Transform a plain terracotta vessel into a warm, inviting desert landscape with this gradient painting technique. The design features a soothing ombre sky transitioning from soft coral to pale cream, grounded by bold black silhouettes of cacti and rolling dunes.
Detailed Instructions
Materials
- Clean terracotta pot (4-6 inch diameter recommended)
- Acrylic craft paints: Terracotta/Salmon, White, Black
- Painter’s tape or masking tape
- Flat shader brush (medium size)
- Small round detail brush (size 1 or 2)
- Palette or paper plate for mixing
- Cup of water
- Paper towels
- Clear acrylic sealant spray (matte finish)
Step 1: Preparation & Base Gradient
-
Prep the surface:
Ensure your terracotta pot is completely clean and dry. Wipe away any dust with a damp cloth and let it dry. -
Tape the rim:
Apply a strip of painter’s tape just below the heavy rim of the pot. This creates a crisp line, leaving the rim its natural clay color while we paint the body. -
Mix the darkest sky shade:
Squeeze out your terracotta/salmon paint. This will be the darkest color at the top of the sky area, right under the rim. -
Paint the top band:
Using the flat shader brush, paint a band of the dark salmon color around the upper third of the pot’s body. -
Mix the mid-tone:
Without cleaning your brush, pick up a little white paint and mix it into the salmon color on your palette to create a lighter, peachy shade. -
Apply the middle band:
Paint the middle section of the pot with this lighter peach mix, slightly overlapping the dark top band. Use horizontal strokes to blend the wet edges together for a smooth transition. -
Mix the horizon color:
Add significantly more white to your mixture until you have a very pale cream or off-white color that still holds a hint of warmth. -
Complete the gradient:
Paint the bottom third of the distinct painting area with this pale shade. Blend it upward into the middle band while the paint is still wet to create that soft, hazy sunset look. -
Dry completely:
Let the gradient background dry fully. Terracotta absorbs moisture quickly, so this shouldn’t take long, but give it at least 20 minutes.
Uneven Blending?
If your gradient looks stripey rather than smooth, use a very slightly damp brush (minimize water) to feather the lines back and forth while the paint is still wet.
Step 2: Painting the Silhouette
-
Outline the dunes:
Switch to your small detail brush and load it with black acrylic paint. At the very bottom of the pot, paint a wavy, uneven line to represent the rolling desert landscape. -
Fill the ground:
Fill in the area below your wavy line with solid black paint. This grounds your scene. -
Draft the main cactus:
Choose a spot on the left side for your focal cactus. Paint a vertical line upward from the black ground, tapering slightly at the top. -
Add cactus arms:
Add two ‘arms’ to the main cactus—one lower and one higher—curving upward in the classic saguaro shape. -
Add background details:
Using the very tip of your detail brush, paint smaller, simpler cactus shapes or little spiky tufts of grass further away in the distance to create depth. -
Paint the clouds:
Clean your detail brush thoroughly. Dip it into pure white paint and paint thin, horizontal wisps across the upper gradient area. Keep the strokes loose and disconnected for a natural cloud effect. -
Remove the tape:
Once the paint is tacky but almost dry, carefully peel away the painter’s tape to reveal the clean line below the rim. -
Seal the artwork:
Take the pot to a well-ventilated area and spray it with a clear matte sealant. This protects the paint from water damage when you water your plants.
Make It Pop
Add a tiny white highlight line on the side of the black cactus silhouette (the side facing your imaginary sun) to give the flat shape instantaneous 3D dimension.
Place your favorite succulent inside and enjoy your mini desert oasis by the window
Mountain Range and Tiny Cacti
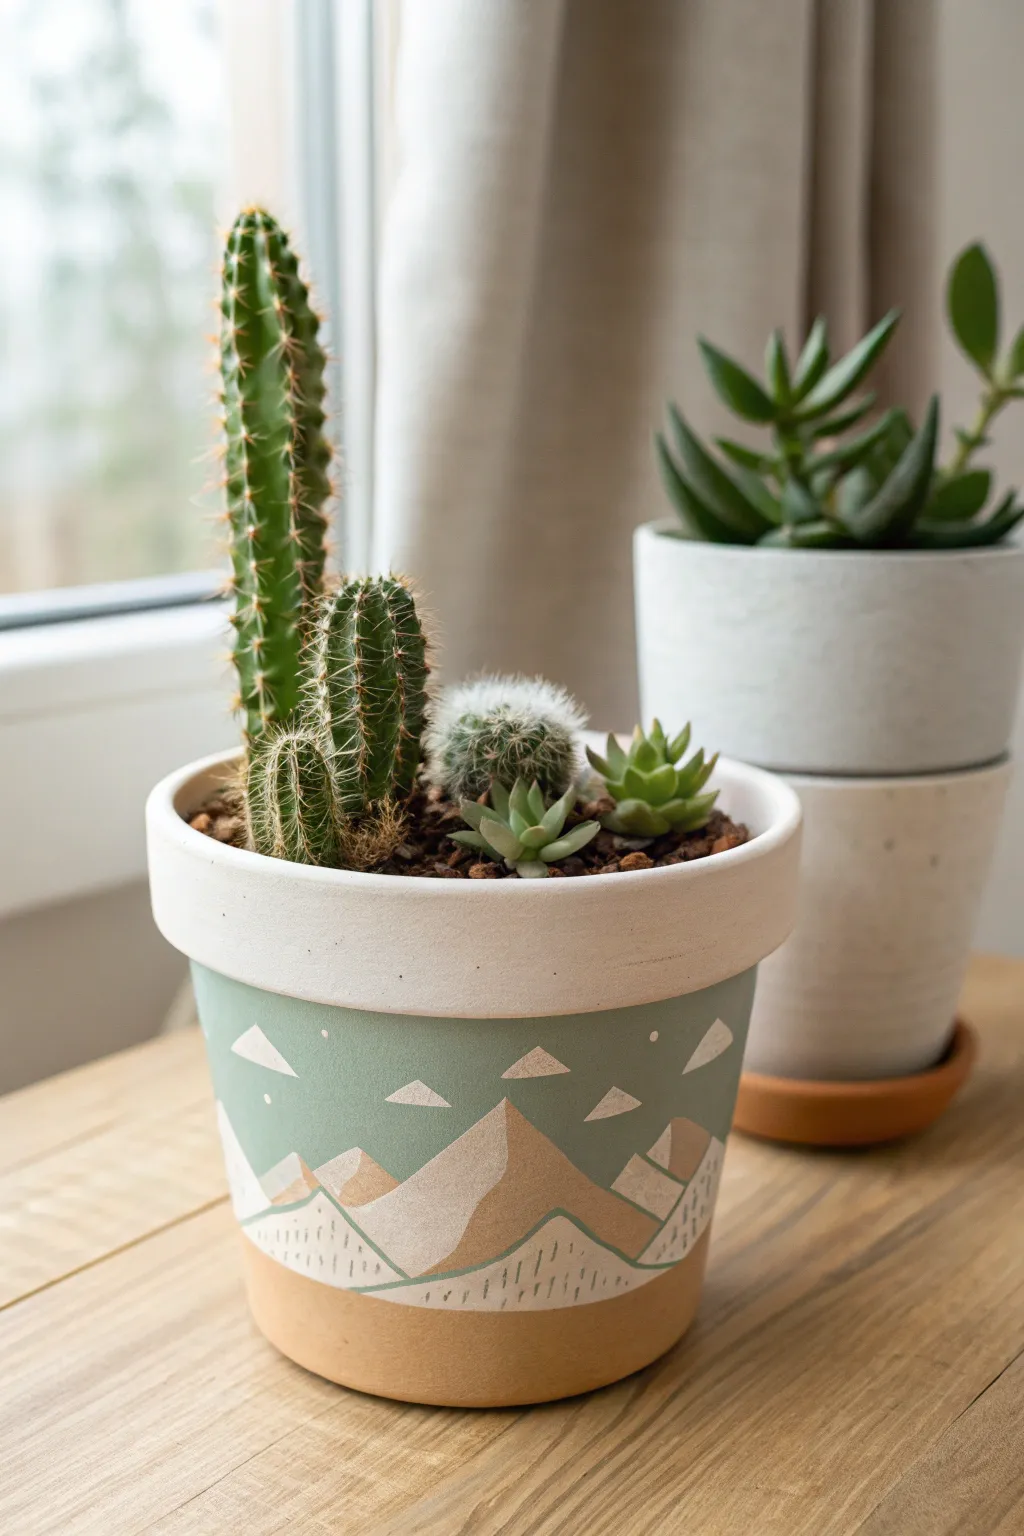
Transform a standard terracotta pot into a modern desert landscape featuring soft, earthy mountains under a sage green sky. This design uses negative space and simple geometric shapes to create a serene backdrop for your favorite cacti collection.
Step-by-Step
Materials
- Terracotta pot (cleaned and dried)
- Acrylic craft paints: Sage Green, Antique White, Sand/Beige, Tan/Light Brown
- Painter’s tape (optional for the rim)
- Flat shader brush (medium size)
- Small round detail brush (size 0 or 1)
- Pencil
- Palette or paper plate
- Water cup and paper towels
Step 1: Planning and Base Layers
-
Prep the surface:
Ensure your terracotta pot is thoroughly clean and dry. If the surface is rough, give it a quick sanding with fine-grit sandpaper to make painting easier. -
Sketch the mountains:
Lightly sketch your mountain ranges using a pencil. You’ll need three overlapping layers: a tall background range, a middle range, and a smaller foreground range. Leave the bottom inch of the pot unpainted to expose the raw clay. -
Define the sky:
Using your flat brush, paint the upper portion of the pot in Sage Green. Start from just below the rim and bring the color down to meet your top pencil line for the mountains. Be careful to keep the bottom edge crisp where it meets the peaks. -
Add a crisp rim:
Paint the thick rim of the pot with Antique White. You may need two coats here to fully cover the terracotta color. I like to paint slightly over the top inner edge for a polished look. -
Paint the background mountains:
Mix a soft Tan/Light Brown shade. Fill in the tallest mountain peaks you sketched earlier. Let the sage green sky dry completely first so the colors don’t bleed into each other.
Step 2: Middle Hills and Details
-
Create the middle range:
Load your brush with the Sand/Beige color. Paint the middle set of mountains, overlapping the tan ones slightly to create depth. Ensure the peaks are distinct and sharp. -
Paint the foreground:
For the bottom-most mountain layer, use Antique White. Bring this paint layer down, stopping in a jagged line about an inch or two from the bottom of the pot to leave that exposed clay base. -
Refine the edges:
Go back with your small brush and touch up any lines where the mountains meet the sky or each other. Clean lines are the secret to this geometric look. -
Add floating triangles:
Using the Antique White paint and a small detail brush, paint small floating triangles in the sage green sky. Stagger them randomly to fill the empty space without crowding it. -
Add white dots:
Dip the tip of your detail brush handle or a toothpick into white paint. Dot a few ‘stars’ near the floating triangles for extra texture.
Clean Lines Hack
Terracotta texture creates bumpy lines. For razor-sharp mountain peaks, gently lightly sand the painting area first, or use a fine-tip paint marker for the outlines instead of a brush.
Step 3: Texture and Finishing
-
Intro to texture details:
Once the main blocks of color are dry, it’s time to add the dashed lines that give this pot its unique illustrative style. -
Detail the white mountains:
Dilute a tiny bit of dark grey or mix your Sage Green with a little brown to get a dark contrast color. Using your smallest detail brush, paint tiny vertical dashed lines on the white foreground mountains. -
Vary the line concentration:
Keep the dashed lines concentrated near the bottom of the white peaks and fade them out as you go up, mimicking stylized shading. -
Outline the white peaks:
Use the Sage Green paint to draw a very thin line tracing the top edge of the white mountains. This helps separate them visually from the beige layer behind them. -
Final clean up:
Check the bottom edge where the paint meets the raw terracotta. If it looks messy, create a deliberate, wavy line with the white paint to smooth the transition. -
Let it cure:
Allow the pot to dry for at least 24 hours before planting. If you plan to keep this outdoors, apply a matte sealant spray to protect your work.
Pro Tip: Color Harmony
Mix a tiny drop of your Sage Green into the Tan and Beige paint colors. This subtly ties the palette together, making the landscape feel cohesive rather than disjointed.
Now your custom desert-themed planter is ready to be the perfect home for your new spiky friends
Terrazzo-Style Speckle Pattern
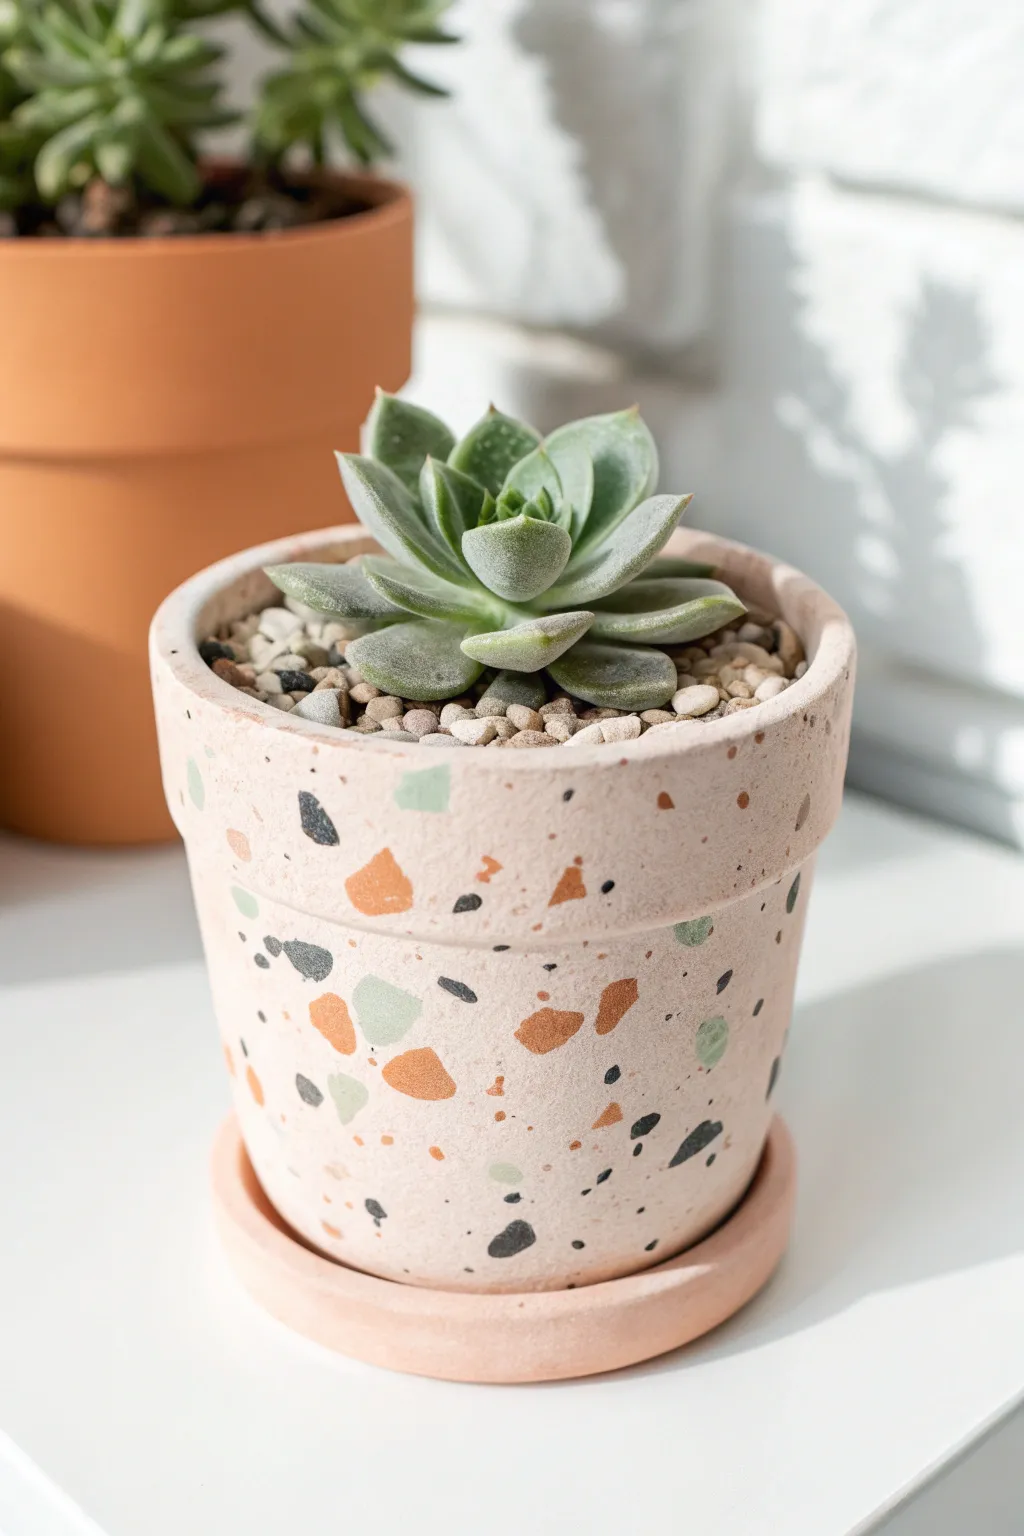
Bring a trendy, modern touch to your plant collection with this faux terrazzo terra cotta pot. Using just a few acrylic colors, you can mimic the beautiful, random patterns of stone aggregate for a high-end look on a budget.
Step-by-Step Tutorial
Materials
- Terra cotta pot and saucer (4-inch or 6-inch)
- White acrylic craft paint
- Burnt orange or terracotta acrylic paint
- Sage or mint green acrylic paint
- Black or charcoal grey acrylic paint
- Peach or light beige acrylic paint (for the base)
- Flat paintbrush (medium size)
- Small round detail brush (size 1 or 2)
- Small flat brush (size 4)
- Palette or paper plate
- Water cup and paper towels
- Matte spray sealer (optional)
Step 1: Base Coat Preparation
-
Clean the surface:
Before you begin painting, use a damp cloth to wipe down your terra cotta pot and saucer to remove any dust or debris. Let them dry completely. -
Mix the base color:
You want a pale, creamy peach or soft beige for the background. If you don’t have a premixed bottle, combine a generous amount of white with a small drop of peach or orange paint. Aim for a very pastel, chalky look. -
Apply the first coat:
Using your medium flat brush, paint the entire exterior of the pot, including the rim. Don’t forget to paint the outer edge and inside rim of the saucer as well. -
Let it dry:
Allow the first coat to dry for about 15-20 minutes. Terra cotta absorbs paint quickly, so this shouldn’t take long. -
Second coat:
Apply a second layer of your base color to ensure opaque, even coverage. Smooth out any visible brushstrokes by using long, horizontal strokes. Let this dry fully before moving to the pattern.
Step 2: Creating the Terrazzo Shapes
-
Prepare the pattern colors:
Squeeze small amounts of burnt orange, sage green, charcoal black, and a lighter beige onto your palette. -
Start with the warm tones:
Load your small flat brush with the burnt orange paint. Dab irregular, geometric shapes onto the pot. Think of chunky triangles or chipped squares rather than perfect circles. -
Space them out:
Scatter these orange shapes randomly, leaving plenty of open space between them. Rotate the pot frequently to ensure the pattern flows naturally around the curve. -
Add Green Accents:
Switch to a clean small flat brush (or wash the previous one thoroughly). Dip into the sage green paint and add similar chunky shapes in the empty spaces. Don’t be afraid to place a green shape near an orange one, but try not to let them touch. -
Layer in light neutrals:
Using a light beige or off-white, add a few more medium-sized shapes. These help break up the stronger colors and add depth to the faux-stone effect.
Natural Edges
Keep shapes angular and jagged, not round. Authentic terrazzo is made from crushed chips of marble and stone.
Step 3: Detailing and Sealing
-
The black speckles:
This is the crucial step for the terrazzo look. I like to switch to a very small round detail brush for this. Load it with black or dark charcoal paint. -
Vary the sizes:
Paint tiny specks and smaller irregular chips in the gaps between your larger colored shapes. Make some tiny dots and some slightly larger jagged strokes to mimic crushed stone. -
Check the balance:
Step back and look at the pot from a distance. If you see any large empty patches, fill them in with a tiny black speck or a small dash of color. -
Don’t forget the saucer:
Repeat the same pattern process on the visible rim of the saucer so the set matches perfectly. -
Final dry time:
Let all your detailed paint work dry for at least one hour to prevent smudging during the sealing process. -
Seal the deal:
In a well-ventilated area, spray the pot and saucer with a clear matte sealer. This protects your handiwork from water damage when you water your plants.
Metallic Pop
Add a fourth color of gold or copper leaf for a luxe, shimmering finish to your pattern.
Once sealed and dry, pot your favorite succulent and enjoy this chic addition to your decor
Faux Marble Swirl
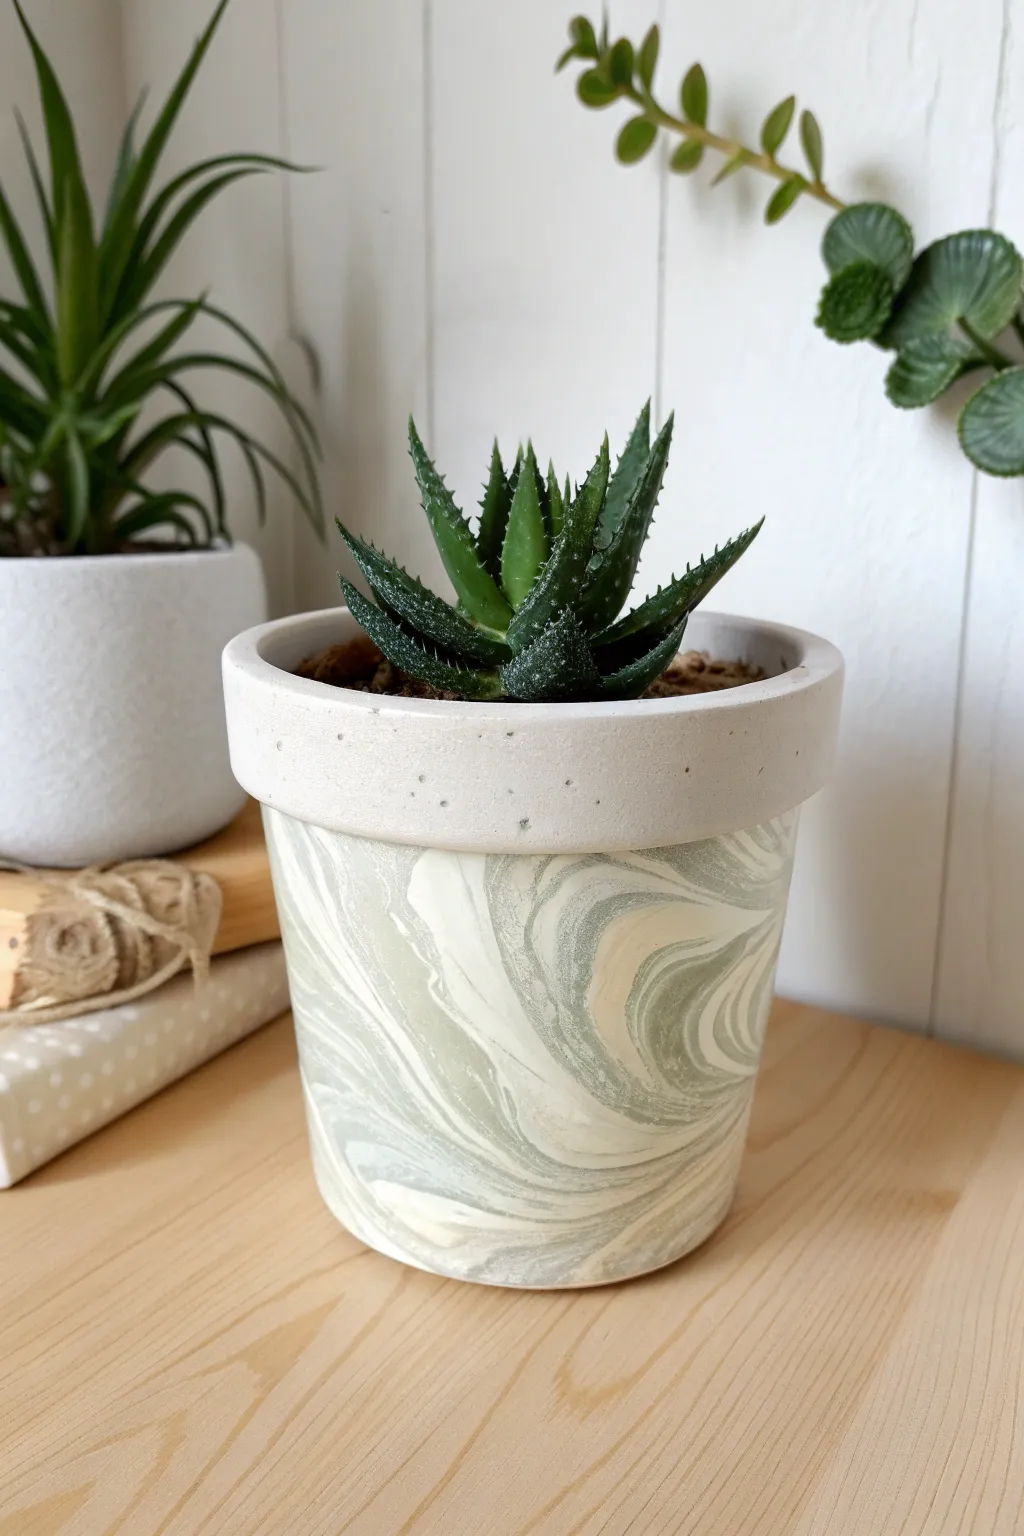
Transform a plain pot into an elegant stone-look masterpiece using the hydro-dipping technique. This method creates organic, flowing swirls of sage green, cream, and faint gold that mimic the natural veins found in real marble, giving your succulents a high-end home.
How-To Guide
Materials
- Small terracotta or concrete pot (clean and dry)
- White acrylic craft paint or spray paint (base coat)
- Sage green spray paint
- Off-white or cream spray paint
- Clear matte spray sealer
- Large plastic bucket or bin (deep enough to submerge the pot)
- Water (room temperature)
- Rubber gloves
- Painter’s tape
- Stick or skewer for stirring
Step 1: Preparation
-
Clean surface:
Begin by wiping down your pot with a damp cloth to remove any dust or oils. A clean surface ensures the paint adheres properly and prevents bubbling later on. -
Apply base coat:
Paint the entire exterior of the pot with your white base color. Using a white spray paint works best for even coverage, but white acrylic brushed on heavily works too. Let this dry completely before moving forward. -
Mask the rim:
Looking at our inspiration piece, notice the distinct solid-colored rim. Tape off the top inch of the pot (the rim area) securely with painter’s tape to keep it white and free of the marble pattern. -
Protect the inside:
Stuff the inside of the pot with newspaper or tape off the inner rim to prevent paint from getting inside where soil will go. This keeps the finish looking professional.
Water Temperature
Use room temperature water (approx 70°F). Cold water causes the paint to clump instantly, while hot water creates a film too fast. Tepid is the sweet spot.
Step 2: The Dip
-
Prepare the water bath:
Fill your large plastic container with lukewarm water. The temperature matters—if it’s too cold, the paint creates a skin too quickly; room temperature is ideal. -
Spray first color:
Shake your sage green spray paint can vigorously. Hold it about 8 inches from the water surface and spray a generous amount into the center of the water. -
Layer second color:
Immediately spray your off-white or cream color directly into the center of the floating green paint. You want circles of color expanding outward. -
Create the swirl:
Use a skewer or stick to gently drag through the floating paint layers. Create swirls and veins, but don’t over-mix, or the colors will turn muddy. Look for pattern densities similar to the reference photo. -
Put on gloves:
Before touching the pot again, put on your rubber gloves. This process is messy and oil-based spray paint is tough to scrub off skin. -
Dip the pot:
Hold the pot by the rim (where the tape is) or place your hand inside to grip it. Slowly lower the pot into the water at a slight angle, allowing the paint film to wrap around the cylindrical shape. -
Submerge fully:
Push the pot all the way down until the water line reaches the tape line. This ensures the marble pattern covers the main body entirely. -
Clear surface water:
While the pot is still submerged, quickly blow on the water surface or wave your hand to disperse the remaining floating paint to the edges of the bucket. This prevents a double-layer of paint from coating the pot when you pull it out. -
Remove and dry:
Lift the pot out of the clean water. Give it a gentle shake to remove excess water droplets, then set it upside down on a protected surface to dry. I find letting it sit for at least an hour is crucial here.
Add Metallic Veins
For a luxe upgrade, add a quick, short burst of gold or copper spray paint into your water bucket swirl. Use a thin brush to trace main veins with gold leaf.
Step 3: Finishing Touches
-
Remove tape:
Once the marbled paint is dry to the touch, carefully peel away the painter’s tape from the rim. Pull slowly at a 45-degree angle to ensure a crisp line. -
Paint the rim:
The reference photo shows a soft, concrete-grey or off-white rim. Use a small brush and acrylic paint in a solid neutral tone to paint the rim area if the white base coat isn’t the final look you want. -
Clean imperfections:
If any marble paint leaked under the tape, use a small brush dipped in white paint to touch up the line and make it sharp. -
Seal the work:
To protect your design from water damage when watering your plant, spray the entire exterior with a clear matte sealer. Two light coats are better than one heavy coat.
Once the sealer cures, pop in your favorite succulent and enjoy the sophisticated stone look you created
Faux Hand-Painted Tile Motif
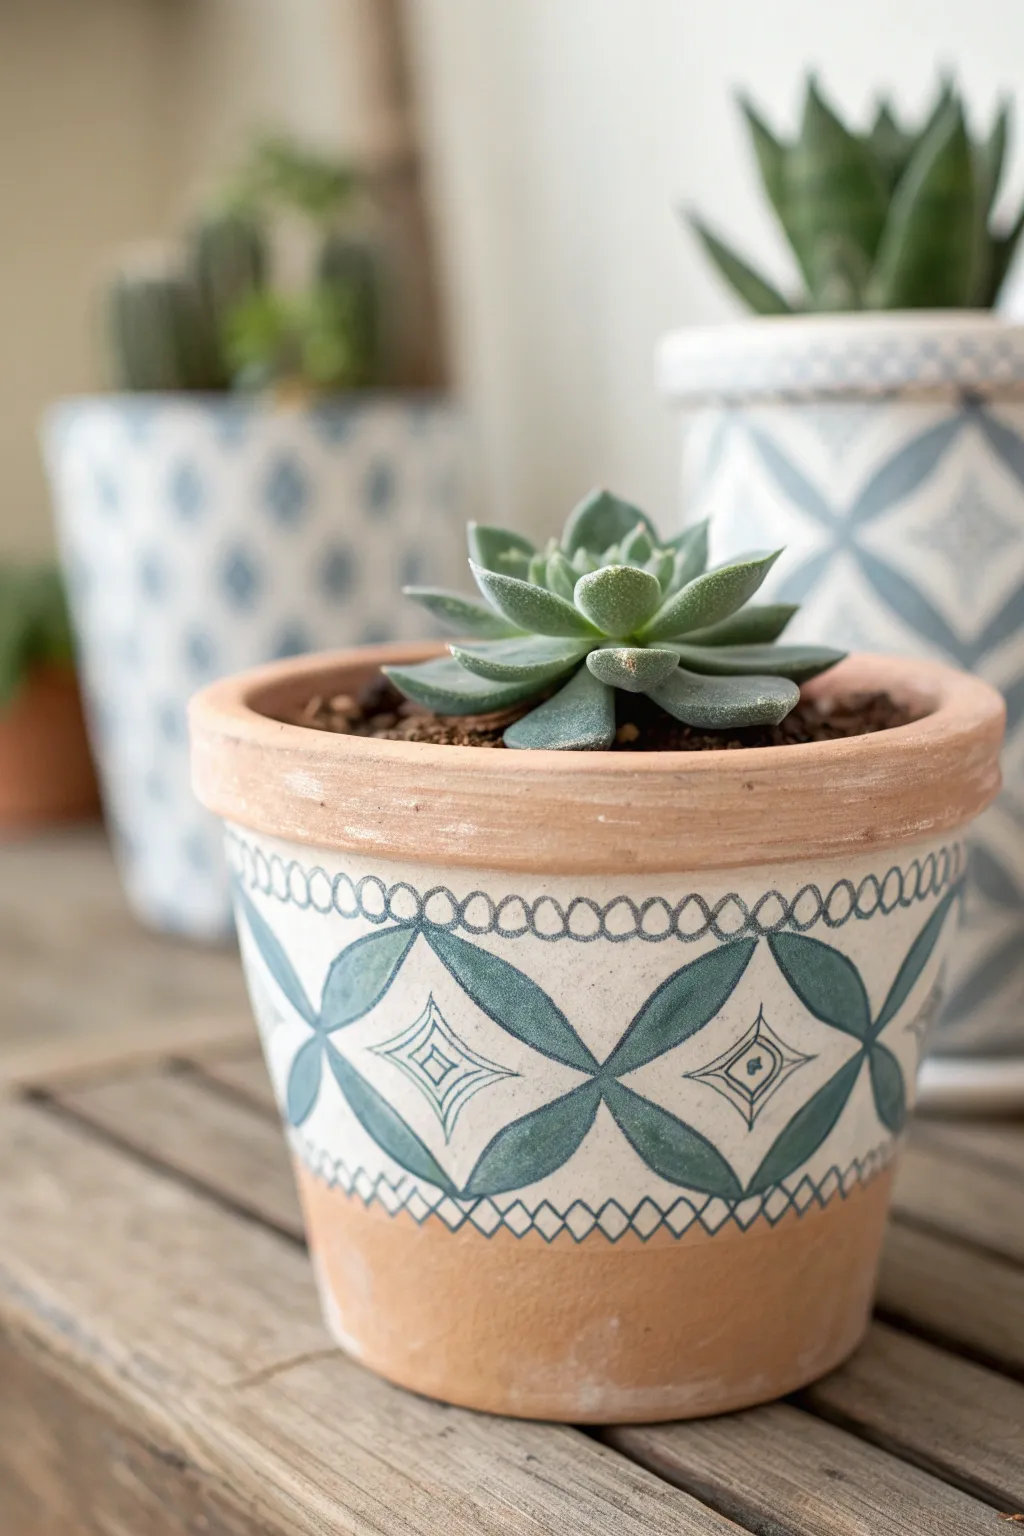
Bring the charm of hand-painted Spanish tiles to your plant collection with this elegant terracotta upcycle. By leaving the rim and base raw, you create a beautiful contrast that grounds the intricate teal geometric patterns.
Step-by-Step Tutorial
Materials
- Standard terracotta pot (cleaned and dried)
- Cream or warm white acrylic craft paint
- Teal acrylic paint (matte finish)
- Dark blue fine-tip paint pen or acrylic marker
- Pencil
- Flexible ruler or measuring tape
- Flat paintbrush (medium width)
- Small round detail brush
- Painter’s tape or masking tape
- Compass (optional)
Step 1: Preparing the Base
-
Clean the surface:
Ensure your terracotta pot is completely free of dust and debris. If it’s an old pot, scrub it well and let it dry fully for at least 24 hours to prevent moisture from bubbling the paint. -
Tape off the sections:
Apply a strip of painter’s tape just below the top rim of the pot. Apply a second strip about an inch from the bottom. These taped areas will remain raw terracotta. -
Paint the background:
Using your flat brush, paint the middle section between the tape lines with the cream or warm white acrylic paint. Apply 2-3 coats for solid coverage, allowing complete drying between layers. -
Remove the tape:
Carefully peel off the painter’s tape while the last coat is still slightly tacky to ensure crisp, clean lines.
Bleeding Lines?
If paint bleeds under the tape, wait for it to dry, then gently scrape the excess off the raw terracotta with a craft knife or use sandpaper.
Step 2: Drafting the Design
-
Mark the center line:
Lightly sketch a horizontal guideline around the exact center of the painted white section using a pencil. -
Divide the circumference:
Measure the circumference of your pot and divide it into equal sections (about 2-3 inches wide depending on pot size). Mark vertical points along your center guideline to denote where the ‘X’ patterns will meet. -
Sketch the quatrefoils:
Draw large ‘X’ shapes that curve outward like petals, connecting your grid points. The goal is to create pointed oval shapes that meet at the center line. -
Add the diamonds:
In the open diamond-shaped spaces between your petal shapes, sketch a smaller diamond. Inside that, draw a simple square or circle detail.
Step 3: Painting the Motifs
-
Fill the petals:
Load your small round brush with teal paint. Carefully fill in the quatrefoil petal shapes. I like to start from the center and brush outward to the points. -
Outline for crispness:
Once the teal paint is dry, use your dark blue paint pen or fine brush to outline the teal petals. This mimics the glazed look of ceramic tiles. -
Draw the border details:
Along the top edge of the white section, use the paint pen to draw a continuous row of small, open circles. Connect them with a faint line if desired. -
Add bottom details:
Along the bottom edge of the white section, draw a zigzag or diamond chain pattern using the fine-tip pen or brush. -
Detail the negative space:
Return to the white diamond spaces between the teal petals. Use the paint pen to draw the inner concentric diamond shapes and tiny central dot you sketched earlier.
Make it Antique
Mix a tiny drop of brown paint into water and lightly wash over the dried design, then wipe off immediately for an aged, weathered tile look.
Step 4: Finishing Touches
-
Erase guidelines:
Check that all paint is bone dry, then gently erase any visible pencil marks with a soft eraser. -
Seal the work:
Apply a clear matte sealer over the painted section only. This protects the design from water damage when watering your succulent.
Pop in your favorite echeveria and enjoy the timeless elegance of your new hand-painted planter
Night-Sky Constellations and Stars
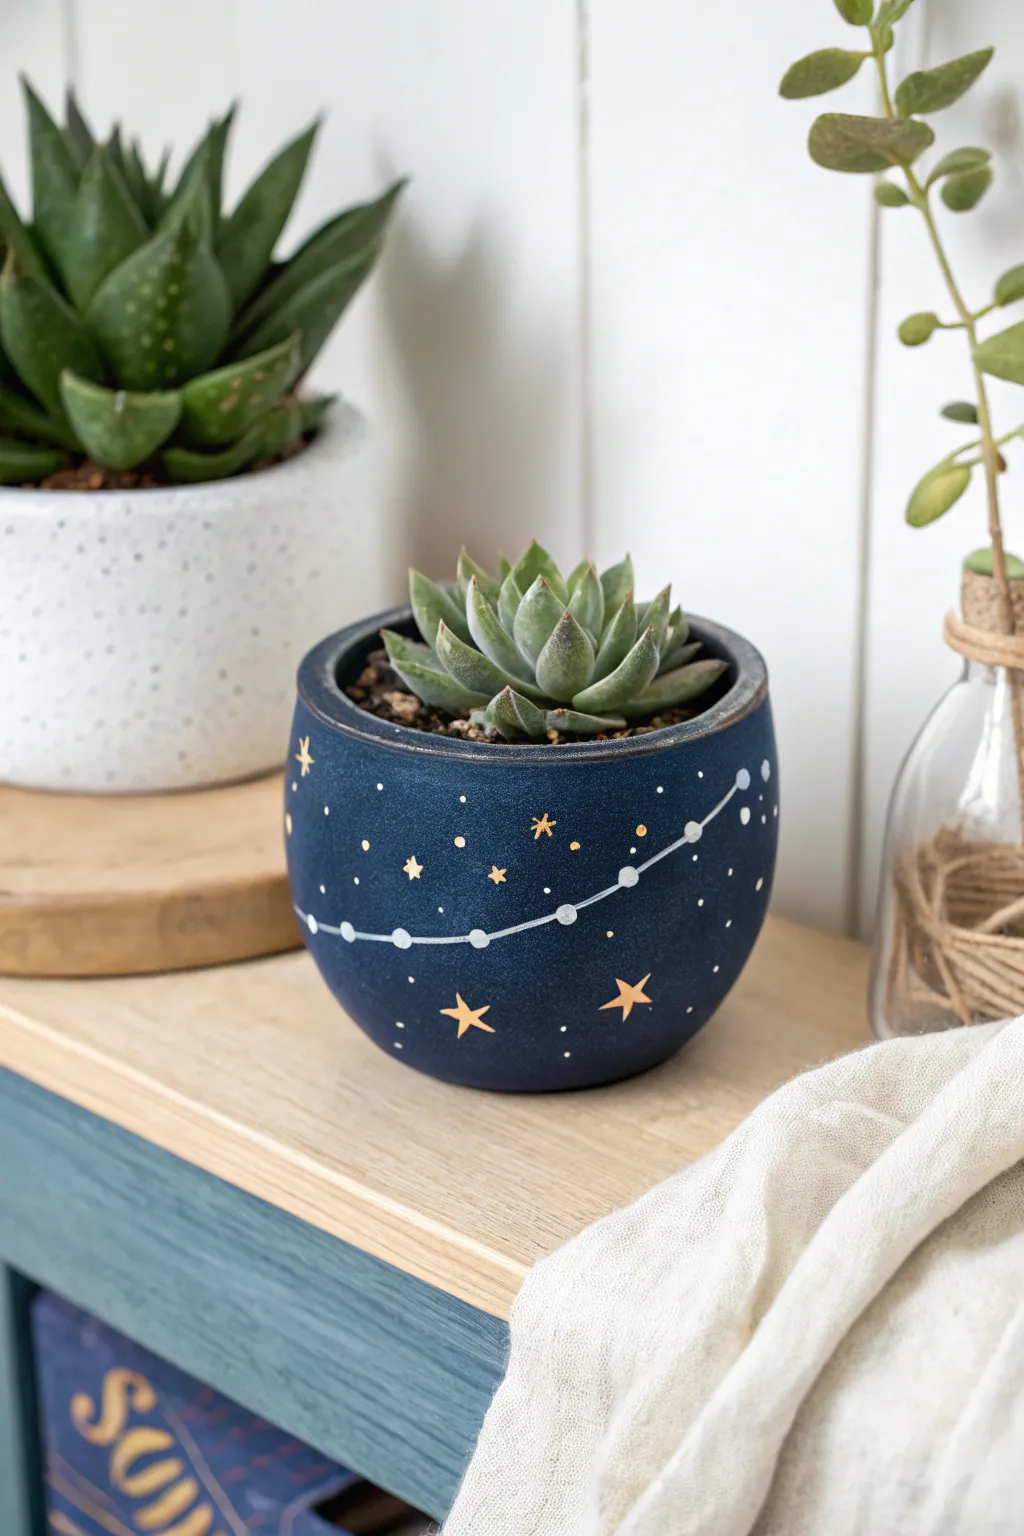
Transform a plain ceramic planter into a dreamy midnight sky with this simple yet elegant painting project. The deep navy backdrop makes the delicate gold stars and white constellation lines pop, creating a magical home for your favorite succulent.
Step-by-Step
Materials
- Small ceramic planter (terra cotta or smooth finish)
- Deep navy blue acrylic paint (matte or satin finish)
- Metallic gold paint or gold paint pen (fine tip)
- White acrylic paint or white paint pen (fine tip)
- Medium flat paintbrush
- Small round paintbrush (size 0 or 1)
- Polyurethane sealer or varnish (matte or satin)
- Pencil and eraser
- Water cup and paper towels
Step 1: Base Coat Preparation
-
Clean surface:
Begin by wiping down your planter with a damp cloth to remove any dust or oils, ensuring a completely clean surface for the paint to adhere to. -
First layer of navy:
Using your medium flat brush, apply a smooth, even coat of deep navy blue acrylic paint. Cover the entire exterior, going slightly over the top rim for a finished look. -
Dry and repeat:
Allow the first coat to dry completely for about 20-30 minutes. If the original pot color is still showing through, apply a second coat to achieve that rich, opaque midnight blue color. -
Optional rim painting:
I like to carefully paint about half an inch inside the top rim, just so the raw clay doesn’t show above the soil line later.
Paint Pen Flow
If your paint pen is skipping over the curved surface, press the tip on a scrap piece of paper to get the flow started again before returning to the pot.
Step 2: Mapping the Constellation
-
Sketch the design:
Once your blue base is bone dry, use a pencil to very lightly sketch out your constellation line. A simple, sweeping curve works best for the round surface. -
Mark star points:
Place small pencil dots along your curve where you want the main ‘stars’ of the constellation to sit. -
Paint constellation nodes:
Using a fine-tip white paint pen or a small round brush with white paint, create solid circles over your pencil marks. These should be larger than standard stars—about flattened pea size. -
Connect the dots:
Carefully draw a thin white line connecting your white circular nodes. A paint pen offers much better control here than a brush, preventing shaky lines.
Step 3: Adding the Stars
-
Create major stars:
Switch to your metallic gold paint. Randomly place 3-5 larger five-point stars around the empty spaces of the pot. Don’t worry about them being perfect geometric shapes; hand-drawn charm is key. -
Add floating sparkles:
In the spaces between stars, paint tiny gold asterisks or four-pointed crosses to represent twinkling distant stars. -
Fill the galaxy:
Dip the very tip of a toothpick or the handle end of a small brush into white paint. Gently dot tiny specks all over the background to create a dense field of distant stars. -
Vary dot sizes:
Mix in a few tiny gold dots among the white ones to add depth and warmth to the ‘sky’. -
Add orbit details:
Paint a few faint, smaller dots trailing off the main white constellation nodes, suggesting movement or smaller orbiting bodies.
Star Design Hack
Struggle drawing stars? Draw a simple capital ‘A’ without the crossbar, then draw a horizontal line across it. It makes a perfect five-point star every time.
Step 4: Finishing Touches
-
Review and touch up:
Step back and look at the overall balance. If there are large empty navy patches, add a few more micro-dots to fill the void. -
Dry thoroughly:
Let all your detailed paint work dry completely for at least an hour to prevent smearing during the sealing process. -
Seal the artwork:
Apply a coat of clear matte or satin sealer over the entire painted surface. This protects your design from water damage when you water your plant. -
Plant:
Once the sealer is cured (check the bottle for time), fill your new cosmic pot with succulent soil and your favorite rosette-shaped succulent.
You now have a shimmering piece of the galaxy ready to display on your windowsill