When the days get long and sunny, I always reach for air-dry clay or polymer clay and make something small, cute, and instantly satisfying. These summer clay ideas are all about beachy textures, fruity colors, and tiny keepsakes you’ll actually want to use (or clip onto your bag).
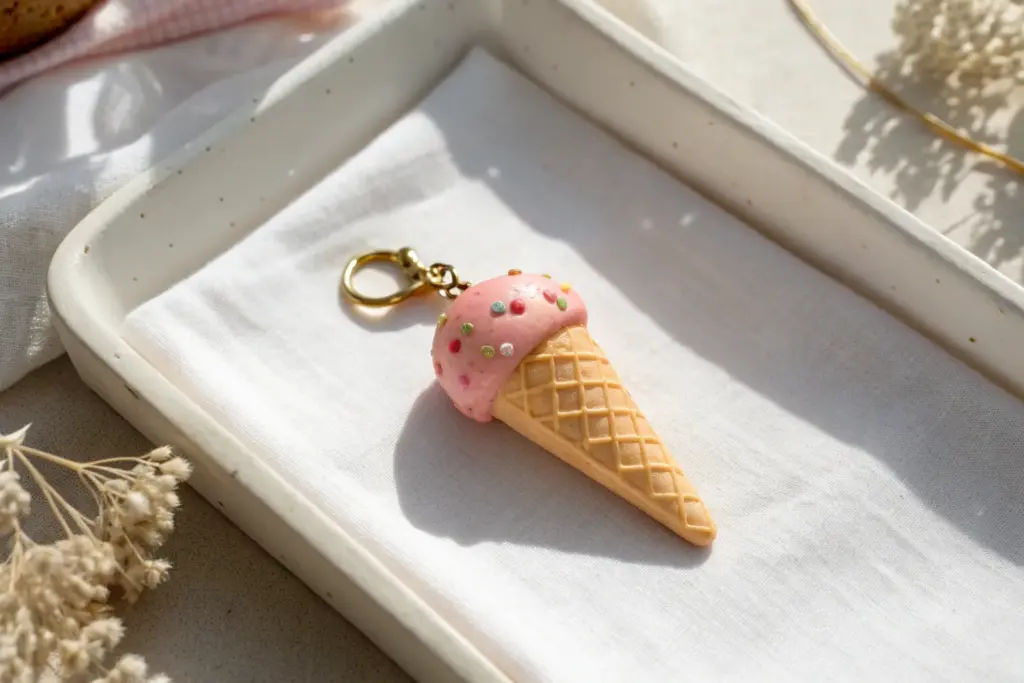
Smiling Ice Cream Cone Charms
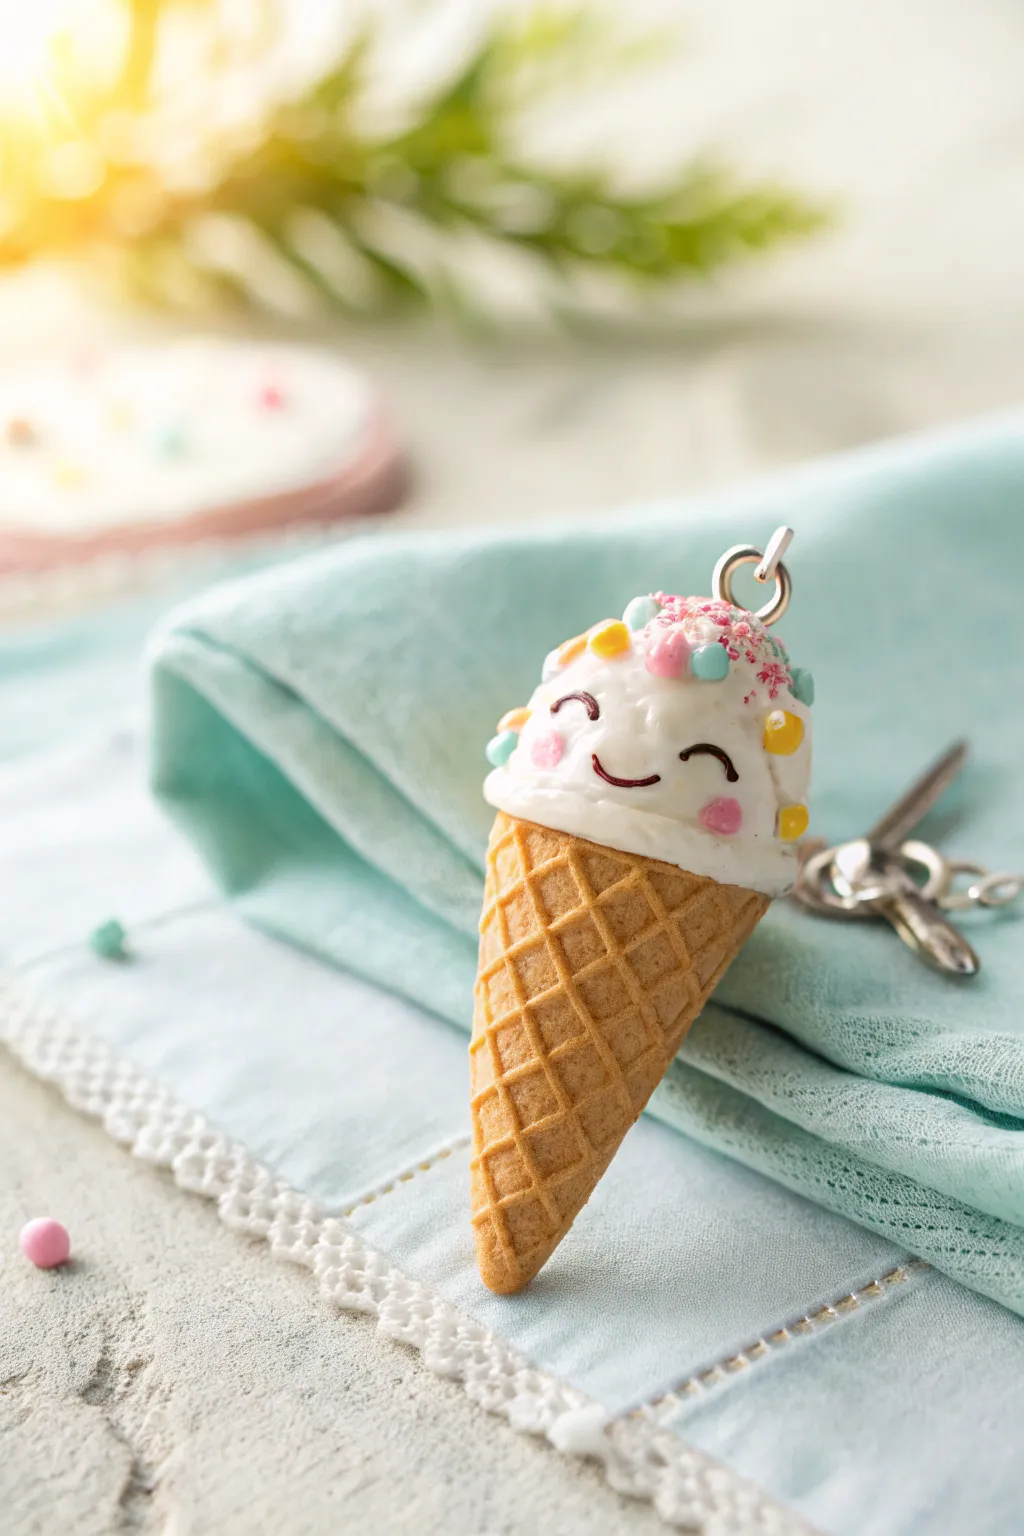
Capture the sweetness of summer with this adorable miniature ice cream charm, featuring a classic waffle texture and a cheerful, blushing face. This project uses polymer clay to create a durable, wearable piece of art perfect for keychains or necklaces.
Step-by-Step
Materials
- Polymer clay (tan/light brown, white, and tiny scraps of pastel blue, pink, and yellow)
- Black liquid clay or fine-tipped black paint marker
- Pink chalk pastel or pink blush makeup
- Fine-tipped paintbrush
- Pointed sculpting tool or needle tool
- Ball stylus tool
- Small metal eye pin
- Texture sheet or ruler for waffle pattern
- Clear gloss glaze (optional)
- Oven and baking tray
Step 1: Shaping the Cone
-
Mix the cone color:
Start by mixing translucent clay with a small amount of yellow and brown to achieve a realistic, baked waffle cone color. If you prefer a simpler route, a pre-mixed tan or beige works beautifully too. -
Form the base cone:
Roll a ball of the tan clay about the size of a large marble, then gently flatten and pull one side to taper it into a smooth cone shape. -
Create the waffle texture:
Using a needle tool or the edge of a ruler, gently press diagonal lines across the surface of the cone in one direction. Don’t press too deep; you just want an indentation. -
Cross-stiff the pattern:
Repeat the pressing motion in the opposite diagonal direction to create the classic diamond waffle grid pattern all around the cone. -
Flatten the top:
Gently tap the wider top of the cone against your work surface to create a flat platform where the ice cream scoop will eventually sit.
Step 2: Adding the Scoop
-
Form the ice cream ball:
Roll a ball of white clay that is slightly diameter larger than the top of your cone. -
Texture the scoop edge:
Flatten the bottom of the white ball slightly and press it onto the cone. Use a needle tool to drag the clay downward slightly at the seam, creating the look of melting ice cream -
Create surface fluffiness:
Take a stiff toothbrush or a crumpled ball of aluminum foil and gently tap it all over the white dome to give it a realistic, airy ice cream texture. -
Insert the hardware:
Before the clay hardens or is baked, carefully insert the metal eye pin into the very top center of the scoop. I find twisting it as I push helps it grip the clay better.
Make It Look Real
Shade the waffle cone with a dusting of orange or brown chalk pastel before baking. Focus on the grid lines to make it look freshly toasted.
Step 3: Kawaii Details
-
Draw the eyes:
Using a very fine tool dipped in black liquid clay (or waiting until after baking to use a marker), draw two small U-shapes for the happily closed eyes. -
Add the smile:
Place a tiny U-shape between the eyes for the mouth. Keep the lines delicate to maintain the cute aesthetic. -
Apply blush:
Scrape a little pink chalk pastel into a powder. Use a soft brush to gently dust two circular pink cheeks right under the eyes. -
Make the sprinkles:
Roll tiny, thread-thin snakes of your pastel colored clays (pink, blue, yellow) and cut them into miniscule bits. -
Place the toppings:
Gently press these tiny clay sprinkles onto the top/back area of the head, avoiding the face area so the expression stays clear. -
Add glitter accents:
If you have oven-safe glitter or micro-beads, press a few into the sprinkle mix for extra sparkle.
Flavor Variations
Change the white clay to light pink for strawberry or mint green for mint-chip. You can even create a double-scoop stack for extra height.
Step 4: Finishing
-
Bake the piece:
Bake your charm according to the manufacturer’s instructions for your specific brand of clay, usually at 275°F (130°C) for about 15-20 minutes. -
Cool and secure:
Let the piece cool completely. If the eye pin feels loose, pull it out, add a drop of super glue, and reinsert it. -
Add shine:
Apply a thin coat of gloss glaze to just the ice cream scoop part to make it look cold and wet, leaving the cone matte.
Now you have a charming little companion ready to hang on your keychain or gift to a friend


Striped Popsicle Keychains
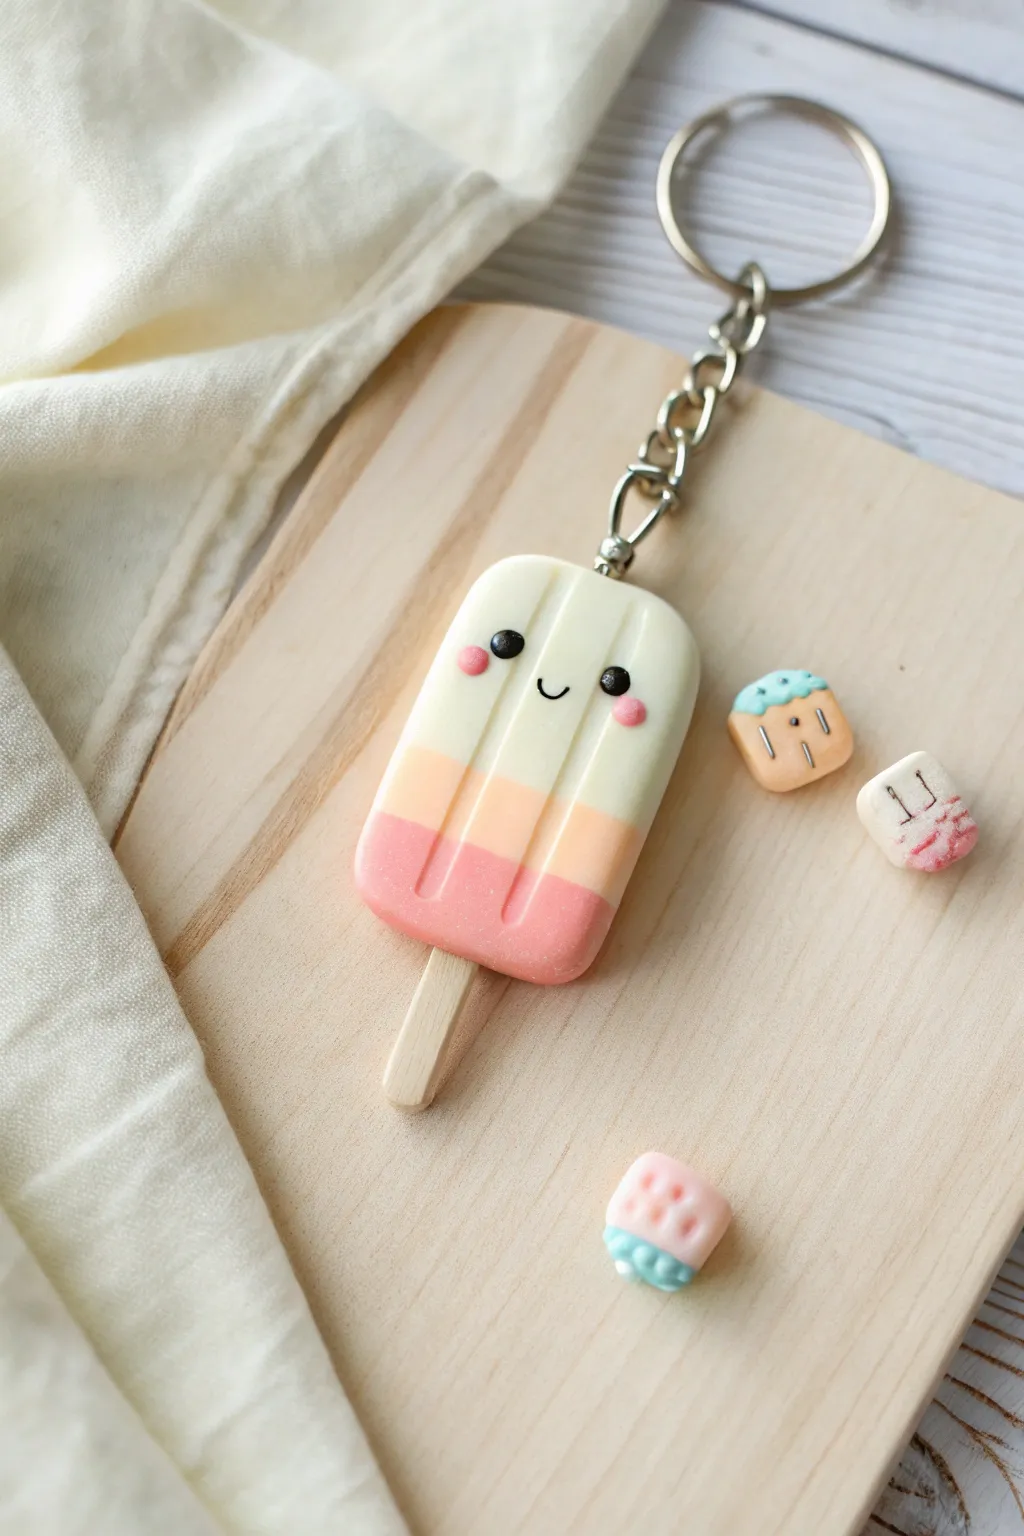
Carry a slice of summer with you everywhere with this adorable three-toned popsicle keychain. Featuring soft pastel layers and a minimal kawaii face, this polymer clay charm is the perfect sweet accessory for your keys or bag.
How-To Guide
Materials
- Polymer clay (white, peach/light orange, pink, black)
- Small wooden popsicle stick or craft stick
- Rolling pin or clay machine
- Blade or craft knife
- Needle tool or ball stylus
- Small circle cutter (optional)
- Keychain hardware with screw eye pin
- Gloss glaze or UV resin (optional)
- Oven for baking
Step 1: Prepping the Layers
-
Condition the clay:
Start by thoroughly conditioning your white, peach, and pink polymer clay separately until each is soft and pliable. This prevents cracks later on. -
Roll out thick slabs:
Roll each color into a thick slab, aiming for about 1/4 inch thickness. You want them all to be uniform so the popsicle looks even. -
Cut uniform strips:
Using your blade, cut a rectangular strip from each color slab. The width of these strips will determine the width of your final popsicle, so ensure they match perfectly. -
Stack the colors:
Stack the strips on top of each other. Place pink on the bottom, peach in the middle, and white on top to mimic the classic layered frozen treat look. -
bond the layers:
Gently press the stack together to bond the clay. I like to lightly roll over the top with a rolling pin just once to ensure the seams adhere without squishing the shape too much.
Step 2: Shaping the Popsicle
-
Cut the basic shape:
Trim the sides of your stack to get clean, straight edges. Then, use your blade to round off the top two corners of the white section to create the traditional curved popsicle dome. -
Smooth the edges:
Use your finger to gently rub the cut edges, softening the sharpness and erasing any fingerprints. This gives the clay a more professional, molded finish. -
Add the stick:
Take your small wooden stick and customize the length if needed by breaking or cutting it. Carefully insert it into the center of the pink bottom layer, pushing it up about halfway into the popsicle for stability. -
Create the indentations:
Using a needle tool or a dull modeling tool, press two vertical indentations into the front of the popsicle. These grooves should run from the top white section down into the pink section, mimicking the molded shape of real ice pops.
Dirty Clay Blues?
White clay picks up dust easily! Keep baby wipes nearby to clean your hands and tools before handling the white layer, or use a piece of scotch tape to lift lint off the raw clay.
Step 3: Adding the Kawaii Face
-
Make the eyes:
Roll two tiny, equal-sized balls of black clay. Press them gently onto the white upper section of the popsicle, spacing them apart to leave room for the mouth. -
Add the cheeks:
Mix a tiny bit of red with white to make a soft pink (or use your existing pink). Roll two small balls, slightly larger than the eyes, and flatten them onto the clay underneath and to the outside of the eyes. -
Create the smile:
Roll a very thin snake of black clay. Cut a tiny U-shape segment and carefully place it between the eyes using a needle tool to create a happy smile. -
Insert hardware:
Screw the eye pin into the top center of the popsicle. Remove it, add a dab of liquid clay or bake-and-bond to the threads, and screw it back in for a secure hold.
Level Up: Realistic Bite
Before baking, use a small scalloped cutter to remove a chunk from the top corner. Texture the inside with a needle tool to look like a bite mark.
Step 4: Finishing Up
-
Bake the charm:
Place your popsicle on a tile or parchment-lined baking sheet. Bake according to your brand of clay’s specific temperature and time instructions. -
Cool down:
Allow the piece to cool completely before handling. Polymer clay is still slightly soft when hot and hardens as it cools. -
Glaze (Optional):
For a shiny, ‘melting’ effect, brush a coat of gloss glaze or apply a thin layer of UV resin over the clay parts, curing it under a UV lamp if using resin. -
Assemble keychain:
Once dry, use pliers to attach your chain and keyring to the eye pin loop.
Now you have a sweet, summer-themed charm ready to brighten up your keyring


Watermelon Slice Earrings
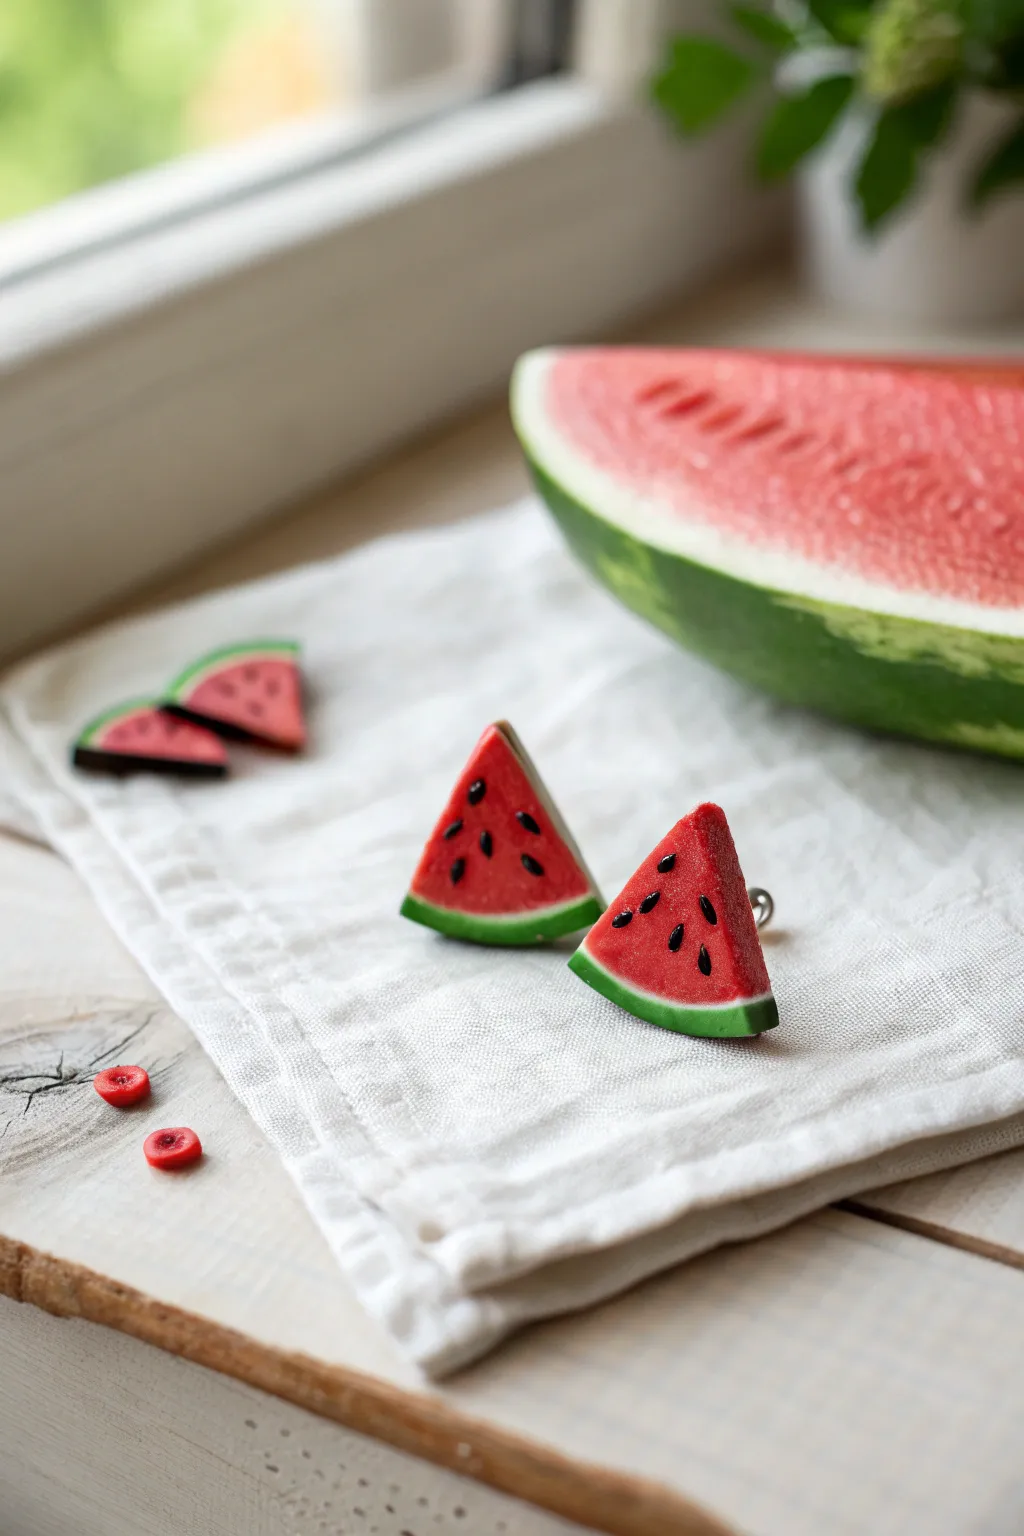
Celebrate the sweet refresh of summer with these delightful little watermelon earrings that look good enough to eat. Using polymer clay allows you to achieve that perfect textured rind and deep, juicy red center, complete with tiny seeds.
Step-by-Step Tutorial
Materials
- Red polymer clay (translucent or regular)
- Green polymer clay
- White or light green polymer clay
- Black polymer clay
- Liquid polymer clay or bake-and-bond
- Tissue blade or X-Acto knife
- Needle tool or toothpick
- Toothbrush or texturing sponge
- Earring posts (surgical steel)
- Super glue or E6000
- Gloss glaze (optional)
- Acrylic rolling pin or pasta machine
Step 1: Creating the Cane
-
Condition the clay:
Start by thoroughly conditioning your red clay until it is soft and pliable. Roll it into a thick, even cylinder or log shape about 1 inch in diameter. -
Prepare the rind layers:
Roll out a sheet of white (or very light green) clay and a sheet of green clay. The white sheet should be slightly thinner than the green one. -
Wrap the inner rind:
Carefully wrap the white sheet of clay around your red cylinder. Trim the excess so the edges meet perfectly without overlapping, and smooth the seam with your finger. -
Wrap the outer rind:
Repeat the previous process with the green sheet of clay, wrapping it over the white layer. Again, trim cleanly and smooth the seam so it disappears. -
Reduce the cane:
Gently squeeze and roll the log to reduce its diameter. Start from the center and work your way out to lengthen the cane while keeping the layers distinct. -
Chill the cane:
Place your finished cane in the refrigerator for about 15-20 minutes. This firms up the clay, making it much easier to slice cleanly without distorting the round shape.
Step 2: Shaping and Texturing
-
Slice the rounds:
Using a very sharp tissue blade, cut slices from your chilled cane. You want them to be about 4-5mm thick for sturdy earrings. -
Cut the wedges:
Take each round slice and cut it into wedges. You can cut it in half, then quarters, or even sixths depending on how large you want your final earrings to be. -
Texture the fruit:
Gently tap the red portion of each wedge with a clean toothbrush or texturing sponge. This creates a realistic, juicy fruit texture, but be careful not to texture the rind. -
Form the seeds:
Roll tiny, tiny teardrop shapes out of your black clay. You will need about 6-8 seeds for each earring slice. -
Embed the seeds:
Using a needle tool, carefully press the black seeds onto the textured red surface. I find it helpful to press them in slightly so they look embedded rather than just sitting on top. -
Refine the shape:
Check the edges of your wedges. If the cutting process flattened the rind, gently reshape it with your fingers to ensure it looks rounded and natural.
Clean Cuts Matter
If your slices are squishing as you cut the log, the clay is too warm. Pop it back in the fridge for 10 minutes to stiffen it up again.
Step 3: Baking and Assembly
-
Pre-bake prep:
Prepare your baking surface with a piece of parchment paper or a ceramic tile to prevent shiny spots on the back of the clay. -
Bake the pieces:
Bake the clay pieces according to the manufacturer’s instructions on your package (usually 275°F/130°C for 15-30 minutes). Do not overbake or the red may darken. -
Cool down:
Allow the clay pieces to cool completely before handling. They are fragile when hot. -
Attach posts:
Apply a small dab of E6000 or strong super glue to the flat back of an earring post. Press it firmly onto the back of a watermelon slice. -
Secure the post:
For extra durability, place a small flattened ball of clay over the pad of the earring post (sandwiching it) and rebake for 10 minutes, or simply let the glue cure fully if you prefer the glue-only method. -
Glaze (optional):
If you want a ‘wet’ look, apply a thin coat of gloss glaze just to the red part of the watermelon, avoiding the rind for a nice matte contrast.
Bite Mark Detail
Use a small, scalloped cutter or the end of a straw to remove a ‘bite’ from the tip of one slice for a playful, eaten look.
Now you have a refreshing accessory perfect for a picnic or sunny day out


Citrus Slice Magnets
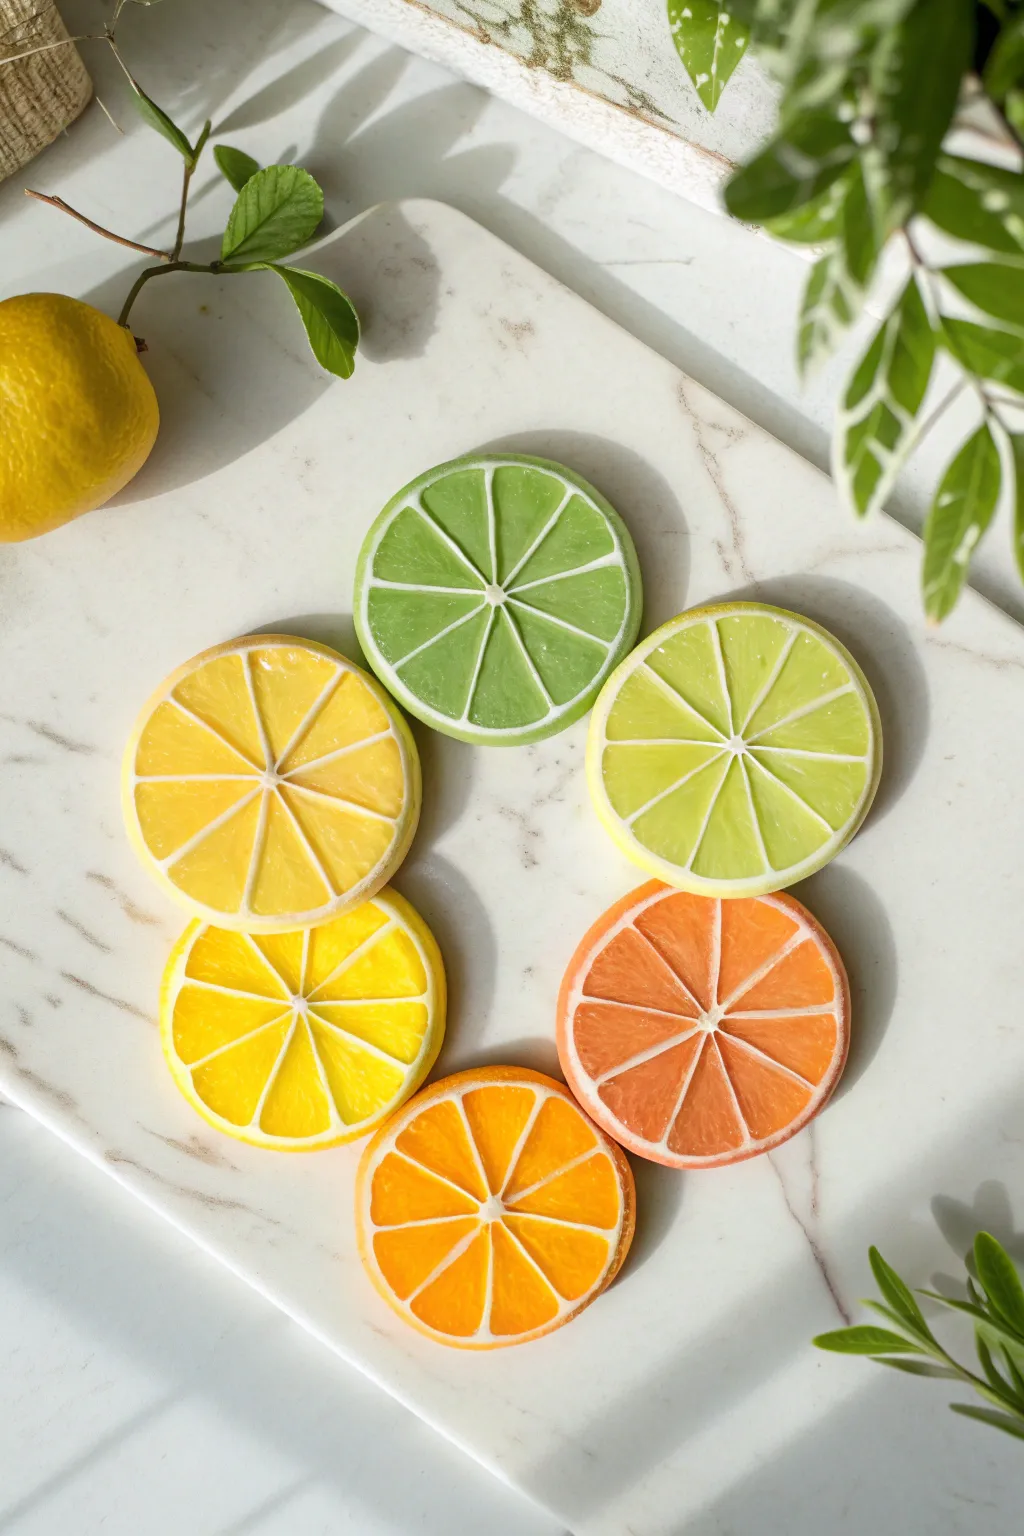
Brighten up your fridge or magnetic board with these incredibly juicy-looking citrus slices. This beginner-friendly project uses the translucency of polymer clay to mimic the delicate texture of real fruit, finishing with a fresh, glossy shine.
How-To Guide
Materials
- Translucent polymer clay (white or uncolored)
- Opaque white polymer clay
- Alcohol inks (Yellow, Green, Orange, Red)
- Round clay cutter (approx. 2-inch diameter)
- Liquid polymer clay (translucent)
- Gloss glaze or UV resin
- Needle tool or toothpick
- Acrylic rolling pin or pasta machine
- Craft knife or tissue blade
- Small circular magnets
- Strong craft glue (e.g., E6000)
Step 1: Preparing the Colors
-
Mix Translucent Base:
Start by conditioning your translucent polymer clay until it is soft and pliable. Divide it into four or five equal portions, depending on how many citrus varieties you want to make (lemon, lime, orange, grapefruit, etc.). -
Tint the Clay:
Add a few drops of alcohol ink to each translucent portion. Wear gloves for this part to avoid staining your hands. Knead the ink thoroughly into the clay until you achieve a consistent, vibrant color. Remember that the color will darken slightly after baking. -
Prepare the Pith:
Condition a block of opaque white clay. Roll this out into a thin sheet, about 1-2mm thick. This will serve as the pith (the white part) of your citrus fruit. -
Create the Rind:
Take a small pinch of your tinted translucent clay and mix it with a tiny bit of opaque white to make a creamy, opaque version of your fruit color. Roll this out into thin sheets similar to the white pith.
Juicy Texture Trick
Before baking, brush a tiny amount of liquid translucent clay over the textured segments. This settles into the needle marks and creates depth without losing the texture.
Step 2: Assembling the Cane
-
Form the Segments:
Take your main tinted translucent clay and roll it into a thick log. Pinch one side of the log along its entire length to create a teardrop or long triangle shape. This is the basic shape of a fruit segment. -
Cut to Size:
Cut this long triangular log into 8 equal lengths. These will become the individual wedges of your citrus slice. -
Wrap the Wedges:
Wrap the long sides of each triangular wedge with a thin layer of your white ‘pith’ clay. Trim the excess so the white only covers the sides, not the ends. -
Assemble the Circle:
Arrange the 8 wrapped wedges into a circle, pointing the sharp ends inward to meet in the center. Gently press them together so they adhere to one another. -
Add Outer Pith:
Wrap the entire assembled circle with a layer of the white clay sheet. Smooth the join line so it disappears. -
Add the Rind:
Wrap the circle one final time with the opaque colored sheet you prepared earlier (the rind color). This completes your citrus cane.
Make it a Cocktail Garnish
Skip the magnet! Drill a small hole near the rind before baking and add a jump ring to turn these into cute charms for wine glass markers or summer earrings.
Step 3: Slicing and Texturing
-
Reduce the Cane:
Gently squeeze and roll the cane to reduce its diameter until it matches the size of your round cutter (or your desired magnet size). I find it helps to let the cane rest for 15 minutes before slicing so it isn’t too soft. -
Slice the Discs:
Use a very sharp tissue blade to slice thin, even discs from your cane. Aim for about 1/4 inch thickness for sturdy magnets. -
Refine the Shape:
If the slicing distorted the round shape, use your round cutter to trim the edges perfectly circular. -
Create Texture:
Using a needle tool, gently tease the surface of the translucent segments. Poke and drag small lines radiating from the center to mimic the juice vesicles of real citrus. -
Bake:
Place your slices on a ceramic tile or baking sheet lined with parchment paper. Bake according to the manufacturer’s instructions for your specific brand of clay (usually around 275°F/130°C for 15-30 minutes).
Step 4: Finishing Touches
-
Cool and Clean:
Allow the slices to cool completely. If there are any rough edges or fingerprints on the back, you can lightly sand them with fine-grit sandpaper. -
Glossing:
Apply a thin layer of gloss glaze or UV resin over the top of the fruit slice. This enhances the transparency of the inner segments and gives that wet, juicy look shown in the photo. -
Attach Magnet:
Once the glaze is fully dry or cured, flip the slice over. Apply a dab of strong craft glue to the back and press your circular magnet firmly into place. -
Final Cure:
Let the glue set for at least 24 hours to ensure a strong bond before placing your new art on the fridge.
Enjoy the splash of color these realistic fruit slices bring to your kitchen decor

The Complete Guide to Pottery Troubleshooting
Uncover the most common ceramic mistakes—from cracking clay to failed glazes—and learn how to fix them fast.
Cute Sun Face Wall Hanging
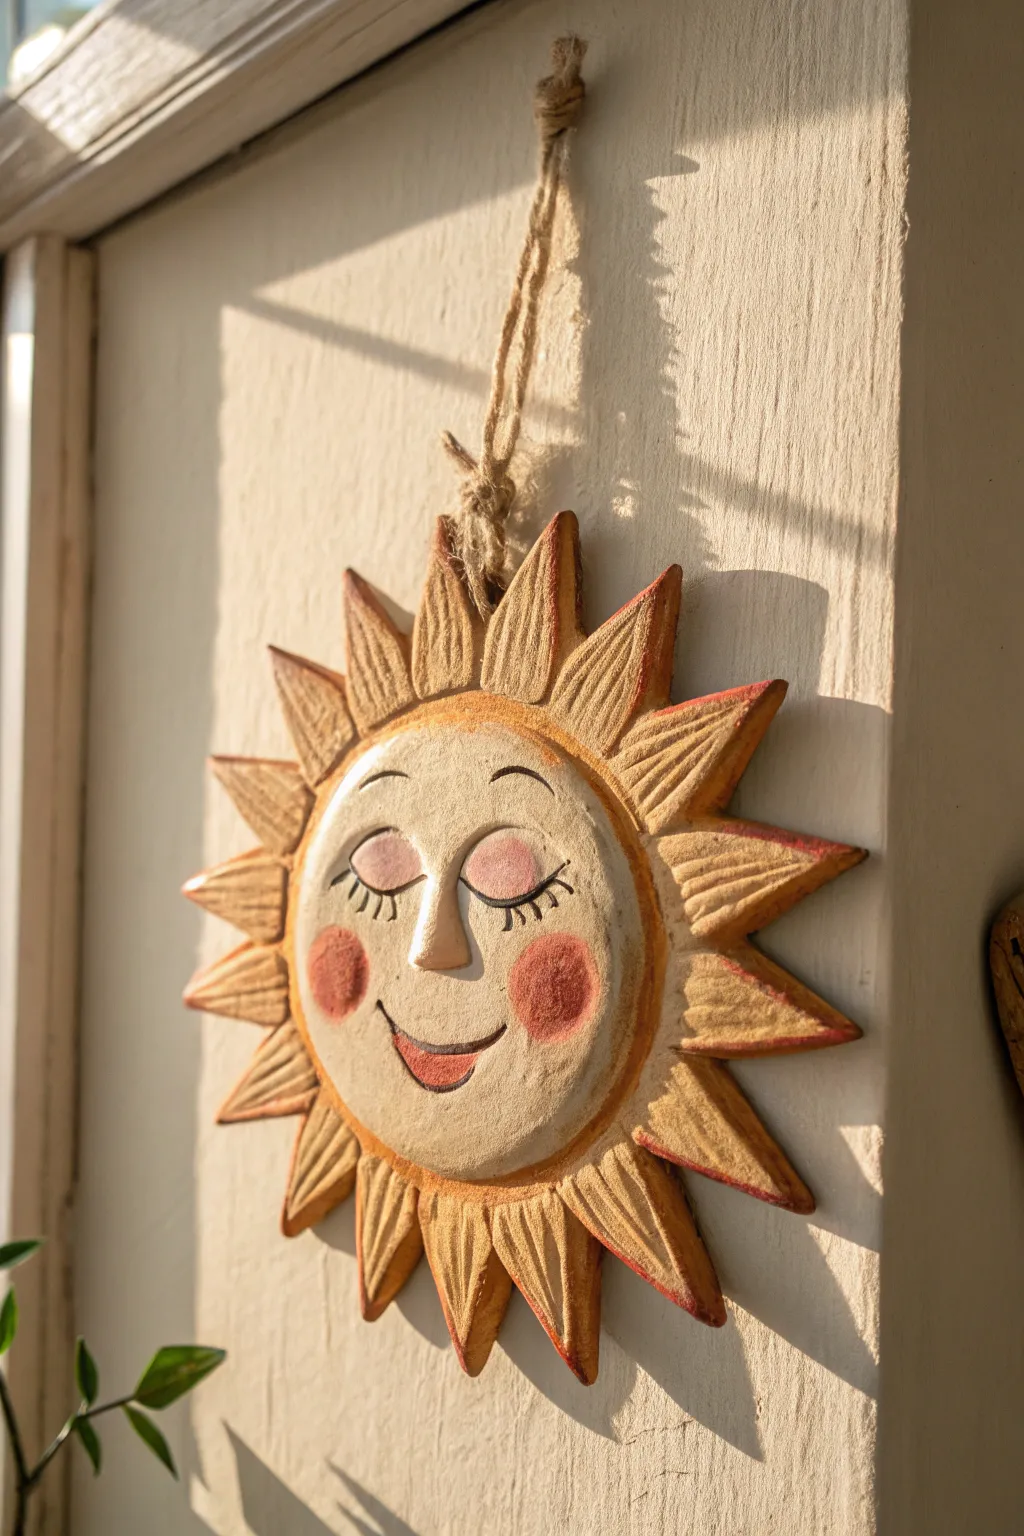
Bring the warmth of summer indoors with this charming, rustic sun face wall hanging. With its sleepy smile, textured rays, and gentle color palette, this project adds a touch of cheerful personality to any nook or cranny.
Detailed Instructions
Materials
- Air-dry clay (or polymer clay)
- Rolling pin
- Circle cutter or bowl (approx. 4-5 inches)
- Clay carving tools or a craft knife
- Ceramic sponge
- Water cup
- Acrylic paints (cream/light yellow, coral pink, dark terracotta, black)
- Small round paintbrushes
- Jute twine
- Straw or toothpick (for piercing holes)
- Fine-grit sandpaper
Step 1: Sculpting the Base
-
Prepare the Clay:
Start by kneading a large ball of air-dry clay until it is smooth and pliable. Roll it out on a flat surface to a thickness of about 1/4 to 1/2 inch, ensuring an even consistency. -
Cut the Central Face:
Use a circle cutter or place a bowl upside down on the clay to cut out a perfect circle for the sun’s face. Remove the excess clay but keep it close by for the rays. -
Create rays:
Re-roll your scraps and hand-cut roughly 12-16 elongated triangles for the sun rays. They don’t need to be identical; a little variation adds to the rustic charm. -
Attach the Rays:
Score the back of the circle’s edge and the base of each ray. Apply a dab of water or slip, then press the rays firmly onto the back of the circle, spacing them evenly around the circumference. -
Add Texture:
Once assembled, use a sculpting tool or a dull knife to press lines into each ray, radiating outward from the center. This creates that carved wood look seen in the photo. -
Prepare for Hanging:
At the tip of the topmost ray, use a straw or toothpick to poke a clean hole all the way through. Make sure it’s big enough for your twine to pass through later.
Step 2: Face Details
-
Sculpt the Nose:
Roll a small, triangular piece of clay and attach it to the center of the face using the score-and-slip method. Blend the edges smoothly into the cheek area so the nose rises naturally from the surface. -
Smooth the Surface:
Dip your ceramic sponge in water and gently wipe the face to remove any harsh fingerprints or bumps. You want a relatively smooth canvas for the facial features. -
Dry the Clay:
Allow your sun to dry completely. For air-dry clay, this usually takes 24-48 hours depending on humidity. Flip it halfway through to ensure the back dries evenly. -
Sand Edges:
Once fully hard, gently run fine-grit sandpaper over any rough edges on the rays or the back of the piece to give it a professional finish.
Fixing Cracks
If tiny hairline cracks appear while drying, don’t panic. Mix a tiny bit of fresh clay with water to make a paste and fill the gaps, then smooth over.
Step 3: Painting & Finishing
-
Base Coat:
Paint the central face area with a cream or very pale yellow acrylic paint. You may need two thin coats for opaque coverage. -
Warm the Rays:
Mix a slightly darker, golden-yellow or terracotta shade. Apply this to the rays using a ‘dry brush’ technique—dip your brush, wipe most paint off, and lightly sweep over the textured grooves to highlight the sculpting. -
Rosy Cheeks:
Dip a dry, round brush into coral pink paint. Dab off the excess and gently stipple two round circles onto the cheeks. The dry application makes them look soft and blushed rather than solid circles. -
Draw Facial Features:
Using a very fine liner brush and black paint, carefully paint two closed, curved eyelids. Add three small lashes to the outer corner of each eye. -
The Smile:
Paint a gentle U-shaped smile. Fill the bottom lip with a touch of diluted reddish-brown to give the mouth depth and character. -
Define the Edges:
Take a terracotta or burnt orange color and carefully outline the rim where the face meets the rays. This separation makes the face pop. -
Add the Hanger:
Cut a length of jute twine. Thread it through the hole in the top ray, tie a secure knot, and create a loop for hanging.
Add Sparkle
For a magical touch, mix a tiny amount of gold mica powder into your ray paint or lightly brush gold edges onto the tips of the sun rays.
Hang your cheerful sun near a window to catch the morning light and start every day with a smile
Seashell Impression Keepsake Discs
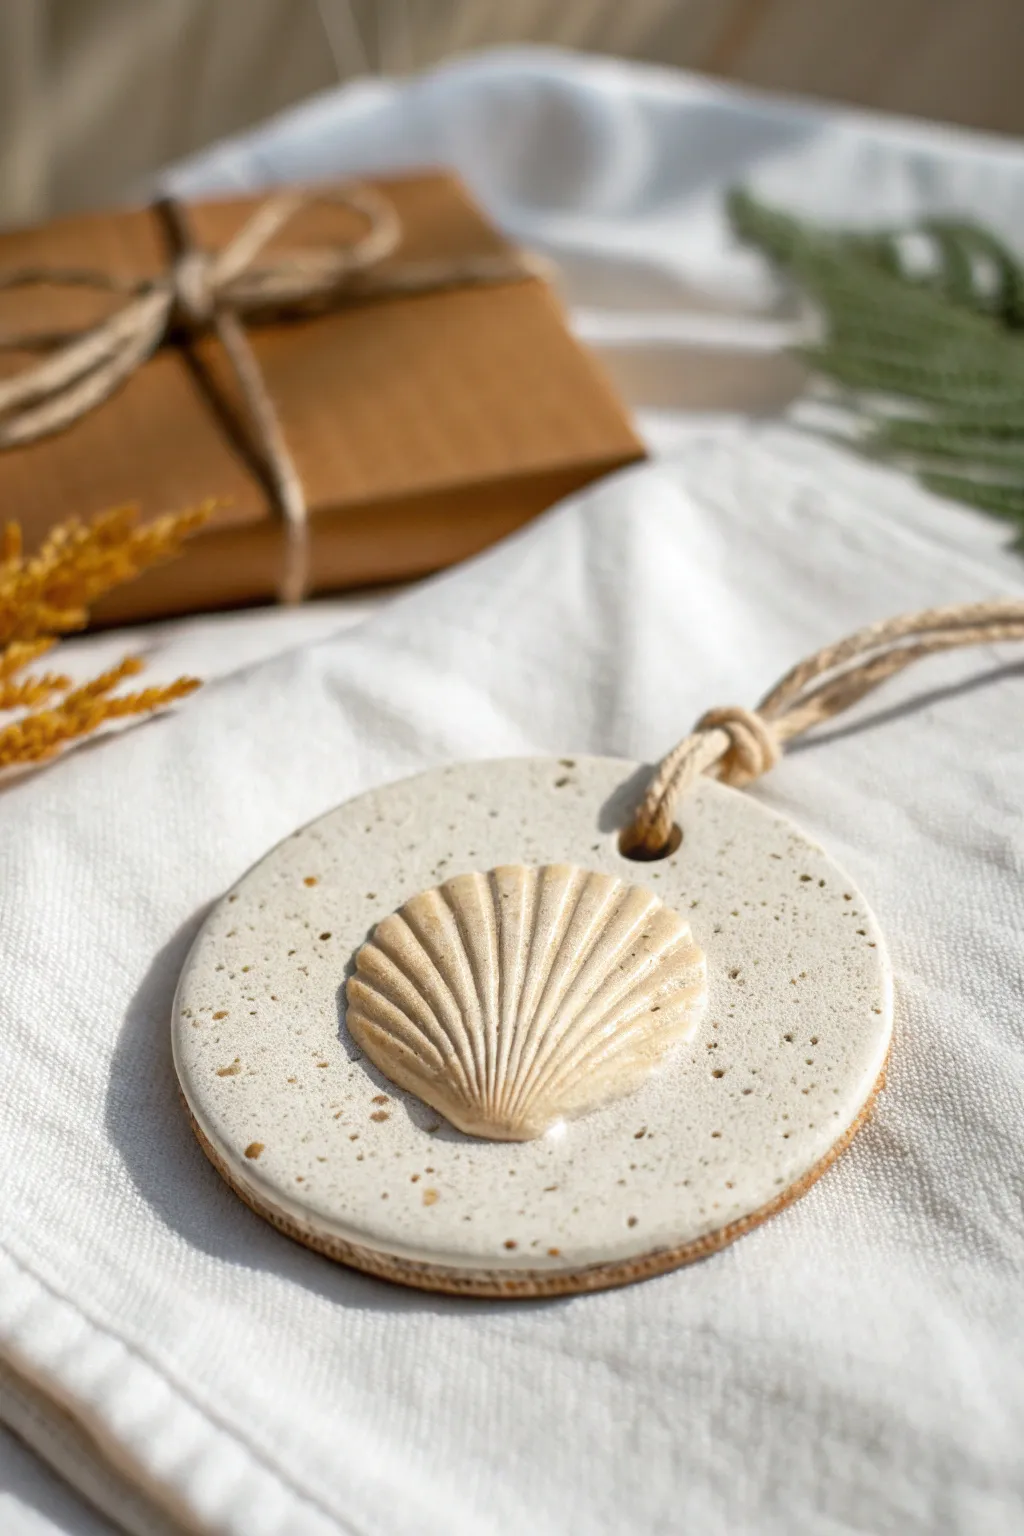
Capture the essence of a beach day with this elegant ceramic-style keepsake disc. Featuring a raised seashell motif and a speckled, sandy finish, this project brings a touch of coastal serenity to your home decor.
How-To Guide
Materials
- Air-dry clay (white or cream)
- Real seashell (scallop shape) or seashell silicone mold
- Rolling pin
- Circle cookie cutter (approx. 3-4 inches)
- Straw or small punch tool
- Sandpaper (fine grit)
- Acrylic paint (cream, beige, white)
- Coffee grounds or speckle medium
- Gloss varnish or resin
- Twine or jute cord
- Sponge or soft paintbrush
Step 1: Shaping the Clay Base
-
Condition the clay:
Begin by taking a handful of air-dry clay and kneading it in your hands until it becomes warm, soft, and pliable to prevent cracking. -
Roll it out:
Place the clay on a smooth, non-stick surface and use your rolling pin to flatten it into an even sheet, aiming for a thickness of about 1/4 inch. -
Cut the circle:
Press your circle cookie cutter firmly into the clay to create a clean, round disc, then gently peel away the excess clay from around the edges. -
Smooth the edges:
Dip your finger in a little water and run it along the cut edge of the circle to smooth out any roughness or sharp ridges left by the cutter. -
Create the hanging hole:
Use a straw or a small punch tool to create a hole near the top edge of the circle, ensuring it’s not too close to the rim to maintain strength.
Natural Texture Hack
Don’t have speckle paint? Mix fine pepper or dried tea leaves into your white paint for an organic, pottery-like finish.
Step 2: Creating the Seashell Motif
-
Form the shell anchor:
Roll a small ball of clay and flatten it slightly into a teardrop shape that roughly matches the size of your seashell. -
Attach the clay:
Score the center of your disc and the back of your teardrop piece, dab a little water on the scored areas, and press the clay firmly onto the center of the disc. -
Impress the shell:
Take your real seashell or mold. If using a real shell, lightly dust it with cornstarch to prevent sticking. Press it firmly and evenly into the added clay mound. -
Refine the edges:
Carefully lift the shell away. If the clay squished out around the shell shape, use a small modeling tool or a knife to trim the excess and smooth the transition between the shell relief and the flat disc. -
Let it dry completely:
Set the ornament aside on a flat surface to dry. I find that flipping it over halfway through the drying process helps keep the disc perfectly flat.
Fixing Warped Clay
If the edges curl up while drying, dampen the underside slightly and place a heavy book on top for a few hours to flatten it.
Step 3: Painting and Finishing
-
Sand for smoothness:
Once fully cured, use fine-grit sandpaper to gently buff the surface and edges, removing any imperfections. -
Mix the base coat:
Mix a warm white or cream acrylic paint. To achieve the speckled look seen in the photo, mix in a tiny pinch of dry used coffee grounds or a specialized speckle medium. -
Apply the speckled glaze:
Paint the top surface of the disc and the shell relief. Avoid painting the very bottom rim if you want to mimic the exposed stoneware look shown. -
Highlight the shell:
Mix a slightly darker beige or watered-down brown paint. lightly brush it over the shell grooves and quickly wipe the surface with a paper towel, leaving the darker color just in the recesses. -
Seal the surface:
Apply a coat of gloss varnish or a thin layer of resin over the painted areas to give it that shiny, ceramic-glaze appearance. -
Add the hanger:
Cut a length of natural jute twine. Fold it in half, push the loop through the hole from front to back, and pull the tails through the loop to create a lark’s head knot.
Now you have a beautiful piece of faux-ceramic art that perfectly preserves summer memories


What Really Happens Inside the Kiln
Learn how time and temperature work together inside the kiln to transform clay into durable ceramic.
Sandy Beach Trinket Dishes
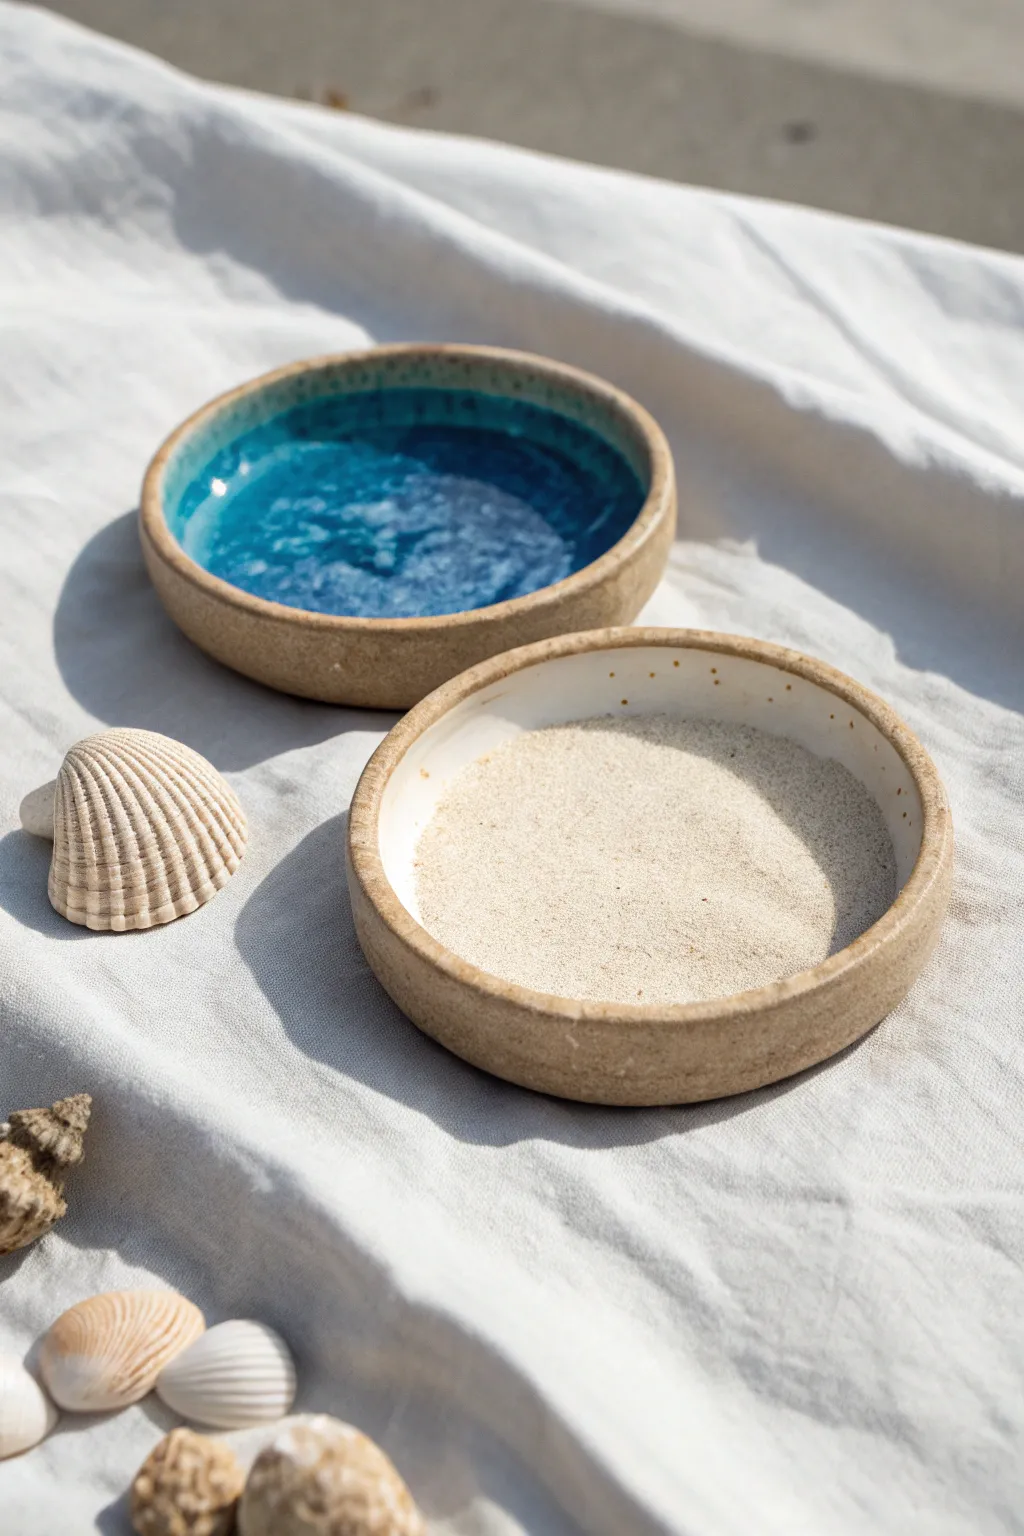
Capture the essence of a summer shoreline with these minimalist ceramic dishes that mimic the textures of sand and sea. Featuring speckled stoneware clay and custom glazes, this project creates a stunning contrast between a matte, sandy finish and a glossy, watery depth.
Detailed Instructions
Materials
- Speckled stoneware clay (mid-fire)
- Potter’s wheel (or rolling pin and slab mold for hand-building)
- Rib tool (wood or metal)
- Loop tool for trimming
- Sponge
- Wire cutter
- White matte glaze (for the ‘sand’ dish)
- Glossy turquoise or teal crackle glaze (for the ‘sea’ dish)
- Small paintbrush
- Kiln
- Wax resist (optional)
Step 1: Shaping the Clay Body
-
Wedge the clay:
Begin by thoroughly wedging about 1 pound of speckled stoneware clay to remove any air bubbles and ensure the particles are aligned properly. -
Center on the wheel:
Secure your clay ball onto the wheel head and center it using steady pressure and water for lubrication. -
Open the form:
Push your thumbs into the center of the spinning clay, opening it up but leaving about a half-inch thick floor for a sturdy base. -
Pull the walls:
Gently pull the clay outward and slightly upward to create a low, shallow dish shape. Aim for straight vertical walls about 1 inch high. -
Compress the floor:
Use a straight wooden rib or just your fingers to compress the floor of the bowl flat; this prevents cracking during firing. -
Refine the rim:
Use a chamois or a damp sponge to smooth the rim, keeping it slightly rounded and substantial rather than sharp and thin. -
Wire off:
Run a wire cutter underneath the pot to separate it from the wheel head, then set it aside until it reaches leather-hard consistency.
Uneven Glaze?
If your pool of glaze looks too thick or cloudy after firing, apply thinner layers next time. A pooled glaze that is too thick can sometimes crawl or bubble.
Step 2: Trimming and Finishing
-
Center for trimming:
Once leather-hard, place the dish upside down on the wheel. Secure it with small coils of clay. -
Trim the excess:
Using a sharp loop tool, trim away excess clay from the bottom edge to give the dish a slight lift and a clean vertical profile. -
Create a distinct foot:
Carve a shallow foot ring on the underside. This helps the piece sit flat and adds a professional touch. -
Smooth the surface:
I like to run a slightly damp sponge over the trimmed areas to bring the grog (the speckled texture) back to the surface before drying. -
Bisque fire:
Allow the dishes to dry completely (bone dry) before loading them into the kiln for a bisque firing to cone 04.
Texture Trick
For the ‘sand’ dish, try mixing a tiny amount of actual sand or extra grog into the white glaze for a literal gritty texture.
Step 3: Glazing the Elements
-
Clean the bisque:
Wipe the fired bisque ware with a clean, damp sponge to remove any kiln dust that could prevent the glaze from adhering. -
Glaze the ‘Sea’ dish:
Pour a glossy turquoise or teal crackle glaze into the center of the first dish. Swirl it to coat the entire interior floor. -
Detail the rim:
Dip just the very top rim of the ‘Sea’ dish into the glaze, or carefully paint it on, leaving the exterior raw to show off the speckled clay. -
Glaze the ‘Sand’ dish:
For the second dish, brush a coat of matte white glaze on the interior floor. Keep the application slightly uneven to mimic natural sand variation. -
Leave the exterior raw:
Ensure the exterior walls of both dishes remain unglazed. The bare stoneware provides that earthy, sandy texture essential to the look. -
Wipe the foot:
Use a clean sponge to wipe absolutely all glaze off the bottom foot ring so it doesn’t fuse to the kiln shelf. -
Final Fire:
Fire the pieces again to the maturation temperature of your specific clay and glaze (usually cone 5 or 6 for stoneware).
Once cooled, fill these beautiful vessels with sea glass or shells to complete your coastal vignette
Flip-Flop and Sunglasses Charms
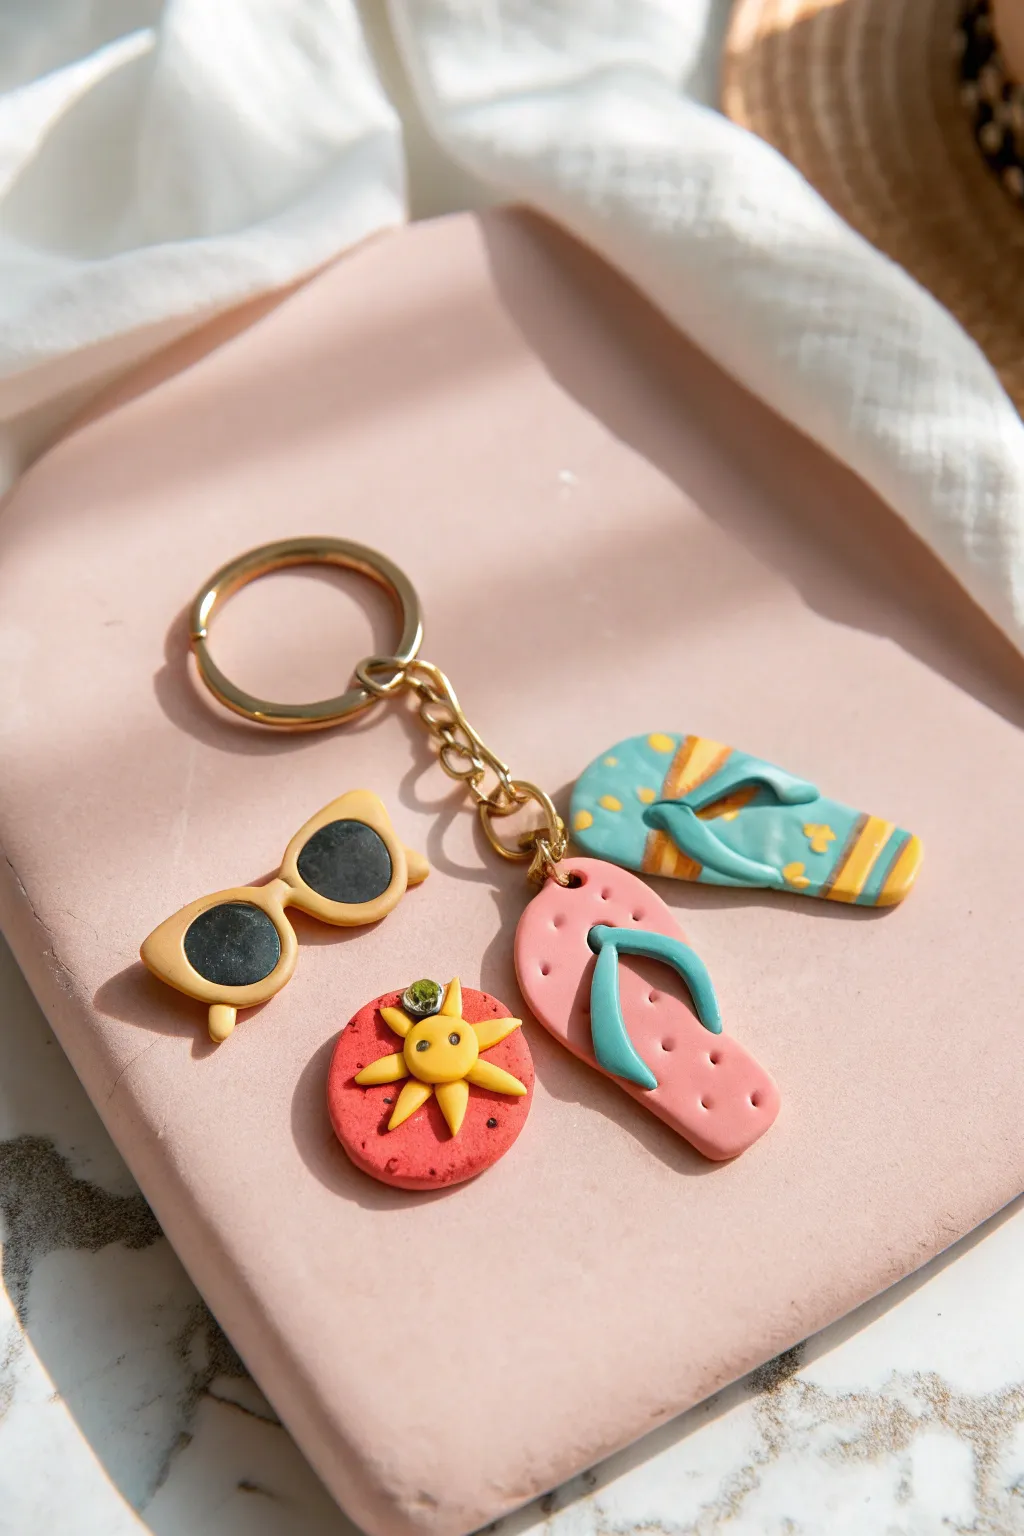
Capture the essence of a perfect beach day with this charming polymer clay keychain set. Featuring tiny flip-flops, retro sunglasses, and a smiling sun, this project packs vibrant summer colors into delightful miniature accessories.
Step-by-Step
Materials
- Polymer clay (teal, bright yellow, coral pink, bright red, black)
- Clay roller or pasta machine
- X-acto knife or clay blade
- Needle tool or toothpick
- Small circle cutter (approx. 1 inch)
- Dotting tool or ball stylus
- Headpins or eye screws (gold)
- Gold jump rings
- Gold keychain ring with chain
- Needle-nose pliers
- Oven and baking sheet
Step 1: Sculpting the Flip-Flops
-
Shape the Bases:
Condition the teal and coral pink clay until soft. Roll them out into slabs about 3-4mm distinct. Use your blade to cut out two oval, bean-like shapes for the soles of the flip-flops, slightly wider at the top and narrower at the heel. -
Add Stripes (Teal Flip-Flop):
Roll out a very thin sheet of yellow clay. Cut two narrow strips and press them gently across the lower half of the teal sole to create beachy stripes. -
Decorate the Sole (Teal Flip-Flop):
Add tiny yellow dots or flower shapes near the toe area using tiny bits of clay, pressing them flat so they merge with the sole. -
Texture the Sole (Pink Flip-Flop):
For the pink flip-flop, take a needle tool and gently poke small indentations in a pattern around the edge of the sole to mimic stitching or rubber texture. -
Create the Straps:
Roll thin snakes of teal clay. Cut two short pieces for each shoe. Join them in a ‘V’ shape. -
Attach the Straps:
Press the point of the ‘V’ into the top center of the sole. Curve the ends down to the sides of the sole and press firm to attach, creating the classic thong sandal look. -
Secure Hardware:
Carefully insert a headpin or eye screw into the top center of each flip-flop (through the strap connection point or just above it) while the clay is still raw.
Step 2: Making the Accessories
-
Form the Sunglasses Base:
Roll out yellow clay to about 3mm thick. Cut a modified figure-8 shape or two connected ovals to form the frames. -
Add Lenses:
Roll out black clay very thinly. Cut two small ovals slightly smaller than your yellow frames and press them gently into the center of the frames. -
Sculpt Arms:
Create two small tapered logs of yellow clay for the temple arms. Attach them to the outer corners of the frames, folding them slightly inward as if the glasses are folded. -
Create the Sun Charm Base:
Use the small circle cutter to create a disc from red clay. Texture the surface by lightly dabbing it with an old toothbrush or sandpaper for a sandy finish. -
Add the Sun Face:
Form a small ball of yellow clay and flatten it onto the center of the red disc. Roll tiny tear-drop shapes for sun rays and arrange them around the central yellow face. -
Detail the Face:
Use a needle tool to poke two eye holes and draw a small smile on the yellow sun. I like to add a tiny rhinestone or crystal at the top for extra sparkle. -
Insert Hardware:
Insert eye screws into the top corner of the sunglasses and the top edge of the red sun disc.
Loose Eye Screws?
If a screw feels loose after baking, unscrew it, add a drop of superglue or E6000 to the threads, and screw it back in for a permanent hold.
Step 3: Baking and Assembly
-
Bake:
Arrange all charms on a baking sheet lined with parchment paper. Bake according to your clay manufacturer’s instructions (usually 275°F/135°C for 15-30 minutes). -
Cool Down:
Allow the pieces to cool completely before handling so they harden fully. -
Attach to Chain:
Open your gold jump rings with pliers. Thread the eye screw loops of your charms onto the jump rings. -
Final Assembly:
Attach the jump rings to various links on the main keychain chain, spacing them out so they dangle nicely without tangling.
UV Resin Finish
Coat just the ‘lenses’ of the sunglasses and the flip-flop straps with UV resin for a realistic, wet-look shine that contrasts with the matte clay.
Clip this adorable set onto your tote bag and enjoy those summery vibes all year round

TRACK YOUR CERAMIC JOURNEY
Capture glaze tests, firing details, and creative progress—all in one simple printable. Make your projects easier to repeat and improve.
Surfboard Bag Tags
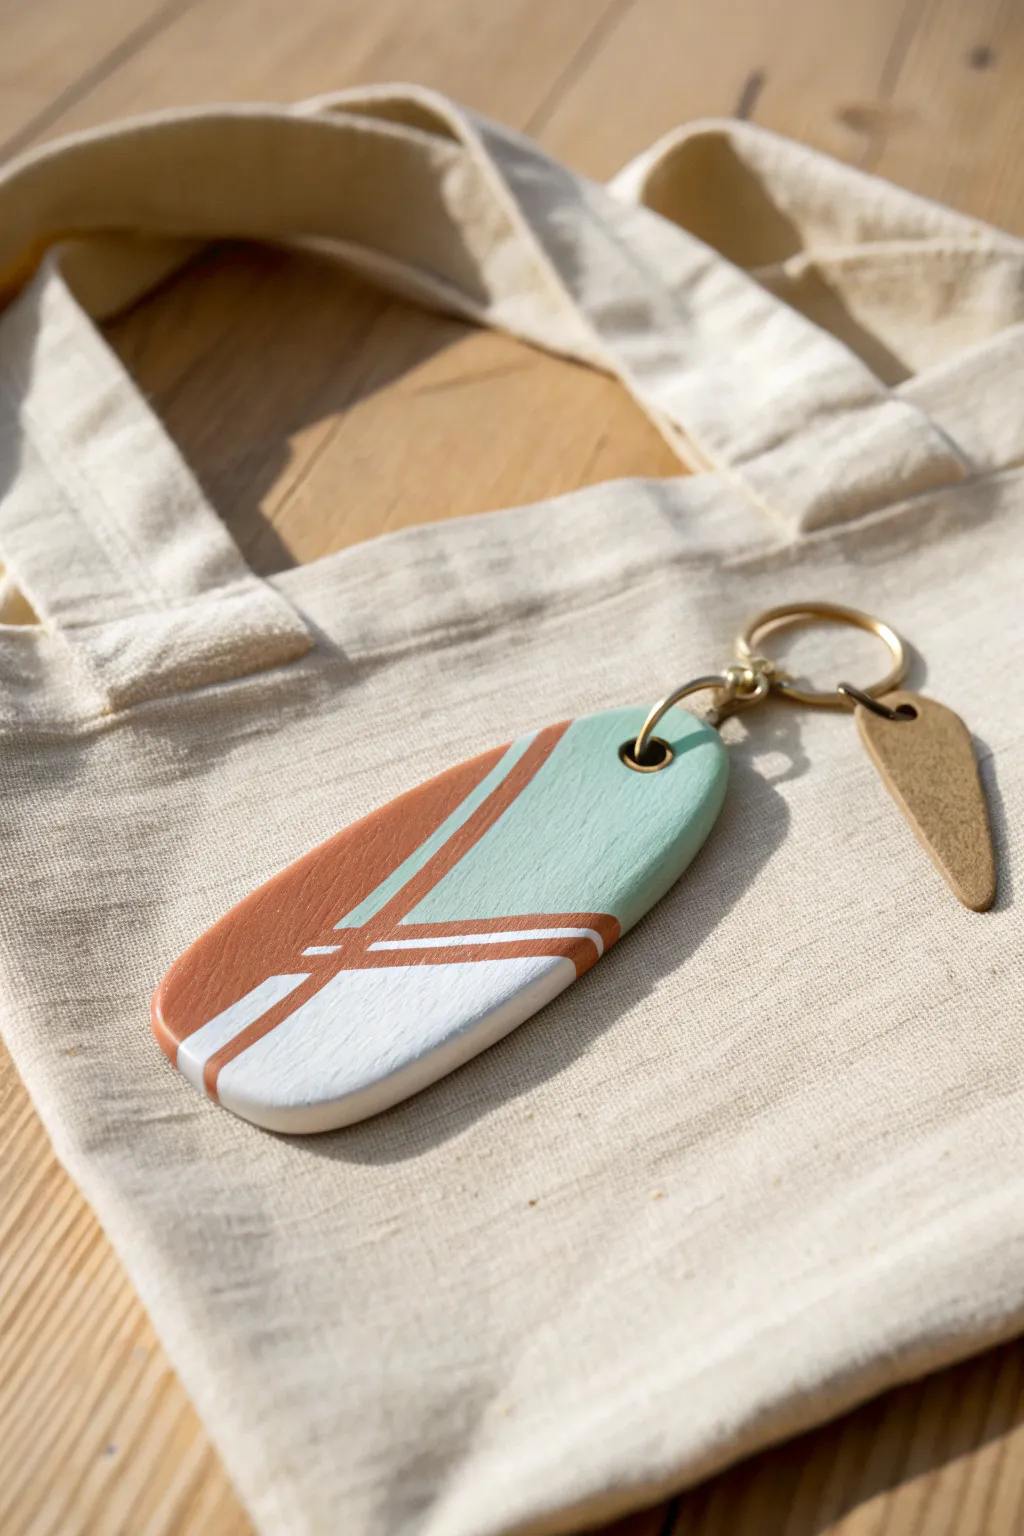
Capture the laid-back vibes of summer with these geometric surfboard bag tags that bring a touch of the coast to any tote. With a striking palette of terracotta, mint, and white, this simple clay project turns a basic shape into a stylish accessory.
Step-by-Step Tutorial
Materials
- White polymer clay or air-dry clay
- Rolling pin or smooth glass jar
- Craft knife or clay cutting blade
- Sandpaper (fine grit)
- Acrylic paints (Terracotta, Mint Green, White)
- Fine detail paintbrush
- Washi tape or masking tape (for crisp lines)
- Gold jump rings (10mm)
- Gold keychain keyring
- Small scrap of leather or faux leather (optional)
- Glaze or sealant (matte or glossy)
- Pencil and paper (for template)
Step 1: Shaping the Board
-
Draft your template:
Sketch a simple, elongated oval shape on a piece of paper to mimic a classic surfboard silhouette. Aim for about 3 inches in length for a substantial tag. Cut this paper template out to use as a guide. -
Condition the clay:
Take a portion of white clay and knead it until it’s soft and pliable. Warm hands make this process much faster, ensuring the clay won’t crack during rolling. -
Roll it out:
Roll the clay onto a smooth, non-stick surface until it is an even thickness, roughly 1/4 inch thick. You want it sturdy enough to hang on a bag without snapping. -
Cut the shape:
Place your paper template onto the rolled clay. Using a sharp craft knife, carefully trace around the edge of the paper to cut out your surfboard shape. -
Smooth the edges:
Dip your finger in a little water (for air-dry clay) or baby oil (for polymer clay) and gently run it along the cut edges to round them off and remove any sharp angles. -
Create the hole:
Use a straw or a clay tool to punch a hole near the top, rounded end of the surfboard. Make sure the hole is not too close to the edge to prevent tearing later. -
Cure or dry:
According to your specific clay’s packet instructions, either bake the piece in an oven (polymer) or let it sit in a dry, ventilated area for 24-48 hours (air-dry). -
Sand for perfection:
Once fully cured and cooled, use fine-grit sandpaper to buff the surface and edges. This ensures the paint will glide on smoothly.
Clean Lines
Burnish the edges of your masking tape with your fingernail before painting. This extra pressure guarantees that absolutely no paint seeps underneath.
Step 2: Painting the Design
-
First masking layer:
To get those sharp geometric lines, apply strips of washi tape across the surfboard. Press down firmly to prevent paint bleed. Section off a large diagonal area for your first color. -
Apply mint green:
Paint the upper section with the mint green acrylic paint. Apply thin, even coats, letting them dry in between, rather than one thick gloopy coat. -
Shift the tape:
Once the green is completely dry, remove the tape. Re-apply new tape to mask off the green area and define the section for the terracotta color, leaving a thin strip of unpainted white space between them. -
Apply terracotta:
Paint the lower diagonal section with the terracotta or rust-orange paint. I like to use a flat brush here to get good coverage near the taped edges. -
Freehand details:
If you want the white lines to be painted rather than raw clay, use a very fine liner brush and white acrylic to paint thin intersecting lines over the colored sections, following the geometric angles. -
Seal the deal:
After the paint is bone dry, apply a coat of varnish. A matte varnish gives it a modern, ceramic look, while a gloss varnish makes it look like a polished surfboard.
Step 3: Final Assembly
-
Attach hardware:
Open a large gold jump ring using two pairs of pliers. Thread it through the hole in your clay surfboard. -
Add the leather accent:
Cut a tiny teardrop shape from a scrap of leather and punch a hole in it. Slide this onto the jump ring alongside the surfboard for extra texture. -
Secure the keyring:
Attach the main keyring loop to the jump ring, then close the jump ring securely so there is no gap for the tag to slip through.
Make It Glossy
Cover the painted surface with a layer of UV resin and cure it under a UV lamp. This creates a durable, glass-like dome that mimics real fiberglass.
Clip this onto your beach tote and enjoy the handmade summer style you’ve created
Pool Float Donut Charms
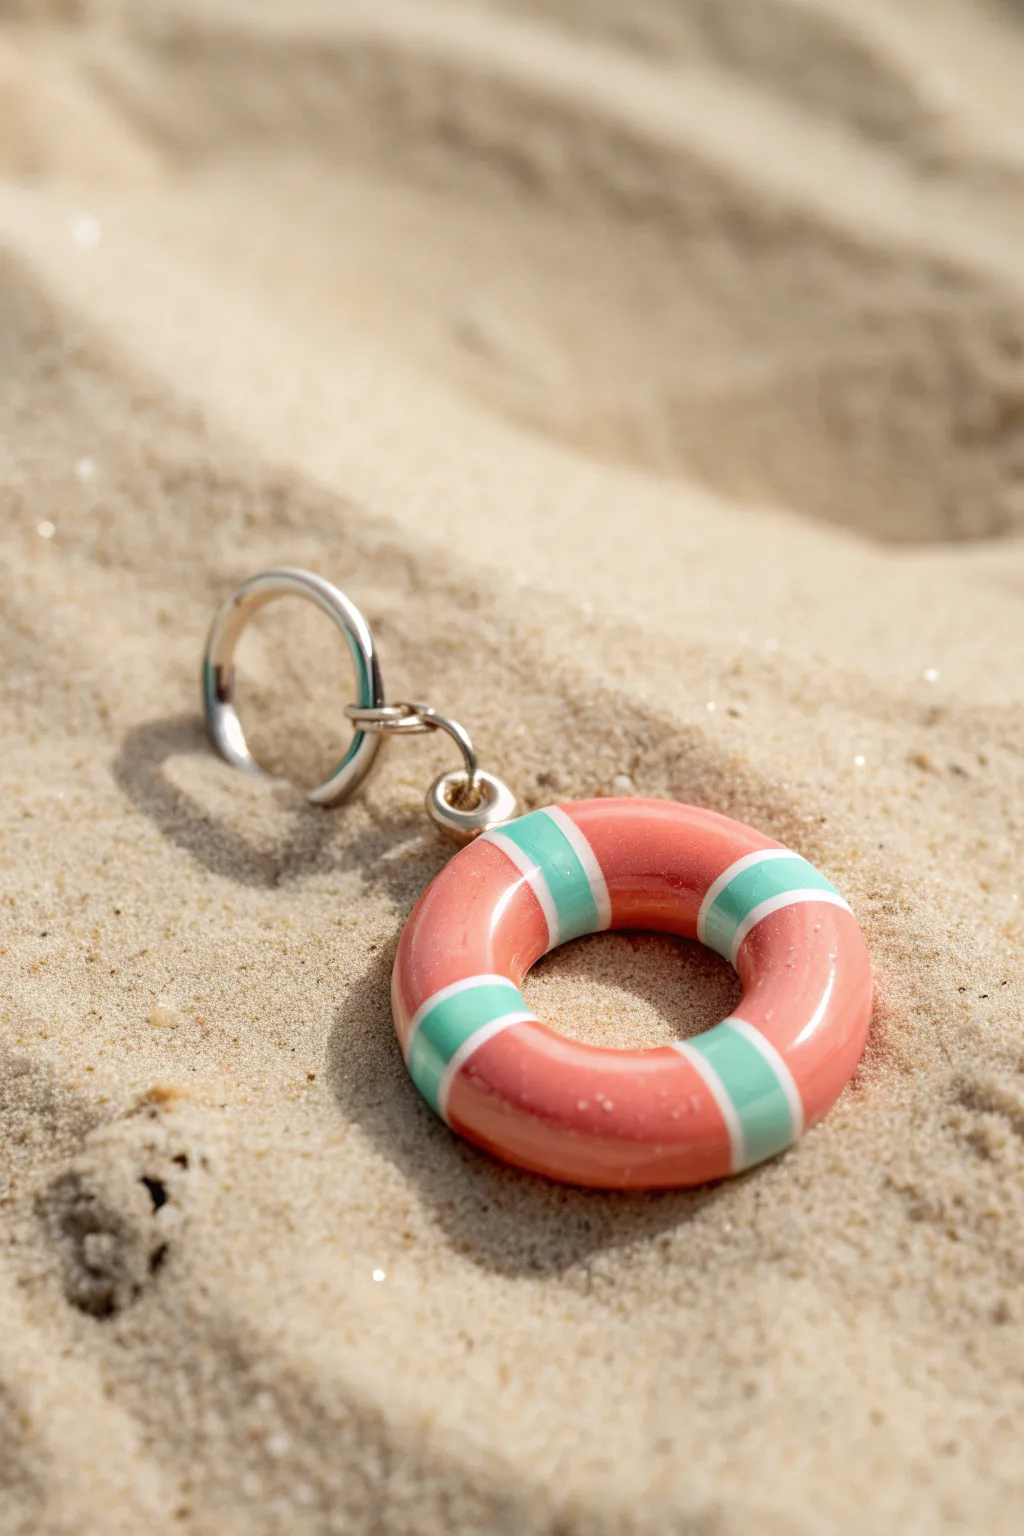
Capture the spirit of a day at the beach with this adorable polymer clay charm that mimics a vintage life preserver. The combination of coral pink and teal stripes under a thick, glossy coat gives it a durable, high-end finish perfect for your keys.
Step-by-Step
Materials
- Polymer clay (Coral/Salmon Pink)
- Polymer clay (Teal/Mint Green)
- Polymer clay (White)
- Acrylic roller or pasta machine
- Circle cutters (various small sizes)
- Needle tool or blade
- Eye pin or screw eye
- Jump ring and split ring keychain finding
- UV resin or polyurethane gloss varnish
- UV lamp (if using resin)
- Small paintbrush
- Baking tile or parchment paper
- Oven
Step 1: Forming the Float Base
-
Condition the base clay:
Start by taking a chunk of your coral pink polymer clay and kneading it in your hands until it becomes soft, pliable, and free of cracks. -
Roll the main coil:
Roll the conditioned clay into a smooth, even log or snake on your work surface. Aim for a thickness of about 1/2 inch to 3/4 inch, depending on how chunky you want your final charm. -
Form the ring:
Gently curve the log into a circle, bringing the two ends together. Slice through both overlapping ends simultaneously with a blade to create a clean, flush join, then smooth the seam with your finger so it disappears. -
Refine the shape:
Once connected, gently pat and round out the ring to ensure it looks like an inflated tube rather than a flat donut. I like to gently press the center with a smaller tool to maintain the hole’s roundness.
Step 2: Adding the Stripes
-
Prepare striping colors:
Roll out your white and teal clay into very thin sheets. You can use a pasta machine on a low setting or an acrylic roller for this. -
Cut the accent strips:
Using a sharp blade, cut narrow strips of the teal clay (about 5mm wide) and slightly narrower strips of the white clay (about 1-2mm wide). -
Place the teal bands:
Lay a teal strip across the pink ring at four equidistant points (12, 3, 6, and 9 o’clock positions). Gently wrap the strip around the tube and trim the excess on the underside or inside edge for a clean look. -
Add white borders:
Take your tiny white strips and place one on each side of every teal band. This crisp border really gives it that classic pool float aesthetic. -
Smooth the seams:
very gently roll the entire ring on your work surface just once or twice to help embed the stripes into the base clay so they don’t look like they are sitting on top.
Uneven Stripes?
If your stripes warp while wrapping, chill the clay strips in the fridge for 5 minutes first. Cooler clay stretches less and holds its shape better.
Step 3: Hardware and Finishing
-
Insert the hardware:
choose a spot between the stripes and push a screw eye or eye pin into the outer edge of the ring. If using an eye pin, trim it short and add a dab of liquid clay or bake-and-bond for extra security. -
Bake the charm:
Place the charm on a ceramic tile or parchment paper. Bake according to the manufacturer’s instructions for your specific brand of clay (usually around 275°F/130°C for 15-30 minutes). -
Cool down:
Allow the piece to cool completely before handling. It will be slightly soft when hot but hardens as it returns to room temperature. -
Apply the gloss:
For that wet, pool-side look seen in the photo, brush on a generous layer of UV resin or high-gloss polyurethane varnish. Ensure you cover the stripes and crevices evenly. -
Cure or dry:
If using UV resin, cure it under a UV lamp for 2-3 minutes until hard and tack-free. If using varnish, let it air dry in a dust-free area. -
Assemble the keychain:
Open a jump ring using two pliers (twist, don’t pull apart) and thread it through the eye pin on your charm. Connect this to the larger split ring keychain finding and close the jump ring securely.
Make it Shine
Add super fine iridescent glitter into your UV resin or glaze before applying it. It creates a subtle, sun-kissed sparkle that looks like wet plastic.
Attach your new floaty charm to your beach bag and enjoy the summer vibes all year round
Ocean Animal Buddy Minis
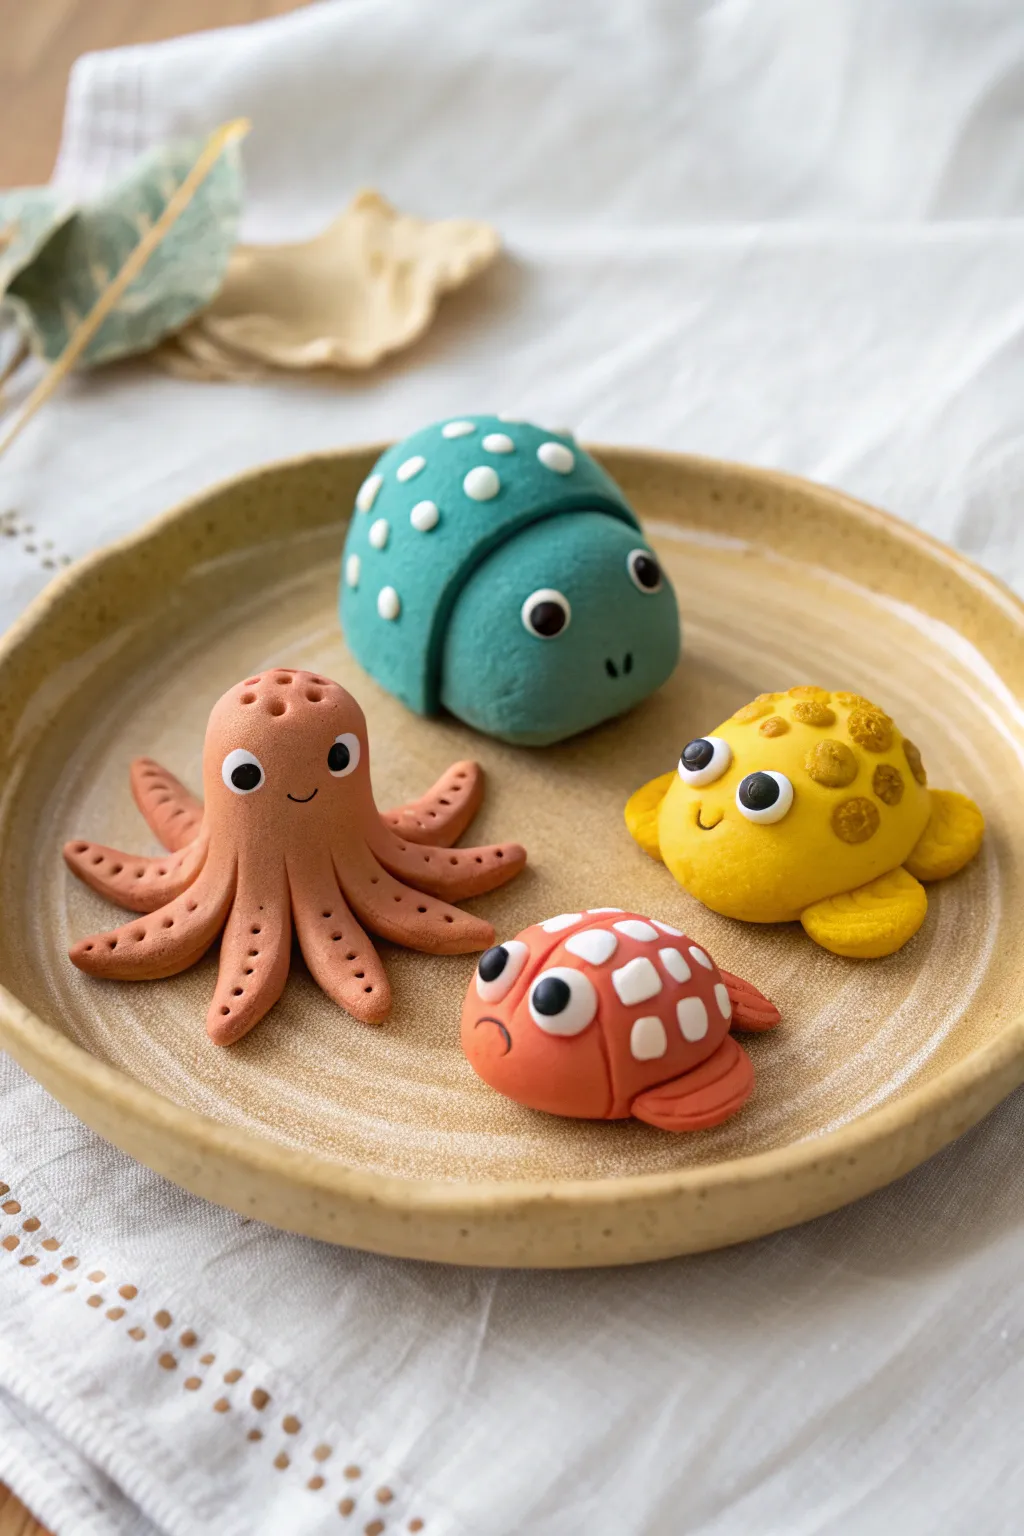
These adorable miniature sea creatures are perfect for a summer afternoon craft session, bringing a splash of seaside charm to your desk or shelf. Using simple shapes and vibrant polymer clay, you’ll sculpt a cheerful octopus, a spotted turtle, a shy fish, and a gentle snail that look almost like sweet marzipan treats.
How-To Guide
Materials
- Polymer clay in coral pink, sunny yellow, teal blue, tangerine orange, and white
- Small amount of black polymer clay
- Ball stylus tools (various sizes)
- Needle tool or toothpick
- Clay roller or acrylic rolling pin
- Flexible clay blade or craft knife
- Baking sheet and parchment paper
- Ceramic plate for display (optional)
Step 1: Sculpting the Happy Octopus
-
Form the base:
Start with a walnut-sized ball of coral pink clay. Gently roll it into a smooth teardrop shape, keeping the bottom wider for the tentacles and the top rounded for the head. -
Create the tentacles:
Flatten the wider bottom portion slightly. Using your craft knife or blade, make eight cuts radiating from the center outwards, like cutting a pizza, but only go halfway up the body. -
Shape the legs:
Gently pull and roll each cut section between your fingers to round them into distinct tentacle shapes. Curl the tips slightly upward for movement. -
Add suckers:
Use a small ball tool or a dull toothpick to press a line of tiny indentations along the length of each tentacle to mimic suction cups. -
Detail the head:
Poke a few tiny holes on the very top of the head for texture. Add two flat white clay circles for eyes and top them with tiny black clay pupils. Carve a small ‘u’ shape for a smile.
Clean Clay Pro-Tip
White clay picks up dust easily! Always wash your hands or use baby wipes before handling the white clay for the eyes and dots to keep those details bright.
Step 2: Crafting the Spotted Turtle
-
Shape the body:
Roll a ball of yellow clay and flatten it slightly to create a dome shape for the shell. This serves as the main body. -
Make the flippers:
Create four small, flattened teardrop shapes from the same yellow clay. Attach two near the front and two near the back, pressing the seams underneath the shell to blend. -
Create shell spots:
Take small pinches of a slightly darker yellow or orange-yellow clay. Roll them into tiny balls, flatten them, and press them all over the domed shell. -
Add texture:
I like to use a clean piece of sponge or a textured tool to gently tap the spots, giving them a pitted, realistic finish. -
Finalize the face:
Attach two large white clay balls to the front of the dome for eyes, adding black pupils. Use a needle tool to etch a small, friendly smile.
Step 3: Forming the Gentle Snail & Fish
-
Shape the teal snail shell:
Roll teal blue clay into a large, smooth egg shape. Gently indent a groove about one-third of the way from one end to separate the ‘head’ area from the ‘shell’ back. -
Decorate the snail:
Roll tiny balls of white clay and press them onto the back portion to create a polka-dot pattern. Add the eyes low on the front section. -
Build the fish body:
Form a tangerine orange oval. Pinch one end slightly to define the tail area. -
Add fish scales:
Create several small, flat squares of white clay. Press them onto the fish’s back in a grid pattern to suggest scales. -
Complete the fish details:
Attach small orange fins to the sides and tail. Add the tell-tale white and black eyes, and use a tool to carve a small frown or neutral mouth for character. -
Bake the buddies:
Arranged your finished creatures on parchment paper. Bake according to your brand of polymer clay instructions (usually 275°F/135°C for 15-30 minutes).
Glossy Level-Up
After baking and cooling, apply a coat of UV resin or water-based gloss glaze specifically to the eyes. It gives them a ‘wet’ look that makes the characters come alive.
Once cooled, arrange your new ocean friends on a desk or gift them to someone who needs a smile
Coral-Inspired Desk Decor
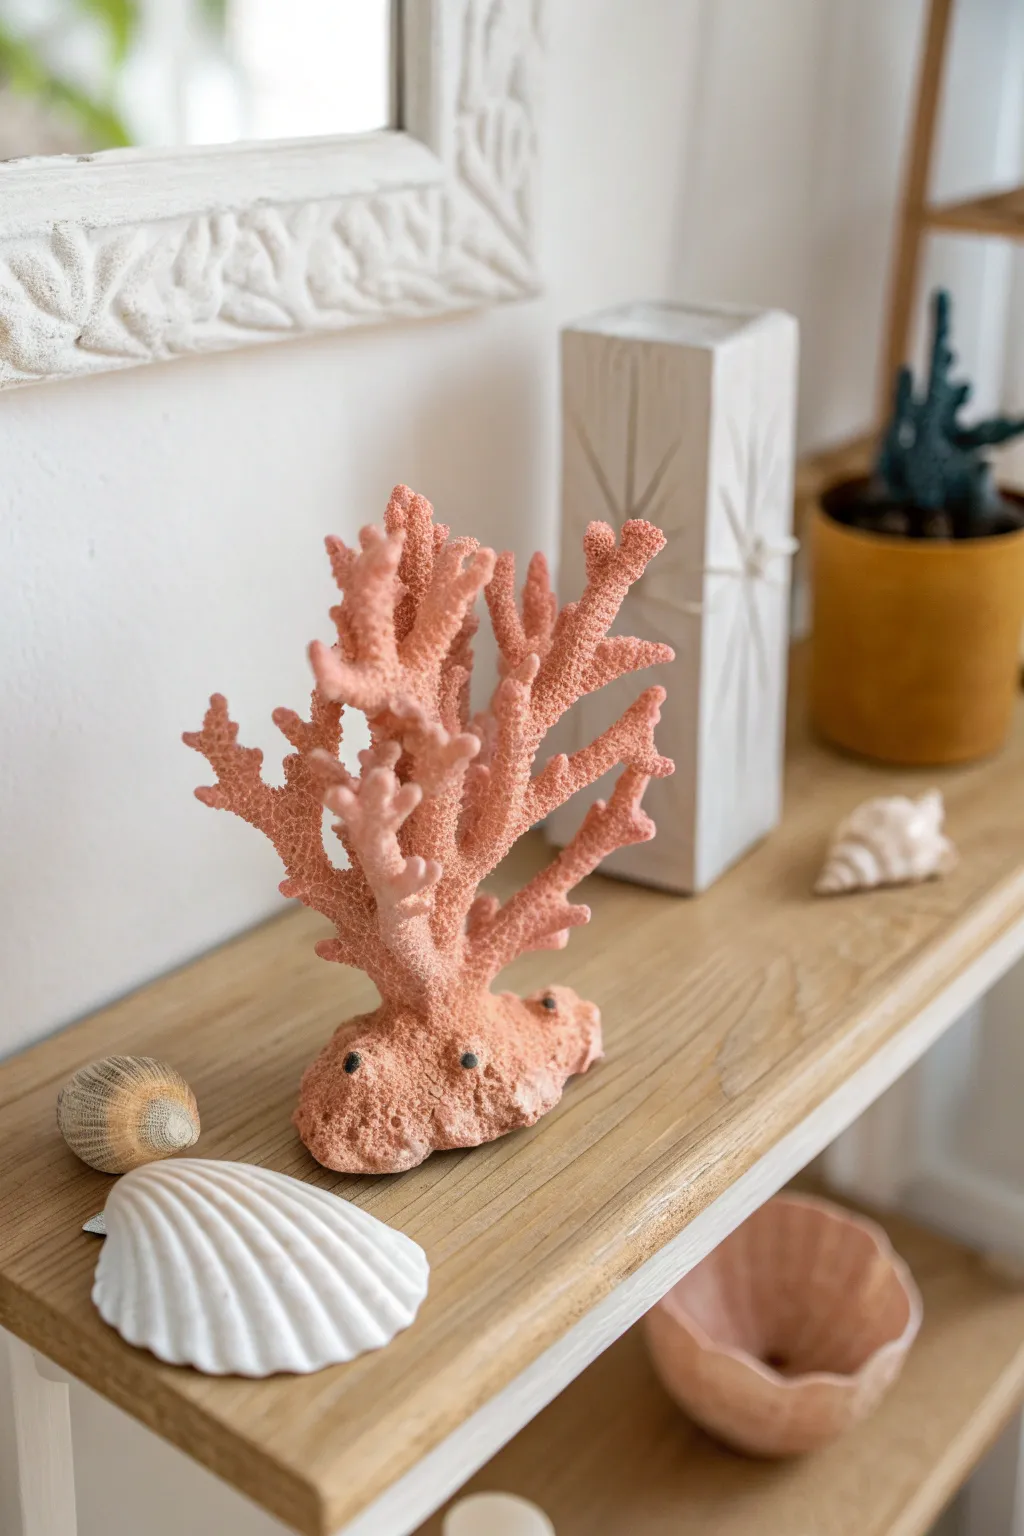
Bring the serene beauty of a reef to your shelf with this textured coral sculpture, perfect for summer styling. Using air-dry or polymer clay, you’ll create an organic, branching form with a realistic porous surface that looks surprisingly like the real thing.
Step-by-Step Guide
Materials
- Air-dry clay or oven-bake polymer clay (white or terracotta)
- Aluminum foil
- Wire (20-gauge for armature)
- Texture tools (stiff toothbrush, needle tool, or crumpled foil)
- Pink acrylic paint (pale coral shade)
- White acrylic paint (for dry brushing)
- Small sea sponge or stiff paintbrush
- Matte sealant spray
Step 1: Building the Armature
-
Form the base:
Start by creating a stable base for your coral. Crumple aluminum foil into a rough, irregular mound shape, flattening the bottom so it sits securely on your work surface. -
Wire structure:
Cut several lengths of wire, ranging from 4 to 8 inches. These will become the main branches of your coral. -
Insert wiring:
Poke the wires into your foil base, arranging them so they fan out slightly. Twist a few shorter wires onto the longer main stems to create secondary branches. -
Secure the form:
Wrap small bits of foil around the base of the wires to secure them tightly to the mound. The structure doesn’t need to be pretty, just stable enough to hold the clay.
Step 2: Sculpting the Coral
-
Cover the base:
Roll out a sheet of clay and drape it over the foil base. Press the clay firmly against the foil, smoothing the edges underneath so the foil is completely hidden. -
Clad the branches:
Take small snakes of clay and wrap them around the wire branches. Use your fingers to smooth the seams where the clay snakes join the base, ensuring a seamless transition. -
Add volume:
Build up the thickness of the branches, making them wider at the bottom and tapering slightly toward the tips. Real coral is rarely perfectly uniform, so variations in thickness add realism. -
Create nubs:
Roll tiny little balls or teardrops of clay and press them randomly onto the main branches. Blend the bottom edges of these nubs into the branch to create new sprouting growth points. -
Shape the tips:
Blunt the ends of your branches and the new nubs. Coral tips are usually rounded or slightly flattened, rather than sharp points.
Needle Tool Trick
Work in sections when texturing. If the clay starts to dry and the texture isn’t holding, lightly spritz it with water to soften the surface again.
Step 3: Texturing and Detailing
-
Initial texturing:
This is the most crucial step for realism. Take a stiff toothbrush or a ball of crumpled foil and press it repeatedly all over the wet clay surface. -
Deepen the pores:
I find that using a needle tool to poke distinct, deeper holes randomly across the surface breaks up the uniformity of the toothbrush texture. -
Base details:
Add larger indentations or slight craters to the heavy base mound to mimic where the coral would attach to a rock. -
Refine the surface:
Look for any smooth spots you missed. The entire surface should look rough, porous, and organic. -
Drying or baking:
If using air-dry clay, let the piece dry for 24-48 hours until fully hard. If using polymer clay, bake according to the package instructions and let it cool completely.
Ocean Ombré
Create a gradient effect by painting the base a darker coral shade and gradually mixing in more white as you paint toward the branch tips.
Step 4: Painting and Finishing
-
Base coat:
Mix a soft, pale pink acrylic paint. Apply this color over the entire sculpture, making sure to work the paint into all the little textured crevices and pores. -
Second coat:
Let the first coat dry, then check for missed spots. The texture can sometimes hide white clay underneath, so a second pass is usually necessary. -
Dry brushing:
Load a dry, stiff brush with a very small amount of white or lighter pink paint. wiping most of it off on a paper towel first. -
Highlighting texture:
Lightly sweep the dry brush over the raised surfaces of the coral. This catches the high points of your texture, making the ‘pores’ look deeper and more defined. -
Optional sea accents:
Paint a few tiny dark grey or black dots near the base to simulate small organic imperfections or barnacles often found on natural coral. -
Seal:
Finish with a matte spray varnish to protect the paint and remove any unnatural shine, giving it that dry, calcified look of real coral.
Place your sculpture among some collected seashells or driftwood to complete your coastal vignette
Pressed Wildflower Summer Tiles
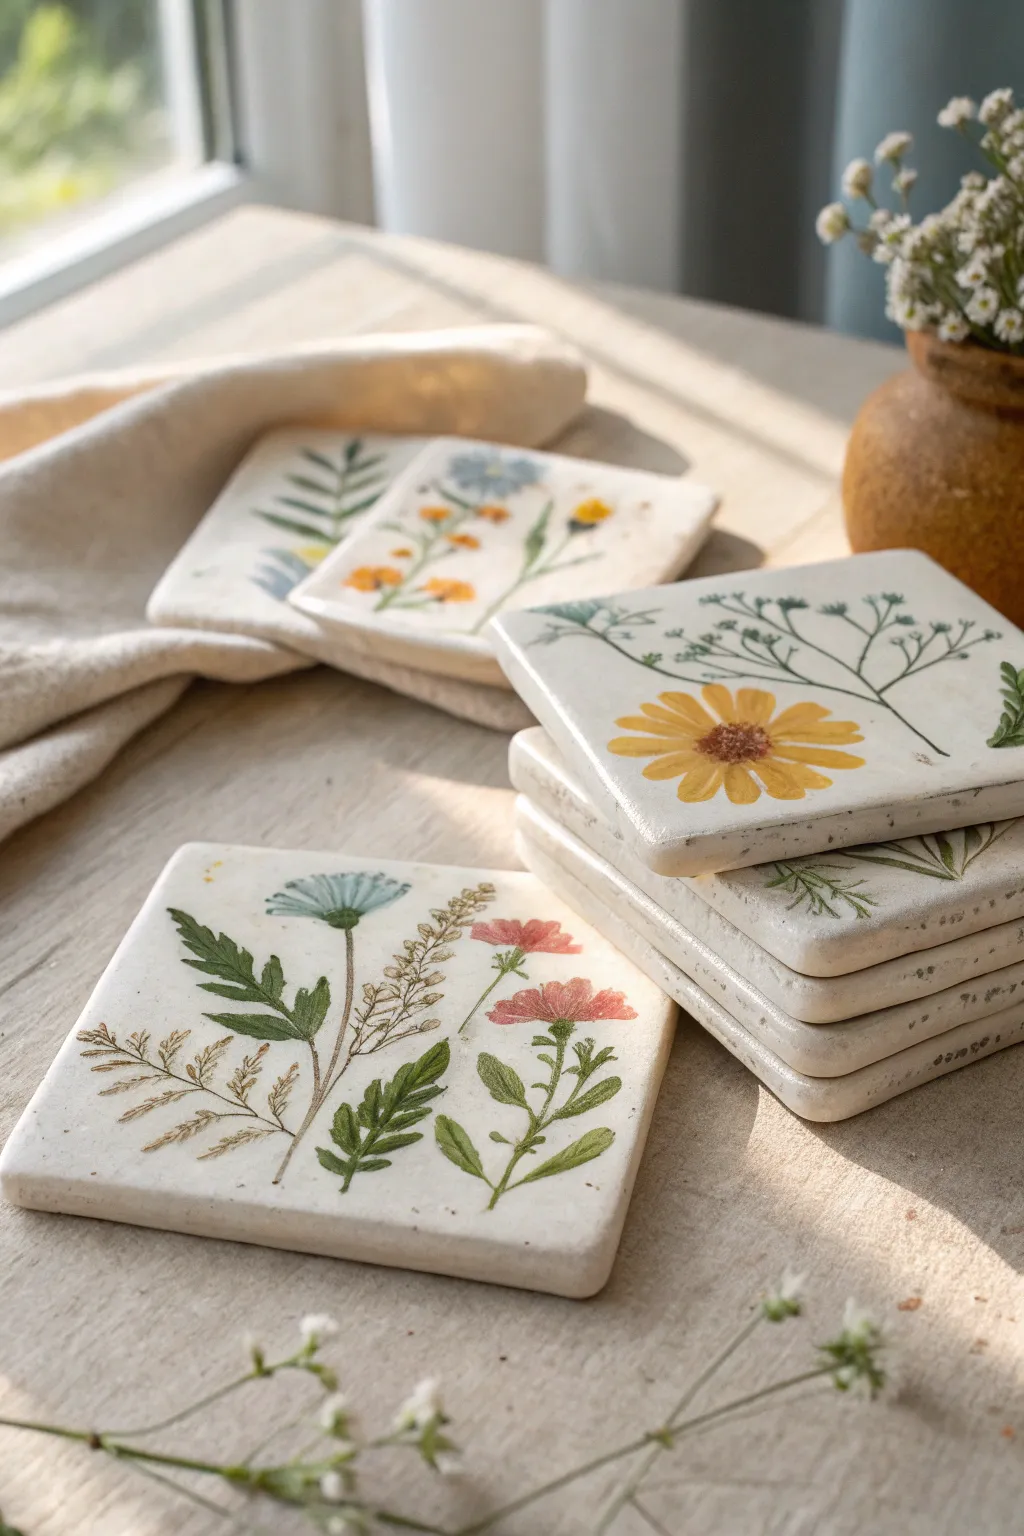
Capture the fleeting beauty of a summer meadow with these delicate clay tiles, featuring hand-painted botanical designs that mimic the look of pressed flowers. The soft, creamy white clay provides the perfect rustic canvas for vibrant yellows, deep greens, and dusty pinks, creating a set of coasters or decorative accents that bring nature indoors.
Step-by-Step Tutorial
Materials
- Air-dry clay (white or cream) or polymer clay
- Rolling pin
- Square cookie cutter (approx. 4×4 inches) or craft knife
- Sandpaper (fine grit)
- Acrylic paints (botanical shades: olive green, sap green, mustard yellow, dusty pink, light blue)
- Fine-tipped paintbrushes (sizes 0 and 00)
- Matte or satin waterproof varnish/sealer
- Canvas or parchment paper (for rolling)
- Cup of water and palette
- Small natural sponge or texture tool (optional)
Step 1: Shaping the Clay Base
-
Prepare the workspace:
Lay down a piece of canvas or parchment paper to prevent sticking. Take a large ball of white air-dry clay and knead it briefly until it is warm and pliable. -
Roll the slab:
Roll out the clay to an even thickness of about 1/4 inch. If you want a uniform set, place wooden guide sticks on either side of the clay while rolling. -
Add subtle texture:
For that natural, organic stone look seen in the photo, lightly dab the surface with a barely-damp natural sponge or crumpled paper towel. You want a matte, slightly imperfect finish rather than glossy smoothness. -
Cut the shapes:
Use your square cutter or a ruler and craft knife to cut out your tile shapes. Gently smooth the sharp edges with your finger dipped in a little water to round them off slightly. -
Dry completely:
Place the tiles on a wire rack to ensure air circulation. Let them dry for 24-48 hours, flipping them occasionally to prevent warping. -
Refine the surface:
Once fully dry, use fine-grit sandpaper to smooth out any rough edges or uneven bumps on the surface, wiping away the dust with a dry cloth.
Step 2: Painting the Botanicals
-
Plan your composition:
Lightly sketch your flower placement with a very pale pencil, or I often prefer to freehand it by looking at reference photos of real pressed flowers. -
Paint the stems:
Using a thin liner brush and watered-down olive green or brown paint, create delicate, spindly stems. Let the lines break slightly to mimic dried plant matter. -
Add base leaves:
Draft the leaves using a mix of sap green and a touch of brown. Press the brush down at the base of the leaf and lift as you pull outward to create a tapered point. -
Layering fern details:
For fern-like fronds, use the very tip of your smallest brush to make tiny, rapid strokes outward from a central vein. Keep the paint thin so it looks translucent. -
Adding main blooms:
Paint the flower heads. For the yellow daisy, use a mustard yellow, applying distinct, separate strokes for petals. Don’t make them too perfect; gaps add to the realism. -
Detailing the centers:
Once the petals are dry, stipple the center of the flowers with a burnt sienna or dark brown to create texture and depth. -
Adding delicate fillers:
Introduce smaller wildflowers like Baby’s Breath or blue chicory using tiny dots or faint washes of blue and white. -
Create depth:
Go back over some of the darker green leaves with a slightly lighter green highlight to simulate the veining found in pressed plants.
Natural Impressions
Before drying, gently press a real leaf into the clay and remove it. Paint inside the impression for a true 3D botanical effect.
Step 3: Sealing and Finishing
-
Dry the paint:
Allow the acrylic paint to dry completely, which usually takes about 30 minutes to an hour depending on thickness. -
Apply first coat of sealer:
Brush on a thin layer of matte or satin varnish. This protects the clay from moisture, which is crucial if these will be used as coasters. -
Sand and recoat:
If the first coat raised the grain of the clay slightly, give it a very gentle sand with ultra-fine sandpaper, then apply a second final coat of varnish. -
Add backing:
glue small cork pads or a square of felt to the bottom of each tile to protect your furniture surfaces from scratches.
Vintage Patina
Mix a tiny drop of brown paint into your varnish or water. Wash it over the dried white clay to give it an aged, antique ceramic look.
Now you have a stunning set of nature-inspired tiles that double as functional art for your coffee table
Mini Coastal House Figurines

Capture the breezy charm of a seaside town with this row of miniature clay houses. Their rustic textures and soft, muted pastel glazes make them perfect for catching the light on a sunny windowsill or shelf.
How-To Guide
Materials
- Air-dry clay (white or grey) or polymer clay
- Rolling pin
- sharp craft knife or clay blade
- Ruler
- Small sculpting tools (needle tool, small spatula)
- Fine-grit sandpaper
- Acrylic paints (teal, cream, ochre, soft blue, dark grey)
- Small flat paintbrush
- Fine detail paintbrush
- Matte varnish or sealant
Step 1: Shaping the Structures
-
Prepare the clay:
Begin by conditioning your clay. If using air-dry clay, knead it briefly to remove air bubbles. Roll it into a thick log, approximately 1.5 inches wide and high. -
Cut the blocks:
Slice the log into segments of varying widths, roughly 1 to 2 inches long. Mixing up the sizes adds character to your village. -
Form the roofs:
Stand a block upright. Using your craft knife, slice the top two corners off carefully at an angle to create a pitched roof shape. Vary the steepness of the angles so each house looks unique. -
Refine the sides:
Gently tap the sides of the house on your work surface to square them up, but don’t worry about perfection; the handmade wobbles are part of the charm. -
Add texture:
I like to take a piece of crumpled foil or sandpaper and press it lightly against the roof and walls to give the surface a stone-like, weathered texture.
Fixing Cracks
If small cracks appear as the clay dries, make a slip (paste) of clay and water. Fill the crack, smooth it over with a damp finger, and let it dry again.
Step 2: Carving Details
-
Mark window locations:
Using a needle tool, lightly scratch the outline of where you want your windows and doors to be. Keep the designs simple—small squares for windows and arches for doors. -
Carve the windows:
For the indented windows seen on the cream house, press a small square modeling tool directly into the clay to create a recessed shape. -
Create muntins:
If you want pane details, use the very tip of your knife to gently score a cross inside the recessed window squares. -
Carve the doors:
Use a small loop tool or the tip of a knife to carve out a shallow arch for the doorway. On some houses, you can leave the door flush and just paint it later. -
Smooth rough edges:
Dip your finger in a tiny bit of water and gently run it over any sharp clay burrs created by carving. -
Dry completely:
Let the houses dry fully according to package instructions. For air-dry clay, this usually takes 24-48 hours. Rotate them occasionally for even drying.
Add a Chimney
Before drying, attach a tiny cube of clay to a roof slope using water and scoring. Paint it a terracotta color later to mimic a chimney pot.
Step 3: Painting and Finishing
-
Sand for finish:
Once bone dry, lightly sand the bottoms so they sit perfectly flat. You can also smooth the roof peaks if they feel too sharp. -
Base coat:
Mix your acrylics with a tiny drop of water to create a wash. Paint each house a solid color—try a muted teal, a warm ochre, or a soft grey-blue. Keep one or two plain cream. -
Distress the paint:
Before the paint fully sets, use a paper towel to gently wipe some pigment off the textured areas and edges. This reveals the clay underneath and creates that weathered coastal look. -
Paint details:
Using your smallest brush and dark grey or navy paint, fill in the recessed window squares. Add small dots or lines for window panes on the flush surfaces. -
Add door accents:
Paint the doors in contrasting colors. A simple vertical line in a bright color, like the red on the blue house, adds a focal point. -
Seal the work:
Finish with a coat of matte varnish to protect the paint and give the houses a finished, ceramic-like feel without making them too shiny.
Arranging these little dwellings together creates an instant storybook scene right in your home