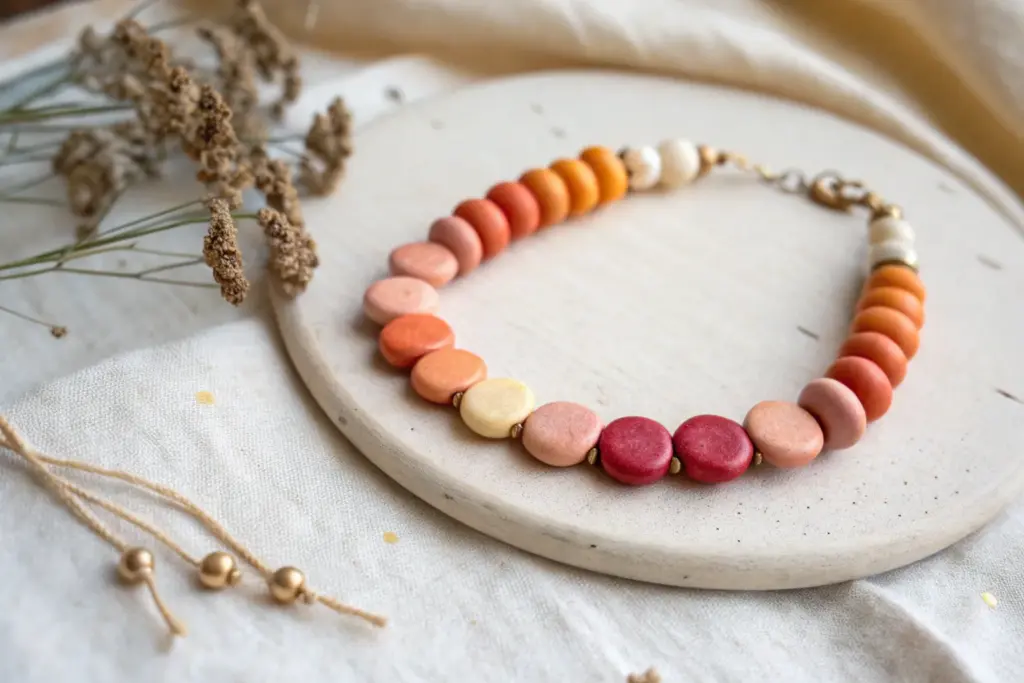
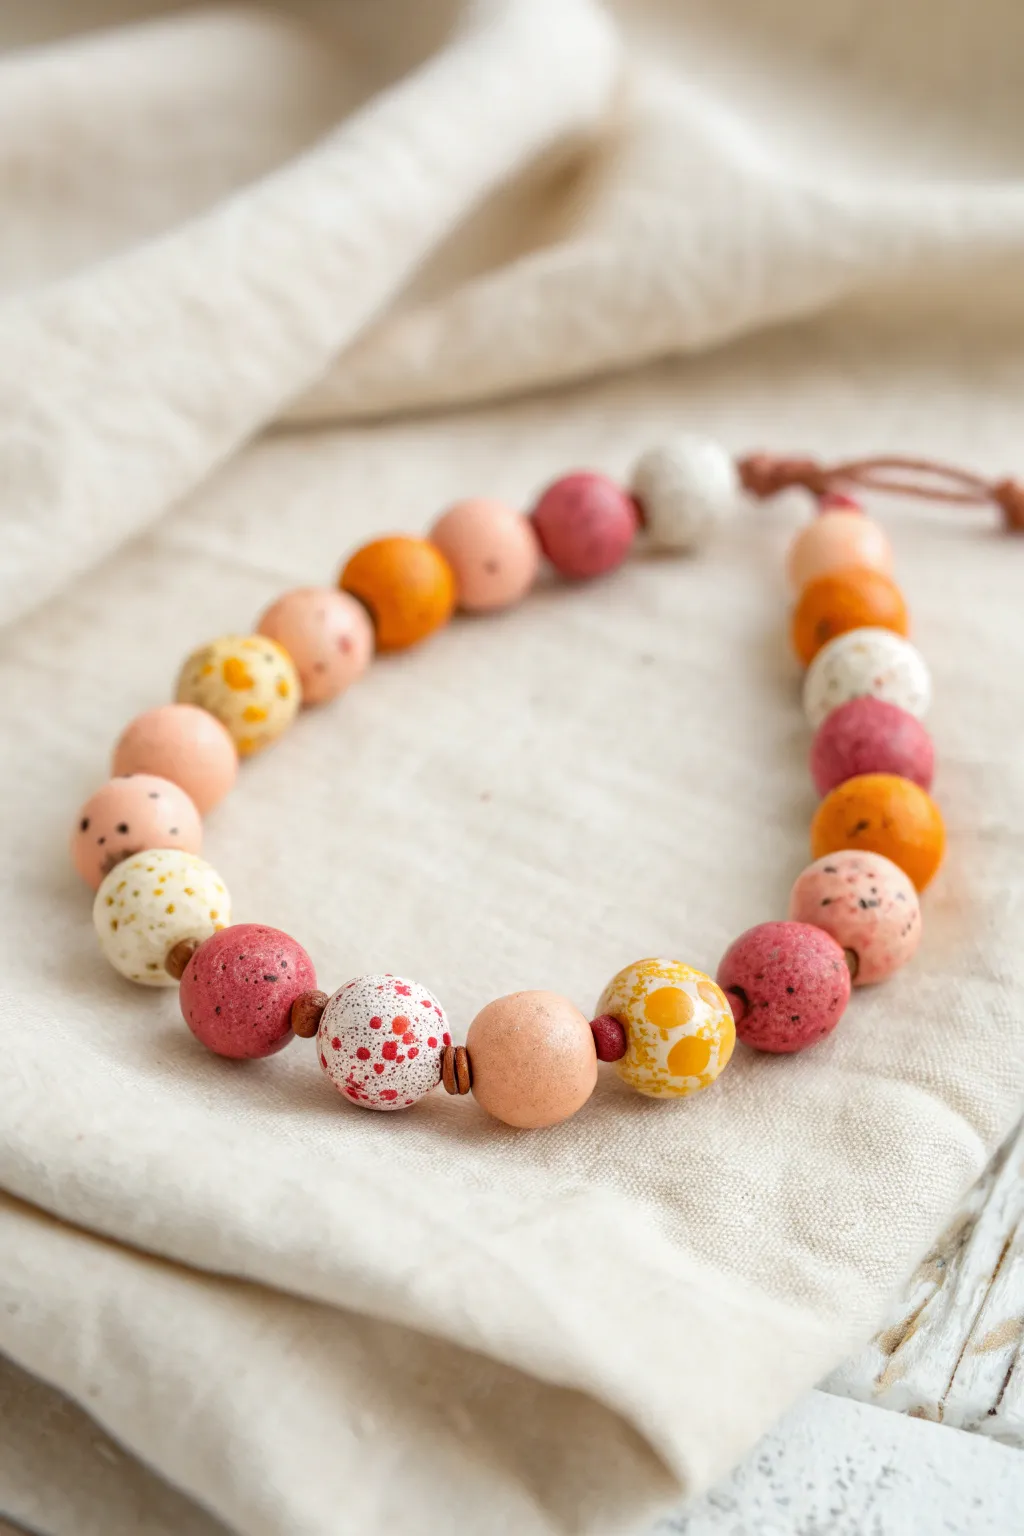
There’s something magical about wearing a little sunset palette on your wrist—those warm fades from golden yellow to coral, pink, and violet just never get old. Here are my go-to sunset clay bead bracelet ideas, starting with the classic crowd-pleasers and moving into the fun, studio-experiment zone.
Classic Sunset Ombre Fade
Capture the fleeting beauty of dusk with this elegant beaded bracelet that transitions from creamy beige into vibrant oranges and soothing lavenders. The symmetrical color blocking and minimal gold accents create a polished look perfect for stacking or wearing solo.
Step-by-Step Tutorial
Materials
- Polymer clay heishi beads (6mm or 4mm) in: cream/off-white, light peach, coral orange, salmon pink, soft lavender, medium purple
- Gold spacer beads (small round beads)
- Gold rondelle spacer beads (flat discs)
- Elastic beading cord (0.8mm clear)
- Jewelry glue or clear nail polish
- Scissors
- Bead stopper or tape
- Measuring tape
Step 1: Planning and Prep
-
Measure your wrist:
Before cutting any cord, wrap a measuring tape around your wrist to find your size. Add about 3-4 inches to this measurement to ensure you have plenty of slack for tying the final knot. -
Cut the cord:
Cut your elastic cord according to your measurement. Pre-stretch the elastic by gently pulling on both ends a few times; this prevents the bracelet from stretching out permanently after the first wear. -
Secure the end:
Place a bead stopper or a piece of masking tape on one end of the cord so your beads don’t slide right off while you work.
Step 2: Creating the Sunset Pattern
-
Start with the base:
Since this design is symmetrical, start stringing with your cream or off-white heishi beads. This section will form the back of the bracelet. -
Add first gold accent:
After your cream section is substantial (about 1-1.5 inches), slide on one gold rondelle spacer followed by a small gold round bead. -
Begin the warm transition:
Transition into the sunset colors by adding a small section of coral orange beads. Aim for about 5-6 beads here to create a distinct block of color. -
Soften the gradient:
Follow the coral with a slightly lighter, peachy-salmon shade. Use about 4-5 beads for this section to start the ombre fade. -
Introduce pink tones:
Thread on your soft pink beads next. I find using just 3-4 beads here helps merge the orange zone into the cooler purple zone seamlessly. -
Center pivot point:
Place a single gold rondelle spacer, then one small grey or light blue bead as a bridge color, followed by another gold rondelle spacer. This marks the center of the color transition. -
Switch to cool tones:
Mirror the pattern on the other side by starting with medium purple beads immediately after the center gold accent. -
Complete the purple fade:
Add your lighter lavender beads next, keeping the count similar to the pink section on the opposite side. -
Add final gold accent:
Finish the color section with a gold rondelle spacer and a gold round bead, mirroring the very first gold accent you placed. -
Close the loop:
Finish stringing by adding cream beads until the bracelet reaches your desired length. Check the fit by wrapping it around your wrist before tying.
Knot Slipping?
If your elastic knot feels loose, try tying it while the cord is under tension. A dab of Hypo Cement is better than superglue as it stays flexible.
Step 3: Finishing Touches
-
Tie the knot:
Remove the bead stopper and bring both ends together. Tie a surgeon’s knot (looping the cord through twice) or a square knot. Pull it tight. -
Secure with adhesive:
Apply a tiny drop of jewelry glue or clear nail polish directly onto the knot. Let this dry completely before trimming anything. -
Hide the knot:
Trim the excess cord close to the knot. If possible, gently tug the bracelet so the knot slides inside one of the adjacent beads to hide it.
Add a Charm
Attach a small gold sun or star charm to one of the jump rings for extra movement. It emphasizes the celestial sunset theme beautifully.
Slip on your new accessory and enjoy the warm glow of sunset colors right on your wrist


Golden Hour Yellow-To-Coral Blend
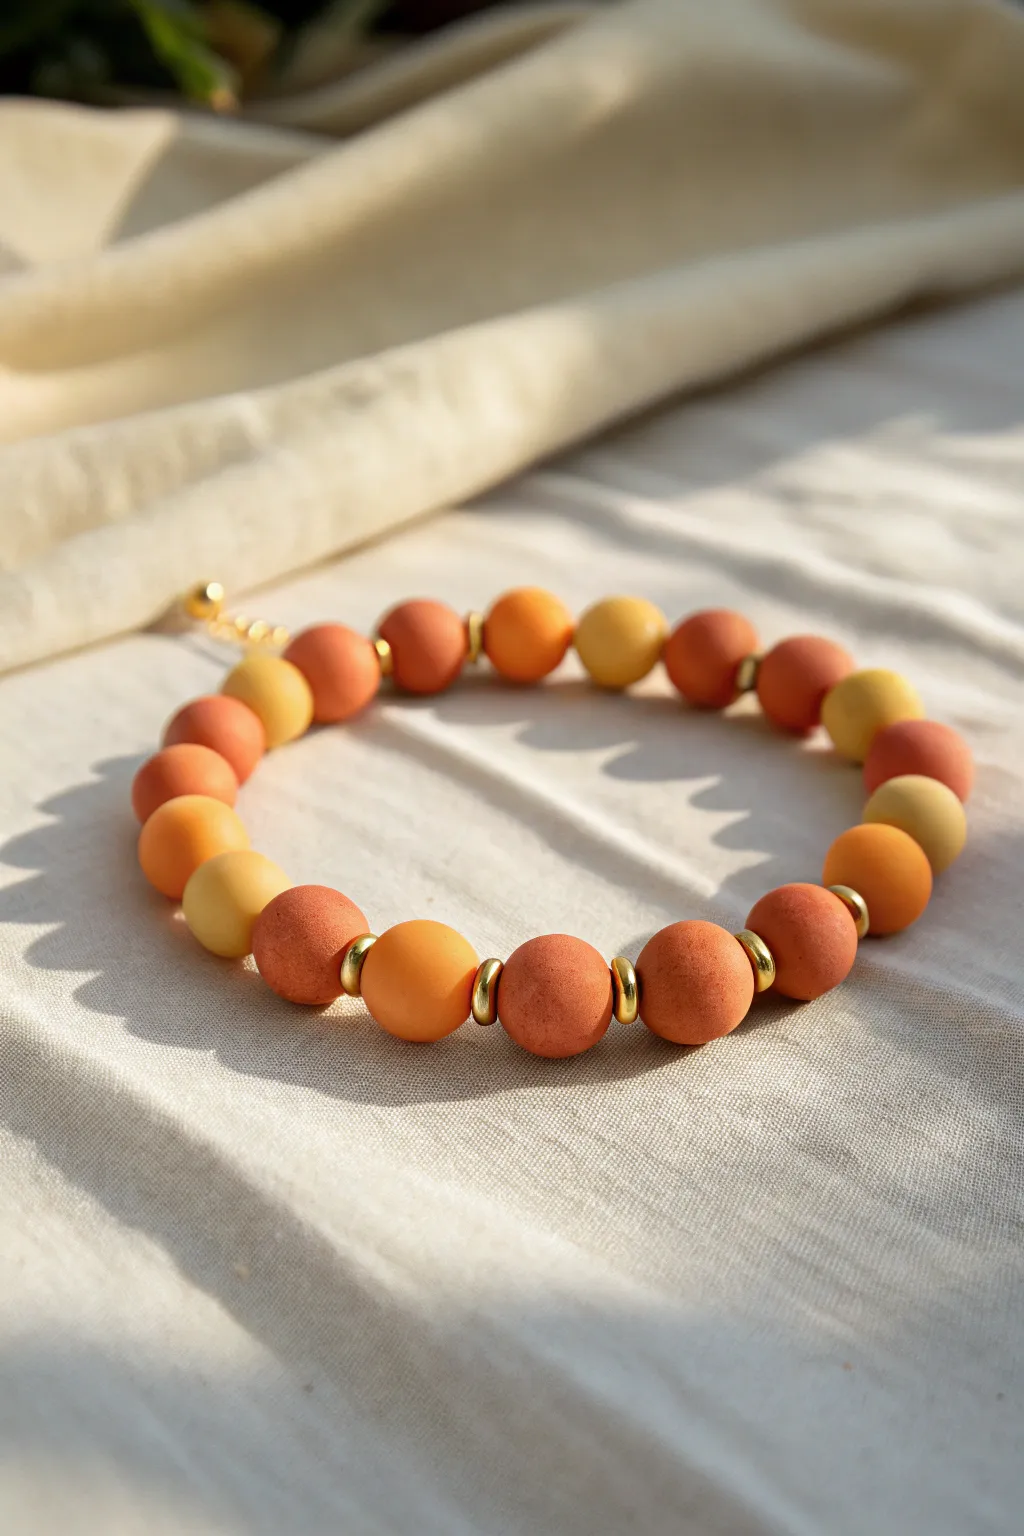
Capture the fleeting beauty of a late summer sunset with this textured polymer clay bracelet. The soft matte finish of the clay combined with warm coral, russet, and mustard tones creates a sophisticated accessory that glows against the skin.
Step-by-Step
Materials
- Polymer clay in Russet/Burnt Orange
- Polymer clay in Coral/light terracotta
- Polymer clay in Mustard Yellow/Ochre
- Polymer clay in Pale Peach/Cream
- Gold plated spacer discs (3-4mm)
- Strong elastic cord (0.8mm)
- Bead reamer or piercing tool
- Sandpaper or salt for texturing
- Oven for baking
- Super glue or jewelry knot cement
- Gold crimp bead cover (optional)
Step 1: Mixing & Creating Beads
-
Condition the clay:
Start by warming up your polymer clay blocks in your hands until they are soft and pliable. You want a smooth consistency without cracks. -
Mix custom shades:
To achieve that organic, gradient look, don’t use colors straight from the pack. Mix russet with a tiny bit of coral for a mid-tone, and mustard with a pinch of peach for a softer yellow. Aim for about 4-5 distinct shades ranging from deep burnt orange to pale yellow. -
Form the spheres:
Pinch off small portions of clay and roll them between your palms to create round beads. Aim for a consistent size, roughly 8-10mm in diameter. -
Add texture:
The beads in the photo have a lovely matte, slightly porous texture. To mimic this, gently roll your raw clay balls over a piece of medium-grit sandpaper or a textured sponge before baking. -
Pierce the holes:
Using a bead reamer or a thick needle, carefully pierce a hole through the center of each bead. Twist the tool gently as you push through to avoid distorting the sphere shape. -
Inspect the shape:
After piercing, the beads might be slightly oval. Give them a very gentle roll between your fingers to round them out again while keeping the hole open.
Hole Distortion?
If your beads squash into ovals when piercing, try refrigerating the raw clay balls for 10 minutes first. The firmer clay holds its shape better against the piercing tool.
Step 2: Baking & Finishing Beads
-
Bake the beads:
Arrange your beads on a baking sheet lined with parchment paper. Bake according to your specific brand’s package instructions (usually around 275°F/135°C for 15-30 minutes). -
Let them cool completely:
Resist the urge to touch them while hot. Let the beads cool fully to harden properly. -
Wash and dry:
If you used salt for texture, wash the cooled beads in warm water to dissolve the salt, revealing the pitted texture. If you used sandpaper, just wipe them down to remove dust.
Scented Stone
Use terracotta or porous air-dry clay instead of polymer, then add a drop of essential oil to the finished beads. The porous material acts as a personal diffuser.
Step 3: Assembly
-
Layout the design:
Lay your beads out on a bead board or towel. I like to arrange mine in a loose gradient—grouping the yellows, then moving into peaches, corals, and finally the deeper russet tones. -
Insert gold spacers:
Place a gold spacer disc between every few beads. In the reference image, the spacers aren’t between *every* single bead, but rather grouping sets of 2 or 3 same-colored beads together. -
Cut the elastic:
Cut a piece of elastic cord about 10-12 inches long. This gives you plenty of room to tie knots without struggling. -
Pre-stretch the cord:
Give your elastic cord a few firm tugs. This pre-stretching prevents the bracelet from becoming loose and saggy after the first few wears. -
String the beads:
Thread your beads onto the elastic following your laid-out pattern. Double-check the gradient flow as you go. -
Test the fit:
Wrap the strand around your wrist to check the size. It should be snug but comfortable. Add or remove beads if necessary. -
Tie the knot:
Tie a surgeon’s knot (right over left twice, then left over right twice). Pull the elastic tight to secure the knot. -
Secure with glue:
Apply a tiny dot of super glue or jewelry cement directly onto the knot. Let it dry for a minute. -
Hide the knot:
Trim the excess cord carefully. If the hole of a neighboring bead is large enough, gently pull the knot inside to hide it.
Wear your golden hour create with pride and enjoy the warmth it brings to your outfit


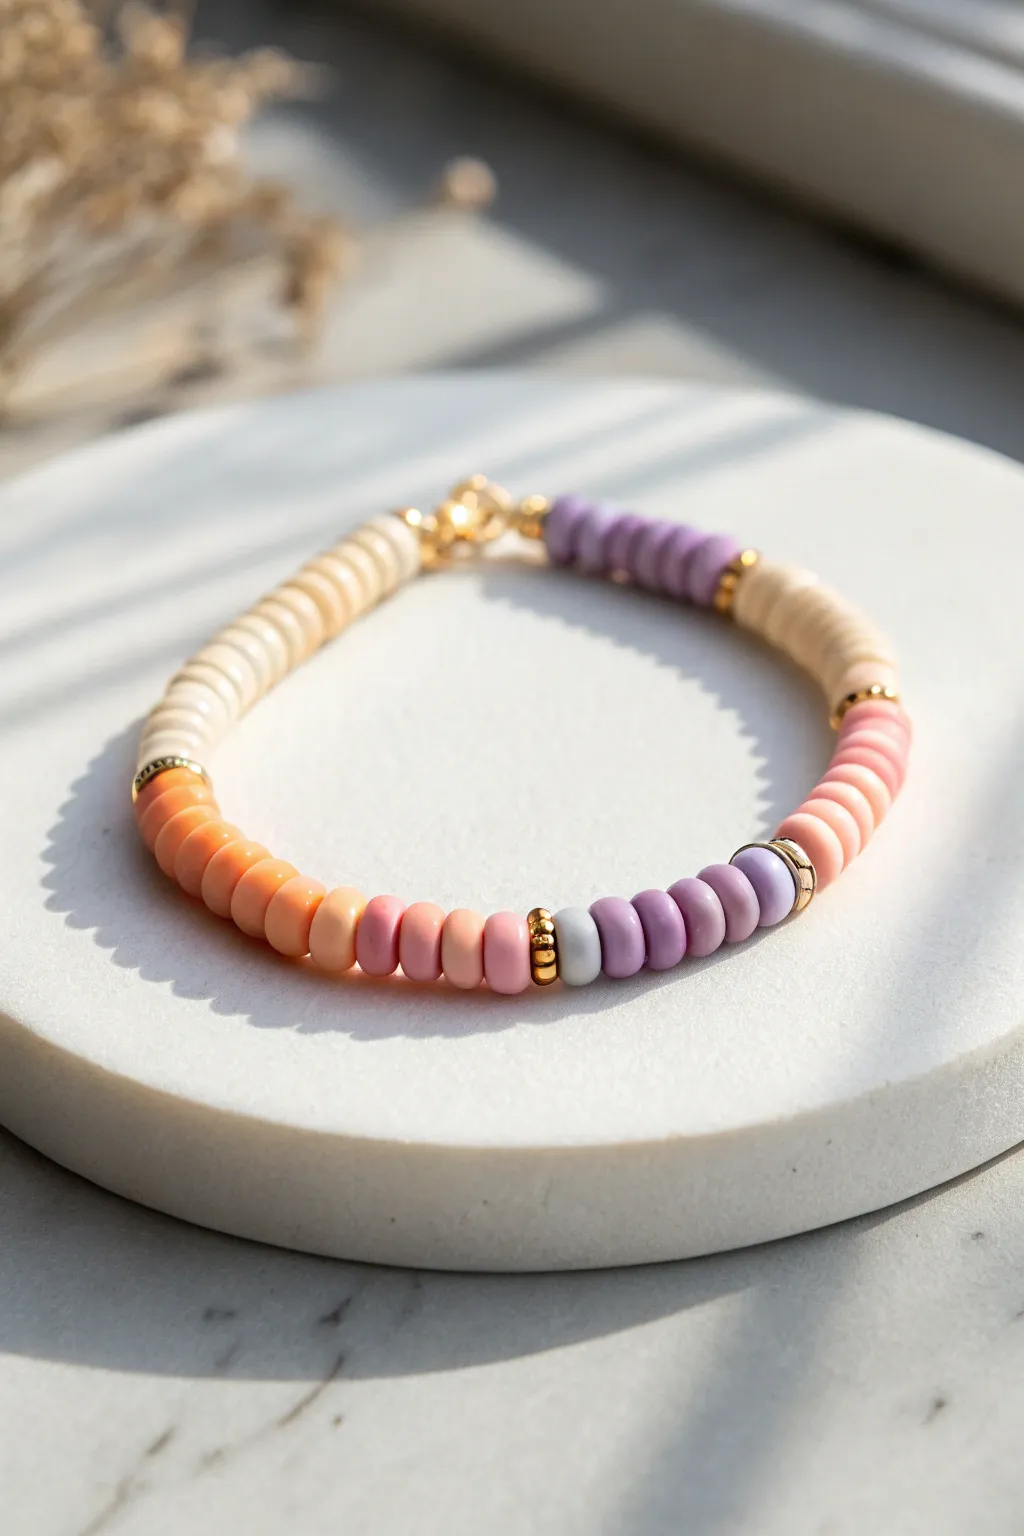
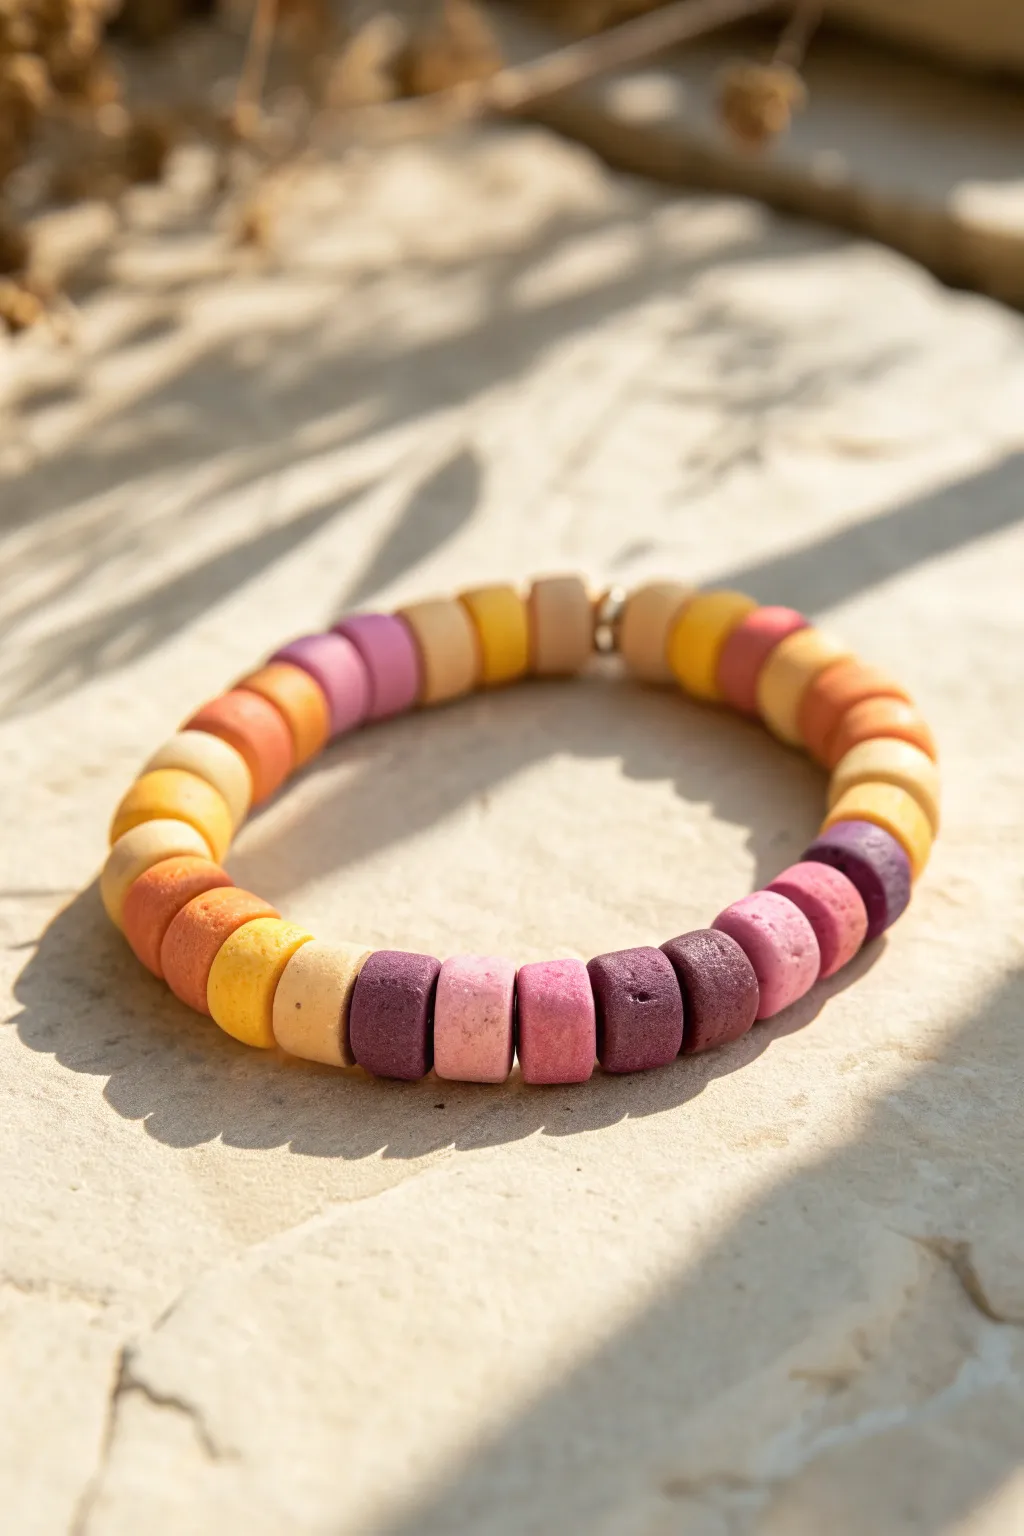
Cotton Candy Twilight Pastels
Soft peach, creamy white, and twilight lavender come together in this gentle, sunset-inspired design. The contrast between the matte clay discs and the high-shine gold spacer beads creates a sophisticated yet playful accessory perfect for dreamy afternoons.
Step-by-Step Guide
Materials
- 6mm polymer clay disc beads (Heishi beads) in peach/coral
- 6mm polymer clay disc beads in pastel lavender
- 6mm polymer clay disc beads in cream or off-white
- 4-6mm gold-plated rondelle spacer beads
- Strong elastic beading cord (0.8mm recommended)
- Beading needle (optional but helpful)
- Super glue or jewelry cement
- Scissors
Step 1: Planning and Preparation
-
Measure your wrist:
Before you begin stringing, measure your wrist and add about half an inch for a comfortable fit. This style works best when it’s slightly loose rather than tight. -
Cut the cord:
Cut a piece of elastic cord about 10-12 inches long. This generous length gives you plenty of room to tie secure knots at the end without struggling. -
Pre-stretch the elastic:
Give your cut piece of elastic a few firm tugs. This is a crucial step I always do because it prevents the bracelet from stretching out permanently after you wear it a few times. -
Secure the end:
Attach a bead stopper or simply place a piece of tape on one end of the cord so your beads don’t slide off while you work.
Step 2: Creating the Pattern
-
Start with the main color:
Begin by threading on the peach/coral clay beads. To match the photo, you’ll need a long solid section of about 25-30 beads. This constitutes roughly half the bracelet’s circumference. -
Add the first transition:
After the main peach section, slide on one gold spacer bead, followed by a short section of 3-4 cream beads, and another gold spacer. -
Introduce the twilight hue:
Thread on a section of lavender beads. Use about 10-12 beads here to create a distinct color block. -
Create the focal pattern:
Now for the detailed pattern section: Add one gold spacer, then 4 cream beads, followed by one gold spacer. -
Add a contrasting dash:
String on a small group of 3-4 lavender beads, followed by a gold spacer. -
Continue the pattern:
Add 2 cream beads, a gold spacer, and then another small group of 3-4 lavender beads. -
Finish the sequence:
Complete the pattern loop by adding a final gold spacer, followed by a section of cream beads (about 5-6) to connect back to your starting peach section. -
Check the fit:
Wrap the unfinished strand around your wrist to check the size. If it’s too short, add more peach beads to the beginning or lavender beads to the pattern sections.
Golden Glow Tip
Use gold-filled or high-quality plated spacers instead of cheap plastic ones. Since the clay beads are matte, the metal’s shine is key to the premium look.
Step 3: Finishing Touches
-
Prepare to knot:
Remove the tape or bead stopper carefully. Bring the two ends of the elastic together, ensuring there are no gaps between the beads. -
Tie the first knot:
Tie a simple overhand knot and pull it tight, stretching the elastic slightly as you pull. -
Secure with a surgeon’s knot:
For the second knot, make a loop but pass the tail end through the loop twice instead of once (a surgeon’s knot). Pull this very tight. -
Hide the knot:
Apply a tiny dot of super glue to the knot. Let it dry for a moment, then trim the excess cord close to the knot. -
Tuck it away:
Ideally, gently pull the elastic so the knot slides inside the hole of one of the gold spacer beads or a clay bead to hide it completely.
Gap Issues?
If you see gaps between beads after tying, your knot wasn’t pulled tight enough while the elastic was stretched. You must tension the cord while knotting.
Now you have a piece of wearable twilight art to enjoy


Sunset Confetti Mix
Capture the golden hour with this chunky polymer clay bracelet featuring a mix of warm peaches, deep berries, and sunshine yellows. The playful speckled ‘confetti’ technique gives each bead a unique, ceramic-like finish without needing a kiln.
How-To Guide
Materials
- Polymer clay in sunset colors: white, ochre yellow, burnt orange, pale peach, deep berry pink
- Acrylic paint in similar shades (for speckling)
- Old toothbrush or stiff bristle brush
- Bead piercing tool or toothpick
- Waxed cotton cord or leather cord (1mm)
- Baking sheet and parchment paper
- Wet wipes
- Oven (for curing clay)
- Gloss or matte varnish (optional)
Step 1: Creating the Bead Base
-
Condition the Clay:
Begin by warming up your polymer clay blocks in your hands. Knead each color separately until soft and pliable to prevent cracking later. -
Portion Control:
Pinch off equal amounts of clay for your beads. Aim for pieces about the size of a large marble or a grape to create that chunky look seen in the photo. -
Roll Spheres:
Roll the clay pieces between your palms to create smooth, round spheres. You’ll need a mix of colors: roughly 3-4 of each shade (yellow, orange, peach, pink, white). -
Piercing the Holes:
Before baking, use your piercing tool or a toothpick to gently bore a hole through the center of each bead. Rotate the tool as you push through to avoid squishing the bead’s shape. -
Widen the Channel:
Ensure the holes are wide enough for your cord to pass through easily, perhaps even twice if you plan on complex knotting. I usually wiggle the tool a bit to widen the exit points.
Step 2: The Confetti Technique
-
Prepare the Splatter Station:
Lay down scrap paper or a messy mat. This part gets fun but messy. Place your unbaked beads on the surface. -
Dilute the Paint:
Mix a small amount of acrylic paint with a drop of water. You want it fluid enough to splatter, but not so watery that it runs off the bead. -
Splatter Technique:
Dip an old toothbrush into the paint. Hold it over the beads and run your thumb across the bristles to flick tiny specks of paint onto the clay surfaces. -
Mix and Match:
Use contrasting colors for the speckles. Try red speckles on the white beads, and yellow or white speckles on the pink ones. Leave the solid peach and orange beads un-speckled for variety. -
Let Dry:
Allow the acrylic paint speckles to dry completely on the raw clay before moving to the oven.
Clean Bead Hack
Before baking, lightly wipe your unpainted beads with a baby wipe or a little rubbing alcohol. This removes fingerprints and lint for a professional finish.
Step 3: Baking and Assembly
-
Bake the Beads:
Arrange the beads on a parchment-lined baking sheet. Bake according to your clay manufacturer’s instructions (usually 275°F/135°C for 15-30 minutes per 1/4 inch thickness). -
Cool Down:
Let the beads cool completely in the oven with the door cracked open. This helps anneal the clay and makes it stronger. -
Optional Varnish:
If you want a ceramic shine or to protect the paint, brush a thin coat of polymer clay varnish over the cooled beads. -
Stringing the Design:
Cut a length of cord about 12 inches long. Tie a knot at one end, leaving a tail for the closure. -
Pattern Layout:
Thread your beads onto the cord. Follow the organic gradient in the image: group warm oranges, transition to whites, then peaches, then berry tones. Don’t worry about perfect symmetry. -
Add Spacer Knots:
For added texture, tie a simple overhand knot between a few select beads, particularly where the colors shift dramatically. This keeps the beads from rubbing and adds a rustic touch. -
Finishing the Closure:
Once all beads are added, tie a final knot securely against the last bead. Create a sliding knot closure or a simple loop-and-knot fastening with the excess cord.
Level Up: Texture
Before baking the solid-colored beads, roll them gently over a piece of sandpaper or a textured sponge to give them a stone-like surface contrast.
Wear your new bracelet stacked with other textures for a relaxed bohemian vibe

The Complete Guide to Pottery Troubleshooting
Uncover the most common ceramic mistakes—from cracking clay to failed glazes—and learn how to fix them fast.
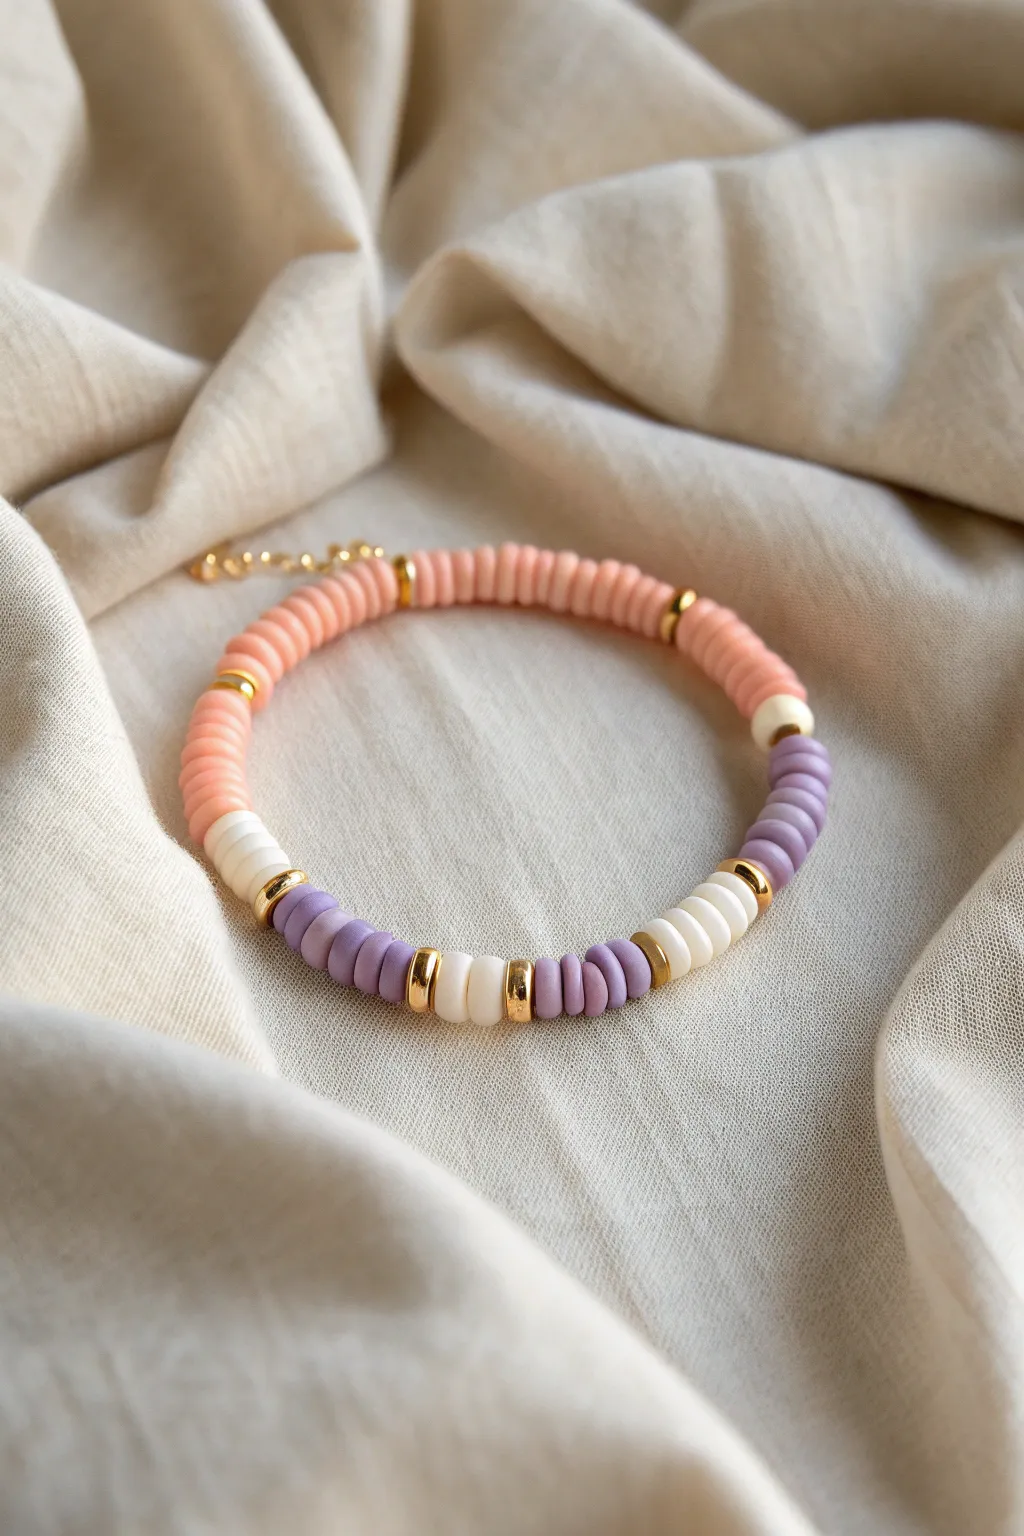
Color-Blocked Horizon Bands
Capture the warmth of the golden hour with this stunning color-blocked clay bead bracelet. Using a carefully curated palette of dusky purples, soft pinks, and warm ambers, this design mimics the shifting hues of a fading horizon.
Detailed Instructions
Materials
- Polymer clay Heishi beads (approx. 6mm diameter) in: deeply saturated purple, muted plum, soft lavender pink, vibrant hot pink, pale yellow, honey yellow, burnt orange, and terracotta
- Strong elastic cord (0.8mm clear stretch cord recommended)
- Jewelry glue or clear nail polish
- Scissors
- Bead stopper or masking tape
- Measuring tape
- Small crimp bead cover (optional, gold tone)
Step 1: Preparation & Selection
-
Measure your wrist:
Wrap your measuring tape around your wrist to find your size, then add about half an inch for a comfortable fit. Cut a length of elastic cord roughly 10 inches long to give yourself plenty of room for tying knots. -
Secure the end:
Attach a bead stopper or simply place a piece of masking tape on one end of your elastic cord. This prevents your beads from sliding off while you design your pattern. -
Audit your colors:
Lay out your clay beads on a flat surface. You want to group them into color families: deep purples, transitioning pinks, and the warm yellow-to-orange spectrum. This visual sort helps ensure a smooth gradient later.
Step 2: Creating the Color Blocks
-
Start with the deep tones:
Begin threading your beads with the darkest hue first. Thread about 3-4 beads of the deep saturated purple. These thicker ‘blocks’ of solid color are what give the bracelet its distinctive horizon look compared to a random mix. -
Transition to plum:
Next, add 3-4 beads of the muted plum color. You usually want to keep the number of beads in each color block consistent, though I sometimes vary them by one bead to make it look a bit more organic. -
Add the pinks:
Move into the pink section by stringing on the soft lavender-pink beads, followed immediately by the vibrant candy pink beads. The contrast here really makes the design pop. -
Shift to light:
Now introduce the pale yellow beads. This stark change from pink to yellow mimics that moment when the sun dips below the clouds. -
Build the warmth:
Continue the gradient by adding the honey yellow beads. Ensure the beads sit flush against each other; clay beads have a unique texture that nests well. -
Deepen the orange:
Thread on the burnt orange section next. This color bridges the gap between the bright yellows and the darker reds coming next. -
Finish the warm spectrum:
Complete this specific sequence with the terracotta or deep red-orange beads. You have now completed one full ‘sunset cycle’.
Smooth Gradients
To get that perfect ombre flow, lay out beads in a line before stringing. Squint your eyes to check if any color jumps out too harshly against its neighbor.
Step 3: Repeating & Finishing
-
Repeat the pattern:
Start the sequence over again with your deep purple beads. Continue repeating the full color order until the beaded section matches your desired wrist length. -
Check the fit:
Wrap the unfinished strand around your wrist to verify the size. The beads should touch comfortably without gaps, but shouldn’t feel tight enough to leave an imprint. -
Pre-stretch the cord:
Before tying, give the ends of the elastic a gentle tug. This pre-stretching prevents the bracelet from loosening up significantly after you wear it the first few times. -
Tie the surgeon’s knot:
Remove the tape or stopper. Cross the ends, loop one side through twice, and pull tight. Repeat this process to secure the knot firmly. -
Secure with adhesive:
Dab a tiny drop of jewelry glue or clear nail polish directly onto the knot. Let this dry completely before moving or trimming anything. -
Hide the knot:
Trim the excess elastic close to the knot. If possible, gently tug the bracelet so the knot slides inside the hole of one of the neighboring clay beads to conceal it. -
Add a metal accent (optional):
If you are using a crimp cover or a metal spacer bead to hide the join, clamp it gently over the knot area now using pliers for a polished finish.
Knot Slipping?
If your elastic knot won’t stay tight, try rubbing the cord with a little beeswax or using a textured elastic rather than the super-slick smooth silicone type.
slip on your new accessory and enjoy carrying the colors of the sunset with you all day
White Cloud Break Spacers
Capture the warmth of a setting sun with this stunning beaded bracelet that blends rich terracotta tones with soft pinks and cloudy whites. The addition of intricate gold spacers and textured focal beads gives this piece an approachable yet sophisticated artisan feel.
Step-by-Step Tutorial
Materials
- Terracotta/rust round cylinder clay beads (approx. 8mm)
- Soft pink round matte beads (approx. 8mm)
- Burnt orange round matte beads (approx. 8mm)
- Textured gold accent bead (large focal)
- Gold tone spacer discs
- Ornate gold bead caps or textured rondelles
- White or cream speckled/textured beads (the ‘cloud’ spacers)
- Gold textured focal ring/charm
- Strong elastic beading cord (0.8mm or 1mm)
- Jewelry glue (e.g., G-S Hypo Cement)
- Scissors
Step 1: Preparation
-
Measure your wrist:
Wrap a measuring tape loosely around your wrist to find your size. Add about 0.5 to 1 inch to this measurement depending on how loose you like your fit. -
Cut the cord:
Cut a piece of elastic cord about 10-12 inches long. Having this extra length makes tying the final knot much easier than fighting with short ends. -
Pre-stretch the elastic:
Give your cut elastic a few firm tugs. This prevents the bracelet from stretching out and becoming loose shortly after you finish making it. -
Secure the end:
Place a piece of tape or a bead stopper on one end of the cord so your beads don’t slide off while you are working.
Pro Tip: Texture Mix
Mix matte stone beads with porous lava beads or polymer clay. The contrast in textures makes the simple color palette feel much more expensive.
Step 2: Designing the Gradient
-
Lay out the pattern:
Before stringing, arrange your beads on a bead board or soft cloth. You want to create a color block effect. Start with a group of the darkest terracotta beads. -
Transition to orange:
Next to the terracotta, place your burnt orange beads. This creates the first part of the sunset gradient. -
Add the ‘Cloud’ break:
Insert a textured white or cream bead between the darker sections to mimic a cloud breaking up the sunset colors. -
The pink horizon:
Set up your section of soft pink beads opposite the darker tones. This lighter section will balance the visual weight of the bracelet.
Troubleshooting: Visible Knot
If your bead holes are too small to hide the knot, use a crimp cover bead over the knot instead. It looks like a purposeful gold accent!
Step 3: Assembly
-
Start stringing:
Begin threading your beads onto the elastic. I suggest starting with the burnt orange section so your knot will eventually be hidden near a metal accent. -
Insert the gold ring:
Slide on a gold spacer ring or thick gold rondelle between the orange and terracotta sections for a flash of metallic shine. -
Add the darker beads:
Thread on the dark terracotta/rust beads. Follow this with a textured white ‘cloud’ bead sandwiched between two small gold spacers. -
Create the focal point:
String the large textured gold focal bead. Flank it with flat gold disc spacers to make it stand out against the matte clay beads. -
Finish with pink:
Thread the soft pink beads. To add detail, intersperse this section with ornate gold bead caps or the smaller textured white spacers. -
Check the fit:
Wrap the unfinished strand around your wrist to check the size. If it’s too tight, add a few more spacer beads; if too loose, remove a clay bead.
Step 4: Finalizing
-
Prepare the knot:
Remove the tape or stopper. Bring both ends of the elastic together, ensuring there are no gaps between the beads. -
Tie the knot:
Tie a surgeon’s knot: cross right over left, then left over right and loop it through twice. Pull all four strands (two tails and the loop) firmly. -
Secure with glue:
Apply a tiny drop of flexible jewelry glue directly onto the knot. Let it dry for a moment before trimming. -
Hide the knot:
Trim the excess cord close to the knot, then gently pull the cord to slide the knot inside the hole of the nearest large bead.
Slip on your new sunset-inspired creation and enjoy the warm, golden vibes it brings to your outfit


What Really Happens Inside the Kiln
Learn how time and temperature work together inside the kiln to transform clay into durable ceramic.
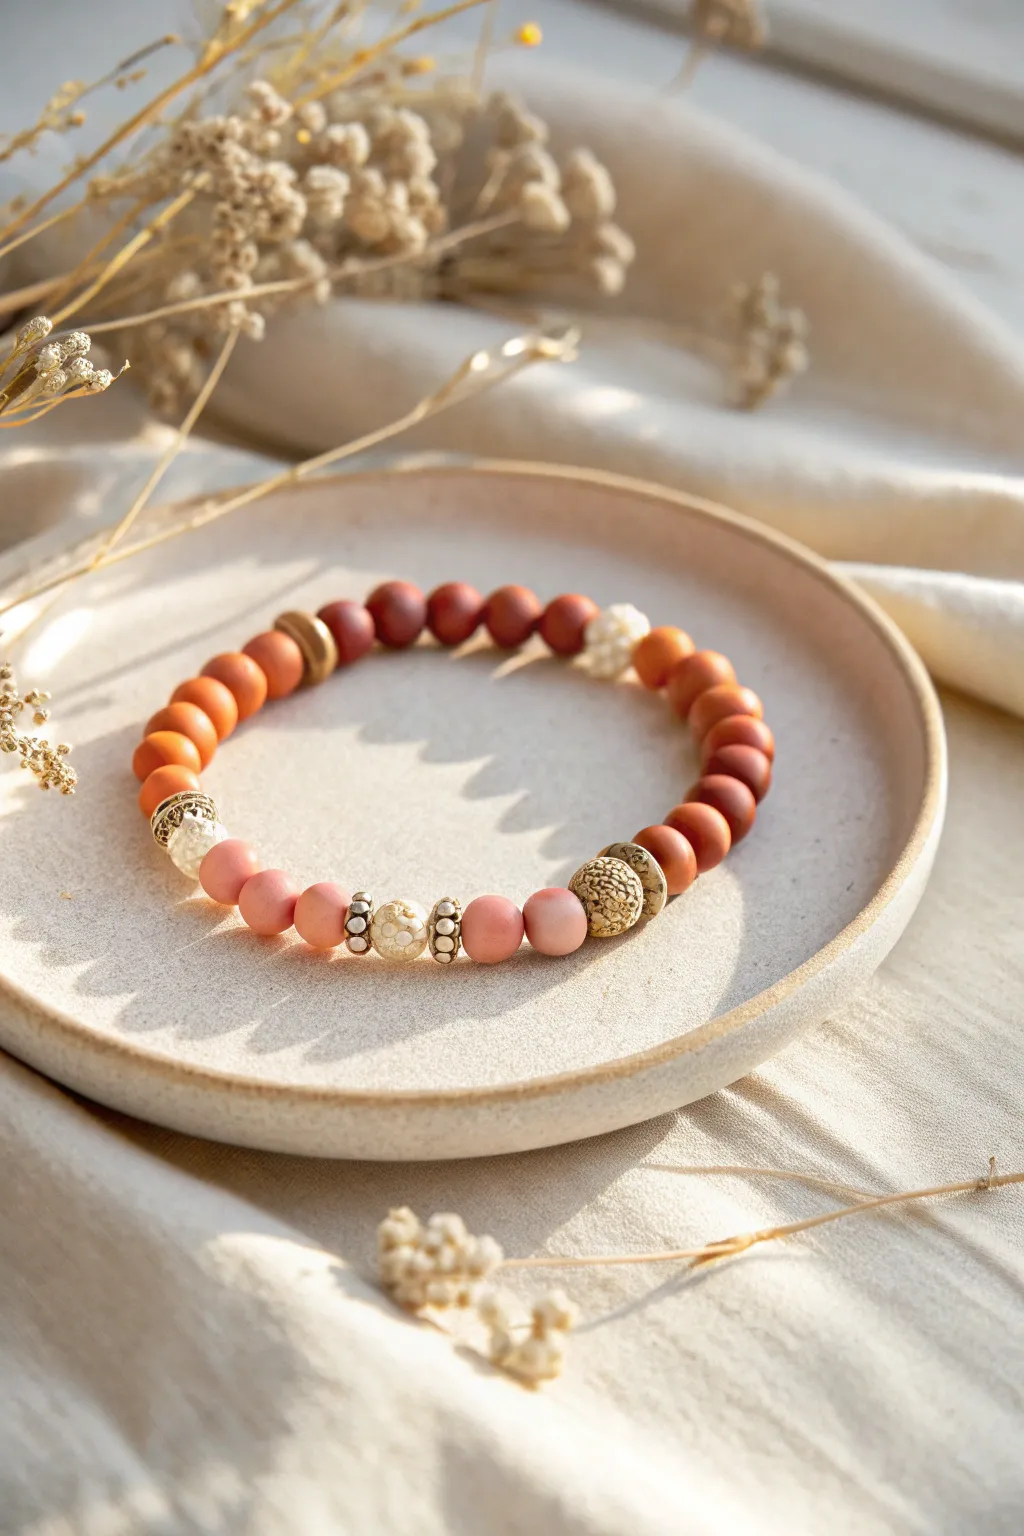
Metallic Sun-Kissed Spacing
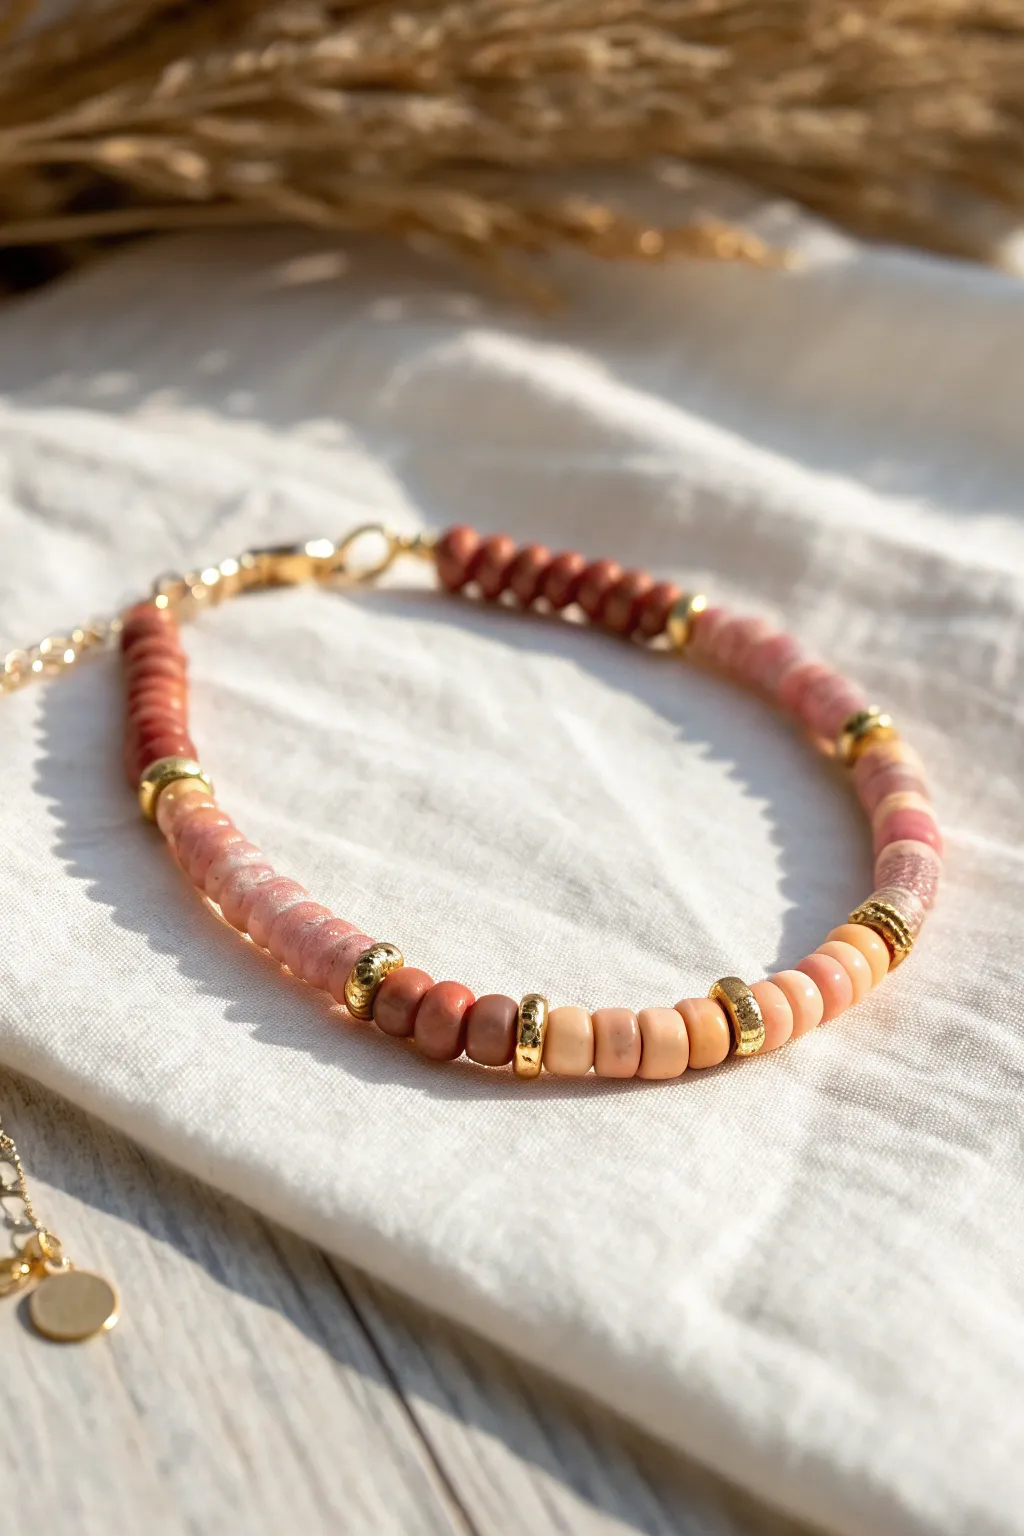
Capture the warmth of a setting sun with this elegant clay bead bracelet that transitions from deep rust to soft peach. The strategic placement of gold accents elevates the simple heishi beads into a sophisticated piece of jewelry perfect for layering or wearing solo.
Detailed Instructions
Materials
- ~4mm polymer clay heishi beads (Terracotta/Rust)
- ~4mm polymer clay heishi beads (Dusty Pink/Mauve)
- ~4mm polymer clay heishi beads (Salmon Pink)
- ~4mm polymer clay heishi beads (Pale Peach/Cream)
- ~4-5mm gold plated spacer beads (textured or smooth rondelle shape)
- Standard gold heishi spacer beads (thin discs)
- Gold plated crimp beads (2mm)
- Gold plated wire guards (optional but recommended)
- Gold plated jump rings (4mm)
- Gold plated lobster clasp
- Gold plated extension chain (optional)
- Beading wire (0.38mm or 0.45mm)
- Crimping tool or flat nose pliers
- Wire cutters
- Ruler or tape measure
Step 1: Preparation & Mapping
-
Measure your wrist:
Wrap a measuring tape loosely around your wrist. Add about half an inch to this measurement to determine your final bracelet length, ensuring a comfortable fit. -
Cut the wire:
Cut a length of beading wire approximately 10 inches long. I find this gives plenty of extra room to work with the clasp ends without fumbling. -
Secure the first end:
Thread a crimp bead onto one end of the wire, followed by a wire guard. Loop the wire back through the crimp bead to create a loop (or thread directly onto a jump ring if skipping the wire guard). Use your crimping tool to flatten the crimp bead securely. -
Attach the clasp:
Slide your lobster clasp onto the loop you just created (using a jump ring if necessary) so one end is completely finished before you start beading.
Uneven Tension?
If the bracelet feels stiff or curls up rigidly instead of draping, you likely crimped it too tight. Leave a 1-2mm gap of exposed wire before crimping to allow movement.
Step 2: Creating the Pattern
-
Start with deep tones:
Begin threading your terracotta/rust-colored clay beads. String about 10-12 of these beads to form the first block of color. -
Add first gold accent:
Slide on a textured gold rondelle bead. These thicker gold beads act as the primary dividers between your major color zones. -
Transition to dusty pink:
String on your next color block using the dusty pink/mauve beads. Aim for a slightly shorter section here, perhaps 8-10 beads. -
Insert a thin spacer:
For variety, thread a very thin, standard gold heishi spacer bead. Then add just 2-3 more dusty pink beads. -
Second major accent:
Add another textured gold rondelle bead to mark the transition to the next shade. -
The salmon pink section:
Thread on your salmon pink beads. To keep it organic, string about 15 beads, then add a thin gold spacer, followed by 5 more salmon beads. -
Third major accent:
Slide on another textured gold rondelle spacer. -
Lightest peach tones:
Begin the pale peach section. String about 5 beads, add a thin gold spacer, and then continue with 5-6 more peach beads. -
Close the loop:
If your bracelet needs more length to encircle your wrist, reverse the ombre pattern or continue adding small sections of your favorite color separated by gold spacers until the desired length is reached.
Mixed Metals Chic
Swap the uniform gold spacers for alternating gold and silver, or even rose gold, to create a stunning mixed-metal piece that matches all your jewelry.
Step 3: Finishing Touches
-
Check the fit:
Carefully wrap the unsealed bracelet around your wrist to verify the length. Remember that the clasp will add a tiny bit of length. -
Prepare the final crimp:
Thread a crimp bead onto the open wire end, followed by a wire guard (or make a loop directly). -
Loop and secure:
Pass the wire back through the crimp bead and pull it snug against the last clay bead. Don’t pull too tight; the beads need a little wiggle room to drape nicely. -
Crimp it shut:
Use your crimping tool to crush the crimp bead flat and secure. Trim the excess wire tail close to the crimp bead. -
Attach the extension:
Open a jump ring with your pliers (twist sideways, don’t pull apart). Hook it onto the final loop and attach your extension chain or a solid closed jump ring for the clasp to grab. -
Final polish:
Double-check that all jump rings are closed tightly so your wire doesn’t slip out.
Now you have a warm, custom-beaded bracelet ready to catch the light
Simple A-B-C Sunset Pattern
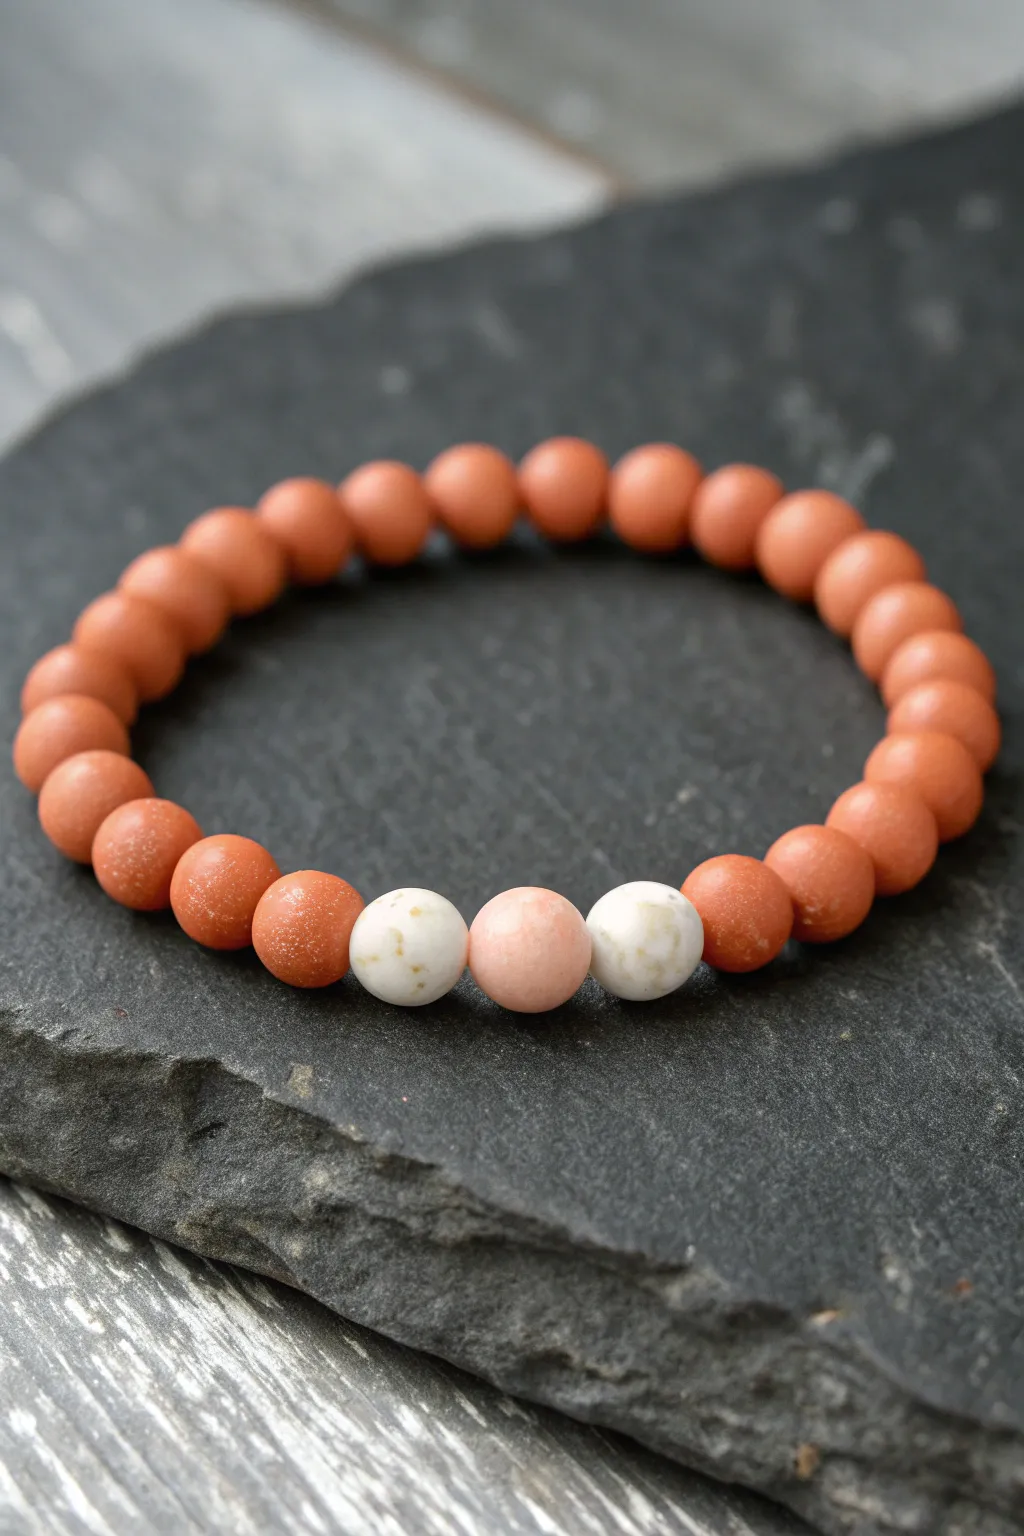
Capture the soft, fading light of dusk with this elegantly simple gemstone bracelet. Featuring a soothing rhythm of matte terracotta beads centered by a trio of creamy, sun-bleached accents, this accessory is perfect for everyday wear.
Step-by-Step Tutorial
Materials
- 20-22 Matte terracotta jasper beads (8mm round)
- 2 White speckled beads (8mm round) – possibly white turquoise or howlite
- 1 Pale pink semi-precious bead (8mm round) – possibly pink opal or rhodonite
- 0.8mm clear elastic stretch cord
- Jewelry crafting glue or clear nail polish
- Scissors
- Bead stopper or masking tape
- Beading needle (optional but helpful)
Step 1: Planning and Preparation
-
Measure your wrist:
Before cutting any cord, wrap a measuring tape or piece of string around your wrist to find your comfortable size. Add about half an inch to this measurement for a standard fit. -
Cut the elastic:
Cut a piece of your clear elastic cord to approximately 10-12 inches long. Having extra length makes tying the final knot significantly easier than struggling with short ends. -
Pre-stretch the cord:
I always take a moment here to firmly pull on the elastic cord several times. This ‘pre-stretching’ technique prevents the bracelet from sagging or expanding permanently after the first time you wear it. -
Secure the end:
Place a bead stopper or a piece of masking tape on one end of the cord. This simple safety measure ensures your beads won’t slide right off the other side while you are stringing them.
Knot Slipping?
If your elastic keeps un-tying before you can glue it, clamp the first half of the knot with a small binder clip while you prepare the second loop to hold tension.
Step 2: Stringing the Design
-
Sort your beads:
Lay out your beads on a soft cloth or beading mat. This prevents them from rolling away and lets you visually arrange the color pattern before committing it to the string. -
Start with the main color:
Begin by threading the matte terracotta jasper beads onto the elastic. Start with approximately half of your total terracotta beads—around 10 or 11 beads depending on your wrist size. -
Add the first accent:
Once half of the base color is strung, slide on one of the white speckled beads. This will be the first part of your central focal point. -
Place the center bead:
Thread the single pale pink bead next. This unique bead sits directly in the middle of the design, acting as the soft ‘sun’ in your sunset palette. -
Complete the focal trio:
Add the second white speckled bead immediately after the pink one. You should now have a distinct A-B-A pattern in the center: White, Pink, White. -
Finish the strand:
Thread the remaining terracotta beads onto the cord. Ensure you use the same number here as you did in the beginning so the focal point remains perfectly centered on your wrist. -
Check the fit:
carefully wrap the unfinished strand around your wrist. The ends should meet comfortably without gaps, but shouldn’t be loose enough to slide off your hand.
Step 3: Finishing Touches
-
Prepare to knot:
Remove the bead stopper or tape. Hold both ends of the elastic securely so the beads remain tight against one another. -
Tie the first knot:
Cross the ends and tie a simple overhand knot. Pull it tight, allowing the elastic to stretch slightly so the beads snuggle close together. -
Secure with a surgeon’s knot:
Follow up with a surgeon’s knot. This is done by looping one end through the knot loop twice instead of just once before pulling it tight. This adds extra friction and security. -
Apply adhesive:
Place a tiny dab of jewelry glue (or clear nail polish in a pinch) directly onto the knot. Be careful not to get glue on the neighboring beads if possible. -
Hide the knot:
While the glue is still slightly tacky but not wet, pull the knot gently inside the hole of the nearest terracotta bead. This hides the mechanics for a seamless professional look. -
Trim the excess:
Once the knot is hidden and the glue has dried for a few minutes, use your scissors to trim the excess elastic tails as close to the bead hole as safely possible.
Add Variety
Try swapping the two white speckled beads for metallic gold spacers or raw wood beads to give the project a more rustic or glamorous texture.
Enjoy the warm, earthy tones of your new bracelet as it adds a touch of natural elegance to your outfit

TRACK YOUR CERAMIC JOURNEY
Capture glaze tests, firing details, and creative progress—all in one simple printable. Make your projects easier to repeat and improve.
Sun Centerpiece Pop
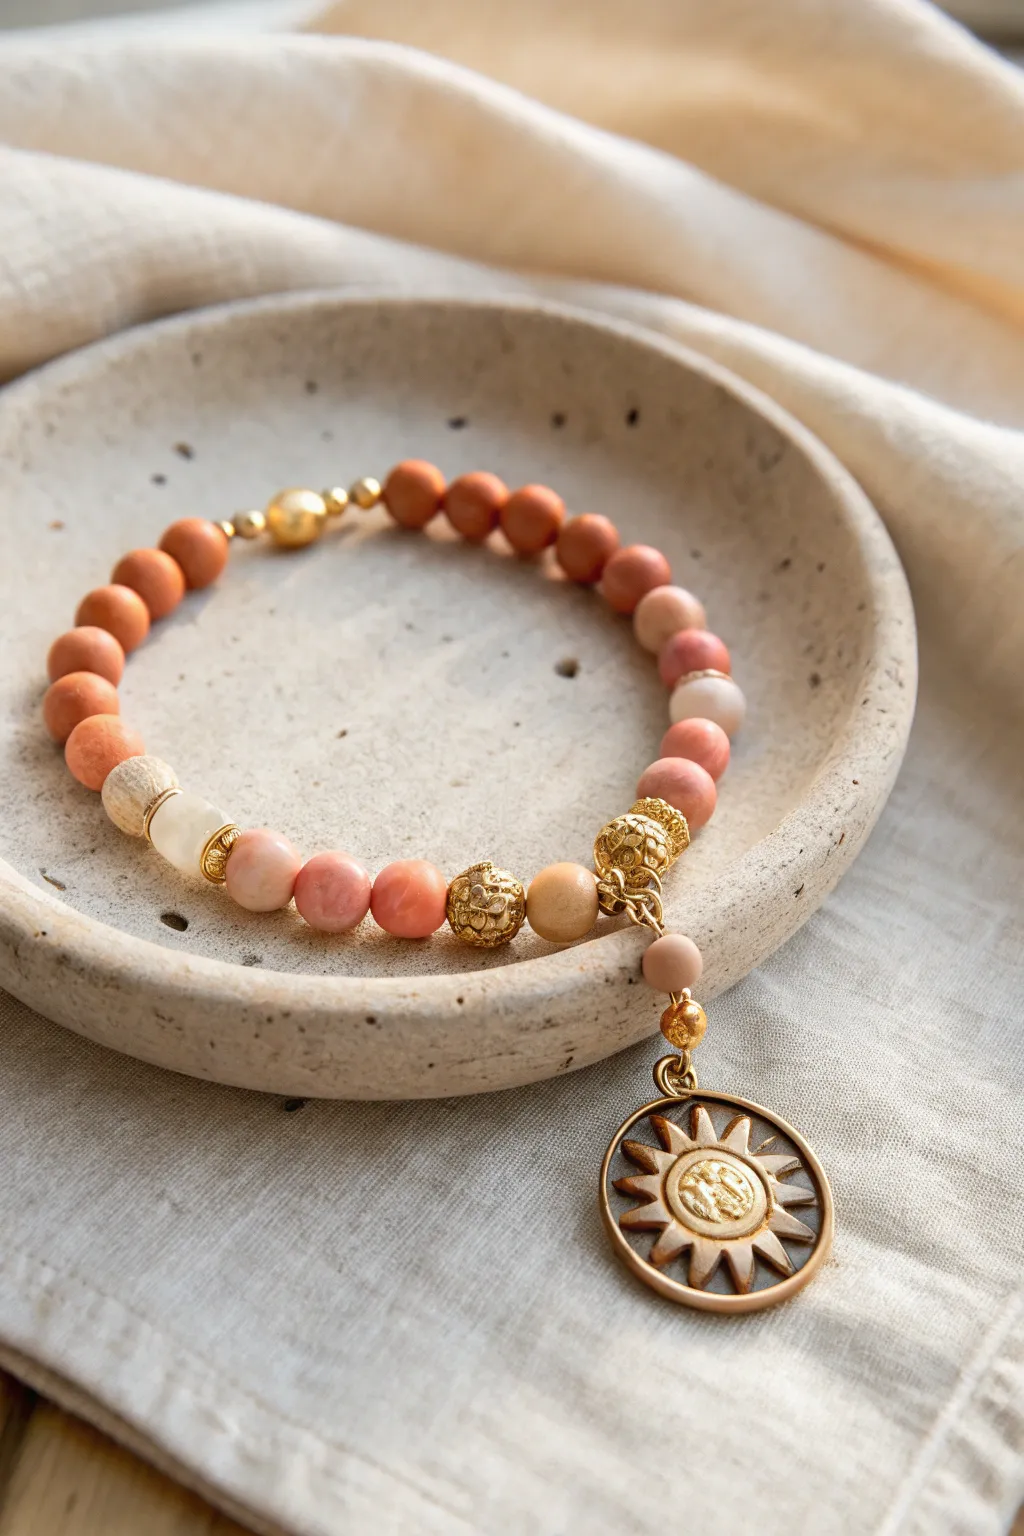
Capture the warmth of the golden hour with this stunning beaded bracelet featuring earthy terracotta and peach tones anchored by a radiant sun charm. The interplay of matte clay textures and gleaming gold accents creates a sophisticated accessory perfect for summer evenings.
Step-by-Step Guide
Materials
- Matte round beads (8mm) in terracotta/burnt orange
- Polished round beads (8mm) in peach/coral stone (like sunstone or peach aventurine)
- Small round wood or beige stone bead (6mm)
- Faceted cream/white bead (8mm)
- Gold filigree round metal beads (8mm and 10mm)
- Smooth gold round bead (8mm)
- Tiny gold spacer beads (2-3mm)
- Gold sun charm (approx 20mm diameter)
- Gold jump rings (open)
- Small gold bead dangle headpin
- Strong elastic stretch cord (0.8mm or 1mm)
- Jewelry glue (GS Hypo Cement)
- Scissors
- Pliers (flat nose and round nose)
Step 1: Preparation & Layout
-
Measure your wrist:
Before cutting any cord, wrap a measuring tape around your wrist to determine your size. Add about 0.5 inches for a comfortable fit. -
Cut the elastic:
Cut a piece of elastic cord about 10-12 inches long. Having this extra length makes tying the final knot much easier without fumbling. -
Pre-stretch the cord:
Give your cut piece of elastic a few firm tugs. This pre-stretching prevents the bracelet from sagging or loosening up immediately after you finish making it. -
Lay out the design:
Place your beads on a bead board or a soft towel. Arrange them in a circle to mimic the photo: group the darker terracotta beads on one side and the lighter peach/coral ones on the other, separating sections with gold accents.
Knot Slipping?
If the elastic is slippery, try a ‘surgeon’s knot.’ Loop the elastic through twice on the first pass of the knot instead of once for extra friction before pulling tight.
Step 2: Stringing the Beads
-
Start with the back section:
Begin threading the matte terracotta beads. String about 8-10 of these to form the back half of the bracelet. -
Add the gold focal bead:
After the terracotta section, slide on a tiny gold spacer, followed by the smooth large gold bead, and another tiny spacer. This sits opposite the charm. -
Continue the pattern:
Add 3-4 more terracotta beads, then transition into a sequence of a small gold spacer, a cream faceted bead, and a textured gold filigree bead. -
Create the heavy gold section:
Thread on your peach/coral stones. After 3-4 stones, verify the sizing against your wrist. Next, add a large gold filigree bead—this creates a visual anchor near where the charm will hang. -
Add the connector bead:
Place a beige wood or stone bead next to the large filigree bead. Then, add the most critical piece: a gold bail or a large jump ring threaded directly onto the elastic. This will hold your charm. -
Close the loop:
Finish stringing with any remaining peach or terracotta beads needed to complete the circle until the ends meet.
Step 3: Creating the Charm Cluster
-
Prepare the dangle bead:
Take a headpin and thread on a single small matte peach bead and a tiny gold spacer. Using round nose pliers, create a small wrapped loop at the top of the bead. -
Open the jump ring:
Identify the large jump ring or bail you strung onto the bracelet earlier. Use two pairs of pliers to twist it open gently (side-to-side motion, never pull apart). -
Attach the sun:
Slide the sun charm onto the open jump ring. Orient it so the ‘front’ of the sun faces outward when worn. -
Add the bead dangle:
Slide the wrapped loop of the peach bead dangle onto the same jump ring so it sits just above the sun. -
Secure the charm:
Close the jump ring securely using your pliers, ensuring there is no gap for the charm to slip through.
Layered Look
Create a matching stack by making two simpler bracelets—one entirely of the matte terracotta beads and one of just gold spacers and peach stone—to frame this centerpiece.
Step 4: Finishing Touches
-
Tie the knot:
Bring the two ends of the elastic cord together. Tie a standard square knot (right over left, left over right) and pull it tight. -
Secure the knot:
I always add a tiny dab of jewelry glue (like GS Hypo Cement) directly onto the knot. Let it dry for a few minutes. -
Hide the knot:
Once dry, trim the excess elastic close to the knot. Gently pull the elastic so the knot slides inside the hole of the nearest large bead (the large gold filigree bead works perfectly for this).
Slip on your new bracelet and enjoy the warm, sun-drenched vibes it brings to your outfit
Beach Sunset With Shell Accents
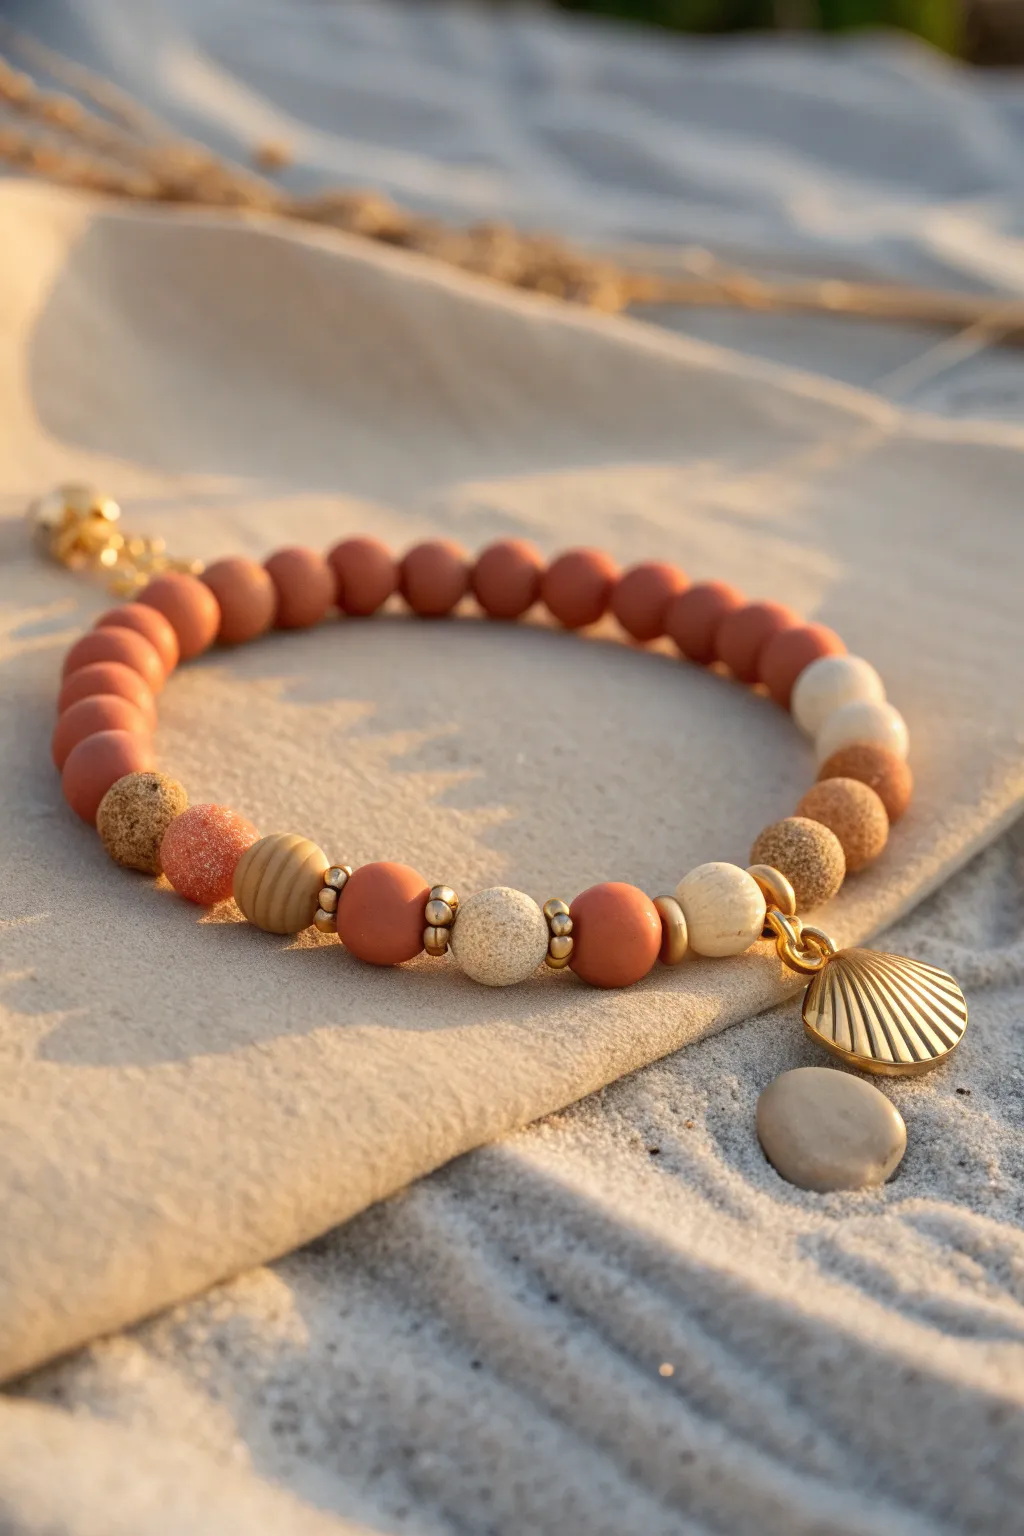
Capture the warmth of a setting sun sinking into the ocean with this beautifully composed clay bead bracelet. Featuring a soothing palette of terracotta, sand, and cream, accented by a gleaming gold shell, this accessory is summer encapsulated.
How-To Guide
Materials
- Polymer clay beads (8mm round) in matte terracotta/rust
- Polymer clay beads (8mm round) in cream or off-white
- Textured accent beads (8mm) in speckled beige/sand (lava stone or textured clay)
- Textured accent beads (8mm) in darker cork or brown stone
- One large textured beige bead (10mm, optional focal point)
- Gold tone metal spacer beads (small rounds or heishi)
- Gold tone scallop shell charm with jump ring
- Gold tone extension chain and lobster clasp
- Strong beading wire or elastic cord (0.8mm)
- Crimp beads (if using wire)
- Beading pliers (flat nose and cutting pliers)
Step 1: Planning and Preparation
-
Lay out your design:
Before stringing anything, arrange your beads on a bead board or a piece of felt. This helps visualize the ombre-style transition from the solid rust colors to the mixed textures near the charm. -
Establish the pattern:
For the back half of the bracelet, create a uniform row of the matte terracotta clay beads. This solid block of color grounds the design and mimics the deep sunset hues. -
Design the focal section:
Transition from the solid terracotta into your textured feature beads. Alternate a terracotta bead with a textured sand or cork-style bead to create visual rhythm. -
Add metallic accents:
Insert small gold spacer beads on either side of the feature beads near the center. Ideally, place two spacers flanking a central textured bead to frame where the charm will eventually hang.
Step 2: Stringing the Beads
-
Prepare your cord:
Cut a length of beading wire or elastic cord about 10 inches long. This gives you plenty of excess space to work with while knotting or crimping later. -
Attach the first clasp end:
If using wire, thread a crimp bead and one end of your extension chain onto the wire. Loop the wire back through the crimp bead and use your flat nose pliers to squash it flat, securing the chain. -
Start with the solids:
Begin threading the beads, starting with the solid terracotta section. String about 10-12 of these simple round beads first. -
Transition the colors:
After the solid block, add a darker textured cork-style bead, followed by a lighter terracotta clay sphere. -
Build the texture:
Thread on a sparkly or highly textured copper-tone bead, then a patterned beige bead. I like to verify the length against my wrist at this point to ensure the focal point sits centrally. -
Create the charm station:
Thread a solid terracotta bead, then a gold spacer, a cream textured bead, another gold spacer, and finally another solid terracotta bead. We will attach the distinct charm here later. -
Finish the sequence:
Complete the loop by mirroring the transitional beads—add a cream bead, then a darker textured bead to balance the design before meeting the clasp end.
Matte vs. Glossy
To get that earthy, natural look shown in the photo, ensure your polymer clay beads have a matte verify finish. Avoid clear glossy glaze.
Step 3: Finishing Touches
-
Secure the second end:
Thread a crimp bead and the jump ring of your lobster clasp onto the open end of the wire. -
Create the loop:
Pass the wire back through the crimp bead and pull it tight so there are no gaps between beads, but not so tight the bracelet becomes stiff. -
Crimp to close:
Use your pliers to flatten the crimp bead securely. Trim the excess wire tail with your cutting pliers, tucking a tiny remaining end into the adjacent bead hole if possible. -
Prepare the charm:
Locate a jump ring on your gold scallop shell charm. Open the jump ring by twisting it sideways with two pairs of pliers (never pull it apart). -
Attach the charm:
Hook the open jump ring onto the bracelet wire between the two gold spacer beads you placed in the focal section. Close the jump ring securely by twisting it back into place.
Scent Infusion
Use porous lava stone beads for the ‘textured’ cream sections. You can add a drop of coconut or sea salt essential oil for a scented accessory.
Slip on your creation and enjoy a piece of the beach sunset wherever you go
Sunset Flower Focal Bracelet
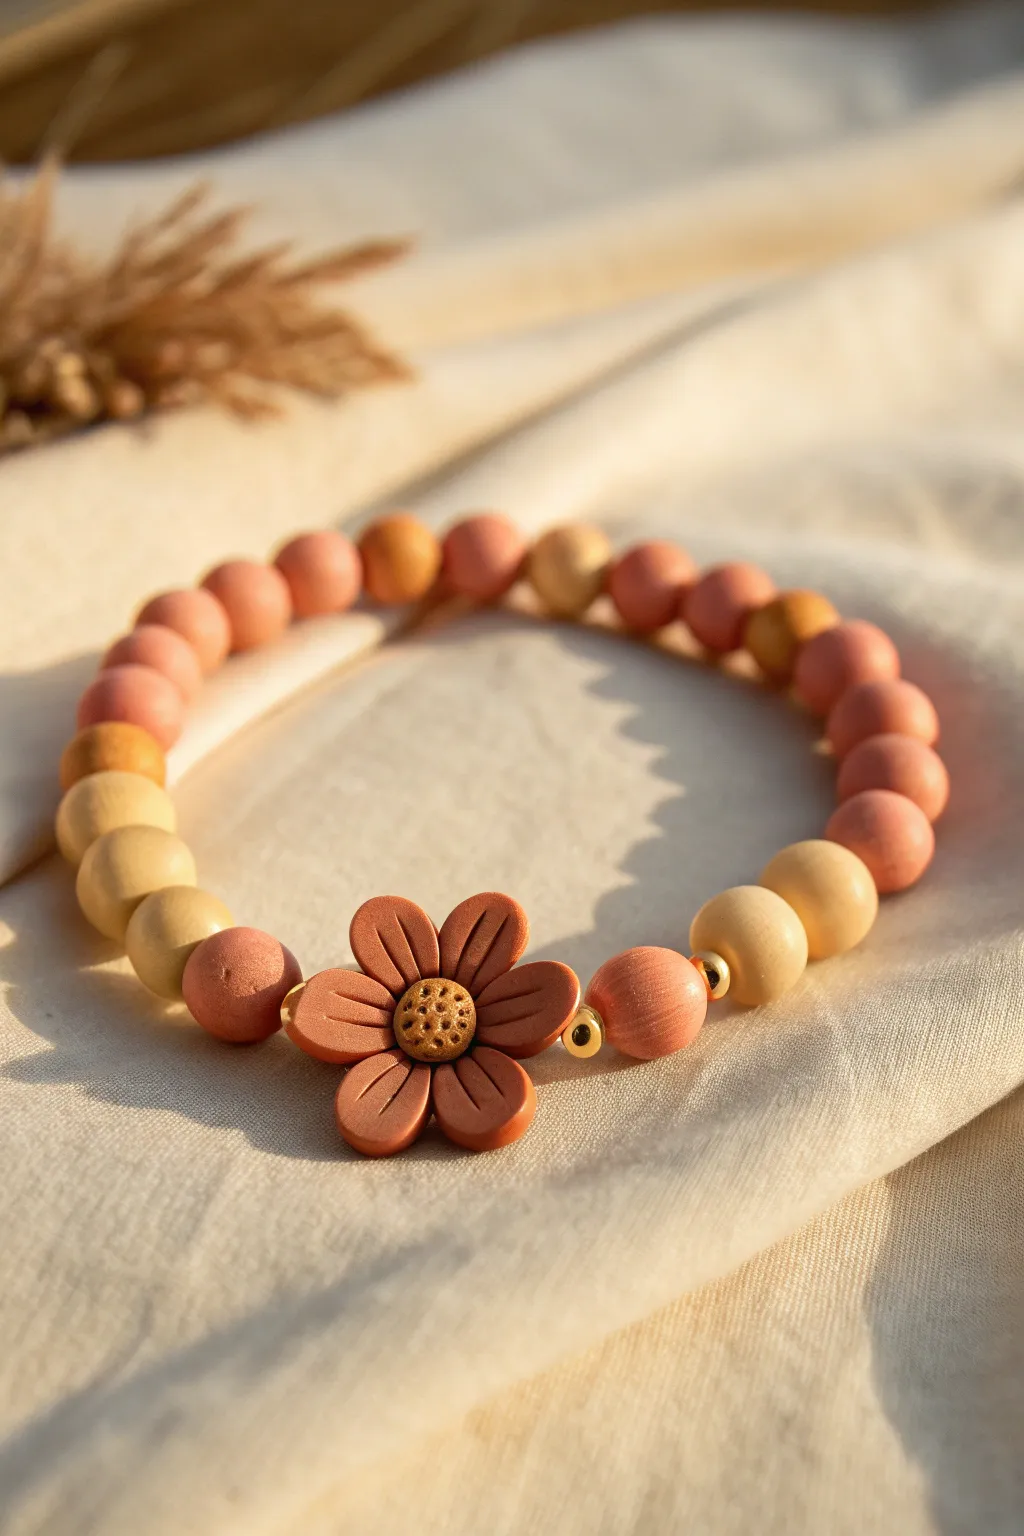
Capture the golden hour on your wrist with this warm, inviting design featuring soft terracotta tones and natural wood textures. The central clay flower acts as a charming focal point, surrounded by an alternating pattern that mimics the fading light of a summer evening.
Step-by-Step Guide
Materials
- Polymer clay (terracotta/burnt orange and ochre yellow)
- Small round clay cutter (approx. 1.5 cm diameter) or flower mold
- Modeling tools (needle tool, ball stylus)
- Round wooden beads (8mm, light natural finish)
- Round wooden beads (8mm, dyed dusty rose/terracotta)
- 2 small gold spacer beads (round or saucer shape)
- Elastic stretch cord (0.8mm or 1mm)
- Hypo-cement or strong jewelry glue
- Scissors
Step 1: Sculpting the Flower Focal
-
Condition the Clay:
Begin by warming up a small amount of terracotta polymer clay in your hands until it is pliable and smooth. Roll it into a ball about the size of a marble. -
Shape the Petals:
Flatten the ball slightly into a thick disk. Using a needle tool or craft knife, cut 6 even notches around the perimeter to create separate petal sections, leaving the center intact. -
Refine the Form:
Gently pinch and round the edges of each petal with your fingers to soften the look. Use the side of your needle tool to press an indentation down the center of each petal for dimension. -
Create the Bead Hole:
Carefully insert a thick needle or toothpick horizontally through the flower’s center. Ensure the hole is wide enough for your elastic cord to pass through later, and wiggle it slightly to prevent sticking. -
Add the Center:
Roll a very small ball of ochre yellow clay. Press this firmly into the center of your flower. -
Texture the Details:
Using a needle tool, poke tiny dots all over the yellow center to create a pollen-like texture. -
Bake the Bead:
Bake the flower bead according to your clay manufacturer’s instructions (usually 275°F/135°C for 15-30 minutes). Let it cool completely before using.
Hole Distortion?
If the bead hole squishes when you pierce the flower, bake the flower for 5 mins first to firm it up, then drill the hole carefully.
Step 2: Stringing the Design
-
Prepare the Cord:
Cut a piece of elastic cord about 10-12 inches long. I like to pre-stretch the elastic by pulling it firmly a few times; this prevents the finished bracelet from sagging later. -
Start the Pattern:
Begin stringing your beads. The pattern should be alternating sets of colors to create a gradient effect. Thread on 3 light natural wooden beads first. -
Add Warm Tones:
String 3 dusty rose wooden beads next. This block-color method creates that soft, rhythmic transition. -
Continue the Rhythm:
Repeat this pattern—3 light beads, then 3 rose beads—until you have enough length to cover almost your entire wrist. -
Position the Focal:
Once the main strand is complete, add one small gold spacer bead to the cord. -
Thread the Flower:
Slide on your cooled terracotta flower bead. The gold spacer should sit snugly against its side. -
Secure the Focal:
Add the second gold spacer bead on the other side of the flower to frame it perfectly. -
Check the Fit:
Wrap the strand around your wrist to check the sizing. If there’s a gap or it feels too tight, add or remove wooden beads from the ends symmetrically to keep the flower centered.
Step 3: Finishing Touches
-
Tie the Knot:
Bring the two ends of the elastic together. Tie a standard square knot (right over left, left over right) and pull it tight. -
Secure with Glue:
Apply a tiny dot of jewelry glue or hypo-cement directly onto the knot. Wait a few moments for it to become tacky. -
Hide the Knot:
While the glue is still slightly wet but stable, slide the nearest wooden bead over the knot to conceal it inside. -
Trim Excess:
Once the glue is fully dry, trim the excess elastic cord close to the bead using sharp scissors.
Smoother Finish
Before baking, lightly brush the clay with a little baby oil or cornstarch to smooth out any fingerprints for a professional look.
Now you have a piece of wearable art that captures the warmth of a setting sun
Mirrored Sunset Gradient
Capture the warmth of dusk with this mirrored gradient design, featuring matte beads that transition from deep twilight purples to bright solar yellows. The adjustable sliding knot closure ensures a perfect fit while adding a touch of rustic charm to the finished piece.
Step-by-Step Tutorial
Materials
- Matte round gemstone or clay beads (8mm): dark purple/plum, muted grape, dusty rose/terracotta, burnt orange, golden yellow, bright yellow
- Smaller accent beads (4-6mm) for cord ends: silver metal spacer and dark plum
- Nylon beading cord or waxed cotton cord (0.8mm or 1mm) in taupe or light brown
- Scissors
- Lighter or thread burner (for sealing synthetic cord ends)
- Tape or clipboard (to hold work in place)
- Beading needle (optional, if cord is thick)
Step 1: Planning the Gradient
-
Lay out the design:
Before restringing, lay your beads out on a bead board or soft cloth. Identify your center point—this design uses a block of bright yellow and orange at the top, transitioning down the sides to purple. -
Establish the pattern:
Create a mirrored effect. Start from the center ‘top’ with 3-4 bright yellow beads. Flank them with golden yellow, then move outward to orange, terracotta, muted grape, and finally deep plum at the bottom ends. -
Check the length:
Measure your wrist. The beaded section should cover most of your wrist but leave about 1-1.5 inches of gap flexibility for the adjustable closure. Add or remove purple end beads to adjust size.
Fixing “Twisty” Knots
If your sliding closure starts twisting into a spiral, you likely forgot to alternate sides. You must switch left/right starter cords for every single knot to keep the band flat.
Step 2: Stringing the Beads
-
Prepare the cord:
Cut a piece of cord approximately 24 inches long. This generous length gives you plenty of room to work the knots later without struggling. -
String the beads:
Thread all your pre-arranged beads onto the cord. If the cord ends are fraying, burn the tip quickly with a lighter and roll it between your fingers (carefully!) to create a hard ‘needle’ end. -
Center the work:
Slide the entire group of beads to the exact center of your 24-inch cord. -
Secure the ends:
Tie a simple overhand knot firmly against the last bead on both the left and right sides. This keeps the beads tight and prevents them from sliding while you work on the closure.
Step 3: Creating the Sliding Knot
-
Overlap the cords:
Curve the bracelet into a circle, overlapping the two tail ends of the cord by about 3-4 inches. You can tape these down to a table to keep them parallel and steady. -
Prepare the knotting cord:
Cut a separate joining piece of cord, about 10 inches long. This will become the sliding mechanism. -
Start the square knots:
Slide the 10-inch cord underneath the two overlapped bracelet cords. Center it, then tie a basic starting knot. -
Tie the macramé square knots:
Create the flat square knot: Pass the left cord over the center strands, then the right cord over the left cord, under the center strands, and up through the loop on the left. Pull tight. -
Complete the sequence:
Repeat the previous step, but start with the right cord first. Alternate left and right for about 5-6 full knots (creating roughly 0.5 inches of woven closure). -
Finish the sliding knot:
Trim the excess lengths of the knotting cord (not your main bracelet cords!) to about 2mm. Carefully melt these short stubs with a lighter and press them flat against the knot to seal.
Add Essential Oil
If using porous lava stone or unfinished wood beads for the ‘terracotta’ color section, add a drop of essential oil. They act as a natural diffuser.
Step 4: Finishing Touches
-
Thread the tassels:
On one of the long tail cords, thread a small silver spacer bead followed by a dark purple bead. -
Tie off the end:
Tie an overhand knot right below that final purple bead. Check the length first—make sure the bracelet can open wide enough to fit over your hand before securing the knot. -
Repeat on the other side:
Add the spacer and purple bead to the second tail cord. I like to measure this against the first tail to ensure they hang at the exact same length. -
Final trim:
Trim the excess cord below the end knots and carefully singe the tips to prevent fraying.
Slide the bracelet on and enjoy the warm gradient colors on your wrist
Sunset Stack Trio Set
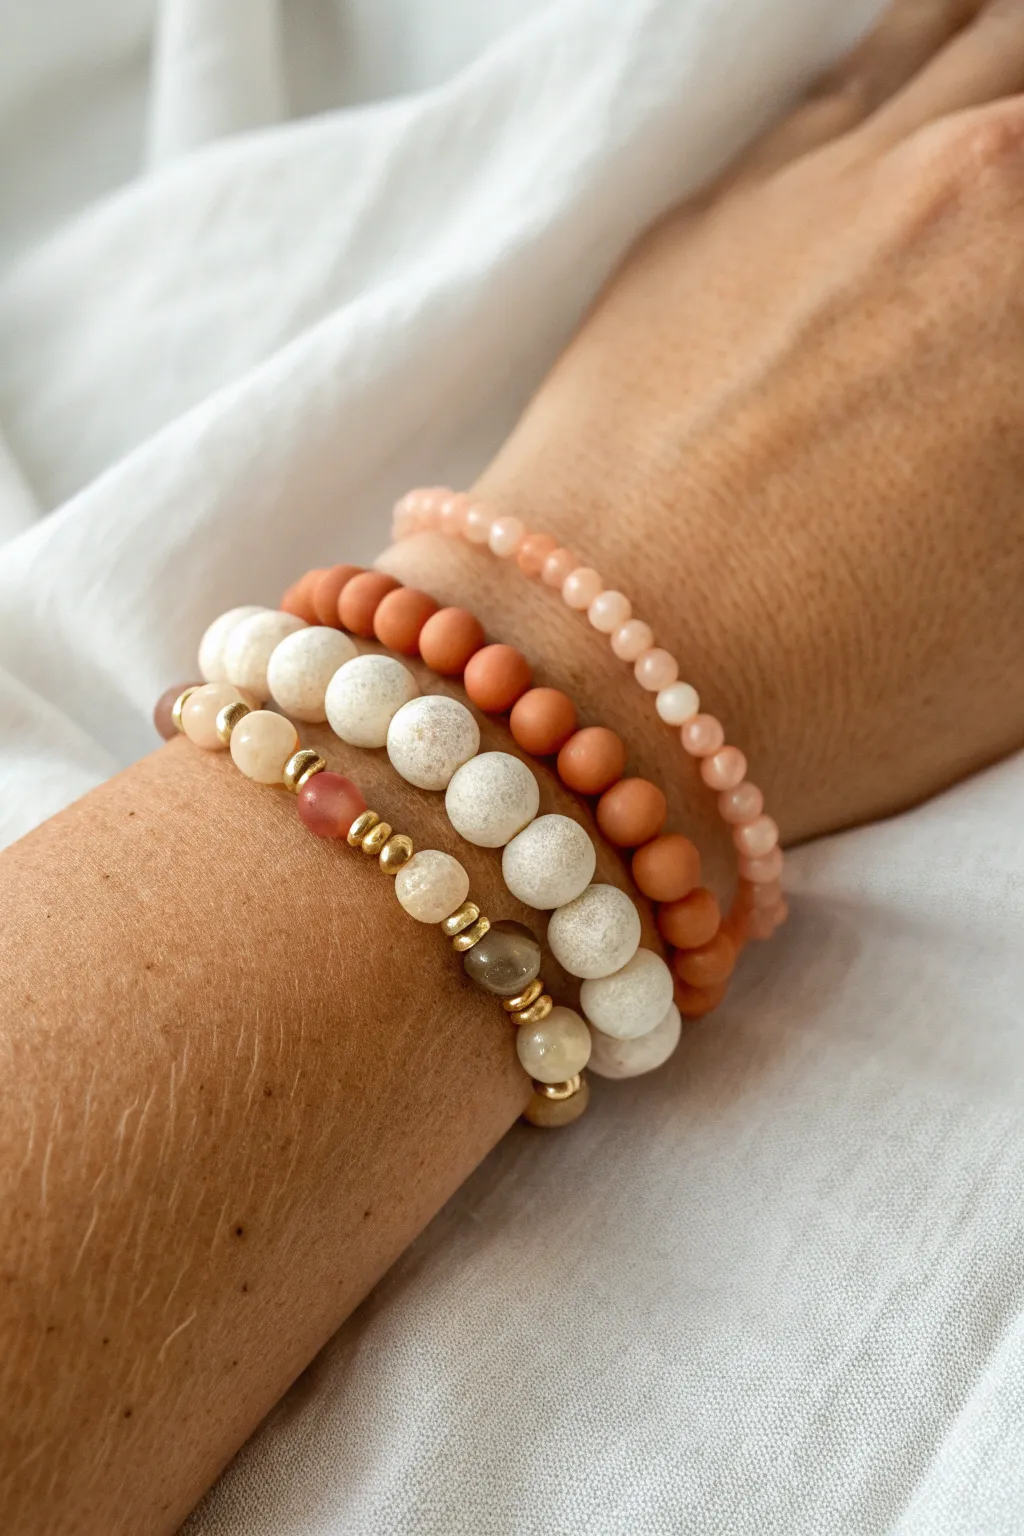
Capture the warmth of a fading day with this set of three complementary bracelets featuring a mix of textures and earthy tones. By combining matte stones, polished rounds, and gleaming gold accents, you’ll create a cohesive stack that feels both organic and elegant.
Step-by-Step Guide
Materials
- Elastic stretch cord (0.7mm or 0.8mm)
- 6mm matte peach polished gemstone beads
- 8mm terracotta/clay round beads (matte finish)
- 8mm textured white/cream stone beads (like lava stone or matte agate)
- Small gold spacer beads (heishi or rondelle style)
- Large gold spacer beads
- Mixed accent beads (champagne glass, muted gold stone)
- Jewelry glue or clear nail polish
- Scissors
- Bead stopper or tape
Step 1: The Petite Peach Strand
-
Prepare the cord:
Cut a piece of elastic cord about 10 inches long. This gives you plenty of room to tie knots later without struggling. I usually pre-stretch the cord by tugging it gently a few times to prevent the bracelet from loosening later. -
Secure the end:
Place a bead stopper or a piece of tape on one end of the cord so your beads don’t slide off as you work. -
String the beads:
Thread on your 6mm matte peach gemstone beads. Continue adding beads until the strand measures approximately 6.5 to 7 inches, or fits comfortably around your wrist with a little ease. -
Check the fit:
Wrap the strand around your wrist to verify the size. Add or remove a bead or two until it sits perfectly. -
Tie the knot:
Remove the stopper and tie a strong surgeon’s knot (right over left, left over right, and loop through an extra time). Pull it tight. -
Finish the strand:
Add a tiny dab of jewelry glue to the knot. Let it dry, then snip the excess cord close to the knot. Hide the knot inside a bead hole if possible.
Knot Security
Hide your knot inside a bead with a larger hole. If using beads with small holes, try to place the knot next to a gold spacer, which often has a larger opening.
Step 2: The Terracotta Statement
-
Start the second strand:
Cut another 10-inch length of elastic and secure the end just like before. -
Create the base:
String on the 8mm matte terracotta beads. These are slightly larger and have a rich, clay-like appearance that anchors the stack. -
Sizing check:
Measure this against the first bracelet. Since the beads are larger, you might need a slightly longer length of cord to ensure it fits the same way on the wrist. -
Finalize and secure:
Once the length matches your wrist size, tie your surgeon’s knot, apply glue, and trim the ends neatly.
Make It Yours
Add a small gold charm, like a sun or a starfish, to the mixed texture bracelet for an extra touch of customized personality.
Step 3: The Mixed Texture Accent
-
Begin the final piece:
Cut your third piece of elastic cord. This bracelet is the most detailed, involving pattern work. -
Start the pattern:
Thread on five or six of the 8mm textured white stone beads. -
Add the focal section:
Now, slide on a gold spacer, followed by a champagne transom or glass bead, another gold spacer, a muted gold stone, another spacer, and a dark peach accent bead. -
Complete the loop:
Finish the rest of the strand with more of the white textured beads until you reach the desired length. The gold and mixed beads should sit as a focal point on top of the wrist. -
Knot and seal:
Perform the final tie-off using the surgeon’s knot technique. Apply your adhesive to secure the knot permanently. -
Trim and arranging:
Cut the tails of the cord. Slide the beads around so the knot is hidden inside one of the larger white beads.
Slip on your new stack and enjoy the warm, glowing palette on your wrist
Neon Sunset Pop Colors
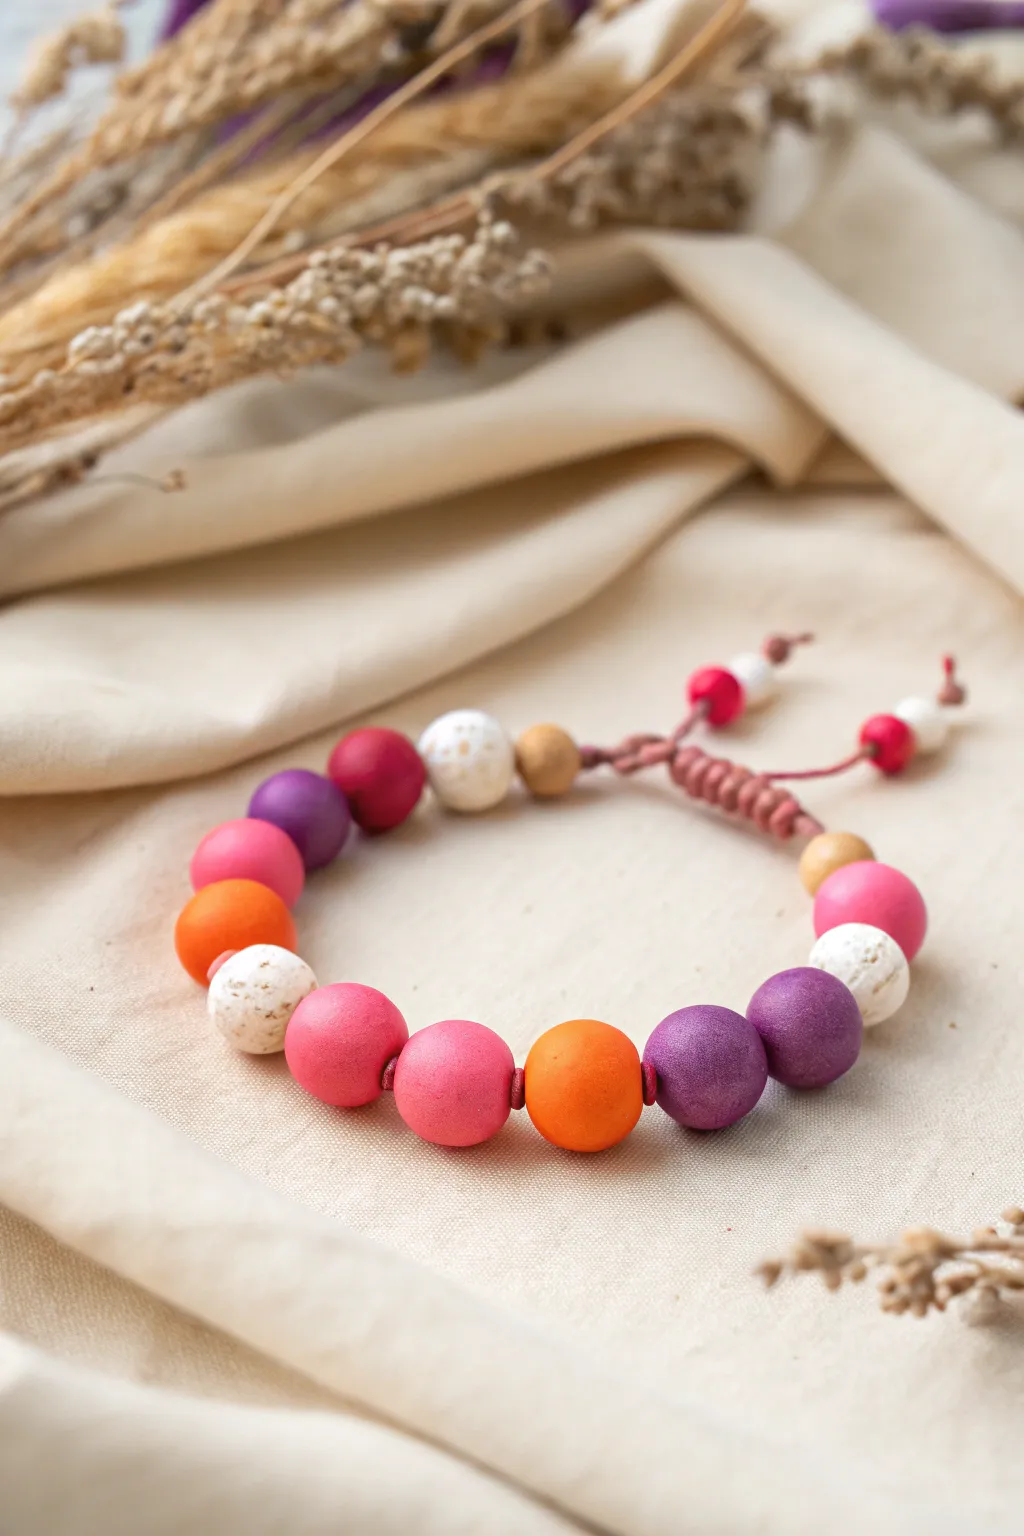
Capture the fleeting beauty of a vibrant sunset with this bold clay bead bracelet. Featuring a stunning gradient of warm pinks, oranges, and purples accented with textured white and gold, this adjustable piece brings an energetic pop of color to any wrist stack.
Step-by-Step
Materials
- Polymer clay (fuchsia, hot pink, orange, purple, white, and translucent for mixing)
- Granite or speckled effect polymer clay (white/black speckle)
- Gold polymer clay or metallic powder
- Waxed polyester cord (dark rose or mauve, approx. 0.8mm – 1mm)
- Bead roller tool (for round beads)
- Needle tool or toothpick (for piercing)
- Oven for baking clay
- Baking sheet and parchment paper
- Lighter (for sealing cord ends)
- Scissors
Step 1: Crafting the Clay Beads
-
Condition the clay:
Begin by warming up your polymer clay blocks in your hands. You’ll need neon pink, deep fuchsia, bright orange, purple, and a speckled white granite clay. Condition them until they are soft and pliable. -
Mix custom shades:
To achieve the sunset gradient, create intermediate shades. Mix a little orange into the pink for a coral tone, and blend purple with fuchsia for a rich berry color. This creates a smoother transition between the main colors. -
Portion the clay:
Pinch off equal-sized pieces of each color. For this bracelet, aim for beads that are roughly 10mm to 12mm in diameter. You will need about 2 beads of the main colors and 3-4 of the speckled or accent beads. -
Roll the spheres:
Roll each portion into a smooth ball between your palms. I like to use a bead roller tool here to ensure they are perfectly spherical and uniform in size, but hand-rolling works if you are careful. -
Create the texture:
For the white speckled beads, use the granite clay. Roll them into balls just like the others. For the small gold spacer beads, roll tiny amounts of gold clay into 4-5mm spheres. -
Pierce the holes:
Using a needle tool or a thick toothpick, gently pierce a hole through the center of each bead. Rotate the bead as you push the tool through to prevent it from squishing out of shape. -
Bake the beads:
Arrange your beads on a baking sheet lined with parchment paper. Follow the baking instructions on your specific brand of polymer clay (usually around 275°F or 135°C for 15-30 minutes). Let them cool completely before handling.
Step 2: Stringing and Assembly
-
Prepare the cord:
Cut a length of waxed polyester cord, approximately 18 inches long. This extra length is necessary for creating the adjustable sliding knot later. -
Seal the end:
Briefly run a flame from a lighter over one end of the cord to melt it into a stiff, needle-like point. This acts as a built-in needle and makes stringing the beads much easier. -
String the beads:
Thread your beads onto the cord. Follow the pattern seen in the image: start with the smaller gold spacer, then alternate your colored beads (purple, pink, textured white, pink, textured white, orange, purple, etc.) to create a varied, organic look. -
Check the fit:
Wrap the beaded section around your wrist to verify the length. The beads should cover the top and sides of your wrist, leaving the underside open for the closure.
Smooth Rolling Hack
To avoid fingerprints on your beads, lightly dust your palms with cornstarch before rolling, or wear latex gloves while handling the raw clay.
Step 3: Creating the Adjustable Closure
-
Cross the cords:
Bring the two tail ends of the cord together so they overlap and run parallel to each other, forming a circle with the bracelet. -
Start the macramé knot:
Cut a separate piece of cord about 8 inches long. Tie this new piece around the two overlapped main strands using a basic square knot. -
Braid the slider:
Continue tying square knots (macramé) over the overlapped cords for about half an inch. This creates the sliding mechanism that allows the bracelet to expand and contract. -
Finish the slider:
Trim the excess ends of the knotting cord (not the main bracelet cords!) close to the knot. Carefully melt the trimmed ends with a lighter and press them flat against the knot to secure it. -
Add stopper beads:
Slide a small accent bead (like the red and white ones shown) onto the end of each main drawcord. Tie a simple overhand knot after the bead to keep it in place. -
Final trim:
Trim any excess cord beyond the stopper knots and quickly seal the tips with your lighter to prevent fraying.
Add a Scent Boost
For a sensory twist, incorporate a lava stone bead in the sequence. Add a drop of essential oil to it, and your bracelet becomes a diffuser.
Enjoy styling your new sunset-inspired accessory with your favorite summer outfits
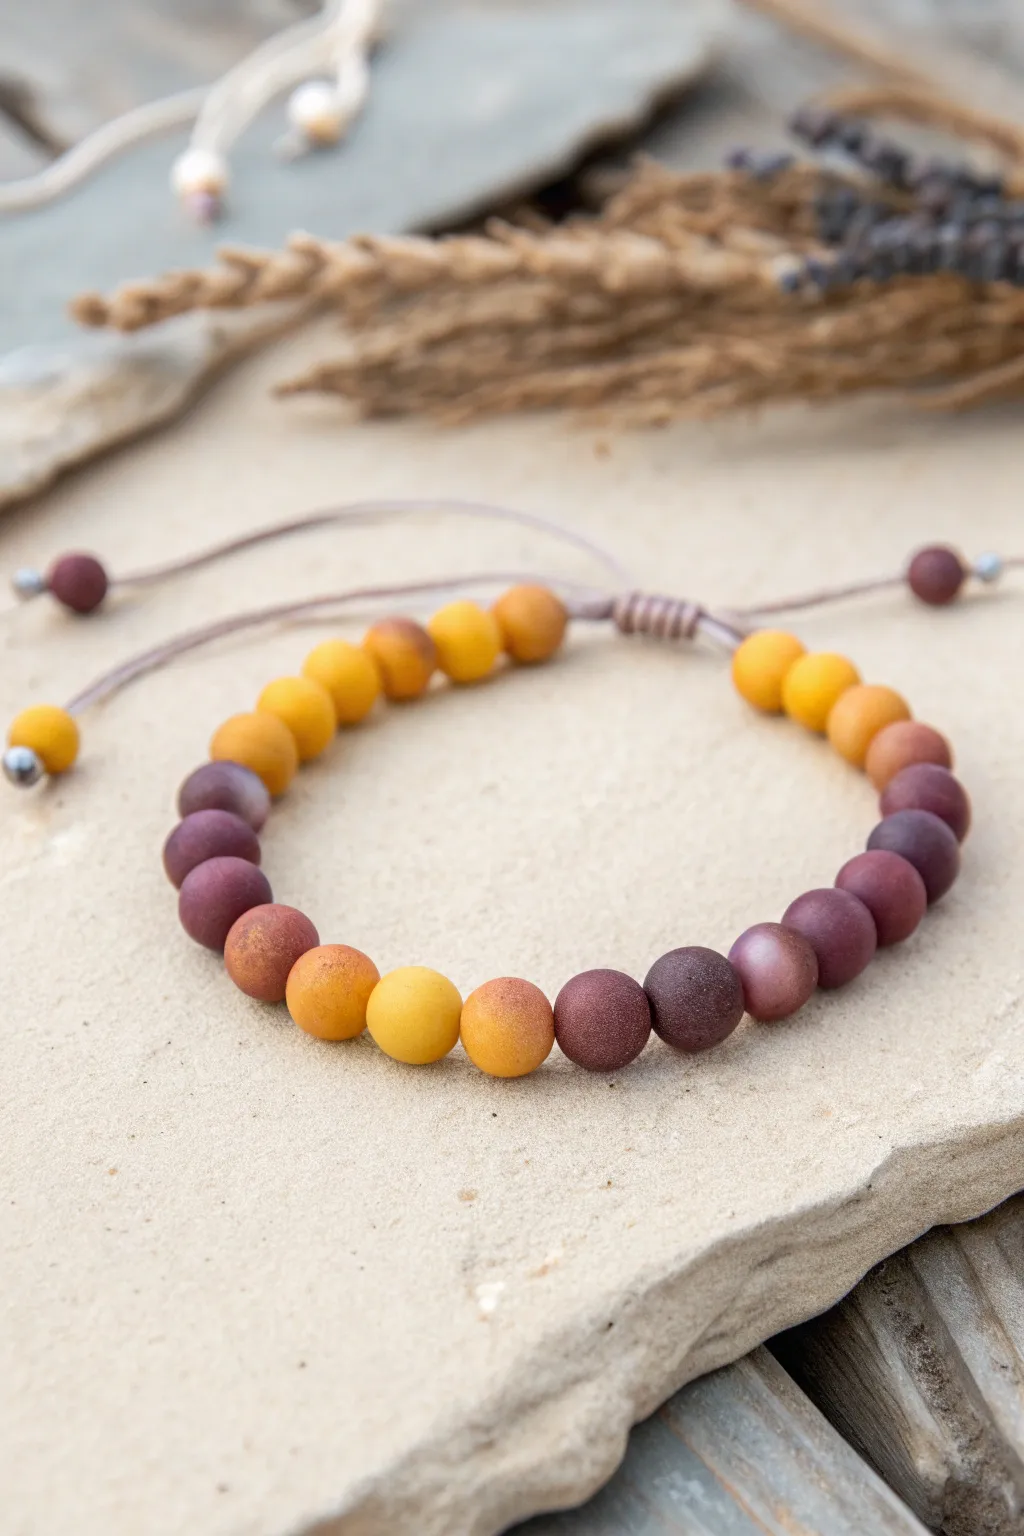
Deep Dusk Purple-End Fade
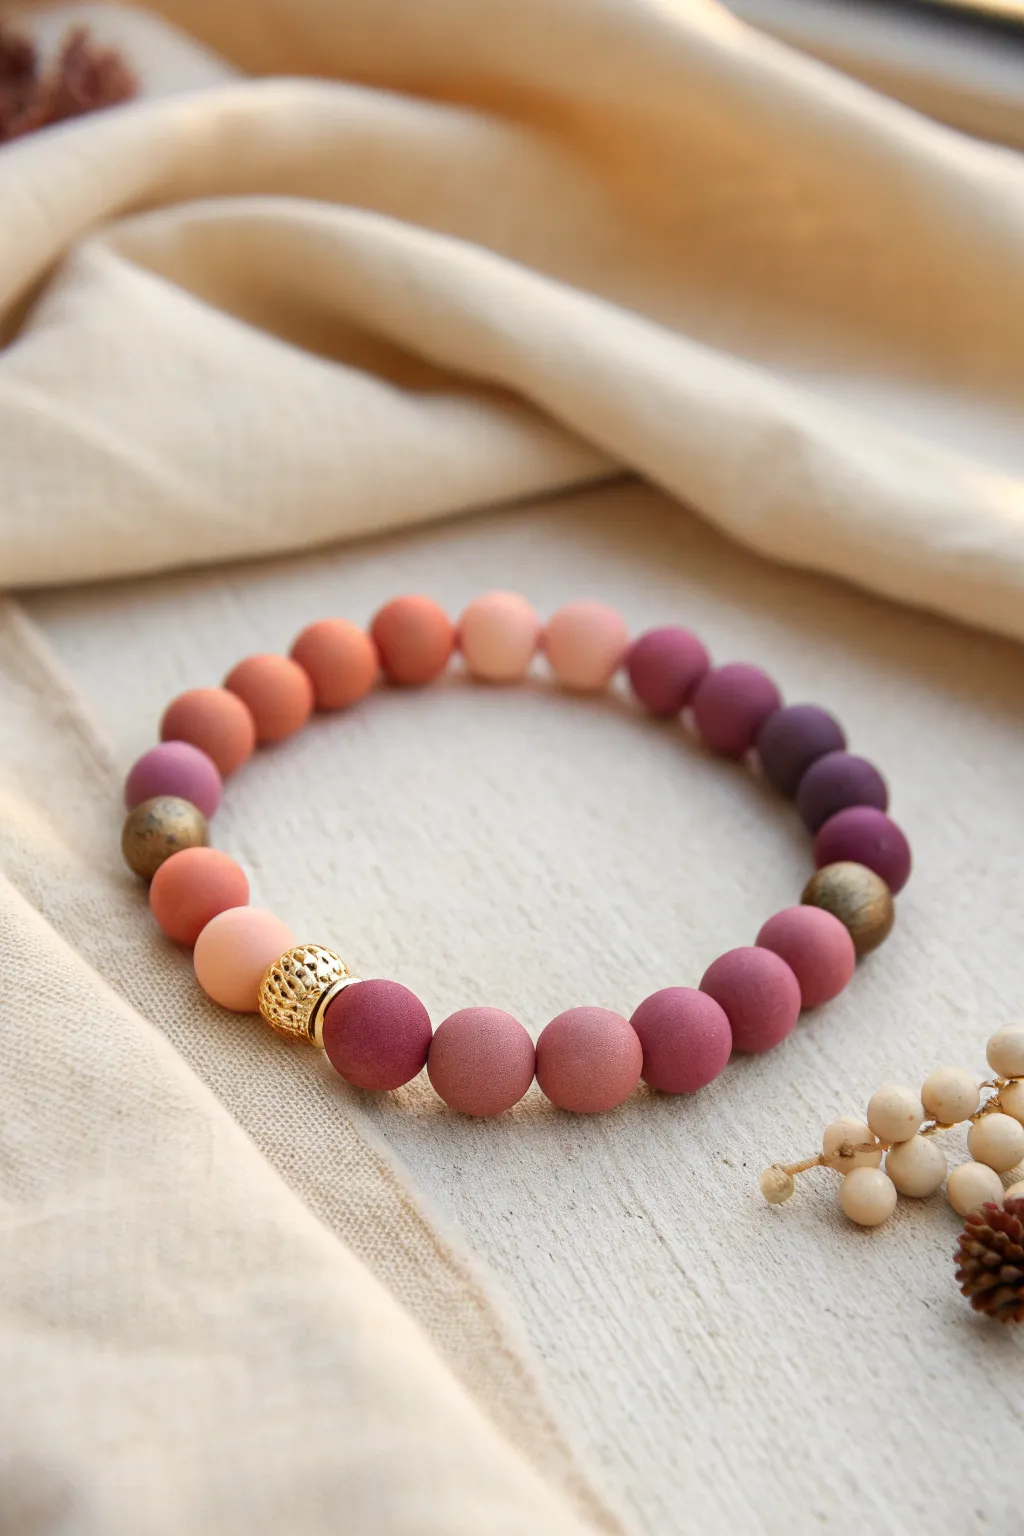
Capture the moody romance of twilight with this stunning clay bead bracelet. The design features a seamless gradient fading from soft peach into deep plum, punctuated by elegant metallic accents for a touch of warmth.
Step-by-Step Tutorial
Materials
- Matte polymer clay beads (8mm or 10mm) in gradient shades: pale peach, coral, mauve, plum, and deep eggplant
- Gold filigree or textured focal bead (metal or gold-plated)
- Small antique bronze or brown spacer bead (optional)
- Strong elastic cord (0.8mm or 1mm)
- Jewelry glue or clear nail polish
- Scissors
Step 1: Planning the Gradient
-
Sort your spectrum:
Begin by laying out all your clay beads on a bead board or a soft piece of fabric to prevent them from rolling away. Organize them strictly by color value, starting with the lightest peach and moving towards the darkest purple. -
Establish the pattern:
Create your color story by placing beads in a circular formation to visualize the transition. The goal is a smooth blend, so use 3-4 beads of each shade before transitioning to the next slightly darker tone. -
Place the metallic accents:
Identify the ‘seam’ of your gradient—where the lightest color meets the darkest. This is the perfect spot for your focal point. I like to place the large gold filigree bead right between the ending dark purple and the starting light peach to bridge the contrast. -
Add texture variation:
Locate a spot midway through the darker purple section to insert the antique bronze bead. This breaks up the solid matte texture and adds an organic feel.
Step 2: Stringing the Beads
-
Prepare the cord:
Cut a length of elastic cord about 10-12 inches long. This gives you plenty of extra room for tying knots without struggling against tension. -
Pre-stretch the elastic:
Hold the cord ends and give it a few firm tugs. Pre-stretching prevents the bracelet from loosening up and sagging after you wear it a few times. -
Start with the focal bead:
String the gold filigree bead first. This ensures it will cover the knot later if the bead’s hole is large enough, or simply serves as your starting anchor. -
Thread the light side:
Begin threading your lightest peach beads next to the gold bead. Following your prepared layout, continue adding the coral and mauve tones in order. -
Transition to darks:
Continue stringing the progressively darker beads—the plums and eggplants—until you reach the end of your gradient. -
Check the fit:
Wrap the strung beads around your wrist to check the size. It should be snug but not tight. Add or remove a bead from the dark section if sizing adjustments are needed.
Knot Security Pro-Tip
Don’t cut the elastic flush immediately! Leave 2mm tails when trimming. If the knot slips slightly inside the bead, those tiny tails act as a final brake to prevent it from undoing completely.
Step 3: Finishing Touches
-
Tie the first knot:
Bring the two ends of the elastic together. Tie a simple overhand knot to bring the beads into a circle, pulling tight enough to remove gaps but loose enough that the beads don’t buckle. -
Secure with a surgeon’s knot:
For the main security knot, use a surgeon’s knot: cross the threads, wrap one side around the other twice, and pull tight. This extra loop provides significant friction to hold the elastic. -
Apply adhesive:
Dab a tiny drop of jewelry glue or clear nail polish directly onto the knot. Be careful not to get glue on the neighboring clay beads, as it can ruin the matte finish. -
Hide the knot:
While the glue is still slightly tacky, pull the elastic firmly so the knot slips inside the large hole of the gold filigree bead. -
Trim the excess:
Once the glue has fully dried (wait at least 15 minutes), use your scissors to trim the excess elastic tails as close to the bead hole as possible without nicking the knot itself.
Level Up: Essential Oils
Since these are unglazed clay beads, they are porous. Put a drop of lavender essential oil on the darkest purple beads to turn this accessory into a calming aromatherapy diffuser.
Slip on your new creation and enjoy the warm, sophisticated colors of dusk on your wrist
Speckled Sunset Clay Beads

Capture the warmth of a fading day with this adjustable bracelet featuring handmade clay beads in soft corals, pinks, and yellows. The porous, lava-like texture adds a wonderful tactile element that perfectly mimics natural stone.
Step-by-Step
Materials
- Polymer clay (coral, light pink, yellow, orange)
- Black pepper or dried coffee grounds (for speckling)
- Toothpicks or bead piercing tool
- Coarse sea salt or sugar (for texturing)
- Wet wipes
- Medium-weight jewelry cord (nylon or waxed cotton, roughly 1mm)
- Scissors
- Lighter (if using nylon cord)
- Tape or clipboard
- Oven and baking sheet
Step 1: Creating the Lava-Style Beads
-
Prepare your clay colors:
Condition small amounts of coral, pink, orange, and yellow polymer clay until they are soft and pliable. You want a gradient of warm, sunset-inspired shades. -
Add the speckles:
Flatten each color slightly and sprinkle a tiny pinch of coarse black pepper or dried coffee grounds onto the clay. Fold the clay over and knead it until the specks are evenly distributed, giving that natural stone look. -
Portion the beads:
Roll each color into a thin log or snake. Cut equal segments from each log to ensure your finished beads will be roughly the same size, about the size of a pea. -
Form the spheres:
Roll each segment between your palms to create smooth, round spheres. -
Create the porous texture:
This is the secret to the ‘lava’ look: pour some coarse sea salt or sugar onto your work surface. Gently roll the raw clay beads over the granules so they indent the surface without sticking permanently. -
Refine the surface:
If the salt gets stuck inside, that’s okay for now; it will dissolve later. Alternatively, use a toothbrush or a ball tool to poke random, shallow holes for texture if you prefer not to use salt. -
Pierce the holes:
Using a bead piercing pin or toothpick, carefully poke a hole through the center of each bead. Rotate the bead as you push the tool through to prevent it from squishing into an oval shape. -
Bake the beads:
Arrange your beads on a baking sheet or tile. Bake according to the manufacturer’s instructions for your specific brand of clay (usually around 275°F/130°C for 15-30 minutes). -
Wash and finish:
Once the beads are completely cool, soak them in a bowl of warm water if you used the salt method. The salt will dissolve, revealing the pitted, porous texture. Pat them dry.
Step 2: Assembling the Bracelet
-
Prepare the main cord:
Cut a piece of jewelry cord about 12 inches long. If you are using nylon cord, I find it helpful to lightly melt the tip with a lighter to make stringing easier. -
String the beads:
Thread your beads onto the center of the cord. Arrange them in a random, mixed pattern or an ombré gradient—starting with yellow, fading to pink, then coral. -
Check the fit:
Wrap the beaded section around your wrist to verify the length. Add or remove beads until the beaded portion covers the top and sides of your wrist comfortably. -
Secure the ends:
Tie a simple overhand knot tightly against the last bead on both sides to keep the beads centered and secure.
Texture Trick
Before baking, lightly dust the raw beads with cornstarch if using the salt method. It prevents the salt from bonding too tightly to the clay during baking.
Step 3: Creating the Adjustable Closure
-
Form a circle:
Cross the two tail ends of your bracelet cord so they overlap, creating a circle shape. -
Start the macramé knot:
Cut a separate piece of cord, about 8 inches long. Tie this new piece around the two overlapped tail cords with a simple knot. -
Knot the slider:
Create 4-5 square knots (macramé) over the overlapped cords. This creates a ‘tunnel’ that creates the sliding mechanism. -
Finish the slider:
Trim the excess ends of the *knotting* cord (not the bracelet tails). Melt the trimmed ends carefully with a lighter and press them flat against the knot to seal. -
Add stopper beads:
Thread one matching clay bead onto the very end of each bracelet tail. Tie a knot at the very tip to keep the bead on, trim the excess, and melt to seal.
Scent Diffuser
Because of the porous texture created by the salt, these clay beads work as essential oil diffusers. Add a drop of citrus or rose oil to the finished beads.
Slide your new bracelet on and enjoy the warm, textured reminders of summer sunsets on your wrist
Sunset Rainbow With Unexpected Teal
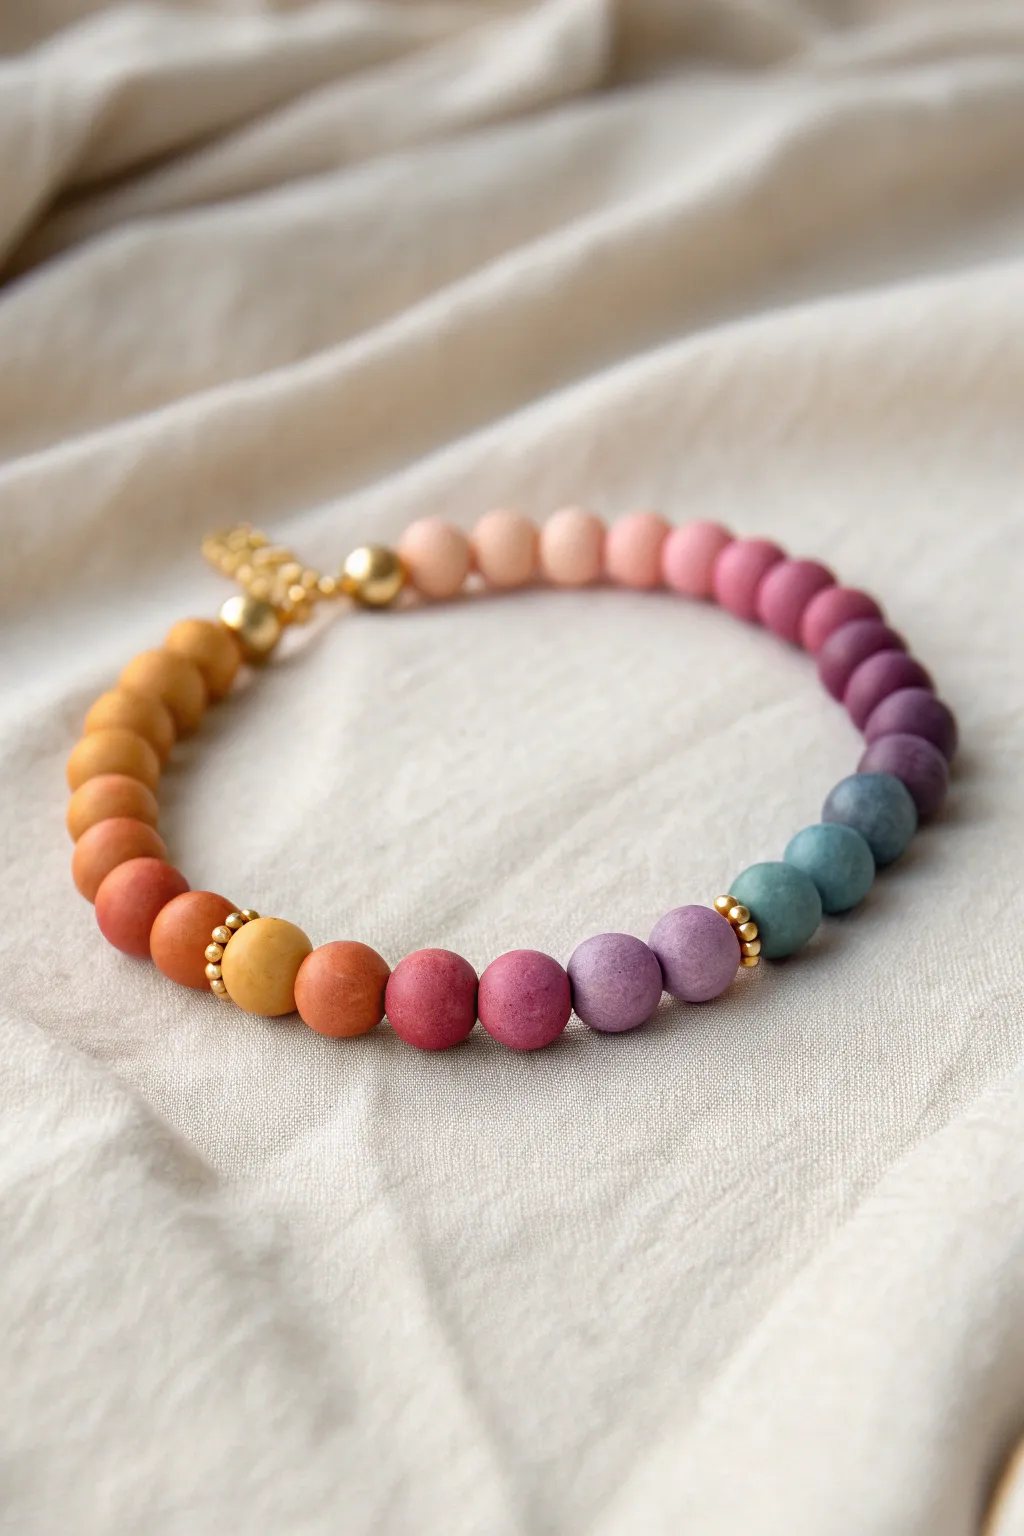
This unique bracelet design takes the classic warm gradients of a sunset and interrupts them with a splash of cool, moody teal and violet. Using matte polymer clay beads gives the piece a sophisticated, velvety texture that feels wonderful on the wrist.
Step-by-Step Guide
Materials
- Matte polymer clay round beads (8mm or 10mm): deep orange, light orange, yellow, pale pink, lavender/purple, deep plum, teal/blue-green
- Small gold spacer beads (2-3mm), round or heishi style
- Gold textured focal spacer beads (optional)
- Strong elastic beading cord (0.7mm or 0.8mm)
- Jewelry glue or clear nail polish
- Scissors
Step 1: Planning the Gradient
-
Lay out the palette:
Begin by selecting your bead colors. You want a distinct transition: start with the deep terracottas and oranges, move into yellows and pale pinks, transition to purples, and finally select your contrasting teal shades. -
Arrange the main sequence:
On a bead board or a piece of felt, lay out the beads in a circle to mimic the finished shape. Start a gradient flow: Deep Orange → Light Orange → Golden Yellow → Pale Peach/Pink → Rose Pink → Deep Plum → Purple. -
Insert the cool tones:
Now, disrupt the warm flow. Between the purples and the deep oranges (where the loop closes), place your teal and blue-green beads. This creates the ‘unexpected’ pop that defines this style. -
Add gold accents:
Identify a few key transition points to add shine. In the example, gold spacers are placed flanking the yellow bead, flanking the purple/teal transition, and grouping near the clasp area.
Step 2: Stringing the Design
-
Prepare the cord:
Cut a piece of elastic cord about 10-12 inches long. This gives you plenty of extra room for tying knots without struggling. Pre-stretch the cord by tugging it firmly a few times to prevent sagging later. -
Secure the end:
If you don’t have a bead stopper, place a piece of tape or a binder clip on one end of the cord so your beads don’t slide off while you work. -
Begin stringing:
Start threading your beads, following the layout you created. I find it easiest to start with the teal section so the knot will eventually be hidden there, but any distinctive color block works. -
Insert the spacer clusters:
When you reach the yellow bead, thread a small gold spacer, then the yellow bead, then another spacer. Repeat this ‘framing’ technique for the purple and teal transition area. -
Add the focal gold beads:
If you are using larger gold beads or a charm cluster (as seen on the left side of the image near the orange beads), add those now. The example uses a larger gold bead paired with tiny spacers. -
Check the fit:
Once all beads are strung, carefully wrap the strand around your wrist. The ends should touch comfortably without gaps, but shouldn’t feel tight or pinch your skin.
Hiding the Shine
Matte beads show glue stains easily. If you accidentally get glue on a bead, wipe it immediately with an alcohol wipe before it cures to save the finish.
Step 3: Finishing Touches
-
Prepare the knot:
Remove the tape or clip. Hold both ends of the elastic firmly and bring them together, ensuring there is no slack between the beads. -
Tie a surgeon’s knot:
Cross the ends right over left, then wrap the end through the loop twice. Pull tight. Then cross left over right, and pull tight again. This extra wrap creates a very secure bond. -
Secure with glue:
Dab the tiniest drop of jewelry glue or clear nail polish directly onto the knot. Be careful not to get glue on the neighboring beads, as it can ruin the matte finish. -
Hide the knot:
While the glue is still slightly tacky but not wet, slide the nearest bead (preferably one with a slightly larger hole) over the knot to conceal it inside. -
Trim the excess:
Once the glue is fully dry (wait at least 15 minutes), use your sharp scissors to trim the remaining cord ends close to the bead hole.
Texture Play
Try mixing the texture! Swap the solid matte clay teal beads for semi-translucent frosted glass beads in the same shade for a subtle light-catching effect.
Now you have a stunning, gradient accessory that captures the twilight sky perfectly