When I’m craving something fun and low-pressure, I reach for super clay because it’s lightweight, smooth, and dries into that dreamy matte finish. Here are my favorite super clay art ideas you can totally pull off at your table with simple shapes and happy colors.
Chubby Kawaii Animal Figurines
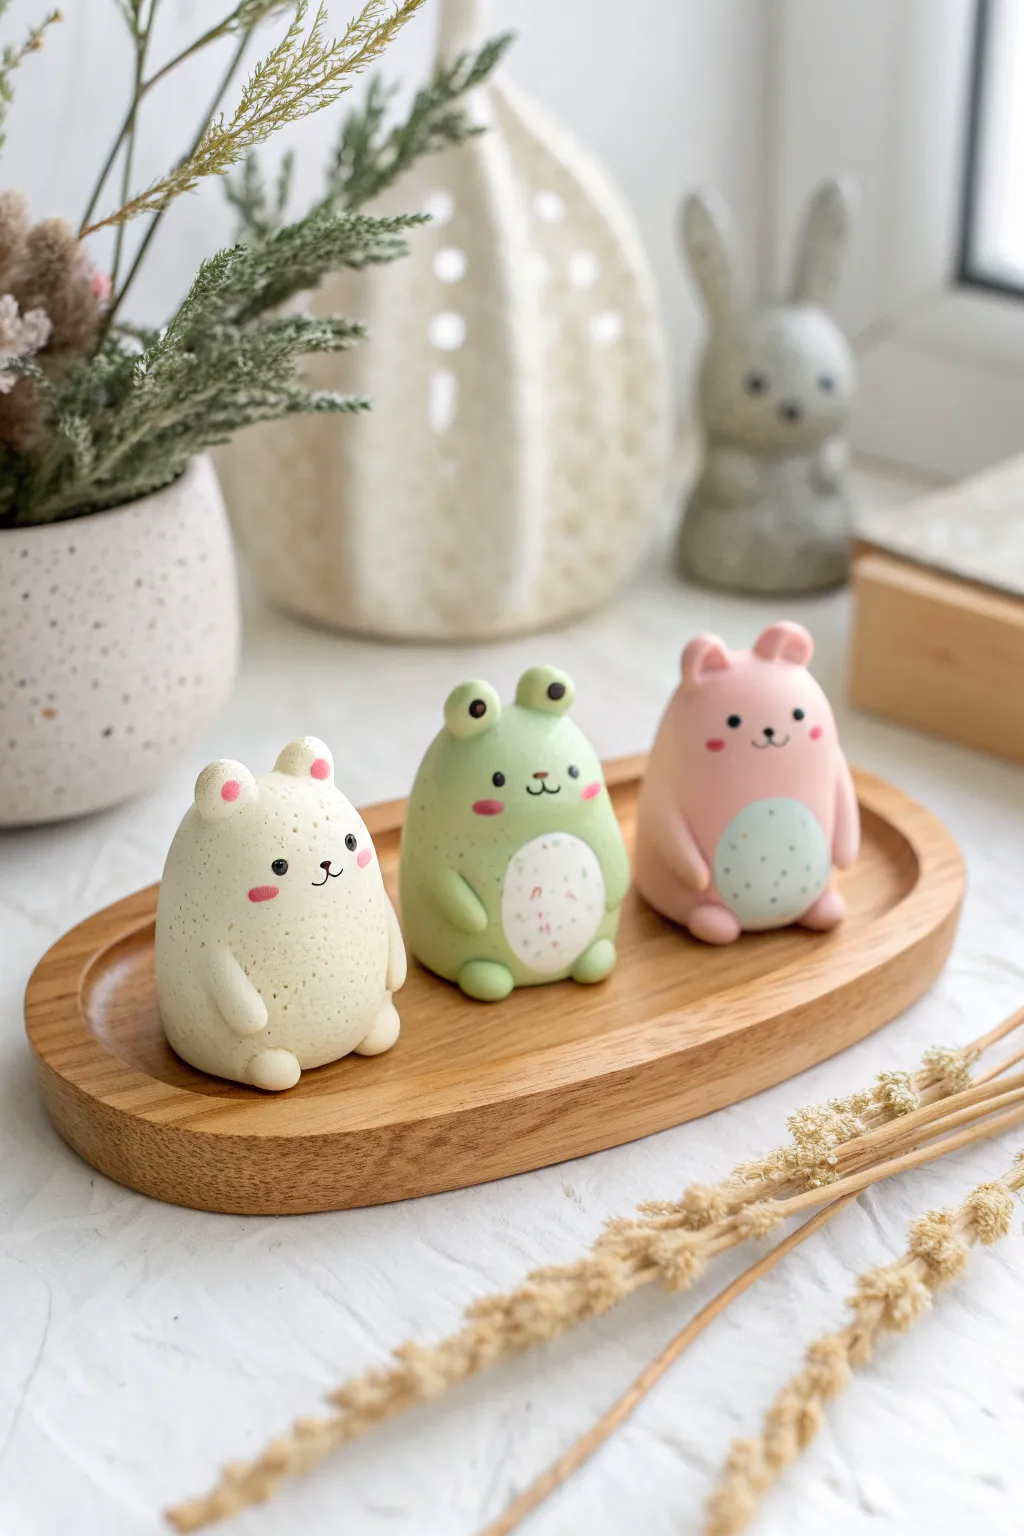
Create a delightful set of round, marshmallow-like animal figurines that will instantly brighten your desk. This project features a white bear, a green frog, and a pink bear, all stylized with adorable chubby bodies and simple, sweet expressions.
Detailed Instructions
Materials
- Air-dry clay or polymer clay (white, green, pink)
- Acrylic paints (black, pink, white, mint green)
- Fine-point paintbrush or dotting tool
- Ball stylus tool
- Water cup (for smoothing)
- Matte varnish or sealant (optional)
- Clean working surface
Step 1: Shaping the Base Bodies
-
Form the core shapes:
Start by rolling three equal-sized balls of clay—one white, one light green, and one pink. Gently roll them on your surface to elongate them slightly into rounded, egg-like gumdrop shapes. They should be wider at the bottom than the top to sit stably. -
Flatten the bottoms:
Tap the bottom of each shape against your table to create a flat base so the figurines stand upright on their own without wobbling. -
Smooth the surface:
Dip your finger in a tiny bit of water (if using air-dry clay) or baby oil (if using polymer) and rub away any fingerprints or cracks. The goal is a smooth, marshmallow-like finish.
Cracking Issues?
If air-dry clay cracks while drying, mix a tiny bit of fresh clay with water to make a paste (slip) and fill in the gaps, then smooth over.
Step 2: Adding Extremities
-
Create tiny ears:
For the white and pink figures, roll two tiny balls of clay matching their body color. Press them gently onto the top of the head. Use your ball stylus to create a small indentation in the center of each ear. -
Make frog eyes:
For the green frog, roll two small green balls and place them right on top of the head rather than the sides. These will be the protruding frog eyes. -
Form the arms:
Roll six tiny sausages of clay (two for each color). Attach them to the sides of the bodies, curving them slightly inward as if the animals are resting their hands on their bellies. Blend the clay at the shoulder joint so it looks seamless. -
Attach the feet:
Roll six small balls for the feet. Flatten them slightly and attach them to the front base of each figure, positioning them so they poke out just beneath the belly.
Seamless Joining
Score (scratch) the surfaces where you join limbs to bodies, then add a drop of water or liquid clay for a bond that won’t break off later.
Step 3: Adding Details & Painting
-
Mix belly colors:
If you are using colored clay, you can mix a lighter shade for the belly patches. Alternatively, you can paint these later. For the frog, use a white clay oval; for the pink bear, use a light mint green or pale blue clay oval. -
Apply belly patches:
Press the thin oval patches onto the lower front of the frog and pink bear. Gently roll over them to merge them flush with the main body. -
Let them cure:
Wait for your figures to dry completely (24-48 hours for air-dry) or bake them according to your polymer clay package instructions. I find waiting patiently here prevents smudged paint later. -
Paint the eyes:
Using a fine-point brush or the end of a toothpick dipped in black acrylic paint, create two wide-set dots for eyes on each character. For the frog, place the dots in the center of the protruding eye bumps. -
Add noses and mouths:
Paint a tiny ‘Y’ shape or a simple curved ‘w’ between the eyes for the mouths. Keep the lines very thin for that delicate kawaii look. -
Apply blush:
Dip a Q-tip or a dry brush into a tiny amount of pink paint. Dab off the excess on a paper towel, then gently stamp soft pink cheeks onto the white and green figures. For the pink one, use a slightly darker rose shade. -
Detail the bellies:
Add tiny decorative specks on the belly patches. Use pastel pink and purple dots for the frog’s white belly, and dark grey or black speckles for the pink one’s mint belly. -
Seal the work:
Once the paint is fully dry, coat the figures with a matte varnish to protect them while maintaining their soft, velvety appearance.
Arranging these three little friends together creates a heartwarming scene perfect for a shelf or gift


Mini Food Charms With Sweet Details
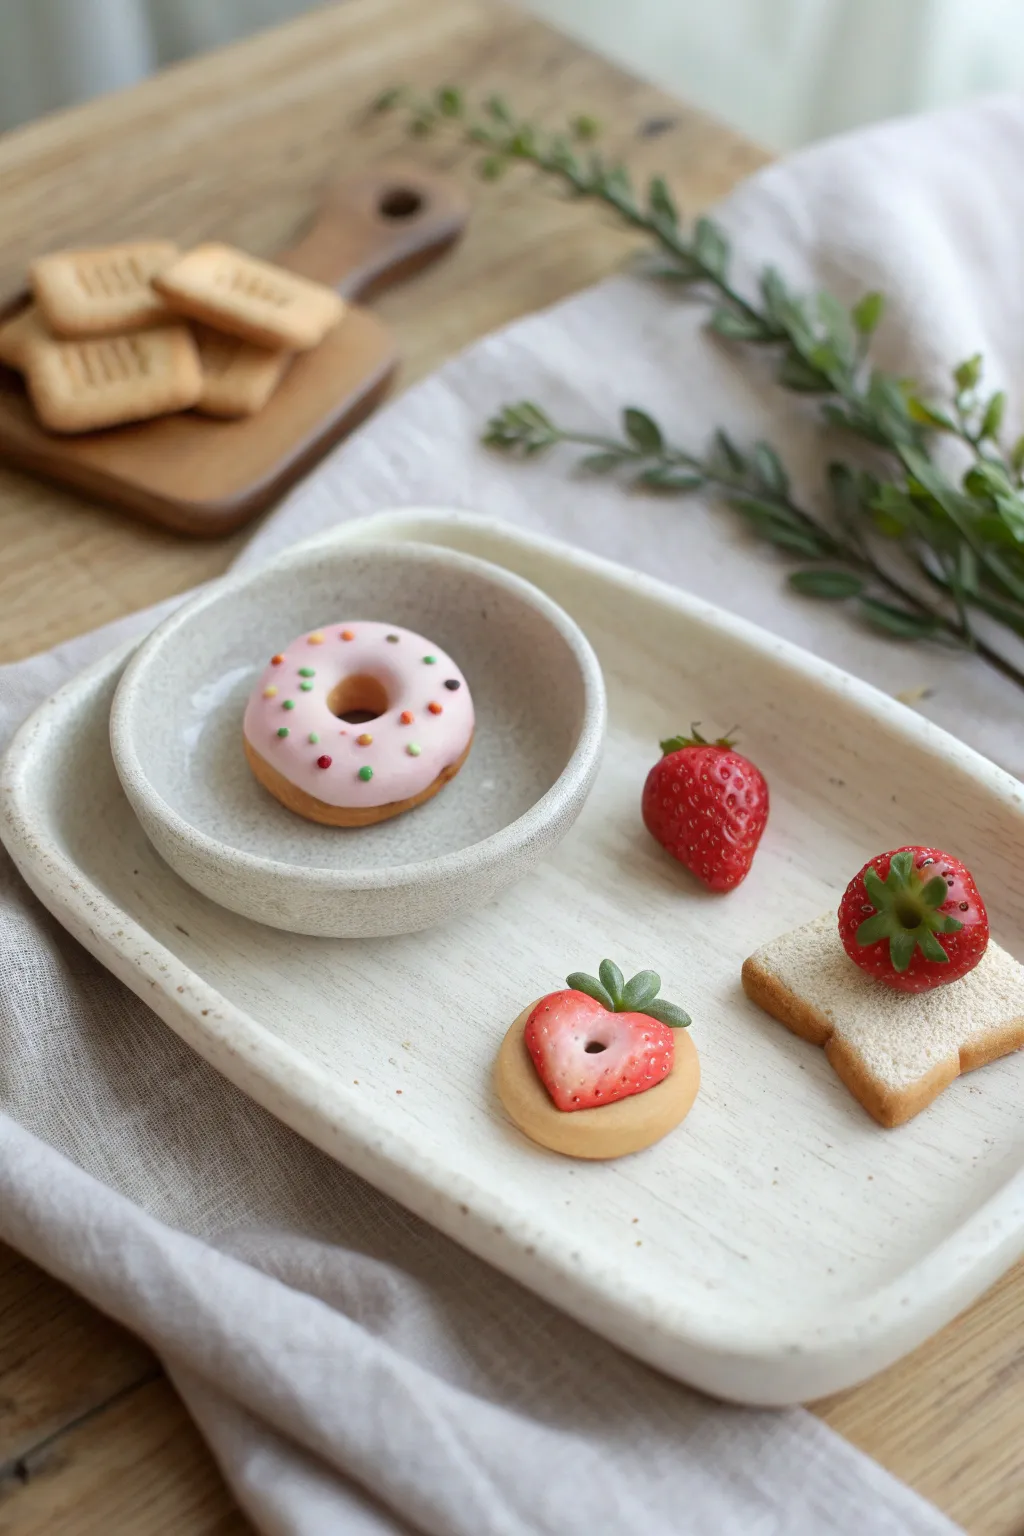
These delightful clay miniatures capture the sweetness of a tiny picnic, featuring realistic berries and baked goods. The set includes a sprinkled donut, fresh whole strawberries, a jammy heart cookie, and a tiny toast slice, all crafted with charming detail.
Step-by-Step Guide
Materials
- Polymer clay (beige, white, translucent, red, pink, brown, green)
- Liquid polymer clay (pink and translucent)
- Clay tools (needle tool, dotting tool, blade)
- Chalk pastels (brown, orange, yellow orche)
- Soft paintbrush
- Gloss glaze or UV resin
- Texture tool (toothbrush or stiff brush)
Step 1: Creating the Baked Goods Base
-
Mix the dough color:
Start by mixing white clay with a small amount of yellow ochre and brown to achieve a realistic light biscuit or bread dough color. -
Form the toast:
Roll a small ball of the dough mixture and flatten it slightly into a square shape with rounded corners. Gently press the center to create a slight indentation for toppings. -
Texture the bread:
Using a needle tool, gently tease the surface of the clay in circular motions to mimic the airy texture of bread. Use a toothbrush to texturize the crust edges. -
Shade the crust:
Shave some brown and orange chalk pastel into a powder. Use a soft, dry paintbrush to dust the edges of the toast to give it that perfectly toasted golden-brown look. -
Make the donut:
Roll a snake of the same dough color and join the ends to form a ring. Smooth the seam with your finger or a tool until it’s invisible. -
Shape the round cookie base:
Flatten a small ball of dough into a neat circle for the strawberry heart cookie base. Keep the edges smooth and rounded.
Step 2: Crafting the Strawberries
-
Mix the berry red:
Combine red clay with a tiny touch of translucent clay to give the strawberries a juicy, realistic depth rather than a flat plastic look. -
Shape the whole berry:
Roll a teardrop shape for the whole strawberry. Flatten the wider end slightly where the leaves will attach. -
Add strawberry seeds:
Use a fine needle tool to press tiny, shallow holes all over the berry surface. Don’t go too deep; just enough to catch the light. -
Create the leafy tops:
Mix green clay. Create tiny teardrops, flatten them, and attach them to the top of the strawberry in a star pattern. -
Make the heart cut-out:
For the cookie topper, shape a red piece into a heart. Use a small cutter or tool to remove a tiny circle from the center, revealing the ‘jam’ or just creating a decorative hole.
Sticky Situation?
If your clay gets too soft and sticky while shaping tiny details, pop it in the fridge for 10 minutes to firm it up for easier handling.
Step 3: Assembly and Icing
-
Frost the donut:
Mix pink clay with liquid clay until it reaches a frosting consistency. Carefully apply this to the top of your donut ring, letting it dribble slightly down the sides. -
Add sprinkles:
Roll hair-thin snakes of various colored clays. Chop them into tiny bits and sprinkle them onto the wet icing. Note: I find tweezers help place them precisely. -
Assemble the toast:
Place a whole strawberry on top of your textured toast slice. Press gently to ensure it adheres. -
Assemble the cookie:
Place the red heart strawberry shape onto the round biscuit base. -
Highlight the seeds:
For extra realism, you can roll minuscule specks of yellow-green clay and press them into the seed indents, though the indentation alone often works well for this scale.
Turn it into Jewelry
Insert a small metal eye pin into the top of the donut or strawberry before baking to instantly turn these miniatures into charm bracelet pendants.
Step 4: Baking and Glazing
-
Bake the pieces:
Bake your creations according to your clay manufacturer’s instructions, usually around 275°F (130°C) for 15-20 minutes. -
Cool down:
Allow the pieces to cool completely before handling to prevent fingerprints on the warm clay. -
Glaze for shine:
Apply a coat of gloss glaze or UV resin specifically to the ‘strawberry’ parts and the donut icing to make them look wet and sweet.
Display your tiny bakery items on a miniature plate or turn them into the sweetest jewelry charms you own


Puffy Keychain Icons
Capture the softness of a sunset with this puffy cloud keychain featuring gently shifting layers of white, butter yellow, and coral pink. This tactile, smooth accessory adds a touch of dreamy charm to your keys or bag.
Detailed Instructions
Materials
- White polymer clay or air-dry clay (super light clay works best for puffiness)
- Small amounts of yellow and pink clay (or acrylic paint to tint white clay)
- Clay roller or acrylic rolling pin
- Cloud-shaped cookie cutter (small)
- Keyring hardware with jump rings and chain
- Small eye pins or screw eyes
- Needle tool or toothpick
- Pliers (round nose and flat nose)
- Gloss glaze (optional)
Step 1: Preparing the Colors
-
Condition the base:
Start by kneading a generous amount of white clay until it is soft, pliable, and free of any cracks. -
Mix the yellow:
Take a small portion of white clay and mix in a tiny dot of yellow clay or paint. Knead thoroughly until you achieve a very pale, buttery yellow tone. -
Create the pink:
Repeat the process with another small portion of white clay and a touch of pink. Aim for a soft, warm coral or pastel pink shade. -
Check consistency:
Ensure all three clay balls (white, yellow, pink) are roughly the same consistency so they blend together smoothly without separation.
Clean Breaks Only
If your clay cracks when you insert the eye pin, the clay is too dry. Remove the pin, add a drop of water or clay softener to the spot, smooth it over, and try twisting the pin in slowly.
Step 2: Forming the Gradient
-
Roll snakes:
Roll each color into a long, thick snake or log. Keep them roughly the same thickness. -
Arrange the layers:
Lay the snakes side-by-side on your work surface. Place the white on top, the yellow in the middle, and the pink on the bottom. -
Merge the seams:
Gently press the logs together so they stick. I like to lightly roll over the seams with my finger to start the blending process. -
Roll flat:
Using your acrylic roller, roll the combined clay slab out. Aim for a thickness of about 1/4 inch (6mm) to keep that nice puffy look. -
Check the back:
Flip the slab over carefully to ensure the colors are joined securely on the reverse side as well.
Step 3: Shaping and Finishing
-
Cut the shape:
Position your cloud cutter over the gradient so the white is at the top puff and the pink at the bottom. Press down firmly to cut. -
Soften edges:
Remove the excess clay. Use your fingertip to gently rub and round off the sharp cut edges, enhancing the cloud’s puffy appearance. -
Insert the hardware:
While the clay is still soft, carefully screw a small eye pin into the top center of the white section. If using air-dry clay, you can dip the end in glue first. -
Smooth imperfections:
Do a final check for fingerprints. Lightly buff them away with a drop of baby oil or water depending on your clay type. -
Cure or dry:
Bake according to the polymer clay package instructions, or let air-dry clay sit for 24-48 hours until fully hardened. -
Attach the ring:
Once cool and hard, use your pliers to open the jump ring on your keychain hardware. -
Connect the chain:
Loop the jump ring through the eye pin embedded in the cloud, then close the ring securely with pliers. -
Seal (optional):
For extra durability, you can brush on a thin layer of matte or gloss varnish to protect the surface.
Seamless Gradient
For a smoother color transition, run the clay sheet through a pasta machine or roll it out, fold it over, and roll again several times before cutting out the final cloud shape.
Your adorable sky-inspired accessory is now ready to brighten up your daily routine


Animal Pencil Toppers That Sit Tight
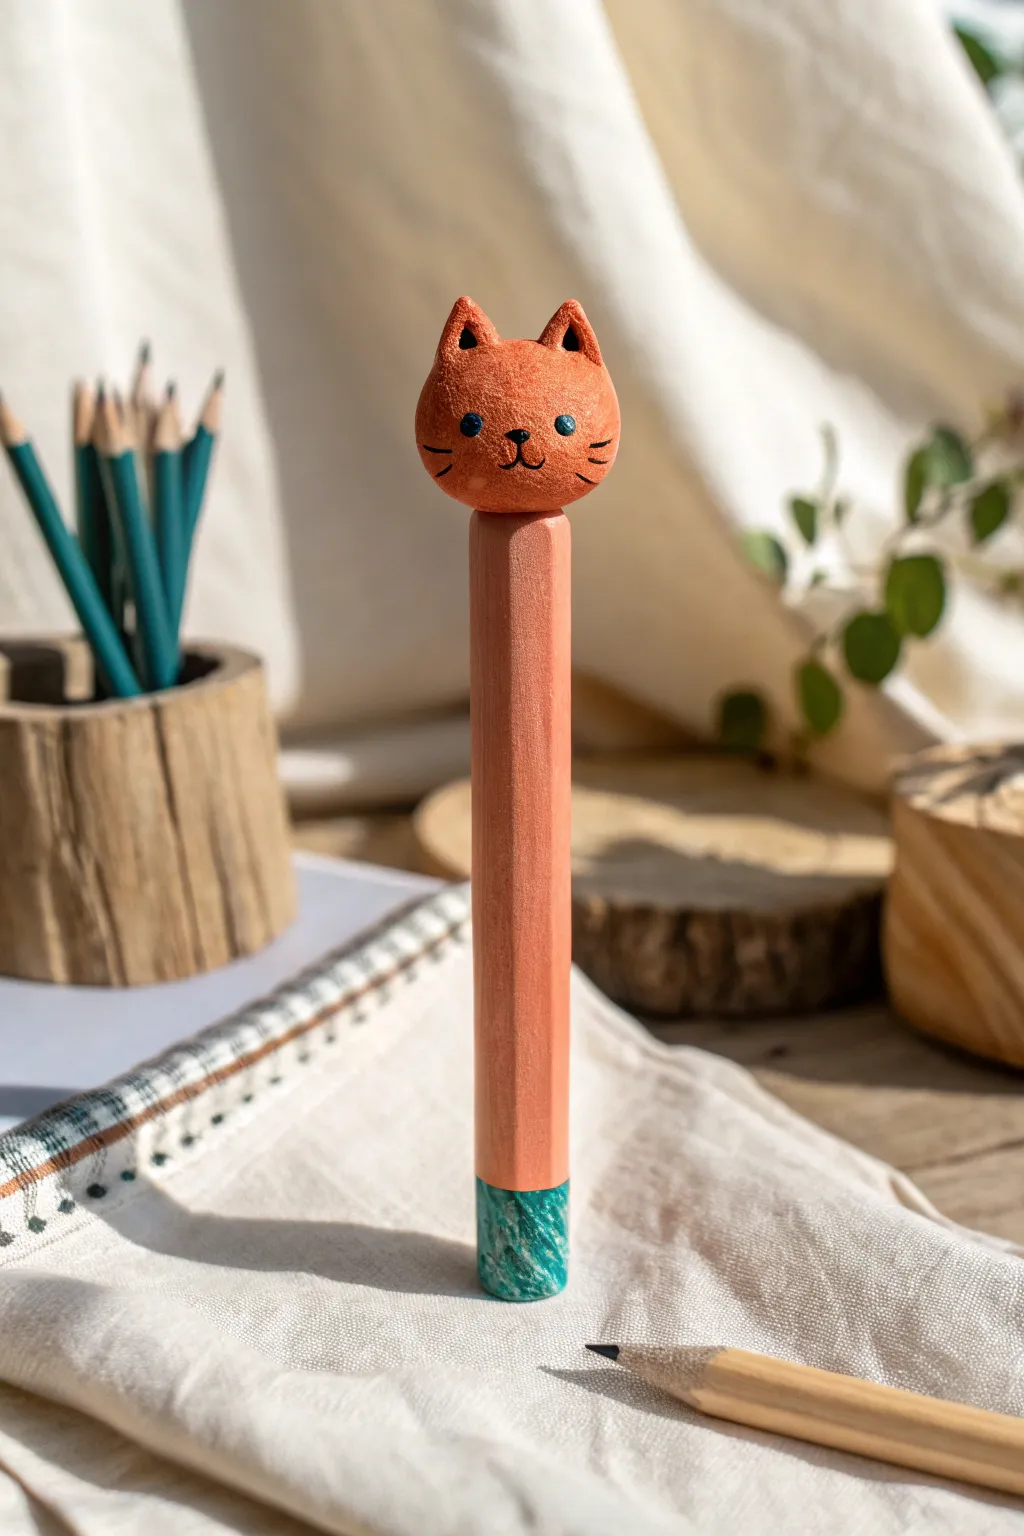
Turn a plain pencil into a charming desk companion with this minimalist cat topper. Its warm terracotta tones and simple facial features give it a modern, whimsical look that makes writing a little more fun.
Step-by-Step Tutorial
Materials
- Air-dry clay (terracotta color or white to be painted)
- Standard hexagonal wooden pencil
- Acrylic paints: Orange/Terracotta, Teal/Emerald Green, Black
- Small paintbrush
- Super glue or strong craft glue
- Fine-point black permanent marker or detailing brush
- Sandpaper (fine grit)
- Matte varnish (optional)
Step 1: Painting the Pencil Base
-
Prep the pencil:
Start with a clean, unsharpened wooden pencil. If it has a glossy finish, lightly sand the entire surface to help the paint adhere better. -
Base coat application:
Paint the upper two-thirds of the pencil with your terracotta or orange acrylic paint. Depending on the opacity, you might need two coats for a solid, opaque look. -
The dipped effect:
Once the orange paint is dry, paint the bottom inch of the pencil in a contrasting teal or emerald green. I like to use a piece of painter’s tape to get a crisp, straight line where the colors meet. -
Adding texture:
To mimic the speckled look in the photo, create a ‘dry brush’ effect on the green section. Dip a dry brush lightly in white or light green paint, wipe most of it off, and scuff it over the teal base.
Step 2: Sculpting the Cat Head
-
Form the basic sphere:
Roll a piece of air-dry clay into a smooth ball, roughly the size of a large marble or a chestnut. It should be slightly wider than the pencil. -
Shape the ears:
Pinch the top of the sphere gently on the left and right sides to create two small, triangular ears. Keep them rounded at the tips for a softer look. -
Create the mounting hole:
While the clay is still soft, press the unpainted top of a pencil into the bottom of the cat head to create an indentation. Remove the pencil and let the head dry separately—this prevents it from getting stuck permanently before you’re ready. -
Smooth the surface:
Dip your finger in a tiny bit of water and rub it over the clay to smooth out any fingerprints or cracks. -
Drying time:
Allow the clay head to dry completely according to the package instructions. This usually takes 24 hours.
Loose Topper?
If the hole is too big after drying, wrap a small layer of masking tape around the pencil tip before gluing to create a snug fit.
Step 3: Assembly and Detailing
-
Paint the head:
If you used white clay, paint the entire head with the same terracotta color used on the pencil body. If you used colored clay, you can skip this step. -
Attach the head:
Apply a drop of strong craft glue or super glue into the hole at the bottom of the cat head. Insert the painted pencil firmly and hold it for a moment until it sets. -
Draw the face:
Using a fine-point black marker or a very thin brush with black paint, draw two small dots for eyes. -
Add the nose and mouth:
Place a small triangular nose between the eyes, and draw a simple ‘w’ shape directly underneath for the mouth. -
Whiskers and ears:
Add three short horizontal lines on each cheek for whiskers. Finally, paint the inside triangles of the ears black to give them depth. -
Optional highlight:
For a bit of life, add a tiny speck of white paint to the upper corner of each eye. -
Seal the project:
To protect your paint job from handling, coat the entire pencil and topper with a layer of matte varnish.
Level Up: Texture
Before the clay dries, gently tap the surface with a stiff toothbrush. This creates a subtle fur-like texture that looks great when painted.
Now you have a custom stationery piece that makes every note-taking session a little bit cuter

The Complete Guide to Pottery Troubleshooting
Uncover the most common ceramic mistakes—from cracking clay to failed glazes—and learn how to fix them fast.
Smiley Magnets With 3D Cheeks
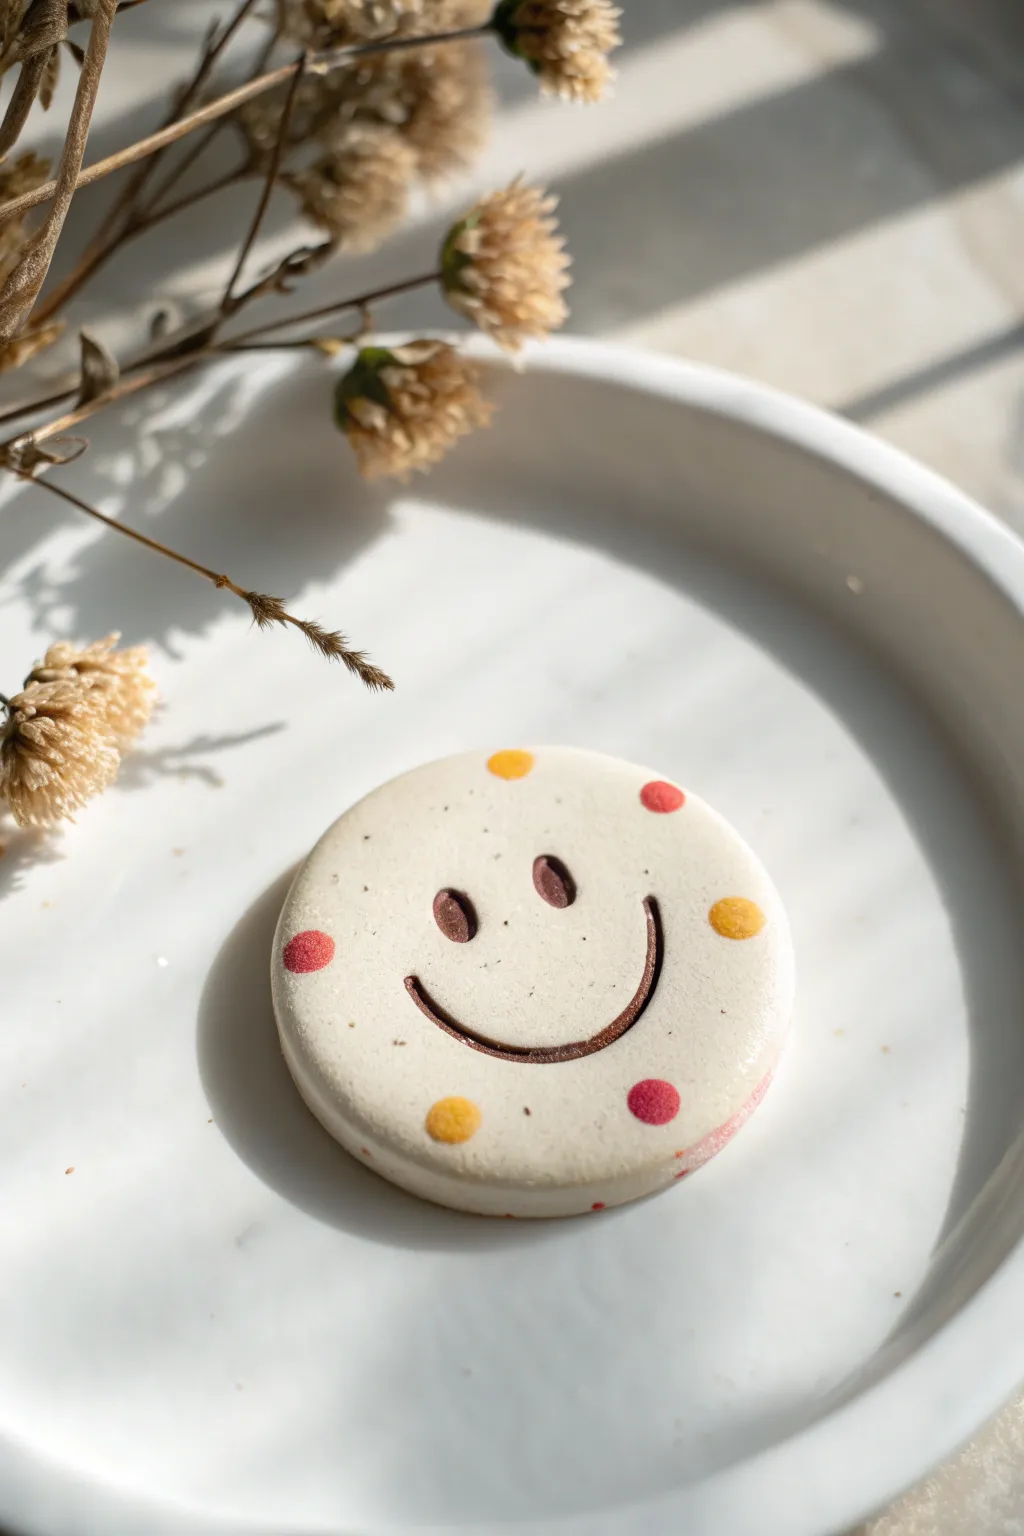
Brighten up your fridge or workspace with these charmingly simple ceramic-style magnets. The speckled clay finish gives them a trendy, high-end pottery look without needing a kiln, while the playful polka dots add just the right amount of whimsy.
Step-by-Step
Materials
- White air-dry clay or polymer clay
- Ground black pepper or dried coffee grounds (for speckling)
- Small round cookie cutter (approx. 2 inches)
- Acrylic rolling pin
- Parchment paper
- Small ball stylus tool or the end of a paintbrush
- Brown acrylic paint
- Red and yellow acrylic paint (or Posca pens)
- Fine detail paintbrush
- Matte varnish or sealant
- Strong round magnet based on the size of your clay piece
- Super glue (E6000 or similar)
Step 1: Prepping the Clay Base
-
Condition the clay:
Start by kneading a golf-ball-sized amount of white clay until it is soft and pliable. Warm clay is much less likely to crack when you shape it. -
Add the speckled texture:
To mimic that beautiful ceramic speckle seen in the photo, sprinkle a tiny pinch of ground black pepper or used (dried) coffee grounds onto the clay. Fold the clay over itself and knead until the specks are evenly distributed throughout. -
Roll it out:
Place your speckled clay on a sheet of parchment paper. Use your acrylic roller to flatten the clay to an even thickness of about 1/4 inch (6mm). You want it thick enough to hold the impression but not too heavy for the magnet. -
Cut the circle:
Press your round cookie cutter firmly into the clay. Give it a gentle wiggle to ensure a clean cut, then lift away the excess clay. -
Smooth the edges:
Dip your finger in a tiny bit of water and run it gently around the cut edge of the circle to soften any sharp ridges or burrs left by the cutter.
Clean Lines Hack
If your carved smile lines look messy, lay a piece of cling film over the wet clay before pressing your tools into it. This softens the edges instantly.
Step 2: Sculpting the Face
-
Mark the eyes:
Visualize where the face should sit. Using a medium-sized ball stylus or the rounded end of a paintbrush, press two oval-shaped indents into the upper center of the circle for the eyes. -
Carve the smile:
For that wide, friendly grin, use a clean carving tool or a toothpick. Press gently to create a deep, curved line connecting the area below the eyes. I find dragging the tool slightly creates a cleaner channel than just pressing. -
Add the cheek dimples:
At the ends of your smile line, press slightly deeper or curve the line upward just a hair to give the expression a genuine, happy look. -
Define the features:
Go back over your indented lines with a damp brush to smooth out any clay crumbs that might have been displaced during the carving process.
Make it a Set
Create a whole mood board set! Make different expressions like a winking face, a sleeping face, or a surprised ‘O’ mouth using the same techniques.
Step 3: Drying and Decorating
-
Let it cure:
Allow the clay to dry completely according to the package instructions. Flip it over halfway through the drying time to prevent curling. This usually takes 24-48 hours for air-dry clay. -
Paint the groove:
Once dry and hard, mix a little water into your dark brown acrylic paint to create a wash. carefully paint this into the eye indents and the smile groove. -
Wipe the excess:
Quickly wipe the surface with a barely damp paper towel. This leaves the brown paint only in the deep recesses, emphasizing the carved look while keeping the face surface clean. -
Add cheek dots:
Dip a small round tool or the back of a brush into muted red or pink paint. Stamp two dots on the far edges of the face, slightly lower than the eyes, to form the rosy cheeks. -
Add decorative spots:
Using mustard yellow and the same red, add alternating polka dots around the remaining perimeter of the circle. Try to keep the spacing random but balanced. -
Seal the piece:
Protect your work with a coat of matte varnish. A glossy finish works too, but matte looks more like the stoneware pictured. -
Attach the magnet:
Once the varnish is fully dry, flip the smiley over. Apply a strong dab of super glue or E6000 to the center and press your magnet firmly into place. Let it cure completely before sticking it to the fridge.
Now you have a cheerful little friend to hold up your grocery lists and photos
Sprinkle Rim Trinket Dishes
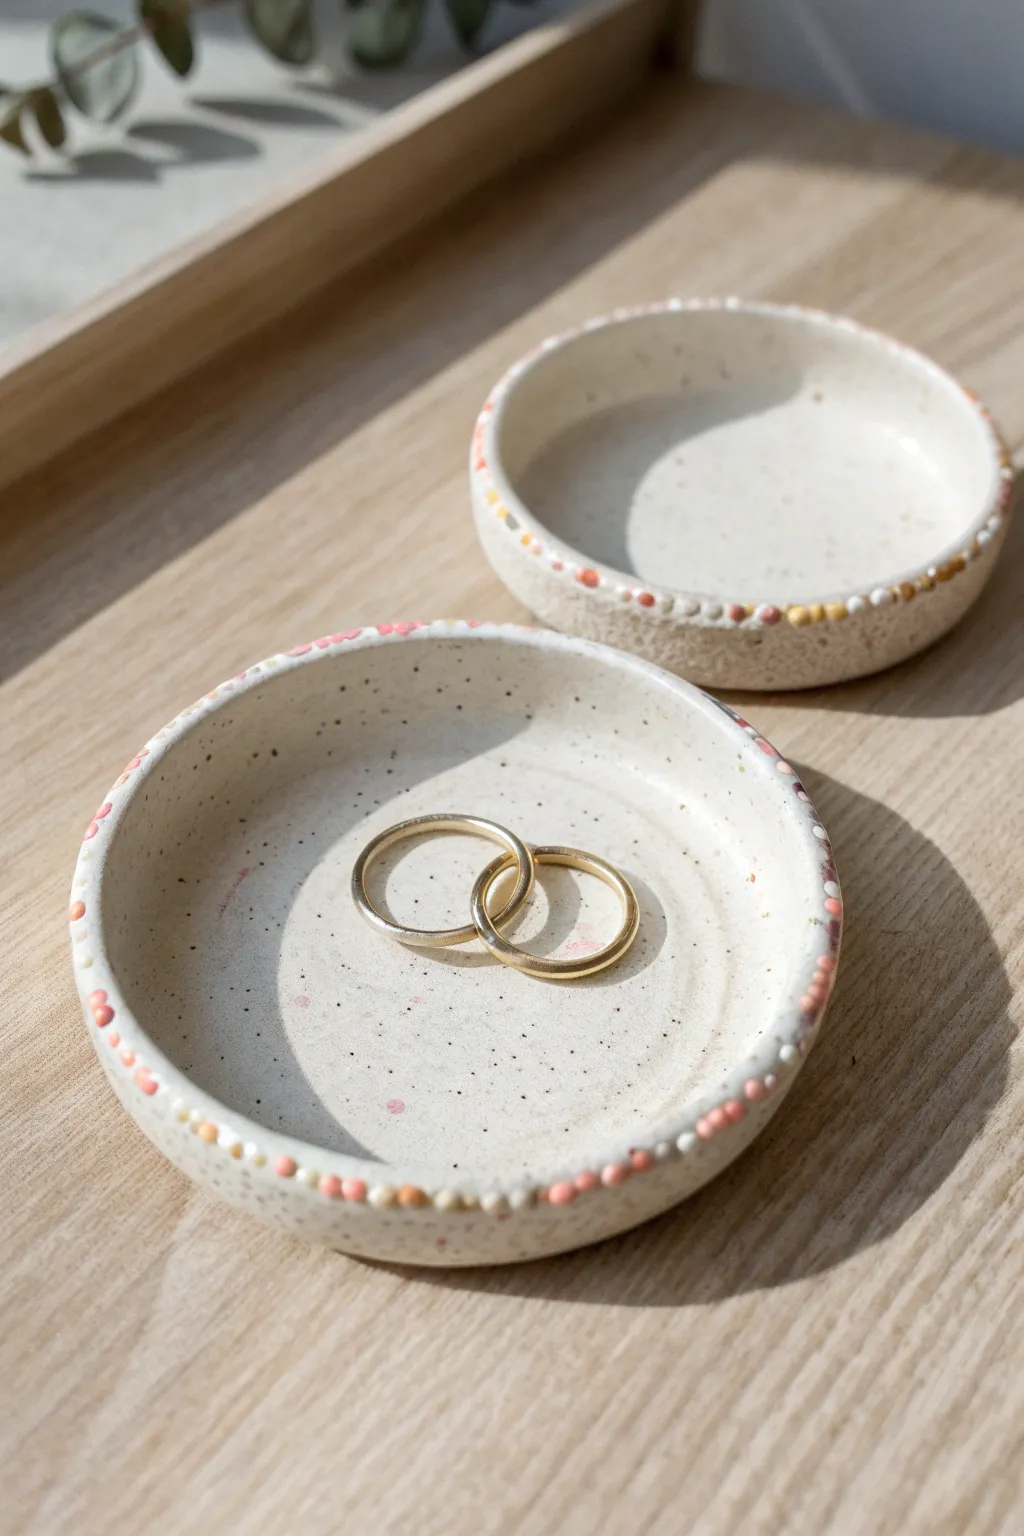
Elevate your vanity with these charming trinket dishes that combine a minimalist speckled aesthetic with a playful pop of color. The confetti-like rim invites a touch of sweetness to your decor, making them the perfect resting spot for your favorite rings and studs.
Step-by-Step Tutorial
Materials
- Speckled polymer clay (e.g., Soufflé or Premo in a granite or sandstone effect)
- Polymer clay in accent colors (pastel pink, orange, yellow, white)
- Rolling pin or pasta machine
- Round cookie cutter (approx. 3-4 inches)
- Small glass or ceramic bowl (oven-safe) to use as a form
- Clay slicing blade
- Needle tool
- Sandpaper (fine grit)
- Glaze or varnish (optional, matte or satin finish)
- Oven
Step 1: Forming the Base
-
Condition the clay:
Begin by taking your speckled polymer clay and kneeling it in your hands until it becomes soft and pliable. This conditioning step is crucial to prevent cracks later on. -
Roll it out:
Using a rolling pin or a pasta machine on a thick setting, roll the conditioned speckled clay into a smooth, even sheet. Aim for a thickness of about 1/4 inch so the dish feels substantial. -
Cut the circle:
Place your round cookie cutter onto the clay sheet and press down firmly to create a clean circle. If you don’t have a cutter, you can trace around a bowl with a needle tool. -
Smooth the edges:
Lift the clay circle carefully. Run your finger gently along the cut edge to soften any sharp corners left by the cutter, creating a slightly rounded rim.
Sprinkle Drop-off?
If your colored dots fall off after baking, use a tiny dab of liquid polymer clay (like Bake & Bond) as an adhesive before attaching the raw dots to the raw rim.
Step 2: Creating the Sprinkles
-
Prep accent colors:
Condition small amounts of your pink, orange, yellow, and white clays. You only need a very small amount of each color for the rim details. -
Roll tiny snakes:
Roll each color into a very thin snake or rope, roughly the thickness of a toothpick or 1-2mm. -
Slice the dots:
Using your slicing blade, cut tiny little slices off these ropes. They don’t need to be perfectly uniform; slight variation adds to the organic look. -
Roll into balls:
Take each tiny slice and roll it specifically between your thumb and forefinger to create minuscule spheres.
Make it Glossy
To mimic a high-end glazed ceramic look without a kiln, use UV resin as a final coat. Cure it under a UV lamp for a glass-like, ultra-durable finish.
Step 3: Application and Shaping
-
Apply the pattern:
Gently press the tiny colored balls onto the very edge of your flat clay circle. I like to alternate colors randomly to ensure an even distribution of the ‘sprinkle’ effect all the way around. -
Secure the dots:
Once the rim is covered, gently press down on the dots again or roll the side of the disk lightly on your work surface to ensure they are firmly bonded to the main clay body. -
Shape the dish:
Pick up your embellished clay circle and gently drape it into the center of your oven-safe bowl. Let gravity help it sink down to create a shallow curve. -
Refine the curve:
Use your fingers to gently press the clay against the bowl’s curve, ensuring the bottom is flat enough to sit stably on a table later.
Step 4: Finishing Touches
-
Bake the piece:
Place the bowl with the clay inside into your oven. Bake according to the manufacturer’s instructions for your specific brand of clay (usually around 275°F or 130°C for 15-30 minutes). -
Cool down:
Once baked, remove the bowl from the oven and let it cool completely before trying to remove the clay dish. Removing it while hot might warp the shape. -
Pop it out:
Gently pry the clay dish out of the forming bowl. It should release easily once cool. -
Sand imperfections:
If there remain any rough spots on the bottom or edges, wet a piece of fine-grit sandpaper and lightly buff them away. -
Seal (Optional):
For a sealed finish that protects the sprinkle details, apply a thin coat of matte or satin varnish. This mimics the ceramic look of the original inspiration beautifully.
Now you have a sweet, handmade vessel ready to keep your daily treasures safe and organized.


What Really Happens Inside the Kiln
Learn how time and temperature work together inside the kiln to transform clay into durable ceramic.
Soft Petal Flower Coasters
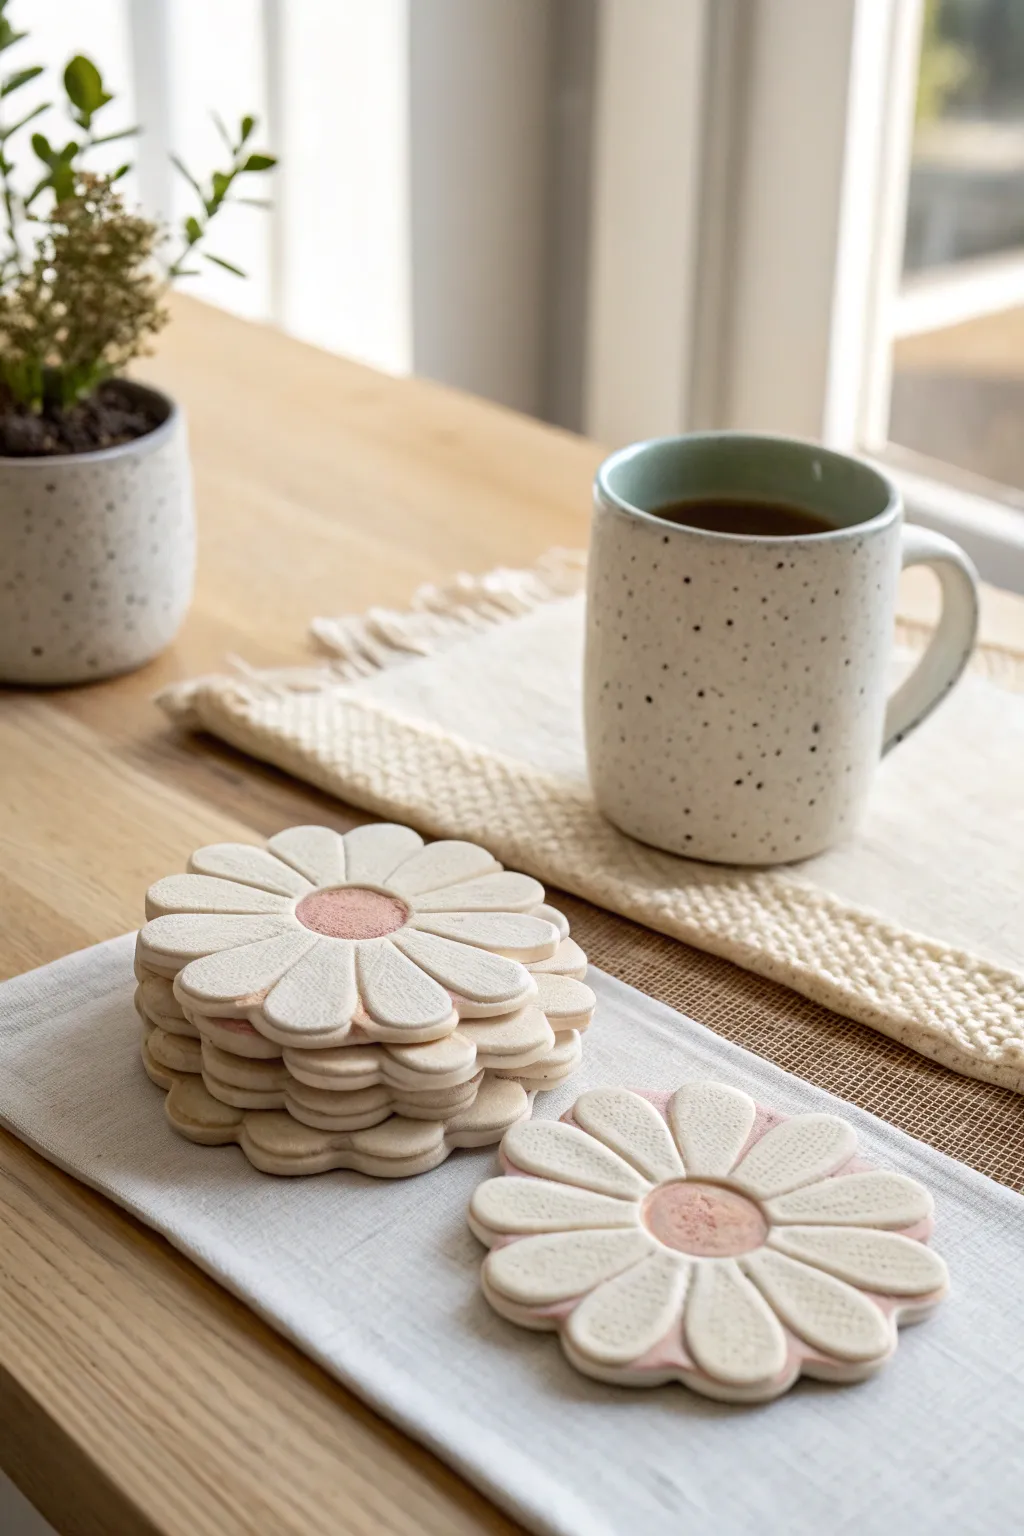
Bring the blooming beauty of a garden to your coffee table with these charming daisy-shaped coasters. Their soft matte finish and raised petal design offer a perfect blend of whimsical style and practical surface protection.
Step-by-Step Guide
Materials
- White polymer clay or air-dry clay (approx. 50g per coaster)
- Terra cotta or soft pink polymer clay for centers
- Rolling pin
- Flower-shaped cookie cutter (approx. 4 inches)
- Modeling tool or butter knife
- Sandpaper (fine grit)
- Matte varnish or sealant
- Canvas fabric or textured mat (optional for texture)
- Small round cutter or bottle cap
Step 1: Prepping the Clay Base
-
Condition the white clay:
Begin by warming the white clay in your hands, kneading it thoroughly until it becomes soft, pliable, and free of cracks. -
Roll out the slab:
Roll the clay out evenly onto a flat surface to a thickness of about 1/4 inch. If you want the subtle texture seen in the photo, roll the clay out on a piece of canvas fabric. -
Cut the main shape:
Press your large flower-shaped cutter firmly into the white clay slab to create the base coaster shape. -
Smooth the edges:
Gently run your finger along the cut edges of the flower to soften any sharp ridges left by the cutter, giving it that soft, ceramic look.
Step 2: Sculpting the Petals
-
Mark the center:
Using a small round cutter or a bottle cap, lightly press a circle into the exact center of the flower indentation. Do not cut all the way through; just mark the guideline. -
Define the petals:
Take your modeling tool or the back of a butter knife and gently press indents radiating from the center circle out to the divots between the petal tips. -
Round the petal surfaces:
Use your thumb or a smooth modeling tool to gently press down the edges of each individual petal, making the middle of the petal look slightly raised and puffy. -
Create the center insert space:
Using your knife or a small spoon tool, carefully scoop out a shallow layer of clay from inside that central circle guideline you made earlier.
Clean Clay Tip
Keep baby wipes nearby! White clay picks up every speck of dust. Wipe your hands and tools often to keep the petals pristine.
Step 3: Adding the Center & Finishing
-
Prepare the center color:
Condition a small amount of the pink or terra cotta colored clay. I find mixing a tiny bit of white into terra cotta softens the tone nicely. -
Create the center disc:
Roll this colored clay out thinly (about 1/8 inch) and cut a circle that matches the size of the center indentation you scooped out. -
Texture the center:
Before placing it, lightly tap the colored circle with a toothbrush or crumpled foil to give it a speckled, pollen-like texture. -
Insert the center:
Place the textured colored circle into the scooped-out center of the white flower, pressing gently so it adheres without squashing the texture. -
Add surface detail:
For extra realism, use a needle tool to add very faint, tiny dots or pores across the white petals to mimic the ceramic texture shown in the image. -
Bake or dry:
If using polymer clay, bake according to the package instructions (usually 275°F for 15-30 minutes). If using air-dry clay, let them sit in a dry spot for 24-48 hours. -
Sand for perfection:
Once fully cured and cooled, use fine-grit sandpaper to buff away any fingerprints or rough edges on the rim. -
Apply sealant:
Finish by brushing on a coat of matte varnish. This protects the coaster from moisture without making it look plasticky or shiny.
Warping Woes?
If your coasters curl while baking, weigh them down immediately after taking them out of the oven with a heavy book until cool.
Stack your new floral creations near your favorite mug for a delightful morning coffee setup
Bubble Texture Dot Coasters
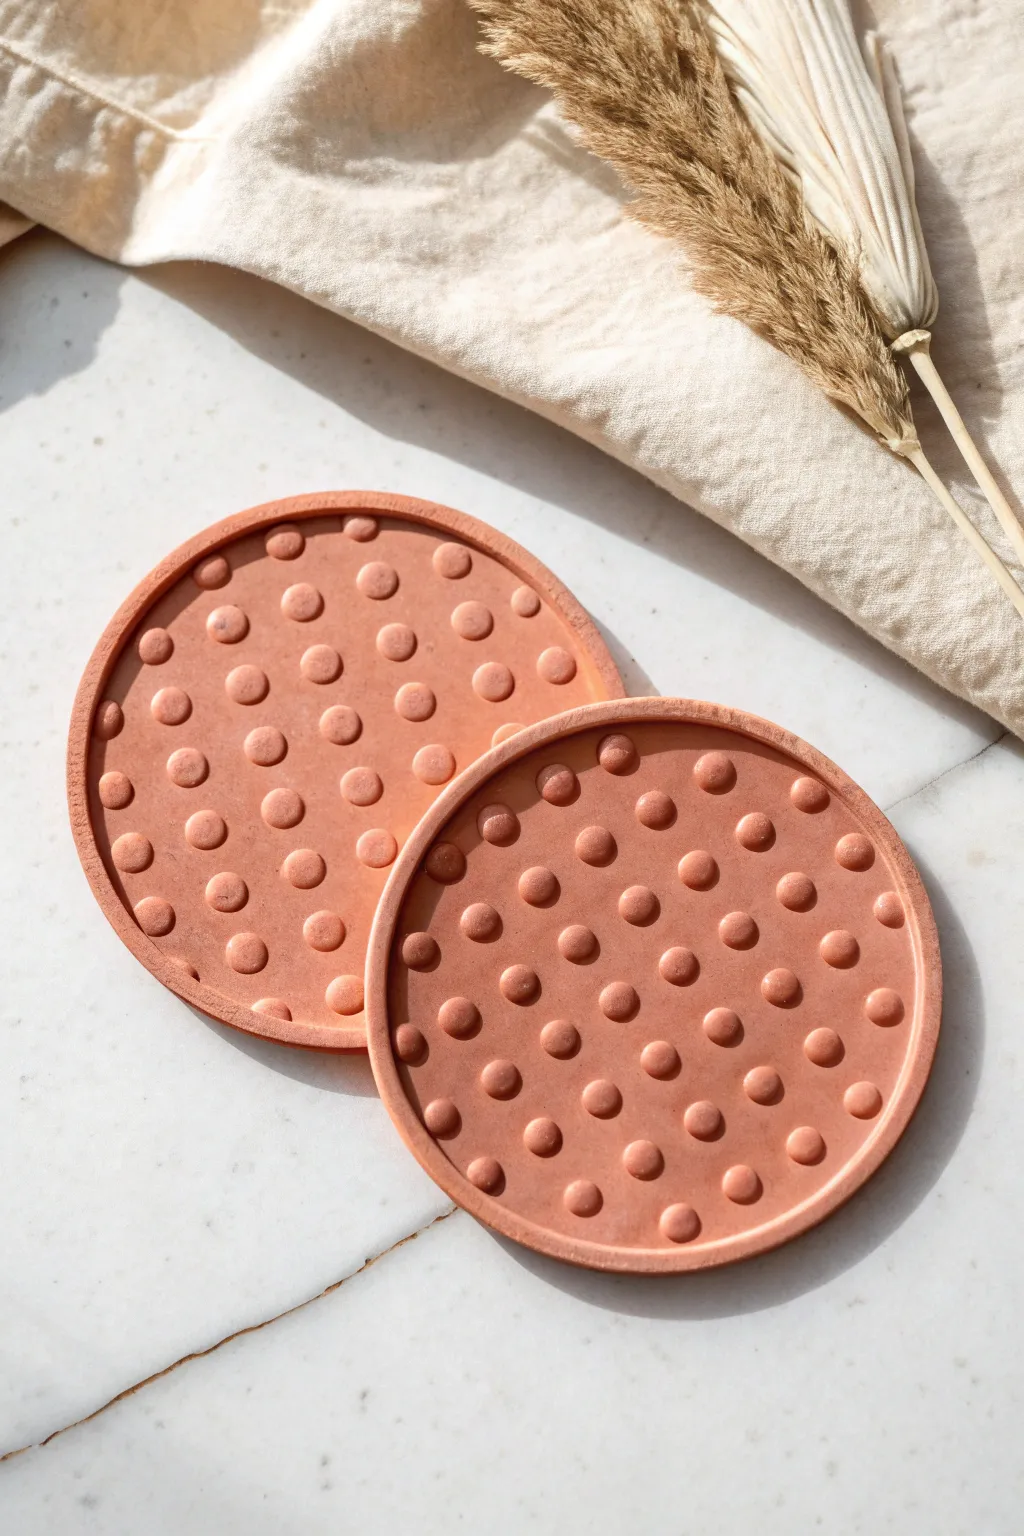
These monochromatic coasters bring a modern, tactile element to your coffee table with their raised geometric dot pattern. Surprisingly simple to make, they offer high-impact texture and a chic, earthy aesthetic that rivals expensive ceramic housewares.
Step-by-Step Tutorial
Materials
- Air-dry clay (terracotta or peach color)
- Round cookie cutter (approx 3.5 – 4 inches)
- Small circle plunger cutter or piping tip
- Rolling pin with guide rings
- Water in a small dish
- Sponge or fine-grit sandpaper
- Acrylic sealer (matte)
- Non-stick work surface or glossy tile
Step 1: Base Construction
-
Condition the clay:
Begin by taking a handful of your air-dry clay and kneading it thoroughly until it is soft and pliable. If the clay feels dry or cracks, work in a few drops of water. -
Roll the slab:
Roll out the clay onto your non-stick surface to a uniform thickness of about 1/4 inch. Using rolling pin guide rings helps ensure the surface is perfectly flat and even. -
Cut the circles:
Press your large round cookie cutter firmly into the slab to create the coaster base. Carefully remove the excess clay from around the circle, leaving the coaster shape on the work surface to avoid warping it by lifting. -
Smooth the edges:
Dip your finger in a little water and gently run it along the cut edge of the circle. This softens the sharp cut line and gives it a more finished, ceramic look.
Fixing Cracks
If tiny cracks appear while drying, make a paste of clay and water. Fill the cracks, smooth with a finger, and let dry again before sanding.
Step 2: Creating the Bubble Texture
-
Prepare the dots:
Roll out a separate, thinner slab of clay, roughly 1/8 inch thick. This will be used exclusively for cutting out your decorative dots. -
Cut the bubbles:
Using a small circle plunger cutter or the round end of a piping tip (approx 1cm wide), punch out dozens of small circles. You will need around 35-40 dots per coaster. -
Plan the pattern:
I prefer to lightly mark a grid on the base coaster with a needle tool to guide placement, or you can eyeball it starting from the center and working outward in concentric rings. -
Score and slip:
To ensure permanent adhesion, lightly scratch the back of a dot and the spot on the coaster where it will go. Apply a tiny dab of water or liquid clay slip to the scratched area. -
Attach the dots:
Press the dot gently onto the base. Don’t press so hard that you flatten the dome shape; just enough to seat it firmly. -
Create the rim:
Roll a very long, thin snake of clay. It should be consistent in width and long enough to circle the entire coaster. -
Attach the rim:
Score the outer edge of the coaster face. Apply slip, then gently lay the clay snake around the perimeter to frame the dots. -
Refine the border:
gently press the rim down to secure it, smoothing the seam where the two ends of the snake meet so it looks continuous.
Go Multicolor
Mix different colors of air-dry clay for the dots to create a gradient effect, or paint the dots in metallic gold after drying for a luxe look.
Step 3: Finishing Touches
-
Initial dry:
Let the coasters sit undisturbed for about 24-48 hours. Flipping them over gently halfway through the drying process helps prevent curling. -
Sand imperfections:
Once bone dry, inspect your work. Use a fine-grit sandpaper or a slightly damp sponge to buff away any fingerprints or rough edges on the rim. -
Dust off:
Wipe the coaster down with a dry brush or cloth to remove any clay dust generated from sanding. -
Seal for protection:
Apply a coat of matte acrylic sealer. This step is crucial for coasters as it prevents moisture from cold drinks from degrading the clay. -
Add backing:
Glue a felt circle or small cork pads to the bottom of the coaster to protect your furniture and prevent slipping.
Now you have a set of stylish, custom-made coasters ready to hold your favorite beverages

TRACK YOUR CERAMIC JOURNEY
Capture glaze tests, firing details, and creative progress—all in one simple printable. Make your projects easier to repeat and improve.
Tiny Magnetic Bud Vases
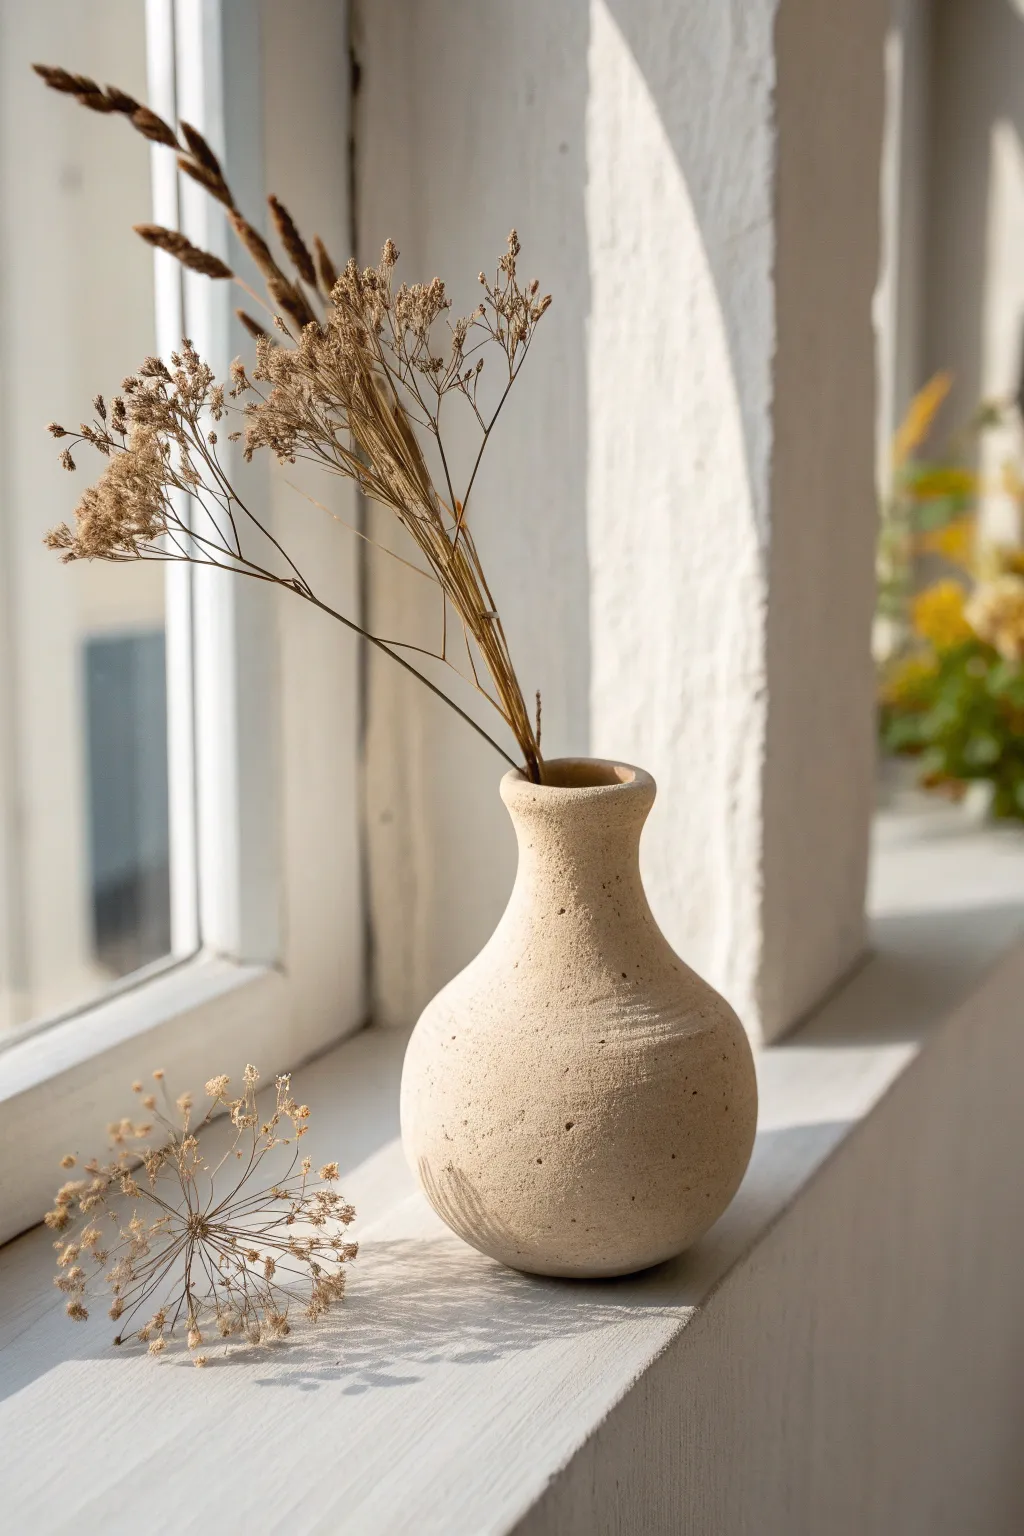
Embrace the beauty of wabi-sabi with this petite, textured bud vase that mimics the look of ancient stoneware. Using a simple speckling technique and air-dry clay, you can achieve this sophisticated, sandy finish perfect for displaying delicate dried stems on a sunlit ledge.
Step-by-Step
Materials
- White or cream air-dry clay
- Used coffee grounds or fine sand
- Small rolling pin
- Pottery sponge
- Small bowl of water
- Mod Podge or matte varnish (optional for sealing)
- Strong craft magnet (optional for magnetic version)
- Sandpaper (fine grit)
- Clay sculpting tools or a butter knife
Step 1: Preparing the Clay
-
Condition the clay:
Begin by taking a handful of white air-dry clay and kneading it in your hands to warm it up. This makes it pliable and prevents cracking during the sculpting process. -
Add texture:
To create that lovely speckled, sandy look seen in the photo, flatten your clay slightly and sprinkle in a pinch of dry used coffee grounds or very fine sand. -
Knead in the speckles:
Fold the clay over the texture material and knead thoroughly until the speckles are evenly distributed throughout the white clay body.
Cracks Appearing?
If small cracks form while drying, mix a tiny bit of clay with water to make a ‘slip’ paste. Fill the cracks, smooth over with a finger, and let dry again.
Step 2: Shaping the Base
-
Form a ball:
Roll your textured clay into a smooth, solid ball about the size of a tangerine. This ensures you start with an even amount of material. -
Start the pinch pot:
Hold the ball in one hand and gently press your thumb into the center, stopping about a half-inch from the bottom to create the base thickness. -
Open the walls:
Using a pinching motion with your thumb and fingers, slowly rotate the ball while pressing the walls outward. Keep the bottom rounded and bulbous. -
Create the bulb shape:
Focus on keeping the lower section wide and round. I sometimes cup the bottom in my palm to help maintain that spherical curve while I work the clay upwards.
Step 3: Refining the Neck
-
Gather the clay:
As you move up the walls, start gently squeezing the clay inward to narrow the opening. You want to transition from the wide bulb to a distinct, tighter neck. -
Elongate the neck:
Gently pull the clay upward at the opening to create a short vertical rise. The neck needs to be narrow enough to hold a few stems upright. -
Flare the rim:
Once the neck is formed, use your pinky finger to gently flare the very top edge outward, creating a soft lip for the vase. -
Smooth the transition:
Run a damp finger or sponge over the curve where the bulb meets the neck to ensure a fluid, organic silhouette without sharp angles.
Color Wash
For an aged look, mix brown acrylic paint with lots of water. Brush it over the dried vase and immediately wipe it off, leaving dark color only in the textured pits.
Step 4: Finishing Touches
-
Surface texturing:
Take a slightly damp sponge and dab it all over the exterior. This roughs up the surface slightly and exposes more of the coffee or sand speckles for that stone-like effect. -
Flatten the base:
Gently tap the vase on your table to create a small flat spot on the bottom so it stands steadily without wobbling. -
Add the magnet (optional):
If you are making the magnetic version mentioned in the article title, press a strong magnet into the soft clay on the side or back, burying it flush with the surface. -
Let it dry:
Place the vase in a cool, dry spot away from direct heat. Let it dry for at least 24-48 hours until it turns a chalky, lighter white. -
Sand and soften:
Once bone dry, use fine-grit sandpaper to gently smooth the rim or any fingerprints, but leave the body rough to maintain the texture. -
Seal the piece:
Apply a coat of matte varnish or Mod Podge to protect the clay, though remember that air-dry clay is not waterproof and should only hold dried florals.
Place your favorite dried wildflowers inside and enjoy the calm, organic feel this little vessel brings to your space
Character Photo And Card Holders
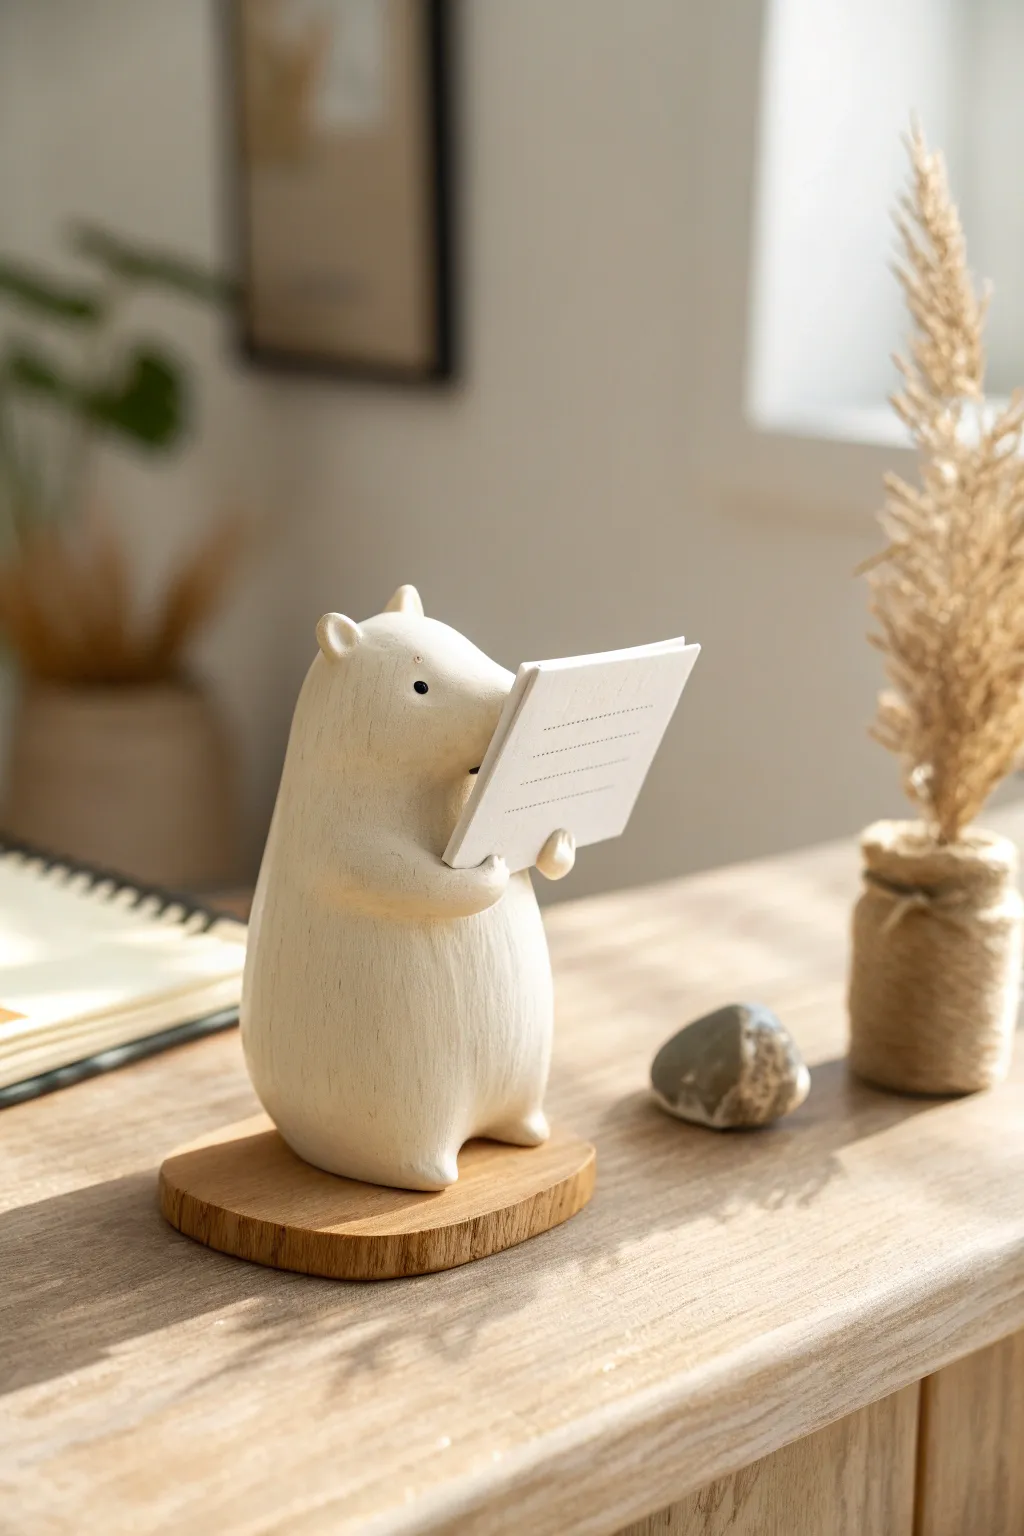
This charming, minimalist polar bear is a delightful way to display a business card or a small note on your desk. Its soft, rounded form and textured finish give it a lovely carved-wood appearance without needing any woodworking tools.
How-To Guide
Materials
- White polymer clay or air-dry stone clay
- Small round wooden coaster or wood slice
- Acrylic paint (black)
- Small stiff-bristled brush (for texturing)
- Needle tool or toothpick
- Strong craft glue or E6000
- Rolling pin
- Sandpaper (fine grit)
- Matte varnish (optional)
- Small scrap of cardstock
Step 1: Base Form
-
Condition the clay:
Start by kneading your white clay until it is soft and pliable. If you are using stone clay, ensure it’s moist enough to work with without cracking. -
Shape the body:
Roll a large ball of clay, roughly the size of a tangerine. Gently shape it into a rounded cone or teardrop shape, flattening the bottom so it stands up on its own. -
Form the head:
Pinch the top, narrower part of the cone forward slightly to create the neck and head area. The transition should be very smooth and subtle, not a sharp angle. -
Refine the snout:
Gently pull and smooth the clay at the very front of the head to form a blunt, rounded snout. It shouldn’t be too pointy; aim for a soft bear profile.
Step 2: Details & Limbs
-
Add the ears:
Roll two tiny balls of clay. Press them onto the top of the head and use a modeling tool to blend the seams perfectly so they look like part of the main sculpt. -
Create the legs:
For the feet, pull two small nubs of clay out from the bottom front of the base. Keep them stubby and rounded to maintain the cute, stylized look. -
Shape the arms:
Roll two small sausages of clay for the arms. Attach them to the sides of the body, blending the shoulder seams smoothly into the torso. -
Position the paws:
Bend the arms forward so the paws meet just under the snout. Use a scrap of cardstock (the thickness of what you plan to display) and press it between the snout and the paws to ensure the spacing is correct. -
Form the paw grip:
While the cardstock is in place, gently curl the paws upward slightly to create a little hook that will help hold the paper later.
Pro Tip: Hidden Weight
If using lightweight air-dry clay, crumple a small ball of foil and hide it inside the bottom of the bear’s body. This adds weight and stability so it won’t tip over.
Step 3: Texture & Finish
-
Add texture:
To mimic the faux-wood or stone look in the photo, take a stiff-bristled brush or a toothbrush and firmly tap it all over the surface of the moist clay. Alternatively, drag a needle tool lightly vertically to simulate fur or wood grain. -
Bake or dry:
Remove the cardstock spacer carefully. If using polymer clay, bake according to package instructions. If using air-dry clay, let it dry for at least 24-48 hours. -
Sand the flaws:
Once fully cured or dry, lightly sand any fingerprints or harsh bumps, though keep the texture you created earlier intact. -
Paint the details:
Using a tiny detail brush, dip the tip in black acrylic paint. Dot two small eyes on the side of the head and paint the very tip of the nose black. -
Prepare the base:
Take your wooden coaster or wood slice. If it’s rough, give the top surface a quick sanding to ensure the bear sits flat. -
Assembly:
Apply a strong adhesive to the bottom of the bear and press it firmly onto the center of the wooden base. -
Final coat:
I like to finish pieces like this with a matte varnish to protect the paint and give the clay a professional, unifying sheen without it looking shiny or plastic-like.
Level Up: Seasonal Swap
Make the arms slightly flexible or use a wider gap so you can swap what the bear holds—try a mini greeting card, a photo, or even a dried flower stem.
Place your favorite memo or photo in the bear’s paws and enjoy your new desk companion
Tiny Animal Ring Cones
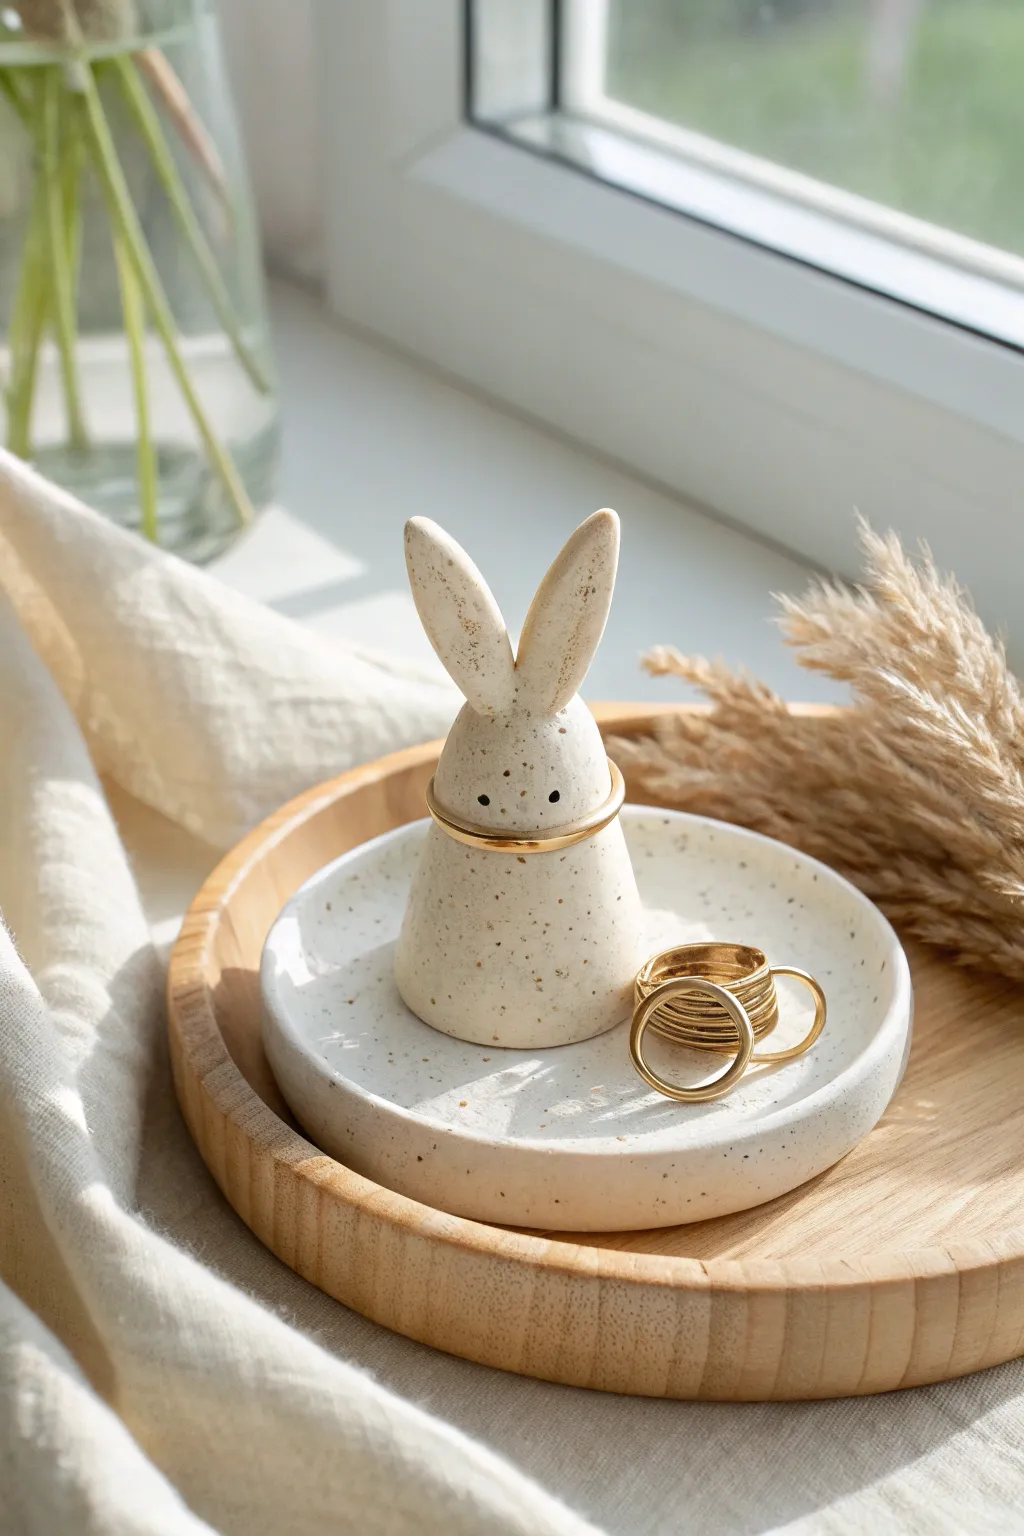
This adorable jewelry display set features a minimalist rabbit cone and a matching trinket dish, perfect for holding your favorite rings. The finish mimics high-end speckled pottery, bringing a touch of modern earthiness to your vanity.
Step-by-Step Tutorial
Materials
- White polymer clay (or air-dry clay)
- Black pepper or dried coffee grounds (for speckles)
- Rolling pin
- Circle cookie cutter (approx. 3-4 inches)
- Small craft knife or clay tool
- Sandpaper (fine grit)
- Gloss or matte varnish (optional)
- Water (for smoothing)
Step 1: Preparing the Speckled Clay
-
Condition the clay:
Begin by kneading your white clay until it is soft, pliable, and warm in your hands. This prevents cracking later on. -
Add texture:
To achieve that faux-stone look, sprinkle a generous pinch of coarse black pepper or dry coffee grounds onto your flattened clay. -
Fold and mix:
Fold the clay over the speckles and continue kneading. Repeat this process until the specks are evenly distributed throughout the entire ball of clay.
Natural Texture
Don’t over-blend the clay after adding pepper. Leaving some clusters makes the faux-stone effect look more realistic and organic.
Step 2: Sculpting the Bunny Cone
-
Shape the base:
Pinch off a portion of clay roughly the size of a golf ball. Roll it into a smooth sphere between your palms to remove any seams. -
Form the cone:
Place the sphere on your work surface and gently roll it into a tapered cone shape. The bottom should be wide and stable, tapering up to a rounded point for the head. -
Flatten the bottom:
Tap the bottom of the cone firmly against the table to ensure it stands completely flat and won’t wobble. -
Create ears:
Take two small, equal amounts of clay and roll them into elongated teardrops. Gently flatten them slightly so they aren’t too thick. -
Attach the ears:
Score the bottom of the ears and the top of the cone head. Press the ears onto the head, blending the clay downwards with a tool so they are seamlessly attached. -
Refine the shape:
Smooth out the clay where the ears connect. I like to gently curve the tips of the ears for a more organic, playful look. -
Add facial features:
Using a needle tool or a toothpick, poke two small holes for the eyes. Keep it simple and minimalist; no other details are needed.
Cracks Appearing?
If you see tiny cracks while smoothing the rim, your clay might be too dry. Add a drop of baby oil (for polymer) or water (for air-dry) to rehydrate.
Step 3: Making the Tray
-
Roll the slab:
Take your remaining speckled clay and roll it out into a slab about 1/4 inch thick. Aim for an even thickness throughout. -
Cut the circle:
Use your circle cutter to punch out a perfect round base for your dish. -
Create the rim:
Roll a long, thin snake of clay. It needs to be long enough to wrap around the entire circumference of your circle base. -
Attach the rim:
Place the snake on top of the circle edge. Use your thumb or a modeling tool to blend the inside seam completely onto the base, so it looks like one piece. -
Smooth the outside:
Gently smooth the outside seam as well, creating a vertical lip that defines the tray shape. -
Final smooth:
Dip your finger in a tiny bit of water and run it over the bunny and the tray to erase any fingerprints. -
Cure:
Bake the clay according to the package instructions (usually 275°F for polymer clay) or let it air dry for 24-48 hours if using air-dry clay.
Once fully cured, your new jewelry holder is ready to organize your rings in style
Cloud-Foot Pen Cup
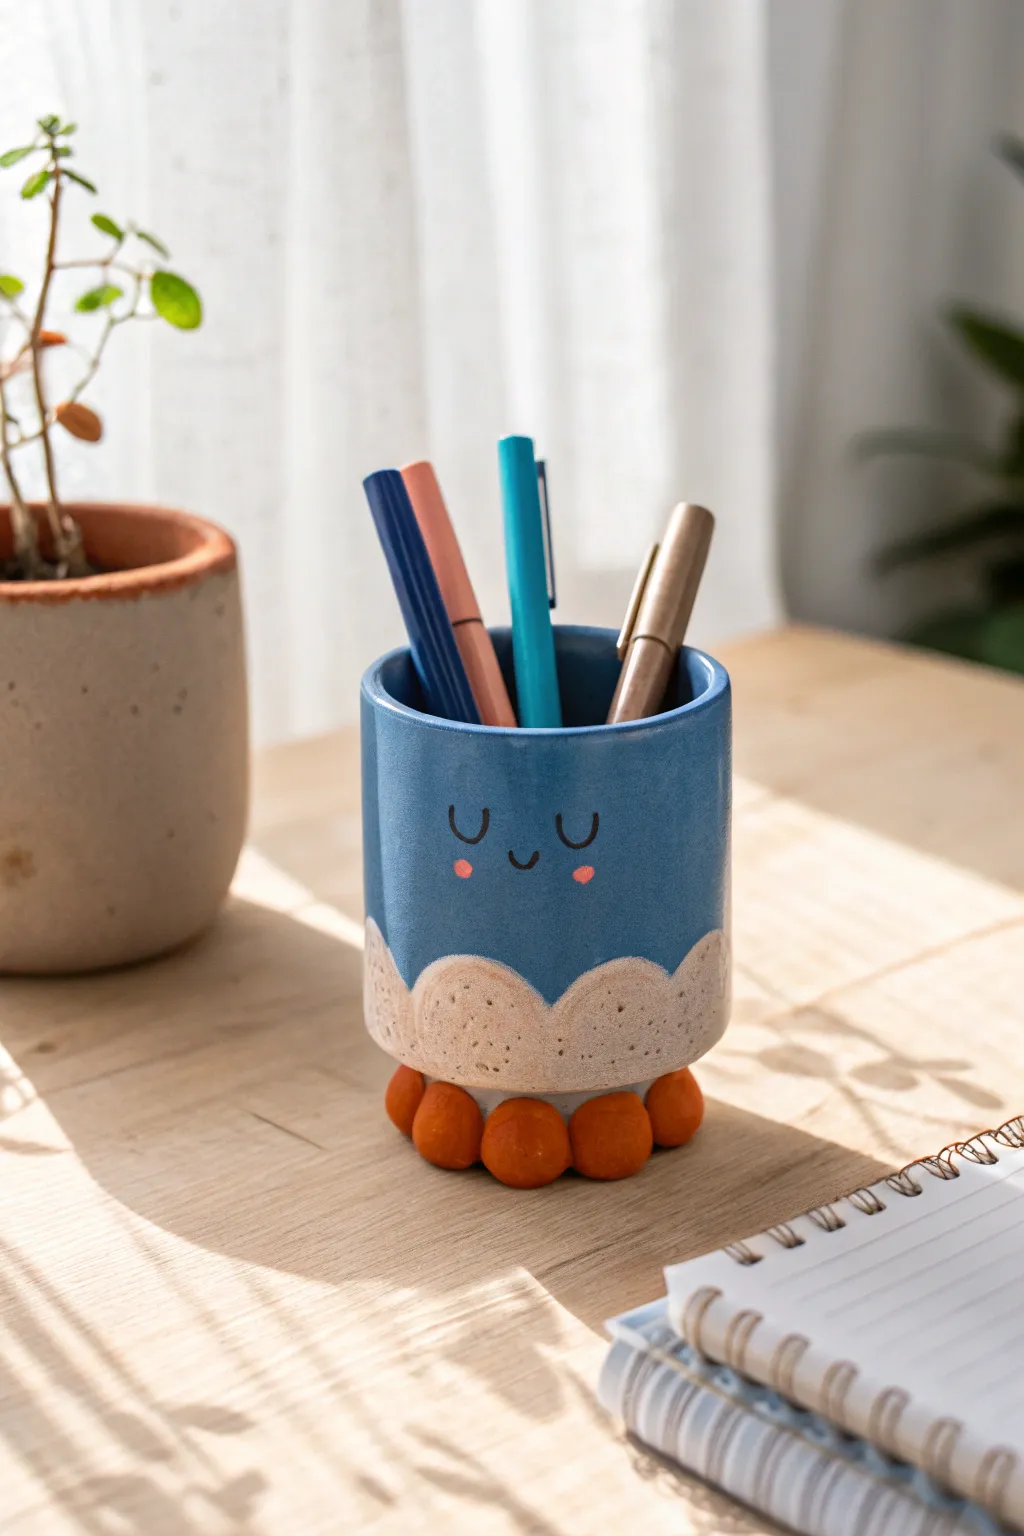
Bring a little sky-blue whimsy to your desk with this adorable ceramic-style pen cup featuring a sleepy face and puffy cloud details. The unique feature is its base of bouncy terracotta-colored ‘feet’ that add stability and a pop of warm contrast to the cool blue glaze.
How-To Guide
Materials
- Air-dry clay or polymer clay (white)
- Small circular cookie cutter or jar lid (approx. 3-inch diameter)
- Rolling pin
- Craft knife or clay tools
- Slip (water/clay mixture) or liquid clay adhesive
- Acrylic paints: Sky blue, beige/sand, terracotta orange, black, pink
- Paintbrushes: Flat tip and fine detail liner
- Glossy varnish or sealant
- Sandpaper (fine grit)
- Water cup and sponge
Step 1: Building the Base Structure
-
Roll the base:
Start by rolling out a slab of clay to about 1/4 inch thickness. Use your circular cutter or jar lid to cut a perfect circle for the bottom of the cup. -
Create the walls:
Roll out a long rectangular strip of clay with the same 1/4 inch thickness. Ensure the strip is long enough to wrap around the circumference of your base circle and tall enough for your pens (about 4-5 inches). -
Assemble the cylinder:
Score the edges of both the base circle and the bottom of your rectangular strip. Apply a little slip or adhesive to the scored areas. -
Join the seams:
Wrap the wall around the base, pressing gently to seal. Where the two ends of the wall meet, score and slip the vertical seam, then smooth it out inside and outside with your finger or a smoothing tool so the join becomes invisible. -
Smooth the lip:
Run a slightly damp sponge along the top rim to round off any sharp edges and ensure the height is even all around.
Feet Falling Off?
If the clay balls detach after drying, don’t panic. Use a strong super glue or 2-part epoxy to reattach them permanently to the base.
Step 2: Adding the Cloud Detail
-
Roll thin coils:
Roll out a thin sheet of clay (thinner than the walls) or use the scraps from earlier. -
Cut the scallops:
Cut a strip about an inch wide with a scalloped top edge to mimic cloud puffs. You want this strip to wrap around the bottom portion of your cup. -
Attach the clouds:
Score the bottom section of your cup walls and the back of your scalloped strip. Attach the strip to the cup, blending the bottom edge seamlessly into the cup wall while leaving the scalloped top slightly raised for texture. -
Add texture:
Using an old toothbrush or a stiff bristle brush, gently tap the surface of the scalloped cloud area to give it a stony, porous texture. I usually do this before the clay dries too much.
Smoother Seams
Dip your finger in a tiny bit of water (for air-dry) or baby oil (for polymer) to smooth the vertical seam perfectly before texture is added.
Step 3: Creating the Feet
-
Form the balls:
Roll 8 to 10 equal-sized spheres of clay, each about the size of a large marble. These will be the orange feet. -
Attach to base:
Flip your cup upside down carefully. Score the bottom rim of the cup and slightly flatten one side of each ball. -
Secure the ring:
Attach the balls in a ring around the bottom edge, using slip to secure them. Make sure they touch each other slightly for extra stability. -
Dry completely:
Allow the entire structure to dry fully. For air-dry clay, this takes 24-48 hours; for polymer, bake according to package instructions.
Step 4: Painting and Finishing
-
Sand imperfections:
Once dry, lightly sand any rough patches on the main blue area to ensure a smooth surface for the face. -
Base coat the clouds:
Paint the scalloped cloud section at the bottom with a beige or sandy color. Dab the paint on to highlight the texture you created earlier. -
Paint the sky:
Paint the upper cylinder section with a rich sky blue. You may need two coats for opaque coverage. Be careful to keep a clean line where the blue meets the beige clouds. -
Color the feet:
Paint the ball feet in a warm terracotta orange. -
Paint the face:
Using a fine detail brush and black paint, draw two small ‘U’ shapes for closed sleepy eyes and a tiny smile in the center. Add two small pink dots for cheeks. -
Seal:
Finish with a coat of glossy varnish over the entire piece to mimic a ceramic glaze and protect your paint work.
Now your desk has a cozy new companion to keep your pens organized
Sleepy Critter Incense Holder

This charming ceramic piece features a rounded, sleeping creature nesting in a shallow dish, perfect as an incense holder or a cute decorative accent. Its speckled cream finish and subtle golden details give it a cozy, organic feel that brings a sense of calm to any space.
Detailed Instructions
Materials
- White stoneware or polymer clay (if not firing)
- Speckled clay body (optional, or mix in speckles)
- Small rolling pin
- Pottery sponge
- Needle tool
- Felting needle or toothpick (for fine details)
- Slip (clay and water slurry)
- Underglaze (black and golden-brown)
- Clear matte glaze
- Small paintbrush
- Modeling tool (rounded end)
Step 1: Shaping the Dish
-
Prepare the base clay:
Begin by wedging a ball of speckled white clay to remove any air bubbles. If you don’t have speckled clay, you can wedge in some granular manganese or heavy grog to achieve that natural, spotted look seen in the photo. -
Roll the slab:
Roll out a portion of the clay into a slab about 1/4 inch thick. This will form the base dish. -
Cut the circle:
Use a round cookie cutter or a bowl as a template to cut out a perfect circle, approximately 4-5 inches in diameter. -
Build the rim:
Roll a separate coil of clay, roughly the thickness of a pencil. Score the outer edge of your circular base and apply a bit of slip. -
Attach and smooth:
Place the coil onto the scored edge to create the rim. Use your thumb or a modeling tool to blend the clay downwards into the base on both the inside and outside, ensuring a seamless connection. -
Refine the shape:
Gently smooth the rim with a damp sponge to round it off, matching the soft, curved aesthetic of the reference image.
Step 2: Sculpting the Critter
-
Form the body:
Take a separate lump of clay and roll it into a ball, then flatten the bottom so it sits stable. It should be a half-dome shape, slightly smaller than the interior of your dish. -
Hollow it out (optional):
If you are firing this piece in a kiln, carefully hollow out the underside of the dome to ensure even wall thickness and prevent cracking during firing. If using polymer clay, foil can be used as a core. -
Check the fit:
Place the dome inside the dish to ensure the proportions look right. It should fill most of the center space. -
Create the ears:
Pinch two small, equal-sized pieces of clay into teardrop shapes. Use your thumb or a rounded tool to press an indentation into the center of each to form the inner ear. -
Attach the ears:
Score and slip the top of the head where you want the ears to sit. Press them on firmly and blend the clay at the base so they look like they are growing naturally from the head. -
Make the nose:
Roll a tiny, tiny ball of clay for the nose. Score a spot low on the front of the face and attach it securely.
Uneven Drying?
To prevent warping as the dish dries, dry it very slowly. Cover loosely with plastic for the first 24 hours so the rim and base shrink at the same rate.
Step 3: Adding Details & Finish
-
Add the incense hole:
Using a needle tool or a skewer that matches your incense stick size, poke a hole into the top or back of the critter’s body. I like to angle it slightly backward so the ash falls into the dish. -
Carve facial features:
With a very fine needle tool, gently crave two curved lines for the sleeping eyes and three whiskers on each cheek. Keep your hand steady for clean lines. -
Paint the details:
Using underglaze, paint the nose black. Carefully fill the carved eye and whisker lines with black/dark brown, then wipe the surface with a damp sponge so the color stays only in the recesses. -
Add warmth:
Paint the inner ears with a warm golden-brown underglaze. Using the tip of your brush, dab small dots of the same color onto the back of the creature to mimic the spots seen in the image. -
Fire and Glaze:
Bisque fire the piece. Once cooled, apply a clear matte glaze over the entire piece (except the bottom) to preserve the natural stone texture while protecting the clay.
Perfect Whiskers
For ultra-crisp lines, let the clay dry to a ‘leather hard’ state before carving the eyes and whiskers. The tool will cut cleanly without dragging the clay.
Once fired, place your favorite incense stick in the holder and enjoy the peaceful vibe this little critter brings to the room
Lightweight Floral Wreath Hoop
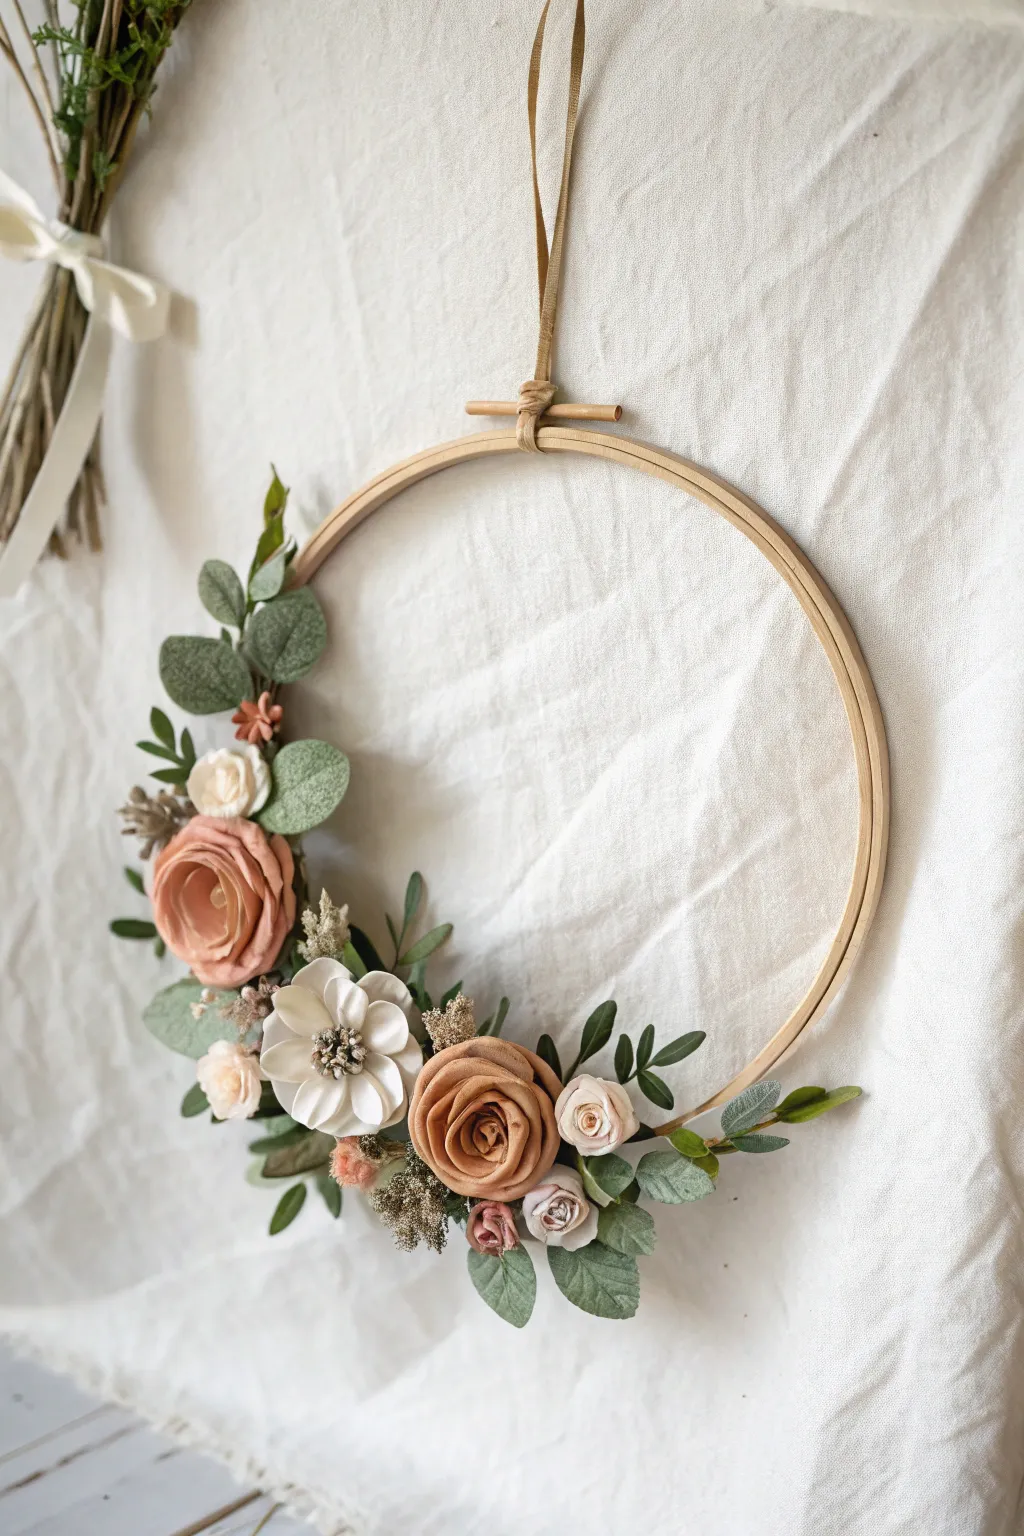
Bring a touch of everlasting nature into your home with this delicate and modern floral hoop. Using lightweight air-dry clay, you’ll sculpt soft, realistic blooms in earthy tones of terracotta, cream, and sage to create a charming wall hanging.
Step-by-Step Tutorial
Materials
- 10-inch wooden embroidery hoop
- Lightweight air-dry clay (white, peach/terracotta, sage green, brown)
- Floral wire (20-gauge and 24-gauge)
- Floral tape (brown or green)
- Small clay tools (ball stylus, veining tool)
- All-purpose craft glue or hot glue gun
- Small scissors
- Satin or velvet ribbon for hanging (beige or gold)
- Artificial stamens (black or brown tips)
- Optional: dried baby’s breath or faux filler for texture
Step 1: Prepping the Base
-
Prepare the hoop:
Separate the embroidery hoop rings. You will only need the inner ring for a minimalist look, or use the outer ring with the hardware at the top (as shown in the image) for easy hanging. Ensure the wood is smooth. -
Add the ribbon:
Loop a length of satin or velvet ribbon around the top hardware mechanism. Tie a secure knot or bow at the top to create your hanger before you start adding fragile flowers.
Pro Tip: Realistic Petals
To make clay petals look real, keep the centers thick for stability but roll the very edges paper-thin. This allows light to pass through the edges just like a real flower.
Step 2: Sculpting the Clay Blooms
-
Mix your colors:
Knead your clay to condition it. Mix white clay with a tiny amount of brown and orange to achieve that dusty terracotta shade. Create a separate cream pile and a sage green pile. -
Form the rose centers:
Roll a small cone of terracotta clay. Flatten a small ball of clay into a petal shape on your palm, thinning the edges with your finger. Wrap this tightly around the top of the cone. -
Build the roses:
Continue adding flattened, teardrop-shaped petals around the center, slightly overlapping each previous one. I like to curl the edges of the outer petals backward slightly for a blooming effect. Make 2-3 main roses. -
Create the white anemone:
For the focal white flower, shape 6-8 wider, flatter petals. Press a texture tool or real leaf into them for subtle veining. -
Assemble the anemone:
Arrange the white petals in a circle, adhering them together at the base. Take a bundle of small artificial stamens, fold them in half, and glue them into the center. -
Make mini filler flowers:
Roll tiny balls of cream and pale pink clay. Press a small ball tool into the center of each to cup them. Make about 5-7 of these smaller buds.
Troubleshooting: Cracking Clay
If your petals crack while drying, you likely used too much water or the clay was too old. Knead a tiny bit of lotion or baby oil into the raw clay before sculpting to restore elasticity.
Step 3: Crafting Greenery
-
Shape the eucalyptus leaves:
Roll sage green clay into thin sheets. Cut out oval shapes or use a small cutter. Smooth the edges with your finger to soften the cut marks. -
Add detail to leaves:
Draw a central vein down the middle of each leaf using a needle tool. Curve the leaves slightly so they don’t look stiff. -
Create leaf branches:
For sturdier greenery, wrap floral wire with green clay or floral tape. Attach your clay leaves to the wire stems by pressing onto the fresh clay or gluing them once dry. -
Dry the components:
Let all your flowers and leaves dry completely on a foam pad or soft sponge. This usually takes 24 hours depending on humidity.
Step 4: Final Assembly
-
Plan your layout:
Dry-fit your arrangement on the hoop. The design should be asymmetrical, curving from the bottom left upwards, covering about half the circle. -
Attach the greenery base:
Glue the leafy branches directly onto the wooden rim first. Have the leaves pointing outward in both directions from the center point of your arrangement. -
Mount the focal flowers:
Glue your large terracotta roses and white anemone cluster near the lower-left curve. This anchors the visual weight of the wreath. -
Fill in the gaps:
Tuck the smaller cream buds and any additional textured filler (like dried moss or baby’s breath) into the empty spaces between the large blooms. -
Final touches:
Look at the wreath from a distance. If you see any bare wood through the arrangement that looks messy, glue tiny individual clay leaves to cover the mechanics.
Hang your beautiful handcrafted wreath in a spot where the soft colors can catch the daylight
Sun Catchers With Clay Frames
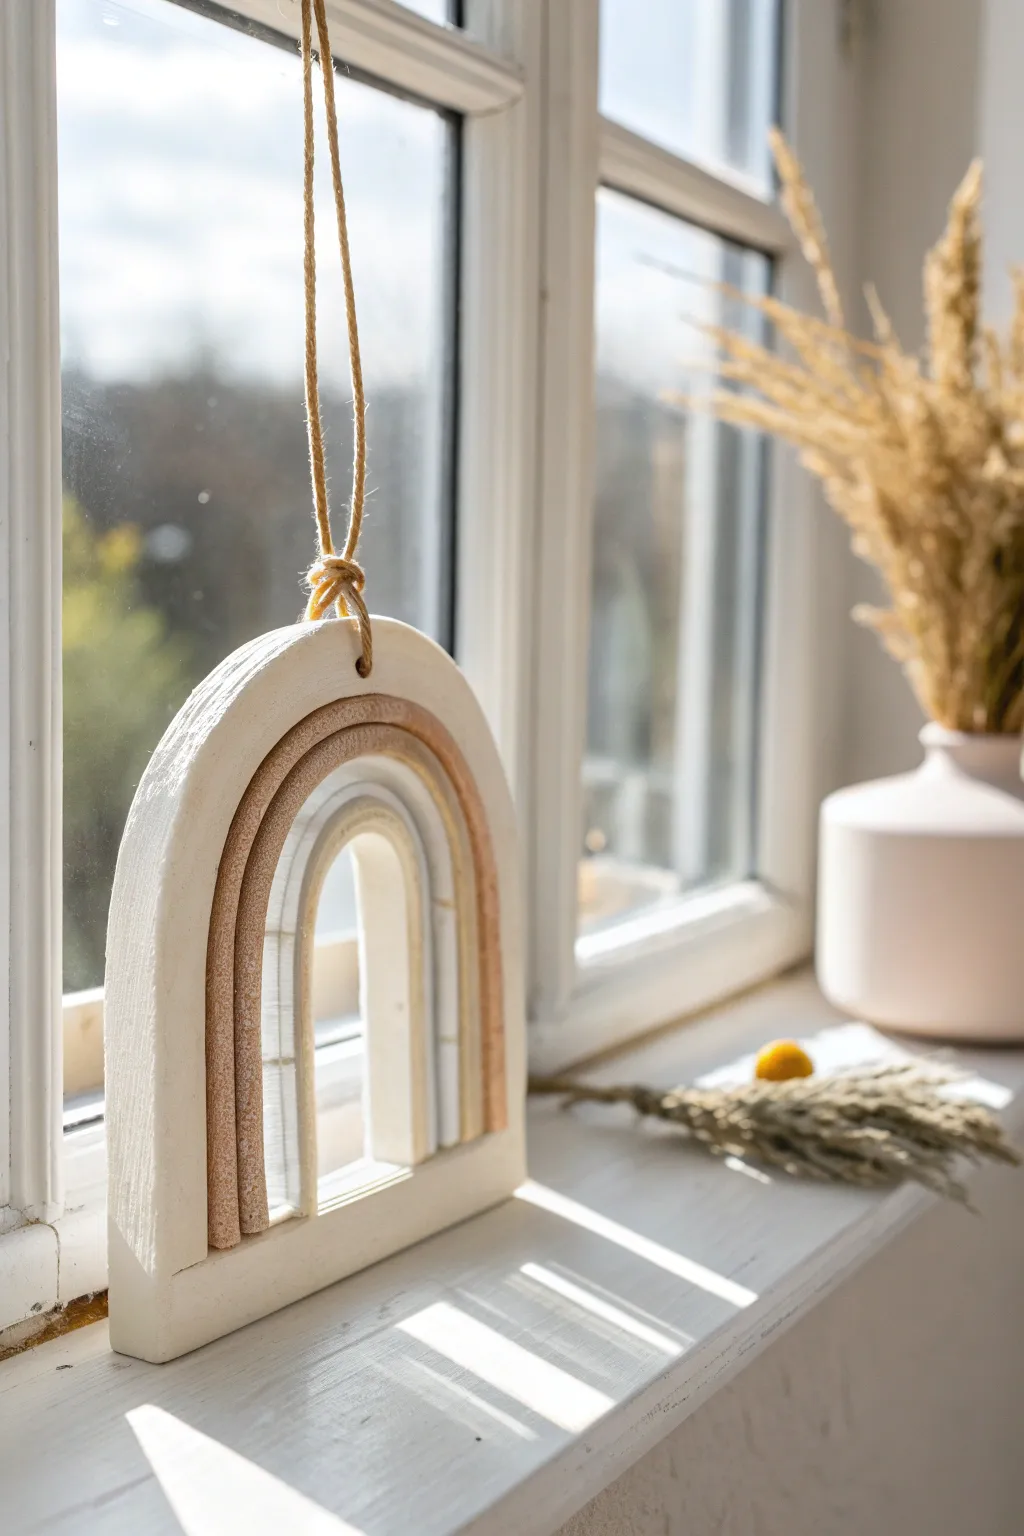
This minimalist hanging decoration combines the earthy texture of stone-effect clay with a clean, modern arch design. It is perfect for catching the morning light in a window, bringing a serene and artistic touch to any room.
How-To Guide
Materials
- White air-dry clay or polymer clay
- Stone-effect or granite textured clay (beige/tan)
- Rolling pin
- Craft knife or clay slicer
- Ruler
- Sandpaper (fine grit)
- Jute twine or rustic string
- A straw or small round tool (for the hole)
- Water and a small brush (for joining)
- Clear acrylic sheet or sturdy acetate (optional backing)
- Strong craft glue (if using backing)
Step 1: Shaping the Base Arch
-
Prepare the workspace:
Begin by cleaning a flat surface and laying down a silicone mat or parchment paper to prevent sticking. -
Roll the main slab:
Take a large portion of white clay and roll it out into a slab about 0.5 to 0.75 inches thick. You want it substantial enough to stand on its own without warping. -
Cut the outer shape:
Using a craft knife, freehand cut a tall U-shape or use a paper template to ensure symmetry. The bottom should be perfectly flat. -
Create the inner opening:
Cut a smaller, concentric arch out of the center of your shape, leaving a frame width of about 1 inch all around. -
Smooth the edges:
Dip your finger in a little water and run it along the cut edges to soften any sharpness or crumbling bits. -
Add the hanging hole:
Use a straw or a small circular cutter to punch a hole at the very top center of the arch. Make sure it goes all the way through cleanly.
Step 2: Adding Texture and Detail
-
Create the inner detail strip:
Roll out a thin snake or flattened strip of the stone-effect or beige clay. This will be the decorative inner arch. -
Fit the decorative strip:
Gently press this colored strip against the inner curve of your white frame. It should nestle inside perfectly. -
Texture the surface:
To achieve that rustic, stone-like finish seen in the photo, you can gently tap the surface with a crumpled ball of aluminum foil or a stiff-bristled toothbrush. -
Secure the join:
Score the meeting points between the white frame and the beige strip with a needle tool, add a dab of water or liquid clay, and press them firmly together. -
Dry the piece:
Let the clay dry completely according to the package instructions. For air-dry clay, turning it over halfway through the drying process helps prevent warping.
Cracks Appearing?
If you see small cracks while air-dry clay is drying, mix a tiny bit of fresh clay with water to make a paste and fill them in immediately.
Step 3: Assembly and Finishing
-
Sand for perfection:
Once fully cured or dry, use fine-grit sandpaper to smooth out the bottom edge so it sits flat, and refine the outer curve. -
Optional backing:
If you want a true ‘sun catcher’ effect, cut a piece of clear acrylic or acetate to the size of the inner arch and glue it to the back. This adds stability and shine. -
Prepare the twine:
Cut a length of jute twine, approximately 20 inches long, depending on how low you want the piece to hang. -
Fold the loop:
Fold the twine in half to find the center point, creating a loop. -
Attach the hanger:
Feed the folded loop through the hole from front to back, then pull the loose ends through the loop to create a lark’s head knot. -
Secure the knot:
Tie a simple overhand knot with the loose ends at the very top to close the loop for hanging. -
Final check:
Ensure the knot at the clay arch is tight and secure before hanging your new art piece in a sunny window.
Add Sparkle
Embed small glass beads, mirror mosaic tiles, or even sea glass into the inner arch while the clay is wet for colorful light refraction.
Now you have a serene piece of handmade decor to brighten up your window ledge
Mini Room Dioramas In A Tiny Box
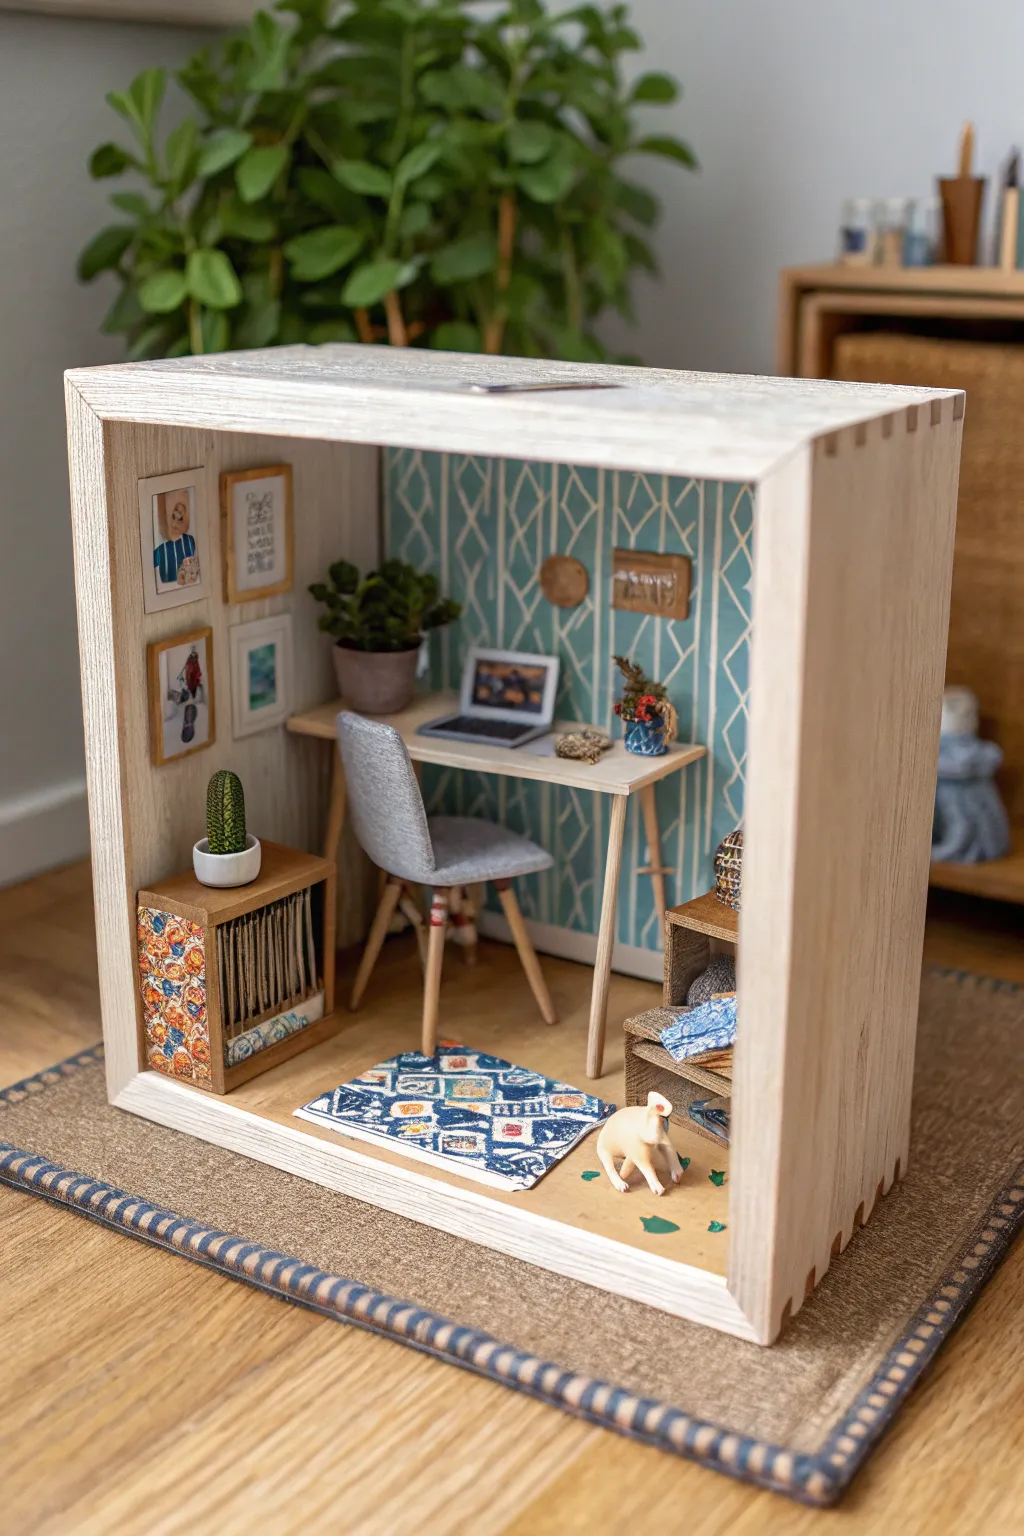
Transform a simple wooden box into a charmingly detailed miniature workspace, complete with tiny furniture, lush plants, and personalized wall art. This diorama captures the cozy vibe of a modern home office in a display piece that fits right on your bookshelf.
Step-by-Step Tutorial
Materials
- Small wooden display box (unfinished or light wood, approx. 6×6 inches)
- Balsa wood sheets and dowels
- Air-dry clay (white and terracotta)
- Scrapbooking paper (patterned for wallpaper and rug)
- Acrylic paints (various colors)
- Miniature fabric scraps (grey felt, patterned cotton)
- Cardstock and printer (for mini posters and laptop)
- Small beads or wire (for plant pots/decor details)
- Strong craft glue and wood glue
- X-Acto knife and cutting mat
- Fine-grit sandpaper
- Tweezers
Step 1: Setting the Scene
-
Prepare the Box:
Begin by sanding any rough edges of your wooden display box. If the wood is too raw, give the exterior a light wash of white acrylic paint diluted with water to create a whitewashed effect while keeping the interior natural for the floor. -
Wallpaper the Back Wall:
Measure the inside back panel of your box precisely. Cut a piece of patterned turquoise or geometric scrapbooking paper to fit this space and adhere it smoothly using a glue stick or spray adhesive to avoid wrinkling. -
Create the Rug:
Cut a small rectangle from a different patterned paper or a piece of stiff fabric to serve as the area rug. Position it on the floor of the box, slightly angled, but don’t glue it down permanently until you arrange the furniture.
Scale Reference
Keep a coin or ruler nearby while working. If an item looks ‘off,’ it’s usually scale. Most dollhouse minis are 1:12, but for these boxes, just ensure items relate correctly to each other.
Step 2: Constructing Furniture
-
Build the Desk Top:
Cut a rectangular piece of balsa wood for the desk surface. Sand the edges until smooth. You can leave it natural or stain it lightly with diluted brown paint. -
Assemble Desk Legs:
Cut four equal lengths of balsa dowel for the legs. Adhere them to the corners of the desktop using wood glue. I find it helpful to turn the desk upside down and let the glue cure completely before flipping it over. -
Craft the Chair Base:
Form the seat shape using a small piece of bent balsa wood or sturdy cardboard. Attach four smaller dowel pieces for the legs, angling them slightly outward for a mid-century modern look. -
Upholster the Chair:
Cover the seat glue with a small piece of grey felt. Trim any excess fabric closely with scissors so the shape remains distinct and tidy. -
Make the Record Player Stand:
Construct a small open-front box using balsa wood scraps. This will serve as a side table or record storage unit. Paint the exterior a warm wood tone to contrast with the light floor.
Lighting Upgrade
Drill a tiny hole in the ceiling of the box and thread through a single battery-operated LED fairy light. Hide the battery pack on top or behind the box for a working lamp effect.
Step 3: Clay Creations & Accessories
-
Sculpt Tiny Plants:
Using green air-dry clay (or white clay painted green later), sculpt tiny cacti and leafy plants. Use a toothpick to add texture to the cactus and to shape individual leaves. -
Make Miniature Pots:
Form small pots from terracotta-colored clay or use large wooden beads as bases. Place your clay plants inside and let them dry overnight. -
Create the Pet:
Sculpt a tiny dog or cat figurine using plain air-dry clay. Keep the shapes simple—round for the body and head—and add tiny ears. Once dry, paint it cream or white. -
Assemble the Laptop:
Cut a small piece of cardstock and fold it in half. Print or draw a tiny ‘screen’ image and glue it to the inside top half. Paint the outside silver or grey to mimic a laptop. -
Design Wall Art:
Print out miniature images or draw tiny sketches on white paper. Frame them by gluing them onto slightly larger rectangles of balsa wood or thick cardstock.
Step 4: Final Assembly
-
Install Wall Art:
Using tweezers and a tiny dot of glue, attach your framed pictures to the side walls and the wallpapered back wall. Vary the heights for a gallery wall effect. -
Position Furniture:
Glue the desk against the back wall. Place the chair in front of it, slightly pulled out. Glue the record player stand to the left side wall. -
Add Decorative Details:
Arrange the clay plants on the desk and the side table. Glue the laptop onto the desk surface. Add tiny details like a bead for a bowl or a scrap of fabric for a throw blanket. -
Place the Pet:
Secure your little clay animal on the floor near the rug, adding a lively touch to the otherwise still room.
Step back and admire your tiny, perfectly organized world that never needs cleaning
Moon And Star Night Scene Figurines
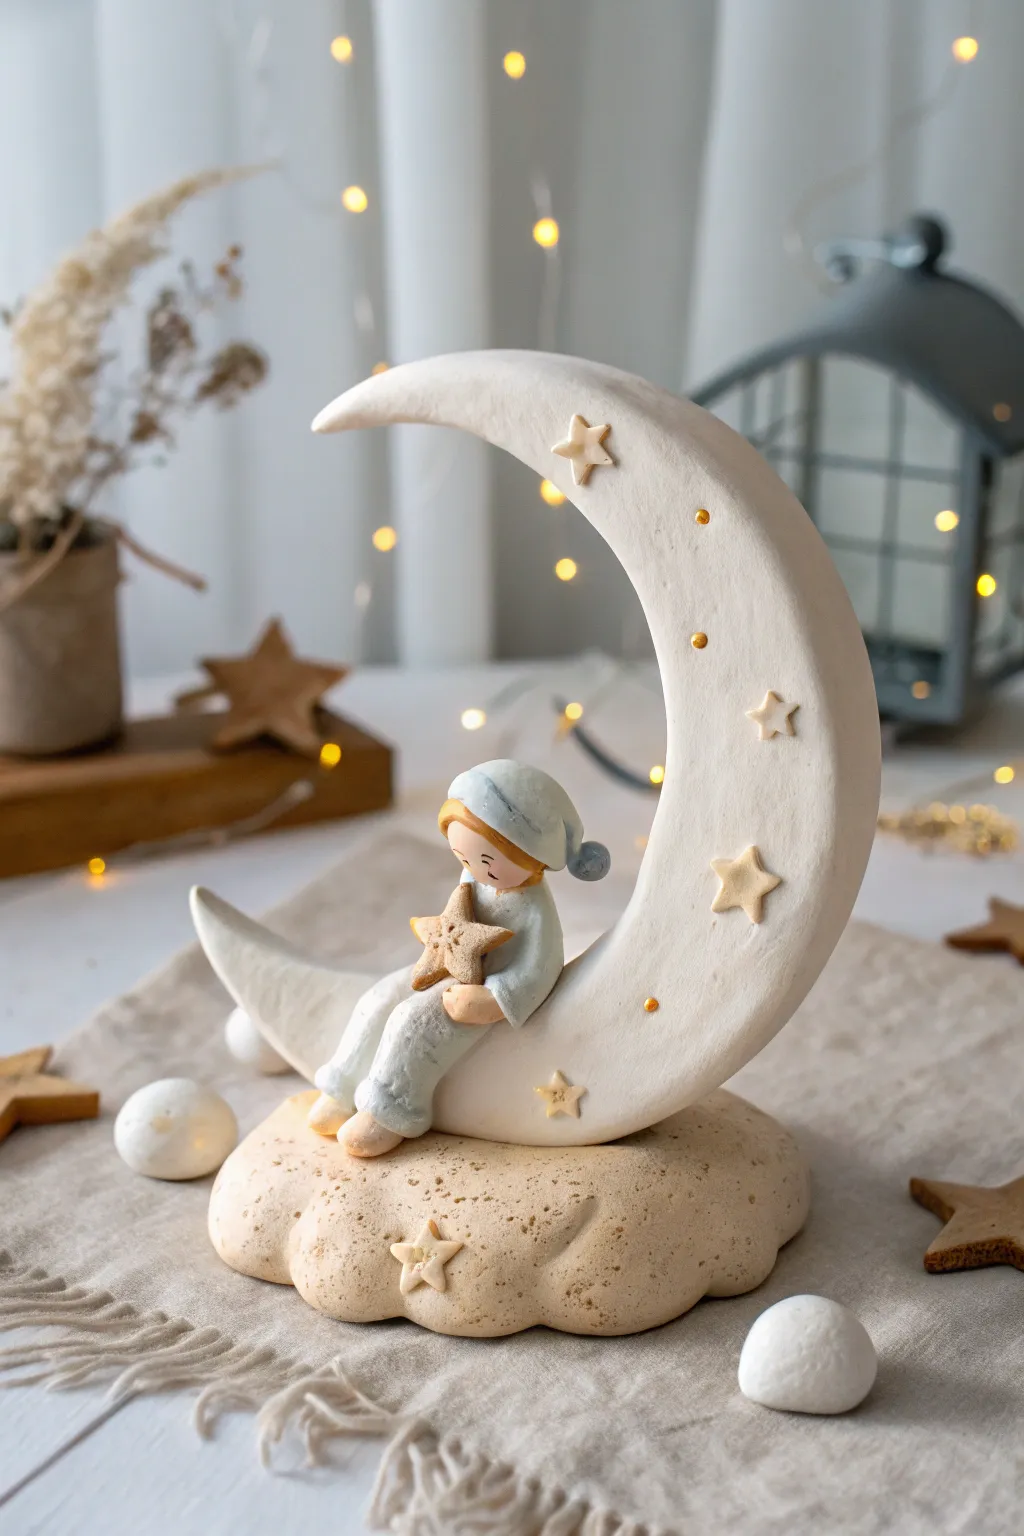
Capture the magic of bedtime stories with this enchanting figurine featuring a sleepy child resting on a crescent moon. This project uses pale, creamy tones and soft textures to create a soothing nursery decoration or a whimsical gift.
How-To Guide
Materials
- White air-dry clay or polymer clay (oven-bake)
- Beige or sand-colored clay
- Light blue clay
- Acrylic paints (gold, blush pink, light brown)
- Small rolling pin
- Sculpting tools (needle tool, ball stylus)
- Aluminum foil (for armature)
- Small star-shaped cookie cutter (optional)
- Sandpaper (fine grit)
- Craft glue or liquid clay
- Toothbrush (for texturing)
Step 1: Shaping the Celestial Base
-
Form the cloud base:
Start with a generous ball of beige or sand-colored clay. Flatten it into an irregular, lumpy oval shape about 3-4 inches wide to resemble a fluffy cumulus cloud. -
Add cloud texture:
Use a clean toothbrush or a ball of crumpled foil to gently press all over the surface of the cloud. This creates that porous, dreamy stone texture seen in the photo. -
Create the moon armature:
To keep the moon lightweight and sturdy, tightly crumple a piece of aluminum foil into a crescent shape. This saves clay and helps the structure hold its form while drying. -
Sculpt the moon:
Roll out a sheet of white clay and wrap it completely around your foil armature. Smooth the seams with a little water or baby oil until the surface is flawless. -
Attach moon to cloud:
Score the bottom of the moon and the center of the cloud base (scratch cross-hatch marks). Apply a dab of glue or liquid clay and press the moon firmly onto the cloud. -
Moon details:
While the clay is still soft, gently press tiny gold beads or roll minuscule balls of clay into the moon’s surface for subtle craters. Add a few small clay stars randomly along the curve.
Step 2: Crafting the Sleepy Character
-
Form the legs:
Roll two small sausages of light blue clay for the pajama bottoms. Bend them slightly at the knees and attach them so they hang over the inner curve of the moon. -
Create the torso:
Make a small pear shape from the same blue clay on top of the legs. This will be the body. Make sure it leans back slightly against the moon for a relaxed posture. -
Sculpt the head:
Roll a smooth ball of beige skin-tone clay. Attach this to the top of the torso. I find it helpful to insert a small piece of toothpick or wire between the head and body for extra neck support. -
Add the sleeping cap:
Fashion a small cone of blue clay. Drape it over the head, letting the tip flop down naturally. Add a tiny ball of grey or blue clay to the tip for a pom-pom. -
Shape the arms:
Roll two thinner blue logs for arms. Position them so they are reaching forward, as if hugging something against the chest. -
holding the star:
Create a medium-sized star from the beige clay. Place it against the chest and wrap the character’s arms around it gently.
Gravity Defying Tip
If the moon wobbles on the cloud before drying, prop it up with a small object (like a spice jar) behind the curve until it hardens completely.
Step 3: Finishing Touches
-
Add decorative stars:
Make several extra tiny stars. Press one onto the front of the cloud base and scatter a few more on the moon’s surface if it looks bare. -
Smoothing and drying:
Go over the piece with a damp brush to smooth out any fingerprints. Let the piece dry completely (24-48 hours for air-dry clay) or bake according to package instructions. -
Painting details:
Once solid, use a fine liner brush and brown paint to draw the simple closed eyelids and a tiny smile. Add a soft blush to the cheeks with diluted pink paint. -
Gilding accents:
Carefully paint the stars on the moon and the cloud with light brown or gold paint to make them pop. Add tiny gold dots to the moon for extra sparkle. -
Hair details:
Paint or sculpt a small tuft of hair peeking out from under the sleeping cap using an orange-brown shade.
Make It Glow
For a magical nightlight effect, embed a small battery-operated LED tea light into the hollow of the moon before you seal the clay around the foil.
Place your lovely night-time sculpture on a shelf to bring sweet dreams to any room
Gradient Color-Blended Wall Tiles
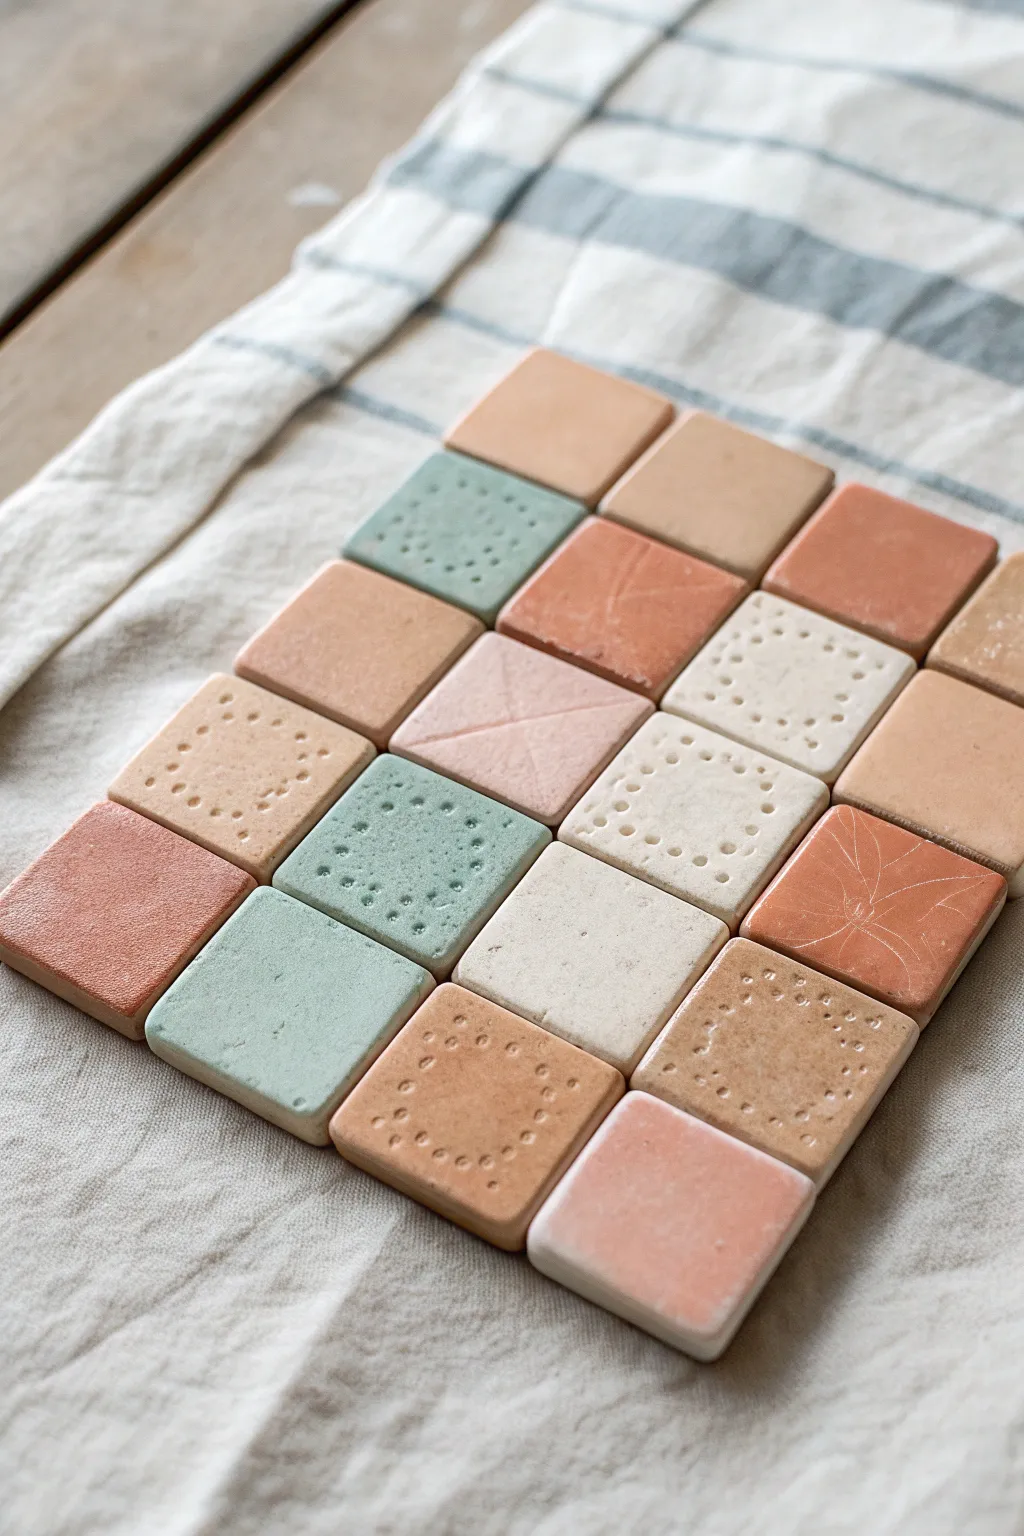
Create a stunning mosaic of miniature ceramic tiles featuring a soothing palette of terracotta, sage, and cream. These small clay squares mix smooth surfaces with tactile, imprinted textures for a sophisticated, artisanal look.
Step-by-Step Guide
Materials
- Polymer clay (terracotta, white, sage green, blush pink)
- Acrylic rolling pin
- Square clay cutter (approx. 1 inch)
- Needle tool or toothpick
- Smooth work surface (glass or tile)
- Parchment paper
- Baking sheet
- Fine-grit sandpaper (optional)
- Matte varnish (optional)
Step 1: Color Mixing & Preparation
-
Condition the clay:
Begin by kneading each block of clay separately until it is soft, pliable, and free of cracks. Warm clay is essential for getting those crisp edges later. -
Create custom shades:
To achieve the gradient look seen in the photo, don’t just use clay straight from the pack. Mix a little white into your terracotta to soften it, or blend sage with a touch of tan for an earthier green. -
Marbling technique:
For the subtle, stone-like variations, take two similar shades (like cream and white), twist them together partially, but stop before they are fully blended. -
Roll out the slab:
Using your acrylic rolling pin or a pasta machine, roll your clay out to a uniform thickness, aiming for about 1/4 inch thick. Uniformity is key for the tiles to lay flat together.
Step 2: Cutting and Texturing
-
Cut the bases:
Press your square cutter firmly into the clay slab to create your tile shapes. Gently wiggle the cutter before lifting to ensure a clean release. -
Smooth the edges:
After cutting, run your finger lightly along the edges of each square to soften any sharp ridges or loose bits of clay. -
Plan the layout:
Lay your plain squares out in a grid to visualize your color balance. I usually like to keep half of them smooth and texture the rest. -
Imprint dotted squares:
For the dotted geometric pattern, use a blunt needle tool or the end of a small paintbrush. Gently press dots into the clay to form a square outline within the tile. -
Etch linear designs:
Use a sharp needle tool to scratch delicate lines into select tiles. You can create an ‘X’ shape or faint botanical sketches like the flower petals seen in the bottom right. -
Add deep texture:
For a more pitted, limestone look, gently tap the surface of a cream tile with a stiff-bristled toothbrush or a crumpled ball of aluminum foil.
Depth Perception
After texturing, lightly brush a darker pastel chalk powder over the imprinted dots or lines before baking to make the patterns pop.
Step 3: Baking and Finishing
-
Prepare for baking:
Transfer the tiles onto a baking sheet lined with parchment paper. Ensure they aren’t touching each other. -
Baking process:
Bake according to your clay manufacturer’s instructions. A general rule for polymer clay is 275°F (135°C) for 15-30 minutes per 1/4 inch of thickness. -
Cool down:
Allow the tiles to cool completely on the baking sheet. They are fragile while hot and harden as they cool. -
Sanding edges:
Once cool, inspect the edges. If there are any rough spots, gently buff them away with fine-grit sandpaper under running water. -
Seal (optional):
To protect the surface from dust, apply a very thin coat of matte varnish. Avoid glossy finishes to maintain that natural, earthen aesthetic.
Uneven Thickness?
If you don’t have a pasta machine, tape stacks of playing cards to your table on either side of your clay to act as depth guides for your rolling pin.
Arrange your finished tiles on a coffee table or mount them in a shadow box to enjoy your handmade mosaic