I love how a humble teacup can turn into a tiny stage for flowers, candles, and whole little worlds. Whether you’re upcycling vintage china or making a faux cup from paper or air-dry clay, these ideas are the kind of projects you’ll want to try the same day.
Teacup Succulent Planter
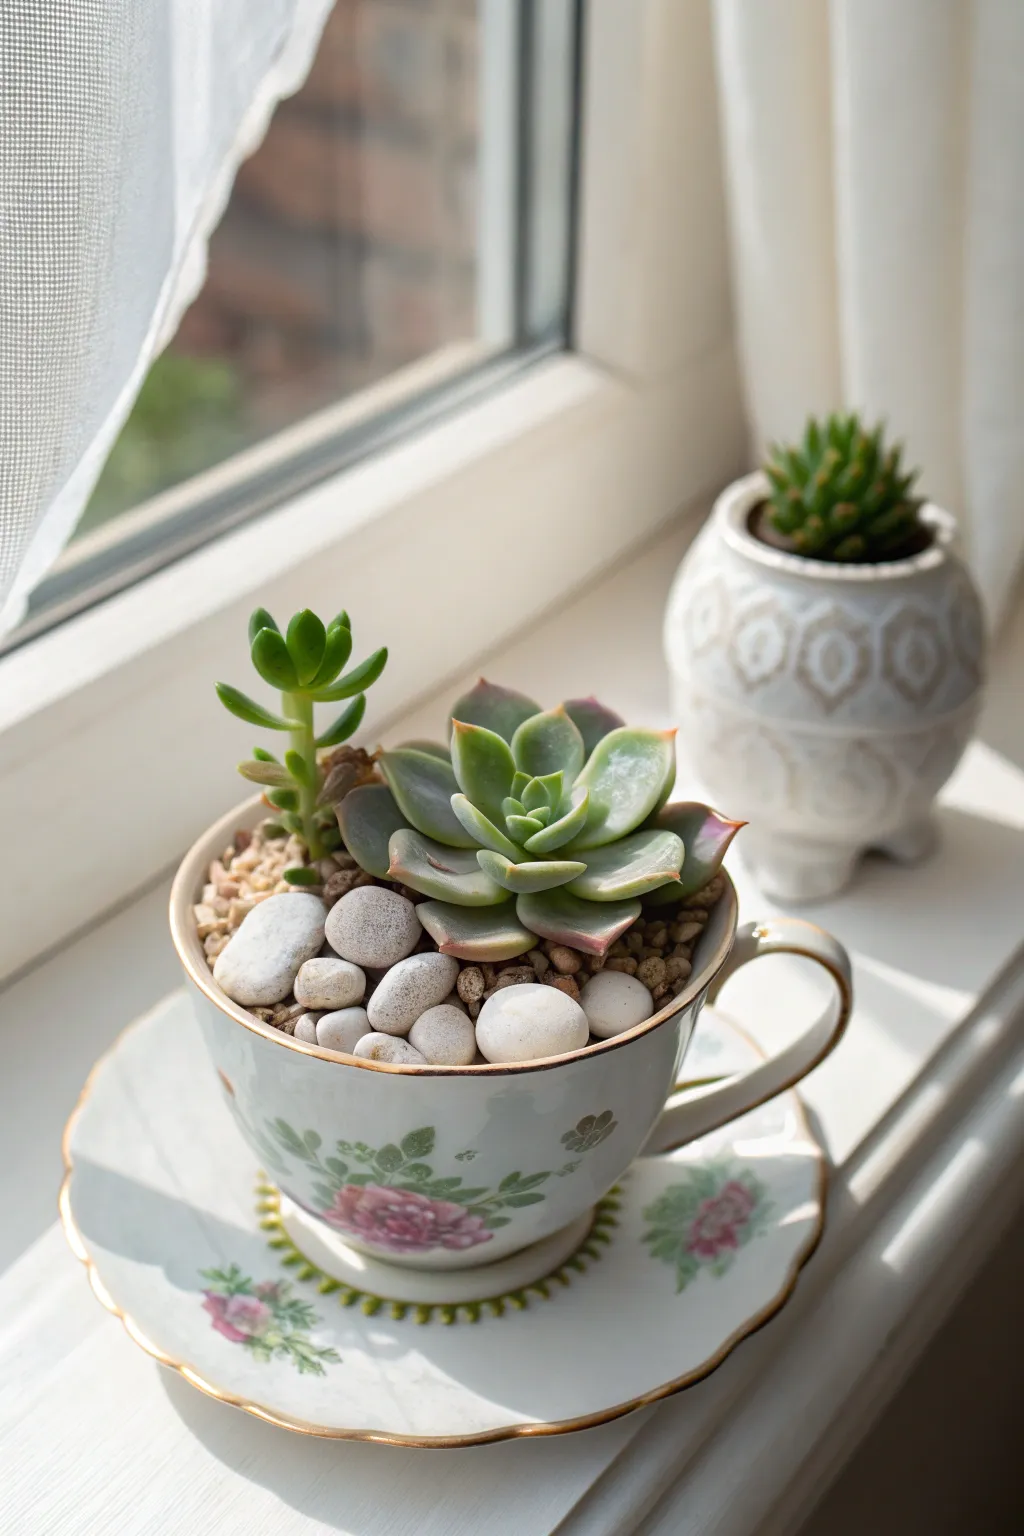
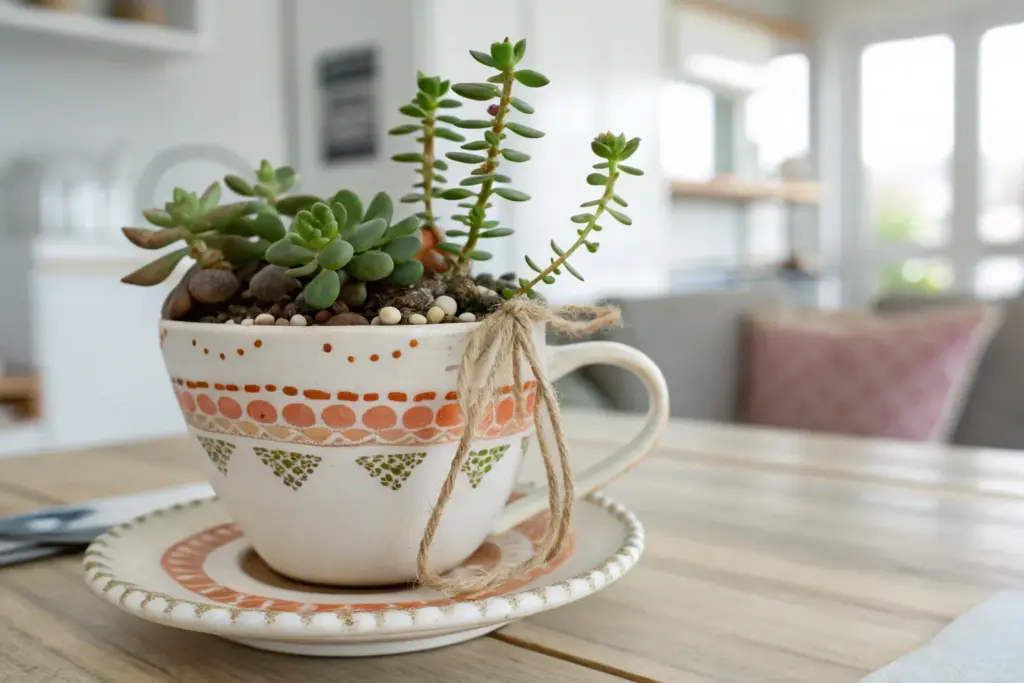
Transform a dainty vintage teacup into a charming miniature garden that brightens any windowsill. This project combines the elegance of floral china with the rugged beauty of succulents, finished with polished stones for a clean, professional look.
Step-by-Step Guide
Materials
- Vintage floral teacup with matching saucer
- Small Echeveria succulent (rosette shape)
- Small Sedum or Jelly Bean succulent (taller, vertical growth)
- Succulent/cactus potting mix
- Small gravel or perlite for drainage
- Smooth white decorative pebbles (approx. 1-2 cm size)
- Small spoon or scoop
- Soft paintbrush (for cleaning leaves)
- Diamond drill bit (optional, for drainage holes)
- Painter’s tape and water (if drilling)
Step 1: Preparing the Vessel
-
Clean the china:
Begin by washing your vintage teacup and saucer thoroughly with mild soap and water to remove any dust or residue. -
Assess drainage needs:
Most teacups don’t have holes. While you can drill one carefully using a diamond bit, painter’s tape, and constant water lubrication, I find you can skip this if you’re very careful with watering later. -
Create a drainage layer:
If you aren’t drilling a hole, add a thin layer of small gravel or perlite—about a half-inch deep—to the very bottom of the cup. This creates a reservoir for excess water to sit away from roots.
Step 2: Planting Phase
-
Prepare the soil base:
Spoon your cactus potting mix into the cup, filling it about halfway up. Don’t pack it down too tightly; succulents need aerated soil. -
Unpot the Echeveria:
Gently squeeze the nursery pot of your rosette succulent to loosen it. Remove the plant and gently gently crumble away the excess dry soil from the root ball without breaking the delicate roots. -
Position the main star:
Place the Echeveria slightly off-center in the cup. This asymmetric placement creates a more natural, pleasing composition similar to the reference photo. -
Add the vertical accent:
Take your taller Sedum or stem succulent and prepare its roots similarly. Nestle it into the space behind or beside the rosette to add height variation. -
Fill the gaps:
Use your small spoon to carefully add more potting mix around the root balls until the soil level is about a half-inch below the cup’s rim. Gently tap the cup on the table to settle the soil.
Watering Wisdom
Since there is likely no drainage hole, be extremely sparse with water. Use a pipette or spray bottle to moisten the soil only when completely dry.
Step 3: Finishing Touches
-
Clean the foliage:
It’s almost inevitable that soil will get stuck in the succulent leaves. Use a soft, dry paintbrush to gently sweep away any dirt specks from the rosette center. -
Add top dressing:
Pour a thin layer of fine gravel over the exposed soil. This acts as a stabilizer for the plants and a base for the larger stones. -
Place decorative stones:
Select several smooth, white river stones. Arrange them deliberately in the empty spaces around the base of the succulents, covering the soil completely. -
Secure the composition:
Press the white stones gently into the soil so they feel secure and don’t roll around when the cup is moved. -
Final positioning:
Place the finished teacup onto its matching saucer. Center it perfectly, ensuring the handle is angled nicely for display. -
Check stability:
If the cup rattles on the saucer, you can add a tiny dab of floral putty or museum wax underneath the cup to keep the two pieces united. -
Initial care:
Wait about a week before watering to let any damaged roots heal. When you do water, use a dropper or syringe to target the soil directly, avoiding the leaves.
Vintage Vibes
Look for teacups with gold rims or painted interiors. The soil level is low enough that patterned insides will peek through behind the plants.
Place your new miniature garden in a sunny spot and enjoy the delicate mix of porcelain and nature


Mini Fairy Garden in a Teacup
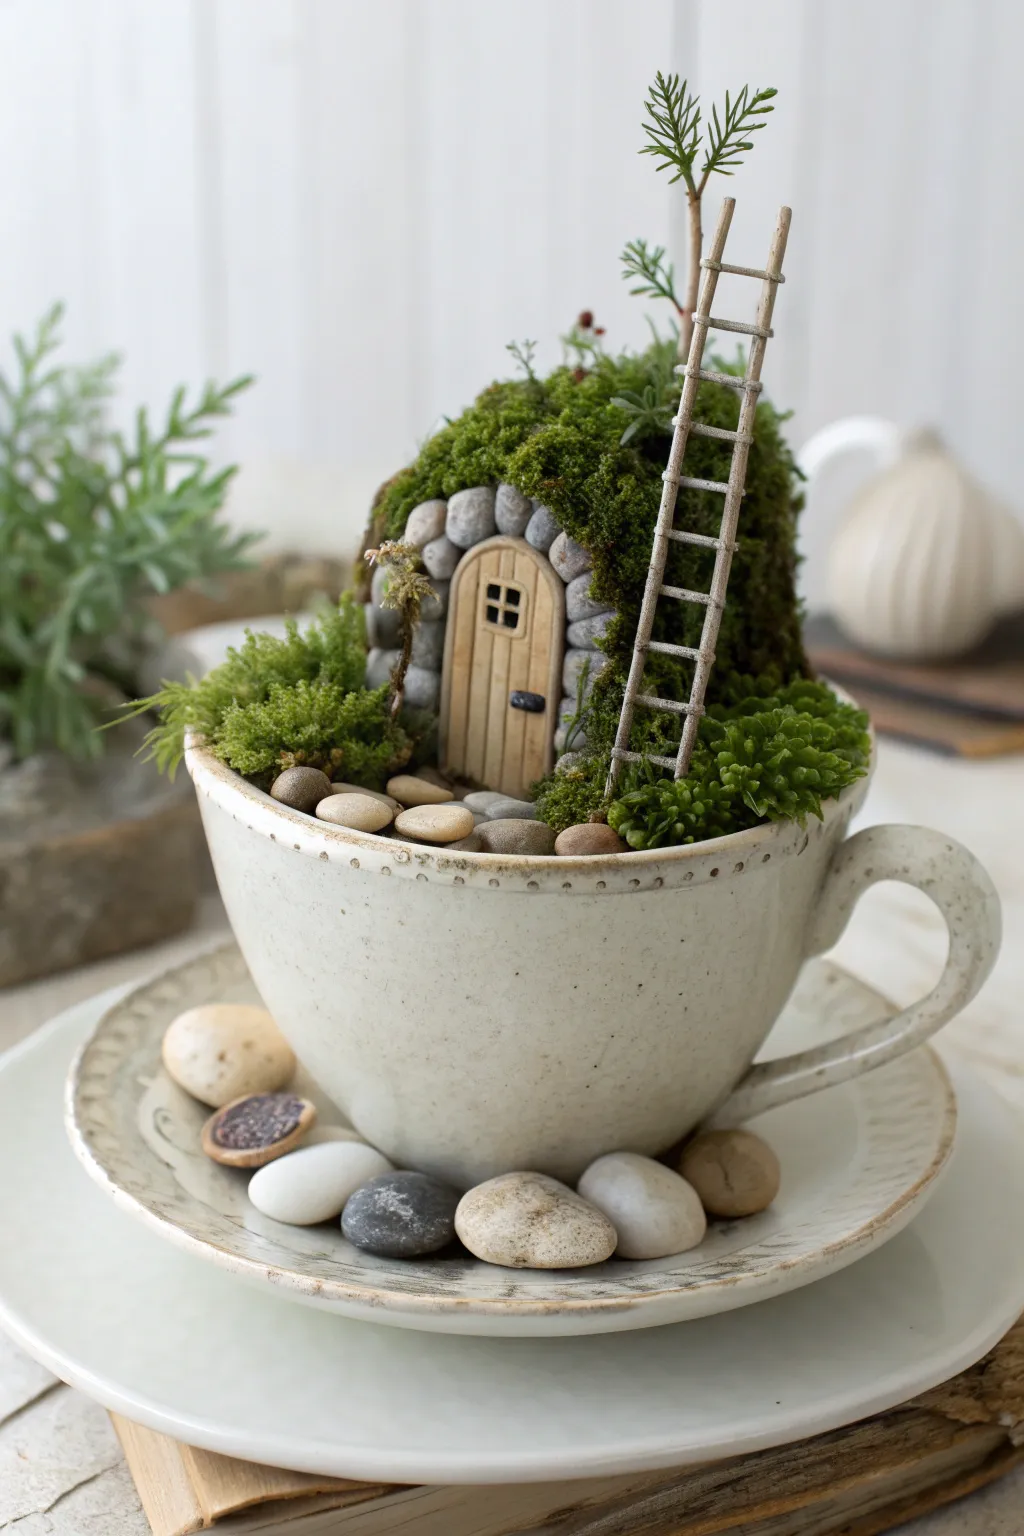
Transform a simple ceramic cup into a whimsical dwelling fit for a tiny forest creature. This enchanting miniature garden features a stone-encased wooden door nestled into a mossy hill, suggesting a secret world hidden just beneath the rim.
Detailed Instructions
Materials
- Wide-rimmed ceramic teacup and matching saucer
- Floral foam or styrofoam block
- Air-dry clay or small flat stones (for the arch)
- Small piece of balsa wood or craft sticks
- Preserved sheet moss and clump moss
- Small smooth river pebbles (various sizes)
- Tiny twigs or dried stems
- Hot glue gun and glue sticks
- Brown acrylic paint and fine brush
- Craft knife
- Tweezers
Step 1: Building the Foundation
-
Prepare the base:
Begin by shaping a piece of floral foam or styrofoam to fit snugly inside your teacup. Cut it so it rises well above the rim, forming a rounded hill shape on one side where the house will sit. -
Secure the foam:
Glue the foam securely into the bottom of the cup to prevent shifting. Leave the front section of the cup relatively flat or lower to accommodate the ‘yard’ area. -
Craft the door:
Cut a small arched door shape from balsa wood. Use the tip of your craft knife to score vertical lines into the wood, mimicking planks. -
Add door details:
Paint the door a light natural wood color. Once dry, use a fine brush to paint a tiny black window square and a small handle. I like to add a tiny wash of darker brown to the scored lines to make them pop.
Sticky Situation
If hot glue leaves visible blobs on your tiny stones, switch to a clear-drying tacky craft glue. It takes longer to set but dries invisible.
Step 2: Constructing the Dwelling
-
Position the door:
Glue the wooden door onto the front face of your foam hill. Ensure it is centered but sitting slightly back from the cup’s rim. -
Create the stone arch:
Select tiny, flat grey pebbles. Carefully hot glue them around the curved edge of the door frame to create a rustic stone archway. If you can’t find perfect stones, shape small balls of grey air-dry clay and press them into place instead. -
Build the hill structure:
Cover the exposed sides and top of the foam hill with a layer of glue. This prepares the surface for the greenery. -
Apply the moss roof:
Press sheets of preserved moss firmly over the glue, wrapping around the stone arch. Ensure no foam is visible.
Lighting It Up
Hide a tiny battery-operated LED fairy light inside the foam hill before gluing on the door. Drill a hole so the light shines through the window.
Step 3: Landscaping the Garden
-
Lay the pathway:
In the flat space in front of the door, arrange medium-sized smooth pebbles to create a patio. Glue them down flat. -
Plant the shrubs:
Tuck small pieces of brighter, clumpier moss (like mood moss) around the base of the hill and the edges of the cup to simulate bushes. -
Build the ladder:
Find two straight, thin twigs about 3 inches long. Glue shorter twig segments horizontally between them to form a rustic ladder. -
Install the ladder:
Lean the ladder against the side of the mossy hill. Secure the feet of the ladder into the moss or glue them to a hidden pebble for stability. -
Add a ‘tree’:
Insert a slightly taller sprig of greenery or a dried botanical stem behind the ladder to act as a miniature tree reaching toward the sky.
Step 4: Final Touches
-
Saucer scaping:
Place the cup onto the saucer. Scatter a few larger river stones around the base of the cup on the saucer to visually ground the scene. -
Detail work:
Use tweezers to remove any visible strands of hot glue (sometimes called ‘spiderwebs’) from the moss and stones. -
Clean the rim:
Wipe the ceramic rim of the teacup with a damp cloth to ensure it gleams against the rustic interior.
Now you have a peaceful little corner of the world preserved right on your tabletop


Hanging Teacup Bird Feeder
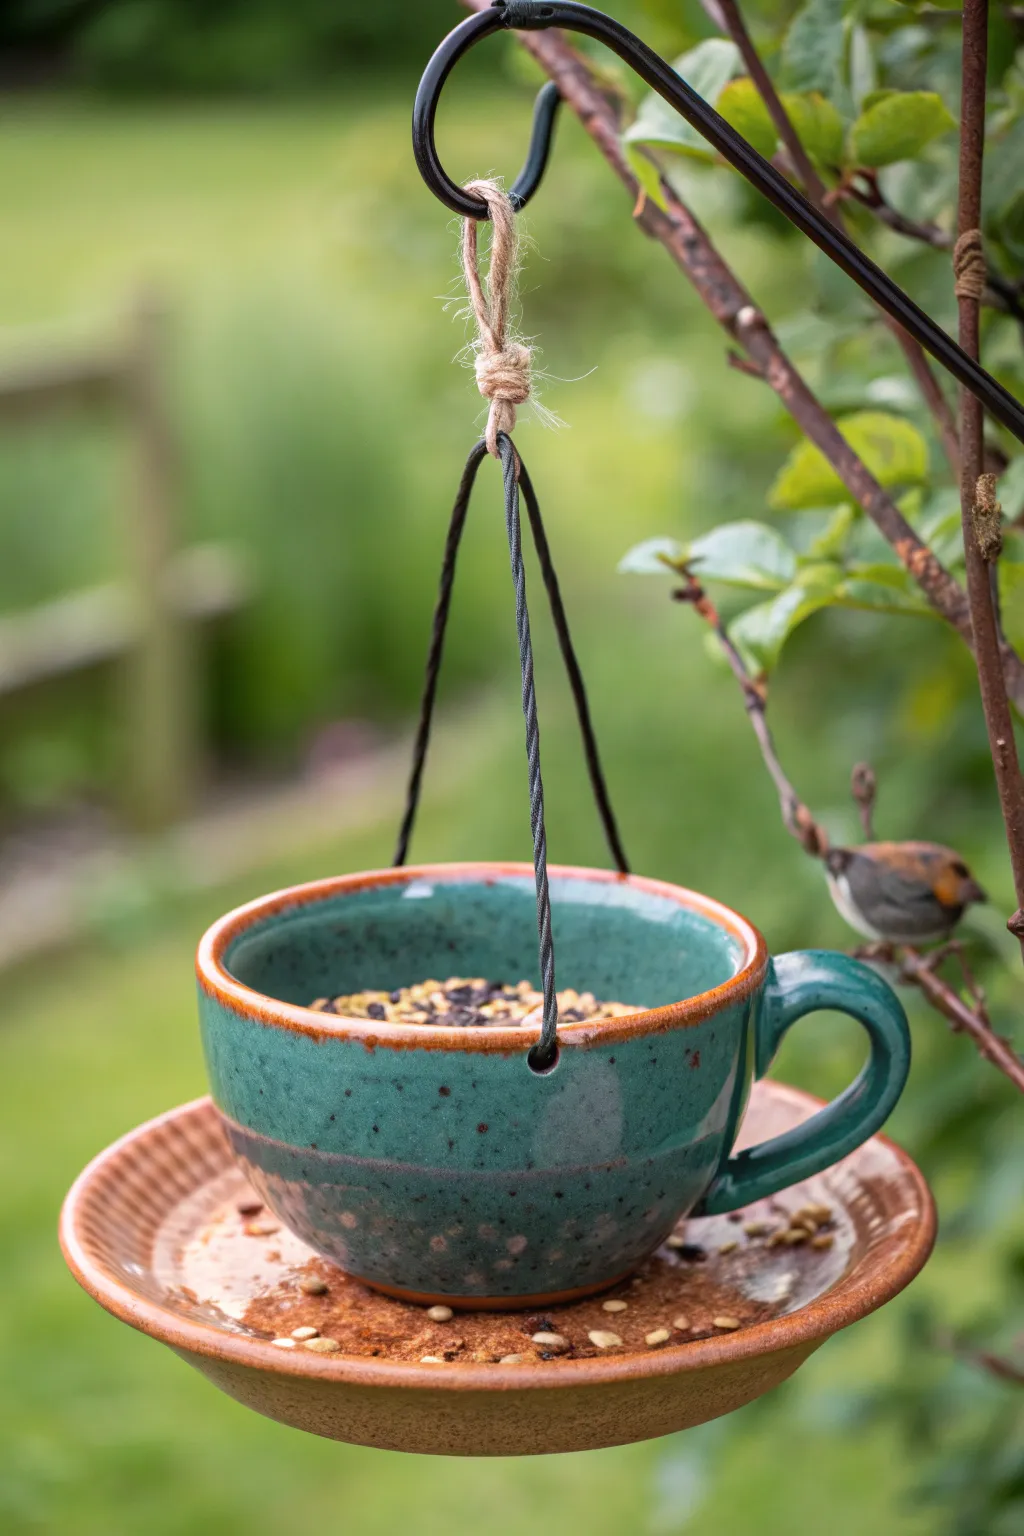
Transform a lovely but unused teacup and saucer set into a whimsical dining spot for your garden visitors. This project combines drilling ceramic with sturdy assembly to create a hanging feeder that holds seeds in both the cup and the saucer catch-tray.
Step-by-Step Guide
Materials
- Ceramic teacup and matching saucer
- Power drill
- Diamond-tipped ceramic drill bit (approx. 6mm or 1/4 inch)
- Strong waterproof adhesive (like E6000 or marine epoxy)
- Masking tape
- Three lengths of sturdy black cord, thin chain, or coated wire (approx. 18 inches each)
- Jute twine for the top loop
- Scrap wood block
- Permanent marker
- Birdseed
Step 1: Preparation and Drilling
-
Mark drilling spots:
Place strips of masking tape on the rim of the teacup at three equidistant points. The tape helps prevent the drill bit from slipping on the slick glaze surface. Mark your exact drilling spots with a permanent marker. -
Set up your workspace:
Place the scrap wood block on your work surface and rest the teacup rim on it. Creating a solid backing helps reduce the vibration that can crack delicate ceramics. -
Drill the first hole:
Using your diamond-tipped bit and a slow speed, begin drilling at a 45-degree angle to start the hole. Once it bites into the glaze, slowly straighten the drill to 90 degrees. -
Apply water cooling:
While drilling, add a few drops of water to the hole frequently or have a helper spray it. Keeping the ceramic cool is crucial to prevent cracking from heat buildup. -
Finish the holes:
Apply gentle, consistent pressure until the bit breaks through to the wood block. Repeat this process for all three marked spots on the cup rim. -
Clean the ceramic:
Remove the masking tape and wash the teacup thoroughly to remove any ceramic dust. Ensure both the cup and saucer are completely dry and free of oils.
Cracked Cup?
If the ceramic cracks while drilling, you’re likely pressing too hard or the bit is getting too hot. Back off the pressure, use more water, and keep the drill speed slow and steady.
Step 2: Assembly and Bonding
-
Position the bond:
Turn the saucer right-side up. Identify the center where the teacup usually sits. Place the teacup on the saucer, ensuring the handle is positioned where you want it aesthetically. -
Apply adhesive:
Lift the cup and apply a generous bead of waterproof adhesive to the bottom ring of the teacup. I prefer to add a small amount to the center of the saucer as well for extra grip. -
Secure the pieces:
Press the teacup firmly onto the saucer. Check from all angles to ensure it is perfectly centered. If any glue squeezes out, wipe it away immediately with a damp cloth. -
Allow to cure:
Let the adhesive cure completely according to the manufacturer’s instructions—usually at least 24 hours. Do not rush this step, as the bond carries the weight of the feeder.
Level Hanging
Before tying the final top knot, hang the feeder temporarily. Adjust each individual cord length until the saucer sits perfectly flat, then commit to tying the main loop.
Step 3: Rigging the Hanger
-
Thread the cords:
Take your three lengths of black cord or coated wire. Thread one end of each piece through the holes you drilled in the teacup rim from the outside in. -
Secure the ends:
Tie a double or triple knot on the inside of the cup for each cord. Pull the cord tight to ensure the knot is larger than the hole and won’t slip through. -
Gather the strands:
Bring all three cords together at the top, ensuring equal tension so the saucer hangs level. You can test this by holding the varying lengths and lifting the feeder. -
Create the top loop:
Take a piece of jute twine and wrap it tightly around the gathered cords to bind them together. Create a sturdy loop with the twine for hanging on a bracket or branch. -
Final check:
Give the feeder a gentle tug to ensure all knots are secure and the glue hold is solid before taking it outside.
Fill the cup and the saucer rim with seed and watch the birds enjoy their new tea time treat


Teacup Flower Arrangement Centerpiece
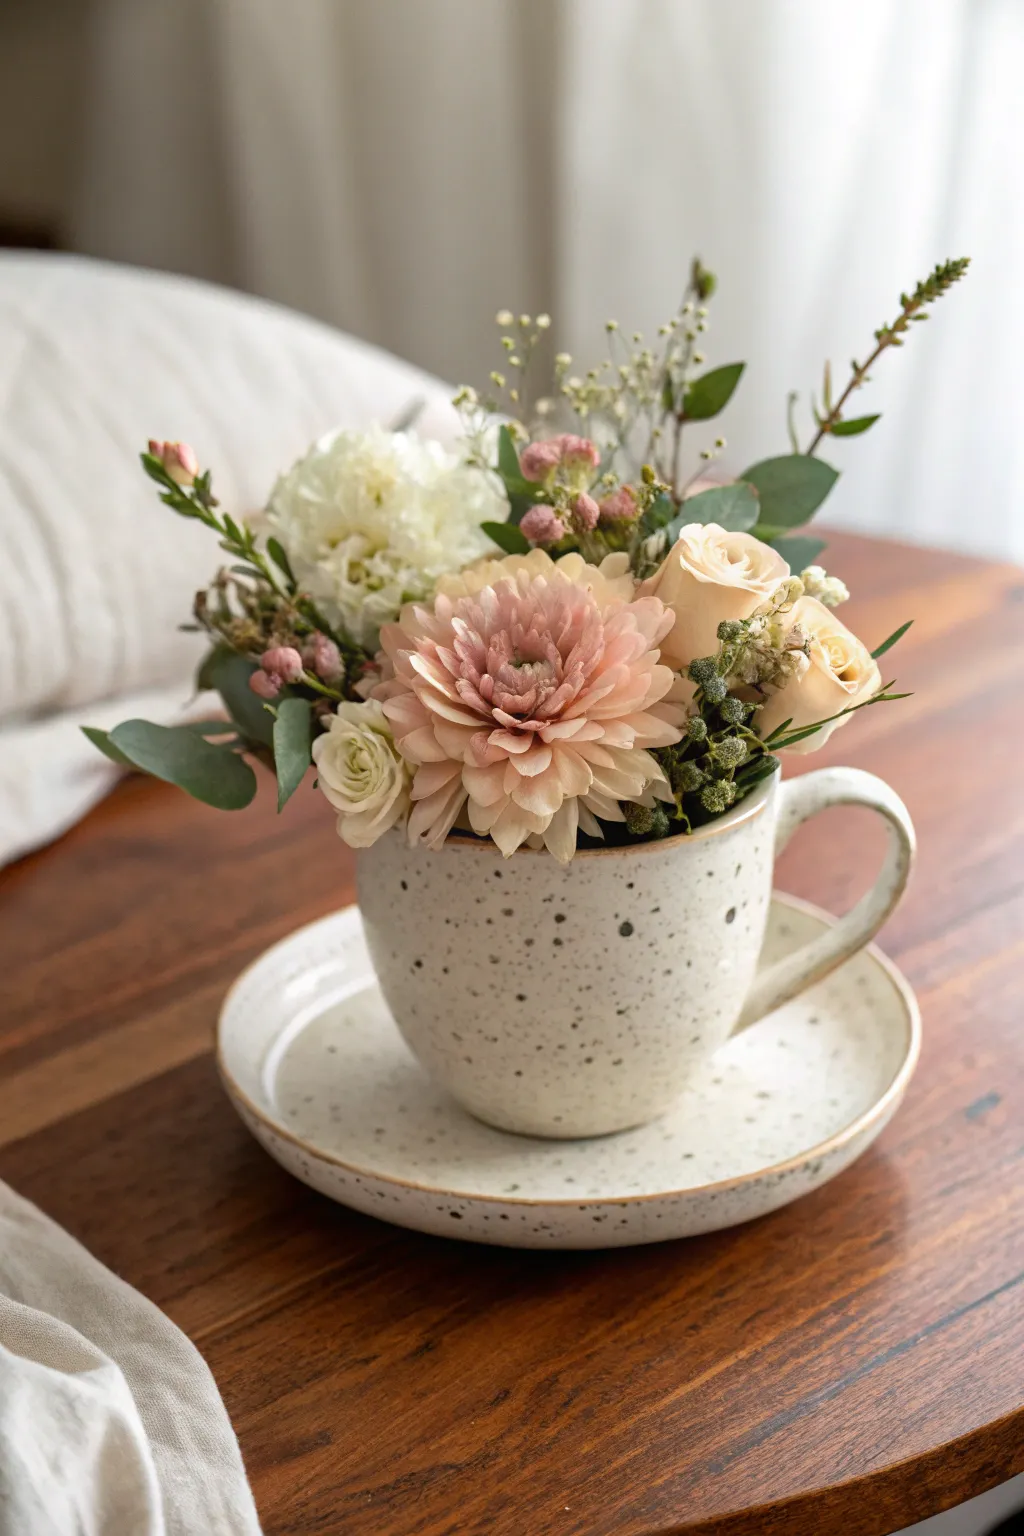
Transform a charming ceramic teacup into a delightful miniature garden that brings a touch of rustic elegance to any table setting. This project combines the soft warmth of peach and cream blooms with speckled pottery for a cozy, vintage-inspired look perfect for teatime or brunch.
Detailed Instructions
Materials
- Speckled ceramic teacup and matching saucer
- Floral foam (wet foam for fresh flowers)
- Small pairing knife or floral knife
- Floral shears or scissors
- Peach-colored dahlia or ranunculus (focal flower)
- Cream or white spray roses/carnations
- Eucalyptus stems (Silver Dollar or Gum)
- Wax flower or baby’s breath sprigs
- Berry stems (hypericum or similar)
- Water
Step 1: Preparing the Vessel
-
Soak the foam:
Begin by filling a large bowl or sink with water. Place your block of floral foam on the surface and let it sink naturally on its own to ensure it is fully saturated without air pockets. -
Cut to size:
Once saturated, use your knife to carve a piece of foam that will fit snugly inside your teacup. It needs to be firm enough not to wobble. -
Secure the foam:
Press the foam gently into the cup. I like to leave about half an inch of foam rising above the rim; this added height helps the stems drape naturally over the edge rather than sticking straight up. -
Shave the edges:
Carefully shave down the sharp corners of the exposed foam to create a rounded mound shape, which makes arranging the side flowers much easier.
Step 2: Building the Greenery Base
-
Trim the eucalyptus:
Cut your eucalyptus or greenery into short sprigs, stripping the bottom leaves so you have a clean stem to insert. -
Create the framework:
Insert the greenery around the rim of the cup first, angling them downwards so they spill over the side, softening the ceramic edge. -
Add vertical interest:
Place a taller sprig of greenery or a whispy branch towards the back or one side to establish the overall height and asymmetry of the arrangement.
Foam Pro-Tip
Use waterproof floral tape to create an ‘X’ across the top of the foam and secure it to the cup rim if your flowers are heavy or leaning.
Step 3: Arranging the Blooms
-
Place the focal flower:
Cut the stem of your largest peach flower (the dahlia or ranunculus) short enough to nestle low in the arrangement, facing slightly forward and to the side. -
Add secondary blooms:
Tuck the cream or white spray roses (or carnations) around the focal flower. Vary their heights slightly to create depth rather than a flat surface. -
Incorporate texture:
Insert the small berry stems in the gaps between the larger flowers. The pinkish berries add a lovely color bridge between the peach and white blooms. -
Fill with delicates:
Use the wax flower or baby’s breath to fill in any remaining holes where the foam is visible. These should look light and airy. -
Check all angles:
Rotate the saucer slowly. Ensure the arrangement looks full from the sides and back, though the front can remain the ‘face’ of the piece. -
Water maintenance:
Check if the foam feels dry after handling the flowers. You can carefully pour a tiny amount of water into the cup near the edge to top it up.
Loose Flowers?
If a stem feels loose in the foam, don’t just push it deeper. Remove it entirely, recut the stem at a fresh angle, and insert it into a new spot.
Step 4: Final Touches
-
Clean the ceramic:
Wipe away any water droplets, pollen, or bits of foam from the outside of the teacup and the saucer surface with a clean cloth. -
Adjust positions:
Step back and look at the silhouette. If a leaf is sticking out awkwardly, gently reposition it or give it a quick trim.
Place your lovely petite arrangement on a sunny table and enjoy the fresh burst of nature indoors

The Complete Guide to Pottery Troubleshooting
Uncover the most common ceramic mistakes—from cracking clay to failed glazes—and learn how to fix them fast.
Decoupage Teacup Makeover
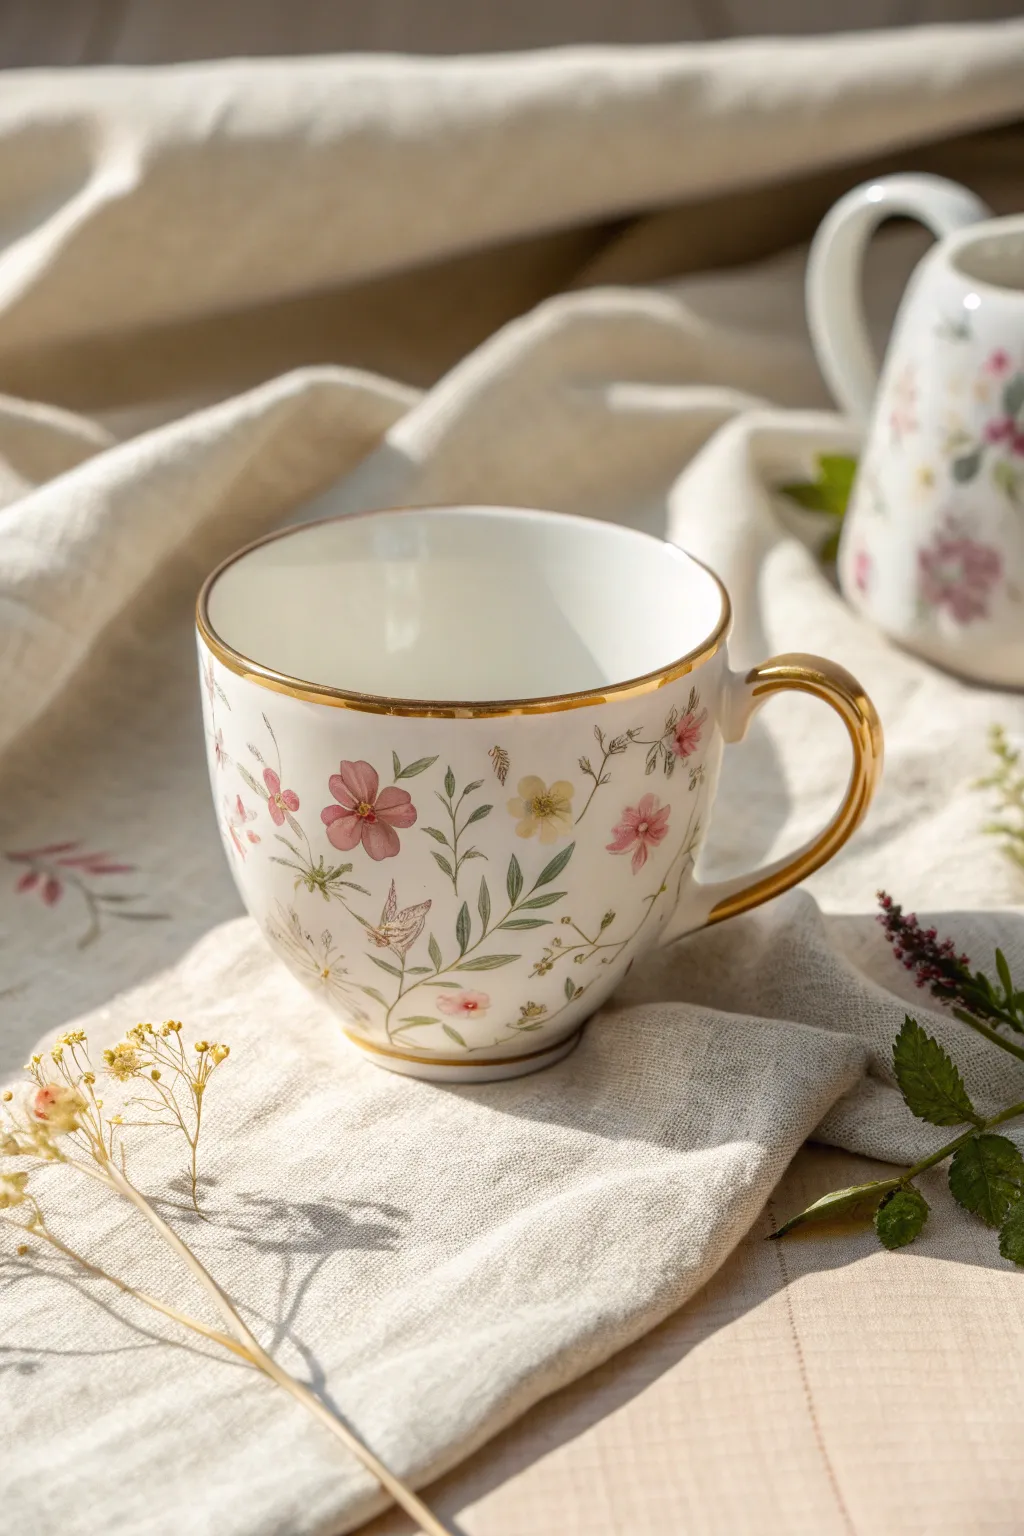
Transform a plain white teacup into a vintage-inspired masterpiece using delicate floral decoupage and rich gold accents. This project brings the charm of an English garden right to your tea table with barely any artistic skill required.
Step-by-Step
Materials
- Plain white ceramic teacup and saucer
- Floral napkins or rice paper (small scale patterns)
- Decoupage glue (dishwasher safe formula recommended)
- Small soft brush for glue
- Detail scissors
- Liquid gold leaf or gold ceramic paint
- Fine liner brush
- Isopropyl alcohol
- Lint-free cloth
- Sealant (glossy finish)
Step 1: Preparation and Cutting
-
Clean surface:
Begin by thoroughly cleaning the teacup with isopropyl alcohol and a lint-free cloth. This removes invisible oils and fingerprints that could prevent adhesion. -
Select motifs:
Examine your napkins or rice paper. Look for small, dainty floral stems—think tiny pink cosmos, yellow buttercups, and delicate greenery rather than large blooms. -
Isolate layers:
If using napkins, carefully peel away the white backing layers until you are left with only the single, printed top sheet. This transparency is crucial for the ‘painted on’ look. -
Fussy cutting:
Using your smallest detail scissors, cut out your chosen flowers. Cut extremely close to the edge of the design; I find it helpful to leave almost no white border at all for the most realistic finish. -
Plan placement:
Dry fit your cutouts on the cup without glue. Arrange them in a loose, organic pattern, ensuring some stems reach upwards while others curve naturally.
Wrinkle Rescue
If a napkin wrinkle appears while gluing, dip your finger in water and gently massage it flat. If it persists, wait for it to dry and lightly sand it down with high-grit sandpaper.
Step 2: Decoupage Application
-
Apply base glue:
Brush a very thin layer of decoupage glue onto a small section of the cup where your first flower will go. Don’t cover the whole cup at once. -
Place the design:
Gently pick up a floral cutout and press it onto the wet glue. Start from the center of the flower and lightly smooth it outward to prevent air bubbles. -
Seal the top:
Immediately dip your brush in a little more glue and gently sweep it over the top of the adhered paper. Use a feather-light touch to avoid tearing the wet tissue. -
Continue patterning:
Repeat this process around the cup. Add variety by placing a pink bloom here, a yellow one there, and filling gaps with isolated leaves or stems. -
Check density:
Step back and assess the spacing. The design should feel airy and light, not crowded. Leave plenty of white porcelain visible. -
Partial drying:
Let the cup sit for about 20 minutes until the glue is dry to the touch before moving on to the detailing phase.
Step 3: Gilding and Finishing
-
Prepare gold paint:
Shake your liquid gold leaf or ceramic gold paint thoroughly. You want a consistent, metallic luster without separation. -
Paint the rim:
Load a fine liner brush with gold paint. Steady your hand against the table and carefully paint the very top rim of the cup. -
Refine the line:
Some irregularity adds charm, but try to keep the line relatively thin. If you make a mistake, quickly wipe it away with a damp Q-tip. -
Gild the handle:
Paint the entire handle in gold. Depending on your paint’s opacity, you might need two thin coats rather than one thick, gloopy one. -
Add detail band:
Paint a very fine gold line just below the rim on the exterior for a double-banded effect, framing your floral work perfectly. -
Final cure:
Follow the curing instructions on your specific glue and paint. Some require baking in a home oven to become durable enough for gentle washing.
Vintage Patina
For an antique look, lightly sponge a tiny amount of diluted brewing tea over the dried floral images before the final seal to tone down the brightness of the paper.
Enjoy sipping from your beautiful new creation, knowing you’ve given a plain object a second life full of character
Mini Clay Teacup Ornaments
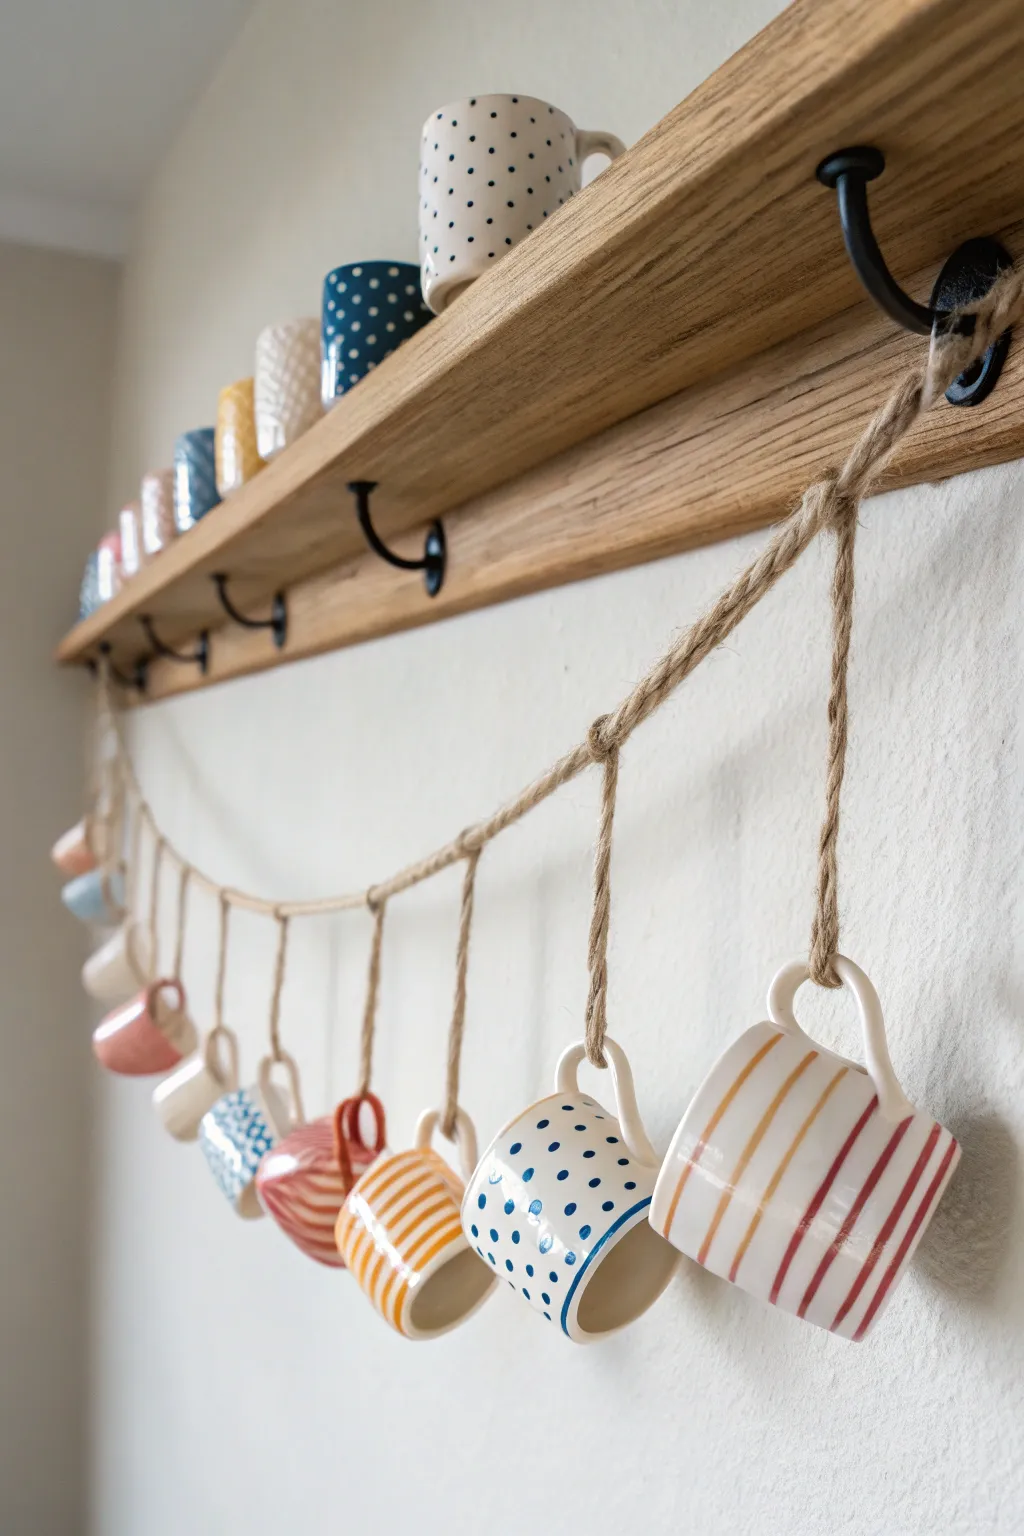
Transform simple polymer clay into a delightful string of tiny hanging teacups, perfect for adding cozy charm to a kitchen corner or a holiday tree. This project mimics the look of hand-painted ceramics with classic stripes and polka dots on a petite scale.
Detailed Instructions
Materials
- White polymer clay (oven-bake)
- Set of small clay sculpting tools
- Rolling pin
- Small circular cutter (approx. 1 inch diameter)
- Acrylic paints (red, yellow, blue, black)
- Fine-tipped paintbrushes
- High-gloss varnish or glaze (for clay)
- Thick jute twine
- Oven and baking sheet
- Super glue (gel type recommended)
Step 1: Shaping the Teacups
-
Condition the clay:
Start by warming the white polymer clay in your hands, kneading it until it is soft, pliable, and free of cracks. -
Component creation:
For each cup, separate a walnut-sized ball of clay for the body and a tiny snake of clay for the handle. -
Form the cup body:
Take a clay ball and press your thumb into the center to create an indentation. Gently pinch and rotate the clay between your thumb and forefinger to pull up the walls, creating a hollow cup shape. -
Refine the shape:
Flatten the bottom slightly by tapping it on your work surface so the cup can stand upright. Smooth out any fingerprints with a drop of baby oil if needed. -
Attach the handle:
Take the small snake of clay and curve it into a ‘C’ shape. Score the attachment points on the cup body and the handle ends slightly with a needle tool to create rough textures. -
Bond the handle:
Press the handle onto the side of the cup. Use a smoothing tool to blend the clay seams completely so the handle is securely integrated and won’t pop off later. -
Create the set:
Repeat this process to make 8-10 miniature cups. Try to keep them relatively uniform in size, though slight variations add to the handmade charm. -
Bake the clay:
Place your finished cups on a baking sheet lined with parchment paper or cardstock. Bake according to the specific manufacturer instructions on your package of clay.
Smooth Perfection
Before baking, brush your raw clay cups with a tiny amount of rubbing alcohol. This melts away fingerprints and dust for a flawless finish.
Step 2: Painting and Finishing
-
Cool and clean:
Allow the cups to cool completely inside the oven. Once cool, wipe them down with a slightly damp cloth to remove any residue. -
Paint the stripes:
Using a fine brush, paint vertical stripes on several cups using red and yellow ochre acrylics. I find that resting my hand on the table helps steady lines. -
Add polka dots:
For the dotted cups, dip the non-brush end of a paintbrush into blue paint and dot it onto the white clay surface for perfect circles. -
Create solid colors:
Paint a few remaining cups in solid pastel pink or light blue to balance out the patterned ones. -
Glaze the finish:
Once the paint is fully dry, apply two coats of high-gloss varnish to give the cups that authentic, shiny ceramic appearance.
Drooping Handles?
If cup handles sag before baking, prop them up with a small roll of paper or folded foil to hold the shape until they harden in the oven.
Step 3: Assembly
-
Prepare the garland:
Cut a length of thick jute twine that is about 2 feet longer than your desired display width. -
Create hangers:
Cut smaller pieces of twine, roughly 6 inches long, to serve as the individual hangers for each cup. -
Knot the hangers:
Loop a small piece of twine through a teacup handle and tie a knot at the top to create a loop. -
Attach to main line:
Tie the top of each cup loop onto the main long variety of jute string. Space them evenly, about 3-4 inches apart. -
Secure the knots:
Put a tiny drop of super glue on the knots where the cups attach to the main line to prevent them from sliding out of place.
Hang your charming new garland and enjoy the whimsical touch it brings to your space