I swear a good tea cup can change your whole day—something about that little curve in the rim and the way a glaze catches the light. Here are my favorite tea cup design ideas, starting with the classics and ending with a few delightfully unexpected twists.
Classic Floral Tea Cup With Delicate Vines
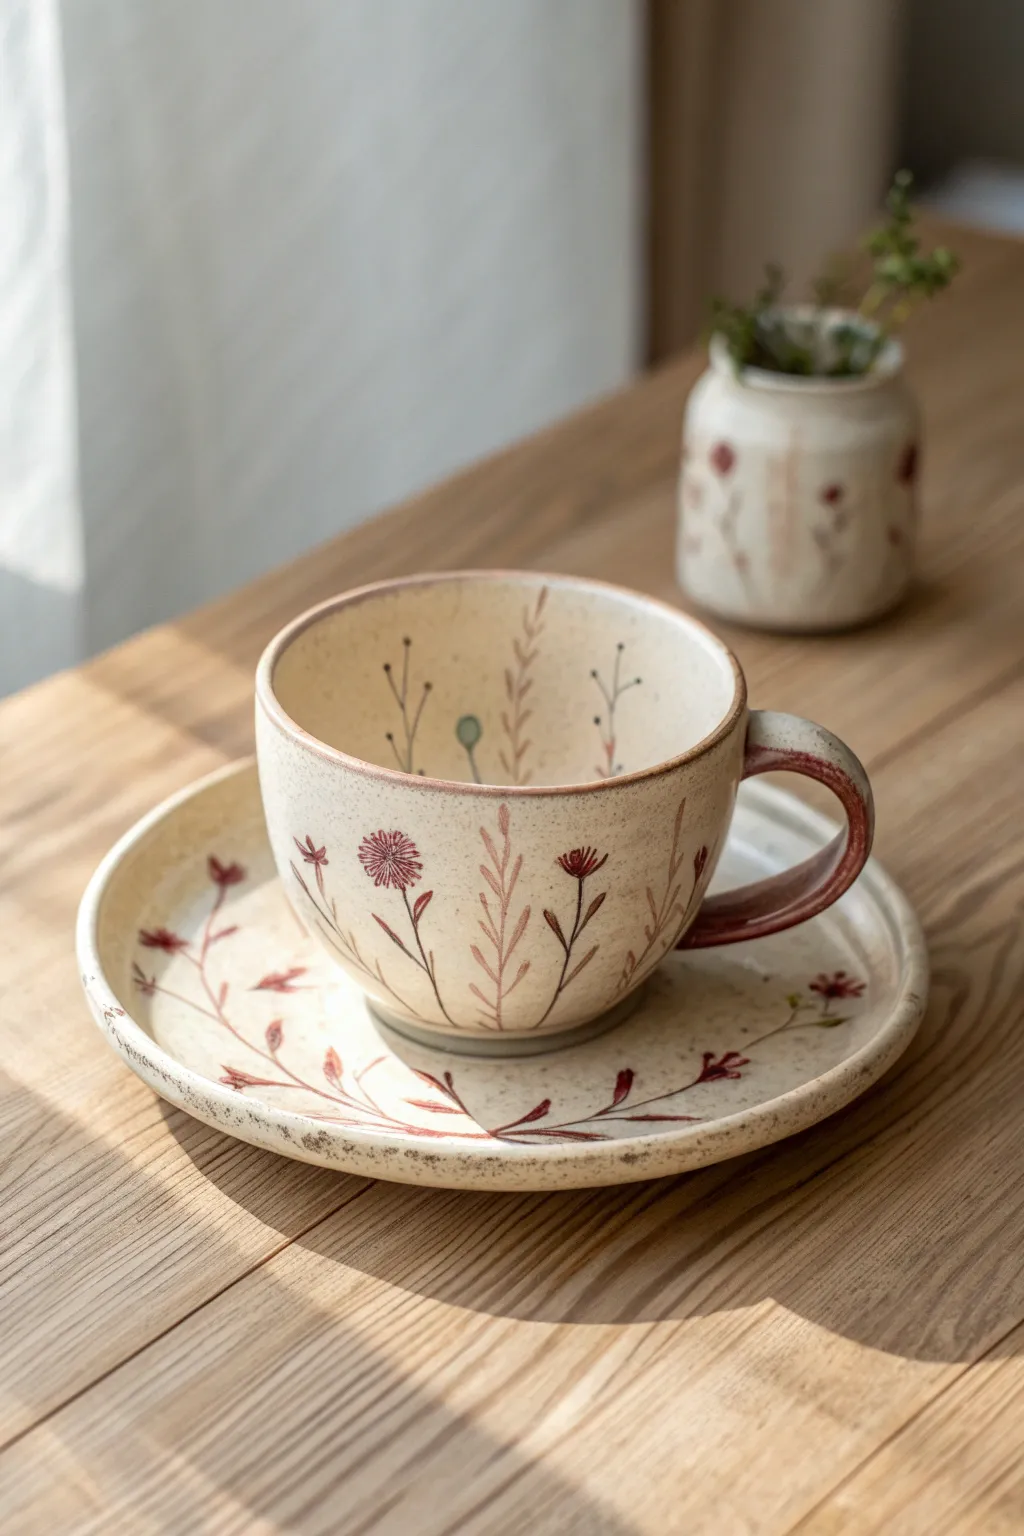
Capture the essence of a serene cottage garden with this hand-painted ceramic cup and saucer set. Featuring delicate vines and wildflowers on speckled cream stoneware, this project combines traditional wheel-throwing with intricate underglaze detailing for a timeless, earthy aesthetic.
How-To Guide
Materials
- Speckled stoneware clay (mid-fire)
- Pottery wheel
- Throwing tools (rib, sponge, wire cutter)
- Trimming tools
- Underglazes: Deep red-brown, muted pink, sage green, dark olive
- Fine detail brushes (sizes 00 and 0)
- Clear matte or satin glaze
- Kiln
- Wax resist
Step 1: Shaping the Clay
-
Throwing the Cup:
Begin with about 1 pound of speckled clay centered on your wheel. Pull the walls up to create a simple, rounded cylinder shape with a slightly wider opening than the base, aiming for a cozy, huggable form. -
Refining the Rim:
Use a chamois or a wet sponge to carefully round off the rim. A smooth rim is crucial for a comfortable drinking experience. -
Throwing the Saucer:
Center a slightly smaller ball of clay and flatten it into a wide disc. Pull up a low, gentle rim to catch spills, ensuring the center is flat enough to hold the cup stably. -
Drying to Leather Hard:
Allow both pieces to dry slowly to a leather-hard state. This usually takes a day or two depending on humidity; the clay should be firm enough to handle without deforming but still cool to the touch. -
Trimming:
Center the leather-hard cup upside down on the wheel and trim the bottom to create a neat foot ring. Repeat this process for the saucer to clean up the underside. -
Adding the Handle:
Pull a strap of clay for the handle. Attach it to the side of the cup by scoring and slipping both contact points, blending the seams smoothly for a secure bond. Aim for a generous loop that fits a finger comfortably.
Smudged Lines?
If underglaze smudges while painting, let it dry completely. Then, gently scratch the mistake away with an X-Acto knife or needle tool rather than wiping it.
Step 2: Painting the Flora
-
Planning the Layout:
Lightly sketch your design onto the leather-hard clay using a dull pencil. The pencil lines will burn off in the kiln. -
Painting the Main Stems:
Using a size 0 brush and deep red-brown underglaze, paint the primary vertical stems. Start from the bottom of the cup and sweep upward with varied pressure to create natural, organic lines. -
Adding Delicate Vines:
Switch to your finest brush (00) to add thinner, branching vines. Create movement by curving them gently; on the saucer, paint a long, sweeping vine that follows the curve of the rim. -
Creating the Leaves:
Mix a tiny amount of brown into your sage green to mute it. Paint small, almond-shaped leaves attaching to the stems, varying their direction to look windswept. -
Painting the Blooms:
Using the muted pink and deep red underglazes, dab small clusters of strokes to form the flower heads. For the dandelion-style flowers, use quick, radiating strokes from a center point. -
Interior Details:
Don’t forget the inside of the cup! Paint a few tall, solitary stems rising from the bottom interior to create depth when looking into the mug. -
Glazing the Handle:
Apply a wash of the reddish-brown underglaze to the handle, letting some of the speckled clay show through for a rustic, worn effect.
Step 3: Finishing and Firing
-
Applying Wax Resist:
Apply wax resist to the foot ring of the cup and the bottom of the saucer to prevent them from sticking to the kiln shelf. -
Bisque Firing:
Load the bone-dry greenware into the kiln for a bisque fire (usually cone 04 or 06). This hardens the clay and prepares it for glazing. -
Glazing:
Dip the bisqued pieces into a clear matte or satin glaze. I prefer pouring the glaze inside the cup and swirling it out to ensure full interior coverage before dipping the exterior. -
Glaze Firing:
Fire the pieces again to the maturity temperature of your clay body (typically cone 5 or 6 for stoneware). -
Sanding the Foot:
Once cool, use fine-grit sandpaper or a diamond pad to smooth the unglazed foot rings, ensuring they won’t scratch your table surface.
Add Gold Accents
For a luxe touch, apply gold overglaze luster to the flower centers or the cup rim after the glaze firing. This requires a third, lower-temperature kiln firing.
Enjoy your morning brew in a vessel that feels as lovely as a walk through a meadow


Minimal White Tea Cup With One Bold Brushstroke
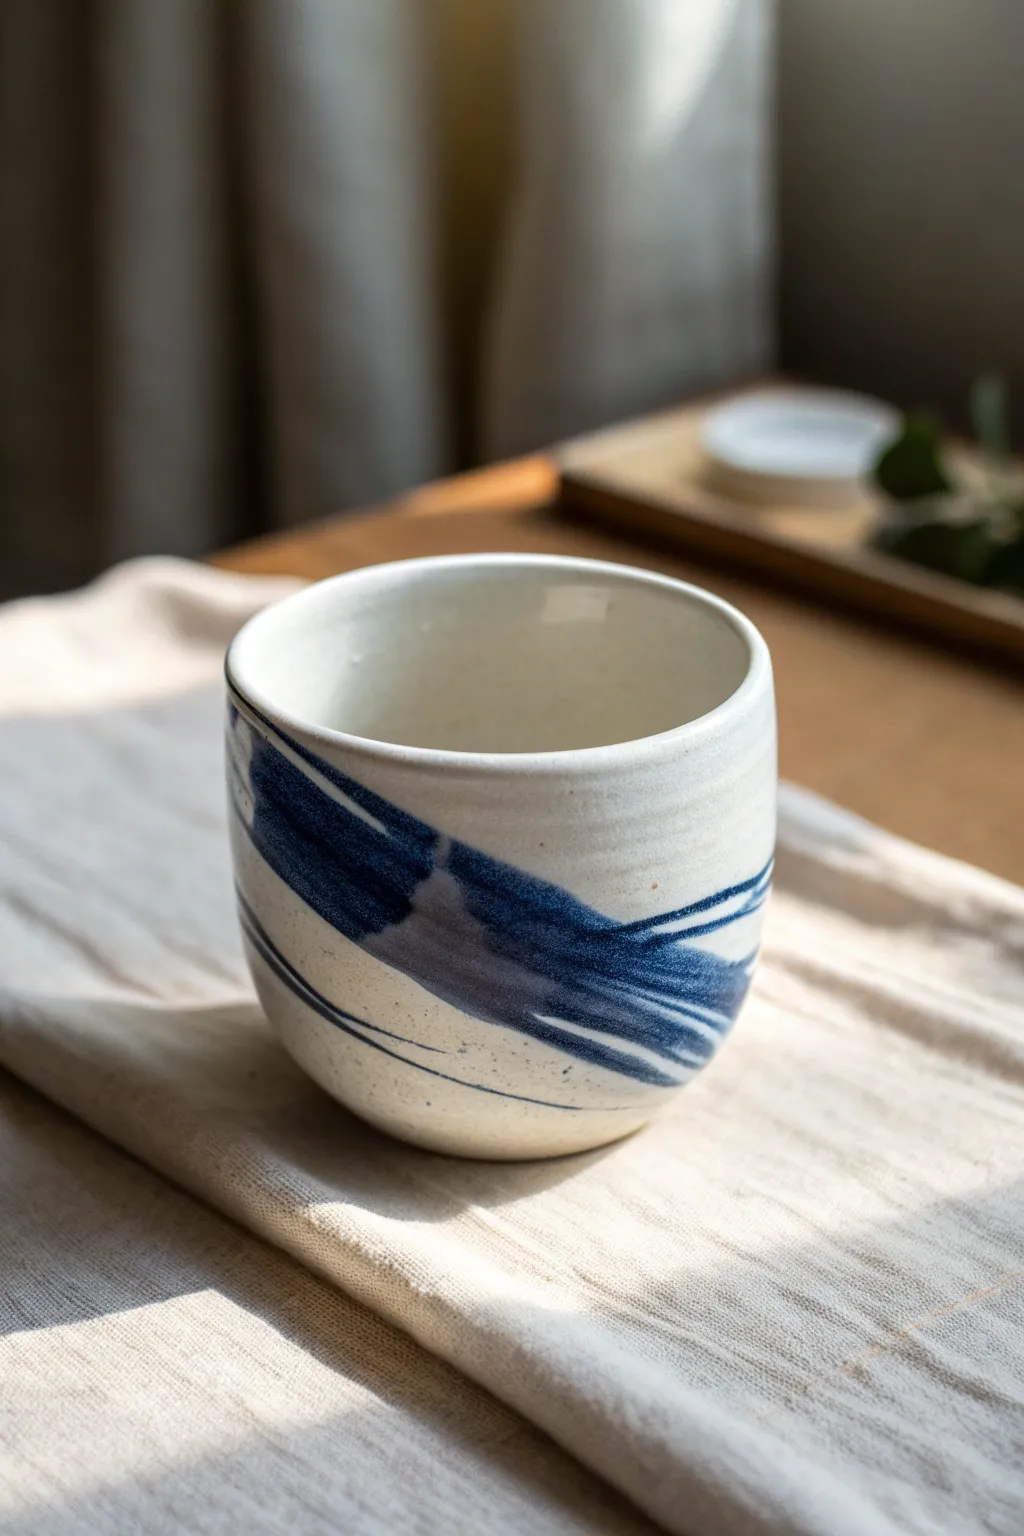
Embrace the beauty of wabi-sabi with this minimalist ceramic project that transforms a simple vessel into a piece of modern art. A single, confident sweep of cobalt blue glaze across a creamy white base creates a striking contrast that feels both ancient and contemporary.
Detailed Instructions
Materials
- Bisque-fired handleless ceramic cup (stoneware clay recommended)
- Glossy white dipping glaze
- Cobalt blue underglaze
- Large, soft calligraphy brush (bamboo handle)
- Wide, flat fan brush (for glazing)
- Clean sponge
- Bowl of water
- Damp cloth
- Kiln access (or a local pottery studio firing service)
Step 1: Preparation and Base Glaze
-
Clean the bisque ware:
Begin with your handleless bisque cup. Wipe the entire surface with a lightly damp sponge to remove any dust or kiln debris, which can cause pinholes in your final glaze. -
Mix the white glaze:
Stir your glossy white dipping glaze thoroughly. It should have the consistency of heavy cream. If it’s too thick, add small amounts of water; if too thin, let it settle and decant some water. -
Interior glazing:
Pour the white glaze into the cup, filling it nearly to the brim. Immediately pour it back out while rotating the cup to ensure an even coating on the entire interior. -
Dip the exterior:
Using glazing tongs or a swift hand-dip motion, coat the exterior of the cup in the white glaze. Hold it upside down for a few seconds to let excess drips fall off. -
Clean the foot:
Once the glaze is dry to the touch (chalky appearance), use a damp sponge to wipe the bottom foot ring completely clean. Any glaze left here will fuse your cup to the kiln shelf.
Smudged the glaze?
If you mess up the blue stroke, don’t wipe it! The blue pigment stains deeper layers. Instead, gently scrape the error off with a knife, patch with white glaze, dry, and try again.
Step 2: Applying the Brushstroke
-
Prepare the cobalt:
Pour a small amount of cobalt blue underglaze onto a palette. You want a consistency that flows easily but isn’t watery, perhaps slightly thinner than the base glaze. -
Load the brush:
Saturate your large calligraphy brush with the blue underglaze. Press the bristles gently to ensure the belly of the brush holds enough pigment for a long stroke. -
Practice your motion:
Before touching the clay, practice the sweeping motion in the air. The stroke should start diagonally low and sweep upward around the curve of the cup. -
Begin the stroke:
Place the brush tip firmly against the white glazed surface. Apply pressure to fan out the bristles, creating the wide starting point of the mark. -
Sweep and lift:
In one fluid motion, drag the brush across the rounded surface while slowly releasing pressure. This creates the tapering, feathery tail of the stroke seen in the image. -
Add texture marks:
If the main stroke looks too solid, lightly drag a nearly dry brush parallel to the main mark to add those faint, scratchy ‘dry brush’ lines for texture. -
Inspect the density:
The blue should look opaque. I usually check to see if the white glaze is showing through too much; if so, dab a little more blue into the center of the stroke, but keep the edges rough.
Try a resist technique
Apply wax resist in a pattern before the blue layer. The blue will bead up off the wax, leaving crisp white negative space lines cutting through your bold brushstroke.
Step 3: Firing and Finishing
-
Dry completely:
Let the cup sit for at least 24 hours. The glazes need to be bone dry before entering the kiln to prevent steam explosions. -
Load the kiln:
Place the cup in the kiln. Ensure it isn’t touching any other pieces, as the glaze will become molten glass during the firing. -
Fire to temperature:
Fire the kiln to the cone temperature recommended for your specific white glaze and clay body (often Cone 5 or 6 for stoneware). -
Cool down:
Allow the kiln to cool naturally until it is under 200°F before opening. Opening too early can cause thermal shock and crack your piece. -
Final inspection:
Remove the cup and check the foot ring. If there are any sharp burrs of glaze near the bottom, sand them down gently with wet-dry sandpaper.
Enjoy the peaceful ritual of drinking tea from a vessel that captures a moment of creative flow


Speckled Stoneware Tea Cup With a Satin Glaze
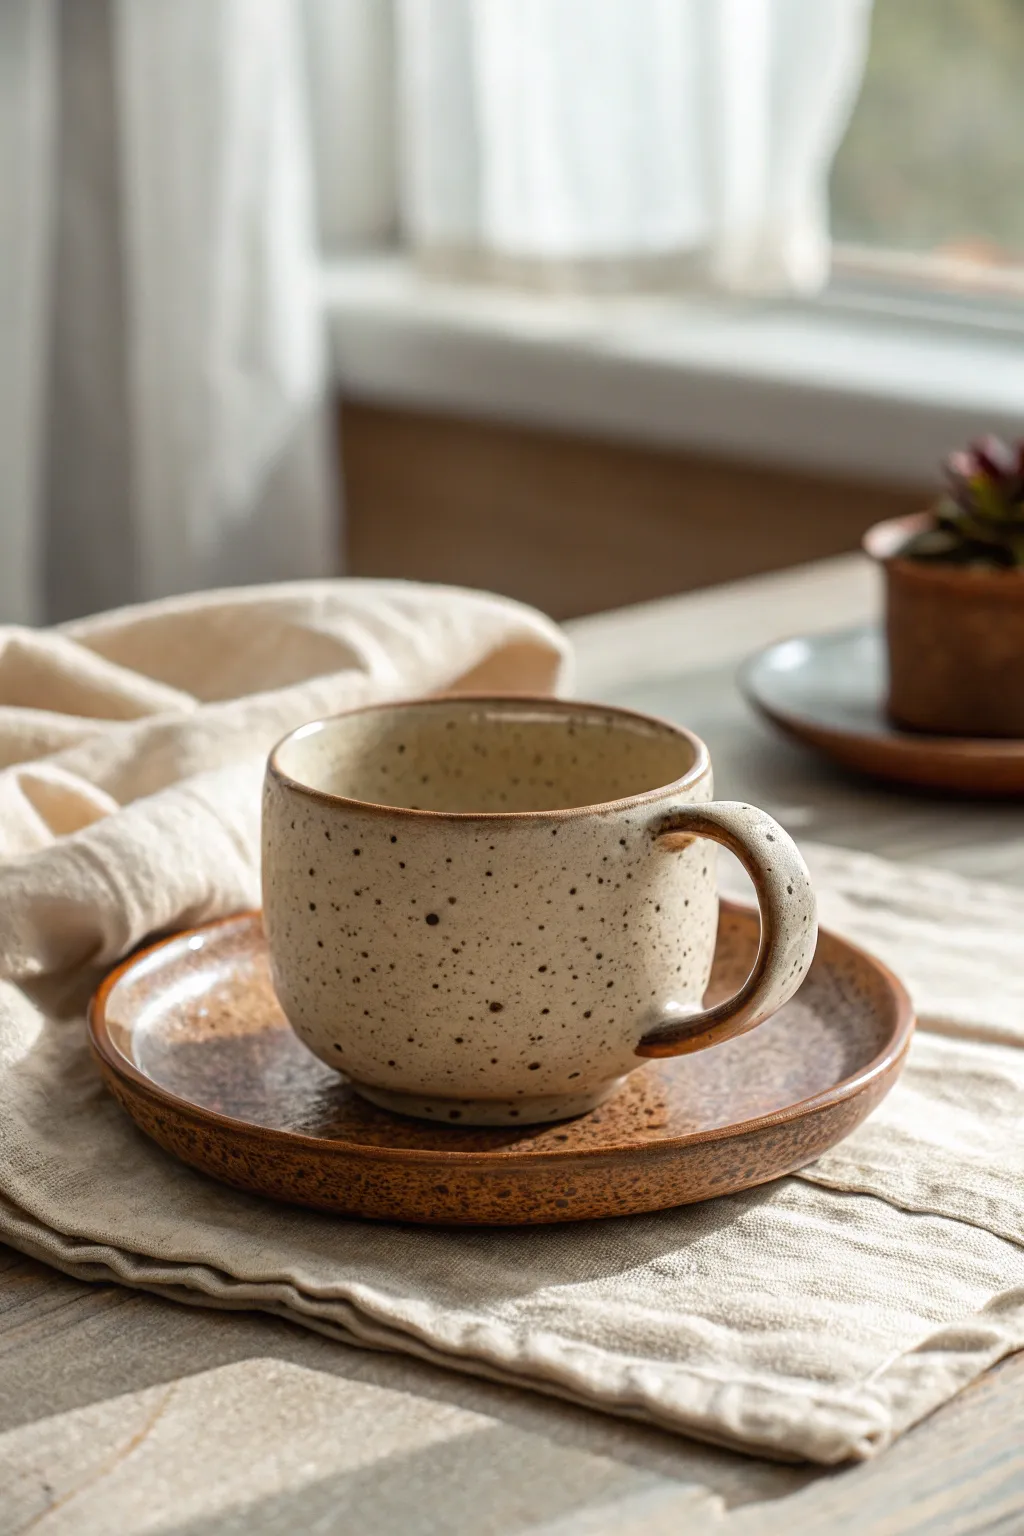
Embrace the warmth of handcrafted ceramics with this speckled stoneware tea cup and saucer set. The project balances a creamy, satin-matte glaze with the raw, earthy tones of brown speckling, creating a cozy and rustic vessel perfect for morning rituals.
Step-by-Step Guide
Materials
- Speckled buff stoneware clay (or a clay body containing manganese speckles)
- Pottery wheel (or hand-building tools if preferred)
- Throwing sponge
- Wire cutter
- Wooden rib tool
- Metal kidney scraper
- Needle tool
- Trimming tools (loop tools)
- Satin matte cream glaze
- Iron oxide wash (optional, for rim enhancement)
- Kiln (bisque and glaze firing capabilities)
- Small paintbrush
Step 1: Throwing the Cup
-
Center the clay:
Start with about 1 lb of well-wedged speckled stoneware clay. Secure it to the wheel head and use water to center it, creating a smooth, stable mound. -
Open the form:
Press your thumbs into the center to create the floor, leaving it about a half-inch thick to account for trimming a foot later. Pull the clay outward to establish the base width. -
Pull the walls:
Slowly pull the walls upward, maintaining a cylindrical shape initially. Aim for even thickness from bottom to top, slightly tapering the rim. -
Shape the curve:
Using a wooden rib on the inside and your hand on the outside, gently belly out the form to create that rounded, hugging shape characteristic of a cozy tea cup. -
Refine the surface:
Run a metal kidney scraper lightly up the exterior while the wheel spins to remove excess slip and reveal the grog and texture of the clay.
Step 2: Crafting the Saucer & Handle
-
Throw the saucer:
Using a smaller amount of clay, throw a flat plate with a slightly raised rim. Measure your cup’s foot against the saucer’s center to ensure a proper fit. -
Pull a handle:
Pull a strap of clay for the handle directly from a lug of clay, keeping it thick enough to be comfortable to hold but proportional to the cup. Let it set to a leather-hard state. -
Attach the handle:
Score and slip both the cup and the handle attachment points. Press the handle firmly onto the cup, creating an ear-shaped curve, and smooth the joints with a damp sponge.
Pinholes in Glaze?
If you see tiny pinholes in the satin glaze, try a ”drop-and-hold” firing schedule. Hold the peak temperature for 15 minutes to let gases escape and the surface heal.
Step 3: Trimming and Bisque Firing
-
Trim the foot:
Once the cup is leather hard, center it upside down on the wheel. Trim a definitive foot ring that mirrors the curve of the cup, removing excess weight from the bottom. -
Smooth the edges:
Use a damp sponge to soften any sharp edges on the rim, handle, and foot ring. This is crucial for a comfortable drinking experience. -
Bisque fire:
Load your bone-dry greenware into the kiln and fire to Cone 04 (or your clay’s specific bisque temperature). This hardens the clay for glazing.
Enhance the Speckle
If your clay is plain buff, you can wedge in 0.5% granular manganese or iron filings before throwing to artificially create those lovely organic speckles.
Step 4: Glazing and Final Fire
-
Prepare the glaze:
Mix your satin matte cream glaze thoroughly. If you want extra speckling and your clay body doesn’t have enough, you can mix a small amount of granular ilmenite into the glaze. -
Dip the cup:
Hold the cup by the foot and dip it into the glaze bucket. I usually count to three for an even coat. Stop the glaze line just before the foot ring to prevent sticking. -
Glaze the saucer:
Pour glaze over the saucer or dip it, ensuring the bottom foot remains unglazed. -
Accent the rim:
For that warm, toasted edge look, apply a very thin wash of iron oxide to the rim of the cup and the edge of the saucer using a small brush. This interacts with the cream glaze during firing. -
Clean the foot:
Use a damp sponge to wipe any glaze drips off the foot of the cup and saucer. Any glaze touching the shelf will ruin the piece and the kiln furniture. -
Glaze fire:
Fire the kiln to the glaze’s maturity temperature (likely Cone 5 or 6 for stoneware). Allow the kiln to cool naturally before unloading to avoid thermal shock.
Enjoy the simple pleasure of sipping tea from a vessel you shaped with your own hands


Soft Pastel Tea Cup With a Glossy Interior
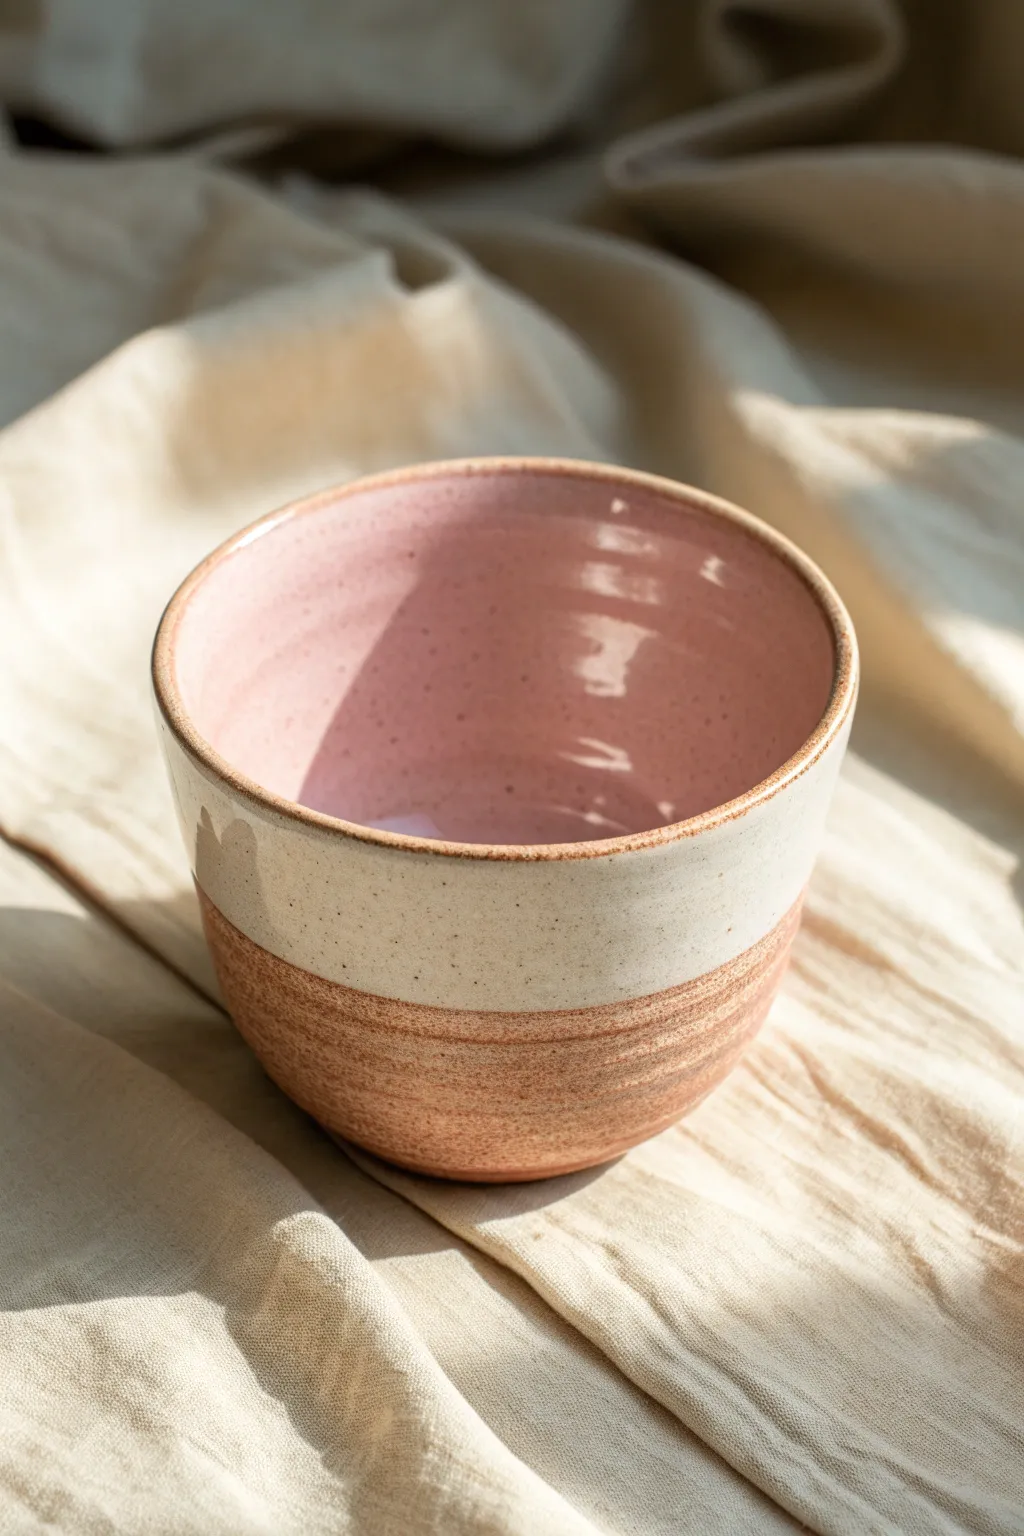
Embrace the natural beauty of speckled stoneware with this charming handleless tea cup project that balances raw texture with soft color. The design features a gentle pink interior glaze paired with a crisp white exterior band, leaving the base unglazed for a delightful tactile contrast.
Step-by-Step Tutorial
Materials
- Speckled stoneware clay (approx. 1 lb)
- Pottery wheel
- Throwing sponge
- Needle tool
- Wire cutter
- Trimming tools (loop tool, rib)
- Glossy pastel pink glaze (food safe)
- Opaque white glaze
- Wax resist
- Paintbrush for wax
- Kiln (bisque and glaze firing capabilities)
Step 1: Throwing the Form
-
Center the clay:
Start by wedging your speckled stoneware clay thoroughly to remove air bubbles. Place the ball of clay on the wheel head and center it using firm pressure and water. -
Open the vessel:
Create the opening by pressing your thumbs into the center, leaving about half an inch for the floor. Gently pull the opening outward to establish the base width of your cup. -
Pull the walls:
Slowly pull the walls up to create a cylinder. Maintain an even thickness from bottom to top, aiming for walls slightly thicker than a standard mug since this is handleless and needs to insulate heat. -
Shape the curve:
Using a rib tool on the inside and your fingers on the outside, gently belly out the form. I like to keep the curve subtle so it fits comfortably in two cupped hands. -
Refine the rim:
Choose a soft chamois or a wet sponge to compress and smooth the rim. A rounded rim feels best against the lips. -
Cut from the wheel:
Run a wire cutter underneath the pot to separate it from the wheel head, then carefully set it aside on a ware board to dry to a leather-hard state.
Uneven Glaze Line?
If your dip line is shaky, use automotive detailing tape instead of freehand wax. Apply the tape, dip the glaze, let it dry slightly, and peel the tape for a razor-sharp edge.
Step 2: Trimming and Bisque Firing
-
Secure the cup:
Once leather-hard, center the cup upside down on the wheel. Secure it with small coils of clay or a gripping tool. -
Trim the foot:
Use a sharp loop tool to carve away excess weight from the bottom. Define a clean foot ring, which will act as the visual separation for your unglazed section later. -
Smooth the exterior:
Run a smooth rib over the trimmed area to burnish the clay slightly, bringing out those beautiful speckles in the raw stoneware. -
Dry completely:
Allow the cup to dry slowly and evenly until it is bone dry. This is crucial to prevent cracking in the kiln. -
Bisque fire:
Load the bone-dry cup into the kiln for a bisque firing (usually around Cone 04). This hardens the clay and prepares it for glazing.
Step 3: Glazing the Design
-
Clean the bisque:
Wipe the fired cup with a damp sponge to remove any kiln dust. This ensures the glaze adheres properly. -
Wax the foot:
Apply a line of wax resist around the bottom third of the exterior. This reserve area will remain raw clay. Be precise with your line, as this defines the design. -
Glaze the interior:
Pour the glossy pastel pink glaze into the cup. Rotate it quickly to coat the entire interior, then pour the excess back into your bucket. -
Clean the rim:
If any pink glaze dripped onto the outside rim, wipe it away cleanly with a sponge. -
Dip the exterior:
Hold the cup by the foot (where the wax is) and dip the top two-thirds into the opaque white glaze. Stop just as the glaze meets your wax line. -
Check the overlap:
The white exterior glaze should meet the pink interior glaze perfectly at the rim. If needed, do a tiny touch-up with a detail brush. -
Final wipe:
Use a sponge to wipe any glaze droplets off the waxed bottom section. The wax resists most of it, but beads of glaze can stick. -
Glaze fire:
Fire the piece again to the maturation temperature of your specific clay and glaze (typically Cone 5 or 6 for stoneware). Let the kiln cool completely before opening.
Level Up: Texture
Before the first firing, carve shallow vertical flutes into the raw clay base area. The glaze will break beautifully over the texture where the two sections meet.
Enjoy your quiet morning tea in a vessel that feels as grounding as the earth it came from.

The Complete Guide to Pottery Troubleshooting
Uncover the most common ceramic mistakes—from cracking clay to failed glazes—and learn how to fix them fast.
Blue-and-White Tea Cup With Simple Folk Motifs
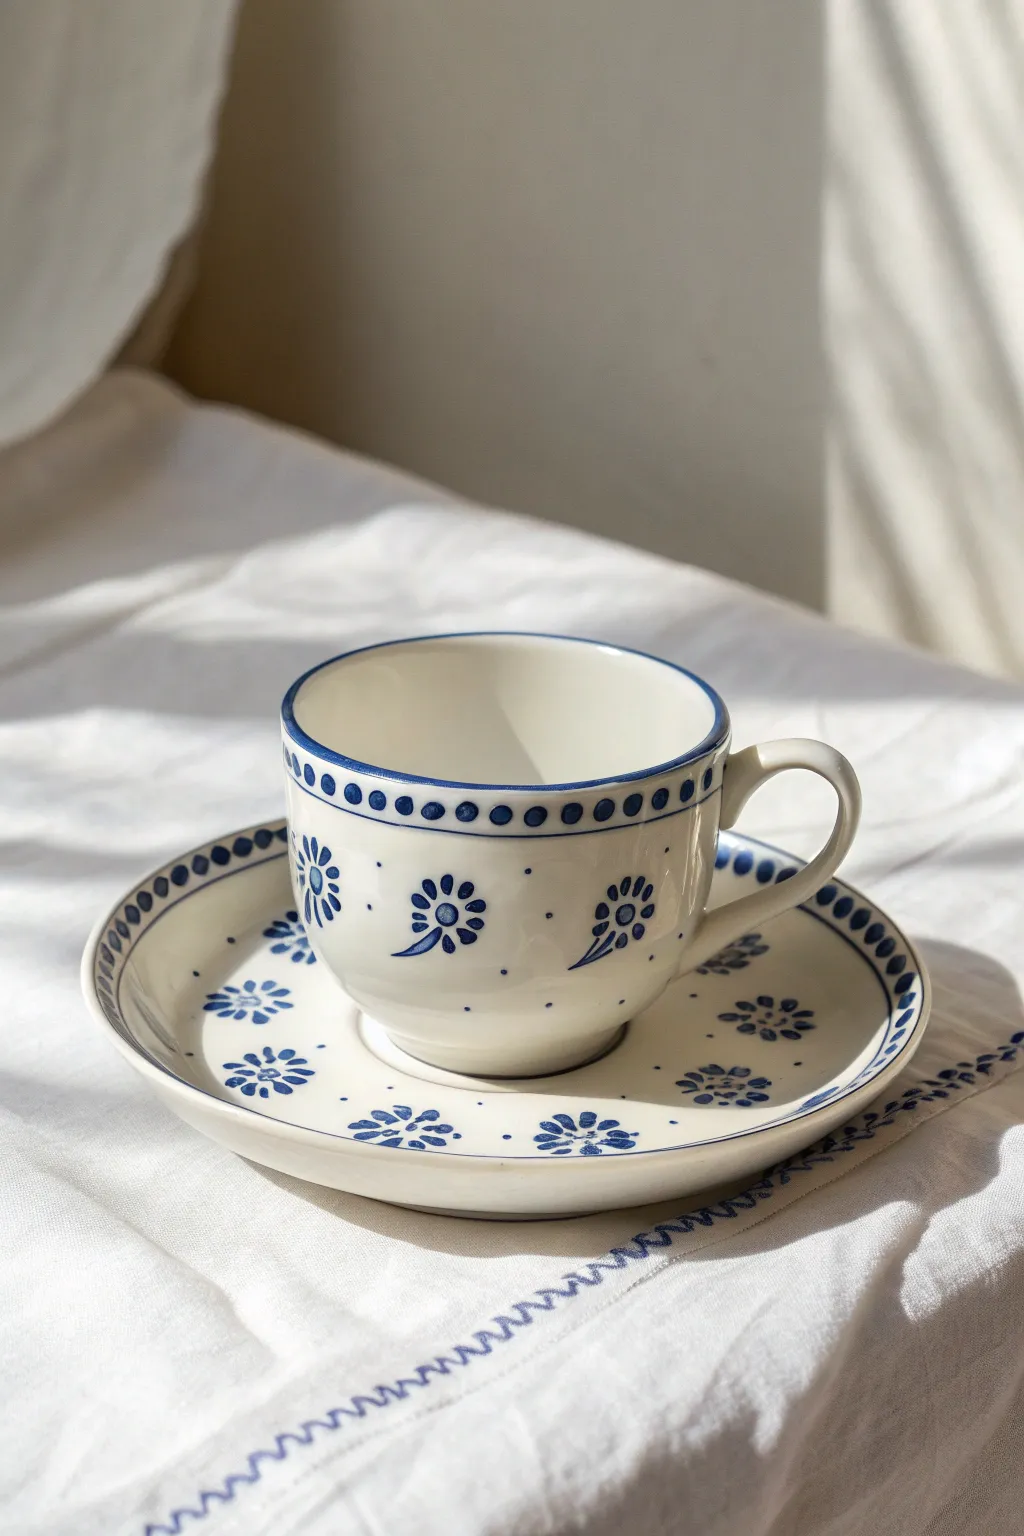
Transform a plain ceramic set into a charming, vintage-inspired piece using traditional blue-and-white folk motifs. This simple yet elegant design features repeating floral patterns and dot work that evokes the cozy feeling of classic European pottery.
Step-by-Step Guide
Materials
- Plain white ceramic glazed tea cup and saucer
- Pebeo Porcelaine 150 paint (dunkelblau/dark blue or similar navy)
- Fine liner brush (size 00 or 0)
- Small round brush (size 2)
- Dotting tool or toothpick
- Rubbing alcohol and cotton pads
- Paper palette or small dish
- Oven for baking (if using heat-set paints)
- Cotton swabs for cleanup
Step 1: Preparation & Cup Rim
-
Clean the surface:
Before laying down any paint, wipe the entire cup and saucer with rubbing alcohol on a cotton pad. This removes invisible oils and fingerprints which can prevent the paint from adhering properly. -
Load your brush:
Squeeze a small amount of dark blue porcelain paint onto your palette. Dip your size 2 round brush, ensuring the bristles are coated but not dripping. -
Paint the top rim:
Carefully paint a thin, consistent blue line along the very edge of the cup’s rim. Stabilize your hand by resting your pinky finger against the cup as you rotate it. -
Create the border guide:
Paint a second thin line about 1 cm below the rim line, circling the entire circumference of the cup. This creates the ‘channel’ for your dot border. -
Add the dot border:
Using a dotting tool or the non-brush end of your paintbrush, dip into the paint and press dots into the space between your two blue lines. Space them evenly, reloading paint every 2-3 dots for consistency.
Wobbly Lines?
If your rim lines look shaky, use a piece of masking tape as a guide. Press it firmly to prevent bleed, paint your line, and peel it off while the paint is still wet.
Step 2: Floral Motifs on Cup
-
Establish the flowers:
Switch to your fine liner brush. Imagine the cup face divided into quadrants. Paint a small circle for the center of your first flower in the middle of one quadrant. -
Paint petals:
Around the center dot, paint 5-7 teardrop-shaped petals radiating outward. Keep them loose and slightly separated for that folk-art look. -
Add stems and extra details:
Paint two small curved lines coming off the bottom of the flower head for leaves. I tend to make these quick, flicking strokes to keep them looking fluid. -
Repeat the pattern:
Move around the cup, painting identical flowers at equal intervals. Aim for 3-4 main flowers around the body of the cup. -
Fill the negative space:
Use your smallest dotting tool to place single, tiny blue dots in the empty white spaces between the flowers to balance the design.
Step 3: Saucer Design
-
Paint the saucer rim:
Just like the cup, paint a thin blue line along the extreme outer edge of the saucer and another line about 1 cm inward. -
Detail the rim border:
Fill the space between the saucer lines with slightly vertical dashes or ovals rather than perfect dots, mimicking the rhythm on the cup rim. -
Center the saucer motifs:
On the flat face of the saucer surrounding the cup indentation, paint smaller versions of the main flower motif. -
Vary the saucer flowers:
Try painting these flowers as just ‘heads’ without stems, scattering them evenly around the circle. Aim for about 5-6 flowers total. -
Add final dots:
intersperse the saucer flowers with tiny blue dots, creating a ‘polka dot’ field effect that ties the whole set together.
Pro Tip: Consistency
For perfectly uniform dots without specialized tools, use heads of different sized nails or the bottom of a drill bit dipped in paint.
Step 4: Finishing
-
Clean up errors:
If you smudged any wet paint, dip a cotton swab in a little water (or alcohol if dried slightly) and gently wipe away the mistake. -
Dry time:
Allow the paint to air dry for exactly 24 hours. Do not rush this step, as moisture trapped underneath can bubble during baking. -
Bake to set:
Place the ceramics in a cool oven. Set the temperature to 300°F (150°C) and bake for 35 minutes. Turn the oven off and let the pieces cool partially inside to prevent thermal shock.
Enjoy sipping from your beautiful, custom-painted teaware knowing it will last for years
Monochrome Stripe Tea Cup With Graphic Bands
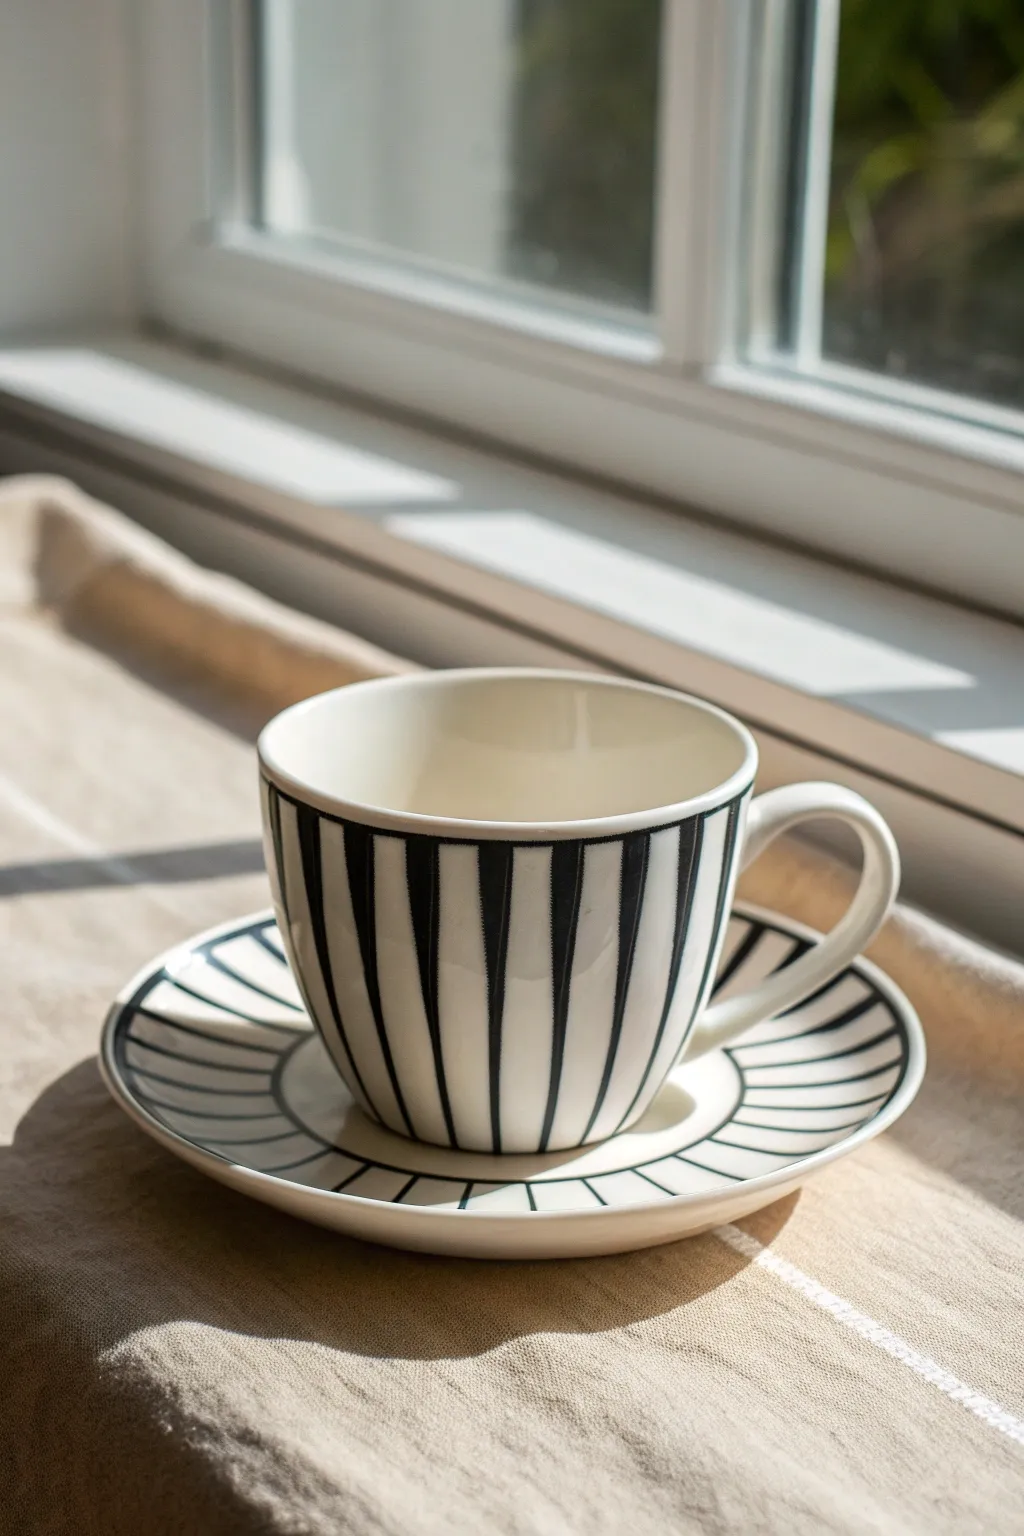
Transform a plain white tea set into a sophisticated statement piece with this high-contrast monochrome design. The bold, graphic bands create a modern aesthetic that balances perfectly with the organic warmth of hand-painted lines.
Detailed Instructions
Materials
- Plain white ceramic tea cup and saucer
- Black porcelain marker or ceramic paint pen (fine and medium tips)
- Rubbing alcohol and cotton pads
- Soft pencil or water-soluble marker
- Flexible measuring tape
- Q-tips (for cleanup)
- Oven (for curing)
Step 1: Preparation and Planning
-
Surface Cleaning:
Begin by thoroughly wiping down your cup and saucer with rubbing alcohol on a cotton pad. This removes any invisible oils or fingerprints that could prevent the paint from adhering properly. -
Marking the Cup Rim:
Using your flexible measuring tape, measure the circumference of the cup’s rim. Divide this number by your desired number of stripes (around 16-20 looks good) to determine the spacing. -
Marking the Cup Base:
Repeat the measurement process for the base of the cup. Since the base is smaller, your marks will be closer together than at the rim, which helps create the tapered stripe effect. -
Sketching Guidelines:
With a soft pencil, lightly connect the corresponding marks from the rim to the base. Don’t worry if these lines aren’t perfect; they are just guides to keep your spacing consistent. -
Saucer Spacing:
For the saucer, mark the outer rim with even spacing similar to the cup. Place corresponding marks on the inner ridge where the cup sits.
Wobbly Lines?
If your hand shakes, rest your pinky finger on the cup for leverage. Alternatively, apply masking tape to the cup surface to act as a stencil for crisp, straight edges.
Step 2: Painting the Cup
-
Outlining Vertical Bands:
Take your black porcelain marker and carefully draw the left and right edges of a single vertical stripe, following your pencil guide. I find it helpful to start from the top and pull the pen downward for a smoother line. -
Tapering the Shape:
Ensure the stripe is slightly wider at the rim and narrows as it reaches the bottom curve of the cup. This mimics the vessel’s form beautifully. -
Filling the Stripes:
Use a medium-tip marker to fill in the space between your outlines. Work slowly to ensure solid, opaque coverage without streakiness. -
Defining the Rim:
Once all vertical stripes are filled, carefully run the side of your marker tip along the very top edge of the cup rim to create a thin, unifying black border. -
Refining Edges:
Inspect your lines. If any edges look ragged, use a fine-tip marker to sharpen them. -
Cleanup Duties:
If you smudge any paint, immediately dampen a Q-tip with water or alcohol and wipe it away before it dries.
Step 3: Painting the Saucer
-
Drawing Radial Lines:
On the saucer, draw straight lines connecting the inner ridge marks to the outer rim marks. These will form the sides of your trapezoidal shapes. -
Creating the Grid:
Draw two concentric circles: one defining the outer edge of the painted area (near the rim) and one defining the inner edge (near the cup well). This boxes in your stripes. -
Filling the Sections:
Color in every other section to create the radiating effect shown in the image. Keep the strokes distinct and bold. -
Inner Circle Detail:
Add a thin circle outline around the center indentation where the cup rests to frame the set cohesively.
Paint Pen Pro Tip
Store your paint pens horizontally when not in use. Before starting, pump the nib on scrap paper to ensure the ink flows smoothly and isn’t watery or separated.
Step 4: Curing and Finishing
-
Initial Drying:
Let the paint dry completely for at least 24 hours. The ink needs to settle before being exposed to heat. -
Cleaning Guidelines:
Once fully dry, gently wipe away any visible pencil marks with a damp cloth or eraser, being careful not to scratch the paint. -
Baking the Set:
Place the cold ceramics into a cold oven. Set the temperature to the manufacturer’s instructions for your specific paint pen (usually around 300°F/150°C). -
Cooling Down:
After the baking time (typically 30-40 minutes), turn off the oven and leave the door closed. Let the ceramics cool down completely inside the oven to prevent cracking.
Enjoy your morning brew in a custom piece that combines classic style with your personal artistic touch


What Really Happens Inside the Kiln
Learn how time and temperature work together inside the kiln to transform clay into durable ceramic.
Two-Tone Dipped Glaze Tea Cup
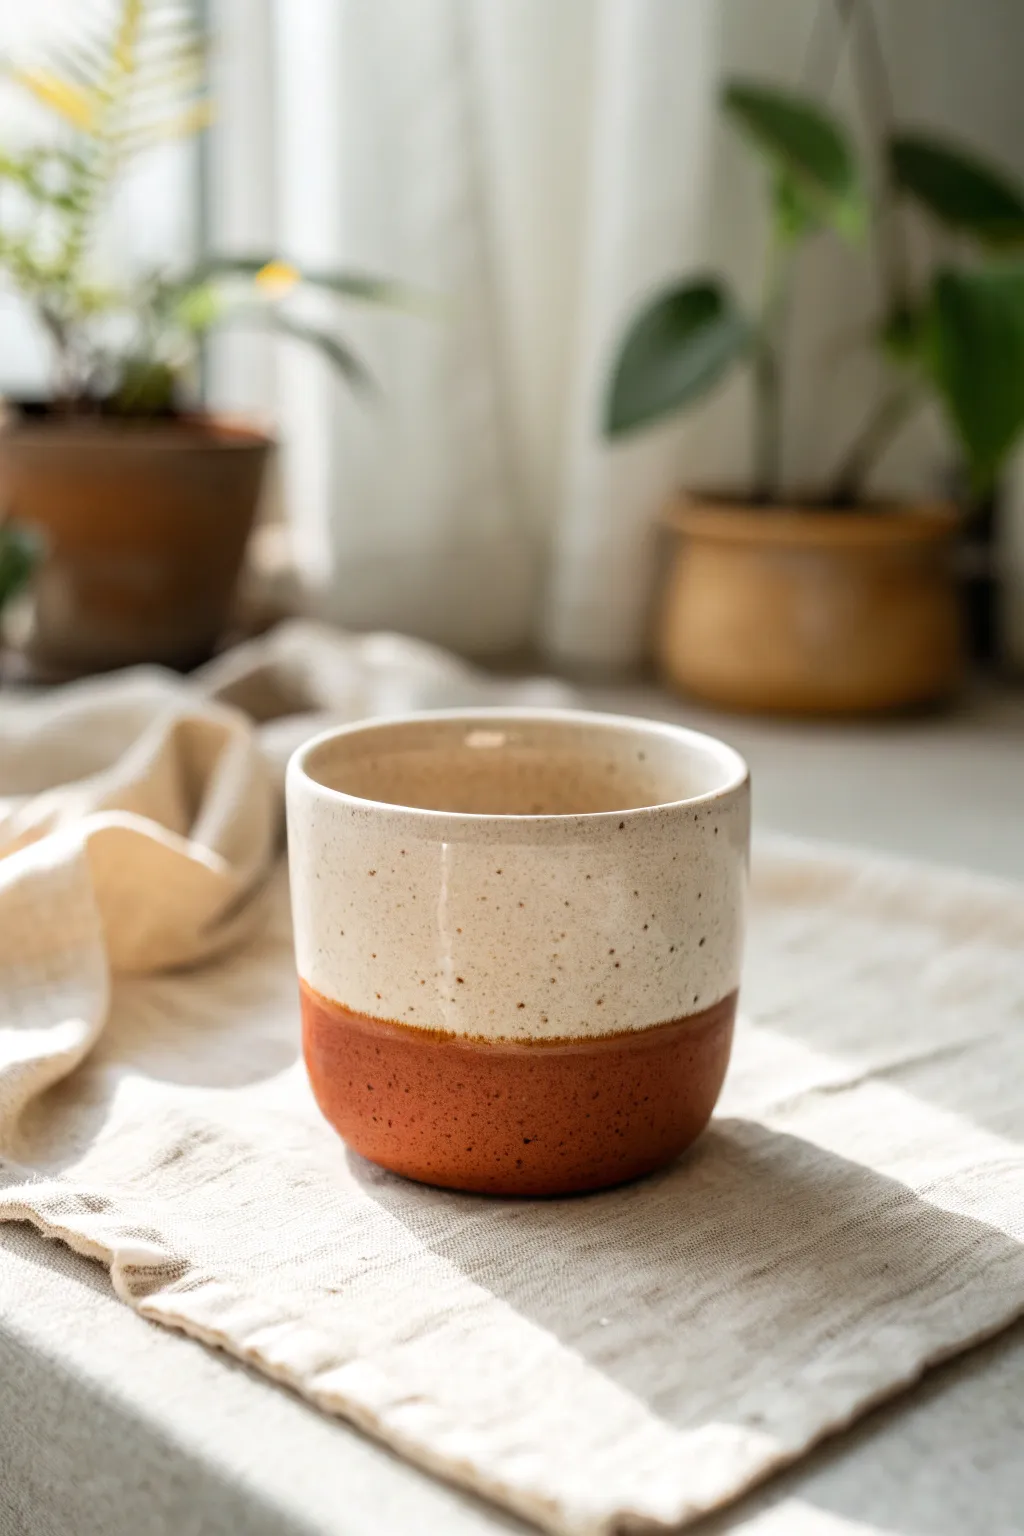
Embrace the beauty of raw clay with this elegant wheel-thrown tea cup design. The contrast between the warm, textured terracotta base and the smooth, creamy speckled glaze creates a timeless and cozy aesthetic perfect for your morning brew.
Step-by-Step
Materials
- Speckled buff stoneware clay (or red stoneware)
- Pottery wheel
- Throwing tools (sponge, rib, needle tool, wire cutter)
- Trimming tools (loop tool)
- Creamy matte or satin white dipping glaze
- Wax resist (liquid)
- Sponge or brush for wax
- Kiln for bisque and glaze firing
Step 1: Throwing and Shaping
-
Prepare the clay:
Begin with about 1 pound of well-wedged speckled buff or red stoneware clay. Ensure there are no air bubbles, as this clay choice is key to the final color contrast. -
Center and open:
Secure the clay on the wheel head and center it. Open the form down to the base, leaving about a quarter-inch of thickness for the bottom. -
Pull the walls:
Pull the walls up into a cylinder first. Aim for even thickness from bottom to top, keeping the walls relatively straight. -
Shape the curve:
Using a rib tool on the inside, gently belly out the form to create a soft, rounded curve near the bottom that tapers slightly straight or inward toward the rim. -
Refine the rim:
Compress the rim using a chamois or your sponge. Keep the lip simple and slightly rounded, avoiding any sharp edges. -
Check dimensions:
This style works best as a handleless cup, so ensure the width is comfortable to hold in one hand—usually about 3-3.5 inches wide. -
Remove from wheel:
Wire the cup off the wheel head and set it aside on a ware board. Let it dry to a leather-hard state.
Uneven Glaze Line?
If your wax line wasn’t straight, use a fettling knife to gently scrape away the dry glaze edge to correct the curve before firing. A damp sponge can then smooth the transition.
Step 2: Trimming and Finishing
-
Center for trimming:
Once leather hard, center the cup upside down on the wheel. Secure it with clay lugs or a chuck. -
Trim the foot:
Trim a clean, rounded bottom curve. You don’t need a deeply carved foot ring for this style; a flat bottom with a slight bevel works well to emphasize the modern shape. -
Smooth the surface:
I like to use a soft rubber rib or burnishing stone on the exterior bottom third to compress the clay, which makes the unglazed portion feel smoother to the touch. -
Bisque fire:
Allow the cup to dry completely to the bone-dry stage. Load it into the kiln for a bisque firing (usually Cone 04 or 06 depending on your clay body).
Pro Tip: Iron Flecks
To enhance speckling if your clay is plain, try mixing a tiny amount of granular ilmenite or iron oxide into your white glaze for that organic, scattered-spot effect shown in the photo.
Step 3: Glazing technique
-
Clean the bisque:
Wipe down the bisqued cup with a damp sponge to remove any dust that might interfere with glaze adhesion. -
Apply wax resist:
Carefully paint liquid wax resist onto the bottom of the cup. For that precise dipped look, bring the wax line up about one-third of the way up the wall. Ensure the line is straight and even. -
Let wax dry:
Allow the wax to dry completely. It should feel tacky but not wet. -
Prepare the glaze:
Mix your creamy white dipping glaze thoroughly. If you want extra speckles, ensure they are suspended well in the mixture. -
Perform the dip:
Holding the cup by the foot (or using glazing tongs if preferred), dip the cup straight down into the glaze bucket until the glaze meets your wax line. Hold for 3-5 seconds. -
Drain and dry:
Lift the cup out promptly and give it a gentle shake to remove excess drips. Turn it upright and place it on a clean surface. -
Clean the line:
Even with wax, some glaze beads might form on the resisted area. Use a damp sponge to wipe the bottom third completely clean, creating a sharp transition line. -
Glaze fire:
Load the cup into the kiln for the final glaze firing (typically Cone 5 or 6). Ensure the unglazed bottom doesn’t touch other pots.
Once the kiln cools, you will have a stunning, functional piece of art ready for your favorite tea
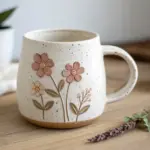
Scalloped Rim Tea Cup for a Romantic Silhouette
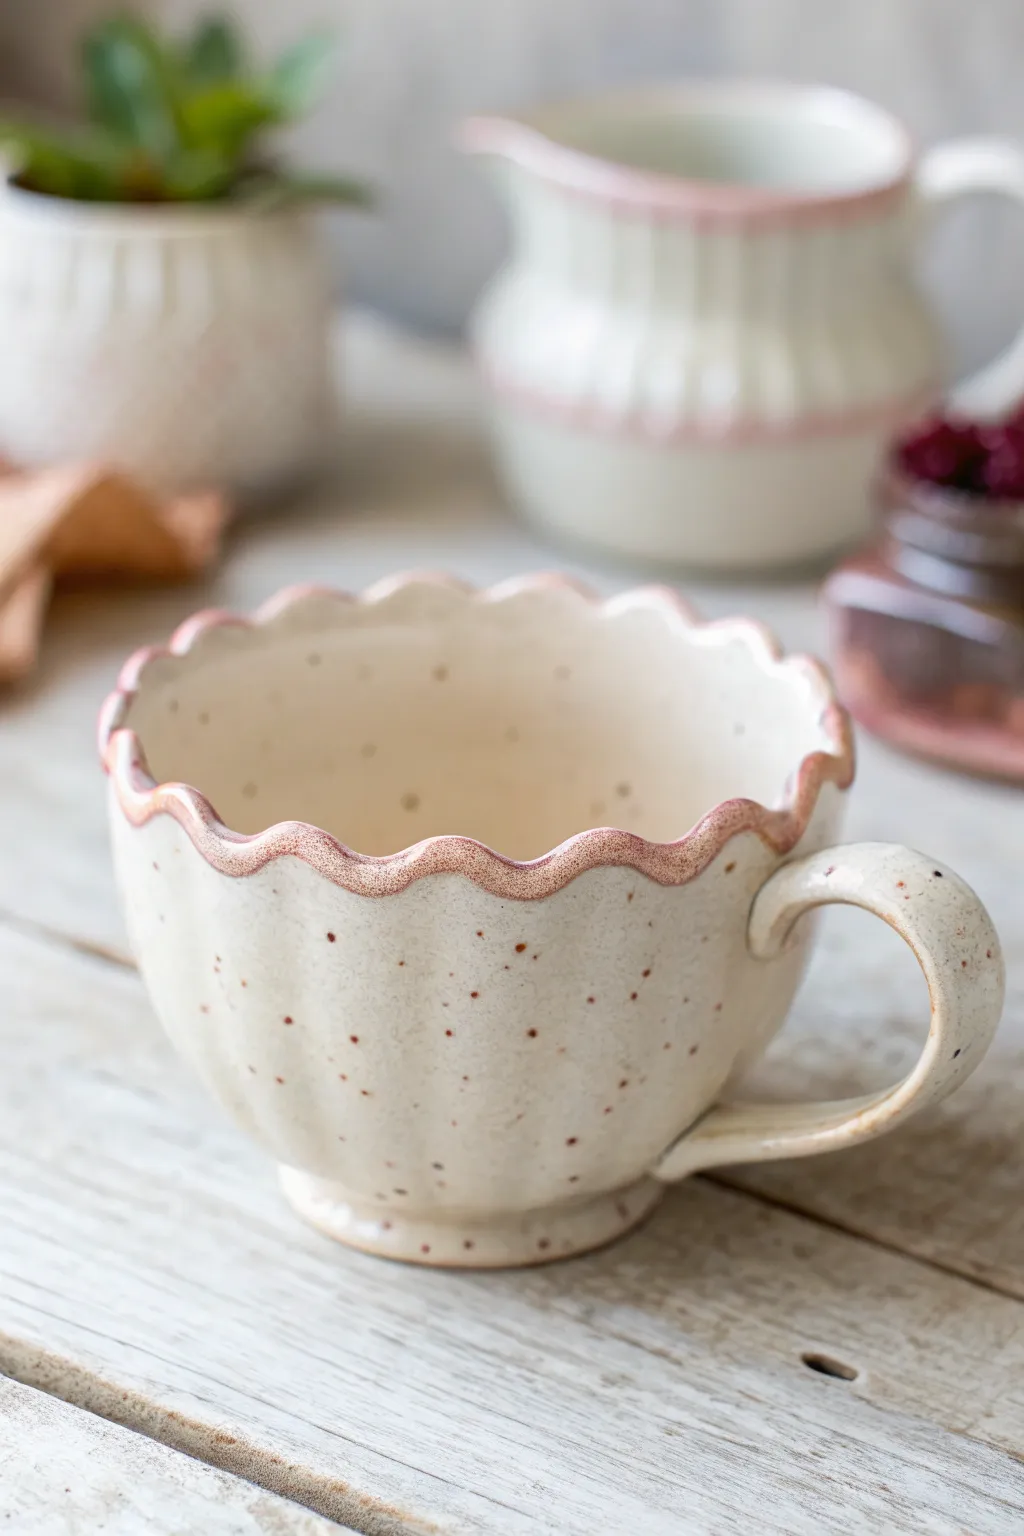
Capture the essence of rustic romance with this hand-built ceramic cup, featuring a delicate scalloped rim and soft, fluted texture. The speckled finish and pink-accented edge give it a cozy, vintage feel perfect for your morning brew.
Step-by-Step Guide
Materials
- Speckled stoneware clay (about 1 lb)
- Potter’s wheel (optional ideal) or slab roller & rolling pin
- Wooden modeling tool or rib
- Wire clay cutter
- Sponge
- Needle tool
- Fetling knife
- Loop trimming tool
- Underglaze (Soft Pink or Terrace Cotta)
- Clear or translucent white glaze (cone 5/6 compatible)
- Soft fan brush
- Lid or circle template (approx 3-4 inches diameter)
Step 1: Forming the Bast
-
Prepare the clay:
Begin by wedging your speckled stoneware clay thoroughly to remove air bubbles, ensuring a smooth, workable consistency. -
Center and open:
If using a wheel, center the clay and open it up to create a wide, bowl-like base rather than a tall cylinder. If hand-building, roll a slab and drape it over a slump mold to form a deep bowl shape. -
Pull the walls:
Pull the walls up and slightly outward to create that generous tea-cup curve. Aim for a thickness of about 1/4 inch for durability. -
Create the fluted texture:
While the clay is still plastic but supportive, use a wooden modeling tool or your fingers to press gentle vertical indentations from the base up towards the rim, creating a soft, fluted effect. -
Refine the shape:
Use a damp sponge to smooth the transition between the flutes, ensuring the inside remains smooth for easy cleaning later.
Chamois Smoother
Use a strip of soft leather chamois kept wet to run over the scalloped rim. It compresses the clay particles and makes the edge perfectly smooth for drinking.
Step 2: Crafting the Scalloped Rim
-
Mark the intervals:
Lightly mark even intervals around the top edge of your cup with a needle tool to guide your scallops. -
Shape the waves:
Gently push down between your marks with a rounded tool or your thumb, while supporting the clay on either side to push it upward. This creates the undulating wavy motion. -
Refine the edge:
Smooth the rim with a chamois or a tiny strip of damp plastic to ensure the lip is comfortable to drink from and not sharp. -
Trim the foot:
Once leather hard, flip the cup over and trim a neat foot ring using a loop tool. This elevates the cup and gives it a finished profile.
Step 3: Handle and Details
-
Pull a handle:
Pull a small strap of clay for the handle. Keep it relatively delicate to match the cup’s aesthetic. -
Attach the handle:
Score and slip the attachment points on both the cup and handle. Press firmly to join, blending the clay with a modeling tool for a seamless look. -
Create the thumb rest:
At the top of the handle curve, press a small divot or add a tiny coil to create a comfortable resting spot for the thumb. -
Initial bisque fire:
Allow the cup to dry slowly and completely before firing it to bisque temperature (usually Cone 04).
Matching Saucer
Make a matching saucer by rolling a flat slab and pressing the same fluted texture into the rim before slumping it into a shallow bowl mold.
Step 4: Glazing and Finishing
-
Apply rim accent:
Using a small brush, carefully apply the pink oxide or underglaze just along the very edge of the scalloped rim. Let it bleed slightly down for a natural look. -
Enhance speckles (optional):
If your clay isn’t naturally speckled, flick iron oxide wash or a speckle glaze additive onto the surface with a stiff toothbrush. -
Dip in clear glaze:
Dip the entire cup into a clear or semi-transparent white glaze. I like to double-check that the glaze isn’t too thick, so the clay’s texture shows through. -
Clean the foot:
Wipe the foot ring completely clean of glaze with a damp sponge to prevent it from fusing to the kiln shelf. -
Final firing:
Fire the piece to maturity (Cone 5 or 6, depending on your clay body specifications) to vitrify the clay and melt the glaze.
Enjoy using your beautifully handmade cup for a quiet moment of reflection

TRACK YOUR CERAMIC JOURNEY
Capture glaze tests, firing details, and creative progress—all in one simple printable. Make your projects easier to repeat and improve.
Faceted Tea Cup With Crisp Geometric Planes
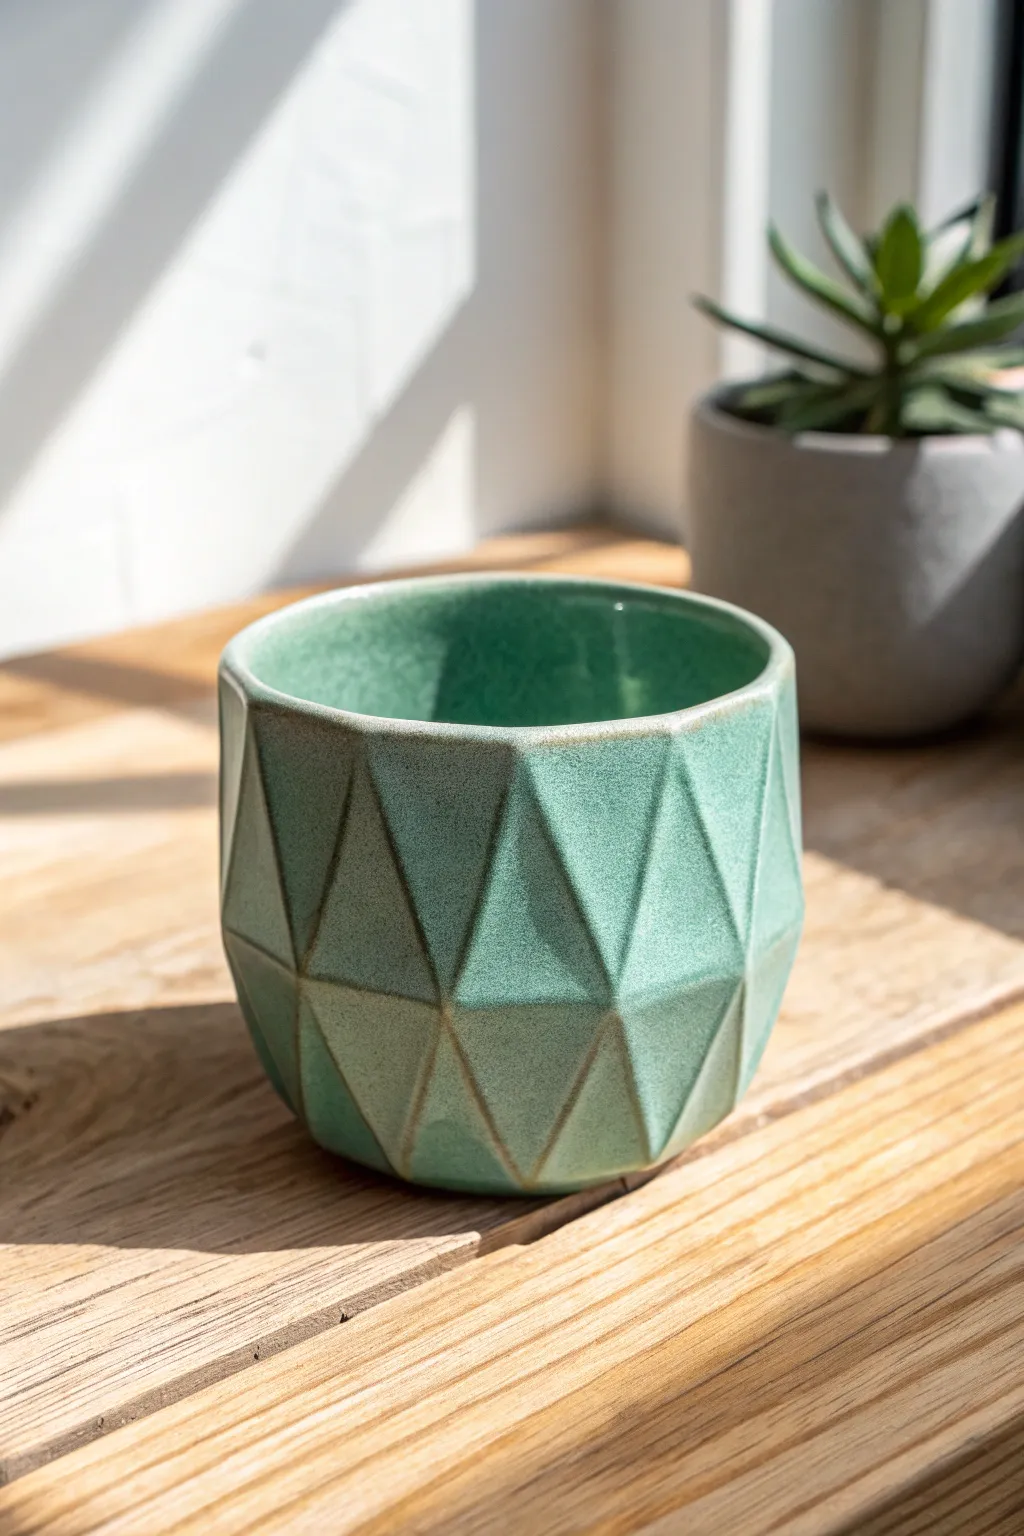
This project transforms a simple block of clay into a stunning, jewel-like vessel featuring sharp, faceted planes that catch the light beautifully. The finished cup boasts a rich teal glaze that breaks over the hard edges, highlighting the crisp geometric relief pattern.
Step-by-Step
Materials
- Stoneware clay (smooth, without grog for cleaner cuts)
- Fettling knife or sharp craft knife
- Wire clay cutter
- Pottery wheel (optional, can be hand-built)
- Small sponge
- Rubber kidney tool
- Flexible metal rib
- Surform tool (cheese grater style)
- Teal celadon or breaking glaze
- Clear glaze (optional liner)
- Small banding wheel (for hand-building or trimming)
- Loop trimming tools
Step 1: Forming the Blank Cylinder
-
Throw or Build the Cylinder:
Begin by creating a thick-walled cylinder. If throwing on the wheel, aim for walls about 3/4-inch thick to allow ample depth for carving. If slab building, join a thick slab into a cylinder shape. -
Establish the Rim:
While the clay is soft, refine the rim. I like to keep the rim slightly thinner than the body so it feels comfortable to drink from, even though the cup looks heavy. -
Dry to Leather Hard:
This is crucial. Let the cylinder dry slowly under loose plastic until it reaches a firm leather-hard stage. It should be stiff enough to carve without warping, but soft enough to cut like cheddar cheese.
Dull Knife Drama?
If clay drags or tears while cutting, your clay is too soft or your tool is dull. Wait 2 hours for it to firm up, or sharpen your knife. Clean cuts require resistance.
Step 2: Mapping the Geometry
-
Mark the Grid:
Using a needle tool, lightly scratch a faint horizontal line around the center of the cup. Then, mark vertical divisions around the rim to determine how many facets you want (e.g., 6 or 8). -
Draw the Diamond Pattern:
Connect your marks to create a lattice of diamonds or triangles. These guidelines don’t need to be deep; they are just a roadmap for your knife.
Step 3: Carving the Facets
-
The First Cuts:
Take your sharp fettling knife or wire tool. Starting at the top intersection, slice downward and inward toward the center line of a diamond. Remove the wedge of clay. -
Create the Planes:
Continue cutting adjacent planes. The goal is to have the high points (ridges) meet exactly where you drew your grid lines, while the deepest parts of the cut form the valleys. -
Refining the Edges:
Once the primary facets are cut, go back and clean up the planes. Use a Surform tool to flatten any bumps on the facets, ensuring the planes are truly flat and the edges are sharp. -
Smooth the Surface:
Take a slightly damp sponge or a flexible metal rib and very gently burnish the facets. Don’t round over that crisp edge you just worked so hard to create; just remove the cutting texture. -
Address the Foot:
Carve the bottom of the cup to create a slight undercut or ‘foot ring’ that mimics the geometric style, lifting the form slightly off the table.
Pro Tip: Breaking Edges
After glazing but before firing, gently wipe a damp sponge over the sharpest ridges. This thins the glaze slightly, guaranteeing that beautiful brown ‘break’ line.
Step 4: Bisque and Glazing
-
Slow Drying:
Allow the faceted cup to dry very slowly to prevent cracking, especially where the wall thickness varies. -
Bisque Fire:
Fire the piece to cone 04 (or your clay’s specific bisque temperature) to prepare it for glazing. -
Clean the Bisque:
Wipe the fired cup with a damp sponge to remove any kiln dust which could cause glaze defects. -
Apply the Glaze:
Dip the cup into a teal celadon glaze. Celadons are perfect here because they are translucent; they will pool in the valleys (appearing darker) and break over the sharp ridges (appearing lighter or brown). -
Check the Rim and Foot:
Wipe the foot ring completely clean of glaze. Check the rim to ensure the glaze isn’t too thick, as you don’t want it running off during firing. -
Final Firing:
Fire the cup to the maturity temperature of your clay and glaze (typically Cone 5 or 6 for stoneware). The heat will flux the glaze, highlighting your carving work.
Once cooled, your cup is ready for tea, with its unique geometric texture providing a delightful tactile experience in your hands
Ribbed Tea Cup With Throwing Lines Left Visible

This project celebrates the raw beauty of the pottery process by highlighting vertical texture on a classically shaped wheel-thrown cup. The finish combines the tactile appeal of carved throwing lines with a warm, speckled cream glaze that breaks beautifully over the ridges.
How-To Guide
Materials
- Stoneware clay (speckled or buff)
- Pottery wheel
- Pin tool or needle tool
- Carving tool (fluting tool or small loop tool)
- Throwing sponge
- Wire cutter
- Flexible metal rib
- Trimming tools
- Satin matte cream or white glaze
- Bats for wheel
Step 1: Throwing the Form
-
Prepare the clay:
Begin by thoroughly wedging about 1 pound of stoneware clay to remove air bubbles and ensure consistency. Center the ball of clay firmly on the wheel head. -
Open and center:
Open the centered clay and compress the bottom to prevent cracks. Pull the floor out to your desired width, remembering that the clay will shrink during firing. -
Pull the walls:
Pull the walls up into a simple cylinder first to establish height and even thickness. -
Shape the belly:
Gently push from the inside out with your fingers or a rib to create a rounded, bulbous belly, slightly tapering back inward at the rim. -
Define the rim:
Compress the rim with a chamois or your finger to make it smooth and pleasant for drinking. -
Refine the curve:
Use a flexible metal rib on the outside to smooth the surface and finalize the curve, removing excess slip so the carving will be clean later.
Step 2: Creating the Ribbed Texture
-
Wait for leather hard:
Allow the cup to dry to a firm leather-hard stage. If the clay is too soft, the carving tool will drag; if too dry, it will chip. -
Mark vertical guides:
Lightly mark vertical lines with a pin tool if you want perfect symmetry, though I prefer freehanding for a more organic look. -
Carve the first line:
Using a small loop tool or a specialized fluting tool, start just below the rim and drag downward to the foot in a single, confident stroke. -
Complete the ribs:
Continue carving parallel lines around the entire circumference. Vary the pressure slightly if you want the lines to have a hand-drawn character. -
Smooth the ridges:
Once the carving is done, lightly run a damp sponge or a soft finger over the sharp edges of the ridges to soften them without erasing the texture.
Glaze Interaction
Choose a ‘breaking’ glaze. These glazes thin out over high points (your carved ridges), turning jagged and darker, while pooling thicker and lighter in the grooves.
Step 3: Trimming and Finishing
-
Trim the foot:
Place the cup upside down on the wheel (using a chuck or adhering it to the wheel head). Trim a neat foot ring, ensuring it defines where the ribbed texture ends. -
Clean the lines:
Inspect the bottom edge where your carving meets the trimmed area and clean up any burrs. -
Bisque fire:
Slowly dry the piece completely, then bisque fire it to Cone 04 (or your clay’s specific bisque temperature).
Uneven Spacing?
Don’t panic if your lines aren’t perfectly parallel. The handmade charm of this cup comes from the slight wobble and variation in the carved texture.
Step 4: Glazing
-
Wax the foot:
Apply wax resist to the bottom foot ring to prevent glaze from sticking to the kiln shelf. -
Dip or pour glaze:
Dip the cup into a satin cream or white glaze. A glaze that breaks (thins) over edges is best to highlight the carved ribs. -
Wipe back (optional):
If your glaze is very thick, you can lightly wipe the raised ridges with a damp sponge to expose more of the clay body for contrast. -
Final firing:
Glaze fire to Cone 6 (or your clay/glaze maturity temperature). The iron speckles in the clay will bleed through the cream glaze, adding to the rustic aesthetic.
Enjoy your morning brew in a vessel that perfectly balances tactile texture with smooth, simple curves
Sgraffito Tea Cup With Carved Botanical Pattern
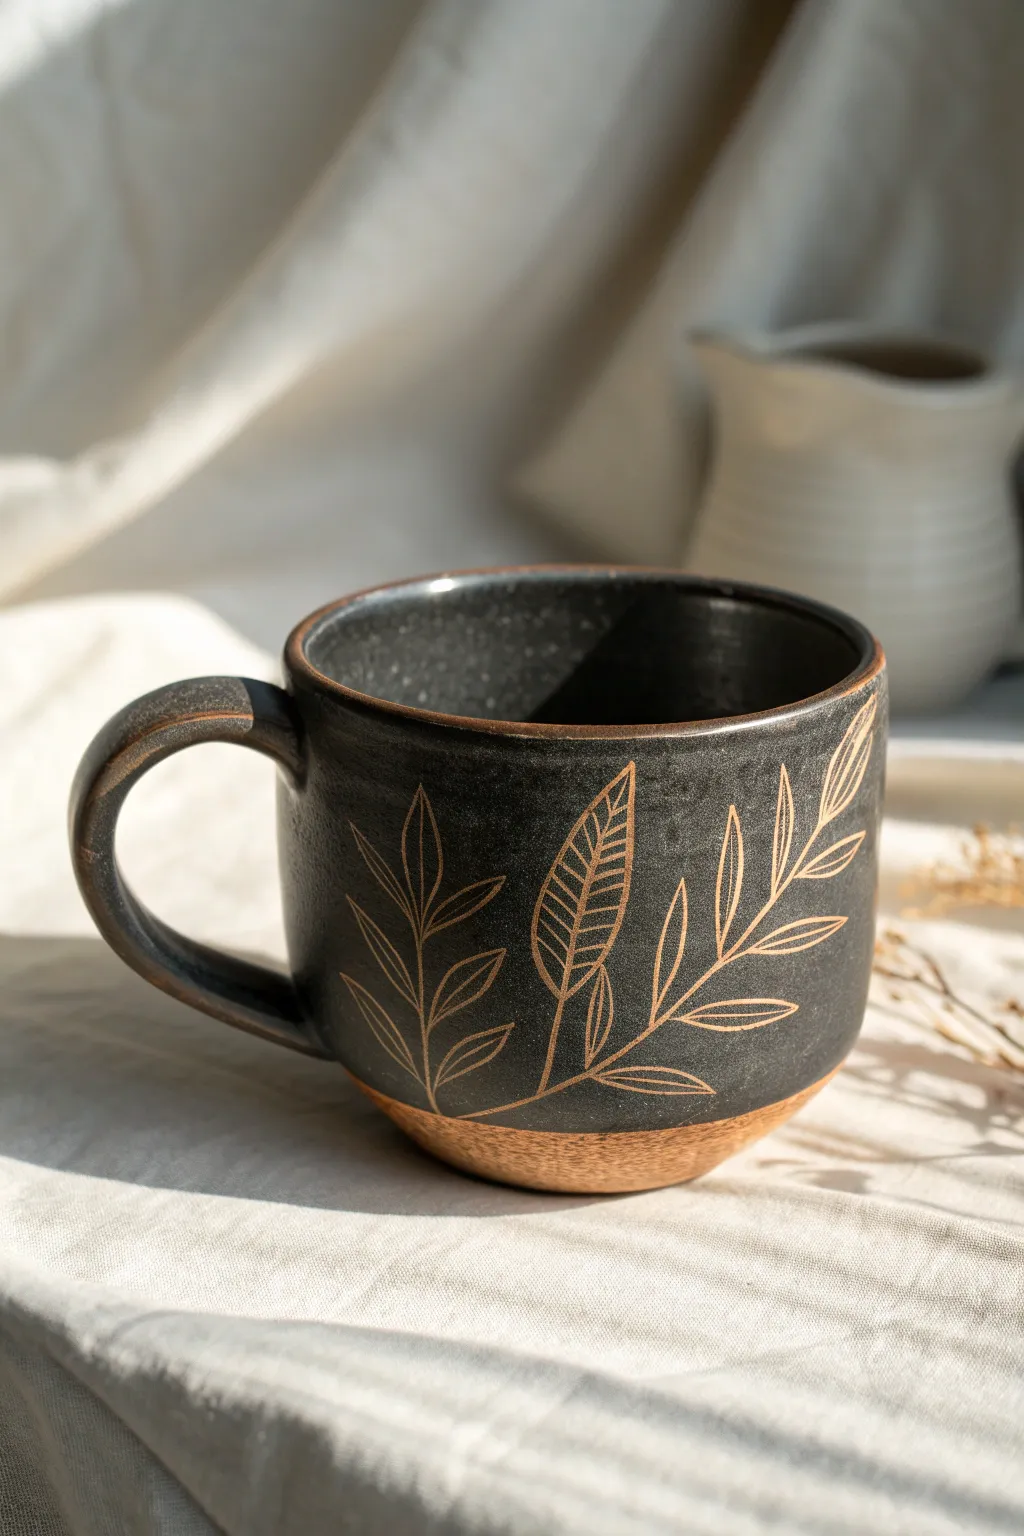
This stunning mug combines the contrast of matte black underglaze against warm, toasted stoneware for a sophisticated rustic look. Using the sgraffito technique, you’ll carve delicate botanical lines through the dark surface to reveal the clay body beneath.
Step-by-Step Tutorial
Materials
- Speckled buff stoneware clay (or similar mid-fire clay)
- Pottery wheel (or slab rolling tools for hand-building)
- Black underglaze (velvet finish recommended)
- Sgraffito tool (small loop tool or needle tool)
- Rib tool (metal or rubber)
- Sponge
- Clear matte or satin glaze (optional for interior)
- Kiln
- Soft fan brush
Step 1: Forming the Vessel
-
Wedge and center:
Begin with about 1 to 1.5 lbs of speckled buff clay. Wedge it thoroughly to remove air bubbles, then throw it firmly onto the wheel head and center the clay. -
Throw the cylinder:
Key to this design is a gentle curve. Open the clay and pull the walls into a cylinder, shaping it so it creates a slightly rounded belly that tapers just slightly at the rim. -
Refine the surface:
While the wheel is spinning slowly, use a rib tool on the exterior to smooth away throwing lines and compress the clay particles, creating a blank canvas for your carving. -
Pull and attach the handle:
Pull a strap handle from a separate piece of clay. Once the mug is leather hard, score and slip the attachment points and secure the handle. Ensure the curve mimics the ‘ear’ shape seen in the reference for a comfortable grip.
Step 2: Applying the Underglaze
-
Check moisture level:
Wait until your mug is leather hard—firm enough to hold its shape but soft enough to carve. The surface should feel cool to the touch but not sticky. -
Isolate the base:
Decide where you want the black glaze to end. For this design, leave the bottom quarter of the mug unglazed. You can use masking tape to create a crisp line, or carefully freehand it. -
Apply the first coat:
Using a soft fan brush, apply a smooth, even coat of black underglaze to the exterior (and interior if desired, though a contrasting white or clear liner glaze is also nice). Avoid the bottom section. -
Layer up:
Allow the first coat to dry slightly until the shine disappears. I usually apply at least three coats to ensure the black is opaque and solid, leaving no streakiness.
Smudged Lines?
If you accidentally smear black underglaze onto the raw clay drawing, wait for it to dry completely. Then, gently scratch the mistake away with an X-Acto knife or needle tool.
Step 3: Carving the Design (Sgraffito)
-
Plan the layout:
Lightly sketch your botanical design onto the dried underglaze with a dull pencil. The graphite will burn off in the kiln, serving only as a guide for your carving. -
Outline the stems:
Using a fine-point sgraffito tool or a sharp needle tool, carve the main central stems of your branches first. Apply steady pressure to cut through the black layer and slightly into the clay body. -
Carve the leaf outlines:
Branching off the stems, carve simple, elongated leaf shapes. Keep your wrist loose to create organic, flowing curves rather than stiff, straight lines. -
Detail the veins:
Inside the larger leaves, carve delicate hatch marks or veins. For the smaller leaves, a single central line often suffices. Vary your pressure to create varied line weights. -
Clean up the burrs:
As you carve, little crumbs of clay (burrs) will accumulate. Do not brush them away with your hand, as this can smear the black underglaze. Instead, gently blow them off or use a very soft, dry brush.
Moisture Matters
Carve when the clay is leather hard. If it’s too wet, the lines will be mushy; too dry, and the clay will chip or flake. Wrap your piece in plastic if you need to take a break.
Step 4: Finishing and Firing
-
Bisque fire:
Once the mug is completely bone dry, load it into the kiln for a bisque firing (usually to Cone 04). This sets the shape and prepares it for the final glaze. -
Glaze the interior:
After the bisque fire, pour a clear glaze or a white liner glaze into the interior of the mug. Pour it out quickly to coat just the inside. -
Exterior clear coat (optional):
For the exterior, you can leave the black underglaze raw (matte) as pictured, or apply a very thin coat of clear matte glaze over the carving to seal it. -
Final fire:
Fire the mug to maturity (usually Cone 5 or 6 for stoneware). Ensure the bottom raw clay section is wiped clean so it doesn’t stick to the kiln shelf.
Enjoy your morning coffee with the satisfaction of holding a piece of art you carved by hand
Mishima Inlay Tea Cup With Line Art
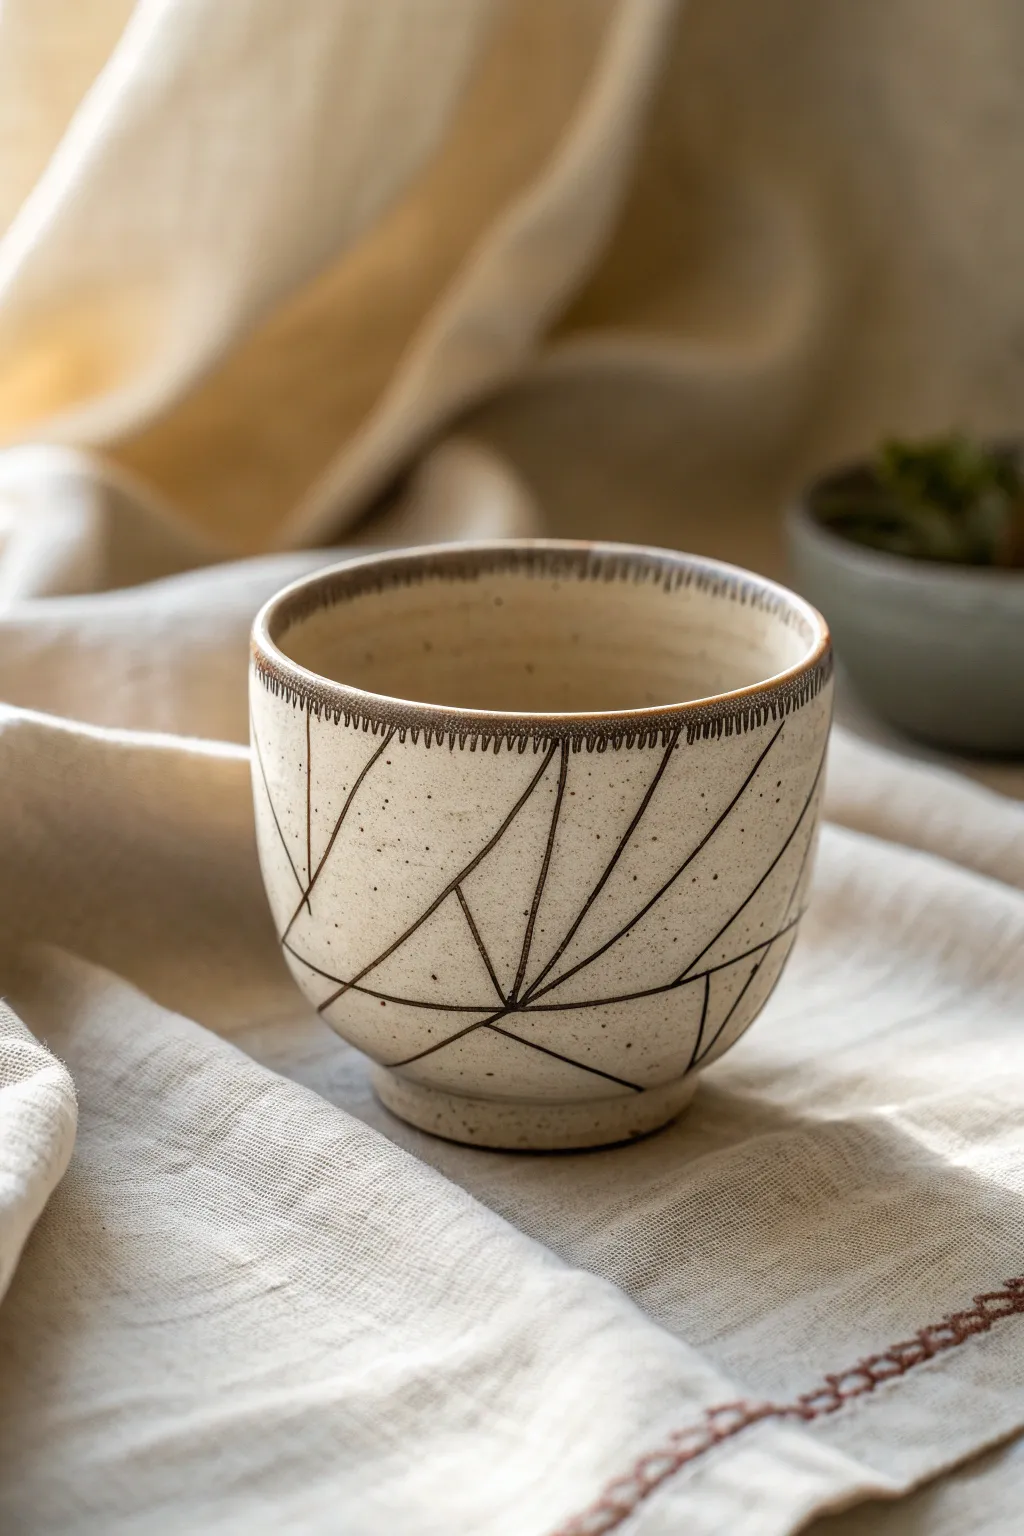
This project explores the ancient Japanese technique of Mishima, where fine lines are inlaid into clay to create striking contrast. The result is a contemporary tea cup featuring crisp, abstract geometry against a warm, speckled stoneware body.
Step-by-Step Guide
Materials
- Speckled buff stoneware clay
- Potter’s wheel and basic throwing tools
- Trimming tools
- Black underglaze (or black slip)
- X-Acto knife or needle tool
- Small carving loop tool
- Soft paintbrush
- Metal rib
- Clear matte glaze
- Sponge and bucket of water
- Wire cutter
Step 1: Throwing and Trimming
-
Prepare the clay:
Begin by intensely wedging about 1 pound of speckled buff stoneware clay. Wedging is crucial here to ensure a smooth canvas for your future carving. -
Center and open:
Throw the clay onto the wheel head and center it perfectly. Open the center to create the floor of your cup, keeping it relatively narrow for a tea cup shape. -
Pull the walls:
Pull the walls up into a gentle curve. Aim for a shape that is slightly wider at the rim than the base, with a smooth, continuous profile. -
Refine the surface:
Use a smooth metal rib on the outside while the wheel is spinning to compress the clay and remove any throwing lines. A smooth surface is essential for clean inlay work. -
Drying to leather hard:
Wire the cup off the wheel and let it dry slowly to a leather-hard state. It needs to be firm enough to handle without warping but soft enough to carve. -
Trim the foot:
Center the leather-hard cup upside down on the wheel. Trim a clean, defined foot ring that lifts the form slightly, mirroring the elegance of the pictured cup.
Clean Lines Tip
When wiping back the underglaze, wipe perpendicular to your carved lines rather than parallel. This prevents the sponge from scooping the color out of the grooves your just filled.
Step 2: Carving the Design
-
Plan the geometry:
Lightly sketch your geometric pattern onto the surface with a dull pencil. The design relies on intersecting triangles and sharp angles that radiate from lower points. -
Carve the main lines:
Using a sharp needle tool or an X-Acto knife, carve into your pencil lines. You want a V-shaped or U-shaped groove that is distinct but not too deep—perhaps 1-2mm. -
Detail the rim:
Create the texture along the rim by making tiny, vertical repetitive hash marks just below the lip. I find a small serrated tool or just the tip of a needle tool works best for this uniform spacing. -
Clean the burrs:
Gently rub a finger over the carved lines to knock off any large clay crumbs, but don’t smooth it out completely yet. -
Wax resist (optional):
For easier cleanup later, you can apply a thin layer of wax resist over the whole outside surface, but ensure it doesn’t pool in the carved lines.
Avoid Smudging
If your black lines look grey or smudged, your sponge was too wet or the underglaze wasn’t dry enough. Let it sit longer, wring the sponge out thoroughly, and try again.
Step 3: Inlay and Finishing
-
Apply the underglaze:
Paint black underglaze or slip generously over all the carved lines. Don’t worry about being neat; you want the pigment to get all the way into the bottom of the grooves. -
Let it set:
Allow the underglaze to dry until it is no longer shiny. This prevents it from smearing out of the lines during the next step. -
Scrape back the focused surface used:
Using a sharp metal rib or a slightly damp sponge (if you didn’t use wax), gently scrape or wipe away the excess black from the surface. The goal is to leave black only inside the carved lines. -
Clean until crisp:
Continue cleaning until the clay body is bright and the lines are sharp black. If using a sponge, rinse it frequently to avoid staining the surrounding clay. -
Bisque fire:
Once bone dry, fire the cup in a bisque kiln to prepare it for glazing. -
Glaze application:
Dip the cup into a clear matte glaze. A matte finish complements the earthy texture of the stoneware better than a high gloss would. -
Final firing:
Fire the piece to the maturity temperature of your clay (usually Cone 5 or 6). This will reveal the speckles in the clay body alongside your stark black lines.
Once cooled, your cup is ready for a warm brew, showcasing a timeless design that feels distinctively handmade
Marbled Clay Swirl Tea Cup
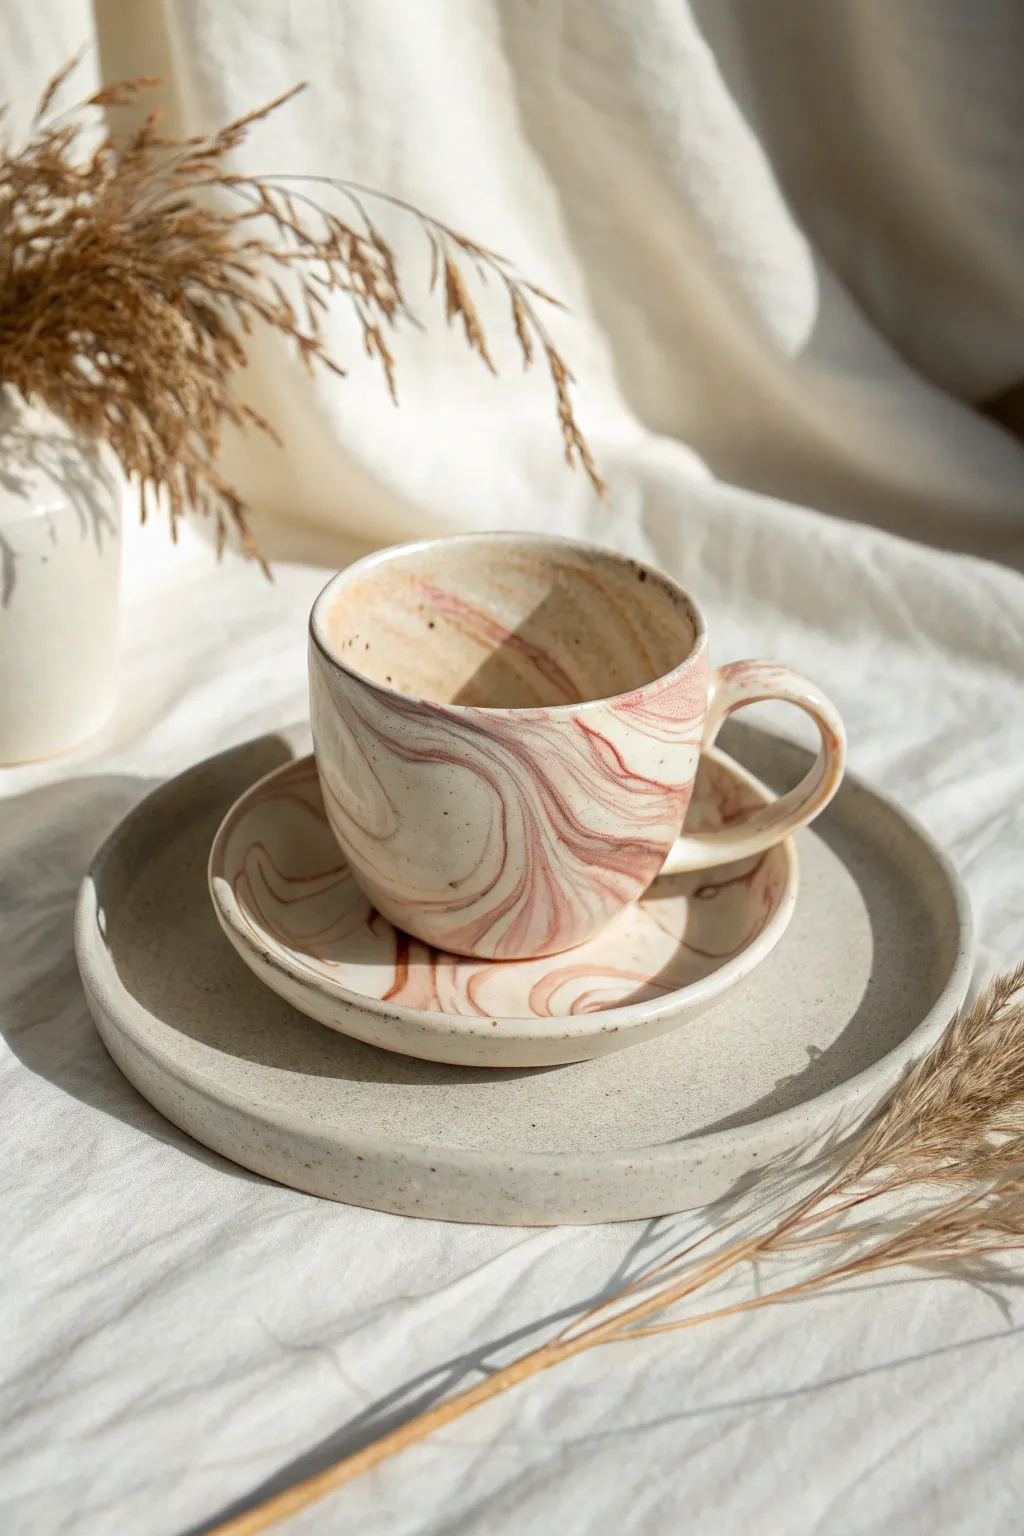
Embrace the organic beauty of mixed clays with this marbling technique that ensures no two cups are ever identical. The result is a stunning, warm-toned vessel with sweeping ribbons of terracotta and cream that feels as cozy as the tea it holds.
Step-by-Step Tutorial
Materials
- White stoneware or porcelain clay
- Red earthenware or terracotta clay
- Wire clay cutter
- Rolling pin
- Canvas mat or cloth
- Rib tool (wooden or silicone)
- Circular cookie cutters or templates
- Sponge
- Scoring tool or needle tool
- Clear glaze (food safe)
- Kiln access
Step 1: Preparing the Marbled Slab
-
Prepare Clay Portions:
Begin with about 80% white stoneware and 20% red clay. The white clay acts as your base, while the red will provide the dramatic veining seen in the image. -
Wedging and Layering:
Shape both clay types into thick logs. Slice the logs into smaller sections and stack them alternately, placing thin slices of red clay between chunks of white. -
Initial Kneading:
Gently wedge the stacked clay together. Do not over-wedge, or the colors will blend into a uniform pink instead of distinct swirls. Stop when you see clear separation. -
Create the Twist:
Roll the combined clay into a thick cylinder. Grip both ends and twist them in opposite directions like a candy wrapper to spiral the grain inside. -
Slam and Flatten:
Lift the twisted log and slam it down onto your canvas to flatten it slightly. This compresses the layers without muddying the design. -
Roll the Slab:
Using a rolling pin and guide sticks (if available), roll the clay out to a consistent 1/4-inch thickness. Roll in multiple directions to stretch the marbling pattern organically. -
Compress with Rib:
Drag a rib tool firmly across the surface of your slab. This aligns the clay particles, smooths the texture, and often reveals more of the hidden marble pattern underneath.
Step 2: Forming the Cup and Saucer
-
Cut the Shapes:
For the cup, cut a long rectangle (for the walls) and a small circle (for the base). For the saucer, cut a larger circle. I typically use a template to ensure my rectangle fits the circumference of the base perfectly. -
Form the Cylinder:
Score vertically along the short edges of your rectangle and apply slip. Curve the clay into a cylinder, overlapping the scored edges slightly, and press firmly to seal the seam. -
Attach the Base:
Score and slip the bottom edge of the cylinder and the edge of the small circle base. Press them together, then use a wooden tool to smudge the clay across the seam on the outside for a watertight bond. -
Shape the Cup:
Support the wall from the inside with one hand while using your fingers or a rib on the outside to gently bell out the shape, giving it that rounded, comfortable curve. -
Shape the Saucer:
Take the larger circle slab and gently pinch up the edges to create a shallow rim. Smooth the rim with a damp sponge to remove any sharp edges. -
Create the Handle:
Cut a strip from your remaining marbled scraps. Pull it gently to shape a handle or simply curve the strip. Score and slip the contact points on the cup and attach the handle firmly. -
Refining Edges:
Once the pieces are leather hard, use a damp sponge to smooth the lip of the cup and the edge of the saucer, ensuring they are comfortable to touch.
Slice for Pattern
To get the most dramatic swirls, try using a wire cutter to slice a thin layer off the top of your rolled slab before forming. The pattern inside is often bolder than the surface.
Step 3: Finishing and Firing
-
Drying:
Allow the pieces to dry slowly under loose plastic for a few days to prevent warping, especially where the handle attaches. -
Bisque Fire:
Load the bone-dry greenware into the kiln for the initial bisque firing (usually Cone 04). -
Glazing:
Dip or brush a clear, food-safe glaze over the entire piece. The clear glaze will deepen the contrast between the red and white clays, making the pattern pop. -
Final Firing:
Fire the glazed pieces to the maturity temperature of your stoneware (typically Cone 5 or 6). Let the kiln cool completely before opening.
Avoid Muddy Colors
If your swirl looks blurry or pink, you over-wedged. Stop mixing sooner next time. The clays mix further during rolling, so start with very distinct chunks.
Enjoy your morning coffee in a vessel that is truly one of a kind.
Lace-Stamped Tea Cup With Sweet Texture

This charming, handle-less tea cup features a dual-tone finish with a creamy, speckled glaze on top and exposed, textured clay beneath. The real star is the stunningly detailed fan-shaped pattern stamped into the raw clay, resembling delicate lace or crochet work.
How-To Guide
Materials
- Stoneware clay (buff or speckled)
- Pottery wheel
- Throwing tools (sponge, wire cutter, ribs)
- Trimming tools
- Textured lace, stamps, or a patterned roller (fan/scallop design)
- Small wooden modeling tool
- Loop tool (small)
- Bisque firing kiln
- Satin matte cream glaze (speckled)
- Wax resist
- Glaze firing kiln
Step 1: Throwing and Shaping
-
Center the clay:
Start with a ball of wedged stoneware clay on your wheel head. Center it firmly, ensuring there are no wobbles before you begin opening. -
Open and pull the walls:
Note the cup’s distinct shape—it has a slightly tapered base that swells gently in the middle before tapering back in at the rim. Pull your walls to an even thickness of about 1/4 inch. -
Refine the curve:
Use a kidney rib on the inside to push the belly out slightly while using your outside hand to guide the clay inward near the top rim for that cozy, cupped shape. -
Smooth the exterior:
Run a metal or rubber rib along the outside to remove throwing lines. The surface needs to be smooth for the texture to register clearly later. -
Cut from the wheel:
Wire the pot off the wheel head and set it aside on a ware board until it reaches a leather-hard state.
Clean Impressions
Dust your stamps lightly with cornstarch before pressing them into the clay. This acts as a release agent and prevents the stamp from sticking and ruining the crisp lines.
Step 2: Trimming and Texturing
-
Trim the foot:
Once leather-hard, center the cup upside down on the wheel. Trim the bottom to create a neat foot ring, refining the curve of the lower wall. -
Plan the texture zone:
Decide where your texture will stop. In the image, the texture covers the bottom half, leaving the top smooth for comfortable sipping. -
Stamp the pattern:
Using a scallop-patterned stamp or a textured rolling tool, press firmly into the clay. Work your way around the cup, interlapping the fans slightly to create a seamless scaling effect. -
Refine the border:
For the transition line between the smooth top and textured bottom, use a small loop tool or the end of a paintbrush to impress a row of small, uniform circles. -
Clean up burrs:
Stamping often pushes up little sharp edges of clay. Gently smooth these down with your finger or a soft sponge, but be careful not to erase the detail. -
Slow drying:
Wrap the cup loosely in plastic to let it dry slowly. This prevents warping, especially since the stamped area is now thinner and more compressed than the rim. -
Bisque fire:
Once bone dry, load the cup into the kiln for a bisque firing to cone 04 or your clay body’s specification.
Fixing Warped Rims
If aggressive stamping warped your rim out of round, gently gently re-center the cup on the wheel (don’t spin it fast!) and use a rib to gently nude it back to a circle.
Step 3: Glazing and Finishing
-
Clean the bisque:
Wipe the fired cup with a damp sponge to remove any kiln dust, which can prevent glaze from adhering properly. -
Apply wax resist:
This is crucial for the look. Carefully paint wax resist over the entire textured bottom section, right up to the row of stamped circles. -
Wipe back drips:
If you accidentally get wax on the upper smooth part, scratch it off or sand it lightly, otherwise the glaze won’t stick there. -
Dip the glaze:
Holding the cup by the foot (or using glazing tongs), dip the entire cup into a bucket of satin cream speckled glaze. -
Wipe the texture:
The wax resist should repel most of the glaze, but beads of glaze will sit on top of the wax. Use a damp sponge to wipe the textured area completely clean, revealing the raw clay color. -
Check the interior:
Ensure the inside is fully coated. If you poured glaze inside instead of dipping, make sure the rim coverage is even. -
Clean the foot:
Double-check the very bottom of the foot ring is free of glaze so it doesn’t fuse to the kiln shelf. -
Final firing:
Fire the cup to the maturity temperature of your clay and glaze (typically Cone 5 or 6 for stoneware).
Now you have a beautifully tactile cup that feels as cozy to hold as the tea inside it is to drink
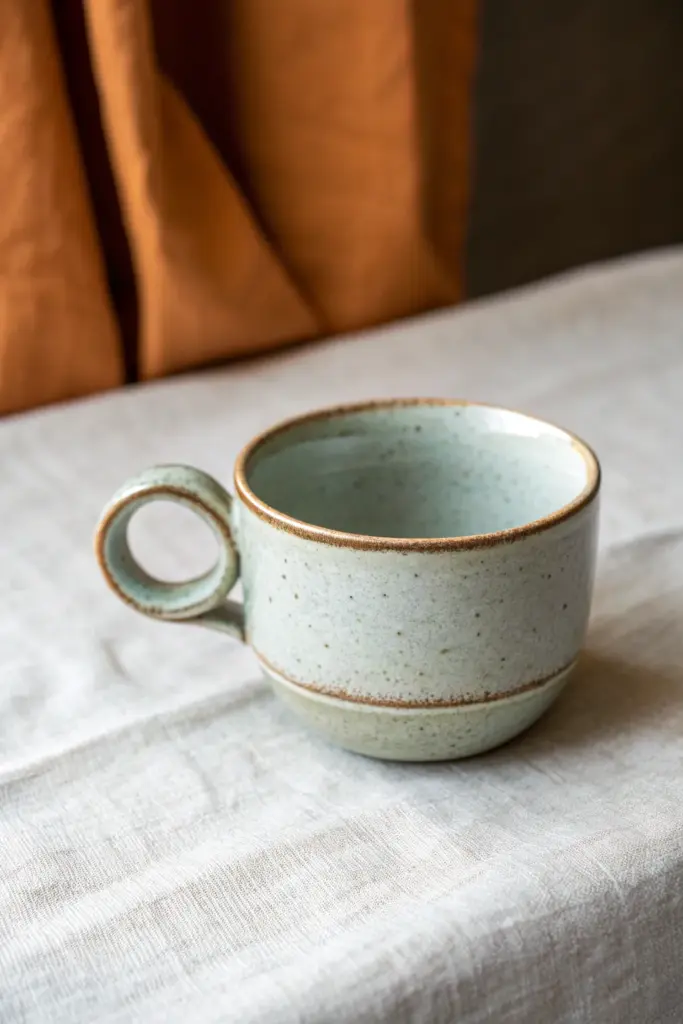
Sculptural Handle Tea Cup With a Twist

Elevate your morning ritual with this hand-built ceramic cup, featuring a distinctive circular handle that acts as a sculptural focal point. The design balances a speckled, cool-toned glaze with warm, exposed clay edges for a rustic yet modern aesthetic.
Step-by-Step Tutorial
Materials
- Speckled stoneware clay (mid-fire)
- Potter’s wheel (optional, can be hand-built)
- Needle tool
- Trimming tools
- Scoring tool or serrated rib
- Slip (clay mixed with water)
- Sponge
- Cutting wire
- Circle cutter (approx. 1 inch diameter)
- Wooden modeling tool
- Glossy speckled celadon or light blue glaze
- Wax resist
Step 1: Forming the Body
-
Prepare the Clay:
Begin by wedging about 1 pound of speckled stoneware clay to remove any air bubbles and ensure particle alignment. -
Center and Open:
Throw the clay onto the wheel head and center it. Open the clay to create the floor, leaving it slightly thicker than usual to allow for a trimmed foot later. -
Pull the Walls:
Pull the walls up into a straight-sided cylinder. Aim for a height of about 3 inches and a width of 3.5 inches. -
Shape the Curve:
Using a rib on the inside, gently belly out the form slightly, creating a soft curve near the bottom one-third of the cup while keeping the top rim relatively straight. -
Refine the Rim:
Compress the lip with a chamois or your finger to ensure it is smooth and pleasant to drink from. -
Wire Off:
Run a wire tool under the base and set the cylinder aside on a ware board until it reaches a leather-hard state.
Step 2: Creating the Ring Handle
-
Roll a Coil:
Roll out a thick coil of clay, roughly the thickness of your pinky finger. Ensure it is consistent in diameter. -
Form the Ring:
Wrap the coil around a dowel or use your fingers to form a perfect circle. The outer diameter should be about 1.5 to 2 inches. -
Cut and Join:
Cut the ends of the coil at an angle where they meet. Score and slip the ends, then press intended joints together firmly. -
Smooth the Seam:
Blend the clay over the join line until the ring looks seamless. I like to smooth this with a barely damp sponge to erase fingerprints. -
Flatten the Connection Point:
Gently tap one side of the ring against a table to create a small flat spot. This will be the attachment point to the cup body.
Handle Drooping?
If your ring handle sags while drying, prop it up with a small piece of foam or a wad of paper towel placed underneath the loop until the clay stiffens completely.
Step 3: Assembly & Glazing
-
Trim the Foot:
Once leather hard, center the cup upside down on the wheel. Trim excess clay from the bottom to create a defined foot ring. -
Score and Slip:
Score the flat spot on your ring handle and the corresponding spot on the cup wall. Apply a generous amount of slip to both areas. -
Attach the Handle:
Press the ring firmly onto the side of the cup. Visually check that it is straight vertically. -
Reinforce the Joint:
Use a small coil to reinforce the connection point if needed, smoothing it completely so it appears as one continuous piece. -
Carve the Detail Line:
Using a needle tool or trimming tool, carve a subtle horizontal line around the lower third of the cup body, just below where the handle attaches. -
Bisque Fire:
Allow the cup to dry slowly, then bisque fire it to cone 04 (or your clay body’s specifications). -
Wax Resist Application:
Apply wax resist to the very top rim, the carved detail line near the bottom, and the foot ring. This will keep these areas raw and unglazed. -
Glaze Dipping:
Dip the cup into a semi-opaque light blue or celadon glaze. Shake off excess drips and clean up any spots where glaze adhered to the wax. -
Final Fire:
Glaze fire the piece to cone 5/6, allowing the speckles to burn through and the raw clay accents to turn a warm, toasted brown.
Clean Lines Pro Tip
After applying wax resist to the rim and carved line, wipe those areas with a damp sponge immediately after dipping. This ensures crisp, sharp edges between the glaze and the raw clay.
Now you have a stunning, architecturally inspired cup ready for your favorite brew