I love how a plain terra cotta clay pot can go from “hardware store basic” to totally display-worthy with just a few simple decorating tricks. Here are my favorite clay pot decoration ideas, starting with the classics and ending with the fun, slightly unexpected transformations.
Classic Solid Color With a Matte Finish
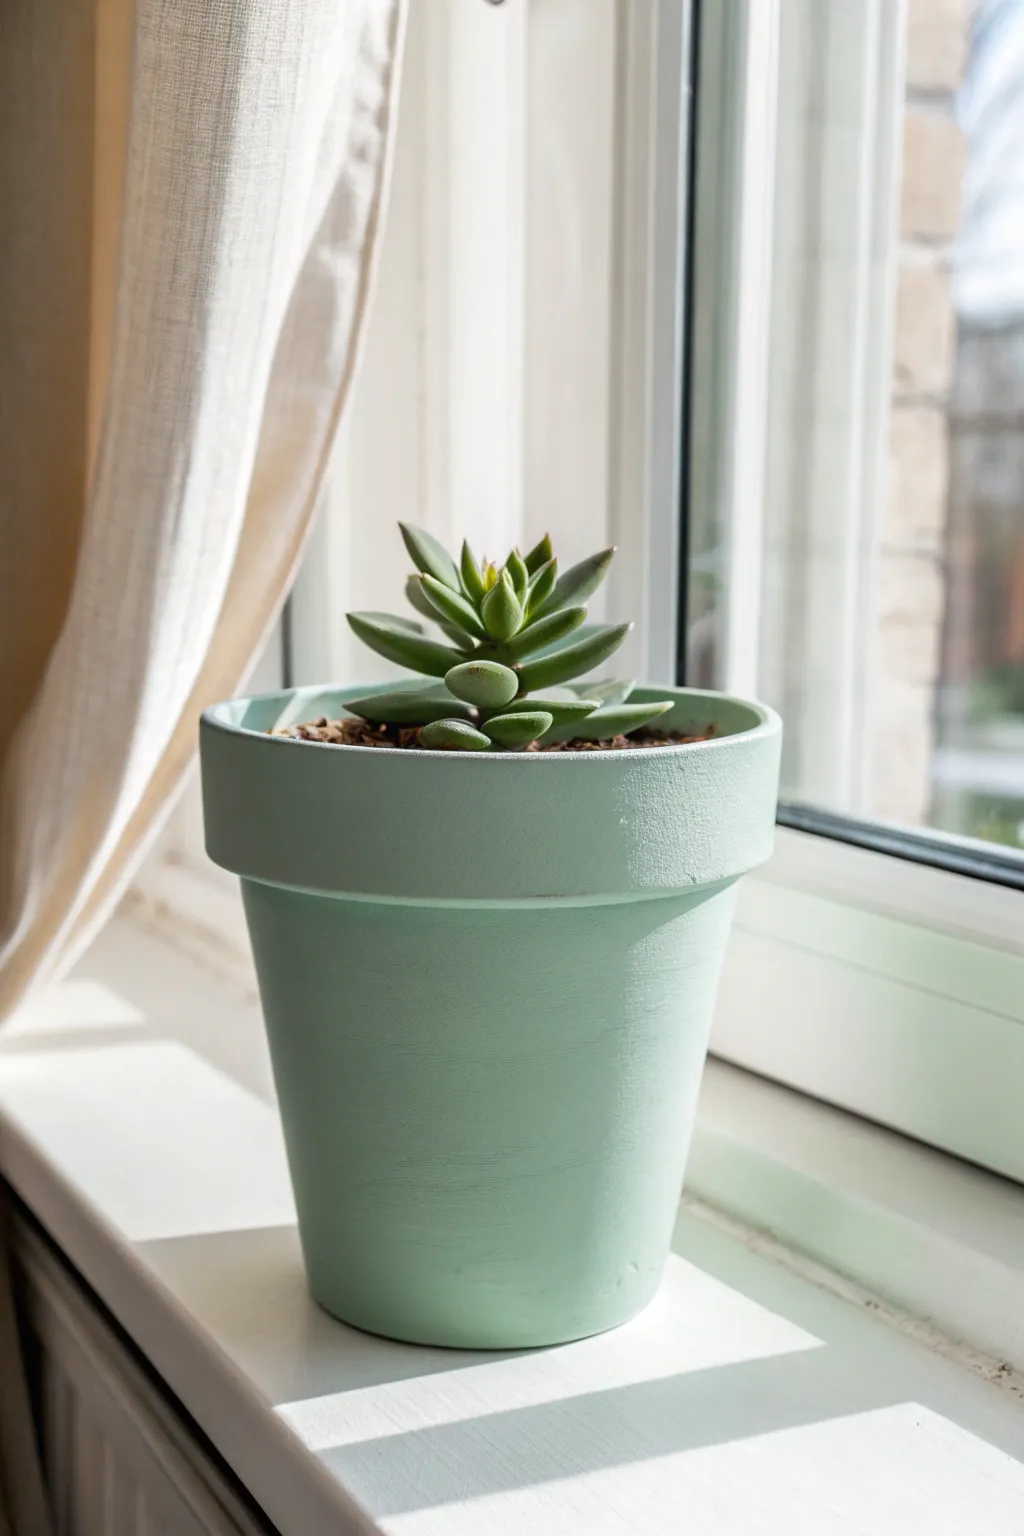
Sometimes simplicity makes the boldest statement, and this project proves just that with a refreshing coat of mint green paint. By transforming a standard planter into a modern matte vessel, you create the perfect serene home for your favorite succulents.
Step-by-Step
Materials
- Standard terra cotta pot (approx. 4-6 inches)
- Matte acrylic craft paint (Mint Green or Sage)
- White matte acrylic paint (for mixing/priming)
- Foam sponge brush (1-inch width)
- Small flat bristle brush
- Water-based matte spray sealer
- Fine-grit sandpaper (220 grit)
- Damp cloth or tack cloth
- Newspaper or drop cloth
Step 1: Preparation and Cleaning
-
Soak the pot:
Before doing anything, submerge your terra cotta pot in warm water for about an hour. This helps remove stickers and brings salts to the surface. -
Scrub the surface:
Give the pot a vigorous scrub with a stiff brush to remove any lingering dirt, dust, or sticker residue that could ruin your smooth finish. -
Dry completely:
Let the pot dry fully. This is crucial—terra cotta is porous and holds moisture. I usually let it sit overnight to be absolutely sure. -
Sand for smoothness:
Lightly sand the exterior with 220-grit sandpaper to knock down any bumps or rough clay textures. -
Wipe down:
Use a damp cloth or tack cloth to remove all the sanding dust so your paint adheres perfectly.
Paint Bubbling?
If paint bubbles after watering, moisture is seeping through the clay. Seal the INSIDE of the pot with a brush-on waterproof sealer before planting to stop water from pushing the paint off.
Step 2: Priming and Base Coat
-
Mix a primer:
Create a simple primer by mixing a small amount of water with white acrylic paint until it has a milky consistency. -
Apply the primer:
Brush this watered-down white mixture over the entire exterior and the top few inches of the interior rim. -
Let it absorb:
Allow this base layer to dry completely; the clay will soak it up quickly, sealing the pores for better color application later.
Step 3: Applying the Color
-
Prepare the mint shade:
Pour your matte mint green paint onto a palette or paper plate. If the shade feels too dark, mix in a drop of white to soften it. -
First coat application:
Using the foam brush, apply the paint in long, horizontal strokes around the pot, following the curve of the clay. -
Cover the rim:
Switch to your flat bristle brush to carefully paint under the rim’s lip and inside the top edge where the soil line will be. -
Dry time:
Allow the first coat to dry for at least 30-45 minutes. It will look streaky, but don’t worry. -
Second coat:
Apply a second layer of mint paint, this time using vertical strokes to help minimize visible brush marks and create a solid, opaque look. -
Check coverage:
inspect the pot in good lighting. If you see any classic orange clay peeking through, dab a little extra paint on those stubborn spots. -
Final dry:
Let the painted pot cure for several hours. The finish should look chalky and completely matte when dry.
Texture Twist
For a stone-like texture, mix a teaspoon of baking soda into your acrylic paint before applying the final coat. It creates a trendy, gritty ceramic feel.
Step 4: Sealing and Finishing
-
Prepare to seal:
Take the pot to a well-ventilated area for sealing. -
Apply sealer:
Spray a light, even coat of matte water-based sealer over the painted surface. This protects the paint from bubbling when you water your plant. -
Final cure:
Let the sealer dry for at least 24 hours before adding soil and your succulent.
Now you have a serene, modern planter ready to showcase your greenery on the sunniest windowsill


Tape-Blocked Geometric Stripes
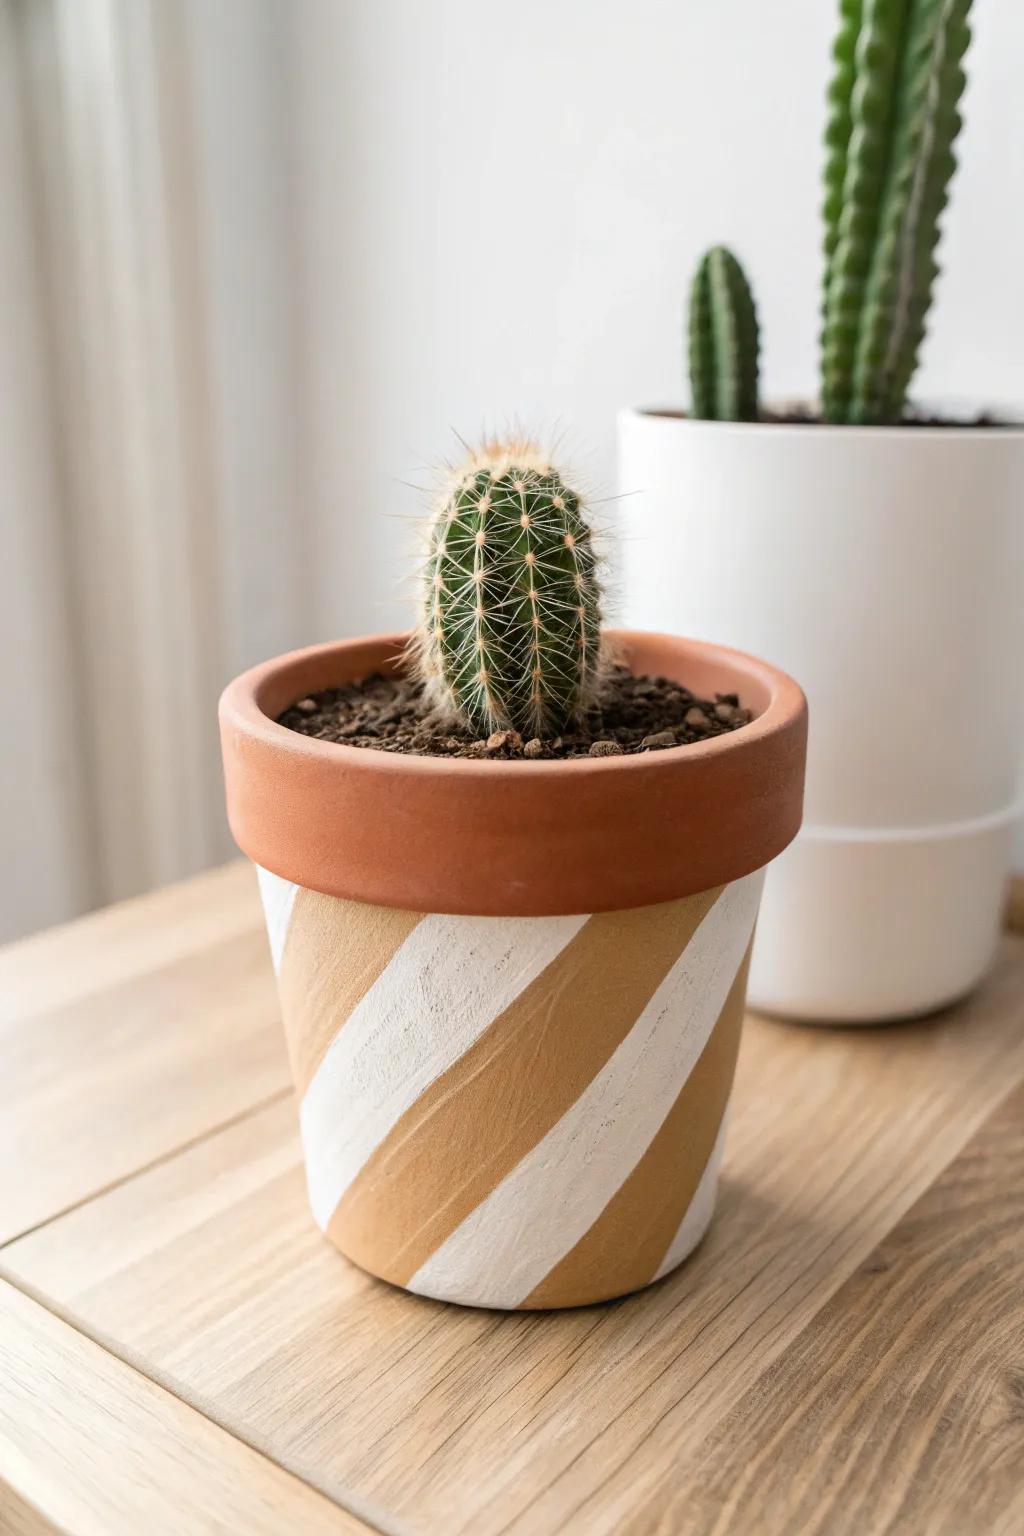
Transform a plain clay pot into a modern home for your succulents with this crisp, geometric design. By using the natural terracotta color as one of your stripes, you create a warm, earthy look that pairs perfectly with bright white lines.
How-To Guide
Materials
- Small terracotta pot (cleaned and dried)
- Painter’s tape or masking tape (1-inch width)
- White acrylic craft paint
- Foam brush or small flat paintbrush
- Scissors
Step 1: Preparation
-
Clean surface:
Ensure your terracotta pot is completely free of dust and dirt. Wipe it down with a damp cloth and let it dry fully before starting. -
Assess the tape:
I recommend using a low-tack painter’s tape for this, as standard masking tape can sometimes leave a sticky residue on the porous clay.
Bleeding Lines?
If paint bleeds, dip a small brush in the pot’s original terracotta color (mix orange and brown) and touch up the edges for a clean fix.
Step 2: Taping the Design
-
Start the spiral:
Begin at the top of the pot, just under the rim. Place the end of your tape at a diagonal angle pointing downwards. -
Wrap diagonally:
Continue wrapping the tape around the pot in a downward spiral. Aim for a consistent angle so the gap between the tape strips remains roughly the same width as the tape itself. -
Adjust spacing:
As you wrap, check that the exposed clay areas (which will be painted white) are even. If the stripes look too wide or narrow, gently lift and reposition the tape. -
Finish at the bottom:
Continue wrapping until the tape reaches the bottom edge of the pot. Cut the tape cleanly with scissors and press the end down firmly. -
Seal the edges:
Run your fingernail or a credit card firmly along the edges of the tape. This is crucial to prevent paint from bleeding under the tape and ruining your crisp lines.
Go Geometric
Use tapes of varying widths or place multiple strips in crisscross patterns to create complex plaid or diamond designs.
Step 3: Painting
-
First coat:
Dip your foam brush into the white acrylic paint. Apply a thin, even layer to the exposed terracotta areas between the tape lines. -
Mind the rim:
Be careful near the top rim. I like to paint just up to the natural groove under the rim, keeping the top lip unpainted for contrast. -
Let it dry:
Allow the first coat to dry for about 15-20 minutes. Terracotta absorbs paint quickly, so it might dry faster than expected. -
Second coat:
Apply a second coat of white paint to ensure solid coverage. The white needs to be opaque enough to hide the orange clay beneath. -
Inspect coverage:
Check for any patchy spots and touch them up lightly. Avoid glopping on too much paint, which can cause ridges.
Step 4: Revealing the Pattern
-
Timing is key:
Don’t let the paint dry completely before removing the tape. Wait until it is dry to the touch but strictly no longer than 30 minutes after the last coat. -
Peel slowly:
Carefully peel the tape away at a 45-degree angle. Pull slowly to ensure a clean line and prevent paint chipping. -
Clean up:
If any paint bled under the tape, use a damp toothpick or a craft knife to gently scrape it away while the paint is still slightly fresh. -
Final cure:
Let the pot sit for a full 24 hours to let the paint cure completely before adding soil or moisture.
Once fully dry, pop in your favorite cactus and enjoy the striking contrast of your new modern planter


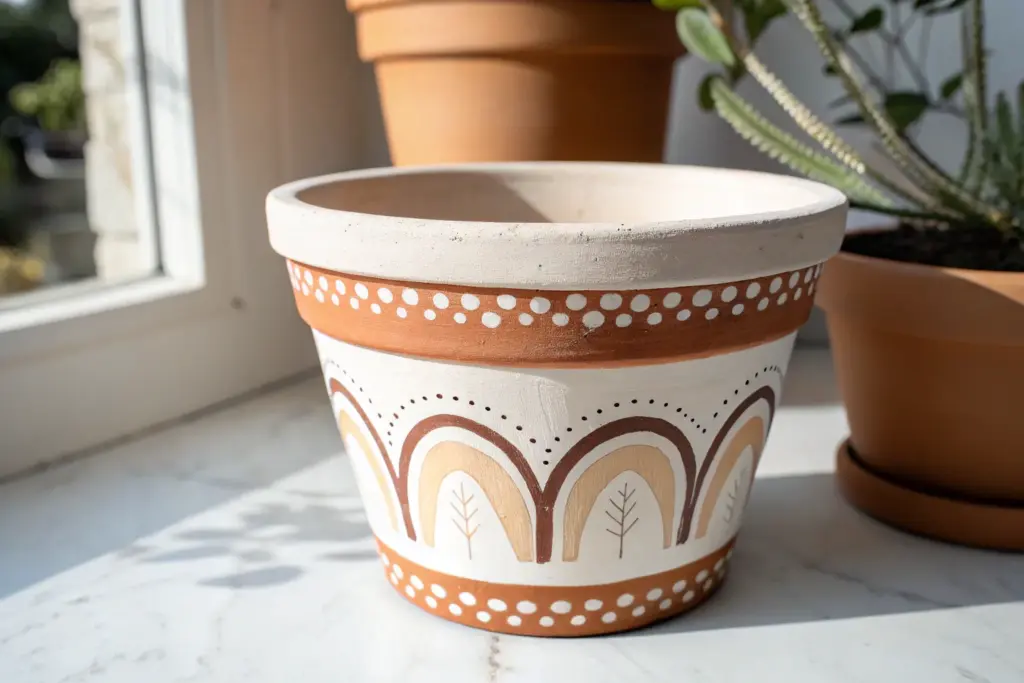
Easy Stenciled All-Over Pattern
Transform a plain terracotta pot into a charming garden accent with this dual-pattern design featuring delicate rim details and a bold floral body. The crisp white paint pops beautifully against the classic clay background, giving your plants a stylish new home.
Step-by-Step Tutorial
Materials
- Standard terracotta pot with saucer (clean and dry)
- White acrylic craft paint or outdoor patio paint
- Small round bristle stencil brush
- Fine liner paintbrush (size 0 or 00)
- Daisy floral stencil (flexible adhesive stencils work best)
- Painter’s tape or low-tack masking tape
- Paper plate or palette
- Paper towels
- Clear matte acrylic sealer spray (optional)
Step 1: Preparation & Planning
-
Clean surface:
Ensure your terracotta pot is thoroughly cleaned and completely dry. Any dust or moisture will prevent the paint from adhering properly. -
Plan spacing:
Look at your stencil size relative to the pot’s surface area. Visualize how many rows of flowers will fit comfortably around the tapered body.
Pro Tip: Dry Brushing
The key to crisp stencil lines is using very little paint. “Off-load” your brush on a paper towel until it produces almost no color before touching the pot.
Step 2: Stenciling the Body
-
Position first stencil:
Apply your adhesive daisy stencil to the main body of the pot. If using a non-adhesive stencil, secure it firmly with painter’s tape to prevent slipping. -
Load the brush:
Dip your stencil brush into the white paint, then dab off almost all the excess onto a paper towel. The brush should feel almost dry to the touch. -
Apply paint:
Using a straight up-and-down dabbing motion, apply paint through the stencil openings. Avoid brushing side-to-side, as this pushes paint under the edges. -
Remove and repeat:
Carefully peel back the stencil while the paint is still wet. Reposition it next to the first flower and repeat the process. -
rotate the pot:
Continue working your way around the circumference of the pot, maintaining even spacing between each floral motif. -
Create second row:
Once the top row is dry to the touch, start a second row below it. Ideally, offset the flowers so they sit in the gaps of the row above, creating a brick-lay pattern. -
Fill gaps:
Continue until the entire body of the pot is covered. Don’t worry if the pattern cuts off slightly at the bottom edge; this adds to the organic look. -
Let it dry:
Allow the stenciled main body to dry completely while you prepare your fine liner brush for the rim detail.
Troubleshooting: Bleeding
If paint bleeds under the stencil, don’t wipe it wet. Let it dry completely, then gently scrape the excess away with a craft knife or toothpick.
Step 3: Painting the Rim
-
Mark guide points:
To keep the rim pattern symmetrical, lightly mark faint pencil dots around the rim at equal intervals where the peaks of your design will go. -
Draw the zig-zag:
Using the fine liner brush and thinned white paint, paint a continuous zig-zag line connecting your guide points. I find resting my pinky against the pot helps steady my hand. -
Add vertical lines:
From the bottom point of every ‘V’ in your zig-zag, paint a straight vertical line extending upward, stopping just short of the zig-zag peak. -
Dot the peaks:
Dip the handle end of a paintbrush into the paint to create perfect dots. Place one dot at the very top of each zig-zag peak. -
Create dotted lines:
Using the fine brush tip, carefully paint smaller dots down the slopes of the zig-zag lines. Try to fit 3-4 small dots on each side of the peak. -
Add detail lines:
Paint a very thin, curved line next to the straight vertical lines you painted earlier, adding a bit of elegance to the geometric shape.
Step 4: Finishing Touches
-
Clean up edges:
If any stencil edges look blurry, use your fine liner brush with a tiny bit of white paint to sharpen the petal shapes manually. -
Erase guides:
Once the paint is 100% dry, gently erase any visible pencil marks from the rim. -
Seal the pot:
Take the pot outside and apply a coat of clear matte acrylic sealer. This protects your hard work from water damage and fading.
Once sealed and dry, your custom planter is ready to showcase your favorite herbs or succulents on the porch


Playful Polka Dots and Confetti Spots
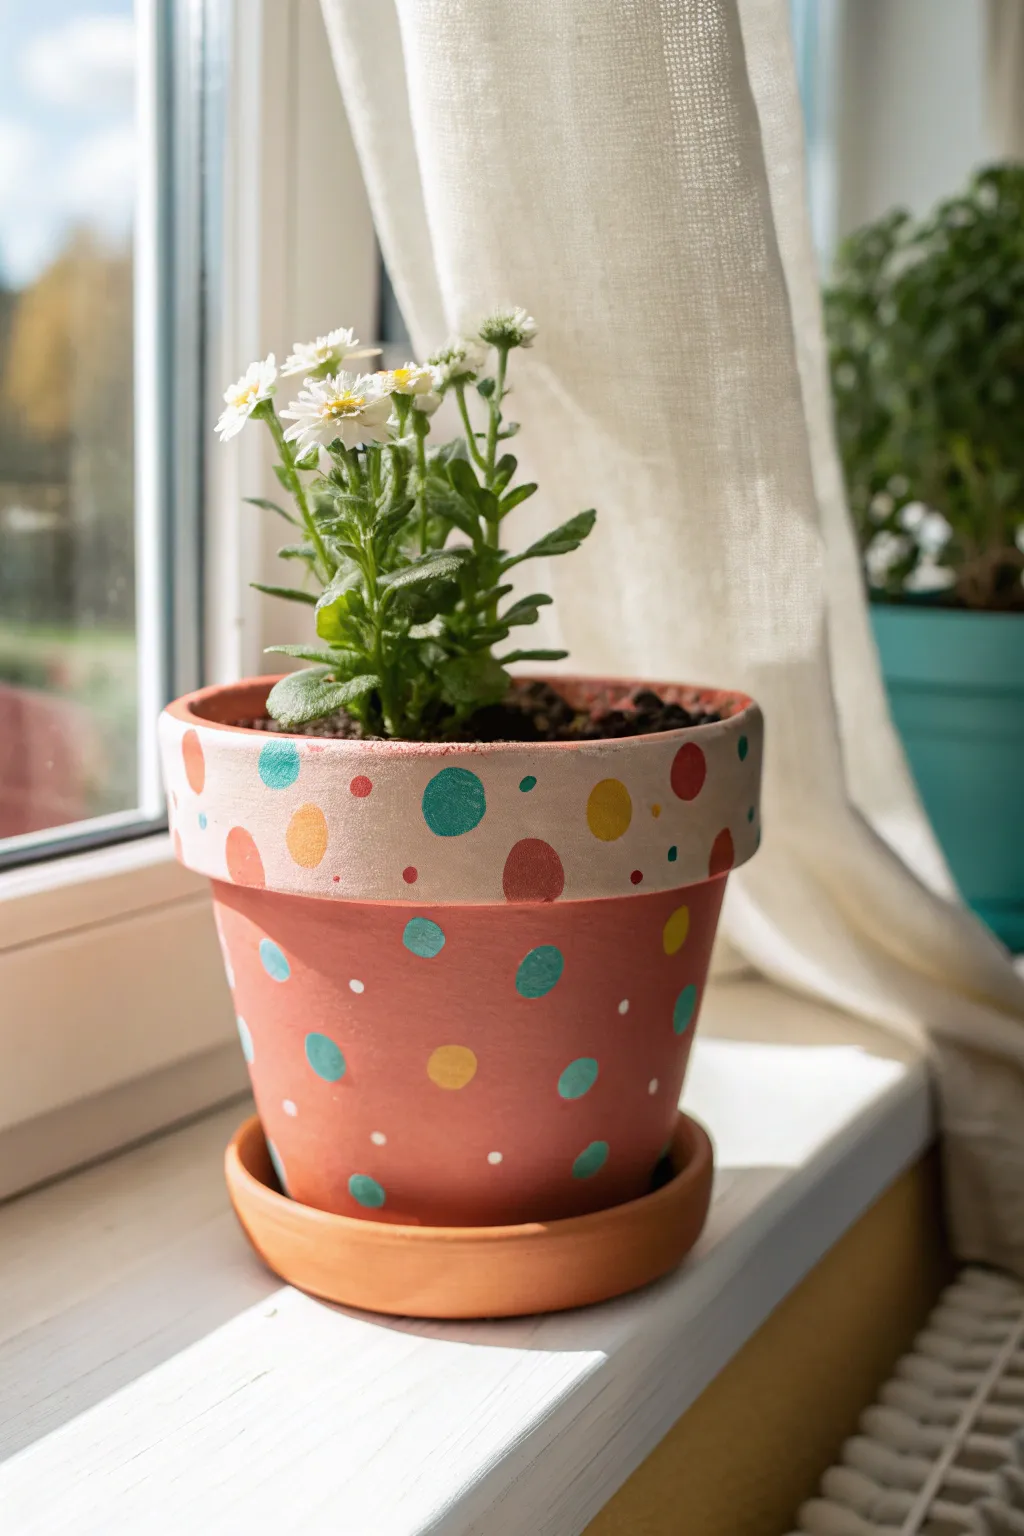
Transform a standard clay pot into a playful home for your favorite blooms with this easy polka dot design. By leaving the base natural and painting the rim a soft cream, you create a lovely contrast that makes the colorful spots really pop.
Step-by-Step
Materials
- Standard terracotta pot (4-6 inch diameter)
- Matching terracotta saucer
- Acrylic craft paint (Cream/Off-White)
- Acrylic craft paint (Teal/Turquoise)
- Acrylic craft paint (Mustard Yellow)
- Acrylic craft paint (Coral/Red-Orange)
- Acrylic craft paint (White)
- Flat paintbrush (1 inch width)
- Round sponge pouncers (varying sizes)
- Small detail brush or cotton swabs
- Water cup and paper towels
- Clear matte acrylic sealer (spray or brush-on)
Step 1: Preparation and Base Coat
-
Clean the surface:
Begin by wiping down your terracotta pot with a damp cloth to remove any dust or loose clay particles. Let it dry completely so the paint adheres properly. -
Paint the rim:
Using the flat paintbrush, apply a coat of cream or off-white acrylic paint to the entire rim of the pot. Don’t worry if it looks streaky at first. -
Extend inside:
Bring the cream paint just over the top edge and paint about an inch down the inside of the pot. This ensures a clean look even when the soil level drops slightly. -
Apply second coat:
Allow the first layer to dry for about 15 minutes. Apply a second coat of cream paint to the rim to get a solid, opaque coverage. I find two coats are usually perfect for hiding the orange clay underneath. -
Dry thoroughly:
Set the pot aside until the rim is completely dry to the touch. This prevents smudging when you start adding the dots.
Perfect Circles Tip
Don’t have sponge pouncers? Use the flat eraser head of a new pencil. Dip it in paint and stamp straight down for uniform, medium-sized polka dots.
Step 2: Creating the Pattern
-
Select rim colors:
Prepare your palette with teal, mustard yellow, and coral paint. These will be the primary colors for the large dots on the rim. -
Stamp main rim dots:
Dip a medium-sized round sponge pouncer or a large round brush into the teal paint. Press firmly onto the cream rim to create a circle. Repeat with yellow and coral, spacing them out randomly around the circumference. -
Add small rim details:
Using the handle end of a paintbrush or a small dotting tool, dip into the same colors and add tiny accents between the larger dots on the cream background. -
Switch to the body:
Move down to the unpainted terracotta body of the pot. You will use the same teal and mustard yellow colors here, but skip the large coral dots to keep the design balanced. -
Paint large body dots:
Paint scattered medium-sized circles using teal and yellow. You can paint these freehand with a round brush for an organic look, or use a sponge pouncer for precision. -
Layer smaller accents:
Once the main dots are placed, take a small detail brush or the handle of a brush and dip it into white paint. -
Add white confetti:
Dot tiny white specks randomly around the teal and yellow circles on the terracotta body. This creates a ‘confetti’ effect and adds brightness to the raw clay. -
Check density:
Step back and look at the pattern. If there are large empty spaces, fill them with a small extra dot of color or a few more white specks.
Oops! Smudged Dot?
If a dot smudges, wait for it to dry completely. Then, either gently sand it off or paint over it with the background color (cream or terracotta match).
Step 3: Finishing Touches
-
Cure the paint:
Allow the entire pot to dry for at least 3-4 hours, or overnight if possible, to ensure the paint is fully hardened. -
Apply sealer:
Coat the outside of the pot and the painted inner rim with a clear matte acrylic sealer. This protects your design from water damage when you water your plant. -
Prepare for planting:
Once the sealer is dry, place your pot into its matching saucer. The saucer is left unpainted in this project to anchor the natural look.
Now you have a cheerful, customized planter ready to brighten up any windowsill

The Complete Guide to Pottery Troubleshooting
Uncover the most common ceramic mistakes—from cracking clay to failed glazes—and learn how to fix them fast.
Soft Ombre Fade
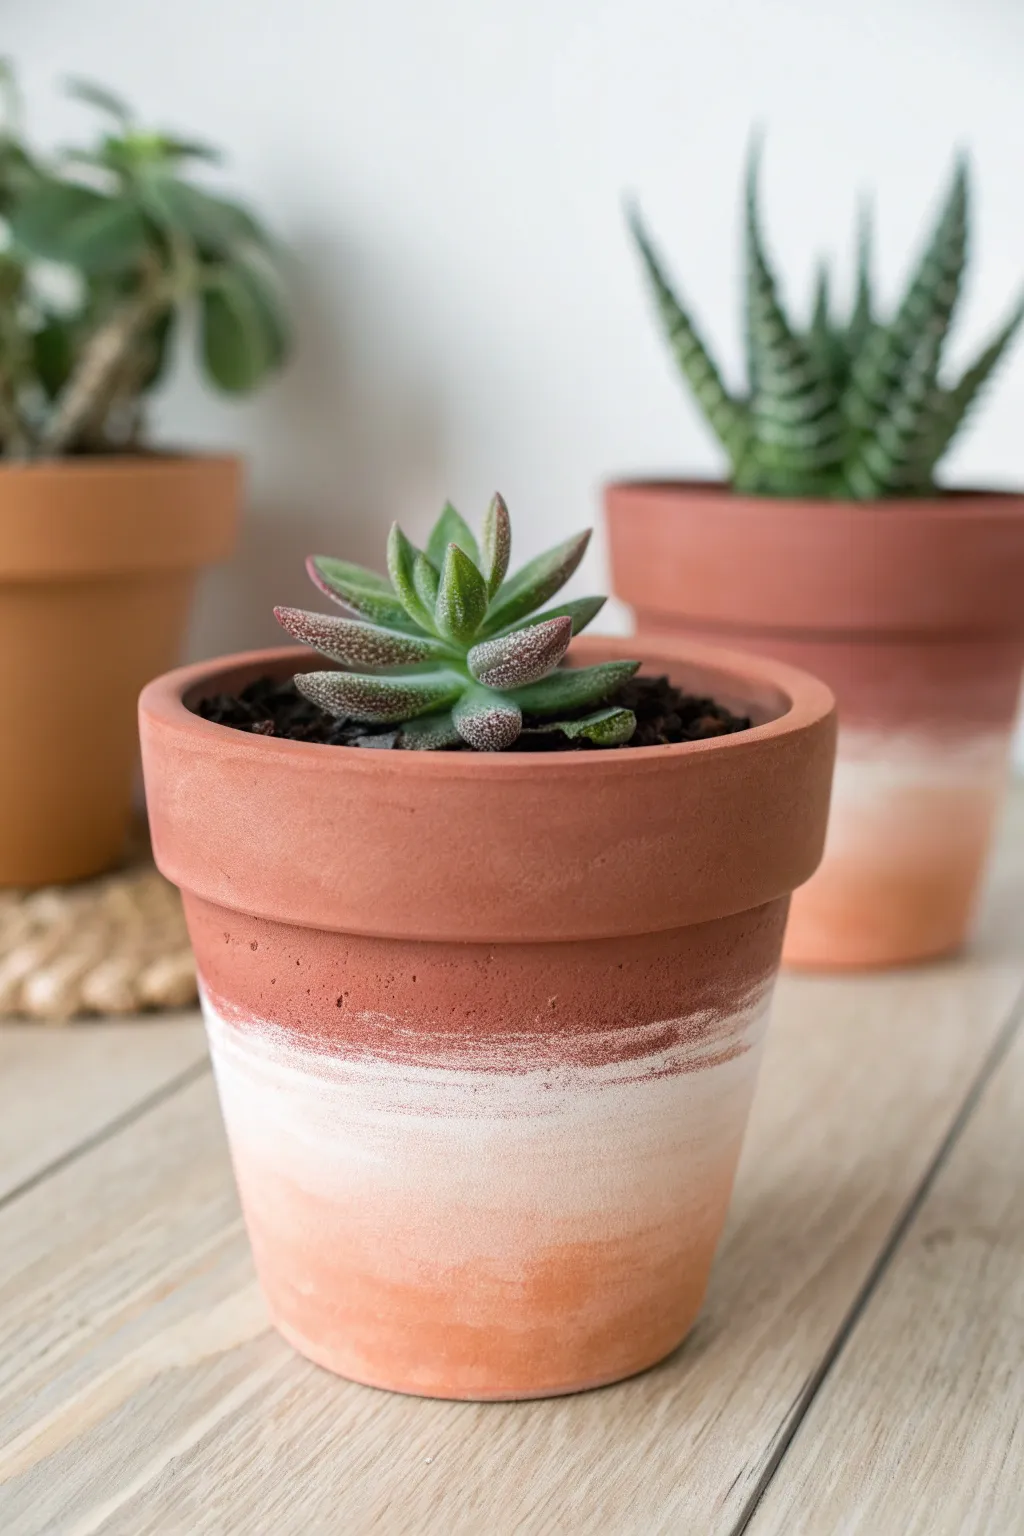
Achieve a gentle, weathered look on standard terra cotta with this clever paint technique. By creating a soft white band that fades into the natural clay tones, you mimic the beautiful patina of pots left in the sun for years.
Step-by-Step Guide
Materials
- Standard terra cotta pot
- White acrylic paint (matte finish)
- Wide, flat paintbrush or foam brush
- Paper towel or rag
- Palette or paper plate
- Water container
- Clear matte sealant spray (optional)
Step 1: Preparation
-
Clean surface:
Begin by thoroughly cleaning your terra cotta pot. Wipe away any dust or loose clay particles with a damp cloth to ensure the paint adheres smoothly to the porous surface. -
Dry completely:
Let the pot air dry completely before starting. Trapped moisture can affect how the acrylic paint bonds and absorbs into the clay.
Step 2: Painting the Base Layer
-
Load the brush:
Squeeze a moderate amount of white matte acrylic paint onto your palette. Load your wide flat brush, but don’t over-saturate it; we want control over the opacity. -
Apply the central band:
Starting about an inch below the rim, paint a solid, opaque band of white around the circumference of the pot. This will be the brightest point of your gradient. -
Thicken the band:
Widen this white band downwards slightly, keeping the paint fairly thick and solid in the middle section.
Pro Tip: Moisture Management
Terra cotta is super absorbent. Dampen your brush slightly with water before picking up paint to help the acrylic glide smoother for a better fade.
Step 3: Creating the Ombre Effect
-
Dry brush preparation:
Wipe most of the remaining paint off your brush onto a paper towel. You want the bristles to be almost dry, holding very little pigment. -
Feathering upwards:
Using this ‘dry brush’ technique, lightly drag the bristles from the wet white band upwards toward the rim. Use quick, light vertical strokes. -
Softening the edge:
The goal is to let the natural terra cotta color show through more and more as you verify closer to the rim. Stop before you cover the rim entirely; leave that original clay color visible. -
Reload lightly:
Dab just a tiny bit of fresh paint onto your brush, then offload most of it onto the towel again. You need a very subtle amount for the bottom fade. -
Feathering downwards:
Repeat the feathering process, this time dragging the brush from the solid white band downwards toward the bottom of the pot. -
Extending the fade:
Continue these downward strokes until you reach about an inch from the bottom edge. The white should become very sheer and scratchy here. -
Assess the gradient:
Step back and look at your fade. If the transition looks too harsh, use a clean, dry rag to gently smudge the edges while the paint is still tacky.
Level Up: Color Wash
Mix a tiny drop of dusty pink or sage green into your white paint. This creates a tinted ombre that coordinates perfectly with specific plant colors.
Step 4: Refining the Details
-
Intensify the brightness:
If the center white band has become too transparent during blending, I like to dab a little extra white right in the middle to re-establish the bright core. -
Create texture:
For a more rustic look, you can use a coarse sandpaper to lightly distress the painted areas once they are dry, revealing tiny specks of clay underneath. -
Dry styling:
Allow the pot to dry completely for at least one hour. Acrylics on terra cotta dry fast, but you want to ensure it’s set before handling. -
Sealing (Optional):
If this pot will live outdoors, spray a light coat of matte clear sealant over the painted exterior to protect your ombre finish from the elements. -
Potting:
Fill with potting soil and your favorite succulent to complete the look.
Now you have a beautifully weathered vessel ready to display your favorite greenery
Whitewashed Distressed Cottage Style
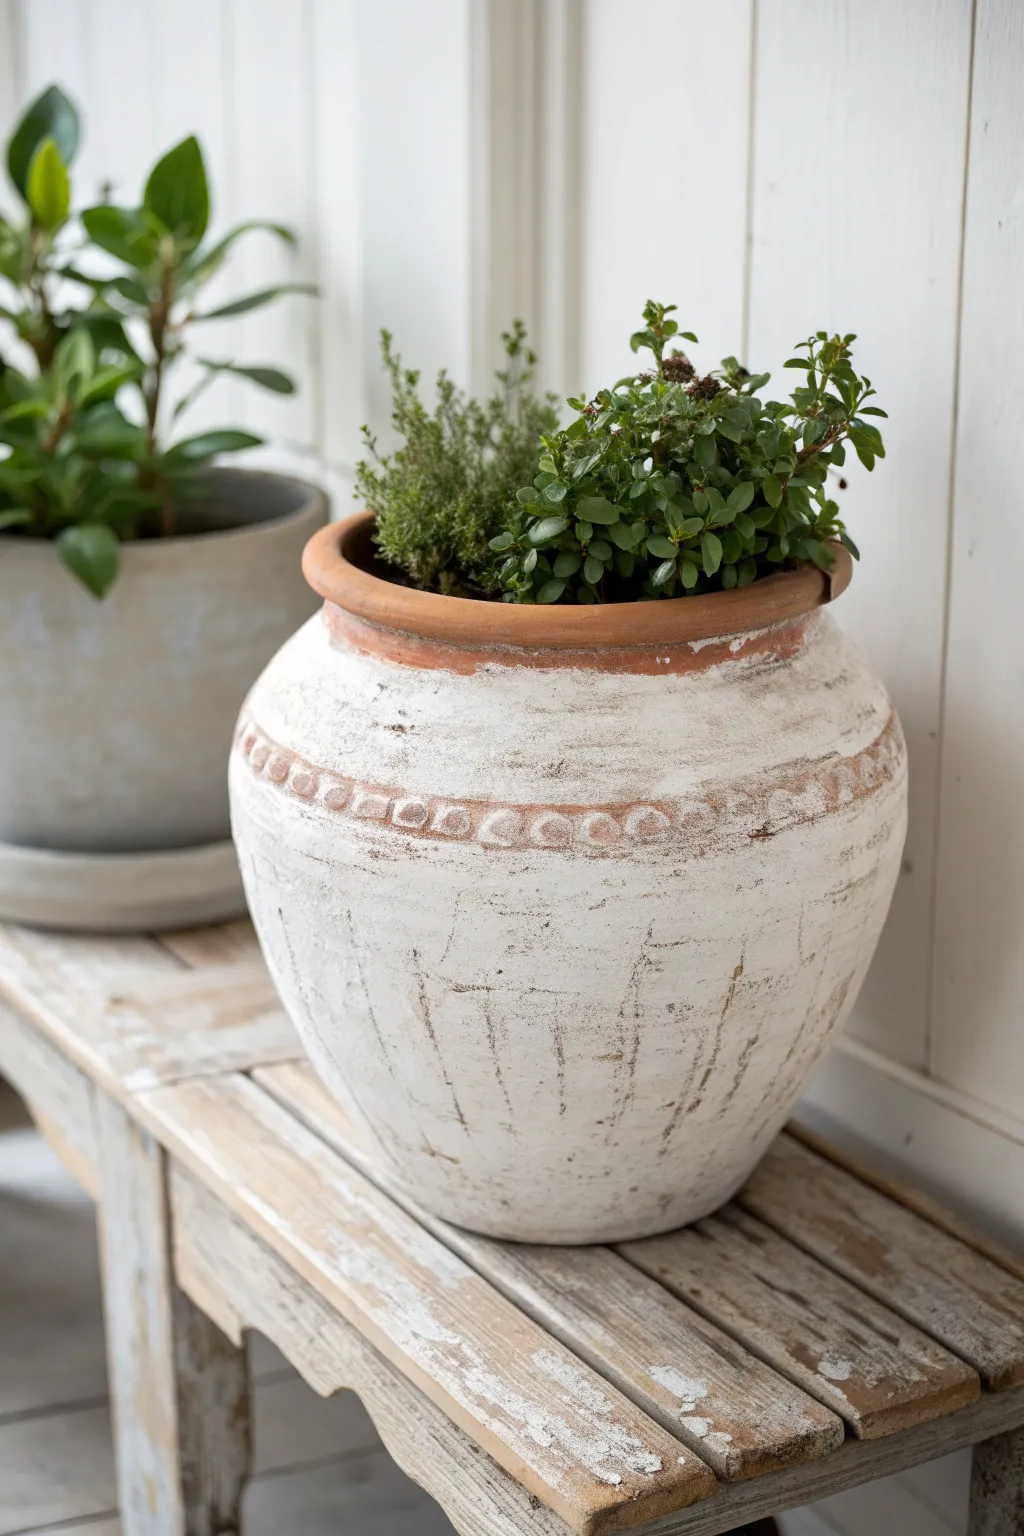
Transform a plain terra cotta pot into a charming, found-treasure planter with a few simple techniques. This project creates a heavily textured, whitewashed finish that perfectly mimics the look of vintage pottery from a French garden shed.
Step-by-Step Tutorial
Materials
- Large terra cotta pot (preferably with a rim or raised detail)
- White or off-white chalk paint
- Water
- Medium-grit sandpaper
- Clean rag or old t-shirt
- Chip brush or old paintbrush
- Plastic container for mixing
- Garden dirt or brown antiquing wax
- Paper towels
Step 1: Preparation & First Coat
-
Clean surface:
Begin by wiping down your terra cotta pot with a damp cloth to remove any dust or sticker residue. Let it dry completely. -
Mix the wash:
In your plastic container, mix your white chalk paint with a small amount of water. You want a consistency slightly thicker than milk but thinner than heavy cream. -
Dry brushing:
Dip just the tips of your dry chip brush into the paint mixture. Dab the excess off onto a paper towel. -
Apply base layer:
Apply the paint to the pot using random, cross-hatch strokes. Don’t try to cover the orange clay completely; let plenty of the original color peek through. -
Focus on texture:
Pay special attention to the rim and the raised decorative band. I like to jab the bristles into these crevices to deposit extra paint, creating contrast.
Too white?
If the pot looks too bright, brew extremely strong black tea. Sponge it over the dry paint to stain the white a warmer, aged ivory color.
Step 2: Building Layers & Texture
-
Initial drying:
Allow the first coat to dry for about 15-20 minutes. It should feel dry to the touch but not fully cured. -
Second heavy coat:
Reload your brush with unthinned chalk paint this time. Apply it more heavily in the center sections of the pot, creating thick patches of opaque white. -
Create brush marks:
While this second layer is wet, drag the bristles vertically down the pot to create visible striations and texture lines. -
Rim detailing:
Paint the rim, but leave the very top edge mostly bare to simulate wear from years of handling. -
Drying time:
Let the pot dry completely, preferably for an hour or two.
Step 3: Distressing & Aging
-
Sand for imperfections:
Take your medium-grit sandpaper and aggressively sand random patches of the pot. Focus on the raised decorative band to reveal the clay underneath. -
Deep scratches:
Use the edge of the sandpaper or a stiff wire brush to create deep vertical scratches on the body of the pot, mimicking the crazing found on old ceramic glazes. -
Scrape technique:
For extra character, use a scraping tool or old spoon to chip away small flakes of the thickest paint layers. -
Dirt application:
To get that ‘just dug up’ look, rub a little real garden dirt or brown antiquing wax over the entire surface. -
Wipe back:
Immediately wipe the dirt or wax off with a clean rag. The dark pigment will stay trapped in the deep scratches and crevices you created. -
Final smooth:
Give the entire pot one last gentle wipe with a dry cloth to blend the finish and soften the texture.
Add Greenery
For a ‘mossy’ shed look, dab small amounts of dark green acrylic paint near the bottom rim and in the cracks before applying your wax finish.
Fill your new old-world urn with fresh herbs and enjoy the timeless cottage vibe it brings to your space


What Really Happens Inside the Kiln
Learn how time and temperature work together inside the kiln to transform clay into durable ceramic.
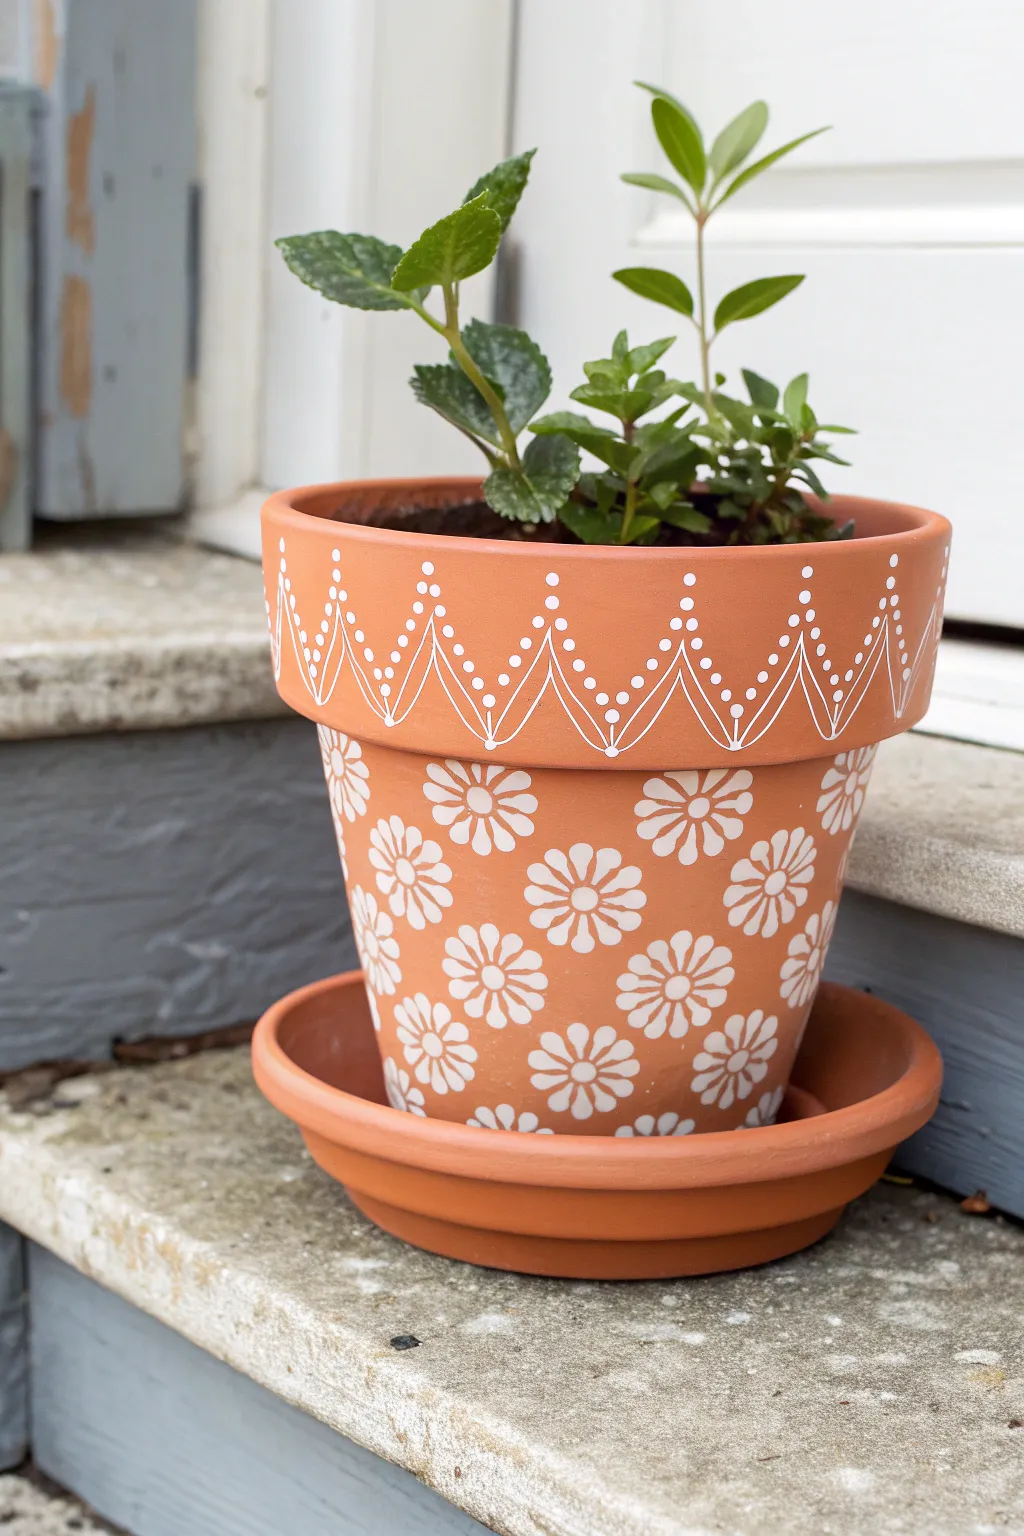
Floral Napkin Decoupage Wrap
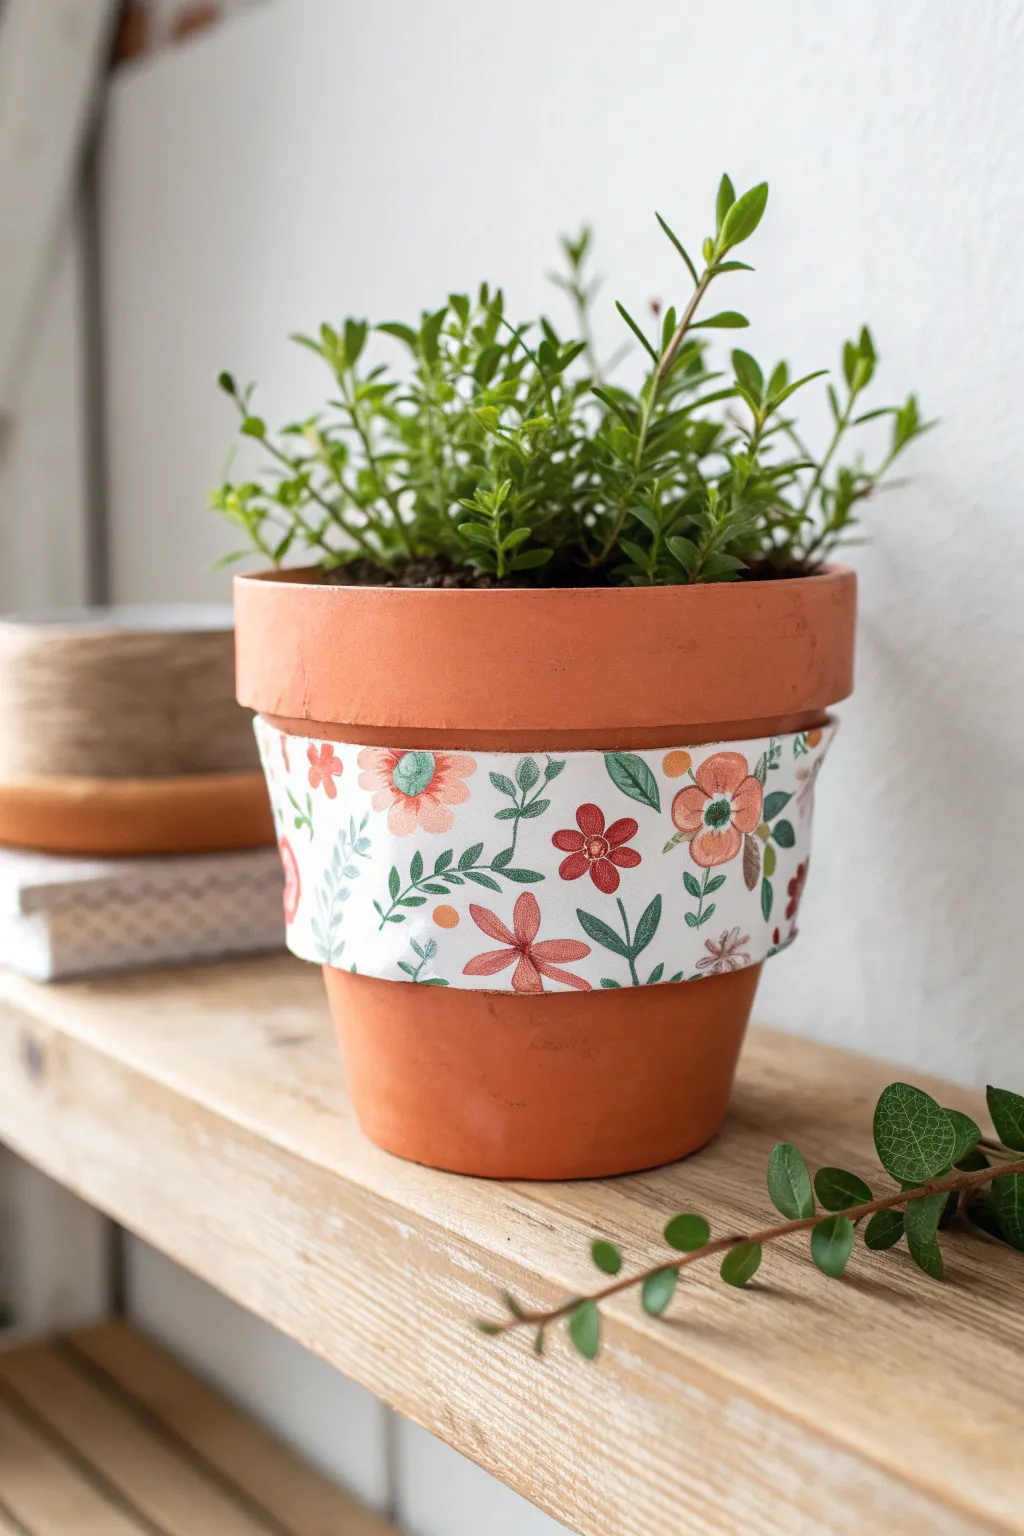
Transform a plain terra cotta pot into a charming centerpiece with this simple decoupage technique. The delicate floral band adds a touch of cottagecore elegance without covering the rustic clay entirely.
Step-by-Step Guide
Materials
- Standard terra cotta pot (approx. 6 inch)
- White acrylic paint (flat or matte finish)
- Decorative paper napkin with small floral print
- Mod Podge (Matte or Satin finish)
- Soft flat paintbrush (1 inch)
- Scissors
- Pencil
- Ruler or measuring tape
- Water container
- Paper towels
Step 1: Preparing the Surface
-
Clean the pot:
Before anything else, wipe down your terra cotta pot with a damp cloth to remove any dust or loose clay particles. -
Dry completely:
Let the pot air dry fully for at least 30 minutes; moisture trapped in the clay can affect how the paint adheres. -
Mark the band:
Using a ruler and pencil, lightly mark a band around the center of the pot where you want your design to sit. This wrap appears to be about 2.5 to 3 inches wide. -
Paint the background:
Paint the area inside your marked lines with white acrylic paint. This is crucial because napkins become translucent when glued, and the orange clay would otherwise dull the floral colors. -
Allow to dry:
Let the white paint dry completely. If the terra cotta still shows through strongly, apply a second coat of white.
Wrinkle Rescue
If you get big wrinkles while pasting, don’t panic. Gently tap them down with your wet brush. Small texture often resembles painted brushstrokes once dry.
Step 2: Preparing the Napkin
-
Separate the plies:
Most decorative napkins are 2 or 3-ply. Carefully peel away the white backing layers until you are left with only the single, thin printed top sheet. -
Measure the circumference:
Wrap the napkin strip loosely around the pot to determine the length needed, adding about half an inch for overlap. -
Cut the strip:
Cut a long rectangular strip from the napkin that matches the width of your painted white band.
Step 3: Decoupage Application
-
Apply base glue:
Brush a thin, even layer of Mod Podge directly onto the dried white painted section of the pot. -
Position the paper:
Gently place one end of your napkin strip onto the wet glue. I find it easiest to start at the ‘back’ of the pot. -
Smooth gently:
Use your fingers or a dry, soft brush to smooth the napkin down as you wrap it around, working slowly to minimize wrinkles. -
Beware of tearing:
Be extremely gentle here; once wet with glue, the tissue paper tears very easily. Do not pull or stretch it. -
Overlap the ends:
When you reach the starting point, overlap the ends slightly and seal them down with a dab of glue. -
Let it set:
Allow this base layer to dry for about 15-20 minutes. It doesn’t need to be bone dry, but tack-free helps preventing rips in the next step.
Vintage Vibe
For an aged, antique look, lightly sand the edges of the dry decoupage with fine-grit sandpaper, then sponge on a tiny bit of brown distress ink.
Step 4: Sealing and Finishing
-
Top coat application:
Dip your brush in Mod Podge and apply a top coat over the entire floral band to seal it. -
Seal edges:
Pay distinct attention to the top and bottom edges of the paper, ensuring they are fully adhered to prevent peeling later. -
Clean up stray glue:
If you got any Mod Podge on the bare terra cotta sections, wipe it away immediately with a damp rag before it dries shiny. -
Final dry time:
Let the pot cure for at least 24 hours before filling it with soil or inserting a plant.
Now you have a beautifully customized planter ready for your favorite herbs or succulents
Simple Mosaic Tile Band
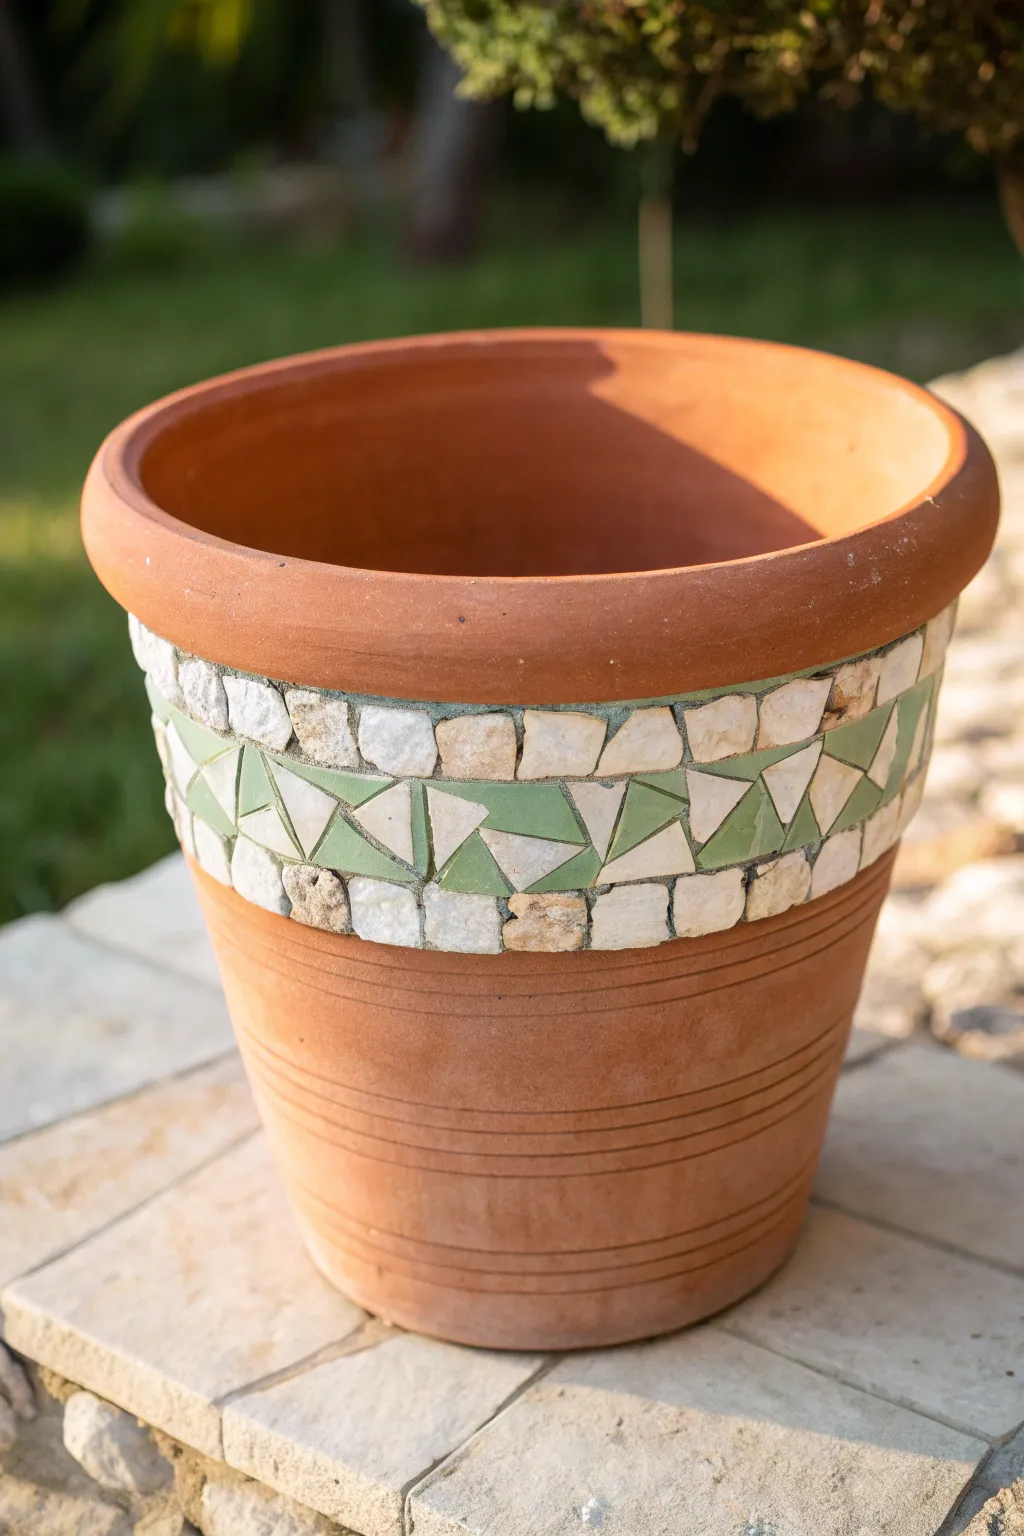
Elevate a standard garden pot with a touch of Mediterranean charm using a simple yet striking mosaic band. This project combines rustic white stones with sleek green geometric tiles to create a textured, sophisticated accent for your patio.
Detailed Instructions
Materials
- Standard terracotta pot (approx. 10-12 inches diameter)
- Rough-cut white marble or stone tesserae (approx. 1/2 inch)
- Green ceramic tile (for cutting)
- White or cream ceramic tile (for cutting)
- Tile nippers or wheeled glass cutters
- Tile adhesive or thin-set mortar
- Sanded grout (light beige or ivory color)
- Grout float or rubber spatula
- Sponge and water bucket
- Soft cloth for polishing
- Protective eyewear
Step 1: Preparation and Planning
-
Clean the pot surface:
Before applying any adhesive, ensure your terracotta pot is distinctively clean and dry. Wipe away any dust or loose clay particles with a damp cloth and let it dry completely to ensure a strong bond. -
Mark your guidelines:
Decide on the width of your mosaic band. Using a pencil, lightly draw two parallel lines around the upper section of the pot, just below the rolled rim, to define the top and bottom boundaries of your working area. -
Prepare the geometric tiles:
Wearing your protective eyewear, take your green and white ceramic tiles and use the nippers to cut them into small triangles. Aim for pieces that are roughly equivalent in size to fit within the center of your band.
Sliding Tiles?
If tiles slip down the vertical surface while the glue is wet, use painter’s tape to secure them in place or lay the pot on its side (supported by towels) while working in sections.
Step 2: Adhering the Mosaic
-
Apply adhesive for the top border:
Spread a small layer of tile adhesive along the top pencil line you drew. Work in small sections, about 3-4 inches at a time, so the glue doesn’t dry out before you place the stones. -
Place the top row:
Press the rough-cut white stone tesserae firmly into the adhesive along the top line. Try to keep them snug against each other, though slight natural variations in the stone shape add character. -
Create the bottom border:
Repeat the previous step for the bottom pencil line using the same rough white stones. This creates a framed channel for your geometric middle section. -
Dry fit the pattern:
Before gluing the middle section, verify your triangle sizes. I find it helpful to lay out a few inches of the pattern on a table first to see how the green and white triangles nest together. -
Apply adhesive to the center:
Apply adhesive to the empty space between your two white stone borders. Ensure the layer is thick enough to hold the tiles but not so thick that it oozes out excessively. -
Install the geometric center:
Press your green and white triangles into the center channel. Alternate their orientation—point up, point down—to create an interlocking geometric look. Adjust the spacing slightly as you go to accommodate the pot’s curve. -
Let it cure:
Once the entire band is complete, allow the adhesive to dry fully. This usually takes about 24 hours, but check your specific adhesive’s label for confirmation.
Go Monochromatic
For a minimalist desert vibe, replace the green ceramic triangles with terracotta-colored shards or dark slate pieces to create a subtle tone-on-tone effect.
Step 3: Grouting and Finishing
-
Mix the grout:
Mix your sanded grout with water according to package directions. You want a consistency similar to peanut butter—thick but spreadable. -
Apply the grout:
Using a grout float or a rubber spatula, spread the grout over the entire mosaic band. Press firmly to force the grout into all the crevices between the stones and tiles. -
Remove excess grout:
Scrape off the bulk of the excess grout with the edge of your float. Be careful not to pull fresh grout out of the joints. -
First sponge wipe:
Wait about 10-15 minutes for the grout to set slightly. Dampen a sponge (wring it out well) and gently wipe across the surface to clean the tile faces. Rinse the sponge frequently. -
Clean the haze:
Allow the grout to dry for another hour until a hazy film appears. Use a clean, dry cloth to buff away this haze, revealing the shine of the green tiles and the texture of the white stone. -
Final cure:
Let the finished pot sit for a few days to fully cure before planting inside or placing it outdoors.
Your customized planter is now ready to showcase your favorite blooms with handmade style

TRACK YOUR CERAMIC JOURNEY
Capture glaze tests, firing details, and creative progress—all in one simple printable. Make your projects easier to repeat and improve.
Twine-Wrapped Rim With a Cute Tag
Add an instant touch of farmhouse style to your windowsill with this beautifully simple project. By wrapping earthy jute twine around the rim and adding a customizable tag, you can turn a plain terra cotta vessel into a personalized planter perfect for gifting.
How-To Guide
Materials
- Small terra cotta pot (approx. 4-inch diameter)
- Succulent potting soil mix
- Small gravel or perlite (for top dressing)
- Small Echeveria succulent or similar plant
- Jute twine (natural brown color)
- Small rectangular kraft paper tag
- Hot glue gun and glue sticks
- Scissors
- Hole punch (if your tag doesn’t have a hole)
Step 1: Wrapping the Rim
-
Prepare the surface:
Begin by wiping down the exterior of your terra cotta pot with a dry cloth to remove any dust or loose clay particles. This ensures your glue will adhere properly. -
Anchor the twine:
Apply a very small dot of hot glue just under the lip of the pot’s rim. Press the end of your jute twine into the glue and hold it for a few seconds until secure. -
Begin winding:
Start wrapping the twine horizontally around the pot, keeping it snugly under the protruding rim. Ensure your first loop is level. -
Create the band:
Continue wrapping the twine around the pot, stacking each new layer directly below the previous one. Keep the tension tight so there are no gaps between the strands. -
Secure occasionally:
To prevent the twine from slipping, add a tiny dot of hot glue every two or three wraps, specifically on the back side of the pot. -
Finish the wrap:
Once you have created a band of twine about 1 to 1.5 inches wide, cut the twine. Tuck the raw end under the final loop and secure it firmly with a dab of hot glue.
Sticky Situation
Use a low-temp glue gun if possible. High-temp glue can seep through the twine weave and leave visible glossy blobs that ruin the matte, rustic look.
Step 2: Adding the Tag
-
Cut the tie string:
Cut a separate piece of jute twine, approximately 12 inches long. This will be used to attach your tag. -
Thread the tag:
Take your kraft paper tag and thread the new piece of twine through the hole at the top. -
Position the tag:
Place the tag against the front of your wrapped twine band. I find it looks best when centered or slightly offset to the right. -
Wrap the tie:
Bring the two ends of the tag’s twine around the back of the pot. -
Secure the back:
You can either tie a knot at the back or, for a cleaner look, use a small dot of glue to hold the string in place against the existing twine wrap. -
Bring ends forward:
Bring the loose ends back around to the front of the pot, crossing over the tag area. -
Tie the bow:
Tie a small, simple bow directly over where the tag hangs. Adjust the loops so they sit neatly. -
Trim the ends:
Snip the tails of the bow so they are proportional to the pot, leaving them slightly frayed for a rustic look.
Step 3: Planting and Finishing
-
Fill with soil:
Add your succulent potting mix into the pot, filling it about three-quarters of the way full. -
Prepare the plant:
Gently remove your succulent from its nursery container, loosening the roots slightly with your fingers. -
Plant the succulent:
Nestle the plant into the center of the soil. Add more soil around the sides, pressing down gently to secure the roots. -
Add top dressing:
Pour a layer of small white gravel, perlite, or decorative stones over the exposed soil. This not only looks polished but prevents leaves from touching wet soil. -
Clean up:
Use a small brush or a puff of air to remove any stray soil granules from the leaves of the succulent or the rim of the pot.
Make It Yours
Stamp a word on the tag like ‘Grow’ or the plant’s Latin name. Use a white paint pen for a chalkboard effect on a black tag for contrast.
Place your new creation in a sunny spot and enjoy the natural texture it brings to your space
Boho Mandala Medallion Center
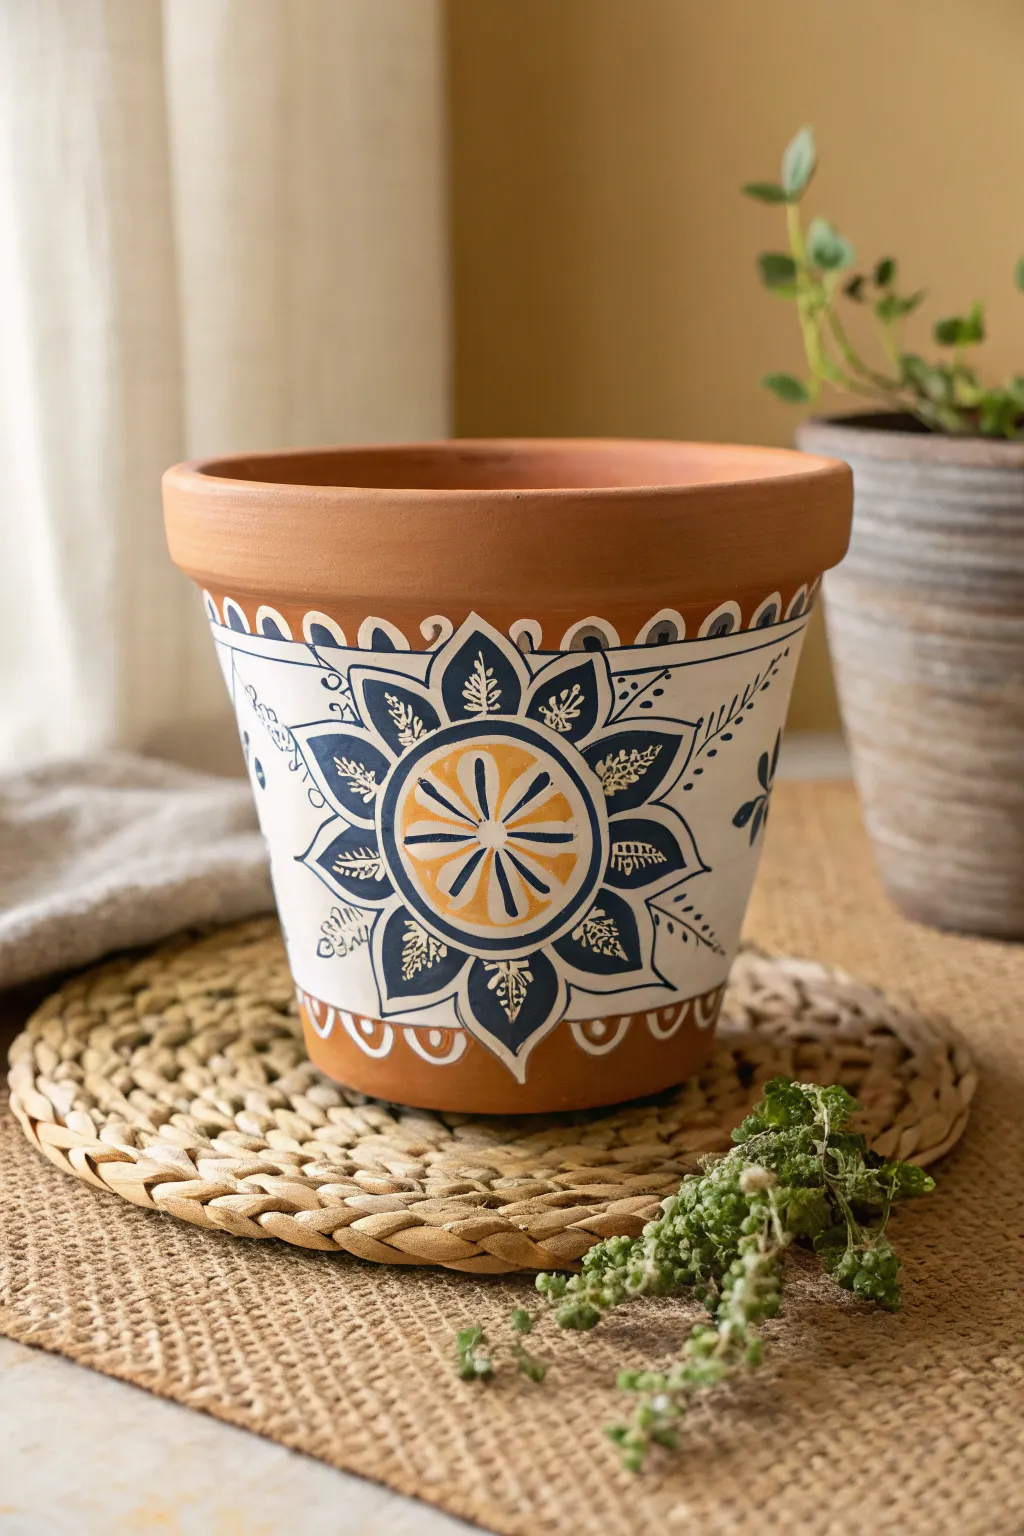
Transform a plain clay vessel into a bohemian centerpiece featuring a striking mandala medallion in deep indigo and mustard yellow. The bold, high-contrast design sits beautifully against a crisp white band, bringing an artistic, hand-painted touch to your indoor garden.
How-To Guide
Materials
- Standard terracotta pot (clean and dry)
- Acrylic craft paints: White (Titanium or Warm White), Navy/Deep Indigo Blue, Mustard Yellow
- Flat paintbrush (1-inch width)
- Small round detail brush (size 0 or 1)
- Medium round brush (size 4 or 6)
- Painter’s tape or masking tape
- Graphite transfer paper
- Pencil
- Water cup and palette
- Spray sealer (matte or satin finish)
Step 1: Base Preparation
-
Clean the surface:
Ensure your terracotta pot is completely free of dust or sticker residue. Wipe it down with a damp cloth and let it dry fully before painting. -
Tape the boundaries:
Apply a strip of painter’s tape horizontally around the pot, about one to two inches below the rim. Apply a second strip locally near the base, leaving a wide central band exposed for your artwork. -
Paint the background band:
Using the 1-inch flat brush, fill the space between the tape lines with white acrylic paint. You may need 2-3 coats for opaque coverage, allowing 15-20 minutes of drying time between layers. -
Remove tape:
Carefully peel off the painter’s tape while the final coat is still slightly tacky to ensure a crisp edge. Let the white band cure for at least an hour.
Step 2: Painting the Medallion
-
Mark the center:
Lightly find the center of your white band with a pencil. Draw a small circle here (about 2 inches in diameter) to serve as the core of your mandala. -
Paint the yellow core:
Fill this central circle with your mustard yellow paint using the medium round brush. Apply two coats if necessary for vibrancy. -
Outline the core:
Once the yellow is dry, use your smallest detail brush and the indigo blue paint to outline the yellow circle. Add a second, slightly larger concentric circle around it. -
Create the spokes:
Paint eight tear-drop shapes inside the yellow circle using blue paint, radiating outward from the center point like wheel spokes. -
Draft the petals:
Lightly sketch or freehand eight large, pointed petals radiating from the central medallion. These should extend almost to the edges of the white band. -
Outline and detail petals:
Paint the outline of these large petals in blue. Inside each petal, add a smaller, solid blue petal shape that mimics the outer contour but leaves a white border. -
Add veining:
Switching back to white paint on your finest brush, add delicate fern-like veins or small dots inside the solid blue petal shapes for texture.
Fixing Wobbly Lines
If your fine lines look shaky, thin your acrylic paint with a tiny drop of water. Ink-like consistency flows smoother off the liner brush.
Step 3: Accents and Finishing
-
Paint side embellishments:
If viewing the pot from the front leaves empty white space on the sides, add partial petal shapes or simple vine lines in blue to fill the voids. -
Detail the rim border:
Along the top edge of the white band (just below the terracotta rim), paint a series of small blue arches or scallops. Add a tiny white dot inside each arch. -
Detail the base border:
Repeat the scallop pattern along the bottom edge where the white paint meets the raw terracotta. -
Clean up lines:
Check for any smudges or uneven lines. I find it helpful to use a damp cotton swab to quickly erase mistakes before the paint sets. -
Seal the work:
Once the artwork is completely dry (preferably overnight), take the pot to a well-ventilated area and apply a clear spray sealer to protect the paint from moisture.
Add Dimension
Mix a tiny amount of white into your yellow paint to create a lighter highlight color. Dab this onto the center of the yellow wheel for a 3D effect.
Now your new planter is ready to add a splash of boho charm to your favorite sunny corner
Pot People With Succulent Hair
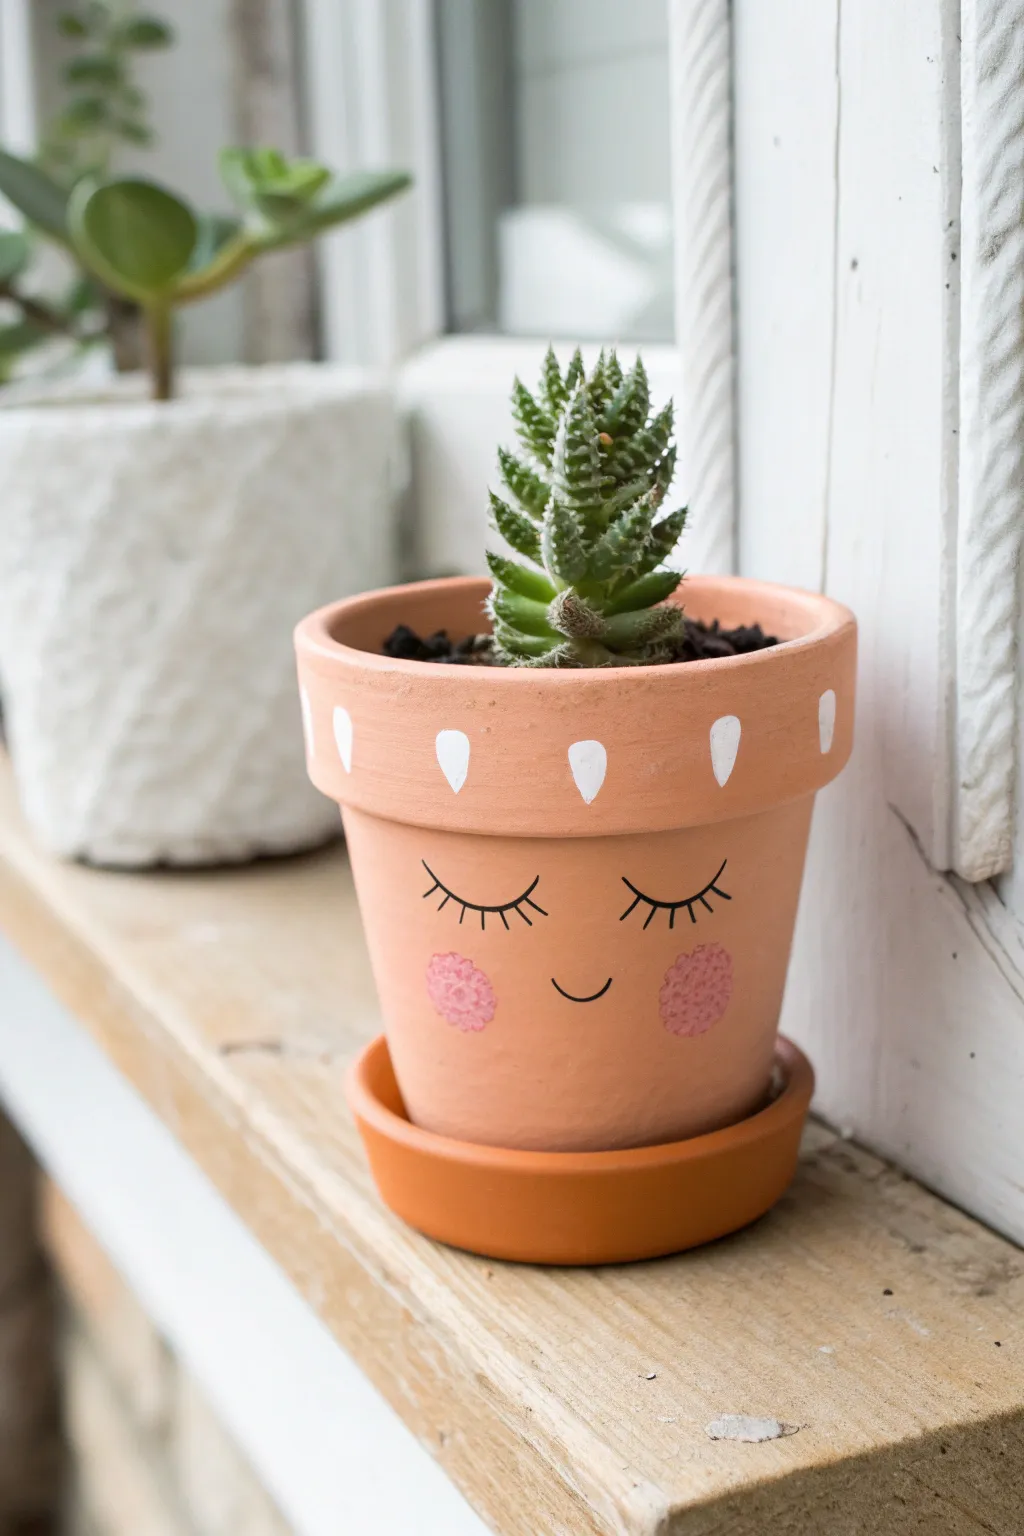
Transform a plain clay pot into a charming, sleeping character with just a few strokes of paint and a fitting succulent hairstyle. This project combines simple face painting with gardening to create a peaceful little companion for your windowsill.
Step-by-Step Guide
Materials
- Small terracotta pot with matching saucer
- Acrylic craft paint: white, black, light pink
- Small round paintbrush (size 2 or 4)
- Small detail paintbrush (size 0 or 00)
- Clear matte sealant spray (optional)
- Small succulent (like a Haworthia or Aloe)
- Potting soil designed for cacti/succulents
Step 1: Preparing the Canvas
-
Clean the pot:
Before you begin, wipe down your terracotta pot with a damp cloth to remove any dust or nursery grime. Terracotta is very porous, so any dirt left behind will interfere with paint adhesion. Let it dry completely. -
Test your layout:
If you’re nervous about freehanding the face, use a pencil to very lightly sketch the placement of the eyes and mouth. Keep the lines faint so they don’t show through the finished design.
Fixing Wobbly Lines
If your eyelash lines get too thick or shaky, wait for the black paint to dry fully. Then, use a fine sandpaper or an exacto knife to gently scrape away the excess paint.
Step 2: Painting the Face Details
-
Paint the closed eyes:
Using your small detail brush and black acrylic paint, create two curved, U-shaped lines for the closed eyelids. Place them centered on the pot body, leaving enough space below the rim. -
Add the lashes:
Carefully stroke four or five small lines extending outward from each eyelid curve. Vary the angles slightly to mimic natural eyelashes. -
Complete the expression:
Paint a small, simple U-shape centered between and slightly below the eyes to create a gentle smile. -
Create the blushing cheeks:
Dip your round brush into the pink paint. Blot it on a paper towel first so the brush is almost dry. -
Stipple the cheeks:
Gently dab the pink paint onto the cheeks in a circular shape. I find that stippling (dabbing repeatedly) creates a softer, more textured look than painting a solid circle. -
Let the face dry:
Allow the black and pink paint to dry completely to avoid any accidental smudging while you handle the rim.
Adding Personality
Try painting glasses around the eyes or adding freckles with a brown marker. You can also mix different succulents to create a ‘wilder’ hairstyle for your pot person.
Step 3: Decorating the Rim
-
Start the rim pattern:
Using white paint and your round brush, paint a simple teardrop or inverted triangle shape on the rim of the pot. -
Space the shapes:
Continue painting these white shapes all around the circumference of the rim. Try to keep the spacing relatively even, leaving about an inch between each drop. -
Refine the edges:
Go back over your white shapes if the terracotta color is showing through too much; a second coat often makes the white pop. -
Dry completely:
Set the pot aside until all paint is totally dry to the touch. -
Seal the art (optional):
If this pot will be outdoors or watered frequently, lightly mist the outside with a matte clear acrylic sealer to protect your artwork from water damage.
Step 4: Creating the Hairstyle
-
Prepare the saucer:
Place the matching saucer underneath the pot. -
Add drainage layer:
If your pot has a large hole, place a small piece of mesh or a pottery shard over it inside to keep soil from washing out. -
fill with soil:
Fill the pot about two-thirds full with cactus or succulent soil. -
Plant the ‘hair’:
Remove your succulent from its nursery container and gently loosen the roots. Place it into the new pot. -
Secure the plant:
Fill in the remaining space around the roots with more soil, pressing down gently to secure the plant upright. -
Clean up:
Brush off any stray soil particles from the painted face or rim using a clean, dry brush.
Your peaceful pot person is now ready to add a calm vibe to your favorite sunny spot
Animal Face Pots With Painted Ears
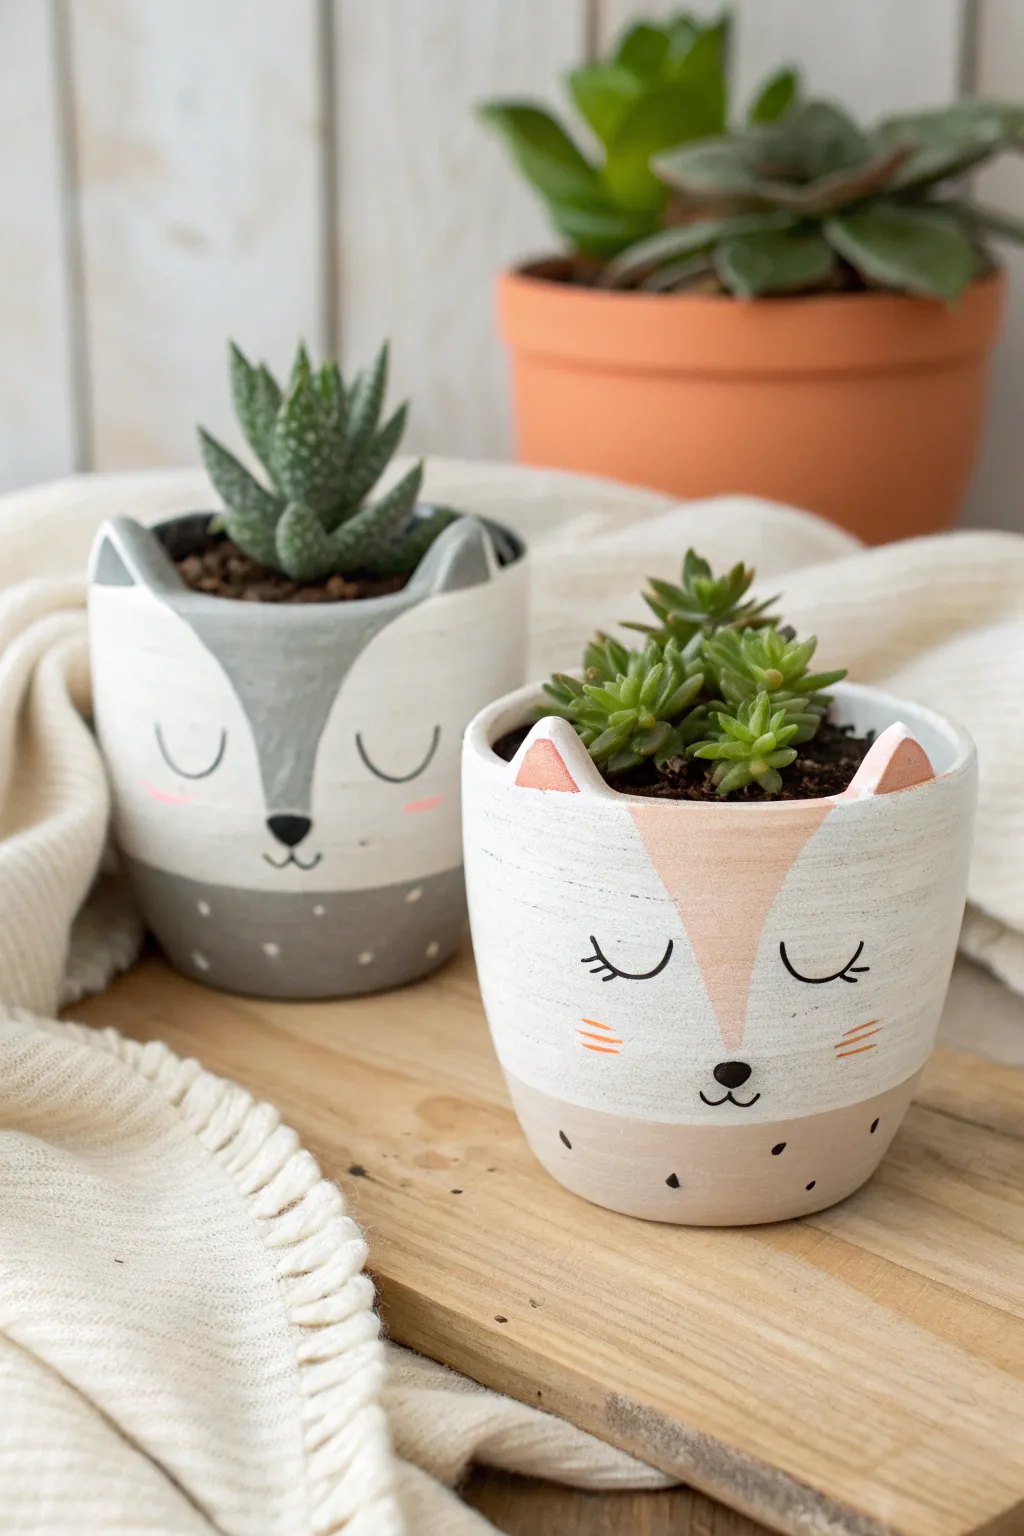
Transform ordinary small planters into adorable woodland creatures with this simple painting project. Featuring a sleepy grey wolf and a sweet blush fox, these character pots add a charming touch to any succulent collection.
Detailed Instructions
Materials
- Small round pots (terra cotta or ceramic)
- Air-dry clay (if pots don’t have ears)
- White acrylic paint (matte finish)
- Grey acrylic paint
- Blush pink or light salmon acrylic paint
- Black acrylic paint or black paint pen
- Warm orange acrylic paint
- Assorted paintbrushes (medium flat, small round, fine detail)
- Matte spray sealer
- Sandpaper (fine grit)
- Strong craft glue (optional)
Step 1: Preparation and Base Coat
-
Clean the surface:
Begin by wiping down your pots with a damp cloth to remove any dust or oils. Let them dry completely before starting to ensure the paint adheres properly. -
Create the ears:
If your pots don’t already have ear shapes on the rim, mold two small triangles from air-dry clay. Curve them slightly to match the pot’s rim and attach them with a dab of glue. Let the clay cure fully according to the package instructions. -
Smooth the texture:
Once the clay is dry, use fine-grit sandpaper to gently smooth out any fingerprints or rough edges on the ears, blending the join where they meet the pot rim. -
Apply the white base:
Paint the entire exterior of the pot, including the ears, with matte white acrylic paint. Painting horizontally around the pot helps minimize brush strokes. -
Add a second coat:
Allow the first layer to dry for about 15-20 minutes. Apply a second coat of white to ensure a solid, opaque coverage where the underlying pot color doesn’t show through.
Uneven Lines?
Use a pencil to lightly sketch the face shapes before painting. If you make a mistake, wipe it off gently with a damp Q-tip before the paint dries.
Step 2: Painting the Wolf Pot
-
Map out the grey fur:
For the wolf, visualize a heart-shaped face. Using your grey paint, outline a curved ‘V’ shape starting from the outer edge of each ear down toward the center creating a widow’s peak. -
Fill in the grey coat:
Paint the area outside this face shape grey, covering the sides and back of the pot. Also, paint the bottom third of the pot in a contrasting dark grey band. -
Detail the ears:
Paint the back of the ears grey, leaving the front inner triangle white. This creates depth and helps the ears stand out. -
Paint the white dots:
Using a very small brush or the non-brush end of a paintbrush, dip into white paint and create a row of small, uneven polka dots along the dark grey band at the bottom. -
Add the face details:
With a fine detail brush and black paint, draw two ‘U’ shapes for closed sleepy eyes. Add a small inverted triangle for the nose and a tiny ‘w’ shape underneath for the mouth. -
Blush the cheeks:
Dilute a tiny drop of pink paint with water. Gently dab two small lines or ovals on the cheeks for a soft, rosy effect.
Texture Twist
For a rustic look, gently sand the painted surface after drying to reveal bits of terracotta, giving the pot a weathered, vintage toy aesthetic.
Step 3: Painting the Fox Pot
-
Outline the orange mask:
For the fox, mix a soft blush or salmon color. Paint a large inverted triangle shape starting from the forehead area, narrowing down between the eyes to the nose. -
Paint the ears:
Use a warm orange or coral paint to fill in the inner triangles of the ears, giving the fox its signature perkiness. -
Create the bottom band:
Paint the bottom third of the pot in a beige or light taupe color to ground the design. -
Draw the facial features:
Switch to your black paint or pen. Draw two curved lines with eyelashes for the eyes, placing them wider apart than the wolf’s. Add a small nose and mouth. -
Add whiskers:
Using the same orange as the ears, paint three small horizontal lines on each cheek to represent whiskers. -
Dot the base:
Finish the fox by adding tiny black dots scattered randomly across the beige bottom band for a playful pattern.
Step 4: Finishing Up
-
Seal the artwork:
Once all paint is completely dry (I usually wait at least an hour), take the pots outdoors and spray them with a clear matte sealer. This protects your paint from water damage when you water your plants. -
Plant your succulents:
After the sealer has cured, fill your new animal friends with potting soil and your favorite small succulents or cacti.
Now you have a charming duo ready to brighten up your windowsill
Clay Pot Gnome Garden Decor
Transform ordinary terracotta pots into a charming garden guardian with this simple stacking project. This sage green gnome features a textured brim and a hand-painted beard, making it a delightful addition to flower beds or porches.
Step-by-Step
Materials
- 1 medium terracotta pot (for the body)
- 1 small terracotta pot (for the head/upper body)
- 1 tall, narrow terracotta cone or overturned vase (for the hat)
- Strong outdoor craft adhesive (E6000 or similar)
- Sage green outdoor acrylic paint
- White outdoor acrylic paint
- Flesh-tone outdoor acrylic paint
- Brown outdoor acrylic paint
- Dark grey outdoor acrylic paint
- Textured stone spray paint or sand additive with brown paint
- Medium flat paintbrush
- Fine detail liner brush
- Small wooden ball or air-dry clay (for nose)
- Outdoor matte sealant spray
- Pencil
Step 1: Base Assembly and Painting
-
Clean the Terra Cotta:
Before starting, ensure all your terracotta pieces are thoroughly cleaned and dried to help the paint adhere properly. Remove any price stickers and wipe away dust. -
Paint the Base Coat:
Invert your medium and small pots. Paint the entire exterior of both pots and the tall cone with your sage green outdoor acrylic paint. This creates the gnome’s coat and hat color. -
Apply Second Coat:
Allow the first layer to dry completely, then add a second coat of sage green to ensure solid, opaque coverage without streaks. -
Create the Hat Detail:
Using a pencil, lightly sketch a curved line around the tall cone, just a few inches from the bottom edge. This will mark the separation for the hat’s brim. -
Texture the Hat Brim:
Paint the area below your pencil line with brown paint mixed with a little sand, or use a textured stone spray paint. This creates the rugged, woolen look of the gnome’s hat rim.
Paint Peeling?
Terracotta is porous and absorbs moisture. If paint peels, sand the pot lightly and apply an outdoor primer before repainting the base coat.
Step 2: Face and Features
-
Outline the Face:
On the small inverted pot (the upper body), sketch an oval shape where the face will peek out from under the hat. Keep it centered. -
Paint the Skin Tone:
Fill in the oval area with flesh-tone acrylic paint. You may need two coats here to cover the green base effectively. -
Draft the Beard:
Sketch the outline of a flowing beard starting from the sides of the face area and coming to a point near the bottom rim of the small pot. Don’t forget a mustache shape above! -
Paint the White Beard:
Using white paint and a smaller brush, fill in the beard and mustache area. I find that dabbing the brush rather than stroking helps create a fluffy hair texture. -
Add Facial Details:
Use the fine detail brush and black paint to add two small dots for eyes. Paint your small wooden ball (or clay ball) with the flesh tone for the nose. -
Attach the Nose:
Glue the painted nose securely in the center of the face, slightly overlapping the mustache for a cute, dimensional look.
Level Up: 3D Arms
Instead of painting arms, cut lengths of thick green rope or clay coils. Glue them to the sides and attach mini clay mittens for a tactile 3D effect.
Step 3: Assembly and Finishing Touches
-
Stack the Body:
Apply a ring of strong adhesive to the bottom (now top) of the medium pot. Center the small pot on top of it to form the torso. -
Secure the Hat:
Apply adhesive to the top of the small pot and place the tall cone hat over it. Ensure the hat sits low enough to frame the painted face perfectly. -
Paint the Buttons:
Using brown paint, add three circular buttons down the front of the green coat—one typically lands on the upper pot and two on the lower pot. -
Add Arms and Mittens:
Paint simple curved lines in sage green on the sides to suggest sleeves, ending in dark grey ovals for little mittens resting on his belly. -
Detail the Hat Rim:
Paint a very thin, distinct white line at the very bottom edge of the bottom pot to mimic a hem or trim. -
Seal the Project:
Once all paint is fully cured (usually 24 hours), spray the entire gnome with a clear matte outdoor sealant to protect it from the elements.
Place your new friendly gnome amongst some daisies or succulents to watch over your garden
Fairy House With a Saucer Roof
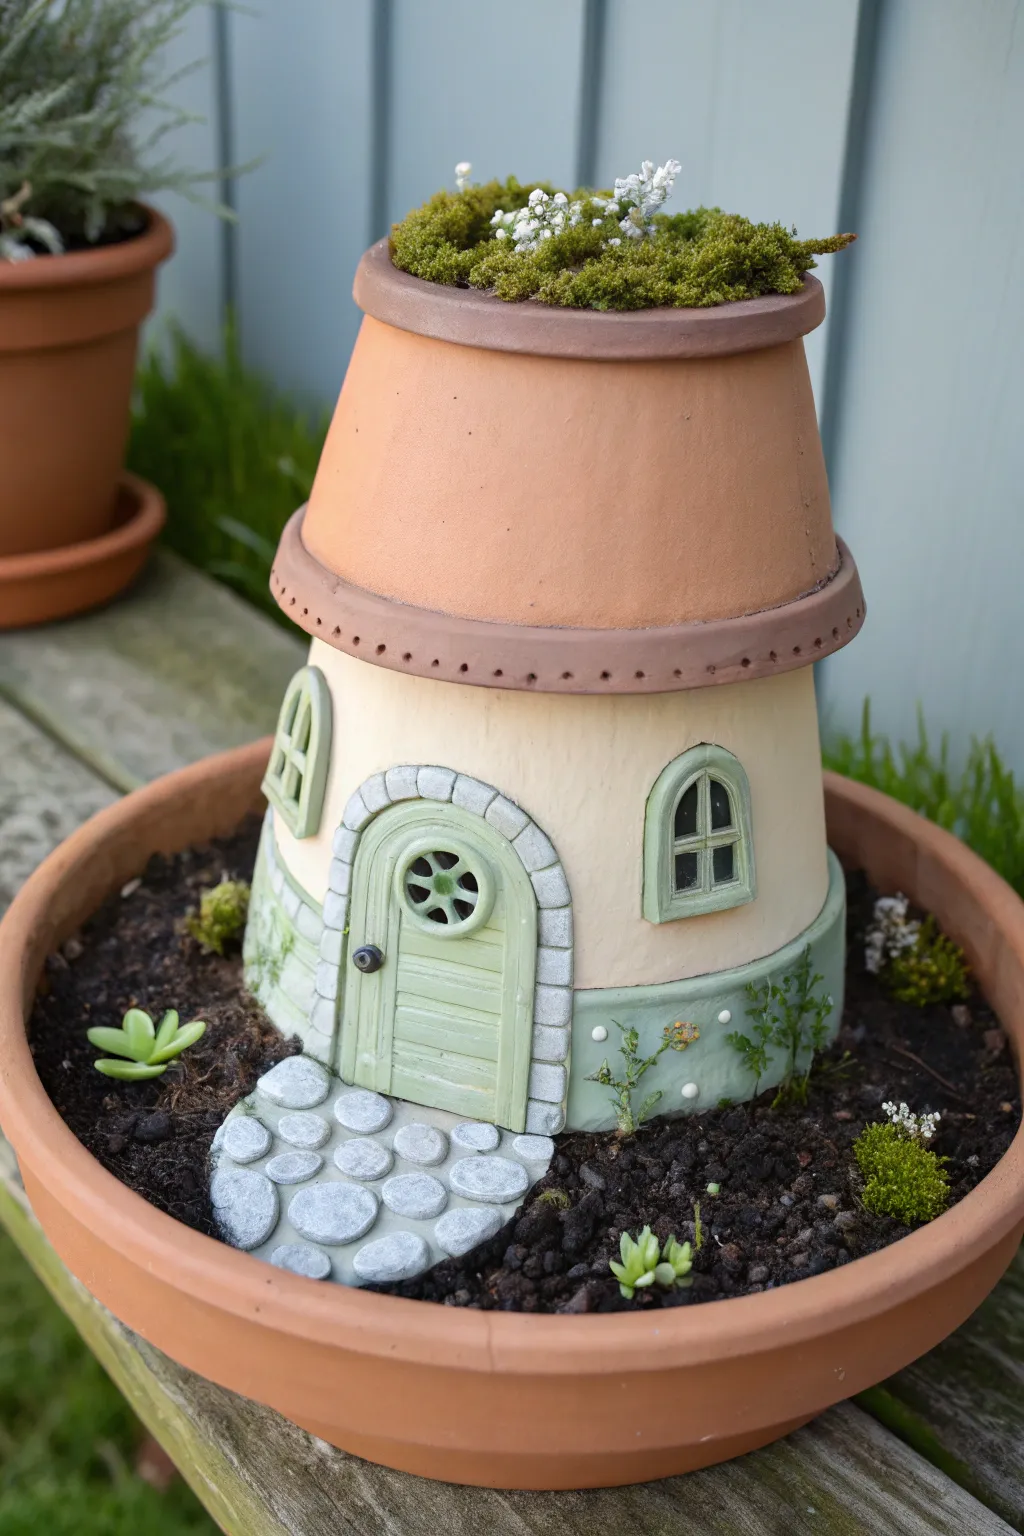
Transform ordinary terracotta pots into an enchanting two-story fairy dwelling complete with a mossy rooftop garden. This sweet architectural project combines painting, modeling, and gardening to create a magical centerpiece for your patio or garden bed.
Step-by-Step
Materials
- One medium terracotta pot (base)
- One slightly smaller terracotta pot (roof)
- One large terracotta saucer (foundation)
- One small terracotta saucer (rooftop planter)
- Acrylic outdoor craft paints (cream, sage green, light grey, brown)
- Air-dry clay or epoxy sculpt clay
- Strong waterproof adhesive (E6000 or similar)
- Clear outdoor sealant spray (matte finish)
- Potting soil and small succulents or moss
- Small gravel or decorative stones
- Paintbrushes (flat shader and fine detail)
- Sculpting tools or a toothpick
Step 1: Preparing the Structure
-
Clean and Dry:
Begin by thoroughly scrubbing all your terracotta pots and saucers to remove dust or price tag residue. Let them dry completely, as trapped moisture can cause paint to peel later. -
Assemble the Tower:
Invert the medium pot to serve as the house walls. Place the slightly smaller inverted pot on top of it to form the roof shape. Test the fit to ensure they stack stably without wobbling. -
Initial Bonding:
Apply a ring of waterproof adhesive to the bottom rim of the base pot (the house) and center it within the large foundation saucer. Let this cure according to the glue instructions so your base is solid.
Clay Adhesion Trick
Score the terracotta surface with sandpaper before applying clay. Dampen the clay back slightly for a stronger bond that won’t pop off later.
Step 2: Sculpting Details
-
Create the Door:
Roll out a slab of clay about 1/4 inch thick. Cut an arched shape for the door and press it firmly onto the side of the base pot. Texture horizontal lines into the clay to mimic wood planks. -
Door Frame:
Roll a snake of clay and flatten it slightly. Wrap this around your door shape to create a stone archway. Use a sculpting tool to impress perpendicular lines, turning the strip into individual stones. -
Window Work:
Form two smaller arched shapes for windows. Apply one near the door and one on the side. Add thin rolls of clay to create mullions (the cross pattern) and a surrounding frame. -
Cobblestone Path:
Roll small balls of clay and flatten them into irregular discs. Press these onto the saucer base leading up to the door to create a charming stepping stone walkway. -
Base Trim:
Add a strip of clay around the bottom edge of the house pot to simulate a foundation line or wainscoting effect, smoothing the edges where it meets the terracotta. -
Roof Detailing:
I like to add a decorative rim to the roof pot. Roll a thin snake of clay, wrap it around the bottom edge of the roof pot, and use a toothpick to poke small, evenly spaced holes for a whimsical border.
Rainy Weather Advice
If keeping this outdoors, drill drainage holes in the large saucer base so your ground-floor plants don’t drown in standing water.
Step 3: Painting
-
Base Color:
Once the clay is fully hardened, paint the ‘walls’ of the house (the main pot) in a warm cream color. Avoid painting the clay details for now. -
Roof Tone:
Leave the roof pot largely unpainted to show off the natural terracotta warmth, or lightly sponge on some watered-down brown paint to give it an aged look. -
Detailing the Woodwork:
Paint the door and the lower wall trim in a soft sage green. For the door knob, a tiny dot of black or dark silver adds realism. -
Stonework:
Paint the door frame stones and the stepping stone path in light grey. After the grey dries, dry-brush a little white over the top to highlight the texture. -
Window Panes:
Carefully paint the inside of the window panes black or dark grey to create depth, then paint the frames to match the sage green trim.
Step 4: Assembly and Planting
-
Attach the Roof:
Glue the roof pot onto the base house pot. Ensure the clay decorative rim sits just above the junction. -
Rooftop Garden:
If your roof pot has a drainage hole, block it with a shard of pottery or mesh. Fill the top recessed area (the bottom of the inverted pot) with soil. -
Finishing Touches:
Fill the large saucer base around the house with potting soil. Plant small succulents or tuck in patches of moss around the stepping stones. -
The Final Seal:
Before watering any plants, spray the painted and clay areas with a clear matte outdoor sealer to protect your handiwork from the elements.
Place your finished fairy home in a quiet corner of the garden and wait for magical residents to move in
Inverted Pot Pedestal Display Stand
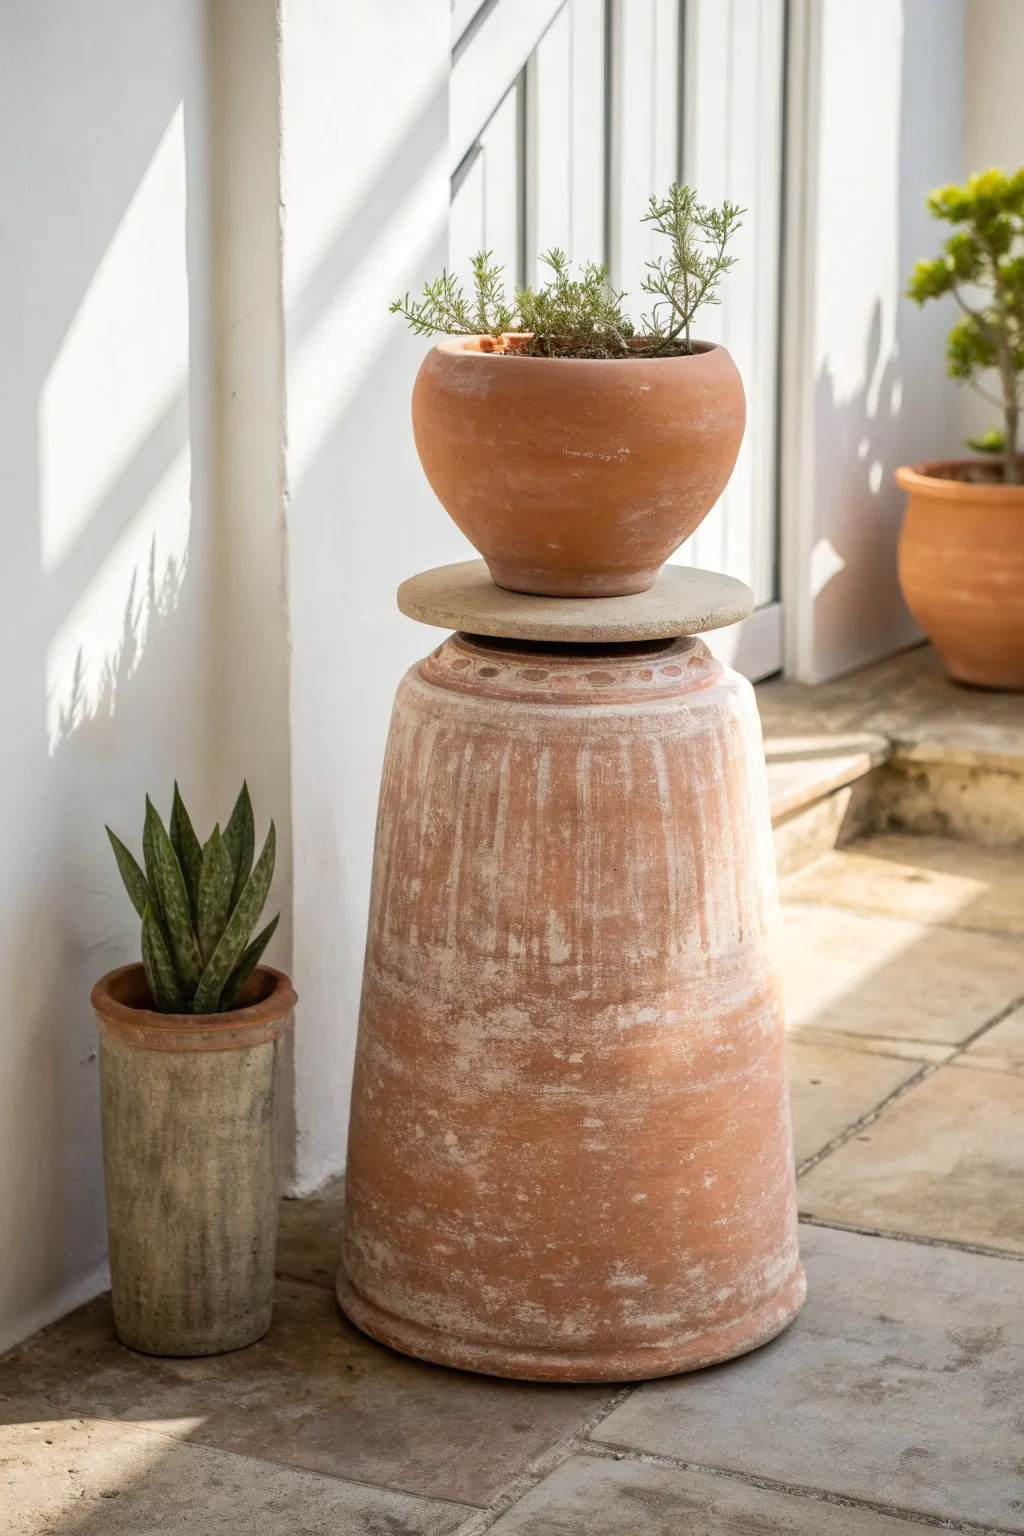
Elevate your favorite potted herbs with this rustic, architectural display that repurposes a tall terracotta chimney flue or long tom pot. The weathered, whitewashed finish gives it an ancient Mediterranean feel, perfect for adding vertical interest to patios or garden corners.
Step-by-Step Guide
Materials
- Tall terracotta chimney flue or extra-tall ‘long tom’ pot (approx. 24-30 inches high)
- Standard terracotta bulb bowl or shallow planter (approx. 10-12 inches diameter)
- Round stepping stone or slate disc (slightly wider than the chimney top)
- White or cream latex paint (matte finish)
- Water for diluting paint
- Rough-bristled chip brush
- Clean rags or sponge
- Sandpaper (80-100 grit)
- Clear matte outdoor sealer (optional)
- Construction adhesive meant for masonry (optional for permanent bonding)
- Potting soil and herbs (rosemary, thyme, or lavender)
Step 1: Creating the Weathered Base
-
Prepare the workspace:
Set up your project area outdoors or on a drop cloth. Dust off the tall terracotta chimney pot to remove any loose dirt or cobwebs. -
Mix the whitewash:
In a small container, mix your white latex paint with water. Aim for a 50/50 ratio initially; you want a milky consistency that is translucent rather than opaque. -
Apply the first wash:
Using the chip brush, apply the watered-down paint liberally over the entire surface of the tall chimney pot. Don’t worry about even coverage; drips and streaks add character here. -
Wipe back:
Immediately after applying a section, take a damp rag and wipe away much of the paint. The goal is to leave paint in the crevices, pores, and decorative grooves while exposing the raw clay on the raised surfaces. -
Build layers:
Let the first coat dry for about 15 minutes. If you want a more aged look, spot-apply a second layer of whitewash to specific areas, like the rim or the bottom edge, and wipe back again. -
Distress the finish:
Once the paint is fully dry, take your coarse sandpaper and scuff up the surface. Focus on the vertical ridges and the rim to simulate decades of weathering. -
Seal the finish (optional):
If this piece will be exposed to harsh elements, apply a coat of matte outdoor sealer to lock in the whitewash finish without adding shine.
Instant Age Trick
Rub moist garden soil over the wet whitewash before it dries fully. The dirt stains the paint, creating an authentic, grimy antique patina instantly.
Step 2: Assembling the Structure
-
Position the base:
Place the tall chimney pot or inverted long tom pot in its final location. Ensure the ground is level so the tower doesn’t wobble. -
Add the stabilizer:
Place the round stone or concrete disc on top of the chimney pot. Center it carefully. -
Check for wobble:
Press down on the edges of the stone disc. If it rocks, use small terracotta shards or flat stones as shims underneath the disc to stabilize it. -
Bonding (Optional):
I prefer to leave these unglued for modularity, but if you have pets or children, apply a bead of masonry adhesive to the top rim of the chimney pot before setting the stone down.
Step 3: Planting and Final Styling
-
Prepare the top pot:
Take your standard terracotta bulb bowl. If you want it to match the base perfectly, repeat the whitewashing steps on this pot as well. -
Add drainage material:
Place a shard of pottery over the drainage hole at the bottom of the bowl to keep soil in while allowing water out. -
Fill with soil:
Fill the bowl with a high-quality potting mix suitable for the plants you chose. For Mediterranean herbs like the ones pictured, add a little extra perlite or grit for drainage. -
Plant the herbs:
transplant your chosen greenery into the bowl. Something with vertical sprigs, like Rosemary, mimics the vertical lines of the base wonderfully. -
Top the pedestal:
Lift the planted bowl and place it squarely in the center of the stone disc. -
Final adjustment:
Step back and check the silhouette from a distance. Rotate the top bowl to find its ‘best side’ relative to the base.
Level Up: Mossy Texture
Mix plain yogurt with moss spores in a blender and paint it onto the terracotta. Keep it moist in a shady spot, and real green moss will grow on your pedestal.
Enjoy the timeless elegance this simple architectural hack brings to your garden space