Whenever I’m craving that cozy, earthy vibe, I reach for terracotta air dry clay because it instantly makes a project look warm and intentional. These ideas are all about clean shapes, simple textures, and practical pieces you’ll actually want to keep out on display.
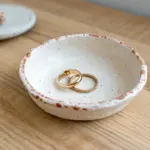
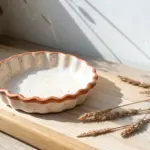
Minimal Terracotta Trinket Dish
Embrace the earthy warmth of natural hues with this simple yet sophisticated trinket dish. Its smooth, circular design and matte terracotta finish make it the perfect minimalist catch-all for your favorite rings and small treasures.
Step-by-Step
Materials
- Terracotta-colored air dry clay
- Rolling pin or smooth glass jar
- Circle template (small bowl or large cookie cutter, approx. 4-5 inches)
- Small kitchen knife or clay needle tool
- Small bowl of water
- Fine-grit sandpaper (220-400 grit)
- Acrylic sealant (matte or satin)
- Soft paintbrush
- Parchment paper or canvas mat
Step 1: Shaping the Base
-
Prepare your workspace:
Lay down a sheet of parchment paper or a canvas mat to prevent the clay from sticking to your table. Clean hands are essential here to avoid transferring dust to your clay. -
Condition the clay:
Take a handful of terracotta air dry clay and knead it in your hands for a minute or two. This warms it up and makes it more pliable and less prone to cracking. -
Roll the slab:
Place the clay ball in the center of your work surface. Using your rolling pin, roll it out evenly until it is approximately 1/4 inch thick. Turn the clay occasionally to ensure an even thickness throughout. -
Cut the circle:
Place your chosen circle template (like a small overturned bowl) onto the rolled clay. Use your knife or needle tool to trace around the edge, cutting out a perfect circle. Remove the excess clay scraps.
Cracks Appearing?
If small cracks appear while drying, mix a tiny bit of fresh clay with water to make a paste. Fill the cracks, smooth over, and let dry again.
Step 2: Building the Wall
-
Create a coil:
Take the excess clay scraps and roll them between your palms or on the table to create a long, snake-like coil. Aim for a thickness of about 1/2 inch, slightly thicker than your base. -
Score the edges:
Using your needle tool or knife, make small hash marks (scoring) all around the outer rim of your flat circle base. Do the same to one side of your long coil. -
Wet the connection:
Dip your finger in water and lightly dampen the scored areas on both the base and the coil. This creates a slip that acts like glue. -
Attach the rim:
Place the coil on top of the scored edge of the base, creating a wall. Cut off any excess coil length and join the two ends of the snake together by smoothing the clay across the seam.
Add Texture
Before drying, press a piece of linen fabric or a dried leaf into the base of the dish to create a subtle, fossil-like impression.
Step 3: Refining the Form
-
Blend the outside:
Using your thumb or a modeling tool, firmly dragging the clay from the coil down onto the base on the exterior side. Smudge the clay downward until the seam completely disappears. -
Blend the inside:
Repeat the previous step on the interior of the dish. I like to use the back of a spoon for this part to get a nice curve where the wall meets the floor. -
Smooth the surfaces:
Dip your finger in a little bit of water and run it over the entire surface to smooth out fingerprints and bumps. Don’t use too much water, or the clay will become mushy. -
Create the straight edge:
To achieve the modern look in the photo, gently tap the outer wall with a flat object (like a ruler or wood block) to ensure the sides stand up straight rather than flaring out. -
Final wipe:
Give the piece one last inspection. Use a slightly damp sponge or finger to smooth the top rim so it looks polished and crisp.
Step 4: Finishing Touches
-
Drying time:
Place your dish in a cool, dry spot away from direct sunlight. Let it dry for 24-48 hours. Turn it over gently halfway through to let the bottom dry evenly. -
Sanding:
Once bone dry, take your fine-grit sandpaper and gently sand away any rough spots, specifically focusing on the rim and any uneven areas on the walls. Wipe away the dust with a dry cloth. -
Sealing:
Apply a thin layer of matte acrylic sealant to the entire dish using a soft brush. This protects the clay from moisture and gives it a finished look without making it too shiny. Let the sealer dry completely before use.
Now you have a chic, modern vessel ready to organize your daily essentials with style


Arch-Shaped Terracotta Earrings
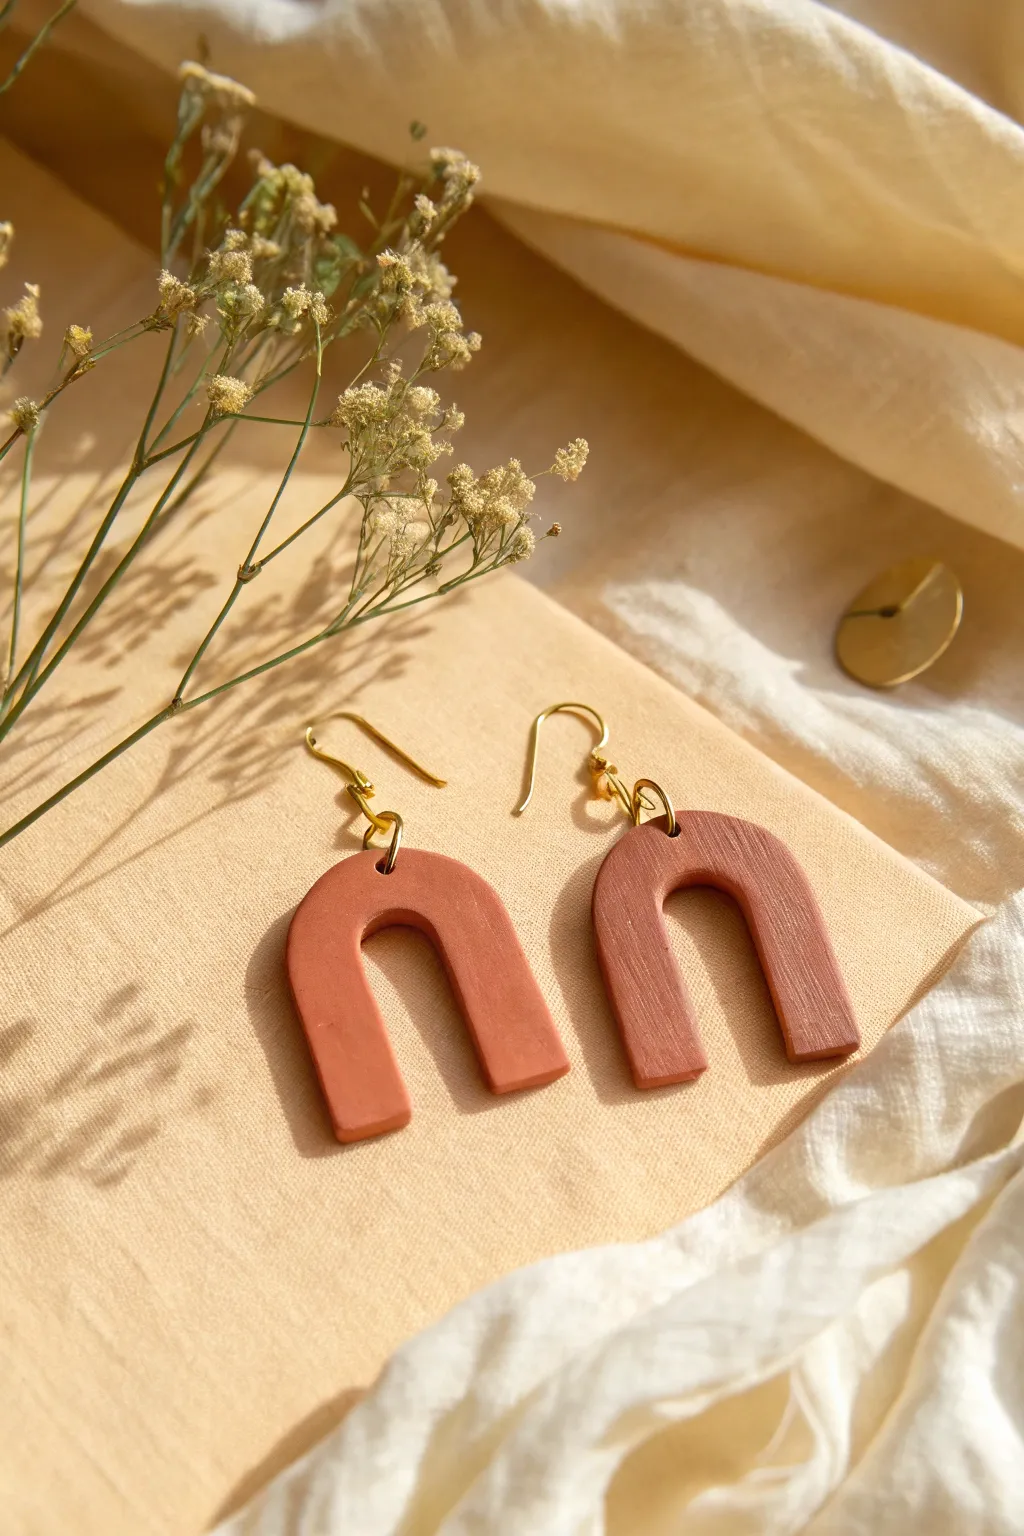
Embrace the warmth of the earth with these minimalist arch-shaped earrings, crafted to showcase the beautiful, dusty reddish-brown hue of terracotta. The subtle texture and gentle curves give them an organic, handmade charm that pairs perfectly with soft linens and golden hour lighting.
How-To Guide
Materials
- Terracotta colored air-dry clay
- Rolling pin or smooth glass bottle
- Parchment paper or silicone mat
- Clay blade or craft knife
- U-shaped clay cutter (approx. 1.5 inches tall)
- Small circle cutter or toothpick (for holes)
- Fine-grit sandpaper (400 or 600 grit)
- Sealer (matte varnish or liquid polymer clay)
- Gold earring hooks
- Gold jump rings (6-8mm)
- Two pairs of jewelry pliers
Step 1: Prepping and Shaping
-
Condition the clay:
Begin by taking a chunk of your terracotta air-dry clay and kneading it in your hands. You want it warm and pliable to prevent internal air bubbles, which can cause cracks later. -
Roll out a slab:
Place your clay onto a piece of parchment paper. Using your rolling pin, roll the clay out into an even slab. Aim for a thickness of about 3-4mm—thick enough to be sturdy, but thin enough to be lightweight for ears. -
Cut the arches:
Press your U-shaped cutter firmly into the clay slab. If you don’t have a specific cutter, you can print a U-shape template on cardstock, place it over the clay, and carefully trace around it with a craft knife. -
Smooth the edges:
Before the clay creates a ‘skin,’ dip your finger in a tiny bit of water and gently run it along the cut edges. This softens the harsh angles left by the cutter and gives that organic, refined look shown in the photo. -
Create connection points:
Using a small circle cutter or a toothpick, pierce a hole at the very top center of the arch. Make sure the hole is big enough for your jump ring to move freely, but not so close to the edge that the clay might break.
Cracks Appearing?
If tiny cracks appear while drying, mix a small amount of clay with water to make a paste (slip). Fill the crack, smooth it over with a finger, and let it dry again.
Step 2: Drying and Refining
-
Initial drying:
Let the pieces rest on a flat surface away from direct sunlight. Air-dry clay shrinks slightly as it dries. To prevent curling, I like to place a light book on top of them once they are dry to the touch but still contain moisture. -
Full cure time:
Allow the earrings to dry completely for 24 to 48 hours. The color will lighten slightly as the moisture evaporates, turning into that lovely matte terracotta shade. -
Sand for perfection:
Once fully bone-dry, use fine-grit sandpaper to gently smooth out any unevenness on the back or sides. Be gentle, as dried air-dry clay can be brittle before sealing. -
Remove dust:
Wipe the pieces down with a slightly damp cloth or a soft brush to remove all white sanding dust, which would otherwise get trapped under your sealer.
Step 3: Assembly and Finish
-
Seal the clay:
Apply a thin layer of matte varnish to protect the earrings from humidity and skin oils. The matte finish preserves the natural look of the clay better than a glossy one. -
Dry the varnish:
Let the varnish dry completely according to the manufacturer’s instructions, flipping them over to ensure both sides are coated and cured. -
Open the jump rings:
Using two pairs of pliers, grip a gold jump ring on either side of the split. Twist one hand forward and one backward to open the ring (never pull them apart sideways). -
Attach the hook:
Slide the open jump ring through the hole in your clay arch, then slide the loop of the earring hook onto the same jump ring. -
Close the hardware:
Using the same twisting motion with your pliers, close the jump ring tightly so there is no gap for the hook to slip out of. -
Final check:
Repeat the assembly process for the second earring. Hold them up together to ensure they hang at the same length and that the fronts are facing the correct way.
Add Subtle Texture
Before cutting the shape, gently press a piece of coarse linen or canvas into the clay surface. This leaves a subtle fabric imprint for a tactile finish.
Your new earrings are ready to add a touch of earthy elegance to any outfit you choose


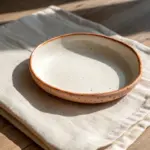
Terracotta Coasters With Simple Imprints
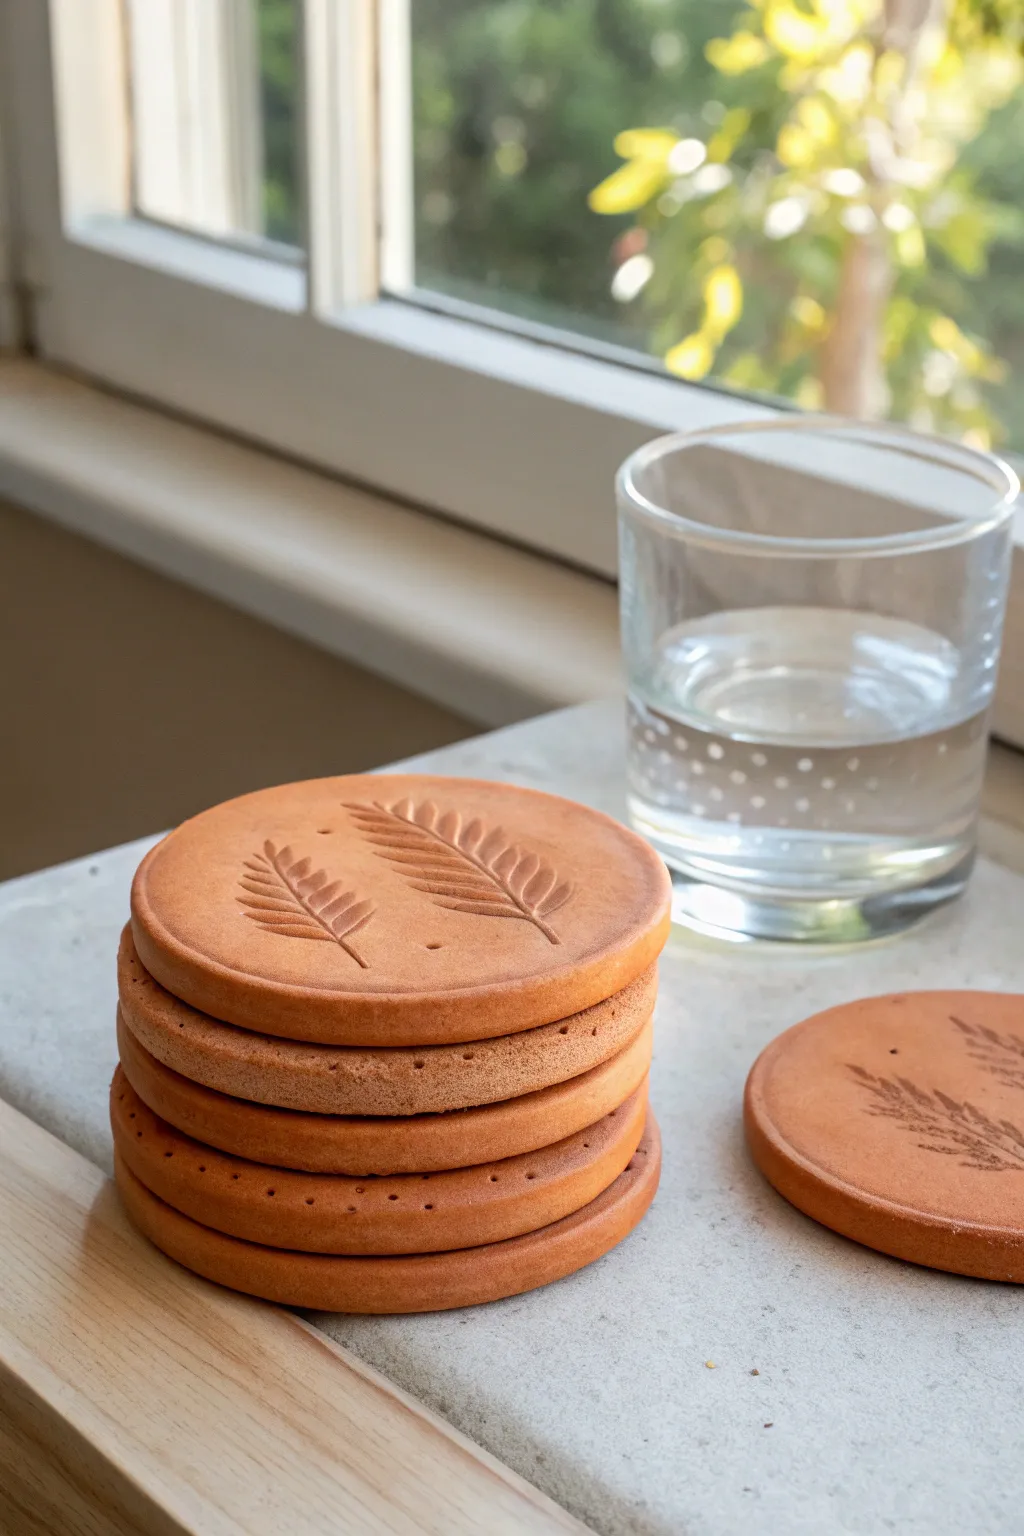
Bring a touch of nature to your coffee table with these warm, earthy coasters made from terracotta air-dry clay. Using real botanical elements for imprinting creates a subtle, organic texture that looks beautifully refined yet rustic.
Step-by-Step Tutorial
Materials
- Terracotta air-dry clay
- Rolling pin or smooth glass jar
- Parchment paper or canvas mat
- Round cookie cutter (approx. 3.5-4 inches)
- Small fern leaves or botanical stems
- Pin tool or toothpick
- Fine-grit sandpaper
- Bowl of water
- Matte acrylic varnish or clay sealant
- Soft synthetic brush
Step 1: Shaping the Clay
-
Prepare your workspace:
Lay down a sheet of parchment paper or a canvas mat to prevent sticking. This makes it much easier to move your coasters later without warping them. -
Condition the clay:
Take a handful of terracotta air-dry clay and knead it in your hands until it feels pliable and warm. If it feels a bit dry, dip your fingers in water and work it in. -
Roll out the slab:
Place the clay on your work surface and roll it out evenly. Aim for a thickness of about 1/4 inch (6mm). You can use guide sticks on either side if you struggle with even thickness. -
Cut the shapes:
Press your round cookie cutter firmly into the clay slab. Give it a little wiggle to ensure a clean cut, then lift away the excess clay. -
Smooth the edges:
Dip your finger in a little bit of water and gently run it around the circumference of the circle to smooth out any rough cut marks or stray bits of clay.
Step 2: Imprinting the Design
-
Position the botanicals:
Select two small fern fronds or leaves. Arrange them gently on the clay surface exactly where you want the impression. I often like to offset them slightly rather than centering them perfectly. -
Press the design:
Use your rolling pin to roll gently but firmly over the leaves. You want to push them flush into the clay surface without thinning the coaster significantly. -
Reveal the pattern:
Carefully find the stem of the leaf and use tweezers or a pin tool to lift it up. Peel the leaf away slowly to reveal the detailed impression underneath. -
Add detail dots:
Using a pin tool or the blunt end of a small paintbrush, poke small decorative holes gently into the clay around the leaves if you want to mimic the look in the photo. -
Check flatness:
The pressing action might have slightly distorted the round shape. Gently pat the edges back into a perfect circle if needed.
Curling Edges?
If edges lift while drying, gently weigh the coasters down with a heavy book placed over a paper towel once the clay is ‘leather hard’ (firm but not fully dry).
Step 3: Drying and Finishing
-
Initial drying:
Place the coasters on a wire rack or leave them on parchment paper in a cool, dry area. Do not place them in direct sunlight, or they may crack. -
Flip for evenness:
flip the coasters over every few hours during the first day. This is crucial for preventing the edges from curling up as the top dries faster than the bottom. -
Full cure:
Let them dry completely for 24 to 48 hours. The clay will lighten in color and feel hard to the touch when truly dry. -
Sand the surfaces:
Once fully dry, take fine-grit sandpaper and lightly circular-sand the edges and the top surface to remove any burrs or rough spots. -
Seal the top:
Apply a thin layer of matte varnish to the top and sides. This seals the clay against moisture from drinking glasses. -
Dry and repeat:
Let the first coat dry, then add a second coat for extra durability. -
Seal the bottom:
Flip the coaster and seal the bottom side as well to ensure the clay is completely protected.
Color Wash
Dilute some white acrylic paint heavily with water and brush it into the leaf impressions, then wipe the surface clean to highlight the botanical details.
Stack your finished set on the table and enjoy the organic warmth they add to your space

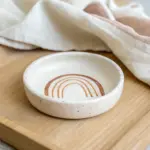

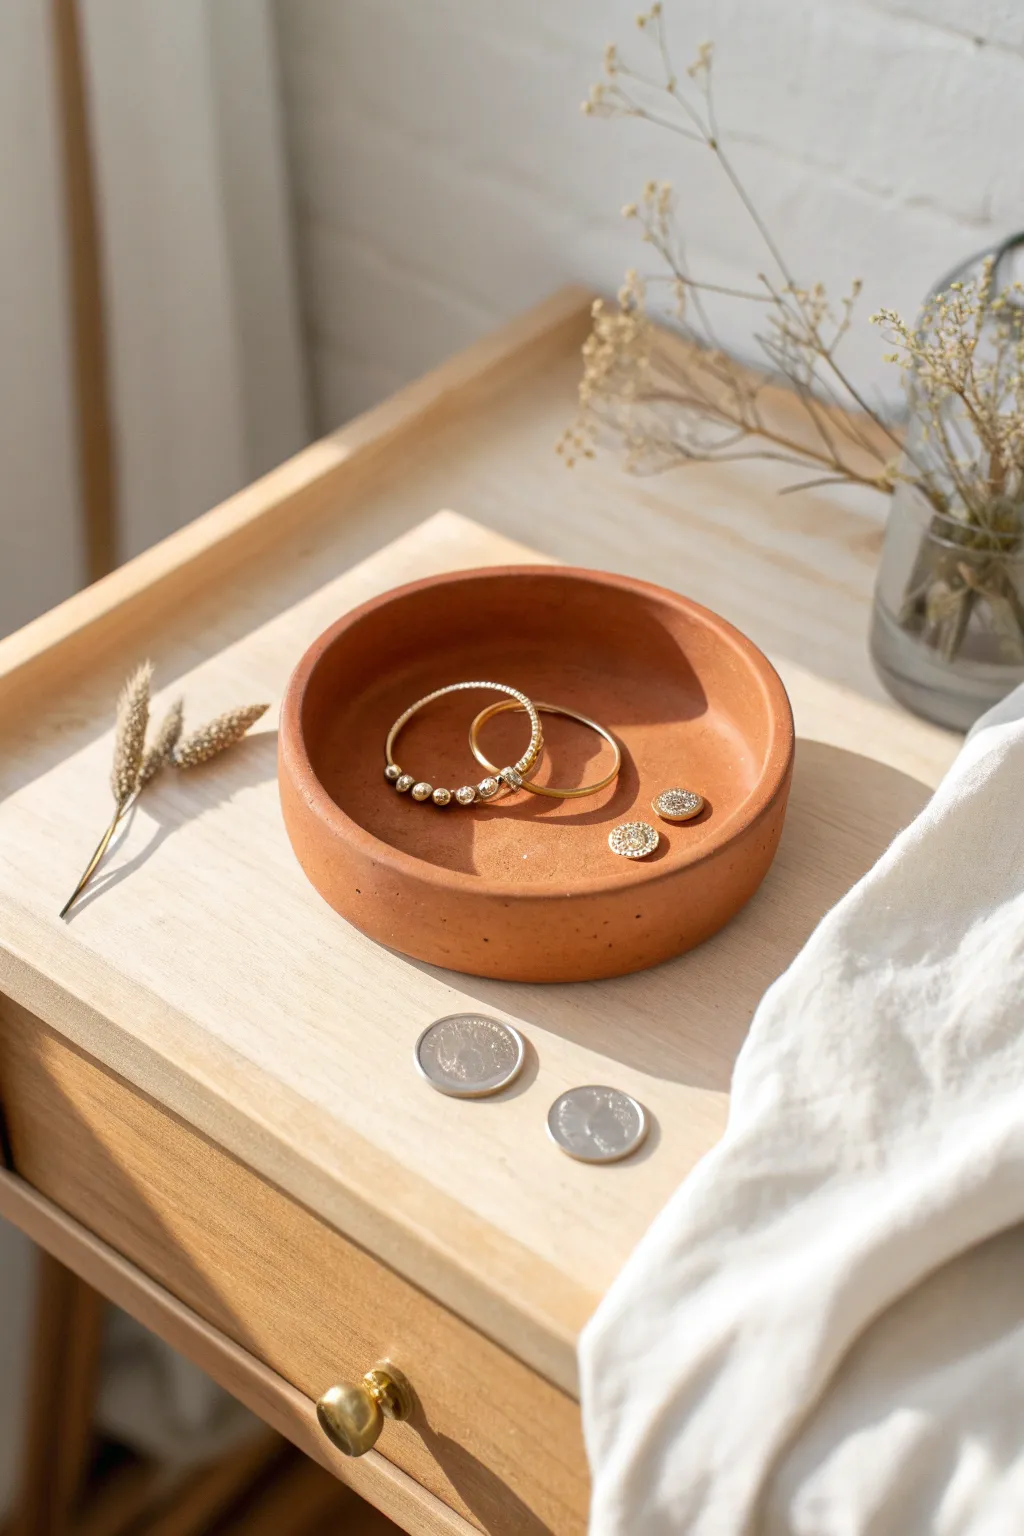
Terracotta Ring Cone Holder
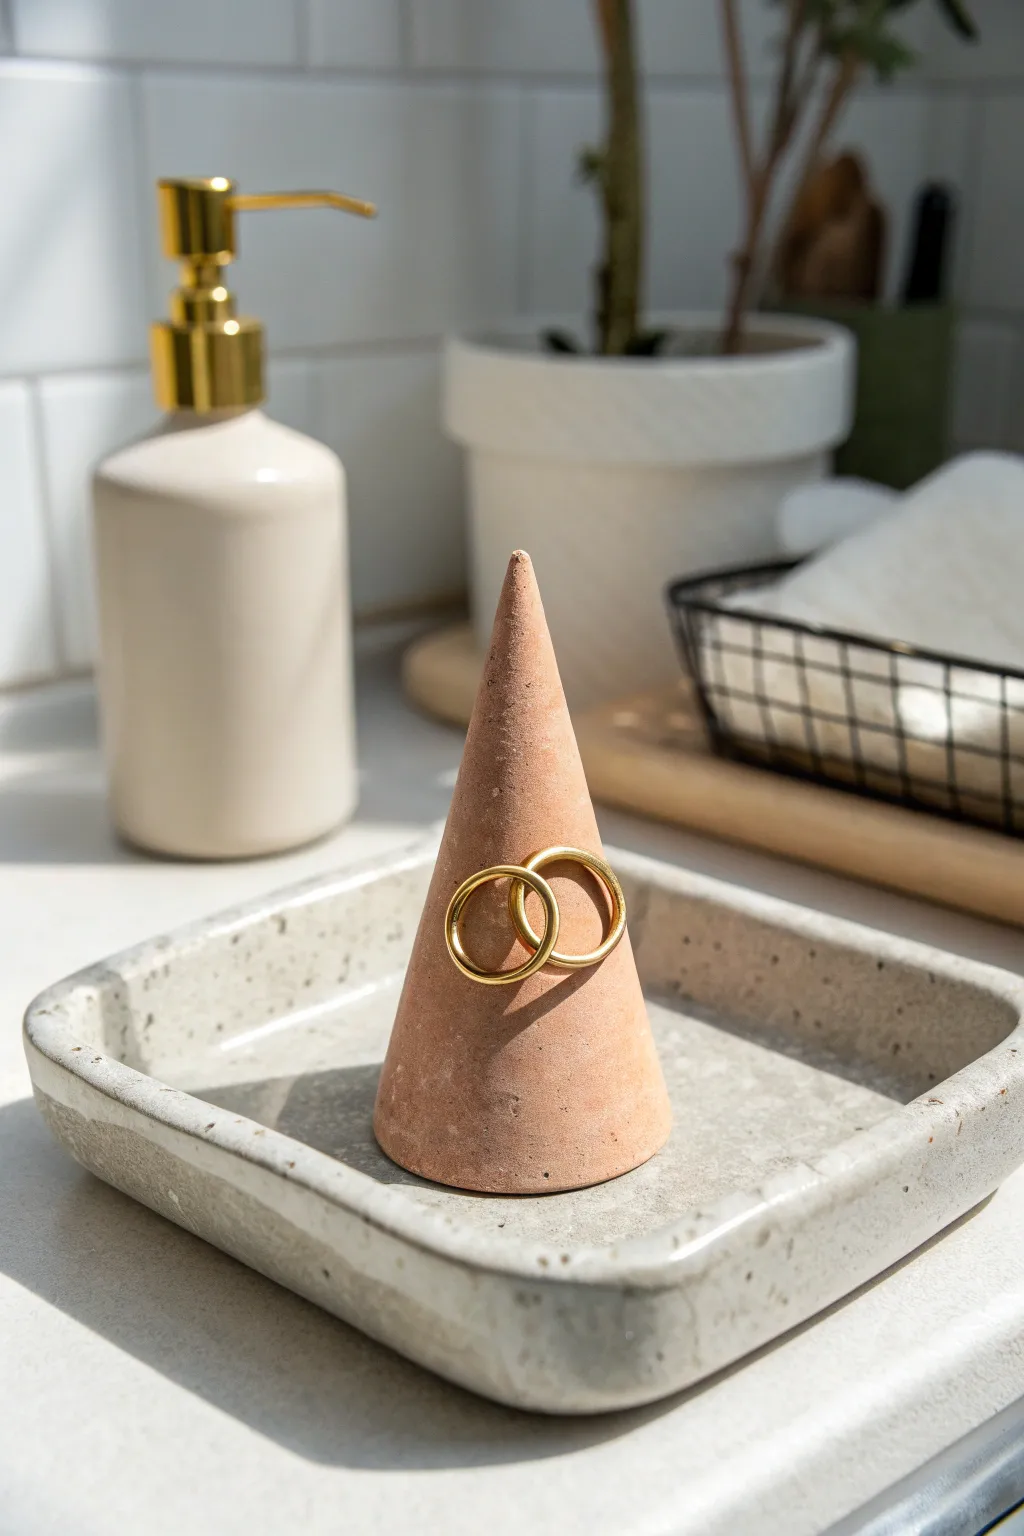
Embrace earthy tones and functional design with this sleek ring cone and matching trinket dish set. The warm terracotta color combined with the speckled stone-effect dish creates a modern, sophisticated home for your favorite jewelry pieces.
Step-by-Step
Materials
- Terracotta-colored air dry clay
- White or grey air dry clay (for the dish)
- Speckled stone spray paint (or black acrylic paint + toothbrush)
- Rolling pin
- sharp knife or clay cutting tool
- Sandpaper (fine and medium grit)
- Small bowl of water
- Clear matte varnish or sealant
- Square cookie cutter or template (approx. 4-5 inches)
- Ruler
Step 1: Shaping the Ring Cone
-
Condition the Clay:
Begin by taking a chunk of terracotta air dry clay and kneading it in your hands until it becomes soft, pliable, and free of any cracks. -
Form a Basic Cone:
Roll the clay into a ball, then place it on your work surface. Use your flat palm to roll it back and forth while applying more pressure to one side to create a tapered cone shape. -
Refine the Height:
Stand the cone up to check its height. For a standard ring holder, aim for about 3 to 4 inches tall. If it’s too tall, simply trim the bottom with your knife. -
Smooth the Surface:
Dip your finger in a little water and run it over the cone to smooth out any fingerprints or bumps. Following the upward slope helps maintain the sharp point at the top. -
Flatten the Base:
Press the cone firmly onto your work surface to ensure the bottom is perfectly flat and stable. It shouldn’t wobble when touched.
Step 2: Creating the Speckled Dish
-
Roll out the Slab:
Take your white or grey clay and roll it out to a uniform thickness of about 1/4 inch. I find using guide sticks on either side of the rolling pin helps keep it perfectly even. -
Cut the Square Shape:
Using a square cookie cutter or a paper template with a knife, cut out a square shape. Round off the corners slightly with your finger for a softer look. -
Form the Rims:
Gently curve the edges of the square upward to create a lip. Pinch the corners specifically to give them slightly more definition and height. -
Smooth the Edges:
Use a wet finger or a damp sponge to smooth the rim of the dish so it feels seamless and organic, rather than sharp. -
Dry Completely:
Set both the cone and the dish aside in a cool, dry place. Let them dry for at least 24-48 hours, flipping the dish occasionally to ensure even drying.
Cracks appear during drying?
Mix a small amount of fresh clay with water to create a paste (slip). Fill the cracks, smooth over, and let dry again before sanding.
Step 3: Finishing Touches
-
Sand for Smoothness:
Once bone dry, use medium grit sandpaper to remove any major bumps, focusing on the rims. Follow up with fine grit sandpaper for a silky smooth finish on the cone. -
Prep for Painting:
Wipe away all sanding dust with a barely damp cloth or dry brush. Ensure the dish is completely clean before applying any paint. -
Create the Speckled Effect:
Take the dish outside or to a ventilated area. Apply a light coat of stone-effect spray paint. Alternatively, dilute black acrylic paint and flick it off a toothbrush onto the dish for manual speckles. -
Seal the Terracotta:
Leave the cone unpainted to show off the natural clay color, but apply a coat of matte varnish to seal it and deepen the terracotta hue slightly. -
Seal the Dish:
Once the speckles are dry, seal the entire dish with the same matte varnish to protect it from moisture and wear.
Add a luxe detail
Paint the very tip of the terracotta cone with liquid gold leaf or metallic gold paint for a chic, high-end contrast.
Now you have a stylish, handmade display set ready to organize your daily jewelry essentials

What Really Happens Inside the Kiln
Learn how time and temperature work together inside the kiln to transform clay into durable ceramic.
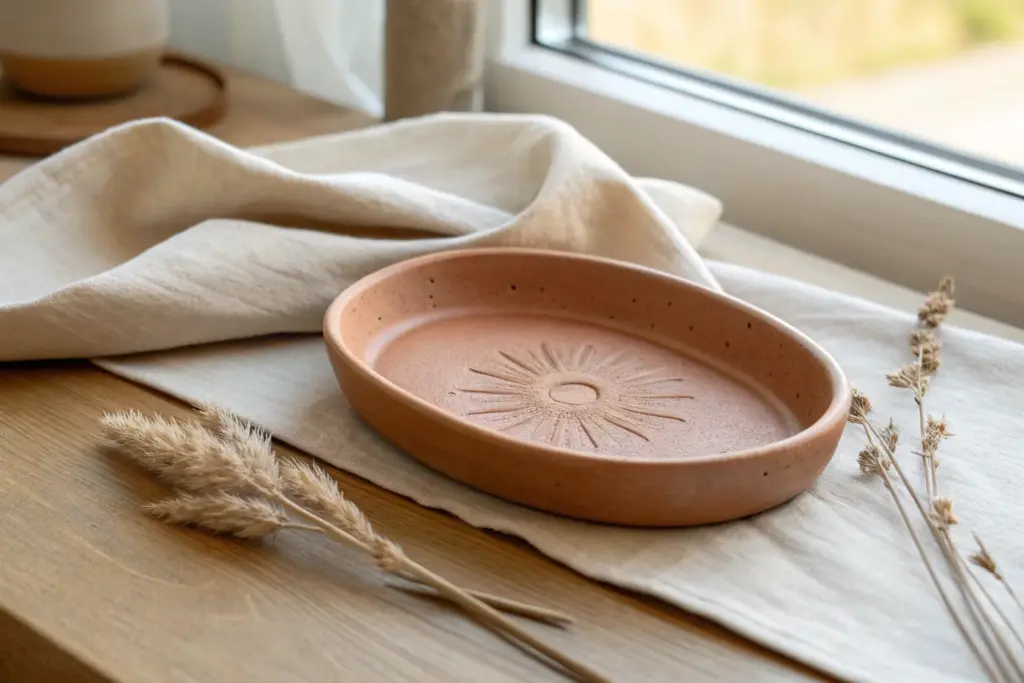
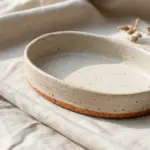
Low-Profile Terracotta Incense Dish
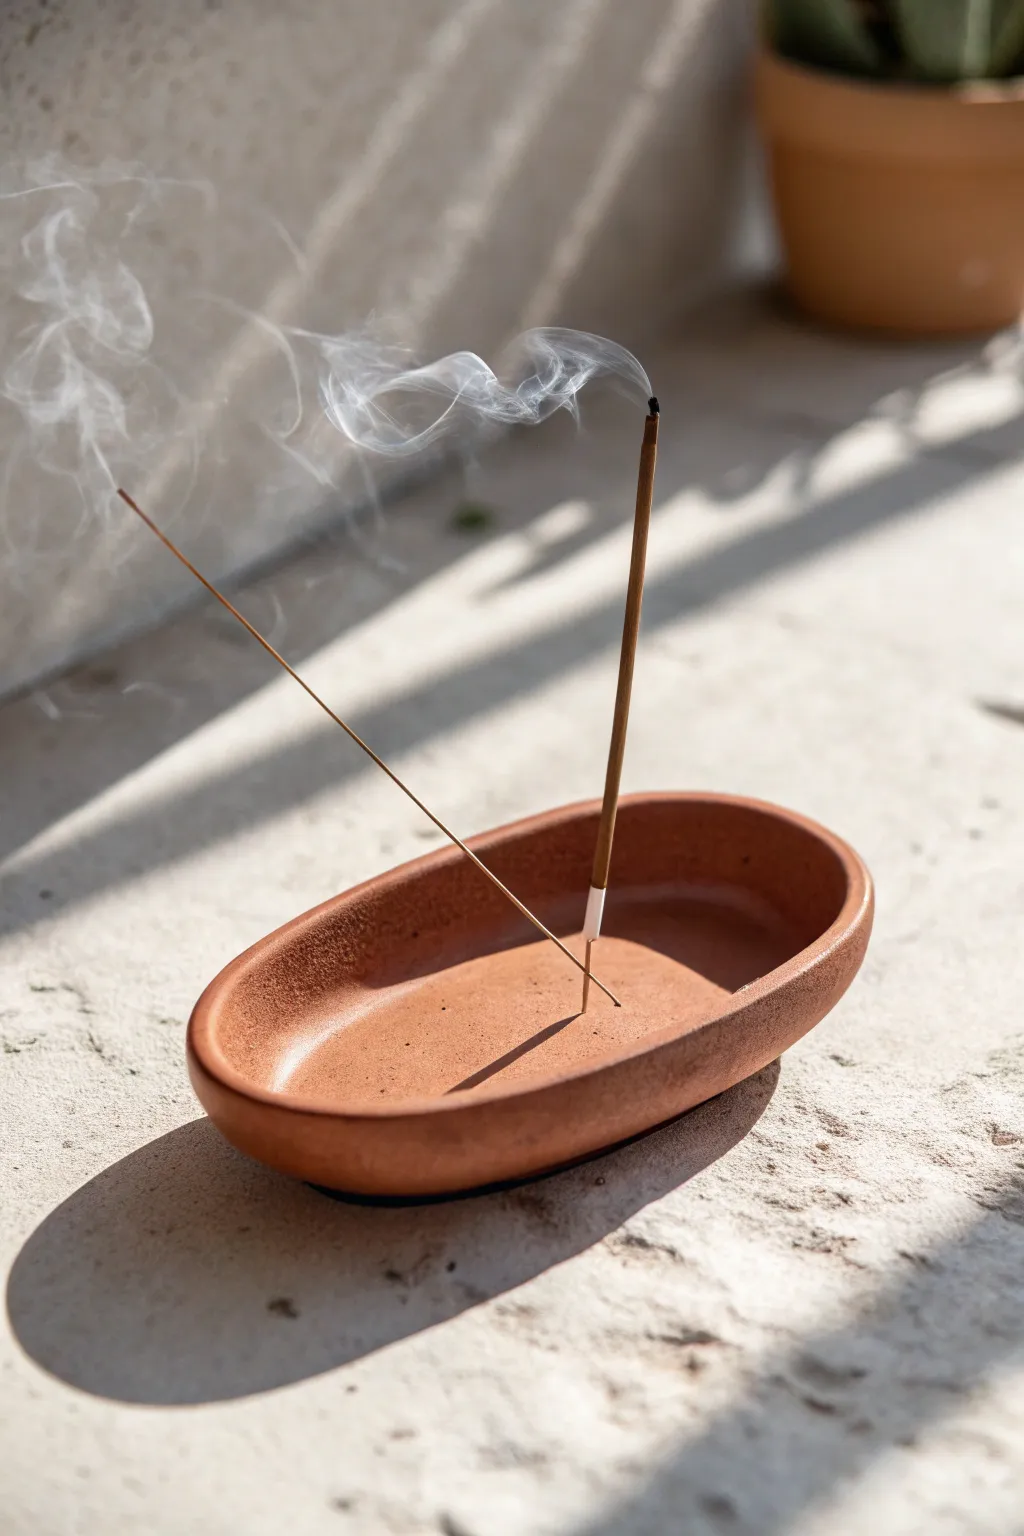
This elegant, low-profile incense holder combines functionality with organic beauty, featuring a shallow basin to catch ash and a dedicated spot to hold your favorite scents. The warm terracotta tone adds a grounding, earthy feel to any meditation space or entryway table.
How-To Guide
Materials
- Terracotta colored air-dry clay
- Rolling pin
- Oval paper template (approx. 6 inches long)
- Craft knife or clay cutter
- Sponge
- Bowl of water
- Fine-grit sandpaper (220-400 grit)
- Wooden skewer or toothpick
- Matte varnish or sealant
Step 1: Shaping the Base
-
Prepare the Clay:
Cut off a generous chunk of terracotta air-dry clay and knead it well in your hands to activate the fibers and warm it up, ensuring it is pliable and crack-free. -
Roll the Slab:
Place the clay on a smooth surface or canvas mat. Use your rolling pin to roll it out into an even slab, aiming for a thickness of about 1/4 inch. -
Cut the Shape:
Lay your oval paper template lightly on top of the slab. Use a craft knife to trace around the edge, cutting cleanly through the clay to create your oval base. -
Smooth the Edges:
Dip your finger in a little water and run it along the cut edge of the oval to soften any sharp corners left by the knife.
Water Wisdom
Use water sparingly when smoothing! Too much water breaks down the clay structure and can cause warping or cracking as it dries.
Step 2: Building the Walls
-
Create a Coil:
Roll a remaining piece of clay into a long, even ‘snake’ or coil. It should be thick enough to form a sturdy wall, roughly the width of your pinky finger. -
Attach the Coil:
Score the outer edge of your oval base base and the bottom of your coil with a needle tool or toothpick. Apply a dab of water to the scored areas (slip) and press the coil onto the rim of the base. -
Blend the Seams:
Using your thumb or a modeling tool, drag the clay from the coil down onto the base on both the inside and outside to merge them seamlessly. Creating a smooth connection here adds durability. -
Refine the Wall Height:
With the coil attached, gently pinch the walls upward to create a rim. I prefer to keep this quite low-profile, perhaps only half an inch high, to maintain that sleek look in the photo. -
Level the Rim:
Flip the entire piece upside down gently onto a flat surface and press lightly. This helps ensure the top rim is perfectly level.
Step 3: Detailing and Finishing
-
Smooth the Surface:
Use a damp sponge to wipe over the entire piece. Focus on erasing fingerprints, tool marks, and ensuring the transition from the floor to the wall is a soft curve. -
Create the Holder:
Roll a tiny ball of clay and press it securely into the center of the dish. This bump will serve as the anchor for the incense stick. -
Pierce the Hole:
Take a wooden skewer or an incense stick and press it into the small mound you just created. Make sure to press it in at a slight angle so the ash will fall into the dish, not outside it. -
Widen the Hole Slightly:
Give the skewer a tiny wiggle to make the hole just fractionally larger than the stick, as air-dry clay shrinks slightly when it dries. -
Let it Dry:
Place the finished dish in a cool, dry place away from direct sunlight. Let it cure for 24-48 hours until it turns a lighter, chalky color and feels room temperature to the touch. -
Sand for Perfection:
Once fully dry, take your fine-grit sandpaper and gently sand any rough spots on the rim or the outside curve to achieve that professional, stone-like finish. -
Seal the Piece:
Apply a coat of matte varnish or sealant to protect the clay from ash stains and humidity, preserving that natural terracotta appearance.
Cracked While Drying?
Create a ‘slip’ paste by mixing clay scraps with water. Fill the crack with this paste, smooth it over, and let it dry again completely.
Light your favorite incense and enjoy the calm atmosphere your handmade creation brings to the room
Modern Terracotta Taper Candle Holders
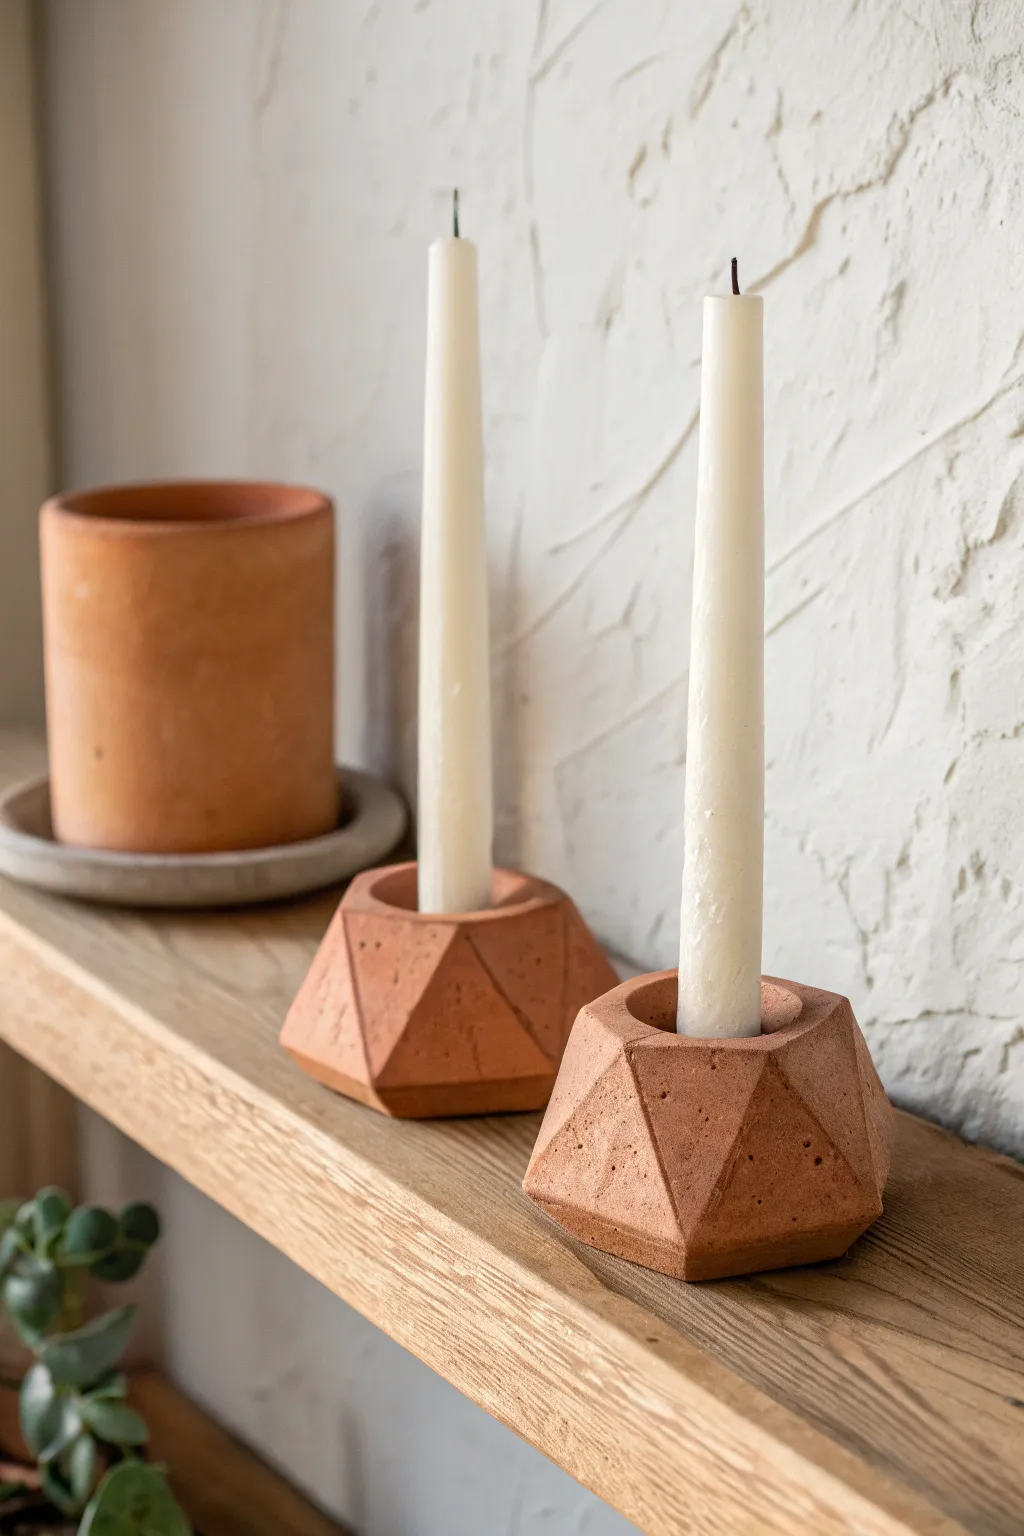
Bring a touch of modern earthiness to your mantle with these faceted candle holders made from terracotta air-dry clay. Their structured geometric shape contrasts beautifully with the warm, rustic texture of the clay, creating a sophisticated yet handmade aesthetic.
Step-by-Step Guide
Materials
- Terracotta air-dry clay
- Rolling pin
- Sharp crafting knife or clay slicer
- Ruler
- Taper candle (for sizing)
- Small cup of water
- Sponge or smoothing tool
- Fine-grit sandpaper
- Clear matte varnish (optional)
Step 1: Prepping the Base Form
-
Condition the Clay:
Start by taking a generous chunk of terracotta air-dry clay. Knead it in your warm hands for a few minutes until it becomes pliable and smooth, eliminating any cracks. -
Form a Sphere:
Roll the conditioned clay into a smooth, tight ball. It should be slightly larger than a tennis ball, or roughly 3 inches in diameter, to ensure you have enough material to carve away later. -
Create a Flat Base:
Gently press the ball onto your work surface to create a stable, flat bottom. You don’t want to flatten it completely into a pancake, just enough so it sits sturdy without rolling. -
Shape the General Form:
Using your hands or a flat tool, gently tap the sides to start shaping the round ball into a rough, squat cylinder or hexagon shape. This doesn’t need to be perfect yet; it’s just a guide for carving.
Fixing Cracks
If small cracks appear while drying, mix a tiny bit of fresh clay with water to make a paste (slip). Fill the cracks, smooth over, and let dry again.
Step 2: Carving the Geometrics
-
Slice the First Facet:
Take your sharp crafting knife or clay slicer. Make a clean, straight cut on one side of the clay mound, slicing off a rounded edge to create a flat, triangular or trapezoidal face. -
Rotate and Repeat:
Rotate the clay slightly and make another slice next to the first one. Angle your knife so the new face meets the previous one at a sharp edge. I like to vary the angles slightly to get that organic, gem-like look. -
Continue Faceting:
Work your way around the entire circumference of the holder, slicing off rounded sections until the exterior is entirely made of flat geometric planes. Aim for symmetry, but embrace slight irregularities for handmade charm. -
Clean the Edges:
Dip your finger in a little water and very gently run it along the sharp ridges where the faces meet. You want to smooth out tiny burrs without dulling the crisp geometric lines.
Elevate the Look
Mix black or white acrylic paint into your varnish for a subtle wash, or use gold leaf on just one triangular facet for a luxe, modern asymmetrical detail.
Step 3: Adding Functionality
-
Mark the Center:
Locate the top center of your faceted shape. Gently press the bottom of your taper candle into the clay to leave a circular impression as a cutting guide. -
Carve the Candle Hole:
Using a loop tool or a small knife, carefully scoop out the clay from the center circle. Dig down about 1 to 1.5 inches deep to ensure the candle will stand securely. -
Test the Fit:
Insert your taper candle into the hole. Wiggle it slightly to ensure the opening is wide enough. It should be a snug fit, but remember the clay shrinks slightly as it dries, so make the hole just a hair larger than the candle base. -
Smooth the Rim:
Use a damp sponge to smooth the rim of the hole and the top surface. Ensure there are no jagged bits of clay inside the hole that might prevent the candle from sitting flush.
Step 4: Finishing Touches
-
Let it Dry:
Place your finished holders in a cool, dry spot away from direct sunlight. Let them air dry for at least 24-48 hours. Turn them over halfway through to help the bottom dry evenly. -
Sand for Perfection:
Once fully dry and hard, take fine-grit sandpaper and lightly buff the faceted faces. This removes fingerprints and enhances the sharp geometric look. -
Dust Off:
Wipe the piece down with a dry cloth or a soft brush to remove all sanding dust. -
Seal:
For longevity, apply a thin coat of matte varnish. This will protect the clay from moisture and give it a finished, professional appearance without hiding the natural terracotta texture.
Now you have a stunning, modern centerpiece ready to light up your next dinner party


The Complete Guide to Pottery Troubleshooting
Uncover the most common ceramic mistakes—from cracking clay to failed glazes—and learn how to fix them fast.
Terracotta Tea Light House Cutouts
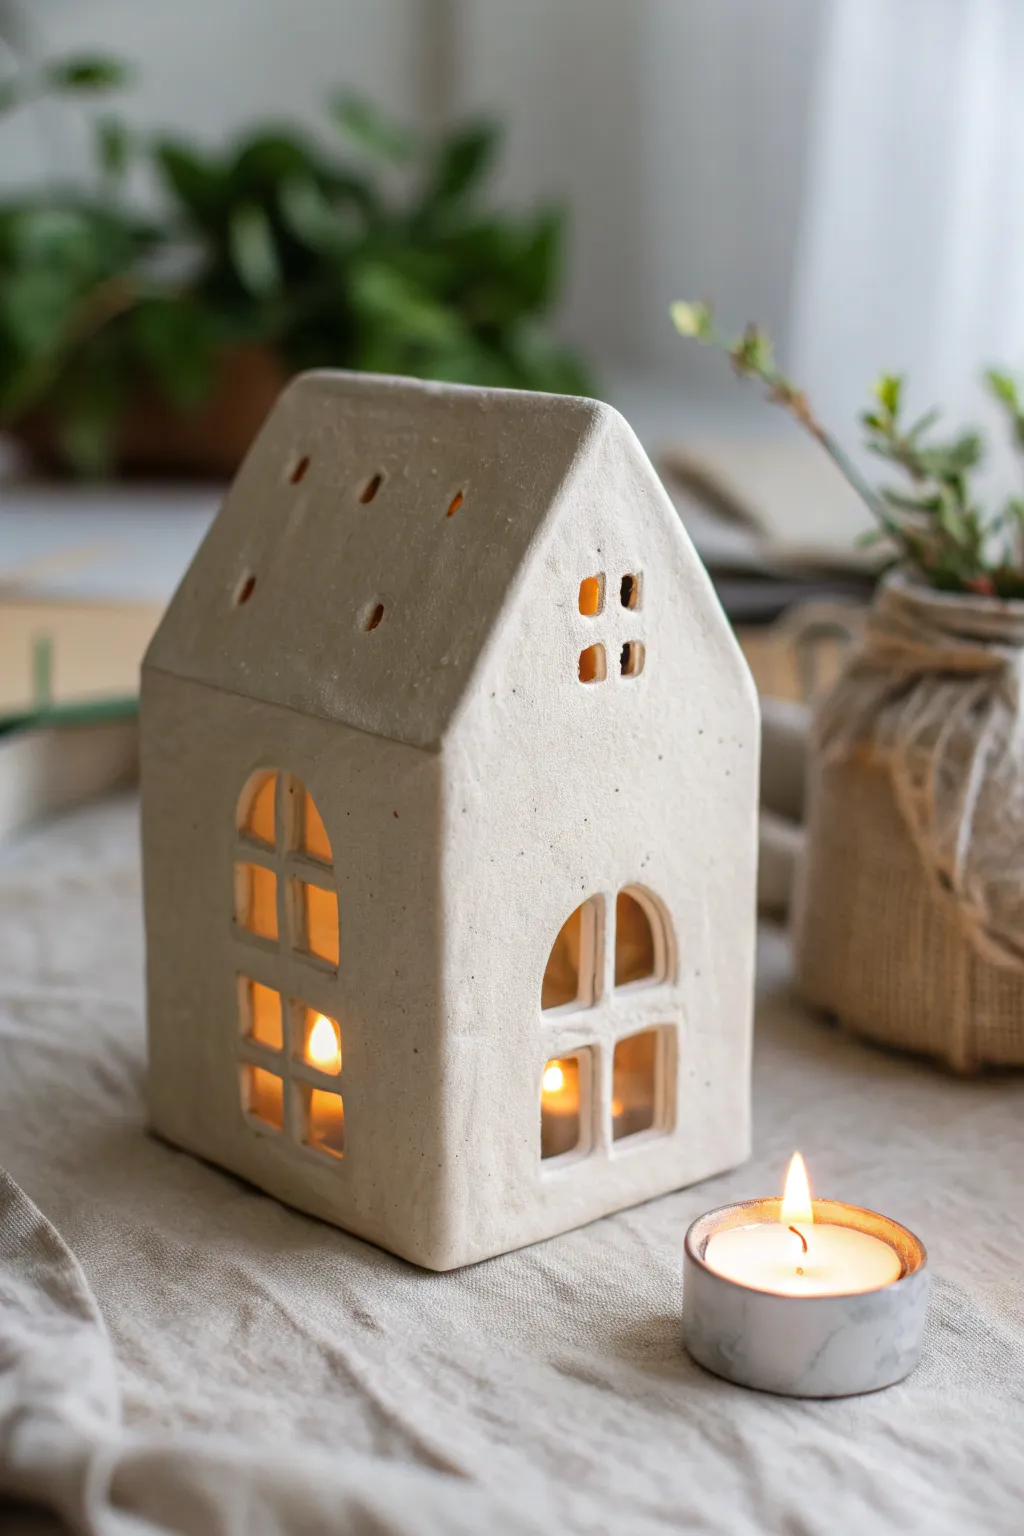
Create a cozy, architectural luminary that looks like kiln-fired ceramic but is made right at your kitchen table. With its arched windows and rustic texture, this little house casts a warm, inviting glow perfect for any mantle or centerpiece.
Detailed Instructions
Materials
- White terracotta air dry clay (or white stoneware-style air dry clay)
- Roller or rolling pin
- Sharp craft knife or scalpel
- Ruler
- Two wooden dowels or slat guides (approx. 5mm thick)
- Clay slip (made by mixing scrap clay with water)
- Small round cutter or a straw
- Fine-grit sandpaper
- Small sponge
- Cardboard or stiff cardstock (for templates)
- Acrylic varnish (matte or satin, optional)
Step 1: Planning and Preparation
-
Create your templates:
Sketch out the shapes on cardstock first. You’ll need two identical pentagon shapes for the front and back (the ‘house’ shape with a pointed roof) and two rectangles for the side walls. Ensure the side walls are the same height as the vertical part of your front/back pieces. -
Roll the clay slab:
Place your clay between two wooden guides or dowels. This ensures an even thickness—about 5mm is ideal for structural stability without being too heavy. Roll the clay out into a large, smooth slab. -
Cut the walls:
Lay your cardstock templates onto the rolled clay. Using your sharp craft knife and a ruler for guidance, carefully cut out the four wall pieces. Save the excess clay for the roof later.
Straight Cuts Only
A metal ruler isn’t just for measuring; press it gently onto the clay as a guide while cutting to ensure your walls are perfectly straight and crisp.
Step 2: Adding Details
-
Draft the windows:
Before cutting, lightly impress the outline of your arched windows onto the damp clay using a tool or a light pencil touch. Aim for a large arched window on the front and similarly styled ones on the sides. -
Cut the window panes:
Carefully slice out the negative space within the windows, leaving thin strips of clay to form the distinctive cross-hatch windowpanes. This requires a steady hand; if a pane breaks, use a tiny bit of water to rejoin it immediately. -
Punch roof ventilation:
On the upper triangular part of your front and back pieces (the gables), use a small square cutter or carefully cut four small squares to form a decorative grid window. -
Refine the edges:
Dip your finger in a little water and smooth down any sharp or ragged burrs along your cut lines. This gives that soft, finished pottery look seen in the photo.
Step 3: Assembly
-
Score and slip:
Score (scratch) the side edges of all your wall pieces where they will join. Apply a generous amount of clay slip (your clay glue) to these roughened areas. -
Build the walls:
Stand the walls up, pressing the scored edges together to form the rectangular base. I find it helpful to assemble this directly on a piece of parchment paper so I can rotate it easily. -
Reinforce the interior:
Roll a very thin ‘snake’ or coil of clay and press it into the interior corners where the walls meet. Smooth this out with a modeling tool to strengthen the bond. -
Measure the roof:
Measure the distance from the roof peak to the eaves and the length of the house. Roll out a new slab and cut two rectangles for the roof panels, allowing for a slight overhang if desired. -
Attach the roof:
Score and slip the top edges of the wall assembly. Place your roof panels on top, joining them at the peak. Smooth the peak seam thoroughly so it looks like one continuous piece. -
Add roof holes:
Using a straw or small round tool, punch several holes in the roof panels. These aren’t just decorative; they are crucial for letting heat escape when a candle is lit inside.
Warm It Up
Paint the inside walls a pale gold or yellow before assembly. When unlit, it’s subtle, but when the candle is glowing, it amplifies the warmth beautifully.
Step 4: Finishing Touches
-
Texture the surface:
Take a slightly damp sponge and gently pat the entire exterior. This mimics the slightly porous, stony texture of terracotta and removes any fingerprints. -
Slow drying:
Loosely cover the house with a plastic bag for the first 24 hours to prevent cracking. Then, uncover and let it air dry completely for another 24-48 hours until it turns bright white and feels room temperature. -
Sanding:
Once bone dry, gently sand any remaining rough edges or uneven corners with fine-grit sandpaper. -
Seal:
Apply a coat of matte varnish to protect the surface from soot or dust, strictly following the manufacturer’s drying times.
Place a battery-operated tea light inside and enjoy the gentle ambiance of your handmade village house
Terracotta Plant Cachepot Cover
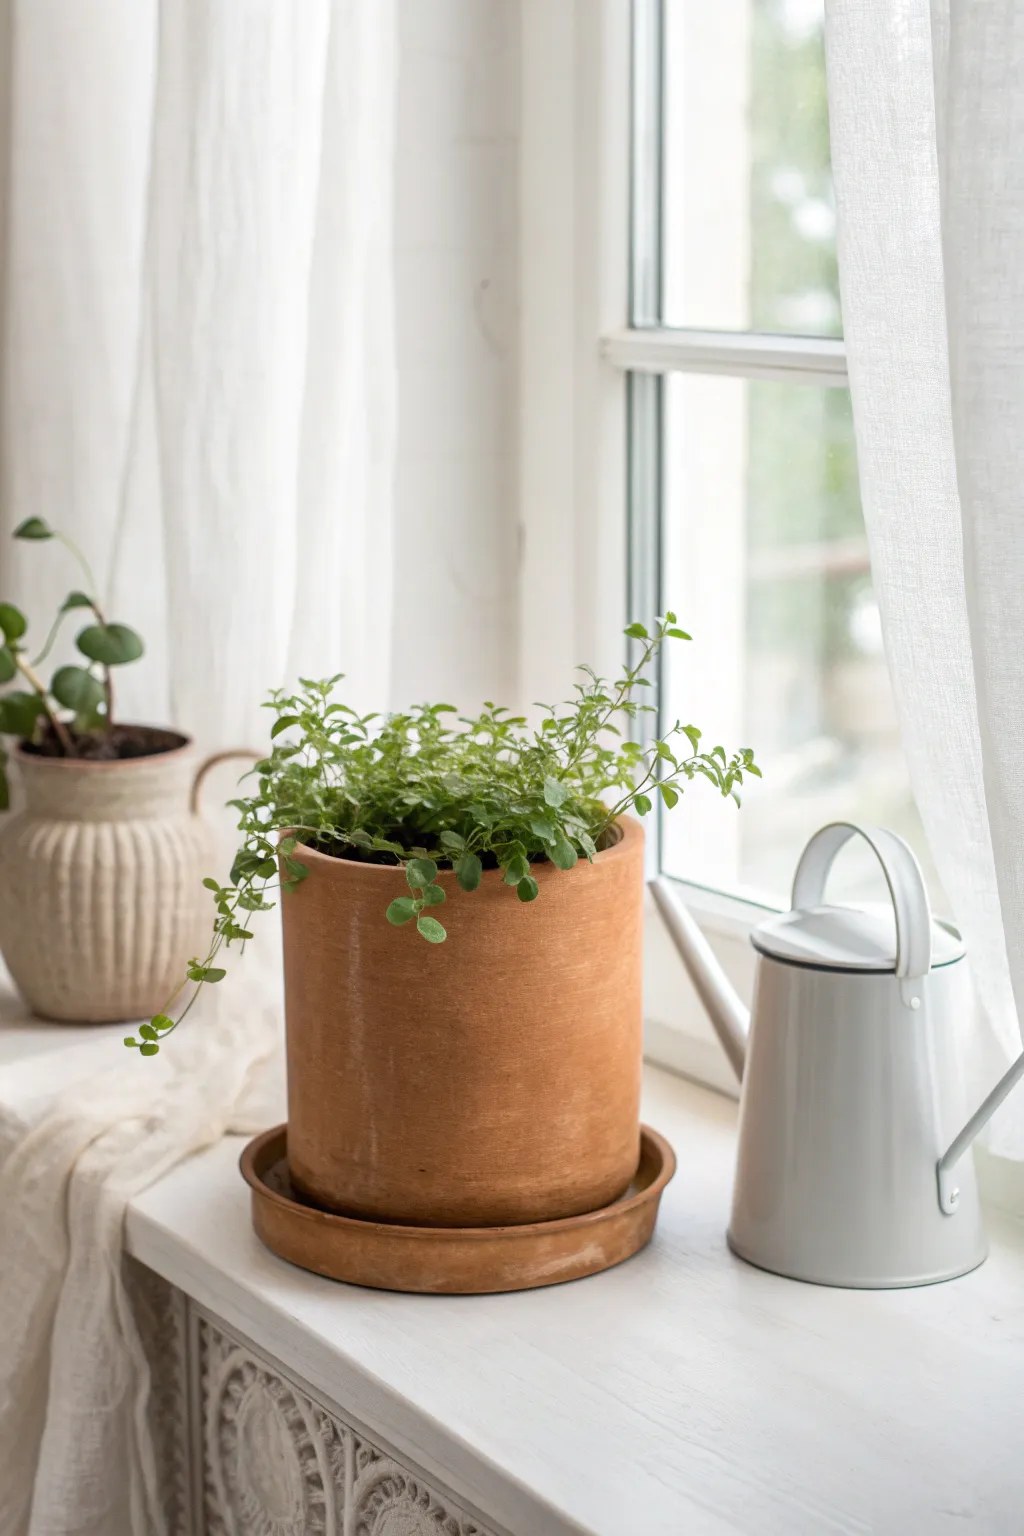
Bring the warmth of a Mediterranean garden indoors with this simple yet elegant cachepot project. Using terracotta-colored air dry clay, you can craft a planter cover that looks authentically rustic, complete with a matching drainage saucer.
Step-by-Step
Materials
- Terracotta-colored air dry clay (approx. 2kg)
- Large cylindrical container (for a mold)
- Small round plate or bowl (for saucer mold)
- Rolling pin
- Cling film or plastic wrap
- Craft knife or clay cutter
- Bowl of water
- Sponge
- Sandpaper (medium and fine grit)
- Matte spray varnish or sealant
Step 1: Creating the Cachepot Base
-
Prepare the mold:
Select a cylindrical container slightly larger than the plant pot you intend to cover. Wrap the outside fully in cling film to prevent the clay from sticking. -
Roll out the base:
Take a large chunk of clay and roll it out into a circle about 0.5cm thick. This will form the bottom of your pot. -
Cut the base:
Place your wrapped container on top of the rolled clay circle. Tracing around the bottom with your craft knife, cut out a circle that matches the diameter of your mold exactly. -
Roll the side wall:
Roll out a large, long rectangle of clay. You need it to be long enough to wrap around the circumference of your cylinder and tall enough to cover the height. -
Check thickness:
Ensure the clay rectangle maintains an even 0.5cm thickness throughout so the pot dries structurally sound. -
Cut to size:
Trim the top and bottom edges of your rectangle so they are perfectly straight and parallel.
Step 2: Assembling the Pot
-
Attach the wall:
Carefully lift the long clay rectangle and wrap it around your plastic-wrapped mold. Where the two ends meet, cut through both layers at an angle for a cleaner seam. -
Seal the vertical seam:
Score the raw edges of the seam with cross-hatching marks, apply a little water, and press them firmly together. Use your thumb to smooth the clay downward until the line disappears. -
Attach to base:
Score and slip the bottom edge of the wall and the outer edge of your base circle. Press them together firmly. -
Blend the join:
I usually use the back of a spoon or a wooden tool to drag clay from the wall down onto the base, ensuring a tight bond around the entire perimeter. -
Smooth the surface:
Dip your sponge in water and wring it out well. Gently wipe the entire outside surface to remove fingerprints and create that smooth, matte texture seen in the photo.
Crack Repairs
If hairline cracks appear during drying, mix a small amount of fresh clay with water to make a thick paste (slip). Fill the cracks, smooth over, and let dry again.
Step 3: The Saucer and Finishing
-
Mold the saucer:
Roll out another slab of clay. drape it inside a cling-film-lined shallow bowl or plate that is slightly wider than your pot. -
Trim the rim:
Use your knife to trim the excess clay flush with the rim of the bowl mold, creating a clean, uniform lip. -
Slow drying process:
Let the pieces dry on their molds for at least 24 hours. Don’t rush this, or the clay might crack. Once stiff, remove the molds and let the inside dry for another 24-48 hours. -
Sanding:
Once bone dry, sand any rough edges or uneven spots on the rim with medium grit sandpaper, finishing with fine grit for a velvety touch. -
Seal the warmth:
Apply two coats of matte spray varnish to protect the clay from humidity, preserving that raw terracotta look without the fragility.
Aged Finish
For a vintage garden look, dry brush a tiny amount of diluted white acrylic paint onto the textured areas before sealing to mimic natural salt deposits.
Now you have a timeless vessel ready to showcase your favorite greenery.

TRACK YOUR CERAMIC JOURNEY
Capture glaze tests, firing details, and creative progress—all in one simple printable. Make your projects easier to repeat and improve.
Hanging Terracotta Air Plant Pods
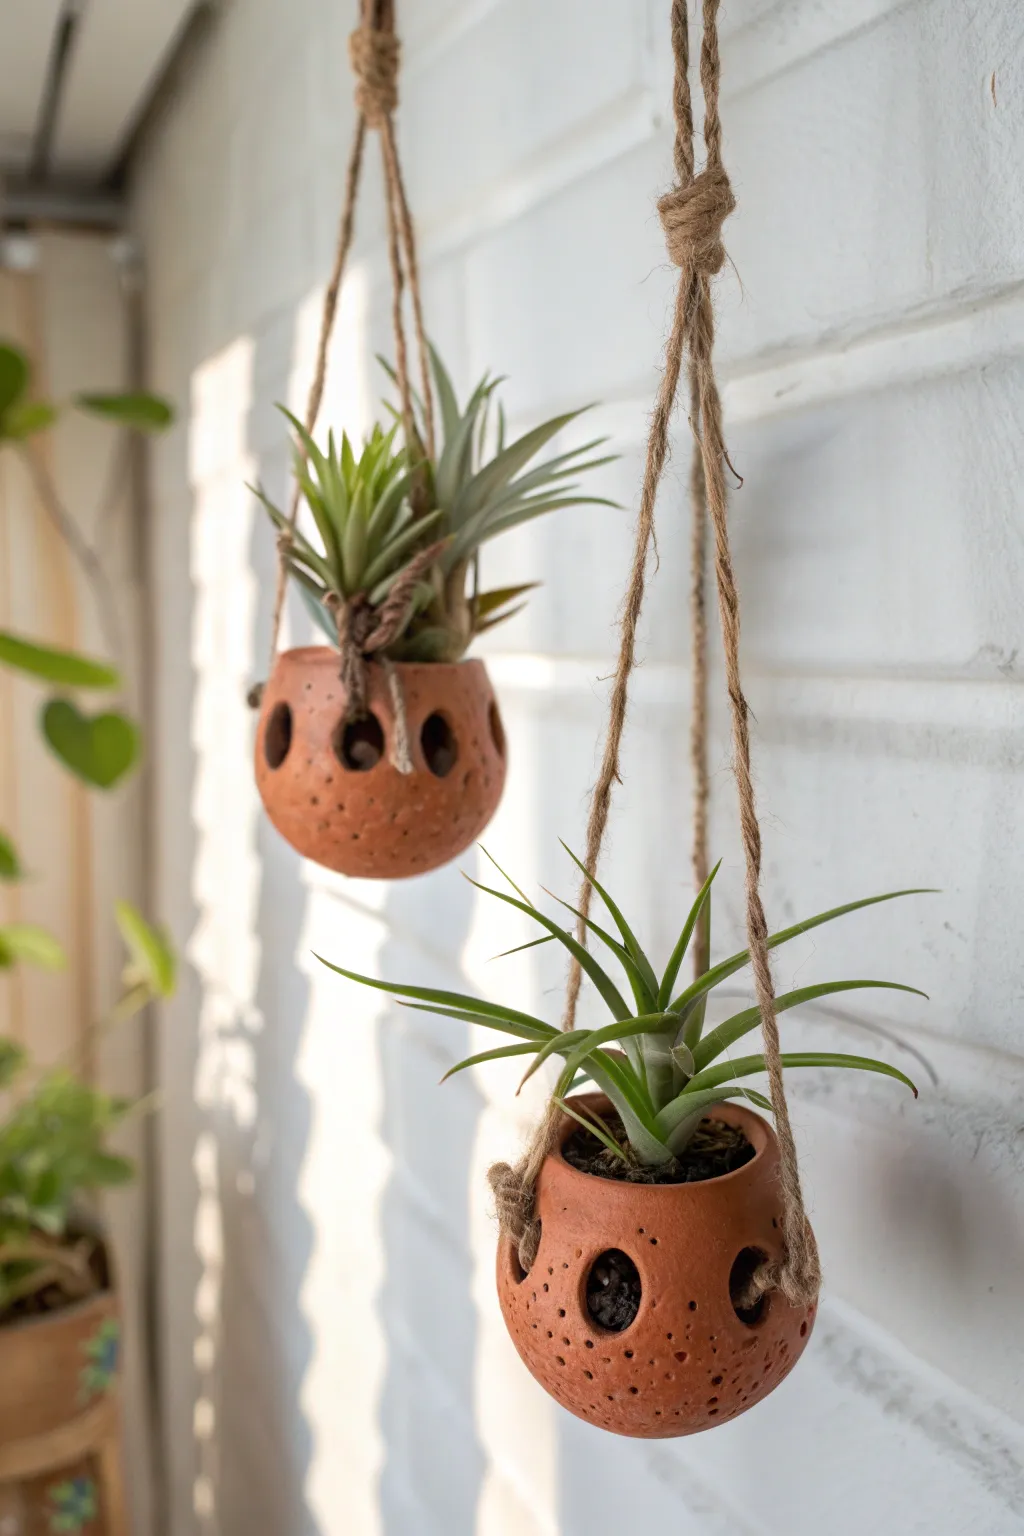
These miniature hanging gardens bring a wonderful earthy texture to any sunlit corner with their warm terracotta tones and rustic jute suspension. The dotted pattern and circular windows create a playful, organic home perfect for showing off spiky air plants.
How-To Guide
Materials
- Terracotta colored air dry clay
- Jute twine (natural brown)
- Small rolling pin or smooth jar
- Round cookie cutter (approx. circle size for base/top)
- Small circular cutter (bottle cap or piping tip, approx. 1 inch)
- Aluminum foil
- Toothpick or skewer
- Small bowl of water
- Sanding sponge (fine grit)
- Needle tool or awl
Step 1: Forming the Clay Pod
-
Prepare the foil armature:
Creating a lightweight core is essential for the pod’s shape. Crumple a piece of aluminum foil into a tight ball, roughly the size of a tangerine or a tennis ball, depending on how large you want your final planter to be. -
Roll out the clay slab:
Take a handful of terracotta air dry clay and roll it out onto a clean surface until it is about 1/4 inch thick. You want it sturdy enough to hold its shape but not too heavy. -
Cover the foil core:
Drape the clay sheet over your foil ball. Gently press and smooth the clay down around the foil to encase it completely, cutting away excess clay at the bottom where the seams meet. -
Smooth the seams:
Dip your finger in a little water and rub away the join lines until the sphere looks seamless and smooth. Rolled clay sometimes has small cracks, so take a moment to buff those out now. -
Create the opening:
Using a sharp knife or a round cutter, slice off the very top of the sphere to create the main opening where the plant sit. Don’t remove the foil yet; keep it inside for support while you work. -
Smooth the rim:
I always take a moment here to dampen my finger and round off the cut edge of the rim so it looks finished rather than sharp.
Step 2: Adding texture and Details
-
Cut the side windows:
Using a small circular cutter (like a piping tip or a tiny bottle cap), press firmly into the side of the clay sphere to cut out three or four decorative holes. Space them evenly around the equator of the pod. -
Remove the cutouts and foil:
Carefully pry out the clay circles you just cut. Now, gently pull out the aluminum foil interior through the top opening. If the foil stuck a bit, use tweezers to grab the small pieces. -
Refine the interior:
Reach inside with a slightly damp finger to smooth out any rough textures left by the foil so the inside is as neat as the outside. -
Pierce suspension holes:
Using a skewer or needle tool, poke three holes near the top rim, spaced equally apart. Make these holes slightly larger than your twine, as clay shrinks when drying. -
Add the stippled texture:
Take your toothpick and gently poke shallow dots all over the surface of the pod. Vary the spacing slightly to give it that organic, porous look seen in the photo. Be careful not to puncture all the way through. -
Let it dry completely:
Set the pod aside in a dry, room-temperature spot. Allow it to air dry for at least 24-48 hours. The color will lighten noticeably as the moisture evaporates.
Smooth Operator
To get that perfectly round finish without fingerprints, lightly dampen a soft sponge and pat the clay surface just before adding the texture dots.
Step 3: Assembly and Hanging
-
Sand for perfection:
Once fully bone dry, use a fine-grit sanding sponge to gently buff away any sharp burrs around the holes or rim. -
Cut the twine:
Cut three equal lengths of jute twine, about 24 inches long each (or adjust for your desired hanging height). -
Attach the suspension lines:
Thread one end of a twine piece through one of the rim holes from the outside in. Tie a double knot on the inside so it won’t pull through. Repeat for the other two holes. -
Create the main knot:
Gather all three strings together at the top. Ensure the pod is hanging level, then tie a large overhand knot with all three strands to form the main hanging loop. -
Secure the top loop:
A few inches above your first knot, tie a second knot to create a secure loop for a hook, then trim any excess fraying from the very ends. -
Add your greenery:
Nestle a Tillandsia (air plant) into the top opening, letting its leaves spill comfortably over the side.
Slumping Shapes?
If the clay feels too soft and the sphere sags after removing the foil, stuff the inside loosely with dry paper towel to support the walls while it dries.
Hang these near a bright window and enjoy the modern, airy vibe they add to your space
Terracotta Wall Relief Face Plaque
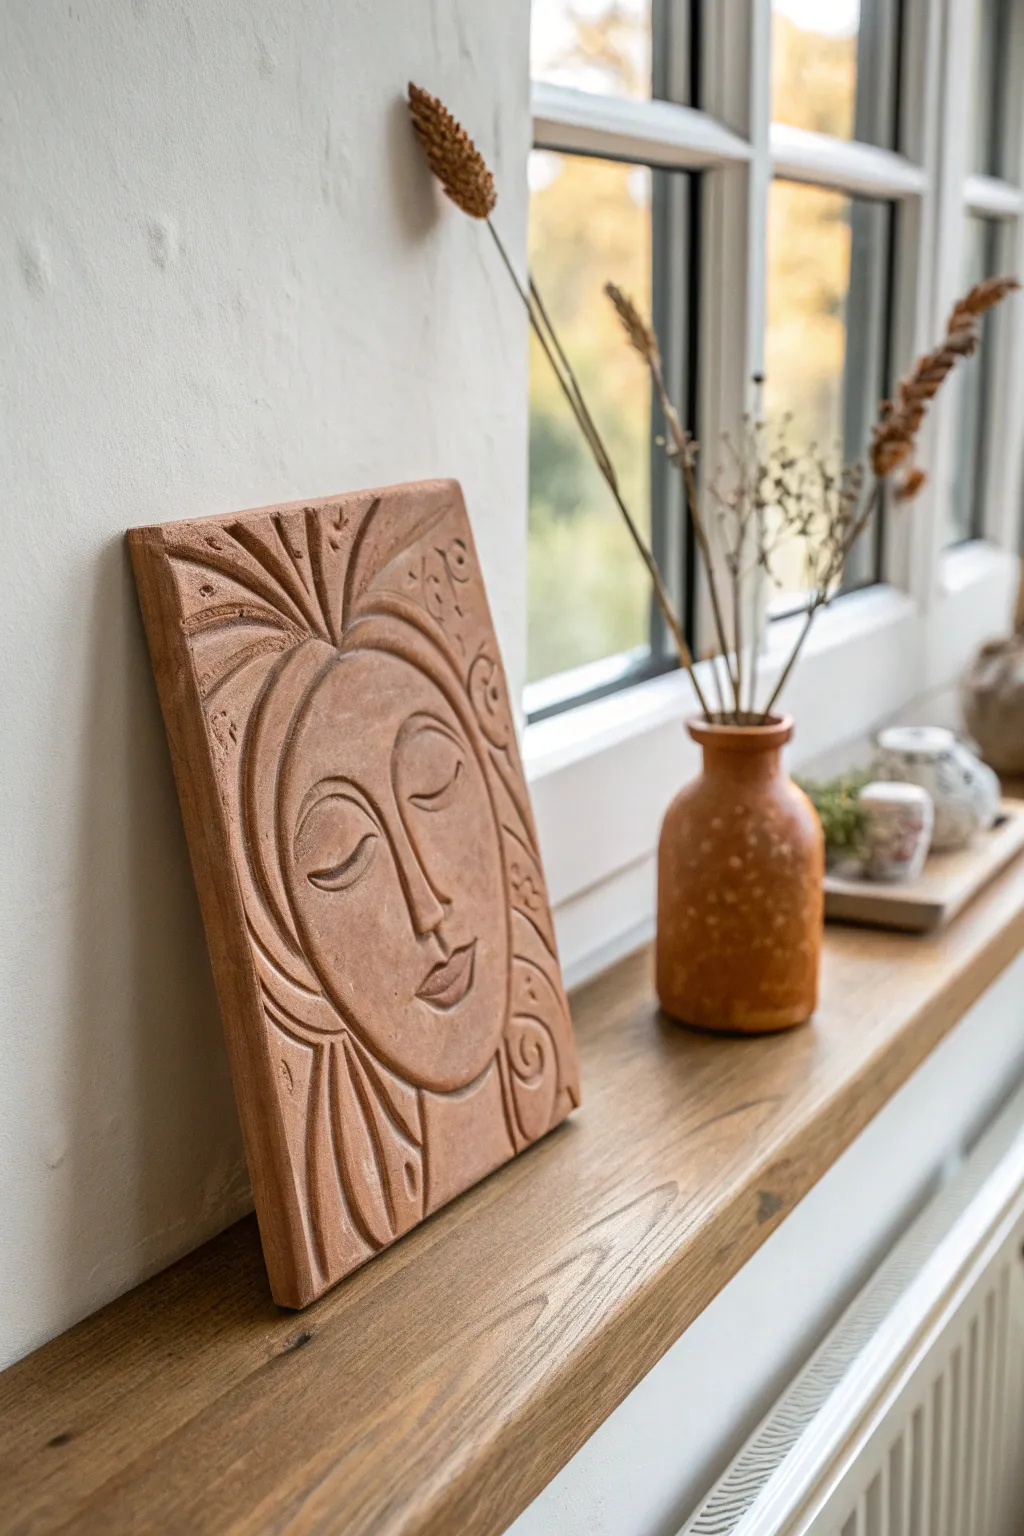
Capture a moment of quiet contemplation with this stylized clay relief plaque, perfect for adding an artistic, earthy touch to any shelf or mantelpiece. Using terracotta air dry clay, you’ll sculpt flowing lines and gentle features to create a timeless piece of wall art without needing a kiln.
Step-by-Step Tutorial
Materials
- Terracotta air dry clay (approx. 500g-1kg)
- Rolling pin
- Two wooden guide strips (approx. 1 cm thick)
- Clay carving tools (needle tool, loop tool, wire cutter)
- Modelling tool or smooth wooden spoon handle
- Ruler
- Bowl of water and sponge
- Canvas or heavy cloth (for rolling out clay)
- Fine grit sandpaper
Step 1: Preparing the Base
-
Prepare your workspace:
Lay down your canvas or heavy cloth on a flat, sturdy table. This prevents the clay from sticking to your surface and picks up a nice texture on the back. -
Roll out the clay slab:
Place a ball of terracotta air dry clay between two wooden guide strips. Use your rolling pin to flatten the clay until it is level with the guides, ensuring an even thickness of about 1 cm throughout. -
Cut the rectangle:
Using a ruler and a needle tool or knife, cut a clean, straight-edged rectangle. A size of roughly 15×20 cm works beautifully for a portrait like this. -
Smooth the edges:
Dip your finger slightly in water and run it along the cut edges to soften the harsh corners and remove any clay crumbs.
Step 2: Drafting the Design
-
Outline the composition:
With a needle tool, very lightly sketch the main shapes onto the wet slab. Draw a large arch for the hair boundary and an oval shape for the face in the center. -
Mark facial features:
Lightly mark a vertical line down the center of the face for symmetry, then indicate horizontal lines for where the eyes, nose, and mouth will sit.
Clean Lines Pro-Tip
When carving lines, pull the tool towards you rather than pushing away. This gives you greater control and prevents the tool from sketching out of the groove.
Step 3: Sculpting Relief Details
-
Carve the hair outline:
Use a V-shaped carving tool or needle tool to deepen the lines defining the hair. Create sweeping curves that frame the face, pressing firmly to establish a deep groove. -
Define the nose:
Instead of adding clay, we represent the nose through incision and slight modeling. Carve a deep line alongside the nose bridge, sloping it gently into the cheek area to make the nose appear raised. -
Shape the eyes:
Carve two symmetrical arch shapes for the closed eyelids. Use a loop tool to gently remove a sliver of clay from the area just under the brow bone to give the eyelids dimension. -
Refine the eyelids:
I like to use a smooth modeling tool to burnish (rub) the eyelids, making them distinct from the surrounding clay without cutting too deep. -
Sculpt the mouth:
Carve the line of the mouth and the bottom of the lower lip. Keep the expression neutral and peaceful by curving the corners slightly upward. -
Add decorative hair details:
At the top of the head, carve radiating lines resembling a sunburst or stylized hair strands. Keep these lines purposeful and relatively deep so they read well from a distance. -
Embellish the background:
In the corners of the plaque outside the main hair shape, press small circles or scroll patterns using the small end of a loop tool or the back of a paintbrush.
Level Up: Antique Wash
After drying, brush on watered-down white acrylic paint and immediately wipe it off with a rag. The white will stay in the grooves, highlighting your carving work.
Step 4: Refining and Drying
-
Smooth the surface:
Using a slightly damp sponge, wipe over the high points of the relief (the forehead, cheeks, and hair). This removes any sharp tool marks or burrs. -
Final check:
Look at the plaque from an angle in good light. Deepen any lines that look too shallow, as drying tends to soften details slightly. -
Controlled drying:
Place a piece of plastic wrap loosely over the plaque for the first 24 hours to slow down drying and prevent warping. Then remove the plastic. -
Full cure:
Let the piece dry completely for another 2-3 days, turning it over occasionally once it’s firm enough to handle, ensuring the back dries evenly. -
Finish sanding:
Once bone dry, take your fine-grit sandpaper and gently buff the flat surfaces and edges for a professional, matte terracotta finish.
Place your finished relief on a sunny windowsill where the light can play across the textures you created
Terracotta Rainbow Wall Hanging
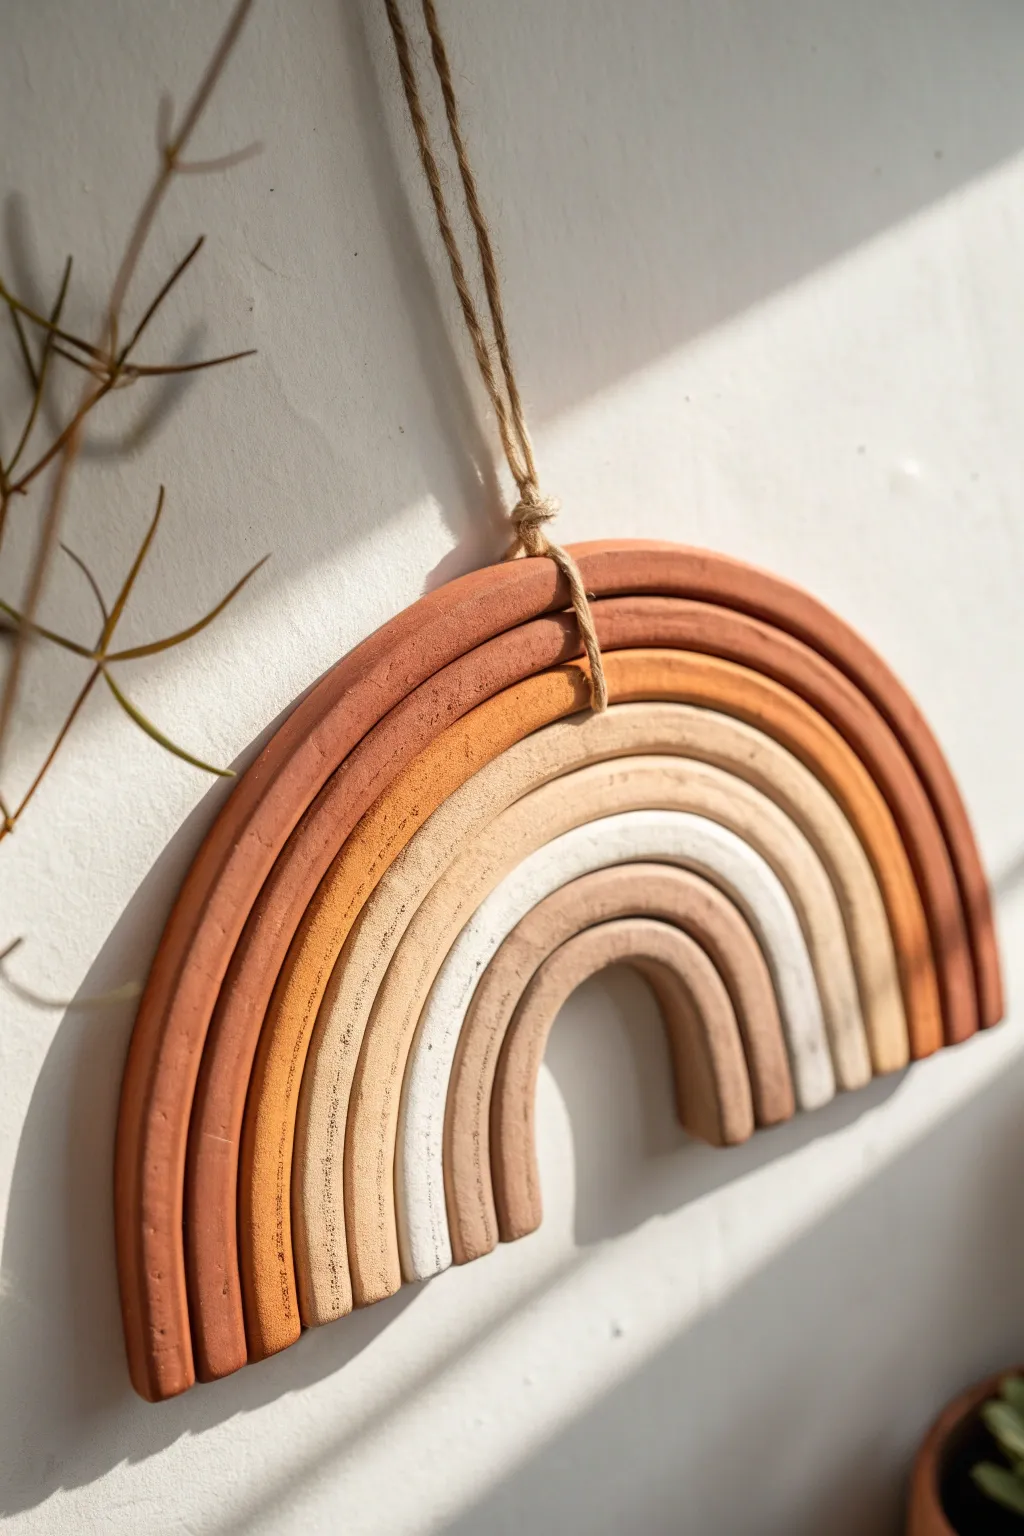
Embrace the warmth of natural tones with this minimalist wall hanging that mimics the look of real fired ceramic. By combining traditional terracotta clay with softer earthy paints, you create a charming, textured décor piece that feels both modern and timeless.
Detailed Instructions
Materials
- Terracotta colored air-dry clay (or standard air-dry clay)
- Acrylic paints (dark rust, burnt orange, beige, white, cream)
- Hemp cord or jute twine
- Rolling pin
- Sharp crafting knife
- Water in a small cup
- Sandpaper (fine grit)
- Strong craft glue (e.g., E6000 or super glue gel)
- Wax paper or a silicone mat
Step 1: Shaping the Arches
-
Prepare your workspace:
Lay down wax paper or a silicone mat to prevent the clay from sticking to your table. Take a large handful of your air-dry clay and knead it well to warm it up and remove air bubbles. -
Roll the first coil:
Start with the largest outer arch. Roll a long snake of clay on your surface using the palms of your hands. Aim for an even thickness of about 1/2 to 3/4 inch throughout the entire length. -
Form the U-shape:
Curve the clay snake into a rainbow U-shape. This will determine the overall size of your hanging, so make sure you are happy with the width and height. -
Create subsequent arches:
Repeat the rolling process for the next inner layer. Place the new snake directly inside the first one to check the fit, ensuring they nestle together snugly without gaps. -
Continue nesting:
Continue rolling and nesting coils until you have created five distinct arches, getting progressively smaller toward the center. -
Trim the bottoms:
Once all five arches are nestled together, take a long ruler or just eyeball a straight line across the bottom legs. Use your sharp craft knife to slice through all the coils simultaneously for a perfectly flat base. -
Smooth the imperfections:
Dip your finger in a little water and smooth out any cracks or harsh ridges on the surface of the coils. Don’t over-wet the clay, or it forces drying time to drag on. -
Separate for drying:
Carefully separate the arches slightly so they aren’t touching. This allows air to circulate around each piece for even drying. -
Let it cure:
Allow the clay pieces to dry completely on a flat surface. This usually takes 24-48 hours depending on humidity. Flip them over halfway through to ensure the backs dry thoroughly.
Cracking Up?
If you see hairline cracks while drying, mix a tiny bit of fresh clay with water to make a paste (slip). Fill the cracks, smooth with a finger, and let dry again.
Step 2: Assembly and Finishing
-
Sand the edges:
Once fully dry, use fine-grit sandpaper to gently smooth any rough spots, especially around the cut bottom edges. Wipe away the dust with a dry cloth. -
Paint selection:
Prepare your palette. Keep the outermost arch natural (or paint it a deep rust). For the inner arches, mix white into your base terracotta or orange paint in increasing amounts to create a gradient effect. -
Painting the arches:
I like to paint the front and sides of each arch individually before gluing them. Paint the second arch a burnt orange, the third a sandy beige, the fourth a light cream, and the center a darker tan as shown in the photo. -
Glue the structure:
Apply a strong line of craft glue along the inner curve of the largest arch and press the second arch into it. Continue gluing each smaller arch inside the previous one until the full rainbow is reassembled. -
Secure the hanger:
Cut a length of hemp cord or jute twine. Double it over to create a loop. -
Attach the cord:
Tie a knot at the bottom of the loop. Apply a generous dab of glue to the back of the rainbow, right at the top center peak, and press the knot into it. You may want to glue a small scrap of fabric over the knot for extra security. -
Wrap the center:
For the look in the photo, take the loose ends of the twine and wrap them a few times around the absolute center of the top arch, tying it off securely. This creates a functional and decorative hanging point. -
Final dry:
Let the glue cure completely according to the package instructions before hanging your new artwork.
Texture Trick
To get that specific stone-like texture, mix a teaspoon of baking soda into your acrylic paint before applying. It fluffs up the paint for a matte, ceramic finish.
Hang your beautiful handmade rainbow in a spot that catches the afternoon sun to highlight those rich earthy textures
Terracotta Photo and Card Stand
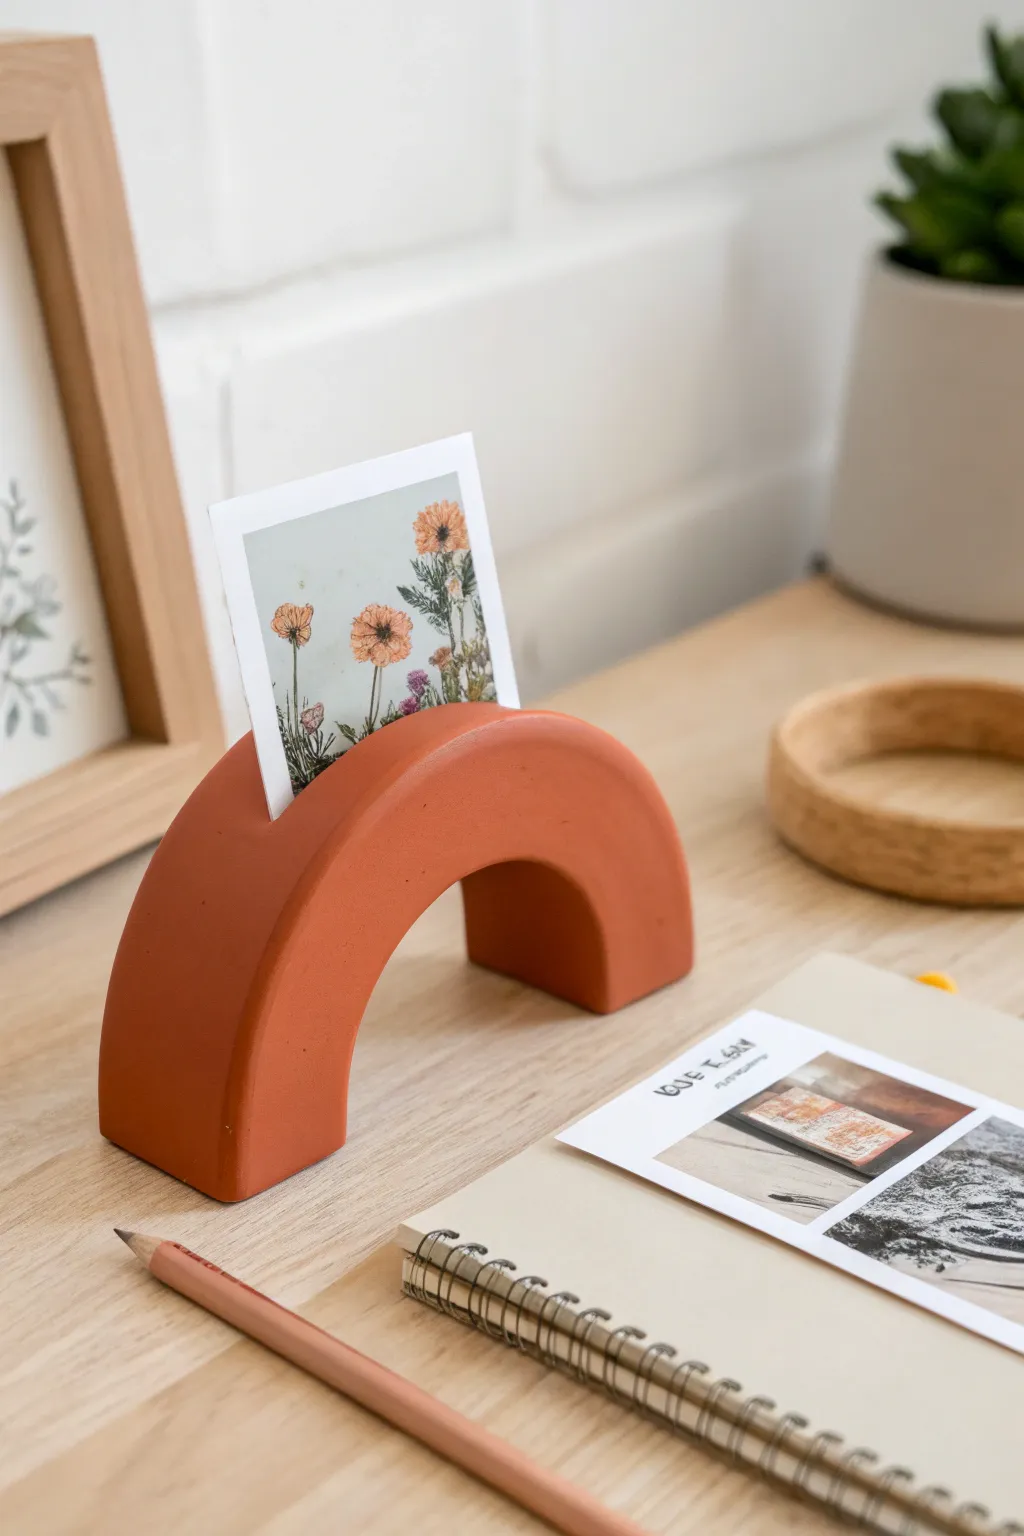
Bring a touch of modern warmth to your desk with this incredibly simple yet stylish card holder. Molded into a sleek arch shape using terracotta-colored air dry clay, it’s the perfect spot to display your favorite instant photos, postcards, or inspirational quotes.
Step-by-Step Tutorial
Materials
- Terracotta air dry clay (e.g., DAS or Crayola)
- Dough roller or rolling pin
- Sharp craft knife or clay slicer
- Ruler
- Small bowl relative to your desired arch size (for shaping)
- Water in a small cup
- Fine-grit sandpaper (220-400 grit)
- Matte sealant or varnish (optional)
- Smooth work surface or silicone mat
Step 1: Shaping the Base
-
Condition the clay:
Begin by taking a generous handful of terracotta air dry clay. Knead it in your hands for a few minutes until it is warm, pliable, and free of any air bubbles. -
Roll a log:
Roll the clay into a thick, even cylinder on your work surface. You want it to be roughly 1.5 inches in diameter to ensure the stand is stable enough to hold a card. -
Flatten into a strip:
Using your roller, gently flatten the cylinder into a thick, rectangular slab. Aim for a thickness of about 1 inch and a width of 1.5 to 2 inches. -
Trim the edges:
Use your ruler and craft knife to trim the long sides of the slab so they are perfectly straight and parallel. This will give the finished piece that clean, modern look. -
Create the arch form:
Take your slab and gently drape it over your chosen round object (like a small bowl or a sturdy cardboard tube) to create the arch shape. Ensure the clay is draped evenly. -
Cut the ends:
Once bent into shape, use your knife to cut the two bottom ends flat against the table surface so the arch sits flush and level. -
Smooth the surface:
Dip your finger in a little water and run it over the entire surface of the clay. Smooth out any fingerprints, cracks, or uneven textures. This step is crucial for that flawless finish.
Smooth Operator
Use a tiny amount of olive oil on your fingers instead of water for the final smoothing. It prevents the clay from getting too mushy while erasing prints.
Step 2: Creating the Slot and Finishing
-
Mark the center:
Find the very top center of your arch. Use your ruler to lightly mark a straight line across the width where the card will sit. -
Slice the card slot:
Carefully press your craft knife directly down into the clay along your marked line. You want to cut about 1/2 to 3/4 of an inch deep, but be careful not to slice all the way through or distort the arch shape. -
Widen the slot slightly:
Wiggle the knife very gently side-to-side to create a slightly wider opening. Test the width with a piece of thick cardstock to ensure it fits easily. -
Initial drying phase:
Let the clay sit and dry for about 24 hours. I usually flip the piece gently every few hours during this time to ensure air reaches the bottom surfaces. -
Sanding:
Once the clay is fully hardened (light grey-orange and cool to the touch often means it’s still damp inside, so wait until it feels room temp), sand the entire piece. Use fine-grit sandpaper to buff away any remaining imperfections. -
Clean up dust:
Wipe away all the sanding dust with a slightly damp cloth or a soft brush. -
Refining the slot:
If the slot shrank during drying, fold a piece of sandpaper and run it back and forth inside the groove to open it up perfectly. -
Sealing (Optional):
For longevity, apply a thin coat of matte varnish. This keeps the terracotta look natural while protecting it from moisture.
Textured Twist
Before bending the arch, press dried flowers or a patterned fabric into the clay slab to create a subtle, embossed texture on the surface.
Place your favorite memory in the slot and enjoy your new custom desk accessory
Terracotta Desk Catchall Tray
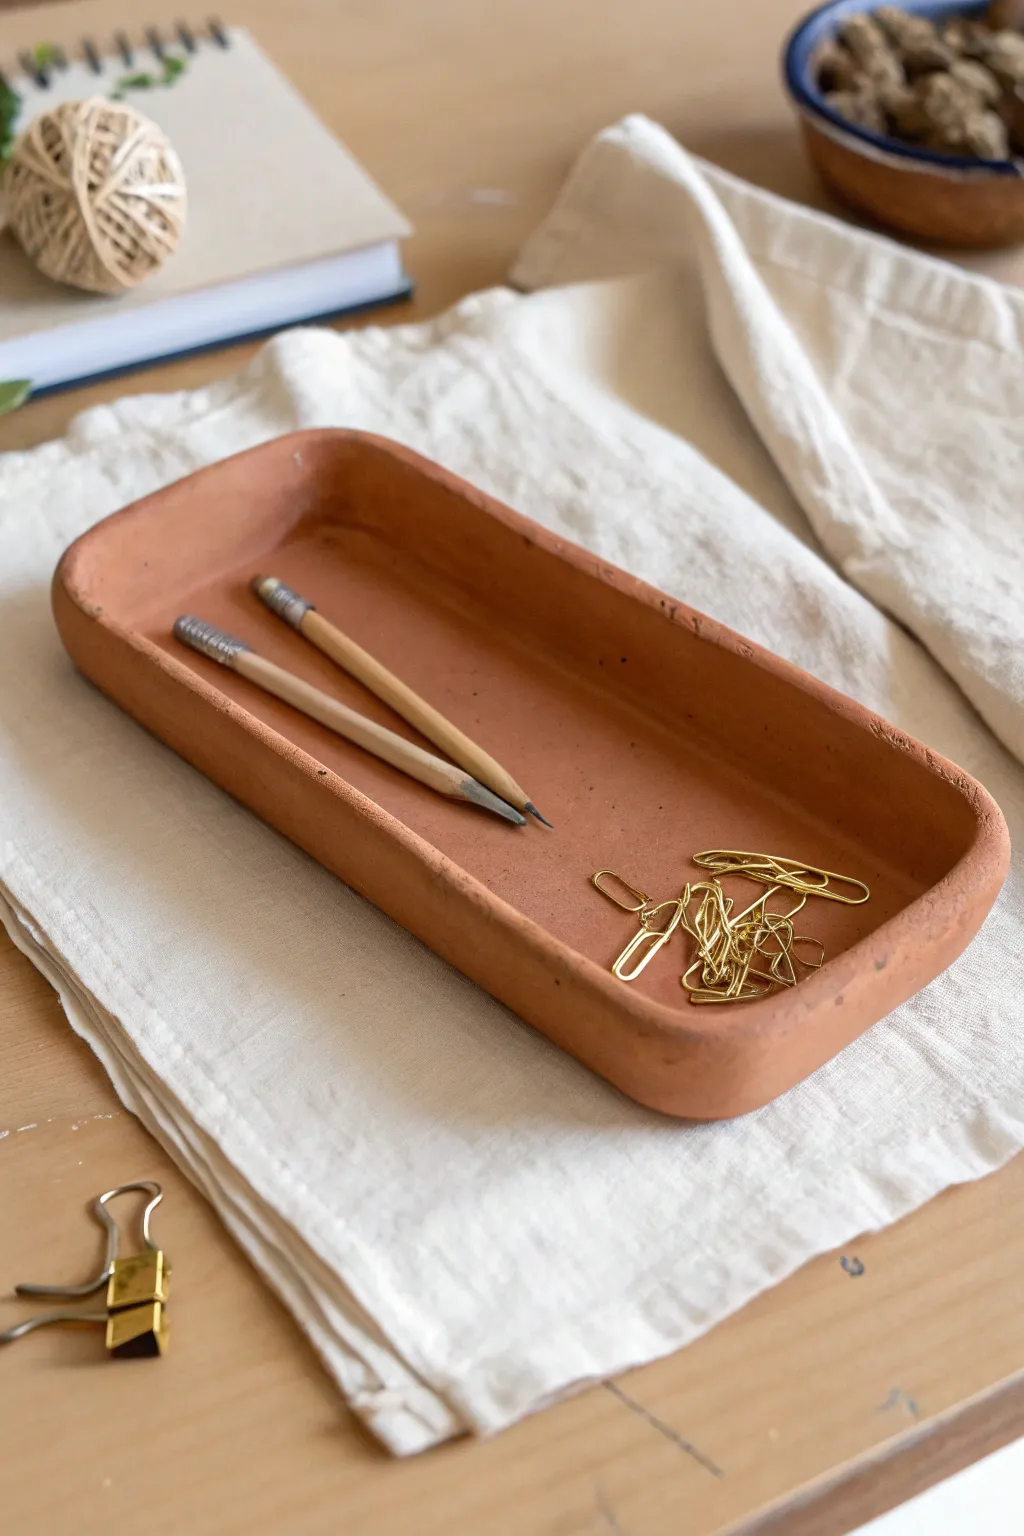
Bring a touch of earthy warmth to your workspace with this simple yet functional catchall tray. Modeled from terracotta-tinted air-dry clay, its soft, rounded edges and matte finish mimic the look of fired pottery without needing a kiln.
Step-by-Step
Materials
- Terracotta colored air-dry clay (approx. 500g)
- Rolling pin
- Two wooden guide strips (approx. 5mm thick)
- Rectangular template (cardboard or sturdy paper)
- Craft knife or clay cutter
- Small bowl of water
- Sponge
- Sandpaper (fine grit)
- Clear matte varnish (optional)
Step 1: Shaping the Base
-
Prepare the clay:
Start by kneading a generous lump of terracotta air-dry clay in your hands until it feels warm and pliable. This conditioning step is crucial to prevent internal air bubbles and cracking later on. -
Roll out the slab:
Place the clay on a clean, smooth work surface or a canvas mat. Position your wooden guide strips on either side of the clay to ensure an even thickness. -
Flatten the clay:
Using the rolling pin, roll the clay out until it is perfectly flat and consistent between the guide strips. You want a slab that is about 5mm (1/4 inch) thick throughout. -
Cut the rectangle:
Place your rectangular cardboard template on top of the clay slab. Using a sharp craft knife held vertically, carefully trace around the template to cut out the base shape. -
Create wall strips:
Gather the excess clay scraps and re-roll them into a long, flat strip of the same 5mm thickness. This will become the side walls for your tray. -
Measure the walls:
Cut the long strip into four pieces that match the lengths of your rectangle’s four sides. I usually cut them slightly longer than needed so I can trim them to a perfect fit during assembly.
Cracks Appearing?
If tiny cracks appear while drying, mix a small amount of fresh clay with water to make a paste. Fill the crack, let dry, then sand smooth.
Step 2: Assembly and Refining
-
Score the edges:
Use your craft knife or a dedicated scoring tool to scratch rough hatch marks along the outer top edge of the base interior and the bottom edge of your wall strips. -
Apply slip:
Dab a small amount of water (or a clay slurry mixture) onto the scored areas. This acts as the glue that bonds the pieces together. -
Attach the walls:
Press the wall strips firmly onto the base. Ensure the corners meet tightly. Trim away any excess length on the strips for a flush corner fit. -
Reinforce the seams:
Using your thumb or a modeling tool, drag a little clay from the wall down onto the base on the inside, and from the base up onto the wall on the outside to seal the join. -
Create the coil roll:
Roll a very thin ‘snake’ of clay and press it into the interior seam where the wall meets the floor. Smooth this out completely to create a gentle, rounded transition rather than a sharp 90-degree angle. -
Round the corners:
Use your fingers and a damp sponge to smooth the four corners of the tray. The goal is to soften the sharp geometric edges into the organic curves seen in the photo. -
Smooth the rim:
Run a damp sponge along the top rim of the tray to remove any sharp ridges and create a consistent, rounded lip. -
Final smoothing:
Do a final pass over the entire surface with a barely damp sponge to erase fingerprints and tool marks. Don’t use too much water, or the clay will become mushy. -
Slow drying:
Place the tray on a wire rack to dry. To prevent warping, cover it loosely with a plastic bag for the first 24 hours, then uncover it to finish drying for another 24-48 hours. -
Sand and finish:
Once fully dry and chalky to the touch, gently sand any rough spots or sharp edges with fine-grit sandpaper. Wipe away the dust with a dry cloth.
Add Subtle Texture
Before the clay dries, gently press a piece of linen fabric into the bottom of the tray to create a subtle woven texture on the interior floor.
Now you have a beautifully organized spot for your favorite pens and clips that adds natural charm to your desk
Terracotta Bud Vase Sleeve Over Glass
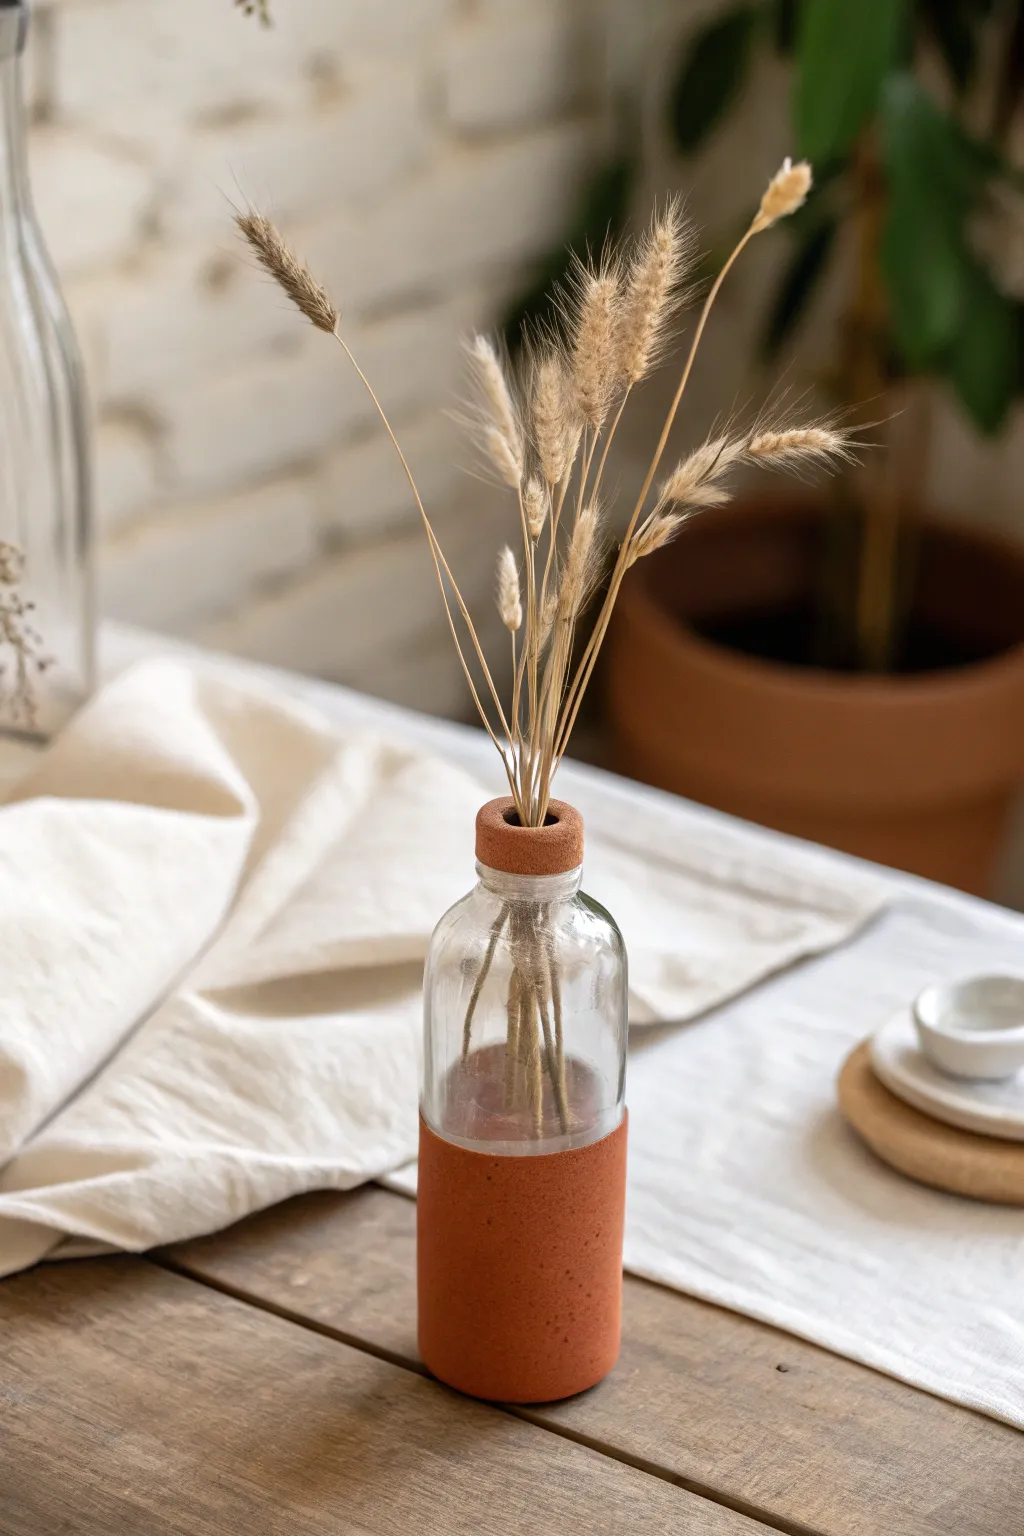
Transform a simple glass bottle into a trendy décor piece with the warm, earthy texture of terracotta clay. This easy project creates a seamless, modern look by adding a custom clay sleeve and matching neck ring to ordinary glassware, perfect for displaying dried botanicals.
Step-by-Step Tutorial
Materials
- Terracotta air-dry clay
- Small glass bottle or bud vase (clean and dry)
- Rolling pin
- Parchment paper or non-stick silicone mat
- Craft knife or scalpel
- Ruler
- Small bowl of water
- Sponge or finishing tool
- Fine-grit sandpaper (optional)
Step 1: Preparation and Base Layer
-
Clean the Glass:
Begin by thoroughly washing your glass bottle with warm soapy water to remove any grease or oils. Dry it completely to ensure the clay adheres well to the surface. -
Knead the Clay:
Take a handful of terracotta air-dry clay and knead it well in your hands. This warms up the material, making it more pliable and less prone to cracking as you work. -
Roll It Out:
Place the clay on parchment paper and roll it into a long, rectangular slab. Aim for a thickness of about 4-5mm—too thin might crack, while too thick will look clunky. -
Measure the Height:
Decide how high you want the clay sleeve to reach on your bottle. In the reference image, it covers the bottom third. Use a ruler to measure this height against your glass. -
Cut the Strip:
Using your ruler and craft knife, cut a clean, straight rectangular strip from your rolled clay that matches your measured height and is long enough to wrap around the bottle’s circumference with a little overlap.
Seamless Join Pro Tip
To make the seam truly invisible, use the back of a spoon to burnish the joint after blending. The smooth metal compresses the clay particles for a flawless finish.
Step 2: Attaching the Sleeve
-
Wrap the Bottle:
Carefully lift the clay strip and wrap it around the base of the glass bottle. Ensure the bottom edge of the clay aligns perfectly with the bottom edge of the glass so it sits flat. -
Join the Seams:
Where the two ends of the clay meet, cut vertically through both layers of overlap with your knife. This creates a perfect butt joint. Remove the excess scraps. -
Score and Slip:
Lightly score the cut edges with your knife, dab a tiny bit of water on them, and press them firmly together to bond. -
Smooth the Seam:
Dip your finger in water and gently rub the seam in a circular motion until it disappears completely. The goal is to make the sleeve look like a continuous piece. -
Refine the Bottom Edge:
Flip the bottle upside down to check the bottom. If the clay extends past the glass, gently trim or push it inward so the bottle remains stable when standing. -
Smooth the Surface:
Moisten a sponge slightly and drag it over the entire clay surface. This removes fingerprints and creates that sleek, matte finish seen in the photo.
Step 3: Creating the Neck Ring
-
Roll a Small Coil:
Take a smaller piece of leftover clay and roll it into a thick slab, similar to the base but slightly thicker to create a substantial rim. -
Cut a Narrow Strip:
Cut a strip about 1-1.5 cm tall. Wrap this strip around the very top neck of the bottle, similar to how you applied the base sleeve. -
Secure the Neck:
Join the seam using the score-and-slip method. I tend to spend extra time smoothing this top ring since it’s a focal point. -
Flatten the Top:
Gently press down on the top edge of the clay ring to flatten it slightly, giving it a finished, manufactured look rather than a raw clay edge. -
Final Polish:
Do a final once-over with your damp sponge on both the neck ring and the base sleeve to ensure textures match perfectly.
Cracking Up?
If you see tiny cracks appearing while drying, mix a small amount of clay with water to make a paste (slip) and fill them in immediately with a paintbrush.
Step 4: Drying and Finishing
-
Let it Dry:
Place the vase in a cool, dry spot away from direct sunlight. Allow it to air dry for at least 24-48 hours. The terracotta color will lighten as it dries. -
Check for Shrinkage:
Air-dry clay shrinks slightly. If the sleeve feels loose after drying, a dab of clear strong glue (like E6000) inside the rim can secure it strictly to the glass. -
Sand for Smoothness:
Once fully dry, use fine-grit sandpaper to buff away any remaining rough spots or uneven edges. -
Seal (Optional):
If you want to protect the finish, apply a matte varnish. However, leaving it raw maintains the authentic terracotta texture shown in the example.
Pop in your dried wheat stems or wild grasses and enjoy the minimalistic warmth your new vase brings to the table
Terracotta Essential Oil Diffuser Stones
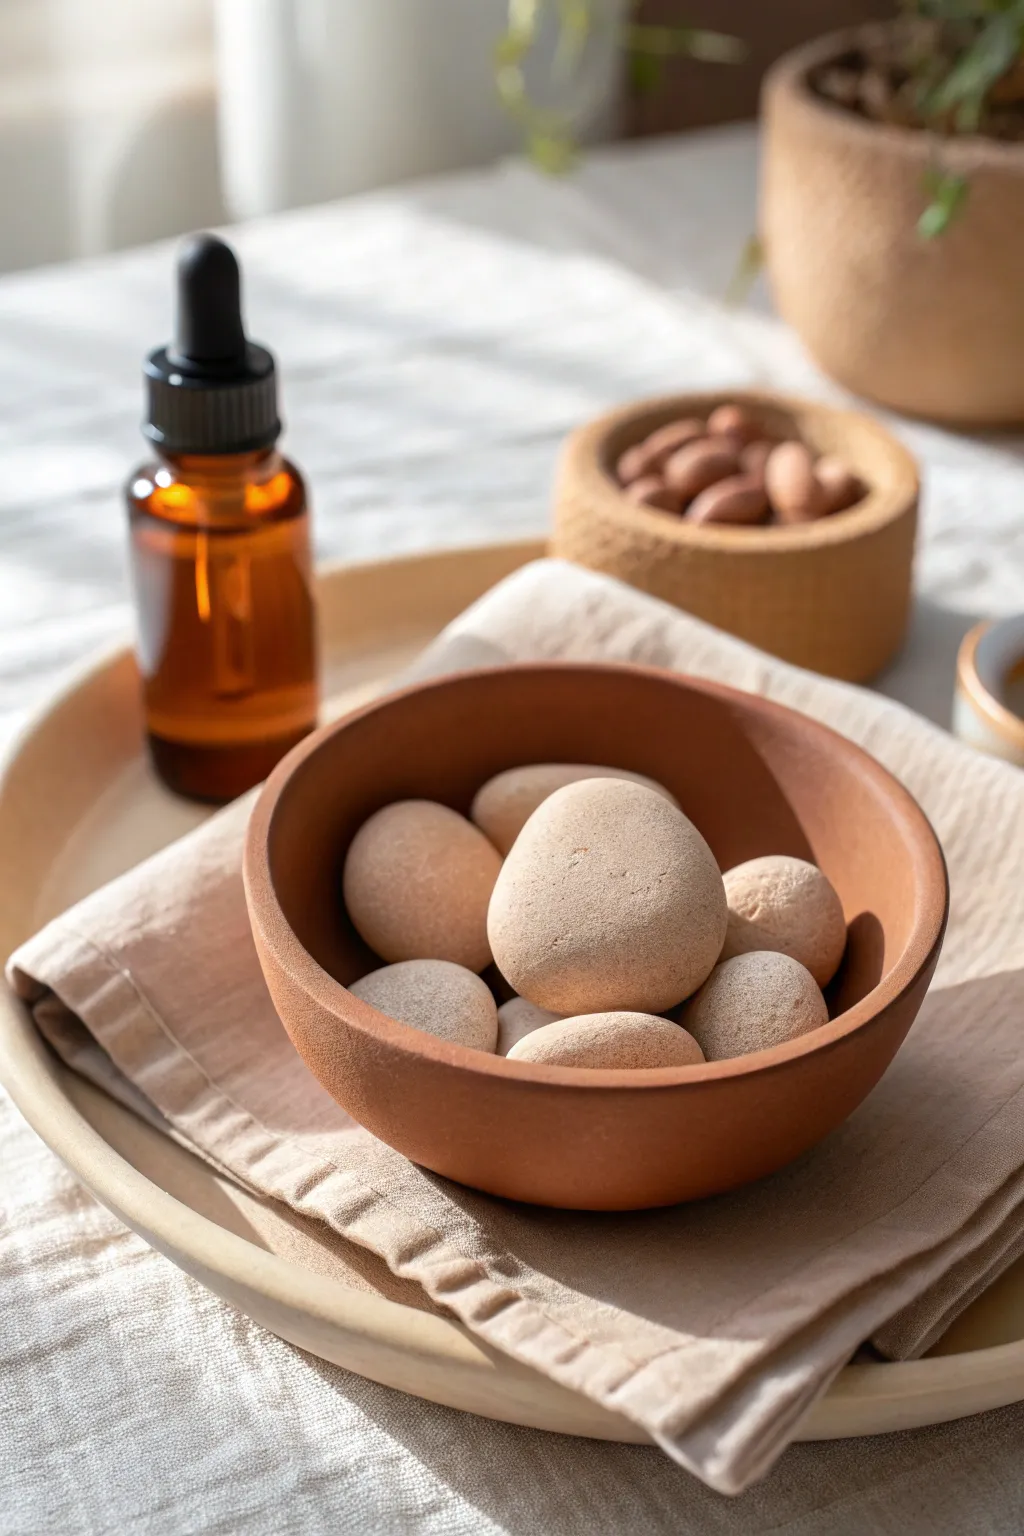
Bring the grounding warmth of terracotta into your home with this dual-purpose project featuring hand-formed diffuser stones and a matching clay bowl. The porous nature of air-dry clay makes these smooth, river-rock-inspired pebbles perfect for absorbing and slowly releasing your favorite essential oils.
Step-by-Step Guide
Materials
- Terracotta air-dry clay
- Rolling pin
- Small bowl (to use as a mold)
- Plastic wrap
- Sandpaper (medium and fine grit)
- Small bowl of water
- Sponge
- Matte sealant (optional, for bowl exterior only)
- Essential oils
Step 1: Shaping the Diffuser Stones
-
Portion the clay:
Begin by pulling off several chunks of terracotta clay. You’ll want varied sizes to mimic natural river rocks, ranging from walnut-sized to slightly larger pieces. The stones will shrink slightly as they dry, so account for that now. -
Roll into spheres:
Take a chunk of clay and roll it briskly between your palms to create a tight ball. Press firmly at first to compress the clay and remove air pockets, then lighten your touch to smooth the surface. -
Create organic shapes:
Gently press the sphere against your work surface to flatten it slightly. Natural stones are rarely perfect spheres; manipulate the clay with your fingers to create subtle irregularities, ovals, or slightly flatter skipping-stone shapes. -
Water smoothing:
Dip your finger into a bowl of water and rub it over the entire surface of the stone. This ‘slip’ creates a silky finish and erases your fingerprints. Ensure there are no cracks, as these will expand during drying. -
Repeat the process:
Continue forming stones until you have enough to fill your intended vessel—usually about 6 to 10 stones depending on size. Varying the shapes keeps the set looking organic. -
Initial dry:
Set the stones on a clean board or piece of paper to dry. Rotate them every few hours so the bottoms don’t stay flat or damp. Let them dry fully, which can take 24-48 hours depending on humidity.
Cracking Up?
If you see hairline cracks while drying, mix a tiny bit of fresh clay with water to make a paste (slip) and fill the crack. Smooth it over and let it dry again.
Step 2: Crafting the Terracotta Bowl
-
Prepare the slab:
While the stones dry, roll out a larger slab of terracotta clay to a thickness of about 1/4 inch. Keep the thickness consistent for even drying. -
Mold preparation:
Find a small kitchen bowl with a shape you like. Line the inside of this bowl with plastic wrap; this prevents sticking and makes removal easy. -
Slump the clay:
Gently lift your clay slab and drape it into the lined bowl. Press it softly into the curve of the bowl, starting from the center and working outwards to avoid trapping air bubbles underneath. -
Trim the rim:
Use a knife or clay tool to trim the excess clay flush with the rim of your mold bowl. For the look in the photo, you want a clean, simple edge, so smooth the cut rim with a wet finger. -
Drying the bowl:
Allow the clay to dry inside the mold for roughly 24 hours until it is leather-hard and holds its shape. -
Remove and finish drying:
Carefully lift the clay bowl out using the plastic wrap. Peel off the plastic and let the bowl dry completely in the open air for another day or two.
Color Washed
For a two-tone look, water down some white acrylic paint and give the dry stones a ‘whitewash’ before adding oils. It highlights the texture beautifully.
Step 3: Refining and Using
-
Sanding the stones:
Once the stones are bone dry, use medium-grit sandpaper to remove any major bumps. Follow up with fine-grit sandpaper to achieve that ultra-smooth, polished texture visible in the image. -
Sanding the bowl:
Sand the rim and exterior of your bowl to match the texture of the stones. I usually pay extra attention to the rim to ensure it feels soft to the touch. -
Cleaning up dust:
Wipe all your clay pieces down with a slightly damp sponge or cloth to remove the fine terracotta dust created by sanding. -
Optional sealing:
If you wish, apply a matte sealant to the *exterior* of the bowl only. Do not seal the stones; they must remain porous to absorb the oil effectively. -
Assembly:
Arrange your sanded stones inside the bowl. -
Adding scent:
To use, drip 3-5 drops of essential oil directly onto the stones. The porous clay will soak it up immediately and diffuse the scent gently over several hours.
Place your new diffuser on a bedside table or desk for a touch of natural calm
Stamped Terracotta Letter Tags
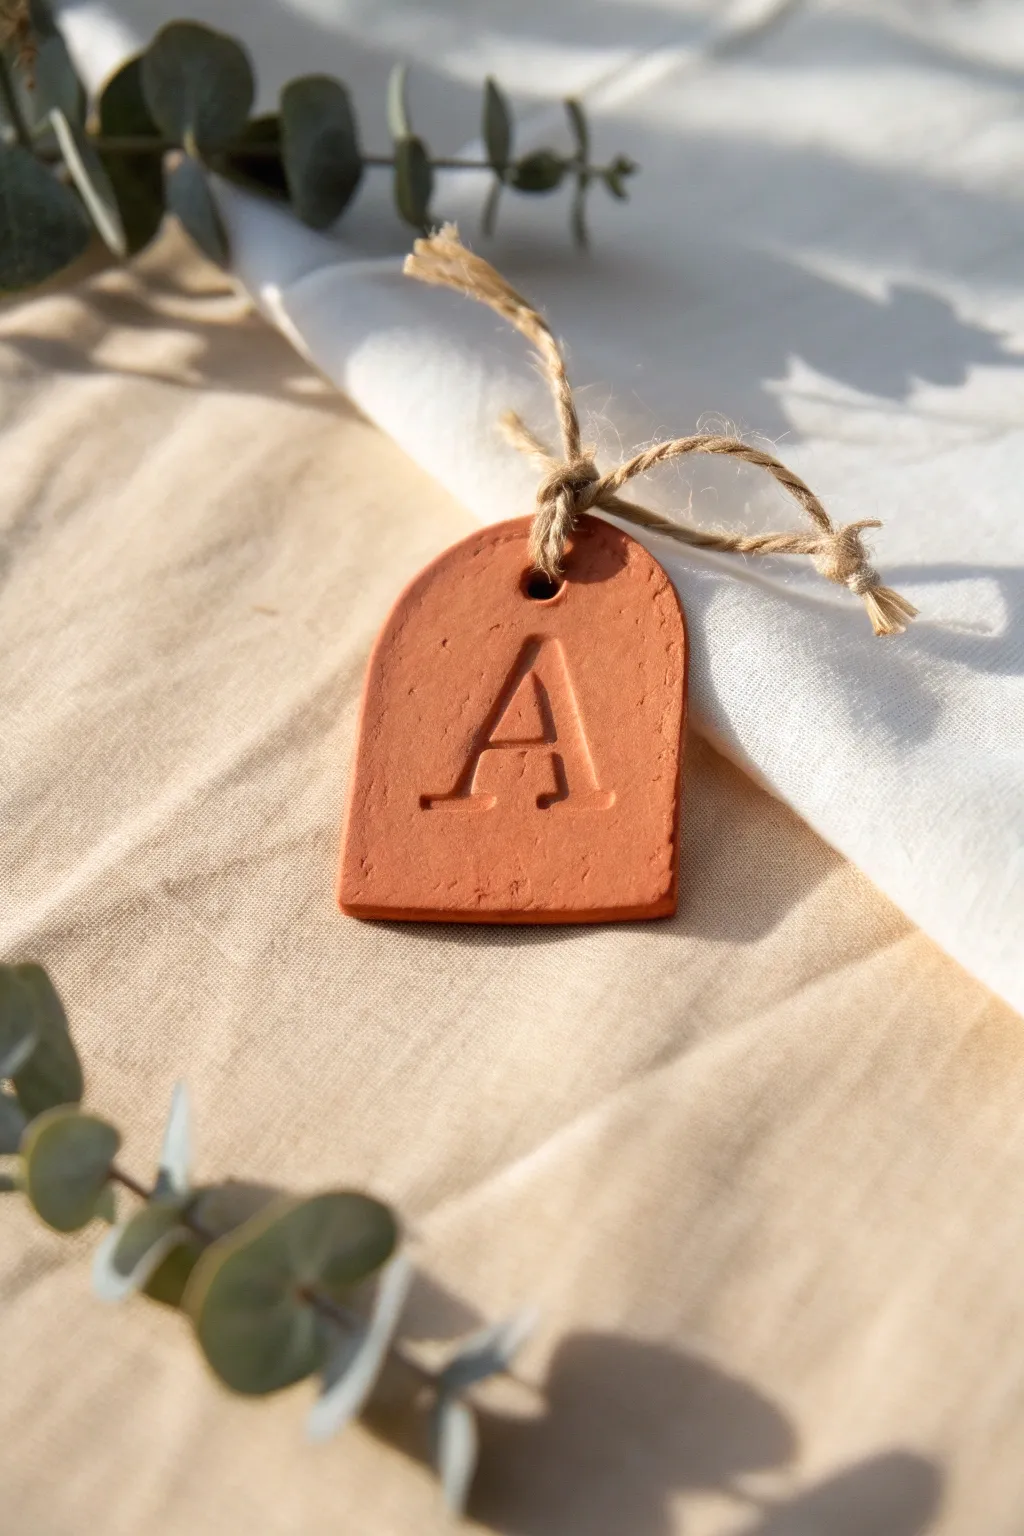
These charming, rustic tags add a personalized touch to gifts, table settings, or home decor with their warm terracotta hue and clean, stamped typography. The beauty lies in their simplicity, combining a classic arch shape with the earthy texture of air-dry clay.
Detailed Instructions
Materials
- Terracotta air-dry clay
- Rolling pin or smooth glass bottle
- Parchment paper or non-stick craft mat
- Arch-shaped clay cutter (or a sharp craft knife and a paper template)
- Small round cutter or straw (for the hole)
- Letter stamp set (serif font)
- Fine-grit sandpaper
- Small bowl of water
- Jute twine or rustic string
- Acrylic sealer or matte varnish (optional)
- Sponge or soft brush (optional)
Step 1: Preparation & Rolling
-
Condition the clay:
Begin by taking a chunk of terracotta air-dry clay and kneading it in your hands. You want it warm and pliable to prevent cracking later. -
Set up your workspace:
Lay down a sheet of parchment paper or a non-stick craft mat. This ensures your clay won’t stick to the table and makes it easier to move the shapes later. -
Roll out the slab:
Use your rolling pin to flatten the clay. Aim for a thickness of about 1/4 inch (approx. 5-6mm). Try to keep the pressure even so the depth is consistent across the slab. -
Smooth the surface:
Dip your finger slightly in water and gently glide it over the surface of the clay to remove any rolling marks or fingerprints. -
Release the slab:
Carefully lift the rolled slab off the parchment and place it back down. This releases any suction and prevents the clay from warping when you cut it.
Clean Cuts Pro Tip
Before cutting your arch, lightly dust the cutter edge with cornstarch or dip it in water. This prevents sticking and ensures a crisp, clean edge.
Step 2: Cutting & Stamping
-
Cut the arch shape:
Press your arch-shaped cutter firmly into the clay. If you don’t have a cutter, place a paper template on the clay and carefully trace around it with a sharp craft knife. -
Remove excess clay:
Peel away the scrap clay from around your cut shape, leaving the arch pristine on the parchment paper. -
Smooth the edges:
Dip your finger in water again and very gently run it along the cut edges of the arch to soften any sharp corners or drag marks left by the cutter. -
Create the hanging hole:
Use a small round cutter, a straw, or the end of a paintbrush to punch a hole near the top center of the arch. Make sure it’s not too close to the edge to prevent breakage. -
Position the stamp:
Select your letter stamp. Hover it over the center of the arch to gauge the perfect placement before committing. -
Make the impression:
Press the stamp straight down into the clay with firm, even pressure. Avoid wiggling it, as this can blur the lines of the letter. Lift it straight up to reveal the impression.
Fixing Cracks
If tiny cracks appear while drying, don’t panic. Mix a tiny bit of fresh clay with water to make a paste (slip) and smooth it into the crack with your finger.
Step 3: Finishing Touches
-
Dry the tag:
Move the parchment paper with your tag to a flat, safe spot. Let it air dry for at least 24-48 hours. I find flipping it over halfway through the drying process helps keep it perfectly flat. -
Check for dryness:
The clay will lighten in color and feel hard and room temperature (not cold) to the touch when it is fully dry. -
Sand imperfections:
Once fully dry, take a piece of find-grit sandpaper and lightly buff the edges or surface if there are any rough spots. -
Seal (optional):
For durability, you can brush on a thin layer of matte varnish. This deepens the terracotta color slightly and protects it from moisture. -
Cut the twine:
Cut a length of jute twine, roughly 8-10 inches long. -
Attach the string:
Fold the twine in half and push the loop through the hole from front to back. Pull the tails through the loop to create a lark’s head knot. -
Final tie:
Tie the loose ends of the twine together in a simple knot to complete the loop for hanging.
Hang your finished tag on a gift or napkin ring to enjoy that lovely handmade aesthetic
Interlocking Terracotta Chain Links
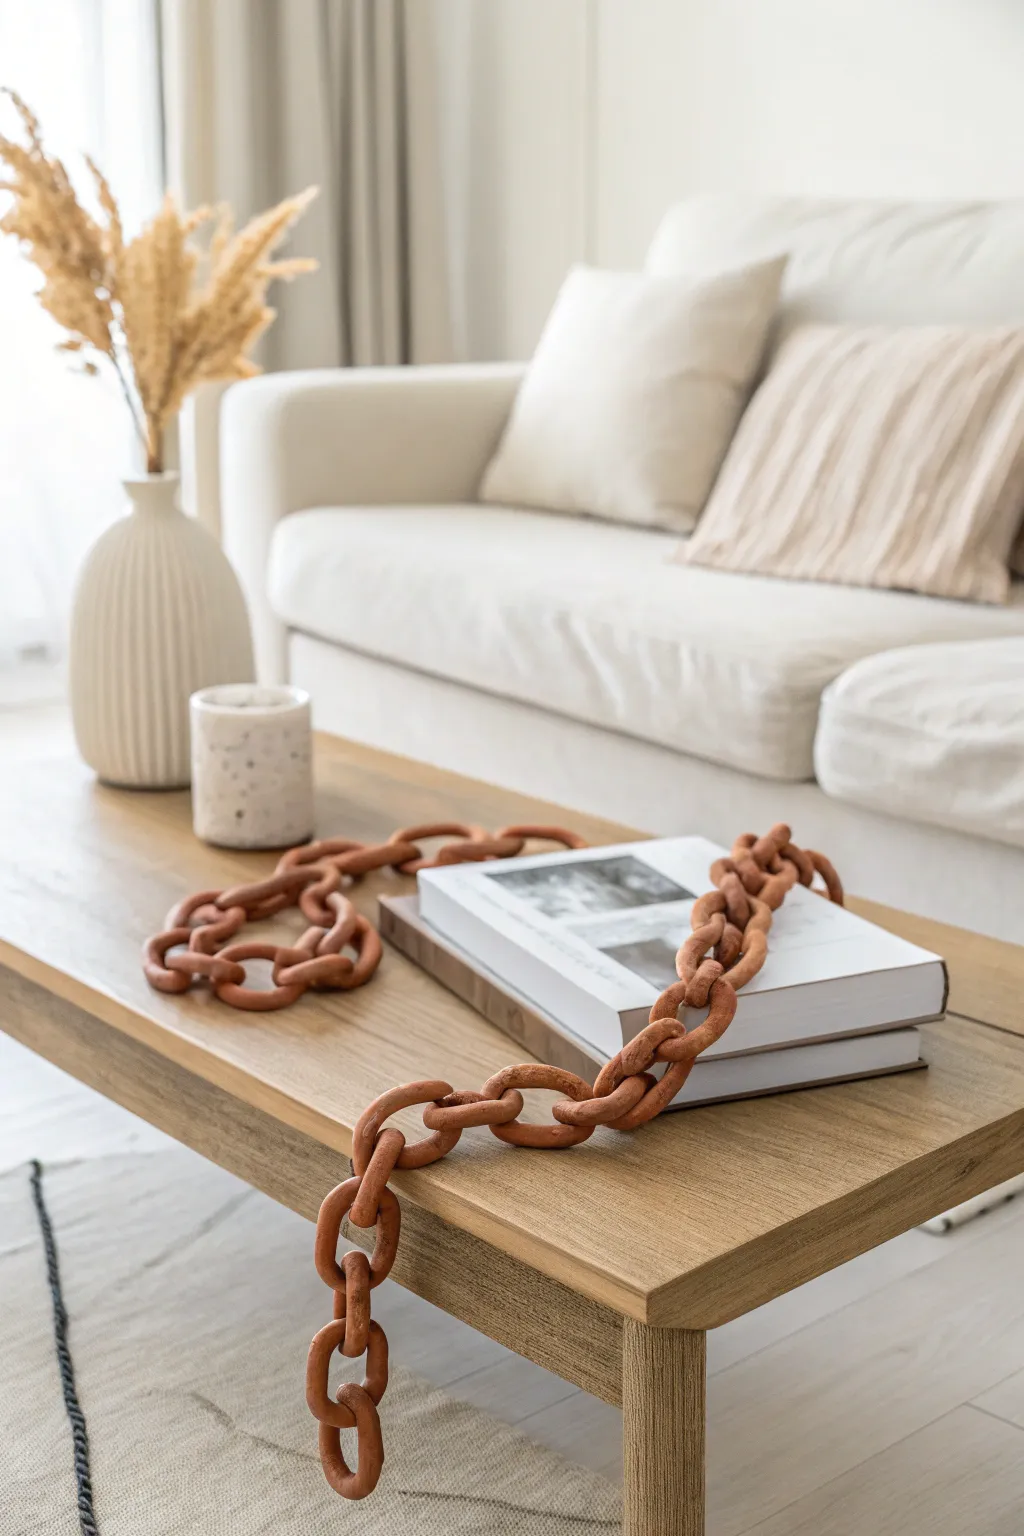
This sculptural chain link decor brings an organic, earthy element to coffee table styling with its rich terracotta tone and matte finish. The substantial links have a hand-forged look that feels both rustic and modern, perfect for draping over books or coiling in a bowl.
Step-by-Step
Materials
- Terracotta colored air-dry clay (approx. 1kg)
- Clay rolling pin or acrylic roller
- Ruler
- Sharp crafting knife or clay blade
- Bowl of water
- Sponge or smoothing tool
- Fine-grit sandpaper (220-400 grit)
- Matte acrylic sealer or varnish
Step 1: Preparation & Rolling
-
Condition the clay:
Begin by kneading your terracotta air-dry clay thoroughly. You want it warm and pliable to prevent cracks from forming later. -
Roll out a slab:
Roll the clay out onto a clean, flat surface until it is an even thickness, roughly 1/2 inch thick. Try to keep the thickness consistent for a uniform look. -
Cut uniform strips:
Using your ruler and knife, cut long strips of clay. For the chunky look in the photo, aim for strips about 1 inch wide and 7-8 inches long.
Crack Control
If small cracks appear while drying, mix a tiny bit of fresh clay with water to make a paste (slip) and fill them in, then sand smooth once dry.
Step 2: Forming the Links
-
Create the first link:
Take your first strip and gently curve it into an oval or oblong circle. Overlap the ends by about half an inch. -
Join the seam:
Score the overlapping areas with your knife (make small hatch marks) and add a drop of water. Press the ends firmly together. -
Blend the join:
Use your thumb or a smoothing tool to drag clay across the seam until the join is invisible. I find wetting my finger slightly helps smudge the clay seamlessly. -
Shape the oval:
Gently manipulate the ring into a perfect oval shape. Lay it flat on your work surface to ensure it isn’t twisted. -
Start the chain:
Take a second strip of clay and thread it through the first closed link you just made. -
Close the second link:
Bring the ends of the second strip together, repeating the scoring, wetting, and blending process to seal it. -
Continue the chain:
Repeat this process, threading a new strip through the previous link each time, until you reach your desired length. The example shown has roughly 15-20 links.
Texture Twist
Before rolling the strips into loops, gently press a piece of canvas or linen onto the clay surface to imprint a subtle woven texture.
Step 3: Refining & Finishing
-
Smooth the surfaces:
Before the clay dries, take a slightly damp sponge and wipe over all the links to remove fingerprints and harsh edges. -
Adjust the shape:
Lay the damp chain out flat in a straight line or gentle curve to ensure the links dry in natural-looking shapes, not distorted by gravity. -
Let it dry:
Allow the chain to dry completely. This usually takes 24-48 hours depending on humidity. Rotate the links occasionally so the undersides dry evenly. -
Sand imperfections:
Once fully dry and hard, use fine-grit sandpaper to buff away any remaining rough spots or uneven seams. -
Dust off:
Wipe the chain down with a dry cloth or brush to remove all sanding dust. -
Apply sealer:
Brush on a coat of matte acrylic sealer. This deepens the terracotta color and protects the clay without adding an unnatural shine, preserving that raw texture.
Style your new chain over a stack of coffee table books to add instant architectural interest to your living space
Terracotta Suncatcher Arch Frame
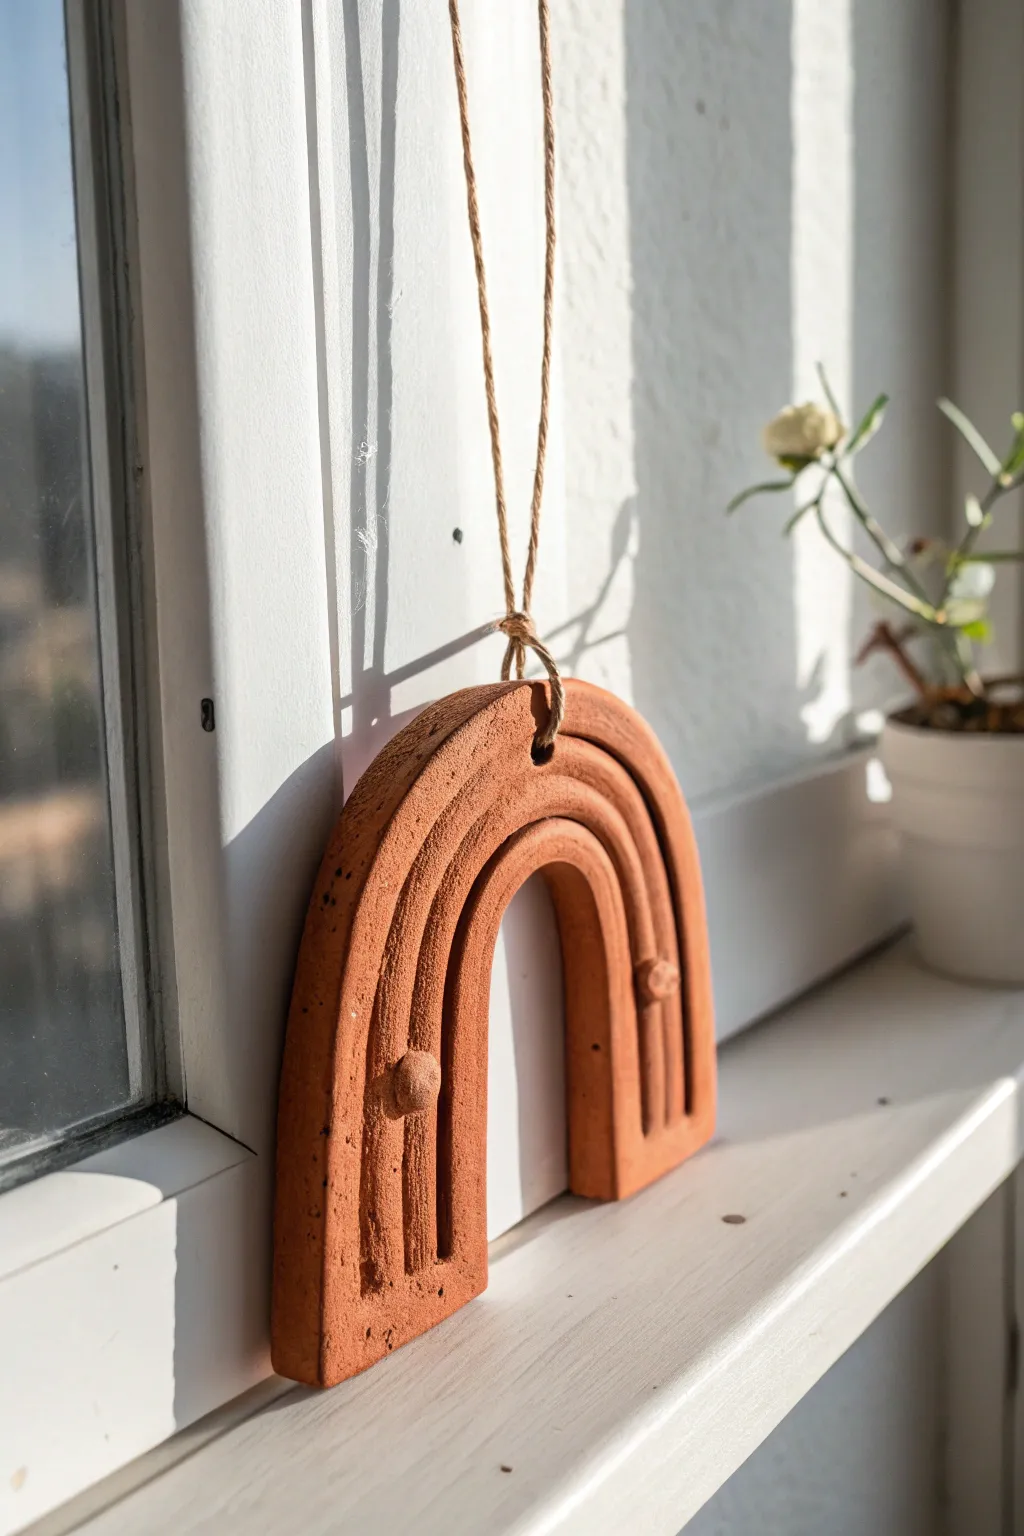
Bring a touch of earthy warmth to your windows with this simple yet striking clay arch. The textured terracotta finish and minimalist raised details create a modern bohemian piece perfect for catching the morning light.
How-To Guide
Materials
- Terracotta air dry clay
- Rolling pin
- Clay knife or craft knife
- Ruler
- Small bowl or round cutter (for arch shape)
- Straw or skewer (for hole)
- Water and sponge
- Jute twine
- Sandpaper (fine grit)
Step 1: Shaping the Base
-
Prepare the slab:
Start by kneading a generous amount of terracotta air dry clay until it feels pliable and warm. Roll it out on a flat surface to an even thickness of about 1/4 to 1/3 inch. Aim for a consistent slab, as this ensures the arch hangs straight. -
Cut the outer arch:
Place a round object or use a circle cutter as a guide for the curved top. Use your clay knife to cut a U-shape, ensuring the legs of the arch are straight and parallel. The specific size is up to you, but a 4-inch width works nicely. -
Remove the center:
Inside your U-shape, cut a smaller, concentric arch to create the open negative space. Leave the frame thick enough—roughly 1 inch wide—to maintain structural integrity. -
Smooth the edges:
Dip your finger in a little water and run it along all cut edges. This softens the sharp angles and removes any loose clay crumbs from cutting.
Don’t Rush the Dry
To prevent warping, flip your clay arch over every few hours during the first half-day of drying. This ensures both sides lose moisture at the same rate.
Step 2: Adding Details
-
Create the grooves:
Use a modeling tool or the blunt back edge of your knife to gently press two parallel arched lines into the face of the clay. Go slowly to keep the curves smooth, mimicking a rainbow shape. -
Deepen the texture:
Go over the lines a second time if needed. You want them distinct enough to be visible after drying, but be careful not to slice all the way through the slab. -
Make decorative dots:
Roll two small balls of clay, about the size of a pea. Flatten the backs slightly and score them to help adhesion. -
Attach the accents:
Apply a tiny dab of water (slip) to the spots where you want the accents. Press the small balls firmly onto the arch face, generally near the base of the curve on each side as shown in the photo. -
Blend the attachments:
Use a small tool or your fingernail to gently encourage the clay of the dot to grip the main body, ensuring they don’t pop off later. -
Create the hanging hole:
Find the exact center top of the arch. Insert a straw or skewer to create a clean hole for the twine alone. Make sure the hole isn’t too close to the very edge to prevent cracking.
Add a Scent Sachet
Terracotta is porous and holds scent well! Add a few drops of essential oil to the back of the dried arch to turn it into a hanging passive diffuser.
Step 3: Refining and Finish
-
Texture the surface (optional):
For that grainy, stone-like appearance seen in the image, lightly dab the surface with a coarse sponge or a crumpled ball of aluminum foil before the clay hardens. -
Let it dry:
Place the arch on a wire rack or rotate it frequently on a flat surface to dry evenly. Terracotta clay can take 24 to 48 hours to cure completely depending on humidity. -
Sand imperfections:
Once fully dry and hard, take a piece of fine-grit sandpaper and gently buff the edges. Focus on the inner curve which can sometimes be rough from cutting. -
Thread the twine:
Cut a length of natural jute twine. Fold it in half and feed the loop through the hole from front to back. -
Secure the loop:
Pull the loose ends of the twine through the loop and tighten gently to create a lark’s head knot directly on the clay, or simply tie a standard knot at the top as visible here. -
Hang and enjoy:
Find a sunny spot near a window where the warm terracotta tones can glow against the natural light.
This simple textured arch creates a charming focal point wherever you choose to hang it