If you love that sun-baked, earthy vibe, terracotta clay is about to become your new best friend. These terracotta clay ideas are the exact kind of simple, beginner-friendly projects I reach for when I want big style without fancy equipment.
Terracotta Pinch Pot Trinket Dishes
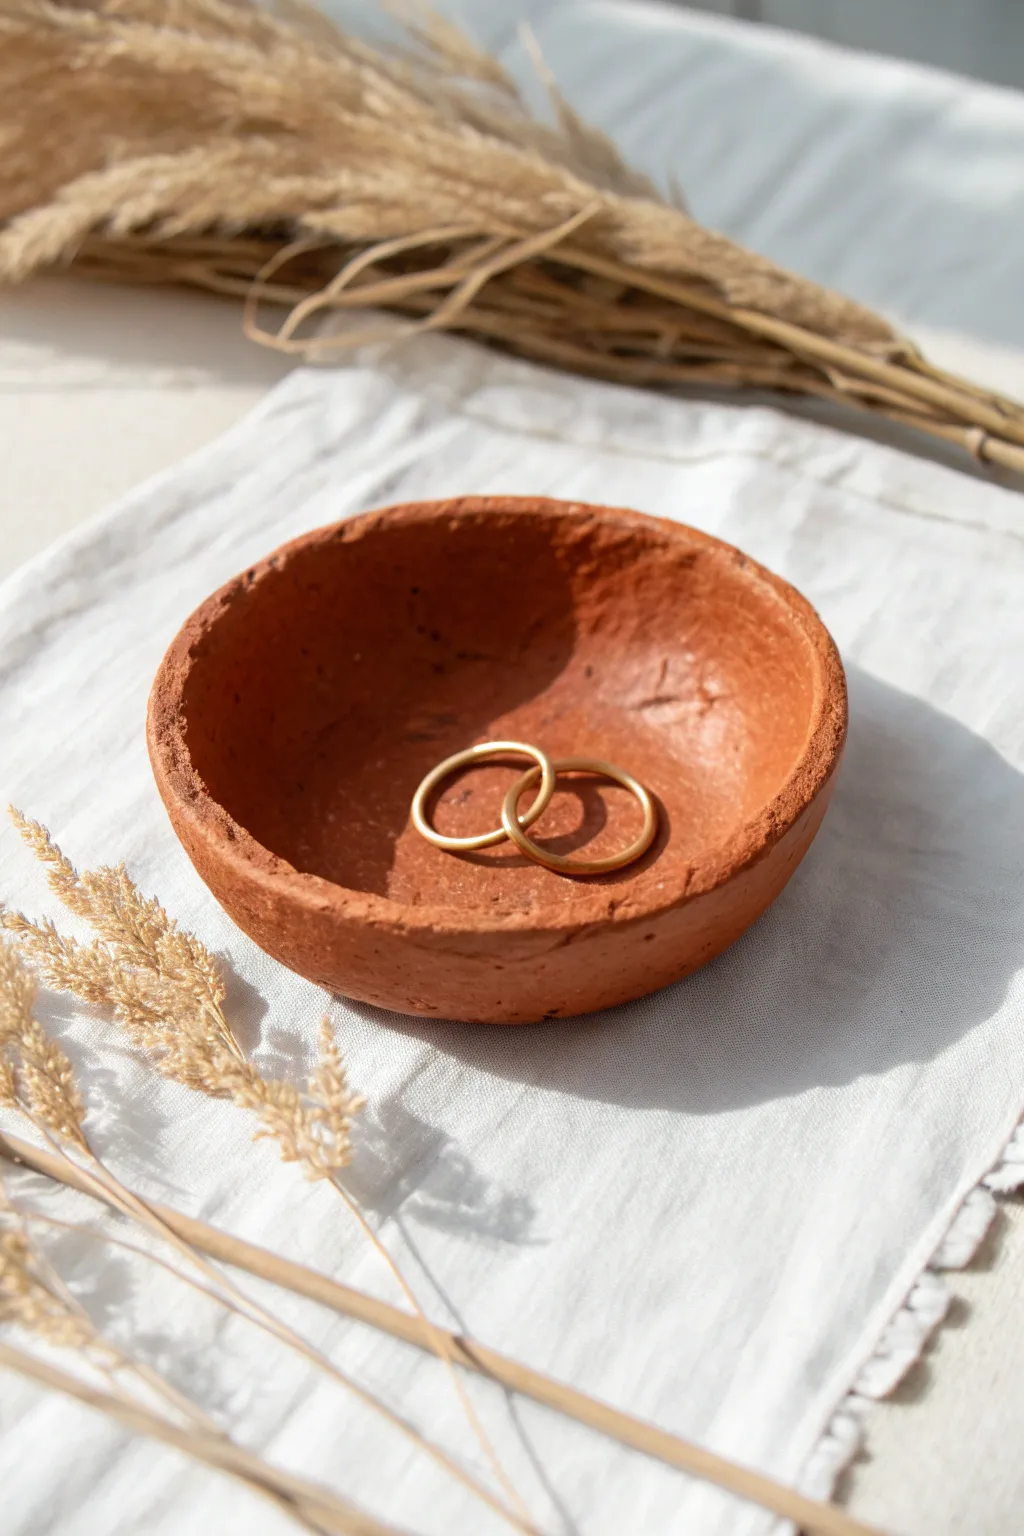
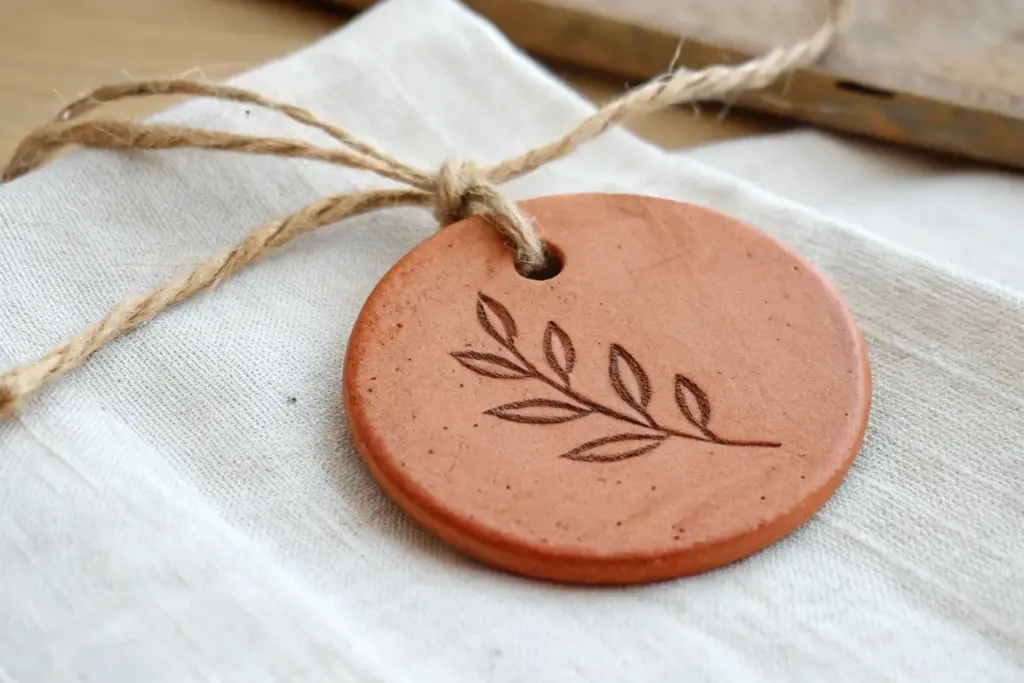
Capture the earthy warmth of natural clay with this simple yet elegant pinch pot project. Its raw, textured finish and rich reddish-brown hue make it the perfect minimalist vessel for holding your favorite jewelry pieces.
Detailed Instructions
Materials
- Terracotta air-dry clay (or kiln-fire terracotta)
- Small bowl relative to hand size (for water)
- Sponge
- Sandpaper (fine and medium grit)
- Hard, flat working surface
- Matte sealant or varnish (optional)
- Clay wire cutter or knife
Step 1: Preparation & Basic Shape
-
Cut the clay:
Start by slicing off a chunk of terracotta clay. A piece roughly the size of a tangerine or a tennis ball is usually perfect for a trinket dish. -
Form a sphere:
Roll the clay firmly between your palms to create a smooth, tight ball. Aim to eliminate any major cracks or air pockets during this rolling process. -
Begin the pinch:
Hold the ball in your non-dominant hand. Press your thumb gently but firmly into the center of the sphere, stopping about half an inch from the bottom. -
Widen the opening:
With your thumb still inside, use your fingers on the outside to pinch the clay walls. Slowly rotate the ball as you pinch, working your way from the bottom upward. -
Even out the walls:
Continue pinching and rotating until the walls are an even thickness—aim for about a quarter-inch thick all around. I like to keep the rim slightly thicker for that rustic look. -
Check the base:
Gently tap the bottom of the pot against your flat work surface to create a stable, flat base. This ensures your dish won’t wobble when holding jewelry.
Slow Your Roll
Don’t let air-dry clay dry too fast near a heater or window, or it will crack. Cover it loosely with a plastic bag for the first 12 hours to slow the process.
Step 2: Refining & Texture
-
Smooth the interior:
Dip your finger or a small piece of sponge into water—just a little dampness is needed. Rub the inside curve of the bowl to smooth out deep fingerprints, but don’t erase every mark; the handmade texture is part of the charm. -
Address the rim:
Run a damp finger along the top rim to soften any sharp edges. The goal is a slightly uneven, organic circle rather than a machine-perfect roundness. -
Surface detailing:
Inspect the outer walls. If you want a very rustic texture like the example, leave some of the natural clay grain and small fissures visible. If big cracks appear, smooth them over with a tiny bit of water. -
Initial drying validation:
Place the dish on a porous surface (like wood or cardboard) and let it sit for about an hour. Check it again to smooth any new cracks that might form as the moisture starts to leave the clay.
Step 3: Drying & Finishing
-
Full dry time:
Allow the clay to dry completely. For air-dry clay, this usually takes 24-48 hours depending on humidity. The color will lighten significantly when it is fully dry. -
Sanding edges:
Once bone dry, take your fine-grit sandpaper and gently gently buff the rim. You aren’t trying to reshape it, just removing any sharp burrs that could scratch your skin. -
Sanding the interior:
Lightly sand the interior curvature if there are rough spikes, but maintain the dimpled appearance. -
Dust removal:
Wipe the entire piece down with a slightly damp cloth or a dry brush to remove the fine clay dust created by sanding. -
Sealing (Optional):
To protect the raw clay finish while keeping the matte look, apply a thin coat of matte varnish. This prevents oils from your hands or jewelry from staining the porous terracotta over time.
Fixing Big Cracks
If a large crack forms while drying, create a ‘slip’ by mixing a little dry clay dust with water to make a paste. Fill the crack, smooth it, and let dry again.
Place your new dish on a bedside table to keep your daily rings safe and organized


Mini Terracotta Planters and Seedling Dishes
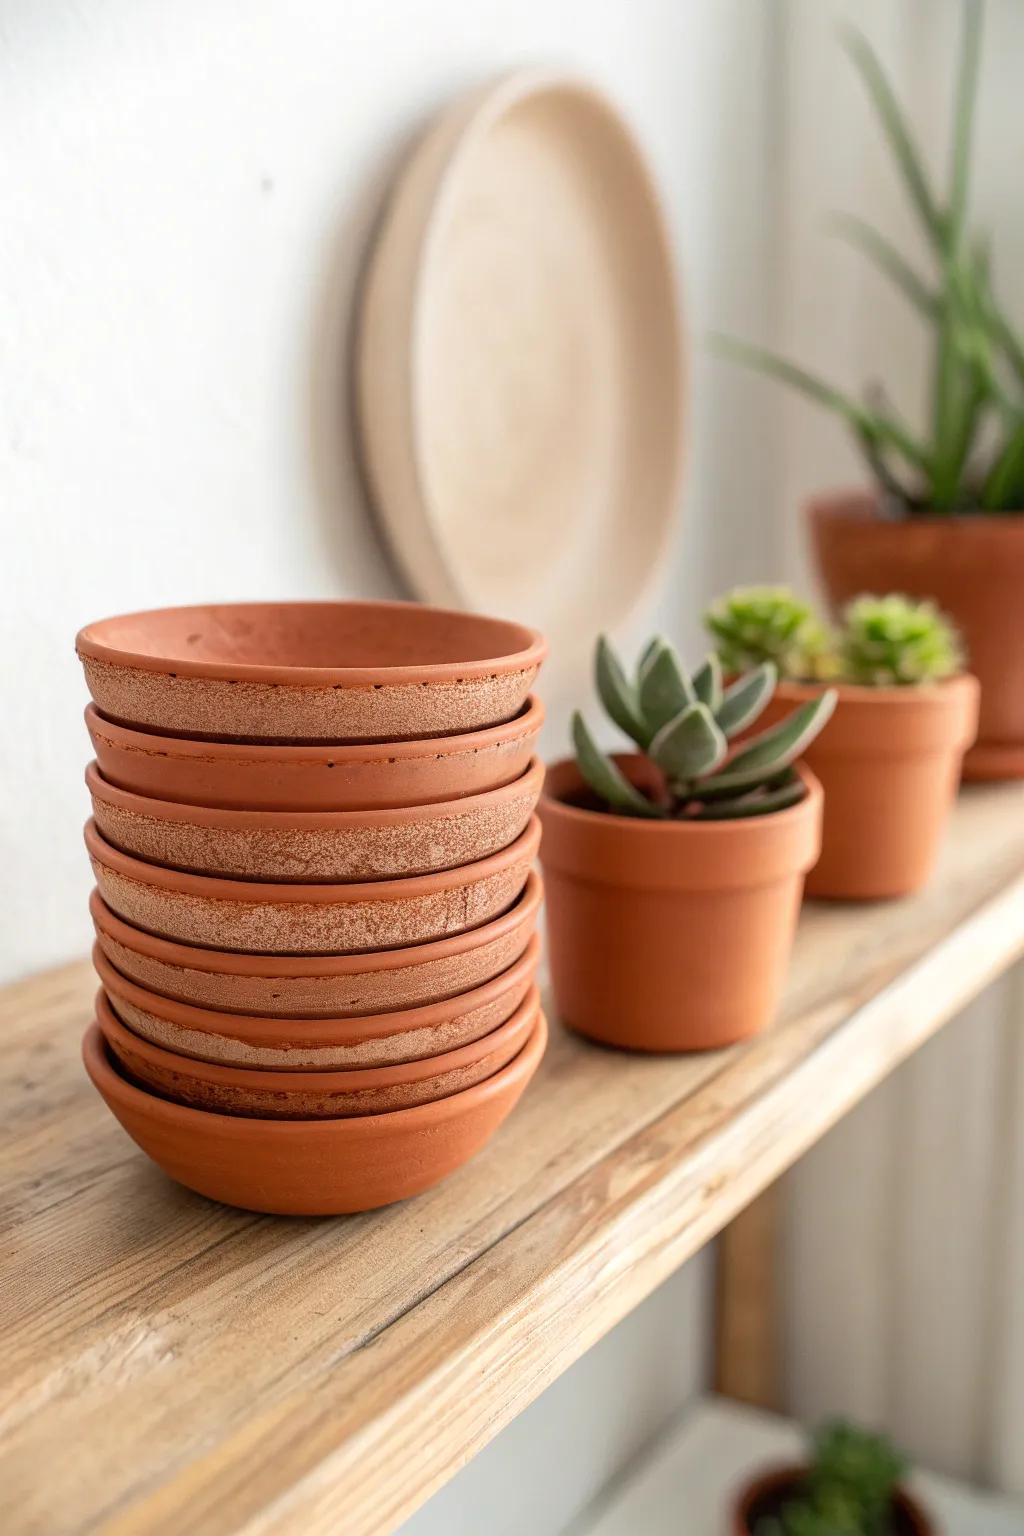
These charming, stackable terracotta saucers are perfect for holding seedlings or acting as water catchers for miniature pots. Their raw, unglazed finish highlights the natural beauty of the clay and promotes breathability for your plants roots.
Step-by-Step
Materials
- Terracotta air-dry clay or low-fire earthenware clay
- Rolling pin
- Circle cutter or a round bowl (approx. 4-inch diameter)
- Fettling knife
- Small bowl of water
- Sponge
- Fine-grit sandpaper
- Canvas mat or cloth (to prevent sticking)
- Small shallow bowl (for use as a slump mold)
Step 1: Preparation & Rolling
-
Wedge the clay:
Begin by taking a handful of your terracotta clay and wedging it thoroughly on your canvas mat. This removes air bubbles and ensures the consistency is uniform, which is crucial for preventing cracks later. -
Roll out the slab:
Place the clay ball in the center of your cloth. Use the rolling pin to flatten it into an even slab. Aim for a thickness of about 1/4 inch; too thin and it will be fragile, too thick and it will look chunky. -
Smooth the surface:
Before cutting, take a slightly damp sponge and gently wipe the surface of the slab. I find this helps smooth out the canvas texture and prepares the clay for a cleaner cut.
Step 2: Shaping the Dishes
-
Cut the circles:
Press your circle cutter or the rim of a bowl firmly into the clay slab to define your shape. If using a bowl, trace around it with a fettling knife to cut out the disc. -
Soften the edges:
Lift the clay circle carefully. Dip your finger in water and run it along the cut edge to round it off slightly, removing any sharp burrs created by the knife. -
Slump the clay:
Drape your clay circle gently inside a shallow bowl lined with a piece of paper towel or thin plastic. This acts as a slump mold to give the saucer its curved shape. -
Define the rim:
While the clay is in the mold, gently press the outer rim with your thumb to verify the depth. You want a shallow curve, not a steep bowl shape. -
Create the stack:
Repeat this process to create multiple saucers. Consistency is key if you want them to stack neatly like in the example photo.
Uneven Rims?
If your saucers warp while drying, place a small, flat board with a light weight on top of the rim-down saucers during the leather-hard stage.
Step 3: Texturing & Refining
-
Add subtle texture:
To achieve the rustic look seen in the image, lightly dab the exterior rim with a dry, coarse sponge while the clay is still leather-hard. This mimics a stone-like texture. -
Check the lip:
Run a damp sponge along the very top edge of the rim one last time to ensure it is comfortable to touch and visually clean. -
Initial drying:
Let the saucers sit in their molds for about 2-3 hours until they hold their shape but are still slightly cool to the touch. -
Remove from molds:
Carefully pop the saucers out of the molds. Place them rim-down on a flat board to encourage the rims to dry flat and level.
Stamp It
Before the clay dries, use small letter stamps to press the names of herbs directly into the rim for functional and stylish markers.
Step 4: Finishing
-
Complete drying:
Allow the clay to dry completely. For air-dry clay, this takes 24-48 hours. If firing in a kiln, follow your specific clay body’s firing schedule. -
Sand imperfections:
Once fully dry (and before firing if applicable), use fine-grit sandpaper to gently smooth any rough spots on the bottom or rim. -
Clean dust:
Wipe away the sanding dust with a slightly damp cloth or a dry brush. -
Optional sealing:
If using air-dry clay for plants, apply a matte waterproof sealant to the inside to protect the material from moisture.
Stack your finished saucers on a shelf near a window for a beautiful display of simple, handmade utility


Terracotta Coasters With Texture Presses
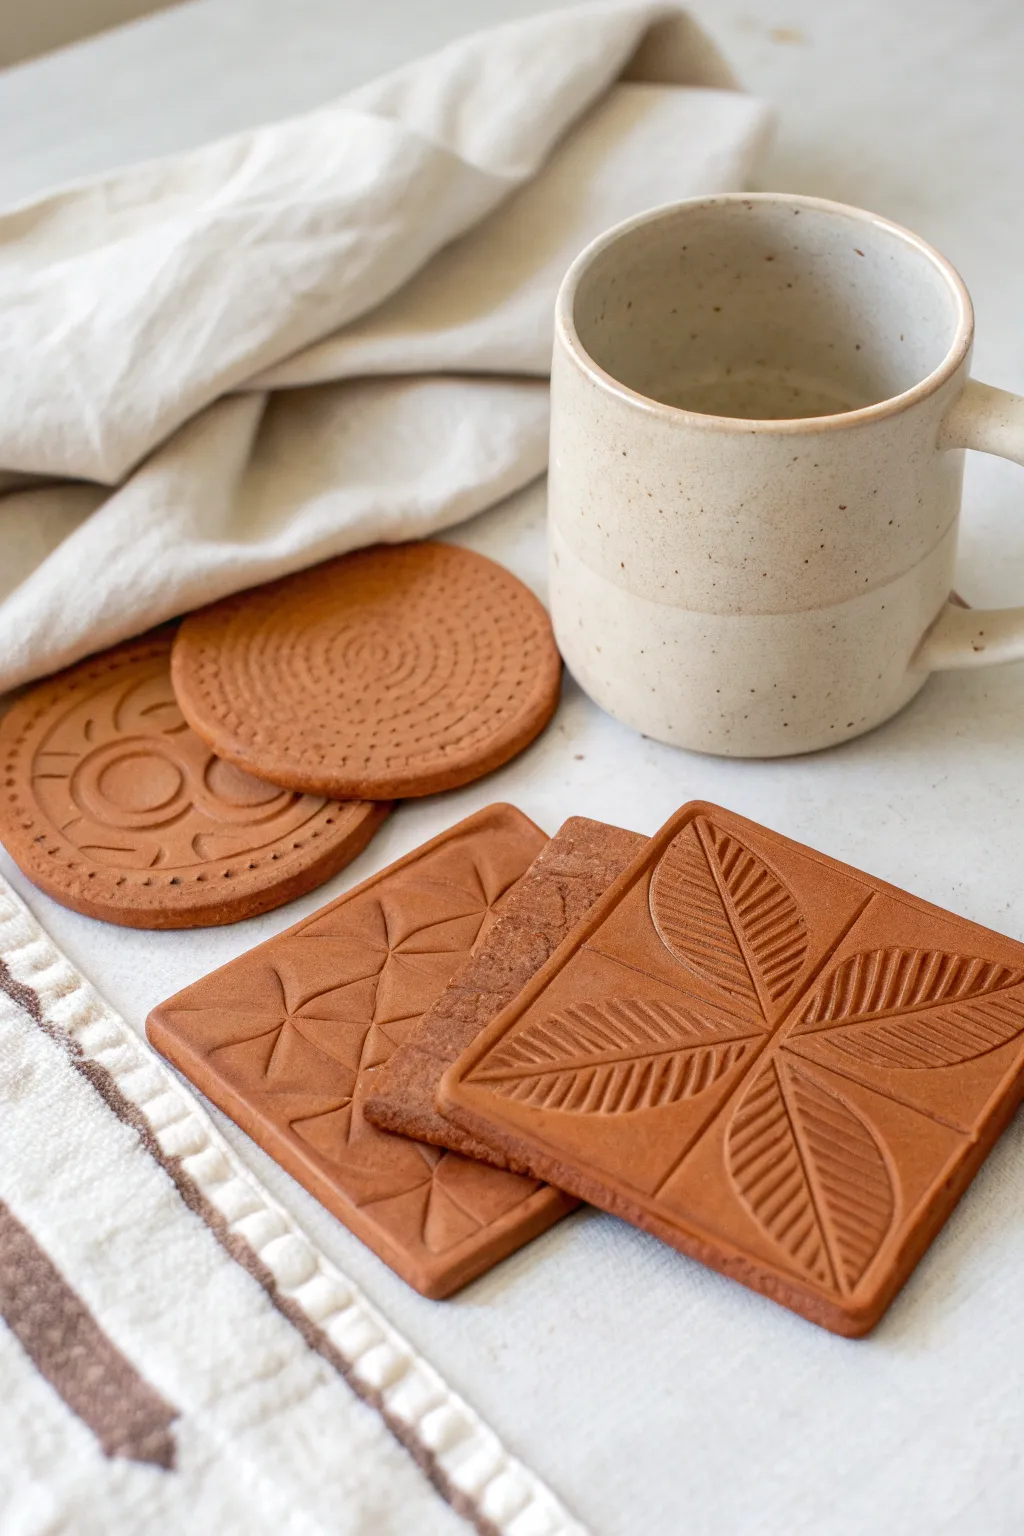
Embrace the natural warmth of earthy clay with these beautifully textured terracotta coasters. Using simple pressing techniques, you can transform plain clay slabs into intricate, functional art pieces featuring botanical and geometric reliefs.
Detailed Instructions
Materials
- Terracotta air-dry clay or kiln-fire clay
- Rolling pin
- Two wooden guide slats (approx. 1/4 inch thick)
- Square and circular clay cutters (or templates with a craft knife)
- Texture stamps (wooden block stamps, rubber stamps, or found objects)
- Canvas or heavy cloth (to roll clay on)
- Sponge and water
- Sandpaper (fine grit)
- Clear acrylic sealer or varnish (matte finish)
Step 1: Preparing the Clay Base
-
Set up your workspace:
Lay down a piece of heavy canvas or cloth on your table. This prevents the clay from sticking to the surface and adds a subtle texture to the bottom of your coasters. -
Condition the clay:
Take a handful of terracotta clay and knead it briefly in your hands to warm it up and ensure it’s pliable and free of air bubbles. -
Roll the slab:
Place the clay between your two wooden guide slats. Using the rolling pin, roll the clay out until the pin rests on the slats, ensuring an even thickness of about 1/4 inch across the entire slab. -
Smooth the surface:
Using a slightly damp sponge, gently wipe the surface of the clay slab to remove any rolling marks or heavy canvas texture, creating a smooth canvas for your designs.
Prevent Stickiness
Dust your stamps lightly with cornstarch before pressing them into the clay. This acts as a release agent and ensures the clay doesn’t get stuck in the fine details of the stamp.
Step 2: Cutting and Texturing
-
Cut the shapes:
Using your square and circular cutters, press firmly into the clay to cut out your coaster blanks. If you don’t have cutters, trace around a template with a sharp craft knife. -
Clean the edges:
After lifting away the excess clay, dip your finger in water and gently run it along the cut edges to smooth down any sharpness or ragged bits. -
Plan your texture:
Select your stamps. For the leaf design, I like to use a large wooden block stamp that fills the entire square. For the geometric patterns, smaller repetitive stamps work best. -
Press the botanical design:
Center your large leaf stamp over a square coaster. Press down firmly and evenly with the palm of your hand. Rock it very slightly to ensure the corners imprint, then lift straight up to reveal the relief. -
Create geometric patterns:
For the other square coaster, use a smaller geometric stamp. Press it into one quadrant, then rotate and repeat for the other sections to build a continuous pattern. -
Texture the round coasters:
For the circular designs, use tools with small points or circular heads to press dotted spirals or concentric rings directly into the wet clay.
Fixing Warped Coasters
If a coaster curls while drying, dampen the concave side slightly with a sponge and place it under a heavy book (with paper between) for a day to flatten it back out.
Step 3: Drying and Finishing
-
Initial drying phase:
Place your stamped coasters on a flat board covered with a paper towel. Let them dry slowly away from direct heat or sunlight to prevent warping. -
Flip for even drying:
After about 12 hours, gently flip the coasters over so the bottom side can dry. This helps keep them perfectly flat. -
Check for dryness:
Allow them to dry completely, which may taking 24-48 hours depending on humidity. The clay will lighten in color and feel hard and room temperature to the touch. -
Sand imperfections:
Once bone dry, take fine-grit sandpaper and lightly sand the edges and any rough spots on the surface. Be careful not to sand away your beautiful texture. -
Remove dust:
Wipe the coasters down with a dry cloth or soft brush to remove all sanding dust before sealing. -
Apply sealer:
Apply a thin coat of matte acrylic sealer or varnish. This step is crucial for coasters as it protects the clay from moisture rings and stains. -
Final cure:
Let the first coat dry, then apply a second coat for extra durability. Allow the coasters to cure fully according to the varnish instructions before using them.
Now you have a stunning set of custom coasters ready to protect your surfaces with style


Classic Terracotta Hanging Ornaments

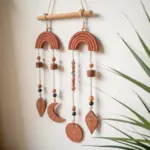
Bring earthy warmth to your walls with this rustic hanging mobile, combining simple geometric shapes with natural textures. The unglazed terracotta creates distinctively modern silhouettes featuring stars, rainbows, and florals suspended from a weathered branch.
Step-by-Step Tutorial
Materials
- Air-dry terracotta clay (or polymer clay)
- Rolling pin
- Parchment paper or craft mat
- Cookie cutters (star, flower, rainbow/arch)
- Drinking straw or skewer (for holes)
- Texturing tools (stamps or needle tool)
- Jute twine or hemp cord
- Wooden beads (assorted sizes)
- Driftwood stick or wooden dowel
- Sandpaper (fine grit)
- Scissors
Step 1: Shaping the Elements
-
Prepare the Clay:
Begin by kneading a portion of terracotta clay until it’s smooth and pliable. Roll it out on parchment paper to an even thickness of about 1/4 inch (6mm). Using guide sticks on either side of your roller can ensure uniformity. -
Cut the Stars:
Cut out three star shapes using a cookie cutter. If edges are rough, dip your finger in water and gently smooth them down while the clay is wet. -
Create the Flower:
Cut out one flower shape. Using a blunt tool or the end of a paintbrush, press a small indentation into the very center to define the flower’s eye intricate detail. -
Form the Rainbows:
Cut out two arch shapes. If you don’t have a cutter, you can cut a circle and slice it in half, then remove a smaller semi-circle from the bottom. These will become the rainbow charms. -
Add Texture:
On the two rainbow pieces, use a needle tool or small stamp to create patterns. Press small ‘plus’ signs or starbursts scattered across the surface, and sketch a line following the curve of the inner arch. -
Make Hanging Holes:
Use a straw or skewer to poke holes for stringing. Each star and flower needs one hole at the top and one at the bottom. The rainbows only need one hole at the top. -
Create Cylinder Beads:
Roll small rectangles of clay and wrap them around a thick skewer to form the ‘headers’ for the tassels seen at the bottom of the star strands. Smooth the seam and slide them off carefully. -
Drying Time:
Lay all pieces flat on parchment paper in a cool, dry place. Let them dry completely for 24-48 hours, flipping them halfway through to prevent warping.
Cracked Clay?
Cracks happen if clay dries too fast. Repair hairline cracks by mixing a tiny bit of clay dust with white glue to make a paste, filling the gap, and sanding smooth.
Step 2: Refining and Assembly
-
Sand and Smooth:
Once fully dry (opaque and hard), use fine-grit sandpaper to gently smooth away any sharp edges or burrs leftover from cutting. Wipe away dust with a slightly damp cloth. -
Cut the Twine:
Cut four lengths of jute twine. Two should be longer (around 18 inches) for the outer strands, and two slightly shorter (around 12 inches) for the inner strands, though we will trim later. -
Strand One: The Star & Tassel:
Tie a double knot around the branch for the first strand. Thread the twine down through a small wooden bead, then through the top hole of a star, and out the bottom hole. -
Adding the Tassel:
Cut 6-8 short pieces of twine (3 inches long). Fold them in half and thread the fold through your handmade clay cylinder bead. Pass the main hanging string through the center, tie a large knot underneath to secure everything, and trim the tassel ends evenly. -
Strand Two: The Star & Rainbow:
Attach the second string to the branch. Thread a bead, then a star (passing through top and bottom holes), then another bead. Tie the end securely to the top hole of a rainbow charm. -
Strand Three: The Solo Star:
For the third strand, replicate the tassel method from Strand One, using a star element. I usually vary the height slightly here to create visual interest. -
Strand Four: Flower & Rainbow:
Tie the final string to the branch. Thread a bead, passed through the flower charm, then another bead, and finish by tying it to the second rainbow charm. -
Final Adjustments:
Slide the attachment loops along the driftwood branch until they are evenly spaced. Use a dot of glue on the knots at the branch to keep them from slipping if necessary. -
Hanging Loop:
Tie a long piece of twine to both ends of the driftwood branch to create the main hanger for the mobile.
Add Subtle Color
Before sealing, dilute white acrylic paint with water (1:5 ratio) and give the rainbows a ‘whitewash’ effect. Wipe firmly with a rag so paint remains only in the stamped textures.
Hang your mobile near a window where the light can catch the textured clay surfaces

What Really Happens Inside the Kiln
Learn how time and temperature work together inside the kiln to transform clay into durable ceramic.
Terracotta Essential Oil Diffuser Discs
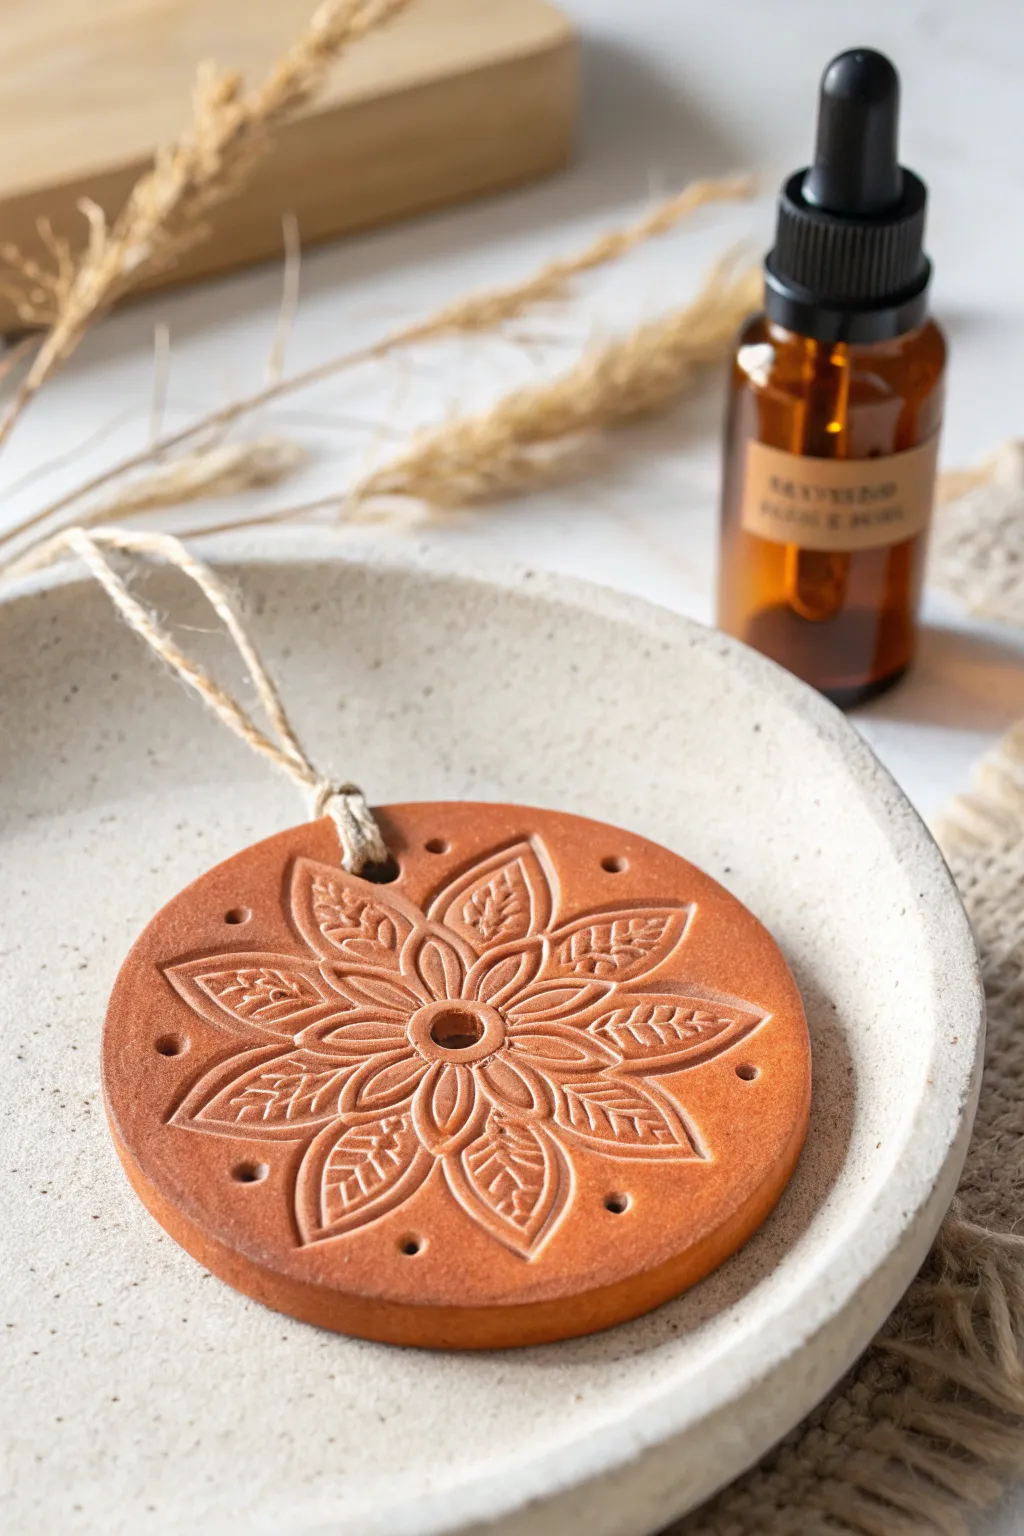
Create a natural and rustic essential oil diffuser using warm terracotta clay and botanical impressions. This simple project results in a beautiful, reusable hanging disc that slowly releases your favorite scents while adding an earthy touch to your decor.
Step-by-Step
Materials
- Terracotta air-dry clay or polymer clay (baked according to instructions)
- Rolling pin
- Circle cookie cutter (approx. 3-4 inches diameter)
- Rubber stamp with mandala or botanical design
- Drinking straw or skewer
- Jute twine or hemp cord
- Fine-grit sandpaper
- Parchment paper or non-stick work mat
- Small bowl of water (for smoothing edges)
Step 1: Shaping the Clay Base
-
Prepare the Clay:
Start by taking a handful of terracotta clay and kneading it in your hands until it becomes soft, pliable, and free of cracks. This warm-up helps prevent fissures later on. -
Roll it Out:
Place the clay on a sheet of parchment paper. Use your rolling pin to flatten the clay into a slab that is roughly 1/4 inch thick. Aim for an even thickness throughout so the diffuser dries uniformly. -
Cut the Circle:
Press your circle cookie cutter firmly into the rolled clay slab. Lift the cutter straight up to get a clean edge. Reserve the excess clay for future projects. -
Smooth the Edges:
Dip your finger slightly into water and run it gently around the cut rim of the circle. This softens the sharp cut lines and gives the piece a professional, finished look.
Step 2: Adding Detail and Texture
-
Center Your Stamp:
Select a rubber stamp with a deep relief pattern—mandalas or symmetrical floral designs work best. Position it carefully over the center of your clay circle. -
Apply Pressure:
Press the stamp down evenly into the clay. You want to go deep enough to leave a crisp impression of the petals and leaves, but not so deep that you distort the overall shape of the disc. -
Reveal the Design:
Gently peel the stamp away from the clay. If the clay sticks slightly, just wiggle the stamp a bit before lifting. I like to inspect the impression here and gently pat down any tiny clay burrs. -
Create the Hanging Hole:
Using a drinking straw or a thick skewer, punch a hole near the top edge of the disc. Make sure it’s at least a quarter-inch from the edge to ensure the clay doesn’t crack under the weight of the string later. -
Optional Decorative Accents:
If your design allows, use a needle tool or small stylus to add tiny dots or extra indentations around the outer rim of the stamped design for added texture.
Stamp Release Trick
Dust your rubber stamp lightly with cornstarch or baby powder before pressing it into the wet clay. This ensures a clean release and prevents the detailed pattern from pulling up or sticking.
Step 3: Finishing Touches
-
Drying Time:
Place the clay disc on a drying rack or a fresh sheet of parchment paper. Allow it to air dry completely for 24-48 hours. Turn it over halfway through the process to ensure the bottom dries evenly. -
Sanding:
Once fully dry and hard, take a piece of fine-grit sandpaper and very lightly buff the edges and flat surfaces to remove any remaining rough spots or fingerprints. -
Clean Up:
Wipe the disc with a barely damp cloth or a dry soft brush to remove the clay dust created by sanding. -
Attaching the String:
Cut a length of jute twine, about 8 inches long. Thread one end through the hole you created earlier. -
Securing the Loop:
Bring the ends of the twine together and tie a secure knot to create a loop for hanging. Trim any excess twine if necessary. -
Fragrance Application:
Place the finished disc in a small bowl or on a coaster. Add 3-5 drops of your preferred essential oil directly onto the unsealed clay. The porous terracotta will absorb the oil and diffuse the scent slowly.
Color Wash Effect
After drying, dilute white acrylic paint with water and brush it over the surface. Wipe it back quickly with a rag; the white will settle in the stamped grooves, making the pattern pop.
Hang your new diffuser in a closet, car, or bathroom and enjoy the subtle release of natural fragrance
Terracotta Herb Garden Markers
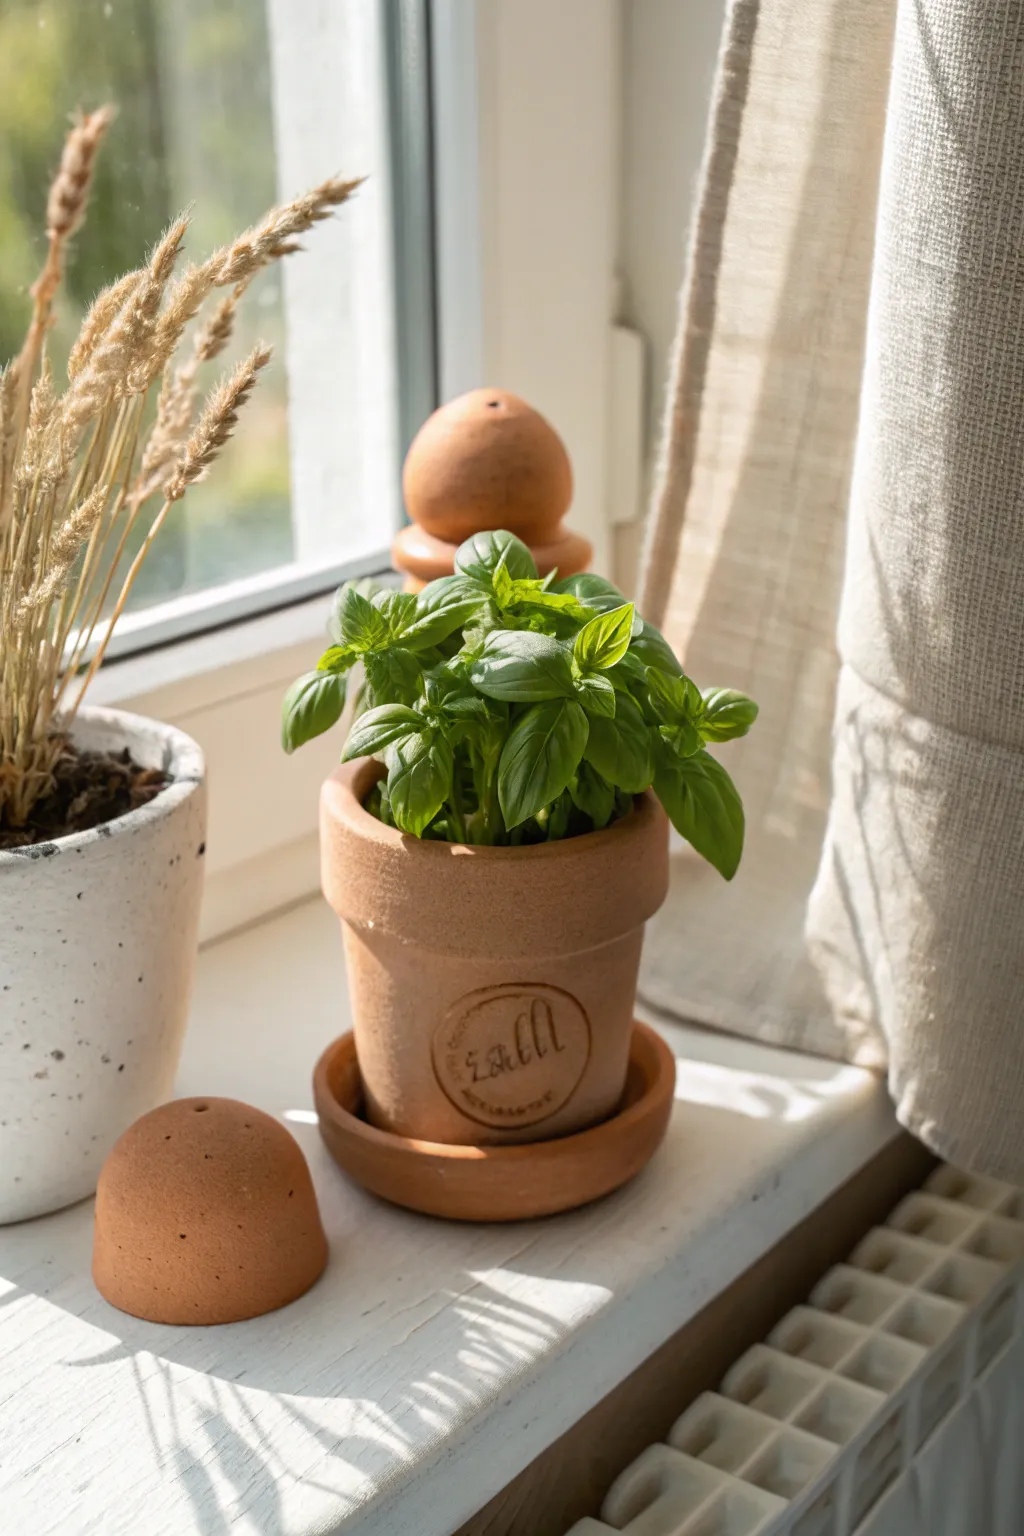
Elevate a simple terracotta planter into a custom herb home with stamped labels and clever matching humidity domes. This project teaches you how to create a unified set that looks like professional pottery but uses accessible air-dry or oven-bake clay techniques.
Step-by-Step Guide
Materials
- Terracotta-colored air-dry clay (or polymer clay)
- Small terracotta pot (clean and dry)
- Matching terracotta saucer
- Rolling pin
- Circle cutter (or a small glass)
- Letter stamps (small size)
- Textured fabric or sandpaper (optional)
- Water and a small sponge
- Modeling tool or butter knife
- Bowl (size of your desired dome)
- Plastic wrap
- Sealant (matte varnish suitable for clay)
- Strong craft glue (e.g., E6000)
Step 1: Creating the Stamped Badge
-
Condition the clay:
Begin by kneading a small ball of terracotta-colored clay until it is soft, pliable, and free of cracks. -
Roll it flat:
Roll the clay out on a smooth surface to a thickness of about 3-4mm. If you want a more rustic texture like the photo, you can lightly press a piece of rough fabric onto the surface before cutting. -
Cut the badge shape:
Use your circle cutter or the rim of a small glass to cut out a perfect circle. This will become the label on the front of your pot. -
Stamp the name:
Take your letter stamps and arrange the word ‘BASIL’ (or your chosen herb). Press them firmly into the center of the soft clay circle. I find it helpful to start with the middle letter to ensure everything is centered. -
Add detail rings:
To mimic the double-ring design shown, find two circular objects slightly smaller than your outer edge—like bottle caps or lids—and gently press them into the clay around the text to create concentric indented rings. -
Shape to the pot:
Carefully lift the clay badge. While it is still soft, gently press it against the curve of your terracotta pot to ensure it dries with the correct curvature. You don’t need to glue it yet; just let it take the shape. -
Dry the badge:
Set the badge aside to dry completely (or bake according to package instructions) while retaining that curved shape. Resting it on a similar-sized curved bottle works well.
Stamp Alignment
Struggling to keep letters straight? Place a piece of masking tape on the clay as a guide line, stamping lightly right above it, then peel the tape away.
Step 2: Forming the Humidity Domes
-
Prepare the mold:
Find a small bowl or sphere that matches the diameter you want for your dome. Cover it tightly with plastic wrap to prevent sticking. -
Roll a larger slab:
Roll out a larger amount of clay, keeping it slightly thicker (around 5mm) for structural stability. -
Shape the dome:
Drape the clay sheet over your plastic-covered mold. Smooth it down with your hands, gently stretching it to form a seamless half-sphere shape. -
Trim the edges:
Use a knife or needle tool to trim the excess clay at the base of the mold to create a clean, flat bottom edge. -
Smooth the surface:
Wet your finger or a small sponge and buff out any fingerprints or tool marks on the dome’s exterior for that sleek, matte finish seen in the image. -
Create ventilation holes:
Using a skewer or needle tool, poke several small holes in the top of the dome. This allows air circulation when you use it as a cover for seeds or seedlings. -
Dry or bake:
Allow the dome to dry or bake fully on the mold. Once rigid, carefully remove it from the mold and peel away the plastic wrap.
Step 3: Assembly and Finish
-
Attach the badge:
Apply a strong craft glue to the back of your curved, dried badge and press it firmly onto the center of your terracotta pot. Hold it in place with painter’s tape until the glue sets. -
Sanding edges:
If the bottom edge of your dome feels rough after drying, lightly sand it against a flat piece of fine-grit sandpaper to ensure it sits flush on surfaces. -
Sealing:
Apply a coat of matte varnish to both the badge and the dome. This protects the clay from moisture, which is crucial for items living near plants and water. -
Final aesthetic touch:
Once dry, you can lightly dust the stamped letters with a tiny bit of dark pigment powder or watered-down brown paint, then wipe the surface, to make the ‘BASIL’ text pop.
Color Matching
If your air-dry clay dries lighter than your pot, mix a drop of burnt orange acrylic paint into the wet clay before rolling to color-match the terracotta.
Now you have a charming, customized planter set ready to nurture your favorite kitchen herbs


The Complete Guide to Pottery Troubleshooting
Uncover the most common ceramic mistakes—from cracking clay to failed glazes—and learn how to fix them fast.
Terracotta Tea Light Holders
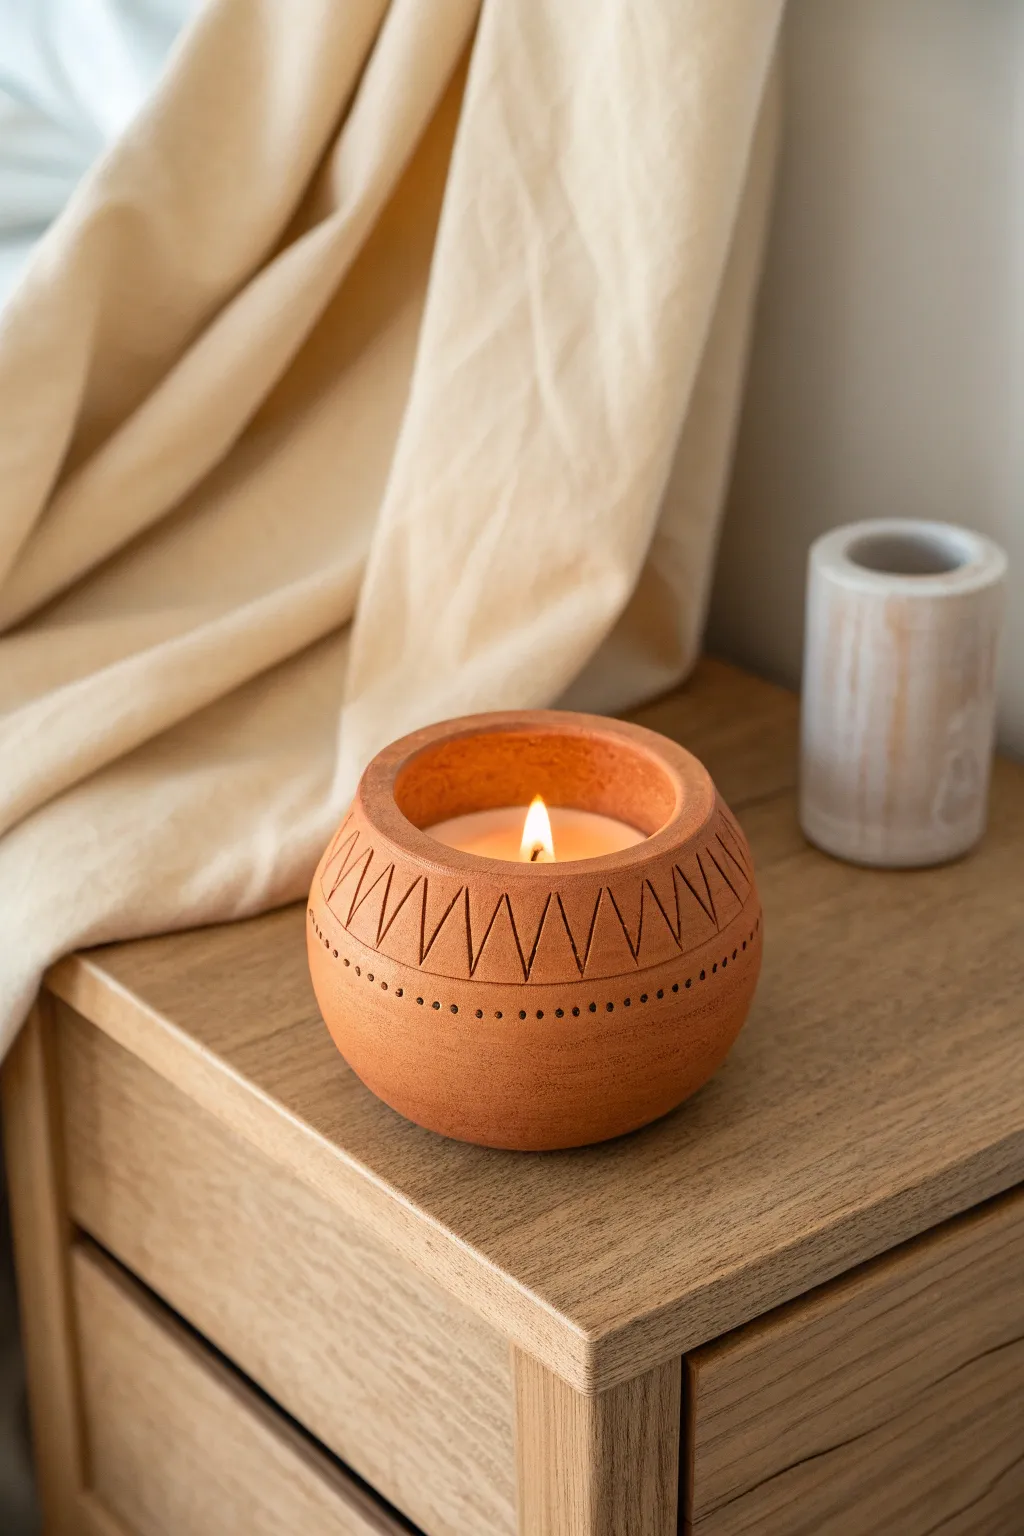
Bring warmth to your space with this earthy, handmade terracotta candle vessel featuring geometric carvings. Its chunky, rounded shape and simple zigzag patterns create a cozy, artisanal feel perfect for holding tea lights or hand-poured candle wax.
How-To Guide
Materials
- Terracotta air-dry clay or kiln-fire clay
- Rolling pin
- Small bowl or sphere mold (approx. 4-5 inches diameter)
- Plastic wrap
- Fettling knife or clay cutting tool
- Needle tool or toothpick
- Small blending sponge
- Cup of water
- Sandpaper (fine grit)
- Candle wax and wick (optional for filling)
Step 1: Forming the Vessel
-
Prepare your workspace:
Start by laying down a canvas cloth or non-stick mat. Wedge a grapefruit-sized ball of terracotta clay thoroughly to remove any air bubbles, which helps prevent cracks later on. -
Roll out the slab:
Roll your clay into a slab that is approximately 1/4 to 1/3 inch thick. You want this vessel to feel substantial and chunky, so avoid rolling it too thin. -
Mold the base shape:
Cover your bowl or sphere mold with plastic wrap to prevent sticking. drape the clay slab over the mold, gently pressing it down to conform to the rounded shape. -
Trim the excess:
Use your fettling knife to trim the clay around the base of the mold to create an even, circular rim. This cut edge will actually become the top opening of your candle holder. -
Refine the rim:
While the clay is still on the mold, use a damp sponge or your finger to smooth the cut edge. You want a flat, wide rim rather than a sharp edge to match the reference image. -
Create the flat bottom:
Gently press the very top of the dome (which will be the bottom of your pot) against a flat surface to create a stable base so it won’t rock. -
Initial drying phase:
Let the clay sit on the mold until it is leather-hard—stiff enough to hold its shape but soft enough to carve. This usually takes about 1-2 hours depending on humidity.
Step 2: Carving the Details
-
Mark your guidelines:
Carefully remove the clay from the mold. Using a needle tool, lightly scratch two horizontal parallel lines around the upper portion of the rounded body. This defines the band where your zigzags will go. -
Carve the zigzags:
Inside your parallel lines, use your needle tool or a small carving loop to cut deep ‘V’ shapes. Press firmly to create visible, distinct grooves rather than faint scratches. -
Add the dot details:
Just below your bottom guideline, use the blunt end of a small paintbrush or a detail tool to press a row of small dots all the way around the circumference. -
Smooth the imperfections:
Carving often leaves little ‘burrs’ of clay. Wait just a moment for them to stiffen, then gently brush them away with a soft, dry brush or your finger. Don’t use water here, or you’ll wash away your crisp lines. -
Dry completely:
Set the finished piece aside to dry fully. If using air-dry clay, wait 24-48 hours. If using ceramic clay, prepare it for bisque firing according to your kiln schedule.
Clean Lines
When carving the zigzags, pull the tool toward you rather than pushing it away. This gives you better control over the depth and straightness of the lines.
Step 3: Finishing Touches
-
Sand for texture:
Once bone dry, take fine-grit sandpaper and lightly sand the exterior. The goal isn’t to make it perfectly smooth but to remove sharp rough spots while keeping that matte, earthen texture. -
Seal (for air-dry clay):
If you used air-dry clay, apply a matte sealant to protect it from heat and moisture. I prefer doing two thin coats to ensure durability. -
Add the candle:
Place a simple tea light inside, or alternatively, secure a wick to the bottom and carefully pour in melted soy wax for a permanent candle fixture.
Uneven Drying?
If the rim dries faster than the base, it might warp. Loosely drape a piece of plastic over the top rim to slow its drying speed while the thicker bottom catches up.
Light your candle and enjoy the warm, patterned glow cast by your new handmade vessel
Terracotta Ring Cones and Catchalls
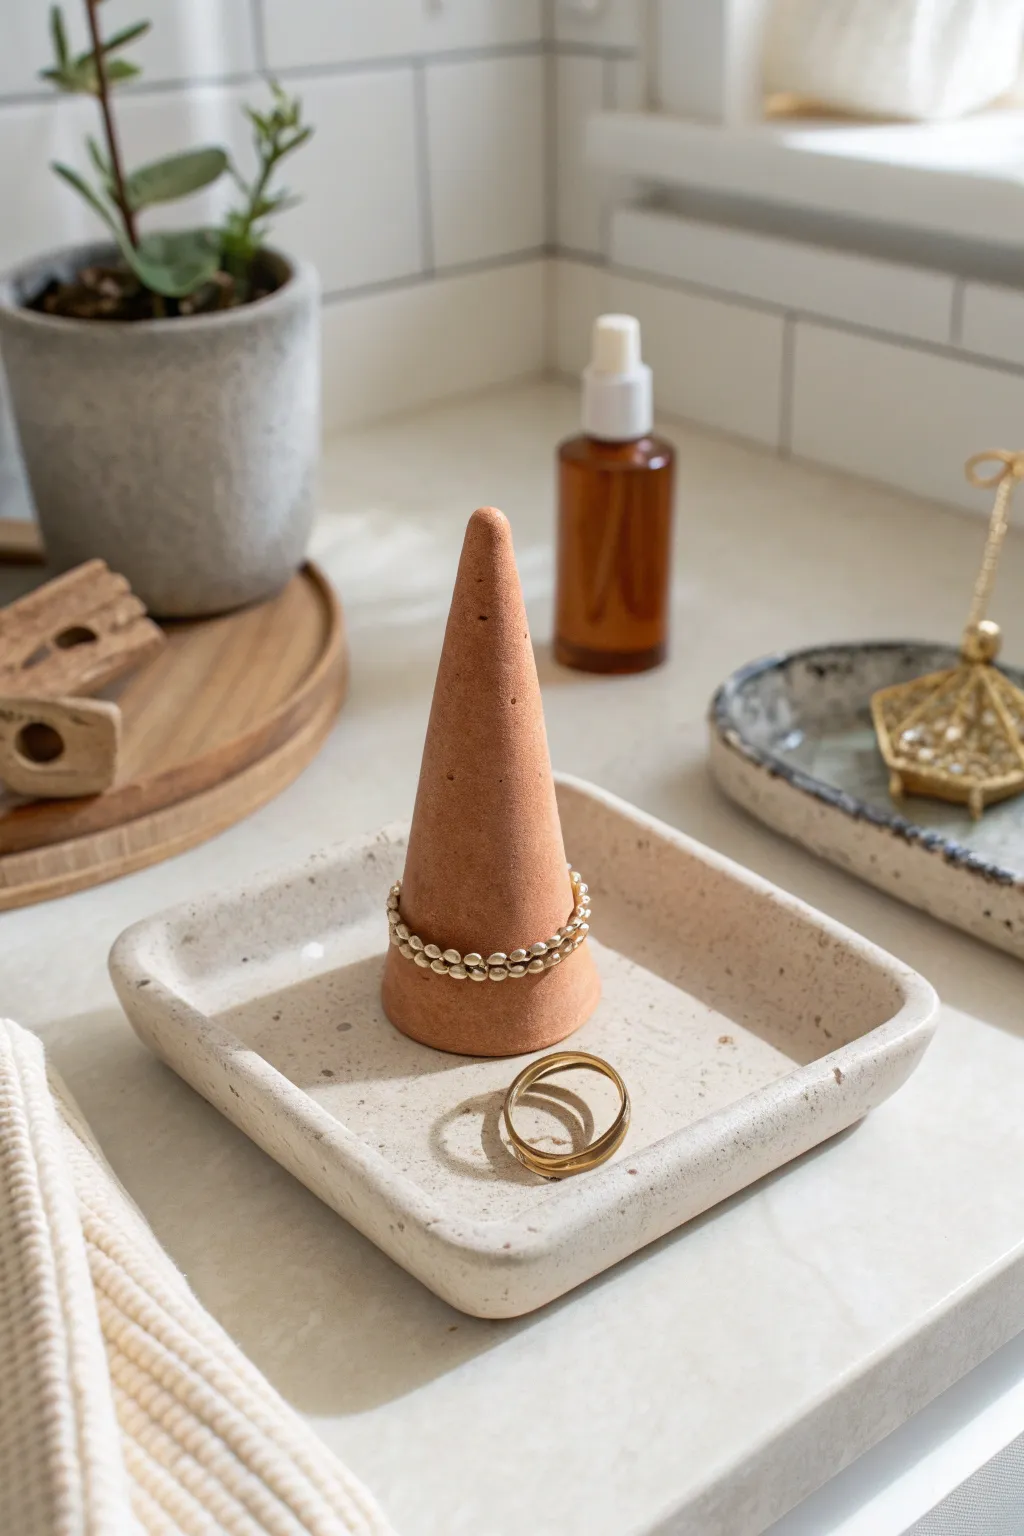
Create a minimalist and functional home for your favorite jewelry with this two-part clay set. The warm, earthy tone of the terracotta cone pairs beautifully with the speckled stone-effect catchall tray for a modern, organic look.
Detailed Instructions
Materials
- Terracotta air-dry clay or polymer clay
- White or cream polymer clay (for the tray)
- Dried coffee grounds or black pepper (for speckling)
- Rolling pin
- sharp craft knife or blade
- Square cookie cutter (approx 4-5 inches)
- Sandpaper (fine grit)
- Gloss or matte varnish (optional)
- Small bowl of water (for smoothing)
- Ruler
Step 1: Shaping the Terracotta Cone
-
Condition the Clay:
Begin by taking a chunk of terracotta clay and warming it up in your hands. Knead it thoroughly until it is soft, pliable, and free of any cracks. -
Form a Ball:
Roll the conditioned clay into a smooth sphere about the size of a golf ball or slightly larger, depending on how tall you want your ring holder to be. -
Roll Into a Cone:
Place the ball on your work surface. Using the flat of your hand, roll the clay back and forth while applying more pressure to one side to naturally form a tapered cone shape. -
Refine the Shape:
Stand the cone upright. Gently tap the base on the table to flatten it so it stands stable. Use your fingers to smooth the sides, ensuring the tip is rounded but not too sharp. -
Smooth Imperfections:
Dip your finger in a little water and run it over the surface of the clay to erase fingerprints and smooth out any tiny bumps. Set this piece aside to dry or bake according to package instructions.
Step 2: Crafting the Speckled Tray
-
Prepare the Speckled Mix:
Take your white or cream clay and flatten it slightly. Sprinkle a pinch of dried coffee grounds or coarse black pepper onto the clay. -
Knead to Distribute:
Fold the clay over the specks and knead repeatedly. I like to fold and twist until the specks are evenly distributed throughout the batch for that natural stone look. -
Roll Out the Slab:
Roll the speckled clay out into a flat, even slab, aiming for a consistent thickness of about 1/4 inch. -
Cut the Base:
Use your square cookie cutter or a ruler and craft knife to cut a perfect square from the slab. -
Create the Sidewalls:
From the remaining clay scraps, roll a long snake or thin strip. Flatten this strip to create a long ribbon of clay with the same thickness as your base. -
Attach Walls to Base:
Score the edges of your square base (make tiny scratches). Place the ribbon of clay on top of the edges to form the rim. -
Blend the Seams:
Use a modeling tool or your finger to smear the clay from the wall down onto the base on both the inside and outside, blending the seam until it’s invisible. -
Soften the Edges:
Gently gently round over the top lip of the tray with your fingertip to give it that soft, handmade organic feel seen in the photo. -
Final Smoothing:
Give the entire tray a final pass with a damp finger or sponge to remove tool marks before letting it dry or cure.
Cracks Appearing?
If you see tiny cracks while the clay dries, mix a small amount of fresh clay with water to make a paste and fill them in immediately.
Step 3: Finishing Touches
-
Sand for Smoothness:
Once your pieces are fully hardened, use fine-grit sandpaper to gently buff away any rough spots, especially along the rim of the tray and bottom of the cone. -
Seal (Optional):
For durability, apply a thin coat of matte varnish. This protects the clay from moisture and gives the finished piece a professional sheen.
Go Geometric
Try carving vertical facets into the cone with a blade before it hardens for a modern, angular look instead of a smooth round finish.
Place your finished cone in the center of the tray and enjoy organizing your rings on this stylish display

TRACK YOUR CERAMIC JOURNEY
Capture glaze tests, firing details, and creative progress—all in one simple printable. Make your projects easier to repeat and improve.
Terracotta Photo and Card Holders
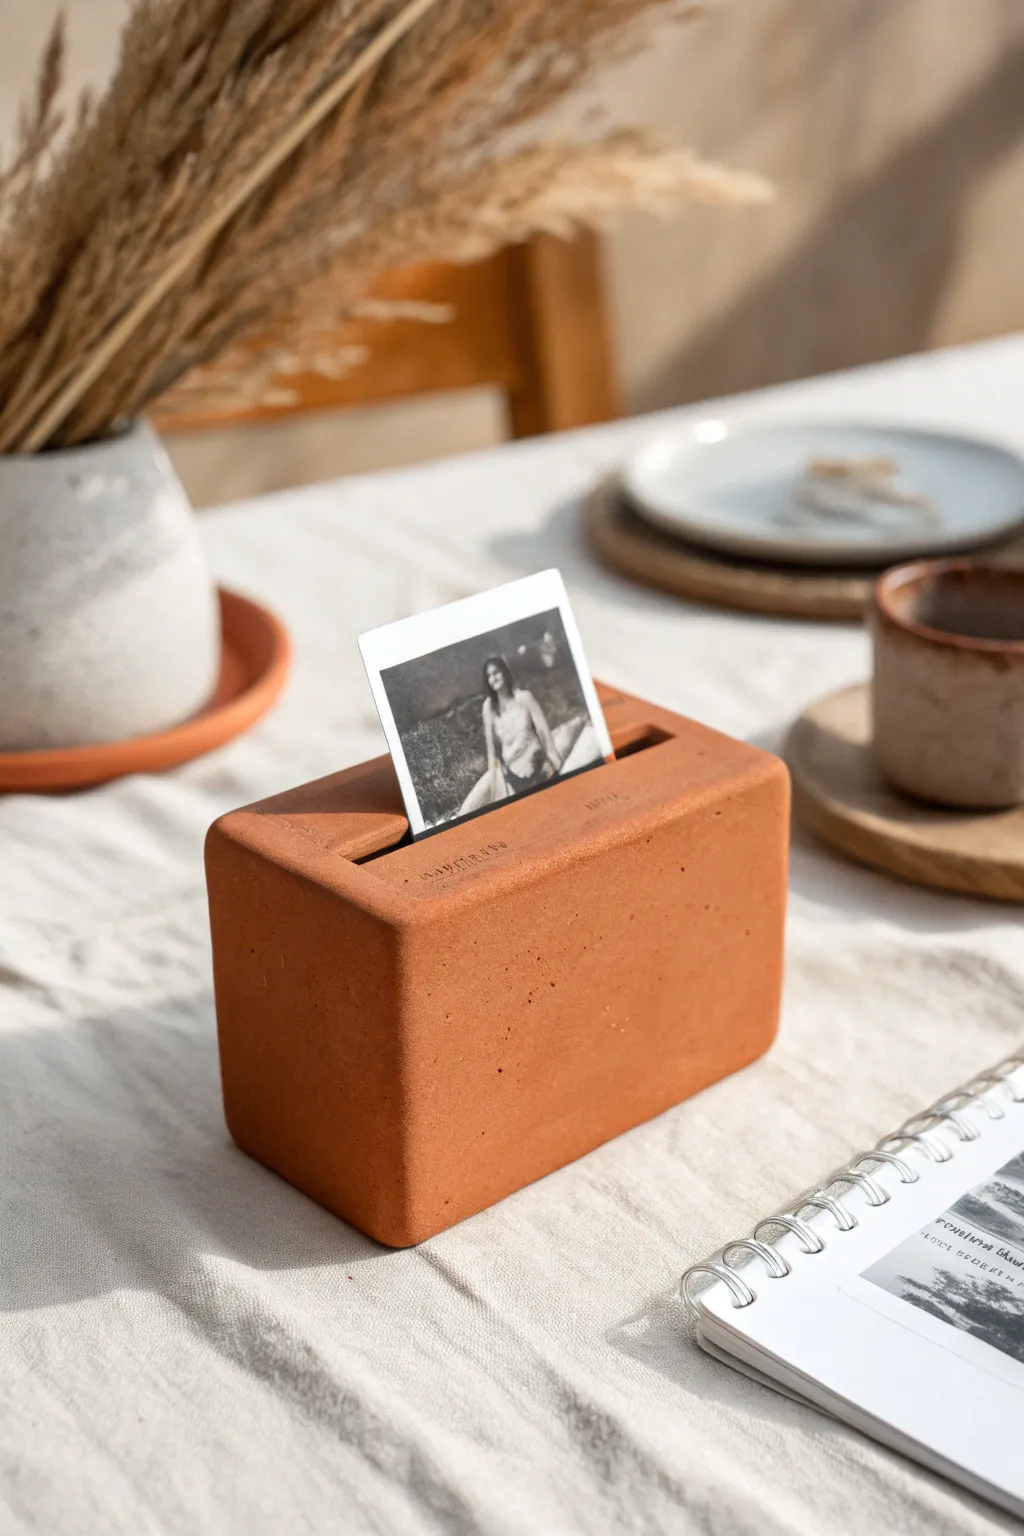
Embrace the earthy warmth of terracotta with this sleek, geometric photo holder that brings a touch of modern bohemian style to your desk or shelf. Its substantial weight and clean lines make it a timeless piece for displaying your favorite polaroids or postcards.
Step-by-Step
Materials
- Air-dry terracotta clay or polymer clay (approx. 500g)
- Rolling pin
- Sharp clay blade or kitchen knife
- Ruler
- Sandpaper (fine grit)
- Rectangle template (cardboard)
- Thick cardstock or a plastic card (for the slot)
- Small letter stamps (optional)
- Water and sponge
- Matte varnish (optional)
Step 1: Shaping the Block foundation
-
Condition the clay:
Begin by working your terracotta clay in your hands until it is warm, pliable, and free of cracks. If you are using natural air-dry clay, ensure it isn’t too dry; add a drop of water if needed. -
Form a rough brick:
Shape the clay into a thick, rectangular log roughly the size you want your finished holder to be. I like to aim for about 6 inches long by 3 inches high. -
Flatten the sides:
Using your work surface, gently tap each side of the block against the table to flatten the faces. You want crisp, parallel sides rather than rounded edges. -
Slice for precision:
To get those perfectly sharp corners seen in the photo, use your ruler and sharp blade. Slice off thin layers from each of the six sides to create a perfect geometric rectangular prism. -
Smooth the surface:
Dip your finger or a small sponge in water and gently run it over the clay to erase any fingerprints or cutting marks. The goal is a smooth, stone-like finish.
Clean Cuts Pro Tip
Coat your blade with a tiny bit of oil or water before slicing the clay block. This prevents drag marks and results in much sharper, crisper corners.
Step 2: Adding Functionality and Details
-
Mark the slot:
Using a ruler, find the center line running lengthwise along the top face of your block. Lightly mark this line with a needle tool or toothpick. -
Create the photo slot:
Press a piece of thick cardstock or an old plastic gift card deep into the clay along your marked line. wiggle it slightly to ensure the opening is wide enough for a photo, then carefully remove it. -
Refine the opening:
Check the edges of the slot you just made. If the clay pulled up slightly, gently pat it back down so the top surface remains perfectly flat. -
Add a personal stamp:
If you want to recreate the stamped detail shown in the image, gently press small letter stamps into the clay near the slot. A date or meaningful word works beautifully here. -
Final smoothing:
Do one last check over the entire piece. Use the flat side of your blade to burnish (rub) the sides slightly, compressing the clay for a smoother texture.
Level Up: Speckled Effect
Mix dried coffee grounds or coarse sand into the clay before shaping. This mimics a stone texture and adds lovely visual interest to the surface.
Step 3: Drying and Finishing
-
Slow drying phase:
Place your block on a clean board to dry. Cover it loosely with a plastic bag for the first 24 hours to prevent the outside from drying too fast and cracking. -
Rotate frequently:
Every few hours, flip the block or turn it onto a different side. This ensures even airflow and prevents the bottom from staying damp. -
Full cure:
Allow the piece to dry completely for 48-72 hours. The clay will lighten in color and feel hard to the touch when ready. -
Sanding for perfection:
Once fully dry, take your fine-grit sandpaper and lightly buff the corners and flat surfaces. This removes any tiny imperfections and gives it that professional, manufactured look. -
Seal the deal:
For longevity, apply a coat of matte varnish. This protects the clay from moisture and dust without altering the natural, earthy appearance.
Now you have a stunning, architectural piece ready to showcase your fondest memories on any tabletop
Terracotta Arch Wall Hangings
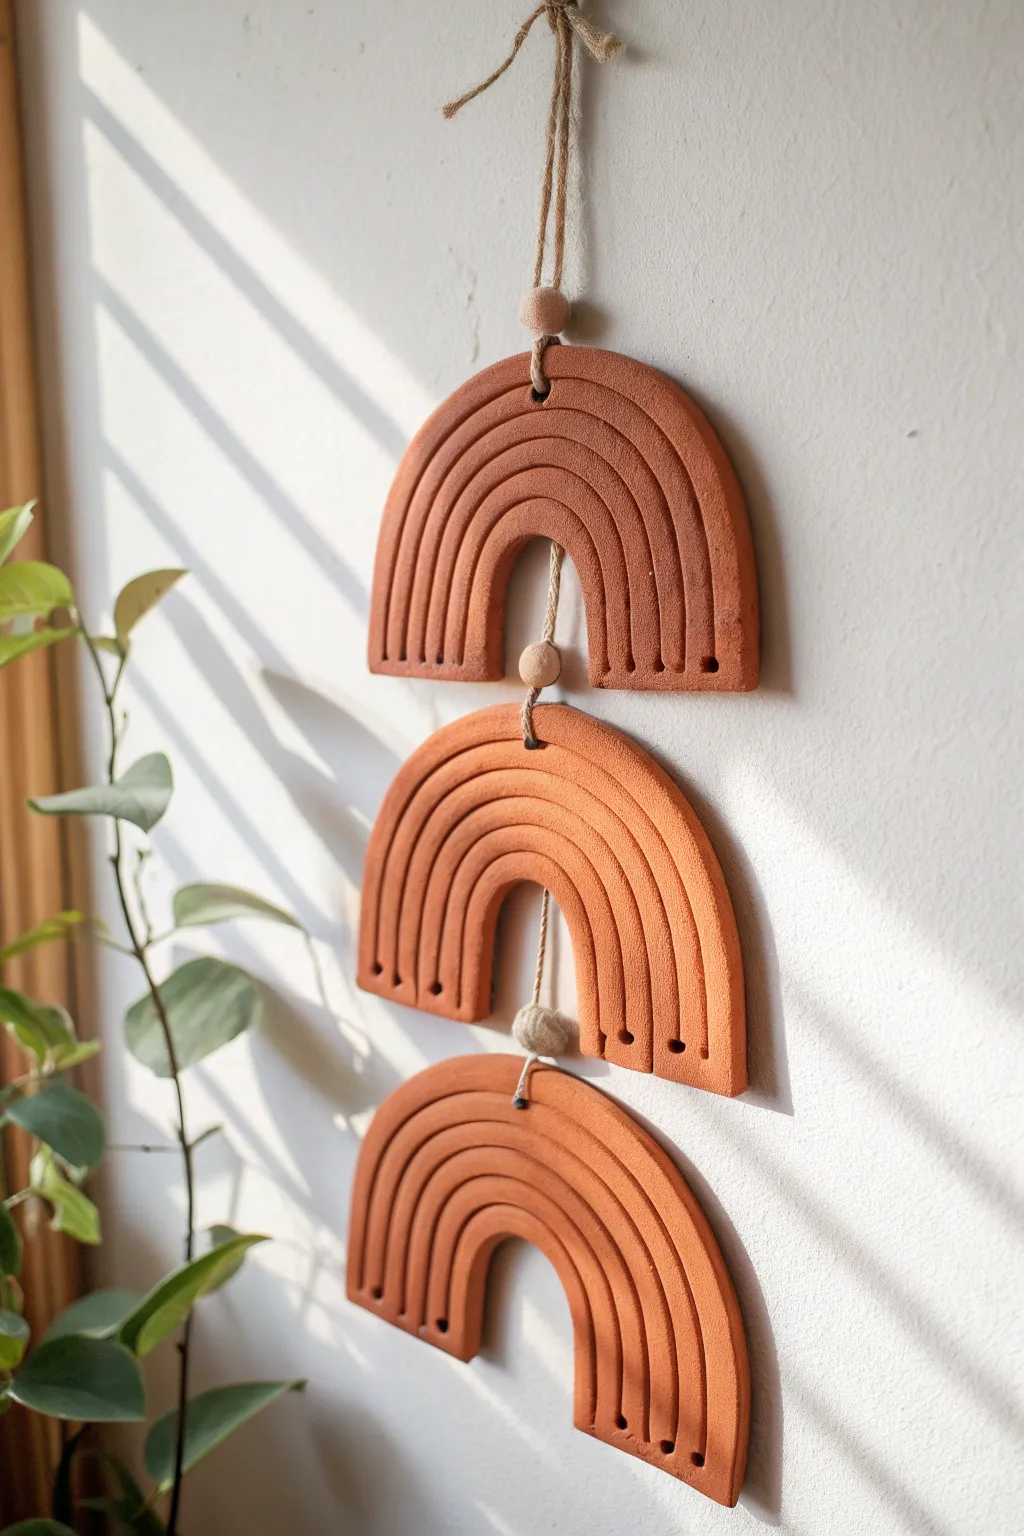
Add earthy warmth to your walls with an elegant, stacked wall hanging made from classic terracotta clay. This project combines simple geometric rainbow arches with rustic twine and bead accents for a modern bohemian look.
How-To Guide
Materials
- Terracotta air-dry clay (or kiln-fire clay)
- Rolling pin
- Parchment paper or canvas mat
- Clay knife or fettling knife
- Needle tool or toothpick
- Round cookie cutters (various sizes) or paper templates
- Wooden skewer or straw (for holes)
- Sanding sponge (fine grit)
- Jute twine or hemp cord
- 3 wooden beads (approx. 1/2 inch diameter)
- Ruler
- Small bowl of water
Step 1: Shaping the Arches
-
Prepare your workspace:
Lay down parchment paper or a canvas mat to prevent the clay from sticking. Simple preparation now saves a headache later. -
Roll out the slab:
Take a generous intricate of terracotta clay and roll it out into a smooth, even slab. You want a thickness of about 1/4 inch to ensure durability without being too heavy. -
Cut the base shapes:
Using concentric round cutters or a paper template you’ve drawn, cut out three identical rainbow arch shapes. Each should be roughly 4-5 inches wide at the base. -
Smooth the edges:
Dip your finger in a little water and run it along the cut edges of each arch to soften any sharp corners or clay burrs.
Step 2: Adding Texture & Details
-
Mark the grooves:
To create the rainbow effect, use a needle tool to gently score three curved lines following the shape of the arch. Press firmly enough to make a groove, but don’t cut all the way through. -
Widen the lines:
Go back over your scored lines with a slightly blunter tool, like the back of a knife or a modeling tool, to widen them slightly and clean up any crumbs. -
Create holes for hanging:
Using a straw or wooden skewer, poke a hole at the very top center of each arch. Wiggle the tool slightly to ensure the hole is large enough for your twine. -
Add connection holes:
For the top and middle arches only, poke a second hole at the bottom center (directly under the top hole) or two holes spaced apart if you prefer a double-strand look. The reference image uses a central vertical connection style. -
Refine the surface:
Look over your pieces one last time. Smooth out any fingerprints with a damp sponge or finger before setting them aside.
Fixing Cracks
If hairline cracks appear while drying, mix a tiny bit of clay with water to make a paste (slip). Fill the crack, smooth it over, and let it dry again.
Step 3: Drying and Assembly
-
Let it dry slowly:
Place the arches on a flat surface away from direct heat. I prefer to flip them over once a day to ensure they dry evenly and don’t warp. Allow 24-48 hours for air-dry clay. -
Sand the imperfections:
Once bone dry, use a fine-grit sanding sponge to gently buff the edges and surface for a professional, matte finish. -
Prepare the bottom arch:
Cut a length of jute twine. Tie a large knot at one end, thread it through the top hole of the bottom arch (from back to front), and slide on a wooden bead. -
Connect the middle arch:
Thread the twine up through the bottom hole of the middle arch and out the top hole. Tie a knot exactly where you want the arch to sit so it hovers above the first one. -
Add the middle bead:
Slide another wooden bead onto the twine so it rests on top of the middle arch. -
Attach the top arch:
Thread the twine through the connection points of the top arch, just like the previous step, ensuring the spacing is consistent. -
Final bead and hanging loop:
Add the final bead on top of the highest arch. Then, tie a strong loop at the end of the twine for hanging on a hook or nail.
Color Pop
Before sealing, dry brush white acrylic paint lightly over the textured grooves. It highlights the rainbow lines while keeping the terracotta feel.
Hang your new terracotta creation in a sunny spot to let the shadows play with the textured grooves
Terracotta Bead Garland Decor
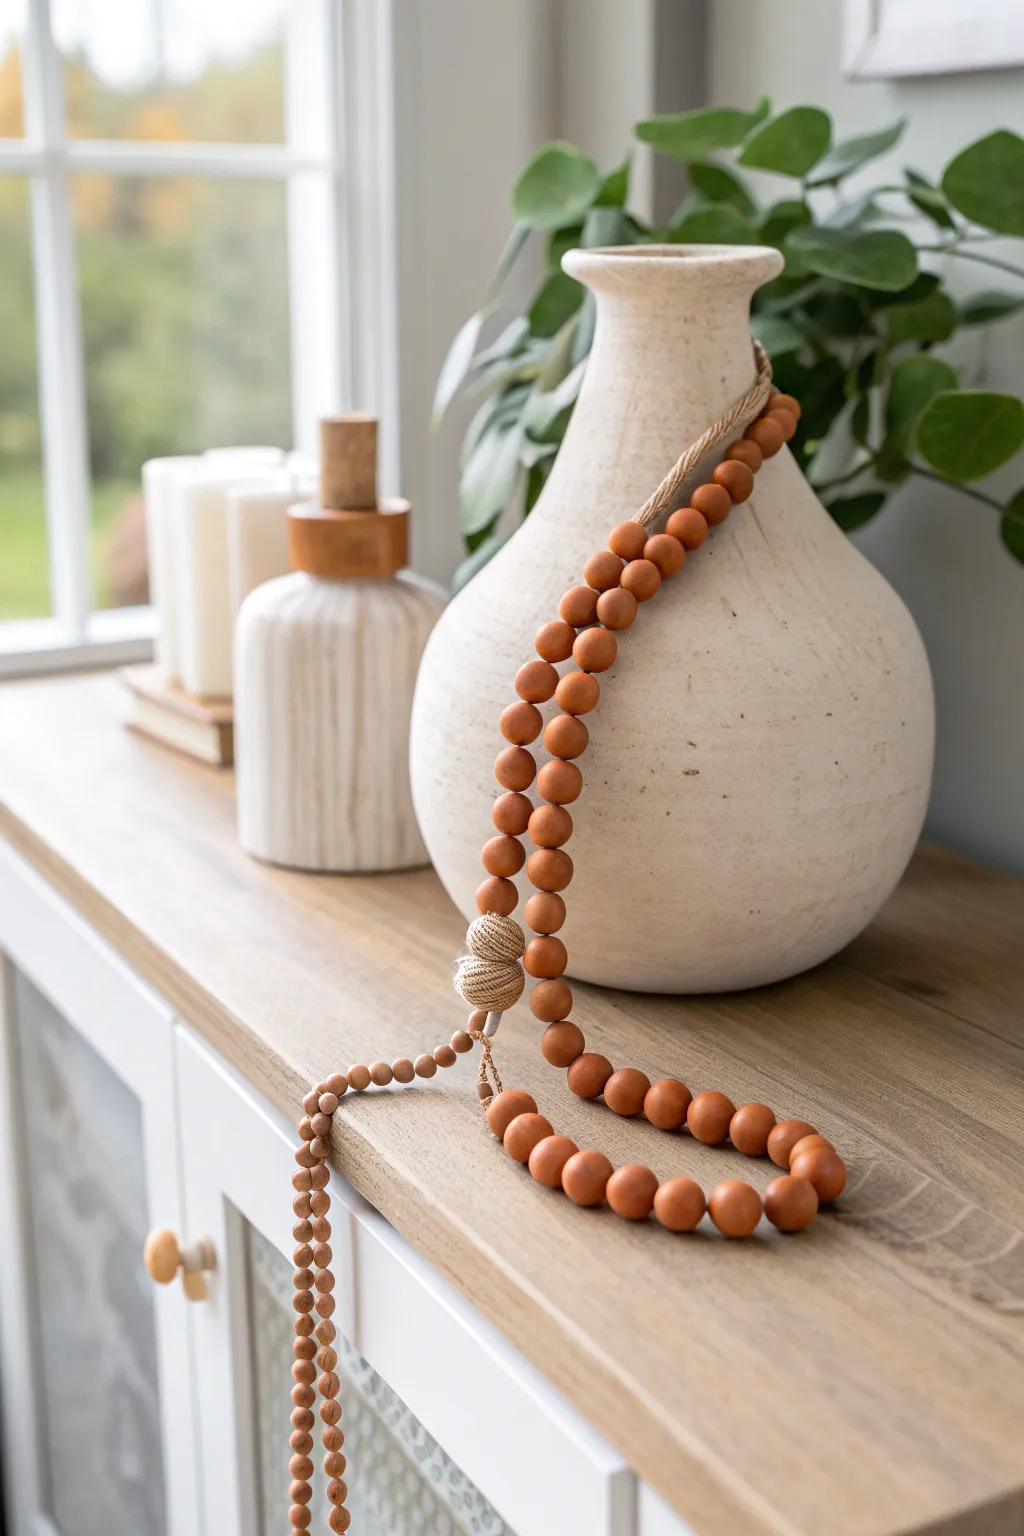
Bring warmth and texture to your home decor with this handcrafted terracotta bead garland. Draped effortlessly over a vase or styled on a tray, the rich clay tones and natural twine accents create a sophisticated, earthy aesthetic.
Step-by-Step Guide
Materials
- Air-dry terracotta clay (or polymer clay in terracotta color)
- Bamboo skewers or thick knitting needle
- Fine-grit sandpaper
- Jute twine or heavy hemp cord
- Small wooden accent beads (unfinished)
- Thick cotton rope (for the core knot)
- Scissors
- Clear sealant juice (optional)
- Ruler
Step 1: Creating the Clay Beads
-
Condition the Clay:
Begin by taking a chunk of your terracotta air-dry clay and kneading it in your hands until it is smooth and pliable. This prevents cracking later. -
Size the Portions:
Pinch off pieces of clay to form the main beads. Aim for about 1 inch in diameter. Rolling a ‘snake’ of clay and cutting equal segments helps keep them uniform. -
Roll Spheres:
Roll each segment between your palms to create a smooth, round sphere. Don’t worry if they aren’t factory-perfect; minor variations add organic charm. -
Pierce the Holes:
Using a bamboo skewer or knitting needle, carefully pierce a hole through the center of each bead. Wiggle the tool slightly to ensure the hole is wide enough for your thick twine. -
Dry Completely:
Place the beads on a clean, flat surface to dry. Rotate them every few hours so they dry evenly and keep their round shape. Let them cure for 24-48 hours depending on humidity. -
Sand and Refine:
Once fully dry, inspect your beads. Use fine-grit sandpaper to gently smooth out any fingerprints or rough ridges around the holes.
Smooth Seams
To erase fingerprints before drying, dip your finger in a tiny bit of water and lightly run it over the surface of the wet clay beads.
Step 2: Assembling the Accent Knot
-
Prepare the Core:
Take a short length of thick cotton rope (about 3 inches long) to act as the core for the decorative wrapped knot seen in the image. -
Start the Wrap:
Using your thinner jute twine, lay a loop against the rope core. Begin wrapping the twine tightly around the core, working your way down. -
Secure the Knot:
Wrap until you have a solid cylinder of twine about 1.5 inches long. Thread the end through your initial loop and pull the top tail to tighten and hide the knot inside. -
Attach Main Twine:
Thread a very long piece of your main stringing twine through the center of this wrapped knot component so you have two long tails coming out of one end.
Step 3: Stringing the Garland
-
String the Main Loop:
Take a long length of jute twine (approx. 4-5 feet) and fold it to create a loop. This loop will drape over the vase neck. Measurements depend on your specific vase size. -
Thread Big Beads:
Start threading your dry terracotta beads onto the twine. I find wrapping a piece of tape around the twine tip makes threading much easier. -
Create the Bead Pattern:
Continue adding the large terracotta beads until you have a substantial loop. The image shows a continuous strand, so fill the length until the ends meet. -
Join the Ends:
Bring the two ends of your beaded strand together. Tie them securely to the top of your decorative wrapped knot component. Hide the knot by pushing it slightly inside the bead hole.
Texture Play
Before the clay dries, gently press a piece of linen fabric or a stone against a few beads to add subtle, organic texture variance.
Step 4: Adding the Tassels
-
Prepare Tassel Strings:
Cut two lengths of twine, about 12 inches long, to create the dangling tassels shown at the bottom of the garland. -
Attach to Main Body:
Tie these strings to the bottom of the wrapped knot component so they hang freely. -
Add Small Beads:
Thread the smaller, unfinished wooden beads onto these hanging strings. The image shows a long, thin sequence of tiny beads. -
Knot the Tips:
Once the small beads cover the length of the string, tie a large double knot at the very end to secure them and trim any excess twine.
Drape your finished garland over a vase or bowl to admire the rich, handcrafted texture you’ve created
Terracotta Soap Dishes With Drain Ridges
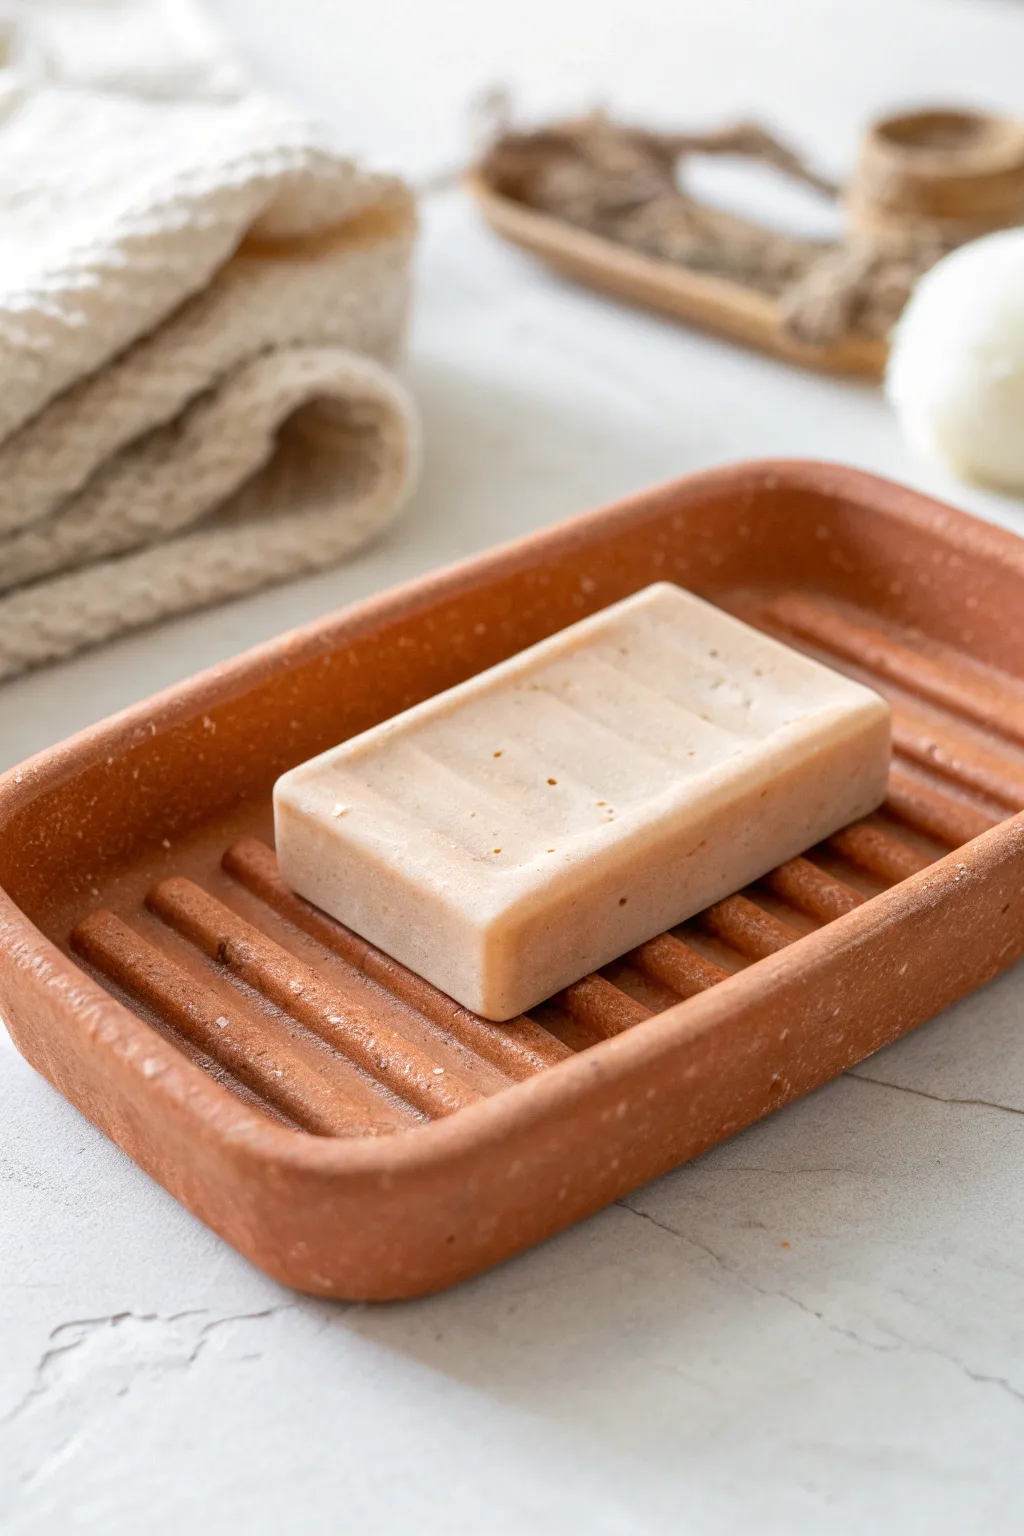
Bring earthy warmth to your bathroom with this handmade terracotta soap dish. The design features raised internal ridges that allow your soap to dry properly between uses, extending its life while looking effortlessly chic.
Step-by-Step
Materials
- Terracotta air-dry clay or kiln-fire clay
- Rolling pin
- Two wooden guide strips (approx. 1/4 inch thick)
- Rectangular template or ruler
- Clay knife or fettling knife
- Sponge
- Bowl of water
- Smoothing tool (rib tool)
- Wire clay cutter
Step 1: Preparing the Base
-
Wedge the clay:
Start by taking a manageable lump of terracotta clay and wedging it thoroughly on your work surface to remove air bubbles and ensure an even consistency. -
Set up guides:
Place your two wooden guide strips on either side of the clay. These will ensure your slab is rolled to a perfectly uniform thickness. -
Roll the slab:
Use your rolling pin to flatten the clay until the pin rests on the guide strips. Rotate the clay occasionally so it doesn’t stick to the surface. -
Cut the shape:
Using a paper template or a ruler, cut out a rectangle approximately 4 inches wide by 6 inches long. Smooth the cut edges with a damp finger to remove any sharpness.
Cracks Appearing?
If tiny cracks appear while drying, dampen your finger with a little vinegar-water mix and gently buff them out. The vinegar helps break down the clay slightly for a better seal.
Step 2: Forming the Walls
-
Create coils:
Roll out a long, even coil of clay, about the thickness of a pencil. This will become the wall of your dish. -
Score the edges:
Use a needle tool or fork to score (scratch) the outer perimeter of your rectangular base. Apply a small amount of water or slip to the scored area. -
Attach the coil:
Lay the coil onto the scored edge of the base. Gently press it down to adhere it. -
Blend the clay:
Using your thumb or a modeling tool, drag the clay from the coil down onto the base on the inside, and from the base up onto the coil on the outside. -
Smooth the walls:
Once the coil is blended, use a damp sponge to smooth the transition so it looks like a single piece. Shape the wall to be slightly rounded and about 3/4 inch high.
Make it Glossy
For a functional bathroom item, apply a clear waterproof sealant or glaze after the clay is fully cured. This makes cleaning soap scum much easier later on.
Step 3: Creating Drainage Ridges
-
Roll ridge coils:
Roll out 4 or 5 shorter coils, slightly thinner than the wall coil. These should be cut to fit the width of the interior of your dish. -
Position the ridges:
Lay the coils inside the dish, spacing them evenly apart. I like to dry fit them first to ensure the spacing looks balanced before committing. -
Score and slip:
Mark where each ridge will go, then remove them. Score the base along those lines and apply a little water/slip. -
Attach ridges:
Place the coils back onto the scored lines. Press them down firmly but gently so you don’t flatten the ridge completely. -
Blend the base connection:
Use a small modeling tool to smooth the bottom edges of the ridges where they meet the floor of the dish, ensuring a strong bond without gaps where water could hide.
Step 4: Finishing Touches
-
Refine the shape:
Go over the entire piece with a slightly damp sponge. Smooth out any fingerprints and soften the tops of the ridges so they aren’t sharp. -
Check level:
Place the dish on a flat surface and look at it from eye level to ensure the walls are even and the dish isn’t warped. -
Dry slowly:
Loosely cover the dish with plastic wrap for the first day to let it dry slowly. This helps prevent cracking, especially where the ridges meet the base. -
Final dry:
Once leather hard, remove the plastic and let it air dry completely for several days before firing or sealing.
Once fully cured, your new soap dish is ready to add a touch of handcrafted charm to your sink area
Terracotta Tile Mosaic Tray Inserts
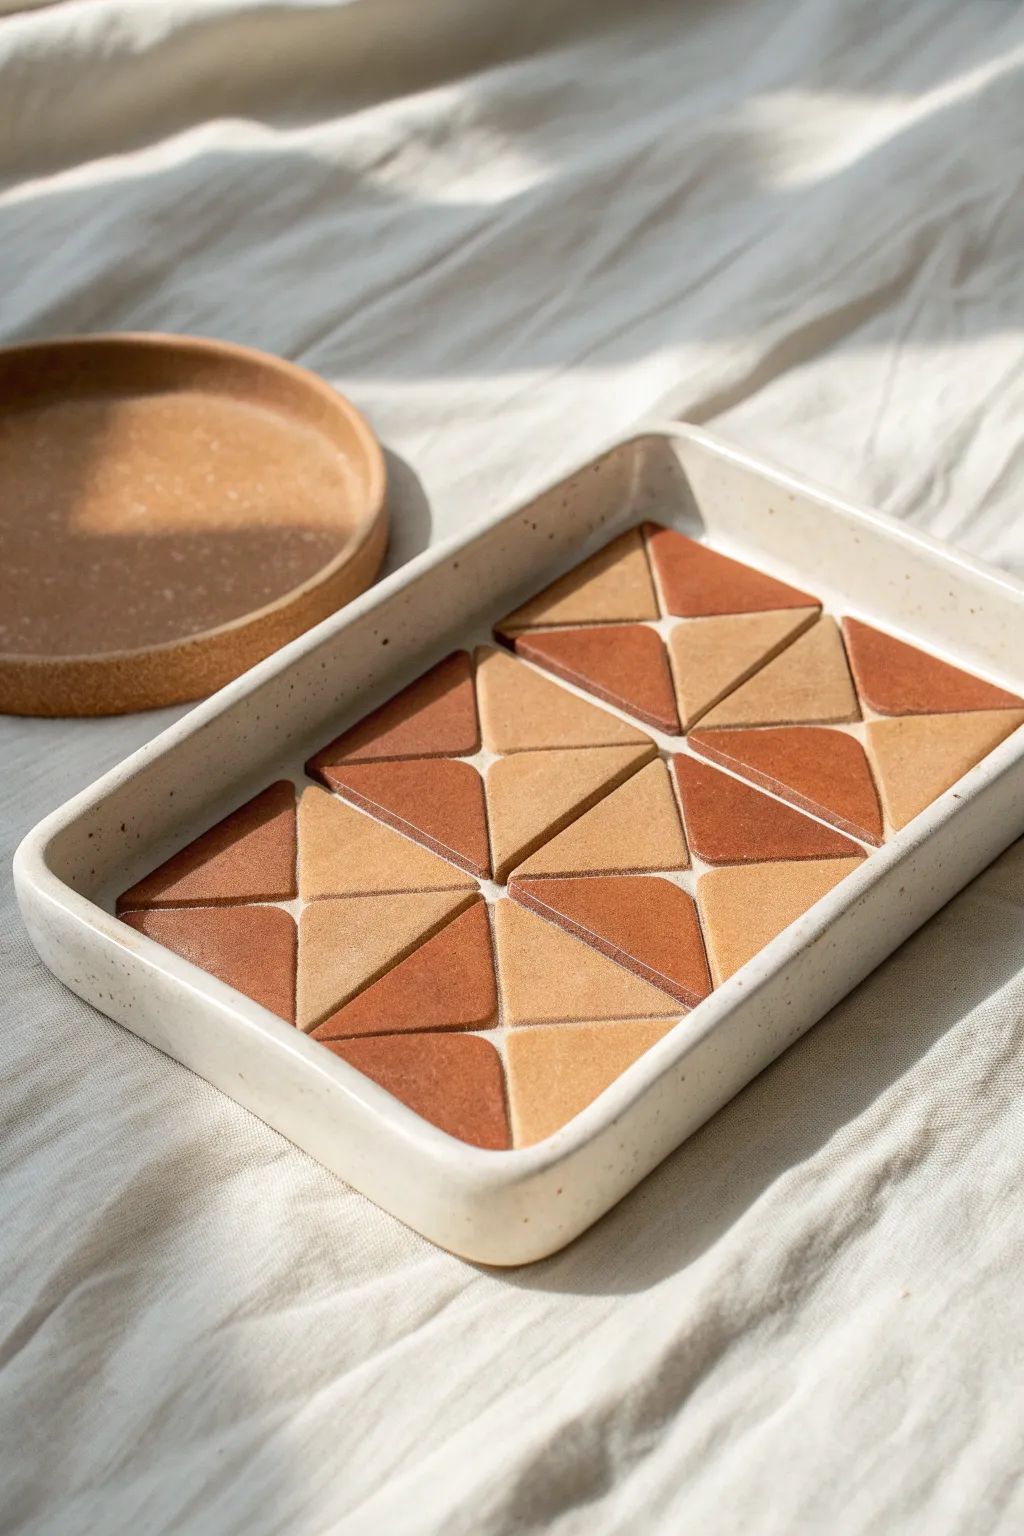
Transform a simple ceramic dish into a piece of functional art with this warm, geometric mosaic insert. By combining two shades of clay in a structured pattern, you can create a striking contrast that feels both modern and earthy.
How-To Guide
Materials
- Terracotta clay (classic red-brown)
- White or buff clay (mixed with terracotta for lighter shade)
- Rectangular ceramic serving tray (roughly 6×9 inches)
- Rolling pin
- Two thickness strips (slats) or playing cards
- Equilateral triangle clay cutter (roughly 1.5 inch)
- Sharp clay knife or blade
- Ruler
- Sandpaper or sanding sponge
- Clear matte varnish (waterproof)
Step 1: Preparing the Clay Colors
-
Condition the main clay:
Start by kneading a block of your classic terracotta clay until it’s soft, pliable, and free of air bubbles. It should feel smooth and warm in your hands. -
Mix the lighter shade:
To achieve the two-tone look seen in the photo, create a lighter blend. Mix approximately 60% white or buff clay with 40% terracotta clay. Knead them together thoroughly until you have a uniform, sandy-beige color with no marbling. -
Roll out slabs:
Place your thickness strips on your work surface to ensure evenness. Roll out both clay colors into slabs that are about 1/4 inch thick. I find rolling carefully in multiple directions helps prevent warping later.
Step 2: Cutting and Drying
-
Measure the tray:
Measure the exact interior dimensions of your ceramic tray. This will determine how many rows and columns of tiles you need. -
Cut the triangles:
Using your triangle cutter, press firmly into the clay slabs. Cut an equal number of dark terracotta triangles and light beige triangles. Cut a few extras just in case. -
Smooth the edges:
Gently run your finger along the cut edges of each triangle while the clay is still wet to soften any sharp ridges or burrs left by the cutter. -
Initial Arrangement:
Before drying, do a ‘dry fit’ on a flat surface matching the tray’s dimensions. Arrange four triangles (two dark, two light) to form a square, rotating them to create the pinwheel pattern shown. -
Adjust sizing:
If your arranged pattern is slightly too large for the tray, gently trim the outer edges of the perimeter tiles while the clay is soft. -
Dry the tiles:
Transfer the tiles to a drying board or mesh rack. To prevent curling, you can place a light board on top of them. Let them air dry completely according to your clay manufacturer’s instructions (usually 24-48 hours).
Warped Tiles?
If your tiles curl while drying, flip them over every few hours. For stubborn curls, lightly dampen the concave side and weigh it down between two flat boards overnight.
Step 3: Finishing and Assembly
-
Smooth imperfections:
Once fully dry (and fired if using kiln clay), use a fine-grit sanding sponge to smooth the flat surfaces and edges for a professional, stone-like finish. -
Seal the tiles:
Apply a thin coat of matte clear varnish to each tile. This protects the porous surface and deepens the clay colors slightly without adding artificial gloss. -
Clean the tray:
Wipe the interior of your ceramic tray with isopropyl alcohol to ensure it is perfectly clean and free of dust. -
Place the insert:
Simply lay your finished tiles into the tray in the desired pattern. This project is designed as a removable insert, so no glue or grout is needed—this makes cleaning easier.
Grout it in
For a permanent version, glue the tiles down and use a dark grey grout between the gaps. This turns the removable insert into a solid, waterproof mosaic tray bottom.
Enjoy using your new tray for jewelry, keys, or simply as a beautiful coffee table accent
Terracotta Two-Tone Dipped Finish
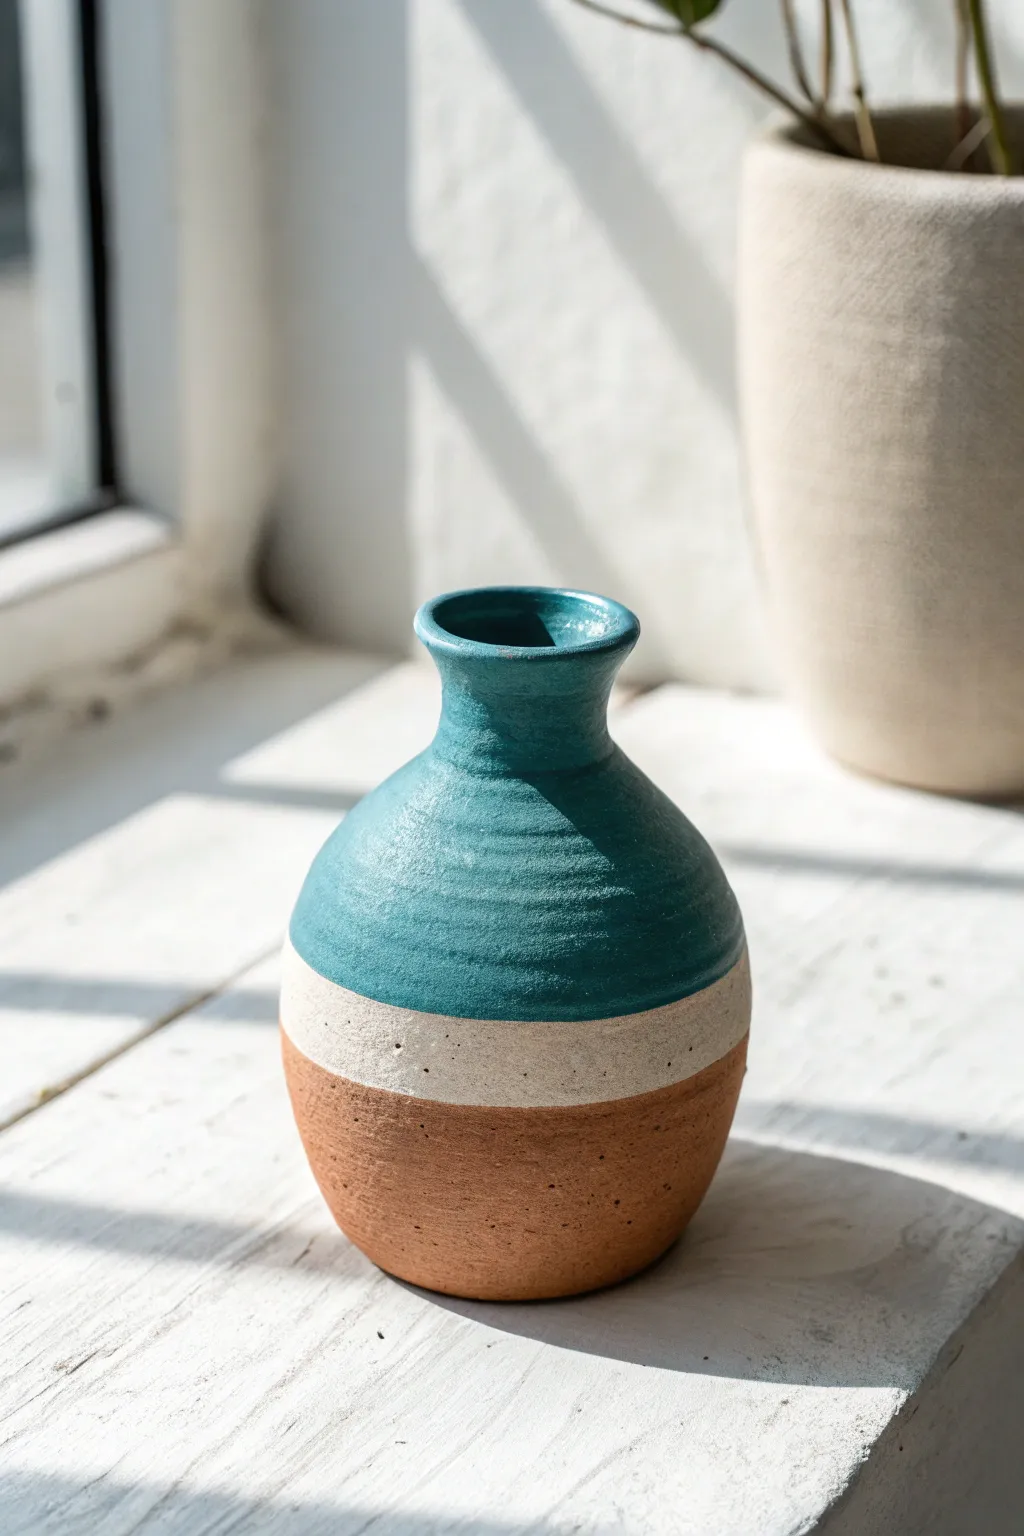
Transform simple terracotta into a contemporary statement piece by combining raw clay texture with banded layers of color. This project uses a distinct glazing or painting technique to create a beautiful gradient from earthy rust to matte cream and finally a rich, glossy teal.
Step-by-Step Guide
Materials
- Small terracotta vase (bisque fired or purchased unfinished)
- White matte acrylic paint or white underglaze (if re-firing)
- Teal gloss glaze or high-gloss teal acrylic paint
- Painter’s tape or masking tape (approx 1 inch width)
- Soft synthetic flat brush (medium size)
- Small round brush for touch-ups
- Fine-grit sandpaper (220 grit)
- Clear matte sealant spray (if using acrylics)
- Clean rag or sponge
- Water container
Step 1: Preparation & Base Clean-Up
-
Clean the surface:
Before starting, wipe down your terracotta vase with a slightly damp sponge to remove any dust or oils from manufacturing. -
Smooth imperfections:
If there are any sharp burrs or rough seams on the clay body, gently sand them down with fine-grit sandpaper until the surface feels pleasant to the touch. -
Dry thoroughly:
Let the vase dry completely after cleaning. Moisture trapped in the clay can affect paint adhesion.
Crisp Line Pro-Tip
Before applying your paint, run a fingernail or credit card firmly over the edge of the painter’s tape. This seals the tape to the textured clay and prevents fuzzy paint lines.
Step 2: Creating the White Band
-
Mark the first line:
Decide where you want the raw terracotta to end. Apply a strip of painter’s tape horizontally around the lower third of the vase, pressing the edges down firmly to prevent bleeding. -
Apply the white layer:
Using your flat brush, paint the section immediately above the tape with the matte white paint. Extend this white section all the way up to where the neck begins. -
Build opacity:
Terracotta is porous and dark, so you will likely need two or three thin coats of white to get solid coverage. Allow it to dry to the touch between coats. -
Feather the top edge:
Don’t worry about a perfect line at the neck of the vase, as the teal layer will cover it later. -
Remove tape:
While the final coat of white is still slightly tacky, carefully peel off the tape at a 45-degree angle to reveal a crisp line against the raw clay.
Level Up: Speckled Effect
Mix a tiny amount of black paint with water and flick it off a stiff toothbrush onto the white section before removing the tape. This mimics intricate ceramic stoneware clay bodies.
Step 3: Adding the Teal Glaze
-
Mask the second line:
Once the white paint is fully cured (give it at least an hour), apply a new ring of painter’s tape over the white section. Place it about an inch below the neck to preserve that band of cream color. -
Prepare the teal:
If using a thick gloss paint or glaze, stir it well. I find thinning it very slightly with a drop of water helps it flow into the grooves of the pottery for a more natural look. -
Paint the top section:
Apply the teal color to the entire top portion of the vase, including the rim and slightly inside the opening. -
Texture check:
Brush horizontally around the vase to mimic wheel-thrown lines. The brushstrokes add character here, so they don’t need to be invisible. -
Second coat:
Apply a second coat of teal for richness and depth, ensuring the color is vibrant. -
Reveal the layers:
Carefully remove the second strip of tape. You should now see three distinct sections: raw clay, white band, and teal top.
Step 4: Finishing Touches
-
Clean up edges:
If any paint bled under the tape, use a slightly damp small round brush or a toothpick to gently scrape or wipe away the excess for a sharp line. -
Seal the piece:
To protect the unglazed finishes and unify the look, spray the entire vase with a clear matte sealant. This prevents the raw terracotta from absorbing water if you get it wet. -
Final dry:
Let the sealant cure for 24 hours in a well-ventilated area before handling or placing on a shelf.
Place your finished vase on a sunny windowsill where the light can catch the texture of the different layers
Terracotta Fossil-Style Botanical Plaques
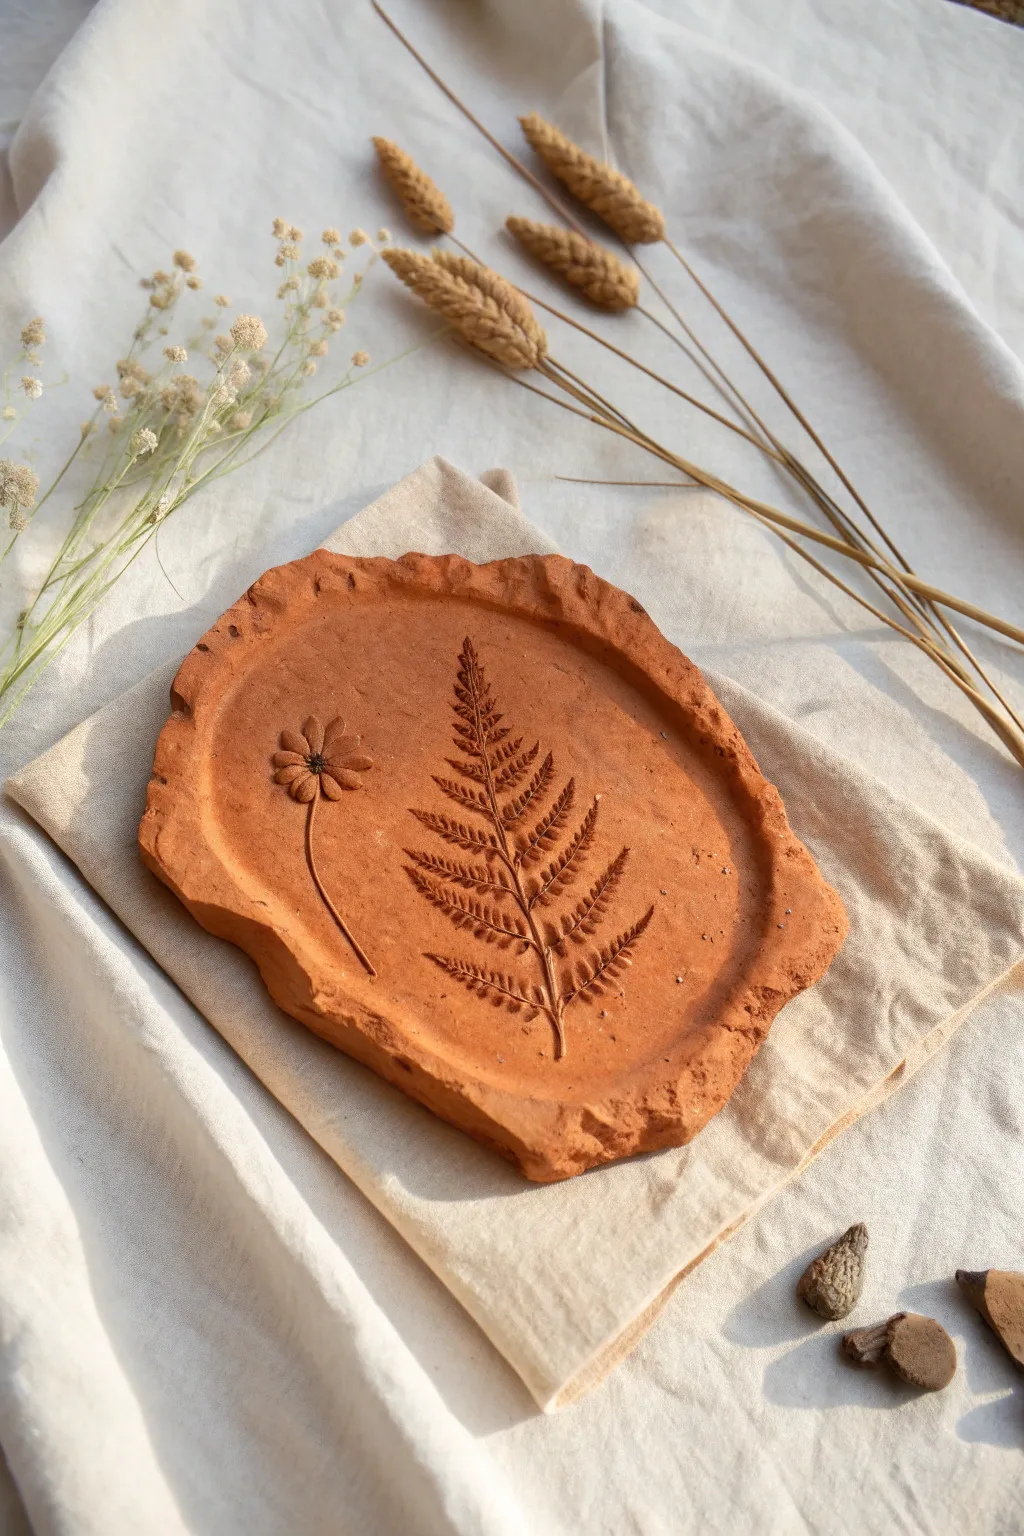
Capture the delicate beauty of nature forever with this simple yet stunning terracotta project. These organic plaques feature deeply pressed floral and fern motifs, bordered by raw, textured edges that mimic the look of an ancient fossil discovery.
Step-by-Step
Materials
- Terracotta air-dry clay or kiln-fire clay
- Rolling pin
- Fresh or dried botanical specimens (fern frond and small daisy)
- Small wooden board or canvas mat (working surface)
- Needle tool or toothpick
- Sponge
- Clear matte varnish (optional)
Step 1: Preparation & Shaping
-
Condition the clay:
Begin by taking a handful of terracotta clay and kneading it thoroughly in your hands. You want to warm it up and remove any air bubbles until it feels smooth and pliable. -
Initial flattening:
Press the ball of clay onto your working surface with your palm to create a thick, rounded patty. -
Roll the slab:
Using a rolling pin, gently roll the clay out. Aim for a thickness of about 1/4 to 1/2 inch. Don’t worry about making it perfectly round or smooth; the charm lies in the irregularity. -
Create the rough edge:
Instead of cutting a clean shape, use your fingers to pinch and tear away small bits of clay from the perimeter. This creates that jagged, broken-stone aesthetic shown in the photo. -
Refine the surface:
Lightly dampen a sponge and swift wipe the surface of the clay slab to remove any canvas textures or fingerprints, creating a smooth canvas for your botanicals.
Sticky Situation?
If the clay sticks to your roller when pressing plants, lay a sheet of wax paper or cling film over the botanicals before rolling over them.
Step 2: Creating the Impressions
-
Arrange the botanicals:
Place your fern frond diagonally across the center of the slab. Position the small daisy-like flower to the left of the fern, leaving some negative space for balance. -
Initial press:
Gently press the plant materials into the clay with your fingertips to tack them in place. -
Deepen the impression:
Use the rolling pin to roll directly over the vegetation. Apply firm, even pressure to push the stems and veins deep into the clay body. I find doing one confident pass works better than rolling back and forth. -
Check the edges:
Ensure the tips of the fern and the petals are pressed in. If the rolling pin missed them, press firmly with your thumb. -
Remove the plants:
Carefully find the stem edge of your botanicals. Using a needle tool or tweezers, slowly lift the plant material out of the clay. Pull straight up to avoid smearing the delicate lines.
Sharper Details
Pick fresh leaves with pronounced veins on the underside. Place them vein-side down for the deepest, crispest fossil impression.
Step 3: Finishing
-
Clean up details:
If any plant debris remains in the crevices, pick it out gently with a toothpick. -
Enhance texturing:
Inspect the jagged outer edges. If they got flattened during rolling, roughen them up again with your fingers or a stiff brush to maintain the organic look. -
Dry partially:
Let the piece sit for about hour until it is leather-hard (firm but cool to the touch). -
Check for warping:
While drying, flip the piece over gently occasionally to ensure even drying and prevent the edges from curling upward. -
Full cure:
Allow the clay to dry completely (24-48 hours for air dry) or fire it in a kiln according to the clay manufacturer’s instructions. -
Optional sealing:
If using air-dry clay, apply a thin coat of clear matte varnish to protect the surface from moisture while keeping the natural terracotta look.
Display your finished fossil plaque on a shelf or use it as a rustic coaster to bring a touch of the outdoors inside