
If you love that earthy, sun-baked terracotta glow, it can carry an entire wedding look without feeling heavy. Here are my favorite terracotta wedding ideas—from classic decor staples to artsy clay-forward details you can totally pull off.
Terracotta Bridesmaid Dresses
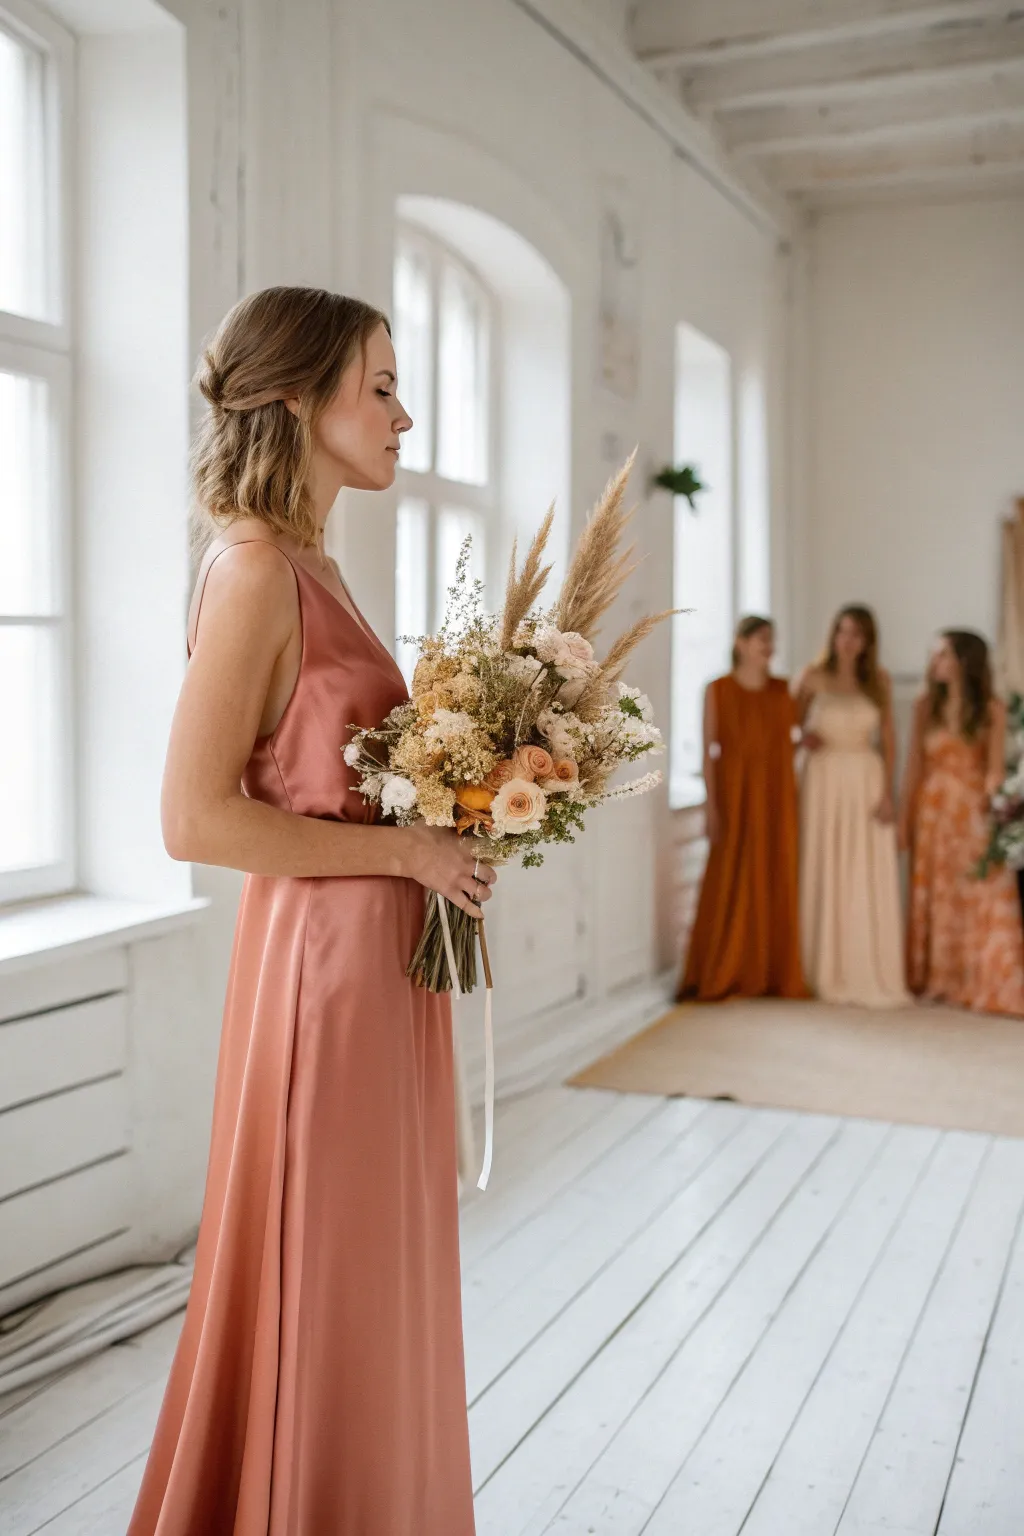
Create a stunning, minimalist bridesmaid dress that perfectly captures the warm, earthy tones of a terracotta theme. This project focuses on sewing a bias-cut slip dress with delicate spaghetti straps and a smooth, flowing silhouette that flatters every figure.
How-To Guide
Materials
- Terracotta or rust-colored satin or silk charmeuse fabric (approx. 2.5–3 yards)
- Matching polyester thread
- Lightweight fusible interfacing (for facings)
- Pattern paper or a slip dress sewing pattern
- Sewing machine with straight stitch capability
- Loop turner or safety pin
- Fabric scissors and rotary cutter
- Fine sewing pins and sewing clips
- Iron and ironing board
Step 1: Preparation and Cutting
-
Pre-wash your fabric:
Before you cut anything, wash and dry your satin fabric according to the manufacturer’s instructions to prevent shrinking later. Press it smooth with a low-heat iron. -
Prepare the pattern:
Using a bias-cut slip dress pattern, layout your pieces. If you are drafting your own, ensure the front and back bodice pieces are oriented at a 45-degree angle to the selvage to achieve that signature bias drape. -
Cut the main pieces:
Carefully cut out your front and back dress panels. Use weights instead of pins if possible to avoid snagging the delicate satin, and use a rotary cutter for the cleanest edges. -
Cut the facing and straps:
Cut facing pieces for the neckline and long, thin strips for your spaghetti straps. The strap strips should be cut on the bias as well for flexibility.
Step 2: Creating the Bodice
-
Make the spaghetti straps:
Fold your strap strips in half lengthwise, right sides together. Stitch with a very narrow seam allowance, then use a loop turner to pull them right side out. Press flat. -
Stay-stitch the neckline:
Run a line of stitching just inside the seam allowance along the neckline of both the front and back panels. This prevents the bias-cut fabric from stretching out while you work. -
Apply interfacing:
Iron small strips of lightweight fusible interfacing to the wrong side of your facing pieces to give the neckline structure and support. -
Attach straps to the front:
Pin your finished straps to the ‘peaks’ of the front bodice neckline, right sides together. Baste them in place to ensure they don’t shift during the next step. -
Sew the front facing:
Pin the front facing to the front bodice, sandwiching the straps in between. Stitch along the neckline, trim the seam allowance, and understitch the facing to keep it from rolling out. -
Repeat for the back:
Attach the other end of the straps to the back bodice (try it on first to get the length right!), then attach the back facing just like you did for the front.
Fabric Slipping?
Satin is slippery. Place tissue paper under the fabric while sewing to prevent it from getting sucked into the machine feed dogs, then tear it away after.
Step 3: Assembly and Finishing
-
Pin the side seams:
With right sides together, pin the front and back dress panels together along the side seams. Let the dress hang on a hanger for 24 hours before sewing if possible; bias cuts can stretch, and this lets the fabric settle. -
Sew French seams:
For a professional luxury finish, use French seams. First, sew the sides wrong sides together with a scant 1/4 inch seam. Trim excess, press, then flip to right sides together and sew again to enclose the raw edge. -
Press seams open:
Carefully press your side seams. I find a tailor’s ham is helpful here to maintain the curve of the hip without flattening the fabric unnaturally. -
Even out the hem:
Put the dress on a dress form or have the wearer try it on. Measure from the floor up to ensure the hem is even all the way around, trimming any longer sections that may have stretched. -
Prepare the baby hem:
Turn the bottom edge up by 1/4 inch and press. Stitch close to the fold. Trim the excess fabric close to your stitching line carefully with small scissors. -
Finish the hem:
Turn the hem up one more time—just a tiny 1/8 to 1/4 inch roll—and stitch again on top of your previous stitch line for a delicate baby hem. -
Final press:
Give the entire dress a final steam or low-heat press, paying attention to the facing and hem to ensure everything lies perfectly flat.
Level Up: Cowl Neck
Add extra fabric to the front neckline pattern piece and drape it downwards before cutting to create a trendy, soft cowl neck effect.
Now you have a custom-fitted, elegant slip dress ready for the aisle or evening wear


Groom Accents in Terracotta
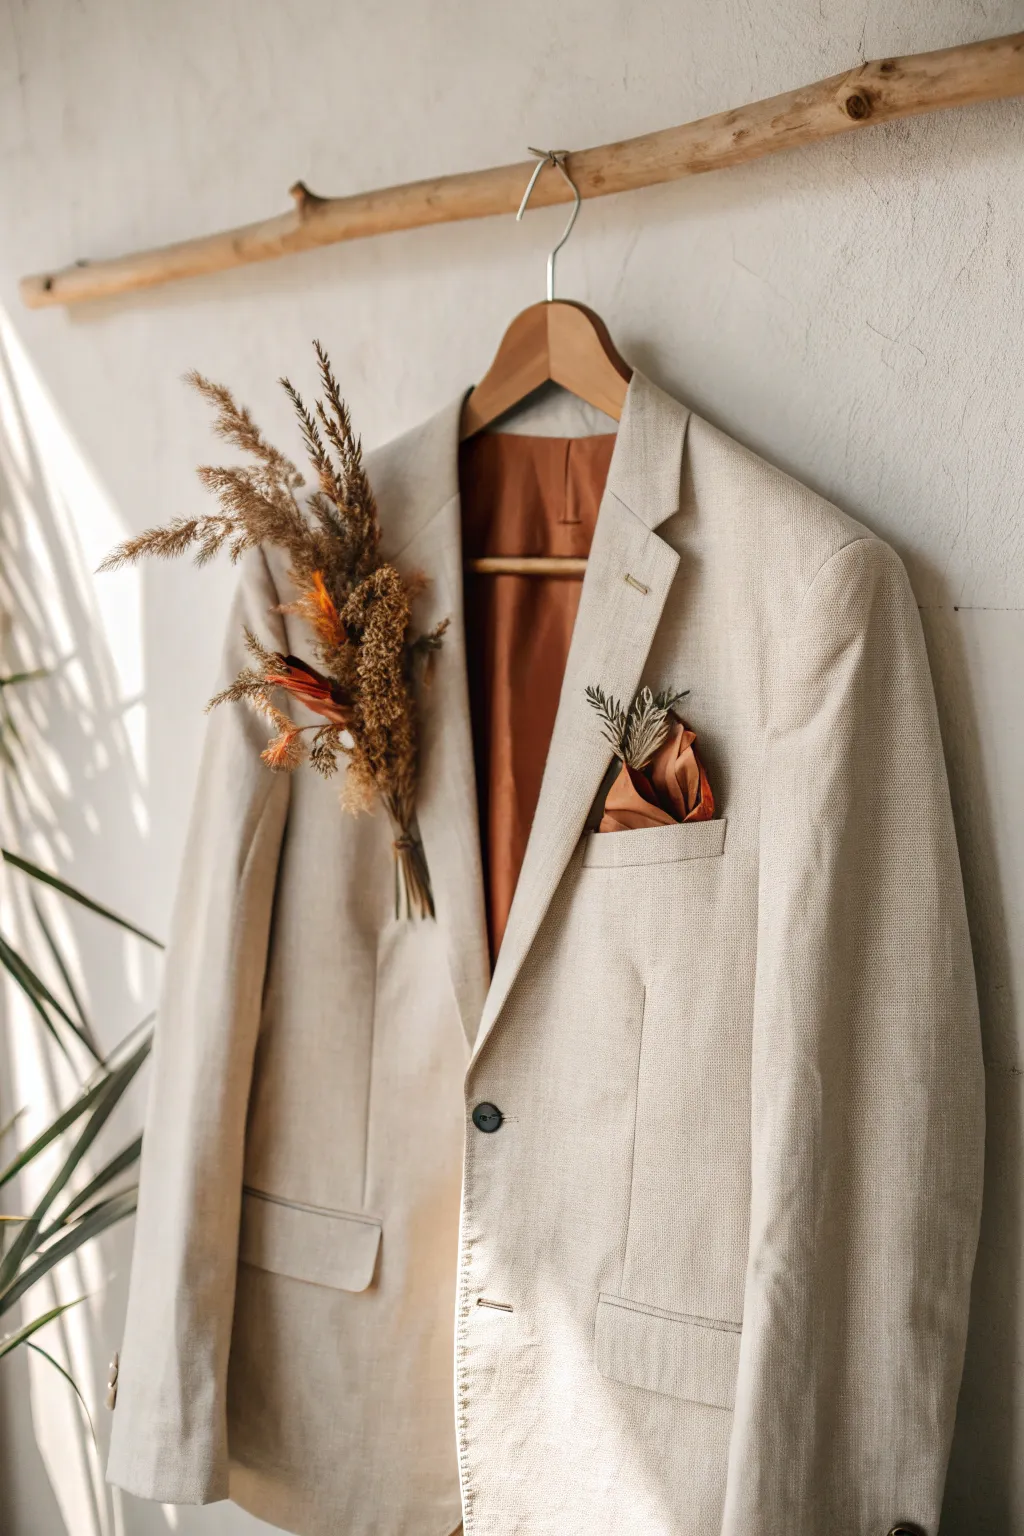
Bring earthy warmth to the groom’s attire with this custom set featuring natural dried elements and rich terracotta accents. The combination of textured grasses and rust-toned fabric creates a sophisticated yet relaxed bohemian look perfect for an autumn or rustic wedding.
Detailed Instructions
Materials
- Light beige linen suit jacket (for fitting)
- Dried pampas grass (small plumes)
- Dried bunny tails (lagurus), natural or bleached
- Dried wheat stalks
- A crisp, dried orange fern leaf or ruscus
- Terracotta or burnt orange velvet ribbon (1/4 inch width)
- Small piece of terracotta/rust silk or linen fabric (approx. 10×10 inches)
- Floral tape (brown or neutral)
- Floral wire (fine gauge)
- Boutonniere pin or magnet
- Fabric scissors
- Wire cutters
- Hot glue gun (optional)
Step 1: Assembling the Boutonniere
-
Select your base stems:
Begin by choosing three to four stems of dried wheat and heavier grasses. These will form the sturdy vertical backbone of your boutonniere. Trim them to roughly 4-5 inches in length. -
Add texture layers:
Place smaller sprigs of pampas grass slightly in front of and to the side of your wheat base. The goal is to create an asymmetrical, wind-swept look rather than a perfect bundle. -
Incorporate color accents:
Tuck the dried orange fern or ruscus leaf into the center of the bundle. I like to position this piece so it peeks out distinctly, adding that essential pop of terracotta against the beige. -
Secure the bundle:
Holding the stems tightly about 1.5 inches from the bottom, wrap floral tape firmly around the gathering point. Stretch the tape as you wrap to activate the adhesive. -
Refine the shape:
Once taped, gently fan out the top elements. Check the profile view to ensure it isn’t too flat; add a small bunny tail stem to the front for depth if needed. -
Trim the stems:
Cut the bottom of the stems cleanly at a slight angle, leaving about 1 to 1.5 inches of stem visible below the binding point. -
Finish the binding:
Take your fine floral wire or a thin strip of twine and wrap it neatly over the floral tape to conceal it. A small dab of hot glue on the back secures the end invisibly.
Stay Sharp
Spray the dried florals with a light coat of unscented hairspray. This prevents shedding on the dark suit fabric throughout the wedding day.
Step 2: Crafting the Pocket Square Detail
-
Prepare the fabric:
Iron your square of terracotta silk or linen to remove any creases. Fold it into a casual puff or points fold—irregularity looks best here for a relaxed vibe. -
Create the mini-spray:
Select two very small, delicate sprigs of greenery or dried grass (about 2 inches long). These act as a subtle echo of the main boutonniere. -
Secure the mini-spray:
Using a tiny piece of floral tape, bind these two sprigs together at the very base. -
Insert into pocket:
Place the folded terracotta fabric into the jacket breast pocket first, arranging it until it sits naturally. -
Final placement:
Tuck the mini-spray behind the fabric fold or just resting inside the pocket edge, so just the tips of the greenery are visible.
Step 3: Styling and Attachment
-
Position the boutonniere:
Hold the main floral piece against the groom’s left lapel. It should sit centered on the lapel, roughly aligned with the pocket square below. -
Pin securely:
Use a pearl-headed pin or a hidden magnet to attach the boutonniere. If using a pin, weave it from the back of the lapel, through the stem, and back into the fabric to hide the mechanism. -
Final adjustments:
Step back and check the balance. Gently fluff the pampas plumes one last time to ensure they catch the light beautifully.
Make it Match
Wrap the boutonniere stem in a scrap of the same terracotta fabric used for the pocket square for a perfectly cohesive, high-end finish.
This cohesive set adds a personal, handcrafted touch that beautifully ties the groom’s look into your terracotta color palette


Terracotta Ceremony Arch Focal Point

Bring the warmth of a sunset into your ceremony with this stunning wooden arch design featuring flowing terracotta and cream chiffon. The asymmetrical floral arrangements and draped fabric create a romantic, wind-swept look perfect for an outdoor wedding.
Step-by-Step Tutorial
Materials
- Wooden wedding arch (rectangular frame, approx. 7ft x 5ft)
- 6 yards of terracotta-colored chiffon fabric
- 6 yards of ivory or cream chiffon fabric
- Two large floral foam cages
- Zip ties (clear or green)
- Floral wire and tape
- Faux or fresh roses (terracotta, burnt orange, cream)
- Faux or fresh greenery (eucalyptus, dusty miller)
- Dried elements (pampas grass or dried ferns for texture)
- Step ladder
- Scissors
Step 1: Setting the Structure
-
Anchor the frame:
Ensure your wooden arch is completely stable on the ground. If you are outdoors on grass, use U-shaped ground stakes over the base legs to prevent tipping in the wind. -
Prepare the floral cages:
Soak your floral foam if using fresh flowers, or use dry foam for faux stems. Secure the cages tightly to the wood using zip ties. Place the larger cage on the top-left corner and the smaller cage on the right vertical post, about a third of the way down.
Step 2: Draping the Fabric
-
Position the terracotta chiffon:
Take your terracotta fabric and find the center point. Drape this center point over the top beam, slightly to the right of the center. -
Create the swag:
Let the fabric swoop down on the right side. Gather it at the point where you placed the side floral cage. Use a zip tie to loosely secure the fabric to the post underneath the cage, allowing a long tail to puddle on the ground. -
Add the cream layer:
Take the ivory chiffon and anchor one end behind the top-left floral cage. I find it helpful to zip-tie this securely so it doesn’t slip later. -
Create the crossover:
Bring the ivory fabric across to the right side, creating a soft, U-shaped drape that hangs slightly lower than the terracotta fabric. Tuck it behind the terracotta fabric at the top right gathering point. -
Secure the left drape:
Let the remainder of the ivory fabric hang straight down the left post, pooling generously on the ground to mirror the right side. -
Refine the folds:
Gently pull and pleat the fabric where it hangs to create distinct, elegant folds rather than a messy bunch. Use small pins if needed to keep pleats in place on the wood.
Secure It Tightly
Wind is the enemy of arches. Double up your zip ties on the floral cages and ensure the fabric is pinned securely at the gathering points to prevent slipping.
Step 3: Arranging the Florals
-
Build the greenery base:
Start with the top-left arrangement. Insert long stems of greenery (like eucalyptus) extending outwards to the left and upwards to create height and width. -
Add drooping elements:
Insert trailing greenery like amaranthus or ivy at the bottom of the cage so it cascades down over the ivory fabric. -
Place focal flowers:
Insert your largest terracotta and cream roses into the center of the foam. These should face forward and slightly down towards the guests. -
Review the side arrangement:
Move to the side arrangement on the right post. Repeat the process but keep the scale smaller. Focus the greenery to spray outward and downward. -
Fill the gaps:
Use smaller filler flowers and dried textures like pampas grass to fill any visible foam spots. Make sure to cover the mechanics where the fabric is tied. -
Blend the colors:
Ensure you have a balanced mix of the dark burnt orange and light cream blooms in both arrangements to tie the look together visually. -
Final fluff:
Step back about ten feet to view the arch. Adjust the fabric drapes one last time, ensuring the ‘puddle’ on the ground looks intentional and romantic.
Add a Glow
Place vintage lanterns with LED candles at the base of the arch near the fabric pooling for a romantic touch as the sun goes down.
Now you have a breathtaking backdrop ready for your special moment


Terracotta Pots Lining the Aisle
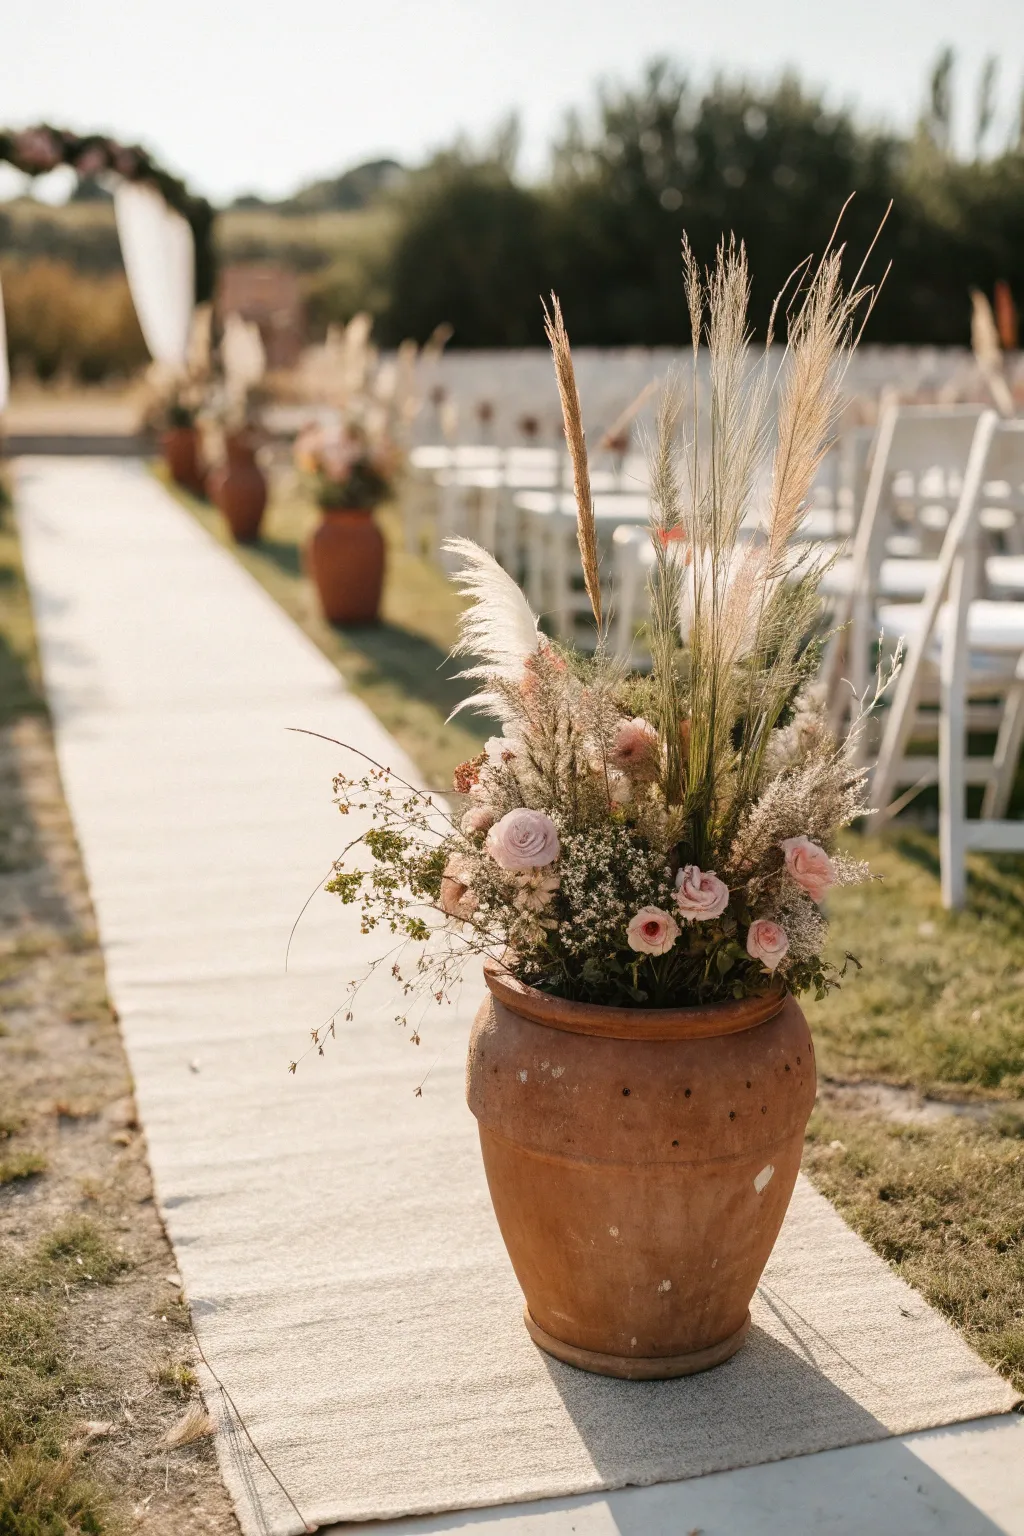
Create a stunning, earthy focal point for your ceremony aisle with these lush terracotta arrangements. Combining the texture of dried grasses with the romance of soft blush roses, this design perfectly balances rustic charm and elegance.
How-To Guide
Materials
- Large, weathered terracotta pot (approx. 18-24 inches tall)
- Floral foam bricks (wet)
- Waterproof liner or heavy-duty trash bag
- Chicken wire
- Wire cutters
- Strong floral tape
- Tall pampas grass plumes (beige/sand color)
- Dried ornamental grasses (various heights)
- Fresh blush pink roses (standard and spray)
- Dried filler flowers (like baby’s breath or limonium)
- Textured greenery (dried eucalyptus or ruscus)
- Pruning shears
Step 1: Preparing the Vessel
-
Line the pot:
Since terracotta is porous, start by placing a waterproof liner or a trimmed heavy-duty trash bag inside your pot. This prevents water leakage onto your aisle runner and protects the clay. -
Soak the foam:
Fill a sink or bucket with water and float your floral foam bricks on top. Let them sink naturally until fully saturated; don’t force them down or you’ll create dry air pockets inside. -
Secure the base:
Place the soaked foam bricks into the lined pot. They should fit snugly. If the pot is very deep, you can fill the bottom half with rocks or crumpled newspaper first to elevate the foam to about 2 inches below the rim. -
Add structure:
Cut a piece of chicken wire slightly larger than the pot’s opening. Mold it over the foam and secure it with floral tape across the rim. This grid is crucial for holding heavy stems like pampas grass in place.
Step 2: Building the Greenery & Grasses
-
Establish height:
Begin with your tallest pampas grass stems. Insert 3-5 stems towards the back and center of the arrangement to create a vertical line. Vary their heights slightly for a natural look. -
Add secondary grasses:
Introduce your thinner, wispy dried ornamental grasses. Place these around the pampas, angling some slightly outward to start building the width of the arrangement. -
Create the shape:
Insert your textured dried greenery (like ruscus) around the base and sides. I like to angle these stems almost horizontally near the rim to help hide the mechanics and mechanical edges of the pot. -
Fill the gaps:
Continue adding mixed dried grasses into the middle section, creating a dense, textural background that will support the delicate fresh flowers later.
Weather the Pot
To get that aged, dusty look on new terracotta, rub plain yogurt or buttermilk on the outside and let it sit in a shady spot for a few weeks before the event to encourage moss growth.
Step 3: Adding Florals & Detail
-
Insert focal roses:
Cut your blush rose stems at an angle. Place the largest blooms low and front-facing, nestling them into the dried grasses so they look like they are growing out of the texture. -
Layer smaller blooms:
Add spray roses or smaller flower heads slightly higher than the focal roses. Grouping them in odd numbers, like clusters of three, often looks more organic than spacing them out evenly. -
Add airy filler:
Take your dried baby’s breath or limonium and disperse it throughout the arrangement. This softens the transition between the rigid grasses and the soft rose petals. -
Introduce movement:
Select a few stems of wire-thin dried grass or vines that have a natural curve. Insert them so they spill gracefully over the front edge or reach high and wide, breaking up any stiff shapes. -
Check the profile:
Step back and look at the arrangement from the side. Ensure the flowers aren’t too flat; build depth by pulling some blooms forward and pushing others deeper into the foliage. -
Conceal the mechanics:
Do a final check near the rim of the pot. If any foam or chicken wire is visible, use small tufts of moss or short cuts of leftover greenery to cover these spots completely. -
Final fluff:
Gently tease open the pampas grass plumes with your fingers if they look matty, and spray a light mist of hairspray on them to prevent shedding during the ceremony.
Color Palette Swap
Swap the blush roses for burnt orange dahlias or terracotta-colored carnations to shift the vibe from romantic boho to a deeper, autumnal desert aesthetic.
Now step back and admire how these textures transform your walkway into a grand entrance

The Complete Guide to Pottery Troubleshooting
Uncover the most common ceramic mistakes—from cracking clay to failed glazes—and learn how to fix them fast.
Terracotta Vase Table Centerpieces
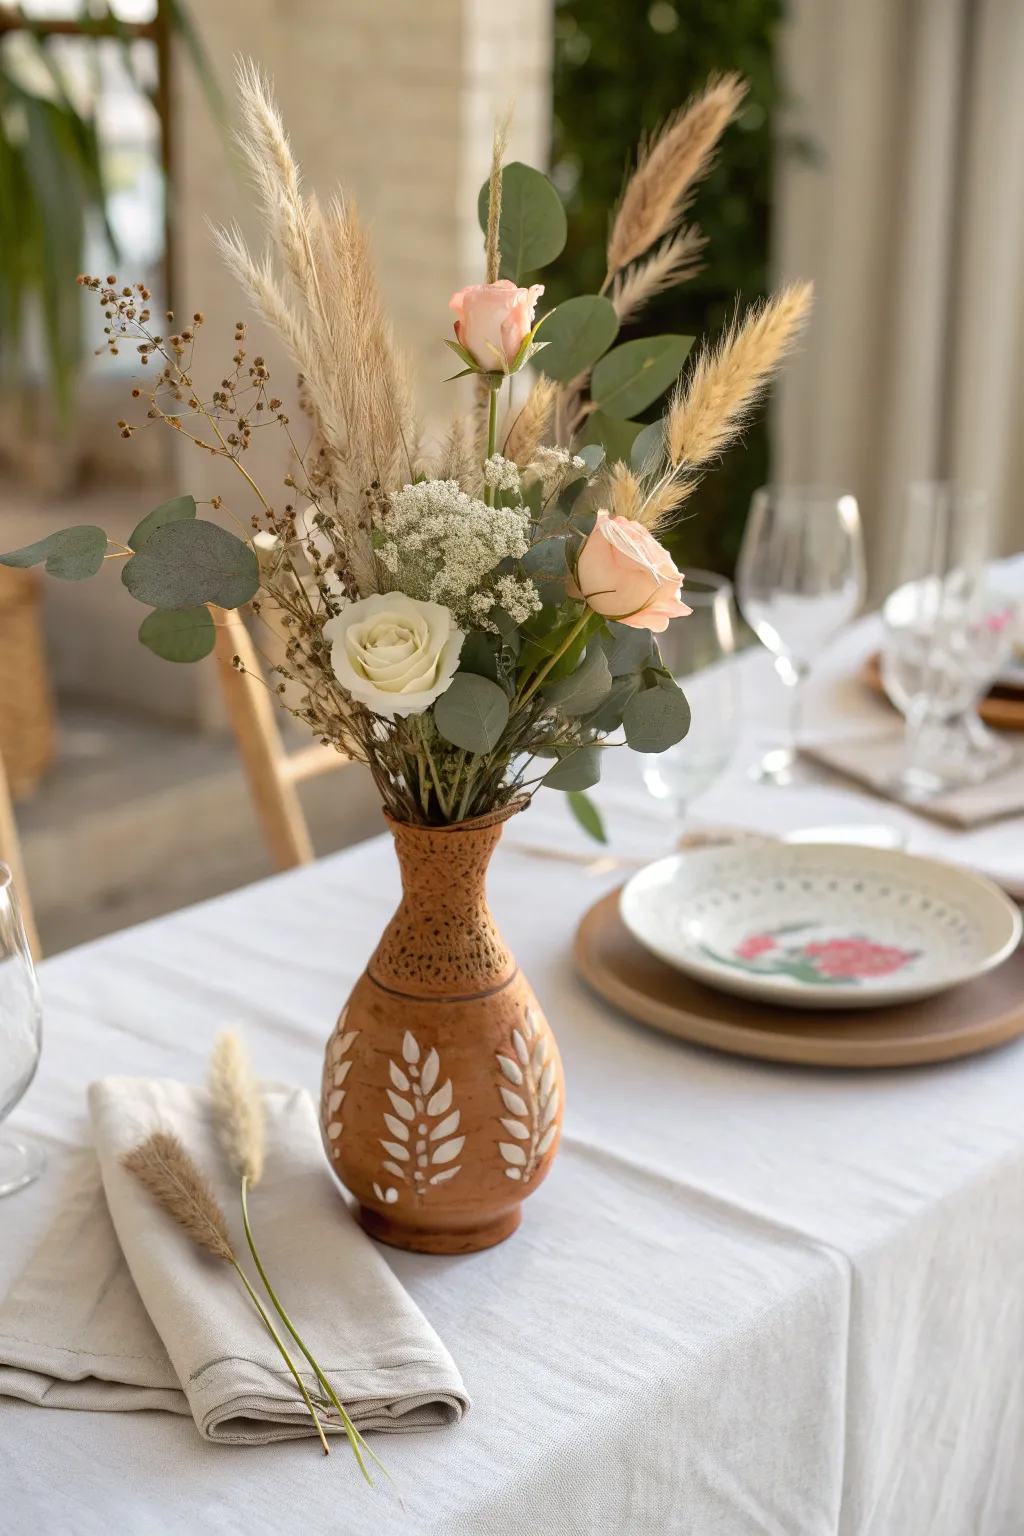
Bring earthy warmth to your wedding reception tables with these custom-painted terracotta vases. The fusion of rustic clay textures with delicate white leaf motifs creates a perfectly balanced boho-chic aesthetic that feels both handcrafted and elegant.
Detailed Instructions
Materials
- Tall terracotta bud vase (approx. 8-10 inches)
- White acrylic craft paint or chalk paint
- Small round detail brush (size 2 or 4)
- Fine liner brush (size 0 or 00)
- Pencil for sketching
- Paper towel or cloth
- Floral shears
- Fresh peach-colored roses
- Fresh cream or white roses
- Dried pampas grass stems
- Fresh silver dollar eucalyptus stems
- Dried wild grasses or seeded branches
- White baby’s breath (optional filler)
- Water for the vase
Step 1: Preparing and Painting the Vase
-
Clean the surface:
Wipe down your terracotta vase with a slightly damp cloth to remove any dust or pottery residue. Let it dry completely before starting, as moisture can prevent the paint from adhering properly. -
Sketch the leaf design:
Using a pencil, very lightly sketch a vine pattern climbing up the belly of the vase. You don’t need to be perfect here; just map out a central stem line and mark where the leaves will branch off. -
Paint the central stems:
Dip your fine liner brush into the white acrylic paint. Carefully trace over your pencil lines to create the thin central stems of your foliage design. Keep a steady hand, but remember that slight organic wiggles make it look more natural. -
Add the first leaves:
Switch to your small round brush. Load it with white paint and press it down gently at the base of a leaf, then pull away and lift to create a tapered point. This ‘press and pull’ method creates a classic leaf shape effortlessly. -
Fill out the pattern:
Continue adding leaves in pairs or alternating patterns up the stems. I like to vary the size slightly, making the leaves at the bottom a bit larger than the delicate ones near the neck. -
Add decorative dots:
Using the very tip of your round brush or the back end of the brush handle, dip into the paint and add small dots around the neck or shoulder of the vase for extra texture. -
Let it cure:
Allow the paint to dry completely. Acrylics usually dry to the touch in 20 minutes, but give it an hour to fully set before handling.
Pro Tip: Paint Consistency
If your acrylic paint feels too thick or leaves distinct ridges, dilute it with a tiny drop of water. It should flow like heavy cream for smooth, crisp leaf shapes.
Step 2: Arranging the Florals
-
Prep the stems:
Strip all lower leaves from your roses and eucalyptus stems so that no foliage sits below the water line. This keeps the water fresh and prevents bacterial growth. -
Fill with water:
Fill the vase about two-thirds full with fresh, cool water. -
Establish the height:
Start with your tallest elements. Place 2-3 stems of dried pampas grass towards the back and center. Their feathery texture adds height and drama. -
Add greenery structure:
Insert the eucalyptus branches next. Allow them to drape naturally to the sides, creating a lush, asymmetrical framework. -
Insert the focal flowers:
Cut your peach rose stems at slightly different lengths. Place the tallest peach rose near the center, slightly forward of the pampas grass. -
Layer in secondary blooms:
Nestle the cream or white rose lower in the arrangement, creating a visual step-down effect. This draws the eye into the center of the bouquet. -
Fill the gaps:
Tuck in sprigs of baby’s breath or dried wild grasses into any empty spaces between the roses and greenery. These act as textual bridges between the bold blooms and the leafy greens. -
Final adjustments:
Rotate the vase slowly. Adjust any stems that look squashed or out of place, ensuring the arrangement looks balanced from the angles your guests will see.
Level Up: Gloss Finish
Apply a clear matte sealant spray over the dried paint to protect your design from water splashes, or use a high-gloss spray to make the white pop against the matte clay.
Step 3: Styling the Table Setting
-
Place on the table:
Set your finished vase in the center of the table. -
Add napkin accents:
To tie the look together, place a folded neutral napkin beside the vase. Lay two stems—one dried pampas plume and one dried grass stalk—diagonally across the napkin. -
Coordinate elements:
Ensure the surrounding tableware, like wooden chargers or ceramic plates, complements the warm earth tones of the terracotta.
Now you have a stunning, handcrafted centerpiece that perfectly captures the rustic elegance of a terracotta wedding theme
Rust Gauze Table Runner Layers
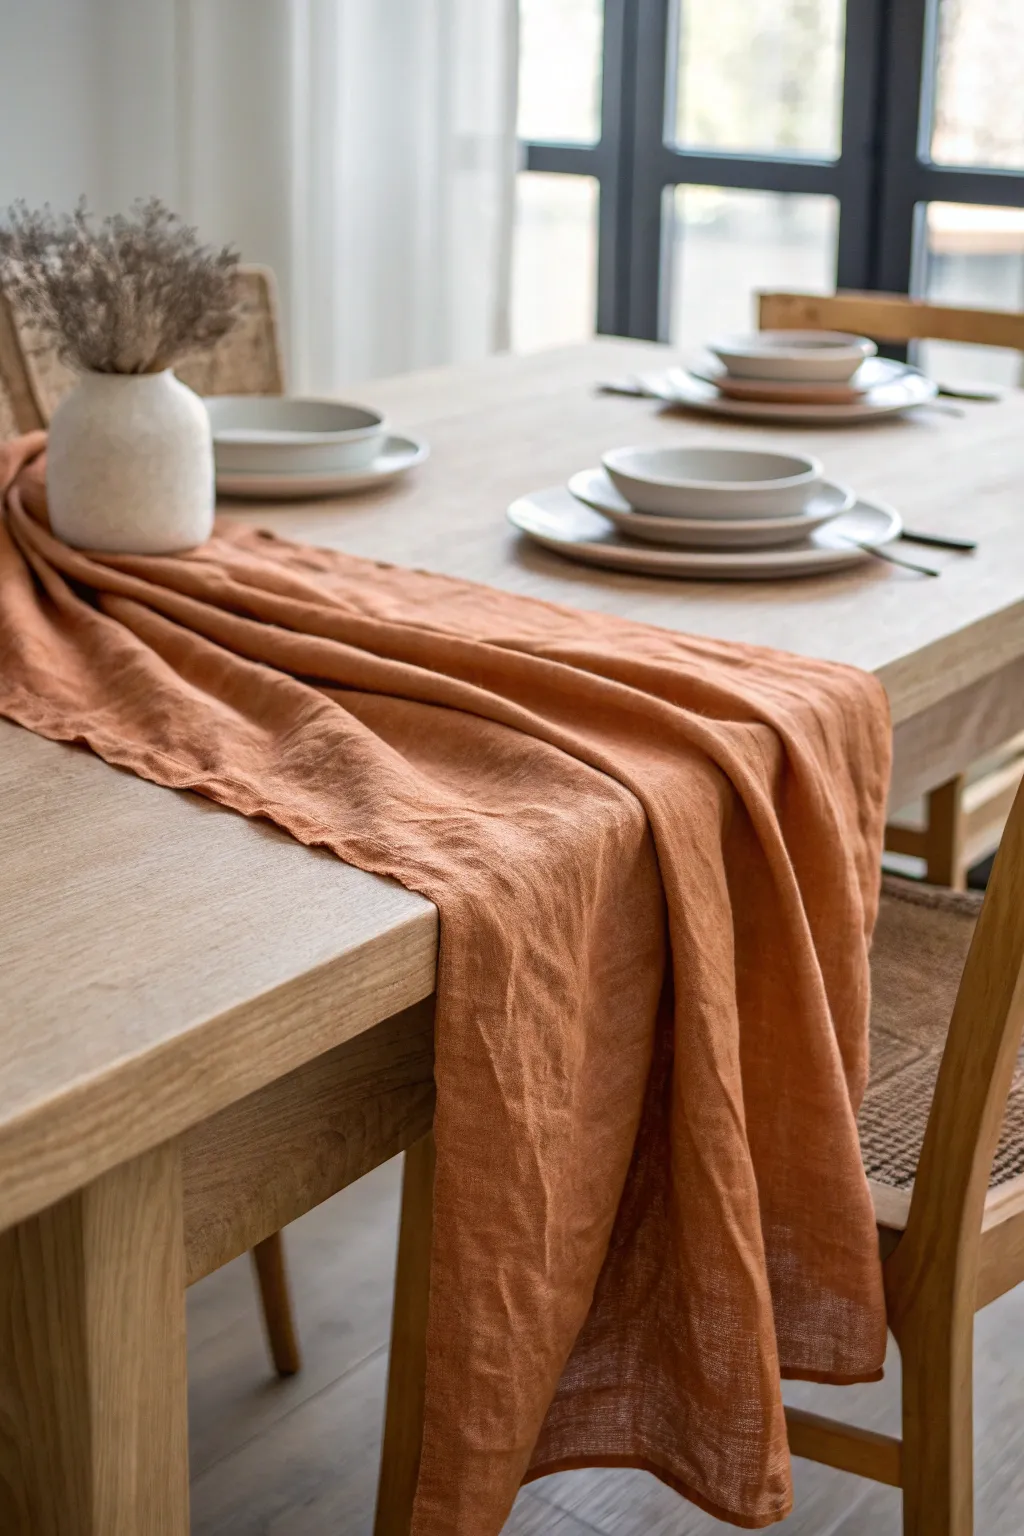
Bring warmth and texture to your tablescape with this effortless rust-colored gauze runner. Its crinkled texture and trailing ends create that perfect relaxed, romantic vibe essential for a terracotta-themed wedding or dinner party.
Step-by-Step
Materials
- 5 yards of cheesecloth or cotton gauze fabric (Grade 50 or 90)
- Terracotta or rust liquid fabric dye
- Large stainless steel pot or bucket
- Rubber gloves
- Salt or vinegar (fixative)
- Mild detergent
- Tongs or stirring spoon
- Iron (optional)
Step 1: Preparation
-
Calculate Length:
Measure your table length and add at least 2-3 feet on each side so the fabric can pool dramatically on the floor, or puddle on chair seats as shown. -
Pre-wash Fabric:
Wash your cheesecloth or gauze in warm soapy water to remove any sizing or factory residues. This ensures the dye absorbs evenly. -
Keep It Damp:
Do not dry the fabric completely; keep it damp but not dripping wet while you prepare the dye bath.
Step 2: Dyeing Process
-
Prepare the Bath:
Fill your large pot with enough hot water to submerge the fabric freely. Bring it to a near-simmer on the stove. -
Mix the Color:
Shake your dye bottle well and pour it into the hot water. I usually test the color intensity on a paper towel first to ensure it’s the right shade of terracotta. -
Add Fixative:
Stir in about a cup of salt (for cotton) or vinegar into the dye bath to help the color set permanently. -
Submerge Fabric:
Wearing rubber gloves, gently lower your damp gauze into the dye bath. Use tongs to push it down so it is fully covered. -
Stir Constantly:
Stir the fabric actively for the first few minutes, then periodically for 20-30 minutes. Constant movement prevents streaks and creates an even, solid color. -
Color Check:
Remember that wet fabric looks darker. Lift a section out to check the hue, aiming for a shade slightly darker than your desired finish.
Too Pale?
If the dried runner is lighter than you hoped, simply re-wet it and dye it again. Fabric color builds up, so a second dip will deepen the tone.
Step 3: Finishing the Texture
-
Rinse Well:
Remove the fabric and rinse it under cool running water until the water runs completely clear. -
Twist to Dry:
Here is the secret to the texture: Do not hang it flat. Wring out the excess water, then twist the fabric into a tight rope. -
Coil and Rest:
Coil this twisted rope upon itself like a cinnamon roll and let it air dry. This encourages those beautiful, deep wrinkles. -
Unfurl Gently:
Once fully dry, untwist the fabric gently. Do not iron out the wrinkles; they provide the essential rustic charm.
Two-Tone Effect
Mix a tiny drop of brown dye into your orange bath for an earthier rust, or dip just the ends in a darker mix for an ombre look.
Step 4: Styling the Table
-
Lay the Base:
Center the runner on your wooden table. Let the ends hang evenly off both sides. -
Create Volume:
Use your fingers to pinch and bunch the fabric in the center of the table, creating valleys and peaks. -
Drape the Edge:
At the table edge, create a sweeping curve rather than a straight drop. Let the fabric naturally fold over itself. -
Add Elements:
Nestle your ceramic vase or centerpiece directly into a gathered fold of the runner to anchor the fabric. -
Final Adjustments:
Pull a few loose threads gently along the raw edges if you want a more distressed, organic finish.
Your table is now set with a stunning textural foundation ready for your next gathering


What Really Happens Inside the Kiln
Learn how time and temperature work together inside the kiln to transform clay into durable ceramic.
Terracotta Chargers and Neutral Plates
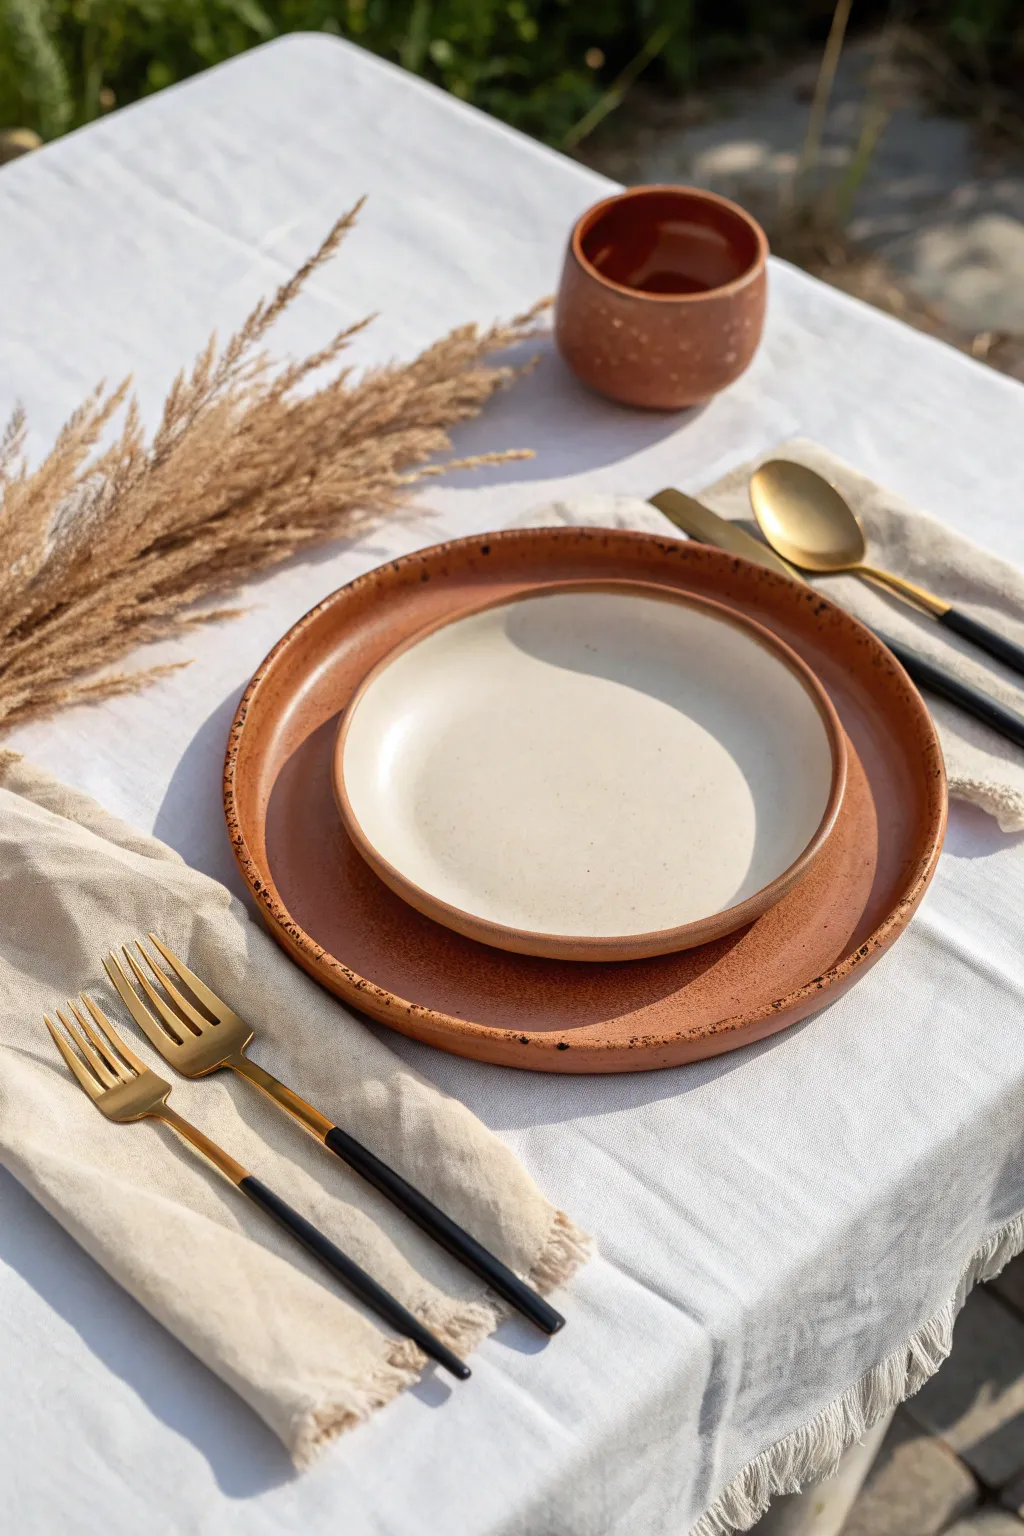
Bring the warmth of Tuscany to your reception table with this dual-piece project mimicking hand-thrown pottery. By transforming standard, budget-friendly tableware with specialized paint techniques, you achieve that authentic speckled terracotta look without the high price tag.
Detailed Instructions
Materials
- Large clear glass charger plate (smooth)
- Small white ceramic salad plate
- Terracotta colored acrylic craft paint (matte)
- Baking soda (sodium bicarbonate)
- Dark brown acrylic paint
- Clean toothbrush
- Wide flat paintbrush
- Small detail paintbrush
- Polycrylic clear coat (matte finish)
- Painters tape
- Gloves
- Drop cloth or cardboard
Step 1: Painting the Charger Plate
-
Clean the surface:
Start with your large glass charger plate. Wipe it down thoroughly with isopropyl alcohol or soapy water to remove any grease or oils, ensuring the paint adheres properly. -
Mix the texture paint:
In a small container, mix roughly 1 part baking soda to 2 parts terracotta acrylic paint. Stir until you have a fluffy, mousse-like consistency. This creates that gritty, earthen texture found in real pottery. -
Apply the base coat:
Turn the glass plate upside down if you want the top surface to remain glassy and food-safe, or paint the top surface if it will only be a charger under another plate. Using the wide flat brush, apply your baking soda mixture in even strokes. -
Stipple for texture:
While the paint is still wet, use the tip of your brush to tap or ‘stipple’ the surface. This breaks up brush strokes and enhances the clay-like appearance. -
Let it dry:
Allow this first textured coat to dry completely. It usually takes about an hour, depending on humidity. -
Add a second coat:
Apply a second layer of the textured paint mixture to ensure full opacity. Pay special attention to the rim, as this is the most visible part.
Quick Fix Tip
If you spatter too many dark speckles in one spot, quickly dab them gently with a dry paper towel while wet to lift the pigment and soften the look.
Step 2: Creating the Speckled Effect
-
Prepare the speckle mix:
Dilute a small amount of dark brown acrylic paint with water until it is very runny, almost like ink. -
Flick the paint:
Dip a clean toothbrush into the watered-down brown paint. Hold it about 6-10 inches away from the painted charger. -
Create the speckles:
Use your thumb to run across the bristles, flicking fine droplets of paint onto the terracotta surface. Practice on cardboard first to control the spray. -
Vary density:
Apply more speckles near the rim and fewer towards the center to mimic natural clay variations.
Upgrade the Look
Mix a tiny drop of burnt orange or deep red into your terracotta paint for the chargers to create a subtle two-tone effect that adds visual depth.
Step 3: Detailing the Salad Plate
-
Clean the salad plate:
Ensure your smaller white ceramic or stoneware plate is perfectly clean and dry. -
Mix rim paint:
Mix a fresh batch of terracotta paint and baking soda. For the rim, the texture should be slightly finer, so use a little less baking soda than before. -
Freehand the edge:
I prefer to freehand this step for a more organic, artisan look. Using a small detail brush, carefully paint the very edge of the plate’s rim with the terracotta mixture. -
Create the inner ring:
Extend the paint slightly onto the inner lip of the plate, creating a defined terracotta border against the white center. -
Apply speckles to the white:
Using the toothbrush technique again, very lightly mist the white center of the salad plate with brown speckles to tie the two pieces together.
Step 4: Sealing and Setting
-
Dry thoroughly:
Allow all paint layers on both plates to dry for at least 24 hours. -
Seal the charger:
Apply a coat of matte Polycrylic sealer over the painted surface of the charger plate to protect the finish from chipping. -
Curing note:
Remember that acrylic paint is generally not food safe. These painted chargers are for decorative use or under-plates only, and the salad plates should only be hand-washed gently.
Once arranged with your linen napkins and gold cutlery, your guests will never guess you crafted these high-end looking pieces yourself
Terracotta Candleholders for Warm Glow
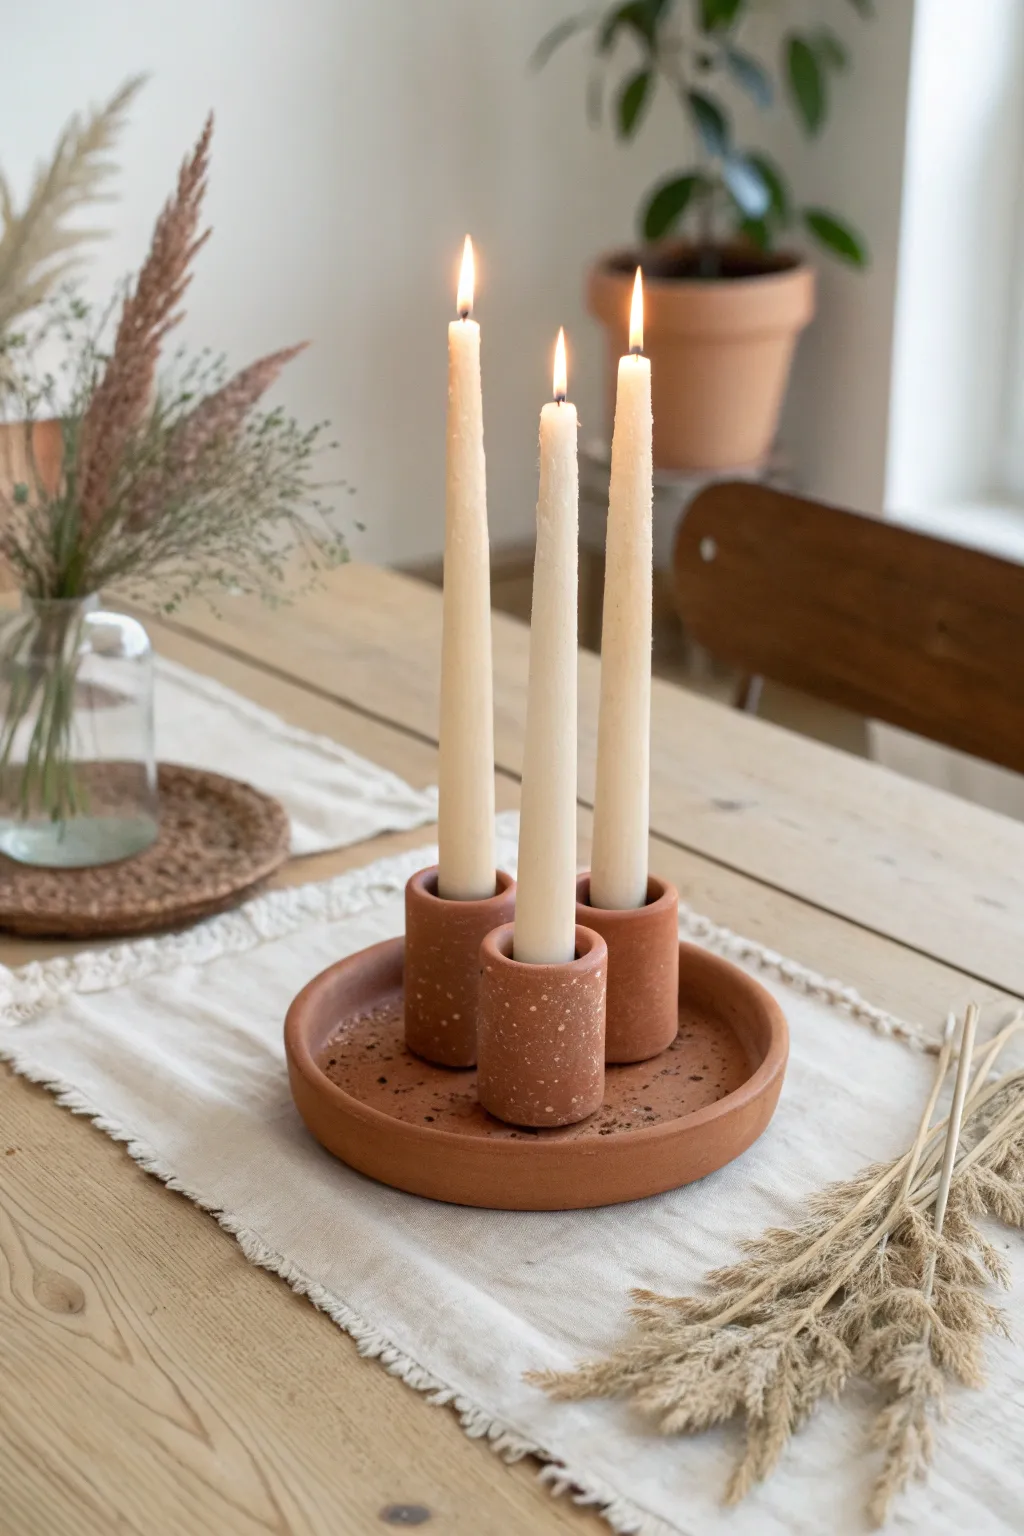
Bring earthy warmth to your wedding tablescape with this stunning terracotta centerpiece featuring three distinct candle pillars in a matching tray. The speckled, handmade finish offers a raw and organic feel that perfectly complements a bohemian aesthetic.
Step-by-Step
Materials
- Air-dry clay (terracotta color) or polymer clay
- Rolling pin
- Circle cookie cutter (approx. 8 inches for tray)
- Craft knife or clay blade
- Three empty toilet paper rolls or 1-inch dowel (for shaping)
- Small bowl of water
- Sandpaper (fine grit)
- Acrylic paint (burnt orange, rust, and white)
- Old toothbrush
- Clear matte sealant spray
- Wax paper or craft mat
Step 1: Shaping the Base Tray
-
Prepare the workspace:
Lay down your wax paper or craft mat to prevent sticking. Take a large ball of terracotta clay and knead it well until it is pliable and smooth. -
Roll the slab:
Roll the clay out evenly until it is about 1/4 inch thick. Aim for a consistent thickness to ensure the tray dries without warping. -
Cut the circle:
Place your large circle cutter or a bowl upside down on the clay. Use the craft knife to cut around the edge to create a perfect circle base. -
Create the rim:
Roll a long snake of clay, approximately 1/2 inch thick and long enough to maximize the circumference of your base. -
Attach the rim:
Score the outer edge of the base and one side of the clay snake with a needle tool or knife. Dab a little water on the scored areas. -
Smooth the edges:
Press the snake onto the edge of the base. Use your thumb to smudge the clay downwards, blending the snake seamlessly into the base on both the inside and outside.
Step 2: Crafting the Pillars
-
Prepare pillar clay:
Roll out a fresh slab of clay to the same 1/4 inch thickness. You will need enough for three cylinders. -
Cut rectangular strips:
Cut three rectangular strips. The height should be about 2-3 inches, or slightly varied heights if you prefer a staggered look. The length needs to wrap around your shaping tool. -
Form the cylinders:
Wrap a strip around your dowel or cardboard tube. If using a cardboard tube, I like to wrap it in parchment paper first so the clay slides off easily later. -
Seal the seams:
Score and wet the overlapping edges of the clay strip. Press them together firmly and smooth the seam with your finger or a sculpting tool until it disappears. -
Repeat for all holders:
Repeat this process for the other two pillars. Ensure the top flat edges are relatively level, though a little organic unevenness is charming. -
Dry fit the arrangement:
Place the three cylinders inside the tray to check spacing. They should be clustered in the center but not touching the rim.
Clean Edges Pro Tip
Dip your finger in water and run it along the top rim of the clay cylinders before they dry. This creates a soft, professional rounded edge rather than a sharp cut.
Step 3: Assembly and Finish
-
Attach pillars to base:
Score the bottom of each cylinder and the corresponding spots on the tray floor. Apply water and press the cylinders firmly into place. -
Reinforce the joints:
Roll a very thin worm of clay and wrap it around the base of each pillar where it meets the tray. Smooth this out with a modeling tool to create a strong bond. -
Allow to dry:
Let the entire piece dry completely. For air-dry clay, this usually takes 24-48 hours. Keep it away from direct heat to prevent cracking. -
Light sanding:
Once fully dry, use fine-grit sandpaper to smooth out any rough fingerprints or sharp edges on the rims. -
Create texture:
Dilute a small amount of white or light beige acrylic paint with water. Dip an old toothbrush into the mixture. -
Apply the speckle:
Running your thumb over the bristles, flick the paint onto the terracotta piece to create a fine, speckled stone effect. -
Seal the project:
In a well-ventilated area, spray the entire candle holder with a clear matte sealant. This protects the clay and gives it a finished, professional look. -
Add candles:
Once the sealer is dry, insert your taper candles. You can melt a little wax at the bottom to help them stand straight if the fit is loose.
Crack Control
If you see small cracks appearing as the clay dries, mix a tiny bit of fresh clay with water to make a paste (slip) and fill them in immediately, then smooth over.
Light these candles at your reception to create an intimate, warm atmosphere for your guests

TRACK YOUR CERAMIC JOURNEY
Capture glaze tests, firing details, and creative progress—all in one simple printable. Make your projects easier to repeat and improve.
Dried Florals With Terracotta Tones
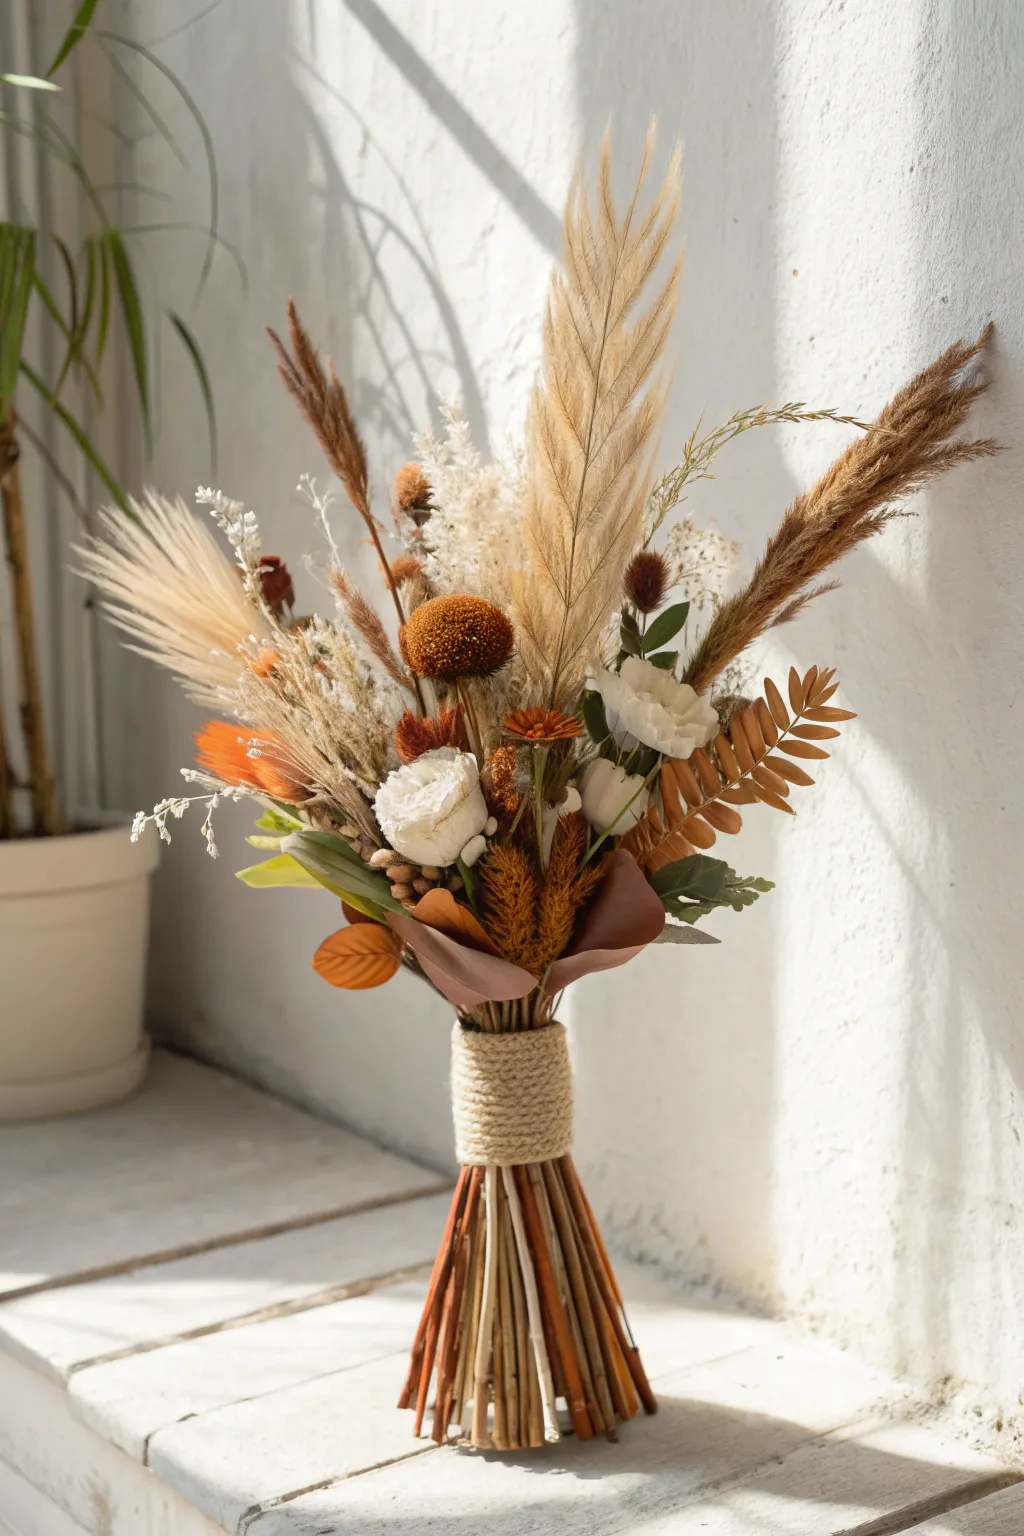
Embrace the warmth of autumn and the rustic charm of the desert with this self-standing dried floral arrangement. Featuring a rich palette of burnt orange, cream, and varied browns, this bouquet doubles as a stunning centerpiece or a unique bridal accessory.
Step-by-Step Guide
Materials
- Dried pampas grass (natural beige/tan)
- Dried ruscus (bleached white or cream)
- Dried billy buttons (craspedia) dyed burnt orange/brown
- Rabbit tail grass (lagurus) in natural and terracotta
- Dried fern leaves (brown)
- Artificial or dried roses (cream/ivory)
- Wheat stalks or dried grain grasses
- Brown bouquet paper or stiff fabric sheet
- Thick jute twine
- Hot glue gun and glue sticks
- Floral tape
- Sharp floral shears
Step 1: Preparing the Stems
-
Clean the stems:
Begin by stripping the lower 4-5 inches of all your floral stems. Remove any excess leaves or small offshoots so the bottom section acts as a clean, sturdy handle. -
Sort by height:
Group your dried florals by type and height on your work surface. This makes grabbing the right texture much easier as you build the layers. -
Fluff the pampas:
Take your pampas grass plumes and gently shake them outside to remove loose seeds. You can lightly spray them with hairspray to prevent future shedding.
Wobbly Bouquet?
If the bouquet won’t stand, the stems are too thin. Insert thick wooden dowels or bamboo skewers into the center of the stem bundle before wrapping with twine.
Step 2: Assembling the Core
-
Start the center:
Create a central focal point by holding two or three tall pampas grass stems together. Add a few sprigs of the bleached ruscus slightly lower than the pampas tips. -
Add the focal flowers:
Position your cream roses and the large burnt orange billy buttons (craspedia) around the base of the pampas. These should sit lower, establishing the ‘heart’ of the bouquet. -
Layer textures:
Tuck stems of rabbit tail grass and wheat in gaps around your focal flowers. Vary the heights slightly to keep the arrangement looking organic and windswept. -
Incorporate the ferns:
Place the brown dried fern leaves towards the outer edges. Fan them out so they drape slightly, creating a beautiful silhouette against the lighter grasses. -
Secure the bundle:
Once you are happy with the arrangement, wrap floral tape tightly around the gathering point—just below the lowest bloom—to hold everything firmly in place.
Texture Boost
Mix varying shades of terracotta. Using spray paint to lightly dust some natural grasses with copper or burnt sienna adds incredible depth.
Step 3: Creating the Standing Base
-
Align the bottom stems:
This bouquet features a unique exposed stem design. Ensure all the bottom sticks are relatively straight. If some stems are flimsy, reinforce the bundle by adding extra plain dried reed sticks around the perimeter. -
Trim the base:
Using sharp shears, cut the bottom of the stem bundle flat. It needs to be perfectly flush so the bouquet can stand upright on its own without tipping. -
Add the collar:
Take a small square of brown bouquet paper or stiff fabric. Wrap it around the ‘neck’ of the bouquet (where you taped it), folding it casually to look like a leaf or petal collar. -
Start the twine wrap:
Dab a minimal amount of hot glue at the top of the handle area, right over the bottom of your paper collar. Press the end of your thick jute twine into the glue. -
Bind the handle:
Tightly wind the jute twine down the stem bundle. I find that pulling the twine taut with every rotation ensures a professional, stiff handle structure. -
Finish the binding:
Wrap until you have covered about 2-3 inches of the handle, creating a solid cuff. Cut the twine and secure the end with a hidden dot of hot glue on the back side. -
Final stem trimming:
Re-check the balance. Set the bouquet on a flat surface. If it wobbles, trim individual stems at the bottom one by one until it stands perfectly vertical.
Place your finished arrangement on a sunny windowsill or table to enjoy those warm earthy tones year-round
Table Numbers on Terracotta Slabs
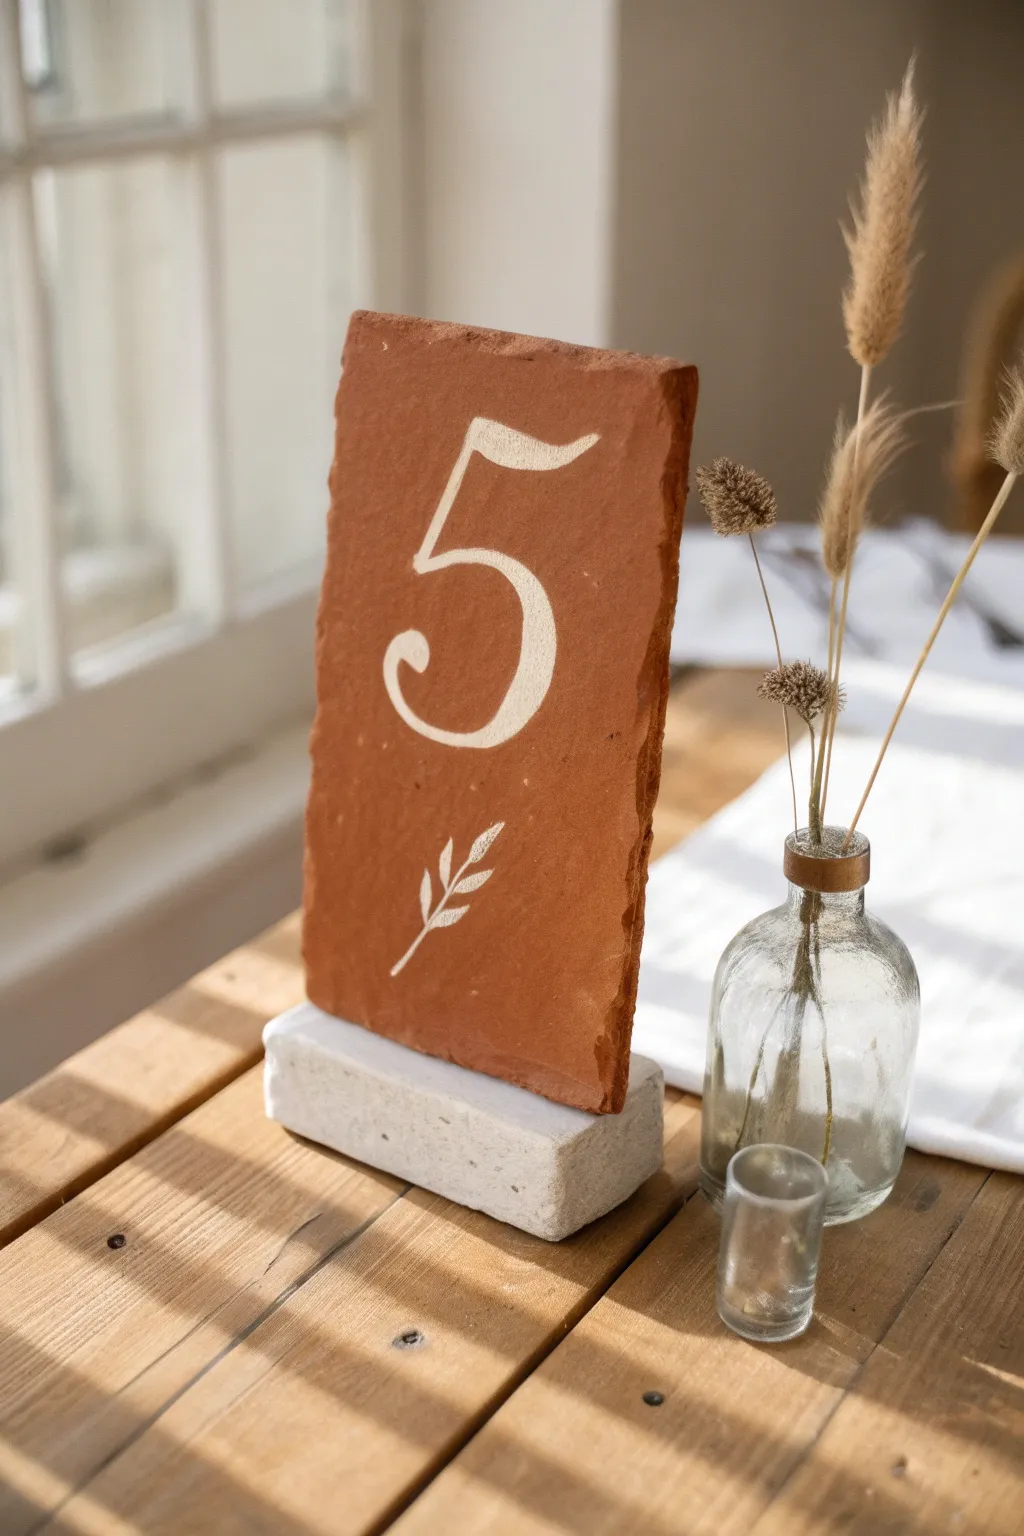
Bring an earthy, artisanal touch to your wedding tables with these hand-painted terracotta slabs. The contrast of crisp white calligraphy against the warm, rough-hewn clay creates a stunning focal point that feels both modern and timeless.
How-To Guide
Materials
- Rectangular terracotta tiles (approx. 4×8 inches)
- White paint marker (oil-based works best) or acrylic paint with a fine liner brush
- Pencil and eraser
- Ruler
- Limestone or concrete brick paver (sized slightly widet than the tile)
- Construction adhesive or heavy-duty stone glue
- Matte clear sealant spray (optional)
- Carbon transfer paper (optional for tracing design)
Step 1: Preparing the Surface
-
Clean the tile:
Start by wiping down your terracotta slab with a slightly damp cloth to remove any dust or loose clay particles. Let it dry completely before moving on. -
Plan your layout:
Measure the center of your tile to determine exactly where the number should sit. I like to leave a little extra visual weight at the bottom for the leaf illustration. -
Draft the number:
Lightly sketch your number using a pencil. Aim for a classic serif font style that mimics calligraphy, focusing on elegant curves and variation in line thickness. -
Add the botanical detail:
Below the number, lightly draw a simple stem with leaves. Keep the leaves small and angled upward to lead the eye back toward the number.
Use a Stencil
Not confident in your freehand lettering? Print your numbers on paper, place carbon paper underneath, and trace the design directly onto the tile before painting.
Step 2: Painting the Design
-
Prepare your paint marker:
Shake your white paint marker vigorously to mix the pigment. Press the nib down on a scrap piece of paper until the paint flows smoothly. -
Outline the number:
Carefully trace over your pencil lines to create the outline of the number first. Don’t worry about filling it in yet; just focus on getting smooth edges. -
Fill the thick strokes:
Determine which parts of the number should be thick (the downstrokes). Color these areas in completely, ensuring solid opacity. -
Refine the thin strokes:
Go over the thin upstrokes with a lighter hand to crisp them up. The contrast between thick and thin lines is what gives the number that professional calligraphy look. -
Paint the leaf detail:
Trace your botanical sketch at the bottom. Since this is a delicate detail, use the very tip of your marker or brush for precise lines. -
Second coat:
Terracotta is porous and soaks up paint quickly. Once the first layer is dry, apply a second coat to the number to make the white really pop against the clay background. -
Clean up:
Once the paint is fully dry—give it about 30 minutes—gently erase any visible pencil marks with a soft eraser.
Color Coordination
Instead of white, match the paint color to your wedding metallic accents using a gold leaf pen or a copper paint marker for a luxe finish.
Step 3: Assembly and Finishing
-
Prepare the base:
Ensure your limestone or concrete brick is clean and dry. This heavy base is crucial for keeping the table number upright during the reception. -
Apply adhesive:
Apply a generous bead of construction adhesive or heavy-duty stone glue along the center length of the brick. -
Position the tile:
Firmly press the terracotta tile into the adhesive, centering it on the brick. -
Support while drying:
Since the tile is tall, prop it up with heavy books or cans on either side to keep it perfectly vertical while the glue cures. Check your glue’s instructions for drying times. -
Seal (optional):
If you’re displaying these outdoors, a light mist of matte sealant will protect the paint from moisture without altering the natural stone look.
Place these beautiful markers alongside simple glass bud vases to complete your effortlessly elegant tablescape
Terracotta Menu Signage
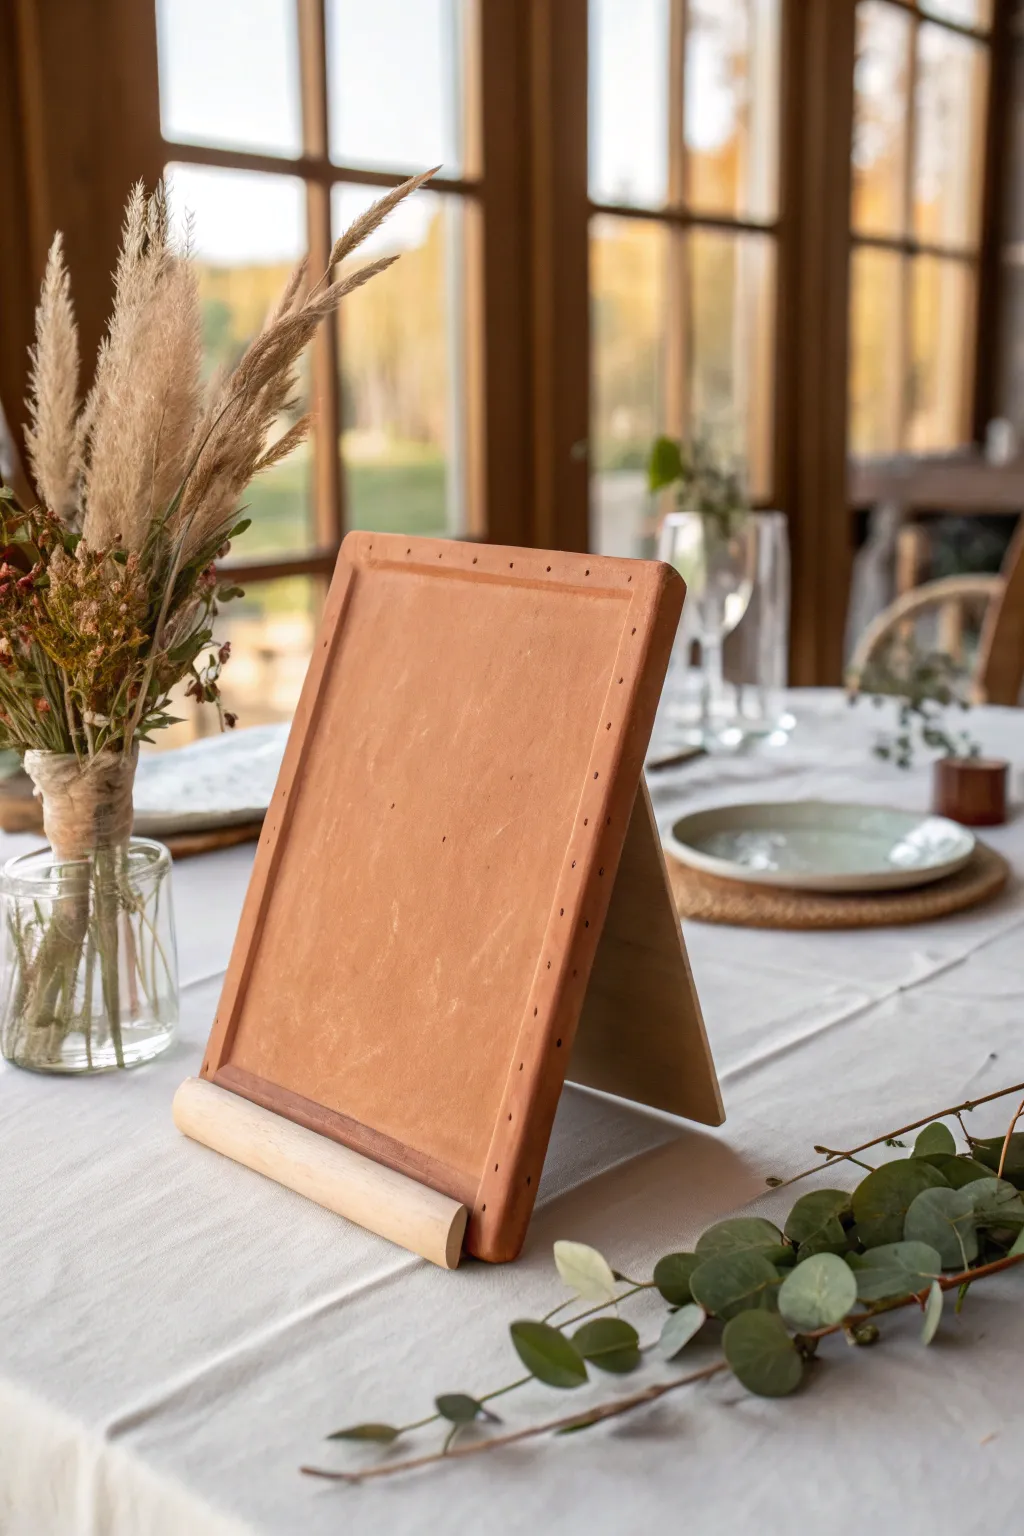
Bring the warmth of the earth to your tablescape with this stunning mock-terracotta menu display. This project uses polymer clay to create a durable, freestanding tablet with a classic rustic border that perfectly complements bohemian or natural wedding themes.
Step-by-Step Tutorial
Materials
- Terracotta-colored polymer clay (approx. 1 lb)
- Parchment paper
- Rolling pin
- Ruler
- Craft knife or clay slicer
- Wooden dowel (1/2 inch or 3/4 inch diameter)
- Small wooden skewer or large needle tool
- Sandpaper (fine grit)
- Strong craft glue or epoxy
- Thin wooden easel back or sturdy cardboard triangle
- Oven (for baking clay)
- Flat baking sheet and heavy book (for flattening)
Step 1: Shaping the Clay Base
-
Condition the Clay:
Begin by warming the polymer clay in your hands, kneading it thoroughly until it becomes soft and pliable. This conditioning step is crucial to prevent cracks during baking. -
Roll Out the Slab:
Place the conditioned clay between two sheets of parchment paper to prevent sticking. Use your rolling pin to roll it into a large, even slab approximately 1/4 inch thick. -
Measure and Cut:
Using your ruler as a guide, measure a rectangle roughly 5 inches by 7 inches (or your desired menu size). Use the craft knife to slice clean, straight edges for a professional finish. -
Smooth the Edges:
Dip your finger in a tiny bit of water or baby oil and run it along the cut edges to smooth out any sharpness or roughness left by the knife.
Texture Trick
Before baking, lightly gently dab the surface with a crumpled ball of aluminum foil or a stiff paintbrush to give the clay an authentic, porous stone texture.
Step 2: Adding Details and Baking
-
Create the Border Holes:
Take your wooden skewer or needle tool and gently press small holes around the perimeter of the rectangle. Space them about half an inch apart and keep them about a quarter-inch from the edge. -
Form the Base Roll:
If you want the cylindrical base detail seen in the photo, roll a snake of clay the same width as your tablet, or plan to glue a wooden dowel there later. For a full clay look, attach a thick roll of clay to the bottom front edge now. -
Pre-Bake Preparation:
Transfer the parchment paper with the clay slab onto a flat baking sheet. Ensure the surface is perfectly flat to avoid warping. -
Bake the Clay:
Bake the piece according to your specific clay package instructions (usually 275°F for 15-30 minutes). I verify my oven temperature with an external thermometer to be safe. -
Flatten While Cooling:
Once removed from the oven, immediately place a piece of parchment paper and a heavy book on top of the hot clay while it cools. This ensures the tablet stays perfectly flat.
Step 3: Assembly and Finishing
-
Prepare the Wooden Accent:
If you chose to use a wooden dowel for the bottom accent instead of clay, cut the dowel to match the width of your baked tablet exactly. -
Sand the Wood:
Lightly sand the ends of the dowel to ensure they are smooth and free of splinters. -
Attach the Bottom Accent:
Apply a strong craft glue or epoxy along the bottom front edge of the terracotta tablet. Press the wooden dowel (or half-round molding) firmly into place and let it set. -
Create the Easel Back:
Cut a right-angled triangle from sturdy wood or thick cardboard. The vertical side should be about two-thirds the height of your tablet to provide stability. -
Sand the Clay Edges:
Once the clay is fully cool, use fine-grit sandpaper to buff the edges one last time for a stone-like finish. -
Attach the Stand:
Glue the vertical side of your triangle support to the center back of the terracotta tablet. Hold it in place until the adhesive grabs securely. -
Final Inspection:
Check that the tablet stands freely without wobbling. If it tips, adjust the angle of the back support or sand the bottom of the support until it rests flush with the table.
Add Your Menu
Use a white paint pen or a custom vinyl decal to apply your menu text. For a reusable option, use loops of twine through the border holes to tie on a paper card.
Place your finished terracotta signs amidst greenery for a truly grounded and elegant display
Hanging Terracotta Planters Over Tables
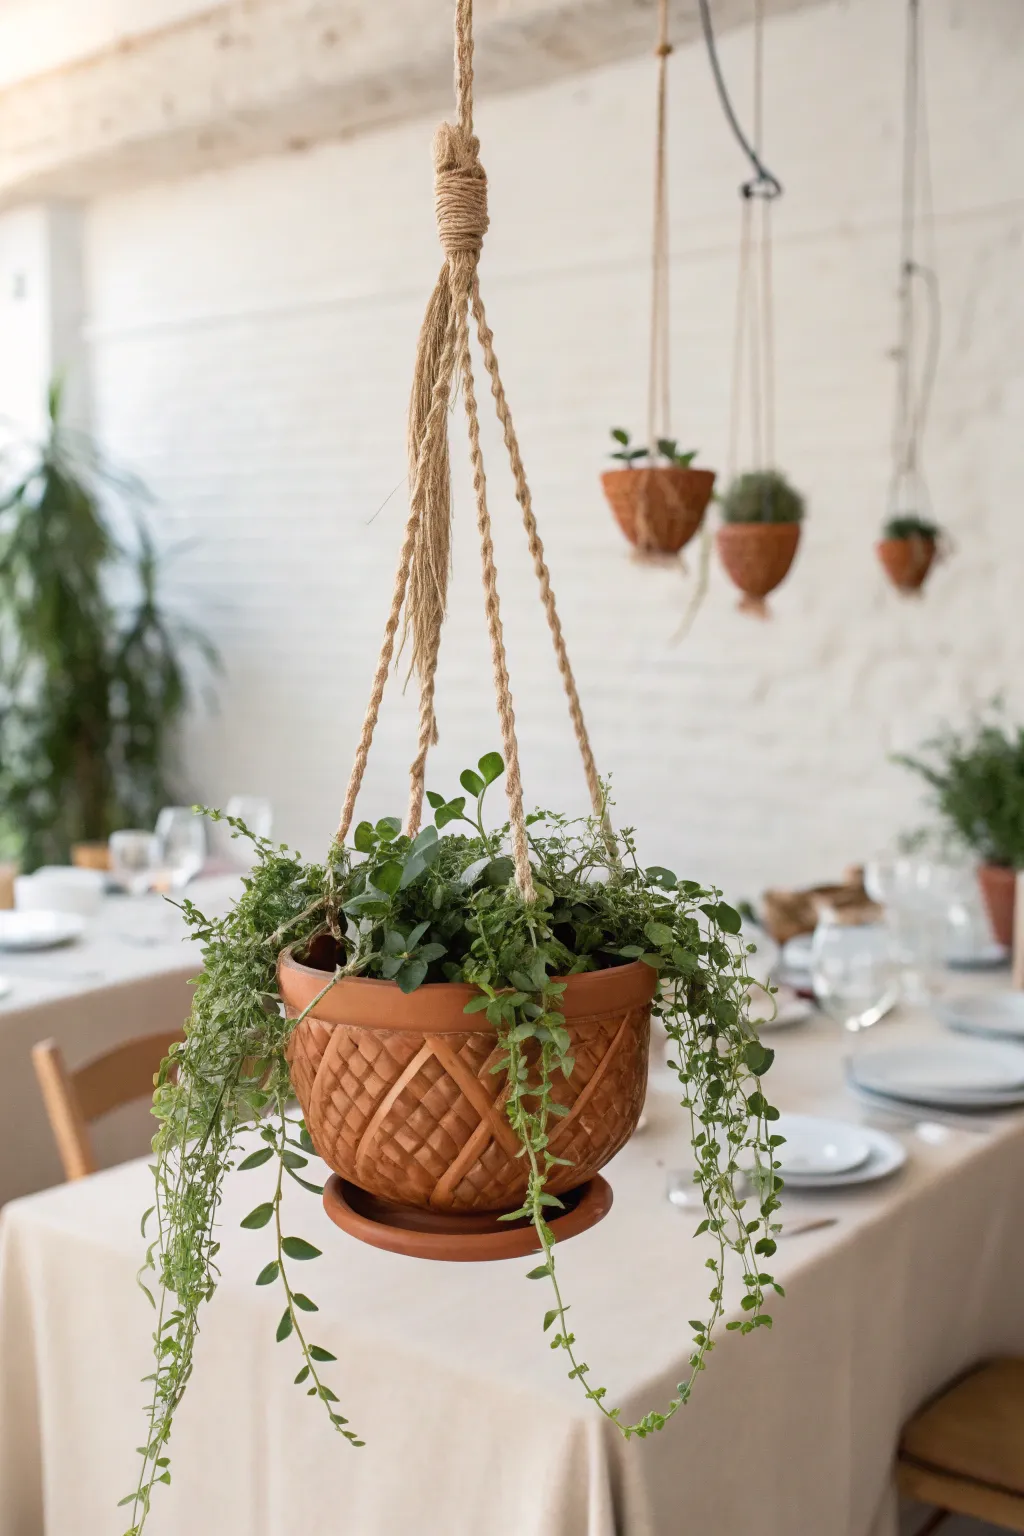
Elevate your wedding decor with these gorgeous hanging terracotta planters that dangle gracefully above reception tables. This project combines classic earthen textures with rustic jute suspension for a look that is both organic and elegant.
Step-by-Step Guide
Materials
- Medium-sized terracotta pot (8-10 inches)
- Matching terracotta saucer
- Self-hardening clay (terracotta colored) or polymer clay
- Jute rope (approx. 5-7mm thickness)
- Strong craft glue or construction adhesive (e.g., E6000)
- Sculpting tools or a butter knife
- Measuring tape
- Scissors
- Masking tape
- Trailing plants (like ivy, ferns, or vinca vine)
- Potting soil
Step 1: Texturing the Pot
-
Prepare surface:
Begin by wiping down your terracotta pot with a damp cloth to remove any dust or debris, ensuring a clean surface for adhesion. -
Roll clay coils:
Using the terracotta-colored clay, roll out numerous long, thin ‘snakes’ or coils. Aim for a diameter of about 1/4 inch for a delicate weave look that matches the photo. -
Create vertical ribs:
Lay pairs of clay coils vertically against the pot exterior, spacing them about an inch apart. Press them gently to adhere, trimming the excess at the rim and base. -
Weave the pattern:
Take shorter segments of clay and press them diagonally between the vertical ribs to create the ‘basket weave’ illusion. You don’t need to actually weave them; simply pressing them into the gaps at opposing angles creates the texture. -
Refine the texture:
Use a sculpting tool or knife to gently hatch or cross-hatch the surface of the clay strips. This mimics the fibrous texture of a real basket. -
Let it cure:
Allow the clay to dry completely according to the package instructions. If using polymer clay, bake the pot as directed (terracotta is oven-safe).
Clay Adhesion Fix
If the clay strips refuse to stick to the porous terracotta, brush a thin layer of PVA glue (white craft glue) onto the pot surface before applying the clay coils.
Step 2: Creating the Suspension
-
Cut the rope:
Cut three lengths of jute rope, each about 6 feet long. You want plenty of excess to adjust the height later. -
Attach base loop:
I prefer to loop the rope continuously under the saucer for safety. Create a small ring of rope slightly smaller than the saucer’s diameter and secure the three long strands to it at equal intervals. -
Secure the saucer:
Using heavy-duty adhesive, glue the terracotta saucer to the bottom of the main pot. This not only catches water but creates a lip for the rope to sit securely against. -
Position the ropes:
Place the pot into your rope sling. Ensure the three vertical ropes run up the sides evenly. You can use small dabs of hot glue near the rim to keep them from sliding while you work. -
Wrap the connection:
Twist the rope strands slightly as they ascend for a decorative touch. Gather all three ropes about 2 feet above the pot rim. -
Creating the knot:
Hold the three main ropes together. Take a separate piece of jute (about 2 feet long) and perform a ‘gathering knot’ or simple wrap around the main bundle to secure them together tightly. -
Fray the ends:
Trim the loose ends of the wrapping cord. For the excess rope hanging from the knot (the tassel), untwist the jute strands to create that soft, fringed look seen in the image.
Golden Hour Glow
For an evening reception, weave battery-operated copper wire fairy lights into the jute ropes or amongst the trailing ivy for a magical, floating lantern effect.
Step 3: Planting and Installation
-
Add drainage:
Place a small layer of pebbles or gravel at the bottom of the pot to help with water regulation, since the saucer is glued on. -
Pot the plants:
Fill the container with potting soil and arrange your plants. Place taller leafy plants in the center and trailing vines like ivy near the edges to clearer drape over the textured sides. -
Suspend securely:
Use a strong ceiling hook or beam mount to hang the planter. Ensure the hardware is rated for roughly 15-20 lbs, as wet soil and terracotta are surprisingly heavy.
Step back and admire how these floating gardens transform the vertical space of your venue
Textured Terracotta-Inspired Wedding Cake
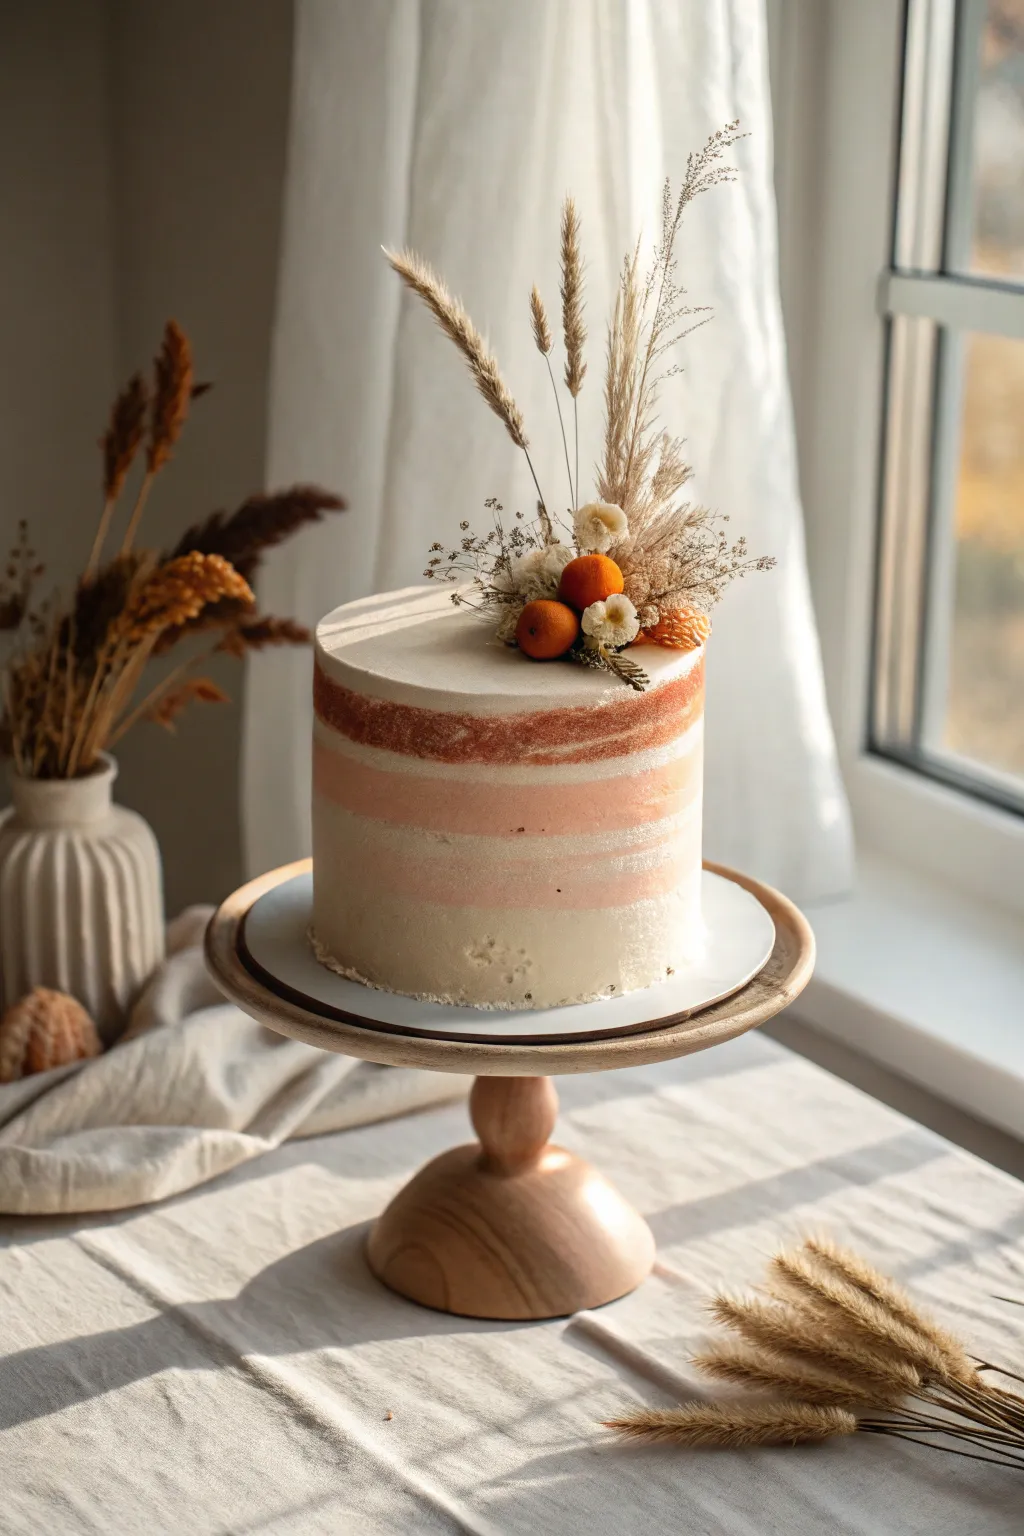
Embrace the warmth of earthy tones with this stunning semi-naked cake, featuring soft horizontal bands of rust and blush buttercream. Topped with dried florals and kumquats, it captures a perfect boho-chic aesthetic suitable for any terracotta-themed celebration.
Detailed Instructions
Materials
- 3 layers of 6-inch sponge cake (vanilla or spice flavor works well)
- Swiss Meringue Buttercream (large batch, naturally white)
- Gel food coloring: Terracotta, Rust, Peach, and Ivory
- Cake turntable
- 8-inch cake board
- Offset spatula
- Tall metal cake scraper (bench scraper)
- Piping bags
- Dried bunny tails
- Dried pampas grass stems
- Dried ruscus or baby’s breath
- Fresh kumquats or small dried oranges
- Floral tape and toothpicks (for food safety)
Step 1: Preparation & Stacking
-
Level the layers:
Begin by leveling your three cooled cake layers with a serrated knife to ensure they are perfectly flat. This is crucial for those clean, horizontal lines later on. -
Base coat:
Place a dab of buttercream on your cake board to secure the first layer. Spread an even layer of plain white buttercream filling, then stack the next cake layer. Repeat until all three are stacked. -
Crumb coat:
Apply a very thin layer of white buttercream all over the cake to trap any loose crumbs. Use your scraper to smooth it down so the cake sides are straight. -
Chill:
Pop the cake into the fridge for at least 20-30 minutes. You need this base to be firm before applying the decorative stripes.
Clean Scrape Secret
Heat your metal scraper under hot water and dry it off immediately before your final pass. The heat slightly melts the butter, creating a silky-smooth finish.
Step 2: Creating the Terracotta Palette
-
Mix the colors:
Divide your remaining buttercream into three bowls. Keep the largest portion plain white or ivory. In the second bowl, mix a deep terracotta/rust shade. In the third, create a softer peach-blush tone. -
Prep piping bags:
Fill three separate piping bags with your prepared colors. Snip a medium-sized opening (about 1 inch) at the tip of each bag.
Step 3: Frosting & Texturing
-
Pipe the stripes:
With the cake on the turntable, pipe a thick band of the terracotta color around the upper-middle section of the cake. Below that, pipe a band of the peach-blush tone. -
Fill the gaps:
Fill the top section and the bottom section of the cake generously with the plain white ivory buttercream. -
First scrape:
Hold your tall metal scraper vertically against the side of the cake. Spin the turntable while holding the scraper still to smooth the bands together. The colors will start to blur and blend delightfully. -
Achieve the semi-naked look:
Continue scraping, applying slightly more pressure to remove excess frosting. You want to reveal parts of the cake layers underneath, creating that translucent, textured ‘semi-naked’ effect. -
Clean the edges:
Use your offset spatula to gently pull the crown of buttercream at the top edge inward towards the center for a crisp, flat top. I find wiping the spatula clean between each stroke ensures a sharper finish. -
Final chill:
Return the cake to the fridge. The frosting needs to set completely before you add the delicate decorations.
Metallic Accent
For a luxe upgrade, mix a tiny amount of gold luster dust with vodka and spatter it gently onto the cake sides with a clean paintbrush for a subtle shimmer.
Step 4: Floral Styling
-
Prepare florals:
Trim your dried grasses and bunny tails to varying lengths. Wrap the bottom inch of the stems in floral tape to seal them, or insert them into small straws before placing them in the cake for safety. -
Build height:
Insert the tallest stems of pampas grass and dried wheat off-center on top of the cake. Angle them slightly outward to create vertical movement. -
Create the focal point:
Cluster the shorter dried florals, like the bunny tails and baby’s breath, at the base of the tall grasses to create a dense, textured nest. -
Add fruit accents:
Place 2-3 fresh kumquats or dried orange buds into the floral cluster. Their varied orange tones will tie the whole terracotta color scheme together perfectly.
Now step back and admire the warm, beautiful textures you have created.
Mini Terracotta Pot Wedding Favors
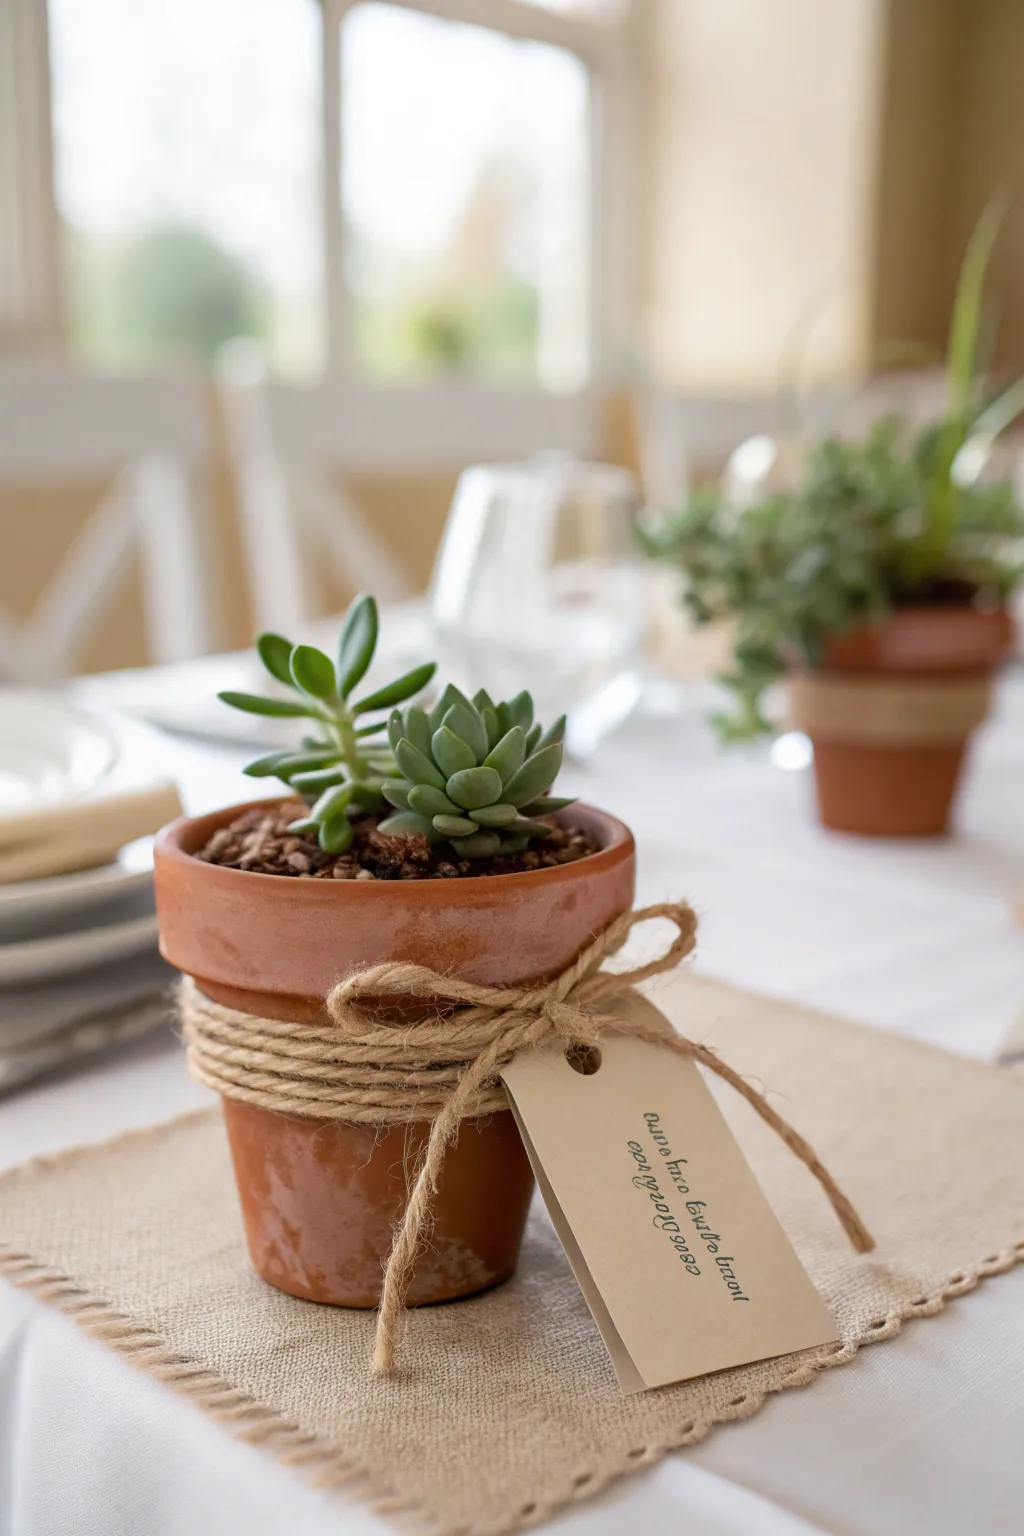
These charming mini terra cotta favors strike the perfect balance between rustic elegance and simple, natural beauty. Featuring a mix of succulents nestled in rich soil and wrapped with a classic jute twine bow, they serve as unique, living keepsakes for your guests.
Step-by-Step
Materials
- Mini terra cotta pots (2-3 inch diameter)
- Succulent potting soil (well-draining mix)
- Small succulent cuttings or plugs (1-3 varieties per pot, e.g., jade, echeveria)
- Jute twine or hemp cord (medium thickness)
- Cardstock (cream or kraft paper)
- Scissors
- Single-hole punch
- Fine-point permanent marker or calligraphy pen
- Small spoon or gardening scoop
- Spray bottle with water
Step 1: Preparing the Pots and Plants
-
Clean the pots:
If your terra cotta pots are brand new, wipe them down with a slightly damp cloth to remove any manufacturing dust. Let them air dry completely before planting to prevent muddy streaks. -
Add the base soil:
Using a small spoon, fill each pot about two-thirds of the way full with succulent potting soil. Press the soil down gently with your thumb to create a firm base, but don’t pack it too tightly. -
Arrange the succulents:
Select your succulents. For a visually interesting look like the photo, I like to pair a taller, branching variety (like a jade or sedum) with a lower rosette type (like an echeveria). -
Position the plants:
Make a small well in the center of the soil. Carefully remove your succulents from their nursery trays and gently tease the roots apart if they are pot-bound. -
Plant and fill:
Place the succulents into the pot. Use your small spoon to fill in the remaining space around the roots with more soil, bringing the level just below the terra cotta rim. -
Clean up and water:
Brush off any loose soil crumbs from the plant leaves or the pot’s rim using a dry brush or your fingers. Give the soil a very light misting with your spray bottle to settle the dirt without soaking the roots.
Loose Twine?
If the twine slips down the tapered pot, apply a tiny dot of hot glue to the back of the pot on the first wrap to anchor it in place before winding.
Step 2: Creating the Tags
-
Cut the tags:
Cut your cream cardstock into small rectangles, approximately 1.5 inches wide by 3 inches long. You can leave the corners sharp or snip them at an angle for a luggage-tag look. -
Punch the hole:
Use your single-hole punch to create a hole centered near the top short edge of the tag. -
Add the message:
Write your message on the tag using a fine-point pen. A vertical orientation works best here. You might write a thank you note, the couple’s names, or a sweet phrase like ‘Let Love Grow’.
Make It Personal
Use a customized rubber stamp for the tags instead of handwriting to save time and ensure consistency, or print guests’ names to double as place cards.
Step 3: Assembly and Finishing Touches
-
Start the wrap:
Take your jute twine and hold one end against the side of the pot. Begin wrapping the twine around the middle section of the pot’s body. -
Layer the twine:
Wrap the twine around the pot 5 to 7 times. Keep the loops close together so they create a solid band of texture, covering about an inch of the terra cotta surface. -
Secure the ends:
Once you have a nice thick band, bring the working end of the twine back to meet the starting end. Cut the twine, leaving about 8 inches of excess length on both ends for tying. -
Attach the tag:
Thread one of the loose twine ends through the hole in your prepared tag. Slide the tag close to the pot so it rests against the wrapped twine section. -
Tie the bow:
Tie the two ends together in a simple knot to secure the wrapped band. Then, tie a standard shoelace bow directly over the knot. -
Adjust and trim:
Gently tug the loops of the bow to make them symmetrical. Trim the tails of the twine so they hang down slightly past the bottom of the pot but don’t drag too much. -
Display setup:
To complete the rustic look shown in the image, place the finished pot on a square or runner of plain burlap fabric.
Your guests will love taking home these living mementos that continue to grow long after the celebration ends