Thanksgiving is basically the perfect excuse to play with cozy colors, simple shapes, and a little bit of goofy charm in clay. Here are my favorite Thanksgiving clay ideas you can make for your table, your mantel, or a laid-back craft day with family.
Classic Clay Turkey Figurines
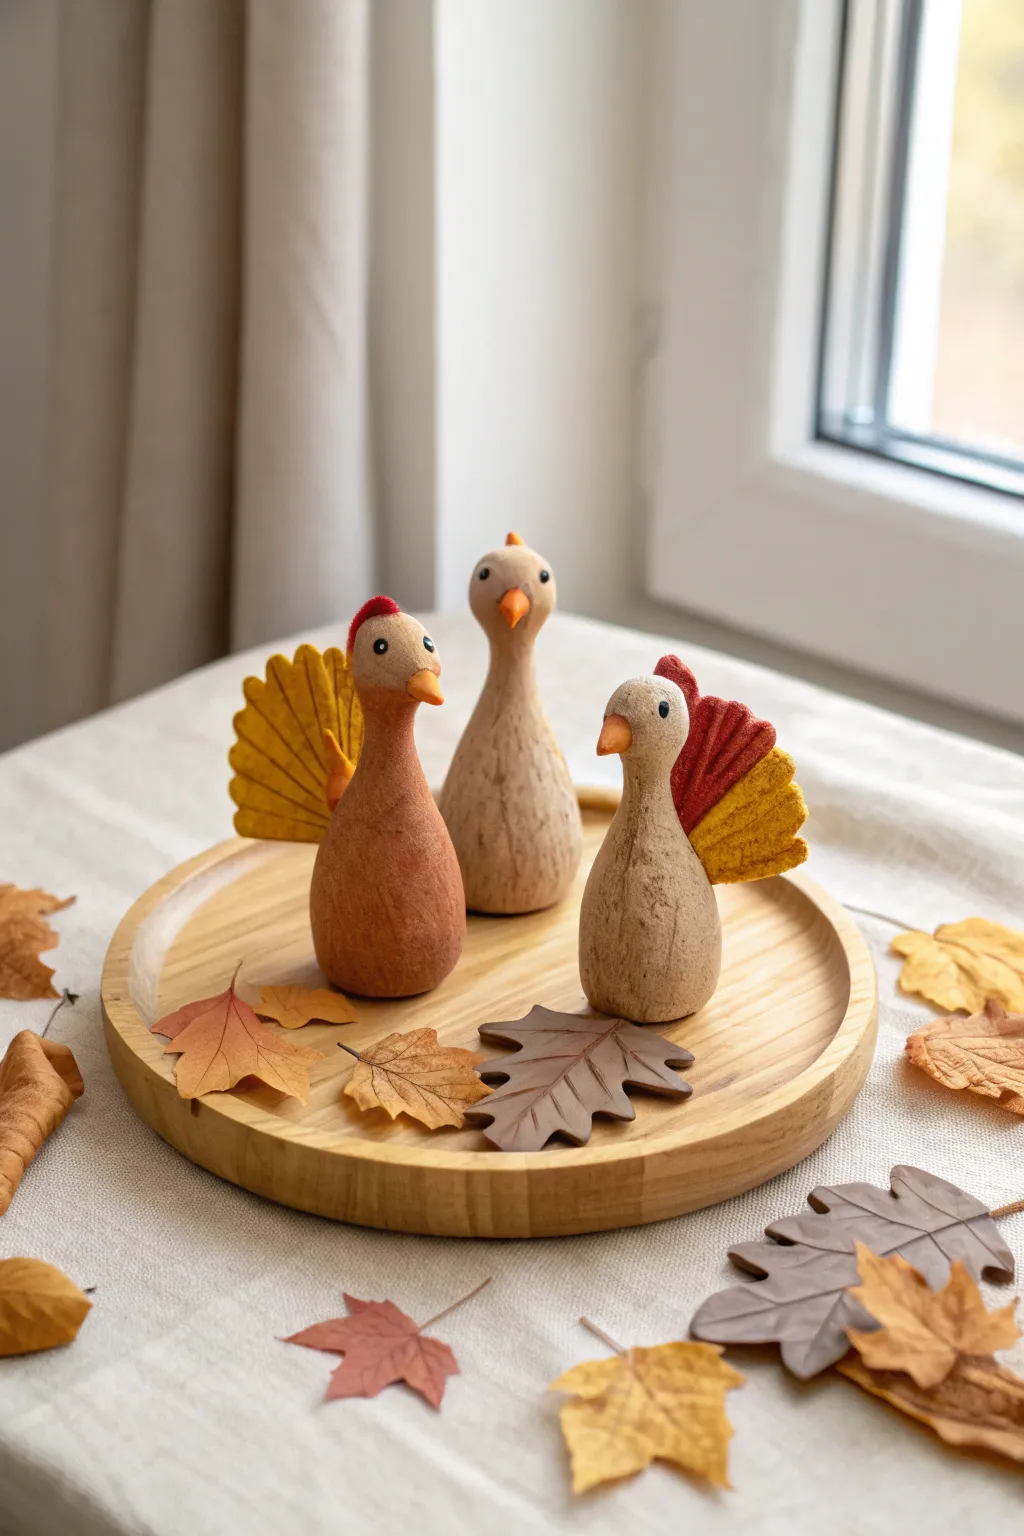
Embrace a modern farmhouse aesthetic this Thanksgiving with these charmingly simple clay turkey figurines. Their stylized pear shapes and muted, earthy tones make them a sophisticated alternative to traditional bright cartoon decorations.
Step-by-Step Guide
Materials
- Air-dry clay (stone finish or white)
- Acrylic paints (terracotta, beige/sand, dark brown, mustard yellow, burnt orange)
- Fine-grit sandpaper
- Small detail paintbrushes
- Sculpting tools (needle tool and small knife)
- Aluminum foil (for armatures)
- Matte varnish or sealant
- Water cup
Step 1: Sculpting the Bodies
-
Create the core:
Start by crumpling a small piece of aluminum foil into a pear shape. This saves clay and keeps the figurine lightweight. -
Form the base shape:
Roll a ball of clay and flattening it slightly, then wrap it around your foil core. Smooth it out until you have a seamless, elongated pear shape with a flat bottom so it stands securely. -
Shape the neck:
Gently gently squeeze and pull the top third of the shape upwards to elongate the neck, keeping the transition from body to neck smooth and gradual. -
Define the head:
At the very top, round off the clay to form a small, distinct head shape that flows naturally from the neck. -
Add the beak:
Take a tiny pinch of clay and roll it into a small cone. Score the back slightly and press it firmly onto the center of the face, blending the edges just a little for a secure bond.
Texture Trick
Before drying, dab the clay surface lightly with a crumpled paper towel or stiff brush. This creates a stone-like texture that grabs the antique wash later.
Step 2: Adding Details
-
Create the tail feathers:
Roll out a small slab of clay, about 1/4 inch thick. Cut out a fan or scallop shape for the tail feathers. -
Texture the tail:
Using a knife tool, gently score vertical lines radiating from the base of the fan to the edges to mimic individual feathers. -
Attach the tail:
Score the back of the turkey body and the base of the tail fan. Apply a dab of water or slip, then press the tail firmly onto the lower back of the bird. -
Sculpt the wattle:
For the turkey on the left, add a small, teardrop-shaped piece of clay draped over the beak or on top of the head for a comb, blending it carefully. -
Drying time:
Let your turkeys sit undisturbed for 24-48 hours until completely dry and hard to the touch.
Leafy Base
Sculpt matching fall leaves from leftover clay. Paint them in coordinating muted browns and oranges to scatter around the base of your turkeys.
Step 3: Painting and Finishing
-
Sand for smoothness:
Once fully dry, lightly gently run fine-grit sandpaper over the surface to remove any fingerprints or rough bumps. Wipe away the dust. -
Base coat fitting for the trio:
Paint one turkey in a solid terracotta color, and the other two in a speckled beige or sand color to match the image variety. -
Distressing the finish:
To get that rustic look, mix a little dark brown paint with water to make a wash. Brush it over the dry base coat and immediately wipe most of it off with a paper towel, leaving pigment in the crevices. -
Painting the details:
Paint the beaks a bright orange. For the tail feathers, use a mix of mustard yellow and burnt orange, possibly painting the inner fan one color and the outer fan another for contrast. -
Adding eyes:
Using the handle end of a paintbrush or a dotting tool, dab two small black dots for eyes. Add a tiny white highlight dot if you want extra life, though plain black keeps it rustic. -
Sealing the work:
Finish with a coat of matte varnish. This protects the paint and unifies the sheen without making them look glossy or plastic.
Now you have a timeless centerpiece ready for your Thanksgiving table


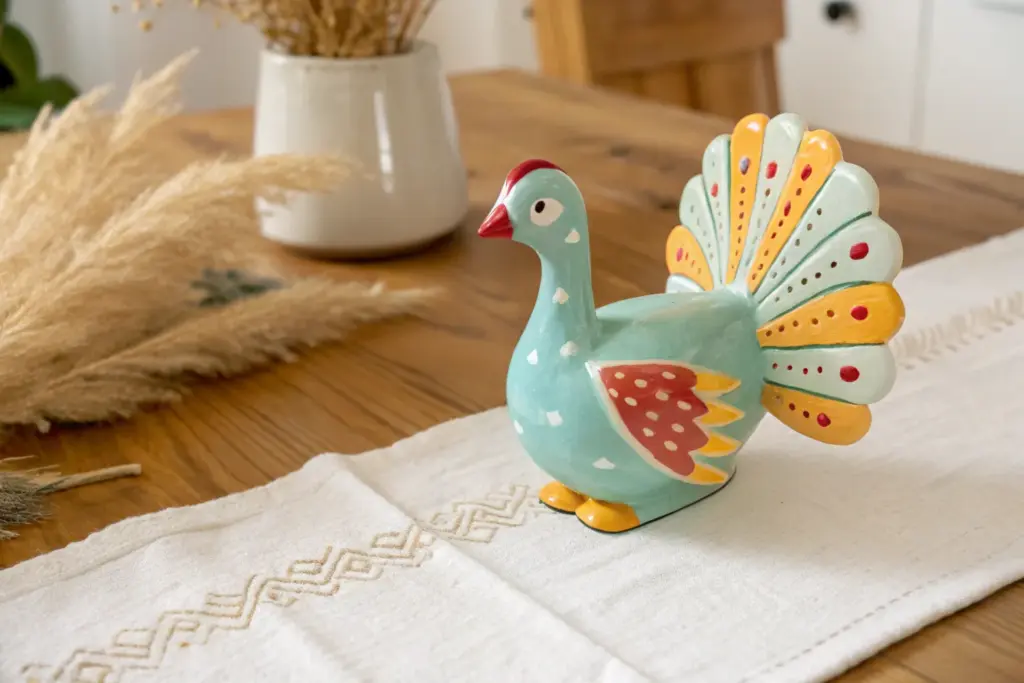
Turkey Napkin Rings

Add a touch of warmth to your Thanksgiving table with these charming turkey napkin rings that mimic the look of classic terracotta. Their detailed fan tails and textured bodies create an artisanal feel that elevates even the simplest linen napkins.
Step-by-Step
Materials
- Terracotta-colored polymer clay (or air-dry clay)
- Rolling pin
- Sharp craft knife or scalpel
- Large circle cutter (cookie cutter or jar lid, approx. 3-4 inches)
- Small sculpting tools (needle tool, small ball tool)
- Ruler
- Parchment paper or baking mat
- Napkin ring base (cardboard tube or pre-baked clay cylinder)
- Strong craft glue (E6000 or similar)
- Matte varnish (optional)
Step 1: Sculpting the Components
-
Condition the Caly:
Begin by kneading your terracotta-colored polymer clay until it is soft and malleable. If the clay feels too stiff, warm it in your hands for a few minutes to prevent cracking. -
Roll the Base Sheet:
Roll out a portion of slightly thicker clay, roughly 1/4 inch thick, on a piece of parchment paper. This thicker base will ensure your turkey is sturdy enough to hold the napkin. -
Cut the Tail Shape:
Use your large circle cutter to cut a round shape, then use the craft knife to slice off the bottom third, creating a flat base for the fan-shaped tail. You want a semi-circle that is slightly more than half a circle. -
Create the Fan Texture:
Using a blunt knife tool or the back of your craft knife, gently press vertical lines radiating from the center bottom of the semi-circle to the outer edge. These lines separate the individual feathers of the tail. -
Form the Body:
Roll a separate ball of clay into a teardrop shape for the turkey’s body. Flatten it slightly so it matches the thickness of the tail. -
Shape the Head and Neck:
From the narrower top of your teardrop, gently pull and curve the clay upwards to form the S-curve of the neck. Pinch the very end to define a small beak.
Step 2: Adding Details & Assembly
-
Attach Body to Tail:
Place the body piece in the center of your fan tail. Gently press the edges together to bond them. You can use a small dab of liquid polymer clay or water (if using air-dry clay) to ensure a secure connection. -
Layer the Wings:
Create a smaller, flattened teardrop shape for the wing. Press this onto the side of the body. I like to position it at a slight angle to give the turkey a dynamic, puffed-up look. -
Detail the Feathers:
Using a needle tool, press short, repeated texture lines into the body and wing to mimic small feathers. For the tail feathers, use a small U-shaped tool or the cap of a pen to stamp curved lines along the grooved sections you made earlier. -
Refine the Edges:
Go around the outer perimeter of the tail fan with your smoothing tool. Soften any sharp cutting marks so the clay looks like molded ceramic. -
Create the Ring Loop:
Roll a strip of clay approximately 1 inch wide and long enough to wrap around a standard napkin. Form it into a ring, overlapping the ends and pressing them firmly together. -
Reinforce the Join:
Smooth the seam inside and outside the ring loop so it is seamless and strong. Check that the ring sits flat on your work surface.
Uneven Texture?
If your carved lines look messy with clay burrs, dip your finger in a tiny bit of baby oil (for polymer) or water (for air-dry) and gently rub the surface to smooth rough edges before baking.
Step 3: Baking and Finalizing
-
Bake the Pieces:
Place your turkey front pieces and the separate ring loops on a baking sheet lined with parchment paper. Bake according to your polymer clay package instructions (typically 275°F for 15-30 minutes). -
Cool Completely:
Allow all pieces to cool completely on the baking tray. Do not attempt to move them while hot, as polymer clay is fragile until it fully cures and hardens. -
Glue the Assembly:
Apply a strong adhesive like E6000 to the back of the turkey body. Press the clay ring firmly onto the glue spot. Lay the assembly face down (ring up) and let the glue cure overnight. -
Adding a Finish:
If you want to protect the surface from food stains, brush on a thin coat of matte varnish. This keeps the rustic, unglazed look while adding durability.
Level Up: Antiquing
After baking, rub diluted dark brown acrylic paint over the textured feathers, then wipe the surface clean with a damp cloth. The paint stays in the grooves, highlighting the intricate details.
Now you have a set of custom table accents ready to impress your holiday guests


Stamped Gratitude Leaf Ornaments
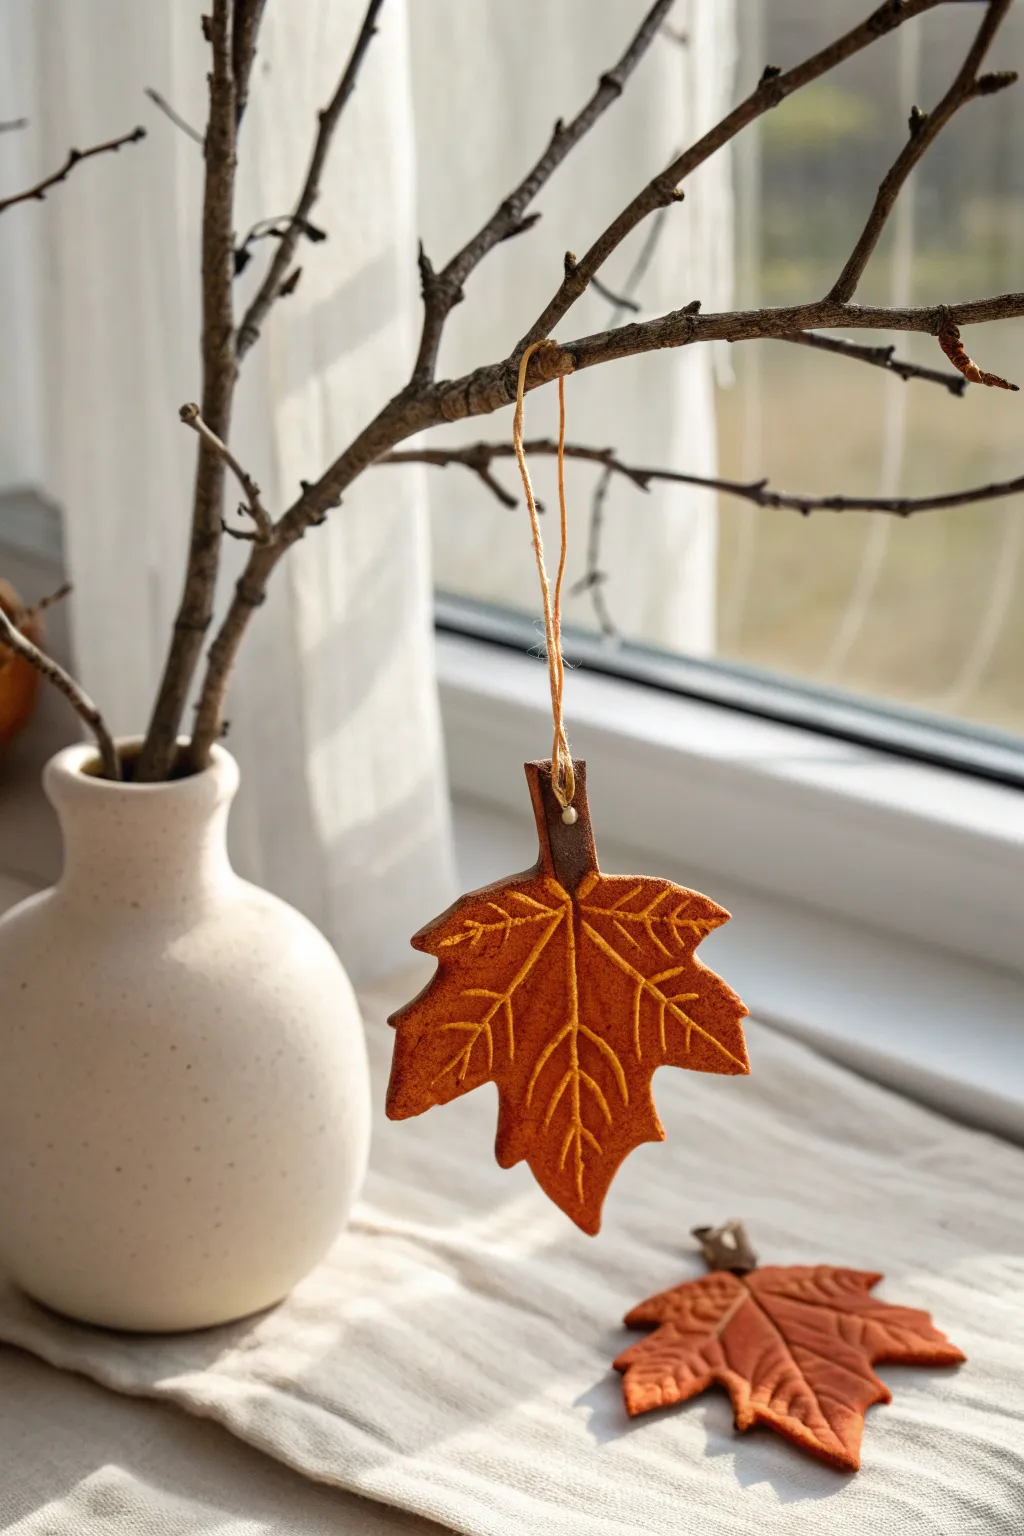
Capture the fleeting beauty of autumn with these warm, textured leaf ornaments that look just like crisp fallen foliage. Made from air-dry clay and finished with rich earth tones, they add a perfect touch of hygge to your Thanksgiving decor.
Step-by-Step
Materials
- White or terracotta air-dry clay
- Maple leaf cookie cutter (or a real leaf and a craft knife)
- Rolling pin
- Parchment paper or canvas mat
- Needle tool or toothpick
- Straw or small circle cutter
- Acrylic paints (Burnt Sienna, spiced pumpkin, or cinnamon tones)
- Gold or light yellow fine-tip paint pen
- Small paintbrush or foam sponge
- Jute twine
- Fine-grit sandpaper (optional)
- Matte sealant spray (optional)
Step 1: Shaping and Sculpting
-
Prepare the workspace:
Lay down a piece of parchment paper or a canvas mat to prevent the clay from sticking to your table. Take a handful of air-dry clay and knead it until it is soft and pliable. -
Roll the slab:
Use your rolling pin to flatten the clay to an even thickness, aiming for roughly 1/4 inch. Avoid going too thin, as the ornaments need to be sturdy enough to hang without cracking. -
Cut the leaf shapes:
Press your maple leaf cookie cutter firmly into the clay slab. If you are using a real leaf as a template, lay it on the clay and carefully trace around the edge with a craft knife. -
Refine the edges:
Gently lift the leaf shape from the excess clay. Smooth any rough or jagged edges with a slightly damp finger to give the ornament a polished look. -
Create the hanging hole:
Use a straw or a small circle cutter to punch a clean hole at the top of the leaf stem. Make sure the hole isn’t too close to the edge to prevent breakage later. -
Add vein details:
With a needle tool or toothpick, gently score the central vein line from the stem to the tip. Then, add branching veins extending to the leaf points. Press deep enough to see the texture, but be careful not to slice all the way through.
Texturizing Trick
Before cutting your shape, press a piece of rough linen or canvas fabric onto the wet clay slab. Peel it off to leave a woven texture behind that catches the paint beautifully.
Step 2: Drying and Painting
-
Let it dry completely:
Place your clay leaves on a flat surface away from direct heat to dry. This typically takes 24-48 hours. I like to flip them over halfway through the process to ensure both sides dry evenly and stay flat. -
Sand imperfections:
Once fully cured and hard, lightly sand any rough spots on the edges with fine-grit sandpaper. -
Apply the base color:
Paint the entire surface of the leaf with a burnt sienna or spiced pumpkin acrylic paint. Use a sponge for a textured, matte look or a brush for fuller coverage. -
Add dimension:
While the paint is still slightly tacky, you can dab a darker brown very lightly near the edges to create a subtle burnt effect. -
Allow paint to cure:
Let the base coat dry completely before moving on to the detailing step. -
Highlight the veins:
Take a gold or light yellow fine-tip paint pen and carefully trace inside the indented vein lines you created earlier. This contrast makes the texture pop and mimics the golden hues of turning leaves. -
Seal the work:
If desired, spray the finished pieces with a matte sealant to protect the paint and give them a finished, professional quality.
Scented Variation
Mix cinnamon and nutmeg directly into the paint or use a cinnamon-dough clay recipe instead of standard air-dry clay for ornaments that smell as good as they look.
Step 3: Assembly
-
Thread the hanger:
Cut a length of jute twine, about 8 inches long. -
Secure the loop:
Thread the twine through the hole in the stem and tie a simple overhand knot at the ends to create a loop for hanging.
Hang these on a gathered branch centerpiece or use them as thoughtful napkin rings for your feast


Leaf-Imprint Trinket Dishes
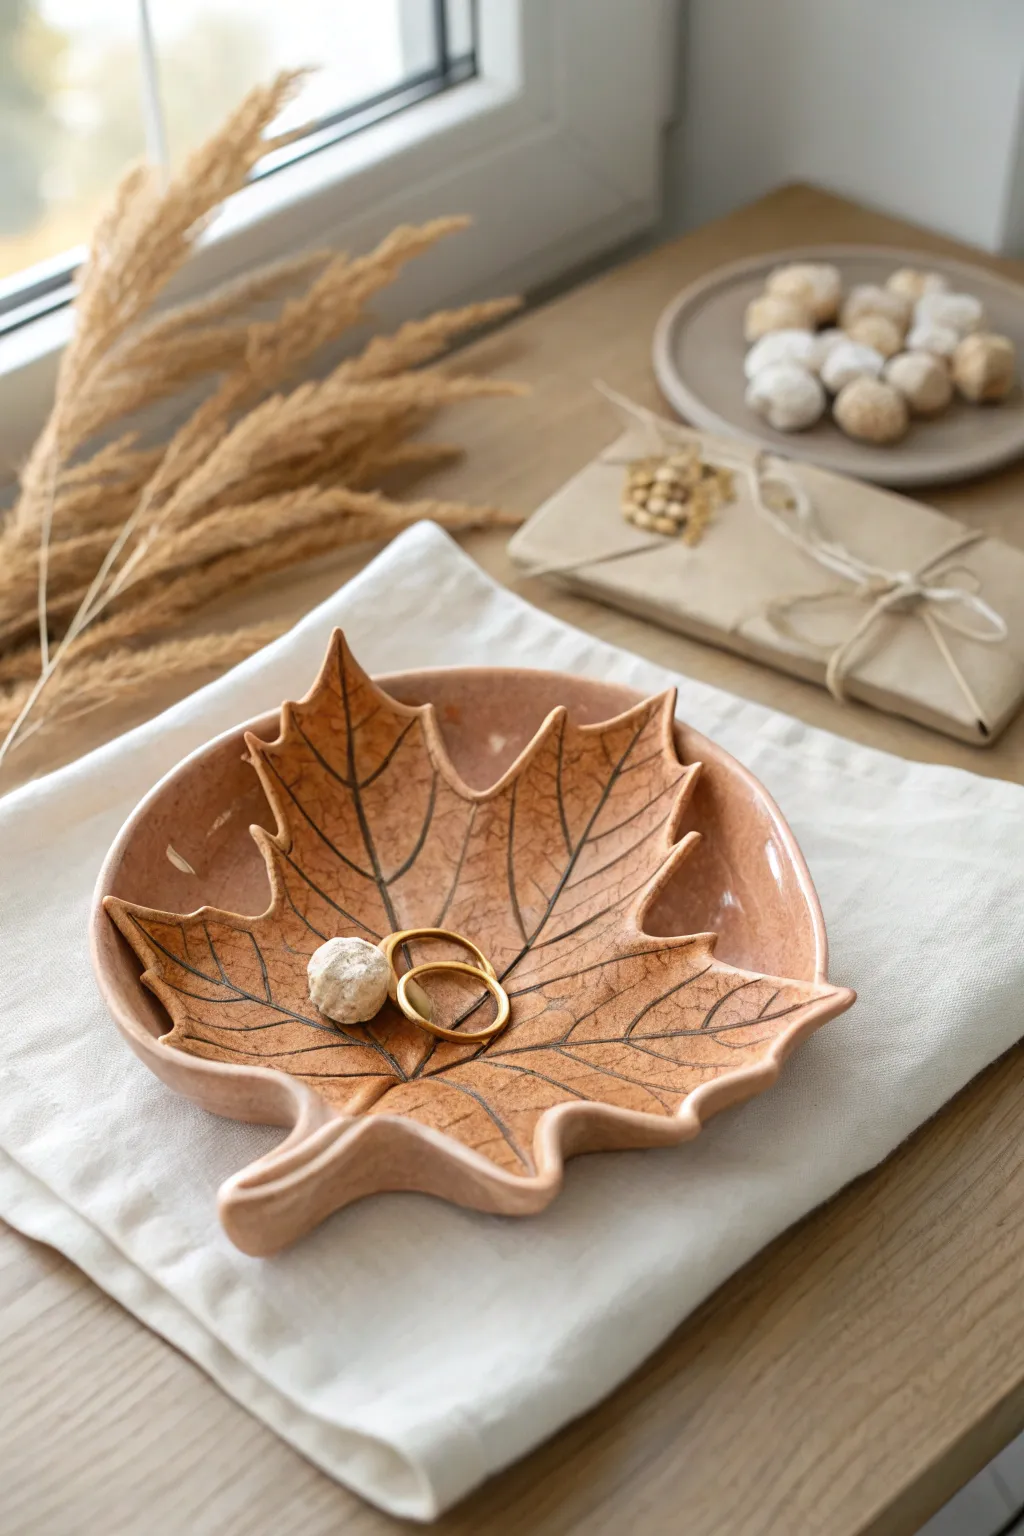
Capture the beauty of autumn with this warm, ceramic-style trinket dish featuring intricate leaf veining. This project uses real foliage to create a stunning natural impression that serves as a perfect seasonal catch-all for rings or keys.
Detailed Instructions
Materials
- Air-dry clay (terra cotta or white)
- Fresh maple leaf (sturdy, with prominent veins)
- Rolling pin
- Parchment paper or canvas mat
- Craft knife or scalpel
- Small bowl (for shaping)
- Small sponge
- Water
- Acrylic paints (warm terracotta, soft pink, dark brown)
- Fine liner paintbrush
- Matte or satin varnish
Step 1: Clay Preparation & Impression
-
Roll the Slab:
Begin by conditioning your air-dry clay until it is smooth and pliable. Roll it out on parchment paper or a canvas mat to an even thickness of about 1/4 inch. -
Place the Leaf:
Select a fresh maple leaf that isn’t too brittle. Place it vein-side down onto your rolled clay slab to ensure the deepest impression. -
Create the Imprint:
Gently roll over the leaf with your rolling pin one or two times. Apply firm, even pressure so the veins bite into the clay, but be careful not to make the slab too thin. -
Cut the Shape:
With the leaf still pressed into the clay, trace around the outer edge using a craft knife or scalpel. Leave a tiny border around the leaf for a smoother finished edge. -
Remove the Leaf:
Carefully peel the leaf away from the clay using the stem as a handle. Reveal the detailed texture underneath.
Cracking Clay?
If small cracks appear while drying, mix a tiny amount of fresh clay with water to make a paste (slip). Fill the cracks, smooth over, and let dry again.
Step 2: Shaping & Refining
-
Smooth the Edges:
Dip your finger or a small sponge in a little water. Run it gently along the cut edges of your clay leaf to soften any sharp cuts or stray crumbs. -
Form the Dish:
Lift the clay leaf carefully and place it inside a small, shallow bowl. Gently press the center down so the leaf takes on a curved, cupped shape. -
Refine the Stem:
If the clay stem feels fragile, add a tiny extra coil of clay underneath it for support and smooth it into the main body. -
Drying Phase:
Allow the dish to dry inside the bowl for at least 24 hours. Once the surface feels firm, flip it over or remove it from the bowl to let the bottom dry completely.
Step 3: Painting & Finishing
-
Base Coat:
Mix a warm terracotta hue with a touch of white or pink to achieve the soft, fleshy tone seen in the photo. Paint the entire surface of the dry dish. -
Second Coat:
Apply a second layer of your base color to ensure opaque coverage, smoothing out any brushstrokes as you go. -
Highlighting Veins:
Dilute a dark brown acrylic paint with water to create a thin wash. Using a fine liner brush, carefully paint into the depressed lines of the major veins. -
Wipe Back:
Immediately after painting the veins, lightly wipe the surface with a damp cloth or sponge. This removes excess paint from the raised areas while leaving the dark pigment inside the crevices. -
Detail Work:
If the smaller veins aren’t distinct enough, use your fine liner brush to delicately draw connecting lines, mimicking the natural network of a real leaf. -
Seal:
Once the paint is fully dry, apply a coat of matte or satin varnish. This protects the finish and gives it that professional, ceramic-like sheen.
Gilded Edges
For an elegant Thanksgiving table setting, paint just the thin outer rim of the dried leaf with liquid gold leaf or metallic angular paint.
Place your finished dish on a entryway table or nightstand to add a touch of woodland warmth to your home decor

The Complete Guide to Pottery Troubleshooting
Uncover the most common ceramic mistakes—from cracking clay to failed glazes—and learn how to fix them fast.
Turkey Feather Wall or Mantel Garland
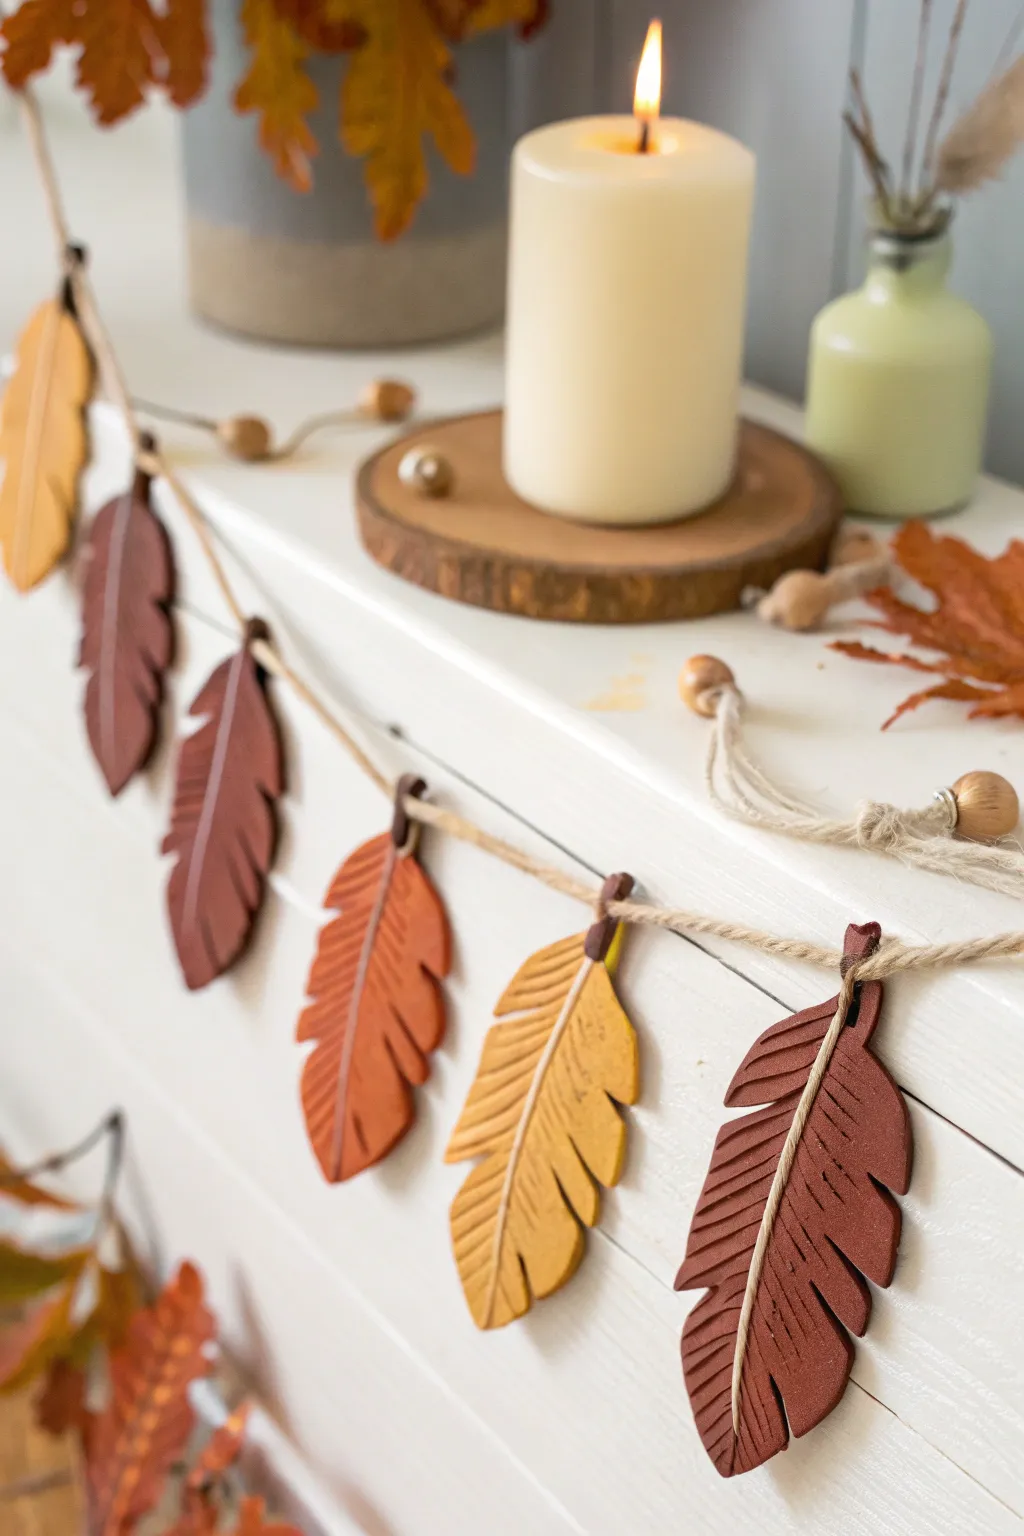
Bring a touch of organic warmth to your Thanksgiving mantel with this handcrafted clay feather garland. The textured finish and earthy palette of deep browns, terracottas, and mustard yellows create a cozy, artisanal look perfect for the season.
Step-by-Step
Materials
- Air-dry clay (terra cotta and white for color mixing) or oven-bake polymer clay
- Acrylic paints (burnt umber, ochre, rust, cream)
- Rolling pin
- Parchment paper or craft mat
- Needle tool or toothpick
- X-Acto knife or clay craft knife
- Feather-shaped cookie cutter (optional) or cardstock template
- Jute twine or hemp cord
- Small wooden beads (optional)
- Small bowl of water (for smoothing)
- Matte sealant or varnish (optional)
Step 1: Prepping the Clay
-
Condition the Clay:
Start by warming up your clay in your hands. Knead it thoroughly until it is soft and pliable. If you want to create custom shades, this is the time to mix different colors of clay together—try marbling white into terracotta for a softer look. -
Roll it Out:
Place a ball of clay onto parchment paper to prevent sticking. Use your rolling pin to flatten the clay into a slab that is roughly 1/4 inch thick. Aim for an even thickness so the feathers dry or bake uniformly.
Fixing Cracks
If air-dry clay cracks while drying, mix a tiny bit of fresh clay with water to make a paste (slip). Fill the crack, smooth it over with a finger, and let it dry again.
Step 2: Shaping the Feathers
-
Cut the Basic Shapes:
If you have a feather-shaped cookie cutter, press it firmly into the clay slab. Alternatively, place a cardstock template over the clay and carefully trace around it with your craft knife to cut out an elongated oval shape that tapers at the top. -
Create the Spine:
Use your needle tool or a dull knife to gently score a line down the center of each feather, stopping about a half-inch from the very top. Don’t cut all the way through; just create an indentation for the central quill. -
Add Texture:
To mimic the barbs of a real feather, use your needle tool to score diagonal lines radiating from the center spine out to the edges. Vary the pressure slightly for a more organic feel. -
Refine the Edges:
Take your craft knife and cut small notches along the edges of the feather to give it a slightly tattered, realistic silhouette. Smooth any rough bits with a fingertip dipped in a tiny bit of water. -
Create the Hanging Hole:
Before the clay hardens, use a straw or a larger needle tool to poke a hole at the stem end of each feather. Make sure the hole is wide enough to accommodate your jute twine later. -
Curve the Clay:
I like to gently drape the wet feathers over a rolling pin or scrunched-up foil while they dry. This adds a slight curve, making them look less stiff and more natural when hanging.
Step 3: Finishing Touches
-
Dry or Bake:
Follow the instructions for your specific clay. If using air-dry clay, let them sit for 24-48 hours until fully hard and white. If using polymer, bake according to the package directions (usually around 275°F for 15-30 minutes). -
Mix Your Palette:
Squeeze out your acrylic paints. Aim for a cohesive fall palette: deep chocolate browns, warm rusts, and muted mustard yellows. You may need to mix in a little brown or white to tone down bright colors. -
Paint the Feathers:
Apply the paint in thin, even coats. For a more rustic look, use a dry-brush technique where you lightly drag a nearly dry brush over the textured surface, highlighting the scored lines. -
Highlight the Spine:
Once the base color is dry, use a fine brush with a lighter shade (like cream or pale beige) to paint a thin line down the center indentation or simply glue a piece of thin light twine into the groove for extra dimension. -
Seal (Optional):
To protect your work, apply a coat of matte varnish. This seals the paint and gives the feathers a finished, professional quality without making them too shiny.
Gilded Edges
dip the very tips of your painted feathers into gold liquid gilding or lightly brush gold metallic paint on the edges for a glamorous Thanksgiving table accent.
Step 4: Assembly
-
Measure the Garland:
Cut a length of jute twine to fit your mantel or wall space, leaving an extra 12 inches on each end for tying loops. -
Thread the Feathers:
String the feathers onto the twine through the hole you made earlier. You can simply thread them on, or tie a simple overhand knot around the top of each stem to keep them straight. -
Space Them Out:
Arrange the feathers so they are evenly spaced, perhaps alternating colors for visual interest. Secure their position by tying a small knot in the twine on either side of the feather stem. -
Add Embellishments:
Slide small wooden beads onto the twine between the feathers if you want extra texture, or leave it simple to let the clay work shine.
Hang your beautiful handmade garland and enjoy the cozy autumn atmosphere it creates in your home
Handprint Turkey Keepsake Plaque
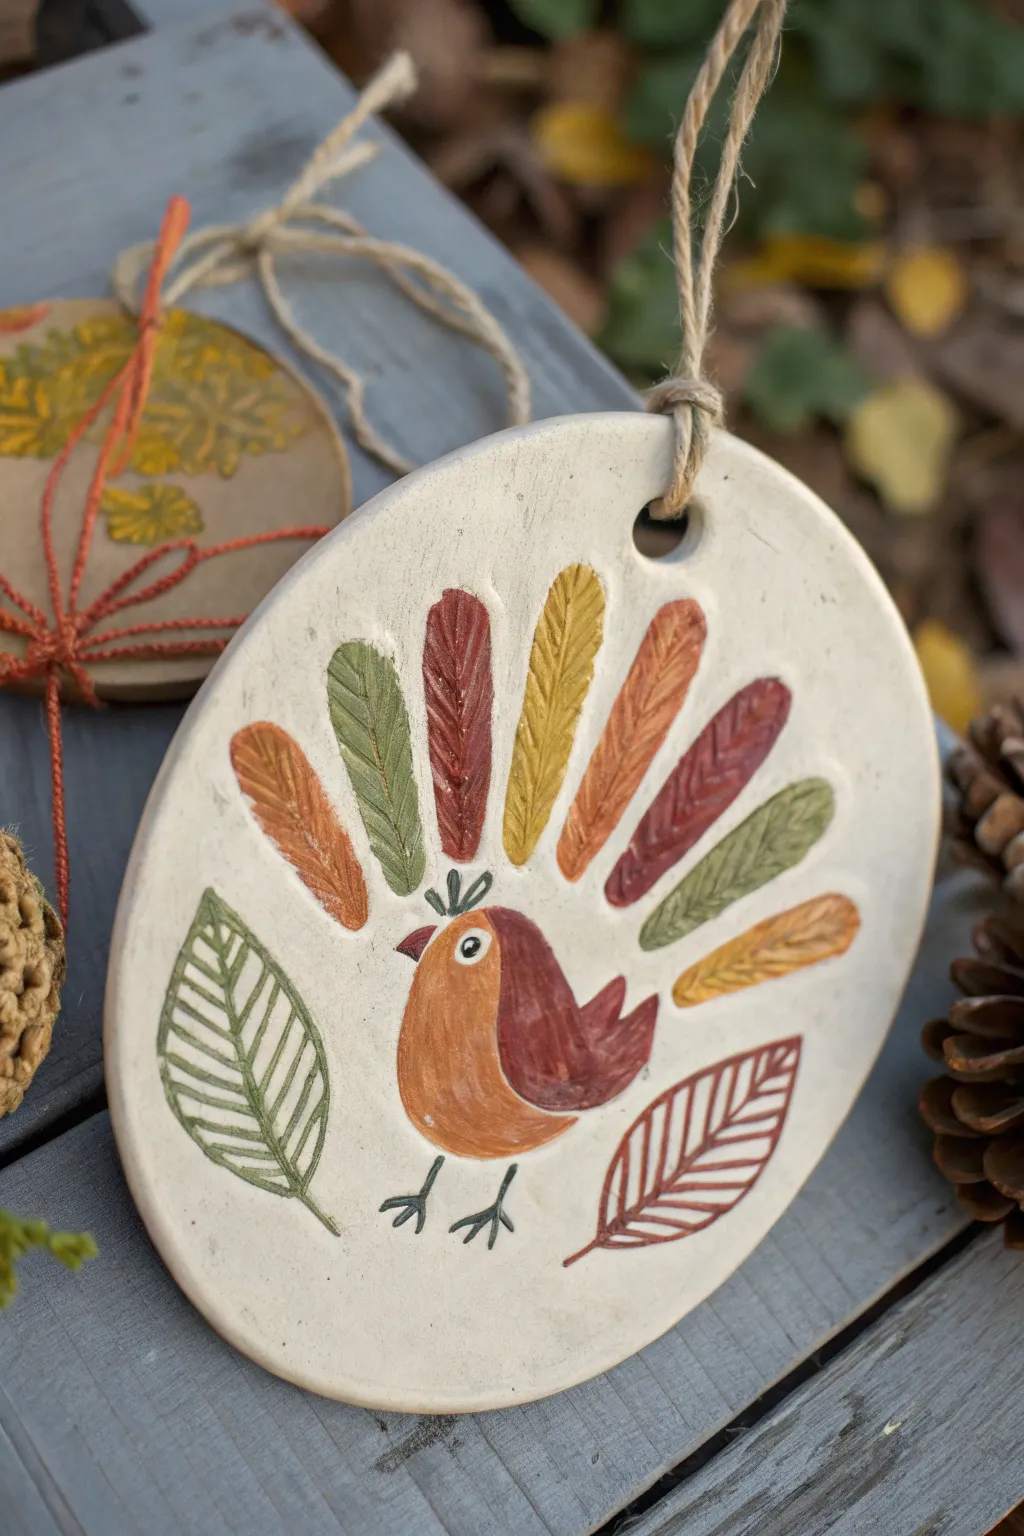
Celebrate the season with this charming handmade ornament that features a whimsical turkey surrounded by fall foliage. The textured feathers and leaves are created using simple clay carving or stamping techniques, finished with warm autumnal glazes for a rustic look.
Step-by-Step Tutorial
Materials
- Air-dry clay or polymer clay (white or cream)
- Rolling pin
- Circle cookie cutter (approx. 4-5 inches)
- Leaf-shaped clay stamps or real small leaves (fern/willow)
- Clay carving tools or a toothpick
- Acrylic paints (rust, mustard yellow, olive green, brown, black, white)
- Fine detail paintbrushes
- Straw or skewer (for hole)
- Jute twine
- Clear matte sealant or varnish
Step 1: Shaping the Base
-
Roll the clay slab:
Begin by conditioning your clay until it is soft and pliable. Roll it out on a smooth surface to an even thickness of about 1/4 inch to ensure durability without being too heavy. -
Cut the circle:
Use your large circle cookie cutter to press out a perfect round shape. If the edges are rough, dip your finger in a little water and gently smooth them out. -
Create the hanging hole:
Using a straw or a skewer, poke a hole near the top edge of the circle. Make sure it’s not too close to the rim to prevent cracking later.
Clean Lines Tip
If your carved lines look messy or have burrs after drying, lightly sand the surface with fine-grit sandpaper before you start painting for a professional finish.
Step 2: Creating the Design
-
Plan the composition:
Lightly sketch the outline of the turkey’s body in the lower center of the circle using a needle tool or toothpick. It should look like a simple round shape with a smaller head. -
Impress the feathers:
For the turkey’s tail feathers, you can use specialized elongated leaf stamps. Press them into the clay in a fan shape radiating from the turkey’s body. If you don’t have stamps, careful carving with a loop tool creates the same effect. -
Add floating leaves:
Stamp or carve two larger, broader leaf shapes on either side of the turkey’s body to fill the negative space and balance the design. -
Refine the turkey details:
Carve or press the wing shape into the turkey body. Define the beak and the small crest on top of the head. -
Texture the feathers:
Go back over your leaf and feather impressions. Use a needle tool to scratch delicate veins into each shape for added realism and texture that will catch the paint later. -
Dry the clay:
Allow the clay to dry completely according to the package instructions. For air-dry clay, I usually leave it for 24-48 hours, flipping it halfway through to prevent curling.
Step 3: Painting and Finishing
-
Base coat the feathers:
Using a small brush, paint the tail feathers in alternating autumn shades. Use rust red, mustard yellow, and olive green, watering the paint down slightly so the clay texture shows through. -
Paint the turkey body:
Paint the main body of the turkey a warm honey-brown color. Use a darker reddish-brown for the wing to make it stand out. -
Detail the face:
Carefully paint a small white circle for the eye, adding a tiny black pupil once dry. Use a dark brown or black for the beak and the stick-figure legs at the bottom. -
Paint the side leaves:
Paint the left leaf in olive green and the right leaf in a rust-brown tone. Keep the veins visible by using a technique called ‘dry brushing’ or wiping away excess paint on the high points. -
Seal the ornament:
Once the paint is fully cured, apply a coat of clear matte sealant. This protects the finish and deepens the colors without making it look plastic. -
Attach the twine:
Cut a length of jute twine, thread it through the hole at the top, and tie a secure loop knot for hanging.
Texture Alternative
Don’t have clay stamps? Press real leaves directly into the clay to create the feather shapes. The natural veins leave an incredibly detailed impression instantly.
Hang this rustic keepsake on a branch or give it as a thoughtful host gift for Thanksgiving dinner


What Really Happens Inside the Kiln
Learn how time and temperature work together inside the kiln to transform clay into durable ceramic.
Turkey Spoons and Place Setting Charms
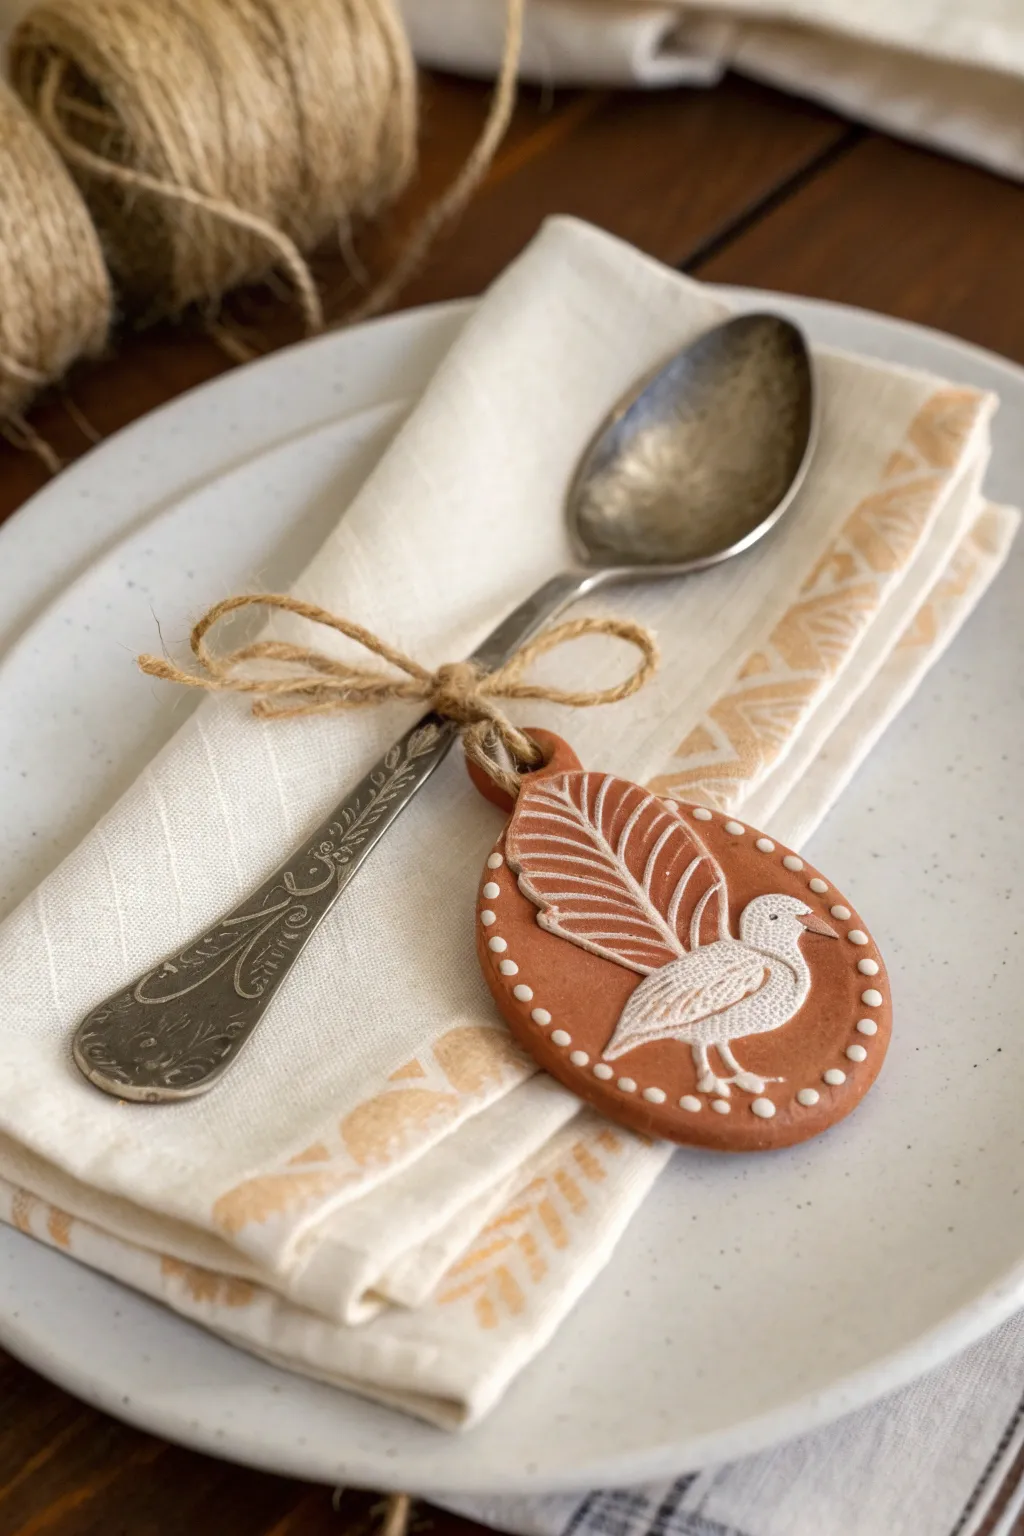
Add a handmade touch to your Thanksgiving table with these charming terracotta clay tags. Featuring a delicate white turkey relief on a warm earthy background, they serve as perfect napkin rings or personalized place setting accents.
Step-by-Step
Materials
- Terracotta-colored polymer clay (or air-dry clay)
- White liquid clay or white acrylic paint
- Oval clay cutter (medium size)
- Turkey or peacock stamp/mold (silicone or rubber)
- Small straw or cocktail stick (for making a hole)
- Jute twine
- Rolling pin
- Parchment paper or baking tile
- Fine-grit sandpaper (optional)
- Matte varnish (optional)
- Vintage silver spoons (for display)
- Cloth napkins
Step 1: Shaping the Base
-
Condition the clay:
Start by kneading your terracotta polymer clay in your hands until it becomes soft and pliable. This prevents cracking later on. -
Roll it out:
Place the clay on a sheet of parchment paper or a clean work surface. Use a rolling pin to flatten it to an even thickness of about 1/4 inch. -
Cut the shape:
Press your oval cutter firmly into the clay to create the tag base. Remove any excess clay from around the edges, but don’t lift the oval just yet to keep its shape pristine. -
Create the hanging loop:
At the narrower end of the oval, use a small straw or a cocktail stick to poke a hole. Ensure the hole is large enough for your jute twine to pass through easily.
Step 2: Creating the Design
-
Stamp the motif:
Take your turkey or bird stamp and press it gently but firmly into the center of the clay oval. You want a clear, deep impression, but be careful not to push all the way through. -
Add decorative borders:
Using a small dotting tool or the blunt end of a toothpick, press a series of small dots around the perimeter of the oval to frame the bird design. -
Smooth edges:
Dip your finger in a tiny bit of water (or baby oil if using polymer clay) and gently run it along the cut edges to smooth out any sharpness or burrs.
Clean Impressions
Dust your rubber stamp lightly with cornstarch or baby powder before pressing it into the clay. This acts as a release agent and prevents sticky clay from getting trapped in the detailed grooves.
Step 3: Baking and Filling
-
Bake or dry:
If using polymer clay, bake according to the package instructions (usually 275°F for 15-30 minutes). If using air-dry clay, let it sit for 24-48 hours until completely hard. -
Cool down:
Allow the clay piece to cool completely before proceeding. Handling hot clay can distort the shape or cause accidental burns. -
Highlight the design:
This is where the magic happens. I like to use white liquid clay or diluted white acrylic paint. Carefully fill in the stamped bird impression and the border dots. -
Wipe the excess:
Before the paint or liquid clay dries fully, gently wipe the surface with a damp cloth or paper towel. The white should remain in the recessed grooves while revealing the terracotta color on the raised surface. -
Final cure (if needed):
If you used liquid polymer clay for the fill, return the piece to the oven for a final short bake to set the white detail. If using paint, simply let it air dry completely.
Hazy White Residue?
If the white paint leaves a cloudy film on the terracotta surface after wiping, wait for it to dry fully, then lightly sand the surface with very fine-grit sandpaper to reveal the clean clay color again.
Step 4: Assembly
-
Prepare the silverware:
Fold your cloth napkin neatly. We chose a cream napkin with a subtle geometric print to match the rustic vibe. Place a vintage silver spoon diagonally across the top. -
String the charm:
Cut a length of jute twine, roughly 10 inches long. Thread one end through the hole in your finished clay tag. -
Tie the knot:
Wrap the twine around the neck of the spoon and the napkin. Tie it securely in a simple shoelace bow, positioning the clay charm so it hangs clearly visible below the bow. -
Adjust and fluff:
Gently pull the loops of the bow to make them even and ensure the charm is facing forward. Trim the twine tails if they look too long.
Now step back and admire how these simple clay accents bring a timeless, handcrafted warmth to your holiday table setting