If you’ve been craving ways to make your therian identity feel a little more tangible, clay is honestly one of the sweetest ways to do it. Here are my favorite therian clay ideas that let you honor your theriotype, whether you want something wearable, pocket-sized, or display-worthy.
Theriotype Totem Mini Figurine
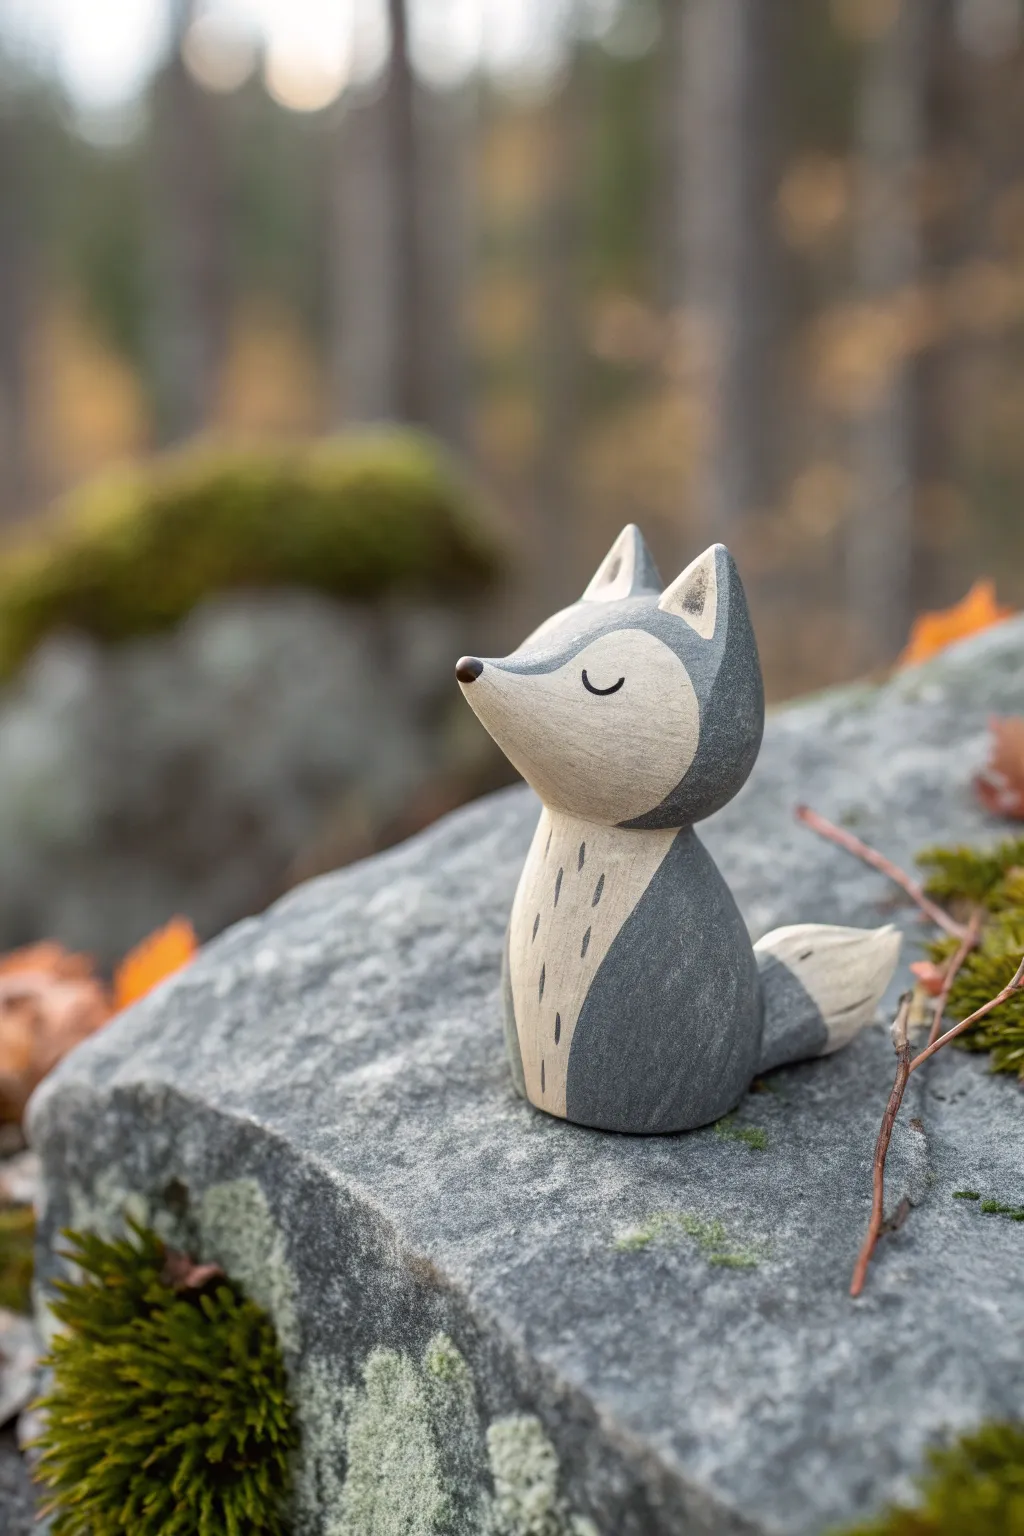
Capture the spirit of the forest with this minimalist fox figurine, sculpted to look like carved wood but crafted from polymer clay. Its clean lines, simple two-tone palette, and peaceful expression make it a perfect pocket companion or desk guardian.
Step-by-Step Tutorial
Materials
- Polymer clay (grey/granite and beige/sand)
- Set of basic sculpting tools (needle tool, smoothing tool)
- Black acrylic paint
- Fine-grit sandpaper (optional)
- Matte varnish
- Aluminum foil (for armature)
- Small paintbrush (size 0 or 00)
- Oven for baking
Step 1: Forming the Base
-
Create the Core:
Start by crumpling a small piece of aluminum foil into a tight teardrop shape about the size of a walnuts. This will be the core of the body and helps save clay. -
Prepare the Body Clay:
Condition a chunk of grey polymer clay until it’s soft and pliable. Roll it into a ball and then flatten it into a thick pancake. -
Wrap the Core:
Wrap the flattened grey clay around the foil teardrop, ensuring the foil is completely covered. Smooth out any seams with your thumb so the surface is seamless. -
Shape the Torso:
Gently shape the clay-covered teardrop so it has a flat bottom for stability. The top should taper slightly where the head will attach. -
Form the Head:
Roll a separate ball of grey clay for the head. Pinch one side to form a pointed nose, creating a droplet shape. -
Attach the Head:
Press the head onto the top of the body. You can use a small piece of wire or a toothpick inserted between them for extra strength. -
Blend the Neck:
Use a smoothing tool to gently blend the clay at the neck seam, so the head flows naturally into the body without looking like a separate stuck-on piece.
Seamless Blending
To make the beige patches look inlaid rather than stuck on top, gently roll the handle of a paintbrush over the edges where colors meet to flush them.
Step 2: Adding Details
-
Sculpt the Ears:
Shape two small triangles of grey clay for the ears. Attach them to the top of the head using a small dot of liquid clay or by blending the base of the ears into the skull. -
Add the Tail:
Create a bushy tail shape using grey clay. Attach it to the lower back of the body, curving it upwards slightly against the figurine’s back. -
Apply the Tummy Patch:
Roll out a very thin sheet of beige or sand-colored clay. Cut an oval shape and carefully press it onto the front of the chest and tummy. -
Add Face Markings:
Cut a heart-shaped or curved piece from the same thin beige sheet. Place this over the face area, wrapping it around the muzzle to create the fox’s signature mask. -
Tail Tip Detail:
Add a small cap of beige clay to the tip of the tail, blending the edges so it looks continuous with the grey part. -
Smooth and Refine:
Go over the entire sculpture with your finger or a soft silicone tool to remove fingerprints. I find a tiny drop of baby oil helps achieve a perfectly smooth finish here.
Level Up: Stone Texture
Before baking, gently dab the grey areas with an old toothbrush or stiff sponge. This creates a speckled, stone-like texture.
Step 3: Designing and Finishing
-
Simulate Wood Texture:
Using a needle tool, gently scratch very light vertical lines into the beige chest patch to mimic hair or wood grain texture. -
Bake the Clay:
Bake the figurine according to your clay package instructions. usually around 275°F (135°C) for 15-30 minutes depending on thickness. -
Cool Down:
Allow the piece to cool completely in the oven with the door slightly ajar to prevent cracking. -
Paint the Face:
Using a very fine brush and black acrylic paint, carefully paint two closed curved lines for sleepy eyes and a tiny dot for the nose. -
Paint Chest Details:
Add small black dashes on the beige chest area to emphasize the fur texture you sculpted earlier. -
Seal the Work:
Once the paint is completely dry, coat the entire figurine with a matte varnish to protect the paint and give it that soft, non-glossy stone or wood look.
Place your finished totem in a quiet spot or keep it with you as a grounding reminder of nature


Pocket Paw Worry Stone
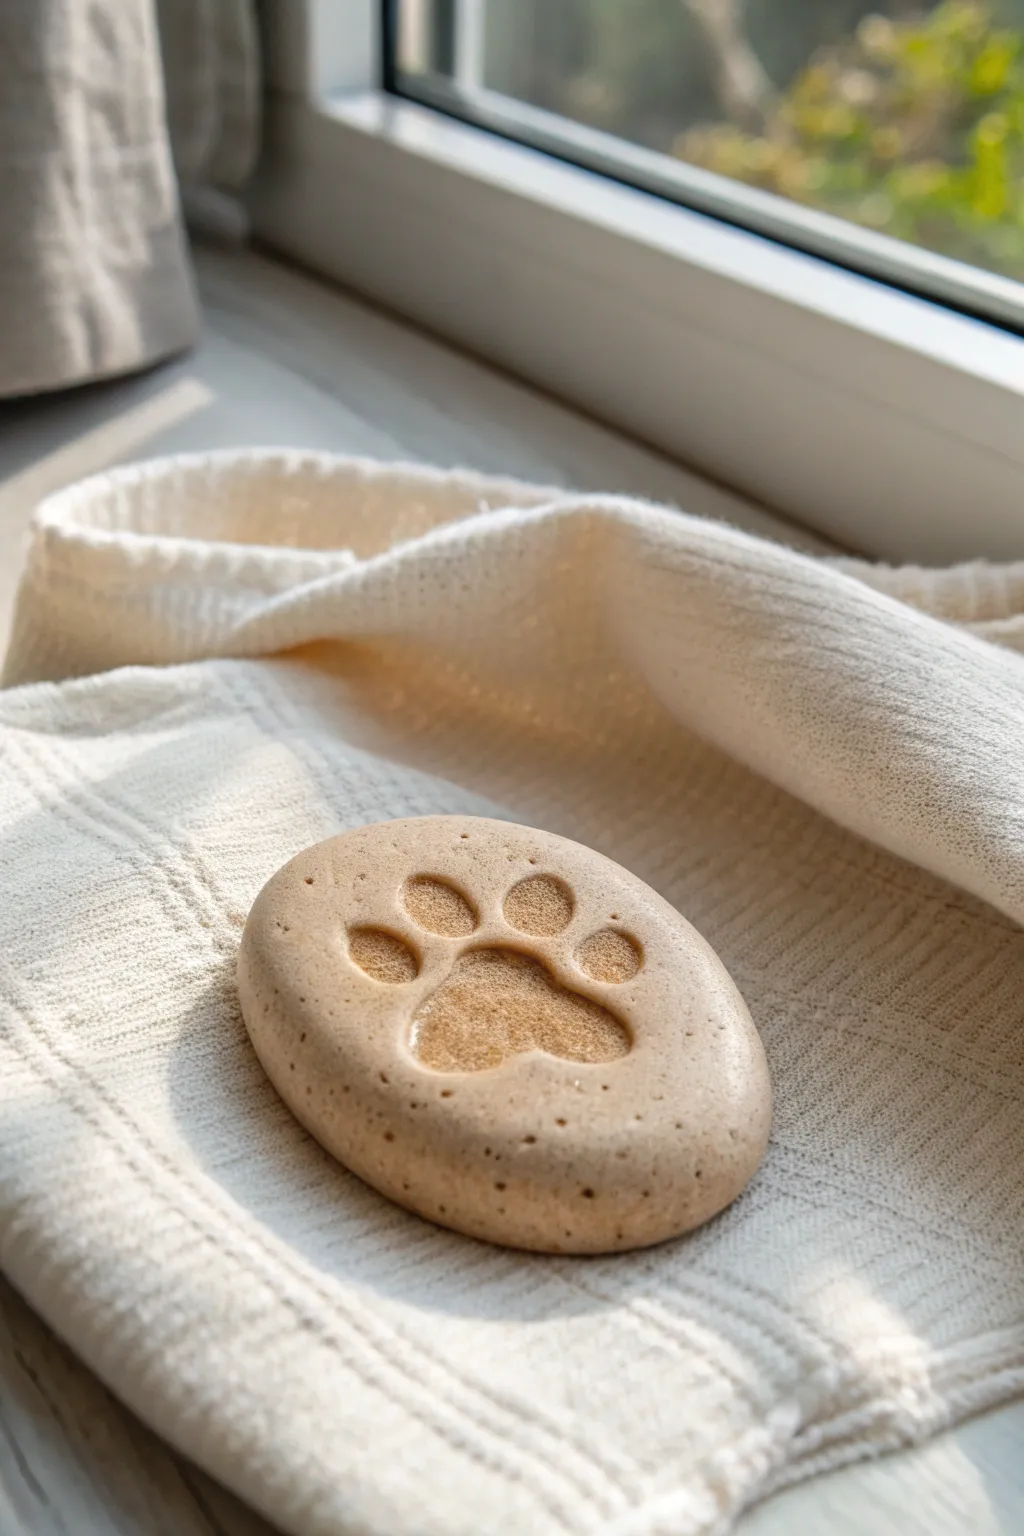
Carry a comforting reminder of your theriotype with this smooth, tactile worry stone. This project features a simple, natural-toned clay oval with a deeply impressed paw print that feels grounding to touch.
Detailed Instructions
Materials
- Polymer clay (beige or light tan)
- Small amount of brown pastel or mica powder
- Soft paintbrush
- Paw print stamp or sculpting tool
- Acrylic roller or smooth glass jar
- Fine-grit sandpaper (400-800 grit)
- Oven and baking sheet (or parchment paper)
- Glaze or varnish (optional)
Step 1: Shaping the Base
-
Condition the clay:
Start by taking a chunk of beige polymer clay roughly the size of a walnut. Knead it thoroughly in your hands until it becomes warm, soft, and pliable. This conditioning step prevents cracks later on. -
Form a ball:
Roll the conditioned clay between your palms to create a smooth, tight sphere. Ensure there are no visible seams or air pockets trapped inside. -
Flatten into a stone shape:
Place the ball on your work surface and gently press it down with your palm or an acrylic roller. Aim for a thick, oval cushion shape—about half an inch thick—that fits comfortably in the curve of your thumb. -
Smooth the edges:
Pick up the clay oval. Use your thumb to gently round over the edges, smoothing away any sharp corners or fingerprints. I find that rubbing a tiny drop of baby oil on my finger helps get it perfectly sleek. -
Add surface texture (Optional):
If you want a more organic, stone-like look, lightly tap the surface with a piece of sandpaper or a toothbrush to create tiny pores, just like the reference image.
Step 2: Creating the Impression
-
Position the paw:
Decide where you want the print. Center it for symmetry or offset it slightly for a casual look. If using a stamp, press it firmly into the center of the stone. -
Sculpting manually (No stamp):
If you don’t have a stamp, use a ball-stylus tool. Press the tool down to create the large main pad first, slightly rocking it to widen the shape. -
Adding the toes:
Press four smaller circular indentations above the main pad using a smaller ball tool or the end of a paintbrush handle. Arrange them in an arch. -
Refining the edges:
Inspect the rim of the impression. If the clay bulged up securely around the print, gently pat it back down so the stone remains smooth to the touch.
Fixing Cracks
Did small cracks appear while baking? Mix a small bit of liquid polymer clay with your base color, fill the crack, smooth it, and re-bake for 10 minutes.
Step 3: Coloring and Finishing
-
Prepare the shading:
Shave a small amount of brown soft pastel into a fine dust using a craft knife or sandpaper. Alternatively, you can use brown mica powder. -
Apply the shade:
Dip a soft, dry paintbrush into the powder. Gently dust it inside the paw print indentations. The powder will stick to the raw clay, creating a darker contrast against the lighter stone surface. -
Clean up excess:
If any powder gets on the raised surface of the stone, wipe it away carefully with a baby wipe or a damp cotton swab, leaving the color only inside the print. -
Add specks (Optional):
To mimic the speckled stone look in the photo, you can flick a tiny amount of watered-down brown acrylic paint onto the stone using a toothbrush, or mix cracked black pepper into the clay before shaping. -
Bake the clay:
Place the stone on a parchment-lined baking sheet. Bake according to your polymer clay package instructions (usually 275°F/135°C for 15-30 minutes depending on thickness). -
Cool down:
Let the stone cool completely in the oven with the door cracked open. This gradual cooling makes the clay stronger. -
Sanding:
Once cool, dip the stone in water and sand it lightly with fine-grit sandpaper to remove any lingering fingerprints or rough texture. -
Buffing:
Rub the stone vigorously with a piece of denim or a soft cloth. This burnishing step gives it a professional, satiny sheen without needing varnish.
Weighted Stone
For a heavier feel, wrap your clay around a smooth river rock. Roll the clay thin, encase the rock fully, and bake. The weight feels incredibly grounding.
Now you have a durable, personalized totem to keep in your pocket whenever you need a moment of calm connection
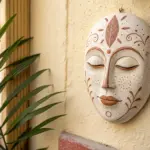


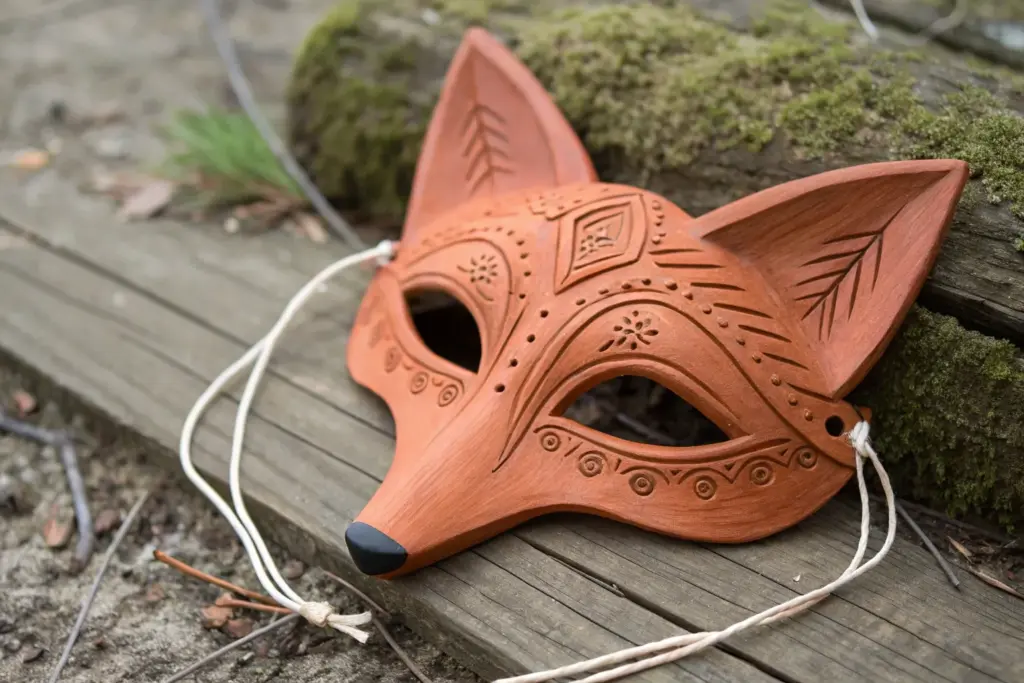
Clay Ears for a Theriotype Mask
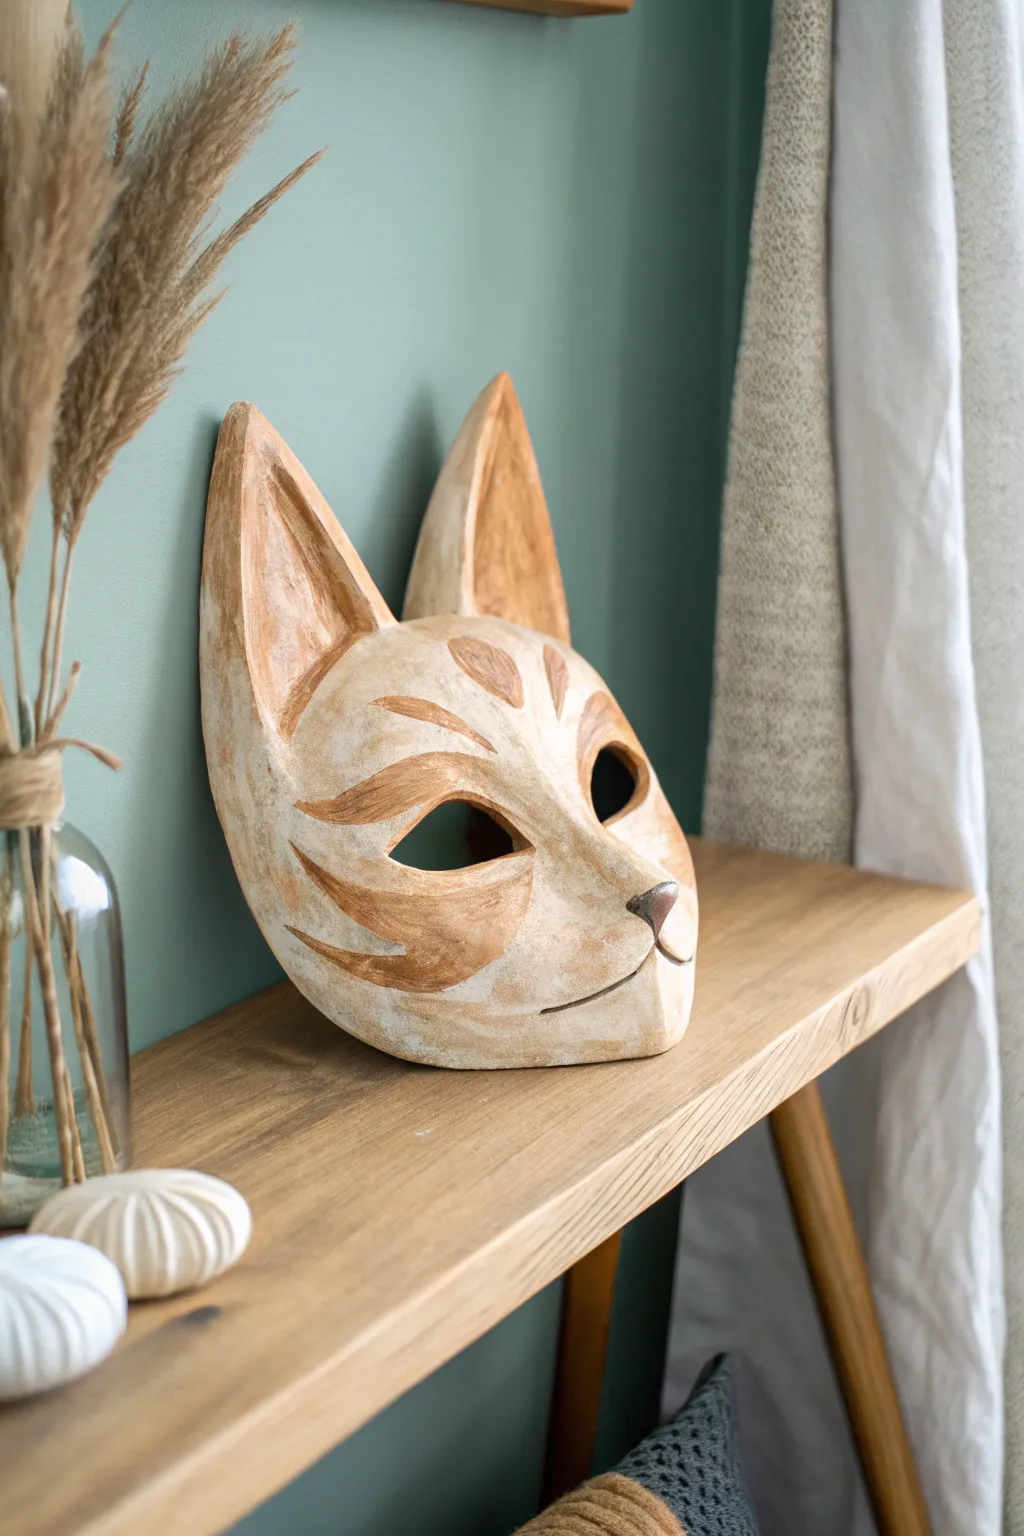
This captivating project guides you through creating a stylized fox mask with a beautiful, weathered finish that looks like carved wood or aged ceramic. Perfect for display or wear, it captures the essence of a forest spirit with its earthy tones and expressive, large ears.
Detailed Instructions
Materials
- Durable mask base (plastic or felt)
- Air-dry clay (smooth texture, white or grey)
- Cardboard or cardstock (for ear extensions)
- Hot glue gun and glue sticks
- Water
- Sculpting tools (ribbon tool, needle tool)
- Sandpaper (fine and medium grit)
- Acrylic paints (White, Raw Siena, Burnt Umber, Black)
- Matte sealant spray
- Sponge or rag for weathering
- Paintbrushes (flat and detail)
Step 1: Building the Form
-
Prepare the Ear Structure:
Cut two large, triangular shapes from stiff cardboard or cardstock to form the exaggerated ears. Slight curving of the cardboard helps them look more natural. -
Attach Ears to Base:
Using hot glue, firmly attach the cardboard ears to the top of your mask base. Ensure they are symmetrical and angled slightly forward for an alert expression. -
Bulk Out the Face:
Add small crumpled balls of foil or paper tape around the nose and brow ridges if your base is too flat; this adds dimension before the clay layer. -
Apply the Clay Layer:
Roll out your air-dry clay to about 1/4 inch thickness. Gently drape and press it over the entire mask surface, smoothing it down over the ears and facial features. -
Refine the Edges:
Wrap the clay slightly around the back edges of the mask and the eye holes to secure it. Use a little water on your finger to smooth out any seams or fingerprints.
Cracking Clay?
If small cracks appear during drying, make a ‘slip’ by mixing clay and water into a paste. Fill the cracks, smooth over, and let dry again.
Step 2: Sculpting Details
-
Define the Eyes:
Use a sculpting tool or a wet brush to shape the eye openings into an elongated almond shape, typical of felines or foxes. -
Sculpt the Nose:
Add a small triangle of clay to the nose tip. Smooth it into the muzzle to create a distinct, slightly raised nose pad. -
Carve the Mouth:
Carve a gentle, curving line for the mouth. You can add a tiny ‘snake’ of clay along the upper lip line to give it more volume before smoothing it out. -
Create Fur Texture (Optional):
While I prefer a smooth finish for this specific look, you can lightly drag a stiff brush through the damp clay if you want a rougher texture. -
Drying:
Set the mask aside in a cool, dry place. Allow it to dry completely for at least 24-48 hours until hard and white. -
Sanding:
Once bone dry, sand the surface. Start with medium grit to knock down bumps, then finish with fine grit for a porcelain-smooth finish.
Step 3: Painting and Weathering
-
Base Coat:
Paint the entire mask with a mixture of White and a tiny drop of Raw Siena to create a warm, off-white bone color. Let this dry fully. -
Marking the Design:
Lightly sketch the forehead stripes, cheek markings, and inner ear triangles with a pencil to guide your painting. -
Painting the Markings:
Mix Raw Siena with a touch of Burnt Umber. Paint the stripes and markings with jagged, fierce strokes to mimic fur patterns. -
The Weathering Wash:
Dilute Burnt Umber paint with water until it’s very thin. Brush this over the entire mask, working in sections. -
Wiping Back:
Immediately wipe away the watered-down paint with a damp sponge or rag. The dark pigment will stick in the crevices and texture, creating an aged, wood-carved look. -
Nose Detail:
Paint the nose pad a solid, dark brown or black. Add a tiny white highlight dot to make it look wet. -
Sealing:
Protect your work with two thin coats of matte sealant spray to prevent the clay from re-absorbing moisture and to lock in that rustic paint job.
Lightweight Lift
Use crumpled aluminum foil to build the core shape of the ears before covering in clay. It keeps the mask light and comfortable to wear.
Place your finished mask on a shelf among natural décor to enjoy its silent, spirited presence


Therian Keychain Totem Tag
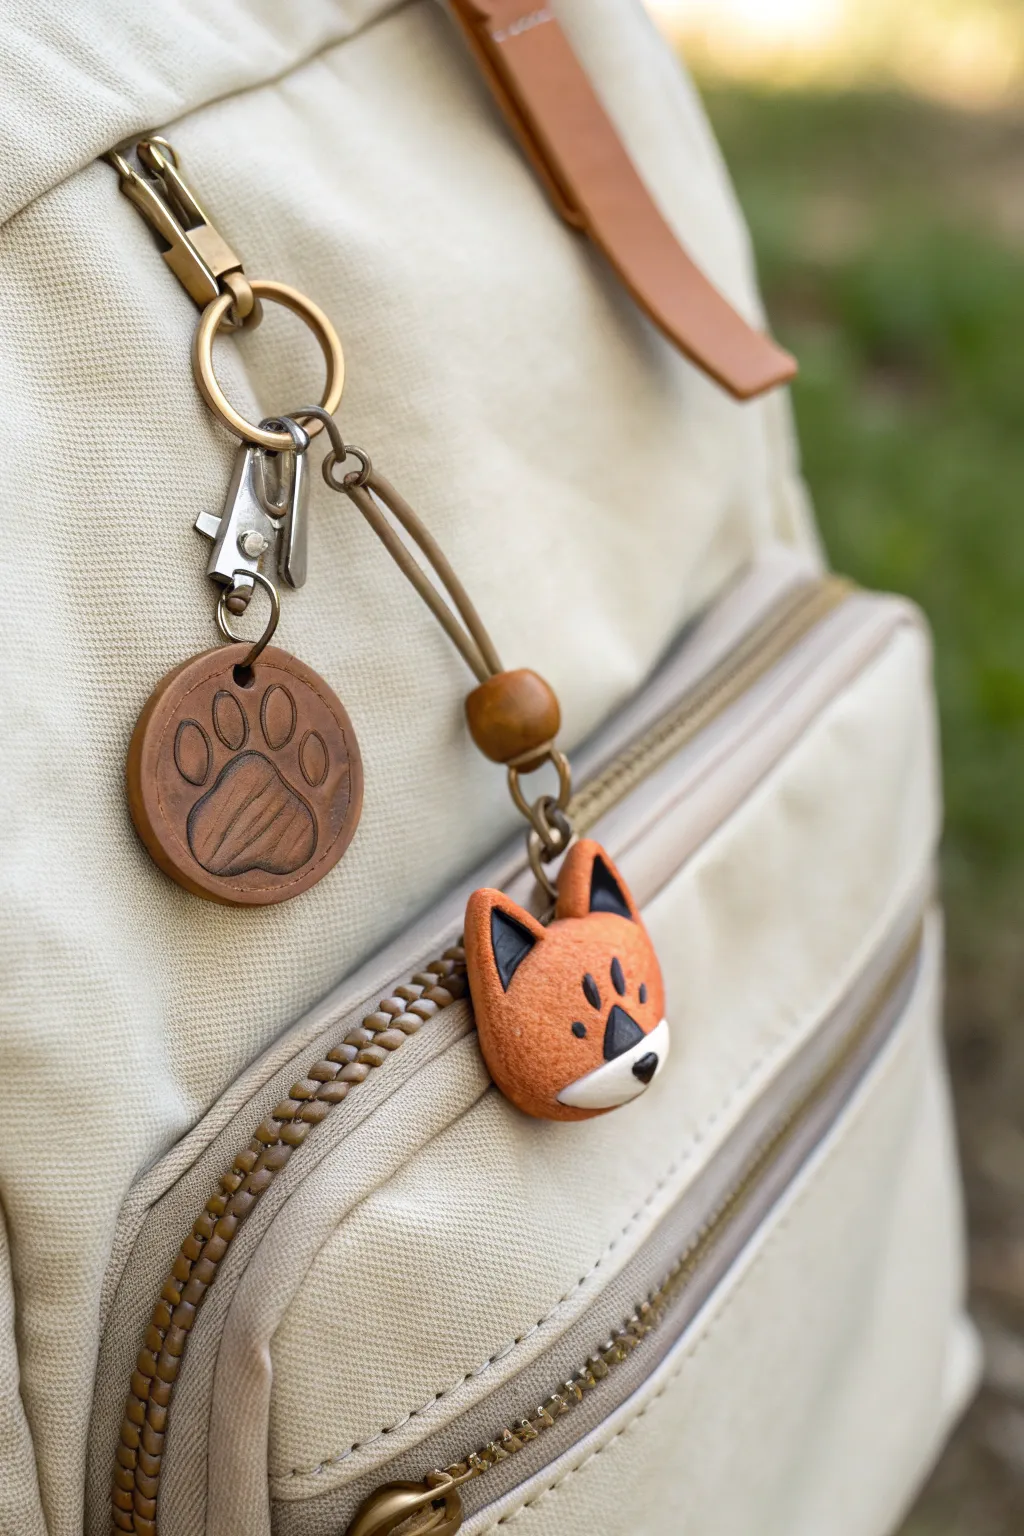
Craft a deeply personal connection to your theriotype with this dual-charm keychain set, featuring a stamped leather-effect paw tag and an adorable sculpted fox head. The combination of earthy textures and cute character design makes for a sturdy, travel-ready backpack accessory.
How-To Guide
Materials
- Polymer clay (terracotta/rust orange, black, white)
- Faux leather polymer clay (or brown leather scraps)
- Small circle cutter (approx 1.5 inch)
- Paw print stamp or ball stylus tool
- Headpins or eye pins
- Small wooden bead
- Waxed cord or suede lace
- Lobster clasp keychain hardware
- Needle tool or toothpick
- Acrylic paint (dark brown/black wash)
- Matte varnish or glaze
- Jewelry pliers
- Oven for baking
Step 1: Sculpting the Fox Head
-
Form the base:
Start by conditioning your terracotta or rust-orange polymer clay until soft. Roll a sphere about the size of a large grape, then gently flatten the back so it sits flush against a surface. -
Shape the face:
Pinch the bottom third of the sphere slightly to create a tapering snout area, giving the head a soft triangular shape. -
Add the ears:
Creating the ears requires two small triangles of orange clay. Press these firmly onto the top of the head, blending the seams downward with a silicone tool or your finger so they don’t pop off later. -
Detail the ears:
Take tiny triangles of black clay, smaller than the orange ones, and press them into the centers of the ears for depth. -
Create the muzzle:
Roll a small, flat oval of white clay. Press this onto the bottom tapered section of the face to define the muzzle area. -
Add facial features:
Place a tiny black clay triangle on the white muzzle for the nose. For the eyes, roll two tiny black teardrop shapes and press them vertically onto the face. Adds small markings above the eyes if desired. -
Insert hardware:
Insert a screw eye pin or a trimmed headpin deeply into the top center of the head. I like to add a dab of liquid clay or Bake and Bond on the shaft for extra security.
Loose Eye Pins?
If the pin pulls out after baking, pull it all the way out, put a drop of superglue on the end, and push it back in immediately.
Step 2: Creating the Paw Tag
-
Prepare the faux leather:
Roll out a sheet of brown leather-effect polymer clay to about 3mm thickness. Alternatively, use regular brown clay textured with a crumpled foil ball. -
Cut the shape:
Use your circle cutter to punch out a clean disc. Smooth the edges with your finger to remove any sharp cutting ridges. -
Stamp the design:
Firmly press a paw print stamp into the center. If you don’t have a stamp, use a ball stylus to manually impress one large pad and four toe beans. -
Create a border:
Use a needle tool or a blunt spacing tool to press a decorative groove line around the inner circumference of the circle. -
Piercing the hole:
Punch a small hole near the top edge of the disc large enough to fit a jump ring. Ensure there is enough clay above the hole so it won’t tear.
Step 3: Finishing and Assembly
-
Bake:
Bake both pieces according to your clay package instructions (usually 275°F/130°C for 15-30 minutes). Let them cool completely. -
Antiquing the tag:
To make the paw print pop, brush diluted brown or black acrylic paint into the recesses of the tag. Wipe away the surface excess with a damp paper towel immediately, leaving dark paint only in the grooves. -
Seal:
Apply a matte varnish to protect the paint and give the fox a finished look. -
String the fox:
Attach a jump ring to the fox’s eye pin. Thread a piece of waxed cord through the jump ring, then thread both ends of the cord through a wooden bead to lock it in place. -
Final assembly:
Tie the cord ends to your main keychain hardware. Attach the paw tag using a separate jump ring directly to the hardware clasp.
Realistic Leather Look
Before baking the tag, gently press a piece of denim or coarse fabric onto the clay surface to mimic the texture of real animal hide.
Clip your new totems onto your bag and carry a piece of your identity with you wherever you roam

The Complete Guide to Pottery Troubleshooting
Uncover the most common ceramic mistakes—from cracking clay to failed glazes—and learn how to fix them fast.
Paw-Shaped Trinket Dish
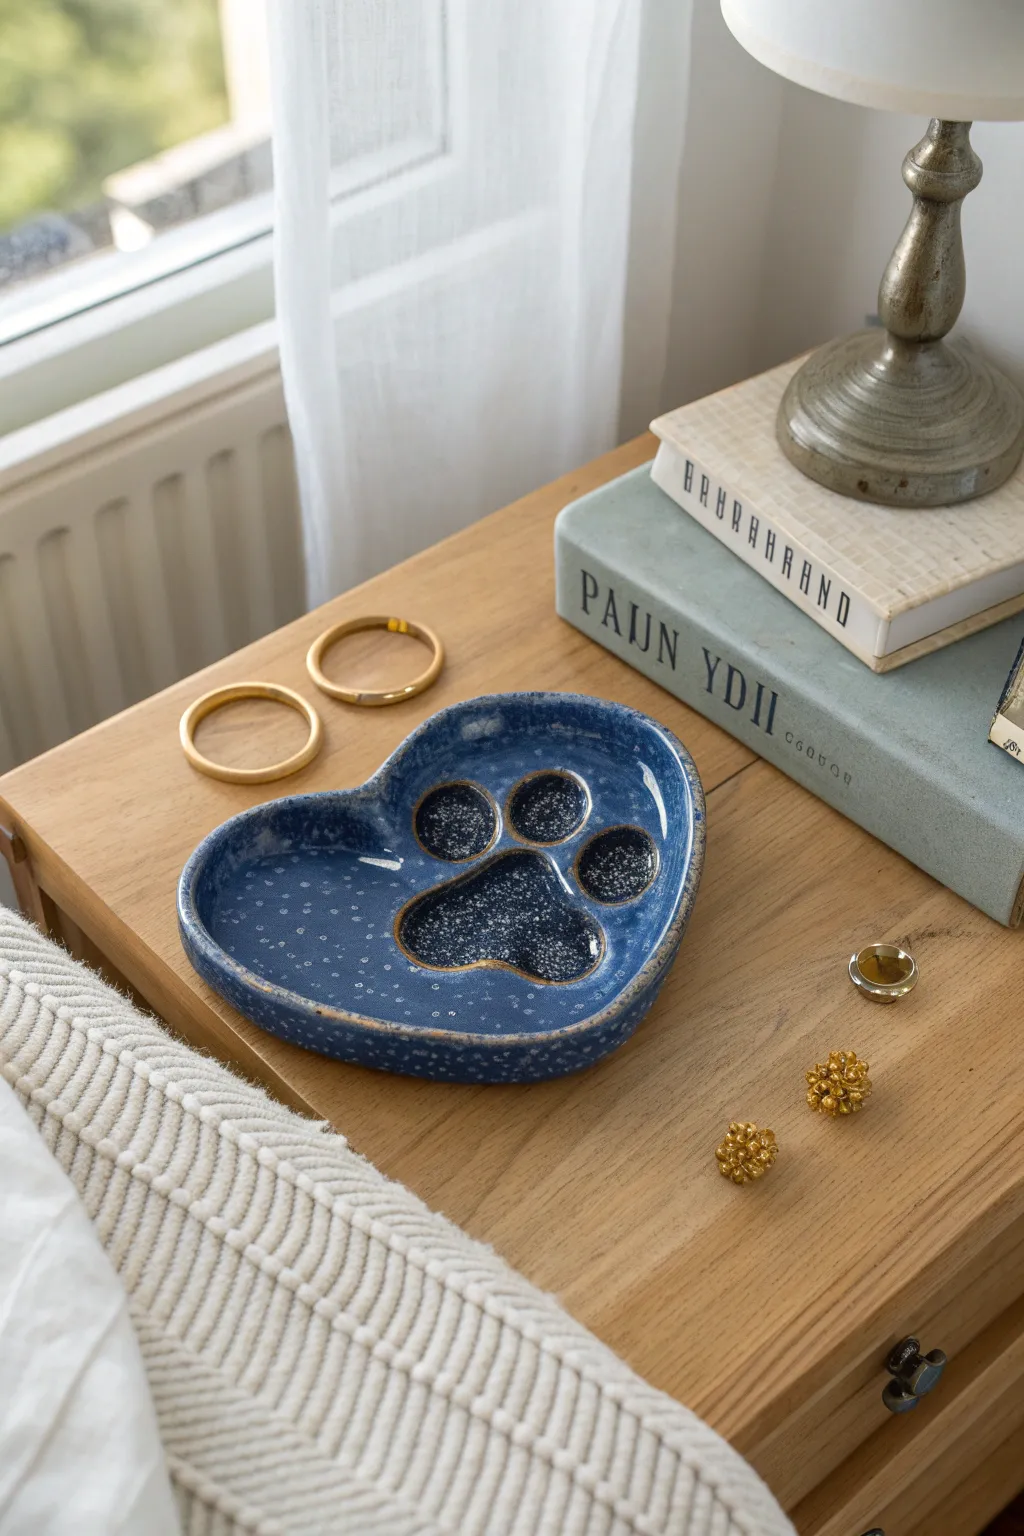
Celebrate your therian identity or love for animals with this celestial-inspired trinket dish. Shaped like a heart and featuring a deep blue, starry paw print, this ceramic piece is perfect for holding your most precious jewelry.
Step-by-Step Guide
Materials
- Air-dry clay or polymer clay (low-fire ceramic clay if you have kiln access)
- Small rolling pin
- Heart-shaped template or cookie cutter (approx. 4-5 inches)
- Modeling tools (specifically a small ball tool)
- Exacto knife or clay cutting tool
- Sponge and water
- Acrylic paints (Navy Blue, Black, White, Gold)
- Glossy varnish or resin for a ceramic finish
- Fine stiff-bristled brush (like an old toothbrush)
- Small round paintbrush
Step 1: Shaping the Base
-
Prepare the Clay:
Begin by conditioning your clay until it is smooth and pliable. Roll it out into an even slab, approximately 1/4 inch thick. Aim for a consistent thickness to ensure even drying. -
Cut the Heart:
Place your heart-shaped template onto the clay or use a large cookie cutter. Carefully cut out the shape using your knife, keeping the edges clean. -
Form the Rim:
Gently lift the edges of the heart upwards to create a shallow wall. Use your fingertips to smooth the clay upwards, creating a seamless curve from the base to the rim. -
Smooth the Edges:
Dip your finger or a small sponge in water and run it along the rim and the interior walls to remove any cracks or fingerprints. The rim should feel soft and rounded, not sharp.
Fixing Cracks
Did small cracks appear while drying? Mix a tiny bit of fresh clay with water to make a paste (slip) and fill the cracks. Smooth over and let dry again before painting.
Step 2: Creating the Paw Impressions
-
Position the Main Pad:
Identify the center of the heart where the main paw pad will go. It should be slightly lower than the center point. Press your thumb or a large ball tool firmly into the clay to create an inverted triangular indentation with rounded corners. -
Refine the Main Shape:
Use a small modeling tool to refine the edges of this main pad depression, ensuring it looks like the large cushion of a paw. -
Add Toe Beans:
Above the main pad, press four smaller, oval indentations in an arch using your pinky finger or a smaller ball tool. These are the toe pads. -
Smooth Transitions:
Lightly smooth the clay around each indentation so the ‘pads’ look distinctly sunken but not rough. I find a damp brush works best for getting into these small crevices.
Galaxy Glow
For a magical touch, mix some glow-in-the-dark pigment powder into your white paint before splattering the stars. Your paw print will shine like a real constellation at night.
Step 3: Drying and Painting
-
Allow to Dry:
Let the dish dry completely according to your clay’s instructions. This usually takes 24-48 hours for air-dry clay. -
Sand Imperfections:
Once fully dry, lightly sand any rough edges on the rim or bottom with fine-grit sandpaper. -
Base Coat:
Paint the entire interior of the dish, including the paw indentations, with a deep navy blue acrylic paint. You may need two coats for full opacity. -
Add Depth:
Mix a tiny amount of black into your navy blue and paint the deep recesses of the paw pads. This shadow effect makes the print pop. -
Starry Texture:
To create the speckled, cosmic look shown in the photo, dilute white acrylic paint slightly with water. Load a stiff brush (like a toothbrush) and flick the bristles to splatter tiny white dots across the blue surface. -
Paint the Rim:
Using a small brush, carefully paint the top edge of the rim with a gold or light bronze paint. This mimics the raw, unglazed edge of traditional pottery. -
Seal the piece:
Finish by applying a high-gloss varnish or a thin layer of resin over the entire dish. This gives it that shiny, glass-like ceramic appearance and protects the paint.
Place your new cosmic dish on your nightstand to keep your treasures safe and sound
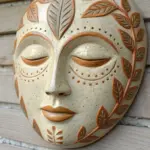
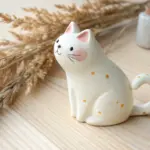
Theriotype Planter With a Face
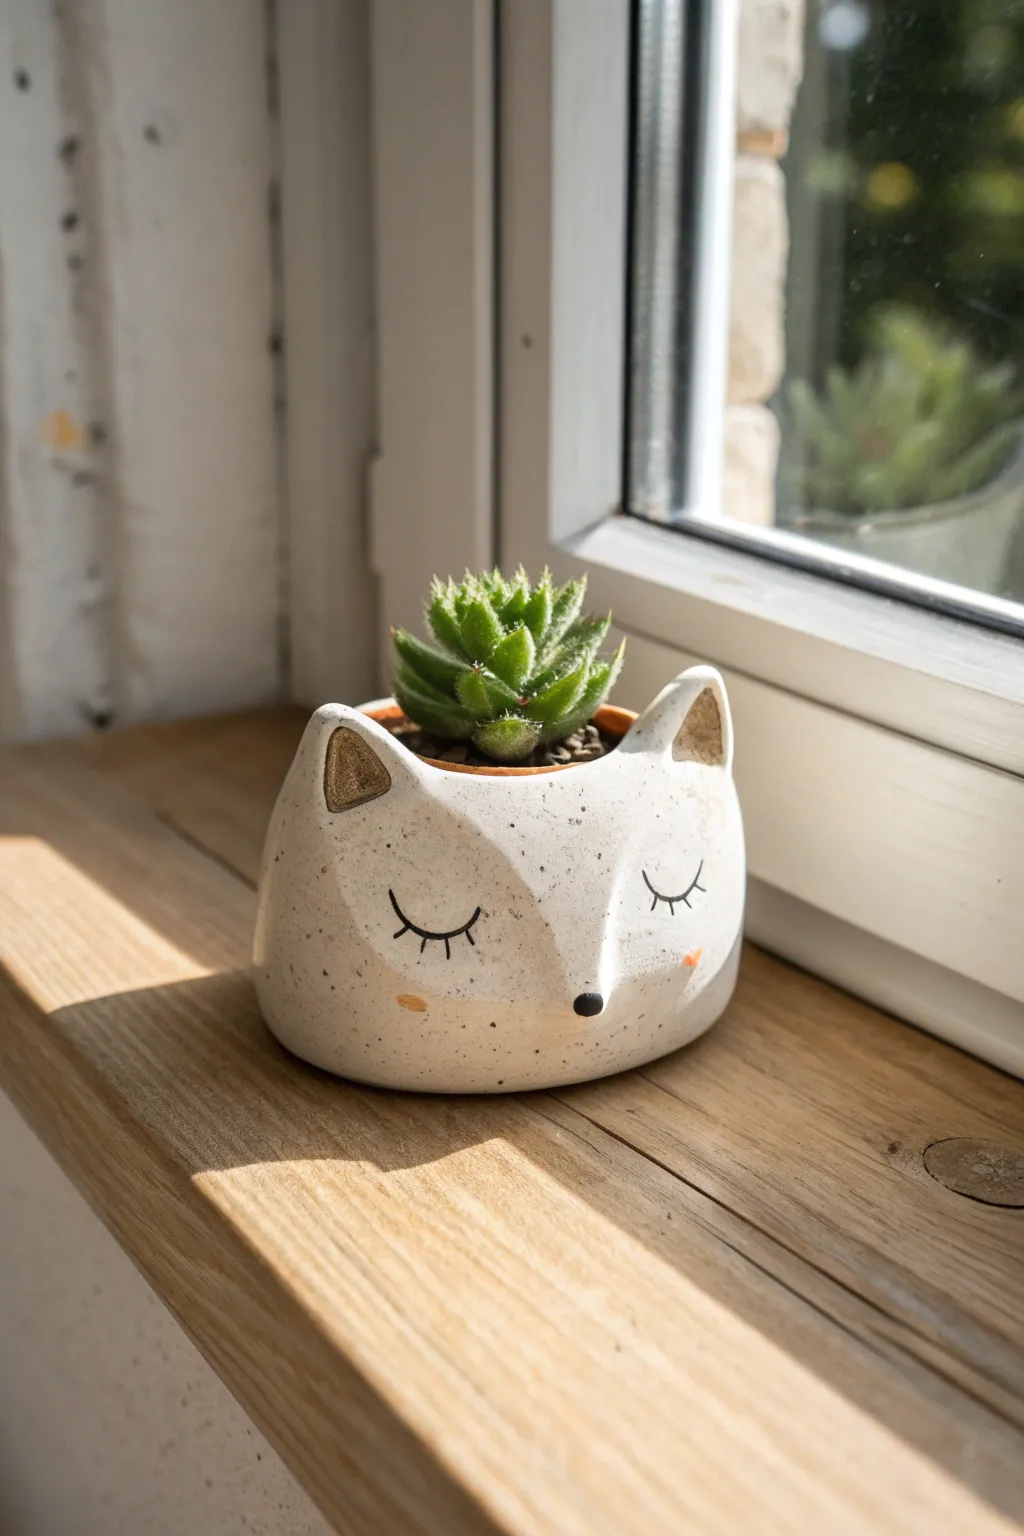
This adorable fox-shaped planter is the perfect way to represent a vulpine theriotype while adding a touch of nature to your windowsill. Its peaceful, sleeping expression and subtle speckled finish give it a charming, handmade ceramic feel without needing a pottery wheel.
Step-by-Step
Materials
- White polymer clay or air-dry clay (approx. 500g)
- Clay sculpting tools (specifically a needle tool and a smoothing tool)
- Rolling pin
- Small bowl or cup (to use as a slump mold)
- Water (for smoothing)
- Acrylic paints (black, soft orange, gold)
- Old toothbrush (for the speckled effect)
- Brown paint mixed with water (optional ‘wash’)
- Fine-grit sandpaper
- Matte or satin sealant spray
- Small succulent plant
Step 1: Shaping the Base
-
Prepare the Clay:
Begin by conditioning your clay until it’s soft and pliable. Roll it out into a flat, even slab about 1/4 inch thick. This thickness ensures the planter is sturdy enough to hold soil later. -
Form the Bowl:
Cut a large circle from your slab. Gently drape this circle inside your small bowl or cup, which acts as a mold to create a uniform rounded shape. Press gently against the sides to ensure a smooth curve. -
Refining the Shape:
Trim any excess clay sticking up over the rim of your mold. Use a little water on your finger to smooth out the rim, making it nice and rounded rather than sharp. -
Adding Height:
Roll a thick snake of clay and attach it to the top rim to build up the height if you want a deeper planter. Blend the seam seamlessly on both the inside and outside using a smoothing tool.
Step 2: Sculpting the Fox Features
-
Pinching the Ears:
Identify where the front of the face will be. Directly above this area, pinch the upper rim of the clay upwards on the left and right sides to form two triangular ear shapes. -
Refining the Ears:
Smooth the clay around the pinched ears so they flow naturally from the rim. Use your thumb to create a slight indentation in the front of each ear for depth. -
Creating the Snout:
Roll a small ball of clay and shape it into a gentle, rounded cone. Attach this to the front center of the planter, blending the edges thoroughly until the snout looks like it emerges naturally from the bowl. -
Smoothing the Sruface:
Before drying, dip a sponge or finger in water and go over the entire exterior. I find that spending extra time here makes the final painting stage much easier and looks more professional. -
Drying Time:
Let the clay dry completely according to the package instructions. If using air-dry clay, this might take 24-48 hours. Don’t rush this step to avoid cracks.
Cracks happen?
Make a ‘slip’ paste mixture of water and fresh clay. Smear this into any cracks that appear during drying, smooth it over, and let it dry again.
Step 3: Painting and Finishing
-
Sanding:
Once fully dry, use fine-grit sandpaper to gently buff away any fingerprints or bumps. Wipe away the dust with a slightly damp cloth. -
Base Coat:
Paint the entire planter with an off-white or creamy white acrylic paint. You may need two coats for full opacity. -
Speckled Effect:
Dip an old toothbrush into watered-down brown or grey paint. Run your thumb over the bristles to flick tiny speckles onto the planter, mimicking a ceramic glaze. -
Painting the Face:
Using a very fine detail brush and black paint, draw two downward curving lines for the sleeping eyes. Add three small, delicate lashes to the outer corner of each eye. -
Adding Details:
Paint the very tip of the snout black for the nose. Paint small, oval-shaped orange or pink cheeks just below the eyes. -
Gilding the Ears:
Carefully paint the inner triangle of the ears with metallic gold paint for a touch of elegance. -
Sealing:
Spray the entire piece with a matte or satin sealant to protect the paint and make it water-resistant. -
Planting:
Once the sealant is dry, nestle your small succulent inside. Using a plastic nursery pot inside your clay creation is best to facilitate drainage.
Level Up: Tail Texture
Sculpt a fluffy tail shape in relief wrapping around the back of the planter for a complete 360-degree fox design.
Now you have a serene little fox guardian for your plants.


What Really Happens Inside the Kiln
Learn how time and temperature work together inside the kiln to transform clay into durable ceramic.
Quiet “Pocket Totem” Animal Coin
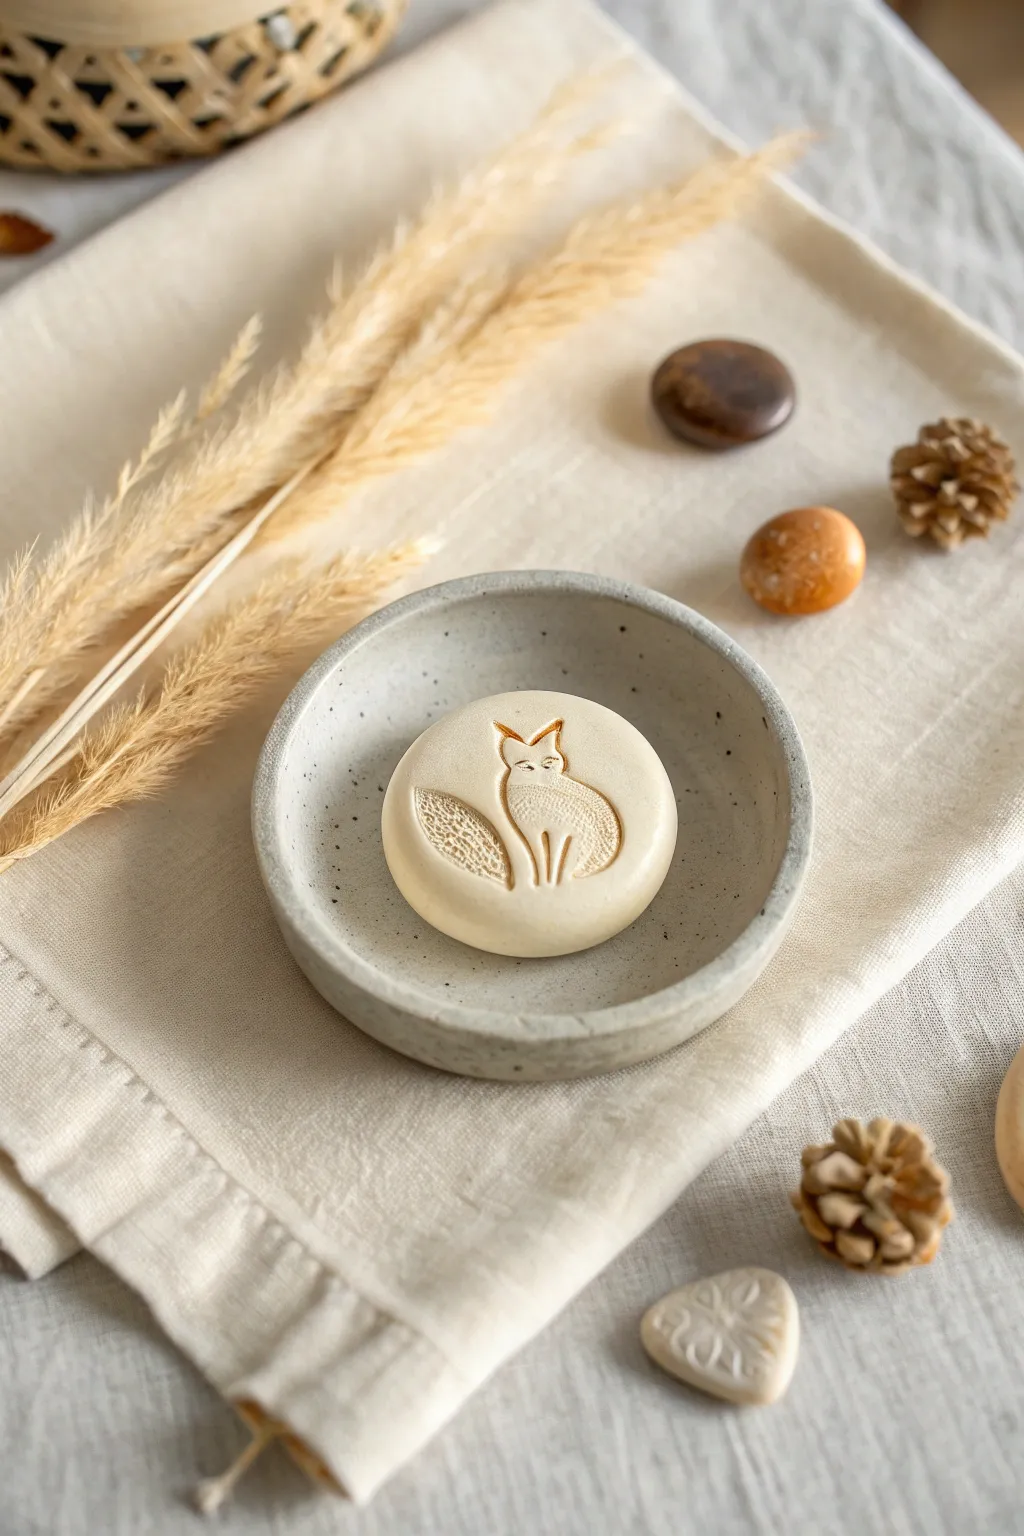
Create a soothing, tactile totem with this simple yet elegant clay coin project. Featuring a stylized fox relief on smooth, creamy clay, this pocket-sized companion is perfect for grounding moments or quiet reflection.
Detailed Instructions
Materials
- White air-dry clay (or polymer clay in ‘white granite’ or ‘porcelain’)
- Rolling pin or smooth glass jar
- Circle cookie cutter (approx. 2 inches diameter)
- Small carving tools or needle tool
- Rubber-tipped clay shapers
- Damp sponge
- Fine-grit sandpaper (400 or 600 grit)
- Optional: Fox-shaped stamp (if not hand-carving)
Step 1: Shaping the Base
-
Condition the clay:
Start by kneading a small ball of white clay until it is warm and pliable. This prevents cracking later on. -
Roll the slab:
Roll out the clay on a clean, smooth surface to a thickness of about 1/4 inch (6-7mm). You want it substantial enough to hold the carving without warping. -
Cut the circle:
Press your circle cutter firmly into the clay to create the coin shape. If you don’t have a cutter, trace around a small lid and cut with a craft blade. -
Soften edges:
Once cut, gently tap the edges of the circle with your fingertip to round them off. I like to use a tiny bit of water here to ensure it feels like a smooth pebble.
Cracks while rolling?
If edges crack when flattening, your clay is too dry. Mix in a drop of water (air-dry) or baby oil (polymer) and knead again until elastic.
Step 2: Creating the Fox Design
-
Sketch the outline:
Lightly trace the outline of a sitting fox onto the center of the disk using a needle tool. Keep the lines very faint so you can correct mistakes. -
Carve the relief:
Using a small loop tool or carving tool, gently scrape away the clay *inside* the outline to lower the fox’s body level slightly, or conversely, scrape the background to make the fox pop. To match the image exactly, focus on incising deep, clean lines for the outline. -
Define the head:
Carve two triangular shapes for the ears and a small diamond shape for the face. Keep the facial features minimal and stylized. -
Detail the tail:
For the fluffy tail texture, create a leaf-like shape curving around the fox’s body. Use a needle tool to stipple tiny dots or short dashes inside this shape to mimic fur texture. -
Add body contours:
Press curved lines into the body to suggest the hind leg. This simple line work gives the figure depth without needing complex sculpting. -
Refine the lines:
Go over your main inscribed lines one last time to ensure they are crisp and deep.
Step 3: Finishing Touches
-
Smooth the surface:
Use a rubber-tipped tool or a softly damp brush to smooth out any clay crumbs created during carving. -
Initial drying (Air Dry Clay):
If using air-dry clay, loosely cover the piece with plastic wrap for the first 12 hours to slow drying and prevent warping, then uncover to dry fully for 24-48 hours. -
Baking (Polymer Clay):
If using polymer clay, bake according to the package instructions (usually around 275°F/135°C for 15-30 minutes). -
Sand for smoothness:
Once fully cured or dry, inspect the edges. Use fine-grit sandpaper to gently buff away any remaining sharp spots or fingerprints. -
Protect the piece:
Leave the finish matte for a natural stone look, or apply a very thin layer of matte varnish to protect it from oils if it will be handled frequently.
Add a Golden Touch
After drying, rub a tiny amount of gold wax or mica powder into the carved lines of the fox to make the design shimmer against the matte clay.
Slide this little fox into your pocket for a comforting reminder to stay clever and adaptable throughout your day
Night-Glow Details for Therian Pieces

Capture the ethereal spirit of the forest with this hand-sculpted fox mask, featuring delicate fur textures and soft golden accents. This project combines clay sculpting techniques with careful painting to create a wearable piece or stunning altar display.
Step-by-Step
Materials
- White polymer clay or air-dry clay (approx. 500g)
- Aluminum foil
- Masking tape
- Rolling pin
- Sculpting tools (needle tool, loop tool, rib)
- Water (for smoothing if using air-dry clay)
- Acrylic paints (White, Black, Metallic Gold, Copper)
- Fine detail paintbrushes
- Elastic cord (optional for wearing)
- Matte sealant spray
Step 1: Forming the Base
-
Create the Armature:
Crumple aluminum foil into a domed oval shape slightly larger than your face. Press two smaller triangular foil shapes onto the top for ears and a small mound for the snout. -
Secure the Structure:
Wrap the entire foil structure tightly with masking tape. This smooths out sharp edges and provides a surface the clay can grip onto. -
Prepare the Clay slabs:
Roll out your clay to a consistent 1/4 inch thickness. I find using guide sticks on either side helps keep the slab perfectly even. -
Cover the Form:
Drape the clay sheet over your foil armature. Gently press it down to conform to the shape, smoothing out any air bubbles or wrinkles with your fingers.
Cracking Clay?
If small cracks appear while drying, mix a tiny bit of fresh clay with water to make a paste (slip) and fill them in before painting.
Step 2: Sculpting Details
-
Define the Eyes:
Using a needle tool, lightly trace almond-shaped eye holes. Carefully cut these out and smooth the raw edges with a damp finger or sponge. -
Build the Snout:
Add a small ball of clay to the tip of the muzzle for the nose. Blend the edges seamlessly into the main mask body so it doesn’t look pasted on. -
Shape the Ears:
Reinforce the ear areas with extra clay, pinching the tips to sharp points. Create the inner ear depth by pressing your thumb into the center of each triangle. -
Carve Fur Texture:
Using a fine loop tool or needle, etch short, directional strokes around the cheeks and forehead to mimic fur. Vary the pressure to create natural-looking depth. -
Add Decorative Dots:
Roll tiny spheres of clay and press them gently between the eyes and ears in a symmetrical pattern for that mystical, ritualistic look.
Glow Up
Mix glow-in-the-dark powder into your white paint or the gold accents. Under low light, your mask’s markings will softly luminescence.
Step 3: Refining and Drying
-
Smooth the Surface:
Check the non-textured areas creating a porcelain-like finish. A slightly damp brush works wonders for erasing fingerprints here. -
Create Strap Holes:
If you plan to wear this, poke holes near the temples now before the clay hardens. Make them large enough for your chosen cord. -
Allow to Dry:
Let the mask dry completely. For air-dry clay, this takes 24-48 hours; for polymer, bake according to package instructions. -
Remove Armature:
Once fully cured, carefully pull the foil and tape out from the back of the mask to allow the interior to dry or cool completely.
Step 4: Painting and Finishing
-
Base Coat:
Apply a thin wash of white acrylic paint over the entire mask to prime the surface and unify the color. -
Darken the Features:
Paint the nose tip solid black. Use a very fine brush to line the eye rims and draw the mouth slit. -
Inner Ear Detail:
Mix copper and a touch of black for the inner ears. Paint this darker shade deep inside the ear crevices for shadow. -
Gild the Accents:
Using your metallic gold paint, carefully fill in the carved fur grooves on the cheeks and paint the decorative clay dots on the forehead. -
Seal the Work:
Finish with two light coats of matte sealant spray to protect the paint and clay from moisture without making it too shiny.
Place your finished mask on a stand or wear it to feel connected to your inner spirit