When I’ve got a fresh lump of clay on my table, I always want a handful of satisfying projects I can actually finish and feel proud of. These things to make with clay ideas are my go-to favorites—starting with the classics and ending with a few “how did you make that?” studio gems.
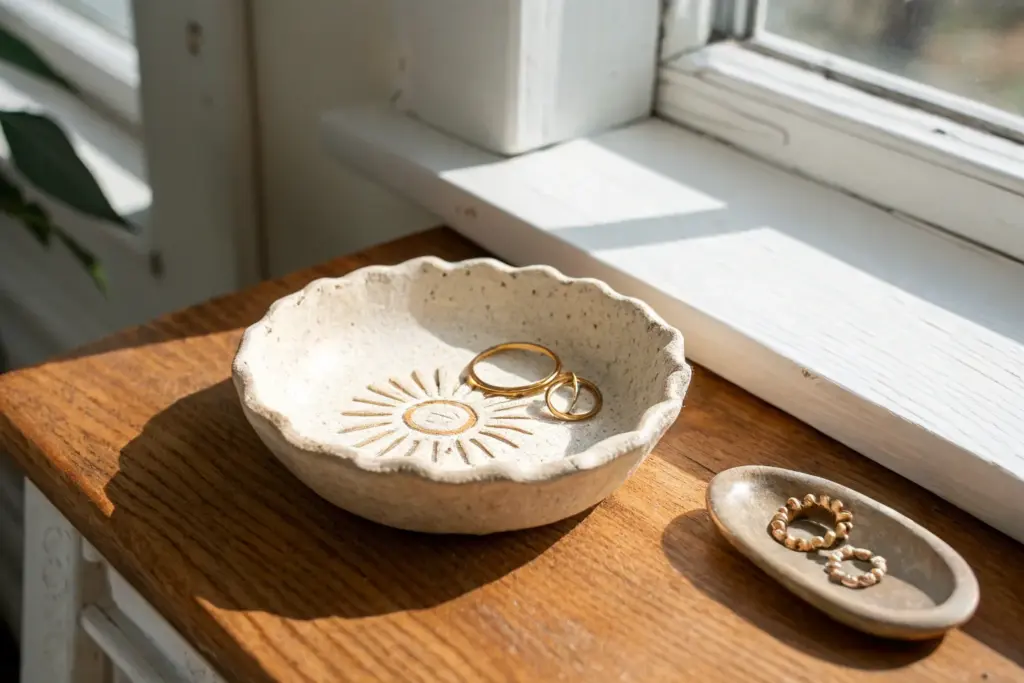
Pinch Pot Trinket Bowl
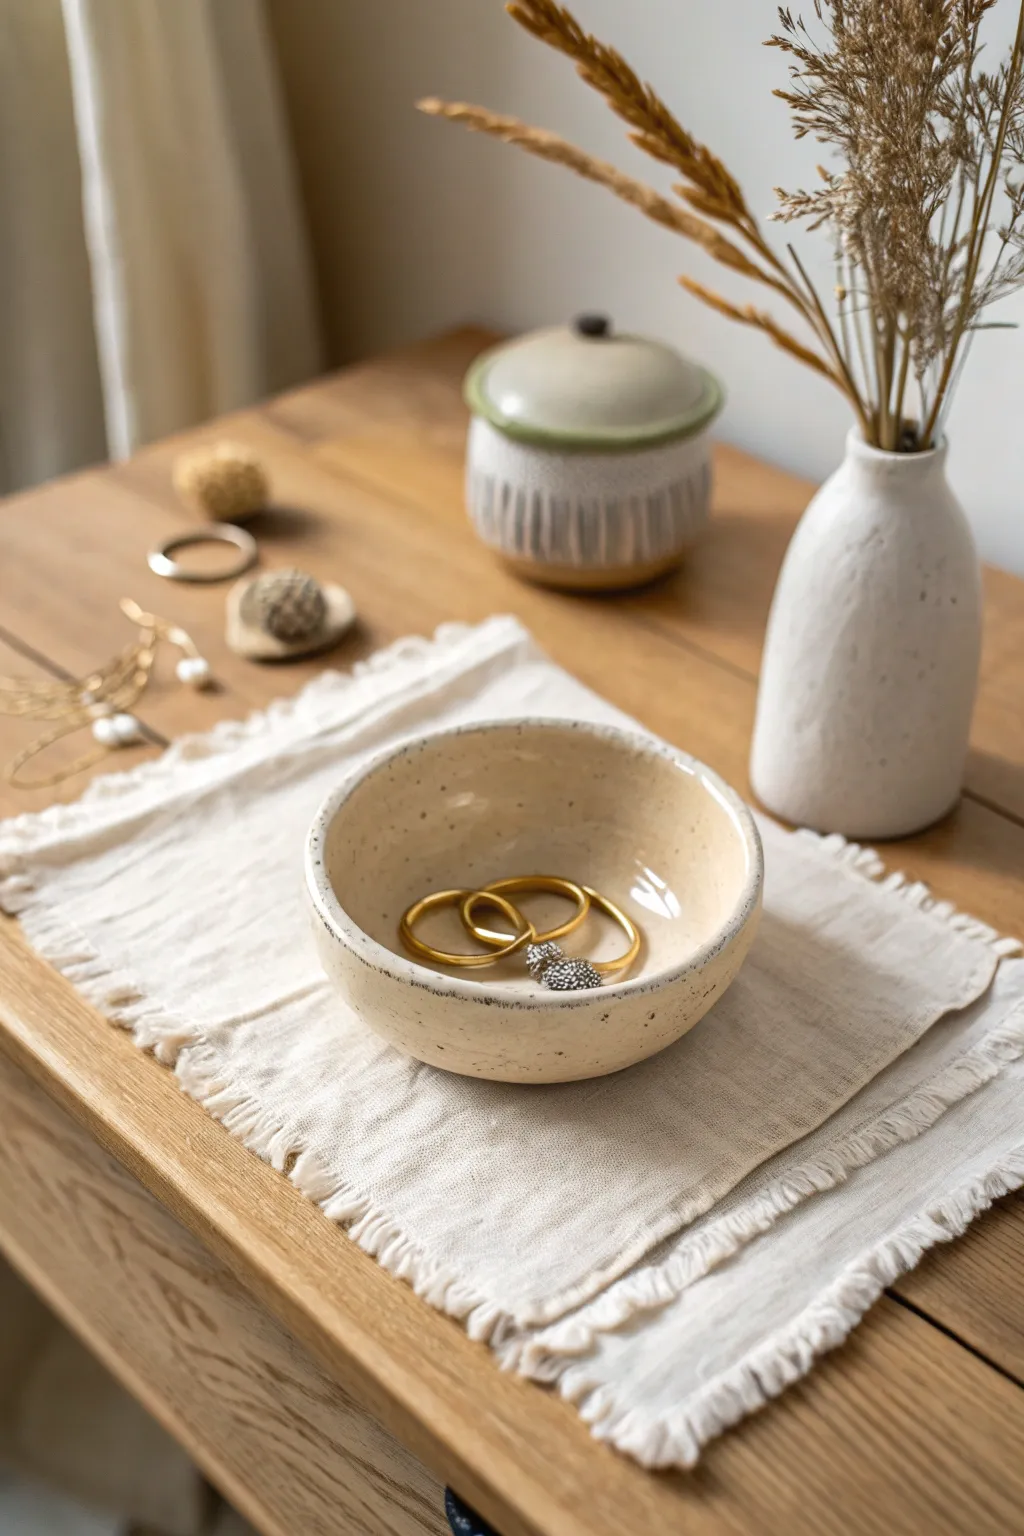
This charming, modest trinket bowl combines the organic feel of hand-pinched pottery with a sophisticated, creamy glaze speckled with subtle dark flecks. It’s the perfect size for holding your everyday jewelry on a dresser or bedside table.
How-To Guide
Materials
- White stoneware or polymer clay (oven-bake)
- Speckled cream glaze (for kiln-fire clay) or acrylic paint with speckling medium
- Gloss varnish (if using polymer clay)
- Small bowl or water for smoothing
- Sponge
- Rolling pin (optional)
- Sandpaper (fine grit)
- Wire clay cutter
- Kiln (if using stoneware)
Step 1: Forming the Base
-
Prepare the Clay:
Cut a portion of clay roughly the size of a tennis ball. Wedge it thoroughly on your work surface to remove air bubbles and ensure an even consistency. -
Create a Sphere:
Roll the wedged clay between your palms until you have a smooth, round ball. -
Open the Pot:
Hold the ball in one hand and gently press your thumb into the center, stopping about a half-inch from the bottom. This forms the interior well of your bowl. -
Pinch the Walls:
Using your thumb on the inside and fingers on the outside, gently pinch and rotate the clay. Work from the bottom upward to thin out the walls evenly. -
Shape the Curve:
As you pinch, gently push the walls outward to create a wider, shallower curve rather than a tall cup shape. Aim for a diameter similar to a small cereal bowl. -
Refine the Rim:
Once the thickness is consistent (about 1/4 inch), gently tap the rim with a flat wooden tool or your finger to smooth any sharp edges, keeping it slightly rounded. -
Smooth the Surface:
Dip a small sponge or your finger in water and run it over the interior and exterior to erase fingerprints and surface cracks. I find a damp chamois works wonders here for an ultra-smooth finish. -
Dry the Greenware:
If using stoneware, set the bowl aside to dry slowly until it is bone dry. If using polymer clay, verify the manufacturer’s baking instructions.
Smooth Operator
To get walls as smooth as the photo, use a flexible metal or rubber rib tool on the inside while supporting the outside with your hand.
Step 2: Firing and Glazing
-
Bisque Fire (Stoneware Only):
Place your bone-dry bowl in the kiln and fire to cone 04 (or your clay’s specific bisque temperature) to harden it for glazing. -
Sand Imperfections:
After the first firing (or after baking polymer clay), use fine-grit sandpaper to gently smooth any rough spots on the rim or base. Wipe away dust with a damp cloth. -
Apply Base Color:
If using polymer clay, paint the entire bowl with a creamy, off-white acrylic paint. Apply 2-3 thin coats for opacity. -
Add Speckles:
For polymer clay, mix a tiny amount of black or dark brown paint with water and flick it onto the bowl with a toothbrush for that speckled pottery look. For stoneware, simply dip or brush on your speckled cream glaze. -
Rim Detail:
If you want the subtle darker rim seen in the photo, wipe a very damp sponge along the very edge of the glaze to thin it out slightly, letting the clay body show through, or lightly dab a darker pigment on the rim. -
Final Fire or Seal:
For stoneware, glaze fire the piece to the appropriate cone (likely cone 5 or 6). For polymer clay, apply a high-gloss varnish to mimic the shine of ceramic glaze. -
Cool and inspect:
Let the piece cool completely. Check the bottom for any rough snags that might scratch furniture and sand them down if necessary.
Gold Rim Upgrade
For a luxe touch, paint the very edge of the rim with gold leaf paint or liquid gold luster after the final glaze firing.
Place your new textured bowl on your dresser to keep your favorite rings safe and accessible


Slab Coasters With Pressed Texture
Bring the calming beauty of nature to your coffee table with this set of minimalist coasters. By pressing simple stamps or found objects into clay, you can achieve a sophisticated, embossed look that feels both rustic and refined.
Step-by-Step Tutorial
Materials
- Air-dry clay (stone or white color recommended)
- Small rolling pin
- Square cookie cutter (approx. 3.5 inches)
- Wooden guide strips (1/4 inch thick)
- Leaf stamps or actual sturdy leaves
- Geometric pattern stamps or texture mat
- Floral/starburst stamp
- Canvas mat or cloth for rolling
- Fine-grit sandpaper
- Clear matte acrylic sealer or varnish
- Brown acrylic paint (optional, for ‘wood’ base effect)
- Felt pads for bottom
Step 1: Preparing the Base
-
Prepare your workspace:
Lay down your canvas mat or cloth to prevent sticking. Place two wooden guide strips parallel to each other on the mat, slightly wider apart than your desired coaster size. -
Roll the clay:
Take a generous handful of air-dry clay and knead it briefly to remove large air bubbles. Place it between your guide strips and roll it flat with the rolling pin. The strips ensure an even thickness across the entire slab. -
Smooth surface:
If there are any wrinkles or cracks on the surface, dip your finger in a tiny bit of water and gently smooth them out. Let the slab sit for about 10 minutes to firm up slightly before cutting.
Uneven Texture?
If your stamp didn’t press evenly, don’t try to restamp directly over it. It’s better to ball up the clay, re-roll the slab, and start fresh for a crisp result.
Step 2: Cutting and Texturing
-
Cut the shapes:
Using your square cookie cutter, press firmly into the clay slab to create your coaster shapes. Don’t remove the excess clay around the edges just yet; use it to support the shape while you stamp. -
Leaf impression:
For the leaf design, take your leaf stamp or a sturdy, veined leaf. Position it carefully in the center of one square. Press down firmly and evenly, ensuring the stem and tip make contact. -
Geometric texture:
For the geometric coaster, place a texture mat or a patterned stamp over the clay square. Roll over the texture tool gently with your rolling pin to ensure a deep, uniform impression without distorting the square shape. -
Floral accent:
Press the floral or starburst stamp into remaining squares. I like to rock the stamp very slightly in a circular motion to ensure the edges of the petals are crisp. -
Clean edges:
Carefully remove the excess clay from around your squares. If the cutting process left ragged edges, smooth them gently with a damp sponge or fingertip.
Two-Tone Effect
Use a polymer clay in ‘granite’ or ‘wood’ tone for the base, and press a thin sheet of white clay on top before cutting for a permanent dual-color look.
Step 3: Drying and Refining
-
Slow drying:
Transfer the coasters to a flat board covered with paper towels. Place another paper towel and a light book on top to keep them flat as they dry. Air-dry clay tends to curl, so this weight is crucial. -
Wait time:
Allow the coasters to dry for at least 24-48 hours. Flip them over halfway through the drying process to ensure airflow reaches both sides. -
Sanding:
Once fully dry and hard, use fine-grit sandpaper to gently smooth the edges and corners. You can also lightly sand the surface if you want a more weathered look.
Step 4: Finishing Touches
-
Paint the base (optional):
To mimic the two-tone look in the inspiration photo, carefully paint the bottom half and sides of the coaster with a warm brown acrylic paint, leaving the textured top creamy white. -
Sealing:
Apply a coat of clear matte acrylic sealer or varnish to the entire coaster. This protects the clay from moisture, which is essential for a coaster. -
Second coat:
Once the first coat is dry, apply a second layer of sealant, paying extra attention to the deep crevices in the texture. -
Final protection:
Stick small felt pads or a square of cork to the bottom of each coaster to protect your furniture surfaces from scratches.
Stack your finished coasters or bundle them with ribbon for a thoughtful handmade gift


Folded Corner Jewelry Tray
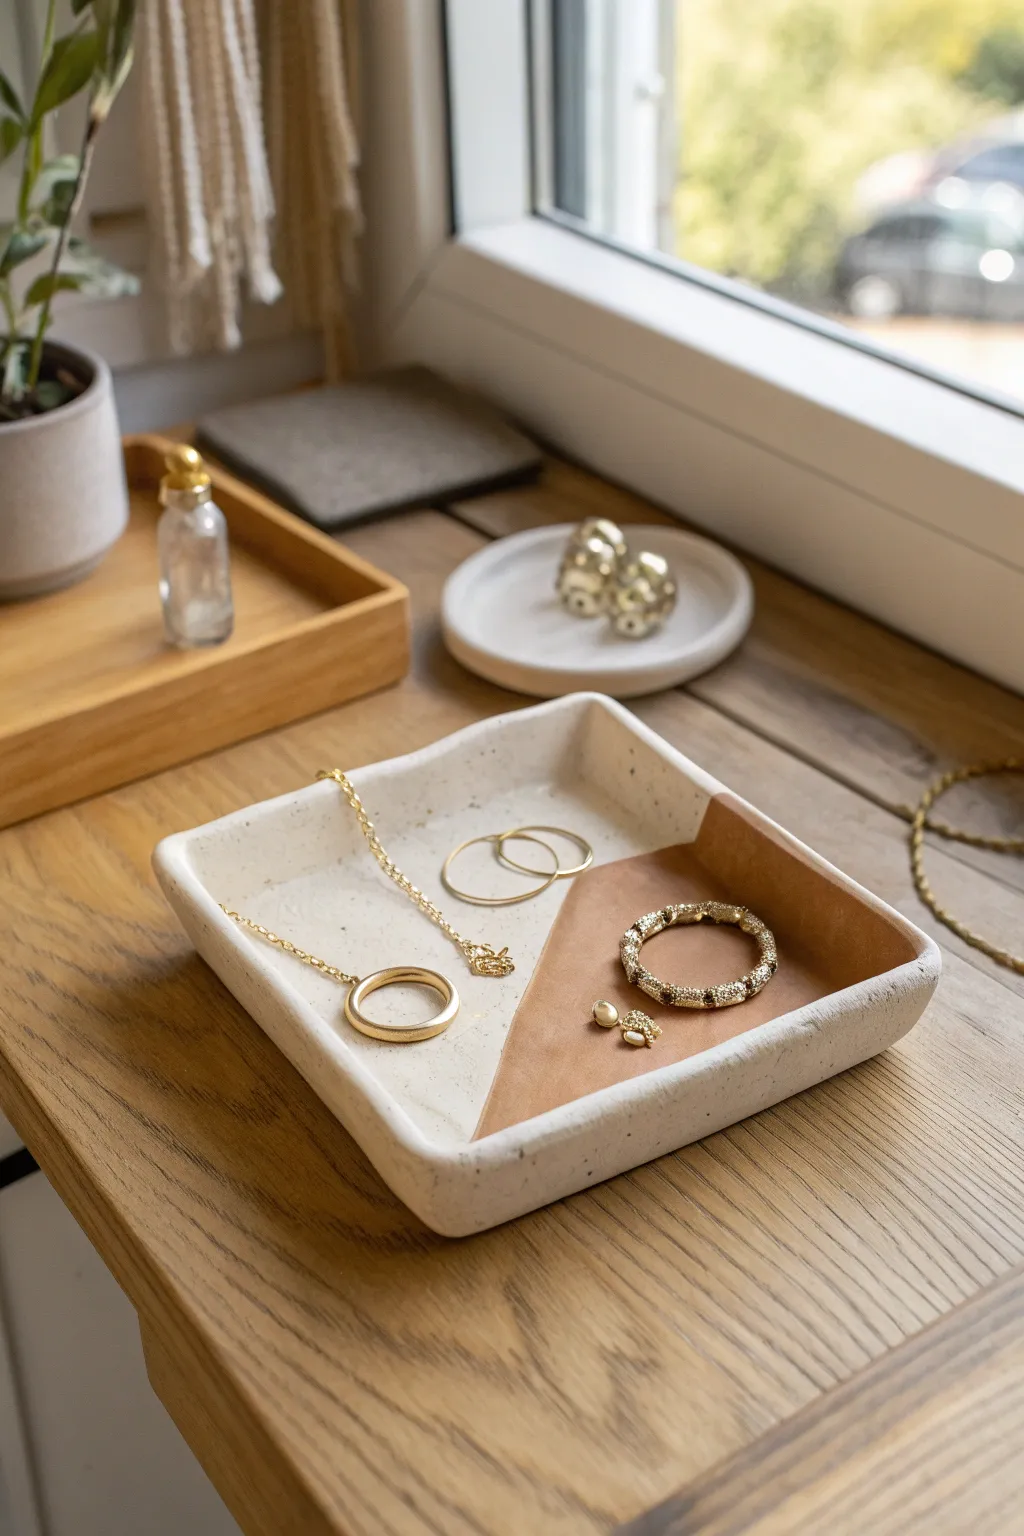
This elegant square jewelry tray combines the modern charm of speckled stoneware with a warm, geometric accent. Its shallow, curved sides and matte finish make it the perfect minimalist catch-all for your favorite rings and necklaces.
Step-by-Step
Materials
- Speckled stoneware clay or polymer clay (granite effect)
- Rolling pin with guide rings (approx. 1/4 inch)
- Square paper template (approx. 6×6 inches)
- Precision craft knife
- Small bowl of water
- Smoothing sponge
- Fine grit sandpaper
- Painter’s tape or masking tape
- Terracotta or warm brown acrylic paint
- Soft flat paintbrush
- Matte spray varnish or sealant
Step 1: Shaping the Clay Base
-
Prepare the Clay:
Begin by conditioning your clay until it is soft and pliable. If using polymer clay, knead it thoroughly in your hands to activate it. If using air-dry or ceramic clay, wedge it briefly to remove air bubbles. -
Roll out the Slab:
Place the clay on a clean, flat surface. Using a rolling pin, roll the clay out into an even slab. I find that using guide rings or placing two magazines on either side helps keep the thickness consistent, aiming for about 1/4 inch. -
Cut the Shape:
Lay your square paper template gently onto the clay slab. Use your precision craft knife to cut around the edges of the template. Remove the excess clay and set it aside for future use. -
Soften the Edges:
Dip your finger or a small sponge into water and run it along the cut edges of your square. This softens the sharp cuts into a pleasant, rounded rim. -
Create the Lip:
Gently lift the edges of the square with your fingertips. Pinch the corners upward very slightly to create a shallow dish shape. You want a subtle curve rather than a sharp vertical wall. -
Smooth the Form:
Once the sides are lifted, use a damp sponge to smooth out any fingerprints or tool marks on the interior and exterior surfaces. Ensure the transition from the flat bottom to the lifted sides is seamless.
Crisp Paint Lines
Before painting the color, paint a thin layer of clear sealant over the tape edge. This seals the gap so any seepage is clear, not colored.
Step 2: Drying and Finishing
-
Allow to Dry:
Let your tray dry completely according to your clay type’s instructions. Air-dry clay often needs 24-48 hours. If using oven-bake polymer clay, bake it now following the manufacturer’s suggested temperature and time. -
Sand for Perfection:
Once the piece is fully cured and cool (or dry), use fine-grit sandpaper to buff away any remaining rough spots on the rim or surface. Wipe away the dust with a slightly damp cloth. -
Tape the Design:
Take a strip of painter’s tape and place it diagonally across the dish, dividing the square into two triangles. Press the tape down firmly, especially in the curved corners, to prevent paint bleed. -
Apply the Color:
Using a soft flat brush, paint one open triangular section with your terracotta or warm brown paint. Apply thin, even coats to avoid brushstrokes. I usually need two or three coats for full opacity. -
Reveal the Line:
While the final coat of paint is still slightly tacky but mostly dry, carefully peel back the painter’s tape. Pulling it away at a sharp angle helps keep the line crisp. -
Seal the piece:
To protect the paint and the raw clay surface, apply a thin layer of matte varnish or spray sealant over the entire dish. This is especially important if you plan to keep the tray in a humid area like a bathroom.
Warping While Drying?
If using air-dry clay, flip the tray over periodically while it dries. This ensures even airflow and prevents the corners from curling up.
Now you have a chic, handmade spot to organize your daily accessories


Ring Cone and Dish Set
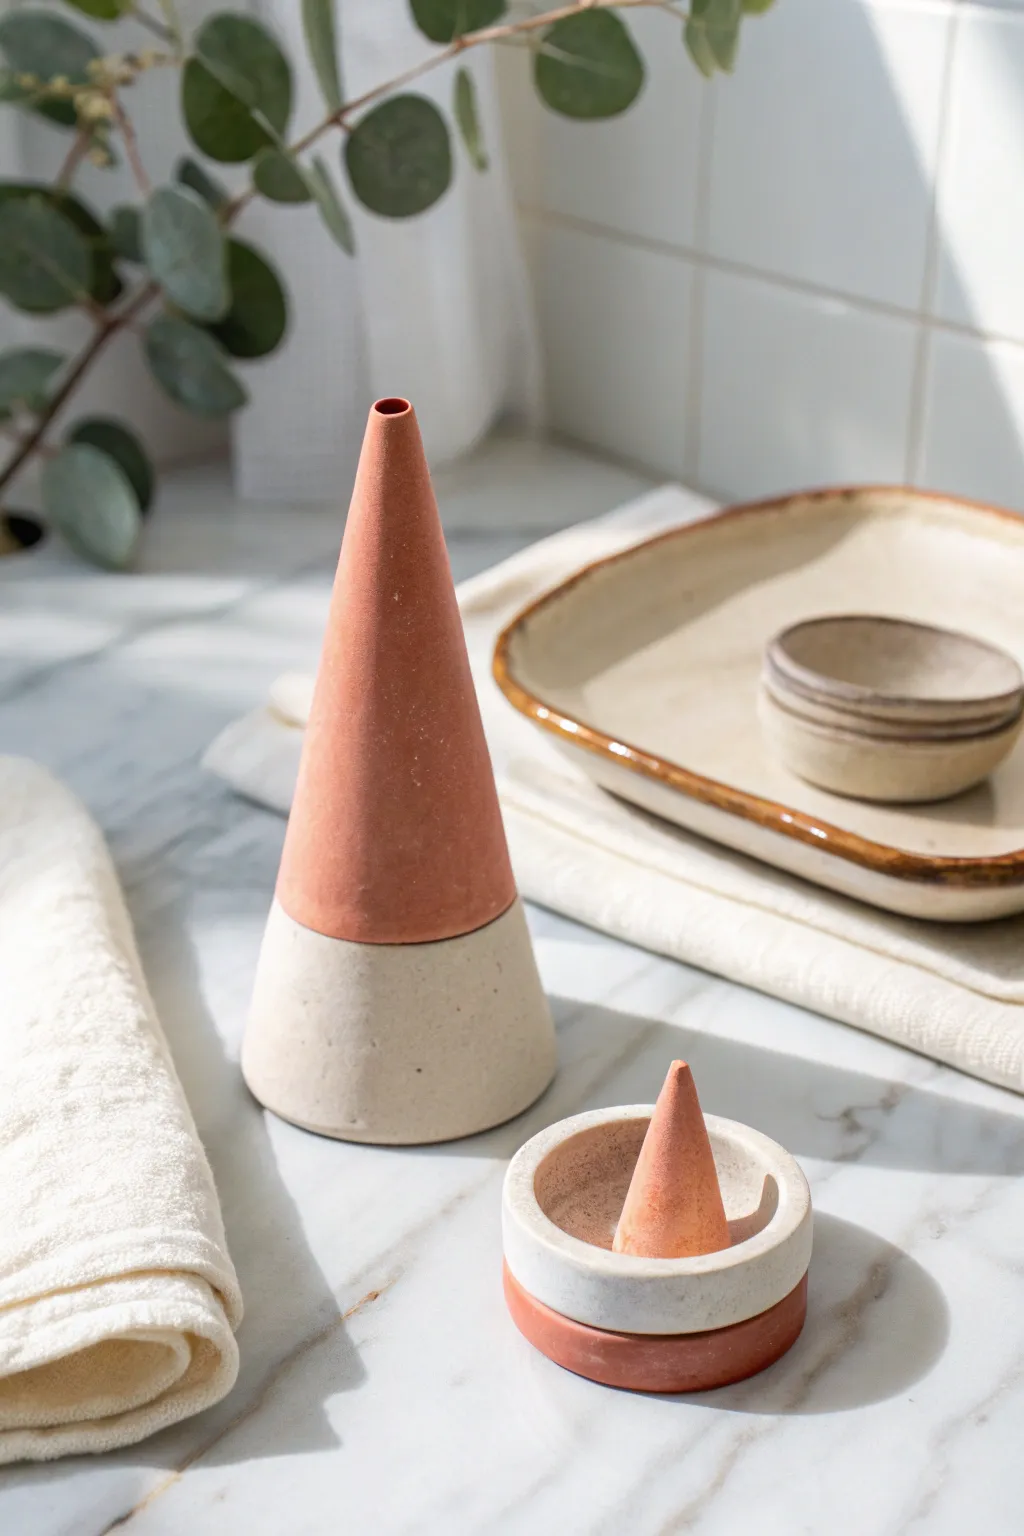
Create a modern, minimalist vanity set featuring striking terracotta and speckled cream clay. This project combines a stately decorative cone vase with a functional ring dish, using contrasting clay bodies for a sophisticated two-tone look.
Step-by-Step Tutorial
Materials
- Terracotta air-dry or polymer clay
- Speckled cream or white air-dry or polymer clay
- Rolling pin
- Clay knife or craft blade
- Circle cutters (various sizes)
- Small sponge
- Water (for smoothing)
- Sandpaper (fine grit)
- Score and slip tool (if using earth clay) or liquid clay (if polymer)
Step 1: Shaping the Large Cone Vase
-
Prepare the base clay:
Start with a generous ball of the speckled cream clay. Roll it into a thick log, then gently taper the sides to form a truncated cone shape—wider at the bottom and slightly narrower at the top. Flatten both ends so it stands stable. -
Refine the base shape:
Roll the base on your work surface to smooth the sides. Ensure the top surface is flat and even, as this is where the terracotta section will join. Use a damp sponge to smooth away any fingerprints. -
Form the top cone:
Take a portion of terracotta clay and roll it into a tall, slender cone. The base of this cone should match the diameter of the top of your cream base perfectly. -
Hollow the top (optional):
If you want this to function as a bud vase, use a narrow tool or chopstick to gently bore a hole down the center of the terracotta cone from the tip, being careful not to puncture the sides. -
Join the sections:
Score the top of the cream base and the bottom of the terracotta cone. Apply a little water (or slip) to the scored areas. Press them firmly together. -
Blend the seam:
While you could blend the clays together, the design looks sharpest with a distinct line. Instead of smearing, run a finger around the seam to ensure a tight seal, then clean up any excess slip with a damp brush.
Clean Seams
To keep the color separation crisp, wash your hands thoroughly between handling the terracotta and cream clays to avoid color transfer.
Step 2: Creating the Ring Dish
-
Cut the base discs:
Roll out a slab of terracotta clay to about 1/4 inch thickness. Use a circle cutter to punch out a perfect round base for your dish. -
Form the dish walls:
Roll a snake of speckled cream clay. Flatten it slightly into a strip. Wrap this strip around the edge of your terracotta base to create the walls of the dish. -
Secure the walls:
Blend the cream clay downward onto the terracotta base on the inside to secure it. On the outside, you can leave the seam visible for that two-tone effect or blend it smooth depending on your preference. -
Carve the interior:
Use a modeling tool to smooth the interior curve where the wall meets the floor, creating a seamless, rounded inside for the dish. -
Make the miniature cone:
From a small piece of terracotta clay, roll a tiny cone shape—just large enough to hold a ring. Ensure its base is flat. -
Attach the cone:
Score and slip the center of the dish and the bottom of the mini cone. Press the cone firmly into the center of the dish.
Step 3: Finishing Touches
-
Initial smoothing:
Before drying, do a final pass with a damp sponge over all surfaces. I find this significantly reduces the amount of sanding needed later. -
Dry slowly:
Let your pieces dry slowly away from direct sunlight or heat sources to prevent cracking, especially at the seams where two clay types meet. -
Sand for texture:
Once fully bone dry (or baked), use fine-grit sandpaper to gently polish the surfaces. This will bring out the natural texture of the terracotta and the speckles in the cream clay. -
Seal (optional):
For a matte finish like the photo, leave the clay raw or apply a very matte varnish. If you made a vase, seal the inside with a waterproof sealer.
Texture Play
Mix dried coffee grounds or cracked pepper into your white clay to manually create a unique, organic speckled effect if you can’t find speckled clay.
Place your finished set on a vanity or beside the sink for a touch of handmade elegance

The Complete Guide to Pottery Troubleshooting
Uncover the most common ceramic mistakes—from cracking clay to failed glazes—and learn how to fix them fast.
Polymer Clay Earrings in Simple Shapes
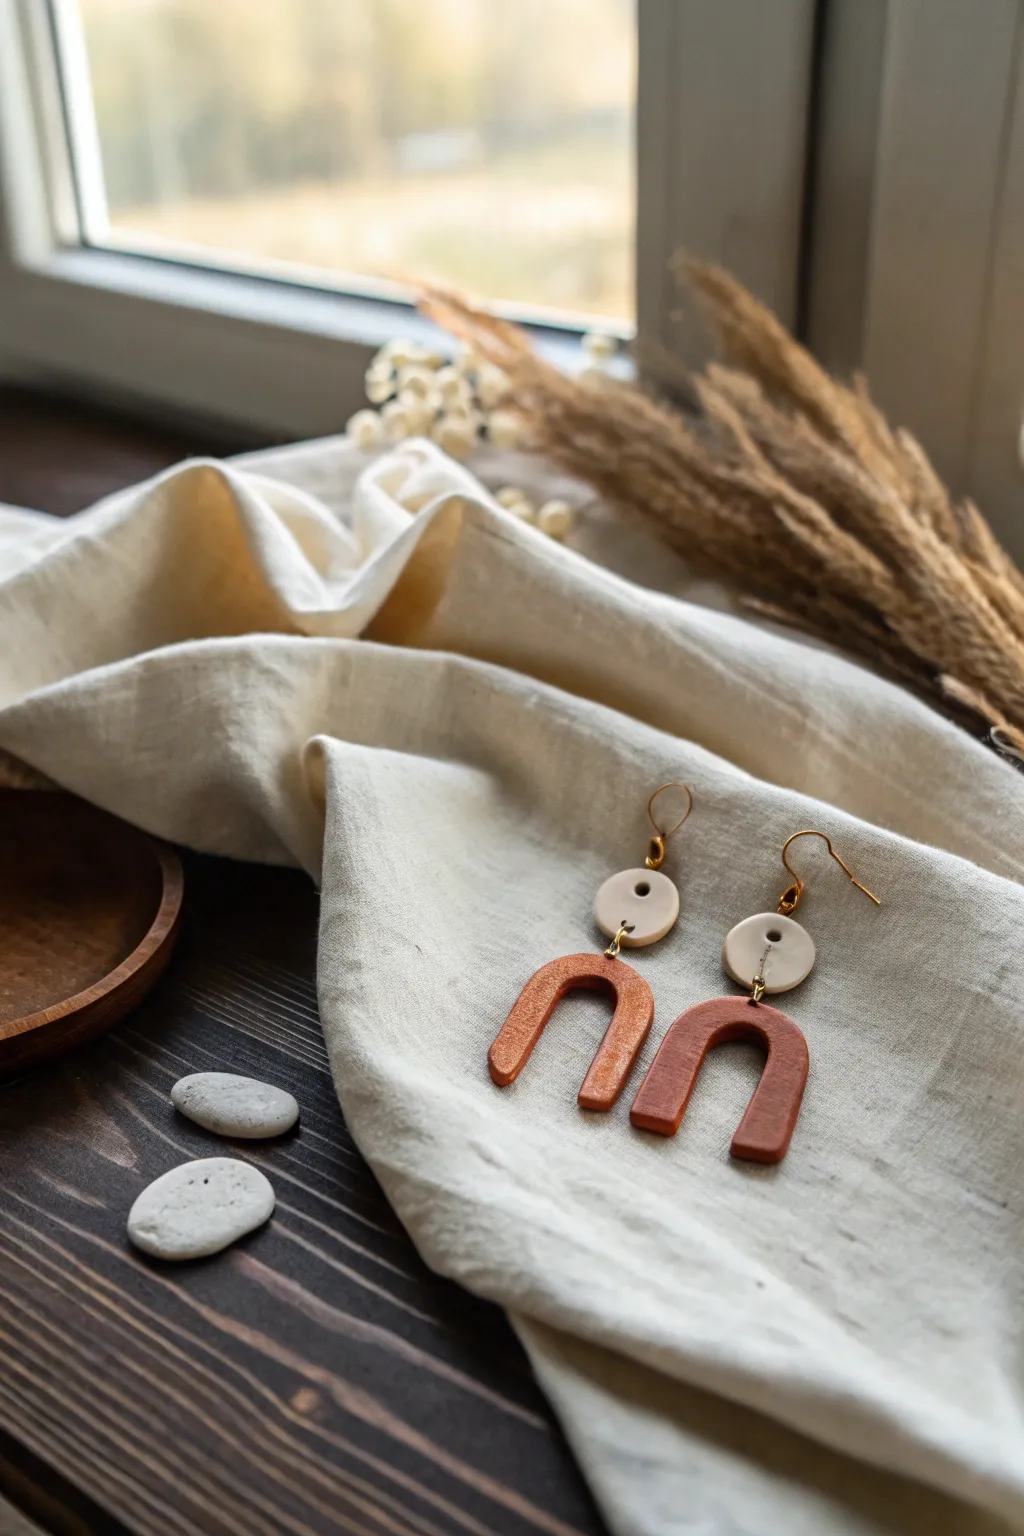
Embrace earthy warm tones with these sophisticated arch earrings that combine a creamy speckled beige top with a rich, shimmering terracotta drop. The geometric simplicity of the shapes makes them modern, while the textured finish adds a lovely handmade touch.
How-To Guide
Materials
- Polymer clay in beige (or granite effect)
- Polymer clay in terracotta or rust orange
- Gold mica powder (optional for shimmer)
- Acrylic roller or pasta machine
- Small circle cutter (approx. 10mm)
- U-shape or arch cutter (approx. 25-30mm)
- Hand drill or cocktail stick
- 2 Gold jump rings (6-8mm)
- 2 Gold earring hooks
- Jewelry pliers (flat nose and round nose)
- Baking sheet and parchment paper
- Fine grit sandpaper (optional)
Step 1: Preparing the Clay
-
Condition the beige clay:
Begin by warming up your beige clay in your hands. Knead and roll it until it becomes soft and pliable. -
Create the terracotta blend:
Condition the terracotta clay similarly. If you want that subtle metallic sheen seen in the photo, mix a very small pinch of gold mica powder directly into the raw clay before rolling. -
Roll out the slabs:
Using your acrylic roller or pasta machine on a medium setting (approx. 3mm thick), roll out both the beige and terracotta clays into smooth, even slabs.
Uneven Surfaces?
If your clay shows fingerprints, lightly brush the raw clay with a little cornstarch or baby oil before baking to smooth it out instantly.
Step 2: Cutting and Shaping
-
Cut the top circles:
Use your small circle cutter to punch out two identical circles from the beige slab. I find pressing firmly and giving a tiny twist helps separate the clay cleanly. -
Cut the arches:
Press your U-shape cutter into the terracotta slab to create two arches. If you don’t have a specific cutter, you can cut a rounded rectangle and use a smaller circle cutter to remove the inner arch. -
Smooth the edges:
Gently run your finger along the cut edges of all four pieces to soften any sharp ridges left by the cutters. -
Pierce holes for assembly:
Using a cocktail stick or a needle tool, poke a hole near the bottom edge of the beige circle and the top center of the terracotta arch. Make sure the hole is big enough for your jump rings. -
Add earring hook holes:
Create a second hole at the very top of the beige circles for the earring hooks to attach later.
Step 3: Baking and Assembly
-
Bake the pieces:
Arrange your clay shapes on a parchment-lined baking sheet. Bake according to the manufacturer’s instructions (typically 275°F/130°C for about 30 minutes). -
Cool down:
Allow the pieces to cool completely on the baking sheet before handling them, as warm clay is fragile. -
Drill (if needed):
If your pre-punched holes closed up during baking, use a small hand drill to reopen them carefully. -
Sand for finish:
Lightly sand the edges with fine-grit sandpaper if there are any rough spots, then wipe clean with a damp cloth. -
Open the jump rings:
Use your two pairs of pliers to grip a jump ring on either side of the split. Twist one hand forward and one back to open it laterally—never pull them apart. -
Connect the shapes:
Thread the open jump ring through the bottom hole of the beige circle and the top hole of the terracotta arch. Close the ring using the same twisting motion. -
Attach the hooks:
Open the small loop on your earring hook with pliers. Slide it through the top hole of the beige circle. -
Secure the hardware:
Gently squeeze the earring hook loop closed to secure the finding. Repeat the assembly steps for the second earring.
Add Texture
Before cutting your shapes, press a piece of coarse fabric or sandpaper onto the raw terracotta slab to give it a stone-like, rustic finish.
Enjoy styling these versatile earrings with your favorite casual outfits
Mini Planter With a Painted Face
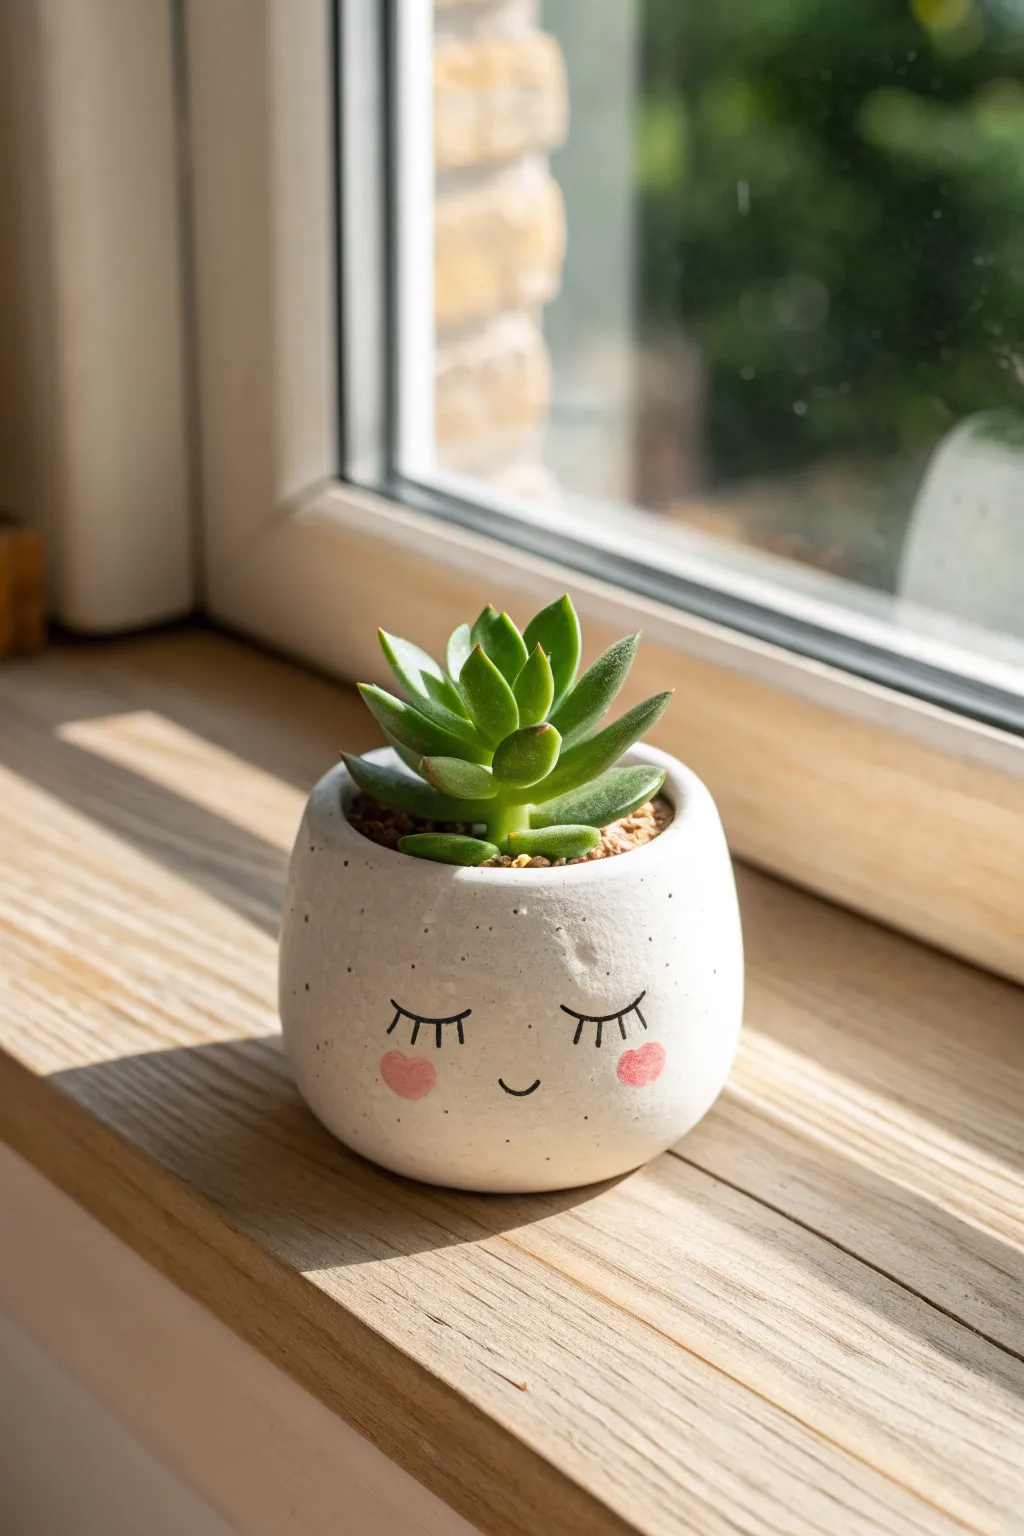
Bring a touch of serenity to your windowsill with this adorable miniature succulent pot crafted from white clay. Its minimalist face design and speckled texture offer a charming, modern aesthetic that perfectly complements small greenery.
Step-by-Step Tutorial
Materials
- White air-dry clay (or polymer clay)
- Small rolling pin
- Small bowl or cup (for molding)
- Plastic wrap
- Sandpaper (fine grit)
- Black acrylic paint or fine-tip permanent marker
- Pink acrylic paint
- Small round paintbrush
- Old toothbrush (optional)
- Grey acrylic paint (optional)
- Matte sealant or varnish
Step 1: Shaping the Vessel
-
Prepare the Clay:
Start by taking a generous handful of white clay and kneading it until it is soft and pliable. If the clay feels too dry, you can wet your hands slightly to introduce a tiny bit of moisture. -
Roll the Base:
Roll the clay into a smooth ball about the size of a tennis ball, ensuring there are no major cracks or air bubbles trapped inside. -
Internal Pinching:
Hold the ball in one hand and press your thumb into the center to create an opening. Unlike a standard pinch pot, you want the walls to remain fairly thick (about 1/4 inch) to mimic the sturdy look of the reference image. -
Refine the Shape:
Gently work the clay upwards, curving it slightly inward at the rim to create a rounded, bowl-like silhouette rather than a straight cylinder. The opening should be slightly narrower than the widest part of the belly. -
Flatten the Base:
Tap the bottom of your pot gently against your work surface to create a flat, stable base so it won’t tip over when sitting on your windowsill. -
Smooth the Surface:
Dip your finger in a little water and run it over the exterior to smooth out any fingerprints or bumps. Aim for a mostly smooth surface, but don’t worry about perfection; slight irregularities add handmade charm. -
Drainage Hole:
If you plan to plant a live succulent directly inside, use a straw or a small tool to poke a drainage hole in the center of the bottom.
Uneven Drying?
If cracks appear while drying, you can patch them with a ‘slip’ made of water and fresh clay. Smooth it into the crack and let dry again.
Step 2: Adding Texture and drying
-
Create Speckles:
To mimic the stone-like texture, mix a tiny drop of water with grey paint. Dip an old toothbrush into the mixture and flick the bristles with your thumb to spray a very fine mist of speckles onto the wet clay. -
Initial Drying:
Set the pot aside in a cool, dry place. I usually let it sit for at least 24-48 hours depending on the brand of clay, flipping it occasionally to ensure the bottom dries evenly. -
Sanding:
Once completely bone dry, use fine-grit sandpaper to gently buff away any sharp edges or rough spots, particularly around the rim.
Step 3: Painting the Face
-
Sketch the Face:
Lightly sketch the sleepy face design with a pencil. Draw two downward-curved arcs for the closed eyes and a small ‘U’ shape for the smile centered below them. -
Draw Lashes:
Add three small perpendicular lines to each eye arc to represent eyelashes. Keep them delicate and evenly spaced. -
Paint the Details:
Using a very fine-tip paintbrush and black acrylic paint (or a permanent marker for better control), trace over your pencil lines accurately. -
Add Cheeks:
Dip a small round brush or even the tip of your finger into pink paint. Dab off the excess onto a paper towel until the paint is almost dry. -
Blush Application:
Gently stipple or dab the pink paint onto the cheeks, just below the outer corners of the eyes, to create soft, rosy circles. -
Sealing:
Finish by applying a coat of matte varnish or sealant to protect the clay from moisture, especially if you plan to water a plant inside.
Waterproofing Tip
Air-dry clay isn’t naturally waterproof. Apply multiple thin coats of polyurethane varnish inside and out for maximum durability.
Pop in your favorite little succulent and enjoy the peaceful vibe this planter adds to your space


What Really Happens Inside the Kiln
Learn how time and temperature work together inside the kiln to transform clay into durable ceramic.
Bud Vase With Carved Lines
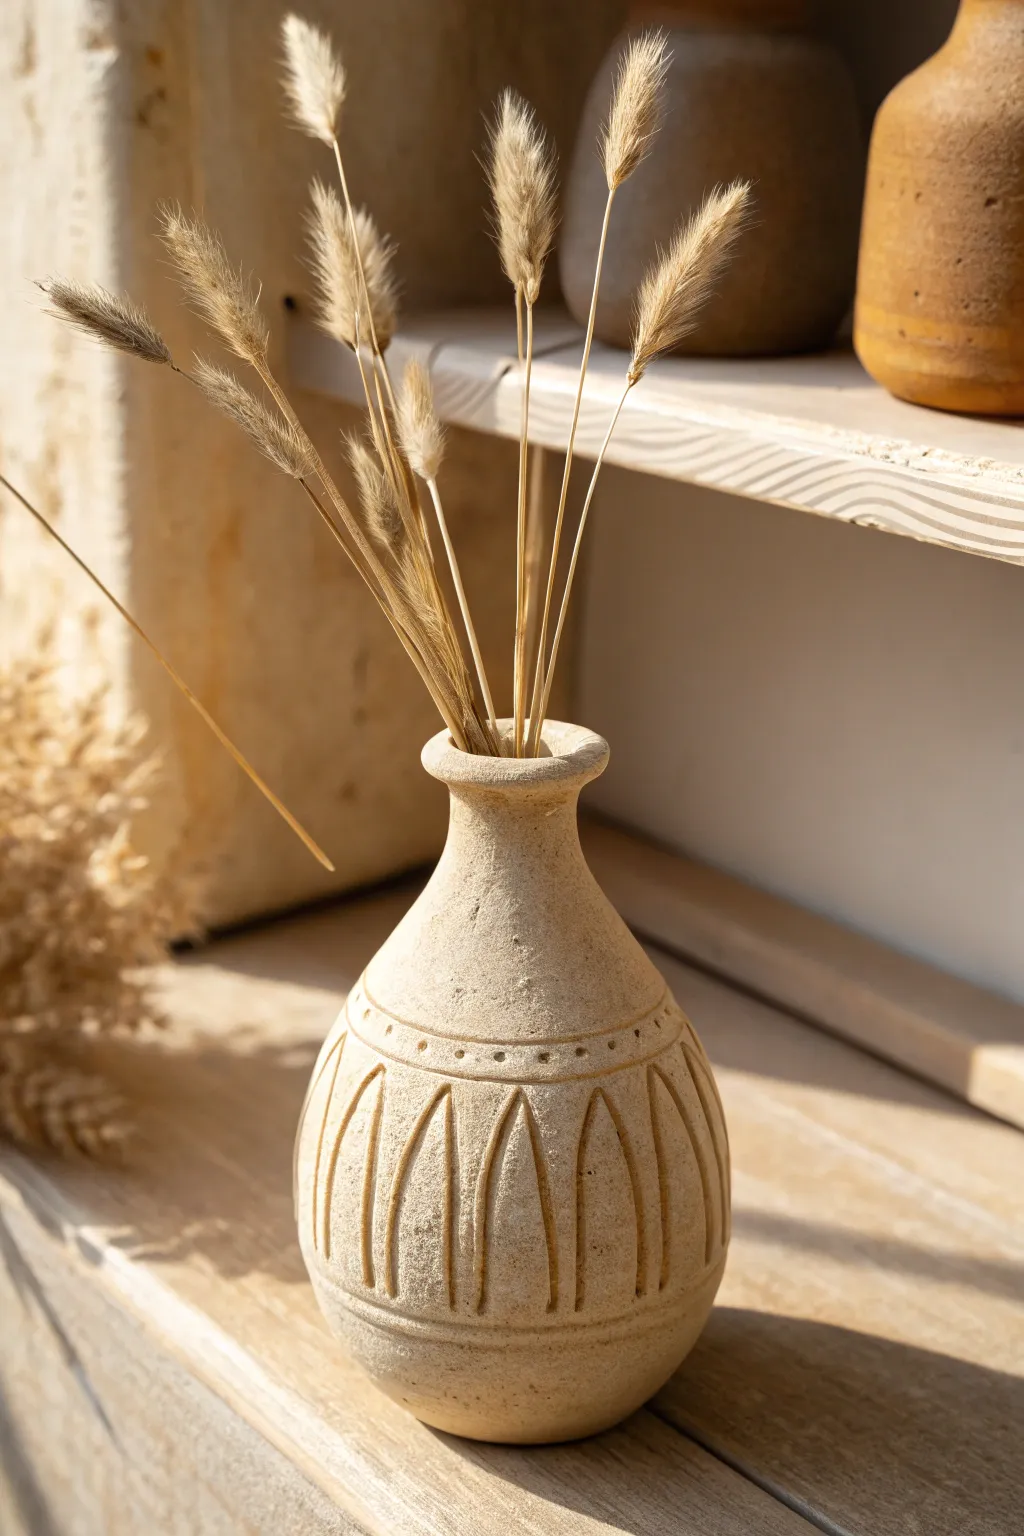
Bring an earthy, tranquil touch to your decor with this textured stoneware bud vase featuring hand-carved details. The simple repetitive patterns and raw finish give it a timeless look perfect for displaying dried grasses.
Detailed Instructions
Materials
- Stoneware clay (buff or speckled)
- Pottery wheel (or coil/pinch supplies)
- Needle tool
- Wire cutter
- Loop trimming tool
- Small round carving tool (or drill bit)
- V-tip carving tool
- Sponge
- Matte transparent glaze (optional for interior)
- Kiln
Step 1: Shaping the Form
-
Wedge and center:
Begin with about 1-1.5 lbs of stoneware clay. Wedge it thoroughly to remove air bubbles, then center it firmly on the wheel head. -
Open the clay:
Open the centered clay to create the interior floor, leaving about a half-inch of thickness at the bottom for the foot. -
Pull the cylinder:
Pull the walls up into a tall, narrow cylinder. Focus on keeping the walls even, creating the height needed for the vase body. -
Shape the belly:
From the inside, gently push the clay outward while supporting the outside to create a rounded belly shape at the bottom half of the vessel. -
Neck constraints:
Collar the top third of the clay inward to narrow the neck significantly. I like to do this gradually over a few rotations to prevent the clay from buckling. -
Refine the rim:
Flare the very top edge slightly outward to create a defined lip, smoothing it with a chamois or your finger for a professional finish. -
Dry to leather hard:
Cut the pot from the wheel using a wire tool and set it aside until it reaches a leather-hard state—firm enough to handle without deforming but soft enough to carve.
Clean Carvings
Wait until the clay is a firm leather-hard before carving. If it’s too wet, the tool will drag and create messy burrs rather than crisp lines.
Step 2: Carving & Finishing
-
Trim the foot:
Place the vase upside down on the wheel (centering it again) and trim away excess clay from the bottom to create a neat foot ring. -
Mark the bands:
Using a needle tool while the wheel spins slowly, lightly score two horizontal guide lines around the upper shoulder of the vase to define the decorative band area. -
Carve the petals:
Use a V-tip carving tool to gouge out vertical, elongated arch shapes around the belly of the vase. Ensure the top points of the arches meet the lower guide line you just created. -
Deepen the lines:
Go over your carved lines a second time if needed to ensure they are deep enough to remain visible after firing, creating a nice shadow play. -
Add the dots:
Between the two horizontal guide lines on the shoulder, press a small round tool or the blunt end of a drill bit into the clay to create a row of evenly spaced recessed dots. -
Enhance texture:
If your clay is too smooth, gently pat the exterior with a coarse sponge or a rough stone to add that gritty, aged texture seen in the photo. -
Bisque fire:
Allow the vase to dry completely—this may take several days depending on humidity—before loading it into the kiln for the bisque firing. -
Glaze interior:
Pour a clear or white matte glaze inside the vase, swirl to coat, and pour out the excess. This makes the vessel water-tight. -
Leave exterior or wash:
To match the reference perfectly, leave the exterior unglazed to show the raw clay body. Alternatively, apply a very thin oxide wash and wipe it back to highlight the carved lines. -
Final firing:
Fire the piece a final time according to your clay body’s temperature requirements (usually cone 6 or cone 10).
Uneven Spacing?
If your pattern doesn’t meet up perfectly around the vase, don’t panic. Gently smudge the last few lines and embrace the handmade ‘wabi-sabi’ aesthetic.
Fill your new vessel with dried lagurus grass for an instantly chic display piece
Candle Holder With Scalloped Edge

This charming project brings a touch of organic warmth to your home decor with its stone-like speckled texture and playful scalloped rim. Perfect for holding a standard tea light, this small clay bowl mimics the look of high-end ceramic stoneware.
Step-by-Step Tutorial
Materials
- Air-dry clay (white or cream)
- Dried coffee grounds or black pepper
- Rolling pin
- Two 1/4 inch wooden guide strips
- Circle cookie cutter (approx. 4-5 inches)
- Small bowl or foam ball (for molding)
- Small round cutter or bottle cap (approx. 0.5 inch diameter)
- Sponge
- Water cup
- Fine grit sandpaper
- Clear matte acrylic sealer
Step 1: Preparation & Mixing
-
Prepare the speckling:
To achieve that beautiful faux-stoneware look, you will need to add texture to your clay before shaping. Take a lump of white air-dry clay about the size of a tennis ball. -
Incporporate the texture:
Sprinkle a teaspoon of dried used coffee grounds or cracked black pepper onto the clay. I find coffee grounds give a slightly warmer, earthier speckle than pepper. -
Knead thoroughly:
Fold and knead the clay repeatedly until the particles are evenly distributed throughout the entire ball. If the clay feels dry, dampen your hands slightly.
Step 2: Forming the Base
-
Roll out the slab:
Place your clay between two wooden guide strips to ensure even thickness. Roll it out until it is smooth and flat, approximately 1/4 inch thick. -
Cut the circle:
Use your large 4-5 inch circle cutter to punch out a perfect round disc. This will form the main body of your candle holder. -
Smooth edges:
Dip your finger in a little water and gently run it along the cut edge of the circle to remove any sharpness or burrs.
Even Scallops Trick
Before cutting, lightly mark the clay circle like a clock face (12, 3, 6, 9) to ensure your scallops stay symmetrical around the rim.
Step 3: Creating the Scallops
-
Mark spacing:
Lightly visualize where your scallops will go around the rim. You want them evenly spaced. -
Cut the scallops:
Take your small round cutter or bottle cap. Instead of cutting a full circle, align it so only half of the cutter overlaps the edge of your clay disc. Press down to remove a semi-circle bite. -
Repeat the pattern:
Continue this process all around the perimeter of the disc. Try to keep the spacing consistent so the ‘points’ between the scallops look uniform. -
Refine the rim:
Once all scallops are cut, use a damp sponge to gently smooth the new edges. The cutting process often leaves jagged bits that are harder to remove once dry.
Cracking While Drying?
If you see tiny cracks forming as it dries, smooth a slurry of water and fresh clay into the crack immediately with your finger.
Step 4: Shaping & Drying
-
Select a mold:
Find a small bowl or a styrofoam ball that has a gentle curve. Cover it with plastic wrap to prevent sticking. -
Drape the clay:
Carefully pick up your scalloped disc and center it over your mold. Gently press it down so it takes on a cupped, bowl-like shape. -
Adjust the rim:
Ensure the scalloped edges are flaring slightly outward rather than curling strictly inward; this open shape frames the candle flame beautifully. -
Initial dry:
Let the clay sit on the mold for about 2-3 hours until it is leather-hard and holds its shape on its own. -
Remove and finish drying:
Carefully remove the clay from the mold and place it upright on a wire rack. This allows air to circulate underneath for even drying. Leave for 24-48 hours.
Step 5: Finishing Touches
-
Sand for perfection:
Once fully cured and bone dry, take your fine-grit sandpaper and lightly sand the rim and the ‘points’ of the scallops to make them soft to the touch. -
Wipe down:
Use a dry brush or tack cloth to remove all sanding dust. -
Seal the piece:
Apply a coat of clear matte acrylic sealer. This protects the clay and keeps those coffee or pepper speckles in place without adding an unnatural gloss. -
Final cure:
Allow the sealer to dry completely before placing a tea light inside.
Now you have a serene little vessel ready to hold a flickering light on your windowsill

TRACK YOUR CERAMIC JOURNEY
Capture glaze tests, firing details, and creative progress—all in one simple printable. Make your projects easier to repeat and improve.
Stackable Desk Organizer Cubes
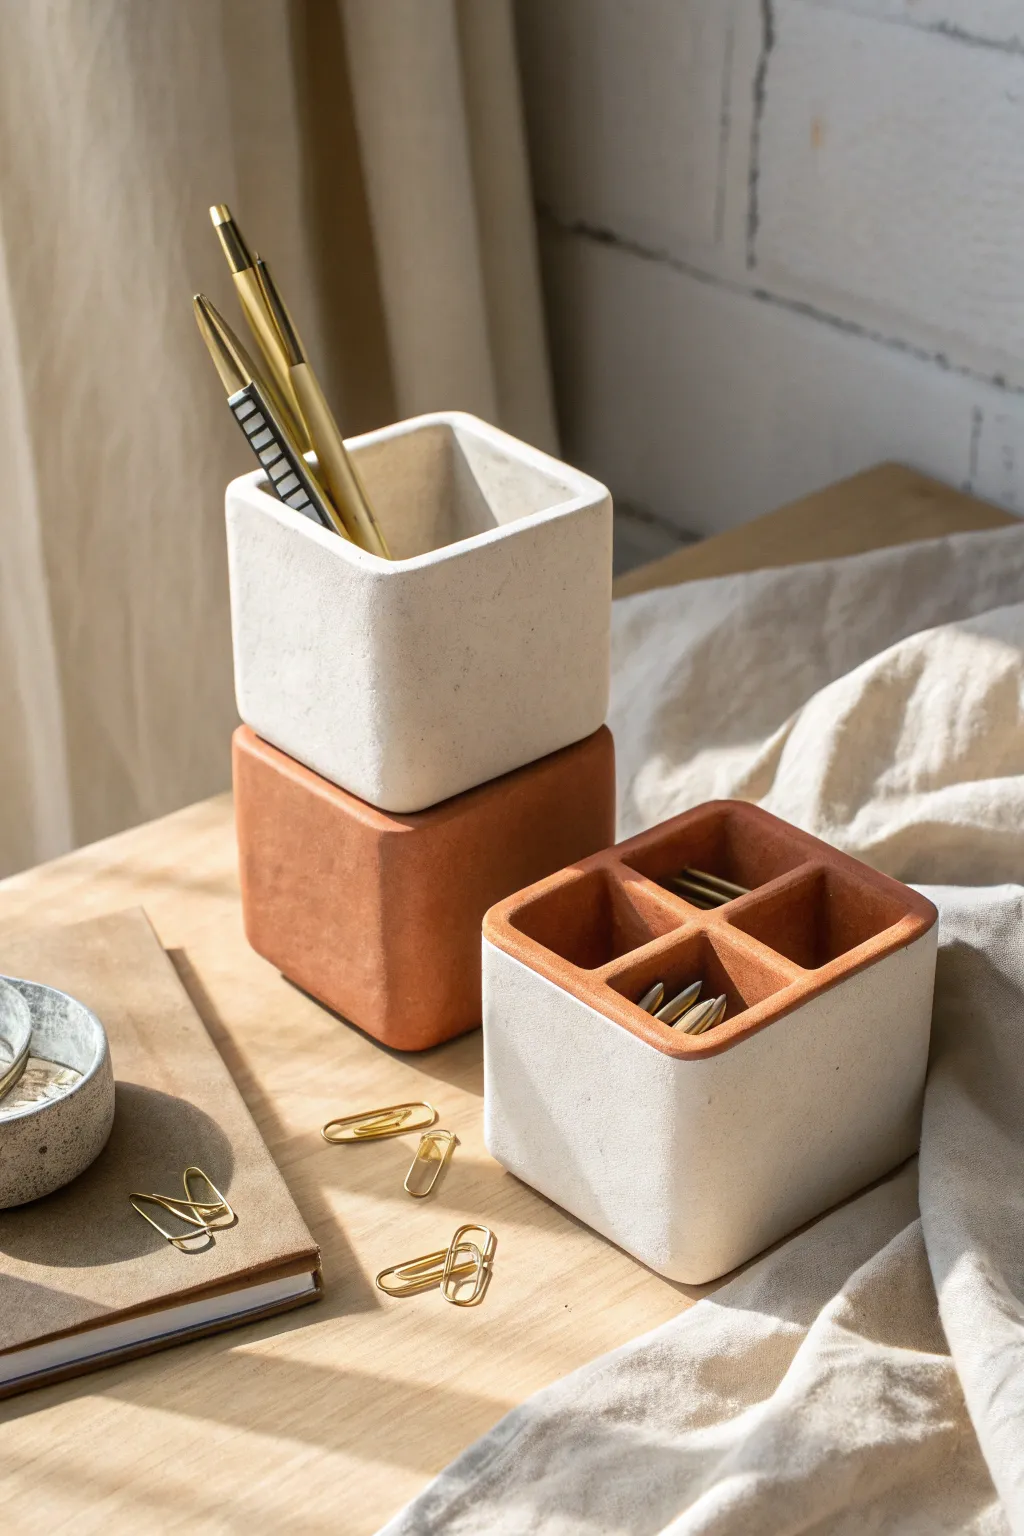
Bring minimalist order to your workspace with this chic set of modular clay organizers. The clean lines and earthy terracotta accents create a modern, stackable system perfect for corralling pens and paperclips.
Step-by-Step
Materials
- Air-dry clay (white and terracotta colored)
- Square cookie cutters or a sharp craft knife
- Rolling pin
- Two 1/4-inch thick wooden slats (for depth guides)
- Ruler or straight edge
- Small cup of water
- Fine-grit sandpaper (220-400 grit)
- Small slip brush
- Cardboard or foam core (for internal support)
- Matte acrylic sealer (optional)
Step 1: Planning and Prep
-
Design your dimensions:
Decide on a uniform size for your cubes. A 3-inch or 4-inch square is standard. Cut a template from cardboard to ensure every wall you roll out is identical. -
Prepare the workspace:
Lay down canvas or wax paper to prevent sticking. Place your two wooden slats on either side of your work area effectively creating rails for your rolling pin to rest on, ensuring a perfectly even thickness.
Warped Walls?
If walls bow inward during drying, create an internal support structure using cardboard wrapped in cling film. Leave it inside the cube until the clay is ‘leather hard’ and can support itself.
Step 2: Creating the Base Forms
-
Roll the slabs:
Take a large chunk of white white air-dry clay and roll it out between your slat guides. Repeat this process with the terracotta clay if you want a two-tone set. -
Cut the walls and bases:
Using your cardboard template and a sharp craft knife, cut out five squares for each open cube: one for the base and four for the walls. Keep your knife perpendicular to the table for clean 90-degree edges. -
Dry fit the pieces:
Before joining, hold the pieces together to check the fit. If necessary, trim the base square slightly smaller so the walls sit flush against its sides rather than on top of it. -
Score the edges:
Use a needle tool or an old fork to scratch up the contact points on the base and the bottom of the wall pieces. This rough texture is crucial for a strong bond. -
Create clay slip:
Mix a tiny amount of scrap clay with water until it forms a thick paste. Apply this ‘slip’ generously to the scored areas you just roughed up.
Step 3: Assembly and Refining
-
Join the walls:
Press the first wall onto the base. Reinforce the inside seam by rolling a tiny ‘snake’ of clay, pressing it into the corner, and smoothing it out with your finger. -
Complete the box:
attached the remaining three walls, scoring and slipping all connecting edges. Use a square object (like a small box wrapped in plastic) inside while joining to keep the shape perfectly geometric. -
Add the terracotta rim:
To achieve the two-tone look on the divided organizer, roll a thin strip of terracotta clay. Score the top edge of your white box and attach the strip, smoothing the seam on the outside so the transition feels seamless. -
Insert dividers:
For the paperclip holder, cut two rectangular clay pieces that match the interior diagonal length. Cut a slit halfway down the center of each, slot them together to form an ‘X’ or cross, and adhere them inside the box with slip. -
Initial smoothing:
Dip your finger in a little water and run it over all exterior seams and sharp edges to soften them slightly. Don’t use too much water, or the clay might warp.
Seamless Transitions
To get a seamless two-tone join, cut both the white and terracotta slabs at a 45-degree angle (miter cut) where they meet, rather than a blunt butt joint, for a stronger connection.
Step 4: Finishing Touches
-
Slow drying:
Let the cubes dry slowly away from direct heat or sunlight to prevent cracking. I usually loosely tent a plastic bag over them for the first 24 hours to control the moisture loss. -
Wait for cure:
Allow the pieces to dry fully for 48-72 hours until they are chalky and room temperature to the touch. -
Sand for perfection:
Once bone dry, take your fine-grit sandpaper and gently sand all the flat surfaces. This is the secret to getting that professional, concrete-like stone finish shown in the photo. -
Seal the surface:
Wipe away any dust with a slightly damp cloth. Apply a coat of matte acrylic sealer to protect the clay from stains and moisture without adding unwanted shine.
Stack your new organizers on your desk and enjoy the satisfaction of a tidy, handmade workspace
Animal Toothbrush Holder
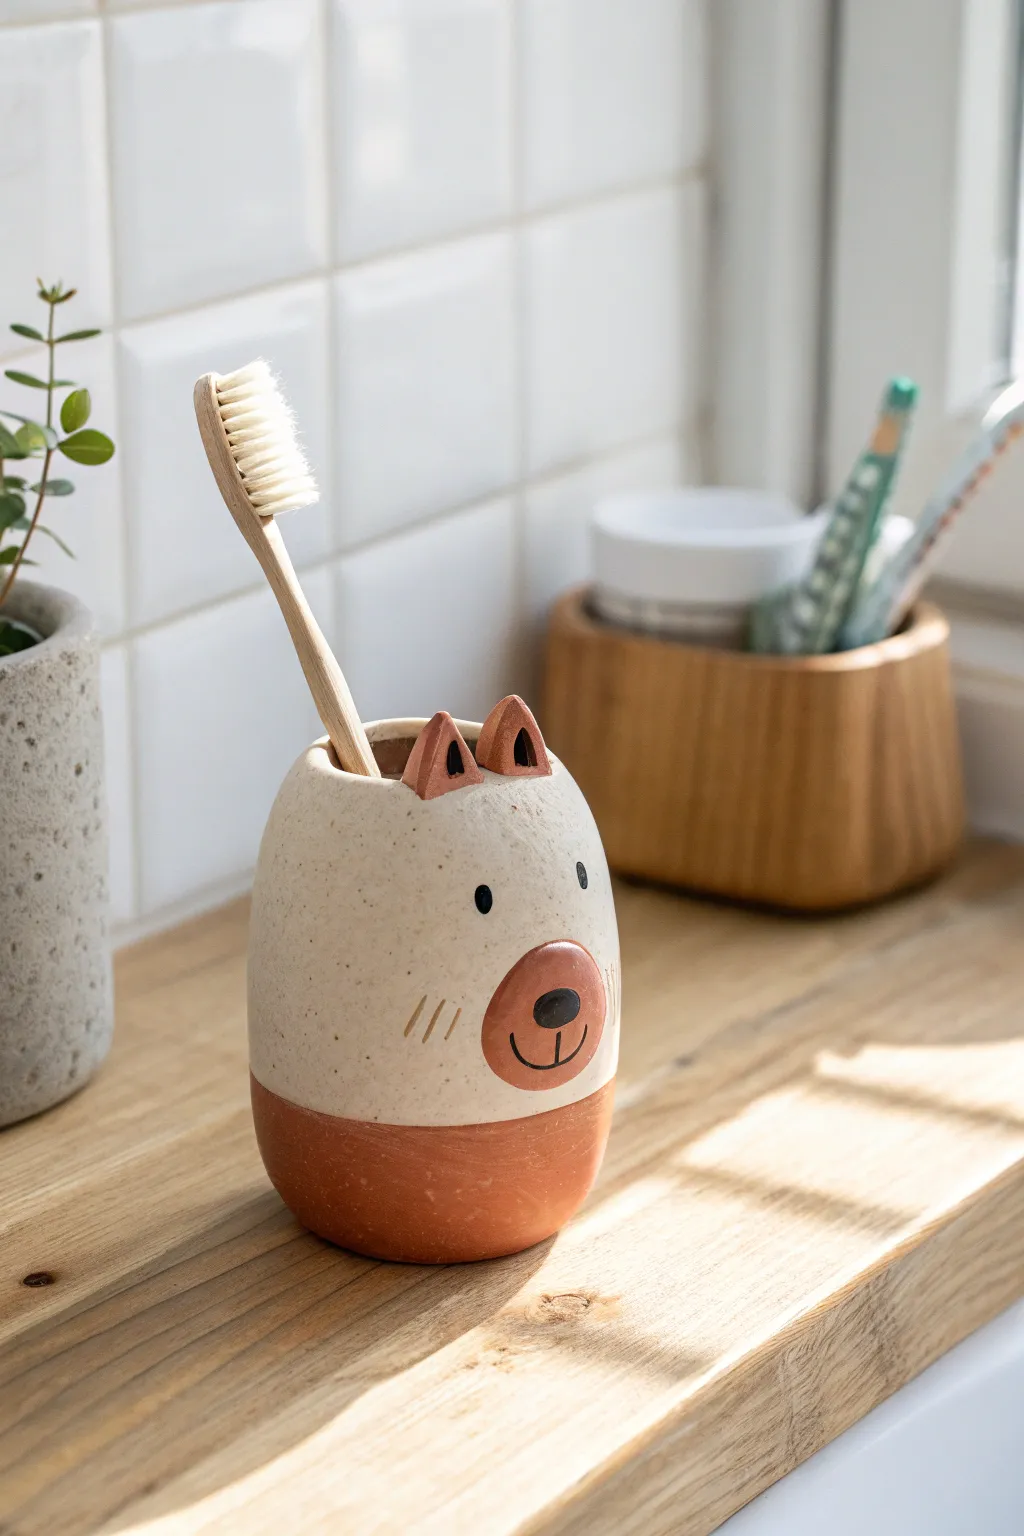
Brighten up your morning routine with this adorable ceramic toothbrush holder, featuring a sweet bear face and earthy two-tone design. The speckled cream glaze contrasts beautifully with the exposed terracotta base, making a functional piece of art that keeps your counter tidy.
How-To Guide
Materials
- Earthenware or stoneware clay (terracotta color recommended)
- Pottery wheel (optional, can be hand-built)
- Clay sculpting tools (needle tool, scoring tool)
- Sponge
- Speckled cream or white glaze (food safe)
- Black underglaze or ceramic paint
- Fine detail paintbrush
- Kiln (or access to a firing service)
- Rolling pin (if hand-building)
Step 1: Forming the Base
-
Prepare the Clay:
Start by wedging a softball-sized ball of terracotta clay to remove air bubbles. If you are throwing on the wheel, center your clay on the bat. -
Shape the Cylinder:
Create a cylindrical form that is slightly tapered at the top. The walls should be about a quarter-inch thick. If hand-building, roll out a slab, cut a rectangle, and join the ends to form a tube, then attach a circular base. -
Refine the Shape:
Smooth the exterior with a rib tool to create a gentle curve. The form should look like extended egg or a rounded tumbler. Make sure the rim is smooth and rounded for safety. -
Add Texture (Optional):
I like to leave the surface slightly organic, but you can smooth it perfectly with a damp sponge if you prefer a cleaner look.
Cracked Seams?
If ears fall off during drying, you simply didn’t score deeply enough. Re-score aggressively and use plenty of slip before reattaching.
Step 2: Sculpting the Features
-
Make the Ears:
Form two small triangles out of leftover clay. They should be roughly the size of a thumbnail. Pinch the centers slightly to give them a concave shape. -
Score and Slip:
Score the bottom of the ears and the attachment points on the rim of your cylinder. Apply slip (clay clue) to both surfaces. -
Attach the Ears:
Press the ears firmly onto the rim. Smooth the clay around the base of the ears to blend the seams, ensuring they are securely attached. -
Create the Snout:
Roll a small, flat circle of clay for the snout area. Attaching a slightly raised element here adds nice dimension, though painting it flat is also an option. -
Attach the Snout:
Using the score and slip method again, attach the clay circle to the lower middle section of the face area. Smooth the edges down so it transitions gently into the main body. -
Dry Slowly:
Loosely cover your piece with plastic and let it dry slowly to the leather-hard stage. This prevents cracking, especially around the added features.
Step 3: Decorating and Firing
-
Bisque Fire:
Once the piece is bone dry, fire it in the kiln to bisque temperature (usually Cone 04). This makes the clay porous and ready for glazing. -
Apply Wax Resist:
Paint a line of wax resist around the bottom third of the holder. This preserves the raw terracotta color at the base, creating that stylish two-tone look. -
Glaze the Interior:
Pour your speckled cream glaze inside the holder, swirl it to coat the entire interior, and pour out the excess. Wipe the rim clean. -
Glaze the Exterior:
Dip the top two-thirds of the holder into the speckled cream glaze. Stops right where your wax resist line begins. -
Clean Up:
Use a damp sponge to wipe away any glaze drips from the wax resist area or the bottom of the pot. The bottom must be perfectly clean so it doesn’t fuse to the kiln shelf. -
Paint the Face:
Using a fine brush and black underglaze (or a specifically designed overglaze), carefully paint the eyes, the nose on the snout, the mouth line, and three little whisker dashes on each cheek. -
Detail the Ears:
Paint the inner triangles of the ears with a darker reddish-brown underglaze, or leave them unglazed to match the base. -
Final Fire:
Place the holder back in the kiln for the glaze firing (temperature depends on your specific clay and glaze, often Cone 5 or 6). -
Cool Down:
Allow the kiln to cool completely before removing your new toothbrush holder to avoid thermal shock.
Make it a Set
Scale up the dimensions by 30% to create a matching soap pump, or widen the form into a shallow bowl to create a soap dish for a full vanity set.
Place your favorite bamboo toothbrush inside and enjoy the whimsical charm added to your bathroom sink
Clay Spoon Rest for the Kitchen
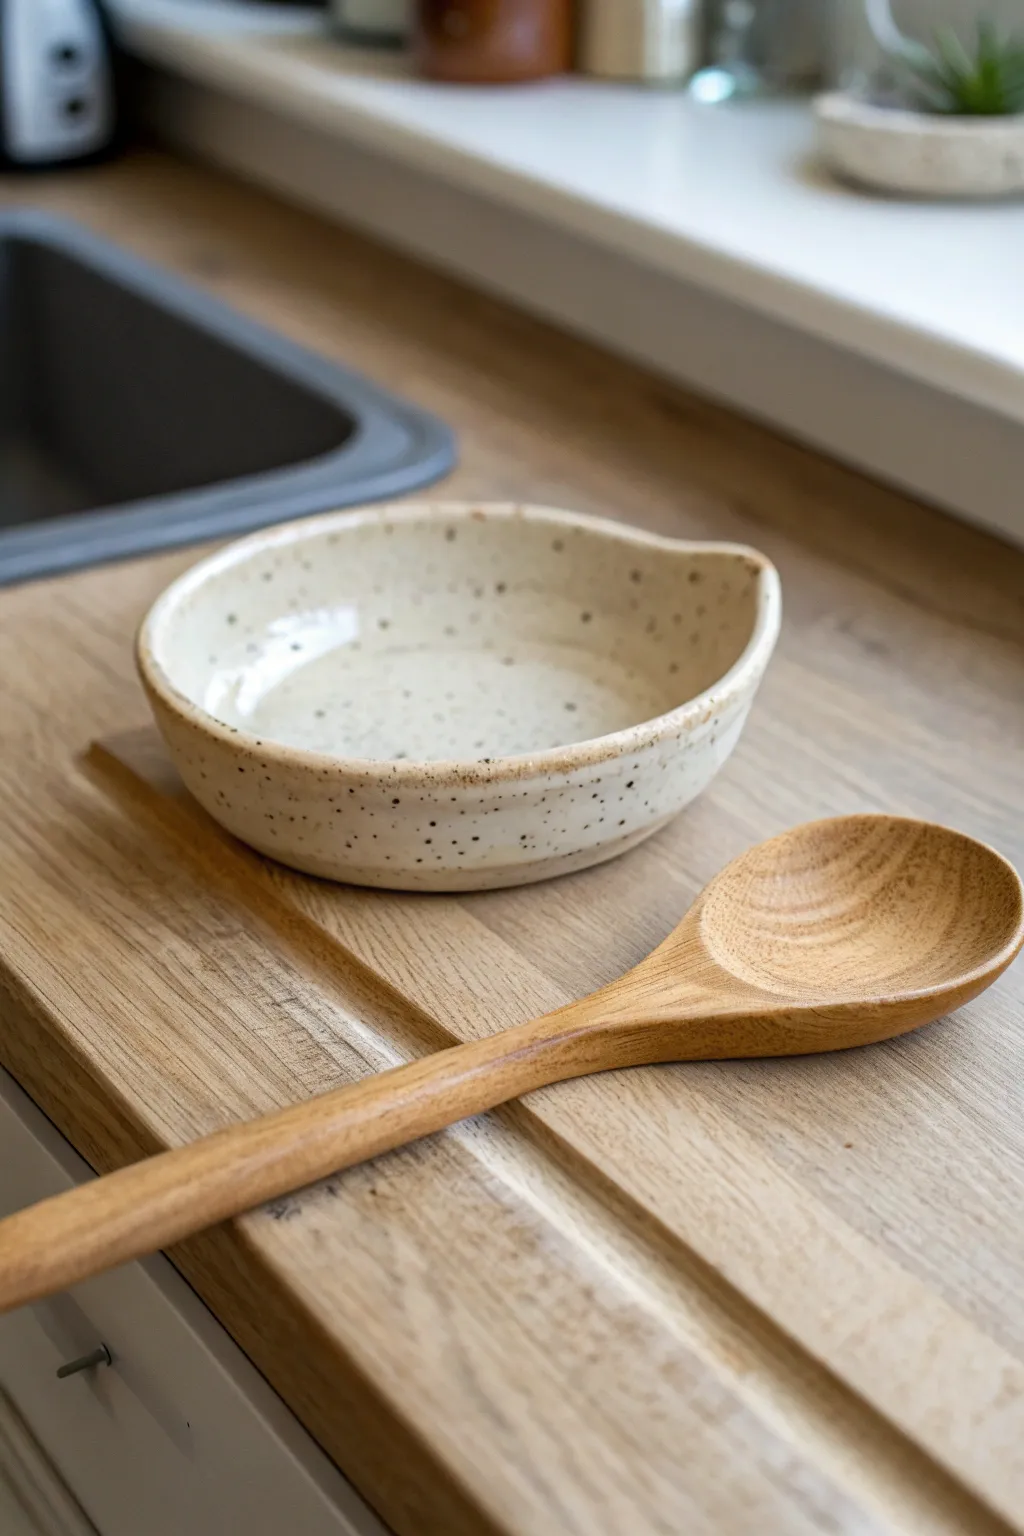
This charming, hand-built spoon rest features a simple organic shape with a speckled creamy glaze that adds warmth to any kitchen counter. Its gentle curve and handy pouring spout design keep utensils secure while capturing drips in style.
Step-by-Step Tutorial
Materials
- Speckled stoneware clay (or white clay with grog)
- Rolling pin
- Two guide sticks (approx. 1/4 inch thick)
- Needle tool or fettling knife
- Small sponge
- Rib tool (wood or rubber)
- Small bowl or slump mold (optional)
- Cream or oatmeal speckled glaze
- Brush for glazing
- Kiln access
Step 1: Shaping the Base
-
Prepare the Clay:
Start with a ball of speckled stoneware clay roughly the size of a tennis ball. Wedge it thoroughly to remove any air bubbles and ensure an even consistency. -
Roll the Slab:
Place your guide sticks on either side of the clay ball on a canvas or mat. Roll the clay out into an even slab until the rolling pin rests on the guide sticks, ensuring a consistent 1/4-inch thickness. -
Smooth the Surface:
Take your rib tool and gently compress the clay slab on both sides. This aligns the clay particles to prevent warping later and creates a nice, smooth canvas for your glaze. -
Cut the Circle:
Using a needle tool or fettling knife, cut a circle approximately 5 to 6 inches in diameter. You can trace around a small cereal bowl or simply freehand it for a more organic feel. -
Soften the Edges:
Dip your finger or a small piece of sponge in water and run it along the cut edge to round it off. Sharp edges can become brittle after firing, so I like to spend extra time here making it feel smooth to the touch.
Spout Symmetry
When making the handle indentation, visualize a clock face. If you pull the rim up at 12, 3, 6, and 9, place your spout ‘rest’ directly between two points for visual balance.
Step 2: Forming the Rest
-
Lift the Walls:
Gently cup the clay circle in your hands and pinch the edges upward to create a slight rim. You want to create a shallow bowl shape, lifting the sides about 3/4 of an inch. -
Refine the Curve:
If you want a very uniform shape, press the slab gently into a shallow slump mold or a curved bowl lined with newspaper. Otherwise, continue shaping by hand on a banding wheel. -
Create the Spout:
Choose one spot on the rim to be the rest for the spoon handle. Gently press down with your index finger while supporting the clay underneath with your thumb to create a ‘u’ shaped indentation or spout. -
Smooth the Indentation:
Use a damp sponge to smooth the edges of this new indentation so the spoon handle will rest comfortably without scraping against sharp clay. -
Clean the Base:
Flip the piece over gently and smooth the bottom. You can stamp your maker’s mark now if you have one. -
Slow Drying:
Loosely cover the spoon rest with plastic and let it dry slowly to the leather-hard stage. This prevents the rim from warping as it shrinks.
Go Geometric
Instead of a complete circle, try cutting a hexagon or oval shape for the base. Contrasting a geometric shape with the organic speckled glaze creates a modern look.
Step 3: Finishing and firing
-
Bisque Fire:
Once bone dry, fire the piece to bisque temperature (usually cone 04 or 06). This prepares the clay to accept the glaze without dissolving. -
Wax the Foot:
Apply wax resist to the bottom of the spoon rest and slightly up the side if you want an unglazed foot ring. This prevents the piece from sticking to the kiln shelf. -
Apply Glaze:
Dip the piece or brush on your cream-colored speckled glaze. Aim for an even application, but avoid making it too thick near the bottom edge. -
Wipe the Rim:
For the look in the photo, take a damp sponge and carefully wipe the glaze off just the very top edge of the rim. This exposes the raw toasted clay for a beautiful contrast. -
Glaze Fire:
Fire the spoon rest again to the maturation temperature of your specific clay and glaze body (often cone 5 or 6 for stoneware). -
Sanding:
Once cool and unloaded, check the bottom for any rough spots on the unglazed clay. Briefly sand the bottom with high-grit sandpaper to ensure it won’t scratch your countertops.
Place your finished piece by the stove and enjoy having a dedicated clean spot for your wooden spoons
Happy Face Fridge Magnets
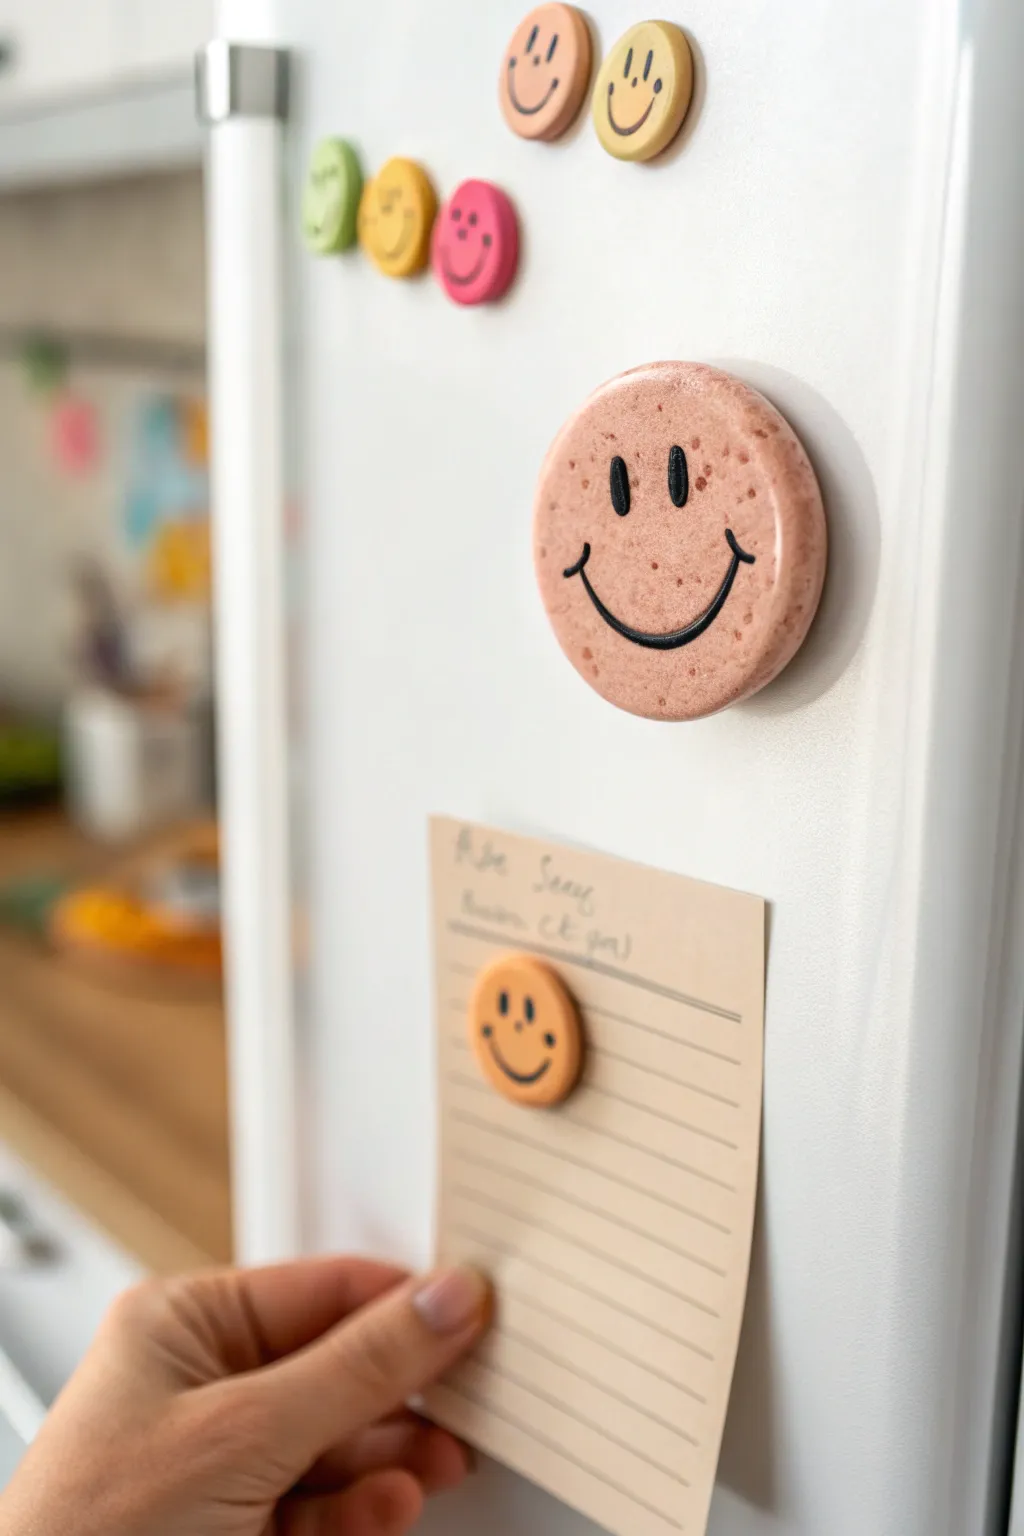
Brighten up your kitchen with these charming, cookie-style happy face magnets. Their speckled, stone-like texture and cheerful expressions add a warm, handmade touch to any magnetic surface.
Step-by-Step
Materials
- Polymer clay (white, beige, translucent, and pink)
- Black polymer clay (for the face details)
- Coarse black pepper or brown acrylic paint (for speckles)
- Round cookie cutters (various sizes)
- Acrylic rolling pin
- Small round piping tip or straw (optional)
- Needle tool or toothpick
- Strong round magnets
- Strong adhesive (E6000 or super glue)
- Baking sheet and parchment paper
- Glossy glaze (optional)
Step 1: Preparing the Speckled Dough
-
Mix base colors:
Start by conditioning your clay. For the large pink magnet, mix white clay with a small amount of pink and a touch of beige to get a soft, muted dusty rose color. -
Create the texture:
To achieve that realistic stony or cookie-like texture, sprinkle a pinch of coarse black pepper directly into your clay mix. Alternatively, you can mix in tiny flecks of dried brown acrylic paint. -
Knead thoroughly:
Fold and knead the clay repeatedly until the speckles are evenly distributed throughout the ball. This texture is the secret to their unique charm. -
Mix secondary colors:
Repeat the process for the smaller magnets using different base shades like vibrant orange, yellow, or soft green, adding the speckles to each batch.
Sticky Situation?
If fingerprints are visible on your raw clay, lightly brush the surface with a little baby oil or cornstarch before baking to smooth them out.
Step 2: Shaping the Faces
-
Roll out clay:
Using your acrylic rolling pin, roll out the speckled clay to a thickness of about 1/4 inch (6mm). You want them thick enough to hold the magnet firmly. -
Cut circles:
Use round cookie cutters to punch out your magnet shapes. Make a variety of sizes for visual interest on your fridge. -
Soften edges:
Gently tap the cut edges with your finger to round them off slightly, removing the sharp cut look and making it look more like a distinct object. -
Prepare black details:
Condition a small piece of black polymer clay until it is very soft. Roll it into extremely thin snakes or threads for the smiling mouths. -
Form the eyes:
Roll tiny balls of black clay and flatten them into ovals for the eyes. Gently press them onto the upper half of your clay circle. -
Apply the smile:
Take a segment of your thin black clay thread and curve it into a wide ‘U’ shape. Press it gently onto the clay face. -
Add smile lines:
Cut tiny snippets of the black thread and place them at the very ends of the smile to create little cheek creases. -
Embed the features:
Use the back of a spoon or your finger to lightly press the black features flush with the surface so they don’t pop off later.
Step 3: Finishing Up
-
Bake:
Place your clay rounds on a parchment-lined baking sheet. Bake according to your clay manufacturer’s instructions (usually 275°F/135°C for 15-30 minutes per 1/4 inch). -
Cool down:
Allow the clay pieces to cool completely on the baking sheet. Moving them while hot can cause warping or cracking. -
Sand edges (optional):
If there are any rough spots on the edges, lightly sand them with fine-grit sandpaper for a professional finish. -
Attach magnets:
Apply a dab of strong adhesive to the back of the cooled clay piece and press a round magnet firmly into the glue. -
Dry time:
Let the glue cure fully, usually for 24 hours, before placing your new friends on the refrigerator.
Texture Twist
Make them look like actual cookies by using a toothbrush to gently stipple the surface of the clay before adding the face details.
Now you have a cheerful set of speckled magnets ready to hold your most important notes and photos
Modern Clay Knot Sculpture
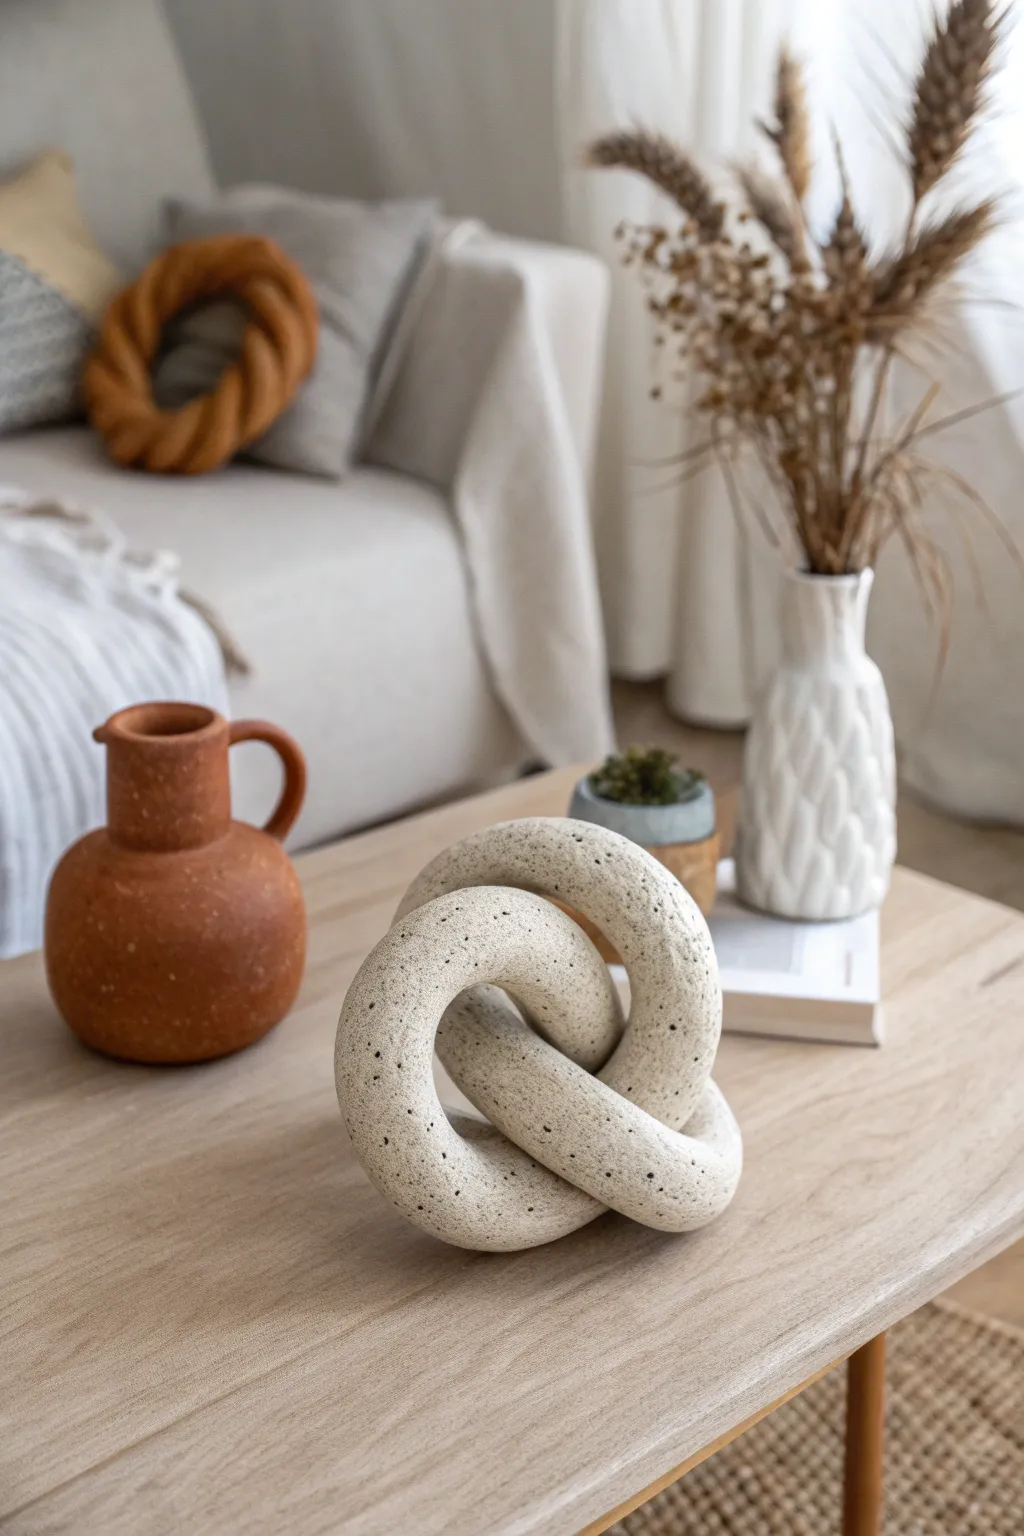
Embrace the beauty of modern organic forms with this speckled clay knot sculpture. Its fluid lines and minimalist aesthetic make it a perfect statement piece for a coffee table or bookshelf, adding a touch of sophisticated calm to any space.
Step-by-Step Tutorial
Materials
- Air-dry clay (stone/speckled effect or plain white)
- Black pepper or dried coffee grounds (for speckling, if using plain clay)
- Wide rolling pin
- Small cup of water
- Sponge
- Sandpaper (fine and medium grit)
- Acrylic sealant (matte)
- Flexible measuring tape
Step 1: Preparation and Rolling
-
Condition the Clay:
Begin with a large handful of air-dry clay, kneading it thoroughly to remove air bubbles and warm it up. If you are using plain white clay and want the speckled look shown in the photo, knead in a pinch of coarse black pepper or dried coffee grounds now. -
Form a Log:
Roll the clay between your palms and then onto your work surface to create a long, thick snake or log. Aim for an even thickness of about 1 to 1.5 inches throughout the length. -
Check the Length:
Continue rolling until your log is approximately 20-24 inches long. A longer log gives you more flexibility when tying the knot, so err on the side of too long rather than too short. -
Smooth the Surface:
Dip your fingers in a little water and run them along the length of the clay log to smooth out any cracks or dryness before you start shaping.
Secret to Smoothness
Keep a small bowl of water nearby while rolling. If the clay starts to crack, immediately smooth it with a wet finger to prevent deep fissures later.
Step 2: Shaping the Knot
-
Create the First Loop:
Take one end of the log and curve it to form a simple open loop on your table, leaving a long tail. -
Weave the Knot:
Take the other end of the log and pass it through the loop you just made. Think of it like tying a very loose overhand knot, but don’t pull it tight. -
Adjust for Balance:
Gently manipulate the curves so the knot looks puffy and open, rather than tight and constricted. The goal is to have soft, rounded negative spaces. -
Join the Ends:
Bring the two cut ends of the clay log together, likely tucking them underneath one of the loops to hide the seam. I usually slice the ends at a diagonal angle to increase the surface area for a strong bond. -
Seal the Seam:
Score the ends with a tool or fingernail, add a dab of water, and press them firmly together. Use your finger to smear the clay across the join line until it disappears completely.
Step 3: Refining and Finishing
-
Smooth Imperfections:
With a damp sponge, gently wipe over the entire sculpture to smooth out fingerprints and minor bumps. Be careful not to distort the shape while doing this. -
Initial Drying Phase:
Let the sculpture sit for about 24-48 hours. Turn it over gently halfway through the drying process to ensure the bottom dries evenly and doesn’t trap moisture. -
Sanding for Texture:
Once fully dry and hard, use medium-grit sandpaper to remove any major unevenness. Follow up with fine-grit sandpaper to achieve that smooth, matte stone finish. -
Enhancing the Speckles:
If you added pepper or grounds, sanding will reveal them beautifully. Wipe away the dust with a slightly damp cloth or tack cloth. -
Protect the Surface:
Apply a coat of matte acrylic sealant or varnish. This protects the clay from moisture and preserves that lovely raw, organic look without adding unwanted shine.
Fixing Cracks
If minor cracks appear while drying, mix a small amount of fresh clay with water to make a paste (slip) and fill the cracks, then sand smooth once dry.
Place your sculptural knot on a stack of books or a wooden tray to instantly elevate your decor game
Moon Phase Wall Hanging Tiles
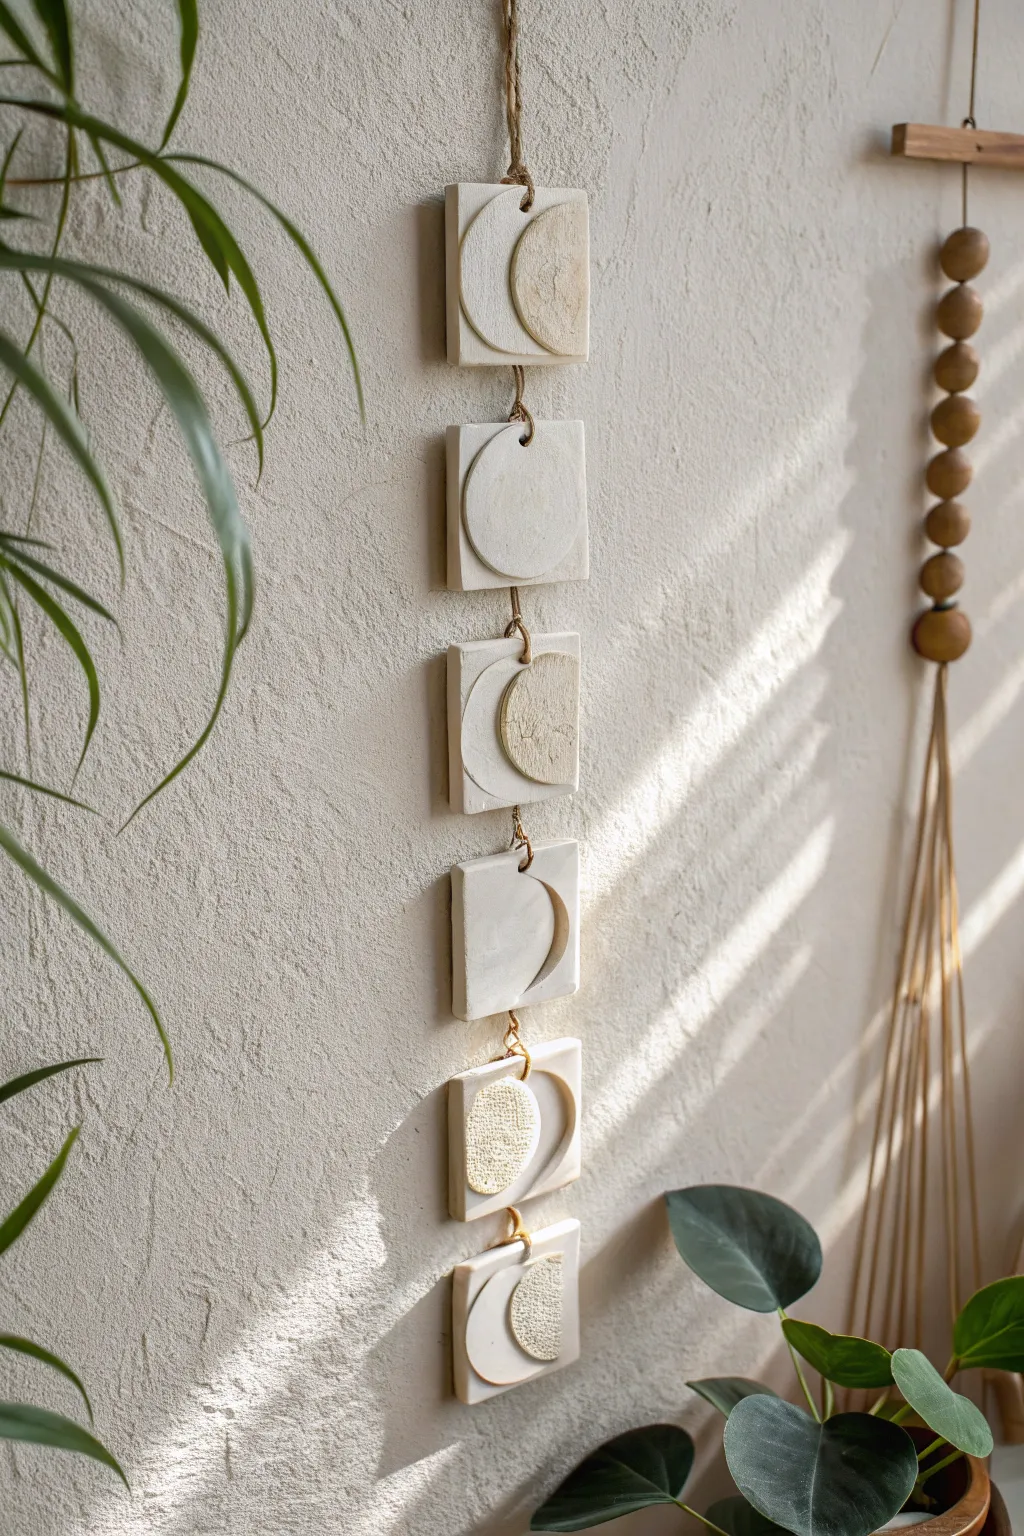
Bring the celestial cycle indoors with this textured, neutral-toned wall hanging that features creamy white square tiles depicting the phases of the moon. Suspended by rustic twine, this vertical mobile adds a touch of bohemian elegance and natural texture to any blank wall space.
Detailed Instructions
Materials
- Air-dry clay (white)
- Rolling pin
- Square cookie cutter (approx. 3-4 inches) or ruler and knife
- Circle cookie cutter (slightly smaller than the square width)
- Texturing material (e.g., burlap, heavily woven fabric, or sandpaper)
- Jute twine or hemp cord
- Wooden dowel or skewer (for making holes)
- Acrylic paint (warm cream and beige/gold optional)
- Paintbrush
- Fine-grit sandpaper
- Craft glue or slip (clay and water mix)
Step 1: Shaping the Base Tiles
-
Roll the clay:
Start by conditioning your air-dry clay until it is soft and pliable. Roll it out on a non-stick surface to a consistent thickness of about 1/4 inch. -
Cut the squares:
Using your square cookie cutter, cut out six identical square tiles. If you don’t have a cutter, measure and cut 3-inch squares carefully with a ruler and knife for clean edges. -
Smooth the edges:
Dip your finger in a little water and run it along the cut edges of each square to smooth down any roughness or clay crumbs. -
Add hanging holes:
Using a wooden dowel or a straw, poke a hole in the center of the top and bottom edge of each square. Since the clay shrinks as it dries, make these holes slightly larger than you think you need.
Fixing Curled Edges
If your tiles curl while drying, slightly dampen the concave side and place them under a heavy book overnight to flatten them back out.
Step 2: Creating the Moon Phases
-
Roll thinner clay:
Roll out a fresh piece of clay, but make this layer slightly thinner than your base tiles, perhaps 1/8 inch thick. -
Texture the surface:
Before cutting, press your texturing material (like a piece of burlap or rough fabric) firmly into this thin sheet of clay to create a pitted, moon-like surface. -
Cut whole circles:
Use your circle cutter to punch out six textured circles. -
Slice the phases:
You will need to cut these circles into specific moon shapes: a full circle, crescents (waxing and waning), and gibbous shapes. Use your circle cutter again to slice off sections of the circles to create the crescents and curves. -
Attach the moons:
Apply a small amount of slip (or water) to the back of your textured moon pieces and press them firmly onto the center of your square tiles. -
Dry the tiles:
Lay all the tiles flat on a wire rack or parchment paper. Let them dry completely, which usually takes 24-48 hours depending on humidity. Flip them occasionally to prevent curling.
Adding Golden Details
Mix just a drop of gold acrylic paint into your beige color when dry-brushing the moons to catch the light beautifully.
Step 3: Assembly and Finishing
-
Sand the edges:
Once fully dry, use fine-grit sandpaper to gently smooth the outer edges of the squares and any sharp points on your moon shapes. -
Seal or paint:
For a two-tone look like the photo, leave the background smooth and creamy, but lightly dry-brush the textured moon parts with a beige or metallic champagne paint to highlight the craggy surface. -
Cut the twine:
Cut five short lengths of jute twine (about 4 inches each) for connecting the tiles, and one long piece for the top hanging loop. -
Connect the tiles:
Start at the bottom. Thread a short piece of twine through the top hole of the bottom tile and the bottom hole of the tile above it. -
Knot the connections:
Tie a secure knot in the front (or back, depending on preference) to link them, leaving just enough slack so the tiles hang freely without twisting. -
Repeat the process:
Continue linking the tiles upward until all six are connected in a vertical line. -
Add the top loop:
Thread your long piece of twine through the top hole of the uppermost tile, tie a knot close to the tile, and then create a large loop for hanging.
Hang your finished piece in a sunny spot where the light can play across the textured moon surfaces