When I’m craving a quick win in the studio, I go small—because tiny clay projects let you finish something adorable in one sitting. Here are my go-to tiny clay ideas you can make with polymer clay or air dry clay, even if you’re just getting started.
Tiny Smiling Avocado Charm
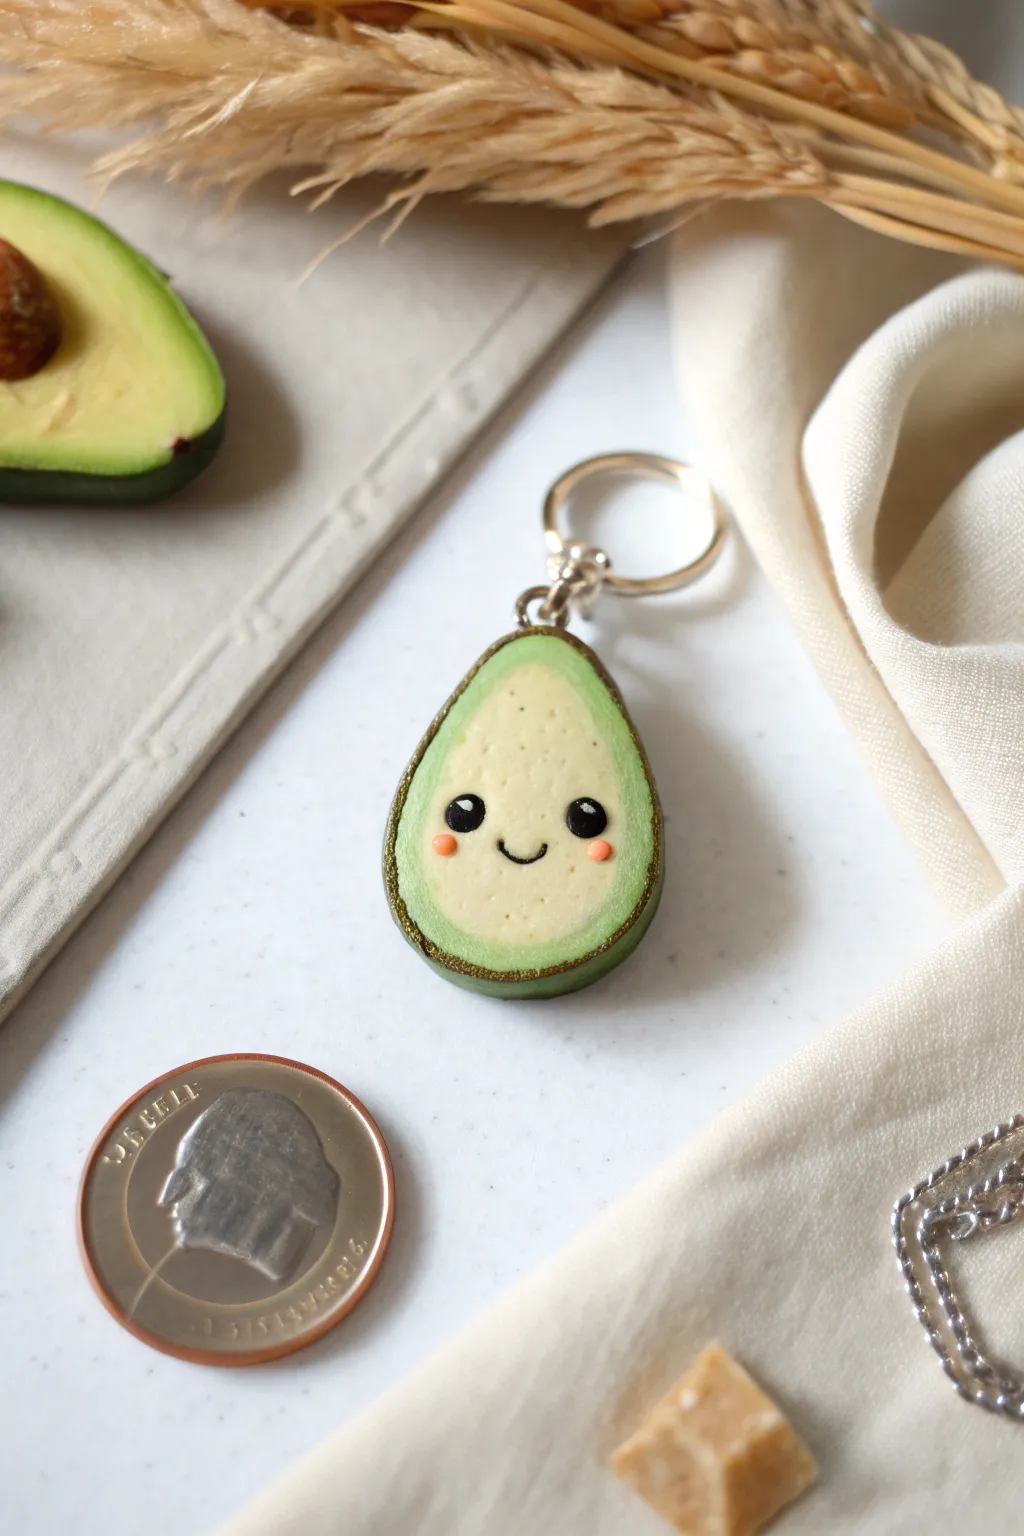
Craft a pocket-sized friend with this adorable smiling avocado charm, perfect for adding a touch of whimsy to your keys or bag. This polymer clay project features a realistic gradient finish and charming little facial details that bring the character to life.
Step-by-Step Guide
Materials
- Polymer clay (dark green, light yellow-green, translucent white, black, pink)
- Soft pastel chalks within the green spectrum
- Soft paintbrush for pastels
- Gold acrylic paint or metallic powder pigment
- Fine detail paintbrush or dotting tool
- Eye screw pin
- Keychain jump ring and clasp assembly
- Gloss glaze or UV resin (optional)
- Small blade or craft knife
- Sandpaper or nail buffer
Step 1: Shaping the Base
-
Mix the Flesh Tone:
Begin by conditioning your clay. Mix a pale yellow-green with a generous amount of translucent white clay. This creates that realistic, slightly waxy look of avocado flesh rather than a flat, opaque color. -
Form the Shape:
Roll your mixed clay into a smooth ball about the size of a large marble. Gently flatten it and pinch the top portion to create the classic pear or teardrop shape of an avocado. -
Create the Skin:
Roll out a thin sheet of dark green clay. Wrap this carefully around the pale inner shape, trimming away any excess so the seams meet cleanly on the back or sides. -
Smooth the Join:
Gently roll the entire piece in your palms to blend the dark skin layer with the light flesh, ensuring they are firmly bonded and the surface is smooth. -
Flatten the Face:
Press the shape down slightly onto your work surface to create a flat front face, simulating a cut avocado half.
Clean Clay Tip
Keep wet wipes nearby! White and pale green clay attracts dust like a magnet. Clean your hands and tools thoroughly before handling the lighter colors to keep the face pristine.
Step 2: Coloring and Detailing
-
Apply Gradient Shading:
Shave a little green soft pastel chalk into a powder. Using a soft, dry brush, gently dust the outer edges of the pale flesh where it meets the dark skin to create a natural ripening gradient. -
Texture the Surface:
Take a toothbrush or a ball of aluminum foil and very lightly tap the light green surface. I like to keep this subtle—just enough to mimic the organic texture of the fruit so it isn’t perfectly smooth. -
Make Eye Sockets:
Use a small ball tool to make two shallow indentations where you want the eyes to sit. This helps the black clay sit flush rather than bulging out. -
Add the Eyes:
Roll two tiny specks of black clay into balls and press them into the sockets. Flatten them slightly. -
Paint the Smile:
Roll an incredibly thin snake of black clay for the mouth, or simply paint a small ‘u’ shape with black acrylic paint and a fine liner brush between the eyes. -
Add Cheek Blush:
Place two tiny flat discs of pink clay under the eyes for cheeks, or dust a tiny amount of pink chalk on with a Q-tip. -
Add Eye Sparkles:
Use a needle tool or toothpick to place a microscopic dot of white acrylic paint (or white clay) in the upper corner of each black eye for a lifelike reflection.
Step 3: Finishing Touches
-
Insert Hardware:
Screw an eye pin into the top center of the avocado. If you want extra security, dab a little liquid clay on the screw threads before inserting. -
Bake:
Bake the piece according to your specific brand of polymer clay’s instructions—usually around 275°F (135°C) for 15-30 minutes. -
Cool Down:
Allow the charm to cool completely before handling. Polymer clay is fragile while hot. -
Gild the Edge:
Using a small brush, carefully paint the rim of the dark green skin with gold acrylic paint to give it a polished, decorative border. -
Seal (Optional):
Coat the front face (or the whole piece) with a matte or satin varnish to protect the pastel shading. Avoid high gloss unless you want a wet look. -
Attach Keychain:
Open a jump ring using two pairs of pliers, loop it through the eye pin and your keyring assembly, and close it securely.
Make it a Pit
For a different look, create a round brown clay dome in the center (the seed) and place the facial features onto that instead of the flesh.
Your tiny avocado pal is now ready to tag along on your daily adventures


Mini Toast and Egg Besties
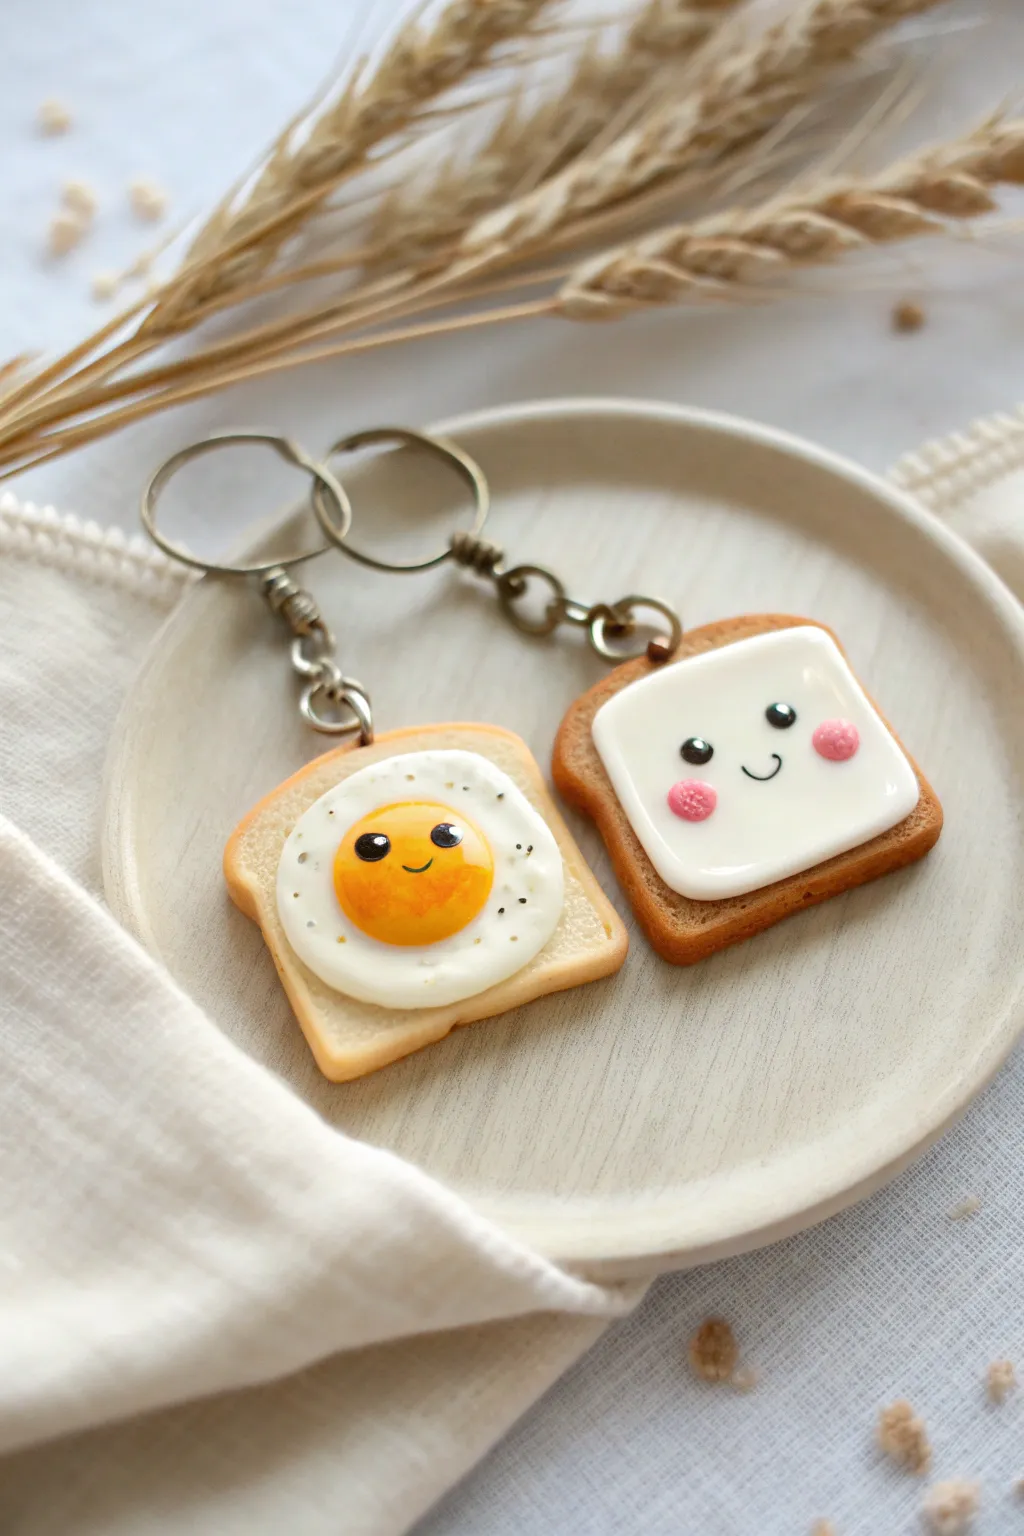
Create an adorable pair of breakfast-themed keychains featuring sunny-side-up egg toast and its cheerful creamy companion. These tiny clay charms are finished with high-gloss resin for a realistic shine and sweet, simple kawaii expressions.
How-To Guide
Materials
- Polymer clay (white, translucent, yellow, beige, brown)
- Liquid polymer clay (white and translucent)
- Black acrylic paint or fine-point paint pen
- Pink chalk pastel
- UV resin and UV lamp
- Soft paintbrush for shading
- Needle tool or toothbrush (for texturing)
- Eye pins and keychain hardware
- Craft knife
- Rolling pin
Step 1: Baking the Bread Bases
-
Mix the Dough Color:
Start by mixing white clay with a small amount of beige and translucent clay. The goal is a light, realistic bread dough color that isn’t stark white. -
Shape the Loaf Slices:
Roll the clay out to about 1/4 inch thickness. Use a small square cutter or cut two squares freehand with your craft knife. Gently curve the top edge to create that classic loaf shape and indent the sides slightly to define the crust. -
Texturize the Bread:
This is the secret to realism. Use a toothbrush or a crumpled ball of aluminum foil to gently tap texture onto the front and back surfaces of the slices. Avoid the edges for now where the crust will be. -
Shade the Crust:
Scrape some brown chalk pastel into a fine powder. Use a soft, dry paintbrush to dust the edges of the bread slices, building up the color to look like a golden-brown crust. -
Add Eye Pins:
Insert a metal eye pin into the top center of each slice. I prefer to add a tiny dab of liquid clay to the pin’s shaft before inserting it to ensure it bonds permanently during baking. -
First Bake:
Bake the bread bases according to your clay package instructions (usually 275°F for 15 minutes). Let them cool completely before moving to the next phase.
Bread Texture Pro-Tip
For the most realistic bread texture, use a stiff-bristled toothbrush and use a tapping motion rather than dragging. Do this before shading for deeper pits.
Step 2: Adding Toppings & Personality
-
Create the Egg White:
Take a small ball of white clay and flatten it into an irregular, organic circle. Place this centered on the first toast slice, pressing the edges down gently so they slope onto the bread. -
Form the Yolk:
Roll a tiny ball of yellow clay mixed with a speck of orange for warmth. Press this onto the center of the egg white, flattening slightly into a dome. -
Add ‘Pepper’ Texture:
If you want a seasoned look like the example, sprinkle tiny flecks of black clay or dried tea leaves onto the egg white before baking. -
Apply the Cream Spread:
For the second slice, cut a piece of white clay slightly smaller than the toast surface. Soften the edges and press it onto the second slice to mimic a thick layer of cream cheese or butter. -
Add Faces:
Roll incredibly tiny balls of black clay for the eyes and press them onto the egg yolk and the cream cheese. Alternatively, make small indentations where the eyes will go to paint later. -
Paint the Smiles:
Use a needle tool dipped in black paint or a very fine paint pen to draw a tiny smile between the eyes on both charms. -
Add Blush:
Scrape pink chalk pastel into powder. Use a small detail brush or cotton swab to dab rosy cheeks onto the cream cheese face. For the egg, paint two tiny white highlights on the black eyes for extra cuteness. -
Second Bake:
Bake the pieces again for another 15-20 minutes to set the toppings. Let them cool fully.
Step 3: The Glossy Finish
-
Apply UV Resin:
Carefully drip UV resin over the egg yolk and the white part of the egg. For the other charm, cover the entire white cream square with resin. -
Spread and Seal:
Use a toothpick to guide the resin to the edges of the toppings, ensuring the surface tension creates a nice dome effect without spilling over onto the ‘bread’ texture. -
Cure the Resin:
Place under a UV lamp for 2-3 minutes until hard and non-tacky. This gives that wet, fresh food look. -
Assembly:
Open the jump rings on your keychain findings using pliers and attach them to the eye pins on your finished toasts.
Fixing Sticky Resin
If your resin finish feels tacky after curing, wipe it quickly with an alcohol wipe and cure it under the lamp for another 60 seconds.
Clip these little breakfast buddies onto your keys or backpack for a daily dose of morning cheer


Mini Strawberry Milk Carton Pendant
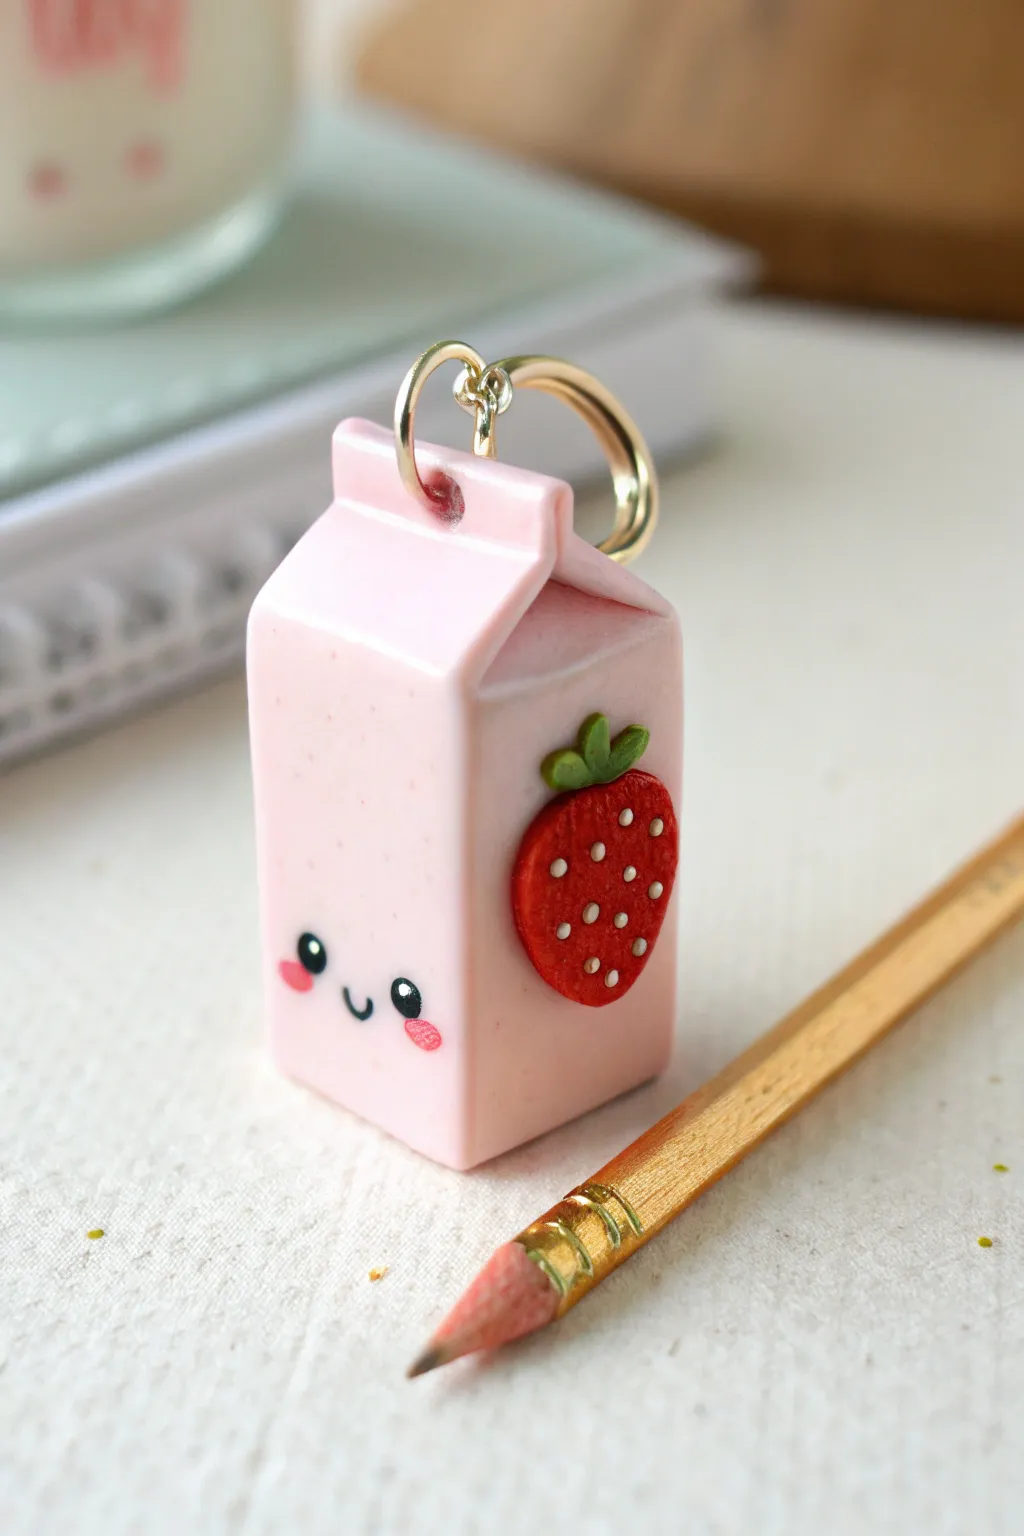
This adorable miniature charm transforms a simple block of clay into a nostalgic strawberry milk carton straight out of a kawaii dream. With its soft pink hue, sweet little face, and tiny strawberry detail, it’s the perfect size for a necklace or keychain.
Step-by-Step Tutorial
Materials
- Polymer clay (light baby pink)
- Polymer clay (red and green for the strawberry)
- Acrylic paint (black, white, bright pink)
- Fine detail paintbrush or dotting tool
- Blade or X-Acto knife
- Eye pin or screw eye
- Gold jump ring
- Gloss glaze (UV resin or polyurethane varnish)
- Needle tool
- Rolling pin
Step 1: Shaping the Carton Base
-
Condition the Clay:
Begin by thoroughly conditioning your light pink clay until it is soft and pliable. If the clay feels too firm, work it in your warm hands for a few minutes. -
Form the Prism:
Shape the pink clay into a thick, rectangular block. You want distinct, sharp corners, so gently tap each side against your work surface to flatten them. -
Establish the Size:
Trim the block with your blade to your desired height, ensuring the sides remain parallel. A height of about 1 inch usually works perfectly for a pendant. -
Create the Top Ridge:
Pinch the top center of the rectangle to form a triangular ridge, mimicking the folded top of a milk carton. Smooth out any fingerprints as you go. -
Detail the Indents:
Use the side of your needle tool or a dull knife to press horizontal indentations just below the roof peak on the front and back, defining the sealed flap area. -
Define the Spout:
On one side of the top ridge, gently press inward to suggest the pouring spout typically found on cartons.
Smooth Operator
Before baking, brush a tiny amount of baby oil or clay softener over the surface to remove fingerprints and dust for a flawless finish.
Step 2: Adding the Strawberry Detail
-
Shape the Berry:
Take a tiny amount of red clay and roll it into a ball, then pinch one end to form a teardrop shape. -
Flatten and Attach:
Flatten the teardrop slightly between your fingers so it isn’t too bulky, then press it firmly onto the side of the carton. I find placing it slightly off-center adds character. -
Create the Seeds:
Using your needle tool, poke tiny, shallow holes all over the surface of the red strawberry. You can fill these with white paint later, or add tiny bits of white clay now. -
Add Leaves:
Roll three miniscule snakes of green clay. Join them at one end to make a tuft, and press this onto the top of the strawberry.
Step 3: Finishing Touches
-
Insert Hardware:
Trim an eye pin to size and insert it into the center of the carton’s top ridge. Secure it with a touch of liquid clay if you have it. -
Bake:
Bake the piece according to your clay manufacturer’s instructions. Usually, this is around 275°F (135°C) for 15-30 minutes. -
Paint the Face:
Once cooled, use a fine dotting tool dipped in black paint to create two wide-set eyes on the front face of the carton. -
Add the Smile:
With your finest brush, paint a tiny, u-shaped smile directly between the eyes. -
Cheeks and Seeds:
Dab two small spots of bright pink paint for blush cheeks. Also, paint tiny white dots into the seed indentations on the strawberry if you didn’t use clay earlier. -
Glaze:
Coat the entire charm in a gloss glaze or UV resin to give it that shiny, plastic finish and protect the paint. -
Assemble:
Once the glaze is fully cured, use pliers to open your gold jump ring and attach it to the eye pin.
Flavor Variations
Change the clay color to light blue for ‘plain milk’ or light yellow for ‘banana milk’ and swap the fruit detail to match.
Your tiny carton is now ready to add a sweet touch to your favorite bag or necklace chain


Tiny Peas in a Pod Keychain Charm
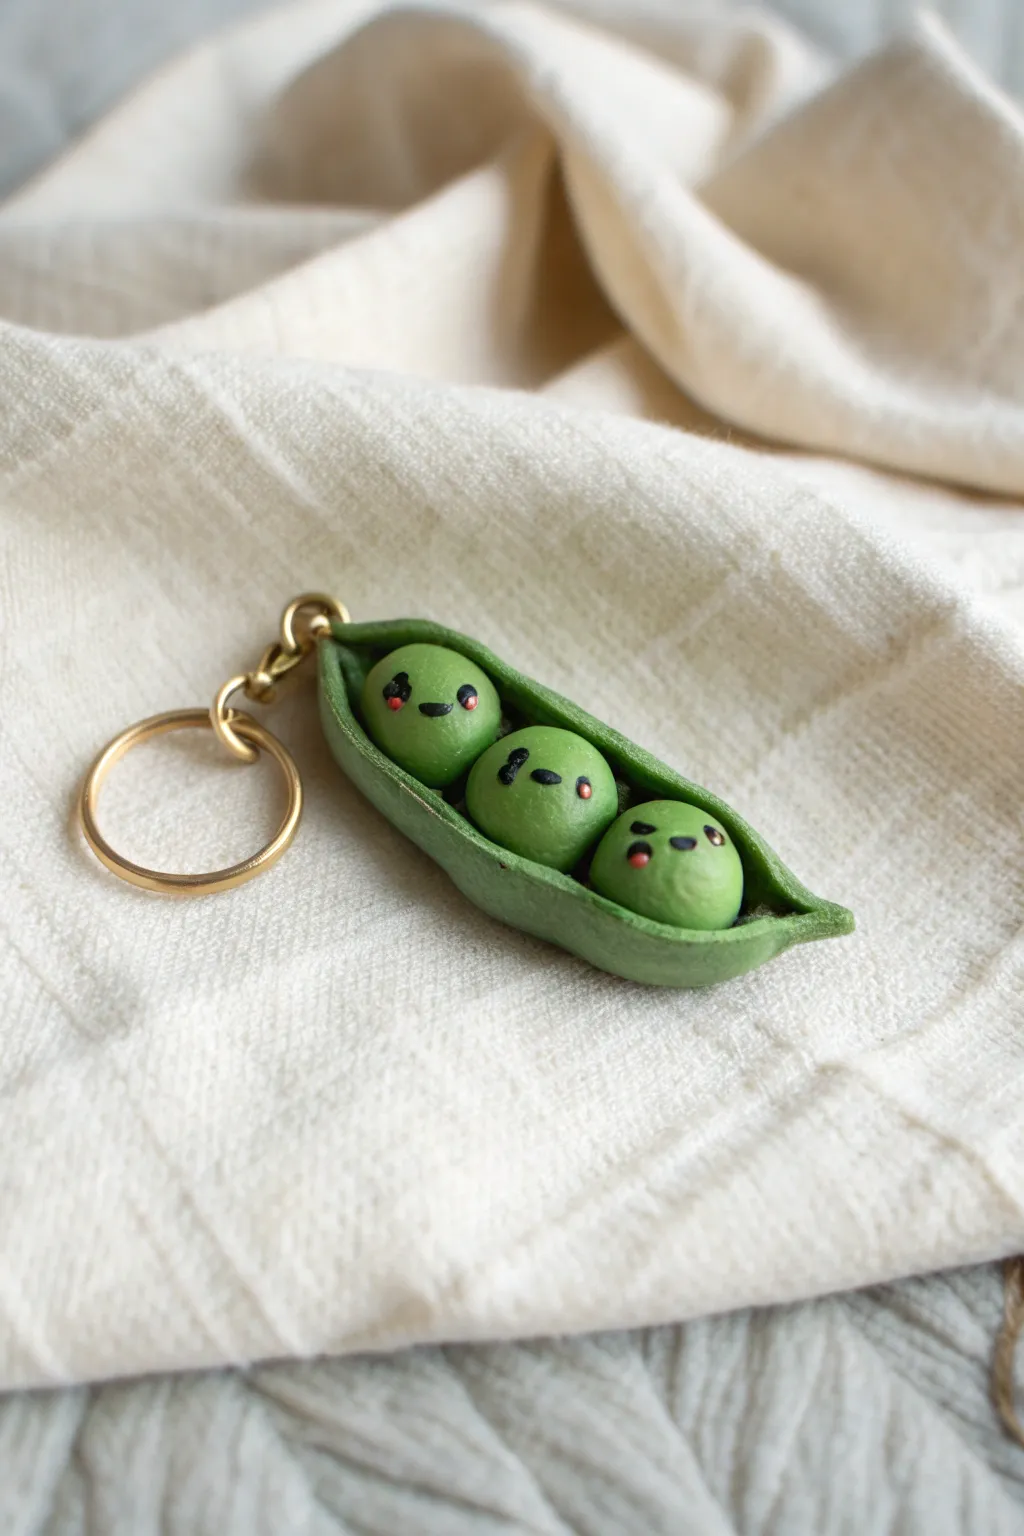
Create an adorable companion for your keys with this charming polymer clay project. This trio of tiny peas nestles inside a textured, sculpted pod, showcasing unique facial expressions that bring the whole piece to life.
Detailed Instructions
Materials
- Green polymer clay (one shade lighter for peas, one shade darker for the pod)
- Black acrylic paint or clay detailing pen
- Pink or red acrylic paint (tiny amount)
- Gloss glaze or polyurethane varnish (for the eyes)
- Keyring hardware with jump ring and screw eye pin
- Detailing tool or needle tool
- Soft-bristle brush (for texture)
- Clay roller or pasta machine
- X-acto knife or clay blade
- Oven for baking
Step 1: Sculpting the Peas
-
Prepare the clay:
Begin by conditioning your lighter green clay until it is soft and malleable. This prevents cracking later on. -
Form the spheres:
Divide the light green clay into three equal portions. Roll each piece between your palms to create smooth, perfect spheres about the size of a small blueberry. -
Check the fit:
Line the three spheres up next to each other to ensure they are roughly the same size. They don’t need to be mathematically identical, but consistency looks best. -
Set aside:
Place your three peas on a clean surface while you work on their home.
Step 2: Creating the Pod
-
Condition darker clay:
Take your darker green clay and condition it thoroughly. -
Shape the base:
Roll a log of dark green clay that is slightly longer than your three peas lined up. -
Flatten the log:
Gently flatten the log with your finger or a roller to create an elongated oval shape. It should be thick enough to hold interaction but thin enough to look delicate. -
Add texture:
I like to take a soft toothbrush or a texture tool and gently dab the outside of the flattened oval to give it a realistic, organic skin texture rather than leaving it perfectly smooth. -
Place the peas:
Position your three light green spheres in a row right in the center of the flattened pod base. -
Wrap the pod:
Carefully curl the sides of the dark green base up and around the peas. You want the clay to cup them securely. -
Pinch the ends:
Bring the ends of the pod together at the top and bottom. Pinch them into varied, tapered points to mimic a real peapod stem. -
Refine the edges:
Use a silicone tool or your finger to smooth the seam where the pod meets the peas slightly, ensuring the peas are firmly embedded and won’t pop out after baking.
Clean Clay Tip
Keep hand wipes nearby! Switching between dark green and light green clay can transfer pigments. Clean your hands and tools before rolling the light colored peas to keep them bright.
Step 3: Assembly and Detailing
-
Insert hardware:
Take a screw eye pin and gently insert it into one of the tapered ends of the pod. A little liquid clay on the screw threads can help secure it permanently. -
Bake:
Bake the piece according to your specific clay brand’s package instructions (usually 275°F/135°C for 15-30 minutes). Let it cool completely before painting. -
Paint the faces:
Using a very fine detail brush or a needle tool dipped in black paint, carefully draw tiny eyes and mouths. Give each pea a different expression for character—maybe one is winking or looking sideways. -
Add blush:
Dip a toothpick into pink paint, dab most of it off onto a paper towel, and gently apply tiny blush marks to the cheeks. -
Gloss the eyes:
Once the paint is fully dry, apply a drop of UV resin or heavy gloss glaze just to the black eyes. This gives them a lively, wet sparkle. -
Attach keychain:
Open the jump ring on your keychain hardware using two pairs of pliers. Through the eye pin on your pod, attach the ring and close it securely.
Make it Sparkle
Mix a tiny amount of mica powder or pearl ex into the lighter green clay before rolling the peas. This gives them a subtle, pearlescent shimmer that catches the light beautifully.
Attach this sweet little pod to your bag or keys and enjoy your new miniature friends

The Complete Guide to Pottery Troubleshooting
Uncover the most common ceramic mistakes—from cracking clay to failed glazes—and learn how to fix them fast.
Tiny Mushroom Buddy Figurines
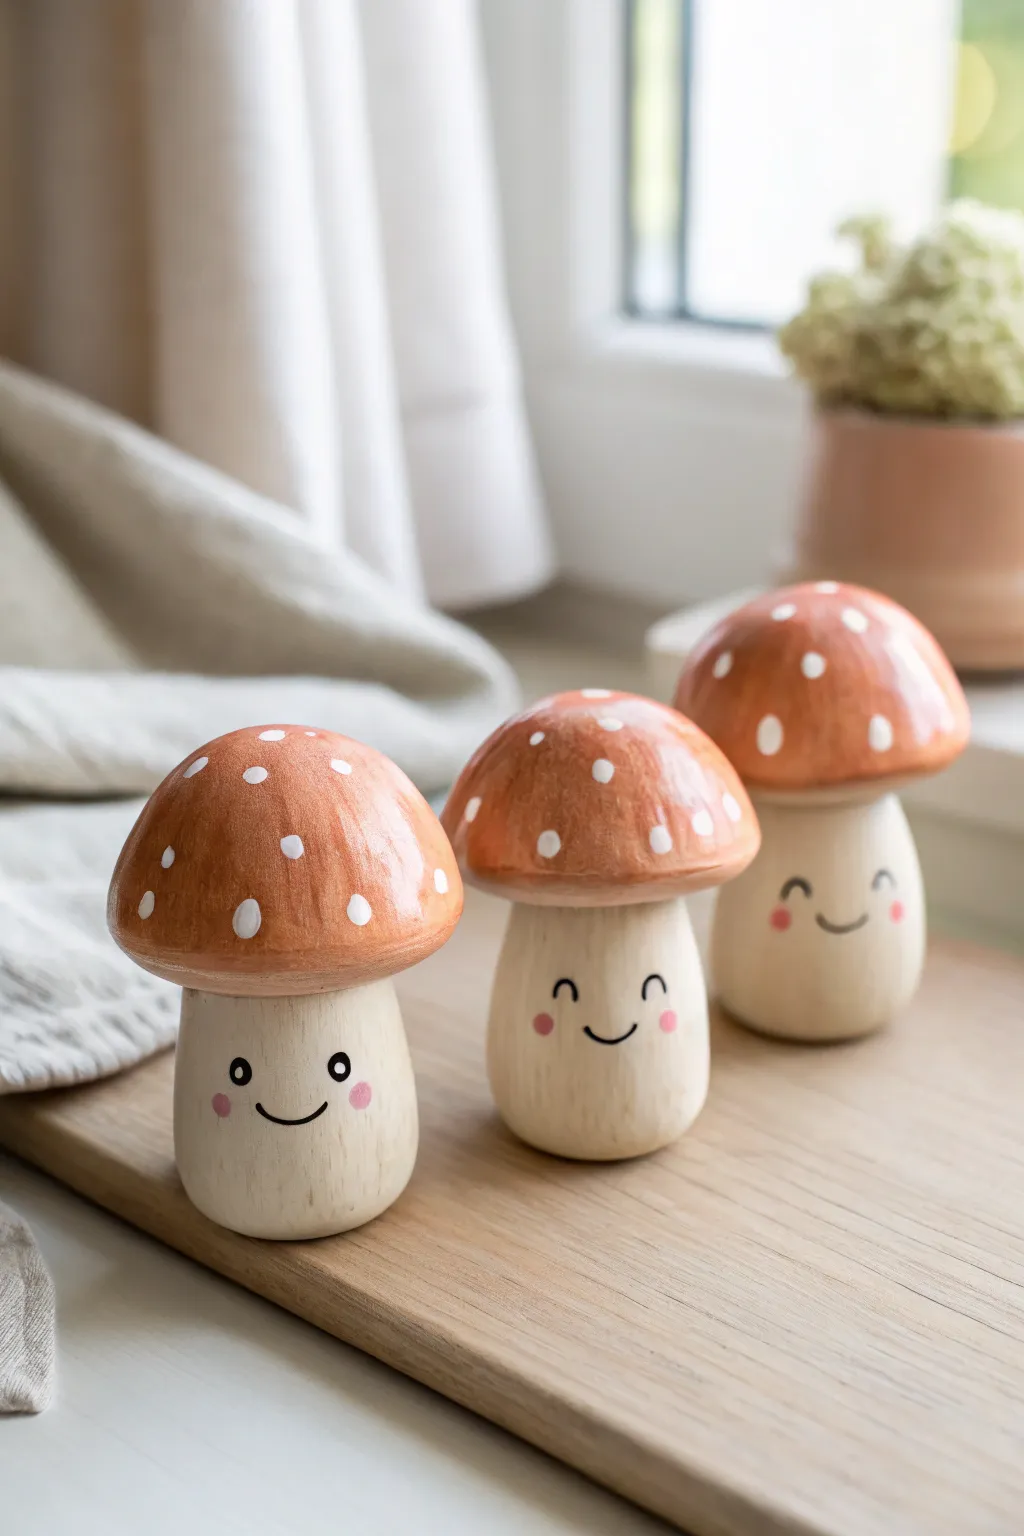
Create a cheerful little family of mushroom figurines that blend the rustic charm of natural wood with playful, painted details. These adorable buddies feature smooth, rounded caps and sweet minimalist expressions that are perfect for brightening up any windowsill or shelf.
Step-by-Step Guide
Materials
- Polymer clay (white or beige)
- Acrylic paints (burnt sienna, terra cotta, titanium white, black, pale pink, cream/beige)
- Small paintbrush (flat and detail round)
- Dotting tool or toothpick
- Ball tool (large)
- Aluminum foil
- Gloss varnish or glaze
- Matte varnish (optional)
- Sandpaper (fine grit)
Step 1: Shaping the Base Forms
-
Create foil cores:
Crumple three small pieces of aluminum foil into tight balls—one slightly larger for the biggest mushroom, and two smaller ones. This saves clay and keeps the figurines lightweight. -
Condition the clay:
Warm up your polymer clay by kneading it thoroughly in your hands until it becomes soft and pliable, which prevents cracking later. -
Form the stems:
Roll three cylinder shapes of clay. Make them thick and stout, slightly wider at the bottom for stability, and smooth out the sides to mimic a chopped piece of wood. -
Shape the caps:
Roll balls of clay and flatten them slightly into domes. Press your thumb or a large ball tool into the underside to create a curved indent where the stem will attach. -
Attach cap to stem:
Place the caps onto the stems. Gently blend the clay where they meet underneath, or use a little liquid aesthetic clay (or water for air-dry) to secure them firmly together. -
Bake or dry:
Follow the manufacturer’s instructions for your specific clay type to bake or air-dry the figures until they are completely hard.
Step 2: Creating the Faux-Wood & Cap Finish
-
Base coat the stems:
Mix a cream or light beige acrylic paint. Apply a solid coat to the stems and let it dry completely. -
Add wood grain texture:
dilute a tiny amount of pale brown paint with water to make a wash. Use a stiff brush to streak it vertically down the stem, giving the impression of light wood grain. -
Paint the caps:
Mix burnt sienna with a touch of terra cotta to get that warm, organic reddish-brown. Paint the entire top surface of the mushroom caps. -
Layering color:
While the first coat is still slightly tacky, I like to stipple on a slightly lighter orange-brown near the top center to add dimension and highlight. -
Adding the signature dots:
Once the red paint is fully dry, dip a dotting tool or the back of a paintbrush into white acrylic paint. Apply scattered dots across the cap, varying the spacing for a natural look.
Smooth Operator
Before painting, lightly sand your cured clay with fine-grit sandpaper. This removes fingerprints and creates a better surface for the faux-wood paint job.
Step 3: Bringing Them to Life
-
Draft the faces:
Use a very light pencil mark to plan where the eyes and mouth will go on the stem area to ensure they are centered and level. -
Paint the eyes:
Using your finest detail brush or a toothpick, paint two small black ovals or small arches for sleepy eyes. Keep them relatively wide apart for maximum cuteness. -
Add the smile:
connect the space between the eyes with a tiny, thin U-shaped smile using black paint. -
Rosy cheeks:
Dip a rounded tool into pale pink paint and stamp two soft circles just outside the smile line to give them their blushing cheeks. -
Eye highlights:
If painting open oval eyes, add a minuscule white dot near the top of the black oval to make the eyes sparkle. -
Seal the work:
Apply a coat of gloss varnish to the colored mushroom caps to make them look wet and ceramic-like. Use a matte varnish on the stems to maintain the natural wood effect.
Garden Party
Glue a small piece of preserved moss or a tiny dried flower to the base of the stem to make it look like your mushroom was just plucked from a fairy forest.
Now you have a trio of forest friends ready to watch over your desk or plants
Chibi Cat Head Mini Charms
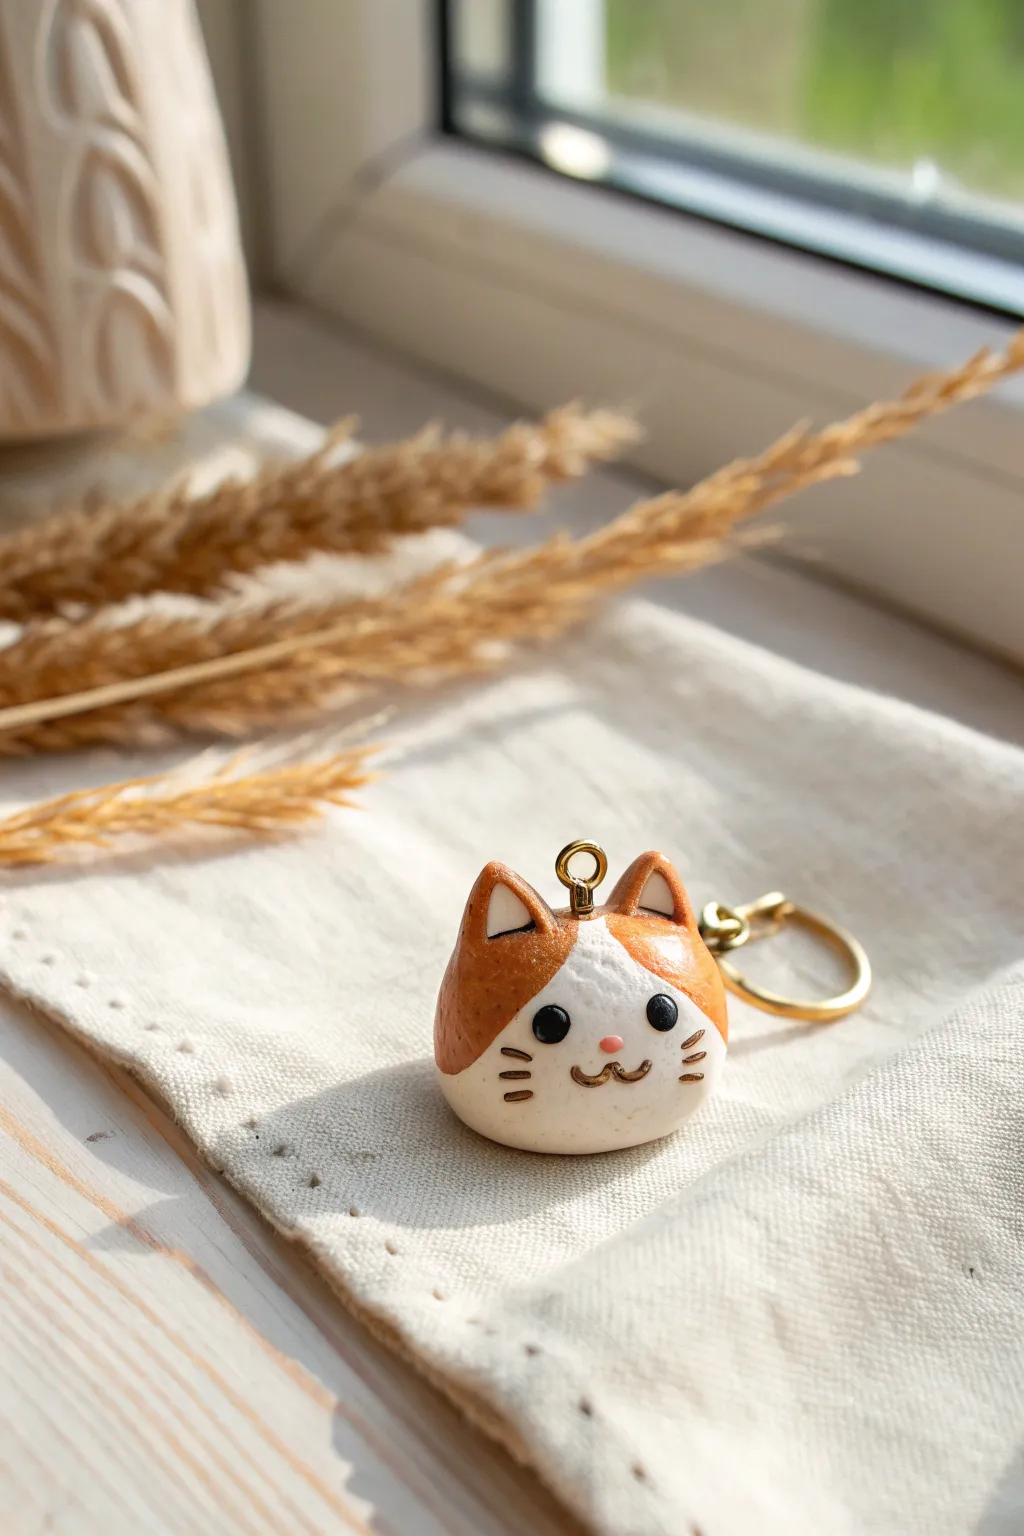
Capture the sweetness of a feline friend with this adorable, round cat head charm. Featuring a classic orange and white calico pattern, this glossy polymer clay creation makes for a perfect keychain or zipper pull.
How-To Guide
Materials
- Polymer clay (White, Orange/Terracotta, Black, Light Pink)
- Blade or craft knife
- Ball stylus tools (small and medium)
- Needle tool
- Gold screw eye pin
- Gold jump ring and keychain fitting
- Glossy polymer clay glaze or UV resin
- Small paintbrush (for glazing)
- Oven and baking sheet
Step 1: Shaping the Base
-
Create the core:
Start by conditioning a chunk of white polymer clay until it is soft and pliable. Roll it into a smooth ball about the size of a large malt ball or a small walnut. Press it gently onto your work surface to flatten the bottom slightly so it stands upright. -
Mix the orange tone:
If your orange clay is too bright, mix in a tiny speck of brown or red to achieve that warm, toasted terracotta color seen in the photo. -
Apply the coloring:
Flatten two small pieces of the orange clay into thin, irregular pancakes. Drape them over the top left and right sides of the white ball to create the calico patches, smoothing the seams down with your finger until the clay merges seamlessly. -
Shape the ears:
Form two small triangles of orange clay. Pinch them gently to curve slightly. Press a smaller, flattened triangle of white clay into the center of each orange ear to create the inner ear detail. -
Attach the ears:
Place the ears onto the orange patches on top of the head. Use a blending tool or the back of your fingernail to smooth the orange clay at the base of the ears into the head so they are securely attached.
Dirty Clay?
White clay picks up lint instantly. Keep a pack of wet wipes nearby and clean your hands and tools thoroughly before handling the white clay to keep it pristine.
Step 2: Adding the Face Details
-
Indent eye sockets:
Using a medium ball stylus, press two shallow divots into the white face area where you want the eyes to go. This helps the eyes sit securely rather than bulging out. -
Place the eyes:
Roll two tiny balls of black clay. Insert them into the indented sockets and press gently to flatten them slightly. They should look wide-set and friendly. -
Add the nose:
Roll a minuscule ball of light pink clay—truly tiny! Place it centrally below the eyes and press it flat into a small oval. -
Sculpt the mouth:
Roll a very thin snake of black or dark brown clay. Cut two tiny identical curves. Using a needle tool, carefully place these coming off the bottom of the pink nose to form the ‘w’ shaped mouth. -
Create whiskers:
Roll another extremely thin snake of dark clay. Cut six tiny segments. Place three on each cheek, pressing them in lightly with the needle tool to secure them. Keep them parallel for a neat look.
Step 3: Finishing Touches
-
Insert hardware:
Take your gold screw eye pin. I like to twist it directly into the top center of the head while the clay is attractive and soft. It holds better than a straight pin. -
Smooth fingerprints:
Before baking, lightly brush the entire surface with a little bit of baby oil or cornstarch on your finger to remove any stray fingerprints or dust motes. -
Bake:
Bake the charm according to your clay manufacturer’s instructions (usually 275°F/135°C for 15-30 minutes). Let it cool completely before handling. -
Glaze:
Once cool, apply a coat of glossy glaze or UV resin to the entire charm. This gives it that ceramic-like shine and protects the tiny face details. -
Assemble keychain:
Open a jump ring using two pairs of pliers. Loop it through the eye pin on the cat’s head and the keychain fitting, then close the ring securely.
Pro Tip: Secure Eyes
For extra durability, you can use a tiny dot of liquid polymer clay (Bake & Bond) in the eye sockets before placing the black balls to ensure they never pop off.
Now you have a charming little pocket companion to keep your keys company


What Really Happens Inside the Kiln
Learn how time and temperature work together inside the kiln to transform clay into durable ceramic.
Tiny Dino Buddy With Soft Spikes
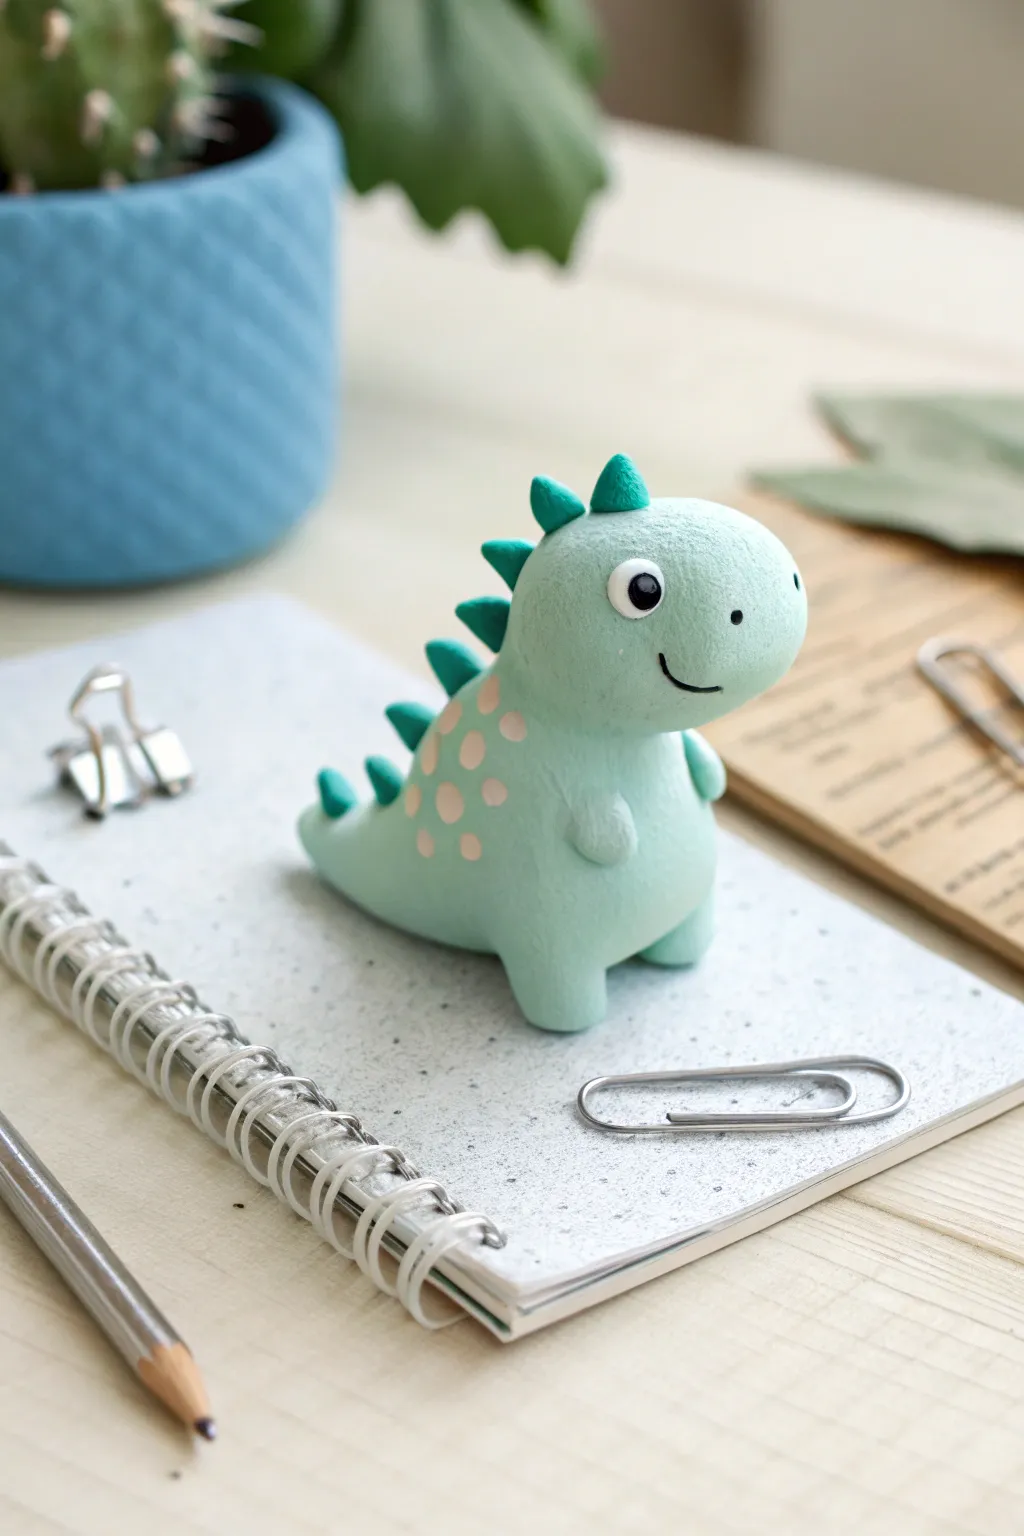
This adorable mint-green dinosaur is a charming desk companion with soft, curved spikes and gentle pink spots. The smooth matte finish gives it a professional look, perfect for guarding your paperclips or perching on your notebook.
Step-by-Step
Materials
- Polymer clay (Mint Green or Paste Blue)
- Polymer clay (Darker Teal/Green for dipping spikes)
- Polymer clay (Light Pink for spots)
- Polymer clay (White and Black for eyes)
- Needle tool or toothpick
- Ball stylus tool
- Small blade or craft knife
- Oven for baking
- Black acrylic paint or fine-tip marker (optional for mouth)
- Matte varnish (optional)
Step 1: Body Basics
-
Shape the Torso:
Begin with a golf-ball-sized amount of mint green clay. Condition it until soft, then roll it into a very smooth sphere. -
Refine the Form:
Gently gently elongated the sphere into a pear shape. The wider bottom will be the belly, and the slightly narrower top will become the head area, though keep the transition very subtle and chubby. -
Create the Tail:
Pull a section of clay from the bottom back of your pear shape. Gently roll and tap this extension until it forms a short, pointed tail that curves slightly upward. -
Add Tiny Legs:
Roll two small pea-sized balls of the same mint clay.Flatten the tops slightly and press them firmly underneath the front of the belly to support the figure. -
Shape the Arms:
Create two tiny teardrops of mint clay. Press them onto the sides of the chest area, blending the top seam smooth so the arms look integrated but the little hands stick out slightly.
Fingerprint Fix
Before baking, brush your raw clay sculpture lightly with a drop of baby oil or cornstarch. This smoothens out any accidental fingerprints for a pro finish.
Step 2: Spikes & Details
-
Prepare the Spikes:
Using the darker teal clay, roll about 6-7 very small balls, graduating slightly in size. -
Form Triangles:
Pinch each teal ball into a soft triangular cone shape. These shouldn’t be sharp; keep the points slightly rounded for a friendly look. -
Attach the Ridge:
Starting from the top of the head down to the tail, press the teal cones onto the spine. Place the largest spikes on the head and back, tapering to the smallest ones on the tail. -
Make the Spots:
Roll tiny specks of light pink clay. Flatten them into small, thin discs. -
Apply the Pattern:
Gently press the pink discs onto the dinosaur’s sides and back, clustering them somewhat randomly under the spike line. Smooth them down so they are flush with the body surface.
Accessorize Him
Make a tiny clay bowtie for his neck or a miniature party hat to sit between his spikes. You can also turn him into a memo holder by baking a wire coil into his back.
Step 3: Face & Finish
-
Eye Placement:
Use a ball tool to make a shallow indentation on the side of the head where the eye will go. -
Construct the Eye:
Place a small flattened ball of white clay into the indentation. Take a tiny speck of black clay and press it into the center of the white circle for the pupil. -
Add a Highlights:
For that sparking look, take a microscopic spec of white clay and place it on the upper corner of the black pupil. -
Carve the Smile:
Using a needle tool or a very fine curved blade, carefully press a small smile line into the snout. I find using a twisting motion helps prevent the clay from dragging. -
Nostril Detail:
Use the needle tip to poke a tiny dot just above the smile for the nostril. -
Bake:
Bake the figure according to your clay package instructions (usually 275°F/135°C for 15-30 minutes per 1/4 inch thickness). -
Highlight the Smile:
Once cool, if your smile indentation isn’t visible enough, carefully trace the carved line with a fine black marker or a wash of acrylic paint.
Now you have a prehistoric buddy ready to keep your desk company
Stackable Pill-Shaped Animal Minis
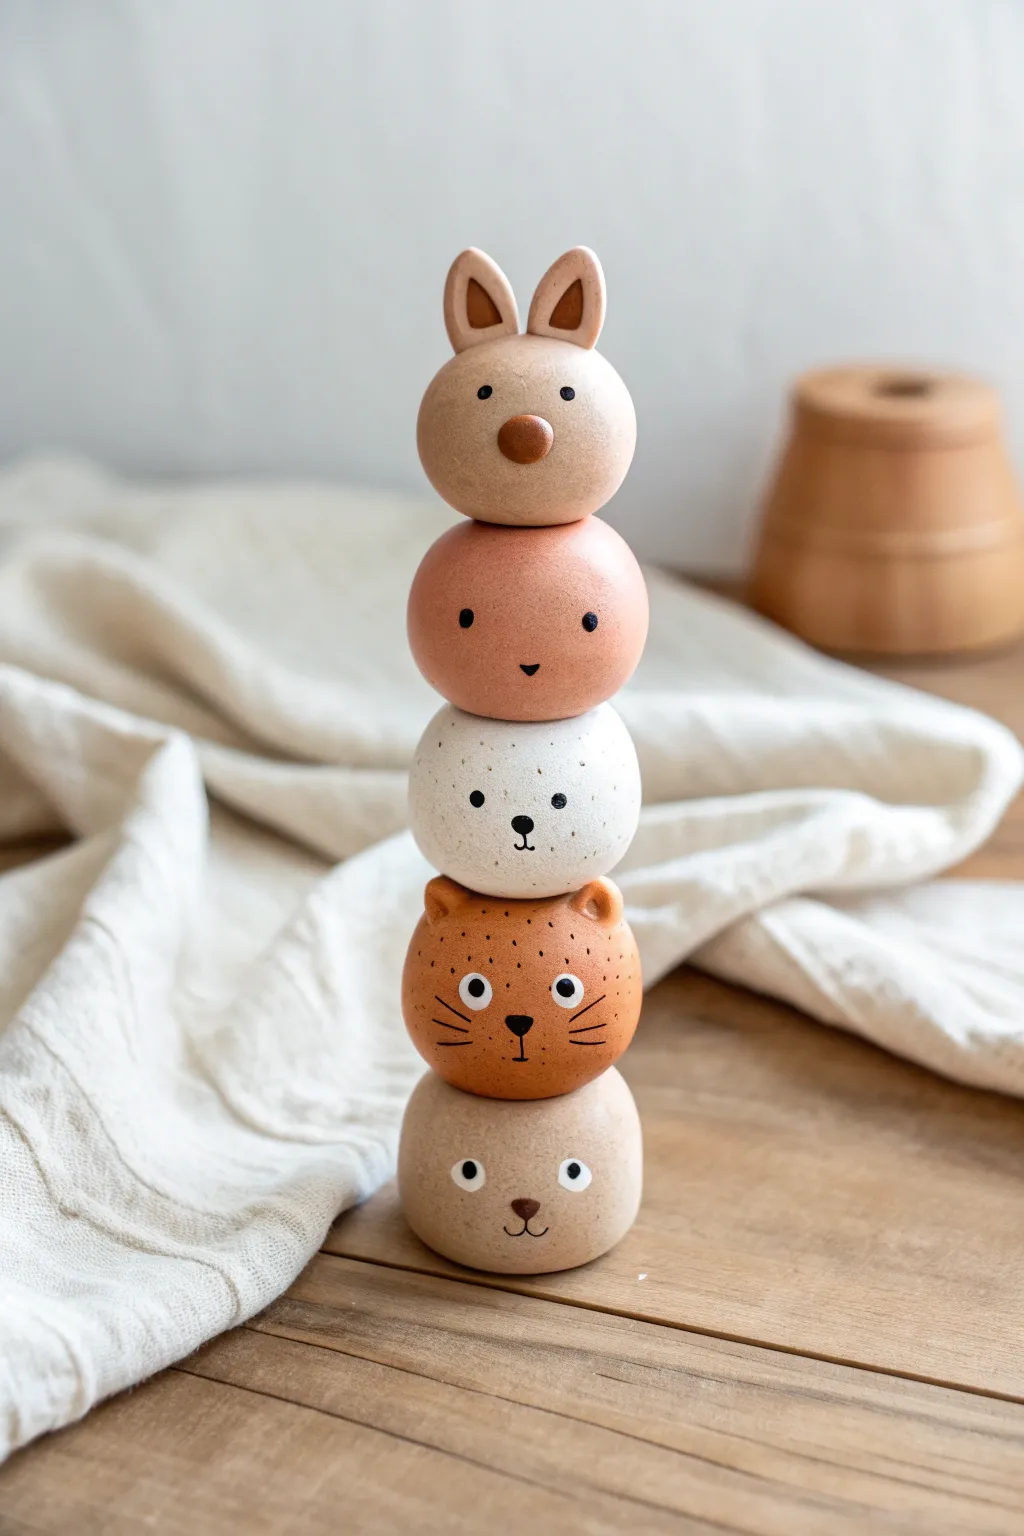
Create a whimsical vertical display with these stackable, pill-shaped animal heads. Crafted from clay and painted in soft, natural earth tones, each character adds personality to this balancing act that doubles as charming decor.
How-To Guide
Materials
- Polymer clay or air-dry clay (white or neutral base)
- Acrylic paints (beige, terracotta, cream, white, burnt orange, black)
- Small rolling pin
- Fine-grit sandpaper
- Detail paintbrushes (liner brush and small round brush)
- Matte sealant or varnish
- Sculpting tools (needle tool, ball stylus)
- Water cup and palette
Step 1: Shaping the Base Forms
-
Portioning clay:
Begin by dividing your clay into five equal portions. Roll each piece into a smooth ball between your palms to remove any cracks or lines. -
Forming the pill shape:
Gently press each ball onto your work surface and roll it slightly back and forth to create a squat, rounded cylinder shape—like a flattened pill or a marshmallow. Ensure the top and bottom are flat enough to stack securely. -
Smoothing surfaces:
Dip your finger in a little water (if using air-dry clay) or baby oil (for polymer) to smooth out any imperfections on the rounded sides. The surface needs to be pristine for painting later.
Step 2: Adding Ears and Details
-
Bunny ears:
For the top piece, shape two small teardrops of clay. Flatten them slightly and attach them to the top of one pill shape, blending the seams downwards with a sculpting tool so they stand upright. -
Cat ears:
Select the pill intended to be the fourth one down (the cat/tiger). Pinch two small triangles of clay and attach them to the top outer edges, blending the clay seamlessly into the main head shape. -
Baking or drying:
Follow the manufacturer’s instructions for your specific clay. If baking polymer clay, create a tent with aluminum foil to prevent scorching. Let them cool or dry completely before sanding lightly with fine-grit sandpaper for an ultra-smooth finish.
Wobbly Stack?
If your dried clay pieces aren’t sitting flat, gently rub the bottom of each piece against piece of sandpaper laid flat on the table until level.
Step 3: Painting the Base Coats
-
Mixing skin tones:
Prepare a palette of earth tones. You’ll need a light beige for the bunny and top rabbit/dog, a warm terracotta for the second head, a speckled white for the middle, an orange-brown for the cat, and a grey-beige for the base. -
Applying color:
Paint each pill shape in its respective base color. I find applying two thin coats gives a much smoother result than one thick coat. allow each layer to fully dry. -
Creating the speckled look:
For the middle white bear, mix a tiny bit of water with black paint. Load an old toothbrush or stiff brush and run your thumb across the bristles to flick tiny speckles onto the dry white paint.
Pro Tip: Consistent Eyes
Don’t trust your steady hand for dots? Use different sized nail art dotting tools or the round heads of sewing pins to stamp perfectly round eyes every time.
Step 4: Painting Faces & Features
-
Bunny nose:
Using a slightly darker brown than the base, paint a small, rounded oval nose in the center of the top bunny’s face. -
Simple eyes:
Use a ball stylus or the handle end of a paintbrush dipped in black paint to stamp perfect circles for the eyes on the top three animals. Keep them wide-set for a cute expression. -
Cat face details:
For the orange cat, paint two larger white circles first for the eyes. Once dry, add small black pupils. Use a fine liner brush to paint whiskers, a small triangular nose, and eyebrows. -
Bottom features:
For the bottom bear, paint white circles for eyes and add tiny black dots for pupils. Paint a small brown inverted triangle nose and a thin ‘w’ shape for the mouth. -
Final touches:
Add tiny details like the inner ear color on the bunny using a darker brown, and small snouts or mouths on the other simple faces using your finest brush.
Step 5: Assembly
-
Sealing:
Once all paint is bone dry, apply a coat of matte varnish to protect the paint and unifict the finish. This also prevents the animals from sticking together. -
Stacking:
Arrange your finished minis in a tower. You can leave them loose to be interactive, or use a dab of strong craft glue between each layer for a permanent sculpture.
Display your delightful totem of animals on a shelf or desk where they can bring a smile to your day

TRACK YOUR CERAMIC JOURNEY
Capture glaze tests, firing details, and creative progress—all in one simple printable. Make your projects easier to repeat and improve.
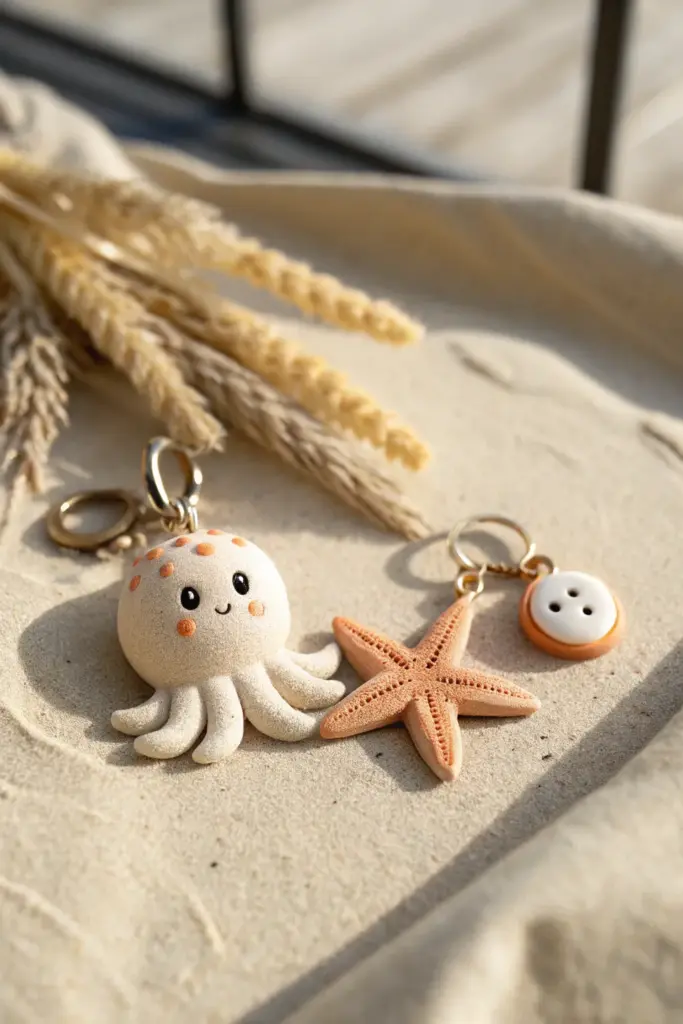
Tiny Octopus and Starfish Charm Set

Bring the ocean to your keychain with these adorable polymer clay charms featuring a blushing octopus and a textured starfish. These miniature creations have a soft, sandy finish that makes them perfect little companions for your beach tote or backpack.
Step-by-Step Tutorial
Materials
- Polymer clay (light beige/sand color, coral orange, white, black)
- Gold keychain findings and jump rings
- Pointed clay sculpting tool (or a needle tool)
- Small ball stylus tool
- Soft toothbrush or sandpaper (for texturing)
- Gloss glaze (optional for eyes)
- Eye pin or screw eye hooks
- Oven (for baking according to clay package)
- Pliers (for jewelry assembly)
Step 1: Sculpting the Octopus
-
Form the Body:
Start by rolling a ball of sand-colored clay about the size of a large grape. Gently flatten the bottom so it sits upright but keeps a rounded, domed top for the head. -
Create the Tentacles:
From the same clay color, roll eight small, equal-sized tapered logs. Arrange them in a radial circle, pointed ends facing outward. -
Attach and Blend:
Place the head on the center of your tentacle circle. Use a blending tool or your finger to smooth the clay where the body meets the tentacles underneath, ensuring a secure bond. -
Curl the Ends:
Gently lift the tip of each tentacle and curl it upward slightly to give the octopus a playful, wiggling movement. -
Add Texture:
Since this little guy has a stone-like look, gently tap the entire surface with a soft toothbrush or a piece of crumpled foil to create a subtle, sandy texture. -
Apply the Spots:
Roll tiny, flat discs of coral orange clay. Press them randomly onto the top of the head, flattening them so they become flush with the body’s surface. -
Make the Face:
Use a ball stylus to make two indents for eyes. Insert tiny balls of black clay. Roll two tiny coral ovals for blush cheeks and press them below the eyes. Use a needle tool to impress a small ‘U’ shape between the cheeks for a smile. -
Insert Hardware:
Push an eye pin or screw eye into the top center of the head. I like to add a dab of liquid clay on the pin for extra security before baking.
Sticky Situation?
If your clay gets too soft and sticky while shaping tiny tentacles, pop it in the fridge for 10 minutes. Cooler clay holds fine details much better without deformation.
Step 2: Crafting the Starfish
-
Shape the Star:
Using the coral orange clay, form a five-pointed star. Ensure the arms are relatively thick and rounded, not sharp or flat. -
Texture the Surface:
Just like the octopus, give the starfish a stippled texture using a toothbrush, covering the front and sides completely. -
Detail the Arms:
Take a needle tool and gently press a line of small, evenly spaced dots running down the center ridge of each arm, radiating from the center. -
Add Hardware:
Insert a jump ring or eye pin into one of the starfish’s arm tips. Be sure it’s embedded deep enough to hold weight.
Step 3: Bonus Button Charm
-
Layer the Button:
Flatten a small disc of coral clay and a slightly smaller disc of white clay. Stack the white onto the coral so the orange creates a rim. -
Add Holes:
Use a needle tool to poke two or four holes in the center to mimic a real button, then insert hardware securely into the side or top.
Clean Slate
Before starting with the light sand-colored clay, wipe your hands and workspace with a baby wipe. Dust and lint love to stick to light clay and are hard to remove later.
Step 4: Finishing Touches
-
Bake:
Place all pieces on a baking tile. Bake according to your brand of polymer clay instructions (usually 275°F/135°C for 15-30 minutes). -
Cool and Assemble:
Let the pieces cool completely. Once hard, use pliers to attach your gold keychains and jump rings, connecting the charms together or separately. -
Glaze (Optional):
For a bit of life, add a tiny drop of gloss glaze or UV resin just to the black eyes of the octopus to make them shine.
Attach these gentle sea creatures to your keys and enjoy a little reminder of the beach wherever you go