Whenever I pull out translucent clay, I’m chasing that magical moment when light actually slips through the piece and makes the colors look deeper than they should. These ideas are all about leaning into light transmission, layered depth, and that glassy (or frosted) glow you just can’t fake with opaque clay.
Sea Glass Earrings
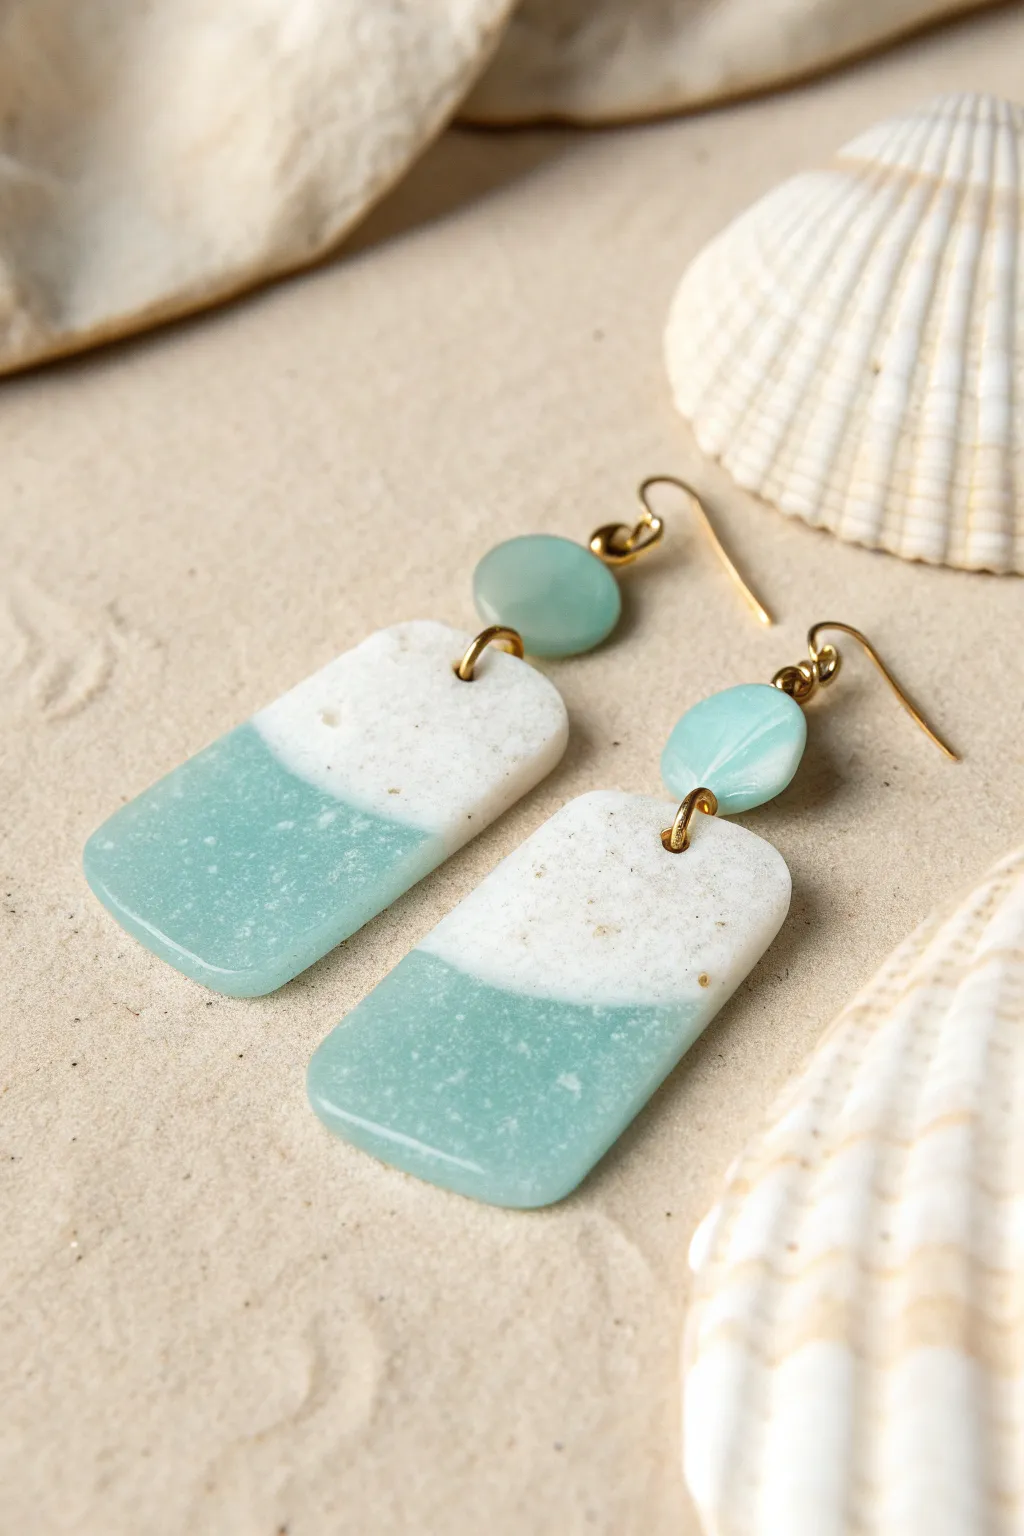
Capture the essence of a beach day with these stunning polymer clay earrings that mimic the frosted look of sea glass and the texture of white sand. The translucent teal clay blends beautifully with a speckled granite white for a modern, coastal accessory.
How-To Guide
Materials
- Translucent polymer clay (teal or aqua)
- Granite or speckled white polymer clay
- Translucent liquid polymer clay
- Small circular clay cutter
- Rectangular clay cutter (or sharp blade)
- Acrylic rolling pin
- Tissue blade
- Hand drill or pin vibe
- Jump rings (gold)
- Earring hooks (gold)
- Wet/dry sandpaper (400-800 grit)
- Small pliers
- Ceramic tile or baking sheet
- Oven
Step 1: Preparing the Clay
-
Condition the clay:
Start by thoroughly conditioning your translucent teal clay until it is soft and pliable. Do the same for the speckled white ‘sand’ clay to ensure no air bubbles are trapped inside. -
Roll out sheets:
Roll both clay colors into separate sheets. Aim for a medium thickness, roughly 3mm (or setting 3 on a pasta machine), so the earrings feel substantial but not heavy. -
Create the join line:
Using your tissue blade, cut a clean, straight edge on both the teal and the white clay sheets. You can cut at a slight diagonal if you prefer an asymmetrical look, or keep it perfectly straight. -
Join the pieces:
Press the cut edges of the teal and white clay together gently on your work surface. To ensure a strong bond, I like to apply a very thin line of translucent liquid clay between the seams before pressing them together. -
Smite the seam:
Place a piece of parchment paper over the joined clay and gently roll over the seam with your acrylic roller to flatten and adhere the two colors into one cohesive sheet.
Ice Water Secret
Plunging baked translucent clay directly into ice water enhances clarity and creates a milky depth perfect for faux sea glass.
Step 2: Cutting and Baking
-
Cut the rectangles:
Position your rectangular cutter (or use a blade for a freehand shape) so the seam sits roughly one-third of the way down. Cut two matching shapes, ensuring the ‘sand’ portion is at the top of the rectangle. -
Soften the edges:
Use your finger to gently tap and smooth the cut edges of the rectangles. This removes the sharp ‘cookie cutter’ look and contributes to the worn sea glass aesthetic. -
Cut the top circles:
Using the remaining translucent teal clay, cut two small circles using your small circular cutter. These will serve as the connector pieces. -
Add texture (optional):
If you want an extra weathered look, lightly tap the surface of the clay with sandpaper or a toothbrush before baking to simulate erosion. -
Pierce holes:
Using a needle tool or toothpick, carefully poke holes for your jump rings. Place one hole at the top of the rectangle (in the white section) and two holes in the teal circles (one top, one bottom). -
Bake:
Place your pieces on a ceramic tile and bake according to the manufacturer’s instructions for your specific brand of clay. Usually, this is around 275°F (135°C) for 30-45 minutes.
Salt Texture Hack
Before baking, press coarse sea salt into the translucent parts. Rinse it away after baking for authentic, pitted sea-weathered divots.
Step 3: Finishing and Assembly
-
Quench the clay:
Immediately after removing the clay from the oven, plunge the pieces into a bowl of ice water. This ‘shocking’ technique significantly increases the transparency of translucent clay. -
Sanding for frost:
Once cool, wet sand the pieces using 400 grit, then 800 grit sandpaper. This is crucial—it removes fingerprints and creates that foggy, matte ‘sea glass’ finish rather than a shiny plastic look. -
Buffing (optional):
Briefly rub the pieces with a piece of denim or a soft cloth. You don’t want a high gloss shine, just a smooth, satin finish. -
Drill if needed:
If your holes closed up during baking, use a small hand drill or pin vise to clear them out gently. -
Attach the connectors:
Open a gold jump ring with pliers and thread it through the top hole of the rectangle and the bottom hole of the teal circle. Close the ring securely. -
Attach the hooks:
Open the loop on your earring hook (or use a second jump ring) and attach it to the top hole of the teal circle. -
Final check:
Ensure all jump rings are fully closed and the earrings hang straight before wearing.
Now you have a breezy, elegant pair of earrings that look like treasures washed up on the shore


Faux Agate Slice Pendants
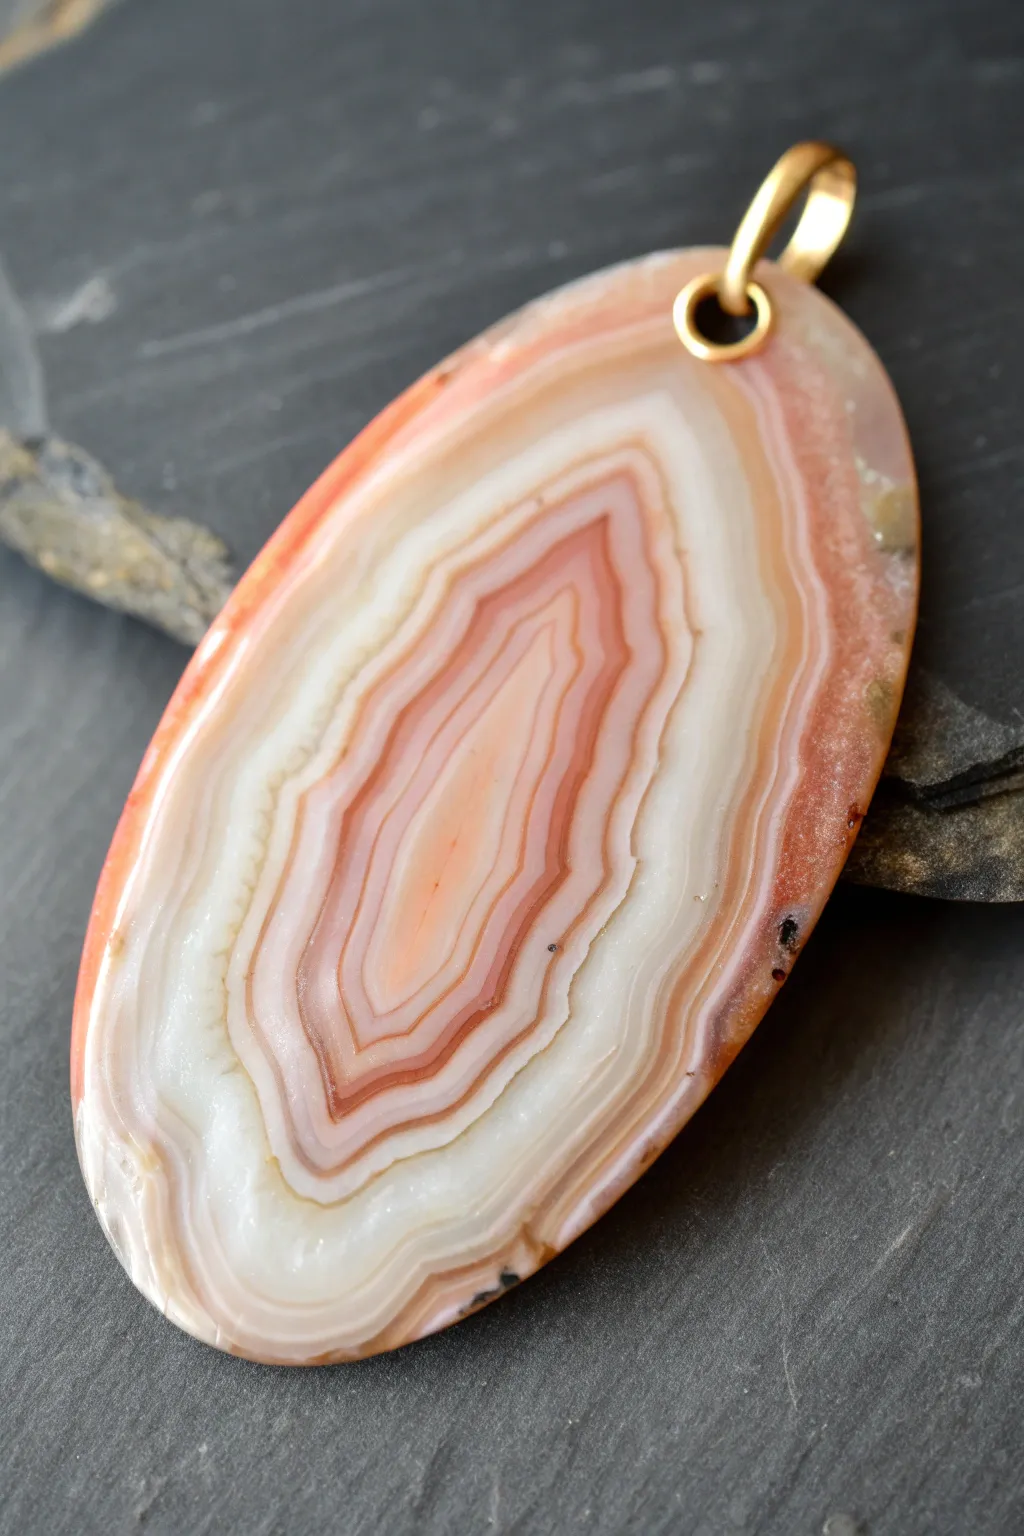
Mimic the organic beauty of natural stone with this striking faux agate pendant. By layering translucent and opaque polymer clays in concentric bands, you can achieve the depth and intriguing patterns found in real geological specimens.
Step-by-Step Guide
Materials
- Translucent polymer clay
- Opaque white polymer clay
- Alcohol inks (Salmon, Terracotta/Reddish-Brown, maybe a touch of Yellow)
- Acrylic roller or pasta machine
- Clay blade or tissue blade
- Oval cutter (large)
- Small amounts of gold or brown clay (for inclusion flecks)
- Sandpaper (various grits from 400 to 2000)
- UV resin or gloss varnish
- Drill bit or hand drill
- Gold jewelry bail and jump ring
Step 1: Creating the Agate Cane
-
Prepare your clay colors:
Begin by conditioning your translucent clay thoroughly. Divide it into three or four portions. Leave one portion plain translucent. Tint the others with alcohol inks to create a gradient: a very pale wash of pink, a medium salmon, and a deeper terracotta reddish-brown. You’ll also need a portion of solid opaque white clay. -
Form the center core:
Take a rough log of the pale pink translucent mix. It doesn’t need to be perfectly round; in fact, a slightly irregular, flattened almond shape works better for a natural look. This will be the center of your ‘stone’. -
Begin wrapping layers:
Roll out a thin sheet of the medium salmon clay. Wrap this around your center core once completely. Trim the excess so the seams meet but don’t overlap significantly, and smooth the join with your fingers. -
Add white definition:
Roll a very thin sheet of opaque white clay. Wrap a layer of this around your cane. The white acts as a defining band that separates the translucent colors, mimicking the quartz lines often seen in real agates. -
alternate translucent bands:
Continue wrapping layers using your plain translucent clay and the darker terracotta mix. Vary the thickness of these sheets. Some layers can be paper-thin, while others can be thicker to create wide bands of color. -
Create the jagged edge:
Once the cane is about 1.5 to 2 inches in diameter, gently squeeze and manipulate it so it isn’t a perfect circle. Indent the sides slightly to create the signature wavy, irregular ‘fortification’ lines found in agate. -
Add the outer crust:
Mix a small amount of scrappy brown or grey clay with tiny flecks of gold or black clay to simulate rock impurities. Roll this into a final sheet and wrap the entire cane to create the rough outer ‘crust’ of the geode. -
Compress and reduce:
Gently squeeze and elongate the cane slightly to ensure all layers are adhered to one another. Let the cane rest for about 15-30 minutes to cool down, which makes slicing much easier.
Step 2: Slicing, Shaping, and Finishing
-
Slice the cane:
Using a sharp tissue blade, slice a piece off your cane approximately 3-4mm thick. Try to cut as evenly as possible. You will reveal the beautiful concentric rings instantly. -
Refine the shape:
Place your slice on a tile or work surface. Use a large oval cutter to trim the slice into a clean oval shape, or if you prefer a more natural look, simply use your fingers to smooth the cut edges and refine the oval silhouette. -
Add detail:
If there are any air bubbles, prick them gently. You can also press tiny specks of black or dark brown clay into the outer edges to enhance the ‘matrix’ look of the stone. -
Bake the piece:
Bake the pendant according to your polymer clay manufacturer’s instructions. Usually, this is around 275°F (135°C) for 30-45 minutes. I prefer to bake slightly longer for translucents to ensure maximum clarity. -
Sand for depth:
Once cooled, wet sand the piece starting with 400 grit sandpaper and working your way up to 2000 grit or higher. This step is crucial for translucency; as you sand, the cloudy surface will disappear, revealing the depth of the layers. -
Polish or resin:
Buff the piece with a denim cloth for a soft sheen. For a high-gloss, glass-like finish that mimics polished stone, apply a thin layer of UV resin or gloss varnish and cure it completely. -
Drill the hole:
Use a small hand drill or rotary tool to drill a hole at the top center of the oval. Go slowly to avoid cracking the faux stone. -
Attach hardware:
Insert a large jump ring through the drilled hole. Attach a gold bail to the jump ring, ensuring it swings freely.
Translucency Tip
Quench the hot clay in ice water immediately after baking. This thermal shock helps increase the clarity of translucent polymer clays.
Level Up: Druzy Effect
Before baking, press coarse glitter or crushed glass into the very center ‘eye’ of the agate slice to simulate a sparkling crystal druzy cavity.
Now you have a stunning, geological-inspired pendant ready to hang on a chain or cord


Opal-Inspired Confetti Beads
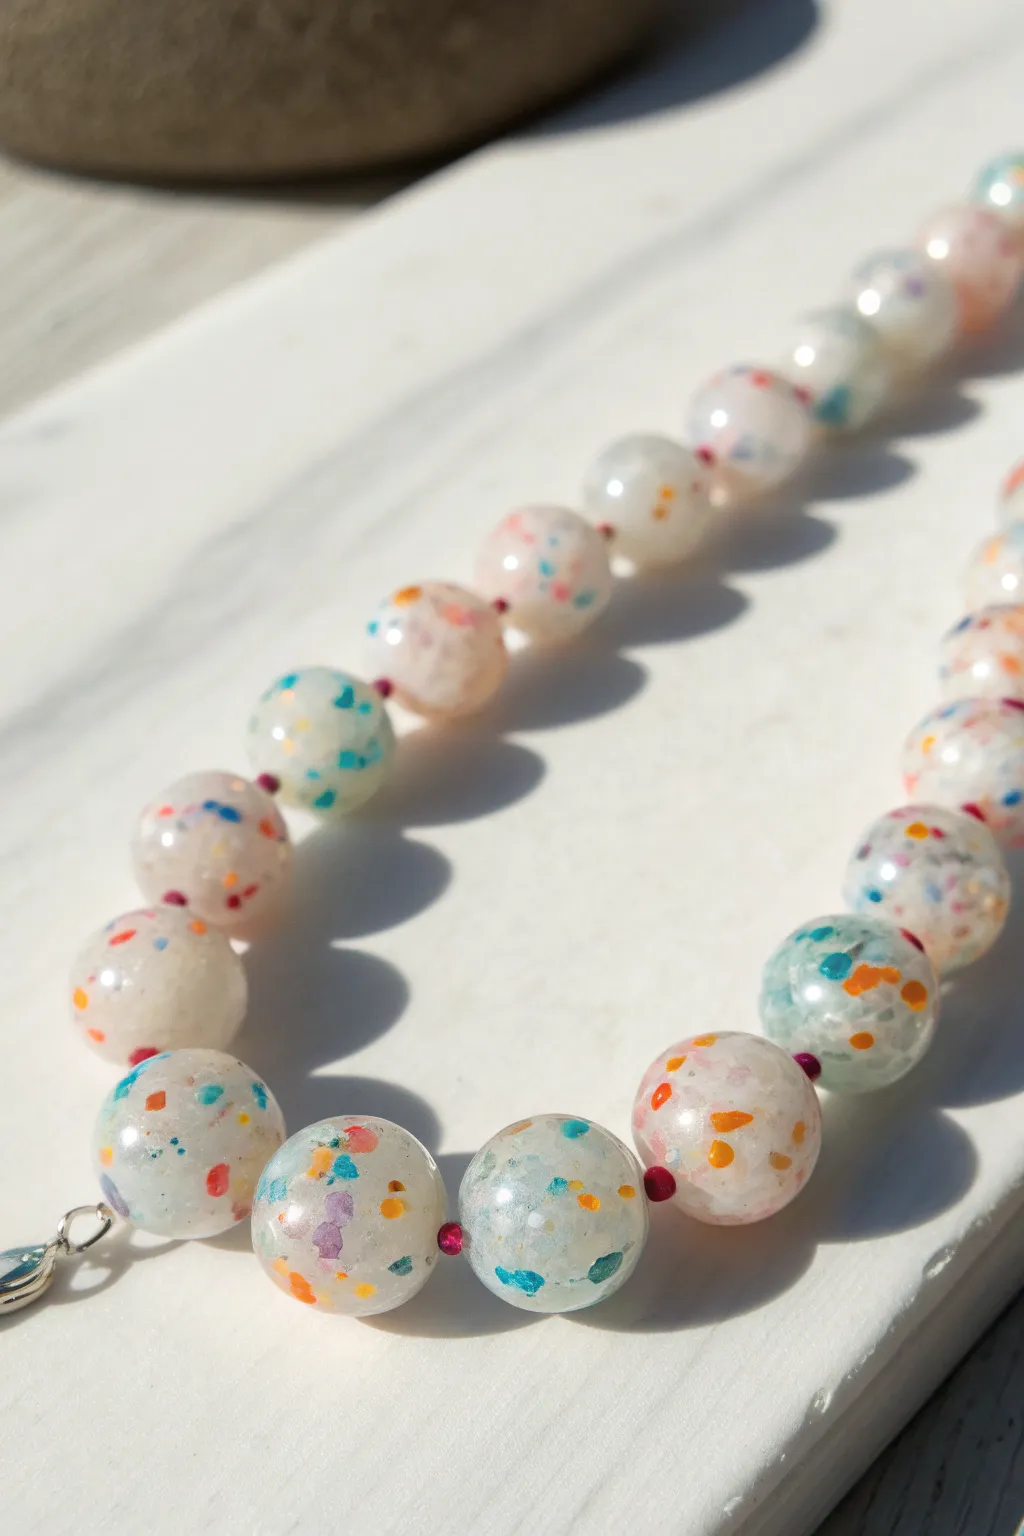
Capture the magic of playful colors suspended in light with these delightful faux opal beads. Using translucent polymer clay and colorful flecks, you’ll create custom jewelry components that look like party confetti frozen in ice.
Step-by-Step Guide
Materials
- Translucent polymer clay (high quality, like Cernit Translucent or Premo)
- Small scraps of colored polymer clay (orange, teal, purple, blue)
- Tissue blade or sharp craft knife
- Acrylic rolling pin
- Pasta machine (optional but helpful)
- Bead piercing pins or toothpicks
- Oven thermometer
- Course grit sandpaper (or cheese grater reserved for craft)
- Wet/dry sandpaper (400 to 1000 grit)
- UV resin or polyurethane gloss varnish
- UV lamp (if using resin)
- Polyester fiberfill or bead rack for baking
Step 1: Creating the Confetti
-
Prepare colored scraps:
Gather your colored clay scraps. You really only need tiny amounts of bright orange, teal blue, and bits of purple. Condition each color until soft. -
Roll thin sheets:
Roll each colored scrap into a very thin sheet. If using a pasta machine, go to a thin setting (around #5 or #6). If rolling by hand, aim for cardstock thickness. -
Bake the sheets:
Place these thin colored sheets on a tile and bake them for about 15-20 minutes at the manufacturer’s recommended temperature. Let them cool completely; they need to be hard to chop effectively. -
Chop into confetti:
Once cooled, take your sharp blade and meticulously chop the baked sheets into tiny, jagged flecks. Aim for varied sizes, mostly resembling ground pepper or small sprinkles.
Depth Perception Tip
Mix just a tiny pinhead of blue alcohol ink into the translucent clay before adding confetti. This counteracts the natural yellowing of the clay.
Step 2: Mixing and Forming Beads
-
Condition translucent clay:
Thoroughly condition a block of translucent clay. It starts opaque white but will clear up after baking. This step is crucial to prevent internal air bubbles. -
Incorporate the confetti:
Flatten your translucent clay and sprinkle a generous pinch of your chopped colored bits onto it. Fold the clay over to trap the pieces. -
Mix gently:
Pass the clay through the pasta machine or roll it out and fold it several times. You want the colored specks distributed evenly throughout the translucent base, but don’t overwork it to the point of smearing. -
Portion the clay:
Roll the mixed clay into a thick log. Use your blade to slice equal sized segments so your beads will be uniform. -
Roll spheres:
Roll each segment between your palms to form a smooth ball. I like to press firmly at first to compact the clay, then lighten my touch to smooth the surface. -
Pierce the holes:
Gently twist a bead piercing pin or toothpick through the center of each bead. Twist as you push to avoid deforming the round shape.
Cloudy Beads?
If your beads look milky after baking, the oven wasn’t hot enough. Use an oven thermometer to ensure you are hitting the exact target temp.
Step 3: Baking and Finishing
-
Prepare for baking:
Place your pierced beads on a bed of polyester fiberfill or suspend them on a bead rack. This prevents flat spots from forming where the bead touches the tray. -
Bake the beads:
Bake according to the translucent clay package directions. Translucent clay often benefits from a slightly longer bake time to clarify fully, so adding 5-10 minutes is usually safe. -
Immediate plunge:
When the timer goes off, carefully remove beads and plunge them immediately into a bowl of ice water. This ‘shocking’ technique is believed by many to increase the translucency of the clay. -
Sand for clarity:
Once cool, wet sand the beads under running water, starting with 400 grit and working up to 1000 grit. This removes fingerprints and surface haze, which is essential for the depth effect. -
Coat with resin:
Mount the beads on toothpicks. Apply a thin, even layer of UV resin or gloss varnish to each bead. This is what truly turns the clay ‘glass-like’ and reveals the confetti inside. -
Cure the finish:
Cure under a UV lamp for a few minutes (or let varnish dry overnight). Rotate the beads during the first few seconds of curing to ensure the coating doesn’t pool on one side. -
Final assembly:
String your gleaming faux opal beads onto jewelry wire or elastic cord to complete your necklace.
Enjoy the unique sparkle of your handmade jewelry as it catches the sunlight


Botanical Inclusion Pendants

Capture the delicate beauty of a dried meadow in a pendant that glows with a soft, ethereal light. By combining translucent polymer clay with delicate dried flora, you can create a piece that looks like frozen sunlight preservation.
How-To Guide
Materials
- Translucent polymer clay (e.g., Cernit Translucent or Sculpey Premo Translucent)
- Small dried botanical stems (e.g., Queen Anne’s Lace, dried herbs, or tiny wildflowers)
- Ceramic tile or glass work surface
- Acryllic roller or pasta machine
- Oval clay cutter
- Liquid translucent polymer clay
- Jewelry eye pin (brass or antique gold finish)
- Faux suede cord (brown)
- Fine-grit sandpaper (400 to 1000 grit)
- Buffing wheel or denim scrap
- X-acto knife or scalpel
- Oven thermometer
Step 1: Preparing the Canvas
-
Condition the clay:
Begin by thoroughly conditioning your translucent polymer clay. Warm it in your hands and knead it until it is pliable and free of cracks. Since translucent clay shows fingerprints easily, wash your hands well before starting. -
Roll out thin sheets:
Using your acrylic roller or pasta machine, roll the clay into a thin, even sheet, approximately 2mm to 3mm thick. This will serve as the base of your pendant. -
Cut the base shape:
Press your oval cutter firmly into the clay sheet to cut out your base shape. Gently lift away the excess clay, leaving the oval on your ceramic tile.
Ice Water Secret
Plunging hot baked clay directly into ice water is the key to maximizing transparency. It stops the cooking process instantly and prevents yellowing.
Step 2: Embedding Nature
-
Select your botanical:
Choose a small, flat-dried sprig that fits nicely within the oval boundaries without overcrowding the edges. Dryness is crucial; any moisture will cause bubbles during baking. -
Position the flower:
Gently place the botanical stem onto the clay oval. I like to use tweezers here to ensure precise placement without marring the smooth surface of the clay. -
Apply liquid clay:
Put a very small drop of liquid translucent clay on the back of the stem to act as an adhesive, then press it lightly into the base sheet. -
Create the top layer:
Roll out a second sheet of translucent clay, this time much thinner than the base—think of it like a skin, roughly 1mm thick or the thinnest setting on a pasta machine. -
Cover the botanical:
Carefully drape this thin sheet over your base and the embedded flower. Start from the center and gently smooth it outwards to push out any trapped air pockets.
Step 3: Shaping and Refining
-
Trim the edges:
Use the same oval cutter again to cut through the new top layer, aligning it perfectly with the base shape underneath to create a clean edge. -
Smooth the seams:
With your fingertip, very gently rub the edges of the oval to meld the two layers together completely. Use a little cornstarch if your finger drags on the clay. -
Texture the back (optional):
If you want a finished look on both sides, gently press a piece of sandpaper or texture sponge against the back of the pendant to hide potential fingerprints. -
Insert hardware:
Take your metal eye pin and carefully push the stem into the top center of the oval, sandwiched between the clay layers. Smooth the clay around the entry point to secure it.
Add Subtle Sparkle
Mix extremely fine gold mica powder or gold leaf flakes into the translucent clay before rolling to give the background a magical, suspended-in-amber effect.
Step 4: Baking and Polishing
-
Bake the piece:
Place the tile with the pendant in your oven. Bake according to the manufacturer’s specific instructions (usually around 275°F/130°C for 30 minutes). Use an oven thermometer to ensure accuracy, as scorching ruins the translucency. -
Cool instantly:
Remove from the oven and immediately plunge the pendant into a bowl of ice water. This thermal shock helps increase the clarity of translucent clay. -
Wet sand:
Once cool, wet sand the surface using fine-grit sandpaper (starting at 400 and moving to 1000) under running water to remove any surface bumps or lint. -
Buff to a shine:
Vigorously rub the pendant with a piece of heavy denim or use a buffing wheel on a rotary tool. This friction creates the glass-like sheens seen in the photo. -
String the pendant:
Thread a length of brown faux suede cord through the eye pin loop. Tie a simple knot at the back to finish your necklace.
Now you have a timeless piece of nature captured in stone to wear or gift.

What Really Happens Inside the Kiln
Learn how time and temperature work together inside the kiln to transform clay into durable ceramic.
Embedded Metallic Flake Studs
These elegant studs capture the ethereal beauty of floating gold suspended in glass-like clarity. By combining translucent polymer clay with metallic leaf, you create a sophisticated accessory that catches the light from every angle.
Step-by-Step Guide
Materials
- Translucent polymer clay (e.g., Cernit Translucent or Pardo)
- Gold leaf or metallic gold flakes
- Ceramic tile or glass work surface
- Tissue blade or craft knife
- Acrylic roller
- Small circle cutter (approx. 10-12mm)
- Latex or nitrile gloves (optional but recommended)
- Ice water bowl
- Stud earring posts and butterfly backs
- Super glue or E6000
- Gloss varnish or UV resin (optional for extra shine)
- Oven thermometer
Step 1: Preparing the Clay Base
-
Clean Your Station:
Before even touching the clay, wipe down your work surface and wash your hands thoroughly. Translucent clay shows every speck of dust or lint, so cleanliness is paramount for that glass-like finish. -
Condition the Clay:
Take a small block of translucent clay and begin kneading it in your hands. Warmth is key here; work it until it becomes soft and pliable. -
Roll it Out:
Using your acrylic roller, flatten the conditioned clay into a sheet about 2mm thick. This doesn’t need to be perfectly even, as we will be chopping it up shortly. -
Apply the Gold:
Gently lay a sheet of gold leaf over the clay or sprinkle a generous amount of gold flakes across the surface. I like to press them down lightly with a finger so they stick well.
Step 2: Creating the Inclusion Effect
-
Roll and Chop:
Roll the clay up into a tight log, trapping the gold inside. Then, using your tissue blade, chop the log into tiny, irregular pieces. This randomizes the flake distribution. -
Re-form the Log:
Gather all those chopped bits and squish them back together into a rough lump. Don’t over-blend, or the gold will break down into dust rather than distinct flakes. -
Shape the Spheres:
Divide the lump into two equal portions. Roll each portion between your palms to form smooth, round spheres. If you are using cutters, flatten the clay first and cut circles, then roll them into balls. -
Check for Clarity:
Inspect the balls. If too much gold is on the surface, you might want into fold the clay one more time to push the metal deeper, giving it that submerged look.
Clean Hands Tip
Wear nitrile gloves while rolling the final spheres to prevent fingerprints. Fingerprints on translucent clay become permanent cloudy smudges after baking.
Step 3: Baking and Finishing
-
Ice Water Bath:
Before baking, immediately drop your shaped spheres into a bowl of ice water for about 10 minutes. This shocks the clay and helps improve the final translucency. -
Bake:
Remove the spheres from the water, pat dry, and place on your baking tile. Bake according to the manufacturer’s instructions (usually 230°F – 275°F) for 30 minutes. Use an oven thermometer to ensure accuracy. -
Quench Again:
As soon as the timer goes off, carefully plunge the hot baked beads back into ice water. This rapid cooling further enhances the clarity of the translucent clay. -
Attach the Hardware:
Once fully cooled and dry, apply a small dot of strong adhesive (like E6000) to the flat pad of an earring post. -
Secure the Post:
Press the earring post firmly onto the flattest side of your sphere. If the sphere is too round, you can sand a tiny flat spot first to help the glue adhere. -
Optional Glaze:
For a wet, glass-like appearance, coat the sphere in a thin layer of UV resin and cure under a UV lamp, or apply a high-gloss polymer clay varnish.
Color Shift
Mix a tiny speck of alcohol ink (blue or green) into the raw translucent clay before adding gold. This creates a faux-gemstone effect like sapphire or emerald.
Enjoy wearing these radiant little treasures that look like they hold captured sunlight
Faux Jade Pebble Beads
Capture the serene beauty of light green jade using translucent polymer clay. These beads feature the soft, milky depth of natural stone, complete with subtle cloud-like inclusions and a smooth, polished finish that glows in the sunlight.
Step-by-Step
Materials
- Translucent polymer clay (high quality, like Cernit or Pardo)
- White translucent polymer clay
- Alcohol inks (green, teal, and a touch of brown)
- Acrylic rolling pin or pasta machine
- Tissue blade
- Assorted grit wet/dry sandpaper (400 to 2000)
- Dremel or hand buffing cloth (denim or soft cotton)
- Needle tool or bead pins
- Beading rack or cardstock accordion
- Light green nylon knotting cord (approx 0.8mm)
- Ice water bath
Step 1: Creating the Jade Base
-
Conditioning the clay:
Begin by thoroughly conditioning a block of standard translucent clay. It needs to be perfectly smooth and free of air bubbles to achieve that stone-like clarity later. -
Tinting the base:
Take about two-thirds of your translucent clay and add a very small amount of green alcohol ink. You want a whisper of color, not a saturated solid, so add one drop at a time and mix thoroughly. -
Adding depth:
To the remaining third of the translucent clay, add a tiny speck of white translucent clay. This will become the milky ‘clouds’ often found in real jade. -
Creating inclusions:
Chop both the green-tinted clay and the milky white mix into extremely fine crumbles using your tissue blade. The smaller the chop, the more natural the stone effect will look. -
Recombining:
Gather all the crumbles into a pile and squeeze them together into a rough log. Twist the log, fold it, and compress it again to marble the colors without fully blending them.
Natural Imperfections
Mix tiny flecks of brown or dried basil into a small pinch of clay. Add these sparsely to your main mix to simulate organic mineral deposits found in real stone.
Step 2: Forming the Beads
-
Measuring portions:
Slice the log into equal segments to ensure your beads are relatively uniform in size. For the look in the photo, aim for portions about the size of a large marble. -
Rolling into spheres:
Roll each segment between your palms. Use a light touch at first to form the sphere, then increase pressure slightly to smooth out any seams. -
Refining the shape:
Jade beads are rarely machine-perfect. I like to gently tap the poles of the sphere to create a slightly flattened, organic pebble shape. -
Piercing the beads:
Using a needle tool, carefully pierce the center of each bead. Twist the tool as you push through to prevent distorting the shape, then pierce from the opposite side to meet in the middle for a clean hole.
Step 3: Baking and Finishing
-
Baking:
Suspend your beads on bead pins over a rack or a folded cardstock accordion. Bake according to your clay manufacturer’s instructions, usually at 275°F (130°C) for at least 45 minutes to maximize translucency. -
Quenching:
Immediately upon removing them from the oven, plunge the hot beads into a bowl of ice water. This thermal shock helps increase the clarity of the translucent clay. -
Sanding:
Once cool, wet sand the beads starting with 400 grit to remove fingerprints, moving up through 600, 1000, and finally 2000 grit for a silky touch. -
Buffing:
Buff the beads vigorously with a piece of denim or a soft cotton wheel on a rotary tool. This friction creates the soft, waxy sheen characteristic of real jade.
Varied Finishes
Make a matching bracelet but coat the beads in UV resin instead of buffing. This creates a ‘wet’ high-gloss look, contrasting nicely with the satin-finish necklace.
Step 4: Assembly
-
Preparing the cord:
Cut a length of light green nylon cord that is double your desired necklace length plus 10 inches for knots. -
Stringing:
Thread your beads onto the cord. Create a single overhand knot between each larger bead to keep them spaced and secure. -
The sliding clasp:
To mimic the photographed style, finish the ends with smaller accent beads and create a sliding macramé square knot closure using the excess cord tails.
Wear your faux jade creation with pride, knowing you’ve crafted a piece of tranquil beauty from scratch