Tripod vessels have that instant “alive” energy—like your pot is standing up to introduce itself. I pulled together my favorite tripod vessel ideas so you can play with three-legged forms that feel sturdy, functional, and full of personality.
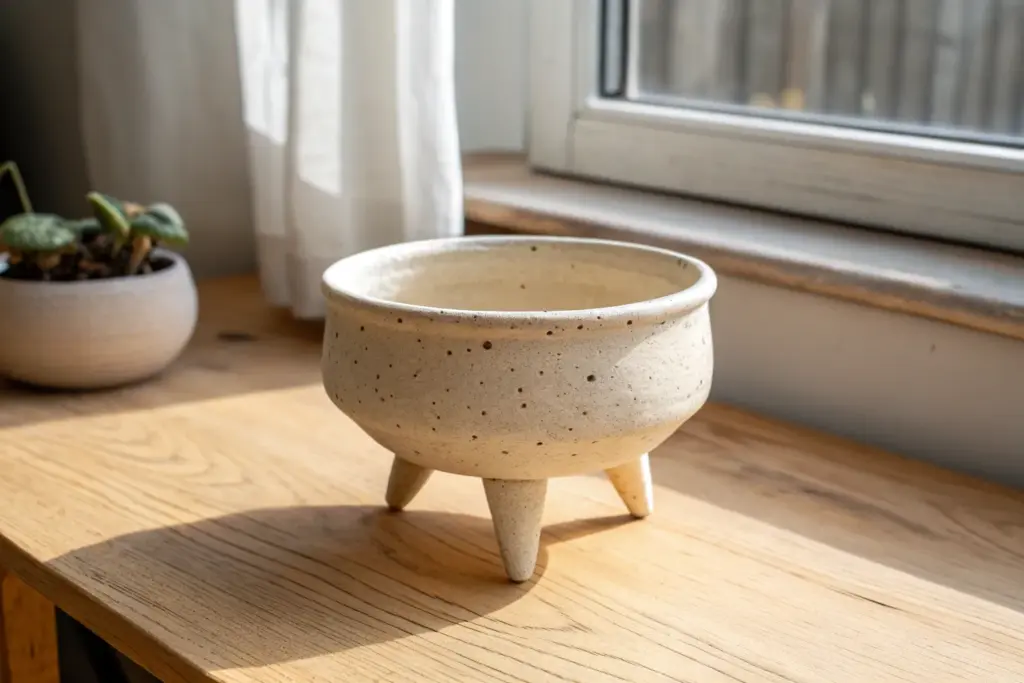
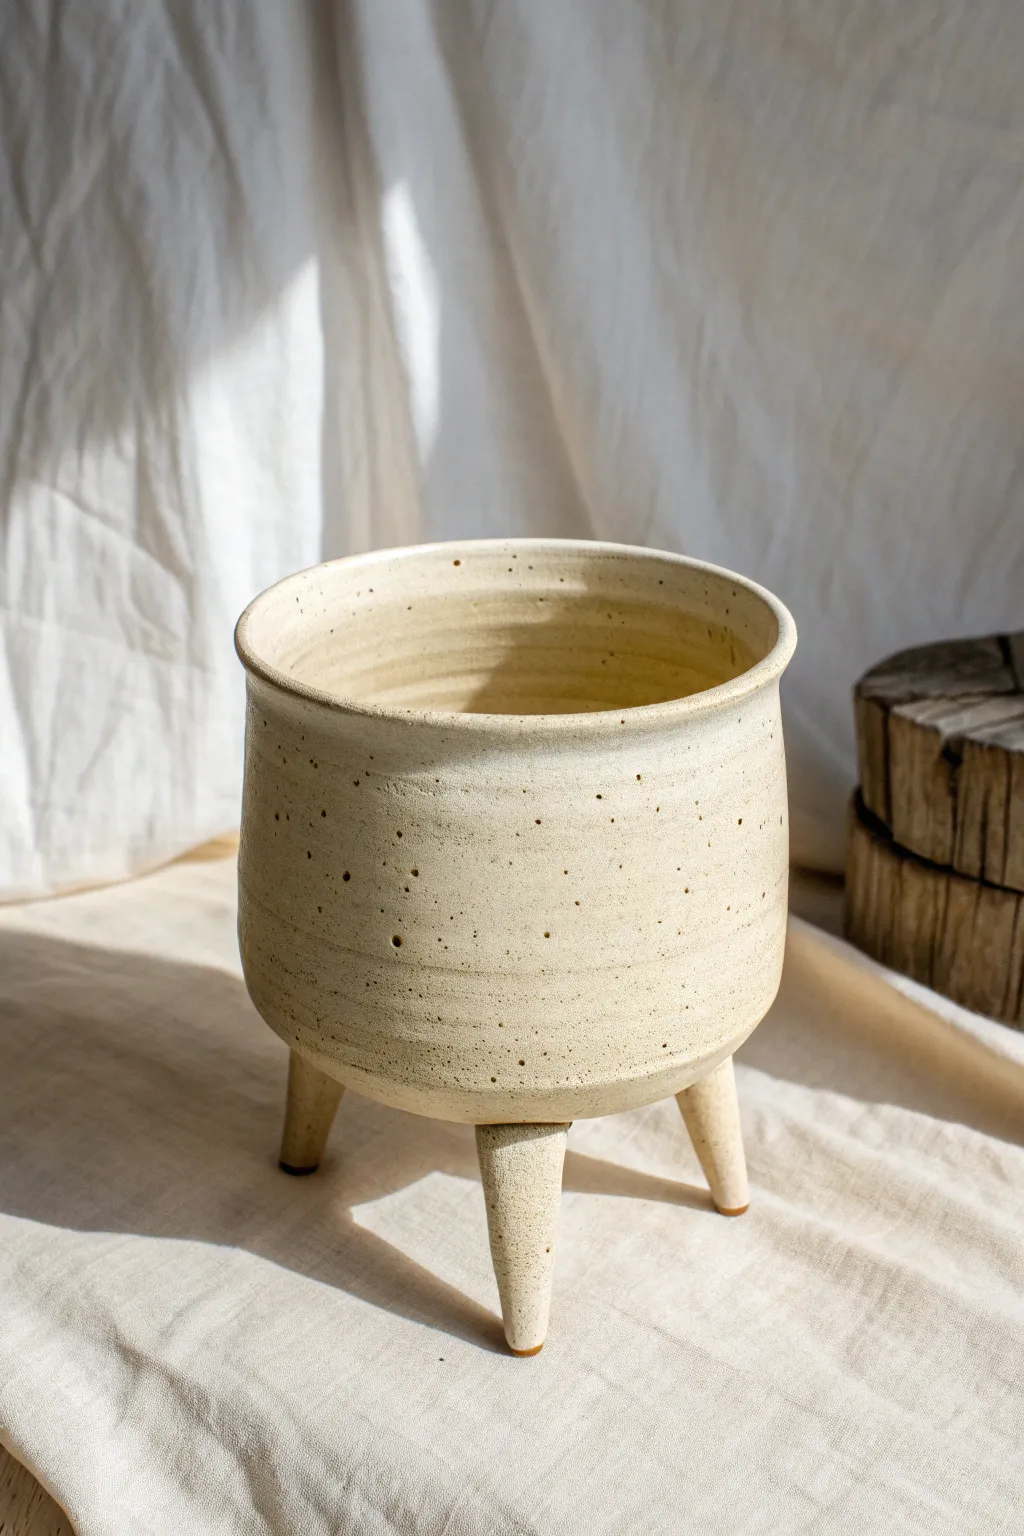
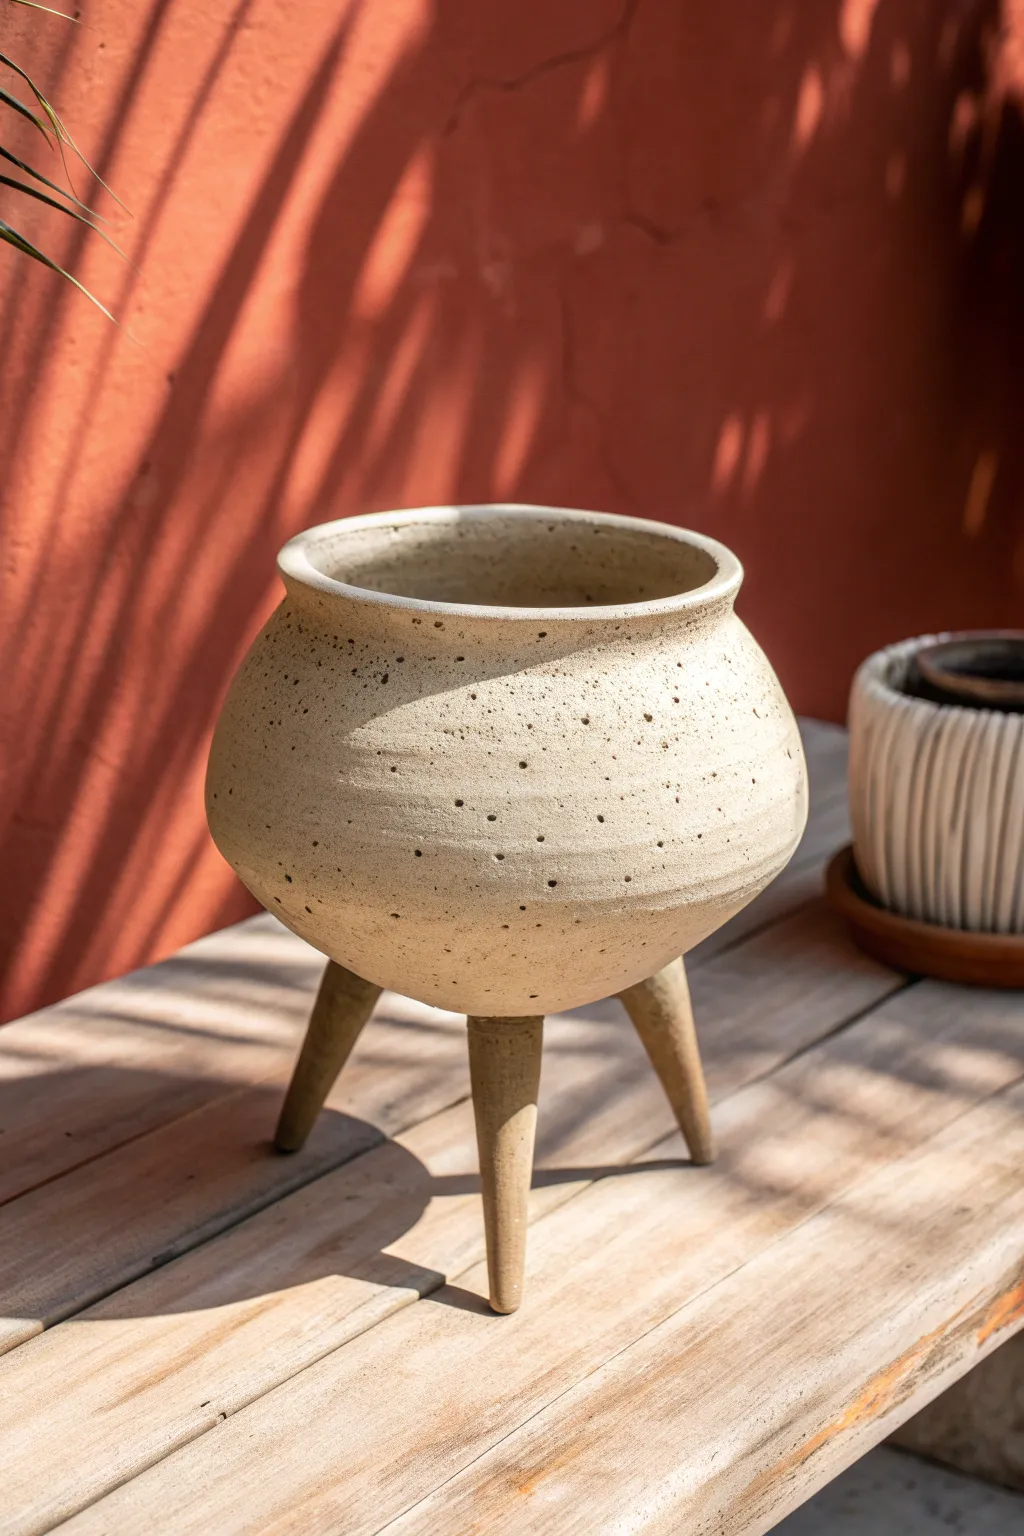
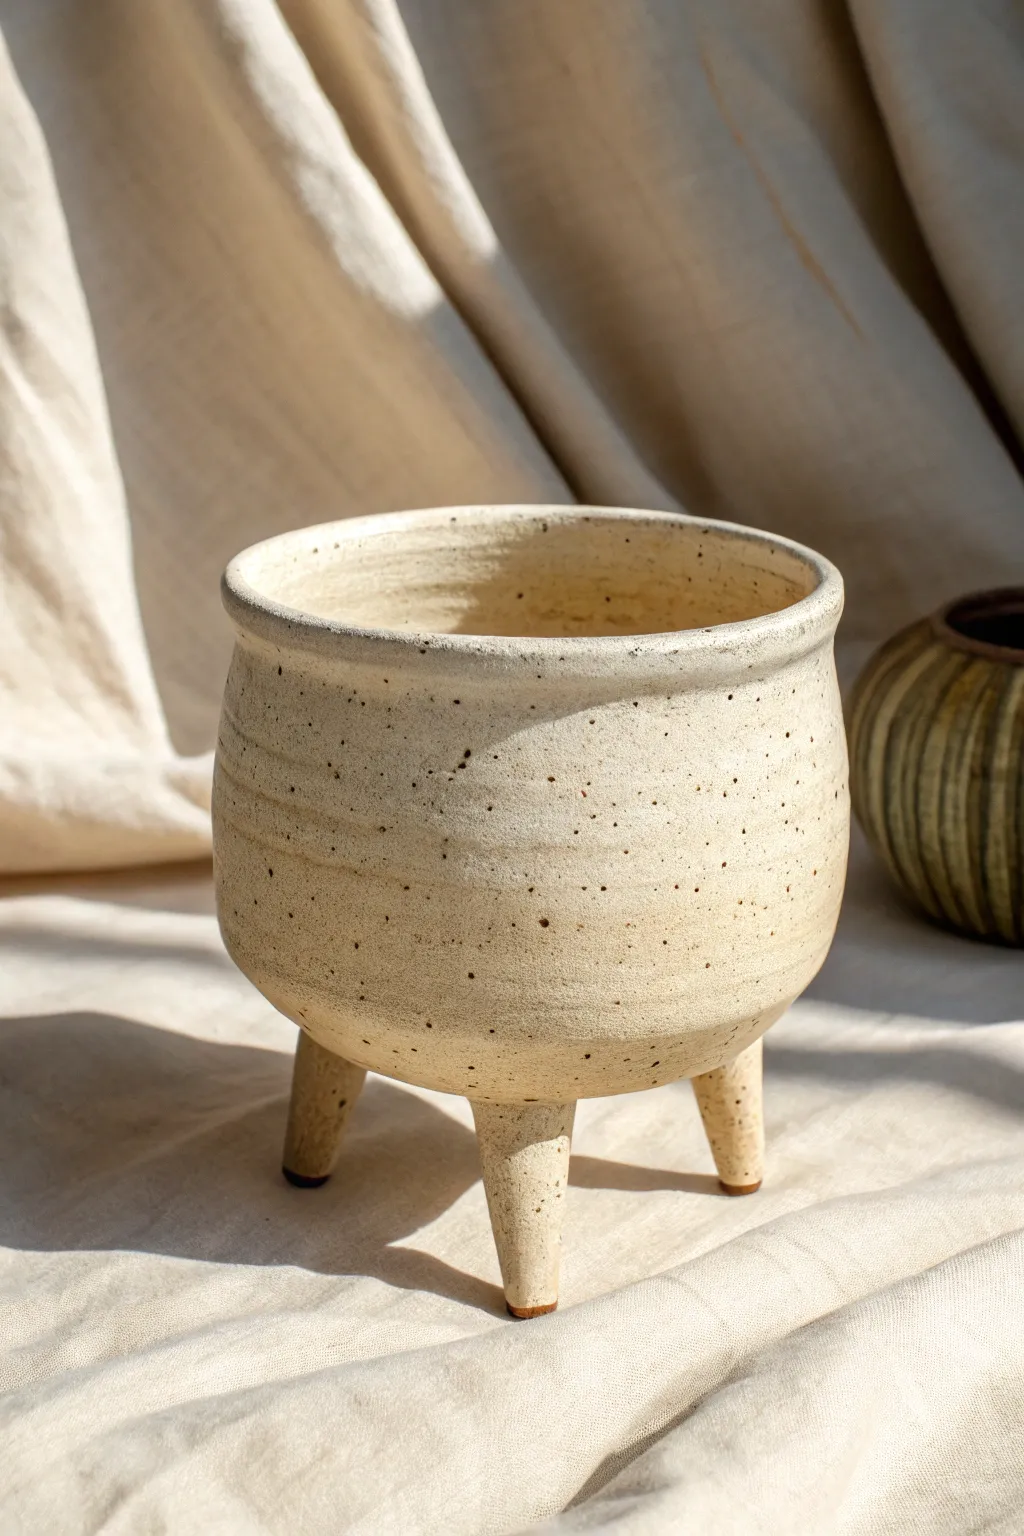
Classic Tripod Bowl With Rounded Feet
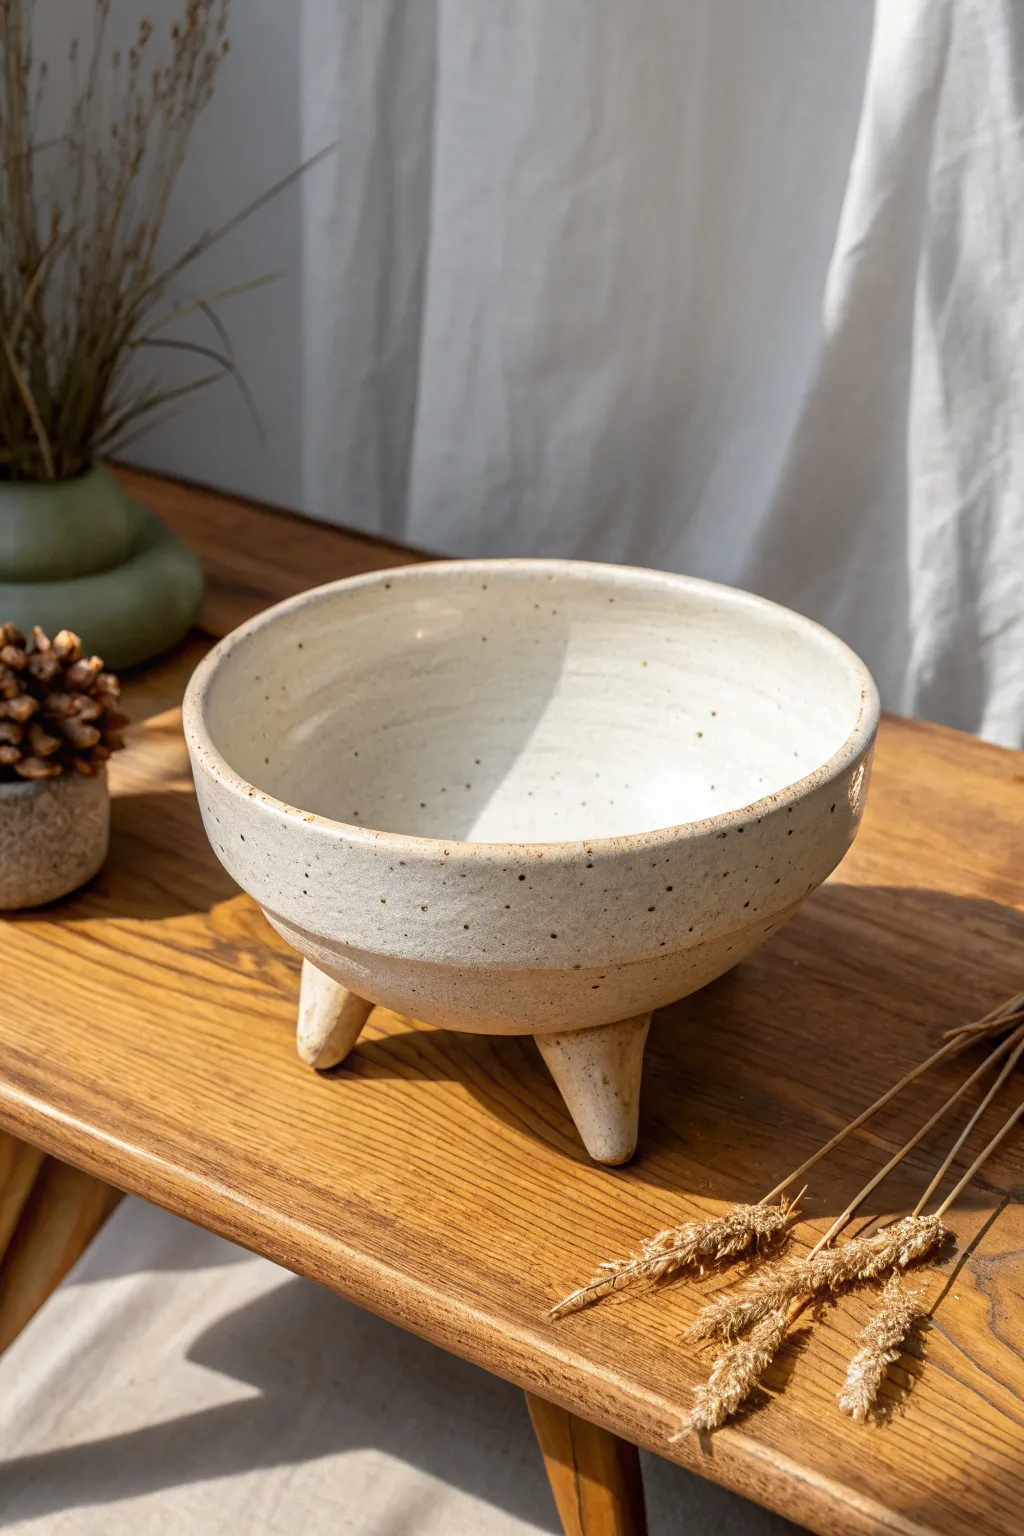
This handmade ceramic vessel features a classic rounded bowl shape elevated by three stout, tapered legs for a modern yet rustic feel. The project showcases the beauty of speckled clay bodies finished with a glossy transparent or creamy white glaze, perfect for minimal interiors.
Detailed Instructions
Materials
- Speckled stoneware clay (approx. 2-3 lbs)
- Pottery wheel (or can be hand-built with coils)
- Throwing tools (sponge, wire cutter, rib)
- Loop trimming tool
- Measuring calipers
- Fettling knife
- Scoring tool or serrated rib
- Slip (clay slurry)
- Glossy white or transparent glaze
- Kiln
Step 1: Throwing the Bowl Form
-
Center the clay:
Begin by wedging your speckled stoneware clay thoroughly to remove air bubbles. Place a 2-pound ball of clay on the wheel head and center it using firm pressure and water. -
Open the vessel:
Open the centered clay to create a floor, being careful not to go too deep. You want a slightly thicker floor than usual (about 3/4 inch) to support the eventual feet, though we will trim most of the bottom later. -
Pull the walls:
Pull the clay upward to create a wide cylinder. Slowly shape it into a gentle curve, aiming for a rounded U-shape rather than a sharp V-shape. -
Refine the rim:
Compress the rim with your chamois or sponge. I like to keep the rim slightly rounded and thick to match the rustic aesthetic of the speckled clay. -
Smooth the interior:
Use a smooth wooden or metal rib on the inside of the bowl to remove throwing lines and compress the surface, ensuring a seamless curve from the rim to the center. -
Wire off:
Run a wire cutter underneath the bowl to separate it from the wheel head, but leave it on the bat to dry until it reaches leather-hard consistency.
Step 2: Creating and Attaching Feet
-
Shape the feet:
While the bowl dries, take three smaller balls of clay (each about the size of a golf ball). Roll them into thick coils and taper one end slightly to create three identical cone-like shapes. -
Flatten attachment points:
Tap the wider end of each cone on your table to create a flat surface for attachment. Ensure all three legs are exactly the same height. -
Invert the bowl:
Once the bowl is leather-hard (firm enough to hold its shape), gently flip it over onto a foam bat or a chuck to trim the bottom. -
Trim the curve:
Use a loop tool to trim the excess clay from the base, continuing the rounded curve of the walls across the bottom. You don’t need a traditional foot ring here; aim for a smooth, round bottom. -
Mark leg positions:
Divide the base of the bowl into three equal sections. Lightly mark where the legs will sit, ensuring they are spaced evenly for stability. -
Score surfaces:
Use a serrated rib or needle tool to aggressively score both the marked spots on the bowl and the flat tops of your three clay legs. -
Apply slip:
Dab a generous amount of clay slip onto the scored areas. This acts as the glue that binds the pieces together. -
Attach the legs:
Firmly press each leg onto the bowl base. Give them a little wiggle to interlock the clay particles and squeeze out trapped air. -
Blend the seams:
Use a wooden modeling tool to smooth the clay where the leg meets the bowl. I prefer to blend the clay downward from the leg onto the bowl for a seamless transition. -
Check for level:
Flip the bowl right-side up and place it on a level surface. Adjust the angle of the legs while the clay is still workable to ensure the rim is perfectly horizontal.
Seamless Transitions
Use a slightly damp sponge to seek out and smooth the connection seam between leg and bowl. A perfect blend makes the vessel look like one organic unit.
Step 3: Dry, Fire, and Glaze
-
Dry slowly:
Loosely cover the bowl with plastic to let the legs and bowl dry at the same rate. Uneven drying can cause cracks at the connection points. -
Bisque fire:
Once bone dry, load the piece into the kiln for a bisque firing (usually to Cone 04 or 06, depending on your clay). -
Glaze application:
Dip the bisqueware into a glossy white or transparent glaze. If using transparent, the natural speckles of the clay will show through beautifully. -
Wipe the feet:
Carefully sponge off any glaze from the bottom of the three feet to prevent them from fusing to the kiln shelf. -
Glaze fire:
Fire the bowl to the maturation temperature of your clay and glaze (typically Cone 5 or 6 for stoneware) to finish the piece.
Wobbly Bowl?
If the bowl rocks after attaching legs, gently tap the vessel down onto a flat wooden board. This compresses the longer legs slightly until all three sit flush.
Place your finished bowl on a sunny table and enjoy how the shadows play around the elevated feet


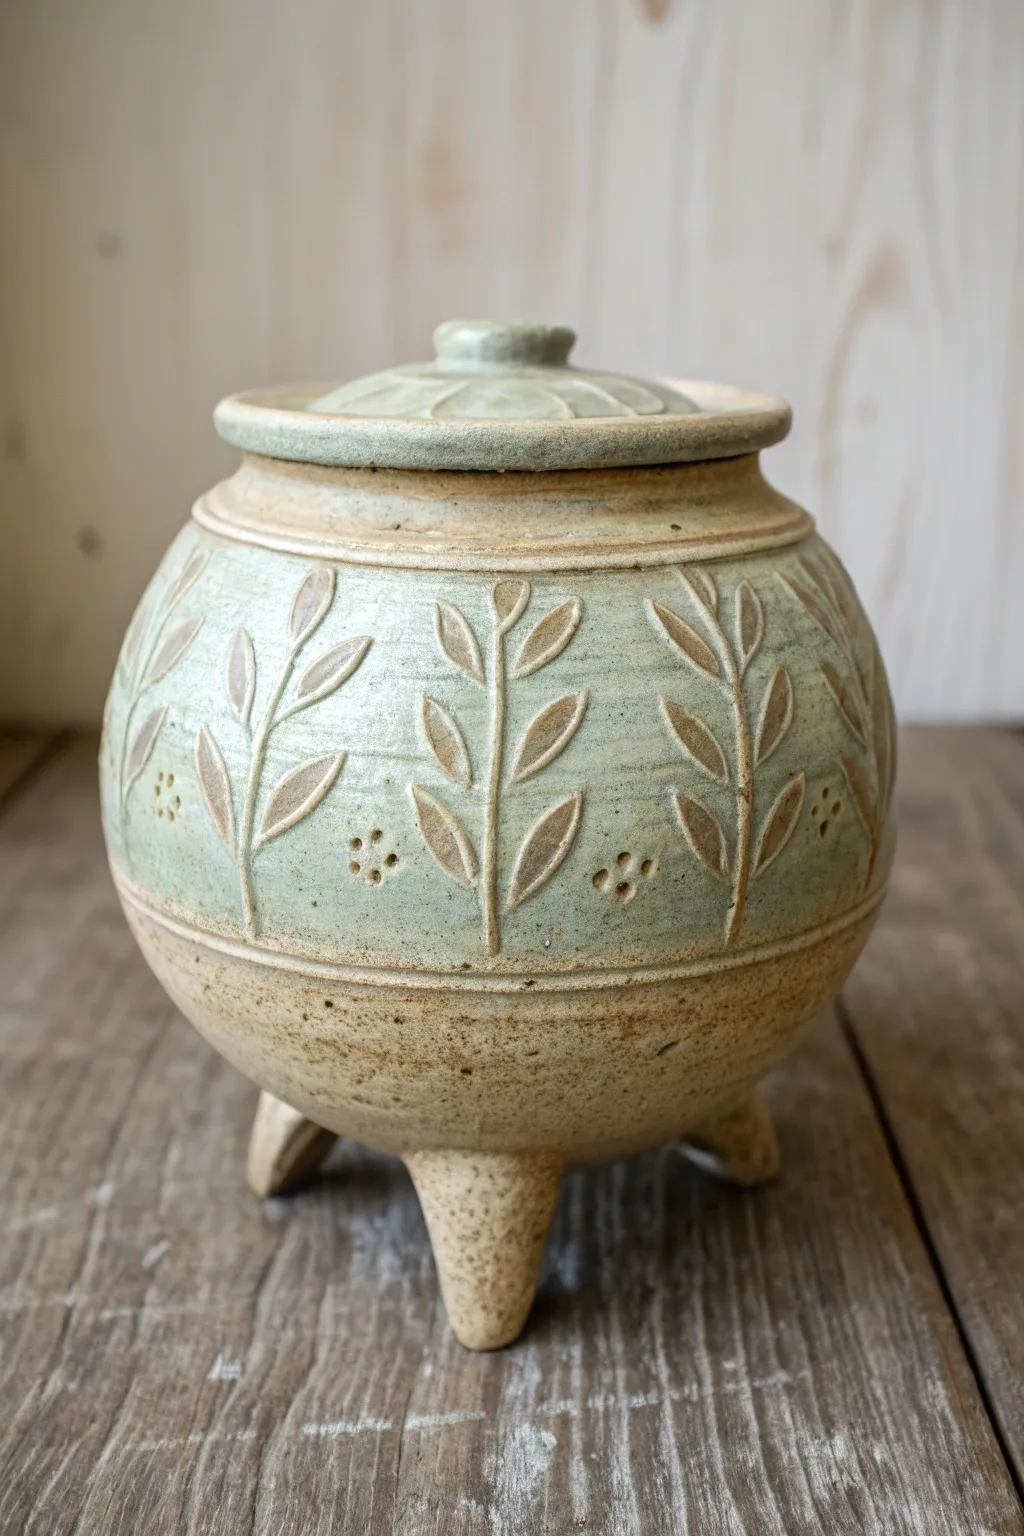
Lidded Tripod Jar for Pantry Storage
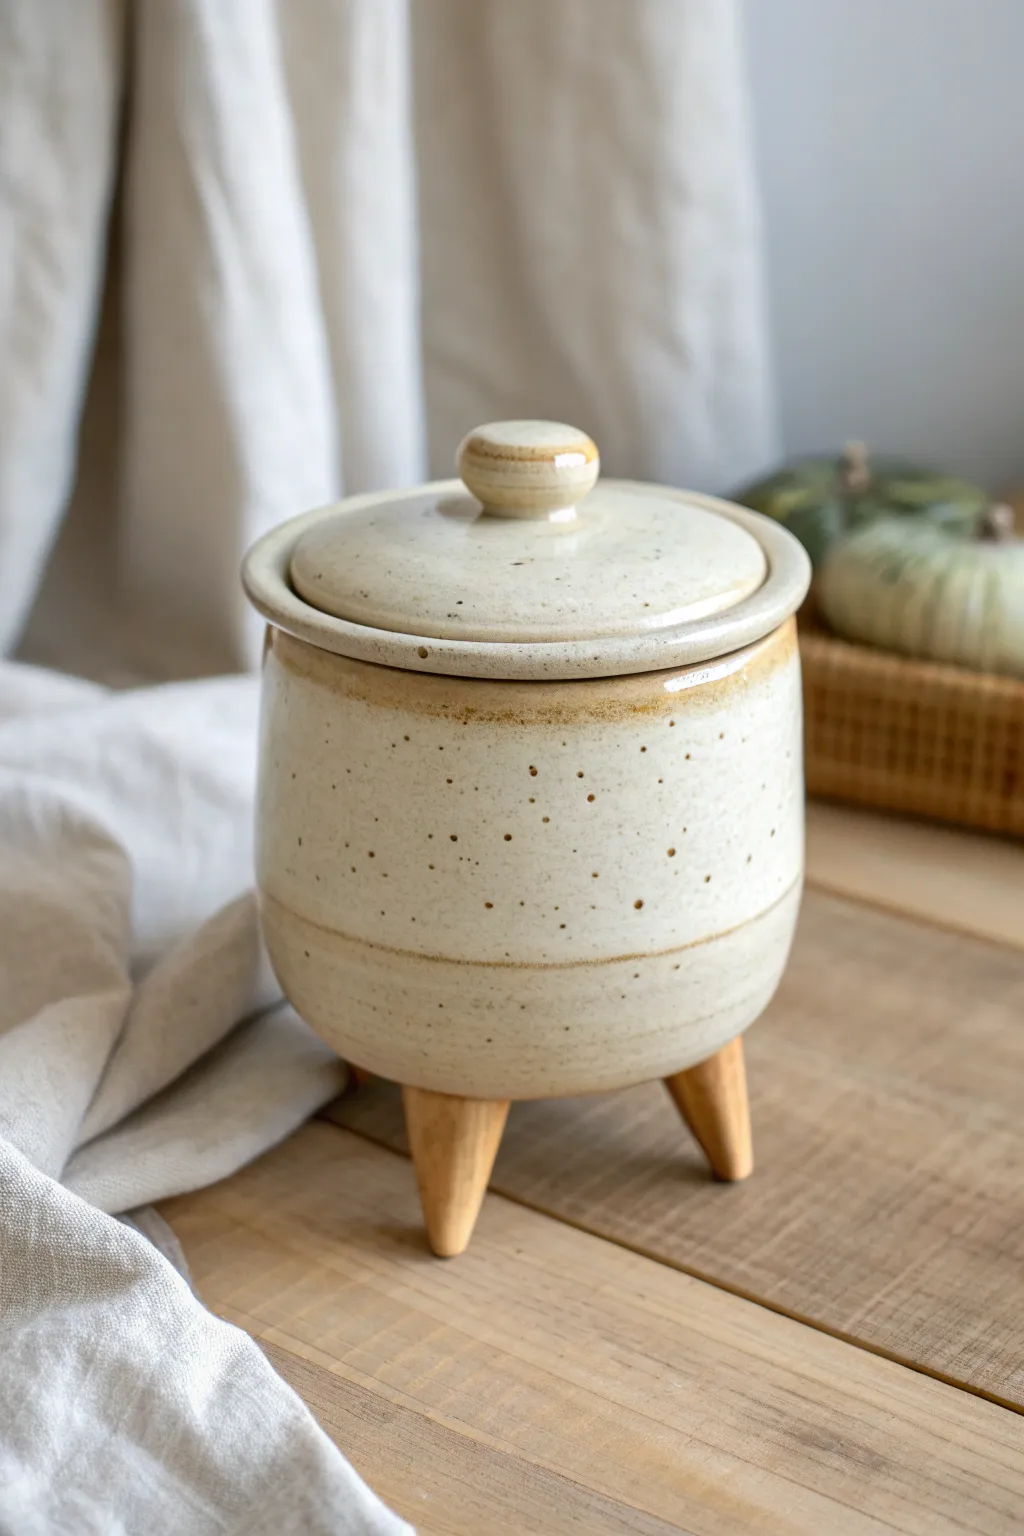
Blend rustic charm with modern functionality in this wheel-thrown ceramic jar. Featuring a cozy speckled glaze and distinct wooden feet, this lidded vessel makes a perfect countertop companion for storing pantry staples.
Step-by-Step Guide
Materials
- Stoneware clay (preferably speckled)
- Pottery wheel
- Throwing tools (sponge, rib, wooden knife, needle tool)
- Trimming tools
- Wire cutter
- Calipers (for measuring the lid)
- Small wooden dowels or custom-turned wooden legs (3)
- Strong two-part epoxy adhesive
- Speckled cream or oatmeal glaze
- Kiln
- Sandpaper
Step 1: Throwing the Vessel Body
-
Center and Open:
Begin with about 2-3 pounds of wedged clay. Center it firmly on the wheel head and open the clay, creating a flat floor about 4 inches wide. -
Pull the Walls:
Pull the walls up into a cylinder first to establish height. Aim for an even thickness of about 1/4 inch throughout the wall. -
Shape the Belly:
Using a rib tool on the inside, gently push the belly of the pot outward to create a rounded, voluminous shape, tapering slightly back in at the top. -
Create the Gallery:
At the rim, use a wooden modeling tool to split the thickness or press down a dedicated ‘gallery’ (a small shelf) inside the rim where the lid will sit. Measure this diameter with calipers. -
Refine the Exterior:
Smooth the exterior with a metal rib to remove throwing lines if you prefer a cleaner look, and define a slight groove or ‘waist’ near the bottom third for visual interest. -
Cut and Dry:
Cut the pot from the wheel with a wire tool and set it aside to dry to a leather-hard state.
Step 2: Creating the Lid
-
Throw the Lid:
Using a smaller amount of clay (about 1 pound), throw a lid ‘upside down’ on a bat. Ensure the flange measurement matches your caliper setting from the jar’s gallery. -
Attach a Knob:
Once the main lid shape is thrown, you can throw a knob directly from the excess clay in the center or attach a small ball of clay and shape it into a rounded button handle. -
Check the Fit:
I like to carefully check the lid fit against the jar while both are still slightly damp to ensure they marry perfectly before final drying.
Uneven Wobble?
If the glued legs create a wobbly jar, place a sheet of sandpaper flat on a table and gently sand the bottoms of the wooden feet simultaneously until level.
Step 3: Trimming and Glazing
-
Trim the Body:
Once leather hard, center the jar upside down on the wheel. Trim the bottom into a smooth curve so it is rounded like a bowl; it won’t need a flat foot ring since we are adding legs. -
Bisque Fire:
Slowly dry both pieces until bone dry, then bisque fire them in the kiln to cone 04 (or your clay’s specific bisque temperature). -
Apply Glaze:
Dip or brush the jar and lid with a speckled cream or oatmeal glaze. Wipe the bottom of the jar clean where the legs will attach. -
Glaze Fire:
Fire the pieces to maturity (usually Cone 5 or 6 for stoneware). Let the kiln cool completely before unloading.
Ceramic Feet Alternative
Instead of wood and glue, you can attach small clay coils or balls directly to the leather-hard pot before firing for a fully ceramic integrated tripod look.
Step 4: Attaching the Tripod Feet
-
Prepare the Base:
Using coarser sandpaper, roughen the ceramic surface at the three points on the rounded bottom where you intend to place the legs. -
Prepare the Legs:
Cut three lengths of wooden dowel (or use pre-turned tapered legs). Sand the top of each leg at a slight angle so they splay outward when attached. -
Mix Epoxy:
Mix a strong, clear two-part epoxy in a well-ventilated area. -
Attach and Cure:
Apply epoxy to the wooden legs and press them firmly onto the sanded spots on the ceramic base. Use painter’s tape to hold them in place while the glue cures fully.
Fill your new vessel with coffee beans or flour and enjoy the handmade warmth it brings to your kitchen shelf


Altered Wheel-Thrown Cylinder Tripod
This charming three-legged vessel elevates your favorite houseplants literally and stylistically. Using a speckled clay body and simple alteration techniques, you can transform a standard wheel-thrown cylinder into a mid-century modern inspired planter with plenty of character.
Detailed Instructions
Materials
- Speckled stoneware clay (approx. 2-3 lbs)
- Potter’s wheel
- Throwing sponge
- Needle tool
- Wire cutter
- Rib tool (wooden or metal)
- Scoring tool (serrated rib)
- Slip
- Wooden modeling tool
- Chamois leather or soft plastic
Step 1: Throwing the Body
-
Center and open:
Begin with about 1.5 to 2 lbs of wedged speckled clay centered on your wheel head. Open the clay to create a flat floor, ensuring it’s not too thin as you’ll need stability for the legs later. -
Pull the walls:
Pull the walls up into a straight cylinder shape. Aim for a height of about 5-6 inches. Don’t worry about perfect smoothness; the throwing rings add a lovely texture to the final piece. -
Shape the belly:
Gently belly out the form from the inside using a sponge or rib. You want a subtle curve that is slightly wider at the bottom than the top rim. -
Define the rim:
Compress the rim well with your sponge or chamois to prevent cracking. Create a slight outward flare at the very top for a finished look. -
Dry to leather hard:
Cut the pot from the wheel using a wire tool and set it aside. Wait until the clay reaches a firm leather-hard stage where it can be handled without warping but is still moist enough to attach additions.
Wobbly Legs?
If the pot leans, place a piece of sandpaper on a flat surface and gently sand down the longer leg in a figure-8 motion after the pot is bone dry.
Step 2: Forming the Legs
-
Roll coils:
While the pot dries, take your remaining clay and roll out a thick coil, roughly 1 inch in diameter. -
Cut leg segments:
Cut three equal segments from the coil, each about 2.5 inches long. These will become the feet. -
Taper the legs:
Gently roll one end of each segment against the table to create a tapered, conical shape. The top should remain flat and wide for attachment, while the bottom becomes rounded and narrow. -
Refine the shape:
Smoothing the legs with a damp sponge helps remove any harsh angles. Check them against each other to ensure they are identical in height and width.
Drainage Holes
Don’t forget functionality! While the pot is upside down for leg attachment, use a hole cutter to punch a central drainage hole.
Step 3: Assembly and Finishing
-
Mark attachment points:
Flip your leather-hard vessel upside down. Divide the base into three equal sections and lightly mark where the legs will go. -
Score surfaces:
Vigorously score the flat top of each leg and the corresponding marked areas on the pot’s base using a serrated rib or needle tool. -
Apply slip and attach:
Dab a generous amount of slip onto the scored areas. I like to twist the leg slightly as I press it onto the pot to create a suction seal and drive out air bubbles. -
Blend the seams:
Use a wooden modeling tool to drag clay from the leg onto the pot body, seamlessly blending the joint. Ensure there is no visible line where the parts meet. -
Level the pot:
Flip the pot right-side up carefully. If it wobbles, gently tap the pot downward on a flat board to level the feet while the clay is still malleable. -
Smooth the texture:
Wipe down the entire piece with a damp sponge to expose the speckles in the clay and smooth over your joinery work. -
Dry slowly:
Cover the pot loosely with plastic to let it dry very slowly. This equalization is crucial to prevent the legs from cracking off as they shrink. -
Bisque fire:
Once bone dry, fire the piece to bisque temperature (usually Cone 04 or 06 depending on your clay). -
Glaze and final fire:
Dip the pot into a transparent or semi-opaque cream glaze. This highlights the natural clay speckles. Clean the bottoms of the feet and fire to maturity.
Once fired, this earthy vessel is ready to become the perfect home for a lush fern or vibrant succulent


Tripod Mug That Feels Extra Fancy
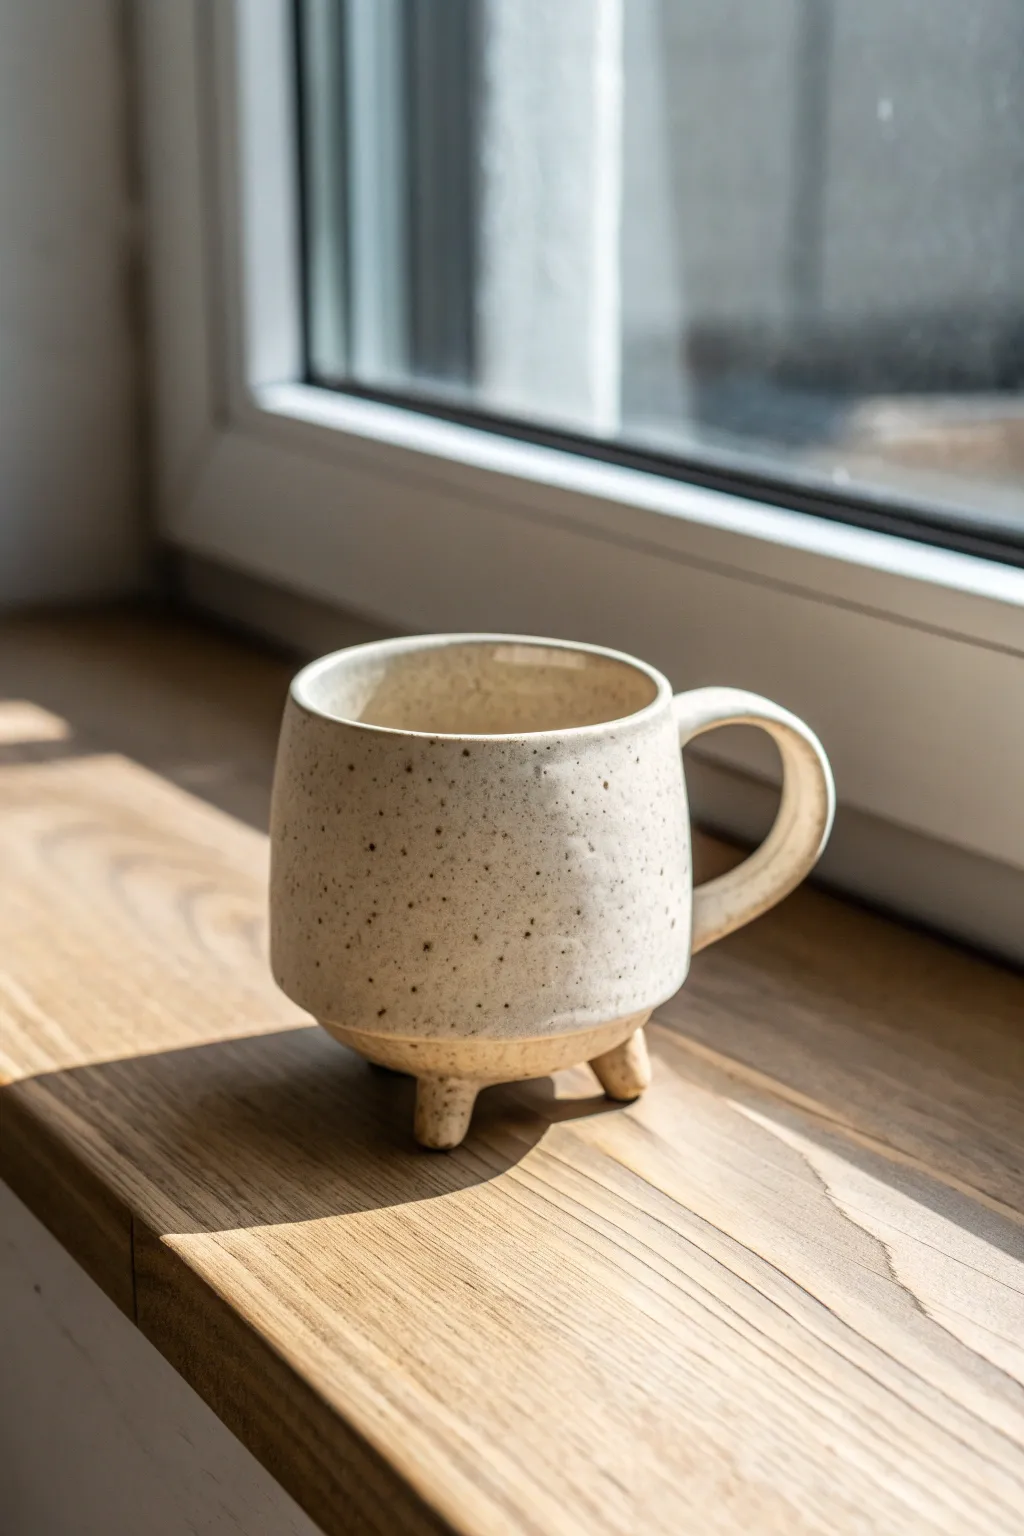
Elevate your morning coffee ritual with this charming, handmade tripod mug that balances rustic texture with modern form. Featuring a classic creamy glaze with natural speckling and three sturdy little feet, this piece adds a sculptural element to your kitchen cupboard that feels both special and grounded.
Step-by-Step Guide
Materials
- Speckled stoneware clay (mid-fire)
- Pottery wheel
- Throwing tools (sponge, wire cutter, ribs)
- Trimming tools
- Needle tool
- Scoring rib or fork
- Slip (clay slurry)
- Rolling pin
- Satin white/cream glaze (translucent)
- Kiln
Step 1: Throwing the Body
-
Prepare your clay:
Begin by thoroughly wedging about 1 to 1.5 pounds of speckled stoneware clay to remove air bubbles. Center the clay on the wheel, focusing on creating a slightly wider base than a standard cylinder. -
Open and pull:
Open the clay and pull up the walls to form a cylinder. Aim for a height of about 3.5 to 4 inches. Unlike a straight cylinder, gently curve the belly outwards slightly as you pull, creating a soft, rounded profile. -
Refine the rim:
Compress the rim with a chamois or your sponge to ensure it is smooth for drinking. I like to leave the rim slightly tapered rather than thick and chunky for a more elegant mouthfeel. -
Create the taper:
Using a rib tool on the outside, gently collar the bottom third of the vessel inward. This inward taper at the base is crucial for the tripod look, as it lifts the visual weight before you add the feet. -
Remove and dry:
Cut the pot from the wheel using your wire tool. Place it on a ware board and let it dry to a leather-hard state. It needs to be firm enough to handle without warping.
Step 2: Adding Feet and Handle
-
Trim the bottom:
Once leather hard, center the mug upside down on the wheel. Trim away excess clay from the bottom, creating a clean, curved underside. Don’t trim a foot ring; the bottom should be round like a bowl. -
Form the feet:
Take three small balls of fresh clay, roughly the size of large marbles. Roll them into tapered cone shapes. Tap the wider end of each cone on the table to flatten the attachment surface. -
Mark placement:
Turn the mug upside down and lightly mark three equidistant points on the rounded bottom. Ensure they are spaced evenly (120 degrees apart) so the mug sits level. -
Attach the legs:
Score the marked spots and the flat tops of your clay feet. Apply slip generously to both surfaces. Press the feet firmly onto the mug base. Use a small wooden modeling tool to smooth the seam where the foot meets the body. -
Level check:
Flip the mug right-side up and gently press it onto a flat surface to ensure all three feet touch the ground evenly and the rim is level. -
Pull a handle:
Pull a strip of clay for the handle, keeping it relatively thin and elegant to match the ‘fancy’ aesthetic. Allow it to set up briefly until it holds a curve. -
Attach handle:
Score and slip the attachment points on the side of the mug. Attach the top of the handle near the rim and swoop it down in a ‘C’ or ear shape, attaching the bottom near the midpoint of the wall. Smooth the connections well.
Level Check
Use a small circular bubble level on the rim immediately after attaching the feet. Adjust the legs while the clay is soft to ensure your coffee won’t sit at a slant.
Step 3: Glazing and Firing
-
Bisque fire:
Allow the completed mug to dry slowly and completely. Bisque fire the piece to Cone 04 (or your clay body’s recommendation). -
Clean the bisque:
Wipe down the bisque-fired mug with a damp sponge to remove any dust or debris, which can cause pinholes in the glaze. -
Apply glaze:
Dip the mug into a satin white or cream glaze. A satin finish works best here; a high-gloss glaze might reflect too much light and hide the clay’s natural speckles. -
Wipe the feet:
Carefully wipe the glaze oof the bottom of each foot with a sponge. To create that raw clay look shown in the image, wipe the glaze slightly higher up the legs, leaving the clay body exposed. -
Final fire:
Glaze fire the piece to Cone 5 or 6 (mid-range). Ensure the feet have plenty of clearance on the kiln shelf or use cookies to prevent sticking.
Level Up: Thumb Rest
Add a tiny clay ‘button’ or flattened oval to the top curve of the handle before firing. It creates a perfectly ergonomic spot for your thumb to rest.
Enjoy the satisfying tactile experience of holding your custom tripod mug during your next coffee break

The Complete Guide to Pottery Troubleshooting
Uncover the most common ceramic mistakes—from cracking clay to failed glazes—and learn how to fix them fast.
Mini Tripod Pitcher or Creamer
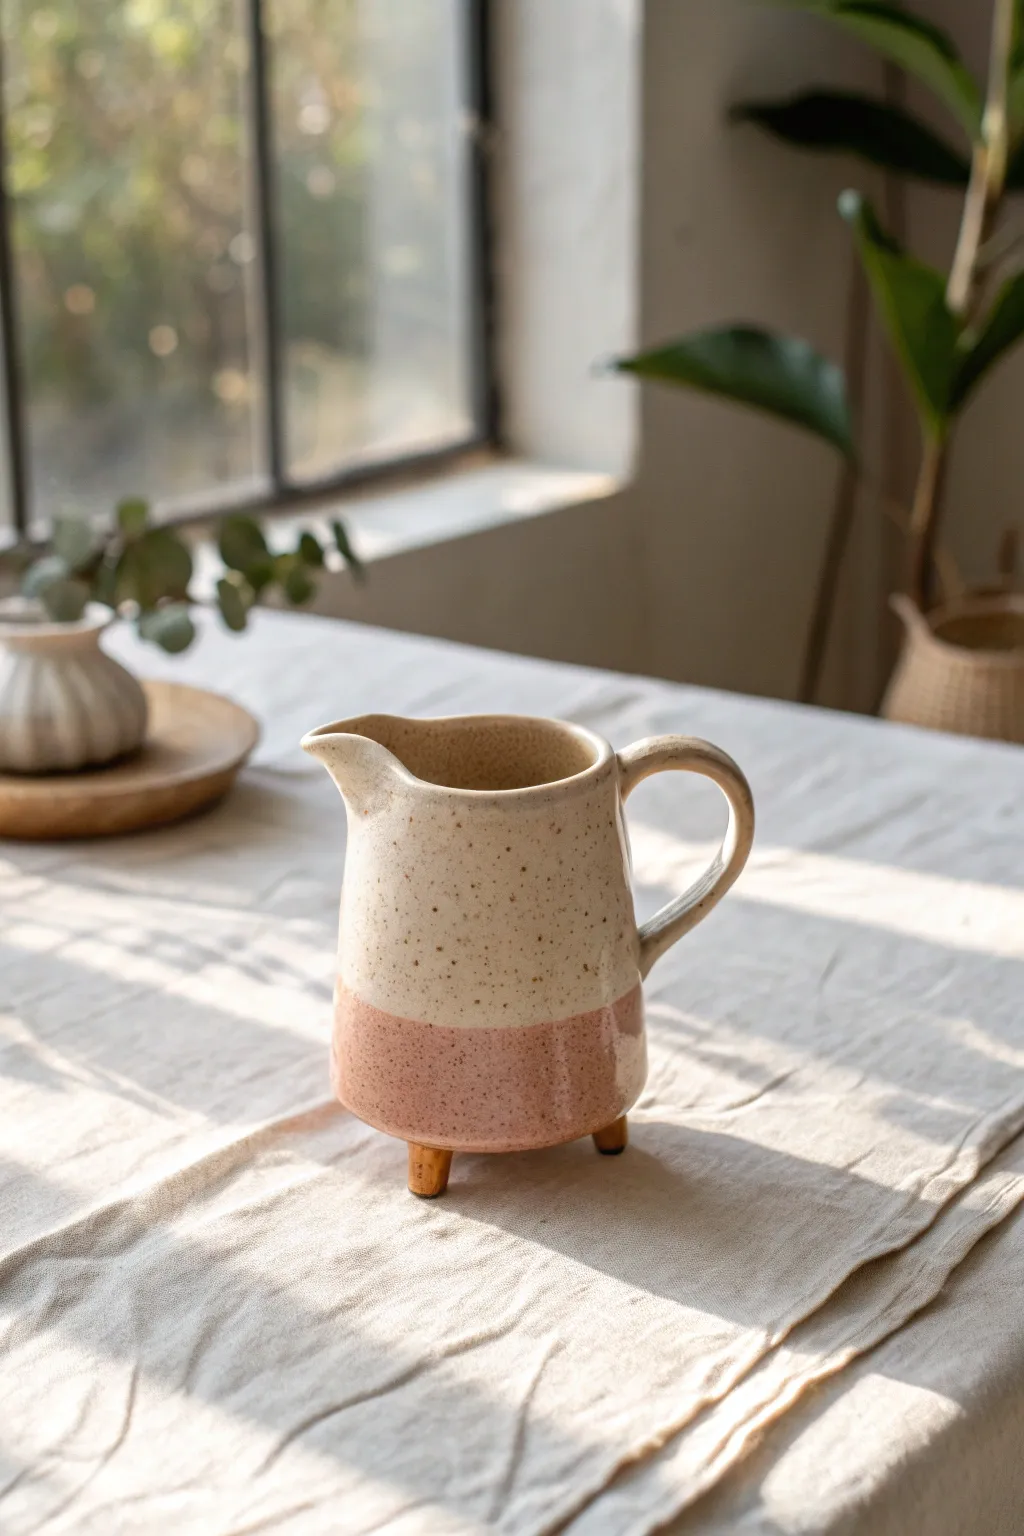
This charming ceramic pitcher features a whimsical tripod design perfect for adding personality to your breakfast table. Its earthy speckled clay, dual-tone glaze, and tiny feet create a modern yet rustic vessel ideal for pouring cream or milk.
Step-by-Step Tutorial
Materials
- Speckled Stoneware Clay (cone 6)
- Pottery Wheel (or tools for slab/coil building)
- Needle Tool
- Rib Tool (wood and metal)
- Sponge
- Cutting Wire
- Scoring Tool
- Slip
- Satin Cream Glaze
- Transparent or glossy blush pink Glaze
- Kiln
Step 1: Forming the Body
-
Throw the Cylinder:
Begin by centering about 1 to 1.5 lbs of speckled stoneware clay on the wheel. Open the clay and pull up the walls to form a cylinder roughly 4-5 inches tall. Keep the walls slightly thicker at the bottom to support the eventual feet. -
Shape the Belly:
Use a rib on the inside of the vessel to gently belly out the form, creating a slight curve that narrows slightly at the rim. I like to keep the silhouette simple and cylindrical. -
Form the Spout:
While the wheel is stopped, use two fingers on the outside and one on the inside to pull a small, classic pitcher spout. Gently run a wet chamois or sponge over the rim to compress and smooth it. -
Trim the Base:
Wire the pot off the bat and let it dry to leather-hard. Turn it over and trim the bottom flat. You don’t need a foot ring since we will be adding attached legs later.
Tip: Speckle Pop
If your white glaze is too opaque, thin it slightly with water. This transparency allows the iron speckles in the clay body to burst through the surface during firing.
Step 2: Adding the Handle and Feet
-
Pull the Handle:
Pull a strap of clay for the handle. Allow it to set up until it holds its curve but is still flexible. Cut it to size, aiming for an elegant ‘C’ shape. -
Attach the Handle:
Score the back of the pitcher opposite the spout and the attachment points of your handle. Apply slip and press the handle firmly into place. Smooth the seams with a modeling tool or damp sponge. -
Create the Tripod Feet:
Roll three small balls of clay, roughly the size of large grapes. Tap them gently on the table to flatten one side slightly, shaping them into tapered nubbins. -
Mark Placement:
On the bottom of the pitcher, mark three equidistant points in a triangle formation. This ensures stability so the pitcher doesn’t tip. -
Attach the Feet:
Score the marked spots and the flat side of the feet. Add slip and press the feet onto the base. Reinforce the connection by smoothing the clay from the foot onto the pot with a small wooden tool. -
Level Check:
Turn the pitcher upright gently to ensure it sits level on its new feet. Adjust by pressing down lightly if it wobbles.
Troubleshooting: Wobble
If the dried feet aren’t level, gently sand the longer leg down on a piece of sandpaper taped to a flat table before bisque firing. Do not sand greenware without a respiratory mask.
Step 3: Glazing and Firing
-
Bisque Fire:
Allow the piece to dry completely (bone dry) before loading it into the kiln for a bisque fire (usually cone 04 or 06). -
Wax the Feet:
Apply wax resist to the bottom of the feet to prevent them from sticking to the kiln shelf. You might also want to wax the very bottom curve if you want that raw clay look shown in the inspiration. -
Dip the Top:
Hold the pitcher by the foot area. Dip the top two-thirds into a satin cream glaze. Pour the glaze out immediately if glazing the interior simultaneously. -
Dip the Bottom:
Once the top glaze is dry to the touch, dip the bottom third into the blush pink glaze. Let the two glazes overlap slightly in the middle to create a soft transition line. -
Clean Up:
Sponge off any glaze that dripped onto the very bottom of the feet where you applied the wax. -
Glaze Fire:
Load the kiln again and fire to the maturity temperature of your clay and glaze (typically cone 6 for stoneware).
Now you have a delightful handmade pitcher ready to serve your morning creamer or simply look beautiful on a shelf
Tripod Planter With Bold Feet
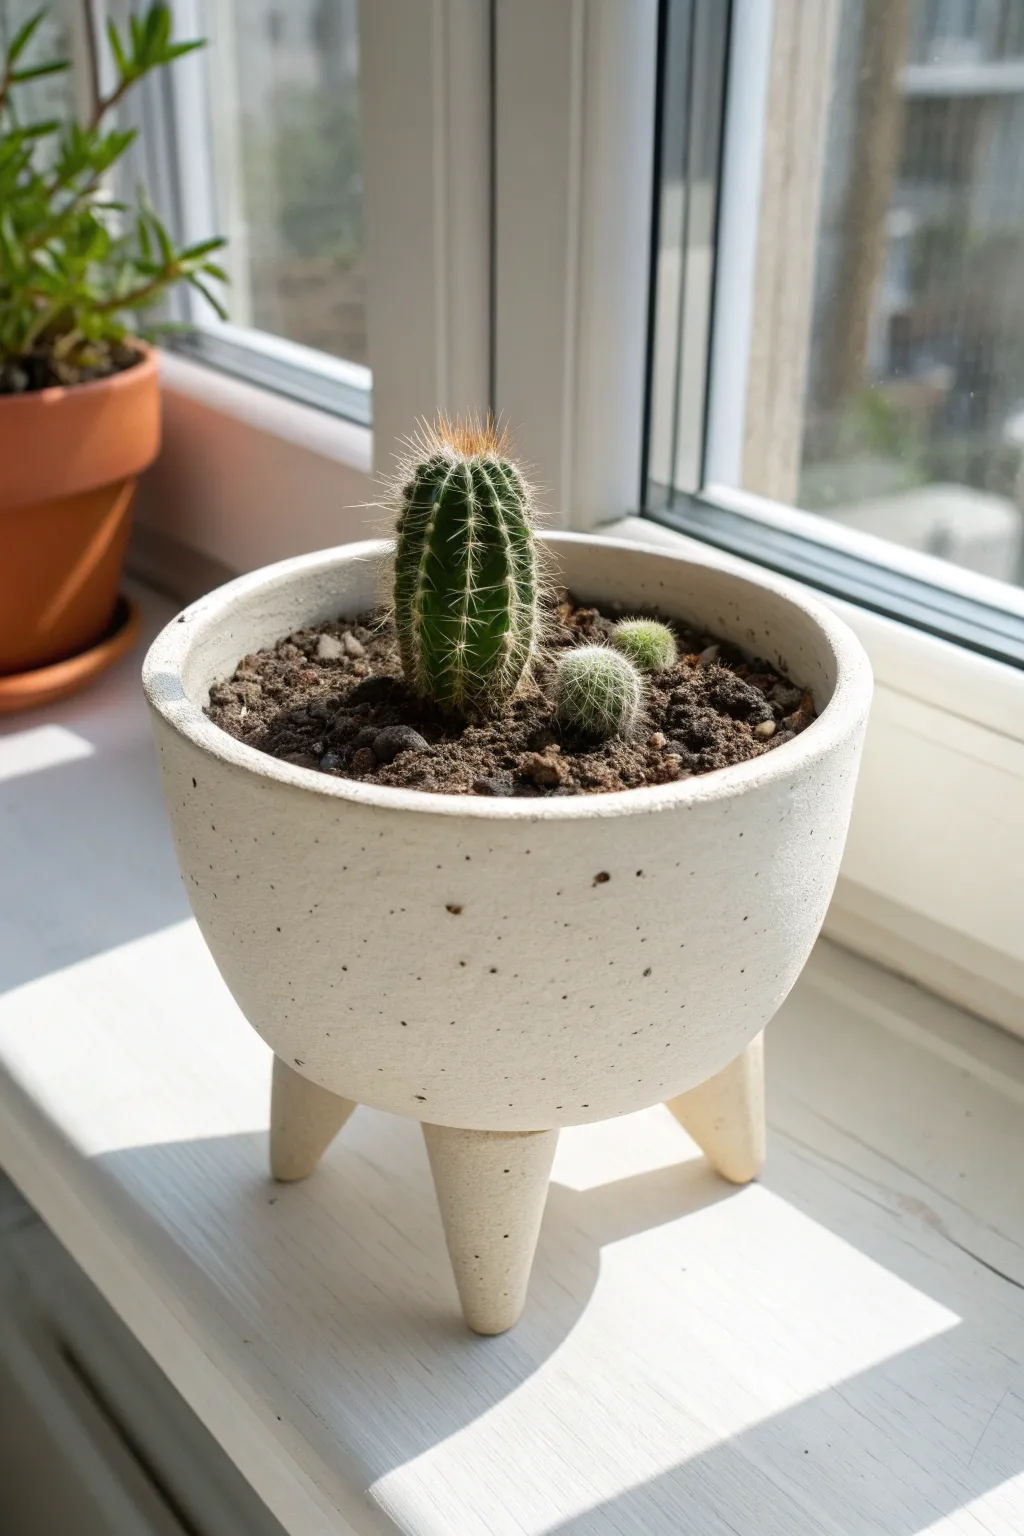
This charming planter features a deep, bowl-like basin resting on three sturdy, conical legs for a mid-century modern vibe. The subtle speckled finish adds organic texture, making it the perfect home for your favorite cacti or succulents.
Detailed Instructions
Materials
- White stoneware clay or air-dry clay (approx. 2 lbs)
- Speckled clay additive or black pepper/sand (if using plain clay)
- Rolling pin
- Circle template or bowl (approx. 6 inches)
- Small tapered corks or cone mold (for feet)
- Needle tool
- Scoring tool or old fork
- Slip (clay and water slurry)
- Sponge
- Sandpaper (fine grit)
- Matte sealant or glaze
Step 1: Forming the Basin
-
Prepare the clay body:
Begin by wedging your clay to remove air bubbles. This is crucial for preventing cracks later. If your clay doesn’t already have speckles, knead in a small amount of dark sand or even coarse black pepper to achieve that dotted texture. -
Roll out the slab:
Roll your clay out into a smooth, even slab about 1/4 inch thick. Keep the thickness consistent so the walls of your pot dry evenly. -
Cut the base:
Using a bowl or circle template as a guide, cut out a circle roughly 5-6 inches in diameter with your needle tool. -
Form the walls:
Cut a long rectangular strip of clay from the remaining slab. The length should match the circumference of your base circle, and the height should be about 3-4 inches. -
Attach the walls:
Score the outer edge of your base circle and the bottom edge of your rectangular strip. Apply slip generously to both scored areas. -
Seal the seam:
Wrap the strip around the base, pressing firmly. Blend the clay together on both the inside and outside seams using your thumb or a modeling tool until the join is invisible. -
Shape the curvature:
Gently cup the walls with your hands, bulging them outward slightly to create a rounded, bowl-like profile rather than a straight cylinder. -
Smooth the rim:
Use a damp sponge to soften the top rim of the pot, ensuring it is level and smooth.
Pro Tip: Balanced Feet
Make the legs slightly wider at the top attachment point than you think you need. A broader connection area provides much better stability and prevents snapping.
Step 2: Adding the Tripod Legs
-
Shape the feet:
Roll three equal balls of clay. Shape each into a tapered cone, roughly 2 inches tall, ensuring the top is wide enough to support the pot’s weight. -
Check for uniformity:
Stand the three legs up next to each other. I like to place a ruler across the tops to make sure they are exactly the same height so the pot won’t wobble. -
Mark placement:
Flip your main pot upside down. Mark three equidistant points on the bottom where the legs will attach, forming a triangle. -
Score and slip connections:
Heavily score both the tops of the leg cones and the marked spots on the pot base. Add plenty of slip. -
Secure the legs:
Press each leg firmly onto the base. Use a small tool to drag clay from the leg onto the pot body, blending the seam thoroughly for a strong bond. -
Level check:
Turn the pot right-side up carefully. Press down gently to ensure all three feet touch the surface evenly. Adjust if necessary while the clay is still workable.
Troubleshooting: Wobbles
If the pot rocks after attaching legs, gently tap the whole planter on the table while the clay is soft. This flattens the leg bottoms exactly level with each other.
Step 3: Finishing Touches
-
Dry slowly:
Loosely cover the pot with plastic to let it dry slowly over 24-48 hours. This slow drying helps prevent the legs from cracking away from the body. -
Sand for texture:
Once fully dry (bone dry), lightly sand the exterior to enhance the speckled texture and smooth out any rough fingerprints. -
Seal or fire:
If using ceramic clay, fire it in a kiln and apply a clear matte glaze. If using air-dry clay, apply two coats of a matte waterproof sealant to protect it from moisture.
Once filled with gritty soil and your favorite prickly cactus, this handmade vessel adds a perfect touch of desert chic to your windowsill


What Really Happens Inside the Kiln
Learn how time and temperature work together inside the kiln to transform clay into durable ceramic.
Tripod Herb Pot With Wide Opening
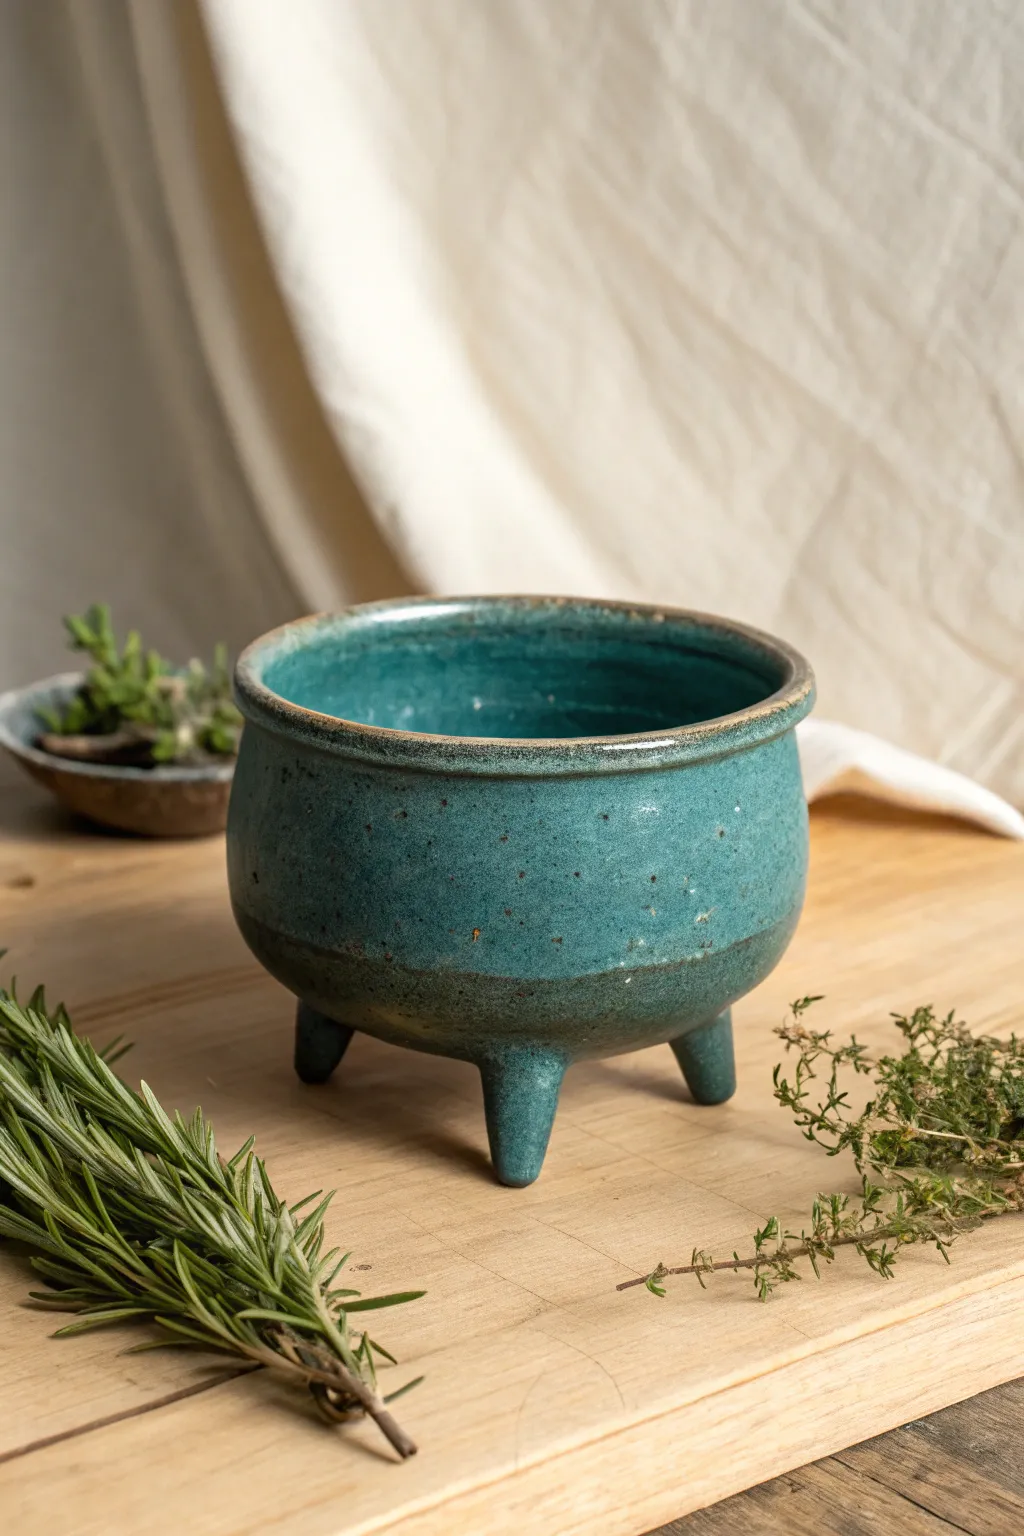
This charming ceramic vessel features a rounded, cauldron-like belly resting on three sturdy feet, perfect for holding small herb bundles or succulents. Its deep teal glaze is accented by subtle speckling and a raw clay rim, giving it an earthy, rustic appeal.
Step-by-Step
Materials
- Stoneware clay (speckled or buff)
- Pottery wheel (optional, can be coiled)
- Needle tool
- Rib tool (wooden or silicone)
- Sponge
- Cutting wire
- Scoring tool or fork
- Slip (clay and water mixture)
- Turquoise stoneware glaze
- Kiln access
Step 1: Forming the Body
-
Center the clay:
Start with a ball of clay roughly the size of a grapefruit. Secure it firmly to your wheel head and use water to center it until it spins without wobbling. -
Open the form:
Press your thumbs into the center to open the clay, leaving the floor roughly 1/2 inch thick to support the eventual feet. Widen the opening to create a broad, bowl-like base. -
Pull the walls:
Gently pull the clay upward to create the height. Aim for a rounded belly shape by pushing slightly outward from the inside as you pull up. -
Shape the rim:
Collar the rim in slightly so the opening is just a bit narrower than the widest part of the belly. Use a chamois or sponge to compress and round the lip for a smooth finish. -
Define the belly:
Use a rib on the outside while pushing from the inside to perfect that smooth, continuous curve. This full, rounded shape is key to the vessel’s character. -
Trim the excess:
Use a wood knife to undercut the base slightly, removing excess clay where it meets the wheel. Wire the pot off the wheel and set it aside until it is leather hard.
Leg Stability Tip
When attaching legs, make them slightly splayed outward rather than straight down. This wider stance adds visual balance and physical stability to the round form.
Step 2: Adding the Feet
-
Trim the bottom:
Once the pot is leather hard, flip it over. You can trim the bottom curve to make it rounder, ensuring it doesn’t look flat when sitting on its legs. -
Form the legs:
Roll three equal balls of soft clay. Hand-shape them into short, tapered cones. I like to tap the wide end on a table to flatten it for a good attachment surface. -
Mark placement:
Turn your pot upside down and divide the base into three equal sections (120 degrees apart). Mark lightly where each leg will go. -
Score and slip:
Aggressively score both the attachment spot on the pot and the flat top of each leg. Apply a generous amount of slip to both surfaces. -
Attach the legs:
Press the legs firmly onto the pot. Give them a little wiggle to lock the clay particles together. Use a modeling tool to blend the seams until they disappear completely. -
Check the level:
Flip the pot right-side up gently. If it wobbles, tap the pot gently on the table to level out the feet while the clay is still malleable. -
Smooth everything:
Run a damp sponge over the entire piece, especially around the leg attachments, to remove any rough fingerprints or tool marks.
Rustic Texture
Use a clay body with iron speckles or add grog. When the glaze melts, these dark specks will bleed through the turquoise for that organic, speckled look.
Step 3: Glazing and Firing
-
Bisque fire:
Allow the pot to dry completely (this may take a week). Fire it to bisque temperature (usually cone 04 or 06) to prepare it for glazing. -
Wax the feet:
Apply wax resist to the bottom of each foot. This prevents glaze from sticking to the kiln shelf during firing. -
Apply the glaze:
Dip the entire pot into a bucket of deep turquoise or teal glaze. Hold it for about 3 seconds to get an even coat. -
Clean the rim (optional):
If you want the raw clay accent shown in the image, lightly sponge the glaze off the very top edge of the rim. This creates a beautiful contrast. -
Final wipe:
Check the feet one last time to ensure no glaze is on the bottom. Wipe away any drips. -
Glaze fire:
Fire the piece to the maturity temperature of your clay and glaze (typically cone 5 or 6 for stoneware). Let the kiln cool naturally before unloading.
Once cooled, your tripod vessel stands ready to elevate your favorite herbs or simply look stunning on a shelf.
Tall-Neck Tripod Bud Vase
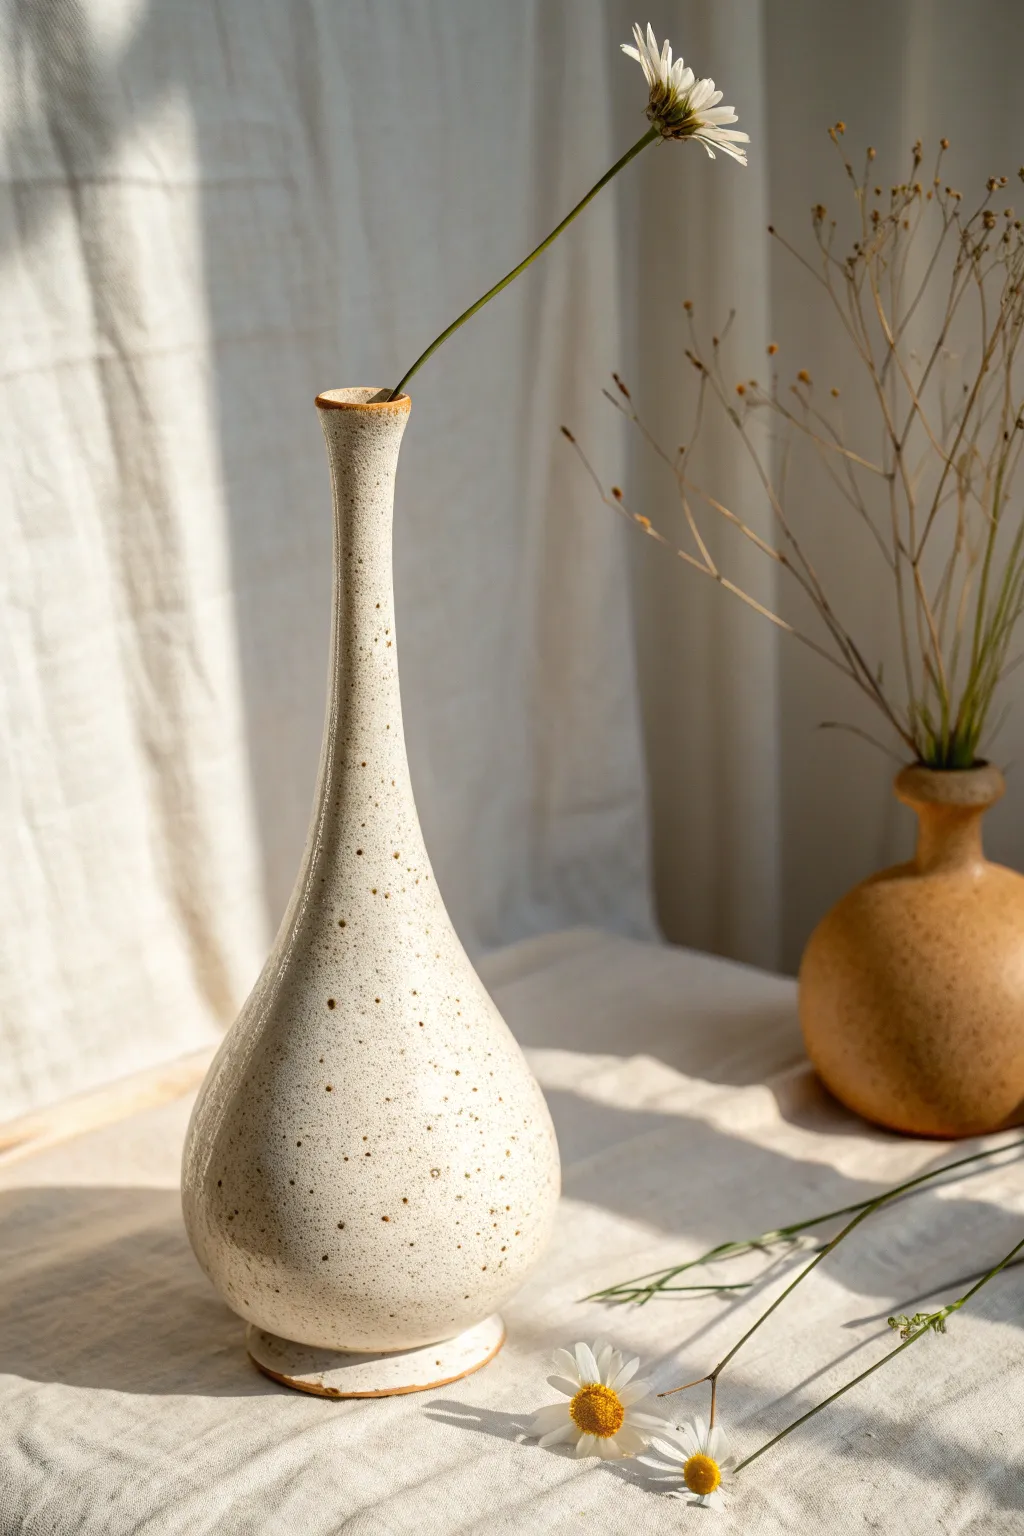
This elegant bud vase features a dramatic, slender neck rising from a voluptuous base, perfect for displaying a single wildflower. The piece is finished with a warm, speckled cream glaze that highlights the organic curves and distinct footed bottom.
Step-by-Step Guide
Materials
- Stoneware clay (smooth or slightly groggy)
- Pottery wheel
- Throwing tools (sponge, needle tool, wooden rib, metal kidney)
- Trimming tools (loop tools)
- Wire cutter
- Speckled cream glaze (cone 5/6 compatible)
- Kiln
- Small paintbrush (for wax resist)
- Wax resist emulsion
Step 1: Throwing the Form
-
Prepare the clay:
Begin by thoroughly wedging about 1.5 to 2 pounds of stoneware clay to ensure there are no air bubbles. -
Center and open:
Secure the clay on the wheel head and center it into a medium-height mound. Open the center, aiming for a narrow interior floor, but leave the floor slightly thicker than usual (about 1/2 to 3/4 inch) to accommodate trimming the foot later. -
Pull the cylinder:
Pull the walls up into a tall, narrow cylinder. Focus on keeping the base somewhat wide while tapering the clay inward as you move up. -
Shape the belly:
Using a rib on the inside and your hand on the outside, gently push the clay outward at the bottom third to create a rounded, bulbous belly. -
Collar the neck:
Begin collaring (squeezing) the upper two-thirds of the clay inward. Do this slowly in several passes to prevent the clay from buckling. -
Refine the neck shape:
As you collar, perform small pulls to lengthen the neck. You want a dramatic transition from the wide belly to a slender, vertical tube. -
Finish the rim:
Use a chamois or your fingertips to compress and smooth the rim, possibly flaring it out just a tiny fraction for a delicate lip. -
Cut and dry:
Wire the vase off the wheel head. Let it dry to a solid leather-hard state; the long neck needs to be stiff enough to handle being turned upside down.
Neck Torque Issues
If the long neck starts twisting or wrinkling during throwing, you are creating too much friction. Use more water and reduce wheel speed while pulling.
Step 2: Trimming and Adding Feet
-
Secure for trimming:
Center the leather-hard vase upside down on the wheel. You may need a ‘chum’ or a tall chuck to support the long neck safely so it doesn’t snap. -
Trim the base profile:
Trim away excess weight from the bottom of the belly to continue that smooth curve. Define a distinct foot ring area. -
Create the tripod effect:
Instead of a standard continuous ring, you can carve away sections of the foot ring to create three distinct ‘legs’ or simply trim a very deep under-cut to give it a floating appearance. If adding separate feet, score and slip three small clay balls onto the trimmed base. -
Smooth the surface:
Use a damp sponge or soft rib to burnish the surface, removing any trimming marks and smoothing the transition between the belly and the foot. -
Bisque fire:
Allow the piece to bone dry completely, which might take a few days due to the neck thickness. Fire to cone 04 (bisque).
Pro Tip: Avoid S-Cracks
Compress the bottom floor significantly during the opening step. This prevents ‘S-cracks’ in the base, which are common in tall, narrow forms like this.
Step 3: Glazing and Final Firing
-
Clean the bisque:
Wipe the bisque-fired vase with a damp sponge to remove any kiln dust ensuring the glaze adheres properly. -
Wax the feet:
Carefully apply wax resist to the bottom of the tripod feet (or foot ring) and slightly up the side of the foot to prevent sticking. -
Glaze the interior:
Pour the speckled cream glaze inside the vase, swirl it to coat the entire inner surface, and pour out the excess. I usually wait a few minutes here for the inside to dry before handling the outside. -
Dip the exterior:
Holding the vase by the foot (or using dipping tongs if the neck is too slick), dip the entire vase into the glaze bucket. Hold for 3 seconds for an even coat. -
Clean the rim:
If the rim glaze looks too thick, gently sponge it back slightly so the brown clay body peeks through, creating that burned rim effect seen in the photo. -
Surface check:
Check for any pinholes or drips. Rub any pinholes with a clean finger to smooth them over. -
Glaze fire:
Load into the kiln and fire to the glaze’s maturity temperature (likely cone 5 or 6). Allow the kiln to cool naturally.
Place a single stem in your new vase to admire the elegant silhouette you created

TRACK YOUR CERAMIC JOURNEY
Capture glaze tests, firing details, and creative progress—all in one simple printable. Make your projects easier to repeat and improve.
Wide-Rim Tripod Serving Dish
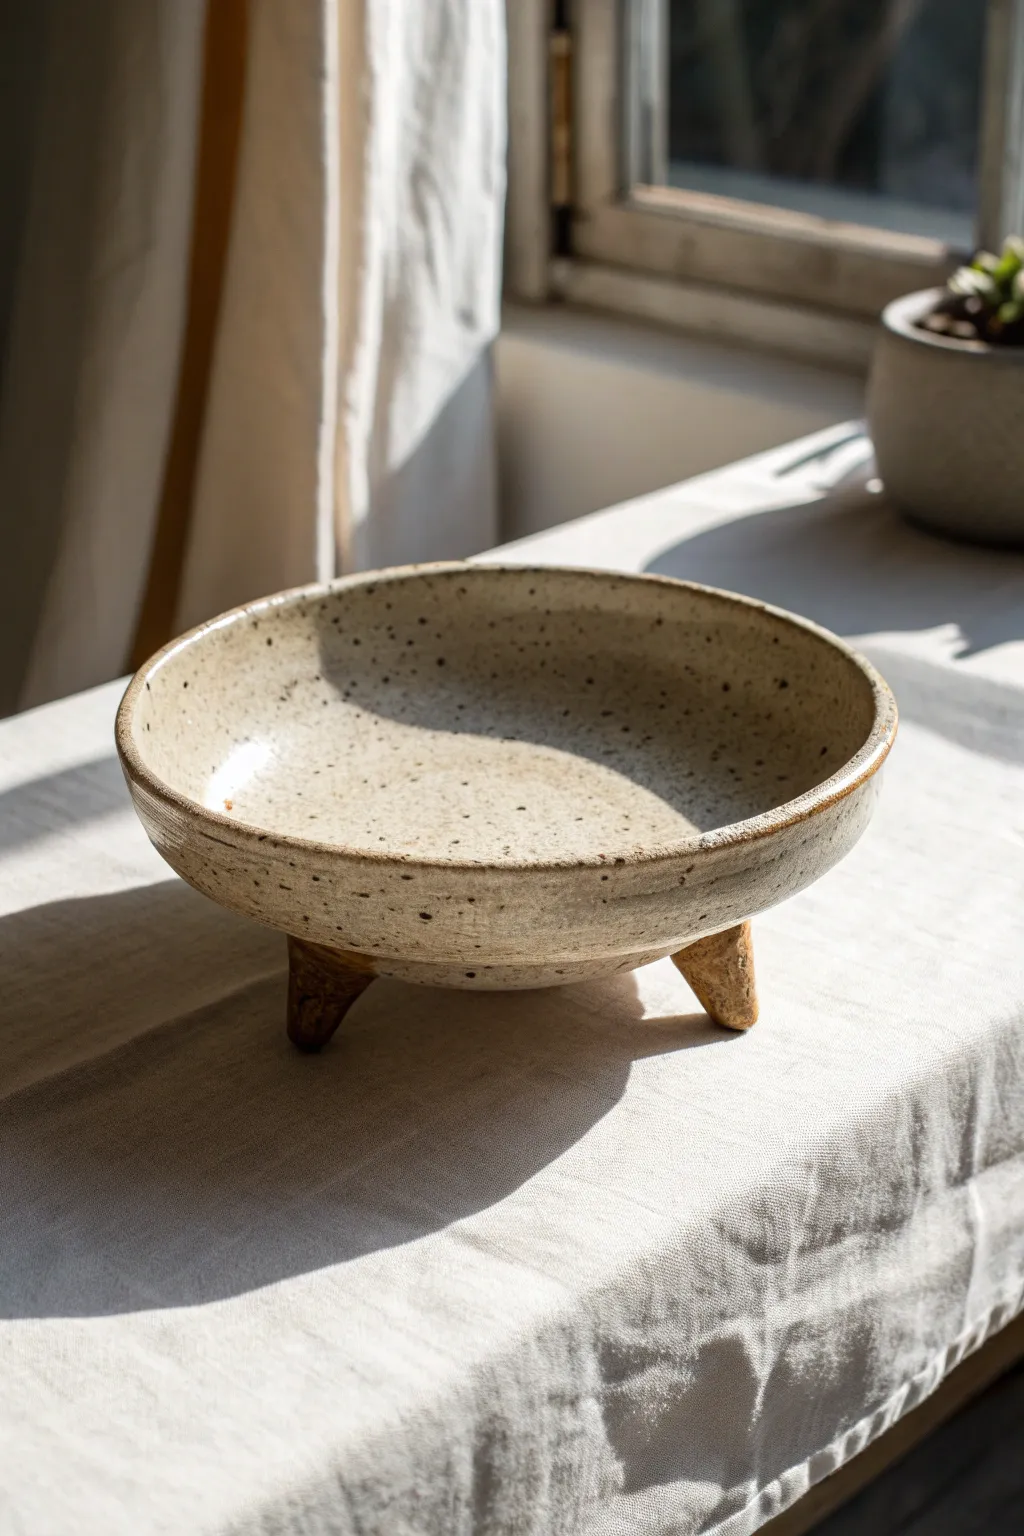
This rustic yet elegant serving dish features a wide, shallow bowl resting confidently on three sturdy legs. The charm lies in the speckled clay body showing through a simple glaze, giving it a timeless, organic feel perfect for centering any table.
Step-by-Step Tutorial
Materials
- Speckled stoneware clay (e.g., Lagunitas or similar)
- Pottery wheel (can also be hand-built using coils)
- Wooden throwing ribs
- Wire clay cutter
- Needle tool
- Sponge
- Trimming tools
- Scoring tool or serrated rib
- Slip (clay slurry)
- Transparent or semi-opaque glossy glaze
- Kiln
Step 1: Throwing the Bowl Form
-
Center the clay:
Start with about 2-3 pounds of speckled clay. Wedge it thoroughly to remove air pockets, then slap it onto the wheel head. Center the clay using steady pressure and medium wheel speed. -
Open the form:
Open the clay to a low, wide shape rather than a tall cylinder. Create a flat bottom inside that curves gently up into the walls, avoiding sharp corners. -
Pull the walls:
Pull the walls outward and upward. Aim for a wide, shallow curve. The rim should be slightly thicker than the body to prevent warping later. -
Shape the profile:
Use a wooden rib on the interior to define a smooth, continuous curve. This compresses the clay and removes throwing lines for a cleaner look. -
Address the rim:
Compress the rim with a chamois or your finger. You want it rounded and distinct, slightly defined from the bowl’s body as seen in the reference. -
Wire off:
Run a wire tool under the base to separate it from the wheel head. Leave it on the bat until it reaches a leather-hard state.
Wobbly Bowl?
If the bowl rocks after attaching legs, place it right-side up on a flat board. Place a secondary board on top of the rim and press down gently to level all three feet at once.
Step 2: Creating the Tripod Legs
-
Roll coils:
While the bowl dries, roll out a thick coil of the same clay, roughly 1 inch in diameter. -
Cut leg segments:
Cut three equal segments from the coil, each about 1.5 to 2 inches long. Taper one end slightly to create the ‘foot’ that touches the table. -
Angle the connection:
On the wider end of each leg, cut a slight angle. This slant will match the curve of the bowl’s exterior, allowing the legs to flare outward slightly for stability.
Step 3: Assembly and Finishing
-
Trim the bowl:
Once leather-hard, center the bowl upside down on the wheel. Trim the bottom to a smooth curve, removing excess weight but keeping the wall thickness consistent. -
Mark leg placement:
While the bowl is inverted, divide the base into three equal sections. I like to use a specifically designed divider tool for precision here. -
Score and slip:
Thoroughly score the attachment points on the bowl and the angled tops of the legs. Apply a generous amount of slip to both surfaces. -
Attach the feet:
Press the legs firmly onto the marked spots. Wiggle them slightly to create a vacuum seal and ensure no air is trapped between the joints. -
Blend the seams:
Using a modeling tool or your finger, smooth the clay from the leg onto the bowl body. The transition should be seamless and strong. -
Check for level:
Flip the bowl over gently. If it wobbles, lightly tap the high points or press down gently on the rim until all three feet sit flush on the table.
Level Up: Texture
Before the clay dries, gently sponge away a thin layer of surface clay. This exposes more of the ‘grog’ or sand, enhancing the rustic, speckled texture after firing.
Step 4: Glazing and Firing
-
Bisque fire:
Allow the piece to dry completely slowly to prevent cracking at the thick joints. Fire to Cone 04 (or your clay’s bisque temperature). -
Wax the feet:
Apply wax resist to the bottom of the three feet to prevent them from fusing to the kiln shelf. -
Apply glaze:
Dip or pour a transparent or light beige glaze over the entire piece. The goal is to let the iron speckles from the clay body show through. -
Clean up:
Wipe back any glaze drips near the feet with a damp sponge. -
Glaze fire:
Fire the vessel to the maturation temperature of your clay choice (typically Cone 5 or 6 for stoneware) and let cool naturally.
Now you have a stunning, elevated serving vessel ready to hold fruit or stand alone as a sculptural centerpiece
Lobed Base Where the Body Becomes the Legs
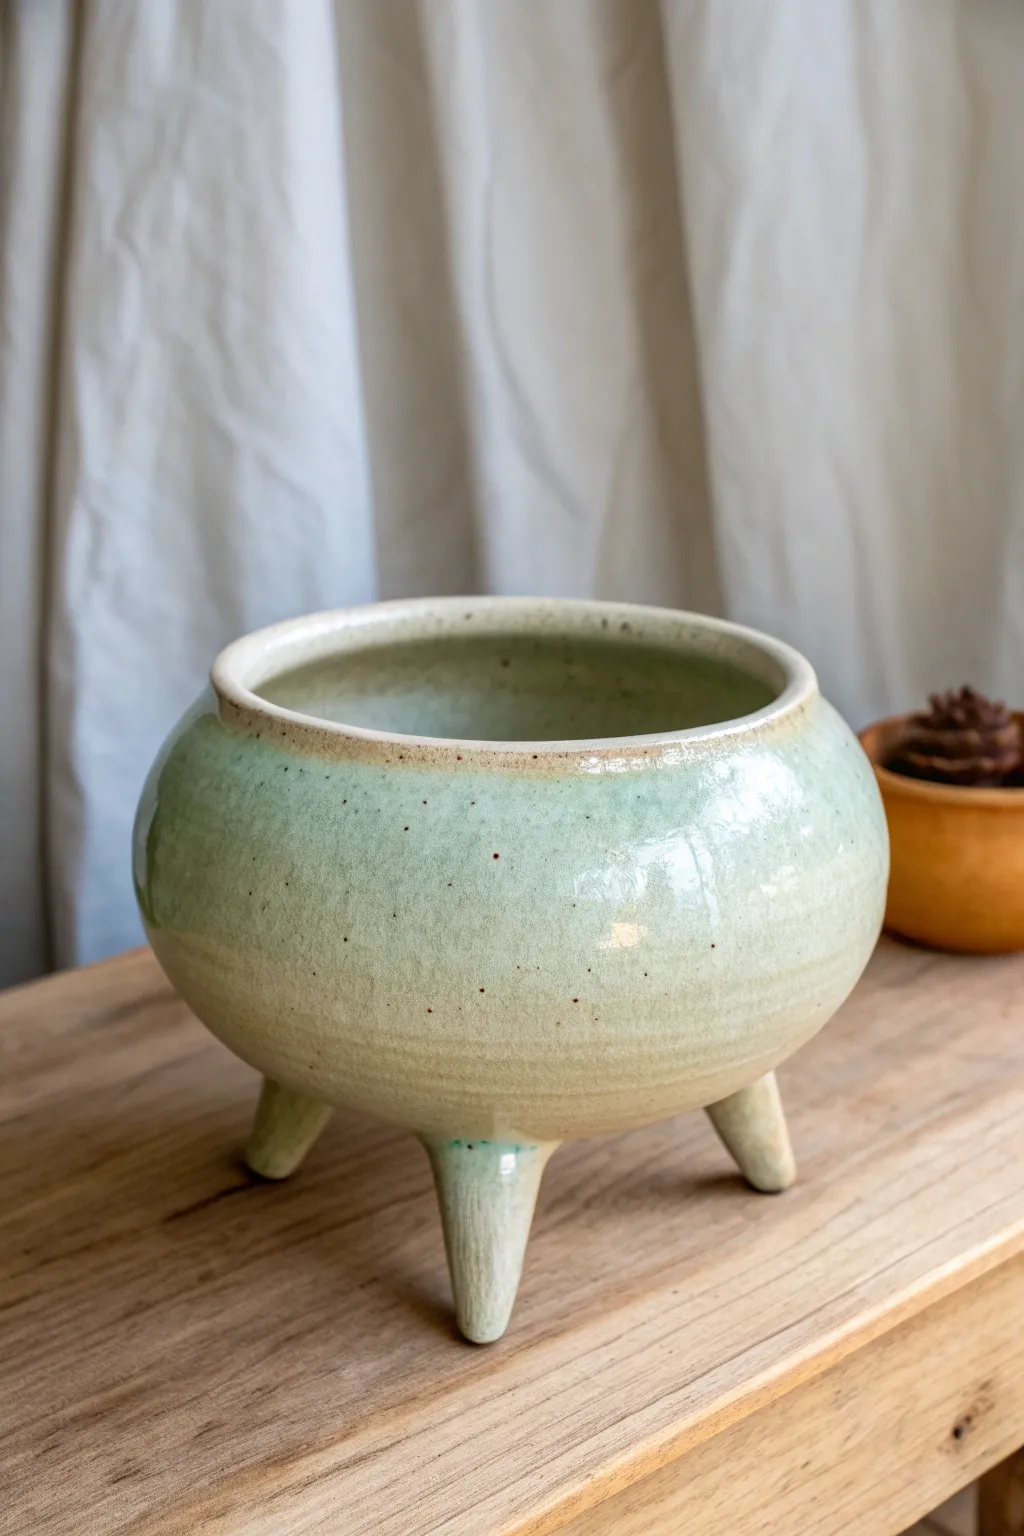
This charming ceramic vessel features a gentle, rounded form supported by three sturdy legs that flow seamlessly from the base. The soft sage green glaze with subtle speckling gives it an organic, earthy feel perfect for holding succulents or small treasures.
Step-by-Step
Materials
- High-fire stoneware clay (light or white body)
- Pottery wheel (optional, can be pinch/coil built)
- Rib tools (metal and rubber)
- Needle tool
- Sponge
- Wire cutter
- Scoring tool (or serrated rib)
- Slip (clay mixed with water)
- Sage green speckled cone 6 glaze
- Small paintbrush for touch-ups
- Kiln access
Step 1: Forming the Body
-
Prepare the Clay:
Start by wedging about 2-3 pounds of stoneware clay to remove air bubbles. This ensures the walls will throw or pull evenly without weak spots. -
Throw the Primary Form:
Center the clay on the wheel and open it up. Shape a rounded, bowl-like form with a slightly narrower rim than the belly. If you are handbuilding, build a pinch pot base and add coils to achieve the height, smoothing as you go. -
Refine the Curve:
Use a flexible metal rib on the outside and your hand on the inside to push the belly out, creating that nice voluminous curve shown in the image. -
Finish the Rim:
Compress the rim with a chamois or sponge. Create a slight inward bevel or a distinct lip, as this adds visual weight to the opening. Cut the pot from the bat with a wire tool. -
Initial Drying:
Let the rounded body dry to a soft leather-hard stage. It needs to be firm enough to handle without deforming but soft enough to attach legs.
Use a Template
Make a paper template for leg placement. Divide a circle into thirds on paper, place your pot upside down on it, and mark where the legs go for perfect symmetry.
Step 2: Creating and Attaching Legs
-
Shape the Legs:
Take three equal balls of fresh clay. Roll them into thick, tapered coils that resemble blunt carrots. These will be your tripod legs. -
Match the Curve:
Gently curve the top of each leg component so it will cup against the rounded bottom of your pot. I find holding the leg against the pot early helps visualize the fit. -
Determine Placement:
Turn your pot upside down. Mark three equidistant points on the base, forming a triangle. This ensures stability. -
Score and Slip:
Aggressively score the attachment points on both the pot base and the tops of the legs. Apply a generous amount of slip to both surfaces. -
Attach the Legs:
Press the legs firmly onto the marks. Wiggle them slightly to create suction and ensure a solid bond. -
Smooth the Transition:
Use a modeling tool or your finger to blend the clay from the leg onto the body. The goal is a seamless transition where the body looks like it’s flowing into the legs. -
Level the Pot:
Flip the pot right-side up. Gently tap it on a flat board to level the feet. If one leg is too long, press it down slightly until the vessel sits evenly without wobbling.
Step 3: Bisque and Glaze
-
Dry Slowly:
Cover the pot loosely with plastic to let it dry slowly. Uneven drying between the thick legs and thin walls can cause cracks. -
Bisque Fire:
Once bone dry, fire the piece to bisque temperature (usually Cone 04) to prepare it for glazing. -
Clean the Surface:
Wipe the bisque ware with a damp sponge to remove any dust, which can cause glaze defects. -
Apply Glaze:
Dip the pot into a sage green speckled glaze, or brush on 2-3 even coats. Ensure the glaze breaks slightly brown over the rim, which adds definition. -
Wipe the Feet:
Carefully wipe the glaze off the bottom of the three feet with a damp sponge. Any glaze left here will fuse the pot to the kiln shelf. -
Final Firing:
Fire the piece to maturity (Cone 6 for most stoneware). Allow the kiln to cool naturally before removing your finished tripod vessel.
Fixing a Wobbly Pot
If the pot wobbles after attaching legs, don’t squish the legs. Instead, gently tap the pot on a flat table while the clay is still soft to level the feet instantly.
Once the kiln cools, you will have a sturdy, elegant vessel ready to elevate your favorite houseplant
Three Sculpted Legs With Matching Belly Curves
This charming vessel features a generous rounded belly resting on three elegantly tapered feet, creating a playful yet modern silhouette. The speckled clay body and matte finish give it an organic, earthy feel perfect for showcasing your favorite houseplants.
Step-by-Step Tutorial
Materials
- Speckled stoneware clay (approx. 3-4 lbs)
- Pottery wheel
- Throwing tools (sponge, metal rib, wooden rib)
- Wire cutter
- Needle tool
- Calipers (optional but helpful)
- Scoring tool or serrated rib
- Slip
- Board for drying
- Clear matte glaze (stoneware temperature)
Step 1: Throwing the Body
-
Center the clay:
Start with a well-wedged ball of speckled stoneware clay. Secure it to the wheel head and center it using firm pressure, ensuring the mound is stable and symmetrical. -
Open and widen:
Open the centered clay down to the base, leaving roughly 1/2 inch of thickness at the bottom. Pull the floor out wide to establish the generous width of the pot’s belly right from the start. -
Pull the walls:
Begin pulling the walls upward. Instead of pulling straight up, guide the clay outward to create a voluminous, rounded form. Keep your pulls steady and slow to maintain even thickness. -
Collar the rim:
As you reach the top third of the pot, gently collar the clay inward to narrow the opening. This emphasizes the belly’s curve. Use a sponge to keep the rim compressed and sturdy. -
Refine the curve:
Use a flexible metal or wooden rib on the exterior while pushing gently from the inside to smooth the curve. Remove throwing lines if you want a clean look, or leave slight spiral ridges for texture as seen in the photo. -
Trim the rim:
Finish the rim by compressing it with a chamois or your sponge. Give it a slight outward flare or keep it rounded, depending on your preference. Cut the pot from the wheel and let it dry to a solid leather-hard state.
Wobbly Pot?
If the pot rocks after attaching legs, use a rasp or sanding screen on the dry feet before bisque firing to gently level them out flawlessly.
Step 2: Creating the Legs
-
Extrude or pull legs:
You can either pull thick handles to use as legs or roll out thick coils. For this tapered look, I prefer to hand-roll three thick coils of clay, about 4 inches long each. -
Shape the taper:
Roll each coil so it is thicker at the top (where it attaches) and tapers down to a narrower, rounded point at the bottom. Ensure all three are roughly the same length and thickness. -
Curve the profile:
Gently bend the legs slightly outward. This slight curve mimics the belly of the pot and adds stability to the finished stance. -
Dry the legs:
Let the shaped legs stiffen up until they are leather-hard, matching the moisture content of the main pot body. This creates the strongest bond.
Add Texture
Before drying, gently pat the exterior with a textured sponge or paddle to enhance the ‘stone-like’ surface feel before glazing.
Step 3: Assembly and Finish
-
Trim the pot:
Place your leather-hard pot upside down on the wheel. Trim away excess weight from the bottom, creating a smooth, rounded curve that will transition seamlessly into the legs. -
Mark leg positions:
While the pot is upside down, divide the base into three equal sections. Mark the attachment points lightly with your needle tool. -
Score and slip:
Aggressively score the marked areas on the pot and the thick ends of the legs. Apply a generous amount of slip to both surfaces. -
Attach the legs:
Press the legs firmly onto the pot. Wiggle them slightly to lock the clay particles together. Use a modeling tool to smooth the seam where the leg meets the pot body, blending the clay until the joint is invisible. -
Check for level:
Turn the pot right-side up gently. If it wobbles, tap the pot lightly on a flat board to level the feet while the clay is still slightly pliable. -
Bisque fire:
Allow the piece to dry slowly and completely to avoid cracks, especially at the leg joints. Fire to bisque temperature (usually cone 04 or 06). -
Glaze application:
Dip or brush a clear matte glaze over the interior and exterior to highlight the natural speckles of the clay body. Wipe the feet bottoms clean. -
Final firing:
Fire the vessel to the maturation temperature of your clay body (likely cone 6 or 10).
Once fired, this distinctive tripod vessel will be ready to elevate your favorite succulent or fern
Texture That Runs From Rim to Tripod Feet
This charming, three-legged vessel combines a sturdy, round body with delicate footing, giving it a playful cauldron-like appearance. The beauty lies in the speckled clay body that offers natural texture from the top rim all the way down to the toes of the tripod feet.
Step-by-Step
Materials
- Speckled clay body (stoneware recommended)
- Pottery wheel
- Throwing sponge
- Wooden throwing ribs
- Wire cutter
- Needle tool
- Scoring tool (serrated rib)
- Slip
- Trimming tools
Step 1: Throwing the Body
-
Center the clay:
Start with a softball-sized ball of speckled clay. Slam it onto the wheel head and center it using firm pressure, coning up and pressing down until the mass is perfectly smooth and stable. -
Open the form:
Drill your thumbs into the center to open the clay, leaving a slightly thicker floor than usual (about half an inch) since we won’t be trimming a foot ring as much as rounding the bottom later. -
Pull the walls:
Pull the walls upward to create a cylinder first. Aim for even thickness from bottom to top, keeping the rim slightly compressed to prevent wobbling. -
Shape the belly:
Using a rib on the inside and gentle pressure on the outside, push the clay outwards to create a rounded, bulbous belly. Allow the curve to start from the very bottom. -
Define the rim:
Collar the top inch of the clay inward slightly to create a subtle neck, then use a chamois or your sponge to round off the lip, making it smooth and defined. -
Cut and dry:
Run a wire underneath the pot to separate it from the wheel head. Let the pot dry to a leather-hard state; this is crucial so it can hold the weight of the legs later.
Step 2: Creating the Feet
-
Form the legs:
While the pot dries, roll out a thick coil of fresh clay. Cut three equal segments, roughly 2-3 inches long. -
Shape the cones:
Roll each segment into a tapered cone shape. The top should be thick enough to support the pot, tapering down to a blunt point. -
Check consistency:
Let these legs stiffen slightly until they match the moisture content (leather-hard) of the main pot body.
Even Drying Matters
Legs dry faster than bodies! Wrap just the legs in a small strip of plastic or wax resist the toes while the main body catches up to prevent cracks.
Step 3: Assembly & Finishing
-
Trim the base:
Place the main pot upside down on a foam bat or chuck. Trim the bottom into a smooth, continuous curve so it looks like a round sphere. -
Mark placement:
Divide the bottom of the pot into thirds. Mark three spots lightly with your needle tool where the legs will attach. -
Score and slip:
Aggressively score the attachment points on the pot and the thick ends of the clay legs. Apply generous slip to both surfaces. -
Attach the legs:
Press the legs firmly onto the pot. Give them a slight wiggle to lock the clay particles together and embrace the curve. -
Blend the seams:
Use a modeling tool or your finger to smooth the clay from the leg onto the body. I like to make this transition seamless so the legs look like they grew out of the pot. -
Level the pot:
Flip the pot right side up and gently tap it on a flat board to ensure all three feet sit level and the pot doesn’t rock. -
Clean up:
Wipe down any messy slip marks with a damp sponge, being careful not to wash away the natural speckles of the clay body. -
Final drying:
Dry the piece slowly under loose plastic to prevent the legs from drying faster than the body, which can cause cracking. -
Firing:
Bisque fire, apply a clear glaze or a simple matte wash to highlight the iron speckles, and glaze fire to cone 6 (or your clay’s specific temperature).
Go For Height
Exaggerate the leg length slightly during the shaping phase. The visual weight of the pot often makes short legs look stubby once assembled.
Once fired, this speckled planter is ready to elevate your favorite succulent or leafy green friend
Sprigged Tripod Vessel With Decorated Legs
This charming lidded vessel features a generous, rounded form resting on three sturdy feet, giving it a playful yet grounded presence. The surface is adorned with carved leafy vines and stamped accents, finished with a soft green celadon-style glaze that breaks beautifully over the textured clay.
Step-by-Step Guide
Materials
- Stoneware clay (smooth or lightly grogged)
- Pottery wheel
- Throwing tools (rib, sponge, wire cutter)
- Trimming tools
- SGRAFFITO or carving tool (small loop or needle)
- Small round texture stamp (or drill bit shank)
- Celadon or translucent green glaze
- Wax resist
- Kiln
Step 1: Throwing the Form
-
Center and open:
Start with about 2-3 lbs of clay. Center it on the wheel and open it up, leaving a floor that is slightly thicker than usual to support the eventual curve of the belly. -
Pull the walls:
Pull the walls into a cylinder first, keeping the rim slightly thicker. Slow your wheel speed as you begin to shape the clay outward. -
Shape the belly:
Use a rounded rib on the inside and a flexible metal rib on the outside to push the belly out into a spherical shape. Identify where the ‘shoulder’ will be and begin angling the clay inward. -
Form the gallery:
Collar the neck in. Use a wooden tool or your thumb to split the rim, creating a gallery (a small ledge) for the lid to sit on. Ensure this ledge is distinct and flat. -
Throw the lid:
Using a separate smaller ball of clay, throw a lid ‘off the hump’ or on a bat. Measure your gallery carefully with calipers first. Throw a small knob in the center of the lid for a handle.
Wobbly Tripod?
If the legs are uneven, place a piece of fine sandpaper on a flat surface. Gently rotate the dry pot’s feet on it until they are perfectly level.
Step 2: Trimming and Adding Feet
-
Trim the base:
Once leather hard, flip the pot onto a chuck or foam bat. Trim away excess weight from the bottom, mirroring the inside curve to create a rounded bottom rather than a flat foot ring. -
Create the tripod feet:
Roll a thick coil of clay and cut three equal cone-shaped segments. Shape them into sturdy, tapered legs. -
Attach the feet:
Score and slip the contact points on both the vessel bottom and the legs. I like to position them in a triangle formation. Press them firmly into place and smooth the seams completely. -
Level the pot:
Flip the pot right-side up and gently tap it on a flat board to ensure all three feet sit evenly and the vessel is level.
Step 3: Carving and Decoration
-
Define the borders:
Place the pot on a banding wheel. Use a carving tool to incise two horizontal parallel lines: one just below the neck and one near the bottom of the belly. -
Sketch the leaves:
Lightly trace vertical stems spaced evenly around the belly using a needle tool. Draw simplistic leaf shapes branching off these stems. -
Carve the relief:
Using a small loop tool, carve out the negative space within the leaves, or carve the outline deeply. The goal is to create recessions where glaze can pool. -
Add texture accents:
In the spaces between the leaf vines, press a small round tool (like the back of a drill bit) to create clusters of three or four dots. -
Refine the surface:
Gently sponge away any sharp clay burrs created by the carving. Smooth the transition between the carved area and the raw clay foot.
Variation: Mishima Inlay
Fill your carved lines with a dark underglaze, let it dry partially, then scrape the surface clean. This creates crisp, dark botanical drawings under the glaze.
Step 4: Glazing and Firing
-
Bisque fire:
Fire the vessel and lid to cone 04 (or your clay body’s bisque temperature). -
Wax resist:
Apply wax resist to the gallery ledge, the very bottom of the lid rim, and the bottom of the three feet. -
Apply glaze:
Dip or pour a translucent green or celadon glaze over the entire piece. This type of glaze highlights the texture by pooling darker in the carved lines and breaking lighter over edges. -
Wipe back (optional):
For a more rustic look, you can gently wipe the glaze off the lower section of the pot near the feet, leaving the raw speckled clay exposed. -
Glaze fire:
Fire the piece to maturity (Cone 5, 6, or 10 depending on your materials). Ensure the lid is fired separately or with alumina hydrate on the gallery to prevent sticking.
Once fired, you will have a delightful jar perfect for storing tea, sugar, or small treasures.
Glaze-Break Tripod for Dramatic Edge Highlights
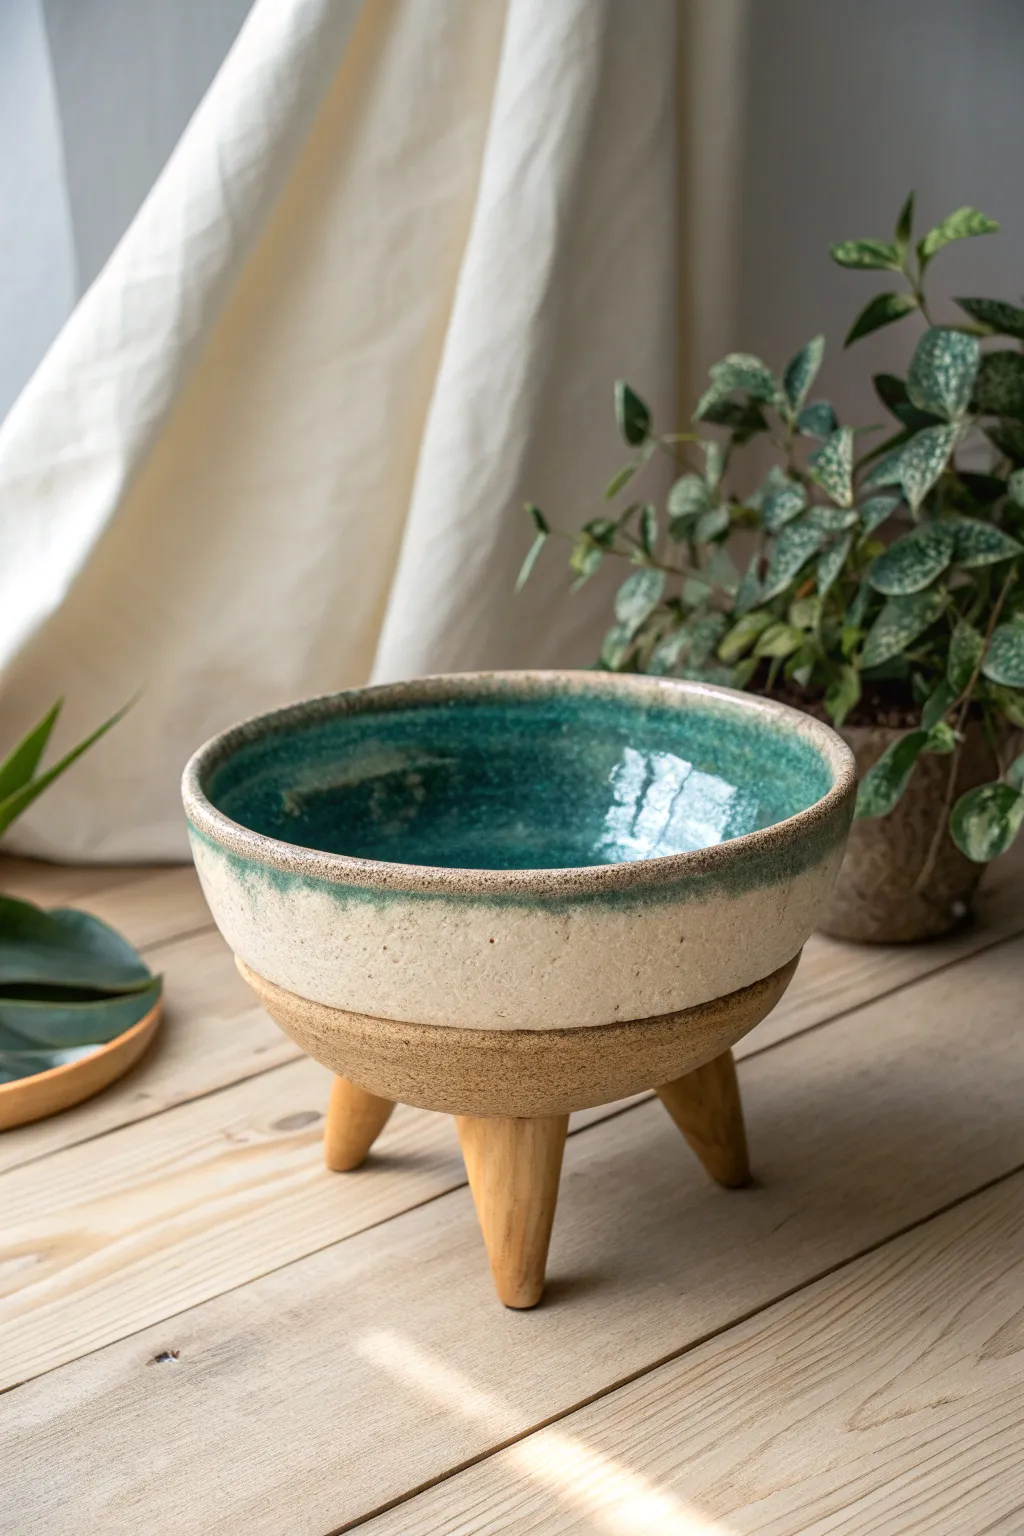
This stunning ceramic bowl combines rustic, unglazed textures with a vibrant, glossy teal interior that breaks beautifully over the rim. It sits atop three sturdy legs, elevating the piece both literally and aesthetically for a perfect centerpiece or planter.
How-To Guide
Materials
- High-fire stoneware clay (buff or speckled)
- Pottery wheel (or slab roller/hand-building tools)
- Throwing tools: sponge, ribs (metal and wood), cutoff wire
- Trimming tools: loop tools of various sizes
- Teal/Cyan high-fire reactive glaze
- Wax resist emulsion
- Paintbrush for wax
- Scoring tool and slip
- Kiln
Step 1: Throwing the Vessel Body
-
Center the clay:
Start with a ball of well-wedged clay (about 2-3 lbs) on the wheel head. Use water and firm pressure to center it perfectly before opening. -
Open the form:
Press your thumbs into the center and pull outwards to create the floor. Since this will be a bowl, aim for a gentle, continuous curve from the center to the walls rather than a flat bottom. -
Pull the walls:
Slowly pull the walls upward and outward. You want a generous, open bowl shape. Keep the rim slightly thick to support the structure and provide a nice edge for the glaze to break over later. -
Refine the curve:
Use a metal or rubber rib inside the bowl to smooth out throwing lines and ensure a perfect, continuous curve. This interior smoothness is crucial for the glossy glaze to shine. -
Finish the rim:
Compress the rim with a chamois or your finger. A slightly rounded rim works best for this glaze effect. -
Cut off:
Wire the pot off the wheel but leave it on the bat to firm up until leather hard.
Wobbly Legs?
If the legs warp during firing and the pot rocks, use wet-dry sandpaper or a diamond sanding pad to grind the bottom of the longest leg until the vessel sits flat.
Step 2: Creating and Attaching the Legs
-
Flip and trim:
Once leather hard, flip the bowl and trim the bottom. You want a rounded bottom here—don’t carve a traditional foot ring. Smooth the surface with a metal rib to erase trimming marks. -
Form the legs:
Roll out a thick coil of clay. Cut three equal segments, roughly 2-3 inches long. Taper them slightly so they are wider at the top attachment point and narrower at the feet. -
Shape the feet:
Tap the narrow end of each leg on the table to create a flat standing surface. Refine the shape so they look like sturdy wooden pegs. -
Mark attachment points:
Turn the bowl upside down. Mark three equidistant points on the rounded bottom. I like to use a compass or a simple paper template to ensure they form a perfect equilateral triangle. -
Score and slip:
Aggressively score the attachment points on the bowl and the tops of the three legs. Apply a generous amount of slip to both surfaces. -
Attach the legs:
Press the legs firmly onto the bowl. Wiggle them slightly to lock the clay particles together. Use a modeling tool to smooth the seam where the leg meets the bowl, blending the clay for a seamless transition. -
Check for level:
Flip the bowl right-side up carefully. Press gently to ensure all three legs touch the surface evenly. If it wobbles, tap the high leg down slightly until it sits stable. -
Dry slowly:
This is critical. Cover the bowl loosely with plastic to let the legs and bowl dry at the same rate. Uneven drying will cause cracks at the joints. Bisque fire once bone dry.
Pro Tip: Better Bonding
When attaching the legs, add a tiny coil of soft clay around the seam before smoothing it out. This reinforcement prevents separation cracks as the thick legs dry.
Step 3: Glazing technique
-
Clean the bisque:
Wipe the bisqueware with a damp sponge to remove any dust. Let it dry for a few minutes. -
Apply wax resist:
Paint wax resist over the entire exterior of the bowl, starting about 1/2 inch below the rim. Cover the bottom curve and the legs completely. This ensures the raw clay texture remains visible on the lower half. -
Pour the interior:
Pour your teal reactive glaze into the bowl. Swirl it around quickly to coat the entire interior surface, then pour the excess out. Check for drips and clean the rim. -
Dip the rim:
Hold the bowl by the foot/legs and dip just the top rim into the glaze bucket. Lower it until the glaze overlaps the wax line slightly. The wax will repel the glaze, creating an organic, wavy line. -
Clean up:
Use a damp sponge to wipe any stray beads of glaze off the waxed exterior areas. The wax resists well, but small droplets often sit on top. -
Fire:
Load into the kiln and glaze fire to the temperature appropriate for your clay and glaze (usually Cone 6 or 10).
Once cooled, the contrast between the rough, warm clay and the cool, glass-like interior creates a piece you’ll want to touch as much as look at
Creature-Like Tripod Cauldron With Attitude
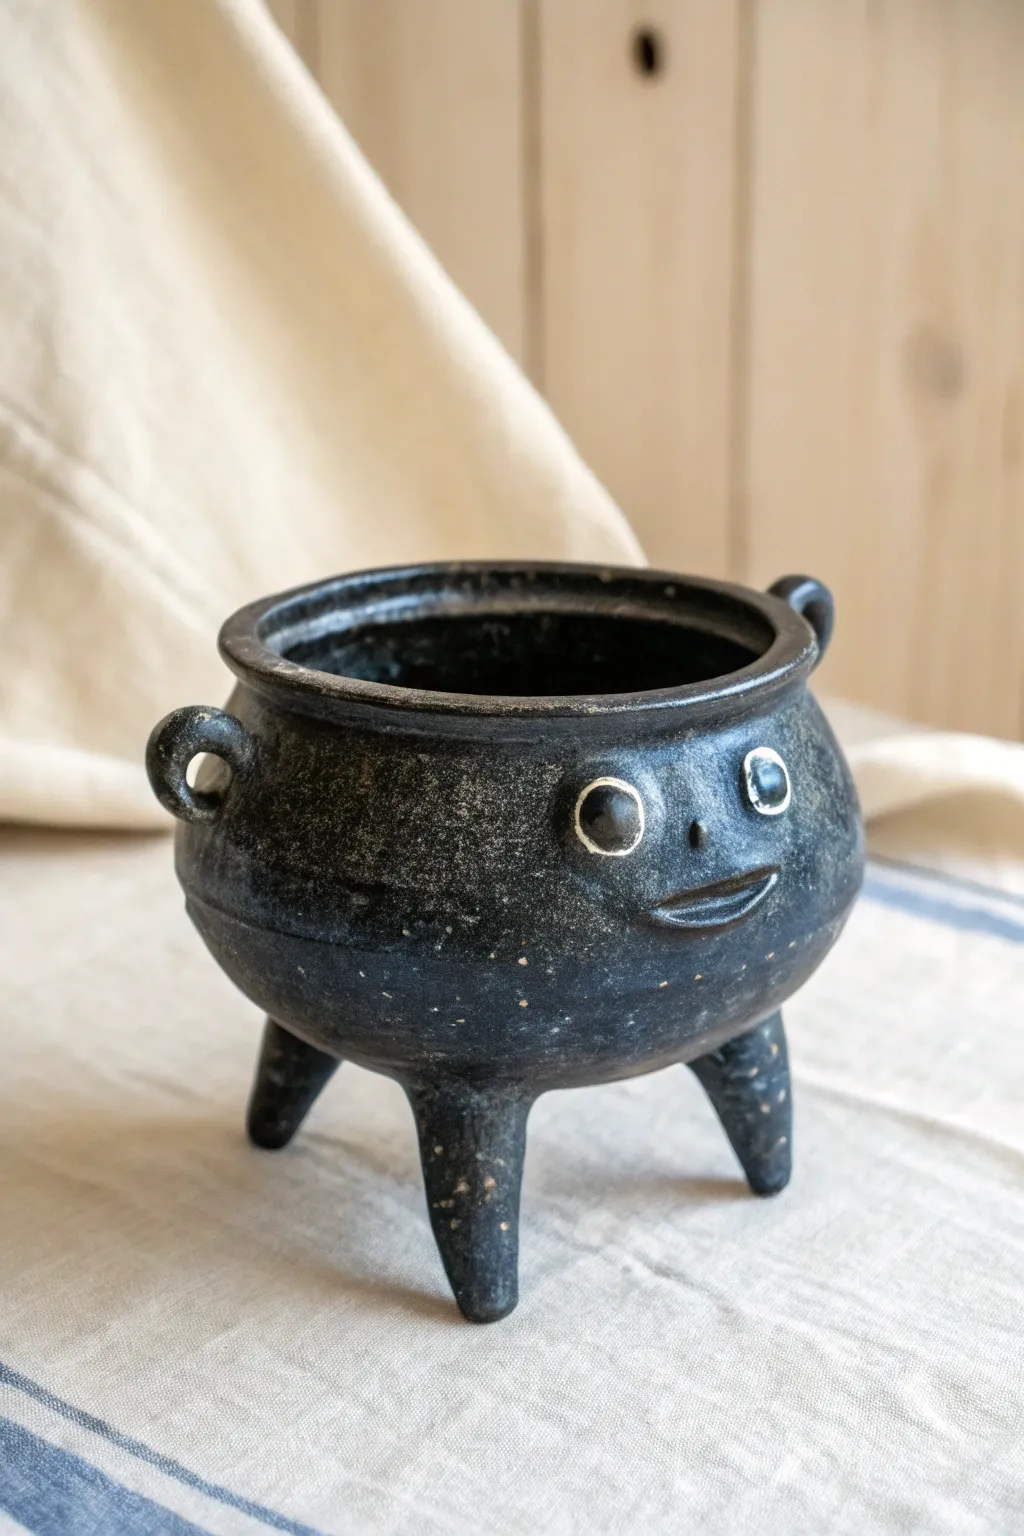
This whimsical little project combines the ancient form of a tripod vessel with a cheeky modern personality. It features a speckled black clay body, stubby legs, and a face that looks like it’s just heard a good joke.
Detailed Instructions
Materials
- Black stoneware clay (preferably with grog/speckles)
- Pottery wheel (or hand-building tools if pinching)
- Needle tool
- Loop trimming tool
- Sponge
- White underglaze or slip
- Small detail brush
- Clear matte glaze (optional)
- Scoring tool
- Kiln
Step 1: Forming the Body
-
Throw the base shape:
Start by throwing a small, round-bellied bowl on the wheel. You want a form that curves inward slightly at the top to create a rim, similar to a classic cauldron shape. -
Define the rim:
Using a rib or your fingers, shape a distinct, rolled rim. This gives the creature a finished look and adds structural integrity to the opening. -
Trim the base:
Once the pot is leather hard, trim the bottom to be rounded rather than flat. You don’t need a foot ring since we will be adding legs.
Oops, he’s wobbling
If the legs dried unevenly and it rocks, carefully sand the bottom of the longest leg on a flat surface using sandpaper before the final firing.
Step 2: Adding the Appendages
-
Roll out the legs:
Roll three equal coils of clay for the legs. They should be thick at the top and taper down to a blunt point, roughly 2-3 inches long. -
Attach the legs:
Flip your bowl upside down. Score and slip the three attachment points on the round bottom. Press the legs on firmly, smoothing the clay so the transition is seamless. -
Check the stance:
Turn the pot right-side up and gently press it down to ensure it stands level. I like to let this stiffen up for an hour so the legs don’t sag under the weight. -
Make the handles:
Roll two very small, thin coils. Loop them into tiny ‘C’ shapes to act as the cauldron’s ears or handles. -
Attach handles:
Score and slip the sides of the vessel just below the rim. Attach the small loops securely.
Step 3: Sculpting the Personality
-
Position the eyes:
Decide where the face will go. Roll two small balls of clay for the eyes and flatten them slightly against the vessel wall using slip to adhere them. -
Refine the eyes:
Use a modeling tool to smooth the edges of the eye discs into the body so they look integrated, not just stuck on. -
Add the nose:
Place a very tiny dot of clay between the eyes for the nose. Don’t overwork it; a simple bump works best here. -
Carve the mouth:
Using a needle tool or a small wire loop, carefully carve a wide, slightly crooked smile. Deepen the line to ensure glaze doesn’t fill it in later. -
Sculpt the lips:
Gently press around the carved mouth line to create a slight ridge, giving the impression of lips.
Make it a planter
Before attaching legs, punch a small hole in the very bottom center of the bowl for drainage so your creature can grow a wacky green hairstyle.
Step 4: Finishing Touches
-
Bisque fire:
Let the piece dry completely (slowly is better to prevent leg cracks) and bisque fire it to cone 04 or your clay’s specification. -
Paint the eyes:
Using a small brush, carefully paint the raised eye discs with white underglaze. Leave the pupil area unpainted to let the black clay show through. -
Highlighting details:
If you want the mouth to pop, you can wash a thin layer of white underglaze into the crevice and wipe away the excess. -
Final glaze fire:
Apply a clear matte glaze if you want to seal the surface, or leave the exterior unglazed if your clay body is vitrified and you prefer the raw stone texture. Fire to maturity (likely cone 5/6 or 10).
Now you have a charming little ceramic void ready to hold your trinkets or treasures
Cutout Window Tripod Vessel With Negative Space
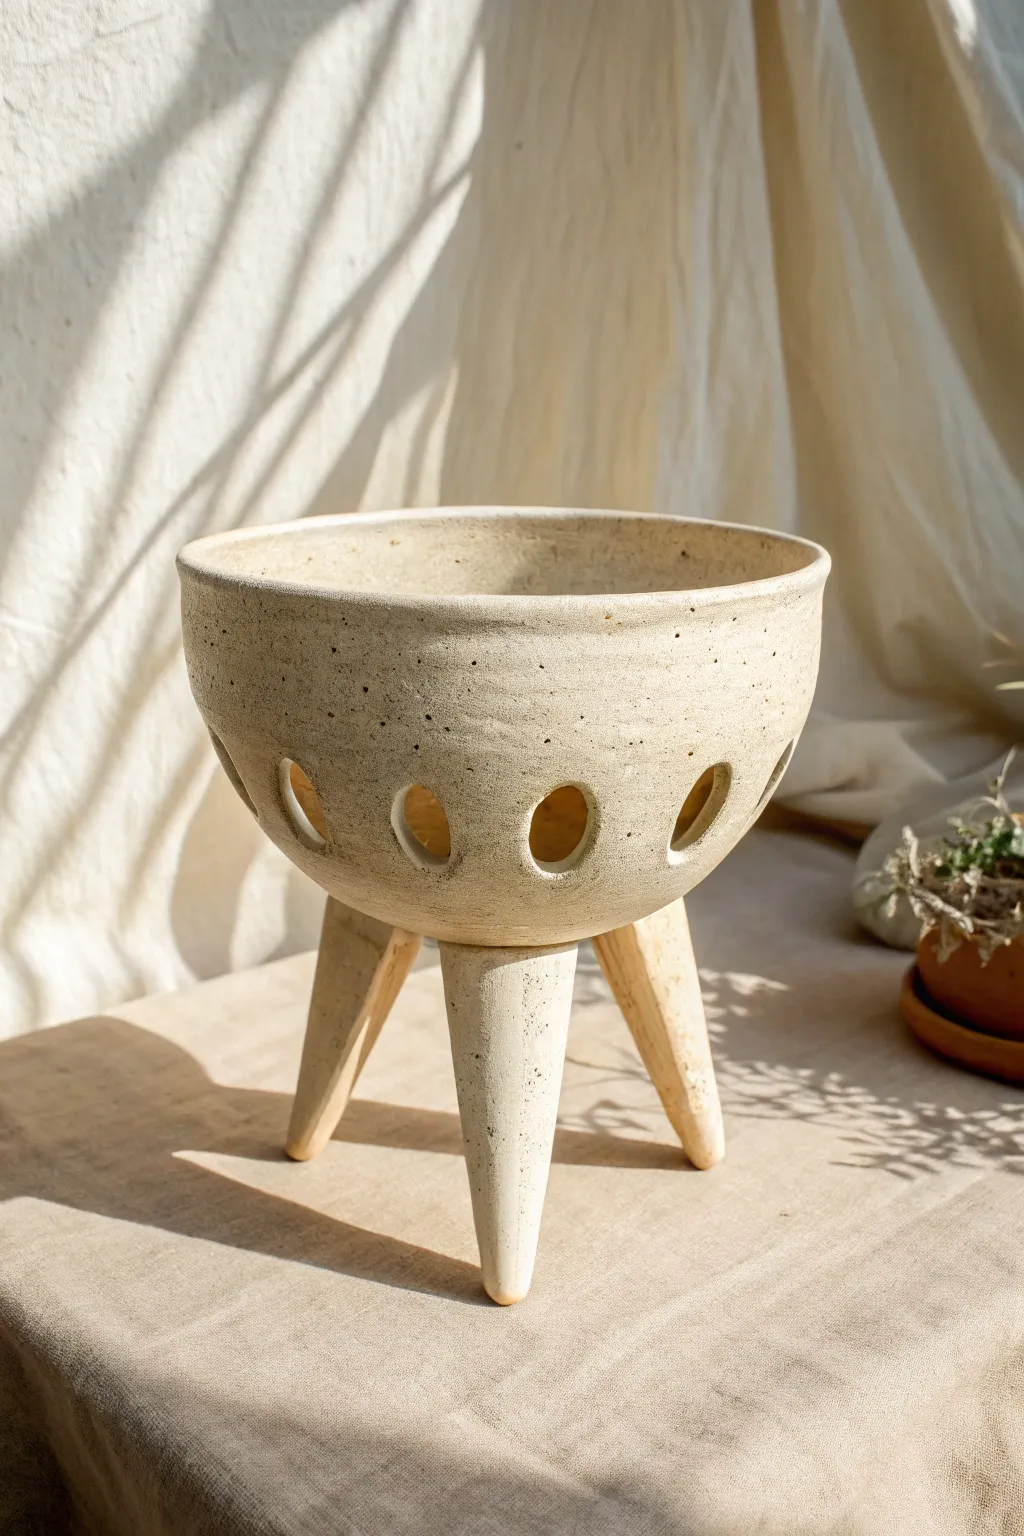
This earthy, tripod-style vessel combines a classic bowl form with playful negative space, perfect for holding air plants or acting as a sculptural fruit bowl. The speckled clay body and matte finish give it a warm, organic feel that highlights the beauty of raw ceramic material.
Step-by-Step
Materials
- Speckled stoneware clay (approx. 3-4 lbs)
- Pottery wheel (or rolling pin and canvas for hand-building)
- Needle tool
- Metal rib and wood rib
- Circular hole cutter or small cookie cutter (approx 1-inch diameter)
- Sponge
- Scoring tool or serrated rib
- Slip (clay mixed with water)
- Matte transparent or white glaze
- fettling knife
- Calipers (optional)
Step 1: Throwing the Bowl
-
Center and open:
Begin with about 2-3 lbs of wedged speckled clay. Center it firmly on the wheel head and open the clay up, aiming for a wider floor rather than a deep cylinder. -
Pull the walls:
Pull the walls upward and outward to create a gentle, rounded bowl shape. Keep the rim slightly thick to support the structure, as you’ll be cutting into the walls later. -
Refine the curve:
Use a wooden rib on the inside and a metal rib on the outside to refine the curve. Smooth out any throwing lines if you prefer a cleaner look, though leaving slight ridges adds organic character. -
Check the thickness:
Ensure the bottom is trimmed or thrown to an even thickness, as you will be attaching legs later. It shouldn’t be too heavy. -
Wire off:
Wire the bowl off the wheel head but leave it on the bat to firm up until it reaches a soft leather-hard stage.
Supporting the Belly
When cutting holes, place a foam cushion or soft towel inside the bowl. This supports the wall against the pressure of the cutter so the spherical shape doesn’t collapse.
Step 2: Creating the Legs
-
Pull or roll coils:
While the bowl dries, create three thick coils for the legs. You can pull these like handles for a tapered look or roll distinct tapered cones by hand. -
Shape the legs:
The legs should be thick at the top (attachment point) and taper to a rounded point at the bottom. Aim for about 3-4 inches in length. -
Check consistency:
Make sure all three legs are roughly the same length and thickness. I like to stand them up next to each other to visually verify their height. -
Curve slightly:
Give the legs a very subtle outward curve if you want them to splay slightly, or keep them straight for a more vertical stance.
Step 3: Assembly and Cutouts
-
Trimming the bowl:
Once leather-hard, flip the bowl over. Trim the bottom to be rounded and smooth; you don’t need a traditional foot ring since we are adding legs. -
Mark leg positions:
Divide the bottom of the bowl into three equal sections. Mark the attachment points for the legs clearly with your needle tool. -
Score and slip:
Aggressively score the attachment points on both the bowl and the tops of the legs. apply a generous amount of slip. -
Attach the legs:
Press the legs firmly onto the bowl. Use a modeling tool handle or your finger to smooth the clay from the leg onto the bowl, blending the seam completely so it looks like one piece. -
Leveling:
Flip the vessel upright gently. Gently press down to ensure all three legs touch the surface evenly and the rim is level. -
Plan the windows:
Measure a consistent height around the belly of the bowl where you want your windows. Mark even spacing for the holes; about 1-2 inches apart works well. -
Cut the holes:
Use a circular hole cutter or a sharp knife to carefully remove the clay circles. Support the wall from the inside with one hand while cutting to prevent warping. -
Clean the edges:
Once the clay is slightly stiffer, use a damp sponge or a finger to smooth the sharp edges of the cutouts. This creates a professional, finished look. -
Final drying:
Cover the piece loosely with plastic to let it dry slowly. This is crucial to prevent the legs from cracking at the uncontrolled join.
Wobbly Legs?
If the pot wobbles after attaching legs, gently tap the whole piece on a flat board while the clay is still soft. This naturally levels the feet.
Step 4: Glazing
-
Bisque fire:
Fire the piece to cone 04 (or your clay’s bisque temperature). -
Wax the feet:
Apply wax resist to the bottom tips of the three legs to prevent them from sticking to the kiln shelf. -
Apply glaze:
Dip the entire piece into a matte transparent or satin white glaze. A translucent glaze is best to let the clay’s natural speckles show through. -
Check the holes:
Ensure glaze hasn’t pooled thickly inside the cutout windows. If it has, wipe the excess away with a small brush or finger. -
Final fire:
Fire to the clay’s maturity temperature (likely Cone 6 or 10 depending on your stoneware).
Now you have a stunning, architectural piece ready to display your favorite trailing plant or stand alone as a centerpiece