
Turtles are one of those clay projects that somehow work at every skill level, from your first little pinch-shape to a more detailed mini sculpture. Here are my favorite turtle clay ideas that play with shell patterns, cute expressions, and a few unexpected twists while still staying totally doable.
Classic Cute Turtle Figurine (Round Shell, Sweet Face)
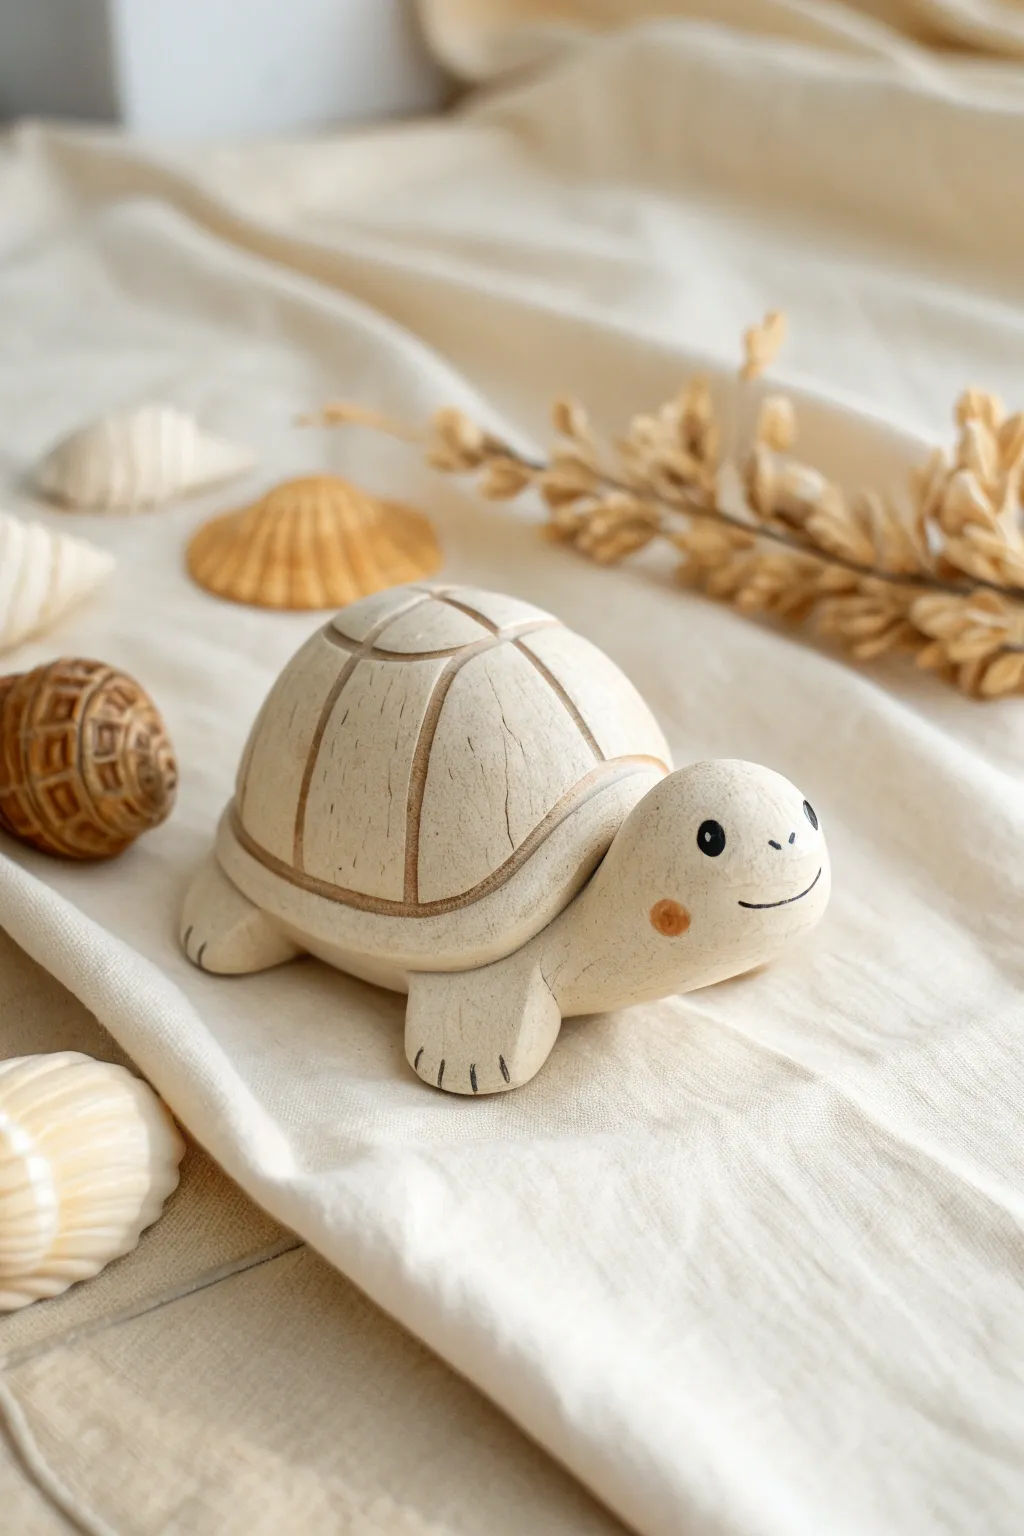
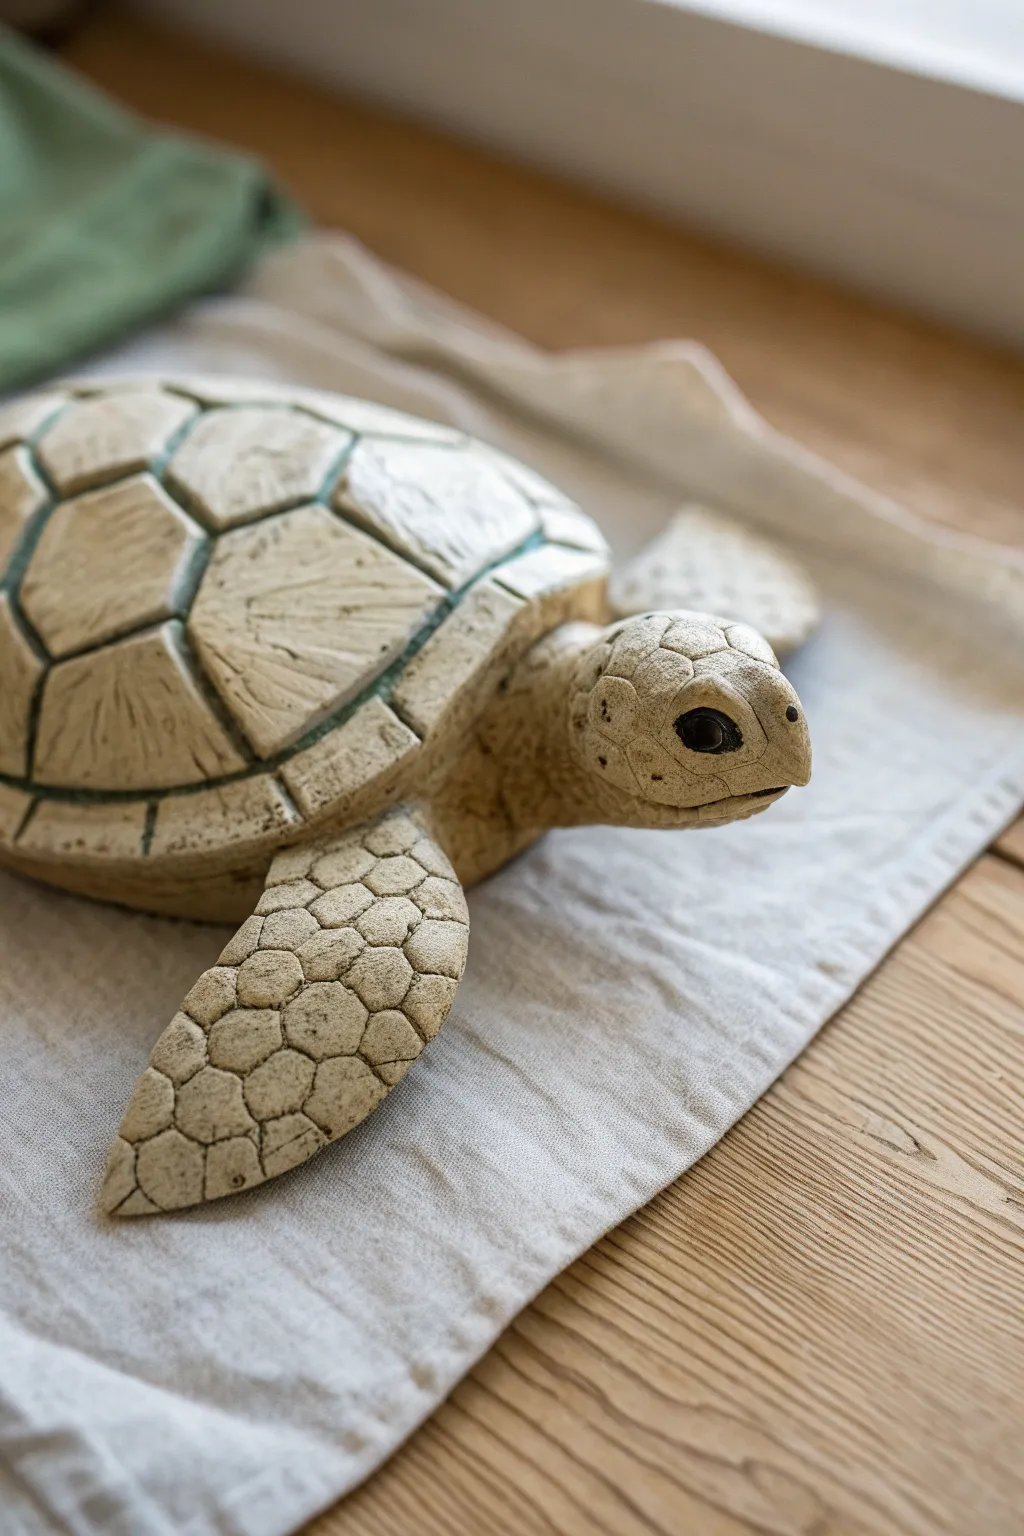
This minimalist turtle figurine captures hearts with its smooth, round shell and gentle expression. Using light-colored clay and subtle scoring techniques, you can create a timeless piece that evokes the feel of carved wood or weathered stone.
Detailed Instructions
Materials
- Air-dry clay (stone or wood color, or white)
- Acrylic paint (cream, white, light beige)
- Black fine-point marker or paint pen
- Burnt orange acrylic paint or blush powder
- Sculpting tools (needle tool, smooth modeling tool)
- Sponge or fine-grit sandpaper
- Water
- Matte sealant or varnish
Step 1: Shaping the Base
-
Form the shell:
Begin with a large ball of clay slightly smaller than a tennis ball. Roll it until it is perfectly smooth, then gently press it onto your work surface to create a dome shape. I like to keep the dome quite high and rounded for that classic look. -
Smooth the surface:
Dip your finger in a little water and buff the surface of the shell until any cracks or fingerprints disappear completely. -
Create the head:
Roll a smaller ball of clay for the head. Shape it into a slightly elongated teardrop, but keep the nose rounded and blunt rather than pointy. -
Attach the head:
Score the underside of the head and the front of the shell where they will meet. Apply a dab of water or slip, press the pieces together, and use a modeling tool to blend the clay at the seam underneath so it’s secure.
Step 2: Adding Limbs and Details
-
Make the flippers:
Create four small, equal-sized balls of clay. Flatten them slightly into rounded, paddle-like shapes. The front flippers can be slightly larger than the back ones if you prefer. -
Attach the limbs:
Position the flippers under the edge of the shell. Blend the clay from the top of the flipper into the underside of the shell body so they look unified. -
Define the shell rim:
Use a needle tool or knife to gently score a horizontal line all the way around the base of the shell, about a quarter-inch from the bottom. This creates the ‘rim’ effect seen in the photo. -
Carve the shell pattern:
carefully carve vertical curved lines starting from the top center of the dome down to the rim. Then, add horizontal curved lines intersecting them to create the classic tortoise-shell segment pattern. Keep the lines relatively deep as paint will fill them later. -
Add toe details:
Use your needle tool to press three small indents into the end of each flipper to suggest toes.
Cracks in the Shell?
If hairline cracks appear while drying, don’t panic. Mix a tiny bit of fresh clay with water to make a paste (slip) and fill the cracks, then sand smooth once dry.
Step 3: Surface & Painting
-
Initial drying:
Allow the sculpted turtle to dry until it is leather-hard. This usually takes a few hours depending on your clay type. -
Refining texture:
Once partially dry, you can gently texturize the surface. Lightly drag a dry sponge or stiff brush over the clay to give it a slightly organic, matte texture rather than a perfectly polished plastic look. -
Full dry:
Let the piece dry completely, usually 24-48 hours. If you want a super smooth finish, sand it lightly with fine-grit sandpaper now. -
Base coat:
Paint the entire turtle with a creamy off-white or light beige acrylic paint. If you used colored clay, you might just do a dry-brush layer of cream to highlight the texture. -
Antique the grooves:
Mix a very watery brown or dark beige wash. Paint it into the carved shell lines, then wipe the surface immediately with a damp cloth. This leaves the dark color in the deep grooves while keeping the surface light. -
Draw the face:
Using a black fine-point marker or paint pen, draw two small solid circles for eyes and a gentle, wide U-shape for the smile. Add tiny eyebrows if you want extra expression. -
Rosy cheeks:
Dip a Q-tip into a tiny amount of watered-down burnt orange paint or even real cosmetic blush. Dab a soft, round cheek spot just below each eye. -
Sealing:
Finish with a coat of matte varnish to protect your work without making it too shiny, preserving that natural, earthy aesthetic.
Stone Effect
For a faux-stone look, flick a toothbrush loaded with diluted grey or brown paint across the finished piece to add tiny speckles before sealing.
Now you have a serene little companion perfect for a desk or shelf display


Easy Air-Dry Turtle With Toothpick Shell Lines
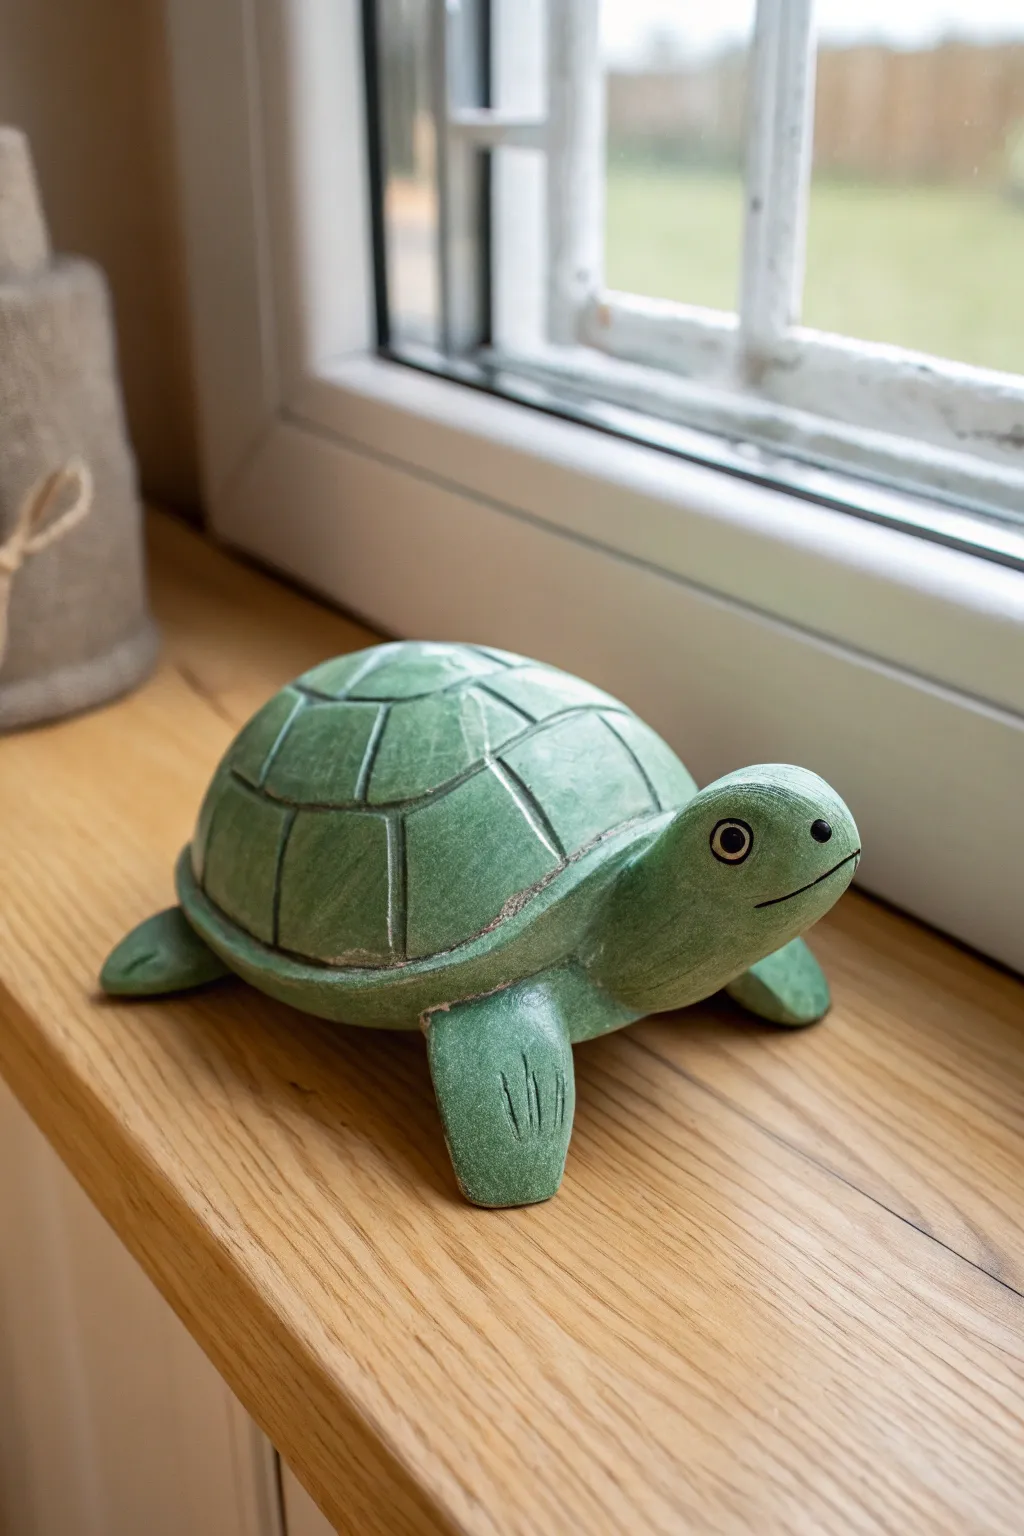
Create a charming, minimalist turtle figurine that looks like carved stone using simple air-dry clay. This project features a smooth, rounded carapace with distinct geometric lines and a friendly, painted face.
How-To Guide
Materials
- White air-dry clay (smooth texture)
- Acrylic paints (Forest green, Sage green, Black, White)
- Fine-grit sandpaper
- Toothpick or clay needle tool
- Small flat brush
- Fine detail brush
- Water cup for smoothing
- Matte or satin varnish
Step 1: Sculpting the Base
-
Form the shell:
Start with a ball of clay roughly the size of a tangerine. Press it gently against your work surface to flatten the bottom while keeping a high, rounded dome shape on top for the shell. -
Create the heavy rim:
Roll a snake of clay about the thickness of a pencil. Wrap this around the base of the dome to create the distinct rim of the shell. Smooth the seam *underneath* the turtle so it blends seamlessly, but leave a slight definition where the rim meets the upper shell. -
Shape the head:
Roll a smaller ball of clay into a teardrop shape for the head and neck. The neck should be thick and sturdy. Attach the wider end to the front of the shell rim, blending the clay thoroughly so it doesn’t fall off. -
Attach the flippers:
Create four flattened, triangular shapes for the flippers. The back ones should be slightly smaller. Attach these to the underside of the shell rim, smoothing the connections securely. -
Refine the shape:
Dip your finger in a little water and smooth out the entire surface. The goal is to make the clay look as smooth as a polished river stone.
Step 2: Detailing and Drying
-
Carve the shell pattern:
Using a toothpick or needle tool, gently carve the scute pattern. I like to start with a hexagon in the center top, then draw lines radiating down to the rim edge. Connect these radial lines with horizontal curves to create the classic turtle grid. -
Add texture lines:
On the front flippers, scratch three deeper lines to represent the toes or claws. Keep them simple and stylized. -
Detail the face:
Use the needle tool to gently impress a curved line for the mouth. It should angle slightly upward for a subtle smile. -
Initial drying:
Let the sculpture dry completely. This usually takes 24-48 hours depending on thickness. Flip it carefully halfway through so the bottom dries too. -
Sand for smoothness:
Once fully dry, take your fine-grit sandpaper and gently sand the shell and head. This step is crucial for achieving that faux-stone look seen in the photo.
Stone Effect Trick
Mix a small pinch of fine sand or baking soda into your green paint. It adds a gritty, realistic texture that mimics carved sandstone instantly.
Step 3: Painting and Finishing
-
Apply base coat:
Paint the entire turtle with a coat of sage green acrylic paint. This lighter underlying color helps give depth later. Let it dry. -
Dry brush texture:
Mix a darker forest green paint. Wipe most of the paint off your brush onto a paper towel, then lightly drag the brush over the shell. This highlights the textures while leaving the grooves lighter. -
Highlight the grooves:
If the shell lines got filled with paint, use a very fine brush or even a clean toothpick to trace the carved lines with a bit of watered-down white or light grey paint to make them pop. -
Paint the eyes:
For the eyes, paint a small black circle. Once dry, add a tiny golden ring around it, and a microscopic white dot inside the black pupil for a ‘spark’ of life. -
Define the mouth:
Run a very thin line of black or dark brown paint along the carved mouth line to define the smile. -
Seal the protective coat:
Finish with a layer of satin or matte varnish. This protects the paint and deepens the green colors, giving it that polished look.
Color Variation
Instead of solid green, try a turquoise wash over the dried clay, then wipe it back with a cloth. It creates a weathered, beach-glass aesthetic.
Place your finished turtle on a sunny windowsill where the light can catch the smooth curves of its shell


Kawaii Turtle Charm With Big Eyes
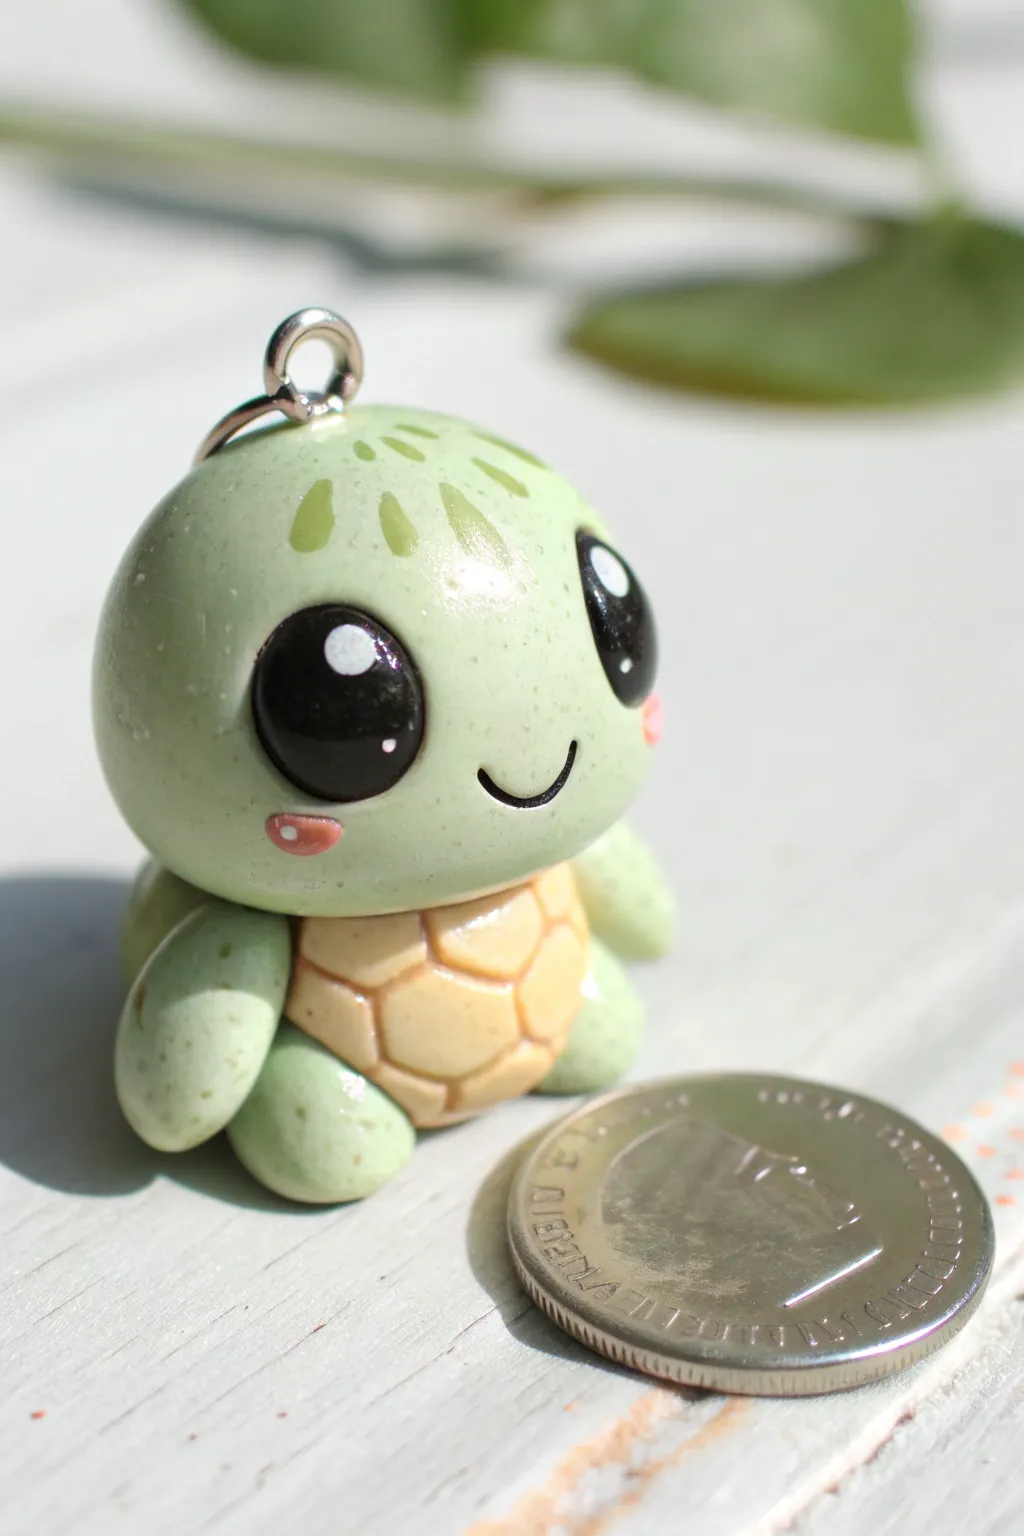
This adorable polymer clay charm features a round, light green turtle with oversized, glossy eyes and a sweet smile. Its tiny size and sturdy shape make it perfect for keychains, earrings, or as a little desk companion to bring a smile to your day.
Step-by-Step Guide
Materials
- Polymer clay (light green, pale yellow/cream, black, white, pink)
- Dotting tools or ball stylus tool
- Gloss glaze or UV resin
- Eye screw pin
- Needle tool or toothpick
- Craft knife or clay blade
- Small paintbrush
- Brown acrylic paint (optional, for shading)
Step 1: Shaping the Body
-
Mix the perfect green:
Start by conditioning your light green clay until it is soft and pliable. If you want a speckled look like the photo, you can mix in tiny flecks of slightly darker green or use a granite-effect clay. -
Form the head shape:
Roll a ball of the green clay slightly larger than a marble. This turtle is mostly head, so this should be the biggest component. Smooth out any fingerprints. -
Create the shell base:
Take a smaller amount of the pale yellow or cream clay and flatten it into a thick, rounded disc. This will serve as the turtle’s front belly shell. -
Add texture to the shell:
Using a needle tool or a dull knife, gently score a hexagonal pattern onto the yellow belly clay to mimic shell scutes. Press gently so you create grooves without cutting all the way through. -
Attach the shell:
Press the yellow belly underneath the green head ball. The head sits directly on top, as this kawaii style omits a distinct neck.
Clean Clay Pro-Tip
Keep baby wipes or rubbing alcohol nearby. Clean your hands and tools thoroughly before switching from the black clay eyes back to the light green body to avoid smudging dark pigments.
Step 2: Adding the Face
-
Indent eye sockets:
Use a large ball tool or the rounded end of a paintbrush handle to press two deep, wide indentations into the face where the eyes will go. Place them wide apart for maximum cuteness. -
Insert the eyes:
Roll two balls of black clay that fit snugly into the indentations you just made. Flatten them slightly as you press them in so they don’t bulge out too far. -
Paint the sheen:
Using a tiny dotting tool and white acrylic paint (or tiny bits of white clay), add a large white reflection dot in the upper corner of each eye and a tiny dot lower down. This brings the character to life. -
Carve the smile:
Use a needle tool or a small u-shaped cutter to create a simple smiling mouth right between the eyes. Fill the groove with a tiny snake of black clay or paint it later for contrast. -
Add flushed cheeks:
Take two minuscule specks of pink clay, flatten them into ovals, and press them onto the cheeks just below the outer corners of the eyes. You can add a tiny white dot to the cheek for extra flair.
Step 3: Limbs and Details
-
Form the flippers:
Roll four small, equal-sized tear drops of green clay. Flatten them slightly to create the flipper shapes. -
Attach the flippers:
Press two flippers onto the sides of the body near the bottom, and two slightly underneath to stabilize the figure. Blend the seams gently with a silicone tool if needed. -
Decorate the head:
Mix a slightly darker shade of green clay (or use paint). Apply three small teardrop shapes to the top of the head like little hair tufts or pattern markings. -
Insert hardware:
If you plan to hang this as a charm, trim the wire of an eye screw pin and twist it into the top center of the head. I like to add a dab of liquid clay or bake-and-bond to the screw for extra security. -
Bake the clay:
Bake the turtle according to your clay manufacturer’s instructions. Usually, this is around 275°F (135°C) for 15-30 minutes, depending on thickness.
Troubleshooting: Lint
If you see dust or lint on your light green clay before baking, use a q-tip dipped in a tiny amount of rubbing alcohol or acetone to gently wipe the surface smooth and clean.
Step 4: Finishing Touches
-
Cool down:
Let the piece cool completely before handling it further, as warm clay is fragile. -
Glaze the eyes:
Apply a coat of gloss glaze or UV resin specifically to the black eyes. This creates that wet, glass-like look that is essential for the kawaii aesthetic. -
Optional shading:
For more depth, you can lightly dry-brush a tiny bit of brown paint into the grooves of the shell belly to make the pattern pop.
Attach a jump ring and your sweet little turtle is ready to travel with you everywhere


Sea Turtle With Flippers And Sleek Silhouette
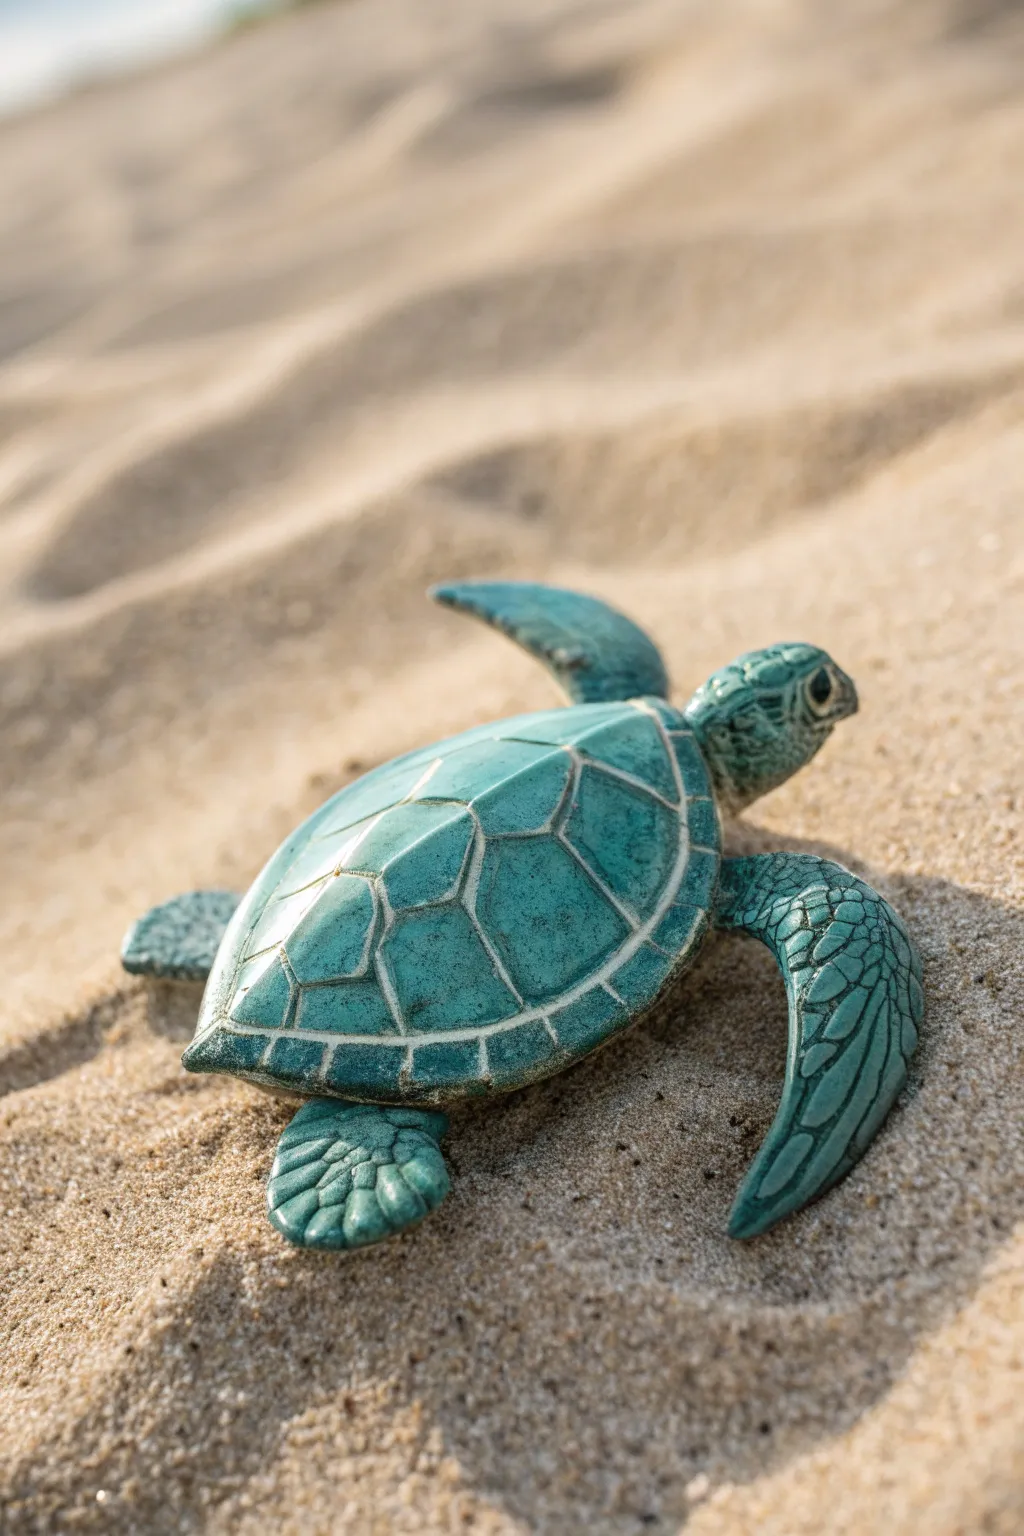
Capture the serene beauty of marine life with this sleek sea turtle sculpture, featuring distinctive flippers and a beautifully textured shell. The striking turquoise finish with highlighted recessed lines gives it an aged, artifact-like quality perfect for any coastal display.
Detailed Instructions
Materials
- Polymer clay (white or light grey)
- Sculpting tools (needle tool, ball stylus, blending tool)
- Rolling pin or pasta machine
- Wire armature wire or aluminum foil
- Acrylic paints (turquoise, teal, dark grey/black, white)
- Small stiff paintbrush
- Soft glazing brush
- Paper towels or sponge
- Gloss varnish or resin (optional)
Step 1: Sculpting the Form
-
Prepare the Core:
Ball up a piece of aluminum foil into a flattened oval shape to create a lightweight core for the turtle’s shell. This saves clay and ensures even baking. -
Cover the Shell:
Roll out a sheet of clay to about 1/4 inch thickness. Drape it over your foil core, smoothing it underneath to fully enclose the foil. Use your thumbs to create a smooth, domed silhouette. -
Shape the Head:
Roll a smaller log of clay for the head and neck. Taper one end slightly for the neck and attach it firmly to the front underside of the shell, blending the clay seams until invisible. -
Form the Flippers:
Create two large teardrop shapes for the front flippers and two smaller, stubbier teardrops for the rear flippers. Flatten them gently, giving the front ones a slight curve to simulate a swimming motion. -
Attach Limbs:
Attach the flippers to the underside of the body. Blend the clay well at the connection points so they are secure. I like to pose the front flippers slightly angled back as if pushing water. -
Refine the Face:
Using a small ball tool, press indentations for the eyes. Add small balls of clay inside for the eyeballs. You can use a needle tool to add a tiny beak line for the mouth.
Groove Guide
Keep your carving tool clean! Clay buildup on the tool tip will create messy, jagged lines. Wipe the needle or sculpting tool on a scrap cloth after every few strokes for crisp scute lines.
Step 2: Detailing Textures
-
Mapping the Shell Scutes:
Using a needle tool, lightly sketch the pattern of the shell. Start with a row of hexagons down the spine, then surround them with slightly distorted pentagons along the sides. -
Deepening the Lines:
Once happy with the pattern, go over the lines again with a carving tool or the side of a needle tool to create deep, V-shaped grooves. These channels need to be deep enough to hold the dark wash later. -
Skin Texture:
On the head and flippers, use a small loop tool or needle to carve irregular, scale-like shapes. Make larger scales on the leading edge of the flippers and smaller, pebble-like textures near the body. -
Smoothing:
Gently brush over the entire sculpture with a soft brush specifically for blending clay, or a fingertip with a little baby oil, to soften any sharp burrs from carving without erasing the texture. -
Bake:
Bake the sculpture according to your polymer clay package instructions. Let it cool completely before painting.
Beach Base
Display your turtle on a small wooden base covered in glue and real sand. Add tiny seashells or bits of driftwood to complete the scene.
Step 3: Painting & Finishing
-
Base Coat:
Paint the entire turtle with a mix of turquoise and teal acrylic paint. You want a solid, opaque coverage. Let this layer dry completely. -
The Dark Wash:
Mix a small amount of black or dark grey acrylic paint with water until it’s very runny. Brush this liberally over the entire shell and skin, ensuring it seeps into every carved groove. -
Wipe Back:
While the wash is still wet, take a damp paper towel or sponge and wipe the surface of the clay. This removes the dark paint from the raised areas but leaves it trapped in the recessed lines, emphasizing the shell pattern. -
Dry Brushing:
Dip a stiff dry brush into a lighter version of your turquoise (mix in a little white) and wipe most of it off on a paper towel. Lightly brush across the raised textures of the shell and scales to make them pop. -
Eye Detail:
Use a fine liner brush to paint the pupils black, adding a tiny dot of white reflection to bring the turtle to life. -
Sealing:
For that wet, from-the-ocean look, apply a coat of gloss varnish or a thin layer of UV resin over the shell and eyes.
Now you have a stunning, authentically textured sea turtle ready to swim across your shelf

The Complete Guide to Pottery Troubleshooting
Uncover the most common ceramic mistakes—from cracking clay to failed glazes—and learn how to fix them fast.
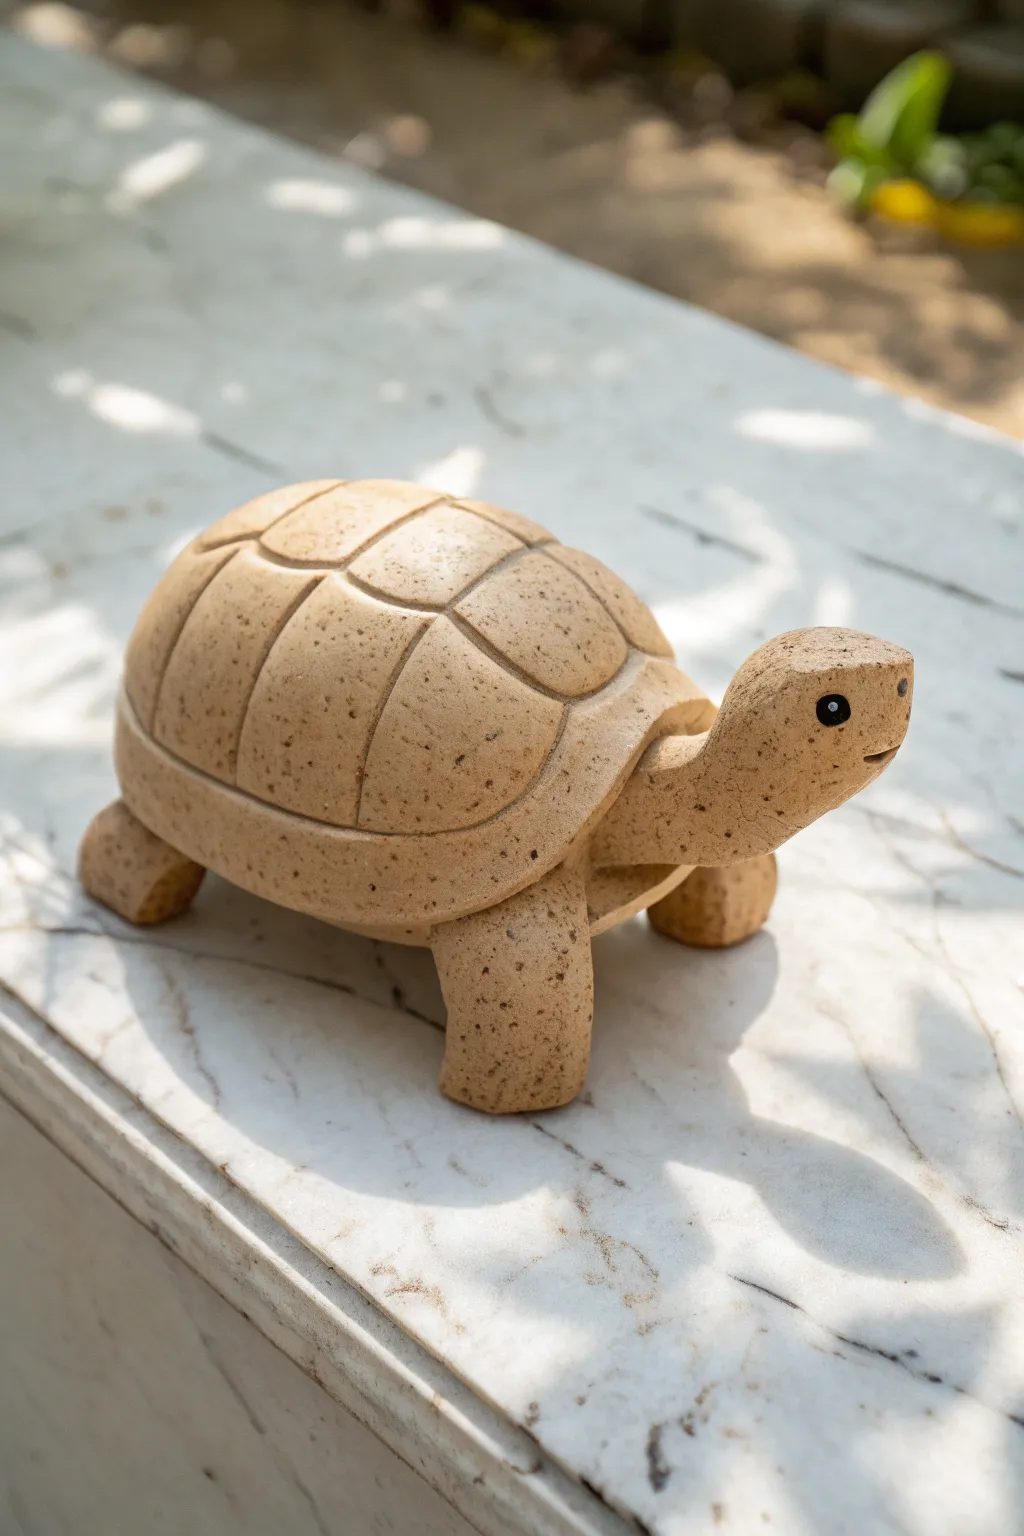
Chunky Tortoise With Stumpy Legs And High Dome Shell

Create a charming, earthy tortoise sculpture that features a high-domed shell and a wonderfully tactile, stippled texture. This project focuses on building distinct geometric scutes and sturdy, stumpy legs for a piece that looks like it was carved from sandstone or wood.
Step-by-Step Tutorial
Materials
- Modeling clay (air-dry, polymer, or ceramic clay with grog)
- Wooden modeling tools
- Needle tool or toothpick
- Serrated rib or old toothbrush (for scoring)
- Slip or water (for joining)
- Small round object (like a bead) for eye impressions
- Acrylic paints (dark brown, tan, ochre) for finishing
Step 1: Forming the Body structure
-
Shape the shell base:
Start with a large ball of clay about the size of an orange. Use your thumb to open it up into a pinch pot, pressing the walls until they are even but thick. This creates the high dome of the shell. -
Create the plastron:
Roll out a flat slab of clay roughly the same circumference as your pinch pot’s opening. This will be the tortoise’s belly (plastron). -
Close the form:
Score (scratch up) the rim of the pinch pot and the edge of the slab. Apply slip or water, then press them together firmly to create a hollow, enclosed dome. Paddle it gently to shape it into a smooth, slightly elongated oval.
Trapped Air Troubleshooting
Since the shell is a hollow enclosed form, you MUST poke a tiny, hidden air vent hole (usually on the belly) before drying. This prevents the air inside from expanding and cracking the piece.
Step 2: Attaching Limbs and Head
-
Form the legs:
Roll four thick, sturdy cylinders of clay. They should be slightly wider at the top than the bottom, resembling tree stumps. Tap the bottoms flat so the tortoise will stand stably. -
Attach the legs:
Score the four corners of the underbelly and the tops of your leg cylinders. Join them securely, blending the clay from the legs onto the body with a wooden tool so no seams are visible. -
Sculpt the head:
Shape a tapered log for the neck and head. The head end should be rounded and blunt. Attach this to the front of the shell, smoothing the neck connection nicely into the underside of the dome.
Level Up: Natural Tone
To get that speckled sandstone look shown in the photo, mix some coarse sand, dried coffee grounds, or black pepper into your clay body before sculpting to create natural flecks.
Step 3: Carving and Detailing
-
Draft the shell pattern:
Using a needle tool, lightly sketch the shell pattern. Draw a row of large hexagonal shapes down the center spine, flanked by smaller geometric shapes on the sides. Don’t forget the ‘marginal scutes’—the ring of smaller rectangles around the very bottom edge of the shell. -
Deepen the shell lines:
Once you are happy with the spacing, carve these lines deeper using a wooden tool. I like to bevel the edges of each plate slightly to make the shell look domed and three-dimensional, rather than just drawn on. -
Detail the face:
Use a small tool or bead to press in socket indentations for the eyes particularly deep. Carve a horizontal mouth line that curves up slightly at the corners for a friendly expression. -
Add the claws:
On each foot, use your needle tool to incise four or five vertical lines at the very bottom to represent heavy, blunt claws.
Step 4: Texture and Surface Finish
-
Stipple the skin:
Take a needle tool or a stiff-bristled brush and poke dense patterns of small holes or dots all over the legs, neck, and head. This stippling effect mimics the rough, leathery skin of a real tortoise. -
Smooth the shell:
Contrast the rough skin with a smoother shell. Use a damp sponge or finger to burnish the shell scutes, removing any crumbled bits of clay. -
Create the antique look:
After your clay has fully dried (and been fired, if ceramic), paint the entire piece with a dark brown acrylic wash. Before it dries completely, wipe the surface with a damp cloth. The dark paint will stay in the deep carved lines and stippled dots, highlighting the texture beautifully.
Place your finished tortoise among some stones or driftwood to admire your handiwork.
Two-Tone Turtle Color Palette (Light Body, Dark Shell)

Create a serene, nature-inspired turtle sculpture that mimics the look of carved green soapstone. This project balances a smooth, dark jade-colored shell against a lighter, textured body for a sophisticated finish that looks lovely on any shelf.
Step-by-Step
Materials
- Polymer clay (translucent, green, and a touch of black)
- White or light grey polymer clay
- Foil (for armature)
- Needle sculpting tool
- Ball stylus tool
- Acrylic paints (dark green, teal, black, white)
- Matte varnish or sealant
- Soft paintbrush
- Sponge or textured sandpaper
Step 1: Armature & Body Basics
-
Shape the core:
Begin by crumbling aluminum foil into a tight oval dome shape. This saves clay and keeps the sculpture lightweight. Compress it firmly against a table to create a flat bottom. -
Mix the body clay:
For the lighter body sections (head and flippers), mix white clay with a tiny pinch of green. You want a pale, minty stone color, not a bright lime. -
Create the head:
Roll a smooth ball of your pale green mixture. Gently elongate it into a blunt cylinder and attach it to one end of your foil dome, smoothing the clay onto the foil for a seamless join. -
Form the flippers:
Shape four flattened teardrop pieces for the flippers. The front two should be significantly larger and longer than the rear two. Curve them slightly downwards to simulate swimming motion. -
Attach the limbs:
Press the flippers firmly onto the underside of the foil dome. Use a blending tool or your thumb to smear the clay connection points underneath so they don’t fall off during baking.
Uneven Shell Lines?
If your carving gets messy, smooth it over with a drop of baby oil on your finger and re-carve. The oil softens the clay temporarily.
Step 2: The Shell & Sculpting Details
-
Mix the shell color:
Create a darker ‘jade’ mix for the shell. Combine translucent clay with green and a speck of black. The translucent base gives it that realistic, stone-like depth when baked. -
Cover the shell:
Roll your jade mixture into a sheet about 1/4 inch thick. Drape this over the foil dome, carefully trimming the excess around the bottom edge where it meets the flippers. -
Refine the joining line:
Create a smooth rim where the dark shell meets the lighter body. You can add a thin snake of the lighter clay around the rim if you want a distinct separation. -
Carve the scutes:
Using a needle tool, lightly sketch the pattern of the shell. Start with a central row of hexagonal shapes, then add the surrounding shapes. Once you are happy with the layout, retrace the lines firmly to create deep grooves. -
Face details:
With a small ball stylus, indent sockets for the eyes. Roll tiny balls of black clay and press them into these sockets. Use a knife tool to cut a simple, straight line for the mouth. -
Texture the flippers:
I prefer to use a needle tool to gently scribe irregular scale patterns on the top of the front flippers. Keep the shapes organic and mosaic-like, rather than perfect squares. -
Bake the piece:
Bake according to your specific clay manufacturer’s instructions. Usually, this is around 275°F (135°C) for 30-45 minutes depending on thickness. Let it cool completely.
Hidden Compartment
Instead of a solid foil core, form the shell over a removable metal bowl to create a hollow lid, turning your sculpture into a trinket box.
Step 3: Faux Stone Finish
-
Apply a wash:
Mix a very watery black or dark teal acrylic paint. Brush this wash over the entire turtle, ensuring it gets into the deep carved lines on the shell and flippers. -
Wipe back:
Before the paint dries, wipe the surface with a damp paper towel or sponge. The dark paint will remain in the crevices, highlighting your texture, while leaving the high points clean. -
Dry brushing:
Dip a dry brush into a tiny amount of white or pale grey paint. Offload most of it onto paper, then lightly whisk it over the shell’s raised areas to simulate scratch marks and weathering. -
Reference check:
Look at the project image—notice the matte finish? Avoid glossy sealants. Instead, buff the darker shell with a soft cloth to give it a natural sheen. -
Final seal:
Apply a clear, matte varnish to protect the paint wash, especially if you plan to handle the turtle often.
Now you have a timeless, stone-inspired piece that brings a quiet calm to your space


What Really Happens Inside the Kiln
Learn how time and temperature work together inside the kiln to transform clay into durable ceramic.
Hexagon Scute Shell Pattern For A Real Turtle Look
Capture the natural beauty of marine life with this detailed sea turtle sculpture, featuring a distinctively carved hexagonal shell pattern. The finished piece has a wonderful organic texture and an antique cream finish that brings out every carved groove.
Step-by-Step Guide
Materials
- High-quality air-dry clay or polymer clay (limestone or cream color)
- Sculpting tools (needle tool, loop tool)
- Small rolling pin
- Slip (clay and water mixture) or scoring tool
- Ball stylus tool
- Black acrylic paint
- Dark green or teal acrylic paint (for weathering)
- Small detail brush
- Soft cloth or paper towel
- Matte sealant spray
Step 1: Forming the Body Structure
-
Shape the Base:
Begin with a large ball of clay for the body. Gently flatten it into a domed oval shape to form the main shell structure, ensuring it is smooth and symmetrical. -
Form the Head:
Roll a smaller cylinder of clay for the head and neck. Taper one end slightly for the beak and smooth the other end where it will attach to the body. -
Attach the Head:
Score the underside of the shell and the neck base. Apply a little slip or water, press the pieces together firmly, and blend the seams so the transition looks seamless. -
Create Flippers:
Shape two large, flat teardrop shapes for the front flippers and two smaller ones for the rear flippers. Give them a slight curve to mimic a swimming motion. -
Connect the Limbs:
Score and slip the attachment points under the shell. Press the flippers into place and blend the clay well to ensure they are securely attached.
Cracking Clay?
If small cracks appear while the clay is air-drying, mix a thick paste of clay dust and water (slip) and fill the cracks. Smooth over with a finger and let dry again.
Step 2: carving the Shell Details
-
Outline the Scutes:
Using a needle tool, lightly sketch a central row of hexagonal shapes down the spine of the shell. This guide will help keep your pattern symmetrical. -
Expand the Pattern:
Draw adjacent irregular polygons connecting to the central hexagons, working your way down the sides of the shell to create the full scute pattern. -
Deepen the Grooves:
Go back over your sketched lines with a V-shaped carving tool or a thicker needle tool to create deep, defined channels between the shell plates. -
Texture the Shell:
Take a stiff brush or a textured sponge and press it gently onto the surface of the shell ‘plates’ to give them a weathered, bone-like texture rather than leaving them perfectly smooth. -
Add Radial Lines:
Using a fine needle tool, scratch tiny, faint lines radiating from the center of each scute towards the edges to mimic natural growth rings.
Step 3: Detailing the Skin
-
Map the Scales:
On the head and flippers, use a small loop tool to lightly press loose, irregular circular patterns. Focus larger scales on the forehead and the edges of the flippers. -
Refine the Eyes:
Press a small indentation on each side of the head for eye sockets. Roll tiny balls of clay, place them inside, and use a tool to sculpt eyelids around them. -
Final Surface Prep:
Look over the entire piece for rough burrs or unwanted fingerprints. Smooth these out with a slightly damp finger or soft brush before letting the clay dry completely according to package instructions.
Oceanic Glow
Mix a tiny amount of metallic gold or bronze powder into your final sealant spray. This adds a subtle, sun-kissed shimmer to the shell, like it’s wet from the ocean.
Step 4: Finishing Touches
-
The Dark Wash:
Mix a small amount of dark green or teal paint with water to create a thin wash. Brush this freely over the shell, ensuring it gets into all the deep carved grooves. -
Wipe Back:
Immediately wipe the surface with a damp cloth. I find this leaves the color only in the crevices, highlighting the hexagonal pattern dramatically. -
Paint the Eyes:
Use solid black acrylic paint and a fine detail brush to carefully fill in the eyes, giving the turtle a lifelike gaze. -
Seal the Work:
Once all paint is fully dry, spray the entire sculpture with a matte sealant to protect the finish and give it a unified sheen.
Place your completed turtle on a shelf or desk where its intricate shell texture can catch the light
Textured Shell Made With Simple Stamps And Pressed Patterns
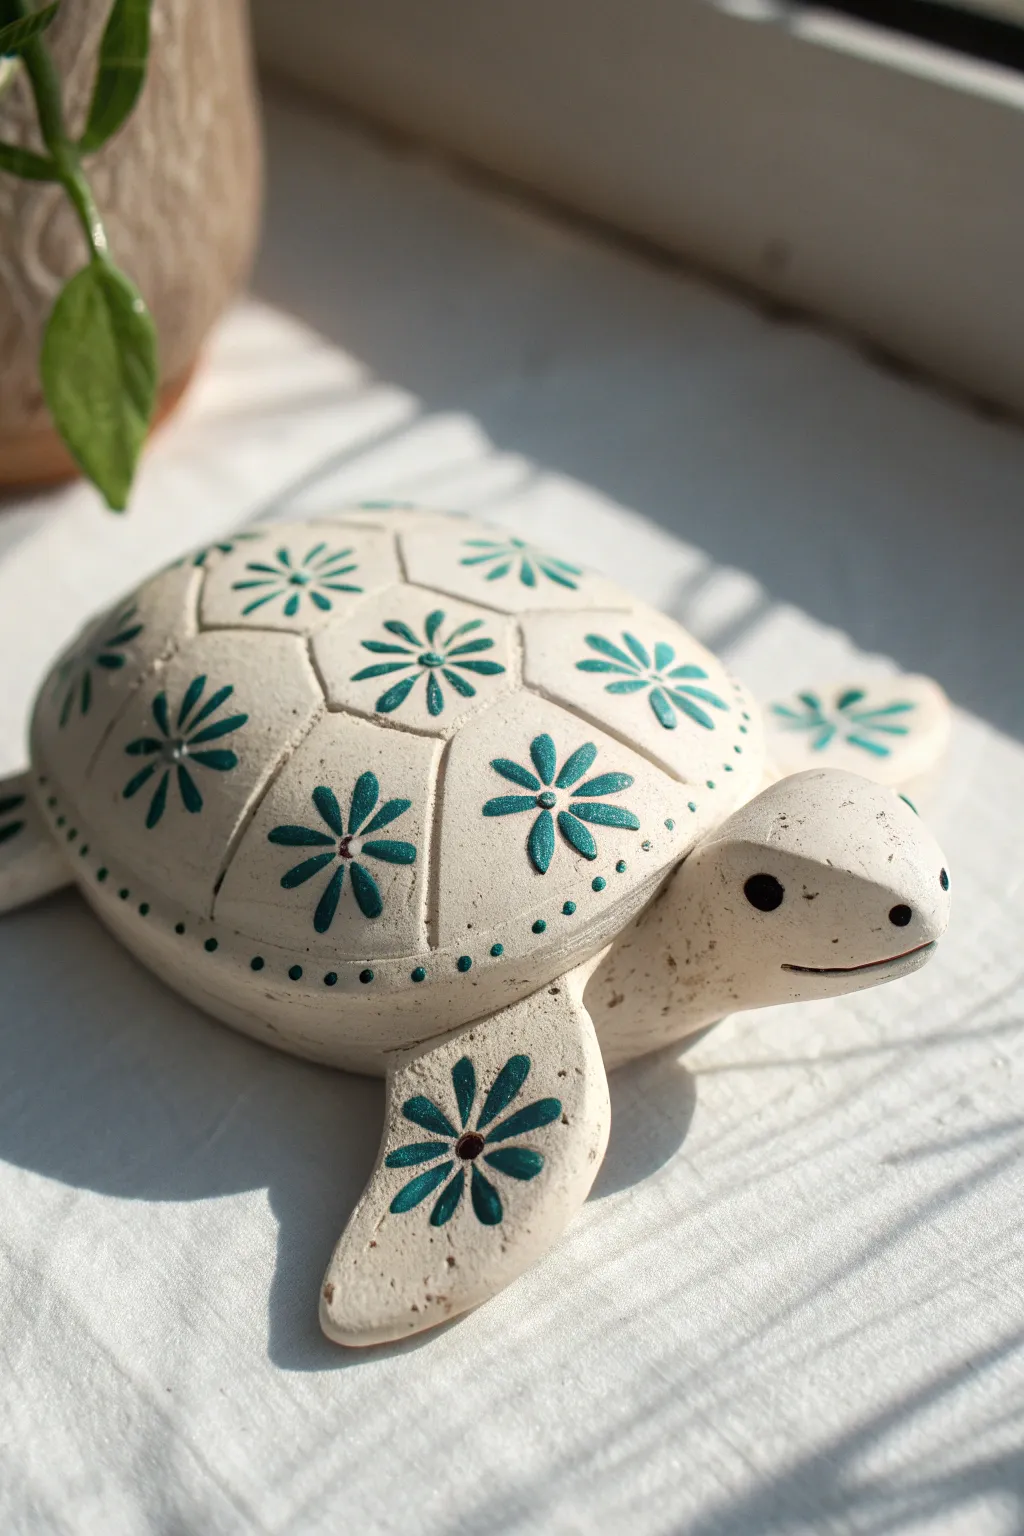
This charming clay turtle combines simple hand-building techniques with a lovely recurring floral motif. The geometric shell pattern serves as individual frames for the teal daisy-like flowers, creating a folky, handcrafted look that works beautifully as garden decor or a desk companion.
Detailed Instructions
Materials
- Air-dry clay or polymer clay (white or light beige)
- Small rolling pin
- Modelling tools (needle tool, blending tool)
- Daisy/flower shaped rubber stamp (small)
- Teal or sea-green acrylic paint
- Fine-point black marker or black acrylic paint
- Small paintbrush
- Water and sponge (for smoothing)
- Matte varnish or sealant
Step 1: Sculpting the Base Form
-
Form the shell:
Start by rolling a ball of clay roughly the size of a tangerine. Flatten the bottom slightly against your work surface and round out the top to create a smooth dome shape for the turtle’s shell. -
Create the head:
Roll a smaller ball of clay into a teardrop shape. Attach the wider end to the front of the shell, blending changes in seam lines thoroughly with a modelling tool or your finger so it becomes one solid piece. -
Make the flippers:
Shape four equal-sized pieces of clay into flattened, elongated teardrops for the legs. Do the same for a tiny tail. Position two flippers angling forward near the head and two angling backward near the tail. -
Attach appendages:
Score the attachment points (scratching the clay surface) and add a dab of water or slip before pressing the flippers and tail onto the underside of the shell. As usual, I like to smooth these seams particularly well so they don’t crack during drying.
Step 2: Carving the Shell Textures
-
Map out the pattern:
Using a needle tool, lightly sketch a hexagon pattern onto the shell. Start with one central hexagon at the very top of the dome and work your way outwards to ensure symmetry. -
Deepen the lines:
Once you are happy with the layout, go over your sketched lines with a slightly thicker tool to carve deep grooves between the shell segments. This separation defines the ‘scutes’ of the turtle. -
Refine the surface:
Use a slightly damp sponge to gently wipe over the shell. This removes any sharp clay crumbs created by the carving process and softens the edges of your grooves.
Stamp Smudging?
If your stamp slips on the curved shell, wipe it off immediately with a damp towel. It’s often easier to hand-paint the simple petals on the curve rather than forcing a flat stamp.
Step 3: Adding the Floral Design
-
Stamp preparation:
The floral pattern isn’t carved; it’s painted or stamped. If sculpting with polymer clay, you can impress a stamp now for texture. For the look in the photo, wait until the clay is fully dry (if air-dry) or baked (if polymer). -
Dry the sculpture:
Allow your turtle to dry completely according to your clay manufacturer’s instructions. This usually takes 24-48 hours for air-dry clay. -
Stamp the flowers:
Dip your small daisy stamp lightly into teal acrylic paint. Test it on paper first to ensure you don’t have too much paint, which causes smudging. -
Apply the pattern:
Carefully stamp one flower into the center of each hexagon segment on the shell. Don’t forget to add a matching flower to the top of each front flipper. -
Add detailing:
Using a very fine brush or dotting tool, dab a small dot of a darker brown or black paint into the center of each stamped flower.
Pro Tip: Consistent Lines
When carving the shell grooves, use a flexible piece of cardstock as a curved ruler. It helps guide your tool over the dome shape for much straighter geometric lines.
Step 4: Face and Finishing Touches
-
Paint the eyes:
Using black acrylic paint and a fine-tip brush, paint two solid black circles for eyes on the side of the head. -
Create the smile:
Paint a very thin, curved line for the mouth. It should sit low on the face to give the turtle a gentle expression. -
Add decorative dots:
Dip the back end of a paintbrush into your teal paint and dot a border along the lower rim of the shell. Space them evenly for a clean finish. -
Seal the piece:
Once all paint is completely dry, apply a coat of matte varnish. This protects the clay and keeps the paint from chipping while preserving that natural, stone-like finish.
Your patterned turtle is now ready to slowly roam across your shelf or windowsill

TRACK YOUR CERAMIC JOURNEY
Capture glaze tests, firing details, and creative progress—all in one simple printable. Make your projects easier to repeat and improve.
Segmented Build Turtle (Shell Plus Separate Head And Legs)
This charming turtle sculpture features a beautifully stylized shell with deep carved segments and a warm, speckled finish that mimics natural sandstone. By building the shell, head, and legs as distinct components, you create a piece with wonderful dimension and character.
Step-by-Step Guide
Materials
- Stoneware clay with grog or speckles (or beige polymer/air-dry clay)
- Clay carving tools (needle tool, small loop tool)
- Slip and scoring tool (if using ceramic clay)
- Sponge and water
- Rolling pin
- Small black beads or black clay for eyes
- Wooden modeling tool
Step 1: Forming the Shell Base
-
Shape the main dome:
Begin with a fist-sized ball of clay. Gently pat and roll it on your work surface to create a smooth, even dome shape. The bottom should be flat, while the top forms a perfect hemisphere. -
Create the rim:
Roll a thin coil of clay, approximately the thickness of a pencil. Attach this coil around the bottom edge of your dome to create the distinct rim of the turtle’s shell, blending the seam on the underside so it stays invisible. -
Refine the shape:
Use a damp sponge to smooth over the connection point between the rim and the dome. You want the rim to bulge out slightly, giving the shell a heavy, solid appearance.
Fixing Cracks
If small cracks appear while carving the shell segments, dip your finger in vinegar (for water-based clay) or water and rub the crack in a circular motion to heal naturally.
Step 2: Carving the Segments
-
Map out the pattern:
Lightly trace your shell pattern with a needle tool before committing to deep cuts. Draw a central shape on top, followed by a ring of segments around it, and finally the segments bordering the rim. -
Deepen the lines:
Using a modeling tool or a dull knife, retrace your lines with firm pressure. I find that pressing rather than dragging often creates a cleaner channel without crumbling the clay. -
Round the edges:
Gently press down the sharp edges of each carved segment to make them look pillowed and soft, rather than freshly cut. This ‘puffed’ look is signature to the style.
Step 3: Sculpting the Appendages
-
Form the legs:
Roll four equal cylinders of clay. Tap one end of each cylinder flat against the table to create the foot, and round off the other end where it will attach to the body. -
Shape the head:
Create a teardrop shape for the head and neck. Elongate the neck portion slightly and curve it upward so the turtle looks like it’s stretching to see. -
Add facial details:
Use a tool to press a small, horizontal line for the mouth. For the eyes, press small indentations on either side and insert small black beads or tiny balls of black clay.
Level Up: Color Wash
After baking or drying, apply a diluted brown acrylic wash over the shell and wipe it back immediately. The dark paint will stay in the deep grooves, making the segments pop.
Step 4: Assembly and Finishing
-
Attach the legs:
Score (scratch) and slip (wet) the top of the legs and the underside of the shell rim. Press the legs firmly into place, ensuring the turtle stands level. -
Attach the head:
Score the neck base and the underside of the shell’s front rim. Join them securely, smoothing the clay underneath to ensure the heavy head is well-supported. -
Texture the skin:
Using a toothbrush or a stiff bristle brush, gently tap the surface of the head and legs to give them a subtle, skin-like texture that contrasts with the smooth shell. -
Final smooth:
Do one last inspection of the shell segments. If handling the turtle distorted any lines, redefine them now before setting the piece aside.
Allow your turtle plenty of time to dry completely before displaying it on a shelf or in the garden
Mini Turtle Family Set (Big, Medium, And Tiny)
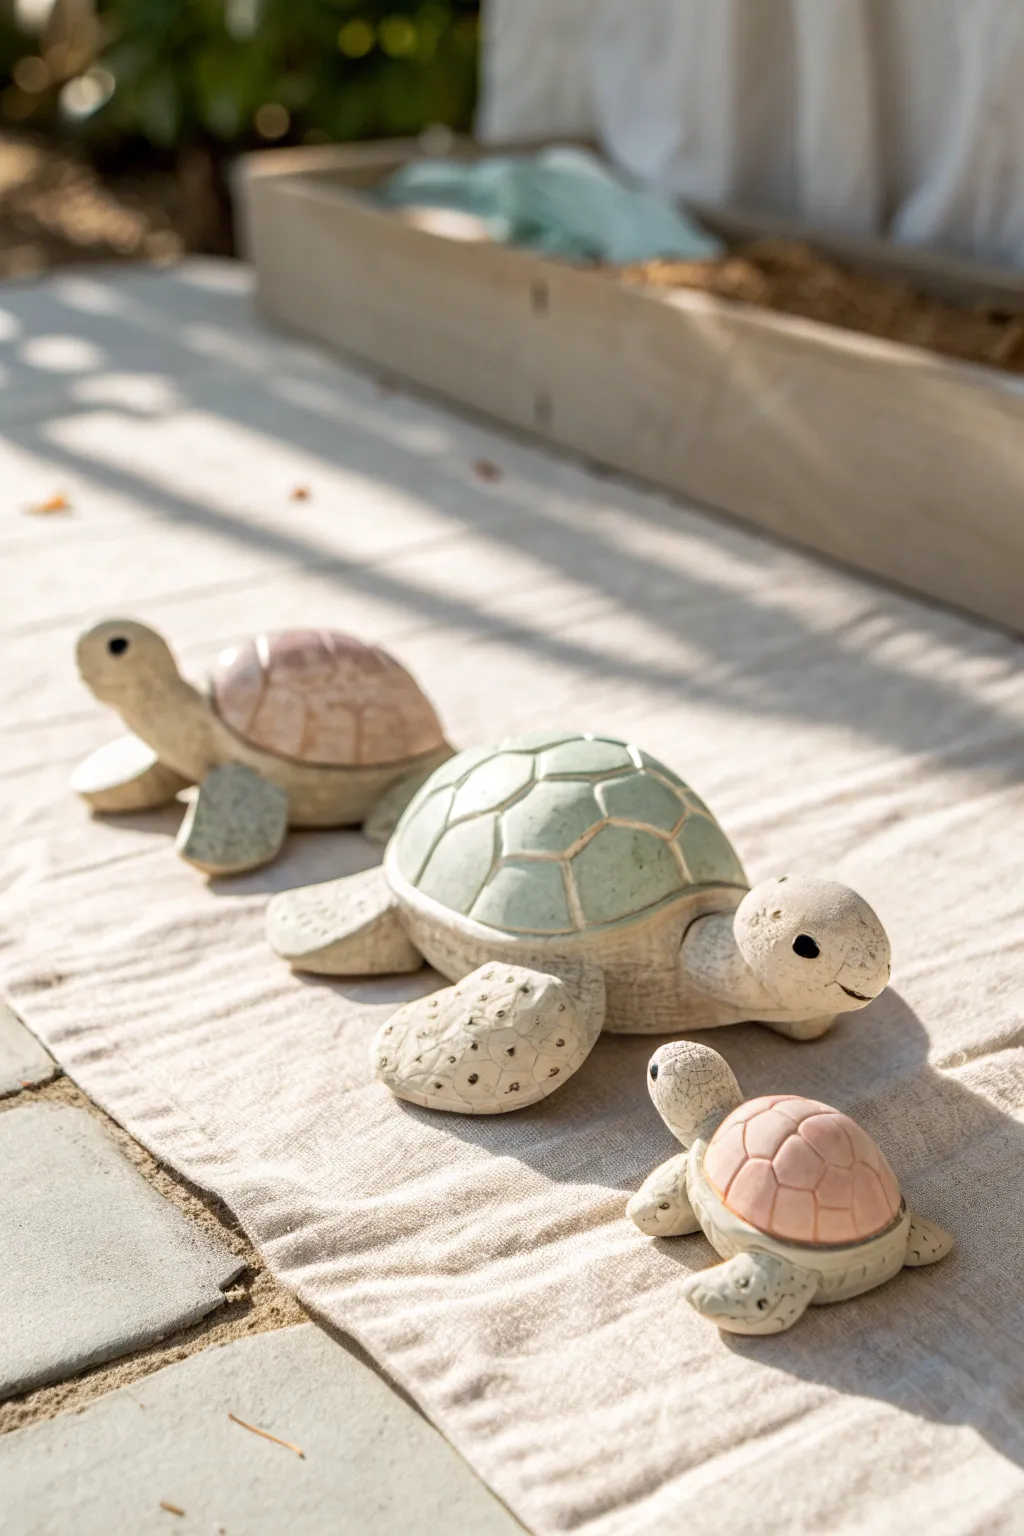
Create this charming family of turtles that looks like aged garden pottery using air-dry clay and a special painting technique. The set features three distinct sizes with beautifully textured shells in soft sage green and terracotta pink, perfect for a garden-inspired display.
Detailed Instructions
Materials
- Air-dry clay (stone or white color)
- Acrylic paints (sage green, dusty pink, cream/off-white, dark brown)
- Clay sculpting tools (needle tool, modeling tool)
- Rolling pin
- Aluminum foil
- Fine grit sandpaper
- Matte sealant or varnish
- Paintbrushes (flat brush and fine detail brush)
- Paper towel or sponge for texturing
Step 1: Sculpting the Forms
-
Create foil armatures:
To keep the turtles lightweight and save clay, scrunch aluminum foil into three distinct dome shapes: one large (about 5-6 inches), one medium, and one small (about 2 inches). Flatten the bottoms slightly so they sit stable. -
Cover the shells:
Roll out a sheet of clay to about 1/4 inch thickness. Drape it over your foil domes, smoothing it down the sides. Trim the excess clay at the bottom and smooth the edges underneath. -
Form the heads:
Roll three balls of clay proportional to the shells for the heads. Elongate them slightly into teardrop shapes. Attach the wider end to the front of the shell, blending the clay seamlessly with a modeling tool or your finger and a dab of water. -
Shape the flippers:
For each turtle, shape four flattened, paddle-like flippers. The front flippers should be slightly longer than the back ones. Attach them firmly to the underside of the shell, blending the seams well so they don’t detach later. -
Add facial details:
Use a needle tool or small ball tool to press indentations for the eyes. Use a knife tool to carve a simple, curved line for the mouth to give them a gentle smile.
Crackled Texture Trick
Apply a layer of white school glue over the base coat before painting the shell color. As the top paint dries over the glue, it will naturally crackle for an aged effect in seconds.
Step 2: Detailing the Shell and Skin
-
Carve the shell pattern:
On the top of each shell, lightly sketch a hexagonal pattern. Start with a central shape and work outward. Once happy with the spacing, carve these lines deeper with a needle tool to create distinct scutes (shell plates). -
Texture the skin:
Using a needle tool, poke random, tiny dots all over the head and flippers to mimic rough, stony skin texture. Don’t worry about being too uniform; irregularity looks more natural here. -
Smooth and dry:
Go over any sharp clay burrs with a slightly damp finger. Let the turtles dry completely for 24-48 hours until they are hard and lighter in color. -
Sand imperfections:
Once fully dry, use fine-grit sandpaper to smooth out any unwanted bumps, particularly around the bottom edges and where the limbs join the shell.
Step 3: Painting the Aged Finish
-
Base coat:
Paint the entire surface of all three turtles with a cream or off-white acrylic paint. This creates a uniform ‘stone’ base. Let this dry completely. -
Paint the shells:
Mix a watery wash of sage green for the large turtle and a dusty pink wash for the medium and small ones. Apply this to the shell sections, letting the color pool slightly in the carved crevices for depth. -
Dry brush highlights:
To enhance the texture, dip a dry brush into white paint, wipe almost all of it off on a paper towel, and lightly graze it over the raised parts of the shell plates. This highlights the texture instantly. -
Create the stone speckle:
Mix a very diluted dark brown or grey paint. Dip an old toothbrush into it and flick the bristles with your thumb to spray tiny speckles over the turtles. This simulates a realistic granite or stone look. -
Paint the eyes:
Use a fine detail brush and black paint to fill in the eye indentations. Add a tiny white dot in the corner of each eye for a life-like glint.
Garden Variation
Instead of pink or green, paint the shells with metallic gold or bronze washes, then dab with a turquoise patina effect for an oxidized metal garden statue look.
Step 4: Finishing
-
Distress the edges:
For that weathered look, lightly sand parts of the painted shell again to reveal a bit of the white base coat underneath, focusing on the high points. -
Seal the work:
Apply a coat of matte varnish or sealant to protect the paint. A matte finish is crucial here to maintain the stone-like appearance rather than making them look plastic.
Arranging your finished turtle family together creates a heartwarming display that brings a touch of slow-living peace to your shelf
Turtle Trinket Dish With A Shell Lid
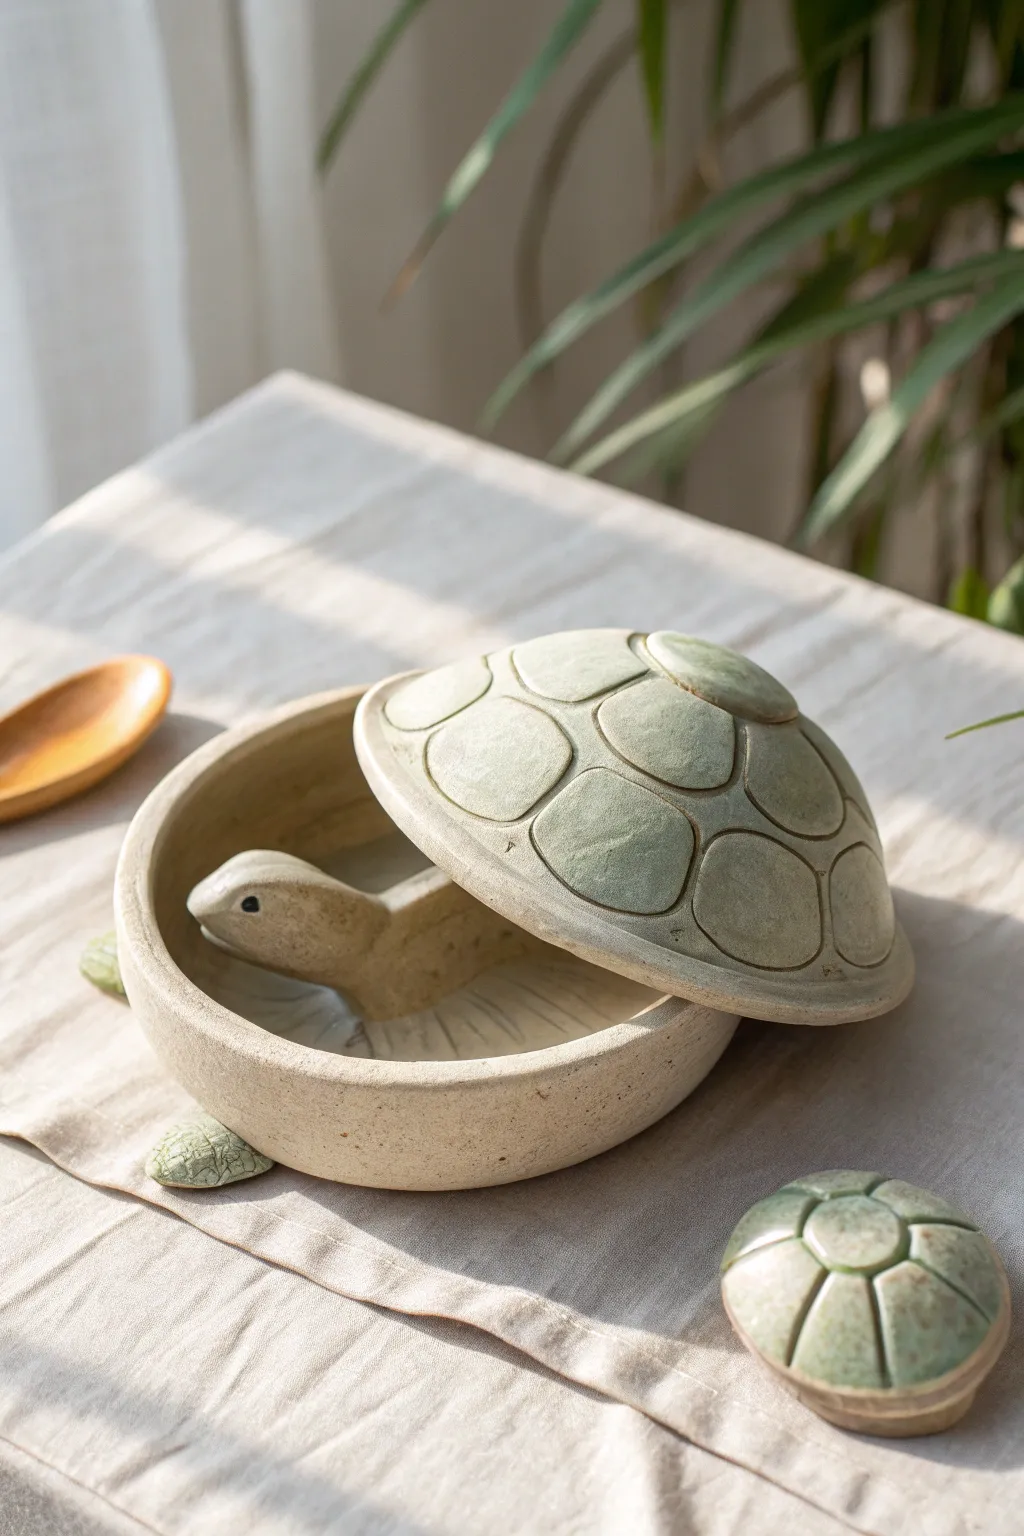
This charming ceramic project combines functionality with a whimsical surprise, featuring a removable shell lid that reveals a turtle basking inside. The textured green glaze on the shell contrasts beautifully with the speckled raw clay body, making it a perfect hiding spot for small treasures.
How-To Guide
Materials
- Speckled buff stoneware clay (or polymer clay for non-functional use)
- Pottery wheel (optional, can be hand-built)
- Rib tool
- Pin tool or needle tool
- Loop tool for trimming
- Sponge
- Slip and scoring tool
- Underglaze (Light Green)
- Clear glaze (matte or satin)
- Carving tool or modeling stick
- Small paintbrush
Step 1: Creating the Base
-
Form the bowl:
Begin by throwing a low, wide cylinder on the wheel, or pinch a ball of clay into a uniform bowl shape about 4 inches in diameter. Keep the walls relatively thick to support the structure. -
Refine the rim:
Smooth the upper rim with a chamois or sponge to ensure it is flat and level; this is crucial for the lid to sit properly later. -
Trim the foot:
Once leather hard, trim a clean, flat foot on the bottom of the bowl to give it a slight lift from the table surface. -
Add the feet:
Fashion four small, flat ovals from clay scraps. Score and slip them onto the underside of the clear rim to act as the turtle’s flippers, peeking out from beneath. -
Texture the feet:
Use a needle tool or small carving tool to scratch a scale-like texture onto the visible parts of the flippers for realism.
Clean Lines
When carving the shell pattern, wait until the clay is firm leather-hard. Soft clay will drag and create burrs, ruining the crisp geometric lines.
Step 2: Sculpting the Interior Turtle
-
Shape the body support:
Inside the bowl, create a sloped mound of clay in the center or slightly off-center to serve as the turtle’s body connecting to the head. -
Sculpt the head:
Roll a coil of clay and shape it into a smooth, tapered turtle head and neck. Attach this firmly to the interior mound or wall so the head rises just below the rim height. -
Detail the face:
Use a small stylus or needle tool to poke distinct eye holes and carve a subtle mouth line. Keep the expression simple and serene.
Hidden Gem
Glaze the inside bottom of the bowl a deep watery blue, so the internal turtle sculpture looks like it is swimming in a small pond when you open it.
Step 3: Crafting the Shell Lid
-
Create the dome:
Roll out a slab or pinch a shallow dome shape that is slightly wider than your bowl’s opening. It needs to overhang the rim slightly. -
Fit the lid:
Invert the lid onto the bowl (place plastic wrap between them if wet) to ensure the curve matches. I like to refine the edge here so it feels seamless. -
Add the flange:
On the underside of the lid, attach a small coil or carve away a lip so the lid locks securely onto the bowl without sliding off. -
Map the scutes:
Lightly sketch a geometric pattern of pentagons and hexagons on the top of the shell using a pencil or needle tool. -
Carve the relief:
Using a carving tool, deepen the lines between the shapes to create raised ‘scutes’ or shell plates. Round off the sharp edges of each plate with a damp sponge. -
Add the central knob:
Form a slightly elevated, rounded scute in the very center to act as a subtle handle for lifting the lid.
Step 4: Glazing and Finishing
-
Bisque fire:
Allow the piece to dry slowly and completely before firing it in the kiln to bisque temperature (usually Cone 06 or 04). -
Apply green wash:
Paint a light green underglaze over the top of the shell lid and the tiny flippers. Wipe back the high points with a sponge so the color stays darker in the carved recesses, highlighting the texture. -
Glaze the interior:
Apply a clear satin glaze to the interior of the bowl and the turtle head to make it food-safe or waterproof, while leaving the exterior raw if you prefer the stony look. -
Final fire:
Fire the piece to the maturity temperature of your clay (e.g., Cone 6). Ensure the lid is fired separately or on stilts if glazed on the rim.
Place this delightful dish on a console table to guard your keys or jewelry with slow and steady charm
Turtle Ring Dish (Shell As The Catch-All Bowl)
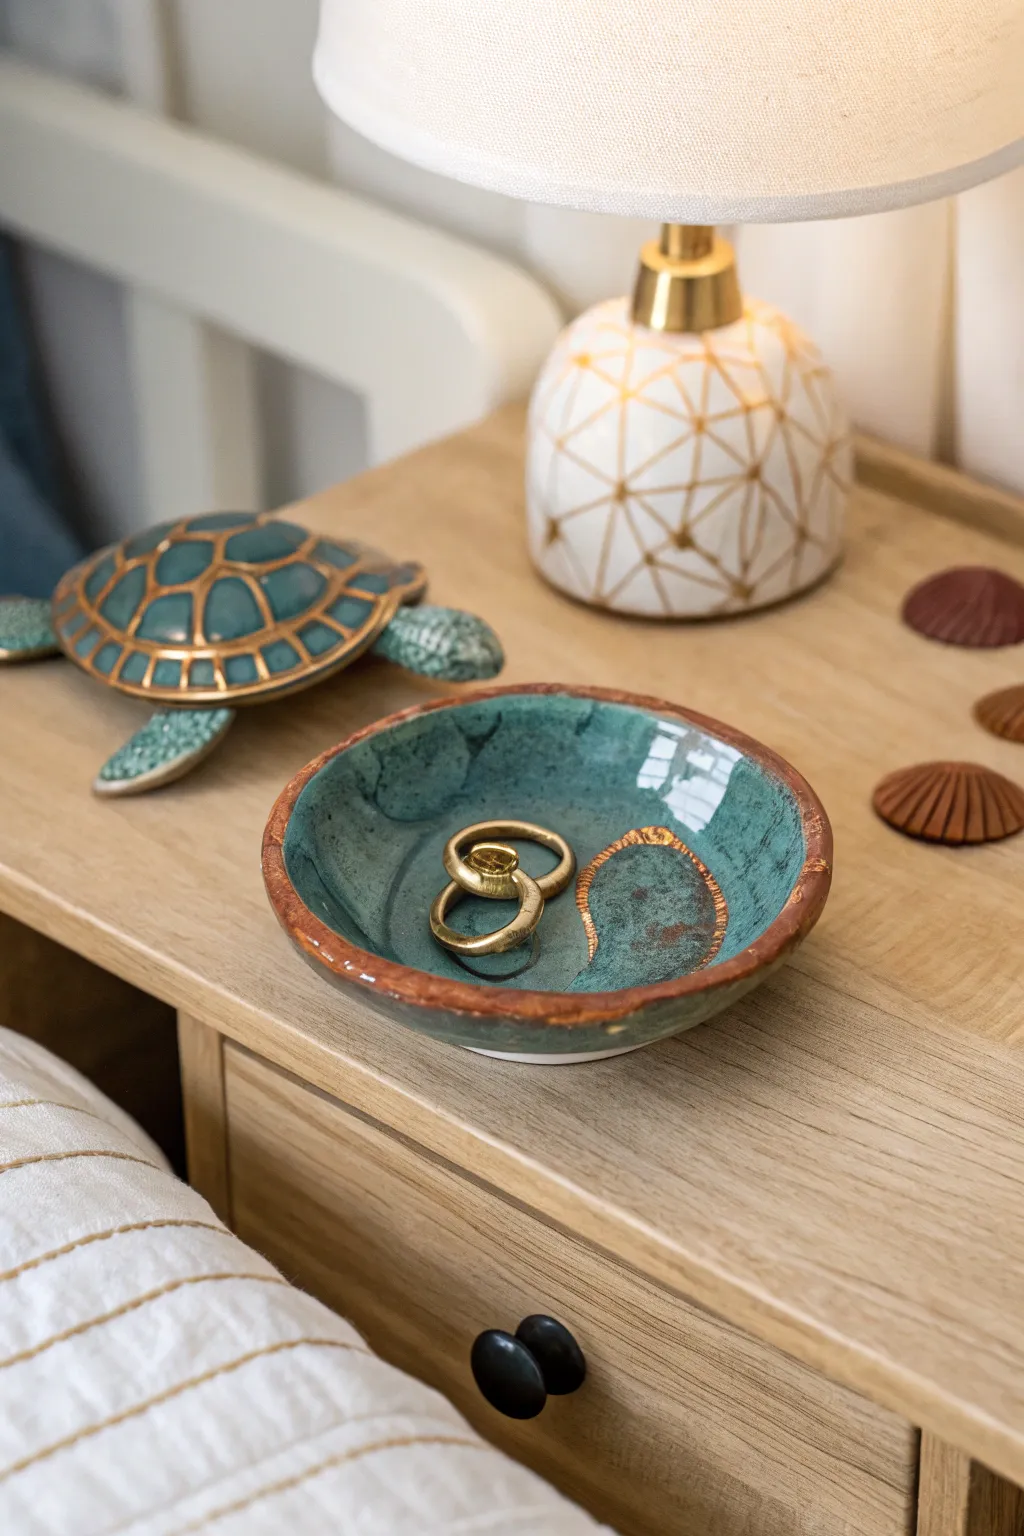
Capture the essence of a serene beach day with this elegant ring dish, designed to mimic the texture and color of an abstract turtle shell. Featuring a stunning teal glaze with distinct gold accents and a rustic brown rim, this piece is perfect for holding your favorite rings or simply adding a splash of coastal charm to your bedside table.
Step-by-Step
Materials
- Air-dry clay or polymer clay (white)
- Small rolling pin
- Circle cutter or small bowl (biscuit size)
- Small bowl (for shaping)
- Sandpaper (fine grit)
- Acrylic paints: Teal/Turquoise, Rust Brown, Gold Metallic
- Fine detail paintbrush
- Medium flat paintbrush
- Gloss varnish or clear resin
Step 1: Shaping the Clay Base
-
Condition the Clay:
Begin by taking a handful of your clay and kneading it thoroughly in your hands until it becomes warm, pliable, and free of any cracks. -
Roll the Slab:
Using your rolling pin, flatten the clay into an even slab about 1/4 inch thick. Try to keep the thickness consistent so it dries evenly. -
Cut the Circle:
Press your circle cutter or place a small upside-down bowl onto the clay slab and cut around it to create a perfect circle. -
Create the Texture:
Before shaping, you can gently press a textured sponge or crumpled foil into the clay surface to give it an organic, non-smooth feel similar to the inside of the dish in the photo. Alternatively, leave it relatively smooth for a modern look. -
Form the Bowl Shape:
Gently lift your clay circle and place it inside your small shaping bowl. Press it lightly so it takes on the curved form. I like to smooth the edges with a bit of water on my finger to remove any harsh cut lines. -
Dry Completely:
Allow the clay to dry fully according to the package instructions. For air-dry clay, this usually takes 24-48 hours. Don’t rush this step to prevent cracking. -
Sand for Smoothness:
Once dry, gently sand the rim and the interior if there are any unwanted rough spots.
Step 2: Painting and Glazing
-
Base Color Application:
Mix a vibrant teal or turquoise acrylic paint. Apply a solid coat to the interior of the bowl. You might need two coats for full opacity. -
Mist and Distress:
While the second coat of teal is still slightly tacky, dab a tiny bit of darker blue or grey paint in random spots to create depth, mimicking the natural variation seen in ceramic glazes. -
Create the Rust Rim:
Using a rust-brown color, carefully paint the very top edge of the rim. Bring the color down slightly into the bowl and onto the outside edge, feathering it so it isn’t a perfect line. This mimics earthenware clay. -
Paint the Exterior:
Paint the outside/bottom of the bowl. You can match the rim color for a rustic look or paint it white for contrast. -
Add Golden Accents:
Once the base paints are dry, dip a fine detail brush into metallic gold paint. Create an organic, incomplete oval shape inside the bowl, or splatter tiny dots for texture. -
Seal the Dish:
Apply a coat of high-gloss varnish over the entire interior. This gives it that wet, ceramic-like shine shown in the reference. -
Optional: Resin Finish:
For a glass-like, waterproof finish that matches the photo’s high reflection, pour a small amount of clear resin into the bowl and swirl it to coat, letting it cure completely.
Rim Perfection
Apply the rust-colored rim paint with a sponge rather than a brush. Dabbing creates a natural, pottery-fired texture instead of harsh brushstrokes.
Sculpted Turtle Add-on
Before drying the clay, sculpt a tiny turtle head and four flippers and attach them to the rim using clay slip to transform the simple bowl into a full turtle character.
Now you have a stunning faux-ceramic piece ready to keep your jewelry safe
Turtle Plant Pal (Tiny Planter Buddy Or Pot Hanger)
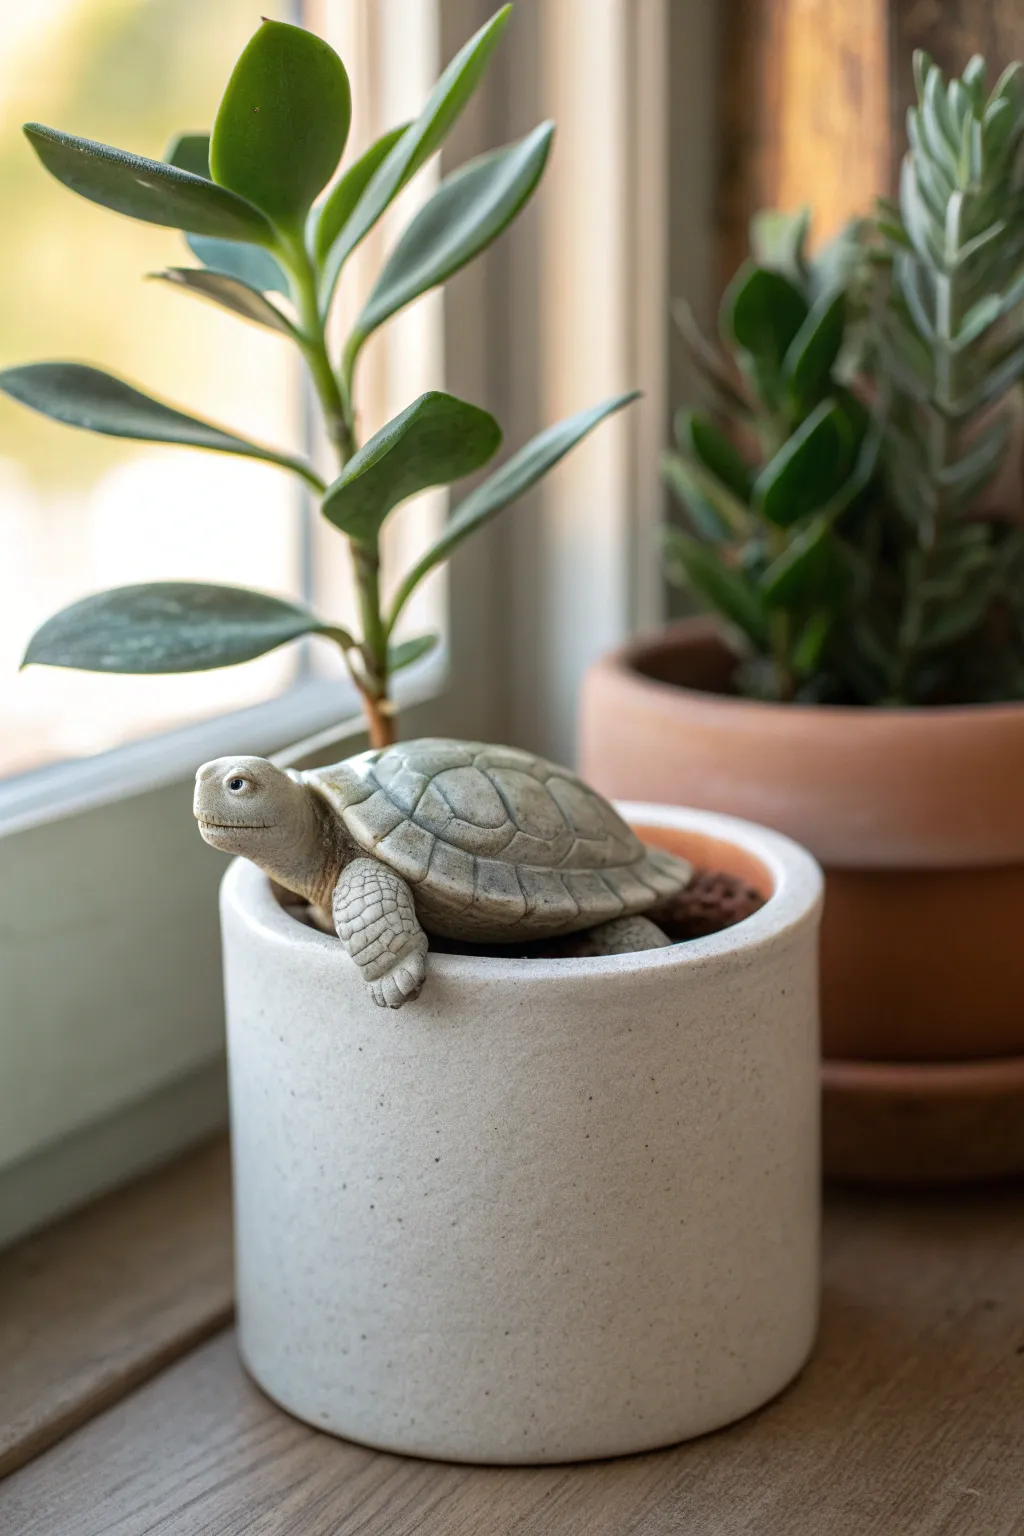
This charming little pot hanger adds a touch of whimsy to your indoor garden, appearing as though a curious turtle is climbing right out of your planter. With its realistic texture and gentle expression, this simple clay project brings subtle personality to any potted succulent or leafy friend.
Detailed Instructions
Materials
- Light grey or beige polymer clay (approx. 2 oz)
- Small amount of white and black clay (for eyes)
- Sculpting tools (needle tool, ball stylus)
- Texture sheet or fine mesh (optional for skin)
- Small rolling pin
- Empty plant pot (for sizing)
- Aluminum foil (for armature)
- Acrylic paints (diluted black/brown for wash)
- Fine paintbrush
- Paper towels
- Oven (if using polymer clay)
Step 1: Forming the Body and Shell
-
Prepare the core:
Crumple a small piece of aluminum foil into a flattened oval shape, roughly 1.5 inches long. This will be the inside of the shell, saving clay and reducing weight. -
Roll the shell clay:
Condition your grey clay until soft, then roll out a sheet about 1/4 inch thick. Drape this over your foil core, smoothing it down the sides to create a dome shape. -
Create the underside:
Roll a smaller, flat piece of clay for the plastron (tummy). Press the domed shell onto this bottom piece and smooth the seams together so the foil is completely sealed inside. -
Shape the rim:
Roll a thin snake of clay and wrap it around the bottom edge of the shell where the dome meets the flat bottom. Blend the top edge of this snake into the shell to create the marginal scutes (the rim of the shell). -
Carve the scutes:
Using a needle tool, lightly sketch a hexagon in the center of the shell fan out lines to the corners to create the classic tortoise shell pattern. Once happy with the spacing, press firmly to deepen these grooves.
Sliding Turtle?
If the dried clay is too slippery on the pot rim, glue a small strip of grippy rubber or a dot of hot glue under the front paws for extra traction.
Step 2: Sculpting the Head and Limbs
-
Attach the neck base:
Roll a thick cylinder of clay for the neck. Attach it to the front underside of the shell, blending the clay smoothly so the connection point is strong. -
Form the head:
Shape a slightly larger oval for the head and attach it to the neck. I like to tilt the head upward slightly so the turtle looks like he is greeting you. -
Define the face:
Use a ball stylus to press shallow sockets for the eyes. Use a needle tool to carve a horizontal line for the mouth, curving it up slightly at the corners for a subtle smile. -
Add the front legs:
Form two thick, bent sausage shapes for the front legs. This is the most crucial step: press these firmly against the rim of your empty practice pot to ensure the ‘hook’ shape fits perfectly. -
Attach the legs:
Score the clay where the legs meet the body (under the shell rim) and press them on. The legs should extend forward, ‘grabbing’ the air as if they are resting on the pot rim. -
Add back legs:
Create two smaller, rounded stumps for the back feet peeking out from under the rear of the shell. You don’t need much detail here, just enough to show presence.
Pro Tip: Custom Fit
Every pot has a different rim thickness. Before hardening, test the fit gently on the specific pot you intend to use to ensure the paws hook securely.
Step 3: Detailing and Finishing
-
Texture the skin:
Using a very small ball tool or a dull needle, press tiny circles or cross-hatching patterns onto the legs, neck, and top of the head to mimic wrinkled reptile skin. -
Refine the hands:
Use a knife tool to press indentations into the ends of the front flippers to suggest toes or claws. -
Add the eyes:
Press tiny balls of white clay into the sockets, followed by minuscule black pupils. A tiny highlight of white on the black dot brings it to life. -
Bake the piece:
If using polymer clay, bake according to the package directions. Pro tip: Bake it hanging on an oven-safe glass bowl rim to maintain the curved arm shape. -
Apply a wash:
Once cool, mix a tiny drop of black or brown acrylic paint with water. Brush it over the entire turtle, getting into the cracks. -
Wipe it back:
Immediately wipe the wet paint off the raised surfaces with a paper towel. The dark paint will stay in the shell lines and skin texture, highlighting your sculpting work.
Place your new slow-moving friend on its pot and enjoy the calm vibe it brings to your windowsill
Turtle Incense Holder With Smoke Trail Vibes
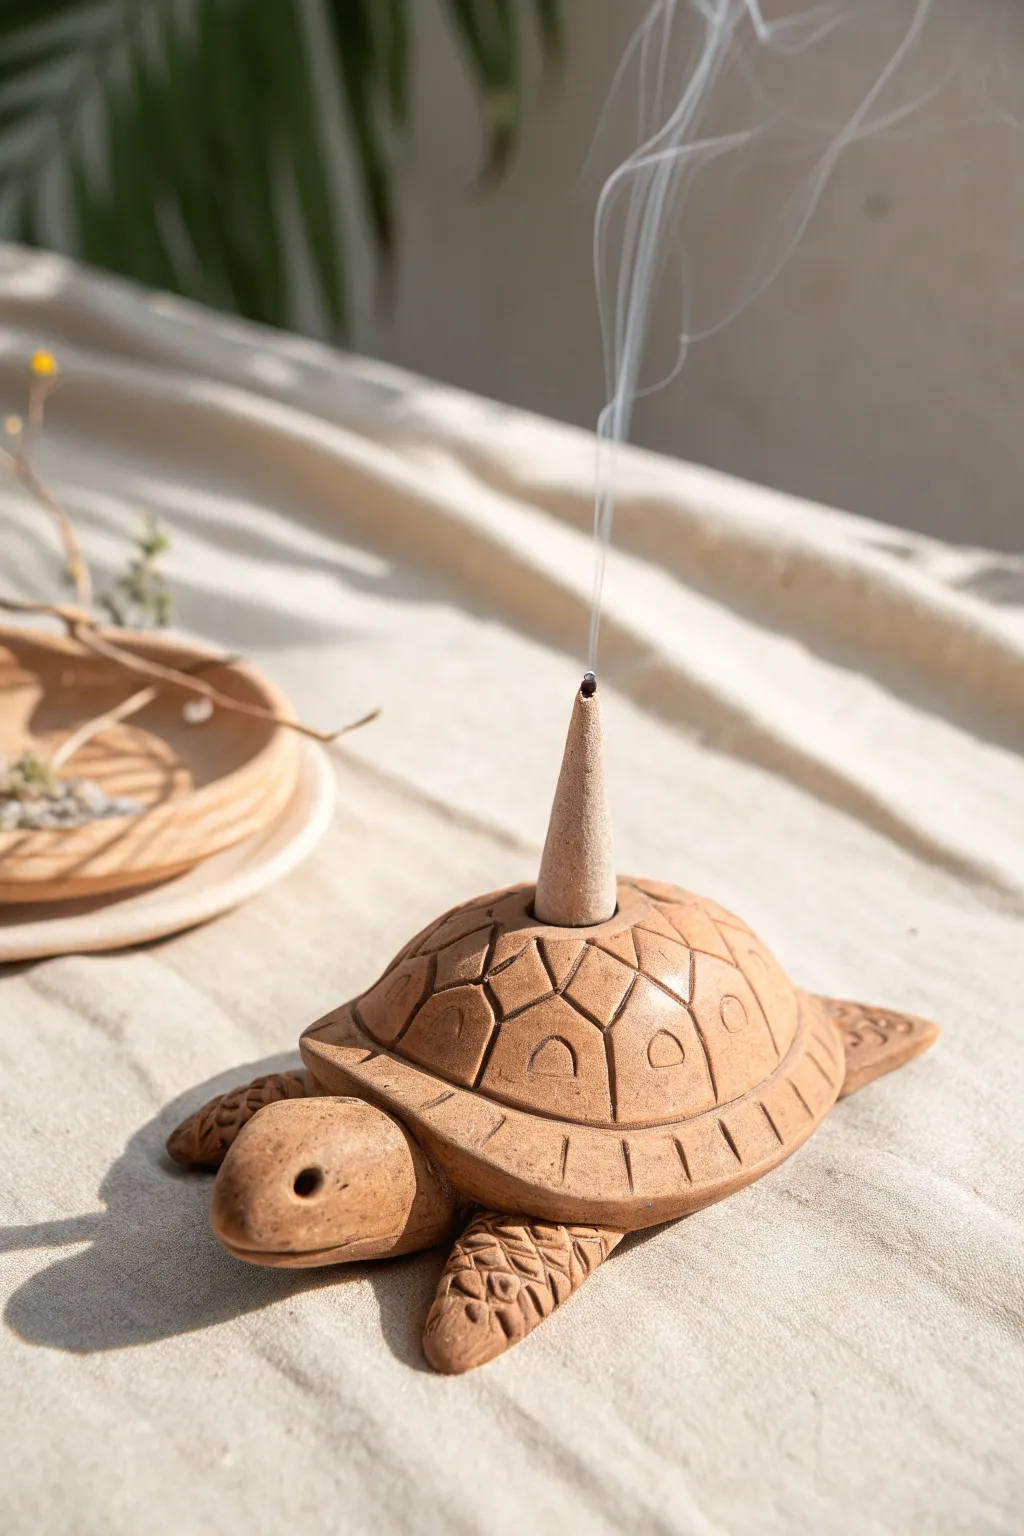
Bring a sense of slow, deliberate calm to your space with this terracotta-style turtle incense burner. Its hollow shell design creates a perfect resting spot for cone incense, allowing delicate wisps of smoke to rise from the center.
Step-by-Step Guide
Materials
- Terracotta-colored air-dry clay or polymer clay
- Rolling pin
- Needle tool or toothpick
- Small circle cutter (or a straw)
- Clay sculpting tools (spoon or loop tool)
- Water and sponge (for smoothing)
- Small bowl (for shaping the shell)
- Cone incense (for sizing)
Step 1: Sculpting the Base Form
-
Prepare the shell:
Start by taking a medium-sized ball of clay and rolling it into a smooth sphere. Gently flatten it into a thick disc, or press it over the back of a small bowl to give it a domed, turtle shell shape. -
Hollow the center:
If you used a solid disc, gently press your thumbs into the underside to create a concave hollow. This space is crucial for airflow if the incense sits underneath, or simply to reduce weight. -
Create the incense seating:
On the very top center of the domed shell, press a small indentation. I find using the base of an actual incense cone creates the perfect size guide, ensuring it sits flat later. -
Shape the head:
Roll a smaller ball of clay into a smooth oval. Slightly flatten one end where it will attach to the body, keeping the nose end rounded and soft. -
Form the flippers:
Create four teardrop shapes for the legs. Flatten them gently so they look like swimming flippers rather than walking legs. -
Attach the limbs:
Score the underside of the shell rim and the tops of the legs and head. Apply a little water or slip (liquid clay) and press them firmly together to join.
Clean Lines Pro Tip
For super crisp carved lines, wait until the clay has stiffened slightly (leather hard) before carving the shell patterns. The clay will drag less.
Step 2: Detailing & Texturing
-
Define the shell rim:
Using a needle tool, draw a line around the circumference of the shell, about a quarter-inch from the bottom usage, to create a distinct rim border. -
Carve the rim segments:
Along that bottom rim border, make small vertical hash marks periodically to mimic the separate scutes found on the edge of a turtle’s shell. -
Draft the central pattern:
Draw a hexagon shape around the central incense indentation. From the points of this hexagon, draw lines extending downward toward the rim border to create the main shell grid. -
Add decorative arches:
Inside each grid section you just created, press a small arch shape. You can freehand this with a needle tool or use the edge of a small straw or tool for uniformity. -
Texture the skin:
Take your needle tool and gently press a scaly pattern onto the flippers. A cross-hatch or diamond pattern works beautifully here to contrast with the smooth head. -
Add facial features:
Using the tip of a small tool or a toothpick, press two small holes for the eyes and a faint horizontal line for the mouth.
Level Up: Fire & Ash
Mix a tiny amount of black acrylic paint into your varnish and wipe it off immediately after applying. The pigment will stay in the grooves, making the pattern pop.
Step 3: Refining & Finishing
-
Smooth the surface:
Dip your finger or a sponge in a little water and gently rub away any harsh fingerprints or rough clay crumbs, paying attention to the smooth areas of the shell. -
Check stability:
Set the turtle on a flat surface to ensure it doesn’t wobble. If the belly bulges too much, gently press the whole piece down to flatten the bottom. -
Final ventilation check:
Ensure the spot where the incense sits is flat and stable. If you want smoke to travel through the shell, you can poke a small hole in the very center, but for a surface burner, a flat indent is fine. -
Dry or bake:
Follow the instructions for your specific clay. If air drying, rotate the piece occasionally so the underside dries evenly. If baking polymer, tent it with foil to prevent scorching.
Once dry, place your favorite incense cone on top and watch the smoke drift upward from your serene little friend
Turtle Magnet Set For Fridge Or Studio Tool Cart
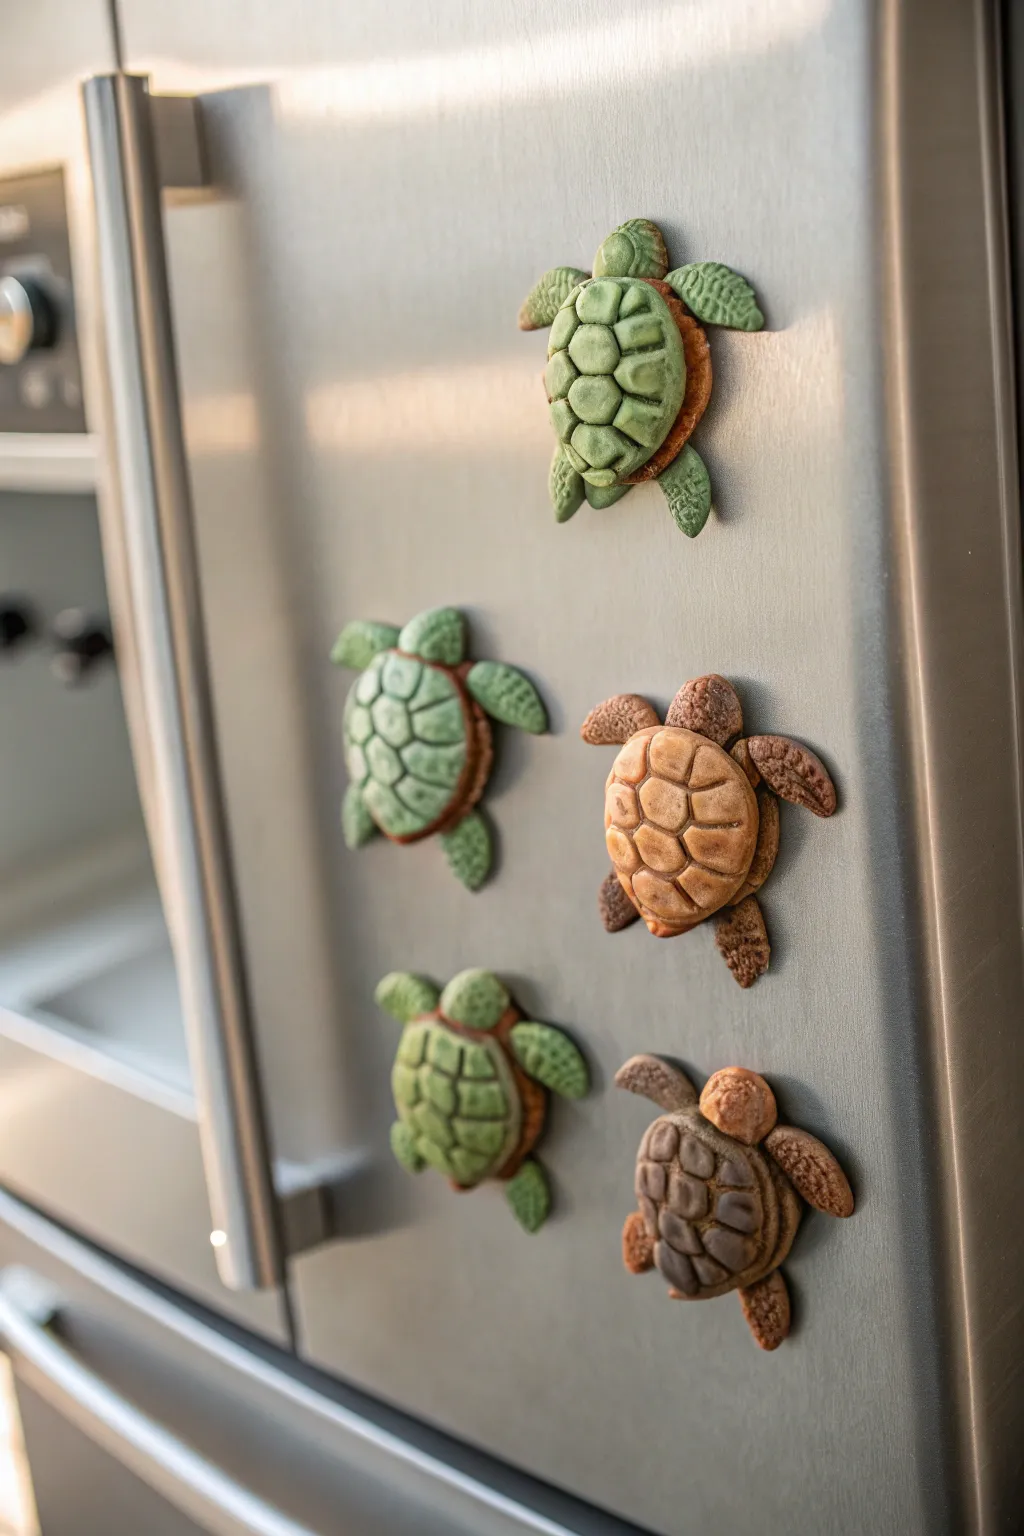
These adorable sea turtle magnets bring a touch of ocean life to your kitchen with their intricate, realistic textures and warm, earthy tones. The design features a charming layered look, resembling tiny turtle cookies or carved sculptures, perfect for holding up photos or notes.
How-To Guide
Materials
- Polymer clay (shades of moss green, leaf green, tan, and chocolate brown)
- Strong round craft magnets (ceramic or neodymium)
- Ball stylus tool (medium size)
- Needle tool or toothpick
- Leaf veining mold, texture sheet, or real leaf (for flippers)
- Small round cutter (approx. 1 inch)
- Small oval cutter (optional)
- Super glue or E6000 adhesive
- Baking sheet and parchment paper
- Oven (for baking clay)
Step 1: Prepping and Shaping the Bodies
-
Condition the clay:
Begin by kneading your chosen clay colors until they are soft and pliable. You will need distinct colors for the shell and the flippers/head to create the two-tone look seen in the photo. -
Form the base:
Roll a small ball of clay (about the size of a marble) for the body base and flatten it slightly into a thick oval disc. This will serve as the anchor for the limbs and head. -
Create the flippers:
To make flippers, roll four small pea-sized balls of clay. Pinch one end of each ball to form a teardrop shape. -
Texturize the flippers:
Gently press each teardrop onto a texture tool—I like using a silicone leaf vein mold or a coarse sponge—to give them that scaly, realistic skin appearance. Flatten them slightly as you press. -
Attack limbs to base:
Press the narrow points of the four flippers onto the underside of your oval base disc. Arrange them so the front flippers are slightly larger and angled forward, while the back flippers angle backward. -
Add the head:
Roll a slightly larger ball for the head. Texture it lightly if desired, or keep it smooth, and press it firmly onto the front center of the base disc.
Step 2: Sculpting the Shell
-
Form the shell dome:
Roll a ball of clay in a contrasting color (e.g., use green if the body is brown). This ball should be large enough to cover the body base but leave the flippers exposed. -
Shape the carapace:
Flatten the bottom of the ball and smooth the top into a gentle dome shape. It should look like a small bun. -
Mark the central scutes:
Using a needle tool or a blunt knife, gently press a hexagon shape into the very center of the shell dome. Do not cut all the way through; just make an indentation. -
Add surrounding scutes:
Draw lines radiating out from the corners of your central hexagon to the edge of the shell. Connect these lines to create the ring of pentagons surrounding the center. -
Soften the edges:
Use your finger or a soft silicone tool to gently tap the sharp edges of your impressed lines. This makes the shell look organic and worn rather than mechanically cut. -
Join shell to body:
Place the sculpted shell on top of the body base. Press down gently to adhere the layers without squashing the texture. The body clay should peek out slightly from underneath the shell edge.
Natural Texture Hack
Don’t have a texture mat? A clean piece of rough sandpaper or a crumpled ball of aluminum foil pressed against the clay flippers creates perfect realistic skin texture.
Step 3: Finishing and Assembly
-
Deepen the textures:
Go back over your shell lines with the needle tool to ensure they are distinctive. You can also add tiny stippling dots to the head for extra detail. -
Embed the magnet (Method A):
If you want the magnet embedded, flip the turtle over and press your magnet into the belly clay to create an indentation. Remove the magnet, bake the clay, and glue it in later. -
Bake the turtles:
Arrange your turtles on a parchment-lined baking sheet. Bake according to your polymer clay manufacturer’s specific instructions (usually 275°F for 15-30 minutes per 1/4 inch thickness). -
Cool down:
Allow the turtles to cool completely on the baking sheet. Moving them while warm can cause cracks or distortion. -
Attach the magnet:
Apply a drop of strong cyanoacrylate glue (super glue) or E6000 to the back of the turtle. Press the magnet firmly into place and let it cure fully before placing it on your fridge.
Avoid Fingerprints
Polymer clay loves to hold onto fingerprints. Lightly dust your fingertips with cornstarch before the final smoothing, or brush the raw clay with a little baby oil to smooth them out.
Once the glue is set, arrange your shiver of turtles on the fridge for a charming daily reminder of the sea
Ocean Scene Turtle With Tiny Seaweed And Shell Friends
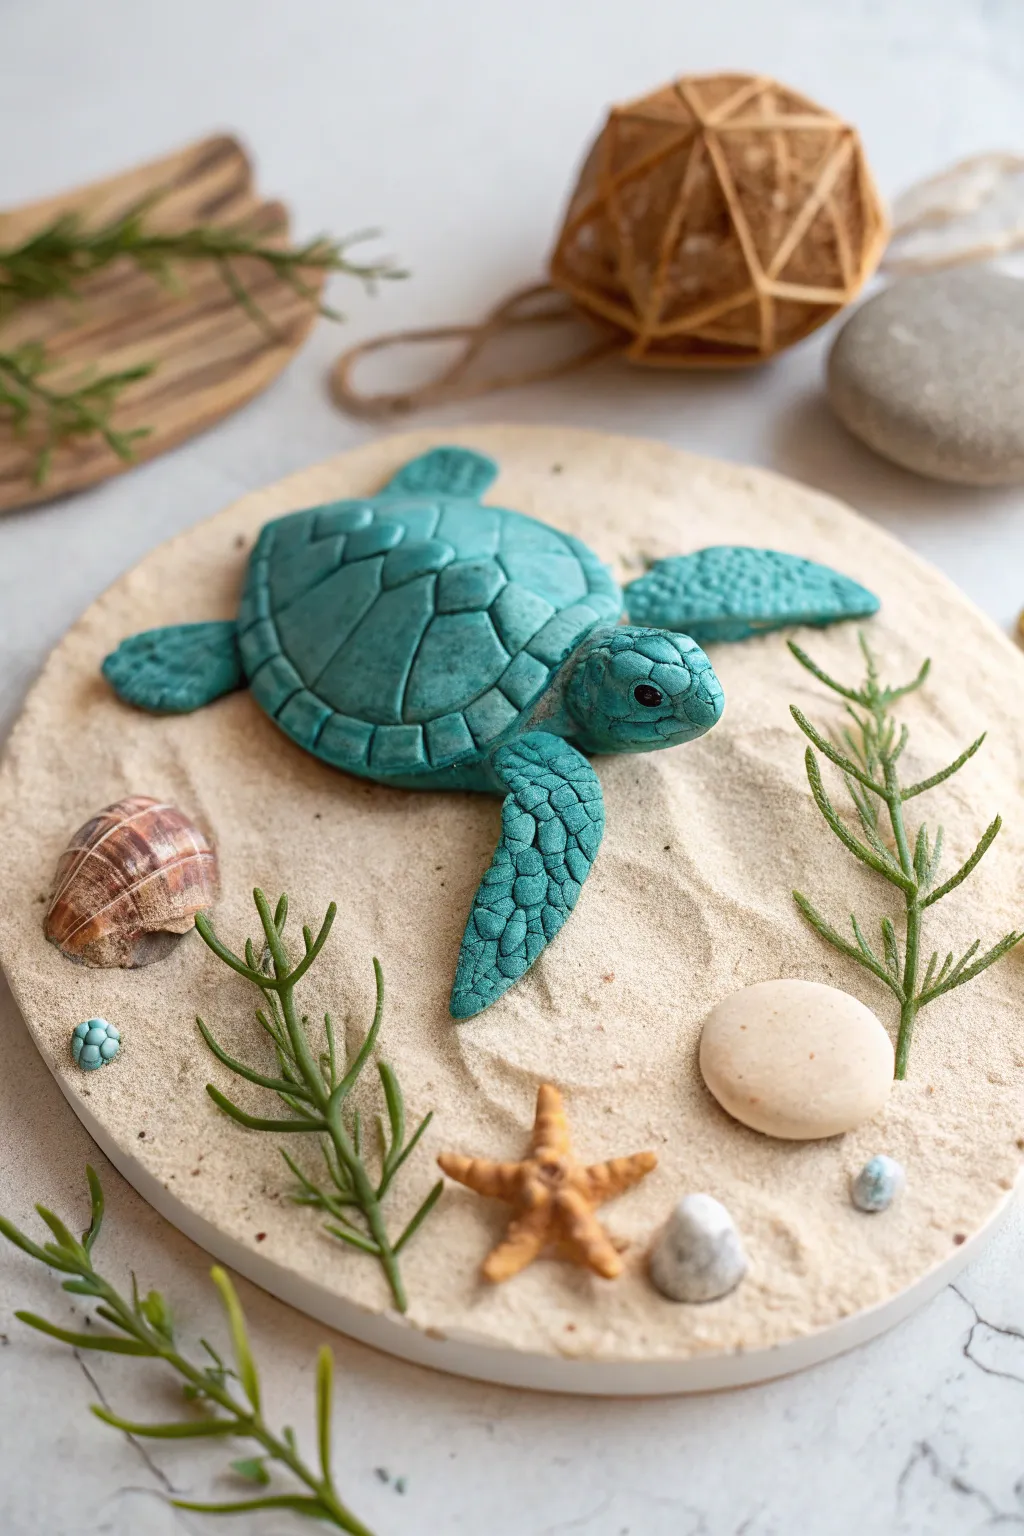
Capture the magic of a shoreline discovery with this incredibly detailed polymer clay scene. Featuring a textured sea turtle resting on realistic sandy terrain alongside tiny starfish and shells, this project is perfect for bringing a piece of the ocean into your home.
Step-by-Step Tutorial
Materials
- Teal or seafoam green polymer clay
- White or beige polymer clay (for the base)
- Small amount of brown/tan clay (for starfish/shells)
- Real sand (fine grain)
- Liquid polymer clay (translucent or bake-and-bond)
- Round cutter (approx. 4-5 inches)
- Needle tool
- Ball stylus tool
- Soft pastel chalks (black, dark green, brown)
- Tiny black beads (for eyes)
- Artificial moss or plastic seaweed sprigs
- Small pebble
- Acrylic roller
- Small paintbrush
- Gloss varnish (optional)
Step 1: Creating the Sandy Base
-
Prepare the foundation:
Roll out a slab of white or beige polymer clay to about 1/4 inch thickness. Use your round cutter to create a perfect circle. -
Add the texture:
Brush a thin layer of liquid polymer clay over the entire top surface of the circle. This acts as the adhesive for the next step. -
Apply the sand:
Generously sprinkle fine sand over the liquid clay. Gently press it down with your fingers to ensure it embeds well, then shake off the excess. Set this base aside.
Step 2: Sculpting the Turtle
-
Shape the shell:
Condition your teal clay and roll a ball about the size of a large walnut. Flatten the bottom slightly and shape the top into a smooth dome. -
Carve the scutes:
Using a needle tool, lightly sketch the pattern of the turtle’s shell plates (scutes). Start with a central hexagon and work your way out. Once happy with the pattern, deepen the lines carefully. -
Texture the shell:
To give the shell a weathered look, gently tap the surface with a piece of sandpaper or a stiff brush. I like to dust a tiny bit of dark green pastel powder into the crevices now to add depth. -
Form the flippers:
Create four teardrop shapes from teal clay. Flatten them. The front two should be larger and curved slightly backward, while the rear two are smaller and rounded. -
Detail the skin:
Use a small ball stylus or needle tool to press a pebble-like texture into the flippers and the neck area. This mimics the scaly skin of a real sea turtle. -
Add the head:
Roll a smaller oval for the head. Press two small indentations for eye sockets and insert the tiny black beads. Use your needle tool to carve the mouth line and nostril details. -
Assemble the turtle:
Place the shell onto the sandy base first. Then, tuck the flippers and head underneath the shell edges, pressing gently to bond the clay parts together.
Loose Sand?
If sand sheds after baking, simply brush a diluted mixture of white craft glue and water over the sandy areas to seal it all in without losing the texture.
Step 3: Adding Sea Life Details
-
Sculpt the starfish:
Take a tiny bit of tan or orange clay. Pinch five small points to create a star shape. Use a needle tool to poke a line of holes down the center of each arm. -
Create the seashell:
Roll a small cone of brown/tan swirled clay. Flatten the wide end slightly and use a blade to indent spiral lines, creating a conch-like shell. -
Weathering effects:
Brush a little brown pastel dust on the starfish and shell to make them look sandy and natural. -
Final arrangement:
Press the starfish, the shell, and a small real pebble into the sand base around the turtle. Ensure they make good contact with the underlying clay.
Ocean Epoxy
Make a shoreline effect! Mix a small amount of two-part epoxy resin with blue dye and pour a tiny puddle on one edge of the base to simulate approaching water.
Step 4: Finishing Touches
-
Plant life:
Take small sprigs of artificial moss or plastic greenery. Press the stems directly into the soft clay base while it is still raw to secure them. -
Baking:
Bake the entire piece according to your polymer clay manufacturer’s instructions (usually 275°F/130°C for 15-30 minutes). Let it cool completely inside the oven to prevent cracking. -
Wet look (optional):
If you want the turtle to look like it just emerged from the water, brush a thin coat of gloss varnish over the shell and eyes.
Now you have a serene little slice of the beach to keep on your desk
Glow-Style Shell Details For A Nighttime Turtle Look
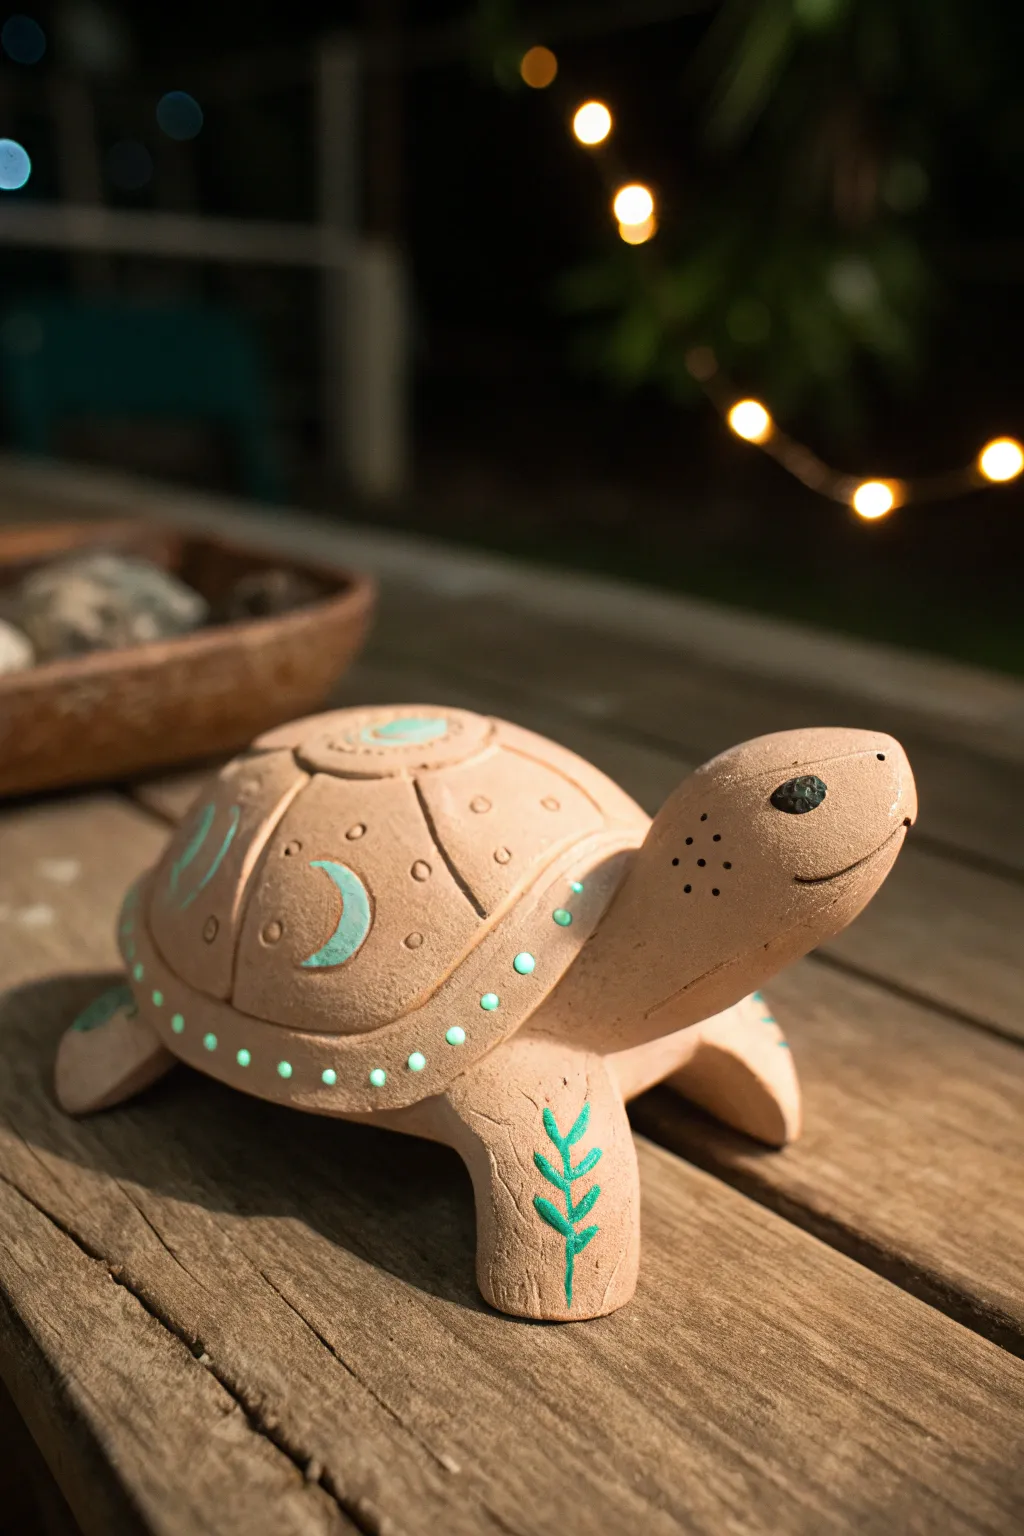
Enhance your garden or patio with this charming earthen turtle featuring celestial motifs and glowing accents. The distinctive terracotta finish paired with luminescent paint creates a magical nighttime effect while remaining earthy and natural during the day.
Step-by-Step Guide
Materials
- Terracotta-colored air dry clay or polymer clay
- Sculpting tools (needle tool, modeling tool)
- Small bowl of water (for smoothing)
- Glow-in-the-dark acrylic paint (turquoise/aqua)
- Fine detail paintbrush (size 0 or 00)
- Small round object (like a bead or tool end) for indentations
- Black acrylic paint
- Matte sealant/varnish
Step 1: Sculpting the Base Form
-
Form the shell:
Start with a large ball of terracotta clay about the size of a grapefruit. Flatten the bottom against your work surface and round out the top to create a smooth, domed shell shape. -
Shape the head:
Roll a smaller ball of clay into a thick teardrop shape. Attach the wider end to the front of the shell, blending the clay seams thoroughly with a little water or slip so the connection is invisible. -
Add the legs:
Create four stout, rectangular logs for the legs. Position them under the corners of the shell, ensuring they are thick enough to support the body’s weight, and blend the seams upward into the shell’s underside. -
Refine the pose:
Gently press the head upwards so the turtle looks slightly raised and alert. Smooth all surfaces with a damp finger to remove fingerprints. -
Carve the mouth:
Use a needle tool or a thin blade to slice a gentle, curved smile line into the side of the snout.
Super Charge Tip
To make the glow paint pop, paint a thin layer of white acrylic inside the carvings first. This white base reflects light through the glow pigment
Step 2: Adding Details & Texture
-
Outline the shell scutes:
Using a needle tool, lightly carve a pattern onto the shell. Start with a central circle at the very top, then carve curved lines radiating downward to divide the shell into distinct segments known as scutes. -
Create the celestial moon motifs:
Inside the side scutes, carefully carve shallow crescent moon shapes. I find it easiest to press a circular tool in twice, slightly offset, to create the perfect crescent curve. -
Add dot details:
Use a small, blunt tool end or the back of a paintbrush to press small circular indentations around the crescent moons and on the top central scute. -
Border texturing:
Create a row of evenly spaced small indentations all along the bottom rim of the shell. These will later become glowing dots. -
Leg details:
On the front legs, use your needle tool to carve a simple leafy vine pattern growing upward. -
Face freckles:
Poke a cluster of tiny dots on the ‘cheeks’ of the turtle using a needle tool for added texture. -
Eye socket preparation:
Press a small oval indentation where the eye should be. This creates a recessed area for the painted eye later. -
Drying:
Allow your clay to dry completely according to the package instructions (usually 24-48 hours for air dry clay) before painting.
Fixing Cracks
If small cracks appear during drying, mix a tiny bit of fresh clay with water to make a paste and fill the cracks, then smooth over with a damp finger
Step 3: Painting the Glow Effects
-
Painting the moons and markings:
Using your fine detail brush, fill the carved crescent moons and the top shell markings with turquoise glow-in-the-dark paint. You may need 2-3 coats for a solid opacity. -
Filling the rim dots:
Carefully dab a drop of the glow paint into each indentation along the shell’s bottom rim. Let the paint pool slightly in the divot. -
Highlighting the vine:
Paint the carved vine pattern on the leg with the same glow paint. -
Painting the eye:
Paint the recessed eye socket black. Once dry, add a tiny dot of glow paint or white paint as a reflection highlight to bring the character to life. -
Sealing the piece:
Once all paint is fully dry, apply a coat of matte varnish over the entire turtle to protect the clay and paint from moisture.
Now you have a whimsical garden guardian that reveals its magic when the sun goes down
Geometric Modern Turtle (Clean Lines, Graphic Shell)
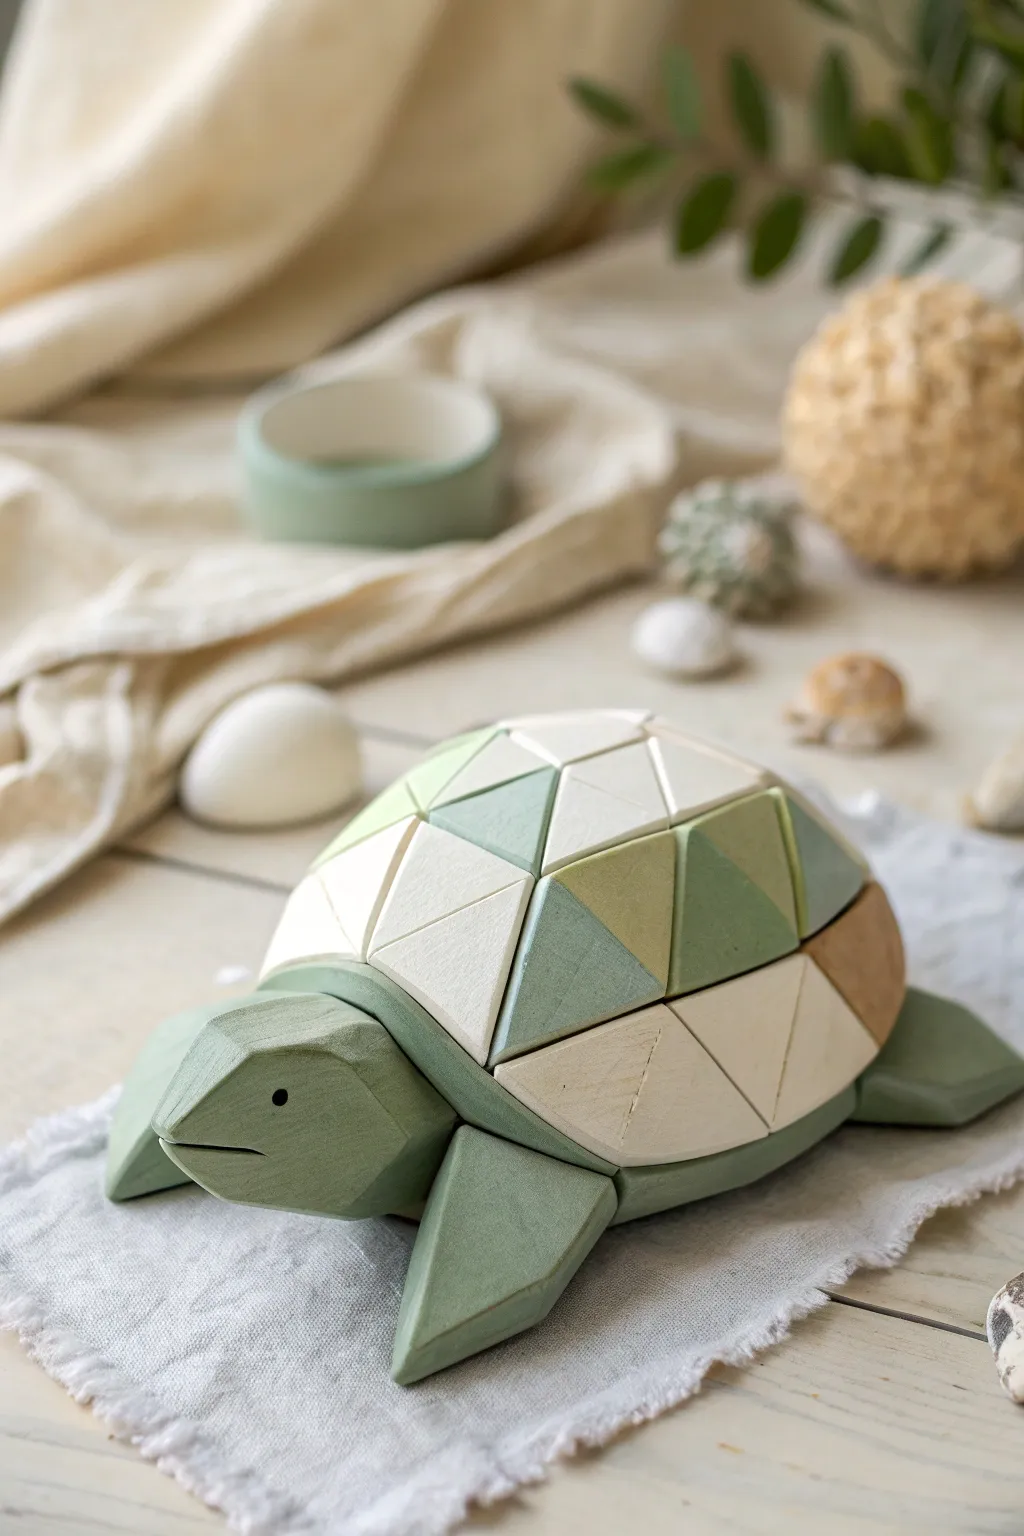
Embrace modern minimalism with this sleek turtle sculpture featuring a striking geometric shell. The design relies on clean, faceted planes and a soft, muted color palette of sage and cream to create a sophisticated decorative piece.
Detailed Instructions
Materials
- White air-dry clay or polymer clay (approx. 500g)
- Acrylic paints (sage green, off-white/cream, raw sienna)
- Craft knife or scalpel blade
- Rolling pin
- Ruler or straight edge
- Sandpaper (fine grit)
- Small flat paintbrush
- Matte varnish or sealant
- Water and slip (if using air-dry clay)
- Foil or paper armature (optional for shell volume)
Step 1: Sculpting the Base Body
-
Form the main dome:
Begin by rolling a large ball of clay for the shell. Gently flatten the bottom against your work surface to create a sturdy dome shape. If you want to save weight, you can sculpt this over a crumpled foil core. -
Shape the head:
Roll a smaller, oval-shaped piece of clay for the head. Instead of smoothing it into a round organic shape, use your craft knife to slice away planes on the sides and top, creating a faceted, low-poly look. -
Create the flippers:
Cut four thick triangular slabs for the flippers. Similar to the head, use your knife to trim the edges at sharp angles, giving them a geometric, chiseled appearance rather than a rounded aquatic feel. -
Assemble the parts:
Score and slip (or use liquid clay) to attach the faceted head and flippers to the underside of the shell dome. Ensure the connections are seamless underneath, but keep the visible faceted edges sharp. -
Define facial features:
Use a fine point tool or the tip of your knife to carve a simple horizontal line for the mouth. Prick two small holes for the eyes, keeping the expression neutral and stylized.
Clean Cuts Pro Tip
Chill your clay in the fridge for 15 minutes before cutting tiles. It firms up the material, resulting in much sharper corners.
Step 2: Creating the Geometric Shell
-
Roll out clay for tiles:
Roll a slab of clay to an even thickness of about 3-4mm. This will be used to create the distinct triangle tiles that cover the shell. -
Cut the triangles:
Using a ruler and craft knife, cut numerous equilateral triangles from the slab. You will need roughly 20-30 pieces depending on the size of your turtle. -
Dry fitting:
Before gluing anything, place your triangles on the rounded shell to plan the arrangement. They won’t sit perfectly flat against the curve, which is actually desirable as it adds dimension. -
Attach the top tiles:
Begin attaching the clay triangles starting at the very top center of the shell. Use a small amount of slip or adhesive to secure them. -
Work downwards:
Continue placing triangles in concentric rings moving down the shell. Allow small gaps between the tiles to simulate grout lines and emphasize the geometric construction. -
Trim edges:
For the bottom-most row, you may need to trim the triangles to align with the bottom rim of the shell dome for a clean finish.
Gaps Between Tiles?
If gaps between triangles are too large due to the shell’s curve, fill them with a dark grey paint to create intentional shadow lines.
Step 3: Refining and Painting
-
Let it dry:
Allow the entire piece to dry completely. If using air-dry clay, this may take 24-48 hours. I like to let this dry slowly away from direct heat to prevent cracking. -
Sand for sharpness:
Once hard, use fine-grit sandpaper to gently smooth the flat surfaces of the triangles and the faceted body. Be careful not to round over your crisp edges. -
Base coat the body:
Paint the head, flippers, and the visible gaps between the shell tiles in a solid, matte sage green. -
Paint the shell tiles:
Paint the individual triangles. To recreate the image, use a random pattern of cream white, sage green, and a few accents of raw sienna (light brown). -
Add eye details:
Use a tiny dot of black paint inside the eye indents to bring the turtle to life. -
Seal result:
Apply a coat of matte varnish over the entire sculpture. This protects the paint and unifies the finish without making it look glossy or plastic.
Place your modern turtle on a shelf or desk where the light can catch its faceted angles
Whimsical Turtle Totem (Stacked Mini Shells As Sculpture Art)
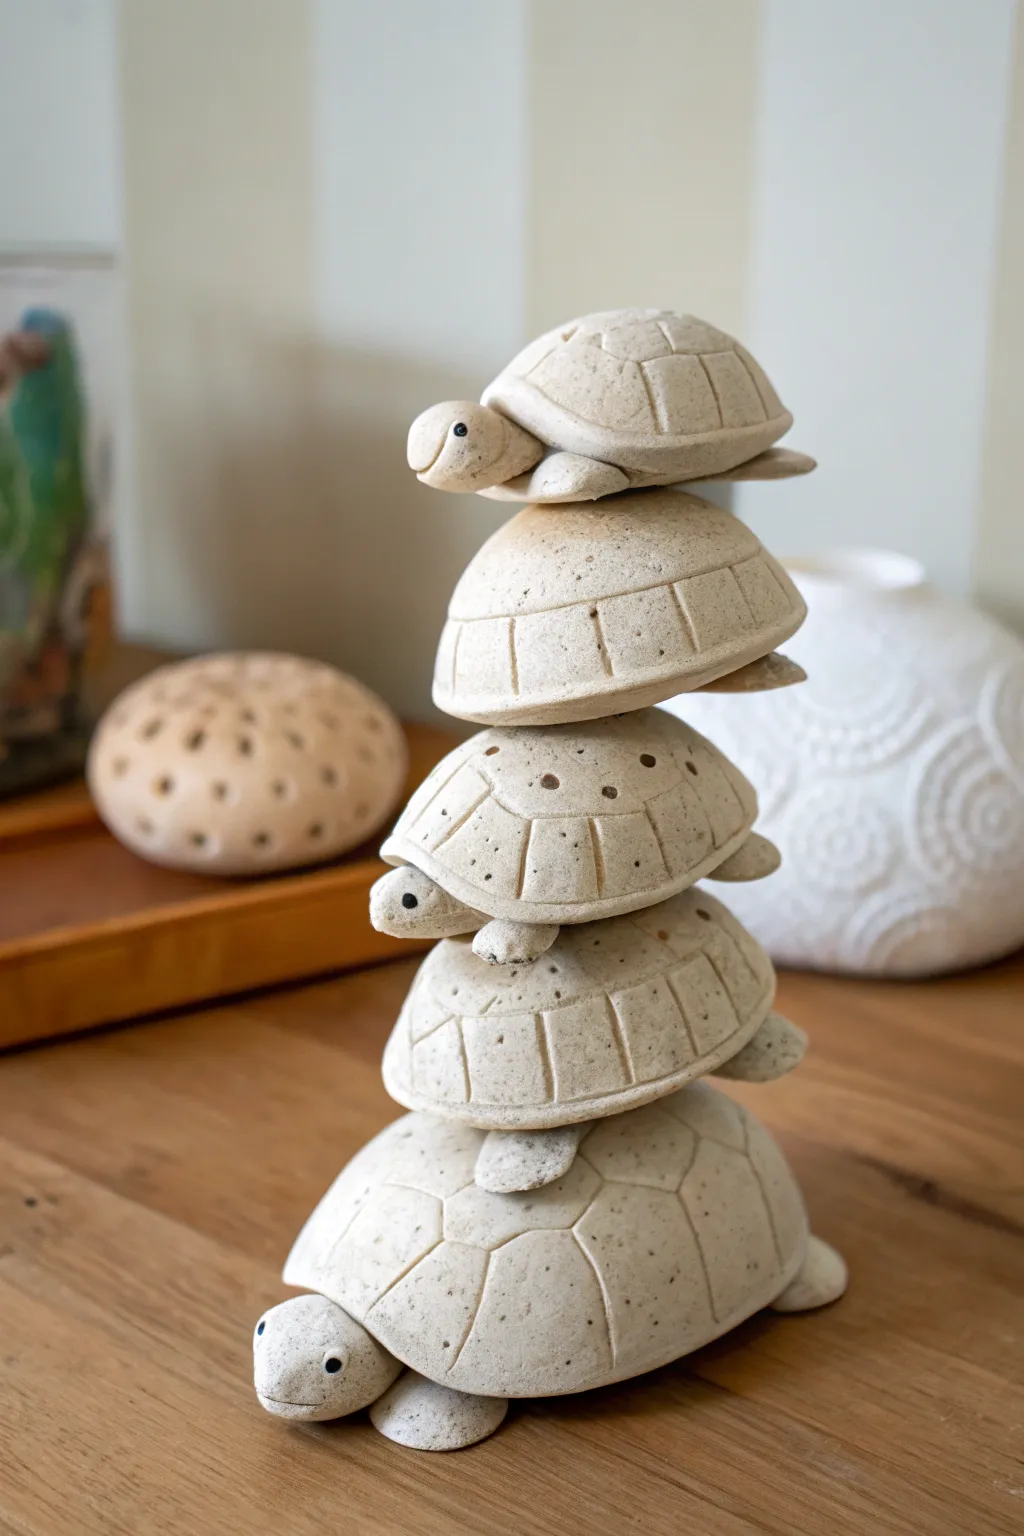
This charming sculpture features a precarious-looking stack of five clay turtles, graduated in size from a sturdy base to a tiny topper. The speckled, stone-like finish and simple incised shell patterns give it a timeless, organic feel perfect for a shelf display.
Step-by-Step
Materials
- White or cream-colored polymer clay (2-3 blocks)
- Speckled clay additive or coarse black pepper/sand
- Rolling pin or pasta machine
- Assorted circle cutters (5 graduated sizes)
- Needle tool or toothpick
- Ball stylus tool
- Small black glass beads (for eyes)
- Liquid clay or bake-and-bond
- Aluminum foil
- Sculpting tools (silicone shapers)
- Oven for baking
Step 1: Preparing the Clay
-
Mix the faux-stone:
Start by conditioning your white or cream clay until soft. To achieve that organic, speckled stone look seen in the photo, kneed in a small amount of speckled clay additive or even coarse black pepper and fine sand until evenly distributed. -
Divide the portions:
Separate your clay into five portions, graduating in size. You’ll need a large chunk for the base turtle, and increasingly smaller amounts for the four stacked on top.
Step 2: Sculpting the Base Turtle
-
Form the shell body:
Take the largest portion of clay. Roll a ball of aluminum foil to use as a core armature—this saves clay and prevents sinking. Wrap the clay around the foil to create a smooth, domed oval shape. -
Create the limbs:
Roll four small logs for legs and flatten them slightly into paddle shapes. Attach these to the underside of the shell body, blending the seams with a silicone tool so they are secure. -
Sculpt the head:
Roll a slightly larger tear-drop shape for the head. Press it gently into the front of the shell. Use a ball stylus to make indentations for eye sockets, then press a small black bead into each socket. -
Detail the shell:
Using a needle tool, lightly draw a hexagonal pattern on the top of the shell. Start with a central shape and draw radiating lines down the sides to mimic a turtle’s scutes. Don’t press too hard; just score the surface.
Slumping shells?
If your turtles are sagging under the weight of the stack before baking, bake the base turtle first for 15 minutes, let it cool, then stack and bake raw clay on top.
Step 3: Creating the Stacked Shells
-
Sculpt the intermediate shells:
For the three middle turtles, you’ll focus primarily on the shell shape. Roll your medium portions into domed ovals. These don’t need legs, as they will be sandwiched in the stack, but you can add small protrusions on the sides if you want them to peek out. -
Add texture:
Score the shell patterns on these three oval domes just like the base turtle. Variety is good here—some can have wider scutes, others narrower, to simulate individual personalities. -
Heads are optional:
Looking closely at the design, not every turtle needs a visible head if it messes with the balance, but adding small protruding heads to the second and fourth shells creates a nice rhythm. -
Form the top turtle:
For the smallest turtle at the very top, repeat the full process used for the base turtle (legs, head, and eyes), but on a miniature scale. Make sure he has a defined face since he is the focal point.
Make it Mossy
After baking and cooling, dab a tiny bit of watered-down green acrylic paint into the crevices of the shell patterns to simulate aged, mossy garden stone.
Step 4: Assembly and Baking
-
Test the stack:
Before bonding, stack your raw clay pieces to ensure balance. It helps to slightly flatten the top of each shell (except the very top one) to create a platform for the next turtle to sit securely. -
Secure the bond:
Apply a drop of liquid clay or ‘bake-and-bond’ between each layer. Press them gently together to ensure good contact, adjusting angles to make it look slightly whimsical but structurally sound. -
Verify stability:
Insert a piece of uncooked spaghetti or a wire down through the center of the top turtles into the base if the structure feels wobbly. This acts as an internal spine. -
Final texturing:
Take a toothbrush or a piece of sandstone and gently tap it over the surfaces of the stacked turtles. This removes fingerprints and enhances the stony texture. -
Bake the totem:
Place the entire stack on a baking sheet. Follow the temperature instructions on your clay package. Since the stack is thick, I recommend baking for a longer period at the recommended temperature (often 45-60 minutes) to ensure the core cures. -
Cooling down:
Let the sculpture cool completely in the oven with the door slightly ajar. Sudden temperature changes can cause cracking in thick clay projects.
Once fully cooled, your totem is ready to bring a steady, slow-paced charm to your favorite shelf