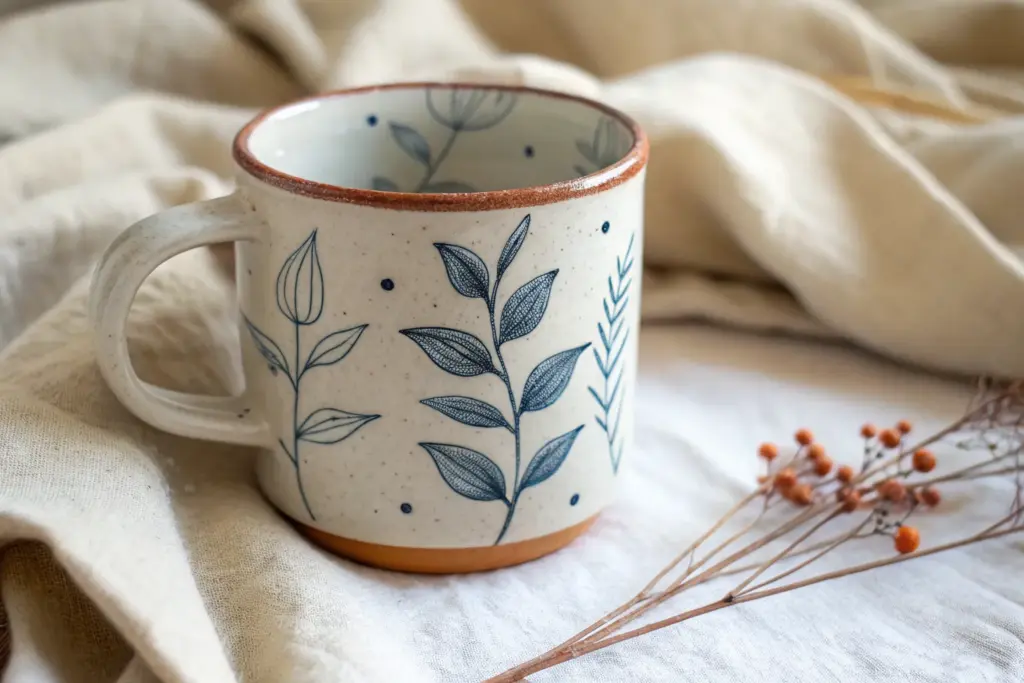
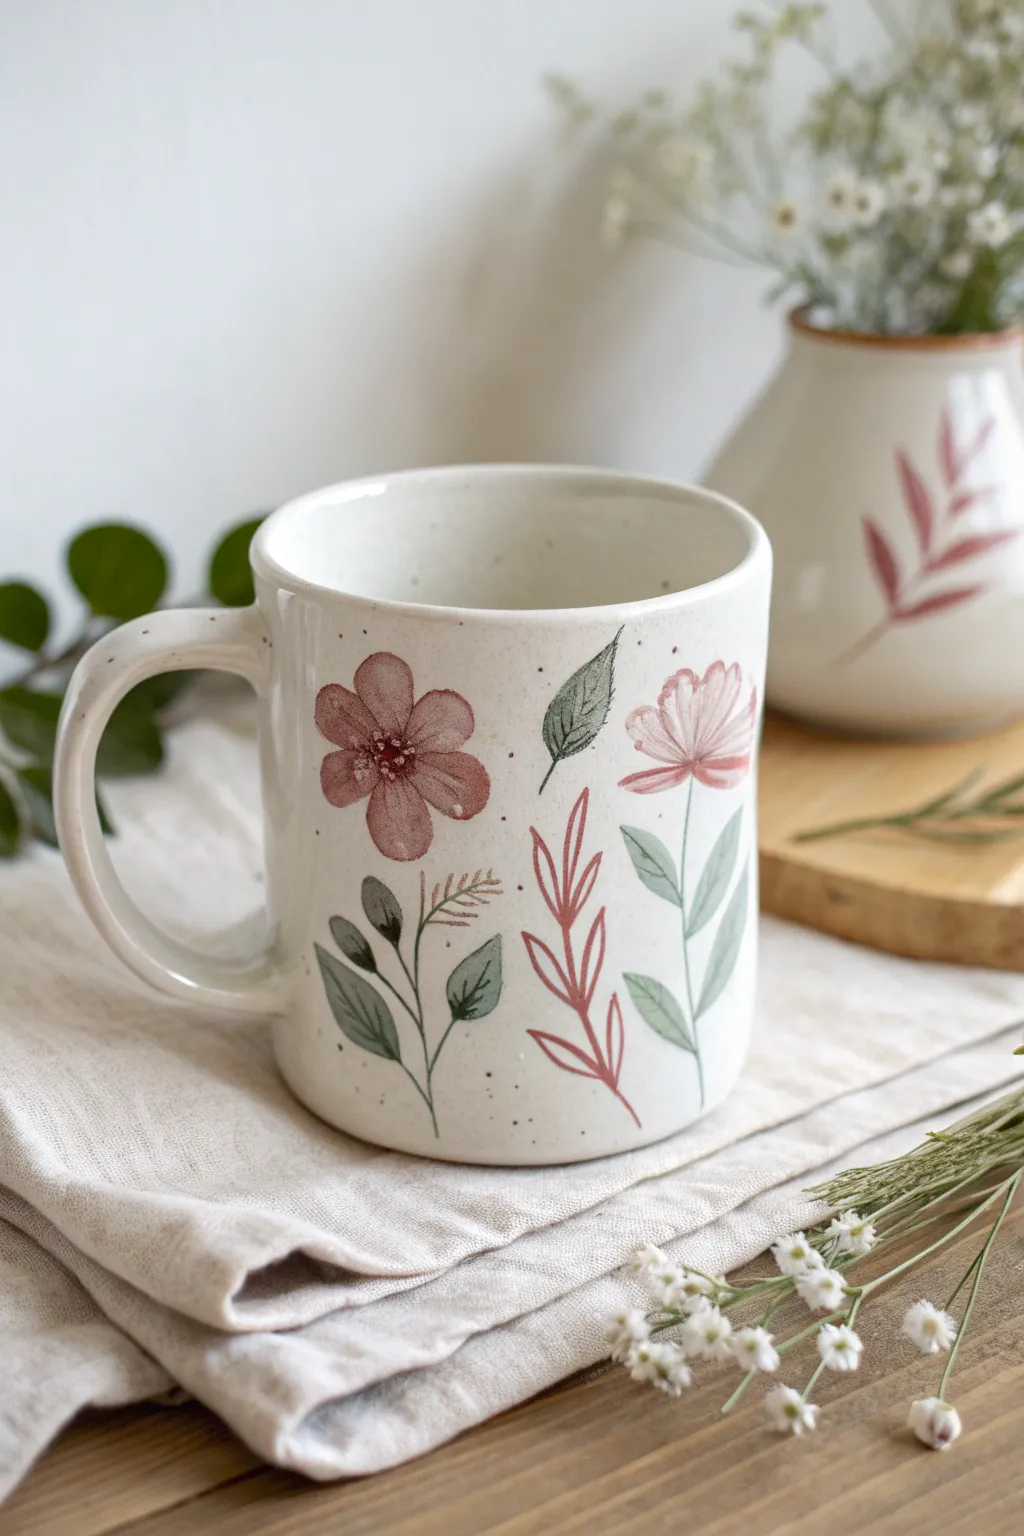
When I’m stuck staring at a plain bisque mug, underglaze is the quickest way I know to turn it into something totally you. Here are my favorite underglaze ideas—starting with the classics everyone loves and ending with a few playful twists that always get that “how did you do that?” reaction.
Classic Brush-Painted Florals
Capture the delicate beauty of a spring meadow on your morning vessel with this botanical underglaze project. Using simple brushstrokes and a soft, earthy palette, you will create an elegant floral design that feels both vintage and fresh.
Step-by-Step Tutorial
Materials
- Bisque-fired ceramic mug (white or light clay body)
- Underglazes: Dusty Rose, Burnt Sienna, Sage Green, Forest Green
- Clear transparent glaze (cone 06 or cone 6, matching your clay)
- Round watercolor brushes (size 4 and size 0/liner)
- Pencil (standard HB)
- Clean water container
- Sponge
Step 1: Preparation and Planning
-
Surface Prep:
Begin by wiping down your bisque mug with a damp sponge. This removes any kiln dust that could repel the underglaze and ensures a clean canvas. -
Sketch Layout:
Using a standard pencil, lightly sketch the placement of your three main floral elements. Don’t worry about perfection; pencil marks will burn away in the kiln. Just mark the center of the flowers and the general curve of the main stems.
Water Control Pro Tip
Keep underglazes slightly watered down to a skim-milk consistency. Thick layers can flake off, while thin, watery washes create that lovely watercolor aesthetic.
Step 2: Painting the Foliage
-
Mixing Greens:
Pour a small amount of Sage Green and Forest Green onto your palette. I like to keep them separate but allow them to touch slightly for natural blending. -
Fern Stems:
Load your liner brush (size 0) with watered-down Sage Green. Paint thin, arching lines for the stems of the fern-like foliage. -
Fern Leaves:
Using the tip of the liner brush, add tiny, alternating dashes along the stems to create the fern fronds. Keep the pressure light to maintain delicacy. -
Broad Leaves Base:
Switch to the size 4 round brush. For the broader leaves at the bottom, mix a little Forest Green with the Sage. Press the belly of the brush down and lift as you pull outward to create a tapered leaf shape. -
Layering Leaf Details:
Once the initial green layer is touch-dry, use the dark Forest Green and your liner brush to add a central vein to the larger leaves for dimension. -
Red Sprigs:
For the contrasting red foliage seen in the design, dilute a bit of Dusty Rose mixed with Burnt Sienna. Paint vertical, branching sprigs with the liner brush, ensuring the lines are fluid and organic.
Step 3: Painting the Florals
-
Primary Flower Petals:
Load the size 4 brush with Dusty Rose. Starting from the center mark you penciled earlier, paint five broad, rounded petals. Let the brush stroke be slightly translucent to mimic watercolor. -
Adding Depth:
While the petals are still slightly damp, drop a tiny amount of Burnt Sienna getting darker towards the center of the flower. This creates a natural gradient. -
Second Flower Variety:
For the taller, tulip-like flower, paint upward sweeping strokes using a lighter wash of the pink mixture. Keep the top edges loose and uneven. -
Flower Centers:
Dip the very tip of your smallest brush or a toothpick into undiluted Burnt Sienna. Dot the center of the main five-petal flower to create the stamen cluster. -
Connecting Stems:
Use the liner brush with Sage Green to connect the flower heads to the bottom of the mug with long, slender lines. It’s okay if they cross over the foliage behind them.
Level Up: Sgraffito
After painting the leaves, let them dry fully. Then, scratch fine lines through the paint with a needle tool to reveal the white clay beneath for sharp, white veins.
Step 4: Finishing Touches
-
Splatter Effect:
Dilute a small amount of Burnt Sienna with water until it’s very runny. Dip a toothbrush or stiff brush into it and run your thumb over the bristles to flick tiny speckles onto the mug. -
Clean Up:
Check the rim and handle for any accidental smudges and wipe them away with a damp sponge. -
Drying:
Allow the underglaze design to dry completely, usually for a few hours or overnight. -
Clear Glaze Application:
Dip the entire mug into your clear transparent glaze. Ensure an even coat and shake off excess drips gently. -
Final Fire:
Fire the mug in the kiln to the appropriate temperature for your clay and glaze combination.
Now you have a stunning, hand-painted mug ready for your favorite tea or coffee


Bold Black Outline Illustrations
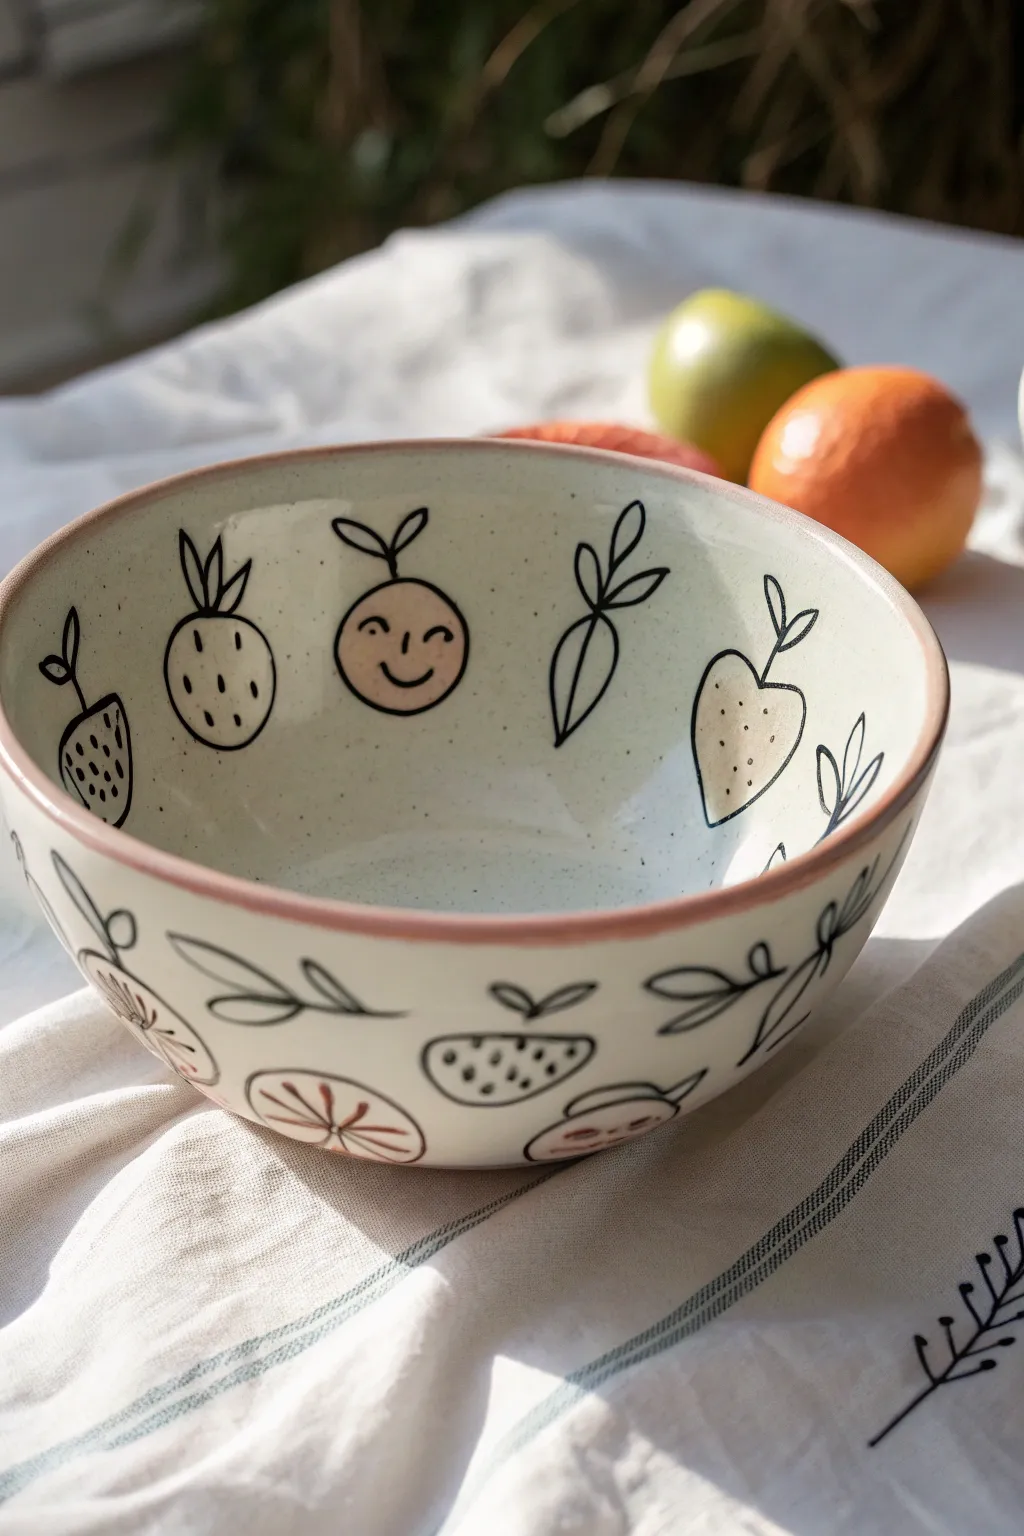
Embrace the playful simplicity of hand-drawn illustrations with this charming ceramic bowl project. Using bold underglaze pencil lines or fine brushwork against a speckled clay body creates a modern, illustrative look that highlights individual fruit characters.
Detailed Instructions
Materials
- Bisque-fired ceramic bowl (speckled cream stoneware preferred)
- Black underglaze (or underglaze pencil/applicator bottle)
- Peachy-pink underglaze
- Clear transparent glaze
- Fine liner brush (size 0 or 00)
- Small round brush (size 2 or 4)
- Sponge
- Pency (hb or 2b) for sketching
- Pottery wheel or banding wheel (optional)
Step 1: Preparation & Sketching
-
Clean the bisque:
Begin by wiping down your bisque-fired bowl with a damp sponge. This removes any kiln dust or oils from your hands that might resist the glaze. -
Plan your layout:
Lightly sketch your fruit designs directly onto the bowl using a regular graphite pencil. The graphite will burn off in the kiln, so don’t worry about being messy. -
Mix your motifs:
Alternate different fruit shapes around the interior wall. Sketch a round orange with a face, a triangular strawberry, a leafy carrot, and a pineapple shape to create variety. -
Repeat on the exterior:
Flip the bowl over and sketch similar loose botanical motifs on the outside. Include vines, leaves, and sliced citrus rounds to keep the pattern dynamic.
Needle Tip Control
If using an applicator bottle for lines, keep a pin handy. If the flow stops, clear the clog immediately. Test flow on paper first to avoid blobs.
Step 2: Adding Color Washes
-
Prepare the wash:
Dilute your peachy-pink underglaze slightly with water on a palette. You want a watercolor consistency rather than a thick, opaque coat. -
Fill the orange:
Using the small round brush, paint a circle for the ‘orange’ character. It doesn’t need to be perfect; a loose organic shape adds to the charm. -
Address the rim:
While you have the pink color out, paint a steady band along the very top rim of the bowl. Using a banding wheel here makes getting a smooth line much easier. -
Add exterior details:
Paint the inside of the citrus slices and select flower centers on the outside of the bowl with the same pink wash. -
Let it dry:
Wait until the pink areas are completely dry to the touch before moving to the black outlines to prevent smudging.
Mismatched Sets
Make a full set where each bowl features a different ‘main character’ fruit in the center—like a lemon, pear, or cherry bowl.
Step 3: Black Line Work
-
Choose your tool:
For the black lines, you can use a fine liner brush with thinned black underglaze, or an underglaze squeeze bottle with a fine needle tip for consistent thickness. -
Outline the orange:
Trace over your pencil sketch for the orange fruit. Add the cute stem on top with two small leaves. -
Add the face:
Carefully paint the simple smiling face on the orange. Two small dots for eyes and a wide gentle curve for the smile bring it to life. -
Outline the strawberry:
Paint the strawberry outline. Instead of filling it with color, add small dots or seeds inside the shape for texture. -
Draw the carrot:
Create the carrot shape using just the black outline. Focus on the tall, leafy greens extending upward from the root vegetable. -
Detail the pineapple:
Outline the oval pineapple shape. Add short vertical dashed lines inside to suggest the fruit’s texture. -
Finish the exterior:
Complete the bowl by outlining the leaves, vines, and fruit slices you sketched on the outside. Quick, confident strokes work best here.
Step 4: Did someone say Glaze?
-
Bisk or single fire?:
If your underglaze requires a bisque fire to set (check the manufacturer’s label), fire the piece to cone 04. If not, proceed directly to glazing once dry. -
Dip in clear:
Dip the entire bowl into a clear, transparent glaze. Ensure the glaze isn’t too thick, or it might cloud over your fine black lines. -
Clean the foot:
Wipe the bottom foot ring of the bowl with a wet sponge to ensure no glaze touches the kiln shelf. -
Final Fire:
Fire the bowl to the maturation temperature of your clay and glaze (usually Cone 5 or 6 for stoneware).
Enjoy your morning cereal in this happy, handmade vessel


Simple Two-Color Sgraffito Silhouettes

This elegant ceramic cup uses the classic sgraffito technique to create striking high-contrast botanical designs. By carving through a layer of dark underglaze to reveal the lighter clay body beneath, you achieve distinct, graphic silhouettes of monstera and palm leaves.
Step-by-Step Tutorial
Materials
- Leather-hard ceramic vessel (preferably a light stoneware or porcelain)
- Black velvet underglaze
- Soft fan brush
- Sgraffito loop tool (small wire tip)
- Needle tool (for fine veins)
- Damp sponge
- Clear transparent glaze
- Pencil (optional for sketching)
Step 1: Preparation & Application
-
Assess clay state:
Ensure your thrown or hand-built cup is at the perfect leather-hard stage. It should be firm enough to hold its shape without distorting, but soft enough to carve into easily. -
Clean surface:
Gently wipe the exterior with a barely damp sponge to smooth out any ribs marks or imperfections. A smooth canvas is crucial for clean lines. -
Apply first coat:
Using a soft fan brush, apply a generous, even layer of black underglaze to the exterior of the cup. Brush in horizontal strokes. -
Layering:
Wait until the first coat loses its sheen (is dry to the touch), then apply a second coat. I recommend alternating your brush stroke direction to vertical to ensure solid, opaque coverage without streaks. -
Third coat check:
If the black looks thin, apply a third coat. Allow the piece to dry back to a leather-hard state; the surface shouldn’t be tacky when you touch it.
Chipped Lines?
If your carved lines look jagged or chipped, your clay is likely too dry. Mist it lightly with water and wrap it in plastic for an hour to restore moisture
Step 2: Carving the Design
-
Light sketching:
Use a regular pencil to lightly outline your leaf placements directly onto the black surface. Don’t worry about lead marks; they will burn off in the kiln. -
Outline the Monstera:
Start with the main feature: the heart-shaped Monstera leaf. Use your small loop tool to carve the perimeter, scratching away the black underglaze to reveal the clay. -
Carve the Fenestrations:
Carve the characteristic ‘swiss cheese’ cutouts (fenestrations) and deep grooves into the sides of the monstera leaf. -
Clear negative space:
Within your leaf outline, gently scrape away the remaining black underglaze. Keep your tool angle shallow to avoid gouging the clay body too deeply. -
Add detail veins:
Switch to a needle tool or the very tip of your loop tool to draw the center vein and branching veins back into the cleared area. You are essentially drawing with black line work. -
Secondary leaves:
Move around the the cup and outline the simpler, pointed palm-style leaves. Repeat the process of scraping out the interior of the leaf shapes. -
Palm details:
Carve the central vein and the distinct, parallel curved lines for the palm leaf texture. Keep these lines fairly thin for a delicate look.
Go Geometric
Instead of botanical leaves, try using drafting tape to block off crisp triangles or stripes before applying underglaze for a modern, hard-edge look
Step 3: Finishing Touches
-
Clean up burrs:
Carving creates little clay crumbs (burrs). Wait until the pot is bone dry, then verify gently brush them off with a dry, soft brush. Don’t wipe them while wet or you’ll smear black into your white lines. -
Rim check:
Ensure the rim is clean. You can choose to leave a thin line of exposed clay at the very top lip for a framed effect, as seen in the photo. -
Bisque fire:
Load the piece for a bisque firing (typically Cone 04) to set the design permanently. -
Clear glaze:
Once bisqued, dip or brush a clear transparent glaze over the entire piece. This will make the black pop and seal the raw clay areas. -
Final fire:
Fire the piece to your clay body’s maturity temperature (e.g., Cone 5/6 for stoneware).
Enjoy using your custom botanical cup for your morning coffee or tea ritual


Mishima Inlay Linework That Stays Crisp
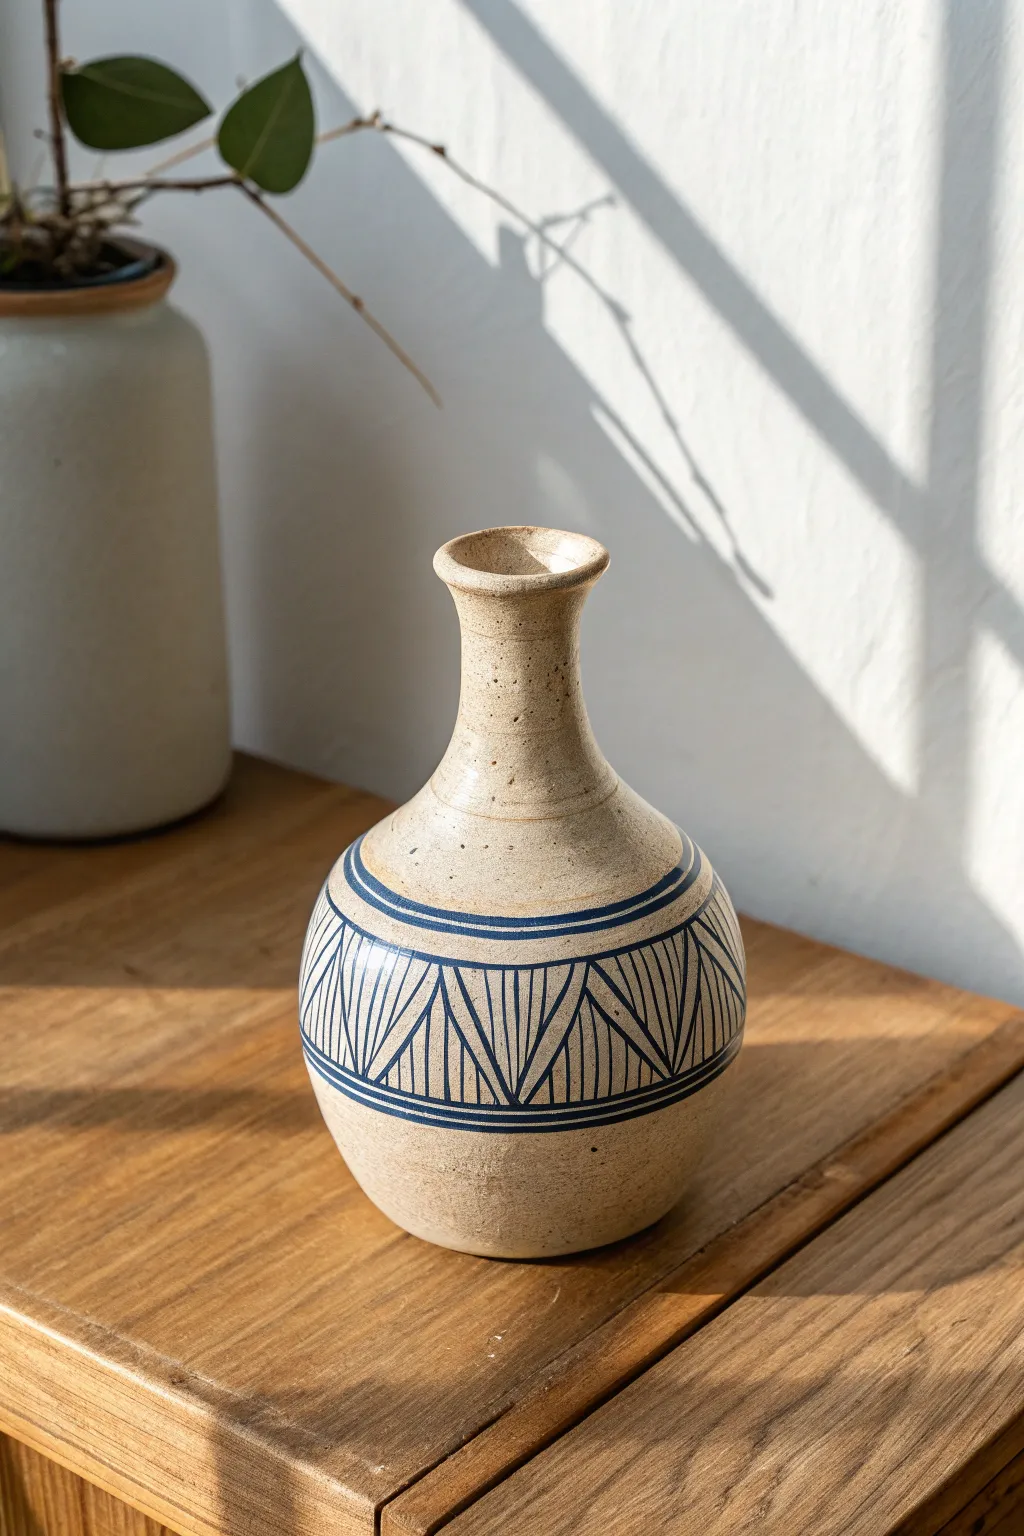
This project showcases the crisp, graphic potential of the Mishima technique, where fine lines are carved into leather-hard clay and filled with contrasting slip or underglaze. The result is a smooth, flush surface with a striking geometric pattern that feels integral to the pot rather than just sitting on top.
Detailed Instructions
Materials
- Stoneware clay body (smooth, light-colored)
- Throwing wheel and tools
- Carving tool (needle tool or very fine loop tool)
- Navy blue underglaze
- Wax resist
- Soft brush for slip/underglaze application
- Metal rib or scraper
- Clear glaze
- Sponge and water
Step 1: Forming the Vessel
-
Throw the base form:
Begin by centering your clay on the wheel. Open up and pull the walls to create a bulbous, spherical body, keeping the weight steady at the bottom for stability. -
Collar the neck:
Gently collar the top section inward to create a long, tapered neck. Take your time here to avoid buckling the clay, compressing the rim frequently. -
Refine the rim:
Finish the form with a slight outward flair at the very top lip for a classic bottle silhouette. Smooth the surface with a flexible rib to remove throwing lines, as a smooth canvas is crucial for Mishima. -
Dry to leather hard:
Allow the piece to dry slowly until it reaches a sturdy leather-hard state. It needs to be firm enough to carve without burrs but soft enough to incise easily.
Clean Lines Hack
Apply wax resist BEFORE carving. You carve through the wax, then inlay color. When you wipe back, the wax acts as a barrier, keeping the main clay body completely stain-free.
Step 2: Carving the Design
-
Map out the bands:
Place the leather-hard pot back on the wheel or a banding wheel. Using a needle tool, lightly score two horizontal guide lines around the widest part of the belly to define the top and bottom of your pattern band. -
Divide the space:
Vertically divide the space between your bands into even sections to create the triangular grid. I usually make faint tick marks first to ensure the spacing works out before committing to the cut. -
Carve the triangles:
Connect your tick marks to carve a series of zig-zag lines, forming a continuous row of triangles around the belly of the vase. -
Add vertical details:
Inside each triangle, carve a central vertical line from the peak to the base. Then, carve angled lines radiating from the base corners up toward that central line, creating a fan-like effect within each geometric shape. -
Review depth:
Go over your lines to ensure they are clean and deep enough to hold the underglaze. The cuts should be V-shaped or U-shaped channels. -
Protect the surface:
Apply a thin coat of wax resist over the entire patterned area (and the surrounding uncarved surface). This clever step protects the light clay body from staining when we apply the dark underglaze.
Step 3: Inlay and Finishing
-
Apply the underglaze:
Once the wax is dry, brush a generous amount of navy blue underglaze over the carved lines. Don’t worry about being neat; the goal is to fill the crevices completely. -
Let it set:
Allow the underglaze to dry until it loses its sheen. If you wipe it away too wet, you’ll pull the pigment out of the grooves. -
Scrape back:
Using a metal rib or a sharp scraping tool, gently scrape the surface of the pot. The wax resist will help the excess underglaze peel away easily, leaving clean, crisp lines where the underglaze remains trapped in the carving. -
Clean up:
Use a slightly damp sponge to wipe away any remaining hazy residue, being careful not to scrub too hard over the inlaid lines. -
Horizontal definition:
If your boundary lines got messy, place the pot on the banding wheel and carefully re-paint or touch up the two solid horizontal bands framing the triangles. -
Bisque fire:
Fire the piece to bisque temperature (usually cone 04 or 06). This sets the form and the underglaze design permanently. -
Glaze and final fire:
Dip or brush a clear, glossy glaze over the entire piece. Fire to the maturity temperature of your clay body (likely cone 5/6 or cone 10) to reveal the final contrast.
Level Up: Color Shift
Instead of a single blue underglaze, try inlaying alternating triangles with two different colors, like teal and charcoal, for a more complex visual rhythm.
The satisfaction of scraping back the surface to reveal those perfectly crisp lines makes the meticulous carving process worth every minute

The Complete Guide to Pottery Troubleshooting
Uncover the most common ceramic mistakes—from cracking clay to failed glazes—and learn how to fix them fast.
Stamped Motifs Filled With Underglaze
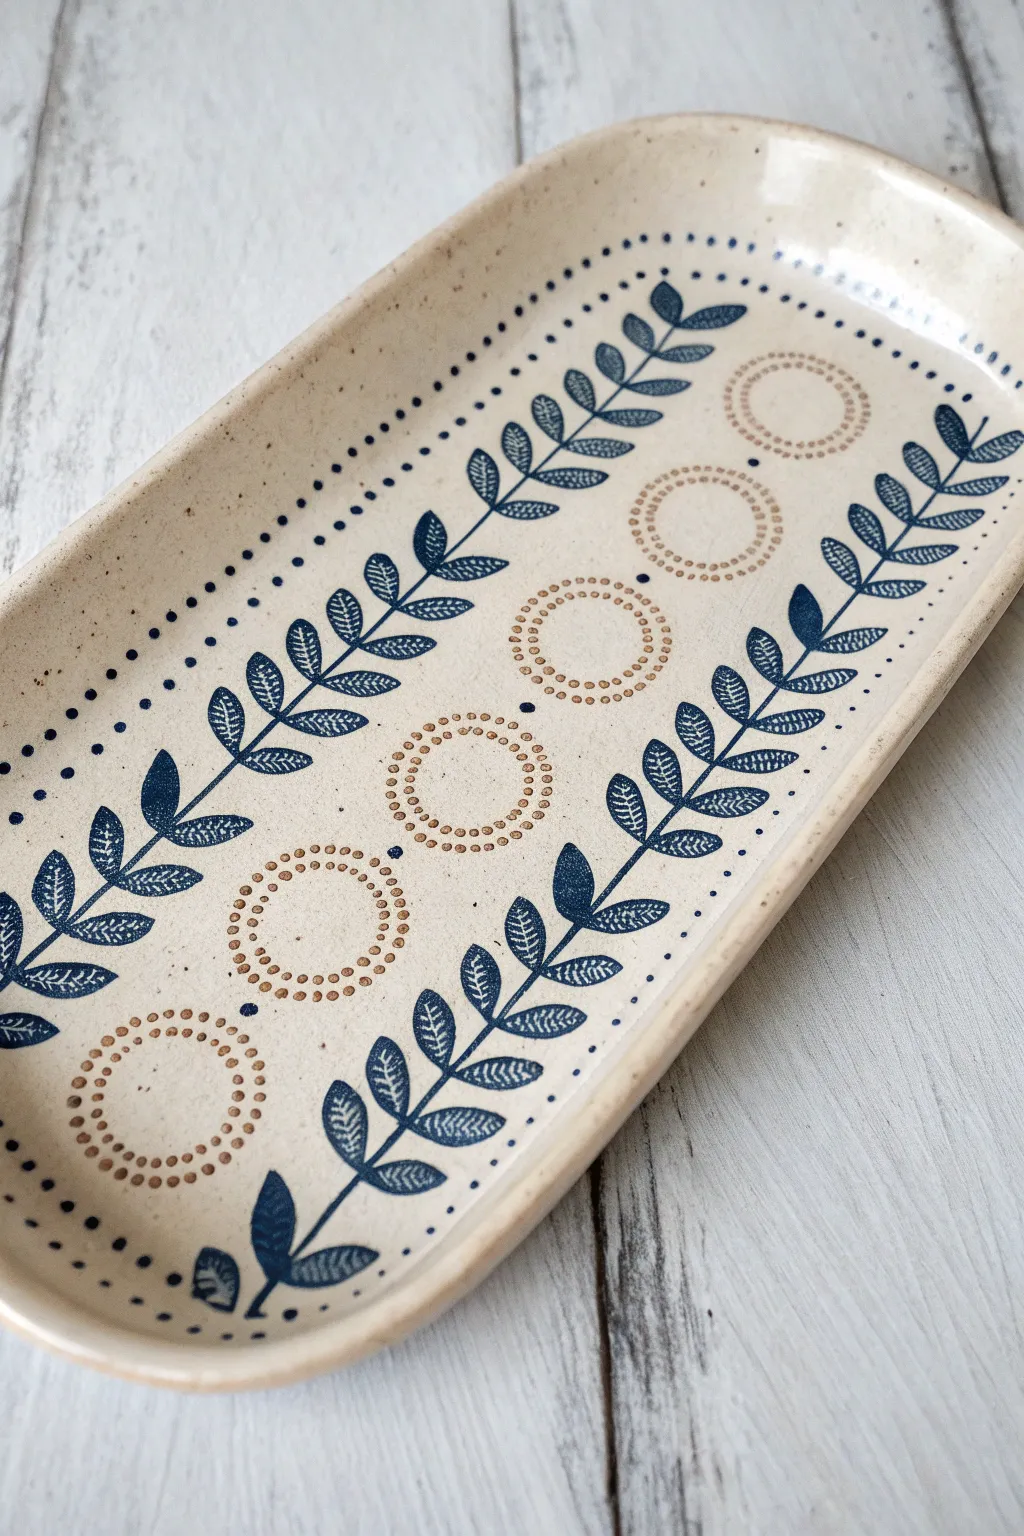
This charming rectangular tray features a repeating botanical pattern that feels both modern and timeless. By combining simple stamping techniques with deep blue and warm brown underglazes on speckled clay, you can achieve a crisp, illustrated look perfect for serving or display.
Detailed Instructions
Materials
- Rectangular slab mold or template
- Speckled stoneware clay (mid-fire)
- Slab roller or rolling pin with thickness guides
- Rubber kidney rib
- Fettling knife
- Sponge
- Bisque stamps (leaf/fern design)
- Circle texture tool or improvised circle stamp (like a marker cap)
- Needle tool
- Royal blue underglaze
- Warm brown or tan underglaze
- Small stiff-bristled brushes
- Clear transparent glaze
- Soft fan brush for glazing
Step 1: Forming the Tray
-
Roll the slab:
Begin by rolling out your speckled stoneware clay into a slab approximately 1/4 inch thick. Compress the slab on both sides with a rubber kidney rib to align the clay particles and prevent warping. -
Cut to shape:
Using a template or ruler, cut a long rectangle with your fettling knife. Round the corners gently for a softer, organic look similar to the example image. -
Shape the rim:
Place your clay slab over a slump mold or gently lift the edges by hand to create a shallow rim. If forming by hand, use small foam supports under the rim while it stiffens to maintain the curve. -
Smooth the edges:
Take a damp sponge and run it along the rim to smooth out any sharp cutting lines or roughness. A well-finished rim is crucial for a professional look. -
Wait for leather-hard:
Allow the tray to dry slowly until it reaches a firm leather-hard state. The clay needs to be firm enough to take a stamp impression without deforming, but soft enough to accept the texture.
Smudged Design?
If you wipe away too much underglaze, let it dry, re-apply the color into the stamp, and try wiping again with a slightly drier sponge.
Step 2: Stamping the Design
-
Plan the layout:
Determine the spacing for your botanical vines. They should run parallel along the long sides of the tray. You can lightly mark a guideline with a needle tool if you are worried about keeping them straight. -
Stamp the circles:
Start with the central motifs. Using a circular texture tool or stamp, press a column of circles down the center of the tray. Ensure they are evenly spaced. -
Stamp the vines:
Using your leaf or fern stamp, press the recurring vine pattern along both long sides of the tray. I find it helpful to start from the center and work outward to ensure symmetry. -
Add detail dots:
Use a small tool, like the back of a paintbrush or a specialized dotting tool, to impress a border of small dots around the very edge of the rim and occasionally between the larger stamped elements. -
Bisque fire:
Let the piece dry completely to bone dry, then bisque fire it according to your clay body’s specifications (usually Cone 04 or 06).
Step 3: Applying Underglaze (Mishima-style)
-
Fill the circles:
Mix your warm brown underglaze to a slightly fluid consistency. Paint it generously into the recessed dots of the central circle motifs. Don’t worry about staying perfectly inside the lines; the excess will be wiped away. -
Fill the vines:
Using the royal blue underglaze, fill in the stamped leaf impressions and the dot border. Ensure the glaze gets all the way into the deepest parts of the texture. -
Let it set:
Allow the underglaze to dry completely. It should look chalky and matte. -
Wipe back:
Dampen a sponge—it should be clean and squeezed out well, not dripping. Gently wipe across the surface of the tray. The goal is to remove the underglaze from the high points of the clay while leaving it trapped in the stamped recesses. -
Rinse and repeat:
Rinse your sponge frequently. Keep wiping until the clay surface is clean and the design stands out crisp and clear against the speckled background. -
Clean up stains:
If stubborn smears remain, let the piece dry for a moment and go back in with a clean, barely damp sponge for a final polish.
Wax Resist Method
For sharper lines, apply wax resist over the entire surface before carving or stamping. The underglaze will wipe off the waxed areas effortlessly.
Step 4: Glazing and Final Fire
-
Apply clear glaze:
Once the underglaze is dry, apply 2-3 coats of a clear transparent glaze over the entire piece using a soft fan brush. Wait for each coat to dry before applying the next. -
Check for cloudiness:
Ensure your clear glaze application isn’t too thick, as this can make the underglaze details look milky or cloudy after firing. -
Final wipe:
Wipe the foot or bottom of the tray clean of any glaze to prevent it from sticking to the kiln shelf. -
Glaze fire:
Fire the tray to the maturity temperature of your clay and glaze (typically Cone 5 or 6 for stoneware).
Now you have a stunning, food-safe tray ready to hold trinkets or serve appetizers
Underglaze Pencil Sketchbook Vibes
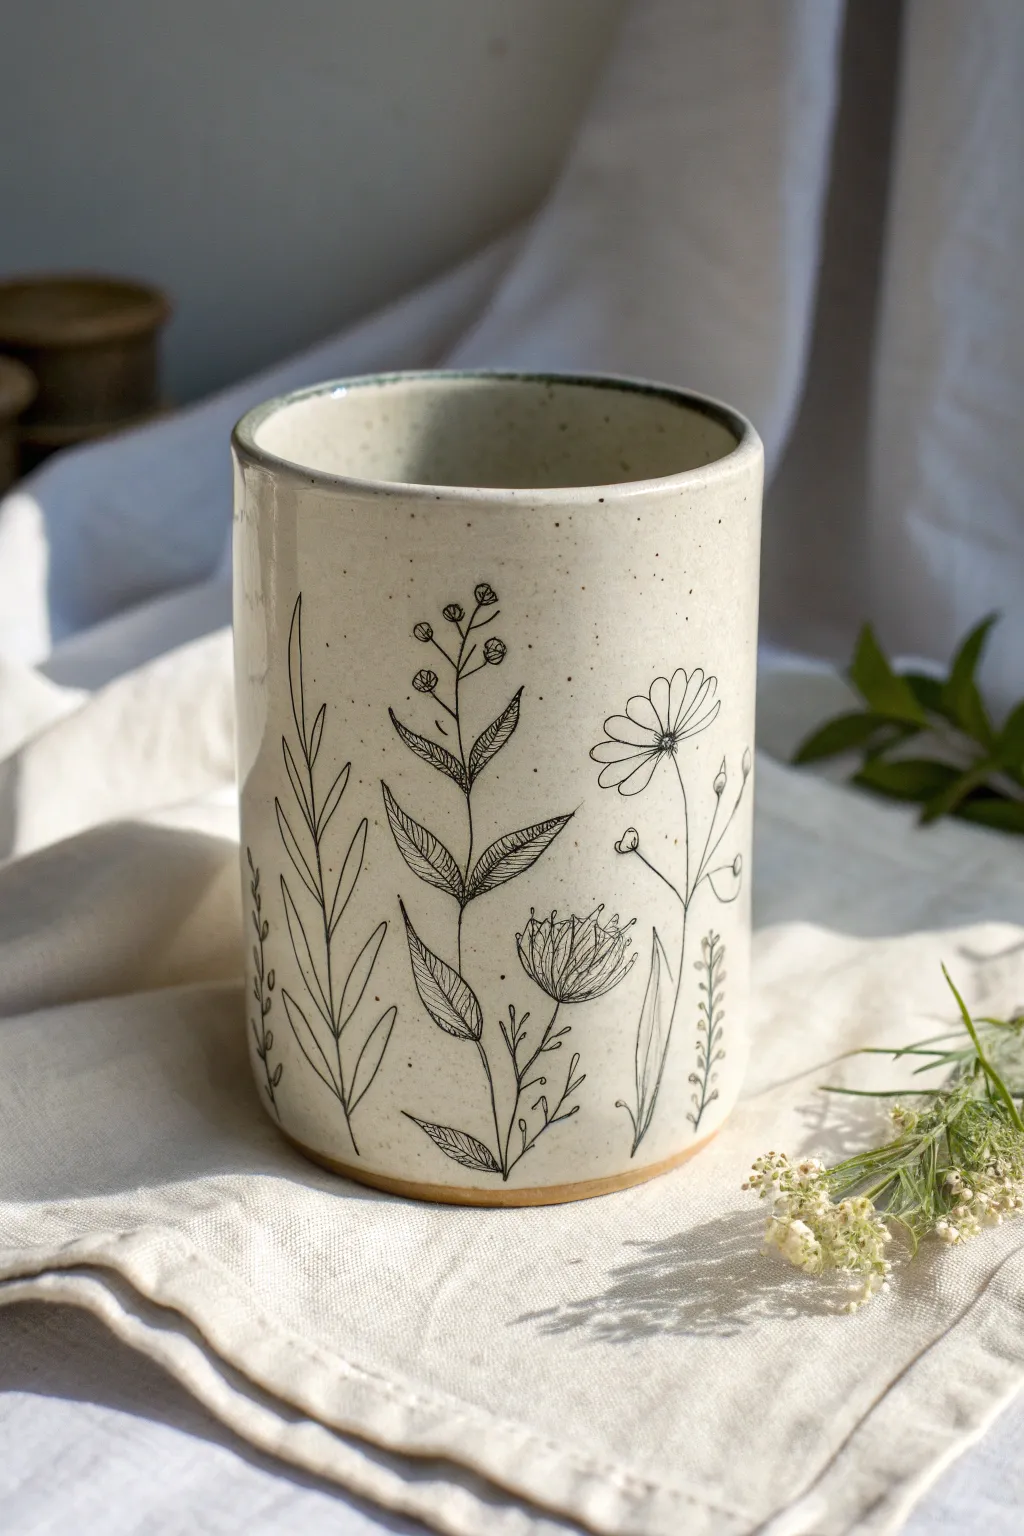
Capture the delicate charm of a naturalist’s field diary on a functional ceramic piece. With its matte speckled finish and fine, illustrative lines, this tumbler brings the quiet beauty of a sketchbook directly into your daily routine.
Step-by-Step Tutorial
Materials
- Leather-hard cylinder ceramic vessel (stoneware clay recommended)
- Black underglaze pencil
- Clear matte or satin glaze (food safe)
- White or cream underglaze (optional, if your clay body isn’t light)
- Soft sponge
- Clean water
- Reference images of wildflowers and leaves
- Sharpening knife or dedicated pencil sharpener
- Large soft fan brush
- Kiln access
Step 1: Preparation & Surface Design
-
Prepare the canvas:
Ensure your thrown or hand-built cylinder is at a solid leather-hard stage. It should be firm enough to handle pressure but soft enough that the pencil drags slightly. -
Smooth the surface:
Run a very slightly damp sponge or a metal rib over the exterior surface. You want the canvas to be as smooth as paper to prevent the pencil tip from skipping over coarse grog. -
Sharpen your tool:
Sharpen your black underglaze pencil. I prefer using a craft knife to whittle the wood away, leaving a longer lead exposed for more versatile line weights. -
Draft the tall stems:
Start by drawing three to five main vertical stems around the cylinder. Vary their heights and curvatures slightly to mimic natural growth habits. -
Add main foliage:
Draw larger, spear-shaped leaves on one of the stems. Use confident strokes to create the vein structure lines inside each leaf. -
Sketch the flowers:
Add the floral heads. Create a daisy-like shape with open petals on one stem, and a thistle-like bloom with tight, upward strokes on another. -
Incorporate smaller details:
Fill the gaps with smaller sprigs, tiny buds, or delicate fern-like fronds. These secondary elements help balance the composition around the curve. -
Refine the lines:
Go back over key areas like the base of the stems or shadow areas of leaves with a second pass of the pencil to darken and emphasize the drawing. -
Clean up smudges:
Underglaze pencil smears easily. If you have unwanted smudges, carefully whisk them away with a dry, clean brush or dab gently with a damp sponge corner.
Fixing Mistakes
Make a bad line? Don’t use a normal eraser. Instead, lightly scrape the surface with a metal tool or sanding pad to remove the mistakes before firing.
Step 2: Bisque & Glazing
-
First firing:
Bisque fire the piece to Cone 04 (or your clay body’s specific bisexual temperature). This sets the underglaze drawing permanently. -
Post-fire inspection:
Once cool, wipe the bisque ware down with a damp sponge to remove any kiln dust. Be careful not to scrub hard over the drawing, although it should be stable now. -
Line the interior:
Pour clear glaze into the interior of the mug, swirl it to coat entirely, and pour out the excess. Wipe the rim clean. -
Glaze the exterior:
Using a large soft fan brush, apply a coat of clear matte or satin glaze over the exterior. A dip method works too, but ensure the glaze isn’t too thick or it might cloud the drawing. -
Check density:
If your clear glaze is known to be milky, apply a thinner layer. You want the raw clay speckles and the drawing to show through clearly. -
Clean the foot:
Wipe the bottom of the tumbler and a few millimeters up the side (the ‘foot ring’) with a wet sponge to prevent it sticking to the kiln shelf. -
Final firing:
Glaze fire to the maturity temperature of your clay and glaze combination (typically Cone 5 or 6 for stoneware).
Add Watercolor Effect
Before the bisque fire, use a slightly wet brush to gently drag some of the black pencil lines, creating a soft, gray wash shadow inside the leaves.
Now you have a permanently captured garden sketch ready for your morning tea


What Really Happens Inside the Kiln
Learn how time and temperature work together inside the kiln to transform clay into durable ceramic.
Underglaze Trailing for Hand-Drawn Details
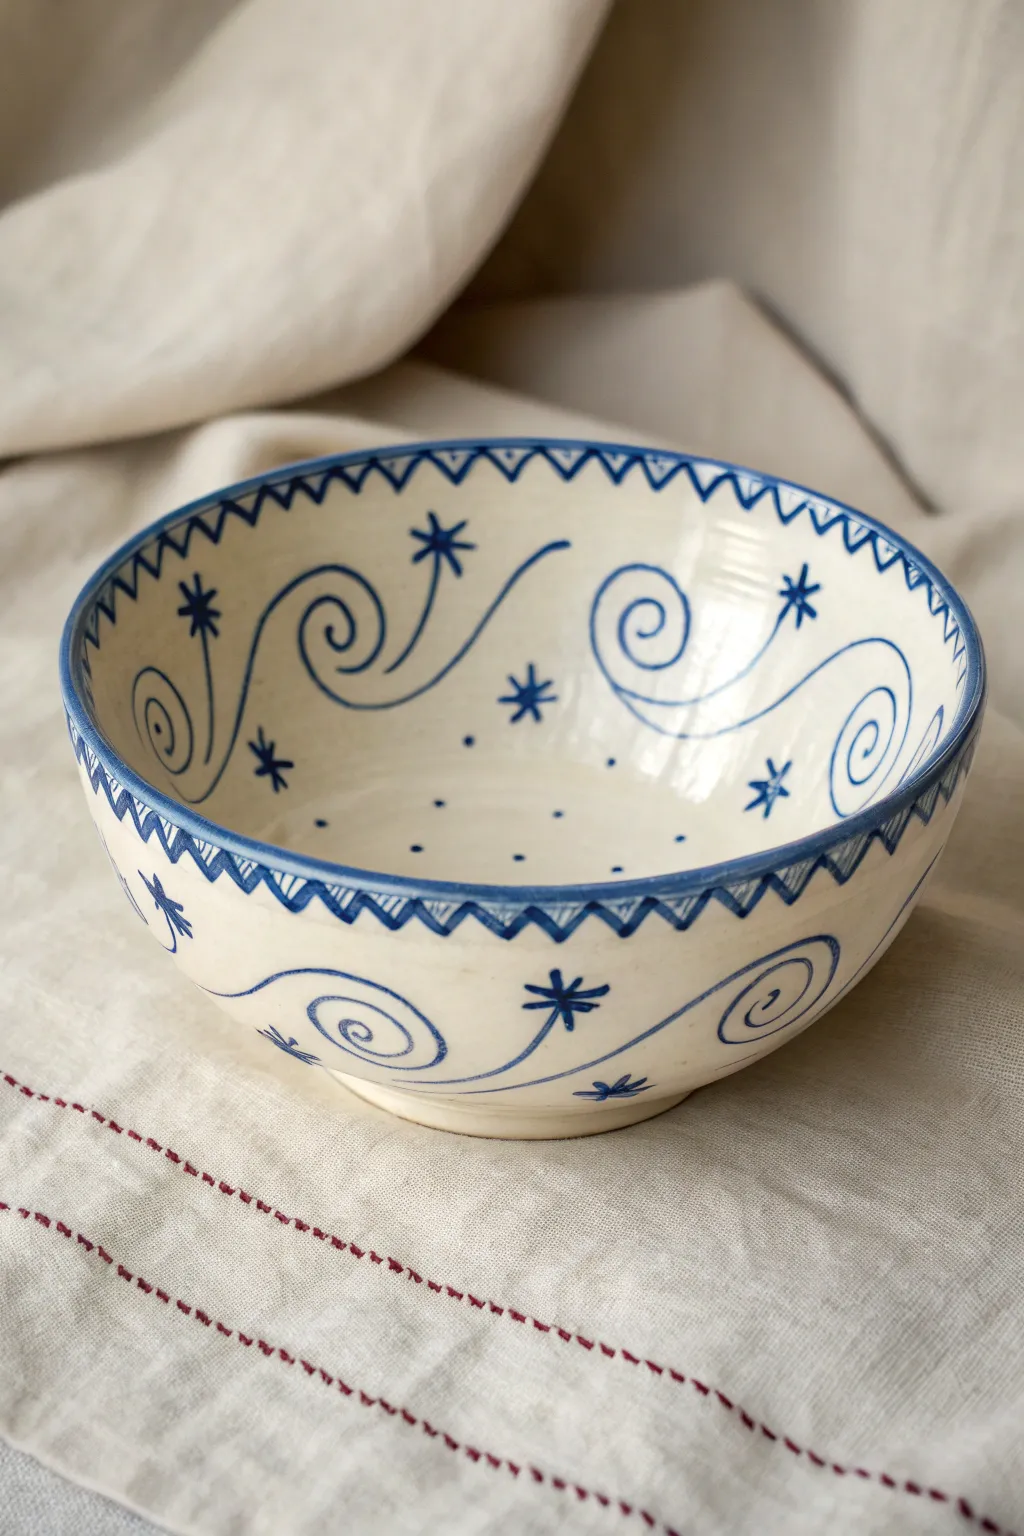
Transform a simple wheel-thrown or hand-built bowl into a dreamy piece of art using trailing techniques for sharp, graphic lines. This design features rhythmic scrolls, delicate stars, and a sawtooth rim pattern in classic cobalt blue against a creamy white clay body.
Step-by-Step Guide
Materials
- Bisque-fired ceramic bowl (white stoneware or porcelain style)
- Cobalt blue underglaze
- Fine-point trailing bottle or applicator bulb (2 oz size is good)
- Metal writer tip (finest gauge, around 0.5mm)
- Clear transparent glaze
- Small round detail brush (size 0 or 1)
- Damp sponge
- Pencil (for sketching)
- Lazy Susan or banding wheel
Step 1: Preparation & Mapping
-
Clean the Bisque:
Wipe down your bisque-fired bowl with a damp sponge to remove any dust or kiln wash residue. Allow it to dry for a few minutes until the surface is no longer cool to the touch. -
Establish the Rim:
Place the bowl on a banding wheel. Using a pencil, lightly draw a single horizontal line about half an inch below the rim on the outside. Repeat this on the inside, creating a border zone for the sawtooth pattern. -
Sketch the Main Motifs:
Lightly sketch the large scroll waves along the exterior belly of the bowl. Aim for a flowing, interconnected look, leaving negative space between the swirls. Repeat a similar, slightly larger pattern on the interior walls. -
Place the Stars:
Mark small x’s where your starbursts will go. Scatter them randomly around the scrolls—some near the rim, some deeper in the bowl—to create a sense of movement in a night sky.
Pro Tip: Consistent Flow
If your underglaze feels too thick for the fine tip, mix in a few drops of water or a specialized dragging medium. The consistency should be like heavy cream for perfect lines.
Step 2: Underglaze Trailing
-
Prepare the Applicator:
Fill your trailing bottle with cobalt blue underglaze. Give it a good shake. Squeeze a test line onto a scrap piece of paper or clay to ensure the flow is smooth and the tip isn’t clogged. -
Trail the Exterior Rim:
Begin with the exterior rim border. Squeeze gently to create a solid blue line along the rim’s edge, and then trail the second horizontal line you sketched below it. -
Create the Sawtooth Pattern:
Connect the top and bottom rim lines with a zigzag ‘V’ pattern. Try to keep your pressure consistent so the lines have a uniform thickness. -
Detail the Interior Rim:
Repeat the exact same rim border process on the inside of the bowl: trail the top edge, the lower guide line, and fill the gap with the continuous zigzag pattern. -
Draw the Exterior Scrolls:
Moving to the outside surface, trace your pencil sketches of the large scrolls. Keep your hand steady and let the bottle tip hover just above the clay surface rather than dragging on it. -
Add the Starbursts:
At each star location on the exterior, draw intersecting lines to form an asterisk shape (*). If you want variation, make some stars 5-pointed and others 6-pointed. -
Finish the Exterior Layout:
Fill any large empty gaps with tiny trailed dots or simple dashes to balance the composition without overcrowding it. -
Trail the Interior Design:
Move to the inside of the bowl. Recreate the sweeping scroll lines, ensuring they flow nicely with the curve of the bowl’s interior. -
Interior Details:
Add the starbursts and dots to the interior, mirroring the style of the outside. I sometimes like to add a single star or spiral at the very bottom center of the bowl as a surprise for when the food is finished.
Step 3: Refining & Glazing
-
Clean Up Mistakes:
If a line smeared or went astray, wait for it to dry completely. Then, gently scratch the mistake away with a needle tool or stiff brush. Do not wipe it while wet, or you’ll stain the white clay blue. -
Bisque Fire (Optional):
If your underglaze is thick or you are worried about smudging during glazing, you can do a second low-fire bisque to set the decoration. Otherwise, let the underglaze dry thoroughly for at least 24 hours. -
Apply Clear Glaze:
Dip the bowl into a clear transparent glaze, or brush on 2-3 coats if you don’t have a dipping bucket. Ensure the coat is even so the blue design shows through clearly. -
Final Fire:
Load the bowl into the kiln and fire to the maturity temperature of your clay and glaze (likely Cone 5/6 for stoneware).
Level Up: Washed Effects
Before trailing the distinct lines, apply a very watered-down wash of pale blue underglaze across the surface. This creates a dreamy, foggy background for your sharp graphic lines.
Once fired, fill your new bowl with fruit or simply display it to enjoy those crisp blue lines against the smooth white surface
Stenciled Underglaze Color Blocking
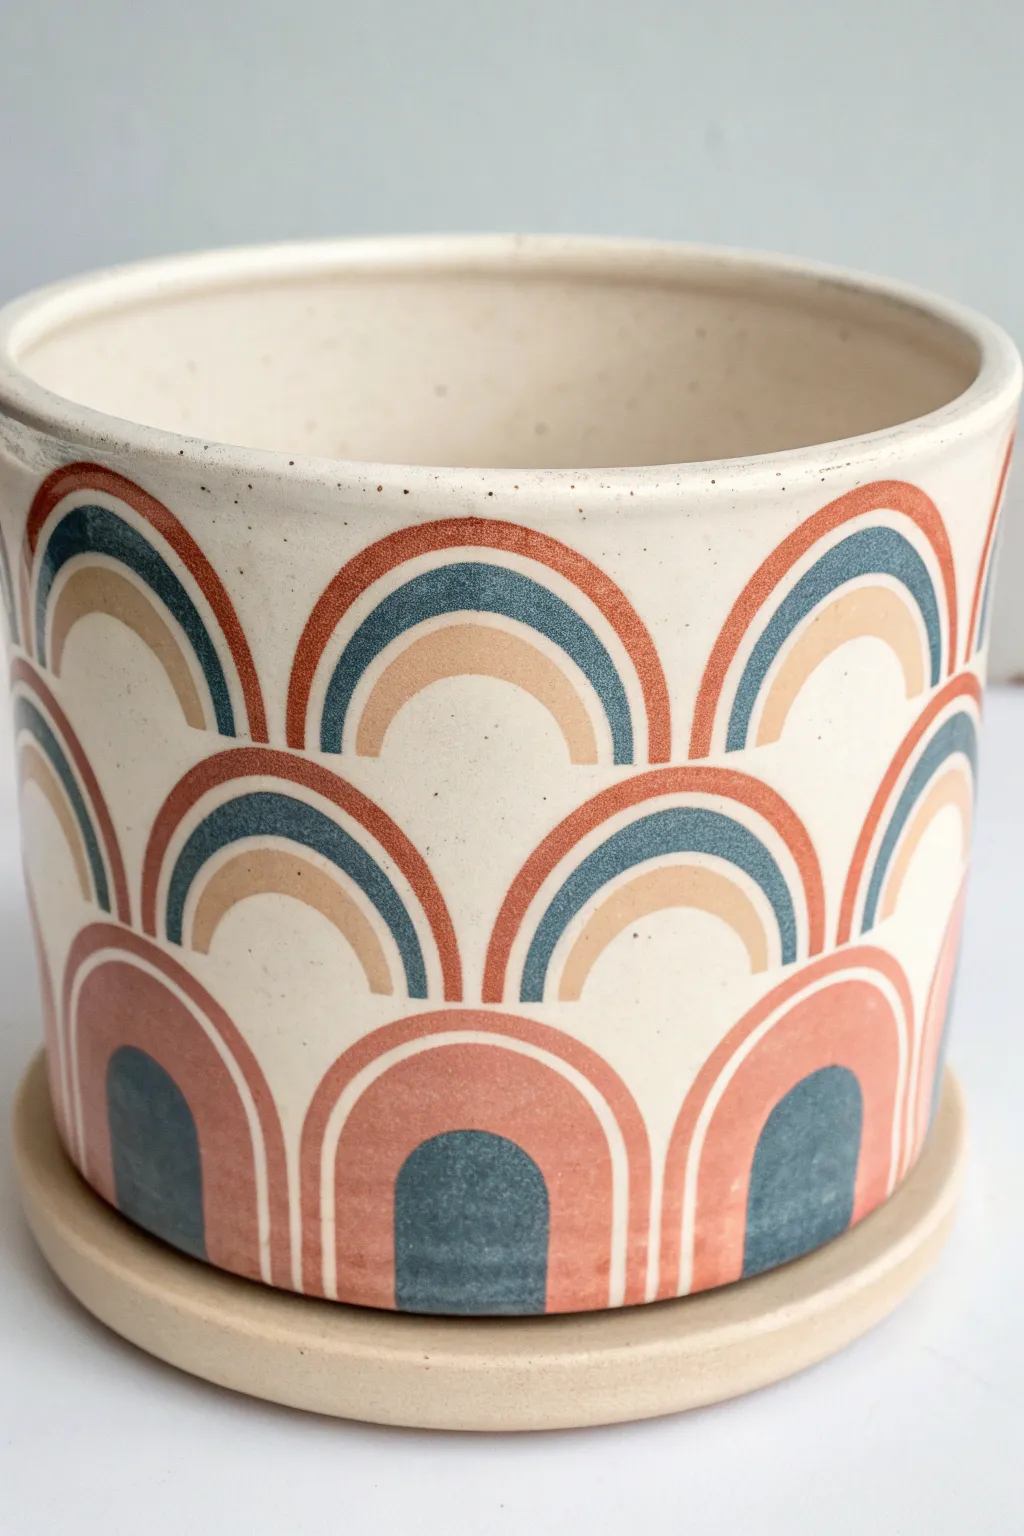
This cheerful planter brings a touch of Art Deco flair to your indoor garden with repeating arch motifs in earthy, muted tones. By layering underglazes with precision stenciling, you will achieve a clean, geometric finish that perfectly mimics the look of high-end ceramic design.
Detailed Instructions
Materials
- Bisque-fired ceramic planter (cylinder shape)
- Small cylinder catch plate (bisque)
- Underglazes (Terracotta/Rust, Deep Teal/Navy, Muted Peach/Beige)
- Flexible vinyl tape or stencil film
- X-Acto knife with fresh blades
- Cutting mat
- Ruler and pencil
- Fan brush (soft)
- Small detail brush
- Clear transparent glaze
- Sponge and water bucket
Step 1: Surface Preparation & Planning
-
Clean the bisque:
Start by wiping down your bisque-fired pot and saucer with a damp sponge. This removes any kiln dust or oils from your hands that might resist the glaze. -
Map out the grid:
Measure the circumference of your pot. Divide this number by the amount of arch columns you want (the example shows about 8-10 columns). Lightly mark vertical guidelines with a pencil to keep your pattern straight. -
Cut the arch stencils:
Using stencil film or wide vinyl tape on a cutting mat, cut out a series of identical arch shapes. You will need negative space stencils (the outline of the arch) for the crisp edges. -
Create the inner arch masks:
You also need to cut smaller arches to block out the spaces between the colored bands. Cut one size for the gap between the outer rust band and the teal band, and another for the gap between the teal and peach center.
Step 2: Applying the Bottom Tier
-
Establish the base arches:
The bottom row is solid color blocking. Apply a stencil for the large outer arch shape directly along the bottom edge of the pot. -
Apply the first color:
Using the terracotta/rust underglaze, paint the outer shape of the bottom arch. Apply 2-3 coats for opacity, letting each coat dry until it’s matte before adding the next. -
Add the inner detail:
Once the outer arch is dry, carefully hand-paint or stencil the smaller inner arch using the Deep Teal color. This creates the ‘doorway’ look at the bottom. -
Clean up edges:
Peel away your stenciling material while the underglaze is slightly leather-hard but not bone dry to prevent flaking. Use a damp stiff brush or cleanup tool to sharpen any fuzzy lines.
Sticky Situation
If your stencil tape isn’t sticking well to the dusty bisque surface, wipe the area with a slightly damp sponge immediately before applying the tape to improve adhesion.
Step 3: Layering the Upper Tiers
-
Position the middle row:
Starting halfway up the height of the bottom arches, place your stencils for the second row. Ideally, the center of a middle-row arch should align with the gap between two bottom-row arches. -
Paint the outer band:
Apply the terracotta/rust underglaze to form the outermost rainbow curve. Keep your brush damp to ensure smooth flow. -
Paint the middle band:
Moving inward, apply the Deep Teal strip. Leave a small gap of raw clay between this and the rust band to let the natural speckle show through. -
Paint the center arch:
Fill the smallest, innermost arch with the Muted Peach/Beige underglaze. Ensure you apply consistent layers so the color fires solid. -
Repeat for the top row:
Move up to the rim section. Place your stencils offset again (aligned with the bottom row). Repeat the three-color banding process: Rust outer, Teal middle, Peach center.
Make It Yours
Try a monochromatic look by using three shades of the same color (like navy, medium blue, and sky blue) for a moody, ombre effect instead of the retro palette.
Step 4: Finishing Touches
-
Glaze the saucer:
While the main pot dries, paint the accompanying saucer. You can leave it raw speckled clay or apply a solid coat of the Muted Beige to match the lightest arch tone. -
Final cleanup:
Inspect the entire pot. Use an X-Acto knife to gently scrape away any stray droplets of underglaze that landed on the unpainted background areas. -
Bisque fire (optional but recommended):
If you have access, doing a second bisque firing to set the underglaze prevents smearing during the clear glaze application. If not, proceed carefully to glazing. -
Apply clear glaze:
Dip or brush a clear, transparent glaze over the entire piece. Ensure the coating is even to avoid milkiness over your dark colors. -
Final firing:
Fire the piece to the temperature recommended for your specific clay and glaze (likely Cone 5 or 6 for stoneware).
Once fired, the glossy finish will make those retro colors pop beautifully against the speckled clay body

TRACK YOUR CERAMIC JOURNEY
Capture glaze tests, firing details, and creative progress—all in one simple printable. Make your projects easier to repeat and improve.
Bubble Underglaze for Organic Cell Patterns

This project combines the unpredictable beauty of bubble glazing with hand-carved details to create a tactile, nature-inspired mug. The resulting pattern features organic cellular shapes in soothing teal and earthy tones against a creamy, speckled clay background.
How-To Guide
Materials
- Speckled buff stoneware clay (leather hard mug)
- White slip or white underglaze
- Teal/Cyan underglaze
- Brown/Tan underglaze
- Small cup or bowl for mixing
- Water
- Dish soap
- Straw
- Sponge
- Needle tool or sgraffito tool
- Clear glaze (zinc-free recommended)
Step 1: Preparation and Base Layer
-
Prepare the Mug:
Begin with a leather-hard mug made from speckled buff clay. Ensure the handle is securely attached and the surface is smooth and free of burrs. -
Apply White Slip:
Coat the exterior of the mug (excluding the bottom inch or so, leaving raw clay exposed) with a layer of white slip or white underglaze. This provides a bright canvas for the bubbles. -
Initial Drying:
Let the white slip layer dry until it loses its sheen but is not bone dry. It needs to be firm enough to accept the bubbles without smearing. -
Mix Bubble Solution:
In a small cup, mix a tablespoon of teal underglaze with a teaspoon of water and a squirt of dish soap. Stir well. -
Create the Foam:
Insert a straw into the mixture and blow gently until a mound of bubbles rises above the rim of the cup. The bubbles should be small and tight for the best cell pattern.
Soap Ratio Tip
Too much water makes bubbles drip and run. Add more soap if bubbles aren’t holding their structure on the clay surface.
Step 2: Applying the Bubble Pattern
-
Transfer Bubbles:
Carefully scoop the foam onto the mug surface, or hold the mug over a collection tray and let the bubbles cascade onto distinct circular areas. Aim for isolated ‘islands’ of bubbles rather than covering the whole piece. -
Let Bubbles Pop:
Wait patiently for the bubbles to pop and dry on their own. Do not touch them while wet, as this will smear the delicate cellular pattern. -
Repeat for Variation:
Repeat the process with a small amount of brown or tan underglaze bubbles in select spots closer to the bottom to add warmth and variety. -
Clean Up Edges:
I like to use a slightly damp sponge to gently tidy up the circular perimeters if any bubbles dripped too far, keeping the shapes distinct and rounded.
Layered Depth
Try layering two different colored bubble mixtures on top of each other in one patch for multicolored cells.
Step 3: Carving Details and Finishing
-
Sgraffito the Centers:
Once the underglaze designs are dry to the touch, use a needle tool to gently scratch into the center of a few circles, revealing the white slip underneath to create a focal point. -
Radiating Lines:
For the brown accents or select teal spots, carve fine lines radiating outward from the center, mimicking a sunburst or flower stamen texture. -
Additional Texture:
Use the needle tool to poke tiny dots or small circles within the larger bubble patches to enhance the organic, cellular look. -
Bisque Fire:
Let the mug dry completely to the bone-dry stage. Fire the piece to bisque temperature (usually Cone 06 or 04). -
Glazing:
After bisque firing, dip the entire mug into a clear glaze. Ensure the glaze is compatible with your clay body to avoid crazing. -
Final Fire:
Fire the mug to maturity (Cone 5 or 6 depending on your clay). The clear glaze will seal the underglaze decoration and make the surface glossy and food safe.
The result is a fascinating surface that invites touch and study with your morning coffee
Underglaze Transfer Collage for Patchwork Surfaces
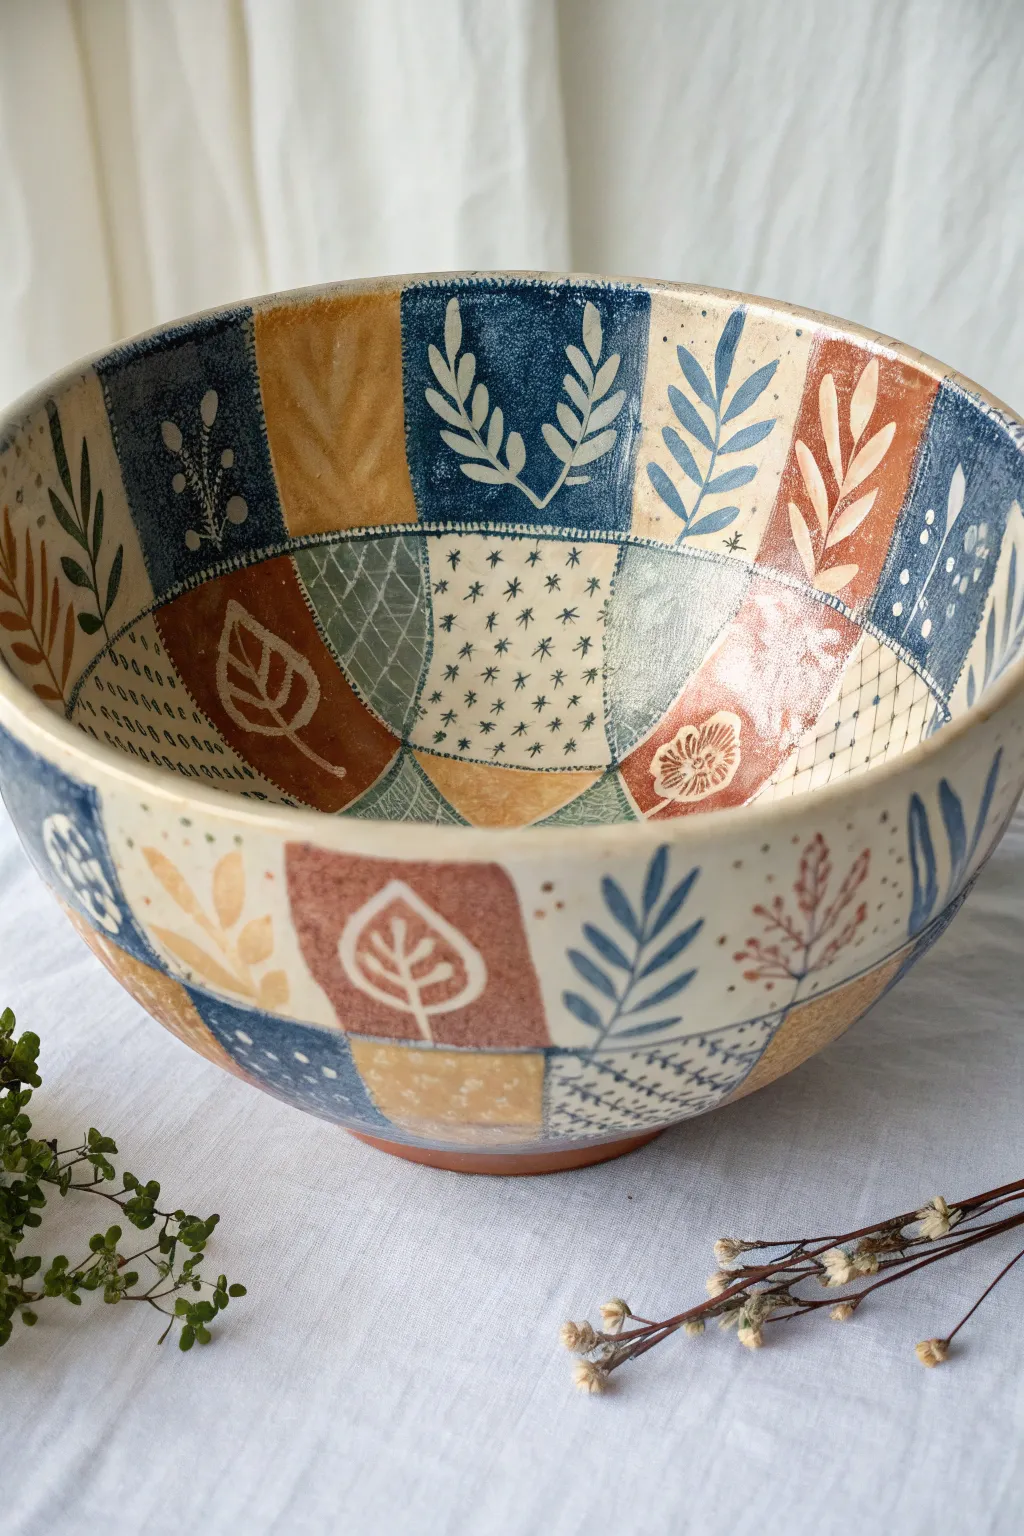
Transform a plain clay vessel into a cozy, quilt-inspired masterpiece using the innovative technique of underglaze transfers. This project combines geometric blocking with organic botanical motifs to create a warm, textured surface that feels both modern and rustic.
Step-by-Step
Materials
- Leather-hard clay bowl (white stoneware or porcelain recommended)
- Underglaze transfer sheets (various patterns: leaves, florals, geometrics)
- Underglaze paints (Navy Blue, Rust Red, Mustard Yellow, Cream)
- Waithake or soft hake brush
- Detail liner brush
- Sponge
- Scissors
- Rib tool (flexible)
- Bowl of water
- Clear glaze (zinc-free recommended for underglaze stability)
Step 1: Planning and Surface Prep
-
Prepare your canvas:
Begin with a leather-hard bowl. The clay should be firm enough to handle without warping but still possess enough moisture to accept the transfers and underglaze. Smooth the surface with a rib tool to ensure there are no groggy bits that could tear the transfer paper. -
Map the grid:
Lightly sketch a grid system onto the leather-hard clay using a dull pencil or a needle tool. You want large, slightly irregular rectangles and squares to mimic a handmade quilt. Don’t worry about perfect straight lines; a little wobble adds character. -
Select your palette:
Choose 3-4 distinct underglaze colors for your background blocks. Looking at the example, a deep navy, an earthy rust, and a muted mustard yellow work beautifully against the natural cream of the clay.
Step 2: Applying Background Blocks
-
Paint the first patches:
Using a soft brush, fill in scattered sections of your grid with the deep navy underglaze. Apply 2-3 coats for full opacity, allowing each coat to dry to a matte finish before adding the next. -
Add warm tones:
Fill in adjacent blocks with the rust red and mustard yellow underglazes, keeping the application even. Leave some blocks unpainted—the raw clay (or a coat of white/cream underglaze) will serve as a neutral background for some patterns. -
Refine the edges:
Once the blocks are touch-dry, use a clean, slightly damp detail brush or a sgraffito tool to neaten the edges where the colors meet, creating distinct ‘seams’ for your patchwork.
Curve Control
Cut small slits or darts into the transfer paper when applying to the curved interior. This helps the flat paper conform to the bowl’s round shape without creasing the image.
Step 3: Transfer Application
-
Cut your transfers:
Select your underglaze transfer sheets. Cut out specific motifs like ferns, leaves, or geometric stars that will fit inside your painted blocks. I find it helpful to hover the dry paper over the bowl first to check the sizing. -
Position the transfer:
Place a cut motif ink-side down onto a painted block. For the unpainted blocks, you can apply the transfer directly to the clay. -
Hydrate the backing:
Gently dab the back of the transfer paper with a damp sponge. You want the paper to become translucent and cling to the curve of the bowl, but avoid soaking it so much that water runs down the surface. -
Burnish the design:
Use a flexible rib or a soft rubber brayer to firmly press the transfer onto the clay. Rub from the center outward to push out any air bubbles, ensuring the underglaze ink makes full contact with the surface. -
Peel and reveal:
Wait a moment for the image to set, then carefully peel back a corner to see if the image has transferred. If it looks patchy, lay it back down and rib again. Once clear, peel the paper away completely. -
Repeat the process:
Continue applying transfers to various blocks, mixing and matching visuals. Try placing white leafy patterns over dark navy blocks, and dark outlined leaves over the lighter yellow or cream sections for contrast.
Stitch it Up
Use a slip trailer to add tiny raised dots along the border of each color block. When fired, these will look like stitching threads holding your ‘fabric’ patches together.
Step 4: Details, Bisque, and Glaze
-
Add hand-painted accents:
If some blocks feel empty or the transfers didn’t cover an area, use a fine liner brush to hand-paint simple leaves or dotted patterns. This helps blend the commercial transfers with your own handiwork. -
Create texture (optional):
For added depth, use a sgraffito tool to scratch through some of the solid colored blocks (like the mustard ones) to reveal the clay body underneath, imitating the texture of fabric weave. -
Dry slowly:
Cover the bowl loosely with plastic to let it dry slowly and evenly. This is crucial for large bowls to prevent rim warping. -
Bisque fire:
Once bone dry, fire the piece to bisque temperature (usually cone 04 or 06) to set the underglaze permanently. -
Glaze application:
Dip or brush a clear, zinc-free glaze over the entire piece. Zinc-free is preferred here as zinc can sometimes cause certain underglaze colors (especially greens and pinks) to shift or brown. -
Final firing:
Fire to your clay body’s maturity temperature (e.g., cone 5/6 or cone 10).
Now you have a stunning vessel that warms the home with the charm of a handmade quilt