When you’re craving unique clay ideas, it helps to think smaller, weirder, and way more playful than the usual bowl-or-mug routine. Here are my favorite projects that feel special, personal, and totally doable at your own kitchen table or studio corner.
Tiny Trinket Dishes With Bold Shapes
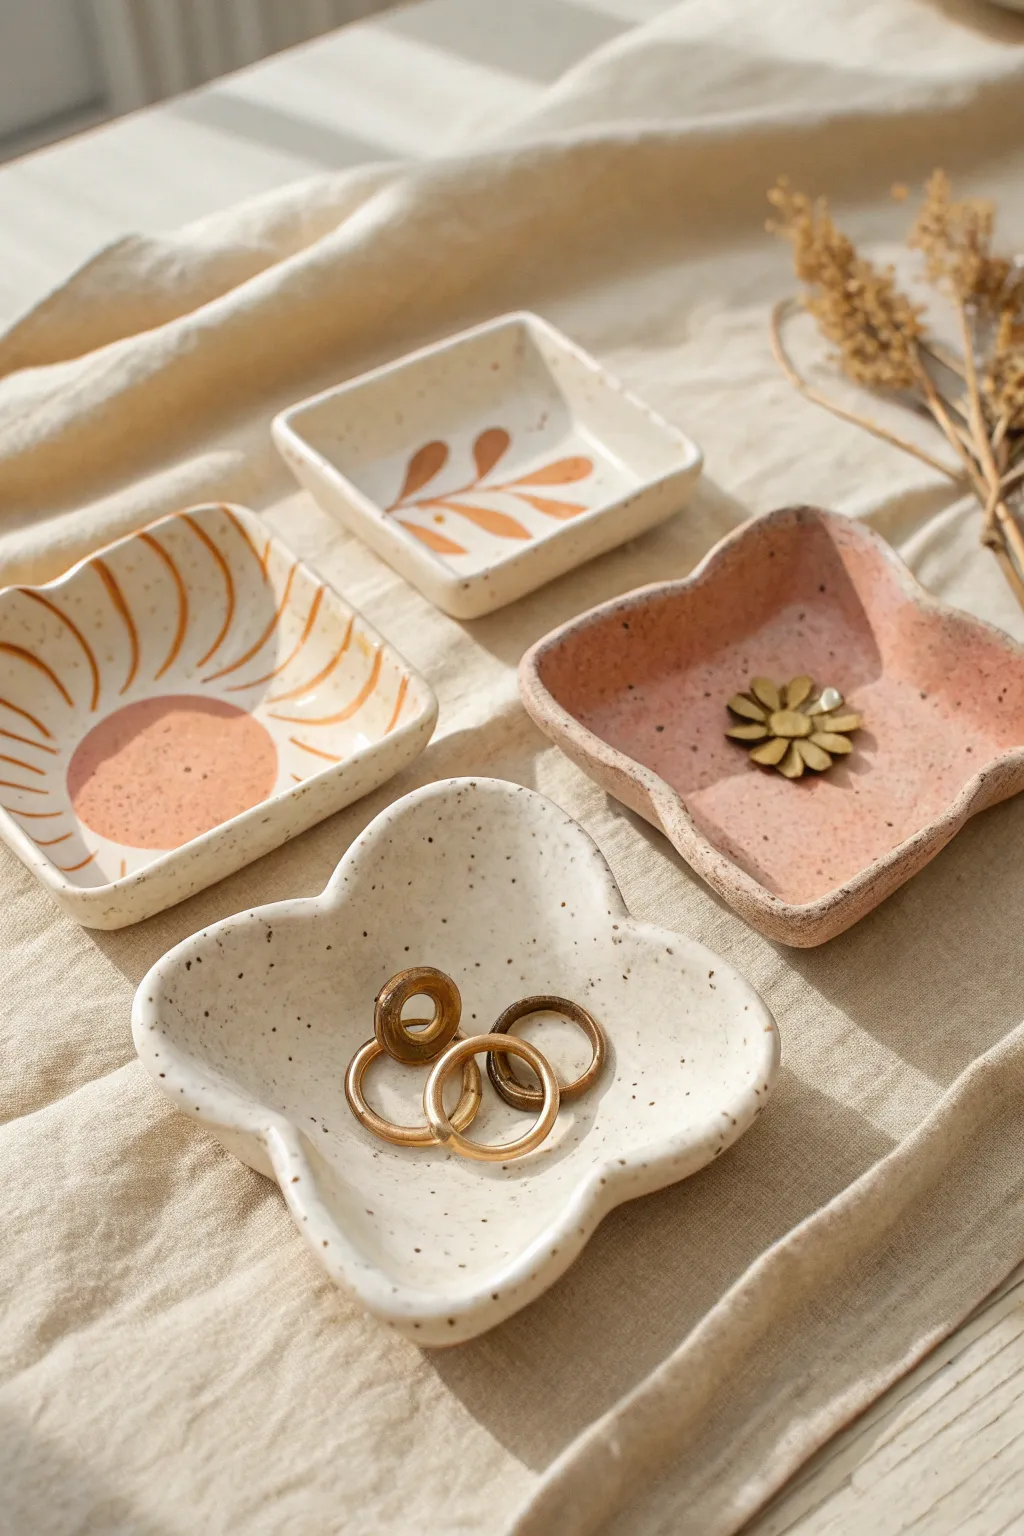
These charming, palm-sized trinket dishes combine organic, hand-built shapes with warm, earthy designs. Featuring speckled finishes and bold silhouettes like four-petal flowers and soft squares, they are perfect for holding your favorite rings or bedside treasures.
Step-by-Step Tutorial
Materials
- White air-dry clay or polymer clay (oven-bake)
- Rolling pin
- Parchment paper or canvas work mat
- Craft knife or clay cutting tool
- Small bowl of water (for smoothing)
- Cookie cutters (flower shape) or paper templates
- Fine grit sandpaper
- Acrylic paints (terracotta, dusty pink, white)
- Fine detail paintbrush
- Medium flat paintbrush
- Glossy varnish or sealant (like Mod Podge or resin)
- Old toothbrush (for speckling)
- Brown fluid acrylic paint (for speckles)
Step 1: Shaping the Dishes
-
Prepare the Clay:
Start by kneading a chunk of clay until it is soft and pliable. If you are using air-dry clay, keep your hands slightly damp to prevent cracking. -
Roll it Out:
Place the clay between two sheets of parchment paper or on a canvas mat. Use the rolling pin to flatten the clay to an even thickness of about 1/4 inch. -
Cut the Shapes:
For the floral dishes, use a large four-petal flower cookie cutter. Alternatively, draw your own organic flower or soft square shape on paper, cut it out, place it on the clay, and trace around it with a craft knife. -
Lift the Edges:
Gently pinch and lift the edges of your cutout shapes upwards to create a rim. Work your way around the perimeter slowly. -
Smooth the Form:
Dip your finger in a little water and smooth out any fingerprints or rough edges along the rim and the interior basin. I like to spend extra time here ensuring the transition from base to wall is seamless. -
Dry or Bake:
Follow the instructions for your specific clay type. If baking polymer clay, place on a baking sheet and heat as directed. If using air-dry clay, let it sit undisturbed for 24-48 hours until fully hardened and white.
Sponge Smoothing
Before drying, wipe your raw clay shapes with a slightly damp, fine-pore sponge. This removes fingerprints better than just water and creates a super professional, smooth surface.
Step 2: Painting & Decorating
-
Sand Imperfections:
Once completely dry or cooled, gently use fine-grit sandpaper to smooth any sharp edges on the rim or bumps on the bottom. -
Base Coating:
For the floral dishes, you can leave the white clay bare or paint one a dusty pink. For the square dishes, apply a base coat of warm cream or leave the natural white clay exposed. -
Sunburst Design:
On the square dish, paint a semi-circle at the bottom edge using terracotta paint. Add curved lines radiating outward to create sun rays. -
Leaf Design:
On the other square dish, use a fine brush to paint a simple botanical sprig with oval leaves in a matching terracotta or amber tone. -
Creating the Speckles:
Dilute a small amount of dark brown acrylic paint with water until it is very fluid. Dip an old toothbrush into this mixture. -
Apply the Splatter:
Hold the toothbrush over the dishes and run your thumb across the bristles to flick tiny droplets of paint onto the surface. Practice on a scrap paper first to control the spray. -
Seal the Work:
Allow all paint to dry completely. Finish by applying two thin coats of glossy varnish or sealant to protect the surface and give it a ceramic-like shine.
Rim Variations
Try painting just the very edge of the rim with gold leaf paint or a contrasting color to add a pop of definition to the organic shapes.
Arranging these on your dresser creates an instant, organized aesthetic for your jewelry


Marbled Mini Bowls With Swirled Color
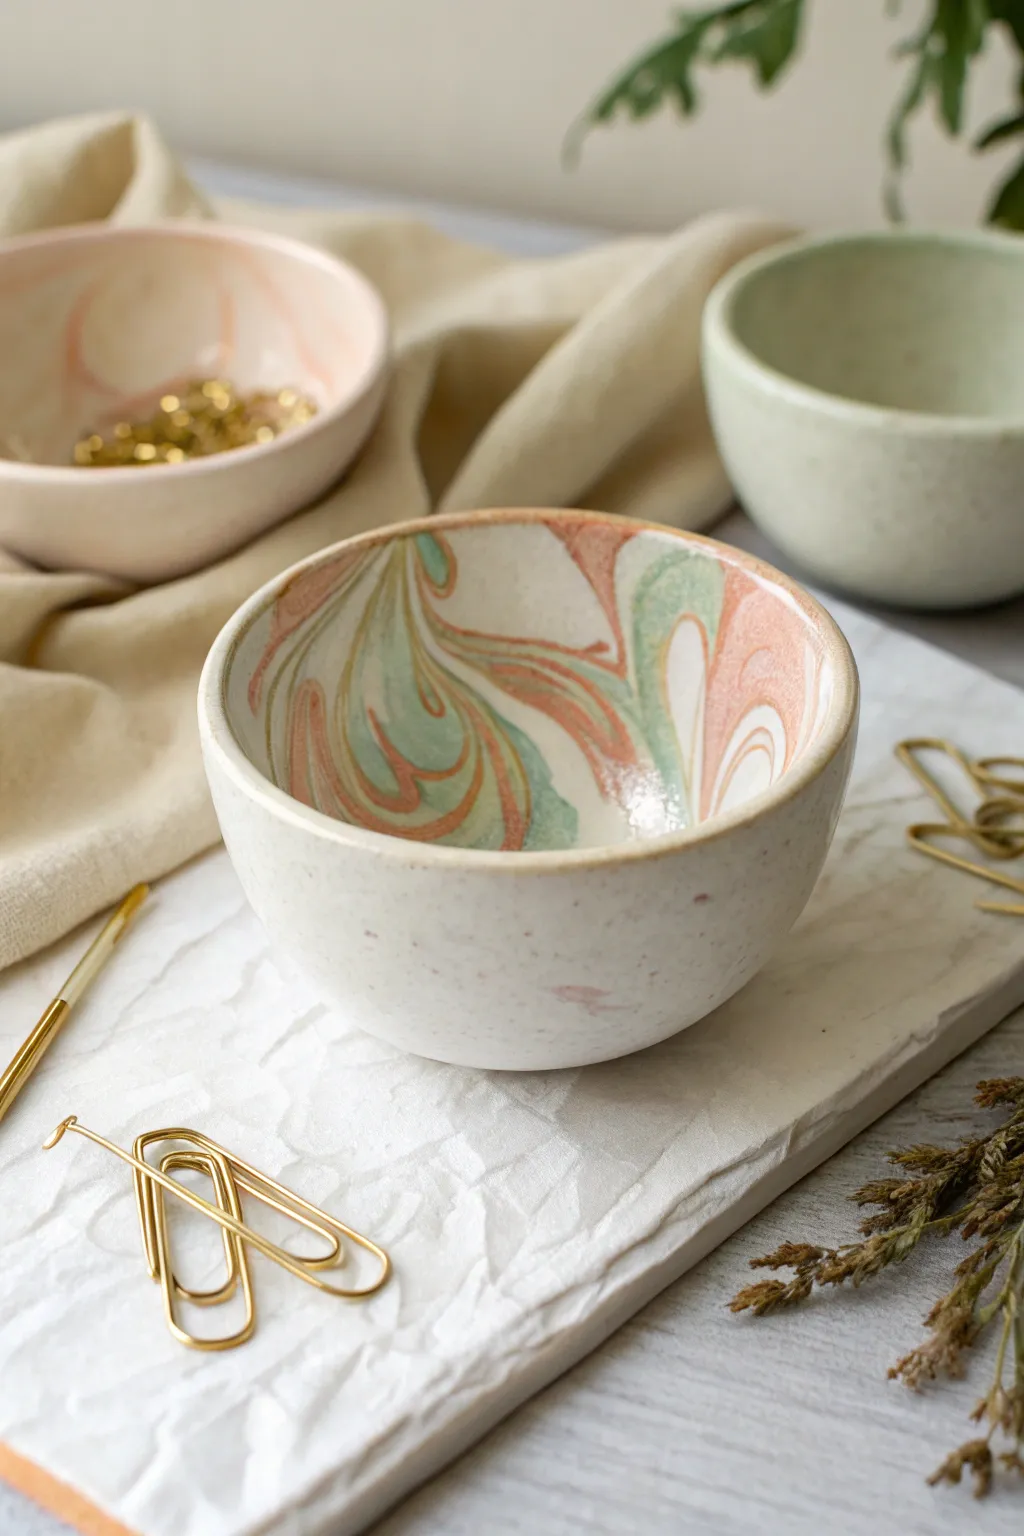
These delicate mini bowls feature mesmerizing ribbons of peach, mint, and cream swirled together to create a one-of-a-kind pattern. The organic marbling technique ensures that no two pieces are ever alike, perfect for holding jewelry or adding a splash of pastel charm to your desk.
Step-by-Step Guide
Materials
- Polymer clay or air-dry clay (White, Peach/Pink, Teal/Mint)
- Acrylic rolling pin
- Small bowl or ramekin (to use as a mold)
- Craft knife or scalpel
- Fine-grit sandpaper (400-600 grit)
- Clear gloss varnish or glaze (optional)
- Soft paintbrush
- Parchment paper or baking mat
Step 1: Preparing the Clay
-
Condition the white clay:
Start by taking a generous amount of white clay, roughly the size of a golf ball. Knead it in your hands until it is soft, pliable, and warm to the touch. -
Prep the accent colors:
Take smaller amounts of your peach and teal clays—about a quarter of the amount of the white clay. Condition these separately until they are soft and ready to blend. -
Create individual ropes:
Roll each color of clay into a long, thin snake or rope on your work surface. Aim for them to be roughly the same length, though the white rope should be thicker than the colored ones.
Step 2: Marbling and Shaping
-
Combine the ropes:
Twist the three ropes of clay together into one large spiral. Fold this twisted rope in half and twist it again. -
Repeat the twist:
Gently roll the combined rope on the table to smooth it out, then fold and twist once more. Be careful not to over-twist, or the colors will muddy rather than creating distinct ribbons. -
Ball it up:
Roll the twisted clay into a smooth ball. You should already see beautiful swirls forming on the surface. -
Roll out the slab:
Place the ball on your parchment paper. Using the acrylic rolling pin, flatten the ball into a disc about 1/4 inch thick. Rotate the clay as you roll to keep a circular shape. -
Assess the pattern:
Examine your slab. If you want more distortion in the pattern, you can gently stretch the edges of the clay outward. -
Cut the circle:
Find a circular cutter or a glass slightly larger than your intended bowl size. Press it into the clay to cut a clean, perfect circle. Remove the excess scraps.
Muddy Colors?
If your colors look grey or brown instead of distinct swirls, you have over-mixed. Stop twisting sooner next time; barely combined clay creates the boldest marble effect.
Step 3: Forming and Finishing
-
Shape the bowl:
Gently lift your clay circle and drape it *inside* your small mold bowl. Using your fingers, carefully press the clay against the sides and bottom to take the shape. -
Smooth the interior:
Run your thumb along the inside surface to smooth out any fingerprints or trapped air bubbles, ensuring the marbling looks seamless. -
Refine the rim:
I like to use a craft knife or a wet finger to gently smooth the top rim of the clay while it’s in the mold, creating a soft, rounded lip instead of a sharp edge. -
Dry or bake:
If using polymer clay, bake according to the package instructions (usually 275°F/135°C for 15-30 minutes) while still in the mold (ensure the mold is oven-safe!). If using air-dry clay, let it sit for 24-48 hours until fully hardened. -
Remove from mold:
Once cool or dry, carefully pop the clay bowl out of the mold. It should release easily. -
Sand for smoothness:
Take your fine-grit sandpaper and gently buff the rim and the outside of the bowl to remove any uneven texture or sharp bits. -
Dust off debris:
Wipe the bowl down with a slightly damp cloth to remove any sanding dust before the final step. -
Add a glossy finish:
For that ceramic look shown in the photo, apply a thin coat of gloss varnish or glaze to the inside of the bowl. This highlights the swirl colors beautifully. -
Final cure:
Let the varnish dry completely according to the manufacturer’s instructions before using your new dish.
Gilded Edge Upgrade
Once the sealer is dry, use a small brush to paint the very rim of the bowl with liquid gold leaf or metallic gold paint for a luxurious, high-end finish.
Enjoy styling your vanity or desk with these soft, whimsical creations


Statement Coasters With Texture and Pattern

These elegant coasters feature a classic embossed design that looks far more intricate than it actually is to create. By using simple clay tools and stamps, you can achieve a sophisticated, heirloom-quality finish perfect for protecting your surfaces in style.
Step-by-Step Tutorial
Materials
- White or light beige air-dry clay (or polymer clay)
- Rolling pin
- 4-inch round cookie cutter
- Medium-grit sandpaper
- Fine-grit sandpaper
- Wooden sculpting tool with a blunt point
- Textured stamp or found object (for the center medallion)
- Small dotting tool or toothpick
- Matte acrylic sealer or varnish
- Canvas mat or parchment paper
Step 1: Preparing the Base
-
Condition the clay:
Begin by kneading a handful of your clay until it is warm, pliable, and free of any air bubbles. -
Roll it out:
Place the clay on your canvas mat or parchment paper. Use the rolling pin to flatten the clay to an even thickness of about 1/4 inch. -
Cut the shape:
Press the 4-inch round cookie cutter firmly into the clay to create a perfect circle. Peel away the excess clay from the outside before lifting the cutter. -
Smooth the edges:
Dip your finger in a little bit of water and run it gently around the cut edge of the coaster to smooth out any roughness from the cutter.
Step 2: Adding the Design
-
Mark the border:
Using a blunt wooden sculpting tool or the back of a butter knife, gently press a shallow groove about 1/4 inch inward from the outer edge to create a defined rim. -
Create the beading:
Take your small dotting tool or a toothpick. Press small, evenly spaced indentations all along the raised outer rim you just defined. Keep the pressure consistent for a uniform look. -
Add inner details:
Move slightly inward from your first groove and create a second ring of smaller dots or indentations. This adds layers to the visual texture. -
Stamp the center:
Position your decorative stamp or a textured object (like the bottom of a detailed glass or a button) exactly in the center of the circle. -
Impress the design:
Apply firm, even pressure to the stamp to leave a clear impression of the medallion design, then lift straight up to avoid smudging the details. -
Optional texturing:
If the plain space between the center and the border feels too empty, I sometimes like to lightly sponge it for a subtle stone-like texture.
Stay Flat
To prevent warping while drying, place a lightweight book or board on top of the coasters once they are leather-hard (dry to the touch but still cool).
Step 3: Finishing Touches
-
Let it dry:
Allow the coasters to dry completely. For air-dry clay, this usually takes 24-48 hours. Flip them over halfway through the drying process to prevent curling. -
Sand the surface:
Once bone dry, use medium-grit sandpaper to smooth out any unevenness on the rim or bottom. Follow up with fine-grit sandpaper for a polished feel. -
Dust off:
Wipe the coasters down with a slightly damp cloth or a dry brush to remove all sanding dust from the crevices of the pattern. -
Apply sealer:
Brush on a thin, even coat of matte acrylic sealer. This is crucial for protecting the clay from moisture/condensation when in use. -
Dry and repeat:
Let the first coat dry, then apply a second coat to ensure a watertight seal.
Antique Effect
Mix a tiny drop of brown paint with water and brush it over the dried texture. Wipe it back immediately with a cloth to leave color only in the grooves.
Enjoy your beautiful, custom-made coasters with your next warm cup of coffee


Minimal Bud Vases With a Twist
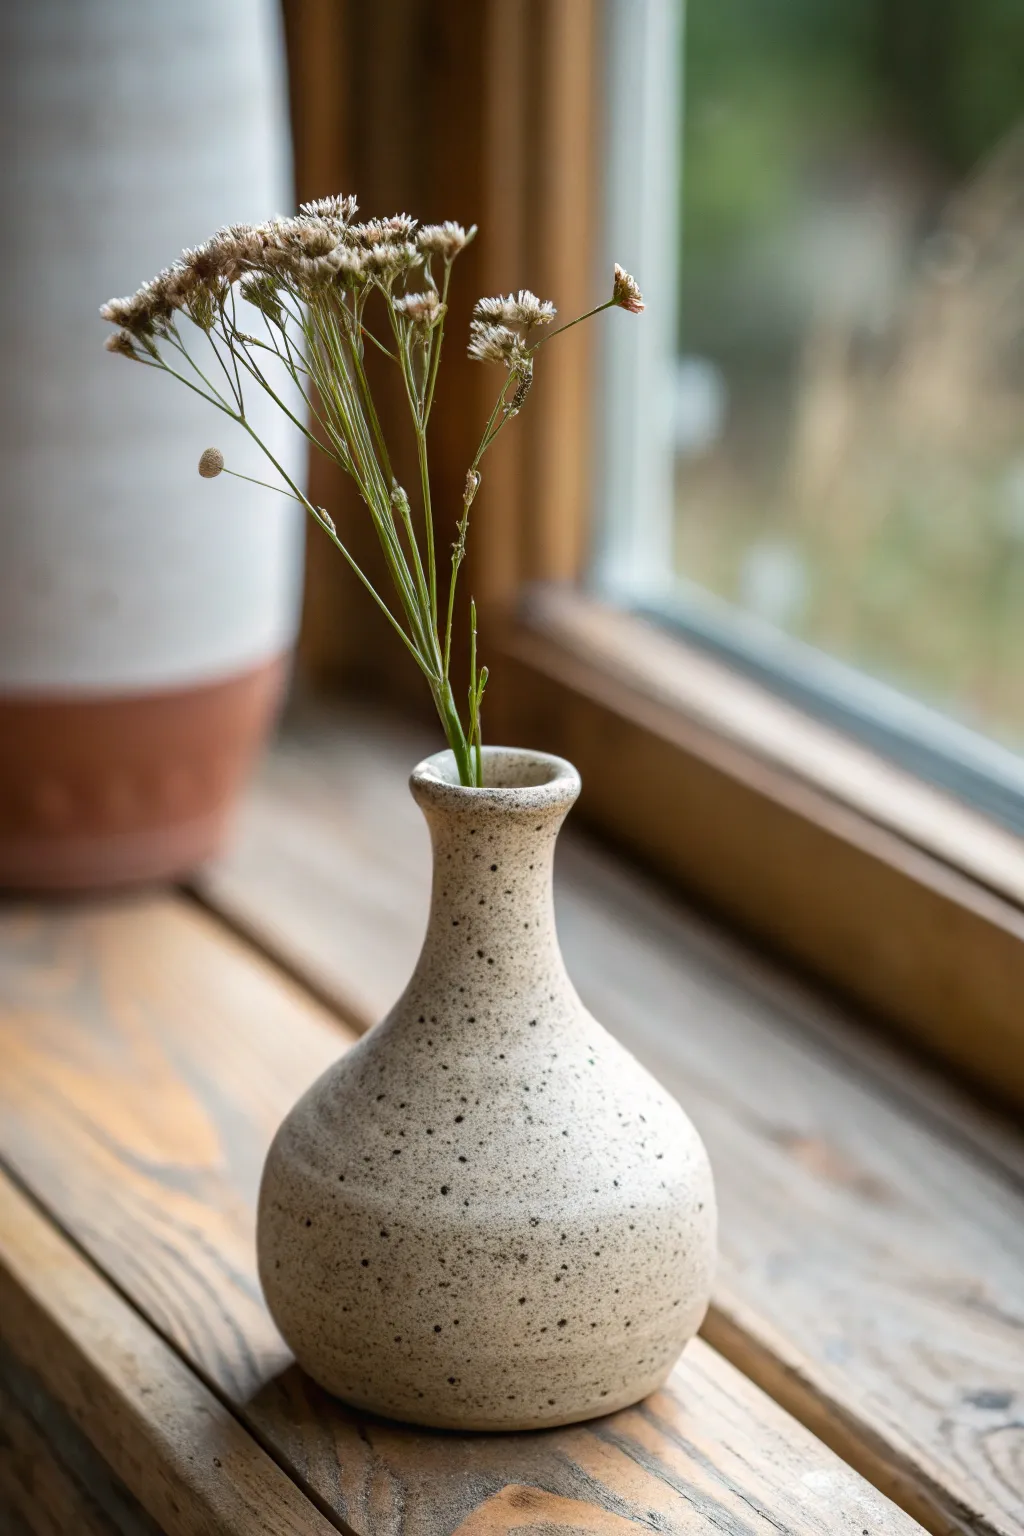
This project captures the quiet beauty of simple forms with a speckled clay bud vase that feels both modern and timeless. By focusing on a bulbous base and a slender neck, you’ll create a charming vessel perfect for showcasing delicate dried stems or wildflowers.
Detailed Instructions
Materials
- Speckled stoneware clay (e.g., clay with manganese spots)
- Pottery wheel
- Throwing sponge
- Wooden throwing rib
- Metal kidney rib
- Needle tool
- Wire cutter
- Trimming tools (loop tool)
- Small chamois strip
- Clear matte or satin glaze
- Kiln access
Step 1: Throwing the Form
-
Prepare the Clay:
Wedge about 1 to 1.5 pounds of speckled stoneware clay thoroughly to remove air bubbles. Since this is a small form, ensure your clay ball is perfectly round before sticking it to the wheel head. -
Center and Open:
Center the clay on the wheel using firm pressure. Open up the clay, creating a narrower floor than usual—about 1.5 to 2 inches wide—since this will be a small-footed vase. -
Pull the Cylinder:
Slowly pull the walls up into a tall, narrow cylinder. Keep the walls even, aiming for a consistent thickness from bottom to top. It helps to keep the top slightly tapered inward (coned) to maintain control. -
Belly Out the Form:
Using a throwing sponge on the inside and your fingers on the outside, gently push the clay outward from the inside near the bottom third of the cylinder. Create a rounded, bulbous belly while leaving the top section narrow. -
Refine the Curve:
Use a wooden rib on the outside to smooth and define the curve of the belly. Press gently against the rib from the inside to create that continuous, organic roundness.
Collaring Success
When narrowing the neck, increase your wheel speed slightly. Fast rotation helps keep the clay centered and upright while you apply inward pressure.
Step 2: Collaring the Neck
-
Begin Collaring:
Moisten your hands slightly. Place them around the upper section of the vase and gently squeeze inward while the wheel spins to narrow the neck. Do this in several passes to avoid buckling the clay. -
Elongate the Neck:
After each collaring pass, do a small pull on the neck to regain height and thin out the wall, which thickens as you squeeze it in. Rise slowly to keep the neck straight. -
Create the Flare:
Once the neck is sufficiently narrow, gently use your index finger or the handle of a tool to slightly flare the very top rim outward, creating a small lip. -
Smooth the Rim:
Wrap a small strip of chamois leather over the rim and gently compress it as the wheel spins. This ensures a smooth, professional finish that won’t chip easily. -
Cut and Dry:
Use a wooden tool to undercut the base slightly, defining where the foot will be. Slice partially through the bottom with a wire tool, then let the pot reach leather-hard consistency before removing it from the bat for trimming.
Satin Texture
For a tactile finish, skip the glaze on the outside! Sand the raw clay smooth after firing, or use a liquid wax resist on the exterior before dipping just the inside.
Step 3: Trimming and Finishing
-
Trim the Foot:
Center the leather-hard vase upside down on the wheel. Secure it with clay lugs. Use a sharp loop tool to trim away excess weight from the bottom, creating a tidy foot ring that mirrors the curve of the pot. -
Smooth the Surface:
I like to run a smooth metal rib or the back of a spoon over the trimmed areas to burnish them slightly, removing any grog marks and tightening the surface. -
Bisque Fire:
Allow the vase to dry completely slowly to prevent cracking. Once bone dry, fire the piece in a bisque kiln (usually Cone 04 or 06) to prepare it for glazing. -
Apply Glaze:
Wipe the bisque ware with a damp sponge to remove dust. Dip the vase into a clear matte or satin glaze. Alternatively, use a white glaze that is slightly translucent to allow the natural clay speckles to show through. -
Wipe the Foot:
Thoroughly wipe all glaze off the bottom foot ring with a damp sponge. Any glaze left here will fuse the vase to the kiln shelf. -
Final Firing:
Fire the vase to the maturity temperature of your clay body (likely Cone 5/6 or Cone 10). This high fire will bring out the rich, dark speckles in the clay.
Place a few dried stems in your finished vase to admire how perfectly the natural speckles complement organic textures

The Complete Guide to Pottery Troubleshooting
Uncover the most common ceramic mistakes—from cracking clay to failed glazes—and learn how to fix them fast.
Magnet Mini Vases for Single Stems
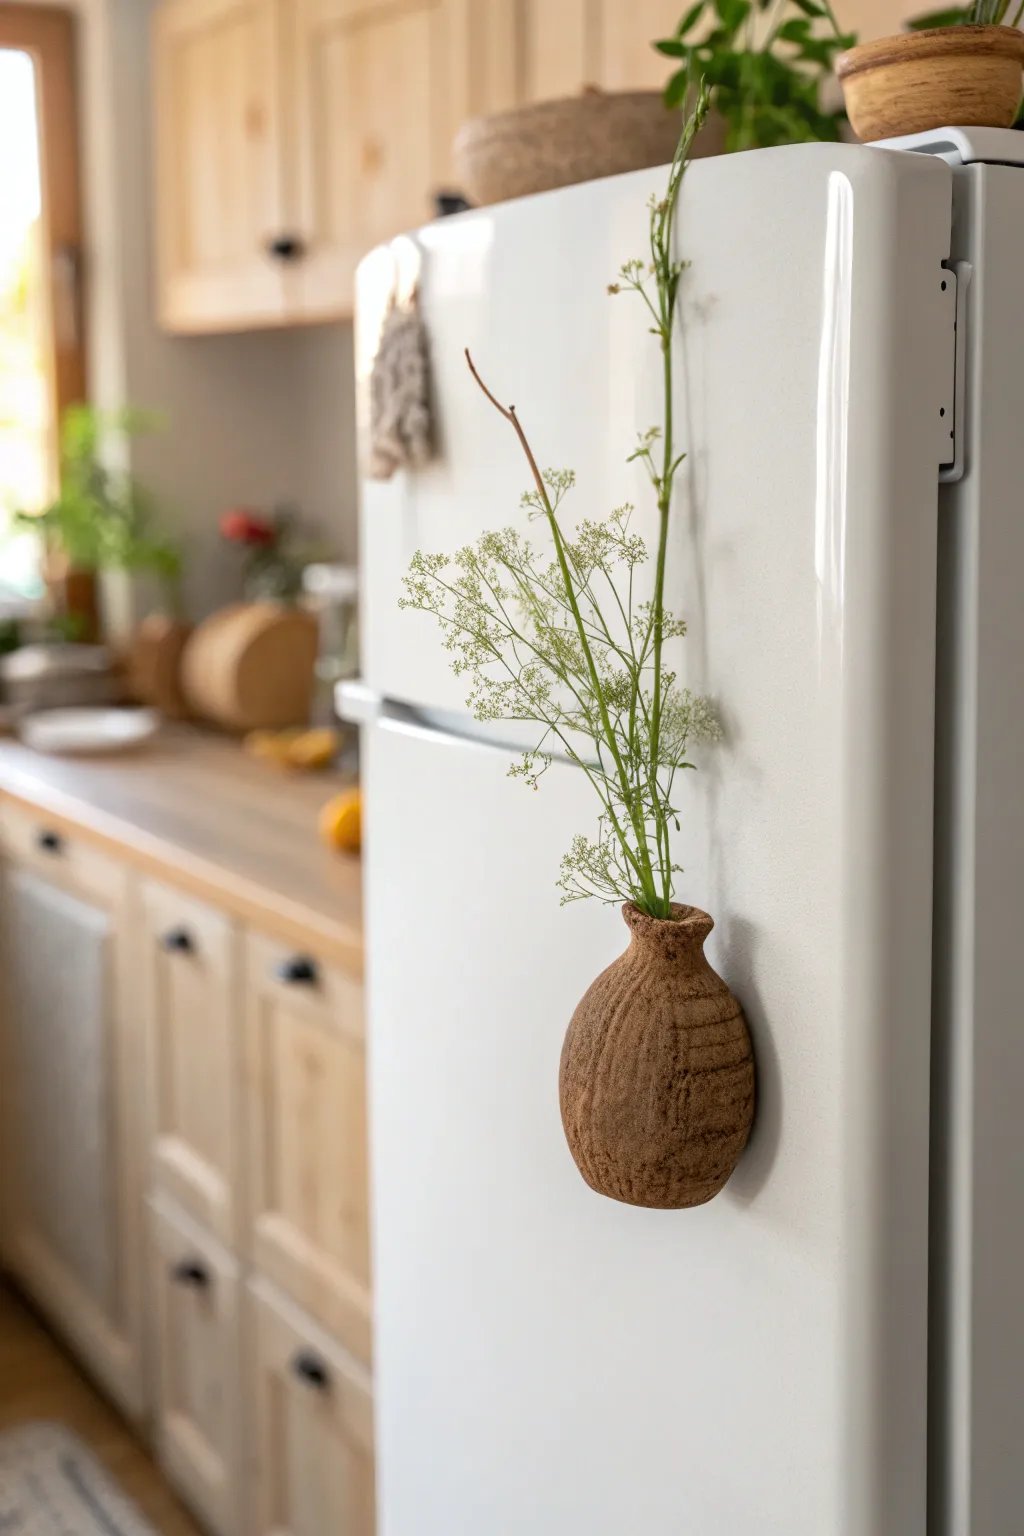
Bring a touch of organic warmth to your kitchen with this rustic, textured bud vase that clings right to your refrigerator. Modeled from clay to look like a found artifact, it’s the perfect vessel for displaying delicate wildflowers or dried herbs.
Step-by-Step Guide
Materials
- Air-dry clay (terra cotta or brown color)
- Strong neodymium disc magnets (approx. 10mm)
- Small bowl of water
- Modeling tools or a blunt knife
- Texturing tool (coarse sponge, sandpaper, or an old toothbrush)
- Piece of rough fabric or burlap
- Rolling pin
- Super glue or heavy-duty craft adhesive
Step 1: Shaping the Base
-
Condition the clay:
Start with a walnut-sized ball of brown air-dry clay. Knead it in your hands until it’s warm and pliable, eliminating any cracks. -
Form the initial shape:
Roll the clay into a smooth sphere, then gently flatten it into a thick oval disc. This will be the back of your vase that sits against the fridge. -
Create the pocket:
Take a slightly smaller piece of clay and flatten it into a rounded shape. Gently curve the edges inward to create a cup-like form. -
Join the pieces:
Score the edges of both pieces where they will meet—the back disc and the cup-like front. Dab a little water or slip on the scored areas. -
Seal the seams:
Press the front piece onto the backing disc. Use a modeling tool or your finger to smooth the clay over the seam, blending the two parts until they look like a single unit. -
Refine the neck:
Pinch the top opening slightly to create a narrower neck. I like to flare the rim out just a tiny bit to give it a classic pottery silhouette.
Magnet slipping?
If the magnet pulls out of the glue, score the back of the magnet with sandpaper before re-gluing. This rough surface gives the adhesive much better grip on the smooth metal.
Step 2: Adding Texture and Detail
-
Smooth the surface:
Dip your finger in water and run it over the entire piece to remove harsh fingerprints, but don’t make it perfectly smooth—imperfections add character. -
Apply rough texture:
Press a piece of coarse fabric or burlap gently against the belly of the vase. Rock it back and forth to imprint a subtle woven texture. -
Create vertical ridges:
Using a blunt knife or modeling tool, drag vertical lines down the body of the vase. Keep them slightly uneven and organic rather than perfectly straight. -
Add horizontal details:
On the right side of the vase, press horizontal lines across the vertical ridges to clear a patch or create a ‘stitched’ look, adding visual interest. -
Distress the surface:
Lightly tap the surface with an old toothbrush or a crumpled ball of foil to add tiny pits and pores that mimic aged stone or earthenware. -
Create the magnet intentation:
Flip the vase over to the flat back. Press your magnet into the clay to create a perfect indentation, then remove the magnet. Do not glue it yet.
Step 3: Finishing Up
-
Deepen the opening:
Ensure the hole at the top is deep enough to hold a stem inside. Use the handle of a paintbrush to carefully bore down into the pocket without piercing the bottom. -
Dry completely:
Set the vase aside in a dry, room-temperature area. Let it cure for at least 24 to 48 hours until it is hard and light in color. -
Sand edges:
Once dry, use fine-grit sandpaper to soften any sharp edges around the lip or the back, ensuring it won’t scratch your fridge. -
Attach the magnet:
Apply a drop of strong super glue or heavy-duty adhesive into the indentation on the back. Press the magnet in firmly and let the glue cure completely. -
Check balance:
Before adding flowers, stick the magnet to a metal surface to ensure it holds the weight of the clay securely.
Make it watertight
Air-dry clay isn’t waterproof. To hold fresh flowers with water, coat the INSIDE with two layers of clear resin or a waterproof varnish before using.
Pop in a sprig of dried greenery and admire your new functional piece of art.
Clay Photo Holders in Modern Forms
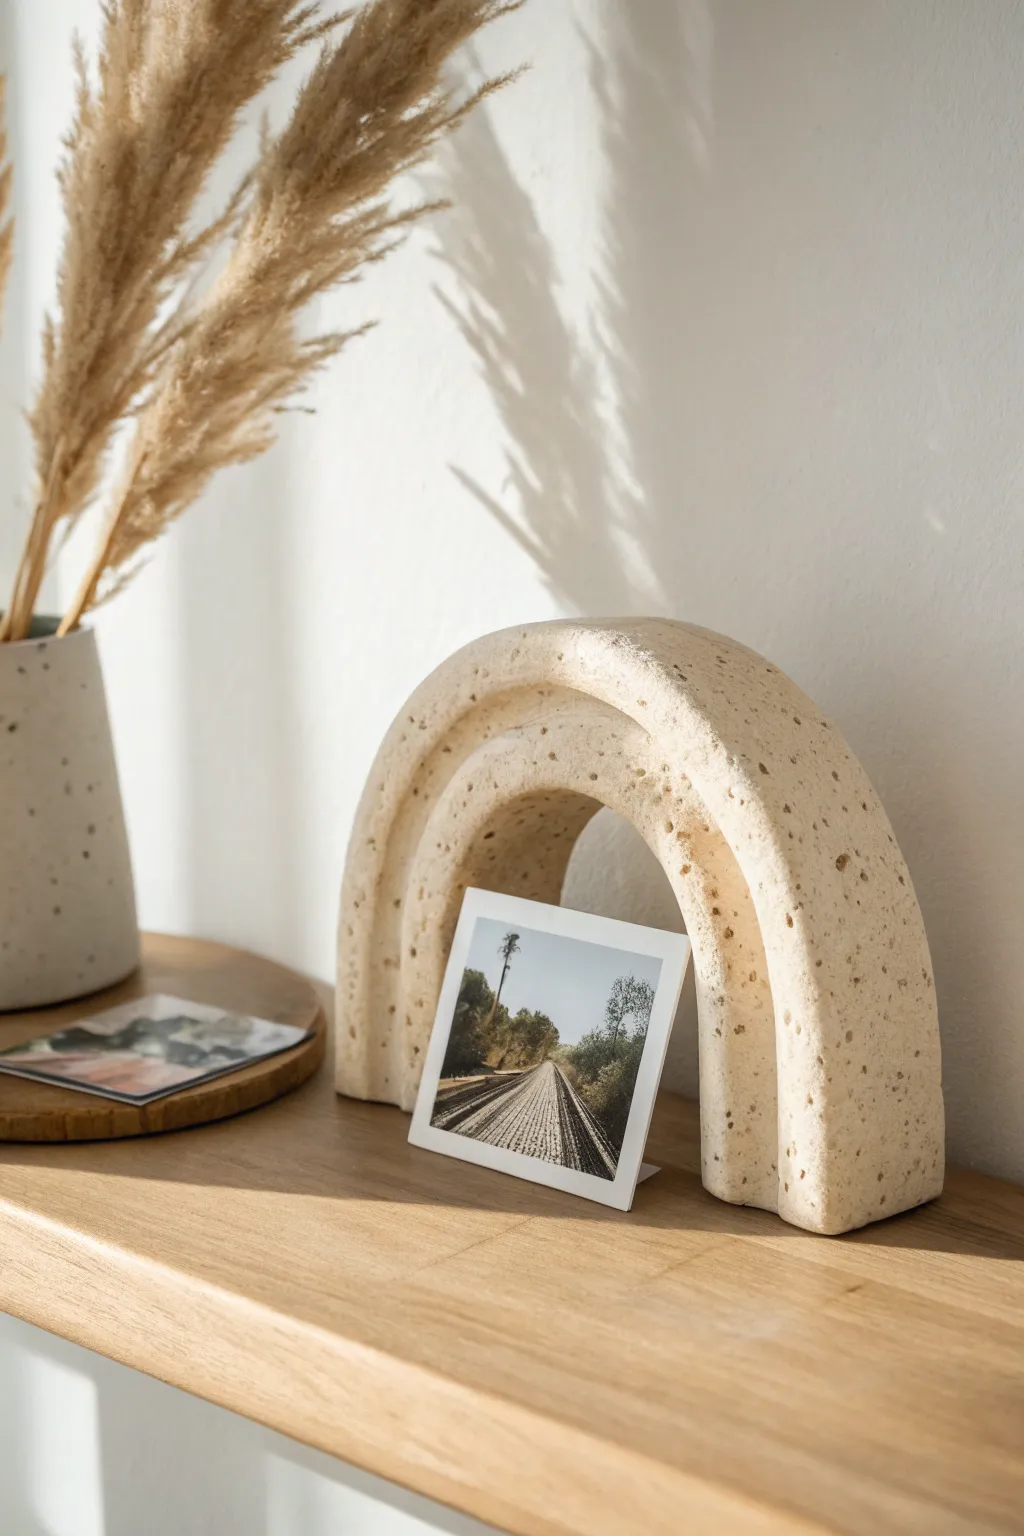
Bring a touch of architectural elegance to your shelving with this minimalist clay arch. Its rough, speckled finish mimics the look of high-end travertine stone while serving as a sturdy backdrop for your favorite prints.
Detailed Instructions
Materials
- Air-dry clay (white or beige)
- Black pepper or dried coffee grounds
- Rolling pin
- Craft knife or clay wire cutter
- Large circular cookie cutters (or bowls for templates)
- Sandpaper (medium and fine grit)
- Small bowl of water
- Parchment paper
Step 1: Preparing the Faux Stone Clay
-
Mix the texture:
Begin with a large handful of plain air-dry clay. To achieve that organic, speckled look seen in the photo, flatten the clay slightly and sprinkle in a generous pinch of cracked black pepper or dried coffee grounds. -
Knead thoroughly:
Fold the clay over the speckles and knead repeatedly. You want the particles distributed evenly throughout the entire block so the texture appears natural rather than surface-level. -
Roll it out:
Place your clay on parchment paper. Roll it out into an even slab, aiming for a thickness of about 1 inch to 1.5 inches. This substantial thickness gives the piece its structural integrity and stone-like weight. -
Smooth the surface:
Dip your finger in a little water and gently run it over the surface of the slab to remove any major cracks or rolling pin marks before cutting.
Step 2: Shaping the Arch
-
Cut the outer curve:
Use a large circular cutter or trace around a bowl to define the top of your arch. Cut strictly downward with your craft knife to keep the edges sharp and perpendicular to the table. -
Define the sides:
Use a ruler to cut straight vertical lines down from the widest point of your semi-circle, creating the classic tombstone arch shape. -
Cut the inner arch:
Place a smaller circular cutter or template in the center of your shape. Carefully cut out this inner window, ensuring the distance between the inner and outer edge is uniform—roughly 1.5 to 2 inches thick. -
Refine the legs:
Extend the cut lines from the inner circle straight down to the base. Trim the bottom of the two ‘legs’ so they are perfectly flat and level, allowing the piece to stand upright without wobbling. -
Soften the edges:
I like to dampen my fingertip with water and gently run it along all cut edges. You aren’t rounding them off completely, just removing the sharp burrs left by the knife.
Uneven Legs?
If the arch wobbles after drying, tape a sheet of sandpaper to a flat table. Rub the bottom of the arch legs back and forth over it until they are perfectly level.
Step 3: Finishing and Drying
-
Add surface texture:
While the clay is still wet, take an old toothbrush or a stiff bristle brush and tap it randomly over the surface. This creates tiny pits that mimic real limestone. -
Initial drying phase:
Let the arch dry flat on the parchment paper for 24 hours. Placing a light book on top (with parchment between) can help prevent the legs from warping upwards. -
Flip and dry:
After the first day, carefully flip the arch over to let the underside breathe. Allow it to dry for another 24-48 hours until it is bone dry and lighter in color. -
Sand for stone effect:
Once fully dry, use medium-grit sandpaper to aggressively sand the flat surfaces. This will expose more of the pepper or coffee speckles buried inside. -
Detail sanding:
Switch to fine-grit sandpaper to smooth out the inner curves and any rough patches on the legs, ensuring the finish feels matte but not scratchy. -
Clean up:
Wipe the entire piece down with a dry cloth or a barely damp sponge to remove the clay dust, revealing the clear speckled pattern. -
Seal (optional):
If you want to protect the piece, apply an ultra-matte varnish. Avoid glossy sealers, as they will ruin the natural stone aesthetic.
Pro Tip: Warping
Air-dry clay shrinks. To prevent cracks, dry it slowly away from direct sunlight or heat vents. Rotate it frequently so one side doesn’t dry faster than the other.
Place your favorite photo in front of your new sculpture and enjoy the modern, organic vibe it adds to your space


What Really Happens Inside the Kiln
Learn how time and temperature work together inside the kiln to transform clay into durable ceramic.
Playful Jewelry Charms and Pendants
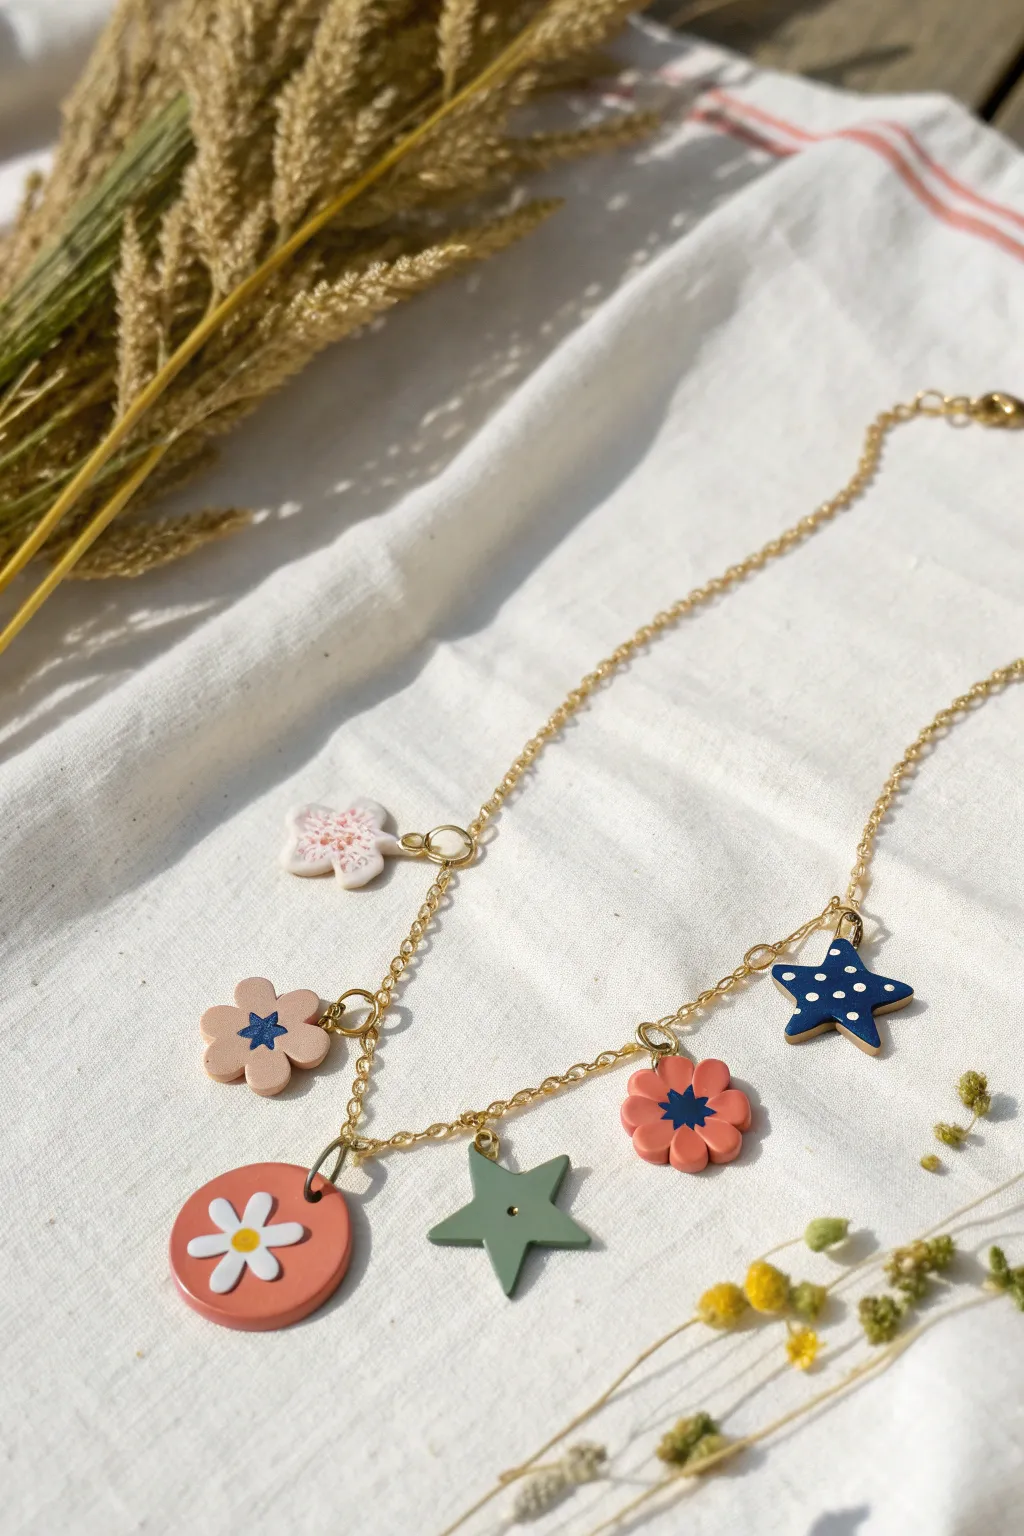
Embrace a playful aesthetic with this delightful charm necklace, featuring a mix of stars and flowers in muted pastels and bold navy tones. This project combines simple geometric shapes with charming hand-painted details to create a truly personalized accessory.
How-To Guide
Materials
- Polymer clay in various colors: coral pink, light beige/sand, sage green, navy blue, and white
- Gold-toned chain (about 18-20 inches)
- Gold-toned jump rings (various sizes, 4mm-6mm)
- Eye pins or head pins (gold-toned)
- Rolling pin or clay pasta machine
- Small cookie cutters (star and flower shapes)
- X-acto knife or clay blade
- Needle tool or toothpick
- Acrylic paints (white, yellow, navy blue, light pink)
- Fine detail paintbrush
- Jewelry pliers (round nose and flat nose)
- Oven for baking
- Matte varnish (optional)
Step 1: Prepping and Cutting Shapes
-
Condition the clay:
Begin by kneading each color of polymer clay separately until it is soft and pliable. This conditioning step is crucial to prevent cracks during baking. -
Roll out slabs:
Roll each color into a flat, even sheet, aiming for about 3mm thickness. If you have a pasta machine, use a medium setting; otherwise, a rolling pin with depth guides works perfectly. -
Cut the navy star:
Use a medium-sized star cutter on the navy blue clay slab. Smooth the edges with your finger to remove any jagged bits. -
Create the sage star:
Cut a slightly larger star from the sage green clay. Gently pull two of the points outward just a tiny bit to give it a more relaxed, asymmetrical look. -
Cut the flower charms:
Use a small five-petal flower cutter on both the coral pink and beige clay slabs. You’ll need at least one of each color. -
Form the round pendant base:
For the focal point, cut a circle (approx. 2cm diameter) from the coral clay. Press gently to flatten it slightly so it isn’t too heavy. -
Make the snowflake flower:
Cut a uniquely shaped flower or four-leaf clover shape from white clay for the top charm.
Sticky Situation?
If your clay sticks to the cutters or work surface, lightly dust the clay slab with cornstarch or baby powder before cutting shapes.
Step 2: Adding Details and Holes
-
Assemble the daisy pendant:
On the coral circle, create a small white daisy using tiny balls of white clay flattened into petals. Add a minuscule yellow center and press gently to adhere them to the base. -
Create hanging holes:
Using a needle tool, carefully pierce a hole near the top of every charm *except* the sage green star. Ensure the hole is wide enough for your jump rings. -
Pierce the sage star:
For the green star, pierce the hole through one of the star points rather than the center, allowing it to dangle vertically. -
Add texture (optional):
For the white snowflake charm, you can lightly texture the surface with a piece of sandpaper or a texture sponge before baking. -
Bake the pieces:
Arrange all clay pieces on a parchment-lined baking sheet. Bake according to your clay manufacturer’s instructions (usually 275°F/130°C for 15-30 minutes). Let them cool completely.
Make It Yours
Swap the painted details for embedded cane slices or use textured rollers on the raw clay for a pattern that doesn’t require painting.
Step 3: Painting and Assembly
-
Paint flower centers:
Using a fine brush and navy blue acrylic paint, add a simple starburst shape to the center of the coral and beige flowers. I find dotting the center first helps guide the lines. -
Detail the navy star:
Dip the tip of a toothpick or a dotting tool into white paint and add small, random polka dots across the surface of the navy star. -
Add pink speckles:
On the white textured charm, gently dry-brush or splatter a tiny amount of pink paint to give it a speckled finish. -
Seal (optional):
Once the paint is fully dry, you can coat the charms with a thin layer of matte varnish to protect the paint and give a uniform finish. -
Prepare the chain:
Lay out your gold chain flat. Identify where you want the center charm (the round daisy pendant) to sit. -
Attach the center pendant:
Open a jump ring using two pliers (twist, don’t pull apart). Thread it through the round pendant and the center link of the chain, then close securely. -
Attach remaining charms:
Space the other charms evenly along the chain—about 1.5 to 2 inches apart works well. Attach each with a jump ring, alternating colors and shapes for balance.
Wear your new constellation of charms with pride, knowing each piece was crafted by hand.
Earrings With Sculpted, Mismatched Pairs
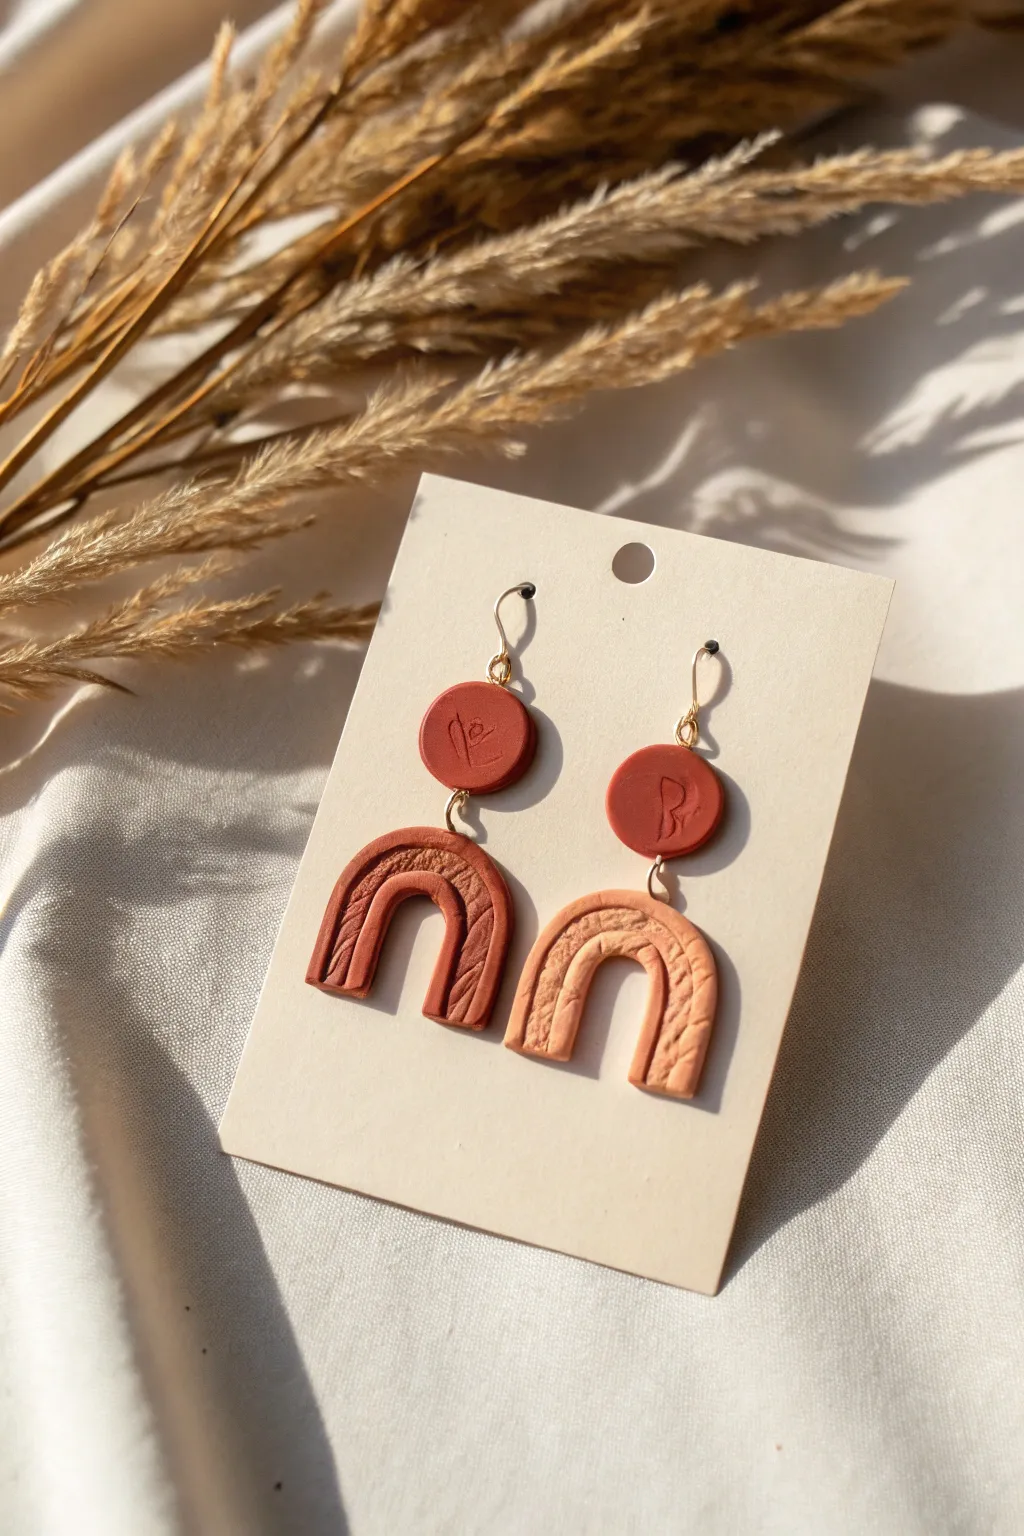
Embrace the beauty of subtle asymmetry with these warm, earth-toned earrings featuring a mismatched color palette. The combination of deep rust and soft peach clay, paired with delicate embossed textures, creates a sophisticated yet playful accessory.
Step-by-Step Tutorial
Materials
- Polymer clay in deep rust/terracotta
- Polymer clay in soft peach/clay pink
- Acrylic rolling pin or pasta machine
- Small circle cutter (approx. 10-12mm)
- U-shaped or rainbow arch cutter (approx. 25-30mm)
- Texture sheet, lace, or a fine knitting pattern for imprinting
- Line art stamp or a fine needle tool for the top stud design
- Small jump rings (gold)
- Earring hooks or lush post backs (gold)
- Jewelry pliers (round nose and flat nose)
- Needle tool or toothpick
- Baking sheet and parchment paper
- Fine grit sandpaper (optional)
Step 1: Conditioning and Imprinting
-
Prep the Clay:
Begin by conditioning the deep rust and peach polymer clays separately. Knead them in your hands until they are soft and pliable, ensuring there are no air bubbles trapped inside. -
Roll the Sheets:
Roll out both colors of clay to an even thickness, roughly 3mm (or setting 3 on a pasta machine). Aim for a uniform slab that feels sturdy but not too heavy. -
Texture the Arch Clay:
Select the areas of your clay sheets destined for the bottom arches. Gently press your texture sheet (a knit pattern or fabric texture work beautifully here) into the clay. Roll over it once firmly with your roller to transfer the pattern deeply without thinning the clay too much. -
Prepare the Stud Clay:
For the circular top pieces, roll out a small section of the deep rust clay. Keep this surface smooth initially, as you will add a specific focused design later.
Step 2: Cutting and Refining
-
Cut the Arches:
Using your U-shaped cutter, press firmly into the textured rust clay to cut one arch, and then into the textured peach clay to cut the second arch. This creates your mismatched color pair. -
Cut the Studs:
Use the small circle cutter to punch out two circles from the smooth rust clay slab. These will form the top components of your earrings. -
Emboss the Studs:
Take your line art stamp or a fine needle tool. Gently press a simple, abstract floral or flowing line design into the center of each rust circle. Use a light touch so you don’t distort the round shape. -
Pierce the Holes:
Use a needle tool to create holes for assembly. Pierce a hole at the very top of each arch and the very bottom of each circle stud. Wiggle the tool slightly to ensure the hole is wide enough for your jump rings. -
Smooth the Edges:
Before baking, gently run your finger along the cut edges of all pieces to smooth out any harsh lines or clay burrs left by the cutters.
Clean Cuts Every Time
Dip your clay cutters into cornstarch or water before pressing them into the clay. This acts as a release agent and prevents the clay from sticking inside the cutter.
Step 3: Baking and Assembly
-
Bake the Clay:
Arrange your clay pieces on a parchment-lined baking sheet. Bake according to your polymer clay package instructions—typically around 275°F (135°C) for 30 minutes. I personally like to tent foil over them to prevent any scorching of lighter colors. -
Cool Down:
Once baked, remove the tray from the oven and let the pieces cool completely. The clay hardens fully as it returns to room temperature. -
Prepare Jump Rings:
Using two pairs of pliers, twist open your jump rings. Remember to twist the ends away from each other (like opening a door) rather than pulling them apart, which maintains their circular shape. -
Connect the Pieces:
Thread an open jump ring through the hole in the rust arch and the bottom hole of one rust circle stud. Close the jump ring securely using your pliers. -
Repeat for the Peach Pair:
Repeat the previous step to connect the peach arch to the second rust circle stud. Ensure the textured sides are facing forward. -
Attach Earring Hooks:
Twist open the loop at the base of your earring hook. Thread it through the top hole of the circle studs (if you made one there) or glue a flat earring post to the back of the stud if you prefer a dangle-free top. -
Final Check:
Double-check that all jump rings are closed tightly so the pieces don’t slip apart while wearing.
Fingerprints Be Gone
If you notice fingerprints on your raw clay, lightly brush the surface with a tiny bit of baby oil or acetone on a Q-tip before baking to smooth them out completely.
Now you have a stunning pair of chic, mismatched earrings ready to elevate any casual outfit

TRACK YOUR CERAMIC JOURNEY
Capture glaze tests, firing details, and creative progress—all in one simple printable. Make your projects easier to repeat and improve.
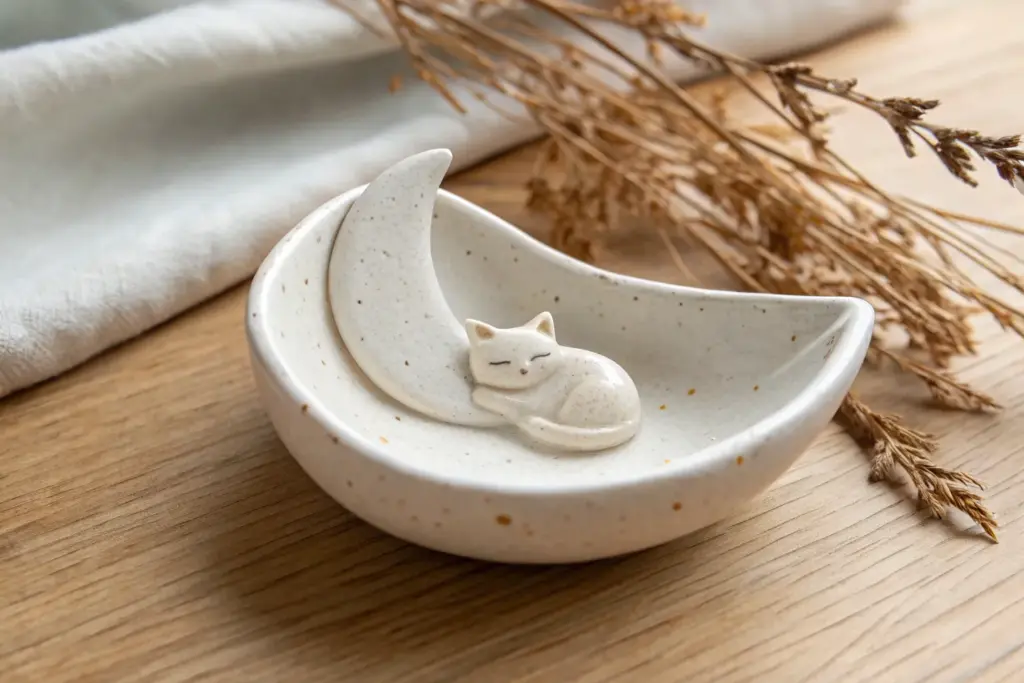
Character Toothbrush Holders for One Brush
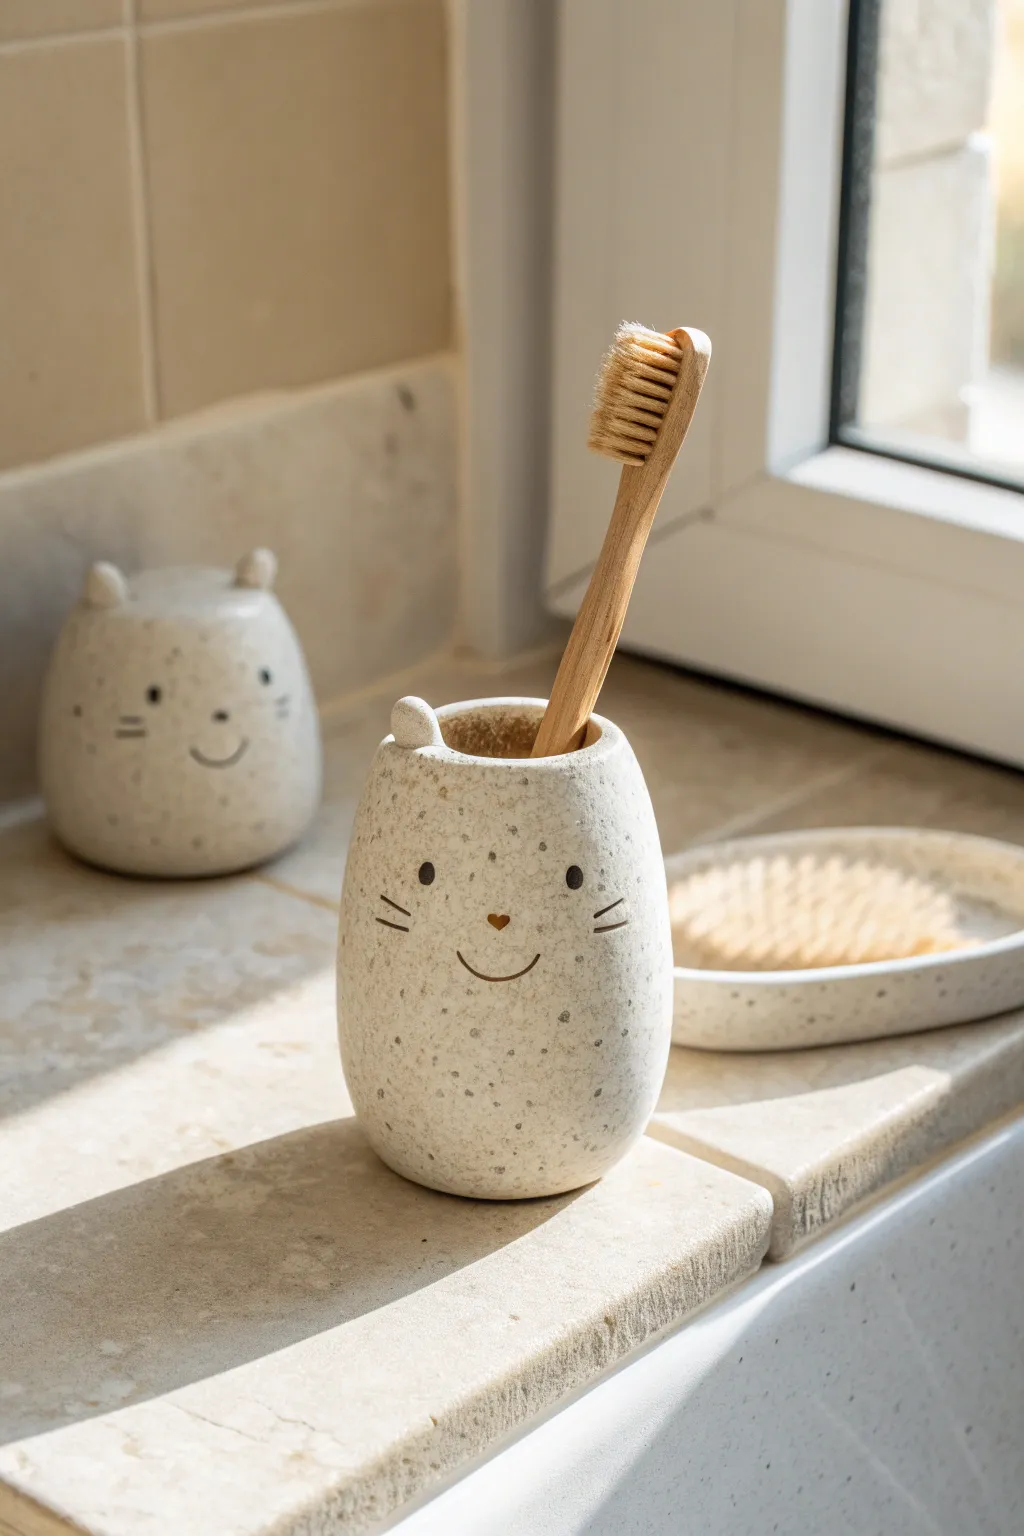
Bring a touch of charm to your bathroom counter with this adorable speckled clay toothbrush holder. Shaped like a happy cat with minimalist facial features, this piece is perfectly sized for a single bamboo brush and adds a modern, organic feel to your morning routine.
Detailed Instructions
Materials
- Speckled stoneware clay (white with iron flecks)
- Pottery wheel (optional, can be hand-built)
- Clay carving tools or needle tool
- Sponge
- Water bowl
- Black underglaze
- Gold or bronze luster (optional for the nose)
- Fine detail brush
- Clear matte glaze
- Kiln
Step 1: Forming the Body
-
Prepare the Clay:
Begin by wedging a baseball-sized amount of speckled stoneware clay. Ensure there are no air bubbles, as this clay body often shows texture beautifully when fired. -
Center and Thrown:
If using a wheel, center your clay and open it up. Creating a narrow, tall cylinder is key here—aim for about 3-4 inches in height and 2 inches in width. -
Alternative: Pinch Pot Method:
For hand-builders, start with a ball of clay and insert your thumb. Gently pinch and rotate to form high walls, smoothing the exterior with a rib tool to get that clean, manufactured look seen in the photo. -
Choke the Rim:
Whether throwing or pinching, slightly bring the rim inward at the top. This creates a gentle curve that keeps the toothbrush upright. -
Smooth the Surface:
Use a damp sponge or a soft rib to remove any finger marks. The goal is a uniform, egg-like smoothness that highlights the clay’s natural speckles.
Smudged Your Paint?
If you make a mistake with the underglaze face, don’t wipe it with a wet sponge, which smears pigment into the pores. Instead, gently scrape the mistake off with a sharp blade.
Step 2: Adding Character
-
Shape the Ears:
While the clay is leather hard, take two very small balls of clay. Flatten them slightly into rounded triangles. -
Attach the Ears:
Score the top rim of your cylinder where the ears will sit. Add a dab of slip and press the ears firmly onto the rim, blending the seams down with a wooden tool so they look seamless. -
Refine the Rim:
Go back over the area between the ears with a damp finger to ensure the rim remains smooth and comfortable to the touch. -
Dry to Leather Hard:
Let the piece dry slowly until it is firm leather hard. This is the perfect stage for painting details without smudging the form.
Step 3: Decorating and Firing
-
Paint the Eyes:
Using a very fine detail brush and black underglaze, paint two small vertical ovals for the eyes. Position them about one-third of the way down from the rim. -
Add Whiskers and Mouth:
With a steady hand, paint three thin lines on each cheek for whiskers. I like to paint a simple ‘u’ shape for the smile right between the whiskers. -
Heart Nose Detail:
Paint a tiny heart shape right above the mouth. For the look in the photo, you can use a brown underglaze or save this spot for a gold luster accent after the glaze firing. -
Bisque Fire:
Place your bone-dry piece into the kiln for a bisque fire. This hardens the clay and prepares it for glazing. -
Glazing:
Dip the entire piece into a clear matte glaze. A matte finish is crucial to maintaining that soft, stone-like appearance rather than a high-gloss shine. -
Glaze Fire:
Fire the piece again to the temperature recommended for your specific clay and glaze combination (usually Cone 5 or 6 for stoneware). -
Optional Luster:
If you want the golden heart nose shown in similar styles, apply a dab of overglaze luster to the nose area now and fire a third time at a much lower temperature (around Cone 018).
Make a Set
Create a whole family by varying the heights of the cylinders. A shorter, wider one works perfectly for cotton swabs, while a slightly larger jar can hold toothpaste.
Place your new ceramic friend by the sink to brighten up every morning and evening
Hanging Critter Planters That Hug the Pot
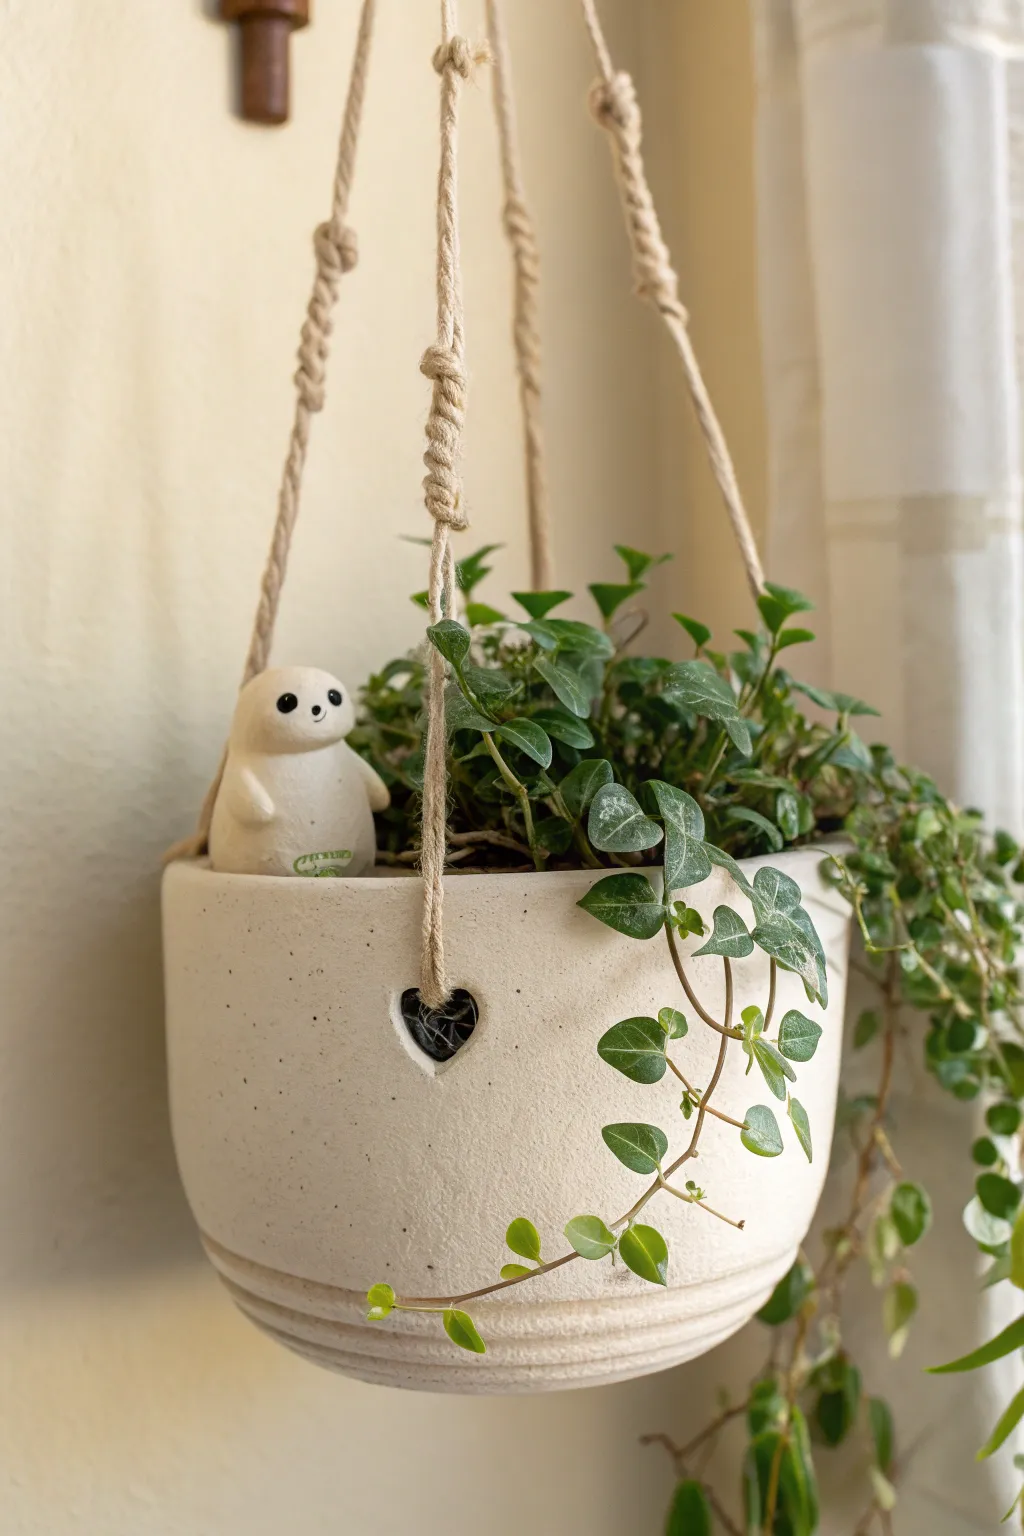
Add a whimsical touch to your indoor garden with this charming hanging planter featuring a friendly little critter perched right on the rim. The natural, speckled clay finish gives it a modern, organic look that perfectly complements trailing vines.
Step-by-Step Guide
Materials
- White polymer clay or air-dry clay (speckled variety preferred)
- Rolling pin
- Circle template or bowl (approx. 6 inches diameter)
- Craft knife or clay blade
- Heart-shaped hole cutter or small clay cutter
- Smoothing tool or sponge
- Acrylic black paint
- Fine detail paintbrush
- Jute twine or macrame cord
- Small drill bit (if using baked clay)
- Matte varnish (optional)
- Bowl for shaping (oven-safe if using polymer clay)
Step 1: Shaping the Planter Base
-
Roll out the clay:
Begin by conditioning your clay until it is soft and pliable. Roll it out on a flat surface to an even thickness of about 1/4 inch, ensuring there are no air bubbles trapped inside. -
Cut the clay circle:
Place your circle template or mixing bowl onto the rolled sheet. Use your craft knife to trace around the edge, cutting out a clean, perfect circle which will form the body of your pot. -
Form the bowl shape:
Identify a bowl that has the curve you want for your planter. Carefully drape your clay circle inside or over the outside of this mold to establish the shape. Gently press it to conform to the bowl’s curve without stretching it too thin. -
Add texture lines:
While the clay is still on the mold, use a sculpting tool or the blunt edge of a knife to gently press two or three horizontal grooves near the bottom for the decorative ribbed effect seen in the photo. -
Create hanging points:
Locate three equidistant points around the rim. Use your heart-shaped cutter to punch out holes about an inch below the rim. These need to be large enough for your rope to pass through later.
Step 2: Sculpting the Hugging Critter
-
Form the body:
Take a walnut-sized ball of clay and roll it into a smooth, rounded cone shape to create the critter’s body. The bottom should be slightly flattened where it will sit. -
Shape the head:
Gently mold the top of the cone to distinguish a rounded head area. Keep the features minimal and soft for that cute, blob-like aesthetic. -
Attach the arms:
Roll two small, Tic-Tac-sized logs of clay for the arms. Adhere them to the sides of the body so they curve forward slightly. I find scoring the clay first helps them stick securely. -
Position on the rim:
Take your formed critter and gently press it onto the rim of your still-soft planter. You want it to look like it’s peeking out or hugging the edge. -
Secure the join:
Use a sculpting tool to blend the clay from the bottom of the critter into the rim of the pot on the inside, ensuring a strong bond so it doesn’t pop off later. -
Refine the surface:
Dip a sponge or your finger in a little water (or clay softener) and smooth over any fingerprints or rough joins, giving the entire piece a unified, professional finish.
Use a Release Agent
Dust your mold bowl lightly with cornstarch before draping the clay. This prevents sticking and makes removing the dried form much easier.
Step 3: Finishing Touches
-
Cure or dry the clay:
Follow the manufacturer’s instructions for your specific clay. If baking polymer clay, keep the planter on the oven-safe mold to maintain its shape during heating. -
Paint the face:
Once fully cured and cooled, dip a fine detail brush into black acrylic paint. Dot two wide-set eyes and a tiny nose onto the critter’s face. -
Add decorative details:
For the tiny green logo or leaf detail seen on the critter’s belly, use a touch of green paint or a fine-tip paint pen to draw a small swoosh or leaf shape. -
Seal the piece:
Apply a coat of matte varnish to the entire planter, or just the painted areas, to protect it from moisture and scratches. -
Attach suspension cords:
Cut three equal lengths of jute twine. Thread one end through each heart-shaped hole from the outside in, and tie a large, secure knot on the inside. -
Knot the top:
Gather the three loose ends of rope at the top, ensuring the planter hangs level, and tie them together in a strong overhand knot or wrap knot for hanging.
Slumping Issues?
If the clay walls slump down while wet, bolster them with crumpled paper towels or painter’s tape on the outside until the clay firms up.
Now you have a delightfully unique planter ready to be the new home for your favorite trailing plant.
Shaggy Animal Sculptures With Fur Texture
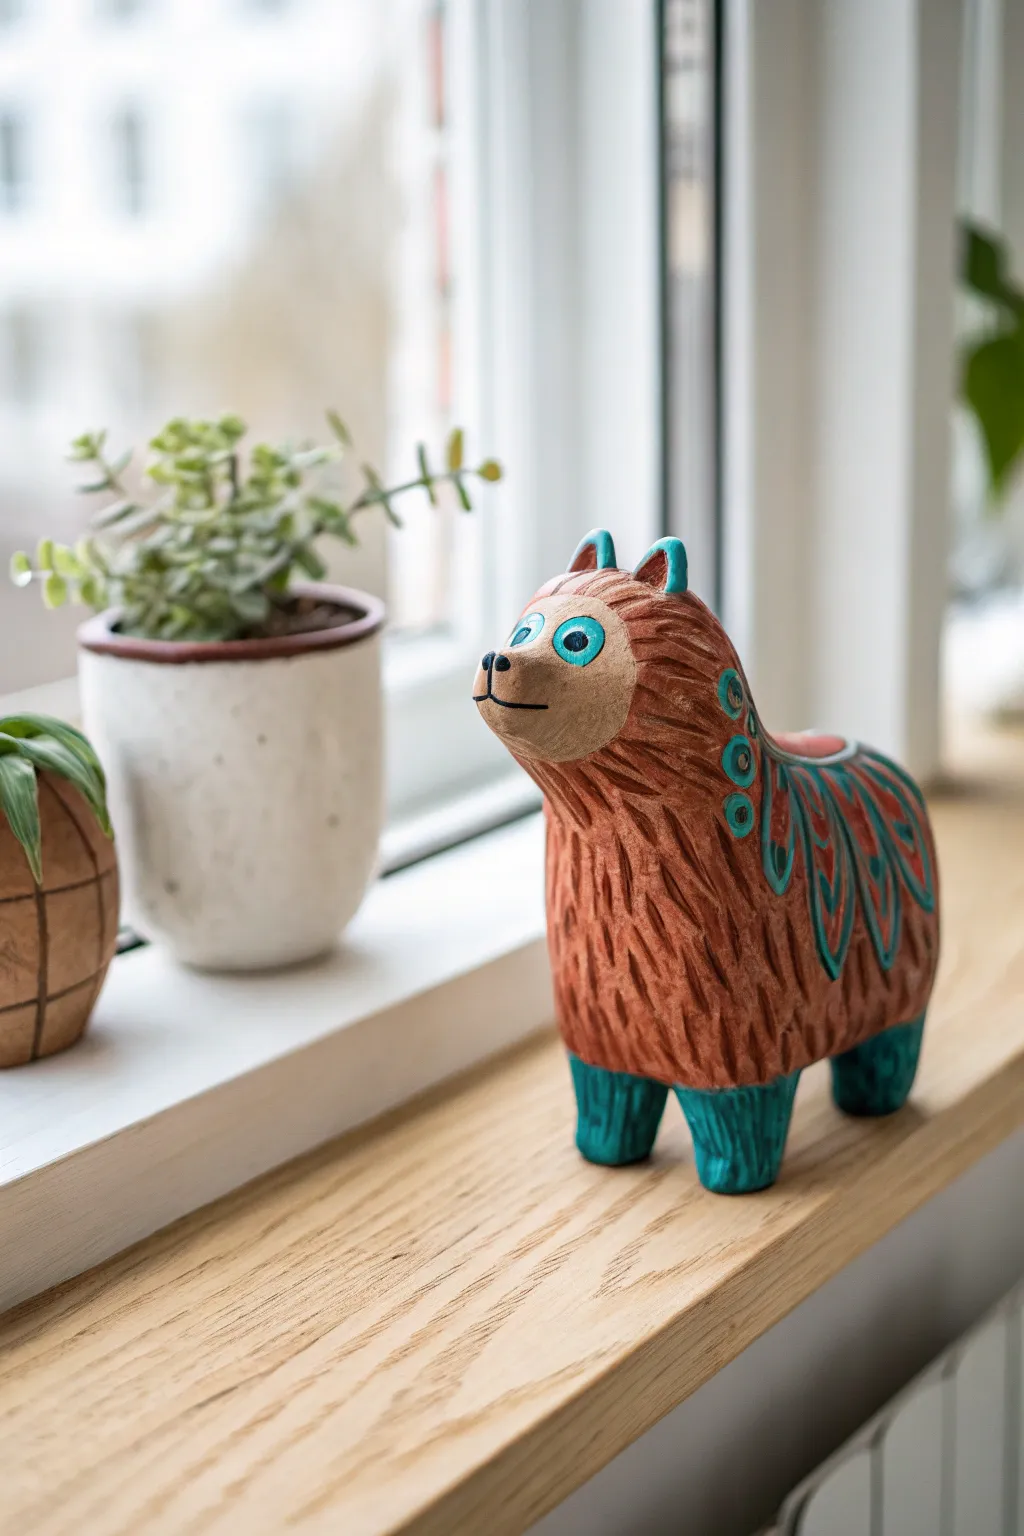
Sculpt this charming, folk-art inspired animal figurine that celebrates tactile surfaces with its carved fur texture. The combination of warm, reddish-brown clay and striking turquoise accents creates a beautiful contrast perfect for a windowsill display.
Detailed Instructions
Materials
- Red-brown sculpting clay (terracotta air-dry or polymer)
- Small loop tool or needle tool
- Clay sculpting knife
- Water and sponge (for smoothing)
- Acrylic paints (turquoise/teal, black, white)
- Fine detail paintbrush
- Matte varnish or sealant
Step 1: Shaping the Base Form
-
Create the body:
Start with a large ball of reddish-brown clay. Roll it into an oblong, bean-like shape to form the main torso of the animal. -
Form the head:
Pull a section of clay upwards from one end of the torso to create the neck and head area. Smooth the join immediately so the neck flows seamlessly into the body. -
Refine the snout:
Pinch the front of the head to form a distinctive, slightly pointed snout. Flatten the end slightly where the nose will eventually be painted. -
Add the legs:
Roll four short, sturdy cylinders of clay. Attach them to the bottom of the body. Blend the clay at the attachment points thoroughly so the legs are integrated, not just stuck on. -
Attach the ears:
Shape two small triangles and attach them to the top of the head. Keep them slightly rounded at the tips for a softer look. -
Smooth the surface:
Using a slightly damp sponge or your finger, go over the entire form to remove fingerprints and bumps. The muzzle area specifically needs to be very smooth.
Cracks while drying?
If you see hairline cracks forming as the clay dries, mix a tiny bit of fresh clay with water to make a paste (slip) and fill them in immediately.
Step 2: Carving the Texture
-
Plan the fur zones:
Identify the areas to texture: the neck, back, and sides. Leave the face (muzzle and around they eyes) and the very ends of the feet smooth. -
Carve the fur:
Take a small loop tool or a sharp carving tool. Press and flick downwards to remove small scoops of clay, creating a pattern of shaggy dashes. -
Follow the form:
Ensure your carving rows curve along with the animal’s body shape to simulate how natural fur would lay. I find working from the neck downwards helps maintain a consistent flow. -
Detail the wings:
On the flanks, instead of simple fur dashes, carve longer, stylized feather or leaf shapes in a wing-like arrangement. Outline these shapes distinctively. -
Dry the sculpture:
Allow your clay to dry completely according to package instructions. Terracotta air-dry clay will turn a lighter color when fully dry.
Step 3: Painting and Finishing
-
Paint the feet:
Using turquoise acrylic paint, color the bottom portion of each leg. Use a dry-brush technique near the top of the painted area to blend it slightly into the fur texture. -
Accent the wings:
Carefully paint inside the carved wing/feather shapes on the flank with the same turquoise. Leave the raised ridges between feathers the natural clay color. -
Detail the face:
Paint the insides of the ears and outline large circular eyes in turquoise. Add a small black dot for the pupil and a tiny white highlight. -
Add the nose:
Paint a simple black triangle on the tip of the snout and a thin line for the mouth. -
Decorative dots:
Add a vertical row of small turquoise circles or dots down the side of the neck for extra ornamentation. -
Seal the piece:
Once the paint is fully dry, apply a coat of matte varnish to protect the surface and enrich the natural clay color.
Make it a Planter
Hollow out the back of the animal before drying to turn this sculpture into a small air plant holder or succulent pot.
Place your finished creature near some greenery to highlight its natural, earthy tones
Frog Desk Buddy With Date Blocks
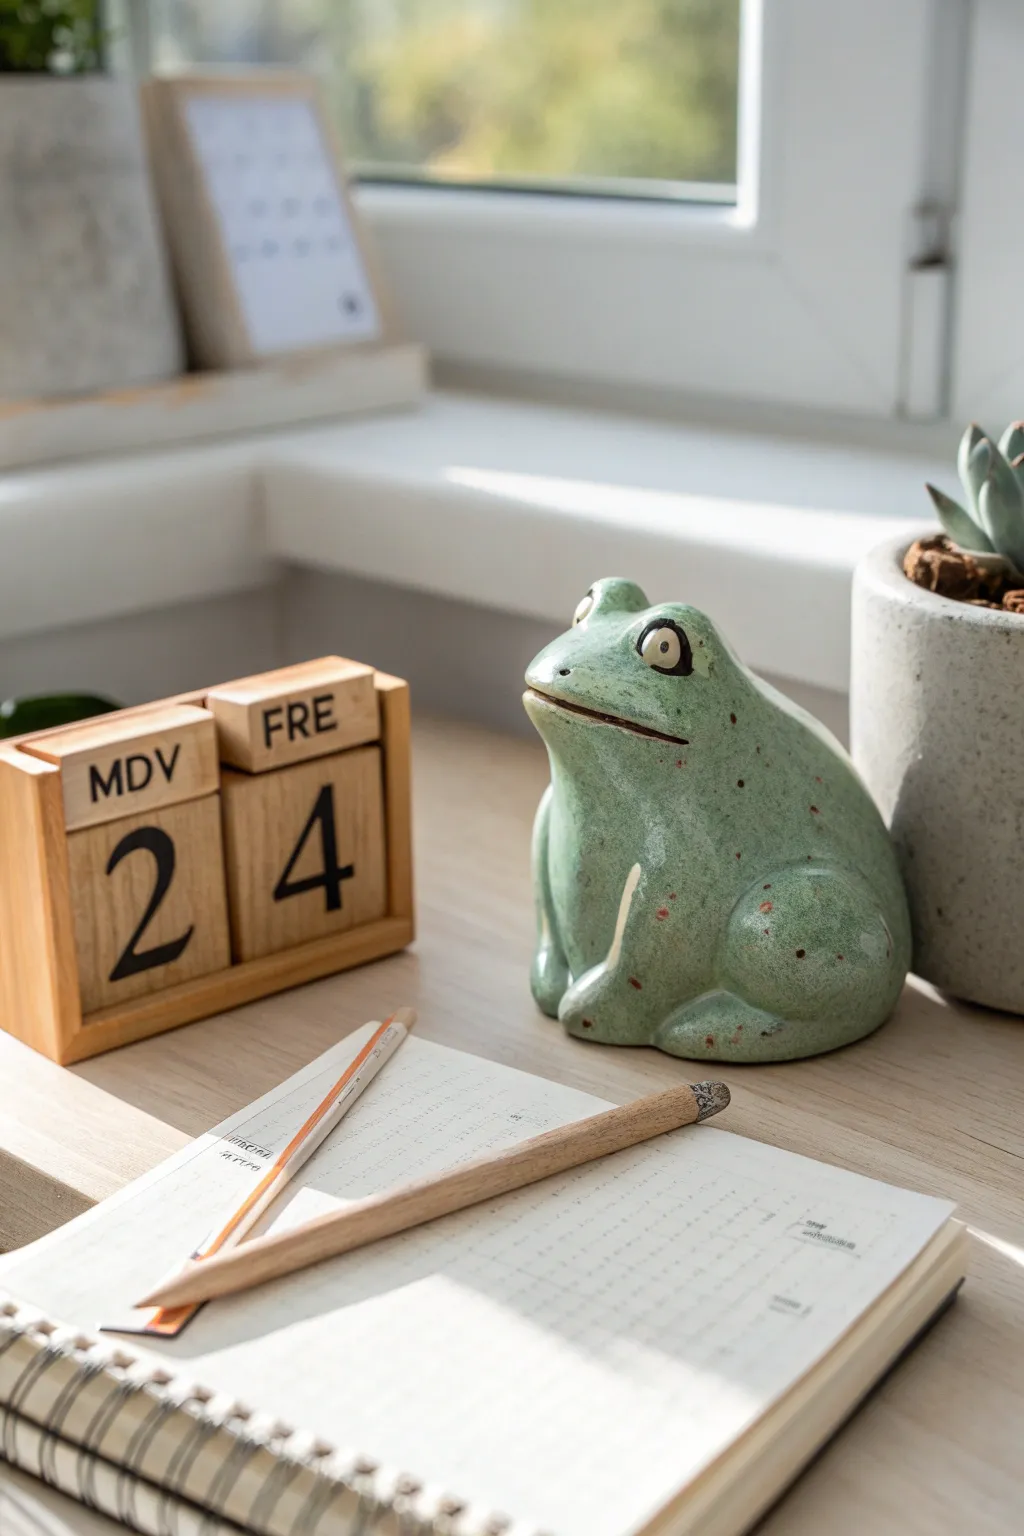
Add a touch of whimsy to your workspace with this hand-sculpted ceramic frog companion. Its gentle expression and speckled glaze finish make it a charming, sturdy paperweight or simply a friendly face next to your calendar.
Step-by-Step Tutorial
Materials
- Earthenware or stoneware clay (white or light grey)
- Modeling tools (wooden knife, needle tool)
- Pottery sponge
- Slip (clay mixed with water)
- Underglazes: light sage green, dark forest green, white, black
- Clear glossy glaze
- Paintbrushes: various sizes including a fine liner
- Kiln (or air-dry clay and acrylics + varnish for a non-fired version)
Step 1: Sculpting the Body
-
Form the base:
Begin with a fist-sized ball of clay. Gently roll it into a pear shape, keeping the bottom flat so the frog sits stably on a desk surface. -
Define the head:
Using your thumbs, smooth the narrower top part of the pear shape to define a head area, allowing it to slope naturally into the back. It shouldn’t be a separate ball, but a continuous form. -
Add the back legs:
Roll two thick, sausage-like coils of clay. Flatten them slightly and curve them into ‘C’ shapes. -
Attach the legs:
Score and slip the sides of the body where the rear haunches will go. Press the curved coils firmly onto the body, blending the clay edges seamlessly with a wooden tool until no seams are visible. -
Shape the front legs:
Create two smaller, thinner coils for the front legs. Attach these vertically to the front chest area, blending the top into the body and leaving the bottom ends slightly thicker for feet. -
Detail the feet:
Use a needle tool or small knife to gently press indentations into the ends of the front and back legs to suggest toes, keeping the look stylized rather than hyper-realistic.
Hollow It Out
If your frog is thicker than 1 inch, hollow out the underside with a loop tool before closing it up. It prevents cracking in the kiln.
Step 2: Face and Refining
-
Create the mouth:
Use a thin wire tool or a sharp fettling knife to cut a long, horizontal smile line. Gently press slightly deeper at the corners to give it that contented expression. -
Add eye sockets:
Press your thumbs gently into the top of the head to create shallow indentations where the eyes will sit. -
Form the eyes:
Roll two small balls of clay. Score and slip the indentations, then press the balls in. They should bulge out prominently like real frog eyes. -
Smooth the surface:
Wipe the entire sculpture with a slightly damp sponge. This removes fingerprints and creates that smooth, organic surface essential for the glaze later. -
Drying:
Allow the piece to dry slowly under plastic for a day, then uncover to dry completely until bone dry. Fire to bisque temperature if using a kiln.
Date Keeper Upgrade
Flatten the frog’s back slightly while sculpting so you can rest small wooden date blocks directly on top of him.
Step 3: Glazing and Finishing
-
Base coat:
Apply three even coats of a light sage green underglaze to the entire body, avoiding the eyes. Let each coat dry to the touch before adding the next. -
Define the belly:
Mix a tiny bit of white into your green or use a lighter wash to paint a subtle, pale stripe down the chest and belly area for dimension. -
Add speckles:
Dilute a small amount of rust-brown or dark green underglaze. Dip an old toothbrush in it and flick the bristles with your thumb to spray tiny speckles across the frog’s back and sides. -
Paint the eyes:
I prefer using a very steady hand here to paint the eyeballs solid white. Once dry, add a bold black pupil in the center and a thin black outline around the rim of the eye. -
Final clear coat:
Once the underglaze is fully dry, apply a clear glossy glaze over the entire piece. This will make the green pop and give it that ‘wet frog’ look. -
Final firing:
Fire the piece again to the recommended temperature for your clear glaze. Ensure the bottom is wiped clean of glaze so it doesn’t stick to the kiln shelf.
Place your finished amphibian friend on your desk and enjoy the serene vibe he brings to your workday
Mushroom Collections in Mixed Sizes
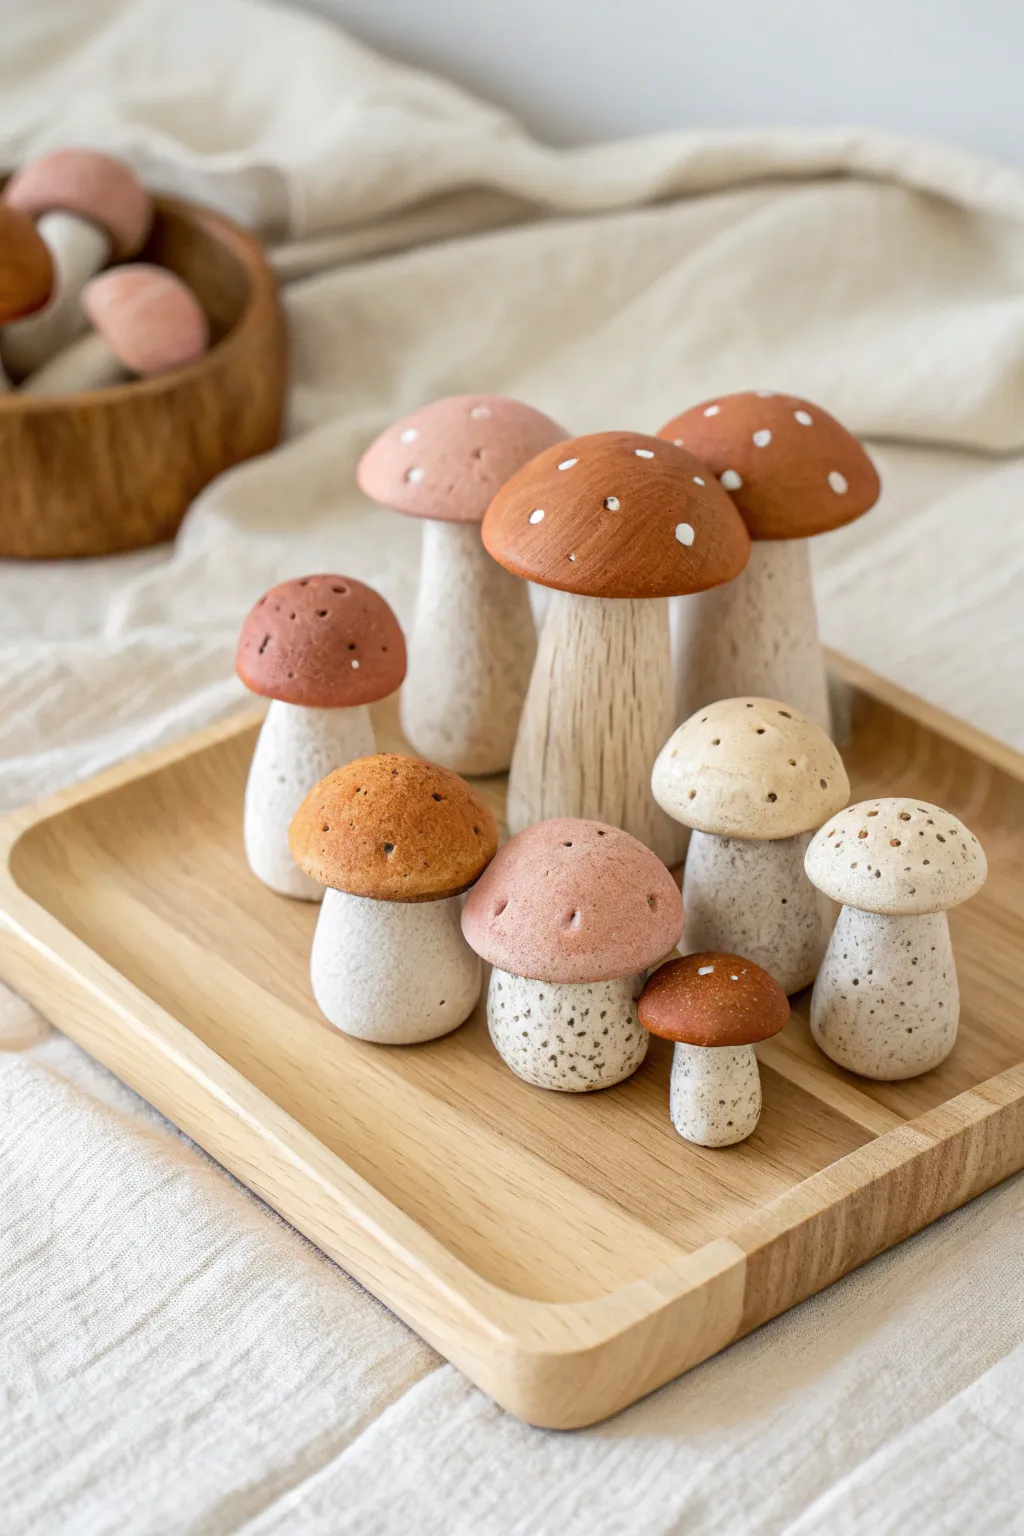
Create a charming, rustic forest floor scene with these handcrafted clay mushrooms in varying heights and earthy tones. The mix of terracotta browns, soft blush pinks, and speckled creams creates a sophisticated yet whimsical collection perfect for shelf styling.
How-To Guide
Materials
- Air-dry clay or polymer clay (white base)
- Acrylic paints (terracotta, burnt sienna, dusty rose, cream, white, espresso)
- Sculpting tools (needle tool, small ball stylus)
- Basic clay roller
- Aluminum foil (for armatures)
- Toothpicks or thin wooden dowels
- Old toothbrush or stiff bristle brush
- Fine-grit sandpaper
- Detail paintbrush
- Matte varnish or sealant
Step 1: Shaping the Stems
-
Prepare the foil cores:
To keep the mushrooms lightweight and save clay, crunch pieces of aluminum foil into rough cylinder shapes. Make at least three distinct sizes: tall and thin, medium and stout, and short and round. -
Wrap the stems:
Roll out sheets of white clay to about 1/4 inch thickness. Wrap these sheets around your foil cores, smoothing the seams together with a bit of water (if using air-dry clay) or by rubbing gently (for polymer). -
Refine the shapes:
Roll the clay-covered stems on your work surface to create even cylinders. For the stouter mushrooms, gently press the base onto the table to flatten it slightly so it stands on its own. -
Add structural support:
Insert a toothpick or small piece of wire halfway into the top of each stem. This will act as an anchor for the mushroom caps later. -
Texture the stems:
For the taller mushrooms, use a needle tool to drag vertical lines from the top to the bottom of the stem, mimicking natural fibrous textures. Leave the smaller, rounder stems smooth or lightly textured.
Fixing Wobbly Stems
If a mushroom won’t stand straight, wait for it to dry/harden completely. Then, rub the bottom vigorously against coarse sandpaper to create a perfectly flat base.
Step 2: Sculpting the Caps
-
Form the cap bases:
Roll balls of clay corresponding to the size of your stems. Flatten them into thick discs, then gently pinch and pull the edges downward to create a dome shape. -
Vary the silhouettes:
Make some caps distinct domes (like the tall orange ones), create wider, flatter caps for the medium sizes, and create rounded, button-like caps for the smallest mushrooms. -
Attach caps to stems:
Push the clay cap onto the exposed toothpick of its matching stem. Press firmly to ensure a tight fit, blending the clay slightly underneath where the cap meets the stem if you want a seamless look, or leaving it distinct for this specific style. -
Add surface details:
Using a small ball tool or the end of a paintbrush, create tiny indentations or ‘pores’ on the tops of a few caps for variety.
Step 3: Painting and Finishing
-
Dry or bake:
Allow your mushrooms to fully cure according to your clay manufacturer’s instructions. Air-dry clay needs 24-48 hours; polymer needs baking. -
Base coat the stems:
Mix a creamy off-white paint. Paint all the stems. For the textured stems, water down a tiny bit of brown paint and wash it over the grooves, wiping away the excess so the dark color stays only in the cracks. -
Speckle the bases:
I find this step adds the most realism: dip an old toothbrush into thinned black or dark brown paint. Flick the bristles with your thumb to spray tiny speckles onto the lower parts of the white stems. -
Paint the caps:
Paint the caps in your chosen palette. Use terracotta orange for the tall ones, a dusty rose pink for the medium ones, and a warm caramel brown for the small accents. -
Add the dots:
Using a fine detail brush or a toothpick, paint small, deliberate white dots on the terracotta caps. Group them slightly rather than spacing them perfectly evenly. -
Create porosity:
For the beige caps, take a needle tool and gently poke small holes into the wet paint (or pre-poked clay) to emphasize the pitted texture. -
Enhance with wash:
Apply a very watered-down brown wash over the beige and pink caps to dirty them up slightly, giving them an organic, forest-floor feel. -
Seal the work:
Finish with a coat of matte varnish. Avoid glossy finishes, as the natural clay aesthetic relies on that soft, matte texture.
Pro Tip: Weighted Base
Before wrapping your foil core in clay, push a small metal washer into the bottom of the foil. This adds weight and prevents the tall mushrooms from tipping over easily.
Arranging these beauties on a wooden tray brings an instant touch of woodland calm to your home.
Botanical Imprint Dishes From Real Leaves
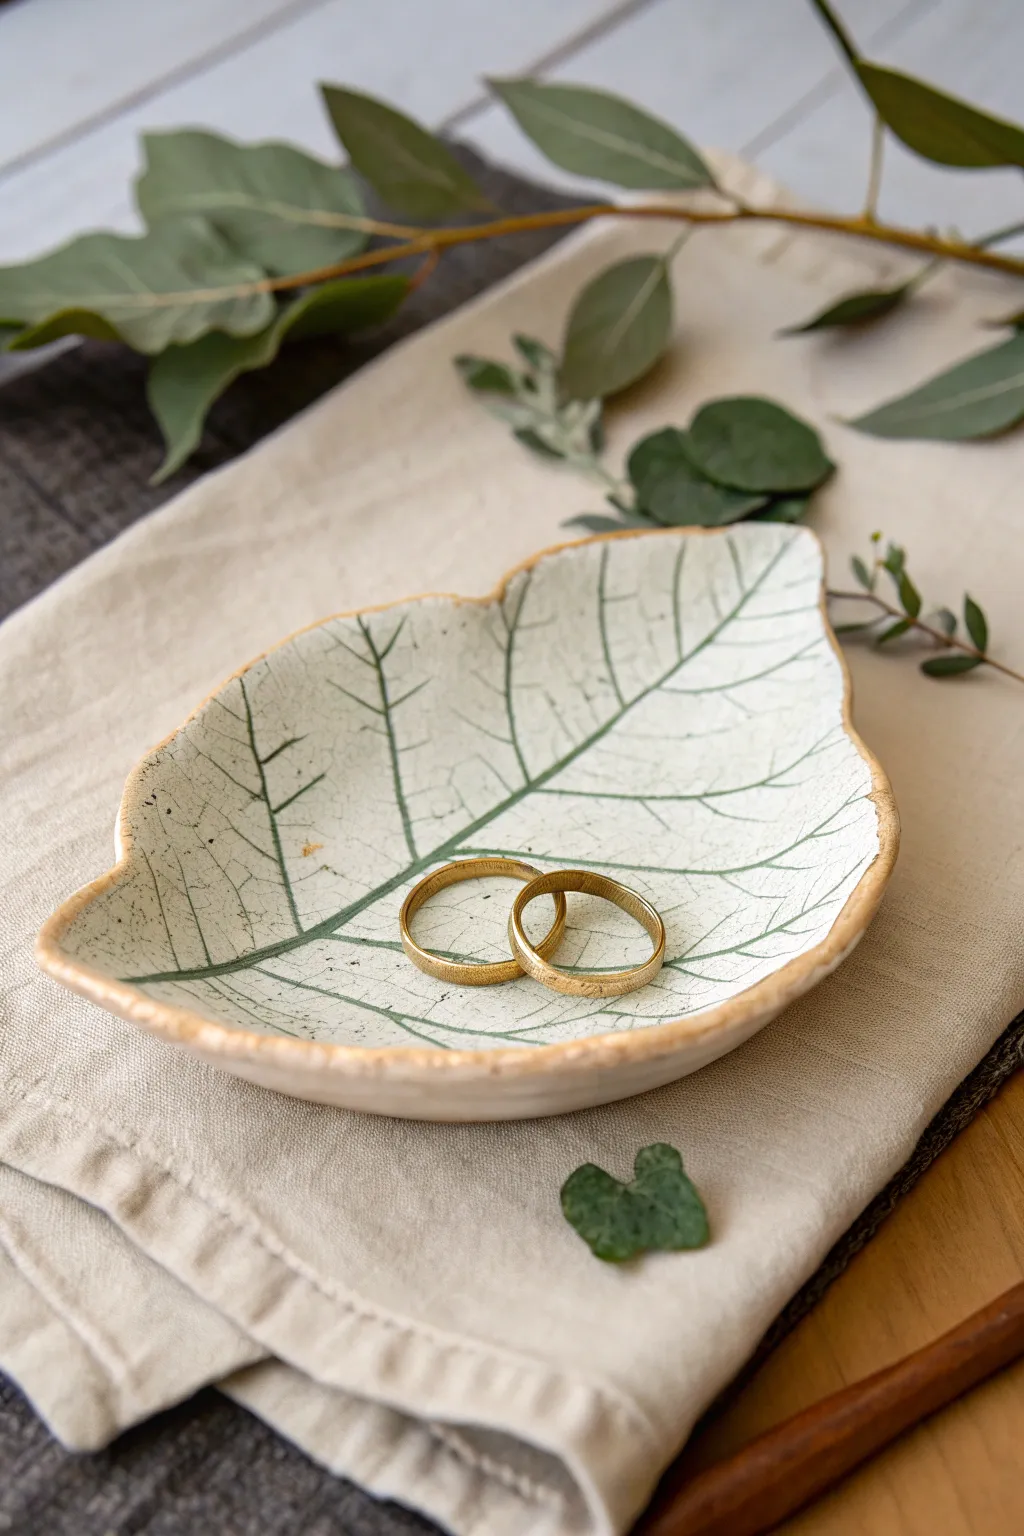
Immortalize the delicate veins of your favorite foliage with this elegant leaf-shaped jewelry dish. The natural imprint is beautifully highlighted with soft green washes, while a touch of gold luster on the rim adds a sophisticated finish perfect for holding precious rings.
Step-by-Step
Materials
- White air-dry clay or low-fire ceramic clay
- Large, fresh leaf with prominent veins (e.g., hydrangea or hosta)
- Rolling pin
- Canvas mat or parchment paper
- Craft knife or needle tool
- Small bowl for shaping
- Fine-grit sandpaper
- Green acrylic paint or underglaze
- Water and paper towels
- Gold leaf paint or gold luster
- Small paintbrush
- Clear sealant or gloss varnish
Step 1: Creating the Imprint
-
Prep your surface:
Begin by laying down a canvas mat or parchment paper to prevent sticking. Take a handful of white clay and knead it briefly until it is pliable and smooth. -
Roll the slab:
Roll the clay out into an even slab, aiming for a thickness of about 1/4 inch. Ensure the slab is large enough to accommodate your chosen leaf with some room to spare. -
Placing the botanical:
Place your selected leaf face-down onto the clay slab. The underside of the leaf usually has the most prominent veins, which creates a deeper, more detailed impression. -
Pressing the details:
Gently roll your rolling pin over the leaf. Apply firm, even pressure to push the veins into the clay, but be careful not to make the slab too thin. -
Reveal the texture:
Carefully lift the stem and peel the leaf away from the clay to reveal the intricate network of veins stamped into the surface.
Fixing Cracks
If hairline cracks appear while drying, mix a tiny bit of clay with water to make a paste (slip) and fill the crack, then sand smooth once dry.
Step 2: Shaping and Refining
-
Cut the shape:
Using a craft knife or needle tool, cut around the outline of the leaf imprint. I like to leave a tiny border of smooth clay around the edge rather than cutting exactly on the line. -
Smooth the edges:
Dip your finger in a little water and run it along the cut edges to smooth out any sharpness or crumbs left by the knife. -
Form the curve:
Lift the clay leaf carefully and place it inside a shallow bowl. Press it gently so it takes on a curved, dish-like form. -
Drying phase:
Allow the clay to dry completely in the bowl. If using air-dry clay, this takes 24-48 hours; ceramic clay will need to be bone dry before firing. -
Sanding:
Once fully dry, lightly sand the rim and edges with fine-grit sandpaper to ensure a professional, smooth finish.
Step 3: Painting and Finishing
-
Creating the wash:
Dilute a small mount of green paint with water until it is very runny and resembles watercolor or ink. -
Apply the color:
Paint the wash over the entire textured surface of the leaf. Don’t worry about being neat; you want the paint to settle into the deep vein depressions. -
Wipe back:
Immediately use a damp paper towel to wipe the surface. This removes paint from the high points while leaving the green color trapped in the veins, highlighting the pattern. -
Sealing:
Apply a coat of clear varnish or sealant to protect the clay and give it a subtle sheen. -
The golden touch:
Dip a fine brush into gold leaf paint. Carefully paint the very rim of the dish to frame the piece. -
Final dry:
Let the gold paint and varnish cure completely according to the manufacturer’s instructions before placing any jewelry inside.
Make it Organic
Instead of a smooth cut, gently tear the edges of the clay around the leaf shape for a rustic, raw-edge look before shaping it in the bowl.
Place your rings in their new botanical home and enjoy a piece of nature on your dresser
Surreal Melting Pots and Drippy Forms
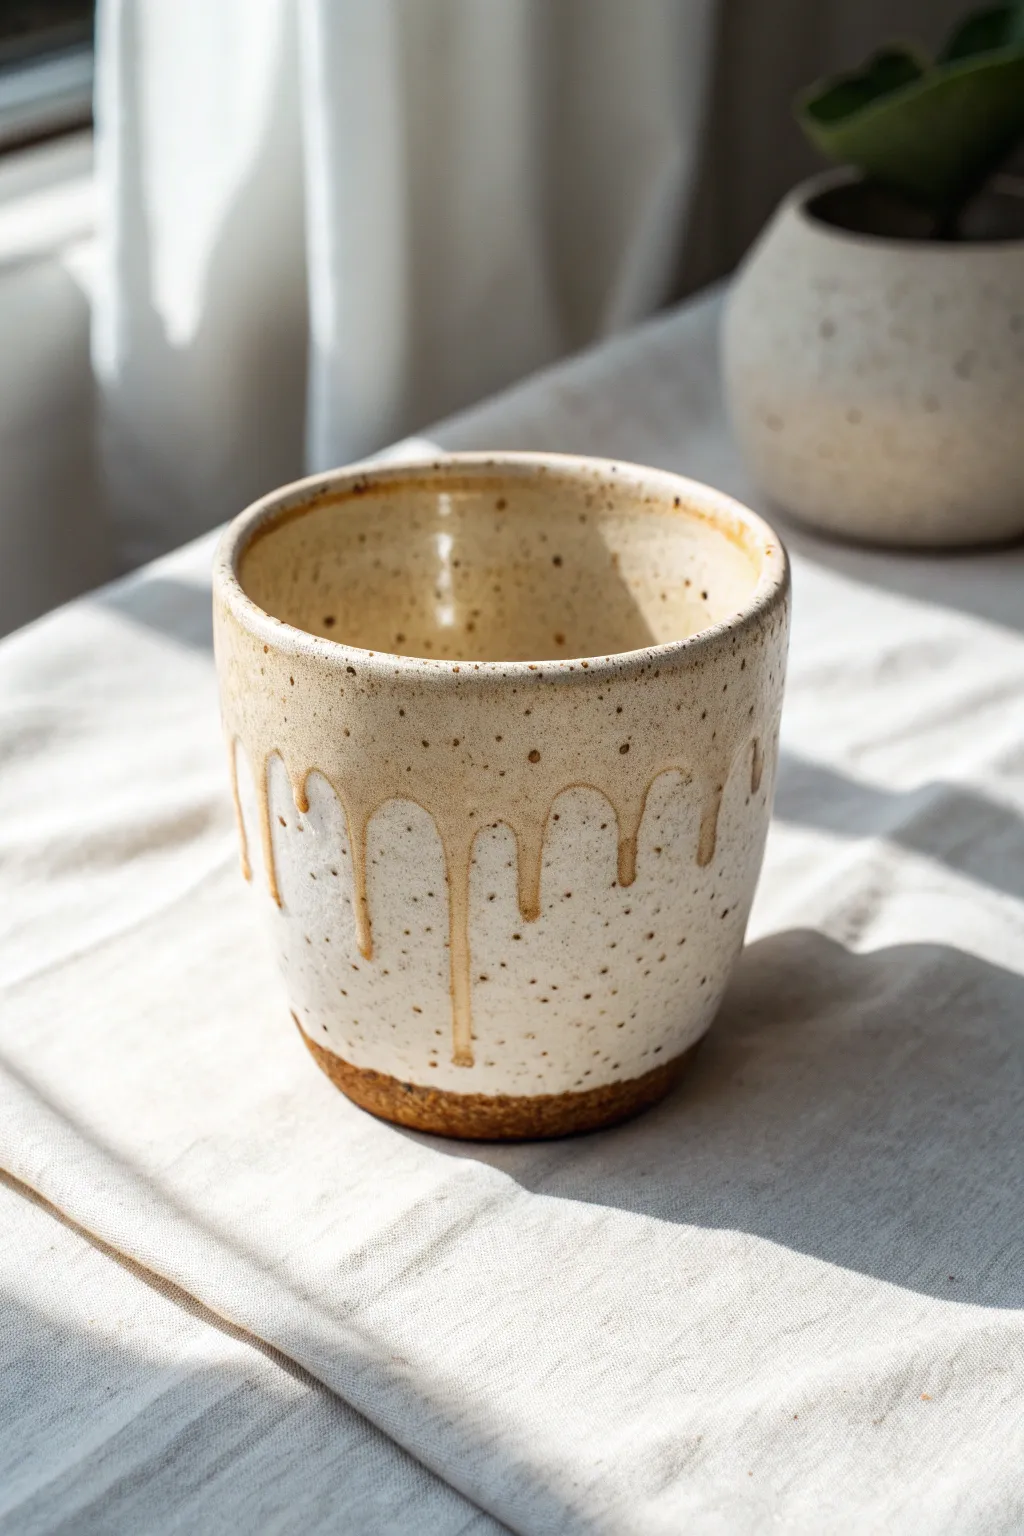
Capture the beauty of suspended motion with this charming ceramic tumbler, featuring a thick, honey-colored drip glaze over a speckled cream body. This project combines wheel-throwing basics with careful glaze application to achieve that perfect surreal melt effect.
How-To Guide
Materials
- Speckled buff stoneware clay
- Pottery wheel
- Sponge
- Wire cutter
- Throwing ribs (wood and metal)
- Trimming tools
- Speckled cream matte glaze (base)
- Honey/amber gloss glaze (drip)
- Wax resist
- Kiln
Step 1: Throwing and Shaping
-
Prep the clay:
Begin by thoroughly wedging about 1-1.5 lbs of speckled buff clay to remove air bubbles and ensure consistency. -
Center on the wheel:
Secure the clay to the wheel head and center it using steady pressure and water for lubrication. -
Open the form:
Open the center of the clay mound, creating a flat floor about 3 inches wide for a stable base. -
Pull the walls:
Slowly pull the walls up to create a cylinder. Aim for straight vertical sides, keeping the thickness even from bottom to top. -
Shape the tumbler:
Use a rib tool on the inside to gently belly out the walls slightly if you want a softer curve, or keep them straight for a modern cylinder look. -
Refine the rim:
Compress the rim with a chamois or sponge to ensure it is smooth and pleasant for drinking. -
Wire off:
Slide your wire cutter underneath the pot to release it from the wheel, then let it dry to leather-hard.
Tip: Gravity Test
Create test tiles with your drip glaze combination first. This helps you gauge exactly how far the amber glaze runs so you don’t ruin your kiln shelves
Step 2: Trimming and Bisque
-
Trim the foot:
Once leather-hard, center the pot upside down on the wheel. Use trimming tools to carve a clean foot ring, revealing the raw speckled clay texture at the bottom. -
Smooth the surface:
Run a slightly damp sponge or a smooth rib over the exterior to remove any coarse trimming marks, creating a pristine canvas for the glaze. -
Dry completely:
Allow the piece to dry slowly until it is bone dry and lighter in color. -
Bisque fire:
Load the kiln and fire the piece to bisque temperature (usually cone 04 or 06) to prepare it for glazing.
Level Up: Mix & Match
Try using a metallic bronze glaze for the drips instead of amber. The contrast between matte cream and shiny metal creates a stunning industrial-chic look
Step 3: Glazing the Drips
-
Wax the foot:
Apply wax resist to the bottom foot ring and about 1/4 inch up the side wall to keep the raw clay exposed. -
Apply base glaze:
Dip the entire cup into the speckled cream matte glaze. Hold it for 3-4 seconds for good coverage, then let it dry completely. -
Mix the drip glaze:
Prepare your amber or honey-colored gloss glaze. It should be slightly thicker than usual to control the run. -
Apply the rim:
Dip just the top 1-2 inches of the rim into the amber glaze. Alternatively, use a brush to apply a thick band around the top edge. -
Create the drips:
Using a loaded brush or a slip trailer, add extra dollops of the amber glaze at uneven intervals along the rim band. Gravity will pull these down during firing. -
Clean up:
Check the foot again to ensure no glaze has dripped onto the waxed area; wipe it clean if necessary. -
Glaze fire:
Fire the kiln to the maturity temperature of your clay and glaze (typically cone 5 or 6). The heat will cause the amber glaze to melt and travel down the matte base.
Now you have a stunning, functional piece of art that looks like it’s frozen in a sweet moment of melting
Tiny Diorama Trinket Boxes With a Hidden Scene
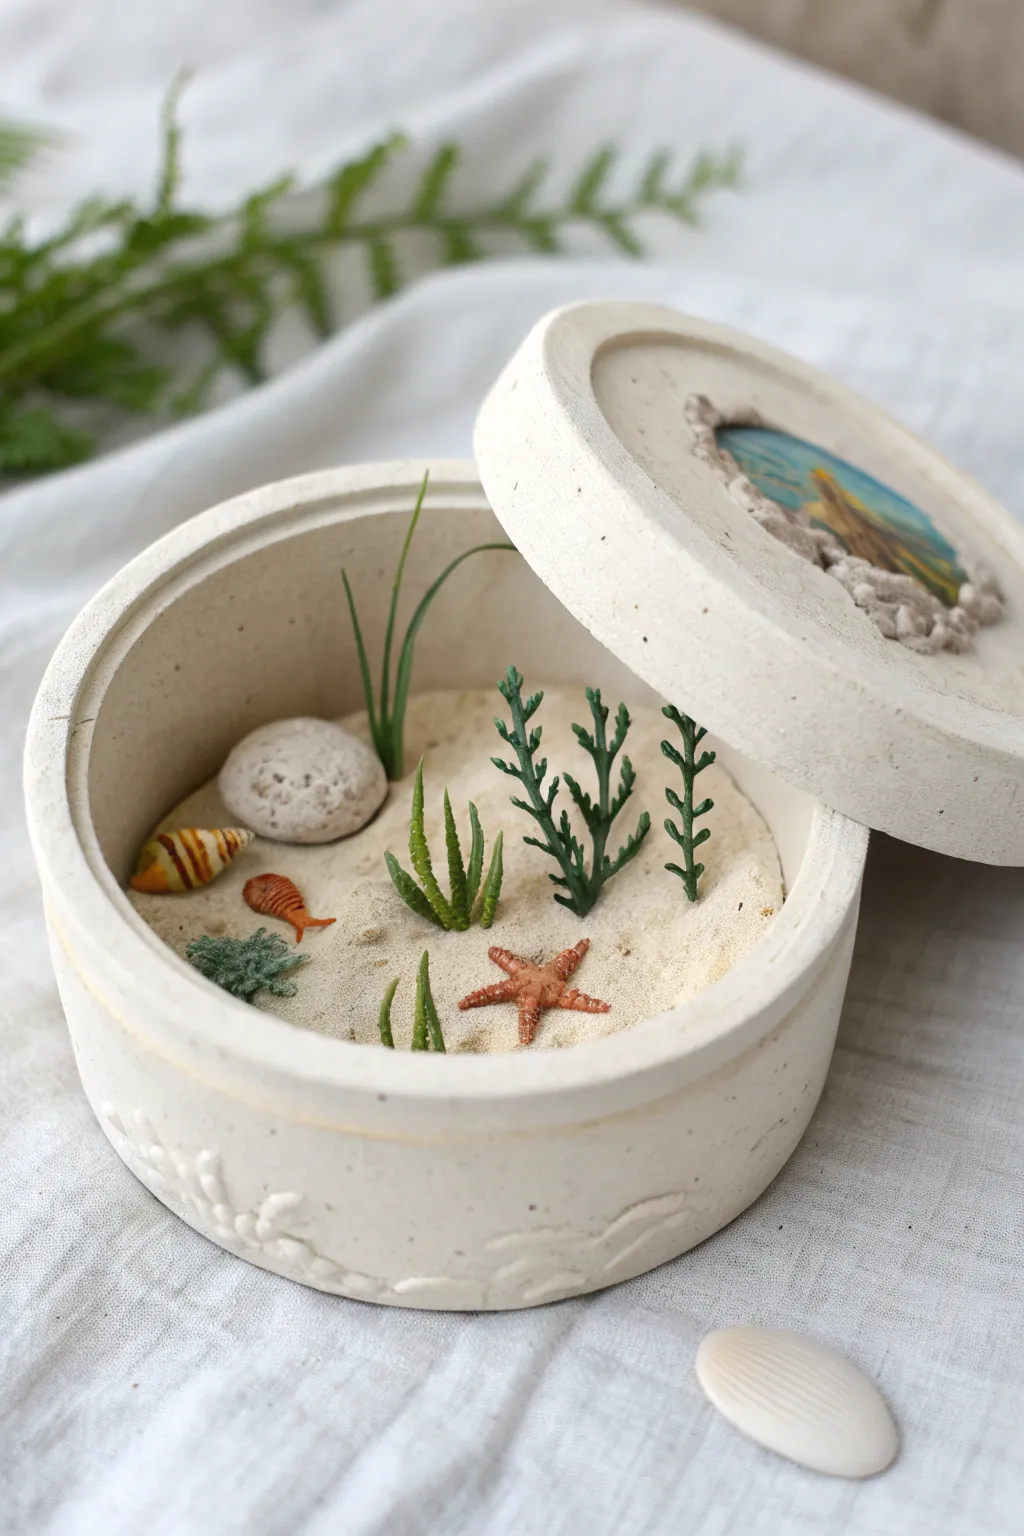
Create a captivating secret world inside a simple clay vessel with this charming diorama box project. When closed, it appears to be an elegant, textured trinket holder, but lifting the lid reveals a tiny, permanent slice of ocean life nestled in sand.
Detailed Instructions
Materials
- Air-dry clay (white or stone texture)
- Fine-grit sandpaper
- Acrylic paints (sand, coral, green, blue tones)
- Small rolling pin
- Circle cutters (two sizes)
- Craft knife
- Texture tools (or a rough stone)
- Mod Podge or strong clear glue
- Fine white sand (decorative)
- Miniature model plants or preserved moss
- Tiny sea shells (real or sculpted)
- Super glue (gel formula)
- Detail paintbrushes (00 and 0)
Step 1: Sculpting the Vessel
-
Prepare the Clay:
Begin by conditioning a large ball of air-dry clay until it is smooth and pliable. Roll it out to an even thickness of about 1/4 inch. -
Cut the Base and Lid:
Use your larger circle cutter (or a bowl as a template) to cut two identical circles. One will be the base of the pot, and the other will become the lid. -
Form the Walls:
Roll a long snake of clay and flatten it into a strip the same thickness as your base. Wrap this strip around the edge of the base circle to create the walls, trimming the excess. -
Blend the Seams:
Using a little water on your fintertips, smooth the seam where the wall ends meet, and blend the clay downwards to join the wall firmly to the base. I find using a flat modeling tool helps ensure a seamless connection inside and out. -
Create the Lid Lip:
For the lid to sit securely, roll a thinner strip of clay and attach it to the underside of your second circle, creating an inner ring that fits just inside the box walls. -
Add Exterior Texture:
While the clay is still damp, gently press a texture tool or even a real seashell into the lower exterior of the box to create the subtle wave reliefs shown in the photo. -
Dry the Components:
Allow both the box and lid to dry completely for 24-48 hours. Turn them occasionally to ensure even drying and prevent warping.
Step 2: Creating the Miniature Elements
-
Sculpt Tiny Creatures:
Using tiny scraps of fresh clay, sculpt miniature elements like a starfish, a small fish, and coral shapes. These should be scaled to fit comfortably inside your box. -
Make the Rock:
Form a small, irregular lump of clay to serve as the white rock. Texture it by poking it with a toothbrush or stiff brush to mimic porous coral stone. -
Paint the Miniatures:
Once the tiny pieces are dry, paint them with acrylics. Use burnt orange for the starfish, stripes for the shell, and bright green for any clay seaweed. -
Refine the Box:
Sand the rim of the box and the edge of the lid with fine-grit sandpaper so they fit together smoothly and look polished.
Scale Check
Before gluing, put the lid on! Ensure no plants or rocks are too tall, preventing the box from closing properly.
Step 3: Assembling the Scene
-
Base Layer Preparation:
Paint a generous layer of Mod Podge or thick craft glue across the entire inside bottom of the box. -
Add the Sand:
Pour fine white sand over the wet glue, tilting the box to coat it fully. Tap out the excess and let this base layer dry completely. -
Position the Features:
Plan your arrangement. Place the rock, taller plastic plants, and main coral pieces without glue first to check the composition. -
Secure the Rock:
Glue the white porous rock into place. Use a pinch more sand around its base to make it look embedded rather than just sitting on top. -
Add Vertical Elements:
Using super glue (gel works best here so it doesn’t run), attach your plastic seaweed or wire-and-paper plants vertically. -
Place the Sea Life:
Glue the starfish and the tiny fish onto the sand. For the fish, you can prop it up slightly on a grain of sand or a tiny clay support so it looks like it’s swimming. -
Final Touches:
Use a dry brush to dust off any loose sand from the sides of the box or the tops of the plants to keep the scene looking clean and crisp. -
Seal (Optional):
If you want the sand to be rock-hard, you can drip a watered-down glue mixture over the sand using a pipette, avoiding the painted creatures.
Sanding Tips
If the lid is too tight after drying, sand the inner rim of the lid rather than the box walls for a cleaner exterior look.
Place this little curiosity on your shelf and wait for guests to discover the secret ocean view hidden inside