Whenever I’m craving something a little different, polymer clay is my go-to because it can swing from polished and modern to downright whimsical in one afternoon. Here are my favorite unique polymer clay ideas that feel totally doable, but still give you that “wait, you made that?” payoff.
Terrazzo Arch Earrings
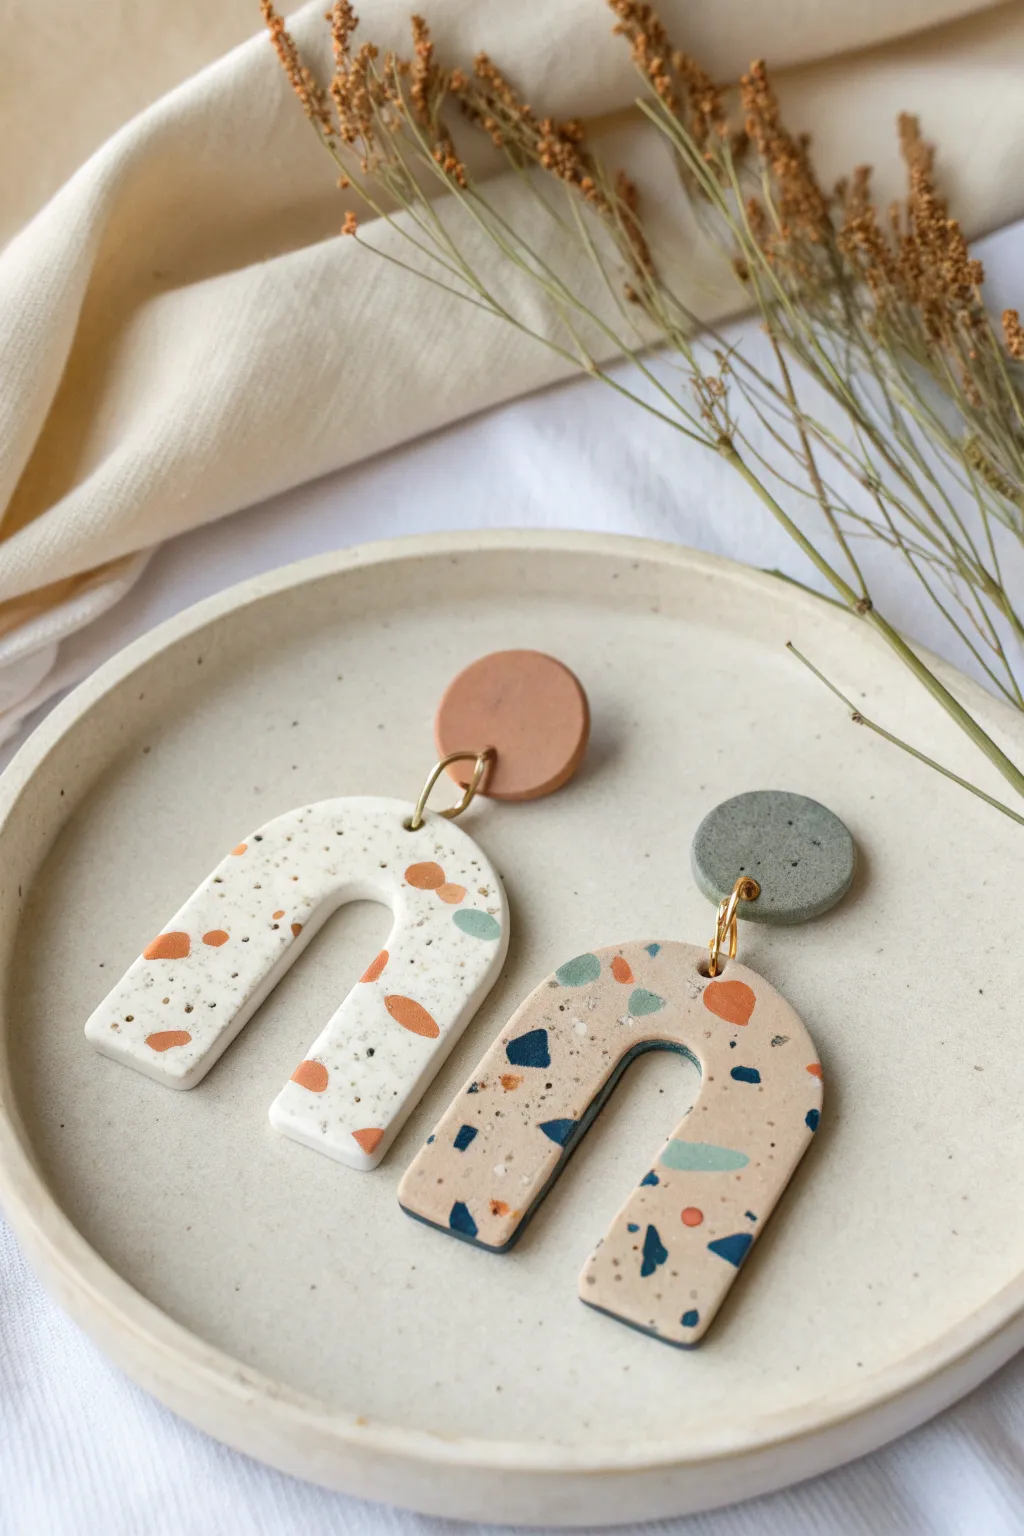
Embrace the modern, earthy aesthetic with these stunning terrazzo-style arch earrings. This project combines geometric shapes with scattered pops of color to create a sophisticated yet playful accessory perfect for everyday wear.
How-To Guide
Materials
- Polymer clay (White, Beige, Terracotta, Navy Blue, Sage Green)
- Clay roller or pasta machine
- Tissue blade or X-Acto knife
- Arch-shaped clay cutter (medium size)
- Small circle clay cutter (for the studs)
- Parchment paper or ceramic tile work surface
- Rolling pin
- Hand drill or pin vibe
- Jewelry pliers (flat nose and round nose)
- Jump rings (gold)
- Earring posts and backs
- Super glue or UV resin
- Fine grit sandpaper (optional)
Step 1: Prepping the Terrazzo Chips
-
Condition accent colors:
Start by conditioning your accent clay colors—the terracotta, navy blue, and sage green—until they are soft and pliable. -
Create thin sheets:
Roll each of these accent colors into very thin, paper-like sheets. The thinner the better for crisp terrazzo flakes. -
Chop into flakes:
Use your tissue blade to irregularly chop these thin sheets into tiny jagged confetti pieces. Keep each color pile separate for now. -
Mix sizes:
Ensure you have a variety of sizes, from tiny specks to slightly larger distinctive chunks, to create visual interest in the final pattern.
Step 2: Creating the Base Slabs
-
Condition base clay:
Clean your hands and work surface thoroughly, then condition your white clay and your beige clay separately. -
Roll the base:
Roll out the white clay to about 3mm thickness. Do the same for the beige clay. These will be the foundations for your earrings. -
Scatter the chips:
Gently pick up your chopped clay flakes and sprinkle them onto the base slabs. For the white slab, use mostly terracotta flakes with tiny hints of green. For the beige slab, create a darker mix with plenty of navy, green, and orange. -
Embed the chips:
Place a piece of parchment paper over the spotted clay. Gently roll over the top with your acrylic roller to press the flakes flush into the base clay. -
Smooth the surface:
Roll in different directions to ensure the surface is completely flat and the chips are fully integrated, becoming one seamless sheet.
Clean Cuts Pro Tip
Before cutting your shapes, dip your clay cutters into a small pile of cornstarch or water. This prevents sticking and ensures your clay releases cleanly from the cutter.
Step 3: Cutting and Baking
-
Cut the arches:
Position your arch cutter over the most interesting section of your terrazzo pattern and press down firmly to cut the main earring shapes. -
Cut the studs:
From the remaining patterned clay (or a solid color block like the terracotta shown in the photo), cut two small circles for the earring studs. -
Smooth edges:
Before baking, gently run your finger along the cut edges to smooth out any harsh lines or fingerprints. -
Pierce holes:
Using a needle tool or toothpick, carefully poke a hole at the top center of each arch and the bottom edge of each circle stud. Make sure the hole is big enough for your jump rings. -
Bake:
Place your pieces on a ceramic tile or parchment-lined baking sheet. Bake according to your brand of clay’s instructions (usually 275°F/135°C for 30 minutes).
Level Up: Texture
After baking, seal the pieces with a matte varnish for a natural look, or use UV resin for a high-gloss, ceramic-like finish that makes colors pop.
Step 4: Finishing and Assembly
-
Cool and sand:
Let the pieces cool completely. If you want a matte stone look, I sometimes lightly sand the surface under water with 1000-grit sandpaper to reveal the sharp edges of the terrazzo chips. -
Drill (optional):
If you didn’t pierce holes before baking, use a hand drill or pin vibe now to create the connection points. -
Attach posts:
Use a dab of strong super glue to attach the metal earring posts to the back of the small circular studs. Let dry completely. -
Connect pieces:
Twist open a gold jump ring using two pairs of pliers. Thread it through the hole in the arch and the hole in the stud. -
Close the ring:
Gently twist the jump ring closed so the ends meet flush, securing the two pieces together with a nice dangle.
Wear your new handmade statement pieces with pride or gift them to a lucky friend who loves modern design


Marble-Swirl Pendant Charms

These sophisticated pendants mimic the organic look of natural stone with soft swirls of white, gold, and pale pink. The marbled effect ensures that every single piece is unique, making them perfect for personalized gifts or a special addition to your own jewelry collection.
Step-by-Step Tutorial
Materials
- Polymer clay (white, beige/tan, metallic gold, pale pink)
- Acrylic rolling pin or pasta machine
- Tissue blade or sharp craft knife
- Circle and oval clay cutters
- Small jump rings (gold finish)
- Gold necklace chain
- Jewelry pliers (round nose and flat nose)
- Toothpick or needle tool
- Fine-grit sandpaper (optional)
- Gloss glaze (optional)
Step 1: Preparing the Clay
-
Condition the clay:
Start by kneading each color of clay separately until they are soft, pliable, and warm. This prevents cracks and makes mixing much smoother. -
Create color logs:
Roll each color into a distinct ‘snake’ or log shape. The white log should be the thickest, as it’s the base color, while the gold and pink logs should be thinner for accent streaks. -
Combine the logs:
Gather your clay snakes and twist them together into one large, multi-colored rope. Fold this rope in half and twist it again.
Golden Veins Tip
For sharper gold veins, add thin sheets of gold leaf between layers of clay before the twisting phase, rather than just mixing gold clay.
Step 2: Creating the Marble Effect
-
Mix and marble:
Continue the twist-and-fold method gently. Be careful not to overmix; you want distinct streaks of color, not a muddy blend where the colors disappear. -
Check the pattern:
I usually stop mixing when I see defined ribbons of gold running through the white. If the colors are too separated, give it one more fold. -
Form a ball:
Roll the twisted rope into a smooth ball. This helps consolidate the pattern and removes air bubbles.
Step 3: Cutting and Shaping
-
Flatten the clay:
Using your acrylic roller or pasta machine, roll the clay ball out into a flat slab. Aim for a thickness of about 3mm to 4mm for a sturdy pendant. -
Select your spot:
Look closely at your slab to find the most visually pleasing area of the swirl pattern to capture. -
Cut the shapes:
Press your oval or circle cutter firmly into the clay slab. Wiggle it slightly before lifting to ensure a clean cut. -
Smooth the edges:
Gently rub the edges of your cut-out shapes with your fingertip to soften any sharp ridges left by the cutter. -
Pierce the hole:
Use a toothpick or needle tool to carefully poke a hole near the top of the pendant. Ensure the hole is large enough for your jump ring to fit through.
Muddy Colors?
If your colors are blending into a single mushy shade, you are over-kneading. Stop mixing sooner to keep the distinct swirled definition.
Step 4: Baking and Assembly
-
Bake the pieces:
Place your clay pieces on a baking tile or parchment-lined tray. Bake according to the manufacturer’s instructions on your specific package of clay. -
Cool down:
Let the pieces cool completely inside the oven or on a wire rack before handling them to prevent warping. -
Sand for finish (optional):
If there are rough spots or fingerprints, wet sand the cured clay lightly with fine-grit sandpaper for a professional smoothness. -
Add the hardware:
Using two pairs of pliers, twist open a jump ring laterally. Thread it through the hole in your pendant. -
Attach the chain:
Before closing the jump ring, slide your gold chain through it. Use the pliers to twist the jump ring back into a closed circle.
Once assembled, your new marble pendant is ready to wear or gift to a friend who loves handmade style


Patterned Cane Beads
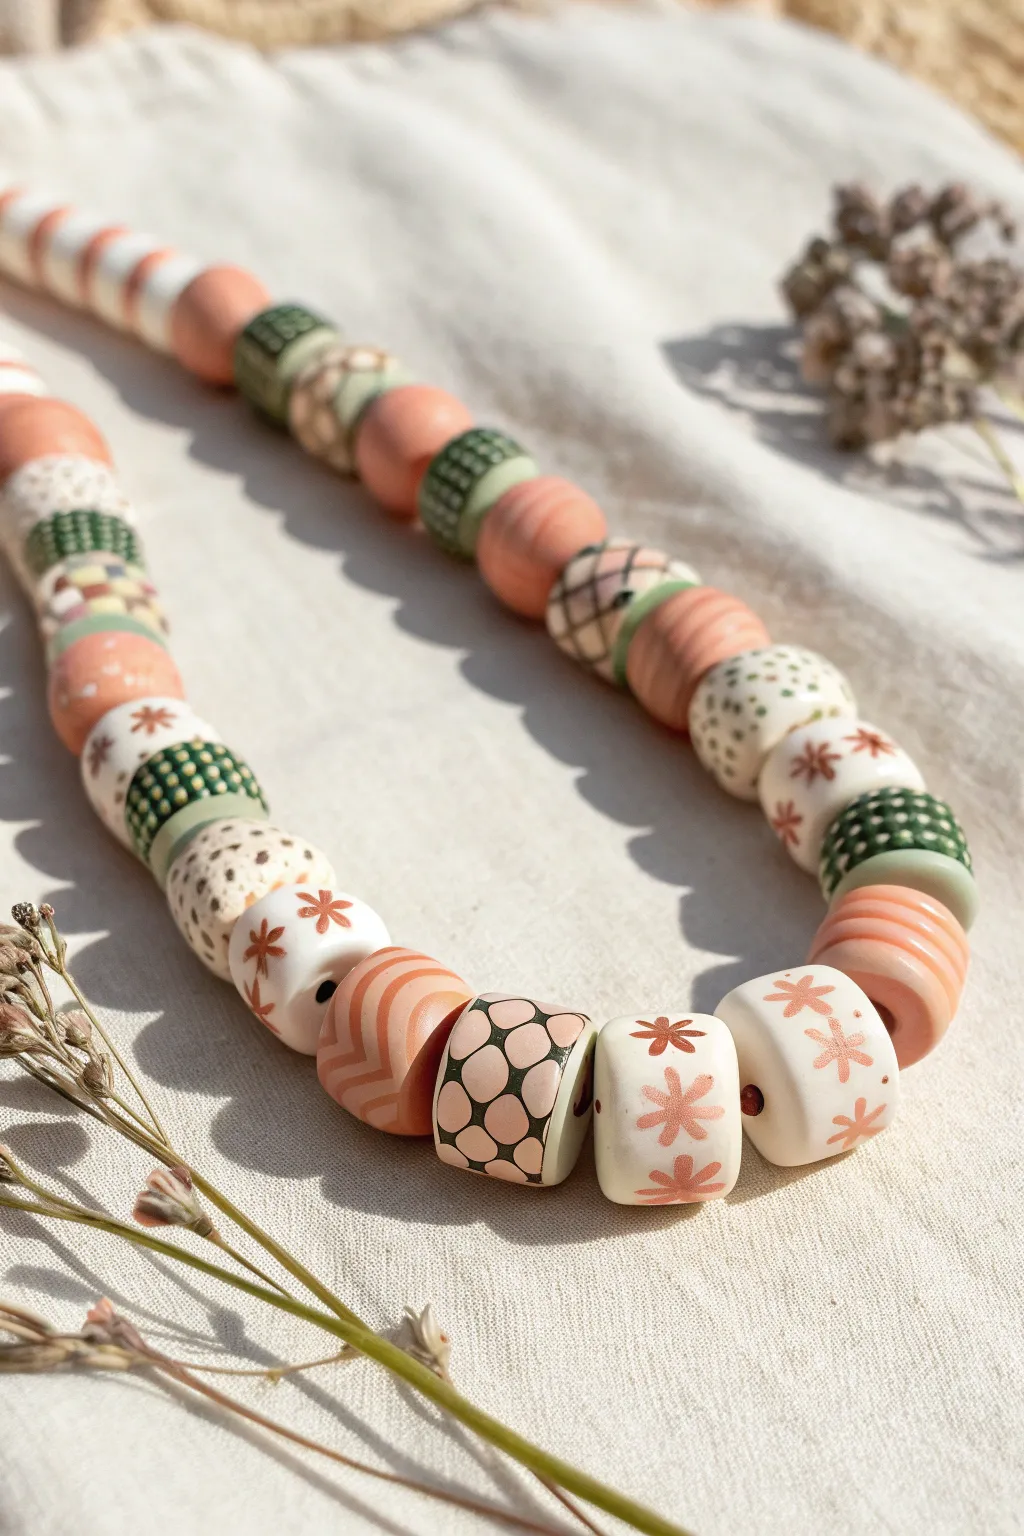
Create a stunning statement necklace featuring an array of hand-rolled polymer clay beads in soft peach, sage green, and cream tones. This project combines simple cane work, surface patterning, and texture techniques to produce a cohesive yet eclectic look reminiscent of vintage pottery.
Step-by-Step
Materials
- Polymer clay (terracotta/peach, sage green, cream/white, black)
- Acrylic rolling pin or clay machine
- Tissue blade or flexible clay slicer
- Needle tool or bead piercing pins
- Small round cutter (for consistent sizing)
- Dotting tool or toothpick
- Sandpaper (wet/dry, various grits)
- Oven for baking
- Beading cord (waxed cotton or hemp)
- Gloss or matte varnish (optional)
Step 1: Color Mixing & Base Prep
-
Condition the clay:
Start by conditioning your clay blocks until they are soft and pliable. If the terracotta color is too vibrant, mix in a tiny amount of white or beige to achieve that soft, sun-baked peach tone seen in the photo. -
Create the sage green:
Mix green with a bit of white and a touch of brown or black to desaturate it into a muted sage color. You want a natural, earthy palette. -
Form base balls:
Roll your clay into sheets of equal thickness. Use a small round cutter to punch out circles, then roll these into smooth balls. This ensures all your beads are relatively uniform in size before you start decorating.
Step 2: Designing the Cane Beads
-
Make a simple flower cane:
Create a small ‘bullseye’ cane with a peach center and cream wrapping. Reduce this cane (stretch it thin) and cut slices to press onto a larger cream bead base for the floral patterns. -
Create the polka dot cane:
Make a thin snake of sage green clay wrapped in a sheet of cream clay. Stretch this cane until it is very thin. Slice thin disks and press them onto a sage green base bead to create the dotted texture effect. -
Assemble the grid pattern:
For the checkerboard-style beads, stack alternating strips of black and cream clay. Slice thin cross-sections and carefully wrap them around a core of scrap clay, smoothing the seams gently with your finger. -
Apply the veneer:
Once you have applied your cane slices (flowers, dots, or grids) to the base beads, gently roll the bead between your palms. The heat and pressure will merge the decorative slices into the base for a smooth surface.
Smudged Patterns?
If cane slices smear while rolling, chill the beads in the fridge for 10 minutes before the final roll. Cool clay holds detail better than warm, soft clay.
Step 3: Adding Texture & Detail
-
Carve the ribbed beads:
Take a plain peach or sage bead and use the side of a needle tool or a dull knife to press horizontal indentations around the circumference. Rotate the bead slowly to create evenly spaced rings. -
Create the dotted texture:
On some of the cream beads, use a dotting tool or the tip of a small paintbrush dipped in black acrylic paint (or black liquid clay) to add tiny, irregular speckles for a ceramic look. -
Hand-paint florals (alternative):
If you struggle with canes, I sometimes find it easier to bake a plain cream bead first, then use a fine-tip paintbrush and peach acrylic paint to hand-draw the simple six-petal flowers shown in the image.
Pro Tip: Consistent Holes
Bake your beads ON the piercing pins suspended over a foil pan. This prevents flat spots from forming on the bottom of the bead during the baking process.
Step 4: Baking & Finishing
-
Pierce the beads:
Before baking, gently twist a bead piercing pin or needle tool through the center of each bead. Twist as you push to avoid distorting the spherical shape. -
Refine the shape:
Give each bead one final gentle roll in your hands to smooth out any fingerprints or distortion caused by the piercing tool. -
Bake the batch:
Arrange the beads on a baking sheet lined with cardstock or standard paper (to prevent shiny spots). Bake according to your clay manufacturer’s instructions, usually 275°F (130°C) for about 30-45 minutes. -
Sand for smoothness:
Once fully cooled, wet-sand the beads under running water using 400 grit sandpaper, moving up to 800 or 1000 grit. This reveals the true depth of the pattern and removes any lint. -
Buff or varnish:
Rub the beads vigorously with a denim scrap for a natural matte sheen. If you hand-painted any details, apply a thin coat of matte varnish to protect the design. -
String the necklace:
Thread your finished beads onto a sturdy cotton or hemp cord. Arrange them so the patterns alternate—separating busy patterns (like the grid) with simpler textures (like the ribbed peach beads).
Now you have a completely custom set of beads ready to be worn or gifted


Tiny Floral Hair Clips
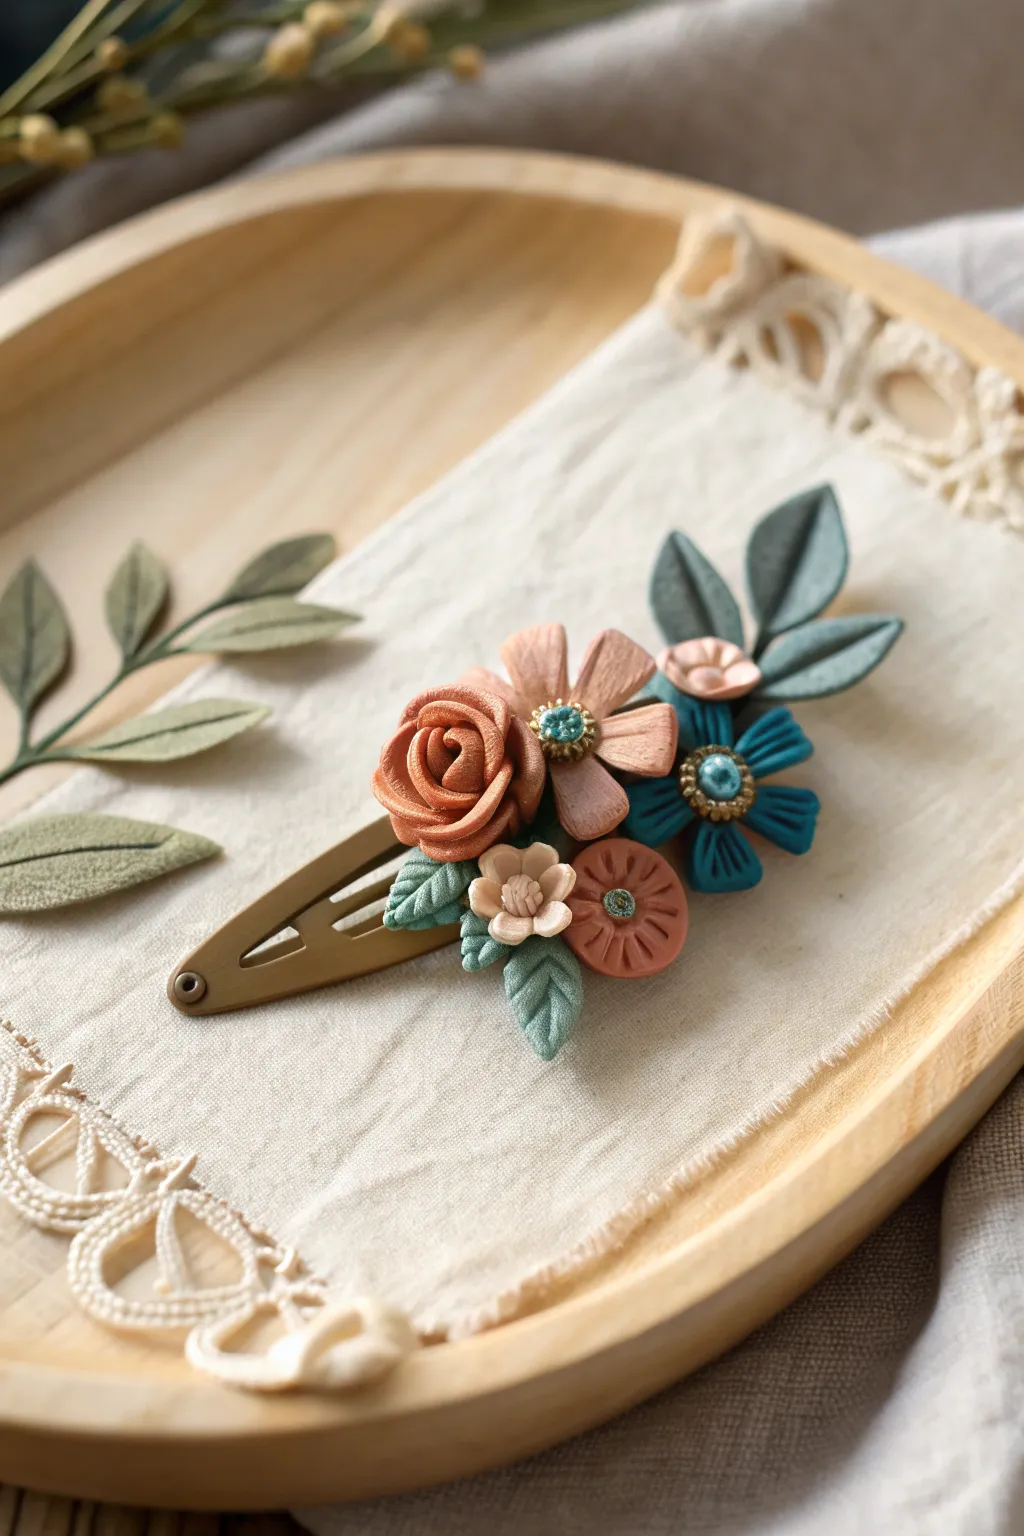
These delicate hair clips capture the essence of a tiny woodland garden with their muted teal, soft peach, and terracotta blooms. This project involves sculpting miniature flowers and leaves from polymer clay to create a one-of-a-kind accessory perfect for a romantic touch.
Step-by-Step Guide
Materials
- Polymer clay (terracotta, peach, soft teal, muted blue, sage green)
- Metal snap hair clip (beige or antique brass finish)
- Small ball tool
- Needle tool or toothpick
- Liquid polymer clay (bakeable adhesive)
- Tiny microbeads or seed beads (gold and teal)
- Silicone sculpting mat
- Craft knife
- Oven for baking
Step 1: Base Preparation
-
Condition the Clay:
Begin by thoroughly kneading your clay colors until they are soft and pliable. This prevents cracking later on when shaping small petals. -
Prepare the Clip:
Apply a thin layer of liquid polymer clay along the top surface of the metal hair clip. Roll out a thin strip of sage green or beige clay and press it firmly onto the clip to create a secure foundation for your flowers.
Step 2: Sculpting the Rose
-
Rose Center:
Using the terracotta clay, roll a tiny strip and coil it tightly to form the center bud of the rose. -
Adding Petals:
Roll several small balls of terracotta clay and flatten them into thin discs with your fingertips. Gently wrap these around the center bud, overlapping them slightly to create an open bloom effect. -
Mounting the Rose:
Cut off any excess clay from the bottom of your rose so it sits flat. Press it gently near the wider end of the hair clip base.
Clean Cuts Matter
Keep baby wipes nearby to clean your hands between colors. Terracotta and teal residues can easily muddy the lighter peach clay petals.
Step 3: Creating the Daisy Elements
-
Forming Petals:
For the large peach daisy, shape five or six teardrop pieces. Flatten each one and use your needle tool to indent a subtle line down the center of each petal for texture. -
Assembly:
Arrange the peach petals in a circle next to the rose. Press a small ball of teal clay into the center and texture it with a needle tool. -
Adding Detail:
Place a tiny ring of gold microbeads around the center of the peach flower for a touch of sparkle. -
The Blue Flower:
Repeat the petal process with the muted blue clay, making slightly narrower, pointed petals. Arrange these into a flower shape below the peach daisy. -
Blue Center:
Add a small pearl or a ball of metallic clay to the center of the blue flower.
Loose Petals?
If petals aren’t sticking to the base, add a tiny drop of liquid polymer clay or ‘Bake and Bond’ under the loose piece before curing.
Step 4: Filler Flowers & Leaves
-
Tiny Blossoms:
Create smaller filler flowers using peach and terracotta clay. Use a ball tool to cup the petals slightly, giving them a three-dimensional look. -
Textured Buttons:
Make a small disc of terracotta clay and use a needle tool to press radial lines from the center out creates a ‘button flower’ look. -
Leaf Veining:
Shape classic leaf forms from the sage green and dark teal clay. Use your craft knife to gently score a central vein on each leaf. -
Leaf Placement:
Tuck the leaves under the edges of the flowers, extending them outwards especially at the top end of the clip to create a flowing silhouette. -
Final Check:
Look over your composition to ensure no metal base is showing through gaps. Add tiny clay buds or leaves to fill empty spaces.
Step 5: Baking & Finishing
-
Baking:
Place the entire clip on a tile or baking sheet. Bake according to your clay manufacturer’s instructions (usually around 275°F or 130°C for 15-30 minutes). -
Cooling:
Allow the clip to cool completely before handling. The clay is fragile while warm. -
Varnishing (Optional):
If you want a glossy finish or extra durability, apply a thin coat of matte or satin polymer clay varnish to the flowers.
Clip this into a messy bun or braid to enjoy your handcrafted floral accessory

What Really Happens Inside the Kiln
Learn how time and temperature work together inside the kiln to transform clay into durable ceramic.
Stamped Name Key Fobs
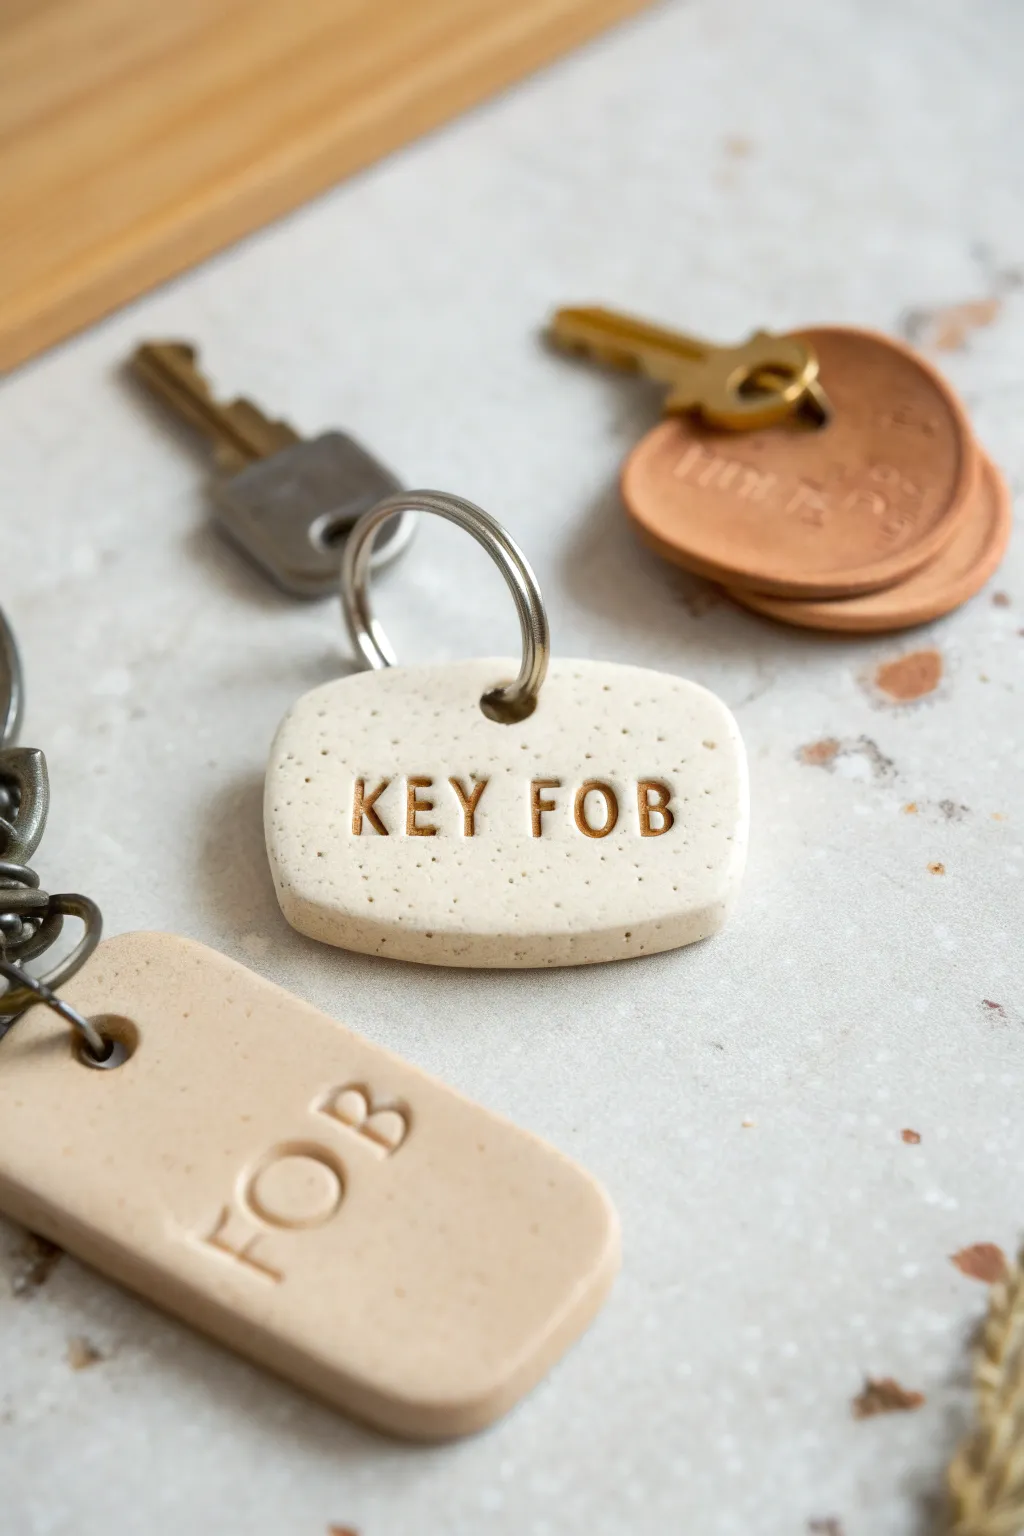
These minimalist key fobs combine a modern, stone-like aesthetic with practical function, creating personalized accessories that feel great in your hand. Using speckled polymer clay and simple letter stamps, you can craft durable tags perfect for organizing keys or gifting to friends.
Detailed Instructions
Materials
- Polymer clay (granite or speckled white effect)
- Polymer clay (beige or sand color)
- Acrylic rolling pin or pasta machine
- Rectangle clay cutter (rounded corners)
- Miniature letter stamp set
- Small metal jump rings (approx. 8-10mm)
- Keyrings
- Small round cutter or straw (for the hole)
- Baking sheet
- Parchment paper
- Fine-grit sandpaper (optional)
- Acrylic paint (brown or gold, optional for inlay)
- Paper towel or baby wipe
Step 1: Preparation & Rolling
-
Condition the clay:
Begin by warming the speckled polymer clay in your hands. Knead it thoroughly until it is soft, pliable, and free of any cracks. -
Roll out the slab:
Place the conditioned clay on a clean, smooth work surface. Use your acrylic roller to flatten the clay into an even slab. -
Check thickness:
Aim for a thickness of about 4mm to 5mm. You want the fob to be substantial enough to be durable, but not too heavy. If using a pasta machine, I usually go for the thickest or second-thickest setting.
Stamp Alignment Trick
Place a piece of clear tape across the clay just below where you want the letters. Rest the bottom edge of your stamp on the tape for a perfectly straight line.
Step 2: Cutting & Shaping
-
Cut the shape:
Press your rectangular cutter with rounded corners firmly into the clay slab. Wiggle it slightly to ensure a clean separation before lifting it away. -
Smooth the edges:
Gently run your finger along the cut edges of the fresh clay shape to soften any sharpness or cutting residue. This saves sanding time later. -
Create the hole:
Use a small round cutter or a simple drinking straw to punch a hole centered near the top edge of the rectangle. Ensure the hole is large enough to accommodate your jump ring comfortably.
Faux Stone Texture
Mix black pepper or dried used tea leaves into plain white clay before rolling to create your own custom organic speckled stone effect.
Step 3: Stamping & Detailing
-
Plan your spacing:
Before pressing into the clay, arrange your letter stamps on the table to check the spacing and ensure you have the correct letters selected. -
Stamp the text:
Gently but firmly press the letter stamps into the center of the clay piece. Press straight down and pull straight up to avoid distorting the letters. -
Check depth:
Inspect the impressions. They should be deep enough to hold paint later, but not so deep that they warp the back of the fob. -
Final smooth:
If the stamping caused slight bulging around the letters, gently tap the surface with your finger or light roller to flatten it back down without erasing the text.
Step 4: Baking & Finishing
-
Prepare for baking:
Transfer your clay pieces onto a baking sheet lined with parchment paper. Check one last time for fingerprints or dust. -
Bake the clay:
Bake according to your specific clay brand’s instructions—usually around 275°F (135°C) for 30 minutes per 1/4 inch of thickness. Always double-check your package directions. -
Cool down:
Remove from the oven and allow the pieces to cool completely. The clay hardens fully only after it has cooled. -
Highlight the text:
To make the letters pop like in the photo, brush a small amount of brown or gold acrylic paint into the stamped grooves. -
Wipe excess paint:
Quickly wipe across the surface with a damp paper towel or baby wipe, removing surface paint while leaving the pigment inside the indented letters. -
Sand edges (optional):
If there are any rough spots, lightly buff the edges with fine-grit sandpaper under running water for a polished finish. -
Assemble hardware:
Open a jump ring using pliers, thread it through the hole in the clay fob, and attach your main keyring before closing the jump ring securely.
Attach your new custom fob to your keys and enjoy the organized, stylish upgrade to your daily carry
Mini Food or Rainbow Magnets
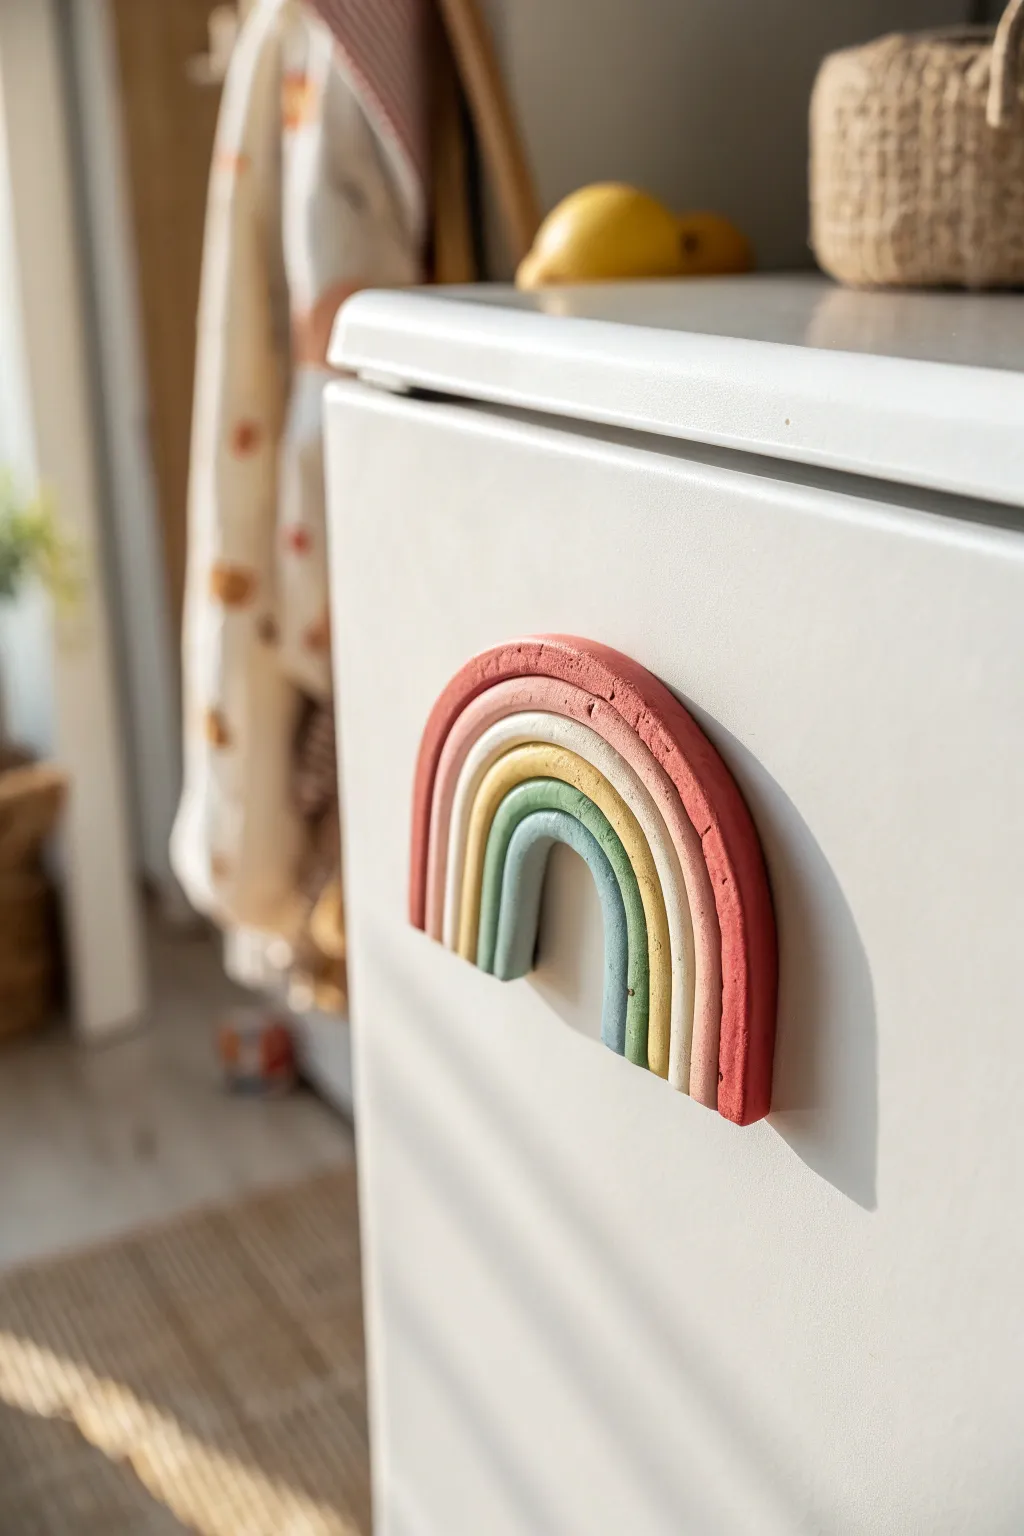
Add a touch of warmth to your kitchen with this charming, earth-toned rainbow magnet made from clay. Its textured, matte finish and muted colors give it a lovely organic feel that looks much more expensive than it is.
Step-by-Step
Materials
- Polymer clay (terracotta, cream, mustard yellow, sage green)
- Acrylic rolling pin
- Liquid polymer clay or craft glue
- Ceramic tile or baking sheet
- Texturing tool (toothbrush or stiff bristle brush)
- Strong round magnet
- Super glue
- Sharp crafting blade
- Oven for baking
Step 1: Preparing the Colors
-
Condition the clay:
Begin by warming up your clay in your hands. Knead each color separately until it is soft, pliable, and free of any cracks. -
Mix custom shades:
If you don’t have pre-mixed earth tones, blend primary colors with plenty of white and a touch of brown to achieve that soft, muted look seen in the photo. -
Roll the snakes:
Roll each color into a long, even snake shape. Aim for a thickness of about 0.5 cm (1/4 inch) for each strand to replicate the chunky look. -
Equalize thickness:
Place the snakes side-by-side to ensure they are consistent. Gently stretch or roll individual strands so they match perfectly in diameter.
Step 2: Forming the Arch
-
Create the center arch:
Take your sage green (or smallest) strand and bend it into a tight U-shape on your ceramic tile. This will be the innermost layer. -
Apply adhesive:
Apply a very thin line of liquid polymer clay (or scoring gel) along the outer edge of the green arch to help the next layer stick. -
Add the yellow layer:
Wrap the mustard yellow snake snugly around the green one. Gently press them together to ensure there are no gaps between the coils. -
Add the cream layer:
Repeat the process with the cream-colored strand, applying adhesive and wrapping it tightly around the yellow arch. -
Finish with the outer arch:
Secure the final terracotta red strand around the cream layer, making sure the overall shape remains symmetrical.
Stone Effect
Mix just a pinch of black pepper or craft sand into your clay before rolling. This adds speckles and grit for a realistic stone texture.
Step 3: Finishing Touches
-
Cut the ends:
Use a long, sharp blade to make a single straight cut across the bottom of the rainbow. Press straight down so you don’t squash the rounded coils. -
Add texture:
To get that stone-like, matte appearance, gently tap the surface of the clay with a clean toothbrush or a stiff bristle brush. I find this hides fingerprints beautifully. -
Check structure:
Look at the rainbow from the side and ensure it’s sitting flat against your work surface. If it’s warped, gently press it down with an acrylic block. -
Bake firmly:
Bake the clay according to the manufacturer’s instructions on the package. Usually, this is around 275°F (130°C) for 15-30 minutes. -
Cool down:
Allow the rainbow to cool completely before moving it. It is most fragile right when it comes out of the oven. -
Attach magnet:
Apply a drop of strong super glue to the back of the rainbow and press a heavy-duty round magnet firmly into place. -
Final cure:
Let the glue set for at least an hour to ensure a permanent bond before placing it on your fridge.
Cloud Base
Instead of a straight cut at the bottom, attach two small white balls of clay to the ends of the rainbow to create fluffy cloud feet.
Now your fridge has a sweet, handmade accent piece that brings a little joy every time you reach for a snack


The Complete Guide to Pottery Troubleshooting
Uncover the most common ceramic mistakes—from cracking clay to failed glazes—and learn how to fix them fast.
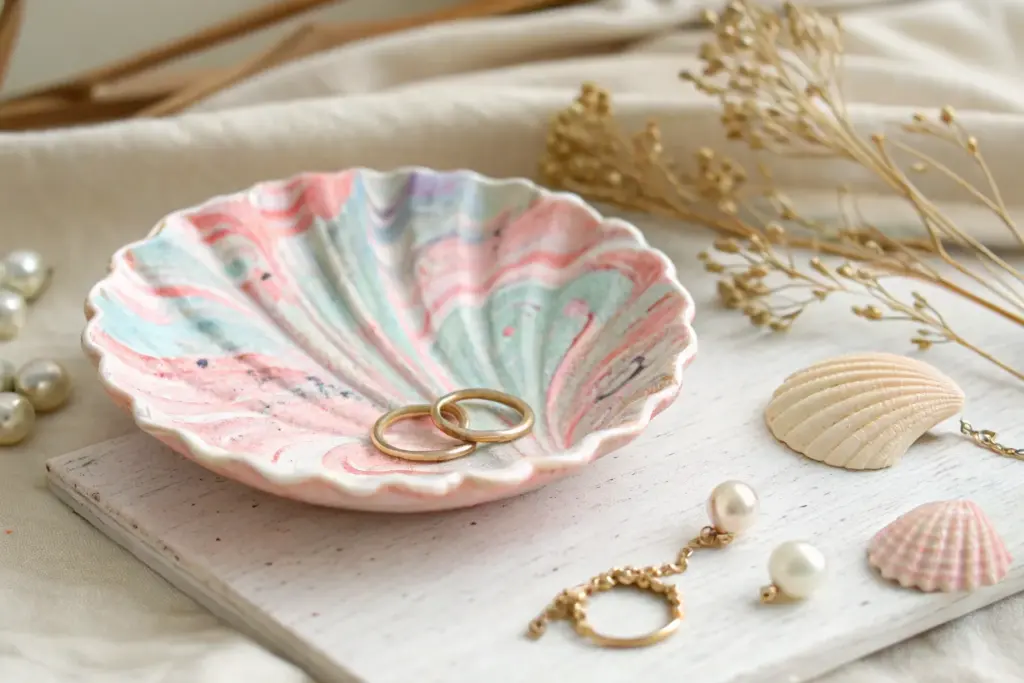
Fruit-Slice Trinket Dishes
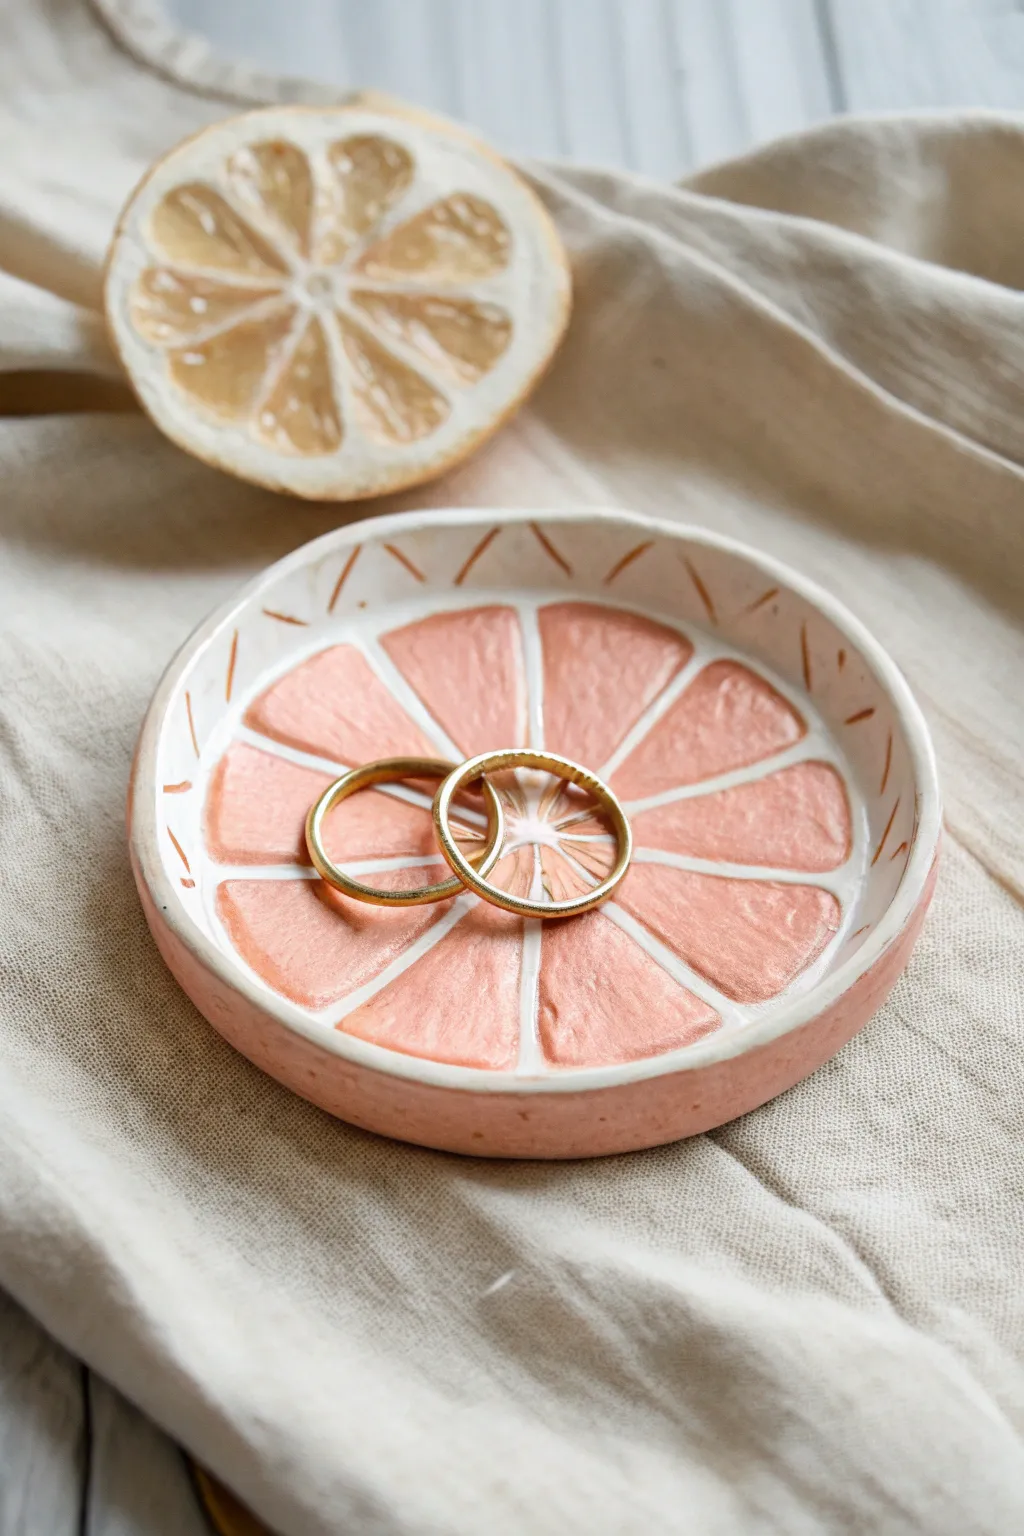
Capture the refreshing zest of summer with this charming grapefruit-inspired trinket dish. With its textured pink segments and rustic white rind, it acts as the perfect cheerful catch-all for your favorite rings and small treasures.
Detailed Instructions
Materials
- White polymer clay
- Peach or pink polymer clay (for the fruit flesh)
- Circle cutter (approx. 4-5 inches diameter)
- Ceramic bowl or oven-safe form (for shaping)
- Acrylic rolling pin
- Craft knife or scalpel tool
- Needle tool or toothpick
- Coarse sandpaper or texture sponge
- Tan or light brown acrylic paint
- Fine paintbrush
- Gloss glaze or varnish
Step 1: Creating the Base
-
Prepare the Clay:
Condition your white polymer clay until it is soft and pliable. Roll it out into a smooth, even sheet about 1/4 inch thick. This will form the sturdy outer rind and base of your dish. -
Cut the Circle:
Use your large circle cutter to stamp out a perfect round shape. If you don’t have a cutter specifically this size, trace around a bowl with a craft knife to get a clean edge. -
Shape the Rim:
Gently pinch up the very edges of the circle to create a slight lip. You want it to look like a shallow bowl rather than a flat plate so it can hold items securely.
Step 2: Adding the Fruit Flesh
-
Roll the Pink Clay:
Condition your pink or peach-colored clay. Roll this sheet slightly thinner than your white base, aiming for about 1/8 inch thickness. -
Cut the Segments:
Cut a circle from the pink clay that is slightly smaller than your white base (leaving a border for the rind). Use your craft knife to slice this pink circle into 8-10 equal triangular wedges, just like slices of a pie. -
Soften the Edges:
Pick up each pink wedge and gently tap the cut edges with your finger to round them off slightly. This makes the segments look organic and juicy rather than sharp and geometric. -
Attach the Segments:
Place the pink wedges onto the white base in a radial pattern. Leave a thin gap of white showing between each segment to represent the pith of the citrus. -
Texture the Fruit:
Using a needle tool, a ball of aluminum foil, or coarse sandpaper, gently press texture into the pink segments. Stipple the surface to mimic the lumpy texture of fruit juice vesicles.
Sticky Situation?
Does your clay get stuck to the table? Roll your clay out on a piece of parchment paper or a ceramic tile. You can then move the whole paper to the oven without distorting your perfectly cut circle shape.
Step 3: Shaping and Baking
-
Form the Curve:
I like to carefully place the clay circle into a shallow, oven-safe bowl or draped over an inverted bowl to give it a curved shape while it bakes. Ensure it sits evenly so the final dish won’t wobble. -
Bake the Piece:
Bake the clay according to the manufacturer’s instructions on your clay package. This is typically around 275°F (130°C) for 15-30 minutes, but verify your specific brand. -
Cool Down:
Allow the dish to cool completely inside the oven or on a wire rack before handling. Polymer clay is fragile when hot and needs to harden fully.
Botanical Twist
Before baking, press real lemon zest or dried herbs into the white rim for organic texture. Use yellow clay for a lemon version or bright orange for a tangerine dish to create a full citrus set.
Step 4: Adding Details & Finish
-
Add Rind Details:
Once cool, take a fine liner brush and the tan acrylic paint. Paint small, rustic dashes along the white rim of the bowl, pointing inward toward the center, to simulate the texture of the peel. -
Define the Center:
Add faint tan lines radiating from the very center of the dish, creating a small starburst pattern where the segments meet. -
Let Paint Dry:
Allow the acrylic paint to dry completely. This usually takes only a few minutes if applied thinly. -
Apply Glaze:
Apply a coat of gloss glaze or varnish, focusing specifically on the pink fruit segments. This gives them a fresh, wet look while leaving the rind matte for contrast.
Place this delightful dish on your vanity or bedside table for a daily dose of summery brightness
Speckled Ring Cones
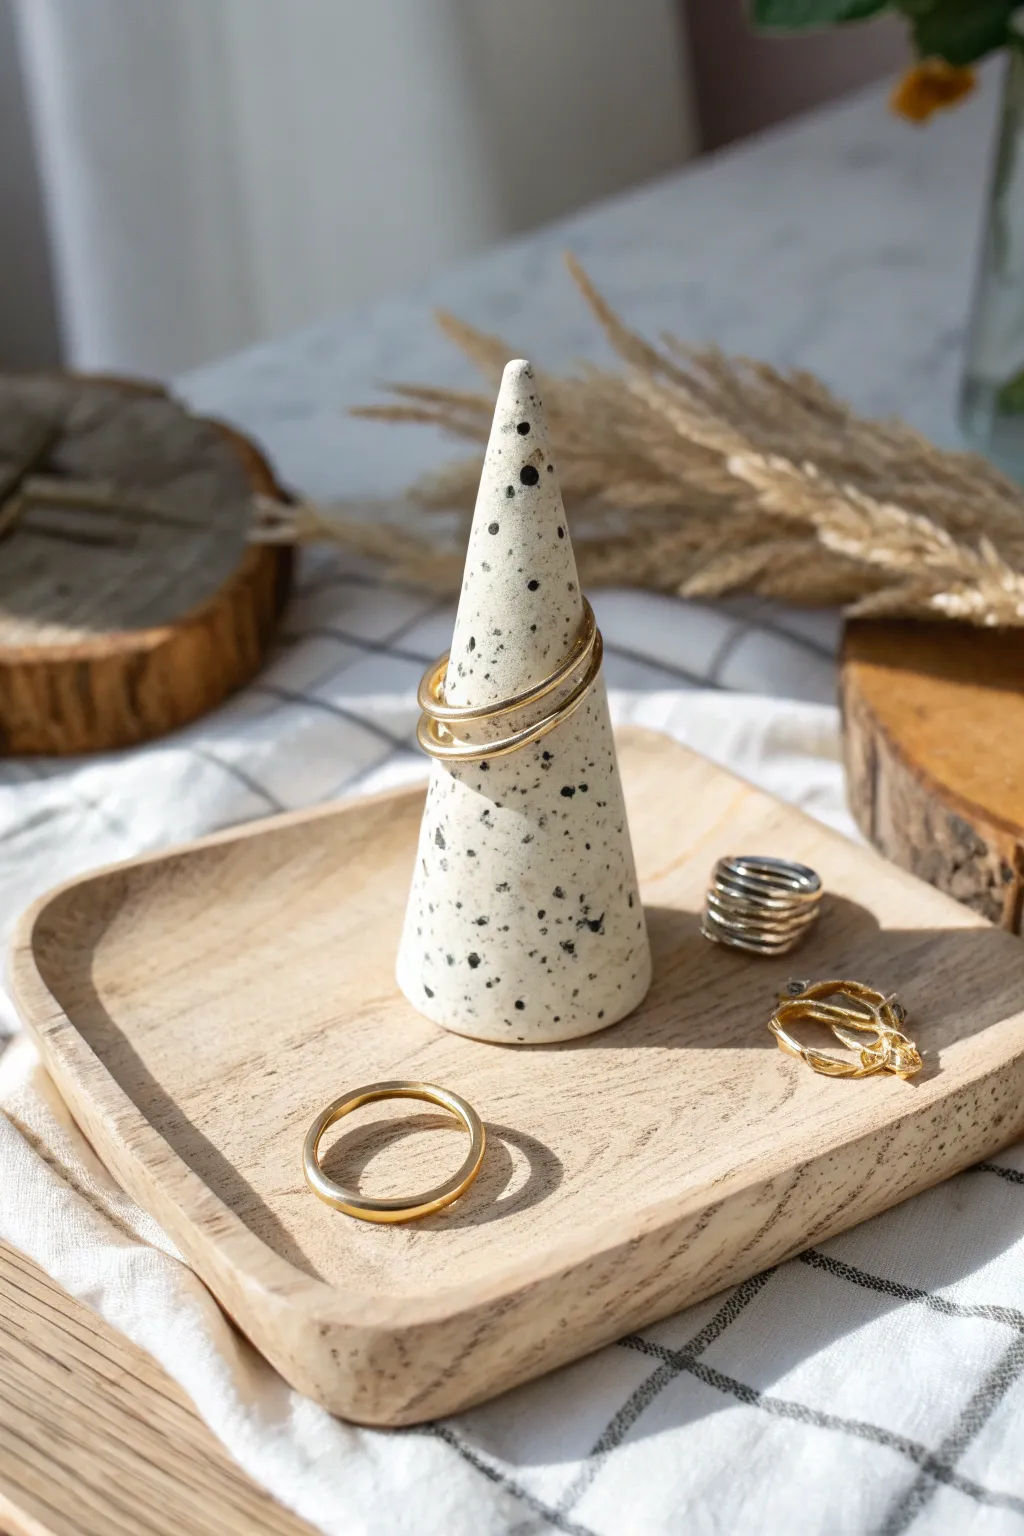
Bring a touch of modern minimalism to your vanity with these chic ring cones that mimic the look of speckled ceramic or granite. They are surprisingly simple to sculpt and provide a stylish, organized home for your favorite jewelry pieces.
Step-by-Step Tutorial
Materials
- White polymer clay (2 oz block)
- Black pepper or dried coffee grounds (for speckles)
- A smooth work surface (tile or glass)
- Acrylic roller
- Tissue blade or craft knife
- Smooth sandpaper (400-600 grit)
- Cardstock or paper
- Tape
- Oven for baking
Step 1: Preparation and Mixing
-
Condition the Clay:
Begin by warming the white polymer clay in your hands. Knead and roll it repeatedly until it feels soft, pliable, and free of any cracks. -
Add Texture:
Flatten the conditioned clay into a pancake shape. Sprinkle a generous pinch of ground black pepper or finely dried coffee grounds onto the surface. I prefer pepper for smaller, sharper specks. -
Incorporate the Specks:
Fold the clay over the specks and knead it thoroughly. Continue folding and rolling until the black particles are evenly distributed throughout the white clay, creating that signature granite effect. -
Form a Ball:
Once mixed, roll the clay into a smooth, tight ball between your palms to ensure there are no air bubbles trapped inside.
Uneven Taper?
If your cone looks lumpy, roll it against a flat acrylic block or hard book instead of your hand. The flat surface applies even pressure, smoothing lumps instantly.
Step 2: Shaping the Cone
-
Initial Roll:
Place the ball on your work surface. Using the heel of your hand, start rolling one side of the ball back and forth, applying more pressure to one end than the other. -
Refine the Shape:
As the clay elongates, it will naturally take on a cone shape. Continue rolling, using a flat acrylic block or your hand to smooth out any bumps, aiming for a height of about 3 to 4 inches. -
Check Symmetry:
Stand the cone up occasionally to check its profile. The taper should be gradual and even from the base to the tip. -
Flatten the Base:
Firmly press the wide bottom of the cone onto your work surface to create a flat, stable base. Ensure the cone stands perfectly straight without leaning. -
Soften the Tip:
Gently tap the very tip of the cone with your finger. You want it slightly rounded rather than dangerously sharp, which also helps prevent breakage.
Step 3: Smoothing and Baking
-
Remove Fingerprints:
Lightly brush the surface of the cone with a little bit of cornstarch or baby oil if needed, and gently rub away any fingerprints or imperfections. -
Bake the Clay:
Place your cone on a baking sheet lined with parchment paper or cardstock. Bake according to the manufacturer’s instructions for your specific brand of clay (usually around 275°F for 15-30 minutes). -
Cool Down:
Once the baking time is up, turn off the oven and let the cone cool down completely inside. This gradual cooling helps prevent cracks. -
Sanding:
Once fully cool, take your sandpaper and gently buff the surface under running water. This wet sanding technique removes any shine and reveals the specks more clearly. -
Final Buff:
Dry the cone with a soft towel. If you want a slight sheen, you can buff it vigorously with a piece of denim or leave it matte for a raw ceramic feel.
Gold Tips
Add a luxe touch by dipping the very tip of your baked cone into liquid gold leaf or painting a thin gold rim around the base for an elegant contrast.
Now you have a stylish display piece ready to hold your rings on your dresser or nightstand

TRACK YOUR CERAMIC JOURNEY
Capture glaze tests, firing details, and creative progress—all in one simple printable. Make your projects easier to repeat and improve.
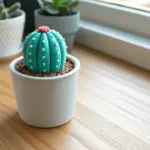
Petal-Wrapped Mini Planters
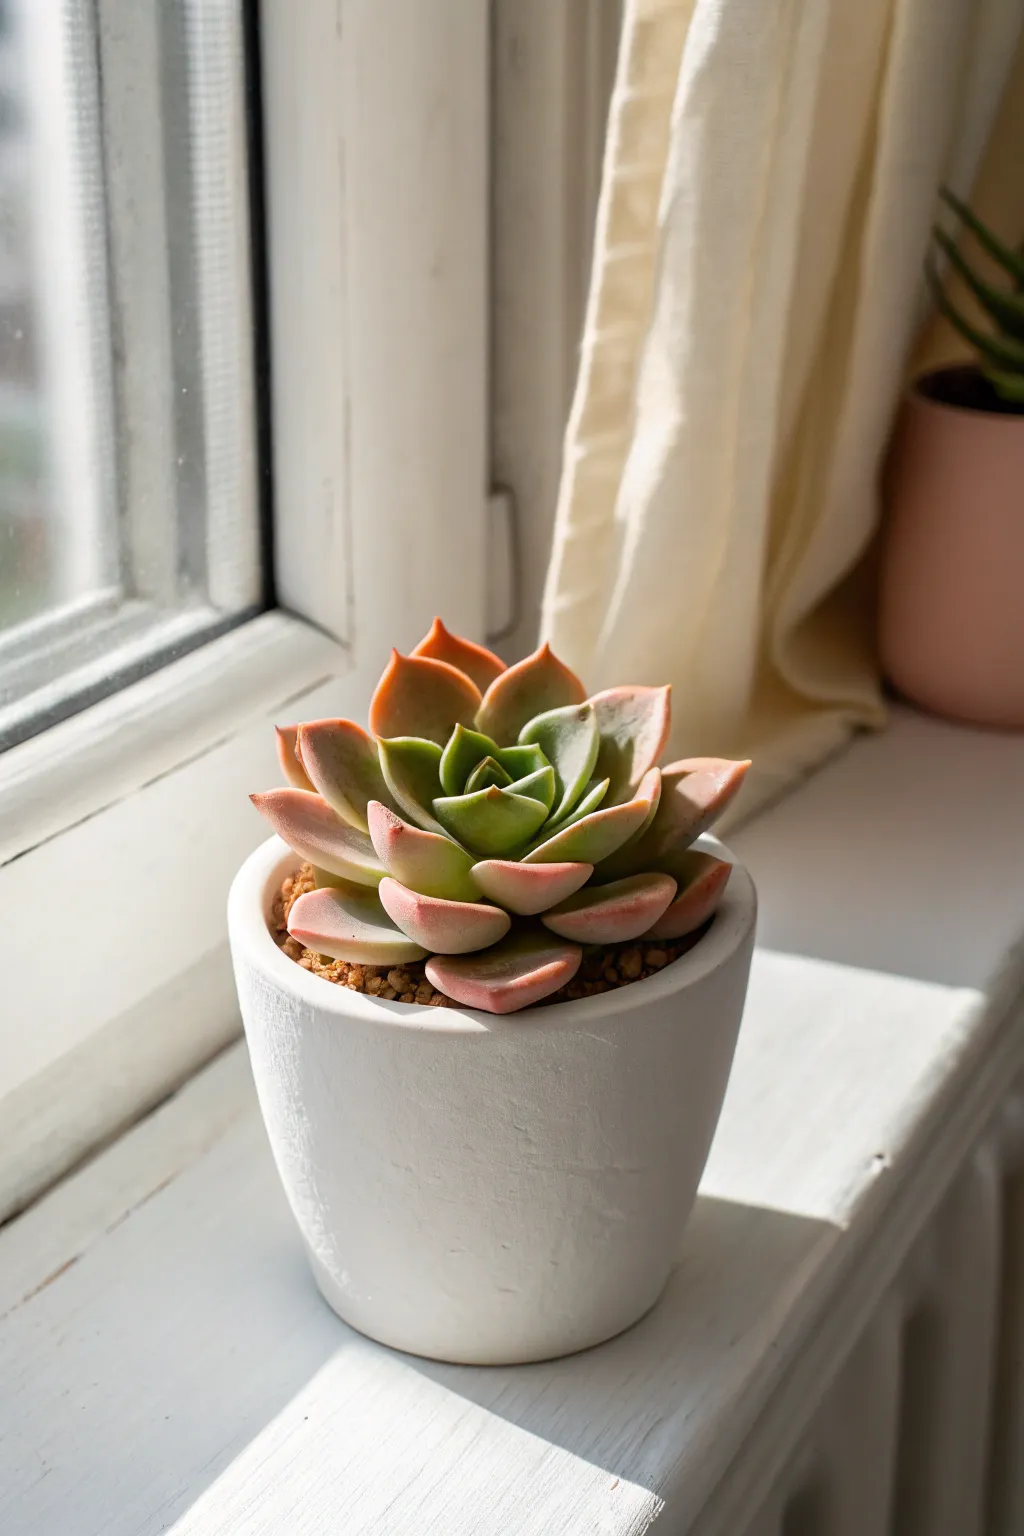
Transform a plain ceramic pot into a stunning trompe l’oeil sculpture that mimics the delicate gradient of a succulent. This intermediate polymer clay project uses careful layering and blending to create soft, fleshy ‘petals’ that wrap protectively around a central core.
Detailed Instructions
Materials
- White or transclucent polymer clay
- Olive green polymer clay
- Blush pink or coral polymer clay
- Small ceramic or terracotta pot (clean and dry)
- Acrylic rolling pin
- Clay blending machine (pasta machine) – optional but helpful
- Needle tool
- Ball stylus tool
- Soft pastel chalks in pink and rust
- Soft paintbrush for shading
- Liquid polymer clay (bake and bond)
- Oven thermometer
Step 1: Creating the Gradient Base
-
Prepare the Skinner blend:
Begin by conditioning your green and pink clays separately until soft and pliable. To achieve that seamless transition seen in the photo, create a ‘Skinner blend’ by forming triangles of green and pink, putting them together to form a rectangle, and running them through your pasta machine repeatedly until the colors merge into a smooth ombre gradient. -
Sheet the clay:
Roll your blended clay out to a medium thickness (about 2-3mm). You want the sheet to be substantial enough to hold the petal shape without flopping over. -
Cut the basic shapes:
Using a tear-drop cutter or a scalpel, cut out approximately 15-20 leaf shapes. I find it helpful to cut them in slightly graduating sizes—small for the center, larger for the outer ring.
Natural Imperfections
Real succulents aren’t perfect. Don’t stress if a leaf is slightly crooked or uneven; intentionally twisting one leaf slightly adds realism and character to the final piece.
Step 2: Shaping the Leaves
-
Thinning the edges:
Place a clay leaf in your palm. Using a ball stylus, gently roll around the very edge of the petal to thin it out slightly, giving it a more organic, delicate look compared to the thicker center. -
Pinching the tips:
Gently pinch the pink end of each leaf to create a distinct, sharp point. This mimics the characteristic tip of Echeveria succulents. -
Curving the body:
Press the center of the leaf into your thumb to create a concave, spoon-like curve. The leaf should cup inwards, not lie flat. -
Adding texture:
Leaves in nature aren’t perfectly smooth. You can lightly press a very fine texture sponge or sandpaper against the surface for a matte, realistic finish.
Step 3: Assembly
-
Prepare the core:
Create a small cone of scrap clay or aluminum foil to act as the center bud. Apply a thin layer of liquid polymer clay (Bake and Bond) to it. -
Attach the center rosette:
Take your three smallest petals. Arrange them tightly around the central cone so they overlap significantly, almost closing up at the top like a budding flower. -
Building the second tier:
Apply a dab of liquid clay to the base of the next set of medium petals. Place these in the gaps between the first layer’s petals, opening them up slightly more. -
Adding the outer ring:
Continue attaching the largest petals for the final outer row. These should angle outward more dramatically to create the open rosette shape. -
Securing to the pot:
If you are attaching this directly to a pot rim, apply a layer of liquid clay to the pot’s edge. Press the assembled succulent firmly onto the rim or into the pot if filled with a clay ‘soil’ base.
Dew Drop Details
After baking, add tiny drops of UV resin to a few leaves and cure with a UV lamp. This creates a permanent ‘freshly watered’ look that stays glossy forever.
Step 4: Finishing Touches
-
Enhancing the blush:
Before baking, use a soft brush to dust chipped pink or rust-colored pastel chalk onto the very tips and edges of the petals. This intensifies the ‘sun-stressed’ look of the succulent. -
Final smooth check:
Look over your piece for distinct fingerprints. Lightly brush with a huge of baby oil or clay softener to smooth them away without distorting the shape. -
Baking:
Bake the piece according to your clay manufacturer’s instructions (usually 275°F/130°C for 30 minutes per 1/4 inch of thickness). Support any drooping petals with crumpled tissue or cornstarch. -
Cooling and protecting:
Let the piece cool completely in the oven. Once cool, apply a matte varnish to the leaves to protect the pastel shading, or leave it raw for a natural matte texture.
Place your finished pot on a sunny windowsill where the light can catch the translucent edges of your everlasting plant
Geometric Incense Holders
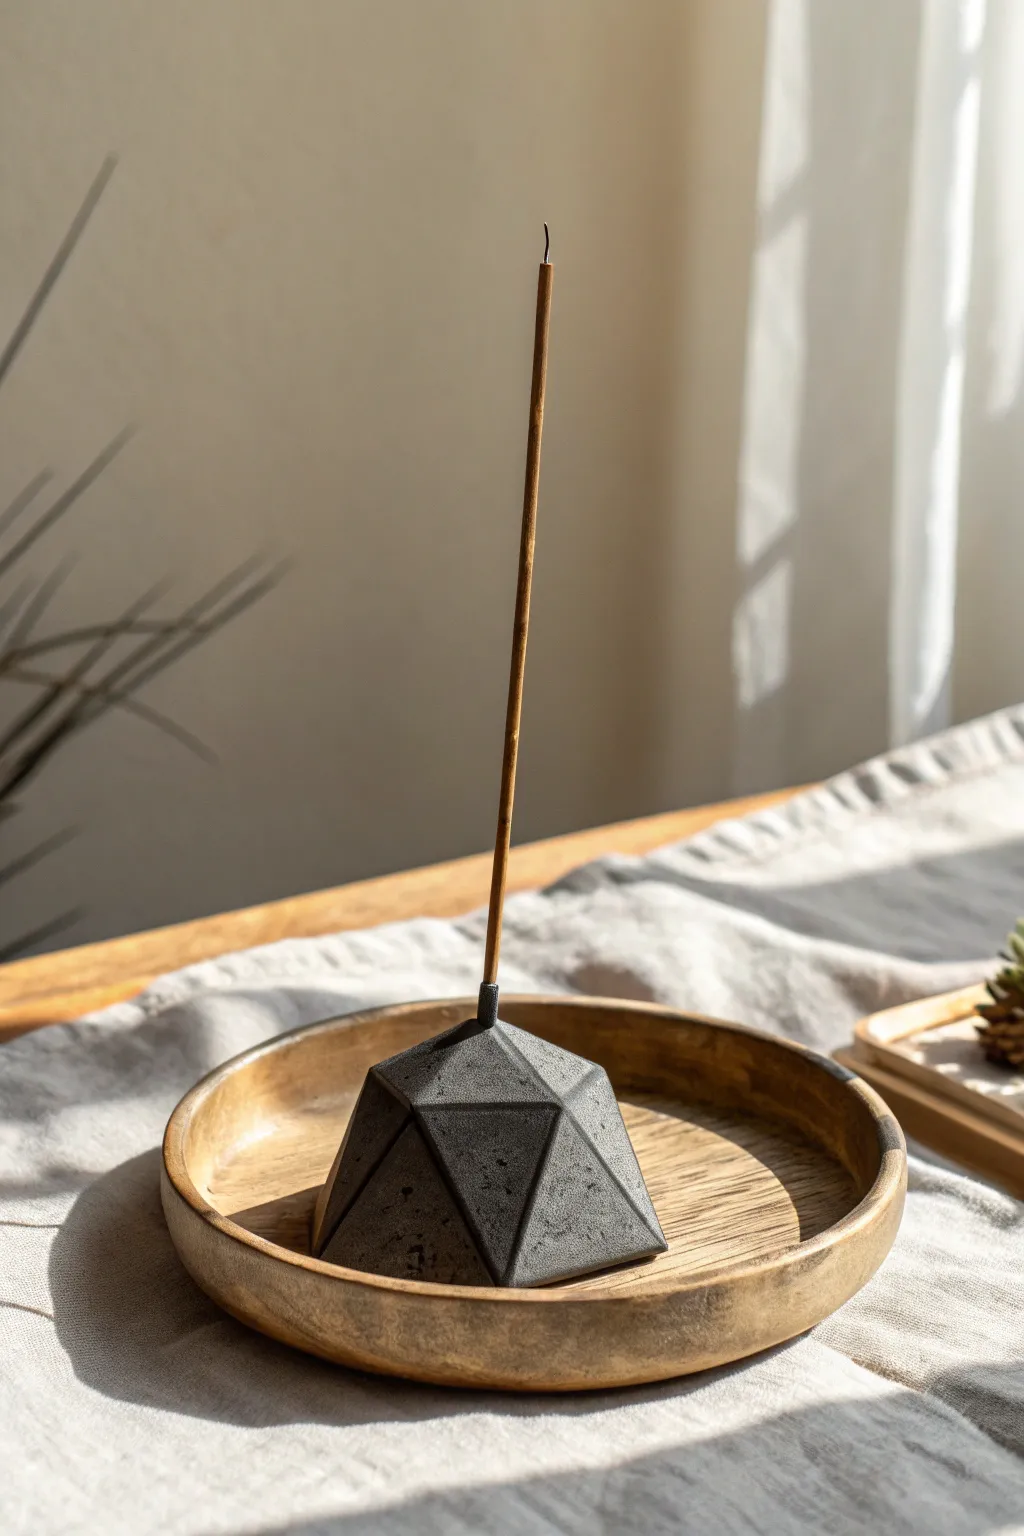
Embrace minimalism with this striking geometric incense holder that mimics the raw, industrial look of dark concrete or basalt. Its sharp, multi-faceted design catches the light beautifully, creating a modern centerpiece that is sturdy enough to hold incense sticks securely upright.
Step-by-Step Guide
Materials
- Black polymer clay
- Granite effect polymer clay (or white/translucent for mixing)
- Coarse black pepper or black embossing powder (for texture)
- Sharp rigid blade or tissue blade
- Incense stick (for sizing)
- Sandpaper (various grits from 400 to 1000)
- Acrylic roller or pasta machine
- Ruler
- Baking tile or parchment paper
- Soft brush
Step 1: Creating the Faux Stone Mix
-
Condition the clay:
Start by thoroughly conditioning a large block of black polymer clay until it is soft and pliable. You want a solid, dense base for this project, so aim for a ball roughly the size of a tangerine. -
Add texture elements:
To achieve that realistic stony grit seen in the photo, flatten your black clay and sprinkle in a small amount of granite-effect clay or embossing powder. If you don’t have specialty clay, cracked black pepper works surprisingly well for organic speckling. -
Marbling and blending:
Fold and roll the clay repeatedly. I like to stop just before the colors are completely uniform; leaving slight streaks adds to the natural stone aesthetic. -
Form the base shape:
Roll the mixed clay into a smooth, tight ball, ensuring there are no trapped air bubbles inside. Then, gently press it against your work surface to flatten the bottom, creating a thick, rounded dome or mound shape approximately 2 inches tall.
Clean Cuts Pro-Tip
Clean your blade with alcohol after every 2-3 slices. Clay residue on the knife causes drag marks and prevents that crisp, sharp glass-like cut essential for the geometric look.
Step 2: Sculpting the Geometric Form
-
Chill the clay:
Place your clay mound in the refrigerator for about 15–20 minutes. Firm clay is much easier to slice cleanly, which is crucial for getting those sharp, defined facets. -
The first cuts:
Using your sharp rigid blade, slice off a section of the dome at an angle. Make this cut decisive and straight. rotate the piece slightly and make another slice that intersects with the edge of the first one. -
Create the pyramid variation:
Continue slicing facets around the mound. Aim for irregular triangles and trapezoids rather than a perfect symmetry. The goal is a low-poly, gem-like appearance. Leave the top somewhat pointed or flat depending on your preference, but ensure the structure tapers upward. -
Refine the edges:
Once you have the general shape, look for any distorted edges caused by the blade dragging. Gently smooth these with your finger or slice a tiny sliver off to correct the plane. -
Create the holder mechanism:
This specific design features a small, cylindrical neck at the very top to hold the incense. Roll a small leftover piece of your stone mix into a cylinder about 1/4 inch high and attached it to the peak of your geometric shape. Blend the seam so it looks like one solid piece. -
Insert the incense hole:
Take an unlit incense stick and press it vertically into the center of the small cylinder neck. Push it down about half an inch into the main body to ensure stability. Give the stick a tiny wiggle to widen the hole slightly, as clay shrinks slightly when baked.
Hole too tight?
If your incense stick doesn’t fit after baking, use a small hand drill or a twist drill bit held in your fingers to gently widen the opening manually without cracking the neck.
Step 3: Refining and Finishing
-
Surface texturing:
To enhance the concrete look, gently tap a toothbrush or coarse sandpaper over the flat surfaces. This removes fingerprints and adds a matte, porous texture. -
Baking:
Bake the piece according to your clay manufacturer’s instructions. Since this is a thick block of clay, I recommend baking it for a slightly longer duration at the recommended temperature (often 45-60 minutes) to ensure the core cures completely. -
Cooling down:
Let the piece cool completely in the oven with the door cracked open. Sudden temperature changes can sometimes cause thick clay objects to crack. -
Sanding the facets:
Once cool, use wet/dry sandpaper on the flat facets. Place the sandpaper on a flat surface and rub the clay object against it to keep the planes perfectly flat. Start with 400 grit and move to 800 grit. -
Final wash:
Rinse off any sanding dust and dry the piece thoroughly. The water will reveal the beautiful speckling within your clay mix. -
Optional matte varnish:
If the sanding made the piece look too chalky, apply a very thin layer of matte polymer clay varnish to bring back the deep charcoal color without adding artificial shine.
Place your new holder in a wooden bowl or on a slate coaster to complete the modern, sculptural vibe
Textured Border Coasters
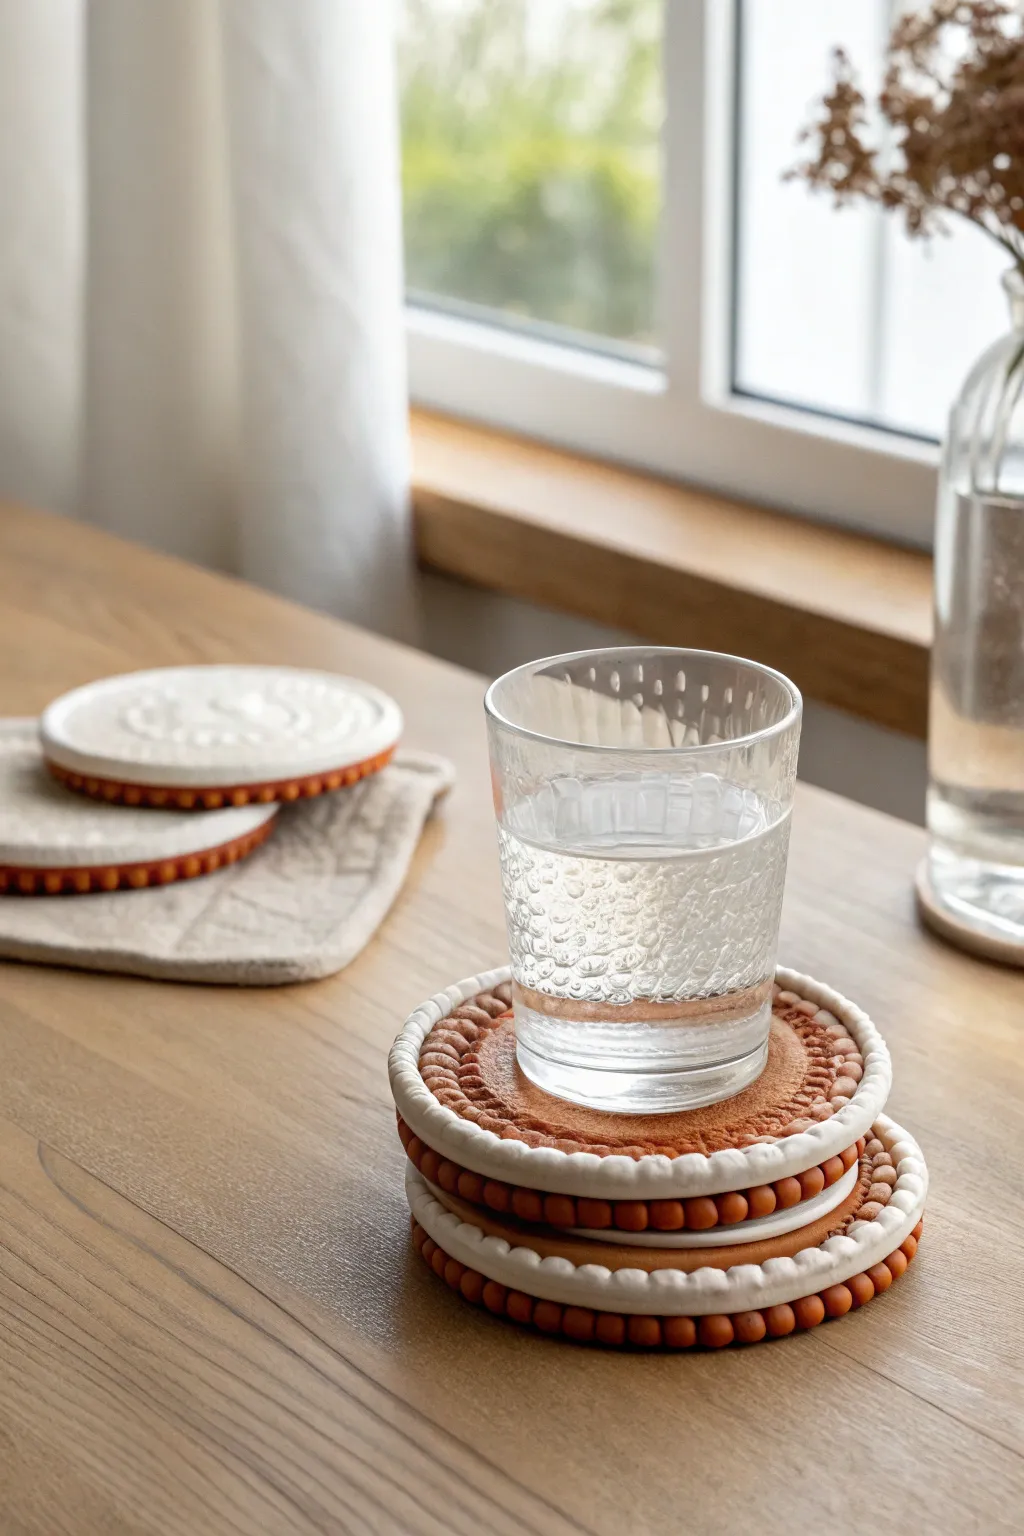
These charming coasters combine the rustic warmth of terracotta tones with crisp white clay in a unique sandwich-style design. The beaded edge adds a delightful tactile element while the textured surfaces keep your drinks secure and stylish.
How-To Guide
Materials
- White polymer clay (approx. 2 blocks)
- Terracotta or rust-colored polymer clay (approx. 1 block)
- Round cookie cutter (approx. 4 inches)
- Acrylic roller or pasta machine
- Texture sheet (fabric, canvas, or linen pattern)
- Liquid polymer clay (clear or white)
- Small round piping tip or tiny circle cutter (for uniform beads)
- Needle tool or toothpick
- Ceramic tile or baking sheet
- Parchment paper
- Medium grit sandpaper (optional)
Step 1: Creating the Bases
-
Condition the white clay:
Begin by conditioning your white polymer clay until it is soft and pliable. Ensure your hands and work surface are clean to avoid transferring lint to the white clay. -
Roll out the slab:
Roll the white clay out to a thickness of approximately 1/4 inch (6mm). This substantial thickness is necessary because we will be imprinting texture into it. -
Add texture:
Enhance the clay surface by pressing a linen or canvas texture sheet firmly into the slab. If you don’t have a texture sheet, gently rolling a piece of coarse fabric over the creative works just as well. -
Cut the circles:
Using your 4-inch round cutter, punch out two circles for each coaster you intend to make. These will form the top and bottom plates. -
Clean the edges:
Gently smooth the cut edges of your white circles with your finger to remove any sharp ridges created by the cutter.
Step 2: Forming the Beaded Core
-
Prepare the terracotta clay:
Condition the terracotta-colored clay. Roll it into a long, thin log or ‘snake’ about the thickness of a pencil. -
Section the clay:
Cut the log into small, equal-sized segments. I find using a small round cutter or piping tip to measure equal volumes helps keep the bead sizes consistent. -
Roll the beads:
Roll each small segment between your palms to create perfect little spheres. You will need roughly 40-50 beads per coaster, depending on their size. -
Texture the core base:
Roll out a separate, thinner sheet of terracotta clay and cut a circle slightly smaller than your white circles (about 3.5 inches). This will be the hidden structural center. -
Apply adhesive:
Smear a thin layer of liquid polymer clay around the outer edge of this smaller terracotta circle to act as glue. -
Place the beads:
Arrange the terracotta spheres side-by-side along the glued perimeter of the inner circle. Ensure they are touching each other and sticking slightly off the edge.
Uneven Seams?
If the gap between the white layers looks uneven, don’t squish it. Instead, adhere an extra thin ‘snake’ of clay inside the gap behind the beads to prop up the white layers evenly.
Step 3: Assembly and Baking
-
Prepare for stacking:
Apply a small amount of liquid polymer clay to the top and bottom surfaces of your beaded terracotta center piece. -
Sandwich the layers:
Carefully place one textured white circle on top of the beaded ring and one on the bottom. Press gently so the white layers bond with the hidden inner terracotta disc. -
Secure the beads:
The white circles should just slightly lip over the beads, creating that trapped, sandwich look. Gently press the rim of the white clay down to ensure it contacts the tops of the beads. -
Add top detail (optional):
For the additional white beaded rim shown in some variations, roll tiny white spheres and press them into the top edge of the upper white circle using the needle tool to indent slightly. -
Final inspection:
Check the roundness of your coaster. If the pressure warped it, gently nudge it back into a perfect circle with your palms. -
Bake:
Place the coasters on a ceramic tile lined with parchment paper. Bake according to your brand’s instructions, usually at 275°F (130°C) for 45-60 minutes. -
Cool and finish:
Allow the coasters to cool completely in the oven to prevent cracking. Once cool, lightly sand the bottom if needed to ensure it sits perfectly flat on your table.
Pro Tip: Bead Sizing
Use a bead roller tool if you have one. It speeds up the process immensely and ensures every single terracota sphere is identical, giving the edge a professional, uniform finish.
Stack your finished coasters on the coffee table to show off that satisfying layered texture
Rainbow-Edged Mirror Frame
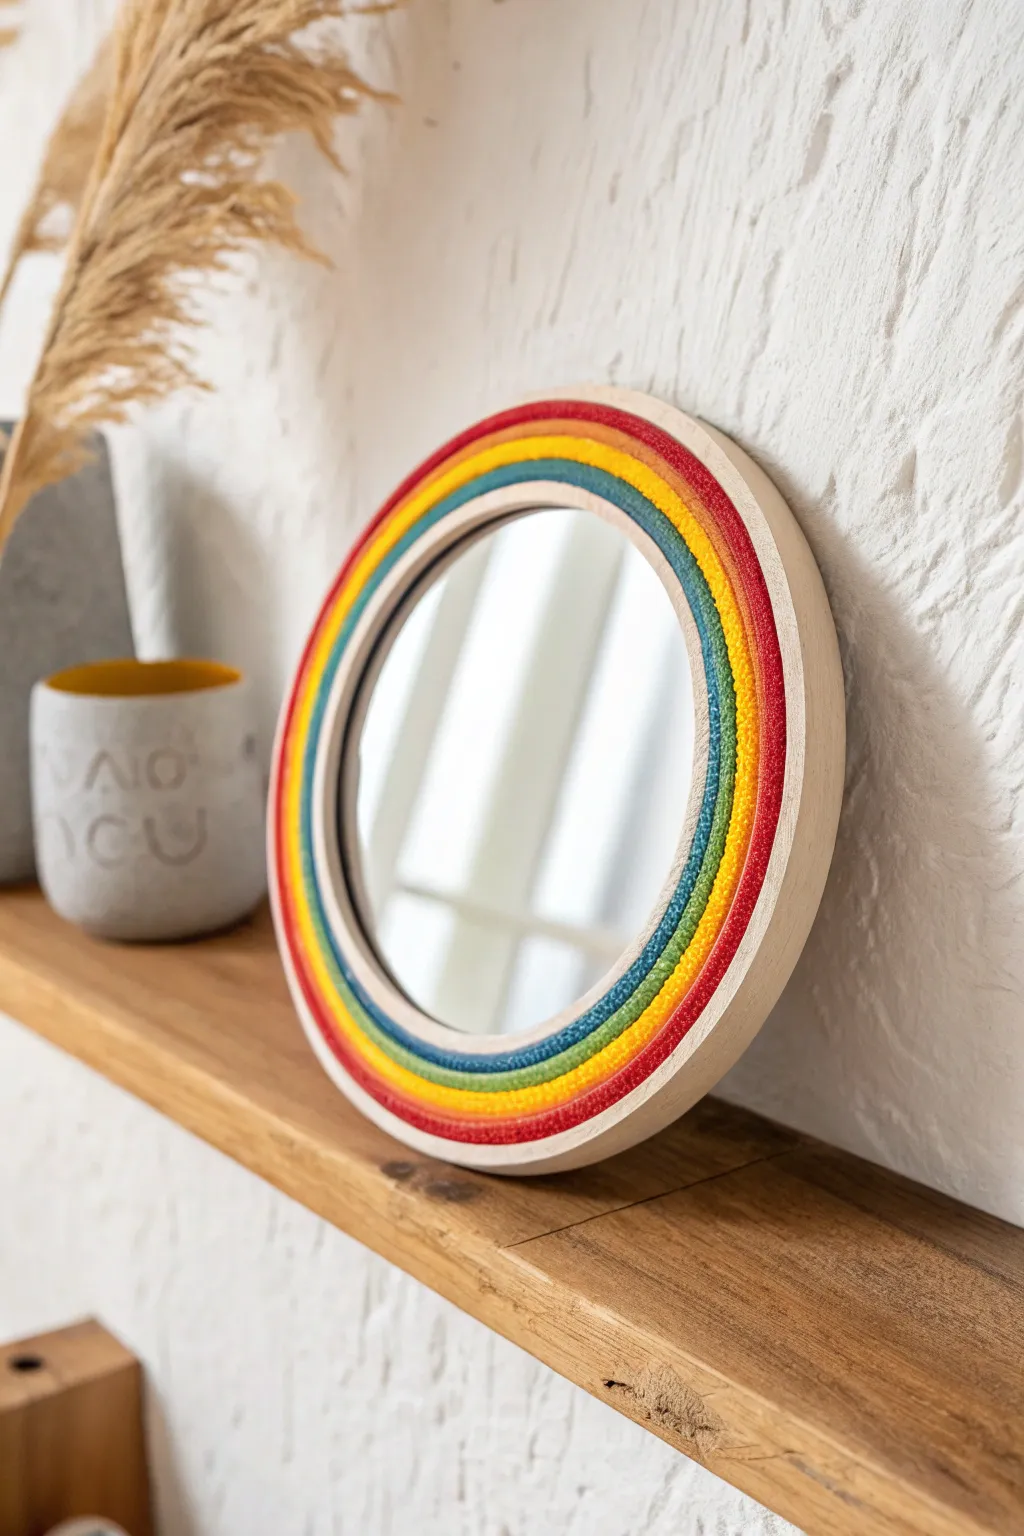
Brighten up any corner with this cheerful, texture-rich mirror frame that uses simple polymer clay coils to create a vibrant statement piece. The finished look combines the natural warmth of light wood with a distinct, tactile rainbow stripe that feels both playful and modern.
Detailed Instructions
Materials
- Round wooden mirror frame (with a recessed channel for inlay)
- Polymer clay in Red, Yellow, Green, and Blue
- Clean rolling surface or ceramic tile
- Clay extruder (optional but helpful)
- Acrylic roller
- Liquid polymer clay (such as Bake & Bond)
- Needle tool or small ball stylus
- Craft knife
- Ruler
- Oven for baking
Step 1: Preparation
-
Prepare the Mirror Frame:
If your wooden frame has a backing, remove the glass or mirror insert before starting. If the mirror is glued in, mask it carefully with painter’s tape to protect it from stray clay or tools. -
Condition the Clay:
Start by conditioning your red, yellow, green, and blue polymer clay separately. Knead each color until it is soft, pliable, and free of cracks. -
Plan the Arrangement:
Measure the width of the channel in your wooden frame. Divide this width by four to determine how thick each colored stripe needs to be to fit perfectly inside the groove.
Step 2: Creating the Coils
-
Roll Snakes:
Roll out long snakes of each clay color. Aim for an even thickness. -
Refine the Size:
For the most precise results, I prefer using a clay extruder with a small circular disc. This ensures every coil is identical in diameter. -
Check Length:
Ensure each coil is long enough to wrap around the entire circumference of the mirror frame with a little overlap to spare. You may need to join two lengths together for larger frames. -
Flatten Slightly:
Gently press down on your coils with the acrylic roller just enough to create a slightly flat bottom surface, which will help them sit flush against the wood.
Seamless Circles
Cut your coil ends at a diagonal angle rather than straight down. Overlap the angled cuts and smooth them together for a join that completely disappears.
Step 3: Assembly
-
Apply Adhesive:
Apply a thin, even layer of liquid polymer clay (Bake & Bond) into the recessed channel of the wooden frame. This acts as the glue that will bond the raw clay to the wood during baking. -
Place the Outer Ring:
Starting with the red clay, press the coil firmly against the outermost edge of the channel. Work your way around the circle, ensuring there are no gaps between the clay and the wood wall. -
Seam the Join:
When the ends meet, cut them at a 45-degree angle with your craft knife and smooth the seam together so it becomes invisible. -
Add the Yellow Ring:
Place the yellow coil directly next to the red one. Gently push it snug against the red ring so they fuse slightly. -
Continue the Gradient:
Repeat the process with the green coil, followed by the blue coil on the innermost edge. The fit should be tight; if there’s a gap, gently stretch the clay to fill the space.
Ombré Effect
Instead of solid primary colors, mix your clays to create intermediate shades (like yellow-green or red-orange) for a smoother, 6-stripe gradient transition.
Step 4: Texturing and Finishing
-
Create Texture:
Using a needle tool or a small ball stylus, stipple the surface of the clay. Press the tool repeatedly into the clay to create a pitted, dot-like texture that mimics fabric or beadwork. -
Refine the Edges:
As you texture, be careful near the color transitions. Try to blur the lines slightly with your texture tool to make the rings feel like a unified piece. -
Clean Up:
Check the wooden rim for any stray fingerprints or liquid clay residue and wipe it away with a baby wipe or a little rubbing alcohol. -
Bake:
Bake the entire frame (wood and clay together) in your dedicated oven according to the clay manufacturer’s temperature instructions. Usually, 275°F (135°C) for 30 minutes is standard. -
Cool Down:
Let the frame cool completely in the oven with the door slightly ajar to prevent the wood from warping due to sudden temperature changes. -
Final Assembly:
Once cool, remove any masking tape and reinsert the mirror glass if you removed it earlier.
This vibrant mirror adds a wonderful pop of handcrafted color to your wall and is sure to make checking your reflection a little more joyful
Scrap-Mix Clay Pens
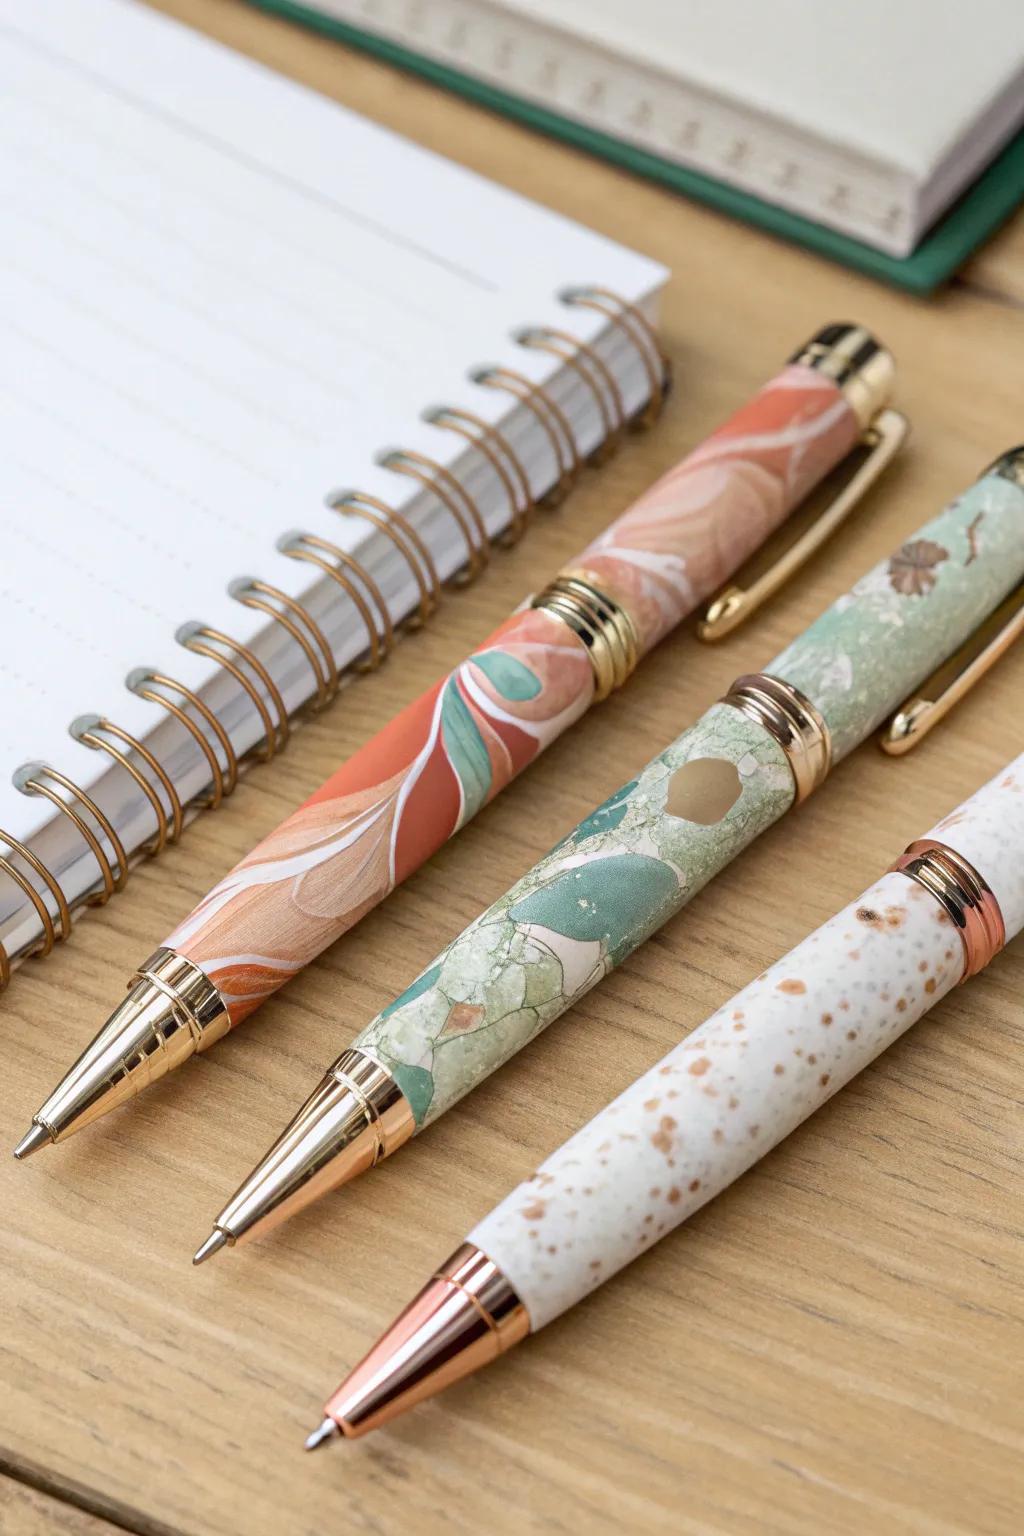
Transform ordinary ballpoint pens into elegant desk accessories using leftovers from previous projects. These three distinct designs—swirled marble, terrazzo collage, and granite speckle—give new life to clay scraps while creating a sophisticated, custom stationery set.
How-To Guide
Materials
- Refillable metal pen kits (or disassembled metal-barrel ballpoint pens)
- Polymer clay scraps (coral, teal, white, translucent, metallic gold/copper)
- Acrylic rolling pin or pasta machine
- Tissue blade or craft knife
- Sandpaper (various grits: 400, 600, 800, 1000)
- Buffing wheel or denim cloth
- Oven
- Ceramic tile or baking sheet
- Liquid polymer clay (optional, for adhesion)
Step 1: Preparation
-
Disassemble the hardware:
Begin by taking apart your metal pen kits. You need only the central metal tubes for the clay application. Set the tips, clips, and twisting mechanisms aside safely in a small bowl so tiny parts don’t roll away. -
Prime the barrel:
Lightly sand the surface of the metal tubes to create texture. This mechanical grip helps the clay stick. For extra security, I like to apply a very thin layer of liquid polymer clay to the metal tube.
Clean Trim Tip
Before baking, roll the pen tube gently against the sharp edge of your blade on the table. This trims the excess clay from the very ends perfectly flush with the metal tube.
Step 2: Design 1: The Swirled Marble
-
Mix colors:
Gather scraps of coral, peach, white, and a touch of teal clay. Condition them until soft, then roll each color into a thin snake. -
Twist and fold:
Gather the snakes into a bundle, twist them together, fold the bundle in half, and twist again. Don’t overmix, or the colors will turn muddy; stop while the distinct lines are still visible. -
Flatten the sheet:
Roll your twisted log into a flat sheet about 2mm thick. You should see beautiful, organic swirls of color. -
Wrap the barrel:
Cut a rectangle from the sheet sized to wrap perfectly around one metal tube. Carefully wrap the clay around the tube, pressing the seam edges together. Gently roll the pen on your work surface to smooth the seam until it disappears.
Level Up: UV Resin
For a glass-like commercial finish that protects the clay from ink stains, coat the baked barrels in a thin layer of UV resin and cure under a UV lamp for 2-3 minutes.
Step 3: Design 2: The Green Terrazzo
-
Prepare the base:
Roll a sheet of translucent or pale green clay as your background layer. It needs to be thin enough to not add too much bulk once the chips are added. -
Create the chips:
Take cured or raw scraps of dark green, mint, white, and beige clay. Chop them irregularly with your blade into geometric shards and angular confetti pieces. -
Embed the pattern:
Scatter the clay chips onto your base sheet. Include a few flakes of gold leaf or metallic clay for shine. Use your acrylic roller to press these chips firmly into the base until the surface is flat again. -
Apply to tube:
Cut the terrazzo sheet to size and wrap the second tube, smoothing the seam meticulously. Ensure the walls are even so the hardware will fit back on later.
Step 4: Design 3: The Granite Speckle
-
Create the granite mix:
Finely chop white clay mixed with a substantial amount of translucent clay. Add grated specks of metallic copper or gold clay, and perhaps tiny flecks of black or brown for depth. -
Consolidate the clay:
Squish the chopped pile together to form a solid lump, then roll it out. The random distribution of metallic bits will mimic natural stone or granite. -
Wrap the final pen:
Wrap this third sheet around the final metal tube. Trim the ends flush with the metal tube openings using your blade so no clay obstructs the assembly points.
Step 5: Finishing Touches
-
Bake carefully:
Place all three covered tubes on a ceramic tile. Bake according to your clay brand’s instructions (usually around 275°F/130°C) for 30 minutes. Let them cool completely before handling. -
Sand for smoothness:
Wet sand each barrel under running water, starting with 400 grit and working up to 1000 grit. This removes fingerprints and reveals the depth of the terrazzo and granite patterns. -
Buff to shine:
Rub the pens vigorously with a piece of denim or use a buffing wheel on a rotary tool to create a soft, satin sheen or high gloss. -
Reassemble:
Press the metal tips, clips, and end caps back into the tubes. If the clay is slightly too thick at the ends, shave a tiny angled rim off the inside clay edge with a craft knife to accommodate the hardware.
Enjoy using your custom pen set or box them up as a thoughtful handmade gift
Knot-Style Paperweights
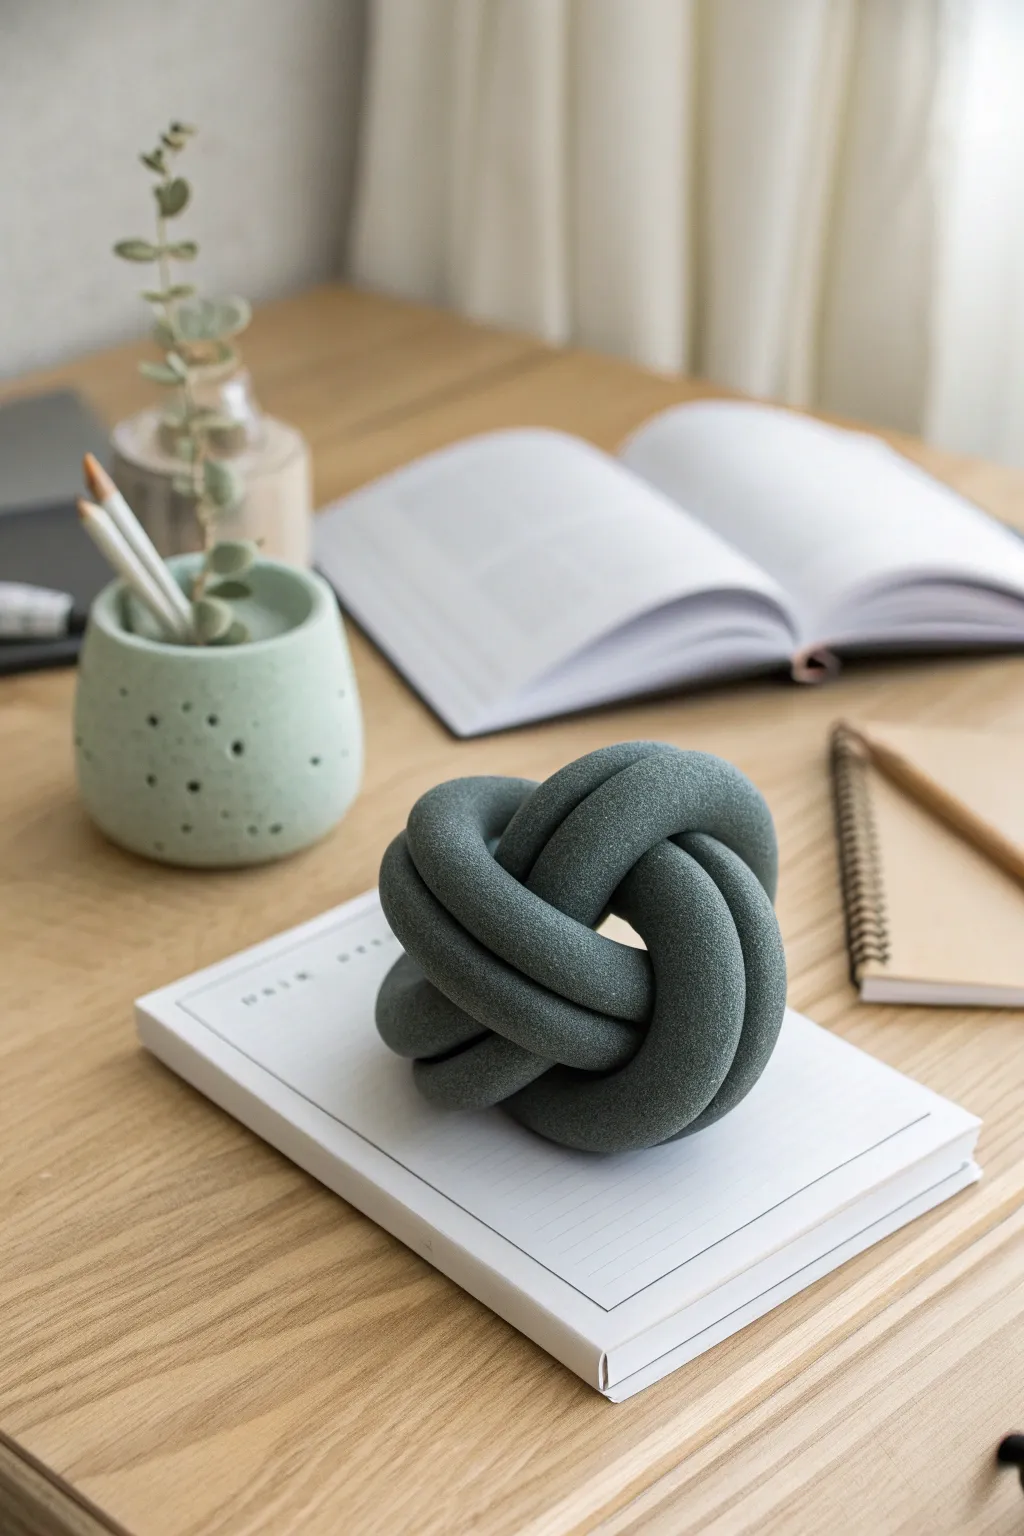
Elevate your desk decor with this sophisticated knot-style paperweight that mimics the look of honed stone. Using polymer clay and a clever texturing technique, this project creates a substantial, sculptural piece that looks high-end but is surprisingly simple to construct.
Step-by-Step
Materials
- Polymer clay (granite, slate, or dark teal color)
- Fimo Leather-Effect or similar textured clay (optional, for texture)
- Acrylic roller or pasta machine
- Clean work surface (glass or tile)
- Blade or craft knife
- Sandpaper (coarse grit like 80 or 100)
- Old toothbrush or stiff bristle brush
- Aluminum foil (for core)
- Oven thermometer
- Matte varnish (optional)
Step 1: Preparation and Conditioning
-
Mix Your Color:
Begin by conditioning your polymer clay. To achieve the deep, muted teal-grey shade seen in the photo, try mixing a slate grey clay with a touch of emerald green and a tiny bit of black. Knead until the color is completely uniform. -
Roll Snakes:
Roll your conditioned clay into two long, thick snakes. These should be roughly 3/4 inch in diameter and about 10-12 inches long. Ensure they are even in thickness from end to end. -
Apply Initial Texture:
Before knotting, we want to create that stone-like surface. Gently roll the snakes over a piece of coarse sandpaper. This imitates the porous nature of porous stone. -
Stipple the Surface:
Take your old toothbrush and firmly tap the bristles all over the surface of the clay snakes. I like to do this quite aggressively to ensure the texture creates deep enough pits that won’t smooth out during bending.
Stone Effect Secret
Mix a small amount of translucent clay into your color block. It adds visual depth and makes the faux stone look less like opaque plastic and more like organic material.
Step 2: Forming the Knot
-
Create the First Loop:
Take one clay snake and form a simple ‘U’ shape on your work surface. Cross the right end over the left to create a basic loop. -
Weave the Second Snake:
Take the second snake and lay it horizontally underneath the loop you just made. Thread its ends up and through the existing loop, following an ‘over-under’ pattern. -
Tighten the Shape:
Slowly and gently push the coils together to tighten the knot. You want it to look spherical and dense, similar to a monkey’s fist knot, but slightly looser so the individual tubes are visible. -
Hide the Ends:
Trim the ends of your snakes at an angle. Tuck these cut ends underneath the curves of the knot so they are hidden from view and the sculpture appears continuous. -
Refine the Shape:
Cup the knot in your hands and gently round it out. Check from all angles to ensure it sits flat on one side (the bottom) so it won’t roll away when used as a paperweight.
Sagging clay?
If the clay is too soft and the tubes flatten, put the clay in the fridge for 20 mins before knotting, or build the knot around a crumpled ball of aluminum foil.
Step 3: Finishing Touches
-
Re-texture:
Handling the clay likely smoothed out some of your texture. Go back in with the toothbrush, paying special attention to the outer curves where the light catches the surface. -
Bake the Piece:
Place your knot on a ceramic tile or a baking sheet lined with plain paper. Bake according to your clay manufacturer’s instructions—usually 275°F (130°C) for 30-45 minutes given the thickness. -
Cool Down:
Let the piece cool completely in the oven with the door slightly ajar. Sudden temperature changes can sometimes cause cracks in thick clay pieces. -
Enhance the Stone Look:
Once cool, you can lightly sand the very tops of the curves with fine-grit sandpaper. This creates a slightly lighter color on the high points, mimicking worn stone. -
Seal (Optional):
If you want to protect the surface, apply a very thin layer of matte varnish. Avoid glossy finishes, as they will ruin the realistic stone effect.
Place your new creation on a stack of journals or papers to instantly add a touch of modern gallery style to your workspace
Perpetual Desk Calendar Cubes
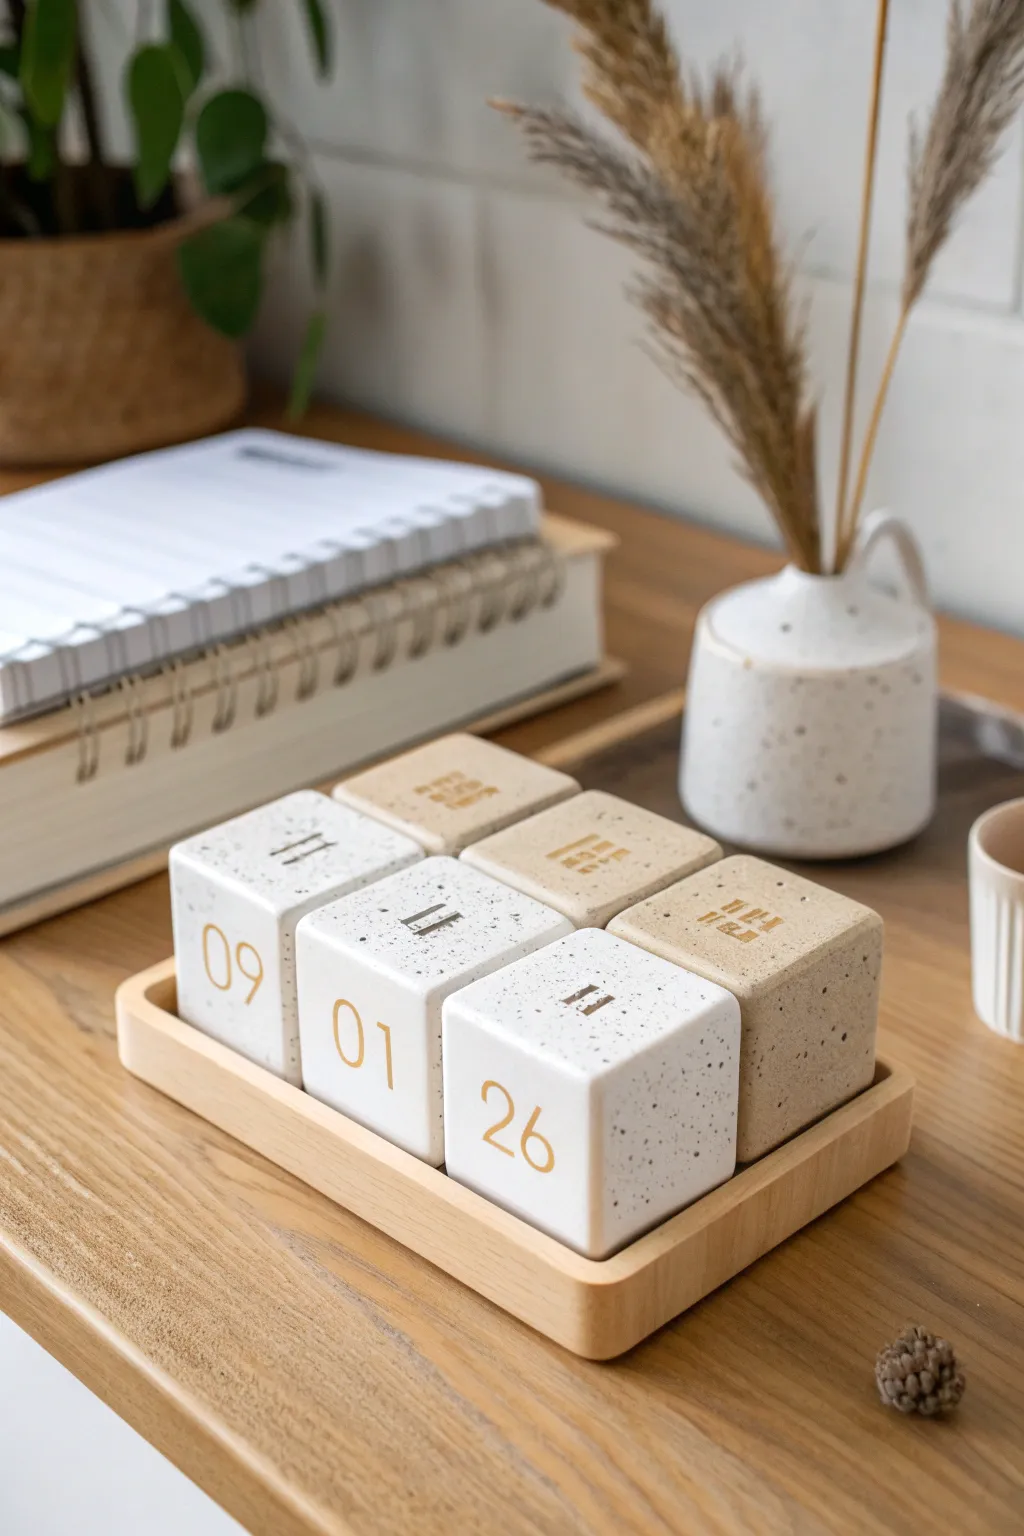
Bring a touch of modern elegance to your desk with this minimalist perpetual calendar. Crafted from polymer clay with a faux granite effect, these substantial cubes feature gold-inlaid numbers for a timeless, sophisticated look.
Step-by-Step Tutorial
Materials
- White or translucent white polymer clay (approx. 4-5 blocks)
- Beige or sand-colored polymer clay (approx. 4-5 blocks)
- Black pepper or finely ground dried coffee grounds (for speckles)
- Square clay cutters or a sharp tissue blade
- Ruler
- Gold acrylic paint
- Fine detail paintbrush
- Small letter/number stamp set (optional)
- Needle tool or toothpick
- Sandpaper (various grits from 400 to 1200)
- Matte varnish or sealant
- Rolling pin or pasta machine
- Wooden tray (sized to fit 6 cubes) – can be bought or made separately
Step 1: Preparing the Faux Stone Clay
-
Condition the white clay:
Begin by thoroughly kneading your white polymer clay until it is soft and pliable. This is the base for your front-row day cubes. -
Create the speckled effect:
Flatten the white clay and sprinkle a generous pinch of ground black pepper or dried coffee grounds over it. Fold the clay over and run it through your pasta machine or roll it out repeatedly until the specks are evenly distributed throughout the block. -
Condition the beige clay:
Repeat the conditioning and speckling process with the beige or sand-colored clay, which will form the back row of month cubes. Aim for a similar density of speckles to keep the set cohesive.
Step 2: Forming the Cubes
-
Measure your tray:
Before cutting, measure the interior width of your wooden tray. Divide this measurement by three to determine the exact size each cube needs to be to fit snugly side-by-side. -
Shape the clay log:
Form your speckled white clay into a thick, square log. I like to use two acrylic blocks or flat rulers on either side of the clay to press it into a perfect square shape rather than just relying on my hands. -
Cut the cubes:
Using a very sharp tissue blade, slice the square log into individual cubes based on your measurements. You will need three white cubes for the dates: 01-31. -
Refine the edges:
Gently tap each side of the cubes on your work surface to ensure they are perfectly flat. Smooth away any fingerprints with a light touch of baby oil on your finger. -
Repeat for beige cubes:
Follow the same shaping and cutting steps for the beige clay to create three Month cubes for the back row.
Clean Cuts Pro Tip
Chill your clay log in the fridge for 20 minutes before slicing. Firm clay resists squishing, giving you much sharper 90-degree corners for your cubes.
Step 3: Stamping and Baking
-
Plan your numbering:
For the date cubes, you need to stamp numbers strategically. One cube usually holds 0, 1, 2, 3, 4, 5. The second holds 0, 1, 2, 6, 7, 8 (where 6 doubles as 9). The third can be decorative or hold remaining numbers depending on your system, or simply display just the day like in the image. -
Impress the numbers:
Press your number stamps firmly into the center of the cube faces. If you don’t have stamps, use a needle tool to carefully carve the numbers deep enough to hold paint later. The image shows large numbers on the front face and smaller decorative lines on top. -
Add top detailing:
On the top face of each cube, impress small parallel lines or hash marks as seen in the photo to add texture and visual interest. -
Bake the batch:
Arrange your cubes on a dedicated baking tile or sheet pan. Tent them with foil to prevent scorching or yellowing. Bake according to your clay manufacturer’s instructions, typically at 275°F (130°C) for 45-60 minutes since these are thick pieces. -
Cool completely:
Allow the cubes to cool fully inside the oven if possible. This annealing process makes the clay stronger and less brittle.
Uneven Sides?
If your cubes aren’t perfectly square after baking, use a heavy-grit nail file or sandpaper on a flat surface to grind down the uneven side until it sits flat.
Step 4: Finishing Touches
-
Sand for smoothness:
Once cool, wet sand the cubes under running water, starting with 400 grit and working up to 1200 grit. This removes fingerprints and gives the surface a professional, stone-like feel. -
Paint the inlay:
Paint gold acrylic paint into the impressed numbers and top lines. Don’t worry about being messy; ensure the paint gets into every crevice. -
Wipe excess paint:
Before the paint fully dries, wipe the surface of the cube with a slightly damp paper towel. The paint will stay in the recessed numbers but wipe clean from the flat surface. -
Varnish (optional):
For durability, apply a very thin coat of matte varnish. This protects the gold paint and enhances the ‘stone’ look without making it look plastic and shiny. -
Assemble:
Place your finished cubes into the wooden tray, arranging them to show today’s date.
Now you have a stylish, handmade calendar that will last for years to come
Plush-Style Mini Critter Figurines
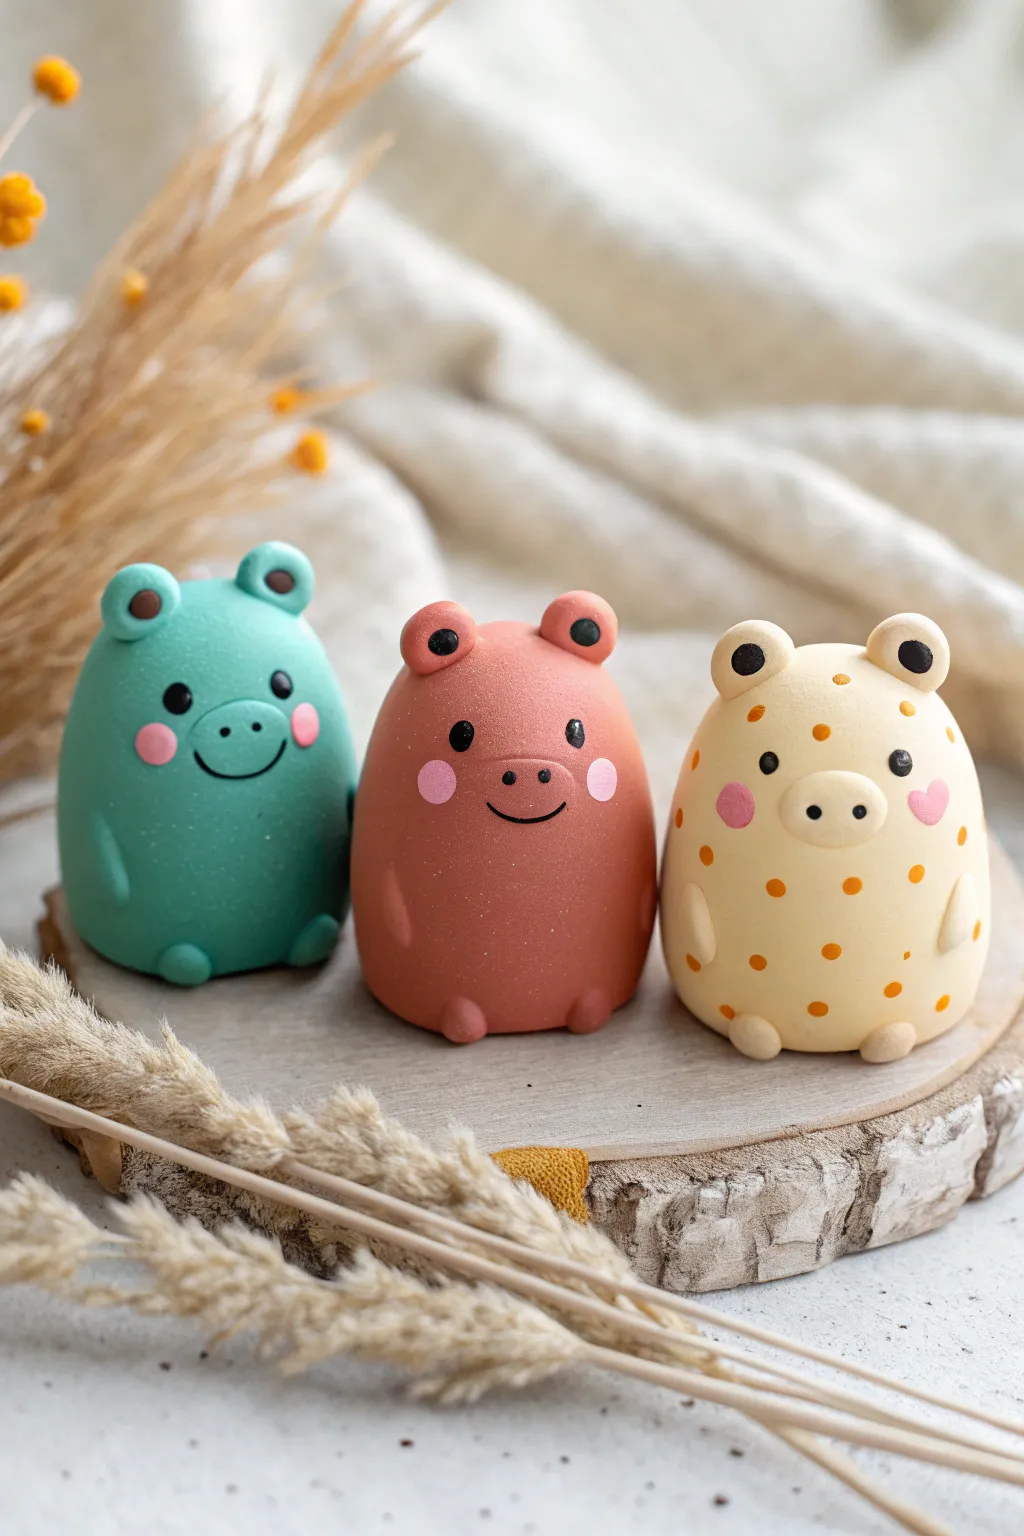
These utterly adorable figurines capture the soft, huggable aesthetic of plush toys in durable polymer clay form. With their matte finish, simple geometric shapes, and sweet pastel color palette, this trio makes for charming desk companions or a heartfelt handmade gift.
Detailed Instructions
Materials
- Polymer clay (teal, coral pink, cream/pale yellow, black, bright pink)
- Acrylic roller
- Small ball tool
- Needle tool or toothpick
- Baking sheet and parchment paper
- Oven
- Matte varnish (optional)
- Fine detail paintbrush (optional for painted spots)
- Orange acrylic paint (if painting spots)
Step 1: Shaping the Bodies
-
Condition the clay:
Start by thoroughly kneading your teal, coral pink, and cream clays separately until they are soft and pliable. This prevents cracks during baking. -
Form the base shapes:
Roll each color into a smooth ball about the size of a golf ball. Then, gently roll them into slightly elongated, sturdy egg shapes with a flattened bottom so they stand independently. -
Create the snouts:
For the teal and coral figures, flatten a very small ball of matching clay into an oval and press it onto the center of the face area. For the cream figure, use a tiny ball of the cream clay. -
Add nostrils:
Using a needle tool or small ball tool, gently poke two shallow indents into each snout to create the nostrils.
Clean Clay Pro-Tip
Keep baby wipes or hand sanitizer nearby. Clean your hands thoroughly when switching from dark clay (like black) to light clay (like cream) to avoid smudging colors.
Step 2: Adding Ears and Limbs
-
Make the ears:
Create two small balls for each animal. For the teal and cream figures, flatten them slightly and indent the center with a ball tool. For the coral figure, keep them slightly rounder. -
Attach the ears:
Press the ears firmly onto the top sides of the head. I like to blend the clay slightly at the connection point with a silicone tool to ensure they don’t pop off later. -
Detail the inner ears:
Roll tiny balls of dark brown or black clay and press them into the indented centers of the ears for contrast. -
Form the arms:
Roll tiny logs of the main body color clay. Attach them vertically to the sides of the body, curving them slightly inward as if the animal is resting its arms. -
Add the feet:
Create two small, flattened semi-circles for feet and attach them to the very bottom front of the figurine.
Fixing Fingerprints
Before baking, lightly brush your figurines with a little baby oil or cornstarch. This smooths out accidental fingerprints and gives the surface a professional finish.
Step 3: Facial Features and Details
-
Create the eyes:
Roll extremely small balls of black clay. Press these onto the face, spacing them widely apart above the snout for that cute ‘kawaii’ look. -
Add rosy cheeks:
Flatten tiny circles of bright pink clay and press them onto the cheeks, just below the outer corners of the eyes. -
Draw the smiles:
Roll a microscopically thin snake of black clay and curve it into a smile shape. Press this gently under the snout. Alternatively, you can paint this after baking. -
Pattern the cream figure:
For the spotted friend on the right, you can either press small flat dots of orange clay all over the body now, or paint them on later.
Step 4: Baking and Finishing
-
Bake the batch:
Place your trio on parchment paper and bake according to your clay manufacturer’s instructions, usually around 275°F (130°C) for 15-30 minutes depending on thickness. -
Cool down:
Let the figurines cool completely in the oven with the door cracked open to prevent thermal shock cracks. -
Paint details (optional):
If you didn’t maximize the clay for patterning, paint small orange polka dots on the cream figure using a fine brush and acrylic paint. -
Final coat:
To mimic the matte look of the photo, leave the clay natural or apply a strictly matte varnish. Avoid glossy glaze, as it ruins the ‘plush’ effect.
Enjoy your customized collection of adorable desk buddies
Curvy Mini House Sculptures
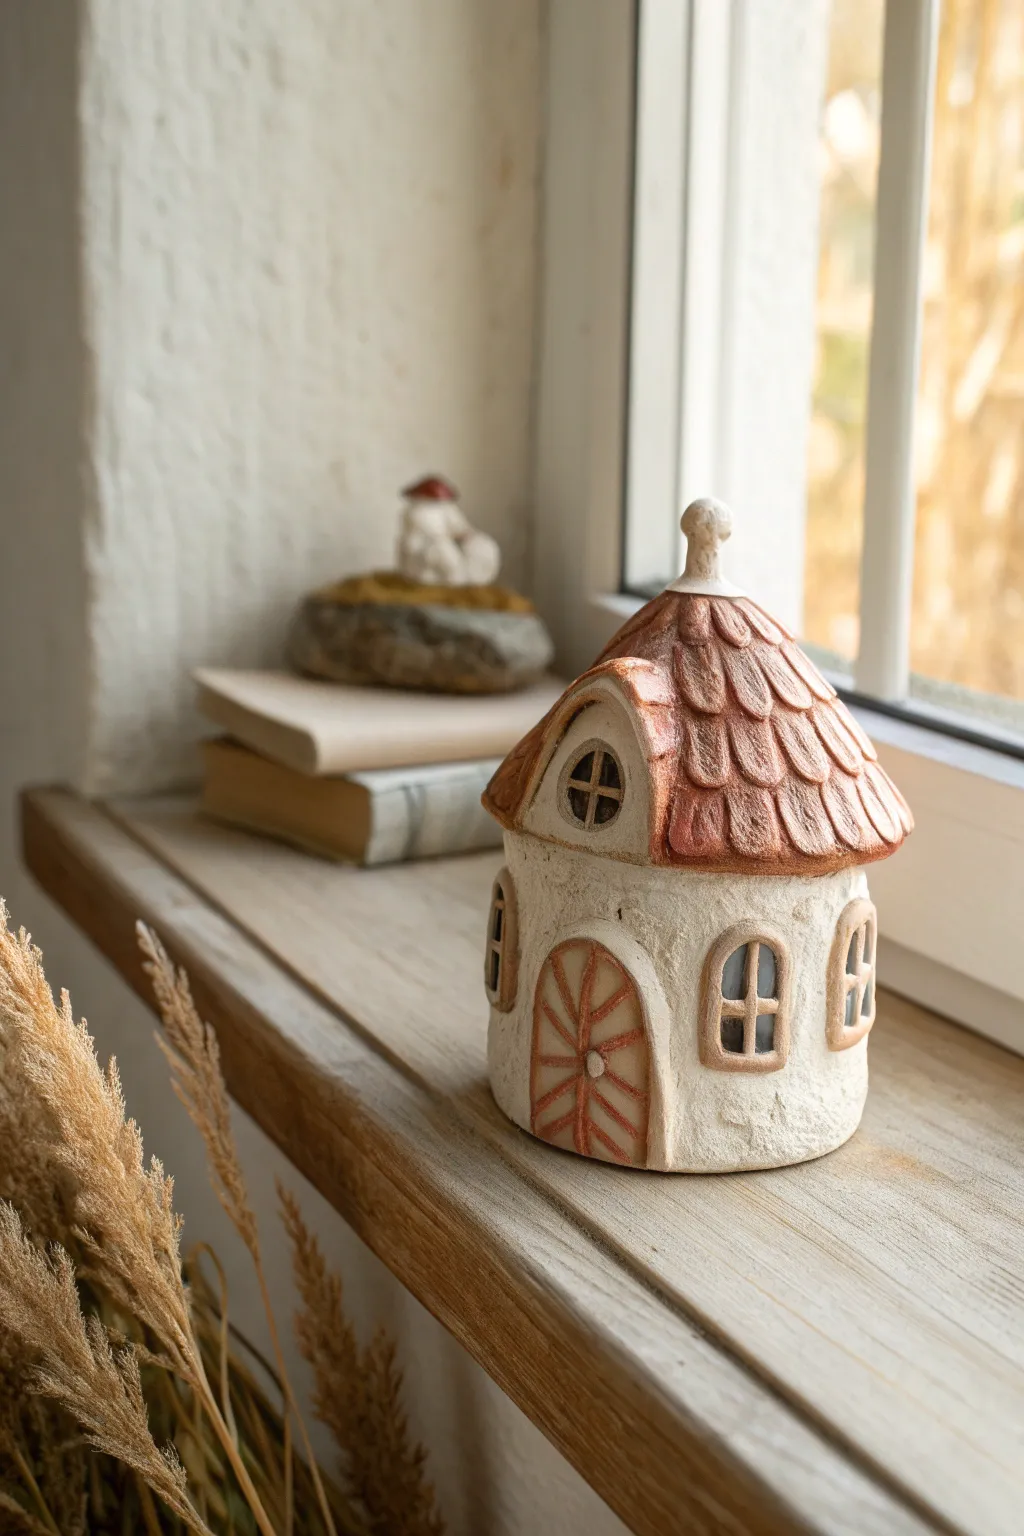
Capture the charm of a fairytale village with this curvaceous mini house sculpture, featuring textured stucco-style walls and a warm terracotta roof. This delightful piece looks lovely on a windowsill and can even house an LED tealight for a cozy glow.
How-To Guide
Materials
- White or cream polymer clay
- Terracotta or rust-colored polymer clay
- Aluminum foil
- Liquid polymer clay (optional)
- Small rolling pin
- Needle tool and X-Acto knife
- Texture tools (stiff brush like a toothbrush or crumpled foil)
- Small round cutters (various sizes)
- Brown acrylic paint (for antiquing)
- Paper towels
- Matte varnish
Step 1: Forming the Base Structure
-
Create the core:
Begin by crumpling aluminum foil into a cylinder shape with a slightly rounded top. This saves clay and keeps the sculpture lightweight. If you plan to use an LED tealight inside, form the foil around a dummy tea light to create a hollow cavity at the bottom, then remove the dummy. -
Sheet the wall clay:
Condition your white or cream clay until soft and pliable. Roll it out into a medium-thick sheet, roughly 1/8 inch thick. -
Wrap the walls:
Cover the foil armature with your clay sheet. Smooth the seams carefully with your fingers so they disappear completely. The walls should curve gently inward toward the top. -
Texturize the surface:
To achieve that rustic, stucco look, take a stiff toothbrush or a ball of crumpled foil and press it repeatedly all over the white clay. Don’t be afraid to be quite firm; deep texture catches the antiquing finish beautifully later.
Sticky Situation?
If your clay gets too soft and sticky to handle, pop it in the fridge for 10 minutes. The slight chill firms it up, making detailed work like window panes much easier.
Step 2: Crafting the Windows and Door
-
Cut window shapes:
Roll out a small amount of the terracotta clay. Use small arched cutters or your knife to cut out three or four arched window frames. -
Attach the frames:
Press the frames onto the house body. I find using a tiny dot of liquid clay helps them stick better to the textured surface. -
Add window panes:
Roll tiny snakes of the terracotta clay. Place them inside the window frames in a cross pattern to create the mullions. -
Form the door:
Create a larger arch shape from the terracotta clay for the door. Use your needle tool to impress lines radiating from the center, creating a sunburst wood plank effect. -
Place the door:
Secure the door to the front of the cottage. Roll a tiny snake of clay to outline the door frame, blending it slightly into the wall texture.
Step 3: Building the Roof
-
Prepare the roof cone:
Create a cone shape from aluminum foil that fits atop your house base. Cover this foil cone with a sheet of terracotta clay. -
Create shingles:
Roll out a thin sheet of terracotta clay. Use a small round cutter to punch out many small circles, or simply teardrop shapes by hand. -
Layer the shingles:
Starting at the bottom edge of the roof, press the clay circles onto the cone, overlapping them as you move upward. Offset each row slightly for a natural look. -
Add roof texture:
Once the shingles are placed, use your needle tool to scratch vertical lines into each shingle for wood grain texture. This adds incredible depth. -
Construct the dormer window:
Make a small triangle of white clay and attach it to the roof slope. Give it a tiny terracotta roof and a small circular window, repeating the texturing steps. -
The chimney finish:
Top the peak of the roof with a small ball or finial shape made of white clay to cap off the shingles.
Pro Tip: Hollow Out
To make it a true luminary, cut out the clay inside the window frames before baking. After baking, the light from an LED candle will actually shine through.
Step 4: Finishing Touches
-
Bake the piece:
Preheat your oven according to the clay manufacturer’s instructions (usually around 275°F/130°C). Bake the sculpture for 30-45 minutes. Let it cool completely. -
Apply an antique wash:
Dilute brown acrylic paint with water. Brush it liberally over the entire house, ensuring it gets into all the stucco pits and shingle lines. -
Wipe back:
Before the paint dries, quickly wipe the surface with a damp paper towel. The brown paint will stay in the crevices, highlighting the textures, while the raised areas return to their original color. -
Seal:
Once the paint is fully dry, apply a coat of matte varnish to protect your work and eliminate any tackiness.
Place your finished cottage on a sunny shelf to enjoy its rustic charm every day