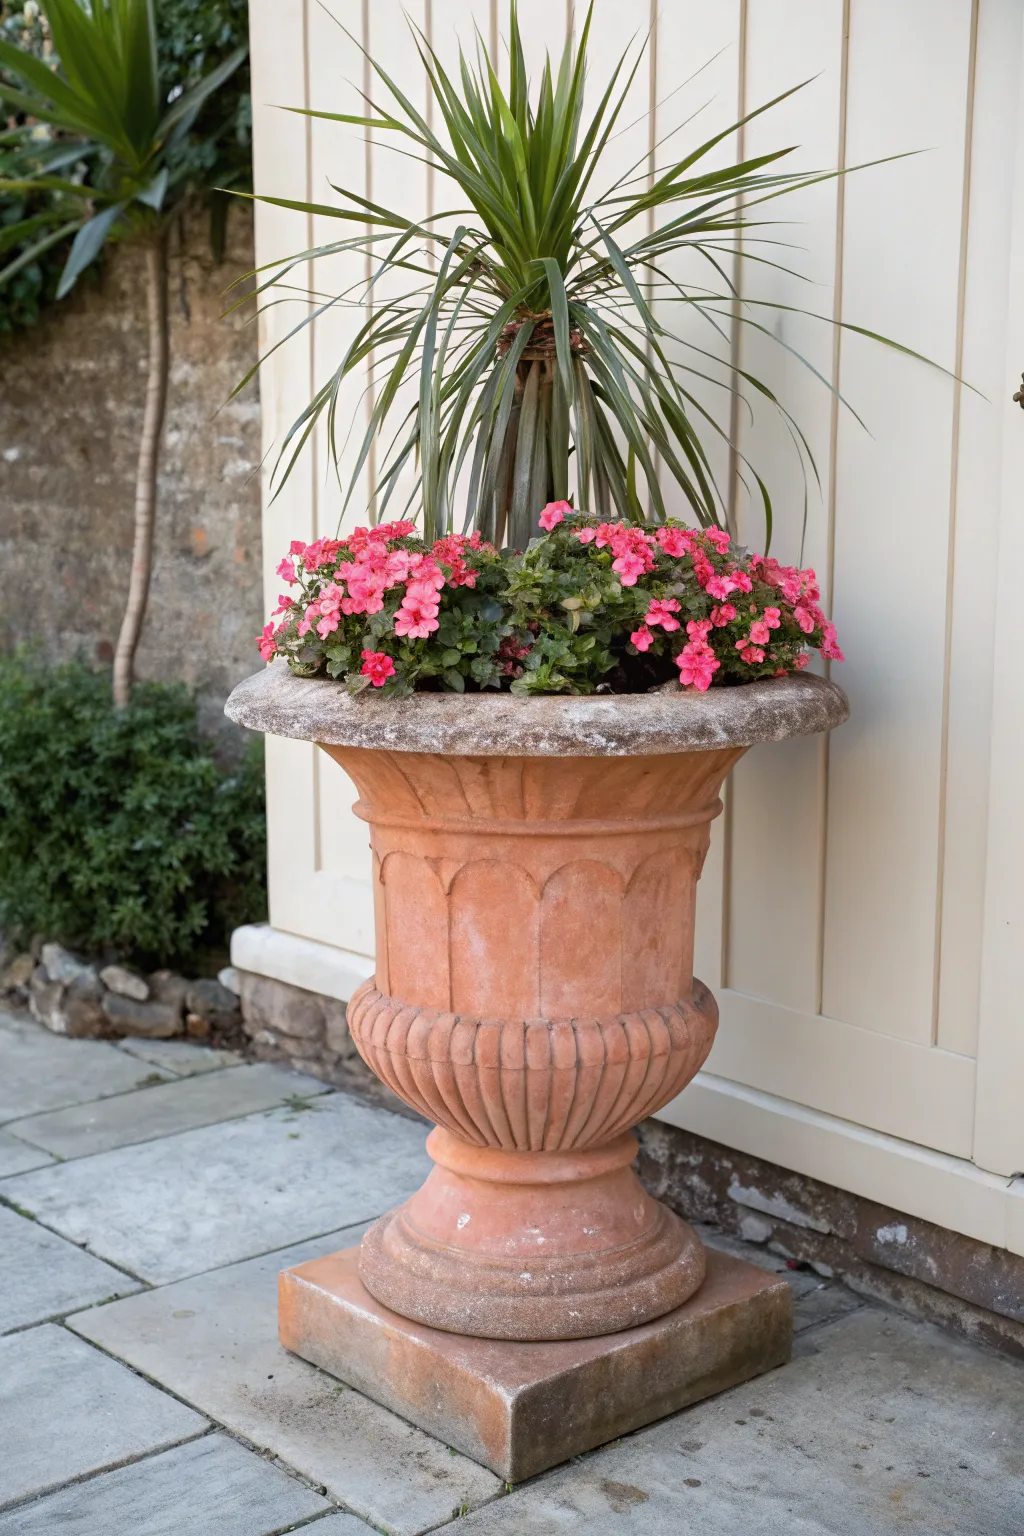
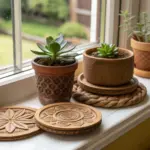
Urn planters have that instant “wow” factor—tall, classic, and perfect for making plants feel like a real design moment. Here are my favorite urn planter ideas for building gorgeous, balanced arrangements that look intentional from the curb, the patio, or your garden path.
Classic Thriller, Filler, Spiller Urn Recipe
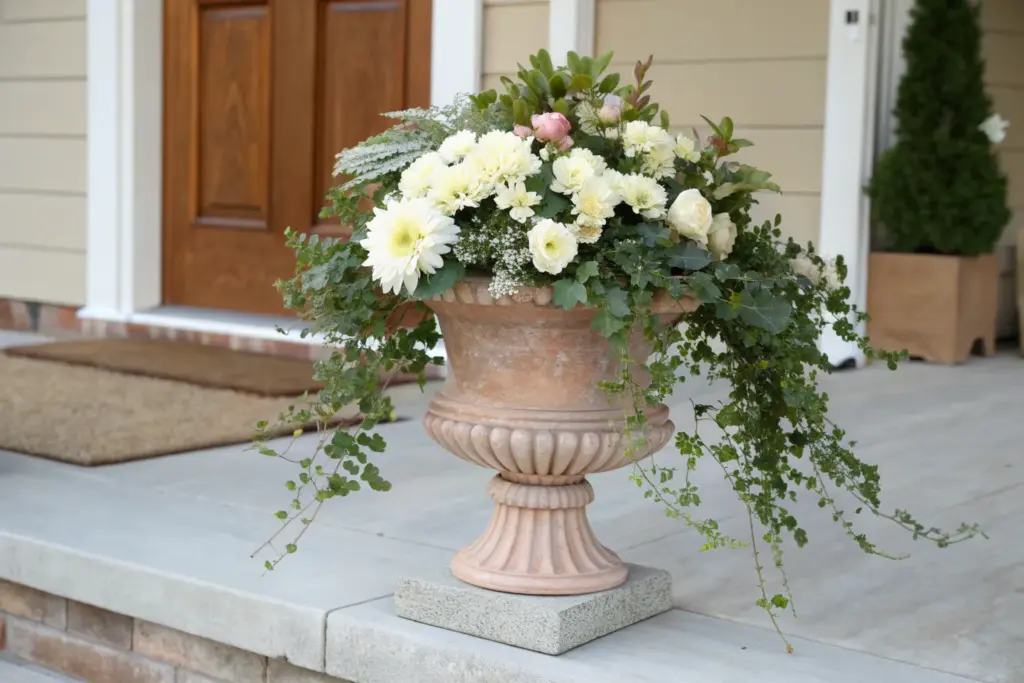
Create a sophisticated focal point for your garden or patio with this classic terracotta urn arrangement. Featuring a dramatic spiky centerpiece surrounded by a lush carpet of vibrant pink blooms, this display balances height and color for a tailored, professional look.
How-To Guide
Materials
- Large terracotta urn planter (approx. 24-30 inches tall) with a wide rim and square base
- Potting soil (high-quality, well-draining mix)
- Slow-release fertilizer granules
- Gravel or broken pottery shards (for drainage)
- 1 Large Dracaena or Cordyline Indivisa (green variety) – The ‘Thriller’
- 6-8 Pink Impatiens or Wax Begonias – The ‘Filler’ and ‘Spiller’
- Gardening gloves
- Hand trowel
- Watering can
Step 1: Preparing the Foundation
-
Position the urn:
Place your terracotta urn exactly where you want it to stay. These planters become extremely heavy once filled with soil and water, so it’s best to build the arrangement in its permanent location. -
Create drainage:
Check the bottom of the urn for a drainage hole. If one exists, cover it loosely with a layer of gravel or broken pottery shards. This prevents soil from washing out while ensuring water can still escape freely. -
Fill with soil:
Pour your high-quality potting mix into the urn. Fill it until the soil level is about 2 to 3 inches below the rim. Press down lightly to remove large air pockets, but keep the soil relatively loose for root growth. -
Add nutrients:
Sprinkle a handful of slow-release fertilizer granules over the top of the soil. Mix them gently into the top few inches with your trowel or gloved hands to provide steady nutrition throughout the season.
Drainage Tip
To save on soil weight and cost for very large urns, turn an empty plastic nursery pot upside down in the bottom of the urn before filling with soil.
Step 2: Planting the Elements
-
Prepare the thriller:
Remove the Dracaena (spike plant) from its nursery pot. Gently tease the roots outward with your fingers if they are tightly wound in a circle, which helps them establish faster in their new home. -
Plant the centerpiece:
Dig a hole in the absolute center of the soil. Place the Dracaena into the hole, ensuring it sits at the same depth it was in its nursery pot. Backfill with soil and press down firmly around the base to secure it upright. -
Arrange the flowers:
Take your pink Impatiens or Begonias and arrange them while still in their pots around the central spike. Space them evenly in a circle to visualize the spacing before committing to digging. -
Plant the fillers:
Beginning at the ’12 o’clock’ position, unpot the first flowering plant. Dig a small hole about an inch from the rim of the urn and nestle the plant in. Repeat this process around the circumference of the pot. -
Close the gaps:
Ensure the flowers are planted close enough that their foliage touches slightly. This creates that instant ‘full’ look. Pack extra soil into the gaps between the root balls so no roots are exposed to the air.
Step 3: Finishing Touches
-
Clean the rim:
Brush off any loose soil that has landed on the rim or the exterior of the terracotta urn. A clean edge makes the final presentation look instantly more polished. -
Initial watering:
Water the arrangement thoroughly using a watering can with a rosette attachment. Pour water gently until you see it trickling out from the base of the urn, ensuring the entire root zone is hydrated. -
Settle the soil:
After the water has soaked in, check the soil level. It often settles after the first watering. If roots are exposed or depressions appear, top off with a handful of fresh potting mix. -
Rotate for sun:
If your urn is against a wall, rotate the pot a quarter turn every week or so. This encourages even growth on all sides, preventing the plants at the back from becoming leggy as they reach for the light.
Level Up: Trailing Ivy
Add 3 small variegated ivy plants alternating between the flowers. As they grow, they will trail down the sides of the urn, adding vertical drama.
Enjoy the classic beauty of your garden urn as it fills out and blooms throughout the season


Matching Pair of Urns for a Symmetrical Entry

Create a stunning, symmetrical entryway with this matching pair of classic urn planters featuring structured topiaries and cascading white blooms. This project combines height, texture, and crisp color contrasts to frame your front door with timeless sophistication.
Detailed Instructions
Materials
- Two large, footed concrete or stone-look urns (fluted design)
- Two standard topiary shrubs (e.g., Boxwood, Privet, or Euonymus trained on a stem)
- High-quality potting soil mix (large bag)
- Slow-release fertilizer pellets
- Gravel or crushed stone for drainage
- Landscape fabric (optional)
- 8-10 white flowering annuals (e.g., Vinca, New Guinea Impatiens, or Begonias) per urn
- Watering can or hose with gentle spray nozzle
- Pruning shears
- Gardening gloves
Step 1: Preparing the Foundation
-
Establish drainage:
Begin by ensuring your large urns have drainage holes at the bottom. If they don’t, carefully drill one central hole using a masonry bit. -
Layer drainage material:
Pour a 2-inch layer of gravel or crushed stone into the bottom of each urn. This essential step prevents root rot by keeping the soil from sitting in standing water. -
Add a filter layer:
Cut a piece of landscape fabric to fit over the gravel layer. This keeps the soil from washing down into the rocks and clogging the drainage, though I sometimes just use a coffee filter for smaller pots. -
Fill with soil:
Fill the urns about halfway with your high-quality potting mix. Lightly pat it down to remove large air pockets, but keep the soil relatively loose for root growth.
Uneven Sinking?
If one topiary sinks lower after watering, don’t just pull it up by the trunk. Remove the side flowers first, lift the root ball, and pack more soil tightly underneath to relevel.
Step 2: Planting the Topiaries
-
Position the centerpiece:
Remove your standard topiary shrub from its nursery pot. Gently loosen the root ball with your fingers if it looks tightly bound. -
Ensure perfect height:
Place the topiary in the dead center of the urn. Check the depth; the top of the root ball should sit about 2 inches below the rim of the planter. -
Adjust soil levels:
If the tree sits too low, add more soil underneath. If it’s too high, scoop some out. Consistency is key here—measure both urns to ensure the trees stand at the exact same height. -
Secure the tree:
Fill in soil around the sides of the root ball until the shrub stands firmly on its own. Press down firmly around the base of the trunk to stabilize it against wind.
Step 3: Adding the Floral Underplanting
-
Plan the arrangement:
Before planting, arrange your white flowering annuals (like vinca or impatiens) around the base of the tree while they are still in their pots to check spacing. -
Plant the flowers:
Remove the flowers from their containers and plant them snugly in a ring around the central trunk. Angle the outer plants slightly toward the edge of the urn to encourage a spilling effect. -
Fill gaps:
Add extra potting soil between the small flowers, ensuring all roots are covered. Leave about an inch of space from the soil surface to the rim for watering. -
Feed the plants:
Sprinkle a generous amount of slow-release fertilizer pellets over the soil surface according to package directions to keep blooms vigorous throughout the season.
Fullness Factor
For an instantly lush look, pack the underplanting flowers tighter than recommended on the tag. Use 20% more plants; the competition keeps them compact and the urns look fuller.
Step 4: Finishing Touches
-
Water deeply:
Water both urns thoroughly until you see water trickling out from the bottom drainage holes. This settles the soil and eliminates air pockets around the roots. -
Clean up:
Wipe down the sides of the urns with a damp cloth to remove any soil smudges or dust from planting. -
Prune for shape:
Use your pruning shears to snip any stray branches from the topiary head, reinforcing that perfect spherical shape. -
Initial care:
Check the soil moisture daily for the first week as the plants establish themselves in their new home.
Enjoy the welcoming atmosphere your new symmetrical planters bring to your front porch entrance


Tall Grass and White Blooms for a Clean, Modern Urn Look
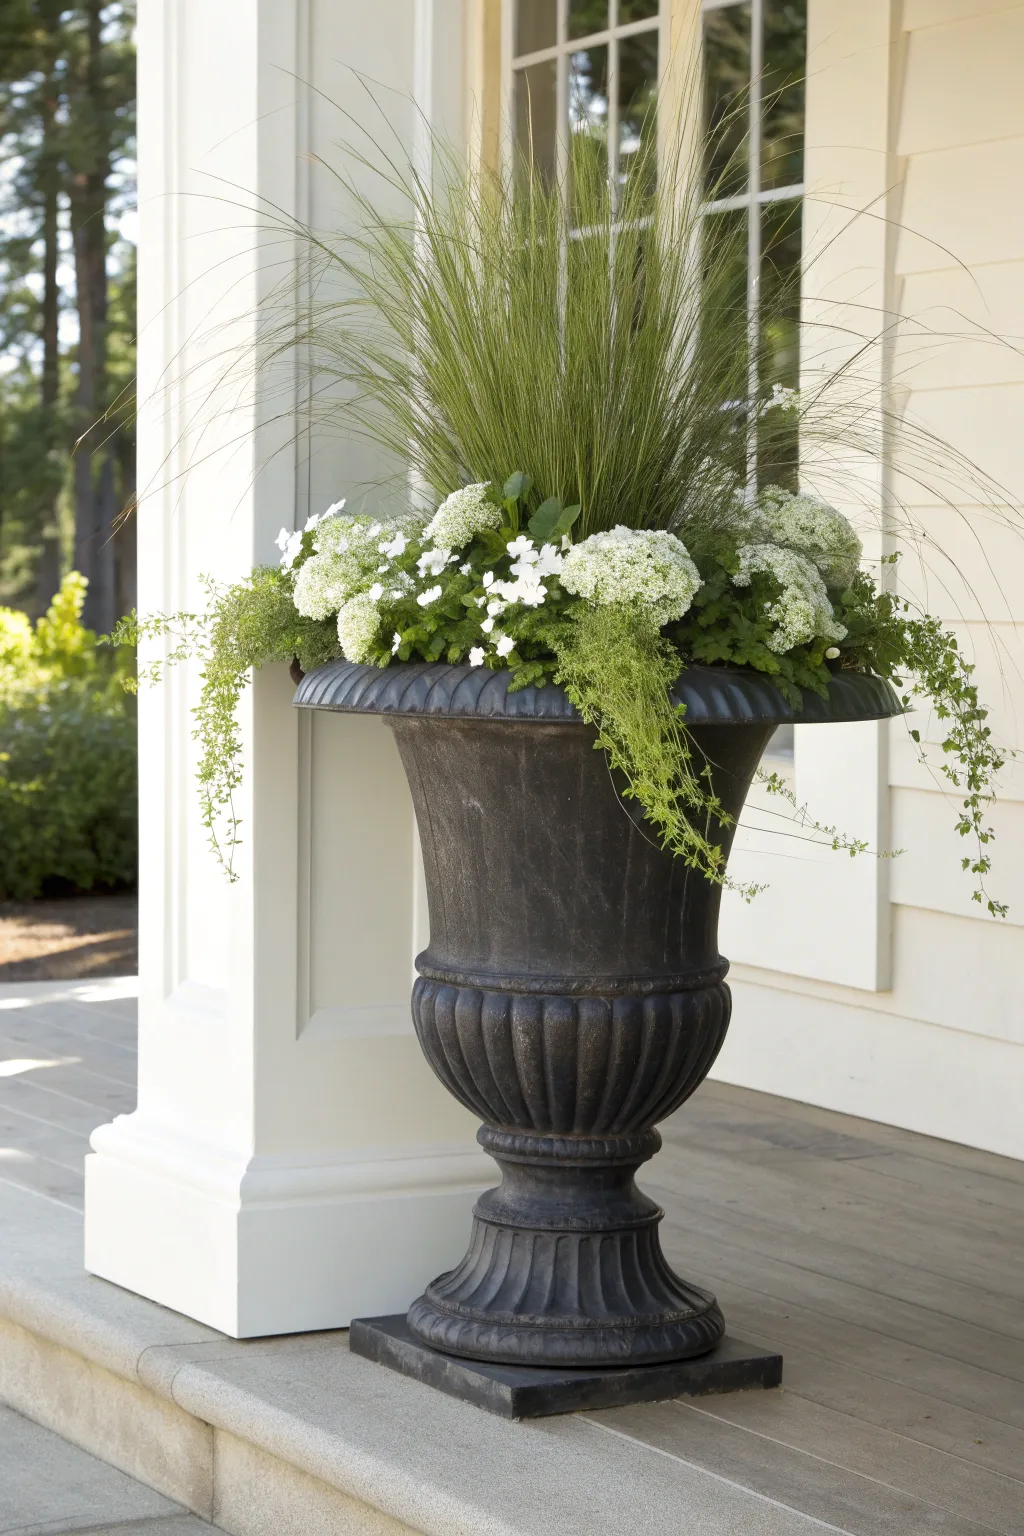
Achieve a sophisticated entrance with this stately pedestal urn arrangement, featuring a dramatic centerpiece of tall ornamental grass surrounded by clouds of white blooms. The contrast between the dark, weathered vessel and the fresh, bright florals creates a classic yet modern look perfect for flanking a front door.
How-To Guide
Materials
- Large black pedestal urn (fiberglass, cast iron, or plastic)
- Potting mix (premium quality)
- Slow-release fertilizer granules
- 1 Large ornamental grass (Karl Foerster or similar upright variety)
- 3-4 White Hydrangea plants (compact variety like Bobo or Little Lime)
- 4-6 White annual fillers (White Impatiens or Vinca)
- 4-6 Trailing plants (Creeping Jenny or Ivy)
- Gardening gloves
- Trowel
- Watering can
- Optional: Plastic pot insert or filler material (empty water bottles/styrofoam) for bottom of urn
Step 1: Preparation & Base
-
Position the Urn:
Before adding any soil, place your urn in its final location. Once filled with wet soil and plants, these large vessels become incredibly heavy and difficult to move. -
Check Drainage:
Ensure there is a drainage hole at the bottom. If your urn sits flush against the pavement, you may need to raise it slightly with pot feet or shims to allow water to escape freely. -
Fill the Bottom (Optional):
If the urn is extremely deep, you can fill the bottom third with lightweight filler material like crushed clean plastic containers or styrofoam chunks to save on soil and reduce weight. -
Add Potting Mix:
Fill the urn with high-quality potting mix, stopping about 2-3 inches from the rim. I like to mix in a handful of slow-release fertilizer at this stage to feed the plants throughout the season.
Thriller, Filler, Spiller
This design follows the classic formula: The grass is the ‘Thriller’ (height), the blooms are the ‘Filler’ (volume), and the vines are the ‘Spiller’ (cascading edge).
Step 2: Installing the Centerpiece
-
Prepare the Center Hole:
Dig a hole in the direct center of the soil that is slightly larger than the root ball of your ornamental grass. -
Plant the Grass:
Remove the tall ornamental grass from its nursery pot. Gently tease the roots outward if they are tightly wound. -
Secure the Center:
Place the grass into the center hole. Whatever height it sits at now will determine the look, so ensure the base of the plant is level with the soil surface. Backfill and press down firmly to anchor it.
Seasonal Swap
Keep the central grass and trailing ivy year-round. Swap the white hydrangeas for mums in autumn or faux poinsettias and pine boughs in winter for easy updates.
Step 3: Layering Flowers & Trailers
-
Position Hydrangeas:
Arrange your hydrangea plants in a triangle or square formation around the central grass, depending on how many you are using. Leave a little space between them for the smaller annuals. -
Plant the Hydrangeas:
Plant the hydrangeas at the same depth as the grass, ensuring they are snug but not overcrowded. -
Add White Fillers:
Tuck the smaller white annual flowers (like impatiens or vinca) into the gaps between the hydrangeas. These provide constant color while the hydrangeas cycle through blooms. -
Prepare the Rim:
Clear small pockets of soil right at the very edge of the planter rim for your trailing plants. -
Plant the Trailers:
Insert your Creeping Jenny or ivy into these edge pockets. Angle the root balls slightly outward so the foliage naturally spills over the side of the urn rather than growing upright. -
Fill Gaps:
Add extra potting soil to any remaining gaps between plants, ensuring all roots are covered. Use your fingers to gently firm the soil around each plant base.
Step 4: Finishing Touches
-
Clean the Urn:
Brush off any loose soil that may have fallen onto the leaves or down the sides of the black urn during planting. A soft dry brush works well for the textured exterior. -
Deep Water:
Water the container thoroughly until you see water starting to trickle from the drainage hole at the bottom. This settles the soil and eliminates air pockets. -
Initial Grooming:
Snip off any broken stems or damaged leaves that occurred during the planting process to give the arrangement a pristine start.
Step back and enjoy the grand, welcoming statement your new planter brings to your entryway


All-Green Urn Planter for Texture-Only Drama
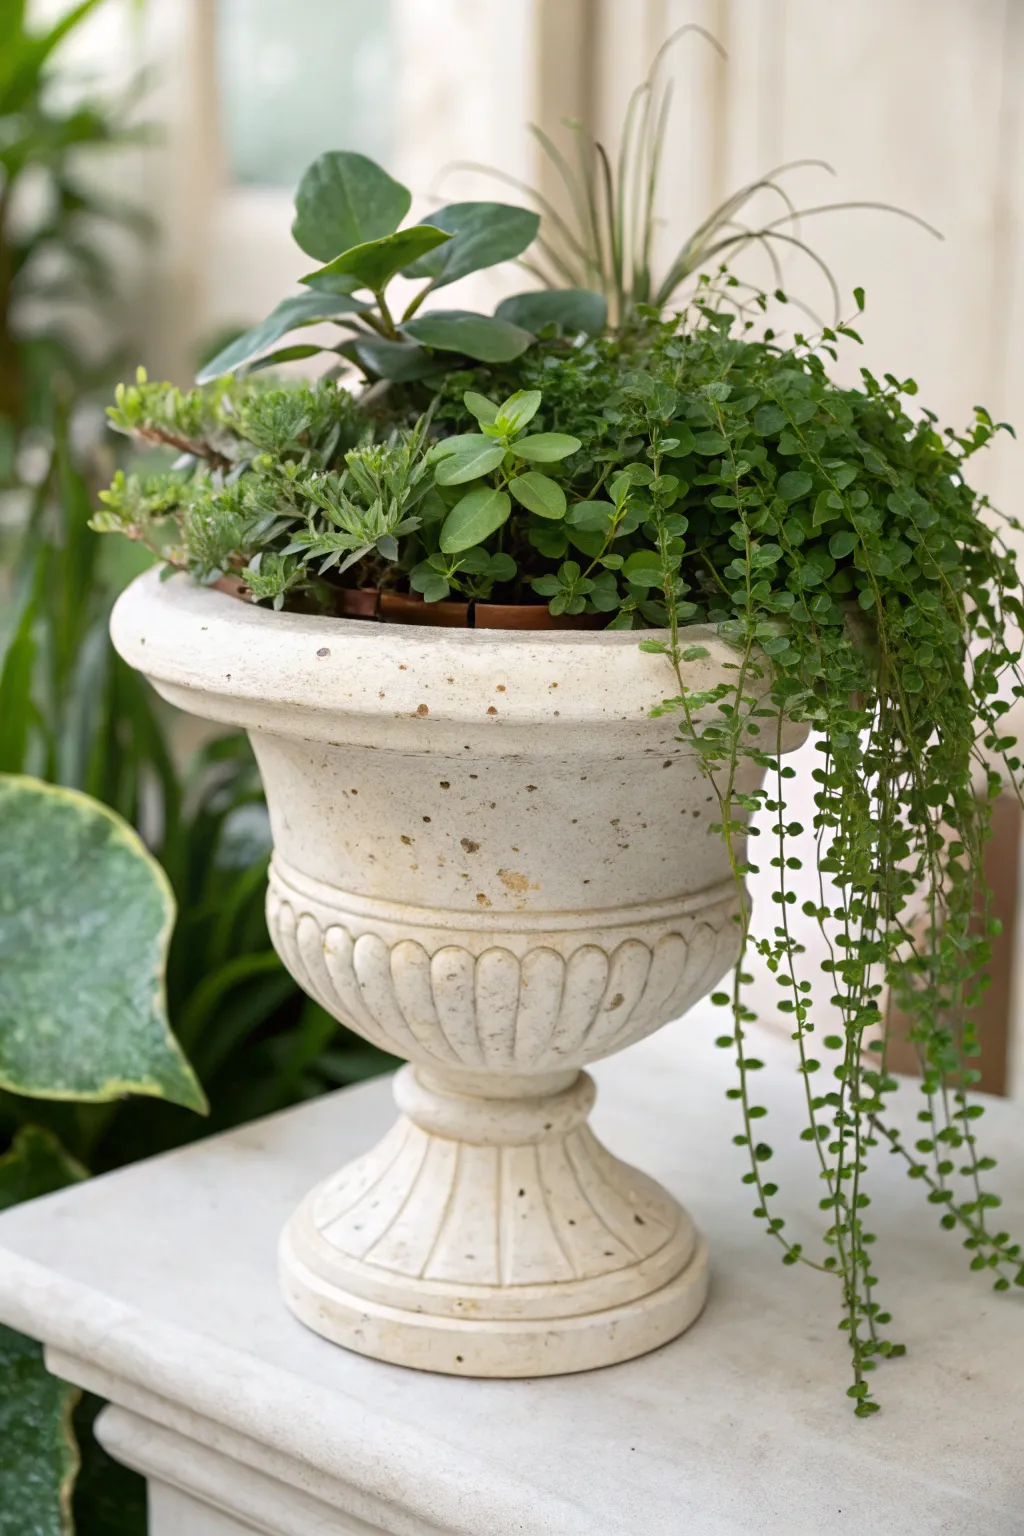
Embrace the understated elegance of an all-green palette by combining varied leaf shapes and textures in a classic stone-look urn. This project focuses on foliage contrast rather than blooms, creating a soothing and sophisticated centerpiece that looks stunning indoors or on a shaded patio.
Step-by-Step Tutorial
Materials
- Classic white or cream stone-finish urn planter (approx. 10-12 inch diameter)
- Peperomia obtusifolia (Baby Rubber Plant) – 4-inch pot
- Wire vine (Muehlenbeckia complexa) – 4-inch pot
- Small-leaf trailing sedum or similar groundcover succulent
- Ornamental grass or dracaena spikes (small sized)
- High-quality potting soil
- Pebbles or broken pottery shards for drainage
- Trowel
- Watering can
- Gardening gloves
Step 1: Preparing the Foundation
-
Drainage Setup:
Begin by ensuring your urn has a drainage hole at the bottom. If it does, cover it loosely with a curved pottery shard or a small piece of mesh to keep soil in while letting water out. -
Adding Drainage Layer:
Pour a layer of small pebbles or gravel about 1-2 inches deep at the bottom of the urn. This prevents roots from sitting in stagnant water, which is crucial for container health. -
Soil Base:
Fill the urn about two-thirds full with your potting mix. Press it down gently to remove large air pockets, but keep it loose enough for roots to spread.
Drooping Vines?
If the wire vine looks limp after planting, mist it daily alongside regular watering. It often needs higher humidity to recover from transplant shock.
Step 2: Arranging the Thriller and Filler
-
Positioning the Height:
Take your Peperomia obtusifolia (the plant with thick, round leaves) and position it slightly off-center towards the back. This provides the sturdy, upright ‘thriller’ element without dominating the scene. -
Planting the Backdrop:
Place the small ornamental grass or spiky dracaena behind or beside the Peperomia. The thin blades offer a fantastic textural contrast to the round rubber plant leaves. -
Initial Soil Fill:
Scoop a little soil around the base of these first two plants to secure them upright before moving on to the smaller varieties. -
Adding Mid-Height Texture:
On the side opposite the trailing vine, tuck in the small-leaf sedum or groundcover plant. Its dense, mat-forming habit acts as a ‘filler,’ covering the soil surface beautifully.
Moss Up The Mix
Add a layer of preserved sheet moss or live mood moss over the exposed soil. It hides the dirt and creates a woodland floor aesthetic instantly.
Step 3: The Spiller Effect
-
Placing the Wire Vine:
Locate the Wire Vine (Muehlenbeckia). Position it near the front edge of the urn where it has the most room to cascade. -
Teasing the Strands:
Gently tease the long strands of the vine so they drape over the rim of the planter. I like to let some strands hang long and loop others back slightly to create a fuller look at the rim. -
Filling Gaps:
Check for any empty spots where the soil is visible. You can either gently nudge the existing plants closer together or add a bit more soil to level everything off. -
Top Dressing:
Add the final layer of soil, bringing the level to about half an inch below the urn’s rim. This reservoir space prevents water from overflowing when you water the plants.
Step 4: Finishing Touches
-
Cleaning Up:
Brush off any loose soil that may have landed on the leaves or the exterior of the urn using a soft brush or a dry cloth. -
First Watering:
Water the arrangement thoroughly until you see a little moisture escaping the bottom drainage. Use a gentle stream to settle the soil around the roots without displacing it. -
Leaf Polish:
For an extra professional touch, gently wipe the larger Peperomia leaves with a damp cloth to remove water spots and make them shine against the matte stone texture. -
Placement:
Set your finished urn on a pedestal, table, or mantel where it receives bright, indirect light to keep the growth compact and lush.
Enjoy the calming presence of your new living sculpture as it grows and spills over time

The Complete Guide to Pottery Troubleshooting
Uncover the most common ceramic mistakes—from cracking clay to failed glazes—and learn how to fix them fast.
Bright Annual Color Pop in a Dark Urn
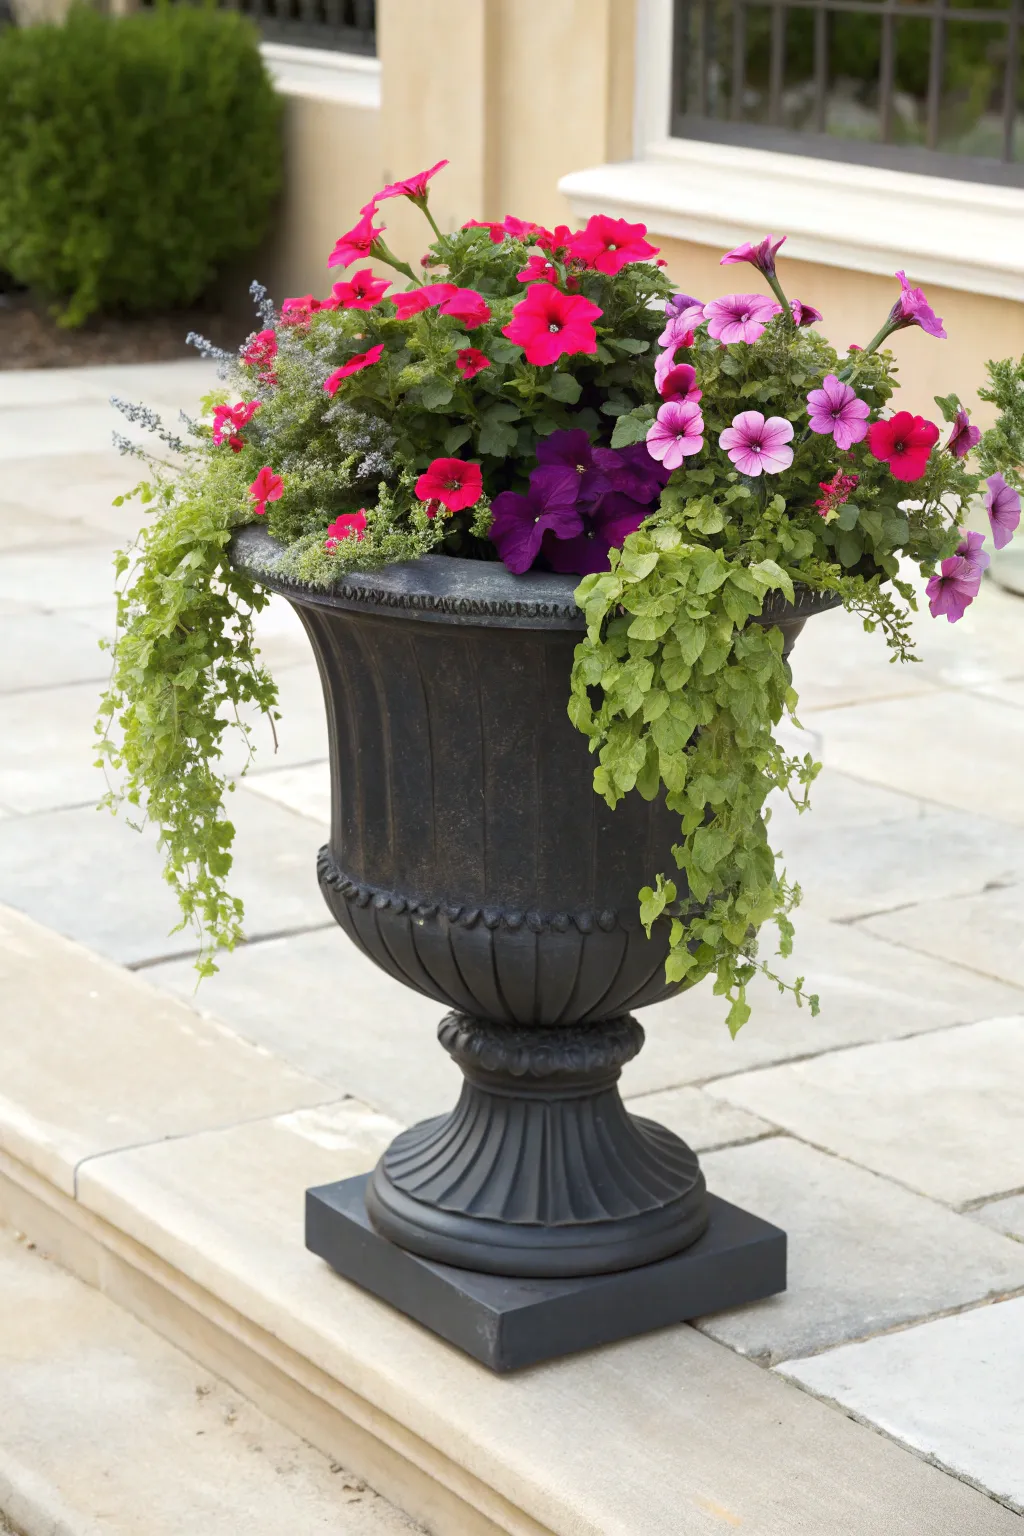
This elegant container garden pairs the stately drama of a traditional black urn with an explosion of cheerful summer annuals. The mix of hot pinks, purples, and trailing lime green foliage creates a vibrant focal point perfect for patios or entryways.
Step-by-Step
Materials
- Large black pedestal urn (cast iron, resin, or fiberglass)
- Square riser base (stone or painted wood matching the urn)
- High-quality potting mix with moisture control
- Slow-release fertilizer granules
- Hot pink Petunias (Supertunia Vista Bubblegum or similar)
- Purple Petunias (vibrant violet shades)
- Deep purple Calibrachoa or Petunias (for depth)
- Creeping Jenny (Lysimachia nummularia ‘Aurea’) for trailing
- Silver foliage accent (like Dusty Miller or Artemisia)
- Hand trowel
- Watering can
- Gardening gloves
Step 1: Setting the Stage
-
Position the container:
Before you add soil, place your square riser base exactly where you want the finished planter to live. Once the urn is filled and watered, it will be extremely heavy and difficult to move. -
Secure the urn:
Center the pedestal urn on the square base. Ensure it is level and stable so it won’t tip over in high winds. -
Fill with medium:
Fill the urn with high-quality potting mix until it is about 2 to 3 inches below the rim. I like to mix in a handful of slow-release fertilizer at this stage to feed the plants throughout the season. -
Moisten the soil:
Lightly water the soil to settle it before planting. This prevents the soil level from sinking too much later.
Heat Management Risk
Black urns absorb significant heat in direct sun, which can cook roots. If in full sun, line the inside with bubble wrap (leaving drainage holes open) to insulate the soil.
Step 2: Building the Arrangement
-
Establish the center:
Start by planting your tallest bright pink Petunias slightly off-center near the back or middle. These will act as your ‘thriller’ component, providing height and volume. -
Add deep tones:
Tuck the deep purple Petunias or Calibrachoa next to the pink ones. This dark color bridges the gap between the bright flowers and the matte black container. -
Layer in light pinks:
In the remaining pockets of the main planting area, add the lighter pink and violet bi-color Petunias. Grouping them closely gives that abundant, overflowing look. -
Incorporate texture:
Insert small plugs of silver foliage like Artemisia or Licorice Plant near the pinks to break up the color block and add a cool, misty texture.
Step 3: Creating the Cascade
-
Plant the spillers:
Take full pots of Creeping Jenny (Lysimachia) and plant them right at the edge of the urn. You want at least three distinct ‘spill’ points around the rim. -
Train the vines:
Gently gently tease the long stems of the Creeping Jenny over the edge of the urn so they hang down immediately. -
Fill the gaps:
Look for any visible soil gaps between the main flowering plants and the rim. Fill these spots with more trailing petunias to ensure the pot looks full from day one. -
Check for symmetry:
Step back and view the urn from all sides. If one side looks thin, shift a plant or add a small extra plug to balance the visual weight.
Seasonal Swap Strategy
Design the center planting pocket to be slightly removable. When petunias fade in autumn, you can easily pop in a distinct ornamental kale or mum without disturbing the trailers.
Step 4: Maintenance and Care
-
Water thoroughly:
Give the entire arrangement a deep soak until water trickles out of the bottom drainage hole. This settles the roots into their new home. -
Clean the container:
Wipe down the exterior of the black urn with a damp cloth to remove any potting soil dust or water spots, restoring its sleek matte finish. -
Deadhead regularly:
As the petunias fade, pinch off the spent blooms to encourage constant new flowering and prevent the plant from going to seed. -
Monitor moisture:
Urns can dry out quickly, especially black ones that absorb heat. Check the soil moisture daily during hot spells, watering whenever the top inch feels dry.
Enjoy the dramatic flair this planter brings to your outdoor space all summer long
Porch Corner Softener With Cascading Spillers
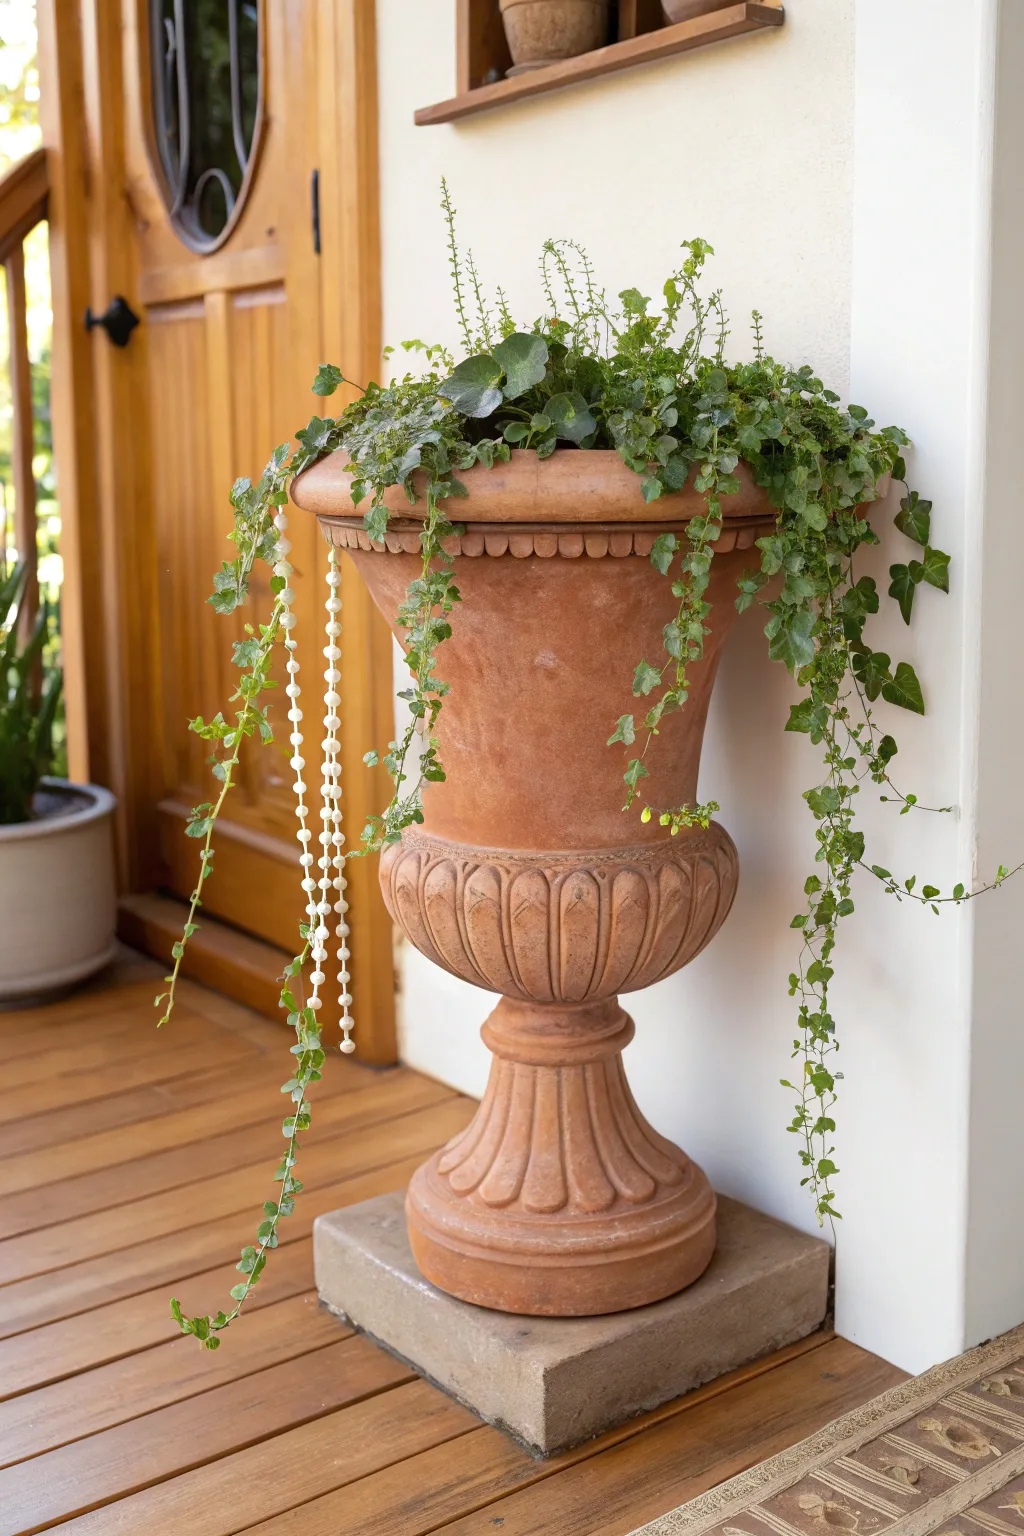
Transform a bare porch corner into a lush entryway statement with this classic urn arrangement. Combining trailing plants like ivy and wire vine with a unique string-of-pearls accent creates a soft, welcoming look that feels both established and curated.
How-To Guide
Materials
- Large terracotta urn (approx. 24-30 inches tall with fluted details)
- Square concrete or stone riser block (approx. 14 inches)
- Potting soil (high-quality, well-draining mix)
- Perlite or vermiculite
- Slow-release fertilizer granules
- English Ivy (Hedera helix) – 2-3 nursery pots
- Angel Vine (Muehlenbeckia complexa) or Creeping Wire Vine – 1-2 pots
- Decorative bead garland or strand (white or cream, outdoor safe)
- Garden trowel
- Gardening gloves
- Watering can
- Landscape fabric or coffee filter (optional)
Step 1: Setting the Stage
-
Select the location:
Choose a spot on your porch that receives appropriate light for your chosen plants; most ivies prefer bright, indirect light rather than scorching midday sun. -
Place the riser:
Position your square concrete or stone block on the decking. This elevates the urn, giving trailing plants more vertical space to cascade without hitting the floor immediately. -
Position the urn:
Carefully lift and center the terracotta urn onto the riser block. Ensure it is stable and doesn’t rock; you may need to shim it slightly if the stone surface is uneven. -
Prepare drainage:
Check the drainage hole at the bottom of the urn. If the hole is very large, I usually place a coffee filter or small piece of landscape fabric over it to keep soil in while letting water out.
Step 2: Building the Soil Base
-
Create the mix:
In a separate bucket or wheelbarrow, mix your potting soil with a few handfuls of perlite to improve aeration, ensuring the roots won’t rot in the deep vessel. -
Add nutrients:
Stir in the slow-release fertilizer granules according to the package instructions for the volume of soil you are using. -
Fill the urn:
Scoop the soil mixture into the urn, filling it until the soil level is about 2 to 3 inches below the rim. Press down lightly to eliminate large air pockets.
Uneven Growth?
Rotate the urn a quarter turn every week. This ensures all sides get equal light exposure, preventing the plants from growing lopsided toward the sun.
Step 3: Planting the Arrangement
-
Arrange the ivy:
Remove the English Ivy from its nursery pots. Tease the roots gently if they are pot-bound. -
Plant the primary spillers:
Position the ivy plants near the edges of the urn, specifically targeting the sides where you want the most dramatic draping effect. -
Add texture contrast:
Place the Angel Vine or Creeping Wire Vine in the gaps between the ivy. These have smaller leaves and wiry stems, providing a beautiful textural contrast to the broader ivy leaves. -
Fill the center:
If you have extra creeping fig or a slightly taller foliage plant, place it in the center to create a bit of volume before it spills over, burying the root balls firmly. -
Top off soil:
Add more soil around the root balls to secure them providing a level surface. Leave about an inch of space from the rim for easy watering.
Pro Tip: Height Hack
To save on soil weight and cost, fill the bottom third of a large urn like this with empty plastic water bottles or upside-down plastic nursery pots before adding soil.
Step 4: Styling and Finishing Touches
-
Train the vines:
Gently guide the long tendrils of the ivy and wire vine over the edge of the urn. You want them to flow naturally down the sides, reaching toward the stone base. -
Add the beaded accent:
Take your decorative bead garland. Anchor one end securely into the soil (you can use a landscape staple or bury a knotted end). -
Drape the garland:
Let the beads drape down alongside the longest vines. This mimics the look of a ‘String of Pearls’ succulent but is far more durable for outdoor porch conditions. -
Water thoroughly:
Water the planter slowly until you see moisture beginning to seep from the bottom drainage hole. This settles the soil around the roots. -
Clean up:
Wipe down the exterior of the terracotta urn with a damp cloth to remove any soil dust or fingerprints. -
Final adjustment:
Step back and assess the cascade. Gently separate any tangled vines to ensure the arrangement looks full and lush from the front view.
Enjoy the gentle green welcome your new planter brings to your entryway every time you come home


What Really Happens Inside the Kiln
Learn how time and temperature work together inside the kiln to transform clay into durable ceramic.
Pathway Marker Urns to “Punctuate” a Garden Walk
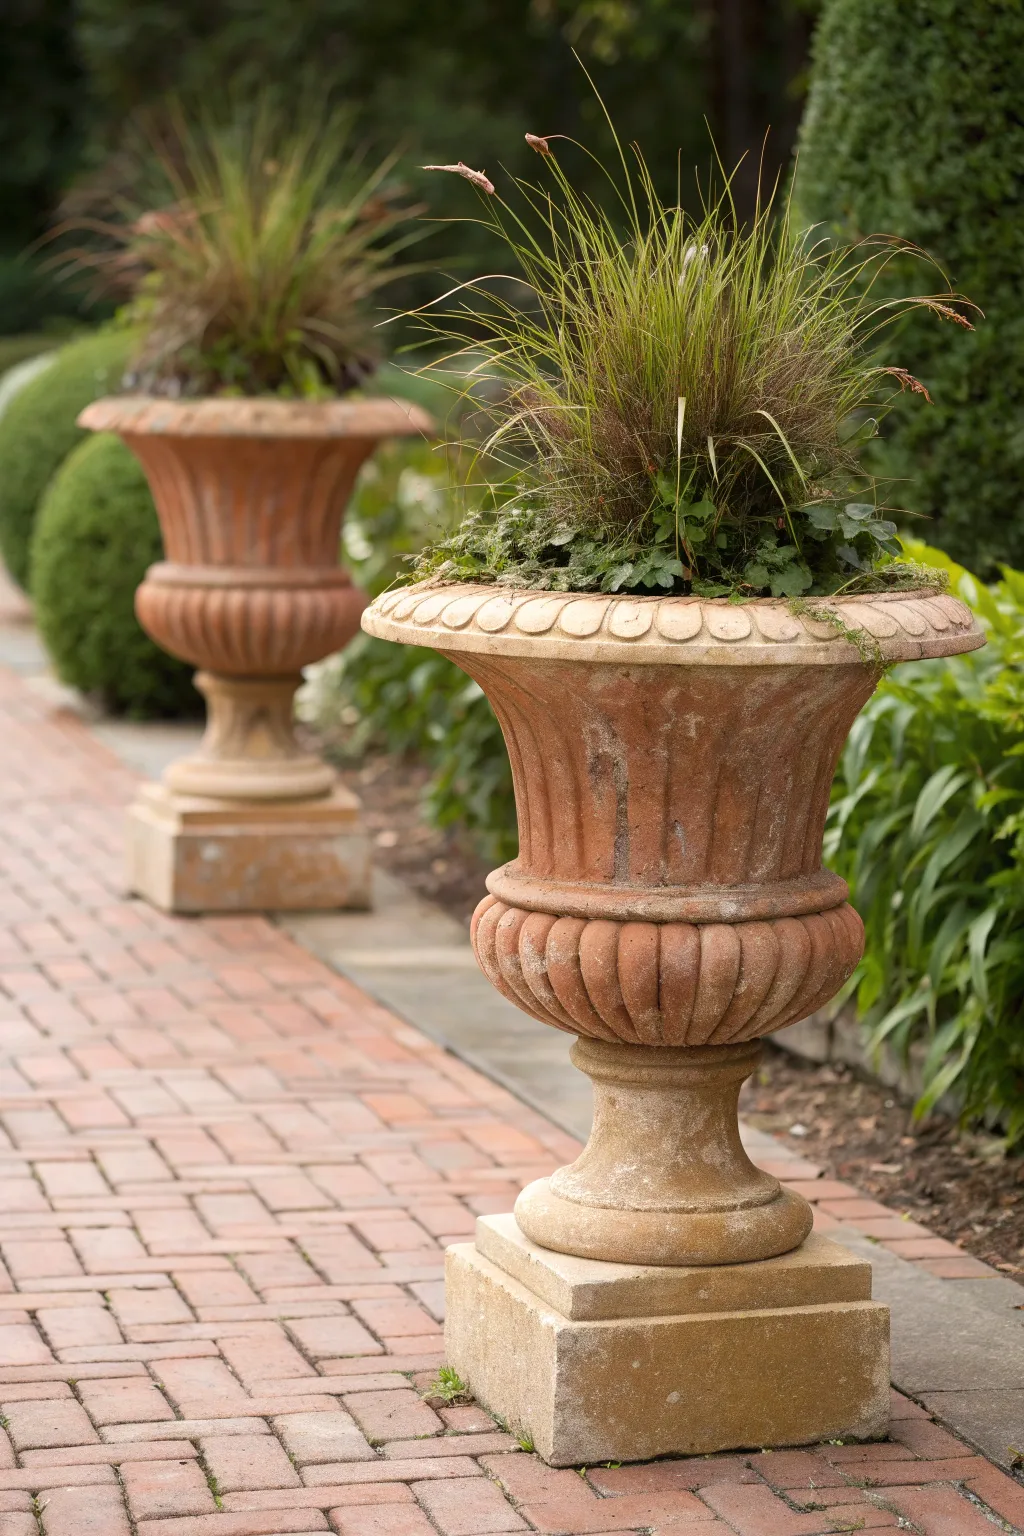
These stately urn planters add a touch of formal elegance to any garden path, using height and texture to draw the eye along the walkway. With weathered terracotta tones and ornamental grasses, they strike a perfect balance between structured design and natural movement.
Step-by-Step
Materials
- Two large classical-style urn planters (terracotta or cast stone)
- Two matching square pedestal bases
- Potting soil mix
- Slow-release fertilizer granules
- Drainage gravel or pottery shards
- 2 Ornamental grasses (e.g., Fountain Grass or Sedge)
- Trailing greenery (e.g., Ivy or Vinca vine)
- Heuchera or similar filler plants (optional)
- Garden spade or trowel
- Watering can
Step 1: Setting the Foundation
-
Select the location:
Choose two spots directly opposite each other along your garden path. The symmetry is crucial for the ‘punctuation’ effect, so measure from the path edge to ensure they are equidistant. -
Prepare the ground:
Clear any debris or uneven turf where the pedestals will sit. The ground needs to be perfectly level to prevent the heavy urns from tipping over in high winds. -
Position the pedestals:
Place your square pedestal bases on the prepared spots. Use a spirit level to check they are flat; if not, shim them with flat stones or pack dirt underneath until stable. -
Place the urns:
Carefully lift the urns onto the pedestals. Center them precisely so the base of the urn aligns with the center of the square block for visual balance. -
Establish drainage:
Check the drainage holes at the bottom of each urn. To keep them clear, I like to drop in a layer of gravel or a few curved pottery shards over the holes before adding soil.
Step 2: Planting the Layers
-
Fill with soil:
Fill the urns about two-thirds full with a high-quality potting mix. Lightly press the soil down to remove large air pockets, but keep it loose enough for root growth. -
Add nutrients:
Sprinkle a handful of slow-release fertilizer granules into the soil and mix it in lightly with your trowel to feed the plants throughout the season. -
Position the centerpiece:
Remove your ornamental grass from its nursery pot. Tease the roots gently if they are bound up, then place the grass in the exact center of the urn. -
Check the height:
Ensure the base of the grass plant sits slightly below the rim of the urn. Add or remove soil underneath until the planting depth is correct. -
Add filler plants:
Surround the central grass with your filler plants, such as Heuchera for foliage contrast. Place them midway between the center grass and the urn’s rim. -
Insert trailing elements:
Tuck the trailing ivy or vinca vines near the very edge of the pot. Position them so they will naturally spill over the curved lip of the urn. -
Top up soil:
Fill in the gaps around the root balls with more potting mix. Bring the soil level up to about an inch below the rim to allow space for watering.
Weathering Trick
To age new terracotta quickly, rub plain yogurt on the exterior. It encourages moss and lichen growth for that antique garden look.
Step 3: Finishing Touches
-
Secure the plants:
Firm the soil around the base of each plant with your fingers to anchor them securely. This ensures good contact between roots and soil. -
Clean the exterior:
Brush off any loose soil that may have spilled onto the decorative ridges or the rim of the urns during planting. -
Water thoroughly:
Water the planters deeply until you see water just starting to trickle from the bottom drainage holes. This settles the soil and eliminates air pockets. -
Style the grass:
Fluff up the ornamental grass blades gently with your hands to give them a natural, windswept look right from the start.
Seasonal Swaps
Keep the grass as a permanent anchor but swap the lower filler plants seasonally—pansies in spring, petunias in summer, and mums in fall.
Enjoy the structured beauty these twin sentinels bring to your garden walkway
Fluted or Ribbed Urn Planter Styled With Simple Greenery
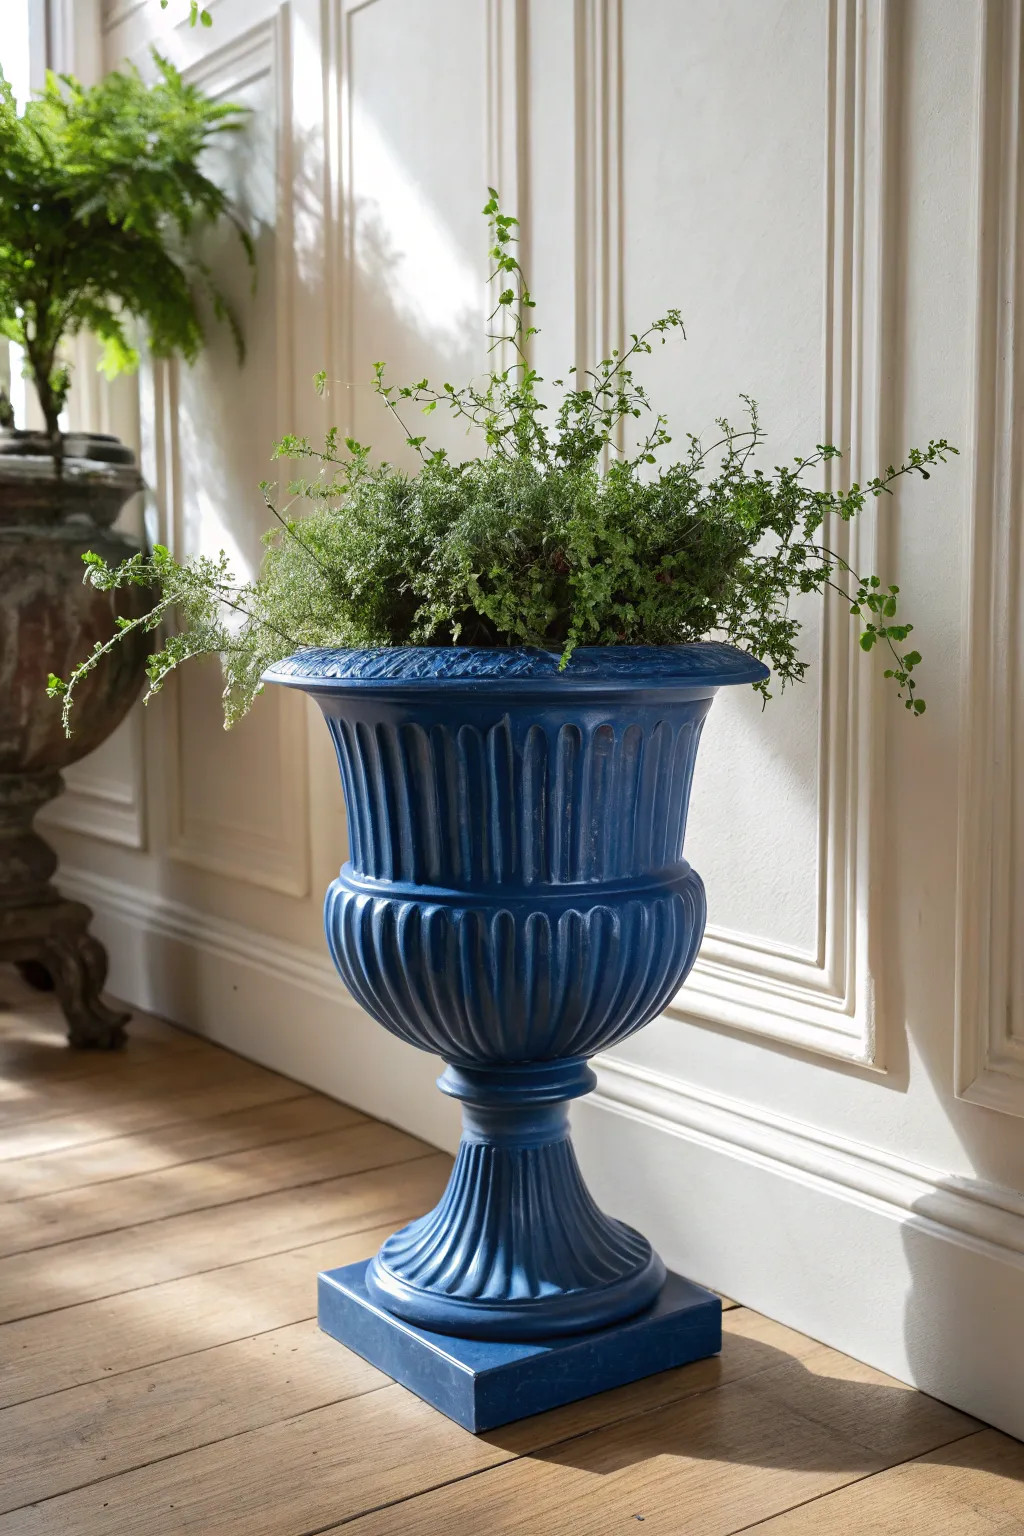
Transform a plain garden urn into a statement piece with a rich, matte blue finish that perfectly contrasts with delicate greenery. This project focuses on achieving a smooth, uniform color on a fluted surface and styling it with an overflowing maidenhair vine for a touch of indoor elegance.
Step-by-Step Guide
Materials
- Large pedestal urn planter (fiberglass, plastic, or concrete)
- Matte spray paint or chalk paint (deep navy or royal blue)
- Spray primer (grey or white suitable for plastic/concrete)
- Fine-grit sandpaper (220 grit)
- Drop cloth or cardboard
- Damp cloth
- Potting soil
- Lush green trailing plant (like Maidenhair vine or Asparagus fern)
- Gravel or drainage rocks
- Painter’s tape (optional)
Step 1: Prepping the Urn
-
Clean the surface:
Start by thoroughly cleaning your urn to remove any dirt, dust, or oils. If it’s an old planter, scrub it well with soapy water and let it dry completely in the sun. -
Sand for adhesion:
Lightly sand the entire surface of the urn using 220-grit sandpaper. This is crucial for plastic or glossy fiberglass urns to ensure the paint sticks properly. Focus on getting into the fluted grooves. -
Wipe away dust:
Use a damp cloth to wipe away all sanding residue. The surface must be bone dry before you begin painting. -
Set up your workspace:
Lay down a large drop cloth or flattened cardboard in a well-ventilated area, preferably outdoors or in a garage with the door open.
Step 2: Painting the Finish
-
Apply primer:
Spray a thin, even coat of primer over the entire urn. Start spraying slightly off the object and sweep across it. Let this coat dry for about 30 minutes or according to the can’s instructions. -
First coat of color:
Begin applying your deep blue matte paint. Hold the can about 8-10 inches away and use steady, sweeping motions. Don’t try to get full coverage in one go; thin coats prevent drips. -
Focus on the fluting:
Pay special attention to the ribbed or fluted sections of the urn. Spray from multiple angles—top-down, side-to-side, and bottom-up—to ensure the vivid blue covers the deep recesses. -
Check for missed spots:
Inspect the rim and the base of the pedestal. I find it’s easy to miss the underside of the rim, so crouch down to check those hidden angles. -
Apply second coat:
Once the first coat is dry to the touch (usually 15-20 minutes), apply a second coat for full opacity and depth of color. -
Touch up if needed:
If you see any uneven patches after the second coat, apply a very light third dusting just on those areas. -
Allow to cure:
Let the planter dry completely for at least 24 hours. The matte finish needs time to harden so it doesn’t scratch easily when you begin planting.
Smooth Moves
To avoid ‘orange peel’ texture on plastic, warm the spray can in a bowl of warm water for 5 minutes before painting. This helps the paint flow smoother.
Step 3: Planting and Styling
-
Prepare drainage:
If your urn has a drainage hole, great. If not, and you’re keeping it indoors like the photo, fill the bottom 2 inches with gravel or rocks to create a reservoir for excess water. -
Add soil:
Fill the urn about three-quarters full with high-quality potting soil suitable for indoor plants. -
Arrange the plant:
Remove your plant from its nursery pot. Gently loosen the root ball to encourage growth. Place it in the center of the urn. -
Secure the plant:
Fill in the gaps around the root ball with more soil, pressing down gently to remove air pockets. The soil level should be about an inch below the rim. -
Style the vines:
Gently fluff and arrange the vines so they spill over the edges asymmetrically. The goal is a wild, airy look that contrasts with the structured urn. -
Clean the rim:
Brush off any stray soil from the blue rim with a soft, dry paintbrush to keep that matte finish pristine.
Gilt Trip
For extra luxury, lightly brush Metallic Gold wax or paint onto the raised ribs of the fluting to highlight the texture against the dark blue.
Now you have a striking architectural piece that brings a sophisticated pop of color to your room

TRACK YOUR CERAMIC JOURNEY
Capture glaze tests, firing details, and creative progress—all in one simple printable. Make your projects easier to repeat and improve.
Monochrome Urn Arrangement in Purple Tones
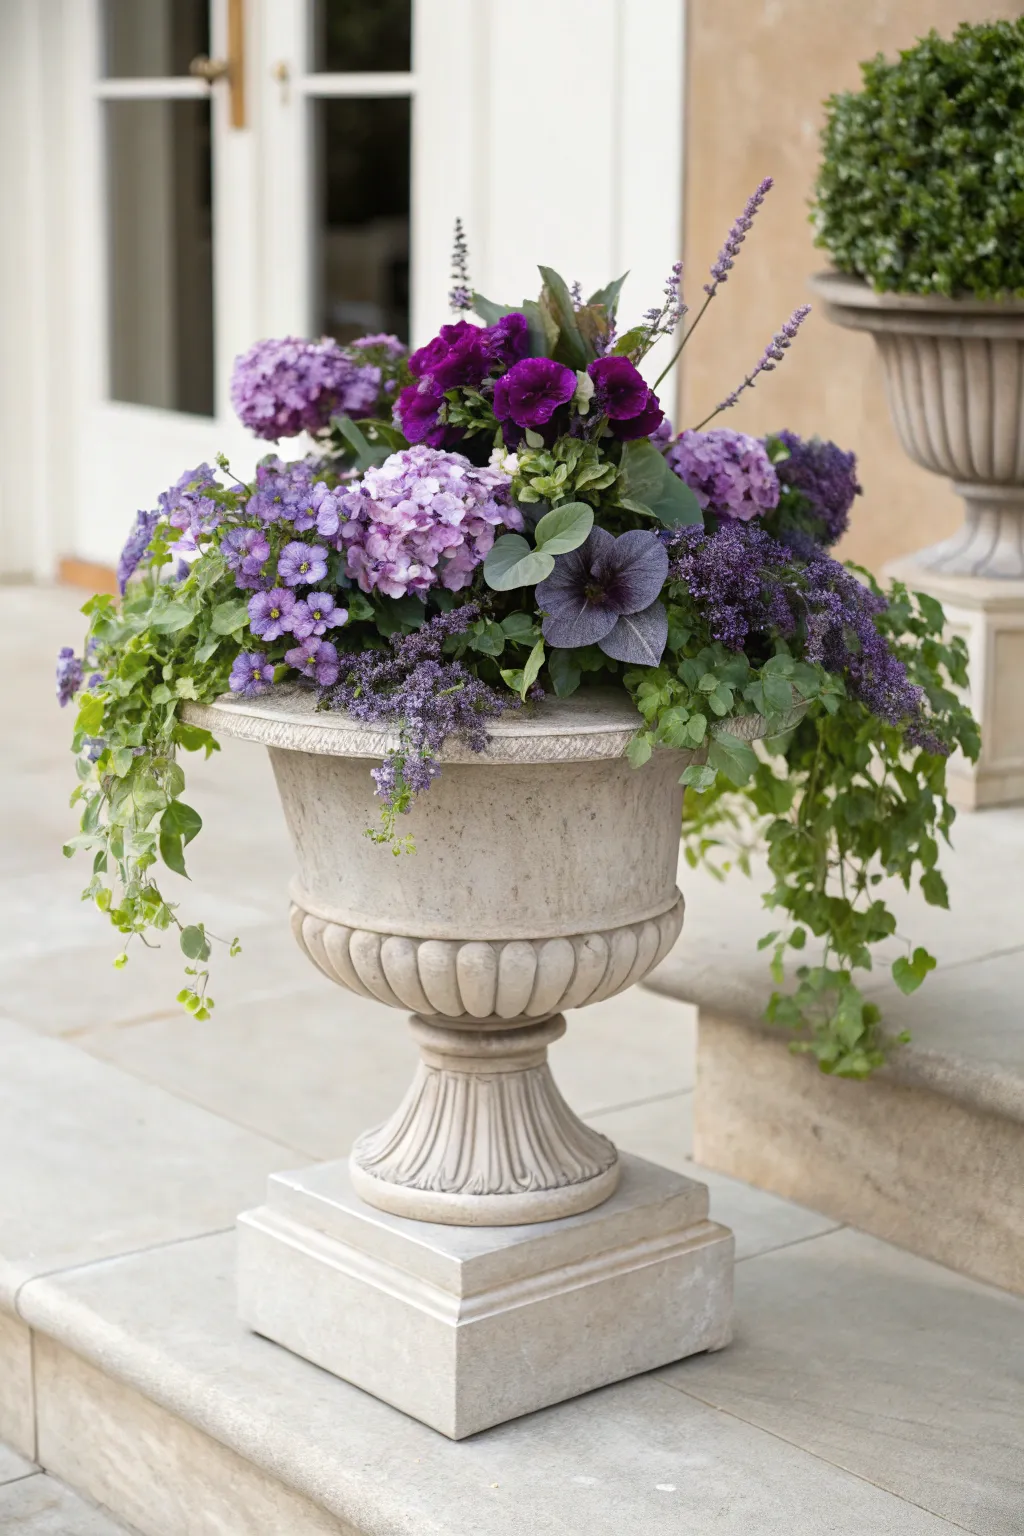
This sophisticated arrangement relies on a stunning monochrome palette to create depth and drama in a classic stone vessel. By blending various textures—from soft hydrangea blooms to trailing ivy and spiky lavender—you achieve a look that feels both curated and abundant.
How-To Guide
Materials
- Large classic stone or resin urn planter (approx. 24-30 inches tall) with a square pedestal base
- Quality potting mix with slow-release fertilizer
- Purple Hydrangea (mophead variety)
- Deep Purple Petunias (Wave or Supertunia varieties)
- Purple Calibrachoa (Million Bells)
- Trailing Ivy (Hedera helix) or Variegated Vinca Vine
- Lavender or Salvia (for height and spikes)
- Dark purple sweet potato vine or ornamental kale (for foliage contrast)
- Small purple filler flowers (like Heliotrope or Verbena)
- Gardening gloves
- Trowel
- Watering can
Step 1: Preparation and Foundation
-
Position the planter:
Place your urn exactly where you want it displayed before filling specifically because these stone planters become incredibly heavy once filled with wet soil. -
Check drainage:
Ensure the bottom of the urn has a drainage hole to prevent root rot; if the hole is very large, cover it with a piece of mesh or a pottery shard to keep soil in. -
Fill with soil:
Fill the urn about two-thirds full with high-quality potting mix, pressing down lightly to remove large air pockets but keeping the soil fluffy. -
Mix in nutrition:
I like to mix a handful of slow-release fertilizer into this bottom layer of soil to feed the roots as they grow down deeply throughout the season.
Color Depth Secret
Combine different purple hues—lilac, indigo, and deep plum—rather than a single shade. This creates visual vibration and prevents the arrangement from looking flat.
Step 2: Creating the Arrangement
-
Establish the centerpiece:
Remove the purple hydrangea from its nursery pot and gently loosen the root ball. -
Plant the anchor:
Place the hydrangea slightly off-center toward the back middle of the urn; this serves as the main volume and ‘thriller’ of the container. -
Add vertical height:
Plant the lavender or salvia spikes behind and slightly to the side of the hydrangea to create architectural height and a wispy texture. -
Position the dark voids:
Tuck the dark purple petunias near the center, nesting them close to the hydrangea to create a deep, shadowy contrast against lighter blooms. -
Integrate bold foliage:
Insert the dark sweet potato vine or ornamental foliage in the middle ground, allowing its broad, dark leaves to break up the flower clusters. -
Layer the mid-sized blooms:
Fill the gaps around the center with Calibrachoa or smaller purple bedding plants, ensuring you vary the shades from lilac to deep violet.
Seasonal Swap
Keep the ivy and foundation plants but swap the central blooms. Use ornate purple cabbage in autumn or silver dusty miller in winter for year-round appeal.
Step 3: The Trailing Edge
-
Start the spill:
Take your trailing ivy or variegated vinca vines and plant them right at the rim of the urn. -
Encourage the drape:
Angling the root balls of the trailing plants slightly outward helps them spill naturally over the stone lip rather than growing straight up. -
Add soft spillers:
Intersperse trailing verbena or lobelia between the ivy strands for a ‘flowering curtain’ effect that softens the hard edge of the stone. -
Fill remaining gaps:
Look for any visible soil patches and plug them with the smallest filler plants or moss to achieve that instant, bountiful look. -
Top off soil:
Add small scoops of potting soil around all the root balls, ensuring everything is tucked in securely without burying the stems too deep.
Step 4: Finishing Touches
-
Initial watering:
Water the container thoroughly until you see water trickling from the base, which settles the soil around the roots. -
Clean the urn:
Wipe down the exterior of the stone urn with a damp cloth to remove any soil smudges or dust from the planting process. -
Prune for shape:
Snip off any broken stems or awkward protruding leaves to give the arrangement a tidy, rounded shape right from day one.
Enjoy the royal elegance this monochromatic masterpiece brings to your patio entryway.
Sun-Loving Urn Planter With Silver Foliage Contrast
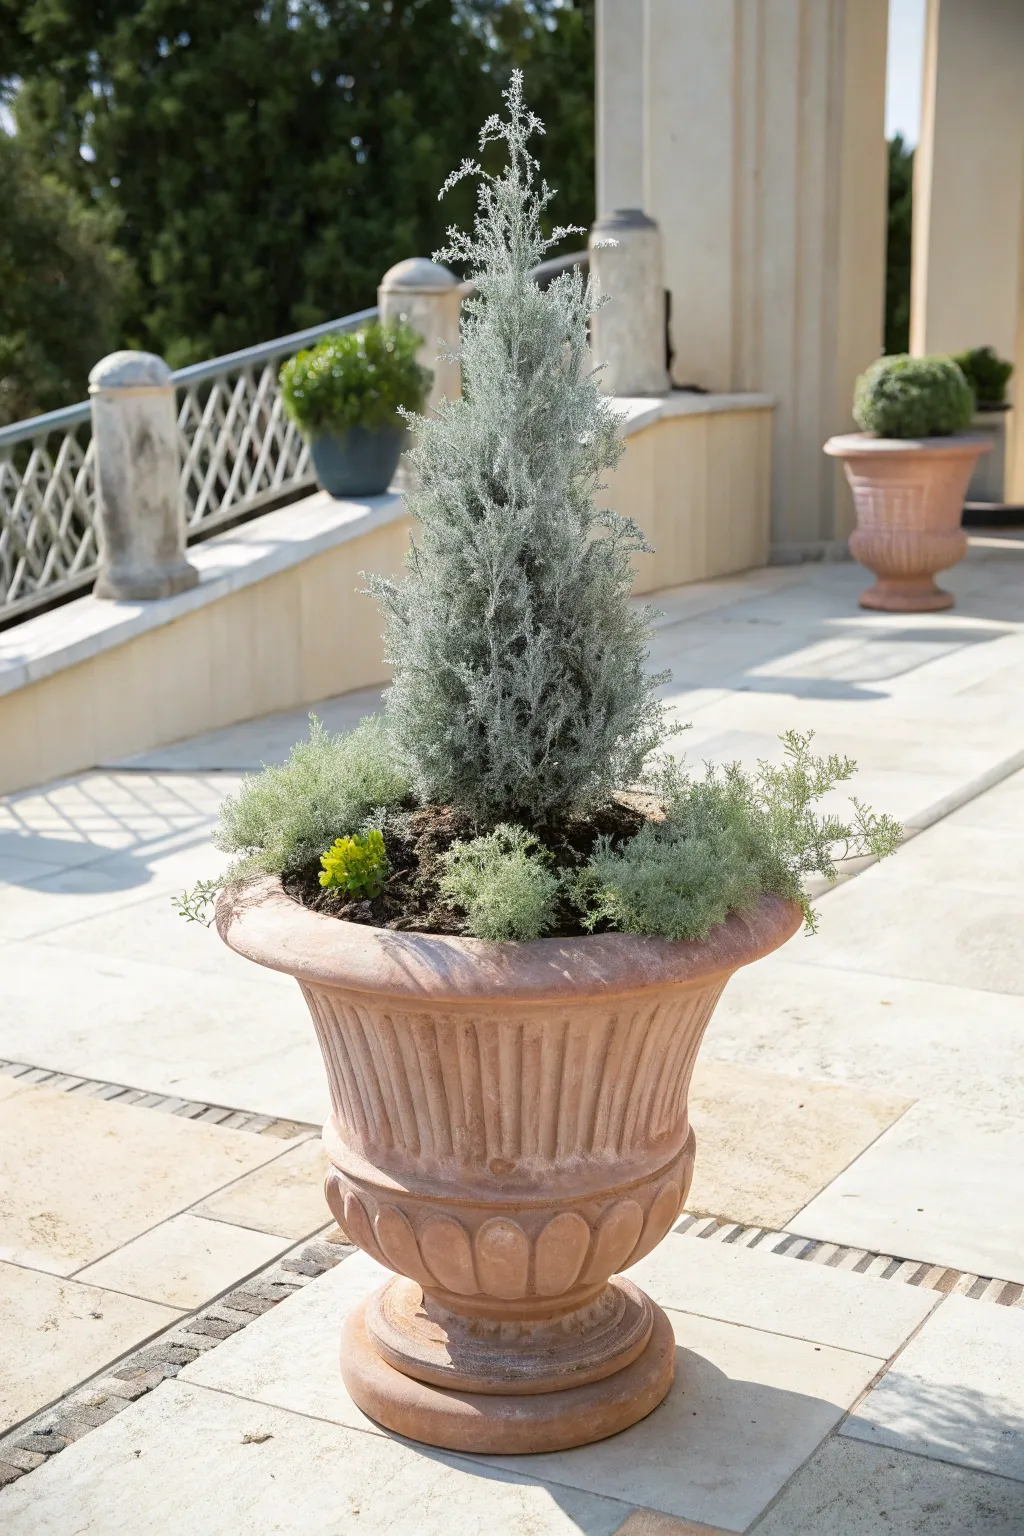
This elegant planter arrangement focuses on texture and cool tones, pairing the architectural height of a silvery evergreen with low-growing, soft foliage. The result creates a sophisticated focal point for a sunny patio or entryway that feels timeless yet fresh.
Step-by-Step Guide
Materials
- Large terracotta or cast stone urn with fluted detailing
- Potting soil (high-quality, well-draining mix)
- Slow-release fertilizer granules
- One 3-5 gallon upright evergreen (e.g., Juniperus scopulorum or Ellwood’s Gold Cypress)
- 3-4 small potted silver foliage plants (e.g., Silver Mound Artemisia or Santolina)
- 1 small chartreuse accent plant (e.g., Sedum ‘Angelina’ or Lemon Ball Stonecrop)
- Large plastic pot shards or drainage gravel
- Gardening gloves
- Hand trowel
- Watering can
Step 1: Preparation & Foundation
-
Check drainage:
Before adding any soil, examine the bottom of your urn. Ensure there is at least one clear drainage hole to prevent waterlogging, which these plants dislike. -
Layer drainage material:
Place a few large pot shards or a shallow layer of gravel over the drainage hole. This keeps the soil inside while still allowing excess water to escape freely. -
Fill with base soil:
Pour your potting mix into the urn until it is about two-thirds full on the sides, leaving a bit of a well in the center for the main plant. -
Mix nutrition:
Sprinkle a handful of slow-release fertilizer granules into the soil and mix it in lightly with your trowel or gloved hands.
Sun Strategy
Rotate the urn a quarter turn every week. This ensures all sides of the evergreen get equal sunlight, preventing bald spots.
Step 2: Planting the Centerpiece
-
Remove pot:
Take your main upright evergreen and gently squeeze the sides of the nursery pot to loosen the root ball. Slide the plant out carefully, supporting the base of the stem. -
Tease roots:
If the roots are circling tightly around the bottom, use your fingers to gently tease them outward. This encourages them to grow into the new soil rather than staying pot-bound. -
Position the height:
Place the evergreen in the center of the urn. Check the height—the top of the root ball should be about 1-2 inches below the urn’s rim to allow for watering. -
Backfill center:
Add more soil around the base of the evergreen to stabilize it. Press down firmly with your hands to remove large air pockets, ensuring the tree stands perfectly straight.
Winter Interest
For holiday flair, tuck pinecones or red berry sprigs into the base soil during winter months when the lower plants are dormant.
Step 3: Adding texture & finishing
-
Plan the perimeter:
Arrange your smaller silver foliage plants (like Artemisia or Santolina) around the central tree while they are still in their pots to check spacing. -
Plant the silver accents:
Remove the smaller plants from their pots and snug them into the soil around the central tree. I usually angle them slightly outward so they will eventually spill over the urn’s edge. -
Add the pop of color:
Select a spot near the front or side for your chartreuse accent plant (the yellow-green Sedum). Dig a small hole and tuck it in, creating a bright contrast against the darker soil and silver leaves. -
Fill gaps:
Use handfuls of soil to fill in any remaining spaces between the root balls. Be careful not to bury the stems of the small plants too deep. -
Final tamp:
Go around the edge of the urn and firmly press the soil down one last time to secure all the plants. -
Water thoroughly:
Water the planter slowly until you see water starting to trickle out of the bottom drainage hole. This settles the soil around the roots. -
Clean the urn:
Wipe down the outside of the terracotta urn with a damp cloth to remove any soil smudges or dust from the potting process.
Place your finished silver urn in a sunny spot and enjoy the classic structure it brings to your outdoor space
Shady Urn Planter With Ferns and Trailing Greens

Bring timeless sophistication to your shady porch with this lush arrangement featuring spilling ferns in a stately, speckled stone-look urn. This project combines the architectural beauty of a classical pedestal planter with the wild, verdant texture of woodland greens for a perfectly balanced display.
Detailed Instructions
Materials
- Large pedestal urn planter (white/cream with stone speckle finish)
- Square paving stone or riser block (optional, for base height)
- Potting soil mix (well-draining)
- Peat moss or compost
- Large Boston Fern or similar hardy fern variety (2-3 plants depending on pot size)
- Slow-release fertilizer granules
- Watering can
- Gardening gloves
- Small hand trowel
Step 1: Preparing the Vessel
-
Start with the base:
If your urn needs extra height or stability, place a square paving stone or concrete block on your porch surface first. Ensure it is level so the heavy urn won’t tip over once filled with soil and water. -
Position the urn:
Set your pedestal urn centrally on the base. Make sure you are happy with the location now, as moving it later will be difficult and heavy. -
Check drainage:
Inspect the bottom of the urn’s bowl for drainage holes. If none exist, you may need to drill a few small holes carefully to prevent waterlogging, which ferns dislike. -
Create a drainage layer:
Though not strictly mandatory for all pots, adding a thin layer of gravel or broken pottery shards at the very bottom can help ensure the drainage holes don’t get clogged with compacted soil.
Moisture Magic
Ferns love humidity. Mist the fronds with a spray bottle every few days to keep difficult brown tips at bay and maintain that lush green look.
Step 2: Soil and Planting
-
Mix your medium:
In a wheelbarrow or bucket, mix your potting soil with a generous amount of peat moss or compost. Ferns thrive in rich, organic material that mimics a forest floor. -
Initial fill:
Fill the urn about half to three-quarters full with your soil mixture. Press it down lightly with your hands to remove large air pockets, but keep it relatively loose. -
Prepare the ferns:
Gently remove your ferns from their nursery containers. If the roots are tightly wound (root-bound), tease them outward gently with your fingers to encourage new growth. -
Arrangement test:
Place the ferns into the urn while still in their nursery shape to test the height. The crown of the plant—where the stems meet the roots—should sit just below the rim of the urn. -
Planting the center:
If you are using multiple plants, place the largest or tallest fern in the center. I like to mound the soil slightly in the middle to give it a nice domed shape.
Step 3: Finishing and Care
-
Filling the gaps:
Add the remaining ferns around the central one if using multiple, or simply backfill with soil if using one large specimen. Ensure soil gets into all the crevices between root balls. -
Feed the greens:
Sprinkle a handful of slow-release fertilizer granules over the top of the soil. This will provide steady nutrients throughout the growing season. -
Top dressing:
Add a final layer of soil up to about an inch below the rim. This space is crucial so water doesn’t spill over the edge immediately when you irrigate. -
Initial watering:
Water the planter thoroughly until you see water trickling from the drainage holes. This settles the soil around the roots and eliminates hidden air pockets. -
Clean up:
Wipe down the exterior of the urn with a damp cloth to remove any soil smudges or dust, letting the stone-speckle finish shine brightly. -
Rotate regularly:
Ferns will naturally grow toward the light source. To keep your arrangement looking symmetrical and full on all sides, rotate the urn a quarter turn every week or so.
Drooping Fronds?
If fronds look limp despite watering, check for root rot from standing water. Ensure drainage holes are clear and soil isn’t soggy.
Enjoy the peaceful, shady retreat created by your beautiful new fern planter.
Low-Maintenance Urn Planter Using Drought-Tolerant Shapes
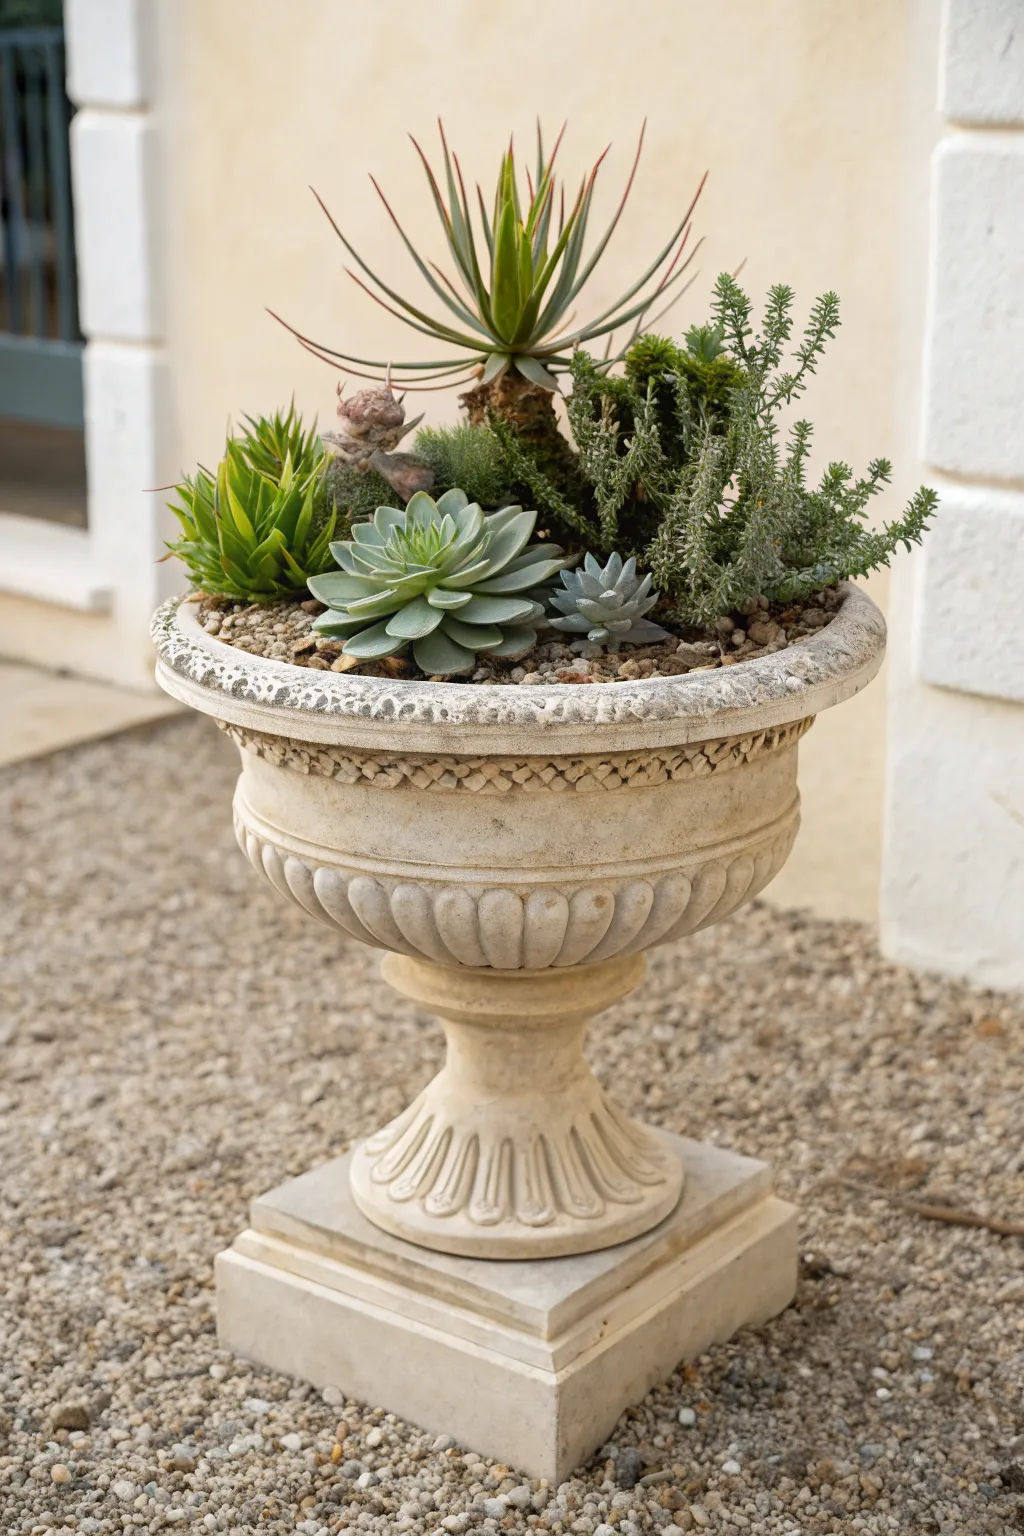
This elegant planter arrangement combines the classical formality of a stone urn with the sculptural, modern appeal of drought-tolerant succulents. The contrasting textures—from the spiky agave-like central plant to the soft, creeping sedum—create a display that looks sophisticated but requires minimal upkeep.
How-To Guide
Materials
- Stone or concrete pedestal urn (approx. 18-24 inches tall) with drainage hole
- Cactus and succulent potting mix
- Pumice or perlite (for extra drainage)
- Small gravel or pea pebbles (for top dressing)
- Hesperaloe (Red Yucca) or similar spiky central plant (e.g., Agave Geminiflora)
- Echeveria Elegans (Mexican Snowball) or similar rosette succulent
- Miniature succulent or Graptopetalum
- Small aloe grouping (such as Lace Aloe or Gold Tooth Aloe)
- Creeping Sedum or Crassula muscosa (Watch Chain) for texture
- Pot shards or mesh screen (to cover the drainage hole)
- Trowel
- Gardening gloves
Step 1: Preparing the Foundation
-
Prepare the drainage:
Begin by covering the central drainage hole at the bottom of your urn with a piece of mesh screen or a convex pottery shard. This keeps the soil in while allowing excess water to escape freely. -
Create the soil mix:
In a separate bucket, mix your cactus soil with a generous handful of pumice or perlite. Even though cactus mix is well-draining, urns can hold moisture at the bottom, so I always add this extra aeration to prevent root rot. -
Fill the urn:
Fill the urn about two-thirds full with your custom soil blend. Press it down lightly to remove large air pockets, but keep it loose enough for roots to penetrate.
Don’t Over-Pot
Succulents prefer cozy quarters. Packing them tightly limits soil volume, which actually helps the soil dry out faster between waterings—perfect for preventing rot.
Step 2: Planting the Specimen
-
Position the centerpiece:
Remove your tallest spiky plant (the Hesperaloe or Agave) from its nursery pot. Gently loosen the root ball if it’s tight. -
Plant high:
Place this central plant slightly off-center or toward the back if the urn will be viewed from one side. Ensure the base of the plant sits slightly higher than the rim of the pot to encourage water runoff away from the crown. -
Add the textured filler:
Nestle the shrubby, textured plant (like the creeping sedum or Crassula) next to the central spike. This creates a ‘middle ground’ height and adds a dark green, mossy texture to contrast against the stone.
Color Stressing
Place the urn in direct sun to ‘stress’ the succulents slightly. This causes many varieties, especially Echeverias and Aloes, to develop vibrant red or purple tips.
Step 3: Adding the Accents
-
Place the rosette:
Take your large Echeveria rosette and position it prominently in the foreground. Angle it slightly outward so its face greets the viewer. -
Insert the spiky cluster:
Group the small aloe cluster on the opposite side of the Echeveria. This echoes the spiky texture of the main plant but on a smaller scale. -
Fill the gaps:
Tuck the smallest miniature succulent into the remaining negative space between the large rosette and the shrubby filler. -
Secure the roots:
Backfill carefully with the remaining soil mix, using your fingers or a chopstick to push soil into the crevices between root balls without burying the leaves.
Step 4: Finishing Touches
-
Clean the foliage:
Use a soft brush (a clean paintbrush works wonders) to dust off any soil that may have fallen into the rosettes or trapped between the spiky leaves. -
Add top dressing:
Spread a layer of pea gravel or small stones over the exposed soil surface. This ‘mulch’ keeps the leaves dry, prevents soil splash-back during watering, and gives the planter that finished, professional look. -
Initial watering:
Wait about 3-5 days before watering to allow any broken roots to callous over. After that waiting period, water thoroughly until you see drips from the bottom of the pedestal.
Place your completed urn on a patio corner or near an entryway where its sculptural details can be admired daily
Front Steps “Tiered” Look With Urns at Different Heights
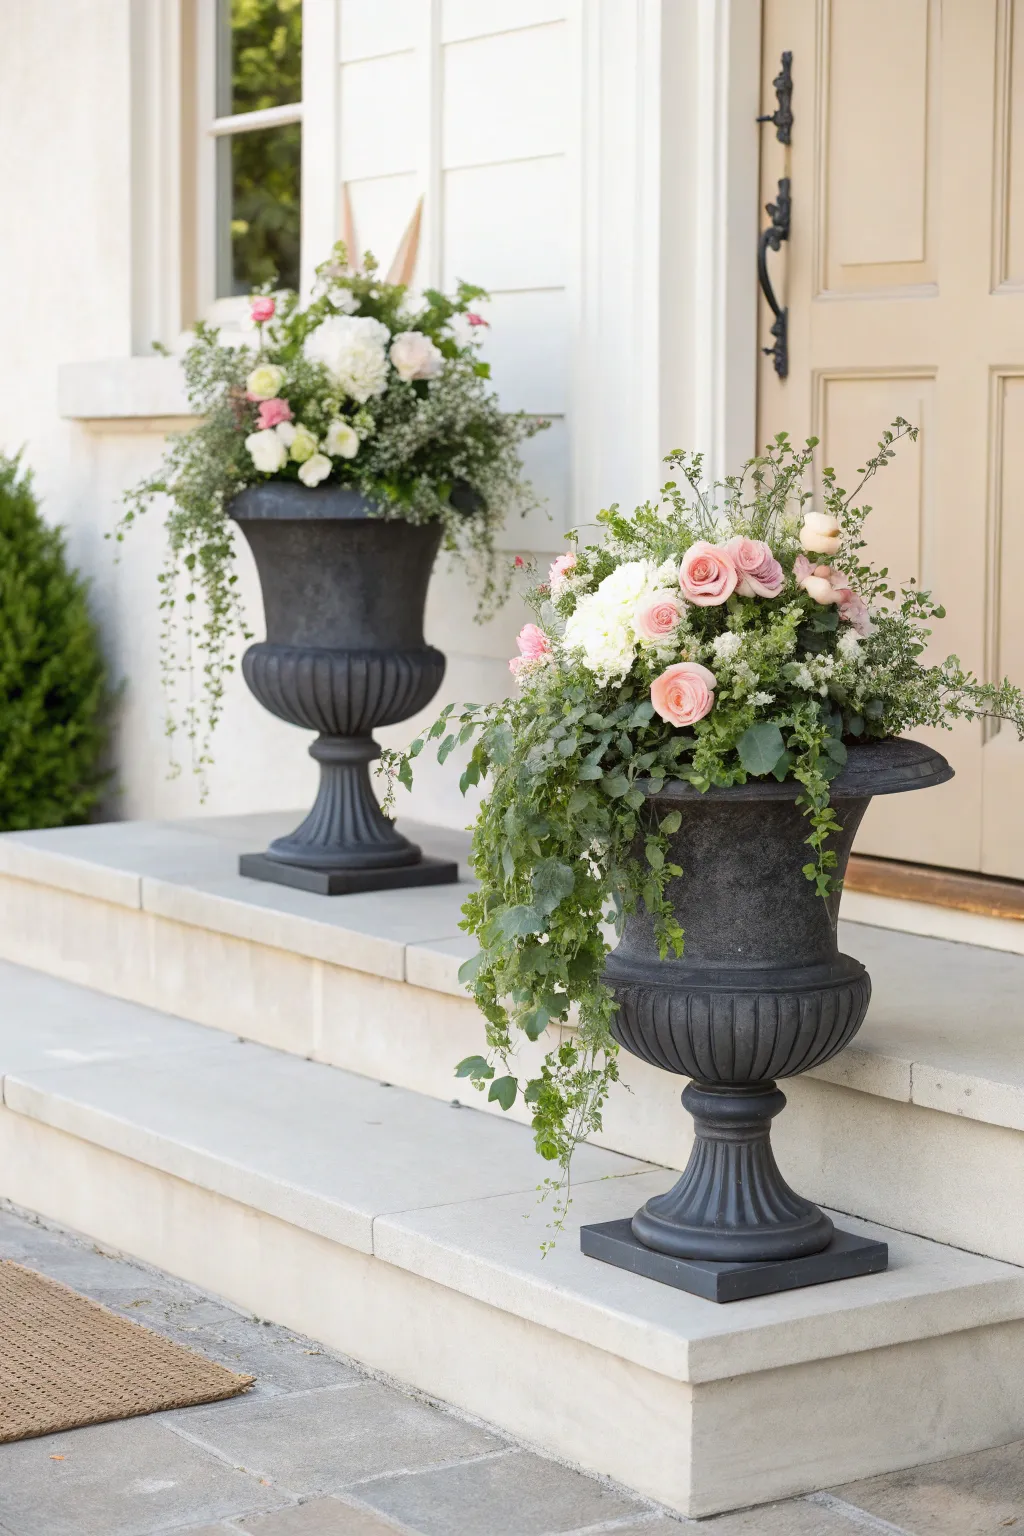
Elevate your home’s entrance with this sophisticated floral display that utilizes the natural height difference of your front steps. By staggering matching urns, you create a cascading visual flow of soft roses, hydrangeas, and trailing ivy that greets guests with timeless charm.
Step-by-Step Guide
Materials
- 2 Large black pedestal urn planters (approx. 24-30 inches tall)
- Potting soil (high-quality, well-draining)
- Slow-release fertilizer granules
- 2 Large white hydrangeas (potted)
- 6-8 Pink roses (can be established nursery pots)
- 4-6 Trailing ivy plants (English ivy or similar)
- Filler greenery (Eucalyptus or Maidenhair fern)
- Garden trowel
- Watering can
- Gardening gloves
- Pruning shears
Step 1: Preparation & Foundation
-
Position the Urns:
Place your dry, empty urns on the steps first to confirm spacing. Set one urn on the lower step and one on the step immediately above it or two steps up, ensuring they are slightly offset rather than perfectly aligned for a natural look. -
Check Stability:
Ensure the bases are sitting flat on the stone or concrete. If there is any wobble, use small shim wedges to stabilize them before filling, as they will become very heavy once watered. -
Base Fill:
Fill the bottom third of each urn with soil. I like to mix in a handful of slow-release fertilizer at this stage so the roots have nutrients waiting for them as they grow down. -
Add Main Soil:
Continue filling the urns with potting soil until you are about 3-4 inches from the rim. Press down lightly to eliminate large air pockets but keep the soil fluffy.
Drooping Blooms?
If hydrangeas wilt quickly, they likely need more water. These thirsty plants may require daily watering in hot weather, especially in black pots which absorb heat.
Step 2: Planting the Upper Urn
-
Centerpiece Placement:
Start with the urn on the higher step. Dig a hole in the center and plant your large white hydrangea. This acts as the ‘thriller’ or main focal point of the arrangement. -
Adding Height and Texture:
Tuck 2-3 pink roses around the hydrangea, slightly angling them outward. These add color and a different floral shape to contrast with the large hydrangea blooms. -
The Trailing Effect:
Plant trailing ivy near the front rim of the urn. Tease the vines over the edge so they spill down the black pedestal immediately. -
Filling Gaps:
Use your fern or eucalyptus filler greenery to plug any holes where soil is visible between the main flowers. This creates a lush, overflowing appearance.
Step 3: Planting the Lower Urn
-
Asymmetrical Balance:
For the lower urn, we want to create a connection to the upper one. Plant your second hydrangea, but perhaps place it slightly off-center towards the back. -
Layering Roses:
Group your remaining pink roses in the front-center of this urn. Since this pot is lower, these blooms will be most visible to someone walking up the path. -
Dramatic Spilling:
This is crucial for the look: Plant extra trailing ivy on the side of the urn that faces the walkway. Encourage the vines to cascade heavily, almost touching the ground. -
Textural wisps:
Add sprigs of airy filler like baby’s breath or fine-leaf foliage among the roses to soften the transition between the heavy blooms and the dark urn rim.
Seasonal Swap
Design with plastic nursery pots inside these urns. This lets you lift out spring flowers and drop in mums for fall or evergreen boughs for winter instantly.
Step 4: Finishing Touches
-
Watering In:
Water both urns thoroughly until you see water trickling from the drainage holes. This settles the soil around the new root balls. -
Clean Up:
Wipe down the exterior of the black urns with a damp cloth to remove any soil dust or muddy splashes from planting. -
Pruning:
Snip off any broken leaves or spent blooms. If the ivy looks too messy, give it a light trim to shape the cascade. -
Final Adjustment:
Take a step back to the bottom of your walkway. Check that the ‘spill’ of both planters looks balanced and that the height difference feels intentional and harmonious.
Enjoy the welcoming sight of your new tiered garden entrance every time you come home
Urn Planter With Trailers That Highlight the Pedestal Stem

Elevate your indoor greenery with this classic pedestal urn planter that specifically showcases trailing vines. The height of the vessel allows delicate foliage to spill over the edge, creating a romantic and airy display that draws the eye downward.
Step-by-Step
Materials
- Footed ceramic urn planter (cream or off-white with beaded rim detail)
- Creeping Wire Vine (Muehlenbeckia complexa) or Angel Vine (Muehlenbeckia complexa)
- High-quality potting soil appropriate for houseplants
- Gravel or small pebbles for drainage
- Small hand shovel or trowel
- Watering can with a thin spout
- Optional: Horticultural charcoal
Step 1: Preparation
-
Select the perfect urn:
Look for a planter with a distinct pedestal base. The key to this look is the height; you want enough clearance between the bowl and the table for the vines to dangle freely. -
Check for drainage holes:
Inspect the bottom of your urn. If it has a hole, ensure you have a subtle saucer or plug if using indoors. If there is no hole, you will need to create a drainage layer inside. -
Create a drainage layer:
Pour a 1-inch to 2-inch layer of small gravel or pebbles into the bottom of the urn. This prevents water from sitting directly against the roots, which is crucial for vine health. -
Add a charcoal filter (optional):
Sprinkle a thin layer of horticultural charcoal over the gravel. I find this helps keep the soil fresh and prevents odors in containers lacking bottom drainage.
Leaves dropping?
If your vine starts shedding leaves rapidly, the soil is likely too dry. These thin vines dehydrate quickly. Soak the root ball thoroughly to rehydrate.
Step 2: Planting
-
Prepare the soil base:
Fill the urn about half to two-thirds full with fresh potting soil. Don’t pack it down too tightly; you want it to remain airy for root growth. -
Loosen the plant roots:
Gently remove your Muehlenbeckia vine from its nursery pot. Carefully massage the root ball to loosen any circling roots, which encourages them to spread into the new soil. -
Position the plant:
Place the plant in the center of the urn. The surface of the root ball should sit roughly 1 inch below the urn’s rim to allow space for watering. -
Fill the gaps:
Scoop more soil around the sides of the root ball, filling the space between the plant and the container walls. Use your fingers to gently tuck the soil into pockets.
Step 3: Styling and Maintenance
-
Arrange the trails:
Examine the vines and identify the longest strands. Gently guide these strands over the lip of the urn so they cascade naturally down one side, mimicking the asymmetrical look in the photo. -
Prune for shape:
Snip off any dead leaves or awkward vertical shoots that disrupt the flowing shape. You want to emphasize the horizontal and downward movement. -
Clean the rim:
Brush off any loose soil from the beaded rim or the exterior of the urn. A soft, dry paintbrush works wonders for getting dust out of textured ceramic grooves. -
Initial watering:
Water the plant slowly around the base of the stems, attempting to avoid wetting the delicate foliage excessively. Stop when the soil feels moist but not soggy. -
Placement:
Set the finished planter on a wood console table or pedestal where the light hits it from the side, highlighting the texture of the urn and the delicate leaves. -
Ongoing care:
Monitor the soil moisture weekly. Creeping Wire Vine prefers consistent moisture but hates soggy feet, so adjust your watering based on the humidity in your home.
Antique Finish
For an aged look, rub a little dark wax or diluted brown paint into the beaded detail and crevices of the urn, then wipe away the excess with a rag.
Now you have a charming, living sculpture that brings a touch of classic garden elegance indoors
Seasonal Swap Urn Planter: Same Vessel, New “Recipe”
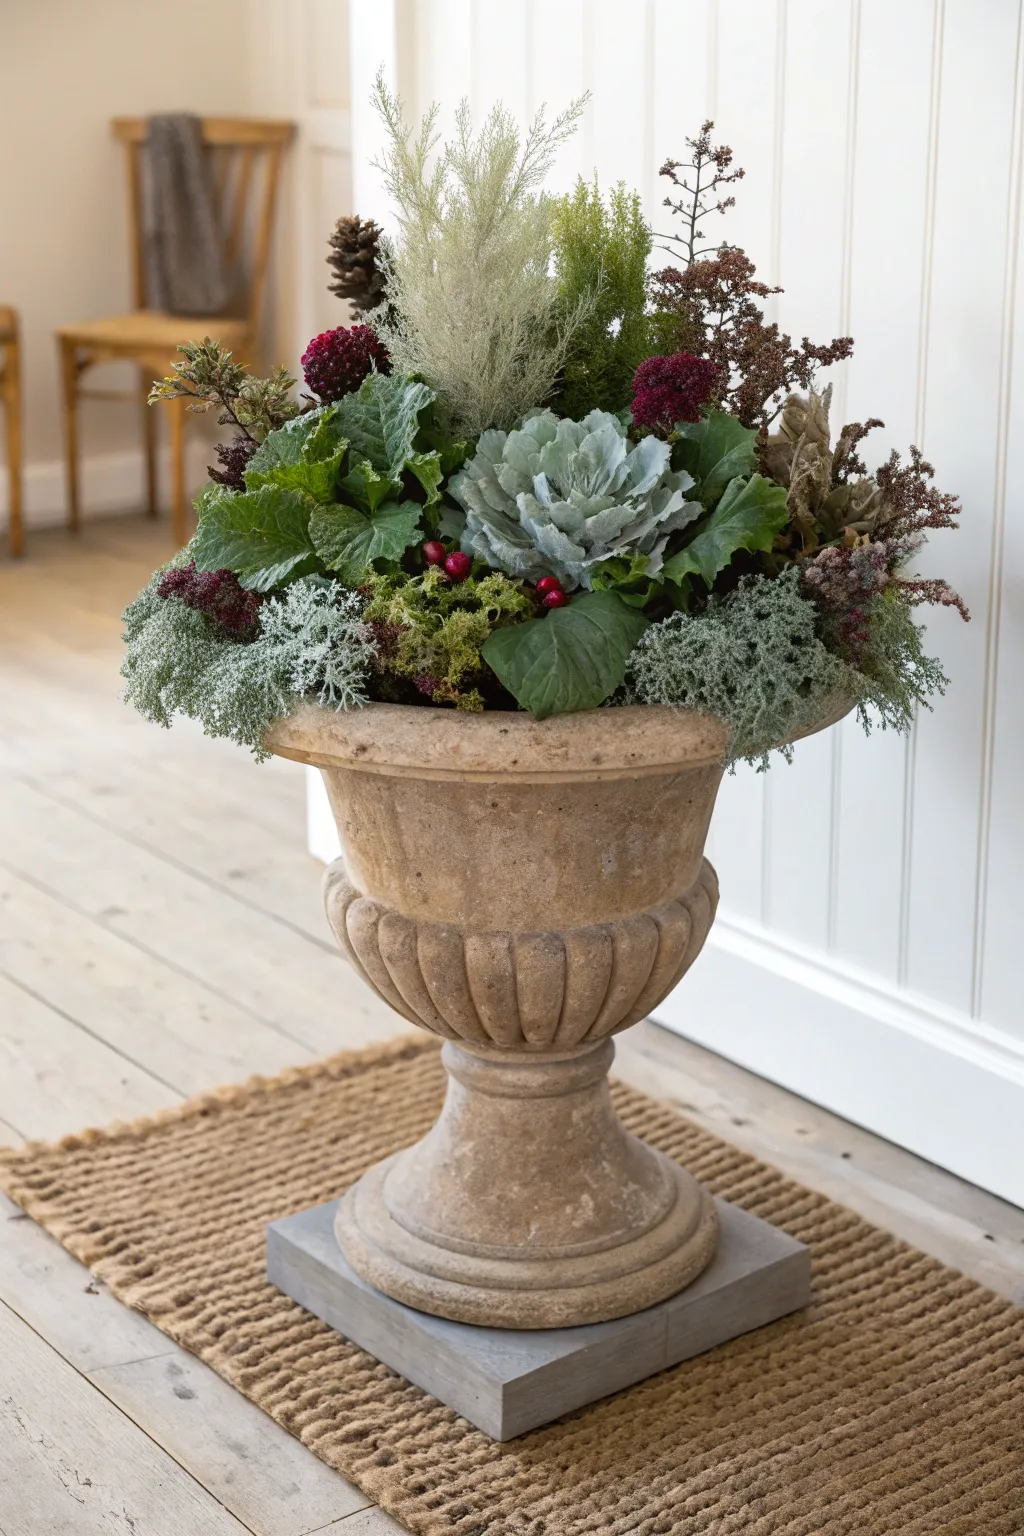
Celebrate the understated beauty of the colder months with this textural arrangement featuring hardy foliage and muted jewel tones. This ‘recipe’ transforms a classic stone urn into a lush display of ornamental kale, heather, and faux berries, perfect for a sheltered porch or entryway.
Step-by-Step Guide
Materials
- Large stone or reconstituted stone urn planter (approx. 18-24 inches tall)
- Square paving stone or riser (optional, to elevate the urn)
- Potting soil mix with added perlite/grit for drainage
- 1 large ornamental kale/cabbage (centerpiece)
- 2-3 smaller ornamental kale plants (purple and green varieties)
- 1 small Picea glauca ‘Conica’ or similar dwarf evergreen shrub
- 2-3 heather or Calluna plants (silver-foliage variety like ‘Silver Knight’)
- 2-3 Skimmia japonica or similar dark-leaved shrub with buds
- Dried seed heads (sedum or hydrangea work well)
- Faux or fresh berry sprigs (deep red/burgundy)
- Pinecones on wire picks
- Reindeer moss or cushion moss (optional filler)
Step 1: Preparing the Foundation
-
Set the Stage:
Before you begin planting, position your urn exactly where you want it displayed. Once filled with soil and damp plants, it will be extremely heavy to move. Place it on a square riser or paver if you want a little extra height and stability. -
Check Drainage:
Ensure the bottom of your urn has adequate drainage holes. If the holes are very large, cover them with a few shards of broken pottery or a piece of mesh to keep soil from washing out. -
Fill with Soil:
Fill the urn about three-quarters full with your potting mix. Press it down lightly with your hands to remove large air pockets, but keep it loose enough for roots to breathe.
Keep Kale Crisp
To keep ornamental kale looking fresh, remove yellowing bottom leaves immediately. They thrive in cooler temps, so don’t worry about frost—it actually intensifies their color.
Step 2: Arranging the Foliage
-
Establish Height:
Start by planting your tallest element, such as the dwarf evergreen or ornamental grass, slightly off-center or toward the back. This creates the vertical axis for your arrangement. -
Position the Star:
Take the largest ornamental kale—the one with that beautiful rosette shape—and plant it slightly forward and center. Angle it slightly outward so its face greets the viewer directly. -
Add Greenery:
Nestle the smaller green leafy kale or cabbage plants around the central rosette. These act as a lush, leafy collar that bridges the gap between the centerpiece and the rim of the pot. -
Insert Deep Tones:
Place the Skimmia japonica or dark-leaved plants on the sides. Their burgundy buds or dark leaves provide a crucial contrast to the pale green kale and add visual weight to the mid-ground. -
Soften the Rim:
Plant the silver heather or ‘Silver Knight’ plants around the very edge of the urn. Tease their branches so they spill over the rim, softening the hard stone edge with their frosty texture.
Holiday Transformation
When December arrives, swap the dried sedum for sparkly baubles or add battery-operated fairy lights to the evergreen branches for an instant festive update.
Step 3: Adding Texture & Detail
-
Insert Dried Elements:
Tuck stems of dried sedum or hydrangea into the gaps between the green plants. I find these dried elements act as a wonderful transition, adding that rustic, autumnal brown tone. -
Layer in Berries:
Take your berry sprigs and insert them deeply into the soil near the leafy greens. Group them in clusters of two or three for a more natural look rather than spotting them singly all over. -
Add Pinecones:
Wire your pinecones if they aren’t already on picks. Tuck them into the arrangement near the taller evergreen elements to echo the woodland theme. -
Fill the Gaps:
Look for any patches of exposed soil. Tuck small pieces of reindeer moss or cushion moss into these voids to make the arrangement look instantly established and lush. -
Water In:
Gently water the soil around the base of the plants to settle them in. Avoid watering directly onto the rosette of the ornamental kale if possible, as standing water can sometimes cause rot in freezing temps. -
Final Adjustments:
Step back and view the urn from a few feet away. Fluff the silver heather and adjust the angle of the berry sprigs until the composition feels balanced and full.
Enjoy the rich textures of your frost-proof garden display all season long
Fall Urn Planter With Mums and Natural Texture Accents
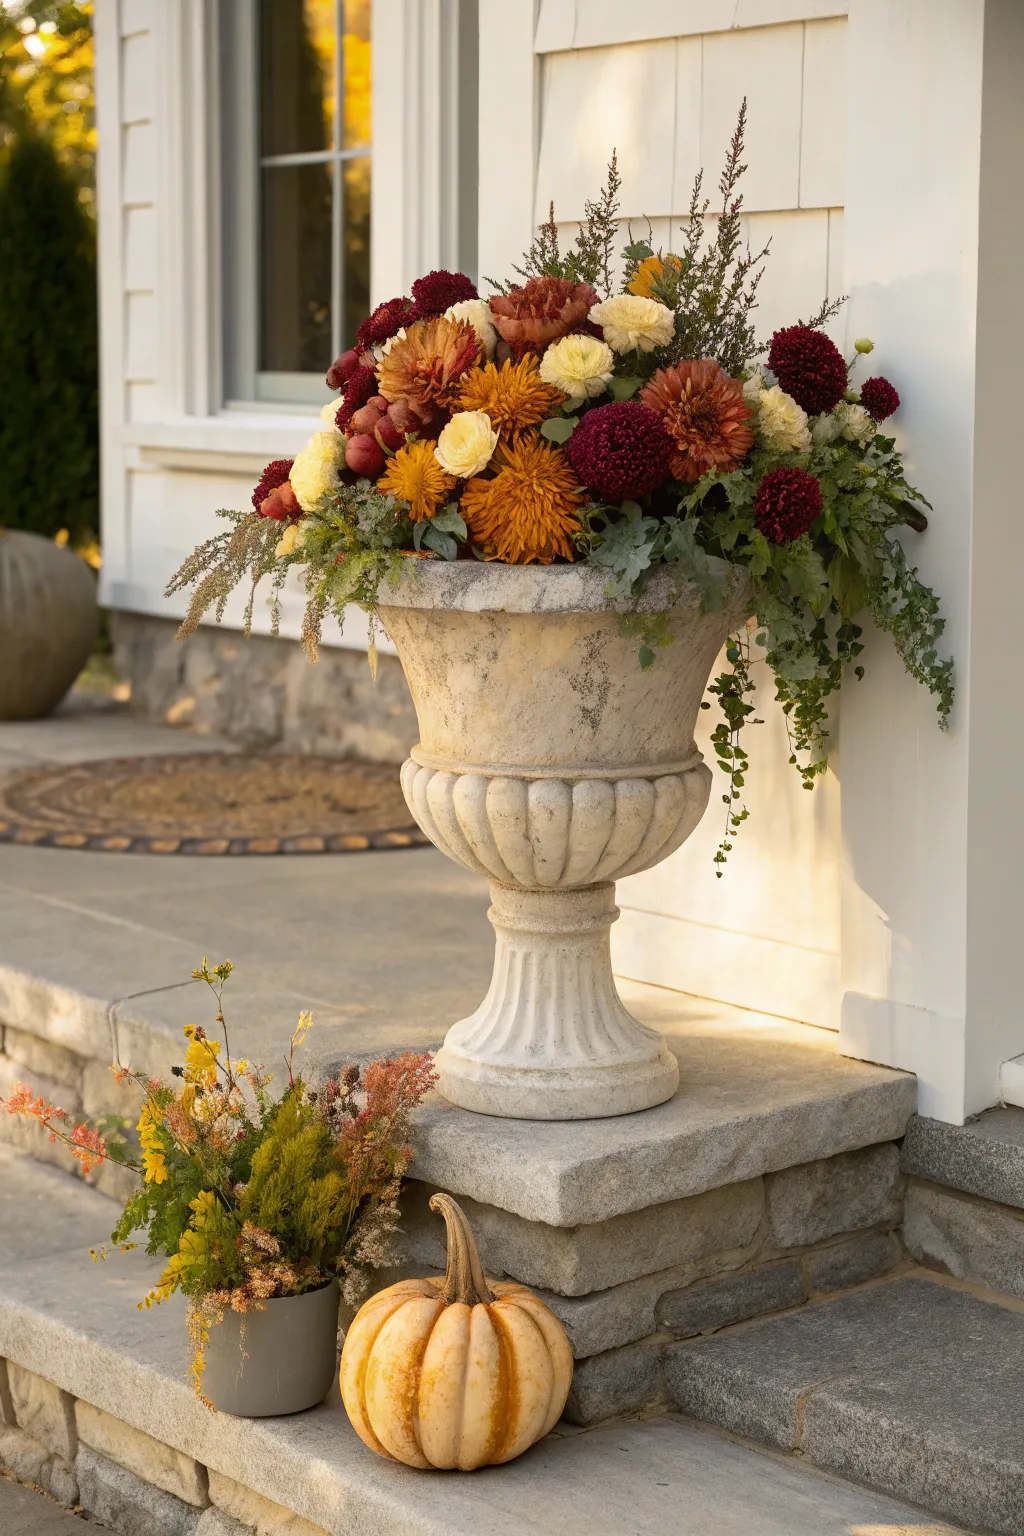
Embrace the richness of fall with this overflowing urn arrangement that combines deep burgundy mums, rustic orange tones, and trailing ivy. The weathered stone planter provides the perfect classical foundation for a textured display that celebrates the changing seasons.
Step-by-Step
Materials
- Classic pedestal stone or concrete urn (24-30 inches tall)
- Potting soil mixed with slow-release fertilizer
- 3 Burgundy button mums
- 3 Bronze/orange cushion mums
- 3 Cream/yellow mums (smaller blooms)
- 2 Trailing ivy plants (English ivy or similar)
- Dried filler stems (brown seeded branches or astilbe)
- Tall vertical accents (branches or tall grass wisps)
- Optional: Floral foam blocks if not planting directly
- Small grey pot (for side arrangement)
- Small pumpkin (Cinderella or heirloom variety)
- Wildflower mix or dried grasses for side pot
Step 1: Preparing the Foundation
-
Clean the Urn:
Start by ensuring your stone urn is clean and has a drainage hole. If it looks too new, you can rub a little soil or yogurt on the exterior a few weeks prior to encourage a weathered patina. -
Fill with Soil:
Fill the urn about three-quarters full with high-quality potting soil. Pack it down lightly to create a firm base for your plants, ensuring there’s room for the root balls. -
Arrange the Base Layer:
If you are using nursery pots, gently squeeze them to loosen the roots. I find it easiest to place the plants while they are still in their plastic pots first to visualize the spacing before committing to planting.
Pro Tip: Fullness Hack
Pack plants tighter than you would for a garden bed. Since this is a temporary seasonal display, roots don’t need extensive room to grow.
Step 2: Building the Arrangement
-
Insert Trailing Elements:
Plant your trailing ivy near the front right edge of the urn. Angle the root ball slightly outward so the vines cascade naturally down the side of the stone pedestal. -
Position the Focal Mums:
Take your largest burgundy mums and place them slightly off-center. These deep red tones anchor the design and draw the eye immediately. -
Add Warmth with Orange:
Nestle the bronze and orange cushion mums next to the burgundy ones. Grouping them closely creates a dense, luxurious look rather than a polka-dot effect. -
Incorporate Light Tones:
Tuck the cream or pale yellow mums in between the darker flowers. These lighter pops of color add dimension and prevent the arrangement from looking too heavy or dark. -
Fill in Gaps:
Add extra scoop of soil around the root balls as you go, tucking it in firmly with your fingers to remove air pockets.
Step 3: Adding Texture and Height
-
Insert Height Accents:
Place your tall, wispy branches or grasses towards the back center of the arrangement. These should tower slightly over the blooms to give the silhouette a triangular shape. -
Add Dried Fillers:
Intersperse the dried seeded branches or brown textural fillers on the left side and throughout the mums. This adds that essential ‘harvest’ feel and breaks up the softness of the petals. -
Create Asymmetry:
Allow some of the textural greenery or dried elements on the left to spill over the edge, balancing the heavy ivy trail on the right. -
Water Thoroughly:
Give the entire urn a generous watering to help the plants settle into their new home. Wash away any loose dirt from the rim of the urn.
Troubleshooting: Wilting Blooms
If mums droop quickly, the root balls are likely dry at the center. Dunk the entire root ball in a bucket of water before planting to rehydrate.
Step 4: Styling the Scene
-
Prepare the Side Pot:
Fill a small, simple grey pot with soil or floral foam. Arrange a handful of wildflowers, yellow filler flowers, and dried grasses loosely to create a ‘wild’ look. -
Place the Accents:
Set the main urn on your step or porch corner. Position the small grey pot near the base of the pedestal on the left. -
Add the Pumpkin:
Place a medium-sized heirloom pumpkin (a muted orange or tan color works best) next to the small pot. Lean its stem slightly for a casual, unposed vibration. -
Final Check:
Step back and assess the composition. Fluff the ivy strands and rotate the pumpkin if needed to show its best side.
Now you have a stunning, professional-looking fall display to welcome guests to your home
Winter Urn Planter With Evergreen Boughs and Birch Stems
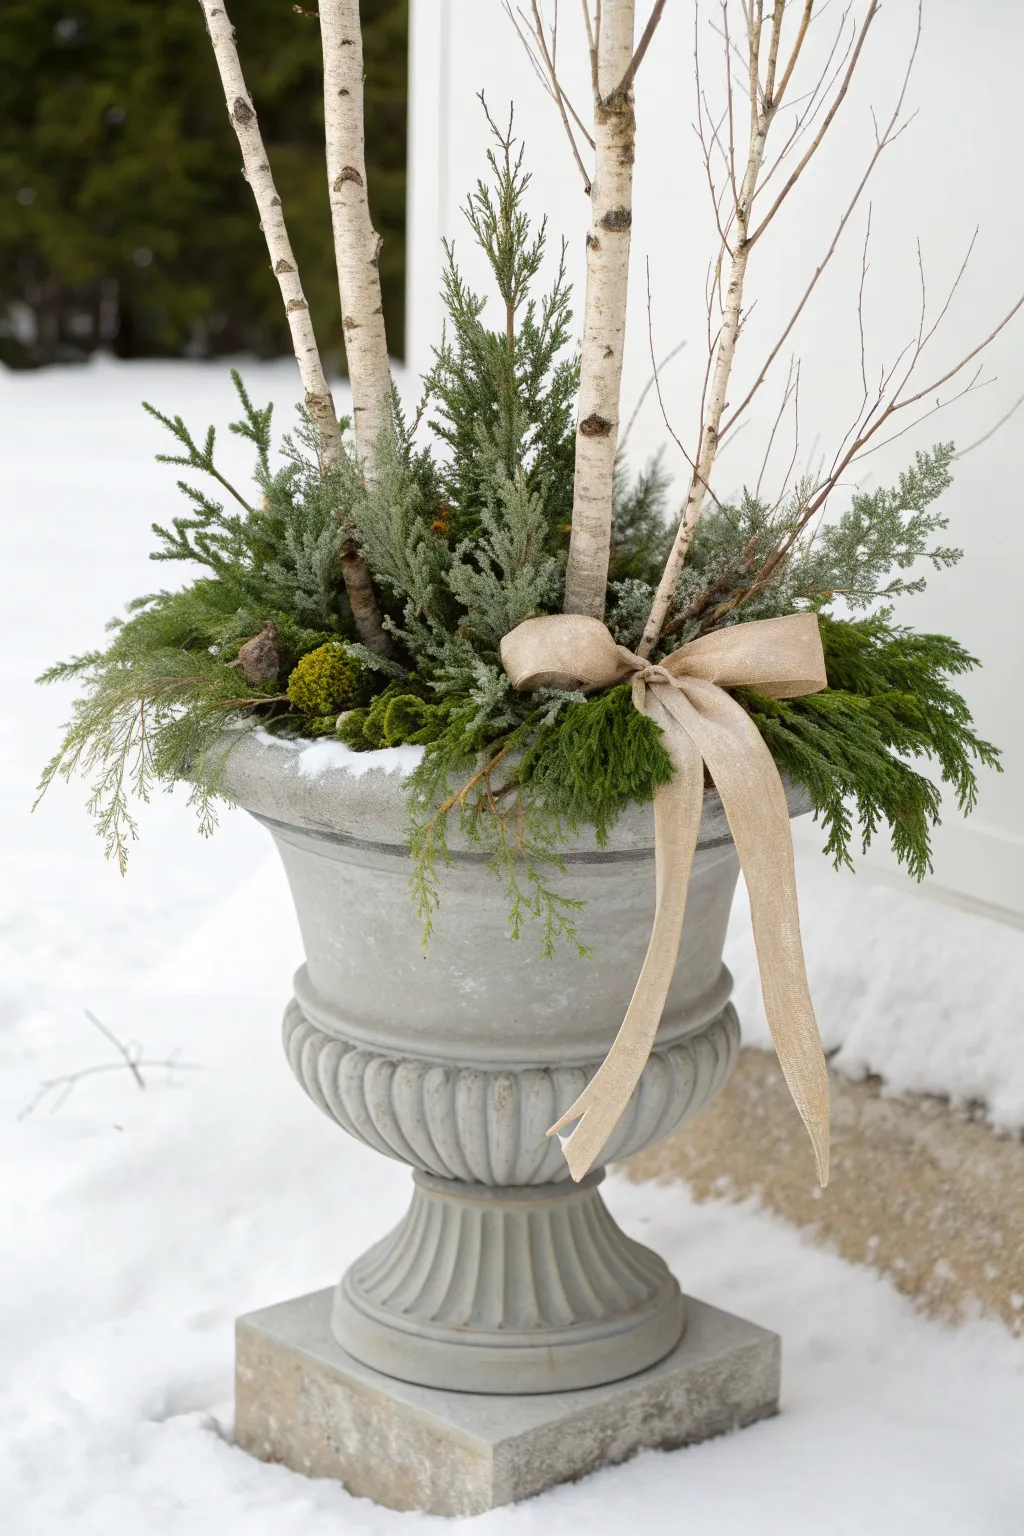
Transform your entryway with this serene winter arrangement featuring stark white birch poles rising from a lush bed of mixed evergreens. The neutral palette of snow-dusted greens, bark, and burlap creates a sophisticated, rustic look perfect for the entire winter season.
How-To Guide
Materials
- Large, classic pedestal urn (stone or resin)
- Potting soil or sand (to fill the urn)
- 3-4 White birch poles (various thicknesses, 3-5 feet tall)
- Assorted evergreen boughs (cedar, juniper, pine, spruce)
- Dry foam block or floral foam (optional, for stability)
- Wide burlap ribbon (wired edge recommended)
- Floral wire or green paddle wire
- Pruning shears
- Watering can
Step 1: Setting the Foundation
-
Prepare the Urn:
Begin by positioning your urn exactly where you want it to stay for the season, as it will be heavy once filled. If the urn is empty, fill it firmly with soil or sand. If using existing potting soil from summer, ensure it’s unfrozen enough to work with. -
Anchor the Birch:
Select your tallest birch pole and insert it deep into the center of the soil, pushing down at least 6-8 inches for stability against winter winds. I like to angle them ever so slightly outward rather than perfectly vertical for a more natural look. -
Grouping the Poles:
Place two or three additional birch poles around the central one. Vary their heights and thicknesses to create visual interest rather than a uniform fence-post look. Pack the soil firmly around the base of each pole.
Step 2: Building the Greenery
-
Establish the skirt:
Start with your draping greens, like cedar or heavy pine boughs. Insert these around the very rim of the urn, angling them downward so they spill over the pot’s edge. This softens the stone lip and creates a lush foundation. -
Layer with height:
Take taller, stiffer upright branches—like spruce or fir tops—and insert them vertically closer to the birch poles. These should bridge the gap between the soil line and the white bark, hiding the base of the poles. -
Add texture variety:
Fill in the middle ground with textural contrasting greens. Look for ‘blue’ junipers with berries or yellowish cypress to break up the dark green. Cut these stems shorter and fill in any visible soil gaps. -
Create fullness:
Step back and check for bare spots. Continue adding medium-sized boughs until the arrangement looks abundant and overflowing. Use the natural curve of the branches to create a rounded, mounded shape. -
Incorporate twigs:
For an airy, wild touch, tuck a few thin, bare twigs or red twig dogwood stems among the greenery. These fine lines mimic the bare trees of winter and add delicate height.
Loose Poles?
If your soil is too loose to hold the heavy birch poles securely, wedge large stones or bricks around their bases beneath the soil surface to lock them in place before adding greens.
Step 3: Adding the Accents
-
Introduce moss accents:
Nestle a few clumps of bright green reindeer moss or cushion moss near the front center, just above the rim. This pop of chartreuse adds a lovely, living detail. -
Tie the bow:
Cut a long length of wide burlap ribbon. Form a simple, large shoelace bow, ensuring the loops are generous and fluffy. Leave the tails long enough to drape gracefully down the front of the urn. -
Secure the ribbon:
Wrap a piece of floral wire through the back loop of your knot. Secure the bow to a sturdy distinct branch or a wooden pick inserted into the soil near the front right of the birch cluster. -
Shape the tails:
Adjust the ribbon tails so one cascades naturally over the greenery. If using wired ribbon, gently manipulate the fabric to look like it’s fluttering in a breeze rather than hanging stiffly. -
Freeze in place:
Water the soil thoroughly immediately after arranging. In freezing climates, this water will turn to ice, effectively cementing your arrangement in place and keeping it fresh and upright all winter.
Light It Up
Wrap battery-operated classic warm white LED fairy lights around the birch poles and weave them through the boughs for a magical nighttime glow that highlights the textures.
Enjoy the peaceful view of your winter garden as the snow settles on your new arrangement
Painted or Faux-Aged Finish to Make Any Urn Look Heirloom
Transform a standard fiberglass or plastic garden urn into a stunning architectural piece that looks like it has weathered centuries in a French chateau garden. This layering technique uses multiple paint shades and texture mediums to create an authentic, chipped-stone patina full of character.
Step-by-Step Guide
Materials
- Large plastic or fiberglass urn planter with pedestal base
- Sandpaper (120 and 220 grit)
- Spray primer (grey or terra cotta)
- Stone-textured spray paint (optional base)
- Chalk paint or acrylic paints (taupe, warm cream, charcoal grey, raw umber)
- Plaster of Paris or joint compound
- Sea sponge
- Chip brushes (various sizes)
- Clean cotton rags
- Matte clear sealer spray
- Paper towels
- Garden soil
- Assorted greenery and white flowers (ivy, ferns, ranunculus)
Step 1: Preparation & Base Coat
-
Clean the surface:
Begin by thoroughly cleaning your urn with soapy water to remove any manufacturing oils or dust. Let it dry completely. -
Scuff sanding:
Lightly sand the entire exterior surface with 120-grit sandpaper. This roughens the smooth plastic finish, giving the paint something substantial to grip onto. -
Apply primer:
Spray the entire urn with a high-quality primer. A grey or terra cotta primer works well as an undertone that will subtly peek through later layers. -
Add texture foundation:
To mimic real stone, you can apply a layer of stone-textured spray paint. Alternatively, mix a little baking soda or Plaster of Paris into a taupe base paint to create a gritty texture. -
Base color application:
Paint the entire urn with a warm taupe or ‘greige’ color using a chip brush. Don’t worry about perfect coverage; a little patchiness adds to the aged effect.
Fixing “Too New” Looks
If the finish looks too uniform, spatter slightly watered-down brown paint using an old toothbrush to create random, natural-looking speckles.
Step 2: Creating the Aged Patina
-
Adding dimension:
Mix a small amount of joint compound with cream paint to create a thick paste. Dab this onto high points, rims, and decorative carvings using a sea sponge or stiff brush to simulate calcium deposits or chipped stone. -
Let it set:
Allow the texture paste to dry until it’s firm to the touch but not fully cured—usually about 30 to 45 minutes depending on humidity. -
Knockdown texture:
Gently gently sand the dried paste patches with 220-grit sandpaper to soften any sharp peaks and integrate the texture into the urn’s surface. -
Dry brushing cream:
Dip the tips of a dry chip brush into warm cream chalk paint. Offload most of the paint onto a paper towel, then lightly drag the brush over raised details to highlight the texture. -
create depth with wash:
Mix raw umber paint with water (about 1 part paint to 4 parts water). Brush this watery mixture into crevices, grooves, and under the rim where dirt would naturally accumulate. -
Wipe back:
Before the dark wash dries, wipe the surface with a damp rag. This removes the dark color from the high points while leaving it settled deep in the carvings for instant shadow and definition. -
Adding grey weathering:
I like to stipple on touches of charcoal grey paint in random spots, particularly near the base and underside of the bowl, to mimic mold or water stains. -
Blending the layers:
Using a slightly damp sea sponge, gently dab over areas where paint colors meet to soften harsh lines, creating a natural, weathered transition between the hues.
Step 3: Final Touches & Planting
-
Sealing the finish:
Once you are happy with the look and the paint is fully dry, spray the entire urn with a matte clear sealer to protect your faux finish from rain and sun. -
Prepare for planting:
Ensure the urn has proper drainage holes. If not, drill a few in the bottom. Fill the urn with high-quality potting soil. -
Arranging greenery:
Start by planting spilling greenery like ivy or creeping jenny around the edges so they drape over the rim, softening the stone look. -
Adding height and fullness:
Fill the center with bushy ferns or leafy plants for volume. Intersperse white blooms like ranunculus or roses for a classic, romantic touch that complements the aged stone color.
Mossy Accent
For an ancient vibe, dab plain yogurt onto parts of the finished urn and leave it in a shady spot; real moss may start to grow on the textured surface.
Place your newly aged urn by your entryway or in a garden corner to instantly add a sense of history and charm to your outdoor space