Air dry clay is my favorite way to make pieces that actually earn a spot in your daily routine, not just on a shelf. If you’re craving projects that feel both pretty and practical, these useful air dry clay ideas are the sweet spot.
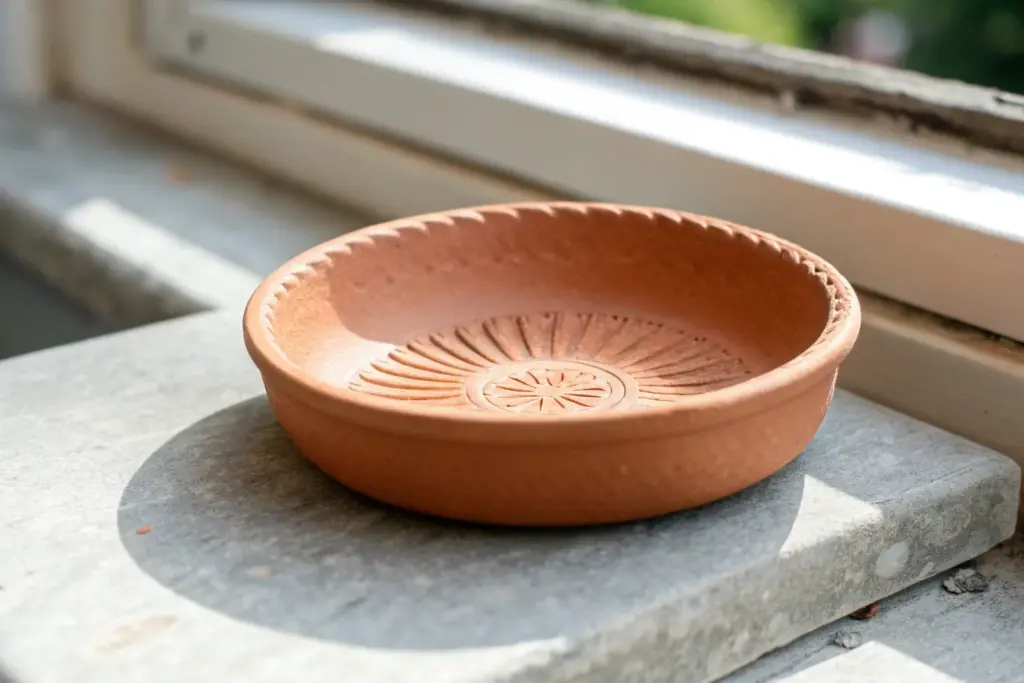
Classic Trinket Dish for Daily Jewelry
This elegant little trinket dish mimics the high-end look of speckled stoneware pottery without needing a kiln. Its gentle, irregular rim and natural finish provide the perfect resting spot for your daily rings and studs.
Step-by-Step
Materials
- White air dry clay
- Rolling pin
- Circle cutter (or a bowl approx. 4 inches wide)
- Craft knife
- Small bowl for shaping (optional)
- Small sponge
- Water
- Fine-grit sandpaper (220 grit or higher)
- Black acrylic paint
- Old toothbrush or stiff bristle brush
- Gloss or satin varnish (mod podge or polyurethane)
- Gold paint or gold gilding wax (for the rim)
Step 1: Shaping the Base
-
Prepare the Clay:
Cut off a chunk of white air dry clay and knead it well in your hands to warm it up and remove any air bubbles. It should feel pliable and smooth. -
Roll it Out:
Place the clay on a smooth surface or canvas mat. Use a rolling pin to flatten it into an even slab, aiming for a thickness of about 1/4 inch. -
Cut the Circle:
Press your circle cutter or place an inverted bowl onto the clay slab as a template. Use a craft knife to cut around the edge cleanly. -
Create the Lip:
Gently lift the edges of the clay circle with your fingers to create a shallow rim. I like to pinch the sides upward slightly while rotating the piece to keep it symmetrical. -
Smooth the Edges:
Dip your finger into a little water and run it along the rim and the interior surface to smooth out any cracks or fingerprints. Don’t use too much water, or the clay will become mushy. -
Refine the Shape:
If you want a perfectly round curve, you can place your clay circle inside a small bowl lined with plastic wrap to help it hold its shape while it begins to set. -
Initial Drying:
Allow the dish to dry for 24 to 48 hours in a cool, dry place. Flip it over halfway through the drying process to ensure the bottom dries evenly and prevents warping.
Splatter Control Tips
Test your splatter technique on a piece of scrap paper first. If the drops are too big, wipe the brush slightly; if nothing comes out, add more water.
Step 2: Finishing and Decorating
-
Sand for Smoothness:
Once the dish is bone dry and hard, use fine-grit sandpaper to buff the rim and surface. Focus on removing any sharp ridges left from the cutting or shaping phase. -
Clean the Dust:
Wipe the entire piece down with a slightly damp sponge or cloth to remove all sanding dust. This ensures your paint and varnish will adhere properly. -
Prepare the Splatter:
Squeeze a small amount of black acrylic paint onto a palette. add a drop or two of water to thin it down until it has an inky consistency. -
Create the Speckles:
Dip an old toothbrush into the thinned black paint. Hold the brush over the dish and run your thumb across the bristles to flick tiny specks of paint onto the surface. -
Control the Density:
Continue splattering until you achieve your desired look. For this project, a fairly dense, random pattern mimics the look of stoneware clay. -
Dry the Paint:
Let the paint speckles dry completely, which should only take about 10 to 15 minutes. -
Apply the Gold Rim:
Using a small detail brush or your fingertip, apply a thin line of gold paint or gilding wax along the very top edge of the rim. This adds that touch of elegance seen in the reference. -
Seal the Dish:
Apply a coat of gloss or satin varnish over the entire top surface of the dish. This seals the clay and makes the speckled effect pop. -
Final Cure:
Allow the varnish to cure fully according to the manufacturer’s instructions before placing any jewelry inside.
Make it a Set
Use different sized bowls to create a nesting trio of dishes. Try splattering with navy blue or dark brown for a different ‘stone’ effect.
Your finished dish now has the sophisticated charm of pottery store find, ready to hold treasures on your nightstand


Catch-All Key Bowl for Your Entry Table

This charming, rustic catch-all bowl features a gently undulating rim and a lovely speckled finish that mimics high-end stoneware. Perfect for organizing keys and trinkets, its natural texture and warm, toasted edges bring an earthy elegance to any entryway table.
Step-by-Step Tutorial
Materials
- White air dry clay (approx. 1 lb)
- Rolling pin
- Canvas mat or parchment paper
- Medium mixing bowl (to use as a mold)
- Plastic wrap
- Craft knife or needle tool
- Sponge and water
- Acrylic paints (Cream/Off-White, Burnt Umber or Dark Brown)
- Old toothbrush (for splattering)
- Small detail paintbrush
- Matte varnish or sealant
Step 1: Shaping the Clay
-
Prepare the slab:
Begin by removing a substantial chunk of white air dry clay from the package. Knead it briefly in your hands to warm it up and ensure it’s pliable without air bubbles. -
Roll it out:
Place the clay on a canvas mat or parchment paper to prevent sticking. Use your rolling pin to flatten the clay into a large circle, aiming for an even thickness of about 1/4 inch. -
Cut the circle:
Find a bowl or plate slightly larger than your desired finished size to use as a template. Place it lightly on the clay and trace around it with a needle tool or craft knife to cut a clean circle. -
Prepare the mold:
Select a medium-sized kitchen bowl to act as your slump mold. To ensure easy removal later, cover the inside of the bowl entirely with plastic wrap, smoothing it out as much as possible. -
Form the shape:
Gently lift your clay circle and lay it inside the prepared bowl. Press it lightly into the bottom so it takes the curve of the mold. -
Create the wave:
This is where the character shines. Using your fingers, gently push and pull sections of the rim to create a wavy, organic edge. I like to make some dips deeper than others for a natural look. -
Smooth the edges:
Dip a sponge or your finger in a little water and run it along the rim to soften any sharp cuts or rough spots. The edge should look rounded and worn, not sliced. -
Let it dry:
Allow the clay to dry inside the mold for at least 24 hours. Once the top feels touch-dry, carefully pop it out of the mold, peel off the plastic, and let the bottom dry for another 12-24 hours until fully hardened and white.
Step 2: Finishing and Painting
-
Refine the surface:
Once fully dry, check for any unwanted rough patches. You can use fine-grit sandpaper to gently smooth the surface, but don’t over-sand; the organic texture is part of the charm. -
Base coat:
Mix a creamy off-white acrylic paint. Apply two coats to the entire bowl, inside and out, allowing the first coat to dry before adding the second for solid coverage. -
Create the speckles:
Dilute a small amount of dark brown or burnt umber paint with water until it’s quite runny. Dip an old toothbrush into this mixture. -
Splatter technique:
Hold the toothbrush over the bowl and run your thumb across the bristles to flick tiny droplets of paint onto the surface. Rotate the bowl to get even, random coverage. -
Paint the rim:
Using the same dark brown paint (undiluted this time) and a small detail brush, carefully paint the very edge of the rim. Let the line be slightly uneven to enhance the rustic aesthetic. -
Distress the rim:
While the rim paint is still slightly wet, dab it gently with a paper towel or a dry brush to feather the color downward slightly, giving it that toasted, vintage pottery appearance. -
Seal the piece:
Protect your work by applying a layer of matte varnish or sealant. This will keep the paint from chipping and make the bowl easier to dust later.
Pro Tip: Thickness Matters
Don’t roll the clay too thin! A thickness of 1/4 inch is ideal. If it’s too thin, the wavy edges become fragile and are prone to cracking during the drying process.
Troubleshooting: Warping
If the bottom of the bowl puffs up while drying, gently weigh it down with a small bag of rice or beans placed inside the bowl during the final drying phase to keep it flat.
Place your finished bowl on your console table and enjoy the organized simplicity it brings to your daily routine


Terrazzo-Style Coasters That Protect Your Surfaces
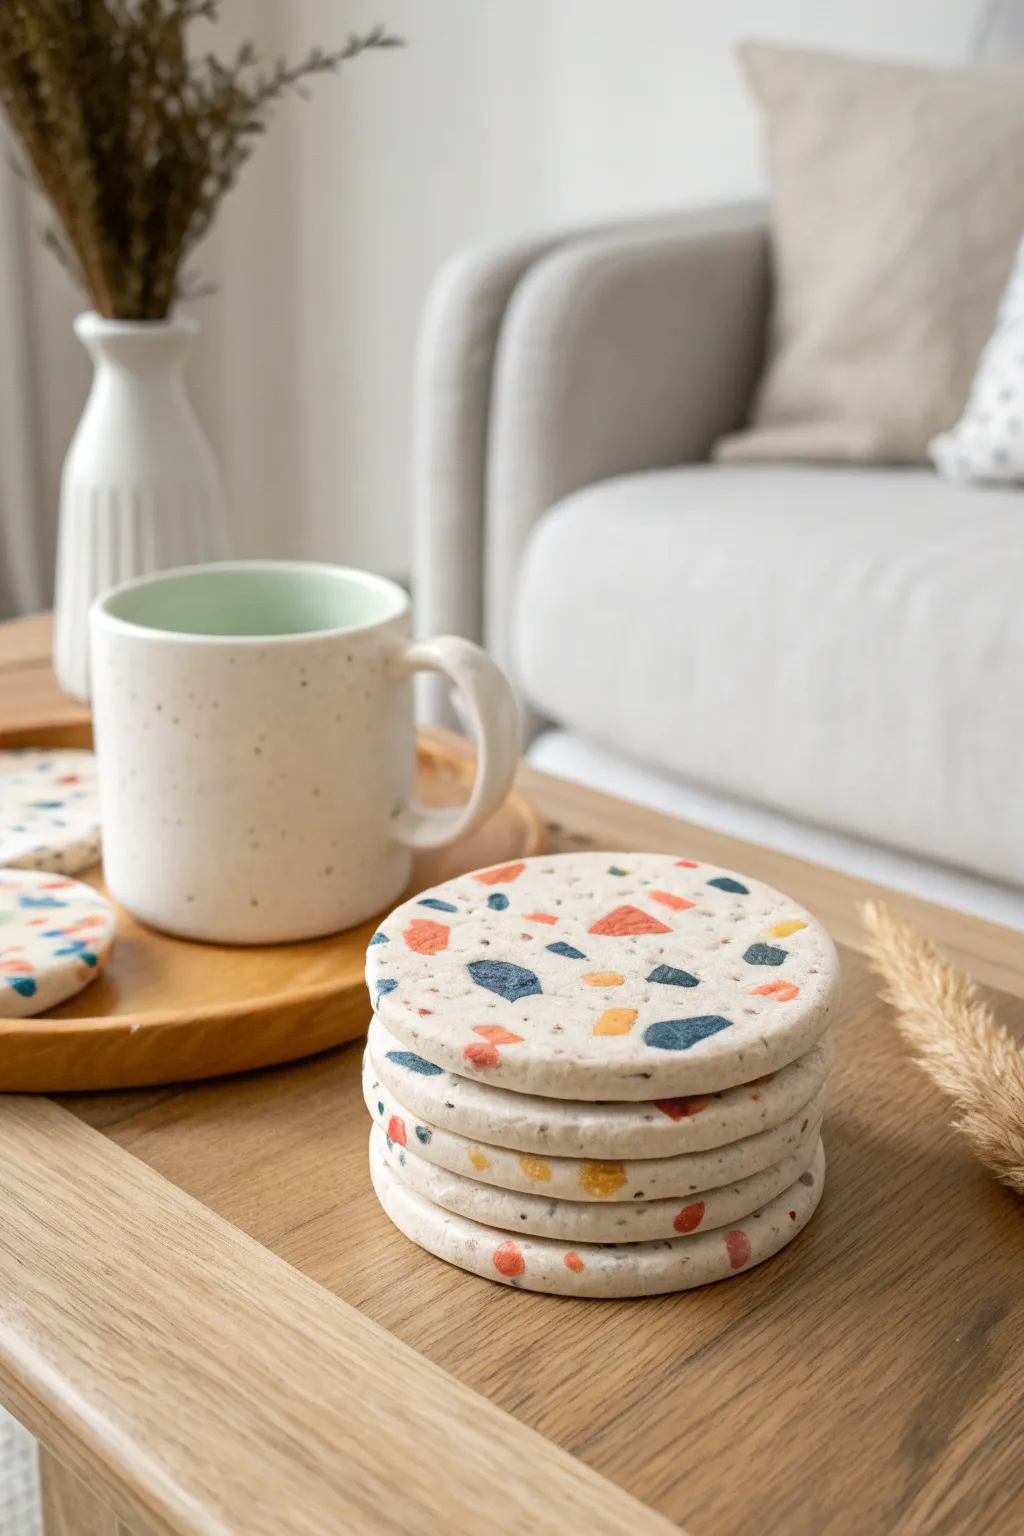
Bring a touch of artisan charm to your coffee table with these trendy terrazzo-style coasters. Using basic air dry clay and a fun inlay technique, you can create smooth, durable pieces that look like expensive stone but are surprisingly lightweight.
Step-by-Step
Materials
- White or light grey air dry clay
- Acrylic paints (primary colors: blue, red/orange, yellow, teal)
- Rolling pin
- Circular cookie cutter or large glass (approx. 4 inches)
- X-acto knife or craft blade
- Sandpaper (medium and fine grit)
- Acrylic sealer, Mod Podge, or varnish (matte or satin finish)
- Parchment paper or silicone mat
- Small paintbrush
- Small bowl of water
Step 1: Preparing the ‘Chips’
-
Mix your colors:
Pull off four or five small, grape-sized balls of clay. Knead acrylic paint into each ball individually to create your chip colors—aim for a muted teal, a rust orange, a sunny yellow, and a deep navy blue as seen in the photo. -
Flatten the colored clay:
Roll each colored ball out very thinly, about 1-2mm thick. It doesn’t need to be perfectly round or neat. -
Dry partially:
Let these thin colored sheets sit out for about 15-20 minutes. You want them to be slightly leathery and firm, but not bone dry. -
Create the chips:
Tear or cut the colored sheets into irregular, jagged shapes of various sizes. Keep them relatively small, ranging from tiny specks to pea-sized chunks.
Step 2: Forming the Base
-
Roll the main slab:
Take a large chunk of white clay and knead it until soft. Roll it out on parchment paper to a uniform thickness of about 1/4 inch (6-7mm). -
Distribute the chips:
Scatter your colored clay chips randomly across the surface of the white slab. I like to make sure I have a good mix of colors in every area. -
Embed the design:
Gently run your rolling pin over the slab again. Press firmly enough to drive the colored chips flat into the white clay so the surface becomes level again. -
Cut the shape:
Using your circular cutter or a glass as a template, cut out your coaster shapes. If using a knife, keep the blade vertical for a clean edge. -
Smooth the edges:
Dip your finger in a little water and gently run it around the circumference of each coaster to remove any sharp cutting marks or burrs.
Preventing Curling
If coasters warp while drying, place a heavy book on top of them (sandwich them between parchment paper) once they are semi-dry to force them flat
Step 3: Finishing and Sealing
-
Initial drying:
Place the coasters on a flat surface away from direct heat to dry. Flip them over every few hours to ensure they dry evenly and don’t curl. -
Wait for full cure:
Allow at least 24-48 hours for the clay to dry completely. The clay should look chalky white and feel room temperature, not cool to the touch. -
Sanding for exposure:
Sand the top surface aggressively with medium-grit sandpaper. This is the magic step that scrapes away the top film of white clay to reveal the sharp, clear shapes of the colored chips underneath. -
Final smoothing:
Switch to fine-grit sandpaper to buff the surface until it feels buttery smooth. Wipe away all dust with a slightly damp cloth. -
Apply sealer:
Paint a thin layer of acrylic varnish or sealant over the top and sides. This protects the clay from moisture from your mugs. -
Second coat:
Once dry, apply a second coat of sealer for extra durability, paying attention to the edges.
Level Up: Stone Texture
Mix dried tea leaves or used coffee grounds into your white base clay before rolling. This adds tiny speckles that mimic real granite stone texture
Stack your set on the coffee table and enjoy your handcrafted décor


Tiny Salt Spoon for a Handmade Table Moment
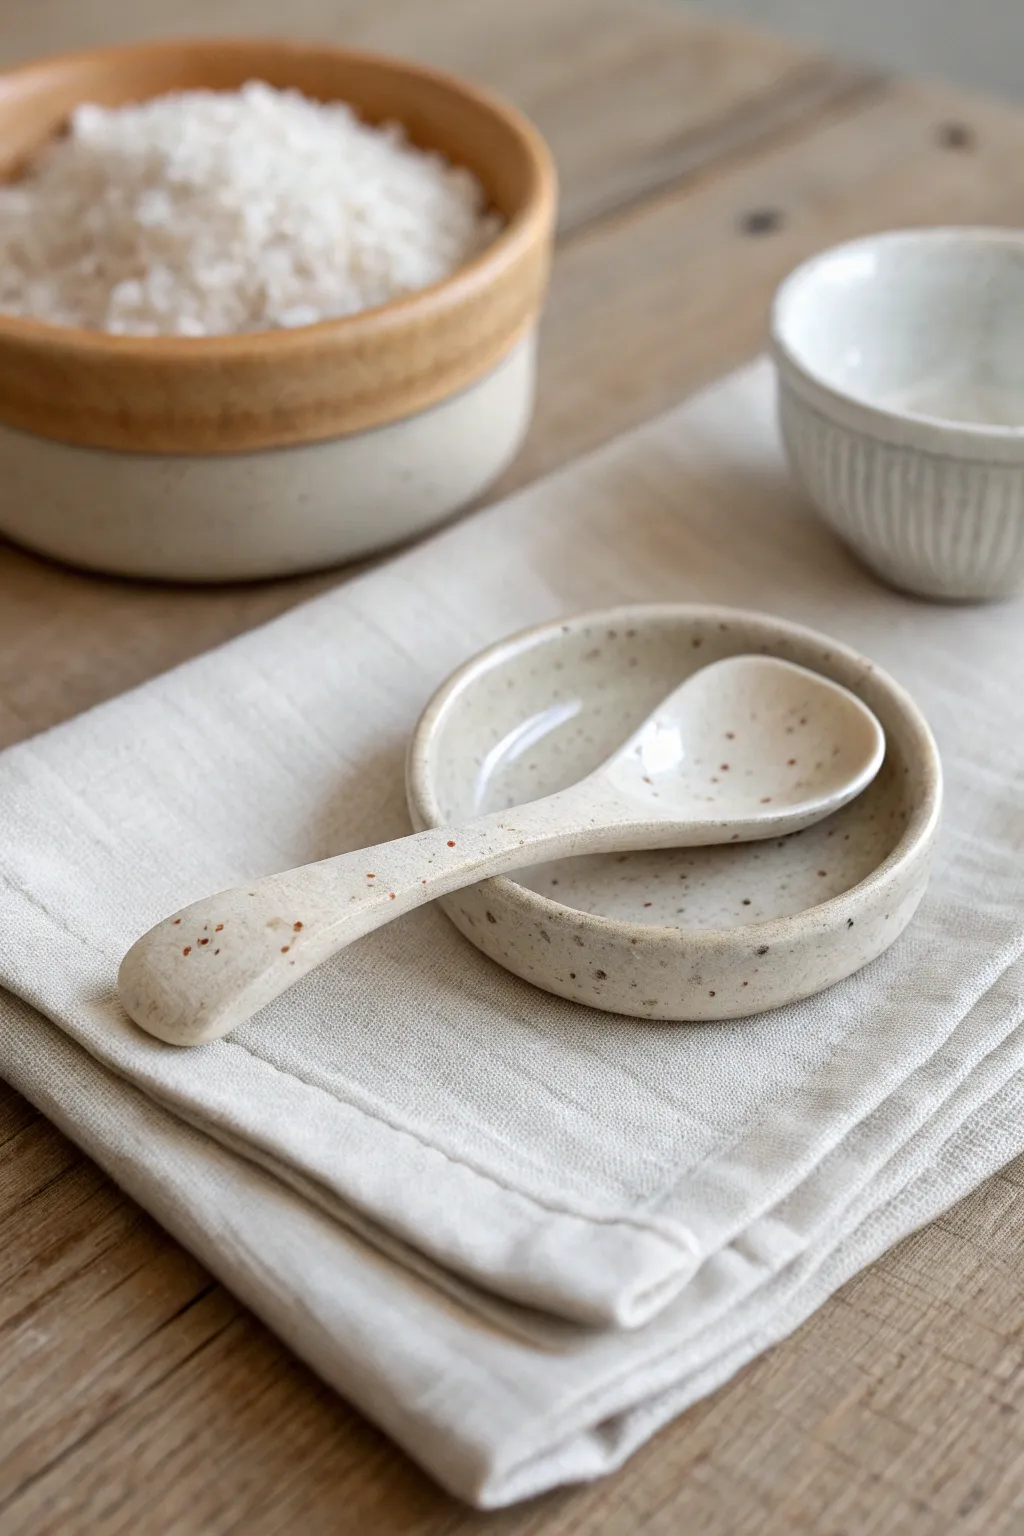
Elevate your table setting with this charming, faux-ceramic salt spoon that looks like it came straight from a pottery studio. With its organic shape and speckled finish, this tiny utensil adds a touch of artisan warmth to your spice jars or serving dishes.
How-To Guide
Materials
- White air-dry clay (fine grain)
- Small cup of water
- Modeling tools (or a toothpick and small knife)
- Fine-grit sandpaper (400-600 grit)
- Acrylic paints: Cream/Off-white, Light Brown, Dark Brown
- Old toothbrush or stiff bristle brush
- Gloss varnish or food-safe sealant (if intended for light dry use)
- Soft paintbrush
Step 1: Shaping the Spoon
-
Prepare the clay:
Start by pinching off a small lump of air-dry clay, roughly the size of a marble. Knead it in your fingers until it feels warm and pliable, eliminating any existing cracks. -
Roll the coil:
Roll the ball between your palms to form a short, thick cylinder. One end should remain slightly bulbous for the spoon’s bowl, while the other tapers gently for the handle. -
Form the bowl:
Using your thumb, gently press into the bulbous end to create the indentation. Rotate the piece as you press to keep the walls even, aiming for a shallow, organic curve rather than a perfect circle. -
Refine the handle:
Smooth the handle down, flattening the very end slightly if you want a comfortable grip. I like to curve the handle just a bit so it rests nicely on the edge of a pinch bowl. -
Smooth the surface:
Dip your finger in a tiny amount of water and run it over the entire spoon to erase fingerprints. Be careful not to use too much water, or the clay will become mushy. -
Initial dry:
Set the spoon aside to dry completely. This usually takes 24-48 hours depending on humidity. Flip it over halfway through to ensure the bottom dries evenly.
Smoother Finishes
To get a truly porcelain-like finish, burnish the clay with the back of a metal spoon when it’s ‘leather hard’ (semi-dry) before it fully dries.
Step 2: Refining and Painting
-
Sanding:
Once fully dry and hard, gently sand the spoon with fine-grit sandpaper. Focus on the rim of the bowl and the handle tip to ensure they are soft to the touch. -
Base coat:
Mix a creamy off-white acrylic paint. Apply two thin coats to the entire spoon, allowing the first layer to dry before applying the second for opaque coverage. -
Mixing the speckle:
Dilute a small amount of light brown and dark brown paint with water on your palette. You want a fluid, ink-like consistency for the splattering technique. -
The flicking technique:
Dip an old toothbrush into the watered-down brown paint. Hold the brush over the spoon and run your thumb across the bristles to flick tiny speckles onto the surface. -
Adding dimension:
Repeat the speckling process with the darker brown paint, but use a lighter touch. This creates depth and mimics the natural iron spots found in fired stoneware. -
Detailing:
If any speckles look too large or unnatural, quickly dab them with a clean paper towel or paint over them with a tiny dot of your base cream color. -
Sealing:
Apply a coat of high-gloss varnish to give the spoon that wet, glazed pottery look. If you plan to use this for actual salt, ensure you use a food-safe sealant specifically designed for non-fired clay.
Create a Set
Don’t stop at one! Make a matching pinch pot by forming a simple ball and pressing your thumb into the center, using the same speckle technique.
Now you have a darling little utensil perfect for scooping salt or spices

What Really Happens Inside the Kiln
Learn how time and temperature work together inside the kiln to transform clay into durable ceramic.
Napkin Rings That Make Weeknight Dinner Feel Special
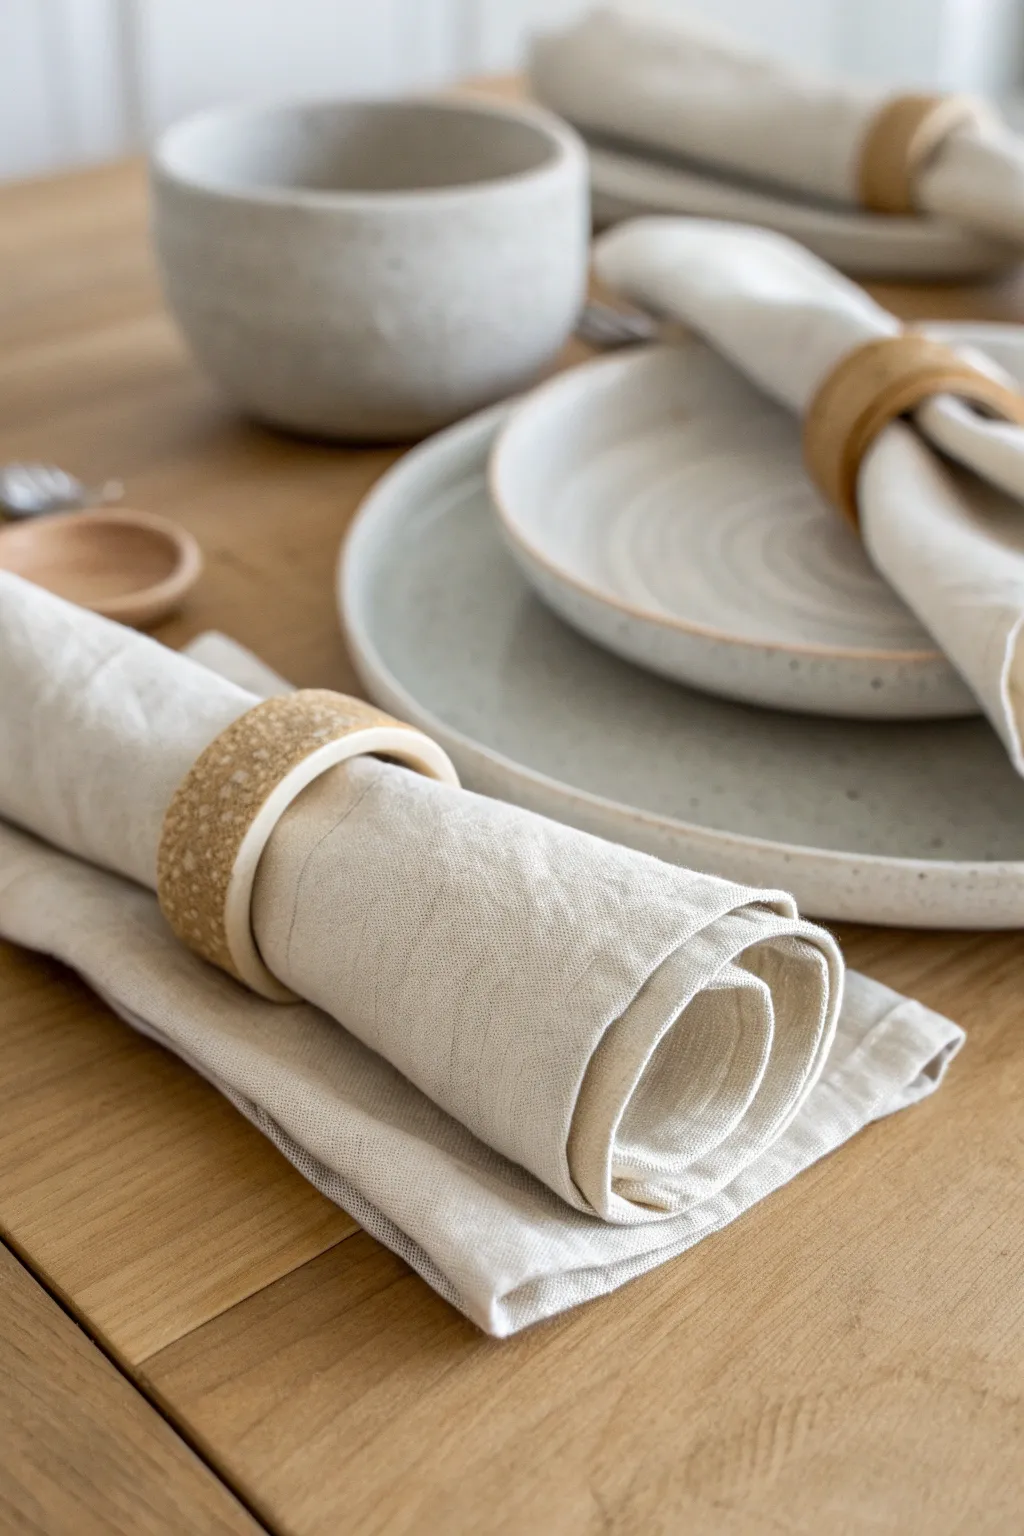
Elevate your dining table with these minimalist, faux-stoneware napkin rings that bring an organic warmth to any setting. Using air dry clay and a simple texturing technique, you can achieve this high-end ceramic look right at home without a kiln.
Step-by-Step Tutorial
Materials
- White air dry clay
- Rolling pin
- Sharp craft knife or clay slicer
- Cardboard tube (like a paper towel roll) or PVC pipe
- Parchment paper
- Small bowl or cup of water
- Sandpaper (fine grit)
- Used coffee grounds or coarse sand (for texture)
- Matte acrylic varnish or sealant
- Sponge or paint brush
Step 1: Preparation & Mixing
-
Prepare your workspace:
Lay down a sheet of parchment paper on a flat surface. This prevents the clay from sticking and makes cleanup much easier. -
Slice the clay:
Cut a manageable block of white air dry clay, enough to make your desired number of rings. A fist-sized amount is usually good for a set of four. -
Create the texture mix:
To get that speckled, organic look seen in the photo, flatten your clay slightly and sprinkle a pinch of dried used coffee grounds or coarse sand onto the surface. -
Knead thoroughly:
Fold the clay over the grounds and knead it well. I like to keep kneading until the specks are evenly distributed throughout the entire ball to mimic natural stoneware clay.
Clean Cuts Pro-Tip
Coat your craft knife blade with a tiny bit of oil or lotion before slicing the clay. This helps the blade glide through cleanly without dragging or warping your straight edges.
Step 2: Shaping the Rings
-
Roll out the slab:
Use your rolling pin to flatten the clay into a long, even strip. Aim for a thickness of about 1/4 inch (approx. 6mm) to ensure durability without looking chunky. -
Cut uniform strips:
Using a ruler and your craft knife, cut long rectangular strips. Each strip should be about 1.5 inches wide and roughly 6 inches long. -
Prepare the mold:
Wrap your cardboard tube or PVC pipe in a small piece of parchment paper. This critical step ensures the clay slides off easily once dry. -
Form the ring:
Take one clay strip and wrap it gently around the parchment-covered tube. Bring the ends together until they overlap slightly or meet flush, depending on your preference. -
Join the seam:
Score the meeting ends with your knife (make little crosshatch scratches), dab a tiny bit of water on them, and press firmly together to bond. -
Smooth the connection:
Dip your finger in water and smooth out the seam on both the inside and outside until the join is invisible. The ring should look like one continuous loop.
Step 3: Finishing Touches
-
Refine the edges:
While the clay is still damp on the tube, gently run a wet finger along the top and bottom rims to soften any sharp cutting lines. -
Initial drying:
Stand the tube upright and let the clay dry for about 24 hours. Keep it away from direct heat sources to prevent cracking. -
Remove from mold:
Once the clay feels firm and dry to the touch, gently slide the rings off the tube and peel away the parchment paper. -
Inside drying:
Lay the rings on their sides to let the interior dry completely. This usually takes another 12-24 hours depending on humidity. -
Sand for perfection:
Once bone dry, use fine-grit sandpaper to smooth out any bumps, uneven rims, or remaining texture from the seam area. Wipe away the dust with a slightly damp cloth. -
Seal the piece:
Apply a coat of matte acrylic varnish to the entire ring. This protects the clay from moisture and gives it that finished ceramic feel. -
Final cure:
Let the varnish cure fully according to the bottle instructions before using them with your best linens.
Two-Tone Level Up
Paint the inside of the dry ring with a contrasting glossy glaze or cream acrylic paint before sealing. This creates a sophisticated, professional ‘dipped’ look.
Setting the table with these handmade pieces creates a beautiful, grounded atmosphere instantly
Pen Cup Desk Organizer With a High-End Finish
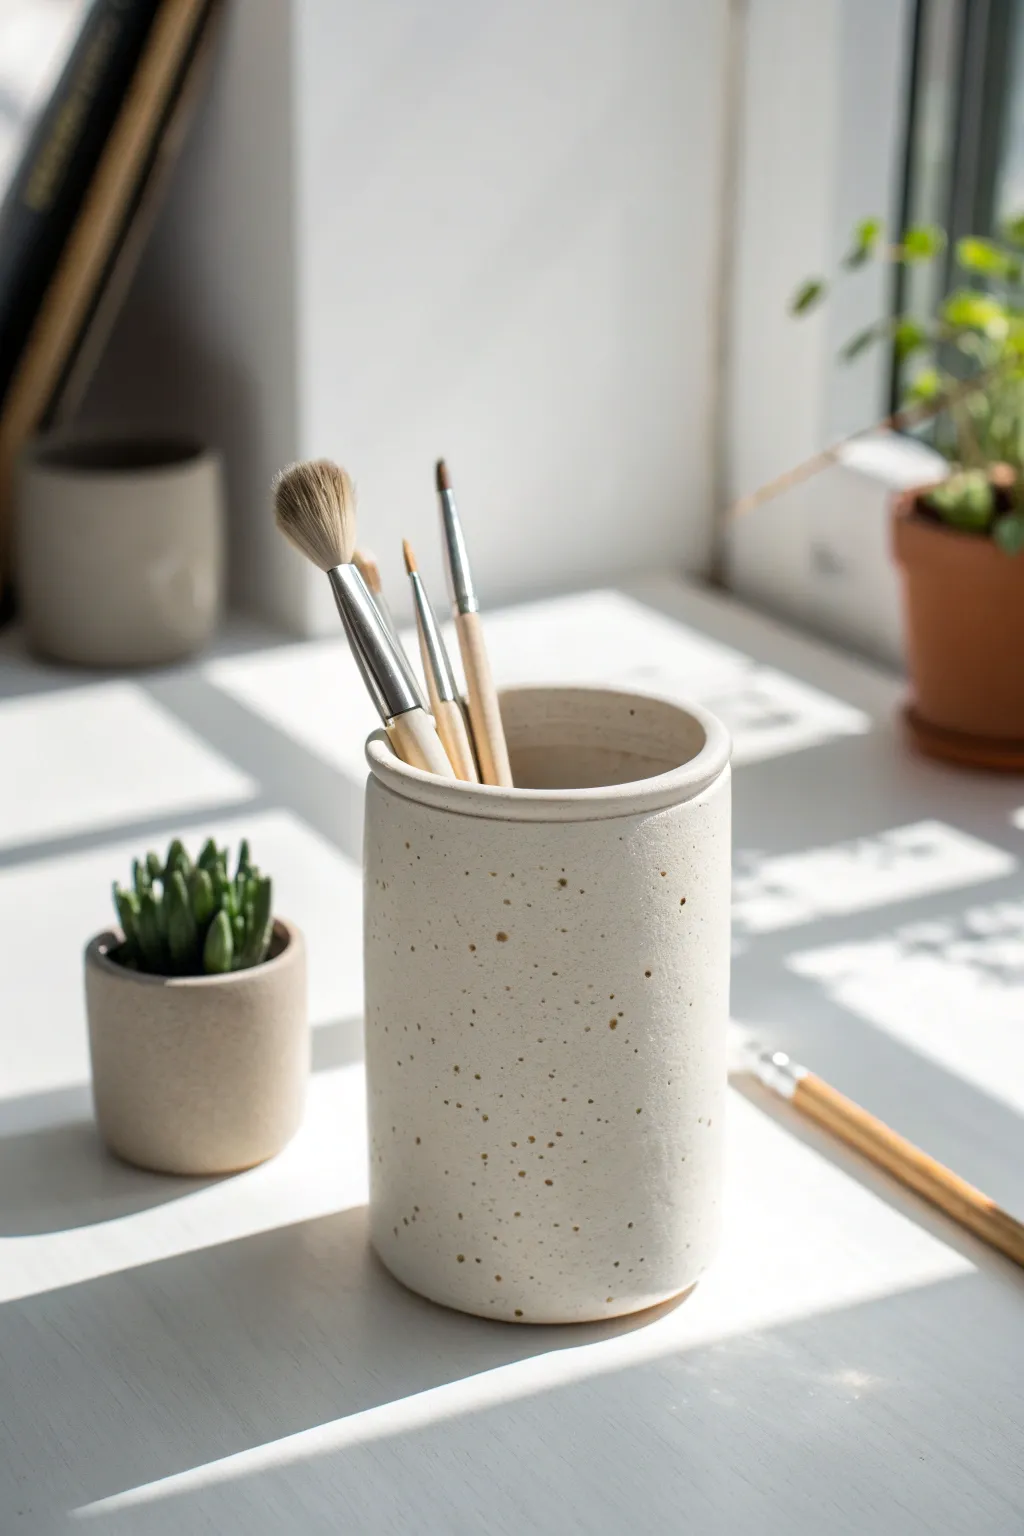
This minimalist desk organizer mimics the look of high-end speckled pottery without needing a kiln. Its clean cylindrical shape and subtle organic texture make it a sophisticated addition to any workspace.
Step-by-Step Tutorial
Materials
- White air dry clay (approx. 500g)
- Rolling pin
- Empty can or jar (to use as a mold)
- Craft knife or clay cutter
- Slip (clay mixed with water)
- Sandpaper (fine grit)
- Tan or light brown acrylic paint (for speckles)
- Old toothbrush or stiff bristle brush
- Matte or satin acrylic varnish
- Small bowl of water
- Parchment paper or canvas mat
Step 1: Forming the Base Structure
-
Prepare your workspace:
Lay down parchment paper or a canvas mat to prevent sticking. Take a large chunk of white air dry clay and knead it briefly until it is pliable and smooth. -
Roll the slab:
Use your rolling pin to flatten the clay into a long rectangular slab. Aim for an even thickness of about 1/4 inch (6mm). If you want perfect uniformity, place guide stick strips on either side of the clay. -
Cut the rectangle:
Measure the height and circumference of your mold (the can or jar). Cut a rectangle from your clay slab that is slightly larger than these measurements so you have room to trim later. -
Create the base:
Roll out a separate, smaller piece of clay for the bottom. Place your mold on top of it and trace around the bottom with a needle tool or knife to cut out a perfect circle. -
Wrap the mold:
Wrap your rectangular clay slab loosely around your mold. Before sealing, ensure the mold is wrapped in parchment paper or plastic wrap so the clay doesn’t get stuck permanently.
Cracking Up?
If small cracks appear during drying, make a paste of clay and water. Fill the cracks, let dry, and sand smooth before painting.
Step 2: Assembly and Refining
-
Score and slip the seam:
Where the two ends of the rectangle meet, scratch the edges with your knife (scoring) and apply a dab of water or clay slip. Press the ends together firmly to create the cylinder wall. -
Attach the bottom:
Score the bottom edge of your cylinder and the outer edge of your circular base. Apply slip, then press the cylinder onto the base. Use a modeling tool or your finger to smooth the clay from the wall down onto the base to seal the joint. -
Smooth the exterior:
Wet your fingers slightly and run them over the vertical seam and the bottom join until they are invisible. The goal is a seamless, continuous surface. -
Shape the rim:
Focus on the top lip of the cup. For that handmade pottery look seen in the photo, flatten the rim slightly with your thumb, creating a distinct, slightly thick edge rather than a sharp one. -
Remove the mold:
Allow the clay to firm up for an hour or two so it can support its own weight. Carefully slide the mold out. If the shape warps slightly, gently pat it back into a circle. -
Dry completely:
Let the piece dry for 24-48 hours. Turn it upside down halfway through the drying process to ensure the bottom dries thoroughly.
Step 3: Creating the Faux-Ceramic Finish
-
Sand for smoothness:
Once fully dry, use fine-grit sandpaper to remove any fingerprints or rough bumps. Wipe away the dust with a slightly damp cloth. -
Mix the speckle paint:
Dilute a small amount of tan or light brown acrylic paint with water. It should be fluid, distinct from the thick paint in the tube. -
Apply the splatter:
Dip an old toothbrush into the diluted paint. Hold the brush a few inches from the cup and run your thumb across the bristles to flick tiny specks onto the surface. I prefer to practice on paper first to get the density right. -
Rotate and repeat:
Rotate the cup and continue splattering until you have an even distribution of speckles all around. Vary the distance slightly to create different sized dots. -
Seal the piece:
Once the paint is dry, apply two coats of matte or satin varnish. This mimics the look of glazed stoneware and protects the clay from moisture.
Go Geometric
Carve vertical grooves into the wet clay using a loop tool before drying for a modern, fluted texture instead of smooth.
Now you have a stylish, custom organizer ready to tidy up your best brushes and pens


The Complete Guide to Pottery Troubleshooting
Uncover the most common ceramic mistakes—from cracking clay to failed glazes—and learn how to fix them fast.
Incense Holder Tray That Catches the Ash
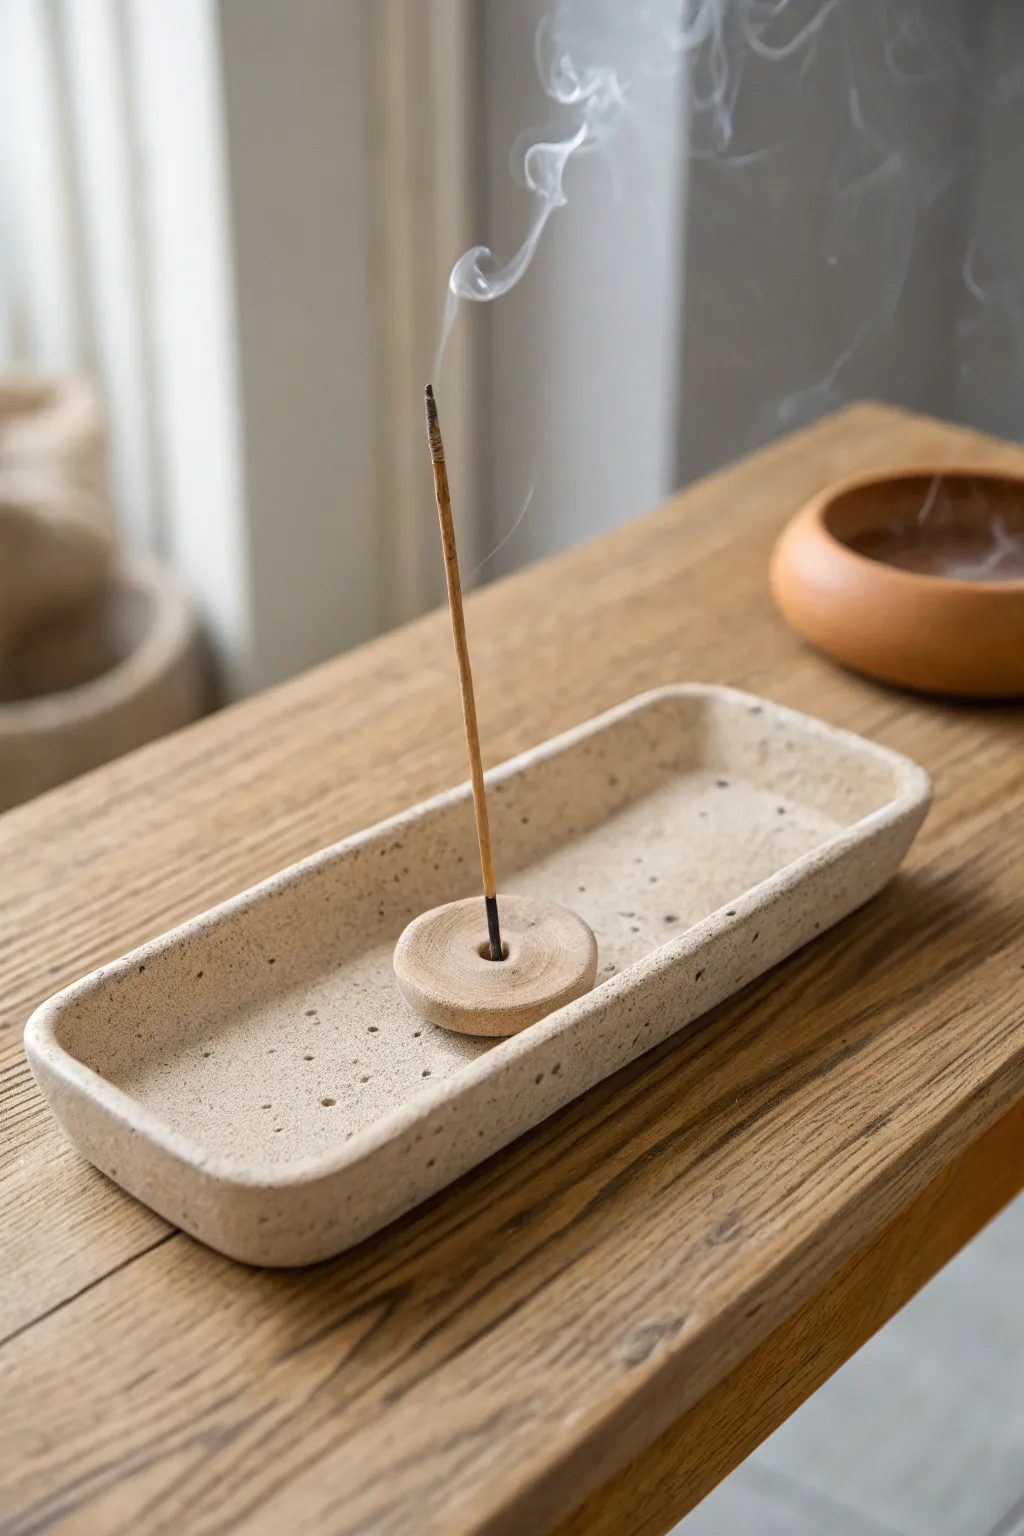
This elegant incense holder combines a long, rectangular tray with a simple disc insert to keep your surfaces clean while adding a touch of organic calm to your space. The speckled finish mimics the look of natural stone, giving it a high-end feel achievable with simple air dry clay.
Detailed Instructions
Materials
- White or natural air dry clay
- Rolling pin
- Two wooden guide strips (approx. 5-7mm thick)
- Ruler and craft knife
- Small bowl of water
- Sponge
- Ground coffee or black pepper (for speckles)
- Sandpaper (fine grit)
- Wooden skewer or toothpick
- Gloss or matte varnish/sealant
- Acrylic rolling pin or glass jar
Step 1: Preparing the Clay Body
-
Mix the Speckles:
Start by taking a large handful of air dry clay. To achieve that beautiful stone-like texture, sprinkle in a teaspoon of used (dried) heavy coffee grounds or coarse black pepper. Knead the clay thoroughly until the specks are evenly distributed throughout the mass. -
Roll the Slab:
Place your clay between two wooden guide strips on a non-stick surface. Use your rolling pin to flatten the clay. The guides ensure your tray has a consistent thickness from end to end, which is crucial for even drying. -
Cut the Base Shape:
Using a ruler and a craft knife, cut a rectangle approximately 3 inches wide by 8 inches long. Don’t discard the excess clay just yet; you’ll need it for the holder component. -
Soften the Edges:
Dip your finger in a little water and gently run it along the cut edges of your rectangle. You want to smooth out the sharp angles into a soft, rounded curve to match the organic feel of the reference image.
Warp Whack-a-Mole
If the tray edges curl up while drying, gently weigh down the center with a small beanbag or bag of rice to keep it flat.
Step 2: Forming the Tray Walls
-
Create Coils:
Take your leftover clay scraps and roll out long, thin snakes (coils) about the thickness of a pencil. These will form the rim of your tray. -
Score and Slip:
Use a needle tool or toothpick to scratch hatched lines (scoring) along the outer top edge of your rectangular base. Do the same to one side of your clay coil. Apply a small amount of water (slip) to the scored areas. -
Attach the Rim:
Press the coil firmly onto the edge of the base, working your way around the entire perimeter. If the coil breaks, simply score and slip the ends to join a new piece. -
Blend the Seams:
Using a modeling tool or just your thumb, drag the clay from the coil down onto the base on the inside, and from the base up onto the coil on the outside. This blending bonds the pieces into one solid unit. -
Refine the Wall Shape:
Once blended, use a damp sponge to smooth everything out. Gently pinch the walls to create a uniform height and slight curvature. The goal is for the rim to look like it naturally flows from the base, rather than sitting on top of it.
Step 3: Creating the Stick Holder
-
Cut the Disc:
Roll out a small piece of the remaining speckled clay, aiming for a slightly thicker slab than before—about 1cm thick. Use a small round cookie cutter or a bottle cap to cut out a perfect circle. -
Round the Form:
Smooth the sharp edges of the disc with your wet finger, giving it a soft, pebble-like appearance. -
Create the Insertion Hole:
Take an incense stick (or a skewer of the same diameter) and press it into the absolute center of the disc. I like to wiggle it slightly to ensure the stick won’t get stuck once the clay shrinks during drying. -
Check the Angle:
Ensure the hole goes all the way through or is deep enough to hold a stick securely upright. If you want the stick to angle slightly, tilt your tool now.
Level Up: Color Wash
Mix a tiny drop of burnt umber acrylic paint into your varnish for an aged, antique ceramic look.
Step 4: Finishing Touches
-
Slow Drying:
Place both the tray and the disc holder in a cool, dry place away from direct sunlight. Let them dry for at least 24-48 hours. Flipping the tray gently halfway through helps prevent warping. -
Sanding:
Once bone dry, take fine-grit sandpaper and lightly buff the surface. This will expose the coffee or pepper speckles more clearly and remove any lingering fingerprints. -
Clean and Dust:
Wipe away all sanding dust with a slightly damp cloth or a dry paintbrush to ensure a clean surface for sealing. -
Sealing:
Apply a coat of matte varnish or sealant to protect the clay from ash stains. A matte finish preserves the natural stone look better than gloss. Let the sealer cure fully before use.
Now you have a serene, custom-made spot to burn your favorite scents and relax
Taper Candle Holder for Cozy Evenings
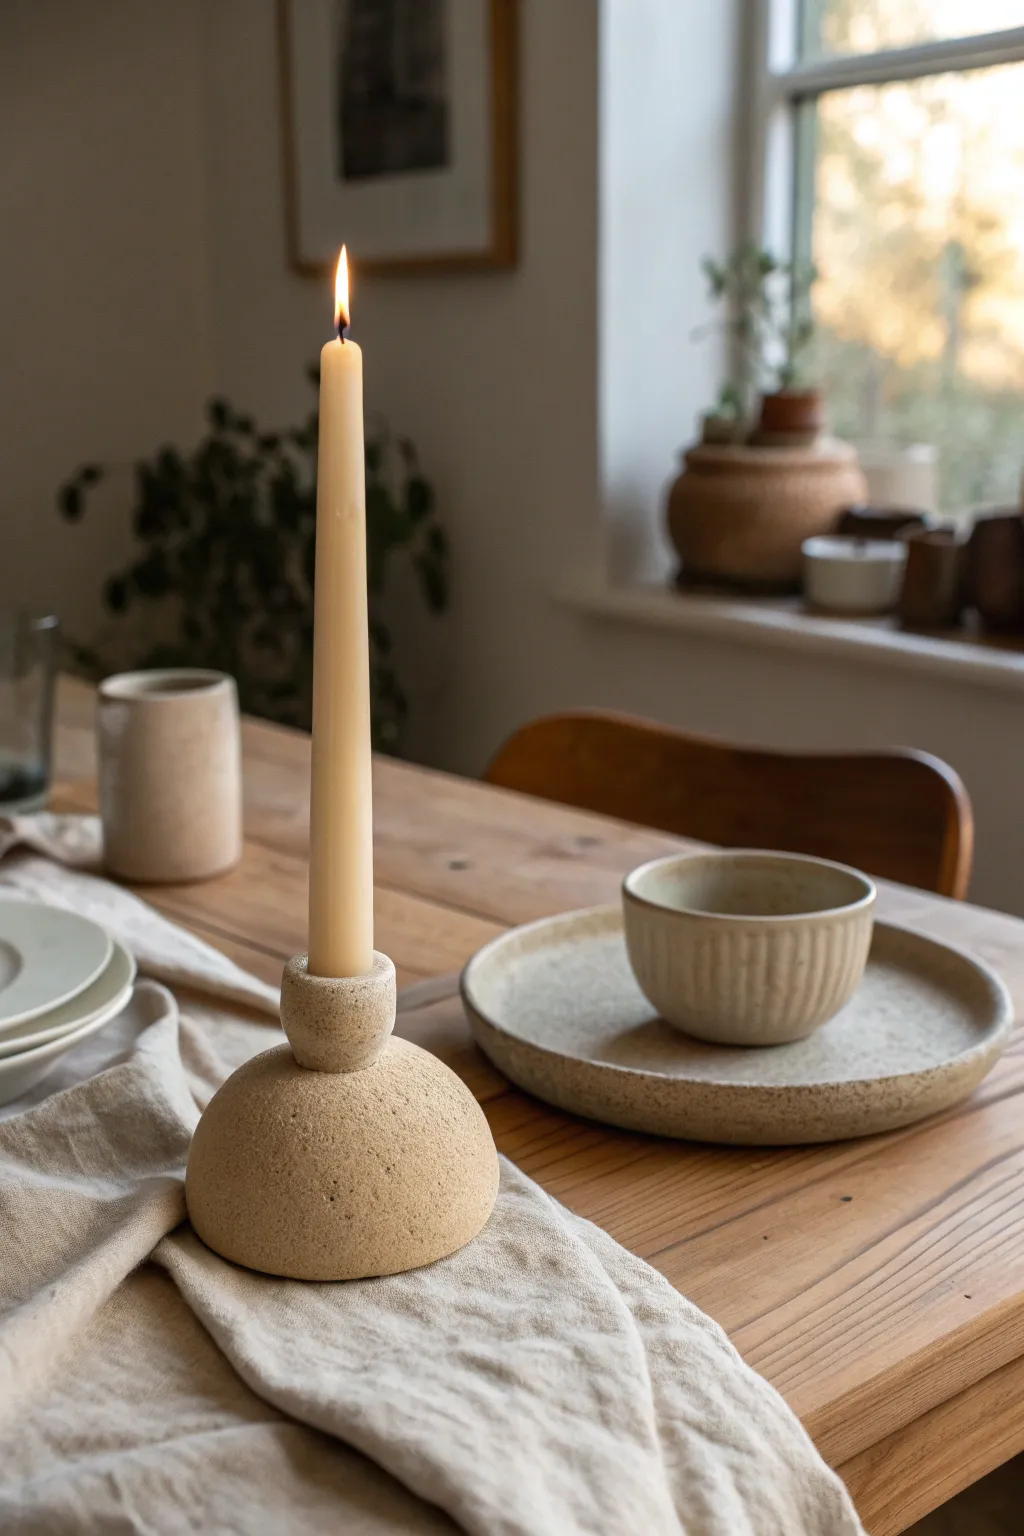
Bring the calming warmth of natural stone into your dining space with this minimalist taper candle holder. Achieve a high-end, textured ceramic look using simple air dry clay and a clever baking soda trick.
Step-by-Step Guide
Materials
- Air dry clay (white or terracotta)
- Acrylic rolling pin
- Small bowl or half-sphere mold (approx. 4-5 inches diameter)
- Craft knife or clay cutter
- Water and sponge
- Standard taper candle (for sizing)
- Sandpaper (medium and fine grit)
- Acrylic paint (beige/cream and light brown)
- Baking soda
- Paintbrush (stiff bristle)
- Clear matte varnish (optional)
Step 1: Shaping the Base
-
Condition the clay:
Start by kneading a large handful of air dry clay until it is soft, pliable, and free of cracks. Warm clay is much easier to work with. -
Roll a slab:
Roll the clay out into a thick slab, approximately 1/4 inch thick. Ensure the thickness is even to prevent cracking later. -
Cut a circle:
Place your bowl or circular template onto the clay and cut around it to create a perfect circle. -
Form the dome:
Lightly oil the outside of your small bowl or half-sphere mold. Drape the clay circle over the mold, pressing it gently to conform to the shape. -
Smooth the surface:
Dip your fingers in a little water and smooth out any fingerprints or bumps on the dome. I like to spend extra time here to ensure a flawless curve. -
Trim the edge:
Use your craft knife to trim any excess clay at the bottom of the dome so it sits flush when turned over. -
Initial drying:
Let the dome dry on the mold for about 2-3 hours until it holds its shape, then carefully remove it to let the inside dry.
Step 2: Creating the Candle Cup
-
Roll a coil:
While the base dries, roll a thick coil of fresh clay, about 1 inch thick and 3 inches long. -
Shape the cylinder:
Flatten the top and bottom of the coil to create a squat cylinder. This will be the holder for the candle. -
Size the hole:
Press the bottom of your actual taper candle into the center of the cylinder to create the indentation. Wiggle it slightly to make the hole just a hair larger than the candle to account for shrinkage. -
Refine the cup:
Smooth the outside of this cylinder with wet fingers, rounding the top lip slightly for a soft look.
Cracked Clay Rescue
If small cracks appear while drying, don’t panic. Mix a small amount of fresh clay with water to make a paste (slip) and fill the cracks, then sand smooth once dry.
Step 3: Assembly and Finishing
-
Attach the pieces:
Score the top center of the dome and the bottom of the cylinder with a needle tool. Apply a little water or clay slip to both scratched areas. -
Secure the bond:
Press the cylinder firmly onto the dome. Blend the clay at the seam using a modeling tool or your finger to make it look like one continuous piece. -
Full dry:
Allow the entire structure to dry completely for 24-48 hours. Turn it occasionally to ensure even airflow. -
Sand imperfections:
Once fully dry, use sandpaper to smooth out any rough edges or uneven spots. -
Mix textured paint:
Mix beige acrylic paint with a teaspoon of baking soda. The baking soda reacts with the paint, creating a thick, fluffy texture that mimics stoneware. -
Apply base coat:
Dab this textured mixture all over the holder using a stiff brush. Do not stroke; use a stippling motion to build up the ‘stone’ surface. -
Add dimension:
While the paint is still slightly tacky, lightly splatter or dry-brush a very small amount of watered-down light brown paint to create natural stone speckles.
Weight it Down
For better stability, place a small heavy stone or metal washer inside the dome before you attach the top piece to lower the center of gravity.
Place your favorite taper candle inside and enjoy the organic ambiance of your new centerpiece

TRACK YOUR CERAMIC JOURNEY
Capture glaze tests, firing details, and creative progress—all in one simple printable. Make your projects easier to repeat and improve.
Mini Planter Sleeve for Succulents (With Insert)
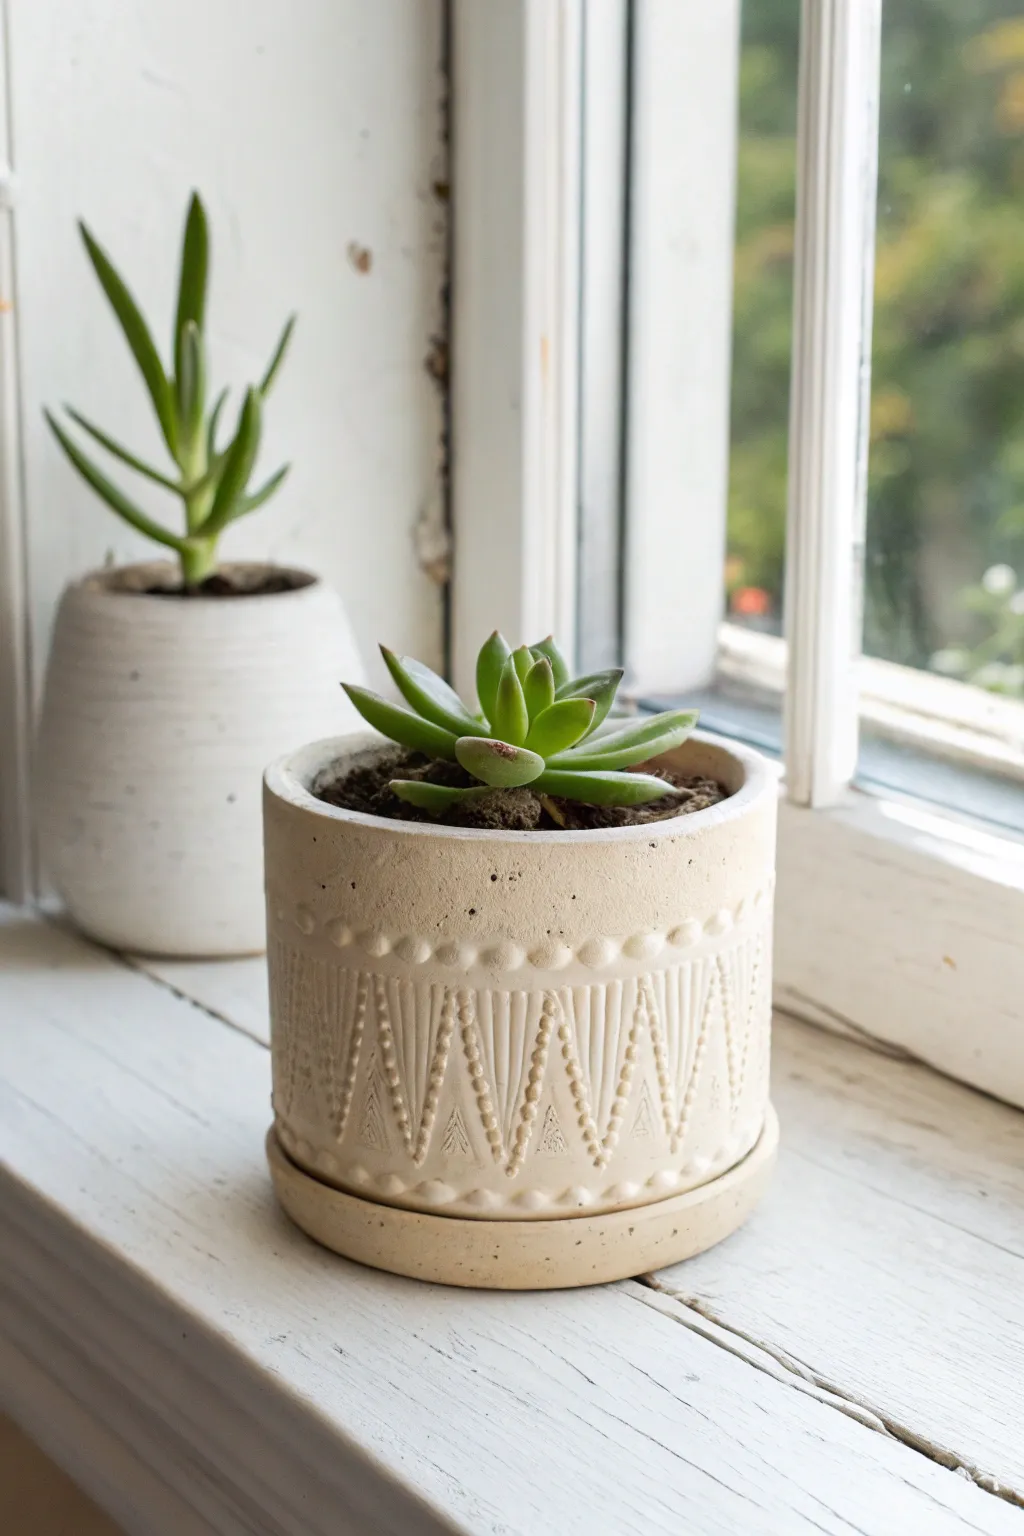
Elevate your indoor garden with this charming handcrafted planter featuring delicate dotted textures and tribal-inspired geometric patterns. The creamy, matte finish gives it a sophisticated ceramic look without the need for a kiln.
How-To Guide
Materials
- Air dry clay (white or stone color)
- Rolling pin
- Empty plastic container or tin can (to use as a mold insert)
- Clay knife or craft blade
- Small bowl of water
- Needle tool, toothpick, or dotting tool
- Ruler
- Fine-grit sandpaper
- Acrylic paint (cream/off-white)
- Matte spray varnish or sealant
- Sponge or paintbrush
Step 1: Forming the Base Structure
-
Prepare the clay slab:
Begin by conditioning a large ball of air dry clay until it is pliable. Roll it out on a flat surface to an even thickness of about 1/4 inch across. -
Measure your mold:
Take your chosen insert (like a clean yogurt cup or tin can) and measure its height and circumference. Cut a rectangular strip of clay based on these measurements, adding a slight overlap for the seam. -
Wrap the form:
Carefully wrap the clay strip around your insert mold. You don’t want it sticking permanently, so wrapping a layer of parchment paper around the mold first is a smart move. -
Seal the seam:
Where the clay edges meet, score both sides with your knife and dampen them slightly. Press them together firmly and smooth the join with a wet finger until the seam is invisible. -
Create the bottom:
Place your wrapped cylinder onto the remaining clay slab and cut a circle around the base. Attach this circular bottom to your cylinder using the score-and-slip method, smoothing the clay upward to creating a watertight seal. -
Make the saucer:
Cut a second, slightly larger circle from the clay slab for the saucer. Roll a thin snake of clay and attach it to the rim of this circle to create a shallow lip, smoothing the inside curve completely.
Step 2: Texturing and Detailing
-
Mark the design spacing:
Using a ruler, lightly mark even intervals around the top rim of the pot. These will serve as the anchor points for your zigzag pattern. -
Create the top border:
Use a small dotting tool or the blunt end of a paintbrush to press a row of uniform dots horizontally around the upper section of the pot, creating a beaded look. -
Draft the triangles:
Lightly trace V-shapes descending from your top border using a needle tool. I find lightly sketching this first helps ensure the triangles meet evenly at the bottom. -
Emboss the pattern:
Follow your traced V-lines with your dotting tool, pressing firmly to create deep, distinct divots. Create parallel dotted lines inside the triangles for that detailed, embroidered effect. -
Add vertical texture:
Between the dotted triangles, use a needle tool to scratch delicate vertical lines, filling the negative space with subtle texture. -
Refine the saucer:
Add a simple row of dots around the exterior rim of your saucer to match the main pot’s aesthetic.
Clean Lines Pro-Tip
Dip your dotting tool or needle into water or cornstarch before pressing into the clay. This prevents the tool from sticking and dragging the clay, ensuring crisp, clean indentations.
Step 3: Finishing Touches
-
Remove the mold:
Once the clay has stiffened slightly but isn’t fully dry (usually after 1-2 hours), carefully slide the inner mold out so the inside can dry properly. -
Let it cure:
Allow the pot and saucer to dry completely for 24-48 hours in a cool, dry place away from direct sunlight to prevent cracking. -
Sand for smoothness:
Gently sand the top rim and any rough patches on the surface with fine-grit sandpaper to achieve a professional, polished finish. -
Apply paint:
Dab a cream or off-white acrylic paint over the surface using a sponge. The sponge helps get paint into the textured dots without filling them completely. -
Seal the project:
Since this is for a plant, apply 2-3 coats of a waterproof varnish or sealant, paying extra attention to the inside of the pot to protect the clay from moisture.
Level Up: Faux Stone
Mix a small amount of used coffee grounds or black pepper into your white clay before rolling. This creates specialized speckles that mimic the look of real organic stoneware pottery.
Pop in your favorite succulent or cactus and enjoy the handmade warmth this piece brings to your windowsill
Wall Pocket Planter for Vertical Storage and Greenery
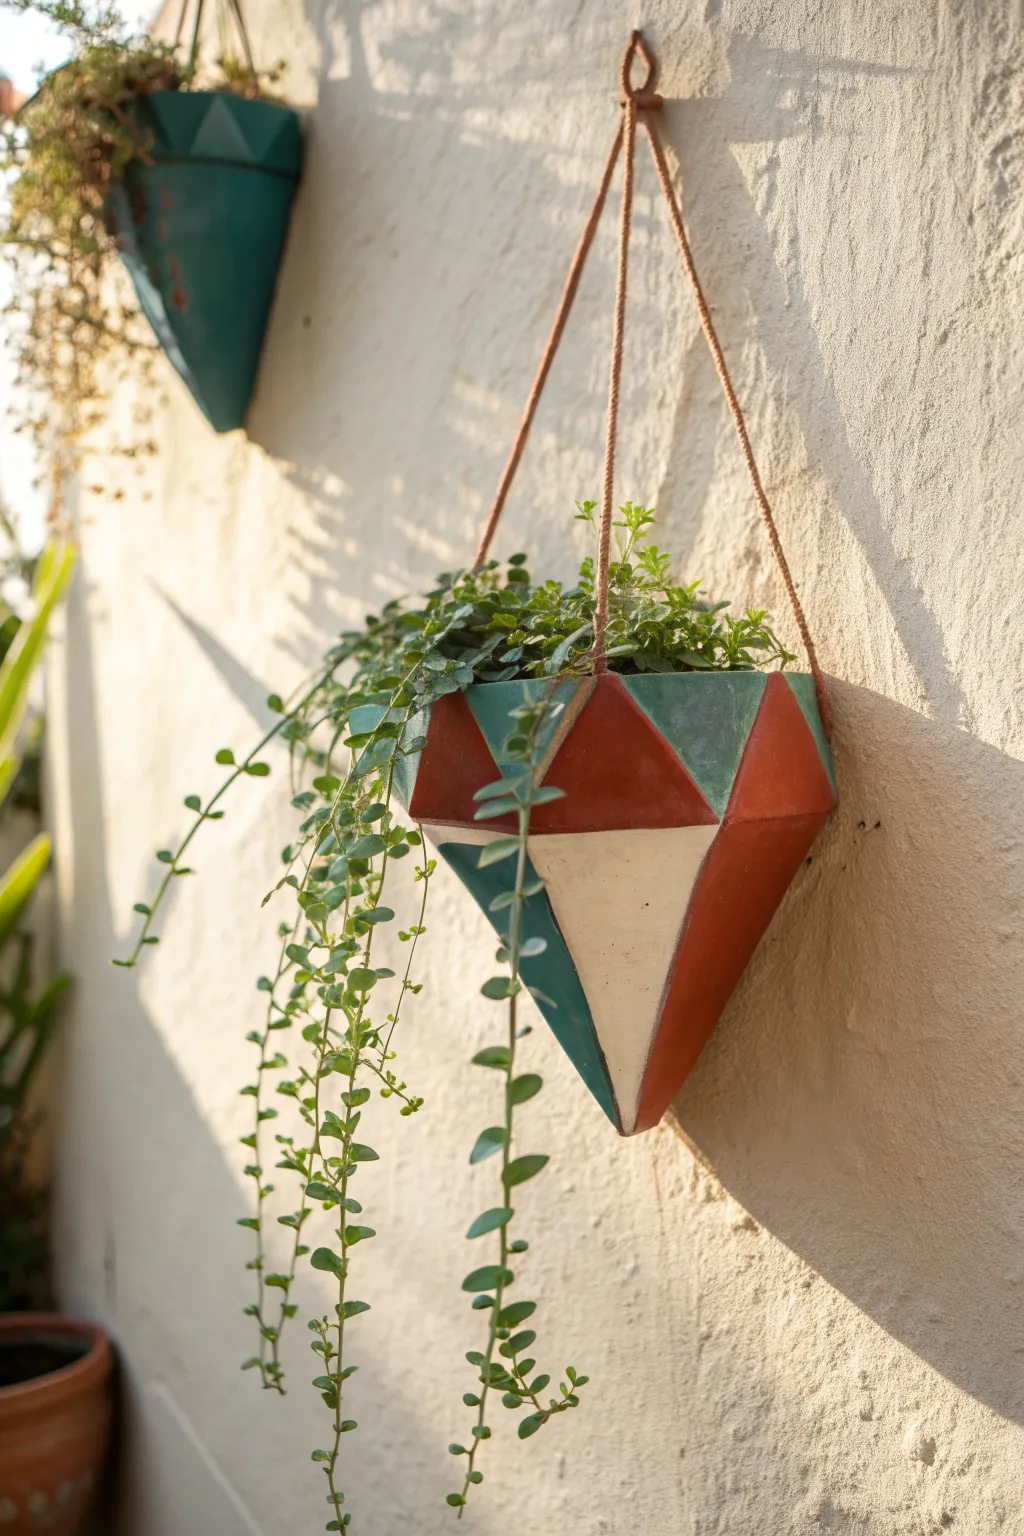
Bring your vertical garden dreams to life with this striking diamond-shaped wall pocket. Featuring a modern geometric design and a warm, earthy color palette of teal, rust, and cream, this air dry clay planter adds instant bohemian charm to any sunny wall.
Step-by-Step Guide
Materials
- High-quality air dry clay (2-3 lbs)
- Rolling pin
- sharp craft knife or X-Acto blade
- Ruler or straight edge
- Paper and pencil for template
- Clay slip (clay mixed with water)
- Sanding sponge or fine-grit sandpaper
- Acrylic paints (Teal, Terracotta/Rust, Cream/Off-white)
- Painter’s tape (low tack)
- Flat paintbrushes
- Matte spray varnish or water-resistant sealer
- Jute twine or woven rope
- Drill with a bit sized for your rope (or a straw)
Step 1: Shaping the Structure
-
Draft your template:
Begin by drawing a diamond shape on paper. You will need a large central diamond for the back and three triangular pieces to form the front ‘pocket’ shape. The front pieces should fit together to create a 3D prism effect. -
Prepare the slab:
Roll out your air dry clay on a smooth surface or canvas mat. Aim for a consistent thickness of about 1/4 inch to ensure the planter is sturdy enough to hold soil but not too heavy. -
Cut the components:
Place your paper templates onto the clay slab. Using a ruler as a guide for your craft knife, carefully cut out the back diamond panel and the three triangular front panels. -
Score the edges:
Use a needle tool or the tip of your knife to scratch cross-hatch marks (scoring) along every edge that will be joined. This creates texture for the clay to grip onto. -
Apply slip and assemble:
Dab clay slip onto the scored edges. Connect the side triangles to the back panel first, pressing firmly. Then, attach the front center triangle to close the pocket form. -
Reinforce the seams:
Roll a very thin snake (coil) of clay. Press this into the inside seams of the pocket, smoothing it down with a modeling tool or your finger to ensure a watertight bond.
Step 2: Refining and Drying
-
Create suspension holes:
While the clay is still wet, use a straw or a tool to poke holes near the top two corners of the back diamond panel. Ensure they are wide enough for your rope and at least half an inch from the edge. -
Smooth the surface:
Dip your finger in a little water and smooth out any rough exterior seams or fingerprints. You want the geometric angles to stay sharp, but the surface texture to be uniform. -
Slow drying process:
Set the planter aside to dry. I prefer to loosely tent a plastic bag over it for the first 24 hours to prevent cracking, then let it air dry fully for another 2-3 days until bone dry and white. -
Sand for finish:
Once fully cured, use a sanding sponge to gently smooth any sharp edges or bumps on the surface. Wipe away the dust with a slightly damp cloth.
Cracks happen
If hairline cracks appear during drying, mix a small amount of fresh clay with white glue to make a paste. Fill the crack, smooth it over, and let dry before sanding.
Step 3: Painting and Hanging
-
Mask the design:
Plan your geometric color blocking. Use low-tack painter’s tape to mark off triangular sections on the planter. Press the tape edges down firmly so paint doesn’t bleed underneath. -
Apply base colors:
Paint the exposed sections with your first color—try the deep teal first. Apply two thin coats for opaque coverage, letting it dry between layers. -
Add accent colors:
Carefully peel back the tape and re-mask for the next color sections. Paint the remaining triangles in terracotta rust and cream, creating that bold, faceted look. -
Seal the piece:
Because this will hold moisture, coat the entire planter—inside and out—with a water-resistant sealer or varnish. Give the inside an extra coat for durability. -
Attach the hanger:
Cut a long length of jute rope. Thread the ends through the holes from front to back and tie sturdy double knots on the back side to secure it. -
Add greenery:
If you are planting directly, use a small amount of gravel at the bottom for drainage, or simply slide a small plastic nursery pot inside for easier maintenance.
Stronger seams
After joining seams, use a wet paintbrush to smooth the clay connection. This blends the clay particles better than your finger and results in a seamless, stronger bond.
Hang your new geometric planter in a bright spot and enjoy the unique, handcrafted texture it adds to your space
Stackable Drawer Trays for Tiny Stuff That Roams
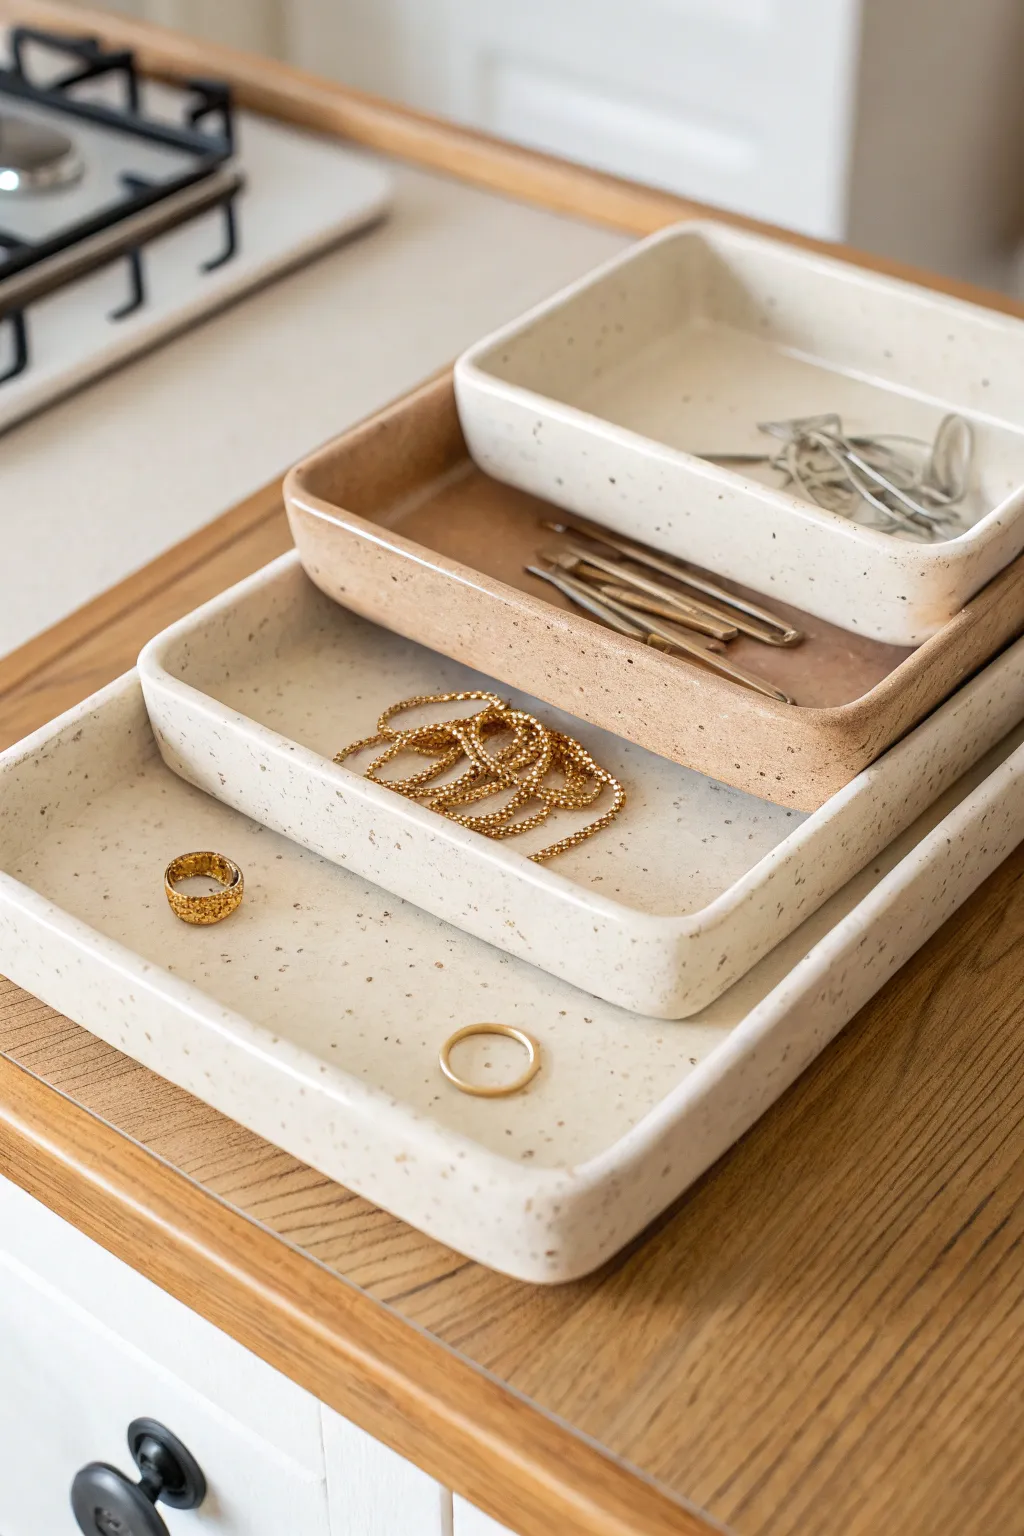
These sleek, stackable trays bring a modern, minimalist aesthetic to your desk or vanity while keeping small treasures corralled. With their faux-stone finish and varying sizes, they look like high-end ceramics but are surprisingly simple to sculpt from air-dry clay.
Detailed Instructions
Materials
- White air-dry clay (approximately 1kg)
- Fine grit sandpaper (220 and 400 grit)
- Rolling pin
- Two wooden rulers or guide strips (approx 5mm thick)
- Craft knife or clay blade
- Small bowl of water
- Sponge
- Acrylic paints (brown, black, and beige)
- Old toothbrush
- Matte varnish or sealant
- Rectangular templates (cardboard cutouts in graduated sizes)
Step 1: Preparing the Slabs
-
Prepare your templates:
Cut three or four rectangular templates from cardboard to serve as the bases for your trays. Each one should be slightly larger than the next to allow them to visually stack well, though the actual fit will depend on your wall placement. -
Roll out the clay:
Take a large portion of clay and knead it until soft and pliable. Place it on a smooth surface between your two wooden guide strips. -
Achieve uniform thickness:
Roll the clay flat using the rolling pin. The guide strips ensure the entire slab is an even thickness (around 5mm), which is crucial for a professional look. -
Cut the bases:
Place your cardboard templates onto the clay slab. Using your craft knife, carefully cut around each template to create the rectangular bases for your various trays.
Step 2: Constructing the Trays
-
Cut the walls:
From the remaining rolled clay, cut long strips that act as the side walls. These should be the same width as your desired tray height—about 2-3 cm looks elegant. -
Score the edges:
Use your knife or a needle tool to scratch cross-hatch marks (‘scoring’) along the edges of the base where the walls will attach, and do the same on the bottom edge of your wall strips. -
Apply slip:
Dab a little water or liquid clay (slip) onto the scored areas. This acts as glue to bond the pieces together securely. -
Attach the walls:
Press the wall strips onto the base. Simply butt the ends of the strips together at the corners, cutting away any excess length. -
Reinforce the seams:
Roll a very thin ‘snake’ of clay and press it into the interior corners where the wall meets the base. Smooth this out with your finger to strengthen the joint. -
Blend the outside:
On the exterior, use a modeling tool or your finger to drag clay across the seam line connecting the wall to the base, blending until the line disappears completely.
Warping Woes?
If the base starts curling up while drying, gently weigh it down with a heavy book placed on top of a piece of parchment paper. Fliping the trays over periodically during drying also helps prevent this.
Step 3: Refining and Finishing
-
Smooth the rims:
Dip your sponge lightly in water and run it over the top edges of the walls to round them off slightly. Sharp edges tend to be fragile, so a soft curve is better. -
Let it dry completely:
Place the trays on a wire rack or flip them occasionally to ensure even airflow. Let them dry for at least 24-48 hours until they are bone dry and turn white. -
Sand for perfection:
Once fully dry, sand the entire surface. Start with 220 grit to remove bumps, then switch to 400 grit for that buttery smooth, ceramic-like feel. -
Create the speckles:
Dilute a small amount of dark brown or black acrylic paint with water. Dip an old toothbrush into this mixture. -
Splatter technique:
Hold the toothbrush over the trays and run your thumb across the bristles to flick tiny speckles onto the surface. I suggest practicing on paper first to control the spray. -
Paint the contrast tray:
For the darker tray shown in the stack, paint the entire interior and exterior with a wash of watered-down beige or terracotta acrylic paint before adding speckles. -
Seal the work:
Finish with two coats of matte varnish to protect the surface from scratches and give it that soft, non-glossy stone appearance.
Make it Modular
Before drying, press the base of a smaller tray into the wet clay of a larger one to create a custom indentation. This creates a secure ‘locking’ mechanism when you stack them later.
Enjoy arranging your new bespoke organizers to display your everyday essentials beautifully