When I’m playing with polymer clay, my favorite projects are the ones that actually earn a spot in my everyday routine. Here are useful polymer clay ideas you can make at home—practical, giftable, and totally doable without fancy tools.
Marbled Ring Dish
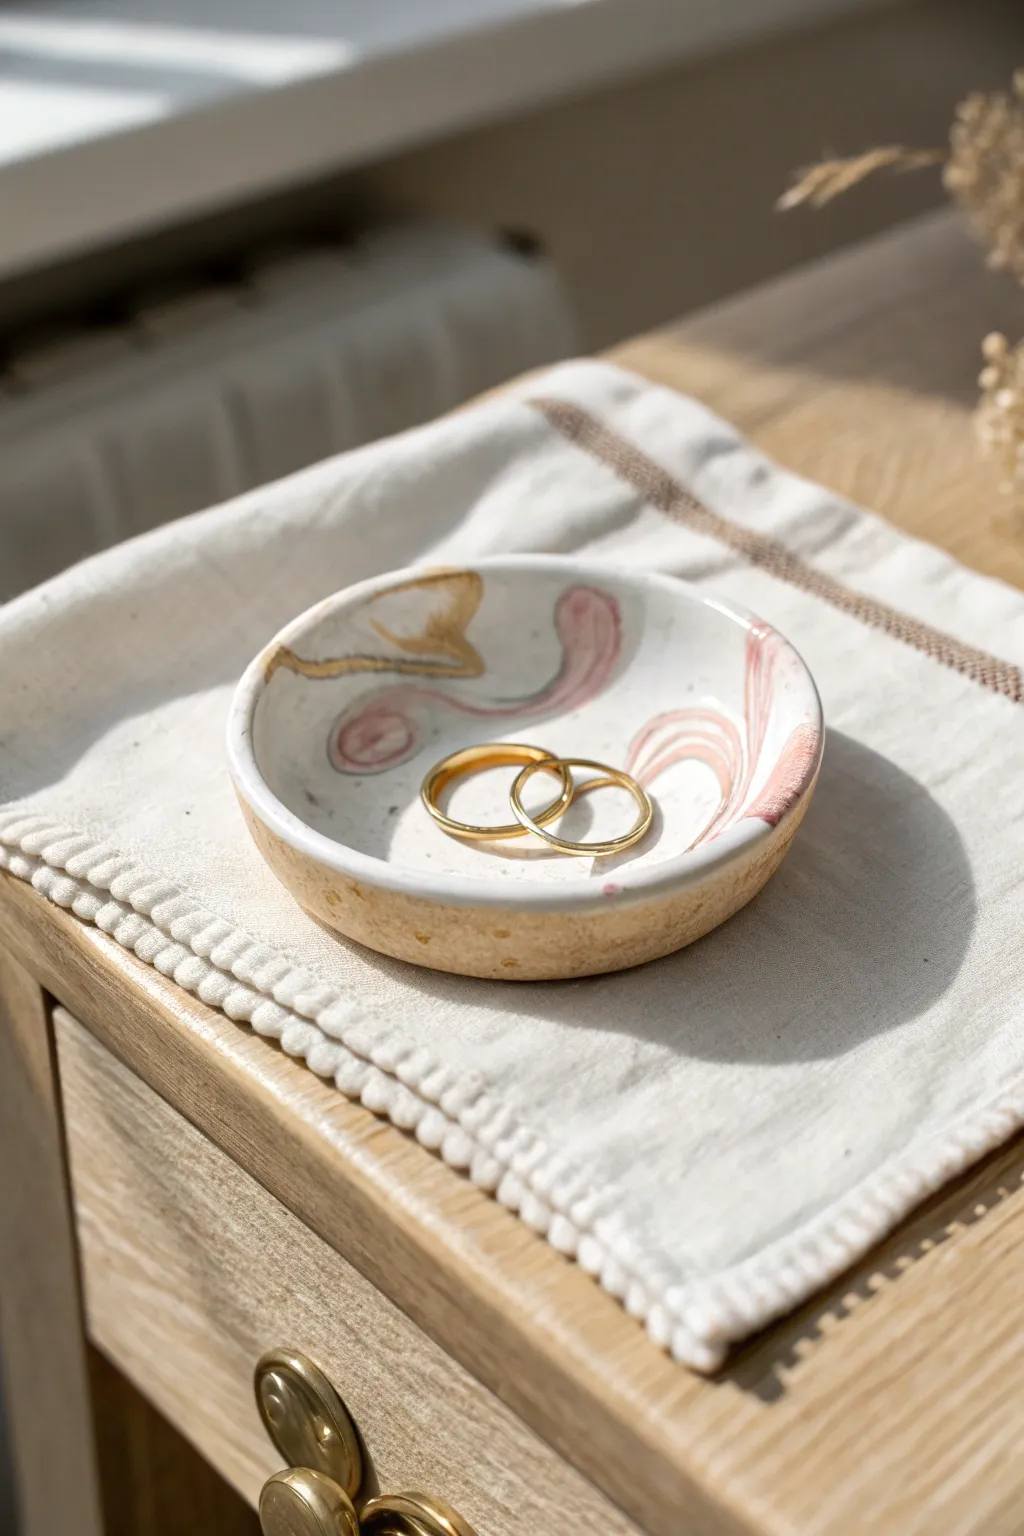
This charming ring dish combines the rustic texture of speckled clay with modern, painterly strokes. With its delicate pink swirls and touches of gold leaf, it’s a beautiful, functional piece of art for your bedside table.
Step-by-Step
Materials
- White or beige speckled polymer clay (e.g., Fimo or Premo granite effect)
- Acrylic rolling pin
- Small glass or ceramic bowl (to use as a mold)
- Circle cutter or a sharp craft knife
- Sandpaper (fine grit)
- Acrylic paints: Dusty Rose/Soft Pink, White
- Fine detail paintbrush
- Gold leafing pen or liquid gold leaf
- Gloss or matte varnish (optional, for sealing)
- Oven for baking
Step 1: Shaping the Dish
-
Condition the Clay:
Start by taking a chunk of your speckled polymer clay. Knead it thoroughly in your hands until it is soft, pliable, and warm to the touch. -
Roll it Out:
Place the clay on a clean, smooth surface. Using your acrylic rolling pin, roll the clay out to an even thickness of about 1/4 inch (approx. 5-6mm). -
Cut the Circle:
If you have a large circle cutter, use it to punch out your base shape. Alternatively, place a bowl or cup upside down on the clay and trace around it with a craft knife to cut a perfect circle. -
Prepare the Form:
Take your oven-safe bowl that will serve as the mold. I like to lightly dust the bottom of the bowl with cornstarch to prevent sticking. -
Form the Curve:
Gently lift your clay circle and drape it over the bottom of your upside-down bowl. Or, you can place it inside the bowl for a different curve. -
Smooth the Edges:
While the clay is on the mold, gently press it to conform to the shape. Take a moment to smooth the rim with your finger so the final edge is soft and rounded rather than sharp. -
Bake:
Place the clay (still on the mold) into the oven. Follow the baking temperature and time instructions specific to your brand of polymer clay. -
Cool Down:
Once baked, remove from the oven and let the dish cool completely before trying to separate it from the mold.
Step 2: Adding the Art
-
Sand for Texture:
If there are any rough spots on the rim, gently sand them with fine-grit sandpaper. Wipe away any dust with a damp cloth. -
Prepare the Paint Palette:
Squeeze a small amount of dusty rose acrylic paint onto a palette. You can mix in a tiny bit of white if you want a softer, pastel look. -
Paint Abstract Swirls:
Using a fine detail brush, paint free-flowing, curved lines onto the inner surface of the dish. Think of these as abstract, fluid ribbons rather than perfect shapes. -
Vary the Stroke Width:
Try to make some parts of your pink lines thicker and others thinner to mimic the organic feel seen in the photo. -
Let it Dry:
Allow the acrylic paint to dry completely. This usually takes about 10–15 minutes depending on the thickness of the paint. -
Add Gold Accents:
Shake your gold leafing pen well. Draw thin gold lines that follow the contours of your pink swirls, sometimes overlapping them and sometimes dancing alongside them. -
Highlight the Rim:
If you wish, add small touches of gold or pink near the rim to frame the design, keeping it asymmetrical for an artistic touch. -
Seal the Dish:
Once all paint and gold leaf is fully dry, apply a thin coat of varnish to the inside of the dish to protect your artwork from scratches.
Smooth Moves
Before baking, wipe the raw clay with a little baby oil on your finger. This magically smooths out fingerprints and lint without needing to sand later.
Make it Marble
Instead of painting, try mixing translucent and opaque clays together before rolling. Add gold flakes directly into the raw clay for an embedded sparkle effect.
Now you have a stunning, personalized catch-all that looks like expensive boutique ceramic.


Everyday Statement Earrings
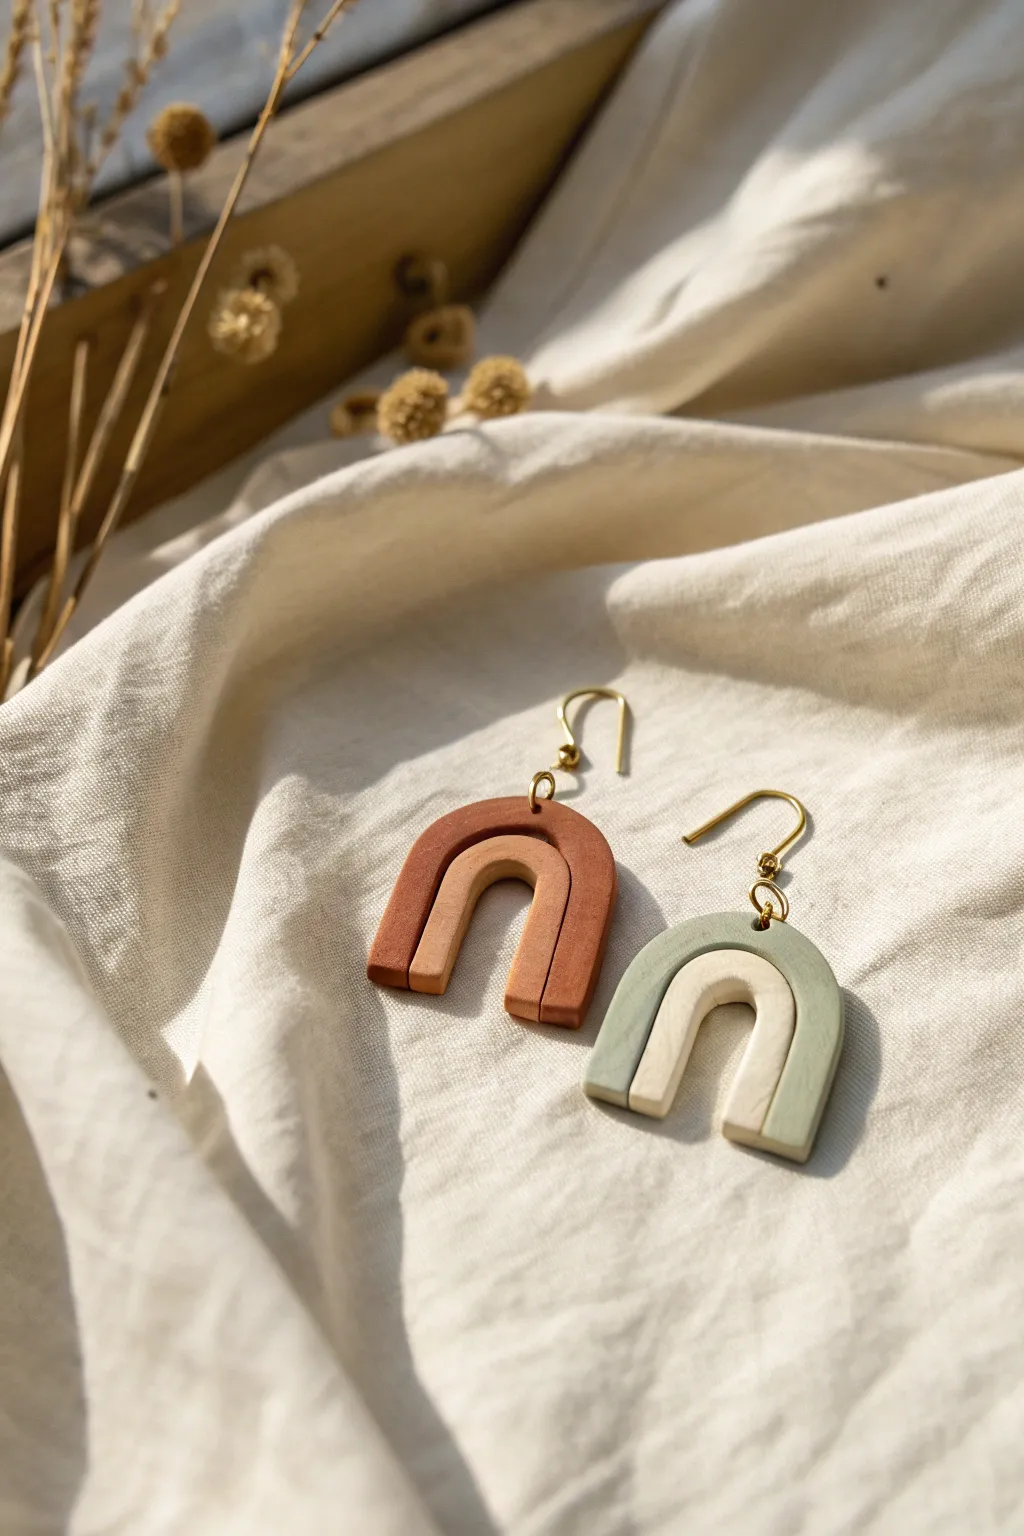
Embrace earthy tones and simple geometry with these stylish U-shaped arch earrings. Combining warm terra cotta hues with soft sage and cream creates a versatile accessory perfect for everyday wear.
Detailed Instructions
Materials
- Polymer clay in Terra Cotta, Tan/Peach, Sage Green, and Cream/White
- Rolling pin or acrylic roller
- Sharp tissue blade or X-Acto knife
- U-shaped clay cutters (two harmonious sizes) OR a template and knife
- Small round cutter (approx. 2mm) or piercing tool
- Gold earring hooks (fishhook style)
- Jump rings (gold, 4mm-6mm)
- Jewelry pliers (round nose and flat nose)
- Ceramic tile or baking sheet
- Parchment paper
- Oven
Step 1: Conditioning and Shaping the Clay
-
Condition the terra cotta clay:
Start by warming the terra cotta clay in your hands, kneading it until it is soft and pliable. This conditioning step is crucial to prevent cracks during baking. -
Roll out the slab:
Using your acrylic roller, flatten the conditioned terra cotta clay into a slab that is approximately 3mm to 4mm thick. Aim for an even thickness throughout. -
Create the first outer arch:
Use your larger U-shaped cutter to press firmly into the clay. If you don’t have cutters, trace a U-shape on paper, cut it out, lay it on the clay, and carefully trace around it with your blade. -
Cut the inner void:
Currently, you have a solid arch. Use a smaller U-cutter or your blade to remove the center, creating the rainbow or tunnel shape. The walls of the arch should be substantial enough to hold a jump ring later. -
Repeat for the lighter tone:
Condition your tan or peach-colored clay. Roll it out to the exact same thickness as the terra cotta piece. -
Cut the inner arch:
Using a smaller U-shaped cutter (one size down from the previous one), cut out a smaller arch shape. This will nestle inside the terra cotta arch. -
Test the fit:
Gently place the tan arch inside the terra cotta arch on your work surface. They should fit snugly but not distort each other. If the fit is tight, trim a hair’s breadth off the inner arch’s edges.
Clean Cuts Every Time
Before pressing your cutter into the clay, dip it into a bit of cornstarch or water. This acts as a release agent and prevents the clay from sticking to the cutter.
Step 2: Creating the Second Earring
-
Condition sage and cream clay:
Clean your hands or roller to avoid color transfer, then repeat the conditioning process for the sage green and cream clays. -
Cut the sage arch:
Roll the sage clay to the established thickness. Use the large U-cutter to create the outer arch shape for the second earring. -
Cut the cream arch:
Roll out the cream clay and use the smaller U-cutter to create the inner arch piece that will sit inside the sage green frame. -
Smooth the edges:
Before assembling, run your finger lightly over the cut edges of all four pieces to smooth down any rough clay burrs or sharp corners.
Step 3: Assembly and Baking
-
Join the arches:
Apply a tiny amount of liquid polymer clay or ‘e-glue’ to the inner edge of the large arches. Press the smaller arches inside them so they adhere together as one solid unit. -
Make the holes:
Use a small piercing tool or a tiny round cutter to create a hole at the very top center of the outer arch. Ensure the hole is large enough for your jump rings. -
Texture check:
I prefer to do a final check for lint or fingerprints here. Use a cotton swab dipped in a little rubbing alcohol to gently wipe the surface clean if needed. -
Bake the clay:
Place your earrings on a ceramic tile or baking sheet lined with parchment paper. Bake according to your clay manufacturer’s instructions (usually around 275°F or 130°C for 15-30 minutes). -
Cool down:
Let the pieces cool completely in the oven with the door cracked open. This gradual cooling helps prevent brittleness.
Textured Finishes
Before baking, gently press a piece of coarse sandpaper or denim onto the clay surface to give your earrings a stone-like, matte texture.
Step 4: Final Hardware Assembly
-
Open the jump rings:
Using two pairs of pliers, twist a gold jump ring open laterally (twist ends away from each other, don’t pull apart). -
Attach the hook:
Slide the open jump ring through the hole you created in the clay, and then slide on the loop of the earring hook. -
Close the ring:
Use your pliers to twist the jump ring back into a closed position, ensuring the gap is perfectly shut so the hook doesn’t slip out. -
Repeat:
Repeat the hardware attachment process for the second earring.
Enjoy wearing your sophisticated new handmade accessories


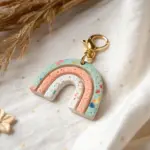
Keychain And Zipper Pull Charms
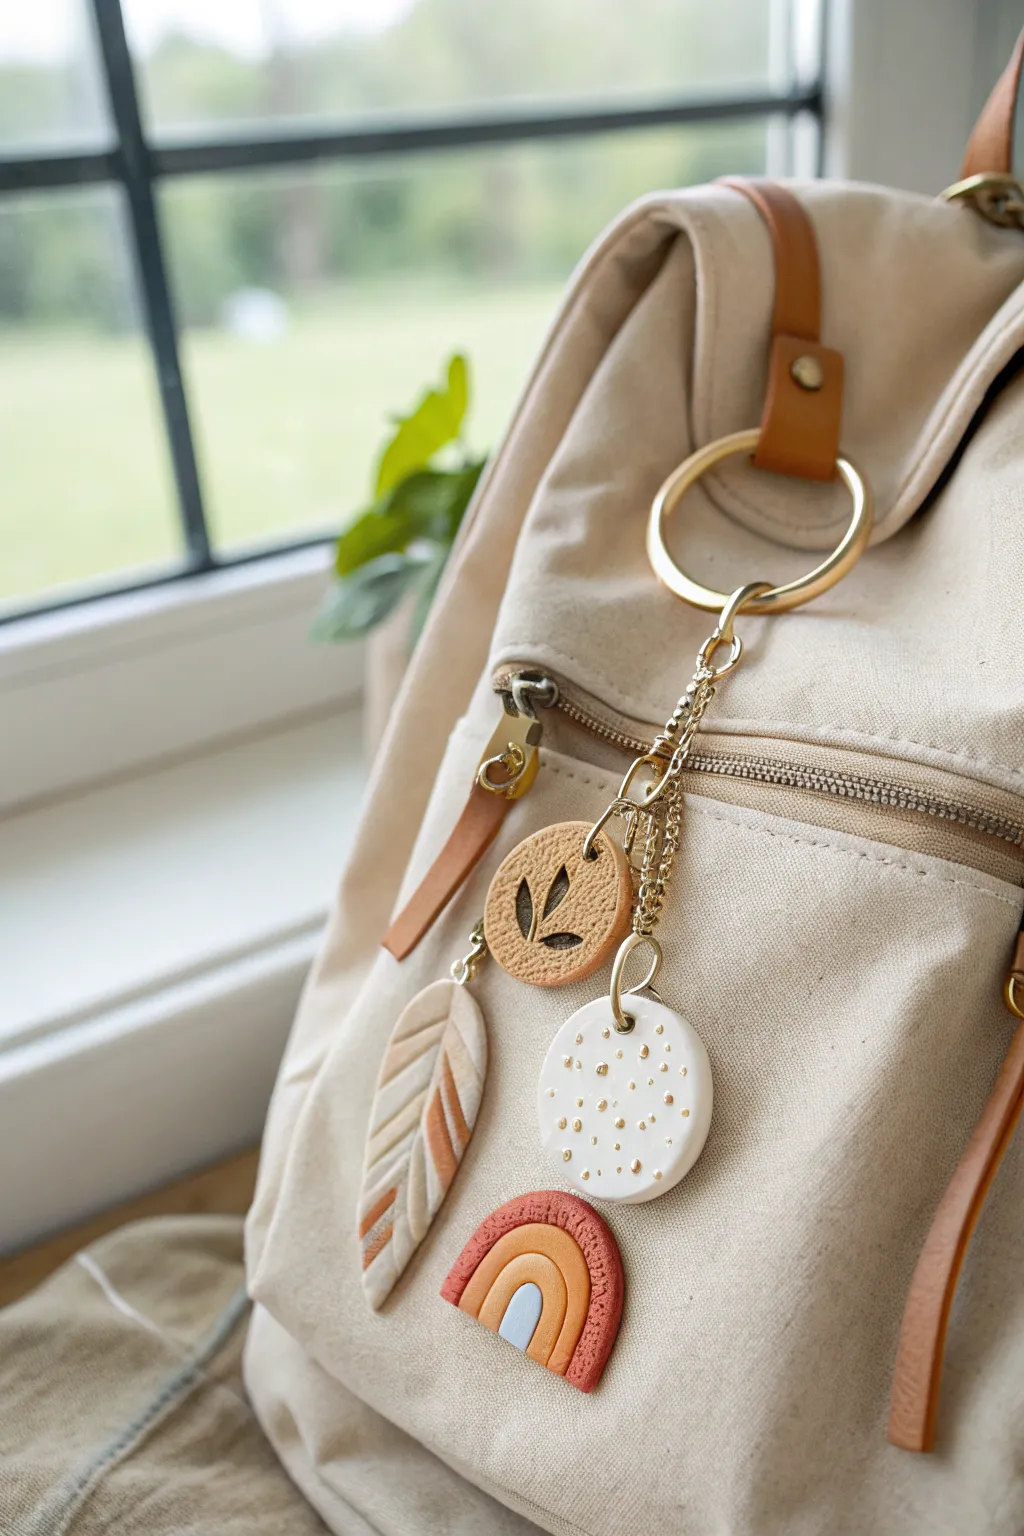
Upgrade your favorite bag with this earthy, textured collection of polymer clay charms. Featuring a mix of botanical stamps, subtle speckles, and warm terracotta tones, this tutorial guides you through creating a stylish accessory that combines modern aesthetics with handcrafted warmth.
Step-by-Step
Materials
- Polymer clay in beige/white, terracotta, tan, and light blue
- Gold acrylic paint or gold foil flakes
- Small botanical leaf stamp or carving tool
- Pointed sculpting tool or toothpick
- Clay roller
- Round clay cutters (small and medium)
- Small knife or clay blade
- Gold jewelry chain (small links)
- Large gold O-ring clasp
- Assorted gold jump rings (4mm and 6mm)
- Adhesive (optional)
- Jewelry pliers
Step 1: Prepping and Modeling the Charms
-
Condition the Clay:
Begin by kneading your chosen clay colors until they are soft and pliable. For this project, you’ll need a dominant beige/cream, a terracotta rust, a warm tan, and a tiny bit of soft blue. -
Create the Speckled Disk:
Roll a ball of white or cream clay and flatten it into a thick disk, about 3-4mm thick. Use a small round cutter to ensure the edges are clean. -
Add Texture:
For the speckled look, use a pointed tool to gently poke various sized indentations into the surface of the white disk. These will hold gold paint later. Pierce a hole near the top for a jump ring. -
Sculpt the Rainbow:
Roll thin snakes of clay in terracotta, tan, and light blue. Arch them over each other to form a small rainbow shape. Use your blade to trim the bottom flat so all arches are even. -
Detail the Rainbow:
I like to add texture to the outer terracotta arch by gently pressing a needle tool or toothbrush against it to give it a rough, stone-like finish. Pierce a hole through the top of the outer arch. -
Create the Feather Shape:
Flatten a piece of beige clay into an elongated marquise or leaf shape. You can cut this freehand or use a cutter if you have one. -
Pattern the Feather:
Press thin strips of terracotta clay diagonally onto the feather base to create stripes. Gently roll over the entire piece to flatten the stripes into the base clay so it becomes one smooth surface. -
Carve Feather Veins:
Use a sharp tool to carve a central line and diagonal veins into the feather to give it definition. Pierce a hole at the top. -
Stamping the Botanical Disk:
Roll out a ball of tan clay and cut a circle slightly smaller than your speckled disk. Press a leaf stamp firmly into the center. If you don’t have a stamp, carefully crave a simple three-leaf design. -
Texturing the Tan Disk:
Use a stiff brush or a textured sponge to dab the surface around the leaf design, creating a leather-like texture. Don’t forget to pierce the hanging hole.
Step 2: Baking and Assembly
-
Bake the Charms:
Arrange all four pieces on a tile or parchment-lined baking sheet. Bake according to your clay package instructions (usually 275°F/135°C for 15-30 minutes). -
Cool and Finish:
Allow the pieces to cool completely. Once cool, take your gold acrylic paint and carefully fill the indentations on the white speckled charm. Wipe away excess surface paint so the gold only remains in the dots. -
Cut the Chains:
Cut four lengths of gold chain. vary the lengths slightly—between 1 inch and 2.5 inches—so the charms will hang at different heights. -
Attach Jump Rings:
Using two pairs of pliers, twist open the small jump rings. Thread one through the hole of each clay charm and attach it to the end of a chain length. Close the rings securely. -
Secure to O-Ring:
Open larger jump rings or use the top link of your chains to attach all four distinctive strands onto the large gold O-ring clasp. -
Final Arrangement:
Hold up the keychain to check how the charms fall. If they clump together too much, adjust the chain lengths by removing a few links until they cascade pleasingly.
Clean Edges Trick
Before baking, smooth the rough edges of your clay cutouts with a fingertip dipped in a tiny bit of baby oil or cornstarch.
Add Movement
String tiny gold spacer beads onto the chain links between the clay charms to add extra jingle and sparkle to your bag.
Clip this charm cluster onto your backpack zipper for an instant touch of handmade personality


Terrazzo Style Coasters
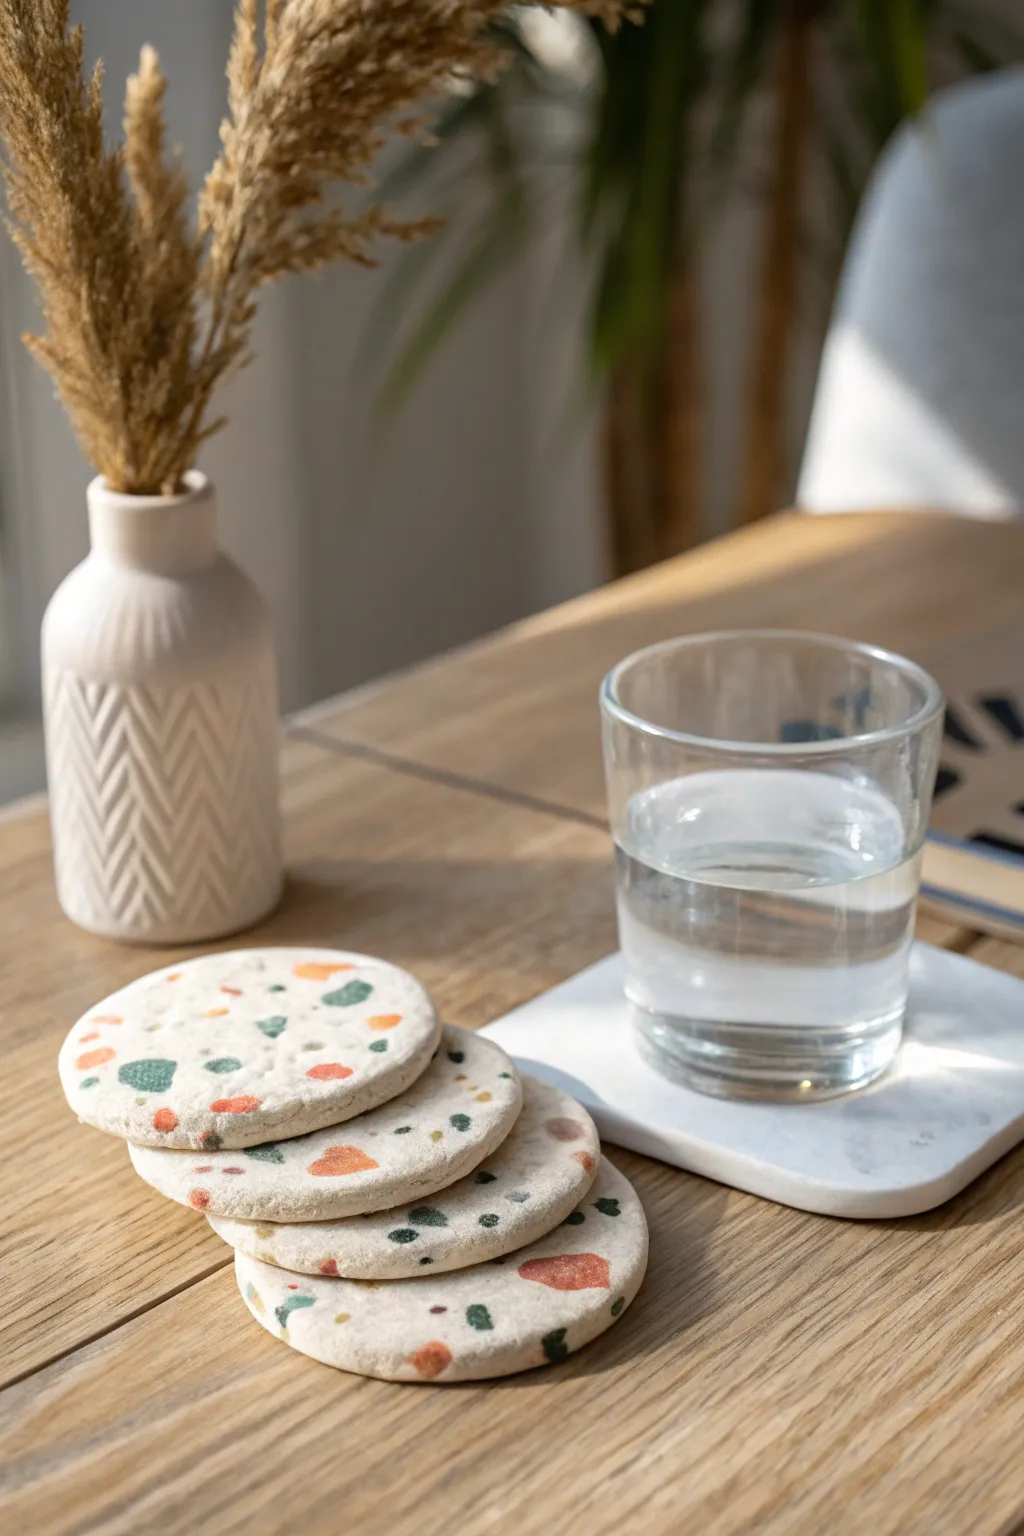
Bring a touch of modern Italian design to your coffee table with these trendy terrazzo-style coasters. Using polymer clay, you can easily replicate the classic speckled stone look in a lightweight, durable format that’s perfect for everyday use.
Detailed Instructions
Materials
- White or cream polymer clay (main block)
- Small amounts of colored polymer clay (burnt orange, sage green, charcoal)
- Rolling pin or acrylic roller
- Round cookie cutter (approx. 3.5 inches)
- Parchment paper or baking mat
- Sharp blade or X-Acto knife
- Fine-grit sandpaper (400 and 800 grit)
- Oven/toaster oven
- Matte or satin sealant (optional)
Step 1: Preparing the ‘Chips’
-
Condition the colored clay:
Start by taking small amounts of your burnt orange, sage green, and charcoal clay. Knead each color separately in your hands until they are soft and pliable. -
Flatten the colors:
Roll each colored piece into a very thin sheet. You want these to be quite delicate, almost like paper, so they don’t add too much bulk later. -
Create the terrazzo fragments:
Using your sharp blade, chop these thin sheets into random, jagged little shapes. Aim for variety—some tiny specks and some slightly larger triangles or trapezoids. -
Separate the pieces:
Gently scatter the cut pieces on your work surface so they aren’t sticking together in clumps. This ‘confetti’ is what creates the pattern.
Step 2: Forming the Base
-
Condition the white clay:
Take your large block of white or cream clay. Condition it thoroughly by kneading and rolling it until it’s warm and smooth. -
Roll the slab:
Roll the white clay out onto parchment paper. Aim for a thickness of about 1/4 inch (6mm). If you have depth guides for your roller, use them to ensure an even surface. -
Apply the first layer of chips:
Randomly sprinkle your colored clay chips onto the white slab. Don’t overthink the placement; randomness is key to the natural stone look. -
Embed the chips:
Gently roll over the slab with your rolling pin just enough to press the chips into the surface. -
Add a second layer:
Apply a second, lighter sprinkling of chips to fill in gaps, ensuring the colors are evenly distributed across the slab. -
Final roll:
Roll over the slab firmly one last time. You want to fully embed the colored chips until the surface feels completely smooth and flush.
Keep it Clean
Baby wipes are essential! Clean your hands and roller between handling the dark charcoal chips and the white base to prevent gray smudges.
Step 3: Cutting and Baking
-
Cut the shapes:
Position your round cutter on the best parts of the pattern and press down firmly to cut out your coaster shapes. -
Refine the edges:
Lift away the excess clay. If the edges look a bit ragged, smooth them gently with your finger. I find dipping my finger in a little cornstarch helps reshape without leaving prints. -
Transfer to baking sheet:
Move the parchment paper with the cut clay circles onto a baking sheet. -
Bake:
Bake in a preheated oven according to your clay manufacturer’s instructions. Usually, this is around 275°F (135°C) for 30 minutes, but double-check your package. -
Cool down:
Allow the coasters to cool completely on the baking sheet before handling them.
Make it a Set
Don’t toss the scraps! Ball up the leftover clay with the chips inside and re-roll it to create a matching ‘marbled’ coaster for a varied set.
Step 4: Finishing Touches
-
Wet sanding:
Once cool, dip your sandpaper in water and sand the surface and edges of the coasters. Start with the 400 grit to remove imperfections. -
Polishing:
Switch to the 800 grit sandpaper for a smoother finish. This step really brings out the clarity of the colored chips against the white background. -
Rinse and dry:
Wash off any milky residue from sanding and pat the coasters dry with a clean cloth. -
Seal (Optional):
If you want extra protection against drink stains, apply a thin layer of matte or satin clay varnish.
Stack your new coasters on the coffee table and enjoy your chic, handmade home decor

What Really Happens Inside the Kiln
Learn how time and temperature work together inside the kiln to transform clay into durable ceramic.
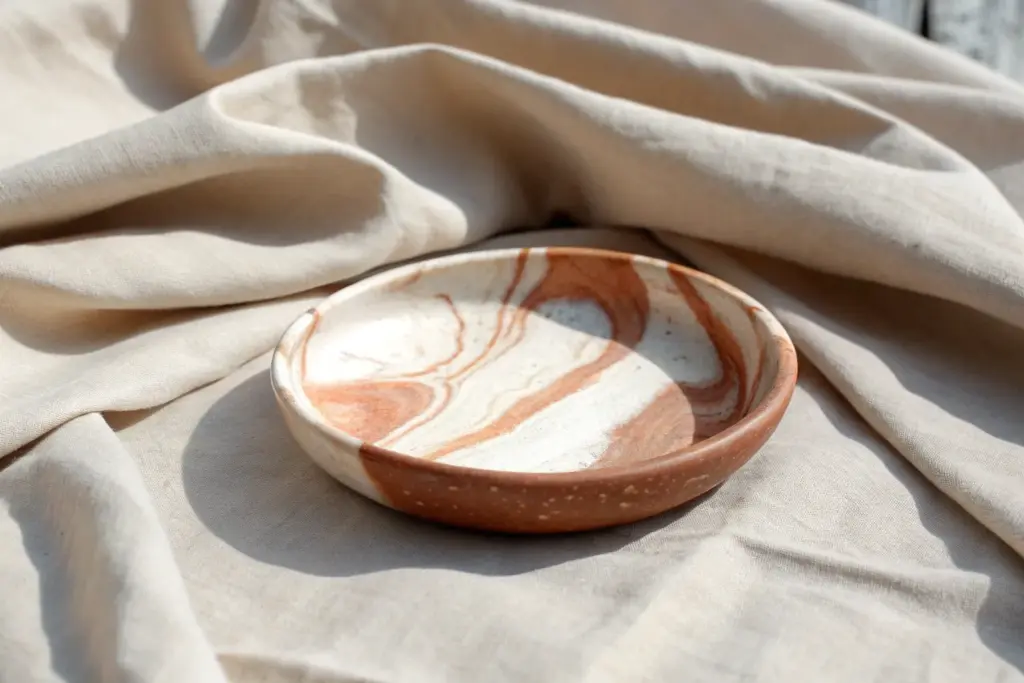
Catch-All Trinket Tray
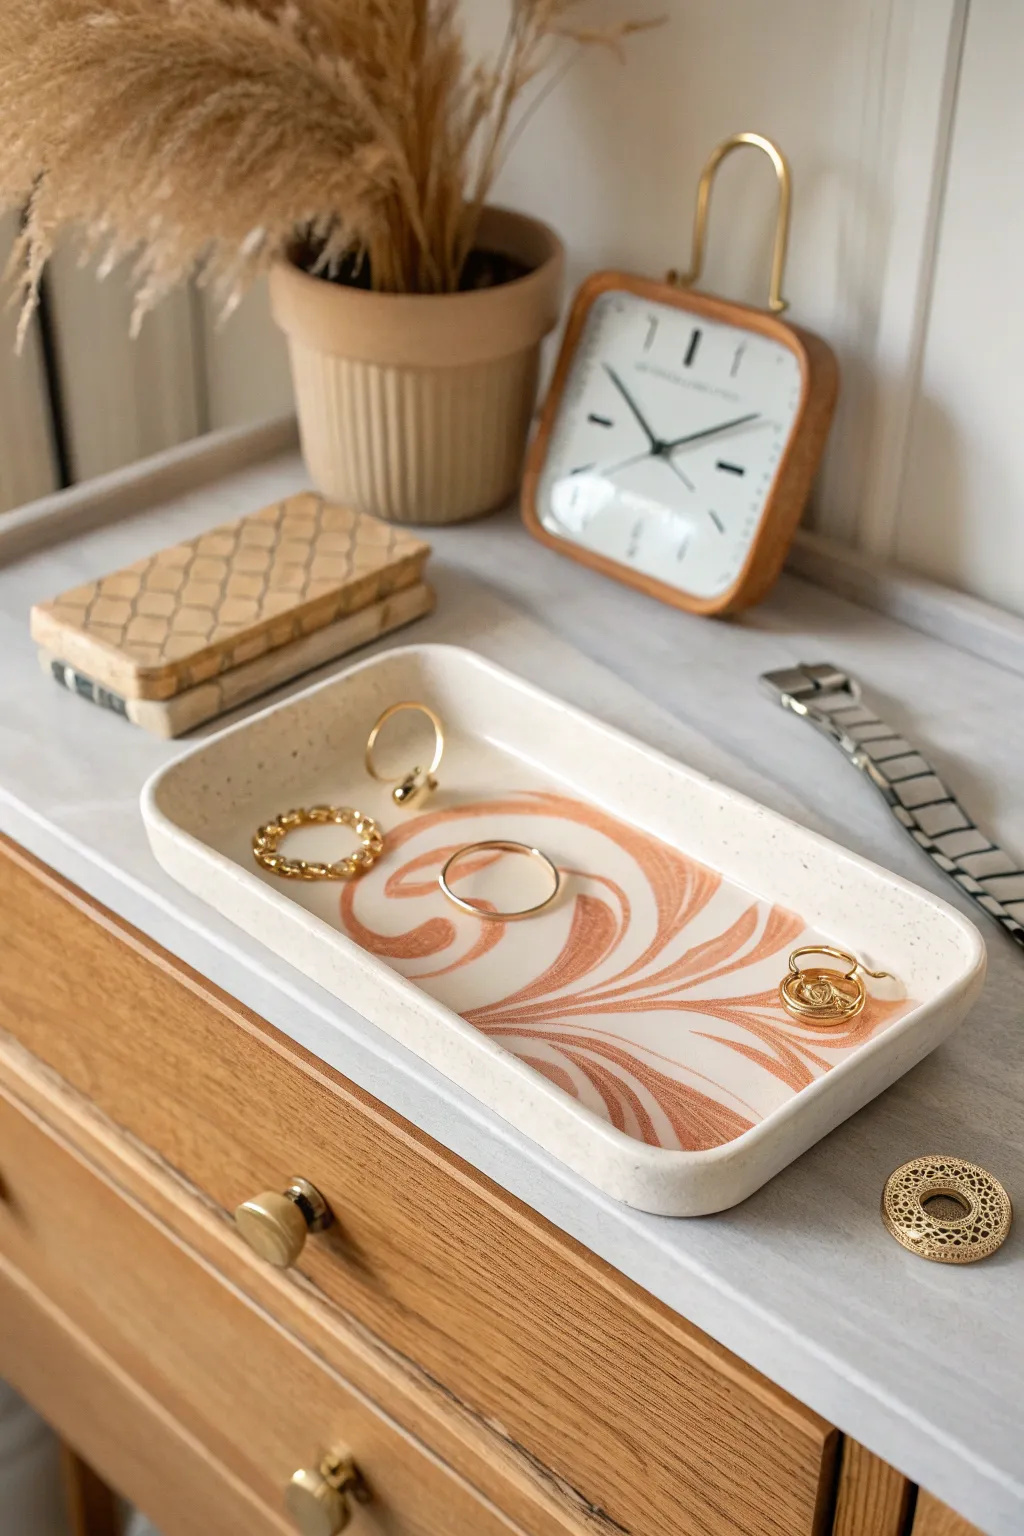
This elegant rectangular tray combines a minimalist granite aesthetic with warm, organic swirls of copper clay, creating a functional piece of art for your jewelry. The speckled finish gives it a professional stoneware look without needing a kiln.
Detailed Instructions
Materials
- Polymer clay (white or translucent)
- Polymer clay (terracotta or copper metallic)
- Black pepper or dried coffee grounds (for speckling)
- Acrylic rolling pin
- Rectangle clay cutter (or craft knife and ruler)
- Small ceramic tile or oven-safe glass dish (for baking form)
- Sandpaper (various grits from 400 to 1000)
- Matte or satin polymer clay varnish
- Oven
- Parchment paper
Step 1: Creating the Speckled Base
-
Prepare the White Clay:
Start by conditioning a large block of white polymer clay until it is soft and malleable. If you are using translucent clay for a stonier look, mix it with a small amount of white. -
Add Texture:
Sprinkle a generous pinch of coarse black pepper or fine dried coffee grounds onto the flattened clay. Fold the clay over itself and knead thoroughly to distribute the speckles evenly throughout the block. -
Sheet Formation:
Roll the speckled clay out into a thick, even sheet, approximately 1/4 inch thick. This will ensure your tray feels substantial and durable.
Clean Cuts
Chill your rolled clay sheet in the fridge for 10 minutes before cutting the rectangle. This prevents the clay from dragging and distorting.
Step 2: Marabling the Copper Accents
-
Prepare Accent Color:
Condition a smaller amount of terracotta or copper metallic clay. Roll it into a few thin ‘snakes’ or ropes. -
Apply the Swirls:
Lay the copper ropes randomly across the surface of your white speckled sheet. I find that curving them gently creates a more natural flow. -
Embed the Color:
Gently roll over the sheet with your acrylic roller just enough to press the copper ropes flush into the white base. -
Create the Marble Effect:
Fold the sheet in half, twist it slightly, and roll it out again. Repeat this folding and rolling process just 2-3 times. Be careful not to over-mix, or the colors will turn muddy instead of distinct swirls.
Go Graphic
Instead of organic swirls, use a hexagonal cutter to punch out the marbled clay and reassemble them like tiles for a geometric terrazzo look.
Step 3: Shaping the Tray
-
Cut the Shape:
Roll the marbled slab out to your final thickness (about 1/4 inch). Place your rectangle cutter onto the sweetest spot of the marbling pattern and press down firmly. Alternatively, measure a rectangle with a ruler and cut cleanly with a craft knife. -
Form the Lip:
Take a long strip of the remaining speckled white clay (without the marble pattern, if possible) to create the raised rim. Roll it into a long snake and flatten it into a ribbon. -
Attach the Rim:
Wrap this ribbon around the perimeter of your rectangular base. Stand it upright to form the wall of the tray. -
Blend the Seams:
Using a modeling tool or your finger, gently smudge the clay from the wall down onto the base on the *inside* of the tray to seal the seam. Do the same on the outside. Smooth until the transition is invisible. -
Refine the Edges:
Use your fingers to round off the top edge of the rim so it looks soft and ceramic-like, rather than sharp and geometric.
Step 4: Baking and Finishing
-
Final Smoothing:
Give the entire piece a quick wipe with a bit of baby oil on your finger to smooth out any fingerprints before baking. -
Bake:
Place the tray on parchment paper on a baking sheet. Bake according to your clay manufacturer’s instructions (usually 275°F/135°C for 30 minutes per 1/4 inch of thickness). -
Cool Down:
Let the tray cool completely in the oven with the door cracked open. This helps prevent thermal shock and potential cracking. -
Sand for Smoothness:
Once cool, wet sand the edges and rim. Start with 400 grit to remove bumps, then move to 1000 grit for a silky smooth finish. -
Seal:
Apply a thin coat of matte or satin varnish to protect the surface and make the speckles pop.
Now you have a chic, modern spot to corral your daily essentials while adding a handmade touch to your dresser.
Planter Wrap And Texture Upgrade
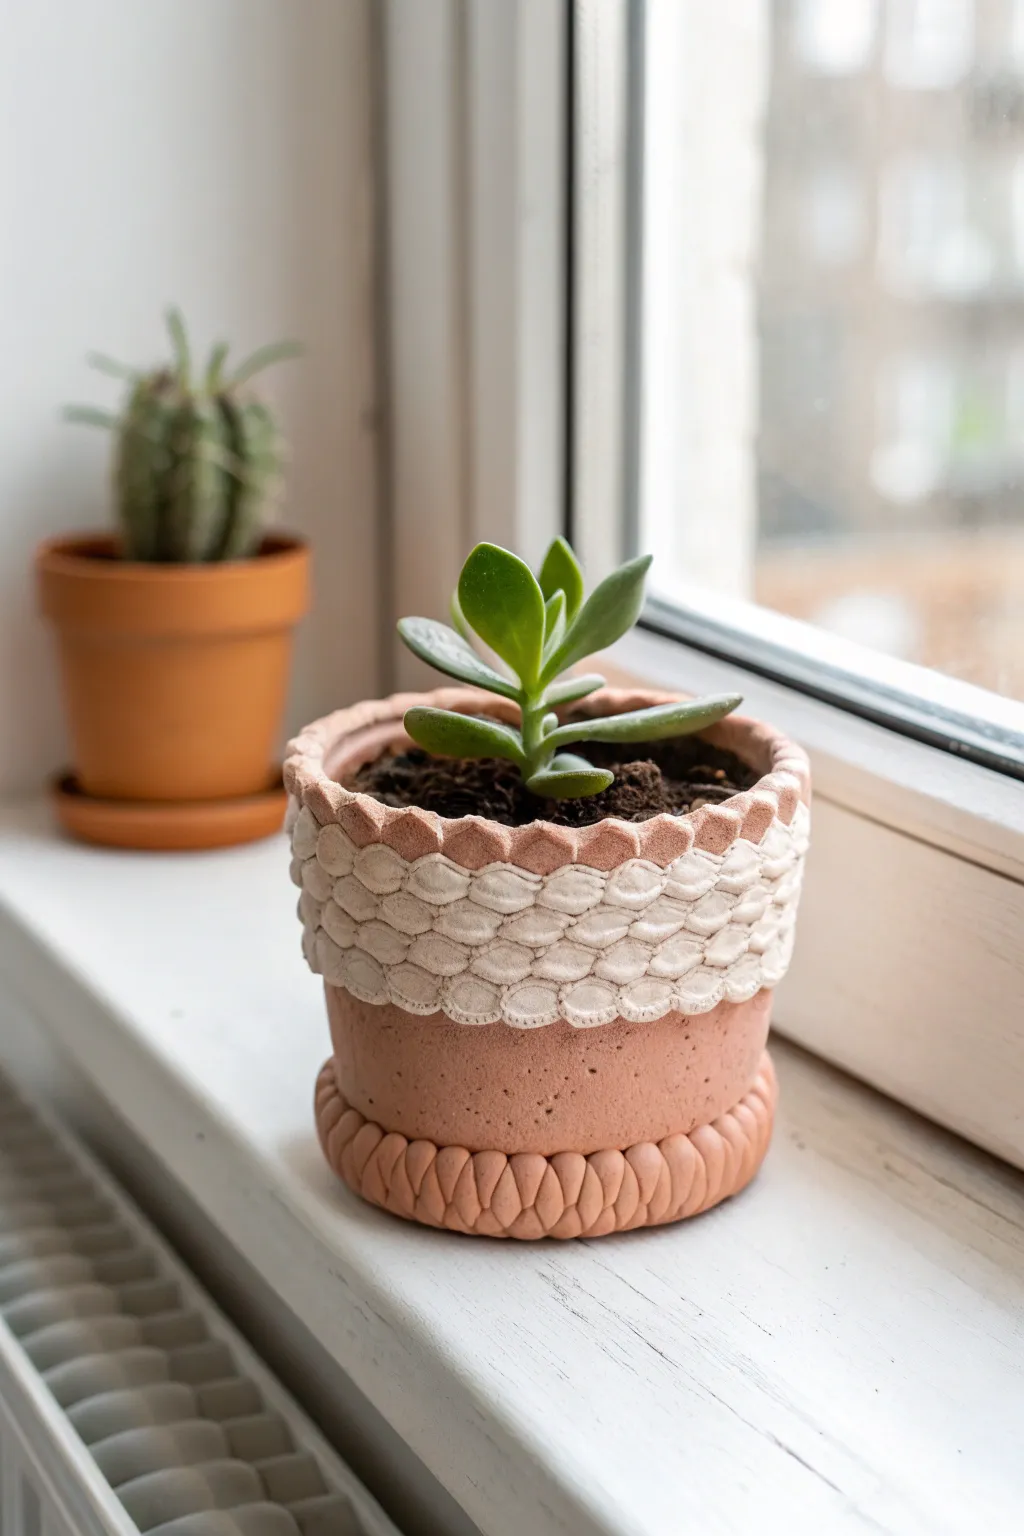
Transform a plain terracotta pot into a chic, bohemian planter using textured polymer clay accents. This project combines a woven rope detail with a delicate scalloped scale pattern for a touch of handmade elegance.
Step-by-Step Guide
Materials
- Small terracotta pot (clean and dry)
- Terracotta-colored polymer clay
- Cream or beige polymer clay
- Liquid polymer clay (or Bake & Bond)
- Basic clay sculpting tools (needle tool, small ball stylus)
- Small circle cutter (approx. 1cm diameter)
- Rolling pin or pasta machine for clay
- Cornstarch (to prevent sticking)
- Oven (for curing)
Step 1: Preparation & Base Ring
-
Prepare the pot surface:
Ensure your terracotta pot is completely clean and dry. A quick wipe with rubbing alcohol helps remove oils that might prevent the clay from adhering perfectly. -
Condition the terracotta clay:
Take your terracotta-colored polymer clay and knead it thoroughly until it becomes soft and pliable. Warm clay attaches better and cracks less. -
Create the rope base strands:
Roll out two long, even snakes of the terracotta clay. They should be long enough to wrap around the entire base of your pot with a little overlap. -
Twist the rope:
Gently twist the two snakes together to create a twisted rope effect. Ensure the twist is tight and uniform along the entire length. -
Attach the base ring:
Apply a thin layer of liquid polymer clay around the bottom edge of the pot. Press the twisted rope firmly onto this adhesive layer, joining the ends by blending the clay together smoothly so the seam disappears. -
Detail the texture:
Using a blunt tool or your finger, gently press down on the twists to flatten them slightly against the pot, ensuring a solid bond while maintaining the rope texture.
Sticky Situation?
If your clay won’t stick to the terracotta, the pot might be too porous. Coat the attachment areas with a thin layer of PVA glue and let it dry completely before starting.
Step 2: Scalloped Top Texture
-
Condition the accent clay:
Clean your hands to avoid color transfer, then condition the cream or beige polymer clay until soft. -
Roll out the sheet:
Roll the beige clay into a thin, even sheet, roughly 2mm thick. An acrylic roller or pasta machine works best for consistent thickness. -
Cut the scales:
Use your small circle cutter to punch out numerous small circles. You’ll need enough to go around the top of the pot about three or four times. -
Apply adhesive:
Brush a band of liquid polymer clay around the top rim of the pot, extending down about an inch and a half. -
Place the bottom row:
Start applying the clay circles at the lowest point of your planned design. Press the top half of each circle onto the pot, leaving the bottom half slightly loose. Overlap them slightly side-by-side. -
Layer the second row:
Apply the next row of circles above the first, positioning each new circle so it covers the gap between the two circles below it, creating a brick-lay or fish-scale pattern. -
Continue layering:
Repeat this process for a third and fourth row until you reach the rim of the pot. As you move up, gently press the layers together to ensure they adhere to one another. -
Texture the scales:
Here I like to take a piece of rough fabric or a stiff sponge and gently press it against the beige scales. This adds a subtle, stone-like texture that makes the piece look more organic. -
Finish the rim:
For the very top row, fold the excess clay slightly over the lip of the pot or trim it cleanly with a craft knife for a polished edge.
Step 3: Curing & Finishing
-
Final inspection:
Check for any air bubbles or loose edges. Smooth out any fingerprints using a tiny amount of baby oil on your finger if needed. -
Bake the project:
Place the pot in your oven according to the clay manufacturer’s instructions (usually 275°F or 130°C). Remember that the terracotta pot acts as a heat sink, so you may need to add 5-10 minutes to the baking time. -
Cool down:
Turn off the oven and let the pot cool down completely inside. This slow cooling prevents the clay from cracking due to thermal shock.
Seamless Finish
When joining the ends of your rope or scale rows, do it at the ‘back’ of the pot. Use a rubber shaper tool to smudge the seam lines until they vanish.
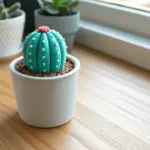
Once cooled, fill your stylish new planter with a succulent and enjoy the handmade warmth it adds to your windowsill


The Complete Guide to Pottery Troubleshooting
Uncover the most common ceramic mistakes—from cracking clay to failed glazes—and learn how to fix them fast.
Minimal Phone Stand
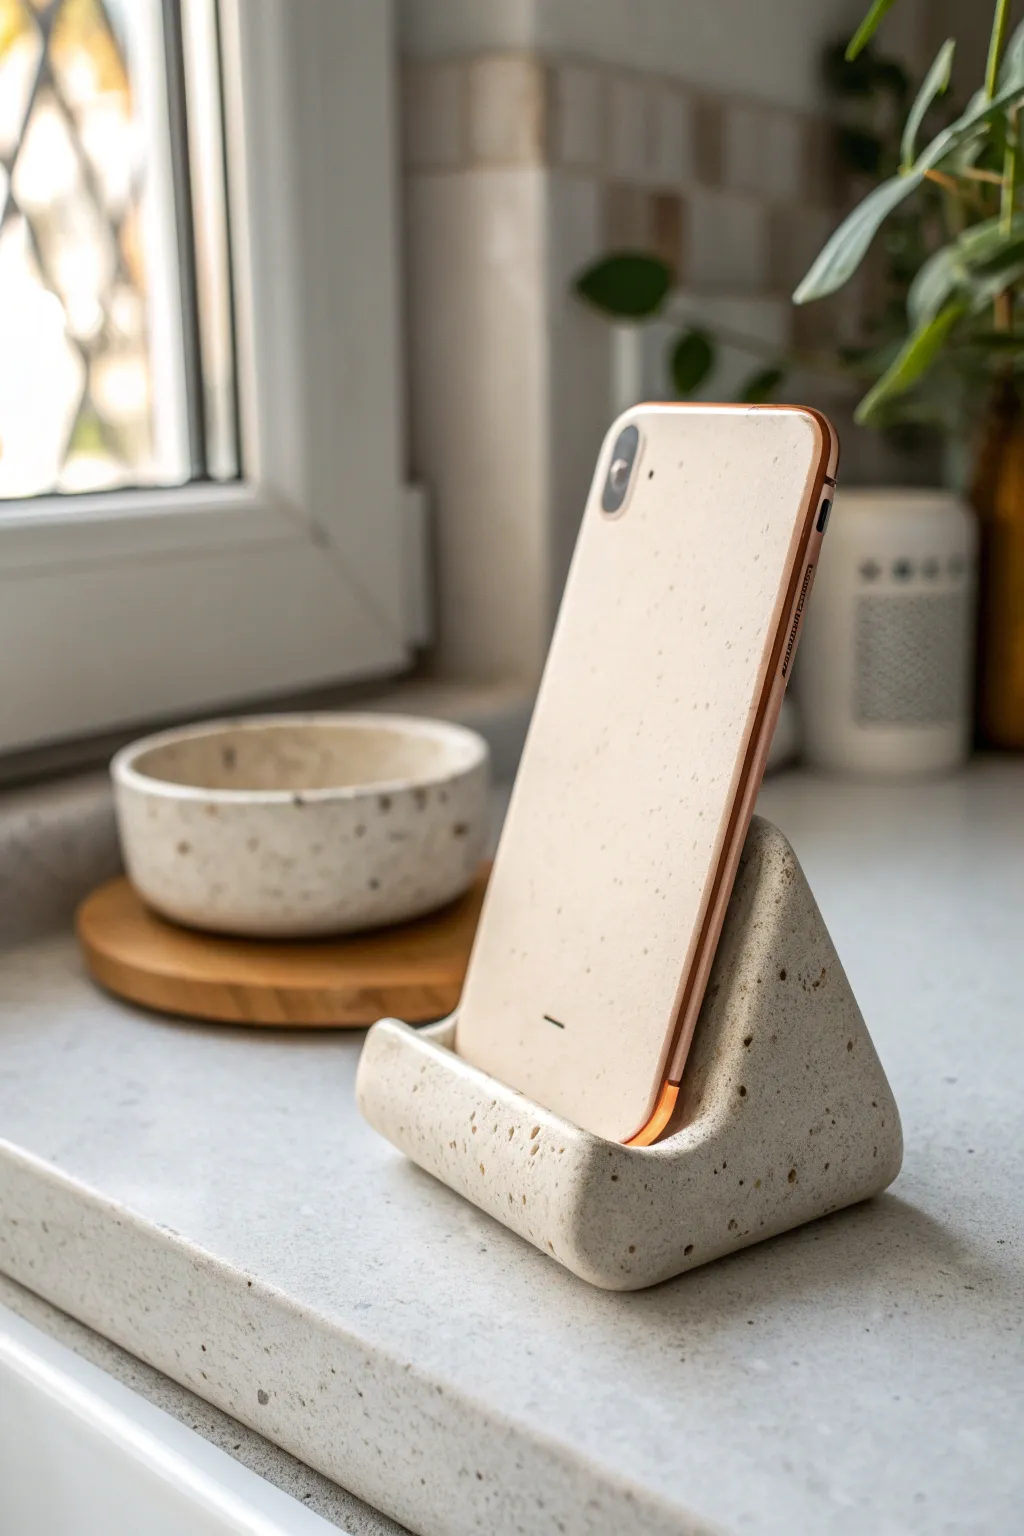
Bring a touch of modern minimalism to your desk with this sleek, geometric phone stand. By using special effect polymer clay, you can easily mimic the heavy, organic look of speckled stone without the weight or complicated tools.
How-To Guide
Materials
- Polymer clay in ‘Granitex’, ‘Faux Granite’, or ‘Speckled Beige’
- Rolling pin or acrylic roller
- Tissue blade or sharp craft knife
- Ruler
- Parchment paper or baking tile
- Sandpaper (various grits: 400, 600, 1000)
- Oven
- Cardstock (for template)
- Smoothing tool or your finger
Step 1: Preparing the Base Form
-
Condition the clay:
Begin by thoroughly conditioning your speckled polymer clay. Knead it in your hands until it is warm, pliable, and free of any cracks. -
Form a large block:
Shape the conditioned clay into a rough, thick log. You want a substantial amount of clay here to ensure the stand is heavy enough to support a phone. -
Rough out the triangle shape:
Place the log on your work surface and begin pressing it into a triangular prism shape. Flatten the bottom first for stability, then use your palms to angle the sides upwards to a peak. -
Define the angle:
Using your acrylic roller or a flat object, press firmly against the back face of the triangle to create a steep, supportive angle. The front face should be angled back slightly to let the phone recline.
Weight is Key
If the stand feels too light, bake a heavy metal washer or a few coins into the center of the clay base. This adds necessary ballast so it won’t tip over.
Step 2: Creating the Lip
-
Roll a snake:
Take a separate piece of the same clay and roll it into a thick snake or cylinder. This needs to be as wide as the base of your triangle. -
Attach the lip:
Press this cylinder onto the bottom front edge of your triangular base. This piece will act as the ‘stop’ that keeps the phone from sliding off. -
Blend the seams:
Use a modeling tool or your thumb to drag clay from the cylinder onto the base, seamlessly blending them together. I find it helpful to smooth this repeatedly so it looks like one solid cast piece rather than two joined parts. -
Refine the curve:
Gently curve the lip upwards. Use the side of your finger to create a smooth, rounded cradle where the phone will sit.
Cracking Issues?
Thick clay can crack if the outside cures faster than the inside. Tin foil tenting during baking helps distribute heat evenly and prevents scorching.
Step 3: Refining and Baking
-
Check dimensions:
Before baking, grab your actual phone (or a dummy object of similar size) and gently test the fit. Ensure the angle is comfortable and the lip is high enough to hold the device securely. -
Slice the sides:
To get that clean, architectural look seen in the photo, use a long tissue blade to slice off the uneven ends of the stand. This creates perfectly flat, vertical side walls. -
Smooth the surface:
Dip your finger in a tiny bit of baby oil or cornstarch and rub it over the entire surface to remove fingerprints and tool marks. -
Texture (Optional):
If you want a rougher stone texture, gently tap the surface with an old toothbrush or a ball of aluminum foil. -
Bake:
Place the stand on a ceramic tile or parchment paper. Bake according to your clay package instructions. Since this is a thick piece, you might need to bake it longer—often 45 minutes to an hour at the recommended temperature ensures strength. -
Cool down:
Let the piece cool completely in the oven with the door slightly ajar. Sudden temperature changes can cause cracking in thick clay objects.
Step 4: Finishing
-
Wet sanding:
Once cool, take your sandpaper and submerge it in water. Sand the flat sides and the bottom of the stand to make them perfectly flush and smooth. -
Refine edges:
Gently sand the rounded lip and the top peak to remove any sharp ridges left from the slicing step. -
Buffing:
Rub the piece briskly with a piece of denim or a soft cloth. This burnishes the clay, bringing out a subtle, stone-like sheen without making it look like plastic.
Enjoy the organized calm your new stone-effect stand brings to your workspace