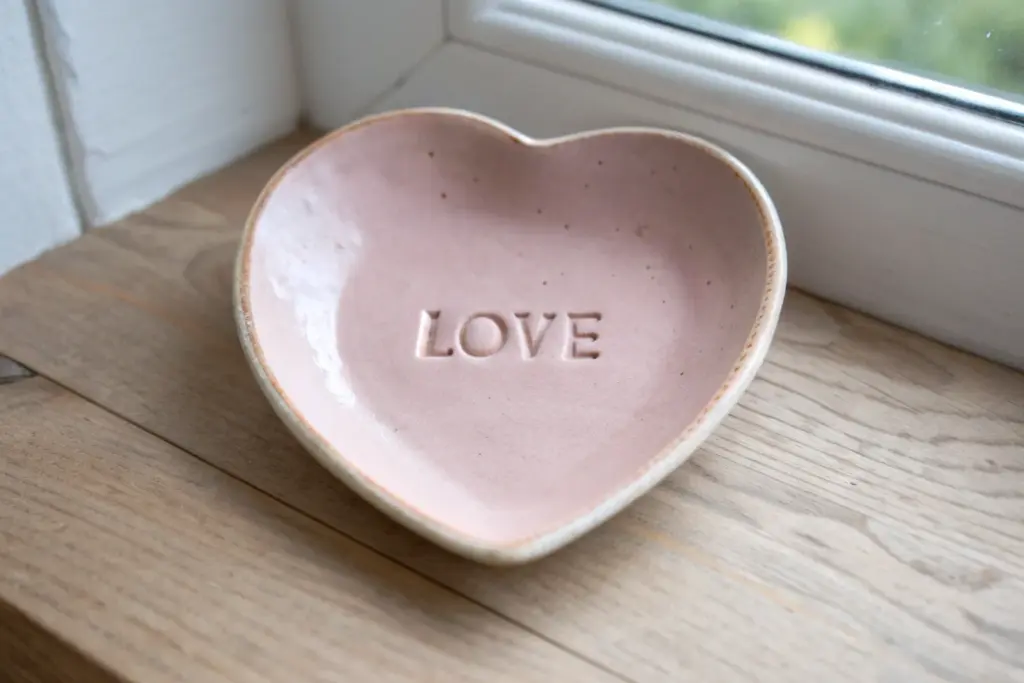
When Valentine’s Day rolls around, I love how air dry clay lets you make something sweet and meaningful without needing a kiln. These ideas are all about easy, giftable projects with lots of heart shapes, love notes, and cozy handmade charm.
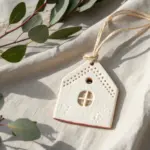
Classic Stamped Heart Ornaments
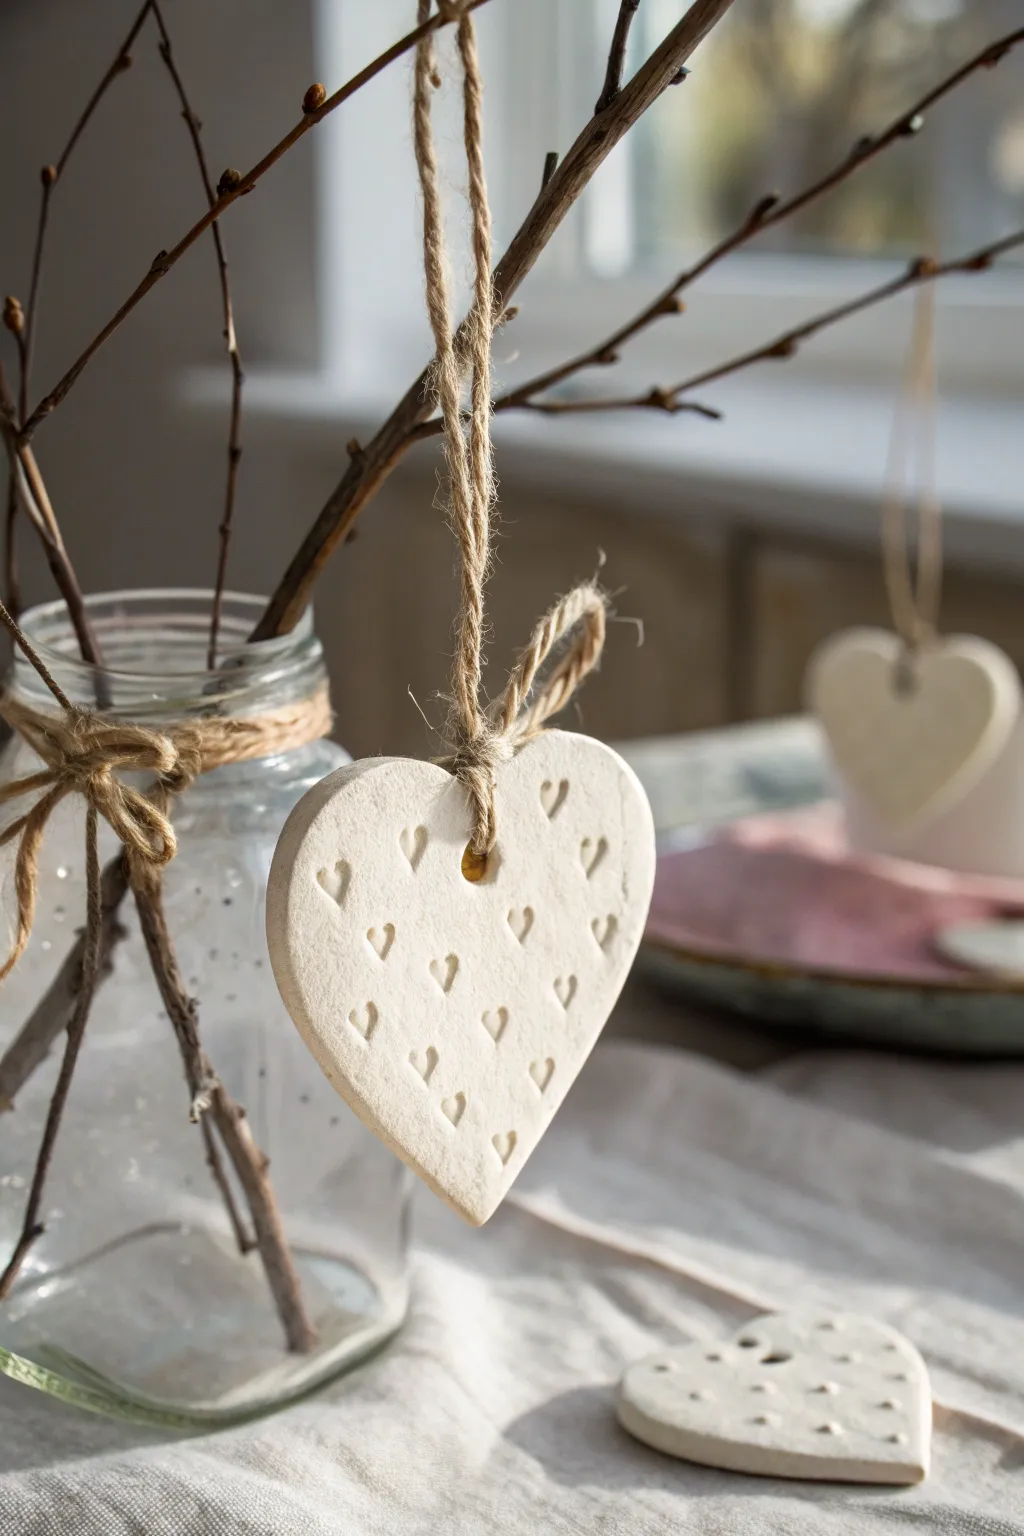
Embrace simplicity with these charming air-dry clay hearts, featuring a delicate, repetitive stamped pattern and rustic twine accents. Their matte white finish and natural texture make them perfect for a minimalist Valentine’s display or sweet handmade gift tags.
Step-by-Step Guide
Materials
- White air-dry clay
- Rolling pin
- Heart-shaped cookie cutter (medium size)
- Small heart stamp or tool (even a toothpick can work)
- Straw or skewer (for creating the hole)
- Fine-grit sandpaper
- Jute twine or hemp cord
- Parchment paper or silicone mat
- Clear matte varnish (optional)
Step 1: Shaping the Clay
-
Prepare your workspace:
Lay down a sheet of parchment paper or a silicone mat to prevent the clay from sticking to your table. This also makes it easier to move the hearts later without distorting their shape. -
Condition the clay:
Take a handful of air-dry clay and knead it in your hands until it feels soft, pliable, and free of cracks. Warm clay is much easier to work with. -
Roll it out:
Using your rolling pin, flatten the clay to an even thickness of about 1/4 inch (5-6mm). Try to keep the thickness consistent so the ornament dries evenly. -
Cut the shapes:
Press your medium-sized heart cookie cutter firmly into the rolled clay. Give it a little wiggle before lifting it up to ensure a clean cut. -
Smooth the edges:
Dip your finger in a tiny bit of water and gently run it along the cut edges of the heart to smooth out any roughness left by the cutter.
Step 2: Detailing and Drying
-
Create the hanging hole:
Use a straw or a skewer to punch a hole near the top center of the heart. Make sure it’s not too close to the edge, or the clay might break when hung. -
Stamp the pattern:
Take your small heart stamp or tool and gently press it into the surface of the clay. Create a random or grid-like pattern of tiny indented hearts across the front. -
Refine the impressions:
If the clay displaced slightly around the stamp marks, gently tap it back down with a fingertip. I find this helps keep the surface looking polished. -
Begin drying:
Place the hearts on a flat surface lined with fresh parchment paper. Let them air dry away from direct heat sources. -
Flip for evenness:
After about 12 hours, flip the hearts over so the bottom side is exposed to the air. This prevents curling as the moisture evaporates. -
Check for dryness:
Wait another 12-24 hours until the clay is completely hard and has turned a bright, chalky white. -
Sand the edges:
Once fully dry, take a piece of fine-grit sandpaper and lightly sand the edges to remove any remaining sharp bits or irregularities.
Stamp Hack
Don’t have a mini heart stamp? Use the tip of a small Phillips head screwdriver for a cross pattern, or the end of a straw for circles.
Step 3: Finishing Touches
-
Optional sealing:
For longevity, you can brush on a coat of clear matte varnish. This seals the clay without changing its natural look. -
Cut the twine:
Cut a length of jute twine, roughly 8-10 inches long, depending on how low you want the ornament to hang. -
Thread and loop:
Fold the twine in half and push the folded end through the hole from front to back, creating a small loop. -
Secure the hanger:
Pull the loose ends of the twine through the loop and tighten gently to secure it to the heart (a lark’s head knot). -
Tie the top:
Knot the two loose ends of the twine together at the very top to complete the hanger loop.
Cracking Issues?
If small cracks appear while drying, mix a tiny bit of fresh clay with water to make a paste and fill them in, then smooth with a finger.
Now you have a set of lovely textured ornaments ready to hang on a branch or tuck into a gift bag


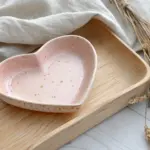
Heart-Shaped Pinch Pot Ring Dishes
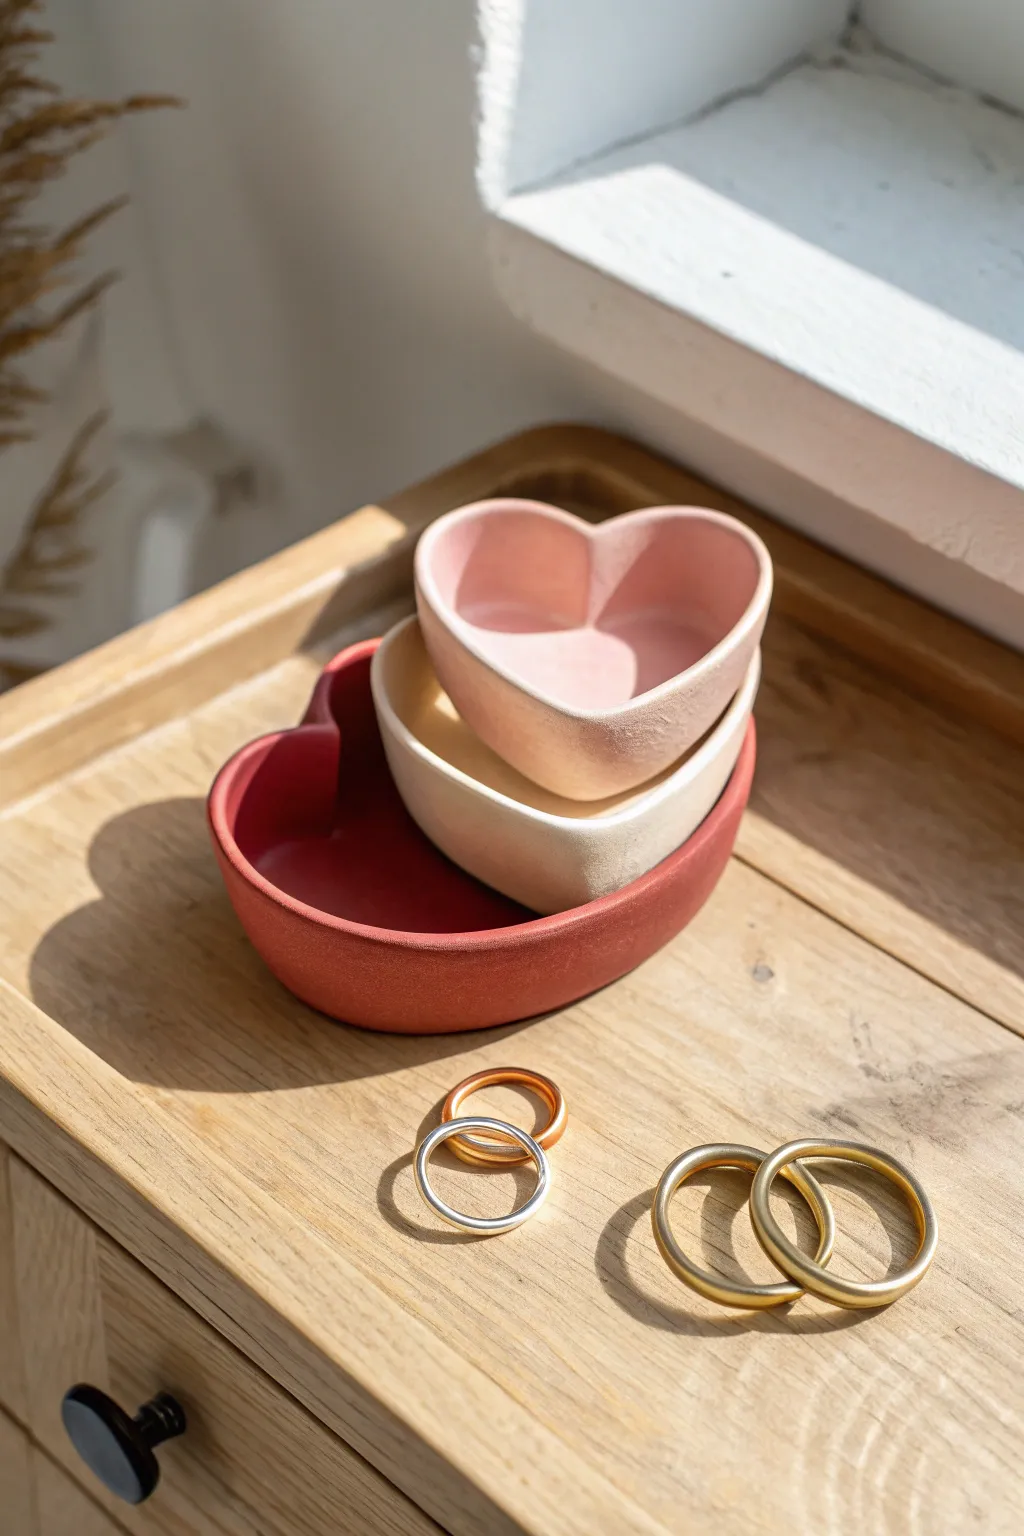
These velvety-smooth, nesting trinket dishes are the perfect minimalist Valentine’s accent for a nightstand or dresser. Created using simple pinch pot techniques, this project yields a gorgeous ombré-style stack in terracotta, cream, and blush tones.
Step-by-Step Tutorial
Materials
- Air dry clay (white)
- Acrylic paints (terracotta red, pale pink, cream/white)
- Clay rolling pin
- Sponge or fine-grit sanding block
- Small bowl or cup of water
- Wax paper or craft mat
- Optional: Clay sealant (matte finish)
Step 1: Shaping the Base Forms
-
Portion the Clay:
Begin by separating your air dry clay into three balls of graduated sizes: one large (about the size of a lemon), one medium (lime-sized), and one small (walnut-sized). -
Roll Smooth Spheres:
Take the largest ball and roll it vigorously between your palms. The goal is to eliminate any cracks or fold lines before you start shaping. -
Start the Pinch Pot:
Gently press your thumb into the center of the sphere, stopping before you push through the bottom. Rotate the ball while pinching the clay walls between your thumb and fingers to thin them out evenly. -
Form the Heart Cleft:
Once you have a round bowl shape, use your finger to press a deep indentation into one side of the rim. This creates the top ‘V’ of the heart. -
Point the Base:
Directly opposite the indentation you just made, pinch the clay wall together to form a distinct point. Smooth the curves leading to this point so the heart shape looks organic. -
Refine the Shape:
Set the dish down on your mat and gently press it flat to ensure it sits level. Use your fingers to flare the walls slightly outward if you want a wider dish. -
Repeat the Process:
Repeat these shaping steps with the medium and small clay balls. I find it helpful to occasionally test-stack them while the clay is still wet to ensure they nest comfortably inside one another.
Smooth Operator
For the smoothest possible finish, dip a soft makeup sponge in water and buff the wet clay before drying. It erases fingerprints better than bare skin.
Step 2: Smoothing and Drying
-
Water Smoothing:
Dip your finger into a small amount of water. Gently rub the surface of the clay to erase fingerprints and tiny cracks. Don’t use too much water, or the clay will become mushy. -
Sharpen the Edges:
For that modern, clean look seen in the photo, run a slightly damp finger along the rim of each dish to square off the edges rather than leaving them rounded. -
Initial Drying:
Place the three hearts on a flat surface lined with wax paper. Let them air dry for 24-48 hours. Flip them over halfway through to ensure the bottoms dry completely. -
Sanding for Perfection:
Once fully cured and hard, use fine-grit sandpaper or a sanding block to buff away any remaining imperfections. The goal is a surface that feels like stone. -
Dust Removal:
Wipe the dishes down with a slightly damp cloth or paper towel to remove all sanding dust before painting.
Step 3: Adding Color
-
Paint the Base Coat:
Start with the largest heart. Paint it entirely in a terracotta or deep red shade. Use long, smooth strokes to avoid brush marks. -
Paint the Medium Heart:
Apply a coat of cream or off-white acrylic paint to the medium-sized dish. You may need two coats here to fully cover the white clay depending on your paint’s opacity. -
Paint the Smallest Heart:
Mix a tiny dot of your red paint into the white paint to create a soft blush pink. Coat the smallest heart fully in this shade. -
Matte Finish:
Allow the paint to dry completely. For protection, apply a matte varnish. Avoid glossy finishes if you want to replicate the earthy texture shown in the image.
Gilded Touch
Paint just the top rim of each heart with liquid gold leaf. The metallic edge adds a luxurious contrast to the matte, earth-toned clay body.
Stack your dried creations together for a lovely handmade display piece that keeps your favorite jewelry organized

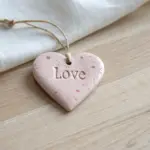
Air Dry Clay Valentine Gift Tags
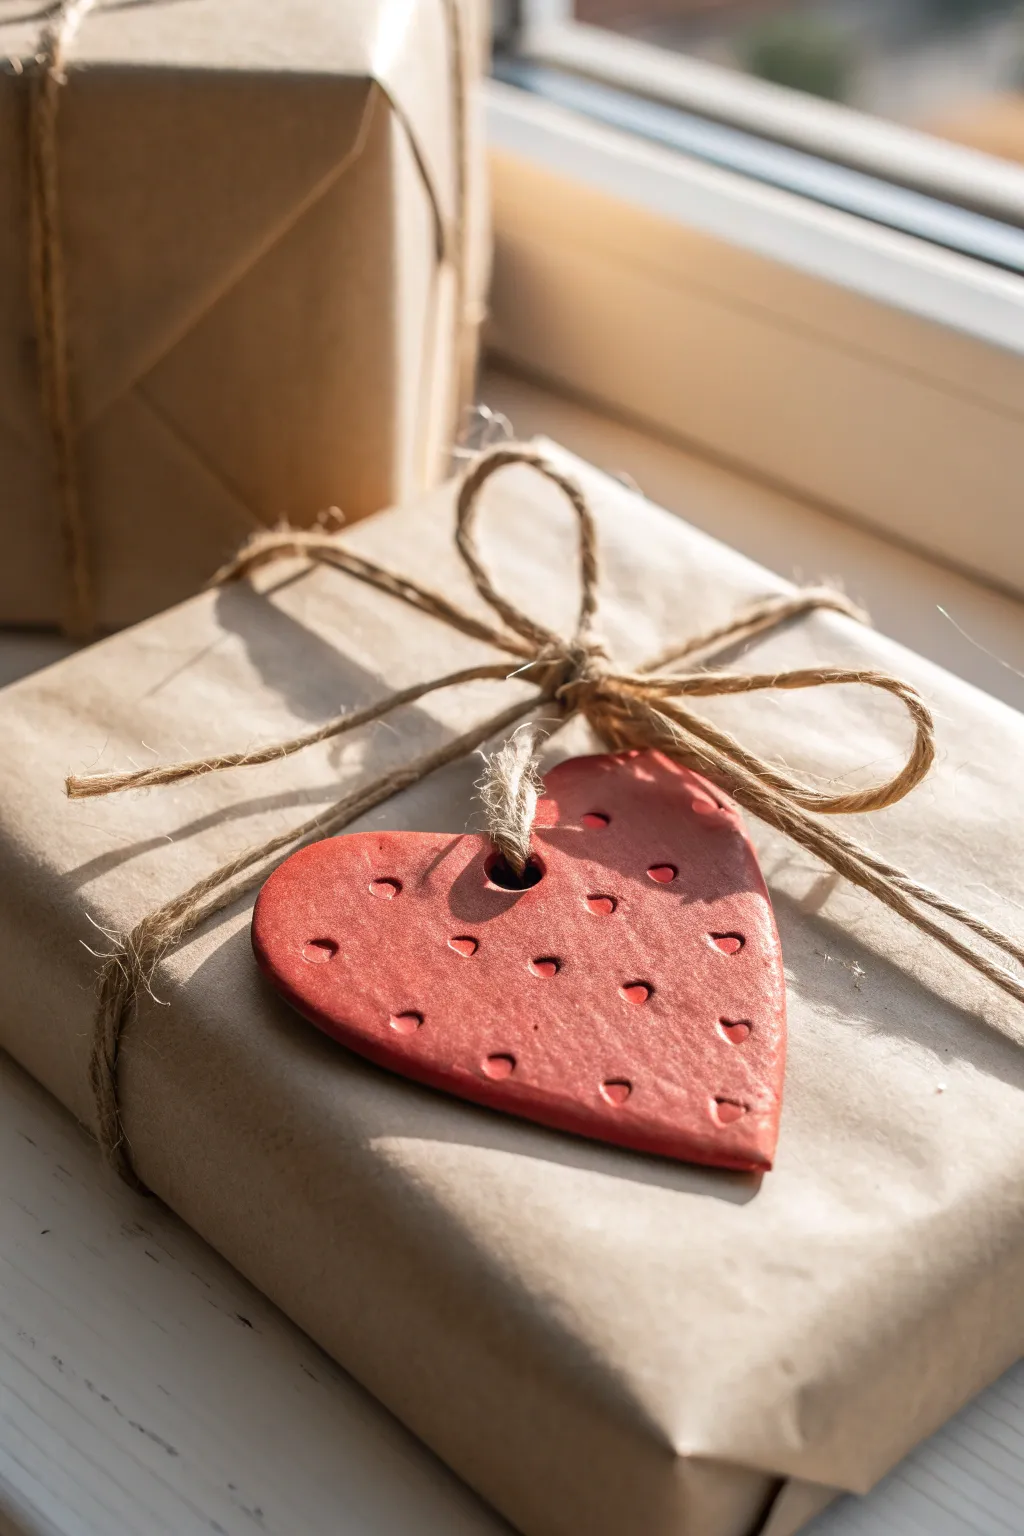
Add a heartfelt touch to your gift wrapping with this charming textured clay tag. The warm red tone and simple dotted pattern create a lovely rustic aesthetic that pairs perfectly with brown kraft paper.
Detailed Instructions
Materials
- Air dry clay (white or terracotta)
- Red acrylic paint (if using white clay)
- Small heart-shaped cookie cutter
- Rolling pin
- Parchment paper or craft mat
- Wooden skewer or toothpick
- Clear matte varnish (optional)
- Jute twine
- Fine grit sandpaper
Step 1: Shaping the Base
-
Prepare the Clay:
Take a small ball of air dry clay and knead it in your hands until it becomes soft and pliable, which helps prevent cracks later. -
Roll it Out:
Place the clay on parchment paper and use a rolling pin to flatten it to an even thickness of about 1/4 inch (4-5mm). -
Cut the Shape:
Using your heart-shaped cookie cutter, press firmly into the clay to cut out your tag shape, then carefully peel away the excess clay from the edges. -
Smooth the Edges:
Dip your finger in a tiny bit of water and gently run it along the cut edges of the heart to soften any sharp ridges left by the cutter.
Clean Edges Trick
Before drying, dip your finger in water and smooth the clay edges. This removes little burrs and saves you from having to sand delicate shapes later.
Step 2: Adding Texture & Details
-
Create the Texture:
Take the blunt end of a wooden skewer or a small round tool. Press it gently into the surface of the clay in a random pattern to create the small divots shown in the image. -
Make the Tie Hole:
Use the skewer to poke a larger hole near the top center of the heart. Wiggle the skewer in a small circular motion to ensure the hole is wide enough for your twine to pass through later. -
Refine the Back:
Flip the heart over gently and smooth down any clay that may have pushed out around the hole edges. -
Drying Phase:
Place the heart on a flat surface to dry for 24-48 hours. I like to flip it over halfway through the drying time to ensure both sides dry evenly and prevent curling.
Change the Vibe
Instead of red paint, try painting it gold or white, then rub a dark brown wax over the surface to make the texture divots pop with an antique look.
Step 3: Finishing Touches
-
Sand for Smoothness:
Once fully dry, lightly sand the edges with fine-grit sandpaper if there are any rough spots remaining. -
Applying Color:
If you used white clay, paint the entire heart with a warm, muted red acrylic paint. You might need two coats for full opacity. -
Highlight the Texture:
If the paint fills in the divots too much, use a pin to gently clear them out while the paint is still wet to maintain that distinct dotted look. -
Seal (Optional):
For durability, apply a thin coat of clear matte varnish. This gives it a professional finish without making it too shiny. -
Attach the Twine:
Cut a short length of jute twine, fold it in half, and push the loop through the hole in the tag. -
Secure the Loop:
Pull the loose ends of the twine through the loop and tighten it against the tag to create a lark’s head knot. -
Tie to Package:
Use the loose ends of the twine to tie the tag securely onto your gift wrapping string or bow.
Now your gift has a personalized, handcrafted element that shows how much you care


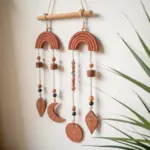
Sweetheart Heart Garland Medallions
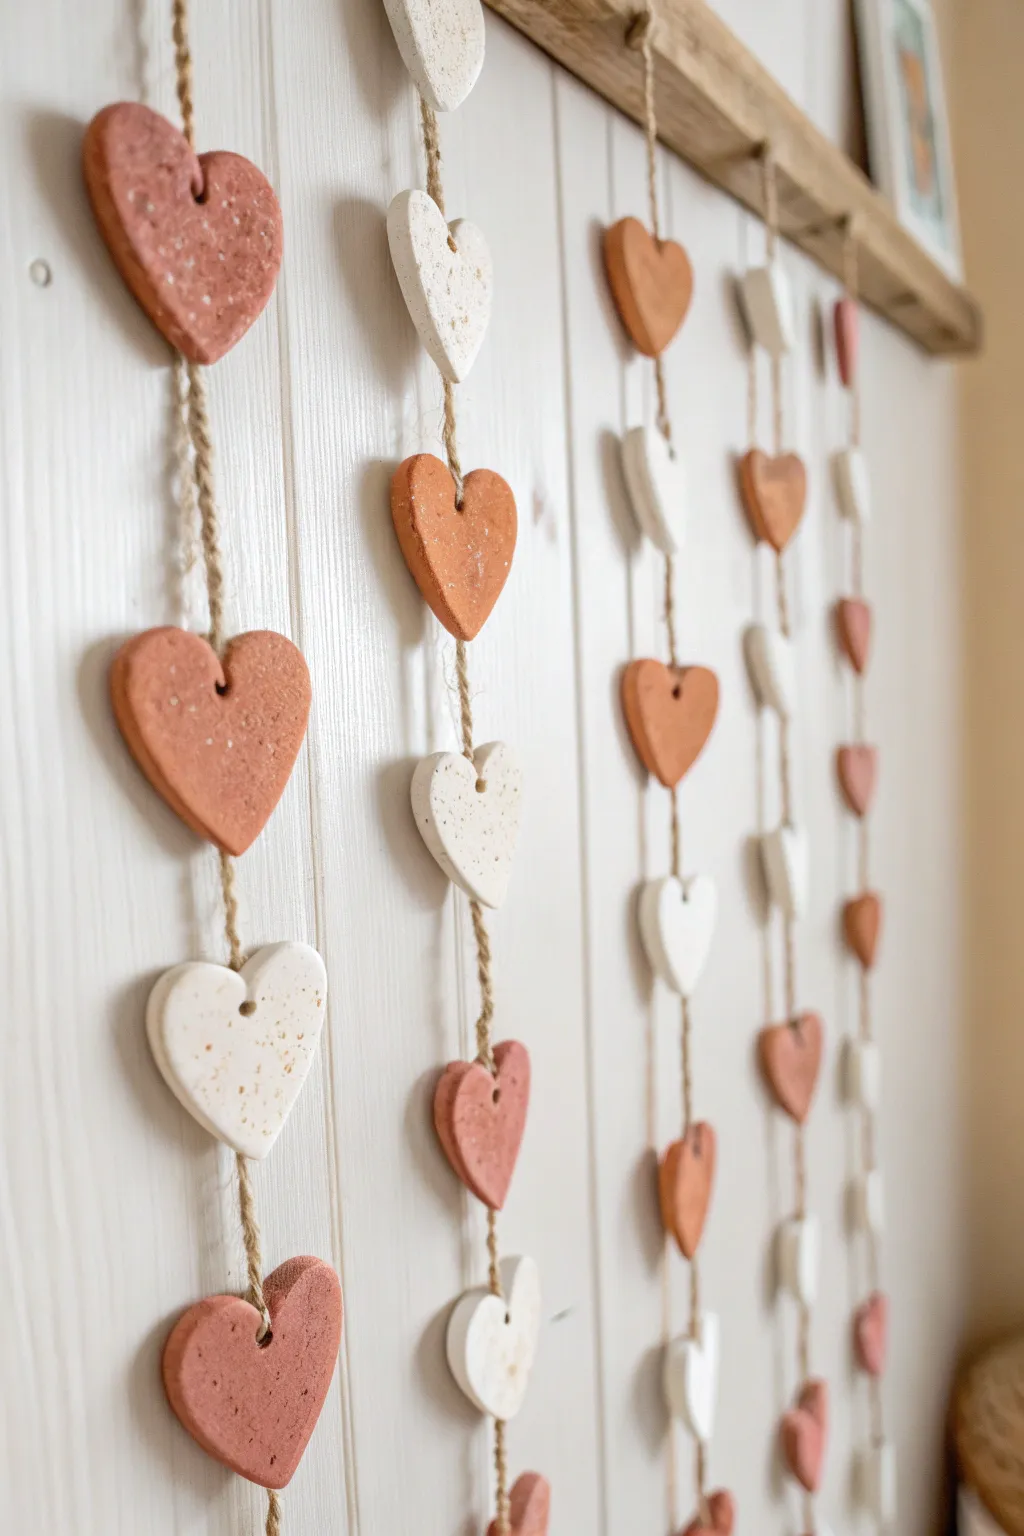
Bring warmth to your walls with this charming, rustic garland featuring handmade air dry clay hearts in alternating earthy tones. The textured, speckled finish and natural jute twine create a cozy, organic look perfect for Valentine’s Day or year-round decor.
Step-by-Step Tutorial
Materials
- Air dry clay (white)
- Acrylic paint (terracotta or reddish-brown)
- Acrylic paint (cream or off-white)
- Rolling pin
- Heart-shaped cookie cutter (medium size)
- Straw or skewer (for poking holes)
- Jute twine
- Sandpaper (fine grit)
- Old toothbrush or stiff brush (for speckling)
- Brown acrylic paint (diluted for speckling)
- Matte sealant (optional)
- Wooden strip or branch for hanging
Step 1: Shaping the Hearts
-
Prepare the Clay:
Begin by kneading your white air dry clay until it is soft, pliable, and free of cracks. -
Roll Out the Slab:
Use a rolling pin to flatten the clay to an even thickness of about 1/4 inch. If the clay sticks, you can roll it out on a piece of parchment paper. -
Cut the Shapes:
Press your heart-shaped cookie cutter firmly into the clay to create your medallions. You will need enough hearts for several vertical strands—count the total number based on your desired length. -
Create Hanging Holes:
While the clay is still wet, take a straw or a skewer and punch a hole near the top center of each heart. Make sure the hole is wide enough for your jute twine to pass through easily. -
Smooth the Edges:
Dip your finger in a little water and gently run it along the cut edges of each heart to smooth out any roughness or jagged bits left by the cutter. -
Dry Completely:
Lay the hearts on a flat surface, flipping them occasionally to prevent curling. Let them dry for 24-48 hours until they are hard and white. -
Sand Imperfections:
Once fully dry, lightly sand any rough spots or sharp edges with fine-grit sandpaper for a polished finish.
Step 2: Painting & Texturing
-
Divide the Batch:
Separate your dried hearts into two equal groups. -
Paint the Base Colors:
Paint the first group with a terracotta or reddish-brown acrylic paint. Paint the second group with a cream or off-white shade to keep the natural clay look consistent. -
Apply Second Coat:
Allow the first layer to dry, then apply a second coat if needed to ensure solid, opaque coverage. -
Prepare the Splatter:
Dilute a small amount of dark brown paint with water until it has an inky consistency. -
Add Speckles:
Dip an old toothbrush into the diluted paint. Hold it over the hearts and run your thumb across the bristles to flick tiny speckles onto the surface. I find doing this outdoors or inside a cardboard box saves a lot of cleanup time. -
Dry the Detail:
Let the speckled paint dry completely before handling the hearts again.
Keep it Smooth
To prevent the clay from cracking as it dries, keep it away from direct heat sources like radiators. Slow, even drying creates the strongest hearts.
Step 3: Assembly
-
Cut the Twine:
Measure and cut several lengths of jute twine based on how long you want your vertical strands to hang. -
Knot the Top:
Tie a loop or knot at the very top of each twine piece so it can be attached to your main hanging rod later. -
Thread the First Heart:
Thread the twine through the hole of your first heart. Decide where you want it to sit—usually near the top for the first one. -
Secure the Position:
Tie a simple overhand knot in the twine right above the heart’s hole to keep it from sliding up, and another knot below if the hole is large, though usually, gravity does the work. -
Add Remaining Hearts:
Continue threading hearts, alternating between terracotta and cream colors. Leave about 4-6 inches of space between each heart. -
Secure the Ends:
Tie a knot securely below the final heart on each strand and trim any excess twine. -
Mount the Garland:
Tie the top loops of your finished vertical strands onto a horizontal wooden strip, branch, or directly onto hooks to complete the display.
Scented Decor
Mix a few drops of essential oil (like cinnamon or vanilla) into the clay during the kneading phase to make your garland smell as sweet as it looks.
Hang your beautiful new garland in a entryway or living space to add a touch of handmade love to your home

The Complete Guide to Pottery Troubleshooting
Uncover the most common ceramic mistakes—from cracking clay to failed glazes—and learn how to fix them fast.
Simple Heart Stud Earrings

These miniature heart studs capture a minimalist, modern aesthetic with their matte finish and stone-like texture. Using simple air dry clay and a clever speckling technique, you can create a gradient trio ranging from blush pink to deep wine red.
How-To Guide
Materials
- White smooth air dry clay
- Acrylic paints (Burgundy, Red, White, Brown)
- Small heart-shaped mini cutter (approx. 1cm)
- Old stiff toothbrush
- Rolling pin or acrylic roller
- Parchment paper or silicone mat
- Fine grit sandpaper (400-600 grit)
- Earring stud posts and backs
- Strong jewelry glue (E6000 or similar)
- Gloss or matte varnish (optional)
Step 1: Preparing the Clay Colors
-
Condition the base:
Start by taking a small handful of white air dry clay. Knead it thoroughly in your hands until it becomes warm, soft, and pliable to prevent cracking later. -
Create the light pink shade:
Pinch off a small marble-sized piece of clay. Add a tiny dot of red paint and an even tinier dot of brown to mute the color. Knead until the color is uniform and pale. -
Mix the medium berry tone:
Take a second marble-sized piece of clay. Add a larger amount of red paint and a small touch of burgundy. Knead well until you have a rich, medium-pink tone. -
Mix the deep red tone:
For the third shade, take another piece of clay and add a generous amount of burgundy and a drop of brown paint. Knead until the clay is saturated air a deep, wine-red color.
Cracked Clay?
If tiny cracks appear while drying, mix a small amount of fresh clay with water to make a paste. Fill the cracks, smooth with a finger, and let dry again.
Step 2: Creating the Stone Texture
-
Roll out the clay slabs:
Roll each colored ball of clay flat onto your parchment paper or mat. Aim for a thickness of about 3-4mm roughly—thick enough to hold a stud post but not too chunky. -
Prepare the speckle mix:
Mix a small amount of dark brown acrylic paint with a few drops of water to create a fluid, ink-like consistency. -
Apply the speckles:
Dip an old toothbrush into the watered-down paint. Hold it over your rolled-out clay slabs and run your thumb across the bristles to flick tiny droplets onto the clay surface. -
Let the paint set:
Wait about 5-10 minutes for the paint speckles to dry completely on the surface so they don’t smear during the cutting process.
Make it a Magnet
Skip the earring posts and glue small neodymium magnets to the back instead. They make adorable fridge magnets or office organizers.
Step 3: Cutting and Finishing
-
Cut the shapes:
Using your mini heart cutter, press firmly into the textured clay. Cut one heart from each color slab to create your gradient set. -
Release the shapes:
Gently wiggle the cutter to release the clay. If the clay sticks inside, lightly push it out from the back using a soft brush handle to avoid denting the front. -
Smooth the edges:
Dip your finger in a little water and very gently run it along the cut edges of the hearts to soften any sharp ridges left by the cutter. -
Dry the hearts:
Place the hearts on a clean flat surface. Let them air dry for at least 24 hours. I usually flip them over halfway through to ensure the back dries evenly too. -
Sand for perfection:
Once fully hard, take your fine-grit sandpaper and lightly buff the edges and back. This removes any final roughness and gives them that polished stone feel. -
Attach the hardware:
Apply a small dab of strong jewelry glue to the flat pad of an earring post. Press it firmly onto the back center of a dried clay heart. -
Final cure:
Allow the glue to cure according to the package instructions (usually another 24 hours) before handling or wearing them.
You now have a chic set of faux-stone hearts ready to gift or wear for a subtle romantic touch
Heart Photo Holder Plaques
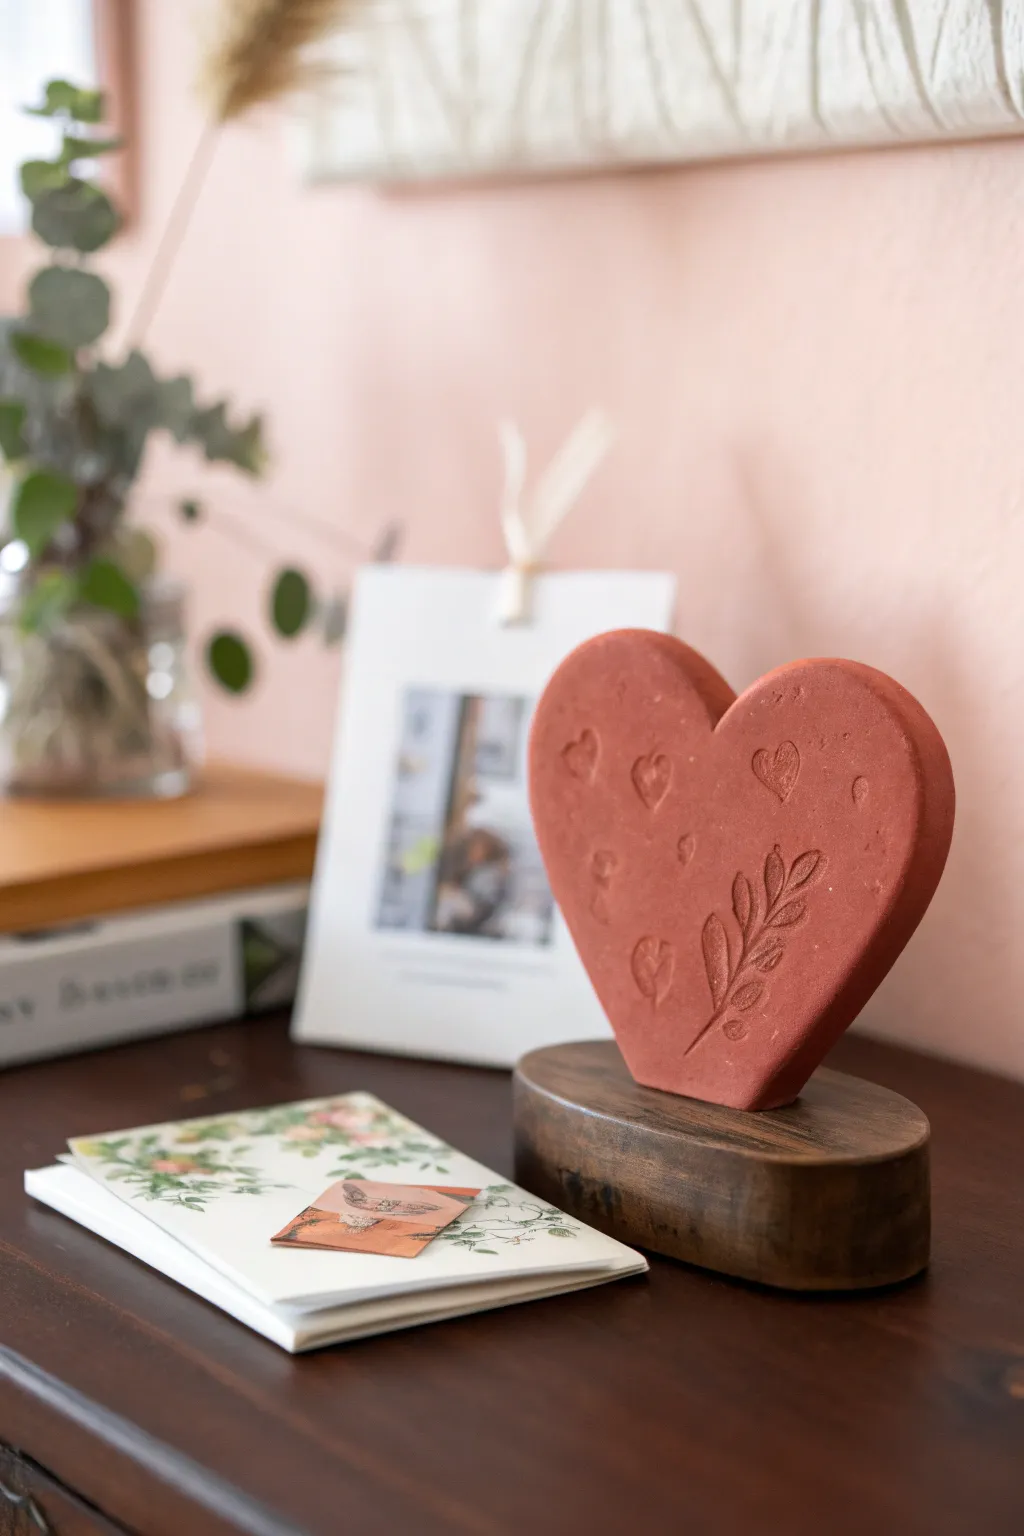
Create a warm, rustic focal point for your Valentine’s décor with this faux-stone heart plaque. Featuring delicate embossed botanical details and a sturdy wooden base, it’s a sophisticated way to display love notes or favorite snapshots.
Detailed Instructions
Materials
- Air dry clay (terracotta color or white)
- Small block of wood or thick branch slice (oval shape preferred)
- Rolling pin
- Heart-shaped cookie cutter (large) or paper template
- Clay sculpting tools or a craft knife
- Fresh or dried leaves/stems for impressing
- Small heart stamps or a stylus tool
- Terracotta acrylic paint (if using white clay)
- Strong craft glue (E6000 or similar)
- Fine-grit sandpaper
- Matte sealant spray
Step 1: Shaping the Clay Heart
-
Condition the Clay:
Begin by kneading a handful of air dry clay until it feels warm, pliable, and free of cracks. If you are using terracotta-colored clay, this saves painting time later, but white clay works perfectly fine too. -
Roll It Out:
Use your rolling pin to flatten the clay into an even slab. Aim for a thickness of about 1/2 inch to ensure the heart is sturdy enough to stand upright later. -
Cut the Shape:
Press a large heart-shaped cookie cutter firmly into the clay. If you don’t have a cutter large enough, lightly trace around a paper heart template with a needle tool and carefully cut it out with a craft knife. -
Smooth the Edges:
Dip your finger in a little bit of water and run it along the cut edges of the heart to smooth out any roughness or sharp angles.
Step 2: Adding Texture and Detail
-
Impress the Botanicals:
Select a leafy twig or fern with distinct veins. Gently press it into the surface of the damp clay on the right side of the heart to create a botanical imprint. Peel it away slowly to reveal the design. -
Create Heart Motifs:
Use a small heart stamp to press scattered heart outlines around the leafy branch. If you don’t have a stamp, I find using a small stylus or a dull pencil tip to freehand-draw tiny hearts adds a lovely handmade charm. -
Flatten the Base:
Stand the clay heart upright on a flat surface and gently tap the bottom point. This creates a small flat area that will help it adhere better to the wooden base later. -
Initial Drying:
Lay the heart flat on a piece of parchment paper or a drying rack. Let it dry for at least 24-48 hours, flipping it occasionally to ensure even drying and prevent curling.
Cracks Appearing?
If small cracks appear while drying, mix a tiny bit of fresh clay with water to make a paste (slip) and fill them in. Smooth with a wet finger.
Step 3: Refining and Color
-
Sand for Smoothness:
Once the clay is completely bone dry and hard, use fine-grit sandpaper to gently buff the surface and edges. Wipe away the dust with a barely damp cloth. -
Painting (Optional):
If you used white clay, apply 2-3 coats of terracotta-colored acrylic paint. Dab the paint into the impressed grooves, then wipe the surface lightly if you want to highlight the texture, or paint it solid for a monochrome look. -
Seal the Finish:
Spray the heart with a matte sealant to protect the clay from moisture and preserve the finish without adding too much shine.
Make it a Holder
Embed a stiff wire or paperclip loop into top of the heart while the clay is wet. Now it can hold a photo or note securely above the artwork.
Step 4: Assembly
-
Prepare the Wood Base:
Take your wooden block and ensure the top surface is clean and level. You might want to stain or seal the wood beforehand to enrich its color. -
Attach the Heart:
Apply a generous amount of strong craft glue to the flattened bottom edge of the clay heart. -
Secure and Hold:
Press the heart firmly onto the center of the wooden base. You may need to prop it up with books or jars on either side to keep it perfectly vertical while the glue sets. -
Final Cure:
Allow the glue to cure fully according to the manufacturer’s instructions before moving or displaying your new art piece.
Place this lovely sculptural piece on a mantel or bedside table to add a touch of romance to your room


What Really Happens Inside the Kiln
Learn how time and temperature work together inside the kiln to transform clay into durable ceramic.
Textured Heart Fridge Magnets
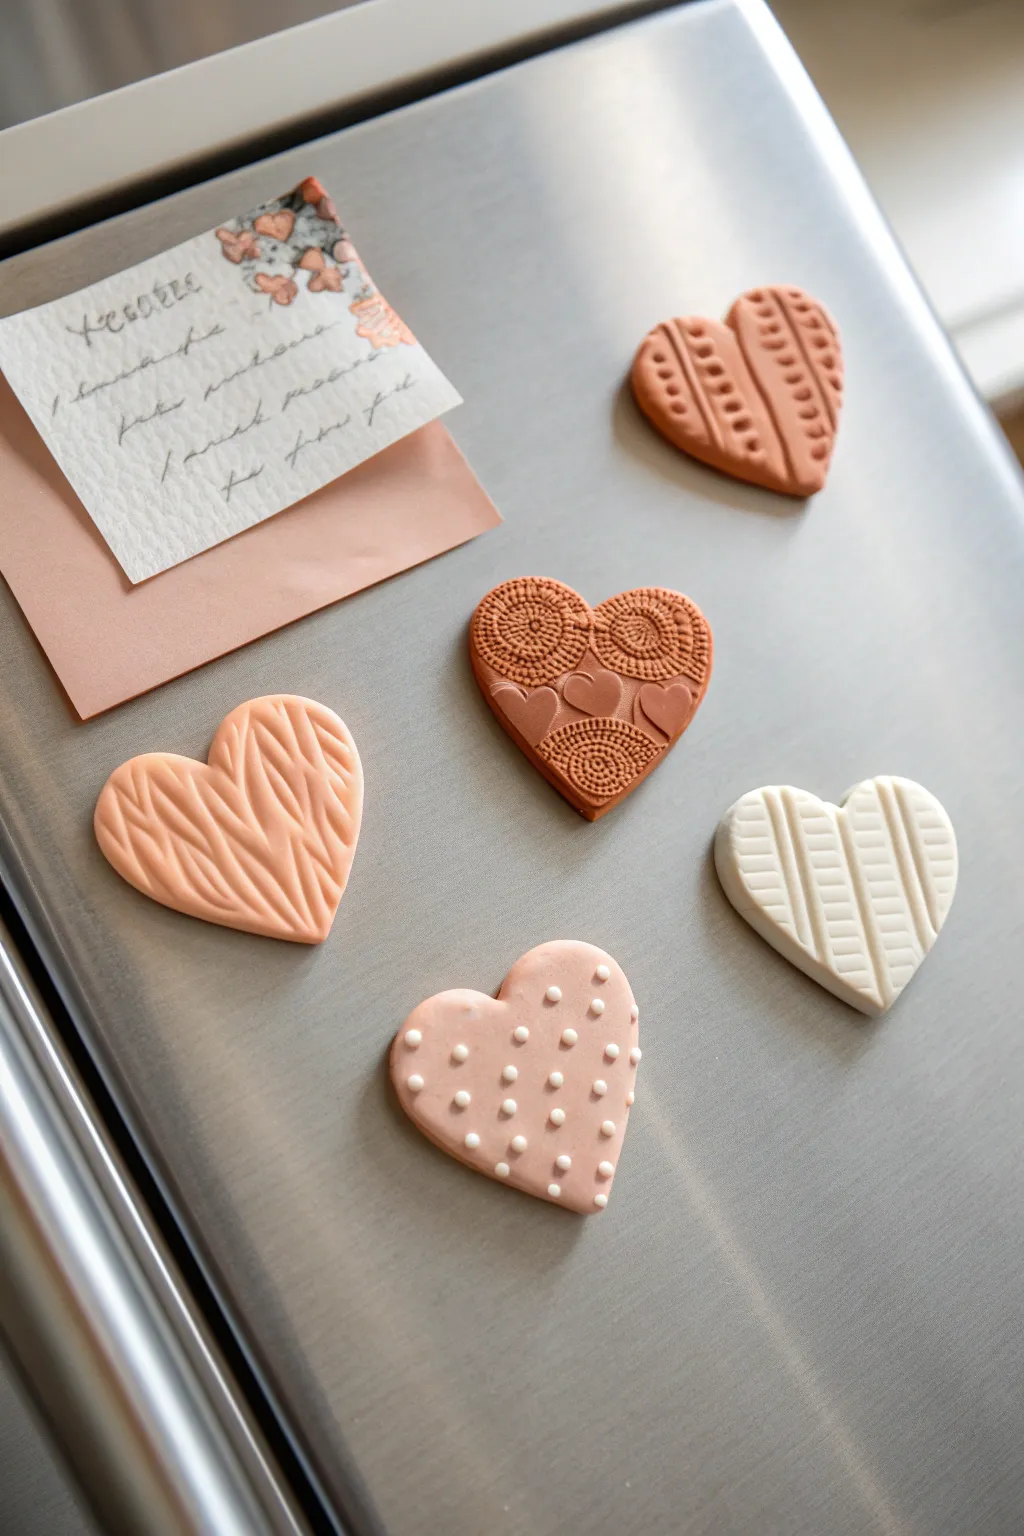
Add a touch of crafty charm to your kitchen with these easy-to-make heart magnets featuring woven, dotted, and embossed textures. Using simple household items as stamps creates a sophisticated, high-end look with very humble materials.
Step-by-Step
Materials
- White air dry clay
- Acrylic paint (terracotta, peach, beige, white)
- Rolling pin
- Heart-shaped cookie cutters (various sizes)
- Texture tools (knitting swatch, lace, toothpicks, old sweaters)
- Round magnets
- Strong craft glue (E6000 or super glue)
- Fine-grit sandpaper
- Matte varnish or sealant (optional)
Step 1: Preparation & conditioning
-
Prepare your workspace:
Lay down a clean silicone mat or a sheet of wax paper to prevent the clay from sticking to your table. Have a small bowl of water nearby for smoothing cracks. -
Condition the clay:
Take a handful of air dry clay and knead it thoroughly in your hands until it’s warm, pliable, and free of cracks. This ensures the final pieces are strong and smooth. -
Roll it out:
Use your rolling pin to flatten the clay to an even thickness. Aim for about 1/4 inch thick—if it’s too thin, the magnets might crack; too thick, and they get heavy.
Fixing Cracks
If you see hairline cracks as the clay dries, mix a tiny bit of fresh clay with water to make a paste (slip) and fill the crack. Smooth it over with a wet finger.
Step 2: Adding texture
-
Create the knit texture:
For the peach heart with the V-pattern, press a piece of chunky knit fabric or a cable-knit sweater deeply into the clay. Roll over it once with the rolling pin to ensure a deep impression, then carefully peel the fabric back. -
Emboss ornate patterns:
For the terracotta heart, use buttons, stamps, or even the bottom of a patterned glass. Press these into the clay surface firmly to create intricate, lace-like details. -
Sculpt the striped heart:
Take a dull knife or a sculpting tool and gently press lines into the white clay heart. Alternate the direction of the lines to mimic a ribbed pattern. -
Make the dotted heart foundation:
Roll a smooth slab of clay for the beige heart base. You won’t texture this one yet, as the dots are added separately. -
Cut the shapes:
Once your clay slab is textured, press your heart-shaped cookie cutter firmly into the design. Wiggle it slightly to separate the shape and lift away the excess clay. -
Smooth the edges:
Dip your finger in a little water and gently run it along the cut edges of each heart to remove any roughness or loose bits of clay.
Level Up: Scented Clay
Knead a few drops of essential oil (like lavender or cinnamon) into the clay before rolling it out to make your magnets double as a passive air freshener.
Step 3: Details & drying
-
Add raised dots:
For the dotted heart, roll tiny, varying-sized balls of clay. Dab a tiny dot of water onto the heart base and press the little balls on top, flattening them slightly to secure them. -
Let them dry:
Place all your hearts on a wire drying rack or a sheet of parchment paper. I like to flip them over halfway through the drying process to keep them from curling. -
Sand for perfection:
Once completely dry (usually 24-48 hours), use fine-grit sandpaper to gently smooth out any sharp edges or uneven spots on the sides.
Step 4: Painting & finishing
-
Mix your palette:
Prepare your acrylic paints. Mix burnt sienna with white to get various shades of terracotta, peach, and blush pink to match the earthy aesthetic. -
Paint the base coats:
Paint each heart fully. It may take two thin coats to get solid, opaque coverage, especially if you are painting over white clay with darker colors. -
Highlight the dots:
For the dotted heart, use a fine detail brush to carefully paint the raised dots in white or cream contrast against the painted base. -
Seal (optional):
If you want extra durability, apply a coat of matte varnish. Avoid glossy finishes if you want to maintain that natural, ceramic look shown in the photo. -
Attach the magnets:
Flip the hearts over and apply a strong dab of craft glue to the center of the back. -
Final assembly:
Press a round magnet firmly into the glue and let it cure completely according to the glue manufacturer’s instructions before sticking them to your fridge.
Now you have a charming set of custom magnets ready to hold your favorite photos and notes on the fridge
Lace-Impressed Heart Coasters
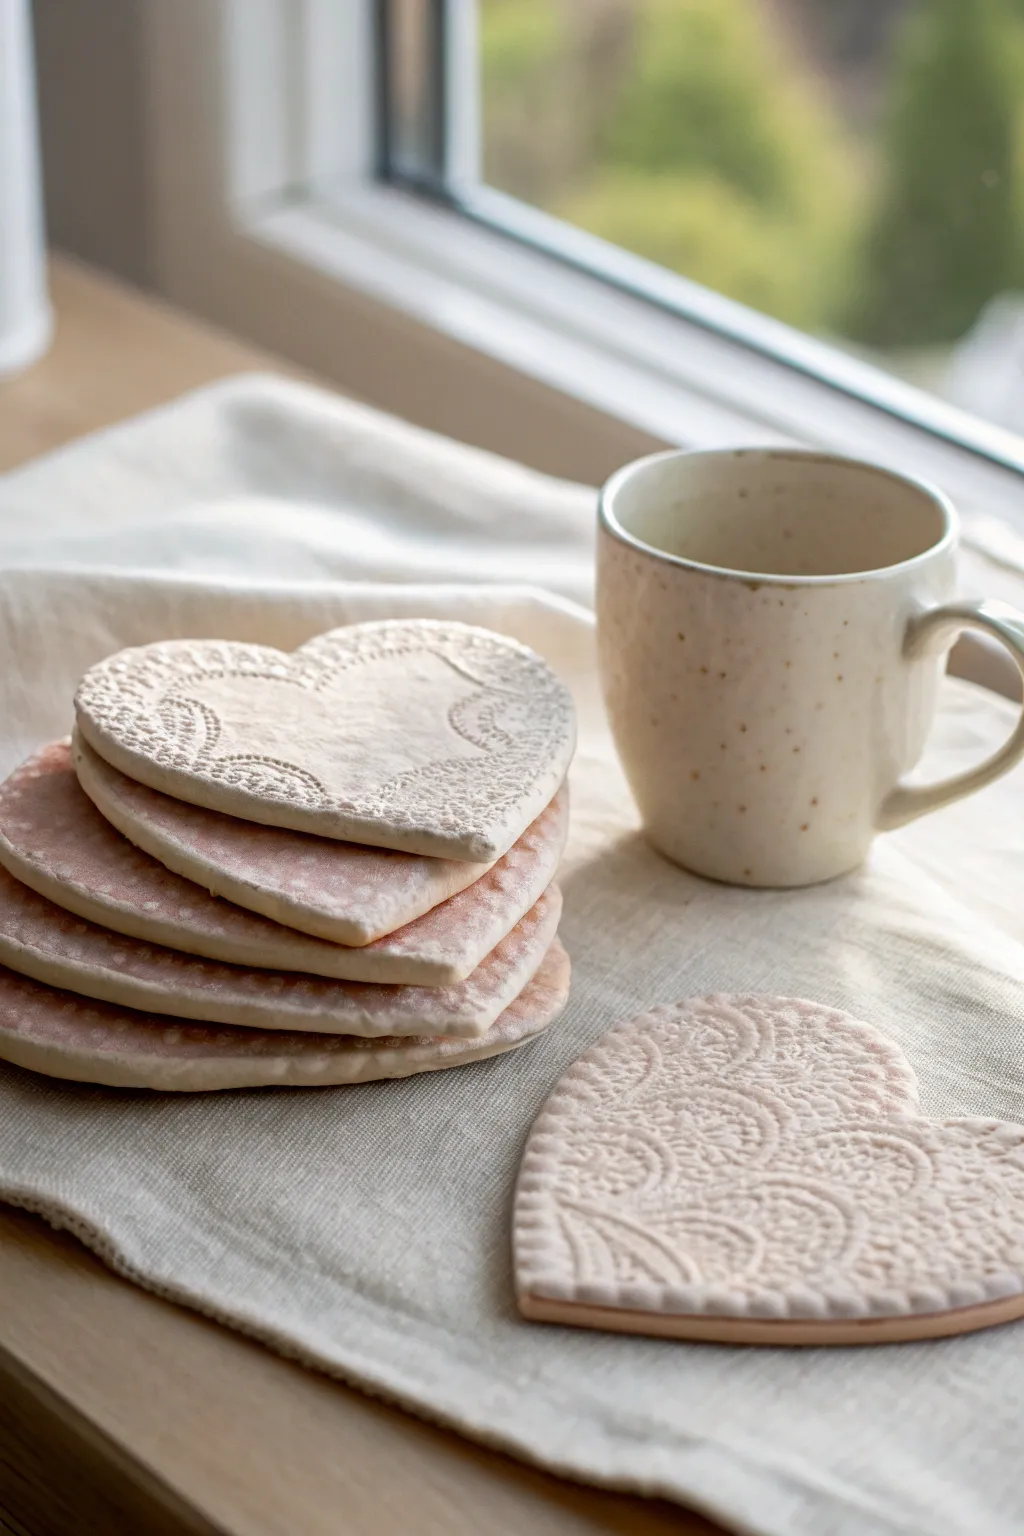
These delicate, textured coasters blend rustic charm with intricate detailing, making them a perfect handmade gift for Valentine’s Day. The soft blush and natural tones, combined with vintage lace impressions, create a functional piece of art that looks lovely on any coffee table.
Detailed Instructions
Materials
- White or terracotta air dry clay
- Rolling pin
- Parchment paper or canvas mat
- Heart-shaped cookie cutters (various sizes optional)
- Vintage lace doily or textured fabric scrap
- Bowl of water
- Fine-grit sandpaper (220 grit)
- Acrylic paints (soft blush pink, cream, white)
- Matte spray varnish or clay sealant
- Sponge or wide brush
- Clean cotton cloth
Step 1: Preparation & Rolling
-
Set up your workspace:
Begin by laying down a sheet of parchment paper or a canvas mat to prevent the clay from sticking to your table. Having a clean surface is crucial for a smooth finish. -
Condition the clay:
Take a handful of air dry clay and knead it well in your hands. You want it to be pliable and warm, free from any air bubbles or stiff lumps. -
Roll the base slab:
Place your clay ball on the parchment and use the rolling pin to flatten it. Aim for an even thickness of about 1/4 inch (6mm) to ensure the coasters are sturdy enough for daily use. -
Smooth the surface:
Dip your finger slightly in water and gently glide it over the surface of the clay slab to remove any rolling marks or tiny imperfections.
Prevent Warping
To keep hearts perfectly flat, dry them slowly away from direct heat. Placing a light book on top after 24 hours helps press them flat.
Step 2: Adding Texture & Cutting
-
Position the lace:
Gently lay your lace doily or textured fabric over the rolled clay. I prefer placing it slightly off-center or across a corner to create varied patterns on different coasters. -
Impress the pattern:
Roll your rolling pin firmly over the lace one single time. Do not roll back and forth, as this creates a double image. Apply enough pressure so the intricate details transfer clearly into the clay. -
Reveal the design:
Carefully peel back the lace to reveal the embossed texture underneath. This is always the most satisfying moment of the process. -
Cut the shapes:
Press your heart-shaped cookie cutter firmly into the textured clay. Try to frame the most interesting parts of the lace pattern within the heart shape. -
Remove excess clay:
Pull away the excess clay from around the cut heart shapes. You can ball this up and store it in an airtight bag for later use. -
Refine the edges:
Dip your finger in water again and gently run it along the cut edges of the hearts. This smooths out any harsh lines or jagged bits left by the cutter.
Highlighting Texture
For a vintage look, use a darker wash (like watered-down brown paint) in the crevices, then dry brush white paint over the raised details.
Step 3: Drying & Finishing
-
Initial drying phase:
Place the clay hearts on a clean, flat surface or wire rack to dry. Let them sit undisturbed for about 24 hours. -
Flip for even drying:
After the first day, flip the coasters over so the bottom side can dry thoroughly. This helps prevent the clay from curling or warping as moisture evaporates. -
Sand the edges:
Once the coasters are bone dry (usually 48-72 hours), take your fine-grit sandpaper and lightly buff the edges to make them perfectly smooth and professional-looking. -
Apply a wash:
Mix a small amount of blush pink or cream acrylic paint with water to create a thin wash. Brush this over the surface, allowing the pigment to settle into the deep recesses of the lace pattern. -
Wipe back the color:
Immediately use a slightly damp cotton cloth to wipe the surface gently. This removes paint from the raised areas while leaving color in the grooves, highlighting the texture. -
Seal the coasters:
Since air dry clay is porous, protect your work by applying two to three thin coats of matte varnish or clay sealant. Allow each coat to dry completely before scaling the next one.
Stack your finished coasters and tie them with a ribbon for a truly heartfelt presentation

TRACK YOUR CERAMIC JOURNEY
Capture glaze tests, firing details, and creative progress—all in one simple printable. Make your projects easier to repeat and improve.
Marbled Pink-and-Red Heart Beads
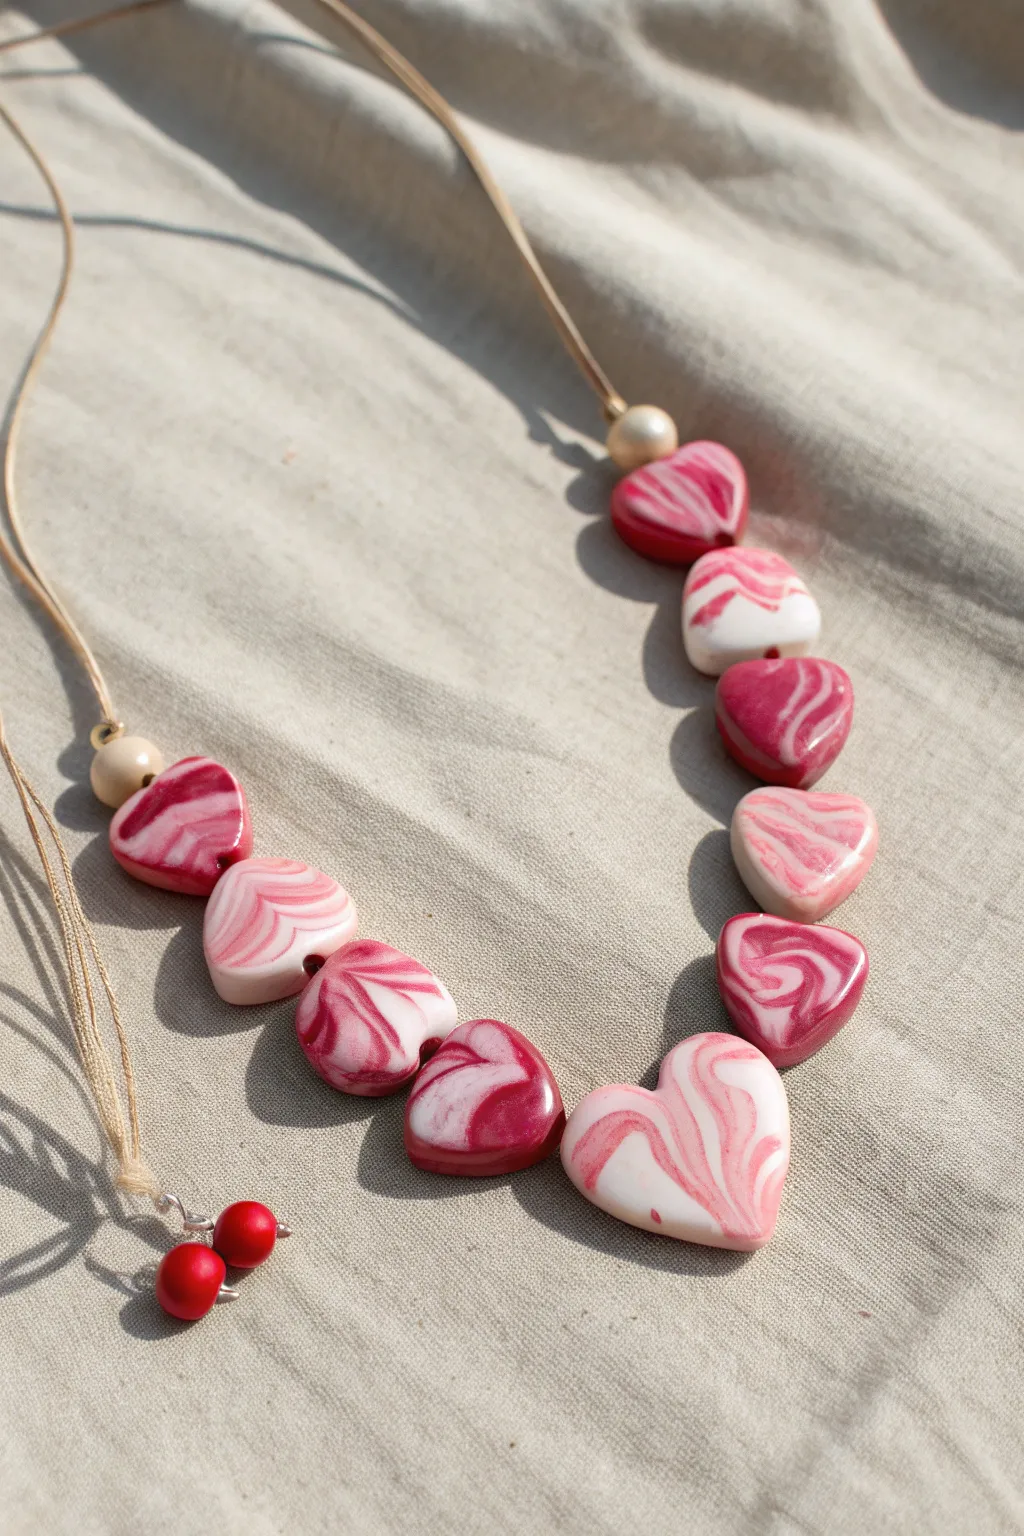
Create a statement piece filled with love using this marbled heart bead necklace tutorial. The swirling patterns of red, pink, and white clay make every single bead unique, resulting in a playful yet elegant accessory perfect for Valentine’s Day.
Step-by-Step Tutorial
Materials
- Air dry clay (white)
- Acrylic paint (red and pink)
- Rolling pin or smooth glass jar
- Heart-shaped clay cutter (medium size)
- Toothpick or bamboo skewer
- Thin suede or leather cord (beige)
- 2 small wooden spacer beads
- 2 small red beads for the ends
- Sandpaper (fine grit)
- Gloss varnish or sealant (optional)
- Gloves (optional to keep hands clean)
Step 1: Marbling the Clay
-
Prepare your colors:
Start with three balls of white air-dry clay. Keep one white. Knead red acrylic paint into the second ball until the color is uniform. Knead pink paint into the third ball. You want distinct, saturated colors. -
Form clay ropes:
Roll each colored ball into a long, snake-like rope. The ropes should be roughly equal in length and thickness. -
Twist and combine:
Lay the three ropes side-by-side and twist them together into one large spiral. Fold this twisted rope in half and twist it again. -
Create the marble effect:
Repeat the folding and twisting process 3-4 times. Be careful not to over-mix, or the colors will blend into a muddy pink instead of distinct swirls. I like to stop just before it looks fully blended to keep those crisp lines. -
Roll out the slab:
Ball up your marbled clay and place it on a smooth surface. Use a rolling pin to flatten it into a slab about 1/4 inch thick. You should see beautiful, random swirls appearing on the surface.
Step 2: Shaping the Beads
-
Cut the hearts:
Use your heart-shaped cutter to punch out shapes from the most visually interesting parts of your marbled slab. You will need about 9-11 hearts for a standard necklace length. -
Smooth the edges:
Dip your finger in a little water and gently run it along the cut edges of each heart to smooth out any roughness left by the cutter. -
Pierce the holes:
While the clay is still wet, carefully push a toothpick or skewer horizontally through the upper third of the heart. Rotate the skewer gently to ensure the hole is clean and wide enough for your cord. -
Refine the shape:
Piercing the bead might distort the shape slightly, so gently pat the heart back into form if needed before setting it aside. -
Let them dry:
Place the beads on a drying rack or a sheet of parchment paper. Let them air dry completely for 24-48 hours, flipping them occasionally for even drying.
Clean Hole Technique
When piercing the bead, push the toothpick halfway through, then pull it out and push it through the other side to meet in the middle. This prevents ‘blowout’ on the exit side.
Step 3: Finishing and Assembly
-
Sand for perfection:
Once fully dry, use fine-grit sandpaper to buff away any remaining rough spots or fingerprints, paying special attention to the sides. -
Seal the beads:
Apply a coat of gloss varnish to protect the clay and make the marbled colors pop. Let this coat dry completely. -
Strung the necklace:
Cut a length of suede cord that fits comfortably over your head. Thread your heart beads onto the cord. -
Add accent beads:
Slide one wooden spacer bead onto each side of the heart grouping to keep them centered and add a natural touch. -
Secure the placement:
Tie a simple overhand knot in the cord right next to each wooden bead. This prevents the hearts from sliding all the way up the necklace. -
Finish the ends:
Tie the ends of the cord together. For a decorative touch like the photo, leave the tail ends long, thread a small red bead onto each tail, and knot the cord below the bead to hold it in place.
Glazed Finish
For a high-shine ceramic look without a kiln, use UV resin instead of varnish. Cure it under a UV lamp for a glass-like, durable finish that makes the colors vibrant.
Enjoy wearing your new handmade jewelry piece that showcases your creativity with every swirl
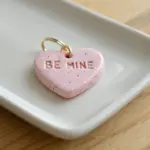
“XOXO” Stamped Pocket Tokens
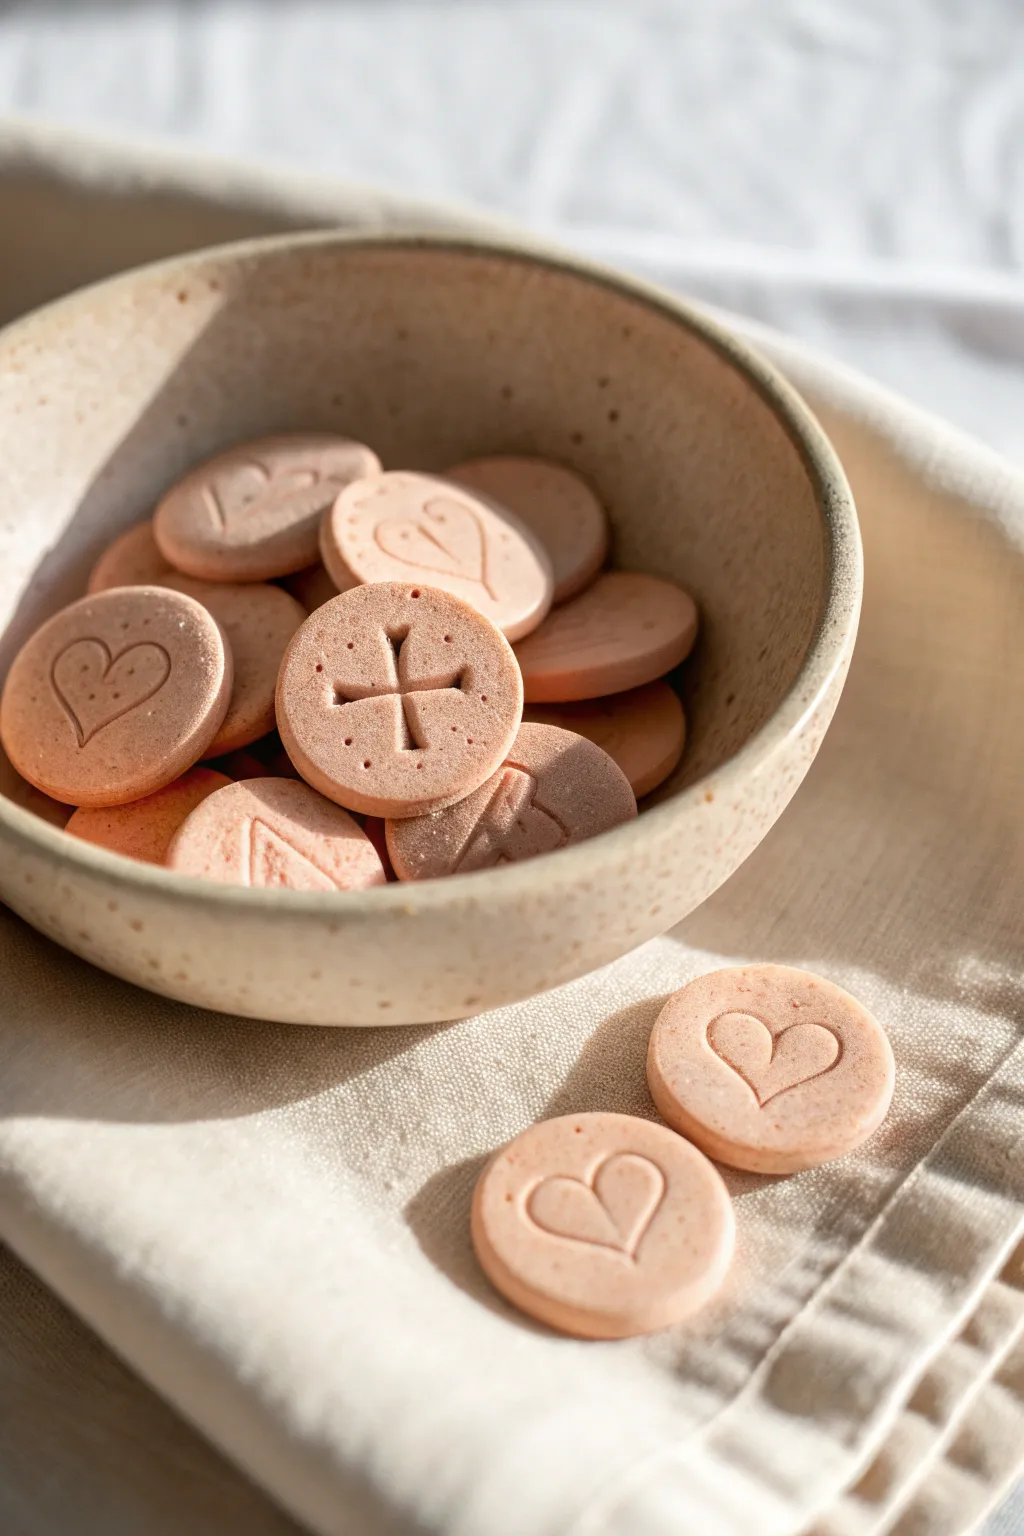
These sweet, keepsake tokens have a beautiful speckled stoneware finish that makes them feel like tiny ceramic treasures. They are perfect for tucking into a valentine card or carrying in a pocket as a reminder of love.
Detailed Instructions
Materials
- Air dry clay (terracotta or white mixed with acrylic)
- Small rolling pin
- Circle cookie cutter (approx. 1-1.5 inch diameter)
- Heart stamp or custom carving tool
- Cross/Plus sign stamp (optional)
- Fine-grit sandpaper
- Small paint brush
- Matte sealant or varnish
- Parchment paper or non-stick mat
- Dried coffee grounds or fine sand (for speckling)
Step 1: Preparing the Clay
-
Condition the clay:
Start with a handful of fresh air dry clay. Knead it in your hands for several minutes until it becomes warm, pliable, and free of cracks. -
Create the color base:
If using white clay, mix in a very small amount of terracotta or dusty rose acrylic paint. Knead thoroughly until the color is completely uniform and streak-free. -
Add the speckled texture:
To achieve that faux-stoneware look, sprinkle a pinch of dried used coffee grounds or very fine dark sand into the clay. Fold and knead until the specks are evenly distributed throughout the ball.
Step 2: Shaping the Tokens
-
Roll out the slab:
Place your clay ball onto a piece of parchment paper. Use a rolling pin to flatten it into an even slab, aiming for a thickness of about 1/4 inch (6mm). -
Check thickness:
Ensure the thickness is consistent across the entire slab so your tokens dry evenly. They should feel substantial, not wafer-thin. -
Cut the circles:
Press your circle cutter firmly into the clay to cut out your token shapes. Twist slightly before lifting to ensuring a clean cut. -
Smooth the edges:
After removing the excess clay, dip your finger in a tiny bit of water and gently run it around the circumference of each circle to soften any sharp cutting ridges.
Natural Speckles
Mix cinnamon or nutmeg into the clay instead of coffee grounds. It adds speckles and a faint, pleasant scent without darkening the clay too much.
Step 3: Stamping Designs
-
Position the stamp:
Take your heart stamp and align it in the center of a clay circle. If you don’t have a stamp, I find using a dull pencil or sculpting tool to manually carve the outline works beautifully too. -
Impress the design:
Press down firmly but evenly. You want a distinct impression that catches the light, but be careful not to push all the way through the clay. -
Create variety:
Mix up your designs by stamping crosses or ‘plus’ signs on some tokens to represent the ‘kiss’ in XOXO. You can also use a needle tool to add tiny dots around the main symbol for extra detail. -
Refine the impressions:
If the stamping process pushed up any rough ridges of clay, gently tap them down with a smooth finger or the back of a spoon.
Make Them Magnets
Before the clay dries, gently press a small, strong disc magnet into the back of each token until flush. Secure with a dab of glue after drying.
Step 4: Finishing Touches
-
Dry the tokens:
Arrange the tokens on a clean sheet of parchment paper in a cool, dry place. Let them air dry for at least 24-48 hours. -
Flip for even drying:
About halfway through the drying process, flip the tokens over so the bottom side gets air exposure. This prevents them from warping or curling. -
Check for dryness:
The clay will lighten in color and feel hard and room temperature (not cold) to the touch when fully dry. -
Sand the surfaces:
Once fully cured, use fine-grit sandpaper to buff away any remaining rough edges or fingerprints, giving the token a professional, smooth feel. -
Seal the work:
Apply a thin coat of matte varnish or sealant. This protects the clay from moisture and deepens slightly the pinkish tone without making it look glossy or plastic.
Now you have a handful of durable little tokens ready to share with friends and loved ones
Diffuser Heart Hanging Fresheners
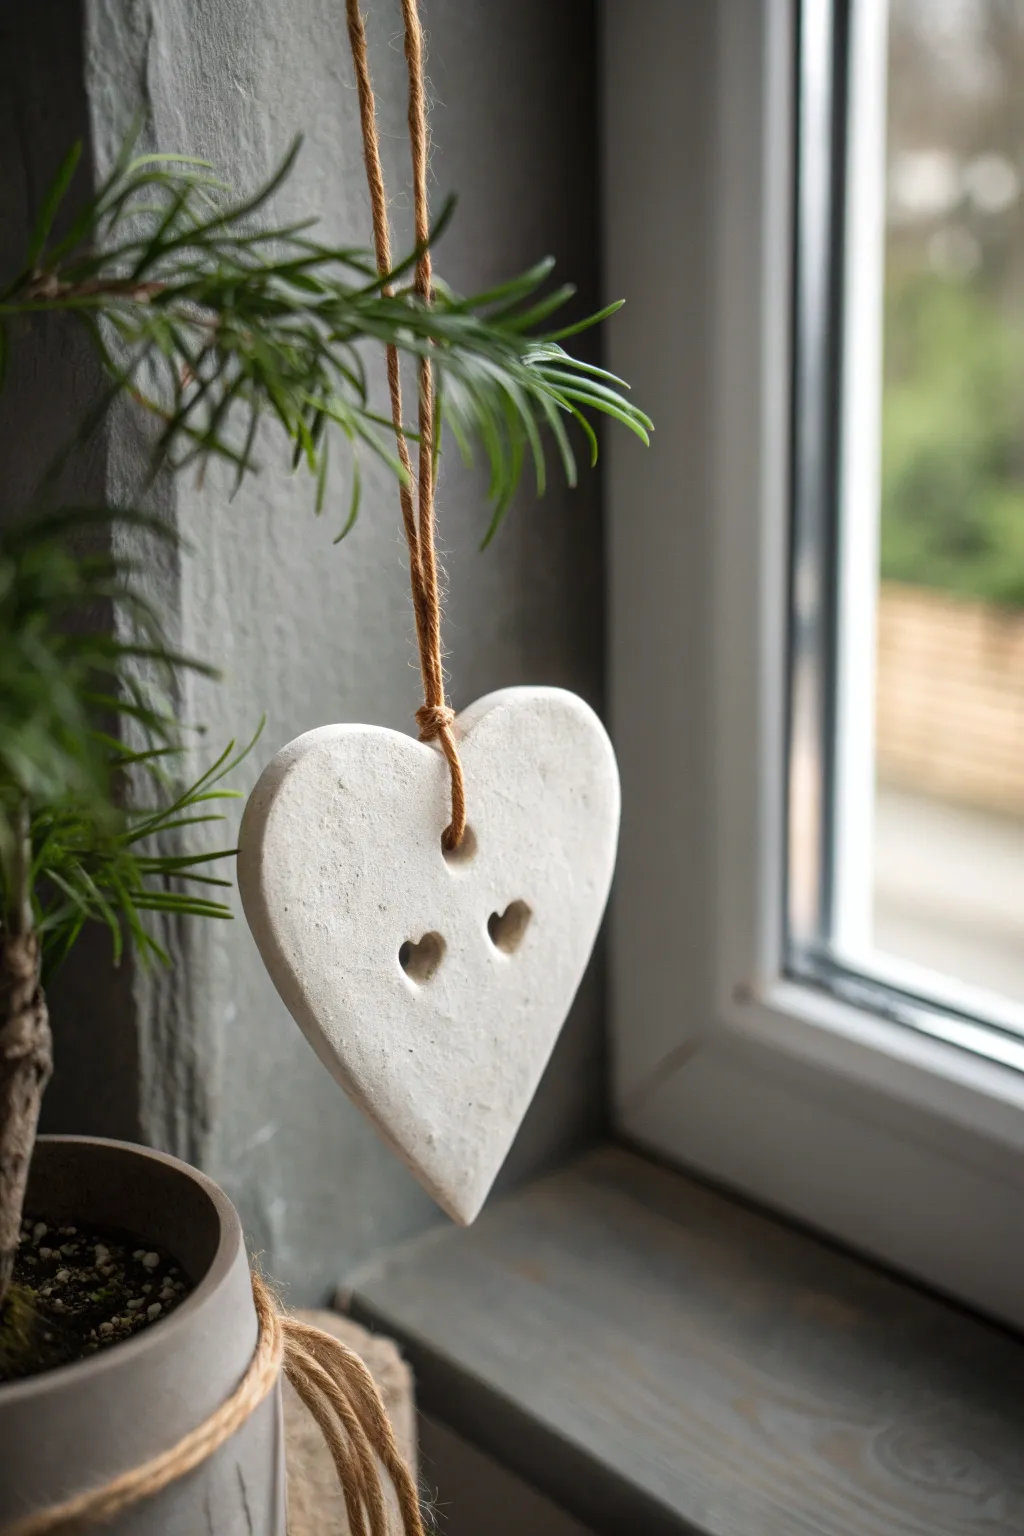
These charming, minimalist hanging hearts double as subtle room fresheners thanks to the porous nature of air-dry clay. With a clean white finish and rustic twine accents, they bring a cozy, decorative touch to any window or car mirror while wafting your favorite essential oils.
How-To Guide
Materials
- White stone-effect air-dry clay
- Rolling pin
- Heart-shaped cookie cutter (medium size)
- Small heart-shaped cutter (tiny size) or a sharp craft knife
- Drinking straw or skewer
- Fine-grit sandpaper (optional)
- Natural jute twine
- Scissors
- Small bowl of water
- Essential oils
Step 1: Shaping the Clay
-
Prepare your workspace:
Lay down a sheet of parchment paper or a silicone mat to prevent the clay from sticking to your surface. -
Condition the clay:
Take a handful of white air-dry clay and knead it in your hands for a minute until it feels soft, pliable, and free of any cracks. -
Roll it out:
Use your rolling pin to flatten the clay to an even thickness. Aim for about 1/4 inch (approx. 5-6mm) thick—you want it sturdy enough to hang but not heavy. -
Cut the main shape:
Press your medium heart-shaped cookie cutter firmly into the clay. Give it a tiny wiggle to ensure a clean cut before lifting it away. -
Create the hanging hole:
Using a straw or a wooden skewer, poke a hole near the top center of the heart. Make sure it’s large enough for your twine to pass through easily. -
Add decorative cutouts:
To mimic the look in the image, create two smaller heart impressions or holes below the main hanging hole. You can use a tiny fondant cutter if you have one. -
Refine by hand:
If you don’t have a tiny cutter, use the tip of a craft knife to carefully carve out two small hearts. I find it helpful to lightly sketch the shape with a needle tool first before committing to the cut. -
Smooth the edges:
Dip your finger into a small bowl of water and gently run it along all the cut edges to smooth down any roughness or burrs.
Step 2: Drying and Finishing
-
Let it dry completely:
Place the heart on a flat surface away from direct heat. Let it dry for at least 24-48 hours. Turn it over halfway through the drying process to ensure both sides dry evenly. -
Check for dryness:
The clay is ready when it turns a uniform chalky white color and feels lighter and harder to the touch. -
Sand imperfections:
Once fully dry, you can lightly buff the edges or surface with fine-grit sandpaper if you want an ultra-smooth finish, though leaving it slightly rough adds to the stone-like charm. -
Prepare the twine:
Cut a length of natural jute twine, approximately 12-15 inches long depending on how low you want it to hang. -
Thread the loop:
Fold the twine in half and push the looped end through the top hole from the front to the back. -
Secure the hanger:
Pass the loose tails of the twine through the loop you just pushed through, pulling tight to create a lark’s head knot right at the top of the heart. -
Create the hanging knot:
Tie the two loose ends of the twine together in a simple overhand knot at your desired length. -
Add the scent:
Lay the heart flat and add 1-2 drops of essential oil directly onto the back of the clay. Wait a few moments for the oil to absorb completely before hanging.
Uneven Drying?
If the edges curl up while drying, gently place a light book on top of the heart once it’s semi-dry (leather hard) to weigh it down and flatten it out again.
Stamp It Up
Before drying, use letter stamps to press a name, date, or short word like ‘LOVE’ into the clay surface for a personalized Valentine’s gift.
Hang your new diffuser in a sunny spot and enjoy the gentle fragrance as it warms up
Tiny Clay Gnome Holding a Heart
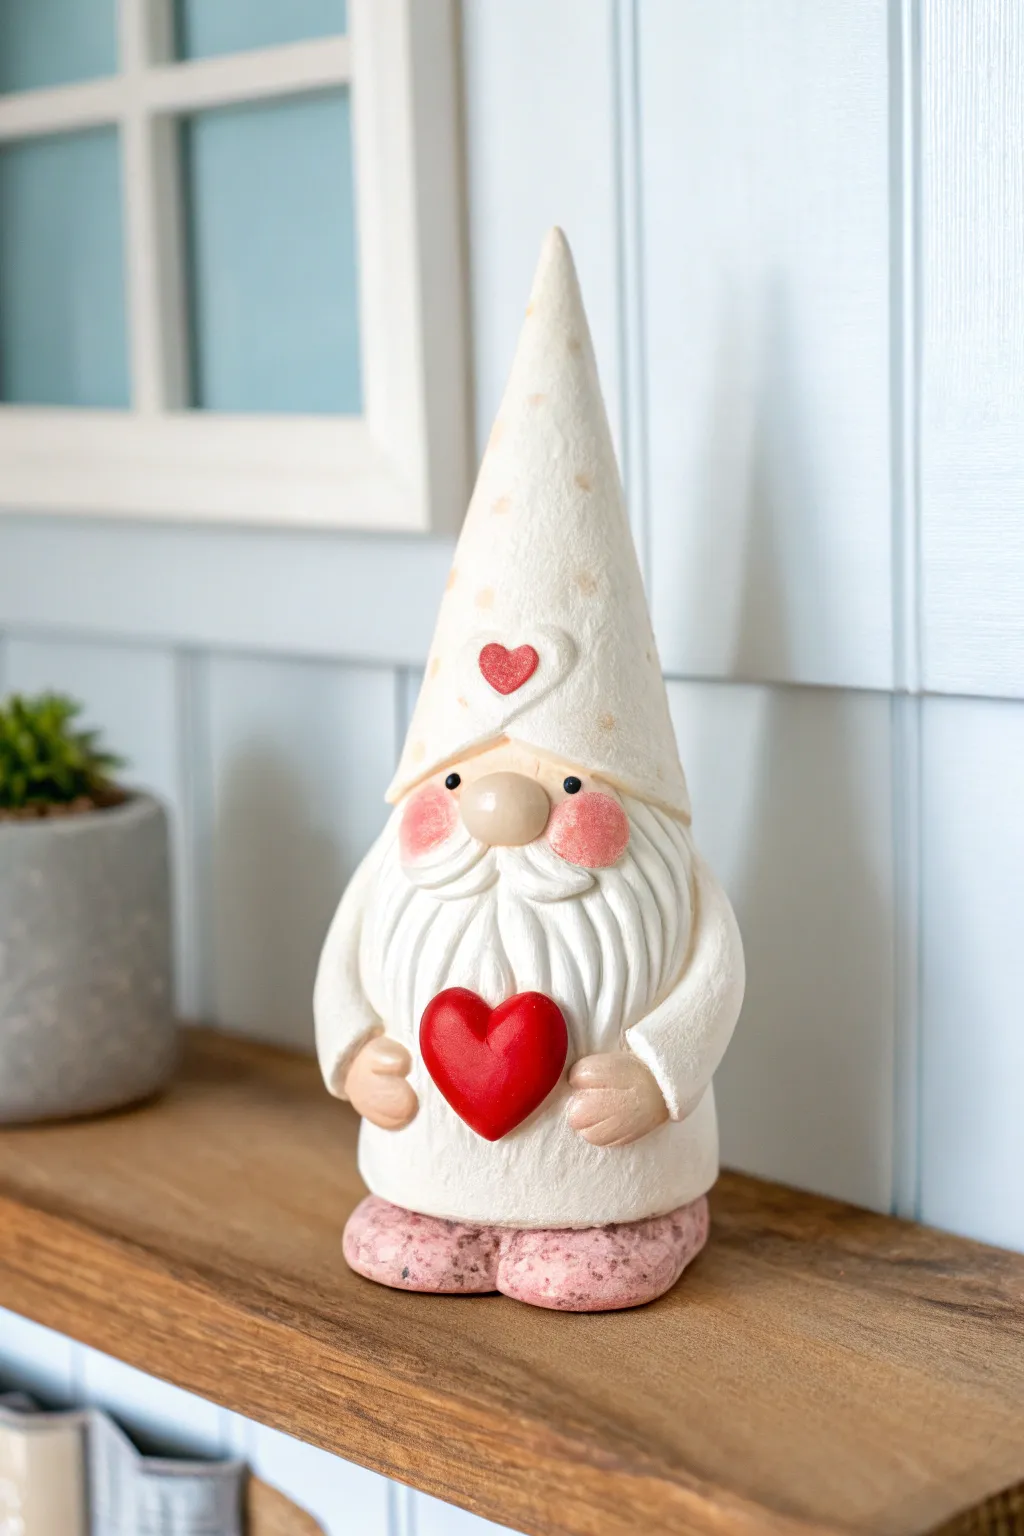
Whimsical and undeniably sweet, this handcrafted gnome brings a touch of romance with his oversized heart and textured beard. The smooth, matte finish mimics porcelain, making him a charming addition to any Valentine’s Day vignette or tiered tray display.
Detailed Instructions
Materials
- White smooth air-dry clay (e.g., DAS or Crayola)
- Acrylic paints: White, Red, Soft Pink, Peach/Flesh tone, Black
- Sculpting tools: Needle tool, ball tool, rolling pin
- Aluminum foil (for armature)
- Small detail brushes
- Cup of water and sponge
- Sandpaper (fine grit)
- Matte sealant or varnish
Step 1: Building the Core
-
Form the foil core:
Crumple aluminum foil into a cone shape roughly 4 inches tall. This saves clay and keeps the figure lightweight. Ensure the base is flat so the core stands steadily on its own. -
Cover the body:
Roll out a sheet of white clay just under 1/4 inch thick. Wrap the lower two-thirds of your foil cone to create the gnome’s body, smoothing the seam at the back with a little water on your finger. -
Add the feet:
Shape two flattened oval blobs of clay for the feet. Press them firmly against the bottom front of the body, blending the connection points so they look like one solid piece.
Step 2: Sculpting Features
-
Attach the nose:
Roll a smooth, medium-sized ball of clay for the nose. Attach it securely to the front of the body, positioning it slightly above the halfway point. Score and slip (scratching the surfaces and adding water) helps it stick better. -
Create the beard base:
Flatten a piece of clay into a U-shape and press it under the nose, draping it down over the chest. Add a smaller, mustache-like strip horizontally across the top of the beard, tucking it under the nose. -
Texture the hair:
Using a needle tool or a dull knife, carve flowing, curved vertical lines into the beard and mustache. I like to vary the depth of these lines to give the hair a deeply grooved, fantastical look. -
Form the hat:
Mold a separate cone of clay for the hat. Hollow it out slightly at the bottom so it sits snugly over the top of the foil core and overlaps the top edge of the nose and beard. Smooth the transition where the hat meets the back of the body. -
Sculpt the arms:
Roll two small sausages of clay for arms. Attach them to the sides of the body, curving them forward so they will eventually cradle the heart. -
Add hands:
Attach small spheres to the ends of the arms for hands. Use a blade to make tiny cuts to suggest fingers or mittens.
Smooth Operator
Keep a small bowl of water nearby while sculpting. Dip your finger in and rub the clay surface periodically to erase fingerprints before the clay begins to harden.
Step 3: Heart & Details
-
Shape the heart:
Form a plump, symmetrical heart shape from a dedicated piece of clay. Test the fit between the hands to ensure it isn’t too large or small. -
Place the heart:
Secure the heart to the gnome’s stomach area using slip. Gently press the hands onto the sides or front of the heart to make it look like he is holding it tight. -
Hat emblem:
Roll a tiny coil of clay and shape it into a heart outline. Press this onto the front brim of the hat, directly above the nose. -
Drying time:
Let the sculpture dry completely in a cool, dry place. This usually takes 24-48 hours depending on humidity. Rotate him occasionally so the bottom dries evenly.
Crack Control
If small cracks appear as the clay dries, don’t panic. Mix a small amount of fresh clay with water to make a paste (slip) and fill in the cracks, then sand smooth once dry.
Step 4: Painting & Finishing
-
Sand imperfections:
Once fully dry, use fine-grit sandpaper to gently smooth out any fingerprints or rough bumps on the hat and body. -
Base coat:
Paint the entire gnome (except the heart and nose) with an off-white or cream acrylic paint. This unifies the color and seals the porous clay. -
Paint the reds:
Paint the heart held in his hands a vibrant, solid red. Carefully paint the inside of the small heart outline on the hat with the same red. -
Skin tones:
Paint the nose and hands with a soft peach or flesh tone. While the paint is still wet, blend in a rosy pink on the top of the nose and the cheeks for a blushing effect. -
Stippling the feet:
Paint the feet a dusty pink. To get the stone-like texture shown in the image, mix a tiny bit of grey/brown into the pink and stipple (dab) it on with a rough sponge. -
Polka dots:
Dilute a light beige or pale pink paint. Use the non-brush end of a paintbrush to stamp subtle, faded polka dots all over the white hat. -
The eyes:
Using your smallest brush or a toothpick, dot two tiny black eyes just under the brim of the hat on either side of the nose. -
Seal:
Finish with a coat of matte spray varnish to protect the paint and give it that soft ceramic sheen.
Now your charming little guardian of love is ready to sit on a shelf and share a smile with everyone who passes by
Lovebird Figurines on a Shared Base
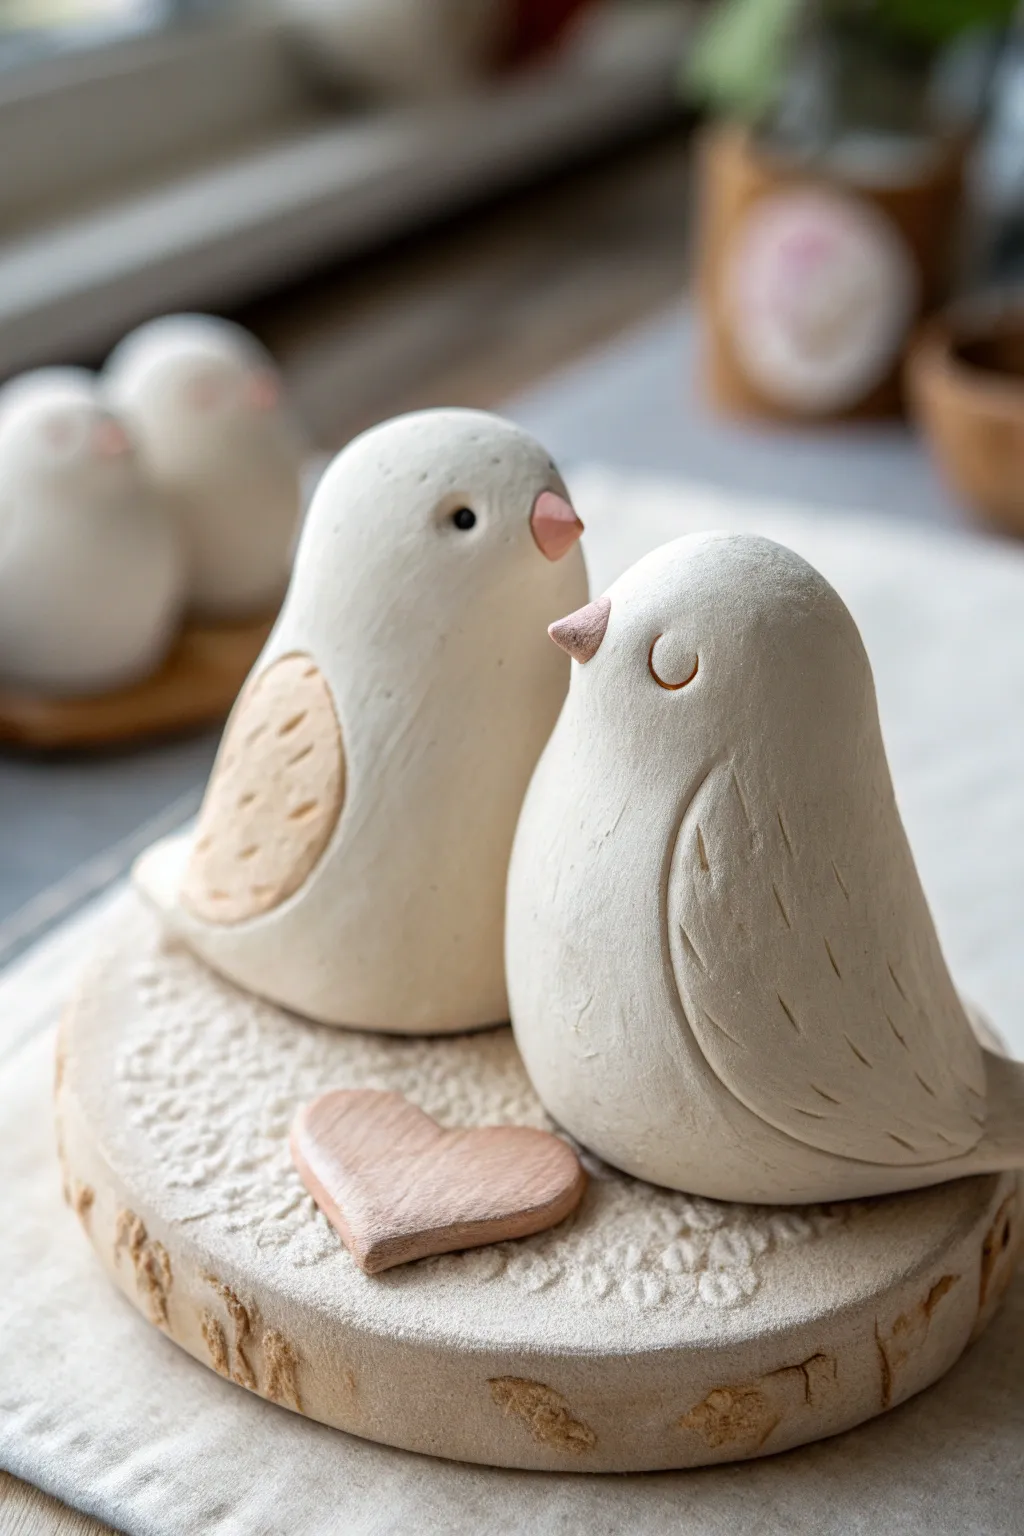
Create a heartwarming centerpiece featuring two minimalist birds nestled together on a beautifully textured circular base. This project combines simple sculpting techniques with charming details like etched feathers and a sweet little heart accent.
Step-by-Step Tutorial
Materials
- White sculpting clay (air dry or polymer)
- Textured rolling pin or lace doily
- Basic sculpting tools (needle tool, modeling tool)
- Small amount of water
- Rolling pin
- Circle cookie cutter or jar lid (approx. 4-inch diameter)
- Fine grit sandpaper
- Acrylic paint (black, soft pink, light brown)
- Fine detail paintbrush
- Matte varnish
Step 1: Creating the Textured Base
-
Roll the slab:
Begin by rolling out a portion of white clay into a consistent slab, about 1/2 inch thick. You want it substantial enough to support the figures without warping. -
Apply texture:
Press a piece of lace or a textured rolling pin firmly onto the surface of the clay slab to imprint a delicate pattern. For the look in the photo, a random, organic texture works perfectly. -
Cut the circle:
Use your circle cutter or jar lid to punch out a perfect round shape from the textured area. Smooth the edges with a wet finger to remove any sharp burs. -
Add side details:
Using a modeling tool or the side of a toothpick, gently press small vertical indentations around the vertical edge of the base to give it a rustic, bark-like appearance.
Smooth Operator
Keep a small bowl of water nearby while sculpting. A slightly damp finger is the best tool for smoothing out cracks or joining seams seamlessly.
Step 2: Sculpting the Lovebirds
-
Form the bodies:
Roll two balls of white clay, roughly the size of a tangerine. Shape each into a smooth teardrop form, keeping the bottom wide for stability and tilting the top slightly to create the head. -
Define the wings:
For the bird on the left, flatten a small oval of clay and attach it to the side as a wing. For the bird on the right, use a carving tool to gently outline a wing shape directly into the body. -
Texture the feathers:
On the left bird’s added wing, press small indentations to mimic feathers. On the right bird, use a needle tool to scratch small, vertical dashes into the wing area for a contrasting texture. -
Shape the beaks:
Pinch a tiny amount of clay from the face area to form a small, pointed beak on each bird. -
Create the eyes:
For the left bird, press a small indentation where the eye will go. For the right bird, use a curved tool or straw to impress a ‘sleeping’ U-shaped eye. -
Make the heart:
Roll a small amount of clay flat and cut out a tiny heart shape. I like to slightly round the edges so it looks soft and puffy rather than sharp.
Make It Personal
Before drying, stamp initials or a special date into the tiny heart or the underside of the base to turn this piece into a custom anniversary gift.
Step 3: Assembly and Finishing
-
Attach figures:
Score the bottom of the birds and the spot on the base where they will sit. Apply a dab of water or slip, then press the birds firmly onto the base, ensuring they fit snugly together. -
Place the heart:
Attach the clay heart to the base right in front of the birds using the same scoring and slipping method. -
Dry completely:
Allow the entire sculpture to dry fully according to your clay’s package directions. Turn firmly dried pieces occasionally to ensure even airflow. -
Sand for smoothness:
Once bone dry, use fine-grit sandpaper to gently buff the birds’ bodies, removing any fingerprints or rough spots, but be careful not to sand away the wing textures. -
Paint the details:
Paint the beaks a soft pink. Use black for the open eye on the left bird. Thin down some light brown paint to create a wash for the left bird’s wing and the heart, wiping away excess to highlight the texture. -
Final seal:
Protect your work with a coat of matte varnish to preserve the natural, unglazed look while sealing the clay.
Now you have a timeless keepsake that celebrates love in a wonderfully handcrafted way